When the AWS CIRT assists customers with incident response during security investigations, we gather AWS service metadata on the types of tactics and techniques that threat actors have used against AWS customers. We use this information to build an internal dataset of indicators of compromise (IOCs) and threat patterns that provides insight into how threat actors are taking advantage of misconfigured AWS resources, overly permissive access, or the methods they use in attempting to achieve their objectives.
We capture this metadata and use it internally to continually improve AWS services to help make them more secure for our customers by making it more difficult for threat actors to perform unauthorized actions. For example, some of the metadata that the AWS CIRT has captured as a result of investigating security events where a threat actor has used the Amazon Bedrock service to consume tokens by invoking large language models (LLMs) has been used to supplement the Amazon GuardDutyIAM Anomalous Behavior finding. Earlier this year, the AWS CIRT identified an increase in data encryption events in Amazon S3 that used an encryption method known as server-side encryption using client-provided keys (SSE-C). AWS CIRT used the Threat Technique Catalog for AWS to classify the new techniques identified in these security events to communicate internally and with other Amazon security teams.
We’ve received feedback from AWS customers that information about the adversarial tactics, techniques, and procedures (TTPs) observed by the AWS CIRT would be valuable and helpful if made available to them, so they could use the information to configure their AWS resources more securely. Over the previous year, we’ve been working with MITRE to make these techniques and sub-techniques available to the global security community. As a result of this collaboration, MITRE has updated and added some of these techniques to MITRE ATT&CK® as part of their October 2024 update cycle (for example, Data Destruction: Lifecycle-Triggered Deletion).
“We greatly appreciated the insight AWS shared with us, and it inspired improvements to a number of techniques in the October release of MITRE ATT&CK. For ATT&CK to keep up with the latest threats, community contributions that benefit the ecosystem are needed, and we value AWS being a part of the ATT&CK community.” –Adam Pennington, project lead, MITRE ATT&CK, MITRE
Companies, entities, and organizations use ATT&CK to help them understand, prioritize and protect against the threats to their on-premises environments, and we believe that taking advantage of an already existing framework to present these adversarial techniques will provide AWS customers and the global security community with the ability to identify and categorize threats on their AWS infrastructure the same way that the AWS CIRT does.
The Threat Technique Catalog for AWS—based on MITRE ATT&CK Cloud—extends these contributions and includes categories of adversarial techniques that are specific to AWS and have been observed by the AWS CIRT; in addition to information on ways to mitigate those techniques and how to detect them. For example, you can go to the Threat Technique Catalog for AWS, filter by the AWS services in your account, and review the content that will help make your environment more secure. The Getting Started section includes additional ways that you can use the Threat Technique Catalog for AWS. We will continue to update and provide additional changes to the Threat Technique Catalog for AWS to help guide you into making your AWS environment more secure and will continue collaborating with MITRE to advise them of new and trending threat actor techniques.
In the cloud security landscape, organizations benefit from aligning their controls and practices with industry standard frameworks such as MITRE ATT&CK®, MITRE EngageTM, and MITRE D3FENDTM. MITRE frameworks are structured, openly accessible models that document threat actor behaviors to help organizations improve threat detection and response.
Figure 1: Interaction between the various MITRE frameworks
Figure 1 showcases how the frameworks interact with each other to identify threatening behavior and provide actionable defensive measures. MITRE ATT&CK provides insights into threat actor behavior while D3FEND translates insights from ATT&CK into actionable defensive measures. MITRE Engage uses both ATT&CK and D3FEND to plan proactive engagement strategies that disrupt threat actor activity. As organizations use AWS to enhance their operational capabilities, implementing comprehensive security strategies becomes an important part of cloud adoption.
This blog post explores how AWS security services align with the MITRE frameworks to provide a systematic approach for threat detection and mitigation. We’ll examine how organizations can use AWS security tools such as Amazon GuardDuty, Amazon Security Lake, and AWS Security Hub in conjunction with MITRE frameworks to implement security controls across different stages of their cloud security operations.
Understanding MITRE frameworks
Today’s security teams face increasingly sophisticated threats, with actors continuously evolving their tactics, techniques, and procedures (TTPs). To help organizations strengthen their security posture, industry frameworks such as MITRE ATT&CK, D3FEND, and Engage provide structured methodologies for understanding and responding to these threats.
Understanding these threats through a risk lifecycle approach is crucial for security teams. This structured methodology enables teams to detect anomalies early, map threats to known risk stages, and implement proactive defense mechanisms. By following a risk lifecycle approach, organizations can enhance threat intelligence, improve incident response, and minimize dwell time, ultimately strengthening their security posture against evolving cyber threats.
The integration of MITRE ATT&CK, D3FEND, and Engage frameworks offers organizations a comprehensive approach across the security operations lifecycle. At the foundation, MITRE ATT&CK provides a common language for describing threat actor TTPs. This knowledge base is invaluable during threat modeling and risk assessment, helping teams identify potential vulnerabilities and threat vectors.
Building upon ATT&CK, MITRE D3FEND complements the tactical knowledge with a framework for defensive countermeasures. It suggests proactive security controls, such as implementing least privilege access or securing system configurations. This allows organizations to align their defenses directly with known exploit patterns.
MITRE Engage then adds a layer of active defense capabilities. It guides security teams in planning and implementing strategies that can help in three different ways and potentially simultaneously. Defenders can expose threat actors by detecting them as they attempt to access or operate on infrastructure. Defenders can use Engage to help impose costs by causing threat actors to focus on fake infrastructure rather than legitimate assets. Finally, defenders can set up enticing fake targets to lure threat actors into exploiting them and thereby revealing tradecraft.
A MITRE operation that was run in conjunction with a partner might clarify how this is valuable. MITRE worked with a partner to set up a fake network to appear as a specific type of entity. The goal was to elicit TTPs from a specific advanced persistent threat (APT) for which MITRE and the partner had a recent malware sample. MITRE ran the sample on the fake network and observed the APT’s activities. From that operation, MITRE gathered a list of specific TTPs that were executed by a script in a particular order that helped the partner develop a novel analytic. Plus, in reviewing event traces, MITRE found a flaw in a well-known security tool that missed a specific type of process-tampering event. This was disclosed to the vendor, who fixed that in later versions. Finally, every minute of operating in this environment imposed a cost on the APT by diverting resources from real victims. Full details of the exercise were presented at Shmoocon 2022.
As we move through the security operations lifecycle, these three MITRE frameworks continue to work in concert:
During detection and monitoring, ATT&CK informs threat hunting and log analysis and correlation, D3FEND strengthens real-time detection and anomaly tracking, and Engage enables strategic detection through deception techniques.
When responding to incidents, ATT&CK helps map incident progression, D3FEND automates response actions, and Engage provides methods to gather additional intelligence about threat activities.
In the post-incident phase, ATT&CK helps map the incident chain for better detection tuning, D3FEND refines security controls, and Engage expands deception tactics based on lessons learned. By integrating these efforts, organizations can implement a systematic approach to security operations that combines tactical knowledge, defensive measures, and strategic engagement capabilities.
Aligning AWS to MITRE frameworks
AWS offers a broad set of cloud services with high security at global scale, and has proven experience helping businesses innovate faster. Customers use AWS services in various configurations to build solutions for their bespoke business needs. A fundamental aspect of using AWS is understanding the Shared Responsibility Model, shown in Figure 2 that follows.
Figure 2: AWS Shared Responsibility Model
AWS is responsible for security of the cloud, while customers are responsible for security in the cloud. This means that AWS is responsible for protecting the infrastructure that runs the services offered in the AWS Cloud, while customer responsibility is determined by the AWS Cloud services that a customer selects. As customers embark on their cloud security journey, we help them understand two important concepts of cloud-scale environments:
Interconnected resources and configurations: Cloud architectures consist of interconnected entities—ranging from virtual machines using Amazon Elastic Compute Cloud (Amazon EC2) to serverless functions using AWS Lambda. To help customers maintain visibility and control, AWS offers native tools designed for cloud-scale management.
Dynamic access management and least privilege: Cloud environments require robust authentication mechanisms and fine-grained permissions. AWS provides comprehensive identity and access management tools to implement least privilege access and manage dynamic workloads effectively.
To support our customers’ security needs, AWS offers native security services that align with industry-standard frameworks like MITRE ATT&CK, D3FEND, and Engage. Here’s how these services map across the security lifecycle:
For threat modeling and risk assessment, Security Lake aggregates logs for MITRE ATT&CK-based analytics, while Amazon Inspector scans for vulnerabilities mapped to threat actor techniques. Amazon Macie detects sensitive data exposure across AWS resources.
When implementing preventive controls, implementing least privilege for access is fundamental. AWS Identity and Access Management (IAM) and AWS Organizations provide capabilities to enforce least privilege across your AWS environment. You can use IAM permissions and service control policies (SCPs) to build an identity perimeter. AWS Web Application Firewall (AWS WAF) provides application-layer protections, while you can use AWS Secrets Manager to store honey tokens. Secrets Manager is an AWS service that you can use to centrally manage the lifecycle of secrets. Honey tokens act as digital decoys that simulate legitimate credentials or sensitive data, enticing threat actors to reveal their presence when they interact with them. When triggered, these tokens generate real-time alerts and detailed event logs, enabling swift investigation and deeper insights into threat actor tactics. Deploying honey tokens on AWS involves creating decoy credentials or sensitive data entries that serve no legitimate purpose yet are closely monitored for unauthorized access attempts. One common approach is to use Secrets Manager to store fake secrets that mimic real credentials. When such tokens, stored in Secrets Manager, are accessed, the service generates detailed event logs with AWS CloudTrail and Amazon CloudWatch. You can continuously monitor these logs and events and configure them to alert you if the decoys are ever accessed.
During the detection and monitoring phase, GuardDuty identifies unusual activity patterns across your AWS accounts and workloads, Amazon Detective helps investigate these anomalies by analyzing root causes and plotting out the incident scope in an interactive way, while Security Hub centralizes security alerts and enables automated responses across your environment.
For incident response, containment, and recovery, Lambda and Step Functions help automate responses when security events occur. AWS Shield and WAF work together to provide real-time threat mitigation against denial-of-service type threats like distributed denial of service (DDoS), while Security Lake and Detective provide the necessary data and tools for conducting thorough forensic analysis. In 2024, AWS announced the AWS Security Incident Response service that uses automated monitoring and investigation through the AWS Customer Incident Response Team to prepare for, respond to, and recover from security events. You can use the service to augment your cloud-based security response function aligned with AWS security best practices.
By blocking malicious traffic, Shield and WAF provide real-time DDoS mitigation. AWS deception tactics could include redirecting threat actors to honeypots or deploying decoy Amazon Simple Storage Service (Amazon S3) files to enhance engagement strategies, like the honey token deployment and storage using Secrets Manager explained earlier in this post. Post incident, Security Lake and Detective assist in forensic analysis, while Security Hub and IAM policies refine security controls based on past exploit trends. MITRE Engage tactics can further evolve by analyzing honeypot interactions. By integrating these AWS security services, you can detect, prevent, and deceive threat actors effectively, strengthening your organization’s overall security posture. The following table maps MITRE lifecycle stages to AWS services and tools.
Lifecycle stage
AWS tools for MITRE ATT&CK (detect and map)
AWS tools for MITRE D3FEND (prevent and contain)
AWS tools for MITRE Engage (deceive and disrupt)
Threat modeling and risk assessment
Security Lake, Amazon Inspector, Macie, and Security Hub
IAM policies and AWS WAF
Secrets Manager and honey tokens
Detection and monitoring
GuardDuty, CloudTrail, and Security Hub
Detective, auto-remediation using AWS services such as Amazon EventBridge, Lambda, and Step Functions.
You can use Table 1 as a guide to understand how AWS services map to the various lifecycle stages in the incident response lifecycle. We will now demonstrate how GuardDuty, an AWS security service that continuously monitors your AWS accounts and workloads to provide automated threat detection, works in line with the MITRE ATT&CK framework.
GuardDuty: MITRE framework integration in action
In 2024, AWS worked extensively with MITRE to create new techniques and sub-techniques, and to update some of the existing detection objects in the MITRE ATT&CK cloud matrix. The work that AWS did with MITRE drew from real-world threat actor techniques performed against AWS customers and helped to provide more detailed information and specific detections on how threat actors abuse AWS services. For example, AWS threat detection teams observed a new tactic in the cloud environment (T1485.001 | Data Destruction: Lifecycle-Triggered Deletion) where threat actors could modify lifecycle policies for S3 buckets to delete all objects stored in the bucket. This technique, along with associated mitigations, detection, and references was submitted back to the MITRE ATT&CK framework.
AWS security services such as AWS Security Incident Response and GuardDuty use MITRE ATT&CK to provide threat intelligence and detailed information on threats identified in an AWS account. You can examine how these AWS security services integrate with MITRE ATT&CK through a specific example. GuardDuty Extended Threat Detection helps customers with contextual threat detection in their AWS environment and aligns the signals with the MITRE ATT&CK lifecycle. GuardDuty automatically detects and correlates individual findings with connected resources to produce an attack sequence finding. Consider an attack sequence finding generated by GuardDuty detecting data compromise in your AWS account. We will use this as an example in this post.
To begin, the finding summary includes a textual description of the sequence of events and the TTPs detected, as shown in Figure 3. It also shows a summary of the observed TTP identifiers, AWS API calls, and IP addresses.
Figure 3: GuardDuty finding summary visible in the service console
As seen in Figure 4, every attack sequence finding highlights the signals and the MITRE tactic associated with the activity. The finding shown in Figure 4 shows the full lifecycle of the threat from discovery to impact.
Figure 4: Signals and MITRE tactics alignment
Diving deeper into each signal reveals the specific MITRE tactic associated with the activity and the technique identifier. Another interesting feature is that you can see the correlation between the AWS API call associated with the resources involved in the attack sequence and the user agent.
Figure 5 shows one of the signals associated with the attack sequence in the previous finding. A data exfiltration activity has been reported because of the nature of the AWS API call (s3:GetObject) and the user agent (Kali Linux) that was used to perform the activity. The level of detail for each signal is contextual based on the type of activity and tactic.
Figure 5: Details for a single signal within a GuardDuty attack sequence finding
Figure 6 shows another signal from the same finding, but in this case the level of detail includes the malicious IP lists and suspicious network activity detected in relation to the signal and associated resources.
Figure 6: Details of TTPs associated with an indicator within a GuardDuty attack sequence finding
This information can be downloaded in a JSON-formatted file. The information from the JSON document can be used to automate responses and remediations for the detections.
Conclusion
AWS security services work together to support the implementation of MITRE frameworks—ATT&CK for threat detection, D3FEND for preventative security, and Engage for threat actor engagement across the cybersecurity lifecycle. As demonstrated through the GuardDuty Extended Threat Detection example, these integrations provide customers with practical, actionable security capabilities across their AWS environment. The alignment of AWS security services with MITRE frameworks helps you build security operations using industry-standard methodologies, implement automated detection and response capabilities, maintain visibility across your AWS environment, and continuously enhance your security controls.
Through this integration of AWS security services with MITRE frameworks, you can implement comprehensive security operations that evolve with your organization’s business needs. To get started, visit the GuardDuty console to enable Extended Threat Detection, and explore our documentation to learn more about implementing these security capabilities in your AWS environment. Join us at AWS re:Inforce 2025 to learn more about AWS security services, including deep dives into the integration of Amazon GuardDuty with MITRE frameworks and hands-on workshops with AWS security experts.
If you have feedback about this post, submit comments in the Comments section below.
Amazon GuardDuty is a threat detection service that continuously monitors, analyzes, and processes Amazon Web Services (AWS) data sources and logs in your AWS environment. GuardDuty uses threat intelligence feeds, such as lists of malicious IP addresses and domains, file hashes, and machine learning (ML) models to identify suspicious and potentially malicious activity in your AWS environment. When GuardDuty identifies a potential security issue, it creates a GuardDuty finding that gives you information about what the potential security issue is, the resources involved, and contextualized information that’s key to remediating the issue. GuardDuty helps you monitor for the latest threats by continually expanding threat detection to emerging and common threats.
In this blog post, I dive deep into an open source tool for testing GuardDuty findings and then walk through three examples of how you can use this tool to test and improve your response to GuardDuty findings.
Overview
If you want to learn more about GuardDuty, you can read about the finding types in this AWS documentation. However, customers often want realistic findings in their environment to understand what a finding looks like and to practice responding hands on. While you can use GuardDuty to create sample findings in your environment, these findings are approximations populated with placeholder values and look different from real findings. Additionally, you cannot practice remediation with these findings because they’re not tied to actual resources in your account. This can be helpful if you only want to see what details are in a finding, but if you want to practice a real-world scenario, these sample findings might not be adequate.
To address this use case and provide customers with a secure and reliable way to test the threat detection capabilities of GuardDuty, the GuardDuty service team launched an open source project called GuardDuty Tester. The GuardDuty Tester creates infrastructure in your environment to simulate different security issues so that you can test GuardDuty findings that mirror actual security issues that you might encounter, such as crypto mining or a reverse shell being created on an Amazon Elastic Compute Cloud (Amazon EC2) instance. The GuardDuty Tester was originally released in 2018 as an AWS CloudFormation template and was focused more on testing investigation workflows than on a wide range of finding types. AWS has since released an updated version that uses the AWS Cloud Development Kit (AWS CDK) to make the infrastructure code easier to read and expanded the test coverage to over 100 unique finding types and resource combinations.
The ability to create findings across different resource types such as Amazon EC2, Amazon Simple Storage Service (Amazon S3), and Amazon Elastic Kubernetes Service (Amazon EKS) is a valuable resource for your security team, allowing them to simulate various types of threats with isolated infrastructure so that you don’t need to compromise your deployed workloads to improve response actions and techniques. Remember that the GuardDuty Tester doesn’t cover every possible scenario, but is instead focused on threat intelligence and rules-based findings. Anomaly-based findings, which require learning about how you operate your environment, aren’t included in the GuardDuty Tester.
Getting started with the GuardDuty Tester
The GuardDuty Tester is deployed by using the AWS CDK to create the required infrastructure and scripts to generate the GuardDuty findings. For safety, AWS recommends that you deploy the GuardDuty Tester in a nonproduction environment in an account that’s used specifically for this purpose. This way, your security team can differentiate between test GuardDuty findings and findings for other workloads that they’re monitoring.
In this post, I won’t walk through configuring the GuardDuty Tester because this is already documented in the GuardDuty documentation. Instead, I will go over what you need to know about the GuardDuty Tester and some of the benefits.
Figure 1 shows the GuardDuty Tester architecture, which includes the resources necessary to create GuardDuty findings for various protection plans such as Amazon S3 buckets, Amazon EC2 instances, and an Amazon EKS cluster. The tester also deploys a dedicated GuardDuty Tester instance where you will run the scripts needed to create the GuardDuty findings.
Figure 1: GuardDuty Tester architecture
The GuardDuty Tester provides key features including:
Access through AWS Systems Manager: The GuardDuty Tester provides secure access by using Systems Manager to minimize open ports to the internet and allowing access only through Systems Manager.
Modular scripts: With an expanded library of tests available, the GuardDuty Tester accepts user parameters to set the scope of the tests to run, which gives you greater flexibility for different testing scenarios.
Setting up the GuardDuty Tester environment is straightforward and requires only a few commands. As outlined in the documentation and the README file in the repository, there are a number of prerequisites to set up the stack. These prerequisites include Python 3+, git, the AWS Command Line Interface (AWS CLI), AWS Systems Manager Session Manager plugin, npm, Docker, and a subscription to Kali Linux image for Amazon EC2. You will have to subscribe to the Kali Linux instance in AWS Marketplace, but will be charged for the instance only while the GuardDuty Tester is deployed. After these prerequisites are met, you can clone the repository, install the packages, and deploy the GuardDuty Tester to your AWS account.
Deploying the GuardDuty Tester can take 20–30 minutes, but if you’re following along with this post, I assume that you have deployed the GuardDuty Tester into your environment and have started your Systems Manager session as stated on Part A of Step 3 – Run tester scripts in the GuardDuty documentation. Now, I will dive into the first testing example.
Manual investigation
The first test use case is about getting familiar with what GuardDuty findings look like and the details that a finding gives you. This might be one of your first steps after turning on GuardDuty, or this might be an activity that you perform to help new team members understand GuardDuty findings.
To start a manual investigation:
Run the following command in your Systems Manager session to view the GuardDuty Tester options.
Python3 guardduty_tester.py --help
Run the following command in your Systems Manager session to create the first test finding.
Python3 guardduty_tester.py - -ec2 - -runtime only - -tactics impact
Before creating the findings, the GuardDuty Tester prompts you to confirm that it’s allowed to change GuardDuty settings in the environment. For example, if you’ve chosen to create findings related to the GuardDuty runtime monitoring feature but don’t have this feature enabled, the GuardDuty Tester will enable it for the tests and then disable it after testing is complete.
Note: This will start the 30-day trial of the enabled features in this account, in this AWS Region, even if the feature is disabled after testing is complete. More information about GuardDuty pricing and free trials can be found on the GuardDuty pricing page.
After choosing y which indicates “yes”, the GuardDuty Tester reports the number of domain reputation findings it’s expecting. Figure 2 shows an example of the expected findings. You can learn more about domain reputation findings in the GuardDuty finding documentation.
Figure 2: Generated GuardDuty findings in the console
After the GuardDuty Tester is finished, wait a few minutes and then go to the AWS Management Console for GuardDuty to see the findings. In this example, there are four new GuardDuty findings as expected from step 4 and shown in Figure 3. With the findings generated, you can start your manual investigation.
Figure 3: GuardDuty finding details
In the preceding figure, you can see some of the finding details presented—such as the action type and the process information—that can help you quickly identify what trigger started the suspicious communication. From here, I encourage you to use this finding to practice your runbooks for investigation and response. For example, you might start with validating and triaging the finding before moving into evidence collection and remediation. If you don’t have incident response runbooks already built, you can use this finding as an example to get started. There are multiple open source examples such as AWS incident response playbooks and AWS customer response playbook. A runbook will help your team evaluate the information provided in the GuardDuty finding and understand what else they need to know about your specific environment to properly respond to the finding. For example, in the finding, you will have resource and actor information but not things such as who is the account owner or point of contact for security for that account.
Creating alerts
The next use case highlights how to create alerts based on GuardDuty findings. When setting up alerting automation with tools such as Amazon Simple Notification Service (Amazon SNS) and Slack, you should create a finding using the GuardDuty Tester to test that you’ve configured your alert correctly. See Creating custom responses to GuardDuty findings for information about creating alerts with either of these tools. Figure 4 shows a sample EventBridge rule that will send GuardDuty findings to SNS.
Figure 4: EventBridge rule to send GuardDuty findings to SNS
For this post, I assume that you’ve already configured an Amazon EventBridge rule and Amazon SNS alert.
To test alerts:
Run the following command in your Systems Manager session to create a privileged container finding.
Shortly after creating this finding, you should see an SNS alert based on the finding type.
Figure 5: SNS notification from a GuardDuty finding
If you’ve configured the alert correctly, you will see an email similar to Figure 5. The email demonstrates that SNS notifications were successfully configured and tested using the GuardDuty Tester. If this is a new finding, you will receive this SNS notification shortly after the GuardDuty Tester generates the finding, but if this is an updated finding, then the timing will be based on the notification frequency configured in the account.
There are many ways that customers consume GuardDuty findings in their environments. Whether you’re using Amazon SNS or another mechanism such as a chat application, ticketing system, or a security information and event management (SIEM) solution, you can use this example of an EventBridge rule and the GuardDuty Tester to test out your notification pipeline.
Automated response
For the third use case, I show you how to create an automated action based on a GuardDuty finding. In this example, I create a finding based on an EC2 instance connecting to a Bitcoin mining domain, then based on this finding, I use Lambda to tag the instance to assist with identification during that investigation steps that follow. Although this is a simple example, it shows you what you can do by combining EventBridge rules and Lambda functions. If you want to create an automated response for GuardDuty runtime monitoring findings that requires making a host-level modification, you can use EventBridge rules with AWS Systems Manager Run Command to run commands locally on a host to remediate a security issue.
Start by creating a Lambda function that will take a GuardDuty event delivered by EventBridge, pull out the instance ID information, and then use that as a parameter in the create_tags API call. See the following example code.
import json
import boto3
import logging

logger = logging.getLogger()
logger.setLevel(logging.INFO)

def lambda_handler(event, context):
    try:
        # Extract the necessary information from the GuardDuty finding
        instance_id = event['detail']['resource']['instanceDetails']['instanceId']
        account_id = event['detail']['accountId']
        region = event['detail']['region']

        # Create an EC2 client
        ec2 = boto3.client('ec2', region_name=region)

        # Add the "infected" and "cryptomining" tag value pair to the instance
        ec2.create_tags(
            Resources=[instance_id],
            Tags=[
                {
                    'Key': 'infected',
                    'Value': 'cryptomining'
                }
            ]
        )

        logger.info(f"Tagged instance {instance_id} with 'infected=cryptomining' in account {account_id} and region {region}")
        return {
            'statusCode': 200,
            'body': 'Instance tagged successfully'
        }
    except Exception as e:
        logger.error(f"Error tagging instance {instance_id}: {str(e)}")
        return {
            'statusCode': 500,
            'body': f"Error tagging instance: {str(e)}"
        }
Next, I create an EventBridge rule specific to the Bitcoin mining finding that I want to test, shown in Figure 6. The target is the Lambda function that I just created.
Figure 6: EventBridge rule for crypto mining GuardDuty finding
Now that the EventBridge rule is in place with the Lambda function as the target, I can use the GuardDuty Tester to trigger a Bitcoin mining finding and test my solution with the following command.
After the finding is generated, I go to my EC2 instance, where there’s a new instance tag with a key of infected and a value of cryptomining, shown in Figure 7.
Figure 7: Updated tags after automated response
Although this is a general example, you can use the same approach across various actions that you might take in response to a GuardDuty finding and then test them using the GuardDuty Tester. Examples include using Lambda to add logic in AWS WAF, a network access control list (network ACL), or AWS Network Firewall to block suspicious traffic, or use Systems Manager Run Command to end a malicious process that’s running on a host.
Conclusion
The updated GuardDuty Tester represents a significant advancement in helping organizations validate and gain confidence in GuardDuty threat detection. The GuardDuty Tester now provides more comprehensive coverage of GuardDuty runtime monitoring and protection plans across various AWS services.
By using the GuardDuty Tester and following the use cases in this post, you can proactively assess your threat detection readiness, identify potential gaps, and implement necessary measures to help you fortify your AWS environments against evolving cyber threats.
If you have feedback about this post, submit comments in the Comments section below. If you have questions about this post, contact AWS Support.
Working with customers, our security teams detected an increase of data encryption events in S3 that used an encryption method known as server-side encryption using client-provided keys (SSE-C). While this is a feature used by many customers, we detected a pattern where a large number of S3 CopyObject operations using SSE-C began to overwrite objects, which has the effect of re-encrypting customer data with a new encryption key. Our analysis uncovered that this was being done by malicious actors who had obtained valid customer credentials, and were using them to re-encrypt objects.
It’s important to note that these actions do not take advantage of a vulnerability within an AWS service—but rather require valid credentials that an unauthorized user uses in an unintended way. Although these actions occur in the customer domain of the shared responsibility model, AWS recommends steps that customers can use to prevent or reduce the impact of such activity.
Using active defense tools, we have implemented automatic mitigations that will help to prevent this type of unauthorized activity in many cases. These mitigations have already prevented a high percentage of attempts from succeeding, without customers taking steps to protect themselves. However, the threat actors used valid credentials, and it is difficult for AWS to reliably distinguish valid usage from malicious use. Therefore, we recommend that customers follow best practices to mitigate risk.
We recommend that customers implement these four security best practices to protect against the unauthorized use of SSE-C:
Block the use of SSE-C unless required by an application
Implement data recovery procedures
Monitor AWS resources for unexpected access patterns
Implement short-term credentials
I. Block the use of SSE-C encryption
If your applications don’t use SSE-C as an encryption method, you can block the use of SSE-C with a resource policy applied to an S3 bucket, or by a resource control policy (RCP) applied to an organization in AWS Organizations.
Resource policies for S3 buckets are commonly referred to as bucket policies and allow customers to specify permissions for individual buckets in S3. A bucket policy can be applied using the S3 PutBucketPolicy API operation, the AWS Command Line Interface (CLI), or through the AWS Management Console. Learn more about how bucket policies work in the S3 documentation. The following example shows a bucket policy that blocks SSE-C request for a bucket called your-bucket-name>.
RCPs allow customers to specify the maximum available permissions that apply to resources across an entire organization in AWS Organizations. An RCP can be applied by using the AWS Organizations UpdatePolicy API operation, the AWS Command Line Interface (CLI), or through the AWS Management Console. Learn more about how RCPs work in the AWS Organizations documentation. The following example shows an RCP that blocks SSE-C requests for buckets in the organization.
Without data protection mechanisms in place, data recovery times can be longer. As a data protection best practice, we recommend that you protect against data being overwritten and that you maintain a second copy of critical data.
Enable S3 Versioning to keep multiple versions of an object in a bucket, so that you can restore objects that are accidentally deleted or overwritten. It is important to note that versioning may increase storage costs, especially for applications that frequently overwrite objects in a bucket. In this case, consider implementing S3 Lifecycle policies to manage older versions and control storage costs.
Additionally, copy or take backups of critical data to a different bucket and perhaps to a different AWS account or AWS Region. To do this, you can use S3 replication to automatically copy objects between buckets. These buckets can reside in the same or in different AWS accounts, as well as in the same or in different AWS Regions. S3 replication also offers an SLA for customers that have more stringent RPO (Recovery Point Objective) and RTO (Recovery Time Objective) requirements. Alternatively, you can use AWS Backup for S3, which is a managed service that automates periodic backup of S3 buckets.
III. Monitor AWS resources for unexpected access patterns
Without monitoring, unauthorized actions on S3 buckets may go unnoticed. We recommend that you use tools such as AWS CloudTrail or S3 server access logs to monitor access to your data.
You can use AWS CloudTrail to log events across AWS services (including Amazon S3) and even combine logs into a single account to make them available to your security teams to access and monitor. You can also create CloudWatch alarms based on specific S3 metrics or logs to alert on unusual activity. These alerts can help you identify anomalous behavior quickly. You can also set up automation that uses Amazon EventBridge and AWS Lambda to automatically take corrective measures. See this topic in the S3 documentation for an example implementation of a setup used to scan all buckets across an organization and apply S3 Block Public Access.
IV. Implement short-term credentials
The most effective approach to mitigating the risk of compromised credentials is to never create long-term credentials in the first place. Credentials that do not exist cannot be exposed or stolen, and AWS provides a rich set of capabilities that alleviate the need to ever store credentials in source code or in configuration files.
All of these technologies rely on the AWS Security Token Service (AWS STS) to issue temporary security credentials that can control access to AWS resources without distributing or embedding long-term AWS security credentials within an application, whether in code or in configuration files.
Summary
Detecting unintended encryption techniques like this in your environment requires vigilance and support. In this post, we highlighted the most common indicators to look for. As your security teams work to constantly protect your environment, know that a number of teams at AWS—including the AWS Customer Incident Response Team (CIRT), Amazon Threat Intelligence, and services teams like the Amazon S3 team—are working diligently to innovate, collaborate, and share insights to help protect your valuable data.
In this post, we provided an update on this recent threat to customer data and highlighted four security best practices that customers can use to protect against the risk of bad actors using SSE-C to encrypt data by using lost or stolen AWS credentials.
As threat actor tactics evolve, our commitment to customer security remains unwavering. Together, we are building a more secure cloud environment, allowing you to innovate with confidence.
If you ever suspect unauthorized activity, please don’t hesitate to contact AWS Support immediately.
Security is a shared responsibility between Amazon Web Services (AWS) and you, the customer. As a customer, the services you choose, how you connect them, and how you run your solutions can impact your security posture.
As part of our work, the AWS Customer Incident Response Team (AWS CIRT) observes tactics and techniques used by various threat actors that leverage unintended customer configurations. Understanding these tactics can help inform your design decisions, help improve your response plans, and help you detect these situations if they occur in your environment.
This blog post dives into some of the recent techniques used by threat actors that leverage specific customer configurations or design to make unauthorized use of resources within an AWS account. We’ll explain the techniques, the customer configurations that created the opportunity, and the AWS features and services you can use to help mitigate the impact of the tactics.
Technique overview
Identity federation is a system of trust between two parties for the purpose of authenticating users and conveying the information needed to authorize their access to resources. In simpler terms, this optional feature allows you to use one central system (an identity store) for all of your users and groups (note that it is possible to configure more than one identity provider for a given AWS account at one time if you wish to do so). You can then grant those identities permissions to your AWS resources by using that trust relationship.
Prerequisites for the event
In order for a threat actor to gain initial access into an AWS account during this type of security event, a third-party IdP must be configured to manage access to an AWS account (or a series of AWS accounts in an organization) through federation. The threat actor must also have gained the ability to write to the customer’s identity store with the third-party IdP (for example, they can create a user, have compromised a sufficiently privileged user, and so on).
When an IdP is configured to access an AWS account, permissions to access resources within that AWS account can be granted to users that have been authenticated by the IdP. This means that AWS uses the preconfigured trust with the IdP when it comes to performing the user identification (such as username, password, and multi-factor authentication (MFA)). With this technique, the threat actor uses the third-party IdP user’s access to obtain authenticated access to modify and create resources in the customer’s linked AWS accounts. This scenario is possible if, for example, the threat actor can create a user in the IdP’s identity store, or if they have obtained access to a privileged user’s credentials already in the identity store.
Detection and analysis opportunities
There are multiple ways that you may be able to find evidence of threat actors’ activities in this type of scenario. The challenge for customers is differentiating between the actions taken by a threat actor, and actions taken in the course of normal operations. The primary source of evidence for customer actions and threat actor activities is AWS CloudTrail, though Amazon GuardDuty and AWS Config also have detections that may be of assistance.
AWS CloudTrail
Your investigation should start by reviewing the CloudTrail event history for specific API calls. The following is a list of some calls (including various request parameters and field values) that have been associated with this tactic.
Remember, during security events there may be other API calls present that could indicate potential threat actor activity. In this post, we’re focusing only on the API calls related to this initial access tactic.
In the organization management account, threat actors leverage actions such as the following:
UpdateTrail – This action is used to update CloudTrail trail settings, such as what events you are logging, and which bucket is to be used for log delivery. Threat actors use this API endpoint to change or reduce the logging of subsequent API calls.
PutEventSelectors – This API call is used to configure which events are selected for a specific CloudTrail trail. AWS CIRT has observed this situation in cases where event selections were configured to deactivate logging for management events for trails configured in some accounts, and to only log read-only events in others (as opposed to write events such as DeleteBucket and RunInstances). The requestParameters field in the event record outlines which selectors were requested for configuration, as shown in Figure 1.
Figure 1: Event selectors set to ReadOnly
Figure 2 displays a CloudTrail event record for the PutEventSelectors action where the includeManagementEvents parameter is set to false.
Figure 2: Event selectors with the includeManagementEvents parameter set to false
StartSSO – This action is recorded when IAM Identity Center is initialized by the threat actor to expand their access into the organization. This event is significant, because this is an uncommon action and can raise awareness of potential malicious activity if this event was not authorized earlier.
CreateUser – This API call is logged when the threat actor creates a user. While the CreateUser action can use an eventSource of iam.amazonaws.com, when the CreateUser API is issued by an identity store, the eventSource will be listed as sso-directory.amazonaws.com. The record for this event, shown in Figure 3, does not actually contain the name of the user created. However, it does contain elements that you can use to determine the username for the user created.
Figure 3: CloudTrail event record for CreateUser event
Using the AWS CLI, you can retrieve the actual username requested by the CreateUser action by using the identityStoreId and the userId in the following command:
Figure 4: Determining an identity store username from UserId
Use this username to filter the CloudTrail event history in the member accounts. That will reduce the events shown to just those taken by this specific user, making it easier to map out the actions taken during this event.
CreateGroup and AddMemberToGroup – The first action creates a group within a specified identity store, and the second action adds members to it (note that these two specific actions use an event source of sso-directory.amazonaws.com).
CreatePermissionSet – This action creates a set of permissions within a specified IAM Identity Center instance that can be applied to a member account in an organization to enable access to resources in that member account. The duration of sessions authorized by the permission set is indicated by the sessionDuration value (in the example in Figure 5, this is set to the maximum duration of 12 hours).
Figure 5: CloudTrail event record for CreatePermissionSet action
To find out specifically what policies were assigned during the permission set creation, you can look for the permission set in the AWS Management Console, or use the AWS CLI command aws sso-admin list-managed-policies-in-permission-set, using the IAM Identity Center instance ARN and permission set ARN as parameters. (This CLI command displays only AWS managed policies. To see customer managed policies or inline policies, use the aws sso-admin get-inline-policy-for-permission-set or the aws sso-admin list-customer-managed-policy-references-in-permission-set CLI commands). Figure 6 shows the output of this command.
Figure 6: Determining policy for permission set
CreateAccountAssignment – This API call assigns access to a principal for an AWS member account that uses a specified permission set, usually the permission set created in the previous action. The request parameters for this action, shown in Figure 7, include the member account ID in the targetId field, the permissionSetArn, and the principalType – either a USER or GROUP. This activity was logged multiple times—each one for a different target member account.
Figure 7: CloudTrail event for CreateAccountAssignment
When the threat actor calls the CreateAccountAssignment action in the organization’s management account, the following actions are automatically taken in the organization’s member accounts:
CreateSAMLProvider – Creates an identity provider that supports SAML 2.0.
AttachRolePolicy – Attaches the specified managed policy to the specified IAM role.
CreateRole – Creates a new role in your AWS account.
CreateAccessKey – This action was used to create an access key for a user under the control of the threat actor.
GetFederationToken – The threat actor assumed the identity of the user referenced in the previous step for which access keys were created, then called the GetFederationToken API action to create temporary credentials. These temporary credentials were then used by the threat actor to continue making unauthorized actions under a new name as identified by the –name parameter specified in the GetFederationToken event that is logged in CloudTrail (see Figure 8). The GetFederationToken event also includes other details, such as the policy that was assigned to the session, the duration of the session, and the accessKeyID generated from the GetFederationToken invocation.
Authenticate – This API call is associated with the IAM Identity Center sign-in procedure and indicates which user is authenticated by the event in the userIdentity.userName field in the CloudTrail event record, as shown in Figure 8.
Figure 9: Name of user being authenticated
Federate – This API call is logged in CloudTrail when a user signs in with the IAM Identity Center AWS Access Portal and selects the Management console option, as shown in Figure 9. (A Federate event is not recorded if the Command line or programmatic access option is selected.)
Figure 10: Signing in through the AWS Access Portal
Additionally, you may see the following actions associated with this tactic in an organization’s member accounts:
AssumeRoleWithSAML – This event record is related to the CreateSAMLProvider action taken in step 7a. It returns a set of temporary security credentials for users who have been authenticated through a SAML authentication response.
ConsoleLogin – This action is recorded by CloudTrail when a user signs in to the AWS Management Console.
Amazon GuardDuty
If Amazon GuardDuty is turned on, a finding of Stealth:IAMUser/CloudTrailLoggingDisabled will be triggered when a CloudTrail trail is configured to stop logging. GuardDuty can also inform you of anomalous API requests observed in your account with the InitialAccess:IAMUser/AnomalousBehavior finding type. For more information on finding types, see Understanding Amazon GuardDuty findings.
AWS Config
You can configure AWS Config rules to monitor and evaluate the compliance of specific AWS configurations. For example, the cloudtrail-security-trail-enabledrule will check for CloudTrail trails that are defined according to security best practices, such as recording both read and write events, and recording management events. You can then configure these rules with an Amazon Simple Notification Service (Amazon SNS) topic to deliver notifications in the event of non-compliance. It is also possible to create custom rules in AWS Config to monitor and evaluate additional configurations. For further information on how to create AWS Config Custom rules, see AWS Config Custom Rules.
Mitigating the impact of the event
If the threat actor has an ability to write to your identity store, whether through a compromised third-party provider, a compromised identity store, or because the threat actor created the identity store, you need to make sure that you are in control of privileged actions. It’s your top priority to establish authority over your AWS Organizations organization before attempting to remove the federated access vector. The threat actor can undermine any remediation you perform if they persist in your organization’s management account.
The actions that are aligned with these top priorities are the following:
Control of the organization’s management account root user: If you do not have control of the password and the MFA token (or tokens) for the management account root user, contact AWS support.
If you do have control of the management account root user, make sure that you are in control of all enabled MFA devices for the root user, remove any and all access keys, and immediately rotate the password. See the IAM User Guide for current root user recommendations.
Enforcement of control over an environment that is using AWS Organizations: The level of enforcement you apply in the early stages of your mitigation efforts will be determined by your business continuity plans, because these enforcement actions can disrupt your workloads.
If you can tolerate the prevention of new, mutating actions from being taken within your organization, you can apply the following service control policy (SCP) to your organizational root. An important point to note is that SCPs do not apply to the management account, which is why our recommendations state, “use the management account only for tasks that require the management account.” This SCP enforces its constraints only for the child organizational units (OUs) and accounts of the organizational root, which is why the first step in this impact mitigation process was making sure that you control the root user for the management account.
Within this SCP, you can see an exemption made for two break-glass roles. Where break-glass access is needed, these roles will need to be created before the SCP is applied. Break-glass access refers to a quick means for a person who does not have access privileges to certain AWS accounts to gain access in exceptional circumstances by using an approved process. (For more information on creating break-glass access for your organization, see this AWS whitepaper).
If you only have tolerance for a partial disruption of non-critical or production workloads, you can reduce and adjust the scope of the SCP to your tolerance level. Apply the same SCP only to those non-production, non-critical organizational units, or even only on individual AWS accounts, as shown in Figure 10.
Figure 11: AWS Organizations levels for service control policies
Regardless of your business continuity tolerance, at a minimum, apply an SCP similar to the following one to your organization root, in order to invalidate sessions and temporary tokens. (Make sure that the value of the aws:TokenIssueTime parameter in the SCP is set to the current date and time and uses the ISO 8601 format.) Consider that this SCP includes any and all sessions and tokens in the organization in its scope, and consider the impact if there are dependencies on sessions or tokens that are not auto-renewing.
The following example SCP denies all actions, on all resources, for any session authenticating with a token issued before 2024-06-20 21:55:34 UTC..
This blog post explains how to revoke federated users’ active AWS sessions.
Removing the federated access vector: Once you’ve recovered some control over your organization by using the preceding actions, you can mitigate two of the federated access vector scenarios with the same action. If the access vector is a threat actor–created identity store, it is a non-disruptive choice to remove that identity store.
If instead your identity store was compromised, and this identity store is the primary or sole method for authorization, deleting it from your AWS account could impact your production environments and business continuity.
Deletion of a threat actor–created identity store: This is a permanent action that cannot be undone. User and group data associated with the deleted identity store is permanently removed. This includes user profiles, group memberships, and any other user- or group-related information. Any users or groups that were previously granted access to AWS resources or services through the deleted identity store will lose that access. Any permissions or roles assigned to users or groups from the deleted identity store will be revoked.
You should be aware that in this scenario where a third-party IdP is compromised, if the identity store that the third-party IdP is connected to is the sole method for authorization, then deleting the third-party IdP configuration could impact your production environments and business continuity.
Removal of the third-party IdP from your federation configuration: When you remove a third-party IdP from your IAM Identity Center instance, any authentication and authorization flows that were using the third-party IdP for federated access to AWS resources will be disrupted. All user and group data that was previously synchronized from the third-party IdP to IAM Identity Center is removed. Any user profiles, group memberships, and other user- or group-related information from the third-party IdP will no longer be available in IAM Identity Center.
You can perform the removal of the third-party IdP by changing your identity source in IAM Identity Center from an external IdP to IAM Identity Center itself. For instructions, see Change your identity source in the IAM Identity Center User Guide.
Regardless of your previous decisions, you should make sure that there are no other methods of federation enablement within your environment. There are three other limited methods of federation into AWS. These methods don’t provide account access or privileges like the vectors mentioned earlier, but you should still review for them. One method is with an Amazon Connect instance, as described in this blog post. A second method is through an account instance of IAM Identity Center, as described in this blog post. The third method is to create an identity provider by using IAM within an individual account, which a threat actor can do by using OIDC federation or SAML 2.0 federation (look for the event names CreateOpenIDConnectProvider, CreateSAMLProvider or CreateInstance in your account’s CloudTrail event history to identify whether this has occurred).
If you don’t want to disconnect IAM Identity Center entirely, another option is to remove permission sets that are assigned individually to each member. See this IAM Identity Center guidance for instructions on removing permission sets. Figure 11 depicts how this action appears in the AWS Management Console.
Figure 12: Permission set removal in IAM Identity Center
At an even less disruptive level, you can remove the policies attached to the permission sets within IAM Identity Center, using the following steps:
Under Multi-account permissions, choose Permission sets.
In the table on the Permission sets page, select the permission set from which you wish to detach the policies.
On the Permissions tab, select the policies you wish to detach, then choose Detach. A pop-up window will appear (see Figure 12). Choose Detach once more to confirm the detachment of the policy from the permission set.
Figure 13: Managed policy removal from a permission set
Eradication
Regardless of what methods you chose for containment, you want to eradicate the threat actor’s persistent access vectors. The following list outlines the actions that customers can take to perform eradication in their environments:
Identify and methodically remove any additional forms of access or persistence within your accounts which you did not create or authorize. Generate an IAM credential report for each account and review the results for forms of access to remove.
If IAM Access Analyzer is enabled, review Access Analyzer for any externally shared resources. During this process, at a minimum, make sure that all static access keys in all accounts are revoked. Also make sure that all IAM users which had static access keys have an inline policy applied that denies access based on the aws:TokenIssueTime, where the value of the aws:TokenIssueTime parameter is set to the current time using the ISO 8601 format.
Make sure that all non-service-linked roles have their sessions revoked. It isn’t possible to revoke sessions of service-linked roles. Revoking sessions for each role invalidates any credentials a threat actor might have obtained by previously assuming the role. (For instructions on how to perform this programmatically in your account, see the section titled Revoking session permissions before a specified time in the topic Revoking IAM role temporary security credentials.)
Make sure that you have control of root users for all remaining AWS accounts. As described previously, the results from the IAM credential report will help you quickly identify any unknown MFA devices or access keys. This item is third in this list because it might be a long process if you’ve lost control of the root users. Remember that as long as you have an appropriate SCP applied, actions by the organization member account root users are blocked.
Figure 14: IAM Credential Report sample
We can see in Figure 13 that the root account user does not have an MFA device assigned.
Before you begin to delete, stop, or terminate workloads, consider taking the opportunity to isolate and perform forensics on any threat actor–created or modified resources and workloads. Although forensics on AWS is beyond the scope of this post, it is described in the AWS Security Incident Response Guide.
Conclusion
The sections in this post can help you mitigate, detect, and prepare to respond to events of this type where threat actors leverage specific customer configurations or designs.
As always, you should measure the guidance provided here against your own security policies and procedures, and should take the business requirements of your organization into consideration.
Additionally, you may want to check your environment to confirm the following:
You have removed or limited long-term access key usage.
You have deployed SCPs that prevent unauthorized manipulation of GuardDuty and prevent unauthorized addition of IdPs.
You have created or updated playbooks that incorporate incident response actions that were performed to recover from the compromise of your IdP.
You have reviewed permissions to verify that your identities adhere to the principle of least privilege. (This blog post provides further information on how to limit permissions.)
Finally, if you want to learn how you can detect and respond to other types of security issues, such as unauthorized IAM credential use, ransomware on Amazon Simple Storage Service (Amazon S3), and cryptomining, head on over to the AWS CIRT publicly available workshops. (You will need an AWS account to use the workshops.)
Thanks for reading, and stay secure!
If you have feedback about this post, submit comments in the Comments section below. If you have questions about this post, contact AWS Support.
January 30, 2025: This post was republished to make the instructions clearer and compatible with OCSF 1.1.
Customers often require multiple log sources across their AWS environment to empower their teams to respond and investigate security events. In part one of this two-part blog post, I show you how you can use Amazon OpenSearch Service to ingest logs collected by Amazon Security Lake to facilitate near real-time monitoring.
Many customers use Security Lake to automatically centralize security data from Amazon Web Services (AWS) environments, software as a service (SaaS) providers, on-premises workloads, and cloud sources into a purpose-built data lake in their AWS environment. OpenSearch Service is a managed service that customers can use to deploy, operate, and scale OpenSearch clusters in the AWS Cloud. It natively integrates with Security Lake to enable customers to perform interactive log analytics and searches across large datasets, create enterprise visualization and dashboards, and perform analysis across disparate applications and logs. With Amazon OpenSearch Security Analytics, customers can also gain visibility into the security posture of their organization’s infrastructure, monitor for anomalous activity, detect potential security threats in near real time, and initiate alerts to pre-configured destinations.
Without using Amazon OpenSearch Service, customers would need to build, deploy and manage infrastructure for an analytics solution, such as an ELK stack.
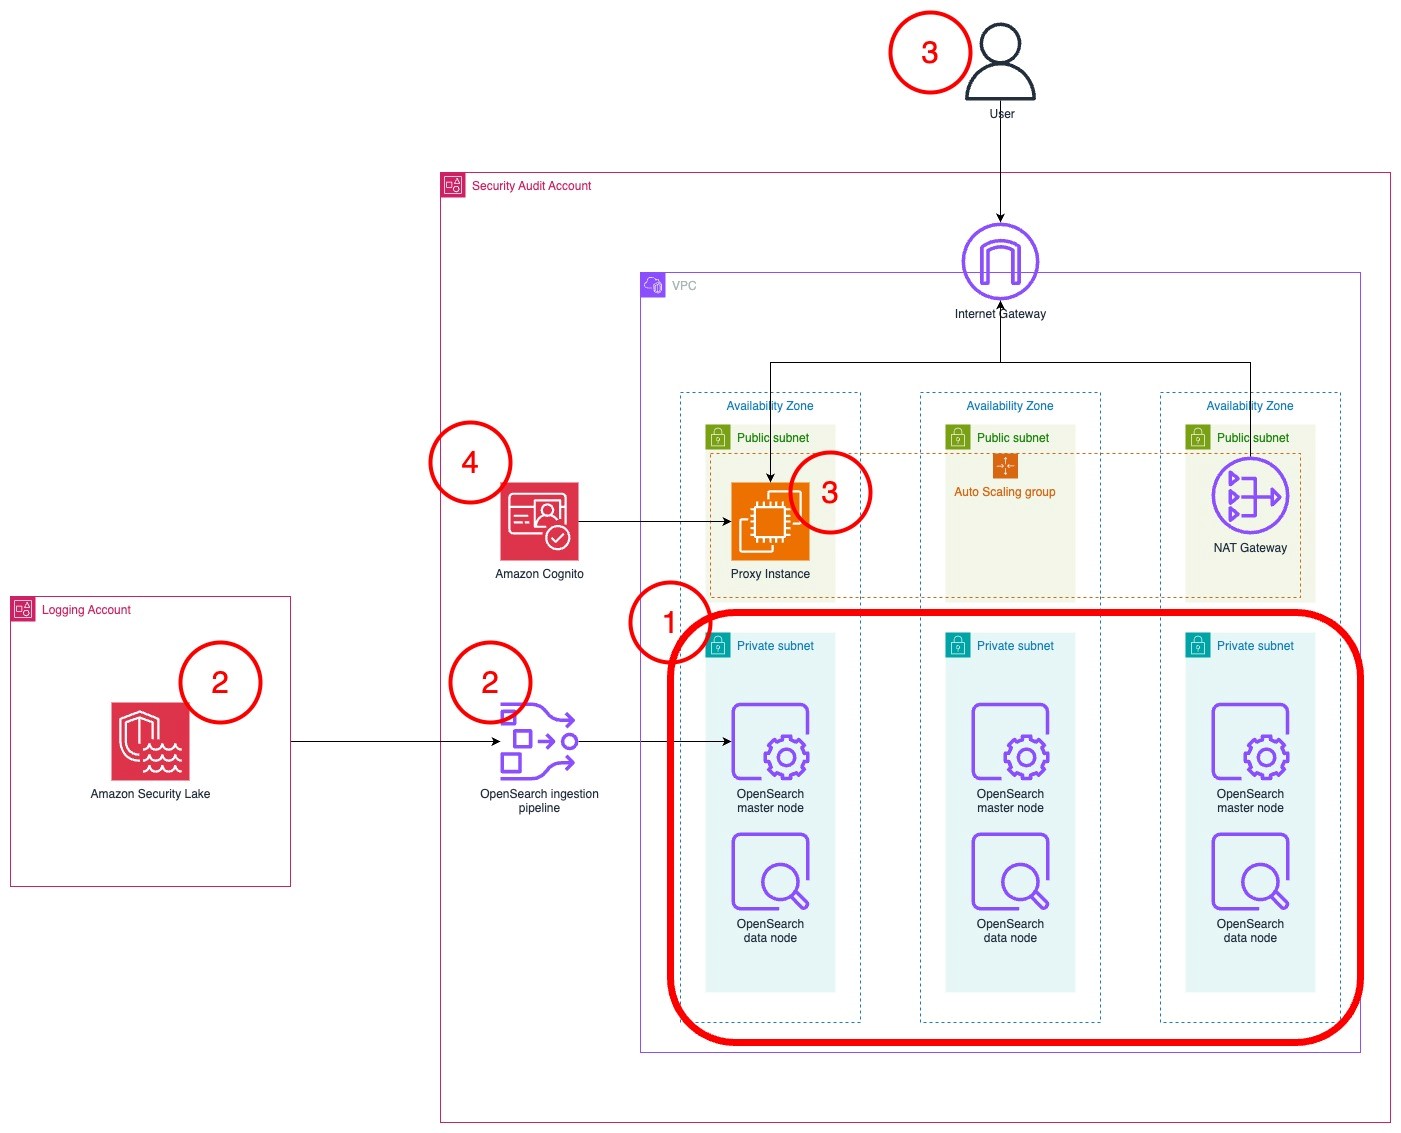
The architecture diagram in Figure 1 shows the completed architecture of the solution.
The OpenSearch Service cluster is deployed within a virtual private cloud (VPC) across three Availability Zones for high availability.
The OpenSearch Service cluster ingests logs from Security Lake using an OpenSearch Ingestion pipeline.
The cluster is accessed by end users through a public-facing proxy hosted on an Amazon EC2 instance.
To reduce costs, the template doesn’t deploy a dead letter queue (DLQ) for the OpenSearch Ingestion pipeline. You can add one later if you want.
Instead of a public facing proxy, you can deploy a VPN to access your cluster.
Authentication to the cluster is managed with Amazon Cognito.
Figure 1: Solution architecture
Planning the deployment
This section will help you plan your OpenSearch service deployment, including what nodes you should choose, the amount of storage to allocate, and where to deploy the cluster.
Deciding instances for the OpenSearch Service master and data nodes
First, determine what instance type to use for the master and data nodes. If your workload generates less than 100 GB of Security Lake logs per day, we recommend using three m6g.large.search master nodes and three r6g.large.search data nodes. You can start small and scale up or scale out later. For more information about deciding the size and number of instances, see Get started with Amazon OpenSearch Service. Note the instance types that you have selected on a text editor because you will use this as an input for the AWS CloudFormation template that you will deploy later.
Configuring storage
To optimize your storage costs, you need to plan your data strategy. In this architecture, Security Lake is used for long-term log storage. Because Security Lake uses Amazon Simple Storage Service (Amazon S3), you can optimize long-term storage costs. You can configure OpenSearch Service to ingest priority logs based on the recent data that you can use for near-real time detection and alerting. Your team can query logs in Security Lake using its Zero-ETL integration with OpenSearch Service to analyze older logs.
Therefore, Security Lake should serve as your primary long-term log storage, with OpenSearch Service storing only the most recent logs.
The number of days of logs in OpenSearch Service will depend on how many days’ worth of data you need to investigate at a given time. I recommend storing 15 days of data in OpenSearch Service. This allows you to react to and investigate the most immediate security events while optimizing storage costs for older logs.
The next step is to determine the volume of logs generated by Security Lake.
Sign in to the Security Lake delegated administrator account.
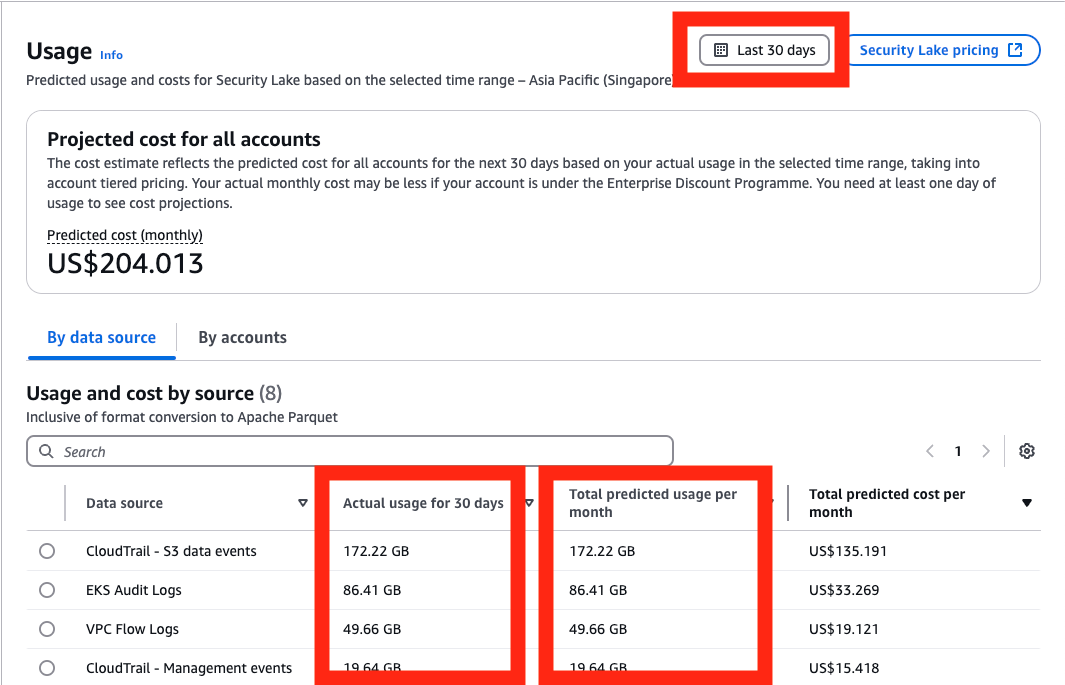
Go to the AWS Management Console for Security Lake. Choose Usage in the navigation pane.
On the Usage screen, select Last 30 days as the range of usage.
Add the total Actual usage for the last 30 days for the data sources that you intend to send to OpenSearch. If you have used Security Lake for less than 30 days, you can use the Total predicted usage per month. Divide this figure by 30 to get the daily data volume.
Figure 2: Select range of usage
To determine the total storage needed, multiply the data generated by Security Lake per day by the retention period you chose, then by 1.1 to account for the indexes, then multiply that number by 1.15 for overhead storage. For more information about calculating storage, see Get started with Amazon OpenSearch Service.
To determine the amount of Amazon Elastic Block Store (Amazon EBS) storage that you need per node, take the total amount of storage and divide it by the number of nodes that you have. Round that number up to the nearest whole number. You can increase the amount of storage after deployment when you have a better understanding of your workload. Make a note of this number in a text editor because you’ll use it as an input in the CloudFormation template later.
Example 1: 10 GB of Security Lake logs generated per day, stored for 30 days in OpenSearch Service in three nodes
10 GB of Security Lake logs stored for 30 days = 10 GB * 30 = 300 GB
Account for additional space for indexes and overhead space = 300 GB * 1.1 * 1.15 = 379.5 GB
Divide the storage required across three nodes, rounded up = 379.5/3 ≈ 127 GB per node
You would need 127 GB per node in OpenSearch Service
Example 2: 200 GB of Security Lake logs generated per day, stored for 15 days in OpenSearch Service across six nodes
200 GB of Security Lake logs stored for 15 days = 200 GB * 15 = 3000 GB
Account for additional space for indexes and overhead space = 3000 GB * 1.1 * 1.15 = 3795 GB
Divide the storage required across three nodes, rounded up = 3795/6 ≈ 633 GB per node
You would need 633 GB per node in OpenSearch Service
Where to deploy the cluster?
If you have an AWS Control Tower deployment or have a deployment modelled after the AWS Security Reference Architecture (AWS SRA), Security Lake should be deployed in the Log Archive account. Because security best practices recommend that the Log Archive account should not be frequently accessed, the OpenSearch Service cluster should be deployed into your Audit account or Security Tooling account.
You need to deploy your Security Lake subscriber in the same Region as your Security Lake roll-up Region. If you have more than one roll-up Region, choose the Region that collects logs from the Regions you want to monitor.
Your cluster needs to be deployed in the same Region as your Security Lake subscriber be able to access data.
Setting up the Security Lake subscriber
Before deploying the solution, create a Security Lake subscriber in your Security Lake roll-up Region so that OpenSearch Service can access data from Amazon Security Lake.
Access the Security Lake console in your Log Archive account.
Choose Subscribers in the navigation pane.
Choose Create subscriber.
On the Create subscriber page, enter a name, such as OpenSearch-subscriber.
Under Data Access, select Under S3 notification type, select SQS queue.
Under Subscriber credentials, enter the AWS account ID for the account you plan to deploy the OpenSearch cluster to, which should be your Security Tooling
Enter OpenSearchIngestion-<AWS account ID> under External ID.
Figure 3: Configuring the Security Lake subscriber
Leave All log and event sources selected and choose Create.
After the subscriber has been created, you will need to collect information to facilitate the deployment.
To gather necessary information:
Select the subscriber that you just created.
Derive the S3 bucket name from the S3 bucket ARN and store it in a text editor. The Amazon Resource Name (ARN) is formatted as arn:aws:s3:::<bucket name>. The bucket name should look like aws-security-data-lake-<region>-xxxxx.
Figure 4: Derive the S3 bucket name from the Subscriber details page
Go to the Amazon Simple Queue Service (Amazon SQS) console and select the SQS queue created as part of the Security Lake subscriber. It should look like AmazonSecurityLake-xxxxxxxxx-Main-Queue. Note the queue’s ARN and URL in your text editor.
Figure 5: Relevant details from the SQS queue
Deploy the solution
To deploy the solution in your Security Tooling account, use a CloudFormation template. This template deploys the OpenSearch Service cluster, OpenSearch Ingestion pipeline, and an AWS Lambda function to initialize the cluster.
To deploy the OpenSearch cluster:
To deploy the CloudFormation template that builds the OpenSearch service cluster, select the Launch Stack button.
In the CloudFormation console, make sure that you are in the correct AWS account. You should be in your Security Tooling account. Also make sure that you have selected the same Region as your Security Lake subscriber.
Enter a name for your stack. A name like os-stack-<day>-<month> can help you keep track of deployments.
Enter the instance types and Amazon EBS volume size that you noted earlier.
Enter the IP address range that you want to allow to access the proxy’s security group. You should limit this to your corporate IP range. You can set it as 0.0.0/0 if you want to expose it to the public internet.
Fill in the details of the Security Lake bucket and the subscriber Amazon SQS queue ARN, URL, and Region.
Figure 6: Add stack parameters
Check the acknowledgements in the Capabilities section.
Choose Create stack to begin deploying the resources.
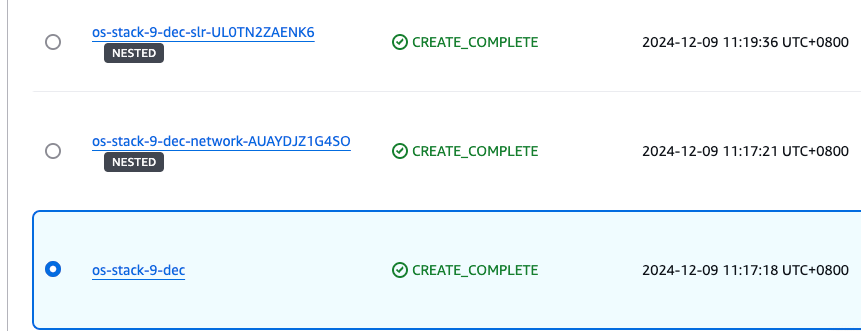
It will take 20–30 minutes to deploy the multiple nested templates. Wait for the main stack (not the nested ones) to achieve the CREATE_COMPLETE status before proceeding to the next step.
Note: If you encounter failures while deployment, you can download the CloudFormation file here and select Preserve successfully provisioned resources under Stack failure options while deploying. This will allow you to troubleshoot the stack deployment.
Go to the Outputs pane of the main CloudFormation stack. Save the DashboardsProxyURL, OpenSearchInitRoleARN, and PipelineRole values in a text editor to refer to later.
Figure 7: The stacks in the CREATE_COMPLETE state with the outputs panel shown
Open the DashboardsProxyURL value in a new tab.
Note: Because the proxy relies on a self-signed certificate, you will get an insecure certificate warning. You can safely ignore this warning and proceed. For a production workload, you should issue a trusted private certificate from your internal public key infrastructure or use AWS Private Certificate Authority.
You will be presented with the Amazon Cognito sign-in page. Use administrator as the username.
Access Secrets Manager to find the password. Select the secret that was created as part of the stack.
Figure 8: The Cognito password in Secrets Manager
Choose Retrieve secret value to get the password.
Figure 9: Retrieve the secret value
After signing in, you will be prompted to change your password and will be redirected to the OpenSearch dashboard.
If you see a pop-up that states Start by adding your own data, select Explore on my own. On the next page, Introducing new OpenSearch Dashboards look & feel, choose Dismiss.
If you see a pop-up that states Select your tenant, select Global, and then choose Confirm.
Figure 10: Select and confirm your tenant
To initialize the OpenSearch cluster:
Choose the menu icon (three stacked horizontal lines) on the top left and select Security under the Management section.
Figure 11: Navigating to the Security page in the OpenSearch console
Select Roles. On the Roles page, search for the all_access role and select it.
Select Mapped users, and then select Manage mapping.
On the Map user screen, choose Add another backend role. Paste the value for the OpenSearchInitRoleARN from the list of CloudFormation outputs. Choose Map.
Figure 12: Mapping the role on the Security page in the OpenSearch console
Leave this tab open and return to the AWS Management console. Go to the AWS Lambda console and select the function named xxxxxx-OS_INIT.
In the function screen, choose Test, and then Create new test event.
Figure 13: Creating the test event in the Lambda console
Choose Invoke. The function should run for about 30 seconds. The execution results should show the component templates that have been created. This Lambda function creates the component and index templates to ingest Open Cybersecurity Framework (OCSF) formatted data, a set of indices and aliases that correspond with the OCSF classes generated by Security Lake, and a rollover policy that will rollover the index daily or if it becomes larger than 40 GB.
Figure 14: Invoking the Lambda function in the Lambda console
To set up the pipeline
Return to the Map user page on the OpenSearch console.
Choose Add another backend role. Paste the value of the PipelineRole from the CloudFormation template output. Choose This will allow the OpenSearch Ingestion to write to the cluster.
Figure 15: Mapping the OpenSearch Ingestion role
Access the Amazon S3 console in the Log Archive account where Security Lake is hosted.
Select the Security Lake bucket in your roll-up Region. It should look like aws-security-data-lake-region-xxxxxxxxxx.
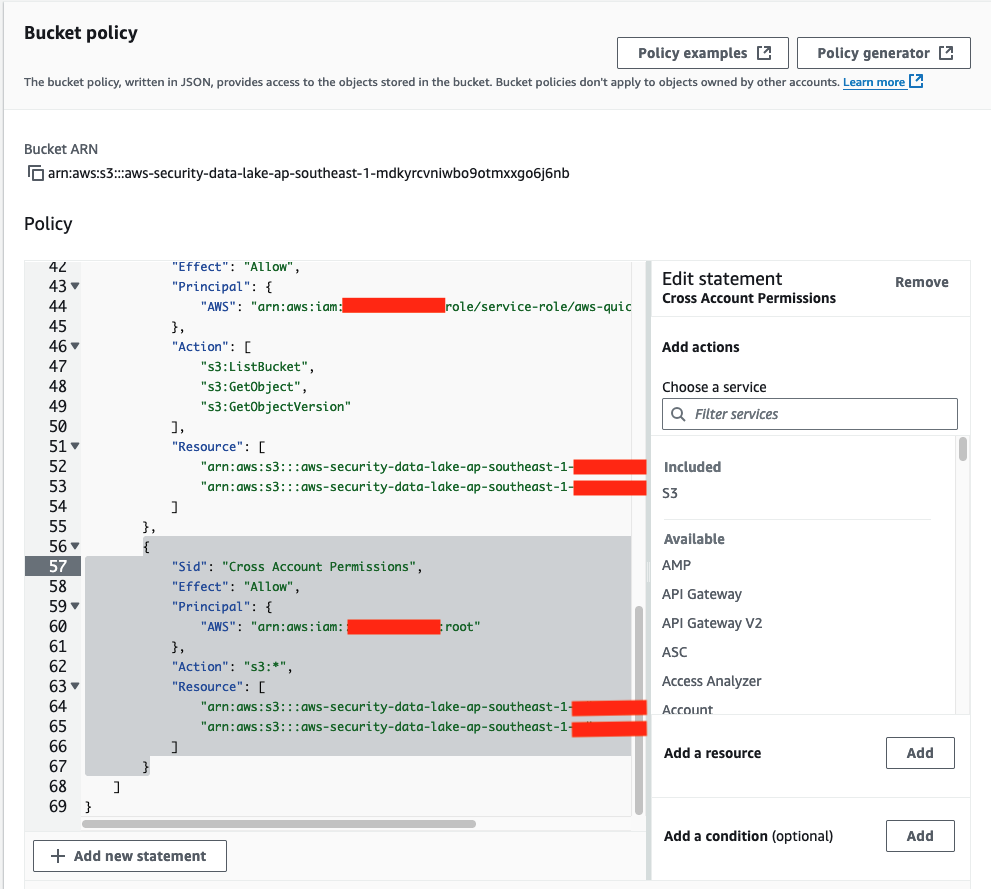
Choose Permissions, then Edit under Bucket policy.
Add this policy to the end of the existing bucket policy. Replace the Principal with the ARN of the PipelineRole and the name of your Security Lake bucket in the Resource section.
{
            "Sid": "Cross Account Permissions",
            "Effect": "Allow",
            "Principal": {
                "AWS": "<Pipeline role ARN>"
            },
            "Action": "s3:*",
            "Resource": [
                "arn:aws:s3:::<Security Lake bucket name>/*",
                "arn:aws:s3:::<Security Lake bucket name>"
            ]
        }
Figure 16: The modified S3 bucket access policy
Choose Save changes.
To upload the index patterns and dashboards
Download the Security-lake-objects.ndjson file by right-clicking on this link and selecting Save link as.
Access the Dashboards Management page through the navigation menu.
Choose Saved objects in the navigation pane.
On the Saved Objects page, choose Import on the right side of the screen.
Figure 17: Import saved objects
Choose Import and select the Security-lake-objects.ndjson file that you downloaded previously.
Leave Create new objects with unique IDs selected and choose Import.
You can now view the ingested logs on the Discover page and visualizations on the Dashboards page, which you can find on the navigation bar.
Figure 18: The Discover page displaying ingested logs
Clean up
To avoid unwanted charges, delete the main CloudFormation template, named os-stack-<day>-<month> (not the nested stacks).
Figure 19: Select the main stack in the CloudFormation console
Modify the Security Lake bucket policy in the logging account to remove the section you added that trusted the PipelineRole. Be careful not to modify the rest of the policy because it could impact the functioning of Security Lake and other subscribers.
Figure 20: The S3 bucket policy with the relevant sections that needed to be deleted
Conclusion
In this post, you learned how to plan an OpenSearch deployment with Amazon OpenSearch Service to ingest logs from Amazon Security Lake. With this solution, you’re able to aggregate and manage logs with Security Lake and visualize and monitor those logs with OpenSearch Service. After deployment, monitor the OpenSearch Service metrics to determine if you need to scale this up or out for improved performance. In part 2, I will show you how to set up the Security Analytics detector to generate alerts to security findings in near-real time.
If you have feedback about this post, submit comments in the Comments section below. If you have questions about this post, contact AWS Support.
The threat detection and incident response track showcased how AWS customers can get the visibility they need to help improve their security posture, identify issues before they impact business, and investigate and respond quickly to security incidents across their environment.
With dozens of service and feature announcements—and innumerable best practices shared by AWS experts, customers, and partners—distilling highlights is a challenge. From an incident response perspective, three key themes emerged.
Proactively detect, contextualize, and visualize security events
When it comes to effectively responding to security events, rapid detection is key. Among the launches announced during the keynote was the expansion of Amazon Detective finding groups to include Amazon Inspector findings in addition to Amazon GuardDuty findings.
Detective, GuardDuty, and Inspector are part of a broad set of fully managed AWS security services that help you identify potential security risks, so that you can respond quickly and confidently.
Using machine learning, Detective finding groups can help you conduct faster investigations, identify the root cause of events, and map to the MITRE ATT&CK framework to quickly run security issues to ground. The finding group visualization panel shown in the following figure displays findings and entities involved in a finding group. This interactive visualization can help you analyze, understand, and triage the impact of finding groups.
Figure 1: Detective finding groups visualization panel
With the expanded threat and vulnerability findings announced at re:Inforce, you can prioritize where to focus your time by answering questions such as “was this EC2 instance compromised because of a software vulnerability?” or “did this GuardDuty finding occur because of unintended network exposure?”
In the session Streamline security analysis with Amazon Detective, AWS Principal Product Manager Rich Vorwaller, AWS Senior Security Engineer Rima Tanash, and AWS Program Manager Jordan Kramer demonstrated how to use graph analysis techniques and machine learning in Detective to identify related findings and resources, and investigate them together to accelerate incident analysis.
In addition to Detective, you can also use Amazon Security Lake to contextualize and visualize security events. Security Lake became generally available on May 30, 2023, and several re:Inforce sessions focused on how you can use this new service to assist with investigations and incident response.
As detailed in the following figure, Security Lake automatically centralizes security data from AWS environments, SaaS providers, on-premises environments, and cloud sources into a purpose-built data lake stored in your account. Security Lake makes it simpler to analyze security data, gain a more comprehensive understanding of security across an entire organization, and improve the protection of workloads, applications, and data. Security Lake automates the collection and management of security data from multiple accounts and AWS Regions, so you can use your preferred analytics tools while retaining complete control and ownership over your security data. Security Lake has adopted the Open Cybersecurity Schema Framework (OCSF), an open standard. With OCSF support, the service normalizes and combines security data from AWS and a broad range of enterprise security data sources.
Figure 2: How Security Lake works
To date, 57 AWS security partners have announced integrations with Security Lake, and we now have more than 70 third-party sources, 16 analytics subscribers, and 13 service partners.
In Gaining insights from Amazon Security Lake, AWS Principal Solutions Architect Mark Keating and AWS Security Engineering Manager Keith Gilbert detailed how to get the most out of Security Lake. Addressing questions such as, “How do I get access to the data?” and “What tools can I use?,” they demonstrated how analytics services and security information and event management (SIEM) solutions can connect to and use data stored within Security Lake to investigate security events and identify trends across an organization. They emphasized how bringing together logs in multiple formats and normalizing them into a single format empowers security teams to gain valuable context from security data, and more effectively respond to events. Data can be queried with Amazon Athena, or pulled by Amazon OpenSearch Service or your SIEM system directly from Security Lake.
Build your security data lake with Amazon Security Lake featured AWS Product Manager Jonathan Garzon, AWS Product Solutions Architect Ross Warren, and Global CISO of Interpublic Group (IPG) Troy Wilkinson demonstrating how Security Lake helps address common challenges associated with analyzing enterprise security data, and detailing how IPG is using the service. Wilkinson noted that IPG’s objective is to bring security data together in one place, improve searches, and gain insights from their data that they haven’t been able to before.
“With Security Lake, we found that it was super simple to bring data in. Not just the third-party data and Amazon data, but also our on-premises data from custom apps that we built.” — Troy Wilkinson, global CISO, Interpublic Group
Use automation and machine learning to reduce mean time to response
Incident response automation can help free security analysts from repetitive tasks, so they can spend their time identifying and addressing high-priority security issues.
LLA operates in over 20 countries across Latin America and the Caribbean. After completing multiple acquisitions, LLA needed a centralized security operations team to handle incidents and notify the teams responsible for each AWS account. They used GuardDuty, Security Hub, and Systems Manager Incident Manager to automate and streamline detection and response, and they configured the services to initiate alerts whenever there was an issue requiring attention.
Speaking alongside AWS Principal Solutions Architect Jesus Federico and AWS Principal Product Manager Sarah Holberg, LLA Senior Manager of Cloud Services Joaquin Cameselle noted that when GuardDuty identifies a critical issue, it generates a new finding in Security Hub. This finding is then forwarded to Systems Manager Incident Manager through an Amazon EventBridge rule. This configuration helps ensure the involvement of the appropriate individuals associated with each account.
“We have deployed a security framework in Liberty Latin America to identify security issues and streamline incident response across over 180 AWS accounts. The framework that leverages AWS Systems Manager Incident Manager, Amazon GuardDuty, and AWS Security Hub enabled us to detect and respond to incidents with greater efficiency. As a result, we have reduced our reaction time by 90%, ensuring prompt engagement of the appropriate teams for each AWS account and facilitating visibility of issues for the central security team.” — Joaquin Cameselle, senior manager, cloud services, Liberty Latin America
After describing the four phases of the incident response process — preparation and prevention; detection and analysis; containment, eradication, and recovery; and post-incident activity—AWS ProServe Global Financial Services Senior Engagement Manager Harikumar Subramonion noted that, to fully benefit from the cloud, you need to embrace automation. Automation benefits the third phase of the incident response process by speeding up containment, and reducing mean time to response.
Citibank Head of Cloud Security Operations Elvis Velez and Vice President of Cloud Security Damien Burks described how Citi built the Cloud Containment Automation Framework (CCAF) from the ground up by using AWS Step Functions and AWS Lambda, enabling them to respond to events 24/7 without human error, and reduce the time it takes to contain resources from 4 hours to 15 minutes. Velez described how Citi uses adversary emulation exercises that use the MITRE ATT&CK Cloud Matrix to simulate realistic attacks on AWS environments, and continuously validate their ability to effectively contain incidents.
Innovate and do more with less
Security operations teams are often understaffed, making it difficult to keep up with alerts. According to data from CyberSeek, there are currently 69 workers available for every 100 cybersecurity job openings.
Effectively evaluating security and compliance posture is critical, despite resource constraints. In Centralizing security at scale with Security Hub and Intuit’s experience, AWS Senior Solutions Architect Craig Simon, AWS Senior Security Hub Product Manager Dora Karali, and Intuit Principal Software Engineer Matt Gravlin discussed how to ease security management with Security Hub. Fortune 500 financial software provider Intuit has approximately 2,000 AWS accounts, 10 million AWS resources, and receives 20 million findings a day from AWS services through Security Hub. Gravlin detailed Intuit’s Automated Compliance Platform (ACP), which combines Security Hub and AWS Config with an internal compliance solution to help Intuit reduce audit timelines, effectively manage remediation, and make compliance more consistent.
“By using Security Hub, we leveraged AWS expertise with their regulatory controls and best practice controls. It helped us keep up to date as new controls are released on a regular basis. We like Security Hub’s aggregation features that consolidate findings from other AWS services and third-party providers. I personally call it the super aggregator. A key component is the Security Hub to Amazon EventBridge integration. This allowed us to stream millions of findings on a daily basis to be inserted into our ACP database.” — Matt Gravlin, principal software engineer, Intuit
At AWS re:Inforce, we launched a new Security Hub capability for automating actions to update findings. You can now use rules to automatically update various fields in findings that match defined criteria. This allows you to automatically suppress findings, update the severity of findings according to organizational policies, change the workflow status of findings, and add notes. With automation rules, Security Hub provides you a simplified way to build automations directly from the Security Hub console and API. This reduces repetitive work for cloud security and DevOps engineers and can reduce mean time to response.
In Continuous innovation in AWS detection and response services, AWS Worldwide Security Specialist Senior Manager Himanshu Verma and GuardDuty Senior Manager Ryan Holland highlighted new features that can help you gain actionable insights that you can use to enhance your overall security posture. After mapping AWS security capabilities to the core functions of the NIST Cybersecurity Framework, Verma and Holland provided an overview of AWS threat detection and response services that included a technical demonstration.
Bolstering incident response with AWS Wickr enterprise integrations highlighted how incident responders can collaborate securely during a security event, even on a compromised network. AWS Senior Security Specialist Solutions Architect Wes Wood demonstrated an innovative approach to incident response communications by detailing how you can integrate the end-to-end encrypted collaboration service AWS Wickr Enterprise with GuardDuty and AWS WAF. Using Wickr Bots, you can build integrated workflows that incorporate GuardDuty and third-party findings into a more secure, out-of-band communication channel for dedicated teams.
A full conference pass is $1,099. Register today with the code secure150off to receive a limited time $150 discount, while supplies last.
AWS re:Inforce is back, and we can’t wait to welcome security builders to Anaheim, CA, on June 13 and 14. AWS re:Inforce is a security learning conference where you can gain skills and confidence in cloud security, compliance, identity, and privacy. As an attendee, you will have access to hundreds of technical and non-technical sessions, an Expo featuring AWS experts and security partners with AWS Security Competencies, and keynote and leadership sessions featuring Security leadership. re:Inforce 2023 features content across the following six areas:
Data protection
Governance, risk, and compliance
Identity and access management
Network and infrastructure security
Threat detection and incident response
Application security
The threat detection and incident response track is designed to showcase how AWS, customers, and partners can intelligently detect potential security risks, centralize and streamline security management at scale, investigate and respond quickly to security incidents across their environment, and unlock security innovation across hybrid cloud environments.
Breakout sessions, chalk talks, and lightning talks
TDR201 | Breakout session | How Citi advanced their containment capabilities through automation Incident response is critical for maintaining the reliability and security of AWS environments. To support the 28 AWS services in their cloud environment, Citi implemented a highly scalable cloud incident response framework specifically designed for their workloads on AWS. Using AWS Step Functions and AWS Lambda, Citi’s automated and orchestrated incident response plan follows NIST guidelines and has significantly improved its response time to security events. In this session, learn from real-world scenarios and examples on how to use AWS Step Functions and other core AWS services to effectively build and design scalable incident response solutions.
TDR202 | Breakout session | Wix’s layered security strategy to discover and protect sensitive data Wix is a leading cloud-based development platform that empowers users to get online with a personalized, professional web presence. In this session, learn how the Wix security team layers AWS security services including Amazon Macie, AWS Security Hub, and AWS Identity and Access Management Access Analyzer to maintain continuous visibility into proper handling and usage of sensitive data. Using AWS security services, Wix can discover, classify, and protect sensitive information across terabytes of data stored on AWS and in public clouds as well as SaaS applications, while empowering hundreds of internal developers to drive innovation on the Wix platform.
TDR203 | Breakout session | Vulnerability management at scale drives enterprise transformation Automating vulnerability management at scale can help speed up mean time to remediation and identify potential business-impacting issues sooner. In this session, explore key challenges that organizations face when approaching vulnerability management across large and complex environments, and consider the innovative solutions that AWS provides to help overcome them. Learn how customers use AWS services such as Amazon Inspector to automate vulnerability detection, streamline remediation efforts, and improve compliance posture. Whether you’re just getting started with vulnerability management or looking to optimize your existing approach, gain valuable insights and inspiration to help you drive innovation and enhance your security posture with AWS.
TDR204 | Breakout session | Continuous innovation in AWS detection and response services Join this session to learn about the latest advancements and most recent AWS launches in detection and response. This session focuses on use cases such as automated threat detection, continual vulnerability management, continuous cloud security posture management, and unified security data management. Through these examples, gain a deeper understanding of how you can seamlessly integrate AWS services into your existing security framework to gain greater control and insight, quickly address security risks, and maintain the security of your AWS environment.
TDR205 | Breakout session | Build your security data lake with Amazon Security Lake, featuring Interpublic Group Security teams want greater visibility into security activity across their entire organizations to proactively identify potential threats and vulnerabilities. Amazon Security Lake automatically centralizes security data from cloud, on-premises, and custom sources into a purpose-built data lake stored in your account and allows you to use industry-leading AWS and third-party analytics and ML tools to gain insights from your data and identify security risks that require immediate attention. Discover how Security Lake can help you consolidate and streamline security logging at scale and speed, and hear from an AWS customer, Interpublic Group (IPG), on their experience.
TDR209 | Breakout session | Centralizing security at scale with Security Hub & Intuit’s experience As organizations move their workloads to the cloud, it becomes increasingly important to have a centralized view of security across their cloud resources. AWS Security Hub is a powerful tool that allows organizations to gain visibility into their security posture and compliance status across their AWS accounts and Regions. In this session, learn about Security Hub’s new capabilities that help simplify centralizing and operationalizing security. Then, hear from Intuit, a leading financial software company, as they share their experience and best practices for setting up and using Security Hub to centralize security management.
TDR210 | Breakout session | Streamline security analysis with Amazon Detective Join us to discover how to streamline security investigations and perform root-cause analysis with Amazon Detective. Learn how to leverage the graph analysis techniques in Detective to identify related findings and resources and investigate them together to accelerate incident analysis. Also hear a customer story about their experience using Detective to analyze findings automatically ingested from Amazon GuardDuty, and walk through a sample security investigation.
TDR310 | Breakout session | Developing new findings using machine learning in Amazon GuardDuty Amazon GuardDuty provides threat detection at scale, helping you quickly identify and remediate security issues with actionable insights and context. In this session, learn how GuardDuty continuously enhances its intelligent threat detection capabilities using purpose-built machine learning models. Discover how new findings are developed for new data sources using novel machine learning techniques and how they are rigorously evaluated. Get a behind-the-scenes look at GuardDuty findings from ideation to production, and learn how this service can help you strengthen your security posture.
TDR311 | Breakout session | Securing data and democratizing the alert landscape with an event-driven architecture Security event monitoring is a unique challenge for businesses operating at scale and seeking to integrate detections into their existing security monitoring systems while using multiple detection tools. Learn how organizations can triage and raise relevant cloud security findings across a breadth of detection tools and provide results to downstream security teams in a serverless manner at scale. We discuss how to apply a layered security approach to evaluate the security posture of your data, protect your data from potential threats, and automate response and remediation to help with compliance requirements.
TDR231 | Chalk talk | Operationalizing security findings at scale You enabled AWS Security Hub standards and checks across your AWS organization and in all AWS Regions. What should you do next? Should you expect zero critical and high findings? What is your ideal state? Is achieving zero findings possible? In this chalk talk, learn about a framework you can implement to triage Security Hub findings. Explore how this framework can be applied to several common critical and high findings, and take away mechanisms to prioritize and respond to security findings at scale.
TDR232 | Chalk talk | Act on security findings using Security Hub’s automation capabilities Alert fatigue, a shortage of skilled staff, and keeping up with dynamic cloud resources are all challenges that exist when it comes to customers successfully achieving their security goals in AWS. In order to achieve their goals, customers need to act on security findings associated with cloud-based resources. In this session, learn how to automatically, or semi-automatically, act on security findings aggregated in AWS Security Hub to help you secure your organization’s cloud assets across a diverse set of accounts and Regions.
TDR233 | Chalk talk | How LLA reduces incident response time with AWS Systems Manager Liberty Latin America (LLA) is a leading telecommunications company operating in over 20 countries across Latin America and the Caribbean. LLA offers communications and entertainment services, including video, broadband internet, telephony, and mobile services. In this chalk talk, discover how LLA implemented a security framework to detect security issues and automate incident response in more than 180 AWS accounts accessed by internal stakeholders and third-party partners using AWS Systems Manager Incident Manager, AWS Organizations, Amazon GuardDuty, and AWS Security Hub.
TDR432 | Chalk talk | Deep dive into exposed credentials and how to investigate them In this chalk talk, sharpen your detection and investigation skills to spot and explore common security events like unauthorized access with exposed credentials. Learn how to recognize the indicators of such events, as well as logs and techniques that unauthorized users use to evade detection. The talk provides knowledge and resources to help you immediately prepare for your own security investigations.
TDR332 | Chalk talk | Speed up zero-day vulnerability response In this chalk talk, learn how to scale vulnerability management for Amazon EC2 across multiple accounts and AWS Regions. Explore how to use Amazon Inspector, AWS Systems Manager, and AWS Security Hub to respond to zero-day vulnerabilities, and leave knowing how to plan, perform, and report on proactive and reactive remediations.
TDR333 | Chalk talk | Gaining insights from Amazon Security Lake You’ve created a security data lake, and you’re ingesting data. Now what? How do you use that data to gain insights into what is happening within your organization or assist with investigations and incident response? Join this chalk talk to learn how analytics services and security information and event management (SIEM) solutions can connect to and use data stored within Amazon Security Lake to investigate security events and identify trends across your organization. Leave with a better understanding of how you can integrate Amazon Security Lake with other business intelligence and analytics tools to gain valuable insights from your security data and respond more effectively to security events.
TDR431 | Chalk talk | The anatomy of a ransomware event Ransomware events can cost governments, nonprofits, and businesses billions of dollars and interrupt operations. Early detection and automated responses are important steps that can limit your organization’s exposure. In this chalk talk, examine the anatomy of a ransomware event that targets data residing in Amazon RDS and get detailed best practices for detection, response, recovery, and protection.
TDR221 | Lightning talk | Streamline security operations and improve threat detection with OCSF Security operations centers (SOCs) face significant challenges in monitoring and analyzing security telemetry data from a diverse set of sources. This can result in a fragmented and siloed approach to security operations that makes it difficult to identify and investigate incidents. In this lightning talk, get an introduction to the Open Cybersecurity Schema Framework (OCSF) and its taxonomy constructs, and see a quick demo on how this normalized framework can help SOCs improve the efficiency and effectiveness of their security operations.
TDR222 | Lightning talk | Security monitoring for connected devices across OT, IoT, edge & cloud With the responsibility to stay ahead of cybersecurity threats, CIOs and CISOs are increasingly tasked with managing cybersecurity risks for their connected devices including devices on the operational technology (OT) side of the company. In this lightning talk, learn how AWS makes it simpler to monitor, detect, and respond to threats across the entire threat surface, which includes OT, IoT, edge, and cloud, while protecting your security investments in existing third-party security tools.
TDR223 | Lightning talk | Bolstering incident response with AWS Wickr enterprise integrations Every second counts during a security event. AWS Wickr provides end-to-end encrypted communications to help incident responders collaborate safely during a security event, even on a compromised network. Join this lightning talk to learn how to integrate AWS Wickr with AWS security services such as Amazon GuardDuty and AWS WAF. Learn how you can strengthen your incident response capabilities by creating an integrated workflow that incorporates GuardDuty findings into a secure, out-of-band communication channel for dedicated teams.
TDR224 | Lightning talk | Securing the future of mobility: Automotive threat modeling Many existing automotive industry cybersecurity threat intelligence offerings lack the connected mobility insights required for today’s automotive cybersecurity threat landscape. Join this lightning talk to learn about AWS’s approach to developing an automotive industry in-vehicle, domain-specific threat intelligence solution using AWS AI/ML services that proactively collect, analyze, and deduce threat intelligence insights for use and adoption across automotive value chains.
Hands-on sessions (builders’ sessions and workshops)
TDR251 | Builders’ session | Streamline and centralize security operations with AWS Security Hub AWS Security Hub provides you with a comprehensive view of the security state of your AWS resources by collecting security data from across AWS accounts, Regions, and services. In this builders’ session, explore best practices for using Security Hub to manage security posture, prioritize security alerts, generate insights, automate response, and enrich findings. Come away with a better understanding of how to use Security Hub features and practical tips for getting the most out of this powerful service.
TDR351 | Builders’ session | Broaden your scope: Analyze and investigate potential security issues In this builders’ session, learn how you can more efficiently triage potential security issues with a dynamic visual representation of the relationship between security findings and associated entities such as accounts, IAM principals, IP addresses, Amazon S3 buckets, and Amazon EC2 instances. With Amazon Detective finding groups, you can group related Amazon GuardDuty findings to help reduce time spent in security investigations and in understanding the scope of a potential issue. Leave this hands-on session knowing how to quickly investigate and discover the root cause of an incident.
TDR352 | Builders’ session | How to automate containment and forensics for Amazon EC2 In this builders’ session, learn how to deploy and scale the self-service Automated Forensics Orchestrator for Amazon EC2 solution, which gives you a standardized and automated forensics orchestration workflow capability to help you respond to Amazon EC2 security events. Explore the prerequisites and ways to customize the solution to your environment.
TDR353 | Builders’ session | Detecting suspicious activity in Amazon S3 Have you ever wondered how to uncover evidence of unauthorized activity in your AWS account? In this builders’ session, join the AWS Customer Incident Response Team (CIRT) for a guided simulation of suspicious activity within an AWS account involving unauthorized data exfiltration and Amazon S3 bucket and object data deletion. Learn how to detect and respond to this malicious activity using AWS services like AWS CloudTrail, Amazon Athena, Amazon GuardDuty, Amazon CloudWatch, and nontraditional threat detection services like AWS Billing to uncover evidence of unauthorized use.
TDR354 | Builders’ session | Simulate and detect unwanted IMDS access due to SSRF Using appropriate security controls can greatly reduce the risk of unauthorized use of web applications. In this builders’ session, find out how the server-side request forgery (SSRF) vulnerability works, how unauthorized users may try to use it, and most importantly, how to detect it and prevent it from being used to access the instance metadata service (IMDS). Also, learn some of the detection activities that the AWS Customer Incident Response Team (CIRT) performs when responding to security events of this nature.
TDR341 | Code talk | Investigating incidents with Amazon Security Lake & Jupyter notebooks In this code talk, watch as experts live code and build an incident response playbook for your AWS environment using Jupyter notebooks, Amazon Security Lake, and Python code. Leave with a better understanding of how to investigate and respond to a security event and how to use these technologies to more effectively and quickly respond to disruptions.
TDR441 | Code talk | How to run security incident response in your Amazon EKS environment Join this Code Talk to get both an adversary’s and a defender’s point of view as AWS experts perform live exploitation of an application running on multiple Amazon EKS clusters, invoking an alert in Amazon GuardDuty. Experts then walk through incident response procedures to detect, contain, and recover from the incident in near real-time. Gain an understanding of how to respond and recover to Amazon EKS-specific incidents as you watch the events unfold.
TDR271-R | Workshop | Chaos Kitty: Gamifying incident response with chaos engineering When was the last time you simulated an incident? In this workshop, learn to build a sandbox environment to gamify incident response with chaos engineering. You can use this sandbox to test out detection capabilities, play with incident response runbooks, and illustrate how to integrate AWS resources with physical devices. Walk away understanding how to get started with incident response and how you can use chaos engineering principles to create mechanisms that can improve your incident response processes.
TDR371-R | Workshop | Threat detection and response on AWS Join AWS experts for a hands-on threat detection and response workshop using Amazon GuardDuty, AWS Security Hub, and Amazon Detective. This workshop simulates security events for different types of resources and behaviors and illustrates both manual and automated responses with AWS Lambda. Dive in and learn how to improve your security posture by operationalizing threat detection and response on AWS.
TDR372-R | Workshop | Container threat detection with AWS security services Join AWS experts for a hands-on container security workshop using AWS threat detection and response services. This workshop simulates scenarios and security events while using Amazon EKS and demonstrates how to use different AWS security services to detect and respond to events and improve your security practices. Dive in and learn how to improve your security posture when running workloads on Amazon EKS.
Browse the full re:Inforce catalog to get details on additional sessions and content at the event, including gamified learning, leadership sessions, partner sessions, and labs.
If you want to learn the latest threat detection and incident response best practices and updates, join us in California by registering for re:Inforce 2023. We look forward to seeing you there!
If you have feedback about this post, submit comments in the Comments section below. If you have questions about this post, contact AWS Support.
Want more AWS Security news? Follow us on Twitter.
I’d like to personally invite you to attend the Amazon Web Services (AWS) security conference, AWS re:Inforce 2023, in Anaheim, CA on June 13–14, 2023. You’ll have access to interactive educational content to address your security, compliance, privacy, and identity management needs. Join security experts, peers, leaders, and partners from around the world who are committed to the highest security standards, and learn how your business can stay ahead in the rapidly evolving security landscape.
As Chief Information Security Officer of AWS, my primary job is to help you navigate your security journey while keeping the AWS environment secure. AWS re:Inforce offers an opportunity for you to dive deep into how to use security to drive adaptability and speed for your business. With headlines currently focused on the macroeconomy and broader technology topics such as the intersection between AI and security, this is your chance to learn the tactical and strategic lessons that will help you develop a security culture that facilitates business innovation.
Here are a few reasons I’m especially looking forward to this year’s program:
Sharing my keynote, including the latest innovations in cloud security and what AWS Security is focused on
AWS re:Inforce 2023 will kick off with my keynote on Tuesday, June 13, 2023 at 9 AM PST. I’ll be joined by Steve Schmidt, Chief Security Officer (CSO) of Amazon, and other industry-leading guest speakers. You’ll hear all about the latest innovations in cloud security from AWS and learn how you can improve the security posture of your business, from the silicon to the top of the stack. Take a look at my most recent re:Invent presentation, What we can learn from customers: Accelerating innovation at AWS Security and the latest re:Inforce keynote for examples of the type of content to expect.
Engaging sessions with real-world examples of how security is embedded into the way businesses operate
AWS re:Inforce offers an opportunity to learn how to prioritize and optimize your security investments, be more efficient, and respond faster to an evolving landscape. Using the Security pillar of the AWS Well-Architected Framework, these sessions will demonstrate how you can build practical and prescriptive measures to protect your data, systems, and assets.
Sessions are offered at all levels and all backgrounds. Depending on your interests and educational needs, AWS re:Inforce is designed to meet you where you are on your cloud security journey. There are learning opportunities in several hundred sessions across six tracks: Data Protection; Governance, Risk & Compliance; Identity & Access Management; Network & Infrastructure Security, Threat Detection & Incident Response; and, this year, Application Security—a brand-new track. In this new track, discover how AWS experts, customers, and partners move fast while maintaining the security of the software they are building. You’ll hear from AWS leaders and get hands-on experience with the tools that can help you ship quickly and securely.
Shifting security into the “department of yes”
Rather than being seen as the proverbial “department of no,” IT teams have the opportunity to make security a business differentiator, especially when they have the confidence and tools to do so. AWS re:Inforce provides unique opportunities to connect with and learn from AWS experts, customers, and partners who share insider insights that can be applied immediately in your everyday work. The conference sessions, led by AWS leaders who share best practices and trends, will include interactive workshops, chalk talks, builders’ sessions, labs, and gamified learning. This means you’ll be able to work with experts and put best practices to use right away.
Our Expo offers opportunities to connect face-to-face with AWS security solution builders who are the tip of the spear for security. You can ask questions and build solutions together. AWS Partners that participate in the Expo have achieved security competencies and are there to help you find ways to innovate and scale your business.
A full conference pass is $1,099. Register today with the code ALUMwrhtqhv to receive a limited time $300 discount, while supplies last.
I’m excited to see everyone at re:Inforce this year. Please join us for this unique event that showcases our commitment to giving you direct access to the latest security research and trends. Our teams at AWS will continue to release additional details about the event on our website, and you can get real-time updates by following @awscloud and @AWSSecurityInfo.
I look forward to seeing you in Anaheim and providing insight into how we prioritize security at AWS to help you navigate your cloud security investments.
If you have feedback about this post, submit comments in the Comments section below. If you have questions about this post, contact AWS Support.
Want more AWS Security news? Follow us on Twitter.
AWS re:Invent returned to Las Vegas, Nevada, November 28 to December 2, 2022. After a virtual event in 2020 and a hybrid 2021 edition, spirits were high as over 51,000 in-person attendees returned to network and learn about the latest AWS innovations.
Now in its 11th year, the conference featured 5 keynotes, 22 leadership sessions, and more than 2,200 breakout sessions and hands-on labs at 6 venues over 5 days.
With well over 100 service and feature announcements—and innumerable best practices shared by AWS executives, customers, and partners—distilling highlights is a challenge. From a security perspective, three key themes emerged.
Turn data into actionable insights
Security teams are always looking for ways to increase visibility into their security posture and uncover patterns to make more informed decisions. However, as AWS Vice President of Data and Machine Learning, Swami Sivasubramanian, pointed out during his keynote, data often exists in silos; it isn’t always easy to analyze or visualize, which can make it hard to identify correlations that spark new ideas.
“Data is the genesis for modern invention.” – Swami Sivasubramanian, AWS VP of Data and Machine Learning
At AWS re:Invent, we launched new features and services that make it simpler for security teams to store and act on data. One such service is Amazon Security Lake, which brings together security data from cloud, on-premises, and custom sources in a purpose-built data lake stored in your account. The service, which is now in preview, automates the sourcing, aggregation, normalization, enrichment, and management of security-related data across an entire organization for more efficient storage and query performance. It empowers you to use the security analytics solutions of your choice, while retaining control and ownership of your security data.
Amazon Security Lake has adopted the Open Cybersecurity Schema Framework (OCSF), which AWS cofounded with a number of organizations in the cybersecurity industry. The OCSF helps standardize and combine security data from a wide range of security products and services, so that it can be shared and ingested by analytics tools. More than 37 AWS security partners have announced integrations with Amazon Security Lake, enhancing its ability to transform security data into a powerful engine that helps drive business decisions and reduce risk. With Amazon Security Lake, analysts and engineers can gain actionable insights from a broad range of security data and improve threat detection, investigation, and incident response processes.
Strengthen security programs
According to Gartner, by 2026, at least 50% of C-Level executives will have performance requirements related to cybersecurity risk built into their employment contracts. Security is top of mind for organizations across the globe, and as AWS CISO CJ Moses emphasized during his leadership session, we are continuously building new capabilities to help our customers meet security, risk, and compliance goals.
In addition to Amazon Security Lake, several new AWS services announced during the conference are designed to make it simpler for builders and security teams to improve their security posture in multiple areas.
Identity and networking
Authorization is a key component of applications. Amazon Verified Permissions is a scalable, fine-grained permissions management and authorization service for custom applications that simplifies policy-based access for developers and centralizes access governance. The new service gives developers a simple-to-use policy and schema management system to define and manage authorization models. The policy-based authorization system that Amazon Verified Permissions offers can shorten development cycles by months, provide a consistent user experience across applications, and facilitate integrated auditing to support stringent compliance and regulatory requirements.
Additional services that make it simpler to define authorization and service communication include Amazon VPC Lattice, an application-layer service that consistently connects, monitors, and secures communications between your services, and AWS Verified Access, which provides secure access to corporate applications without a virtual private network (VPN).
Threat detection and monitoring
Monitoring for malicious activity and anomalous behavior just got simpler. Amazon GuardDuty RDS Protection expands the threat detection capabilities of GuardDuty by using tailored machine learning (ML) models to detect suspicious logins to Amazon Aurora databases. You can enable the feature with a single click in the GuardDuty console, with no agents to manually deploy, no data sources to enable, and no permissions to configure. When RDS Protection detects a potentially suspicious or anomalous login attempt that indicates a threat to your database instance, GuardDuty generates a new finding with details about the potentially compromised database instance. You can view GuardDuty findings in AWS Security Hub, Amazon Detective (if enabled), and Amazon EventBridge, allowing for integration with existing security event management or workflow systems.
To bolster vulnerability management processes, Amazon Inspector now supports AWS Lambda functions, adding automated vulnerability assessments for serverless compute workloads. With this expanded capability, Amazon Inspector automatically discovers eligible Lambda functions and identifies software vulnerabilities in application package dependencies used in the Lambda function code. Actionable security findings are aggregated in the Amazon Inspector console, and pushed to Security Hub and EventBridge to automate workflows.
Data protection and privacy
The first step to protecting data is to find it. Amazon Macie now automatically discovers sensitive data, providing continual, cost-effective, organization-wide visibility into where sensitive data resides across your Amazon Simple Storage Service (Amazon S3) estate. With this new capability, Macie automatically and intelligently samples and analyzes objects across your S3 buckets, inspecting them for sensitive data such as personally identifiable information (PII), financial data, and AWS credentials. Macie then builds and maintains an interactive data map of your sensitive data in S3 across your accounts and Regions, and provides a sensitivity score for each bucket. This helps you identify and remediate data security risks without manual configuration and reduce monitoring and remediation costs.
Encryption is a critical tool for protecting data and building customer trust. The launch of the end-to-end encrypted enterprise communication service AWS Wickr offers advanced security and administrative controls that can help you protect sensitive messages and files from unauthorized access, while working to meet data retention requirements.
Management and governance
Maintaining compliance with regulatory, security, and operational best practices as you provision cloud resources is key. AWS Config rules, which evaluate the configuration of your resources, have now been extended to support proactive mode, so that they can be incorporated into infrastructure-as-code continuous integration and continuous delivery (CI/CD) pipelines to help identify noncompliant resources prior to provisioning. This can significantly reduce time spent on remediation.
Managing the controls needed to meet your security objectives and comply with frameworks and standards can be challenging. To make it simpler, we launched comprehensive controls management with AWS Control Tower. You can use it to apply managed preventative, detective, and proactive controls to accounts and organizational units (OUs) by service, control objective, or compliance framework. You can also use AWS Control Tower to turn on Security Hub detective controls across accounts in an OU. This new set of features reduces the time that it takes to define and manage the controls required to meet specific objectives, such as supporting the principle of least privilege, restricting network access, and enforcing data encryption.
Do more with less
As we work through macroeconomic conditions, security leaders are facing increased budgetary pressures. In his opening keynote, AWS CEO Adam Selipsky emphasized the effects of the pandemic, inflation, supply chain disruption, energy prices, and geopolitical events that continue to impact organizations.
Now more than ever, it is important to maintain your security posture despite resource constraints. Citing specific customer examples, Selipsky underscored how the AWS Cloud can help organizations move faster and more securely. By moving to the cloud, agricultural machinery manufacturer Agco reduced costs by 78% while increasing data retrieval speed, and multinational HVAC provider Carrier Global experienced a 40% reduction in the cost of running mission-critical ERP systems.
“If you’re looking to tighten your belt, the cloud is the place to do it.” – Adam Selipsky, AWS CEO
Security teams can do more with less by maximizing the value of existing controls, and bolstering security monitoring and analytics capabilities. Services and features announced during AWS re:Invent—including Amazon Security Lake, sensitive data discovery with Amazon Macie, support for Lambda functions in Amazon Inspector, Amazon GuardDuty RDS Protection, and more—can help you get more out of the cloud and address evolving challenges, no matter the economic climate.
Security is our top priority
AWS re:Invent featured many more highlights on a variety of topics, such as Amazon EventBridge Pipes and the pre-announcement of GuardDuty EKS Runtime protection, as well as Amazon CTO Dr. Werner Vogels’ keynote, and the security partnerships showcased on the Expo floor. It was a whirlwind week, but one thing is clear: AWS is working harder than ever to make our services better and to collaborate on solutions that ease the path to proactive security, so that you can focus on what matters most—your business.
Over the past year, AWS CIRT has responded to hundreds of such security events, including the unauthorized use of AWS Identity and Access Management (IAM) credentials, ransomware and data deletion in an AWS account, and billing increases due to the creation of unauthorized resources to mine cryptocurrency.
We are excited to release five workshops that simulate these security events to help you learn the tools and procedures that AWS CIRT uses on a daily basis to detect, investigate, and respond to such security events. The workshops cover AWS services and tools, such as Amazon GuardDuty, Amazon CloudTrail, Amazon CloudWatch, Amazon Athena, and AWS WAF, as well as some open source tools written and published by AWS CIRT.
To access the workshops, you just need an AWS account, an internet connection, and the desire to learn more about incident response in the AWS Cloud! Choose the following links to access the workshops.
During this workshop, you will simulate the unauthorized use of IAM credentials by using a script invoked within AWS CloudShell. The script will perform reconnaissance and privilege escalation activities that have been commonly seen by AWS CIRT and that are typically performed during similar events of this nature. You will also learn some tools and processes that AWS CIRT uses, and how to use these tools to find evidence of unauthorized activity by using IAM credentials.
During this workshop, you will use an AWS CloudFormation template to replicate an environment with multiple IAM users and five Amazon Simple Storage Service (Amazon S3) buckets. AWS CloudShell will then run a bash script that simulates data exfiltration and data deletion events that replicate a ransomware-based security event. You will also learn the tools and processes that AWS CIRT uses to respond to similar events, and how to use these tools to find evidence of unauthorized S3 bucket and object deletions.
During this workshop, you will simulate a cryptomining security event by using a CloudFormation template to initialize three Amazon Elastic Compute Cloud (Amazon EC2) instances. These EC2 instances will mimic cryptomining activity by performing DNS requests to known cryptomining domains. You will also learn the tools and processes that AWS CIRT uses to respond to similar events, and how to use these tools to find evidence of unauthorized creation of EC2 instances and communication with known cryptomining domains.
During this workshop, you will simulate the unauthorized use of a web application that is hosted on an EC2 instance configured to use Instance Metadata Service Version 1 (IMDSv1) and vulnerable to server side request forgery (SSRF). You will learn how web application vulnerabilities, such as SSRF, can be used to obtain credentials from an EC2 instance. You will also learn the tools and processes that AWS CIRT uses to respond to this type of access, and how to use these tools to find evidence of the unauthorized use of EC2 instance credentials through web application vulnerabilities such as SSRF.
During this workshop, you will install and experiment with some common tools and utilities that AWS CIRT uses on a daily basis to detect security misconfigurations, respond to active events, and assist customers with protecting their infrastructure.
If you have feedback about this post, submit comments in the Comments section below. If you have questions about this post, contact AWS Support.
Want more AWS Security news? Follow us on Twitter.
In part 1 of this of this two-part series, How to detect security issues in Amazon EKS cluster using Amazon GuardDuty, we walked through a real-world observed security issue in an Amazon Elastic Kubernetes Service (Amazon EKS) cluster and saw how Amazon GuardDuty detected each phase by following MITRE ATT&CK tactics.
In this blog post, we’ll walk you through investigative techniques to use with Amazon Detective, paired with the GuardDuty EKS and malware findings from the security issue. After we have identified impacted resources through our investigation, we’ll provide example remediation tactics and preventative controls to address and help prevent security issues in EKS clusters.
Amazon Detective can help you investigate security issues and related resources in your account. Detective provides EKS coverage that you can enable within your accounts. When this coverage is enabled, Detective can help investigate and remediate potentially unauthorized EKS activity that results from misconfiguration of the control plane nodes or application. Although GuardDuty is not a prerequisite to enable Detective, it is recommended that you enable GuardDuty to enhance the visualization capabilities in Detective with GuardDuty findings.
Prerequisites
You must have the following services enabled in your AWS account to generate and investigate findings associated with EKS security events in a similar manner as outlined in this blog. If you do not have GuardDuty enabled, you can still investigate with Detective, but in a limited capacity.
In the five phases we walked through in part 1, we discussed GuardDuty findings and MITRE ATT&CK tactics that can help you detect and understand each phase of the unauthorized activity, from the initial misconfiguration to the impact on our application when the EKS cluster is used for crypto mining.
The next recommended step is to investigate the EKS cluster and any associated resources. Amazon Detective can help you to investigate whether there was any other related unauthorized activity in the environment. We will walk through Detective capabilities for visualizing and gathering important information to effectively respond to the security issue. If you’re interested in creating detailed incident response playbooks for your security team to follow in your own environment, refer to these sample AWS incident response playbooks.
Depending on your scenario, there are various resources you can use to start your investigation, such as Security Hub findings, GuardDuty findings, related Kubernetes subjects, or an AWS account’s AWS CloudTrail activity. For our walkthrough, we’ll start our investigation from the GuardDuty finding and use the EKS cluster resource to pivot to the Detective console, as shown in Figure 7. Although we initially focus on the EKS cluster, you could start from any entities that are supported in the Detective behavior graph structure in the Amazon Detective User Guide. For example, we could start directly with the Kubernetes subject system:anonymous and find activity associated with the anonymous user.
Figure 7: Example Detective popup from GuardDuty finding for EKS cluster
We’ll now go over the information that you would need to gather from Detective in order to investigate the example security issue.
To investigate EKS cluster findings with Detective
In the GuardDuty console, navigate to an individual finding and hover over Investigate with Detective. Choose one of the specific resources to start. In the image below, we selected the EKS cluster resource to investigate with Detective. You will need to gather some preliminary information about the IAM roles associated with the EKS cluster.
Questions: When was the cluster created? What IAM role created the cluster? What IAM role is assigned to the cluster?
Why it matters: If you are an incident responder, these details can potentially help you identify the owner of the cluster and help you determine what IAM principals are involved.
What next: Start looking into each IAM principal’s activity, as seen in CloudTrail, to investigate whether the IAM entity itself is potentially compromised or what other resources may have been impacted.
Figure 8: Detective summary page for EKS cluster metadata details
Next, on the EKS cluster overview page, you can see the container details associated with the cluster.
Question: What are some of the other container details for the cluster? Does anything look out of the ordinary? Is it using a public image? Is it missing a network policy?
Why it matters: Based on the architecture related to this cluster, you might be able to use this information to determine whether there are unauthorized containers. The contents of unauthorized containers will depend on your organization but typically consist of public images or unauthorized RBAC, pod security policies, or network policy configurations. It’s important to keep in mind that when you look at data in Detective, the scope time is very important. When you pivot from a GuardDuty finding, the scope time will be set to the first time the GuardDuty finding was seen to the last time the finding was seen. The container details reflect the containers that were running during the selected scope time. Changing the scope time might change the containers that are listed in the table shown in Figure 9.
What next: Information found on this page can help to highlight unauthorized resources or configurations that will need to be remediated. You will also need to look at how these resources were initially created and if there are missing guardrails that should have been created during the provisioning of the cluster.
Figure 9: Detective summary page for EKS container metadata details
Finally, you will see associated security findings with this specific EKS cluster, similar to Figure 10, at the bottom of the EKS cluster overview page in Detective.
Question: Are there any other security findings associated with this cluster that I previously was not aware of?
Why it matters: In our example scenario, we walked through the findings that were initially detected and the events that unfolded from those findings. After further investigation, you might see other findings that were not part of the original investigation. This can occur if your security team is only investigating specific findings or severity values. The finding for PrivilegeEscalation:Kubernetes/PrivilegedContainer informs you that a privileged container was launched on your Kubernetes cluster by using an image that has never before been used to launch privileged containers in your cluster. A privileged container has root level access to the host. The other finding, Persistence:Kubernetes/ContainerWithSensitiveMount, informs you that a container was launched with a configuration that included a sensitive host path with write access in the volumeMounts section. This makes the sensitive host path accessible and writable from inside the container. Any finding associated to the suspicious or compromised cluster is valuable because it provides additional insight into what the unauthorized entity was trying to accomplish after the initial detection.
What next: With Detective, you might want to continue your investigation by selecting each of these findings and reviewing all details related to the finding. Depending on the findings, you could bring in additional team members to help investigate further. For this example, we will move on to the next step.
Figure 10: Example Detective summary of security findings associated with the EKS cluster
Shift from the EKS cluster overview section to the Kubernetes API activity section, similar to Figure 11 below. This will give you the opportunity to dig into the API activity associated with this cluster.
Question: What other Kubernetes API activity was attempted from the cluster? Which API calls were successful? Which API calls failed? What was the unauthorized user trying to do?
Why it matters: It’s important to determine which actions were successfully invoked by the unauthorized user so that appropriate remediation actions can be taken. You can look at trends of successful and failed API calls, and can even search by Subject, IP address, or Kubernetes API call.
What next: You might want to look at all cluster role binding from days before the first GuardDuty finding was seen to determine if there was any other suspicious activity you should be investigating regarding the cluster.
Figure 11: Example Detective summary page for Kubernetes API activity on the EKS cluster
Next, you will want to look at the Newly observed Kubernetes API calls section, similar to Figure 12 below.
Question: What are some of the more recent Kubernetes API calls? What are they trying to access right now and are they successful? Do I need to start taking action for other resources outside of EKS?
Why it matters: This data shows Kubernetes subjects who were observed issuing API calls to this cluster for the first time during our scope time. Detective provides you this information by keeping a baseline of the activity associated with supported AWS resources. This can help you more quickly determine whether activity might be suspicious and worth looking into. In our example, we used the search functionality to look at API calls associated with the built-in Kubernetes secrets management. A common way to start your search is to see if an unauthorized user has successfully accessed any secrets, which can help you determine what information you might want to search in the overall API call volume section discussed in step 4.
What next: If the unauthorized user has successfully accessed any secret, those secrets should be marked as compromised, and they should be rotated immediately.
Figure 12: Example Detective summary for newly observed Kubernetes API calls from the EKS cluster
You can also consider the following question when you look at the Newly observed Kubernetes API calls section.
Question: Has the IP address associated with the finding been communicating with any other resources in our environment, and if so, what are the details of that communication?
Why it matters: To answer this question, you can use Detective’s search functionality and the ability to use wild cards to search for IP addresses with the same first three octets. Also note that you can use CIDR notation to search, as well. Based on the results in the example in Figure 13, you can see that there are a number of related IP addresses associated with the environment. With this information, you now can look at the traffic associated with these different IPs and what resources they were communicating with.
Figure 13: Example Detective results page from a query against IP addresses associated with the EKS cluster
You can select one of the IP addresses in the search results to get more information related to it, similar to Figure 14 below.
Question: What was the first time an IP address was observed in the environment? When was the last time it was observed?
Why it matters: You can use this information to start isolating where unauthorized activity is coming from and what actions are being taken. You can also start creating a time series of unauthorized activity and scope.
What next: You can repeat some of the previous investigation steps for each IP address, like looking at the different tabs to review New behavior, Resource interaction, and Kubernetes activity.
Figure 14: Example Detective results page for specific IP address and associated metadata details
In summary, we began our investigation with a GuardDuty finding about an anonymous API request that was successful in using system:anonymous on one of our EKS clusters. We then used Detective to investigate and visualize activity associated with that EKS cluster, such as volume of successful or unsuccessful API requests, where and when those actions were attempted and other security findings associated with the resource. Once we have completed the investigation, we can confirm scope and impact of the security event and start moving towards taking action.
Remediation techniques for Amazon EKS
In this section, we will focus on how to remediate the security issue in our example. Your actions will vary based on your organization and the resources affected. It’s important to note that these actions will impact the EKS cluster and associated workloads, and should accordingly be performed by or coordinated with the cluster operator.
Before you take action on the EKS cluster, you will need to preserve forensic artifacts and evidence for the impacted EKS resources. The order of operations for these actions matters, because you want to get all the data from forensic artifacts in order to determine the overall impact to the resources affected. If you quarantine resources before you capture forensic artifacts, there is a risk that running processes will be interrupted or that the malware attempts to destroy resources that are valuable to a forensics investigation, to cover its tracks.
Now that you have the forensic evidence, you can start to quarantine your EKS resources to restrict unauthorized network communication. The main objective is to prevent the affected EKS pods from communicating with internal resources or exfiltrating data externally.
Attach a security group to the host and remove inbound and outbound rules. Take this action if you believe the underlying host has been compromised.
Depending on existing inbound and outbound rules on the security group, the connections will either be tracked or untracked. Applying an isolation security group will drop untracked connections. For tracked connections, new connections with the host will not be allowed from the isolation security group, but existing tracked connections will not be interrupted.
Important: This action will affect all containers running on the host.
Attach a deny rule for the EKS resources in a network access control list (network ACL). Because network ACLs are stateless firewalls, all connections will be interrupted, whether they are tracked or untracked connections.
Important: This action will affect all subnets using the network ACL and all resources within those subnets.
At this point, the affected EKS resources are quarantined, but the cluster is still configured to allow anonymous, unauthenticated access. You will need to remove all unauthorized permissions that were created or added.
Revoke temporary security credentials that are assigned to the pod or worker node, if necessary. You can also remove the IAM role associated with the EKS resources.
Note: Removing IAM policies or attaching IAM policies to restrict permissions will affect the resources that are using the IAM role.
Redeploy the compromised pod or workload resource.
The actions taken so far primarily target the EKS resource, but based on our Detective investigation, there are other actions you might need to take. Because secrets were involved that could be used outside of the EKS cluster, those secrets will need to be rotated wherever they are referenced. Detective will also suggest additional areas where you can investigate and remediate additional unauthorized activity in your AWS account.
It is important that your team go through game days or run-throughs for investigating and responding to different scenarios in order to make sure the team is prepared. You can run through the EKS security workshop to get your security team more familiar with remediation for EKS.
This section covers several preventative controls that you can use to protect EKS clusters.
How can I prevent external access to the EKS cluster?
To help prevent external access to your EKS clusters, limit the exposure of your API server. You can achieve that in two ways:
Set the API server endpoint access to Private. This will effectively forbid anyone outside of the VPC to send Kubernetes API requests to your EKS cluster.
Set an IP address allow list for the EKS cluster public access endpoint.
How can I prevent giving admin access to the EKS cluster?
To help prevent an EKS cluster user from granting any type of access to anonymous or unauthenticated users, you can set up a ValidatingAdmissionWebhook. This is a special type of Kubernetes admission controller that can be configured in the Kubernetes API. (To learn how to build serverless admission webhooks, see the blog post Building serverless admission webhooks for Kubernetes with AWS SAM.)
The ValidatingAdmissionWebhook will deny a Kubernetes API request that matches all of the following checks:
The request is creating or modifying a ClusterRoleBinding or RoleBinding.
The subjects section contains either of the following:
The user system:anonymous
The group system:unauthenticated
How can I prevent malicious images from being deployed?
Now that you have set controls to prevent external access to the EKS cluster and prevent granting access to anonymous users, you can focus on preventing the deployment of potentially malicious images.
Malicious container images can have different origins, including:
Images stored in public or unauthorized registries
Images replacing the ones that are stored in authorized registries
Authorized images that contain software with existing or newly discovered vulnerabilities
You can address these sources of malicious images by doing the following:
Use admission controllers to verify that images meet your organization’s requirements, including for the image origin. You can also refer to this this blog post to implement a solution with a webhook and admission controllers.
Note: These criteria can vary based on your use case and internal security and compliance standards.
The above controls will help prevent the deployment of a vulnerable, unauthorized, or potentially malicious container image.
How can I prevent lateral movement inside the cluster?
To prevent lateral movement inside the cluster, it is recommended to use network policies, as follows:
Enforce Kubernetes network policies to enforce ingress and egress controls within the cluster. You can implement these policies by following the steps in the Securing your cluster with network policies EKS workshop.
It’s important to note that you could use security groups for the same purpose, but pod security groups should only be used if the cluster is compromised and when you want to control the traffic between a pod and a resource that resides in the VPC, not inter-pod traffic.
In this section, we’ve reviewed different preventative controls that could have helped mitigate our example security incident. With the first preventative control, we could have prevented external actors from connecting to the API server. The second control could have prevented granting access to anonymous users. The third control could have prevented the deployment of an unauthorized or vulnerable container image. Finally, the fourth control could have helped limit the impact of the deployed vulnerable images to only the pods where the images were deployed, making it harder to laterally move to other pods in the cluster.
Conclusion
In this post, we walked you through how to investigate an EKS cluster related security issue with Amazon Detective. We also provided some recommended remediation and preventative controls to put in place for the EKS cluster specific security issues. When pairing GuardDuty’s ability for continuous threat detection and monitoring with Detective’s organization and visualization capabilities, you enable your security team to conduct faster and more effective investigation. By providing the security team the ability quickly view an organized set of data associated with security events within your AWS account, you reduce the overall Mean Time to Respond (MTTR).
Now that you understand the investigative capabilities with Detective, it’s time to try things out! It is important that you provide a mechanism for your security team to practice detection, investigation, and remediation techniques using security incident response simulations. By periodically running simulations, your security team will be prepared to quickly respond to possible security events. You can find more detailed incident response playbooks that can assist you in preparing for events in your environment, see these sample AWS incident response playbooks.
If you have feedback about this post, submit comments in the Comments section below. If you have questions about this post, start a thread on Amazon GuardDuty re:Post.
Want more AWS Security news? Follow us on Twitter.
Amazon Elastic Kubernetes Service (Amazon EKS) is a managed service that you can use to run and scale container workloads by using Kubernetes in the AWS Cloud, which can help increase the speed of deployment and portability of modern applications. Amazon EKS provides secure, managed Kubernetes clusters on the AWS control plane by default. Kubernetes configurations such as pod security policies, runtime security, and network policies and configurations are specific for your organization’s use-case and securing them adequately would be a customer’s responsibility within AWS’ shared responsibility model.
Amazon GuardDuty can help you continuously monitor and detect suspicious activity related to AWS resources in your account. GuardDuty for EKS protection is a feature that you can enable within your accounts. When this feature is enabled, GuardDuty can help detect potentially unauthorized EKS activity resulting from misconfiguration of the control plane nodes or application.
In this post, we’ll walk through the events leading up to a real-world security issue that occurred due to EKS cluster misconfiguration, discuss how those misconfigurations could be used by a malicious actor, and how Amazon GuardDuty monitors and identifies suspicious activity throughout the EKS security event. In part 2 of the post, we’ll cover Amazon Detective investigation capabilities, possible remediation techniques, and preventative controls for EKS cluster related security issues.
Prerequisites
You must have AWS GuardDuty enabled in your AWS account in order to monitor and generate findings associated with an EKS cluster related security issue in your environment.
Before jumping into the security issue, it is important to understand how the AWS shared responsibility model applies to the Amazon EKS managed service. AWS is responsible for the EKS managed Kubernetes control plane and the infrastructure to deliver EKS in a secure and reliable manner. You have the ability to configure EKS and how it interacts with other applications and services, where you are responsible for making sure that secure configurations are being used.
The following scenario is based on a real-world observed event, where a malicious actor used Kubernetes compromise tactics and techniques to expose and access an EKS cluster. We use this example to show how you can use AWS security services to identify and investigate each step of this security event. For a security event in your own environment, the order of operations and the investigative and remediation techniques used might be different. The scenario is broken down into the following phases and associated MITRE ATT&CK tactics:
Phase 1 – EKS cluster misconfiguration
Phase 2 (Discovery) – Discovery of vulnerable EKS clusters
Phase 4 (Persistence) – Impact to persist unauthorized access to the cluster
Phase 5 (Impact) – Impact to manipulate resources for unauthorized activity
Phase 1 – EKS cluster misconfiguration
By default, when you provision an EKS cluster, the API cluster endpoint is set to public, meaning that it can be accessed from the internet. Despite being accessible from the internet, the endpoint is still considered secure because it requires all API requests to be authenticated by AWS Identity and Access Management (IAM) and then authorized by Kubernetes role-based access control (RBAC). Also, the entity (user or role) that creates the EKS cluster is automatically granted system:masters permissions, which allows the entity to modify the EKS cluster’s RBAC configuration.
This example scenario starts with a developer who has access to administer EKS clusters in an AWS account. The developer wants to work from their home network and doesn’t want to connect to their enterprise VPN for IAM role federation. They configure an EKS cluster API without setting up the proper authentication and authorization components. Instead, the developer grants explicit access to the system:anonymous user in the cluster’s RBAC configuration. (Alternatively, an unauthorized RBAC configuration could be introduced into your environment after a developer unknowingly installs a malicious helm chart from the internet without reviewing or inspecting it first.)
In Kubernetes anonymous requests, unauthenticated and unrejected HTTP requests are treated as anonymous access and are identified as a system:anonymous user belonging to a system:unauthenticated group. This means that any entity on the internet can access the cluster and make API requests that are permitted by the role. There aren’t many legitimate use cases for this type of activity, because it’s considered a best practice to use RBAC instead. Anonymous requests are primarily used for setting up health endpoints and custom authentication.
By monitoring EKS audit logs, GuardDuty identifies this activity and generates the finding Policy:Kubernetes/AnonymousAccessGranted, as shown in Figure 1. This finding informs you that a user on your Kubernetes cluster successfully created a ClusterRoleBinding or RoleBinding to bind the user system:anonymous to a role. This action enables unauthenticated access to the API operations permitted by the role.
Figure 1: Example GuardDuty finding for Kubernetes anonymous access granted
Phase 2 (Discovery) – Discovery of vulnerable EKS clusters
Port scanning is a method that malicious actors use to determine if resources are publicly exposed, with open ports and known vulnerabilities. As an increasing number of open-source tools allows users to search for endpoints connected to the internet, finding these endpoints has become even easier. Security teams can use these open-source tools to their advantage by proactively scanning for and identifying externally exposed resources in their organization.
This brings us to the discovery phase of our misconfigured EKS cluster. The discovery phase is defined by MITRE as follows: “Discovery consists of techniques an adversary may use to gain knowledge about the system and internal network. These techniques help adversaries observe the environment and orient themselves before deciding how to act.”
By granting system:anonymous access to the EKS cluster in our example, the developer allowed requests from any public unauthenticated source. This can result in external web crawlers probing the cluster API, which can often happen within seconds of the system:anonymous access being granted. GuardDuty identifies this activity and generates the finding Discovery:Kubernetes/SuccessfulAnonymousAccess, as shown in Figure 2. This finding informs you that an API operation to discover resources in a cluster was successfully invoked by the system:anonymous user. Remember, all API calls made by system:anonymous are unauthenticated, in addition to /healthz and /version calls that are always unauthenticated regardless of the user identity, and any entity can make use of this user within the EKS cluster.
In the screenshot, under the Action section in the finding details, you can see that the anonymous user made a get request to “/”. This is a generic request that is not specific to a Kubernetes cluster, which may indicate that the crawler is not specifically targeting Kubernetes clusters. You can further see that the Status code is 200, indicating that the request was successful. If this activity is malicious, then the actor is now aware that there is an exposed resource.
Figure 2: Example GuardDuty finding for Kubernetes successful anonymous access
Next, in this phase, you might start observing more targeted API calls for establishing initial access from unauthorized users. MITRE defines initial access as “techniques that use various entry vectors to gain their initial foothold within a network. Techniques used to gain a foothold include targeted spearphishing and exploiting weaknesses on public-facing web servers. Footholds gained through initial access may allow for continued access, like valid accounts and use of external remote services, or may be limited-use due to changing passwords.”
In our example, the malicious actor has established initial access for the EKS cluster which is evident in the next GuardDuty finding, CredentialAccess:Kubernetes/SuccessfulAnonymousAccess, as shown in Figure 3. This finding informs you that an API call to access credentials or secrets was successfully invoked by the system:anonymous user. The observed API call is commonly associated with the credential access tactic where an adversary is attempting to collect passwords, usernames, and access keys for a Kubernetes cluster.
You can see that in this GuardDuty finding, in the Action section, the Request uri is targeted at a Kubernetes cluster, specifically /api/v1/namespaces/kube-system/secrets. This request seems to be targeting the secrets management capabilities that are built into Kubernetes. You can find more information about this secrets management capability in the Kubernetes documentation.
Figure 3: Example GuardDuty finding for Kubernetes successful credential access from anonymous user
Phase 4 (Persistence) – Impact to persist unauthorized access to the cluster
The next phase of this scenario is likely to be an impact in the EKS cluster to enable persistence by the malicious actor. MITRE defines impact as “techniques that adversaries use to disrupt availability or compromise integrity by manipulating business and operational processes.” Following the MITRE definitions, “Persistence consists of techniques that adversaries use to keep access to systems across restarts, changed credentials, and other interruptions that could cut off their access. Techniques used for persistence include any access, action, or configuration changes that let them maintain their foothold on systems, such as replacing or hijacking legitimate code or adding startup code.”
In the GuardDuty finding Impact:Kubernetes/SuccessfulAnonymousAccess, shown in Figure 4, you can see the Kubernetes user details and Action sections that indicate that a successful Kubernetes API call was made to create a ClusterRoleBinding by the system:anonymous username. This finding informs you that a write API operation to tamper with resources was successfully invoked by the system:anonymous user. The observed API call is commonly associated with the impact stage of an attack, when an adversary is tampering with resources in your cluster. This activity shows that the system:anonymous user has now created their own role to enable persistent access the EKS cluster. If the user is malicious, they can now access the cluster even if access is removed in the RBAC configuration for the system:anonymous user.
Figure 4 Example GuardDuty finding for Kubernetes successful credential change by anonymous user
Phase 5 (Impact) – Impact to manipulate resources for unauthorized activity
The fifth phase of this scenario is where the unauthorized user is likely to focus on impact techniques in order to use the access for malicious purpose. MITRE says of the impact phase: “Techniques used for impact can include destroying or tampering with data. In some cases, business processes can look fine, but may have been altered to benefit the adversaries’ goals. These techniques might be used by adversaries to follow through on their end goal or to provide cover for a confidentiality breach.” Typically, once a malicious actor has access into a system, they will introduce malware to the system to manipulate the compromised resource and possibly also other resources.
With the introduction of GuardDuty Malware Protection, when an Amazon Elastic Compute Cloud (Amazon EC2) or container-related GuardDuty finding that indicates potentially suspicious activity is generated, an agentless scan on the volumes will initiate and detect the presence of malware. Existing GuardDuty customers need to enable Malware Protection, and for new customers this feature is on by default when they enable GuardDuty for the first time. Malware Protection comes with a 30-day free trial for both existing and new GuardDuty customers. You can see a list of findings that initiates a malware scan in the GuardDuty User Guide.
In this example, the malicious actor now uses access to the cluster to perform unauthorized cryptocurrency mining. GuardDuty monitors the DNS requests from the EC2 instances used to host the EKS cluster. This allows GuardDuty to identify a DNS request made to a domain name associated with a cryptocurrency mining pool, and generate the finding CryptoCurrency:EC2/BitcoinTool.B!DNS, as shown in Figure 5.
Figure 5: Example GuardDuty finding for EC2 instance querying bitcoin domain name
Because this is an EC2 related GuardDuty finding and GuardDuty Malware Protection is enabled in the account, GuardDuty then conducts an agentless scan on the volumes of the EC2 instance to detect malware. If the scan results in a successful detection of one or more malicious files, another GuardDuty finding for Execution:EC2/MaliciousFile is generated, as shown in Figure 6.
Figure 6: Example GuardDuty finding for detection of a malicious file on EC2
The first GuardDuty finding detects crypto mining activity, while the proceeding malware protection finding provides context on the malware associated with this activity. This context is very valuable for the incident response process.
Conclusion
In this post, we walked you through each of the five phases where we outlined how an initial misconfiguration could result in a malicious actor gaining control of EKS resources within an AWS account and how GuardDuty is able to continually monitor and detect the progression of the security event. As previously stated, this is just one example where a misconfiguration in an EKS cluster could result in a security event.
Now that you have a good understanding of GuardDuty capabilities to continuously monitor and detect EKS security events, you will need to establish processes and procedures to enable your security team to investigate these events. You can enable Amazon Detective to help accelerate your security team’s mean time to respond (MTTR) by providing an efficient mechanism to analyze, investigate, and identify the root cause of security events. Follow along in part 2 of this series, How to investigate and take action on an Amazon EKS cluster related security issue with Amazon Detective, where we’ll cover techniques you can use with Amazon Detective to identify impacted EKS resources in your AWS account, possible remediation actions to take on the cluster, and preventative controls you can implement.
If you have feedback about this post, submit comments in the Comments section below. If you have questions about this post, start a thread on Amazon GuardDuty re:Post.
Want more AWS Security news? Follow us on Twitter.
Register now with discount code SALXTDVaB7y to get $150 off your full conference pass to AWS re:Inforce. For a limited time only and while supplies last.
Today we’re going to highlight just some of the sessions focused on threat detection and incident response that are planned for AWS re:Inforce 2022. AWS re:Inforce is a learning conference focused on security, compliance, identity, and privacy. The event features access to hundreds of technical and business sessions, an AWS Partner expo hall, a keynote featuring AWS Security leadership, and more. AWS re:Inforce 2022 will take place in-person in Boston, MA on July 26-27.
AWS re:Inforce organizes content across multiple themed tracks: identity and access management; threat detection and incident response; governance, risk, and compliance; networking and infrastructure security; and data protection and privacy. This post highlights some of the breakout sessions, chalk talks, builders’ sessions, and workshops planned for the threat detection and incident response track. For additional sessions and descriptions, see the re:Inforce 2022 catalog preview. For other highlights, see our sneak peek at the identity and access management sessions and sneak peek at the data protection and privacy sessions.
Breakout sessions
These are lecture-style presentations that cover topics at all levels and delivered by AWS experts, builders, customers, and partners. Breakout sessions typically include 10–15 minutes of Q&A at the end.
TDR201: Running effective security incident response simulations Security incidents provide learning opportunities for improving your security posture and incident response processes. Ideally you want to learn these lessons before having a security incident. In this session, walk through the process of running and moderating effective incident response simulations with your organization’s playbooks. Learn how to create realistic real-world scenarios, methods for collecting valuable learnings and feeding them back into implementation, and documenting correction-of-error proceedings to improve processes. This session provides knowledge that can help you begin checking your organization’s incident response process, procedures, communication paths, and documentation.
TDR202: What’s new with AWS threat detection services AWS threat detection teams continue to innovate and improve the foundational security services for proactive and early detection of security events and posture management. Keeping up with the latest capabilities can improve your security posture, raise your security operations efficiency, and reduce your mean time to remediation (MTTR). In this session, learn about recent launches that can be used independently or integrated together for different use cases. Services covered in this session include Amazon GuardDuty, Amazon Detective, Amazon Inspector, Amazon Macie, and centralized cloud security posture assessment with AWS Security Hub.
TDR301: A proactive approach to zero-days: Lessons learned from Log4j In the run-up to the 2021 holiday season, many companies were hit by security vulnerabilities in the widespread Java logging framework, Apache Log4j. Organizations were in a reactionary position, trying to answer questions like: How do we figure out if this is in our environment? How do we remediate across our environment? How do we protect our environment? In this session, learn about proactive measures that you should implement now to better prepare for future zero-day vulnerabilities.
TDR303: Zoom’s journey to hyperscale threat detection and incident response Zoom, a leader in modern enterprise video communications, experienced hyperscale growth during the pandemic. Their customer base expanded by 30x and their daily security logs went from being measured in gigabytes to terabytes. In this session, Zoom shares how their security team supported this breakneck growth by evolving to a centralized infrastructure, updating their governance process, and consolidating to a single pane of glass for a more rapid response to security concerns. Solutions used to accomplish their goals include Splunk, AWS Security Hub, Amazon GuardDuty, Amazon CloudWatch, Amazon S3, and others.
Builders’ sessions
These are small-group sessions led by an AWS expert who guides you as you build the service or product on your own laptop.
TDR351: Using Kubernetes audit logs for incident response automation In this hands-on builders’ session, learn how to use Amazon CloudWatch and Amazon GuardDuty to effectively monitor Kubernetes audit logs—part of the Amazon EKS control plane logs—to alert on suspicious events, such as an increase in 403 Forbidden or 401 Unauthorized Error logs. Also learn how to automate example incident responses for streamlining workflow and remediation.
TDR352: How to mitigate the risk of ransomware in your AWS environment Join this hands-on builders’ session to learn how to mitigate the risk from ransomware in your AWS environment using the NIST Cybersecurity Framework (CSF). Choose your own path to learn how to protect, detect, respond, and recover from a ransomware event using key AWS security and management services. Use Amazon Inspector to detect vulnerabilities, Amazon GuardDuty to detect anomalous activity, and AWS Backup to automate recovery. This session is beneficial for security engineers, security architects, and anyone responsible for implementing security controls in their AWS environment.
Chalk talks
Highly interactive sessions with a small audience. Experts lead you through problems and solutions on a digital whiteboard as the discussion unfolds.
TDR231: Automated vulnerability management and remediation for Amazon EC2 In this chalk talk, learn about vulnerability management strategies for Amazon EC2 instances on AWS at scale. Discover the role of services like Amazon Inspector, AWS Systems Manager, and AWS Security Hub in vulnerability management and mechanisms to perform proactive and reactive remediations of findings that Amazon Inspector generates. Also learn considerations for managing vulnerabilities across multiple AWS accounts and Regions in an AWS Organizations environment.
TDR332: Response preparation with ransomware tabletop exercises Many organizations do not validate their critical processes prior to an event such as a ransomware attack. Through a security tabletop exercise, customers can use simulations to provide a realistic training experience for organizations to test their security resilience and mitigate risk. In this chalk talk, learn about Amazon Managed Services (AMS) best practices through a live, interactive tabletop exercise to demonstrate how to execute a simulation of a ransomware scenario. Attendees will leave with a deeper understanding of incident response preparation and how to use AWS security tools to better respond to ransomware events.
Workshops
These are interactive learning sessions where you work in small teams to solve problems using AWS Cloud security services. Come prepared with your laptop and a willingness to learn!
TDR271: Detecting and remediating security threats with Amazon GuardDuty This workshop walks through scenarios covering threat detection and remediation using Amazon GuardDuty, a managed threat detection service. The scenarios simulate an incident that spans multiple threat vectors, representing a sample of threats related to Amazon EC2, AWS IAM, Amazon S3, and Amazon EKS, that GuardDuty is able to detect. Learn how to view and analyze GuardDuty findings, send alerts based on the findings, and remediate findings.
TDR371: Building an AWS incident response runbook using Jupyter notebooks This workshop guides you through building an incident response runbook for your AWS environment using Jupyter notebooks. Walk through an easy-to-follow sample incident using a ready-to-use runbook. Then add new programmatic steps and documentation to the Jupyter notebook, helping you discover and respond to incidents.
TDR372: Detecting and managing vulnerabilities with Amazon Inspector Join this workshop to get hands-on experience using Amazon Inspector to scan Amazon EC2 instances and container images residing in Amazon Elastic Container Registry (Amazon ECR) for software vulnerabilities. Learn how to manage findings by creating prioritization and suppression rules, and learn how to understand the details found in example findings.
TDR373: Industrial IoT hands-on threat detection Modern organizations understand that enterprise and industrial IoT (IIoT) yields significant business benefits. However, unaddressed security concerns can expose vulnerabilities and slow down companies looking to accelerate digital transformation by connecting production systems to the cloud. In this workshop, use a case study to detect and remediate a compromised device in a factory using security monitoring and incident response techniques. Use an AWS multilayered security approach and top ten IIoT security golden rules to improve the security posture in the factory.
TDR374: You’ve received an Amazon GuardDuty EC2 finding: What’s next? You’ve received an Amazon GuardDuty finding drawing your attention to a possibly compromised Amazon EC2 instance. How do you respond? In part one of this workshop, perform an Amazon EC2 incident response using proven processes and techniques for effective investigation, analysis, and lessons learned. Use the AWS CLI to walk step-by-step through a prescriptive methodology for responding to a compromised Amazon EC2 instance that helps effectively preserve all available data and artifacts for investigations. In part two, implement a solution that automates the response and forensics process within an AWS account, so that you can use the lessons learned in your own AWS environments.
If any of the sessions look interesting, consider joining us by registering for re:Inforce 2022. Use code SALXTDVaB7y to save $150 off the price of registration. For a limited time only and while supplies last. Also stay tuned for additional sessions being added to the catalog soon. We look forward to seeing you in Boston!
In the week leading up to AWS re:Invent 2021, we’ll share conversations we’ve had with people at AWS who will be presenting, and get a sneak peek at their work.
How long have you been at Amazon Web Services (AWS), and what do you do in your current role?
I’ve been at AWS nearly 4 years, and in IT security over 15 years. I’m a solutions architect with a specialty in security. I work with commercial customers in North America, helping them solve security problems and build out secure foundations for their AWS workloads.
How did you get started in security?
I took part in a Boeing internship for three summers starting my junior year of high school. This internship gave me the opportunity to work with mechanical engineers at Boeing. The specific team I worked with were engineers responsible for building digital tools and robots for the 767-400 line at the Everett plant in Washington state. The purpose of these custom tools and robots was to help build the planes more efficiently and accurately. I had a lot of fun and learned a lot from my time working with them. I asked the group for career advice during lunch one day, and they all pointed me towards computer science (CS) instead of mechanical engineering. Because of their strong support for CS, I took the first course, Intro to Computer Science, and was excited that something that I previously thought was intimidating was actually approachable and a subject I really enjoyed.
During my sophomore year there was a new elective class offered called Digital Security, which piqued my interest and influenced my senior project. I built (coded) an intrusion detection program that identified nefarious network traffic. I also worked on campus during college in the sound services department and participated in the Dance Ensemble Program, where I met the IT manager for a local hospital in Washington state, Good Samaritan Hospital in Puyallup. He was helping mix music at the studio I worked in. After showing him my senior project, he told me about a job opening for a network security specialist at the hospital. No one else had applied for the role. I then interviewed with the team, which was made up of only three engineers including the manager. They were responsible for the all-backend systems including the hospital information system, patient telemetry and clinic systems, the hospital network, etc. The group of people I worked with at the hospital is still very special to me, we are all still friends.
How do you explain your job to non-tech friends?
I’m in tech, and I help companies protect their websites and their customers’ data.
What are you currently working on that you’re excited about?
I’m very excited about re:Invent. It’s the 10th anniversary, we’re back in person, and I’ve got quite a few sessions I’m delivering.
Speaking of AWS re:Invent 2021 – can you give readers a sneak peek at what you’re covering?
The first is a session I’m delivering is called Use AWS to improve your security posture against ransomware (SEC308) with Merritt Baer, Principal in the Office of the CISO. We’re discussing what AWS services and features you can use to help you protect your systems from ransomware.
The second is a chalk talk, Automating and evidencing key compliance security controls (STP211-R1 and STP211-R2), I’m delivering with Kristin Haught, Principal Security TPM, and we’re discussing strategies for automating, monitoring, and evidencing common controls required for multiple compliance standards.
The third session is a builder session called Grant least privilege temporary access securely at scale (WPS304). We’ll use AWS Secrets Manager, AWS Identity and Access Management (IAM), and the isolated compute functionality provided by AWS Nitro Enclaves to allow system administrators to request and retrieve narrowly scoped and limited-time access.
The fourth session is another builder session called Detecting security threats with Amazon GuardDuty (SEC213-R1 and SEC213-R2). It includes several simulated scenarios, representing just a small sample of the threats that GuardDuty can detect. We will review how to view and analyze GuardDuty findings, how to send alerts based on the findings, and, finally, how to remediate findings.
From your perspective, what’s the most important thing to know about ransomware?
Whenever we see a security event continue to make news, it’s a call to action and an opportunity for customers to analyze their security programs including operations and controls. There’s no silver bullet when it comes to protection from ransomware, but it’s time to level up your security operations and controls. This means minimize human access, translate security policies into code, build mechanism and measure them, streamline the use of environment and infrastructure, and use advanced data/database service features.
For example, we still see customers with large amounts of long-lived credentials; it’s time to take inventory and minimize or eliminate them. While there is a small subset of use cases where they may be required, such as on-premises to AWS access, I recommend the following:
Inventory your long-lived credentials.
Ensure the access is least privilege, absolutely no wildcard actions and/or resources.
If the access is interactive, apply multi-factor authentication (MFA).
Ask if you can architect a better option that doesn’t rely on static access keys.
Learn and Be Curious! I am the most happy in my job and personal life when I’m learning new things. I also believe that this principle is a way of life for us technology folks. Learning new technology and finding better ways of implementing technology is our job. My favorite quote/laptop sticker is:
“I hate programming”
“I hate programming”
“I hate programming”
“IT WORKS! ”
“I love programming.”
It just makes me laugh because it’s so true. Of course we are only that frustrated when something is very new. It’s like solving a puzzle. When a project comes together, it’s absolutely worth it – the puzzle pieces now fit.
What’s the best career advice you’ve ever gotten?
Work with a mentor. This can be casual by finding projects where you can collaborate with folks who have more experience than you. Or it can be more formal by asking someone to be your mentor and setting up a regular cadence of meetings with them. I’ve done both, a simple example is by collaborating with Merritt and Kristen on upcoming re:Invent presentations, I’ve already learned a lot from both of them just through the preparation process and developing the content. Having a mentor by your side can be especially helpful when setting new goals. Sometimes we need someone to push us out of our comfort zone and believe that we can achieve bigger things than we would have thought and then can help devise a plan to help you achieve those goals. All it takes is someone else believing in us.
If you had to pick any other job, what would you want to do?
I’ve always been interested in naturopathic medicine and getting to the root cause of an issue. It’s somewhat similar to my job in that I’m solving puzzles and complex problems, but in technology, instead of the body.
If you have feedback about this post, submit comments in the Comments section below.
Want more AWS Security news? Follow us on Twitter.
AWS recently released the Ransomware Risk Management on AWS Using the NIST Cyber Security Framework (CSF) whitepaper. This whitepaper aligns the National Institute of Standards and Technology (NIST) recommendations for security controls that are related to ransomware risk management, for workloads built on AWS. The whitepaper maps the technical capabilities to AWS services and implementation guidance. While this whitepaper is primarily focused on managing the risks associated with ransomware, the security controls and AWS services outlined are consistent with general security best practices.
The National Cybersecurity Center of Excellence (NCCoE) at NIST has published Practice Guides (NIST 1800-11, 1800-25, and 1800-26) to demonstrate how organizations can develop and implement security controls to combat the data integrity challenges posed by ransomware and other destructive events. Each of the Practice Guides include a detailed set of goals that are designed to help organizations establish the ability to identify, protect, detect, respond, and recover from ransomware events.
Identify systems, users, data, applications, and entities on the network.
Identify vulnerabilities in enterprise components and clients.
Create a baseline for the integrity and activity of enterprise systems in preparation for an unexpected event.
Create backups of enterprise data in advance of an unexpected event.
Protect these backups and other potentially important data against alteration.
Manage enterprise health by assessing machine posture.
Detect and respond
Detect malicious and suspicious activity generated on the network by users, or from applications that could indicate a data integrity event.
Mitigate and contain the effects of events that can cause a loss of data integrity.
Monitor the integrity of the enterprise for detection of events and after-the-fact analysis.
Use logging and reporting features to speed response time for data integrity events.
Analyze data integrity events for the scope of their impact on the network, enterprise devices, and enterprise data.
Analyze data integrity events to inform and improve the enterprise’s defenses against future attacks.
Recover
Restore data to its last known good configuration.
Identify the correct backup version (free of malicious code and data for data restoration).
Identify altered data, as well as the date and time of alteration.
Determine the identity/identities of those who altered data.
To achieve the above goals, the Practice Guides outline a set of technical capabilities that should be established, and provide a mapping between the generic application term and the security controls that the capability provides.
AWS services can be mapped to theses technical capabilities as outlined in the Ransomware Risk Management on AWS Using the NIST Cyber Security Framework (CSF) whitepaper. AWS offers a comprehensive set of services that customers can implement to establish the necessary technical capabilities to manage the risks associated with ransomware. By following the mapping in the whitepaper, AWS customers can identify which services, features, and functionality can help their organization identify, protect, detect, respond, and from ransomware events. If you’d like additional information about cloud security at AWS, please contact us.
If you have feedback about this post, submit comments in the Comments section below.
Want more AWS Security how-to content, news, and feature announcements? Follow us on Twitter.
The Security Operations Center (SOC) has a tough job. As customers modernize and shift to cloud architectures, the ability to monitor, detect, and respond to risks poses different challenges.
In this post we address how Amazon GuardDuty can address some common concerns of the SOC regarding the number of security tools and the overhead to integrate and manage them. We describe the GuardDuty service, how the SOC can use GuardDuty threat lists, filtering, and suppression rules to tune detections and reduce noise, and the intentional model used to define and categorize GuardDuty finding types to quickly give detailed information about detections.
Today, the typical SOC has between 10 and 60 tools for managing security. Some larger SOCs can have more than 100 tools, which are mostly point solutions that don’t integrate with each other.
The security market is flush with niche security tools you can deploy to monitor, detect, and respond to events. Each tool has technical and operational overhead in the form of designing system uptime, sensor deployment, data aggregation, tool integration, deployment plans, server and software maintenance, and licensing.
Tuning your detection systems is an example of a process with both technical and operational overhead. To improve your signal-to-noise ratio (S/N), the security systems you deploy have to be tuned to your environment and to emerging risks that are relevant to your environment. Improving the S/N matters for SOC teams because it reduces time and effort spent on activities that don’t bring value to an organization. Spending time tuning detection systems reduces the exhaustion factors that impact your SOC analysts. Tuning is highly technical, yet it’s also operational because it’s a process that continues to evolve, which means you need to manage the operations and maintenance lifecycle of the infrastructure and tools that you use in tuning your detections.
Amazon GuardDuty
GuardDuty is a core part of the modern FedRAMP-authorized cloud SOC, because it provides SOC analysts with a broad range of cloud-specific detective capabilities without requiring the overhead associated with a large number of security tools.
GuardDuty is a continuous security monitoring service that analyzes and processes data from Amazon Virtual Private Cloud (VPC) Flow Logs, AWS CloudTrail event logs that record Amazon Web Services (AWS) API calls, and DNS logs to provide analysis and detection using threat intelligence feeds, signatures, anomaly detection, and machine learning in the AWS Cloud. GuardDuty also helps you to protect your data stored in S3. GuardDuty continuously monitors and profiles S3 data access events (usually referred to as data plane operations) and S3 configurations (control plane APIs) to detect suspicious activities. Detections include unusual geo-location, disabling of preventative controls such as S3 block public access, or API call patterns consistent with an attempt to discover misconfigured bucket permissions. For a full list of GuardDuty S3 threat detections, see GuardDuty S3 finding types. GuardDuty integrates threat intelligence feeds from CrowdStrike, Proofpoint, and AWS Security to detect network and API activity from known malicious IP addresses and domains. It uses machine learning to identify unknown and potentially unauthorized and malicious activity within your AWS environment.
The GuardDuty team continually monitors and manages the tuning of detections for threats related to modern cloud deployments, but your SOC can use trusted IP and threat lists and suppression rules to implement your own custom tuning to fit your unique environment.
GuardDuty is integrated with AWS Organizations, and customers can use AWS Organizations to associate member accounts with a GuardDuty management account. AWS Organizations helps automate the process of enabling and disabling GuardDuty simultaneously across a group of AWS accounts that are in your control. Note that, as of this writing, you can have one management account and up to 5,000 member accounts.
Operational overhead is near zero. There are no agents or sensors to deploy or manage. There are no servers to build, deploy, or manage. There’s nothing to patch or upgrade. There aren’t any highly available architectures to build. You don’t have to buy a subscription to a threat intelligence provider, manage the influx of threat data and most importantly, you don’t have to invest in normalizing all of the datasets to facilitate correlation. Your SOC can enable GuardDuty with a single click or API call. It is a multi-account service where you can create a management account, typically in the security account, that can read all findings information from the member accounts for easy centralization of detections. When deployed in a Management/Member design, GuardDuty provides a flexible model for centralizing your enterprise threat detection capability. The management account can control certain member settings, like update intervals for Amazon CloudWatch Events, use of threat and trusted lists, creation of suppression rules, opening tickets, and automating remediations.
Filters and suppression rules
When GuardDuty detects potential malicious activity, it uses a standardized finding format to communicate the details about the specific finding. The details in a finding can be queried in filters, displayed as saved rules, or used for suppression to improve visibility and reduce analyst fatigue.
Suppress findings from vulnerability scanners
A common example of tuning your GuardDuty deployment is to use suppression rules to automatically archive new Recon:EC2/Portscan findings from vulnerability assessment tools in your accounts. This is a best practice designed to reduce S/N and analyst fatigue.
The first criteria in the suppression rule should use the Finding type attribute with a value of Recon:EC2/Portscan. The second filter criteria should match the instance or instances that host these vulnerability assessment tools. You can use the Instance image ID attribute, the Network connection remote IPv4 address, or the Tag value attribute depending on what criteria is identifiable with the instances that host these tools. In the example shown in Figure 1, we used the remote IPv4 address.
Figure 1: GuardDuty filter for vulnerability scanners
Filter on activity that was not blocked by security groups or NACL
If you want visibility into the GuardDuty detections that weren’t blocked by preventative measures such as a network ACL (NACL) or security group, you can filter by the attribute Network connection blocked = False, as shown in Figure 2. This can provide visibility into potential changes in your filtering strategy to reduce your risk.
Figure 2: GuardDuty filter for activity not blocked by security groups on NACLs
Filter on specific malicious IP addresses
Some customers want to track specific malicious IP addresses to see whether they are generating findings. If you want to see whether a single source IP address is responsible for CloudTrail-based findings, you can filter by the API caller IPv4 address attribute.
Figure 3: GuardDuty filter for specific malicious IP address
Filter on specific threat provider
Maybe you want to know how many findings are generated from a threat intelligence provider or your own threat lists. You can filter by the attribute Threat list name to see if the potential attacker is on a threat list from CrowdStrike, Proofpoint, AWS, or your threat lists that you uploaded to GuardDuty.
Figure 4: GuardDuty filter for specific threat intelligence list provider
Finding types and formats
Now that you know a little more about GuardDuty and tuning findings by using filters and suppression rules, let’s dive into the finding types that are generated by a GuardDuty detection. The first thing to know is that all GuardDuty findings use the following model:
This model is intended to communicate core information to security teams on the nature of the potential risk, the AWS resource types that are potentially impacted, and the threat family name, variants, and artifacts of the detected activity in your account. The Threat Purpose field describes the primary purpose of a threat or a potential attempt on your environment.
The Backdoor threat purpose indicates an attempt to bypass normal security controls on a specific Amazon Elastic Compute Cloud (EC2) instance. In this example, the EC2 instance in your AWS environment is querying a domain name (DNS) associated with a known command and control (C&CActivity) server. This is a high-severity finding, because there are enough indicators that malware is on your host and acting with malicious intent.
GuardDuty, at the time of this writing, supports the following finding types:
Backdoor finding types
Behavior finding types
CryptoCurrency finding types
PenTest finding types
Persistence finding types
Policy finding types
PrivilegeEscalation finding types
Recon finding types
ResourceConsumption finding types
Stealth finding types
Trojan finding types
Unauthorized finding types
OK, now you know about the model for GuardDuty findings, but how does GuardDuty work?
When you enable GuardDuty, the service evaluates events in both a stateless and stateful manner, which allows us to use machine learning and anomaly detection in addition to signatures and threat intelligence. Some stateless examples include the Backdoor:EC2/C&CActivity.B!DNS or the CryptoCurrency:EC2/BitcoinTool.B finding types, where GuardDuty only needs to see a single DNS query, VPC Flow Log entry, or CloudTrail record to detect potentially malicious activity.
Stateful detections are driven by anomaly detection and machine learning models that identify behaviors that deviate from a baseline. The machine learning detections typically require more time to train the models and potentially use multiple events for triggering the detection.
The typical triggers for behavioral detections vary based on the log source and the detection in question. The behavioral detections learn about typical network or user activity to set a baseline, after which the anomaly detections change from a learning mode to an active mode. In active mode, you only see findings generated from these detections if the service observes behavior that suggests a deviation. Some examples of machine learning–based detections include the Backdoor:EC2/DenialOfService.Dns, UnauthorizedAccess:IAMUser/ConsoleLogin, and Behavior:EC2/NetworkPortUnusual finding types.
Why does this matter?
We know the SOC has the tough job of keeping organizations secure with limited resources, and with a high degree of technical and operational overhead due to a large portfolio of tools. This can impact the ability to detect and respond to security events. For example, CrowdStrike tracks the concept of breakout time—the window of time from when an outside party first gains unauthorized access to an endpoint machine, to when they begin moving laterally across your network. They identified average breakout times are between 19 minutes and 10 hours. If the SOC is overburdened with undifferentiated technical and operational overhead, it can struggle to improve monitoring, detection, and response. To act quickly, we have to decrease detection time and the overhead burden on the SOC caused by the numerous tools used. The best way to decrease detection time is with threat intelligence and machine learning. Threat intelligence can provide context to alerts and gives a broader perspective of cyber risk. Machine learning uses baselines to detect what normal looks like, enabling detection of anomalies in user or resource behavior, and heuristic threats that change over time. The best way to reduce SOC overhead is to share the load so that AWS services manage the undifferentiated heavy lifting, while the SOC focuses on more specific tasks that add value to the organization.
GuardDuty is a cost-optimized service that is in scope for the FedRAMP and DoD compliance programs in the US commercial and GovCloud Regions. It leverages threat intelligence and machine learning to provide detection capabilities without you having to manage, maintain, or patch any infrastructure or manage yet another security tool. With a 30-day trial period, there is no risk to evaluate the service and discover how it can support your cyber risk strategy.
If you want to receive automated updates about GuardDuty, you can subscribe to an SNS notification that will email you whenever new features and detections are released.
If you have feedback about this post, submit comments in the Comments section below. If you have questions about this post, start a new thread on the Amazon GuardDuty forum or contact AWS Support.
Want more AWS Security how-to content, news, and feature announcements? Follow us on Twitter.
The collective thoughts of the interwebz
Manage Consent
To provide the best experiences, we use technologies like cookies to store and/or access device information. Consenting to these technologies will allow us to process data such as browsing behavior or unique IDs on this site. Not consenting or withdrawing consent, may adversely affect certain features and functions.
Functional
Always active
The technical storage or access is strictly necessary for the legitimate purpose of enabling the use of a specific service explicitly requested by the subscriber or user, or for the sole purpose of carrying out the transmission of a communication over an electronic communications network.
Preferences
The technical storage or access is necessary for the legitimate purpose of storing preferences that are not requested by the subscriber or user.
Statistics
The technical storage or access that is used exclusively for statistical purposes.The technical storage or access that is used exclusively for anonymous statistical purposes. Without a subpoena, voluntary compliance on the part of your Internet Service Provider, or additional records from a third party, information stored or retrieved for this purpose alone cannot usually be used to identify you.
Marketing
The technical storage or access is required to create user profiles to send advertising, or to track the user on a website or across several websites for similar marketing purposes.