Post Syndicated from The Atlantic original https://www.youtube.com/shorts/tXofDuiLd5w
Intel Announces Xeon 600 Series This is Granite Rapids for Workstations
Post Syndicated from Ryan Smith original https://www.servethehome.com/intel-announces-xeon-600-series-granite-rapids-for-workstations/
Intel this afternoon is taking the wraps off of the Xeon 600 series, the company’s upcoming workstation platform. Based on Intel’s Granite Ridge CPUs, the release of the Xeon 600 series will see Intel’s latest server technology finally cascade down into workstation parts, replacing the current Xeon W-2500/W-3500 (Sapphire/Emerald Rapids) platforms that have been the […]
The post Intel Announces Xeon 600 Series This is Granite Rapids for Workstations appeared first on ServeTheHome.
Federate access to Amazon SageMaker Unified Studio with AWS IAM Identity Center and Ping Identity
Post Syndicated from Raghavarao Sodabathina original https://aws.amazon.com/blogs/big-data/federate-access-to-amazon-sagemaker-unified-studio-with-aws-iam-identity-center-and-ping-identity/
With an identity provider (IdP), you can manage your user identities outside of AWS and give these external user identities permissions to use AWS resources in your AWS accounts. External IdPs, such as Ping Identity, can integrate with AWS IAM Identity Center to be the source of truth for Amazon SageMaker Unified Studio. SageMaker Unified Studio also supports trusted identity propagation for SQL analytics, including Amazon Athena and Amazon Redshift.
SageMaker Unified Studio provides an integrated experience to use your data and tools for analytics and AI. You can use SageMaker Unified Studio to discover your data and put it to work using familiar AWS analytics and machine learning (ML) services for model development, generative AI, big data processing, and SQL analytics, assisted by Amazon Q Developer. By default, SageMaker domains support AWS Identity and Access Management (IAM) user credentials. You can also enable access to SageMaker domains in SageMaker Unified Studio for users with single sign-on (SSO) with IAM Identity Center and direct SAML integration with SageMaker Unified Studio.
Users can access SageMaker Unified Studio with their existing corporate credentials. With IAM Identity Center, administrators can connect their existing external IdPs and continue to manage users and groups in those existing identity systems, which can then be synchronized with IAM Identity Center using System for Cross-domain Identity Management (SCIM).In this post, we show how to set up workforce access with SageMaker Unified Studio using Ping Identity as an external IdP with IAM Identity Center.
In this post, we show how to set up workforce access with SageMaker Unified Studio using Ping Identity as an external IdP with IAM Identity Center.
Solution overview
We walk through the following high-level steps to implement this solution:
- Enable IAM Identity Center.
- Create a SageMaker Unified Studio domain.
- Set up your IdP (for this example, Ping Identity).
- Connect Ping Identity and IAM Identity Center.
- Set up automatic provisioning of users and groups in IAM Identity Center.
- Configure SageMaker Unified Studio SSO user access.
Prerequisites
For this walkthrough, you should have the following prerequisites:
- An AWS account with IAM Identity Center enabled. It is recommended to use an organization-level IAM Identity Center instance for best practices and centralized identity management across your AWS organization.
- A Ping Identity account.
- A browser with network connectivity to Ping Identity and SageMaker Unified Studio.
Enable IAM Identity Center
To enable IAM Identity Center, follow the instructions in Enable IAM Identity Center.
Create a SageMaker Unified Studio domain
To create a SageMaker Unified Studio domain, refer to the instructions in Create a Amazon SageMaker Unified Studio domain – manual setup.
On the SageMaker console, go to the domain details and copy the Amazon Resource Name (ARN) under Domain ARN. You will use this value when you add your trust policy and when you connect your IAM IdP to your Ping Identity instance.

Set up your IdP (Ping Identity)
In this section, we walk through the procedure to set up your IdP (for this example, Ping Identity).
Create an environment in Ping Identity
Complete the following steps to create an environment for Ping Identity:
- Log in to your Ping Identity account.
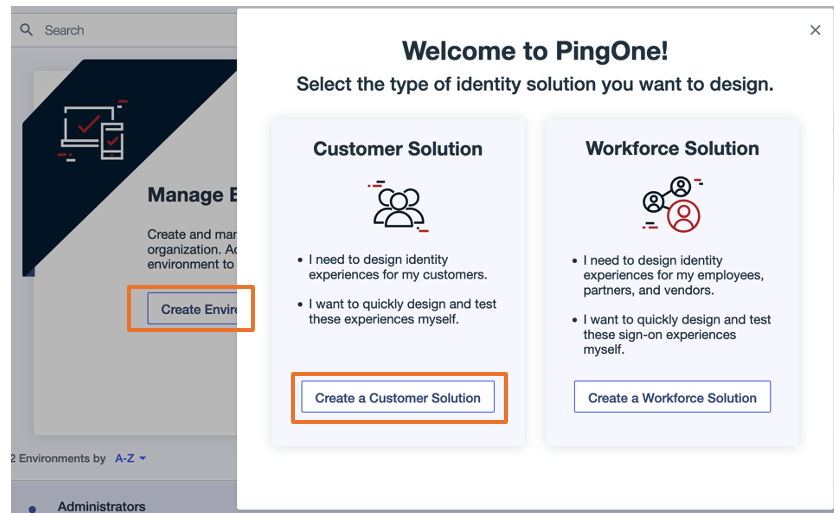
- Choose Create Environment.
- Choose Create a Customer Solution.
- In the Tailor your experiences pop-up, choose Skip.

Create a group in Ping Identity
Complete the following steps to create a group in Ping Identity:
- On the Environments page, choose Manage Environments.
- In the navigation pane, choose Directory, then choose Groups.
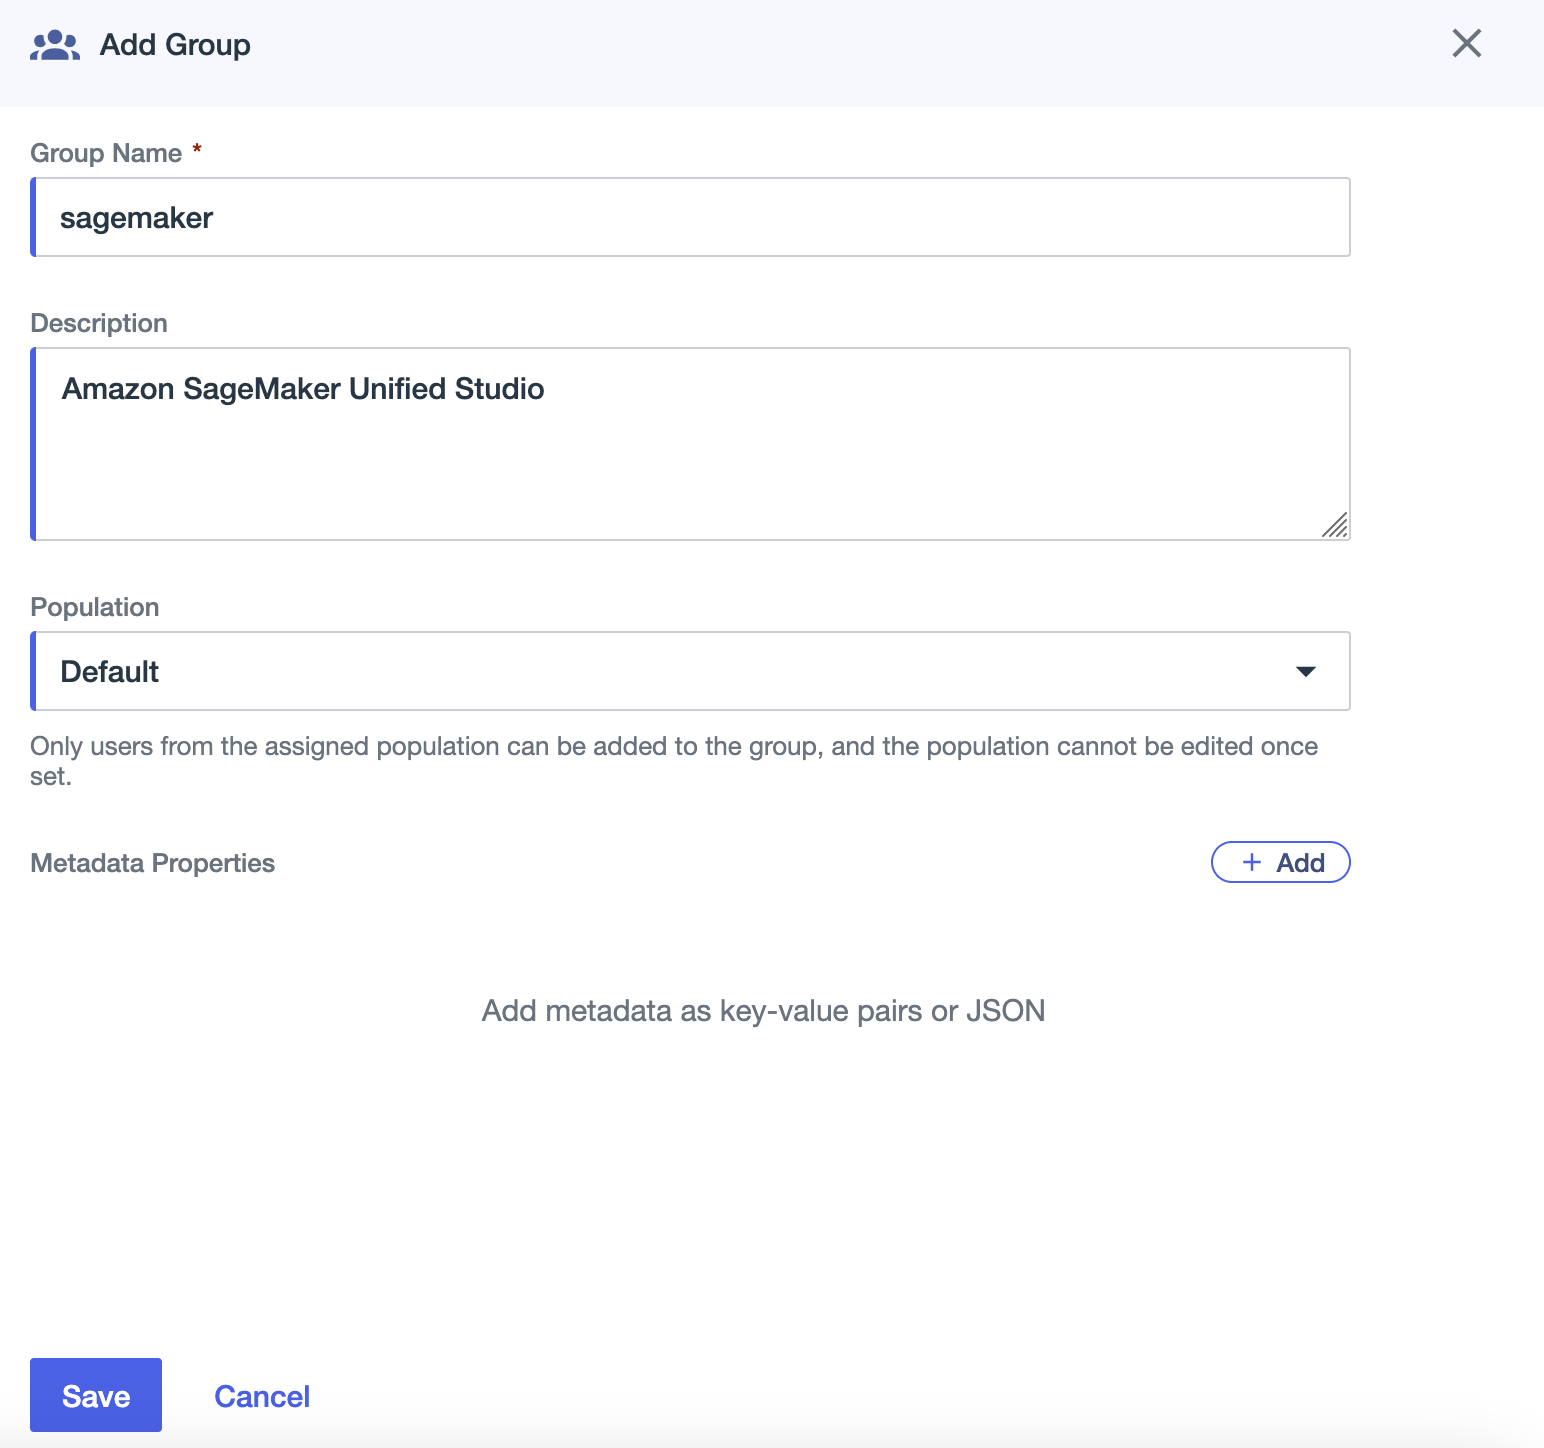
- Choose the plus sign to add a group.
- For Group Name, enter
sagemaker - For Description, enter an optional description (for example,
Amazon SageMaker Unified Studio). - For Population, choose Default.
- Choose Save.

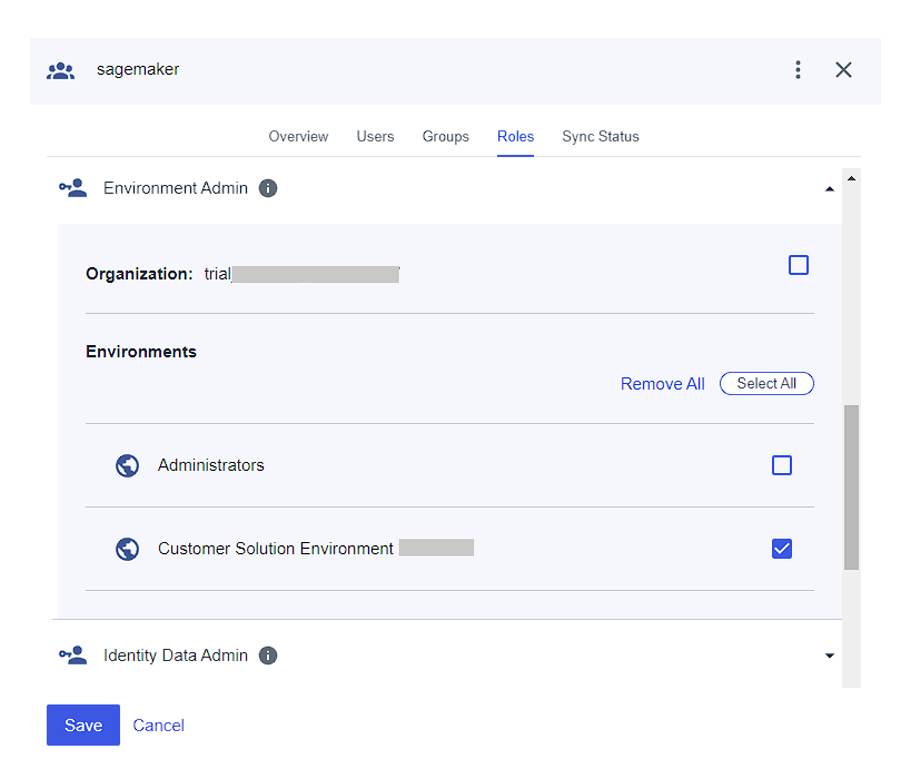
- On the Roles tab for the
sagemakergroup, assign the Environment Admin role to the group.

Create a user in Ping Identity
Complete the following steps to create a user:
- In the navigation pane, choose Directory, then choose Users.
- Choose the plus sign to create a user.
- Provide values for Given name, Family name, Username, and Email.
- For Password, choose First time password.
- Choose Save.
You can add more users as needed.
Assign group to user
Complete the following steps to assign your group to your user:
- In the navigation pane, choose Directory, then choose Groups.
- Choose the
sagemakergroup you created. - On the Users tab, choose the plus sign to add a user.
- Add the user you created.
Connect Ping Identity and IAM Identity Center
To configure the integration between Ping Identity and IAM Identity Center, you need access to both management consoles. Although Ping Identity’s application catalog includes IAM Identity Center, we recommend configuring a standard SAML application for greater control over settings and attribute mappings.
Complete the following steps:
- Go to the Ping Identity environment you created and choose Applications in the navigation pane.
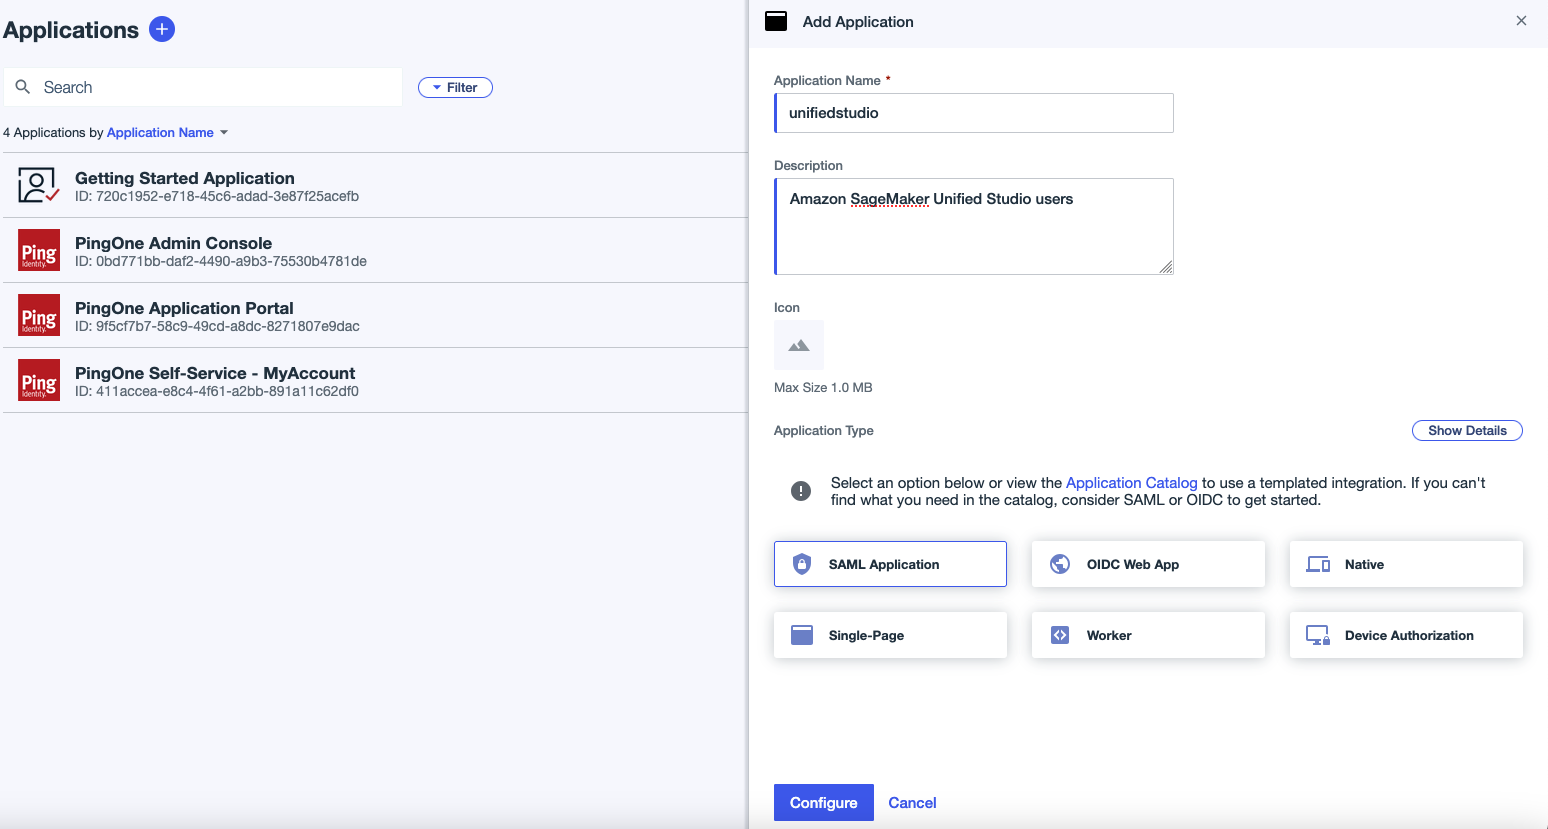
- Choose the plus sign to add an application:
- For Application name, enter a name (for this example, we use
unifiedstudio). - For Description, enter an optional description.
- For Application Type, choose SAML Application.
- Choose Configure.

- For Application name, enter a name (for this example, we use
- Sign in to the IAM Identity Center console as a user with administrative privileges.
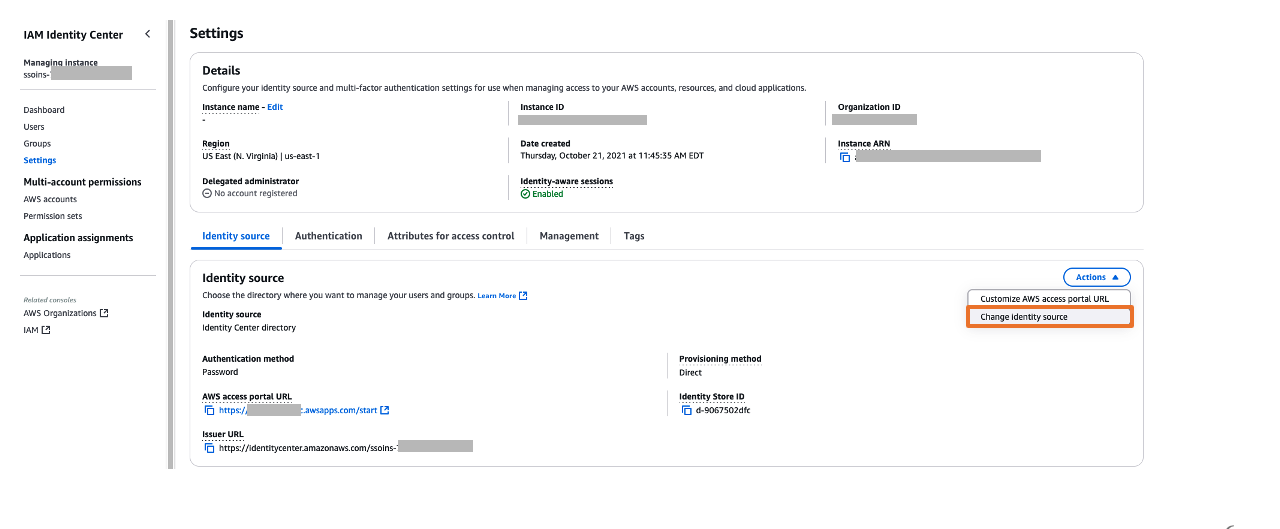
- In the navigation pane, choose Settings to update your settings:
- On the Identity source tab, choose Change identity source on the Actions dropdown menu.

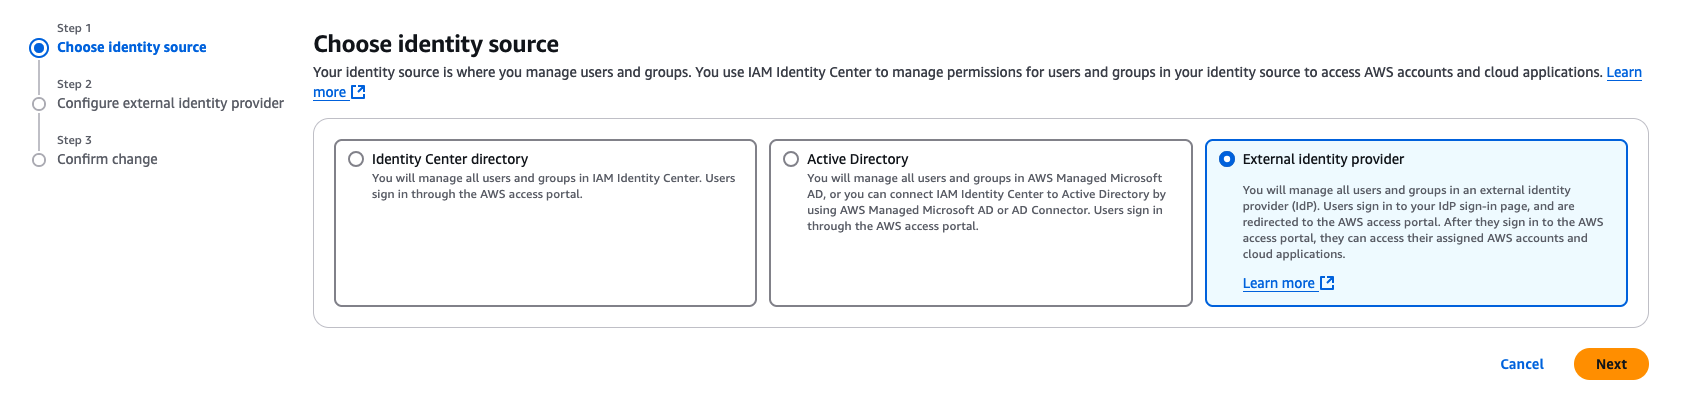
- For Choose identity source, select External identity provider, then choose Next.

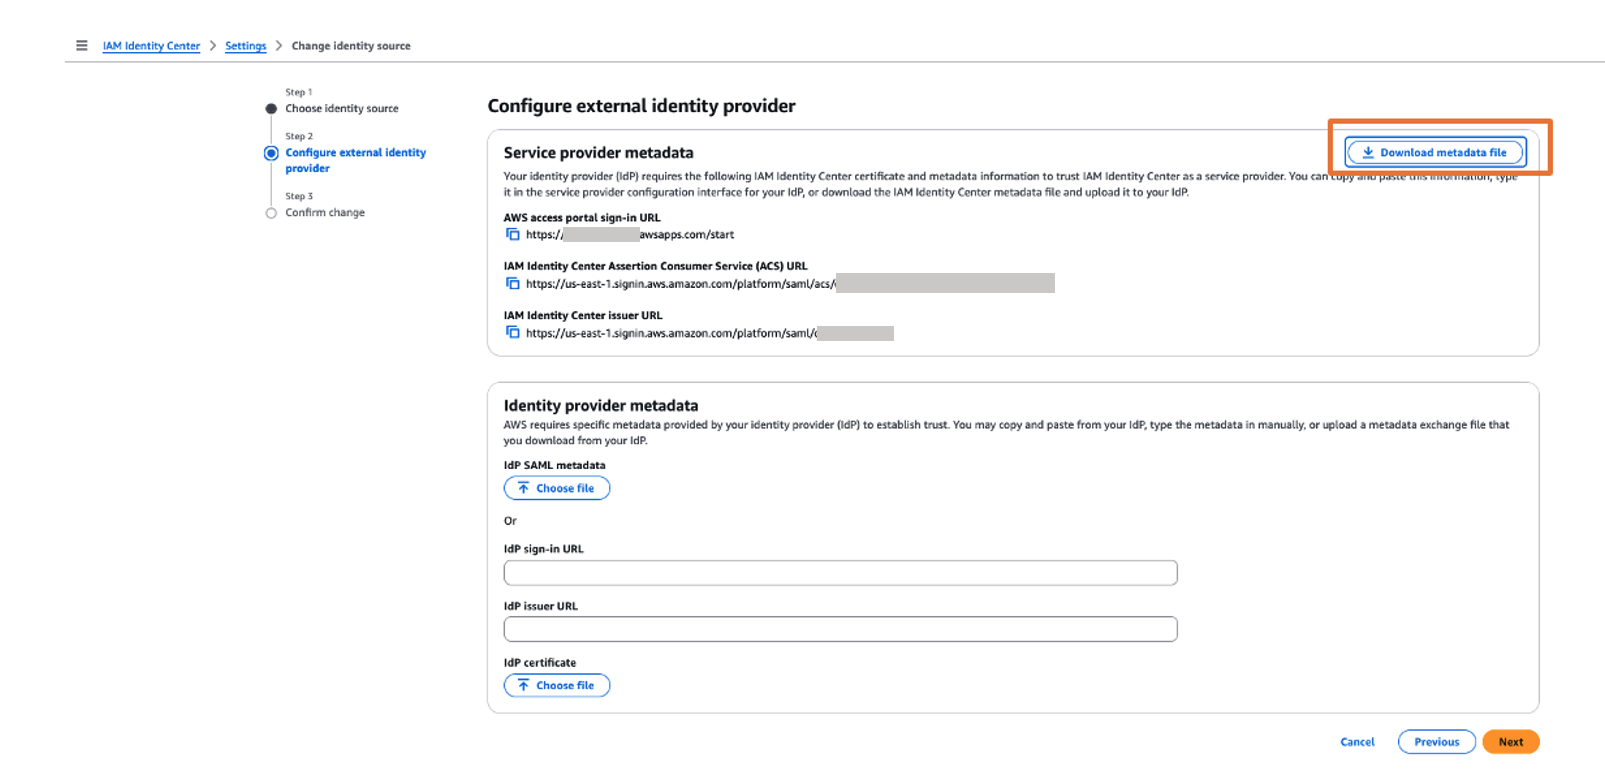
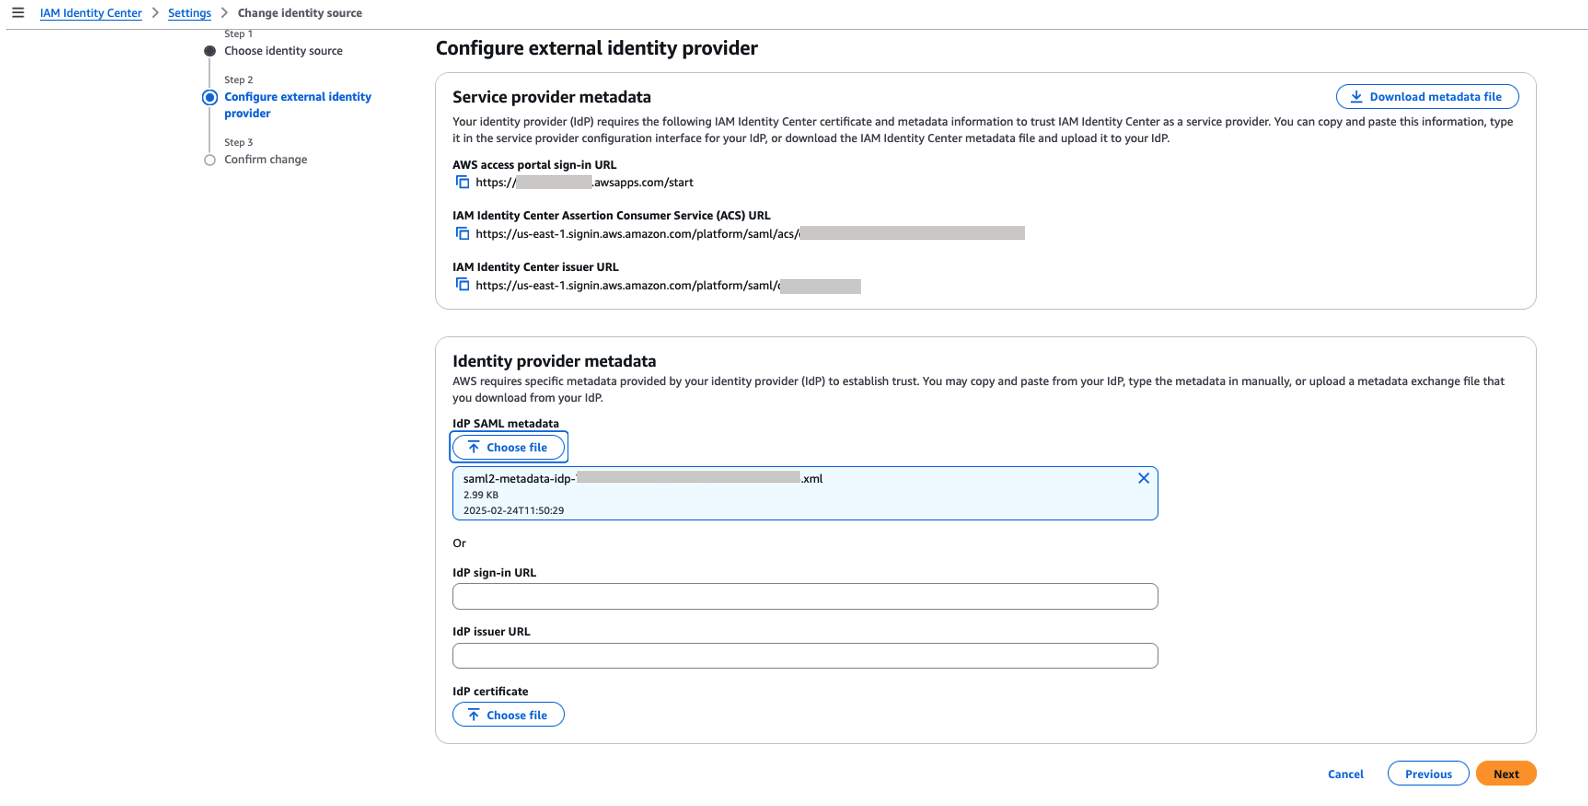
- In the Service provider metadata section, choose Download metadata file to download the IAM Identity Center metadata file.
You will use this service provider metadata file in the next step when you connect Ping Identity with IAM Identity Center.

- On the Identity source tab, choose Change identity source on the Actions dropdown menu.
- Return to the Ping Identity console and the SAML application page.
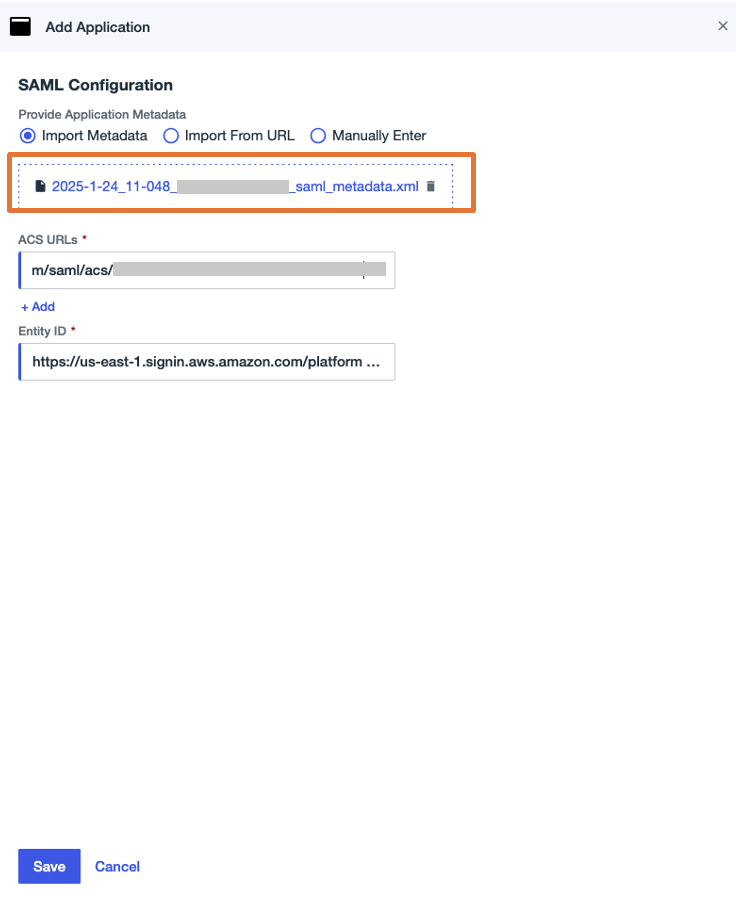
- In the SAML Configuration section, select Import Metadata, upload the metadata file you downloaded, then choose Save.

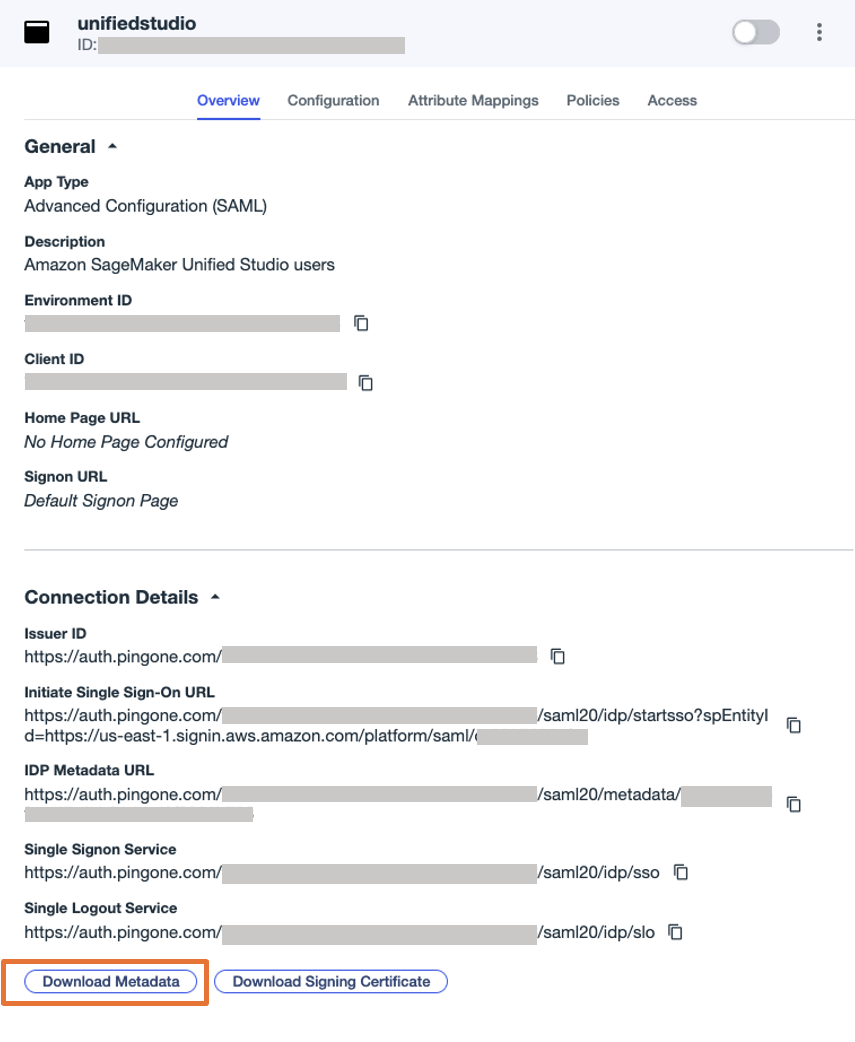
- On the Overview tab of the application page, choose Download Metadata under Connection details to download the Ping Identity IdP metadata.
You will use this for the SAML configuration in IAM Identity Center to set up Ping Identity as an IdP in the next step.
- Return to the IAM Identity Center console and continue configuring your identity source:
- In the Identity provider metadata section, choose Choose file under IdP SAML metadata, upload the metadata file you downloaded from Ping Identity, then choose Next.

- Choose Accept to accept the disclaimer.
- Choose Change identity source.
- In the Identity provider metadata section, choose Choose file under IdP SAML metadata, upload the metadata file you downloaded from Ping Identity, then choose Next.
- Return to the Ping Identity console to complete the SAML configuration.
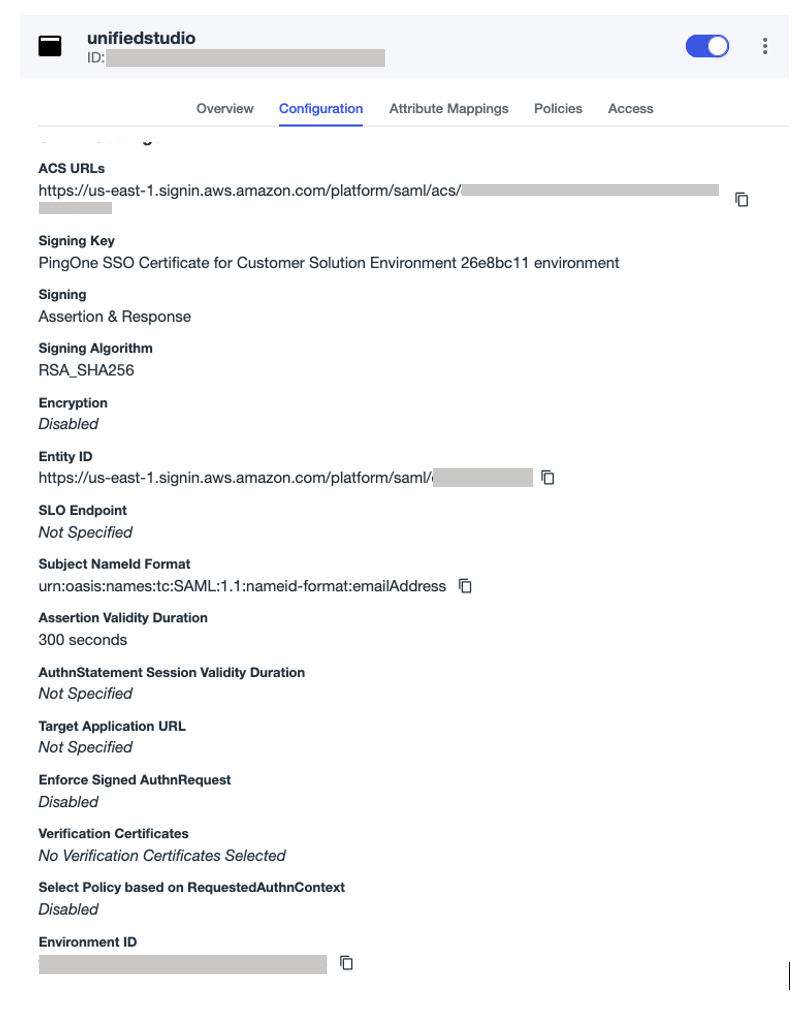
- On the Configuration tab, choose the edit icon to update the configuration:
- For Sign, choose Sign Assertion & Response.
- For Subject Name ID, enter
urn:oasis:names:tc:SAML:1.1:nameid-format:emailAddress. - For Assertion Validity Duration, enter
300. - Leave the remaining values as default.

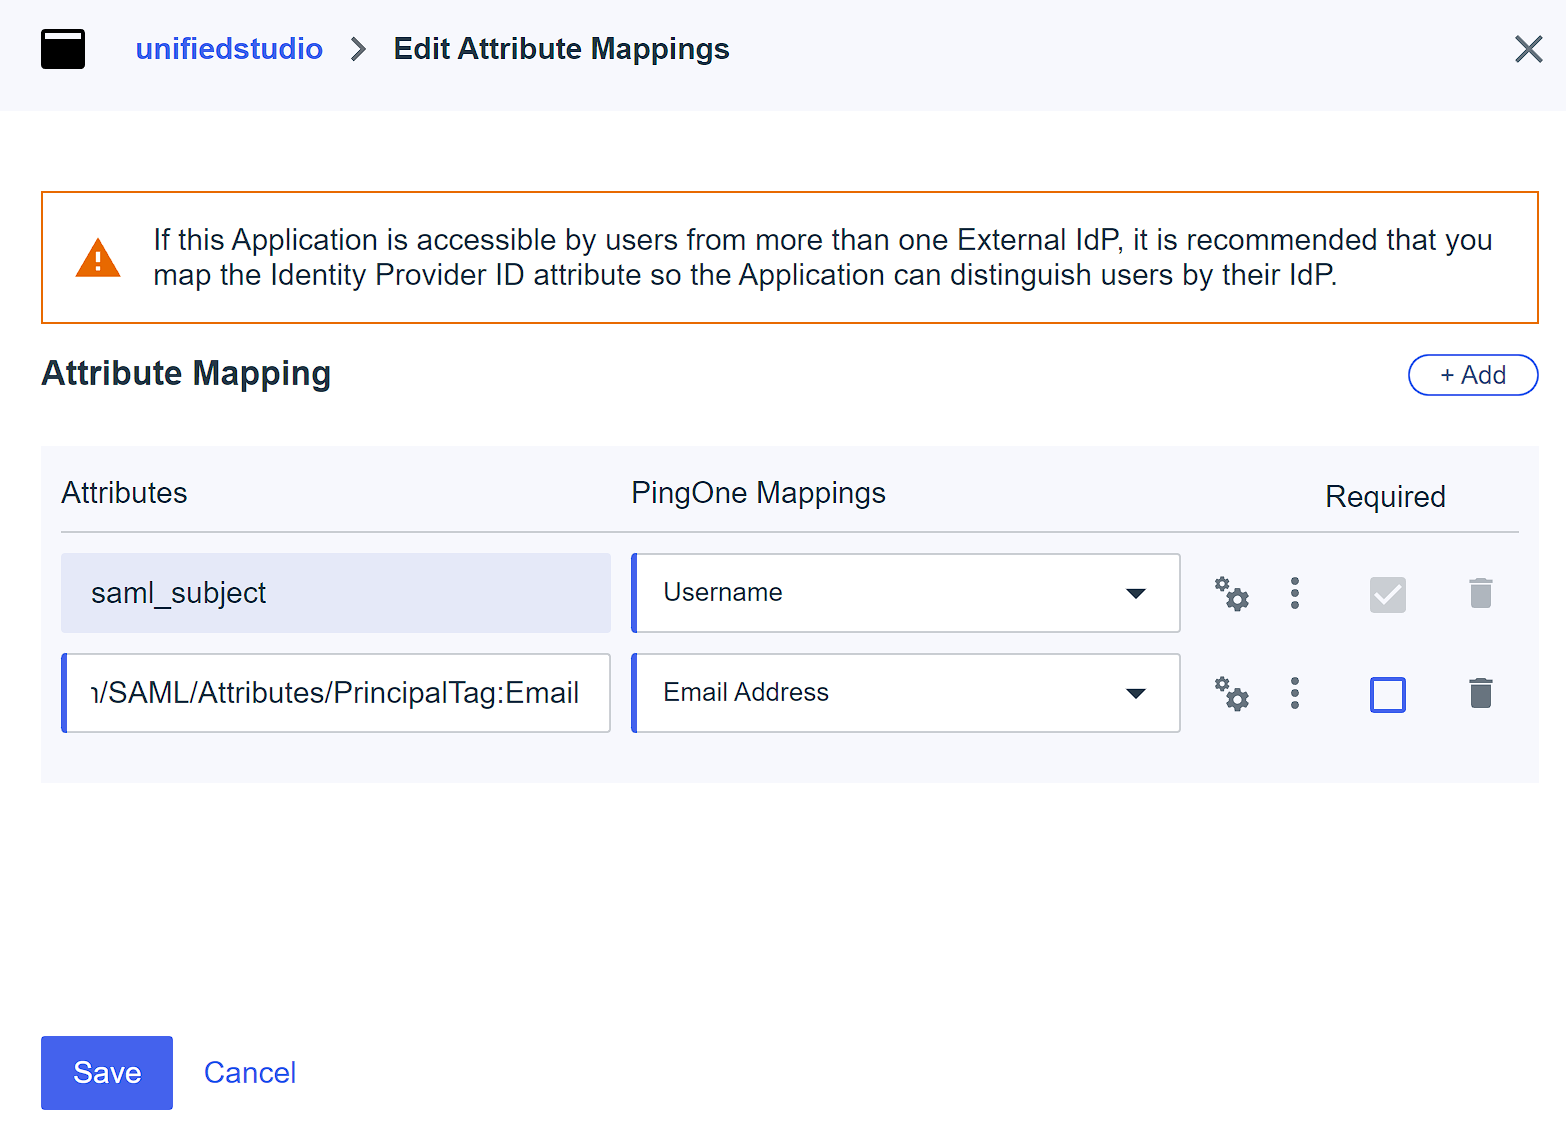
- On the Attributes tab, choose the edit icon.
- Choose +Add to add two attribute mappings:
- Map the attribute
saml-subjecttoUsername, and leave Name format as default. - Map the attribute
https://aws.amazon.com/SAML/Attributes/PrincipalTag:EmailtoEmail Address,and set Name format to Unspecified. - Choose Save.

- Map the attribute
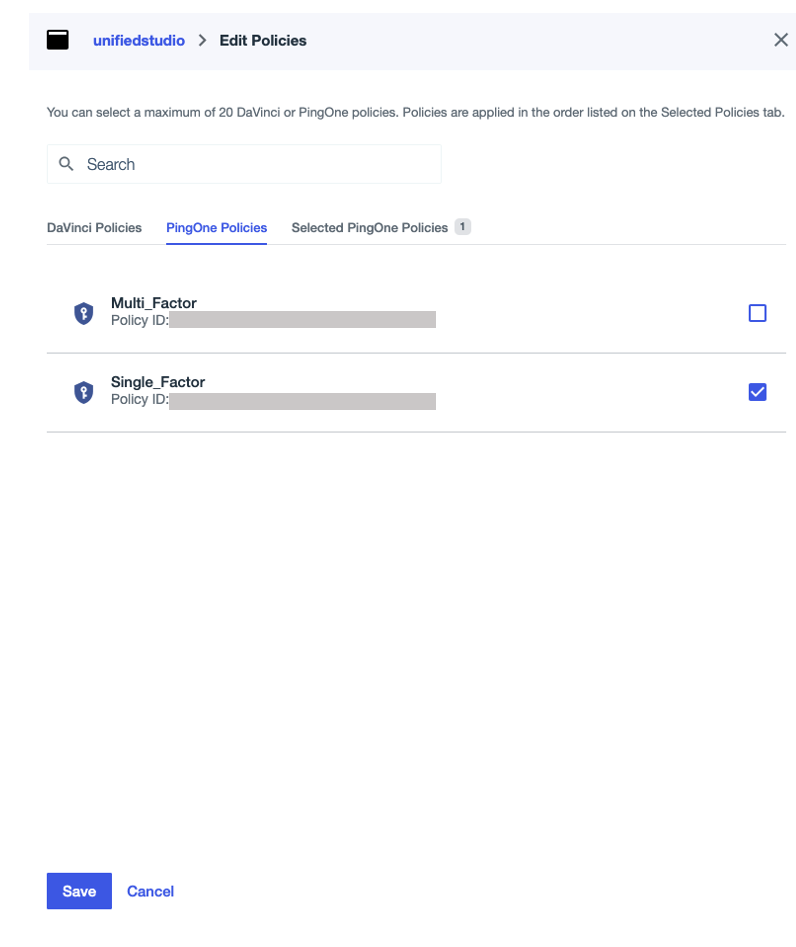
- On the PingOne Policies tab, select Single Factor, then choose Save.
This post uses single-factor authentication for demonstration purposes only. In your environments, follow your organization’s security standards and governance framework.
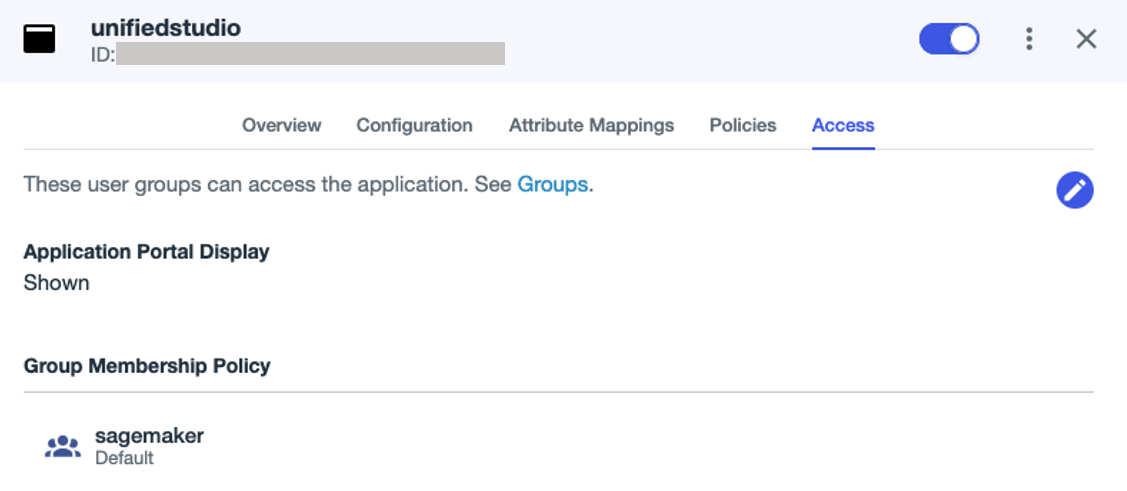
- On the Access tab, search for the
sagemakergroup under Group Membership Policy, and assign theunifiedstudioSAML application to the group. - Enable the application.

Set up automatic provisioning of users and groups from Ping Identity into IAM Identity Center
To configure the automatic provisioning of users and groups between Ping Identity and IAM Identity Center through SCIM, you must have access to both management consoles. Complete the following steps:
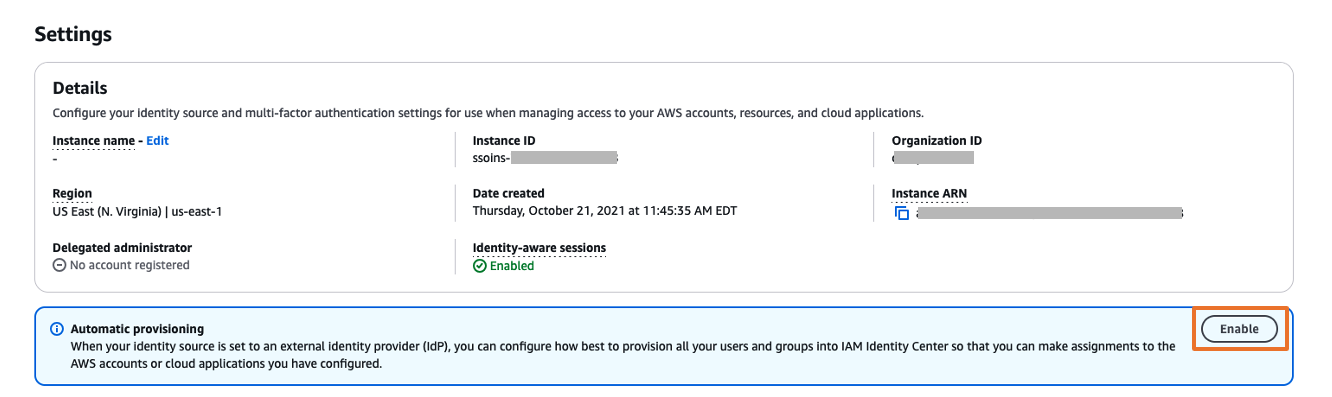
- On the IAM Identity Center console, choose Settings in the navigation pane.
- In the Automatic provisioning section, choose Enable.

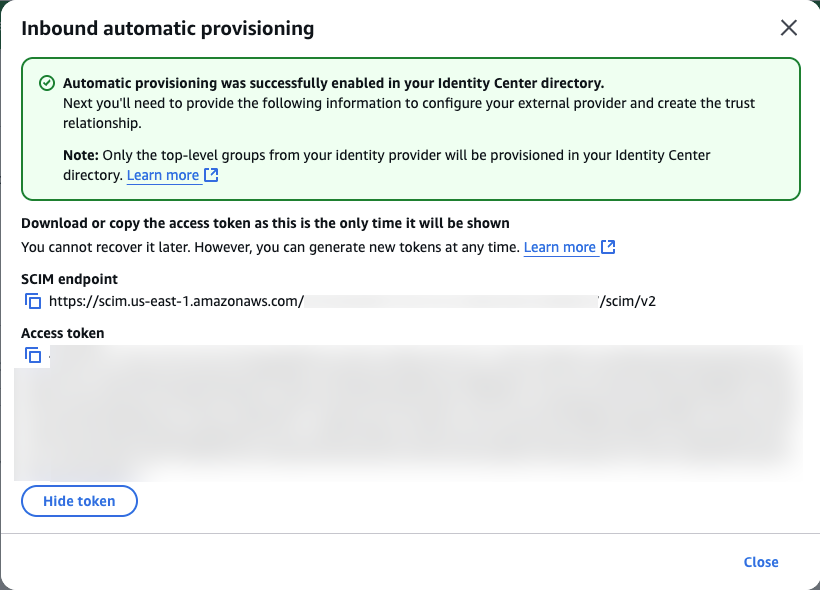
This enables automatic provisioning in IAM Identity Center and displays the necessary SCIM endpoint and access token information.
- In the Inbound automatic provisioning dialog box, copy the values for SCIM endpoint and Access token, then choose Close.
You will use these values to configure provisioning in Ping Identity in the next step.
This completes the setup process in IAM Identity Center.
- Log in to the Ping Identity console.
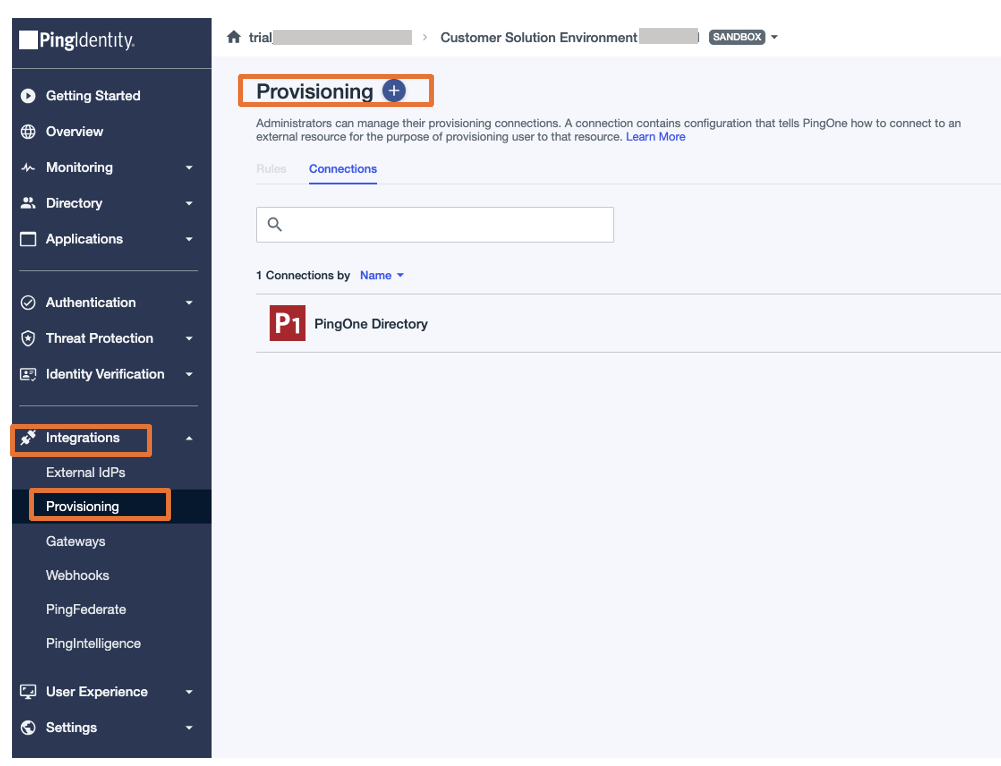
- In the navigation pane, choose Integrations, then choose Provisioning.
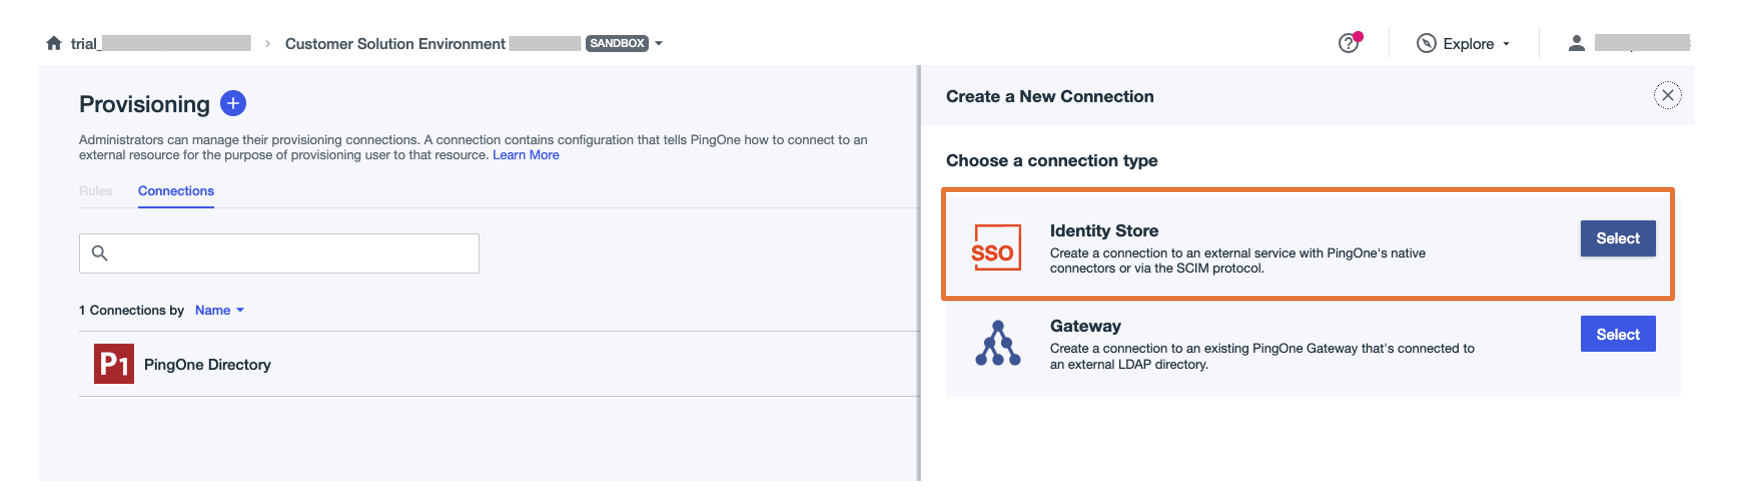
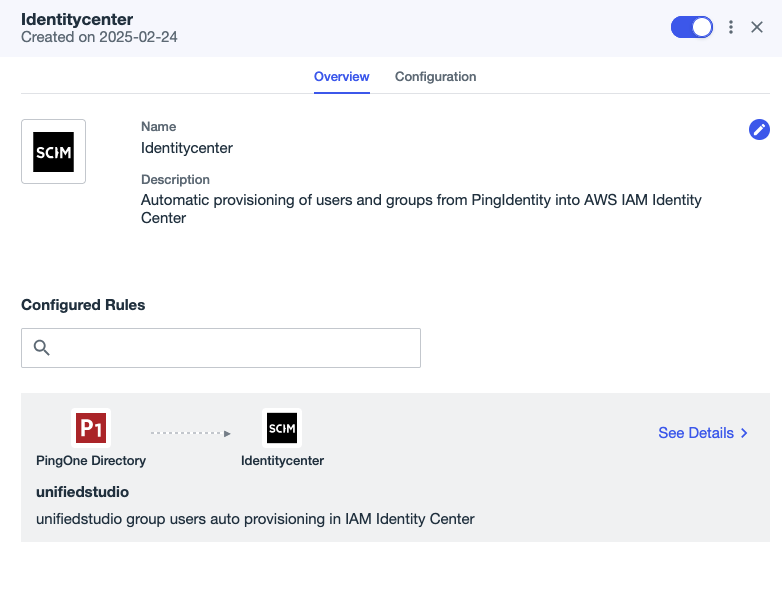
- Choose the plus sign to add a new connection.

- For Choose a connection type, choose Select next to Identity Store.

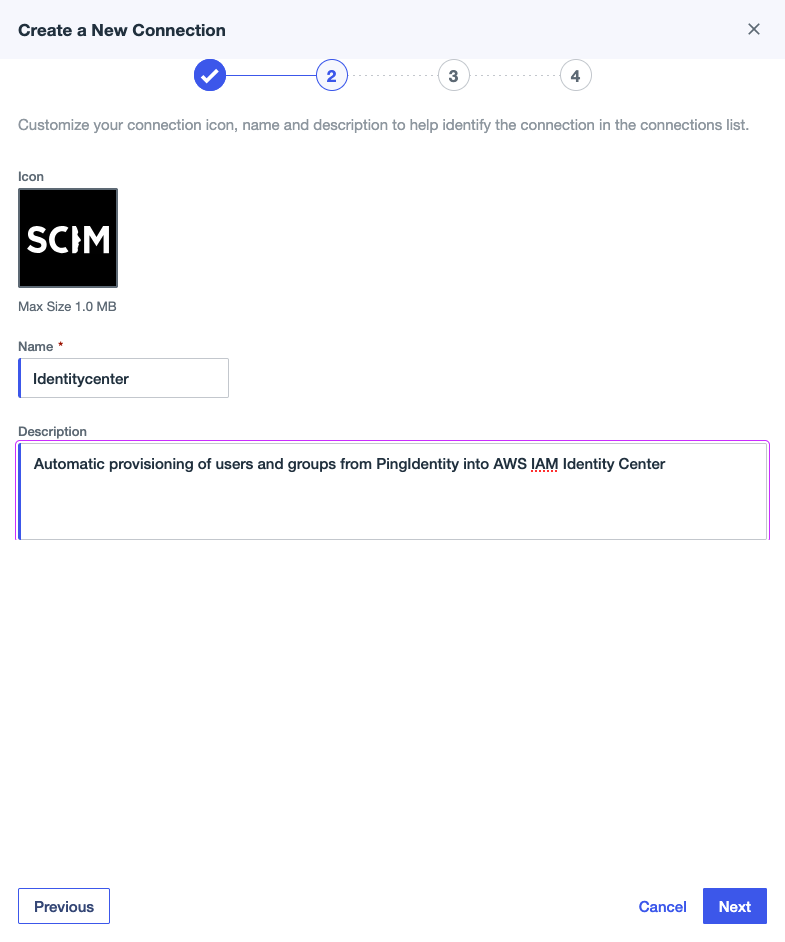
- Provide a name (for this example, we use
Identitycenter) and an optional description, then choose Next.

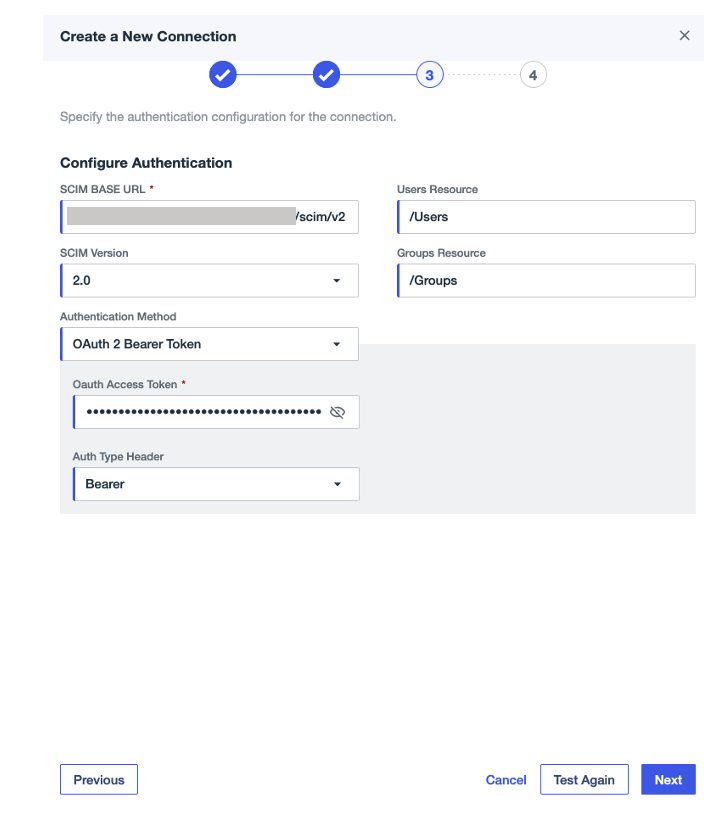
- Under Configuration Authentication, provide the following configuration:
- For SCIM BASE URL, enter the SCIM endpoint from IAM Identity Center.
- For Authentication Method, choose OAuth 2 Bearer Token.
- For Oauth Access Token, enter the access token from IAM Identity Center.
- For Auth Type Header, choose Bearer (default option).
- Choose Test Connection to validate the connection between Ping Identity and IAM Identity Center, then choose Next.

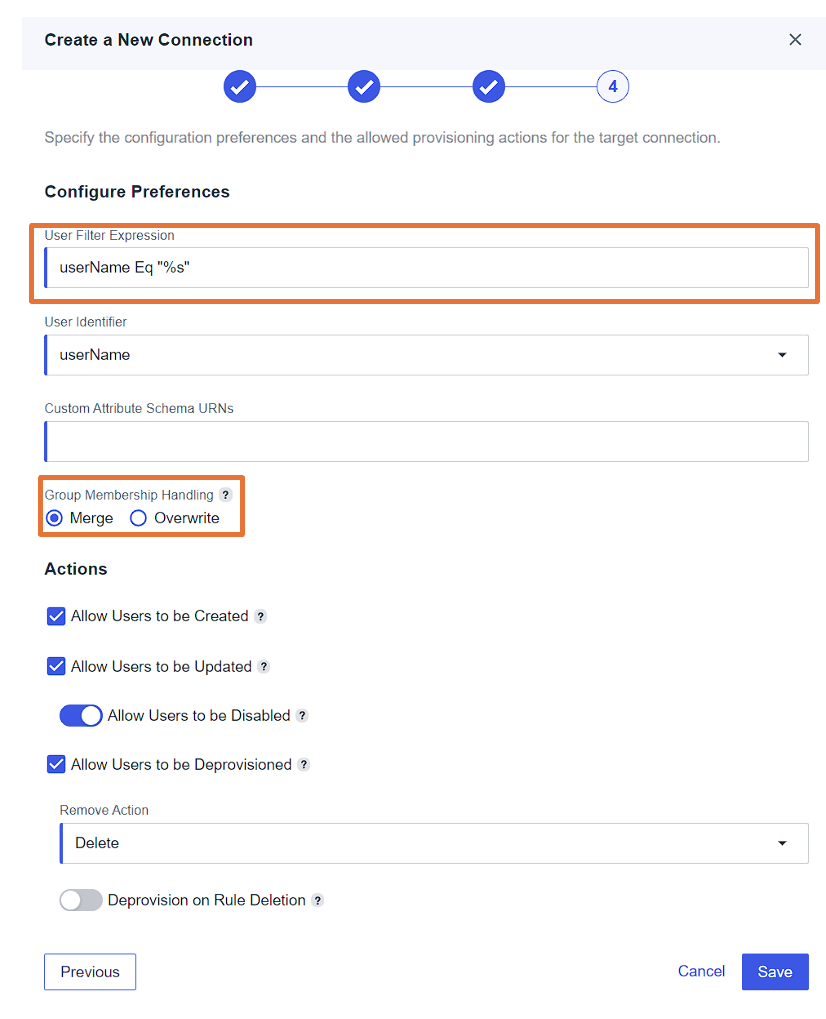
- Under Configuration Preference, provide the following configuration:
- For User Filter Expression, enter
userName Eq “%s”. - For Group Membership Handling, select Merge.
- Leave the remaining settings as default and choose Save.

- For User Filter Expression, enter
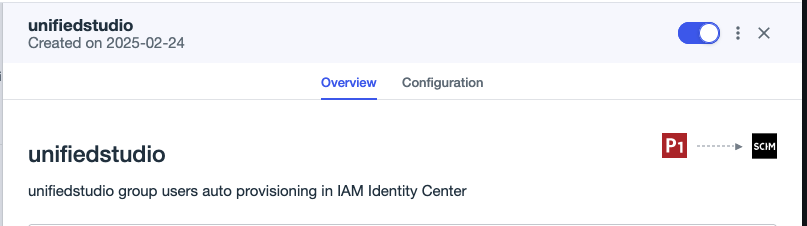
- On the Provisioning tab, choose the plus sign, then choose New Rule to create a rule for the SCIM connection.

- Enter a name (for this example,
unifiedstudio) and an optional description, then choose Create Rule. - Under the newly created rule, choose the plus sign next to Available Connections to add the connection
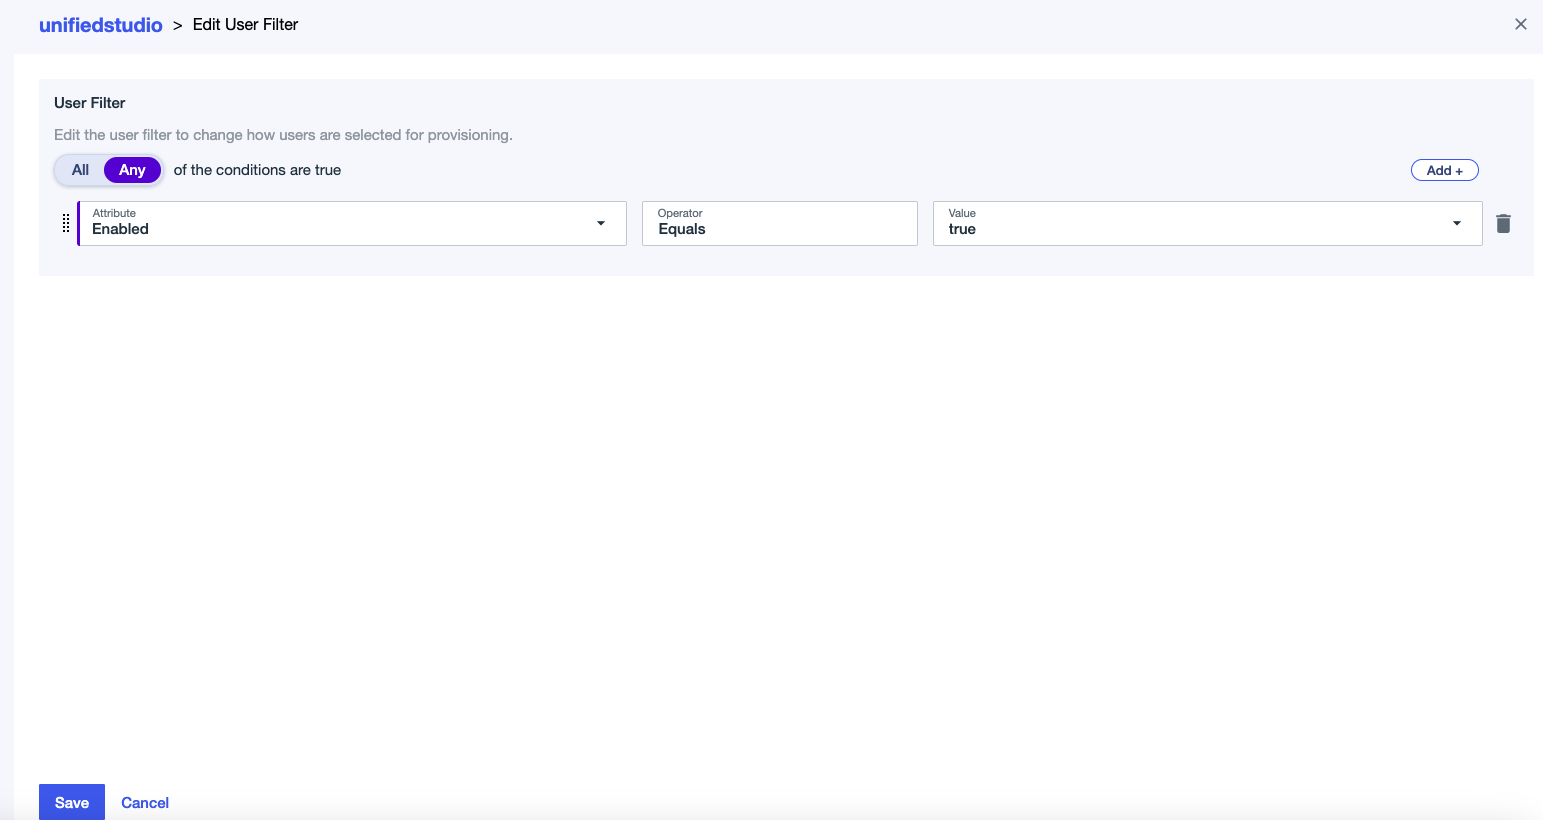
identitycenter, then choose Save. - Edit the user filter:
- For Attribute, choose Enabled.
- For Operator, choose Equals.
- For Value, choose true.
- Choose Save.

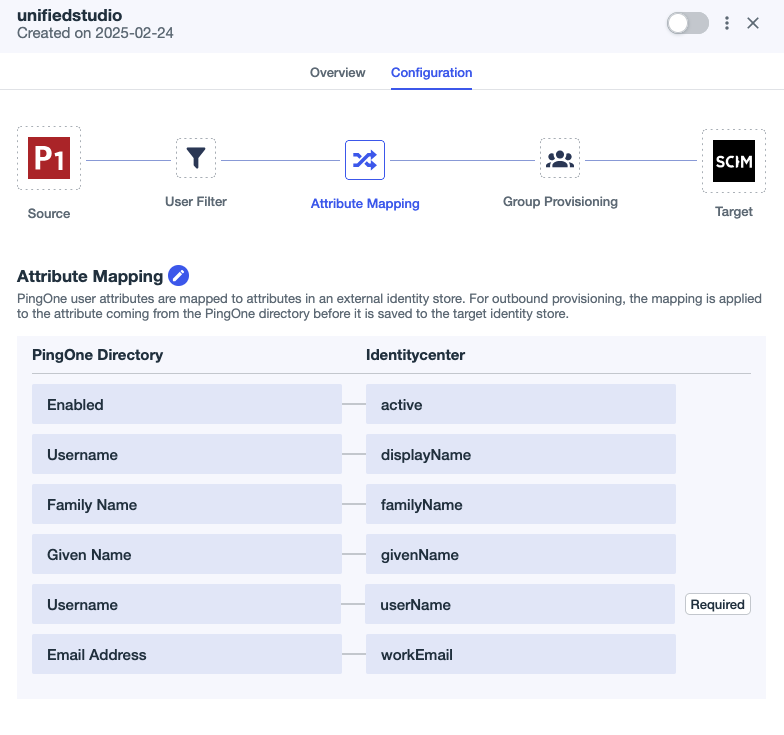
- Choose the edit icon next to Attribute Mapping and set the attribute mappings as shown in the following screenshot:
- Delete the Primary Phone attribute mapping because it’s optional in AWS. Leaving this field blank can cause Ping Identity’s SCIM connector to generate errors during user provisioning.
- Add a new attribute called
Usernameunder PingOne Directory and then map todisplayNameunder Identitycenter.

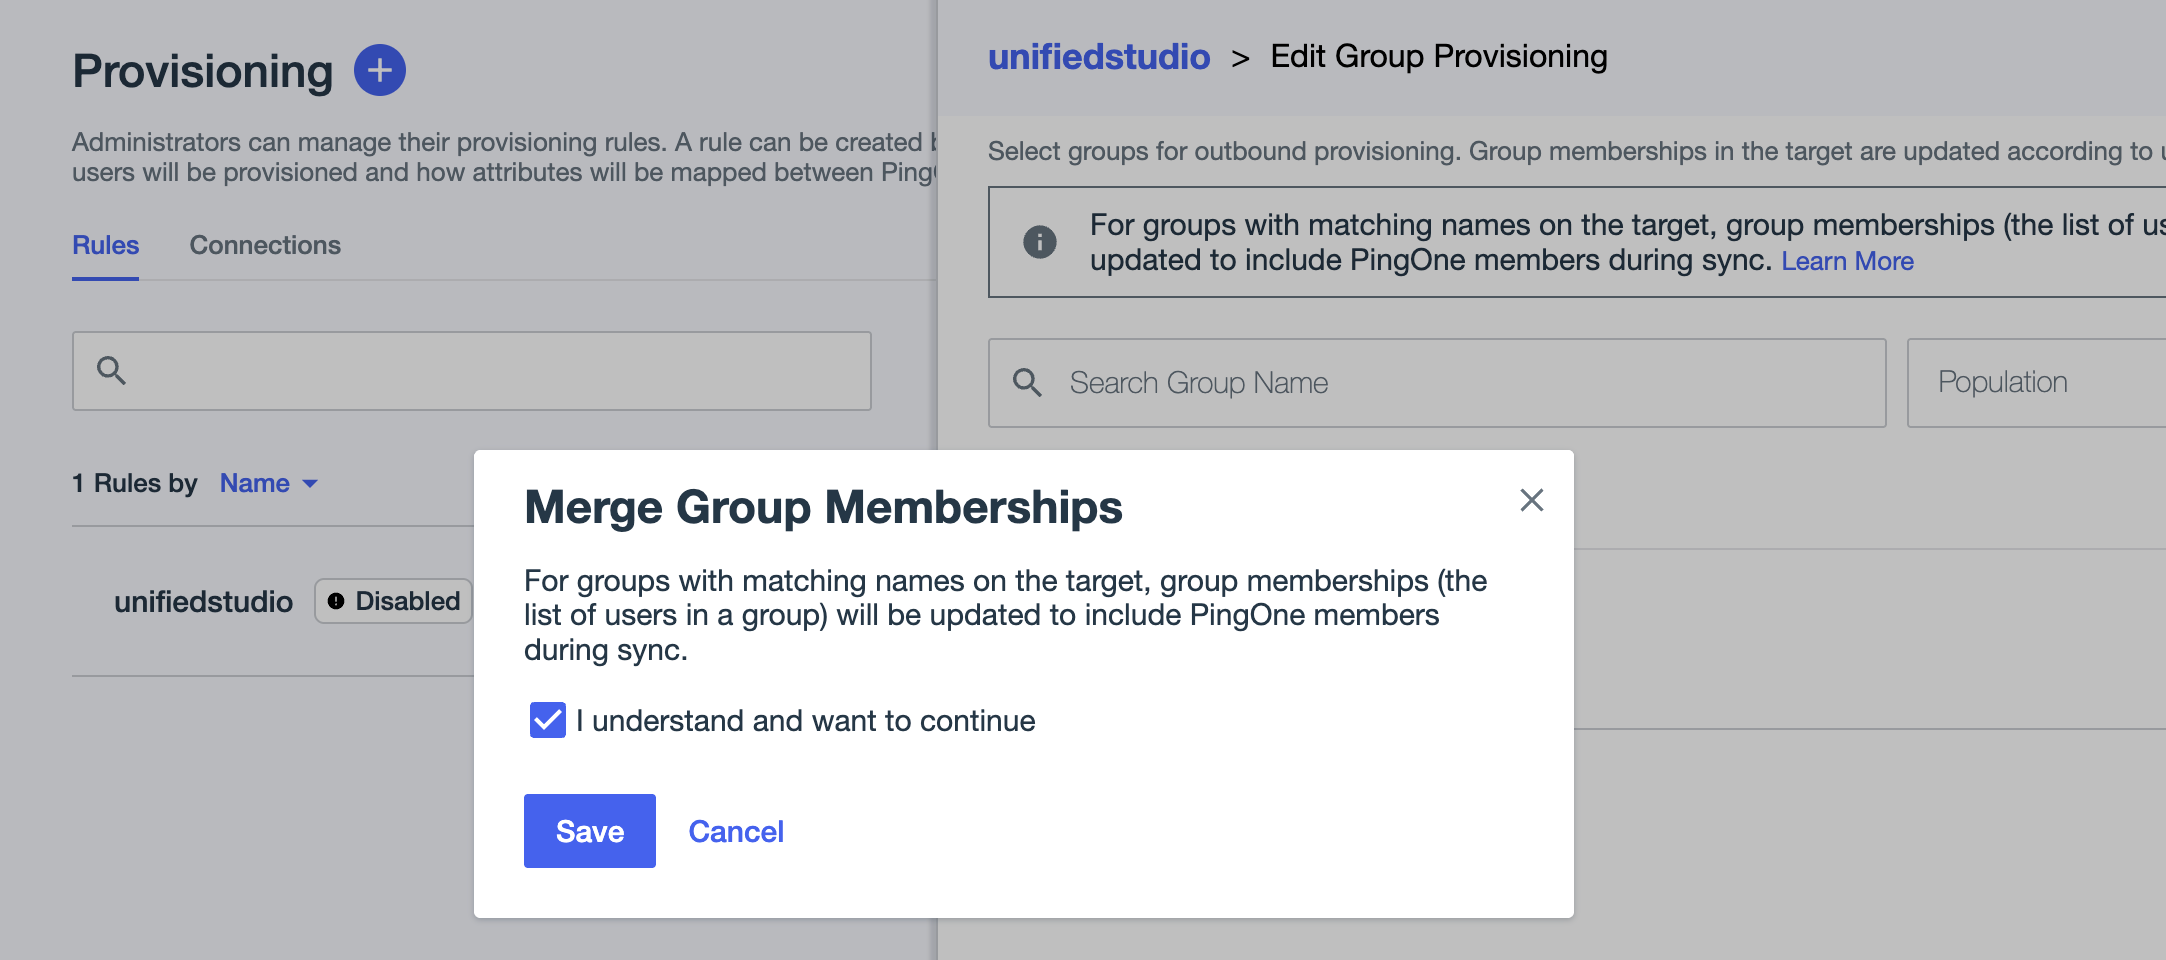
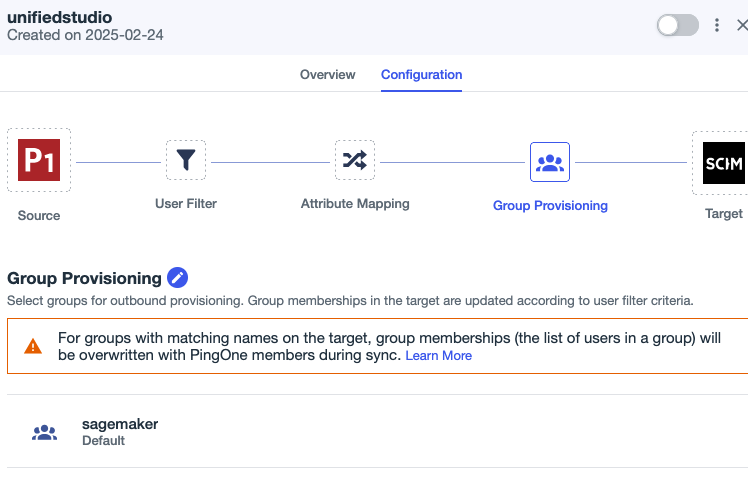
- Under Group Provisioning, choose the
sagemakergroup if you want to sync allsagemakergroup users with auto provisioning.- In the pop-up, select I understand and want to continue, then choose Save.


- On the Provisioning page, choose the Connections tab.
- Enable the SCIM connection
Identitycenterand ruleunifiedstudio.


This completes the SCIM setup process between Ping Identity and IAM Identity Center.
Configure SageMaker Unified Studio SSO user access
Complete the following steps to configure SSO user access to SageMaker Unified Studio for your SageMaker domain:
- On the SageMaker console, choose Domains in the navigation pane.
- Choose the domain for which you want to configure SAML user access.
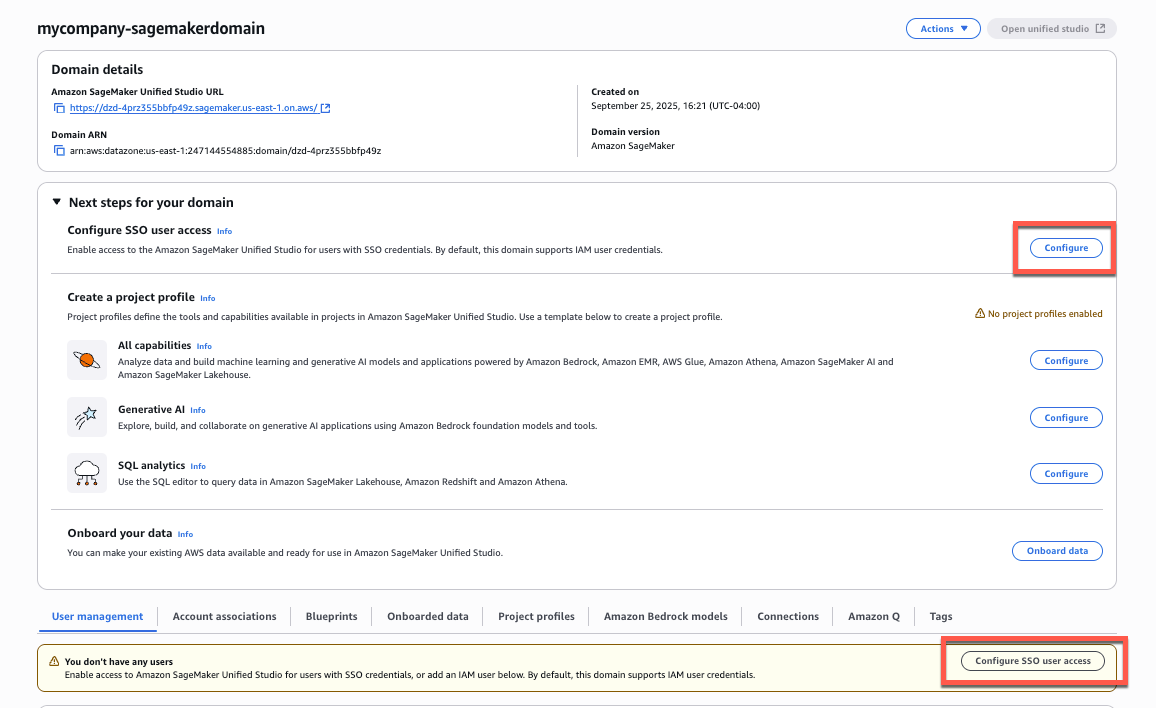
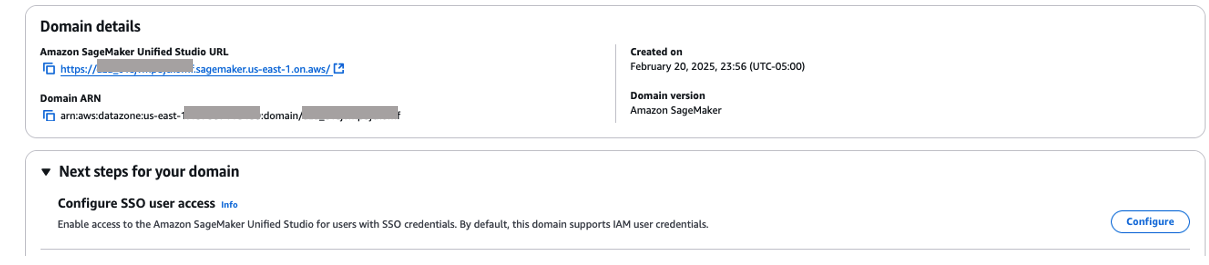
- On the domain details page, you can find the SSO configuration in two locations:
- From the main domain view, choose Configure next to Configure SSO user access.
- Alternatively, scroll down to the User management tab and choose Configure SSO user access.

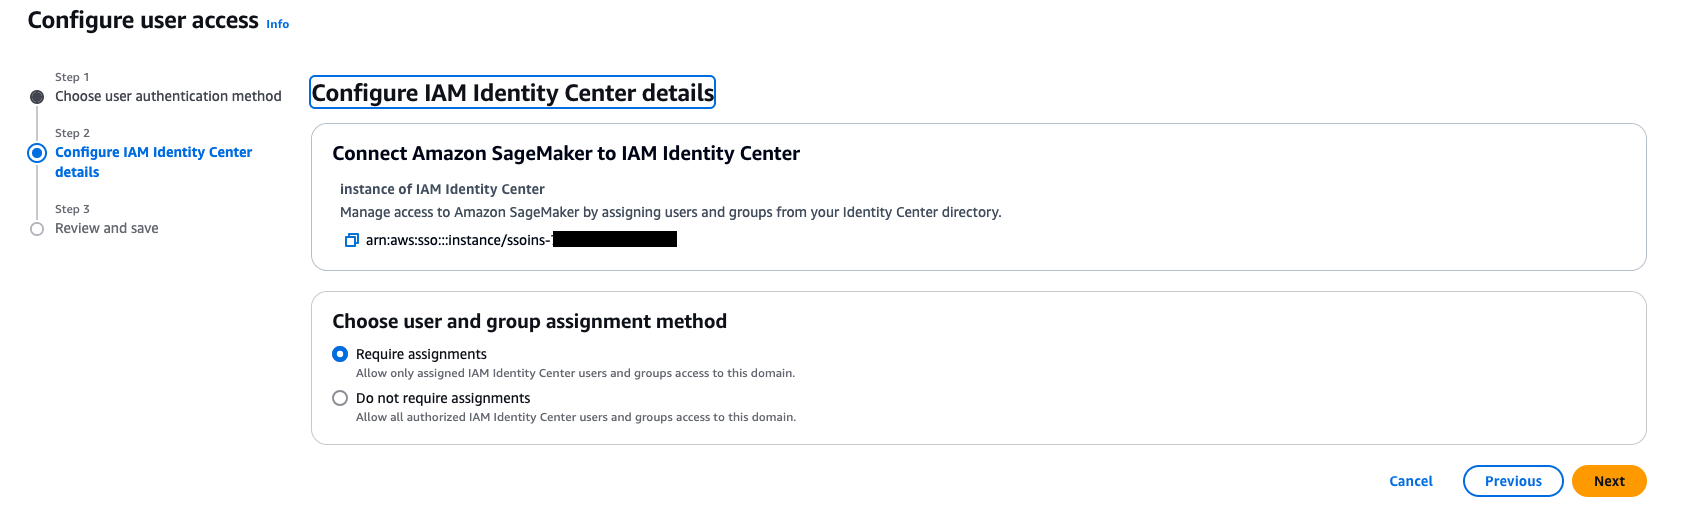
- On the Choose user authentication method page, select IAM Identity Center, then choose Next.

- For Choose user and group assignment method, choose from the following options, then choose Next:
- Require assignments: Users and groups must be explicitly added to the domain to gain access. This provides more granular control over who can access the domain.
- Do not require assignments: All authorized Ping Identity users and groups can access this domain if they have been assigned to the SAML application in Ping Identity.
For either option, users or groups must have access to the Ping Identity SAML application (
unifiedstudioin this example) to authenticate successfully.
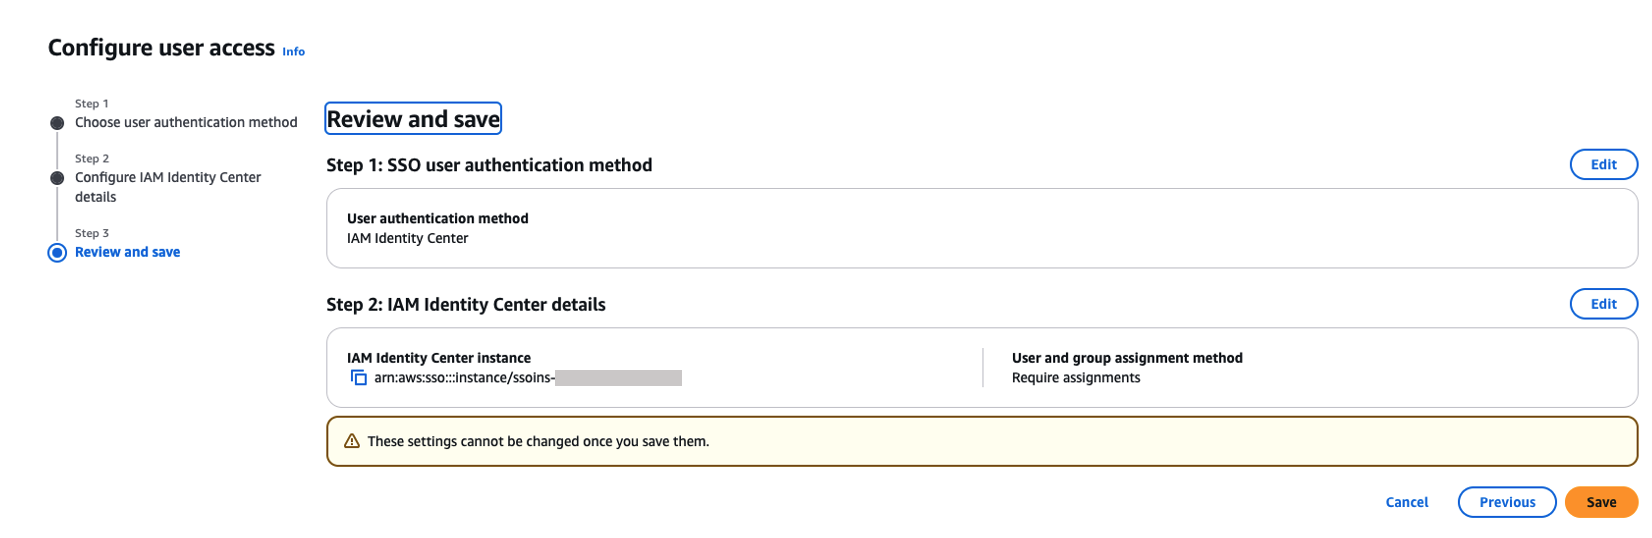
- On the Review and save page, review your choices and choose Save. These settings can’t be changed after you save them.

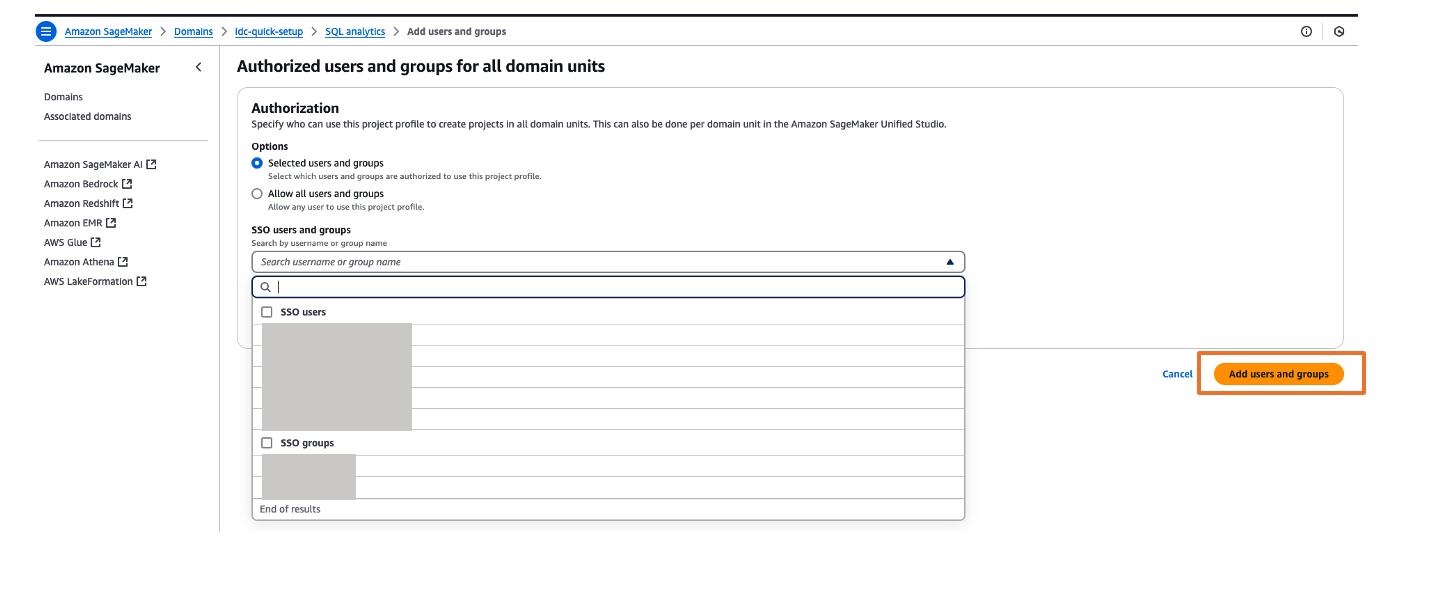
- If you’ve chosen to require assignments, use the Add users and groups section to add SAML users and groups to your domain.



Now, users will be able to access SageMaker Unified Studio using the domain URL with their SSO credentials.
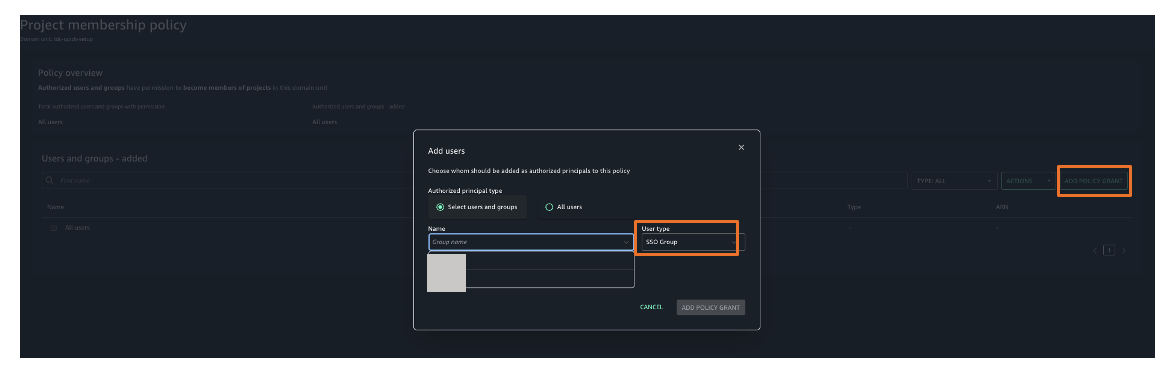
You can explore different projects for your users and assign those projects based on your IdP user groups for fine-grained access controls. For example, you can create different SAML user groups based on their job function in Ping Identity, then assign those Ping Identity groups to the unifiedstudio SAML application in Ping Identity, and then assign those Ping Identity SAML groups to their respective project profiles in SageMaker Unified Studio. To assign project profiles for their respective groups, choose the Project profiles tab and choose your project profile. On the Authorized users and groups page, choose Add, then choose SSO groups. Choose Add users and groups button to complete the project profile assignment.
Validate access with Ping Identity users
Complete the following steps to validate access:
- On the SageMaker domain details page, choose the link for the SageMaker Unified Studio URL.

- Log in with your user credentials.
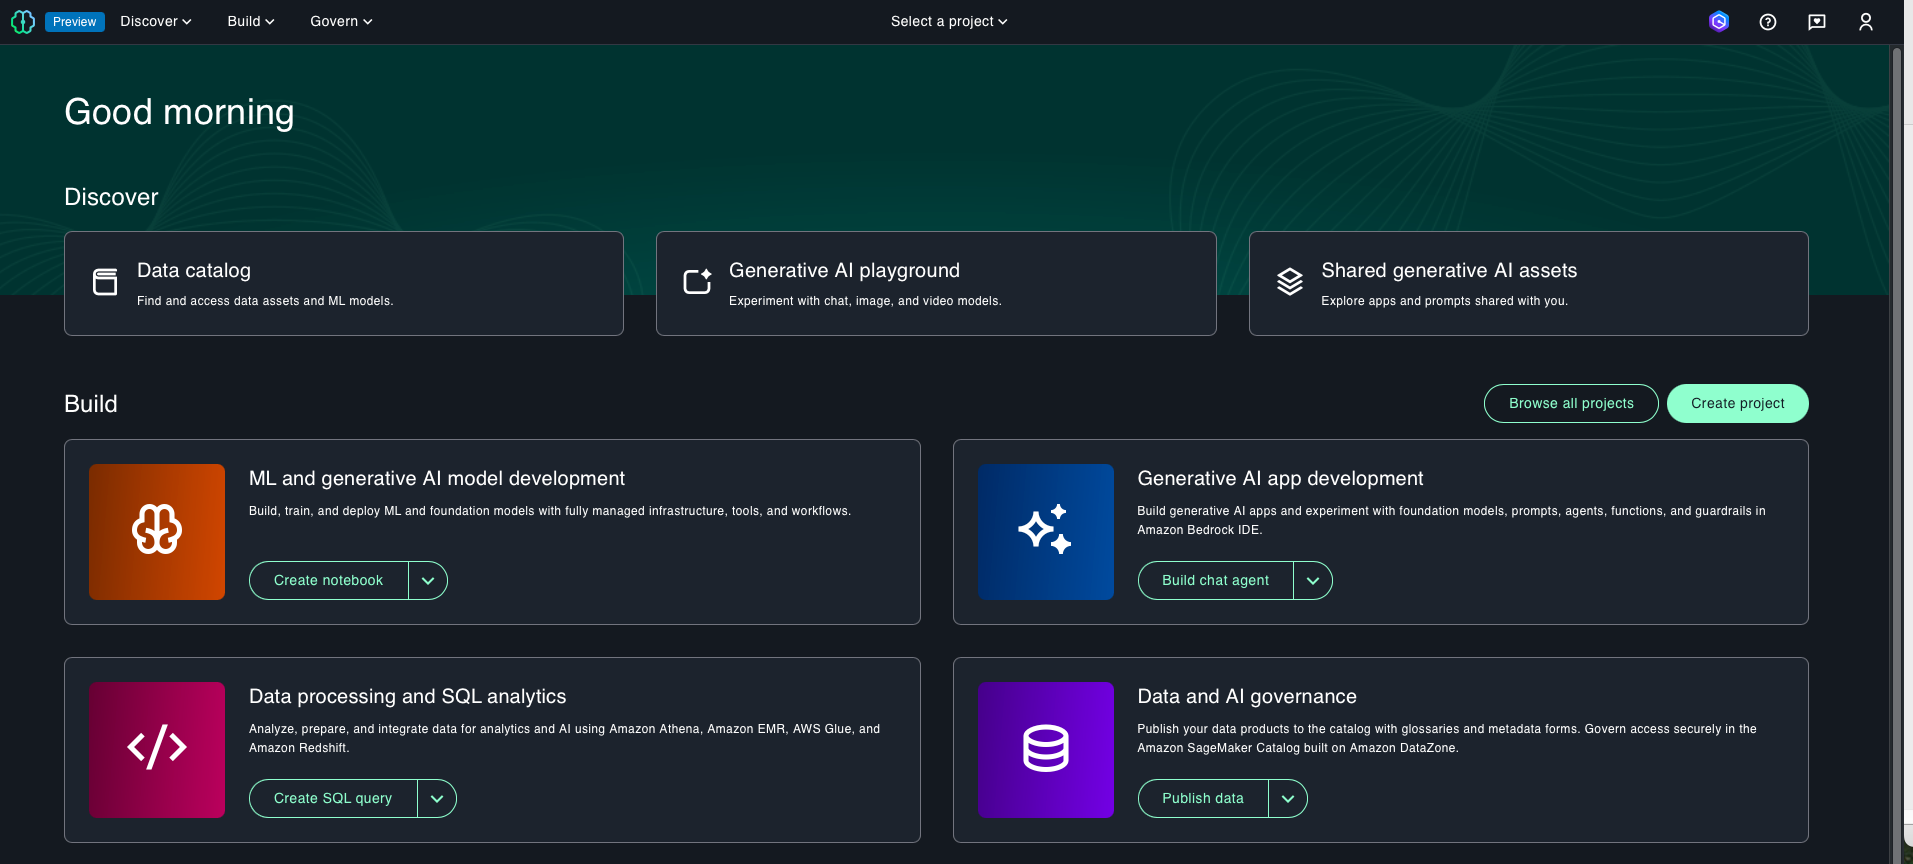
After successful login, you will be redirected to the SageMaker Unified Studio home page. Here, you can explore different projects to your users and assign those projects based on your SAML user groups for fine-grained access control.
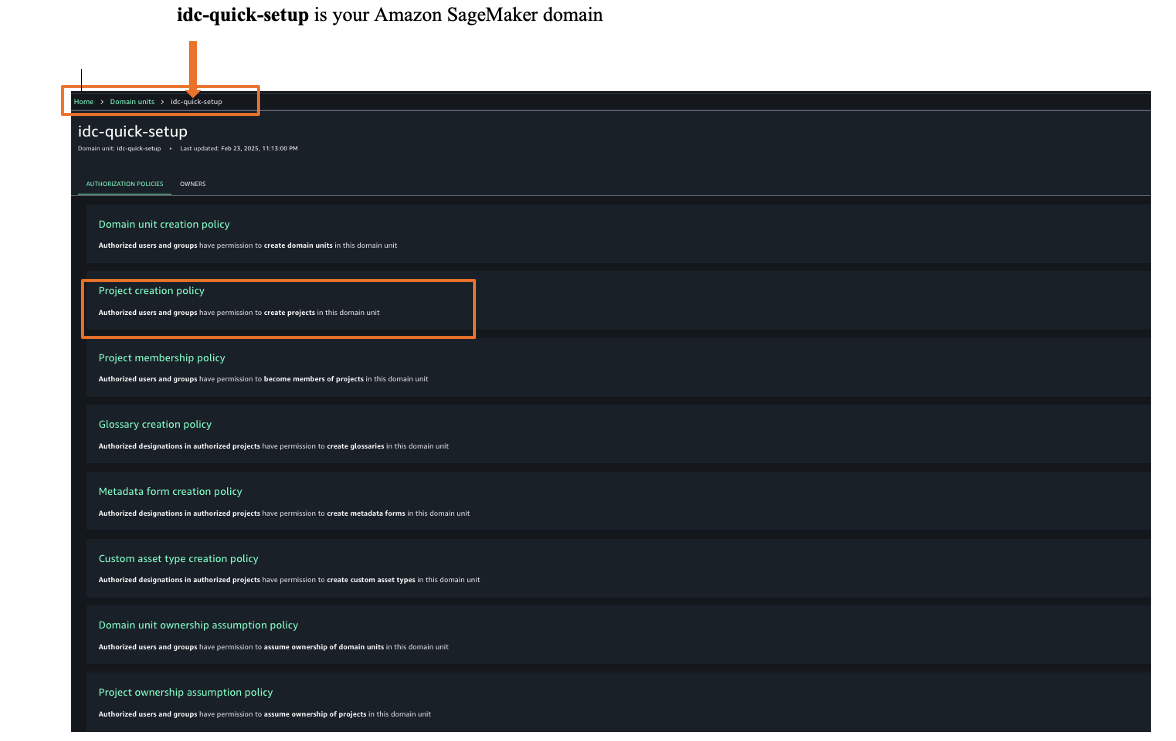
- To assign an authorization policy, those Govern and then Domain units.
- Choose your SageMaker domain, then choose a suitable authorization policy. For this example, we choose Project creation policy.

- Choose Add policy grant to assign user groups or users to their respective project profiles.

You have successfully federated SageMaker Unified Studio with Ping Identity as an IdP with IAM Identity Center. You can connect to SageMaker Unified Studio by using your Ping Identity credentials.
Clean up
After you test out this solution, remember to delete the resources you created to avoid incurring future charges. For instructions to delete your SageMaker Unified Studio domain, refer to Delete domains. If you want to delete your Ping Identity account, reach out to Ping Identity for assistance.
Conclusion
In this post, we demonstrated how to set up Ping Identity as an IdP over SAML authentication for SageMaker Unified Studio access through IAM Identity Center federation. To learn more, refer to the Amazon SageMaker Unified Studio User Guide, which provides guidance on how to build data and AI applications using SageMaker.
About the authors
Git 2.53.0 released
Post Syndicated from corbet original https://lwn.net/Articles/1056955/
Version 2.53.0 of the Git
source-code management system has been released. Changes include
documentation for the Git data model, the ability to choose the diff
algorithm to use with git blame, a new white-space error class,
and more; see the announcement for details.
The David Frum Show: How Trump Could Permanently Alter the Presidency
Post Syndicated from The Atlantic original https://www.youtube.com/shorts/lZE0I897YyA
AWS Weekly Roundup: Amazon Bedrock agent workflows, Amazon SageMaker private connectivity, and more (February 2, 2026)
Post Syndicated from Betty Zheng (郑予彬) original https://aws.amazon.com/blogs/aws/aws-weekly-roundup-amazon-bedrock-agent-workflows-amazon-sagemaker-private-connectivity-and-more-february-2-2026/
 Over the past week, we passed Laba festival, a traditional marker in the Chinese calendar that signals the final stretch leading up to the Lunar New Year. For many in China, it’s a moment associated with reflection and preparation, wrapping up what the year has carried, and turning attention toward what lies ahead.
Looking forward, next week also brings Lichun, the beginning of spring and the first of the 24 solar terms. In Chinese tradition, spring is often seen as the season when growth begins and new cycles take shape. There’s a common saying that “a year’s plans begin in spring,” capturing the idea that this is a time to set one’s direction and start fresh.
Last week’s launches
Here are the launches that got my attention this week:
- Amazon Bedrock enhances support for agent workflows with server-side tools and extended prompt caching – Amazon Bedrock introduced two updates that improve how developers build and operate AI agents. The Responses API now supports server-side tool use, so agents can perform actions such as web search, code execution, and database updates within AWS security boundaries. Bedrock also adds a 1-hour time-to-live (TTL) option for prompt caching, which helps improve performance and reduce the cost for long-running, multi-turn agent workflows. Server-side tools are available with OpenAI GPT OSS 20B and 120B models, and the 1-hour prompt caching TTL is generally available for select Claude models by Anthropic in Amazon Bedrock.
- Amazon SageMaker Unified Studio adds private VPC connectivity with AWS PrivateLink – Amazon SageMaker Unified Studio now supports AWS PrivateLink, providing private connectivity between your VPC and SageMaker Unified Studio without routing customer data over the public internet. With SageMaker service endpoints onboarded into a VPC, data traffic remains within the AWS network and is governed by IAM policies, supporting stricter security and compliance requirements.
- Amazon S3 adds support for changing object encryption without data movement – Amazon S3 now supports changing the server-side encryption type of existing encrypted objects without moving or re-uploading data. Using the
UpdateObjectEncryptionAPI, you can switch from SSE-S3 to SSE-KMS, rotate customer -managed AWS Key Management Service (AWS KMS) keys, or standardize encryption across buckets at scale with S3 Batch Operations while preserving object properties and lifecycle eligibility. - Amazon Keyspaces introduces table pre-warming for predictable high-throughput workloads – Amazon Keyspaces (for Apache Cassandra) now supports table pre-warming, which helps you proactively set warm throughput levels so tables can handle high read and write traffic instantly without cold-start delays. Pre-warming helps reduce throttling during sudden traffic spikes, such as product launches or sales events, and works with both on-demand and provisioned capacity modes, including multi-Region tables. The feature supports consistent, low-latency performance while giving you more control over throughput readiness.
- Amazon DynamoDB MRSC global tables integrate with AWS Fault Injection Service – Amazon DynamoDB multi-Region strong consistency (MRSC) global tables now integrate with AWS Fault Injection Service. With this integration, you can simulate Regional failures, test replication behavior, and validate application resiliency for strongly consistent, multi-Region workloads.
Additional updates
Here are some additional projects, blog posts, and news items that I found interesting:
- Building zero-trust access across multi-account AWS environments with AWS Verified Access – This post walks through how to implement AWS Verified Access in a centralized, shared-services architecture. It shows how to integrate with AWS IAM Identity Center and AWS Resource Access Manager (AWS RAM) to apply zero trust access controls at the application layer and reduce operational overhead across multi-account AWS environments.
- Amazon EventBridge increases event payload size to 1 MB – Amazon EventBridge now supports event payloads up to 1 MB, an increase from the previous 256 KB limit. This update helps event-driven architectures carry richer context in a single event, including complex JSON structures, telemetry data, and machine learning (ML) or generative AI outputs, without splitting payloads or relying on external storage.
- AWS MCP Server adds deployment agent SOPs (preview) – AWS introduced deployment standard operating procedures (SOPs) that AI agents can deploy web applications to AWS from a single natural language prompt in MCP -compatible integrated development environments (IDEs) and command line interfaces (CLIs) such as Kiro, Cursor, and Claude Code. The agent generates AWS Cloud Development Kit (AWS CDK) infrastructure, deploys AWS CloudFormation stacks, and sets up continuous integration and continuous delivery (CI/CD) workflows following AWS best practices. The preview supports frameworks including React, Vue.js, Angular, and Next.js.
- AWS Network Firewall adds generation AI traffic visibility with web category filtering – AWS Network Firewall now provides visibility into generative AI application traffic through predefined web categories. You can use these categories directly in firewall rules to govern access to generative AI tools and other web services. When combined with TLS inspection, category-based filtering can be applied at the full URL level.
- AWS Lambda adds enhanced observability for Kafka event source mappings – AWS Lambda introduced enhanced observability for Kafka event source mappings, providing Amazon CloudWatch Logs and metrics to monitor event polling configuration, scaling behavior, and event processing state. The update improves visibility into Kafka-based Lambda workloads, helping teams diagnose configuration issues, permission errors, and function failures more efficiently. The capability supports both Amazon Managed Streaming for Apache Kafka (Amazon MSK) and self-managed Apache Kafka event sources.
- AWS CloudFormation 2025 year in review – This year-in-review post highlights CloudFormation updates delivered throughout 2025, with a focus on early validation, safer deployments, and improved developer workflows. It covers enhancements such as improved troubleshooting, drift-aware change sets, stack refactoring, StackSets updates, and new -IDE and AI -assisted tooling, including the CloudFormation language server and the Infrastructure as Code (IaC) MCP server.
Upcoming AWS events
Check your calendars so that you can sign up for this upcoming event:
AWS Community Day Romania (April 23–24, 2026) – This community-led AWS event brings together developers, architects, entrepreneurs, and students for more than 10 professional sessions delivered by AWS Heroes, Solutions Architects, and industry experts. Attendees can expect expert-led technical talks, insights from speakers with global conference experience, and opportunities to connect during dedicated networking breaks, all hosted at a premium venue designed to support collaboration and community engagement.
If you’re looking for more ways to stay connected beyond this event, join the AWS Builder Center to learn, build, and connect with builders in the AWS community.
Check back next Monday for another Weekly Roundup.
Why an IRS Worker Resigned
Post Syndicated from The Atlantic original https://www.youtube.com/shorts/9RnQKWsLZIM
Season 13 Trailer: Last Week Tonight with John Oliver (HBO)
Post Syndicated from LastWeekTonight original https://www.youtube.com/watch?v=PawUmci7JuU
Tim Walz on Why Minneapolis Is Being Targeted
Post Syndicated from The Atlantic original https://www.youtube.com/shorts/I-CFRKm50eQ
The Chrysalis Backdoor: A Deep Dive into Lotus Blossom’s toolkit
Post Syndicated from Ivan Feigl original https://www.rapid7.com/blog/post/tr-chrysalis-backdoor-dive-into-lotus-blossoms-toolkit
Rapid7 Labs, together with the Rapid7 MDR team, has uncovered a sophisticated campaign attributed to the Chinese APT group Lotus Blossom. Active since 2009, the group is known for its targeted espionage campaigns primarily impacting organizations across Southeast Asia and more recently Central America, focusing on government, telecom, aviation, critical infrastructure, and media sectors.
Our investigation identified a security incident stemming from a sophisticated compromise of the infrastructure hosting Notepad++, which was subsequently used to deliver a previously undocumented custom backdoor, which we have dubbed Chrysalis.
⠀

⠀
Beyond the discovery of the new implant, forensic evidence led us to uncover several custom loaders in the wild. One sample, “ConsoleApplication2.exe”, stands out for its use of Microsoft Warbird, a complex code protection framework, to hide shellcode execution. This blog provides a deep technical analysis of Chrysalis, the Warbird loader, and the broader tactic of mixing straightforward loaders with obscure, undocumented system calls.
Initial access vector
Forensic analysis conducted by the MDR team suggests that the initial access vector aligns with publicly disclosed abuse of the Notepad++ distribution infrastructure. While reporting references both plugin replacement and updater-related mechanisms, no definitive artifacts were identified to confirm exploitation of either. The only confirmed behavior is that execution of “notepad++.exe” and subsequently “GUP.exe” preceded the execution of a suspicious process “update.exe” which was downloaded from 95.179.213.0.
Analysis of update.exe
⠀
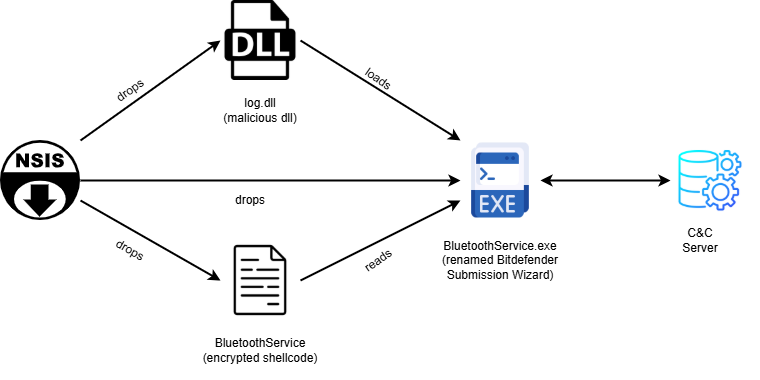
Analysis of “update.exe” shows the file is actually an NSIS installer, a tool commonly used by Chinese APT to deliver initial payload.
The following (Table 1) are the extracted NSIS installer files:
|
File name |
Description |
SHA-256 |
|
[NSIS].nsi |
NSIS Installation script |
8ea8b83645fba6e23d48075a0d3fc73ad2ba515b4536710cda4f1f232718f53e |
|
BluetoothService.exe |
Renamed Bitdefender Submission Wizard used for DLL sideloading |
2da00de67720f5f13b17e9d985fe70f10f153da60c9ab1086fe58f069a156924 |
|
BluetoothService |
Encrypted shellcode |
77bfea78def679aa1117f569a35e8fd1542df21f7e00e27f192c907e61d63a2e |
|
log.dll |
Malicious DLL sideloaded by BluetoothService.exe |
3bdc4c0637591533f1d4198a72a33426c01f69bd2e15ceee547866f65e26b7ad |
⠀
Installation script is instructed to create a new directory “Bluetooth” in “%AppData%” folder, copy the remaining files there, change the attribute of the directory to HIDDEN and execute BluetoothService.exe.
DLL sideloading
Shortly after the execution of BluetoothService.exe which is actually a renamed legitimate Bitdefender Submission Wizard that was abused for DLL sideloading, where a malicious log.dll was placed alongside the executable, causing it to be loaded instead of the legitimate library. Two exported functions from log.dll are called by Bitdefender Submission Wizard: LogInit and LogWrite.
LogInit and LogWrite – Shellcode load, decrypt, execute
LogInit just loads BluetoothService into the memory of the running process.
LogWrite has a more sophisticated goal – to decrypt and execute the shellcode.
The decryption routine implements a custom runtime decryption mechanism used to unpack encrypted data in memory. It derives key material from previously calculated hash value and applies a stream‑cipher–like algorithm rather than standard cryptographic APIs. At a high level, the decryption routine relies on a linear congruential generator, with the standard constants 0x19660D and 0x3C6EF35F, combined with several basic data transformation steps to recover the plaintext payload.
Once decrypted, the payload replaces the original buffer and all temporary memory is released. Execution is then transferred to this newly decrypted stage, which is treated as executable code and invoked with a predefined set of arguments, including runtime context and resolved API information.
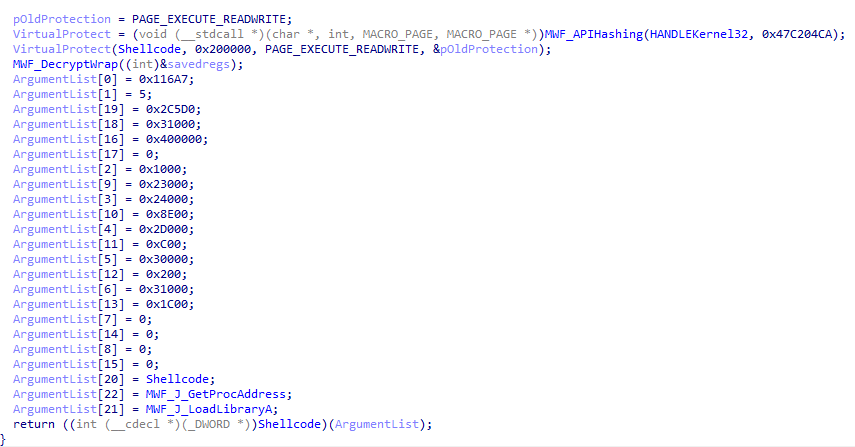
IAT resolution
Log.dll implements an API hashing subroutine to resolve required APIs during execution, reducing the likelihood of detection by antivirus and other security solutions.
API hashing subroutine
The hashing algorithm will hash export names using FNV‑1a (fnv-1a hash 0x811C9DC5, fnv-1a prime 0x1000193 observed), then apply a MurmurHash‑style avalanche finalizer (murmur constant 0x85EBCA6B observed), and comparing the result to a salted target hash.
Analysis of the Chrysalis backdoor
The shellcode, once decrypted by log.dll, is a custom, feature-rich backdoor we’ve named “Chrysalis”. Its wide array of capabilities indicates it is a sophisticated and permanent tool, not a simple throwaway utility. It uses legitimate binaries to sideload a crafted DLL with a generic name, which makes simple filename-based detection unreliable. It relies on custom API hashing in both the loader and the main module, each with its own resolution logic. This is paired with layered obfuscation and a fairly structured approach to C2 communication. Overall, the sample looks like something that has been actively developed over time, and we’ll be keeping an eye on this family and any future variants that show up.
Decryption of the main module
Once the execution is passed to decrypted shellcode from log.dll, malware starts with decryption of the main module via a simple combination of XOR, addition and subtraction operations, with a hardcoded key gQ2JR&9;. See below the pseudocode of decryption routine:
⠀
char XORKey[8] = "gQ2JR&9;";
DWORD counter = 0;
DWORD pos = BufferPosition;

while (counter < size) {
    BYTE k = XORKey[counter & 7];
    BYTE x = encrypted[pos];

    x = x + k;
    x = x ^ k;
    x = x - k;

    decrypted[pos] = x;

    pos++;
    counter++;
}
⠀
XOR operation is performed 5 times in total, suggesting a section layout similar to PE format. Following the decryption, malware will proceed to yet another dynamic IAT resolution using LoadLibraryA to acquire a handle to Kernel32.dll and GetProcAddress. Once exports are resolved, the jump is taken to the main module.
Main module
The decrypted module is a reflective PE-like module that executes the MSVC CRT initialization sequence before transferring control to the program’s main entry point. Once in the Main function, the malware will dynamically load DLLs in the following order : oleaut32.dll, advapi32.dll, shlwapi.dll, user32.dll, wininet.dll, ole32.dll and shell32.dll.
Names of targeted DLLs are constructed on the run, using two separate subroutines. These two subroutines implement a custom, position-dependent character obfuscation scheme. Each character is transformed using a combination of bit rotations, conditional XOR operations, and index-based arithmetic, ensuring that identical characters encrypt differently depending on their position. The second routine reverses this process at runtime, reconstructing the original plaintext string just before it is used. The purpose of these two functions is not only to conceal strings, but also to intentionally complicate static analysis and hinder signature-based detection.
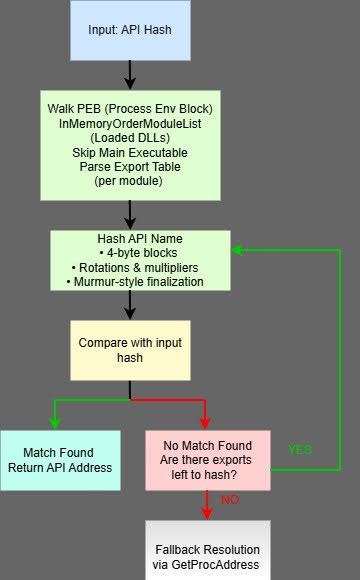
After the DLL name is reconstructed, the Main module implements another, more sophisticated API hashing routine.
API hashing subroutine
⠀
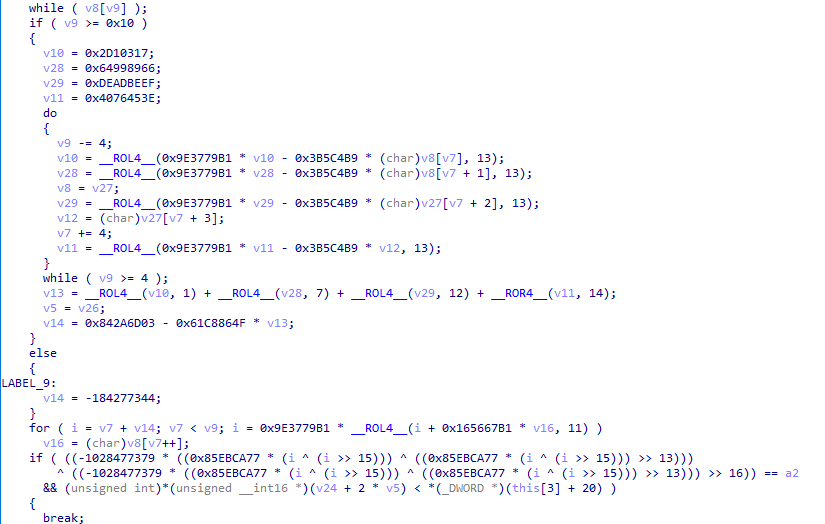
The first difference between this and the API hashing routine used by the loader is that this subroutine accepts only a single argument: the hash of the target API. To obtain the DLL handle, the malware walks the PEB to reach the InMemoryOrderModuleList, then parses each module’s export table, skipping the main executable, until it resolves the desired API. Instead of relying on common hashing algorithms, the routine employs multi-stage arithmetic mixing with constants of MurmurHash-style finalization. API names are processed in 4-byte blocks using multiple rotation and multiplication steps, followed by a final diffusion phase before comparison with the supplied hash. This design significantly complicates static recovery of resolved APIs and reduces the effectiveness of traditional signature-based detection. As a fallback, the resolver supports direct resolution via GetProcAddress if the target hash is not found through the hashing method. The pointer to GetProcAddress is obtained earlier during the “main module preparation” stage.
⠀
Config decryption
The next step in the malware’s execution is to decrypt the configuration. Encrypted configuration is stored in the BluetoothService file at offset 0x30808 with the size of 0x980. Algorithm for the decryption is RC4 with the key qwhvb^435h&*7. This revealed the following information:
- Command and Control (C2) url: https://api.skycloudcenter.com/a/chat/s/70521ddf-a2ef-4adf-9cf0-6d8e24aaa821
- Name of the module: BluetoothService
- User agent: Mozilla/5.0 (Windows NT 10.0; Win64; x64) AppleWebKit/537.36 (KHTML, like Gecko) Chrome/80.0.4044.92 Safari/537.36
Decrypted configuration doesn’t give much useful information besides the C2. The name of the module is too generic and the user agent belongs to Google Chrome browser. The URL resolves to 61.4.102.97, IP address based in Malaysia. At the time of the writing of this blog, no other file has been seen to communicate with this IP and URL.
Persistence and Command-Line Arguments
To determine the next course of action, malware checks command line arguments highlighted in Table 1 and chooses one of four potential paths – if the amount of the command-line arguments is greater than two, the process will exit. If there is no additional argument, persistence is set up primarily via service creation or registry as a fall back mechanism.
See Table 2 below:
|
Argument |
Mode |
Action |
|
(None) |
Installation |
Installs persistence (Service or Registry) pointing to binary with -i flag, then terminates. |
|
-i |
Launcher |
Spawns a new instance of itself with the -k flag via ShellExecuteA, then terminates. |
|
-k |
Payload |
Skips installation checks and executes the main malicious logic (C2 & Shellcode). |
⠀
With the expected arguments present, the malware proceeds to its primary functionality – to gather information about the infected asset and initiate the communication with C2.
Information gathering and C2 communication
A mutex Global\\Jdhfv_1.0.1 is registered to enforce single instance execution on the host. If it already exists, malware is terminated. If the check is clear, information gathering begins by querying for the following : current time, installed AVs, OS version, user name and computer name. Next, computer name, user name, OS version and string 1.01 are concatenated and the data are hashed using FNV-1A. This value is later turned into its decimal ascii representation and used most likely as a unique identifier of the infected host.
Final buffer uses a dot as delimiter and follows this pattern:
⠀
<UniqueID>.<ComputerName>.<UserName>.<OSVersion>.<127.0.0.1>.<AVs>.<DateAndTime>
⠀
The last piece of information added to the beginning of the buffer is a string 4Q. The buffer is then RC4 encrypted with the key vAuig34%^325hGV.
Following data encryption, the malware establishes an internet connection using previously mentioned user agent and C2 api.skycloudcenter.com over port 443. Data is then transferred via HttpSendRequestA using the POST method. Response from the server is then read to a temporary buffer which is later decrypted using the same key vAuig34%^325hGV.
Response and command processing
Note: C2 server was already offline during the initial analysis, preventing recovery of any network data. As a result, and due to the complexity of the malware, parts of the following analysis may contain minor inaccuracies.
The response from the C2 undergoes multiple checks before further processing. First, the HTTP response code is compared against the hardcoded value 200 (0xC8), indicating a successful request, followed by a validation of the associated WinInet handle to ensure no error occurred. The malware then verifies the integrity of the received payload and execution proceeds only if at least one valid structure is detected. Next, malware looks into the response data for a small tag to determine what to do next. Tag is used as a condition for a switch statement with 16 possible cases. The default case will simply set up a flag to TRUE. Setting up this flag will result in completely jumping out of the switch. Other switch cases includes following options:
⠀
|
Char representation |
Hex representation |
Purpose |
|
4T |
0x3454 |
Spawn interactive shell |
|
4U |
0x3455 |
Send ‘OK’ to C2 |
|
4V |
0x3456 |
Create process |
|
4W |
0x3457 |
Write file to disk |
|
4X |
0x3458 |
Write chunk to open file |
|
4Y |
0x3459 |
Read & send data |
|
4Z |
0x345A |
Break from switch |
|
4\\ |
0x345C |
Uninstall / Clean up |
|
4] |
0x345D |
Sleep |
|
4_ |
0x345F |
Get info about logical drives |
|
4` |
0x3460 |
Enumerate files information |
|
4a |
0x3661 |
Delete file |
|
4b |
0x3662 |
Create directory |
|
4c |
0x3463 |
Get file from C2 |
|
4d |
0x3464 |
Send file to C2 |
⠀
4T – The malware implements a fully interactive cmd.exe reverse shell using redirected pipes. Incoming commands from the C2 are converted from UTF‑8 to the system OEM code page before being written to the shell’s standard input, while a dedicated thread continuously reads shell output, converts it from OEM encoding to UTF‑8 using GetOEMCP API, and forwards the result back to the C2.
4V – This option allows remote process execution by invoking CreateProcessW on a C2-supplied command line and relaying execution status back to the C2.
4W – This option implements a remote file write capability, parsing a structured response containing a destination path and file contents, converting encodings as necessary, writing the data to disk, and returning a formatted status message to the command-and-control server.
4X – Similar to the previous switch, it supports a remote file-write capability, allowing the C2 to drop arbitrary files on the victim system by supplying a UTF-8 filename and associated data blob.
4Y – Switch implements a remote file-read capability. It opens a specified file with, retrieves its size, reads the entire contents into memory, and transmits the data back to the C2.
4\\ – The option implements a full self-removal mechanism. It deletes auxiliary payload files, removes persistence artifacts from both the Windows Service registry hive and the Run key, generates and executes a temporary batch file u.bat to delete the running executable after termination, and finally removes the batch script itself.
4_ – Here malware enumerates information about logical drivers using GetLogicalDriveStringsA and GetDriveTypeA APIs and sends the information back to the C2.
4` – This switch option shares similarities with previously analyzed data exfiltration function – 4Y. However, its primary purpose differs. Instead of transmitting preexisting data, it enumerates files within a specified directory, collects per-file metadata (timestamps, size, and filename), serializes the results into a custom buffer format, and sends the aggregated listing to the C2.
4a – 4b – 4c – 4d – In the last 4 cases, malware implements a custom file transfer protocol over its C2 channel. Commands 4a and 4b act as control messages used to initialize file download and upload operations respectively, including file paths, offsets, and size validation. Once initialized, the actual data transfer occurs in a chunked fashion using commands 4c (download) and 4d (upload). Each chunk is wrapped in a fixed-size 40-byte response structure, validated for successful HTTP status and correct structure count before processing. Transfers continue until the C2 signals completion via a non-zero termination flag, at which point file handles and buffers are released.
Additional artifacts discovered on the infected host
During the initial forensics analysis of the affected asset, Rapid7’s MDR team observed execution of following command:
⠀
C:\ProgramData\USOShared\svchost.exe-nostdlib -run
C:\ProgramData\USOShared\conf.c
⠀
The retrieved folder “USOShared” from the infected asset didn’t contain svchost.exe but it contained “libtcc.dll” and “conf.c”. The hash of the binary didn’t match any known legitimate version but the command line arguments and associated “libtcc.dll” suggested that svchost.exe is in fact renamed Tiny-C-Compiler. To confirm this, we replicated the steps of the attacker successfully loaded shellcode from “conf.c” into the memory of “tcc.exe”, confirming our previous hypothesis.
Analysis of conf.c
The C source file contains a fixed size (836) char buffer containing shellcode bytes which is later casted to a function pointer and invoked. The shellcode is consistent with 32-bit version of Metasploit’s block API.
The shellcode loads Wininet.dll using LoadLibraryA, resolves Internet-related APIs such as InternetConnectA and HttpSendRequestA, and downloads a file from api.wiresguard.com/users/admin. The file is read into a newly allocated and execution is then transferred to the start of the 2000-byte second-stage shellcode.
⠀
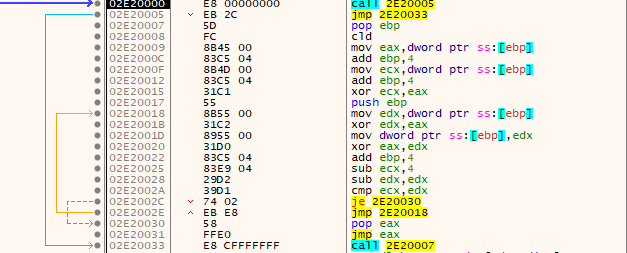
⠀
This stub is responsible for decrypting the next payload layer and transferring execution to it. It uses a rolling XOR-based decryption loop before jumping directly to the decrypted code.
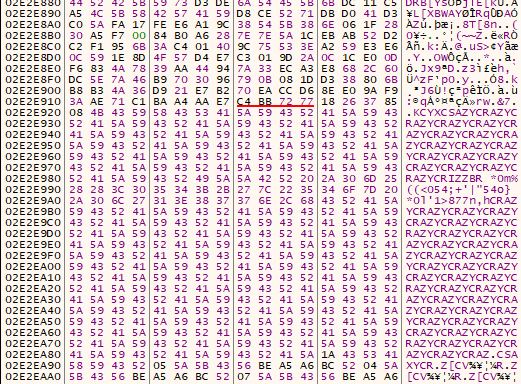
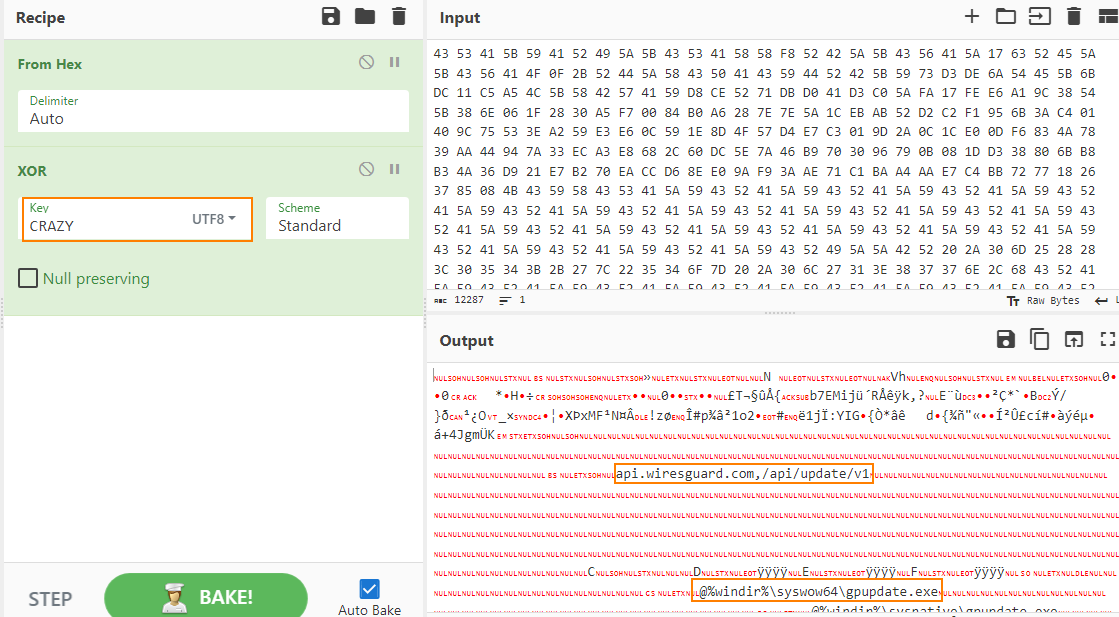
A quick look into the decrypted buffer revealed an interesting blob with a repeated string CRAZY, hinting additional XORed layer, later confirmed by a quick test.
⠀
⠀
⠀
Parsing of the decrypted configuration data confirms that retrieved shellcode is Cobalt Strike (CS) HTTPS beacon with http-get api.wiresguard.com/update/v1 and http-post api.wiresguard.com/api/FileUpload/submit urls.
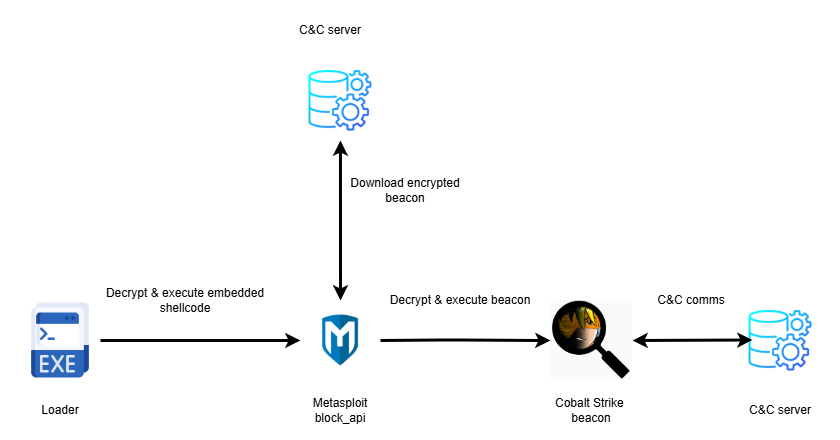
Analysis of the initial evidence revealed a consistent execution chain: a loader embedding Metasploit block_api shellcode that downloads a Cobalt Strike beacon. The unique decryption stub and configuration XOR key CRAZY allowed us to pivot into an external hunt, uncovering additional loader variants.
⠀
Variation of loaders and shellcode
In the last year, four similar files were uploaded to public repositories.
⠀
|
Loader 1 |
Loader 2 |
Loader 3 |
Loader 4 |
|
|
Loader SHA-256 |
0a9b8df968df41920b6ff07785cbfebe8bda29e6b512c94a3b2a83d10014d2fd |
e7cd605568c38bd6e0aba31045e1633205d0598c607a855e2e1bca4cca1c6eda |
b4169a831292e245ebdffedd5820584d73b129411546e7d3eccf4663d5fc5be3 |
fcc2765305bcd213b7558025b2039df2265c3e0b6401e4833123c461df2de51a |
|
Shellcode SHA-256 |
4c2ea8193f4a5db63b897a2d3ce127cc5d89687f380b97a1d91e0c8db542e4f8 |
078a9e5c6c787e5532a7e728720cbafee9021bfec4a30e3c2be110748d7c43c5 |
7add554a98d3a99b319f2127688356c1283ed073a084805f14e33b4f6a6126fd |
7add554a98d3a99b319f2127688356c1283ed073a084805f14e33b4f6a6126fd |
|
User Agent |
Mozilla/5.0 (Macintosh; Intel Mac OS X 10_15_7) AppleWebKit/537.36 (KHTML, like Gecko) Chrome/92.0.4472.114 Safari/537.36 |
Mozilla/5.0 (Macintosh; Intel Mac OS X 10_15_7) AppleWebKit/537.36 (KHTML, like Gecko) Chrome/92.0.4472.114 Safari/537.36 |
Mozilla/5.0 (Windows NT 10.0; Win64; x64) AppleWebKit/537.36 (KHTML, like Gecko) Chrome/134.0.0.0 Safari/537.36 |
Mozilla/5.0 (Windows NT 10.0; Win64; x64) AppleWebKit/537.36 (KHTML, like Gecko) Chrome/134.0.0.0 Safari/537.36 |
|
URL hosting CS beacon |
http://59.110.7.32:8880/uffhxpSy |
http://124.222.137.114:9999/3yZR31VK |
https://api.wiresguard.com/users/system |
https://api.wiresguard.com/users/system |
|
CS http-get URL |
http:// 59.110.7.32:8880/api/getBasicInfo/v1 |
http://124.222.137.114:9999/api/updateStatus/v1 |
https://api.wiresguard.com/api/getInfo/v1 |
https://api.wiresguard.com/api/getInfo/v1 |
|
CS http-post URL |
http:// 59.110.7.32:8880/api/Metadata/submit |
http://124.222.137.114:9999/api/Info/submit |
https://api.wiresguard.com/api/Info/submit |
https://api.wiresguard.com/api/Info/submit |
⠀
From all the loaders we analyzed, Loader 3 piqued our interest for three reasons – shellcode encryption technique, execution and almost identical C2 to beacon that was found on the infected asset . All the previous samples used a pretty common technique to execute the shellcode – decrypt embedded shellcode in user space, change the protection of memory region to executable state and invoke decrypted code via CreateThread / CreateRemoteThread, Loader 3 (original name “ConsoleApplication2.exe”) violates this approach.
Analysis of Loader 3 – ConsoleApplication2.exe
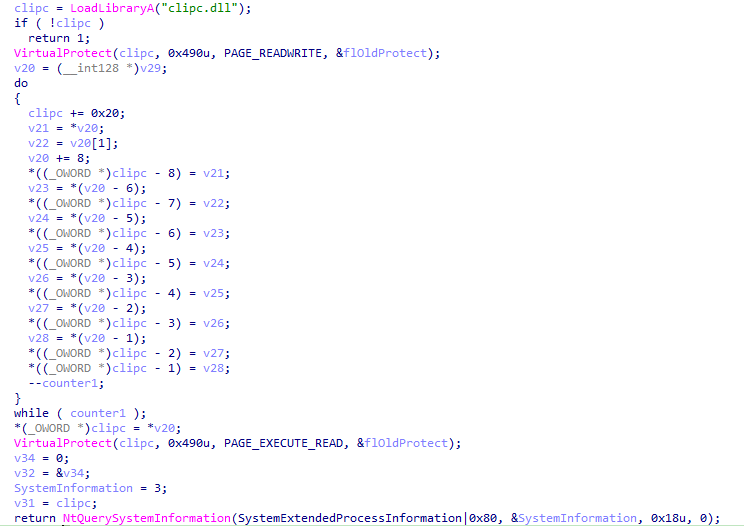
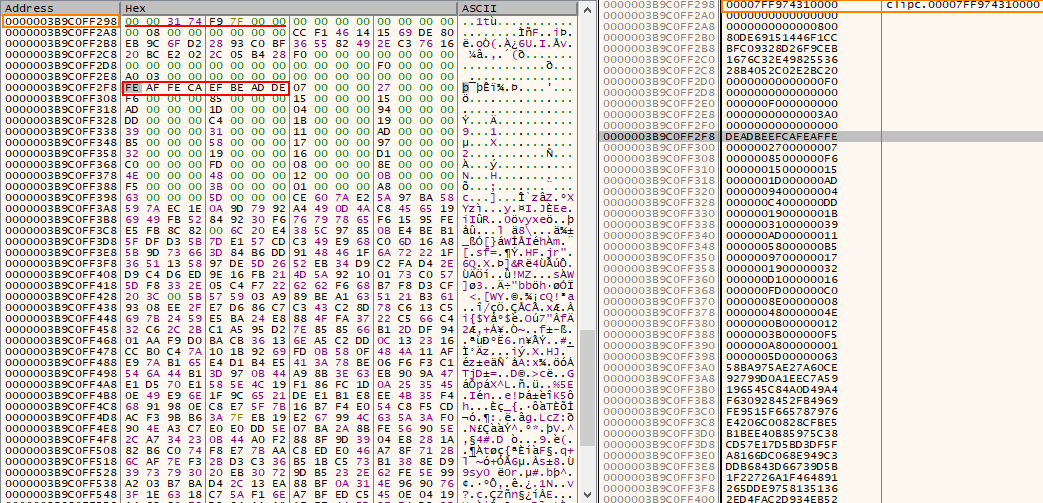
At the first glance, the logic of the sample is straightforward Load the DLL clipc.dll, overwrite first 0x490 bytes, change the protection to PAGE_EXECUTE_READ (0x20), and then invoke NtQuerySystemInformation. Two interesting notes to highlight here – bytes copied into the memory region of clipc.dll are not valid shellcode and NtquerySystemInformation is used to “Retrieve the specified system information”, not to execute code.
⠀
⠀
According to the official documentation, the first parameter of NtQuerySystemInformation is of type SYSTEM_INFORMATION_CLASS which specifies the category of system information to be queried. During static analysis in IDA Pro, this parameter was initially identified as SystemExtendedProcessInformation|0x80 but looking for this value in MSDN and other public references didn’t provide any explanation on how the execution was achieved. But, searching for the original value passed to the function (0xB9) uncovered something interesting. The following blog by DownWithUp covers Microsoft Warbird, which could be described as an internal code protection and obfuscation framework . These resources confirm IDA misinterpretation of the argument which should be SystemCodeFlowTransition, a necessary argument to invoke Warbird functionality. Additionally, DownWithUp’s blog post mentioned the possible operations:
⠀
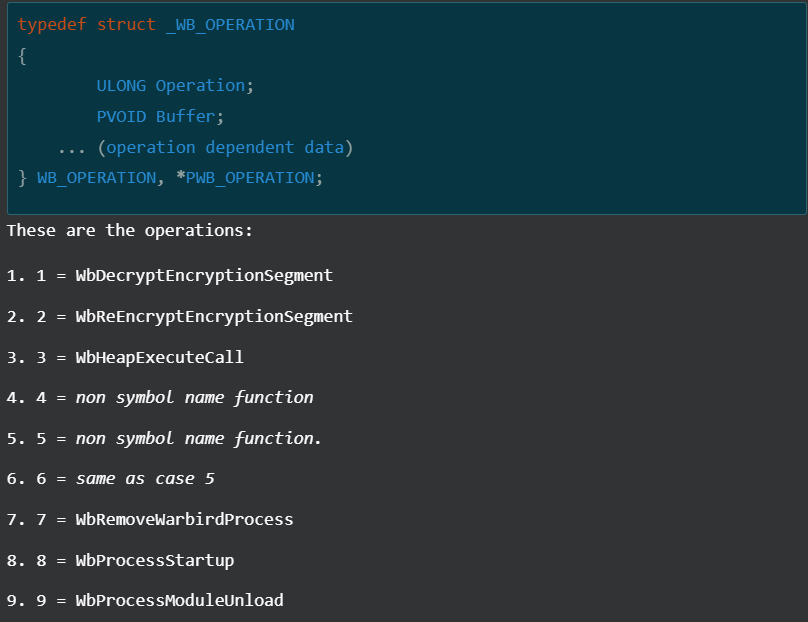
⠀
Referring to the snippet we saw from “ConsoleApplication2.exe”, the operation is equal to WbHeapExecuteCall which gives us the answer on how the shellcode gained execution. Thanks to work of other researchers, we also know that this technique only works if the code resides inside of memory of Microsoft signed binary, thus revealing why clipc.dll has been used. The blog post from cirosec also contains a link for their POC of this technique which is almost the same replica of “ConsoleApplication2.exe”, hinting that author of “ConsoleApplication2.exe” simply copied it and modified to execute Metasploit block_api shellcode instead of the benign calc from POC. The comparison of the Cobalt Strike beacon configuration delivered via “conf.c” and “ConsoleApplication2.exe” revealed shared trades between these two, most notably domain, public key, and process injection technique.
Attribution
Attribution is primarily based on strong similarities between the initial loader observed in this intrusion and previously published Symantec research. Particularly the use of a renamed “Bitdefender Submission Wizard” to side-load “log.dll” for decrypting and executing an additional payload.
In addition, similarities of the execution chain of “conf.c” retrieved from the infected asset and other loaders that we found, supported by the same public key extracted from CS beacons delivered through “conf.c” and “ConsoleApplication2.exe” suggests with moderate confidence, that the threat actor behind this campaign is likely Lotus Blossom.
Conclusion
The discovery of the Chrysalis backdoor and the Warbird loader highlights an evolution in Billbug’s capabilities. While the group continues to rely on proven techniques like DLL sideloading and service persistence, their multi layered shellcode loader and integration of undocumented system calls (NtQuerySystemInformation) marks a clear shift toward more resilient and stealth tradecraft.
What stands out is the mix of tools: the deployment of custom malware (Chrysalis) alongside commodity frameworks like Metasploit and Cobalt Strike, together with the rapid adaptation of public research (specifically the abuse of Microsoft Warbird). This demonstrates that Billbug is actively updating their playbook to stay ahead of modern detection.
Rapid7 Customers
Intelligence Hub
Customers using Rapid7’s Intelligence Hub gain direct access to Chrysalis backdoor, Metasploit loaders and Cobalt Strike IOCs, including any future indicators as they are identified.
Indicators of compromise (IoCs)
File indicators
|
update.exe |
a511be5164dc1122fb5a7daa3eef9467e43d8458425b15a640235796006590c9 |
|
[NSIS.nsi] |
8ea8b83645fba6e23d48075a0d3fc73ad2ba515b4536710cda4f1f232718f53e |
|
BluetoothService.exe |
2da00de67720f5f13b17e9d985fe70f10f153da60c9ab1086fe58f069a156924 |
|
BluetoothService |
77bfea78def679aa1117f569a35e8fd1542df21f7e00e27f192c907e61d63a2e |
|
log.dll |
3bdc4c0637591533f1d4198a72a33426c01f69bd2e15ceee547866f65e26b7ad |
|
u.bat |
9276594e73cda1c69b7d265b3f08dc8fa84bf2d6599086b9acc0bb3745146600 |
|
conf.c |
f4d829739f2d6ba7e3ede83dad428a0ced1a703ec582fc73a4eee3df3704629a |
|
libtcc.dll |
4a52570eeaf9d27722377865df312e295a7a23c3b6eb991944c2ecd707cc9906 |
|
admin |
831e1ea13a1bd405f5bda2b9d8f2265f7b1db6c668dd2165ccc8a9c4c15ea7dd |
|
loader1 |
0a9b8df968df41920b6ff07785cbfebe8bda29e6b512c94a3b2a83d10014d2fd |
|
uffhxpSy |
4c2ea8193f4a5db63b897a2d3ce127cc5d89687f380b97a1d91e0c8db542e4f8 |
|
loader2 |
e7cd605568c38bd6e0aba31045e1633205d0598c607a855e2e1bca4cca1c6eda |
|
3yzr31vk |
078a9e5c6c787e5532a7e728720cbafee9021bfec4a30e3c2be110748d7c43c5 |
|
ConsoleApplication2.exe |
b4169a831292e245ebdffedd5820584d73b129411546e7d3eccf4663d5fc5be3 |
|
system |
7add554a98d3a99b319f2127688356c1283ed073a084805f14e33b4f6a6126fd |
|
s047t5g.exe |
fcc2765305bcd213b7558025b2039df2265c3e0b6401e4833123c461df2de51a |
Network indicators
|
95.179.213.0 |
| api.skycloudcenter.com |
| api.wiresguard.com |
|
61.4.102.97 |
|
59.110.7.32 |
|
124.222.137.114 |
MITRE TTPs
|
ATT&CK ID |
Name |
|
T1204.002 |
User Execution: Malicious File |
|
T1036 |
Masquerading |
|
T1027 |
Obfuscated Files or Information |
|
T1027.007 |
Obfuscated Files or Information: Dynamic API Resolution |
|
T1140 |
Deobfuscate/Decode Files or Information |
|
T1574.002 |
DLL Side-Loading |
|
T1106 |
Native API |
|
T1055 |
Process Injection |
|
T1620 |
Reflective Code Loading |
|
T1059.003 |
Command and Scripting Interpreter: Windows Command Shell |
|
T1083 |
File and Directory Discovery |
|
T1005 |
Data from Local System |
|
T1105 |
Ingress Tool Transfer |
|
T1041 |
Exfiltration Over C2 Channel |
|
T1071.001 |
Application Layer Protocol: Web Protocols (HTTP/HTTPS) |
|
T1573 |
Encrypted Channel |
|
T1547.001 |
Boot or Logon Autostart Execution: Registry Run Keys |
|
T1543.003 |
Create or Modify System Process: Windows Service |
|
T1480.002 |
Execution Guardrails: Mutual Exclusion |
|
T1070.004 |
Indicator Removal on Host: File Deletion |
[$] Modernizing swapping: introducing the swap table
Post Syndicated from corbet original https://lwn.net/Articles/1056405/
The kernel’s swap subsystem is a complex and often unloved beast. It is
also a critical component in the memory-management subsystem and has a
significant impact on the performance of the system as a whole. At the
2025 Linux Storage, Filesystem, Memory-Management and BPF Summit, Kairui
Song outlined a plan to simplify and
optimize the kernel’s swap code. A first installment
of that work, written with help from Chris Li, was merged for the 6.18
release. This article will catch up with the 6.18 work, setting the stage
for a future look at the changes that are yet to be merged.
Security updates for Monday
Post Syndicated from jake original https://lwn.net/Articles/1056923/
Security updates have been issued by AlmaLinux (iperf3, kernel, and php), Debian (ceph, pillow, pyasn1, python-django, and python-tornado), Fedora (bind9-next, cef, chromium, fontforge, java-21-openjdk, java-25-openjdk, java-latest-openjdk, mingw-python-urllib3, mingw-python-wheel, nodejs20, nodejs22, nodejs24, opencc, openssl, python-wheel, and qownnotes), Red Hat (binutils, gcc-toolset-13-binutils, gcc-toolset-14-binutils, gcc-toolset-15-binutils, java-1.8.0-openjdk, and java-25-openjdk), Slackware (expat), SUSE (bind, cacti, cacti-spine, chromedriver, chromium, dirmngr, fontforge-20251009, glib2, golang-github-prometheus-prometheus, govulncheck-vulndb, icinga2, ImageMagick, kernel, logback, openCryptoki, openssl-1_1, python311-djangorestframework, python311-pypdf, python314, python315, qemu, and xen), and Ubuntu (linux, linux-aws, linux-aws-5.4, linux-gcp, linux-gcp-5.4, linux-hwe-5.4,
linux-ibm, linux-ibm-5.4, linux-iot, linux-kvm and linux-aws-fips, linux-fips, linux-gcp-fips).
ABSCAM: Bribery and Corruption
Post Syndicated from The History Guy: History Deserves to Be Remembered original https://www.youtube.com/watch?v=T8lnBIMPsJY
AI Coding Assistants Secretly Copying All Code to China
Post Syndicated from Bruce Schneier original https://www.schneier.com/blog/archives/2026/02/ai-coding-assistants-secretly-copying-all-code-to-china.html
There’s a new report about two AI coding assistants, used by 1.5 million developers, that are surreptitiously sending a copy of everything they ingest to China.
Maybe avoid using them.
Comic for 2026.02.02 – Bridge
Post Syndicated from Explosm.net original https://explosm.net/comics/bridge
New Cyanide and Happiness Comic
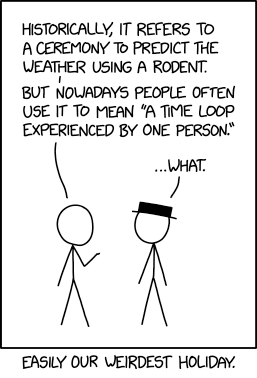
Groundhog Day Meaning
Post Syndicated from xkcd.com original https://xkcd.com/3202/
Kernel prepatch 6.19-rc8
Post Syndicated from corbet original https://lwn.net/Articles/1056812/
The 6.19-rc8 kernel prepatch is out for
testing. “So things all look good, and unless something odd happens
“
we’ll have a final 6.19 next weekend.
BrosTrend 5GbE PCIe Adapter Realtek RTL8126 NIC Review
Post Syndicated from Rohit Kumar original https://www.servethehome.com/brostrend-5gbe-pcie-adapter-realtek-rtl8126-nic-review/
It is finally time to start reviewing 5GbE products. To kick us off, we have the BrosTrend 5GbE adapter. This is enabled by the newer Realtek RTL8126 chip, and provides a relatively inexpensive way to step up from 1GbE networking. Pricing varies, but we purchased ours for under $35, which makes it quite reasonable. Since […]
The post BrosTrend 5GbE PCIe Adapter Realtek RTL8126 NIC Review appeared first on ServeTheHome.
Comic for 2026.02.01 – Under Construction
Post Syndicated from Explosm.net original https://explosm.net/comics/under-construction
New Cyanide and Happiness Comic
С чужда пита… помен…
Post Syndicated from Йовко Ламбрев original https://yovko.net/s-chuzhda-pita-pomen/

Помните ли как през лятото на 2024 година Google премахна данните за градския транспорт на Пловдив от картите си (приложението Maps)? В интервю за „Капитал“ бях предупредил, че това ще се случи още една година по-рано.
Не знам дали има друг град като Пловдив в историята на Google, който може да постигне един и същ резил за втори път, но нека отново да предупредя, че пак сме се запътили натам. Този път съдя за това по косвени белези, защото (за щастие) се дистанцирах от тази болна тема, но нека да разясня заглавието на този текст.
Кризисният PR на община Пловдив никога не е бил особено талантлив и когато се разчу, че Google Maps повече няма да показва данни за тукашния градски транспорт и медиите разшумяха казуса, първоначалната реакция на местната власт беше да замаже положението. Първата глупост беше, че нямали договор с Google. Втората, че имали свое приложение. Пази боже!
Чак в третата идея имаше някакъв рационален елемент. Два месеца по-късно успяха да върнат данните за Пловдив в Google Maps. Даже беше представено като иновация от някои местни подлизурчести медии.
Тогава премълчах, но сега ще споделя и това. Бяха взели последния комплект данни, които ние от „Тракия Тех“ бяхме направили, като вероятно са ги пипнали тук-там, и ги бяха дали отново на Google като актуализирани данни.
Как знам за това ли? Ами много просто… понеже бяха свършили работата като кучето на нивата, както обичаше да казва баба ми. И понеже не си бяха дали зор да попрегледат изискванията на GTFS, изведнъж (в уж актуализираните данни) се появиха едни странни автобусни линии, които Пловдив няма. Например 44w или 27rg.
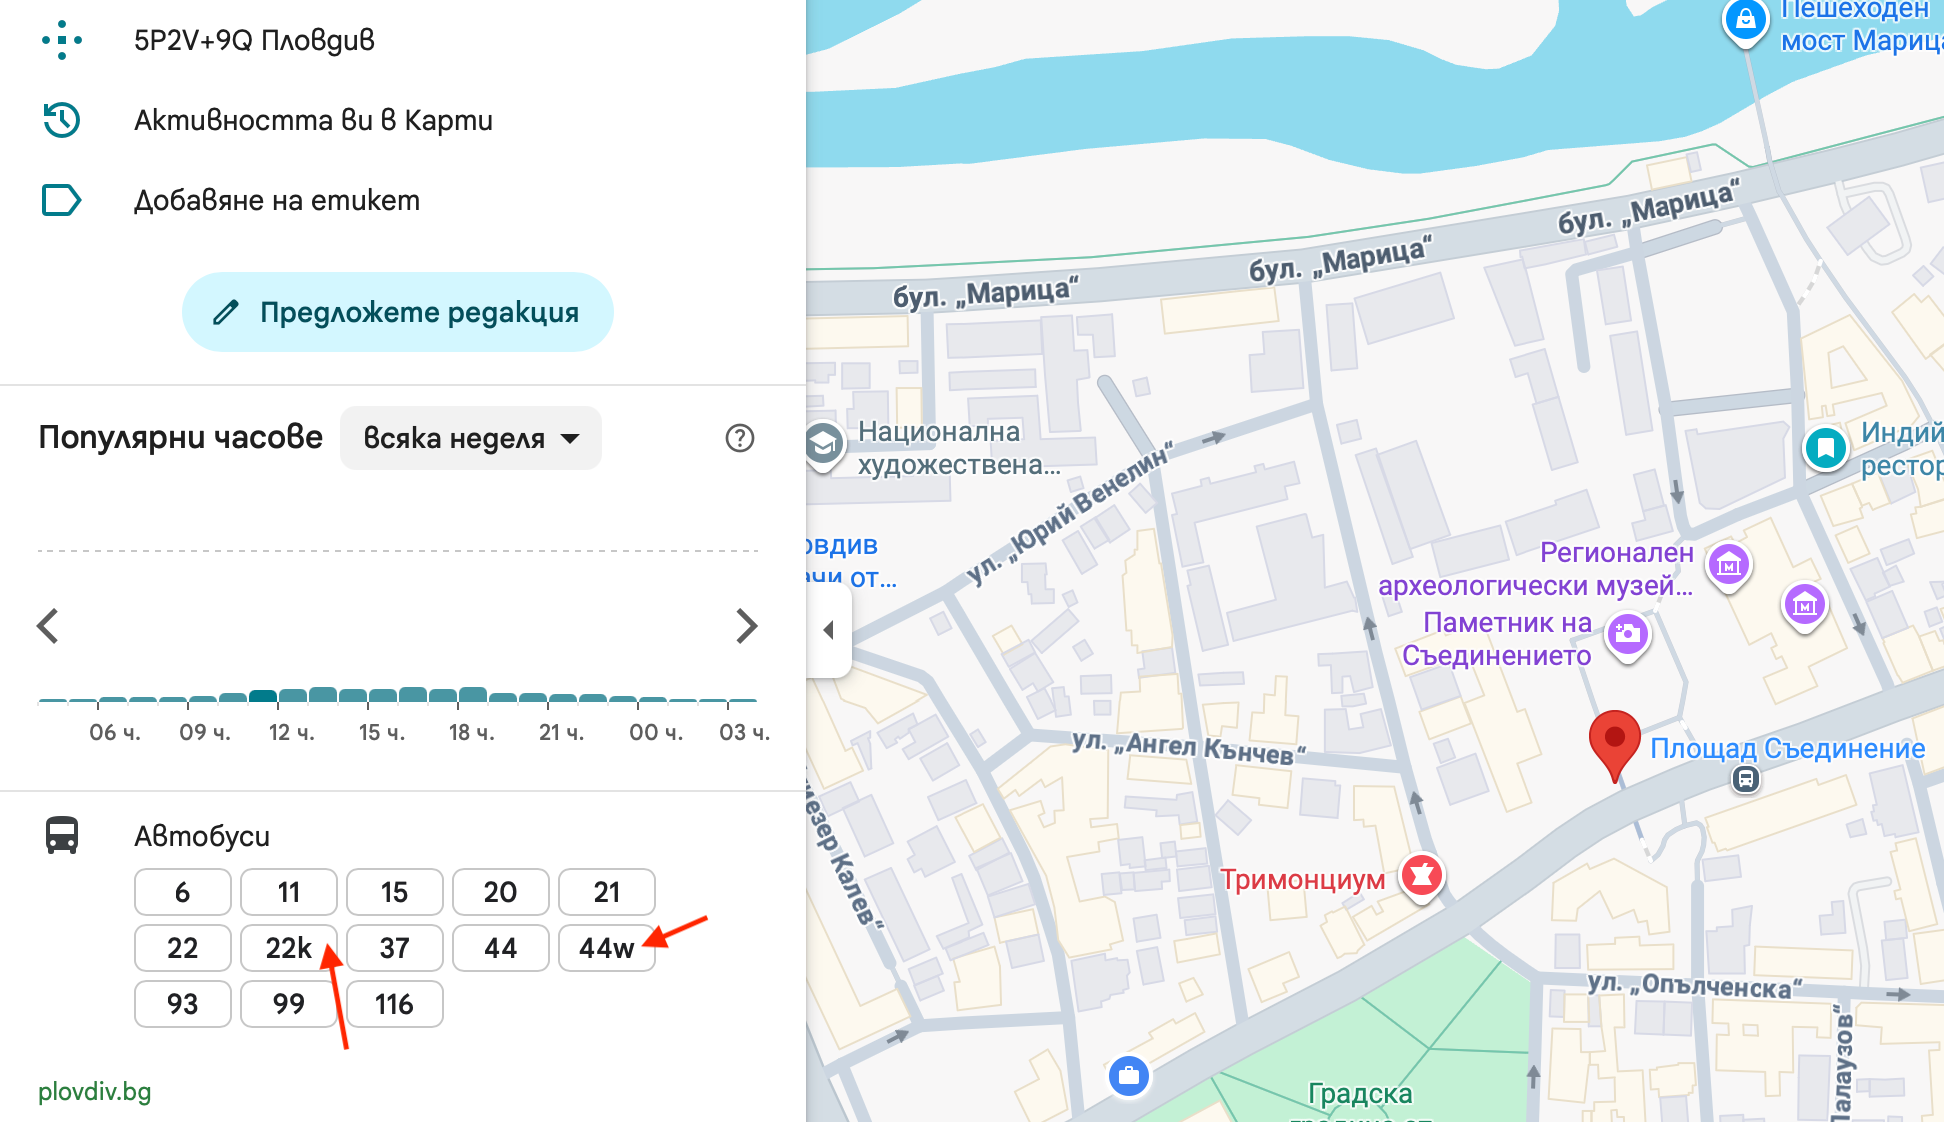
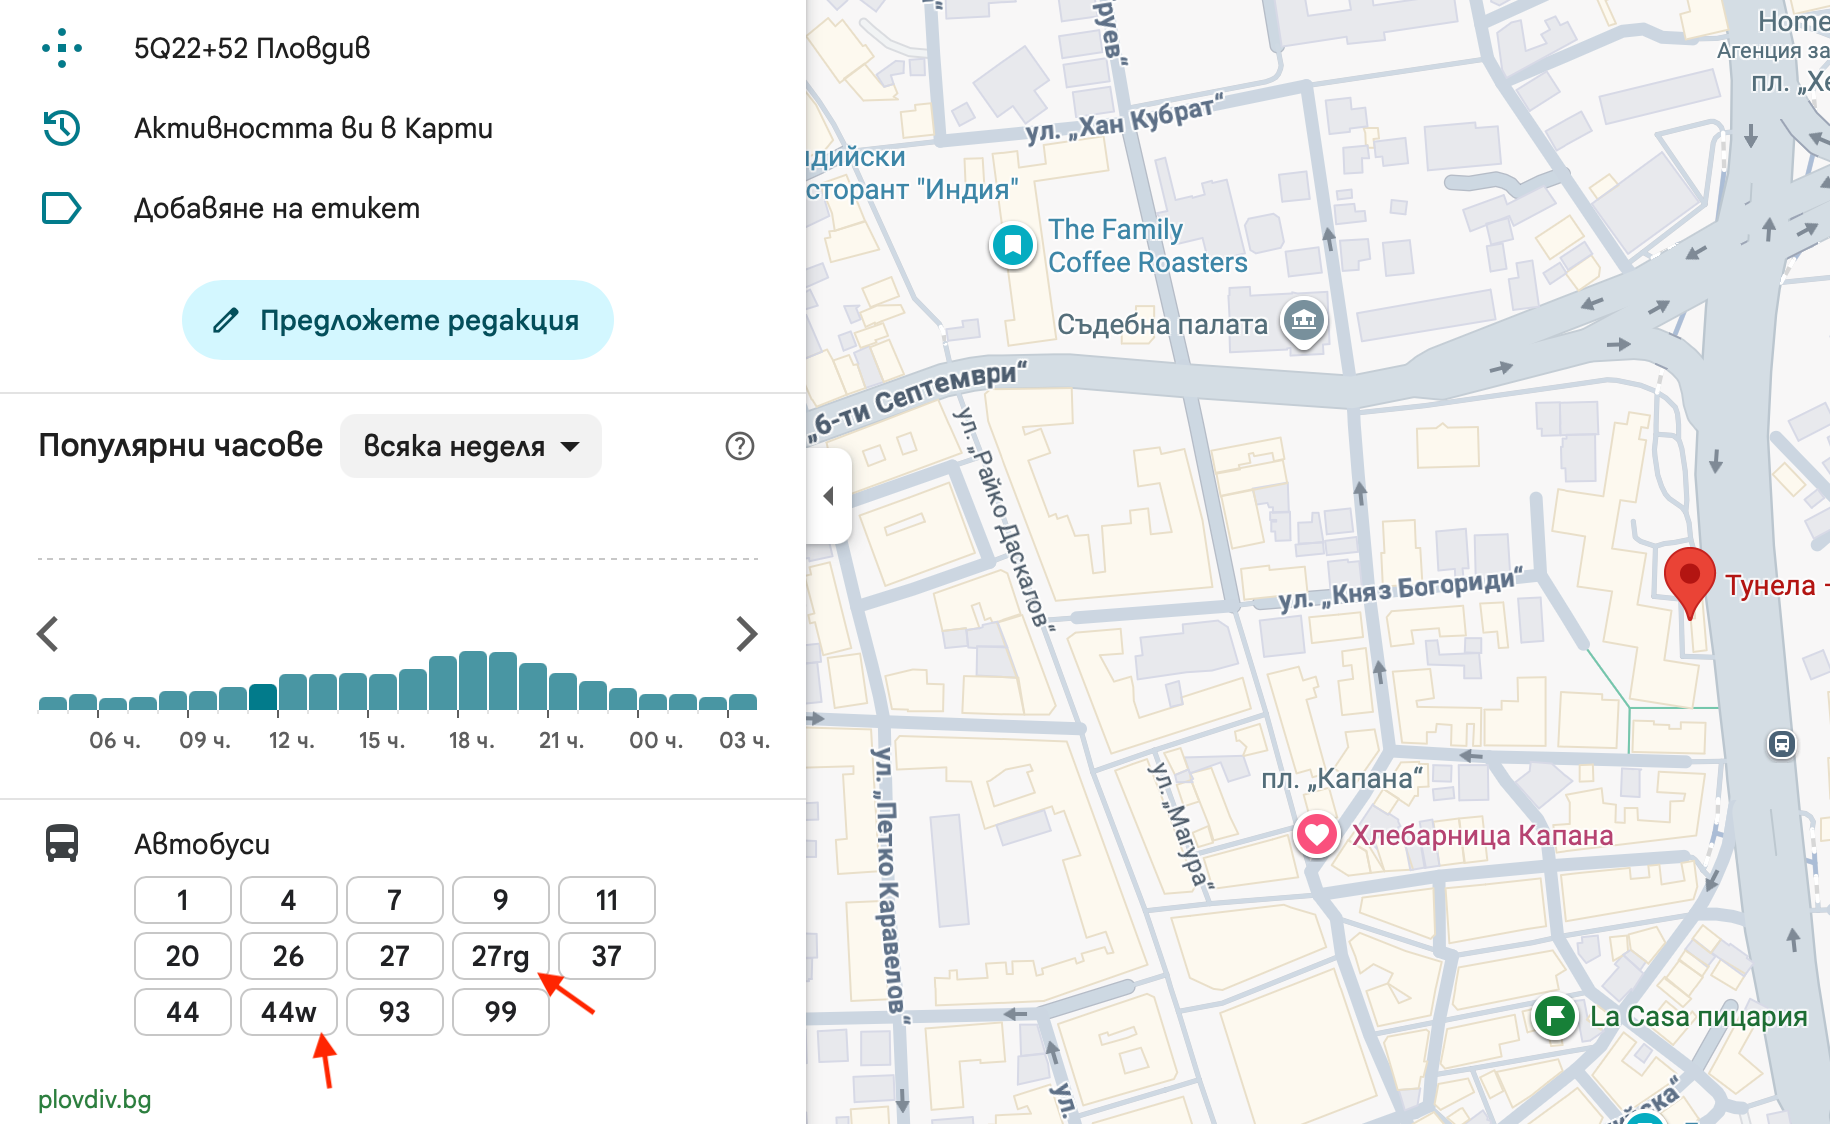
Тези индекси са лично мое дело. Аз съм ги въвел, та си ги познавам. Така разбрах, че са взели нашите данни. Само, че тези индекси не трябва да се виждат, защото не са различни автобусни линии, а модификации на основните. Има няколко линии в града, които в определени дни или часове от деня се движат с модифицирани разписания или маршрути. Затова 44w всъщност е weekend версията на 44, а 27rg са няколкото коли, които вместо до Родина, се движат до Рогошките гробища (rg) и т.н. Схващате идеята. Само, че който се е погрижил за данните през август-септември 2024 не е схванал. И не е прочел достатъчно какво да прави.
Това, че са взели последния комплект от данни, които ние поддържахме не е лошо. Те са публични, а са такива, защото ние държахме да са отворени данни. Лошото е, че са взели един подреден комплект, който само трябваше да актуализират, а всъщност са го оплескали.
Данните с тези грешки и до ден днешен са online и всеки може сам да провери това по-горе. А опасенията ми са, че през 2024 година, в опит бързо да се замаже положението, са качени там някакви си данни и някой от ОКТ или общината е потвърдил пред Google, че те са актуални. Само, че вече сме 2026 година, а през последния месец доста активно използвах градски транспорт, трупайки наблюдения. Това, че разписанията не се спазват е ясно – те и не могат да бъдат спазени, защото не са съобразени с действителността в града. Но има грешки в маршрутите, в началните и крайните времена на тръгване на автобусите и в броя коли, които ги изпълняват. А това Google го разбира, защото „вижда“ движението на телефоните на пътниците по всеки маршрут.
Подозирам и че след извънредния напън през 2024 година да се върнат някакви данни онлайн, след това отново никой не се грижи да ги актуализира. А Google трупа статистика за тези разминавания. И следи дали и кога последно някой е опреснявал данните. Така вероятността Пловдив отново да изпадне от Maps никак не е малка.
През същата 2024 година – т.е. преди малко повече от година – на годишната „Среща на бизнеса от Пловдив, Пазарджик и региона“ бях модератор на панела за дигитализация и транспорт, където от сцената се чуха амбициозни идеи и планове за следващата година. Тя обаче отмина, а нито в посока дигитализация, нито в посока обществен транспорт се забелязва някаква положителна промяна.
″Пловдив 4.0″: електронните мечти на втория град
Камери, датчици, супер приложение, е-транспорт: зам-кметът Владимир Темелков и Николай Недялков от Tixi за близките и по-далечни дигитални амбиции на Пловдив
 Георги Куманов

Ако има някаква добра новина от последните няколко месеца, тя е, че сякаш поне повече автобуси обслужват линиите на градския транспорт. Но на електронните табла по спирките информацията е все по-оскъдна, до степен да е безполезна. Системата за електронно таксуване е все така доникъде. Някак и нещо работи, но така и нищо не бе официално обявено. Таксуващите устройства (където изобщо ги има) много често не са активни. Шофьорите се правят на три и половина, че не разбират и не е тяхна работа, защото имат интерес да продават хартиени билетчета. И да ги препродават по няколко пъти. А контролът е близко до никакъв.
Автобусите преобладаващо са стари и мръсни. Жегата през лятото е сериозна, а климатиците (когато работят) се пускат колкото за отбиване на номера. Доста от водачите са крайно груби, шофират опасно и пропускат спирки. Разписанията, както вече отбелязах са само пожелателни, а напоследък и трудно откриваеми, освен на сайта на общината, който никой няма желание да гледа.
В този ред на мисли, особено за гости на града, който има претенции да бъде и туристическа дестинация, актуалната информация в Google Maps продължава да бъде повече от пътеводна светлина. Дори с несъвършенствата си.
В края на същата 2024 година бях за седмица на гръцкия остров Корфу. Остров. В Йонийско море. С около 100 хиляди души население. И с безупречен обществен транспорт. Билети и карти могат да се купят от автомати по спирките, плащайки в брой или с карта. Билетите и картите могат да се презареждат с допълнителни пътувания, а интерфейсът на машините може да се превключва на 5-6 езика. В автобусите винаги се качваш от първа врата и валидираш билет или карта при шофьора. Ако нямаш, може да се таксуваш в брой или с банкова карта (но малко по-скъпо) при шофьора. Той е в униформа. И задължително се поздравявате взаимно.
Автобусите са чисти и нови. Всяка предстояща спирка се обявява на дисплей с времето до достигането ѝ. На някои по-нови автобуси се обявяват до три предстоящи спирки. Климатиците работят така, че може да се простудиш.
По спирките има разписания на хартия и QR код, който води до електронната им версия, заедно с информация след колко точно минути идва следващия автобус на точно тази спирка.
В Google Maps сe показват не само маршрутите и разписанията, но и движението на автобусите в реално време (с евентуалните закъснения – дори до минута или две) – нещо, което в Пловдив сигурно ще стане възможно след още едно хилядолетие. Пловдивчани сме айляк, за къде да бързаме толкова…
И всичко това на остров в Гърция. Не в Швейцария.