Extend Amazon Bedrock Guardrails to Tool Interactions Using the Strands Agents SDK

Post Syndicated from Stephan Traub original https://aws.amazon.com/blogs/security/extend-amazon-bedrock-guardrails-to-tool-interactions-using-the-strands-agents-sdk/

If you’re running AI agents in production, Amazon Bedrock Guardrails protects the model boundary. But your agents also invoke tools, fetch external data, and communicate with other systems. That data flows outside the model boundary, where model-level guardrails can’t reach.

You can extend guardrail coverage to those interactions using three validation checkpoints built with the Strands Agents SDK lifecycle hooks and Amazon Bedrock guardrails. You implement each checkpoint using a Strands life-cycle hook, which validates data at a critical trust boundary without changing your existing tools or agent logic.

Agents can communicate with other systems through the Model Context Protocol (MCP), a standard for connecting AI systems to data sources and tools. You will learn how to implement three validation checkpoints, scope different guardrails to specific tools, and scale them to other agents.

Extending guardrails beyond the model boundary

Amazon Bedrock Guardrails provides protection at the model boundary. Every model invocation is checked: the input prompt is validated before inference, and the model response is validated after inference. You can enforce guardrail use at the account level using AWS Identity and Access Management (IAM) policies, making guardrails mandatory for model calls across your account. You can further refine this by using Amazon Bedrock Guardrails input tagging to mark specific portions of the prompt for evaluation, so trusted content like system prompts can be skipped.

Guardrails cover what the model sees, but agents do more than call models. They invoke tools, pull data from external sources, communicate with MCP servers, and return results to users. These interactions happen outside the model boundary by design, because model-level guardrails focus on the prompts and responses the model itself handles. Adding validation at the tool boundary complements, rather than replaces, that model-level protection.

Model-level guardrails alone leave you exposed in four ways:

  • Tool parameters pass through unchecked. The model decides which tool to use and what parameters to pass. The agent then calls the tool with those parameters. No validation sits between the model’s decision and the tool’s execution. If the parameters inadvertently contain personally identifiable information (PII) or policy-violating content, the tool runs with that content.
  • External data enters without validation. Agents consume data from tool responses, MCP server outputs, and API calls. Without validation at the tool boundary, content from external sources can influence the agent’s behavior before model-level guardrails have a chance to evaluate it.
  • Misleading content can affect reasoning. An agent that retrieves inaccurate or misleading content from an external source might treat it as authoritative, producing skewed recommendations in lending, healthcare, or legal advice.
  • Multi-agent systems can spread bad data downstream. In multi-agent systems, a misconfigured or poorly designed upstream component can pass policy-violating content to downstream agents. Model-level guardrails at each agent’s boundary don’t inspect data flowing between agents at the tool layer.

Three validation checkpoints

To close these gaps, add three validation checkpoints at each trust boundary where data crosses into or out of your agent as shown in Figure 1.

  • Checkpoint 1: Inbound data validation – Check data before it reaches the model—user input, data from other agents, MCP tool servers, and RAG pipelines. You catch policy-violating or biased content before it enters the model’s context window. In the Strands Agents SDK, you implement this using a BeforeInvocationEvent hook that fires before model inference or tool execution occurs. The hook inspects incoming messages and blocks the request if the content violates policies. The model doesn’t see blocked content.
  • Checkpoint 2: Tool interaction supervision – Before the agent calls a tool, a BeforeToolCallEvent hook checks the parameters it’s about to pass. This is the gap model-level guardrails don’t cover. The model has already decided what to send, but nothing has verified whether that content is safe to act on. If the hook flags the input, the call is canceled before the real-world action occurs.
  • Checkpoint 3: Outbound data validation – Validate results before returning them to the user or passing them to downstream systems. You need this most for tools that ingest external content, like a web search tool fetching web pages from sites outside your control. In Strands, an AfterToolCallEvent hook validates the tool’s return value and replaces it with a block message if the content violates policies.
Figure 1: Three validation checkpoints extend Amazon Bedrock Guardrails from the model boundary to the tool boundary.

Figure 1: Three validation checkpoints extend Amazon Bedrock Guardrails from the model boundary to the tool boundary.

You can adjust the validation intensity of each checkpoint:

  • At Checkpoint 1, use a full Amazon Bedrock guardrail with PII detection, content filtering, and topic enforcement.
  • Checkpoint 2 can be lighter. Configure a separate Amazon Bedrock guardrail with rules tailored to the specific tool being called, or run local checks like regex validation or schema enforcement.
  • For Checkpoint 3, focus on unwanted content detection for tool outputs that return external data.

Mix fast deterministic checks (regex, schema validation, allowlists) with AI-based guardrail evaluations. This keeps latency low.

Implementation

The implementation uses boto3, the AWS SDK for Python, to call the ApplyGuardrail API. The Strands Agents SDK exposes one life-cycle event per checkpoint. Here’s how to implement each one.

Prerequisites

This post assumes you already have a working Strands agent. Your agent should use least-privilege tool access, scoped system prompts, and validated business logic. If you’re starting from scratch, see Strands Agents SDK: A technical deep dive into agent architectures and observability for a step-by-step walk through of building and deploying a Strands agent with Amazon Bedrock Agent Core.

Before implementing the multi-checkpoint approach, you’ will need:

  1. An AWS account with access to Amazon Bedrock
  2. Amazon Bedrock Guardrails configured (see Creating a guardrail)
  3. Python 3.11 or later installed
  4. The Strands Agents SDK installed: pip install strands-agents
  5. AWS credentials configured with permissions for bedrock:ApplyGuardrail and bedrock:InvokeModel
  6. Your guardrail ID and version from the AWS Management Console for Amazon Bedrock (navigate to Guardrails, select your guardrail, and copy the ID)

Create the guardrail validation hook

The GuardrailHook class is a Strands HookProvider. It registers three callbacks, one for each lifecycle event. When Strands triggers an event, the matching callback runs validate_inbound checks user messages, validate_input checks tool parameters before execution, and validate_output checks tool results. All three use the shared _check method, which calls the Amazon Bedrock ApplyGuardrail API.

Create a guardrail_hook.py file and add this implementation. Use the optional tool_names parameter to scope a hook to specific tools, or pass None to apply it everywhere:

import boto3
from strands.hooks import HookProvider, HookRegistry
from strands.hooks.events import (
    BeforeInvocationEvent,
    BeforeToolCallEvent,
    AfterToolCallEvent,
)

class GuardrailHook(HookProvider):

    def __init__(self, guardrail_id, guardrail_version, region_name, tool_names=None):
        self.client = boto3.client("bedrock-runtime", region_name=region_name)
        self.guardrail_id = guardrail_id
        self.guardrail_version = guardrail_version
        self.tool_names = tool_names  # None = apply to all tools

    def register_hooks(self, registry: HookRegistry, **kwargs):
        registry.add_callback(BeforeInvocationEvent, self.validate_inbound)
        registry.add_callback(BeforeToolCallEvent, self.validate_input)
        registry.add_callback(AfterToolCallEvent, self.validate_output)

    def _check(self, content, source="INPUT"):
        """Call Bedrock ApplyGuardrail. Returns True if content is safe."""
        response = self.client.apply_guardrail(
            guardrailIdentifier=self.guardrail_id,
            guardrailVersion=self.guardrail_version,
            source=source,       # "INPUT" applies input policies; "OUTPUT" applies output policies
            content=[{"text": {"text": content}}],
        )
        return response["action"] != "GUARDRAIL_INTERVENED"

    # Checkpoint 1 — BeforeInvocationEvent
    # Validates user input before model inference or tool execution occurs.
    # The model does not see blocked content.
    async def validate_inbound(self, event: BeforeInvocationEvent):
        for msg in reversed(event.messages):
            if msg.get("role") == "user":
                for block in msg.get("content", []):
                    text = block.get("text", "")
                    if text and not self._check(text):
                        event.messages.clear()
                        event.messages.append({
                            "role": "user",
                            "content": [{"text": "Request blocked by safety guardrail."}],
                        })
                        return
                break

    # Checkpoint 2 — BeforeToolCallEvent
    # Validates tool input parameters before the tool executes.
    # Skips tools not in tool_names (if a filter is set).
    async def validate_input(self, event: BeforeToolCallEvent):
        if self.tool_names and event.tool_use.get("name") not in self.tool_names:
            return
        tool_input = event.tool_use.get("input", {})
        for param_value in tool_input.values():
            if isinstance(param_value, str) and not self._check(param_value):
                event.cancel_tool = "This request was blocked by a safety guardrail."
                return

    # Checkpoint 3 — AfterToolCallEvent
    # Validates tool output before it reaches the agent.
    # Skips tools not in tool_names (if a filter is set).
    async def validate_output(self, event: AfterToolCallEvent):
        if self.tool_names and event.tool_use.get("name") not in self.tool_names:
            return
        content_parts = [
            block["text"]
            for block in event.result.get("content", [])
            if "text" in block
        ]
        content = "\n".join(content_parts)
        if content and not self._check(content, source="OUTPUT"):
            event.result = {
                "toolUseId": event.result["toolUseId"],
                "status": "error",
                "content": [{"text": "Content blocked by safety guardrail."}],
            }

Define tools

Strands discovers tools through the @tool decorator. The decorator turns a plain Python function into a tool the model can call, using the function’s docstring and type hints as the tool’s contract. Here are two simple examples used in the registration sections below. A web search tool and a customer data tool:

from strands import tool

@tool
def web_search(query: str) -> str:
    """Search the web and return a result snippet."""
    # Replace with your actual search implementation
    return f"Search results for: {query}"

@tool
def get_customer_data(customer_id: str) -> str:
    """Retrieve customer record by ID."""
    # Replace with your actual data lookup implementation
    return f"Customer record for: {customer_id}"

If you don’t have existing tools, create a tools.py file and copy in the example code above.

Register the hook

Strands activates hooks through the hooks parameter on the Agent constructor. After being registered, the hook’s callbacks run automatically on every matching lifecycle event. No changes are needed in your tools or agent logic. For a single guardrail applied to all tools, create one hook instance and pass it to your agent:

from strands import Agent
from strands.models import BedrockModel
from guardrail_hook import GuardrailHook
from tools import web_search, get_customer_data # Example tools - replace with your tools

# Example model and region selection
model = BedrockModel(
    model_id="us.anthropic.claude-sonnet-4-5",
    region_name="us-east-1",
)

guardrail_hook = GuardrailHook(
    guardrail_id="your-guardrail-id",    # Copy it from the Amazon Bedrock console > Guardrails
    guardrail_version="1",               # Use "DRAFT" for testing
    region_name="us-east-1",             # Region where the guardrails are defined
)

agent = Agent(
    model=model,
    tools=[web_search, get_customer_data], # Example tools
    system_prompt="You are a helpful assistant.", # Example system prompt
    hooks=[guardrail_hook],  # Applied to all tool calls
)

Use different guardrails per tool

Different tools carry different risks. A web search tool fetches external content from untrusted sites and needs strict output filtering. A customer data tool returns internal records and might need PII detection configured differently. The tool_names parameter scopes a hook to specific tools. Strands still runs every registered hook on each event, but hooks skip the call when the tool name doesn’t match. Register one hook per guardrail:

from strands import Agent
from strands.models import BedrockModel
from guardrail_hook import GuardrailHook
from tools import web_search, get_customer_data # Example tools - replace with your tools

# Example model and region selection
model = BedrockModel(
    model_id="us.anthropic.claude-sonnet-4-5",
    region_name="us-east-1",
)
# Strict content filtering and PII detection for web search results
web_search_hook = GuardrailHook(
    guardrail_id="gr-websearch-id",      # Guardrail ID with content filtering + PII detection
    guardrail_version="1",               # Or set to DRAFT
    region_name="us-east-1",             # Change to your region
    tool_names={"web_search"},           # Only applies to the web_search tool
)

# PII detection for customer data — prevents sensitive records from leaking into tool parameters
customer_data_hook = GuardrailHook(
    guardrail_id="gr-customerdata-id",   # Guardrail ID with PII detection
    guardrail_version="1",               # Or set to DRAFT
    region_name="us-east-1",             # Change to your region
    tool_names={"get_customer_data"},    # Only applies to the get_customer_data tool
)

agent = Agent(
    model=model,
    tools=[web_search, get_customer_data],        # Example tools
    system_prompt="You are a helpful assistant.", # Example system prompt
    hooks=[web_search_hook, customer_data_hook],  # Each hook runs only for its assigned tools
)

Each guardrail is configured independently in the Amazon Bedrock console. You can match validation strictness to each tool’s risk level instead of applying one policy across your entire agent.

Test your implementation

Run a quick test with the preceding examples:

  1. Create a project folder and add the following files:
    1. guardrail_hook.py the GuardrailHook class
    2. tools.py the web_search and get_customer_data tool definitions as examples
    3. agent.py the agent setup from the Register the hook section
  2. In agent.py, add a test prompt at the end:
# Send a test prompt
response = agent("Search the web for the latest news on AI security.")
print(response)

  1. Update the guardrail IDs, AWS Region, and model ID in agent.py to match your configuration.
  2. Run the agent from your project folder: python agent.py

The guardrail hook runs at each checkpoint. If the prompt or any tool output is flagged, you’ll see the block message in the response instead of the tool result.

Use the hook across your organization

The GuardrailHook is a standalone HookProvider. Build it once, then attach it to Strands agents by passing it to the hooks parameter. The same hook package can be published as an internal library and consumed by

You can swap guardrail configurations or add checks like regex or schema validation without touching agent or tool code.

Conclusion

Amazon Bedrock Guardrails protects the model boundary, but agents also call tools, consume external data, and return results that never pass through model-level checks. The three validation checkpoints in this post close that gap using Strands Agents SDK lifecycle hooks: BeforeInvocationEvent validates user input, BeforeToolCallEvent validates tool parameters, and AfterToolCallEvent validates tool output. The same GuardrailHook class supports one shared guardrail or different guardrails scoped per tool, and deploys unchanged from local testing to Amazon Bedrock Agent Core Runtime.

To learn more, see:

If you have feedback about this post, submit comments in the Comments section below.


Stephan Traub

Stephan Traub

Stephan is a senior security consultant with AWS Professional Services, where he works closely with customers across different industries. A true technology enthusiast, Stephan is passionate about empowering customers to achieve a robust security posture within their cloud environments and AI workloads. When Stephan isn’t immersed in his AWS work, you can find him on the volleyball court or exploring the world with his family.

How Picnic configured multiple OAuth providers for Amazon MQ

Post Syndicated from Oscar Mapfumo Sibanda original https://aws.amazon.com/blogs/big-data/how-picnic-configured-multiple-oauth-providers-for-amazon-mq/

This post is co-written with Oscar Mapfumo Sibanda from Picnic.

Picnic is an Amsterdam-based tech scale-up that reinvents how people buy food. It isn’t a supermarket with a digital layer but a tech company that happens to deliver groceries. Picnic is engineered in-house: the customer app, the fulfillment platform, the supply chain, and the routing technology that guides a fleet of thousands of electric vehicles through the Netherlands, Germany, and France. Software doesn’t merely support business. Software is a business.

At the center of this system, RabbitMQ is the core component. It’s the communication backbone connecting hundreds of microservices across the entire business lifecycle, from ordering and logistics to delivery and finance. At peak, Picnic’s platform processes close to one million messages per second. At this scale, messaging is no longer only background infrastructure. It becomes part of the company’s operational nervous system. To keep that system highly available, scalable, and resilient as Picnic grows, the company decided to use Amazon MQ as a managed service.

The next challenge was identity. Picnic’s authentication strategy clearly distinguishes between people and services. Operators sign in through Keycloak, the company’s single sign-on provider, while Picnic’s Amazon Elastic Kubernetes Service (Amazon EKS) workloads are adopting AWS Identity and Access Management (IAM) authentication to eliminate static credentials. A single broker therefore must trust two identity providers at once. The Amazon MQ documentation covers configuring OAuth 2.0 with a single provider. This post extends that guidance to a multi-provider setup on the same broker.

In this post, we show how Picnic solved that problem. You will learn how to configure an Amazon MQ for RabbitMQ broker to accept tokens from multiple OAuth 2.0 identity providers, using Keycloak and IAM as the working example. You will also see how to map each provider’s scopes to RabbitMQ permissions and how to roll the change out on a running broker without disrupting connected users.

Background and prerequisites

Amazon MQ for RabbitMQ supports OAuth 2.0 authentication and authorization, where broker users and their permissions are managed by an external identity provider. User authentication and resource permissions for vhosts, exchanges, queues, and topics are centralized through the OAuth 2.0 provider’s scope system.

RabbitMQ’s OAuth 2.0 plugin supports multiple resource servers and audiences, allowing different OAuth 2.0 providers to issue tokens that a single broker can validate. This capability is essential if you operate in multiple environments or have teams registered with separate identity providers.

Prerequisites

To follow along with this post, you need:

  1. An active AWS account.
  2. An Amazon MQ for RabbitMQ broker with OAuth 2.0 configured for at least one identity provider (see Using OAuth 2.0 authentication and authorization for Amazon MQ for RabbitMQ).
  3. A second OAuth 2.0 identity provider configured and operational.
  4. Outbound web identity federation enabled for your AWS account (if using IAM as a provider).
  5. Basic familiarity with RabbitMQ configuration and OAuth 2.0 concepts.
  6. AWS Command Line Interface (AWS CLI) version 2.27 or later (required for the get-web-identity-token command used in the testing section).

Note: The information in this post reflects Amazon MQ for RabbitMQ features and behavior at the time of publication. We recommend checking the Amazon MQ documentation, release notes and best practices before implementation.

Solution architecture

The design rests on a single idea: a RabbitMQ broker can trust more than one identity provider at the same time, and it decides which one to apply per token rather than per broker. RabbitMQ does this by reading the aud (audience) claim of each incoming token and matching it against a configured resource server. Each resource server is bound to one OAuth 2.0 provider, so the audience determines both which signing keys validate the token and which permission rules apply.

Architecture diagram

The following two diagrams show how services and operators authenticate the broker through their respective identity providers.

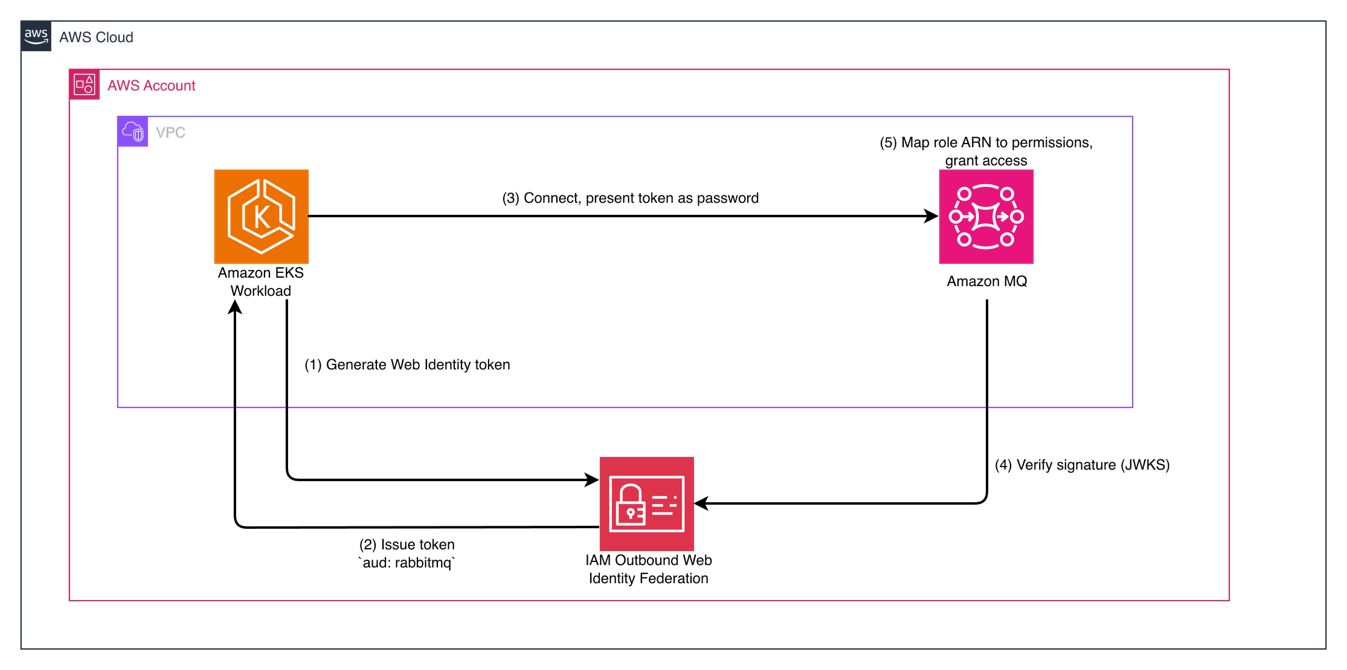
Services authentication flow from an Amazon EKS workload through AWS STS to the Amazon MQ for RabbitMQ broker over AMQPS

Figure 1: Services (IAM) flow

Services authenticate through IAM. An Amazon EKS workload assumes an IAM role and generates a web identity token (1), which AWS Security Token Service (AWS STS) issues with an audience of rabbitmq-iam (2). The workload presents that token as its password when it connects to the broker over Advanced Message Queuing Protocol (AMQPS) on port 5671 (3). The broker selects the matching resource server, verifies the token’s signature against the AWS STS signing keys (4), and maps the role’s Amazon Resource Name (ARN) to the permissions the workload needs (5).

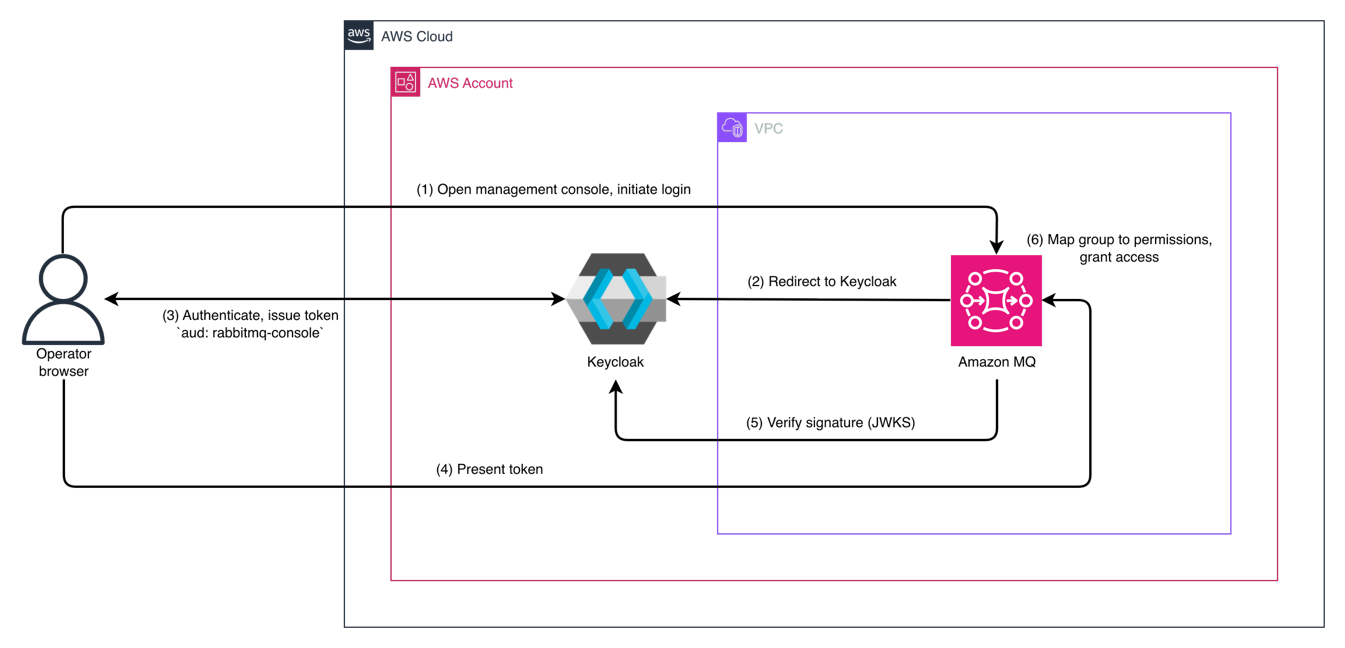
Operators authentication flow from the RabbitMQ management console through Keycloak single sign-on to the broker

Figure 2: Operators (Keycloak) flow

Operators authenticate through Keycloak. An operator opens the RabbitMQ management console and initiates login (1), and the console redirects the browser to Keycloak (2). Keycloak authenticates the operator and issues a token whose audience targets the console resource server, rabbitmq-keycloak (3). The browser presents that token to the broker (4), which verifies the signature against Keycloak’s signing keys (5). The broker then reads the operator’s group membership and grants access (6): the Operator group receives read-only permissions, while the Administrator group receives full control.

Two constraints follow this design. First, audience verification is a single broker-wide setting that applies to every provider at once, so each provider must issue tokens carrying the exact audience its resource server expects. Second, the broker is private, deployed inside an Amazon Virtual Private Cloud (Amazon VPC) with no public exposure. Both providers’ endpoints must be resolvable, either through publicly addressable JSON Web Key Set (JWKS) endpoints or through private networking, because the broker fetches signing keys from those endpoints.

Implementation walkthrough

This walkthrough configures one Amazon MQ for RabbitMQ broker to trust two identity providers: Keycloak for operators and AWS IAM for services. The steps assume you already have a running broker, a Keycloak realm, and outbound web identity federation enabled for your AWS account. All configurations are applied through a RabbitMQ configuration revision using the AWS Command Line Interface (AWS CLI).

Enable OAuth 2.0 on the broker

The first block activates the OAuth 2.0 backend and keeps the internal backend in place. Internal authentication remains active deliberately: Amazon MQ creates an administrator user when the broker is provisioned, and that user is needed for break-glass access.

auth_backends.1 = oauth2
auth_backends.2 = internal
auth_oauth2.verify_aud = true

Setting verify_aud = true tells RabbitMQ to reject any token whose aud claim does not match a configured resource server. This single broker-wide setting governs every provider you add.

Add the first identity provider (Keycloak)

A resource server binds an audience value to a provider and a set of permission rules. The Keycloak resource server uses the id rabbitmq-keycloak, which is the audience the realm must place in its tokens. RabbitMQ reads the operator’s group membership from the group_membership claim and resolves it through scope aliases.

auth_oauth2.resource_servers.1.id = rabbitmq-keycloak
auth_oauth2.resource_servers.1.oauth_provider_id = keycloak
auth_oauth2.resource_servers.1.scope_prefix = rabbitmq.
auth_oauth2.resource_servers.1.additional_scopes_key = group_membership
auth_oauth2.resource_servers.1.preferred_username_claims.1 = email
auth_oauth2.resource_servers.1.scope_aliases.1.alias = Operator
auth_oauth2.resource_servers.1.scope_aliases.1.scope = rabbitmq.read:*/* rabbitmq.write:^$ rabbitmq.configure:^$ rabbitmq.tag:monitoring
auth_oauth2.resource_servers.1.scope_aliases.2.alias = Administrator
auth_oauth2.resource_servers.1.scope_aliases.2.scope = rabbitmq.read:*/* rabbitmq.write:*/* rabbitmq.configure:*/* rabbitmq.tag:administrator

The Operator group is read-only: it can read any resource and view the management UI through the monitoring tag. The Administrator group receives full permissions plus the administrator tag. This role is least privilege by design.

The provider is configured with its issuer and JWKS endpoint:

auth_oauth2.oauth_providers.keycloak.https.hostname_verification = wildcard
auth_oauth2.oauth_providers.keycloak.issuer = https://keycloak.example.com/auth/realms/test
auth_oauth2.oauth_providers.keycloak.jwks_uri = https://keycloak.example.com/auth/realms/test/protocol/openid-connect/certs

To let operators sign in from the management console, expose Keycloak as a management resource:

management.oauth_enabled = true
management.oauth_disable_basic_auth = false
management.oauth_scopes = openid email profile
management.oauth_resource_servers.1.id = rabbitmq-keycloak
management.oauth_resource_servers.1.oauth_client_id = rabbitmq-keycloak
management.oauth_resource_servers.1.label = Keycloak SSO

Add the second identity provider (AWS IAM)

Adding a second provider means adding a second resource server and a second entry under oauth_providers. The IAM resource server uses the id rabbitmq-iam because the audience is set when minting the token.

auth_oauth2.resource_servers.2.id = rabbitmq-iam
auth_oauth2.resource_servers.2.oauth_provider_id = aws_iam
auth_oauth2.resource_servers.2.scope_prefix = rabbitmq/
auth_oauth2.resource_servers.2.additional_scopes_key = sub
auth_oauth2.resource_servers.2.scope_aliases.1.alias = arn:aws:iam::123456789012:role/EKSWorkloadRole
auth_oauth2.resource_servers.2.scope_aliases.1.scope = rabbitmq/read:*/* rabbitmq/write:*/* rabbitmq/configure:*/* rabbitmq/tag:policymaker
auth_oauth2.oauth_providers.aws_iam.https.hostname_verification = wildcard
auth_oauth2.oauth_providers.aws_iam.issuer =
auth_oauth2.oauth_providers.aws_iam.jwks_uri =

The IAM workload receives the policymaker tag. It can publish, consume, and manage policies but does not receive the administrator tag.

Apply the configuration and restart the broker:

CONFIG_ID=$(aws mq describe-broker --broker-id $BROKER_ID \
  --query 'Configurations.Current.Id' --output text)
REVISION=$(aws mq update-configuration --configuration-id $CONFIG_ID \
  --data "$(cat rabbitmq.conf | base64 | tr -d '\n')" \
  --query 'LatestRevision.Revision' --output text)
aws mq update-broker --broker-id $BROKER_ID \
  --configuration Id=$CONFIG_ID,Revision=$REVISION
aws mq reboot-broker --broker-id $BROKER_ID

Note: The base64 command syntax differs between Linux and macOS. The preceding command (cat file | base64 | tr -d '\n') is portable on both operating systems. If running exclusively on Linux, you can also use base64 --wrap=0 rabbitmq.conf. On macOS, the equivalent command is base64 -i rabbitmq.conf.

Testing and validation

Validate each provider independently. For IAM, assume the role and request a token from AWS STS, then present it as the AMQP password:

TOKEN=$(aws sts get-web-identity-token \
  --audience "rabbitmq-iam" \
  --signing-algorithm ES384 \
  --duration-seconds 300 \
  --query 'WebIdentityToken' --output text)
# Username is empty (ignored by the OAuth plugin); the token is passed as the password
curl -u ":$TOKEN" https://<broker-id>.mq.<region>.on.aws/api/overview

Note: The get-web-identity-token API requires outbound web identity federation to be enabled on your AWS account and AWS CLI version 2.27 or later.

A successful response confirms the IAM resource server accepted the token. For Keycloak, open the management console, choose Keycloak SSO, and sign in as an operator.

When a login fails, decode the JSON Web Token (JWT) and check two claims. The aud claim must exactly match a resource server id. With verify_aud = true, a missing or mismatched audience is the most common cause of rejection. If the audience is correct but permissions are missing, verify the scope_prefix is set correctly.

Operational considerations

A few points deserve attention before you run this pattern in production.

  1. Key rotation: When rotating signing keys at a provider, publish the new key in the JWKS endpoint before revoking the old one. The broker caches keys, so overlapping both during the transition window prevents authentication failures while the cache refreshes.
  2. Audience validation: Audience remains the linchpin. With verify_aud enabled, every provider must issue tokens carrying the audience its resource server expects, so confirm this whenever you onboard a new one. Don’t disable audience validation in production. The RabbitMQ OAuth 2.0 plugin does not perform token revocation checks, which makes audience binding a critical control that prevents tokens issued for other services from granting access.
  3. Scope prefix: scope_prefix values are optional. They’re needed only if the tokens don’t follow the default format. RabbitMQ only reads scopes carrying the expected prefix, so a token can authenticate yet grant nothing if the prefix is missing. Map each provider to the least privilege its principals need. For example, prefer narrow scopes like read:orders over blanket read:all to limit the scope of impact if a single provider’s credentials are compromised.
  4. Token lifetime: Because the plugin does not support token revocation, token lifetime is your primary control over leaked credentials. Issue short-lived access tokens and have your client applications refresh them proactively at approximately 75 percent of the token’s lifetime to avoid connection disruptions when a token expires mid-session.
  5. Monitoring: Authentication failures and refused tokens are recorded in the broker’s connection log group in Amazon CloudWatch, which can be reached through the Amazon CloudWatch Logs link on the broker’s page in the Amazon MQ console. Beyond logs, set up CloudWatch alarms on RabbitMQMemUsed, RabbitMQDiskFree, and ConnectionCount. An unexpected spike in failed connections is often the first sign of a token or audience misconfiguration. For unaggregated, per-node visibility, consider enabling the Prometheus metrics endpoint: metrics such as rabbitmq_auth_attempts_failed_total surface OAuth rejections faster than the CloudWatch one-minute polling interval.
  6. Network controls: Enforce defense in depth by restricting broker access using security groups so that only authorized VPCs and IP ranges can reach the AMQPS and management endpoints. This matters especially in an OAuth setup because, once a token has been issued, the broker cannot revoke it before it expires.

Cleanup

To avoid incurring future costs, delete the resources created during this walkthrough if you no longer need them:

  1. Delete Amazon MQ broker and configurations.
  2. Remove test OAuth application registrations from your identity providers.
  3. Delete any IAM roles created for testing.

Conclusion

In this post, we demonstrated how Picnic configured an Amazon MQ for RabbitMQ broker to authenticate tokens from two OAuth 2.0 identity providers: Keycloak for human operators and AWS IAM for machine-to-machine services on a single broker instance. The key mechanism is RabbitMQ’s support for multiple resource servers, where the audience claim in each token determines which provider’s signing keys and permission rules apply.

With this approach, the Picnic team was able to cleanly separate human and machine authentication without the operational overhead of running separate brokers, while retaining fine-grained access control for both token issuers.

This pattern works with any combination of OAuth 2.0 providers and is particularly valuable for organizations looking to consolidate messaging infrastructure while maintaining distinct identity boundaries.

To learn more about Amazon MQ for RabbitMQ and OAuth 2.0 authentication, see Authentication and authorization for Amazon MQ. For a hands-on walkthrough of configuring OAuth 2.0 with Amazon MQ for RabbitMQ, see Using OAuth 2.0 authentication and authorization for Amazon MQ for RabbitMQ. The configuration examples in this post are broker-level settings applied through the Amazon MQ API. No standalone code repository is required.


About the authors

Oscar Mapfumo Sibanda

Oscar Mapfumo Sibanda

Oscar is a Senior Site Reliability Engineer at Picnic Technologies in the Netherlands. He builds infrastructure that supports rapid scaling, empowers engineering teams to move independently, and strengthens the security posture across the organization. Outside of work he paints and takes photographs; he is a technology enthusiast in the pursuit of happiness.

Ayush Kumar

Ayush Kumar

Ayush is a Technical Account Manager at Amazon Web Services based in the Netherlands. He works with enterprise customers to optimize their cloud architectures and accelerate innovation on AWS. You’ll find him experimenting in the kitchen in his spare time.

Amit Singh

Amit Singh

Amit is a Senior Solutions Architect at AWS, working with enterprise retail customers in the Benelux region. He helps customers design cloud-native architectures, navigate complex modernization journeys, and adopt AI/ML capabilities at scale. Outside of work, he enjoys exploring new places and chasing the perfect shot, whether through a camera lens or on a running trail.

Build with geospatial and variant types in Iceberg v3 on AWS Glue 6.0

Post Syndicated from Shoukat Ghouse original https://aws.amazon.com/blogs/big-data/build-with-geospatial-and-variant-types-in-iceberg-v3-on-aws-glue-6-0/

As organizations build data lakes that combine geospatial data, high-frequency event streams, and heterogeneous payloads, the limitations of older table formats become acute. Without a native geospatial type, coordinates require separate float columns (latitude/longitude) with no spatial predicates. Without nanosecond-precision timestamps, sub-microsecond event ordering is lost. Without a variant type, semi-structured data forces a choice between rigid flattening and untyped JSON strings. Each workaround adds complexity, slows queries, and increases maintenance burden.

AWS Glue 6.0, powered by Apache Spark 4.1, removes these workarounds by adding support for Apache Iceberg v3, bringing new column-level capabilities to your data lake tables. These include new data types: native geospatial types (GEOMETRY with spatial predicates, and GEOGRAPHY), nanosecond-precision timestamps, and the VARIANT type for semi-structured data with automatic shredding. Iceberg v3 also adds support for DEFAULT column values. These are table format features. After they’re written, they’re readable by any Iceberg v3-compatible engine that supports these features.

In this post, we build a connected vehicle fleet monitoring pipeline that uses these capabilities in a single Iceberg v3 table. Vehicles emit telemetry events with GPS coordinates (geospatial), sub-microsecond event times (nanosecond), and sensor payloads that vary by vehicle type (variant). We ingest these events, run spatial queries to detect geofence violations, sequence events at nanosecond precision, and extract typed metrics from heterogeneous payloads, all without workarounds, flattening, or external libraries.

Solution overview

A logistics company operates a mixed fleet of delivery vehicles: vans, electric bikes, and delivery robots. Each vehicle type produces telemetry events with a different sensor payload schema. The operations team needs to:

  1. Detect geofence violations: flag vehicles that enter restricted zones (airports, pedestrian areas, private property).
  2. Sequence events precisely: at fleet scale, many events land in the same microsecond window. Nanosecond timestamps give a deterministic order and prevent ties when sequencing or deduplicating events during processing.
  3. Extract metrics from heterogeneous payloads: query battery level from delivery robots, fuel level from vans, and pedal cadence from bikes, all stored in the same column.

We address all three requirements with a single Iceberg v3 table on AWS Glue 6.0. The following data definition language (DDL) shows the table structure. The AWS Glue job we provision in subsequent steps executes this statement.

CREATE TABLE fleet_monitoring_db.vehicle_telemetry (
event_id STRING,
vehicle_id STRING,
vehicle_type STRING DEFAULT 'UNKNOWN',
event_time TIMESTAMP_NTZ(9),
location GEOMETRY(4326),
service_area GEOGRAPHY(4326),
sensor_payload VARIANT,
speed_kmh DOUBLE DEFAULT 0.0,
region STRING DEFAULT 'EMEA'
) USING ICEBERG
TBLPROPERTIES (
'format-version' = '3',
'write.delete.mode' = 'merge-on-read'
)
PARTITIONED BY (days(event_time), vehicle_type)

In the preceding statement, the database is shown as fleet_monitoring_db for readability. The deployed stack creates it as fleet_monitoring_<account-id>.

The following list describes the key columns:

  • event_time TIMESTAMP_NTZ(9): Stores the event timestamp at nanosecond precision.
  • location GEOMETRY(4326): Stores GPS coordinates as native spatial objects using (SRID 4326). You can use predicates like ST_Intersects directly in SQL, replacing hand-coded spatial math on raw latitude/longitude doubles (WGS 84).
  • service_area GEOGRAPHY(4326): Stores geographic coordinates using a spherical (geodesic) model, distinct from GEOMETRY’s planar model. AWS Glue 6.0 writes and reads GEOGRAPHY in Iceberg v3, and the type is portable to any Iceberg v3-compatible engine. Geodesic spatial predicates over GEOGRAPHY are engine-dependent today. In this post we run spatial queries on the GEOMETRY location column, which Glue 6.0 supports natively.
  • sensor_payload VARIANT: Each vehicle type produces a different JSON schema. Vans report fuel and engine metrics, robots report battery and camera status, bikes report cadence and heart rate. All land in this single column without schema unions or separate tables using variant data type.
  • vehicle_type STRING DEFAULT ‘UNKNOWN’ and speed_kmh DOUBLE DEFAULT 0.0: When an ingestion writer omits these fields, Iceberg applies the declared defaults automatically. Useful when multiple producers write to the same table and not all of them populate every column.

The table uses PARTITIONED BY (days(event_time), vehicle_type) so that analytical queries can prune by date range and vehicle type without scanning the full table. 'write.delete.mode' = 'merge-on-read' supports fast row-level corrections (for example, correcting a misreported GPS coordinate) through compact deletion vectors (Roaring Bitmaps) instead of accumulating positional delete files.

In this post, we insert sample data directly to focus on the new Iceberg data types and how to use them together. In production, these events would stream from Amazon Managed Streaming for Apache Kafka (Amazon MSK) into an AWS Glue 6.0 streaming job.

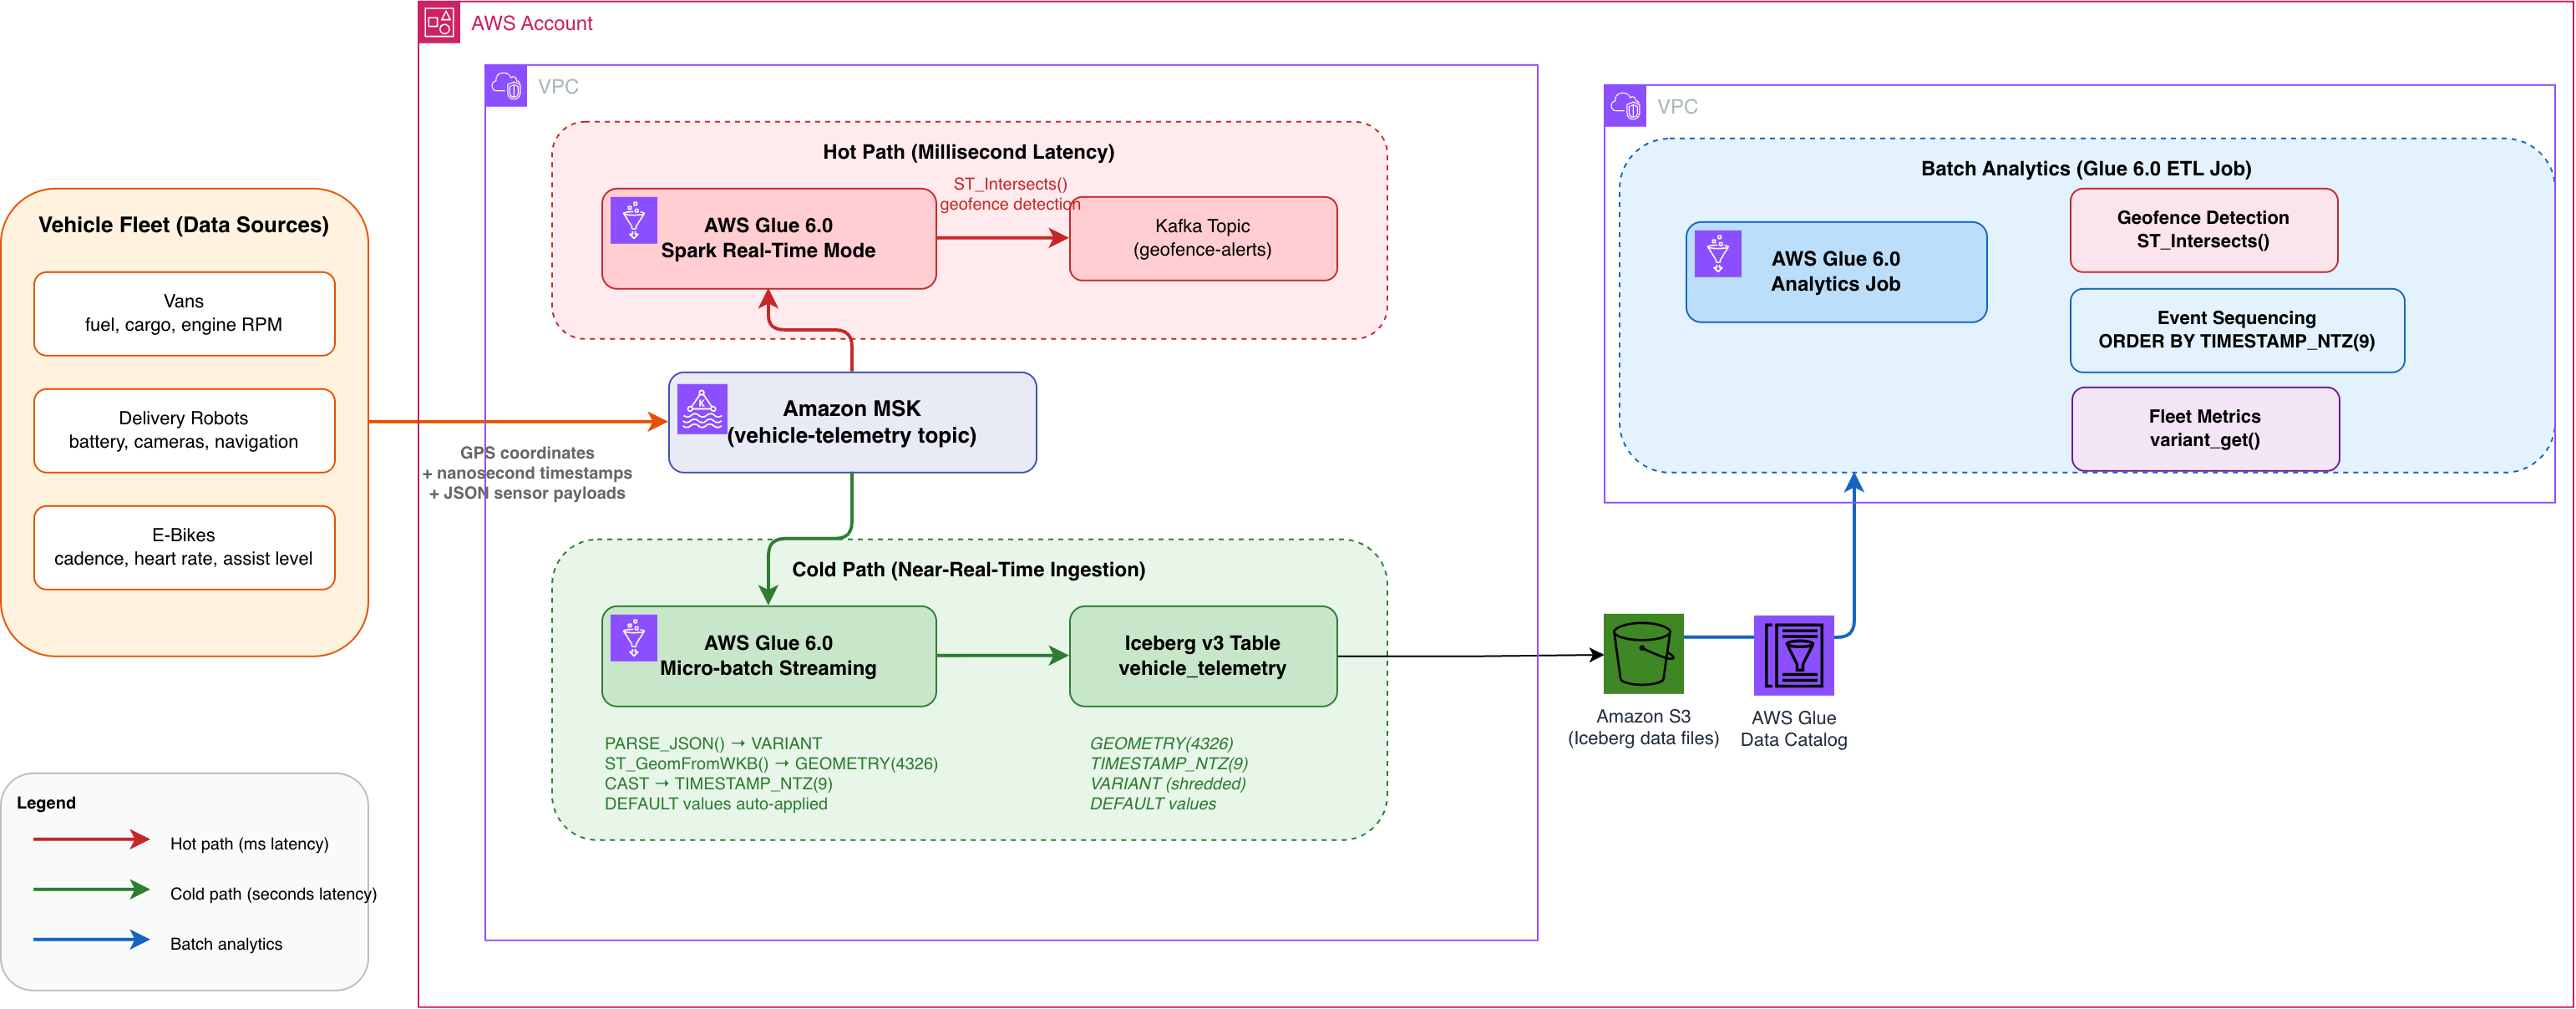
The following diagram illustrates the production architecture for reference:

Architecture diagram showing a vehicle fleet of vans, delivery robots, and electric bikes sending telemetry through Amazon MSK into an AWS account. Within a VPC, a hot path uses AWS Glue 6.0 Spark Real-Time Mode to detect geofence violations and send alerts to a Kafka topic, while a cold path uses a Glue 6.0 micro-batch job to write events into an Apache Iceberg v3 table with GEOMETRY, TIMESTAMP_NTZ(9), VARIANT, and DEFAULT columns. Amazon S3 stores the Iceberg data and the AWS Glue Data Catalog holds metadata. A batch analytics Glue job reads the Iceberg table for geofence detection, nanosecond event sequencing, and per-vehicle-type metric extraction using variant_get

Figure 1: Reference architecture for a fleet telemetry pipeline on AWS Glue 6.0

The architecture processes vehicle telemetry through two paths, with a downstream batch analytics layer:

Hot path (real-time, milliseconds): A Spark Real-Time Mode (RTM) job reads telemetry from Amazon MSK and evaluates geofence violations using spatial predicates like ST_Intersects, routing alerts to a downstream Kafka topic within milliseconds.

Cold path (near-real-time, seconds): A micro-batch job reads the same MSK topic and writes events into an Iceberg v3 table, converting payloads to GEOMETRY, TIMESTAMP_NTZ(9), and VARIANT columns with DEFAULT values applied.

Batch analytics: An AWS Glue job reads the Iceberg v3 table to run batch analytics on geofence detection, nanosecond event sequencing, and per-vehicle-type metric extraction.

Prerequisites

To follow along, you need:

  • An AWS account and an AWS Region where AWS Glue 6.0 is available.
  • An AWS Identity and Access Management (IAM) role with permissions to deploy AWS CloudFormation stacks and create resources including AWS Glue, Amazon Simple Storage Service (Amazon S3), and Amazon CloudWatch Logs.

Deploy the CloudFormation stack

We provide an AWS CloudFormation template that provisions all the resources needed for this walkthrough.

The stack provisions the following resources:

  • An Amazon S3 bucket for Iceberg table storage.
  • An IAM role with permissions for AWS Glue, Amazon S3, and Amazon CloudWatch Logs.
  • An AWS Glue database (fleet_monitoring_<account-id>).
  • An AWS Glue job fleet-telemetry-ingest-<account-id> (PySpark): creates the Iceberg v3 table vehicle_telemetry described earlier and inserts sample telemetry from three vehicle types.
  • An AWS Glue job fleet-telemetry-queries-<account-id> (PySpark): demonstrates geofence detection, nanosecond sequencing, variant extraction, and default values.

Deploy the CloudFormation stack:

  1. Download the CloudFormation template from the GitHub repository.
  2. Sign in to the AWS CloudFormation console.
  3. Choose Create stack, With new resources, Upload a template file, and upload the downloaded template.
  4. Acknowledge the IAM capabilities and choose Create stack.

Stack creation takes approximately 2–5 minutes. No parameters are required.

After the stack completes, navigate to the AWS Glue console and run the jobs in this order:

  1. Run fleet-telemetry-ingest-<account-id>. This job creates the Iceberg v3 table and inserts sample data (approximately 2 minutes).
  2. After it succeeds, run fleet-telemetry-queries-<account-id>. This job executes all demonstration queries (approximately 2 minutes).

The following sections describe each job in detail.

Job 1: Ingest sample telemetry data

The ingestion job creates the Iceberg v3 table described earlier and inserts four sample telemetry events: one for each of the three vehicle types (van, robot, bike), plus one with omitted fields to demonstrate DEFAULT values. You can view the complete script in the GitHub repository. Note that the geospatial types require one additional Spark configuration (spark.sql.geospatial.enabled=true), which is already set in the job’s --conf argument by the CloudFormation template. All other types work with no extra configuration.

The following are the key snippets from the script:

Van telemetry: GPS coordinates with engine metrics and route information:

spark.sql(f"""
INSERT INTO {TABLE} VALUES (
'EVT-001', 'VAN-042', 'VAN',
CAST('2026-07-28 09:15:30.123456789' AS TIMESTAMP_NTZ(9)),
ST_SetSrid(ST_GeomFromWKB(X'0101000000E17A14AE47E1C0BF1F85EB51B84E4940'), 4326),
ST_SetSrid(ST_GeogFromWKB(X'0101000000E17A14AE47E1C0BF1F85EB51B84E4940'), 4326),
PARSE_JSON('{{"fuel_pct": 0.72, "cargo_kg": 450, "door_open": false,
"engine": {{"rpm": 2100, "temp_c": 88.5}},
"route": {{"stops_remaining": 4, "eta_minutes": 35}}}}'),
35.2, 'EMEA'
)
""")

Delivery robot telemetry: Same table, completely different sensor schema (battery, cameras, navigation):

spark.sql(f"""
INSERT INTO {TABLE} VALUES (
'EVT-002', 'ROB-117', 'ROBOT',
CAST('2026-07-28 09:15:30.123456790' AS TIMESTAMP_NTZ(9)),
ST_SetSrid(ST_GeomFromWKB(X'01010000000000000000001040000000000000F03F'), 4326),
ST_SetSrid(ST_GeogFromWKB(X'01010000000000000000001040000000000000F03F'), 4326),
PARSE_JSON('{{"battery_pct": 0.62, "obstacle_distance_m": 2.8,
"navigation_mode": "autonomous",
"cameras": {{"front": "active", "rear": "recording"}}}}'),
48.0, 'EMEA'
)
""")

Note: EVT-001 and EVT-002 are exactly 1 nanosecond apart (.123456789 vs .123456790). Without TIMESTAMP_NTZ(9), both would round to the same microsecond and be indistinguishable.

Default values test: Event inserted with vehicle_type, speed_kmh, and region omitted:

spark.sql(f"""
INSERT INTO {TABLE}
(event_id, vehicle_id, event_time, location, service_area, sensor_payload)
VALUES (
'EVT-004', 'UNK-999',
CAST('2026-07-28 10:00:00.000000000' AS TIMESTAMP_NTZ(9)),
ST_SetSrid(ST_GeomFromWKB(X'0101000000000000000000F03F000000000000F03F'), 4326),
ST_SetSrid(ST_GeogFromWKB(X'0101000000000000000000F03F000000000000F03F'), 4326),
PARSE_JSON('{{"status": "initializing"}}')
)
""")

The omitted columns automatically receive their DEFAULT values: vehicle_type = 'UNKNOWN', speed_kmh = 0.0, region = 'EMEA'.

Job 2: Query the data

The query job demonstrates all four data types working together. After the job succeeds, select the run in the AWS Glue console and choose Output logs to see the results.

The following sections walk through the key queries from the job and the results of each.

Geofence detection with ST_Intersects

The job defines a polygon and finds all vehicles inside it:

POLY = "010300...."
SELECT event_id, vehicle_id, vehicle_type, speed_kmh
FROM fleet_monitoring_db.vehicle_telemetry
WHERE ST_Intersects(
location,ST_SetSrid(ST_GeomFromWKB(X'{POLY}'), 4326)
)
ORDER BY event_id

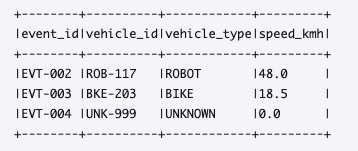
The polygon covers coordinates (0,0)-(5,0)-(5,2)-(0,2). Three vehicles are inside (ROBOT at (4,1), BIKE at (3,1), UNKNOWN at (1,1)). The VAN at (-0.1278, 51.5074) is outside.

Query results listing the ROBOT, BIKE, and UNKNOWN vehicles inside the geofence polygon, with the VAN excluded

Figure 2: Geofence query results showing the three vehicles inside the polygon

Nanosecond event sequencing

Order events by their sub-microsecond timestamps:

SELECT event_id, vehicle_id, CAST(event_time AS STRING) AS precise_time
FROM fleet_monitoring_db.vehicle_telemetry
WHERE event_id IN ('EVT-001', 'EVT-002', 'EVT-003')
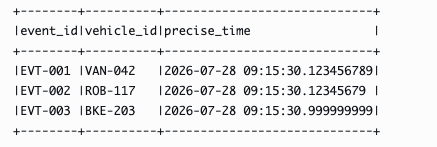
ORDER BY event_time ASC

EVT-001 and EVT-002 are correctly distinguished and ordered despite being only 1 nanosecond apart. With standard TIMESTAMP_NTZ (microsecond precision), both would show .123456 and their relative order would be undefined.

Query results showing EVT-001 and EVT-002 ordered by nanosecond-precision timestamps one nanosecond apart

Figure 3: Nanosecond-precision ordering distinguishing two events one nanosecond apart

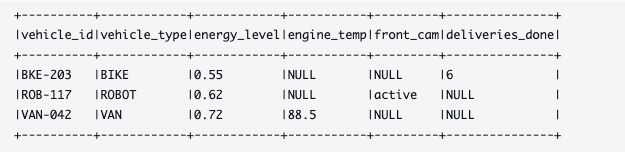
Variant extraction with variant_get

Different sensor schemas per vehicle type, all extracted with variant_get:

SELECT vehicle_id, vehicle_type,
CASE vehicle_type
WHEN 'VAN' THEN variant_get(sensor_payload, '$.fuel_pct', 'DOUBLE')
WHEN 'ROBOT' THEN variant_get(sensor_payload, '$.battery_pct', 'DOUBLE')
WHEN 'BIKE' THEN variant_get(sensor_payload, '$.battery_pct', 'DOUBLE')
ELSE NULL
END AS energy_level,
variant_get(sensor_payload, '$.engine.temp_c', 'DOUBLE') AS engine_temp,
variant_get(sensor_payload, '$.cameras.front', 'STRING') AS front_cam,
variant_get(sensor_payload, '$.deliveries.completed', 'INT') AS deliveries_done
FROM fleet_monitoring_db.vehicle_telemetry
WHERE vehicle_type != 'UNKNOWN'
ORDER BY vehicle_id
Query results showing variant_get extracting energy level, engine temperature, and camera status for each vehicle type

Figure 4: Variant extraction returning typed values from heterogeneous sensor payloads

variant_get takes three arguments: the column, a dot-path expression, and the expected return type. It supports arbitrary nesting depth. $.engine.temp_c reaches two levels deep, $.deliveries.completed reaches into a different structure entirely. When a path doesn’t exist in a particular row’s payload, it returns NULL.

Default values

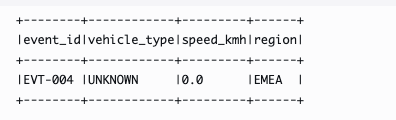
Confirm that omitted columns received their defaults:

SELECT event_id, vehicle_type, speed_kmh, region
FROM fleet_monitoring_db.vehicle_telemetry
WHERE event_id = 'EVT-004'
Query results showing event EVT-004 with the default values UNKNOWN, 0.0, and EMEA applied

Figure 5: Default column values applied to the event inserted with omitted fields

EVT-004 was inserted without vehicle_type, speed_kmh, or region. The declared defaults were applied automatically.

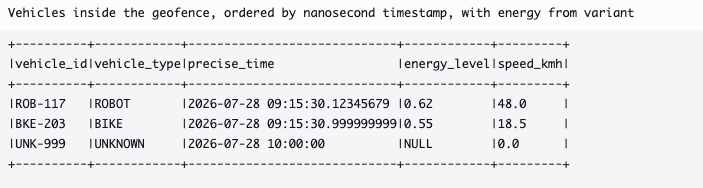
Combined query: Combining spatial, temporal, and variant operations

The following query runs a geospatial predicate, nanosecond ordering, and variant extraction in a single SELECT statement:

SELECT vehicle_id, vehicle_type,
CAST(event_time AS STRING) AS precise_time,
CASE vehicle_type
WHEN 'VAN' THEN variant_get(sensor_payload, '$.fuel_pct', 'DOUBLE')
WHEN 'ROBOT' THEN variant_get(sensor_payload, '$.battery_pct', 'DOUBLE')
WHEN 'BIKE' THEN variant_get(sensor_payload, '$.battery_pct', 'DOUBLE')
ELSE NULL
END AS energy_level,
speed_kmh
FROM fleet_monitoring_db.vehicle_telemetry
WHERE ST_Intersects(location, ST_SetSrid(ST_GeomFromWKB(X'0103000000...'), 4326))
ORDER BY event_time ASC
Query results combining spatial filtering, nanosecond ordering, and variant extraction in a single query

Figure 6: Combined query results over a single Iceberg v3 table

This single query combines a spatial predicate, nanosecond ordering, and variant extraction over one table, with no external libraries, pre-processing, or joins to separate geometry or payload tables.

Clean up

To avoid ongoing charges from the AWS Glue jobs and Amazon S3 storage, delete the CloudFormation stack when you’re done:

  1. Open the AWS CloudFormation console.
  2. Select the stack you deployed earlier and choose Delete.

Conclusion

In this post, we stored and analyzed geospatial coordinates, nanosecond timestamps, and heterogeneous sensor payloads in a single Iceberg v3 table on AWS Glue 6.0, with sensible defaults applied automatically, no external libraries, and no schema flattening.

  • GEOMETRY columns replace latitude/longitude doubles and support native spatial predicates like ST_Intersects for geofence detection. GEOGRAPHY is stored natively.
  • TIMESTAMP_NTZ(9) preserves full nanosecond precision for event sequencing where microsecond resolution is insufficient.
  • VARIANT stores heterogeneous payloads (different schema per vehicle type) in one column with typed extraction through variant_get.
  • DEFAULT values keep field population consistent across multiple ingestion writers without duplicating logic.

All capabilities require Iceberg format-version 3. Geospatial requires one additional configuration (spark.sql.geospatial.enabled=true). Nanosecond timestamps, Variant, and DEFAULT values work with no extra configuration.

These capabilities apply wherever schemas vary by source (IoT fleets, multi-tenant software as a service (SaaS), event-driven architectures), timestamps need sub-microsecond precision (trading, sensor fusion, autonomous systems), or spatial operations replace coordinate workarounds (logistics, real estate, delivery networks).

For more information, see the AWS launch announcement (launch URL to be added before publishing), the AWS Glue documentation, and the Apache Iceberg v3 specification. AWS Glue 6.0 includes additional capabilities such as Spark Real-Time Mode and Spark Declarative Pipelines, which we cover in separate posts.


About the authors

Shoukat Ghouse

Shoukat Ghouse

Shoukat is a Senior Specialist Solutions Architect for Big Data, Analytics, and Data Governance at Amazon Web Services (AWS). He partners with enterprise and financial services customers across EMEA to design and scale production-grade data lakehouse platforms on Apache Spark, Apache Iceberg, AWS Glue, Amazon EMR, and Amazon SageMaker Unified Studio. His focus spans distributed data processing, fine-grained data governance, and helping organizations build AI-ready data foundations that power analytics and machine learning at scale.

Shrey Malpani

Shrey Malpani

Shrey is a Senior Product Manager Technical at Amazon Web Services (AWS), where he works at the intersection of distributed data processing and data integration. He is focused on building and scaling data integration and data management capabilities across services like AWS Glue, Amazon EMR, and Amazon Redshift that help customers build AI-ready data platforms for their analytics and machine learning workflows.

Kartik

Kartik

Kartik is a Software Development Manager on the AWS Glue team. His team builds generative AI features for the Data Integration and distributed system for data integration.

Creating and testing an End User Messaging RCS agent with AWS CLI

Post Syndicated from Bruno Giorgini original https://aws.amazon.com/blogs/messaging-and-targeting/creating-and-testing-an-end-user-messaging-rcs-agent-with-aws-cli/

A step-by-step walkthrough for setting up a Rich Communication Services (RCS) test agent, from brand assets to verified inbound messaging.

If you’re still sending plain SMS, you’re leaving a significant experience gap on the table. SMS gives you 160 characters of unformatted text, no branding, and zero confirmation that your message was even read. Rich Communication Services (RCS) changes that entirely. It delivers branded carousels, read receipts, typing indicators, high-resolution images, and verified sender identity, all through the native messaging app your customers already use. No app download required, no new account to create.

Compared to over-the-top (OTT) platforms like WhatsApp or iMessage for Business, RCS doesn’t fragment your audience. It works on an Android’s default messaging app with RCS enabled or an iPhone on iOS 18 or later, which means you reach users where they already are. You are not limited to the ones who happen to have a specific app installed. And compared to building a custom in-app messaging experience, RCS requires no SDK, no UI work, and no convincing users to enable notifications.

With AWS End User Messaging, standing up an RCS agent is surprisingly fast. You configure your brand assets, submit a registration, and within minutes you have a test agent sending branded messages through production APIs. This is real infrastructure, not a sandbox. That means you can prototype, validate your integration, and show stakeholders a working demo before committing to a full build.

This post walks through the entire process of creating an RCS test agent using only the AWS Command Line Interface (AWS CLI). Using the CLI means every step is a repeatable, scriptable command. Need to spin up another agent in a different account or Region? Run the same script and you’re done in minutes. By the end, you will have a working agent that can send branded messages to verified testers and receive inbound messages with automatic responses.

What you will build

In this walkthrough, you will:

  1. Create an RCS agent and configure its brand identity (logo, banner, accent color).
  2. Submit a test registration for automated approval.
  3. Add a verified tester device.
  4. Send your first branded RCS message.
  5. Configure and verify inbound messaging with an automatic keyword response.

Prerequisites

Before you begin, confirm you have:

  • An AWS account with access to AWS End User Messaging (Amazon Pinpoint SMS and Voice v2 API)
  • AWS CLI v2.35.12 or later installed and configured with credentials that have pinpoint-sms-voice-v2:* permissions. Version 2.35.12 adds the send-rcs-message command, which you will need for rich media messages (rich cards, carousels, and suggestion chips) beyond this walkthrough. For production deployments, scope the IAM policy down to only the specific actions your application requires. The pinpoint-sms-voice-v2:* scope is convenient for testing but broader than necessary.
  • rsvg-convert for generating brand asset images from SVG (install with brew install librsvg on macOS)
  • A test phone that supports RCS messaging.

Verify your setup:

# Confirm AWS credentials are working
aws sts get-caller-identity
# Verify EUM access
aws pinpoint-sms-voice-v2 describe-spend-limits --region us-east-1
# Confirm rsvg-convert is installed
which rsvg-convert

If you use a named AWS CLI profile, append --profile <your-profile> to every AWS command in this walkthrough.

Step 1: Create the RCS agent

The first step is to create an empty RCS agent container. The agent’s display name and branding come from the registration you will configure in Step 2.

aws pinpoint-sms-voice-v2 create-rcs-agent \
  --region us-east-1

Expected output:

{
  "RcsAgentArn": "arn:aws:sms-voice:us-east-1:123456789012:rcs-agent/rcs-a1b2c3d4e5f6a1b2c3d4e5f6a1b2c3d4",
  "RcsAgentId": "rcs-a1b2c3d4e5f6a1b2c3d4e5f6a1b2c3d4",
  "Status": "CREATED",
  "DeletionProtectionEnabled": false,
  "CreatedTimestamp": "2026-07-15T10:00:01.000000-07:00"
}

Save the RcsAgentId and RcsAgentArn values. You will use them throughout this walkthrough.

Next, enable deletion protection to prevent accidental removal. This is especially important once carrier approvals are in place, since re-creating an agent requires a new registration and approval cycle:

aws pinpoint-sms-voice-v2 update-rcs-agent \
  --rcs-agent-id rcs-a1b2c3d4e5f6a1b2c3d4e5f6a1b2c3d4 \
  --deletion-protection-enabled \
  --region us-east-1

Step 2: Generate brand assets

Your RCS agent needs a logo (224×224 px, must be under 50 KB as PNG) and a banner (1440×448 px, must be under 200 KB as PNG). Both must be JPEG or PNG format. You can use your own designs as long as they meet these dimension and size requirements. In this example, we generate them as SVGs and convert to PNG.

Create the logo SVG

Create a file named brand-assets/logo.svg:

<svg xmlns="http://www.w3.org/2000/svg" width="224" height="224" viewBox="0 0 224 224"><defs><linearGradient id="bg" x1="0%" y1="0%" x2="100%" y2="100%"><stop offset="0%" style="stop-color:#0D47A1"/><stop offset="100%" style="stop-color:#1565C0"/></linearGradient></defs><rect width="224" height="224" rx="40" fill="url(#bg)"/><g transform="translate(112,90)"><path d="M-48,-36 L48,-36 C54,-36 58,-32 58,-26 L58,16 C58,22 54,26 48,26             L10,26 L0,42 L-10,26 L-48,26 C-54,26 -58,22 -58,16 L-58,-26             C-58,-32 -54,-36 -48,-36 Z" fill="white" opacity="0.95"/><path d="M-20,-12 C-14,-20 14,-20 20,-12" stroke="#0D47A1" stroke-width="4" fill="none" stroke-linecap="round"/><path d="M-14,-2 C-9,-8 9,-8 14,-2" stroke="#0D47A1" stroke-width="4" fill="none" stroke-linecap="round"/><circle cx="0" cy="6" r="4" fill="#0D47A1"/></g><text x="112" y="168" text-anchor="middle" font-family="Arial, Helvetica, sans-serif" font-size="16" font-weight="bold" fill="white">AWS EUM</text><text x="112" y="188" text-anchor="middle" font-family="Arial, Helvetica, sans-serif" font-size="12" fill="white" opacity="0.85">DEMO</text></svg>

Create the banner SVG

Create a file named brand-assets/banner.svg:

<svg xmlns="http://www.w3.org/2000/svg" width="1440" height="448" viewBox="0 0 1440 448"><defs><linearGradient id="bannerBg" x1="0%" y1="0%" x2="100%" y2="100%"><stop offset="0%" style="stop-color:#0D47A1"/><stop offset="50%" style="stop-color:#1565C0"/><stop offset="100%" style="stop-color:#0D47A1"/></linearGradient></defs><rect width="1440" height="448" fill="url(#bannerBg)"/><circle cx="200" cy="224" r="300" fill="white" opacity="0.03"/><circle cx="1300" cy="100" r="250" fill="white" opacity="0.04"/><text x="720" y="190" text-anchor="middle" font-family="Arial, Helvetica, sans-serif" font-size="56" font-weight="bold" fill="white">    AWS End User Messaging  </text><text x="720" y="250" text-anchor="middle" font-family="Arial, Helvetica, sans-serif" font-size="48" font-weight="bold" fill="white" opacity="0.9">    Demo  </text><text x="720" y="320" text-anchor="middle" font-family="Arial, Helvetica, sans-serif" font-size="24" fill="white" opacity="0.7">    Rich messaging experiences, powered by AWS  </text></svg>

Convert to PNG

rsvg-convert -w 224 -h 224 brand-assets/logo.svg -o brand-assets/logo.png
rsvg-convert -w 1440 -h 448 brand-assets/banner.svg -o brand-assets/banner.png

Verify the file sizes. The logo must be under 50 KB and the banner under 200 KB:

ls -la brand-assets/*.png
# logo.png   ~9 KB
# banner.png ~79 KB

Step 3: Create and configure the registration

RCS agents require a registration that contains all brand details. For testing, use the TEST_RCS_LAUNCH_REGISTRATION type.

Create the registration

aws pinpoint-sms-voice-v2 create-registration \
  --registration-type TEST_RCS_LAUNCH_REGISTRATION \
  --region us-east-1

Expected output:

{
  "RegistrationId": "registration-a1b2c3d4e5f6a1b2c3d4e5f6a1b2c3d4",
  "RegistrationType": "TEST_RCS_LAUNCH_REGISTRATION",
  "RegistrationStatus": "CREATED",
  "CurrentVersionNumber": 1
}

Save the RegistrationId.

aws pinpoint-sms-voice-v2 create-registration-association \
  --registration-id registration-a1b2c3d4e5f6a1b2c3d4e5f6a1b2c3d4 \
  --resource-id rcs-a1b2c3d4e5f6a1b2c3d4e5f6a1b2c3d4 \
  --region us-east-1

Upload brand assets

Upload the logo and banner as registration attachments. Note that --attachment-body and --attachment-url cannot be used together. Use --attachment-body with the fileb:// prefix:

# Upload logo
aws pinpoint-sms-voice-v2 create-registration-attachment \
  --attachment-body fileb://brand-assets/logo.png \
  --region us-east-1
# Save: RegistrationAttachmentId (e.g., attachment-1111aaaa2222bbbb3333cccc4444dddd)
# Upload banner
aws pinpoint-sms-voice-v2 create-registration-attachment \
  --attachment-body fileb://brand-assets/banner.png \
  --region us-east-1
# Save: RegistrationAttachmentId (e.g., attachment-5555eeee6666ffff7777aaaa8888bbbb)

Set registration fields

The registration has 23 fields. Each field has a specific type that determines which CLI parameter to use:

Field type CLI parameter Example
TEXT --text-value --text-value "My Brand"
SELECT --select-choices --select-choices "MULTI_USE"
ATTACHMENT --registration-attachment-id --registration-attachment-id "attachment-abc123"

Do not use --field-values. That parameter does not exist in this CLI.

Set all the TEXT fields:

REG_ID="registration-a1b2c3d4e5f6a1b2c3d4e5f6a1b2c3d4"
REGION="us-east-1"

aws pinpoint-sms-voice-v2 put-registration-field-value \
  --registration-id $REG_ID \
  --field-path "agentDetails.brandName" \
  --text-value "AWS End User Messaging Demo" \
  --region $REGION

aws pinpoint-sms-voice-v2 put-registration-field-value \
  --registration-id $REG_ID \
  --field-path "agentDetails.senderDisplayName" \
  --text-value "AWS End User Messaging Demo" \
  --region $REGION

aws pinpoint-sms-voice-v2 put-registration-field-value \
  --registration-id $REG_ID \
  --field-path "agentDetails.agentDescription" \
  --text-value "Experience the power of rich messaging with AWS End User Messaging" \
  --region $REGION

aws pinpoint-sms-voice-v2 put-registration-field-value \
  --registration-id $REG_ID \
  --field-path "agentDetails.accentColor" \
  --text-value "#0D47A1" \
  --region $REGION

aws pinpoint-sms-voice-v2 put-registration-field-value \
  --registration-id $REG_ID \
  --field-path "agentDetails.contactPhoneNumber" \
  --text-value "+12065550100" \
  --region $REGION

aws pinpoint-sms-voice-v2 put-registration-field-value \
  --registration-id $REG_ID \
  --field-path "agentDetails.contactPhoneLabel" \
  --text-value "Call Us" \
  --region $REGION

aws pinpoint-sms-voice-v2 put-registration-field-value \
  --registration-id $REG_ID \
  --field-path "agentDetails.contactEmailAddress" \
  --text-value "[email protected]" \
  --region $REGION

aws pinpoint-sms-voice-v2 put-registration-field-value \
  --registration-id $REG_ID \
  --field-path "agentDetails.contactEmailLabel" \
  --text-value "Email Us" \
  --region $REGION

aws pinpoint-sms-voice-v2 put-registration-field-value \
  --registration-id $REG_ID \
  --field-path "agentDetails.contactWebsite" \
  --text-value "https://www.example.com" \
  --region $REGION

aws pinpoint-sms-voice-v2 put-registration-field-value \
  --registration-id $REG_ID \
  --field-path "agentDetails.contactWebsiteLabel" \
  --text-value "Visit Website" \
  --region $REGION

aws pinpoint-sms-voice-v2 put-registration-field-value \
  --registration-id $REG_ID \
  --field-path "agentDetails.privacyPolicyUrl" \
  --text-value "https://www.example.com/privacy" \
  --region $REGION

aws pinpoint-sms-voice-v2 put-registration-field-value \
  --registration-id $REG_ID \
  --field-path "agentDetails.privacyPolicyLabel" \
  --text-value "Privacy Policy" \
  --region $REGION

aws pinpoint-sms-voice-v2 put-registration-field-value \
  --registration-id $REG_ID \
  --field-path "agentDetails.termsAndConditionsUrl" \
  --text-value "https://www.example.com/terms" \
  --region $REGION

aws pinpoint-sms-voice-v2 put-registration-field-value \
  --registration-id $REG_ID \
  --field-path "agentDetails.termsAndConditionsLabel" \
  --text-value "Terms and Conditions" \
  --region $REGION

aws pinpoint-sms-voice-v2 put-registration-field-value \
  --registration-id $REG_ID \
  --field-path "agentDetails.serviceName" \
  --text-value "AWS End User Messaging Demo RCS Agent" \
  --region $REGION

aws pinpoint-sms-voice-v2 put-registration-field-value \
  --registration-id $REG_ID \
  --field-path "agentDetails.monthlyRcsVolume" \
  --text-value "1000" \
  --region $REGION

aws pinpoint-sms-voice-v2 put-registration-field-value \
  --registration-id $REG_ID \
  --field-path "complianceKeywords.helpResponse" \
  --text-value "Reply STOP to opt out. For help, contact [email protected]" \
  --region $REGION

aws pinpoint-sms-voice-v2 put-registration-field-value \
  --registration-id $REG_ID \
  --field-path "complianceKeywords.stopResponse" \
  --text-value "You have been unsubscribed. No more messages will be sent." \
  --region $REGION

Set the SELECT fields. These use --select-choices instead of --text-value:

aws pinpoint-sms-voice-v2 put-registration-field-value \
  --registration-id $REG_ID \
  --field-path "agentDetails.useCase" \
  --select-choices "MULTI_USE" \
  --region $REGION

aws pinpoint-sms-voice-v2 put-registration-field-value \
  --registration-id $REG_ID \
  --field-path "agentDetails.billingCategory" \
  --select-choices "CONVERSATIONAL" \
  --region $REGION

aws pinpoint-sms-voice-v2 put-registration-field-value \
  --registration-id $REG_ID \
  --field-path "agentDetails.averageMonthlyRcsFrequency" \
  --select-choices "10" \
  --region $REGION

Set the ATTACHMENT fields. These use --registration-attachment-id:

aws pinpoint-sms-voice-v2 put-registration-field-value \
  --registration-id $REG_ID \
  --field-path "agentDetails.logoImage" \
  --registration-attachment-id "attachment-1111aaaa2222bbbb3333cccc4444dddd" \
  --region $REGION

aws pinpoint-sms-voice-v2 put-registration-field-value \
  --registration-id $REG_ID \
  --field-path "agentDetails.bannerImage" \
  --registration-attachment-id "attachment-5555eeee6666ffff7777aaaa8888bbbb" \
  --region $REGION

A note on accent color

The accent color must meet a 4.5:1 contrast ratio against white. This is the WCAG AA accessibility standard, enforced to make sure the text is readable for users with visual impairments. Colors with an HSL lightness value above ~45% will typically fail this threshold and be rejected with ACCENT_COLOR_CONTRAST_INSUFFICIENT. Safe choices include #0D47A1 (blue), #1B5E20 (green), #BF360C (orange), #B71C1C (red), and #4A148C (purple). If you are using a custom brand color, verify it passes before submitting using the WebAIM Contrast Checker.

Submit the registration

aws pinpoint-sms-voice-v2 submit-registration-version \
  --registration-id $REG_ID \
  --region $REGION

Expected output:

{
  "RegistrationId": "registration-a1b2c3d4e5f6a1b2c3d4e5f6a1b2c3d4",
  "VersionNumber": 1,
  "RegistrationVersionStatus": "SUBMITTED"
}

Step 4: Wait for approval

Poll the registration and agent status. Test registrations typically complete within a few minutes.

# Check registration status
aws pinpoint-sms-voice-v2 describe-registrations \
  --registration-ids $REG_ID \
  --query 'Registrations[0].{Status:RegistrationStatus,Version:CurrentVersionNumber}' \
  --region $REGION

# Check agent status
aws pinpoint-sms-voice-v2 describe-rcs-agents \
  --query "RcsAgents[?RcsAgentId=='rcs-a1b2c3d4e5f6a1b2c3d4e5f6a1b2c3d4'].{Status:Status,TestingStatus:TestingAgent.Status}" \
  --region $REGION

You will see the status progress through these stages:

Registration status Agent status Testing status Meaning
SUBMITTED PENDING PENDING Under review
REVIEWING PENDING PENDING Automated checks in progress
COMPLETE TESTING ACTIVE Ready to use

Wait until TestingAgent.Status shows ACTIVE before proceeding.

NOTE: If the registration returns REQUIRES_UPDATES, run describe-registration-field-values to find fields with a DeniedReason. Create a new registration version with create-registration-version, re-populate all 23 fields (new versions do not inherit values), fix the issue, and re-submit.

Step 5: Add a verified tester

Wait at least 120 seconds after agent creation before adding testers. Then register your test device:

aws pinpoint-sms-voice-v2 create-verified-destination-number \
  --destination-phone-number +12065550199 \
  --rcs-agent-id rcs-a1b2c3d4e5f6a1b2c3d4e5f6a1b2c3d4 \
  --region $REGION

You will receive a tester invitation on your phone within 2 to 20 minutes from “RBM Tester Management.” On iPhone, check the Unknown Senders folder. Tap “Make me a tester” to accept.

After accepting, verify the status:

aws pinpoint-sms-voice-v2 describe-verified-destination-numbers \
  --filters Name=rcs-agent-id,Values=rcs-a1b2c3d4e5f6a1b2c3d4e5f6a1b2c3d4 \
  --region $REGION \
  --query 'VerifiedDestinationNumbers[].{Phone:DestinationPhoneNumber,Status:Status}'

Expected output once accepted:

[
  {
    "Phone": "+12065550199",
    "Status": "VERIFIED"
  }
]

Step 6: Send your first RCS message

Before sending, check for potential blockers.

Check the protect configuration

Verify that the US is not blocked in your account’s default protect configuration:

# List protect configurations
aws pinpoint-sms-voice-v2 describe-protect-configurations --region $REGION

# Check US status on the default (account-default) protect configuration
aws pinpoint-sms-voice-v2 get-protect-configuration-country-rule-set \
  --protect-configuration-id <your-protect-config-id> \
  --number-capability SMS \
  --query 'CountryRuleSet.US' \
  --region $REGION

If the US status is BLOCK, update it to ALLOW:

aws pinpoint-sms-voice-v2 update-protect-configuration-country-rule-set \
  --protect-configuration-id <your-protect-config-id> \
  --country-rule-set-updates '{"US":{"ProtectStatus":"ALLOW"}}' \
  --number-capability SMS \
  --region $REGION

Check the opt-out list

aws pinpoint-sms-voice-v2 describe-opted-out-numbers \
  --opt-out-list-name Default \
  --region $REGION

If your test number appears in the list, remove it:

aws pinpoint-sms-voice-v2 delete-opted-out-number \
  --opt-out-list-name Default \
  --opted-out-number +12065550199 \
  --region $REGION

Now, send the test message:

aws pinpoint-sms-voice-v2 send-text-message \
  --destination-phone-number +12065550199 \
  --origination-identity rcs-a1b2c3d4e5f6a1b2c3d4e5f6a1b2c3d4 \
  --message-body "Hello from AWS End User Messaging Demo! This is your first RCS test message." \
  --message-type TRANSACTIONAL \
  --region $REGION

Expected output:

{"MessageId": "a1b2c3d4-e5f6-7890-abcd-ef1234567890"}

Check your phone. You should see a branded message from your agent with the logo and accent color you configured. On iPhone, check the Unknown Senders folder.

Step 7: Configure and test inbound messaging

With inbound messaging, your agent can respond to messages that testers send back. Configure an automatic keyword response, then verify it end to end.

Set up an automatic keyword response

The put-keyword API configures an automatic reply when someone sends a specific keyword to your agent. With it, you can verify inbound messaging without writing any backend code:

aws pinpoint-sms-voice-v2 put-keyword \
  --keyword RCSINBOUNDTESTING \
  --keyword-action AUTOMATIC_RESPONSE \
  --keyword-message "Inbound test successful! Your message was received." \
  --origination-identity rcs-a1b2c3d4e5f6a1b2c3d4e5f6a1b2c3d4 \
  --region $REGION

Test inbound messaging

While the previous steps used the CLI exclusively, the inbound testing deep link is most easily accessed through the console. Navigate to your agent and use the Testing tab to generate the deep link:

  1. Open the AWS End User Messaging console: https://console.aws.amazon.com/sms-voice/home?region=[REGION]#/rcs-agents.
  2. Select your agent and choose the Testing tab.
  3. Choose Inbound deep link.
  4. Enter RCSINBOUNDTESTING in the message body field.
  5. Choose Generate link.
  6. Scan the QR code with your test phone. The message is pre-filled.
  7. Send the message.

You should receive the automatic response: “Inbound test successful! Your message was received.”

Clean up

To avoid unexpected charges, remove the resources created during this walkthrough when you are finished testing. You must delete resources in the following order. Attempting to delete the agent before its registration results in a ConflictException: RESOURCE_NOT_EMPTY error.

# 1. Remove the keyword
aws pinpoint-sms-voice-v2 delete-keyword \
  --keyword RCSINBOUNDTESTING \
  --origination-identity rcs-a1b2c3d4e5f6a1b2c3d4e5f6a1b2c3d4 \
  --region $REGION

# 2. Remove verified tester
aws pinpoint-sms-voice-v2 delete-verified-destination-number \
  --verified-destination-number-id <your-verified-number-id> \
  --region $REGION

# 3. Disable deletion protection
aws pinpoint-sms-voice-v2 update-rcs-agent \
  --rcs-agent-id rcs-a1b2c3d4e5f6a1b2c3d4e5f6a1b2c3d4 \
  --no-deletion-protection-enabled \
  --region $REGION

# 4. Delete the registration
aws pinpoint-sms-voice-v2 delete-registration \
  --registration-id registration-a1b2c3d4e5f6a1b2c3d4e5f6a1b2c3d4 \
  --region $REGION

# 5. Delete the agent
aws pinpoint-sms-voice-v2 delete-rcs-agent \
  --rcs-agent-id rcs-a1b2c3d4e5f6a1b2c3d4e5f6a1b2c3d4 \
  --region $REGION

If you modified the protect configuration (changed US from BLOCK to ALLOW), revert it to its original state if your account does not need US messaging enabled.

Summary

You now have a working RCS test agent that can send and receive branded messages. Here is a recap of the resources created:

Resource Value
Agent ID rcs-a1b2c3d4e5f6a1b2c3d4e5f6a1b2c3d4
Registration ID registration-a1b2c3d4e5f6a1b2c3d4e5f6a1b2c3d4
Region us-east-1
Console https://us-east-1.console.aws.amazon.com/sms-voice/home?region=us-east-1#/rcs-agents

Registration field reference

For reference, here is the complete list of registration fields and their types:

Field Type Requirement
agentDetails.brandName TEXT Required
agentDetails.serviceName TEXT Required
agentDetails.senderDisplayName TEXT Required
agentDetails.useCase SELECT Required
agentDetails.agentDescription TEXT Required
agentDetails.bannerImage ATTACHMENT Required
agentDetails.logoImage ATTACHMENT Required
agentDetails.accentColor TEXT Required
agentDetails.contactPhoneNumber TEXT Conditional
agentDetails.contactPhoneLabel TEXT Conditional
agentDetails.contactEmailAddress TEXT Conditional
agentDetails.contactEmailLabel TEXT Conditional
agentDetails.contactWebsite TEXT Conditional
agentDetails.contactWebsiteLabel TEXT Conditional
agentDetails.privacyPolicyUrl TEXT Required
agentDetails.privacyPolicyLabel TEXT Optional
agentDetails.termsAndConditionsUrl TEXT Required
agentDetails.termsAndConditionsLabel TEXT Optional
agentDetails.averageMonthlyRcsFrequency SELECT Required
agentDetails.billingCategory SELECT Required
agentDetails.monthlyRcsVolume TEXT Required
complianceKeywords.helpResponse TEXT Conditional
complianceKeywords.stopResponse TEXT Conditional

Troubleshooting

Error Resolution
ACCENT_COLOR_CONTRAST_INSUFFICIENT Use a darker accent color with 4.5:1 contrast ratio against white. Create a new registration version and re-populate all fields.
DESTINATION_COUNTRY_BLOCKED_BY_PROTECT_CONFIGURATION Update the protect configuration to set the US to ALLOW for SMS capability.
DESTINATION_PHONE_NUMBER_OPTED_OUT Remove the number from the Default opt-out list with delete-opted-out-number.
Registration REQUIRES_UPDATES Run describe-registration-field-values to find fields with DeniedReason. Create a new version, re-populate all 23 fields, fix the issue, and re-submit.
No tester invitation received Wait up to 20 minutes. Check the Unknown Senders folder on iPhone. Verify the agent status is ACTIVE.
Message delivered as SMS instead of RCS Confirm the agent is ACTIVE, the device supports RCS, and you used the correct origination identity.

Next steps

With your test agent running, you can explore richer message types such as cards and carousels, set up event destinations for programmatic inbound message handling, or add more verified testers. For production use, submit a full launch registration instead of a test registration.

For an overview of the business case for RCS and implementation strategy, see Upgrade business messaging with RCS on AWS. For sample code and scripts that automate this walkthrough, see the sample-rcs-agent-setup-and-send-messages repository on GitHub. For more information, see the AWS End User Messaging service page and the RCS documentation.


About the authors

[$] Using steal time to moderate CPU demands

Post Syndicated from corbet original https://lwn.net/Articles/1090381/

Virtualization can increase CPU utilization by allowing a large number of
virtual CPUs to share a smaller number of physical CPUs. The amount of CPU
time that is actually available does not change, though, so heavy activity
on too many virtual CPUs can lead to contention and significant performance
loss. The steal governor
patch series
from Shrikanth Hegde is an attempt to address that problem
with a mechanism that allows virtual machines to voluntarily reduce the
number of virtual CPUs they use when contention is high.

Identity-as-a-Service: Uncovering Dark Web Marketplaces Trading Executive SSNs

Post Syndicated from Alexandra Blia original https://www.rapid7.com/blog/post/tr-identity-as-a-service-dark-web-marketplaces-executive-ssn

Introduction

Despite modern verification controls, identity theft remains one of the most pervasive threats to both individuals and enterprise organizations. U.S. Federal Trade Commission statistics show over 1 million identity theft reports annually, with related fraud and imposter scams accounting for billions in financial losses each year. While stolen credit cards enable rapid, short-term monetization, Social Security numbers (SSNs) represent a far more permanent and dangerous tier within the cybercrime ecosystem, because unlike payment cards, they cannot simply be deactivated. Once exposed, an SSN can support enabling unauthorized lines of credit, synthetic identity fraud, and sophisticated tax scams.

When exposed identity data belongs to corporate executives, board members, and other high-profile employees, the risk can extend beyond the individual. Threat actors target these high-profile individuals not just for their premium credit profiles, but to leverage their compromised identities for executive impersonation, corporate espionage, and downstream extortion. Rapid7’s recent alert telemetry underscores the severity of this targeted exposure: since early 2026 alone, we identified 476 instances of compromised SSN records across 395 unique corporate personnel. Over 73% of these exposures directly targeted top-level leadership, with C-suite executives comprising 44.6% of affected profiles and Presidents making up another 28.6%. Unsurprisingly, given the geographical nature of SSNs, 95.6% of these leaks stemmed from U.S.-headquartered organizations, concentrated heavily in high-value sectors like Financials (over 25%) and Industrials (17%).

In this blog, we explore the operational mechanics of the underground identity economy, focusing on three dominant SSN marketplaces tracked by Rapid7: Xilo, Bankom, and PeopleFinder, which together account for 81.5% of all executive SSN leaks in our dataset (led by Xilo at 40.8%, Bankom at 21.8%, and PeopleFinder at 18.9%). Using Rapid7 alert telemetry from the past year, we look at the profiles of affected corporate executives, how these marketplaces operate, and highlight how proactive dark web monitoring can mitigate upstream identity exposure before it is weaponized.

Why stolen SSNs retain their value

Not all stolen data retains its value for the same length of time. Leaked credentials can be reset, payment cards can be cancelled, and session tokens eventually expire. While these data types remain highly sought after by cybercriminals, their usefulness often depends on acting quickly before the victim or service provider invalidates them.

SSNs differ as they are effectively permanent, serving as a core identity attribute. Once exposed, they can remain valuable for years, enabling a wide range of fraud schemes long after the original breach. When combined with other personally identifiable information (PII), such as a victim’s name, date of birth, address, phone number, and employment history, an SSN becomes the foundation of a comprehensive identity profile that can be bought, sold, and repeatedly abused across the criminal ecosystem.

These identity profiles enable far more than traditional identity theft. Threat actors use them to open fraudulent financial accounts, create synthetic identities, bypass identity verification processes, file fraudulent tax or government benefit claims, and support highly targeted social engineering campaigns. Rather than serving a single purpose, a complete identity record becomes a reusable asset that can be monetized multiple times by different threat actors.

For corporate executives and other high-profile employees, exposed identity data can also create risk for the organization they represent. Publicly available information, from regulatory filings to corporate biographies and social media, can be combined with stolen identity data to build highly detailed profiles. These enriched records increase the credibility of phishing, business email compromise (BEC), and executive impersonation attacks, allowing threat actors to target not only the individual but also the organization they represent.

This durability has fueled a thriving underground economy where identity records are treated as searchable, reusable inventory rather than one-time commodities. The marketplaces examined in this research demonstrate just how mature and accessible this ecosystem has become.

Anatomy of an SSN marketplace

While platforms like Xilo, Bankomat, and PeopleFinder present a highly organized, user-friendly storefront, they operate strictly as downstream clearinghouses rather than original creators of their inventory. The vast supply of SSNs flooding these networks relies on a distinct, multi-tiered underground supply chain. The massive volume driving these platforms is primarily fueled by large-scale institutional network breaches, where wholesale hackers compromise data aggregators, healthcare systems, and financial providers. These massive SQL databases are sold in bulk on deep-web forums, where marketplace administrators purchase, parse, and upload them into their searchable storefronts. According to annual telemetry from the Identity Theft Resource Center, billions of individual data records are exposed annually through these mega-breaches, accounting for the vast majority of the inventory available online.

Another source of identity data comes from infostealer malware and targeted phishing campaigns. While mass breaches provide wholesale numbers, infostealers scrape highly contextual local data, such as saved browser forms and PDF documents like tax returns or corporate onboarding paperwork stored on unmanaged personal devices. When these localized logs are parsed by marketplace administrators, they yield the fresh, high-value identity profiles that allow buyers to target specific corporate leaders.

Although these platforms tap into a similar upstream supply chain, how they package and monetize this data varies significantly. To stand out in a maturing, highly competitive cybercrime market, each marketplace focuses on its own operational niche, ranging from ultra-low pricing and identity enrichment features to multi-asset carding integration and legacy data consistency. The following sections provide a deep dive into each marketplace, highlighting their specific functionalities, user interfaces, and distinct market advantages.

Xilo 

Xilo has been active since at least March 2025. The marketplace is hosted as a Tor hidden service, while also maintaining mirror sites on the clear web to improve accessibility and resilience.

Users can search for specific individuals by name, state, country (US or Canada), or year of birth (Figure 1). They can also request records that include phone numbers and email addresses in addition to the victim’s SSN. This can increase the value of the records by reducing the need for threat actors to source additional PII elsewhere. During our analysis, however, we did not identify any records that included email addresses, while records containing phone numbers were available at the same price as standard SSN records. Search results can also be sorted by price, although the cost appears to be fixed at $0.25 per SSN record.

Xilo-search-interface.png
Figure 1 – Xilo search interface

⠀

Search results typically display the victim’s full name, physical address, and date of birth before purchase. This information alone can help threat actors identify specific individuals for targeted campaigns, while the SSN is revealed only after the purchase is completed (Figure 2).

xilo-search-results.png
Figure 2 – Xilo search results

⠀

In addition to standard searches, Xilo offers a reverse lookup service that accepts an SSN or phone number and returns additional PII, including the victim’s full name and phone number (Figure 3). This service costs $0.50 per lookup, suggesting that enriching an existing identity profile is considered more valuable than purchasing an SSN alone. Threat actors can use this functionality to expand records obtained through the standard search, increasing the amount of PII associated with a single individual and, consequently, the potential for identity fraud.

xilo-reverse-search.png
Figure 3 – Xilo reverse search

⠀

The marketplace is supported by a Telegram channel used to announce technical updates and new domains. Although activity on the channel has been relatively limited, it has attracted more than 500 subscribers, providing an indication of interest in the service. Like many established cybercriminal services, Xilo appears prepared for domain disruptions by maintaining alternative access points and communicating them through Telegram, adopting the kind of resilience and service-continuity practices more commonly associated with legitimate online services.

Xilo accepts several cryptocurrencies, including Bitcoin, Litecoin, Monero, Ether, and Tether (USDT). Support for USDT is relatively uncommon among underground marketplaces and may reflect the marketplace’s focus on US-based identity data. The minimum deposit is just $1, lowering the barrier to entry for new users, while bonuses are offered for deposits exceeding $100 to encourage larger account balances.

Beyond its own infrastructure, Xilo actively advertises on well-known cybercrime forums, including XSS, as well as carding communities such as WWH-Club and Altenens (Figure 4). This marketing strategy is common among underground marketplaces seeking to expand their customer base. More notably, Xilo’s presence on carding-focused forums highlights the close relationship between stolen payment data and identity information, illustrating how different segments of the cybercrime ecosystem increasingly overlap and complement one another.

Xilo-advertisement_-Altenens.png
Figure 4 – Xilo advertisement on Altenens

Bankomat

Active since at least March 2022, Bankomat is one of the more established marketplaces operating in the underground identity theft ecosystem. The platform is accessible as a Tor hidden service while maintaining multiple clear web domains to improve availability. Its emergence coincided with the shutdown of several prominent carding and PII marketplaces, including Joker’s Stash and SSNDOB Marketplace, suggesting that Bankomat sought to capitalize on the resulting gap by combining identity data sales with traditional carding services.

The marketplace prominently lists its active domains and encourages users to save its onion address, describing it as the most reliable way to access the service. This reflects an awareness of the operational challenges faced by long-running underground marketplaces, particularly the risk of domain seizures and takedowns. By maintaining multiple access points and actively directing users toward its Tor service, Bankomat demonstrates the operational maturity needed to retain its customer base despite infrastructure disruptions.

Users can search for individuals by first and last name, combined with an additional identifier such as state, city, ZIP code, or date of birth (Figure 5). The search functionality is free, allowing users to identify potential victims before deciding whether to purchase a record. Search results display the victim’s full name, date of birth, and physical addresses, while the SSN is revealed only after purchase at a fixed cost of $4 per record. Unlike Xilo, however, Bankomat does not offer additional identity enrichment services or the ability to purchase supplementary PII directly through the platform.

Bankomat-search-bar.png
Figure 5 – Bankomat search bar

⠀

Beyond SSN records, Bankomat also functions as a traditional carding marketplace by offering stolen payment card details for sale, obtained through third-party sellers. The platform supports card validation services, including Viper and 4chk, allowing buyers to verify whether stolen payment cards remain active before using or reselling them. Similar functionality is offered by established carding marketplaces, such as Findsome and UltimateShop.

This combination of identity records, payment card data, and validation tools positions Bankomat as a one-stop marketplace for financially motivated threat actors. Rather than sourcing stolen identities and payment data from separate platforms, buyers can acquire multiple data types associated with the same victim through a single service. While SSN records cost $4, stolen payment card details are typically advertised for approximately $10, suggesting that Bankomat places greater commercial emphasis on its carding business, likely reflecting both higher profit margins and sustained demand within the underground economy (Figure 6).

bankomat-credit-card-listings.png
Figure 7 – PeopleFinder SSN listings

⠀

Bankomat currently accepts payments exclusively in Bitcoin, in contrast to newer marketplaces that increasingly support a wider range of cryptocurrencies to appeal to a broader customer base.

PeopleFinder

Active since at least February 2023, PeopleFinder is a successor to the SSNDOB Marketplace, whose primary domains were seized by law enforcement in June 2022. Following that takedown, the service re-emerged through a network of lookup mirrors using clear-web-sounding domain names such as “PeopleFinder.” The connection is also visible in the source code, where the front-end login page retains the original “ssndob” title text and logo. Through this infrastructure, the platform provides access to the same legacy database of more than 24 million compromised U.S. PII records.

To maintain a steady customer stream, PeopleFinder actively advertises its database on high-profile cybercrime and carding forums like WWH-Club and Exploit. This deliberate marketing keeps the service highly visible to financially motivated threat actors seeking verification tools for downstream fraud.

The layout itself is highly streamlined, featuring a basic search bar that closely mirrors Bankomat’s interface. Users can search the platform’s database by name, date of birth, or physical address completely free of charge. The initial search output displays the victim’s full name, date of birth, and associated physical addresses, allowing a threat actor to confirm they have targeted the correct corporate executive before paying for the record (Figure 7).

peoplefinder-ssn-listings.png
Figure 7 – PeopleFinder SSN listings

To reveal the hidden SSN, users must pay a fixed cost of $1.50 per lookup, putting its pricing structure right between Xilo and Bankomat. This strict, hyper-commoditized focus solely on core SSN details directly mirrors the operational blueprint of the original SSNDOB model. Rather than expanding into supplementary data types like phone numbers or credit cards, the operators chose to preserve their highly efficient, legacy pay-per-lookup infrastructure. The platform relies exclusively on Bitcoin transactions.

What Rapid7 telemetry reveals about the executive threat landscape

By monitoring dark web SSN marketplaces, Rapid7 actively alerts clients when leaked records of their executives or designated employees are discovered.

Since the beginning of 2026, our telemetry has identified 476 instances of compromised SSN records, representing 395 unique individuals, as several monitored personnel were affected by multiple exposures. Within this sample, most of the leaked SSNs were recorded in Xilo (40.8%), followed by Bankom (21.8%) and PeopleFinder (18.9%) (Figure 8).

leaked-ssns-by-marketplace.png
Figure 8 – The sample distribution of leaked SSNs by marketplace

⠀

Given that SSNs are issued within the United States, the overwhelming majority of compromised records in our dataset, 95.6%, were linked to organizations headquartered in the U.S., with others located in Spain, Canada, and Japan, trailing significantly behind (Figure 9).

leaked-ssns-by-country.png
Figure 9 – The sample distribution of leaked SSNs by country

⠀

Financials represented the largest sector in our sample, accounting for more than a quarter of organizations whose monitored executives appeared in leaked SSN records, followed by Industrials at 17% (Figure 10). One possible reason for the concentration in Financials is the volume and sensitivity of customer and employee data these organizations hold, including PII and tax-related information, which can make exposed identities particularly valuable to threat actors. Industrials may also present attractive targets because of their interconnected supply chains, where compromised identities can potentially support broader fraud, impersonation, or access attempts across partner ecosystems.

leaked-ssns-by-sector.png
Figure 10 – The sample distribution of leaked SSNs by sector

⠀

A closer analysis of the roles of targeted personnel reveals that C-suite executives (such as Chief Executive Officers and Chief Financial Officers) make up the largest portion at 44.6%. Presidential positions represent the second-largest segment at 28.6%, while functional management and administrative roles account for 13.9% of the compromised profiles.

These findings may reflect a natural monitoring bias, since organizations are more likely to prioritize senior personnel whose compromise poses a greater security risk. Even with that caveat, the concentration among senior leadership reinforces why executive identity exposure deserves specific attention.

Compromised executive PII can support targeted phishing, impersonation, and other social engineering campaigns against both the individual and the organization they represent.

Role Category

Key Roles Included

Unique Target Count

% of Unique Targets

Executive Leadership (C-Suite)

CEO, CFO, COO, CTO, CIO, Chief Revenue/Human Resources Officers

176

44.6%

Presidents & Vice Presidents

President, SVP, EVP, Regional Vice Presidents

113

28.6%

Functional Management & Admin

Directors, Heads of Departments, Managers, Executive Assistants

55

13.9%

Legal, Partner & Advisory

Managing Members, Partners, Corporate/Securities Attorneys

33

8.4%

Board, Governance & Officials

Board Trustees, Directors of the Board, State Senators, Vice Chairs

18

4.6%

Total Unique Individuals

395

100.0%

From detection to action: Responding to exposed executive PII

Because SSNs cannot simply be reset after exposure, organizations need a way to identify compromised executive PII early and determine what action can reduce the resulting risk.

These alerts are triggered using customer-defined assets, specifically the names of designated VIPs. When a potential match is flagged, Rapid7 analysts conduct preliminary OSINT verification, checking biographical details such as the VIP’s date of birth and primary locations, to confirm the listing’s accuracy before issuing an alert to the customer.

Once alerted, customers can choose to purchase the exposed SSN record directly through the “Ask-an-Analyst” service using their allocated dark web purchase credits (Figure 11). This capability allows security teams to inspect the full record, verify whether the exposed SSN is genuine, and determine whether additional protective measures are necessary for the affected executive. Furthermore, on platforms like Xilo, purchasing the listing removes the record from the marketplace entirely, actively taking it off the shelf before other threat actors can acquire it.

Rapid7-Platform-alert-leaked-executive-details.png
Figure 11 – Rapid7 Platform alert about the leaked details of a company executive

Conclusion and strategic defense actions

The illicit marketplaces examined by Rapid7 show how cheaply and efficiently stolen identity data can now be searched, purchased, and enriched. For executives and other high-profile employees, an exposed SSN can remain useful to threat actors long after the original compromise and may support identity fraud, social engineering, executive impersonation, or business email compromise. Because that information cannot simply be reset, organizations should treat executive identity exposure as an ongoing security risk.

To reduce that risk, executive protection and security teams should consider the following actions:

  • Monitor executive exposure on the dark web: Use digital risk protection capabilities configured with executive names, known locations, titles, and other relevant identifiers to detect compromised PII across illicit marketplaces and underground channels.

  • Use removal or takedown options where available: Where supported, work with security providers to acquire or remove exposed identity records before they are purchased and reused by other threat actors.

  • Reduce executives’ public digital footprint: Review public records, data-broker listings, corporate biographies, and social media profiles to limit unnecessary exposure of information such as dates of birth, home addresses, and phone numbers that can be used to enrich stolen records.

  • Require out-of-band verification for sensitive requests: Introduce mandatory secondary confirmation for financial transactions, access requests, or administrative changes involving executive accounts to reduce the risk of successful impersonation.

  • Provide targeted phishing and impersonation training: Give C-suite members, board members, and executive assistants focused guidance on how attackers can combine leaked PII with social engineering to make phishing and impersonation attempts more convincing.

The persistence of SSNs means the risk does not end when the original breach is discovered. Ongoing monitoring, rapid validation, and stronger verification controls can help organizations identify exposure earlier, reduce the value of stolen identity data, and make it harder for threat actors to turn compromised executive information into a wider attack against the business.

Security updates for Thursday

Post Syndicated from jzb original https://lwn.net/Articles/1090938/

Security updates have been issued by AlmaLinux (assertj-core, attr, firefox, go-toolset:rhel8, golang, grafana, gstreamer1-plugins-good, httpd, kernel, mingw-openssl, mod_http2, nginx, nginx:1.24, pam, polkit, and sqlite), Debian (bubblewrap, cockpit, emacs, gimp, libdbi-perl, openjdk-11, openjdk-17, wireshark, and xrdp), Fedora (bluez, curl, emacs, golang, knot, libopenmpt, libsoup3, openbao, openssh, rsync, rust-anstyle-hyperlink, rust-anstyle-progress, rust-cargo, rust-cargo-c, rust-cargo-credential-libsecret, rust-cargo-util, rust-cargo-util-schemas, rust-cargo-util-terminal, rust-crates-io, and rust-rustfix), Gentoo (Chromium, Google Chrome, Microsoft Edge, Opera, Chromium, Google Chrome, Microsoft Edge, Opera, Vivaldi, Chromium, Google Chrome, Microsoft Edge. Opera, and OpenRGB), Oracle (abrt, assertj-core, attr, gstreamer1-plugins-base, gstreamer1-plugins-good, httpd, nginx:1.24, nginx:1.26, nodejs24, and polkit), SUSE (apache2-mod_auth_openidc, buildah, curl, docker, dracut, evince, go1.25-openssl, go1.26-openssl, go1.27, gstreamer-plugins-bad, kernel, kubernetes, kubernetes-old, libarchive, LibVNCServer, libwireshark19, pcp, python310-pip, qemu, rootlesskit, rsync, snpguest, and util-linux), and Ubuntu (bind9, libheif, and openssl, openssl1.0).

Backblaze B2 To Encrypt New Uploads by Default

Post Syndicated from Backblaze original https://www.backblaze.com/blog/backblaze-b2-to-encrypt-new-uploads-by-default/

An image of the Backblaze logo on a gradient background.

Always-on SSE-B2 brings AES-256 encryption at rest to every new upload and destination copy—with no application changes, additional cost, or performance impact.

Security works best when it doesn’t depend on one more checkbox. Starting September 14, 2026, we’re making server-side encryption the automatic baseline for Backblaze B2 Cloud Storage.

Backblaze B2 will automatically encrypt all newly uploaded and copied object data at rest using Server-Side Encryption with Backblaze-managed keys (SSE-B2) and AES-256. The default applies immediately to new buckets. Existing buckets will receive the default gradually; once enabled for a bucket, newly uploaded and copied objects use SSE-B2 automatically. If an application doesn’t specify an encryption method, B2 handles it automatically.

Here’s the TL;DR: You don’t need to update your application, add an encryption header, or turn on a bucket setting. There is no additional charge for SSE-B2 and no impact on upload or download performance. New uploads are encrypted by default, existing objects keep their current encryption state, and SSE-C remains available when you want to provide your own key for an individual object.

Secure by Default, Without Extra Work

SSE-B2 encrypts object data at rest with AES-256 while Backblaze manages the encryption keys. Until now, customers could choose to enable SSE-B2 for a bucket or request it for an individual upload. With always-on encryption, SSE-B2 becomes the baseline for every new upload and destination copy when SSE-C is not explicitly requested.

That means fewer settings to manage, fewer opportunities for configuration drift, and a stronger security baseline across your storage environment. Teams can meet encryption-at-rest requirements without building another check into every application or deployment process. Server-side encryption cannot be disabled for new writes.

For new buckets, the default applies immediately. Existing buckets receive it gradually; once enabled for a bucket, new uploads and destination copies receive SSE-B2 automatically. Buckets already configured for SSE-B2 remain configured as they are, and requests that explicitly use SSE-C continue to use SSE-C.

What This Means for Your Existing Workflows

The best kind of security improvement is one that doesn’t force you to rebuild what already works. Always-on encryption is a behavioral update, not a new API contract. Existing integrations can keep using the same upload, copy, multipart-upload, and download operations they use today. B2 automatically decrypts SSE-B2 data for authorized reads, so the way you access objects does not change either.

See the Default in Action

The important part of these examples is what is missing: Neither upload explicitly requests SSE-B2. After this update, Backblaze applies it automatically.

S3-Compatible API: Upload Without an Encryption Flag

aws s3api put-object \
--profile backblaze \
--endpoint-url https://s3.YOUR-REGION.backblazeb2.com \
--bucket YOUR-BUCKET-NAME \
--key hello.txt \
--body ./hello.txt

There is no --server-side-encryption option in the command. B2 still encrypts the new object with SSE-B2. In S3-compatible responses, that effective encryption is represented as AES256.

aws s3api get-bucket-encryption \
  --profile backblaze \
  --endpoint-url https://s3.YOUR-REGION.backblazeb2.com \
  --bucket YOUR-BUCKET-NAME

# Response includes
"SSEAlgorithm": "AES256"

B2 Native API: Omit the SSE-B2 Header

curl "$UPLOAD_URL" \
  -H "Authorization: $UPLOAD_AUTHORIZATION_TOKEN" \
  -H "X-Bz-File-Name: hello.txt" \
  -H "Content-Type: text/plain" \
  -H "X-Bz-Content-Sha1: $SHA1_OF_FILE" \
  --data-binary @hello.txt

# Response includes
"serverSideEncryption": {"mode": "SSE-B2", "algorithm": "AES256"}

The request does not include X-Bz-Server-Side-Encryption. The response still reports SSE-B2 with AES256 because it is now the effective default.

Using the S3-Compatible API?

Requests that omit encryption headers receive SSE-B2 automatically, reported through the S3-compatible AES256 value. PutObject, CopyObject, and multipart uploads all use the new default for the destination object. Valid SSE-C headers still take precedence.

Using the B2 Native API?

You can continue to omit SSE-B2 fields and headers. New uploads, large-file uploads, and destination copies use SSE-B2 by default. Applications can still explicitly request SSE-B2, but doing so is no longer necessary to receive encryption at rest.

Using an SDK, CLI, Integration, or the Web Console?

Because the protection is applied by B2, tools that already upload to Backblaze B2 benefit automatically. No special encryption flag, SDK upgrade, CLI update, or integration change is required. The Backblaze web consoles will show SSE-B2 or AES256 as the effective bucket default and continue to display the encryption actually used for each object.

SSE-C Is Still Available

Some organizations need direct control over the key used for a particular object. SSE-C continues to support that workflow. When a request includes valid SSE-C headers, Backblaze uses the customer-provided AES-256 key instead of SSE-B2 for that object.

As before, Backblaze does not retain the customer key. Customers using SSE-C are responsible for protecting and retaining their keys; a lost key cannot be recovered by Backblaze. You can also continue to encrypt data on the client side before uploading it. SSE-KMS is not part of this update.

What About Objects Already Stored in B2?

Always-on encryption is not retroactive. Objects already stored in a bucket keep the encryption state they had when they were written. We are not rewriting customer data in the background or changing the encryption metadata of historical objects.

If you want an older unencrypted object to use SSE-B2, upload it again or create a new destination copy. The new object is encrypted using the always-on default. Object-information and download responses continue to describe the encryption actually used for each object.

Why Always-On Encryption Matters

Encryption at rest is a foundational part of modern data protection. Making it automatic helps teams establish a consistent security baseline without adding another deployment step or relying on every application to make the same configuration choice.

It also keeps the developer experience simple. Teams can focus on moving, protecting, and using their data while Backblaze applies the default protection behind the scenes—with no added encryption charge or performance trade-off. That’s the kind of cloud storage experience we want to deliver: secure by design, straightforward to operate, and compatible with the tools customers already use.

Frequently Asked Questions

Do I need to change my application?

No. Applications that omit encryption settings automatically receive SSE-B2 for new uploads and destination copies. Existing request formats remain valid.

Can I disable server-side encryption for new uploads?

No. SSE-B2 is the effective default when SSE-C is not requested. Clearing or deleting an explicit bucket encryption configuration does not create an unencrypted default.

Does this encrypt objects that are already stored?

No. Existing objects retain their original encryption state. Uploading or copying an object again creates a new object that uses the always-on default.

Can I still use my own encryption key?

Yes. Supply the required SSE-C headers when you upload, copy, or access an SSE-C object. SSE-C takes precedence over the SSE-B2 default for that object.

Does always-on encryption cost more or affect performance?

No. SSE-B2 is applied at no additional charge and has no impact on upload or download performance. Normal Backblaze B2 storage and API charges still apply.

Available Starting September 14, 2026

Always-on SSE-B2 is available on September 14, 2026 for new buckets in every Backblaze B2 region. Existing buckets will be enabled gradually. For most customers, there’s nothing to turn on and nothing to migrate: once the default is enabled for a bucket, every new upload and destination copy receives SSE-B2 automatically unless you explicitly request SSE-C.

Ready to put secure-by-default cloud storage to work? Get started with Backblaze B2 Cloud Storage.

The post Backblaze B2 To Encrypt New Uploads by Default appeared first on Backblaze Blog | Cloud Storage & Cloud Backup

LLM-Based Social Engineering Scams

Post Syndicated from Bruce Schneier original https://www.schneier.com/blog/archives/2026/08/llm-based-social-engineering-scams.html

OpenAI disrupted a social engineering group from Cambodia that used ChatGPT. Its scope is impressive:

The network simultaneously conducted multiple types of scams, often blending elements from different schemes. For instance, operators used dating personas to build trust before introducing fraudulent investment opportunities involving cryptocurrencies and spot gold trading. Other users engaged in lengthy romantic conversations with targets using fictitious identities, posed as representatives of online gambling platforms offering fake bonuses and winnings, or impersonated law enforcement agencies to tell targets they needed to pay fines for committing serious criminal offenses.

Although the narratives varied, users across the network consistently displayed the same underlying pattern of deceptive behavior. For example, they created and operated fake dating profiles, fictitious investment experts, and fraudulent law enforcement personas. They also generated images of forged documents, including passports, legal notices, stock-purchase confirmations, and gambling platform interfaces.

ICYMI: July 2026 @AWS Security

Post Syndicated from Rodolfo Brenes original https://aws.amazon.com/blogs/security/icymi-july-2026-aws-security/

If you found time for a bit of vacation this summer, you might be in catch-up mode. Here’s a list to help: all the expert blog posts, new service capabilities, code samples, and workshops, in case you missed it, from July 2026.

AWS Security Blog post

This month’s AWS Security Blog posts covered AI agent security, supply chain protection, network firewall automation, DDoS mitigation, and compliance readiness. Read on for guidance on securing AI coding agents, implementing dependency cooldowns, choosing the right key management solution, and preparing for HIPAA Technical Safeguard requirements.

AI Security

Enforce least-privilege authorization in multi-agent AI chains using Cedar
Authors: Dhananjay Karanjkar | Published: July 6, 2026
Learn to implement a three-layer Cedar policy model with OAuth 2.0 authentication to prevent authorization scope expansion across multi-agent delegation chains using Amazon Verified Permissions.

Enforce zero data retention on Amazon Bedrock with Bedrock Projects and service control policies
Author: Rob Higareda | Published: July 7, 2026
Learn to use Amazon Bedrock Projects and SCPs to centrally enforce zero data retention policies, preventing accounts from enabling data sharing with third-party model providers across your organization.

Designing for the inevitable: System prompt leakage and mitigations in generative AI applications
Author: Manideep Konakandla | Published: July 8, 2026
Learn to implement defense-in-depth mitigations for system prompt leakage using Amazon Bedrock Guardrails prompt attack filters, canary tokens, semantic similarity detection, and sandwich instruction patterns.

Balancing speed and safety: A control framework for AI coding agents
Authors: Daniel Begimher, Danny Cortegaca | Published: July 30, 2026
Learn to implement an application security control framework for AI coding agents, with author-time controls that shape what agents produce and build-time controls that verify what reaches production.

Data Protection

How to use the AWS Workload Credentials Provider for cross-account secret retrieval and prefetching secrets
Authors: Derik Wang, Paras Dhawan | Published: July 1, 2026
Learn to configure the AWS Workload Credentials Provider for cross-account secret retrieval using IAM role chaining and prefetching secrets at startup to reduce cold-start latency.

The CISO’s guide to post-quantum mandates and migrations
Author: Rushir Patel | Published: July 8, 2026
A strategic playbook for CISOs navigating post-quantum cryptography migration, covering regulatory timelines, dependency classification, cryptographic telemetry, and building crypto-agile organizations.

AWS KMS or AWS CloudHSM: Choose the right key management solution
Author: Derek Tumulak | Published: July 28, 2026
Learn how to choose between AWS KMS and AWS CloudHSM based on integration needs, cost, and whether you require traditional HSM interfaces or legacy algorithms.

Secure your npm and pip package updates in Amazon Linux
Author: Norbert Manthey | Published: July 29, 2026
Learn to implement a one-line dependency cooldown for npm and pip that skips packages published in the last 24 hours, protecting against supply chain events while still allowing urgent security patches.

Infrastructure security

Secure Amazon container workloads using container attribute-based rules in AWS Network Firewall
Authors: Amit Gaur, Amish Shah, Preetkumar Shah, Akash Kumar Sinha | Published: July 1, 2026
Learn to define AWS Network Firewall rules for Amazon EKS and Amazon ECS workloads using native container attributes like namespaces, pod names, and labels instead of ephemeral IP addresses.

Authenticate legitimate AI agent traffic with AWS WAF Bot Control
Authors: Harith Gaddamanugu, Kaustubh Phatak | Published: July 14, 2026
Learn to use Web Bot Authentication (WBA) in AWS WAF Bot Control to cryptographically verify legitimate AI agent traffic using HTTP message signatures and ed25519 keys.

Accelerating AWS Network Firewall troubleshooting with AWS DevOps Agent
Author: Salman Ahmed | Published: July 24, 2026
Learn to use AWS DevOps Agent to automate root cause analysis for AWS Network Firewall connectivity issues, including domain deny lists, stateless rule priority misconfigurations, and asymmetric cross-AZ routing drops.

AWS Shield Advanced is embracing the AWS WAF Anti-DDoS managed rule group: What changes and how to prepare
Authors: Eitav Arditti, Andrew Chen, Justin Kurpius | Published: July 27, 2026
AWS Shield Advanced is adopting the AWS WAF Anti-DDoS managed rule group as its default application-layer DDoS protection, with a phased migration from July 2026 through January 2027.

Threat detection and incident response

Introducing the Amazon GuardDuty investigation agent: on-demand AI-powered threat assessment
Author: Allan Holmes | Published: July 20, 2026
Learn to use the new Amazon GuardDuty investigation agent (public preview) to automate threat correlation and receive structured assessments with risk levels, confidence scores, MITRE ATT&CK mappings, and actionable recommendations.

Amazon identifies North Korean hacker group behind open-source supply chain attacks
Author: CJ Moses | Published: July 29, 2026
Learn how Amazon Threat Intelligence linked the compromises of axios, debug, chalk, and typo-crypto NPM packages to a single DPRK-linked threat actor, and how attacker tradecraft is evolving with generative AI.

Extend Amazon Inspector SBOM Generator with plugins
Authors: Michael Long, Anthony Verleysen, Charlie Bacon | Published: July 30, 2026
Learn to write custom Lua plugins for the Amazon Inspector SBOM Generator to inventory package ecosystems that aren’t supported out of the box, without modifying source code or waiting for an official release.

Security Hub adds AI workload protection and multicloud support for Microsoft Azure
Author: Michael Fuller | Published: July 14, 2026
AWS Security Hub now monitors Microsoft Azure resources for misconfigurations and vulnerabilities, adds GuardDuty AI Protection for Amazon Bedrock and Amazon SageMaker AI, and introduces an AI inventory for organization-wide visibility.

Governance and compliance

AWS designated as a critical third party to the UK financial sector
Author: Michael Jefferson | Published: July 10, 2026
AWS has been designated as a critical third party to the UK financial sector by HM Treasury, establishing direct regulatory oversight by the Bank of England, PRA, and FCA.

New compliance guidance available: HITRUST i1 on AWS
Authors: Abdul Javid, Shreya Singh | Published: July 13, 2026
AWS published new implementation guidance for HITRUST i1 certification, covering 11 technical control domains with AWS-specific controls for healthcare organizations seeking i1 assessment readiness.

HIPAA Security Rule on AWS – Technical Safeguards Implementation and Readiness Guidance
Authors: Abdul Javid, Hector Rodriguez, Kapil Temghare, Shreya Singh | Published: July 31, 2026
New guidance helping covered entities and business associates implement and evidence compliance with HIPAA Security Rule Technical Safeguards (§164.312) on AWS, including 2025 NPRM proposed changes.

Identity

Introducing OAuth support for AWS MCP Server
Authors: Vaibhav Chowla, Jaimin Bhatt, Ankur Joshi | Published: July 9, 2026
AWS MCP Server now supports OAuth 2.1 authorization through AWS Sign-In, enabling agents like Claude Code,Kiro, and Gemini CLI to connect using existing IAM credentials with browser-based authentication.

July Security Bulletins

In July 2026, AWS published 21 security bulletins (2026-049 through 2026-069) addressing vulnerabilities across open-source SDKs, MCP servers, and developer tools. Key themes include credential disclosure and SSRF, affecting HealthLake, HealthOmics, and API MCP servers, plus Strands Agents tools that could inadvertently expose secrets to unauthorized endpoints. Command and code injection impacted aws-cdk-lib, jsii-diff, Bedrock AgentCore SDK, and Amplify Codegen UI. The smithy-rs framework received three patches for denial-of-service via uncontrolled recursion and Slowloris issues.

Other notable issues include insecure file permissions in the AWS CLI, deserialization remote code execution in the Advanced JDBC Wrapper, SQL injection in mcp-gateway-registry, TLS 1.3 flaws in s2n-tls, and stored XSS in AWS Ops Wheel. A common thread: insufficient input validation in tools interacting with AI agents, reflecting the expanded surface area of LLM-integrated workflows. All patches are available, upgrade promptly. For more information, see AWS Security Bulletins.

AWS Samples

This month brings 14 new AWS samples spanning AI security, identity, data protection, governance, threat detection, and security posture management. From deploying governed AI agent platforms on Amazon Bedrock AgentCore to building data-residency-compliant chatbots and DevSecOps baselines for Kiro, these repositories help you implement security and governance best practices across your AWS environment.

AI Security

Lark MCP on AgentCore
Learn to deploy a hosted remote MCP service on Amazon Bedrock AgentCore that lets AI agents operate Feishu/Lark through 450+ tools, with per-user identity isolation and smart multi-step orchestration via 20+ domain Skills.

Lark CLI MCP Wrapper on AgentCore Runtime and Identity
Learn to securely wrap a CLI tool as an MCP server on AgentCore Runtime using a sidecar credential-isolation pattern, where the CLI process never holds real tokens and all secrets are resolved through AgentCore Identity’s Token Vault.

LiteLLM Bedrock Gateway on EKS
Learn to deploy a production-grade LiteLLM proxy on Amazon EKS as a unified OpenAI/Anthropic-compatible gateway to Amazon Bedrock, with four progressive layers covering network isolation, cross-region inference profiles, and cross-account delegation.

Enterprise Agentic AI Platform Accelerator on AgentCore
Learn to deploy a secure, governed foundation for production AI agents on Amazon Bedrock AgentCore with CDK stacks covering identity, gateway, memory, runtime, and observability; supporting multiple agent frameworks (Strands, LangGraph, Claude SDK) and opt-in security controls including VPC isolation, KMS encryption, Cedar policies, and Bedrock Guardrails.

FlowAMP: AI Agent Governance on AWS
Learn to deploy a single-pane-of-glass agent management platform on Amazon Bedrock AgentCore that discovers, monitors, scores, controls, and cost-accounts AI agents across an AWS Organization with agentic discovery, compliance scanning (NIST AI RMF, ISO 27001, SOC 2), Responsible-AI scoring, FinOps via Cost Explorer, and Cedar-based policy enforcement.

Kiro SecOps Baseline
Learn to deploy a DevSecOps security baseline for Kiro as a single Go CLI that installs global guardrails (permissions.yaml, steering, skills, a security-review agent) and per-project workspace hooks (fail-closed guard, PR/pipeline review gates, scanner configs for gitleaks, trivy, and checkov) with enterprise fleet distribution via MDM and Administration scope.

Identity

OAuth 2.0 Token Exchange with Amazon Cognito
Learn to implement RFC 8693 OAuth 2.0 Token Exchange using Amazon Cognitowith a true delegation pattern, enabling services to act on behalf of users while maintaining distinct service identities and least-privilege access in microservices architectures.

Lark Identity on AgentCore — Gateway Interceptor
Learn to implement enterprise identity pass-through on Amazon Bedrock AgentCore using a Gateway Request Interceptor that forwards the user’s identity and injects per-user credentials to downstream MCP tools, so the agent never holds a token and tools act only as the authenticated user against Lark.

Data Protection

Automated PII Detection Pipeline with Amazon Macie
Learn to build an event-driven pipeline that automatically detects PII in Amazon S3 objects using Amazon Macie, AWS Step Functions, and custom data identifiers, with CSV/JSON reporting and SNSalerting for high-severity findings.

Data-Residency Chatbot with Amazon Bedrock AgentCore
Learn to build a data-residency-compliant natural-language chatbot on Amazon Bedrock AgentCore that keeps all data and AI inference within a single AWS Region, using governed text-to-SQL with whitelist-validated queries, Aurora PostgreSQL in private subnets, and AgentCore Gateway for secure tool access.

Governance and compliance

Video Compliance Agent
Learn to build an end-to-end automated video compliance verification pipeline using Amazon Bedrock, ECS Fargate, and AWS Step Functions that processes videos shot-by-shot, extracting frames, audio transcripts, and OCR text, then flags potential broadcast guideline violations with structured per-shot reports.

Contract Compliance Search with Amazon OpenSearch
Learn to build a contract compliance search system that combines semantic search with semantic highlighting using Amazon OpenSearchService, Amazon Titan V2 embeddings, and a SageMaker-hosted highlighting model to surface relevant clauses across contract documents.

Threat detection and incident response

Multicloud Security Posture Assessment
Learn to deploy a centralized security assessment solution that scans AWS, Azure, Google Cloud Platform, and Oracle Cloud Infrastructure environments from a single AWS deployment using Prowler, with AWS CloudFormation templates for each provider and unified reporting in HTML, CSV, and JSON-OCSF formats.

Centralize AWS Security Agent Findings
Learn to deploy a AWS CloudFormation stack that automatically exports AWS Security Agentpenetration test findings to Amazon S3 and queries them centrally with Amazon Athena, using Amazon EventBridge, Step Functions, and a AWS Glue catalog for tracking findings over time.

Sentinel Harness — Production SecOps Agents as Configuration
Learn to build production security-operations agents as pure configuration on Amazon Bedrock AgentCore Harness, declaring model, prompt, tools, skills, memory, and limits in YAML while AWS runs the agent loop with human-in-the-loop gates, detection-engineering tools, adversary emulation, and a self-improvement closed loop.

AWS Labs

This month brings 1 new AWS Labs repository focused on data protection, helping organizations build automated PII detection and redaction pipelines with AI-powered processing across documents and audio files.

Data Protection

PII Anonymizer
Learn to build an automated PII detection and redaction pipeline using AWS Step Functions, Amazon Bedrock, Amazon Textract, and Amazon Transcribe; supporting PDFs, Word, Excel, images, and audio files with synthetic replacement or blackout modes, concurrency control, and customer-managed KMS encryption.

Conclusion

July 2026 provides guidance and examples for securing AI agent architectures at scale, from governed text-to-SQL with data residency controls and agent management platforms to DevSecOps baselines for AI coding tools. The posts and samples provide patterns for least-privilege authorization in multi-agent chains using Cedar, post-quantum migration planning, container-aware network firewall rules, and multicloud security posture management. Each resource includes deployment steps or runnable code so you can validate in your own environment before adopting. Subscribe to the AWS Security Blog RSS feed to receive updates as they publish, and revisit this digest monthly for a consolidated view of what changed and what to act on.

If you have feedback about this post, submit comments in the Comments section below.


Rodolfo Brenes

Rodolfo Brenes

Rodolfo is a Principal Solutions Architect focused on Cloud Governance and Compliance. With over 18 years of experience, he currently leads a technical field community in AWS helping customers scale and improve their security and governance frameworks. Besides work, Rodolfo enjoys video games, playing with his four cats, and won’t say no to a good outdoor adventure.

Anna Brinkmann

Anna has 18 years of experience in the technical content space and has spent the last 6 years managing the AWS Security Blog. Outside of work, she enjoys spending time with her family.

Migrate an OAuth 2.0 authenticated Apache Kafka cluster to Amazon MSK with MSK Replicator

Post Syndicated from Subham Rakshit original https://aws.amazon.com/blogs/big-data/migrate-an-oauth-2-0-authenticated-apache-kafka-cluster-to-amazon-msk-with-msk-replicator/

In an earlier post, we walked through how Amazon Managed Streaming for Apache Kafka (Amazon MSK) Replicator migrates external and self-managed Apache Kafka clusters to Amazon MSK. It replicates your topics and their configurations, keeps topic and consumer-group names intact, and synchronizes consumer-group offsets, so your producers and consumers can cut over on their own schedule instead of all at once. MSK Replicator now supports OAuth 2.0 (SASL/OAUTHBEARER) authentication to the external cluster, and that is what this post covers.

If your external Kafka cluster authenticates clients with OAuth, MSK Replicator can connect to it, but “OAuth” isn’t a single thing you switch on. It’s a family of grant types, and each one comes with its own trust model, its own set of inputs you need to supply, and its own configuration on both the Replicator side and your identity provider (IdP) side.

In this post, we walk you through the grant types one by one, show you how to configure Replicator for each, call out the network and TLS prerequisites that are commonly missed, and finish with how to handle IdPs that sit behind an additional identity layer. This mechanism works with any OAuth 2.0 (OIDC) identity provider, including Keycloak, Okta, Microsoft Entra ID, PingFederate, and Auth0. OAuth here governs only how Replicator authenticates to your external cluster, so the target can be either Amazon MSK Standard or Express brokers, which always use IAM.

How OAuth authentication works

Before you configure Replicator, it helps to be precise about how the OAuth Kafka handshake works.

The components

  • The Identity Provider (IdP) – Issues access tokens and publishes the public keys. Brokers use these keys to verify the tokens. Examples: Keycloak, Okta, Microsoft Entra ID, PingFederate, Auth0, or a custom OIDC server.
  • The client – In our case, MSK Replicator, acting as a Kafka consumer/producer against your external cluster.
  • The resource server – Your self-managed Kafka broker, which must decide whether to admit a connection.
  • The access token – A JWT (JSON Web Token): a base64url-encoded, three-part string header.payload.signature that the IdP cryptographically signs.

The SASL/OAUTHBEARER handshake, step by step

The following sequence diagram shows the full exchange, from Replicator requesting a token to the broker accepting the connection:

Sequence diagram of the SASL/OAUTHBEARER handshake: Replicator requests a token from the IdP, receives a signed JWT, presents it to the Kafka broker, and the broker verifies the JWT against cached JWKS keys before accepting the connection.

Figure 1: The SASL/OAUTHBEARER handshake. Replicator gets a signed JWT from the IdP and presents it to the broker, which verifies it against cached JWKS keys before accepting the connection.

Walking through it:

  1. Request a token – Replicator asks the IdP for an access token. The exact request depends on the grant type (covered in the next section).
  2. Receive a signed JWT – The IdP returns a signed JWT access token.
  3. Present the token – Replicator opens a SASL/OAUTHBEARER connection to the external Kafka brokers and presents the JWT.
  4. Verify locally – The broker verifies the JWT signature against the IdP’s cached JWKS public keys, without calling the IdP per message.
  5. Connection accepted – The broker admits the connection and derives the Kafka principal from the preferred_username claim.

Step 4 is worth dwelling on: the broker validates the token locally. It fetches the IdP’s JWKS (JSON Web Key Set, the public half of the IdP’s signing keys, RFC 7517) from an endpoint like https://idp.example.com/realms/kafka/protocol/openid-connect/certs and caches it, refreshing on a configurable interval (and re-fetching if it sees a key ID it doesn’t recognize). Incoming JWT signatures are then verified against those cached keys. The IdP is not in the hot path of message traffic. It is contacted only to (a) issue tokens to clients, and (b) serve its public keys for the periodic JWKS refresh.

What the Kafka broker checks

When Replicator presents a JWT, the broker validates:

  • Signature – Proves the IdP issued the token and no one tampered with it (verified against JWKS).
  • iss (issuer) – Must match the broker’s configured oauth.valid.issuer.uri, byte-for-byte, including scheme, host, port, and path. A mismatch is a common configuration error.
  • exp (expiry) – Expired tokens are rejected. Strimzi’s client callback handler proactively refreshes before expiry, so you shouldn’t see mid-stream failures.
  • The principal claim – Typically preferred_username. The broker uses this as the Kafka principal in ACLs (for example, User:service-account-msk-replicator). This matters: the identity Replicator authenticates as on the external cluster must have ACLs that you configure to grant it the read/describe permissions it needs.

Mapping your IdP to a Replicator grant type

A grant type is the protocol by which the client proves its identity to the IdP and obtains a token. This is the front half of the preceding handshake (steps 1 and 2). MSK Replicator supports three of them. You already know how your Kafka clients authenticate to your IdP today, so start from that.

Which grant to use?

Find the row that matches how your clients get tokens today:

How your Kafka clients get tokens from the IdP today Grant type Long-lived secret? What you trust/register on the IdP
A client_id / client_secret (confidential client) CLIENT_CREDENTIALS Yes (stored on AWS Secrets Manager) Nothing new: reuse the existing client, or create one for Replicator
You want secretless, and your IdP can trust an external token issuer IAM_JWT_BEARER No AWS STS as an external token (OIDC) issuer. Trust its JWKS
You want secretless, and your IdP models workloads as signed-JWT clients CLIENT_CREDENTIALS_ASSERTION No AWS STS as the client’s signing authority (private_key_jwt). Trust its JWKS

The simplest mapping is like-for-like: if your clients use a client_id/client_secret, point Replicator at the same client with CLIENT_CREDENTIALS. If you’d rather not give Replicator a long-lived secret, the two secretless grants let it authenticate with its AWS identity instead. Choose between them based on how your IdP prefers to trust an external party.

The rest of this section explains why the three grants differ, using an analogy. If your row is clear and you only want the configuration, skip ahead to Configuring and creating the replicator.

A scenario: checking in at a secure office building

A visitor needs to get into a secure office building. They can’t walk straight in. First they stop at the reception desk to prove who they are and collect a temporary access pass. Only then can they use that pass at the building’s turnstile to get inside. In OAuth terms: the building is your external Kafka cluster, the reception desk is the IdP, the temporary access pass is the access token (JWT), and the visitor is MSK Replicator. Presenting the pass at the turnstile is the SASL/OAUTHBEARER step, and it works the same way for every grant type. What differs is how the visitor proves who they are at the reception desk before it prints a pass.

Scenario 1: CLIENT_CREDENTIALS (the shared PIN)

CLIENT_CREDENTIALS scenario shown as a visitor entering a building: the visitor authenticates at reception with a PIN (the client secret), receives a temporary badge (the access token), and uses it to enter the building (the Kafka cluster).

Figure 2: CLIENT_CREDENTIALS. The visitor authenticates at reception with a PIN (the client_secret), gets a temporary badge (the access token), and uses it to enter the building (the Kafka cluster).

At the reception desk the visitor keys in a PIN the desk already have on file (the client_secret), collects a temporary access pass in return (the access token), and uses that pass to get into the building. Both sides hold the same secret. In practice (RFC 6749 §4.4), Replicator authenticates to the IdP with a client_id/client_secret stored on AWS Secrets Manager, receives the access token, and presents it to the external Kafka brokers over SASL/OAUTHBEARER. Use it when your IdP already issues client secrets for machine clients. This is usually a like-for-like move that reuses the client your existing producers and consumers use, or a new one created for Replicator.

Scenario 2: IAM_JWT_BEARER (the badge is the request)

IAM_JWT_BEARER scenario: the visitor presents an employer-signed badge (an STS JWT) to reception as the request itself and receives an access token, because reception trusts the employer’s stamp (the STS JWKS).

Figure 3: IAM_JWT_BEARER. The visitor shows an employer-signed badge (an STS JWT) to reception as the request itself and gets an access token. Reception accepts it because it trusts the employer’s stamp (the STS JWKS).

First, the visitor collects an employer-signed badge: Replicator calls STS GetWebIdentityToken to mint an STS JWT. At the reception desk the badge itself is the request. The visitor shows it to ask for a pass. Reception trusts the employer’s tamper-proof stamp (STS JWKS), so it accepts the badge and prints a temporary access pass. In practice (RFC 7523 §2.1), the STS JWT is sent as the authorization grant (assertion), and the IdP trusts AWS STS as an external token issuer. Use it when you want secretless authentication, and your IdP can trust an external issuer’s JWTs.

Scenario 3: CLIENT_CREDENTIALS_ASSERTION (the same badge, used as ID on the form)

CLIENT_CREDENTIALS_ASSERTION scenario: the visitor fills out reception’s standard request form and attaches the same STS JWT as identification to receive an access token, which reception grants by trusting the employer’s stamp (the STS JWKS).

Figure 4: CLIENT_CREDENTIALS_ASSERTION. The visitor fills out reception’s standard request form and attaches the same STS JWT as ID, getting an access token. Reception trusts the employer’s stamp (the STS JWKS).

The visitor again collects the same employer-signed badge (STS JWT). This time they fill out the reception desk’s standard access request form (the client_credentials grant) and attach the badge to it as identification, all in one submission. Reception trusts the same employer stamp (STS JWKS) and prints a temporary access pass. In practice (RFC 7521/RFC 7523 §2.2), the same STS JWT is sent as the client_assertion on the client_credentials grant, with the IdP trusting STS as the client’s signing authority (private_key_jwt). Use it when you want secretless authentication and your IdP models external workloads as signed-JWT clients.

Scenarios 2 and 3 in one sentence. Both mint the same STS JWT and share the same benefit: nothing shared can leak, because there is no secret. They differ only in where the STS JWT sits in the token request. IAM_JWT_BEARER sends it as the assertion (the badge is the request), while CLIENT_CREDENTIALS_ASSERTION sends it as the client_assertion on a standard client_credentials request (the badge is ID on the form). That single difference is what you register on the IdP: AWS STS as an external token issuer, or as the client’s signing authority.

Solution overview

Now that you can map your setup to a grant type, the next question is where these pieces actually run. MSK Replicator runs on AWS managed infrastructure but attaches elastic network interfaces (ENIs) into the subnets of the target Amazon MSK cluster’s virtual private cloud (VPC) and initiates every connection from there under a Service Execution Role (SER). Those ENIs sit in private subnets that typically have no NAT or internet gateway, so each external dependency needs an explicit network path. The following diagram shows the full topology for an OAuth migration, including the two pieces that are commonly missed: STS Outbound Web Identity Federation (for the secretless grants) and the interface VPC endpoints for STS and Secrets Manager.

Deployment architecture: the source environment holds the IdP and Kafka brokers; the AWS account holds STS, Secrets Manager, and the Amazon MSK VPC, whose private subnets contain the Replicator ENIs and target cluster, reached through interface VPC endpoints.

Figure 5: Deployment architecture. The source environment holds the IdP and Kafka brokers. The AWS account holds STS, Secrets Manager, and the Amazon MSK VPC, whose private subnets contain the Replicator ENIs and target cluster, reached through interface VPC endpoints.

The source environment (on the left, shown as on-premises here, but it can equally be another cloud or a self-managed cluster on AWS) holds two components: the IdP token endpoint and JWKS (Keycloak, Okta, Entra ID) and the external Kafka brokers on a SASL_SSL / OAUTHBEARER listener. Everything else runs in your AWS account.

The two dotted lines are trust relationships you configure ahead of time, not runtime calls:

  • External Kafka validates token by using IdP JWKS – The broker checks every presented access token against the IdP’s published public keys. This applies to all grants.
  • IdP trusts STS issuer through JWKS – For the secretless grants only, the IdP is configured to trust your account’s STS issuer and validate the STS-signed JWT against STS’s JWKS. When STS Outbound Web Identity Federation is enabled, AWS provisions a per-account issuer URL (https://<id>.tokens.sts.global.api.aws) whose JWKS the IdP trusts. This trust is not used by CLIENT_CREDENTIALS.

The numbered arrows are the runtime flow, all originating from the Replicator ENIs:

  • Step 1: Fetch client credentials and the CA certificate from AWS Secrets Manager, through its VPC endpoint. For CLIENT_CREDENTIALS this includes the client_id/client_secret. For the secretless grants it is only the CA certificate(s).
  • Step 1a (optional): Call GetWebIdentityToken on AWS STS, through the STS VPC endpoint, to mint a JWT of Replicator’s AWS identity. Required only for IAM_JWT_BEARER and CLIENT_CREDENTIALS_ASSERTION.
  • Step 2: Get a signed JWT access token from the IdP token endpoint, exchanging either the client secret or the STS JWT depending on the grant.
  • Step 3: Present the token to the external Kafka brokers over SASL/OAUTHBEARER.
  • Step 4: Replicate to the target Amazon MSK cluster using IAM authentication.

The two supporting pieces inside the VPC, the Secrets Manager and STS interface VPC endpoints, are commonly overlooked precisely because the private subnets have no NAT or internet gateway. We cover exactly why they’re needed, and when, in the following section, Cross-cutting requirements.

Configuring and creating the replicator

With the architecture in mind, you can now configure Replicator itself. MSK Replicator models OAuth through a saslOAuthBearer structure on the external cluster’s clientAuthentication. Exactly one of three mechanism members must be present: clientCredentials, iamJwtBearer, or clientCredentialsAssertion. The control plane enforces this mutual exclusivity. Fields shared across all three (tokenEndpointUrl, scope, tokenEndpointAuthenticationMethod, tokenEndpointTlsCertificateArn, and saslExtensions) live at the saslOAuthBearer level.

Before the per-grant details, here are the requirements that apply to every OAuth migration, whichever grant you choose. Most OAuth setup failures trace back to one of these, so review them first.

Cross-cutting requirements

Here are the five items that apply to every grant: TLS trust, secret format, network reachability, the Service Execution Role, and STS federation.

a) TLS everywhere, and two separate trust settings

Replicator connects to two TLS endpoints, and they are configured independently:

  • encryptionInTransit.rootCaCertificate: the CA that signed your Kafka brokers’ TLS certificates (the SASL_SSL listener – :9096).
  • tokenEndpointTlsCertificateArn: the CA that signed your IdP’s token endpoint TLS certificate (for example – Keycloak on :8443).

If your broker and IdP are signed by the same private CA, you still must supply the CA in both fields. Omitting tokenEndpointTlsCertificateArn when the IdP uses a private or self-signed cert produces a PKIX path building failed error during token acquisition. Because that fails before workers stabilize, you’ll see a generic failure with no worker logs. If your IdP uses a publicly-trusted certificate (for example, it sits behind a public endpoint), you can omit tokenEndpointTlsCertificateArn entirely.

b) Secret format: store key/value pairs, not raw values

Every secret Replicator reads (client credentials, CA certificate) is parsed by the config provider as a set of key/value pairs. Use the Secrets Manager console’s Key/value editor rather than pasting raw text, and it will serialize and escape the values for you.

The keys the provider expects:

Key Value Used for
certificate the CA in PEM (newlines escaped as \n) CA-certificate secrets (rootCaCertificate, tokenEndpointTlsCertificateArn)
client_id, client_secret your OAuth client credentials the CLIENT_CREDENTIALS token-request secret

Custom parameters, headers, and SASL extensions. Some IdPs require extra data on the token request, and some brokers require SASL/OAUTHBEARER extensions. The config provider supports both through reserved key prefixes in the same secret:

Prefix Effect Example key Example value
custom_param. adds a parameter to the token request sent to the IdP custom_param.tenant_token myTenantToken
custom_header. adds an HTTP header to the IdP token request custom_header.X-Tenant-Id acme
extension. adds a SASL/OAUTHBEARER extension presented to the broker (for example, Confluent Cloud’s logicalCluster) extension.logicalCluster myLogicalClusterId

For example, an IdP that expects a tenant token as a request parameter and a Confluent Cloud broker that requires a logical-cluster extension would add custom_param.tenant_token and extension.logicalCluster as extra key/value pairs alongside client_id/client_secret in the same secret.

c) Network reachability from Replicator’s ENIs

Replicator attaches ENIs into the subnets you specify (through the target amazonMskCluster cluster’s vpcConfig) and initiates all connections from there. Those ENIs must be able to reach:

  1. Your external brokers, over VPC peering, AWS Transit Gateway, AWS Direct Connect, or VPN, with security groups permitting the SASL_SSL port.
  2. Your IdP’s token endpoint, over the same networking. The endpoint hostname must resolve from those subnets.
  3. AWS Secrets Manager, to fetch credentials/CA. If the subnets have no NAT/internet gateway, add an interface VPC endpoint for com.amazonaws.<region>.secretsmanager with private DNS.
  4. AWS STS (only for IAM_JWT_BEARER and CLIENT_CREDENTIALS_ASSERTION), to call GetWebIdentityToken. In no-egress subnets this will time out (STS GetWebIdentityToken call failed: Connect timed out) unless you add an interface VPC endpoint for com.amazonaws.<region>.sts with private DNS. This is the most common oversight for the secretless grants.

Both endpoints use private DNS, so the standard secretsmanager.<region>.amazonaws.com and sts.<region>.amazonaws.com hostnames resolve to the endpoint inside the VPC, with no client change needed.

A note on vpcConfig placement. For an external Apache Kafka cluster, vpcConfig is specified on the target amazonMskCluster entry, not the external apacheKafkaCluster entry. The API rejects a vpcConfig on the external cluster. The ENIs it creates are what reach both clusters and all AWS endpoints.

d) The Service Execution Role (SER)

Replicator assumes an IAM role to do its work. Two parts matter:

  • Trust policy – Must allow the Replicator service to assume it. kafka.amazonaws.com needs to be trusted. A trust policy that is too narrow fails with AccessDenied.ServiceExecutionRoleUnassumable.
  • Permissions – The replication permissions are extensive and depend on which features you enable, so follow the service execution role permissions reference to build a least-privilege policy.

e) Enabling STS Outbound Web Identity Federation (secretless grants only)

For IAM_JWT_BEARER and CLIENT_CREDENTIALS_ASSERTION, sts:GetWebIdentityToken must be enabled for your account/role. When enabled, AWS provisions a dedicated issuer URL of the form https://<uuid>.tokens.sts.global.api.aws. Every JWT STS mints for your account carries this as its iss claim, and its public keys are published under this issuer’s JWKS. You configure your IdP to trust this issuer. Granting the sts:GetWebIdentityToken IAM action is necessary but not sufficient. The account-level federation feature must also be turned on.

Create the replicator

A repeatable way to create the replicator is with a request file and --cli-input-json, so you can keep the full configuration under version control. The following example is a complete CLIENT_CREDENTIALS request. The two secretless variants change only the saslOAuthBearer block (shown after).

aws kafka create-replicator \
  --region <region> \
  --cli-input-json file://create-replicator.json

create-replicator.json:

{
  "replicatorName": "oauth-migration-replicator",
  "serviceExecutionRoleArn": "arn:aws:iam::<acct>:role/msk-replicator-execution-role",
  "kafkaClusters": [
    {
      "apacheKafkaCluster": {
        "apacheKafkaClusterId": "<source-cluster-id>",
        "bootstrapBrokerString": "b-1.ext-kafka.example.com:9096,b-2.ext-kafka.example.com:9096"
      },
      "clientAuthentication": {
        "saslOAuthBearer": {
          "tokenEndpointUrl": "https://idp.example.com/realms/kafka/protocol/openid-connect/token",
          "clientCredentials": {
            "tokenRequestSecretArn": "arn:aws:secretsmanager:<region>:<acct>:secret:<oauth-creds>"
          },
          "tokenEndpointAuthenticationMethod": "POST",
          "tokenEndpointTlsCertificateArn": "arn:aws:secretsmanager:<region>:<acct>:secret:<idp-ca>"
        }
      },
      "encryptionInTransit": {
        "encryptionType": "TLS",
        "rootCaCertificate": "arn:aws:secretsmanager:<region>:<acct>:secret:<broker-ca>"
      }
    },
    {
      "amazonMskCluster": {
        "mskClusterArn": "arn:aws:kafka:<region>:<acct>:cluster/target-msk/<uuid>"
      },
      "vpcConfig": {
        "subnetIds": [
          "subnet-aaaa",
          "subnet-bbbb",
          "subnet-cccc"
        ],
        "securityGroupIds": [
          "sg-xxxxxxxx"
        ]
      }
    }
  ],
  "replicationInfoList": [
    {
      "sourceKafkaClusterId": "<source-cluster-id>",
      "targetKafkaClusterArn": "arn:aws:kafka:<region>:<acct>:cluster/target-msk/<uuid>",
      "targetCompressionType": "NONE",
      "topicReplication": {
        "topicsToReplicate": [
          ".*"
        ],
        "detectAndCopyNewTopics": true,
        "copyTopicConfigurations": true
      },
      "consumerGroupReplication": {
        "consumerGroupsToReplicate": [
          ".*"
        ],
        "detectAndCopyNewConsumerGroups": true,
        "synchroniseConsumerGroupOffsets": true
      }
    }
  ]
}

Field names and exact nesting follow the create-replicator API reference. Check it for the full schema and any Region-specific values.

The example above uses CLIENT_CREDENTIALS. For the full schema, any Region-specific values, and detailed examples for the other grant types, check the MSK documentation.

With the requirements and configuration in hand, here is the order to put them in:

  1. Pick your grant type using the preceding decision table. CLIENT_CREDENTIALS is the fastest path if you already manage a client secret. Otherwise choose a secretless grant based on how your IdP models external workloads. For a multi-hop internal chain, use IAM_JWT_BEARER against the proxy pattern described in the next section.
  2. Prepare the IdP: create the client (or the STS-trust configuration), and note the exact token endpoint URL and issuer.
  3. Stage secrets in Secrets Manager, as JSON (requirement b): client credentials (if any) and the CA certificate(s).
  4. Wire the network (requirement c): connectivity from Replicator’s subnets to your brokers and IdP, plus interface VPC endpoints for Secrets Manager and (secretless grants only) STS, both with private DNS.
  5. [Optional but recommended]: Smoke-test the path from inside the VPC – IdP setup is often the part that takes the most iterations, and Replicator provisioning is a slow way to discover a misconfigured token endpoint or a missing TLS trust. Spin up a small EC2 instance in Replicator’s subnets, install a Kafka client, and run an end-to-end produce/consume against the external brokers using SASL/OAUTHBEARER (a client_credentials flow is simplest). This validates the three things most likely to be wrong (network reachability to the IdP and brokers, both TLS trusts for the broker CA and IdP CA, and token vending) while you can still fix them in seconds. Tear the instance down once the round trip works.
  6. Enable STS Outbound Web Identity Federation (requirement e. Secretless grants only) and configure your IdP to trust the resulting issuer.
  7. Build the SER (requirement d) with a trust policy the Replicator service can assume and the required permissions.
  8. Create the replicator with the create-replicator request for your grant. Remember both TLS trust fields for a private-CA IdP (requirement a), and vpcConfig on the target entry only.
  9. Verify – Produce to a topic on the external cluster and confirm the records land on the target (consume with IAM auth on the Amazon MSK side). Then watch the health signals:
    • In the Amazon MSK console, the replicator should reach the RUNNING state.
    • In Amazon CloudWatch, under the AWS/Kafka namespace, watch the replicator’s ReplicationLatency and MessageLag metrics. Both should be low and stable, and MessageLag should trend toward zero as it catches up.
    • A healthy replicator commits offsets continuously. A steady “1 message per batch” with no producer activity is only the internal heartbeat topic, not a stall.

Handling an additional identity layer: the federation-proxy pattern

Who owns what – Before the details, the ownership line is simple and worth stating up front:

  • What Replicator guarantees: it calls the configured tokenEndpointUrl with the configured grant, includes the STS JWT, expects a standard {access_token, token_type, expires_in} response, and refreshes before expiry.
  • What you own: everything at and behind the proxy, including validating the STS JWT, the downstream token exchanges, claim mapping, and the availability and latency of the endpoint. The proxy runs in your VPC and is owned entirely by you.

So far we have assumed you can point Replicator at a single token endpoint. Some organizations can’t. Instead, they have an internal identity chain: several hops of token exchange and federation that a workload must traverse before it holds a token the Kafka brokers accept.

A representative example is a large financial institution whose chain has several hops: an AWS workload’s identity (a signed GetCallerIdentity request) is exchanged at an internal Token Exchange service for an intermediate JWT, which an internal IdP then consumes as a client_assertion to issue the final Bearer token the Kafka brokers accept.

Replicator connects to a single HTTPS token endpoint using one of the three grant types and expects a standard token response. When the identity flow spans multiple hops like this, you place a proxy in front of that chain so Replicator still sees a single endpoint.

The solution: a customer-owned proxy

You deploy a small proxy in your own VPC that collapses the chain behind a single endpoint. From Replicator’s perspective, this is an ordinary OAuth flow against one token endpoint. Everything behind that endpoint is opaque to Replicator and owned entirely by you.

The grant Replicator uses to reach the proxy is a separate choice from the exchanges happening behind it. We recommend a secretless grant (IAM_JWT_BEARER or CLIENT_CREDENTIALS_ASSERTION) so there is no long-lived secret between Replicator and the proxy. CLIENT_CREDENTIALS is also valid if you would rather the proxy authenticate Replicator with a client secret. The following walkthrough uses IAM_JWT_BEARER, where the proxy validates the STS JWT that Replicator presents.

How it works, end to end. The following sequence diagram traces the full token exchange, from Replicator’s request to the Bearer it finally presents to the external Kafka brokers.

Federation-proxy token flow: the proxy validates Replicator’s STS JWT, exchanges its own AWS identity at the Token Exchange service for an intermediate JWT, presents that to the internal IdP, and returns the resulting Bearer token to Replicator.

Figure 6: Federation-proxy token flow. The proxy validates Replicator’s STS JWT, exchanges its own AWS identity at the Token Exchange service for an intermediate JWT, presents that to the internal IdP, and returns the resulting Bearer to Replicator.

  1. Replicator to proxy – Replicator POSTs its STS JWT as assertion to the proxy’s token endpoint, a plain IAM_JWT_BEARER request (grant_type=jwt-bearer). Because the endpoint is private, Replicator reaches it through an execute-api interface VPC endpoint, the same private-connectivity approach used for Secrets Manager and STS. (Replicator first obtains the STS JWT by calling STS GetWebIdentityToken through the STS VPC endpoint.)
  2. Proxy validates the STS JWT (signature against STS’s JWKS, plus iss/aud/exp/sub checks. The sub is the caller’s AWS ARN).
  3. Proxy to Token Exchange service – The proxy exchanges its own AWS identity, presented as a signed GetCallerIdentity request, at the internal Token Exchange service.
  4. Token Exchange service → proxy – It returns a signed intermediate JWT.
  5. Proxy to internal IdP – The proxy makes a client_credentials request that carries the intermediate JWT as the client_assertion.
  6. Internal IdP to proxy – The IdP issues the final Bearer access token.
  7. Proxy to Replicator – The proxy returns the Bearer, and Replicator presents it to the external brokers over SASL/OAUTHBEARER. The brokers validate it against the final IdP’s JWKS, a completely ordinary OAuth handshake from their point of view.

Reference architecture

Here is the reference architecture for the end-to-end solution.

Federation-proxy reference architecture: Replicator ENIs in a private subnet call a customer-owned proxy (a Lambda function behind a private API Gateway) that runs the on-premises identity chain over Direct Connect before Replicator replicates into the target Amazon MSK cluster.

Figure 7: Federation-proxy reference architecture. Replicator ENIs in a private subnet call a customer-owned proxy (a Lambda behind a private API Gateway), which runs the on-premises identity chain over Direct Connect before Replicator replicates into the target Amazon MSK cluster.

Everything on the Replicator side runs in your VPC’s private subnets: the Replicator ENIs, the customer-owned proxy, and the target Amazon MSK cluster. The proxy here is an AWS Lambda function behind a private Amazon API Gateway, but it can run on any compute you prefer (EC2, ECS, or EKS) as long as it exposes a single private HTTPS token endpoint. Connectivity to the on-premises Token Exchange service, internal IdP, and Kafka brokers runs over AWS Direct Connect (a VPN or VPC peering works too).

The outer legs of this flow are exactly the base migration from Solution overview: step 1 (fetch the broker CA from Secrets Manager), step 1a (mint the STS JWT through STS), step 3 (present the Bearer to the brokers), and step 4 (replicate to the target with IAM). What’s new here is the proxy hop in the middle, which replaces the single “step 2” call to a token endpoint:

  • 2. POST /token – Replicator sends the STS JWT as the assertion to the proxy’s private token endpoint, reached through the execute-api interface VPC endpoint. The proxy validates it against STS’s JWKS.
  • 2a. Exchange AWS identity – The proxy presents its own AWS identity (a signed GetCallerIdentity request) to the internal Token Exchange service and gets back a signed intermediate JWT.
  • 2b. Present as client_assertion – The proxy sends a client_credentials request to the internal IdP with the intermediate JWT as the client_assertion, and receives the final Bearer.
  • 2c. Final Bearer token – The proxy returns the Bearer to Replicator, which then continues at step 3.

As in the base architecture, the dotted lines are prerequisite trust relationships, not runtime calls: the proxy trusts AWS STS as an issuer (validating the STS JWT against STS’s JWKS), and the Kafka brokers validate the final Bearer against the internal IdP’s JWKS.

One subtlety worth calling out is the split of TLS trust. Replicator connects directly only to the private API Gateway (which uses a publicly trusted certificate) and to the Kafka brokers, so the only certificate it fetches from Secrets Manager is the broker CA. The internal IdP’s CA is the proxy’s concern: the proxy terminates TLS to the Token Exchange service and internal IdP, so it carries their CA material, not Replicator.

The same single-endpoint pattern handles other “extra layer” scenarios without any Replicator change: claim enrichment (the proxy intercepts and augments), rate-limited IdPs (the proxy caches tokens), IdPs requiring mTLS (the proxy terminates Replicator’s HTTPS and initiates mTLS onward), and IdP migrations (swap the proxy’s target without touching Replicator config).

A working reference implementation of this customer-owned proxy is available at GitHub.

Conclusion

In this post, we walked through how to migrate a self-managed, OAuth-authenticated Apache Kafka cluster to Amazon MSK using MSK Replicator: how the SASL/OAUTHBEARER handshake works, how to map your identity provider to one of the three supported grant types, the deployment architecture and prerequisites that the connection depends on, and how to handle identity providers that sit behind an additional federation layer. To get started, see the Amazon MSK Developer Guide and the Amazon MSK Replicator documentation. For the federation-proxy example, see the sample implementation on GitHub.


About the author
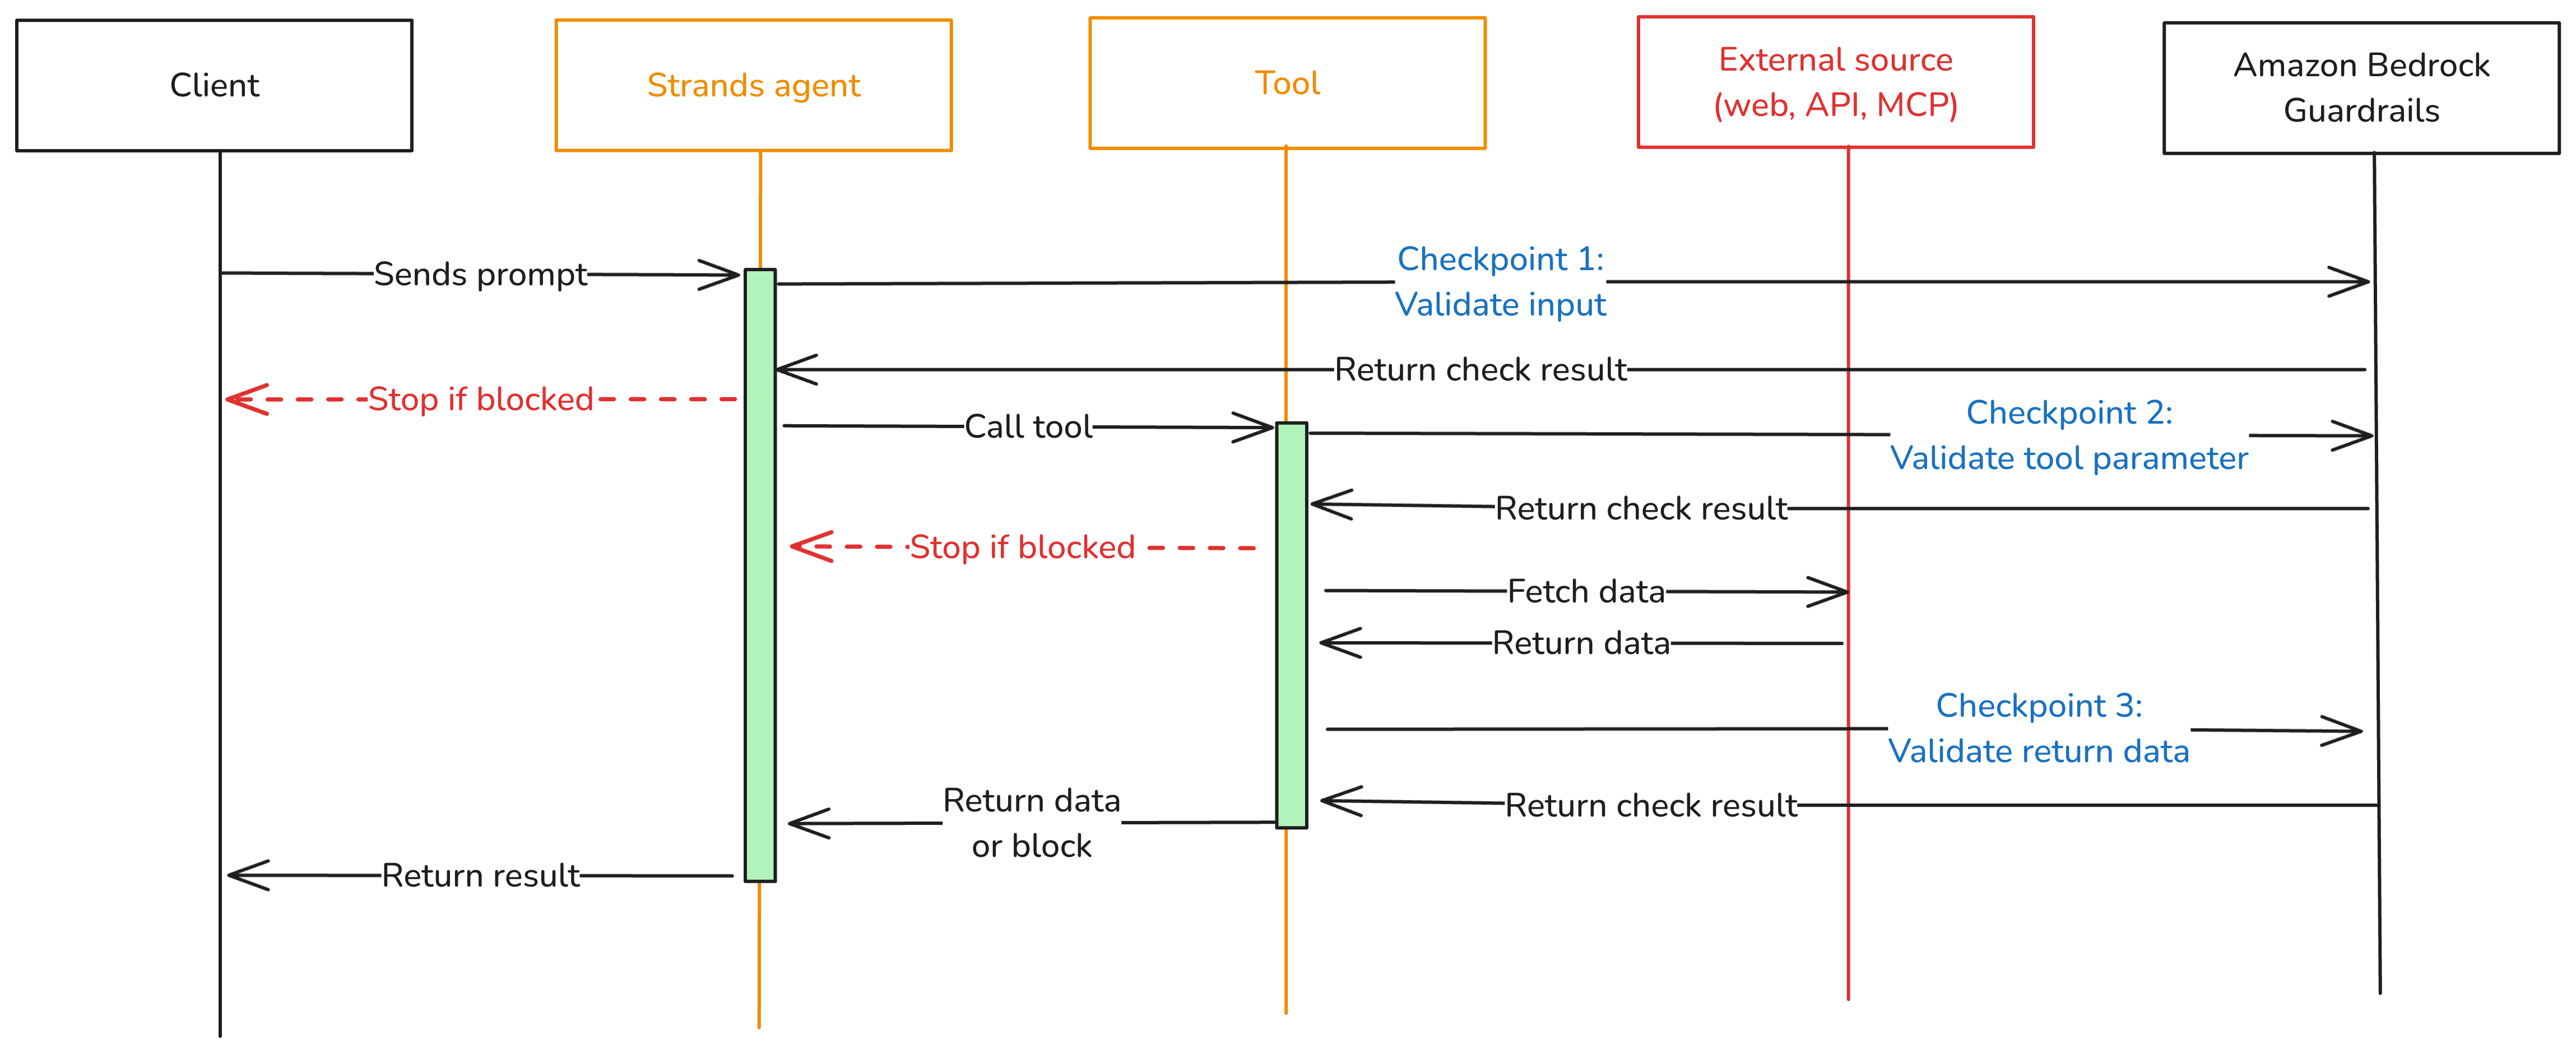
Subham Rakshit

Subham Rakshit

Subham is a Streaming Solutions Architect for Analytics at AWS based in the UK. He works with customers to design and build search and streaming data platforms that help them achieve their business objective. Outside of work, he enjoys spending time solving jigsaw puzzles with his daughters.

Announcing in-place ZooKeeper-to-KRaft cluster upgrades for Amazon MSK

Post Syndicated from Austin Groeneveld original https://aws.amazon.com/blogs/big-data/announcing-in-place-zookeeper-to-kraft-cluster-upgrades-for-amazon-msk/

Apache Kafka 4.0 officially removes ZooKeeper. If your Amazon Managed Streaming for Apache Kafka (Amazon MSK) Provisioned clusters still run in ZooKeeper metadata mode, now is the time to plan your migration. Amazon MSK now supports in-place upgrades from ZooKeeper to KRaft metadata mode, so you can modernize your existing cluster’s metadata management through the familiar version upgrade workflow.

For more than a decade, Apache ZooKeeper provided dependable metadata management for Kafka, including controller election, partition state, broker registration, and topic configuration. With Apache Kafka 4.0, ZooKeeper is officially removed in favor of KRaft, an embedded Raft-based consensus protocol that handles metadata management internally. It brings those responsibilities into Apache Kafka itself, creating a more streamlined foundation for the continued evolution of Kafka. Amazon MSK has supported KRaft-mode clusters since May 2024, and all Kafka 4.x versions on Amazon MSK use KRaft.

With the in-place upgrade, you can retain your cluster data and metadata while Amazon MSK manages the control-plane transition. Your cluster remains available for produce and consume traffic throughout the process, with no expected downtime if you’re following best practices. By using the existing version upgrade workflow, the move to KRaft becomes a natural step in your cluster’s lifecycle. This prepares your cluster for Kafka 4.x and future Kafka releases.

Prerequisites

Before initiating the upgrade, review the following requirements to confirm your cluster is ready for the transition.

Supported source versions

Clusters must be running Kafka 3.9.x in ZooKeeper mode to use the in-place upgrade. If your cluster is running an earlier version, such as 3.6.0, 3.7.x, or 3.8.x, first complete a standard in-place version upgrade to 3.9.x. You can then initiate the upgrade to 3.9.x.kraft.

Kafka 3.9 is the bridge release for this transition because it supports both ZooKeeper and KRaft modes. To support customers through this migration process, Amazon MSK provides extended support for 3.9.x for a minimum of 2 years from its April 2025 release.

Client compatibility

Requirement Detail
Minimum client library Apache Kafka client v3.0+
Recommended client version v3.9 or above
Connection strings Must use bootstrap.servers only. Any ZooKeeper connection strings (the --zookeeper flag) must be removed before upgrade.

The --zookeeper admin flag was deprecated in Kafka 2.5 and removed in 3.0. Before upgrading, update any remaining applications or tools that connect directly to ZooKeeper.

Pre-upgrade checklist

Before beginning the upgrade, confirm the following:

  • For Standard brokers, the cluster must be deployed across three Availability Zones. Express brokers provide this by default.
  • The cluster is running Kafka 3.9.x in ZooKeeper mode.
  • Standard brokers expose direct ZooKeeper access on ports 2181 (plaintext) and 2182 (TLS). Before upgrading, validate that you’ve disabled ZooKeeper access on the cluster and none of your applications rely on these connections.
  • Solutions using dynamic Kafka configurations that relied on ZooKeeper have been removed before attempting the upgrade operation.
    • If you previously configured custom domain names on a ZooKeeper-based deployment using the dynamic override (kafka-configs.sh --alter on advertised.listeners), be aware that KRaft does not support this dynamic configuration. If you attempt to upgrade your MSK cluster to KRaft with altered advertised.listeners, the upgrade operation fails.
    • If you’re implementing your custom domain name solution on MSK moving forward with KRaft, we recommend our coinciding MSK release for custom domain name support by statically configuring the custom.advertised.listeners property through the UpdateClusterConfiguration API.
  • The cluster has no under-replicated partitions.
  • The cluster is running within per-broker partition limits for standard or express broker clusters.
  • For clusters running above the KRaft brokers-per-cluster limit, you might need an additional quota increase. If you previously raised a quota increase for your ZooKeeper brokers-per-cluster, submit another quota increase for the KRaft limit before attempting the upgrade.
  • The cluster has enough reserve capacity to support rolling broker restarts while serving client traffic.
  • As a best practice, verify that monitoring is ready for the transition from ZooKeeper-specific metrics to KRaft controller metrics.
    • After the migration, ZooKeeper-specific Amazon CloudWatch metrics such as ZookeeperRequestLatencyMsMean and ZookeeperSessionState are no longer available.
    • If you use Open Monitoring, Kafka also stops publishing ZooKeeper metrics. Plan to update or retire related alerts and dashboards as part of your migration preparation.

How the upgrade works

When you initiate the upgrade, Amazon MSK performs a managed, multi-phase migration:

  1. Controller quorum bootstrap: Amazon MSK provisions KRaft controller nodes alongside the existing ZooKeeper infrastructure. Both systems operate in parallel during this phase.
  2. Metadata migration: The KRaft controller reads the cluster state from ZooKeeper and writes it to the internal KRaft metadata log.
  3. Broker transition: Amazon MSK performs a rolling update and registers with the KRaft controller quorum. Data plane operations remain available during the transition.
  4. Validation and bake period: Amazon MSK verifies cluster health under KRaft, including partition leadership, replication state, and controller responsiveness.
  5. ZooKeeper decommissioning: After validation succeeds, Amazon MSK removes the ZooKeeper infrastructure and the cluster operates entirely in KRaft mode.

During the upgrade, the cluster enters UPDATING state. You can continue producing and consuming data, while Amazon MSK administrative API operations are temporarily unavailable until the cluster returns to ACTIVE.

Amazon MSK maintains a high bar for durability during the transition. It uses rigorous safety checks at each phase of the migration to protect customer metadata in both roll-forward and rollback scenarios.

Built-in recovery

Amazon MSK monitors cluster health throughout the upgrade. If it detects a condition that prevents the migration from completing, it automatically returns the cluster to its pre-migration state. No customer action is required during recovery.

The operation status changes to Reverting to pre-migration state while Amazon MSK restores the original Kafka version and reconnects ZooKeeper. After the cluster returns to ACTIVE, the describe-cluster-operation API provides error codes, failure reasons, and recommended remediation steps. You can use these to address the issue before starting the upgrade again.

How to perform the upgrade

The following steps walk you through the upgrade process using the Amazon MSK console. You can also perform these steps programmatically using the AWS Command Line Interface (AWS CLI) or SDK.

Step 1: Disable ZooKeeper access (standard brokers only)

Note: This step applies only to Standard broker clusters. Express broker clusters don’t expose direct ZooKeeper access and can skip directly to Step 2.

Standard brokers expose direct ZooKeeper access on ports 2181 (plaintext) and 2182 (TLS). Before upgrading, validate that none of your applications rely on these connections.

Navigate to your cluster’s Properties tab, choose Network settings, and then choose Edit ZooKeeper access.

Figure 1: Editing ZooKeeper access from the cluster network settings

Figure 1: Editing ZooKeeper access from the cluster network settings

In the pop-up window, verify that ZooKeeper access is set to Disabled, and then choose Save.

Edit ZooKeeper access dialog with access set to Disabled and the Save button

Figure 2: Confirming ZooKeeper access is disabled

Confirm that producers, consumers, and admin tooling continue operating normally without ZooKeeper connectivity. This step is fully reversible. Re-enable ZooKeeper access immediately if anything breaks.

Figure 3: Verifying client traffic continues without ZooKeeper access

Step 2: Initiate the version upgrade

In the Amazon MSK console, under Properties, choose Upgrade in the Apache Kafka version section.

Figure 4: Starting a version upgrade from the Apache Kafka version section

Select your cluster and start a version upgrade to 3.9.x with Target metadata mode set to KRaft. Choose Upgrade.

Figure 5: Selecting KRaft as the target metadata mode

You can monitor your upgrade progress on the cluster properties page.

Figure 6: Monitoring upgrade progress on the cluster properties page

Step 3: Monitor upgrade progress

Track progress on the Cluster operations tab in the Amazon MSK console or with the describe-cluster-operation API.

Figure 7: Tracking the upgrade on the Cluster operations tab

Step 4: Validate the KRaft cluster

After the cluster returns to ACTIVE state in KRaft mode:

  • Verify that topics, partitions, and consumer groups are present.
  • Confirm producer and consumer throughput aligns with pre-migration baselines.
  • Update or disable any ZooKeeper-specific monitoring alerts.
  • Update operational documentation and runbooks to reflect KRaft mode.

Figure 8: Cluster running in KRaft mode after the upgrade

After the upgrade completes, your cluster appears in an Active state with KRaft enabled as the metadata mode.

Get ready for the next generation of Kafka on Amazon MSK

The in-place ZooKeeper-to-KRaft mode upgrade makes it straightforward to prepare existing Amazon MSK clusters for the future of Apache Kafka. Beyond removing external metadata dependencies, KRaft delivers faster failover times and higher partition limits per cluster. Amazon MSK handles the entire metadata transition, rolling broker updates, validation, and recovery workflow for you. With the new in-place experience, you have a clear, streamlined path to upgrade on your schedule and unlock enhanced scalability and resilience.

For more details, see the Amazon MSK Developer Guide and the supported Kafka versions documentation.


About the authors

Austin Groeneveld

Austin Groeneveld

Austin is a Streaming Specialist Solutions Architect at Amazon Web Services (AWS), based in the San Francisco Bay Area. In this role, Austin is passionate about helping customers accelerate insights from their data using the AWS platform. He is particularly fascinated by the growing role that data streaming plays in driving innovation in the data analytics space. Outside of his work at AWS, Austin enjoys watching and playing soccer, traveling, and spending quality time with his family.

Ashley Millette

Ashley Millette

Ashley is a Specialist Solutions Architect for Streaming and Analytics at AWS. She partners with customers to design and implement real-time data streaming architectures using services like Amazon MSK, helping them build scalable, cost-effective pipelines that turn data in motion into actionable insights. She is passionate about simplifying complex streaming workloads and enabling customers to modernize their data infrastructure with confidence.

The collective thoughts of the interwebz