AWS Security Profile: Phillip Miller, Principal Security Advisor

Post Syndicated from Maddie Bacon original https://aws.amazon.com/blogs/security/aws-security-profile-phillip-miller-principal-security-advisor/

AWS Security Profile: Phillip Miller
In the weeks leading up to re:Invent, we’ll share conversations we’ve had with people at AWS who will be presenting, and get a sneak peek at their work.


How long have you been at AWS and what do you do in your current role?

I’ve been at AWS since September 2019. I help executives and leaders of builder teams find ways to answer key questions, such as “Is my organization well-protected in the cloud?” and “Are our security investments the best ones to enable scale and optimize outcomes?” Through one-on-one discussions, facilitating workshops, and building automation into compliance programs, I help people envision a secure future that doesn’t limit the outcomes for the business.

What’s your favorite part of your job?

Teaching. Advising includes sharing knowledge and best practices, and finding solutions to customer problems—but I have not performed my role adequately if they have not had an opportunity to learn. It is a tremendous privilege to have leaders invite me to participate in their cloud security journey, and I’m grateful that I am able to help them accomplish key business objectives.

How did you get started in Security?

I can’t really remember a time when I wasn’t working in security, but back in the early 1990s, security was not a distinct function. Through the early 2000s, roles I had in various companies placed different emphasis on infrastructure, or solution delivery, but security always seemed to be “my thing” to emphasize, often because of my legal background. Now, it seems it has come full-circle; everyone recognizes security as “job zero,” and the companies that get this and fully integrate security into all roles are best placed to manage their risk.

How do you explain what you do to non-technical friends or family?

My wife gets the credit for this: “He does difficult things with complex computer systems for large companies that somehow helps them reduce the chance of a data breach.”

What are you currently working on that you’re excited about?

I’ve been helping several companies to create “security frameworks” that can be used to help meet multiple compliance requirements, but also ensure they are satisfying the promise to their customers around privacy and cybersecurity. These frameworks lean in to the benefits of cloud computing, and start with building alignment between CISO, CIO, and CTO so that the business objectives and the security needs do not find themselves in conflict.

You’re presenting at re:Invent this year—can you give readers a sneak peek of what you’re covering?

Compliance is frustrating for many builders; it can be seen as confusing and full of requirements that don’t make sense for modern applications. Executives are increasingly seeking validation that the cloud is reducing cybersecurity risk. My presentation shares six mechanisms for builder teams to use their skills to create gap-closing solutions.

What are you hoping that your audience will do differently after your session?

Take at least one of the six mechanisms that can be used to enhance the relationship between builder teams and compliance groups and try it out.

From your perspective, what’s the biggest thing happening in security right now?

Awareness from a consumer perspective around how companies use data, and the importance for companies to find ways to responsibly use and secure that information.

What is your favorite Leadership Principle at Amazon and why?

Frugality. I enjoy constraints, and how they help sharpen the mind and force us to critically think less about what we need today, but more about what the future will be. 2020 has brought this to the home for a lot of families, who are having to accomplish more with less, such as the home being an office for two people, a schoolhouse, and a gym. When we model frugality at work, it might just help us find ways to make society a better place, too.

What’s the best career advice you’ve ever received?

Always share the bad news as quickly as possible, with clarity, data, and your plan of action. Ensure that the information is flowing properly to everyone with a legitimate need to know, even if it may be uncomfortable to share it.

If you could go back, what would you tell yourself at the beginning of your career?

Always trust your instincts. I began my career building software for microbiology and DNA fingerprinting, but then I selected to read jurisprudence and not pursue a degree relating to transputers and the space industry. I think my instincts were right, but who knows—the alternative reality would probably have been pretty amazing!

What are you most proud of in your career?

I have had so many opportunities to mentor people at all stages in their information security careers. Watching others develop their skills, and helping them unlock potential to reduce risks to their organizations makes my day.

I hear you have an organic farm that you work on in your spare time. How did you get into farming?

Yes, we began farming commercially about a decade ago, mostly out of a desire to explore ways that organic meats could be raised ethically and without excessive markup. In 2021, we’ll be examining ways to turn our success into a teaching farm that also includes opportunities for people to explore woodlands, natural habitats, and cultivated land in one location. It is also a deliberately low-tech respite from the world of cybersecurity!

If you have feedback about this post, submit comments in the Comments section below.

Want more AWS Security how-to content, news, and feature announcements? Follow us on Twitter.

Author

Phillip Miller

As a Principal Security Advisor in the Security Advisory and Assurance team, Phillip helps companies mature their approach to security and compliance in the cloud. With nearly three decades of experience across financial services, healthcare, manufacturing, and retail, Phillip understands the challenges builders face securing sensitive workloads. Phillip most recently served as the Chief Information Security Officer at Brooks Brothers.

Publishing private npm packages with AWS CodeArtifact

Post Syndicated from Ryan Sonshine original https://aws.amazon.com/blogs/devops/publishing-private-npm-packages-aws-codeartifact/

This post demonstrates how to create, publish, and download private npm packages using AWS CodeArtifact, allowing you to share code across your organization without exposing your packages to the public.

The ability to control CodeArtifact repository access using AWS Identity and Access Management (IAM) removes the need to manage additional credentials for a private npm repository when developers already have IAM roles configured.

You can use private npm packages for a variety of use cases, such as:

  • Reducing code duplication
  • Configuration such as code linting and styling
  • CLI tools for internal processes

This post shows how to easily create a sample project in which we publish an npm package and install the package from CodeArtifact. For more information about pipeline integration, see AWS CodeArtifact and your package management flow – Best Practices for Integration.

Solution overview

The following diagram illustrates this solution.

Diagram showing npm package publish and install with CodeArtifact

In this post, you create a private scoped npm package containing a sample function that can be used across your organization. You create a second project to download the npm package. You also learn how to structure your npm package to make logging in to CodeArtifact automatic when you want to build or publish the package.

The code covered in this post is available on GitHub:

Prerequisites

Before you begin, you need to complete the following:

  1. Create an AWS account.
  2. Install the AWS Command Line Interface (AWS CLI). CodeArtifact is supported in these CLI versions:
    1. 18.83 or later: install the AWS CLI version 1
    2. 0.54 or later: install the AWS CLI version 2
  3. Create a CodeArtifact repository.
  4. Add required IAM permissions for CodeArtifact.

Creating your npm package

You can create your npm package in three easy steps: set up the project, create your npm script for authenticating with CodeArtifact, and publish the package.

Setting up your project

Create a directory for your new npm package. We name this directory my-package because it serves as the name of the package. We use an npm scope for this package, where @myorg represents the scope all of our organization’s packages are published under. This helps us distinguish our internal private package from external packages. See the following code:

npm init --scope=@myorg -y

{
  "name": "@myorg/my-package",
  "version": "1.0.0",
  "description": "A sample private scoped npm package",
  "main": "index.js",
  "scripts": {
    "test": "echo \"Error: no test specified\" && exit 1"
  }
}

The package.json file specifies that the main file of the package is called index.js. Next, we create that file and add our package function to it:

module.exports.helloWorld = function() {
  console.log('Hello world!');
}

Creating an npm script

To create your npm script, complete the following steps:

  1. On the CodeArtifact console, choose the repository you created as part of the prerequisites.

If you haven’t created a repository, create one before proceeding.

CodeArtifact repository details console

  1. Select your CodeArtifact repository and choose Details to view the additional details for your repository.

We use two items from this page:

  • Repository name (my-repo)
  • Domain (my-domain)
  1. Create a script named co:login in our package.json. The package.json contains the following code:
{
  "name": "@myorg/my-package",
  "version": "1.0.0",
  "description": "A sample private scoped npm package",
  "main": "index.js",
  "scripts": {
    "co:login": "aws codeartifact login --tool npm --repository my-repo --domain my-domain",
    "test": "echo \"Error: no test specified\" && exit 1"
  }
}

Running this script updates your npm configuration to use your CodeArtifact repository and sets your authentication token, which expires after 12 hours.

  1. To test our new script, enter the following command:

npm run co:login

The following code is the output:

> aws codeartifact login --tool npm --repository my-repo --domain my-domain
Successfully configured npm to use AWS CodeArtifact repository https://my-domain-<ACCOUNT ID>.d.codeartifact.us-east-1.amazonaws.com/npm/my-repo/
Login expires in 12 hours at 2020-09-04 02:16:17-04:00
  1. Add a prepare script to our package.json to run our login command:
{
  "name": "@myorg/my-package",
  "version": "1.0.0",
  "description": "A sample private scoped npm package",
  "main": "index.js",
  "scripts": {
    "prepare": "npm run co:login",
    "co:login": "aws codeartifact login --tool npm --repository my-repo --domain my-domain",
    "test": "echo \"Error: no test specified\" && exit 1"
  }
}

This configures our project to automatically authenticate and generate an access token anytime npm install or npm publish run on the project.

If you see an error containing Invalid choice, valid choices are:, you need to update the AWS CLI according to the versions listed in the perquisites of this post.

Publishing your package

To publish our new package for the first time, run npm publish.

The following screenshot shows the output.

Terminal showing npm publish output

If we navigate to our CodeArtifact repository on the CodeArtifact console, we now see our new private npm package ready to be downloaded.

CodeArtifact console showing published npm package

Installing your private npm package

To install your private npm package, you first set up the project and add the CodeArtifact configs. After you install your package, it’s ready to use.

Setting up your project

Create a directory for a new application and name it my-app. This is a sample project to download our private npm package published in the previous step. You can apply this pattern to all repositories you intend on installing your organization’s npm packages in.

npm init -y

{
  "name": "my-app",
  "version": "1.0.0",
  "description": "A sample application consuming a private scoped npm package",
  "main": "index.js",
  "scripts": {
    "test": "echo \"Error: no test specified\" && exit 1"
  }
}

Adding CodeArtifact configs

Copy the npm scripts prepare and co:login created earlier to your new project:

{
  "name": "my-app",
  "version": "1.0.0",
  "description": "A sample application consuming a private scoped npm package",
  "main": "index.js",
  "scripts": {
    "prepare": "npm run co:login",
    "co:login": "aws codeartifact login --tool npm --repository my-repo --domain my-domain",
    "test": "echo \"Error: no test specified\" && exit 1"
  }
}

Installing your new private npm package

Enter the following command:

npm install @myorg/my-package

Your package.json should now list @myorg/my-package in your dependencies:

{
  "name": "my-app",
  "version": "1.0.0",
  "description": "",
  "main": "index.js",
  "scripts": {
    "prepare": "npm run co:login",
    "co:login": "aws codeartifact login --tool npm --repository my-repo --domain my-domain",
    "test": "echo \"Error: no test specified\" && exit 1"
  },
  "dependencies": {
    "@myorg/my-package": "^1.0.0"
  }
}

Using your new npm package

In our my-app application, create a file named index.js to run code from our package containing the following:

const { helloWorld } = require('@myorg/my-package');

helloWorld();

Run node index.js in your terminal to see the console print the message from our @myorg/my-package helloWorld function.

Cleaning Up

If you created a CodeArtifact repository for the purposes of this post, use one of the following methods to delete the repository:

Remove the changes made to your user profile’s npm configuration by running npm config delete registry, this will remove the CodeArtifact repository from being set as your default npm registry.

Conclusion

In this post, you successfully published a private scoped npm package stored in CodeArtifact, which you can reuse across multiple teams and projects within your organization. You can use npm scripts to streamline the authentication process and apply this pattern to save time.

About the Author

Ryan Sonshine

Ryan Sonshine is a Cloud Application Architect at Amazon Web Services. He works with customers to drive digital transformations while helping them architect, automate, and re-engineer solutions to fully leverage the AWS Cloud.


[$] epoll_pwait2(), close_range(), and encoded I/O

Post Syndicated from original https://lwn.net/Articles/837816/rss

The various system calls and other APIs that the kernel provides for access
to files and filesystems has grown increasingly comprehensive over the
years. That does not mean, though, that there is no need or room for
improvement. Several relatively small additions to the kernel’s
filesystem-related API are under consideration in the development
community; read on for a survey of some of this work.

Nbdev: A literate programming environment that democratizes software engineering best practices

Post Syndicated from Hamel Husain original https://github.blog/2020-11-20-nbdev-a-literate-programming-environment-that-democratizes-software-engineering-best-practices/

At GitHub, we are deeply invested in democratizing software development. Part of this is accomplished by serving as the home of open source and providing tools to educators and students. We are also building features that lower the barrier to entry for software development, such as Codespaces. However, there is much work left to be done in order to make software development more approachable and to make it easier to employ best practices, such as continuous integration, distribution, and documentation of software.

This is why we decided to assist fastai in their development of a new, literate programming environment for Python, called nbdev. A discussion of the motivations behind nbdev as well as a primer on the history of literate programming can be found in this blog post. For the uninitiated, literate programming, as described by Donald Knuth, it is:

…a move away from writing computer programs in the manner and order imposed by the computer, and instead enables programmers to develop programs in the order demanded by the logic and flow of their thoughts.

While a subset of ideas from literate programming have shown up in tools, such as Swift Playgrounds, Jupyter, and Mathematica, there has been a lack of tools that encompass the entire software development life cycle. nbdev builds on top of Jupyter notebooks to fill these gaps and provides the following features, many of which are integrated with GitHub:

  • Automated generation of docs from Jupyter notebooks hosted on GitHub Pages. These docs are searchable and automatically hyperlinked to appropriate documentation pages by introspecting keywords you surround in backticks. An example of this documentation is the official fastai docs.
  • Continuous integration (CI) comes setup for you with GitHub Actions, which will run unit tests automatically for you. Even if you are not familiar with GitHub Actions, this starts working right away without any manual intervention.
  • The nbdev environment, which consists of a web server for previewing a docs site, a Jupyter server for writing code, and a series of CLI tools are set up to work with GitHub Codespaces, which makes getting started even easier. A detailed discussion of how CodeSpaces integrates with nbdev is discussed in this blog post.

As a teaser, this is a preview of this literate programming environment in Codespaces, which includes a notebook, a docs site and an IDE:


In addition to this GitHub integration, nbdev also offers the following features:

  • A robust, two-way sync between notebooks and source code, which allow you to use your IDE for code navigation or quick edits if desired.
  • The ability to write tests directly in notebooks without having to learn special APIs. These tests get executed in parallel with a single CLI command and also with GitHub Actions.
  • Tools for merge/conflict resolution with notebooks in a human readable format.
  • Utilities to automate the publishing of pypi and conda packages.

nbdev promotes software engineering best practices by allowing developers to write unit tests and documentation in the same context as source code, without having to learn special APIs or worry about web development. Similarly, GitHub Actions run unit tests automatically by default without requiring any prior experience with these tools. We believe removing friction from writing documentation and tests promotes higher quality software and makes software more inclusive.

Aside from using nbdev to create Python software, you can extend nbdev to build new types of tools. For example, we recently used nbdev to build fastpages, an easy to use blogging platform that allows developers to create blog posts directly with Jupyter notebooks. fastpages uses GitHub Actions and GitHub Pages to automate the conversion of notebooks to blog posts and offers a variety of other features to Python developers that democratize the sharing of knowledge. We have also used nbdev and fastpages to create covid19-dashboards, which demonstrates how to create interactive dashboards that automatically update with Jupyter notebooks.

We are excited about the potential of nbdev to make software engineering more inclusive, friendly, and robust.  We are also hopeful that tools like nbdev can inspire the next generation of literate programming tools. To learn more about nbdev, please see the following resources:

Finally, If you are building any projects with nbdev or would like to have further discussions, please feel free to reach out on the nbdev forums or on GitHub.

Security updates for Friday

Post Syndicated from original https://lwn.net/Articles/837915/rss

Security updates have been issued by CentOS (firefox), Fedora (chromium, microcode_ctl, mingw-libxml2, seamonkey, and xen), openSUSE (slurm_18_08 and tor), Oracle (thunderbird), SUSE (buildah, firefox, go1.14, go1.15, krb5, microcode_ctl, perl-DBI, podman, postgresql12, thunderbird, ucode-intel, wireshark, wpa_supplicant, and xen), and Ubuntu (firefox and phpmyadmin).

Automate thousands of mainframe tests on AWS with the Micro Focus Enterprise Suite

Post Syndicated from Kevin Yung original https://aws.amazon.com/blogs/devops/automate-mainframe-tests-on-aws-with-micro-focus/

Micro Focus – AWS Advanced Technology Parnter, they are a global infrastructure software company with 40 years of experience in delivering and supporting enterprise software.

We have seen mainframe customers often encounter scalability constraints, and they can’t support their development and test workforce to the scale required to support business requirements. These constraints can lead to delays, reduce product or feature releases, and make them unable to respond to market requirements. Furthermore, limits in capacity and scale often affect the quality of changes deployed, and are linked to unplanned or unexpected downtime in products or services.

The conventional approach to address these constraints is to scale up, meaning to increase MIPS/MSU capacity of the mainframe hardware available for development and testing. The cost of this approach, however, is excessively high, and to ensure time to market, you may reject this approach at the expense of quality and functionality. If you’re wrestling with these challenges, this post is written specifically for you.

To accompany this post, we developed an AWS prescriptive guidance (APG) pattern for developer instances and CI/CD pipelines: Mainframe Modernization: DevOps on AWS with Micro Focus.

Overview of solution

In the APG, we introduce DevOps automation and AWS CI/CD architecture to support mainframe application development. Our solution enables you to embrace both Test Driven Development (TDD) and Behavior Driven Development (BDD). Mainframe developers and testers can automate the tests in CI/CD pipelines so they’re repeatable and scalable. To speed up automated mainframe application tests, the solution uses team pipelines to run functional and integration tests frequently, and uses systems test pipelines to run comprehensive regression tests on demand. For more information about the pipelines, see Mainframe Modernization: DevOps on AWS with Micro Focus.

In this post, we focus on how to automate and scale mainframe application tests in AWS. We show you how to use AWS services and Micro Focus products to automate mainframe application tests with best practices. The solution can scale your mainframe application CI/CD pipeline to run thousands of tests in AWS within minutes, and you only pay a fraction of your current on-premises cost.

The following diagram illustrates the solution architecture.

Mainframe DevOps On AWS Architecture Overview, on the left is the conventional mainframe development environment, on the left is the CI/CD pipelines for mainframe tests in AWS

Figure: Mainframe DevOps On AWS Architecture Overview


Best practices

Before we get into the details of the solution, let’s recap the following mainframe application testing best practices:

  • Create a “test first” culture by writing tests for mainframe application code changes
  • Automate preparing and running tests in the CI/CD pipelines
  • Provide fast and quality feedback to project management throughout the SDLC
  • Assess and increase test coverage
  • Scale your test’s capacity and speed in line with your project schedule and requirements

Automated smoke test

In this architecture, mainframe developers can automate running functional smoke tests for new changes. This testing phase typically “smokes out” regression of core and critical business functions. You can achieve these tests using tools such as py3270 with x3270 or Robot Framework Mainframe 3270 Library.

The following code shows a feature test written in Behave and test step using py3270:

# home_loan_calculator.feature
Feature: calculate home loan monthly repayment
  the bankdemo application provides a monthly home loan repayment caculator 
  User need to input into transaction of home loan amount, interest rate and how many years of the loan maturity.
  User will be provided an output of home loan monthly repayment amount

  Scenario Outline: As a customer I want to calculate my monthly home loan repayment via a transaction
      Given home loan amount is <amount>, interest rate is <interest rate> and maturity date is <maturity date in months> months 
       When the transaction is submitted to the home loan calculator
       Then it shall show the monthly repayment of <monthly repayment>

    Examples: Homeloan
      | amount  | interest rate | maturity date in months | monthly repayment |
      | 1000000 | 3.29          | 300                     | $4894.31          |


# home_loan_calculator_steps.py
import sys, os
from py3270 import Emulator
from behave import *

@given("home loan amount is {amount}, interest rate is {rate} and maturity date is {maturity_date} months")
def step_impl(context, amount, rate, maturity_date):
    context.home_loan_amount = amount
    context.interest_rate = rate
    context.maturity_date_in_months = maturity_date

@when("the transaction is submitted to the home loan calculator")
def step_impl(context):
    # Setup connection parameters
    tn3270_host = os.getenv('TN3270_HOST')
    tn3270_port = os.getenv('TN3270_PORT')
	# Setup TN3270 connection
    em = Emulator(visible=False, timeout=120)
    em.connect(tn3270_host + ':' + tn3270_port)
    em.wait_for_field()
	# Screen login
    em.fill_field(10, 44, 'b0001', 5)
    em.send_enter()
	# Input screen fields for home loan calculator
    em.wait_for_field()
    em.fill_field(8, 46, context.home_loan_amount, 7)
    em.fill_field(10, 46, context.interest_rate, 7)
    em.fill_field(12, 46, context.maturity_date_in_months, 7)
    em.send_enter()
    em.wait_for_field()    

    # collect monthly replayment output from screen
    context.monthly_repayment = em.string_get(14, 46, 9)
    em.terminate()

@then("it shall show the monthly repayment of {amount}")
def step_impl(context, amount):
    print("expected amount is " + amount.strip() + ", and the result from screen is " + context.monthly_repayment.strip())
assert amount.strip() == context.monthly_repayment.strip()

To run this functional test in Micro Focus Enterprise Test Server (ETS), we use AWS CodeBuild.

We first need to build an Enterprise Test Server Docker image and push it to an Amazon Elastic Container Registry (Amazon ECR) registry. For instructions, see Using Enterprise Test Server with Docker.

Next, we create a CodeBuild project and uses the Enterprise Test Server Docker image in its configuration.

The following is an example AWS CloudFormation code snippet of a CodeBuild project that uses Windows Container and Enterprise Test Server:

  BddTestBankDemoStage:
    Type: AWS::CodeBuild::Project
    Properties:
      Name: !Sub '${AWS::StackName}BddTestBankDemo'
      LogsConfig:
        CloudWatchLogs:
          Status: ENABLED
      Artifacts:
        Type: CODEPIPELINE
        EncryptionDisabled: true
      Environment:
        ComputeType: BUILD_GENERAL1_LARGE
        Image: !Sub "${EnterpriseTestServerDockerImage}:latest"
        ImagePullCredentialsType: SERVICE_ROLE
        Type: WINDOWS_SERVER_2019_CONTAINER
      ServiceRole: !Ref CodeBuildRole
      Source:
        Type: CODEPIPELINE
        BuildSpec: bdd-test-bankdemo-buildspec.yaml

In the CodeBuild project, we need to create a buildspec to orchestrate the commands for preparing the Micro Focus Enterprise Test Server CICS environment and issue the test command. In the buildspec, we define the location for CodeBuild to look for test reports and upload them into the CodeBuild report group. The following buildspec code uses custom scripts DeployES.ps1 and StartAndWait.ps1 to start your CICS region, and runs Python Behave BDD tests:

version: 0.2
phases:
  build:
    commands:
      - |
        # Run Command to start Enterprise Test Server
        CD C:\
        .\DeployES.ps1
        .\StartAndWait.ps1

        py -m pip install behave

        Write-Host "waiting for server to be ready ..."
        do {
          Write-Host "..."
          sleep 3  
        } until(Test-NetConnection 127.0.0.1 -Port 9270 | ? { $_.TcpTestSucceeded } )

        CD C:\tests\features
        MD C:\tests\reports
        $Env:Path += ";c:\wc3270"

        $address=(Get-NetIPAddress -AddressFamily Ipv4 | where { $_.IPAddress -Match "172\.*" })
        $Env:TN3270_HOST = $address.IPAddress
        $Env:TN3270_PORT = "9270"
        
        behave.exe --color --junit --junit-directory C:\tests\reports
reports:
  bankdemo-bdd-test-report:
    files: 
      - '**/*'
    base-directory: "C:\\tests\\reports"

In the smoke test, the team may run both unit tests and functional tests. Ideally, these tests are better to run in parallel to speed up the pipeline. In AWS CodePipeline, we can set up a stage to run multiple steps in parallel. In our example, the pipeline runs both BDD tests and Robot Framework (RPA) tests.

The following CloudFormation code snippet runs two different tests. You use the same RunOrder value to indicate the actions run in parallel.

#...
        - Name: Tests
          Actions:
            - Name: RunBDDTest
              ActionTypeId:
                Category: Build
                Owner: AWS
                Provider: CodeBuild
                Version: 1
              Configuration:
                ProjectName: !Ref BddTestBankDemoStage
                PrimarySource: Config
              InputArtifacts:
                - Name: DemoBin
                - Name: Config
              RunOrder: 1
            - Name: RunRbTest
              ActionTypeId:
                Category: Build
                Owner: AWS
                Provider: CodeBuild
                Version: 1
              Configuration:
                ProjectName : !Ref RpaTestBankDemoStage
                PrimarySource: Config
              InputArtifacts:
                - Name: DemoBin
                - Name: Config
              RunOrder: 1  
#...

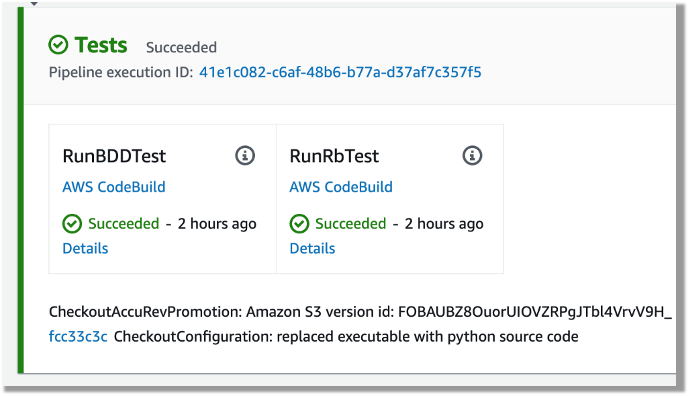
The following screenshot shows the example actions on the CodePipeline console that use the preceding code.

Screenshot of CodePipeine parallel execution tests using a same run order value

Figure – Screenshot of CodePipeine parallel execution tests

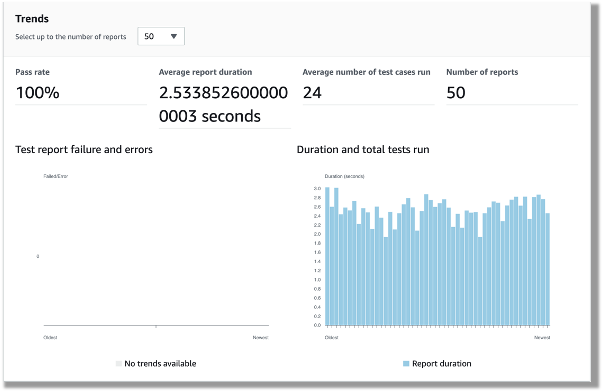
Both DBB and RPA tests produce jUnit format reports, which CodeBuild can ingest and show on the CodeBuild console. This is a great way for project management and business users to track the quality trend of an application. The following screenshot shows the CodeBuild report generated from the BDD tests.

CodeBuild report generated from the BDD tests showing 100% pass rate

Figure – CodeBuild report generated from the BDD tests

Automated regression tests

After you test the changes in the project team pipeline, you can automatically promote them to another stream with other team members’ changes for further testing. The scope of this testing stream is significantly more comprehensive, with a greater number and wider range of tests and higher volume of test data. The changes promoted to this stream by each team member are tested in this environment at the end of each day throughout the life of the project. This provides a high-quality delivery to production, with new code and changes to existing code tested together with hundreds or thousands of tests.

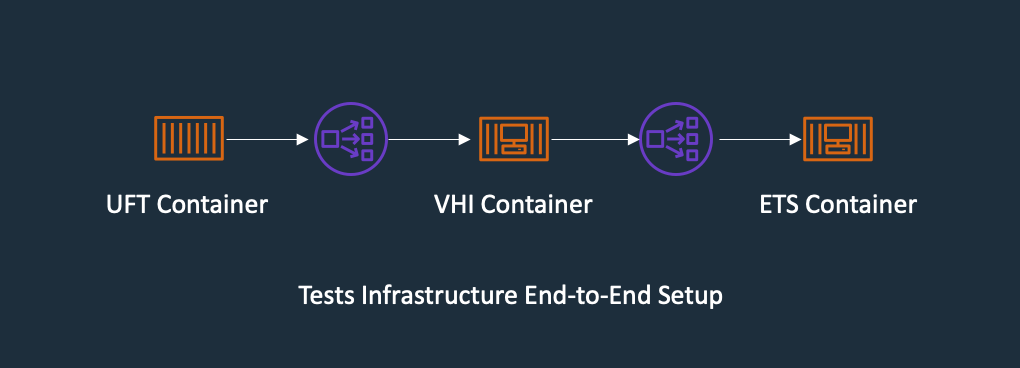
In enterprise architecture, it’s commonplace to see an application client consuming web services APIs exposed from a mainframe CICS application. One approach to do regression tests for mainframe applications is to use Micro Focus Verastream Host Integrator (VHI) to record and capture 3270 data stream processing and encapsulate these 3270 data streams as business functions, which in turn are packaged as web services. When these web services are available, they can be consumed by a test automation product, which in our environment is Micro Focus UFT One. This uses the Verastream server as the orchestration engine that translates the web service requests into 3270 data streams that integrate with the mainframe CICS application. The application is deployed in Micro Focus Enterprise Test Server.

The following diagram shows the end-to-end testing components.

Regression Test the end-to-end testing components using ECS Container for Exterprise Test Server, Verastream Host Integrator and UFT One Container, all integration points are using Elastic Network Load Balancer

Figure – Regression Test Infrastructure end-to-end Setup

To ensure we have the coverage required for large mainframe applications, we sometimes need to run thousands of tests against very large production volumes of test data. We want the tests to run faster and complete as soon as possible so we reduce AWS costs—we only pay for the infrastructure when consuming resources for the life of the test environment when provisioning and running tests.

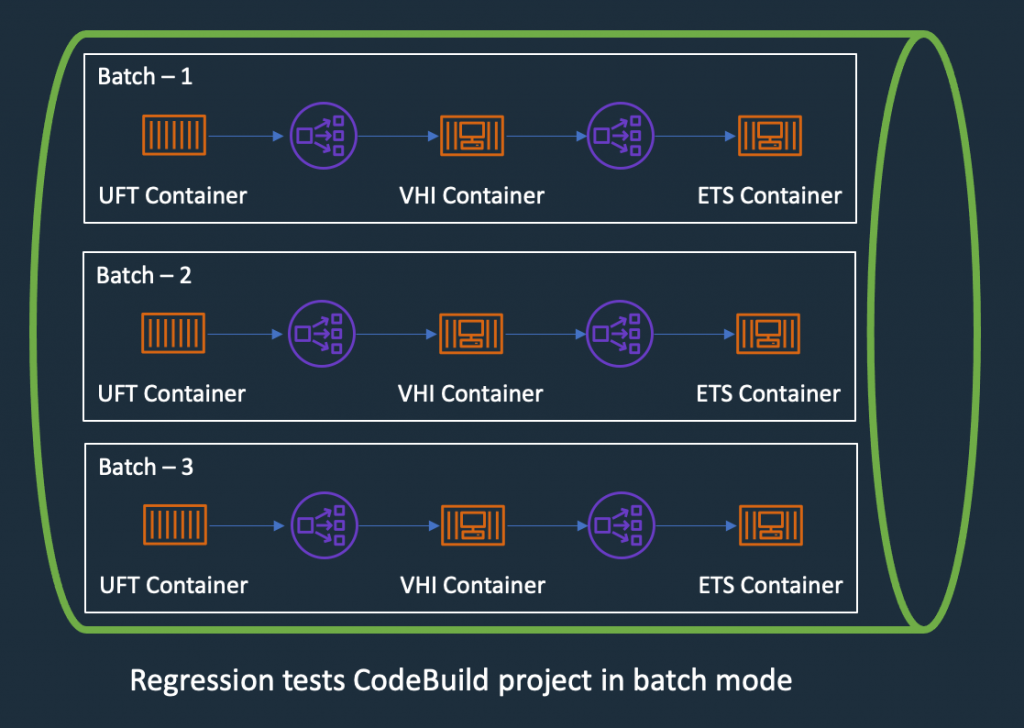
Therefore, the design of the test environment needs to scale out. The batch feature in CodeBuild allows you to run tests in batches and in parallel rather than serially. Furthermore, our solution needs to minimize interference between batches, a failure in one batch doesn’t affect another running in parallel. The following diagram depicts the high-level design, with each batch build running in its own independent infrastructure. Each infrastructure is launched as part of test preparation, and then torn down in the post-test phase.

Regression Tests in CodeBuoild Project setup to use batch mode, three batches running in independent infrastructure with containers

Figure – Regression Tests in CodeBuoild Project setup to use batch mode

Building and deploying regression test components

Following the design of the parallel regression test environment, let’s look at how we build each component and how they are deployed. The followings steps to build our regression tests use a working backward approach, starting from deployment in the Enterprise Test Server:

  1. Create a batch build in CodeBuild.
  2. Deploy to Enterprise Test Server.
  3. Deploy the VHI model.
  4. Deploy UFT One Tests.
  5. Integrate UFT One into CodeBuild and CodePipeline and test the application.

Creating a batch build in CodeBuild

We update two components to enable a batch build. First, in the CodePipeline CloudFormation resource, we set BatchEnabled to be true for the test stage. The UFT One test preparation stage uses the CloudFormation template to create the test infrastructure. The following code is an example of the AWS CloudFormation snippet with batch build enabled:

#...
        - Name: SystemsTest
          Actions:
            - Name: Uft-Tests
              ActionTypeId:
                Category: Build
                Owner: AWS
                Provider: CodeBuild
                Version: 1
              Configuration:
                ProjectName : !Ref UftTestBankDemoProject
                PrimarySource: Config
                BatchEnabled: true
                CombineArtifacts: true
              InputArtifacts:
                - Name: Config
                - Name: DemoSrc
              OutputArtifacts:
                - Name: TestReport                
              RunOrder: 1
#...

Second, in the buildspec configuration of the test stage, we provide a build matrix setting. We use the custom environment variable TEST_BATCH_NUMBER to indicate which set of tests runs in each batch. See the following code:

version: 0.2
batch:
  fast-fail: true
  build-matrix:
    static:
      ignore-failure: false
    dynamic:
      env:
        variables:
          TEST_BATCH_NUMBER:
            - 1
            - 2
            - 3 
phases:
  pre_build:
commands:
#...

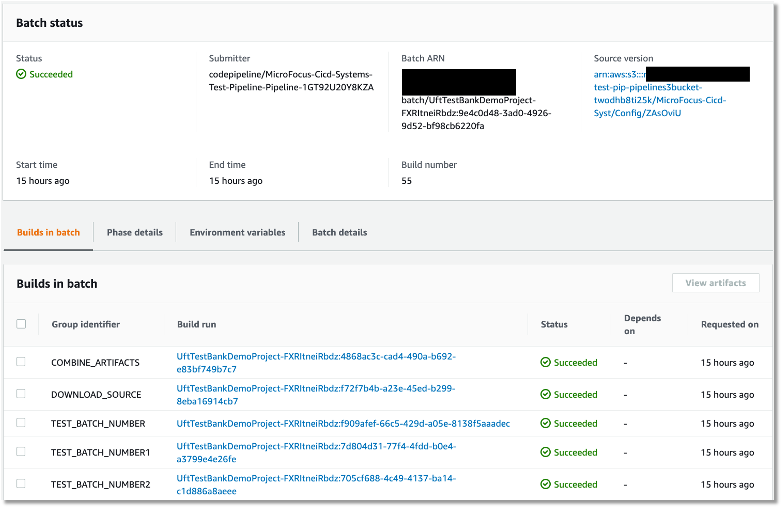
After setting up the batch build, CodeBuild creates multiple batches when the build starts. The following screenshot shows the batches on the CodeBuild console.

Regression tests Codebuild project ran in batch mode, three batches ran in prallel successfully

Figure – Regression tests Codebuild project ran in batch mode

Deploying to Enterprise Test Server

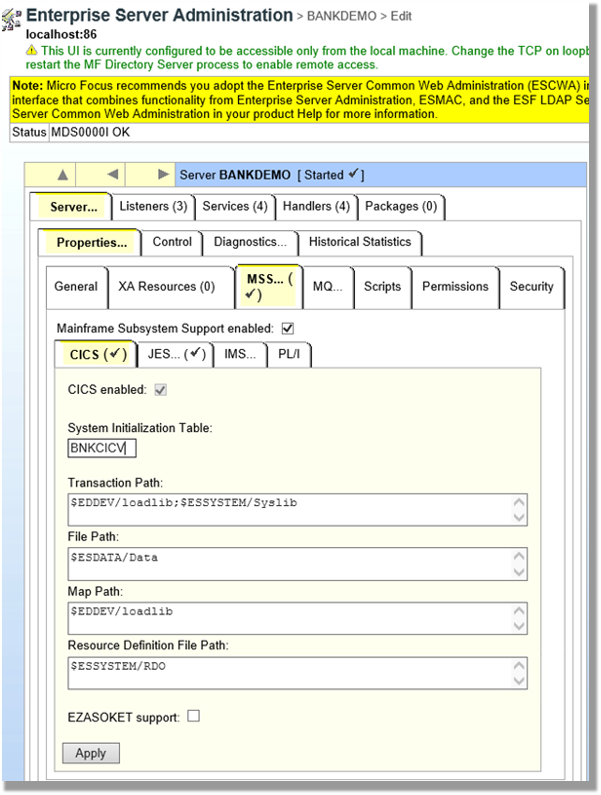
ETS is the transaction engine that processes all the online (and batch) requests that are initiated through external clients, such as 3270 terminals, web services, and websphere MQ. This engine provides support for various mainframe subsystems, such as CICS, IMS TM and JES, as well as code-level support for COBOL and PL/I. The following screenshot shows the Enterprise Test Server administration page.

Enterprise Server Administrator window showing configuration for CICS

Figure – Enterprise Server Administrator window

In this mainframe application testing use case, the regression tests are CICS transactions, initiated from 3270 requests (encapsulated in a web service). For more information about Enterprise Test Server, see the Enterprise Test Server and Micro Focus websites.

In the regression pipeline, after the stage of mainframe artifact compiling, we bake in the artifact into an ETS Docker container and upload the image to an Amazon ECR repository. This way, we have an immutable artifact for all the tests.

During each batch’s test preparation stage, a CloudFormation stack is deployed to create an Amazon ECS service on Windows EC2. The stack uses a Network Load Balancer as an integration point for the VHI’s integration.

The following code is an example of the CloudFormation snippet to create an Amazon ECS service using an Enterprise Test Server Docker image:

#...
  EtsService:
    DependsOn:
    - EtsTaskDefinition
    - EtsContainerSecurityGroup
    - EtsLoadBalancerListener
    Properties:
      Cluster: !Ref 'WindowsEcsClusterArn'
      DesiredCount: 1
      LoadBalancers:
        -
          ContainerName: !Sub "ets-${AWS::StackName}"
          ContainerPort: 9270
          TargetGroupArn: !Ref EtsPort9270TargetGroup
      HealthCheckGracePeriodSeconds: 300          
      TaskDefinition: !Ref 'EtsTaskDefinition'
    Type: "AWS::ECS::Service"

  EtsTaskDefinition:
    Properties:
      ContainerDefinitions:
        -
          Image: !Sub "${AWS::AccountId}.dkr.ecr.us-east-1.amazonaws.com/systems-test/ets:latest"
          LogConfiguration:
            LogDriver: awslogs
            Options:
              awslogs-group: !Ref 'SystemsTestLogGroup'
              awslogs-region: !Ref 'AWS::Region'
              awslogs-stream-prefix: ets
          Name: !Sub "ets-${AWS::StackName}"
          cpu: 4096
          memory: 8192
          PortMappings:
            -
              ContainerPort: 9270
          EntryPoint:
          - "powershell.exe"
          Command: 
          - '-F'
          - .\StartAndWait.ps1
          - 'bankdemo'
          - C:\bankdemo\
          - 'wait'
      Family: systems-test-ets
    Type: "AWS::ECS::TaskDefinition"
#...

Deploying the VHI model

In this architecture, the VHI is a bridge between mainframe and clients.

We use the VHI designer to capture the 3270 data streams and encapsulate the relevant data streams into a business function. We can then deliver this function as a web service that can be consumed by a test management solution, such as Micro Focus UFT One.

The following screenshot shows the setup for getCheckingDetails in VHI. Along with this procedure we can also see other procedures (eg calcCostLoan) defined that get generated as a web service. The properties associated with this procedure are available on this screen to allow for the defining of the mapping of the fields between the associated 3270 screens and exposed web service.

example of VHI designer to capture the 3270 data streams and encapsulate the relevant data streams into a business function getCheckingDetails

Figure – Setup for getCheckingDetails in VHI

The following screenshot shows the editor for this procedure and is initiated by the selection of the Procedure Editor. This screen presents the 3270 screens that are involved in the business function that will be generated as a web service.

VHI designer Procedure Editor shows the procedure

Figure – VHI designer Procedure Editor shows the procedure

After you define the required functional web services in VHI designer, the resultant model is saved and deployed into a VHI Docker image. We use this image and the associated model (from VHI designer) in the pipeline outlined in this post.

For more information about VHI, see the VHI website.

The pipeline contains two steps to deploy a VHI service. First, it installs and sets up the VHI models into a VHI Docker image, and it’s pushed into Amazon ECR. Second, a CloudFormation stack is deployed to create an Amazon ECS Fargate service, which uses the latest built Docker image. In AWS CloudFormation, the VHI ECS task definition defines an environment variable for the ETS Network Load Balancer’s DNS name. Therefore, the VHI can bootstrap and point to an ETS service. In the VHI stack, it uses a Network Load Balancer as an integration point for UFT One test integration.

The following code is an example of a ECS Task Definition CloudFormation snippet that creates a VHI service in Amazon ECS Fargate and integrates it with an ETS server:

#...
  VhiTaskDefinition:
    DependsOn:
    - EtsService
    Type: AWS::ECS::TaskDefinition
    Properties:
      Family: systems-test-vhi
      NetworkMode: awsvpc
      RequiresCompatibilities:
        - FARGATE
      ExecutionRoleArn: !Ref FargateEcsTaskExecutionRoleArn
      Cpu: 2048
      Memory: 4096
      ContainerDefinitions:
        - Cpu: 2048
          Name: !Sub "vhi-${AWS::StackName}"
          Memory: 4096
          Environment:
            - Name: esHostName 
              Value: !GetAtt EtsInternalLoadBalancer.DNSName
            - Name: esPort
              Value: 9270
          Image: !Ref "${AWS::AccountId}.dkr.ecr.us-east-1.amazonaws.com/systems-test/vhi:latest"
          PortMappings:
            - ContainerPort: 9680
          LogConfiguration:
            LogDriver: awslogs
            Options:
              awslogs-group: !Ref 'SystemsTestLogGroup'
              awslogs-region: !Ref 'AWS::Region'
              awslogs-stream-prefix: vhi

#...

Deploying UFT One Tests

UFT One is a test client that uses each of the web services created by the VHI designer to orchestrate running each of the associated business functions. Parameter data is supplied to each function, and validations are configured against the data returned. Multiple test suites are configured with different business functions with the associated data.

The following screenshot shows the test suite API_Bankdemo3, which is used in this regression test process.

the screenshot shows the test suite API_Bankdemo3 in UFT One test setup console, the API setup for getCheckingDetails

Figure – API_Bankdemo3 in UFT One Test Editor Console

For more information, see the UFT One website.

Integrating UFT One and testing the application

The last step is to integrate UFT One into CodeBuild and CodePipeline to test our mainframe application. First, we set up CodeBuild to use a UFT One container. The Docker image is available in Docker Hub. Then we author our buildspec. The buildspec has the following three phrases:

  • Setting up a UFT One license and deploying the test infrastructure
  • Starting the UFT One test suite to run regression tests
  • Tearing down the test infrastructure after tests are complete

The following code is an example of a buildspec snippet in the pre_build stage. The snippet shows the command to activate the UFT One license:

version: 0.2
batch: 
# . . .
phases:
  pre_build:
    commands:
      - |
        # Activate License
        $process = Start-Process -NoNewWindow -RedirectStandardOutput LicenseInstall.log -Wait -File 'C:\Program Files (x86)\Micro Focus\Unified Functional Testing\bin\HP.UFT.LicenseInstall.exe' -ArgumentList @('concurrent', 10600, 1, ${env:AUTOPASS_LICENSE_SERVER})        
        Get-Content -Path LicenseInstall.log
        if (Select-String -Path LicenseInstall.log -Pattern 'The installation was successful.' -Quiet) {
          Write-Host 'Licensed Successfully'
        } else {
          Write-Host 'License Failed'
          exit 1
        }
#...

The following command in the buildspec deploys the test infrastructure using the AWS Command Line Interface (AWS CLI)

aws cloudformation deploy --stack-name $stack_name `
--template-file cicd-pipeline/systems-test-pipeline/systems-test-service.yaml `
--parameter-overrides EcsCluster=$cluster_arn `
--capabilities CAPABILITY_IAM

Because ETS and VHI are both deployed with a load balancer, the build detects when the load balancers become healthy before starting the tests. The following AWS CLI commands detect the load balancer’s target group health:

$vhi_health_state = (aws elbv2 describe-target-health --target-group-arn $vhi_target_group_arn --query 'TargetHealthDescriptions[0].TargetHealth.State' --output text)
$ets_health_state = (aws elbv2 describe-target-health --target-group-arn $ets_target_group_arn --query 'TargetHealthDescriptions[0].TargetHealth.State' --output text)          

When the targets are healthy, the build moves into the build stage, and it uses the UFT One command line to start the tests. See the following code:

$process = Start-Process -Wait  -NoNewWindow -RedirectStandardOutput UFTBatchRunnerCMD.log `
-FilePath "C:\Program Files (x86)\Micro Focus\Unified Functional Testing\bin\UFTBatchRunnerCMD.exe" `
-ArgumentList @("-source", "${env:CODEBUILD_SRC_DIR_DemoSrc}\bankdemo\tests\API_Bankdemo\API_Bankdemo${env:TEST_BATCH_NUMBER}")

The next release of Micro Focus UFT One (November or December 2020) will provide an exit status to indicate a test’s success or failure.

When the tests are complete, the post_build stage tears down the test infrastructure. The following AWS CLI command tears down the CloudFormation stack:


#...
	post_build:
	  finally:
	  	- |
		  Write-Host "Clean up ETS, VHI Stack"
		  #...
		  aws cloudformation delete-stack --stack-name $stack_name
          aws cloudformation wait stack-delete-complete --stack-name $stack_name

At the end of the build, the buildspec is set up to upload UFT One test reports as an artifact into Amazon Simple Storage Service (Amazon S3). The following screenshot is the example of a test report in HTML format generated by UFT One in CodeBuild and CodePipeline.

UFT One HTML report shows regression testresult and test detals

Figure – UFT One HTML report

A new release of Micro Focus UFT One will provide test report formats supported by CodeBuild test report groups.

Conclusion

In this post, we introduced the solution to use Micro Focus Enterprise Suite, Micro Focus UFT One, Micro Focus VHI, AWS developer tools, and Amazon ECS containers to automate provisioning and running mainframe application tests in AWS at scale.

The on-demand model allows you to create the same test capacity infrastructure in minutes at a fraction of your current on-premises mainframe cost. It also significantly increases your testing and delivery capacity to increase quality and reduce production downtime.

A demo of the solution is available in AWS Partner Micro Focus website AWS Mainframe CI/CD Enterprise Solution. If you’re interested in modernizing your mainframe applications, please visit Micro Focus and contact AWS mainframe business development at [email protected].

References

Micro Focus


Peter Woods

Peter Woods

Peter has been with Micro Focus for almost 30 years, in a variety of roles and geographies including Technical Support, Channel Sales, Product Management, Strategic Alliances Management and Pre-Sales, primarily based in Europe but for the last four years in Australia and New Zealand. In his current role as Pre-Sales Manager, Peter is charged with driving and supporting sales activity within the Application Modernization and Connectivity team, based in Melbourne.

Leo Ervin

Leo Ervin

Leo Ervin is a Senior Solutions Architect working with Micro Focus Enterprise Solutions working with the ANZ team. After completing a Mathematics degree Leo started as a PL/1 programming with a local insurance company. The next step in Leo’s career involved consulting work in PL/1 and COBOL before he joined a start-up company as a technical director and partner. This company became the first distributor of Micro Focus software in the ANZ region in 1986. Leo’s involvement with Micro Focus technology has continued from this distributorship through to today with his current focus on cloud strategies for both DevOps and re-platform implementations.

Kevin Yung

Kevin Yung

Kevin is a Senior Modernization Architect in AWS Professional Services Global Mainframe and Midrange Modernization (GM3) team. Kevin currently is focusing on leading and delivering mainframe and midrange applications modernization for large enterprise customers.

Close problem automatically via Zabbix API

Post Syndicated from Aigars Kadiķis original https://blog.zabbix.com/close-problem-automatically-via-zabbix-api/12461/

Today we are talking about a use case when it’s impossible to find a proper way to write a recovery expression for the Zabbix trigger. In other words, we know how to identify problems. But there is no good way to detect when the problem is gone.

This mostly relates to a huge environment, for example:

  • Got one log file. There are hundreds of patterns inside. We respect all of them. We need them
  • SNMP trap item (snmptrap.fallback) with different patterns being written inside

In these situations, the trigger is most likely configured to “Event generation mode: Multiple.” This practically means: when a “problematic metric” hits the instance, it will open +1 additional problem.

Goal:
I just need to receive an email about the record, then close the event.

As a workaround (let’s call it a solution here), we can define an action which will:

  1. contact an API endpoint
  2. manually acknowledge the event and close it

The biggest reason why this functionality is possible is that: when an event hits the action, the operation actually knows the event ID of the problem. The macro {EVENT.ID} saves the day.

To solve the problem, we need to install API characteristics at the global level:

     {$Z_API_PHP}=http://127.0.0.1/api_jsonrpc.php
    {$Z_API_USER}=api
{$Z_API_PASSWORD}=zabbix

NOTE
‘http://127.0.0.1/api_jsonrpc.php’ means the frontend server runs on the same server as systemd:zabbix-server. If it is not the case, we need to plot a front-end address of Zabbix GUI + add ‘api_jsonrpc.php’.

We will have 2 actions. The first one will deliver a notification to email:

After 1 minute, a second action will close the event:

This is a full bash snippet we must put inside. No need to change anything. It works with copy and paste:

url={$Z_API_PHP}
    user={$Z_API_USER}
password={$Z_API_PASSWORD}

# authorization
auth=$(curl -sk -X POST -H "Content-Type: application/json" -d "
{
	\"jsonrpc\": \"2.0\",
	\"method\": \"user.login\",
	\"params\": {
		\"user\": \"$user\",
		\"password\": \"$password\"
	},
	\"id\": 1,
	\"auth\": null
}
" $url | \
grep -E -o "([0-9a-f]{32,32})")

# acknowledge and close event
curl -sk -X POST -H "Content-Type: application/json" -d "
{
	\"jsonrpc\": \"2.0\",
	\"method\": \"event.acknowledge\",
	\"params\": {
		\"eventids\": \"{EVENT.ID}\",
		\"action\": 1,
		\"message\": \"Problem resolved.\"
	},
	\"auth\": \"$auth\",
	\"id\": 1
}" $url

# close api key
curl -sk -X POST -H "Content-Type: application/json" -d "
{
    \"jsonrpc\": \"2.0\",
    \"method\": \"user.logout\",
    \"params\": [],
    \"id\": 1,
    \"auth\": \"$auth\"
}
" $url

Symantec Reports on Cicada APT Attacks against Japan

Post Syndicated from Bruce Schneier original https://www.schneier.com/blog/archives/2020/11/symantec-reports-on-cicada-apt-attacks-against-japan.html

Symantec is reporting on an APT group linked to China, named Cicada. They have been attacking organizations in Japan and elsewhere.

Cicada has historically been known to target Japan-linked organizations, and has also targeted MSPs in the past. The group is using living-off-the-land tools as well as custom malware in this attack campaign, including a custom malware — Backdoor.Hartip — that Symantec has not seen being used by the group before. Among the machines compromised during this attack campaign were domain controllers and file servers, and there was evidence of files being exfiltrated from some of the compromised machines.

The attackers extensively use DLL side-loading in this campaign, and were also seen leveraging the ZeroLogon vulnerability that was patched in August 2020.

Interesting details about the group’s tactics.

News article.

Getting to the Core: Benchmarking Cloudflare’s Latest Server Hardware

Post Syndicated from Brian Bassett original https://blog.cloudflare.com/getting-to-the-core/

Getting to the Core: Benchmarking Cloudflare’s Latest Server Hardware

Getting to the Core: Benchmarking Cloudflare’s Latest Server Hardware

Maintaining a server fleet the size of Cloudflare’s is an operational challenge, to say the least. Anything we can do to lower complexity and improve efficiency has effects for our SRE (Site Reliability Engineer) and Data Center teams that can be felt throughout a server’s 4+ year lifespan.

At the Cloudflare Core, we process logs to analyze attacks and compute analytics. In 2020, our Core servers were in need of a refresh, so we decided to redesign the hardware to be more in line with our Gen X edge servers. We designed two major server variants for the core. The first is Core Compute 2020, an AMD-based server for analytics and general-purpose compute paired with solid-state storage drives. The second is Core Storage 2020, an Intel-based server with twelve spinning disks to run database workloads.

Core Compute 2020

Earlier this year, we blogged about our 10th generation edge servers or Gen X and the improvements they delivered to our edge in both performance and security. The new Core Compute 2020 server leverages many of our learnings from the edge server. The Core Compute servers run a variety of workloads including Kubernetes, Kafka, and various smaller services.

Configuration Changes (Kubernetes)

Previous Generation Compute Core Compute 2020
CPU 2 x Intel Xeon Gold 6262 1 x AMD EPYC 7642
Total Core / Thread Count 48C / 96T 48C / 96T
Base / Turbo Frequency 1.9 / 3.6 GHz 2.3 / 3.3 GHz
Memory 8 x 32GB DDR4-2666 8 x 32GB DDR4-2933
Storage 6 x 480GB SATA SSD 2 x 3.84TB NVMe SSD
Network Mellanox CX4 Lx 2 x 25GbE Mellanox CX4 Lx 2 x 25GbE

Configuration Changes (Kafka)

Previous Generation (Kafka) Core Compute 2020
CPU 2 x Intel Xeon Silver 4116 1 x AMD EPYC 7642
Total Core / Thread Count 24C / 48T 48C / 96T
Base / Turbo Frequency 2.1 / 3.0 GHz 2.3 / 3.3 GHz
Memory 6 x 32GB DDR4-2400 8 x 32GB DDR4-2933
Storage 12 x 1.92TB SATA SSD 10 x 3.84TB NVMe SSD
Network Mellanox CX4 Lx 2 x 25GbE Mellanox CX4 Lx 2 x 25GbE

Both previous generation servers were Intel-based platforms, with the Kubernetes server based on Xeon 6262 processors, and the Kafka server based on Xeon 4116 processors. One goal with these refreshed versions was to converge the configurations in order to simplify spare parts and firmware management across the fleet.

As the above tables show, the configurations have been converged with the only difference being the number of NVMe drives installed depending on the workload running on the host. In both cases we moved from a dual-socket configuration to a single-socket configuration, and the number of cores and threads per server either increased or stayed the same. In all cases, the base frequency of those cores was significantly improved. We also moved from SATA SSDs to NVMe SSDs.

Core Compute 2020 Synthetic Benchmarking

The heaviest user of the SSDs was determined to be Kafka. The majority of the time Kafka is sequentially writing 2MB blocks to the disk. We created a simple FIO script with 75% sequential write and 25% sequential read, scaling the block size from a standard page table entry size of 4096KB to Kafka’s write size of 2MB. The results aligned with what we expected from an NVMe-based drive.

Getting to the Core: Benchmarking Cloudflare’s Latest Server Hardware

Core Compute 2020 Production Benchmarking

Cloudflare runs many of our Core Compute services in Kubernetes containers, some of which are multi-core. By transitioning to a single socket, problems associated with dual sockets were eliminated, and we are guaranteed to have all cores allocated for any given container on the same socket.

Another heavy workload that is constantly running on Compute hosts is the Cloudflare CSAM Scanning Tool. Our Systems Engineering team isolated a Compute 2020 compute host and the previous generation compute host, had them run just this workload, and measured the time to compare the fuzzy hashes for images to the NCMEC hash lists and verify that they are a “miss”.

Because the CSAM Scanning Tool is very compute intensive we specifically isolated it to take a look at its performance with the new hardware. We’ve spent a great deal of effort on software optimization and improved algorithms for this tool but investing in faster, better hardware is also important.

In these heatmaps, the X axis represents time, and the Y axis represents “buckets” of time taken to verify that it is not a match to one of the NCMEC hash lists. For a given time slice in the heatmap, the red point is the bucket with the most times measured, the yellow point the second most, and the green points the least. The red points on the Compute 2020 graph are all in the 5 to 8 millisecond bucket, while the red points on the previous Gen heatmap are all in the 8 to 13 millisecond bucket, which shows that on average, the Compute 2020 host is verifying hashes significantly faster.

Getting to the Core: Benchmarking Cloudflare’s Latest Server Hardware

Core Storage 2020

Another major workload we identified was ClickHouse, which performs analytics over large datasets. The last time we upgraded our servers running ClickHouse was back in 2018.

Configuration Changes

Previous Generation Core Storage 2020
CPU 2 x Intel Xeon E5-2630 v4 1 x Intel Xeon Gold 6210U
Total Core / Thread Count 20C / 40T 20C / 40T
Base / Turbo Frequency 2.2 / 3.1 GHz 2.5 / 3.9 GHz
Memory 8 x 32GB DDR4-2400 8 x 32GB DDR4-2933
Storage 12 x 10TB 7200 RPM 3.5” SATA 12 x 10TB 7200 RPM 3.5” SATA
Network Mellanox CX4 Lx 2 x 25GbE Mellanox CX4 Lx 2 x 25GbE

CPU Changes

For ClickHouse, we use a 1U chassis with 12 x 10TB 3.5” hard drives. At the time we were designing Core Storage 2020 our server vendor did not yet have an AMD version of this chassis, so we remained on Intel. However, we moved Core Storage 2020 to a single 20 core / 40 thread Xeon processor, rather than the previous generation’s dual-socket 10 core / 20 thread processors. By moving to the single-socket Xeon 6210U processor, we were able to keep the same core count, but gained 17% higher base frequency and 26% higher max turbo frequency. Meanwhile, the total CPU thermal design profile (TDP), which is an approximation of the maximum power the CPU can draw, went down from 165W to 150W.

On a dual-socket server, remote memory accesses, which are memory accesses by a process on socket 0 to memory attached to socket 1, incur a latency penalty, as seen in this table:

Previous Generation Core Storage 2020
Memory latency, socket 0 to socket 0 81.3 ns 86.9 ns
Memory latency, socket 0 to socket 1 142.6 ns N/A

An additional advantage of having a CPU with all 20 cores on the same socket is the elimination of these remote memory accesses, which take 76% longer than local memory accesses.

Memory Changes

The memory in the Core Storage 2020 host is rated for operation at 2933 MHz; however, in the 8 x 32GB configuration we need on these hosts, the Intel Xeon 6210U processor clocks them at 2666 MH. Compared to the previous generation, this gives us a 13% boost in memory speed. While we would get a slightly higher clock speed with a balanced, 6 DIMMs configuration, we determined that we are willing to sacrifice the slightly higher clock speed in order to have the additional RAM capacity provided by the 8 x 32GB configuration.

Storage Changes

Data capacity stayed the same, with 12 x 10TB SATA drives in RAID 0 configuration for best  throughput. Unlike the previous generation, the drives in the Core Storage 2020 host are helium filled. Helium produces less drag than air, resulting in potentially lower latency.

Core Storage 2020 Synthetic benchmarking

We performed synthetic four corners benchmarking: IOPS measurements of random reads and writes using 4k block size, and bandwidth measurements of sequential reads and writes using 128k block size. We used the fio tool to see what improvements we would get in a lab environment. The results show a 10% latency improvement and 11% IOPS improvement in random read performance. Random write testing shows 38% lower latency and 60% higher IOPS. Write throughput is improved by 23%, and read throughput is improved by a whopping 90%.

Previous Generation Core Storage 2020 % Improvement
4k Random Reads (IOPS) 3,384 3,758 11.0%
4k Random Read Mean Latency (ms, lower is better) 75.4 67.8 10.1% lower
4k Random Writes (IOPS) 4,009 6,397 59.6%
4k Random Write Mean Latency (ms, lower is better) 63.5 39.7 37.5% lower
128k Sequential Reads (MB/s) 1,155 2,195 90.0%
128k Sequential Writes (MB/s) 1,265 1,558 23.2%

CPU frequencies

The higher base and turbo frequencies of the Core Storage 2020 host’s Xeon 6210U processor allowed that processor to achieve higher average frequencies while running our production ClickHouse workload. A recent snapshot of two production hosts showed the Core Storage 2020 host being able to sustain an average of 31% higher CPU frequency while running ClickHouse.

Previous generation (average core frequency) Core Storage 2020 (average core frequency) % improvement
Mean Core Frequency 2441 MHz 3199 MHz 31%

Core Storage 2020 Production benchmarking

Our ClickHouse database hosts are continually performing merge operations to optimize the database data structures. Each individual merge operation takes just a few seconds on average, but since they’re constantly running, they can consume significant resources on the host. We sampled the average merge time every five minutes over seven days, and then sampled the data to find the average, minimum, and maximum merge times reported by a Compute 2020 host and by a previous generation host. Results are summarized below.

ClickHouse merge operation performance improvement
(time in seconds, lower is better)

Time Previous generation Core Storage 2020 % improvement
Mean time to merge 1.83 1.15 37% lower
Maximum merge time 3.51 2.35 33% lower
Minimum merge time 0.68 0.32 53% lower

Our lab-measured CPU frequency and storage performance improvements on Core Storage 2020 have translated into significantly reduced times to perform this database operation.

Conclusion

With our Core 2020 servers, we were able to realize significant performance improvements, both in synthetic benchmarking outside production and in the production workloads we tested. This will allow Cloudflare to run the same workloads on fewer servers, saving CapEx costs and data center rack space. The similarity of the configuration of the Kubernetes and Kafka hosts should help with fleet management and spare parts management. For our next redesign, we will try to further converge the designs on which we run the major Core workloads to further improve efficiency.

Special thanks to Will Buckner and Chris Snook for their help in the development of these servers, and to Tim Bart for validating CSAM Scanning Tool’s performance on Compute.

Classify your trash with Raspberry Pi

Post Syndicated from Ashley Whittaker original https://www.raspberrypi.org/blog/classify-your-trash-with-raspberry-pi/

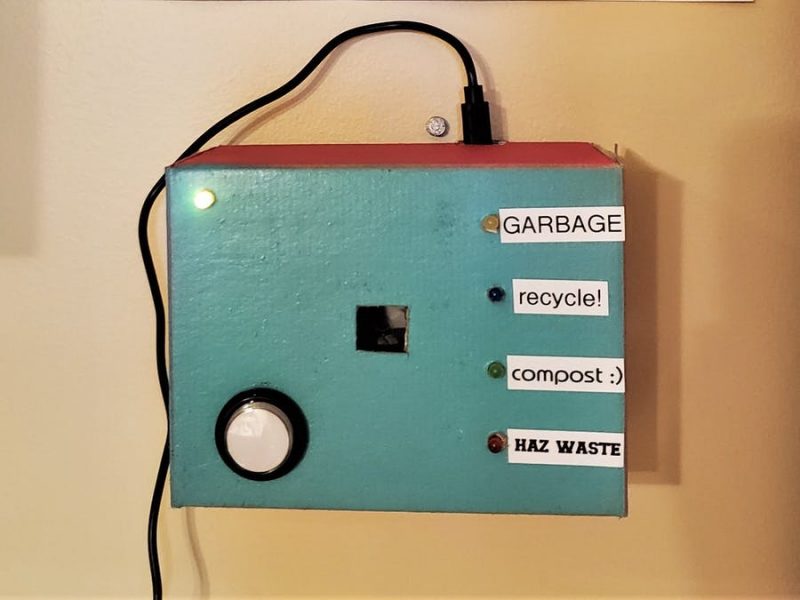
Maker Jen Fox took to hackster.io to share a Raspberry Pi–powered trash classifier that tells you whether the trash in your hand is recyclable, compostable, or just straight-up garbage.

Jen reckons this project is beginner-friendly, as you don’t need any code to train the machine learning model, just a little to load it on Raspberry Pi. It’s also a pretty affordable build, costing less than $70 including a Raspberry Pi 4.

“Haz waste”?!

Hardware:

  • Raspberry Pi 4 Model B
  • Raspberry Pi Camera Module
  • Adafruit push button
  • Adafruit LEDs
Watch Jen giving a demo of her creation

Software

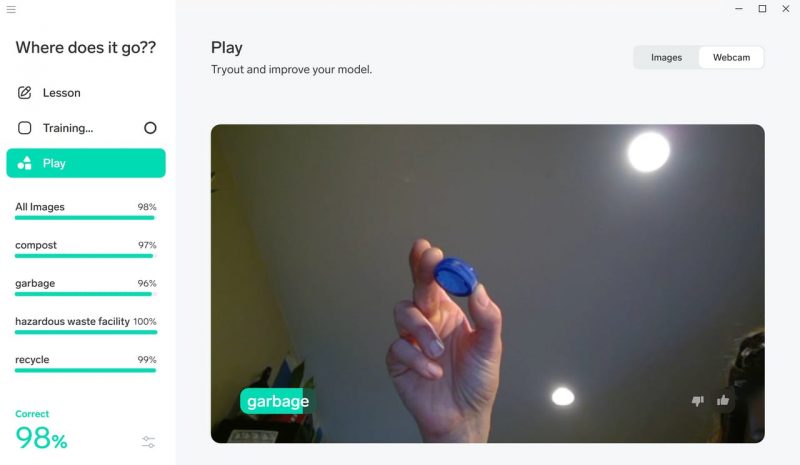
The code-free machine learning model is created using Lobe, a desktop tool that automatically trains a custom image classifier based on what objects you’ve shown it.

The image classifier correctly guessing it has been shown a bottle cap

Training the image classifier

Basically, you upload a tonne of photos and tell Lobe what object each of them shows. Jen told the empty classification model which photos were of compostable waste, which were of recyclable and items, and which were of garbage or bio-hazardous waste. Of course, as Jen says, “the more photos you have, the more accurate your model is.”

Loading up Raspberry Pi

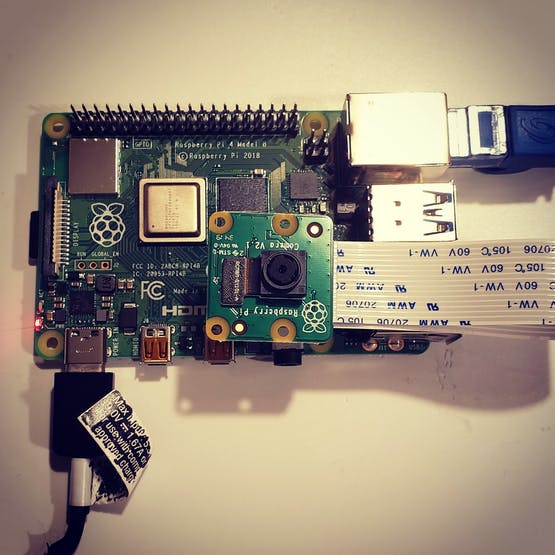
Birds eye view of Raspberry Pi 4 with a camera module connected
The Raspberry Pi Camera Module attached to Raspberry Pi 4

As promised, you only need a little bit of code to load the image classifier onto your Raspberry Pi. The Raspberry Pi Camera Module acts as the image classifier’s “eyes” so Raspberry Pi can find out what kind of trash you hold up for it.

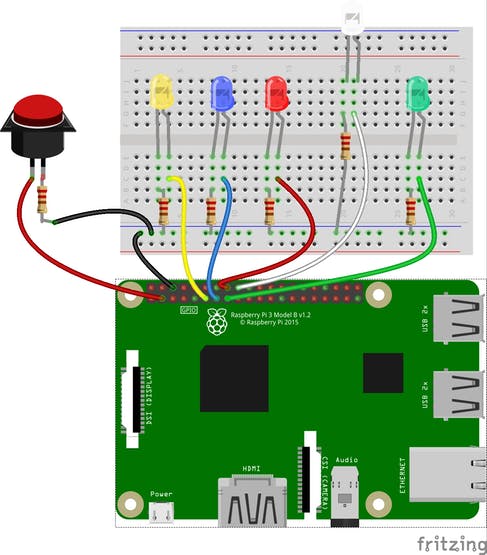
The push button and LEDs are wired up to the Raspberry Pi GPIO pins, and they work together with the camera and light up according to what the image classifier “sees”.

Here’s the fritzing diagram showing how to wire the push button and LEDS to the Raspberry Pi GPIO pins

You’ll want to create a snazzy case so your trash classifier looks good mounted on the wall. Kate cut holes in a cardboard box to make sure that the camera could “see” out, the user can see the LEDs, and the push button is accessible. Remember to leave room for Raspberry Pi’s power supply to plug in.

Jen’s hand-painted case mounted to the wall, having a look at a plastic bag

Jen has tonnes of other projects on her Hackster profile — check out the micro:bit Magic Wand.

The post Classify your trash with Raspberry Pi appeared first on Raspberry Pi.

Let’s Kill Security Questions

Post Syndicated from Bozho original https://techblog.bozho.net/lets-kill-security-questions/

Let’s kill security questions

Security questions still exist. They are less dominant now, but we haven’t yet condemned them as an industry hard enough so that they stop being added to authentication flows.

But they are bad. They are like passwords, but more easily guessable, because you have a password hint. And while there are opinions that they might be okay in certain scenarios, they have so many pitfalls that in practice we should just not consider them an option.

What are those pitfalls? Social engineering. Almost any security question’s answer is guessable by doing research on the target person online. We share more about our lives and don’t even realize how that affects us security-wise. Many security questions have a limited set of possible answers that can be enumerated with a brute force attack (e.g. what are the most common pet names; what are the most common last names in a given country for a given period of time, in order to guess someone’s mother’s maiden name; what are the high schools in the area where the person lives, and so on). So when someone wants to takeover your account, if all they have to do is open your Facebook profile or try 20-30 options, you have no protection.

But what are they for in the first place? Account recovery. You have forgotten your password and the system asks you some details about you to allow you to reset your password. We already have largely solved the problem of account recovery – send a reset password link to the email of the user. If the system itself is an email service, or in a couple of other scenarios, you can use a phone number, where a one-time password is sent for recovery purposes (or a secondary email, for email providers).

So we have the account recovery problem largely solved, why are security questions still around? Inertia, I guess. And the five monkeys experiment. There is no good reason to have a security question if you can have recovery email or phone. And you can safely consider that to be true (ok, maybe there are edge cases).

There are certain types of account recovery measures that resemble security questions and can be implemented as an additional layer, on top of a phone or email recovery. For more important services (e.g. your Facebook account or your main email), it may not be safe to consider just owning the phone or just having access to the associated email to be enough. Phones get stolen, emails get “broken into”. That’s why a security-like set of questions may serve as additional protection. For example – guessing recent activity. Facebook does that sometimes by asking you about your activity on the site or about your friends. This is not perfect, as it can be monitored by the malicious actor, but is an option. For your email, you can be asked what are the most recent emails that you’ve sent, and be presented with options to choose from, with some made up examples. These things are hard to implement because of geographic and language differences, but “guess your recent activity among these choices”, e.g. dynamically defined security questions, may be an acceptable additional step for account recovery.

But fixed security questions – no. Let’s kill those. I’m not the first to argue against security questions, but we need to be reminded that certain bad security practices should be left in the past.

Authentication is changing. We are desperately trying to get rid of the password itself (and still failing to do so), but before we manage to do so, we should first get rid of the “bad password in disguise”, the security question.

The post Let’s Kill Security Questions appeared first on Bozho's tech blog.

Creating multi-architecture Docker images to support Graviton2 using AWS CodeBuild and AWS CodePipeline

Post Syndicated from Tyler Lynch original https://aws.amazon.com/blogs/devops/creating-multi-architecture-docker-images-to-support-graviton2-using-aws-codebuild-and-aws-codepipeline/

This post provides a clear path for customers who are evaluating and adopting Graviton2 instance types for performance improvements and cost-optimization.

Graviton2 processors are custom designed by AWS using 64-bit Arm Neoverse N1 cores. They power the T4g*, M6g*, R6g*, and C6g* Amazon Elastic Compute Cloud (Amazon EC2) instance types and offer up to 40% better price performance over the current generation of x86-based instances in a variety of workloads, such as high-performance computing, application servers, media transcoding, in-memory caching, gaming, and more.

More and more customers want to make the move to Graviton2 to take advantage of these performance optimizations while saving money.

During the transition process, a great benefit AWS provides is the ability to perform native builds for each architecture, instead of attempting to cross-compile on homogenous hardware. This has the benefit of decreasing build time as well as reducing complexity and cost to set up.

To see this benefit in action, we look at how to build a CI/CD pipeline using AWS CodePipeline and AWS CodeBuild that can build multi-architecture Docker images in parallel to aid you in evaluating and migrating to Graviton2.

Solution overview

With CodePipeline and CodeBuild, we can automate the creation of architecture-specific Docker images, which can be pushed to Amazon Elastic Container Registry (Amazon ECR). The following diagram illustrates this architecture.

Solution overview architectural diagram

The steps in this process are as follows:

  1. Create a sample Node.js application and associated Dockerfile.
  2. Create the buildspec files that contain the commands that CodeBuild runs.
  3. Create three CodeBuild projects to automate each of the following steps:
    • CodeBuild for x86 – Creates a x86 Docker image and pushes to Amazon ECR.
    • CodeBuild for arm64 – Creates a Arm64 Docker image and pushes to Amazon ECR.
    • CodeBuild for manifest list – Creates a Docker manifest list, annotates the list, and pushes to Amazon ECR.
  4. Automate the orchestration of these projects with CodePipeline.

Prerequisites

The prerequisites for this solution are as follows:

  • The correct AWS Identity and Access Management (IAM) role permissions for your account allowing for the creation of the CodePipeline pipeline, CodeBuild projects, and Amazon ECR repositories
  • An Amazon ECR repository named multi-arch-test
  • A source control service such as AWS CodeCommit or GitHub that CodeBuild and CodePipeline can interact with
  • The source code repository initialized and cloned locally

Creating a sample Node.js application and associated Dockerfile

For this post, we create a sample “Hello World” application that self-reports the processor architecture. We work in the local folder that is cloned from our source repository as specified in the prerequisites.

  1. In your preferred text editor, add a new file with the following Node.js code:

# Hello World sample app.
const http = require('http');

const port = 3000;

const server = http.createServer((req, res) => {
  res.statusCode = 200;
  res.setHeader('Content-Type', 'text/plain');
  res.end(`Hello World. This processor architecture is ${process.arch}`);
});

server.listen(port, () => {
  console.log(`Server running on processor architecture ${process.arch}`);
});
  1. Save the file in the root of your source repository and name it app.js.
  2. Commit the changes to Git and push the changes to our source repository. See the following code:

git add .
git commit -m "Adding Node.js sample application."
git push

We also need to create a sample Dockerfile that instructs the docker build command how to build the Docker images. We use the default Node.js image tag for version 14.

  1. In a text editor, add a new file with the following code:

# Sample nodejs application
FROM node:14
WORKDIR /usr/src/app
COPY package*.json app.js ./
RUN npm install
EXPOSE 3000
CMD ["node", "app.js"]
  1. Save the file in the root of the source repository and name it Dockerfile. Make sure it is Dockerfile with no extension.
  2. Commit the changes to Git and push the changes to our source repository:

git add .
git commit -m "Adding Dockerfile to host the Node.js sample application."
git push

Creating a build specification file for your application

It’s time to create and add a buildspec file to our source repository. We want to use a single buildspec.yml file for building, tagging, and pushing the Docker images to Amazon ECR for both target native architectures, x86, and Arm64. We use CodeBuild to inject environment variables, some of which need to be changed for each architecture (such as image tag and image architecture).

A buildspec is a collection of build commands and related settings, in YAML format, that CodeBuild uses to run a build. For more information, see Build specification reference for CodeBuild.

The buildspec we add instructs CodeBuild to do the following:

  • install phase – Update the yum package manager
  • pre_build phase – Sign in to Amazon ECR using the IAM role assumed by CodeBuild
  • build phase – Build the Docker image using the Docker CLI and tag the newly created Docker image
  • post_build phase – Push the Docker image to our Amazon ECR repository

We first need to add the buildspec.yml file to our source repository.

  1. In a text editor, add a new file with the following build specification:

version: 0.2
phases:
    install:
        commands:
            - yum update -y
    pre_build:
        commands:
            - echo Logging in to Amazon ECR...
            - $(aws ecr get-login --no-include-email --region $AWS_DEFAULT_REGION)
    build:
        commands:
            - echo Build started on `date`
            - echo Building the Docker image...          
            - docker build -t $IMAGE_REPO_NAME:$IMAGE_TAG .
            - docker tag $IMAGE_REPO_NAME:$IMAGE_TAG $AWS_ACCOUNT_ID.dkr.ecr.$AWS_DEFAULT_REGION.amazonaws.com/$IMAGE_REPO_NAME:$IMAGE_TAG      
    post_build:
        commands:
            - echo Build completed on `date`
            - echo Pushing the Docker image...
            - docker push $AWS_ACCOUNT_ID.dkr.ecr.$AWS_DEFAULT_REGION.amazonaws.com/$IMAGE_REPO_NAME:$IMAGE_TAG
  1. Save the file in the root of the repository and name it buildspec.yml.

Because we specify environment variables in the CodeBuild project, we don’t need to hard code any values in the buildspec file.

  1. Commit the changes to Git and push the changes to our source repository:

git add .
git commit -m "Adding CodeBuild buildspec.yml file."
git push

Creating a build specification file for your manifest list creation

Next we create a buildspec file that instructs CodeBuild to create a Docker manifest list, and associate that manifest list with the Docker images that the buildspec file builds.

A manifest list is a list of image layers that is created by specifying one or more (ideally more than one) image names. You can then use it in the same way as an image name in docker pull and docker run commands, for example. For more information, see manifest create.

As of this writing, manifest creation is an experimental feature of the Docker command line interface (CLI).

Experimental features provide early access to future product functionality. These features are intended only for testing and feedback because they may change between releases without warning or be removed entirely from a future release. Experimental features must not be used in production environments. For more information, Experimental features.

When creating the CodeBuild project for manifest list creation, we specify a buildspec file name override as buildspec-manifest.yml. This buildspec instructs CodeBuild to do the following:

  • install phase – Update the yum package manager
  • pre_build phase – Sign in to Amazon ECR using the IAM role assumed by CodeBuild
  • build phase – Perform three actions:
    • Set environment variable to enable Docker experimental features for the CLI
    • Create the Docker manifest list using the Docker CLI
    • Annotate the manifest list to add the architecture-specific Docker image references
  • post_build phase – Push the Docker image to our Amazon ECR repository and use docker manifest inspect to echo out the contents of the manifest list from Amazon ECR

We first need to add the buildspec-manifest.yml file to our source repository.

  1. In a text editor, add a new file with the following build specification:

version: 0.2
# Based on the Docker documentation, must include the DOCKER_CLI_EXPERIMENTAL environment variable
# https://docs.docker.com/engine/reference/commandline/manifest/    

phases:
    install:
        commands:
            - yum update -y
    pre_build:
        commands:
            - echo Logging in to Amazon ECR...
            - $(aws ecr get-login --no-include-email --region $AWS_DEFAULT_REGION)
    build:
        commands:
            - echo Build started on `date`
            - echo Building the Docker manifest...   
            - export DOCKER_CLI_EXPERIMENTAL=enabled       
            - docker manifest create $AWS_ACCOUNT_ID.dkr.ecr.$AWS_DEFAULT_REGION.amazonaws.com/$IMAGE_REPO_NAME $AWS_ACCOUNT_ID.dkr.ecr.$AWS_DEFAULT_REGION.amazonaws.com/$IMAGE_REPO_NAME:latest-arm64v8 $AWS_ACCOUNT_ID.dkr.ecr.$AWS_DEFAULT_REGION.amazonaws.com/$IMAGE_REPO_NAME:latest-amd64    
            - docker manifest annotate --arch arm64 $AWS_ACCOUNT_ID.dkr.ecr.$AWS_DEFAULT_REGION.amazonaws.com/$IMAGE_REPO_NAME $AWS_ACCOUNT_ID.dkr.ecr.$AWS_DEFAULT_REGION.amazonaws.com/$IMAGE_REPO_NAME:latest-arm64v8
            - docker manifest annotate --arch amd64 $AWS_ACCOUNT_ID.dkr.ecr.$AWS_DEFAULT_REGION.amazonaws.com/$IMAGE_REPO_NAME $AWS_ACCOUNT_ID.dkr.ecr.$AWS_DEFAULT_REGION.amazonaws.com/$IMAGE_REPO_NAME:latest-amd64

    post_build:
        commands:
            - echo Build completed on `date`
            - echo Pushing the Docker image...
            - docker manifest push $AWS_ACCOUNT_ID.dkr.ecr.$AWS_DEFAULT_REGION.amazonaws.com/$IMAGE_REPO_NAME
            - docker manifest inspect $AWS_ACCOUNT_ID.dkr.ecr.$AWS_DEFAULT_REGION.amazonaws.com/$IMAGE_REPO_NAME
  1. Save the file in the root of the repository and name it buildspec-manifest.yml.
  2. Commit the changes to Git and push the changes to our source repository:

git add .
git commit -m "Adding CodeBuild buildspec-manifest.yml file."
git push

Setting up your CodeBuild projects

Now we have created a single buildspec.yml file for building, tagging, and pushing the Docker images to Amazon ECR for both target native architectures: x86 and Arm64. This file is shared by two of the three CodeBuild projects that we create. We use CodeBuild to inject environment variables, some of which need to be changed for each architecture (such as image tag and image architecture). We also want to use the single Docker file, regardless of the architecture. We also need to ensure any third-party libraries are present and compiled correctly for the target architecture.

For more information about third-party libraries and software versions that have been optimized for Arm, see the Getting started with AWS Graviton GitHub repo.

We use the same environment variable names for the CodeBuild projects, but each project has specific values, as detailed in the following table. You need to modify these values to your numeric AWS account ID, the AWS Region where your Amazon ECR registry endpoint is located, and your Amazon ECR repository name. The instructions for adding the environment variables in the CodeBuild projects are in the following sections.

Environment Variable x86 Project values Arm64 Project values manifest Project values
1 AWS_DEFAULT_REGION us-east-1 us-east-1 us-east-1
2 AWS_ACCOUNT_ID 111111111111 111111111111 111111111111
3 IMAGE_REPO_NAME multi-arch-test multi-arch-test multi-arch-test
4 IMAGE_TAG latest-amd64 latest-arm64v8 latest

The image we use in this post uses architecture-specific tags with the term latest. This is for demonstration purposes only; it’s best to tag the images with an explicit version or another meaningful reference.

CodeBuild for x86

We start with creating a new CodeBuild project for x86 on the CodeBuild console.

CodeBuild looks for a file named buildspec.yml by default, unless overridden. For these first two CodeBuild projects, we rely on that default and don’t specify the buildspec name.

  1. On the CodeBuild console, choose Create build project.
  2. For Project name, enter a unique project name for your build project, such as node-x86.
  3. To add tags, add them under Additional Configuration.
  4. Choose a Source provider (for this post, we choose GitHub).
  5. For Environment image, choose Managed image.
  6. Select Amazon Linux 2.
  7. For Runtime(s), choose Standard.
  8. For Image, choose aws/codebuild/amazonlinux2-x86_64-standard:3.0.

This is a x86 build image.

  1. Select Privileged.
  2. For Service role, choose New service role.
  3. Enter a name for the new role (one is created for you), such as CodeBuildServiceRole-nodeproject.

We reuse this same service role for the other CodeBuild projects associated with this project.

  1. Expand Additional configurations and move to the Environment variables
  2. Create the following Environment variables:
Name Value Type
1 AWS_DEFAULT_REGION us-east-1 Plaintext
2 AWS_ACCOUNT_ID 111111111111 Plaintext
3 IMAGE_REPO_NAME multi-arch-test Plaintext
4 IMAGE_TAG latest-amd64 Plaintext
  1. Choose Create build project.

Attaching the IAM policy

Now that we have created the CodeBuild project, we need to adjust the new service role that was just created and attach an IAM policy so that it can interact with the Amazon ECR API.

  1. On the CodeBuild console, choose the node-x86 project
  2. Choose the Build details
  3. Under Service role, choose the link that looks like arn:aws:iam::111111111111:role/service-role/CodeBuildServiceRole-nodeproject.

A new browser tab should open.

  1. Choose Attach policies.
  2. In the Search field, enter AmazonEC2ContainerRegistryPowerUser.
  3. Select AmazonEC2ContainerRegistryPowerUser.
  4. Choose Attach policy.

CodeBuild for arm64

Now we move on to creating a new (second) CodeBuild project for Arm64.

  1. On the CodeBuild console, choose Create build project.
  2. For Project name, enter a unique project name, such as node-arm64.
  3. If you want to add tags, add them under Additional Configuration.
  4. Choose a Source provider (for this post, choose GitHub).
  5. For Environment image, choose Managed image.
  6. Select Amazon Linux 2.
  7. For Runtime(s), choose Standard.
  8. For Image, choose aws/codebuild/amazonlinux2-aarch64-standard:2.0.

This is an Arm build image and is different from the image selected in the previous CodeBuild project.

  1. Select Privileged.
  2. For Service role, choose Existing service role.
  3. Choose CodeBuildServiceRole-nodeproject.
  4. Select Allow AWS CodeBuild to modify this service role so it can be used with this build project.
  5. Expand Additional configurations and move to the Environment variables
  6. Create the following Environment variables:
Name Value Type
1 AWS_DEFAULT_REGION us-east-1 Plaintext
2 AWS_ACCOUNT_ID 111111111111 Plaintext
3 IMAGE_REPO_NAME multi-arch-test Plaintext
4 IMAGE_TAG latest-arm64v8 Plaintext
  1. Choose Create build project.

CodeBuild for manifest list

For the last CodeBuild project, we create a Docker manifest list, associating that manifest list with the Docker images that the preceding projects create, and pushing the manifest list to ECR. This project uses the buildspec-manifest.yml file created earlier.

  1. On the CodeBuild console, choose Create build project.
  2. For Project name, enter a unique project name for your build project, such as node-manifest.
  3. If you want to add tags, add them under Additional Configuration.
  4. Choose a Source provider (for this post, choose GitHub).
  5. For Environment image, choose Managed image.
  6. Select Amazon Linux 2.
  7. For Runtime(s), choose Standard.
  8. For Image, choose aws/codebuild/amazonlinux2-x86_64-standard:3.0.

This is a x86 build image.

  1. Select Privileged.
  2. For Service role, choose Existing service role.
  3. Choose CodeBuildServiceRole-nodeproject.
  4. Select Allow AWS CodeBuild to modify this service role so it can be used with this build project.
  5. Expand Additional configurations and move to the Environment variables
  6. Create the following Environment variables:
Name Value Type
1 AWS_DEFAULT_REGION us-east-1 Plaintext
2 AWS_ACCOUNT_ID 111111111111 Plaintext
3 IMAGE_REPO_NAME multi-arch-test Plaintext
4 IMAGE_TAG latest Plaintext
  1. For Buildspec name – optional, enter buildspec-manifest.yml to override the default.
  2. Choose Create build project.

Setting up CodePipeline

Now we can move on to creating a pipeline to orchestrate the builds and manifest creation.

  1. On the CodePipeline console, choose Create pipeline.
  2. For Pipeline name, enter a unique name for your pipeline, such as node-multi-architecture.
  3. For Service role, choose New service role.
  4. Enter a name for the new role (one is created for you). For this post, we use the generated role name CodePipelineServiceRole-nodeproject.
  5. Select Allow AWS CodePipeline to create a service role so it can be used with this new pipeline.
  6. Choose Next.
  7. Choose a Source provider (for this post, choose GitHub).
  8. If you don’t have any existing Connections to GitHub, select Connect to GitHub and follow the wizard.
  9. Choose your Branch name (for this post, I choose main, but your branch might be different).
  10. For Output artifact format, choose CodePipeline default.
  11. Choose Next.

You should now be on the Add build stage page.

  1. For Build provider, choose AWS CodeBuild.
  2. Verify the Region is your Region of choice (for this post, I use US East (N. Virginia)).
  3. For Project name, choose node-x86.
  4. For Build type, select Single build.
  5. Choose Next.

You should now be on the Add deploy stage page.

  1. Choose Skip deploy stage.

A pop-up appears that reads Your pipeline will not include a deployment stage. Are you sure you want to skip this stage?

  1. Choose Skip.
  2. Choose Create pipeline.

CodePipeline immediately attempts to run a build. You can let it continue without worry if it fails. We are only part of the way done with the setup.

Adding an additional build step

We need to add the additional build step for the Arm CodeBuild project in the Build stage.

  1. On the CodePipeline console, choose node-multi-architecture pipeline
  2. Choose Edit to start editing the pipeline stages.

You should now be on the Editing: node-multi-architecture page.

  1. For the Build stage, choose Edit stage.
  2. Choose + Add action.

Editing node-multi-architecture

  1. For Action name, enter Build-arm64.
  2. For Action provider, choose AWS CodeBuild.
  3. Verify your Region is correct.
  4. For Input artifacts, select SourceArtifact.
  5. For Project name, choose node-arm64.
  6. For Build type, select Single build.
  7. Choose Done.
  8. Choose Save.

A pop-up appears that reads Saving your changes cannot be undone. If the pipeline is running when you save your changes, that execution will not complete.

  1. Choose Save.

Updating the first build action name

This step is optional. The CodePipeline wizard doesn’t allow you to enter your Build action name during creation, but you can update the Build stage’s first build action to have consistent naming.

  1. Choose Edit to start editing the pipeline stages.
  2. Choose the Edit icon.
  3. For Action name, enter Build-x86.
  4. Choose Done.
  5. Choose Save.

A pop-up appears that says Saving your changes cannot be undone. If the pipeline is running when you save your changes, that execution will not complete.

  1. Choose Save.

Adding the project

Now we add the CodeBuild project for manifest creation and publishing.

  1. On the CodePipeline console, choose node-multi-architecture pipeline.
  2. Choose Edit to start editing the pipeline stages.
  3. Choose +Add stage below the Build
  4. Set the Stage name to Manifest
  5. Choose +Add action group.
  6. For Action name, enter Create-manifest.
  7. For Action provider, choose AWS CodeBuild.
  8. Verify your Region is correct.
  9. For Input artifacts, select SourceArtifact.
  10. For Project name, choose node-manifest.
  11. For Build type, select Single build.
  12. Choose Done.
  13. Choose Save.

A pop-up appears that reads Saving your changes cannot be undone. If the pipeline is running when you save your changes, that execution will not complete.

  1. Choose Save.

Testing the pipeline

Now let’s verify everything works as planned.

  1. In the pipeline details page, choose Release change.

This runs the pipeline in stages. The process should take a few minutes to complete. The pipeline should show each stage as Succeeded.

Pipeline visualization

Now we want to inspect the output of the Create-manifest action that runs the CodeBuild project for manifest creation.

  1. Choose Details in the Create-manifest

This opens the CodeBuild pipeline.

  1. Under Build logs, we should see the output from the manifest inspect command we ran as the last step in the buildspec-manifest.yml See the following sample log:

[Container] 2020/10/07 16:47:39 Running command docker manifest inspect $AWS_ACCOUNT_ID.dkr.ecr.$AWS_DEFAULT_REGION.amazonaws.com/$IMAGE_REPO_NAME
{
   "schemaVersion": 2,
   "mediaType": "application/vnd.docker.distribution.manifest.list.v2+json",
   "manifests": [
      {
         "mediaType": "application/vnd.docker.distribution.manifest.v2+json",
         "size": 1369,
         "digest": "sha256:238c2762212ff5d7e0b5474f23d500f2f1a9c851cdd3e7ef0f662efac508cd04",
         "platform": {
            "architecture": "amd64",
            "os": "linux"
         }
      },
      {
         "mediaType": "application/vnd.docker.distribution.manifest.v2+json",
         "size": 1369,
         "digest": "sha256:0cc9e96921d5565bdf13274e0f356a139a31d10e95de9ad3d5774a31b8871b05",
         "platform": {
            "architecture": "arm64",
            "os": "linux"
         }
      }
   ]
}

Cleaning up

To avoid incurring future charges, clean up the resources created as part of this post.

  1. On the CodePipeline console, choose the pipeline node-multi-architecture.
  2. Choose Delete pipeline.
  3. When prompted, enter delete.
  4. Choose Delete.
  5. On the CodeBuild console, choose the Build project node-x86.
  6. Choose Delete build project.
  7. When prompted, enter delete.
  8. Choose Delete.
  9. Repeat the deletion process for Build projects node-arm64 and node-manifest.

Next we delete the Docker images we created and pushed to Amazon ECR. Be careful to not delete a repository that is being used for other images.

  1. On the Amazon ECR console, choose the repository multi-arch-test.

You should see a list of Docker images.

  1. Select latest, latest-arm64v8, and latest-amd64.
  2. Choose Delete.
  3. When prompted, enter delete.
  4. Choose Delete.

Finally, we remove the IAM roles that we created.

  1. On the IAM console, choose Roles.
  2. In the search box, enter CodePipelineServiceRole-nodeproject.
  3. Select the role and choose Delete role.
  4. When prompted, choose Yes, delete.
  5. Repeat these steps for the role CodeBuildServiceRole-nodeproject.

Conclusion

To summarize, we successfully created a pipeline to create multi-architecture Docker images for both x86 and arm64. We referenced them via annotation in a Docker manifest list and stored them in Amazon ECR. The Docker images were based on a single Docker file that uses environment variables as parameters to allow for Docker file reuse.

For more information about these services, see the following:

About the Authors


Tyler Lynch photo

Tyler Lynch
Tyler Lynch is a Sr. Solutions Architect focusing on EdTech at AWS.


Alistair McLean photo

Alistair McLean

Alistair is a Principal Solutions Architect focused on State and Local Government and K12 customers at AWS.


Paalanen: Developing Wayland Color Management and High Dynamic Range

Post Syndicated from original https://lwn.net/Articles/837844/rss

Over on the Collabora blog, Pekka Paalanen writes
about adding color management and high dynamic range (HDR) support to the
Wayland display server
protocol. X11 already has support for color management tools and workflow, but not HDR, and
Wayland currently doesn’t support either, but Paalanen and others are working
to change that. “As color management is all about color spaces and
gamuts, and high dynamic range (HDR) is also very much about color spaces
and gamuts plus extended luminance range, Sebastian [Wick] and I decided that
Wayland color management extension should cater for both from the
beginning. Combining traditional color management and HDR is a fairly new
thing as far as I know, and I’m not sure we have much prior art to base
upon, so this is an interesting research journey as well. There is a lot of
prior art on HDR and color management separately, but they tend to have
fundamental differences that makes the combination not obvious.

GCompris releases version 1.0 to celebrate 20 years

Post Syndicated from original https://lwn.net/Articles/837843/rss


The GCompris project,
which provides a “high quality educational software suite, including
a large number of activities for children aged 2 to 10
“, has announced its 1.0
release
, which celebrates the 20th anniversary of the project. It
includes more than 100 activities, a new Dataset selection in the Activity
Settings menu for more than 50 activities, and four new activities,
including an Analog Electricity activity to simulate and learn about circuits.
KDE.news covered
the release
: “We have built the activities to follow the
principles of ‘nothing succeeds like success’ and that children, when
learning, should be challenged, but not made to feel threatened. Thus,
GCompris congratulates, but does not reprimand; all the characters the
child interacts with are friendly and supportive; activities are brightly
colored, contain encouraging voices and play upbeat, but soothing music.

The hardware requirements for running GCompris are extremely low and it
will run fine on older computers or low-powered machines, like the
Raspberry Pi. This saves you and your school from having to invest in new
and expensive equipment and it is also eco-friendly, as it reduces the
amount of technological waste that is produced when you have to renew
computers to adapt to more and more power-hungry software. GCompris works
on Windows, Android and GNU/Linux computers, and on desktop machines,
laptops, tablets and phones.”

The collective thoughts of the interwebz

By continuing to use the site, you agree to the use of cookies. more information

The cookie settings on this website are set to "allow cookies" to give you the best browsing experience possible. If you continue to use this website without changing your cookie settings or you click "Accept" below then you are consenting to this.

Close