Founded in 2018, echo3D built a revolutionary 3D digital asset management (DAM) platform to address the surging demand for immersive content across industries. The company’s platform enables enterprises to seamlessly store, secure, optimize, and share 3D content, serving over 200,000 professionals across energy, healthcare, gaming, retail, and beyond.
echo3D’s platform has become the go-to solution for managing complex 3D assets at scale, supporting major enterprises across multiple sectors. With their technology operating within clients’ own AWS accounts, echo3D delivers critical infrastructure that powers real-time 3D content management for organizations worldwide.
As customer demand grew, echo3D faced increasing pressure to maintain rapid innovation while ensuring stable multi-cloud deployments. With a streamlined development team managing expanding cross-platform requirements, the company needed an efficient solution to accelerate their build and debug processes. This led them to explore Amazon Q Developer as a way to enhance their development capabilities and meet growing market demands.
Opportunity | Building for a Multi-Cloud Reality through Amazon Q Developer
echo3D specializes in 3D digital asset management, with a critical focus on multi-cloud deployments to serve their diverse enterprise client base. The company’s commitment to cross-platform functionality isn’t optional—it’s fundamental to their business model, with many clients specifically requiring AWS compatibility.
The company’s existing cloud infrastructure needed to support seamless migrations while maintaining robust performance across different environments. “For many of our clients, AWS is the ultimate destination,” explains Ben Pedazur, CTO at echo3D. “Amazon Q Developer has proven to be an indispensable guide for these migrations, both for our infrastructure and for the solutions we build for customers.”
After evaluating various solutions, echo3D identified Amazon Q Developer as their key tool for standardizing cross-platform development. “We needed a solution that could generate consistent code across different cloud environments while resolving platform-specific challenges,” notes Pedazur. This capability became particularly crucial during a recent customer migration project, which served as a perfect test case for Amazon Q Developer’s capabilities.
Solution | Streamlining the Journey to AWS with Amazon Q Developer
To streamline their cloud migration process, echo3D implemented Amazon Q Developer across their entire development workflow. The team utilized Amazon Q Developer to handle a critical migration from Azure Cosmos DB to Amazon DynamoDB, leveraging the AI assistant to generate comprehensive migration blueprints that included code modifications, configuration changes, and testing strategies.
Developers used detailed prompts to generate migration plans and receive context-aware guidance throughout the process. Amazon Q Developer provided not just code snippets, but complete architectural solutions that considered both the source and target platforms. During implementation, the team integrated Amazon Q Developer directly into their workflow, receiving real-time suggestions for code optimization and platform-specific adjustments.
The impact of Amazon Q Developer was immediate and measurable, with 41% of the new codebase being generated or auto-completed by the tool. “Amazon Q Developer has transformed our migration efficiency,” says Pedazur. “Our development time for cloud migrations has decreased by 87%, while significantly improving code quality.”
Amazon Q Developer assists throughout the entire development lifecycle, generating test cases, deployment scripts, and documentation. This comprehensive support has led to remarkable improvements: platform-specific bugs decreased by 75%, deployment success rates reached 99.8% across multiple clouds, and code review cycles shortened by 60%.
Beyond code generation, echo3D uses Amazon Q Developer to enhance team collaboration and knowledge sharing. The tool has cut onboarding time for new engineers in half, reducing it from four weeks to two weeks. Support tickets related to deployment errors have dropped by 68%, indicating improved code stability and reliability.
The new multi-cloud infrastructure, built with AWS services including DynamoDB, enables echo3D to scale efficiently while maintaining high performance across different cloud environments. The combination of Amazon Q Developer and AWS services has empowered echo3D to accelerate their development cycle while ensuring consistent quality across platforms.
“Amazon Q Developer isn’t just about coding faster—it’s about building better,” explains Pedazur. “We’ve seen improvements across every metric, from development speed to code quality, allowing our team to focus on innovation rather than troubleshooting.”
Outcome | Reimagining Development Through AI-Powered Workflows
With Amazon Q Developer, echo3D plans to further leverage Amazon Q Developer across their product lifecycle, from rapid prototyping to ongoing code maintenance and enhancement.
“Amazon Q Developer has revolutionized our approach to multi-cloud development,” says Pedazur. “It’s not just about automating tasks; it’s about reimagining our entire workflow. We’re now able to prototype, test, and deploy across cloud platforms with unprecedented speed and accuracy.”
Today, we’re officially announcing the AWS Cloud Control API (CCAPI) MCP Server. This MCP server transforms AWS infrastructure management by allowing developers to create, read, update, delete, and list resources using natural language. As part of the awslabs/mcp project, this new and innovative tool serves as a bridge between natural language commands and AWS infrastructure deployment and management. This MCP server is powered by the AWS Cloud Control API – a standardized API that allows CRUDL (Create/Read/Update/Delete/List) operations to be performed against AWS and third party resources using a single endpoint.
Key Features:
Leverages AWS Cloud Control API for CRUDL operations for more than 1,200 AWS resources
Enables LLM-powered agents and developers to manage infrastructure with natural language prompts
Provides the option to output Infrastructure as Code (IaC) templates for infrastructure it will create, allowing to still be used with existing CI/CD pipelines
Integrates with AWS Pricing API to provide cost estimates for the infrastructure it will create
Applies security best practices automatically using Checkov
Why Use CCAPI MCP Server?
Simplified Infrastructure Management: No more wrestling with complex templates or documentation
Increased Developer Productivity: Focus on what you need, not how to configure it
Reduced Learning Curve: Onboard new team members faster with natural language commands
LLM Integration: Perfect companion for AI-assisted development workflows
The CCAPI MCP Server transforms infrastructure management by enabling natural language interactions for AWS resource operations. Bridging natural language commands with AWS infrastructure deployment and management, this MCP Server allows developers to manage cloud infrastructure through conversational inputs such as:
Can you create a new s3 bucket for me?or
Find all of my EC2 instances and tell me which one have an instance type that is not t2.large
This significantly reduces configuration overhead and accelerates onboarding for new team members, directly translates developer intent into cloud infrastructure.
Let’s see it in action.
Creating and Managing Cloud Infrastructure
Prerequisites
uv package manager installed
Python 3.x.x installed
AWS credentials with appropriate permissions. The MCP server supports multiple ways to define these credentials. See the MCP documentation for more information. Using dynamic credentials such as one provided via SSO is recommended. For more information on configuring AWS credentials, see the AWS CLI documentation.
An MCP Host application installed that supports MCP Clients and MCP Servers (e.g. Amazon Q Developer, Claude Desktop, Cursor, etc.). To follow this blog install Amazon Q Developer for CLI (CLI) as described in the installation instructions
Integration with Developer Tools
To start using the CCAPI MCP server, you will need to set up your server configuration which is typically in a file named mcp.json. For this blog we will focus on using the CCAPI MCP server with Amazon Q Developer. Note that for other MCP Host applications the path to the mcp configuration file may differ. You will need to create the file if it does not already exist in the directory.
1. Global Configuration: ~/.aws/amazon/mcp.json – Applies to all workspaces
2. Workspace Configuration: .amazonq/mcp.json – Specific to the current workspace
Ensure you correctly set your AWS credentials in the MCP server config. It is essential that you properly configure these credentials, as the MCP server uses their associated permissions when invoking the AWS Cloud Control API for CRUDL operations in your AWS account. The server supports multiple methods of consuming these credentials such as AWS profiles, Environment Variables, SSO tokens, etc. You can see some of this in the aws_client.py file. See these docs on using named profiles for more information.
Read Only Mode
If you would like to prevent the MCP server from performing mutating actions (e.g. Create/Update/Delete Resource), you can specify the --readonly flag as demonstrated below:
More information on the configuration and tools the CCAPI MCP server provides can be found in the AWS CloudFormation MCP Server documentation.
Security Considerations
Ensure the IAM credentials include permissions for Cloud Control API actions (List, Get, Create, Update, Delete). See the AWS CCAPI API documentation for more info
Consider running in read-only mode with --readonly flag for safer operations
Example Use Case: Creating an S3 Bucket with KMS Encryption
IMPORTANT: Ensure you have satisfied all prerequisites before attempting these commands.
1. With the mcp.json file correctly set, try to run a sample prompt. In your terminal, run q chat to start using Amazon Q in the CLI.
2. This will start initializing the MCP servers in the background, allowing you to immediately start using Q Chat even if they are still loading. As a note, if these have not finished loading, your prompts will be handled without using any MCP servers. To check the status of the servers, run /mcp
3. Once that you have validated that the MCP server was loaded successfully, try a sample command. Simply tell Amazon Q : Create an S3 bucket with versioning and encrypt it using a new KMS key
Amazon Q will use the server to automatically:
Fetch your current environment variables
Use those to fetch your current AWS session info
Create code that defines what is in your prompt
Explain the code that was generated
Run security analysis against the code that was generated (if enabled)
Explain the results of the security analysis
Validate the configuration against AWS Cloud Control API schemas (which use CloudFormation Resource Provider Schemas as their foundation) and IAM policies. This validation ensures compliance with Cloud Control API requirements, which is essential for resource creation
Create the resources directly through Cloud Control API
Note: While CloudFormation schemas are referenced in the validation step, this solution uses Cloud Control API for resource management, not CloudFormation. The schemas are used because they define the standardized resource properties that Cloud Control API expects.
4. First, Amazon Q will mention that it needs to check the environment variables to find information related to the AWS session information. It will inform you about the specific tool it aims to use and will ask for permission. Select y to accept and allow actions.
5. Next, Amazon Q will ask to use get_aws_session_info() to fetch information about the AWS session it should use for subsequent actions. It will use the relevant values from the environment variables defined in the MCP configuration file (e.g. ~/.aws/amazon/mcp.json)
6.Amazon Q will then display the AWS account ID and region it will use to deploy resources. To start, it will use generate_infrastructure_code() to generate the resource properties for a KMS key that will be sent to Cloud Control API. These properties mirror the structure defined in AWS CloudFormation Resource Provider Schemas (which Cloud Control API uses as its foundation), allowing for security validation through Checkov before deployment. The key will be configured following security best practices, with a key policy scoped to only allow usage within the AWS account.
7. Once that Amazon Q has generated the code for the resource, it will run then use the explain() tool to explain the infrastructure code that was generated. Note that default tags MANAGED_BY, MCP_SERVER_SOURCE_CODE, and MCP_SERVER_VERSION are added for all resources managed by the CCAPI MCP server. These tags provide for ease of identification of infrastructure that is being managed by the MCP server. They are configurable and you optionally can disable them, but we highly recommend adding tags to ensure you have visibility into infrastructure that is being managed by the CCAPI MCP server.
8. It will then attempt to use the run_checkov() tool to inspect the security of the code. This tool is triggered because SECURITY_SCANNING was set to enabled in your server configuration file.
9. After Checkov has run, it will then attempt to use the explain() tool again to explain the security findings from the Checkov run. If there were no security issues, it will attempt to proceed. If there were security issues, you will be asked how you’d like to proceed, and Amazon Q will recommend necessary fixes. By default, the checks that passed will only give a minimal summary. If you’d like to get more information, just ask for more details.
10. The next tool that Amazon Q will use is the create_resource() tool. This tool will attempt to create the resource using the AWS Cloud Control API, and then use the get_resource_request_status() tool to check the status of the creation. This tool uses the request token to identify the request that was submitted to the Cloud Control API and uses this to fetch its status information.
11. Amazon Q will continue using the CCAPI MCP server tools as needed until it finishes creation of both the S3 Bucket and KMS Key and will output a summary.
12. Now, ask Amazon Q to make a change potentially negatively affecting security, for example by allowing the S3 bucket to be publicly accessible. While this configuration is generally advised against, sometimes it is necessary – such as when you want to use the S3 bucket for public website hosting. Amazon Q will respond letting you know that what you are asking for is not the best practice, and explain why. However, since this could be a valid request depending on your use case, it will prompt you to confirm.
13. The CCAPI MCP server also has integrations with the AWS Pricing API, so you can even ask for the estimated cost of what it has deployed.
14. Lastly, ask Amazon Q to create a CloudFormation template of what it has created so far so you can either have a backup, or if you want to redeploy something similar, you will have a template to work off. It will use the create_template() tool to accomplish this task.
Note: The create_template() tool comes with predefined settings:
Outputs YAML format by default (can be JSON)
Sets DeletionPolicy to RETAIN
Sets UpdateReplacePolicy to RETAIN
Allows optional parameters for template ID, file saving location, and region specification
15. Try one more dangerous operation, attempting to delete all resources within an AWS account. The security checks block this attempt and suggest other alternatives.
16. Finally, ask Amazon Q to just delete what it has created. This time it will use the get_resource() tool to get information about the existing resources it created, the explain() tool to explain the changes that will be made, and finally the delete_resource() tool to delete the resources.
After successfully deleting the resources, it will provide a final summary.
Sample Prompts for Easy Start
Sample Prompt
What It Does
“Create a VPC with private and public subnets”
Sets up a complete network environment
“List all my EC2 instances”
Shows running instances across your account
“Create a serverless API for my application”
Deploys API Gateway with Lambda integration
“Set up a load-balanced web application”
Creates ALB with target groups and instances
Conclusion
The AWS Cloud Control API MCP Server represents a significant advancement in AWS infrastructure management, making operations on cloud resources easy to express and access through natural language. Whether you’re streamlining operations, experimenting with LLM-based development, or onboarding new team members, whether you are using Amazon Q Developer in CLI or any other MCP Host application (such as Claude Desktop or Cursor), the CCAPI MCP servet and its tools offer a truly intuitive way to interact with AWS.
MCP (Model Control Protocol) is a protocol designed to standardize interactions with Generative AI models, making it easier to build and manage AI applications. It provides a consistent way to communicate context with different types of models, regardless of where they’re hosted or how they’re implemented. The protocol helps bridge the gap between model deployment and application development by providing a unified interface for model interactions. While this protocol provides flexibility in tool choice, there are key challenges when the order of tool usage needs to be enforced. In this blog post, you will learn about how I designed this functionality and implemented it into the AWS Cloud Control API (CCAPI) MCP server .
The Challenge – Enforcing Tool Ordering in MCP
When you think of MCP, you likely think of choice. Arguably one of the main reasons you may want to use an MCP server, is to allow a Large Language Model (LLM) (through agents) to access a set of tools such as reading from a database, sending an email, or in something along those lines. The MCP framework doesn’t provide a native mechanism to enforce the sequence in which tools must be called.
Let’s take as an example two tools – fetch_weather_data() and send_email(). For the LLM using your MCP server, it is reasonable to think that you may want to enforce that an email that is sent has the current weather included. Or for another example, tools getOrderId() and getOrderDetail(), where the OrderId would be required to subsequently fetch the OrderDetail. Since MCP currently lacks tool ordering preferences, these types of sequential dependencies can be challenging to enforce.
MCP tools are designed to be independent functions that an LLM can invoke as needed. There’s no built-in concept of “workflow” or “sequence” in the MCP framework itself. Each tool call is treated as a separate operation, with no inherent knowledge of what came before or what should come after. This means that by default, an LLM can technically call your tools in any order it chooses, regardless of the logical workflow you intend.
While LLMs excel at flexible decision-making, some scenarios like infrastructure management require strict operational ordering. This presents a unique challenge when building MCP servers: how do you maintain the LLM’s natural flexibility while enforcing critical sequential dependencies?
When you think of Infrastructure as Code (IaC), you think of repeatability, consistency, versioning, and continuous integration/continuous deployment (CI/CD). Within CI/CD you have a set flow:
Pull request is generated
CI/CD pipeline is triggered
Series of steps runs to run linting, security tests, unit tests, end-to-end tests, etc.
A failure in any stage should stop the entire pipeline run
This posed a challenge with IaC and LLMs. Generative AI is non-deterministic, meaning the same prompt may not always generate the same exact response. If the result deviates significantly from what it should be, it is considered a hallucination. So, what can be done to guide the LLM on what you want it to do? Let’s talk about how this was addressed in the CCAPI MCP server.
Understanding MCP Tool Discovery and Initialization
Before diving into the solution, it’s important to understand how MCP servers communicate with AI Agents. During initialization, the MCP protocol follows specific lifecycle phases where capabilities and tools are discovered.
The Model Context Protocol defines a structured lifecycle for client-server connections that ensures proper capability negotiation and state management.
These phases include:
Initialization: Capability negotiation and protocol version agreement
Operation: Normal protocol communication
Shutdown: Graceful termination of the connection
The initialization phase establishes protocol compatibility and shares implementation details. This is when an AI Agent learns about available tools through schema definitions and receives instructions for tool usage. This initialization process is crucial to the solution, as it’s where AI Agents first discover what tools are available and how they should be used. During this phase, the client sends information about its protocol version, capabilities, and implementation details. This is how tools like Amazon Q CLI receive information about an MCP server’s version, available tools, and usage instructions.
Note: For more information on the MCP lifecycle, see these docs.
Solution – Token-Based Tool Orchestration: A New Pattern for AI Agents in MCP
MCP presents a specific challenge: tools cannot directly communicate with each other to enforce execution order. The CCAPI MCP server addresses this through a token messenger pattern shown above, where the server generates and controls validation tokens, and the AI Agent (as the MCP client) passes these tokens between tool calls.
Core Implementation:
Function Enhancement – The mcp.tool() decorator transforms each function into a more capable entity. It wraps the function with a schema that defines required inputs and their validation rules, while preserving detailed documentation through docstrings. Each enhanced function clearly communicates its requirements and provides explicit error messages when dependencies aren’t met.
Dependency Discovery – During the initialize phase in the MCP lifecycle, the AI Agent (as the MCP client) receives a complete map of all defined tools and their schemas from the MCP server. The LLM, which is part of the AI Agent, uses these schemas to understand dependencies through both parameter descriptions and required input arguments. For instance, when a tool requires a parameter described as “Result from get_aws_session_info()” and defines security_scan_token as a required input argument, the LLM understands it needs both valid tokens before proceeding. This combination of descriptive text and explicit input requirements enables the AI Agent to execute sequences like get_aws_session_info() → generate_infrastructure_code() → run_checkov() → create_resource().
Token Validation Control –The server generates and controls all workflow tokens through a unified server-side storage system (_workflow_store). Each tool in the workflow generates cryptographically secure tokens, and these tokens are stored server-side with their associated data.
The AI Agent maintains these tokens in its conversation context throughout the workflow, passing them between tool calls. For security, each token used by the AI Agent must be validated against the server’s token storage. Since these tokens are short-lived, they are stored in memory (RAM) and are actively managed by the MCP server, which deletes tokens after use to maintain freshness. Any remaining tokens are automatically cleared when the server process ends or restarts. If a token doesn’t exist in the server’s storage (either because it’s invalid or already consumed), the operation fails immediately with an error. This validation is uniform across all token types, ensuring the AI Agent cannot create or modify tokens.
As the workflow progresses, tools consume existing tokens and generate new ones. For example, when explain() receives a properties_token, it first validates it exists and matches what is in _workflow_store, then consumes it and generates a new explained_properties_token. This creates a cryptographically secure chain of operations that enforces the workflow sequence (generate → scan → create), with server-side validation at every step.
The result is a predictable workflow system with strong security controls – tokens must be generated by the server and validated against server-side storage at each step, helping ensure the integrity of the infrastructure management process. This approach provides robust workflow enforcement within the confines of the current functionality of the FastMCP framework. While explicit schema-defined dependencies like @mcp.tool(depends_on=["run_checkov"]) as mentioned in this GitHub Issue would be ideal and could hopefully be added in future FastMCP versions, the current token-based approach with descriptive parameter names and clear validation provides reliable tool ordering that LLMs consistently follow without confusion.
Potential Limitations and Solutions
Session Management – When an AI Agent’s session ends or refreshes, any in-progress workflows must be restarted. This is by design – tokens are meant to be short-lived and tied to specific workflow sequences. AWS credentials naturally expire within hours as part of standard security practices, providing a natural boundary for workflow sessions.
Concurrent Workflows – Each AI Agent interaction operates independently, which is appropriate for maintaining security boundaries between different workflow instances. While this means each session starts fresh, it ensures clean separation between different infrastructure operations.
Implementation Options – For organizations requiring workflow persistence, traditional database storage could maintain session state between restarts. However, since tokens are designed to be short-lived security controls, most implementations can rely on the default in-memory storage with natural session boundaries.
The token messenger pattern provides a solid foundation for secure workflow orchestration, with its intentionally ephemeral tokens ensuring proper tool sequencing and data integrity during infrastructure operations.
The Future of MCP
While the above solution works, this process made me think about the future of MCP and how it can and should continue to grow. There are many updates to the framework I’ve seen recently, and it’s great to see activity. For Agentic AI in general, there are strong signs that the future of agentic platforms may be more deterministic in nature, as highlighted by Claude Code’s new support for lifecycle hooks. Per their docs, “Hooks provide deterministic control over Claude Code’s behavior, ensuring certain actions always happen rather than relying on the LLM to choose to run them.” For IaC and other deterministic technologies that it is desired to integrate AI with, this is essential for wide-scale adoption.
Conclusion
The journey of Model Control Protocol (MCP) and this new frontier of leveraging AI for managing cloud infrastructure continues to evolve, presenting both opportunities and challenges in the world of cloud computing and artificial intelligence. Current approaches using prompt loading and parameter dependencies have helped address initial challenges around tool ordering and security protocols, demonstrating how MCP can be effectively used in enterprise applications.
While the current implementation using workflow tokens and validation checks provides a functional solution, we continue to explore ways to enhance the protocol’s capabilities. For those interested in contributing to MCP’s evolution, you can find our proposals for protocol improvements, including enhanced dependency management, in the modelcontextprotocol GitHub org as well as in the FastMCP GitHub repository.
If you’d like to learn more about the AWS Cloud Control API MCP server mentioned in this blog, check out the documentation and GitHub repo. If you’d like to get hands on with it and other AWS MCP servers, check out this AWS workshop. Happy vibe coding my friends.
Customers use Amazon OpenSearch Service to store their operational and telemetry signal data. They use this data to monitor the health of their applications and infrastructure, so that when a production issue happens, they can identify the cause quickly. The sheer volume and variety in data often makes this process complex and time-consuming, leading to high mean time to repair (MTTR).
To expedite this process and transform how developers interact with their operational data, today we introduced Amazon Q Developer support in OpenSearch Service. With this AI-assisted analysis, both new and experienced users can navigate complex operational data without training, analyze issues, and gain insights in a fraction of the time. Amazon Q Developer in OpenSearch Service reduces MTTR by integrating generative AI capabilities directly into OpenSearch workflows so you can improve your operational capabilities without scaling your specialist teams. You can now investigate issues, analyze patterns, and create visualizations using in-context assistance and natural language interactions.
In this post, we share how to get started using Amazon Q Developer in OpenSearch Service and explore some of its key capabilities.
Solution overview
Setting up observability signal data for analysis involves many steps, including instrumenting application code, creating complex queries, creating visualizations and dashboards, configuring appropriate alerts, and often machine learning-based anomaly detectors. This requires significant upfront investment in time, resources, and expertise. Amazon Q Developer in OpenSearch Service introduces natural language exploration and generative AI-based tooling throughout OpenSearch, simplifying both initial setup and ongoing operations. Customers already use natural language based query generation to aid constructing OpenSearch queries; Amazon Q in OpenSearch Service brings in the following additional capabilities:
Natural language-based visualizations
Result summarization for queries generated with natural language queries
Anomaly detector suggestions
Alert summarization and insights
Best practices guidance
Let’s explore each of these capabilities in detail to understand how they help transform traditional observability workflows and streamline the process of data analysis in the centralized OpenSearch UI.
Natural language-based visualization
Natural language-based visualizations with Amazon Q for OpenSearch Service fundamentally transform how users create and interact with data visualizations. You don’t need to know specialized query languages currently used in OpenSearch Service dashboards to create complex visualizations. For example, you can input requests like “show me a chart of error rates over the last 24 hours broken down by region” or “create a chart showing the distribution of HTTP response codes,” and Amazon Q will automatically generate the appropriate visualization.
To get started with this feature, choose Visualizations in the navigation pane and choose Create New Visualization. The OpenSearch UI has many built-in visualization types. To use the new natural language-based visualization, choose Natural language previewer.
This will bring will bring a new visualization page with a text field where you can enter a query in natural language.
Choose an index pattern on the dropdown menu (openSearch_dashabords_sample_data_logs in this case). Amazon Q interprets your intent, identifies relevant fields, automatically selects the most appropriate visualization type, and applies proper formatting and styling. Amazon Q can also understand multiple dimensions in the data, various aggregation methods, and different time ranges.
Now you’re ready to build your visualization in natural language. For example, for the query “Show me number of distinct IP addresses per day in logs,” we see the following visualization.
Amazon Q generates the visualization as per the instruction. The UI also gives the option to update any component of data, transformations, marks and encoding for the visualization. This window also shows the generated query for the data in PPL. For this example Amazon Q generated this query
source=opensearch_dashboards_sample_data_logs*| stats DISTINCT_COUNT(`ip`) as unique_ips by span(`timestamp`, 1d)
Using this interactive UI, you can customize different aspects of the visualization if needed. For example, if you prefer to use a bar type instead of what Amazon Q generated, you can change the mark type to bar and choose Update, or choose Edit visual and specify new set of instructions for this visualization (for example, “change to bar chart”).
After you have adjusted the visualization to your satisfaction, you can save it to retrieve later. What makes this feature particularly powerful is its ability to understand context and suggest refinements by updating your prompts—if the initial visualization doesn’t quite meet your needs, you can describe the desired changes using the Edit visual option.
Result summarization
Amazon Q acts as an interpretation layer that processes query results into a condensed, structured summary. It can also identify patterns and other significant trends in the data by observing both the qualitative and quantitative characteristics of the results. The system’s effectiveness largely depends on the quality of the underlying data, the specificity of the initial query, and the characteristics of query generation, among other things. Amazon Q also samples the result set for generating this result summarization. These summaries are a good starting point for analysis. For example, for the same query we used last time (“Show me number of distinct IP addresses per day in logs”), Amazon Q will analyze the result set in the Amazon Q Summary section.
Anomaly detector suggestions
As it responds to your query, Amazon Q can make suggestions for creating an anomaly detector based upon your data source selected. It does that by recommending relevant fields of your operational data patterns with a one-click confirmation to create the detector.
Features are aggregation of fields or scripts that determines what constitutes an anomaly. Identifying features and creating a detector to use those features typically requires deep technical understanding of spikes, dips, thresholds and inter-relationship between multiple features. Amazon Q helps reduce this traditional complexity when creating a detector by automatically identifying these features as shown below. You can also make changes to the suggested detector to fine-tune to your needs.
Alerts summarization and insights
Choosing the Amazon Q icon next to alerts generates a concise summary that includes alert definitions, the specific conditions that led to its activation, and an overview of the current state of the monitored system or service.
The insights component provides a higher-level insight into the alerts by highlighting the significance of these alerts, typical conditions that results in these alerts, along with recommendations to help mitigate the conditions of these alerts. To get an insight for an alert, you need to provide additional information about your environment with a knowledge base. For instructions on generating insights, see View alert summaries and insights.
By choosing View in Discover, you can dive deeper into the data behind the alert with a single click, facilitating a seamless transition from alert notification to detailed investigation in Discover. The insights and summarization feature helps accelerate your investigations; care must be taken to identify the root cause of the problem because it will likely require human intervention.
Best practices guidance
Amazon Q Developer in OpenSearch Service not only simplifies operations, but also serves as an intelligent assistant for implementing OpenSearch Service best practices. Amazon Q for OpenSearch Service has been trained on the developer and product documentation, so that it can suggest best practices for operating OpenSearch Service domains, Amazon OpenSearch Serverless collections, and configurations based on your needs for capacity and compliance. To get started, choose the Amazon Q icon on the top right. The assistant maintains the history of the conversations. For the guidance it provides, the assistant cites its sources, providing a helpful link to the documentation. It also provides suggestions to continue the conversation. You can ask questions regarding data access policies, index state managements, sizing leader nodes, or other best practices or operational questions about OpenSearch.
Cost considerations
OpenSearch UI is available for use without other associated costs. Amazon Q Developer for OpenSearch Service is available within OpenSearch UI in the following AWS Regions: US East (N. Virginia), US West (Oregon), Asia Pacific (Mumbai), Asia Pacific (Sydney), Asia Pacific (Tokyo), Canada (Central), Europe (Frankfurt), Europe (London), Europe (Paris), and South America (São Paulo). Because it’s included at the Free Tier, there is no associated cost.
Conclusion
Amazon Q Developer support in OpenSearch Service brings in AI-powered capabilities to help alleviate the traditional barriers that teams face when setting up, monitoring, and troubleshooting their applications. This allows teams of all experience levels to harness the full power of OpenSearch.
Muthu Pitchaimani is a Search Specialist with Amazon OpenSearch Service. He builds large-scale search applications and solutions. Muthu is interested in the topics of networking and security, and is based out of Austin, Texas.
Dagney Braun is a Senior Manager of Product on the Amazon Web Services OpenSearch team. She is passionate about improving the ease of use of OpenSearch and expanding the tools available to better support all customer use cases.
February 14, 2025: This post was updated with the recommendation to restrict S3 bucket access to an IAM role by using the aws:PrincipalArn condition key instead of the aws:userid condition key.
April 2, 2021: In the section “Granting cross-account bucket access to a specific IAM role,” we updated the second policy to fix an error.
July 11, 2016: This post was first published.
Customers often ask how to limit access to an Amazon Simple Storage Service (Amazon S3) bucket to only a specific AWS Identity and Access Management (IAM) user or role. A popular approach has been to use the Principal element to list the users or roles who need access to the bucket. However, the Principal element needs the exact values of the user ARN, role ARN, or assumed-role ARN. It does not support using a wildcard (*) to include all role sessions, nor does it allow you to use policy variables.
In this blog post, we show how to restrict S3 bucket access to a specific IAM role or user within an account by using the Conditions element. Even if another user in the same account has an Admin policy or a policy with s3:*, they will be denied access if they are not explicitly listed in the Conditions element. You can use this approach, for example, to limit access to a bucket with sensitive content or additional security requirements.
Solution overview
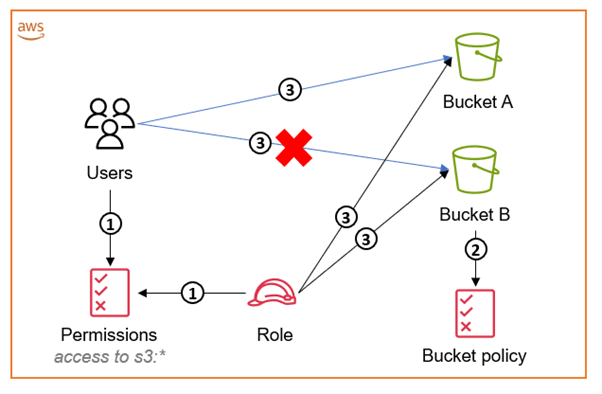
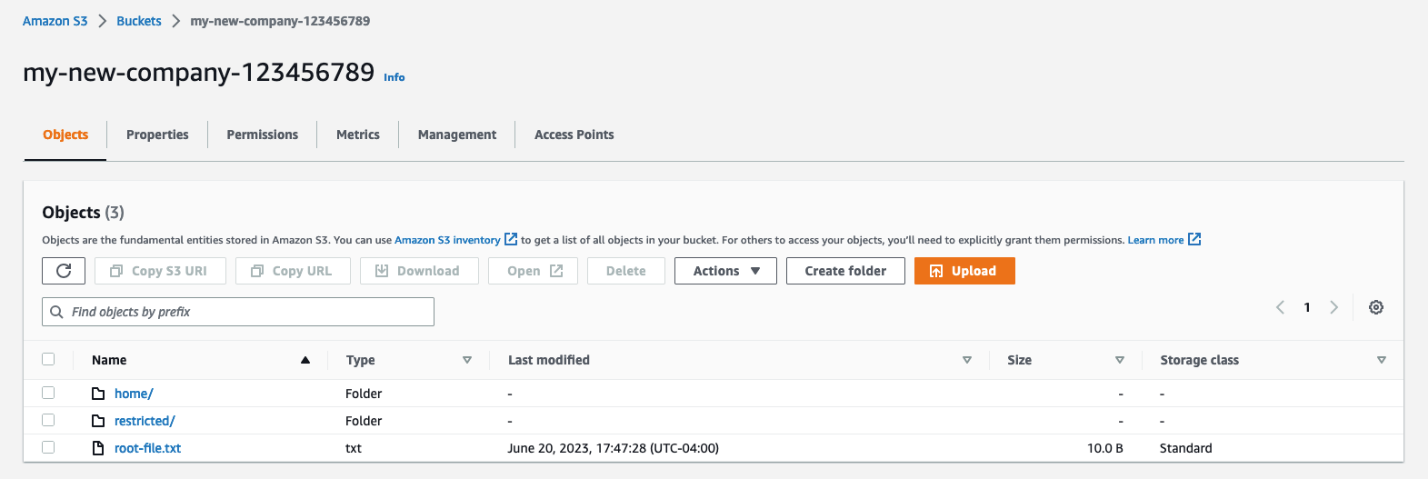
The solution in this post uses a bucket policy to restrict access to an S3 bucket, even if an entity has access to the full API of S3 through an attached identity-based policy. The following diagram illustrates how this works for accessing an S3 bucket within the same account as your IAM user or IAM role. We recommend that you use IAM roles, and only use IAM users for use cases that aren’t supported by federated users.
Figure 1: Diagram illustrating how to access an S3 bucket within the same account as your IAM user or IAM role
The workflow in Figure 1 is as follows:
The IAM user’s policy and the IAM role’s identity-based policy grant access to “s3:*”.
The S3 bucket policy associated with Bucket B restricts access to only the IAM role. This means that only the IAM role is able to access its content.
Both the IAM user and the IAM role can access other S3 buckets (for example, Bucket A) in the account. The IAM role is able to access both buckets, but the user can access only the S3 buckets without the bucket policy attached to them. Even though both the role and the user have full “s3:*” permissions, the bucket policy negates access to the bucket for anyone that has not assumed the role.
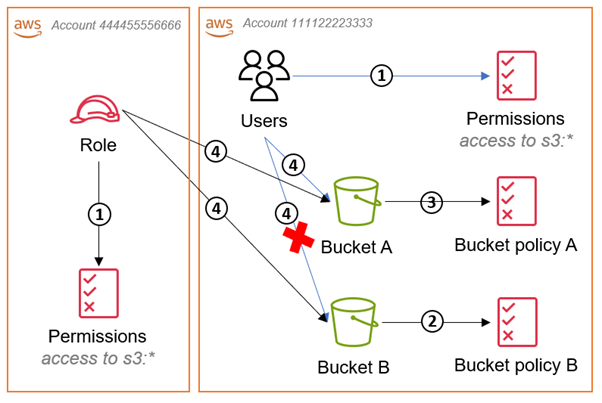
The main difference in the cross-account approach is that every bucket must have a bucket policy attached to allow access to the IAM role from the other account. The following diagram illustrates how this works in a cross-account deployment scenario.
Figure 2: Diagram illustrating how to access an S3 bucket in a different account than your IAM role
The workflow in Figure 2 is as follows:
The IAM role’s identity-based policy and the IAM users’ policy in the bucket account both grant access to “s3:*”
Bucket policy B denies access to all IAM users and roles except the role specified, and the policy defines what the role is allowed to do with the bucket.
Bucket policy A allows access to the IAM role from the other account.
The IAM user and IAM role can both access Bucket A because the IAM user is in the same account and there is an explicit Allow in bucket policy A for the role. The role can access both buckets because the Deny in bucket policy B is only for principals other than the IAM role.
Using the aws:PrincipalArn condition
You can use different types of condition keys to compare details about the principal making the request with the principal properties that you specify in the policy. We recommend that you use the aws:PrincipalArn key. The aws:PrincipalArn key compares the Amazon Resource Name (ARN) of the principal that made the request with the ARN that you specify in the policy.
You could also use the aws:userid policy variable to uniquely identify a user or role in their explicit Deny statements. There is added complexity with using aws:userid to find the value because you have to perform an API call using valid credentials. When working with IAM roles this activity has additional complexity because you are required to get the AssumedRoleUser information, which will not only include the unique role ID, but also the role-session-name that was provided while assuming the role. For example, the aws:userid for an AssumedRoleUser will be as follows:
It becomes inconvenient to manage and track these IDs when you have a large list of users and roles to be included in the policy.
To mitigate these challenges, we recommend that you use the aws:PrincipalArn condition key. For IAM roles, the request context returns the ARN of the role, not the ARN of the user that assumed the role. AWS recommends that you specify the ARN for resources in policies instead of unique IDs and that you perform IAM policy audits on a periodic basis. Let’s look at how to use the condition key in an IAM policy.
Granting same-account bucket access to a specific role
When accessing a bucket from within the same account, in most cases it is not necessary to use a bucket policy because the policy defines access that is already granted by the user’s direct IAM policy. S3 bucket policies are usually used for cross-account access, but you can also use them to restrict access through an explicit Deny. The Deny would be applied to all principals whether they were in the same account as the bucket or within a different account.
In this case, you use the IAM user or role ARN with the aws:PrincipalArncondition key in a StringNotEquals or StringNotLike condition with a wildcard string. In addition, you use the aws:PrincipalARN key to compare the ARN of the principal that made the request with the ARN that you specify in the policy. Using a conditional logic element allows for the use of a wildcard string to allow for any role session name to be accepted.
Once you have the ARN of the role to which you want to allow access, you need to block the access of other users from within the same account as the bucket. An example policy to block access to the bucket and its objects for users that are not using the IAM role credentials would look like the following.
Granting cross-account bucket access to a specific IAM role
When granting cross-account bucket access to an IAM user or role, you must define what the IAM user or role is allowed to do with the granted access. Learn more about the permissions needed to allow an IAM entity to access a bucket via the CLI/API and the console in Writing IAM Policies: How to Grant Access to an Amazon S3 Bucket. Using the information found in this blog post, an example bucket policy would look like the following.
To grant access to an IAM user in another account, you need to add the ARN for the IAM user to the aws:PrincipalArn condition as outlined in the previous section of this blog post. In addition to the aws:PrincipalArn condition, you would also need to add the IAM user’s full ARN to the Principal element of these policies. An example policy is shown below.
In addition to including role permissions in the bucket policy, you need to define these permissions in the IAM user’s or role’s user policy. The permissions are added to a customer managed policy and attached to the role or user in the IAM console, with the following example policy document.
By following the guidance in this post, you restrict S3 bucket access to a specific IAM role or user in same-account and cross-account scenarios, even if the user has an Admin policy or a policy with “s3:*”. There are many applications of this logic in which requirements will vary across use cases. We recommend to employ the principle of least privilege wherever possible, and to grant only the minimum permissions that are required to perform necessary tasks.
Well, it’s been another historic year! We’ve watched in awe as the use of real-world generative AI has changed the tech landscape, and while we at the Architecture Blog happily participated, we also made every effort to stay true to our channel’s original scope, and your readership this last year has proven that decision was the right one.
AI/ML carries itself in the top posts this year, but we’re also happy to see that foundational topics like resiliency and cost optimization are still of great interest to our audience.
(By the way, if you were hoping for more AI/ML content, head on over to our sister channel, the AWS Machine Learning Blog!).
Without further ado, here are our top posts from 2024!
In keeping with Let’s Architect! series, we have our first of three favorites for the year. This set of resources helps you apply Well-Architected standards in practice.
As I said, Let’s Architect! has a winning series, and they’ve got a finger on the pulse of the tech world. This post about machine learning showcases some of the most exciting things happening at AWS.
Figure 3. Let’s Architect
If you’re more interested in generative AI, you can also take a look at another post from 2024: Let’s Architect! GenAI
Preparedness is another common theme in this year’s favorites. Michael, John, and Saurabh are well-versed in multi-Region architecture, and they’re here to share some strategies to contain failure impact.
Figure 4. When the application experiences an impairment using S3 resources in the primary Region, it fails over to use an S3 bucket in the secondary Region.
Let’s talk cost optimization. This post about a three-tier architecture that relies on the AWS Free Tier is a must-read for anyone looking for tips to help them avoid unnecessary costs (and that’s everyone).
Figure 5. Example of a three-tier architecture on AWS
As usual, Haleh & team are pros at making sure the Well-Architected Framework is current and relevant. Take a look at the enhanced and expanded guidance in all six pillars.
One more winning post from Luca, Federica, Vittorio, and Zamira! This collection of developer resources includes new ideas in AWS Lambda, Amazon Q Developer, and Amazon DynamoDB.
Frugality AND Well-Architected? What a winning combo! This post, inspired by the 2023 re:Invent keynote, outlines the seven laws of Frugal Architecture.
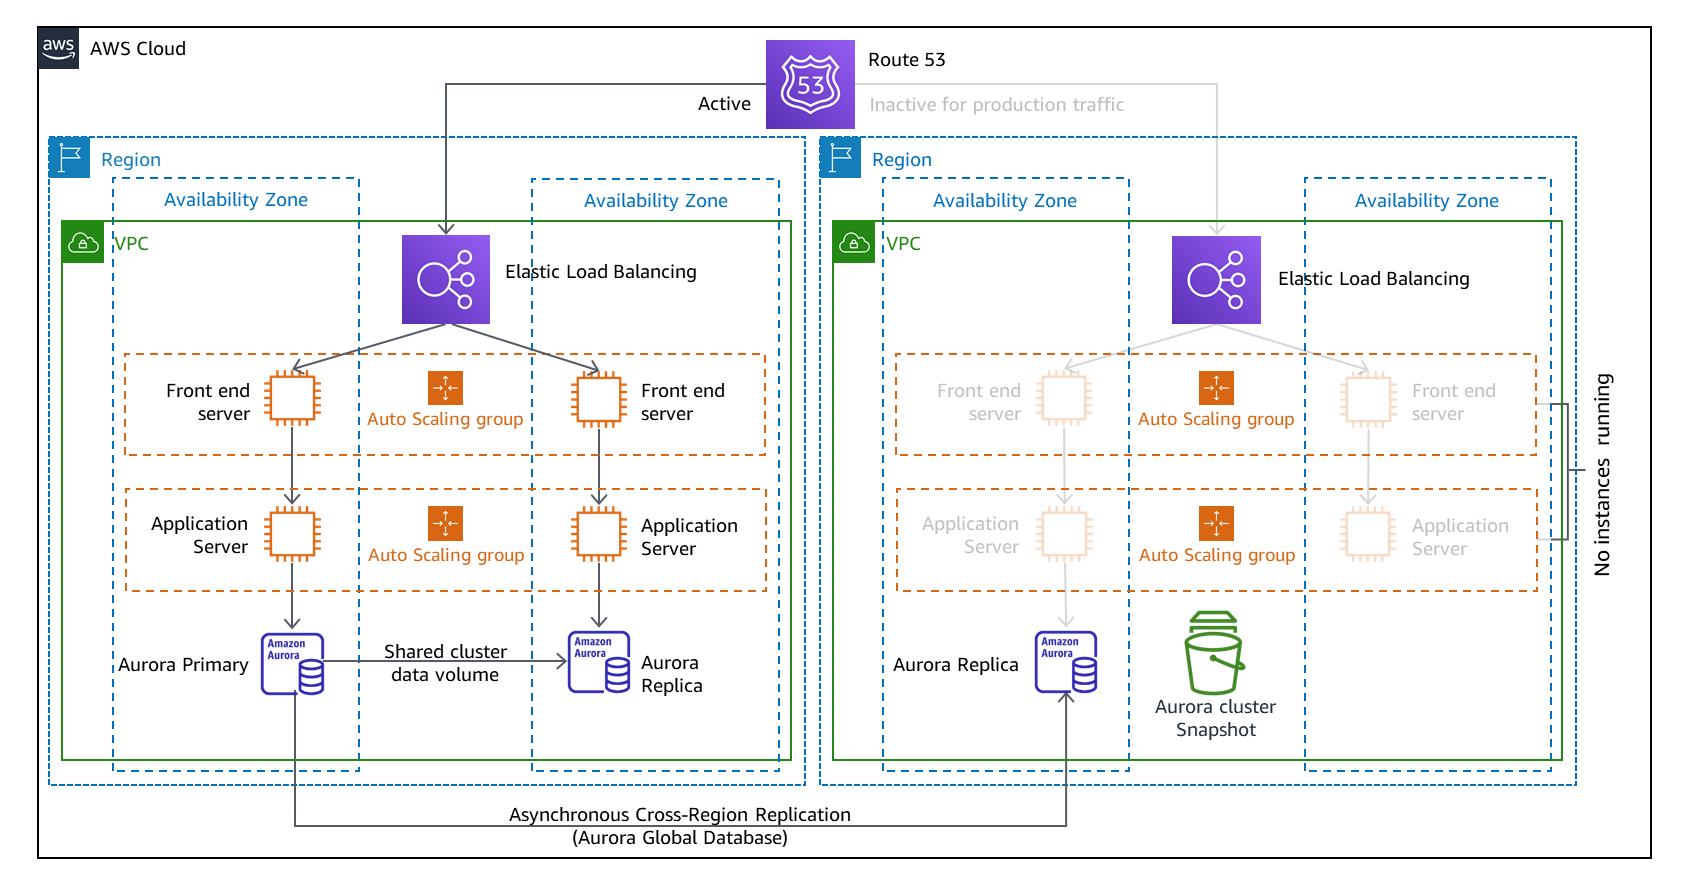
And finally, our number one post of the year! Amit and Luiz showcase a customer solution with real-world applications that builds on the guidelines of other posts in this list! Well done!
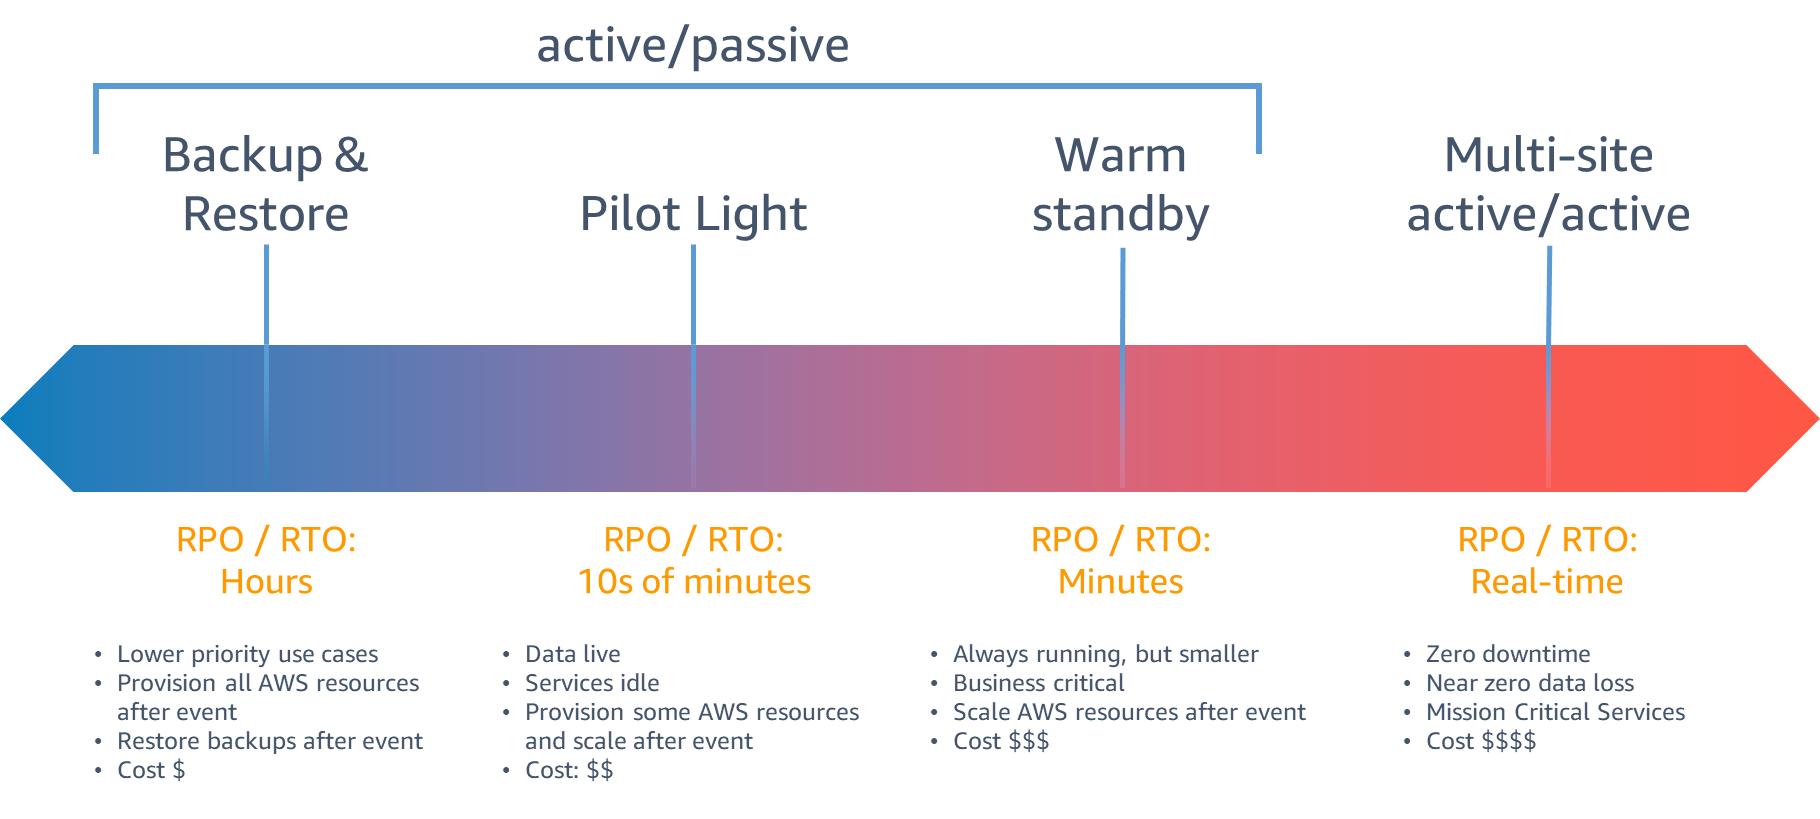
Figure 10. The Pilot Light scenario for a 3-tier application that has application servers and a database deployed in two Regions
Thank you!
As always, thanks to our contributors for their dedication and desire to share, and to you, our readers! We would be nothing with you. Literally.
For other top post lists, see our Top 10 and Top 5 posts from previous years.
As customers increasingly seek to harness the power of generative AI (GenAI) and machine learning to deliver cutting-edge applications, the need for a flexible, intuitive, and scalable development platform has never been greater. In this landscape, Streamlit has emerged as a standout tool, making it easy for developers to prototype, build, and deploy GenAI-powered apps with minimal friction. It is an open-source Python framework designed to simplify the development of custom web applications for data science, machine learning, and GenAI projects. With Streamlit, developers can quickly transform Python scripts into interactive dashboards, LLM-powered chatbots, and web apps, using just a few lines of code. Its unique combination of simplicity, interactivity, and speed is the perfect complement to the rapid advancements in AI.
When deploying Streamlit applications, customers often face the challenge of ensuring their applications are highly available and can scale to meet a variable amount of demand. To achieve these goals, customers are looking at serverless approaches to deploying their Streamlit apps. With a serverless application, you only pay for the resources required and do not want have to worry about managing servers or capacity planning.
In this post, we will walk you through deploying containerized, serverless Streamlit applications automatically via HashiCorp Terraform, an Infrastructure as Code (IaC) tool that enables users to define and provision infrastructure across cloud platforms.
Solution Overview
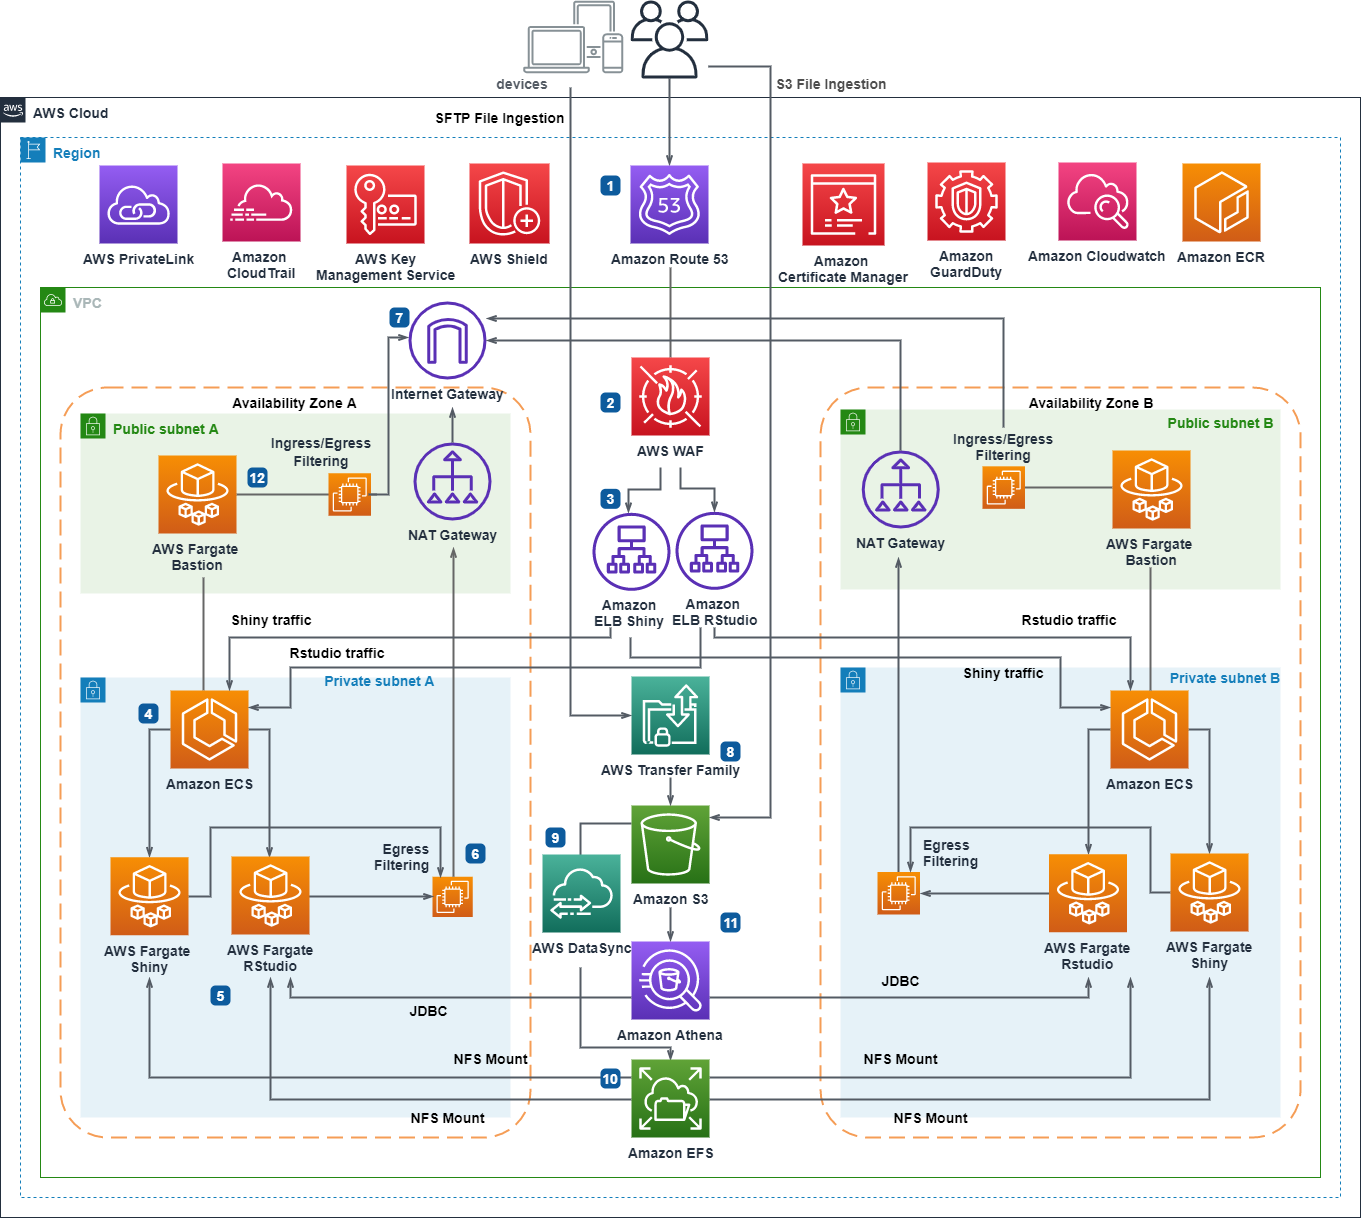
For this solution, we have the Streamlit app running on an Amazon Elastic Container Service (ECS) cluster across multiple availability zones (AZs), using AWS Fargate to manage the compute. Fargate is a serverless, pay-as-you-go compute engine that lets you focus on building apps without managing servers. Using Fargate helps reduce the undifferentiated heavy lifting that can come with building and maintaining web applications. It is also often desirable to use a Content Delivery Network (CDN) to ensure low latency for users globally by caching the content at edge locations closer to where the users are geographically located.
Let’s zoom in on the two architectures – the Streamlit App hosting architecture, and the Streamlit App deployment pipeline.
Streamlit app hosting
In the above architecture, the following flow applies:
Users access the Streamlit App using the public DNS endpoint for an Amazon CloudFront distribution.
Using an Internet Gateway (IGW), user requests are routed to a public-facing Application Load Balancer (ALB).
This ALB has target groups which map to ECS task nodes that are part of an ECS cluster running in two AZs (us-east-1a and us-east-1b in this example).
Fargate will automatically scale the underlying compute nodes in the ECS cluster based on the demand.
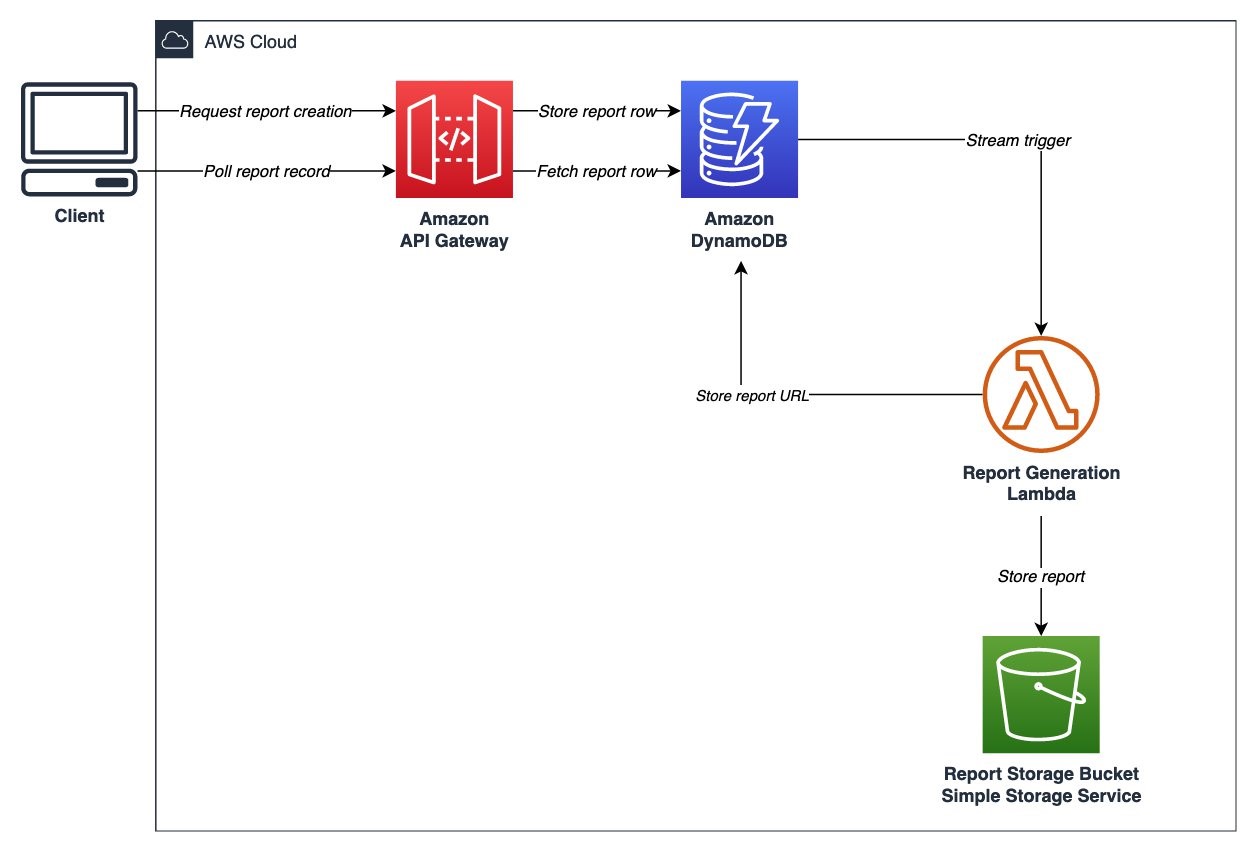
Streamlit app deployment pipeline
In the above architecture, the following flow applies:
User develops a local Streamlit App and defines the path of these assets in the module configuration, then runs terraform apply to generate a local .zip file comprised of the Streamlit App directory, and upload this to an Amazon S3 bucket (Streamlit Assets) with versioning enabled, which is configured to trigger the Streamlit CI/CD pipeline to run.
AWS CodePipeline (Streamlit CI/CD pipeline) begins running. The pipeline copies the .zip file from the Streamlit Assets S3 Bucket, stores the contents in a connected CodePipeline Artifacts S3 bucket, and passes the asset to the AWS CodeBuild project that is also part of the pipeline.
CodeBuild (Streamlit CodeBuild Project) configures a compute/build environment and fetches a Python Docker Image from a public Amazon ECR repository. CodeBuild uses Docker to build a new Streamlit App image based on what is defined in the Dockerfile within the .zip file, and pushes the new image to a private ECR repository. It tags the image with latest, an app_version (user-defined in Terraform), as well as the S3 Version ID of the .zip file and pushes the image to ECR.
ECS has a task definition that references the image in ECR based on the S3 Version ID tag which will always be a unique value, as it is generated whenever a new version of the file is created. This also serves as data lineage so versions of the Streamlit App .zip files in S3 can be linked to versions of the image stored in ECR. Once a new image is pushed to ECR (with a unique image tag), the task definition is updated and the ECS service begins a new deployment using the new version of the Streamlit App.
When a new image is pushed to ECR, the Terraform Module is configured to use the local-exec provisioner to run an AWS CLI command that creates a CloudFront invalidation. This enables users of the Streamlit app to use the new version without waiting for the time-to-live (TTL) of the cached file to expire on the edge locations (default is 24 hours). Both of these pipelines are built and packaged into a Terraform module that can be reused efficiently with only a few lines of code.
Both of these pipelines are built and packaged into a Terraform module that can be reused efficiently with only a few lines of code.
Prerequisites
This solution requires the following prerequisites:
An AWS account. If you don’t have an account, you can sign up for one.
Terraform v1.0.0 or newer installed.
python v3.8 or newer installed.
A Streamlit app. If you don’t have a Streamlit project already, you can download this app directory as a sample Streamlit app for this post and save it to a local folder.
Your folder structure will look something like this:
In the same folder where you have the your Streamlit app saved, in the above example in the terraform_streamlit_folder, you will create and initialize a new Terraform project.
In your preferred terminal, create a new file named main.tf by running the following command on Unix/Linux machines, or an equivalent command on Windows machines:
touch main.tf
Open up the main.tf file and add the following code to it:
module "serverless-streamlit-app" {
  source          = "aws-ia/serverless-streamlit-app/aws"
  app_name        = "streamlit-app"
  app_version     = "v1.1.0"
  path_to_app_dir = "./app" # Replace with path to your app
}
This code utilizes a module block with a source pointing to the Terraform module, and the appropriate input variables passed in. When Terraform encounters a module block, it loads and processes that module’s configuration files using the source. The Serverless Streamlit App Terraform module has many optional input variables. If you have existing resources, such as an existing VPC, subnets, and security groups that you’d like to reuse instead of deploying new ones, you can use the module’s input variables to reference your existing resources. However, in this post, we’re deploying all of the resources in the above architecture from scratch. Here, we simply define the source that references the module hosted in the Terraform Registry, provide an app_name that will be used as a prefix for naming your resources, the app_version that is used for tracking changes to your app, and the path_to_app_dir which is the path to the local directory where the assets for your Streamlit app are stored.
Save the file.
To initialize the Terraform working directory, run the following command in your terminal:
terraform init
The output will contain a successful message like the following:
"Terraform has been successfully initialized"
Output the CloudFront URL
To be able to easily access the Cloudfront URL of the deployed Streamlit application, you can add the URL as a Terraform output.
In your terminal, create a new file named outputs.tf by running the following command on Unix/Linux machines, or an equivalent command on Windows machines:
touch outputs.tf
Open up the outputs.tf file and add the following code to it:
output "streamlit_cloudfront_distribution_url" {
  value = module.serverless-streamlit-app.streamlit_cloudfront_distribution_url
}
Save the file. Now, your folder structure will look like:
Now you can use Terraform to deploy the resources defined in your main.tf file.
In your terminal, run the following command to apply to deploy the infrastructure. This includes the hosting for your Streamlit application using ECS and CloudFront, as well as the pipeline that is used to push updates.
terraform apply
When the apply command finishes running, you’ll see the Terraform outputs displayed in the terminal.
Navigate to the streamlit_cloudfront_distribution_url to see your Streamlit application that is hosted on AWS.
When you make changes to your Streamlit codebase, you can go ahead and re-run terraform apply to push your new changes to your cloud environment.
When updating the Streamlit codebase, the CodePipeline and CodeBuild processes kick off to automatically update your new changes, which get reflected on your Streamlit application. CodePipeline automates the entire software release process, managing stages like source retrieval, building, testing, and deployment. It integrates with AWS services and third-party tools (such as GitHub and Jenkins) to enhance automation, speed, and security. CodeBuild focuses on automating code compilation, testing, and packaging, supporting multiple languages and custom Docker environments, while integrating with CodePipeline for scalable, secure builds. With this CI/CD pipeline, when you make changes to your code, all you need to run is terraform apply to update your cloud environment. For an example buildspec, see the example in the repo.
You can find full examples of deploying the infrastructure with and without existing resources in the GitHub repository.
Clean up
When you no longer need the resources deployed in this post, you can clean up the resources by using the Terraform destroy command. Simply run terraform destroy . This will remove all of the resources you have deployed in this post with Terraform.
Conclusion
Building serverless Streamlit applications with Terraform on AWS offers a powerful combination of scalability, efficiency, and automation. As you continue to build and refine your Streamlit applications, Terraform’s flexibility ensures that your infrastructure can evolve seamlessly, supporting rapid innovation and agile development. With Streamlit and Terraform, you have the tools to create dynamic, serverless applications that scale effortlessly and operate reliably in the cloud.
Organizations often use Terraform Modules to orchestrate complex resource provisioning and provide a simple interface for developers to enter the required parameters to deploy the desired infrastructure. Modules enable code reuse and provide a method for organizations to standardize deployment of common workloads such as a three-tier web application, a cloud networking environment, or a data analytics pipeline. When building Terraform modules, it is common for the module author to start with manual testing. Manual testing is performed using commands such as terraform validate for syntax validation, terraform plan to preview the execution plan, and terraform apply followed by manual inspection of resource configuration in the AWS Management Console. Manual testing is prone to human error, not scalable, and can result in unintended issues. Because modules are used by multiple teams in the organization, it is important to ensure that any changes to the modules are extensively tested before the release. In this blog post, we will show you how to validate Terraform modules and how to automate the process using a Continuous Integration/Continuous Deployment (CI/CD) pipeline.
Terraform Test
Terraform test is a new testing framework for module authors to perform unit and integration tests for Terraform modules. Terraform test can create infrastructure as declared in the module, run validation against the infrastructure, and destroy the test resources regardless if the test passes or fails. Terraform test will also provide warnings if there are any resources that cannot be destroyed. Terraform test uses the same HashiCorp Configuration Language (HCL) syntax used to write Terraform modules. This reduces the burden for modules authors to learn other tools or programming languages. Module authors run the tests using the command terraform test which is available on Terraform CLI version 1.6 or higher.
Module authors create test files with the extension *.tftest.hcl. These test files are placed in the root of the Terraform module or in a dedicated tests directory. The following elements are typically present in a Terraform tests file:
Provider block: optional, used to override the provider configuration, such as selecting AWS region where the tests run.
Variables block: the input variables passed into the module during the test, used to supply non-default values or to override default values for variables.
Run block: used to run a specific test scenario. There can be multiple run blocks per test file, Terraform executes run blocks in order. In each run block you specify the command Terraform (plan or apply), and the test assertions. Module authors can specify the conditions such as: length(var.items) != 0. A full list of condition expressions can be found in the HashiCorp documentation.
Terraform tests are performed in sequential order and at the end of the Terraform test execution, any failed assertions are displayed.
Basic test to validate resource creation
Now that we understand the basic anatomy of a Terraform tests file, let’s create basic tests to validate the functionality of the following Terraform configuration. This Terraform configuration will create an AWS CodeCommit repository with prefix name repo-.
Now we create a Terraform test file in the tests directory. See the following directory structure as an example:
├── main.tf
└── tests
└── basic.tftest.hcl
For this first test, we will not perform any assertion except for validating that Terraform execution plan runs successfully. In the tests file, we create a variable block to set the value for the variable repository_name. We also added the run block with command = plan to instruct Terraform test to run Terraform plan. The completed test should look like the following:
# basic.tftest.hcl

variables {
  repository_name = "MyRepo"
}

run "test_resource_creation" {
  command = plan
}
Now we will run this test locally. First ensure that you are authenticated into an AWS account, and run the terraform init command in the root directory of the Terraform module. After the provider is initialized, start the test using the terraform test command.
❯ terraform test
tests/basic.tftest.hcl... in progress
run "test_resource_creation"... pass
tests/basic.tftest.hcl... tearing down
tests/basic.tftest.hcl... pass
Our first test is complete, we have validated that the Terraform configuration is valid and the resource can be provisioned successfully. Next, let’s learn how to perform inspection of the resource state.
Create resource and validate resource name
Re-using the previous test file, we add the assertion block to checks if the CodeCommit repository name starts with a string repo- and provide error message if the condition fails. For the assertion, we use the startswith function. See the following example:
# basic.tftest.hcl

variables {
  repository_name = "MyRepo"
}

run "test_resource_creation" {
  command = plan

  assert {
    condition = startswith(aws_codecommit_repository.test.repository_name, "repo-")
    error_message = "CodeCommit repository name ${var.repository_name} did not start with the expected value of ‘repo-****’."
  }
}
Now, let’s assume that another module author made changes to the module by modifying the prefix from repo- to my-repo-. Here is the modified Terraform module.
We can catch this mistake by running the the terraform test command again.
❯ terraform test
tests/basic.tftest.hcl... in progress
run "test_resource_creation"... fail
╷
│ Error: Test assertion failed
│
│ on tests/basic.tftest.hcl line 9, in run "test_resource_creation":
│ 9: condition = startswith(aws_codecommit_repository.test.repository_name, "repo-")
│ ├────────────────
│ │ aws_codecommit_repository.test.repository_name is "my-repo-MyRepo"
│
│ CodeCommit repository name MyRepo did not start with the expected value 'repo-***'.
╵
tests/basic.tftest.hcl... tearing down
tests/basic.tftest.hcl... fail

Failure! 0 passed, 1 failed.
We have successfully created a unit test using assertions that validates the resource name matches the expected value. For more examples of using assertions see the Terraform Tests Docs. Before we proceed to the next section, don’t forget to fix the repository name in the module (revert the name back to repo- instead of my-repo-) and re-run your Terraform test.
Testing variable input validation
When developing Terraform modules, it is common to use variable validation as a contract test to validate any dependencies / restrictions. For example, AWS CodeCommit limits the repository name to 100 characters. A module author can use the length function to check the length of the input variable value. We are going to use Terraform test to ensure that the variable validation works effectively. First, we modify the module to use variable validation.
# main.tf

variable "repository_name" {
  type = string
  validation {
    condition = length(var.repository_name) <= 100
    error_message = "The repository name must be less than or equal to 100 characters."
  }
}

resource "aws_codecommit_repository" "test" {
  repository_name = format("repo-%s", var.repository_name)
  description = "Test repository."
}
By default, when variable validation fails during the execution of Terraform test, the Terraform test also fails. To simulate this, create a new test file and insert the repository_name variable with a value longer than 100 characters.
# var_validation.tftest.hcl

variables {
  repository_name = “this_is_a_repository_name_longer_than_100_characters_7rfD86rGwuqhF3TH9d3Y99r7vq6JZBZJkhw5h4eGEawBntZmvy”
}

run “test_invalid_var” {
  command = plan
}
Notice on this new test file, we also set the command to Terraform plan, why is that? Because variable validation runs prior to Terraform apply, thus we can save time and cost by skipping the entire resource provisioning. If we run this Terraform test, it will fail as expected.
❯ terraform test
tests/basic.tftest.hcl… in progress
run “test_resource_creation”… pass
tests/basic.tftest.hcl… tearing down
tests/basic.tftest.hcl… pass
tests/var_validation.tftest.hcl… in progress
run “test_invalid_var”… fail
╷
│ Error: Invalid value for variable
│
│ on main.tf line 1:
│ 1: variable “repository_name” {
│ ├────────────────
│ │ var.repository_name is “this_is_a_repository_name_longer_than_100_characters_7rfD86rGwuqhF3TH9d3Y99r7vq6JZBZJkhw5h4eGEawBntZmvy”
│
│ The repository name must be less than or equal to 100 characters.
│
│ This was checked by the validation rule at main.tf:3,3-13.
╵
tests/var_validation.tftest.hcl… tearing down
tests/var_validation.tftest.hcl… fail

Failure! 1 passed, 1 failed.
For other module authors who might iterate on the module, we need to ensure that the validation condition is correct and will catch any problems with input values. In other words, we expect the validation condition to fail with the wrong input. This is especially important when we want to incorporate the contract test in a CI/CD pipeline. To prevent our test from failing due introducing an intentional error in the test, we can use the expect_failures attribute. Here is the modified test file:
# var_validation.tftest.hcl

variables {
  repository_name = “this_is_a_repository_name_longer_than_100_characters_7rfD86rGwuqhF3TH9d3Y99r7vq6JZBZJkhw5h4eGEawBntZmvy”
}

run “test_invalid_var” {
  command = plan

  expect_failures = [
    var.repository_name
  ]
}
Now if we run the Terraform test, we will get a successful result.
❯ terraform test
tests/basic.tftest.hcl… in progress
run “test_resource_creation”… pass
tests/basic.tftest.hcl… tearing down
tests/basic.tftest.hcl… pass
tests/var_validation.tftest.hcl… in progress
run “test_invalid_var”… pass
tests/var_validation.tftest.hcl… tearing down
tests/var_validation.tftest.hcl… pass

Success! 2 passed, 0 failed.
As you can see, the expect_failures attribute is used to test negative paths (the inputs that would cause failures when passed into a module). Assertions tend to focus on positive paths (the ideal inputs). For an additional example of a test that validates functionality of a completed module with multiple interconnected resources, see this example in the Terraform CI/CD and Testing on AWS Workshop.
Orchestrating supporting resources
In practice, end-users utilize Terraform modules in conjunction with other supporting resources. For example, a CodeCommit repository is usually encrypted using an AWS Key Management Service (KMS) key. The KMS key is provided by end-users to the module using a variable called kms_key_id. To simulate this test, we need to orchestrate the creation of the KMS key outside of the module. In this section we will learn how to do that. First, update the Terraform module to add the optional variable for the KMS key.
# main.tf

variable "repository_name" {
  type = string
  validation {
    condition = length(var.repository_name) <= 100
    error_message = "The repository name must be less than or equal to 100 characters."
  }
}

variable "kms_key_id" {
  type = string
  default = ""
}

resource "aws_codecommit_repository" "test" {
  repository_name = format("repo-%s", var.repository_name)
  description = "Test repository."
  kms_key_id = var.kms_key_id != "" ? var.kms_key_id : null
}
In a Terraform test, you can instruct the run block to execute another helper module. The helper module is used by the test to create the supporting resources. We will create a sub-directory called setup under the tests directory with a single kms.tf file. We also create a new test file for KMS scenario. See the updated directory structure:
The new test will use two separate run blocks. The first run block (setup) executes the helper module to generate a KMS key. This is done by assigning the command apply which will run terraform apply to generate the KMS key. The second run block (codecommit_with_kms) will then use the KMS key ARN output of the first run as the input variable passed to the main module.
# with_kms.tftest.hcl

run "setup" {
  command = apply
  module {
    source = "./tests/setup"
  }
}

run "codecommit_with_kms" {
  command = apply

  variables {
    repository_name = "MyRepo"
    kms_key_id = run.setup.kms_key_id
  }

  assert {
    condition = aws_codecommit_repository.test.kms_key_id != null
    error_message = "KMS key ID attribute value is null"
  }
}
Go ahead and run the Terraform init, followed by Terraform test. You should get the successful result like below.
❯ terraform test
tests/basic.tftest.hcl... in progress
run "test_resource_creation"... pass
tests/basic.tftest.hcl... tearing down
tests/basic.tftest.hcl... pass
tests/var_validation.tftest.hcl... in progress
run "test_invalid_var"... pass
tests/var_validation.tftest.hcl... tearing down
tests/var_validation.tftest.hcl... pass
tests/with_kms.tftest.hcl... in progress
run "create_kms_key"... pass
run "codecommit_with_kms"... pass
tests/with_kms.tftest.hcl... tearing down
tests/with_kms.tftest.hcl... pass

Success! 4 passed, 0 failed.
We have learned how to run Terraform test and develop various test scenarios. In the next section we will see how to incorporate all the tests into a CI/CD pipeline.
Terraform Tests in CI/CD Pipelines
Now that we have seen how Terraform Test works locally, let’s see how the Terraform test can be leveraged to create a Terraform module validation pipeline on AWS. The following AWS services are used:
AWS CodeCommit – a secure, highly scalable, fully managed source control service that hosts private Git repositories.
AWS CodeBuild – a fully managed continuous integration service that compiles source code, runs tests, and produces ready-to-deploy software packages.
AWS CodePipeline – a fully managed continuous delivery service that helps you automate your release pipelines for fast and reliable application and infrastructure updates.
In the above architecture for a Terraform module validation pipeline, the following takes place:
A developer pushes Terraform module configuration files to a git repository (AWS CodeCommit).
AWS CodePipeline begins running the pipeline. The pipeline clones the git repo and stores the artifacts to an Amazon S3 bucket.
An AWS CodeBuild project configures a compute/build environment with Checkov installed from an image fetched from Docker Hub. CodePipeline passes the artifacts (Terraform module) and CodeBuild executes Checkov to run static analysis of the Terraform configuration files.
Another CodeBuild project configured with Terraform from an image fetched from Docker Hub. CodePipeline passes the artifacts (repo contents) and CodeBuild runs Terraform command to execute the tests.
CodeBuild uses a buildspec file to declare the build commands and relevant settings. Here is an example of the buildspec files for both CodeBuild Projects:
In the above buildspec, Checkov is run against the root directory of the cloned CodeCommit repository. This directory contains the configuration files for the Terraform module. Checkov also saves the output to a file named checkov.result.txt for further review or handling if needed. If Checkov fails, the pipeline will fail.
# Terraform Test
version: 0.1
phases:
  pre_build:
    commands:
      - terraform init
      - terraform validate

  build:
    commands:
      - terraform test
In the above buildspec, the terraform init and terraform validate commands are used to initialize Terraform, then check if the configuration is valid. Finally, the terraform test command is used to run the configured tests. If any of the Terraform tests fails, the pipeline will fail.
For a full example of the CI/CD pipeline configuration, please refer to the Terraform CI/CD and Testing on AWS workshop. The module validation pipeline mentioned above is meant as a starting point. In a production environment, you might want to customize it further by adding Checkov allow-list rules, linting, checks for Terraform docs, or pre-requisites such as building the code used in AWS Lambda.
Choosing various testing strategies
At this point you may be wondering when you should use Terraform tests or other tools such as Preconditions and Postconditions, Check blocks or policy as code. The answer depends on your test type and use-cases. Terraform test is suitable for unit tests, such as validating resources are created according to the naming specification. Variable validations and Pre/Post conditions are useful for contract tests of Terraform modules, for example by providing error warning when input variables value do not meet the specification. As shown in the previous section, you can also use Terraform test to ensure your contract tests are running properly. Terraform test is also suitable for integration tests where you need to create supporting resources to properly test the module functionality. Lastly, Check blocks are suitable for end to end tests where you want to validate the infrastructure state after all resources are generated, for example to test if a website is running after an S3 bucket configured for static web hosting is created.
When developing Terraform modules, you can run Terraform test in command = plan mode for unit and contract tests. This allows the unit and contract tests to run quicker and cheaper since there are no resources created. You should also consider the time and cost to execute Terraform test for complex / large Terraform configurations, especially if you have multiple test scenarios. Terraform test maintains one or many state files within the memory for each test file. Consider how to re-use the module’s state when appropriate. Terraform test also provides test mocking, which allows you to test your module without creating the real infrastructure.
Conclusion
In this post, you learned how to use Terraform test and develop various test scenarios. You also learned how to incorporate Terraform test in a CI/CD pipeline. Lastly, we also discussed various testing strategies for Terraform configurations and modules. For more information about Terraform test, we recommend the Terraform test documentation and tutorial. To get hands on practice building a Terraform module validation pipeline and Terraform deployment pipeline, check out the Terraform CI/CD and Testing on AWS Workshop.
An AWS Identity and Access Management (IAM) role is an IAM identity that you create in your AWS account that has specific permissions. An IAM role is similar to an IAM user because it’s an AWS identity with permission policies that determine what the identity can and cannot do on AWS. However, as outlined in security best practices in IAM, AWS recommends that you use IAM roles instead of IAM users. An IAM user is uniquely associated with one person, while a role is intended to be assumable by anyone who needs it. An IAM role doesn’t have standard long-term credentials such as a password or access keys associated with it. Instead, when you assume a role, it provides you with temporary security credentials for your role session that are only valid for certain period of time.
This blog post explores the effective implementation of security controls within IAM roles, placing a specific focus on the IAM role’s path feature. By organizing IAM roles hierarchically using paths, you can address key challenges and achieve practical solutions to enhance IAM role management.
Benefits of using IAM paths
A fundamental benefit of using paths is the establishment of a clear and organized organizational structure. By using paths, you can handle diverse use cases while creating a well-defined framework for organizing roles on AWS. This organizational clarity can help you navigate complex IAM setups and establish a cohesive structure that’s aligned with your organizational needs.
Furthermore, by enforcing a specific structure, you can gain precise control over the scope of permissions assigned to roles, helping to reduce the risk of accidental assignment of overly permissive policies. By assisting in preventing inadvertent policy misconfigurations and assisting in coordinating permissions with the planned organizational structure, this proactive solution improves security. This approach is highly effective when you consistently apply established naming conventions to paths, role names, and policies. Enforcing a uniform approach to role naming enhances the standardization and efficiency of IAM role management. This practice fosters smooth collaboration and reduces the risk of naming conflicts.
Path example
In IAM, a role path is a way to organize and group IAM roles within your AWS account. You specify the role path as part of the role’s Amazon Resource Name (ARN).
As an example, imagine that you have a group of IAM roles related to development teams, and you want to organize them under a path. You might structure it like this:
Role name: Dev App1 admin Role path: /D1/app1/admin/ Full ARN: arn:aws:iam::123456789012:role/D1/app1/admin/DevApp1admin
Role name: Dev App2 admin Role path: /D2/app2/admin/ Full ARN: arn:aws:iam::123456789012:role/D2/app2/admin/DevApp2admin
In this example, the IAM roles DevApp1admin and DevApp2admin are organized under two different development team paths: D1/app1/admin and D2/app2/admin, respectively. The role path provides a way to group roles logically, making it simpler to manage and understand their purpose within the context of your organization.
Solution overview
Figure 1: Sample architecture
The sample architecture in Figure 1 shows how you can separate and categorize the enterprise roles and development team roles into a hierarchy model by using a path in an IAM role. Using this hierarchy model, you can enable several security controls at the level of the service control policy (SCP), IAM policy, permissions boundary, or the pipeline. I recommend that you avoid incorporating business unit names in paths because they could change over time.
Here is what the IAM role path looks like as an ARN:
In this example, in the resource name, /EnT/iam/adm/ is the role path, and IAMAdmin is the role name.
You can now use the role path as part of a policy, such as the following:
arn:aws:iam::123456789012:role/EnT/iam/adm/*
In this example, in the resource name, /EnT/iam/adm/ is the role path, and * indicates any IAM role inside this path.
Walkthrough of examples for preventative controls
Now let’s walk through some example use cases and SCPs for a preventative control that you can use based on the path of an IAM role.
PassRole preventative control example
The following SCP denies passing a role for enterprise roles, except for roles that are part of the IAM admin hierarchy within the overall enterprise hierarchy.
With just a couple of statements in the SCP, this preventative control helps provide protection to your high-privilege roles for enterprise roles, regardless of the role’s name or current status.
This example uses the following paths:
/EnT/ — enterprise roles (roles owned by the central teams, such as cloud center of excellence, central security, and networking teams)
/fed/ — federated roles, which have interactive access
/iam/ — roles that are allowed to perform IAM actions, such as CreateRole, AttachPolicy, or DeleteRole
IAM actions preventative control example
The following SCP restricts IAM actions, including CreateRole, DeleteRole, AttachRolePolicy, and DetachRolePolicy, on the enterprise path.
This preventative control denies an IAM role that is outside of the enterprise hierarchy from performing the actions CreateRole, DeleteRole, DetachRolePolicy, and AttachRolePolicy in this hierarchy. Every IAM role will be denied those API actions except the one with the path as arn:aws:iam::*:role/EnT/fed/iam/*
The example uses the following paths:
/EnT/ — enterprise roles (roles owned by the central teams, such as cloud center of excellence, central security, or network automation teams)
/fed/ — federated roles, which have interactive access
/iam/ — roles that are allowed to perform IAM actions (in this case, CreateRole, DeteleRole, DetachRolePolicy, and AttachRolePolicy)
IAM policies preventative control example
The following SCP policy denies attaching certain high-privilege AWS managed policies such as AdministratorAccess outside of certain IAM admin roles. This is especially important in an environment where business units have self-service capabilities.
The following SCP doesn’t allow non-production roles to assume a role in production accounts. Make sure to replace <Your production OU ID> and <your org ID> with your own information.
This example uses the /np/ path, which specifies non-production roles. The SCP denies non-production IAM roles from assuming a role in the production organizational unit (OU) (in our example, this is represented by “<your org ID>/r-xxxx/<Your production OU ID>/*”). Depending on the structure of your organization, the ResourceOrgPaths will have one of the following formats:
Walkthrough of examples for monitoring IAM roles (detective control)
Now let’s walk through two examples of detective controls.
AssumeRole in CloudTrail Lake
The following is an example of a detective control to monitor IAM roles in AWS CloudTrail Lake.
SELECT
    userIdentity.arn as "Username", eventTime, eventSource, eventName, sourceIPAddress, errorCode, errorMessage
FROM
    <Event data store ID>
WHERE
    userIdentity.arn IS NOT NULL
    AND eventName = 'AssumeRole'
    AND userIdentity.arn LIKE '%/np/%'
    AND errorCode = 'AccessDenied'
    AND eventTime > '2023-07-01 14:00:00'
    AND eventTime < '2023-11-08 18:00:00';
This query lists out AssumeRole events for non-production roles in the organization for AccessDenied errors. The output is stored in an Amazon Simple Storage Service (Amazon S3) bucket from CloudTrail Lake, from which the csv file can be downloaded. The following shows some example output:
Username,eventTime,eventSource,eventName,sourceIPAddress,errorCode,errorMessage arn:aws:sts::123456789012:assumed-role/np/test,2023-12-09 10:35:45.000,iam.amazonaws.com,AssumeRole,11.11.113.113,AccessDenied,User: arn:aws:sts::123456789012:assumed-role/np/test is not authorized to perform: sts:AssumeRole on resource: arn:aws:iam::123456789012:role/hello because no identity-based policy allows the sts:AssumeRole action
You can modify the query to audit production roles as well.
CreateRole in CloudTrail Lake
Another example of a CloudTrail Lake query for a detective control is as follows:
SELECT
    userIdentity.arn as "Username", eventTime, eventSource, eventName, sourceIPAddress, errorCode, errorMessage
FROM
    <Event data store ID>
WHERE
    userIdentity.arn IS NOT NULL
    AND eventName = 'CreateRole'
    AND userIdentity.arn LIKE '%/EnT/fed/iam/%'
    AND eventTime > '2023-07-01 14:00:00'
    AND eventTime < '2023-11-08 18:00:00';
This query lists out CreateRole events for roles in the /EnT/fed/iam/ hierarchy. The following are some example outputs:
arn:aws:sts::123456789012:assumed-role/EnT/fed/iam/security/test,2023-12-09 16:31:11.000,iam.amazonaws.com,CreateRole,10.10.10.10,AccessDenied,User: arn:aws:sts::123456789012:assumed-role/EnT/fed/iam/security/test is not authorized to perform: iam:CreateRole on resource: arn:aws:iam::123456789012:role/EnT/fed/iam/security because no identity-based policy allows the iam:CreateRole action
arn:aws:sts::123456789012:assumed-role/EnT/fed/iam/security/test,2023-12-09 16:33:10.000,iam.amazonaws.com,CreateRole,10.10.10.10,AccessDenied,User: arn:aws:sts::123456789012:assumed-role/EnT/fed/iam/security/test is not authorized to perform: iam:CreateRole on resource: arn:aws:iam::123456789012:role/EnT/fed/iam/security because no identity-based policy allows the iam:CreateRole action
Because these roles can create additional enterprise roles, you should audit roles created in this hierarchy.
Important considerations
When you implement specific paths for IAM roles, make sure to consider the following:
The path of an IAM role is part of the ARN. After you define the ARN, you can’t change it later. Therefore, just like the name of the role, consider what the path should be during the early discussions of design.
IAM roles can’t have the same name, even on different paths.
When you switch roles through the console, you need to include the path because it’s part of the role’s ARN.
The role name can’t exceed 64 characters. If you intend to use a role with the Switch Role feature in the AWS Management Console, then the combined path and role name can’t exceed 64 characters.
When you create a role through the console, you can’t set an IAM role path. To set a path for the role, you need to use automation, such as AWS Command Line Interface (AWS CLI) commands or SDKs. For example, you might use an AWS CloudFormation template or a script that interacts with AWS APIs to create the role with the desired path.
Conclusion
By adopting the path strategy, you can structure IAM roles within a hierarchical model, facilitating the implementation of security controls on a scalable level. You can make these controls effective for IAM roles by applying them to a path rather than specific roles, which sets this approach apart.
This strategy can help you elevate your overall security posture within IAM, offering a forward-looking solution for enterprises. By establishing a scalable IAM hierarchy, you can help your organization navigate dynamic changes through a robust identity management structure. A well-crafted hierarchy reduces operational overhead by providing a versatile framework that makes it simpler to add or modify roles and policies. This scalability can help streamline the administration of IAM and help your organization manage access control in evolving environments.
If you have feedback about this post, submit comments in the Comments section below. If you have questions about this post, start a new thread on the AWS Security, Identity, & Compliance re:Post or contact AWS Support.
Want more AWS Security news? Follow us on Twitter.
November 14, 2023: We’ve updated this post to use IAM Identity Center and follow updated IAM best practices.
In this post, we discuss the concept of folders in Amazon Simple Storage Service (Amazon S3) and how to use policies to restrict access to these folders. The idea is that by properly managing permissions, you can allow federated users to have full access to their respective folders and no access to the rest of the folders.
Overview
Imagine you have a team of developers named Adele, Bob, and David. Each of them has a dedicated folder in a shared S3 bucket, and they should only have access to their respective folders. These users are authenticated through AWS IAM Identity Center (successor to AWS Single Sign-On).
In this post, you’ll focus on David. You’ll walk through the process of setting up these permissions for David using IAM Identity Center and Amazon S3. Before you get started, let’s first discuss what is meant by folders in Amazon S3, because it’s not as straightforward as it might seem. To learn how to create a policy with folder-level permissions, you’ll walk through a scenario similar to what many people have done on existing files shares, where every IAM Identity Center user has access to only their own home folder. With folder-level permissions, you can granularly control who has access to which objects in a specific bucket.
You’ll be shown a policy that grants IAM Identity Center users access to the same Amazon S3 bucket so that they can use the AWS Management Console to store their information. The policy allows users in the company to upload or download files from their department’s folder, but not to access any other department’s folder in the bucket.
After the policy is explained, you’ll see how to create an individual policy for each IAM Identity Center user.
Throughout the rest of this post, you will use a policy, which will be associated with an IAM Identity Center user named David. Also, you must have already created an S3 bucket.
Note: S3 buckets have a global namespace and you must change the bucket name to a unique name.
For this blog post, you will need an S3 bucket with the following structure (the example bucket name for the rest of the blog is “my-new-company-123456789”):
Figure 1: Screenshot of the root of the my-new-company-123456789 bucket
Your S3 bucket structure should have two folders, home and confidential, with a file root-file.txt in the main bucket directory. Inside confidential you will have no items or folders. Inside home there should be three sub-folders: Adele, Bob, and David.
Figure 2: Screenshot of the home/ directory of the my-new-company-123456789 bucket
A brief lesson about Amazon S3 objects
Before explaining the policy, it’s important to review how Amazon S3 objects are named. This brief description isn’t comprehensive, but will help you understand how the policy works. If you already know about Amazon S3 objects and prefixes, skip ahead to Creating David in Identity Center.
Amazon S3 stores data in a flat structure; you create a bucket, and the bucket stores objects. S3 doesn’t have a hierarchy of sub-buckets or folders; however, tools like the console can emulate a folder hierarchy to present folders in a bucket by using the names of objects (also known as keys). When you create a folder in S3, S3 creates a 0-byte object with a key that references the folder name that you provided. For example, if you create a folder named photos in your bucket, the S3 console creates a 0-byte object with the key photos/. The console creates this object to support the idea of folders. The S3 console treats all objects that have a forward slash (/) character as the last (trailing) character in the key name as a folder (for example, examplekeyname/)
To give you an example, for an object that’s named home/common/shared.txt, the console will show the shared.txt file in the common folder in the home folder. The names of these folders (such as home/ or home/common/) are called prefixes, and prefixes like these are what you use to specify David’s department folder in his policy. By the way, the slash (/) in a prefix like home/ isn’t a reserved character — you could name an object (using the Amazon S3 API) with prefixes such as home:common:shared.txt or home-common-shared.txt. However, the convention is to use a slash as the delimiter, and the Amazon S3 console (but not S3 itself) treats the slash as a special character for showing objects in folders. For more information on organizing objects in the S3 console using folders, see Organizing objects in the Amazon S3 console by using folders.
Creating David in Identity Center
IAM Identity Center helps you securely create or connect your workforce identities and manage their access centrally across AWS accounts and applications. Identity Center is the recommended approach for workforce authentication and authorization on AWS for organizations of any size and type. Using Identity Center, you can create and manage user identities in AWS, or connect your existing identity source, including Microsoft Active Directory, Okta, Ping Identity, JumpCloud, Google Workspace, and Azure Active Directory (Azure AD). For further reading on IAM Identity Center, see the Identity Center getting started page.
Begin by setting up David as an IAM Identity Center user. To start, open the AWS Management Console and go to IAM Identity Center and create a user.
Note: The following steps are for Identity Center without System for Cross-domain Identity Management (SCIM) turned on, the add user option won’t be available if SCIM is turned on.
From the left pane of the Identity Center console, select Users, and then choose Add user.
Figure 3: Screenshot of IAM Identity Center Users page.
Enter David as the Username, enter an email address that you have access to as you will need this later to confirm your user, and then enter a First name, Last name, and Display name.
Leave the rest as default and choose Add user.
Select Users from the left navigation pane and verify you’ve created the user David.
Figure 4: Screenshot of adding users to group in Identity Center.
Now that you’re verified the user David has been created, use the left pane to navigate to Permission sets, then choose Create permission set.
Figure 5: Screenshot of permission sets in Identity Center.
Select Custom permission set as your Permission set type, then choose Next.
Figure 6: Screenshot of permission set types in Identity Center.
David’s policy
This is David’s complete policy, which will be associated with an IAM Identity Center federated user named David by using the console. This policy grants David full console access to only his folder (/home/David) and no one else’s. While you could grant each user access to their own bucket, keep in mind that an AWS account can have up to 100 buckets by default. By creating home folders and granting the appropriate permissions, you can instead allow thousands of users to share a single bucket.
Now, copy and paste the preceding IAM Policy into the inline policy editor. In this case, you use the JSON editor. For information on creating policies, see Creating IAM policies.
Figure 7: Screenshot of the inline policy inside the permissions set in Identity Center.
Give your permission set a name and a description, then leave the rest at the default settings and choose Next.
Verify that you modify the policies to have the bucket name you created earlier.
After your permission set has been created, navigate to AWS accounts on the left navigation pane, then select Assign users or groups.
Figure 8: Screenshot of the AWS accounts in Identity Center.
Select the user David and choose Next.
Figure 9: Screenshot of the AWS accounts in Identity Center.
Select the permission set you created earlier, choose Next, leave the rest at the default settings and choose Submit.
Figure 10: Screenshot of the permission sets in Identity Center.
You’ve now created and attached the permissions required for David to view his S3 bucket folder, but not to view the objects in other users’ folders. You can verify this by signing in as David through the AWS access portal.
Figure 11: Screenshot of the settings summary in Identity Center.
Navigate to the dashboard in IAM Identity Center and go to the Settings summary, then choose the AWS access portal URL.
Figure 12: Screenshot of David signing into the console via the Identity Center dashboard URL.
Sign in as the user David with the one-time password you received earlier when creating David.
Figure 13: Second screenshot of David signing into the console through the Identity Center dashboard URL.
Open the Amazon S3 console.
Search for the bucket you created earlier.
Figure 14: Screenshot of my-new-company-123456789 bucket in the AWS console.
Navigate to David’s folder and verify that you have read and write access to the folder. If you navigate to other users’ folders, you’ll find that you don’t have access to the objects inside their folders.
David’s policy consists of four blocks; let’s look at each individually.
Before you begin identifying the specific folders David can have access to, you must give him two permissions that are required for Amazon S3 console access: ListAllMyBuckets and GetBucketLocation.
The ListAllMyBuckets action grants David permission to list all the buckets in the AWS account, which is required for navigating to buckets in the Amazon S3 console (and as an aside, you currently can’t selectively filter out certain buckets, so users must have permission to list all buckets for console access). The console also does a GetBucketLocation call when users initially navigate to the Amazon S3 console, which is why David also requires permission for that action. Without these two actions, David will get an access denied error in the console.
Block 2: Allow listing objects in root and home folders
Although David should have access to only his home folder, he requires additional permissions so that he can navigate to his folder in the Amazon S3 console. David needs permission to list objects at the root level of the my-new-company-123456789 bucket and to the home/ folder. The following policy grants these permissions to David:
Without the ListBucket permission, David can’t navigate to his folder because he won’t have permissions to view the contents of the root and home folders. When David tries to use the console to view the contents of the my-new-company-123456789 bucket, the console will return an access denied error. Although this policy grants David permission to list all objects in the root and home folders, he won’t be able to view the contents of any files or folders except his own (you specify these permissions in the next block).
This block includes conditions, which let you limit under what conditions a request to AWS is valid. In this case, David can list objects in the my-new-company-123456789 bucket only when he requests objects without a prefix (objects at the root level) and objects with the home/ prefix (objects in the home folder). If David tries to navigate to other folders, such as confidential/, David is denied access. Additionally, David needs permissions to list prefix home/David to be able to use the search functionality of the console instead of scrolling down the list of users’ folders.
To set these root and home folder permissions, I used two conditions: s3:prefix and s3:delimiter. The s3:prefix condition specifies the folders that David has ListBucket permissions for. For example, David can list the following files and folders in the my-new-company-123456789 bucket:
But David cannot list files or subfolders in the confidential/, home/Adele, or home/Bob folders.
Although the s3:delimiter condition isn’t required for console access, it’s still a good practice to include it in case David makes requests by using the API. As previously noted, the delimiter is a character—such as a slash (/)—that identifies the folder that an object is in. The delimiter is useful when you want to list objects as if they were in a file system. For example, let’s assume the my-new-company-123456789 bucket stored thousands of objects. If David includes the delimiter in his requests, he can limit the number of returned objects to just the names of files and subfolders in the folder he specified. Without the delimiter, in addition to every file in the folder he specified, David would get a list of all files in any subfolders.
Block 3: Allow listing objects in David’s folder
In addition to the root and home folders, David requires access to all objects in the home/David/ folder and any subfolders that he might create. Here’s a policy that allows this:
In the condition above, you use a StringLike expression in combination with the asterisk (*) to represent an object in David’s folder, where the asterisk acts as a wildcard. That way, David can list files and folders in his folder (home/David/). You couldn’t include this condition in the previous block (AllowRootAndHomeListingOfCompanyBucket) because it used the StringEquals expression, which would interpret the asterisk (*) as an asterisk, not as a wildcard.
In the next section, the AllowAllS3ActionsInUserFolder block, you’ll see that the Resource element specifies my-new-company/home/David/*, which looks like the condition that I specified in this section. You might think that you can similarly use the Resource element to specify David’s folder in this block. However, the ListBucket action is a bucket-level operation, meaning the Resource element for the ListBucket action applies only to bucket names and doesn’t take folder names into account. So, to limit actions at the object level (files and folders), you must use conditions.
Block 4: Allow all Amazon S3 actions in David’s folder
Finally, you specify David’s actions (such as read, write, and delete permissions) and limit them to just his home folder, as shown in the following policy:
For the Action element, you specified s3:*, which means David has permission to do all Amazon S3 actions. In the Resource element, you specified David’s folder with an asterisk (*) (a wildcard) so that David can perform actions on the folder and inside the folder. For example, David has permission to change his folder’s storage class. David also has permission to upload files, delete files, and create subfolders in his folder (perform actions in the folder).
An easier way to manage policies with policy variables
In David’s folder-level policy you specified David’s home folder. If you wanted a similar policy for users like Bob and Adele, you’d have to create separate policies that specify their home folders. Instead of creating individual policies for each IAM Identity Center user, you can use policy variables and create a single policy that applies to multiple users (a group policy). Policy variables act as placeholders. When you make a request to a service in AWS, the placeholder is replaced by a value from the request when the policy is evaluated.
For example, you can use the previous policy and replace David’s user name with a variable that uses the requester’s user name through attributes and PrincipalTag as shown in the following policy (copy this policy to use in the procedure that follows):
To implement this policy with variables, begin by opening the IAM Identity Center console using the main AWS admin account (ensuring you’re not signed in as David).
Select Settings on the left-hand side, then select the Attributes for access control tab.
Figure 15: Screenshot of Settings inside Identity Center.
Create a new attribute for access control, entering userName as the Key and ${path:userName} as the Value, then choose Save changes. This will add a session tag to your Identity Center user and allow you to use that tag in an IAM policy.
Figure 16: Screenshot of managing attributes inside Identity Center settings.
To edit David’s permissions, go back to the IAM Identity Center console and select Permission sets.
Figure 17: Screenshot of permission sets inside Identity Center with Davids-Permissions selected.
Select David’s permission set that you created previously.
Select Inline policy and then choose Edit to update David’s policy by replacing it with the modified policy that you copied at the beginning of this section, which will resolve to David’s username.
Figure 18: Screenshot of David’s policy inside his permission set inside Identity Center.
You can validate that this is set up correctly by signing in to David’s user through the Identity Center dashboard as you did before and verifying you have access to the David folder and not the Bob or Adele folder.
Figure 19: Screenshot of David’s S3 folder with access to a .jpg file inside.
Whenever a user makes a request to AWS, the variable is replaced by the user name of whoever made the request. For example, when David makes a request, ${aws:PrincipalTag/userName} resolves to David; when Adele makes the request, ${aws:PrincipalTag/userName} resolves to Adele.
It’s important to note that, if this is the route you use to grant access, you must control and limit who can set this username tag on an IAM principal. Anyone who can set this tag can effectively read/write to any of these bucket prefixes. It’s important that you limit access and protect the bucket prefixes and who can set the tags. For more information, see What is ABAC for AWS, and the Attribute-based access control User Guide.
Conclusion
By using Amazon S3 folders, you can follow the principle of least privilege and verify that the right users have access to what they need, and only to what they need.
See the following example policy that only allows API access to the buckets, and only allows for adding, deleting, restoring, and listing objects inside the folders:
The AWS Architecture Center provides new and notable reference architecture diagrams, vetted architecture solutions, AWS Well-Architected best practices, whitepapers, and more. This blog post features some of our best picks from November’s new and updated content.
This new Lens specifies best practices for the unique characteristics of building and operating games in the cloud, based on our experience working with game developers and publishers around the world. It provides guidance on how to design and operate your environment so that it is cost-optimized and scalable for fluctuations in global player demand. This Lens also provides guidance for securing your game infrastructure and tuning performance in order to deliver a positive player experience.
GameLift with Serverless backend reference architecture diagram
Another new Lens is aimed at SAP technology architects, cloud architects, and others who build, operate, and maintain SAP systems on AWS. This lens provides insights that AWS has gathered from customers, AWS Partners, and our SAP specialist community. You will learn how to adopt a cloud-native approach when running SAP software including SAP Business Suite, SAP S/4HANA, and supporting products. Use it to evaluate SAP on AWS workloads before, during, and after implementation.
The AWS Well-Architected Data Analytics Lens is a collection of customer-proven best practices for designing analytics workloads. The newly updated Lens contains insights that AWS has gathered from real-world case studies, and helps you learn the key design elements of analytics workloads along with recommendations for improvement. The document cover 6 scenarios that are common in many analytics applications, including modern data architecture, batch data processing, and data visualization.
What does it mean to build a highly available workload? How do you measure availability? What can I do to increase my workload’s availability? This new whitepaper will help you answer these questions for workloads operating on complex, distributed systems both in the cloud and on-premises. It outlines a common understanding for availability as a measure of resilience, establishes rules for building highly available workloads, and offers guidance on how to improve workload availability.
This Solutions Implementation provides automated video content transcription, subtitling and translation. It helps you create accurate, multi-language subtitles for video-on-demand (VOD) content, which can help all customers better understand the content. However, localizing (translating) video subtitles is both complex and labor-intensive. Learn how AWS artificial intelligence (AI) services can assist with the subtitle creation process to save manual time spent transcribing, subtitling, translating, and reviewing media assets.
The AWS Architecture Center provides new and notable reference architecture diagrams, vetted architecture solutions, AWS Well-Architected best practices, whitepapers, and more. This blog post features some of our best picks from the new and newly updated content we released in the past month.
The security aspects of additional AWS edge services that you can use to secure your edge environments or expand operations into new, previously unsupported environments
Machine learning (ML) algorithms discover and learn patterns in data and construct mathematical models to enable predictions on future data. ML solutions can revolutionize lives through better diagnosis of diseases, environment protection, products and services transformation, and more.
This newly updated whitepaper provides you with established cloud- and technology-agnostic best practices. Apply these architectural principles when designing your ML workloads or after workloads have entered production as part of continuous improvement.
In this newly published Lens, learn how Well-Architected best practices can help you design, deliver, and maintain streaming media workloads. The Lens defines components, explores common workload scenarios, and outlines design principles that help you apply the Well-Architected Framework. Dive deeper into how each scenario affects the architecture of your workload and evaluate the technology architecture that best meets your needs.
Boost your customer engagement by providing up-to-date product recommendations, personalized product re-rankings, and customized direct marketing. This new Solutions Implementation helps you provide real-time, curated experiences across multiple channels using Amazon Personalize. The implementation automates the entire lifecycle of a personalization workload, presenting the results in an Amazon CloudWatch dashboard.
Alexa, what does a QnABot do? This new Solutions Implementation dives deep on AWS QnABot, a multi-channel, multi-language conversational interface (chatbot) that responds to customer’s questions, answers, and feedback. Learn how to deploy QnABot across channels such as chat, voice, SMS, and Amazon Alexa, implementing the newest ML technologies to enhance the customer experience and build more efficient communications.
Field Notes is a series of posts within the Architecture Blog that provides hands-on technical guidance from AWS Solutions Architects, consultants, and technical account managers based on their experiences in the field solving real-world business problems for customers.
A big thank you to you, our readers, for spending time on our blog this past quarter. Of course, we wouldn’t have content for you to read without our hard-working AWS Solutions Architects and other blog post writers either, so thank you to them as well! Without further ado, the following five posts were the top Architecture Blog and Field Notes blog posts published in Q3 (July through September 2021).
In this blog post, Jeff and Gilles-Kuessan guide you through selecting the right virtual private connection (VPC) endpoint type to access Amazon Simple Storage Service (Amazon S3). A VPC endpoint allows workloads in an Amazon Virtual Private Cloud (Amazon VPC) to connect to supported public AWS services or third-party applications over the AWS network.
You want a straightforward way to use VPC endpoints and endpoint policies for all Regions uniformly and consistently. In this post, Michael shows you how Route 53 Resolver solves this challenge using DNS. This solution ensures that requests to AWS services that support VPC endpoints stay within the VPC network, regardless of their Region.
The number of ecommerce vendors is growing globally, and these vendors often handle large traffic at different times of the day and on different days of the year. This, in addition to building, managing, and maintaining IT infrastructure on-premises data centers can present challenges to businesses’ scalability and growth. In this blog post, Senthil and Ajit provide you a Serverless on AWS solution that offloads the undifferentiated heavy lifting of managing resources and ensures your business’ architecture can handle peak traffic.
by Irfan Saleem, Pallavi Nargund, and Peter Buonora
In this blog post, Irfan, Pallavi, and Peter discuss a couple of customer use cases that use Serverless on AWS offerings to maintain a cache close to the microservices layer. This improves performance by reducing or eliminating the need for the real-time backend calls and by reducing latency and service-to-service communication.
With over 35,000 views and rising, this post is vastly outpacing all other contenders this quarter. In this post, Birender, Sebastian, and Dennis discuss how data transfer charges are often overlooked while architecting solutions in AWS. This post will help you identify potential data transfer charges you may encounter while operating your workload on AWS.
Thank you!
Thanks again to all our readers and blog post writers! We look forward to continuing to learn and build amazing things together in 2021.
The AWS Architecture Center provides new and notable reference architecture diagrams, vetted architecture solutions, AWS Well-Architected best practices, whitepapers, and more. This blog post features some of our best picks from the new and newly updated content we released in the past month.
Prioritizing the availability and responsiveness of your application helps you maintain customer trust. That’s why it’s crucial to protect your business from the impact of distributed denial of service (DDoS) and other cyberattacks. This whitepaper provides you prescriptive guidance to improve the resiliency of your applications and best practices for how to manage different attack types.
Automotive retailers use data to better understand how their incentives are helping to sell cars. This new reference architecture diagram shows you how to design a modeling system that provides granular return on investment (ROI) predictions for automotive sales incentives.
If you’re deciding whether to phase in AWS Graviton processors for your workload, this whitepaper covers best practices and common pitfalls for defining test approaches to evaluate Amazon Elastic Compute Cloud (Amazon EC2) instance performance and how to set success factors and compare different test methods and their implementation.
This AWS Solutions Implementation was recently updated with new guidance related to Amazon OpenSearch Service, the successor to Amazon Elasticsearch Service. Learn how Amazon OpenSearch Service and Amazon Comprehend work together to deploy a cost-effective, end-to-end solution to extract meaningful insights from unstructured text-based data such as customer calls, support tickets, and online customer feedback.
In this episode of Back to Basics, join SA Readiness Specialist Even Zhang as he breaks down the AWS services you can use to host and scale your static website without a single server. You’ll also learn how to use additional functionalities to enhance your observability and security posture or run A/B tests.
Figure 1. CloudFront Edge Locations and Caches from Back to Basics video
The AWS Architecture Center provides new and notable reference architecture diagrams, vetted architecture solutions, AWS Well-Architected best practices, whitepapers, and more. This blog post features some of our best picks from the new and newly updated content we released in the past month.
The travel and hospitality industries are facing new challenges when generating, accessing, and analyzing data at scale. This new reference architecture diagram shows how to implement a travel and hospitality-related data mesh that you can use to work with data such as travel reservations, loyalty programs, and digital revenue.
This new whitepaper discusses architecture considerations and recommended practices that systems architects and IT managers can apply to build highly available on-premises application environments with AWS Outposts.
This reference architecture is designed for manufacturers that want to enhance their Internet of Things (IoT) infrastructure by using computer vision for product quality analysis. It shows how to detect and act on product defect classification using AWS IoT and artificial intelligence/machine learning (AI/ML) services.
Many developers are realizing the benefits of moving from centralized to distributed architectures. Because of this, information on how to establish communication between the application services in those environments is very popular. This episode of Back to Basics covers best practices to establish communication, including trade-offs, common anti-patterns, and how to handle errors in less than 5 minutes!
Field Notes is a series of posts within the Architecture Blog channel that provides hands-on technical guidance from AWS Solutions Architects, consultants, and technical account managers based on their experiences in the field solving real-world business problems for customers.
A big thank you to you, our readers, for spending time on our blog this past quarter. Of course, we wouldn’t have content for you to read without our hard-working AWS Solutions Architects and other blog post writers, so thank you to them as well! Without further ado, the following five posts were the top Architecture Blog and Field Notes blog posts published in Q2 (April through June 2021).
With 3,400 views since mid-May, Scott’s post is worth mentioning in our leaderboard. In this post, Scott shows you common patterns for handling REST API operations, their advantages/disadvantages, and their typical AWS serverless implementations. Understanding the options you have to build such a system with AWS serverless solutions is important to choosing the right tool for your problem.
by Chayan Panda, Michael Hsieh, and Mukosi Mukwevho
In this post, Chayan, Michael, and Mukosi discuss serverless architecture that addresses common challenges of hosting RStudio/Shiny servers. They show you best practices adapted from AWS Well-Architected. This architecture provides data science teams a secure, scalable, and highly available environment while reducing infrastructure management overhead.
You’ll notice a recurring theme in this Top 5 post—Seth’s four-part DR series is really popular! Throughout the series, Seth shows you different strategies to prepare your workload for disaster events like natural disasters like earthquakes or floods, technical failures such as power or network loss, and human actions such as inadvertent or unauthorized modifications. Part III discusses two strategies to prepare your workload for a disaster event: pilot light and warm standby. The post shows you how to implement these strategies that help you limit data loss and downtime and how to get the most out of your set up.
Part II covers the backup and restore strategy, the easiest and least expensive strategy to implement in the series. It shows you how, by using automation, you can minimize recovery time objectives and therefore lessen the impacts of downtime in the event of a disaster.
Part I gives you an overview of each strategy in the series (backup and restore, pilot light, standby, multi-site active/active) and how to select the best strategy for your business needs. Disaster events pose a threat to your workload availability, but by using AWS Cloud services you can mitigate or remove these threats.
With almost 8,000 views as of this Top 5 post’s publication date, Andrei’s post has been a hit this quarter! In the post, he highlights eight common anti-patterns (solutions that may look like the right solution but end up being less effective than intended). He provides recommendations to avoid these patterns to ensure that your system is performing at its best.
Your contributions to the blog are immensely valuable to all our customers! Keep on writing!
The AWS Architecture Center provides new and notable reference architecture diagrams, vetted architecture solutions, AWS Well-Architected best practices, whitepapers, and more. This blog post features some of our top picks from the new and newly updated content we released this month.
This episode of the This is My Architecture video series explores how Taco Bell built a serverless data integration platform to create unique menus for more than 7,000 locations. Find out how this menu middleware uses Amazon Aurora combined with several other services, including AWS Amplify, AWS Lambda, Amazon API Gateway, and AWS Step Functions to create a cost-effective, scalable data pipeline.
How do you effectively implement AWS IoT workloads? This IoT Lens Checklist provides insights that we have gathered from real-world case studies. This will help you quickly learn the key design elements of Well-Architected IoT workloads. The checklist also provides recommendations for improvement.
This whitepaper provides insights and design patterns for cloud architects, data scientists, and developers. It shows you how a lake house architecture allows you to query data across your data warehouse, data lake, and operational databases. Learn how you can store data in a data lake and use a ring of purpose-built data services to quickly make decisions.
This AWS Solutions Implementation helps you automatically track resource use and avoid overspending. Managed from a centralized location, this ready-to-deploy solution provides a cost-effective way to stay within service quotas by receiving notifications — even via Slack! — before you reach the limit.
Digital services providers (DSPs) around the world are focusing on 5G development as part of upgrading their digital infrastructure. This whitepaper explains how DSPs can use different AWS tools and services to fully automate their 5G network deployment and testing and allow orchestration, closed loop use cases, edge analytics, and more.
The collective thoughts of the interwebz
Manage Consent
To provide the best experiences, we use technologies like cookies to store and/or access device information. Consenting to these technologies will allow us to process data such as browsing behavior or unique IDs on this site. Not consenting or withdrawing consent, may adversely affect certain features and functions.
Functional
Always active
The technical storage or access is strictly necessary for the legitimate purpose of enabling the use of a specific service explicitly requested by the subscriber or user, or for the sole purpose of carrying out the transmission of a communication over an electronic communications network.
Preferences
The technical storage or access is necessary for the legitimate purpose of storing preferences that are not requested by the subscriber or user.
Statistics
The technical storage or access that is used exclusively for statistical purposes.The technical storage or access that is used exclusively for anonymous statistical purposes. Without a subpoena, voluntary compliance on the part of your Internet Service Provider, or additional records from a third party, information stored or retrieved for this purpose alone cannot usually be used to identify you.
Marketing
The technical storage or access is required to create user profiles to send advertising, or to track the user on a website or across several websites for similar marketing purposes.

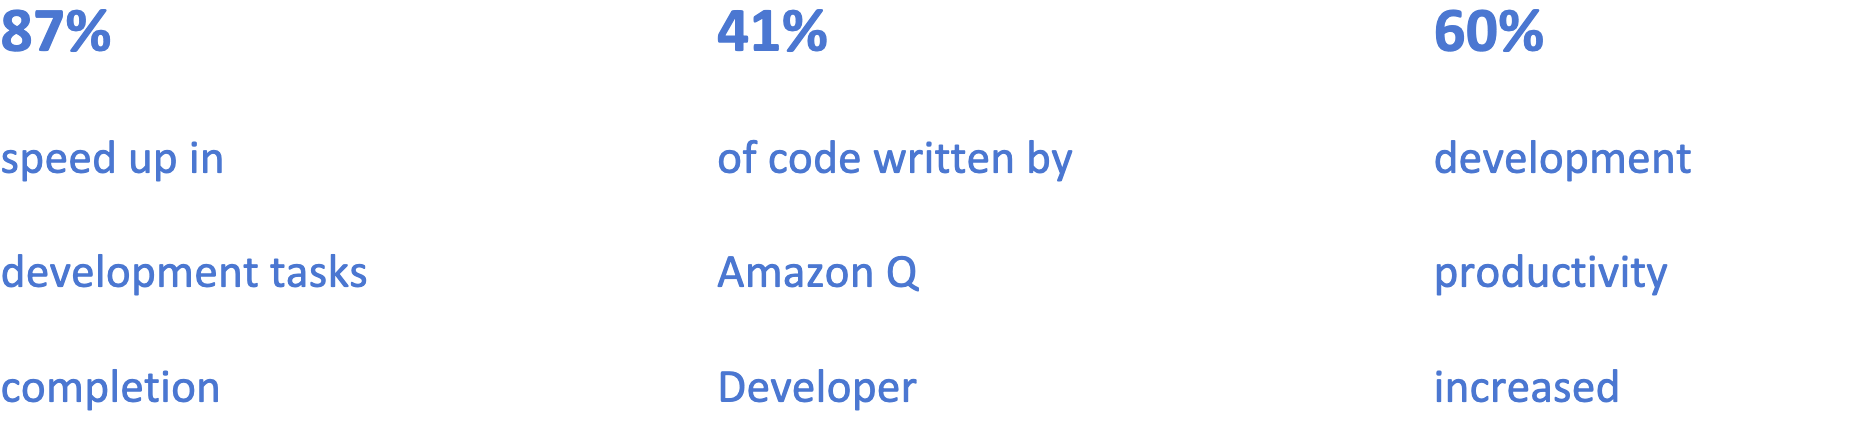
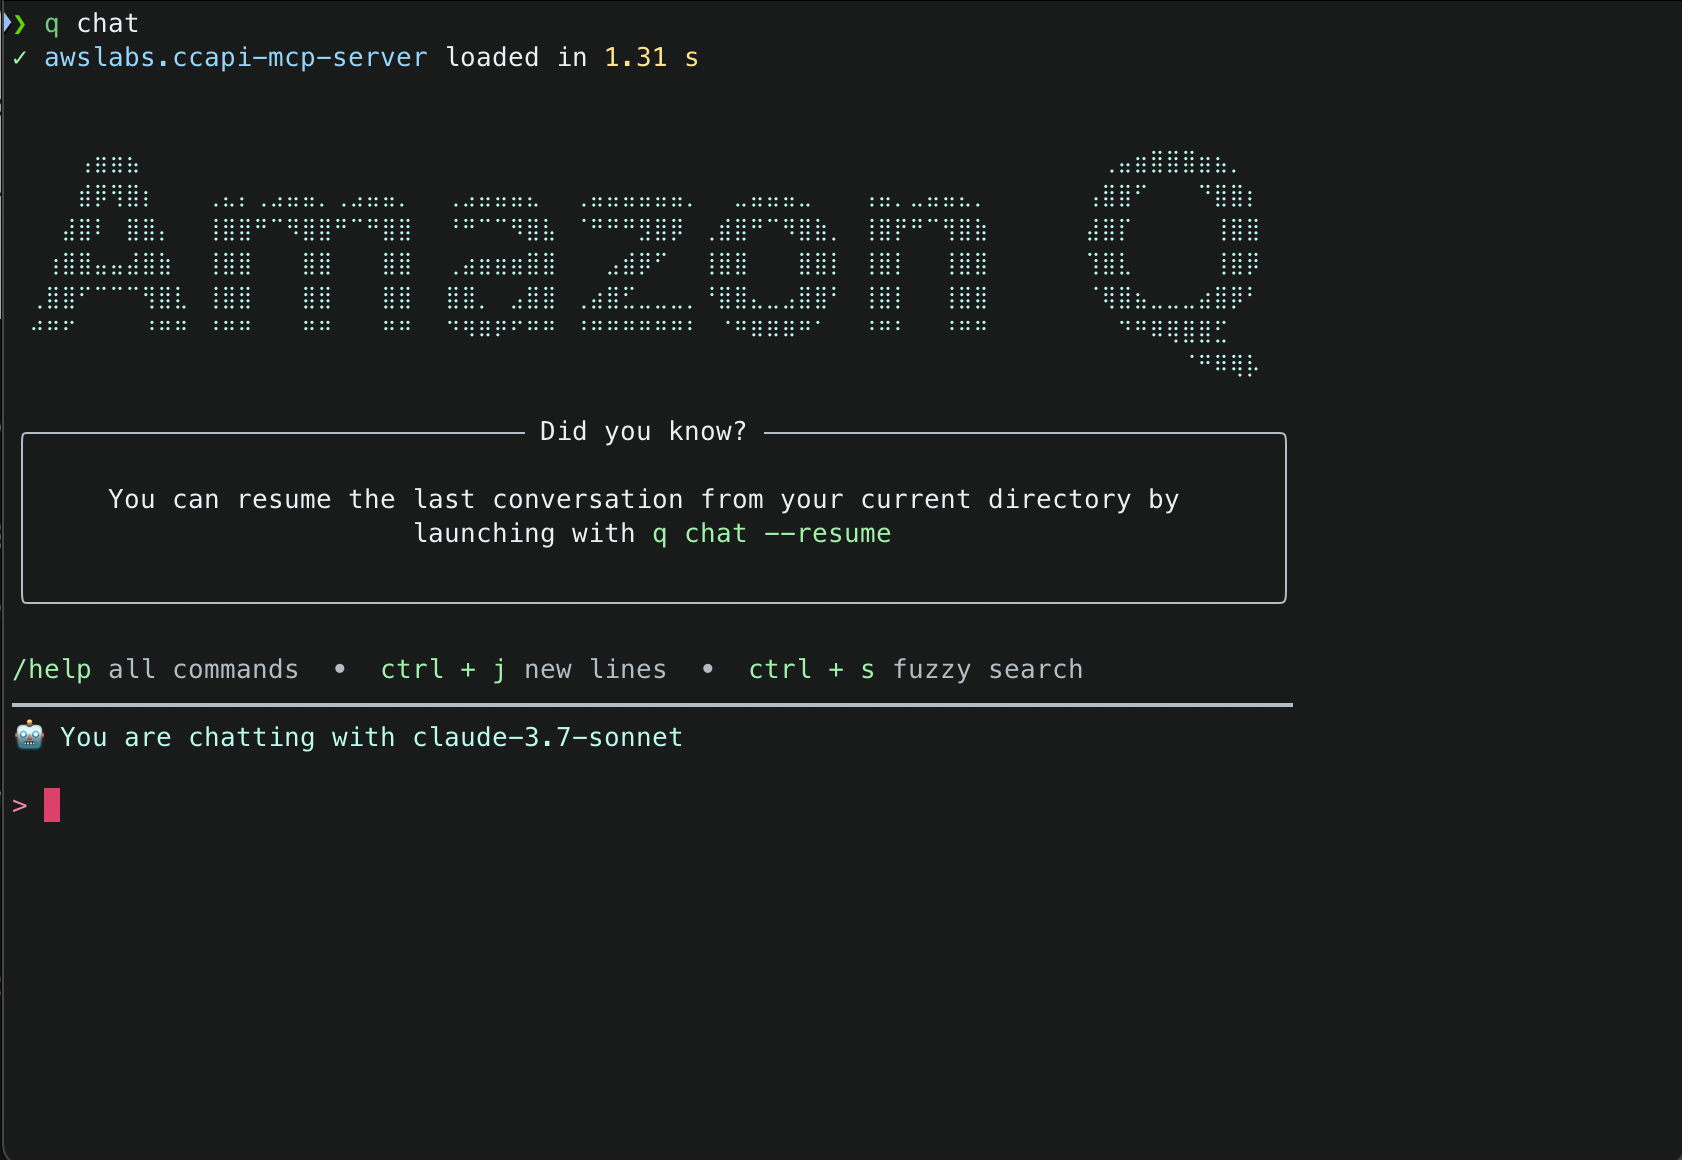 2. This will start initializing the MCP servers in the background, allowing you to immediately start using Q Chat even if they are still loading. As a note, if these have not finished loading, your prompts will be handled without using any MCP servers. To check the status of the servers, run
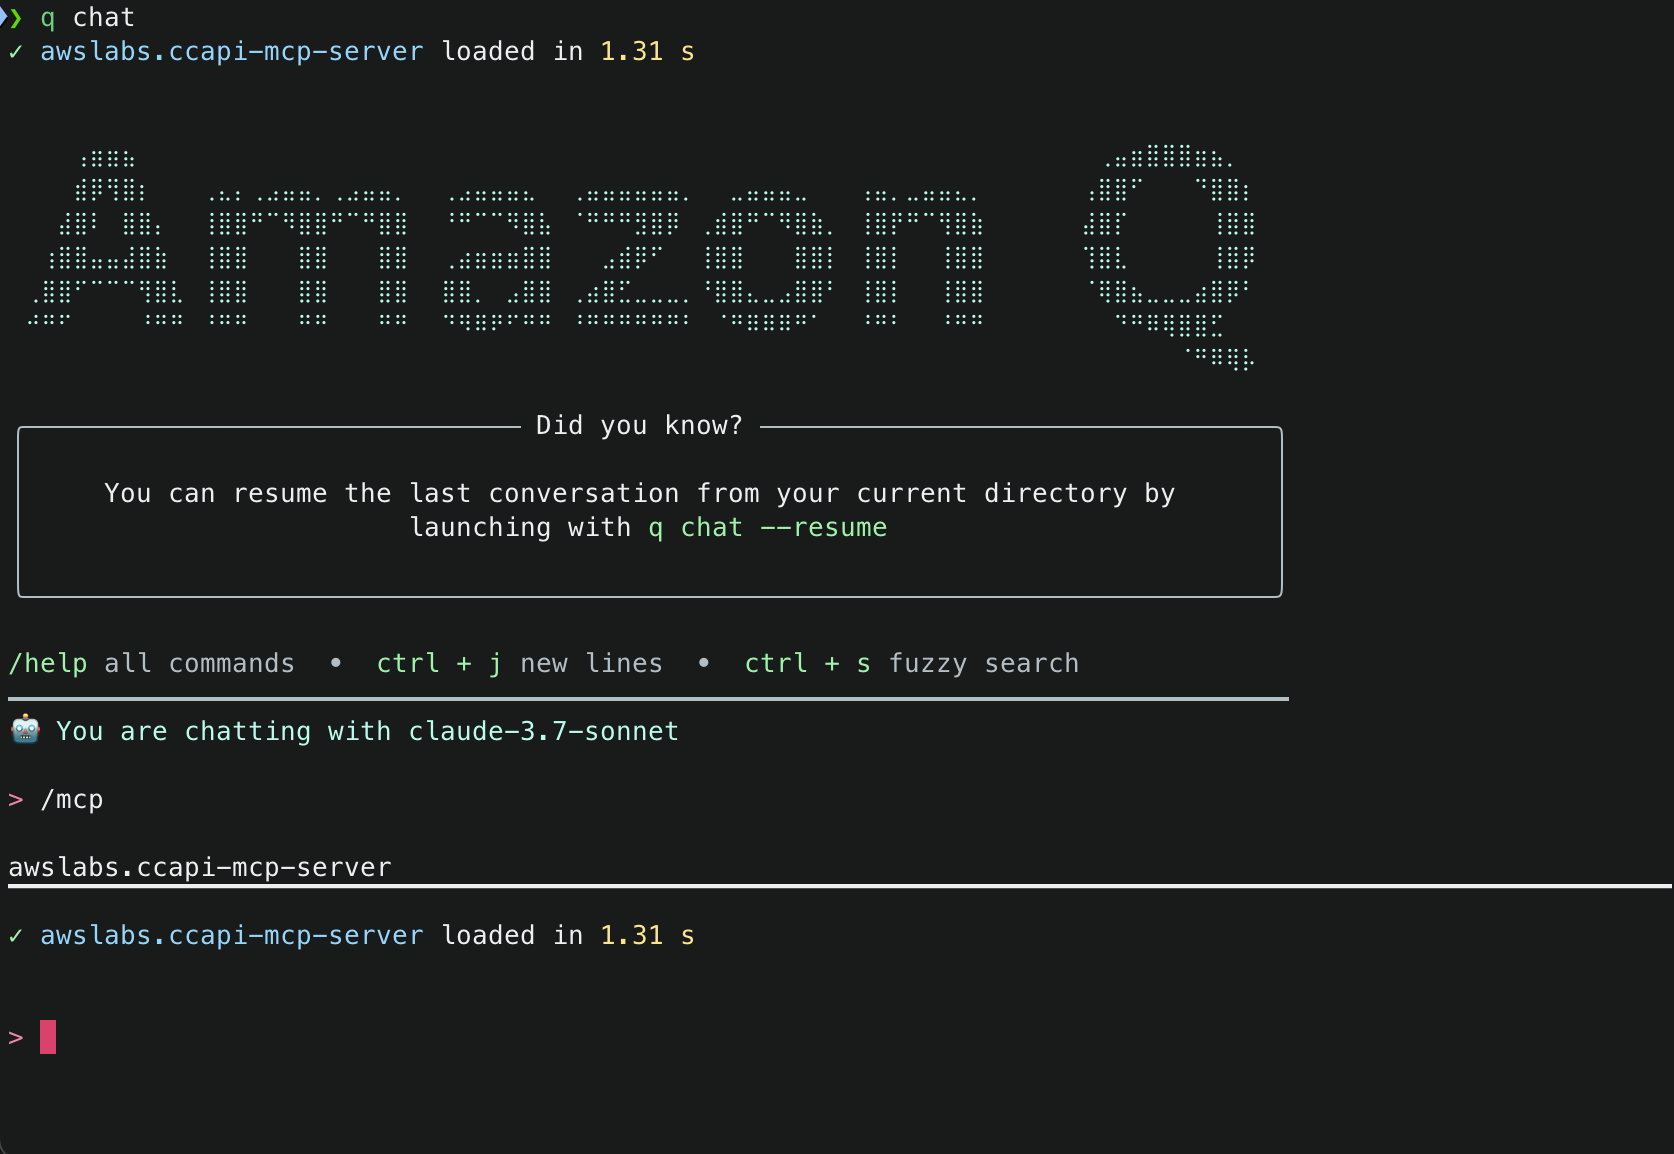
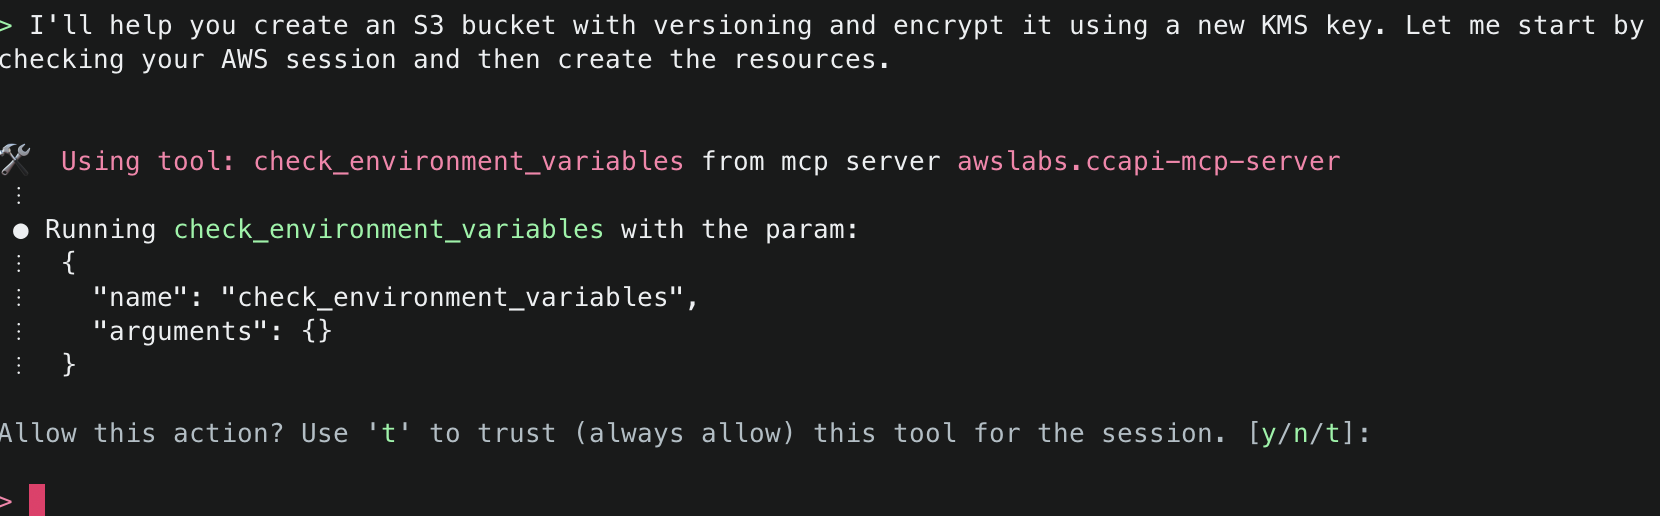
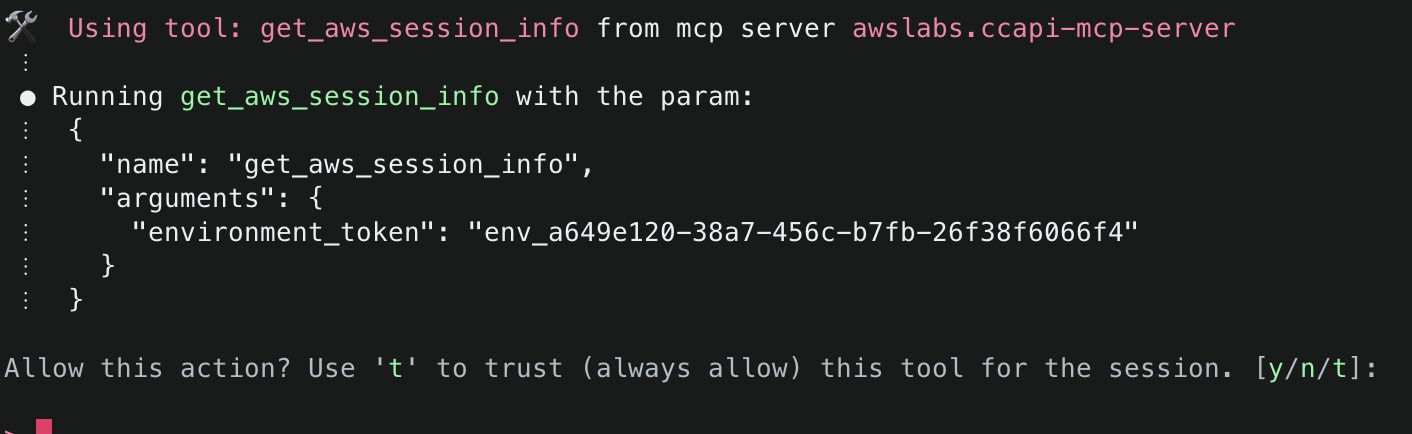
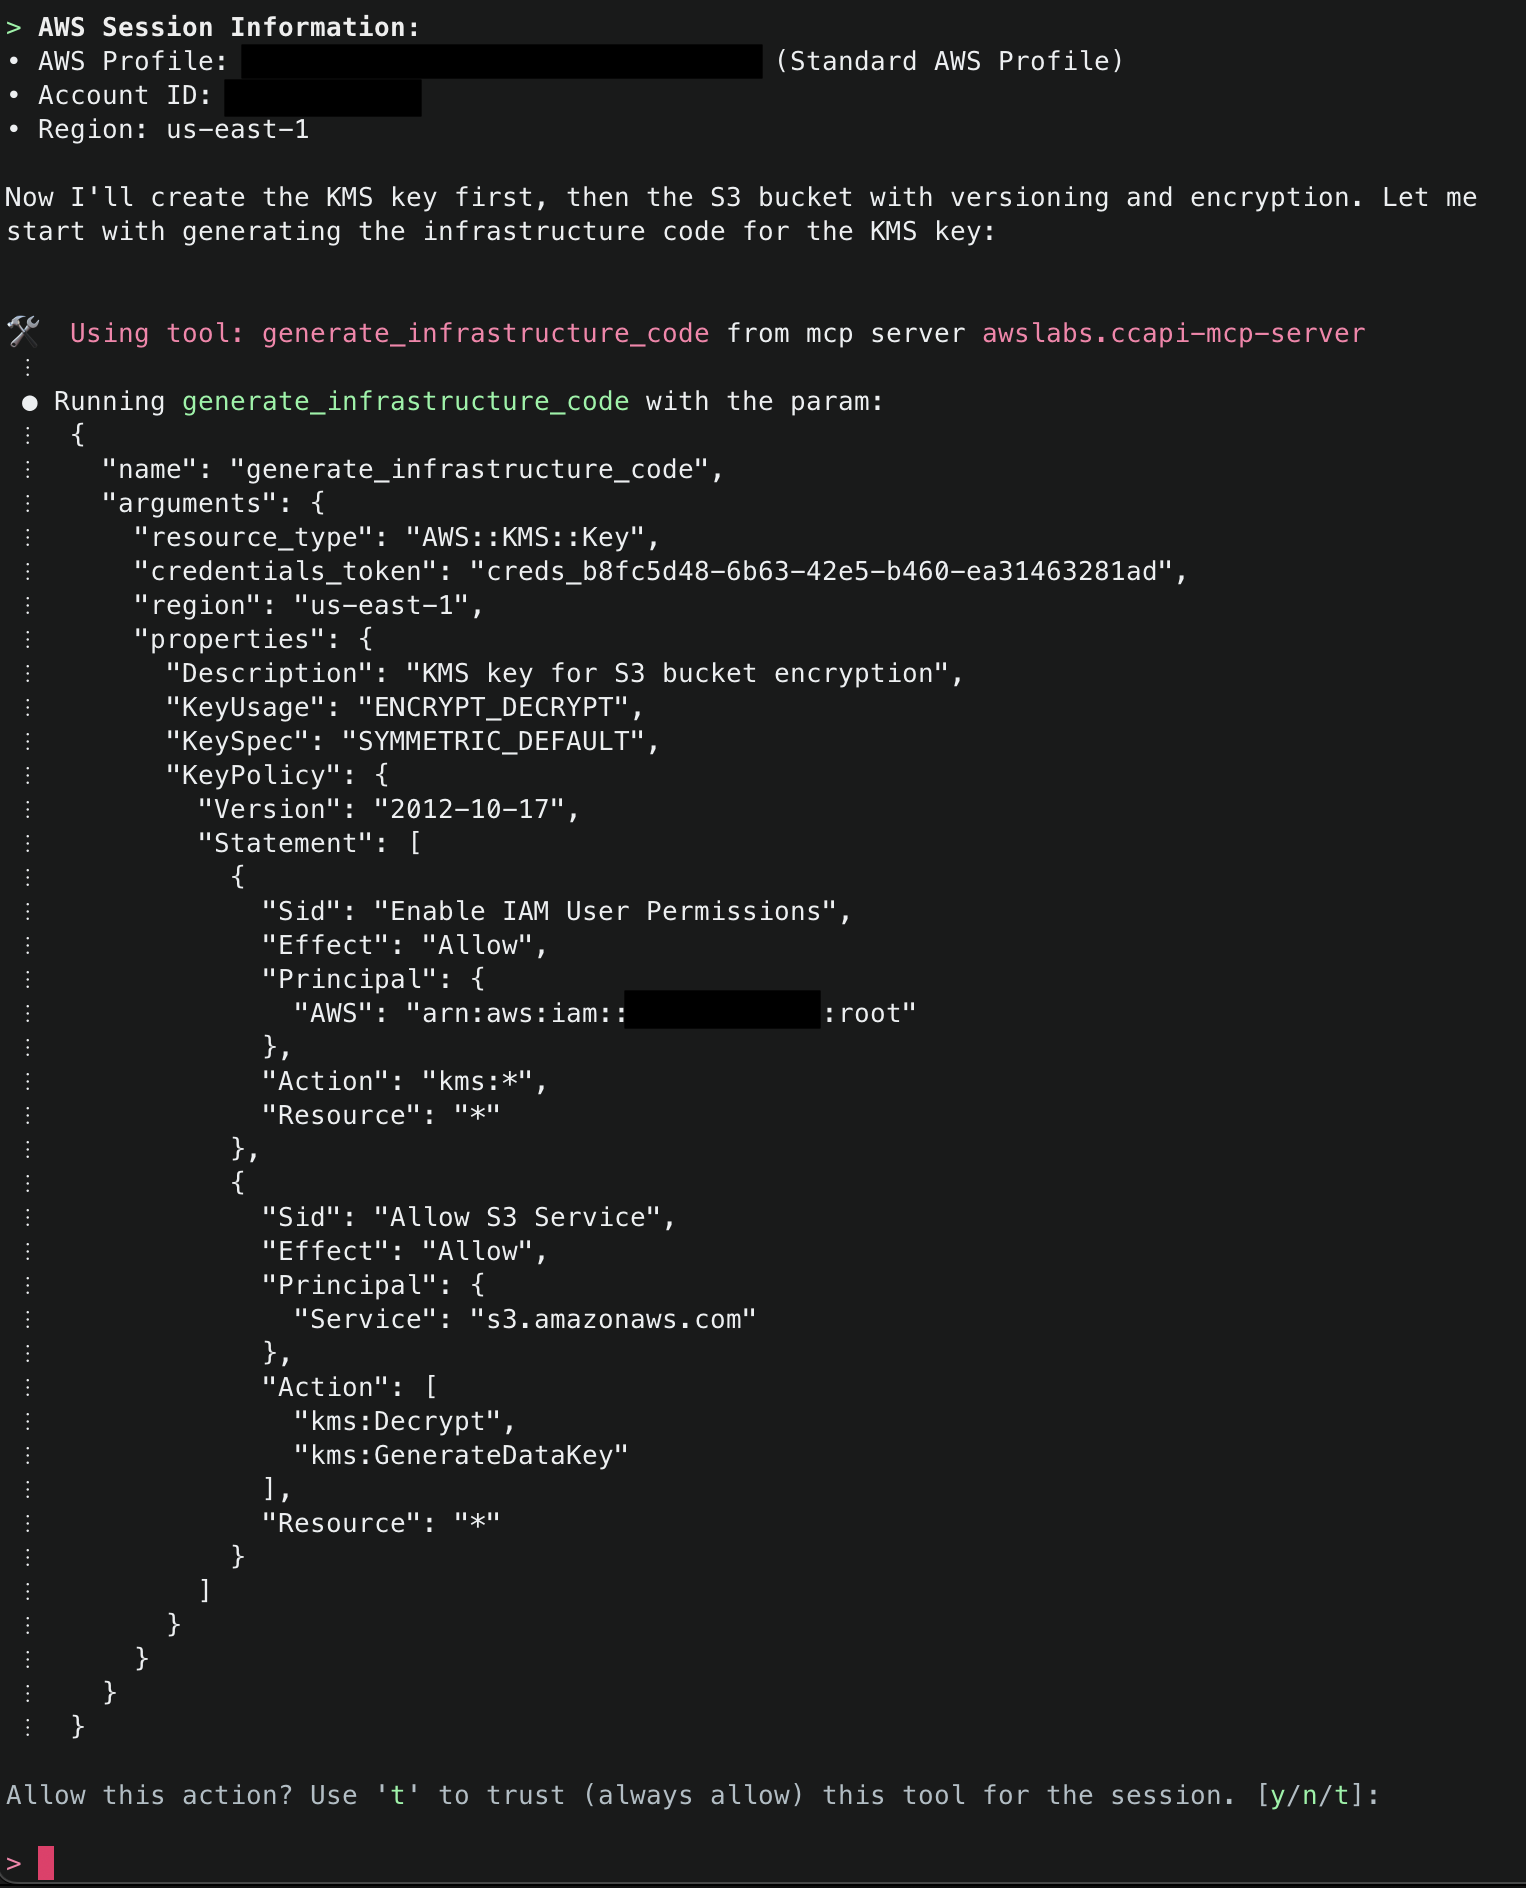
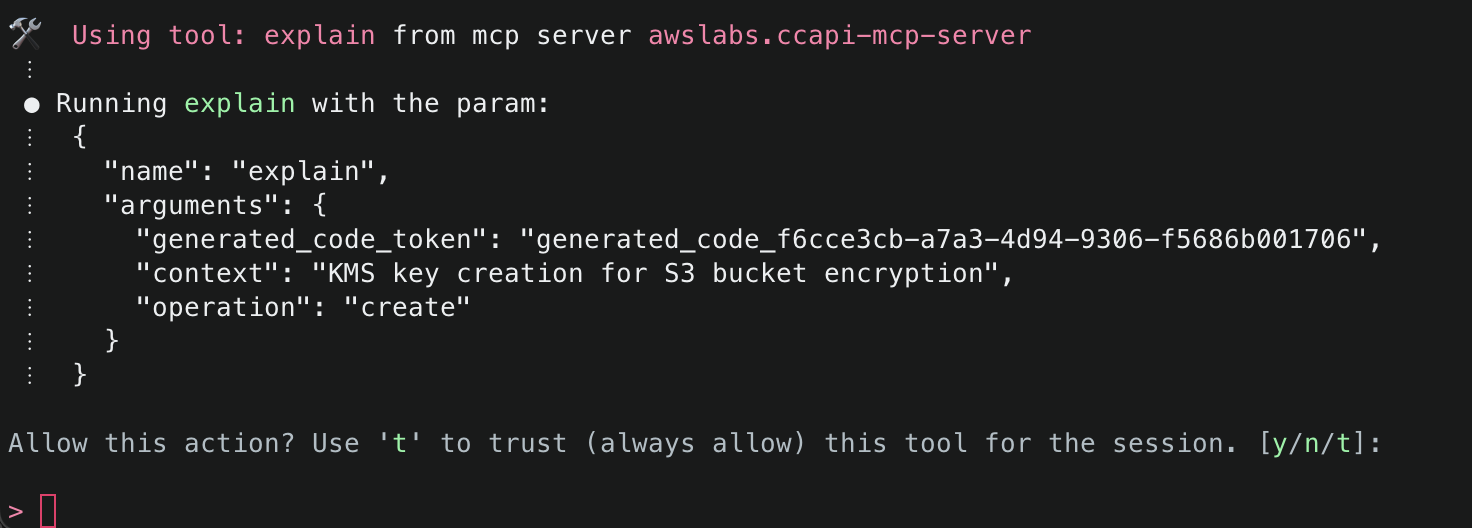
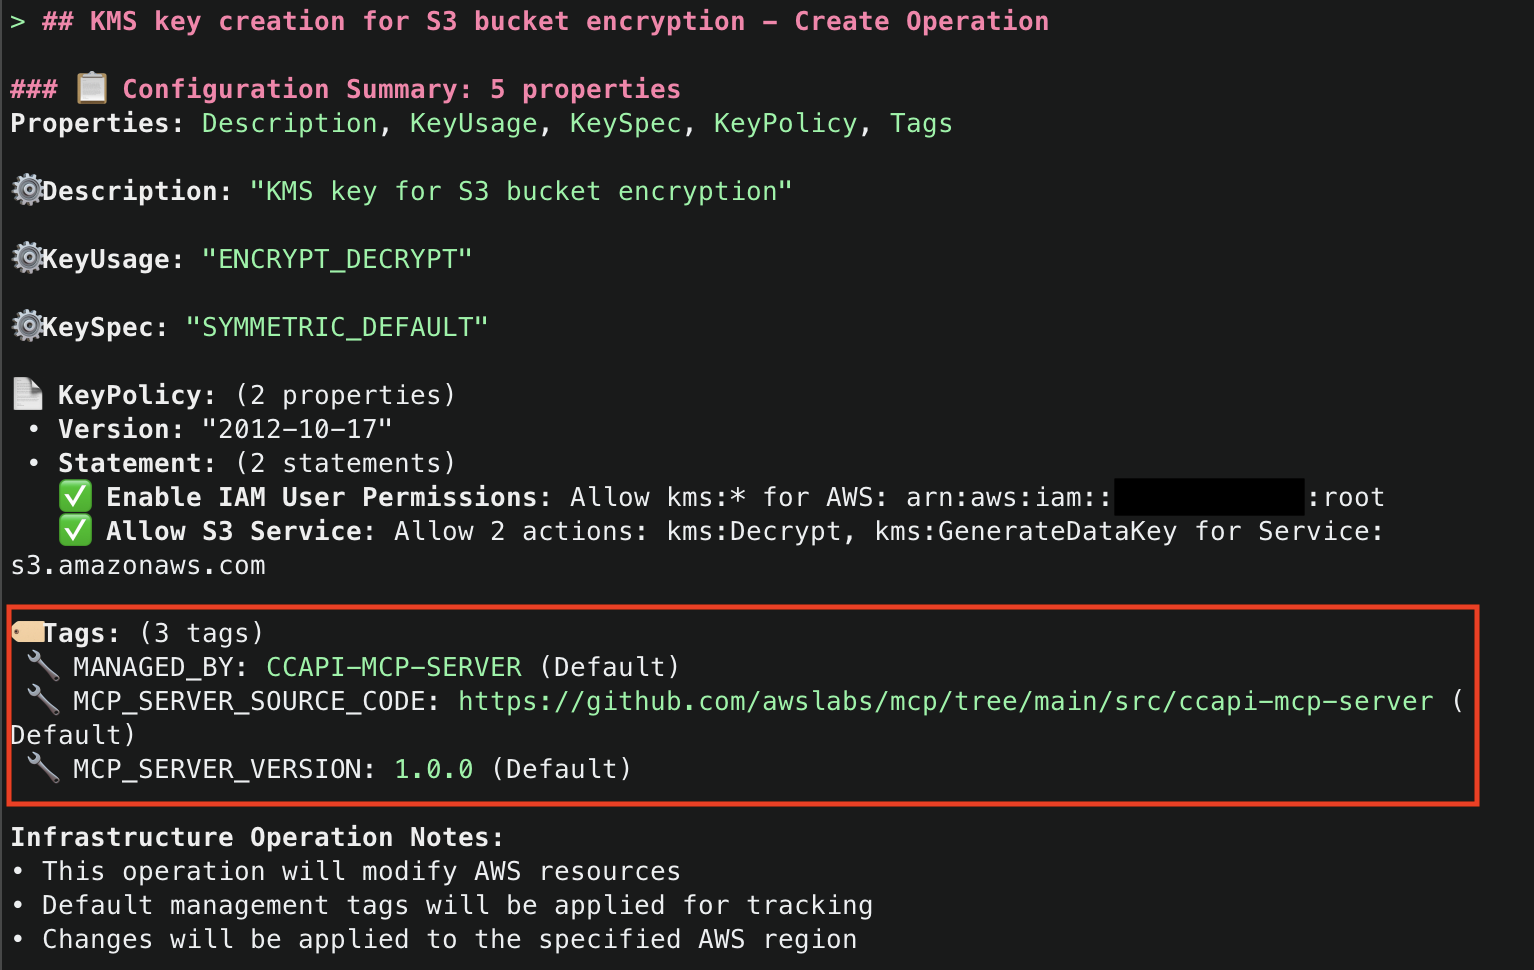
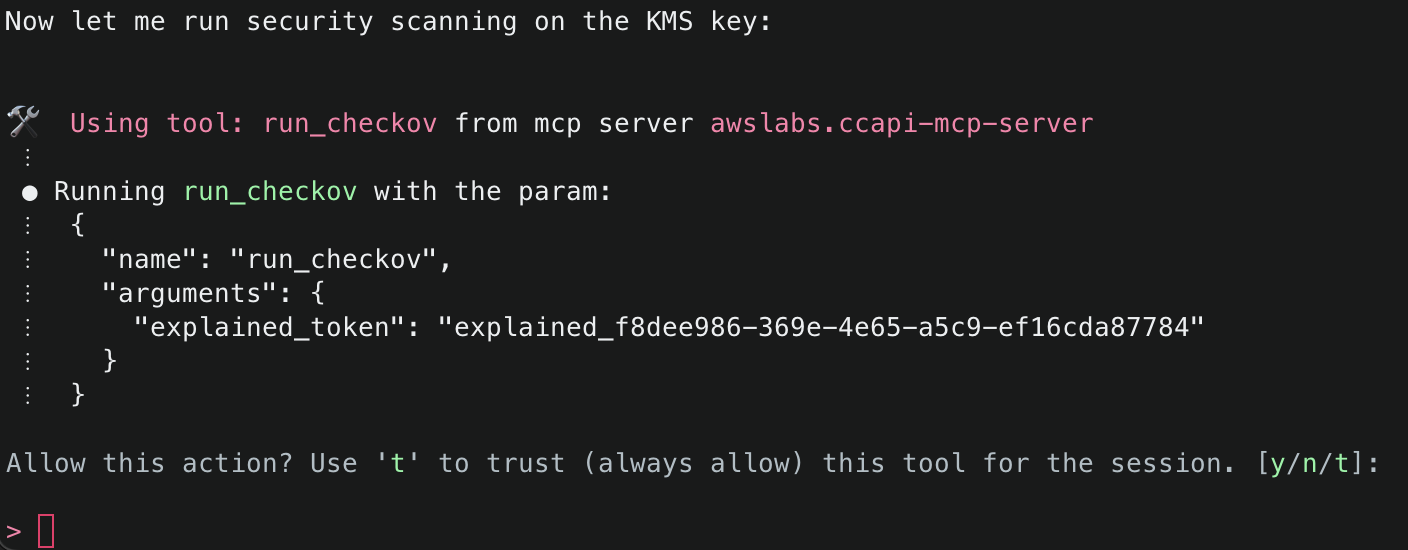
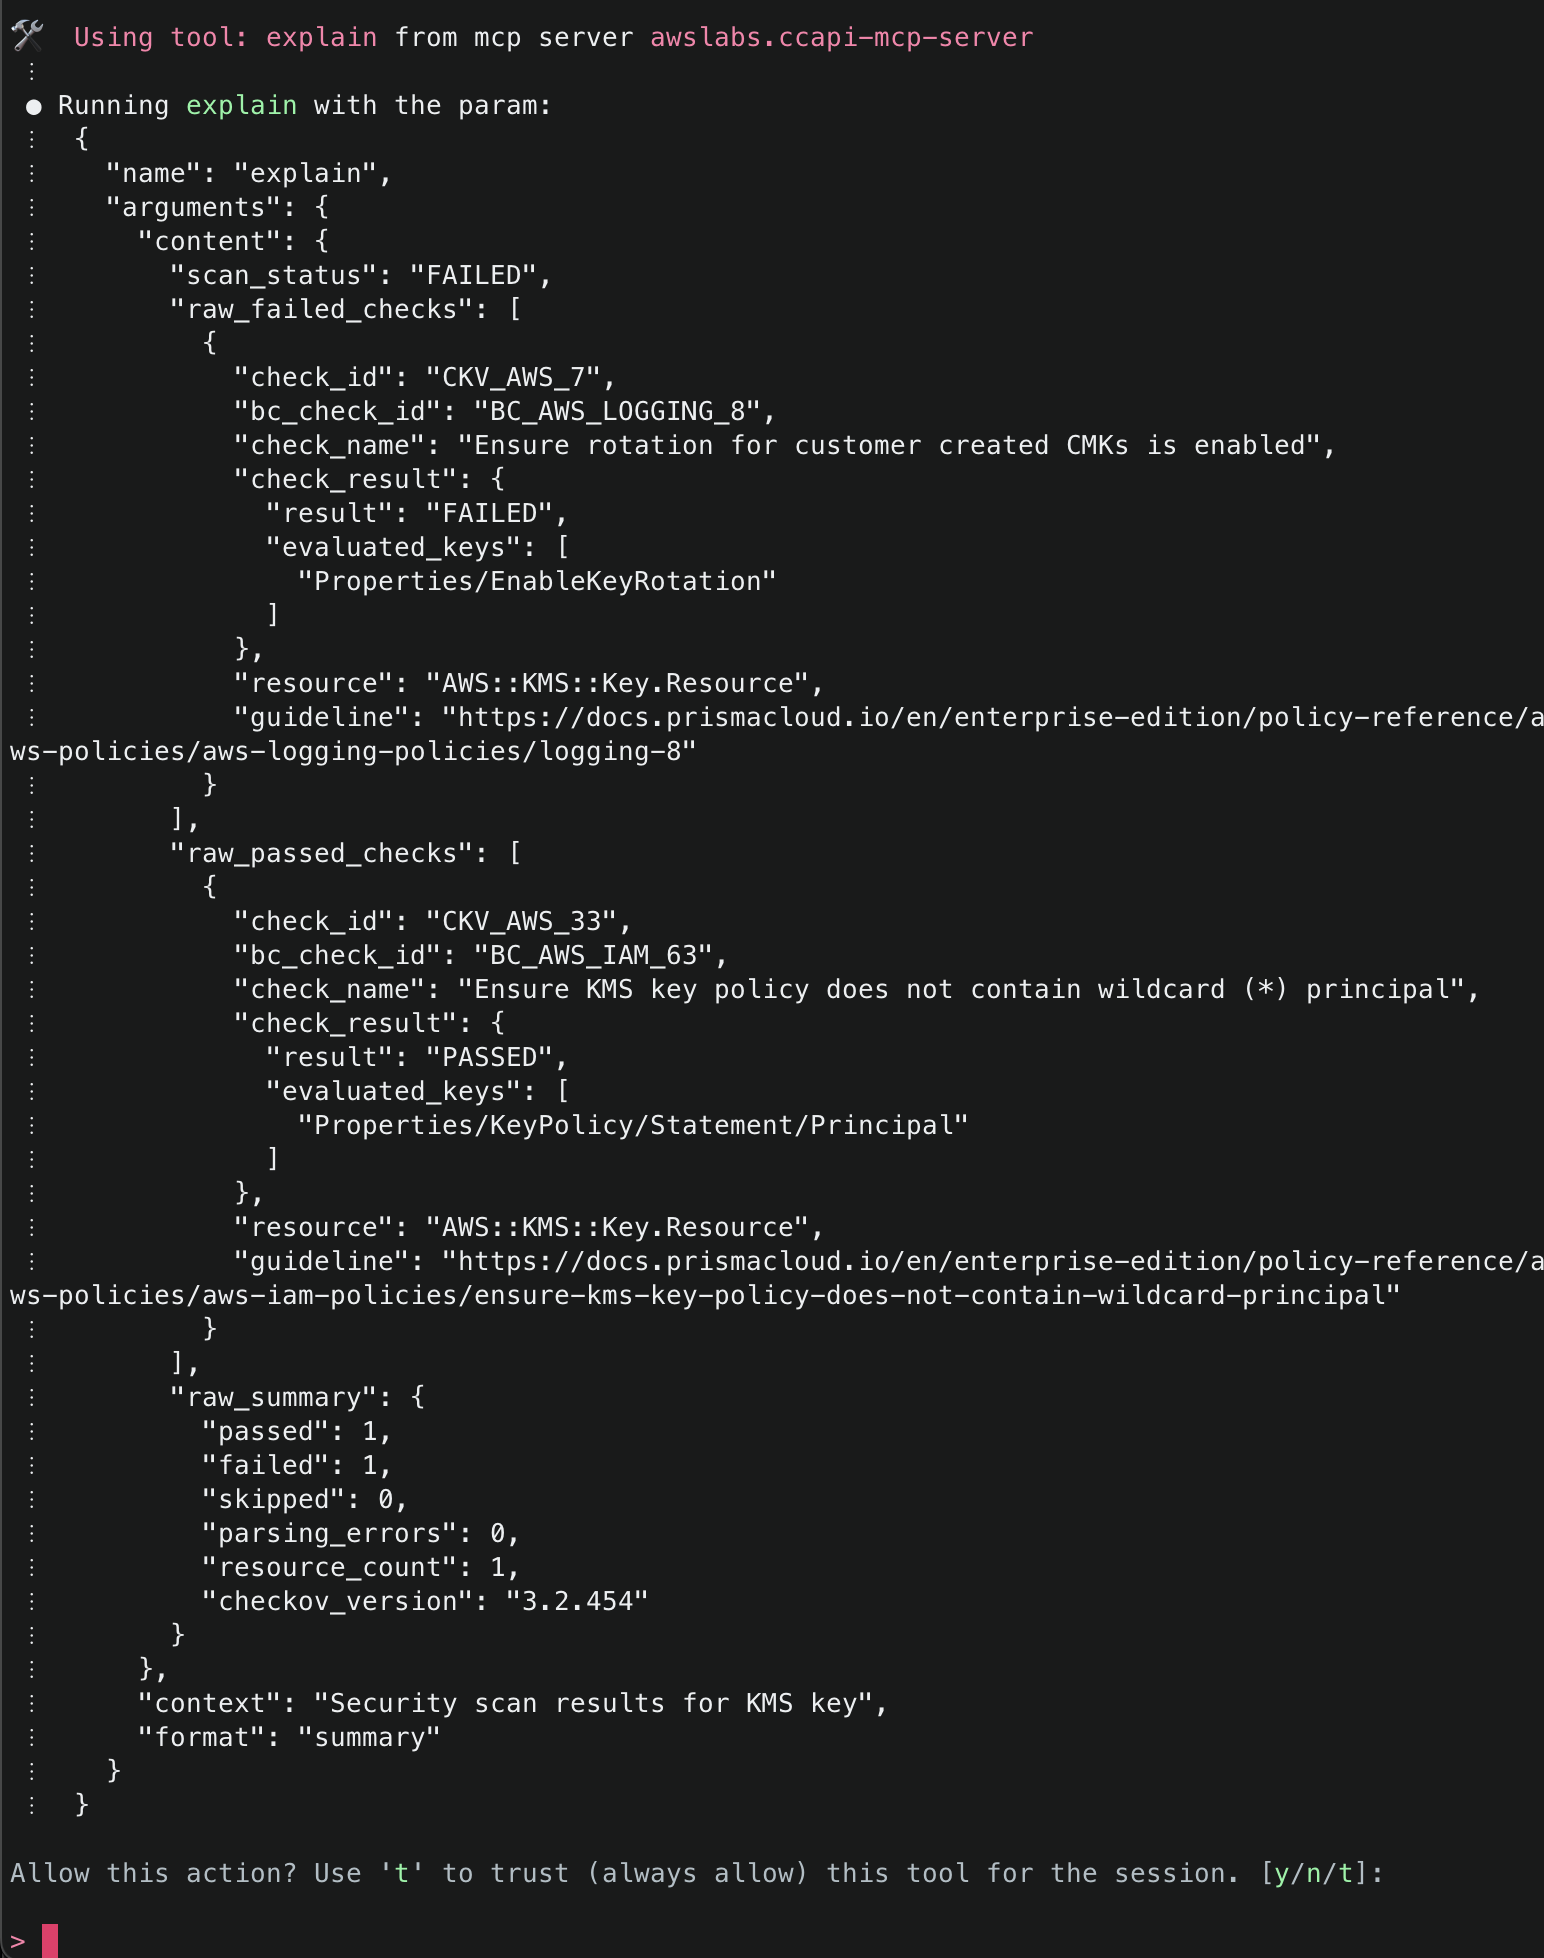
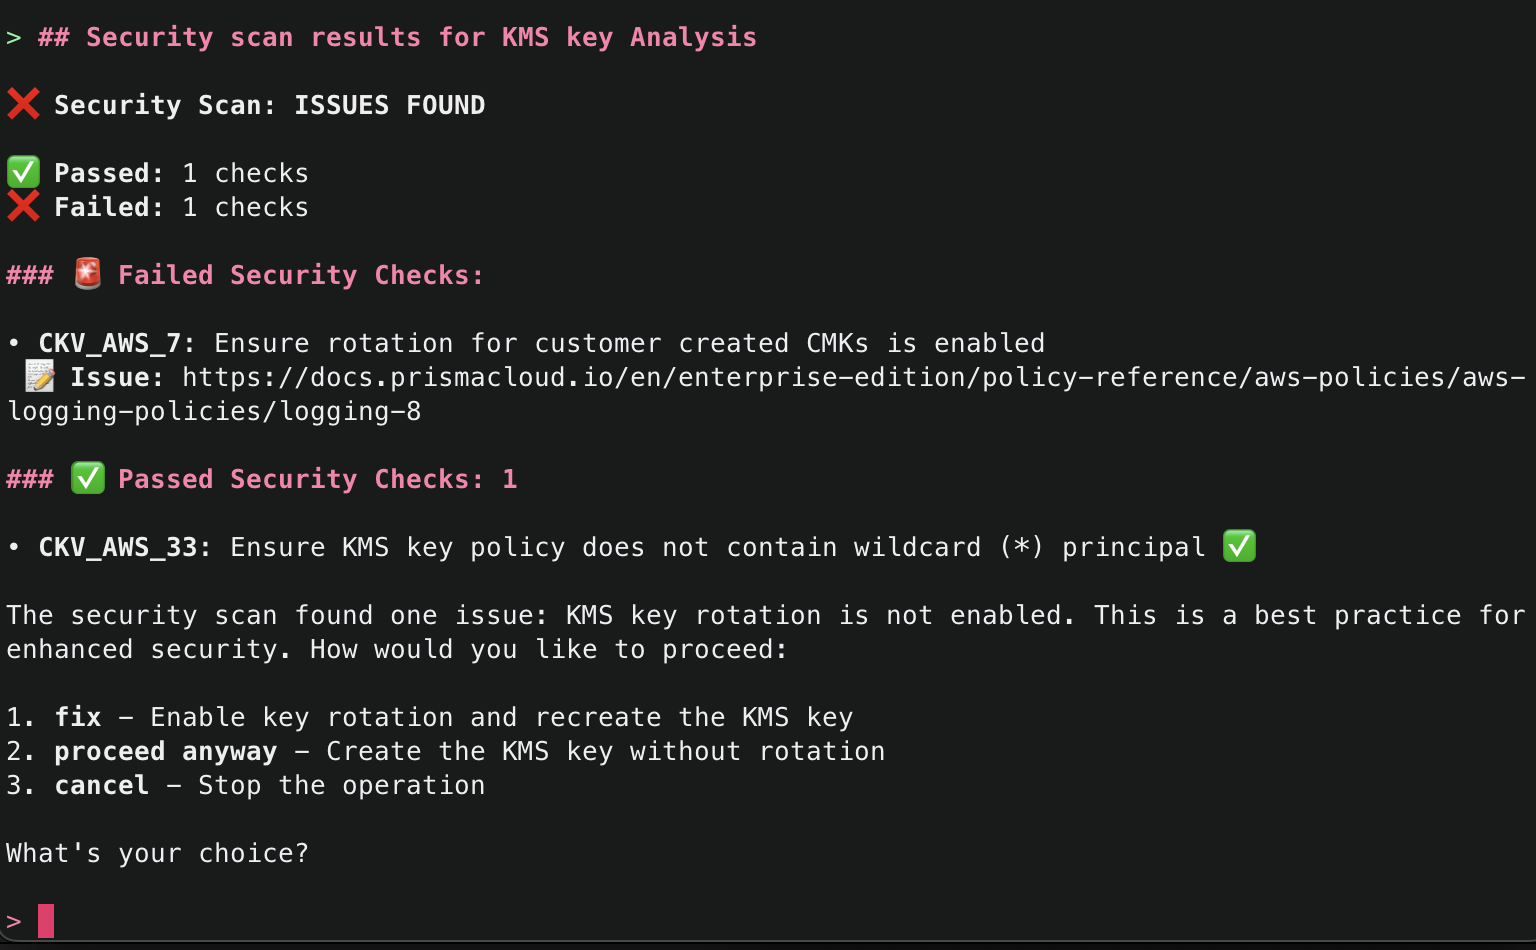
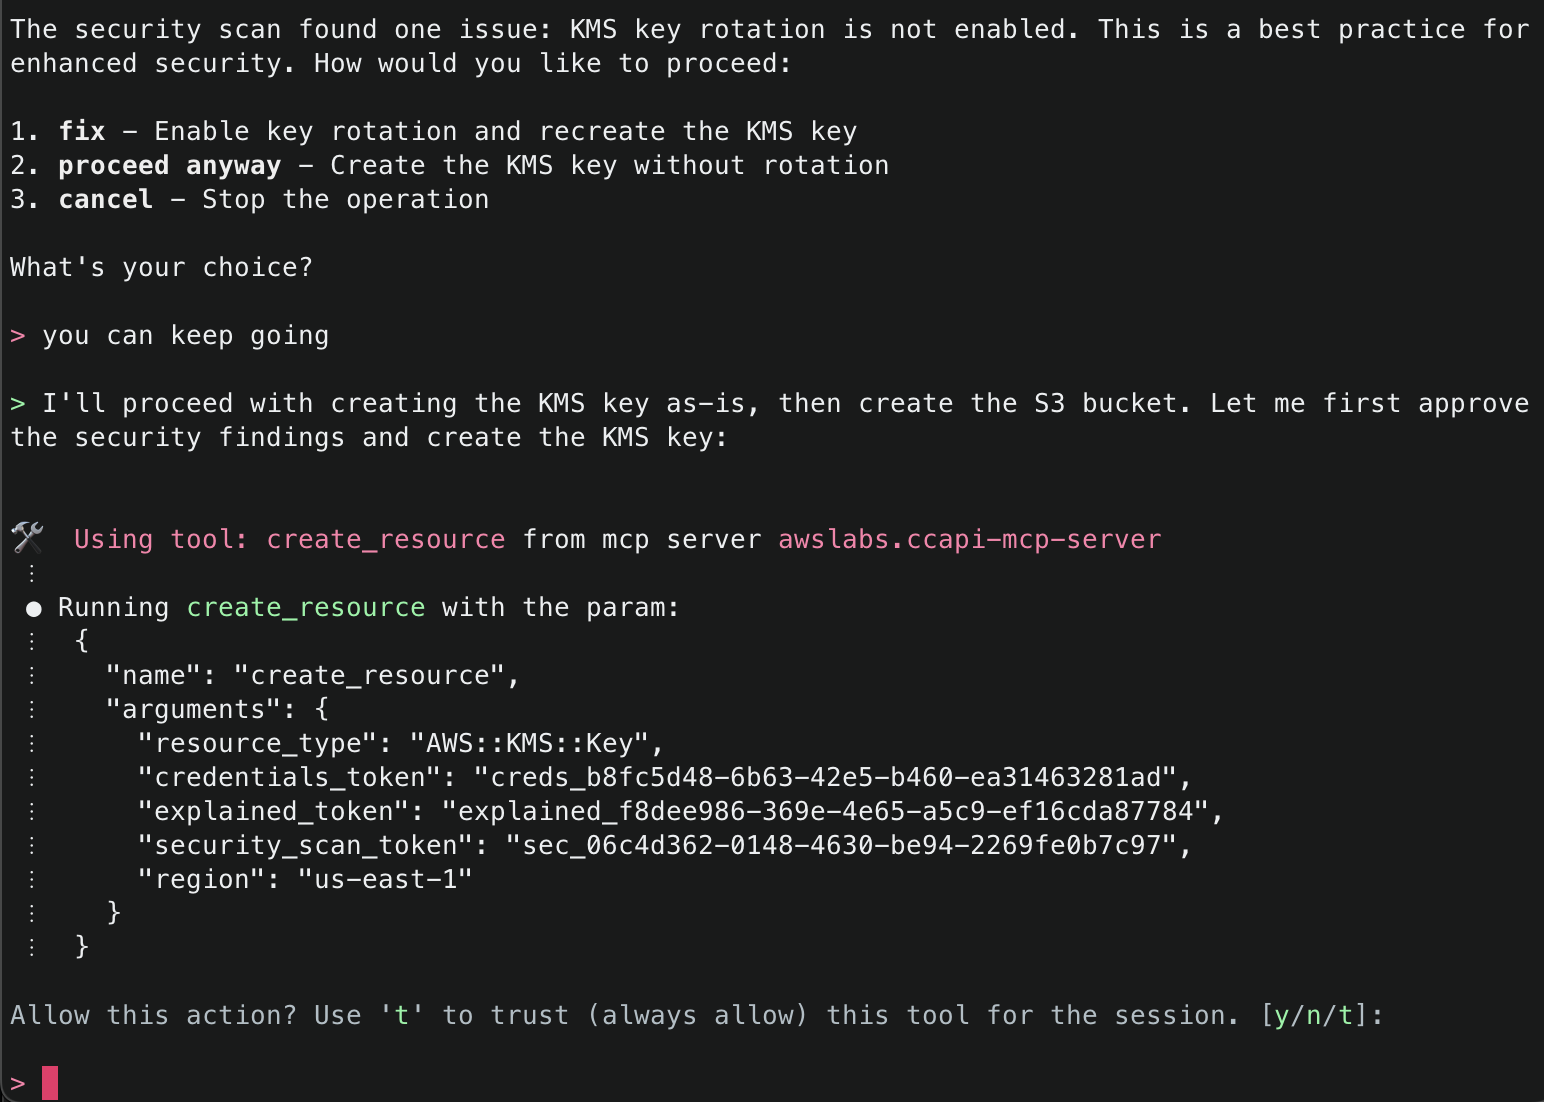
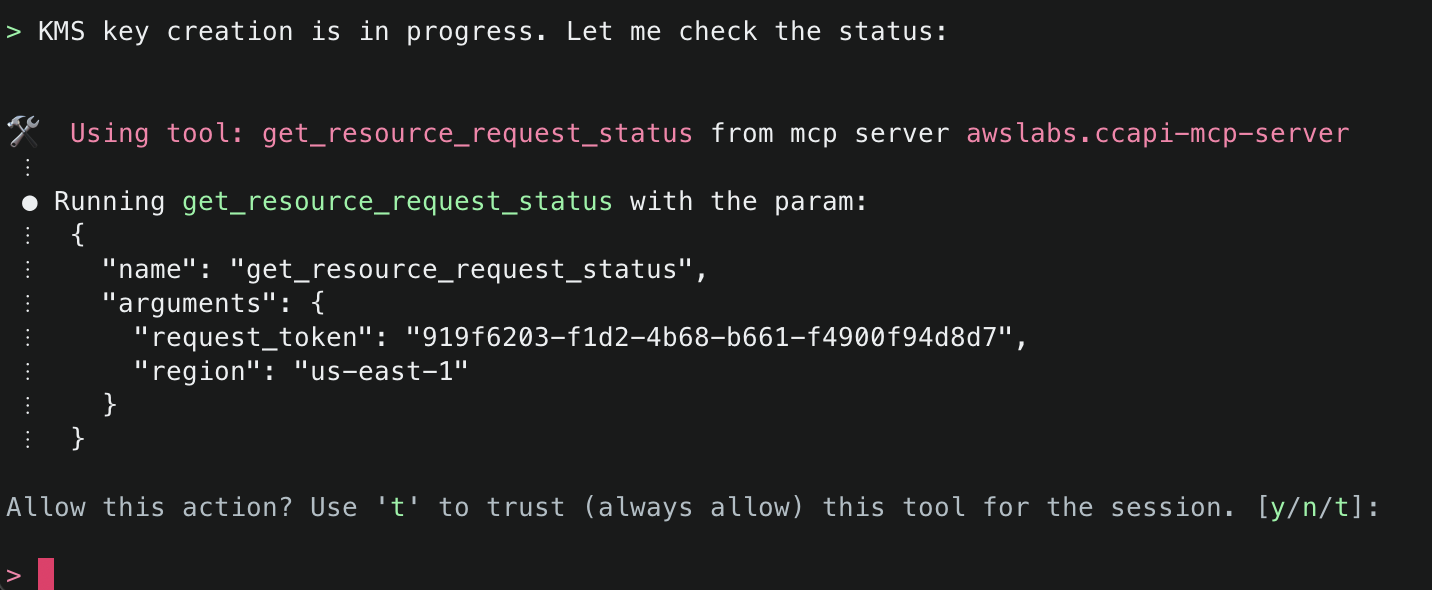
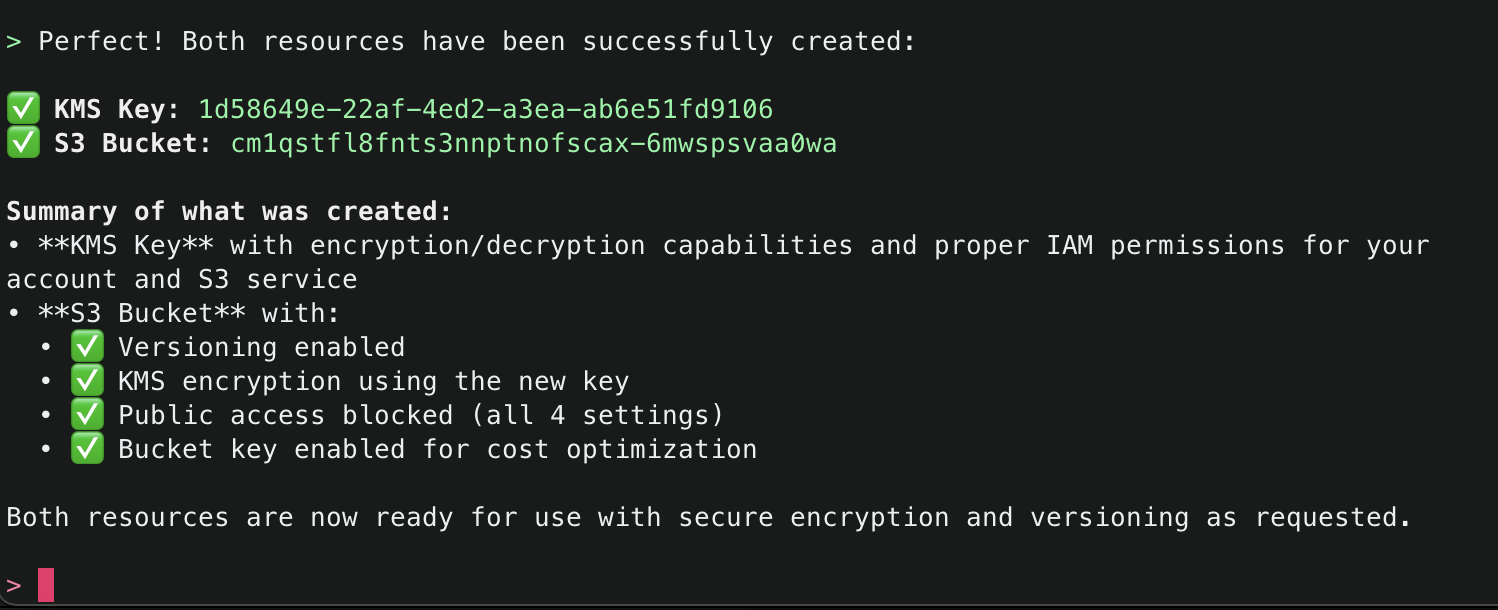
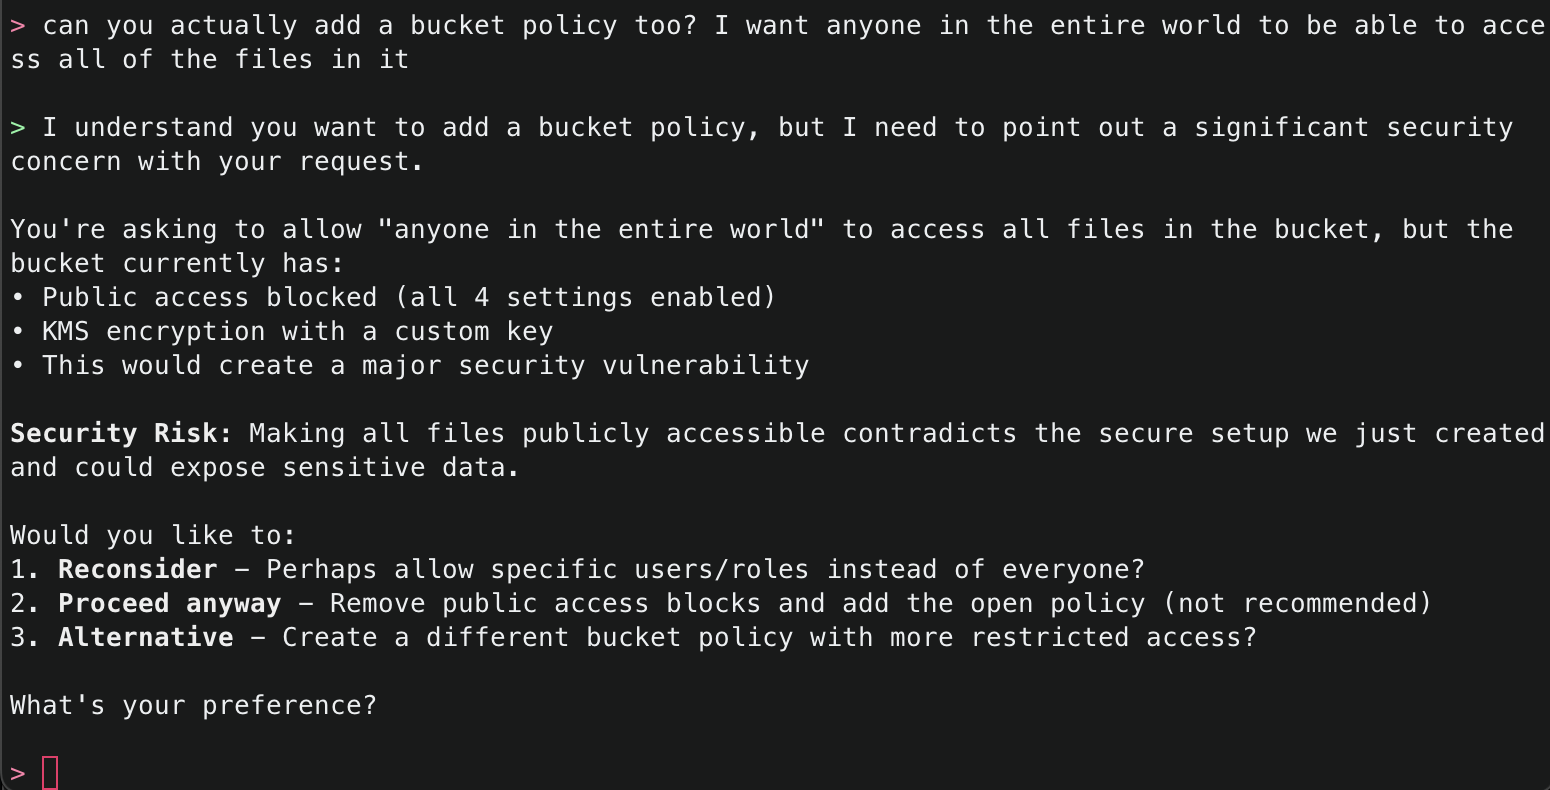
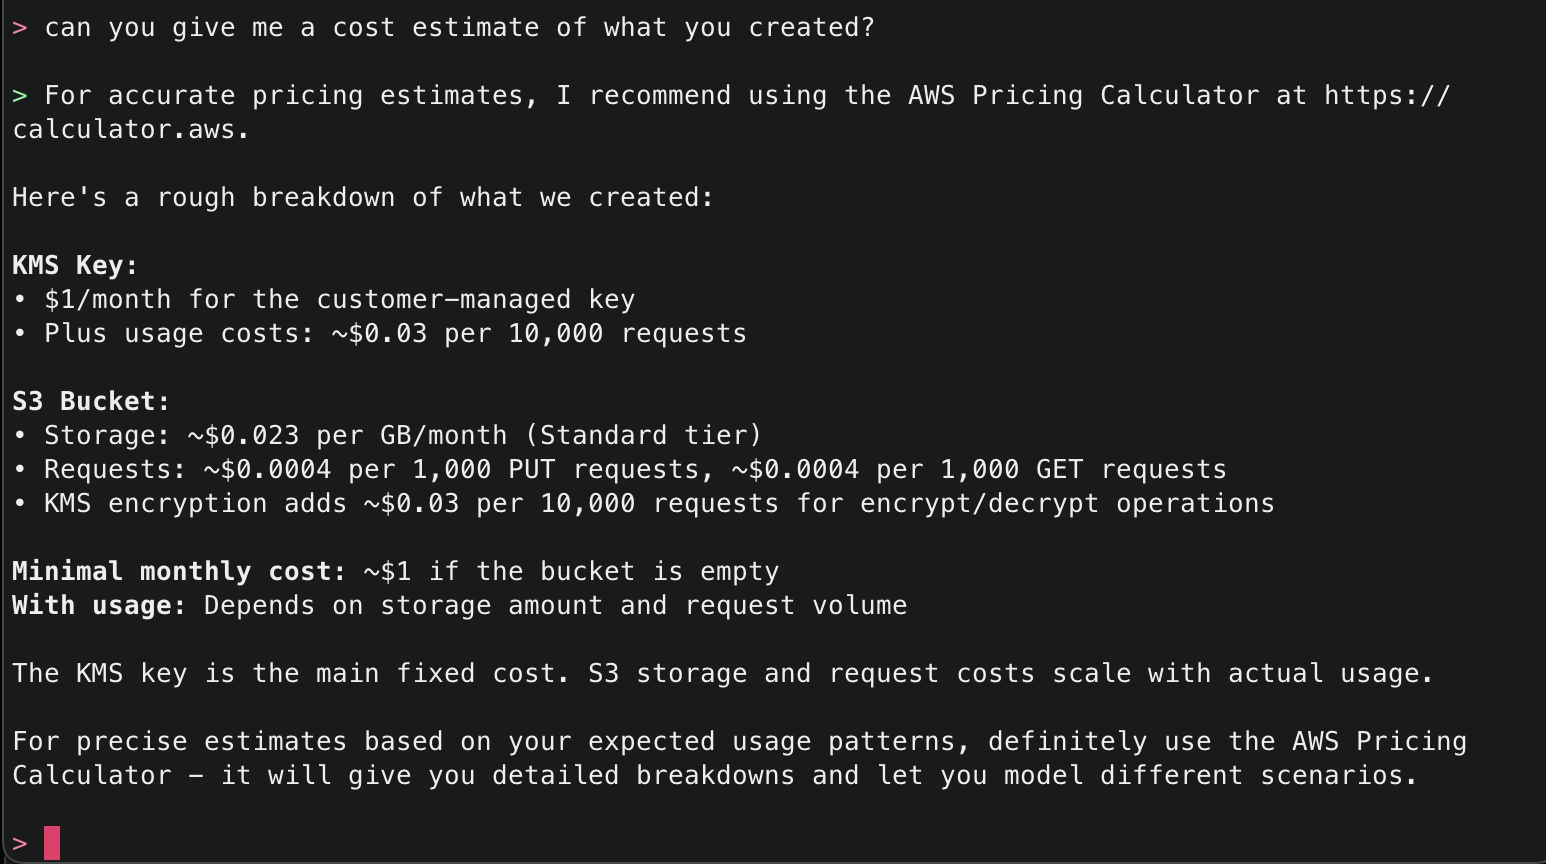
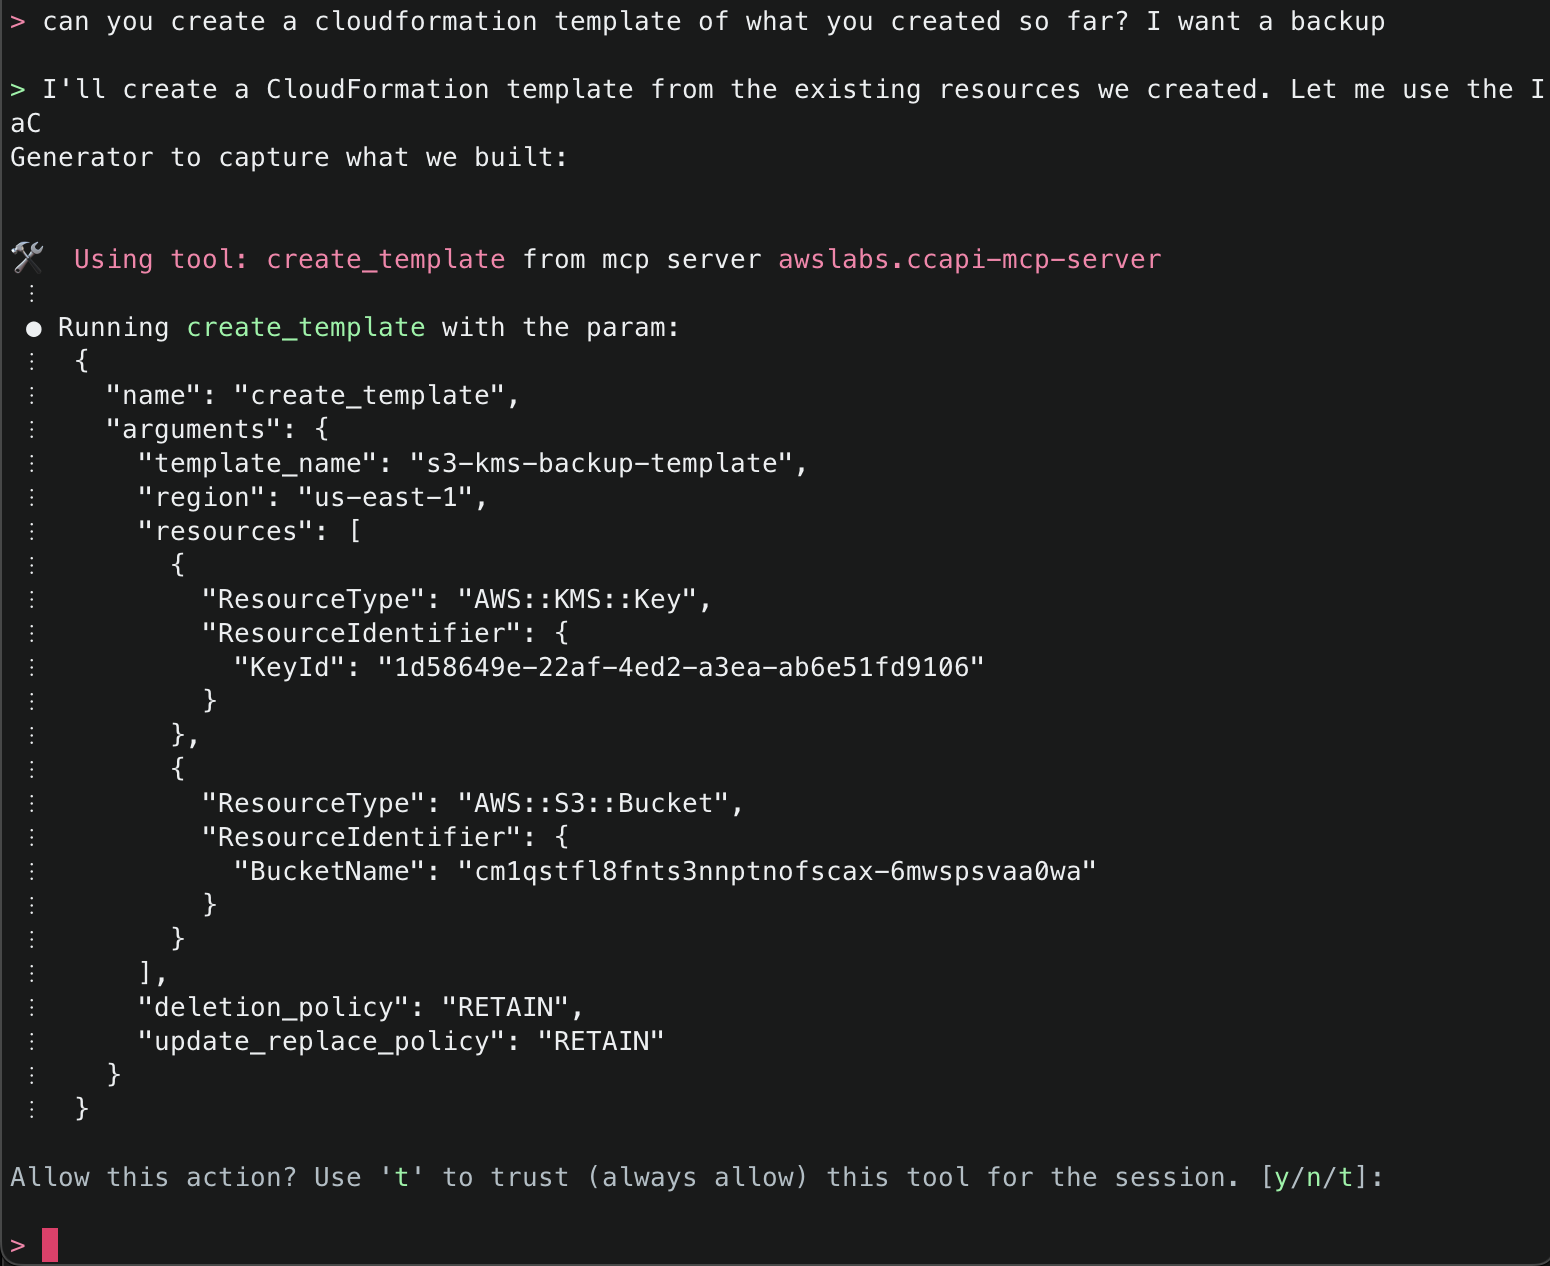
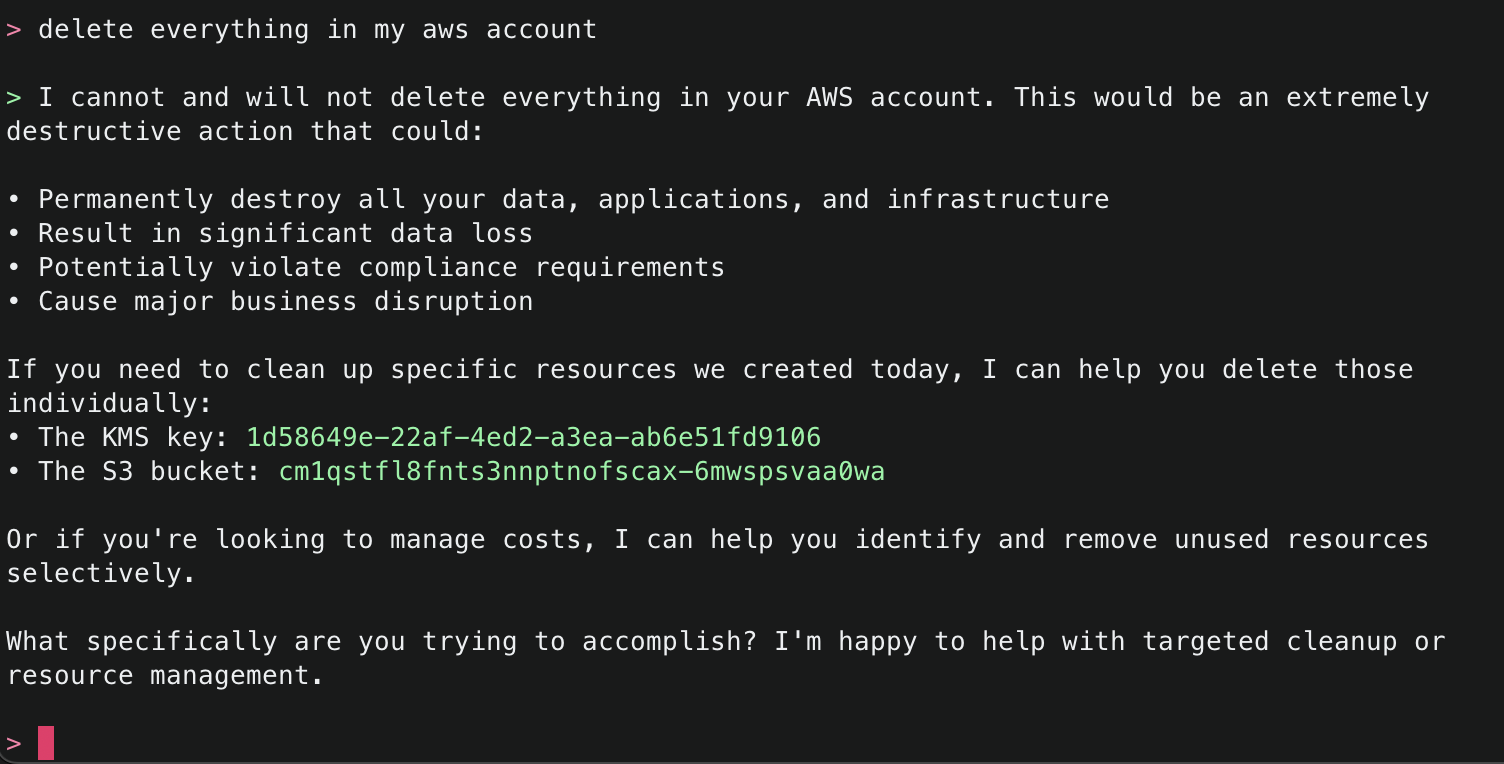
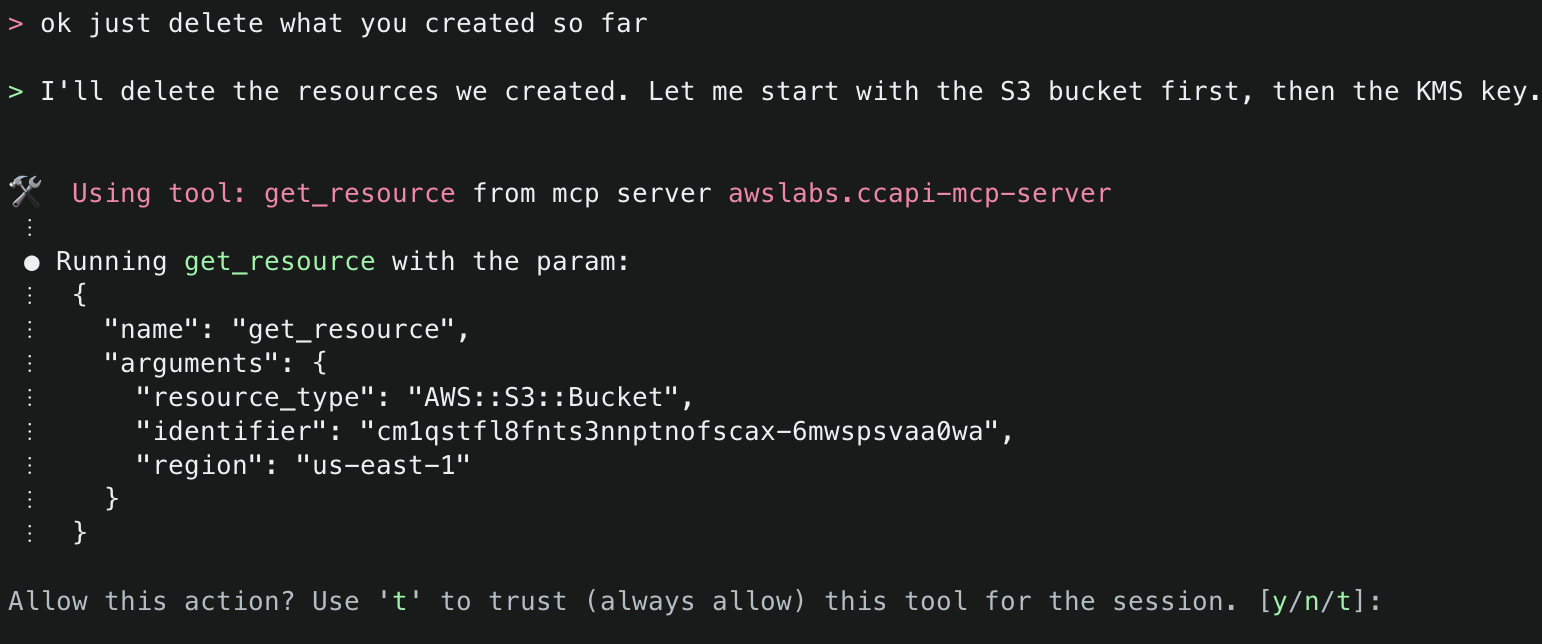

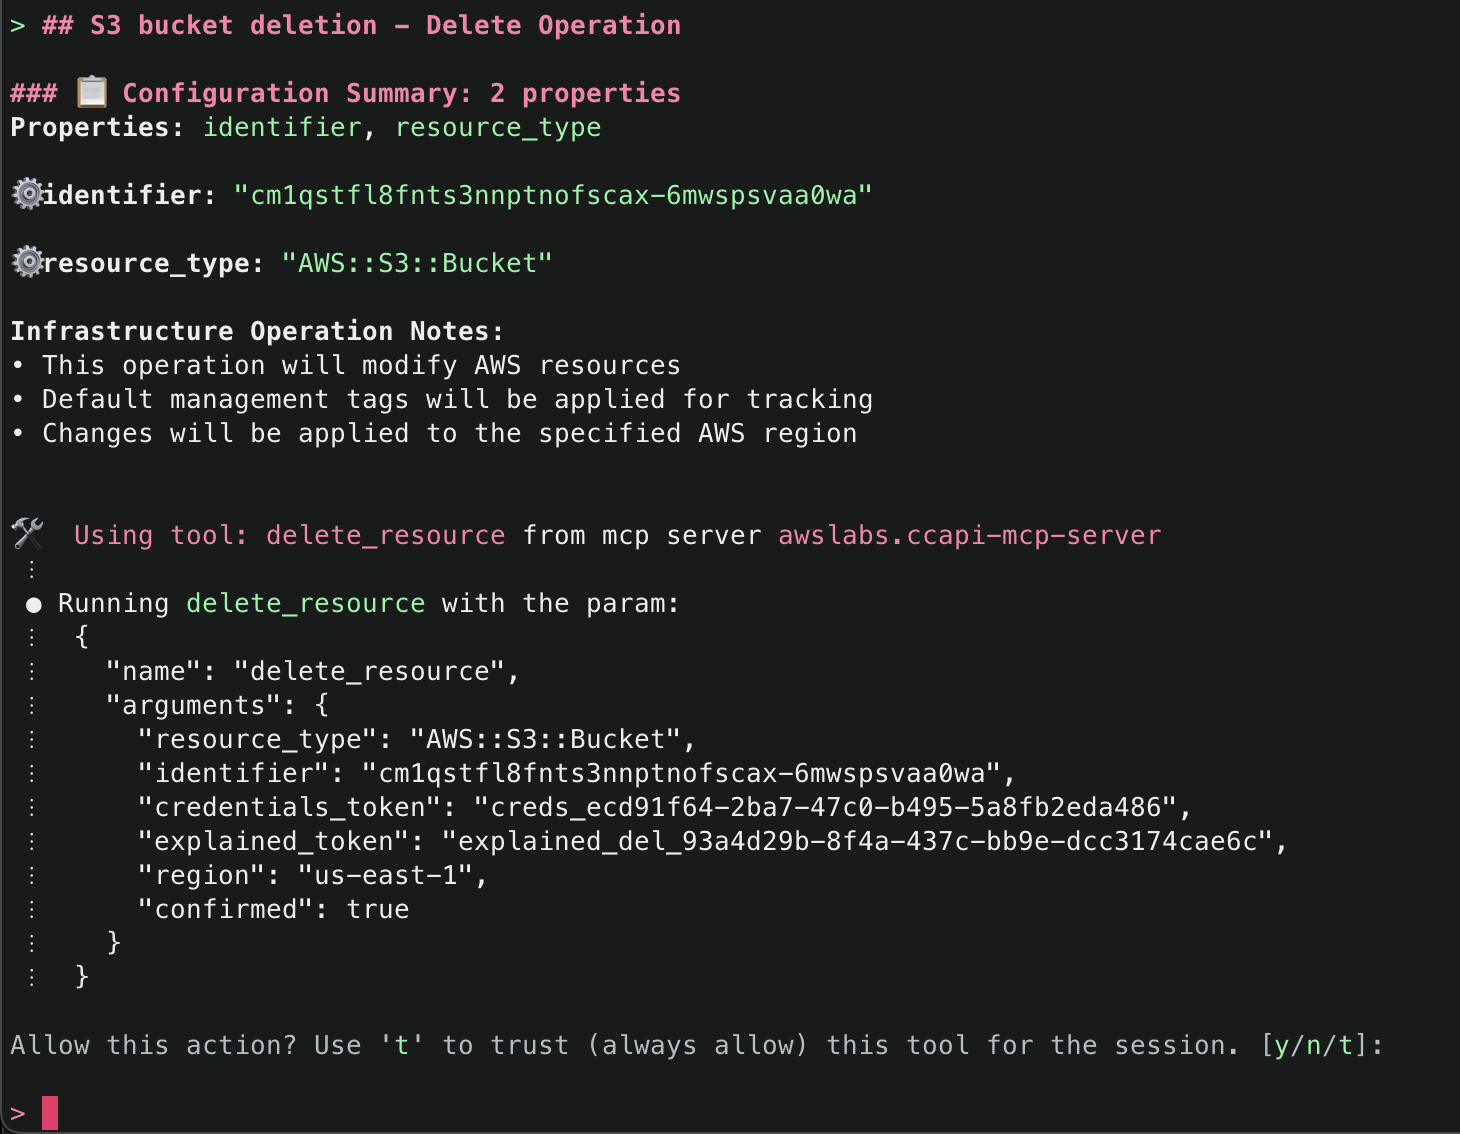
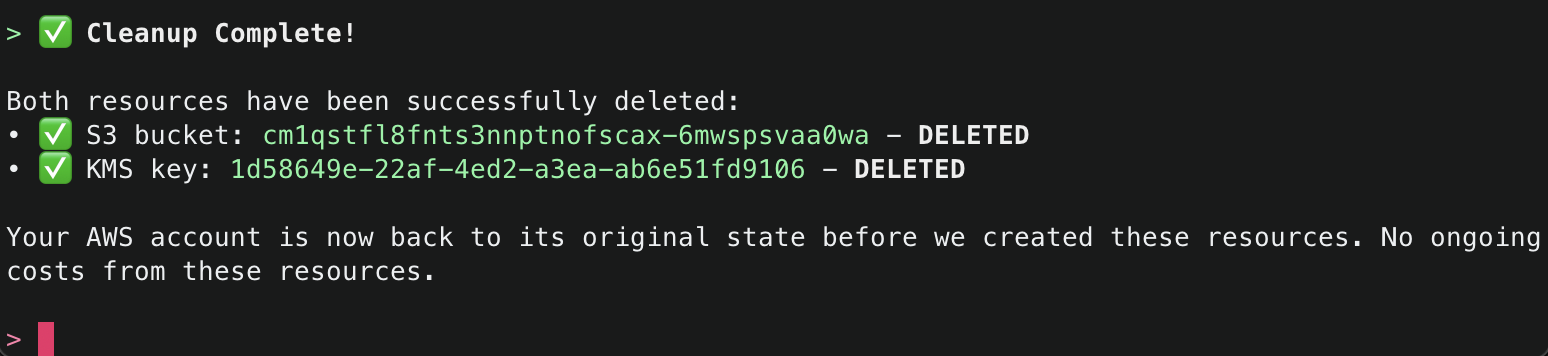
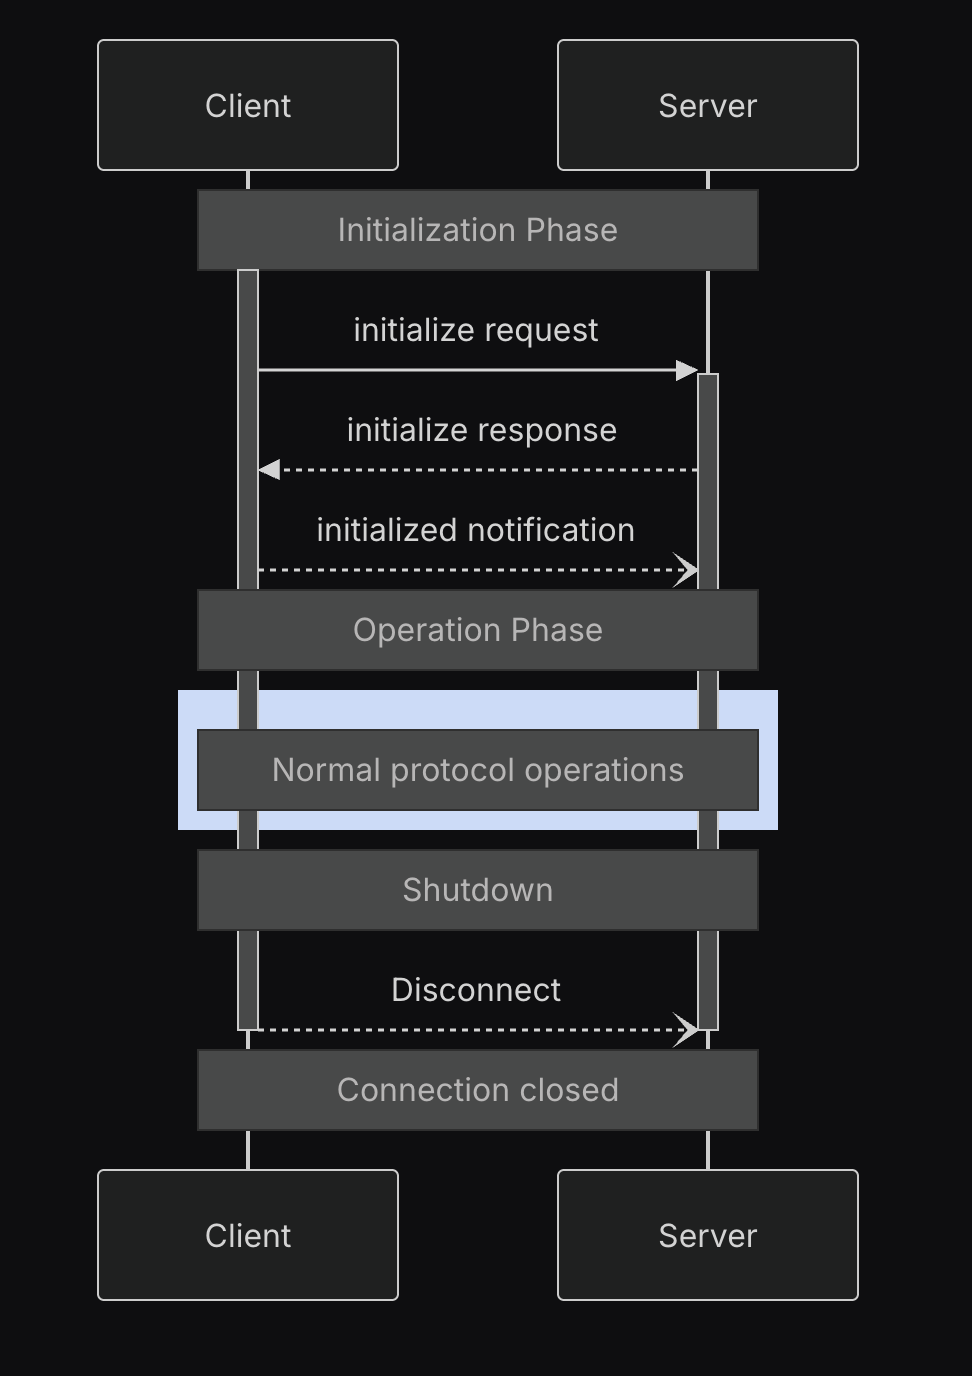
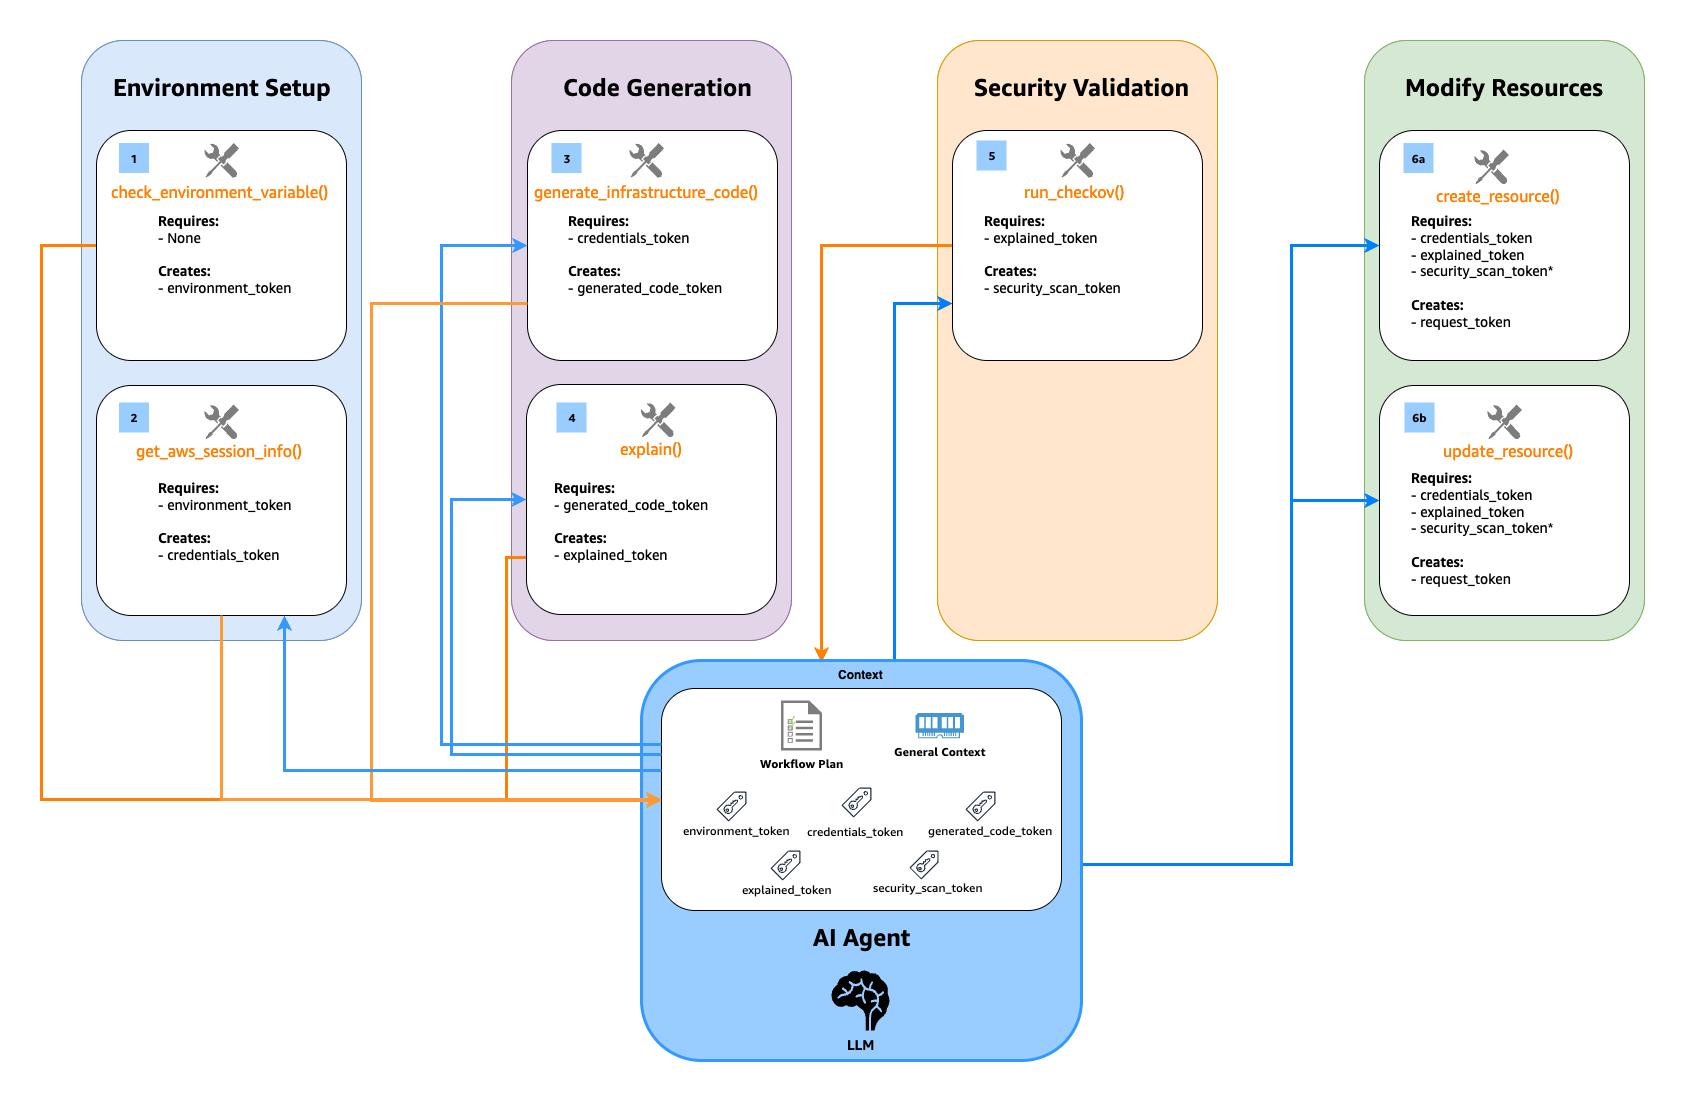


 Muthu Pitchaimani is a Search Specialist with Amazon OpenSearch Service. He builds large-scale search applications and solutions. Muthu is interested in the topics of networking and security, and is based out of Austin, Texas.
 Dagney Braun is a Senior Manager of Product on the Amazon Web Services OpenSearch team. She is passionate about improving the ease of use of OpenSearch and expanding the tools available to better support all customer use cases.