Tag Archives: Amazon Simple Queue Service (SQS)

Create a serverless feedback collector application using Amazon Pinpoint’s two-way SMS functionality

Post Syndicated from Murat Balkan original https://aws.amazon.com/blogs/messaging-and-targeting/create-a-serverless-feedback-collector-application-by-using-amazon-pinpoints-two-way-sms-functionality/

Introduction

Two-way SMS communication is used by many companies to create interactive engagements with their customers. Traditional SMS notifications are one-way. While this is valid for many different use cases like one-time passwords (OTP) notifications and security notifications or reminders, some other use-cases may benefit from collecting information from the same channel. Two-way SMS allows customers to create this feedback mechanism and enhance business interactions and overall customer experience.

SMS is chosen for its simplicity and availability across different sets of devices. By combining the two-way SMS mechanism with the vast breadth of services Amazon Web Services (AWS) offers, companies can create effective architectures to better interact and serve their customers.

This blog post shows you how a serverless online appointment application can use Amazon Pinpoint’s two-way SMS functionality to collect customer feedback for completed appointments. You will learn how Amazon Pinpoint interacts with other AWS serverless services with its out-of-the-box integrations to create a scalable messaging application.

Architecture

By completing the steps in this post, you can create a system that uses the architecture illustrated in the following image:

The architecture of a feedback collector application that is composed of serverless AWS services

The flow of events starts when a Amazon DynamoDB table item, representing an online appointment, changes its status to COMPLETED. An AWS Lambda function which is subscribed to these changes over DynamoDB Streams detects this change and sends an SMS to the customer by using Amazon Pinpoint API’s sendMessages operation.

Amazon Pinpoint delivers the SMS to the recipient and generates a unique message ID to the AWS Lambda function. The Lambda function then adds this message ID to a DynamoDB table called “message-lookup”. This table is used for tracking different feedback requests sent during a multi-step conversation and associate them with the appointment ids. At this stage, the Lambda function also populates another table “feedbacks” which will hold the feedback responses that will be sent as SMS reply messages.

Each time a recipient replies to an SMS, Amazon Pinpoint publishes this reply event to an Amazon SNS topic which is subscribed by an Amazon SQS queue. Amazon Pinpoint will also add a messageId to this event which allows you to bind it to a sendMessages operation call.

A second AWS Lambda function polls these reply events from the Amazon SQS queue. It checks whether the reply is in the correct format (i.e. a number) and also associated with a previous request. If all conditions are met, the AWS Lambda function checks the ConversationStage attribute’s value from its message-lookup table. According to the current stage and the SMS answer received, AWS Lambda function will determine the next step.

For example, if the feedback score received is less than 5, a follow-up SMS is sent to the user asking if they’ll be happy to receive a call from the customer support team.

All SMS replies from the users are reflected to “feedbacks” table for further analysis.

Deploying the Sample Application

  1. Clone this GitHub repository to your local machine and install and configure AWS SAM with a test AWS IAM user.

You will use AWS SAM to deploy the remaining parts of this serverless architecture.

The AWS SAM template creates the following resources:

    • An Amazon DynamoDB table (appointments) that contains information about appointments, customers and their appointment status.
    • An Amazon DynamoDB table (feedbacks) that holds the received feedbacks from customers.
    • An Amazon DynamoDB table (message-lookup) that holds the Amazon Pinpoint message ids and associate them to appointments to track a multi-step conversation.
    • Two AWS Lambda functions (FeedbackSender and FeedbackReceiver)
    • An Amazon SNS topic that collects state change events from Amazon Pinpoint.
    • An Amazon SQS queue that queues the incoming messages.
    • An Amazon Pinpoint Application with an associated SMS channel.

This architecture consists of two Lambda functions, which are represented as two different apps in the AWS SAM template. These functions are named FeedbackSender and FeedbackReceiver. The FeedbackSender function listens the Amazon DynamoDB Stream associated with the appointments table and sends the SMS message requesting a feedback. Second Lambda function, FeedbackReceiver, polls the Amazon SQS queue and updates the feedbacks table in Amazon DynamoDB. (pinpoint-two-way-sms)

          Note: You’ll incur some costs by deploying this stack into your account.

  1. To start the SAM deployment, navigate to the root directory of the repository you downloaded and where the template.yaml AWS SAM template resides. AWS SAM also requires you to specify an Amazon Simple Storage Service (Amazon S3) bucket to hold the deployment artifacts. If you haven’t already created a bucket for this purpose, create one now. The bucket should have read and write access by an AWS Identity and Access Management (IAM) user.

At the command line, enter the following command to package the application:

sam package --template template.yaml --output-template-file output_template.yaml --s3-bucket BUCKET_NAME_HERE

In the preceding command, replace BUCKET_NAME_HERE with the name of the Amazon S3 bucket that should hold the deployment artifacts.

AWS SAM packages the application and copies it into this Amazon S3 bucket.

When the AWS SAM package command finishes running, enter the following command to deploy the package:

sam deploy --template-file output_template.yaml --stack-name BlogStackPinpoint --capabilities CAPABILITY_IAM

When you run this command, AWS SAM shows the progress of the deployment. When the deployment finishes, navigate to the Amazon Pinpoint console and choose the project named “BlogApplication”. This example uses “BlogStackPinpoint” as the stack name, you can change this to any other name you want.

  1. From the left navigation, choose Settings, SMS and voice. On the SMS and voice settings page, choose the Request phone number button under Number settings

Screenshot of request phone number screen

  1. Choose a target country. Set the Default message type as Transactional, and click on the Request long codes button to buy a long code.

Note: In United States, you can also request a Toll Free Number(TFN)

Screenshot showing long code additio

A long code will be added to the Number settings list.

  1. Choose the newly added number to reach the SMS Settings page and enable the option Enable two-way-SMS. At the Incoming messages destination, select Choose an existing SNS topic, and from the drop down select the Amazon SNS topic that was created by the BlogStackPinpoint stack.

Choose Save to save your SMS settings.


Testing the Sample Application

Now that the application is deployed and configured, test it by creating sample records in the Amazon DynamoDB table. Navigate to Amazon DynamoDB console and reach the tables view. Inspect the tables that were created by the AWS SAM application.

Here, appointments table is the table where the appointments and their statuses are kept. It tracks the appointment lifecycle events with items identified by unique ids. In this sample scenario, we are assuming that an appointment application creates a record with ‘CREATED’ status when a new appointment is planned. After the appointment is finished, same application updates the status to ‘COMPLETED’ which will trigger the feedback collection process. Feedback results are collected in the feedbacks table. Amazon Pinpoint message id’s, conversation stage and appointment id’s are kept in the message-lookup table.

  1. To start testing the end-to-end flow, choose the appointments table to open table overview page.
  2. Next, select the Items tab and choose the Create item From the dropdown, select Text. Add the following and choose Save to create your first appointment object. While adding the following object, replace CustomerPhone attribute’s value with a phone number you own. The feedback request messages will be delivered to that number. Note: This number should match the country number for the long code you provisioned.

{

"CustomerName": "Customer A",

"CustomerPhone": "+12345678900",

"AppointmentStatus":"CREATED",

"id": "1"

}

  1. To trigger sending the feedback SMS, you need to set an existing item’s status to “COMPLETED” To do this, select the item and click Edit from the Actions menu.

Replace the item’s current JSON with the following.

{

"AppointmentStatus": "COMPLETED",

"CustomerName": "Customer A",

"CustomerPhone": "+12345678900",

"id": "1"

}

  1. Before choosing the Save button, double check that you have set CustomerPhone attribute’s value to a valid phone number.

After the change, you should receive an SMS message asking for a feedback. Provide a numeric reply of that is less than five to this message. This will trigger a follow up question asking for a consent to receive an in-person callback.


During your SMS conversation with the application, inspect the feedbacks table. The feedback you have given over this two-way SMS channel should have been reflected into the table.

If you want to repeat the process, make sure to increment the AppointmentId field for any additional appointment records.

Cleanup

To clean up the resources you used in your account, simply navigate to AWS Cloudformation console and delete the stack named “BlogStackPinpoint”.

After the stack is deleted, you also need to delete the Long code from the Pinpoint Console by choosing the number and pressing Remove phone number button. You can also delete the Amazon S3 bucket you used for packaging and deploying the AWS SAM application.

Conclusion

This architecture shows how Amazon Pinpoint can be used to make two-way SMS communication with your customers. You can implement Two-way SMS functionality in other use cases such as appointment reminders, polls, Q&A services, and more.

To learn more about Pinpoint and it’s two-way SMS mechanism, you can visit the Pinpoint documentation.


Building Multi-partner integration on AWS using Event-Driven Architecture

Post Syndicated from Vivek Kant original https://aws.amazon.com/blogs/architecture/building-multi-partner-integration-on-aws-using-event-driven-architecture/

Summary

Finserv MARKETS enables customers to buy financial services products such as credit cards, loans, insurance, and investments from various partners. Finserv integrates with a large number of partners in real time to provide services to customers.

Each partner has their own semantic APIs which can pose a challenge. There are also issues of latency and failures. We’ll show how our solution based on Event Driven Architecture (EDA) on AWS with Reactive design offers a solution to address these challenges.

Challenges with multi-partner integration

  • Latency – Making API calls to multiple partners increases latency of a service even in the scenario in which the calls are made in parallel.
  • Timeouts – If a partner’s APIs time out, this could impact overall service performance and availability.
  • Failures – A partner API failure could lead to the failure or major performance degradation of the overall service.
  • Customer Experience – Preserving the customer experience when depending on partner integration is a challenge, considering these technical issues.

Conceptual solution

In order to build this multi-partner platform, we discussed using traditional command-driven synchronous architecture. We also considered adopting an Event-Driven Architecture (EDA). Building our solution on EDA enabled us to deliver consistent customer experience while addressing failures and performance issues from partner APIs.

The diagram following shows a conceptual view of the solution:

Event Driven Conceptual view

Figure 1 – Conceptual View of Our Solution

The key components of the solution are:

1. User Interface: It is the single page application running on the user’s browser. For example, the UI makes an API call to business services to calculate insurance premiums with required parameters and receives a unique identifier. This enables the UI to be reactive and display the responses from the partner as they arrive.

2. Business Service: A microservice which provides APIs for:

• The user interface to submit and generate events for request for partner offer

• A callback to submit the response from the partner integration service in a reactive manner

3. Event Bus: The event bus infrastructure enables transportation, routing, and delivery of events to the right services. The business service raises a set of events to the event bus for a quote request. There is one event for each partner that is listened to by the reactive services.

4. Reactive Services: Services that consume events and call partner integration services for the calling partner API. On receiving the partner response, it calls the callback API on the business service. These services are organized by product domain (for example Motor Insurance).

5. Partner Integration Service: This service is responsible for integration with partners. The service translates the canonical request to partner-specific API calls. The service implements partner-specific security and error handling. There is one partner integration service per partner.

Realizing this solution on AWS

Amazon Web Services (AWS) offers cloud-native services enabling us to realize this solution.

Event Driven Architecture

Figure 2 – Realizing our solution on AWS

We used the following services to implement this architecture:

User Interface
We built the load balancing interface in Angular and host it on Apache Web Servers running Amazon Elastic Container Service (Amazon ECS). Elastic Load Balancing (ELB) distributes traffic evenly across the containers. Running a container gives us the required flexibility and scalability needed.

Business Service
The business service is a microservice built using Spring Boot and running on Amazon ECS containers. It uses an ELB used for service load balancing. The choice of Spring Boot and Amazon ECS gives flexibility and scalability through cluster auto scaling.

Data Store
We use polyglot architecture for data storage. For different product journeys and depending on data lifecycle, we choose either Amazon Aurora Postgres or Amazon ElastiCache for Redis. This gives us the right mix of performance and required durability for each business use case.

Event Bus
We evaluated Amazon Kinesis and Amazon Simple Notification Service (Amazon SNS) and came to the conclusion that for our volume and use cases, Amazon SNS offers the right capability. We implemented this by defining topics, for example, a four-wheeler insurance quote. This topic is subscribed by reactive services for each partner integration, where the partner service is called and a quote is generated. For downstream functionality where the API is to be called of the selected partner (for example, insurance policy issuance or credit card application submission), we chose Amazon Simple Queue Service (SQS). Amazon SQS provides simple queuing for asynchronous processing.

Reactive Services
These services are built using two different technologies. Spring Boot microservice running in an Amazon ECS container and AWS Lambda functions. Spring Boot is chosen due to our team’s familiarity of this technology; however, our plan is to move completely towards usage of Lambda functions for all asynchronous reactive services.

Partner Integration Service
Partner integration services provides the abstraction layer between partner API and canonical API, and is called by reactive services synchronously. In some cases, the error is passed back to reactive service to decide on retry. In other cases, for example, a policy issuance API retry is built into this service using exponential backoff strategy.

Partner API tracking
Partner API tracking gives us the right way of tracking the partner request and proactively address failures. We use Amazon Elasticsearch Service and Kibana for tracking. We can implement a circuit breaker pattern to shut down any partner for a period of time should failures reach a given threshold.

How this solution addresses multi-partner integration

This solution is built on the foundation of Event Driven Architecture with reactive design and is able to address the following challenges:

Latency
Since the user interface asynchronously polls for the response, it receives the partner response as soon as it arrives. This makes the response latency on the fastest partner API rather than slowest.

Timeout
Timeouts are set in the UI for polling, so if a partner API doesn’t respond, we time it out without any degradation. These timeouts are set based on the established user experience benchmarks. For example, how long do we let a user wait to see all insurance quotes before degrading their experience?

Failures
In case of an API failure, the UI will time out. Our API tracking can also enable a circuit breaker pattern to take a partner offline in the event of persistent failures.

Customer Experience
The solution gives a consistent experience to the user. Users can make their choice from the partner quotes/offers in a reactive way as received, rather than waiting for all offers to be shown. This design meets our customer requirements, derived from our Voice of Customer (VoC) study sessions.

Conclusion

In the digital space, APIs are the most common mechanism for system integration. Building a solution that is scalable, resilient, and provides the best customer experience is challenging. Event Driven Architecture with Reactive design offers a solution to address these issues. We process over 5000+ requests every day in Insurance and Credit domains. We’ve been able to achieve required availability of over 99.9%, while maintaining a positive customer experience on this platform.

Using Amazon SQS dead-letter queues to replay messages

Post Syndicated from James Beswick original https://aws.amazon.com/blogs/compute/using-amazon-sqs-dead-letter-queues-to-replay-messages/

Amazon Simple Queue Service (Amazon SQS) is a fully managed message queuing service. It enables you to decouple and scale microservices, distributed systems, and serverless applications. A commonly used feature of Amazon SQS is dead-letter queues. The DLQ (dead-letter queue) is used to store messages that can’t be processed (consumed) successfully.

This post describes how to add automated resilience to an existing SQS queue. It monitors the dead-letter queue and moves a message back to the main queue to see if it can be processed again. It also uses a specific algorithm to make sure this is not repeated forever. Each time it attempts to reprocess the message, the replay time increases until the message is finally considered dead.

I use Amazon SQS dead-letter queues, AWS Lambda, and a specific algorithm to decrease the rate of retries for failed messages. I then package and publish this serverless solution in the AWS Serverless Application Repository.

Dead-letter queues and message replay

The main task of a dead-letter queue (DLQ) is to handle message failure. It allows you to set aside and isolate non-processed messages to determine why processing failed. Often these failed messages are caused by application errors. For example, a consumer application fails to parse a message correctly and throws an unhandled exception. This exception then triggers an error response that sends the message to the DLQ. The AWS documentation contains a tutorial detailing the configuration of an Amazon SQS dead-letter queue.

To process the failed messages, I build a retry mechanism by implementing an exponential backoff algorithm. The idea behind exponential backoff is to use progressively longer waits between retries for consecutive error responses. Most exponential backoff algorithms use jitter (randomized delay) to prevent successive collisions. This spreads the message retries more evenly across time, allowing them to be processed more efficiently.

Solution overview

Solution architecture

The flow of the message sent by the producer to SQS is as follows:

  1. The producer application sends a message to an SQS queue
  2. The consumer application fails to process the message in the same SQS queue
  3. The message is moved from the main SQS queue to the default dead-letter queue as per the component settings.
  4. A Lambda function is configured with the SQS main dead-letter queue as an event source. It receives and sends back the message to the original queue adding a message timer.
  5. The message timer is defined by the exponential backoff and jitter algorithm.
  6. You can limit the number of retries. If the message exceeds this limit, the message is moved to a second DLQ where an operator processes it manually.

How the replay function works

Each time the SQS dead-letter queue receives a message, it triggers Lambda to run the replay function. The replay code uses an SQS message attribute `sqs-dlq-replay-nb` as a persistent counter for the current number of retries attempted. The number of retries is compared to the maximum number (defined in the application configuration file). If it exceeds the maximum, the message is moved to the human operated queue. If not, the function uses the AWS Lambda event data to build a new message for the Amazon SQS main queue. Finally it updates the retry counter, adds a new message timer to the message, and it sends the message back (replays) to the main queue.

def handler(event, context):
    """Lambda function handler."""
    for record in event['Records']:
        nbReplay = 0
        # number of replay
        if 'sqs-dlq-replay-nb' in record['messageAttributes']:
            nbReplay = int(record['messageAttributes']['sqs-dlq-replay-nb']["stringValue"])

        nbReplay += 1
        if nbReplay > config.MAX_ATTEMPS:
            raise MaxAttempsError(replay=nbReplay, max=config.MAX_ATTEMPS)

        # SQS attributes
        attributes = record['messageAttributes']
        attributes.update({'sqs-dlq-replay-nb': {'StringValue': str(nbReplay), 'DataType': 'Number'}})

        _sqs_attributes_cleaner(attributes)

        # Backoff
        b = backoff.ExpoBackoffFullJitter(base=config.BACKOFF_RATE, cap=config.MESSAGE_RETENTION_PERIOD)
        delaySeconds = b.backoff(n=int(nbReplay))

        # SQS
        SQS.send_message(
            QueueUrl=config.SQS_MAIN_URL,
            MessageBody=record['body'],
            DelaySeconds=int(delaySeconds),
            MessageAttributes=record['messageAttributes']
        )

How to use the application

You can use this serverless application via:

  • The Lambda console: choose the “Browse serverless app repository” option to create a function. Select “amazon-sqs-dlq-replay-backoff” application in the public applications repository. Then, configure the application with the default SQS parameters and the replay feature parameters.
  • The Serverless Framework, as described by Yan Cui in this blog post.
  • An AWS CloudFormation template by using the AWS::ServerlessRepo::Application resource, as described in the documentation.

Here is an example of a CloudFormation template using the AWS Serverless Application Repository application:

AWSTemplateFormatVersion: '2010-09-09'
Transform: AWS::Serverless-2016-10-31

Resources:
  ReplaySqsQueue:
    Type: AWS::Serverless::Application
    Properties:
      Location: 
        ApplicationId: arn:aws:serverlessrepo:eu-west-1:1234123412:applications~sqs-dlq-replay
        SemanticVersion: 1.0.0
      Parameters:
        BackoffRate: "2"
        MaxAttempts: "3"

Conclusion

I describe how an exponential backoff algorithm (with jitter) enhances the message processing capabilities of an Amazon SQS queue. You can now find the amazon-sqs-dlq-replay-backoff application in the AWS Serverless Application Repository. Download the code from this GitHub repository.

To get started with dead-letter queues in Amazon SQS, read:

To implement replay mechanisms, see:

For more serverless learning resources, visit https://serverlessland.com.

Getting started with RPA using AWS Step Functions and Amazon Textract

Post Syndicated from James Beswick original https://aws.amazon.com/blogs/compute/getting-started-with-rpa-using-aws-step-functions-and-amazon-textract/

This post is courtesy of Joe Tringali, Solutions Architect.

Many organizations are using robotic process automation (RPA) to automate workflow, back-office processes that are labor-intensive. RPA, as software bots, can often handle many of these activities. Often RPA workflows contain repetitive manual tasks that must be done by humans, such as viewing invoices to find payment details.

AWS Step Functions is a serverless function orchestrator and workflow automation tool. Amazon Textract is a fully managed machine learning service that automatically extracts text and data from scanned documents. Combining these services, you can create an RPA bot to automate the workflow and enable employees to handle more complex tasks.

In this post, I show how you can use Step Functions and Amazon Textract to build a workflow that enables the processing of invoices. Download the code for this solution from https://github.com/aws-samples/aws-step-functions-rpa.

Overview

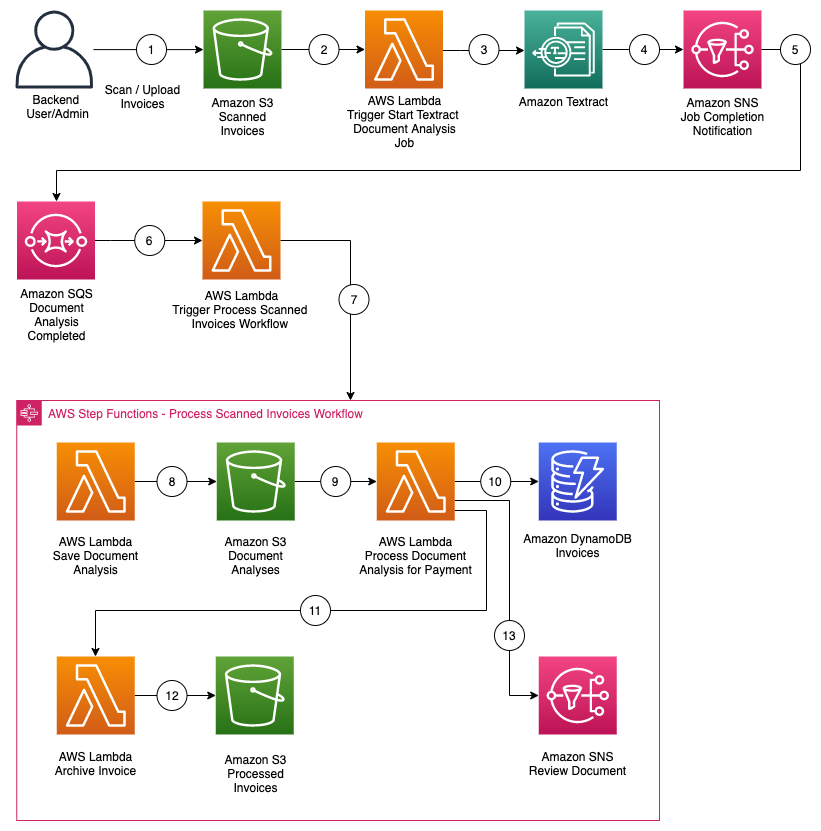
The following serverless architecture can process scanned invoices in PDF or image formats for submitting payment information to a database.

Example architecture
To implement this architecture, I use single-purpose Lambda functions and Step Functions to build the workflow:

  1. Invoices are scanned and loaded into an Amazon Simple Storage Service (S3) bucket.
  2. The loading of an invoice into Amazon S3 triggers an AWS Lambda function to be invoked.
  3. The Lambda function starts an asynchronous Amazon Textract job to analyze the text and data of the scanned invoice.
  4. The Amazon Textract job publishes a completion notification message with a status of “SUCCEEDED” or “FAILED” to an Amazon Simple Notification Service (SNS) topic.
  5. SNS sends the message to an Amazon Simple Queue Service (SQS) queue that is subscribed to the SNS topic.
  6. The message in the SQS queue triggers another Lambda function.
  7. The Lambda function initiates a Step Functions state machine to process the results of the Amazon Textract job.
  8. For an Amazon Textract job that completes successfully, a Lambda function saves the document analysis into an Amazon S3 bucket.
  9. The loading of the document analysis to Amazon S3 triggers another Lambda function.
  10. The Lambda function retrieves the text and data of the scanned invoice to find the payment information. It writes an item to an Amazon DynamoDB table with a status indicating if the invoice can be processed.
  11. If the DynamoDB item contains the payment information, another Lambda function is invoked.
  12. The Lambda function archives the processed invoice into another S3 bucket.
  13. If the DynamoDB item does not contain the payment information, a message is published to an Amazon SNS topic requesting that the invoice be reviewed.

Amazon Textract can extract information from the various invoice images and associate labels with the data. You must then handle the various labels that different invoices may associate with the payee name, due date, and payment amount.

Determining payee name, due date and payment amount

After the document analysis has been saved to S3, a Lambda function retrieves the text and data of the scanned invoice to find the information needed for payment. However, invoices can use a variety of labels for the same piece of data, such a payment’s due date.

In the example invoices included with this blog, the payment’s due date is associated with the labels “Pay On or Before”, “Payment Due Date” and “Payment Due”. Payment amounts can also have different labels, such as “Total Due”, “New Balance Total”, “Total Current Charges”, and “Please Pay”. To address this, I use a series of helper functions in the app.py file in the process_document_analysis folder of the GitHub repo.

In app.py, there is the following get_ky_map helper function:

def get_kv_map(blocks):
    key_map = {}
    value_map = {}
    block_map = {}
    for block in blocks:
        block_id = block['Id']
        block_map[block_id] = block
        if block['BlockType'] == "KEY_VALUE_SET":
            if 'KEY' in block['EntityTypes']:
                key_map[block_id] = block
            else:
                value_map[block_id] = block
    return key_map, value_map, block_map

The get_kv_map function is invoked by the Lambda function handler. It iterates over the “Blocks” element of the document analysis produced by Amazon Textract to create dictionaries of keys (labels) and values (data) associated with each block identified by Amazon Textract. It then invokes the following get_kv_relationship helper function:

def get_kv_relationship(key_map, value_map, block_map):
    kvs = {}
    for block_id, key_block in key_map.items():
        value_block = find_value_block(key_block, value_map)
        key = get_text(key_block, block_map)
        val = get_text(value_block, block_map)
        kvs[key] = val
    return kvs

The get_kv_relationship function merges the key and value dictionaries produced by the get_kv_map function to create a single Python key value dictionary where labels are the keys to the dictionary and the invoice’s data are the values. The handler then invokes the following get_line_list helper function:

def get_line_list(blocks):
    line_list = []
    for block in blocks:
        if block['BlockType'] == "LINE":
            if 'Text' in block: 
                line_list.append(block["Text"])
    return line_list

Extracting payee names is more complex because the data may not be labeled. The payee may often differ from the entity sending the invoice. With the Amazon Textract analysis in a format more easily consumable by Python, I use the following get_payee_name helper function to parse and extract the payee:

def get_payee_name(lines):
    payee_name = ""
    payable_to = "payable to"
    payee_lines = [line for line in lines if payable_to in line.lower()]
    if len(payee_lines) > 0:
        payee_line = payee_lines[0]
        payee_line = payee_line.strip()
        pos = payee_line.lower().find(payable_to)
        if pos > -1:
            payee_line = payee_line[pos + len(payable_to):]
            if payee_line[0:1] == ':':
                payee_line = payee_line[1:]
            payee_name = payee_line.strip()
    return payee_name

The get_amount helper function searches the key value dictionary produced by the get_kv_relationship function to retrieve the payment amount:

def get_amount(kvs, lines):
    amount = None
    amounts = [search_value(kvs, amount_tag) for amount_tag in amount_tags if search_value(kvs, amount_tag) is not None]
    if len(amounts) > 0:
        amount = amounts[0]
    else:
        for idx, line in enumerate(lines):
            if line.lower() in amount_tags:
                amount = lines[idx + 1]
                break
    if amount is not None:
        amount = amount.strip()
        if amount[0:1] == '$':
            amount = amount[1:]
    return amount

The amount_tags variable contains a list of possible labels associated with the payment amount:

amount_tags = ["total due", "new balance total", "total current charges", "please pay"]

Similarly, the get_due_date helper function searches the key value dictionary produced by the get_kv_relationship function to retrieve the payment due date:

def get_due_date(kvs):
    due_date = None
    due_dates = [search_value(kvs, due_date_tag) for due_date_tag in due_date_tags if search_value(kvs, due_date_tag) is not None]
    if len(due_dates) > 0:
        due_date = due_dates[0]
    if due_date is not None:
        date_parts = due_date.split('/')
        if len(date_parts) == 3:
            due_date = datetime(int(date_parts[2]), int(date_parts[0]), int(date_parts[1])).isoformat()
        else:
            date_parts = [date_part for date_part in re.split("\s+|,", due_date) if len(date_part) > 0]
            if len(date_parts) == 3:
                datetime_object = datetime.strptime(date_parts[0], "%b")
                month_number = datetime_object.month
                due_date = datetime(int(date_parts[2]), int(month_number), int(date_parts[1])).isoformat()
    else:
        due_date = datetime.now().isoformat()
    return due_date

The due_date_tag contains a list of possible labels associated with the payment due:

due_date_tags = ["pay on or before", "payment due date", "payment due"]

If all required elements needed to issue a payment are found, it adds an item to the DynamoDB table with a status attribute of “Approved for Payment”. If the Lambda function cannot determine the value of one or more required elements, it adds an item to the DynamoDB table with a status attribute of “Pending Review”.

Payment Processing

If the item in the DynamoDB table is marked “Approved for Payment”, the processed invoice is archived. If the item’s status attribute is marked “Pending Review”, an SNS message is published to an SNS Pending Review topic. You can subscribe to this topic so that you can add additional labels to the Python code for determining payment due dates and payment amounts.

Note that the Lambda functions are single-purpose functions, and all workflow logic is contained in the Step Functions state machine. This diagram shows the various tasks (states) of a successful workflow.

State machine workflow

For more information about this solution, download the code from the GitHub repo (https://github.com/aws-samples/aws-step-functions-rpa).

Prerequisites

Before deploying the solution, you must install the following prerequisites:

  1. Python.
  2. AWS Command Line Interface (AWS CLI) – for instructions, see Installing the AWS CLI.
  3. AWS Serverless Application Model Command Line Interface (AWS SAM CLI) – for instructions, see Installing the AWS SAM CLI.

Deploying the solution

The solution creates the following S3 buckets with names suffixed by your AWS account ID to prevent a global namespace collision of your S3 bucket names:

  • scanned-invoices-<YOUR AWS ACCOUNT ID>
  • invoice-analyses-<YOUR AWS ACCOUNT ID>
  • processed-invoices-<YOUR AWS ACCOUNT ID>

The following steps deploy the example solution in your AWS account. The solution deploys several components including a Step Functions state machine, Lambda functions, S3 buckets, a DynamoDB table for payment information, and SNS topics.

AWS CloudFormation requires an S3 bucket and stack name for deploying the solution. To deploy:

  1. Download code from GitHub repo (https://github.com/aws-samples/aws-step-functions-rpa).
  2. Run the following command to build the artifacts locally on your workstation:sam build
  3. Run the following command to create a CloudFormation stack and deploy your resources:sam deploy --guided --capabilities CAPABILITY_NAMED_IAM

Monitor the progress and wait for the completion of the stack creation process from the AWS CloudFormation console before proceeding.

Testing the solution

To test the solution, upload the PDF test invoices to the S3 bucket named scanned-invoices-<YOUR AWS ACCOUNT ID>.

A Step Functions state machine with the name <YOUR STACK NAME>-ProcessedScannedInvoiceWorkflow runs the workflow. Amazon Textract document analyses are stored in the S3 bucket named invoice-analyses-<YOUR AWS ACCOUNT ID>, and processed invoices are stored in the S3 bucket named processed-invoices-<YOUR AWS ACCOUNT ID>. Processed payments are found in the DynamoDB table named <YOUR STACK NAME>-invoices.

You can monitor the status of the workflows from the Step Functions console. Upon completion of the workflow executions, review the items added to DynamoDB from the Amazon DynamoDB console.

Cleanup

To avoid ongoing charges for any resources you created in this blog post, delete the stack:

  1. Empty the three S3 buckets created during deployment using the S3 console:
    – scanned-invoices-<YOUR AWS ACCOUNT ID>
    – invoice-analyses-<YOUR AWS ACCOUNT ID>
    – processed-invoices-<YOUR AWS ACCOUNT ID>
  2. Delete the CloudFormation stack created during deployment using the CloudFormation console.

Conclusion

In this post, I showed you how to use a Step Functions state machine and Amazon Textract to automatically extract data from a scanned invoice. This eliminates the need for a person to perform the manual step of reviewing an invoice to find payment information to be fed into a backend system. By replacing the manual steps of a workflow with automation, an organization can free up their human workforce to handle more value-added tasks.

To learn more, visit AWS Step Functions and Amazon Textract for more information. For more serverless learning resources, visit https://serverlessland.com.


Application integration patterns for microservices: Running distributed RFQs

Post Syndicated from James Beswick original https://aws.amazon.com/blogs/compute/application-integration-patterns-running-distributed-rfqs/

This post is courtesy of Dirk Fröhner, Principal Solutions Architect.

The first blog in this series introduces asynchronous messaging for building loosely coupled systems that can scale, operate, and evolve individually. It considers messaging as a communications model for microservices architectures. Part 2 dives into fan-out strategies and applies the respective patterns to a concrete use case.

In this post, I look at how to apply messaging patterns to help coordinate distributed requests and responses. Specifically, I focus on a composite pattern called scatter-gather, as presented in the book “Enterprise Integration Patterns: Designing, Building, and Deploying Messaging Solutions” (Hohpe and Woolf, 2004).

I also show how a client can communicate with a backend via synchronous REST API operations while asynchronous messaging is applied internally for processing.

Overview

The use case is for Wild Rydes, a fictional application that replaces traditional taxis with unicorns. It’s used in several hands-on AWS workshops that illustrate serverless development concepts.

Wild Rydes wants to allow customers to initiate requests for quotation (RFQs) for their rides. This allows unicorns to make special offers to potential customers within a defined schedule. A customer can send their ride details and ask for quotations from all unicorns that are within a certain vicinity. The customer can then choose the best offer.

Wild Rydes

The scatter-gather pattern

The scatter-gather pattern can be used to implement this use-case on the server side. This pattern is ideal for requesting responses from multiple parties, then aggregating and processing that data.

As presented by Hohpe and Woolf, the scatter-gather pattern is a composite pattern that illustrates how to “broadcast a message to multiple recipients and re-aggregate the responses back into a single message”. The pattern is illustrated in the following diagram.

Scatter-gather architecture

The flow starts with the Requester to initiate the broadcast to all potential Responders. This can be architected in a loosely coupled manner using pub-sub messaging with Amazon SNS or Amazon MQ, as shown in this blog post.

All responders must send their answers somewhere for aggregation and processing. This can also be architected in a loosely coupled manner using a message queue with Amazon SQS or Amazon MQ, as described in this blog post.

The Aggregator component consumes the individual responses from the response queue. It forwards the aggregate to the Processor component for final processing. Both Aggregator and Processor can be part of the same application or process. If separated, they can be decoupled through messaging. The Requester can also be part of the same application or process as Aggregator and Processor.

Explaining the architecture and API

In this section, I walk through the use-case and explain how it can be architected and implemented. I show how the scatter-gather pattern works in the backend, and the client-to-backend communication.

Submit instant ride RFQ

To initiate such an RFQ, the customer app communicates with the ride booking service on the backend. The ride booking service exposes a REST API. By default, an RFQ runs for five minutes, but Wild Rydes is working on a feature to let a customer individually set that value.

A request to submit an instant-ride RFQ contains start and destination locations for the ride and the customer ID:

POST /<submit-instant-ride-rfq-resource-path> HTTP/1.1
...

{
    "from": "...",
    "to": "...",
    "customer": "..."
}

The RFQ is a lengthy process so the client app should not expect an immediate response. Instead, the API accepts the RFQ, creates an RFQ task resource, and returns to the client. The response contains a URL to request an update for the status. It also provides an estimated time for the end of the RFQ:

HTTP/1.1 202 Accepted
...

{
    "links": {
        "self": "http://.../<rfq-task-resource-path>",
        "...": "..."
    },
    "status": "running",
    "eta": "..."
}

The following architecture shows this interaction, excluding the process after a new RFQ is submitted.

Client app interaction

Processing the RFQ

The backend uses the scatter-gather pattern to publish the RFQ to unicorns and collect responses for aggregation and processing.

Backend architecture

1. The ride booking service acts as the requester in the scatter-gather pattern. Following a new RFQ from the client app, it publishes the details into an SNS topic. This topic is related to the location of the ride’s starting point since customers need quotes from unicorns within the vicinity. These messages are the green request messages.

2. The unicorn management service maintains instances of unicorn management resources and subscribes them to RFQ topics related to their current location. These resources receive the RFQ request messages and handle the interaction with the Wild Rydes unicorn app.

3. The unicorns in the vicinity are notified through the Wild Rydes unicorn app about the new RFQ and can react if they are available. Notification options between the unicorn management service and the Wild Rydes unicorn app include push notifications and web sockets.

4. Every addressed unicorn can now submit their quote. All quotes go back through the unicorn management resources and the unicorn management service into the RFQ response queue. They act as the responders in the sense of the scatter-gather pattern.

5. The ride booking service also acts as aggregator and processor in the sense of the scatter-gather pattern. It uses SQS to consume messages from an RFQ response queue that eventually contains the RFQ responses from the involved unicorns. It starts doing so immediately after it publishes the details of a new RFQ into the RFQ topic. The messages from the RFQ response queue relate to the blue response messages.

The ride booking service consumes all incoming responses from that queue. This continues until the deadline or all participating unicorns have answered, whatever occurs first. The aggregator responsibility can be as simple as persisting the details of each incoming RFQ response into an Amazon DynamoDB table.

To match incoming responses to the right RFQ, it uses a fundamental integration pattern, correlation ID. In this pattern, a requester adds a unique ID to an outgoing message and each responder is asked to forward this ID in their response.

Also, responders must know where to send their responses to. To keep this dynamic, there is another fundamental integration pattern: return address. It suggests that a requester adds meta information into outgoing messages that indicate the address for their responses. In this architecture, this is the ARN of the SQS queue that acts as the RFQ response queue. This supports an option to simplify the response management: the RFQ response queue is a dedicated queue per customer.

Lastly, the processor responsibility in the ride booking service reads the RFQ responses from the DynamoDB table. It converts the data to JSON for the Wild Rydes customer app.

Check RFQ status

During the RFQ processing, a customer may want to know how many responses have already arrived, or if the results are already available. After submitting an instant ride RFQ, the client receives a representation of the running task. It can use the self-link to request an update:

GET /<rfq-task-resource-path> HTTP/1.1

While the task is running, a response from the ride booking service comes back with the respective status value and the count of responses that have already arrived:

HTTP/1.1 200 OK
...

{
    "links": {
        "self": "http://.../<rfq-task-resource-path>",
        "...": "..."
    },
    "status": "running",
    "responses-received": 2,
    "eta": "..."
}

After the RFQ is completed

An RFQ is completed if either the time is up or all unicorns have answered. The result of the RFQ is then available to the customer. If the client requests an update to the task representation, the response indicates this by redirecting to the RFQ result:

HTTP/1.1 303 See Other
Location: <url-of-rfq-result-resource>

Requesting a representation of the results resource, the client receives the quotes of all the participating unicorns. The frontend customer app can visualize these accordingly:

HTTP/1.1 200 OK
...

{
    "links": { ... },
    "from": "...",
    "to": "...",
    "customer": "...",
    "quotes": [ ... ]
}

The ride booking service can also use means of active notifications to make the customer app aware once the RFQ result is ready, including the link to the RFQ result. Examples for this include push notifications and web sockets.

Conclusion

In this blog, I present the scatter-gather pattern, which is a composite pattern based on pub-sub and point-to-point messaging channels. It also employs correlation ID and return address. I show how this is implemented in the Wild Rydes example application. You can use this integration pattern for communication in your microservices.

I cover how synchronous API communication between end user client and backend can work along with asynchronous messaging for request processing internally.

To learn more:

For more serverless learning resources, visit https://serverlessland.com.

Optimizing the cost of serverless web applications

Post Syndicated from James Beswick original https://aws.amazon.com/blogs/compute/optimizing-the-cost-of-serverless-web-applications/

Web application backends are one of the most frequent types of serverless use-case for customers. The pay-for-value model can make it cost-efficient to build web applications using serverless tools.

While serverless cost is generally correlated with level of usage, there are architectural decisions that impact cost efficiency. The impact of these choices is more significant as your traffic grows, so it’s important to consider the cost-effectiveness of different designs and patterns.

This blog post reviews some common areas in web applications where you may be able to optimize cost. It uses the Happy Path web application as a reference example, which you can read about in the introductory blog post.

Serverless web applications generally use a combination of the services in the following diagram. I cover each of these areas to highlight common areas for cost optimization.

Serverless architecture by AWS service

The API management layer: Selecting the right API type

Most serverless web applications use an API between the frontend client and the backend architecture. Amazon API Gateway is a common choice since it is a fully managed service that scales automatically. There are three types of API offered by the service – REST APIs, WebSocket APIs, and the more recent HTTP APIs.

HTTP APIs offer many of the features in the REST APIs service, but the cost is often around 70% less. It supports Lambda service integration, JWT authorization, CORS, and custom domain names. It also has a simpler deployment model than REST APIs. This feature set tends to work well for web applications, many of which mainly use these capabilities. Additionally, HTTP APIs will gain feature parity with REST APIs over time.

The Happy Path application is designed for 100,000 monthly active users. It uses HTTP APIs, and you can inspect the backend/template.yaml to see how to define these in the AWS Serverless Application Model (AWS SAM). If you have existing AWS SAM templates that are using REST APIs, in many cases you can change these easily:

REST to HTTP API

Content distribution layer: Optimizing assets

Amazon CloudFront is a content delivery network (CDN). It enables you to distribute content globally across 216 Points of Presence without deploying or managing any infrastructure. It reduces latency for users who are geographically dispersed and can also reduce load on other parts of your service.

A typical web application uses CDNs in a couple of different ways. First, there is the distribution of the application itself. For single-page application frameworks like React or Vue.js, the build processes create static assets that are ideal for serving over a CDN.

However, these builds may not be optimized and can be larger than necessary. Many frameworks offer optimization plugins, and the JavaScript community frequently uses Webpack to bundle modules and shrink deployment packages. Similarly, any media assets used in the application build should be optimized. You can use tools like Lighthouse to analyze your web apps to find images that can be resized or compressed.

Optimizing images

The second common CDN use-case for web apps is for user-generated content (UGC). Many apps allow users to upload images, which are then shared with other users. A typical photo from a 12-megapixel smartphone is 3–9 MB in size. This high resolution is not necessary when photos are rendered within web apps. Displaying the high-resolution asset results in slower download performance and higher data transfer costs.

The Happy Path application uses a Resizer Lambda function to optimize these uploaded assets. This process creates two different optimized images depending upon which component loads the asset.

Image sizes in front-end applications

The upload S3 bucket shows the original size of the upload from the smartphone:

The distribution S3 bucket contains the two optimized images at different sizes:

Optimized images in the distribution S3 bucket

The distribution file sizes are 98–99% smaller. For a busy web application, using optimized image assets can make a significant difference to data transfer and CloudFront costs.

Additionally, you can convert to highly optimized file formats such as WebP to reduce file size even further. Not all browsers support this format, but you can use CSS on the frontend to fall back to other types if needed:

<img src="myImage.webp" onerror="this.onerror=null; this.src='myImage.jpg'">

The data layer

AWS offers many different database and storage options that can be useful for web applications. Billing models vary by service and Region. By understanding the data access and storage requirements of your app, you can make informed decisions about the right service to use.

Generally, it’s more cost-effective to store binary data in S3 than a database. First, when the data is uploaded, you can upload directly to S3 with presigned URLs instead of proxying data via API Gateway or another service.

If you are using Amazon DynamoDB, it’s best practice to store larger items in S3 and include a reference token in a table item. Part of DynamoDB pricing is based on read capacity units (RCUs). For binary items such as images, it is usually more cost-efficient to use S3 for storage.

Many web developers who are new to serverless are familiar with using a relational database, so choose Amazon RDS for their database needs. Depending upon your use-case and data access patterns, it may be more cost effective to use DynamoDB instead. RDS is not a serverless service so there are monthly charges for the underlying compute instance. DynamoDB pricing is based upon usage and storage, so for many web apps may be a lower-cost choice.

Integration layer

This layer includes services like Amazon SQS, Amazon SNS, and Amazon EventBridge, which are essential for decoupling serverless applications. Each of these have a request-based pricing component, where 64 KB of a payload is billed as one request. For example, a single SQS message with a 256 KB payload is billed as four requests. There are two optimization methods common for web applications.

1. Combine messages

Many messages sent to these services are much smaller than 64 KB. In some applications, the publishing service can combine multiple messages to reduce the total number of publish actions to SNS. Additionally, by either eliminating unused attributes in the message or compressing the message, you can store more data in a single request.

For example, a publishing service may be able to combine multiple messages together in a single publish action to an SNS topic:

  • Before optimization, a publishing service sends 100,000,000 1KB-messages to an SNS topic. This is charged as 100 million messages for a total cost of $50.00.
  • After optimization, the publishing service combines messages to send 1,562,500 64KB-messages to an SNS topic. This is charged as 1,562,500 messages for a total cost of $0.78.

2. Filter messages

In many applications, not every message is useful for a consuming service. For example, an SNS topic may publish to a Lambda function, which checks the content and discards the message based on some criteria. In this case, it’s more cost effective to use the native filtering capabilities of SNS. The service can filter messages and only invoke the Lambda function if the criteria is met. This lowers the compute cost by only invoking Lambda when necessary.

For example, an SNS topic receives messages about customer orders and forwards these to a Lambda function subscriber. The function is only interested in canceled orders and discards all other messages:

  • Before optimization, the SNS topic sends all messages to a Lambda function. It evaluates the message for the presence of an order canceled attribute. On average, only 25% of the messages are processed further. While SNS does not charge for delivery to Lambda functions, you are charged each time the Lambda service is invoked, for 100% of the messages.
  • After optimization, using an SNS subscription filter policy, the SNS subscription filters for canceled orders and only forwards matching messages. Since the Lambda function is only invoked for 25% of the messages, this may reduce the total compute cost by up to 75%.

3. Choose a different messaging service

For complex filtering options based upon matching patterns, you can use EventBridge. The service can filter messages based upon prefix matching, numeric matching, and other patterns, combining several rules into a single filter. You can create branching logic within the EventBridge rule to invoke downstream targets.

EventBridge offers a broader range of targets than SNS destinations. In cases where you publish from an SNS topic to a Lambda function to invoke an EventBridge target, you could use EventBridge instead and eliminate the Lambda invocation. For example, instead of routing from SNS to Lambda to AWS Step Functions, instead create an EventBridge rule that routes events directly to a state machine.

Business logic layer

Step Functions allows you to orchestrate complex workflows in serverless applications while eliminating common boilerplate code. The Standard Workflow service charges per state transition. Express Workflows were introduced in December 2019, with pricing based on requests and duration, instead of transitions.

For workloads that are processing large numbers of events in shorter durations, Express Workflows can be more cost-effective. This is designed for high-volume event workloads, such as streaming data processing or IoT data ingestion. For these cases, compare the cost of the two workflow types to see if you can reduce cost by switching across.

Lambda is the on-demand compute layer in serverless applications, which is billed by requests and GB-seconds. GB-seconds is calculated by multiplying duration in seconds by memory allocated to the function. For a function with a 1-second duration, invoked 1 million times, here is how memory allocation affects the total cost in the US East (N. Virginia) Region:

Memory (MB) GB/S Compute cost Total cost
128 125,000 $ 2.08 $ 2.28
512 500,000 $ 8.34 $ 8.54
1024 1,000,000 $ 16.67 $ 16.87
1536 1,500,000 $ 25.01 $ 25.21
2048 2,000,000 $ 33.34 $ 33.54
3008 2,937,500 $ 48.97 $ 49.17

There are many ways to optimize Lambda functions, but one of the most important choices is memory allocation. You can choose between 128 MB and 3008 MB, but this also impacts the amount of virtual CPU as memory increases. Since total cost is a combination of memory and duration, choosing more memory can often reduce duration and lower overall cost.

Instead of manually setting the memory for a Lambda function and running executions to compare duration, you can use the AWS Lambda Power Tuning tool. This uses Step Functions to run your function against varying memory configurations. It can produce a visualization to find the optimal memory setting, based upon cost or execution time.

Optimizing costs with the AWS Lambda Power Tuning tool

Conclusion

Web application backends are one of the most popular workload types for serverless applications. The pay-per-value model works well for this type of workload. As traffic grows, it’s important to consider the design choices and service configurations used to optimize your cost.

Serverless web applications generally use a common range of services, which you can logically split into different layers. This post examines each layer and suggests common cost optimizations helpful for web app developers.

To learn more about building web apps with serverless, see the Happy Path series. For more serverless learning resources, visit https://serverlessland.com.

Improved failure recovery for Amazon EventBridge

Post Syndicated from Chris Munns original https://aws.amazon.com/blogs/compute/improved-failure-recovery-for-amazon-eventbridge/

Today we’re announcing two new capabilities for Amazon EventBridgedead letter queues and custom retry policies. Both of these give you greater flexibility in how to handle any failures in the processing of events with EventBridge. You can easily enable them on a per target basis and configure them uniquely for each.

Dead letter queues (DLQs) are a common capability in queuing and messaging systems that allow you to handle failures in event or message receiving systems. They provide a way for failed events or messages to be captured and sent to another system, which can store them for future processing. With DLQs, you can have greater resiliency and improved recovery from any failure that happens.

You can also now configure a custom retry policy that can be set on your event bus targets. Today, there are two attributes that can control how events are retried: maximum number of retries and maximum event age. With these two settings, you could send events to a DLQ sooner and reduce the retries attempted.

For example, this could allow you to recover more quickly if an event bus target is overwhelmed by the number of events received, causing throttling to occur. The events are placed in a DLQ and then processed later.

Failures in event processing

Currently, EventBridge can fail to deliver an event to a target in certain scenarios. Events that fail to be delivered to a target due to client-side errors are dropped immediately. Examples of this are when EventBridge does not have permission to a target AWS service or if the target no longer exists. This can happen if the target resource is misconfigured or is deleted by the resource owner.

For service-side issues, EventBridge retries delivery of events for up to 24 hours. This can happen if the target service is unavailable or the target resource is not provisioned to handle the incoming event traffic and the target service is throttling the requests.

EventBridge failures

EventBridge failures

Previously, when all attempts to deliver an event to the target were exhausted, EventBridge published a CloudWatch metric indicating a failed target invocation. However, this provides no visibility into which events failed to be delivered and there was no way to recover the event that failed.

Dead letter queues

EventBridge’s DLQs are made possible today with Amazon Simple Queue Service (SQS) standard queues. With SQS, you get all of the benefits of a fully serverless queuing service: no servers to manage, automatic scalability, pay for what you consume, and high availability and security built in. You can configure the DLQs for your EventBridge bus and pay nothing until it is used, if and when a target experiences an issue. This makes it a great practice to follow and standardize on, and provides you with a safety net that’s active only when needed.

Optionally, you could later configure an AWS Lambda function to consume from that DLQ. The function is only invoked when messages exist in the queue, allowing you to maintain a serverless stack to recover from a potential failure.

DLQ configured per target

DLQ configured per target

With DLQ configured, the queue receives the event that failed in the message with important metadata that you can use to troubleshoot the issue. This can include: Error Code, Error Message, Exhausted Retry Condition, Retry Attempts, Rule ARN, and the Target ARN.

You can use this data to more easily troubleshoot what went wrong with the original delivery attempt and take action to resolve or prevent such failures in the future. You could also use the information such as Exhausted Retry Condition and Retry Attempts to further tweak your custom retry policy.

You can configure a DLQ when creating or updating rules via the AWS Management Console and AWS Command Line Interface (AWS CLI). You can also use infrastructure as code (IaC) tools such as AWS CloudFormation.

In the console, select the queue to be used for your DLQ configuration from the drop-down as shown here:

DLQ configuration

DLQ configuration

When configured via API, AWS CLI, or IaC tools, you must specify the ARN of the queue:

arn:aws:sqs:us-east-1:123456789012:orders-bus-shipping-service-dlq

When you configure a DLQ, the target SQS queue requires a resource-based policy that grants EventBridge access. One is created and applied automatically via the console when you create or update an EventBridge rule with a DLQ that exists in your own account.

For any queues created in other accounts, or via API, AWS CLI, or IaC tools, you must add a policy that allows SQS’s SendMessage permission to the EventBridge rule ARN, as shown below:

{
  "Sid": "Dead-letter queue permissions",
  "Effect": "Allow",
  "Principal": {
     "Service": "events.amazonaws.com"
  },
  "Action": "sqs:SendMessage",
  "Resource": "arn:aws:sqs:us-east-1:123456789012:orders-bus-shipping-service-dlq",
  "Condition": {
    "ArnEquals": {
      "aws:SourceArn": "arn:aws:events:us-east-1:123456789012:rule/MyTestRule"
    }
  }
}

You can read more about setting permissions for DLQ the documentation for “Granting permissions to the dead-letter queue”.

Once configured, you can monitor CloudWatch metrics for the DLQ queue. This shows both the successful delivery of messages via the InvocationsSentToDLQ metric, in addition to any failures via the InvocationsFailedToBeSentToDLQ. Note that these metrics do not exist if your queue is not considered “active”.

Retry policies

By default, EventBridge retries delivery of an event to a target so long as it does not receive a client-side error as described earlier. Retries occur with a back-off, for up to 185 attempts or for up to 24 hours, after which the event is dropped or sent to a DLQ, if configured. Due to the jitter of the back-off and retry process you may reach the 24-hour limit before reaching 185 retries.

For many workloads, this provides an acceptable way to handle momentary service issues or throttling that might occur. For some however, this model of back-off and retry can cause increased and on-going traffic to an already overloaded target system.

For example, consider an Amazon API Gateway target that has a resource constrained backend service behind it.

Constrained target service

Constrained target service

Under a consistently high load, the bus could end up generating too many API requests, tripping the API Gateway’s throttling configuration. This would cause API Gateway to respond with throttling errors back to EventBridge.

Throttled API reply

Throttled API reply

You may decide that allowing the failed events to retry for 24 hours puts too much load into this system and it may not properly recover from the load. This could lead to potential data loss unless a DLQ was configured.

Added DLQ

Added DLQ

With a DLQ, you could choose to process these events later, once the overwhelmed target service has recovered.

DLQ drained back to API

DLQ drained back to API

Or the events in question may no longer have the same value as they did previously. This can occur in systems where data loss is tolerated but the timeliness of data processing matters. In these situations, the DLQ would have less value and dropping the message is acceptable.

For either of these situations, configuring the maximum number of retries or the maximum age of the event could be useful.

Now with retry policies, you can configure per target the following two attributes:

  • MaximumEventAgeInSeconds: between 60 and 86400 seconds (86400, or 24 hours the default)
  • MaximumRetryAttempts: between 0 and 185 (185 is the default)

When either condition is met, the event fails. It’s then either dropped, which generates an increase to the FailedInvocations CloudWatch metric, or sent to a configured DLQ.

You can configure retry policy attributes when creating or updating rules via the AWS Management Console and AWS Command Line Interface (AWS CLI). You can also use infrastructure as code (IaC) tools such as AWS CloudFormation.

Retry policy

Retry policy

There is no additional cost for configuring either of these new capabilities. You only pay for the usage of the SQS standard queue configured as the dead letter queue during a failure and any application that handles the failed events. SQS pricing can be found here.

Conclusion

With dead letter queues and custom retry policies, you have improved handling and control over failure in distributed systems built with EventBridge. With DLQs you can capture failed events and then process them later, potentially saving yourself from data loss. With custom retry policies, you gain the improved ability to control the number of retries and for how long they can be retried.

I encourage you to explore how both of these new capabilities can help make your applications more resilient to failures, and to standardize on using them both in your infrastructure.

For more serverless learning resources, visit https://serverlessland.com.

Building resilient serverless patterns by combining messaging services

Post Syndicated from James Beswick original https://aws.amazon.com/blogs/compute/building-resilient-no-code-serverless-patterns-by-combining-messaging-services/

In “Choosing between messaging services for serverless applications”, I explain the features and differences between the core AWS messaging services. Amazon SQS, Amazon SNS, and Amazon EventBridge provide queues, publish/subscribe, and event bus functionality for your applications. Individually, these are robust, scalable services that are fundamental building blocks of serverless architectures.

However, you can also combine these services to solve specific challenges in distributed architectures. By doing this, you can use specific features of each service to build sophisticated patterns with little code. These combinations can make your applications more resilient and scalable, and reduce the amount of custom logic and architecture in your workload.

In this blog post, I highlight several important patterns for serverless developers. I also show how you use and deploy these integrations with the AWS Serverless Application Model (AWS SAM).

Examples in this post refer to code that can be downloaded from this GitHub repo. The README.md file explains how to deploy and run each example.

SNS to SQS: Adding resilience and throttling to message throughput

SNS has a robust retry policy that results in up to 100,010 delivery attempts over 23 days. If a downstream service is unavailable, it may be overwhelmed by retries when it comes back online. You can solve this issue by adding an SQS queue.

Adding an SQS queue between the SNS topic and its subscriber has two benefits. First, it adds resilience to message delivery, since the messages are durably stored in a queue. Second, it throttles the rate of messages to the consumer, helping smooth out traffic bursts caused by the service catching up with missed messages.

To build this in an AWS SAM template, you first define the two resources, and the SNS subscription:

  MySqsQueue:
    Type: AWS::SQS::Queue

  MySnsTopic:
    Type: AWS::SNS::Topic
    Properties:
      Subscription:
        - Protocol: sqs
          Endpoint: !GetAtt MySqsQueue.Arn

Finally, you provide permission to the SNS topic to publish to the queue, using the AWS::SQS::QueuePolicy resource:

  SnsToSqsPolicy:
    Type: AWS::SQS::QueuePolicy
    Properties:
      PolicyDocument:
        Version: "2012-10-17"
        Statement:
          - Sid: "Allow SNS publish to SQS"
            Effect: Allow
            Principal: "*"
            Resource: !GetAtt MySqsQueue.Arn
            Action: SQS:SendMessage
            Condition:
              ArnEquals:
                aws:SourceArn: !Ref MySnsTopic
      Queues:
        - Ref: MySqsQueue

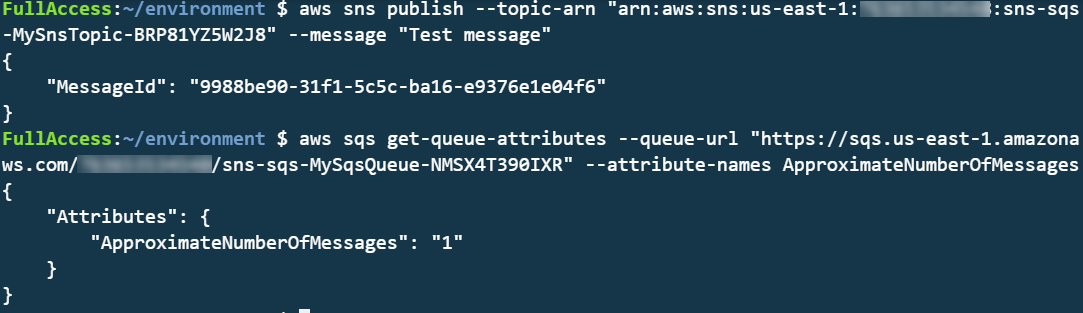
To test this, you can publish a message to the SNS topic and then inspect the SQS queue length using the AWS CLI:

aws sns publish --topic-arn "arn:aws:sns:us-east-1:123456789012:sns-sqs-MySnsTopic-ABC123ABC" --message "Test message"
aws sqs get-queue-attributes --queue-url "https://sqs.us-east-1.amazonaws.com/123456789012/sns-sqs-MySqsQueue- ABC123ABC " --attribute-names ApproximateNumberOfMessages

This results in the following output:

CLI output

Another usage of this pattern is when you want to filter messages in architectures using an SQS queue. By placing the SNS topic in front of the queue, you can use the message filtering capabilities of SNS. This ensures that only the messages you need are published to the queue. To use message filtering in AWS SAM, use the AWS:SNS:Subcription resource:

  QueueSubcription:
    Type: 'AWS::SNS::Subscription'
    Properties:
      TopicArn: !Ref MySnsTopic
      Endpoint: !GetAtt MySqsQueue.Arn
      Protocol: sqs
      FilterPolicy:
        type:
        - orders
        - payments 
      RawMessageDelivery: 'true'

EventBridge to SNS: combining features of both services

Both SNS and EventBridge have different characteristics in terms of targets, and integration with broader features. This table compares the major differences between the two services:

Amazon SNS Amazon EventBridge
Number of targets 10 million (soft) 5
Limits 100,000 topics. 12,500,000 subscriptions per topic. 100 event buses. 300 rules per event bus.
Input transformation No Yes – see details.
Message filtering Yes – see details. Yes, including IP address matching – see details.
Format Raw or JSON JSON
Receive events from AWS CloudTrail No Yes
Targets HTTP(S), SMS, SNS Mobile Push, Email/Email-JSON, SQS, Lambda functions 15 targets including AWS LambdaAmazon SQSAmazon SNSAWS Step FunctionsAmazon Kinesis Data StreamsAmazon Kinesis Data Firehose.
SaaS integration No Yes – see integration partners.
Schema Registry integration No Yes – see details.
Dead-letter queues supported Yes No
Public visibility Can create public topics Cannot create public buses
Cross-Region You can subscribe your AWS Lambda functions to an Amazon SNS topic in any Region. Targets must be same Region. You can publish across Region to another event bus.

In this pattern, you configure an SNS topic as a target of an EventBridge rule:

SNS topic as a target for an EventBridge rule

In the AWS SAM template, you declare the resources in the preceding diagram as follows:

Resources:
  MySnsTopic:
    Type: AWS::SNS::Topic

  EventRule: 
    Type: AWS::Events::Rule
    Properties: 
      Description: "EventRule"
      EventPattern: 
        account: 
          - !Sub '${AWS::AccountId}'
        source:
          - "demo.cli"
      Targets: 
        - Arn: !Ref MySnsTopic
          Id: "SNStopic"

The default bus already exists in every AWS account, so there is no need to declare it. For the event bus to publish matching events to the SNS topic, you define permissions using the AWS::SNS::TopicPolicy resource:

  EventBridgeToToSnsPolicy:
    Type: AWS::SNS::TopicPolicy
    Properties: 
      PolicyDocument:
        Statement:
        - Effect: Allow
          Principal:
            Service: events.amazonaws.com
          Action: sns:Publish
          Resource: !Ref MySnsTopic
      Topics: 
        - !Ref MySnsTopic       

EventBridge has a limit of five targets per rule. In cases where you must send events to hundreds or thousands of targets, publishing to SNS first and then subscribing those targets to the topic works around this limit. Both services have different targets, and this pattern allows you to deliver EventBridge events to SMS, HTTP(s), email and SNS mobile push.

You can transform and filter the message using these services, often without needing an AWS Lambda function. SNS does not support input transformation but you can do this in an EventBridge rule. Message filtering is possible in both services but EventBridge provides richer content filtering capabilities.

AWS CloudTrail can log and monitor activity across services in your AWS account. It can be a useful source for events, allowing you to respond dynamically to objects in Amazon S3 or react to changes in your environment, for example. This natively integrates with EventBridge, allowing you to ingest events at scale from dozens of services.

Using EventBridge enables you to source events from outside your AWS account, offering integrations with a list of software as a service (SaaS) providers. This capability allows you to receive events from your accounts with SaaS providers like Zendesk, PagerDuty, and Auth0. These events are delivered to a partner event bus in your account, and can then be filtered and routed to an SNS topic.

Additionally, this pattern allows you to deliver events to Lambda functions in other AWS accounts and in other AWS Regions. You can invoke Lambda from SNS topics in other Regions and accounts. It’s also possible to make SNS topics publicly read-only, making them extensible endpoints that other third parties can consume from. SNS has comprehensive access control, which you can incorporate into this pattern.

Cross-account publishing

EventBridge to SQS: Building fault-tolerant microservices

EventBridge can route events to targets such as microservices. In the case of downstream failures, the service retries events for up to 24 hours. For workloads where you need a longer period of time to store and retry messages, you can deliver the events to an SQS queue in each microservice. This durably stores those events until the downstream service recovers. Additionally, this pattern protects the microservice from large bursts of traffic by throttling the delivery of messages.

Fault-tolerant microservices architecture

The resources declared in the AWS SAM template are similar to the previous examples, but it uses the AWS::SQS::QueuePolicy resource to grant the appropriate permission to EventBridge:

  EventBridgeToToSqsPolicy:
    Type: AWS::SQS::QueuePolicy
    Properties:
      PolicyDocument:
        Statement:
        - Effect: Allow
          Principal:
            Service: events.amazonaws.com
          Action: SQS:SendMessage
          Resource:  !GetAtt MySqsQueue.Arn
      Queues:
        - Ref: MySqsQueue

Conclusion

You can combine these services in your architectures to implement patterns that solve complex challenges, often with little code required. This blog post shows three examples that implement message throttling and queueing, integrating SNS and EventBridge, and building fault tolerant microservices.

To learn more building decoupled architectures, see this Learning Path series on EventBridge. For more serverless learning resources, visit https://serverlessland.com.

Choosing between messaging services for serverless applications

Post Syndicated from James Beswick original https://aws.amazon.com/blogs/compute/choosing-between-messaging-services-for-serverless-applications/

Most serverless application architectures use a combination of different AWS services, microservices, and AWS Lambda functions. Messaging services are important in allowing distributed applications to communicate with each other, and are fundamental to most production serverless workloads.

Messaging services can improve the resilience, availability, and scalability of applications, when used appropriately. They can also enable your applications to communicate beyond your workload or even the AWS Cloud, and provide extensibility for future service features and versions.

In this blog post, I compare the primary messaging services offered by AWS and how you can use these in your serverless application architectures. I also show how you use and deploy these integrations with the AWS Serverless Application Model (AWS SAM).

Examples in this post refer to code that can be downloaded from this GitHub repository. The README.md file explains how to deploy and run each example.

Overview

Three of the most useful messaging patterns for serverless developers are queues, publish/subscribe, and event buses. In AWS, these are provided by Amazon SQS, Amazon SNS, and Amazon EventBridge respectively. All of these services are fully managed and highly available, so there is no infrastructure to manage. All three integrate with Lambda, allowing you to publish messages via the AWS SDK and invoke functions as targets. Each of these services has an important role to play in serverless architectures.

SNS enables you to send messages reliably between parts of your infrastructure. It uses a robust retry mechanism for when downstream targets are unavailable. When the delivery policy is exhausted, it can optionally send those messages to a dead-letter queue for further processing. SNS uses topics to logically separate messages into channels, and your Lambda functions interact with these topics.

SQS provides queues for your serverless applications. You can use a queue to send, store, and receive messages between different services in your workload. Queues are an important mechanism for providing fault tolerance in distributed systems, and help decouple different parts of your application. SQS scales elastically, and there is no limit to the number of messages per queue. The service durably persists messages until they are processed by a downstream consumer.

EventBridge is a serverless event bus service, simplifying routing events between AWS services, software as a service (SaaS) providers, and your own applications. It logically separates routing using event buses, and you implement the routing logic using rules. You can filter and transform incoming messages at the service level, and route events to multiple targets, including Lambda functions.

Integrating an SQS queue with AWS SAM

The first example shows an AWS SAM template defining a serverless application with two Lambda functions and an SQS queue:

Producer-consumer example

You can declare an SQS queue in an AWS SAM template with the AWS::SQS::Queue resource:

  MySqsQueue:
    Type: AWS::SQS::Queue

To publish to the queue, the publisher function must have permission to send messages. Using an AWS SAM policy template, you can apply policy that enables send messaging to one specific queue:

      Policies:
        - SQSSendMessagePolicy:
            QueueName: !GetAtt MySqsQueue.QueueName

The AWS SAM template passes the queue name into the Lambda function as an environment variable. The function uses the sendMessage method of the AWS.SQS class to publish the message:

const AWS = require('aws-sdk')
AWS.config.region = process.env.AWS_REGION 
const sqs = new AWS.SQS({apiVersion: '2012-11-05'})

// The Lambda handler
exports.handler = async (event) => {
  // Params object for SQS
  const params = {
    MessageBody: `Message at ${Date()}`,
    QueueUrl: process.env.SQSqueueName
  }
  
  // Send to SQS
  const result = await sqs.sendMessage(params).promise()
  console.log(result)
}

When the SQS queue receives the message, it publishes to the consuming Lambda function. To configure this integration in AWS SAM, the consumer function is granted the SQSPollerPolicy policy. The function’s event source is set to receive messages from the queue in batches of 10:

  QueueConsumerFunction:
    Type: AWS::Serverless::Function 
    Properties:
      CodeUri: code/
      Handler: consumer.handler
      Runtime: nodejs12.x
      Timeout: 3
      MemorySize: 128
      Policies:  
        - SQSPollerPolicy:
            QueueName: !GetAtt MySqsQueue.QueueName
      Events:
        MySQSEvent:
          Type: SQS
          Properties:
            Queue: !GetAtt MySqsQueue.Arn
            BatchSize: 10

The payload for the consumer function is the message from SQS. This is an array of messages up to the batch size, containing a body attribute with the publishing function’s MessageBody. You can see this in the CloudWatch log for the function:

CloudWatch log result

Integrating an SNS topic with AWS SAM

The second example shows an AWS SAM template defining a serverless application with three Lambda functions and an SNS topic:

SNS fanout to Lambda functions

You declare an SNS topic and the subscribing Lambda functions with the AWS::SNS:Topic resource:

  MySnsTopic:
    Type: AWS::SNS::Topic
    Properties:
      Subscription:
        - Protocol: lambda
          Endpoint: !GetAtt TopicConsumerFunction1.Arn    
        - Protocol: lambda
          Endpoint: !GetAtt TopicConsumerFunction2.Arn

You provide the SNS service with permission to invoke the Lambda functions but defining an AWS::Lambda::Permission for each:

  TopicConsumerFunction1Permission:
    Type: 'AWS::Lambda::Permission'
    Properties:
      Action: 'lambda:InvokeFunction'
      FunctionName: !Ref TopicConsumerFunction1
      Principal: sns.amazonaws.com

The SNSPublishMessagePolicy policy template grants permission to the publishing function to send messages to the topic. In the function, the publish method of the AWS.SNS class handles publishing:

const AWS = require('aws-sdk')
AWS.config.region = process.env.AWS_REGION 
const sns = new AWS.SNS({apiVersion: '2012-11-05'})

// The Lambda handler
exports.handler = async (event) => {
  // Params object for SNS
  const params = {
    Message: `Message at ${Date()}`,
    Subject: 'New message from publisher',
    TopicArn: process.env.SNStopic
  }
  
  // Send to SQS
  const result = await sns.publish(params).promise()
  console.log(result)
}

The payload for the consumer functions is the message from SNS. This is an array of messages, containing subject and message attributes from the publishing function. You can see this in the CloudWatch log for the function:

CloudWatch log result

Differences between SQS and SNS configurations

SQS queues and SNS topics offer different functionality, though both can publish to downstream Lambda functions.

An SQS message is stored on the queue for up to 14 days until it is successfully processed by a subscriber. SNS does not retain messages so if there are no subscribers for a topic, the message is discarded.

SNS topics may broadcast to multiple targets. This behavior is called fan-out. It can be used to parallelize work across Lambda functions or send messages to multiple environments (such as test or development). An SNS topic can have up to 12,500,000 subscribers, providing highly scalable fan-out capabilities. The targets may include HTTP/S endpoints, SMS text messaging, SNS mobile push, email, SQS, and Lambda functions.

In AWS SAM templates, you can retrieve properties such as ARNs and names of queues and topics, using the following intrinsic functions:

Amazon SQS Amazon SNS
Channel type Queue Topic
Get ARN !GetAtt MySqsQueue.Arn !Ref MySnsTopic
Get name !GetAtt MySqsQueue.QueueName !GetAtt MySnsTopic.TopicName

Integrating with EventBridge in AWS SAM

The third example shows the AWS SAM template defining a serverless application with two Lambda functions and an EventBridge rule:

EventBridge integration with AWS SAM

The default event bus already exists in every AWS account. You declare a rule that filters events in the event bus using the AWS::Events::Rule resource:

  EventRule: 
    Type: AWS::Events::Rule
    Properties: 
      Description: "EventRule"
      EventPattern: 
        source: 
          - "demo.event"
        detail: 
          state: 
            - "new"
      State: "ENABLED"
      Targets: 
        - Arn: !GetAtt EventConsumerFunction.Arn
          Id: "ConsumerTarget"

The rule describes an event pattern specifying matching JSON attributes. Events that match this pattern are routed to the list of targets. You provide the EventBridge service with permission to invoke the Lambda functions in the target list:

  PermissionForEventsToInvokeLambda: 
    Type: AWS::Lambda::Permission
    Properties: 
      FunctionName: 
        Ref: "EventConsumerFunction"
      Action: "lambda:InvokeFunction"
      Principal: "events.amazonaws.com"
      SourceArn: !GetAtt EventRule.Arn

The AWS SAM template uses an IAM policy statement to grant permission to the publishing function to put events on the event bus:

  EventPublisherFunction:
    Type: AWS::Serverless::Function
    Properties:
      CodeUri: code/
      Handler: publisher.handler
      Timeout: 3
      Runtime: nodejs12.x
      Policies:
        - Statement:
          - Effect: Allow
            Resource: '*'
            Action:
              - events:PutEvents      

The publishing function then uses the putEvents method of the AWS.EventBridge class, which returns after the events have been durably stored in EventBridge:

const AWS = require('aws-sdk')
AWS.config.update({region: 'us-east-1'})
const eventbridge = new AWS.EventBridge()

exports.handler = async (event) => {
  const params = {
    Entries: [ 
      {
        Detail: JSON.stringify({
          "message": "Hello from publisher",
          "state": "new"
        }),
        DetailType: 'Message',
        EventBusName: 'default',
        Source: 'demo.event',
        Time: new Date 
      }
    ]
  }
  const result = await eventbridge.putEvents(params).promise()
  console.log(result)
}

The payload for the consumer function is the message from EventBridge. This is an array of messages, containing subject and message attributes from the publishing function. You can see this in the CloudWatch log for the function:

CloudWatch log result

Comparing SNS with EventBridge

SNS and EventBridge have many similarities. Both can be used to decouple publishers and subscribers, filter messages or events, and provide fan-in or fan-out capabilities. However, there are differences in the list of targets and features for each service, and your choice of service depends on the needs of your use-case.

EventBridge offers two newer capabilities that are not available in SNS. The first is software as a service (SaaS) integration. This enables you to authorize supported SaaS providers to send events directly from their EventBridge event bus to partner event buses in your account. This replaces the need for polling or webhook configuration, and creates a highly scalable way to ingest SaaS events directly into your AWS account.

The second feature is the Schema Registry, which makes it easier to discover and manage OpenAPI schemas for events. EventBridge can infer schemas based on events routed through an event bus by using schema discovery. This can be used to generate code bindings directly to your IDE for type-safe languages like Python, Java, and TypeScript. This can help accelerate development by automating the generation of classes and code directly from events.

This table compares the major features of both services:

Amazon SNS Amazon EventBridge
Number of targets 10 million (soft) 5
Availability SLA 99.9% 99.99%
Limits 100,000 topics. 12,500,000 subscriptions per topic. 100 event buses. 300 rules per event bus.
Publish throughput Varies by Region. Soft limits. Varies by Region. Soft limits.
Input transformation No Yes – see details.
Message filtering Yes – see details. Yes, including IP address matching – see details.
Message size maximum 256 KB 256 KB
Billing Per 64 KB
Format Raw or JSON JSON
Receive events from AWS CloudTrail No Yes
Targets HTTP(S), SMS, SNS Mobile Push, Email/Email-JSON, SQS, Lambda functions. 15 targets including AWS LambdaAmazon SQSAmazon SNSAWS Step FunctionsAmazon Kinesis Data StreamsAmazon Kinesis Data Firehose.
SaaS integration No Yes – see integrations.
Schema Registry integration No Yes – see details.
Dead-letter queues supported Yes No
FIFO ordering available No No
Public visibility Can create public topics Cannot create public buses
Pricing $0.50/million requests + variable delivery cost + data transfer out cost. SMS varies. $1.00/million events. Free for AWS events. No charge for delivery.
Billable request size 1 request = 64 KB 1 event = 64 KB
AWS Free Tier eligible Yes No
Cross-Region You can subscribe your AWS Lambda functions to an Amazon SNS topic in any Region. Targets must be in the same Region. You can publish across Regions to another event bus.
Retry policy
  • For SQS/Lambda, exponential backoff over 23 days.
  • For SMTP, SMS and Mobile push, exponential backoff over 6 hours.
At-least-once event delivery to targets, including retry with exponential backoff for up to 24 hours.

Conclusion

Messaging is an important part of serverless applications and AWS services provide queues, publish/subscribe, and event routing capabilities. This post reviews the main features of SNS, SQS, and EventBridge and how they provide different capabilities for your workloads.

I show three example applications that publish and consume events from the three services. I walk through AWS SAM syntax for deploying these resources in your applications. Finally, I compare differences between the services.

To learn more building decoupled architectures, see this Learning Path series on EventBridge. For more serverless learning resources, visit https://serverlessland.com.

Building storage-first serverless applications with HTTP APIs service integrations

Post Syndicated from Eric Johnson original https://aws.amazon.com/blogs/compute/building-storage-first-applications-with-http-apis-service-integrations/

Over the last year, I have been talking about “storage first” serverless patterns. With these patterns, data is stored persistently before any business logic is applied. The advantage of this pattern is increased application resiliency. By persisting the data before processing, the original data is still available, if or when errors occur.

Common pattern for serverless API backend

Common pattern for serverless API backend

Using Amazon API Gateway as a proxy to an AWS Lambda function is a common pattern in serverless applications. The Lambda function handles the business logic and communicates with other AWS or third-party services to route, modify, or store the processed data. One option is to place the data in an Amazon Simple Queue Service (SQS) queue for processing downstream. In this pattern, the developer is responsible for handling errors and retry logic within the Lambda function code.
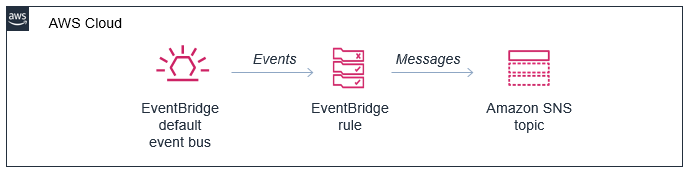
The storage first pattern flips this around. It uses native error handling with retry logic or dead-letter queues (DLQ) at the SQS layer before any code is run. By directly integrating API Gateway to SQS, developers can increase application reliability while reducing lines of code.

Storage first pattern for serverless API backend

Storage first pattern for serverless API backend

Previously, direct integrations require REST APIs with transformation templates written in Velocity Template Language (VTL). However, developers tell us they would like to integrate directly with services in a simpler way without using VTL. As a result, HTTP APIs now offers the ability to directly integrate with five AWS services without needing a transformation template or code layer.

The first five service integrations

This release of HTTP APIs direct integrations includes Amazon EventBridge, Amazon Kinesis Data Streams, Simple Queue Service (SQS), AWS System Manager’s AppConfig, and AWS Step Functions. With these new integrations, customers can create APIs and webhooks for their business logic hosted in these AWS services. They can also take advantage of HTTP APIs features like authorizers, throttling, and enhanced observability for securing and monitoring these applications.

Amazon EventBridge

HTTP APIs service integration with Amazon EventBridge

HTTP APIs service integration with Amazon EventBridge

The HTTP APIs direct integration for EventBridge uses the PutEvents API to enable client applications to place events on an EventBridge bus. Once the events are on the bus, EventBridge routes the event to specific targets based upon EventBridge filtering rules.

This integration is a storage first pattern because data is written to the bus before any routing or logic is applied. If the downstream target service has issues, then EventBridge implements a retry strategy with incremental back-off for up to 24 hours. Additionally, the integration helps developers reduce code by filtering events at the bus. It routes to downstream targets without the need for a Lambda function as a transport layer.

Use this direct integration when:

  • Different tasks are required based upon incoming event details
  • Only data ingestion is required
  • Payload size is less than 256 kb
  • Expected requests per second are less than the Region quotas.

Amazon Kinesis Data Streams

HTTP APIs service integration with Amazon Kinesis Data Streams

HTTP APIs service integration with Amazon Kinesis Data Streams

The HTTP APIs direct integration for Kinesis Data Streams offers the PutRecord integration action, enabling client applications to place events on a Kinesis data stream. Kinesis Data Streams are designed to handle up to 1,000 writes per second per shard, with payloads up to 1 mb in size. Developers can increase throughput by increasing the number of shards in the data stream. You can route the incoming data to targets like an Amazon S3 bucket as part of a data lake or a Kinesis data analytics application for real-time analytics.

This integration is a storage first option because data is stored on the stream for up to seven days until it is processed and routed elsewhere. When processing stream events with a Lambda function, errors are handled at the Lambda layer through a configurable error handling strategy.

Use this direct integration when:

  • Ingesting large amounts of data
  • Ingesting large payload sizes
  • Order is important
  • Routing the same data to multiple targets

Amazon SQS

HTTP APIs service integration with Amazon SQS

HTTP APIs service integration with Amazon SQS

The HTTP APIs direct integration for Amazon SQS offers the SendMessage, ReceiveMessage, DeleteMessage, and PurgeQueue integration actions. This integration differs from the EventBridge and Kinesis integrations in that data flows both ways. Events can be created, read, and deleted from the SQS queue via REST calls through the HTTP API endpoint. Additionally, a full purge of the queue can be managed using the PurgeQueue action.

This pattern is a storage first pattern because the data remains on the queue for four days by default (configurable to 14 days), unless it is processed and removed. When the Lambda service polls the queue, the messages that are returned are hidden in the queue for a set amount of time. Once the calling service has processed these messages, it uses the DeleteMessage API to remove the messages permanently.

When triggering a Lambda function with an SQS queue, the Lambda service manages this process internally. However, HTTP APIs direct integration with SQS enables developers to move this process to client applications without the need for a Lambda function as a transport layer.

Use this direct integration when:

  • Data must be received as well as sent to the service
  • Downstream services need reduced concurrency
  • The queue requires custom management
  • Order is important (FIFO queues)

AWS AppConfig

HTTP APIs service integration with AWS Systems Manager AppConfig

HTTP APIs service integration with AWS Systems Manager AppConfig

The HTTP APIs direct integration for AWS AppConfig offers the GetConfiguration integration action and allows applications to check for application configuration updates. By exposing the systems parameter API through an HTTP APIs endpoint, developers can automate configuration changes for their applications. While this integration is not considered a storage first integration, it does enable direct communication from external services to AppConfig without the need for a Lambda function as a transport layer.

Use this direct integration when:

  • Access to AWS AppConfig is required.
  • Managing application configurations.

AWS Step Functions

HTTP APIs service integration with AWS Step Functions

HTTP APIs service integration with AWS Step Functions

The HTTP APIs direct integration for Step Functions offers the StartExecution and StopExecution integration actions. These actions allow for programmatic control of a Step Functions state machine via an API. When starting a Step Functions workflow, JSON data is passed in the request and mapped to the state machine. Error messages are also mapped to the state machine when stopping the execution.

This pattern provides a storage first integration because Step Functions maintains a persistent state during the life of the orchestrated workflow. Step Functions also supports service integrations that allow the workflows to send and receive data without needing a Lambda function as a transport layer.

Use this direct integration when:

  • Orchestrating multiple actions.
  • Order of action is required.

Building HTTP APIs direct integrations

HTTP APIs service integrations can be built using the AWS CLI, AWS SAM, or through the API Gateway console. The console walks through contextual choices to help you understand what is required for each integration. Each of the integrations also includes an Advanced section to provide additional information for the integration.

Creating an HTTP APIs service integration

Creating an HTTP APIs service integration

Once you build an integration, you can export it as an OpenAPI template that can be used with infrastructure as code (IaC) tools like AWS SAM. The exported template can also include the API Gateway extensions that define the specific integration information.

Exporting the HTTP APIs configuration to OpenAPI

Exporting the HTTP APIs configuration to OpenAPI

OpenAPI template

An example of a direct integration from HTTP APIs to SQS is located in the Sessions With SAM repository. This example includes the following architecture:

AWS SAM template resource architecture

AWS SAM template resource architecture

The AWS SAM template creates the HTTP APIs, SQS queue, Lambda function, and both Identity and Access Management (IAM) roles required. This is all generated in 58 lines of code and looks like this:

AWSTemplateFormatVersion: '2010-09-09'
Transform: AWS::Serverless-2016-10-31
Description: HTTP API direct integrations

Resources:
  MyQueue:
    Type: AWS::SQS::Queue
    
  MyHttpApi:
    Type: AWS::Serverless::HttpApi
    Properties:
      DefinitionBody:
        'Fn::Transform':
          Name: 'AWS::Include'
          Parameters:
            Location: './api.yaml'
          
  MyHttpApiRole:
    Type: "AWS::IAM::Role"
    Properties:
      AssumeRolePolicyDocument:
        Version: "2012-10-17"
        Statement:
          - Effect: "Allow"
            Principal:
              Service: "apigateway.amazonaws.com"
            Action: 
              - "sts:AssumeRole"
      Policies:
        - PolicyName: ApiDirectWriteToSQS
          PolicyDocument:
            Version: '2012-10-17'
            Statement:
              Action:
              - sqs:SendMessage
              Effect: Allow
              Resource:
                - !GetAtt MyQueue.Arn
                
  MyTriggeredLambda:
    Type: AWS::Serverless::Function
    Properties:
      CodeUri: src/
      Handler: app.lambdaHandler
      Runtime: nodejs12.x
      Policies:
        - SQSPollerPolicy:
            QueueName: !GetAtt MyQueue.QueueName
      Events:
        SQSTrigger:
          Type: SQS
          Properties:
            Queue: !GetAtt MyQueue.Arn

Outputs:
  ApiEndpoint:
    Description: "HTTP API endpoint URL"
    Value: !Sub "https://${MyHttpApi}.execute-api.${AWS::Region}.amazonaws.com"

The OpenAPI template handles the route definitions for the HTTP API configuration and configures the service integration. The template looks like this:

openapi: "3.0.1"
info:
  title: "my-sqs-api"
paths:
  /:
    post:
      responses:
        default:
          description: "Default response for POST /"
      x-amazon-apigateway-integration:
        integrationSubtype: "SQS-SendMessage"
        credentials:
          Fn::GetAtt: [MyHttpApiRole, Arn]
        requestParameters:
          MessageBody: "$request.body.MessageBody"
          QueueUrl:
            Ref: MyQueue
        payloadFormatVersion: "1.0"
        type: "aws_proxy”
        connectionType: "INTERNET"
x-amazon-apigateway-importexport-version: "1.0"

Because the OpenAPI template is included in the AWS SAM template via a transform, the API Gateway integration can reference the roles and services created within the AWS SAM template.

Conclusion

This post covers the concept of storage first integration patterns and how the new HTTP APIs direct integrations can help. I cover the five current integrations and possible use cases for each. Additionally, I demonstrate how to use AWS SAM to build and manage the integrated applications using infrastructure as code.

Using the storage first pattern with direct integrations can help developers build serverless applications that are more durable with fewer lines of code. A Lambda function is no longer required to transport data from the API endpoint to the desired service. Instead, use Lambda function invocations for differentiating business logic.

To learn more join us for the HTTP API service integrations session of Sessions With SAM! 

#ServerlessForEveryone