Tag Archives: AWS SAM

Automating Amazon EC2-Windows EBS Volumes monitoring and creating alarms

Post Syndicated from Sheila Busser original https://aws.amazon.com/blogs/compute/automating-amazon-ec2-windows-ebs-volumes-monitoring-and-creating-alarms/

This blog post is written by, Santhosh Kumar Adapa, Database Consultant,  AWS WWCO ProServe,  Jeevan Shetty, Database Consultant, AWS WWCO ProServe, and Bhanu Ganesh Gudivada, Consultant  Databases, AWS WWCO ProServe.

Customers who are running fleets of Amazon Elastic Compute Cloud (Amazon EC2) instances use advanced monitoring techniques to observe their operational performance. Capabilities like aggregated and custom dimensions help customers categorize and customize their metrics across server fleets for fast and efficient decision making. Customers require visibility into not only infrastructure metrics (such as CPU and memory), but also disk usage metrics.

Monitoring Amazon EC2-Windows Amazon Elastic Block Store (Amazon EBS) Volumes usage is critical, especially when customers have a large fleet of Amazon EC2 Windows servers running to host their databases and applications in AWS. Generally, we see issues with EC2 instances running out of disk space, and free disk space isn’t a metric that is directly available with Amazon CloudWatch. Amazon CloudWatch agent helps solve this problem. After installing and configuring the CloudWatch agent on your EC2 instance, the agent will send metric data with the disk utilization to CloudWatch. The next step is to create a CloudWatch alarm to monitor the disk utilization metric.

In this post, we showcase the steps to automate the monitoring and creating alarms for EBS volumes attached to Amazon EC2 Windows instances. Alarms are created using AWS Lambda that monitors the free disk space and alerts whenever thresholds are crossed using Amazon Simple Notification Service (Amazon SNS).

Solution overview

To demonstrate the solution we first install and configure the CloudWatch agent in your Amazon EC2 Windows instance, and then the agent will send metric data with the disk utilization to CloudWatch. To monitor the disk on each Amazon EC2 Windows instance, we’ll use two custom Metrics, “FreeStorageSpaceInMB” and “FreeStorageSpaceInPercent”, that are collected by CloudWatch agent and pushed to CloudWatch.

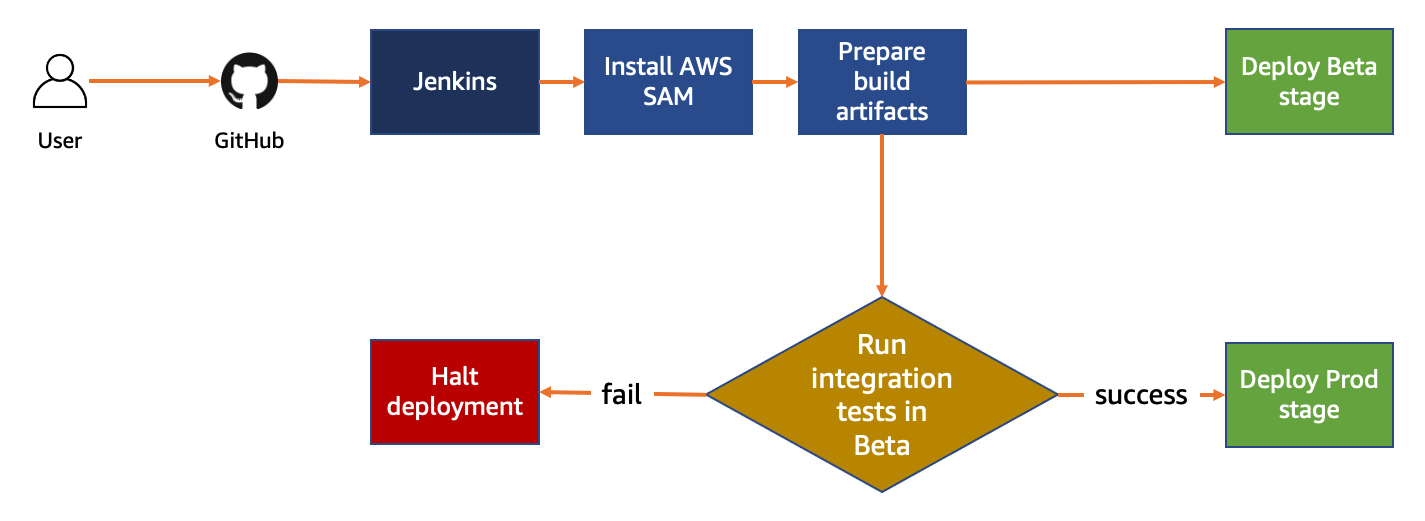
The following diagram illustrates the architecture used in this post:

architecture used in this post

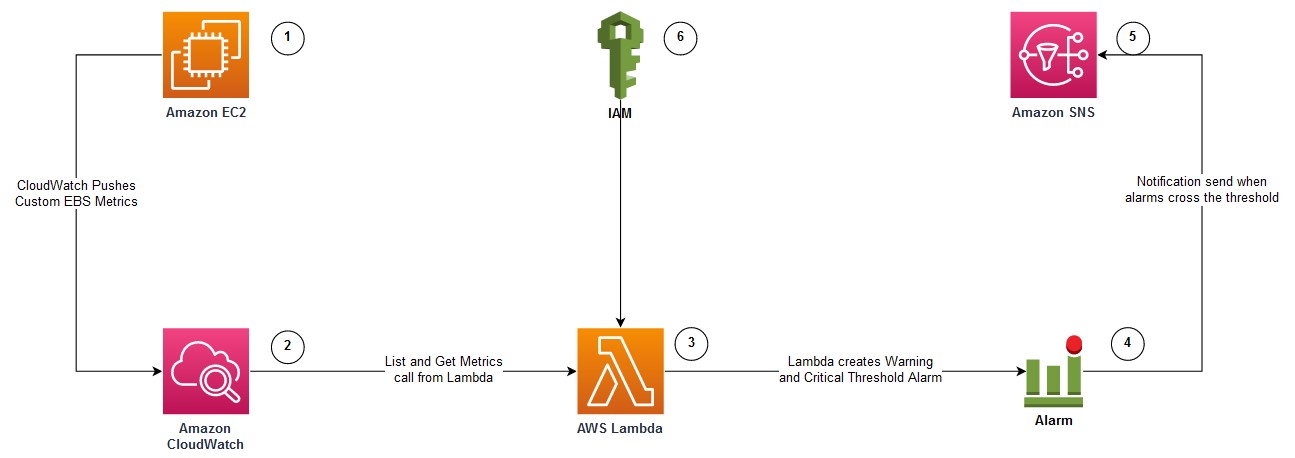
  1. Amazon EC2 Windows instance with attached Amazon EBS Volumes to be monitored for free disk usage. The EC2 instance is configured with Amazon CloudWatch Agent.
  2. CloudWatch agent is configured to monitor the “FreeStorageSpaceInMB” and “FreeStorageSpaceInPercent” metrics, and pushed to AWS CloudWatch.
  3. Lambda function that can be invoked to create CloudWatch alarms for each disk attached to the EC2 instance.
  4. CloudWatch Alarms are created with warnings and critical thresholds based on storage size.
  5. Amazon SNS is used to send alerts when the CloudWatch Alarms crosses the threshold.
  6. AWS Identity and Access Management (IAM) to provide permission to the Lambda function to get Amazon EBS metrics and to create CloudWatch Alarms.

Prerequisites

You will need the following prerequisites:

  • To implement this solution, you must have an Amazon EC2 Windows instance configured with Amazon CloudWatch Agent by following the steps documented in the article – How to monitor Windows and Linux servers and get internal performance metrics.
  • To monitor the “FreeStorageSpaceInMB” and “FreeStorageSpaceInPercent” metrics for Amazon EBS volumes attached to the EC2 instance, the CloudWatch agent configuration JSON should have the following section:
"LogicalDisk": {
	"measurement": [
	{
		"name":"% Free Space",
		"rename":"FreeStorageSpaceInPercent",
		"unit":"Percent"
	},
	{
		"name":"Free Megabytes",
		"rename":"FreeStorageSpaceInMB",
		"unit":"Megabytes"
	}
	],
	"metrics_collection_interval": 10,
	"resources": [
		"*"
	]
},
  1. Amazon EC2 host or bastion host with an IAM role attached that has permissions to create an IAM role, Lambda function, and run Amazon Relational Database Service (Amazon RDS) CLI commands. A Lambda function and an IAM role are created using AWS Serverless Application Model (SAM).

AWS SAM

In this section, we provide the steps to create an IAM role and deploy a Lambda function using AWS SAM.

  1. Log in to the Amazon EC2 host and install the AWS SAM CLI.
  2. Download the source code and deploy it by running the following command:
git clone https://github.com/aws-samples/aws-ec2-windows-ebs-volumes-monitoring

cd aws-ec2-windows-ebs-volumes-monitoring/ebs_volumes_monitoring
sam deploy --guided

3. Provide the following parameters:

    1. Stack Name – Name for the AWS CloudFormation stack.
    2. AWS Region – AWS Region where the stack is being deployed.

The following is the sample output when you run sam deploy –guided with default arguments:

=========================================
Stack Name [ebs-volumes-monitoring]: ebs-volumes-monitoring
AWS Region [us-west-2]:
#Shows you resources changes to be deployed and require a 'Y' to initiate deploy
Confirm changes before deploy [y/N]:
#SAM needs permission to be able to create roles to connect to the resources in your template
Allow SAM CLI IAM role creation [Y/n]:
#Preserves the state of previously provisioned resources when an operation fails
Disable rollback [y/N]:
Save arguments to configuration file [Y/n]:
SAM configuration file [samconfig.toml]:
SAM configuration environment [default]:

In the following sections, we describe the AWS services deployed with AWS SAM.

IAM role

AWS SAM creates an IAM role with policies to describe EC2 instances, as well as List, Get, and Put CloudWatch metrics. Furthermore, it attaches an AWS managed IAM policy called AWSLambdaBasicExecutionRole to the IAM role. This role is attached to the Lambda functions to create Amazon EBS volume alarms for EC2 instances.

Lambda function

AWS SAM also deploys the Lambda function. It uses Python 3.8 and accepts two parameters:

  1. Hostname: Amazon EC2 Windows instance name, or, if we must configure alarms for multiple servers, then you can use a wild card character, such as Instance_name* or Instance_name?
  2. sns_topic_name: ARN of the SNS topic that is used to configure CloudWatch Alarms. Notification is sent to the SNS topic when the Amazon EBS Volume metric crosses the threshold.

Invoking Lambda function

After the SAM deployment is successful, we can invoke the Lambda function with the instance name and the SNS Topic ARN. The Lambda function creates two alarms (Warning and Critical) for every Amazon EBS volume attached to the instance. The Warning and Critical values can be changed in the Lambda code so that there are two different values depending on the size of the disk drive. Furthermore, the alarms are configured to send notifications to the SNS Topic. The following is the sample command to invoke the Lambda function:

aws lambda invoke --function-name ec2-ebs-metric --cli-binary-format raw-in-base64-out \
--payload '{"hostname": "Windows*", "sns_topic_name": "arn:aws:sns:us-west-2:123456789:notify_dba" }' response.json

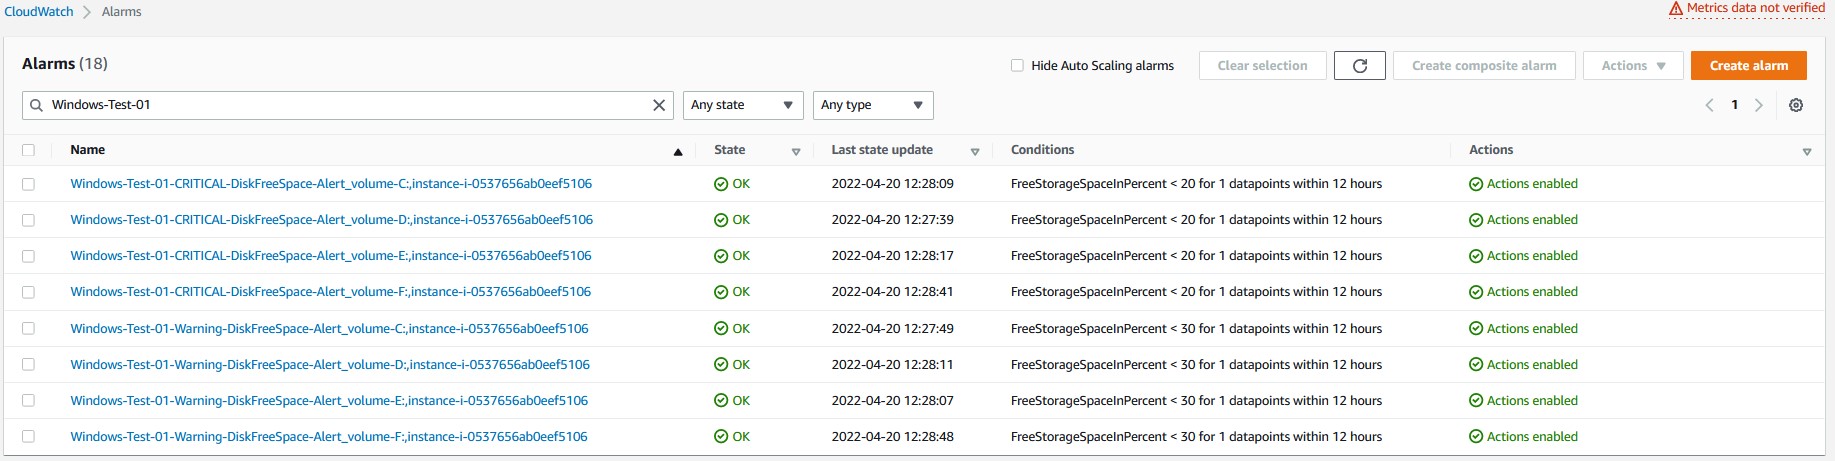
Verifying CloudWatch Alarms:

Verify the CloudWatch Alarms that are created in the CloudWatch console. The following screenshot shows the CloudWatch alarms created for an EC2 instance with four disks. There are two alarms (Warning and Critical) created for every disk (four disks in total). Therefore, we see eight CloudWatch alarms.

CloudWatch console alarms

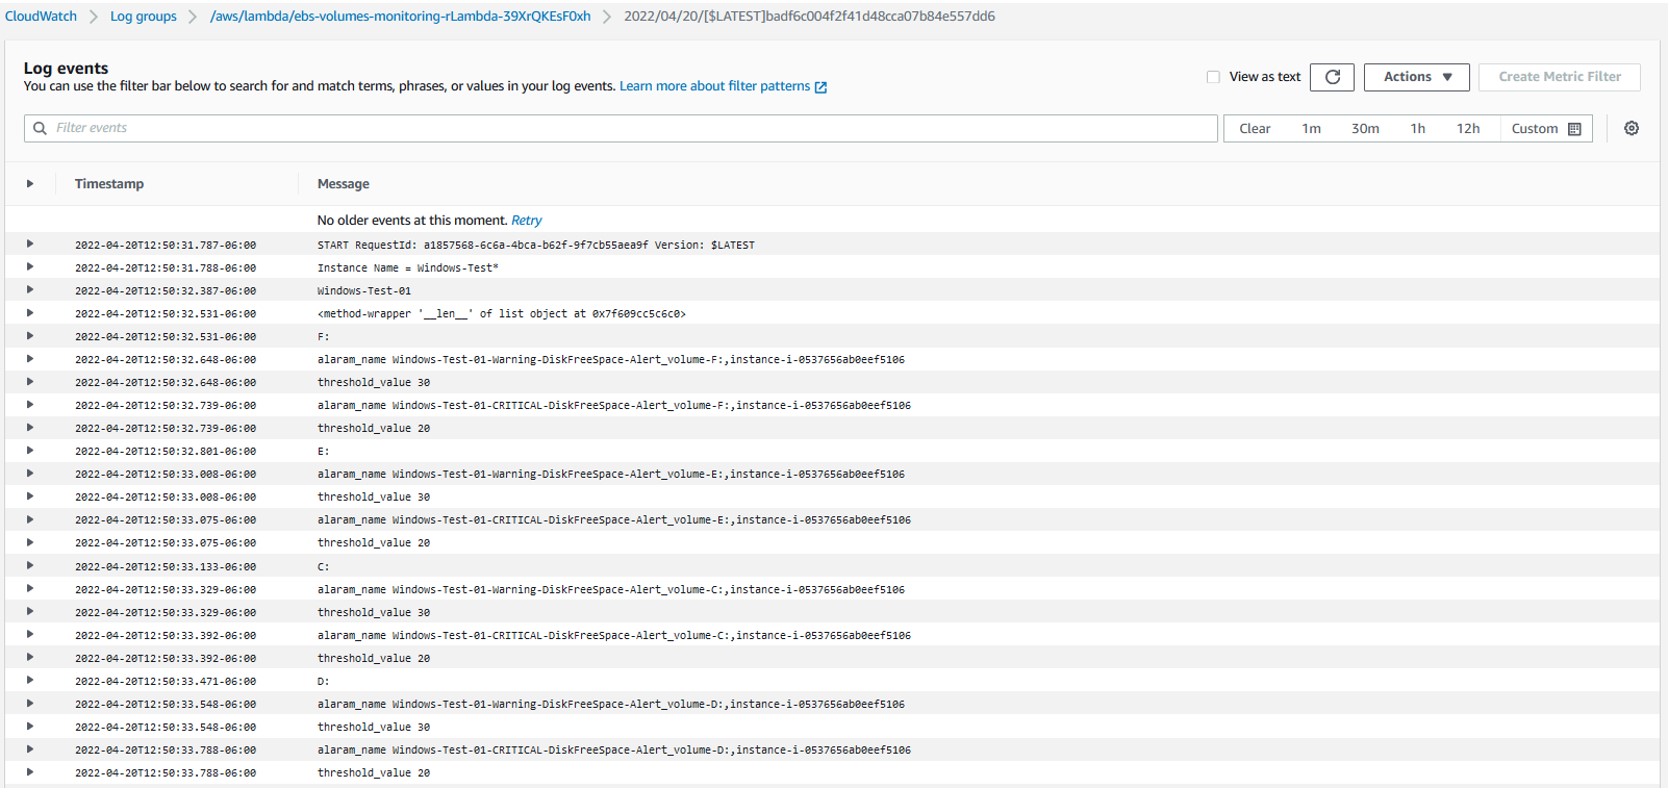
Checking CloudWatch Logs:

After running the Lambda function, to verify the log, go to Lambda Service page, select the Lambda function created, navigate to the Monitor tab, and then select “View logs in CloudWatch”. Then, go to the latest log file to check the CloudWatch log files for any errors.

Checking CloudWatch LogsSelect the latest Log Steam to check the details of the last Lambda function execution.

Log Steam detailsThe log file shows the full details of the Lambda function execution. Furthermore, it shows the CloudWatch alarms configured for each disk, as well as if there are any errors generated during execution.

Log file detailsCleanup

To clean up the resources used in this post, complete the following steps:

  1. Delete the CloudFormation stack by running below command and replacing STACK_NAME with stack name provided in step 3a above, under section “AWS SAM”
sam delete --stack-name STACK_NAME
  1. Confirm the stack has been deleted by running below command. Replace STACK_NAME as mentioned in previous step.
aws cloudformation list-stacks --query "StackSummaries[?contains(StackName,' STACK_NAME ')].StackStatus"
  1. Delete any CloudWatch alarms created by the Lambda function by following the document – Editing or deleting a CloudWatch alarm.

Conclusion

In this post, we demonstrated how the requirement of monitoring Amazon EC2 Windows EBS Volumes usage is critical. In particular, this is essential when customers have a large fleet of Amazon EC2 Windows servers running to host their databases and applications in the cloud. We showcased the process of automating the free disk monitoring using Lambda and notifying through Amazon SNS when disks cross the storage threshold. By implementing such monitoring, customers can prevent issues with EC2 instances running out of disk space thus preventing critical production outages.

Provide any thoughts or questions in the comments section. We also encourage you to explore CloudWatch monitoring and try out additional use cases mentioned in the documentation.

Adding approval notifications to EC2 Image Builder before sharing AMIs

Post Syndicated from Sheila Busser original https://aws.amazon.com/blogs/compute/adding-approval-notifications-to-ec2-image-builder-before-sharing-amis/

This blog post was written by, Glenn Chia Jin Wee, Associate Cloud Architect at AWS and Randall Han, Associate Professional Services Consultant at AWS.

In some situations, you may be required to manually validate the Amazon Machine Image (AMI) built from an Amazon Elastic Compute Cloud (Amazon EC2) Image Builder pipeline before sharing this AMI to other AWS accounts or to an AWS Organization. Currently, Image Builder provides an end-to-end pipeline that automatically shares AMIs after they’ve been built.

In this post, we will walk through the steps to enable approval notifications before AMIs are shared with other AWS accounts. Having a manual approval step could be useful if you would like to verify the AMI configurations before it is shared to other AWS accounts or an AWS Organization. This reduces the possibility of incorrectly configured AMIs being shared to other teams which in turn could lead to downstream issues if applications are installed using this AMI. This solution uses serverless resources to send an email with a link that automatically shares the AMI with the specified AWS accounts. Users select this link after they’ve verified that the AMI is built according to specifications.

Overview

Architecture Diagram

  1. In this solution, an Image Builder Pipeline is run that builds a Golden AMI in Account A. After the AMI is built, Image Builder publishes data about the AMI to an Amazon Simple Notification Service (Amazon SNS) topic.
  2. This SNS Topic passes the data to an AWS Lambda function that subscribes to it.
  3. The Lambda function that subscribes to this topic retrieves the data, formats it, and sends a customized email to another SNS Topic.
  4. The second SNS Topic has an email subscription with the Approver’s email. The approver will receive the customized email with a URL that interacts with the next set of Serverless resources.
  5. Selecting the URL makes a GET request to Amazon API Gateway, thereby passing the AMI ID in the query string.
  6. API Gateway then triggers another Lambda function and passes the AMI ID to it.
  7. The Lambda function obtains the AMI ID from the query string parameter of the API Gateway request, and then shares it with the provided target account.

Prerequisites

For this walkthrough, you will need the following:

Walkthrough

In this section, we will guide you through the steps required to deploy the Image Builder solution that utilizes Serverless resources. The solution is deployed with AWS SAM.

In this scenario, we deploy the solution within the approver’s account. The approval email will be sent to a predefined email address for manual approval, before the newly created AMI is shared to target accounts.

Once the approver selects the approval link, an email notification will be sent to the predefined target account email address, notifying that the AMI has been successfully shared.

The high-level steps we will follow are:

  1. In Account A, deploy the provided AWS SAM template. This includes an example Image Builder Pipeline, Amazon SNS topics, API Gateway, and Lambda functions.
  2. Approve the SNS subscription from your supplied email address.
  3. Run the pipeline from the Amazon EC2 Image Builder Console.
  4. [Optional] After the pipeline runs, launch an Amazon EC2 instance from the built AMI to conduct manual tests
  5. An Amazon SNS email will be sent to you with an API Gateway URL. When clicked, an AWS Lambda function shares the AMI to the Account B.
  6. Log in to Account B and verify that the AMI has been shared.

Step 1: Launch the AWS SAM template

  1. Clone the SAM templates from this GitHub repository.
  2. Run the following command to deploy the templates via SAM. Replace <approver email> with the Approver’s email and <AWS Account B ID> with the AWS Account ID of your second AWS Account.

sam deploy \

–template-file template.yaml \

–stack-name ec2-image-builder-approver-notifications \

–capabilities CAPABILITY_IAM \

–resolve-s3 \

–parameter-overrides \

ApproverEmail=<approver email> \

TargetAccountEmail=<target account email> \

TargetAccountlds=<AWS Account B ID>

Step 2: Verify your email address

  1. After running the deployment, you will receive an email prompting you to confirm the Subscription at the approver email address. Choose Confirm subscription.

Email to confirm SNS topic subscription

  1. This leads to the following screen, which shows that your subscription is confirmed.

SNS topic subscription confirmation

  1. Repeat the previous 2 steps for the target email address.

Step 3: Run the pipeline from the Image Builder console

  1. In the Image Builder console, under Image pipelines, select the checkbox next to the Pipeline created, choose Actions, and select Run pipeline.

Run the Image Builder Pipeline

Note that the pipeline takes approximately 20 to 30 minutes to complete.

Step 4: [Optional] Launch an Amazon EC2 instance from the built AMI

There could be a requirement to manually validate the AMI before sharing it to other AWS accounts or to the AWS organization. With this requirement, approvers will launch an Amazon EC2 instance from the built AMI and conduct manual tests on the EC2 instance to make sure that it is functional.

  1. In the Amazon EC2 console, under Images, choose AMIs. Validate that the AMI is created.

Validate the AMI has been built

  1. Follow AWS docs: Launching an EC2 instances from a custom AMI for steps on how to launch an Amazon EC2 instance from the AMI.

Step 5: Select the approval URL in the email sent

  1. When the pipeline is run successfully, you will receive another email with a URL to share the AMI.

Approval link to share the AMI to Account B

2. Selecting this URL results in the following screen which shows that the AMI share is successful.

Result showing the AMI was successfully shared after selecting the approval link

Step 6: Verify that the AMI is shared to Account B

  1. Log in to Account B.
  2. In the Amazon EC2 console, under Images, choose AMIs. Then, in the dropdown, choose Private images. Validate that the AMI is shared.

AMI is shared when Private images are selected from the dropdown

3. Verify that a success email notification was sent to the target account email address provided.

Successful AMI share email notification sent to Target Account Email Address

Clean up

This section provides the necessary information for deleting various resources created as part of this post.

1. Deregister the AMIs created and shared.

a. Log in to Account A and follow the steps at AWS documentation: Deregister your Linux AMI.

2. Delete the SAM stack with the following command. Replace <region> with the Region of choice.

sam delete –stack-name ec2-image-builder-approver-notifications –no-prompts –region <region>

3. Delete the CloudWatch log groups for the Lambda functions. You’ll identify it with the name `/aws/lambda/ec2-image-builder-approve*`.

4. Consider deleting the Amazon S3 bucket used to store the packaged Lambda artifact.

Conclusion

In this post, we explained how to use Serverless resources to enable approval notifications for an Image Builder pipeline before AMIs are shared to other accounts. This solution can be extended to share to more than one AWS account or even to an AWS organization. With this solution, you will be notified when new golden images are created, allowing you to verify the correctness of their configuration before sharing them to for wider use. This reduces the possibility of sharing AMIs with misconfigurations that the written tests may not have identified.

We invite you to experiment with different AMIs created using Image Builder, and with different Image Builder components. Check out this GitHub repository for various examples that use Image Builder. Also check out this blog on Image builder integrations with EC2 Auto Scaling Instance Refresh. Let us know your questions and findings in the comments, and have fun!

CDK Corner – May 2021

Post Syndicated from Christian Weber original https://aws.amazon.com/blogs/devops/cdk-corner-may-2021/

Social – community engagement

According to Matt Coulter’s tweet, nearly 4000 people signed up for CDK Day to celebrate all things CDK on April 30. As a single-day, two-track event, there was a significant amount of content to learn from while having fun, and interacting with the CDK community.

Eric Johnson as the emcee, keynoted the first session of the morning, presenting “Better together: AWS CDK and AWS SAM.” This keynote was the announcement for the public preview of the AWS Serverless Application Model CLI (AWS SAM CLI). The AWS Serverless Application Model CLI includes support for local development and testing of AWS CDK projects.

To learn more, the blog post announcing the AWS SAM CLI public preview has more detail about the capabilities of the AWS SAM CLI.

If you missed CDK Day, fear not! CDK Day Track 1 and Track2 are available to watch online.

Great job and round of applause to the sign-language translators, the speakers, the organizers, and the hosts for making the second CDK Day a success! We can’t wait for CDK Day number 3!

Updates to the CDK

AWS CDK v2 developer preview

It’s here! The much-anticipated release of CDK v2’s developer preview is now available!

When using CDK previously, developers in JavaScript and TypeScript have faced challenges with the way that npm handles transitive dependencies; the dependencies that your dependencies rely on. For example, the aws-ec2 package.json file lists dependencies for other CDK construct libraries. If one of these transitive dependencies were updated, all of them would be need to be updated. Or you would run into dependency tree resolution errors, as seen in this StackOverflow thread.

With v2, all construct modules are now provided in a single package: aws-cdk-lib. All of the dependencies are now pinned to a single version of aws-cdk-lib, making it easier to manage. This also gives you the flexibility of having all CDK construct library modules available without having to run npm install each time you want to use a new construct library.

Another change to AWS CDK v2 is the removal of experimental modules. To help promote API stability and comply with semantic versioning, CDK v2 ships only with modules marked as stable.

Experimental modules aren’t going away completely, though. In v1, experimental modules and constructs will be provided together with no change. In v2, experimental modules are distributed and versioned separately from the aws-cdk-lib package, in their own dedicated package and namespace. Once a v2 construct is deemed stable, it is then merged into the aws-cdk-lib package.

The CDK team is still determining the best method of distributing experimental modules and constructs, so stay tuned for more information. Read more about the AWS CDK v2 developer preview in the What’s new blog post.

AWS CDK for Go developer preview

On April 7, the AWS CDK team announced support for golang. From the Go tracking issue on GitHub, nearly 900 members of the CDK community have requested for CDK to support golang, and we’re happy to see it become available! We are looking forward to helping out all the golang gophers out there build amazing CDK applications!

To learn more about Go and AWS CDK, read the AWS CDK for Go module API documentation on pkg.go.dev. You can also read the Go bindings for JSII RFC document on GitHub. Want to contribute to the success of Go and CDK? The project tracking board for Go’s General Availability has tasks and items which could use your help.

Construct modules promoted to General Availability

Many new construct modules were promoted to General Availability recently. General Availability indicates a module’s stability, giving confidence to run these modules in production workloads. In April, a total of 15 modules were promoted stable:

Notable new L2 constructs

In the @aws-cdk/route-53 module, name server (NS) records were previously defined with the route53.RecordType enum. In PR#13895, user stijnbrouwers introduces the NS record as its own L2 construct: route53.NSRecord. bringing it into company with other record type L2s, such as route53.ARecord. This makes managing NS records consistent with the other record types represented as L2 constructs.

Improving the @aws-cdk/aws-events-targets module, CDK community user hedrall submitted PR#13823. This change brings support for Amazon API Gateway as a target for an Amazon EventBridge event.

@aws-cdk/aws-codepipeline-actions now includes an L2 construct for AWS CodeStar Connections supporting BitBucket and GitHub. This construct lets you create a CDK application that uses AWS CodeStar with a source connection from either provider, thanks to PR#13781 from the CDK Team.

Level ups to existing CDK constructs

Amazon Elastic Inference makes available low-cost GPU-acceleration for deep-learning workloads. PR#13950 now lets you use the service via @aws-cdk/aws-ecs in Amazon Elastic Container Service tasks, from CDK community user upparekh.

In PR#13473, from pgarbe, the @aws-cdk/aws-lambda-nodejs module will now bundle AWS Lambda functions with Docker images sourced from the Amazon Elastic Container Registry (Amazon ECR) Public Registry, instead of DockerHub. Prior to this change, CDK used your DockerHub credentials to pull a Docker image for the Lambda function. If your account was in DockerHub’s free-tier account level, your account is throttled whenever it exceeds the API limit within a short time frame set by DockerHub. This can cause your AWS CDK deployment to be delayed until you are under DockerHub’s API limit. By moving to the Amazon ECR Public Registry, this removes the risk of being affected by DockerHub’s API rate limiting . You can read more in this blog post giving customers advice about DockerHub rate limits from last year.

With @aws-cdk/aws-codebuild, you can use concurrent build support to speed up your build process. Sometimes you’ll want to limit the number of builds that run concurrently, whether for cost reduction or reducing the complexity of your build process. PR#14185, authored by gmokki, adds the ability to define a concurrent build limit for an AWS CodeBuild project Stage.

It is common for customers to have applications or resources spanning multiple AWS Regions. If you’re using @aws-cdk/aws-secretsmanager, you can now replicate secrets to multiple Regions, with PR#14266 from the CDK team. Make sure you’re not setting your secret as “test123” for your production databases in multiple Regions!

For users of @aws-cdk/aws-eks, PR#12659 from anguslees lets you pass arguments from bootstrap.sh to avoid the DescribeCluster API call. This will speed up the time it takes nodes to join an EKS cluster.

PR#14250 from the CDK team gives developers using @aws-cdk/aws-ec2 the ability to set fixed IPs when defining NAT gateways. This change will now pre-create Elastic IP address allocations and assign them to the NAT gateway. This can be useful when managing links from an Amazon Virtual Private Cloud (VPC) to an on-premises data center that relies on fixed/static IP addresses.

@aws-cdk/aws-iam now lets you add AWS Identity and Access Management (AWS IAM) users to new or existing groups. For example, you might want to have a user in a specific group for the life of a deployed CDK application. And on stack deletion, revoke that membership. Thanks to PR#13698 from jogold, this is now possible.

Learning – Finds from across the internet

If you work with CDK parameters, you might be curious how parameters derive their names and values. Borislav Hadzhiev released a blog post about setting and using CDK parameters.

Ibrahim Cesar’s wrote an awesome blog post detailing the experience of discovering and working with CDK. It’s an enjoyable read of inspiration and animated gifs.

Twitter user edwin4_ released a tool for CDK automation called RocketCDK. From the project’s GitHub repository, this tool will initialize your CDK app, install your packages, and auto-import them into your stack. Neat! Anything that helps save time is a plus-one.

Community acknowledgments

And finally, congratulations and rounds of applause for these folks who had their first Pull Request merged to the CDK repository!

*These users’ Pull Requests were merged in April.

Thank you for joining us on this update of the CDK corner. See you next time!

Building a Jenkins Pipeline with AWS SAM

Post Syndicated from Eric Johnson original https://aws.amazon.com/blogs/compute/building-a-jenkins-pipeline-with-aws-sam/

This post is courtesy of Tarun Kumar Mall, SDE at AWS.

This post shows how to set up a multi-stage pipeline on a Jenkins host for a serverless application, using the AWS Serverless Application Model (AWS SAM).

Overview

This tutorial uses Jenkins Pipeline plugin. A commit to the main branch of the repository starts and deploys the application, using the AWS SAM CLI. This tutorial deploys a small serverless API application called HelloWorldApi.

The pipeline consists of stages to build and deploy the application. Jenkins first ensures that the build environment is set up and installs any necessary tools. Next, Jenkins prepares the build artifacts. It promotes the artifacts to the next stage, where they are deployed to a beta environment using the AWS SAM CLI. Integration tests are run after deployment. If the tests pass, the application is deployed to the production environment.

CICD workflow diagram

CICD workflow diagram

The following prerequisites are required:

Setting up the backend application and development stack

Using AWS CloudFormation to define the infrastructure, you can create multiple environments or stacks from the same infrastructure definition. A “dev stack” is a copy of production infrastructure deployed to a developer account for testing purposes.

As serverless services use a pay-for-value model, it can be cost effective to use a high-fidelity copy of your production stack. Dev stacks are created by each developer as needed and deleted without having any negative impact on production.

For complex applications, it may not be feasible for every developer to have their own stack. However, for this tutorial, setting up the dev stack first for testing is recommended. Setting up a dev stack takes you through a manual process of how a stack is created. Later, this process is used to automate the setup using Jenkins.

To create a dev stack:

  1. Clone backend application repository https://github.com/aws-samples/aws-sam-jenkins-pipeline-tutorial
    git clone https://github.com/aws-samples/aws-sam-jenkins-pipeline-tutorial.git
  2. Build the application and run the guided deploy command:
    cd aws-sam-jenkins-pipeline-tutorial
    sam build
    sam deploy --guided

    AWS SAM guided deploy output

    AWS SAM guided deploy output

This sets up a development stack and saves the settings in the samconfig.toml file with configuration environment specific to a user. This also triggers a deployment.

  1. After deployment, make a small code change. For example, in the file hello-world/app.js change the message Hello world to Hello world from user <your name>.
  2. Deploy the updated code:
    sam build
    sam deploy -–config-env <your_username>

With this command, each developer can create their own configuration environment. They can use this for deploying to their development stack and testing changes before pushing changes to the repository.

Once deployment finishes, the API endpoint is displayed in the console output. You can use this endpoint to make GET requests and test the API manually.

Deployment output

Deployment output

To update and run the integration test:

  1. Open the hello-world/tests/integ/test-integ-api.js file.
  2. Update the assert statement in line 32 to include <your name> from the previous step:
    it("verifies if response contains my username", async () => {
      assert.include(apiResponse.data.message, "<your name>");
    });
  3. Open package.json and add the line in bold:
    {
      ...
      "scripts": {
        "test": "mocha tests/unit/",
        "integ-test": "mocha tests/integ/"
      }
      ...
    }
  4. From the terminal, run the following commands:
    cd hello-world
    npm install
    AWS_REGION=us-west-2 STACK_NAME=sam-app-user1-dev-stack npm run integ-test
    If you are using Microsoft Windows, instead run:
    cd hello-world
    npm install
    set AWS_REGION=us-west-2
    set STACK_NAME=sam-app-user1-dev-stack
    npm run integ-test

    Test results

    Test results

You have deployed a fully configured development stack with working integration tests. To push the code to GitHub:

  1. Create a new repository in GitHub.
    1. From the GitHub account homepage, choose New.
    2. Enter a repository name and choose Create Repository.
    3. Copy the repository URL.
  2. From the root directory of the AWS SAM project, run:
    git init
    git commit -am “first commit”
    git remote add origin <your-repository-url>
    git push -u origin main

Creating an IAM user for Jenkins

To create an IAM user for the Jenkins deployment:

  1. Sign in to the AWS Management Console and navigate to IAM.
  2. Select Users from side navigation and choose Add user.
  3. Enter the User name as sam-jenkins-demo-credentials and grant Programmatic access to this user.
  4. On the next page, select Attach existing policies directly and choose Create Policy.
  5. Select the JSON tab and enter the following policy. Replace <YOUR_ACCOUNT_ID> with your AWS account ID:
    {
        "Version": "2012-10-17",
        "Statement": [
            {
                "Sid": "CloudFormationTemplate",
                "Effect": "Allow",
                "Action": [
                    "cloudformation:CreateChangeSet"
                ],
                "Resource": [
                    "arn:aws:cloudformation:*:aws:transform/Serverless-2016-10-31"
                ]
            },
            {
                "Sid": "CloudFormationStack",
                "Effect": "Allow",
                "Action": [
                    "cloudformation:CreateChangeSet",
                    "cloudformation:DeleteStack",
                    "cloudformation:DescribeChangeSet",
                    "cloudformation:DescribeStackEvents",
                    "cloudformation:DescribeStacks",
                    "cloudformation:ExecuteChangeSet",
                    "cloudformation:GetTemplateSummary"
                ],
                "Resource": [
                    "arn:aws:cloudformation:*:<YOUR_ACCOUNT_ID>:stack/*"
                ]
            },
            {
                "Sid": "S3",
                "Effect": "Allow",
                "Action": [
                    "s3:CreateBucket",
                    "s3:GetObject",
                    "s3:PutObject"
                ],
                "Resource": [
                    "arn:aws:s3:::*/*"
                ]
            },
            {
                "Sid": "Lambda",
                "Effect": "Allow",
                "Action": [
                    "lambda:AddPermission",
                    "lambda:CreateFunction",
                    "lambda:DeleteFunction",
                    "lambda:GetFunction",
                    "lambda:GetFunctionConfiguration",
                    "lambda:ListTags",
                    "lambda:RemovePermission",
                    "lambda:TagResource",
                    "lambda:UntagResource",
                    "lambda:UpdateFunctionCode",
                    "lambda:UpdateFunctionConfiguration"
                ],
                "Resource": [
                    "arn:aws:lambda:*:<YOUR_ACCOUNT_ID>:function:*"
                ]
            },
            {
                "Sid": "IAM",
                "Effect": "Allow",
                "Action": [
                    "iam:AttachRolePolicy",
                    "iam:CreateRole",
                    "iam:DeleteRole",
                    "iam:DetachRolePolicy",
                    "iam:GetRole",
                    "iam:PassRole",
                    "iam:TagRole"
                ],
                "Resource": [
                    "arn:aws:iam::<YOUR_ACCOUNT_ID>:role/*"
                ]
            },
            {
                "Sid": "APIGateway",
                "Effect": "Allow",
                "Action": [
                    "apigateway:DELETE",
                    "apigateway:GET",
                    "apigateway:PATCH",
                    "apigateway:POST",
                    "apigateway:PUT"
                ],
                "Resource": [
                    "arn:aws:apigateway:*::*"
                ]
            }
        ]
    }
  6. Choose Review Policy and add a policy name on the next page.
  7. Choose Create Policy button.
  8. Return to the previous tab to continue creating the IAM user. Choose Refresh and search for the policy name you created. Select the policy.
  9. Choose Next Tags and then Review.
  10. Choose Create user and save the Access key ID and Secret access key.

Configuring Jenkins

To configure AWS credentials in Jenkins:

  1. On the Jenkins dashboard, go to Manage Jenkins > Manage Plugins in the Available tab. Search for the Pipeline: AWS Steps plugin and choose Install without restart.
  2. Navigate to Manage Jenkins > Manage Credentials > Jenkins (global) > Global Credentials > Add Credentials.
  3. Select Kind as AWS credentials and use the ID sam-jenkins-demo-credentials.
  4. Enter the access key ID and secret access key and choose OK.

    Jenkins credential configuration

    Jenkins credential configuration

  5. Create Amazon S3 buckets for each Region in the pipeline. S3 bucket names must be unique within a partition:
    aws s3 mb s3://sam-jenkins-demo-us-west-2-<your_name> --region us-west-2
    aws s3 mb s3://sam-jenkins-demo-us-east-1-<your_name> --region us-east-1
  6. Create a file named Jenkinsfile at the root of the project and add:
    pipeline {
      agent any
     
      stages {
        stage('Install sam-cli') {
          steps {
            sh 'python3 -m venv venv && venv/bin/pip install aws-sam-cli'
            stash includes: '**/venv/**/*', name: 'venv'
          }
        }
        stage('Build') {
          steps {
            unstash 'venv'
            sh 'venv/bin/sam build'
            stash includes: '**/.aws-sam/**/*', name: 'aws-sam'
          }
        }
        stage('beta') {
          environment {
            STACK_NAME = 'sam-app-beta-stage'
            S3_BUCKET = 'sam-jenkins-demo-us-west-2-user1'
          }
          steps {
            withAWS(credentials: 'sam-jenkins-demo-credentials', region: 'us-west-2') {
              unstash 'venv'
              unstash 'aws-sam'
              sh 'venv/bin/sam deploy --stack-name $STACK_NAME -t template.yaml --s3-bucket $S3_BUCKET --capabilities CAPABILITY_IAM'
              dir ('hello-world') {
                sh 'npm ci'
                sh 'npm run integ-test'
              }
            }
          }
        }
        stage('prod') {
          environment {
            STACK_NAME = 'sam-app-prod-stage'
            S3_BUCKET = 'sam-jenkins-demo-us-east-1-user1'
          }
          steps {
            withAWS(credentials: 'sam-jenkins-demo-credentials', region: 'us-east-1') {
              unstash 'venv'
              unstash 'aws-sam'
              sh 'venv/bin/sam deploy --stack-name $STACK_NAME -t template.yaml --s3-bucket $S3_BUCKET --capabilities CAPABILITY_IAM'
            }
          }
        }
      }
    }
  7. Commit and push the code to the GitHub repository by running following commands:
    git commit -am “Adding Jenkins pipeline config.”
    git push origin -u main

Next, create a Jenkins Pipeline project:

  1. From the Jenkins dashboard, choose New Item, select Pipeline, and enter the project name sam-jenkins-demo-pipeline.

    Jenkins Pipeline creation wizard

    Jenkins Pipeline creation wizard

  2. Under Build Triggers, select Poll SCM and enter * * * * *. This polls the repository for changes every minute.

    Jenkins build triggers configuration

    Jenkins build triggers configuration

  3. Under the Pipeline section, select Definition as Pipeline script from SCM.
    • Select GIT under SCM and enter the repository URL.
    • Set Branches to build to */main.
    • Set the Script Path to Jenkinsfile.

      Jenkins pipeline configuration

      Jenkins pipeline configuration

  4. Save the project.

After the build finishes, you see the pipeline:

Jenkins pipeline stages

Jenkins pipeline stages

Review the logs for the beta stage to check that the integration test is completed successfully.

Jenkins stage logs

Jenkins stage logs

Conclusion

This tutorial uses a Jenkins Pipeline to add an automated CI/CD pipeline to an AWS SAM-generated example application. Jenkins automatically builds, tests, and deploys the changes after each commit to the repository.

Using Jenkins, developers can gain the benefits of continuous integration and continuous deployment of serverless applications to the AWS Cloud with minimal configuration.

For more information, see the Jenkins Pipeline and AWS Serverless Application Model documentation.

We want to hear your feedback! Is this approach useful for your organization? Do you want to see another implementation? Contact us on Twitter @edjgeek or via comments!

Working with Lambda layers and extensions in container images

Post Syndicated from Julian Wood original https://aws.amazon.com/blogs/compute/working-with-lambda-layers-and-extensions-in-container-images/

In this post, I explain how to use AWS Lambda layers and extensions with Lambda functions packaged and deployed as container images.

Previously, Lambda functions were packaged only as .zip archives. This includes functions created in the AWS Management Console. You can now also package and deploy Lambda functions as container images.

You can use familiar container tooling such as the Docker CLI with a Dockerfile to build, test, and tag images locally. Lambda functions built using container images can be up to 10 GB in size. You push images to an Amazon Elastic Container Registry (ECR) repository, a managed AWS container image registry service. You create your Lambda function, specifying the source code as the ECR image URL from the registry.

Lambda container image support

Lambda container image support

Lambda functions packaged as container images do not support adding Lambda layers to the function configuration. However, there are a number of solutions to use the functionality of Lambda layers with container images. You take on the responsible for packaging your preferred runtimes and dependencies as a part of the container image during the build process.

Understanding how Lambda layers and extensions work as .zip archives

If you deploy function code using a .zip archive, you can use Lambda layers as a distribution mechanism for libraries, custom runtimes, and other function dependencies.

When you include one or more layers in a function, during initialization, the contents of each layer are extracted in order to the /opt directory in the function execution environment. Each runtime then looks for libraries in a different location under /opt, depending on the language. You can include up to five layers per function, which count towards the unzipped deployment package size limit of 250 MB. Layers are automatically set as private, but they can be shared with other AWS accounts, or shared publicly.

Lambda Extensions are a way to augment your Lambda functions and are deployed as Lambda layers. You can use Lambda Extensions to integrate functions with your preferred monitoring, observability, security, and governance tools. You can choose from a broad set of tools provided by AWS, AWS Lambda Ready Partners, and AWS Partners, or create your own Lambda Extensions. For more information, see “Introducing AWS Lambda Extensions – In preview.”

Extensions can run in either of two modes, internal and external. An external extension runs as an independent process in the execution environment. They can start before the runtime process, and can continue after the function invocation is fully processed. Internal extensions run as part of the runtime process, in-process with your code.

Lambda searches the /opt/extensions directory and starts initializing any extensions found. Extensions must be executable as binaries or scripts. As the function code directory is read-only, extensions cannot modify function code.

It helps to understand that Lambda layers and extensions are just files copied into specific file paths in the execution environment during the function initialization. The files are read-only in the execution environment.

Understanding container images with Lambda

A container image is a packaged template built from a Dockerfile. The image is assembled or built from commands in the Dockerfile, starting from a parent or base image, or from scratch. Each command then creates a new layer in the image, which is stacked in order on top of the previous layer. Once built from the packaged template, a container image is immutable and read-only.

For Lambda, a container image includes the base operating system, the runtime, any Lambda extensions, your application code, and its dependencies. Lambda provides a set of open-source base images that you can use to build your container image. Lambda uses the image to construct the execution environment during function initialization. You can use the AWS Serverless Application Model (AWS SAM) CLI or native container tools such as the Docker CLI to build and test container images locally.

Using Lambda layers in container images

Container layers are added to a container image, similar to how Lambda layers are added to a .zip archive function.

There are a number of ways to use container image layering to add the functionality of Lambda layers to your Lambda function container images.

Use a container image version of a Lambda layer

A Lambda layer publisher may have a container image format equivalent of a Lambda layer. To maintain the same file path as Lambda layers, the published container images must have the equivalent files located in the /opt directory. An image containing an extension must include the files in the /opt/extensions directory.

An example Lambda function, packaged as a .zip archive, is created with two layers. One layer contains shared libraries, and the other layer is a Lambda extension from an AWS Partner.

aws lambda create-function –region us-east-1 –function-name my-function \

aws lambda create-function --region us-east-1 --function-name my-function \  
    --role arn:aws:iam::123456789012:role/lambda-role \
    --layers \
        "arn:aws:lambda:us-east-1:123456789012:layer:shared-lib-layer:1" \
        "arn:aws:lambda:us-east-1:987654321987:extensions-layer:1" \
    …

The corresponding Dockerfile syntax for a function packaged as a container image includes the following lines. These pull the container image versions of the Lambda layers and copy them into the function image. The shared library image is pulled from ECR and the extension image is pulled from Docker Hub.

FROM public.ecr.aws/myrepo/shared-lib-layer:1 AS shared-lib-layer
# Layer code
WORKDIR /opt
COPY --from=shared-lib-layer /opt/ .

FROM aws-partner/extensions-layer:1 as extensions-layer
# Extension  code
WORKDIR /opt/extensions
COPY --from=extensions-layer /opt/extensions/ .

Copy the contents of a Lambda layer into a container image

You can use existing Lambda layers, and copy the contents of the layers into the function container image /opt directory during docker build.

You need to build a Dockerfile that includes the AWS Command Line Interface to copy the layer files from Amazon S3.

The Dockerfile to add two layers into a single image includes the following lines to copy the Lambda layer contents.

FROM alpine:latest

ARG AWS_DEFAULT_REGION=${AWS_DEFAULT_REGION:-"us-east-1"}
ARG AWS_ACCESS_KEY_ID=${AWS_ACCESS_KEY_ID:-""}
ARG AWS_SECRET_ACCESS_KEY=${AWS_SECRET_ACCESS_KEY:-""}
ENV AWS_DEFAULT_REGION=${AWS_DEFAULT_REGION}
ENV AWS_ACCESS_KEY_ID=${AWS_ACCESS_KEY_ID}
ENV AWS_SECRET_ACCESS_KEY=${AWS_SECRET_ACCESS_KEY}

RUN apk add aws-cli curl unzip

RUN mkdir -p /opt

RUN curl $(aws lambda get-layer-version-by-arn --arn arn:aws:lambda:us-east-1:1234567890123:layer:shared-lib-layer:1 --query 'Content.Location' --output text) --output layer.zip
RUN unzip layer.zip -d /opt
RUN rm layer.zip

RUN curl $(aws lambda get-layer-version-by-arn --arn arn:aws:lambda:us-east-1:987654321987:extensions-layer:1 --query 'Content.Location' --output text) --output layer.zip
RUN unzip layer.zip -d /opt
RUN rm layer.zip

To run the AWS CLI, specify your AWS_ACCESS_KEY, and AWS_SECRET_ACCESS_KEY, and include the required AWS_DEFAULT_REGION as command-line arguments.

docker build . -t layer-image1:latest \
--build-arg AWS_DEFAULT_REGION=us-east-1 \
--build-arg AWS_ACCESS_KEY_ID=AKIAIOSFODNN7EXAMPLE \
--build-arg AWS_SECRET_ACCESS_KEY=wJalrXUtnFEMI/K7MDENG/bPxRfiCYEXAMPLEKEY

This creates a container image containing the existing Lambda layer and extension files. This can be pushed to ECR and used in a function.

Build a container image from a Lambda layer

You can repackage and publish Lambda layer file content as container images. Creating separate container images for different layers allows you to add them to multiple functions, and share them in a similar way as Lambda layers.

You can create a separate container image containing the files from a single layer, or combine the files from multiple layers into a single image. If you create separate container images for layer files, you then add these images into your function image.

There are two ways to manage language code dependencies. You can pre-build the dependencies and copy the files into the container image, or build the dependencies during docker build.

In this example, I migrate an existing Python application. This comprises a Lambda function and extension, from a .zip archive to separate function and extension container images. The extension writes logs to S3.

You can choose how to store images in repositories. You can either push both images to the same ECR repository with different image tags, or push to different repositories. In this example, I use separate ECR repositories.

To set up the example, visit the GitHub repo and follow the instructions in the README.md file.

The existing example extension uses a makefile to install boto3 using pip install with a requirements.txt file. This is migrated to the docker build process. I must add a Python runtime to be able to run pip install as part of the build process. I use python:3.8-alpine as a minimal base image.

I create separate Dockerfiles for the function and extension. The extension Dockerfile contains the following lines.

FROM python:3.8-alpine AS installer
#Layer Code
COPY extensionssrc /opt/
COPY extensionssrc/requirements.txt /opt/
RUN pip install -r /opt/requirements.txt -t /opt/extensions/lib

FROM scratch AS base
WORKDIR /opt/extensions
COPY --from=installer /opt/extensions .

I build, tag, login, and push the extension container image to an existing ECR repository.

docker build -t log-extension-image:latest  .
docker tag log-extension-image:latest 123456789012.dkr.ecr.us-east-1.amazonaws.com/log-extension-image:latest
aws ecr get-login-password --region us-east-1 | docker login --username AWS --password-stdin 123456789012.dkr.ecr.us-east-1.amazonaws.com
docker push 123456789012.dkr.ecr.us-east-1.amazonaws.com/log-extension-image:latest

The function Dockerfile contains the following lines, which add the files from the previously created extension image to the function image. There is no need to run pip install for the function as it does not require any additional dependencies.

FROM 123456789012.dkr.ecr.us-east-1.amazonaws.com/log-extension-image:latest AS layer
FROM public.ecr.aws/lambda/python:3.8
# Layer code
WORKDIR /opt
COPY --from=layer /opt/ .
# Function code
WORKDIR /var/task
COPY app.py .
CMD ["app.lambda_handler"]

I build, tag, and push the function container image to a separate existing ECR repository. This creates an immutable image of the Lambda function.

docker build -t log-extension-function:latest  .
docker tag log-extension-function:latest 123456789012.dkr.ecr.us-east-1.amazonaws.com/log-extension-function:latest
docker push 123456789012.dkr.ecr.us-east-1.amazonaws.com/log-extension-function:latest

The function requires a unique S3 bucket to store the logs files, which I create in the S3 console. I create a Lambda function from the ECR repository image, and specify the bucket name as a Lambda environment variable.

aws lambda create-function --region us-east-1  --function-name log-extension-function \
--package-type Image --code ImageUri=123456789012.dkr.ecr.us-east-1.amazonaws.com/log-extension-function:latest \
--role "arn:aws:iam:: 123456789012:role/lambda-role" \
--environment  "Variables": {"S3_BUCKET_NAME": "s3-logs-extension-demo-logextensionsbucket-us-east-1"}

For subsequent extension code changes, I need to update both the extension and function images. If only the function code changes, I need to update the function image. I push the function image as the :latest image to ECR. I then update the function code deployment to use the updated :latest ECR image.

aws lambda update-function-code --function-name log-extension-function --image-uri 123456789012.dkr.ecr.us-east-1.amazonaws.com/log-extension-function:latest

Using custom runtimes with container images

With .zip archive functions, custom runtimes are added using Lambda layers. With container images, you no longer need to copy in Lambda layer code for custom runtimes.

You can build your own custom runtime images starting with AWS provided base images for custom runtimes. You can add your preferred runtime, dependencies, and code to these images. To communicate with Lambda, the image must implement the Lambda Runtime API. We provide Lambda runtime interface clients for all supported runtimes, or you can implement your own for additional runtimes.

Running extensions in container images

A Lambda extension running in a function packaged as a container image works in the same way as a .zip archive function. You build a function container image including the extension files, or adding an extension image layer. Lambda looks for any external extensions in the /opt/extensions directory and starts initializing them. Extensions must be executable as binaries or scripts.

Internal extensions modify the Lambda runtime startup behavior using language-specific environment variables, or wrapper scripts. For language-specific environment variables, you can set the following environment variables in your function configuration to augment the runtime command line.

  • JAVA_TOOL_OPTIONS (Java Corretto 8 and 11)
  • NODE_OPTIONS (Node.js 10 and 12)
  • DOTNET_STARTUP_HOOKS (.NET Core 3.1)

An example Lambda environment variable for JAVA_TOOL_OPTIONS:

-javaagent:"/opt/ExampleAgent-0.0.jar"

Wrapper scripts delegate the runtime start-up to a script. The script can inject and alter arguments, set environment variables, or capture metrics, errors, and other diagnostic information. The following runtimes support wrapper scripts: Node.js 10 and 12, Python 3.8, Ruby 2.7, Java 8 and 11, and .NET Core 3.1

You specify the script by setting the value of the AWS_LAMBDA_EXEC_WRAPPER environment variable as the file system path of an executable binary or script, for example:

/opt/wrapper_script

Conclusion

You can now package and deploy Lambda functions as container images in addition to .zip archives. Lambda functions packaged as container images do not directly support adding Lambda layers to the function configuration as .zip archives do.

In this post, I show a number of solutions to use the functionality of Lambda layers and extensions with container images, including example Dockerfiles.

I show how to migrate an existing Lambda function and extension from a .zip archive to separate function and extension container images. Follow the instructions in the README.md file in the GitHub repository.

For more serverless learning resources, visit https://serverlessland.com.

Performing canary deployments for service integrations with Amazon API Gateway

Post Syndicated from Eric Johnson original https://aws.amazon.com/blogs/compute/performing-canary-deployments-for-service-integrations-with-amazon-api-gateway/

This post authored by Dhiraj Thakur and Sameer Goel, Solutions Architects at AWS.

When building serverless web applications, it is common to use AWS Lambda functions as the compute layer for business logic. To manage canary releases, it’s best practice to use Lambda deployment preferences. However, if you use Amazon API Gateway service integrations instead of Lambda functions, it is necessary to manage the canary release at the API level. This post shows how to use canary releases in REST APIs to gradually deploy changes to serverless applications.

Overview

Modern applications frequently deploy updates to implement new features. But updating or changing a production application is often risky and may introduce bugs. Canary deployments are a popular strategy to help mitigate this risk.

In a canary deployment, you partially deploy a new software feature and shift some percentage of traffic to a new version of the application. This allows you to verify stability and reduce risk associated with the new release. After gaining confidence in the new version, you continually increment traffic until all traffic flows to the new release. Additionally, a canary deployment can be a cost-effective approach as there is no need to duplicate application resources, compared with other deployment strategies such as blue/green deployments.

In this example, there are two service versions deployed with API Gateway. The canary version receives 10% of traffic and the remaining 90% is routed to the stable version.

Canary deploy example

Canary deploy example

After deploying the new version, you can test the health and performance of the new version. Once you are confident that it is ready for release, you can promote the canary version and send 100% of traffic to this API version.

Promoted deployment example

Promoted deployment example

In this post, I show how to use AWS Serverless Application Model (AWS SAM) to build a canary release with a REST API in API Gateway. This is an open-source framework for building serverless applications. It enables developers to define and deploy canary releases and then shift the traffic programmatically. In this example, AWS SAM creates the canary settings necessary to divide traffic and the IAM role used by API Gateway.

API Gateway canary deployment example

For this tutorial, a REST API integrates directly with Amazon DynamoDB. This returns three data attributes from the DynamoDB table. In the canary version, the code is modified to provide additional information from the table.

Create Amazon REST API and other resources

Download the code from this post from https://github.com/aws-samples/amazon-api-gateway-canary-deployment. The template.yaml file is the AWS SAM configuration for the application, and the api.yaml is the OpenAPI configuration for the API. Deploy this application by following the instructions in the README.md file.

The deployment creates an empty DynamoDB table called “<sam-stack-name>-DataTable-*” and an API Gateway REST API called “Canary Deployment” with the stage “PROD”.

  1. Run the Amazon DynamoDB put-item command to create a new item in the DynamoDB table from the AWS CLI. Ensure you have configured AWS CLI – refer to the quickstart guide to learn more.Replace <tablename> with the DynamoDB table name.
    aws dynamodb put-item --table-name <tablename> --item "{""country"":{""S"":""Germany""},""runner-up"":{""S"":""France""},""winner"":{""S"":""Italy""},""year"":{""S"":""2006""}}" --return-consumed-capacity TOTAL

    It returns a success message:

    Update Amazon DynamoDB output

    Update Amazon DynamoDB output

    You can verify the record in the DynamoDB table in the AWS Management Console:

    Scan of Amazon DynamoDB table

    Scan of Amazon DynamoDB table

  2. Select the REST API “Canary Deployment” in Amazon API Gateway. Choose “GET” under the resource section. In the Integration Request, you see the Mapping Template:
    {
      "Key": {
        "year": {
          "S": "$input.params("year")"
        }
      },
      "TableName": "<stack-name>-DataTable-<random-string>"
    }

    The Integration Response is an HTTP response encapsulating the backend response and template looks like this:The TableName indicates which table is used in the REST API call. The value for year is extracted from the request URL using $input.params(‘year’)

    {
      "year": "$input.path('$.Item.year.S')",
      "country": "$input.path('$.Item.country.S')",
      "winner": "$input.path('$.Item.winner.S')"
    }

    It returns the “country”, “year”, “winner” attributes.

  3. You can also check the logs/tracing configuration in the API stage as per the following settings. You can see Amazon CloudWatch Logs are enabled for the API, which helps to check the health of the canary API version.For example, a response code of 2xx indicates that the operation was successful. Other error codes indicate either a client error (4xx) or a server error (5xx). See this link for status code details. Analyze the status of the API in the logs before promoting the canary.

    Enabling logs on the Amazon API Gateway console

    Enabling logs on the Amazon API Gateway console

If you invoke the API endpoint URL in your browser, you can see it returns “country”, “year” and “winner”, as expected from the DynamoDB table.

Invoking endpoint from browser example

Invoking endpoint from browser example

Next, set up the canary release deployment to create a new version of the deployed API and route 10% of the API traffic to it.

Canary deployment

You can now create a new version of the API using the AWS SAM template, which changes the number of attributes returned. With the new version of the API, the additional attribute “runner-up” is returned from the DynamoDB table. For the initial deployment, 10% of API traffic is routed to this API version.

  1. Go to the canary-stack directory and deploy the application. Be sure to use the same stack name that you used for the previous deployment:
    sam deploy -gAWS CloudFormation deploys the canary version and configures the API to route 10% of traffic the new version.You can validate this by checking the canary setting in the PROD stage. You can see “percentage of requests directed to canary” (new version) is “10%” and “percentage of requests directed to Prod” (previous version) is 90%.
  2. Check the Integration Response. The modified template looks like this:
    {
      "year": "$input.path('$.Item.year.S')",
      "country": "$input.path('$.Item.country.S')",
      "winner": "$input.path('$.Item.winner.S')",
      "runner-up": "$input.path('$.Item.runner-up.S')"
    }
  3. Now, test the canary deployment using the API endpoint URL. You can refresh the browser and see the “runner-up” results shown for a small percentage of requests. This demonstrates that 10% of the traffic is routed to the canary. If don’t see this new attribute, even after multiple refreshes, clear your browser cache.Reviewing the Integration Response, you can see that the template now includes the additional attribute “runner-up”. This returns “country”, “year”, “winner” and “runner-up”, as per the new canary release requirement.

    Testing response in browser after change

    Testing response in browser after change

Analyze Amazon CloudWatch Logs

You can analyze the health of the canary version via Amazon CloudWatch Logs. To ensure that there is data in CloudWatch Logs, refresh your browser several times when accessing the API URL.

  1. In the AWS Management Console, navigate to Services -> CloudWatch.
  2. Choose the Region that matches your API Gateway Region, then select Logs on the Left menu.
  3. The logs for API Gateway are named based on the ID of the API. The form is “API-Gateway-Execution-Logs_<api id>/<api stage>
    Viewing the logs, you can see a list of log streams with GUID identifiers. Use the Last Event Time column for a date/time stamp and find a recent execution.
  4. Analyze the canary log to confirm that the REST API call is successful.
Canary promotion options

Canary promotion options

Promote or delete the canary version

To roll back to the initial version, choose Delete Canary or set “Percentage of requests directed to Canary“ to 0. If the Amazon CloudWatch analysis shows that the canary version is operating successfully, you are ready to promote the canary to receive all API traffic.

  1. Navigate to the Canary tab and choose Promote Canary.

    Promoting the canary in the Amazon API Gateway console

    Promoting the canary in the Amazon API Gateway console

  2. Choose Update to accept the settings. This sends 100% traffic to the new version.

    Canary promotion options

    Canary promotion options

Cleanup

See the repo’s README.md for cleanup instructions.

Conclusion

Canary deployments are a recommended practice for testing new versions of applications. This blog post shows how to implement canary deployments for service integrations in API Gateway. I walk through how to analyze the logs generated for canary requests and promote the canary to complete the deployment. Using AWS SAM, you deploy a canary in API Gateway with a predefined routing configuration and strategy.

To learn more, read Building APIs with Amazon API Gateway and Implementing safe AWS Lambda deployments with AWS CodeDeploy.

Building storage-first serverless applications with HTTP APIs service integrations

Post Syndicated from Eric Johnson original https://aws.amazon.com/blogs/compute/building-storage-first-applications-with-http-apis-service-integrations/

Over the last year, I have been talking about “storage first” serverless patterns. With these patterns, data is stored persistently before any business logic is applied. The advantage of this pattern is increased application resiliency. By persisting the data before processing, the original data is still available, if or when errors occur.

Common pattern for serverless API backend

Common pattern for serverless API backend

Using Amazon API Gateway as a proxy to an AWS Lambda function is a common pattern in serverless applications. The Lambda function handles the business logic and communicates with other AWS or third-party services to route, modify, or store the processed data. One option is to place the data in an Amazon Simple Queue Service (SQS) queue for processing downstream. In this pattern, the developer is responsible for handling errors and retry logic within the Lambda function code.

The storage first pattern flips this around. It uses native error handling with retry logic or dead-letter queues (DLQ) at the SQS layer before any code is run. By directly integrating API Gateway to SQS, developers can increase application reliability while reducing lines of code.

Storage first pattern for serverless API backend

Storage first pattern for serverless API backend

Previously, direct integrations require REST APIs with transformation templates written in Velocity Template Language (VTL). However, developers tell us they would like to integrate directly with services in a simpler way without using VTL. As a result, HTTP APIs now offers the ability to directly integrate with five AWS services without needing a transformation template or code layer.

The first five service integrations

This release of HTTP APIs direct integrations includes Amazon EventBridge, Amazon Kinesis Data Streams, Simple Queue Service (SQS), AWS System Manager’s AppConfig, and AWS Step Functions. With these new integrations, customers can create APIs and webhooks for their business logic hosted in these AWS services. They can also take advantage of HTTP APIs features like authorizers, throttling, and enhanced observability for securing and monitoring these applications.

Amazon EventBridge

HTTP APIs service integration with Amazon EventBridge

HTTP APIs service integration with Amazon EventBridge

The HTTP APIs direct integration for EventBridge uses the PutEvents API to enable client applications to place events on an EventBridge bus. Once the events are on the bus, EventBridge routes the event to specific targets based upon EventBridge filtering rules.

This integration is a storage first pattern because data is written to the bus before any routing or logic is applied. If the downstream target service has issues, then EventBridge implements a retry strategy with incremental back-off for up to 24 hours. Additionally, the integration helps developers reduce code by filtering events at the bus. It routes to downstream targets without the need for a Lambda function as a transport layer.

Use this direct integration when:

  • Different tasks are required based upon incoming event details
  • Only data ingestion is required
  • Payload size is less than 256 kb
  • Expected requests per second are less than the Region quotas.

Amazon Kinesis Data Streams

HTTP APIs service integration with Amazon Kinesis Data Streams

HTTP APIs service integration with Amazon Kinesis Data Streams

The HTTP APIs direct integration for Kinesis Data Streams offers the PutRecord integration action, enabling client applications to place events on a Kinesis data stream. Kinesis Data Streams are designed to handle up to 1,000 writes per second per shard, with payloads up to 1 mb in size. Developers can increase throughput by increasing the number of shards in the data stream. You can route the incoming data to targets like an Amazon S3 bucket as part of a data lake or a Kinesis data analytics application for real-time analytics.

This integration is a storage first option because data is stored on the stream for up to seven days until it is processed and routed elsewhere. When processing stream events with a Lambda function, errors are handled at the Lambda layer through a configurable error handling strategy.

Use this direct integration when:

  • Ingesting large amounts of data
  • Ingesting large payload sizes
  • Order is important
  • Routing the same data to multiple targets

Amazon SQS

HTTP APIs service integration with Amazon SQS

HTTP APIs service integration with Amazon SQS

The HTTP APIs direct integration for Amazon SQS offers the SendMessage, ReceiveMessage, DeleteMessage, and PurgeQueue integration actions. This integration differs from the EventBridge and Kinesis integrations in that data flows both ways. Events can be created, read, and deleted from the SQS queue via REST calls through the HTTP API endpoint. Additionally, a full purge of the queue can be managed using the PurgeQueue action.

This pattern is a storage first pattern because the data remains on the queue for four days by default (configurable to 14 days), unless it is processed and removed. When the Lambda service polls the queue, the messages that are returned are hidden in the queue for a set amount of time. Once the calling service has processed these messages, it uses the DeleteMessage API to remove the messages permanently.

When triggering a Lambda function with an SQS queue, the Lambda service manages this process internally. However, HTTP APIs direct integration with SQS enables developers to move this process to client applications without the need for a Lambda function as a transport layer.

Use this direct integration when:

  • Data must be received as well as sent to the service
  • Downstream services need reduced concurrency
  • The queue requires custom management
  • Order is important (FIFO queues)

AWS AppConfig

HTTP APIs service integration with AWS Systems Manager AppConfig

HTTP APIs service integration with AWS Systems Manager AppConfig

The HTTP APIs direct integration for AWS AppConfig offers the GetConfiguration integration action and allows applications to check for application configuration updates. By exposing the systems parameter API through an HTTP APIs endpoint, developers can automate configuration changes for their applications. While this integration is not considered a storage first integration, it does enable direct communication from external services to AppConfig without the need for a Lambda function as a transport layer.

Use this direct integration when:

  • Access to AWS AppConfig is required.
  • Managing application configurations.

AWS Step Functions

HTTP APIs service integration with AWS Step Functions

HTTP APIs service integration with AWS Step Functions

The HTTP APIs direct integration for Step Functions offers the StartExecution and StopExecution integration actions. These actions allow for programmatic control of a Step Functions state machine via an API. When starting a Step Functions workflow, JSON data is passed in the request and mapped to the state machine. Error messages are also mapped to the state machine when stopping the execution.

This pattern provides a storage first integration because Step Functions maintains a persistent state during the life of the orchestrated workflow. Step Functions also supports service integrations that allow the workflows to send and receive data without needing a Lambda function as a transport layer.

Use this direct integration when:

  • Orchestrating multiple actions.
  • Order of action is required.

Building HTTP APIs direct integrations

HTTP APIs service integrations can be built using the AWS CLI, AWS SAM, or through the API Gateway console. The console walks through contextual choices to help you understand what is required for each integration. Each of the integrations also includes an Advanced section to provide additional information for the integration.

Creating an HTTP APIs service integration

Creating an HTTP APIs service integration

Once you build an integration, you can export it as an OpenAPI template that can be used with infrastructure as code (IaC) tools like AWS SAM. The exported template can also include the API Gateway extensions that define the specific integration information.

Exporting the HTTP APIs configuration to OpenAPI

Exporting the HTTP APIs configuration to OpenAPI

OpenAPI template

An example of a direct integration from HTTP APIs to SQS is located in the Sessions With SAM repository. This example includes the following architecture:

AWS SAM template resource architecture

AWS SAM template resource architecture

The AWS SAM template creates the HTTP APIs, SQS queue, Lambda function, and both Identity and Access Management (IAM) roles required. This is all generated in 58 lines of code and looks like this:

AWSTemplateFormatVersion: '2010-09-09'
Transform: AWS::Serverless-2016-10-31
Description: HTTP API direct integrations

Resources:
  MyQueue:
    Type: AWS::SQS::Queue
    
  MyHttpApi:
    Type: AWS::Serverless::HttpApi
    Properties:
      DefinitionBody:
        'Fn::Transform':
          Name: 'AWS::Include'
          Parameters:
            Location: './api.yaml'
          
  MyHttpApiRole:
    Type: "AWS::IAM::Role"
    Properties:
      AssumeRolePolicyDocument:
        Version: "2012-10-17"
        Statement:
          - Effect: "Allow"
            Principal:
              Service: "apigateway.amazonaws.com"
            Action: 
              - "sts:AssumeRole"
      Policies:
        - PolicyName: ApiDirectWriteToSQS
          PolicyDocument:
            Version: '2012-10-17'
            Statement:
              Action:
              - sqs:SendMessage
              Effect: Allow
              Resource:
                - !GetAtt MyQueue.Arn
                
  MyTriggeredLambda:
    Type: AWS::Serverless::Function
    Properties:
      CodeUri: src/
      Handler: app.lambdaHandler
      Runtime: nodejs12.x
      Policies:
        - SQSPollerPolicy:
            QueueName: !GetAtt MyQueue.QueueName
      Events:
        SQSTrigger:
          Type: SQS
          Properties:
            Queue: !GetAtt MyQueue.Arn

Outputs:
  ApiEndpoint:
    Description: "HTTP API endpoint URL"
    Value: !Sub "https://${MyHttpApi}.execute-api.${AWS::Region}.amazonaws.com"

The OpenAPI template handles the route definitions for the HTTP API configuration and configures the service integration. The template looks like this:

openapi: "3.0.1"
info:
  title: "my-sqs-api"
paths:
  /:
    post:
      responses:
        default:
          description: "Default response for POST /"
      x-amazon-apigateway-integration:
        integrationSubtype: "SQS-SendMessage"
        credentials:
          Fn::GetAtt: [MyHttpApiRole, Arn]
        requestParameters:
          MessageBody: "$request.body.MessageBody"
          QueueUrl:
            Ref: MyQueue
        payloadFormatVersion: "1.0"
        type: "aws_proxy”
        connectionType: "INTERNET"
x-amazon-apigateway-importexport-version: "1.0"

Because the OpenAPI template is included in the AWS SAM template via a transform, the API Gateway integration can reference the roles and services created within the AWS SAM template.

Conclusion

This post covers the concept of storage first integration patterns and how the new HTTP APIs direct integrations can help. I cover the five current integrations and possible use cases for each. Additionally, I demonstrate how to use AWS SAM to build and manage the integrated applications using infrastructure as code.

Using the storage first pattern with direct integrations can help developers build serverless applications that are more durable with fewer lines of code. A Lambda function is no longer required to transport data from the API endpoint to the desired service. Instead, use Lambda function invocations for differentiating business logic.

To learn more join us for the HTTP API service integrations session of Sessions With SAM! 

#ServerlessForEveryone