Tag Archives: AWS Organizations

Use new account assignment APIs for AWS SSO to automate multi-account access

Post Syndicated from Akhil Aendapally original https://aws.amazon.com/blogs/security/use-new-account-assignment-apis-for-aws-sso-to-automate-multi-account-access/

In this blog post, we’ll show how you can programmatically assign and audit access to multiple AWS accounts for your AWS Single Sign-On (SSO) users and groups, using the AWS Command Line Interface (AWS CLI) and AWS CloudFormation.

With AWS SSO, you can centrally manage access and user permissions to all of your accounts in AWS Organizations. You can assign user permissions based on common job functions, customize them to meet your specific security requirements, and assign the permissions to users or groups in the specific accounts where they need access. You can create, read, update, and delete permission sets in one place to have consistent role policies across your entire organization. You can then provide access by assigning permission sets to multiple users and groups in multiple accounts all in a single operation.

AWS SSO recently added new account assignment APIs and AWS CloudFormation support to automate access assignment across AWS Organizations accounts. This release addressed feedback from our customers with multi-account environments who wanted to adopt AWS SSO, but faced challenges related to managing AWS account permissions. To automate the previously manual process and save your administration time, you can now use the new AWS SSO account assignment APIs, or AWS CloudFormation templates, to programmatically manage AWS account permission sets in multi-account environments.

With AWS SSO account assignment APIs, you can now build your automation that will assign access for your users and groups to AWS accounts. You can also gain insights into who has access to which permission sets in which accounts across your entire AWS Organizations structure. With the account assignment APIs, your automation system can programmatically retrieve permission sets for audit and governance purposes, as shown in Figure 1.
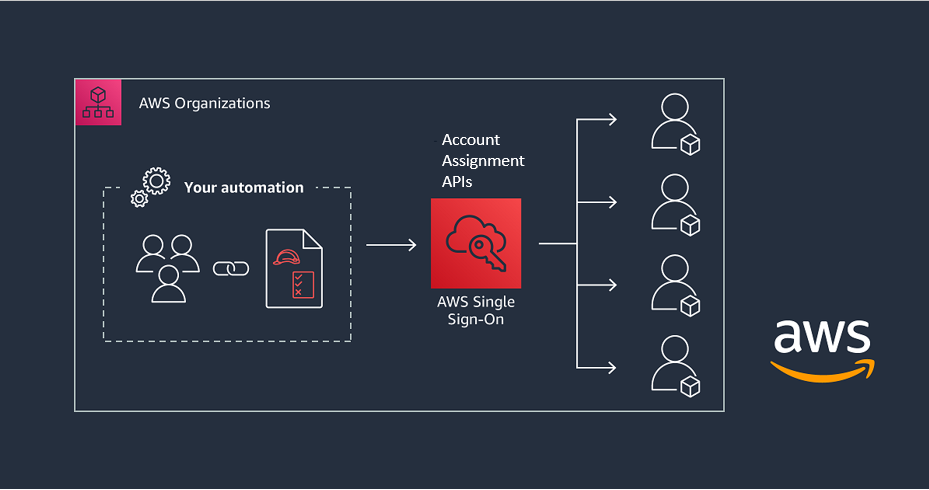
Figure 1: Automating multi-account access with the AWS SSO API and AWS CloudFormation

Figure 1: Automating multi-account access with the AWS SSO API and AWS CloudFormation

Overview

In this walkthrough, we’ll illustrate how to create permission sets, assign permission sets to users and groups in AWS SSO, and grant access for users and groups to multiple AWS accounts by using the AWS Command Line Interface (AWS CLI) and AWS CloudFormation.

To grant user permissions to AWS resources with AWS SSO, you use permission sets. A permission set is a collection of AWS Identity and Access Management (IAM) policies. Permission sets can contain up to 10 AWS managed policies and a single custom policy stored in AWS SSO.

A policy is an object that defines a user’s permissions. Policies contain statements that represent individual access controls (allow or deny) for various tasks. This determines what tasks users can or cannot perform within the AWS account. AWS evaluates these policies when an IAM principal (a user or role) makes a request.

When you provision a permission set in the AWS account, AWS SSO creates a corresponding IAM role on that account, with a trust policy that allows users to assume the role through AWS SSO. With AWS SSO, you can assign more than one permission set to a user in the specific AWS account. Users who have multiple permission sets must choose one when they sign in through the user portal or the AWS CLI. Users will see these as IAM roles.

To learn more about IAM policies, see Policies and permissions in IAM. To learn more about permission sets, see Permission Sets.

Assume you have a company, Example.com, which has three AWS accounts: an organization management account (ExampleOrgMaster), a development account (ExampleOrgDev), and a test account (ExampleOrgTest). Example.com uses AWS Organizations to manage these accounts and has already enabled AWS SSO.

Example.com has the IT security lead, Frank Infosec, who needs PowerUserAccess to the test account (ExampleOrgTest) and SecurityAudit access to the development account (ExampleOrgDev). Alice Developer, the developer, needs full access to Amazon Elastic Compute Cloud (Amazon EC2) and Amazon Simple Storage Service (Amazon S3) through the development account (ExampleOrgDev). We’ll show you how to assign and audit the access for Alice and Frank centrally with AWS SSO, using the AWS CLI.

The flow includes the following steps:

  1. Create three permission sets:
    • PowerUserAccess, with the PowerUserAccess policy attached.
    • AuditAccess, with the SecurityAudit policy attached.
    • EC2-S3-FullAccess, with the AmazonEC2FullAccess and AmazonS3FullAccess policies attached.
  2. Assign permission sets to the AWS account and AWS SSO users:
    • Assign the PowerUserAccess and AuditAccess permission sets to Frank Infosec, to provide the required access to the ExampleOrgDev and ExampleOrgTest accounts.
    • Assign the EC2-S3-FullAccess permission set to Alice Developer, to provide the required permissions to the ExampleOrgDev account.
  3. Retrieve the assigned permissions by using Account Entitlement APIs for audit and governance purposes.

    Note: AWS SSO Permission sets can contain either AWS managed policies or custom policies that are stored in AWS SSO. In this blog we attach AWS managed polices to the AWS SSO Permission sets for simplicity. To help secure your AWS resources, follow the standard security advice of granting least privilege access using AWS SSO custom policy while creating AWS SSO Permission set.
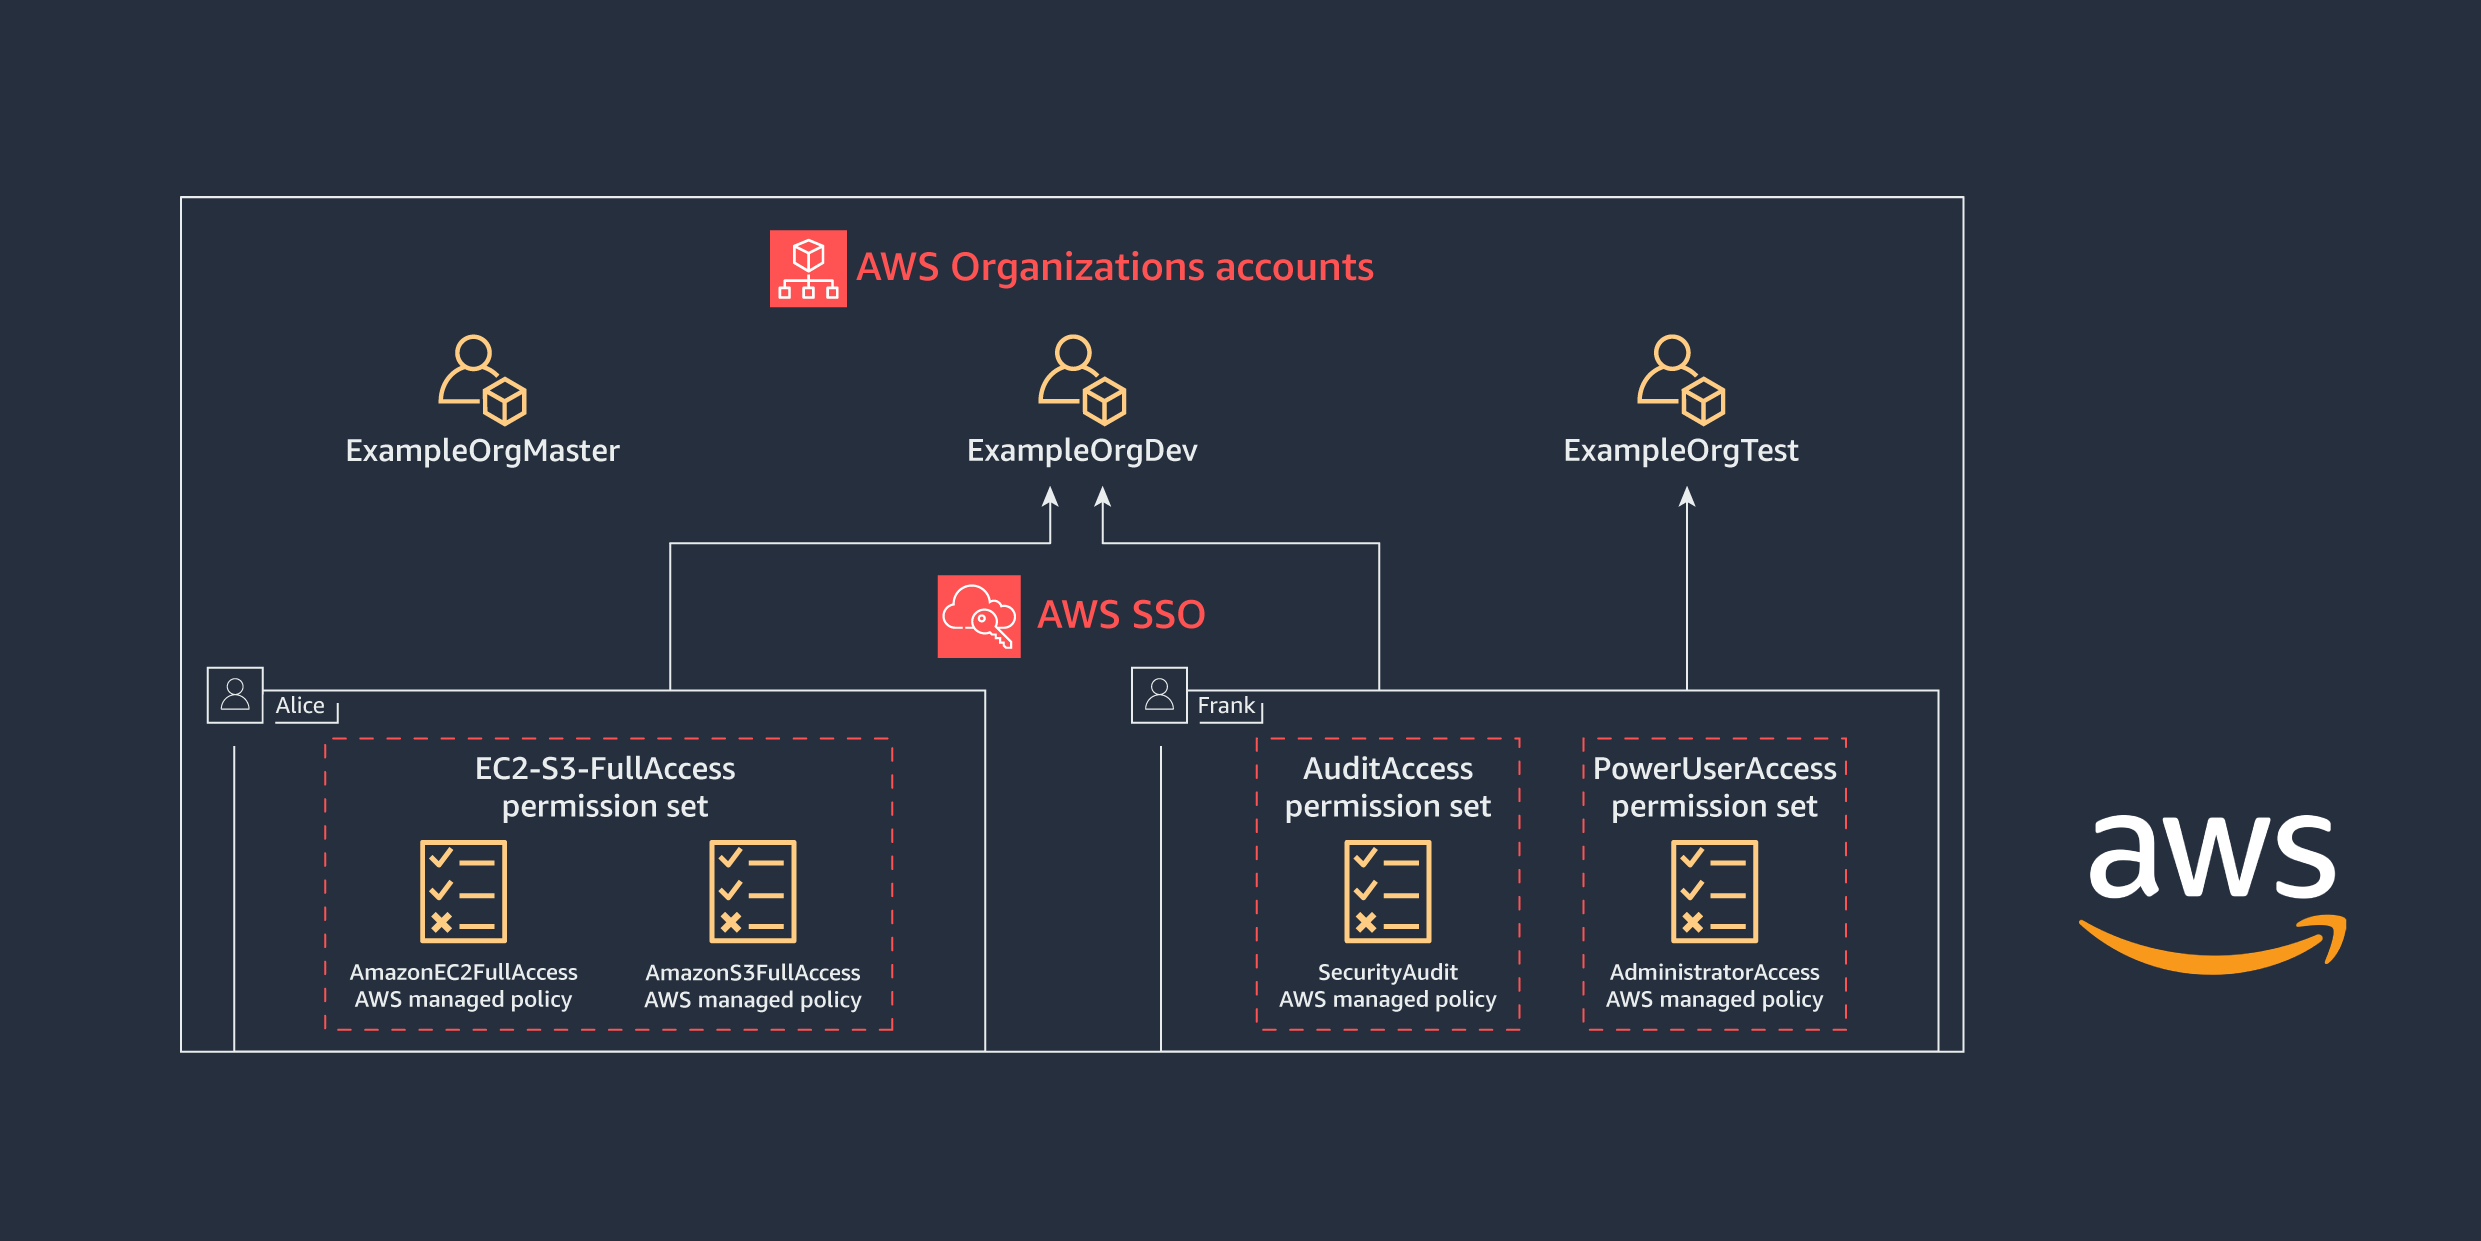
Figure 2: AWS Organizations accounts access for Alice and Frank

Figure 2: AWS Organizations accounts access for Alice and Frank

To help simplify administration of access permissions, we recommend that you assign access directly to groups rather than to individual users. With groups, you can grant or deny permissions to groups of users, rather than having to apply those permissions to each individual. For simplicity, in this blog you’ll assign permissions directly to the users.

Prerequisites

Before you start this walkthrough, complete these steps:

Use the AWS SSO API from the AWS CLI

In order to call the AWS SSO account assignment API by using the AWS CLI, you need to install and configure AWS CLI v2. For more information about AWS CLI installation and configuration, see Installing the AWS CLI and Configuring the AWS CLI.

Step 1: Create permission sets

In this step, you learn how to create EC2-S3FullAccess, AuditAccess, and PowerUserAccess permission sets in AWS SSO from the AWS CLI.

Before you create the permission sets, run the following command to get the Amazon Resource Name (ARN) of the AWS SSO instance and the Identity Store ID, which you will need later in the process when you create and assign permission sets to AWS accounts and users or groups.

aws sso-admin list-instances

Figure 3 shows the results of running the command.
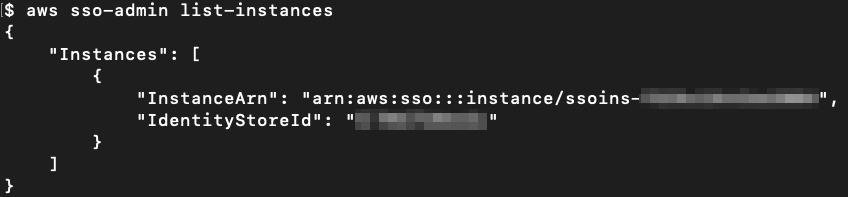
Figure 3: AWS SSO list instances

Figure 3: AWS SSO list instances

Next, create the permission set for the security team (Frank) and dev team (Alice), as follows.

Permission set for Alice Developer (EC2-S3-FullAccess)

Run the following command to create the EC2-S3-FullAccess permission set for Alice, as shown in Figure 4.

aws sso-admin create-permission-set --instance-arn '<Instance ARN>' --name 'EC2-S3-FullAccess' --description 'EC2 and S3 access for developers'
Figure 4: Creating the permission set EC2-S3-FullAccess

Figure 4: Creating the permission set EC2-S3-FullAccess

Permission set for Frank Infosec (AuditAccess)

Run the following command to create the AuditAccess permission set for Frank, as shown in Figure 5.

aws sso-admin create-permission-set --instance-arn '<Instance ARN>' --name 'AuditAccess' --description 'Audit Access for security team on ExampleOrgDev account'
Figure 5: Creating the permission set AuditAccess

Figure 5: Creating the permission set AuditAccess

Permission set for Frank Infosec (PowerUserAccess)

Run the following command to create the PowerUserAccess permission set for Frank, as shown in Figure 6.

aws sso-admin create-permission-set --instance-arn '<Instance ARN>' --name 'PowerUserAccess' --description 'Power User Access for security team on ExampleOrgDev account'
Figure 6: Creating the permission set PowerUserAccess

Figure 6: Creating the permission set PowerUserAccess

Copy the permission set ARN from these responses, which you will need when you attach the managed policies.

Step 2: Assign policies to permission sets

In this step, you learn how to assign managed policies to the permission sets that you created in step 1.

Attach policies to the EC2-S3-FullAccess permission set

Run the following command to attach the amazonec2fullacess AWS managed policy to the EC2-S3-FullAccess permission set, as shown in Figure 7.

aws sso-admin attach-managed-policy-to-permission-set --instance-arn '<Instance ARN>' --permission-set-arn '<Permission Set ARN>' --managed-policy-arn 'arn:aws:iam::aws:policy/amazonec2fullaccess'
Figure 7: Attaching the AWS managed policy amazonec2fullaccess to the EC2-S3-FullAccess permission set

Figure 7: Attaching the AWS managed policy amazonec2fullaccess to the EC2-S3-FullAccess permission set

Run the following command to attach the amazons3fullaccess AWS managed policy to the EC2-S3-FullAccess permission set, as shown in Figure 8.

aws sso-admin attach-managed-policy-to-permission-set --instance-arn '<Instance ARN>' --permission-set-arn '<Permission Set ARN>' --managed-policy-arn 'arn:aws:iam::aws:policy/amazons3fullaccess'
Figure 8: Attaching the AWS managed policy amazons3fullaccess to the EC2-S3-FullAccess permission set

Figure 8: Attaching the AWS managed policy amazons3fullaccess to the EC2-S3-FullAccess permission set

Attach a policy to the AuditAccess permission set

Run the following command to attach the SecurityAudit managed policy to the AuditAccess permission set that you created earlier, as shown in Figure 9.

aws sso-admin attach-managed-policy-to-permission-set --instance-arn '<Instance ARN>' --permission-set-arn '<Permission Set ARN>' --managed-policy-arn 'arn:aws:iam::aws:policy/SecurityAudit'
Figure 9: Attaching the AWS managed policy SecurityAudit to the AuditAccess permission set

Figure 9: Attaching the AWS managed policy SecurityAudit to the AuditAccess permission set

Attach a policy to the PowerUserAccess permission set

The following command is similar to the previous command; it attaches the PowerUserAccess managed policy to the PowerUserAccess permission set, as shown in Figure 10.

aws sso-admin attach-managed-policy-to-permission-set --instance-arn '<Instance ARN>' --permission-set-arn '<Permission Set ARN>' --managed-policy-arn 'arn:aws:iam::aws:policy/PowerUserAccess'
Figure 10: Attaching AWS managed policy PowerUserAccess to the PowerUserAccess permission set

Figure 10: Attaching AWS managed policy PowerUserAccess to the PowerUserAccess permission set

In the next step, you assign users (Frank Infosec and Alice Developer) to their respective permission sets and assign permission sets to accounts.

Step 3: Assign permission sets to users and groups and grant access to AWS accounts

In this step, you assign the AWS SSO permission sets you created to users and groups and AWS accounts, to grant the required access for these users and groups on respective AWS accounts.

To assign access to an AWS account for a user or group, using a permission set you already created, you need the following:

  • The principal ID (the ID for the user or group)
  • The AWS account ID to which you need to assign this permission set

To obtain a user’s or group’s principal ID (UserID or GroupID), you need to use the AWS SSO Identity Store API. The AWS SSO Identity Store service enables you to retrieve all of your identities (users and groups) from AWS SSO. See AWS SSO Identity Store API for more details.

Use the first two commands shown here to get the principal ID for the two users, Alice (Alice’s user name is [email protected]) and Frank (Frank’s user name is [email protected]).

Alice’s user ID

Run the following command to get Alice’s user ID, as shown in Figure 11.

aws identitystore list-users --identity-store-id '<Identity Store ID>' --filter AttributePath='UserName',AttributeValue='[email protected]'
Figure 11: Retrieving Alice’s user ID

Figure 11: Retrieving Alice’s user ID

Frank’s user ID

Run the following command to get Frank’s user ID, as shown in Figure 12.

aws identitystore list-users --identity-store-id '<Identity Store ID>'--filter AttributePath='UserName',AttributeValue='[email protected]'
Figure 12: Retrieving Frank’s user ID

Figure 12: Retrieving Frank’s user ID

Note: To get the principal ID for a group, use the following command.

aws identitystore list-groups --identity-store-id '<Identity Store ID>' --filter AttributePath='DisplayName',AttributeValue='<Group Name>'

Assign the EC2-S3-FullAccess permission set to Alice in the ExampleOrgDev account

Run the following command to assign Alice access to the ExampleOrgDev account using the EC2-S3-FullAccess permission set. This will give Alice full access to Amazon EC2 and S3 services in the ExampleOrgDev account.

Note: When you call the CreateAccountAssignment API, AWS SSO automatically provisions the specified permission set on the account in the form of an IAM policy attached to the AWS SSO–created IAM role. This role is immutable: it’s fully managed by the AWS SSO, and it cannot be deleted or changed by the user even if the user has full administrative rights on the account. If the permission set is subsequently updated, the corresponding IAM policies attached to roles in your accounts won’t be updated automatically. In this case, you will need to call ProvisionPermissionSet to propagate these updates.
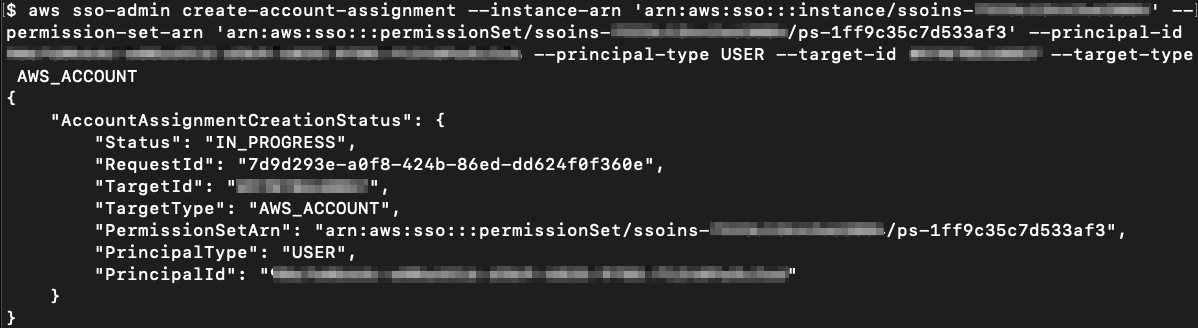
aws sso-admin create-account-assignment --instance-arn '<Instance ARN>' --permission-set-arn '<Permission Set ARN>' --principal-id '<user/group ID>' --principal-type '<USER/GROUP>' --target-id '<AWS Account ID>' --target-type AWS_ACCOUNT
Figure 13: Assigning the EC2-S3-FullAccess permission set to Alice on the ExampleOrgDev account

Figure 13: Assigning the EC2-S3-FullAccess permission set to Alice on the ExampleOrgDev account

Assign the AuditAccess permission set to Frank Infosec in the ExampleOrgDev account

Run the following command to assign Frank access to the ExampleOrgDev account using the EC2-S3- AuditAccess permission set.
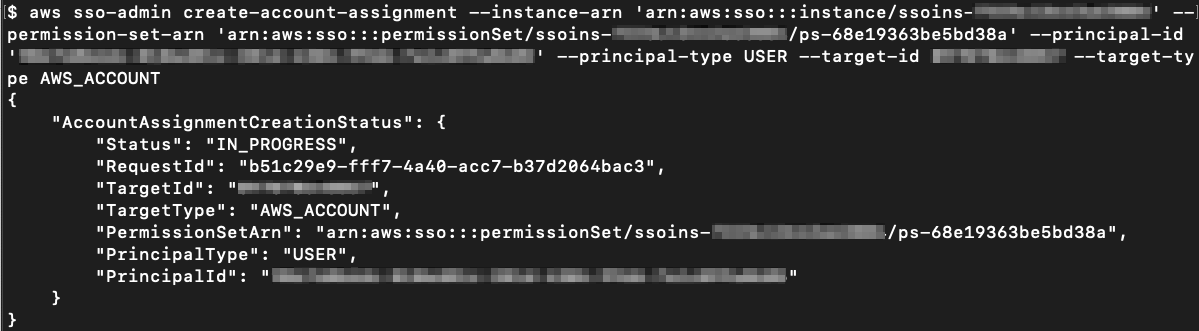
aws sso-admin create-account-assignment --instance-arn '<Instance ARN>' --permission-set-arn '<Permission Set ARN>' --principal-id '<user/group ID>' --principal-type '<USER/GROUP>' --target-id '<AWS Account ID>' --target-type AWS_ACCOUNT
Figure 14: Assigning the AuditAccess permission set to Frank on the ExampleOrgDev account

Figure 14: Assigning the AuditAccess permission set to Frank on the ExampleOrgDev account

Assign the PowerUserAccess permission set to Frank Infosec in the ExampleOrgTest account

Run the following command to assign Frank access to the ExampleOrgTest account using the PowerUserAccess permission set.
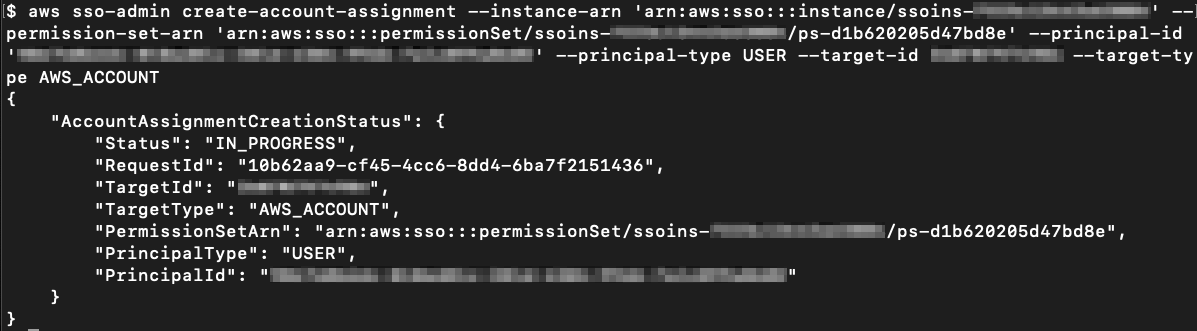
aws sso-admin create-account-assignment --instance-arn '<Instance ARN>' --permission-set-arn '<Permission Set ARN>' --principal-id '<user/group ID>' --principal-type '<USER/GROUP>' --target-id '<AWS Account ID>' --target-type AWS_ACCOUNT
Figure 15: Assigning the PowerUserAccess permission set to Frank on the ExampleOrgTest account

Figure 15: Assigning the PowerUserAccess permission set to Frank on the ExampleOrgTest account

To view the permission sets provisioned on the AWS account, run the following command, as shown in Figure 16.

aws sso-admin list-permission-sets-provisioned-to-account --instance-arn '<Instance ARN>' --account-id '<AWS Account ID>'
Figure 16: View the permission sets (AuditAccess and EC2-S3-FullAccess) assigned to the ExampleOrgDev account

Figure 16: View the permission sets (AuditAccess and EC2-S3-FullAccess) assigned to the ExampleOrgDev account

To review the created resources in the AWS Management Console, navigate to the AWS SSO console. In the list of permission sets on the AWS accounts tab, choose the EC2-S3-FullAccess permission set. Under AWS managed policies, the policies attached to the permission set are listed, as shown in Figure 17.
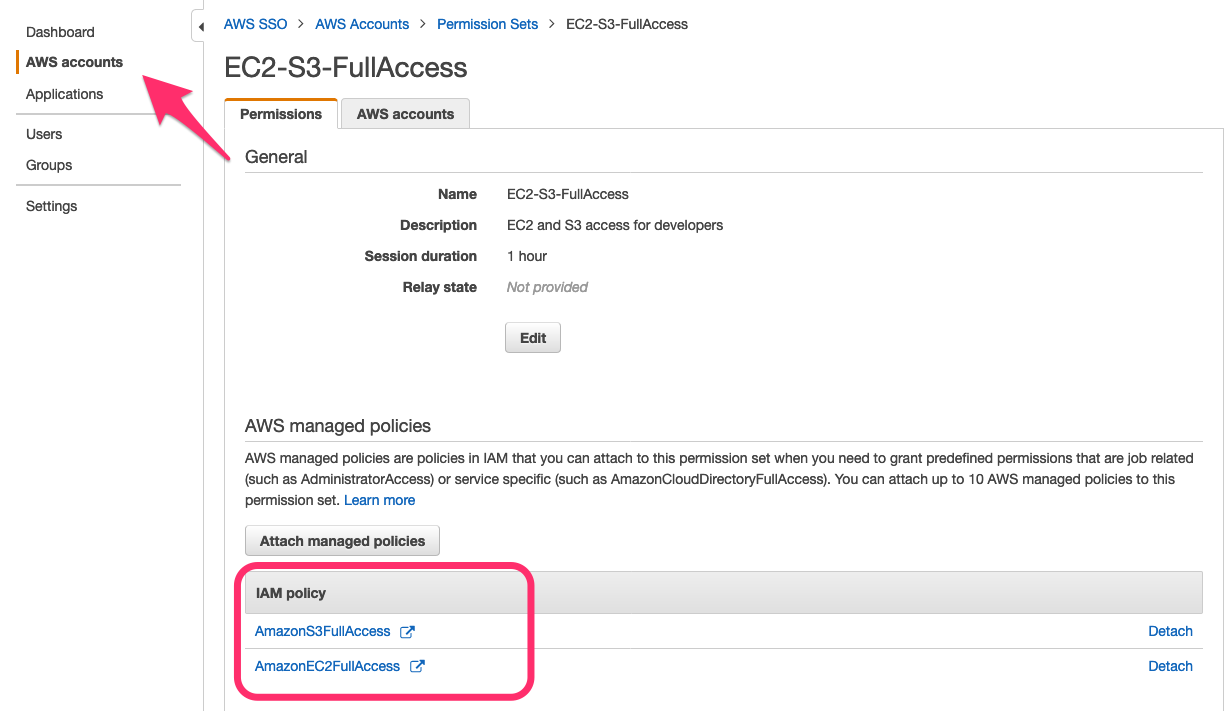
Figure 17: Review the permission set in the AWS SSO console

Figure 17: Review the permission set in the AWS SSO console

To see the AWS accounts, where the EC2-S3-FullAccess permission set is currently provisioned, navigate to the AWS accounts tab, as shown in Figure 18.
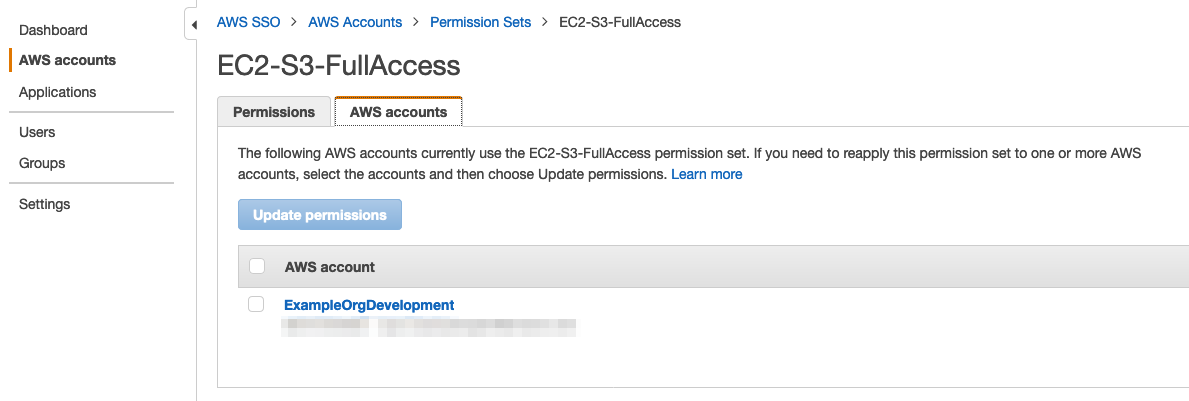
Figure 18: Review permission set account assignment in the AWS SSO console

Figure 18: Review permission set account assignment in the AWS SSO console

Step 4: Audit access

In this step, you learn how to audit access assigned to your users and group by using the AWS SSO account assignment API. In this example, you’ll start from a permission set, review the permissions (AWS-managed policies or a custom policy) attached to the permission set, get the users and groups associated with the permission set, and see which AWS accounts the permission set is provisioned to.

List the IAM managed policies for the permission set

Run the following command to list the IAM managed policies that are attached to a specified permission set, as shown in Figure 19.
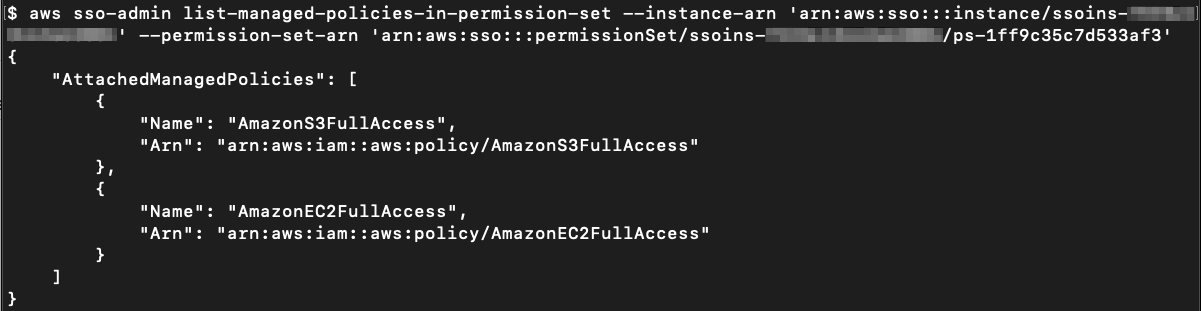
aws sso-admin list-managed-policies-in-permission-set --instance-arn '<Instance ARN>' --permission-set-arn '<Permission Set ARN>'
Figure 19: View the managed policies attached to the permission set

Figure 19: View the managed policies attached to the permission set

List the assignee of the AWS account with the permission set

Run the following command to list the assignee (the user or group with the respective principal ID) of the specified AWS account with the specified permission set, as shown in Figure 20.
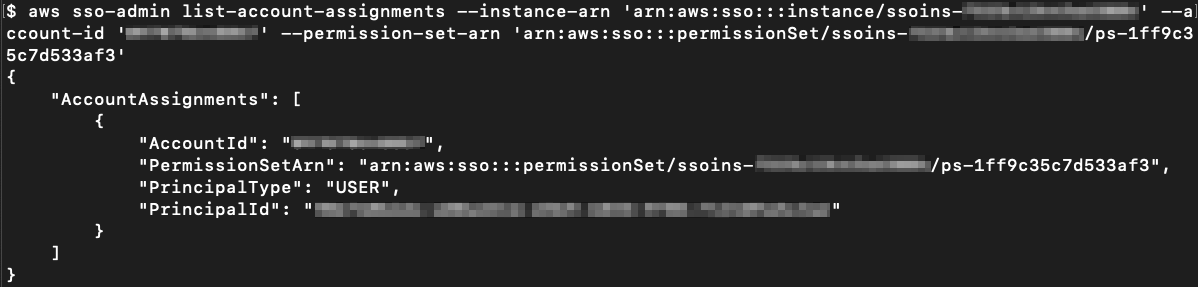
aws sso-admin list-account-assignments --instance-arn '<Instance ARN>' --account-id '<Account ID>' --permission-set-arn '<Permission Set ARN>'
Figure 20: View the permission set and the user or group attached to the AWS account

Figure 20: View the permission set and the user or group attached to the AWS account

List the accounts to which the permission set is provisioned

Run the following command to list the accounts that are associated with a specific permission set, as shown in Figure 21.

aws sso-admin list-accounts-for-provisioned-permission-set --instance-arn '<Instance ARN>' --permission-set-arn '<Permission Set ARN>'
Figure 21: View AWS accounts to which the permission set is provisioned

Figure 21: View AWS accounts to which the permission set is provisioned

In this section of the post, we’ve illustrated how to create a permission set, assign a managed policy to the permission set, and grant access for AWS SSO users or groups to AWS accounts by using this permission set. In the next section, we’ll show you how to do the same using AWS CloudFormation.

Use the AWS SSO API through AWS CloudFormation

In this section, you learn how to use CloudFormation templates to automate the creation of permission sets, attach managed policies, and use permission sets to assign access for a particular user or group to AWS accounts.

Sign in to your AWS Management Console and create a CloudFormation stack by using the following CloudFormation template. For more information on how to create a CloudFormation stack, see Creating a stack on the AWS CloudFormation console.

//start of Template//
{
    "AWSTemplateFormatVersion": "2010-09-09",
  
    "Description": "AWS CloudFormation template to automate multi-account access with AWS Single Sign-On (Entitlement APIs): Create permission sets, assign access for AWS SSO users and groups to AWS accounts using permission sets. Before you use this template, we assume you have enabled AWS SSO for your AWS Organization, added the AWS accounts to which you want to grant AWS SSO access to your organization, signed in to the AWS Management Console with your AWS Organizations management account credentials, and have the required permissions to use the AWS SSO console.",
  
    "Parameters": {
      "InstanceARN" : {
        "Type" : "String",
        "AllowedPattern": "arn:aws:sso:::instance/(sso)?ins-[a-zA-Z0-9-.]{16}",
        "Description" : "Enter AWS SSO InstanceARN. Ex: arn:aws:sso:::instance/ssoins-xxxxxxxxxxxxxxxx",
        "ConstraintDescription": "must be the name of an existing AWS SSO InstanceARN associated with the management account."
      },
      "ExampleOrgDevAccountId" : {
        "Type" : "String",
        "AllowedPattern": "\\d{12}",
        "Description" : "Enter 12-digit Developer AWS Account ID. Ex: 123456789012"
        },
      "ExampleOrgTestAccountId" : {
        "Type" : "String",
        "AllowedPattern": "\\d{12}",
        "Description" : "Enter 12-digit AWS Account ID. Ex: 123456789012"
        },
      "AliceDeveloperUserId" : {
        "Type" : "String",
        "AllowedPattern": "^([0-9a-f]{10}-|)[A-Fa-f0-9]{8}-[A-Fa-f0-9]{4}-[A-Fa-f0-9]{4}-[A-Fa-f0-9]{4}-[A-Fa-f0-9]{12}$",
        "Description" : "Enter Developer UserId. Ex: 926703446b-f10fac16-ab5b-45c3-86c1-xxxxxxxxxxxx"
        },
        "FrankInfosecUserId" : {
            "Type" : "String",
            "AllowedPattern": "^([0-9a-f]{10}-|)[A-Fa-f0-9]{8}-[A-Fa-f0-9]{4}-[A-Fa-f0-9]{4}-[A-Fa-f0-9]{4}-[A-Fa-f0-9]{12}$",
            "Description" : "Enter Test UserId. Ex: 926703446b-f10fac16-ab5b-45c3-86c1-xxxxxxxxxxxx"
            }
    },
    "Resources": {
        "EC2S3Access": {
            "Type" : "AWS::SSO::PermissionSet",
            "Properties" : {
                "Description" : "EC2 and S3 access for developers",
                "InstanceArn" : {
                    "Ref": "InstanceARN"
                },
                "ManagedPolicies" : ["arn:aws:iam::aws:policy/amazonec2fullaccess","arn:aws:iam::aws:policy/amazons3fullaccess"],
                "Name" : "EC2-S3-FullAccess",
                "Tags" : [ {
                    "Key": "Name",
                    "Value": "EC2S3Access"
                 } ]
              }
        },  
        "SecurityAuditAccess": {
            "Type" : "AWS::SSO::PermissionSet",
            "Properties" : {
                "Description" : "Audit Access for Infosec team",
                "InstanceArn" : {
                    "Ref": "InstanceARN"
                },
                "ManagedPolicies" : [ "arn:aws:iam::aws:policy/SecurityAudit" ],
                "Name" : "AuditAccess",
                "Tags" : [ {
                    "Key": "Name",
                    "Value": "SecurityAuditAccess"
                 } ]
              }
        },    
        "PowerUserAccess": {
            "Type" : "AWS::SSO::PermissionSet",
            "Properties" : {
                "Description" : "Power User Access for Infosec team",
                "InstanceArn" : {
                    "Ref": "InstanceARN"
                },
                "ManagedPolicies" : [ "arn:aws:iam::aws:policy/PowerUserAccess"],
                "Name" : "PowerUserAccess",
                "Tags" : [ {
                    "Key": "Name",
                    "Value": "PowerUserAccess"
                 } ]
              }      
        },
        "EC2S3userAssignment": {
            "Type" : "AWS::SSO::Assignment",
            "Properties" : {
                "InstanceArn" : {
                    "Ref": "InstanceARN"
                },
                "PermissionSetArn" : {
                    "Fn::GetAtt": [
                        "EC2S3Access",
                        "PermissionSetArn"
                     ]
                },
                "PrincipalId" : {
                    "Ref": "AliceDeveloperUserId"
                },
                "PrincipalType" : "USER",
                "TargetId" : {
                    "Ref": "ExampleOrgDevAccountId"
                },
                "TargetType" : "AWS_ACCOUNT"
              }
          },
          "SecurityAudituserAssignment": {
            "Type" : "AWS::SSO::Assignment",
            "Properties" : {
                "InstanceArn" : {
                    "Ref": "InstanceARN"
                },
                "PermissionSetArn" : {
                    "Fn::GetAtt": [
                        "SecurityAuditAccess",
                        "PermissionSetArn"
                     ]
                },
                "PrincipalId" : {
                    "Ref": "FrankInfosecUserId"
                },
                "PrincipalType" : "USER",
                "TargetId" : {
                    "Ref": "ExampleOrgDevAccountId"
                },
                "TargetType" : "AWS_ACCOUNT"
              }
          },
          "PowerUserAssignment": {
            "Type" : "AWS::SSO::Assignment",
            "Properties" : {
                "InstanceArn" : {
                    "Ref": "InstanceARN"
                },
                "PermissionSetArn" : {
                    "Fn::GetAtt": [
                        "PowerUserAccess",
                        "PermissionSetArn"
                     ]
                },
                "PrincipalId" : {
                    "Ref": "FrankInfosecUserId"
                },
                "PrincipalType" : "USER",
                "TargetId" : {
                    "Ref": "ExampleOrgTestAccountId"
                },
                "TargetType" : "AWS_ACCOUNT"
              }
          }
    }
}
//End of Template//

When you create the stack, provide the following information for setting the example permission sets for Frank Infosec and Alice Developer, as shown in Figure 22:

  • The Alice Developer and Frank Infosec user IDs
  • The ExampleOrgDev and ExampleOrgTest account IDs
  • The AWS SSO instance ARN

Then launch the CloudFormation stack.
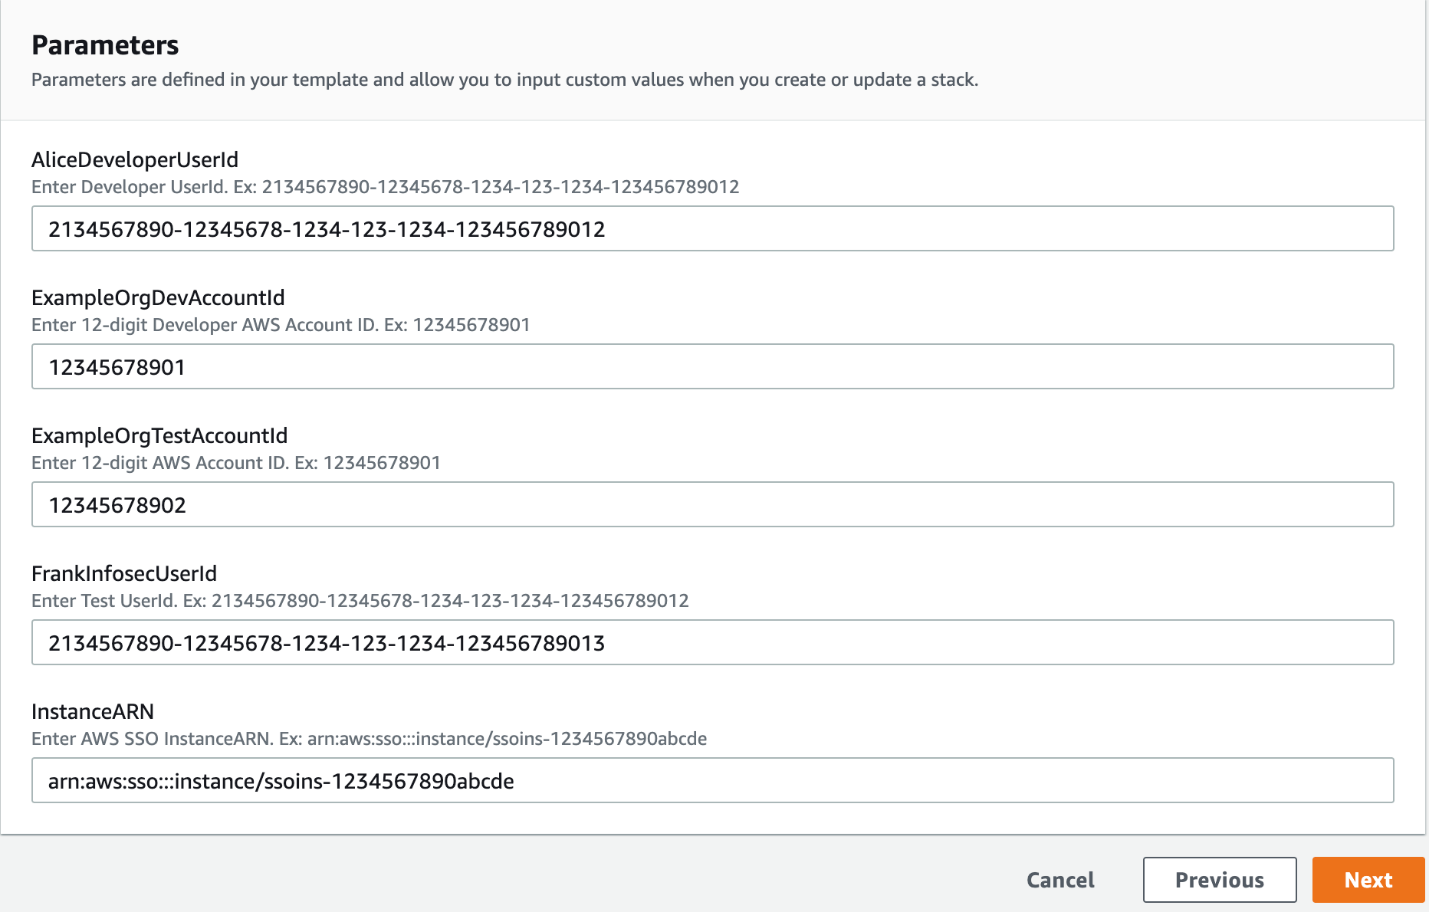
Figure 22: User inputs to launch the CloudFormation template

Figure 22: User inputs to launch the CloudFormation template

AWS CloudFormation creates the resources that are shown in Figure 23.
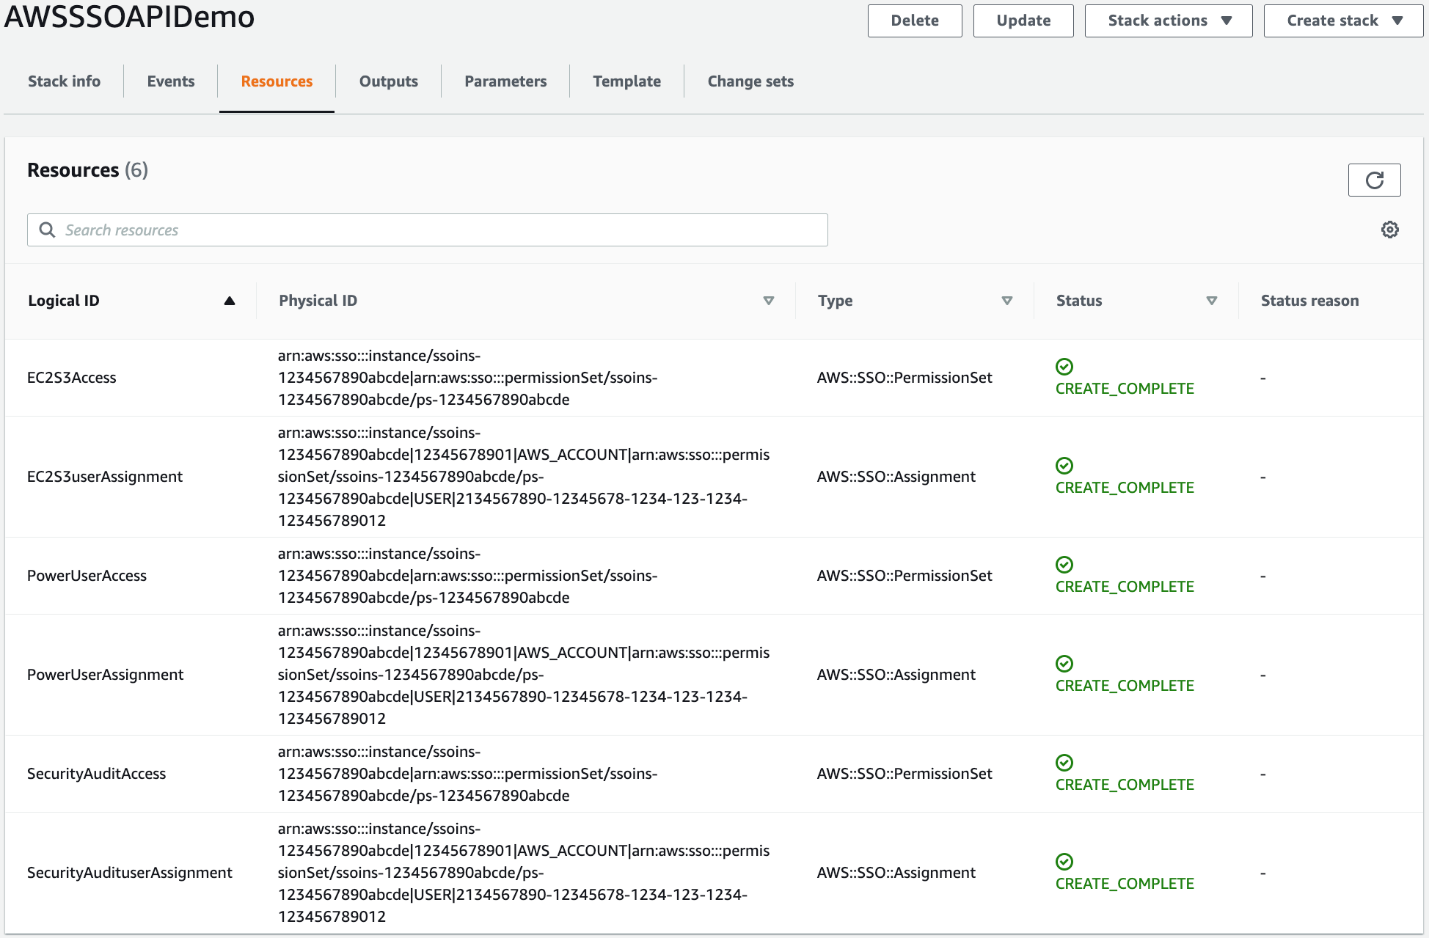
Figure 23: Resources created from the CloudFormation stack

Figure 23: Resources created from the CloudFormation stack

Cleanup

To delete the resources you created by using the AWS CLI, use these commands.

Run the following command to delete the account assignment.

delete-account-assignment --instance-arn '<Instance ARN>' --target-id '<AWS Account ID>' --target-type 'AWS_ACCOUNT' --permission-set-arn '<PermissionSet ARN>' --principal-type '<USER/GROUP>' --principal-id '<user/group ID>'

After the account assignment is deleted, run the following command to delete the permission set.

delete-permission-set --instance-arn '<Instance ARN>' --permission-set-arn '<PermissionSet ARN>'

To delete the resource that you created by using the CloudFormation template, go to the AWS CloudFormation console. Select the appropriate stack you created, and then choose delete. Deleting the CloudFormation stack cleans up the resources that were created.

Summary

In this blog post, we showed how to use the AWS SSO account assignment API to automate the deployment of permission sets, how to add managed policies to permission sets, and how to assign access for AWS users and groups to AWS accounts by using specified permission sets.

To learn more about the AWS SSO APIs available for you, see the AWS Single Sign-On API Reference Guide.

If you have feedback about this post, submit comments in the Comments section below. If you have questions about this post, start a new thread on the AWS SSO forum or contact AWS Support.

Want more AWS Security how-to content, news, and feature announcements? Follow us on Twitter.

Author

Akhil Aendapally

Akhil is a Solutions Architect at AWS focused on helping customers with their AWS adoption. He holds a master’s degree in Network and Computer Security. Akhil has 8+ years of experience working with different cloud platforms, infrastructure automation, and security.

Author

Yuri Duchovny

Yuri is a New York-based Solutions Architect specializing in cloud security, identity, and compliance. He supports cloud transformations at large enterprises, helping them make optimal technology and organizational decisions. Prior to his AWS role, Yuri’s areas of focus included application and networking security, DoS, and fraud protection. Outside of work, he enjoys skiing, sailing, and traveling the world.

Author

Ballu Singh

Ballu is a principal solutions architect at AWS. He lives in the San Francisco Bay area and helps customers architect and optimize applications on AWS. In his spare time, he enjoys reading and spending time with his family.

Author

Nir Ozeri

Nir is a Solutions Architect Manager with Amazon Web Services, based out of New York City. Nir specializes in application modernization, application delivery, and mobile architecture.

Architecture Patterns for Red Hat OpenShift on AWS

Post Syndicated from Ryan Niksch original https://aws.amazon.com/blogs/architecture/architecture-patterns-for-red-hat-openshift-on-aws/

Editor’s note: Although this blog post and its accompanying code make use of the word “Master,” Red Hat is making open source code more inclusive by eradicating “problematic language.” Read more about this.

Introduction

Red Hat OpenShift is an application platform that provides customers with turnkey application platform that is much more than a simple Kubernetes orchestration.

OpenShift customers choose AWS as their cloud of choice because of the efficiency, security, and reliability, scalability, and elasticity it provides. Customers seeking to modernize their business, process, and application stacks are drawn to the rich AWS service and feature sets.

As such, we see some customers migrate from on-premises to AWS or exist in a hybrid context with application workloads running in various locations. For OpenShift customers, this poses a few questions and considerations:

  • What are the recommendations for the best way to deploy OpenShift on AWS?
  • How is this different from what customers were used to on-premises?
  • How does this ensure resilience and availability?
  • Do customers need a multi-region, multi-account approach?

For hybrid customers, there are assumptions and misconceptions:

  • Where does the control plane exist?
  •  Is there replication, and if so, what are the considerations and ramifications?

In this post I will run through some of the more common questions and patterns for OpenShift on AWS, while looking at some of the terminology and conceptual differences of AWS. I’ll explore migration and hybrid use cases and address some misconceptions.

OpenShift building blocks

On AWS, OpenShift 4x is the norm. To that effect, I will focus on OpenShift 4, but many of the considerations will apply to both OpenShift 3 and OpenShift 4.

Let’s unpack some of the OpenShift building blocks. An OpenShift cluster consists of Master, infrastructure, and worker nodes. The Master forms the control plane and infrastructure nodes cater to a routing layer and additional functions, such as logging, monitoring etc. Worker nodes are the nodes that customer application container workloads will exist on.

When deployed on-premises, OpenShift nodes will be placed in separate network subnets. Depending on distance, latency, etc., a single OpenShift cluster may span two data centers that have some nodes in a subnet in one data center and other subnets in a different data center. This applies to customers with data centers within a few miles of each other with high-speed connectivity. An alternative would be an OpenShift cluster in each data center.

AWS concepts and terminology

At AWS, the concept of “region” is a geolocation, such as EMEA (Europe, Middle East, and Africa) or APAC (Asian Pacific) rather than a data center or specific building. An Availability Zone (AZ) is the closest construct on AWS that maps to a physical data center. Within each region you will find multiple (typically three or more) AZs. Note that a single AZ will contain multiple physical data centers but we treat it as a single point of failure. For example, an event that impacts an AZ would be expected to impact all the data centers within that AZ. To this effect, customers should deploy workloads spanning multiple AZs to protect against any event that would impact a single AZ.

Read more about Regions, Availability Zones, and Edge Locations.

Deploying OpenShift

When deploying an OpenShift cluster on AWS, we recommend starting with three Master nodes spread across three AWS AZs and three worker nodes spread across three AZs. This allows for the combination of resilience and availably constructs provided by AWS as well as Red Hat OpenShift. The OpenShift installer provides a means of deploying the underlying AWS infrastructure in two ways: IPI Installer-provisioned infrastructure and UPI user-provisioned infrastructure. Both Red Hat and AWS collect customer feedback and use this to drive recommended patterns that are then included in the OpenShift installer. As such, the OpenShift installer IPI mode becomes a living reference architecture for deploying OpenShift on AWS.

Deploying OpenShift

The installer will require inputs for the environment on which it’s being deployed. In this case, since I am deploying on AWS, I will need to provide the AWS region, AZs, or subnets that related to the AZs, as well as EC2 instance type. The installer will then generate a set of ignition files that will be used during the deployment of OpenShift:

apiVersion: v1
baseDomain: example.com 
controlPlane: 
  hyperthreading: Enabled   
  name: master
  platform:
    aws:
      zones:
      - us-west-2a
      - us-west-2b
      - us-west-2c
      rootVolume:
        iops: 4000
        size: 500
        type: io1
      type: m5.xlarge 
  replicas: 3
compute: 
- hyperthreading: Enabled 
  name: worker
  platform:
    aws:
      rootVolume:
        iops: 2000
        size: 500
        type: io1 
      type: m5.xlarge
      zones:
      - us-west-2a
      - us-west-2b
      - us-west-2c
  replicas: 3
metadata:
  name: test-cluster 
networking:
  clusterNetwork:
  - cidr: 10.128.0.0/14
    hostPrefix: 23
  machineNetwork:
  - cidr: 10.0.0.0/16
  networkType: OpenShiftSDN
  serviceNetwork:
  - 172.30.0.0/16
platform:
  aws:
    region: us-west-2 
    userTags:
      adminContact: jdoe
      costCenter: 7536
pullSecret: '{"auths": ...}' 
fips: false 
sshKey: ssh-ed25519 AAAA... 

What does this look like at scale?

For larger implementations, we would see additional worker nodes spread across three or more AZs. As more worker nodes are added, use of the control plane increases. Initially scaling up the Amazon Elastic Compute Cloud (EC2) instance type to a larger instance type is an effective way of addressing this. It’s possible to add more Master nodes, and we recommend that an odd number of nodes are maintained. It is more common to see scaling out of the infrastructure nodes before there is a need to scale Masters. For large-scale implementations, infrastructure functions such as the router, monitoring, and logging functions can be moved to separate EC2 instances from the Master nodes, as well as from each other. It is important to spread the routing layer across multiple AZs, which is critical to maintaining availability and resilience.

The process of resource separation is now controlled by infrastructure machine sets within OpenShift. An infrastructure machine set would need to be defined, then the infrastructure role edited to be moved from the default to this new infrastructure machine set. Read about this in greater detail.

OpenShift in a multi-account context

Using AWS accounts as a means of separation is a common well-architected pattern. AWS Organizations and AWS Control Tower are services that are commonly adopted as part of a multi-account strategy. This is very much the case when looking to enable teams to use their own accounts and when an account vending process is needed to cater for self-service account provisioning.

OpenShift in a multi-account context

OpenShift clusters are deployed into multiple accounts. An OpenShift dev cluster is deployed into an AWS Dev account. This account would typically have AWS Developer Support associated with it. A separate production OpenShift cluster would be provisioned into an AWS production account with AWS Enterprise Support. Enterprise support provides for faster support case response times, and you get the benefit of dedicated resources such as a technical account manager and solutions architect.

CICD pipelines and processes are then used to control the application life cycle from code to dev to production. The pipelines would push the code to different OpenShift cluster end points at different stages of the life cycle.

Hybrid use case implementation

A common misconception of hybrid implementations is that there is a single cluster or control plan that has worker nodes in various locations. For example, there could be a cluster where the Master and infrastructure nodes are deployed in one location, but also worker nodes registered with this cluster that exist on-premises as well as in the cloud.

Having a single customer control plane for a hybrid implementation, even if technically possible, introduces undesired risks.

There is the potential to take multiple environments with very different resilience characteristics and make them interdependent of each other. This can result in performance and reliability issues, and these may increase not only the possibility of the risk manifesting, but also increase in the impact or blast radius.

Instead, hybrid implementations will see separate OpenShift clusters deployed into various locations. A customer may deploy clusters on-premises to cater for a workload that can’t be migrated to the cloud in the short term. Separate OpenShift clusters can then deployed into accounts in AWS for workloads on the cloud. Customers can also deploy separate OpenShift clusters in different AWS regions to cater for proximity to the consuming customer.

Though adding multiple clusters doesn’t add significant administrative overhead, there is a desire to be able to gain visibility and telemetry to all the deployed clusters from a central location. This may see the OpenShift clusters registered with Red Hat Advanced Cluster Manager for Kubernetes.

Summary

Take advantage of the IPI model, not only as a guide but to also save time. Make AWS Organizations, AWS Control Tower, and the AWS Service catalog part of your cloud and hybrid strategies. These will not only speed up migrations but also form building blocks for a modernized business with a focus of enabling prescriptive self-service. Consider Red Hat advanced cluster manager for multi cluster management.

Field Notes: Building a Shared Account Structure Using AWS Organizations

Post Syndicated from Abhijit Vaidya original https://aws.amazon.com/blogs/architecture/field-notes-building-a-shared-account-structure-using-aws-organizations/

For customers considering the AWS Solution Provider Program, there are challenges to mitigate when building a shared account model with SI partners. AWS Organizations make it possible to build the right account structure to support a resale arrangement. In this engagement model, the end customer gets an AWS invoice from an AWS authorized partner instead of AWS directly.

Partners and customers who want to engage in this service resale arrangement need to build a new account structure. This process includes linking or transferring existing customer accounts to the partner master account. This is so that all the billing data from customer accounts is consolidated into the partner master account.

While linking or transferring existing customer accounts to the new master account, the partner must check the new master account structure. It should not compromise any customer security controls and continue to provide full control of linked accounts to the customer.  The new account structure must fulfill the following requirements for both the AWS customer and partner:

  • The customer maintains full access to the AWS organization and able to perform all critical security-related tasks except access to billing data.
  • The Partner is able to control only billing information and not able to perform any other task in the root account (master payer account) without approval from the customer.
  • In case of contract breach / termination, the customer is able to gain back full control of all accounts including the Master.

In this post, you will learn about how partners can create a master account with shared ownership. We also show how to link or transfer customer organization accounts to the new organization master account and set up policies that would provide appropriate access to both partner and customer.

Account Structure

The following architecture represents the account structure setup that can fulfill customer and partner requirements as a part of a service resale arrangement.

As illustrated in the preceding diagram, the following list includes the key architectural components:

Architectural Components

As a part of resale arrangement, the customer’s existing AWS organization and related accounts are linked to the partner’s master payer account. The customer can continue to maintain their existing master root account, while all child accounts are linked to the master account (as shown in the list).

Customers may have valid concerns about linking/transferring accounts to the owned master payee account and may come up with many ‘what-if’ scenarios for example “What if the partner shuts down environment/servers?”  or, “What if partner blocks access to child accounts?”.

This account structure provides the right controls to both customer and partner that would address customer concerns around the security of their accounts. This includes the following benefits:

  • Starting with access to the root account, neither customer nor partner can access the root account without the other party’s involvement.
  • The partner controls the id/password for the root account while the customer maintains the MFA token for the account. The customer also controls the phone number, security questions associated with the root account. That way, the partner cannot replace the MFA token on their own.
  • The partner only has billing access and does not control any other parts of account including child accounts. Anytime the root account access is needed, both customer and partner team need to collaborate and access the root account.
  • The customer or partner cannot assign new IAM roles to themselves, therefore protecting the initial account setup.

Security considerations in the shared account setup

The following table highlights both customer and partner responsibilities and access controls provided by the architecture in the previous section.

The following points highlight security recommendations to provide adequate access rights to both partner and customers.

  • New master payer/ root account has a joint ownership between the Partner and the Customer.
  • AWS account root users (user id/password) would be with Partner and MFA (multi-factor authentication) device with Customer.
  • IAM (AWS Identity and Access Management) role to be created under the master payer with policies “FullOrganizationAccess”, “Amazon S3” (Amazon Simple Storage Service), “CloudTrail” (AWS CloudTrail), “CloudWatch”(Amazon CloudWatch) for the Customer.
  • Security team to log in and manage security of the account. Additional permissions to be added to this role as needed in future. This role does not have ANY billing permissions.
  • Only the partner has access to AWS billing and usage data.
  • IAM role / user would be created under master payer with just billing permission for the Partner team to log in and download all invoices. This role does not have any other permissions except billing and usage reports.
  • Any root login attempts to master payer triggers a notification to Customer’s SOC team and the Partner’s Customer account management team.
  • The Partner’ email address is used to create an account so invoices can be emailed to the partner’s email. The Customer cannot see these invoices.
  • The Customer phone number is used to create a master account and the customer maintains security questions/answers. This prevents replacement of MFA token by the Partner team without informing customer.  The Customer wouldn’t need the Partner’s help or permission to login and manage any security.
  • No aspect of  the Master Payer / Root Partner team can login to the master payer/Root without the Customer providing an MFA token.

Setting up the shared master AWS account structure

Create a playbook for the account transfer activity based on the following tasks. For each task, identify the owner. Make sure that owners have the right permissions to perform the tasks.

Part I – Setting up new partner master account

  1. Create new Partner Master payee Account
  2. Update payment details section with the required details for payment in Partner Master payee Account
  3. Enable MFA in the Partner Master payee Account
  4. Update contact for security and operations in the Partner Master payee Account
  5. Update demographics -Address and contact details in Partner Master payee Account
  6. Create an IAM role for Customer Team in Partner Master Payee account. IAM role is created under master payer with “FullOrganizationAccess”, “Amazon S3”, “CloudTrail”, “CloudWatch” “CloudFormationFullAccess” for the Customer SOC team to login and manage security of the account. Additional permissions can be added to this role in future if needed.

Select the roles:

create role

7. Create an IAM role/user for Partner billing role in the Partner Master Payee account.

Part II – Setting up customer master account

1.      Create an IAM user in the customer’s master account. This user assumes role into the new master payer/root account.

aws management console


2.      Confirm that when the IAM user from the customer account assumes a role in the new master account, and that the user does not have Billing Access.

Billing and cost management dashboard

Part III – Creating an organization structure in partner account

  1. Create an Organization in the Partner Master Payee Account
  2. Create Multiple Organizational Units (OU) in the Partner Master Payee Account


3. Enable Service Control Policies from AWS Organization’s Policies menu.

service control policies

5. Create/Copy Multiple in to Partner Master Payee Account from Customer root Account.  Any service control policies from the customer root account should be manually copied to new partner account.

6. If customer root account has any special software installed for example, security, install same software in Partner Master Payee Account.

7. Set alerts in Partner Master Payee root account. Any login to the root account would send alerts to customer and partner teams.

8. It is recommended to keep a copy of all billing history invoices for all accounts to be transferred to partner organization. This could be achieved by either downloading CSV or printing all invoices and storing files in Amazon S3 for long term archival. Billing history and invoices are found by clicking Orders and Invoices on Billing & Cost Management Dashboard. After accounts are transferred to new organization, historic billing data will not be available for those accounts.

9. Remove all the Member Accounts from the current Customer Root Account/ Organization. This step is performed by customer account admin and required before account can be transferred to Partner Account organization.

10. Send an invite from the Partner Master Payee Account to the delinked Member Account

master payee account

11.      Member Accounts to accept the invite from the Partner Master Payee Account.

invitations

12.      Move the Customer member account to the appropriate OU in the Partner Master Payee Account.

Setting the shared security model between partner and customer contact

While setting up the master account, three contacts need to be updated for notification.

  • Billing –  this is owned by the Partner
  • Operations – this is owned by the Customer
  • Security – this is owned by the Customer.

This will trigger a notification of any activity on the root account. The contact details contain Name, Title, Email Address and Phone number.  It is recommended to use the Customer’s SOC team distribution email for security and operations, and a phone number that belongs to the organization, and not the individual.

Alternate contacts

Additionally, before any root account activity takes place, AWS Support will verify using the security challenge questionnaire. These questions and answers are owned by the Customer’s SOC team.

security challenge questions

If a customer is not able to access the AWS account, alternate support options are available at Contact us by expanding the “I’m an AWS customer and I’m looking for billing or account support” menu. While contacting AWS Support, all the details that are listed on the account are needed, including full name, phone number, address, email address, and the last four digits of the credit card.

Clean Up

After recovering the account, the Customer should close any accounts that are not in use. It’s a good idea not to have open accounts in your name that could result in charges. For more information, review Closing an Account in the Billing and Cost Management User Guide.

The Shared master root account should be only used for selected activities referred to in the following document.

Conclusion

In this post, you learned how AWS Organizations features can be used to create a shared master account structure.  This helps both customer and partner engage in a service resale business engagement. Using AWS Organizations and cross account access, this solution allows customers to control all key aspects of managing the AWS Organization (Security / Logging / Monitoring) and also allows partners to control any billing related data.

Additional Resources

Cross Account Access

Field Notes provides hands-on technical guidance from AWS Solutions Architects, consultants, and technical account managers, based on their experiences in the field solving real-world business problems for customers.