Post Syndicated from Maitreya Ranganath original https://aws.amazon.com/blogs/security/protect-your-amazon-cognito-user-pool-with-aws-waf/
Many of our customers use Amazon Cognito user pools to add authentication, authorization, and user management capabilities to their web and mobile applications. You can enable the built-in advanced security in Amazon Cognito to detect and block the use of credentials that have been compromised elsewhere, and to detect unusual sign-in activity and then prompt users for additional verification or block sign-ins. Additionally, you can associate an AWS WAF web access control list (web ACL) with your user pool to allow or block requests to Amazon Cognito user pools, based on security rules.
In this post, we’ll show how you can use AWS WAF with Amazon Cognito user pools and provide a sample set of rate-based rules and advanced AWS WAF rule groups. We’ll also show you how to test and tune the rules to help protect your user pools from common threats.
Rate-based rules for Amazon Cognito user pool endpoints
The following are endpoints exposed publicly by an Amazon Cognito user pool that you can protect with AWS WAF:
- Hosted UI — These endpoints are listed in the OIDC and hosted UI API reference. Cognito creates these endpoints when you assign a domain to your user pool. Your users will interact with these endpoints when they use the Hosted UI web interface directly, or when your application calls Cognito OAuth endpoints such as Authorize or Token.
- Public API operations — These generate a request to Cognito API actions that are either unauthenticated or authenticated with a session string or access token, but not with AWS credentials.
A good way to protect these endpoints is to deploy rate-based AWS WAF rules. These rules will detect and block requests with high rates that could indicate an attempt to exceed your Amazon Cognito API request rate quotas and that could subsequently impact requests from legitimate users.
When you apply rate limits, it helps to group Amazon Cognito API actions into four action categories. You can set specific rate limits per action category giving you traffic visibility for each category.
- User Creation — This category includes operations that create new users in Cognito. Setting a rate limit for this category provides visibility for traffic of these operations and threats such as fake users being created in Cognito, which drives up your Monthly Active User (MAU) costs for Cognito.
- Sign-in — This category includes operations to initiate a sign-in operation. Setting a rate limit for this category can provide visibility into the abuse of these operations. This could indicate high frequency, automated attempts to guess user credentials, sometimes referred to as credential stuffing.
- Account Recovery — This category includes operations to recover accounts, including “forgot password” flows. Setting a rate limit for this category can provide visibility into the abuse of these operations, malicious activity can include: sending fake reset attempts, which might result in emails and SMS messages being sent to users.
- Default — This is a catch-all rate limit that applies to an operation that is not in one of the prior categories. Setting a default rate limit can provide visibility and mitigation from request flooding attacks.
Table 1 below shows selected Hosted UI endpoint paths (the equivalent of individual API actions) and the recommended rate-based rule limit category for each.
Table 1: Amazon Cognito Hosted UI URL paths mapped to action categories
| Hosted UI URL path | Authentication method | Action category |
| /signup | Unauthenticated | User Creation |
| /confirmUser | Confirmation code | User Creation |
| /resendcode | Unauthenticated | User Creation |
| /login | Unauthenticated | Sign-in |
| /oauth2/authorize | Unauthenticated | Sign-in |
| /forgotPassword | Unauthenticated | Account Recovery |
| /confirmForgotPassword | Confirmation code | Account Recovery |
| /logout | Unauthenticated | Default |
| /oauth2/revoke | Refresh token | Default |
| /oauth2/token | Auth code, or refresh token, or client credentials | Default |
| /oauth2/userInfo | Access token | Default |
| /oauth2/idpresponse | Authorization code | Default |
| /saml2/idpresponse | SAML assertion | Default |
Table 2 below shows selected Cognito API actions and the recommended rate-based rule category for each.
Table 2: Selected Cognito API actions mapped to action categories
| API action name | Authentication method | Action category |
| SignUp | Unauthenticated | User Creation |
| ConfirmSignUp | Confirmation code | User Creation |
| ResendConfirmationCode | Unauthenticated | User Creation |
| InitiateAuth | Unauthenticated | Sign-in |
| RespondToAuthChallenge | Unauthenticated | Sign-in |
| ForgotPassword | Unauthenticated | Account Recovery |
| ConfirmForgotPassword | Confirmation code | Account Recovery |
| AssociateSoftwareToken | Access token or session | Default |
| VerifySoftwareToken | Access token or session | Default |
Additionally, the rate-based rules we provide in this post include the following:
- Two IP sets that represent allow lists for IPv4 and IPv6. You can add IPs that represent your trusted source IP addresses to these IP sets so that other AWS WAF rules don’t apply to requests that originate from these IP addresses.
- Two IP sets that represent deny lists for IPv4 and IPv6. Add IPs to these IP sets that you want to block in all cases, regardless of the result of other rules.
- An AWS managed IP reputation rule group: The AWS managed IP reputation list rule group contains rules that are based on Amazon internal threat intelligence, to identify IP addresses typically associated with bots or other threats. You can limit requests that match rules in this rule group to a specific rate limit.
Deploy rate-based rules
You can deploy the rate-based rules described in the previous section by using the AWS CloudFormation template that we provide here.
To deploy rate-based rules using the template
- (Optional but recommended) If you want to enable AWS WAF logging and resources to analyze request rates, create an Amazon Simple Storage Service (Amazon S3) bucket in the same AWS Region as your Amazon Cognito user pool, with a bucket name starting with the prefix aws-waf-logs-. If you previously created an S3 bucket for AWS WAF logs, you can choose to reuse it, or you can create a new bucket to store AWS WAF logs for Amazon Cognito.
- Choose the following Launch Stack button to launch a CloudFormation stack in your account.

Note: The stack will launch in the N. Virginia (us-east-1) Region. To deploy this solution into other AWS Regions, download the solution’s CloudFormation template and deploy it to the selected Region.
This template creates the following resources in your AWS account:
- A rule group for the rate-based rules, according to the limits shown in Tables 1 and 2.
- Four IP sets for an allow list and deny list for IPv4 and IPv6 addresses.
- A web ACL that includes the rule group that is created, IP set based rules, and the AWS managed IP reputation rule group.
- (Optional) The template enables AWS WAF logging for the web ACL to an S3 bucket that you specify.
- (Optional) The template creates resources to help you analyze AWS WAF logs in S3 to calculate peak request rates that you can use to set rate limits for the rate-based rules.
- Set the template parameters as needed. The following table shows the default values for the parameters. We recommend that you deploy the template with the default values and with TestMode set to Yes so that all rules are set to Count. This allows all requests but emits Amazon CloudWatch metrics and AWS WAF log events for each rule that matches. You can then follow the guidance in the next section to analyze the logs and tune the rate limits to match the traffic patterns to your user pool. When you are satisfied with the unique rate limits for each parameter, you can update the stack and set TestMode to No to start blocking requests that exceed the rate limits.
The rate limits for AWS WAF rate-based rules are configured as the number of requests per 5-minute period per unique source IP. The value of the rate limit can be between 100 and 2,000,000,000 (2 billion).
Table 3: Default values for template parameters
Parameter name Description Default value Allowed values Request rate limits by action category UserCreationRateLimit Rate limit applied to User Creation actions 2000 100–2,000,000,000 SignInRateLimit Rate limit applied to Sign-in actions 4000 100–2,000,000,000 AccountRecoveryRateLimit Rate limit applied to Account Recovery actions 1000 100–2,000,000,000 IPReputationRateLimit Rate limit applied to requests that match the AWS Managed IP reputation list 1000 100–2,000,000,000 DefaultRateLimit Default rate limit applied to actions that are not in any of the prior categories 6000 100–2,000,000,000 Test mode TestMode Set to Yes to test rules by overriding rule actions to Count. Set to No to apply the default actions for rules after you’ve tested the impact of these rules. Yes Yes or No AWS WAF logging and rate analysis EnableWAFLogsAndRateAnalysis Set to Yes to enable logging for the AWS WAF web ACL to an S3 bucket and create resources for request rate analysis. Set to No to disable AWS WAF logging and skip creating resources for rate analysis. If No, the rest of the parameter values in this section are ignored. If Yes, choose values for the rest of the parameters in this section. Yes Yes or No WAFLogsS3Bucket The name of an existing S3 bucket where AWS WAF logs are delivered. The bucket name must start with aws-waf-logs- and can end with any suffix.
Only used if the parameter EnableWAFLogsAndRateAnalysis is set to Yes.None Name of an existing S3 bucket that starts with the prefix aws-waf-logs- DatabaseName The name of the AWS Glue database to create, which will contain the request rate analysis tables created by this template. (Important: The name cannot contain hyphens.)
Only used if the parameter EnableWAFLogsAndRateAnalysis is set to Yes.rate_analysis WorkgroupName The name of the Amazon Athena workgroup to create for rate analysis.
Only used if the parameter EnableWAFLogsAndRateAnalysis is set to Yes.rate_analysis WAFLogsTableName The name of the AWS Glue table for AWS WAF logs.
Only used if the parameter EnableWAFLogsAndRateAnalysis is set to Yes.waf_logs WAFLogsProjectionStartDate The earliest date to analyze AWS WAF logs, in the format YYYY/MM/DD (example: 2023/02/28).
Only used if the parameter EnableWAFLogsAndRateAnalysis is set to Yes.None Set this to the current date, in the format YYYY/MM/DD - Wait for the CloudFormation template to be created successfully.
- Go to the AWS WAF console and choose the web ACL created by the template. It will have a name ending with CognitoWebACL.
- Choose the Associated AWS resources tab, and then choose Add AWS resource.
- For Resource type, choose Amazon Cognito user pool, and then select the Amazon Cognito user pools that you want to protect with this web ACL.
- Choose Add.
Now that your user pool is being protected by the rate-based rules in the web ACL you created, you can proceed to tune the rate-based rule limits by analyzing AWS WAF logs.
Tune AWS WAF rate-based rule limits
As described in the previous section, the rate-based rules give you the ability to set separate rate limit values for each category of Amazon Cognito API actions.
Although the CloudFormation template has default starting values for these rate limits, it is important that you tune these values to match the traffic patterns for your user pool. To begin the tuning process, deploy the template with default values for all parameters, including Yes for TestMode. This overrides all rule actions to Count, allowing all requests but emitting CloudWatch metrics and AWS WAF log events for each rule that matches.
After you collect AWS WAF logs for a period of time (this period can vary depending on your traffic, from a couple of hours to a couple of days), you can analyze them, as shown in the next section, to get peak request rates to tune the rate limits to match observed traffic patterns for your user pool.
Query AWS WAF logs to calculate peak request rates by request type
You can calculate peak request rates by analyzing information that is present in AWS WAF logs. One way to analyze these is to send AWS WAF logs to S3 and to analyze the logs by using SQL queries in Amazon Athena. If you deploy the template in this post with default values, it creates the resources you need to analyze AWS WAF logs in S3 to calculate peak requests rates by request type.
If you are instead ingesting AWS WAF logs into your security information and event management (SIEM) system or a different analytics environment, you can create equivalent queries by using the query language for your SIEM or analytics environment to get similar results.
To access and edit the queries built by the CloudFormation template for use
- Open the Athena console and switch to the Athena workgroup that was created by the template (the default name is rate_analysis).
- On the Saved queries tab, choose the query named Peak request rate per 5-minute period by source IP and request category. The following SQL query will be loaded into the edit panel.
-- Gets the top 5 source IPs sending the most requests in a 5-minute period per request category ‐‐ NOTE: change the start and end timestamps to match the duration of interest SELECT request_category, from_unixtime(time_bin*60*5) AS date_time, client_ip, request_count FROM ( SELECT *, row_number() OVER (PARTITION BY request_category ORDER BY request_count DESC, time_bin DESC) AS row_num FROM ( SELECT CASE WHEN ip_reputation_labels.name IN ( 'awswaf:managed:aws:amazon-ip-list:AWSManagedIPReputationList', 'awswaf:managed:aws:amazon-ip-list:AWSManagedReconnaissanceList', 'awswaf:managed:aws:amazon-ip-list:AWSManagedIPDDoSList' ) THEN 'IPReputation' WHEN target.value IN ( 'AWSCognitoIdentityProviderService.InitiateAuth', 'AWSCognitoIdentityProviderService.RespondToAuthChallenge' ) THEN 'SignIn' WHEN target.value IN ( 'AWSCognitoIdentityProviderService.ResendConfirmationCode', 'AWSCognitoIdentityProviderService.SignUp', 'AWSCognitoIdentityProviderService.ConfirmSignUp' ) THEN 'UserCreation' WHEN target.value IN ( 'AWSCognitoIdentityProviderService.ForgotPassword', 'AWSCognitoIdentityProviderService.ConfirmForgotPassword' ) THEN 'AccountRecovery' WHEN httprequest.uri IN ( '/login', '/oauth2/authorize' ) THEN 'SignIn' WHEN httprequest.uri IN ( '/signup', '/confirmUser', '/resendcode' ) THEN 'UserCreation' WHEN httprequest.uri IN ( '/forgotPassword', '/confirmForgotPassword' ) THEN 'AccountRecovery' ELSE 'Default' END AS request_category, httprequest.clientip AS client_ip, FLOOR("timestamp"/(1000*60*5)) AS time_bin, COUNT(*) AS request_count FROM waf_logs LEFT OUTER JOIN UNNEST(FILTER(httprequest.headers, h -> h.name = 'x-amz-target')) AS t(target) ON TRUE LEFT OUTER JOIN UNNEST(FILTER(labels, l -> l.name like 'awswaf:managed:aws:amazon-ip-list:%')) AS t(ip_reputation_labels) ON TRUE WHERE from_unixtime("timestamp"/1000) BETWEEN TIMESTAMP '2022-01-01 00:00:00' AND TIMESTAMP '2023-01-01 00:00:00' GROUP BY 1, 2, 3 ORDER BY 1, 4 DESC ) ) WHERE row_num <= 5 ORDER BY request_category ASC, row_num ASC - Scroll down to Line 48 in the Query Editor and edit the timestamps to match the start and end time of the time window of interest.
- Run the query to calculate the top 5 peak request rates per 5-minute period by source IP and by action category.
The results show the action category, source IP, time, and count of requests. You can use the request count to tune the rate limits for each action category.
The lowest rate limit you can set for AWS WAF rate-based rules is 100 requests per 5-minute period. If your query results show that the peak request count is less than 100, set the rate limit as 100 or higher.
After you have tuned the rate limits, you can apply the changes to your web ACL by updating the CloudFormation stack.
To update the CloudFormation stack
- On the CloudFormation console, choose the stack you created earlier.
- Choose Update. For Prepare template, choose Use current template, and then choose Next.
- Update the values of the parameters with rate limits to match the tuned values from your analysis.
- You can choose to enable blocking of requests by setting TestMode to No. This will set the action to Block for the rate-based rules in the web ACL and start blocking traffic that exceeds the rate limits you have chosen.
- Choose Next and then Next again to update the stack.
Now the rate-based rules are updated with your tuned limits, and requests will be blocked if you set TestMode to No.
Protect endpoints with user interaction
Now that we’ve covered the bases with rate-based rules, we’ll show you some more advanced AWS WAF rules that further help protect your user pool. We’ll explore two sample scenarios in detail, and provide AWS WAF rules for each. You can use the rules provided as a guideline to build others that can help with similar use cases.
Rules to verify human activity
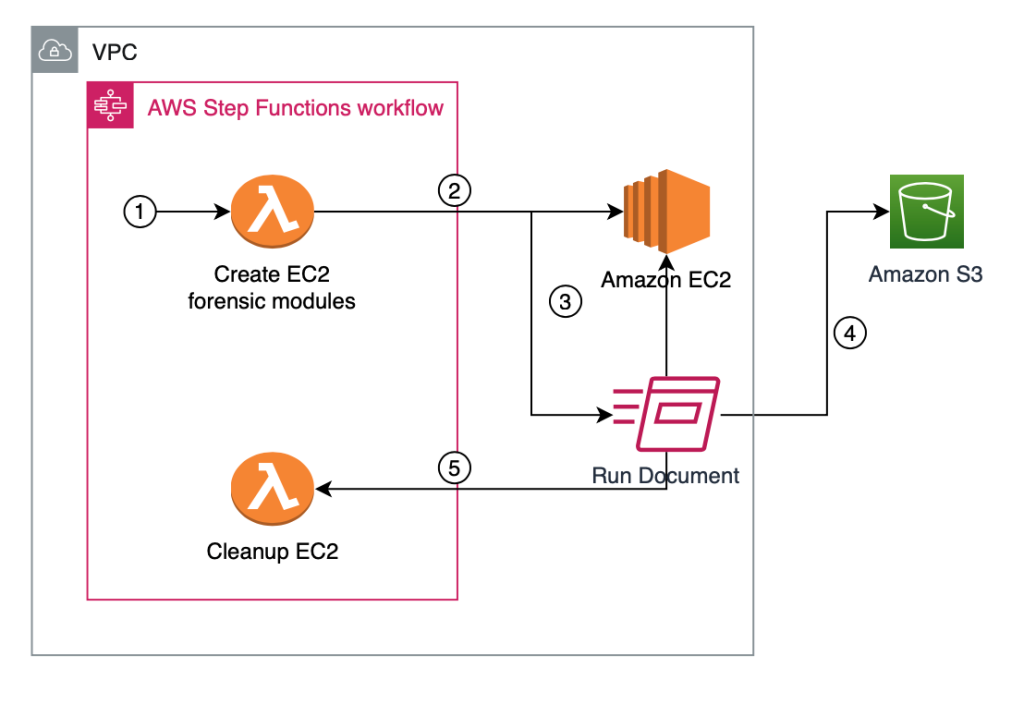
The first scenario is protecting endpoints where users have interaction with the page. This will be a browser-based interaction, and a human is expected to be behind the keyboard. This scenario applies to the Hosted UI endpoints such as /login, /signup, and /forgotPassword, where a CAPTCHA can be rendered on the user’s browser for the user to solve. Let’s take the login (sign-in) endpoint as an example, and imagine you want to make sure that only actual human users are attempting to sign in and you want to block bots that might try to guess passwords.
To illustrate how to protect this endpoint with AWS WAF, we’re sharing a sample rule, shown in Figure 1. In this rule, you can take input from prior rules like the Amazon IP reputation list or the Anonymous IP list (which are configured to Count requests and add labels) and combine that with a CAPTCHA action. The logic of the rule says that if the request matches the reputation rules (and has received the corresponding labels) and is going to the /login endpoint, then the AWS WAF action should be to respond with a CAPTCHA challenge. This will present a challenge that increases the confidence that a human is performing the action, and it also adds a custom label so you can efficiently identify and have metrics on how many requests were matched by this rule. The rule is provided in the CloudFormation template and is in JSON format, because it has advanced logic that cannot be displayed by the console. Learn more about labels and CAPTCHA actions in the AWS WAF documentation.

Figure 1: Login sample rule flow
Note that the rate-based rules you created in the previous section are evaluated before the advanced rules. The rate-based rules will block requests to the /login endpoint that exceed the rate limit you have configured, while this advanced rule will match requests that are below the rate limit but match the other conditions in the rule.
Rules for specific activity
The second scenario explores activity on specific application clients within the user pool. You can spot this activity by monitoring the logs provided by AWS WAF, or other traffic logs like Application Load Balancer (ALB) logs. The application client information is provided in the call to the service.
In the Amazon Cognito user pool in this scenario, we have different application clients and they’re constrained by geography. For example, for one of the application clients, requests are expected to come from the United States at or below a certain rate. We can create a rule that combines the rate and geographical criteria to block requests that don’t meet the conditions defined.
The flow of this rule is shown in Figure 2. The logic of the rule will evaluate the application client information provided in the request and the geographic information identified by the service, and apply the selected rate limit. If blocked, the rule will provide a custom response code by using HTTP code 429 Too Many Requests, which can help the sender understand the reason for the block. For requests that you make with the Amazon Cognito API, you could also customize the response body of a request that receives a Block response. Adding a custom response helps provide the sender context and adjust the rate or information that is sent.

Figure 2: AppClientId sample rule flow
AWS WAF can detect geo location with Region accuracy and add specific labels for the location. These can then be used in other rule evaluations. This rule is also provided as a sample in the CloudFormation template.
Advanced protections
To build on the rules we’ve shared so far, you can consider using some of the other intelligent threat mitigation rules that are available as managed rules—namely, bot control for common or targeted bots. These rules offer advanced capabilities to detect bots in sensitive endpoints where automation or non-browser user agents are not expected or allowed. If you receive machine traffic to the endpoint, these rules will result in false positives that would need to be tuned. For more information, see Options for intelligent threat mitigation.
The sample rule flow in Figure 3 shows an example for our Hosted UI, which builds on the first rule we built for specific activity and adds signals coming from the Bot Control common bots managed rule, in this case the non-browser-user-agent label.
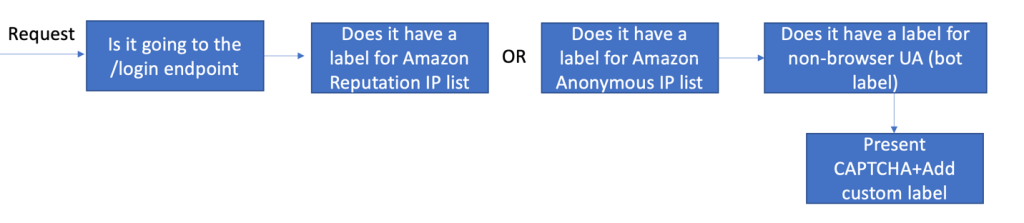
Figure 3: Login sample rule with advanced protections
Adding the bot detection label will also add accuracy to the evaluation, because AWS WAF will consider multiple different sources of information when analyzing the request. This can also block attacks that come from a small set of IPs or easily recognizable bots.
We’ve shared this rule in the CloudFormation template sample. The rule requires you to add AWS WAF Bot Control (ABC) before the custom rule evaluation. ABC has additional costs associated with it and should only be used for specific use cases. For more information on ABC and how to enable it, see this blog post.
After adding these protections, we have a complete set of rules for our Hosted UI–specific needs; consider that your traffic and needs might be different. Figure 4 shows you what the rule priority looks like. All rules except the last are included in the provided CloudFormation template. Managed rule evaluations need to have higher priority and be in Count mode; this way, a matching request can get labels that can be evaluated further down the priority list by using the custom rules that were created. For more information, see How labeling works.
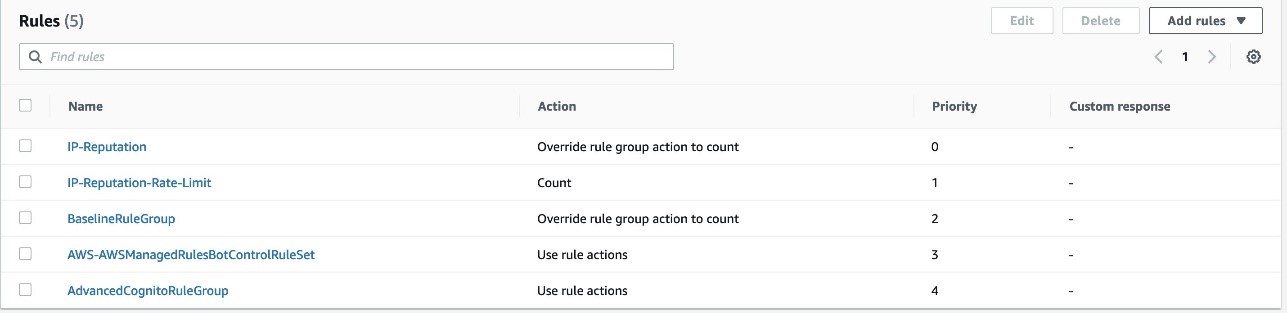
Figure 4: Summary of the rules discussed in this post
Conclusion
In this post, we examined the different protections provided by the integration between AWS WAF and Amazon Cognito. This integration makes it simpler for you to view and monitor the activity in the different Amazon Cognito endpoints and APIs, while also adding rate-based rules and IP reputation evaluations. For more specific use cases and advanced protections, we provided sample custom rules that use labels, as well as an advanced rule that uses bot control for common bots. You can use these advanced rules as examples to create similar rules that apply to your use cases.
If you have feedback about this post, submit comments in the Comments section below. If you have questions about this post, start a new thread on the re:Post with tag AWS WAF or contact AWS Support.
Want more AWS Security news? Follow us on Twitter.