Post Syndicated from Shubhankar Sumar original https://aws.amazon.com/blogs/security/saas-authentication-identity-management-with-amazon-cognito-user-pools/
Amazon Cognito is a customer identity and access management (CIAM) service that can scale to millions of users. Although the Cognito documentation details which multi-tenancy models are available, determining when to use each model can sometimes be challenging. In this blog post, we’ll provide guidance on when to use each model and review their pros and cons to help inform your decision.
Cognito overview
Amazon Cognito handles user identity management and access control for web and mobile apps. With Cognito user pools, you can add sign-up, sign-in, and access control to your apps. A Cognito user pool is a user directory within a specific AWS Region where users can authenticate and register for applications. In addition, a Cognito user pool is an OpenID Connect (OIDC) identity provider (IdP). App users can either sign in directly through a user pool or federate through a third-party IdP. Cognito issues a user pool token after successful authentication, which can be used to securely access backend APIs and resources.
Cognito issues three types of tokens:
- ID token – Contains user identity claims like name, email, and phone number. This token type authenticates users and enables authorization decisions in apps and API gateways.
- Access token – Includes user claims, groups, and authorized scopes. This token type grants access to API operations based on the authenticated user and application permissions. It also enables fine-grained, user-based access control within the application or service.
- Refresh token – Retrieves new ID and access tokens when these are expired. Access and ID tokens are short-lived, while the refresh token is long-lived. By default, refresh tokens expire 30 days after the user signs in, but this can be configured to a value between 60 minutes and 10 years.
You can find more information on using tokens and their contents in the Cognito documentation.
Multi-tenancy approaches
Software as a service (SaaS) architectures often use silo, pool, or bridge deployment models, which also apply to CIAM services like Cognito. The silo model isolates tenants in dedicated resources. The pool model shares resources between tenants. The bridge model connects siloed and pooled components. This post compares the Cognito silo and pool models for SaaS identity management.
It’s also possible to combine the silo and pool models by having multiple tiers of resources. For example, you could have a siloed tier for sensitive tenant data along with a pooled tier for shared functionality. This is similar to the silo model but with added routing complexity to connect the tiers. When you have multiple pools or silos, this is a similar approach to the pure silo model but with more components to manage.
More detail on these models are included in the AWS SaaS Lens.
We’ve detailed five possible patterns in the following sections and explored the scenarios where each of the patterns can be used, along with the advantages and disadvantages for each. The rest of the post delves deeper into the details of these different patterns, enabling you to make an informed decision that best aligns with your unique requirements and constraints.
Pattern 1: Representing SaaS identity with custom attributes
To implement multi-tenancy in a SaaS application, tenant context needs to be associated with user identity. This allows implementation of the multi-tenant policies and strategies that comprise our SaaS application. Cognito has user pool attributes, which are pieces of information to represent identity. There are standard attributes, such as name and email, that describe the user identity. Cognito also supports custom attributes that can be used to hold information about the user’s relationship to a tenant, such as tenantId.
By using custom attributes for multi-tenancy in Amazon Cognito, the tenant context for each user can be stored in their user profile.
To enable multi-tenancy, you can add a custom attribute like tenantId to the user profile. When a new user signs up, this tenantId attribute can be set to a value indicating which tenant the user belongs to. For example, users with tenantId “1234” belong to Tenant A, while users with tenantId “5678” belong to Tenant B.
The tenantId attribute value gets returned in the ID token after a successful user authentication. (This value can also be added to the access token through customization by using a pre-token generation Lambda trigger.) The application can then inspect this claim to determine which tenant the user belongs to. The tenantId attribute is typically managed at the SaaS platform level and is read-only to users and the application layer. (Note: SaaS providers need to configure the tenantId attribute to be read-only.)
In addition to storing a tenant ID, you can use custom attributes to model additional tenant context. For instance, attributes like tenantName, tenantTier, or tenantRegion could be defined and set appropriately for each user to provide relevant informational context for the application. However, make sure not to use custom attributes as a database—they are meant to represent identity, not store application data. Custom attributes should only contain information that is relevant for authorization decisions and JSON web token (JWT) compactness and should be relatively static because their values are stored in the Cognito directory. Updating frequently changing data requires modifying the directory, which can be cumbersome.
The custom attributes themselves need to be defined at the time of creating the Amazon Cognito user pool, and there is a maximum of 50 custom attributes that you can create. Once the pool is created, these custom attribute fields will be present on every user profile in that user pool. However, they won’t have values populated yet. The actual tenant attribute values get populated only when a new user is created in the user pool. This can be done in two ways:
- During user sign-up, a post confirmation AWS Lambda trigger can be used to set the appropriate tenant attribute values based on the user’s input.
- An admin user can provision a new user through the AdminCreateUser API operation and specify the tenant attribute values at that time.
After user creation, the custom tenant attribute values can still be updated by an administrator through the AdminUpdateUserAttributes API operation or by a user with the UpdateUserAttributes API operation, if needed. But the key point is that the custom attributes themselves must be predefined at user pool creation, while the values get set later during user creation and provisioning flows. Figure 1 shows how custom attributes are associated with an ID token and used subsequently in downstream applications.

Figure 1: Associating tenant context with custom attributes
As shown in Figure 1:
- The custom tenant attribute values from the user profile are included in the Cognito ID token that is generated after a successful user authentication. These values can be used for access control for other AWS services, such as Amazon API Gateway.
- You can configure Amazon API Gateway with a Lambda authorizer function that validates the ID token signature (the aws-jwt-verify library can be used for this purpose) and inspects the tenant ID claim in each request.
- Based on the tenant ID value extracted from the ID token, the Lambda authorizer can determine which backend resources and services each authenticated user is authorized to access.
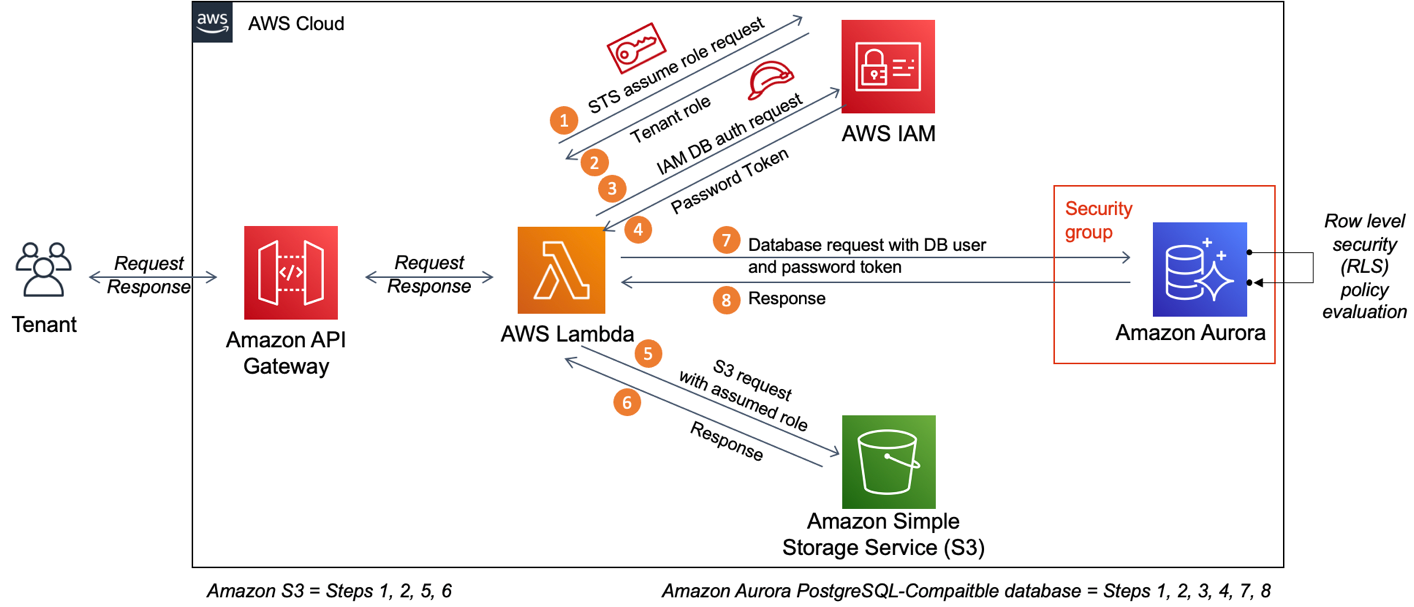
You can use this method to provide fine-grained access control, as described in this blog post, by using tenant claims as context in addition to the user claims embedded within the token. This pattern of embedding information about the user’s identity, along with details on their associated tenant, in a single token is what AWS refers to as SaaS identity.
The multi-tenancy approaches of using siloed user pools, shared pools, or custom attributes rely on embedding tenant context within the user identity. This is accomplished by having Cognito include claims with tenant information in the JWTs issued after authentication.
The JWT encodes user identity information like the username, email address, and so on. By adding custom claims that contain tenant identifiers or metadata, the tenant context gets tightly coupled to the user identity. The embedded tenant context in the JWT allows applications to implement access control and authorization based on the associated tenant for each user.
This combination of user identity information and tenant context in the issued JWT represents the SaaS identity—a unified identity spanning both user and tenant dimensions. The application uses this SaaS identity for implementing multi-tenant logic and policies.
Pattern 2: Shared user pool (pool model)
A single, shared Amazon Cognito user pool simplifies identity management for multi-tenant SaaS applications. With one consolidated pool, changes and configurations apply across tenants in one place, which can reduce overhead.
For example, you can define password complexity rules and other settings once at the user pool level, and then these settings are shared across tenants. Adding new tenants is streamlined by using the settings in the existing shared pool, without duplicating setup per tenant. This avoids deploying isolated pools when onboarding new tenants.
Additionally, the tokens issued from the shared pool are signed by the same issuer. There is no tenant-specific issuer in the tokens when using a shared pool. For SaaS apps with common identity needs, a shared multi-tenant pool minimizes friction for rapid onboarding despite that loss of per-tenant customization.
Advantages of the pool model:
- This model uses a single shared user pool for tenants. This simplifies onboarding by setting user attributes rather than configuring multiple user pools.
- Tenants authenticate using the same application client and user pool, which keeps the SaaS client configuration simple.
Disadvantages of the pool model:
- Sharing one pool means that settings like password policies and MFA apply uniformly, without customization per tenant.
- Some resource quotas are managed at a user pool level (for example, the number of application clients or customer attributes), so you need to consider quotas carefully when adopting this model.
Pattern 3: Group-based multi-tenancy (pool model)
Amazon Cognito user pools give an administrator the capability to add groups and associate users with groups. Doing so introduces specific attributes (cognito:groups and cognito:roles) that are managed and maintained by Cognito and available within the ID tokens. (Access tokens only have the cognito:groups attribute.) These groups can be used to enable multi-tenancy by creating a separate group for each tenant. Users can be assigned to the appropriate tenant group based on the value of a custom tenantId attribute. The application can then implement authorization logic to limit access to resources and data based on the user’s tenant group membership that is encoded in the tokens. This provides isolation and access control across tenants, making use of the native group constructs in Cognito rather than relying entirely on custom attributes.
The group information contained in the tokens can then be used by downstream services to make authorization decisions. Groups are often combined with custom attributes for more granular access control. For example, in the SaaS Factory Serverless SaaS – Reference Solution developed by the AWS SaaS Factory team, roles are specified by using Cognito groups, but tenant identity relies on a custom tenantId attribute. The tenant ID attribute provides isolation between tenants, while the groups define individual user roles and access privileges that apply within a tenant.
Figure 2 shows how groups are associated with the user and then the Lambda authorizer can determine which backend resources and services each authenticated user is authorized to access.

Figure 2: Group-based multi-tenancy
In this model, groups can provide role-based controls, while custom attributes like tenant ID provide the contextual information needed to enforce tenant isolation. The authorization decisions are then made by evaluating a user’s group memberships and attribute values in order to provide fine-grained access tailored to each tenant and user. So groups directly enable role-based checks, while custom attributes provide broader context for conditional access across tenants. Together they can provide the data that is needed to implement granular authorization in a multi-tenant application.
Advantages of group-based multi-tenancy:
- This model uses a single shared user pool for tenants, so that onboarding requires setting user attributes rather than configuring multiple pools.
- Tenants authenticate through the same application client and pool, keeping SaaS client configuration straightforward.
Disadvantages of group-based multi-tenancy:
- Sharing one pool means that settings like password policies and MFA apply uniformly without per-tenant customization.
- There is a limit of 10,000 groups per user pool.
Pattern 4: Dedicated user pool per tenant (silo model)
Another common approach for multi-tenant identity with Cognito is to provision a separate user pool for each tenant. A Cognito user pool is a user directory, so using distinct pools provides maximum isolation. However, this approach requires that you implement tenant routing logic in the application to determine which user pool a user should authenticate against, based on their tenant.
Tenant routing
With separate user pools per tenant (or application clients, as we’ll discuss later), the application needs logic to route each user to the appropriate pool (or client) for authentication. There are a few options that you can use for this approach:
- Use a subdomain in the URL that maps to the tenant—for example, tenant1.myapp.com routes to Tenant 1’s user pool. This requires mapping subdomains to tenant pools.
- Rely on unique email domains per tenant—for example, @tenant1.com goes to Tenant 1’s pool. This requires mapping email domains to pools.
- Have the user select their tenant from a dropdown list. This requires the tenant choices to be configured.
- Prompt the user to enter a tenant ID code that maps to pools. This requires mapping codes to pools.
No matter the approach you chose, the key requirements are the following:
- A data point to identify the tenant (such as subdomain, email, selection, or code).
- A mapping dataset that takes tenant identifying information from the user and looks up the corresponding user pool to route to for authentication.
- Routing logic to redirect to the appropriate user pool.
For example, the AWS SaaS Factory Serverless Reference Architecture uses the approach shown in Figure 3.

Figure 3: Dedicated user pool per tenant
The workflow is as follows:
- The user enters their tenant name during sign-in.
- The tenant name retrieves tenant-specific information like the user pool ID, application client ID, and API URLs.
- Tenant-specific information is passed to the SaaS app to initialize authentication to the correct user pool and app client, and this is used to initialize an authorization code flow.
- The app redirects to the Cognito hosted UI for authentication.
- User credentials are validated, and Cognito issues an OAuth code.
- The OAuth code is exchanged for a JWT token from Cognito.
- The JWT token is used to authenticate the user to access microservices.
Advantages of the one pool per tenant model:
- Users exist in a single directory with no cross-tenant visibility. Tokens are issued and signed with keys that are unique to that pool.
- Each pool can have customized security policies, like password rules or MFA requirements per tenant.
- Pools can be hosted in different AWS Regions to meet data residency needs.
Potential disadvantages of the one pool per tenant model:
- There are limits on the number of pools per account. (The default is 1,000 pools, and the maximum is 10,000.)
- Additional automation is required to create multiple pools, especially with customized configurations.
- Applications must implement tenant routing to direct authentication requests to the correct user pool.
- Troubleshooting can be more difficult, because configuration of each pool is managed separately and tenant routing functionality is added.
In summary, separate user pools maximize tenant isolation but require more complex provisioning and routing. You might also need to consider limits on the pool count for large multi-tenant deployments.
Pattern 5: Application client per tenant (bridge model)
You can achieve some extra tenant isolation by using separate application clients per tenant in a single user pool, in addition to using groups and custom attributes. Cognito configurations from the application client, such as OAuth scopes, hosted UI customization, and security policies can be specific to each tenant. The application client also enables external IdP federation per tenant. However, user pool–level settings, such as password policy, remain shared.
Figure 4 shows how a single user pool can be configured with multiple application clients. Each of those application clients is assigned to a tenant. However, this approach requires that you implement tenant routing logic in the application to determine which application client a tenant should be mapped to (similar to the approach we discussed for the shared user pool). Once the user is authenticated, you can configure Amazon API Gateway with a Lambda authorizer function that validates the ID token signature. Subsequently, the Lambda authorizer can determine which backend resources and services each authenticated user is authorized to access.

Figure 4: Application client based multi-tenancy
For tenants that want to use their own IdP through SAML or OpenID Connect federation, you can create a dedicated application client that will redirect users to authenticate with the tenant’s federated IdP. This has some key benefits:
- If a single external IdP is enabled on the application client, the hosted UI automatically redirects users without presenting Cognito sign-in screens. This provides a familiar sign-in experience for tenants and is frictionless if users have existing sessions with the tenant IdP.
- Management of user activities like joining and leaving, passwords, and other tasks are entirely handled by the tenant in their own IdP. The SaaS provider doesn’t need to get involved in these processes.
Importantly, even with federation, Cognito still issues tokens after successful external authentication. So the SaaS provider gets consistent tokens from Cognito to validate during authorization, regardless of the IdP.
Attribute mapping
When federating with an external IdP, Amazon Cognito can dynamically map attributes to populate the tokens it issues. This allows attributes like groups, email addresses, and roles created in the IdP to be passed to Cognito during authentication and added to the tokens.
The mapping occurs upon every sign-in, overwriting the existing mapped attributes to stay in sync with the latest IdP values. Therefore, changes made in the external IdP related to mapped attributes are reflected in Cognito after signing in. If a mapped attribute is required in the Cognito user pool, like email for sign-in, it must have an equivalent in the IdP to map. The target attributes in Cognito must be configured as mutable, since immutable attributes cannot be overwritten after creation, even through mapping.
Important: For SaaS identity, tenant attributes should be defined in Cognito rather than mapped from an external IdP. This helps to prevent tenants from tampering with values and maintains isolation. However, user attributes like groups and roles can be mapped from the tenant’s IdP to manage permissions. This allows tenants to configure application roles by using their own IdP groups.
Advantages of the bridge model:
- This model enables tenant-specific configuration like OAuth scopes, UI, and IdPs.
- Tenant users access familiar workflows through external IdPs, and when using external IdPs, tenant user management is handled externally.
- No custom claim mappings are needed, but can be used optionally.
- Cognito still issues tokens for authorization.
Disadvantages of the bridge model:
- Requires routing users to the correct app client per tenant.
- There is a limit on the number of app clients per user pool.
- Some user pool settings remain shared, such as password policy.
- There is no dynamic group claim modification.
Conclusion
In this blog post, we explored various ways Amazon Cognito user pools can enable multi-tenant identity for SaaS solutions. A single shared user pool simplifies management but limits the option to customize user pool–level policies, while separate pools maximize isolation and configurability at the cost of complexity. If you use multiple application clients, you can balance tailored options like external IdPs and OAuth scopes with centralized policies in the user pool. Custom claim mappings provide flexibility but require additional logic.
These two approaches can also be combined. For example, you can have dedicated user pools for select high-tier tenants while others share a multi-tenant pool. The optimal choice depends on the specific tenant needs and on the customization that is required.
In this blog post, we have mainly focused on a static approach. You can also use a pre-token generation Lambda trigger to modify tokens by adding, changing, or removing claims dynamically. The trigger can also override the group membership in both the identity and access tokens. Other claim changes only apply to the ID token. A common use case for this trigger is injecting tenant attributes into the token dynamically.
Evaluate the pros and cons of each approach against the requirements of the SaaS architecture and tenants. Often a hybrid model works best. Cognito constructs like user pools, IdPs, and triggers provide various levers that you can use to fine-tune authentication and authorization across tenants.
For further reading on these topics, see the Common Amazon Cognito scenarios topic in the Cognito Developer Guide and the related blog post How to Use Cognito Pre-Token Generation trigger to Customize Claims in ID Tokens.
If you have feedback about this post, submit comments in the Comments section below. If you have questions about this post, start a new thread on Amazon Cognito re:Post