Tag Archives: databases

Upgrading GitHub.com to MySQL 8.0

Post Syndicated from Jiaqi Liu original https://github.blog/2023-12-07-upgrading-github-com-to-mysql-8-0/


Over 15 years ago, GitHub started as a Ruby on Rails application with a single MySQL database. Since then, GitHub has evolved its MySQL architecture to meet the scaling and resiliency needs of the platform—including building for high availability, implementing testing automation, and partitioning the data. Today, MySQL remains a core part of GitHub’s infrastructure and our relational database of choice.

This is the story of how we upgraded our fleet of 1200+ MySQL hosts to 8.0. Upgrading the fleet with no impact to our Service Level Objectives (SLO) was no small feat–planning, testing and the upgrade itself took over a year and collaboration across multiple teams within GitHub.

Motivation for upgrading

Why upgrade to MySQL 8.0? With MySQL 5.7 nearing end of life, we upgraded our fleet to the next major version, MySQL 8.0. We also wanted to be on a version of MySQL that gets the latest security patches, bug fixes, and performance enhancements. There are also new features in 8.0 that we want to test and benefit from, including Instant DDLs, invisible indexes, and compressed bin logs, among others.

GitHub’s MySQL infrastructure

Before we dive into how we did the upgrade, let’s take a 10,000-foot view of our MySQL infrastructure:

  • Our fleet consists of 1200+ hosts. It’s a combination of Azure Virtual Machines and bare metal hosts in our data center.
  • We store 300+ TB of data and serve 5.5 million queries per second across 50+ database clusters.
  • Each cluster is configured for high availability with a primary plus replicas cluster setup.
  • Our data is partitioned. We leverage both horizontal and vertical sharding to scale our MySQL clusters. We have MySQL clusters that store data for specific product-domain areas. We also have horizontally sharded Vitess clusters for large-domain areas that outgrew the single-primary MySQL cluster.
  • We have a large ecosystem of tools consisting of Percona Toolkit, gh-ost, orchestrator, freno, and in-house automation used to operate the fleet.

All this sums up to a diverse and complex deployment that needs to be upgraded while maintaining our SLOs.

Preparing the journey

As the primary data store for GitHub, we hold ourselves to a high standard for availability. Due to the size of our fleet and the criticality of MySQL infrastructure, we had a few requirements for the upgrade process:

  • We must be able to upgrade each MySQL database while adhering to our Service Level Objectives (SLOs) and Service Level Agreements (SLAs).
  • We are unable to account for all failure modes in our testing and validation stages. So, in order to remain within SLO, we needed to be able to roll back to the prior version of MySQL 5.7 without a disruption of service.
  • We have a very diverse workload across our MySQL fleet. To reduce risk, we needed to upgrade each database cluster atomically and schedule around other major changes. This meant the upgrade process would be a long one. Therefore, we knew from the start we needed to be able to sustain operating a mixed-version environment.

Preparation for the upgrade started in July 2022 and we had several milestones to reach even before upgrading a single production database.

Prepare infrastructure for upgrade

We needed to determine appropriate default values for MySQL 8.0 and perform some baseline performance benchmarking. Since we needed to operate two versions of MySQL, our tooling and automation needed to be able to handle mixed versions and be aware of new, different, or deprecated syntax between 5.7 and 8.0.

Ensure application compatibility

We added MySQL 8.0 to Continuous Integration (CI) for all applications using MySQL. We ran MySQL 5.7 and 8.0 side-by-side in CI to ensure that there wouldn’t be regressions during the prolonged upgrade process. We detected a variety of bugs and incompatibilities in CI, helping us remove any unsupported configurations or features and escape any new reserved keywords.

To help application developers transition towards MySQL 8.0, we also enabled an option to select a MySQL 8.0 prebuilt container in GitHub Codespaces for debugging and provided MySQL 8.0 development clusters for additional pre-prod testing.

Communication and transparency

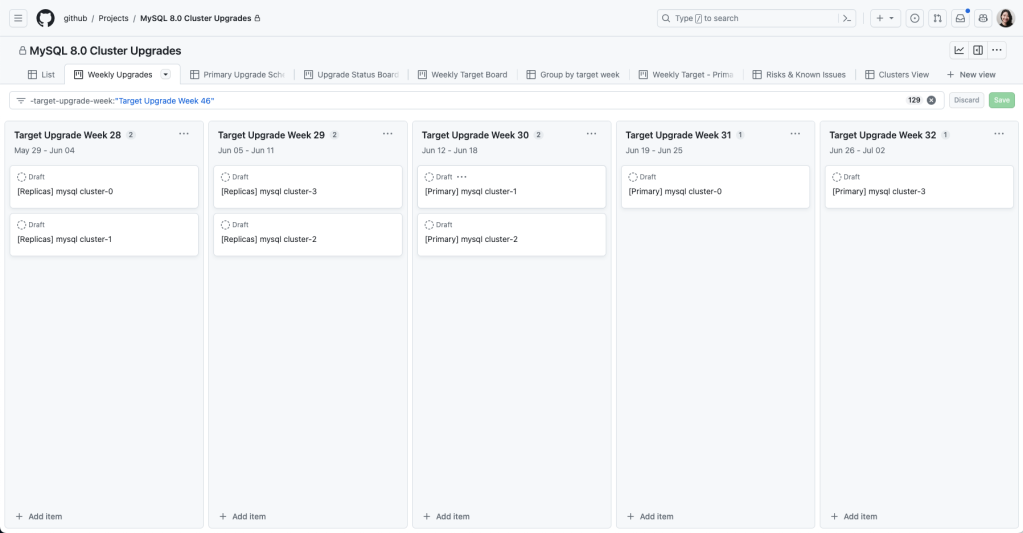
We used GitHub Projects to create a rolling calendar to communicate and track our upgrade schedule internally. We created issue templates that tracked the checklist for both application teams and the database team to coordinate an upgrade.

Project Board for tracking the MySQL 8.0 upgrade schedule

Upgrade plan

To meet our availability standards, we had a gradual upgrade strategy that allowed for checkpoints and rollbacks throughout the process.

Step 1: Rolling replica upgrades

We started with upgrading a single replica and monitoring while it was still offline to ensure basic functionality was stable. Then, we enabled production traffic and continued to monitor for query latency, system metrics, and application metrics. We gradually brought 8.0 replicas online until we upgraded an entire data center and then iterated through other data centers. We left enough 5.7 replicas online in order to rollback, but we disabled production traffic to start serving all read traffic through 8.0 servers.

The replica upgrade strategy involved gradual rollouts in each data center (DC).

Step 2: Update replication topology

Once all the read-only traffic was being served via 8.0 replicas, we adjusted the replication topology as follows:

  • An 8.0 primary candidate was configured to replicate directly under the current 5.7 primary.
  • Two replication chains were created downstream of that 8.0 replica:
    • A set of only 5.7 replicas (not serving traffic, but ready in case of rollback).
    • A set of only 8.0 replicas (serving traffic).
  • The topology was only in this state for a short period of time (hours at most) until we moved to the next step.
To facilitate the upgrade, the topology was updated to have two replication chains.

Step 3: Promote MySQL 8.0 host to primary

We opted not to do direct upgrades on the primary database host. Instead, we would promote a MySQL 8.0 replica to primary through a graceful failover performed with Orchestrator. At that point, the replication topology consisted of an 8.0 primary with two replication chains attached to it: an offline set of 5.7 replicas in case of rollback and a serving set of 8.0 replicas.

Orchestrator was also configured to blacklist 5.7 hosts as potential failover candidates to prevent an accidental rollback in case of an unplanned failover.

Primary failover and additional steps to finalize MySQL 8.0 upgrade for a database

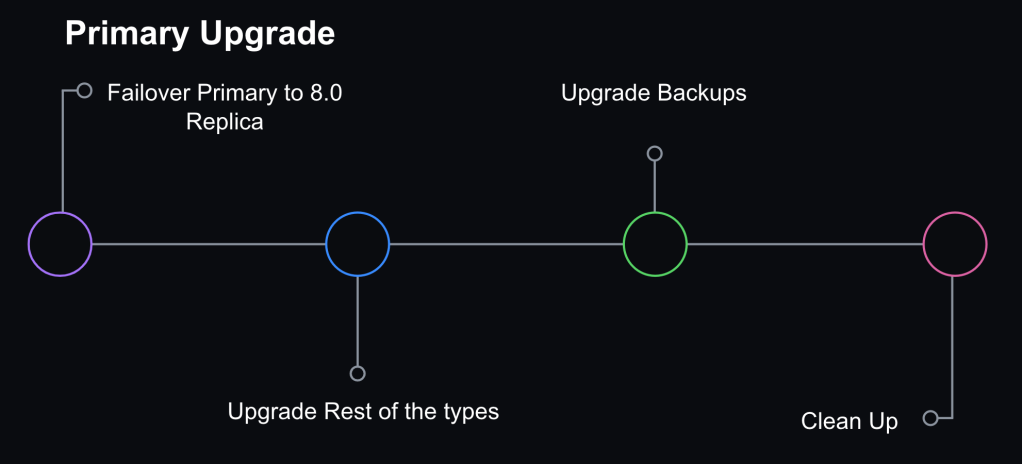
Step 4: Internal facing instance types upgraded

We also have ancillary servers for backups or non-production workloads. Those were subsequently upgraded for consistency.

Step 5: Cleanup

Once we confirmed that the cluster didn’t need to rollback and was successfully upgraded to 8.0, we removed the 5.7 servers. Validation consisted of at least one complete 24 hour traffic cycle to ensure there were no issues during peak traffic.

Ability to Rollback

A core part of keeping our upgrade strategy safe was maintaining the ability to rollback to the prior version of MySQL 5.7. For read-replicas, we ensured enough 5.7 replicas remained online to serve production traffic load, and rollback was initiated by disabling the 8.0 replicas if they weren’t performing well. For the primary, in order to roll back without data loss or service disruption, we needed to be able to maintain backwards data replication between 8.0 and 5.7.

MySQL supports replication from one release to the next higher release but does not explicitly support the reverse (MySQL Replication compatibility). When we tested promoting an 8.0 host to primary on our staging cluster, we saw replication break on all 5.7 replicas. There were a couple of problems we needed to overcome:

  1. In MySQL 8.0, utf8mb4 is the default character set and uses a more modern utf8mb4_0900_ai_ci collation as the default. The prior version of MySQL 5.7 supported the utf8mb4_unicode_520_ci collation but not the latest version of Unicode utf8mb4_0900_ai_ci.
  2. MySQL 8.0 introduces roles for managing privileges but this feature did not exist in MySQL 5.7. When an 8.0 instance was promoted to be a primary in a cluster, we encountered problems. Our configuration management was expanding certain permission sets to include role statements and executing them, which broke downstream replication in 5.7 replicas. We solved this problem by temporarily adjusting defined permissions for affected users during the upgrade window.

To address the character collation incompatibility, we had to set the default character encoding to utf8 and collation to utf8_unicode_ci.

For the GitHub.com monolith, our Rails configuration ensured that character collation was consistent and made it easier to standardize client configurations to the database. As a result, we had high confidence that we could maintain backward replication for our most critical applications.

Challenges

Throughout our testing, preparation and upgrades, we encountered some technical challenges.

What about Vitess?

We use Vitess for horizontally sharding relational data. For the most part, upgrading our Vitess clusters was not too different from upgrading the MySQL clusters. We were already running Vitess in CI, so we were able to validate query compatibility. In our upgrade strategy for sharded clusters, we upgraded one shard at a time. VTgate, the Vitess proxy layer, advertises the version of MySQL and some client behavior depends on this version information. For example, one application used a Java client that disabled the query cache for 5.7 servers—since the query cache was removed in 8.0, it generated blocking errors for them. So, once a single MySQL host was upgraded for a given keyspace, we had to make sure we also updated the VTgate setting to advertise 8.0.

Replication delay

We use read-replicas to scale our read availability. GitHub.com requires low replication delay in order to serve up-to-date data.

Earlier on in our testing, we encountered a replication bug in MySQL that was patched on 8.0.28:

Replication: If a replica server with the system variable replica_preserve_commit_order = 1 set was used under intensive load for a long period, the instance could run out of commit order sequence tickets. Incorrect behavior after the maximum value was exceeded caused the applier to hang and the applier worker threads to wait indefinitely on the commit order queue. The commit order sequence ticket generator now wraps around correctly. Thanks to Zhai Weixiang for the contribution. (Bug #32891221, Bug #103636)

We happen to meet all the criteria for hitting this bug.

  • We use replica_preserve_commit_order because we use GTID based replication.
  • We have intensive load for long periods of time on many of our clusters and certainly for all of our most critical ones. Most of our clusters are very write-heavy.

Since this bug was already patched upstream, we just needed to ensure we are deploying a version of MySQL higher than 8.0.28.

We also observed that the heavy writes that drove replication delay were exacerbated in MySQL 8.0. This made it even more important that we avoid heavy bursts in writes. At GitHub, we use freno to throttle write workloads based on replication lag.

Queries would pass CI but fail on production

We knew we would inevitably see problems for the first time in production environments—hence our gradual rollout strategy with upgrading replicas. We encountered queries that passed CI but would fail on production when encountering real-world workloads. Most notably, we encountered a problem where queries with large WHERE IN clauses would crash MySQL. We had large WHERE IN queries containing over tens of thousands of values. In those cases, we needed to rewrite the queries prior to continuing the upgrade process. Query sampling helped to track and detect these problems. At GitHub, we use Solarwinds DPM (VividCortex), a SaaS database performance monitor, for query observability.

Learnings and takeaways

Between testing, performance tuning, and resolving identified issues, the overall upgrade process took over a year and involved engineers from multiple teams at GitHub. We upgraded our entire fleet to MySQL 8.0 – including staging clusters, production clusters in support of GitHub.com, and instances in support of internal tools. This upgrade highlighted the importance of our observability platform, testing plan, and rollback capabilities. The testing and gradual rollout strategy allowed us to identify problems early and reduce the likelihood for encountering new failure modes for the primary upgrade.

While there was a gradual rollout strategy, we still needed the ability to rollback at every step and we needed the observability to identify signals to indicate when a rollback was needed. The most challenging aspect of enabling rollbacks was holding onto the backward replication from the new 8.0 primary to 5.7 replicas. We learned that consistency in the Trilogy client library gave us more predictability in connection behavior and allowed us to have confidence that connections from the main Rails monolith would not break backward replication.

However, for some of our MySQL clusters with connections from multiple different clients in different frameworks/languages, we saw backwards replication break in a matter of hours which shortened the window of opportunity for rollback. Luckily, those cases were few and we didn’t have an instance where the replication broke before we needed to rollback. But for us this was a lesson that there are benefits to having known and well-understood client-side connection configurations. It emphasized the value of developing guidelines and frameworks to ensure consistency in such configurations.

Prior efforts to partition our data paid off—it allowed us to have more targeted upgrades for the different data domains. This was important as one failing query would block the upgrade for an entire cluster and having different workloads partitioned allowed us to upgrade piecemeal and reduce the blast radius of unknown risks encountered during the process. The tradeoff here is that this also means that our MySQL fleet has grown.

The last time GitHub upgraded MySQL versions, we had five database clusters and now we have 50+ clusters. In order to successfully upgrade, we had to invest in observability, tooling, and processes for managing the fleet.

Conclusion

A MySQL upgrade is just one type of routine maintenance that we have to perform – it’s critical for us to have an upgrade path for any software we run on our fleet. As part of the upgrade project, we developed new processes and operational capabilities to successfully complete the MySQL version upgrade. Yet, we still had too many steps in the upgrade process that required manual intervention and we want to reduce the effort and time it takes to complete future MySQL upgrades.

We anticipate that our fleet will continue to grow as GitHub.com grows and we have goals to partition our data further which will increase our number of MySQL clusters over time. Building in automation for operational tasks and self-healing capabilities can help us scale MySQL operations in the future. We believe that investing in reliable fleet management and automation will allow us to scale github and keep up with required maintenance, providing a more predictable and resilient system.

The lessons from this project provided the foundations for our MySQL automation and will pave the way for future upgrades to be done more efficiently, but still with the same level of care and safety.

If you are interested in these types of engineering problems and more, check out our Careers page.

The post Upgrading GitHub.com to MySQL 8.0 appeared first on The GitHub Blog.

Let’s Architect! Architecting with Amazon DynamoDB

Post Syndicated from Luca Mezzalira original https://aws.amazon.com/blogs/architecture/lets-architect-architecting-with-amazon-dynamodb/

NoSQL databases are an essential part of the technology industry in today’s world. Why are we talking about NoSQL databases? NoSQL databases often allow developers to be in control of the structure of the data, and they are a good fit for big data scenarios and offer fast performance.

In this issue of Let’s Architect!, we explore Amazon DynamoDB capabilities and potential solutions to apply in your architectures. A key strength of DynamoDB is the capability of operating at scale globally; for instance, multiple products built by Amazon are powered by DynamoDB. During Prime Day 2022, the service also maintained high availability while delivering single-digit millisecond responses, peaking at 105.2 million requests-per-second. Let’s start!

Data modeling with DynamoDB

Working with a new database technology means understanding exactly how it works and the best design practices for taking full advantage of its features.

In this video, the key principles for modeling DynamoDB tables are discussed, plus practical patterns to use while defining your data models are explored and how data modeling for NoSQL databases (like DynamoDB) is different from modeling for traditional relational databases.

With this video, you can learn about the main components of DynamoDB, some design considerations that led to its creation, and all the best practices for efficiently using primary keys, secondary keys, and indexes. Peruse the original paper to learn more about DyanamoDB in Dynamo: Amazon’s Highly Available Key-value Store.

Amazon DynamoDB uses partitioning to provide horizontal scalability

Amazon DynamoDB uses partitioning to provide horizontal scalability

Single-table vs. multi-table in Amazon DynamoDB

When considering single-table versus multi-table in DynamoDB, it is all about your application’s needs. It is possible to avoid naïve lifting-and-shifting your relational data model into DynamoDB tables. In this post, you will discover different use cases on when to use single-table compared with multi-table designs, plus understand certain data-modeling principles for DynamoDB.

Use a single-table design to provide materialized joins in Amazon DynamoDB

Use a single-table design to provide materialized joins in Amazon DynamoDB

Optimizing costs on DynamoDB tables

Infrastructure cost is an important dimension for every customer. Despite your role inside an organization, you should monitor opportunities for optimizing costs, when possible.
For this reason, we have created a guide on DynamoDB tables cost-optimization that provides several suggestions for reducing your bill at the end of the month.

Build resilient applications with Amazon DynamoDB global tables: Part 1

When you operate global systems that are spread across multiple AWS regions, dealing with data replication and writes across regions can be a challenge. DynamoDB global tables help by providing the performance of DynamoDB across multiple regions with data synchronization and multi-active database where each replica can be used for both writing and reading data.

Another use case for global tables are resilient applications with the lowest possible recovery time objective (RTO) and recovery point objective (RPO). In this blog series, we show you how to approach such a scenario.

Amazon DynamoDB active-active architecture

Amazon DynamoDB active-active architecture

See you next time!

Thanks for joining our discussion on DynamoDB. See you in a few weeks, when we explore cost optimization!

Other posts in this series

Looking for more architecture content?

AWS Architecture Center provides reference architecture diagrams, vetted architecture solutions, Well-Architected best practices, patterns, icons, and more!

Leak of Russian Censorship Data

Post Syndicated from Bruce Schneier original https://www.schneier.com/blog/archives/2022/03/leak-of-russian-censorship-data.html

The transparency organization Distributed Denial of Secrets has released 800GB of data from Roskomnadzor, the Russian government censorship organization.

Specifically, Distributed Denial of Secrets says the data comes from the Roskomnadzor of the Republic of Bashkortostan. The Republic of Bashkortostan is in the west of the country.

[…]

The data is split into two main categories: a series of over 360,000 files totalling in at 526.9GB and which date up to as recently as March 5, and then two databases that are 290.6GB in size, according to Distributed Denial of Secrets’ website.

Frictionless hosting of containerized ASP.NET web apps using Amazon Lightsail

Post Syndicated from Emma White original https://aws.amazon.com/blogs/compute/frictionless-hosting-of-containerized-asp-net-web-apps-using-amazon-lightsail/

This post is written by Fahad Mustafa, Cloud Application Architect, AWS Professional Services

There are many ways to deploy ASP.NET web apps to AWS. Each with its own use cases and differing pricing models. But what if you have a small website and database that you must deploy rapidly, manage, and scale? What if you want a cost-effective simple monthly plan? In these cases, Amazon Lightsail is a great choice. This post shows you how to take a containerized ASP.NET web application that connects to a PostgreSQL database and deploy it to Lightsail. So that you can get your ASP.NET web app up and running.

Product Overview

Amazon Lightsail is an easy way to get started on AWS. It gives you building blocks to deploy an application or website and provision a database at an affordable, monthly price.

Lightsail is perfect for students, small businesses, and startups to get their website or application up and running in the cloud. By providing a secure, highly available, and managed environment Lightsail does all the heavy lifting like setting up IAM roles and policies.

Lightsail can also run containers! By pointing Lightsail to a public image on Amazon ECR or Docker Hub, or uploading an image from your local machine, you can easily run the container, scale it, monitor it and use a custom domain.

Overview of solution

To deploy an ASP.NET app that connects to a PostgreSQL database, you create a Lightsail container service and PostgreSQL database through the AWS Management Console. Create your app and container image. Push the image to Lightsail and finally create the Lightsail deployment to run the container.

solution diagram

Overview of steps

In this post, you create a sample ASP.NET web app through the .NET CLI. Alternatively, you can use Visual Studio to create the app.

This is the sequence of steps I review in this post:

  • Create a PostgreSQL database
  • Create a Lightsail container service
  • Create an ASP.NET web app
  • Create a Dockerfile and build image
  • Upload the image to Lightsail
  • Deploy and run the image

Prerequisites

For this walkthrough, you should have the following prerequisites:

Walkthrough

Create a PostgreSQL database

In this step, you create a PostgreSQL database through the Lightsail console.

Create the database

  1. Sign in to the Lightsail console.
  2. On the Lightsail home page, choose the Database
  3. Choose Create database.
  4. Choose the Database location by changing the AWS Region and Availability Zone.
  5. Choose the database engine. In this example, select PostgreSQL 12.6.
  6. Optional – Specify login credentials. If not changed, AWS generates a default secure password.
  7. Optional – Specify the master database name. If not changed, AWS will use “dbmaster” as the default.
  8. Choose the database plan. Compare the plan’s memory, CPU, storage, and transfer quota to decide which best fits your needs. The smallest database plan is Free Tier eligible.
  9. Identify your database by giving it a unique name.
  10. Choose Create database.

Creating and configuring the database can take a few minutes. Once ready, the status changes to Available. For more information and options on creating a database in Lightsail, see Creating a database in Amazon Lightsail.

available database

Now you are ready to connect to the database and create a table. To connect, see Connecting to your PostgreSQL database in Amazon Lightsail. This sample uses a database named aspnetlightsaildb and a table named Person that you can create by running the following script using PgAdmin. Note that the Owner value is dbmasteruser. This is the default username AWS generates. If you changed the default, then use the username you specified in step 6.

-- Database: aspnetlightsaildb
CREATE DATABASE aspnetlightsaildb
    WITH 
    OWNER = dbmasteruser
    ENCODING = 'UTF8'
    LC_COLLATE = 'en_US.UTF-8'
    LC_CTYPE = 'en_US.UTF-8'
    TABLESPACE = pg_default
    CONNECTION LIMIT = -1;	
-- Table: public.Person
CREATE TABLE IF NOT EXISTS public."Person"
(
    "Id" integer NOT NULL GENERATED ALWAYS AS IDENTITY ( INCREMENT 1 START 1 MINVALUE 1 MAXVALUE 2147483647 CACHE 1 ),
    "Name" text COLLATE pg_catalog."default",
    "DateOfBirth" date,
    "Address" text COLLATE pg_catalog."default",
    CONSTRAINT "Person_pkey" PRIMARY KEY ("Id")
)
TABLESPACE pg_default;
ALTER TABLE public."Person"
    OWNER to dbmasteruser;

Now your database and table is created and you can create a container service.

Create a Lightsail container service

In this step, you create a Lightsail container service that is ready to accept your container images.

Create the container service

  1. Sign in to the Lightsail console.
  2. On the Lightsail home page, choose the Containers Tab
  3. Choose Create container service.
  4. In the Create a container service page, choose Change AWS Region, then choose an AWS Region for your container service.
  5. Choose a capacity for your container service. For more information, see Container service capacity (scale and power).
  6. Skip the Set up your first deployment step as you’ll create the deployment after creating the container image on your dev machine.
  7. Enter a name for your container service. Take note of this name, you’ll need it later to deploy the container to Lightsail.
  8. Click Create container service.

After a few minutes, your container service status changes from Pending to Ready. This indicates you can now deploy images. If this is the first time you created a service, it can take 10–15 minutes for the status to become Ready.

container service

Create an ASP.NET web app

Using the .NET CLI, you’ll create a sample ASP.NET web app. In an empty directory run the following command:

dotnet new webapp --name HelloWorldLightsail

The “webapp” segment of the commands specifies the project template to use. In this case, it’s a default ASP.NET web app. The “name” parameter is the name of the ASP.NET project.

To connect to your PostgreSQL Db from ASP.NET, you must install the “Npgsql” Nuget package. In the root directory of the project run the following command in the terminal:

dotnet add package Npgsql.EntityFrameworkCore.PostgreSQL –-version 5.0.6

Once installed, you create a Model class to represent the data and a DbContext class to connect and query the database.

public class Person
    {
        public int Id { get; set; }

        public string Name { get; set; }

        public DateTime DateOfBirth { get; set; }

        public string Address { get; set; }
    }

public class PostgreSqlContext : DbContext
    {
        public PostgreSqlContext(DbContextOptions<PostgreSqlContext> options) : base(options)
        {
        }

        public DbSet<Person> Person { get; set; }
    }

The next step is to add the connection string to appSettings.json. In the root of the settings file add a new ConnectionStrings property as shown below. The following properties are required:

  • lightsail-endpoint: The database endpoint as shown in the Lightsail console.
  • db-name: The name of the database you want to connect to.
  • db-username: The username as shown in the Lightsail console.
  • db-password: The password as shown in the Lightsail console.
"ConnectionStrings": {
    "AspnetLightsailDb": "Server=<lightsail-endpoint>;Port=5432;Database=<db-name>;User Id=<db-username>;Password=<db-password>;"
  }

Next step is to tell ASP.NET where to find the connection string and which DbContext class to use. This is done by configuring the DbContext in Startup.cs. Under the ConfigureServices method add the following line of code:

  services.AddDbContext<PostgreSqlContext>(options => options.UseNpgsql(Configuration.GetConnectionString("AspnetLightsailDb")));


Now, you are ready to perform operations against the database. This is done by performing operations against the Person property of the PostgreSqlContext instance.

For example to fetch all records form the Person table:

public IList<Person> Person { get;set; }

        public async Task OnGetAsync()
        {
            Person = await _context.Person.ToListAsync();
        }

You now have an ASP.NET web application that can query the “Person” table against the PostgreSQL database.

Create a Dockerfile and build image

In order to containerize the web app, you must create a Dockerfile. This file provides instructions to Docker on how to build the container image.

To create a Dockerfile and build image

  1. In the root directory of the project, you created (where the .csproj file lives) create an empty file named “Dockerfile”. Note this file does not have an extension.
  2. Open the file with a text editor or IDE and insert the following:
# https://hub.docker.com/_/microsoft-dotnet
FROM mcr.microsoft.com/dotnet/sdk:5.0 AS build
WORKDIR /source

# copy csproj and restore as distinct layers
COPY *.csproj .
RUN dotnet restore

# copy everything else and build app
COPY . .
RUN dotnet publish -c release -o /app --no-restore

# final stage/image
FROM mcr.microsoft.com/dotnet/aspnet:5.0
WORKDIR /app
COPY --from=build /app ./
ENTRYPOINT ["dotnet", "HelloWorldLightsail.dll"]
  1. To build the image, open a terminal in the same directory as the Dockerfile. Run the following command to build the image.
    docker build -t helloworldlightsail .
    The “-t” parameter is a human readable tag you give the image to make it easy to identify.
  2. After the command completes, you can verify that the image exists by running
    docker images
    You should see the newly created image.newly created image

Upload the image to Lightsail

In this step, you upload the newly built image to the Lightsail container service that you created earlier.

To upload the image to Lightsail

  1. Ensure you have configured the AWS CLI to access AWS.
  2. In a terminal enter the following command:
    aws lightsail push-container-image --region ap-southeast-2 --service-name aspnet-helloworld --label helloworldlightsail --image helloworldlightsail:latest
    The –-region and –-service-name parameters should match the container service you created through the AWS Management Console. The –-label parameter is a descriptive name you give the image when it’s stored in the container service. This will help you track the different versions of the image. The –-image parameter consists of the image name and tag on your local machine that you want to push to Lightsail. Read more about how to push images to Lightsail.
  3. After the command runs successfully browse your container service in the Lightsail console and click the “Images” tab. You should see the uploaded image.

3. After the command runs successfully browse your container service in the Lightsail console and click the “Images” tab

Deploy and run the image

Now that your image is uploaded to the container service it’s time to create a deployment to run the app.

To create a deployment

  1. Go to the Deployments tab in the Lightsail console.
  2. Click on Create your first deployment.
  3. Enter the Container name.
  4. Click Choose stored image and select the image you uploaded in the previous step.
  5. Click on Add open ports to add a port mapping to the container. This allows Lightsail to forward web traffic to your ASP.NET web app. By default ASP.NET web server will listen to port 80.
  6. Under the Public endpoint section, select the container from the drop-down. This specifies which container Lightsail will forward traffic to since a single deployment can have more than one container.
  7. Click Save and deploy

Your configuration should looks like this. Read more about creating container services deployments in Lightsail.

configuration overview

After the deployment is complete, you can navigate to the Public domain of your container service. You will see your ASP.NET web app in action!

public domain

Conclusion

In this post, I demonstrated how easy it is to create a PostgreSQL DB and deploy an ASP.NET web app to Amazon Lightsail. Going from a container on your dev machine to a publicly accessible, scalable, and secure cloud environment within minutes.

You can now add a custom domain to your web app through the Lightsail console. Additionally, you can increase the scale of your container to keep up with demand based on the useful CPU and memory metrics provided in the console.

If you have more advanced needs for your web app, you have the whole robust ecosystem of AWS at your disposal. You can deploy your ASP.NET web app to Amazon Elastic Container Service (Amazon ECS) or even decide to go completely serverless and utilize AWS Lambda and API Gateway.

Visit the Amazon Lightsail homepage to get started with your next idea and read the docs for more details about container services on Amazon Lightsail.


Dutch Insider Attack on COVID-19 Data

Post Syndicated from Bruce Schneier original https://www.schneier.com/blog/archives/2021/01/dutch-insider-attack-on-covid-19-data.html

Insider data theft:

Dutch police have arrested two individuals on Friday for allegedly selling data from the Dutch health ministry’s COVID-19 systems on the criminal underground.

[…]

According to Verlaan, the two suspects worked in DDG call centers, where they had access to official Dutch government COVID-19 systems and databases.

They were working from home:

“Because people are working from home, they can easily take photos of their screens. This is one of the issues when your administrative staff is working from home,” Victor Gevers, Chair of the Dutch Institute for Vulnerability Disclosure, told ZDNet in an interview today.

All of this remote call-center work brings with it additional risks.

Amazon Has Trucks Filled with Hard Drives and an Armed Guard

Post Syndicated from Bruce Schneier original https://www.schneier.com/blog/archives/2021/01/amazon-has-trucks-filled-with-hard-drives-and-an-armed-guard.html

From an interview with an Amazon Web Services security engineer:

So when you use AWS, part of what you’re paying for is security.

Right; it’s part of what we sell. Let’s say a prospective customer comes to AWS. They say, “I like pay-as-you-go pricing. Tell me more about that.” We say, “Okay, here’s how much you can use at peak capacity. Here are the savings we can see in your case.”

Then the company says, “How do I know that I’m secure on AWS?” And this is where the heat turns up. This is where we get them. We say, “Well, let’s take a look at what you’re doing right now and see if we can offer a comparable level of security.” So they tell us about the setup of their data centers.

We say, “Oh my! It seems like we have level five security and your data center has level three security. Are you really comfortable staying where you are?” The customer figures, not only am I going to save money by going with AWS, I also just became aware that I’m not nearly as secure as I thought.

Plus, we make it easy to migrate and difficult to leave. If you have a ton of data in your data center and you want to move it to AWS but you don’t want to send it over the internet, we’ll send an eighteen-wheeler to you filled with hard drives, plug it into your data center with a fiber optic cable, and then drive it across the country to us after loading it up with your data.

What? How do you do that?

We have a product called Snowmobile. It’s a gas-guzzling truck. There are no public pictures of the inside, but it’s pretty cool. It’s like a modular datacenter on wheels. And customers rightly expect that if they load a truck with all their data, they want security for that truck. So there’s an armed guard in it at all times.

It’s a pretty easy sell. If a customer looks at that option, they say, yeah, of course I want the giant truck and the guy with a gun to move my data, not some crappy system that I develop on my own.

Lots more about how AWS views security, and Keith Alexander’s position on Amazon’s board of directors, in the interview.

Found on Slashdot.