Tag Archives: low-level discovery

What’s Up, Home? – Monitor your mobile data usage

Post Syndicated from Janne Pikkarainen original https://blog.zabbix.com/whats-up-home-monitor-your-mobile-data-usage/25856/

Can you monitor your mobile data usage with Zabbix? Of course, you can! By day, I am a Lead Site Reliability Engineer in a global cyber security company Forcepoint. By night, I monitor my home with Zabbix & Grafana Labs and do some weird experiments with them. Welcome to my blog about this project.

As it is Easter (the original blog post was published two months ago), this entry is a bit short but as I was remoting into my home systems over VPN and my phone, I got this blog post idea. 

When on the go, I tend to stay connected to my home network over VPN. Or rather, an iOS Shortcut pretty much runs OpenVPN home profile for me whenever I exit my home. 

My Zabbix collects statistics from my home router over SNMP, and as usual, the data includes per-port traffic statistics. VPN clients are shown as tunnel interfaces so Zabbix LLD picks them up nicely.

So, as a result, I get to see how much traffic my phone consumes whenever I’m using a mobile VPN. Here are seven-day example screenshots from ZBX Viewer mobile app. 

VPN connection bits sent.

VPN connection bits received

So, from this data I could get all the statistics I need. And, using my ElastiFlow setup, could likely see to where my phone has been connecting to most.

This post was originally published on the author’s page.

The post What’s Up, Home? – Monitor your mobile data usage appeared first on Zabbix Blog.

LLD Filtering with Macros

Post Syndicated from Markku Leiniö original https://blog.zabbix.com/lld-filtering-with-macros/24959/

When configuring monitoring and using templates in Zabbix you often see low-level discovery (LLD) used for finding out the monitored components or features of a host. In this post, I will explain how user macros and regular expressions are used in LLD for filtering the discovery results.

I’m using the Network Generic Device by SNMP template as an example. (Note that by using the dropdown menu in the top of that linked page you can select the Zabbix version you are using. It defaults to Master, which means the latest Zabbix version that is being developed, currently 6.4.)

Let’s see the Network interfaces discovery rule and specifically the Filters tab:

Discovery rule filters

All these filters use regular expressions to match (or not match) the LLD macro value. For example:

{#IFNAME} matches {$NET.IF.IFNAME.MATCHES}

These are the macros defined in the template:

Macros defined in the template

There we see that {$NET.IF.IFNAME.MATCHES} is defined with a value: ^.*$

That is a regular expression (often called regexp or regex). I won’t try to make this post a full regular expression tutorial, but there is:

  • ^ = match the beginning of the string
  • . = match any single character
  • * = match zero or more occurrences of the previous element (which is any character in this case)
  • $ = match the end of the string

Basically, that means: “match any kind of string, empty or not”

(In this case a shorter .* would mean the exact same thing, but that’s how the template was configured when I downloaded it.)

When the discovery runs, it finds all network interfaces and assigns values to all of the LLD macros (like the interface name to {#IFNAME}), and then the filters are tested.

In the LLD filters Type of calculation is usually set to “And” (see the first screenshot), so that all filters need to be true for the interface to be discovered (in other words, if any of the filters is false, then no item is created for that interface).

If you want to change the filtering by modifying the macros, here is the thing:

  • You don’t modify the macros in the template.
  • You should modify the macros in the host that is using the template.

When you go to the Macros tab on your host, there is the Inherited and host macros button. After clicking it, you will also see all macros that are defined in the templates that the host is using:

Inherited and host macros for a host

You can click the Change link for any of the macros to enter a new value for that macro, and that value will then be used for everything for this host. The value in the template will thus act as a default value that is used whenever there is no other value set at the host level.

If you for example want to discover only interfaces that start with “wan”, “lan” or “vlan”, you can use this regexp in {$NET.IF.IFNAME.MATCHES} macro (again, change it in the host macros, not in the template): ^(wan|lan|vlan)

It means:

  • match “wan”, “lan” or “vlan”
  • but only if they are in the beginning of the string.

This is the same, just grouped differently: (^wan|^lan|^vlan)

If you at the same time want to exclude interface “vlan999”, you can use {$NET.IF.IFNAME.NOT_MATCHES} macro for that (note the “does not match” selection in the LLD filters list). The default value for that macro is:

(^Software Loopback Interface|^NULL[0-9.]*$|^[Ll]o[0-9.]*$|^[Ss]ystem$|^Nu[0-9.]*$|^veth[0-9a-z]+$|docker[0-9]+|br-[a-z0-9]{12})

Quite a mouthful, but it is basically a long list of “or” patterns separated by the vertical bar (|). You can add your own exclusion there inside the parenthesis, separated by |, or if you know that’s the only thing you want to exclude in that particular host, you can just replace the whole string with ^vlan999$ to exclude only vlan999 (and not for example lan999 or vlan9999). Note the use of ^ and $ to make sure it only matches the full interface name, not any partial names.

A common “not matches” macro value for me is something like this: ^(Nu|Tunnel|Loopback|VoIP)

It will exclude all those Null0, Loopback0 and other virtual interfaces that may exist on the device by default but won’t usually be useful in Zabbix statistics. I will always exclude these kinds of interfaces to reduce polling intensity and save database capacity.

It should also be said that all these regular expressions are case-sensitive, so use upper case or lower case as appropriate in your particular device, or expand the regexp to include various syntaxes as needed.

To conclude: When you want to reconfigure the discovery for a host:

  • See the filters that are used in the discovery rule
  • Check which macros are used in the filters
  • In the host you are configuring, change the macro values to achieve the desired filtering results.

This post was originally published on the author’s blog.

Handy Tips #40: Simplify metric pattern matching by creating global regular expressions

Post Syndicated from Arturs Lontons original https://blog.zabbix.com/simplify-metric-pattern-matching-by-creating-global-regular-expressions/24225/

Streamline your data collection, problem detection and low-level discovery by defining global regular expressions. 

Pattern matching within unstructured data is mostly done by using regular expressions. Defining a regular expression can be a lengthy task, that can be simplified by predefining a set of regular expressions which can be quickly referenced down the line.  

Simplify pattern matching by defining global regular expressions:

  • Reference global regular expressions in log monitoring and snmp trap items
  • Simplify pattern matching in trigger functions and calculated items
  • Global regular expressions can be referenced in low-level discovery filters
  •  Combine multiple subexpressions into a single global regular expression
Check out the video to learn how to define and use global regular expressions.
Define and use global regular expressions: 
  1. Navigate to Administration General Regular expressions
  2. Type in your global regular expression name
  3. Select the regular expression type and provide subexpressions
  4. Press Add and provide multiple subexpressions
  5. Navigate to the Test tab and enter the test string
  6. Click on Test expressions and observe the result
  7. Press Add to save and add the global regular expression
  8. Navigate to Configuration Hosts
  9. Find the host on which you will test the global regular expression
  10. Click on either the Items, Triggers or Discovery button to open the corresponding section
  11. Find your item, trigger or LLD rule and open it
  12. Insert the global regular expression
  13. Use the @ symbol to reference a global regular expression by its name
  14. Update the element to save the changes
Tips and best practices
  • Each subexpressions and the total combined result can be tested in Zabbix frontend 
  • Zabbix uses AND logic if several subexpressions are defined 
  • Global regular expressions can be referenced by referring to their name, prefixed with the @ symbol 
  • Zabbix documentation contains the list of locations supporting the usage of global regular expression. 

Sign up for the official Zabbix Certified Specialist course and learn how to optimize your data collection, enrich your alerts with useful information, and minimize the amount of noise and false alarms. During the course, you will perform a variety of practical tasks under the guidance of a Zabbix certified trainer, where you will get the chance to discuss how the current use cases apply to your own unique infrastructure. 

The post Handy Tips #40: Simplify metric pattern matching by creating global regular expressions appeared first on Zabbix Blog.

Handy Tips #38: Automating SNMP item creation with low-level discovery

Post Syndicated from Arturs Lontons original https://blog.zabbix.com/handy-tips-38-automating-snmp-item-creation-with-low-level-discovery/23521/

Let Zabbix automatically discover and start monitoring your SNMP data points.

Creating items manually for each network interface, fan, temperature sensor, and other SNMP data points can be a very time-consuming task. To save time, Zabbix administrators need to automate item, trigger, and graph creation as much as possible.

Automate item, trigger and graph creation with SNMP low-level discovery rules:

  • An entity will be created for each of the discovered indexes
  • Specify multiple OIDs to discover additional information about an entity

  • Filter entities based on any of the discovered OID values
  • Low-level discovery can be used with SNMP v1, v2c and v3

Check out the video to learn how to use Zabbix low-level discovery to discover SNMP entities.

How to use Zabbix low-level discovery to discover SNMP entities:

  1. Navigate to ConfigurationHosts and find your SNMP host
  2. Open the Discovery section and create a discovery rule
  3. Provide a name, a key, and select the Type – SNMP agent
  4. Populate the SNMP OID field with the following LLD syntax
  5. discovery[{#LLD.MACRO1},<OID1>,{#LLD.MACRO2},<OID2>]
  6. Navigate to the Filters section and provide the LLD filters
  7. Press Add to create the LLD rule
  8. Open the Item prototypes section and create an item prototype
  9. Provide the Item prototype name and key
  10. Populate the OID field ending it with the {#SNMPINDEX} LLD macro
  11. Configure the required tags and preprocessing rules
  12. Press Add to create the item prototype
  13. Wait for the LLD rule to execute and observe the discovered items

Tips and best practices
  • snmpwalk tool can be used to list the OIDs provided by the monitored device
  • If a particular entity does not have the specified OID, the corresponding macro will be omitted for it
  • OIDs can be added to your LLD rule for usage in filters and tags
  • The {#SNMPINDEX} LLD macro is discovered automatically based on the indexes listed for each OID in the LLD rule

Learn how Zabbix low-level discovery rules can be used to automate the creation of your Zabbix entities by attending our Zabbix Certified Professional course. During the course, you will learn the many use cases of low-level discovery by performing a variety of practical tasks under the guidance of a Zabbix certified trainer.

The post Handy Tips #38: Automating SNMP item creation with low-level discovery appeared first on Zabbix Blog.

Keep Things Cool with Zabbix

Post Syndicated from Laura Schilder original https://blog.zabbix.com/keep-things-cool-with-zabbix/21534/

Do your friends, colleagues or maybe even your significant other have a nasty habit of leaving the fridge half-open causing you a frustrating evening and potentially even ruining your cherished batch of pistachio-flavored ice cream?

With the right thermometer and a little Zabbix knowledge, you can configure Zabbix to keep a watchful eye on the temperature of your fridge and alert you whenever things in your fridge are about to stop being cool.

IoT

The Internet of things represents objects that are capable of autonomously transferring data over a network. The objects can be something like a temperature sensor, a smart fridge, or an electric scooter Even a garbage can and a vending equipped with proper sensors can be IoT objects.

Well, let’s go back to the thermometer that I was talking about. That thermometer is also an IoT device and it uses a specific protocol; for this specific one, we will use an aggregator: The Things Network (TTN).

But why do we need an aggregator? If you plan on monitoring a large number of sensors you will have to establish connections to each of these sensors individually. An aggregator can be used as the central point of communication, instead of directly connecting to each of the sensors.

In this blog post we will be using the following components:

  • Mini hub TBMH100 (the gateway)
  • Dragino LHT65 (the thermometer)

The Things Network

Now, not just any thermometer can connect to the internet. But the thermometer I used is one from The Things Network. The Things Network is open source, just like Zabbix, and works with LoRaWAN. If you do not know what LoRaWAN is just keep reading and I will explain what it is.

LoRaWAN stands for Long Range Wide Area Network and it’s a protocol that is made for long-distance communication and low power consumption. Certain nodes use this protocol and send information via radio. For Europe the frequency used for transferring data is 868MHz. This is how the thermometer sends the temperature to The Things Network.

Before we are able to see the sent values, we do have to configure a gateway and add it to The Things Network. After adding a gateway to TTN, the only thing remaining is having to add the thermometers. All of this information is also available in The Things Network console. We’re going to set up an MQTT connection via The Things Network console, and configure it so Zabbix can collect, process, and visualize your IoT data, as well as receive alerts whenever the temperature in our fridge gets too hot or too cold.

What is MQTT? In short –  MQTT is a lightweight network protocol. MQTT is designed for remote locations that have devices with resources that have limited bandwidth. It has to run over a transport protocol and is characterized by: Ordered, lossless and bi-directional connections. Typically, TCP/IP connections are used for this. It also is an OASIS standard and an ISO recommendation.

TTN configuration

Let’s start by adding a gateway to The Things Network. To do that, you will have to create an account on the things stack and own a gateway. But, before we get started, check what kind of gateway you have. We will be using the gateway that is meant to be inside a building. If that is done let’s start with adding it to TTN.

Let’s start at the beginning. Open the TTN webpage and log in. Easy as that. Now when you see this screen: click on the Go to gateways button.

After that, you click on the white Claim gateway button. Do not confuse it with the Add gateway button – we need to press Claim gateway.

All the fields you see on the next page will have to be filled in:

As I mentioned before the frequency should be around 868MHz. For this example, I will just use the recommended frequency. After that, click on the Claim gateway button. The gateway should work after this. If you do not know what to fill in the form fields, you can find all the information you need on the backside of your gateway.

This is what it will look like when you have successfully claimed the gateway:


Since we now have a gateway we can add the thermometer to The Things Network. To do this, we have to go to the Application tab in the console. Once we clicked on the Application tab, it will be empty. We will have to make our own application before we can add the thermometer and we will do that by pressing the Add application button. Once clicked, you should see the following:


After you have created your application, click on it and you will see a screen like this:

There you will have to go to End devices and click on Add devices. It will bring you to a screen like this:

Now, you will see just one drop-down menu, but once you start filling them in, additional menus will show up. In our case, we’re using a thermometer from Dragino. After filling in the model and region, the screen should look something like this:


For step two, we had to grab the box in which the sensor was shipped. Inside the box is a sticker with all the information that you need. When you have filled in all the fields, click on the Add device button. After adding the device it will look something like this:


Now, that’s all for adding the thermometers. If everything works, we will just have to set up an MQTT connection between The Things Network and Zabbix. On the TTN side, we have to go to integrations, and then MQTT. Everything you have on that page we can just copy. Generate an API key and copy it. Save it as we will need it later.

Zabbix

After all these steps on The Things Network side, we will finally move to Zabbix. What we will do first in Zabbix is make sure that we can get the information from The Things Network. This will be done via MQTT. For that, we will need Zabbix agent 2. Now there are of course more steps than just that. So, let me explain.

Zabbix MQTT

Let’s start by downloading Zabbix agent 2 (if you already have it you can skip this step) for that we will use this command:

dnf install zabbix-agent2

Once the agent is installed, we will have to modify the config file:

vim /etc/zabbix/zabbix_agent2.conf

I am using vim, but if you want to use something else, feel free to use another text editor. Once the configuration file has been opened, we will go ahead and change the Hostname parameter. We will be changing it to this:

Hostname=TTN

Don’t forget to start (or restart, if the agent 2 has already been installed) your agent 2 service.

systemctl start zabbix-agent2

Now that we have that out of the way we can start by making a new host. It will be a regular Zabbix host. This is what mine looks like:

Note that the Host name here matches the Hostname parameter which we edited in the previous step.  Do you recall when I said that you have to copy all the MQTT information from The Things Network? Well, we will use it here. We will have to make an item that will use the Zabbix agent (active) item type to get the information. Now, for the key, we can select the mqtt key from Zabbix but we will be missing some of the required parameters. The key will have to look something like this:

mqtt.get[broker,topic,username,password]

In the end, the item itself will look something like this:

In our case, the key looks like this:

mqtt.get[tls://eu1.cloud.thethings.network:8883, #, thermometers@ttn, NNSXS.EMK3T5FLBB2YPLYWXLP7BYOG7JHFSBKEUG23BMY.IJSZ4AC475CU5JJOLRJRYLDU6MXEODWCUYIOLZSAWSXP4L32473Q].

To check if it works just navigate to MonitoringLatest data, find our host and you should see the collected data. It should look something like this:

{"v3/thermometers@ttn/devices/eui-a84041a4e10000/up":"{\"end_device_ids\":{\"device_id\":\"eui-a84041a4e1000000\",\"application_ids\":{\"application_id\":\"thermometers\"},\"dev_eui\":\"A84041A4E10000\",\"join_eui\":\"A000000000000100\",\"dev_addr\":\"260B4F08\"},\"correlation_ids\":[\"as:up:01G7CJFS1180WT7M2GHQRWVFKA\",\"gs:conn:01G7A3RFY7CT62SGBH2BGJ7T31\",\"gs:up:host:01G7A3RG2EWWCHEW9HVBQ6KA5A\",\"gs:uplink:01G7CJFRTGY0NV6R4Y8AV9XKGG\",\"ns:uplink:01G7CJFRTHSDCK3DVR7EDGJY5V\",\"rpc:/ttn.lorawan.v3.GsNs/HandleUplink:01G7CJFRTHP5JMRVSNP8ZZR1X1\",\"rpc:/ttn.lorawan.v3.NsAs/HandleUplink:01G7CJFS10A5RAD5SE864Q99R8\"],\"received_at\":\"2022-07-07T14:54:39.137181192Z\",\"uplink_message\":{\"session_key_id\":\"AYGu5fFGW+vxth9cFIw2+g==\",\"f_port\":2,\"f_cnt\":601,\"frm_payload\":\"y/kH5QIoAX//f/8=\",\"decoded_payload\":{\"BatV\":3.065,\"Bat_status\":3,\"Ext_sensor\":\"Temperature Sensor\",\"Hum_SHT\":55.2,\"TempC_DS\":327.67,\"TempC_SHT\":20.21},\"rx_metadata\":[{\"gateway_ids\":{\"gateway_id\":\"gateway7\",\"eui\":\"58A0CBFFFE803D17\"},\"time\":\"2022-07-07T14:54:38.903268098Z\",\"timestamp\":945990219,\"rssi\":-61,\"channel_rssi\":-61,\"snr\":7.5,\"uplink_token\":\"ChYKFAoIZ2F0ZXdheTcSCFigy//+gD0XEMvUisMDGgwIrueblgYQ/fHaugMg+Omki8TiEioMCK7nm5YGEIKO264D\"}],\"settings\":{\"data_rate\":{\"lora\":{\"bandwidth\":125000,\"spreading_factor\":7}},\"coding_rate\":\"4/5\",\"frequency\":\"868500000\",\"timestamp\":945990219,\"time\":\"2022-07-07T14:54:38.903268098Z\"},\"received_at\":\"2022-07-07T14:54:38.929160377Z\",\"consumed_airtime\":\"0.061696s\",\"version_ids\":{\"brand_id\":\"dragino\",\"model_id\":\"lht65\",\"hardware_version\":\"_unknown_hw_version_\",\"firmware_version\":\"1.8\",\"band_id\":\"EU_863_870\"},\"network_ids\":{\"net_id\":\"000013\",\"tenant_id\":\"ttn\",\"cluster_id\":\"eu1\",\"cluster_address\":\"eu1.cloud.thethings.network\"}}}"}

Zabbix LLD with Dependent items

Now, after seeing all the data you want to be able to read it normally. Well, for that we will use Low-Level Discovery. It will also help add the thermometer to Zabbix.

To achieve our goal we will start by navigating to the Configuration – Hosts page. Select the host that you created earlier. Once there, select Discovery rules at the top. Now we are going to create a new Low-level discovery rule. It will be a dependent item. The master item is the item we made in the previous step. Once you have done that, it should look like so:

But we have not finished yet. We will also need to add a pre-processing step. For the pre-processing step, we need to provide a javascript script. The data that has been sent is not ‘native’ Zabbix LLD data, so we need to make it suitable for Zabbix.

We will use a script like this to format our data:

var lld = [];
var regexp = /@ttn\/devices\/([\w-]+)/g;
var lines = value.split("\n");
var lines_num = lines.length;
for (i = 0; i < lines_num; i++)
{
var match = regexp.exec(lines);
var row = {};
row["{#SENSOR}"] = match[1];
lld.push(row);
}
return JSON.stringify(lld);

In the script above we are transforming the data into a format that Zabbix can use it. Let’s drill it down line by line:
Line 1: Declare a new array with name lld
Line 2: Declare a regex with a specific value
Line 3: Let’s split the received value into an array of substrings. Splitting happens on the value “\n” which represents a newline
Line 4: Count the number of lines
Line 5: A For loop to populate the array that is declared in line 1.
Line 7: Match the regex in the lines.
Line 8: Declare an object with the name ‘row’
Line 9: Add the text {#SENSOR} with the 1st value of the variable ‘match’
Line 10: Push the row object into the lld array
Line 12: Convert the lld array into a JSON string

After Line 12, you will get something like this returned:

[{"{#SENSOR}":"eui-a84041a4exxxxxxx"},{"{#SENSOR}":"eui-a84041a4eyyyyyyy"}]

Now the data is formatted into the Zabbix LLD format, ready to be parsed.

Once the preprocessing step is added, the rule should be complete. This means that Zabbix will start discovering the thermometers, but no items are created by just adding the LLD rule like we have done so far. We also need to add the item prototypes.

I will use temperature for the internal sensor as an example here. So, let’s start at the beginning and go to Item prototypes. We will add a new item prototype. In the name and key fields, we will use the Low-level discovery macro: {#SENSOR}. The key is arbitrary – we ill put our LLD macro as a parameter, to make each item created from the prototypes unique. For units, we will use C because it stands for temperature in Celsius. When finished, it should look like this:

Now, if you look closely at the screenshot I also have a tag and preprocessing step. You can see the tag configuration in the image below. The tag will be used for filtering and providing additional information – the  sensor ID.

As for the item prototype preprocessing step –  it is a little bit harder. Do you remember the data that you got from the first item we made? Well, if you take that and throw in a regex, you can make the preprocessing step. What I did was go to https://regex101.com and paste the complete string we received from the master item and start matching the temperatures.

Once the regex is done, go to the Preprocessing tab in Zabbix. Add one step, and choose Regular Expression as the Name. Now the parameters will be (in case of this thermometer):

TempC_SHT\\":(\d+.\d+)}

and in the output field we will use the first capture group – \1. It should look like this:

If we take a careful look at the data provided by the Master item, there is a “decoded payload”:

decoded_payload\":{\"BatV\":3.056,\"Bat_status\":3,\"Ext_sensor\":\"Temperature Sensor\",\"Hum_SHT\":50.8,\"TempC_DS\":21.75,\"TempC_SHT\":21.95}

From that payload, we are cherry-picking the TempC_SHT value. There are more values to collect here, like battery status, voltage, humidity, etc. This highly depends on the sensors used, of course.
In the Low-Level Discovery rule, we can keep on adding more item prototypes to parse all of these metrics and let the LLD automatically create the items from the prototypes.

After adding the low-level discovery rule and the preprocessing step you will see something like this:

Now, as you can see, Multiple items have been created from our prototypes. If you look closely, you will also notice that I get two of everything. This is because the Low-Level Discovery discovered two thermometers.

Conclusion

Now that everything has been configured, we can finally track the temperature of our IoT thermometers. The next time somebody leaves your fridge open, you can find out in time. Cool, right? Well, that’s just one of many IoT examples that we can start to monitor –  the potential for discovering and monitoring IoT devices is unlimited. If you wish to check out the template used for this example, feel free to visit our github page.

The post Keep Things Cool with Zabbix appeared first on Zabbix Blog.

Extend your Low-level discovery rules with overrides

Post Syndicated from Arturs Lontons original https://blog.zabbix.com/extend-your-low-level-discovery-rules-with-overrides/15496/

Overrides is an often overlooked feature of Low-level discovery that makes the discovery of different entities in your environment so much more flexible. In this blog post, we will take a look at how overrides work and how we can use them to extend our Low-level discovery rules with additional logic.


When it comes to Zabbix, Low-level discovery (also known as LLD) is a vital part of the Zabbix feature set. Automated creation of items, triggers, graphs, and hosts, based on existing entities is invaluable in larger environments, where creating these entities by hand is simply not feasible.

But what about use cases where some of your entities need to be created in a somewhat unique fashion compared to the rest of the discovered entities? Say, one of the items needs to have a unique update interval because it’s more critical than the rest. Or what if some of my network interfaces need to have lower trigger severities since they are not mission-critical?

Before Zabbix 5.0 this used to be a common question – how can I work around use cases like that? The only solution used to be creating separate discovery rules and utilizing LLD filters, for example:

LLD rule A discovers one set of entities with their own properties, and filters out everything else, while LLD rule B discovers the few unique entities that require different configuration parameters while filtering out the entities already discovered by the LLD rule A.

Not very elegant, is it? You can also imagine the LLD rule bloat that would occur in large infrastructures with many unique entities. Thankfully, overrides introduced in Zabbix 5.0 address the question in a very efficient manner.

Low-level discovery overrides

Let’s recall how LLD works. Under the hood LLD is a JSON array with LLD macro and macro value pairs:

[{"{#IFNAME}":"eth0"},{"{#IFNAME}":"lo"},{"{#IFNAME}":"eth2"},{"{#IFNAME}":"eth1"}]

In this small example of an LLD JSON, we can see each of our interfaces next to the LLD macro – these are our discovered entities. With overrides, we can define modify objects related to each of these discovered entities.

Overrides are available for each of your LLD rules. Once you open the particular LLD rule, navigate to the “Overrides” tab and add a new override. There are three parts to Overrides:

  • Filters define which of the discovered entities we are going to modify with this override. This is done by matching against the contents of a specific LLD macro or simply checking if a specific LLD macro exists for a discovered entity.
  • Operation conditions define which of the objects (items, triggers, graphs, hosts) we are going to override for the discovered entity.
  • Lastly, we have to define which of the object attributes we are going to change (item update intervals, trigger severity, item history storage period, etc.)

Multiple overrides in a single Low-level discovery rule

In use cases where we have defined multiple overrides in a single LLD rule, there are few things that we need to consider. First off, the override order does matter! The overrides are displayed in a reorderable drag-and-drop list, so we can change the ordering of the overrides by dragging them around.

Secondly, when defining configuring an LLD override we can select from two behaviors if the override matches the discovered entity:

  • Continue overrides – subsequent overrides for the current entity will be processed.
  • Stop processing – subsequent overrides for the current entity will be ignored.

For this reason, the order of our overrides can have a significant impact, especially if we have selected to Stop processing subsequent overrides if one of our overrides matches a discovered entity.

 Network interface discovery override

Let’s take a look at an example of how we can use overrides and define unique settings for some of the discovered network interfaces.

Without any overrides, we can see that we are discovering interfaces eth0, eth1, eth2, and lo. All of them have the same update interval and history/trend retention settings. When we open up the trigger section, we can also see that the triggers for all of the interfaces have the same severity settings, all are enabled and discovered.

Discovered triggers without using any overrides

Now let’s implement a few overrides.

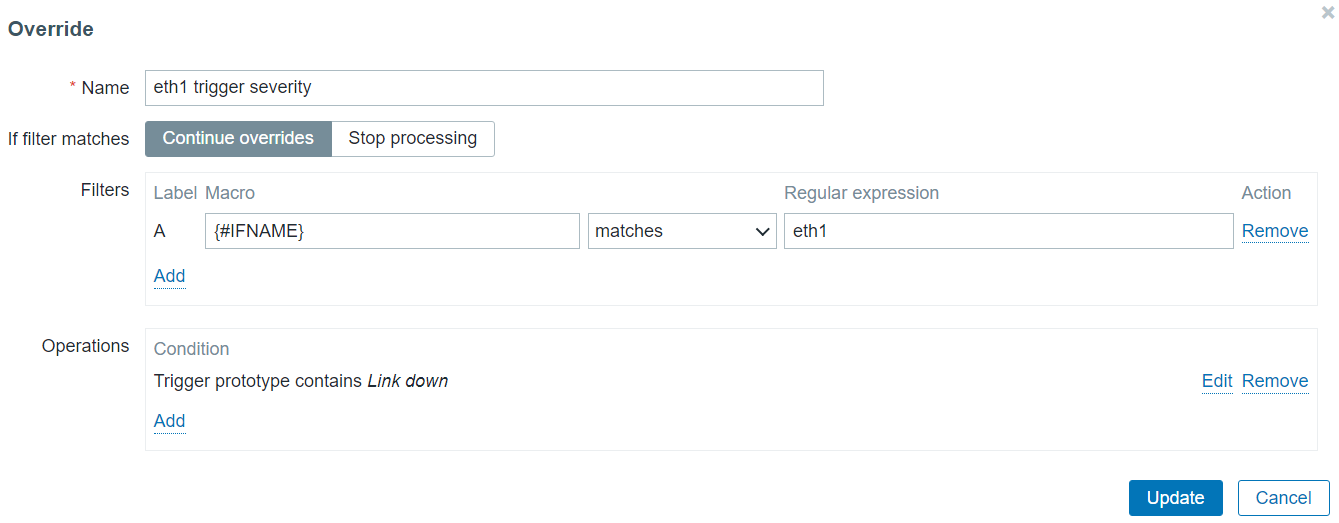
  • Change severity to high for the eth1 interface down trigger
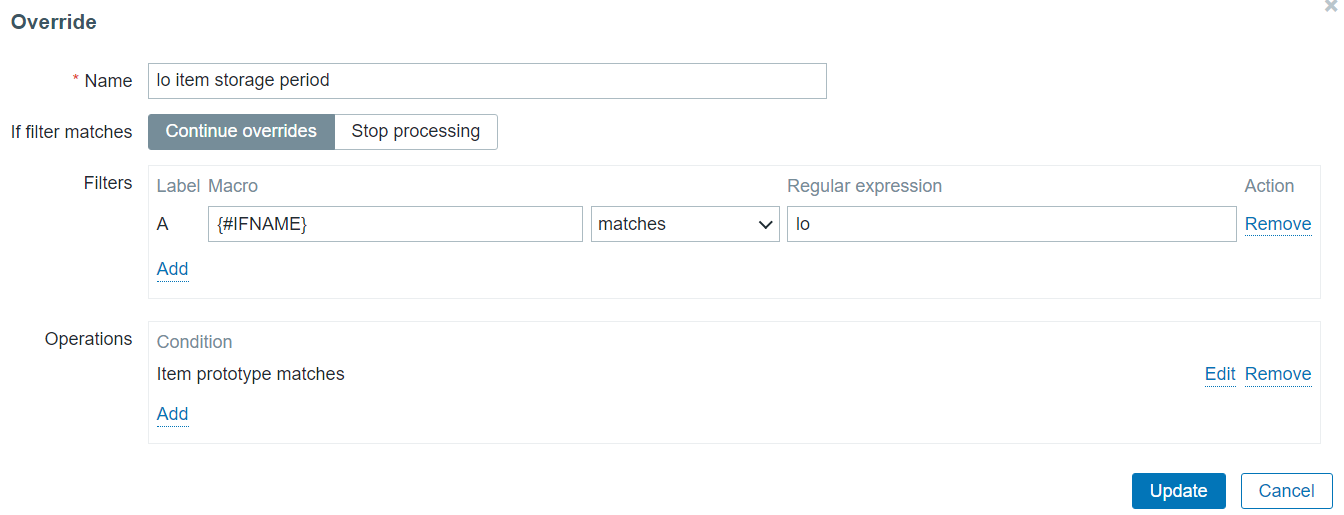
  • Change the history/trend storage period for the items created for the lo interface

Let’s define our first override. We are going to be overriding a trigger prototype on {#IFNAME} matches eth1.
Override only interfaces that match eth1 in the {#IFNAME} macro value

For this entity, we will be changing the severity of the Trigger prototype containing the string “Link down” in the trigger prototype name. Change trigger severity only for triggers that contain Link down in their name

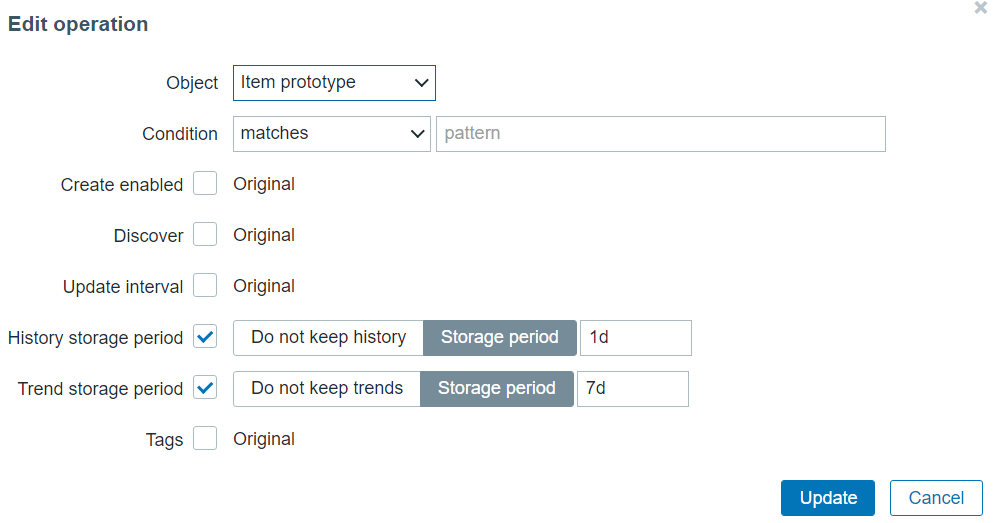
For our second override let’s change the history and trend storage period on items for the entity where {#IFNAME} matches lo, since storing history data for the loopback interface isn’t critical for us.

Override only interfaces that match lo in the {#IFNAME} macro value

To apply this override on the items created from any item prototype in this discovery rule, my operation condition is going to contain an empty matches pattern.

Change item History/Trend storage period for any item created for the lo interface 

Once we re-run the discovery rule, we will see that the changes have been applied to our items and triggers created from the corresponding prototypes.

Note the lo interface History/Trend storage periods – they have been changed as per our override

Note the eth1 trigger severity – it’s now High, as per our override

This way we can finally create any discovered object with a set of unique properties, despite our object prototypes having static settings. The example above is just a general use case of how we can utilize overrides – there can be many complex scenarios for utilizing overrides, especially if we take the execution order and stop/continue processing settings into account. If you are interested in the full list of changes that we can perform on different objects by using overrides, feel free to take a look at the Overrides section in our documentation.

Hopefully, the blog post gave you a glimpse of the flexibility that the override feature is capable of delivering. If you have an interesting use case for overrides or any questions/comments – you are very much welcome to share those in the comments section below the post!

Low-Level Discovery with Dependent items

Post Syndicated from Brian van Baekel original https://blog.zabbix.com/low-level-discovery-with-dependent-items/13634/

The low-level discovery was introduced in Zabbix 2.0 and still belongs to one of the all-time favorites. Before LLD was available, adding items was all manual work. For example adding new disks, new interfaces, network ports on switches and everything else was all manual labor. And then LLD came around and suddenly we were able to ‘discover’ entities, and based on those discovered entities we can add new items, triggers, and such automatically.

Contents

  • Low-Level Discovery setup
  • Dependent items
  • Combing Low-Level Discovery and Dependent items
  • Conclusion

For a video guide, check out the Zabbix YouTube here: Zabbix: Low Level Discovery with Dependent items – YouTube

Low-Level Discovery setup

Let’s go over the idea of Low-Level Discovery first.

For the sake of clarity, we will stick with the default Zabbix agent item. Of course, as we will discover it’s only the format that matters for Zabbix to consider a response as LLD information. Let’s use built-in agent key: vfs.fs.discovery. Once we force the Zabbix agent to execute this item, it will reply with something like this:

[{"{#FSNAME}":"/sys","{#FSTYPE}":"sysfs"},{"{#FSNAME}":"/proc","{#FSTYPE}":"proc"},{"{#FSNAME}":"/dev","{#FSTYPE}":"devtmpfs"},{"{#FSNAME}":"/sys/kernel/security","{#FSTYPE}":"securityfs"},{"{#FSNAME}":"/dev/shm","{#FSTYPE}":"tmpfs"},{"{#FSNAME}":"/dev/pts","{#FSTYPE}":"devpts"},{"{#FSNAME}":"/run","{#FSTYPE}":"tmpfs"},{"{#FSNAME}":"/sys/fs/cgroup","{#FSTYPE}":"tmpfs"},{"{#FSNAME}":"/sys/fs/cgroup/systemd","{#FSTYPE}":"cgroup"},{"{#FSNAME}":"/sys/fs/pstore","{#FSTYPE}":"pstore"},{"{#FSNAME}":"/sys/firmware/efi/efivars","{#FSTYPE}":"efivarfs"},{"{#FSNAME}":"/sys/fs/bpf","{#FSTYPE}":"bpf"},{"{#FSNAME}":"/sys/fs/cgroup/net_cls,net_prio","{#FSTYPE}":"cgroup"},{"{#FSNAME}":"/sys/fs/cgroup/devices","{#FSTYPE}":"cgroup"},{"{#FSNAME}":"/sys/fs/cgroup/hugetlb","{#FSTYPE}":"cgroup"},{"{#FSNAME}":"/sys/fs/cgroup/memory","{#FSTYPE}":"cgroup"},{"{#FSNAME}":"/sys/fs/cgroup/rdma","{#FSTYPE}":"cgroup"},{"{#FSNAME}":"/sys/fs/cgroup/freezer","{#FSTYPE}":"cgroup"},{"{#FSNAME}":"/sys/fs/cgroup/cpu,cpuacct","{#FSTYPE}":"cgroup"},{"{#FSNAME}":"/sys/fs/cgroup/cpuset","{#FSTYPE}":"cgroup"},{"{#FSNAME}":"/sys/fs/cgroup/perf_event","{#FSTYPE}":"cgroup"},{"{#FSNAME}":"/sys/fs/cgroup/blkio","{#FSTYPE}":"cgroup"},{"{#FSNAME}":"/sys/fs/cgroup/pids","{#FSTYPE}":"cgroup"},{"{#FSNAME}":"/sys/kernel/tracing","{#FSTYPE}":"tracefs"},{"{#FSNAME}":"/sys/kernel/config","{#FSTYPE}":"configfs"},{"{#FSNAME}":"/","{#FSTYPE}":"xfs"},{"{#FSNAME}":"/sys/fs/selinux","{#FSTYPE}":"selinuxfs"},{"{#FSNAME}":"/proc/sys/fs/binfmt_misc","{#FSTYPE}":"autofs"},{"{#FSNAME}":"/dev/hugepages","{#FSTYPE}":"hugetlbfs"},{"{#FSNAME}":"/dev/mqueue","{#FSTYPE}":"mqueue"},{"{#FSNAME}":"/sys/kernel/debug","{#FSTYPE}":"debugfs"},{"{#FSNAME}":"/sys/fs/fuse/connections","{#FSTYPE}":"fusectl"},{"{#FSNAME}":"/boot","{#FSTYPE}":"ext4"},{"{#FSNAME}":"/boot/efi","{#FSTYPE}":"vfat"},{"{#FSNAME}":"/home","{#FSTYPE}":"xfs"},{"{#FSNAME}":"/run/user/0","{#FSTYPE}":"tmpfs"}]

When we put this in a more readable format (truncated) it will look like this:

[
{
"{#FSNAME}":"/sys",
"{#FSTYPE}":"sysfs"
},
{
"{#FSNAME}":"/proc",
"{#FSTYPE}":"proc"
},
{
"{#FSNAME}":"/dev",
"{#FSTYPE}":"devtmpfs"
},
{
"{#FSNAME}":"/sys/kernel/config",
"{#FSTYPE}":"configfs"
},
{
"{#FSNAME}":"/",
"{#FSTYPE}":"xfs"
},
{
"{#FSNAME}":"/boot",
"{#FSTYPE}":"ext4"
},
{
"{#FSNAME}":"/home",
"{#FSTYPE}":"xfs"
}
]

In this format it suddenly becomes clear, we have the {#FSNAME} macro, with the name of a filesystem, combined with the type, captured in {#FSTYPE}.

Perfect! We feed this information into Zabbix, and LLD magic will happen.
Based on the Item prototypes, new items per {#FSNAME} will be added, and monitoring will start on those items.

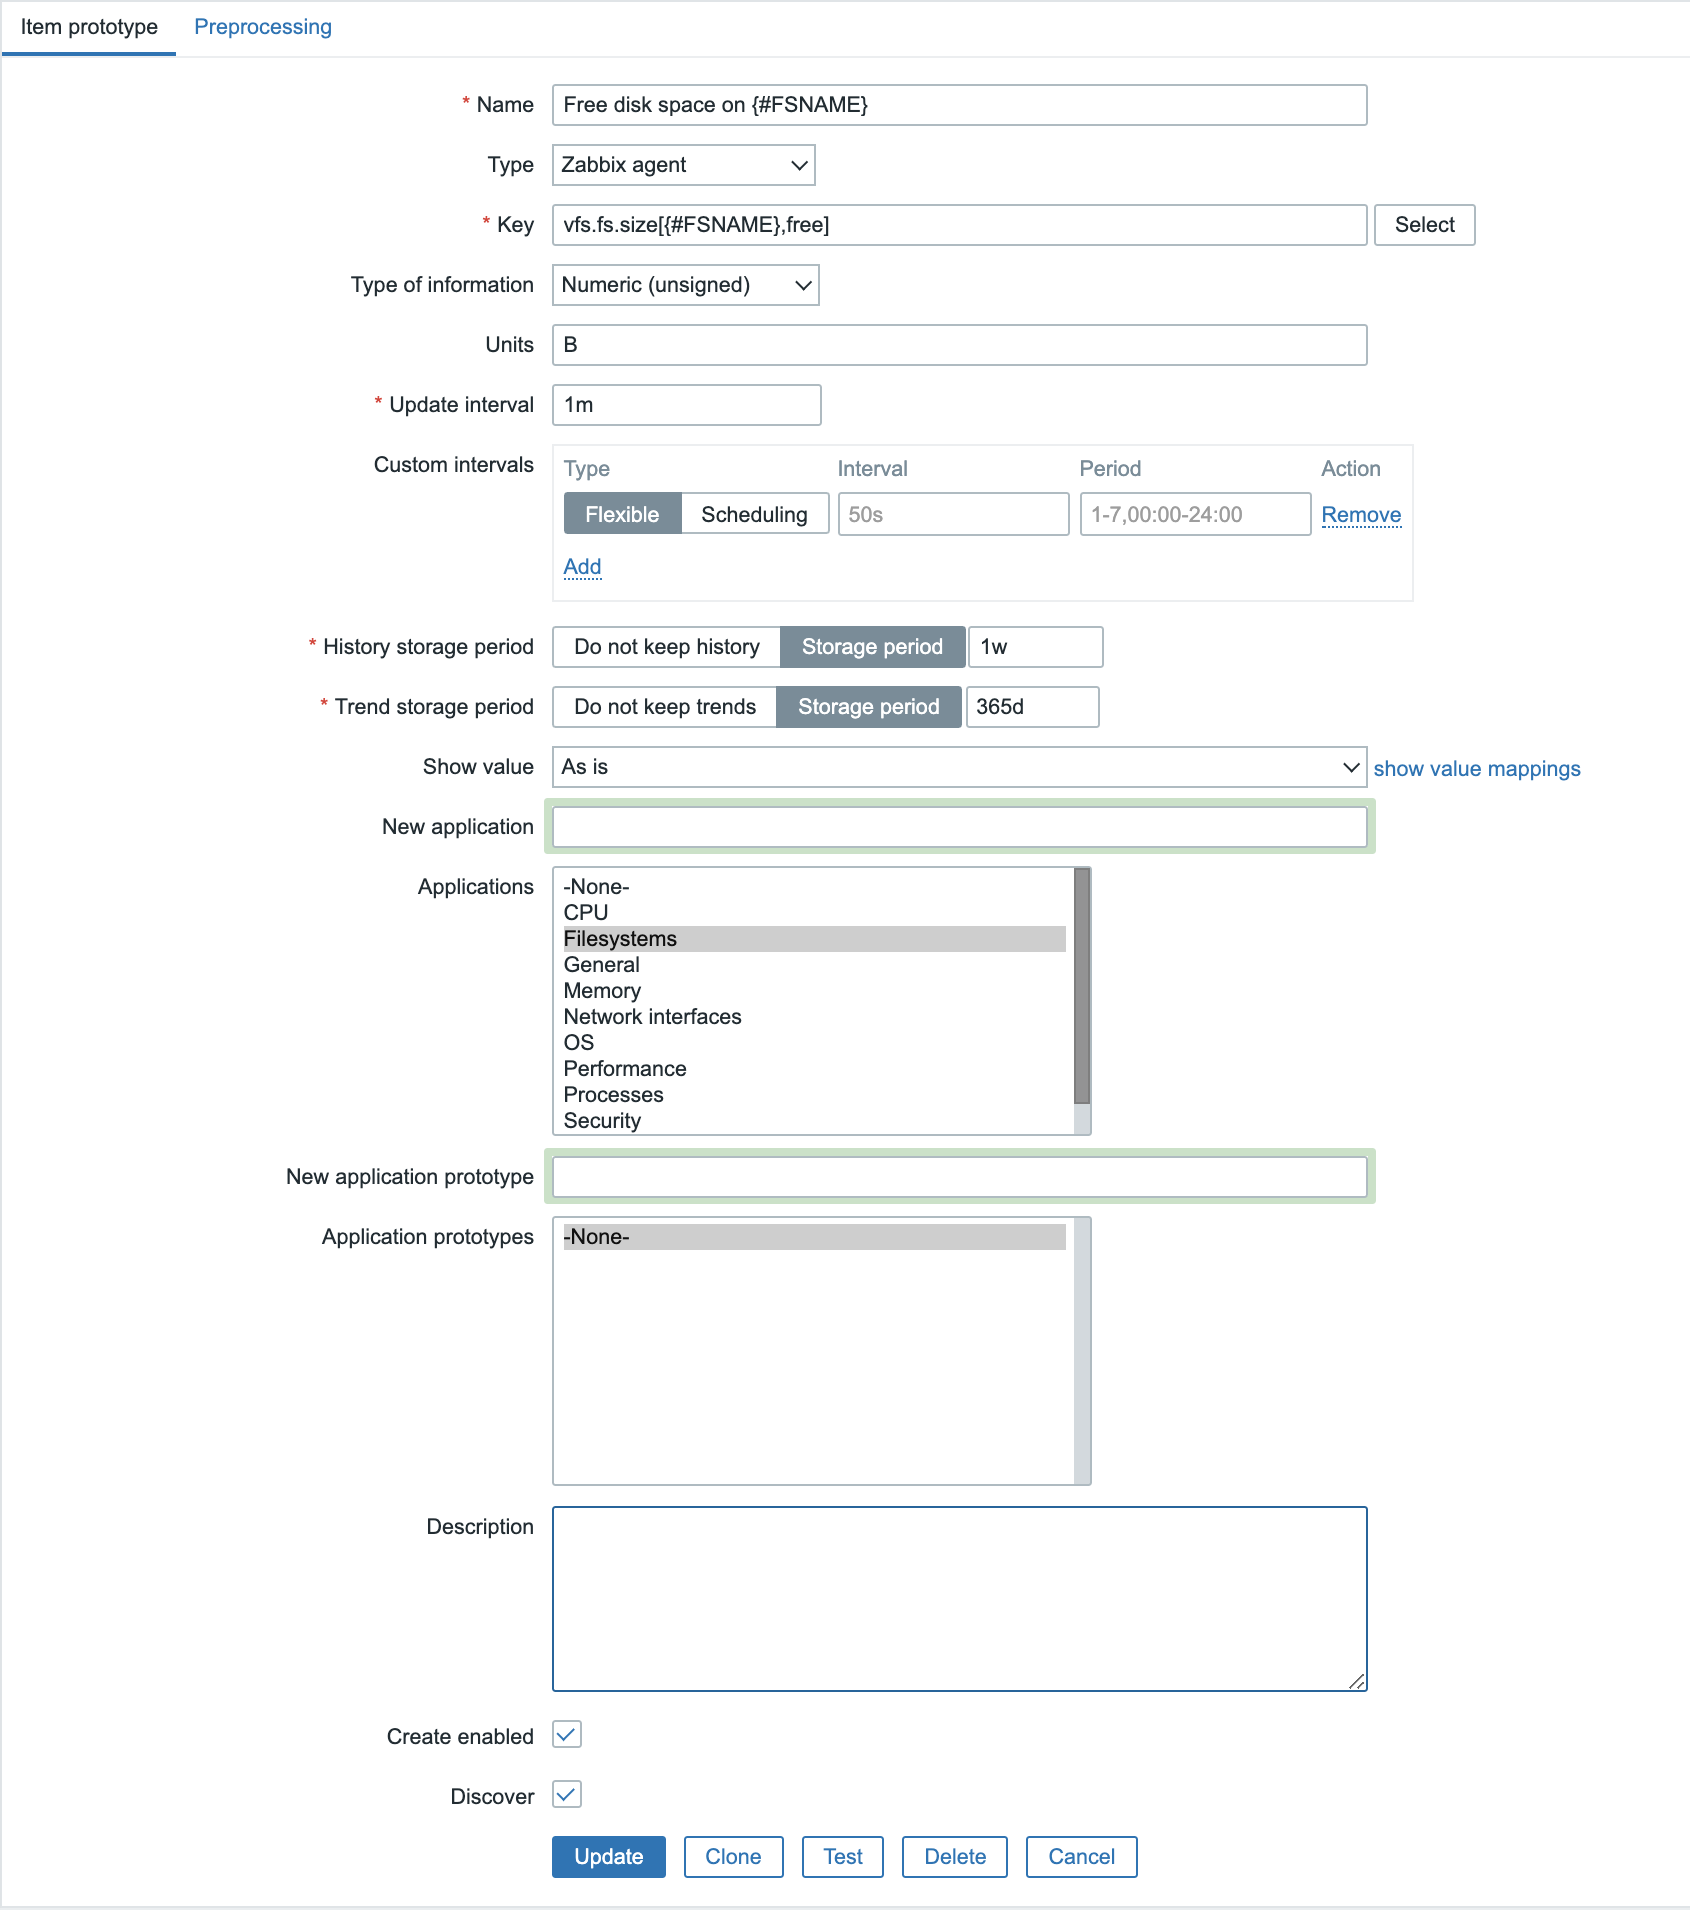
Looking at the Item prototypes, they look a lot like normal items:

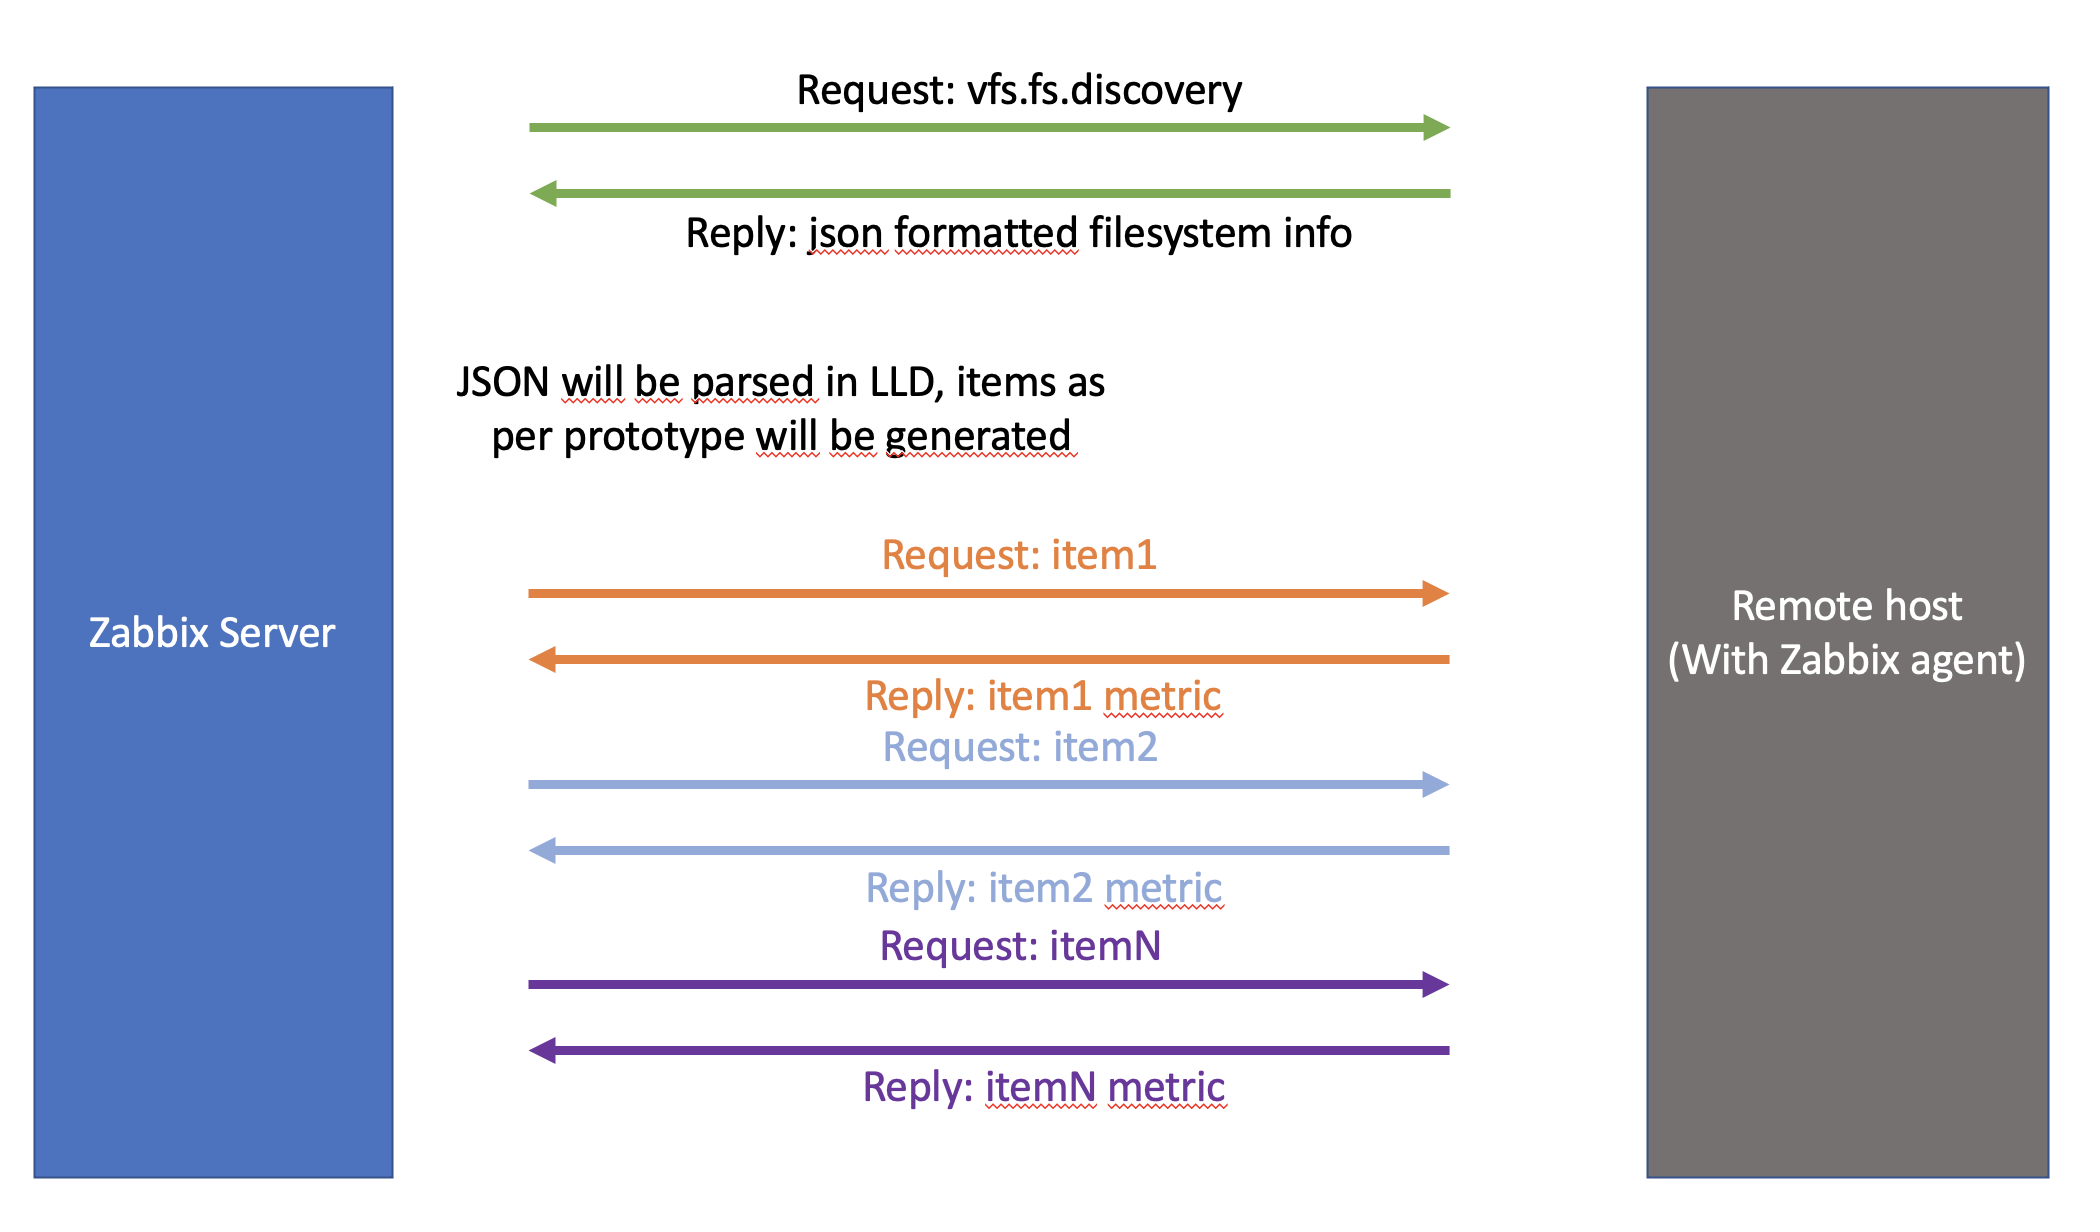
So, we have one item prototype that is responsible for providing the LLD information, and then the created ‘normal’ items to query the filesystem statistics. As you can imagine, with just 5 filesystems and 1 metric per filesystem, queried once per minute, no problem. But what if we have 50 filesystems, 7 metrics per filesystem and they get queried every 10 seconds… That’s a lot of queries against the host! Not only does that add load to the Zabbix server, but obviously also to the monitored host. It works, but is it ideal? It certainly isn’t!

So we’ve basically just setup this:

Dependent items

But then Zabbix introduced dependent items. Let’s take a quick look at dependent items and what they are

We have one master item that gathers all information (in bulk) and propagates that information to all the dependent items. On those dependent items we just do the cherry picking and filtering of the relevant metrics. Let’s put this to work and see how that goes.

So we create an item, with, in this case, the http agent type, which will collect the following information regarding the server status in a single request:

ServerVersion: Apache/2.4.37 (centos)
ServerMPM: event
Server Built: Nov  4 2020 03:20:37
CurrentTime: Monday, 08-Mar-2021 14:35:20 CET
RestartTime: Monday, 08-Mar-2021 11:04:09 CET
ParentServerConfigGeneration: 1
ParentServerMPMGeneration: 0
ServerUptimeSeconds: 12671
ServerUptime: 3 hours 31 minutes 11 seconds
Load1: 0.01
Load5: 0.03
Load15: 0.00
Total Accesses: 1182
Total kBytes: 10829
Total Duration: 95552
CPUUser: 5.01
CPUSystem: 7.34
CPUChildrenUser: 0
CPUChildrenSystem: 0
CPULoad: .0974667
Uptime: 12671
ReqPerSec: .0932839
BytesPerSec: 875.14
BytesPerReq: 9381.47
DurationPerReq: 80.8393
BusyWorkers: 1
IdleWorkers: 99
Processes: 4
Stopping: 0
BusyWorkers: 1
IdleWorkers: 99
ConnsTotal: 4
ConnsAsyncWriting: 0
ConnsAsyncKeepAlive: 0
ConnsAsyncClosing: 0
Scoreboard: _________________________________________________________________________________________W__________............................................................................................................................................................................................................................................................................................................


Now, we create some dependent items, that depend on that first item (which we will call the Master item). Every time the Master item receives information, the complete reply will be pushed to the dependent items, without any altering of that data. So the master and dependent items are identical when no preprocessing is applied. That’s why on the dependent items we apply preprocessing to filter relevant information, for example, the BusyWorkers:

Perfect. So querying a host once, getting all the metrics in bulk, and then parsing it in Zabbix using preprocessing. Say bye to excessive load on the monitored host… (and due to preprocessing processes within Zabbix, no problem on the Zabbix server side).

Combining Low-Level Discovery and Dependent items

Ok, and what if we combine these to concepts? LLD with Dependent items? Wouldn’t that be the ultimate goal? Automatically creating new items without putting extra load to the monitored host? Let’s get this going!

To stick with the first example of LLD, we will discover filesystems, but now without the vfs.fs.discovery key, but the newly introduced vfs.fs.get key. Once we force the agent to execute this key, we will see this reply:

[{"fsname":"/dev","fstype":"devtmpfs","bytes":{"total":1940963328,"free":1940963328,"used":0,"pfree":100.000000,"pused":0.000000},"inodes":{"total":473868,"free":473487,"used":381,"pfree":99.919598,"pused":0.080402}},{"fsname":"/dev/shm","fstype":"tmpfs","bytes":{"total":1958469632,"free":1958469632,"used":0,"pfree":100.000000,"pused":0.000000},"inodes":{"total":478142,"free":478141,"used":1,"pfree":99.999791,"pused":0.000209}},{"fsname":"/run","fstype":"tmpfs","bytes":{"total":1958469632,"free":1892040704,"used":66428928,"pfree":96.608121,"pused":3.391879},"inodes":{"total":478142,"free":477519,"used":623,"pfree":99.869704,"pused":0.130296}},{"fsname":"/sys/fs/cgroup","fstype":"tmpfs","bytes":{"total":1958469632,"free":1958469632,"used":0,"pfree":100.000000,"pused":0.000000},"inodes":{"total":478142,"free":478125,"used":17,"pfree":99.996445,"pused":0.003555}},{"fsname":"/","fstype":"xfs","bytes":{"total":95516360704,"free":55329644544,"used":40186716160,"pfree":57.926877,"pused":42.073123},"inodes":{"total":46661632,"free":46535047,"used":126585,"pfree":99.728717,"pused":0.271283}},{"fsname":"/boot","fstype":"ext4","bytes":{"total":1023303680,"free":705544192,"used":247296000,"pfree":74.046435,"pused":25.953565},"inodes":{"total":65536,"free":65497,"used":39,"pfree":99.940491,"pused":0.059509}},{"fsname":"/home","fstype":"xfs","bytes":{"total":5358223360,"free":5286903808,"used":71319552,"pfree":98.668970,"pused":1.331030},"inodes":{"total":2621440,"free":2621428,"used":12,"pfree":99.999542,"pused":0.000458}},{"fsname":"/run/user/0","fstype":"tmpfs","bytes":{"total":391692288,"free":391692288,"used":0,"pfree":100.000000,"pused":0.000000},"inodes":{"total":478142,"free":478137,"used":5,"pfree":99.998954,"pused":0.001046}}]

And if we format it to be more readable, it will look like this (truncated):

[
  {
    "fsname":"/",
    "fstype":"xfs",
    "bytes":{
      "total":95516360704,
      "free":55329644544,
      "used":40186716160,
      "pfree":57.926877,
      "pused":42.073123
    },
    "inodes":{
      "total":46661632,
      "free":46535047,
      "used":126585,
      "pfree":99.728717,
      "pused":0.271283
    }
  },
  {
    "fsname":"/home",
    "fstype":"xfs",
    "bytes":{
      "total":5358223360,
      "free":5286903808,
      "used":71319552,
      "pfree":98.668970,
      "pused":1.331030
    },
    "inodes":{
      "total":2621440,
      "free":2621428,
      "used":12,
      "pfree":99.999542,
      "pused":0.000458
    }
  }
]

Per filesystem, we get the original information FSNAME and FSTYPE, but also the statistics of these filesystems… bulk metrics! So, we create a normal item (Which will serve as the master item) getting out all those metrics in a single query:

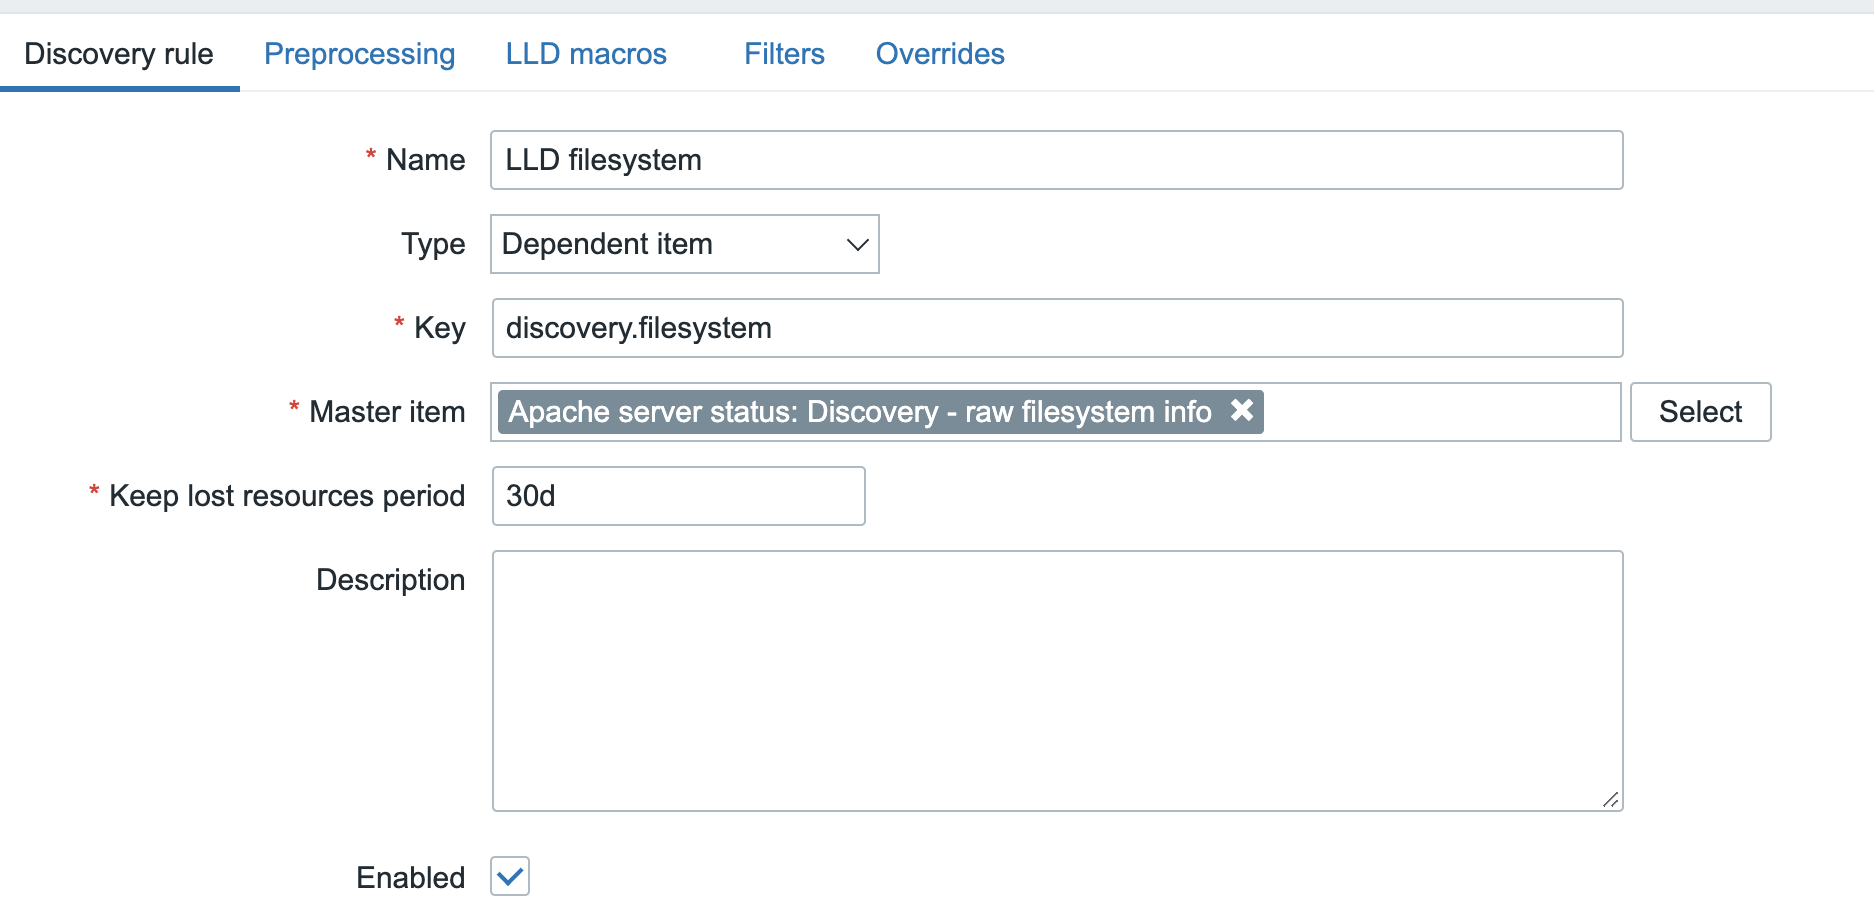
Once we’ve got this data in Zabbix, we feed it into the LLD rule, giving this LLD rule the dependent LLD type:

Of course there are no ready to use LLD macros in this data, but since it is in JSON format, it shouldn’t be too hard to create the LLD macros with the ‘LLD macros’ option in the frontend and the relevant JSONPath expression:

Note: Technically we do not need to create the {#FSTYPE} macro to get this working!

Once this is done, we should be ready to create the item prototypes for this LLD rule. The data is there, macros are available, nothing is going to stop us now!

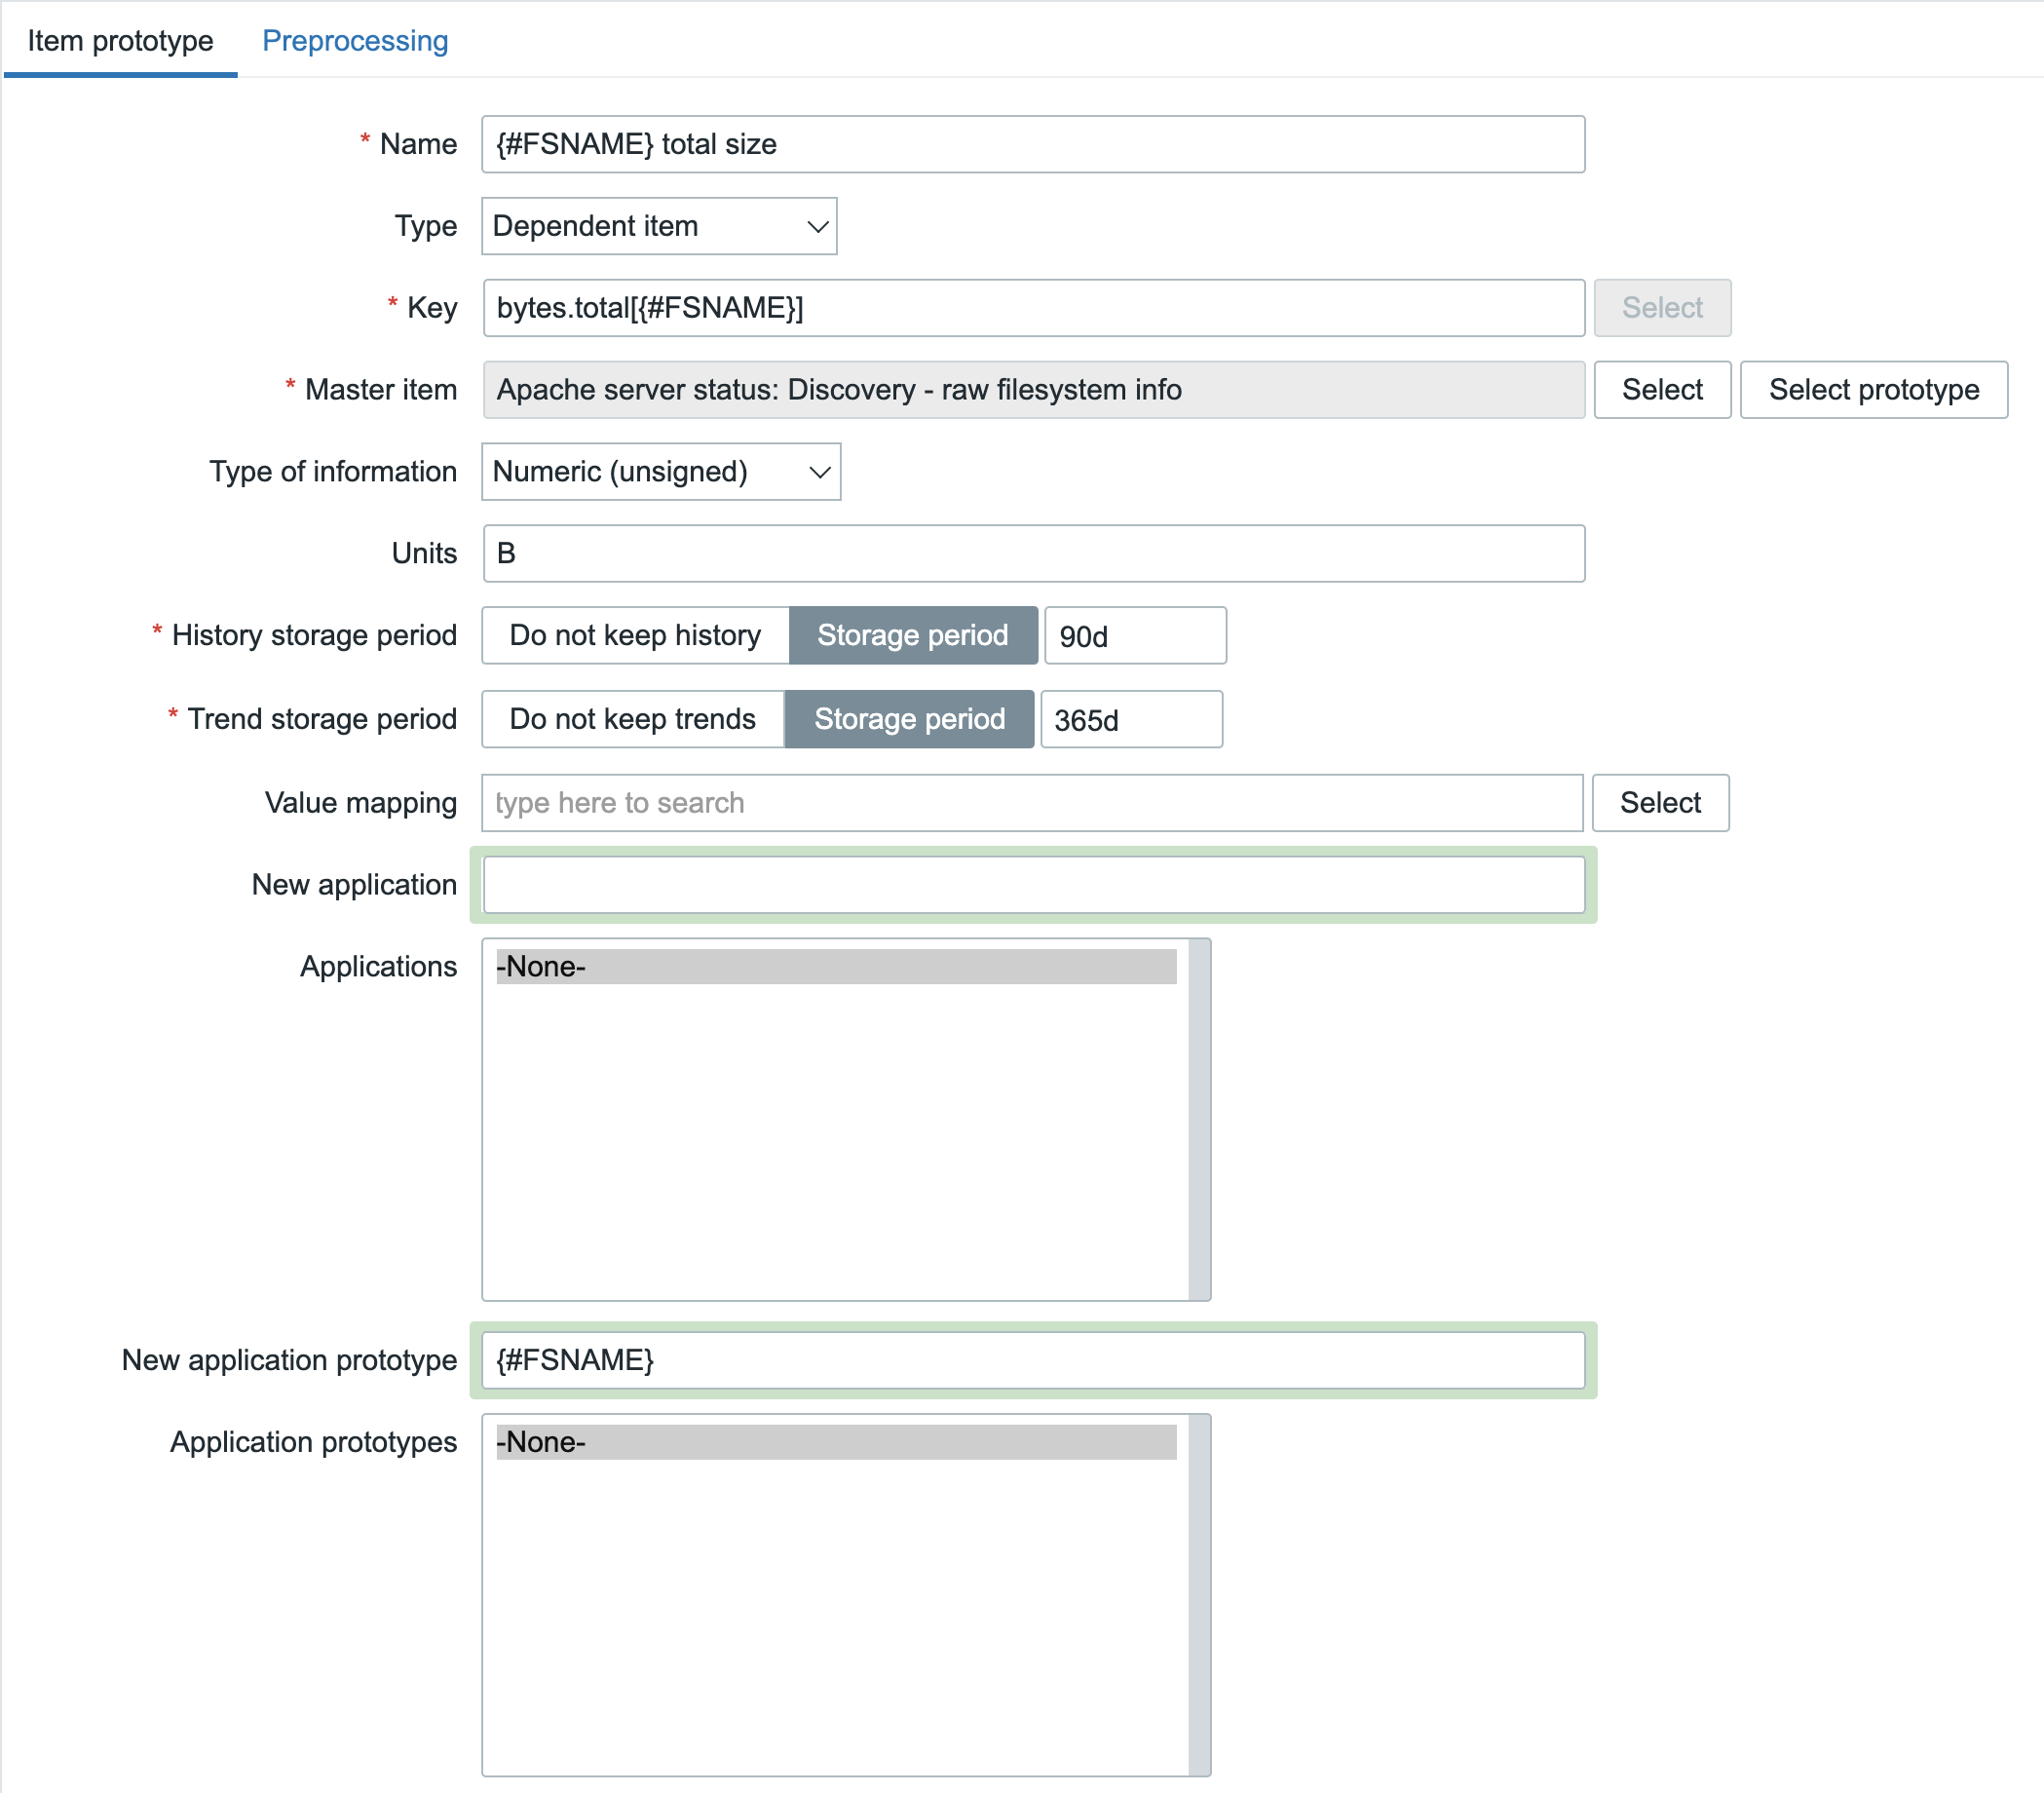
Let’s move on to item prototypes. But of course, we do not want to poll that remote host again per discovered filesystem. That means we will make this item prototype of the dependent item type as well, pointing it back to the master item we’ve created.

For the first item prototype, we want to obtain the total size per filesystem:

But, as I mentioned earlier: a dependent item without any preprocessing is identical to the master item and of course that would be wrong in this case. We just want to see the total bytes per filesystem and not all the collected statistics. In the configuration above we already know what to get out, so the Type of information and Units are filled already. What is not visible on that screenshot is the preprocessing rule that we need. Here the ‘JSONPath’ preprocessing step comes in handy since we receive JSON data. We would like to get out this part for our item (truncated):

[
  {
    "fsname":"/",
    "fstype":"xfs",
    "bytes":{
      "total":95516360704,
      "free":55329644544,
       "used":40186716160,
      "pfree":57.926877,
      "pused":42.073123

So, if we try to get this information out using JSONPath, it should look like: $.bytes.total.first() but this will match on any filesystem, so we need to configure it a bit more specific like: $[?(@.fsname==’/’)].bytes.total.first() 

As you can see, the JSONPath is a bit more complex here. We are forcing it to match on @.fsname==’/’ and from that entity, get out the bytes.total. Now, to make it even more complex we shouldn’t configure the filesystem hardcoded in the JSONPath since we’re working with Item prototypes. It should be the LLD Macro {#FSNAME} instead!

Now we save this item prototype, grab a cup of coffee (or just force a config_cache_reload on the server) and just wait for the magic to happen.

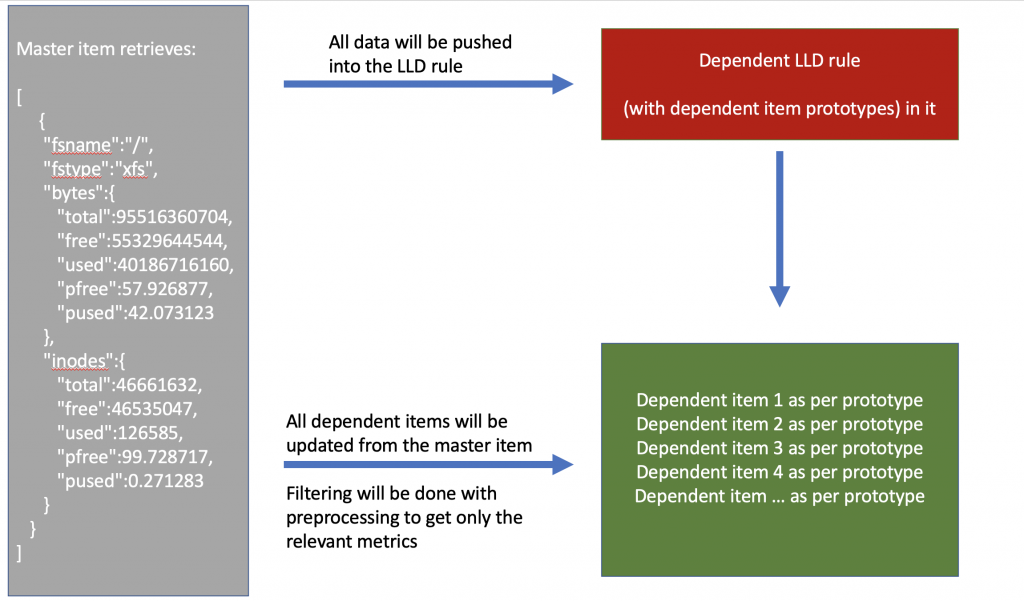
We’ve now built this setup:


So the master item will get values (i.e. obtain bulk data every minute) and push it into the LLD rule. From there, as per item prototypes, items will be created and those are populated from the master item as well, filtering out only the relevant metrics using Preprocessing.

So far, so good, but we have one small problem to solve: We want to get metrics every minute or so, but since all those metrics will get pushed into the LLD rule, we might be adding unnecessary extra load due to the high frequency. Luckily, solving that problem is no too hard. Navigate to the discovery rule, go to the ‘Preprocessing tab’ and select ‘Discard unchanged with heartbeat’ parameter: 1h or even larger interval!

This is insane! With just one poll/query to a host, we will utilize the power of LLD and dependent items, getting all metrics without adding minimal extra load on that host.


Conclusion

That’s it. If you’ve setup everything correctly, you should now get out quite a few filesystem metrics without adding any extra performance overhead on the host by performing unnecessary data requests.

Of course, if you need help optimizing your Zabbix environment, support contracts, consultancy, or training, we from Opensource ICT Solutions are always available to assist you in every possible way, worldwide, 24×7.

Thanks for reading this blog post, see you in the next one.