Tag Archives: siem

Integrating Network Analytics Logs with your SIEM dashboard

Post Syndicated from Omer Yoachimik original https://blog.cloudflare.com/network-analytics-logs/

Integrating Network Analytics Logs with your SIEM dashboard

Integrating Network Analytics Logs with your SIEM dashboard

We’re excited to announce the availability of Network Analytics Logs. Magic Transit, Magic Firewall, Magic WAN, and Spectrum customers on the Enterprise plan can feed packet samples directly into storage services, network monitoring tools such as Kentik, or their Security Information Event Management (SIEM) systems such as Splunk to gain near real-time visibility into network traffic and DDoS attacks.

What’s included in the logs

By creating a Network Analytics Logs job, Cloudflare will continuously push logs of packet samples directly to the HTTP endpoint of your choice, including Websockets. The logs arrive in JSON format which makes them easy to parse, transform, and aggregate. The logs include packet samples of traffic dropped and passed by the following systems:

  1. Network-layer DDoS Protection Ruleset
  2. Advanced TCP Protection
  3. Magic Firewall

Note that not all mitigation systems are applicable to all Cloudflare services. Below is a table describing which mitigation service is applicable to which Cloudflare service:

Mitigation System Cloudflare Service
Magic Transit Magic WAN Spectrum
Network-layer DDoS Protection Ruleset
Advanced TCP Protection
Magic Firewall

Packets are processed by the mitigation systems in the order outlined above. Therefore, a packet that passed all three systems may produce three packet samples, one from each system. This can be very insightful when troubleshooting and wanting to understand where in the stack a packet was dropped. To avoid overcounting the total passed traffic, Magic Transit users should only take into consideration the passed packets from the last mitigation system, Magic Firewall.

An example of a packet sample log:

{"AttackCampaignID":"","AttackID":"","ColoName":"bkk06","Datetime":1652295571783000000,"DestinationASN":13335,"Direction":"ingress","IPDestinationAddress":"(redacted)","IPDestinationSubnet":"/24","IPProtocol":17,"IPSourceAddress":"(redacted)","IPSourceSubnet":"/24","MitigationReason":"","MitigationScope":"","MitigationSystem":"magic-firewall","Outcome":"pass","ProtocolState":"","RuleID":"(redacted)","RulesetID":"(redacted)","RulesetOverrideID":"","SampleInterval":100,"SourceASN":38794,"Verdict":"drop"}

All the available log fields are documented here: https://developers.cloudflare.com/logs/reference/log-fields/account/network_analytics_logs/

Setting up the logs

In this walkthrough, we will demonstrate how to feed the Network Analytics Logs into Splunk via Postman. At this time, it is only possible to set up Network Analytics Logs via API. Setting up the logs requires three main steps:

  1. Create a Cloudflare API token.
  2. Create a Splunk Cloud HTTP Event Collector (HEC) token.
  3. Create and enable a Cloudflare Logpush job.

Let’s get started!

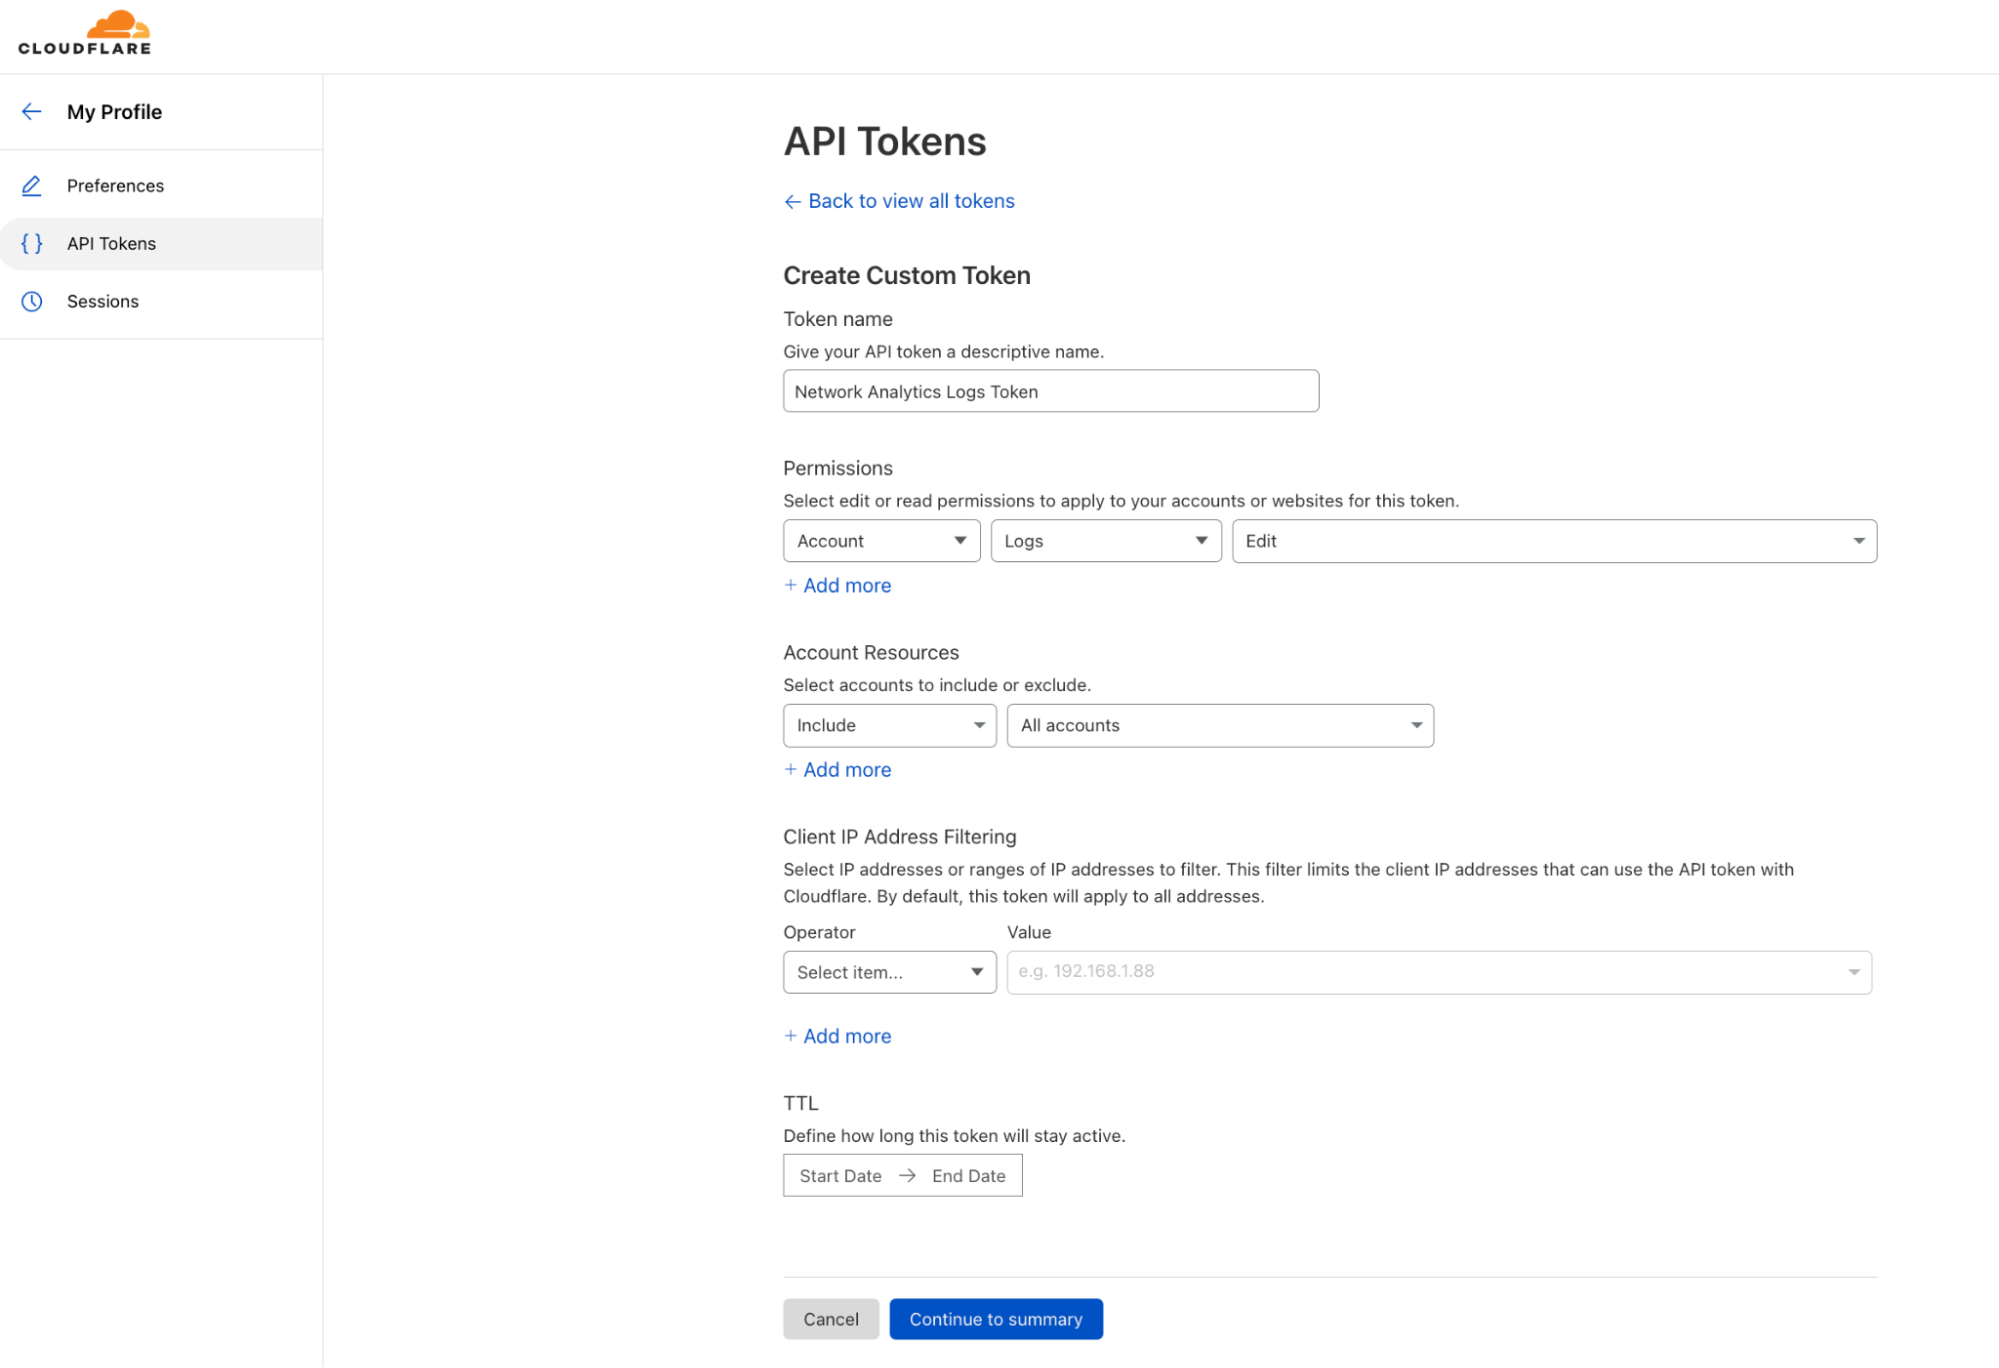
1) Create a Cloudflare API token

  1. Log in to your Cloudflare account and navigate to My Profile.
  2. On the left-hand side, in the collapsing navigation menu, click API Tokens.
  3. Click Create Token and then, under Custom token, click Get started.
  4. Give your custom token a name, and select an Account scoped permission to edit Logs. You can also scope it to a specific/subset/all of your accounts.
  5. At the bottom, click Continue to summary, and then Create Token.
  6. Copy and save your token. You can also test your token with the provided snippet in Terminal.

When you’re using an API token, you don’t need to provide your email address as part of the API credentials.

Integrating Network Analytics Logs with your SIEM dashboard

Read more about creating an API token on the Cloudflare Developers website: https://developers.cloudflare.com/api/tokens/create/

2) Create a Splunk token for an HTTP Event Collector

In this walkthrough, we’re using a Splunk Cloud free trial, but you can use almost any service that can accept logs over HTTPS. In some cases, if you’re using an on-premise SIEM solution, you may need to allowlist Cloudflare IP address in your firewall to be able to receive the logs.

  1. Create a Splunk Cloud account. I created a trial account for the purpose of this blog.
  2. In the Splunk Cloud dashboard, go to Settings > Data Input.
  3. Next to HTTP Event Collector, click Add new.
  4. Follow the steps to create a token.
  5. Copy your token and your allocated Splunk hostname and save both for later.
Integrating Network Analytics Logs with your SIEM dashboard

Read more about using Splunk with Cloudflare Logpush on the Cloudflare Developers website: https://developers.cloudflare.com/logs/get-started/enable-destinations/splunk/

Read more about creating an HTTP Event Collector token on Splunk’s website: https://docs.splunk.com/Documentation/Splunk/8.2.6/Data/UsetheHTTPEventCollector

3) Create a Cloudflare Logpush job

Creating and enabling a job is very straightforward. It requires only one API call to Cloudflare to create and enable a job.

To send the API calls I used Postman, which is a user-friendly API client that was recommended to me by a colleague. It allows you to save and customize API calls. You can also use Terminal/CMD or any other API client/script of your choice.

One thing to notice is Network Analytics Logs are account-scoped. The API endpoint is therefore a tad different from what you would normally use for zone-scoped datasets such as HTTP request logs and DNS logs.

This is the endpoint for creating an account-scoped Logpush job:

https://api.cloudflare.com/client/v4/accounts/{account-id}/logpush/jobs

Your account identifier number is a unique identifier of your account. It is a string of 32 numbers and characters. If you’re not sure what your account identifier is, log in to Cloudflare, select the appropriate account, and copy the string at the end of the URL.

https://dash.cloudflare.com/{account-id}

Then, set up a new request in Postman (or any other API client/CLI tool).

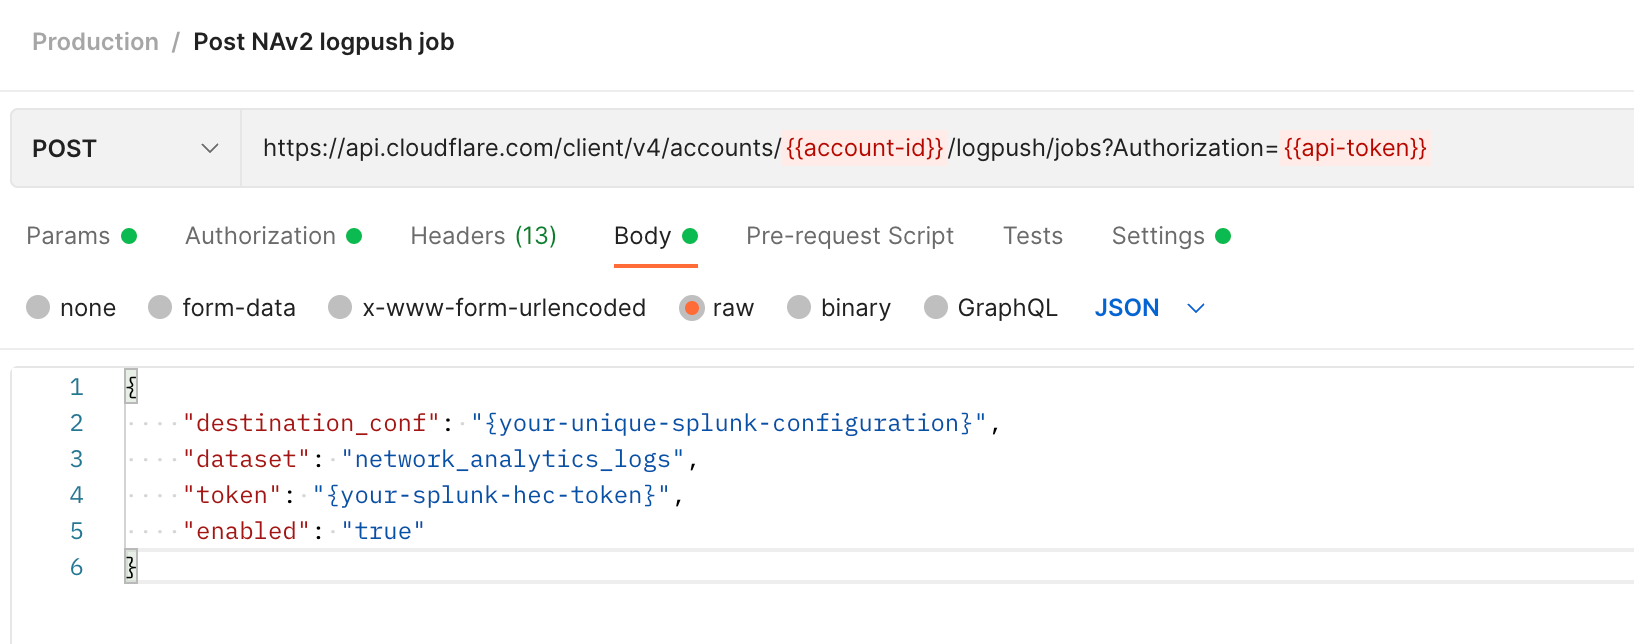
To successfully create a Logpush job, you’ll need the HTTP method, URL, Authorization token, and request body (data). The request body must include a destination configuration (destination_conf), the specified dataset (network_analytics_logs, in our case), and the token (your Splunk token).

Integrating Network Analytics Logs with your SIEM dashboard

Method:

POST

URL:

https://api.cloudflare.com/client/v4/accounts/{account-id}/logpush/jobs

Authorization: Define a Bearer authorization in the Authorization tab, or add it to the header, and add your Cloudflare API token.

Body: Select a Raw > JSON

{
"destination_conf": "{your-unique-splunk-configuration}",
"dataset": "network_analytics_logs",
"token": "{your-splunk-hec-tag}",
"enabled": "true"
}

If you’re using Splunk Cloud, then your unique configuration has the following format:

{your-unique-splunk-configuration}=splunk://{your-splunk-hostname}.splunkcloud.com:8088/services/collector/raw?channel={channel-id}&header_Authorization=Splunk%20{your-splunk–hec-token}&insecure-skip-verify=false

Definition of the variables:

{your-splunk-hostname}= Your allocated Splunk Cloud hostname.

{channel-id} = A unique ID that you choose to assign for.`{your-splunk–hec-token}` = The token that you generated for your Splunk HEC.

An important note is that customers should have a valid SSL/TLS certificate on their Splunk instance to support an encrypted connection.

After you’ve done that, you can create a GET request to the same URL (no request body needed) to verify that the job was created and is enabled.

The response should be similar to the following:

{
    "errors": [],
    "messages": [],
    "result": {
        "id": {job-id},
        "dataset": "network_analytics_logs",
        "frequency": "high",
        "kind": "",
        "enabled": true,
        "name": null,
        "logpull_options": null,
        "destination_conf": "{your-unique-splunk-configuration}",
        "last_complete": null,
        "last_error": null,
        "error_message": null
    },
    "success": true
}

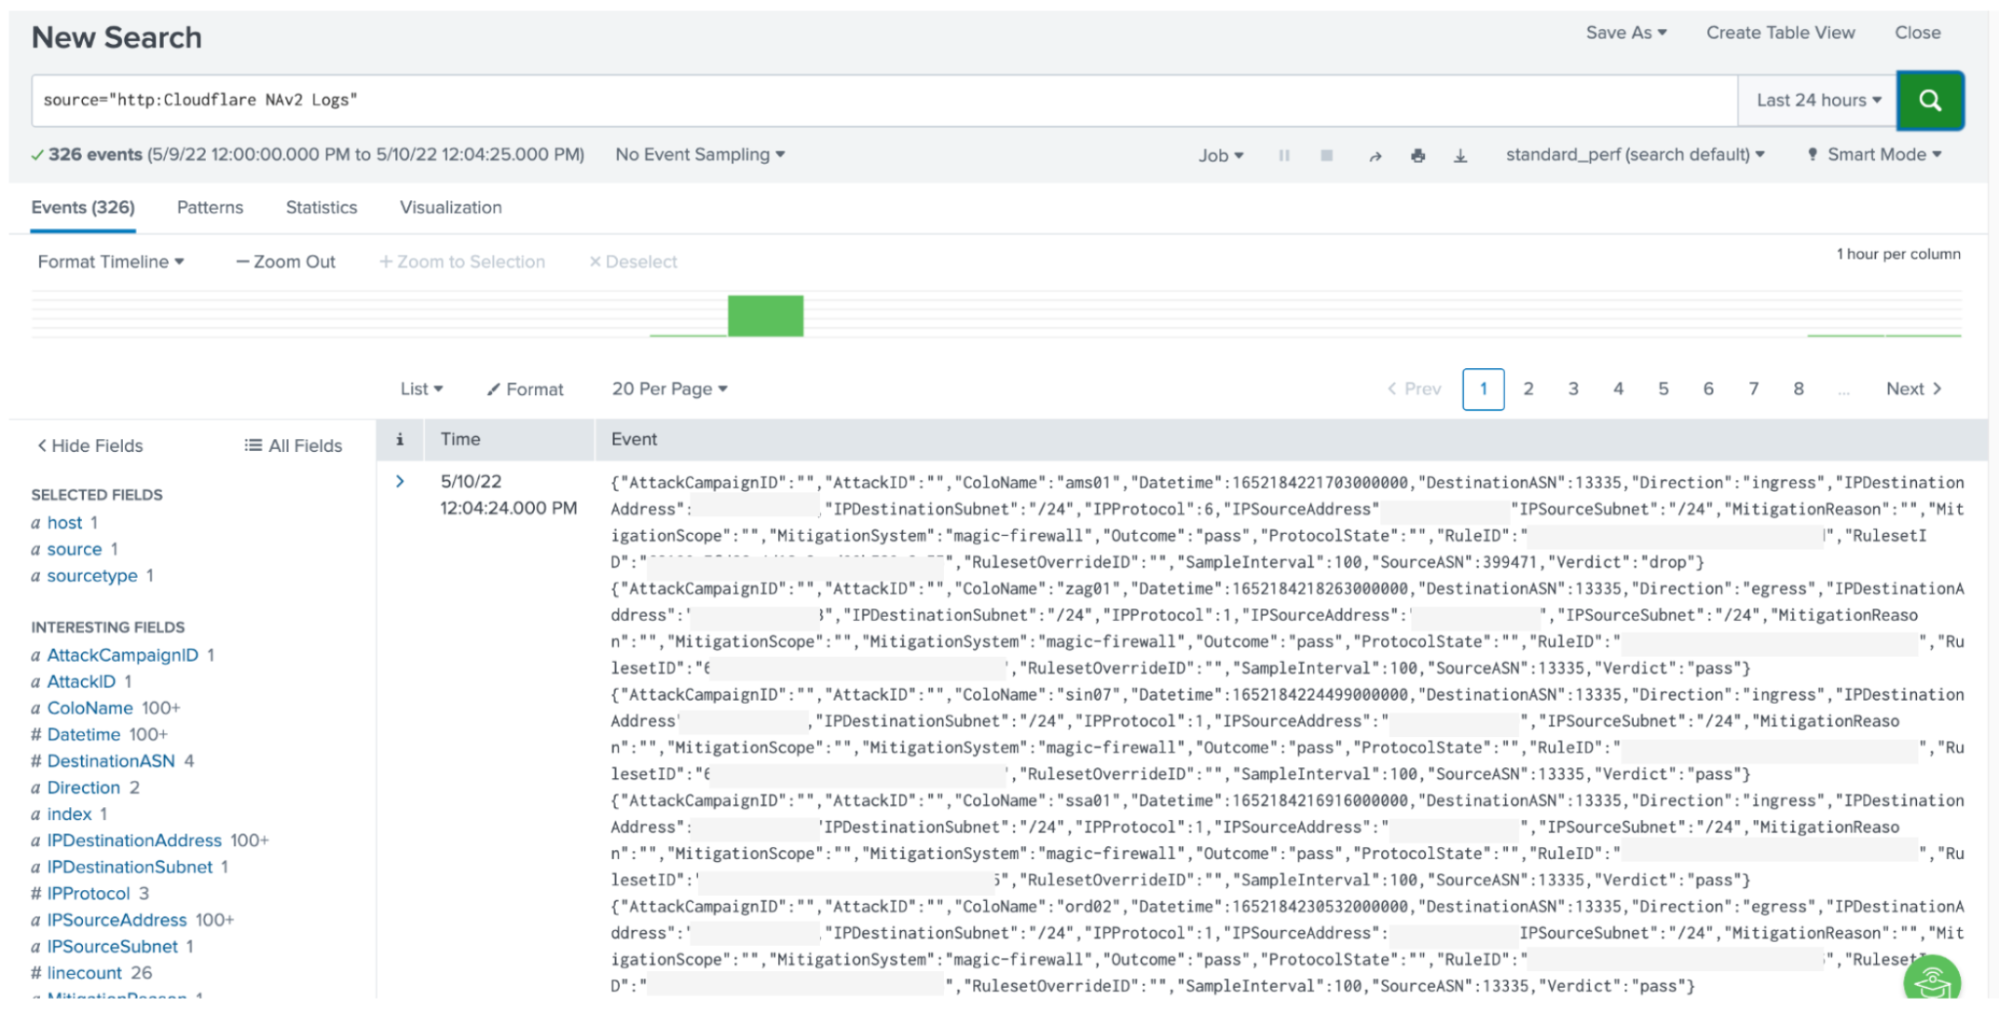
Shortly after, you should start receiving logs to your Splunk HEC.

Integrating Network Analytics Logs with your SIEM dashboard

Read more about enabling Logpush on the Cloudflare Developers website: https://developers.cloudflare.com/logs/reference/logpush-api-configuration/examples/example-logpush-curl/

Reduce costs with R2 storage

Depending on the amount of logs that you read and write, the cost of third party cloud storage can skyrocket — forcing you to decide between managing a tight budget and being able to properly investigate networking and security issues. However, we believe that you shouldn’t have to make those trade-offs. With R2’s low costs, we’re making this decision easier for our customers. Instead of feeding logs to a third party, you can reap the cost benefits of storing them in R2.

To learn more about the R2 features and pricing, check out the full blog post. To enable R2, contact your account team.

Cloudflare logs for maximum visibility

Cloudflare Enterprise customers have access to detailed logs of the metadata generated by our products. These logs are helpful for troubleshooting, identifying network and configuration adjustments, and generating reports, especially when combined with logs from other sources, such as your servers, firewalls, routers, and other appliances.

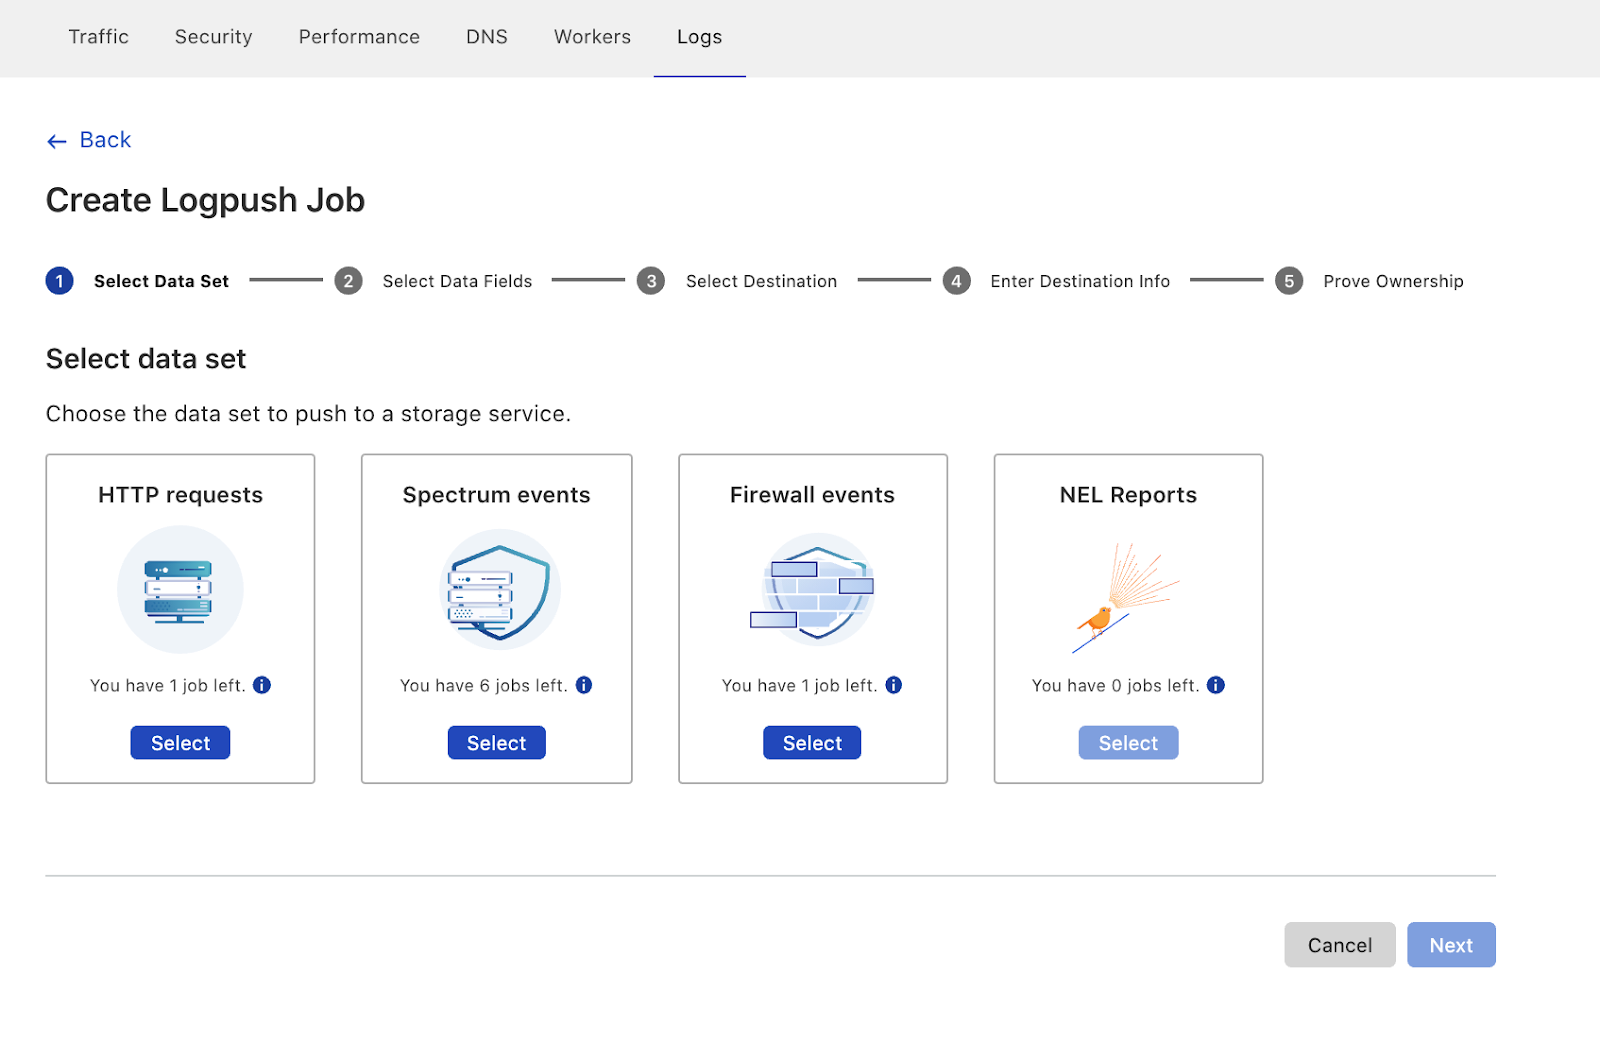
Network Analytics Logs joins Cloudflare’s family of products on Logpush: DNS logs, Firewall events, HTTP requests, NEL reports, Spectrum events, Audit logs, Gateway DNS, Gateway HTTP, and Gateway Network.

Not using Cloudflare yet? Start now with our Free and Pro plans to protect your websites against DDoS attacks, or contact us for comprehensive DDoS protection and firewall-as-a-service for your entire network.

SIEM and XDR: What’s Converging, What’s Not

Post Syndicated from Amy Hunt original https://blog.rapid7.com/2022/03/23/siem-and-xdr-whats-converging-whats-not/

SIEM and XDR: What’s Converging, What’s Not

Let’s start with the conclusion: Security incident and event management (SIEM) isn’t going anywhere anytime soon.

Today, most security analysts are using their SIEMs for detection and response, making it the core tool within the security operations center (SOC). SIEM aggregates and monitors critical security telemetry, enables companies to monitor and detect threats specific to their environment and policy violations, and addresses key regulatory and compliance use cases. It has served – and will continue to serve – very important, specific purposes in the security technology stack.

Where SIEMs have traditionally struggled is in keeping pace with the threat landscape. It expands and changes daily. Very, very few security teams have the resources to consume all the relevant threat intelligence, then create the rules and configure the detections necessary to find them.

Rapid7’s SIEM, InsightIDR, is the exception, designed with a detections-first approach.

InsightIDR leverages internal and external threat intelligence, encompassing your entire attack surface. Our detection library includes threat intelligence from Rapid7’s open-source community, advanced attack surface mapping, and proprietary machine learning. Detections are curated and constantly fine-tuned by our expert Threat Intelligence and Detections Engineering team.

InsightIDR is the only SIEM that can actually do extended detection and response (XDR). And we can’t help but think all the XDR buzz is the security industry’s way of letting you know that, yes, detection and response performance is still lacking.

A cloud SIEM can provide a strong XDR foundation — agile, tailored, adaptable, and elastic

A cloud SIEM approach gives you an elastic data lake that lets you collect and process telemetry across the environment. And the core benefits of SIEM are yours: log retention, fast and flexible search, reporting, and the ability to fine-tune and customize policy violations or other rules specifically for their environment or organization. Cloud SIEM with user and entity behavior analytics (UEBA) and correlation capabilities can already achieve XDR, tying disparate data sources together to normalize, correlate/attribute, and analyze.

Of course, some customers that purchased traditional SIEM for detection and response haven’t been able to get those outcomes. They don’t have a next-generation SIEM that supports big data and real-time event analysis. Perhaps machine learning and behavioral analytics aren’t there yet.

Or maybe the SIEM has security teams drowning in alerts, ignoring too many of them. Detection and response is really hard — and it really is a symphony — especially as the environment continues to sprawl and resources remain scarce.

XDR aims to solve the challenges of the SIEM tool for effective detection and response to targeted attacks and includes behavior analysis, threat intelligence, behavior profiling, recommendations, and automation. The foundation is everything.

When we introduced InsightIDR some time ago, some criticized it as trying to do “too much”

It turns out we were doing XDR.

Today, our highly manicured detections library is expertly vetted by our global Rapid7 Managed Detection and Response (MDR) SOC, where we also get emergent threat coverage. It’s single-platform, integrated with raw threat intel from Rapid7’s open-source communities (Metasploit, Heisenberg, Sonar, Velociraptor) and strengthened signal-to-noise following our acquisition of IntSights external threat intelligence.

Call it what you like

SIEM and XDR are described as “alternatives,” “complementary,” and also barreling toward one another destined to collide. We’ve read how one is dead and the other is the future. (Must it always be this way?)

No matter what you call it, focus on the outcomes, not the acronyms. It’s easy to get lost in the buzz, but the best products for your business will be those that address your top priorities.

Additional reading:

NEVER MISS A BLOG

Get the latest stories, expertise, and news about security today.

How to use AWS Security Hub and Amazon OpenSearch Service for SIEM

Post Syndicated from Ely Kahn original https://aws.amazon.com/blogs/security/how-to-use-aws-security-hub-and-amazon-opensearch-service-for-siem/

AWS Security Hub provides you with a consolidated view of your security posture in Amazon Web Services (AWS) and helps you check your environment against security standards and current AWS security recommendations. Although Security Hub has some similarities to security information and event management (SIEM) tools, it is not designed as standalone a SIEM replacement. For example, Security Hub only ingests AWS-related security findings and does not directly ingest higher volume event logs, such as AWS CloudTrail logs. If you have use cases to consolidate AWS findings with other types of findings from on-premises or other non-AWS workloads, or if you need to ingest higher volume event logs, we recommend that you use Security Hub in conjunction with a SIEM tool.

There are also other benefits to using Security Hub and a SIEM tool together. These include being able to store findings for longer periods of time than Security Hub, aggregating findings across multiple administrator accounts, and further correlating Security Hub findings with each other and other log sources. In this blog post, we will show you how you can use Amazon OpenSearch Service (successor to Amazon Elasticsearch Service) as a SIEM and integrate Security Hub with it to accomplish these three use cases. Amazon OpenSearch Service is a fully managed service that makes it easier to deploy, manage, and scale Elasticsearch and Kibana. OpenSearch Service is a distributed, RESTful search and analytics engine that is capable of addressing a growing number of use cases. You can expand OpenSearch Service with AWS services like Kinesis or Kinesis Data Firehose, by integrating with other AWS services, or by using traditional agents like Beats and Logstash for log ingestion, and Kibana for data visualization. Although the OpenSearch Service also is not a SIEM out-of-the-box tool, with some customization, you can use it for SIEM tool use cases.

Security Hub plus SIEM use cases

By enabling Security Hub within your AWS Organizations account structure, you immediately start receiving the benefits of viewing all of your security findings from across various AWS and partner services on a single screen. Some organizations want to go a step further and use Security Hub in conjunction with a SIEM tool for the following reasons:

  • Correlate Security Hub findings with each other and other log sources – This is the most popular reason customers choose to implement this solution. If you have various log sources outside of Security Hub findings (such as application logs, database logs, partner logs, and security tooling logs), then it makes sense to consolidate these log sources into a single SIEM solution. Then you can view both your Security Hub findings and miscellaneous logs in the same place and create alerts based on interesting correlations.
  • Store findings for longer than 90 days after the last update date – Some organizations want or need to store Security Hub findings for longer than 90 days after the last update date. They may want to do this for historical investigation, or for audit and compliance needs. Either way, this solution offers you the ability to store Security Hub findings in a private Amazon Simple Storage Service (Amazon S3) bucket, which is then consumed by Amazon OpenSearch Service.
  • Aggregate findings across multiple administrator accounts – Security Hub has a feature customers can use to designate an administrator account if they have enabled Security Hub in multiple accounts. A Security Hub administrator account can view data from and manage configuration for its member accounts. This allows customers to view and manage all their findings from multiple member accounts in one place. Sometimes customers have multiple Security Hub administrator accounts, because they have multiple organizations in AWS Organizations. In this situation, you can use this solution to consolidate all of the Security Hub administrator accounts into a single OpenSearch Service with Kibana SIEM implementation to have a single view across your environments. This related blog post walks through this use case in more detail, and shows how to centralize Security Hub findings across multiple AWS Regions and administrators. However, this blog post takes this approach further by introducing OpenSearch Service with Kibana to the use case, for a full SIEM experience.

Solution architecture

Figure 1: SIEM implementation on Amazon OpenSearch Service

Figure 1: SIEM implementation on Amazon OpenSearch Service

The solution represented in Figure 1 shows the flexibility of integrations that are possible when you create a SIEM by using Amazon OpenSearch Service. The solution allows you to aggregate findings across multiple accounts, store findings in an S3 bucket indefinitely, and correlate multiple AWS and non-AWS services in one place for visualization. This post focuses on Security Hub’s integration with the solution, but the following AWS services are also able to integrate:

Each of these services has its own dedicated dashboard within the OpenSearch SIEM solution. This makes it possible for customers to view findings and data that are relevant to each service that the SIEM tool is ingesting. OpenSearch Service also allows the customer to create aggregated dashboards, consolidating multiple services within a single dashboard, if needed.

Prerequisites

We recommend that you enable Security Hub and AWS Config across all of your accounts and Regions. For more information about how to do this, see the documentation for Security Hub and AWS Config. We also recommend that you use Security Hub and AWS Config integration with AWS Organizations to simplify the setup and automatically enable these services in all current and future accounts in your organization.

Launch the solution

In order to launch this solution within your environment, you can either launch the solution by using an AWS CloudFormation template, or by following the steps presented later in this post to customize the deployment to support integrations with non-AWS services, multi-Organization deployments, or launch within your existing OpenSearch Service environment.

To launch the solution, follow the instructions for SIEM on Amazon OpenSearch Service on GitHub.

Use the solution

Before you start using the solution, we’ll show you how this solution appears in the Security Hub dashboard, as shown in Figure 2. Navigate here by following Step 3 from the GitHub README.

Figure 2: Pre-built dashboards within solution

Figure 2: Pre-built dashboards within solution

The Security Hub dashboard highlights all major components of the service within an OpenSearch Service dashboard environment. This includes supporting all of the service integrations that are available within Security Hub (such as GuardDuty, AWS Identity and Access Management (IAM) Access Analyzer, Amazon Inspector, Amazon Macie, and AWS Systems Manager Patch Manager). The dashboard displays both findings and security standards, and you can filter by AWS account, finding type, security standard, or service integration. Figure 3 shows an overview of the visual dashboard experience when you deploy the solution.

Figure 3: Dashboard preview

Figure 3: Dashboard preview

Use case 1: Correlate Security Hub findings with each other and other log sources and create alerts

This solution uses OpenSearch Service and Kibana to allow you to search through both Security Hub findings and logs from any other AWS and non-AWS systems. You can then create alerts within Kibana based on interesting correlations between Security Hub and any other logged events. Although Security Hub supports ingesting a vast number of integrations and findings, it cannot create correlation rules like a SIEM tool can. However, you can create such rules using SIEM on OpenSearch Service. It’s important to take a closer look when multiple AWS security services generate findings for a single resource, because this potentially indicates elevated risk or multiple risk vectors. Depending on your environment, the initial number of findings in Security Hub may be high, so you may need to prioritize which findings require immediate action. Security Hub natively gives you the ability to filter findings by resource, account, severity, and many other details.

As part of the findings, you can send notifications through alerts that are generated by SIEM on OpenSearch Service in several ways: Amazon Simple Notification Service (Amazon SNS) by consuming messages in an appropriate tool or configuring recipient email addresses, Amazon Chime, Slack (using AWS Chatbot) or custom webhook to your organization’s ticketing system. You can then respond to these new security incident-oriented findings through ticketing, chat, or incident management systems.

Solution overview for use case 1

Figure 4: Solution overview diagram

Figure 4: Solution overview diagram

Figure 4 gives an overview of the solution for use case 1. This solution requires that you have Security Hub and GuardDuty enabled in your AWS account. Logs from AWS services, including Security Hub, are ingested into an S3 bucket, then are automatically extracted, transformed, and loaded (ETL) and populated into the SIEM system that is running on OpenSearch Service using AWS Lambda. After capturing the logs, you will be able to visualize them on the dashboard and analyze correlations of multiple logs. Within the SIEM on OpenSearch Service solution, you will create a rule to detect failures, such as CloudTrail authentication failures in logs. Then, you will configure the solution to publish alerts to Amazon SNS and send emails when logs match rules.

Implement the solution for use case 1

You will now set up this workflow to alert you by email when logs in OpenSearch match certain rules that you create.

Step 1: Create and visualize findings in OpenSearch Dashboards

Security Hub and other AWS services export findings to Amazon S3 in a centralized log bucket. You can ingest logs from CloudTrail, VPC Flow Logs, and GuardDuty, which are often used in AWS security analytics. In this step, you import simulated security incident data in OpenSearch Dashboards, and use the dashboard to visualize the data in the logs.

To navigate OpenSearch Dashboards

  1. Generate pseudo-security incidents. You can simulate the results by generating sample findings in GuardDuty.
  2. In OpenSearch Dashboards, go to the Discover screen. The Discover screen is divided into three major sections: Search bar, index/display field list, and time-series display, as shown in Figure 5.
    Figure 5: OpenSearch Dashboards

    Figure 5: OpenSearch Dashboards

  3. In OpenSearch Dashboards, select log-aws-securityhub-* or log-aws-vpcflowlogs-* or log-aws-cloudtrail-* or any other index patterns and add event.module to the display field. event.module is a field that indicates where the log originates from. If you are collecting other threat information, such as Security Hub, @log-type is Security Hub, and event.module indicates where the log originated from (either Amazon Inspector or Amazon Macie for example). After you have added event.module, filter the desired Security Hub integrated service (for example, Amazon Inspector) to display. When testing the environment covered in this blog post outside a production context, you can use Kinesis Data Generator to generate sample user traffic. Other tools are also available.
  4. Select the following on the dashboard to see the visualized information:
    • CloudTrail Summary
    • VpcFlowLogs Summary
    • GuardDuty Summary
    • All – Threat Hunting

Step 2: Configure alerts to match log criteria

Next, you will configure alerts to match log criteria. First you need to set the destination for alerts, and then set what to monitor.

To configure alerts

  1. In OpenSearch Dashboards, in the left menu, choose Alerting.
  2. To add the details of SNS, on the Destinations tab, choose Add destinations, and enter the following parameters:
    • Name: aes-siem-alert-destination
    • Type: Amazon SNS
    • SNS Alert: arn:aws:sns:<AWS-REGION>:<111111111111>:aes-siem-alert
      • Replace <111111111111> with your AWS account ID and correct the Region name
      • Replace <AWS-REGION> with the Region you are using, for example, eu-west-1
    • IAM Role ARN: arn:aws:iam::<111111111111>:role/aes-siem-sns-role
      • Replace &<111111111111> with your AWS account ID
  3. Choose Create to complete setting the alert destination.
    Figure 6: Edit alert destination

    Figure 6: Edit alert destination

  4. In OpenSearch Dashboards, in the left menu, select Alerting. You will now set what to monitor. Here you monitor a CloudTrail trail authentication failure. There are two normalized log times: @timestamp and event.ingested. The difference is between the log occurrence time (@timestamp) and the SIEM reception time (event.ingested). Use event.ingested for logs with a large time lag from occurrence to reception. You can specify flexible conditions by selecting Define using extraction query for the filter definition.
  5. On the Monitors tab, choose Create monitor.
  6. Enter the following parameters. If there is no description, use the default value.
    • Name: Authentication failed
    • Method of definition: Define using extraction query
    • Indices: log-aws-cloudtrail-* (manual input, not pull-down)
    • Define extraction query: Enter the following query.
      {
      	"query": {
      		"bool": {
      			"filter": [
      			{"term": {"eventSource": "signin.amazonaws.com"}},
      			{"term": {"event.outcome": "failure"}},
      			{"range": {
      				"event.ingested": {
      				"from": "{{period_end}}||-20m",
      				"to": "{{period_end}}"}}
      				}
      			]
      		}
      	}
      }
      

  7. Enter the following remaining parameters of the monitor:
    • Frequency: By interval
    • Monitor schedule: Every 3 minutes
  8. Choose Create to create the monitor.

Step 3: Set up trigger to send email via Amazon SNS

Now you will set the alert firing condition, known as the trigger. This is the setting for alerting when the monitored conditions (Monitors) are met. By default, the alert will be triggered if the number of hits is greater than 0. In this step , you will not change it, only give it a name.

To set up the trigger

  1. Select Create trigger and for Trigger name, enter Authentication failed trigger.
  2. Scroll down to Configure actions.
    Figure 7: Create trigger

    Figure 7: Create trigger

  3. Set what the trigger should do (action). In this case, you want to publish to SNS. Set the following parameters for the body of the email
    • Action name: Authentication failed action
    • Destination: Choose aes-siem-alert-destination – (Amazon SNS)
    • Message subject: (SIEM) Auth failure alert
    • Action throttling: Select Enable action throttling, and set throttle action to only trigger every 10 minutes.
    • Message: Copy and paste the following message into the text box. After pasting, choose Send test message at the bottom right of the screen to confirm that you can receive the test email.

      Monitor ctx.monitor.name just entered alert status. Please investigate the issue.

      Trigger: ctx.trigger.name

      Severity: ctx.trigger.severity

      @timestamp: ctx.results.0.hits.hits.0._source.@timestamp

      event.action: ctx.results.0.hits.hits.0._source.event.action

      error.message: ctx.results.0.hits.hits.0._source.error.message

      count: ctx.results.0.hits.total.value

      source.ip: ctx.results.0.hits.hits.0._source.source.ip

      source.geo.country_name: ctx.results.0.hits.hits.0._source.source.geo.country_name

    Figure 8: Configure actions

    Figure 8: Configure actions

  4. You will receive an alert email in a few minutes. You can check the occurrence status, including the history, by the following method:
    1. In OpenSearch Dashboards, on the left menu, choose Alerting.
    2. On the Monitors tab, choose Authentication failed.
    3. You can check the status of the alert in the History pane.
    Figure 9: Email alert

    Figure 9: Email alert

Use case 1 shows you how to correlate various Security Hub findings through this OpenSearch Service SIEM solution. However, you can take the solution a step further and build more complex correlation checks by following the procedure in the blog post Correlate security findings with AWS Security Hub and Amazon EventBridge. This information can then be ingested into this OpenSearch Service SIEM solution for viewing on a single screen.

Use case 2: Store findings for longer than 90 days after last update date

Security Hub has a maximum storage time of 90 days for events, but your organization might require data storage beyond that period, with flexibility to specify a custom retention period to meet your needs. The SIEM on Amazon OpenSearch Service solution creates a centralized S3 bucket where findings from Security Hub and various other services are collected and stored, and this bucket can be configured to store data as long as you require. The S3 bucket can persist data indefinitely, or you can create an S3 object lifecycle policy to set a custom retention timeframe. Lifecycle policies allow you to either transition objects between S3 storage classes or delete objects after a specified period. Alternatively, you can use S3 Intelligent-Tiering to allow the Amazon S3 service to move data between tiers, based on user access patterns.

Either lifecycle policies or S3 Intelligent-Tiering will allow you to optimize costs for data that is stored in S3, to keep data for archive or backup purposes when it is no longer available in Security Hub or OpenSearch Service. Within the solution, this centralized bucket is called aes-siem-xxxxxxxx-log and is configured to store data for OpenSearch Service to consume indefinitely. The Amazon S3 User Guide has instructions for configuring an S3 lifecycle policy that is explicitly defined by the user on the centralized bucket. Or you can follow the instructions for configuring intelligent tiering to allow the S3 service to manage which tier data is stored in automatically. After data is archived, you can use Amazon Athena to query the S3 bucket for historical information that has been removed from OpenSearch Service, because this S3 bucket acts as a centralized security event repository.

Use case 3: Aggregate findings across multiple administrator accounts

There are cases where you might have multiple Security Hub administrator accounts within one or multiple organizations. For these use cases, you can consolidate findings across these multiple Security Hub administrator accounts into a single S3 bucket for centralized storage, archive, backup, and querying. This gives you the ability to create a single SIEM on OpenSearch Service to minimize the number of monitoring tools you need. In order to do this, you can use S3 replication to automatically copy findings to a centralized S3 bucket. You can follow this detailed walkthrough on how to set up the correct bucket permissions in order to allow replication between the accounts. You can also follow this related blog post to configure cross-Region Security Hub findings that are centralized in a single S3 bucket, if cross-Region replication is appropriate for your security needs. With cross-account S3 replication set up for Security Hub archived event data, you can import data from the centralized S3 bucket into OpenSearch Service by using the Lambda function within the solution in this blog post. This Lambda function automatically normalizes and enriches the log data and imports it into OpenSearch Service, so that users only need to configure data storage in the S3 bucket, and the Lambda function will automatically import the data.

Conclusion

In this blog post, we showed how you can use Security Hub with a SIEM to store findings for longer than 90 days, aggregate findings across multiple administrator accounts, and correlate Security Hub findings with each other and other log sources. We used the solution to walk through building the SIEM and explained how Security Hub could be used within that solution to add greater flexibility. This post describes one solution to create your own SIEM using OpenSearch Service; however, we also recommend that you read the blog post Visualize AWS Security Hub Findings using Analytics and Business Intelligence Tools, in order to see a different method of consolidating and visualizing insights from Security Hub.

To learn more, you can also try out this solution through the new SIEM on AWS OpenSearch Service workshop.

If you have feedback about this blog post, submit comments in the Comments section below. If you have questions about this blog post, please start a new thread on the Security Hub forum or contact AWS Support.

 
If you have feedback about this post, submit comments in the Comments section below. If you have questions about this post, contact AWS Support.

Want more AWS Security news? Follow us on Twitter.

Ely Kahn

Ely Kahn

Ely Kahn is the Principal Product Manager for AWS Security Hub. Before his time at AWS, Ely was a co-founder for Sqrrl, a security analytics startup that AWS acquired and is now Amazon Detective. Earlier, Ely served in a variety of positions in the federal government, including Director of Cybersecurity at the National Security Council in the White House.

Anthony Pasquariello

Anthony Pasquariello

Anthony Pasquariello is a Senior Solutions Architect at AWS based in New York City. He specializes in modernization and security for our advanced enterprise customers. Anthony enjoys writing and speaking about all things cloud. He’s pursuing an MBA, and received his MS and BS in Electrical & Computer Engineering.

Aashmeet Kalra

Aashmeet Kalra

Aashmeet Kalra is a Principal Solutions Architect working in the Global and Strategic team at AWS in San Francisco. Aashmeet has over 17 years of experience designing and developing innovative solutions for customers globally. She specializes in advanced analytics, machine learning and builder/developer experience.

Grant Joslyn

Grant Joslyn

Grant Joslyn is a solutions architect for the US state and local government public sector team at Amazon Web Services (AWS). He specializes in end user compute and cloud automation. He provides technical and architectural guidance to customers building secure solutions on AWS. He is a subject matter expert and thought leader for strategic initiatives that help customers embrace DevOps practices.

Akihiro Nakajima

Akihiro Nakajima

Akihiro Nakajima is a Senior Solutions Architect, Security Specialist at Amazon Web Services Japan. He has more than 20 years of experience in security, specifically focused on incident analysis and response, threat hunting, and digital forensics. He leads development of open-source software, “SIEM on Amazon OpenSearch Service”.

This CISO Isn’t Real, but His Problems Sure Are

Post Syndicated from Amy Hunt original https://blog.rapid7.com/2022/02/22/this-ciso-isnt-real-but-his-problems-sure-are/

This CISO Isn’t Real, but His Problems Sure Are

In 2021, data breaches soared past 2020 levels. This year, it’s expected to be worse. The odds are stacked against this poor guy (and you) now – but a unified extended detection and response (XDR) and SIEM restacks them in your favor.

Take a few minutes to check out this CISO’s day, and you’ll see how.

Go to this resource-rich page for smart, fast information, and a few minutes of fun too. Don’t miss it.

This CISO Isn’t Real, but His Problems Sure Are

Still here on this page reading? Fine, let’s talk about you.

Most CISOs like adrenaline, but c’mon

Cybersecurity isn’t for the fragile foam flowers among us, people who require shade and soft breezes. A little chaos is fun. Adrenaline and cortisol? They give you heightened physical and mental capacity. But it becomes problematic when it doesn’t stop, when you don’t remember your last 40-hour week, or when weekends and holidays are wrecked.

Work-life balance programs are funny, right?

A lot of your co-workers may be happy, but life in the SOC is its own thing. CISOs average about two years in their jobs. And 40% admit job stress has affected their relationships with their partners and/or children.

Many of your peers agree: Unified SIEM and XDR changes everything

A whopping 88% of Rapid7 customers say their detection and response has improved since they started using InsightIDR. And 93% say our unified SIEM and XDR has helped them level up and advance security programs.

You have the power to change your day. See how this guy did.

More products, more partners, and a new look for Cloudflare Logs

Post Syndicated from Bharat Nallan Chakravarthy original https://blog.cloudflare.com/logpush-ui-update/

More products, more partners, and a new look for Cloudflare Logs

We are excited to announce a new look and new capabilities for Cloudflare Logs! Customers on our Enterprise plan can now configure Logpush for Firewall Events and Network Error Logs Reports directly from the dashboard. Additionally, it’s easier to send Logs directly to our analytics partners Microsoft Azure Sentinel, Splunk, Sumo Logic, and Datadog. This blog post discusses how customers use Cloudflare Logs, how we’ve made it easier to consume logs, and tours the new user interface.

New data sets for insight into more products

Cloudflare Logs are almost as old as Cloudflare itself, but we have a few big improvements: new datasets and new destinations.

Cloudflare has a large number of products, and nearly all of them can generate Logs in different data sets. We have “HTTP Request” Logs, or one log line for every L7 HTTP request that we handle (whether cached or not). We also provide connection Logs for Spectrum, our proxy for any TCP or UDP based application. Gateway, part of our Cloudflare for Teams suite, can provide Logs for HTTP and DNS traffic.

Today, we are introducing two new data sets:

Firewall Events gives insight into malicious traffic handled by Cloudflare. It provides detailed information about everything our WAF does. For example, Firewall Events shows whether a request was blocked outright or whether we issued a CAPTCHA challenge.  About a year ago we introduced the ability to send Firewall Events directly to your SIEM; starting today, I’m thrilled to share that you can enable this directly from the dashboard!

Network Error Logging (NEL) Reports provides information about clients that can’t reach our network. To enable NEL Reports for your zone and start seeing where clients are having issues reaching our network, reach out to your account manager.

Take your Logs anywhere with an S3-compatible API

To start using logs, you need to store them first. Cloudflare has long supported AWS, Azure, and Google Cloud as storage destinations. But we know that customers use a huge variety of storage infrastructure, which could be hosted on-premise or with one of our Bandwidth Alliance partners.

Starting today, we support any storage destination with an S3-compatible API. This includes:

And best of all, it’s super easy to get data into these locations using our new UI!

“As always, we love that our partnership with Cloudflare allows us to seamlessly offer customers our easy, plug and play storage solution, Backblaze B2 Cloud Storage. Even better is that, as founding members of the Bandwidth Alliance, we can do it all with free egress.”
Nilay Patel, Co-founder and VP of Solutions Engineering and Sales, Backblaze.

Push Cloudflare Logs directly to our analytics partners

While many customers like to store Logs themselves, we’ve also heard that many customers want to get Logs into their analytics provider directly — without going through another layer. Getting high volume log data out of object storage and into an analytics provider can require building and maintaining a costly, time-consuming, and fragile integration.

Because of this, we now provide direct integrations with four analytics platforms: Microsoft Azure Sentinel, Sumo Logic, Splunk, and Datadog. And starting today, you can push Logs directly into Sumo Logic, Splunk and Datadog from the UI! Customers can add Cloudflare to Azure Sentinel using the Azure Marketplace.

“Organizations are in a state of digital transformation on a journey to the cloud. Most of our customers deploy services in multiple clouds and have legacy systems on premise. Splunk provides visibility across all of this, and more importantly, with SOAR we can automate remediation. We are excited about the Cloudflare partnership, and adding their data into Splunk drives the outcomes customers need to modernize their security operations.”
Jane Wong, Vice President, Product Management, Security at Splunk

“Securing enterprise IT environments can be challenging – from devices, to users, to apps, to data centers on-premises or in the cloud. In today’s environment of increasingly sophisticated cyber-attacks, our mutual customers rely on Microsoft Azure Sentinel for a comprehensive view of their enterprise.  Azure Sentinel enables SecOps teams to collect data at cloud scale and empowers them with AI and ML to find the real threats in those signals, reducing alert fatigue by as much as 90%. By integrating directly with Cloudflare Logs we are making it easier and faster for customers to get complete visibility across their entire stack.”
Sarah Fender, Partner Group Program Manager, Azure Sentinel at Microsoft

“As a long time Cloudflare partner we’ve worked together to help joint customers analyze events and trends from their websites and applications to provide end-to-end visibility to improve digital experiences. We’re excited to expand our partnership as part of the Cloudflare Analytics Ecosystem to provide comprehensive real-time insights for both observability and the security of mission-critical applications and services with our Cloud SIEM solution.”
John Coyle, Vice President of Business Development for Sumo Logic

“Knowing that applications perform as well in the real world as they do in the datacenter is critical to ensuring great digital experiences. Combining Cloudflare Logs with Datadog telemetry about application performance in a single pane of glass ensures teams will have a holistic view of their application delivery.”
Michael Gerstenhaber, Sr. Director of Product, Datadog

Why Cloudflare Logs?

Cloudflare’s mission is to help build a better Internet. We do that by providing a massive global network that protects and accelerates our customers’ infrastructure. Because traffic flows across our network before reaching our customers, it means we have a unique vantage point into that traffic. In many cases, we have visibility that our customers don’t have — whether we’re telling them about the performance of our cache, the malicious HTTP requests we drop at our edge, a spike in L3 data flows, the performance of their origin, or the CPU used by their serverless applications.

To provide this ability, we have analytics throughout our dashboard to help customers understand their network traffic, firewall, cache, load balancer, and much more. We also provide alerts that can tell customers when they see an increase in errors or spike in DDoS activity.

But some customers want more than what we currently provide with our analytics products. Many of our enterprise customers use SIEMs like Splunk and Sumo Logic or cloud monitoring tools like Datadog. These products can extend the capabilities of Cloudflare by showcasing Cloudflare data in the context of customers’ other infrastructure and providing advanced functionality on this data.

To understand how this works, consider a typical L7 DDoS attack against one of our customers.  Very commonly, an attack like this might originate from a small number of IP addresses and a customer might choose to block the source IPs completely. After blocking the IP addresses, customers may want to:

  • Search through their Logs to see all the past instances of activity from those IP addresses.
  • Search through Logs from all their other applications and infrastructure to see all activity from those IP addresses
  • Understand exactly what that attacker was trying to do by looking at the request payload blocked in our WAF (securely encrypted thanks to HPKE!)
  • Set an alert for similar activity, to be notified if something similar happens again

All these are made possible using SIEMs and infrastructure monitoring tools. For example, our customer NOV uses Splunk to “monitor our network and applications by alerting us to various anomalies and high-fidelity incidents”.

“One of the most valuable sources of data is Cloudflare,” said John McLeod, Chief Information Security Officer at NOV. “It provides visibility into network and application attacks. With this integration, it will be easier to get Cloudflare Logs into Splunk, saving my team time and money.”

A new UI for our growing product base

With so many new data sets and new destinations, we realized that our existing user interface was not good enough. We went back to the drawing board to design a more intuitive user experience to help you quickly and easily set up Logpush.

You can still set up Logpush in the same place in the dashboard, in the Analytics > Logs tab:

More products, more partners, and a new look for Cloudflare Logs

The new UI first prompts users to select the data set to push. Here you’ll also notice that we’ve added support for Firewall Events and NEL Reports!

More products, more partners, and a new look for Cloudflare Logs

After configuring details like which fields to push, customers can then select where the Logs are going. Here you can see our three new destinations, S3-compatible storage, Sumo Logic, Datadog and Splunk:

More products, more partners, and a new look for Cloudflare Logs

Coming soon

Of course, we’re not done yet! We have more Cloudflare products in the pipeline and more destinations planned where customers can send their Logs. Additionally, we’re working on adding more flexibility to our logging pipeline so that customers can configure to send Logs for the entire account, plus filter Logs to just send error codes, for example.

Ultimately, we want to make working with Cloudflare Logs as useful as possible — on Cloudflare itself! We’re working to help customers solve their performance and security challenges with data at massive scale. If that sounds interesting, please join us! We’re hiring Systems Engineers for the Data team.

How to Combat Alert Fatigue With Cloud-Based SIEM Tools

Post Syndicated from Margaret Zonay original https://blog.rapid7.com/2021/02/22/how-to-combat-alert-fatigue-with-cloud-based-siem-tools/

How to Combat Alert Fatigue With Cloud-Based SIEM Tools

Today’s security teams are facing more complexity than ever before. IT environments are changing and expanding rapidly, resulting in proliferating data as organizations adopt more tools to stay on top of their sprawling environments. And with an abundance of tools comes an abundance of alerts, leading to the inevitable alert fatigue for security operations teams. Research completed by Enterprise Strategy Group determined 40% of organizations use 10 to 25 separate security tools, and 30% use 26 to 50. That means thousands (or tens of thousands!) of alerts daily, depending on the organization’s size.

Fortunately, there’s a way to get the visibility your team needs and streamline alerts: leveraging a cloud-based SIEM. Here are a few key ways a cloud-based SIEM can help combat alert fatigue to accelerate threat detection and response.

Access all of your critical security data in one place

Traditional SIEMs focus primarily on log management and are centered around compliance instead of giving you a full picture of your network. The rigidity of these outdated solutions is the opposite of what today’s agile teams need. A cloud SIEM can unify diverse data sets across on-premises, remote, and cloud environments, to provide security operations teams with the holistic visibility they need in one place, eliminating the need to jump in and out of multiple tools (and the thousands of alerts that they produce).

With modern cloud SIEMs like Rapid7’s InsightIDR, you can collect more than just logs from across your environment and ingest data including user activity, cloud, endpoints, and network traffic—all into a single solution. With your data in one place, cloud SIEMs deliver meaningful context and prioritization to help you avoid an abundance of alerts.

Cut through the noise to detect attacks early in the attack chain

By analyzing all of your data together, a cloud SIEM uses machine learning to better recognize patterns in your environment to understand what’s normal and what’s a potential threat. The result? More fine-tuned detections so your team is only alerted when there are real signs of a threat.

Instead of bogging you down with false positives, cloud SIEMs provide contextual, actionable alerts. InsightIDR offers customers high-quality, out-of-the-box alerts created and curated by our expert analysts based on real threats—so you can stop attacks early in the attack chain instead of sifting through a mountain of data and worthless alerts.

Accelerate response with automation

With automation, you can reduce alert fatigue and further improve your SOC’s efficiency. By leveraging a cloud SIEM that has built-in automation, or has the ability to integrate with a security orchestration and automation (SOAR) tool, your SOC can offload a significant amount of their workload and free up analysts to focus on what matters most, all while still improving security posture.

A cloud SIEM with expert-driven detections and built-in automation enables security teams to respond to and remediate attacks in a fraction of the time, instead of manually investigating thousands of alerts. InsightIDR integrates seamlessly with InsightConnect, Rapid7’s security orchestration and automation response (SOAR) tool, to reduce alert fatigue, automate containment, and improve investigation handling.

With holistic network visibility and advanced analysis, cloud-based SIEM tools provide teams with high context alerts and correlation to fight alert fatigue and accelerate incident detection and response. Learn more about how InsightIDR can help eliminate alert fatigue and more by checking out our outcomes pages.

NEVER MISS A BLOG

Get the latest stories, expertise, and news about security today.