Tag Archives: Third-Party Products

IoT gets a machine learning boost, from edge to cloud

Post Syndicated from Ashley Whittaker original https://www.raspberrypi.org/blog/iot-gets-a-machine-learning-boost-from-edge-to-cloud/

Today, it’s easy to run Edge Impulse machine learning on any operating system, like Raspberry Pi OS, and on every cloud, like Microsoft’s Azure IoT. Evan Rust, Technology Ambassador for Edge Impulse, walks us through it.

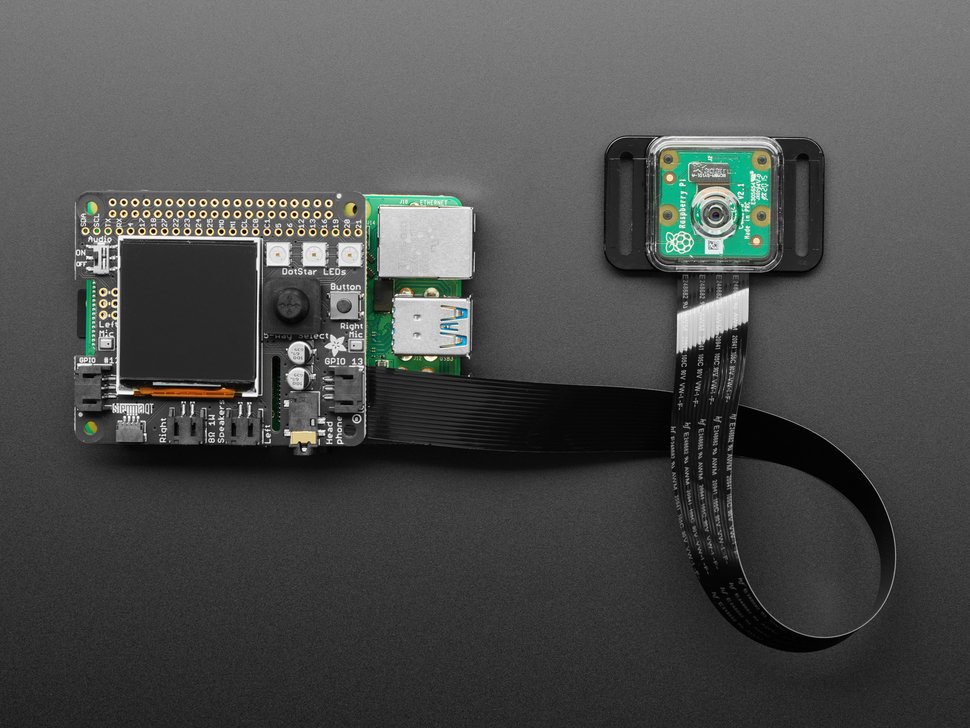
Building enterprise-grade IoT solutions takes a lot of practical effort and a healthy dose of imagination. As a foundation, you start with a highly secure and reliable communication between your IoT application and the devices it manages. We picked our favorite integration, the Microsoft Azure IoT Hub, which provides us with a cloud-hosted solution backend to connect virtually any device. For our hardware, we selected the ubiquitous Raspberry Pi 4, and of course Edge Impulse, which will connect to both platforms and extend our showcased solution from cloud to edge, including device authentication, out-of-box device management, and model provisioning.

From edge to cloud – getting started 

Edge machine learning devices fall into two categories: some are able to run very simple models locally, and others have more advanced capabilities that allow them to be more powerful and have cloud connectivity. The second group is often expensive to develop and maintain, as training and deploying models can be an arduous process. That’s where Edge Impulse comes in to help to simplify the pipeline, as data can be gathered remotely, used effortlessly to train models, downloaded to the devices directly from the Azure IoT Hub, and then run – fast.

This reference project will serve you as a guide for quickly getting started with Edge Impulse on Raspberry Pi 4 and Azure IoT, to train a model that detects lug nuts on a wheel and sends alerts to the cloud.

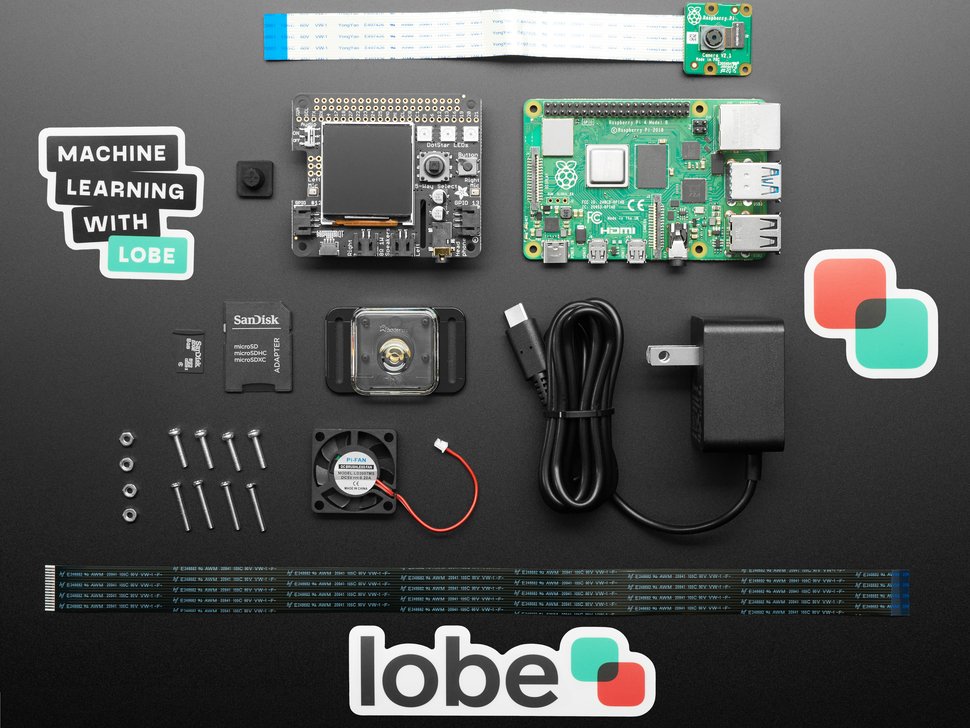
Setting up the hardware

Hardware setup for Edge Impulse Machine Learning
Raspberry Pi 4 forms the base for the Edge Impulse machine learning setup

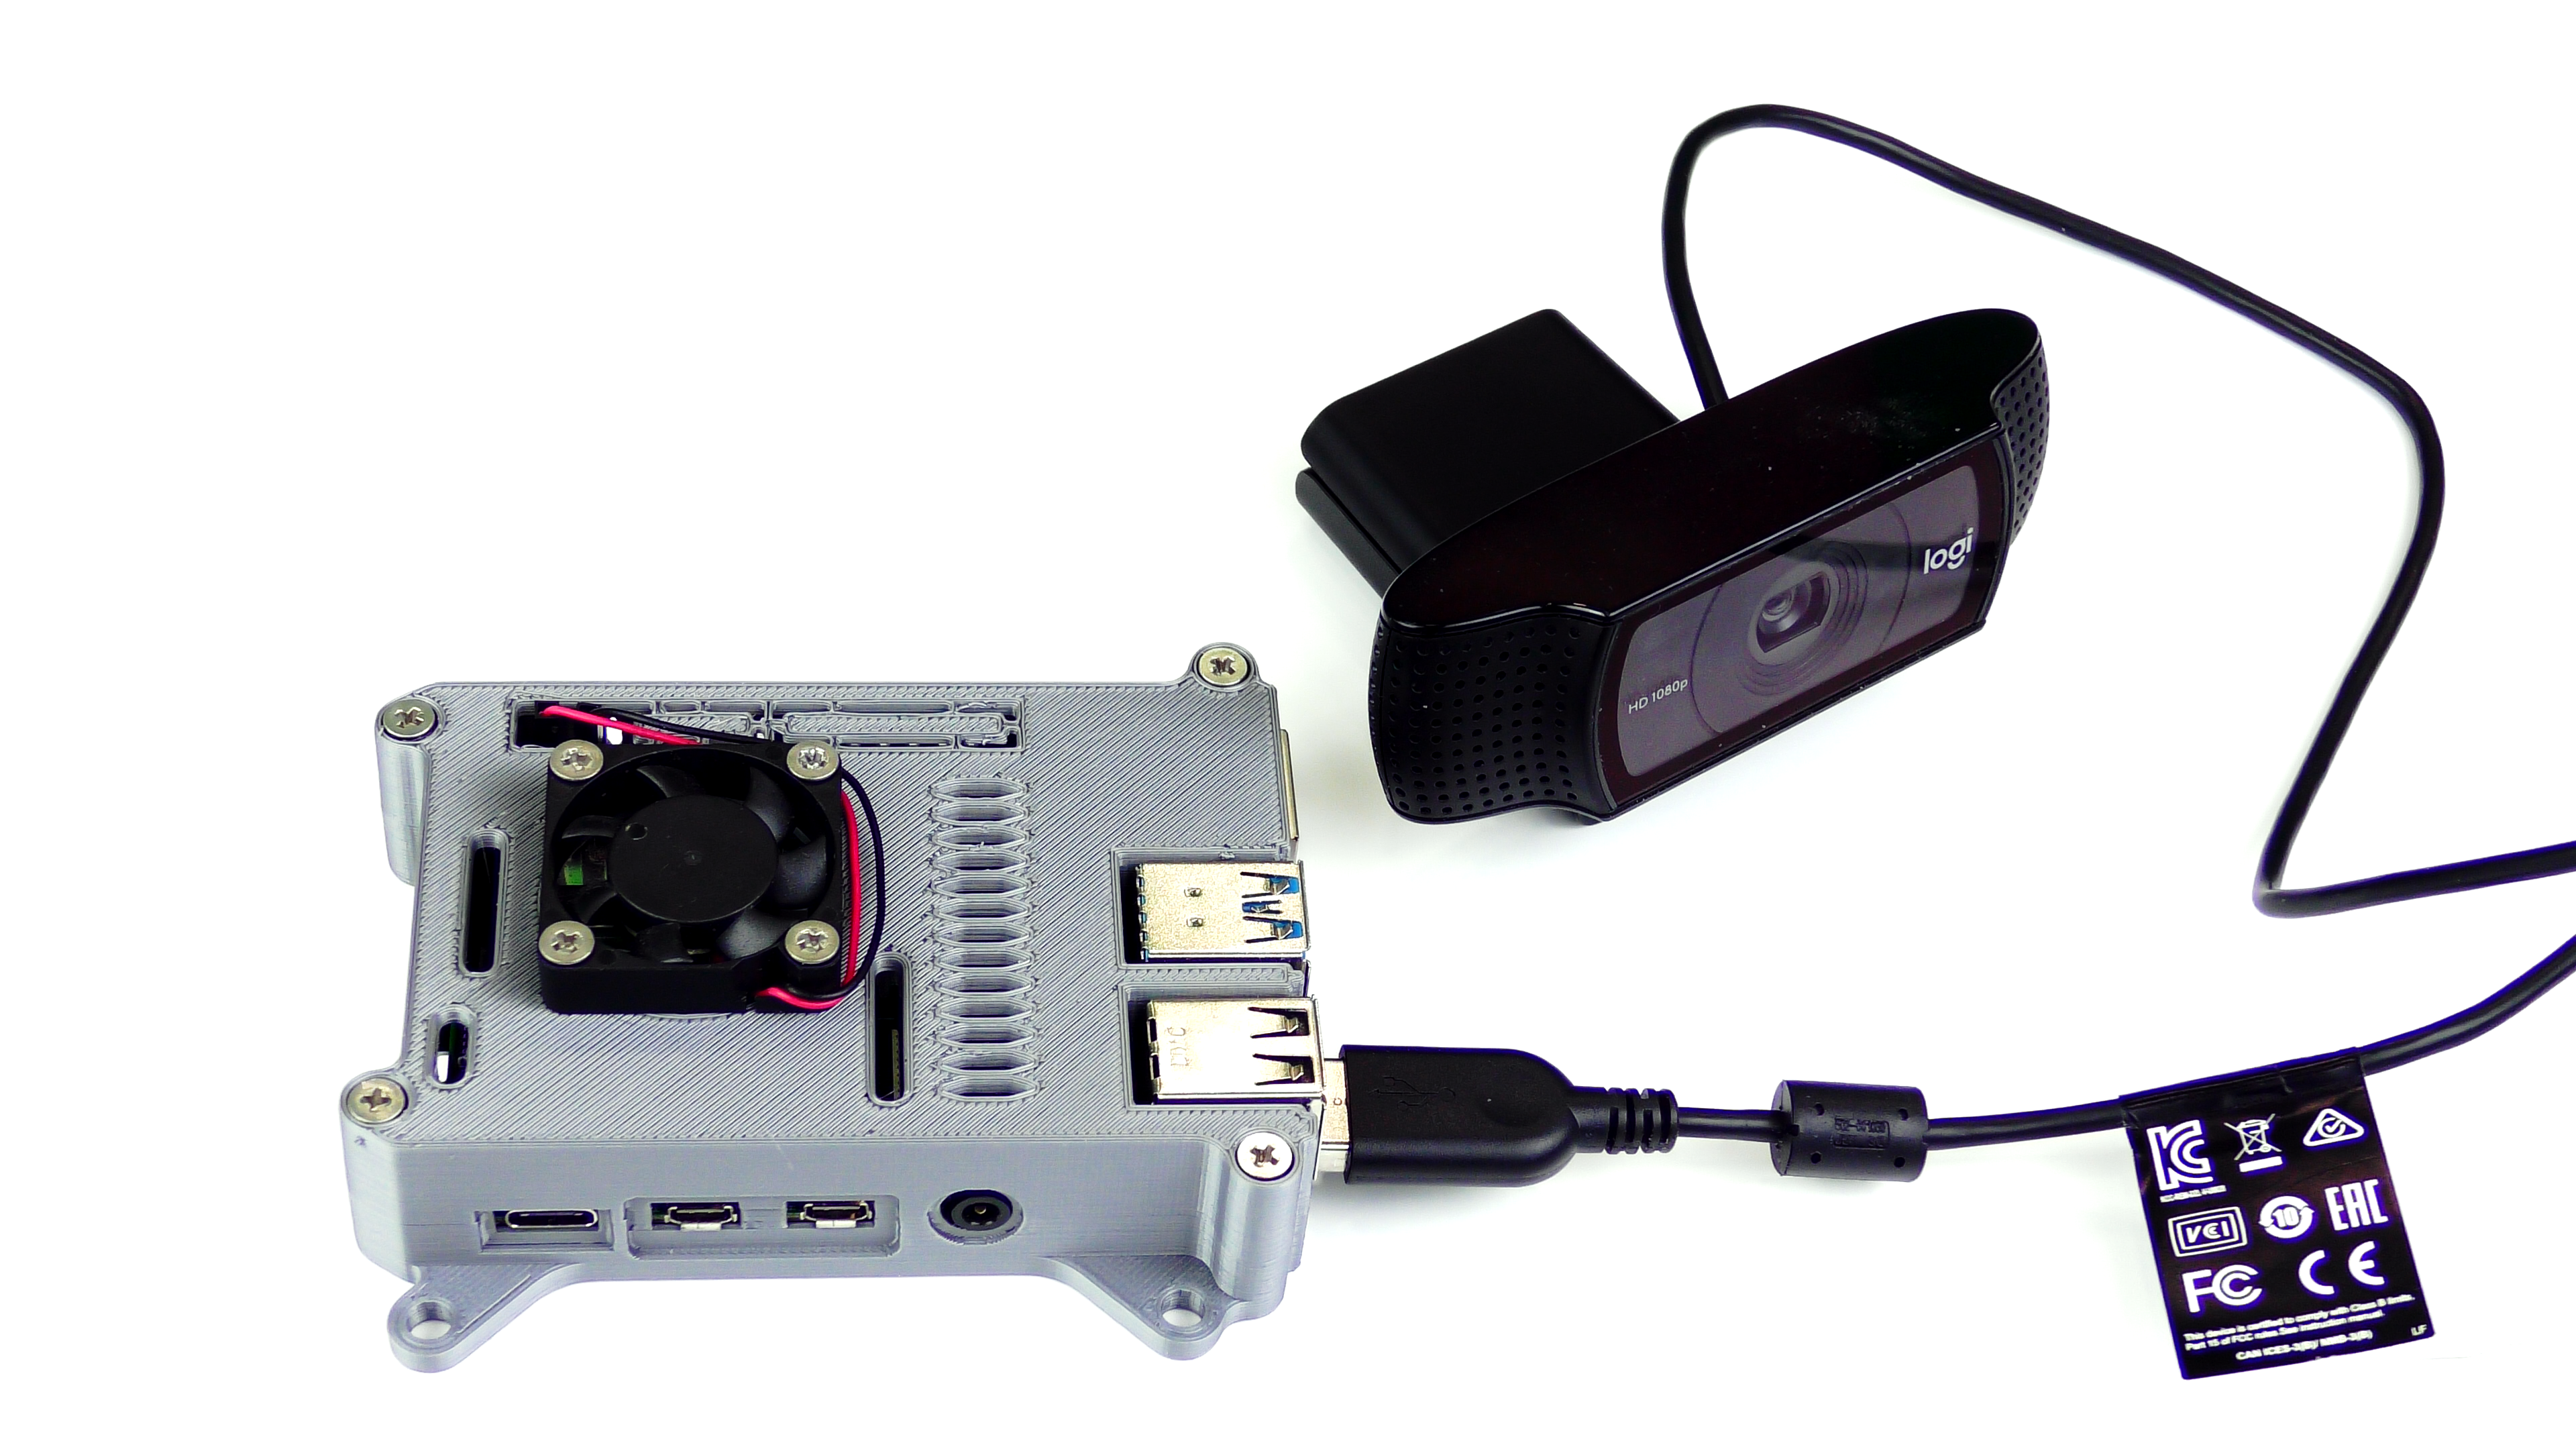
To begin, you’ll need a Raspberry Pi 4 with an up-to-date Raspberry Pi OS image which can be found here. After flashing this image to an SD card and adding a file named wpa_supplicant.conf

ctrl_interface=DIR=/var/run/wpa_supplicant GROUP=netdev
update_config=1
country=<Insert 2 letter ISO 3166-1 country code here>

network={
	ssid="<Name of your wireless LAN>"
	psk="<Password for your wireless LAN>"
}

along with an empty file named ssh (both within the /boot directory), you can go ahead and power up the board. Once you’ve successfully SSH’d into the device with 

$ ssh pi@<IP_ADDRESS>

and the password raspberry, it’s time to install the dependencies for the Edge Impulse Linux SDK. Simply run the next three commands to set up the NodeJS environment and everything else that’s required for the edge-impulse-linux wizard:

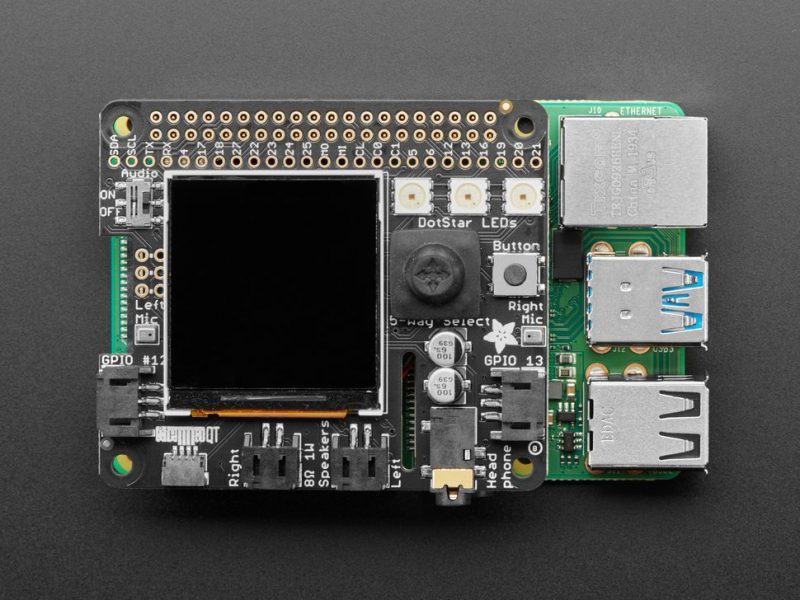
$ curl -sL https://deb.nodesource.com/setup_12.x | sudo bash -
$ sudo apt install -y gcc g++ make build-essential nodejs sox gstreamer1.0-tools gstreamer1.0-plugins-good gstreamer1.0-plugins-base gstreamer1.0-plugins-base-apps
$ npm config set user root && sudo npm install edge-impulse-linux -g --unsafe-perm

Since this project deals with images, we’ll need some way to capture them. The wizard supports both the Pi Camera modules and standard USB webcams, so make sure to enable the camera module first with 
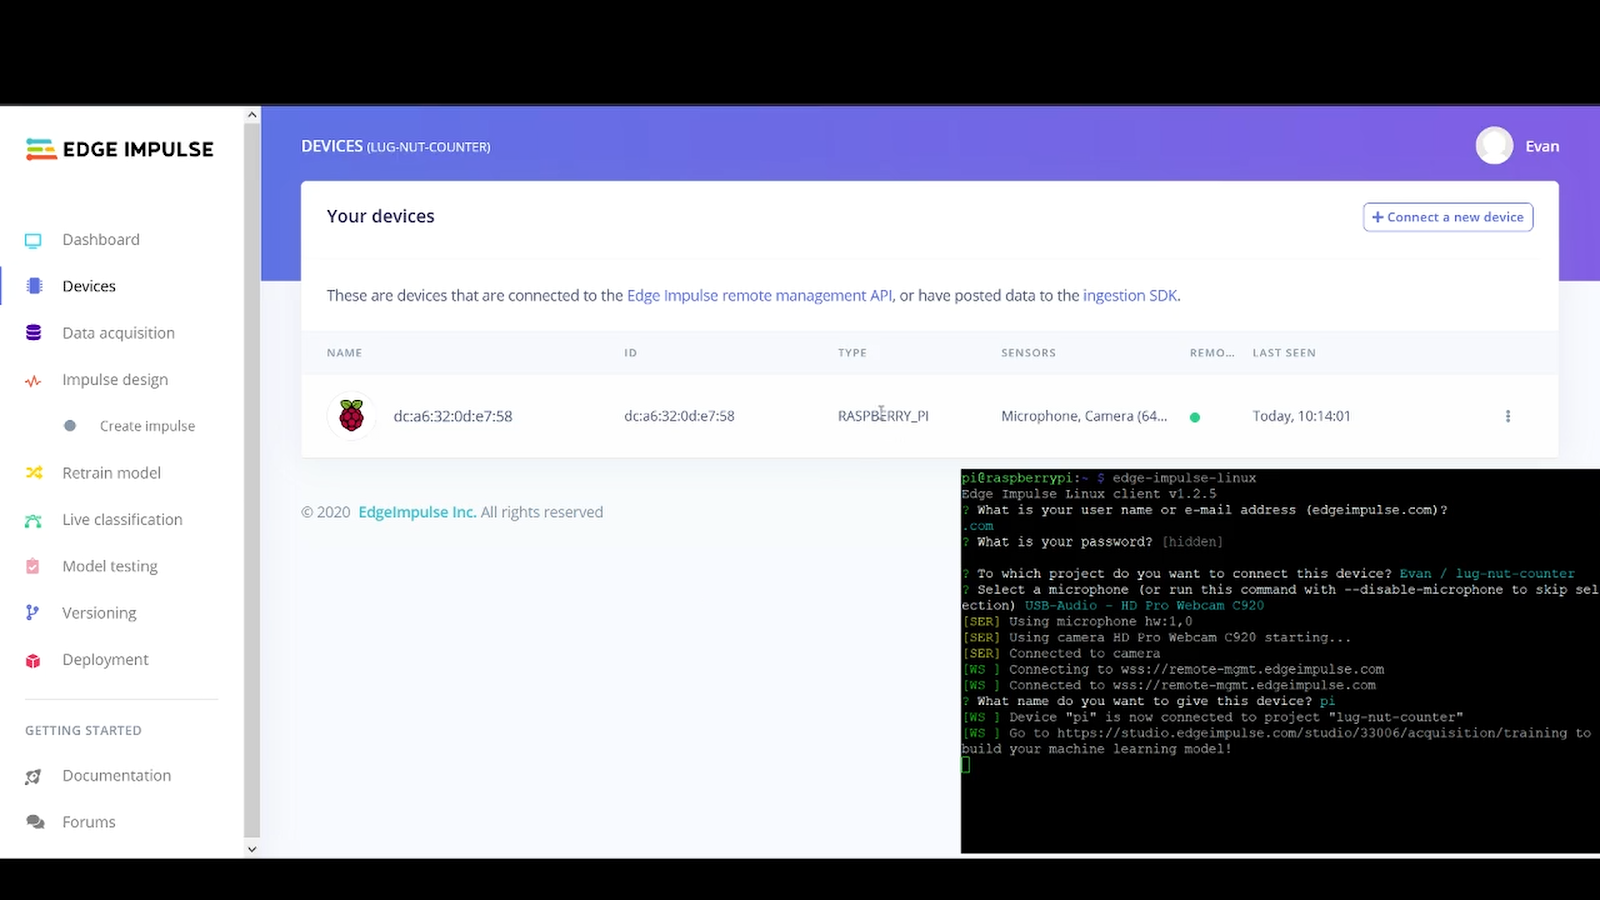
$ sudo raspi-config

if you plan on using one. With that completed, go to the Edge Impulse Studio and create a new project, then run the wizard with 

$ edge-impulse-linux

and make sure your device appears within the Edge Impulse Studio’s device section after logging in and selecting your project.

Edge Impulse Machine Learning screengrab

Capturing your data

Training accurate machine learning models requires feeding plenty of varied data, which means a lot of images are required. For this use case, I captured around 50 images of a wheel that had lug nuts on it. After I was done, I headed to the Labeling queue in the Data Acquisition page and added bounding boxes around each lug nut within every image, along with every wheel.

Edge Impulse Machine Learning screengrab

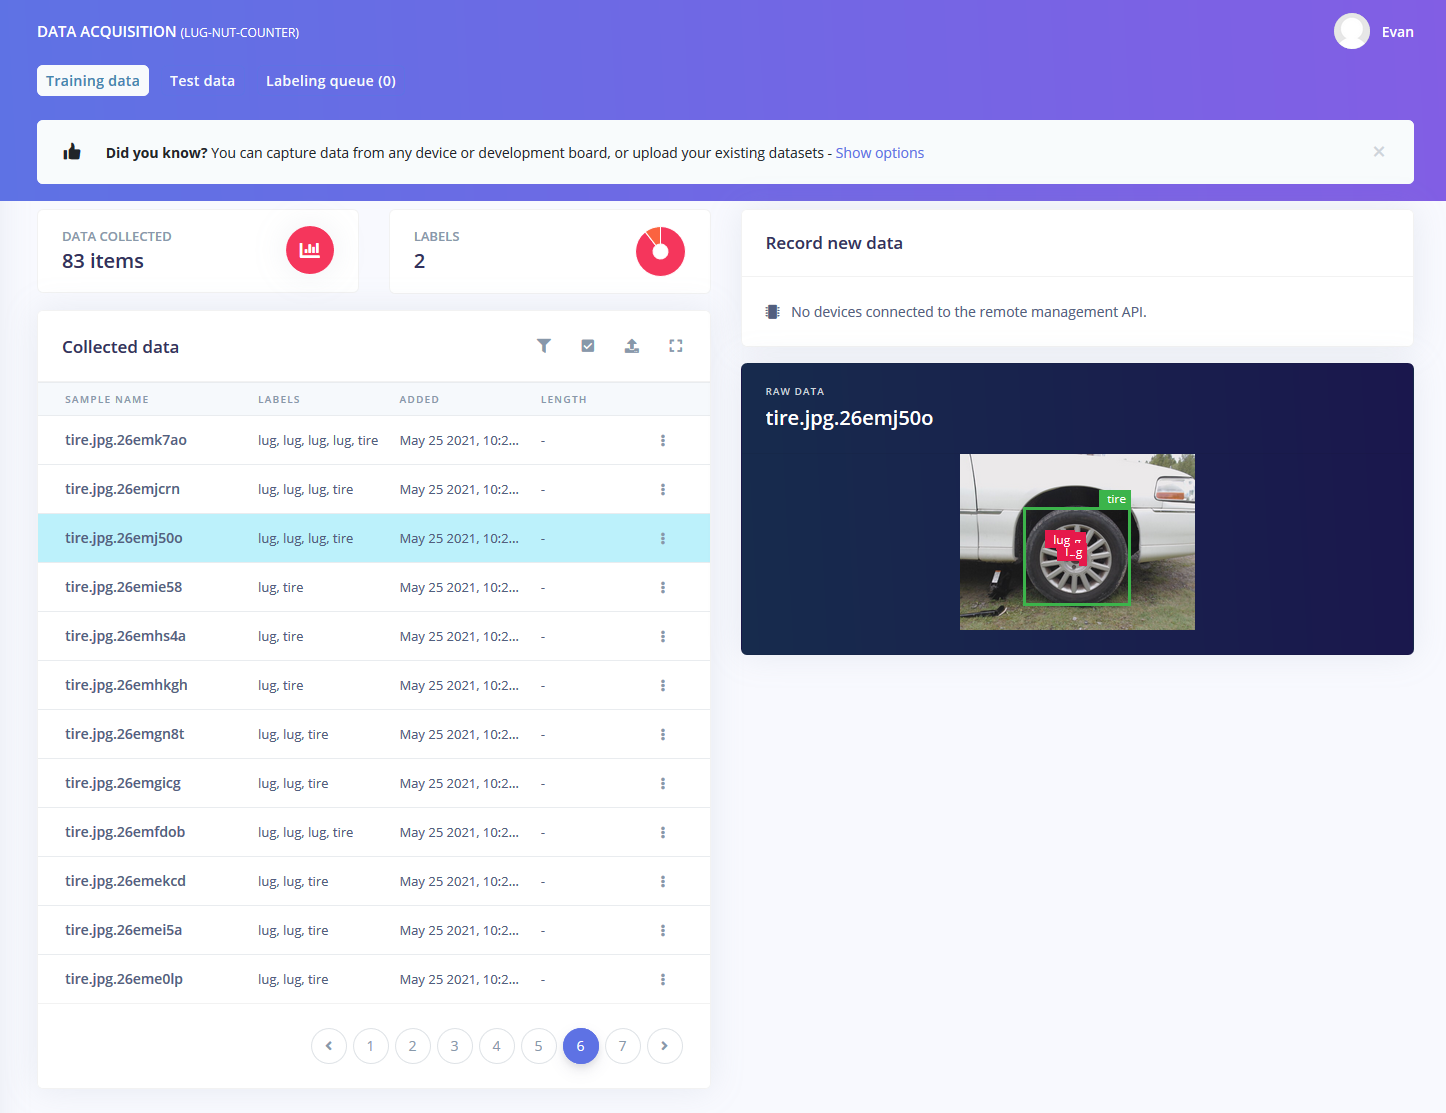
To add some test data, I went back to the main Dashboard page and clicked the Rebalance dataset button, which moves 20% of the training data to the test data bin. 

Training your models

So now that we have plenty of training data, it’s time to do something with it, namely train a model. The first block in the impulse is an Image Data block, and it scales each image to a size of 320 by 320 pixels. Next, image data is fed to the Image processing block which takes the raw RGB data and derives features from it.

Edge Impulse Machine Learning screengrab

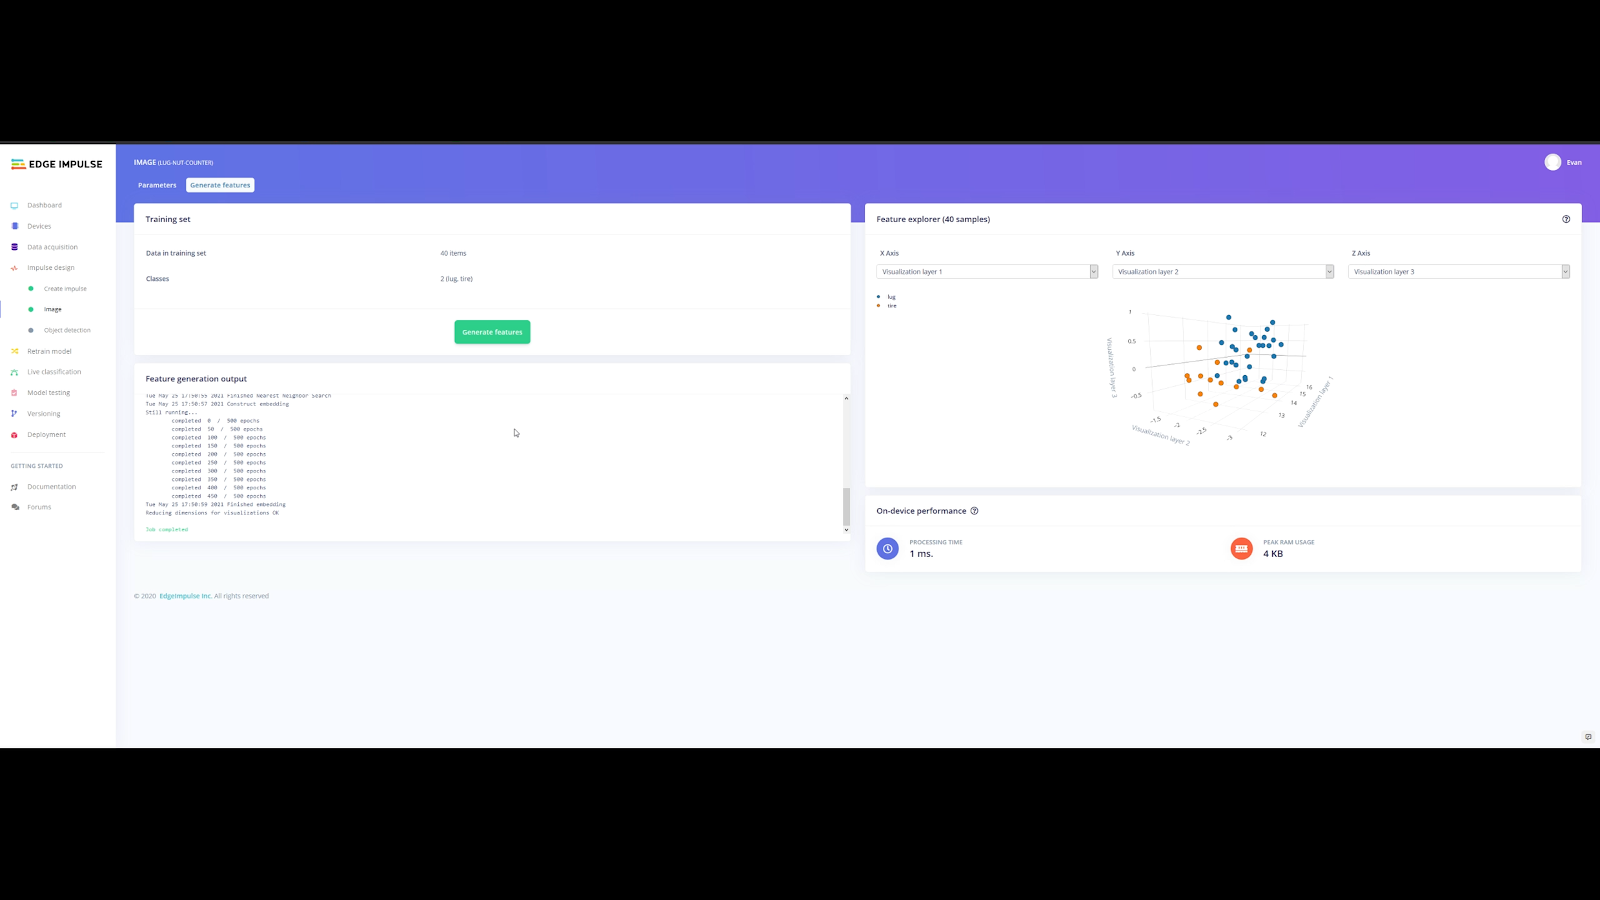
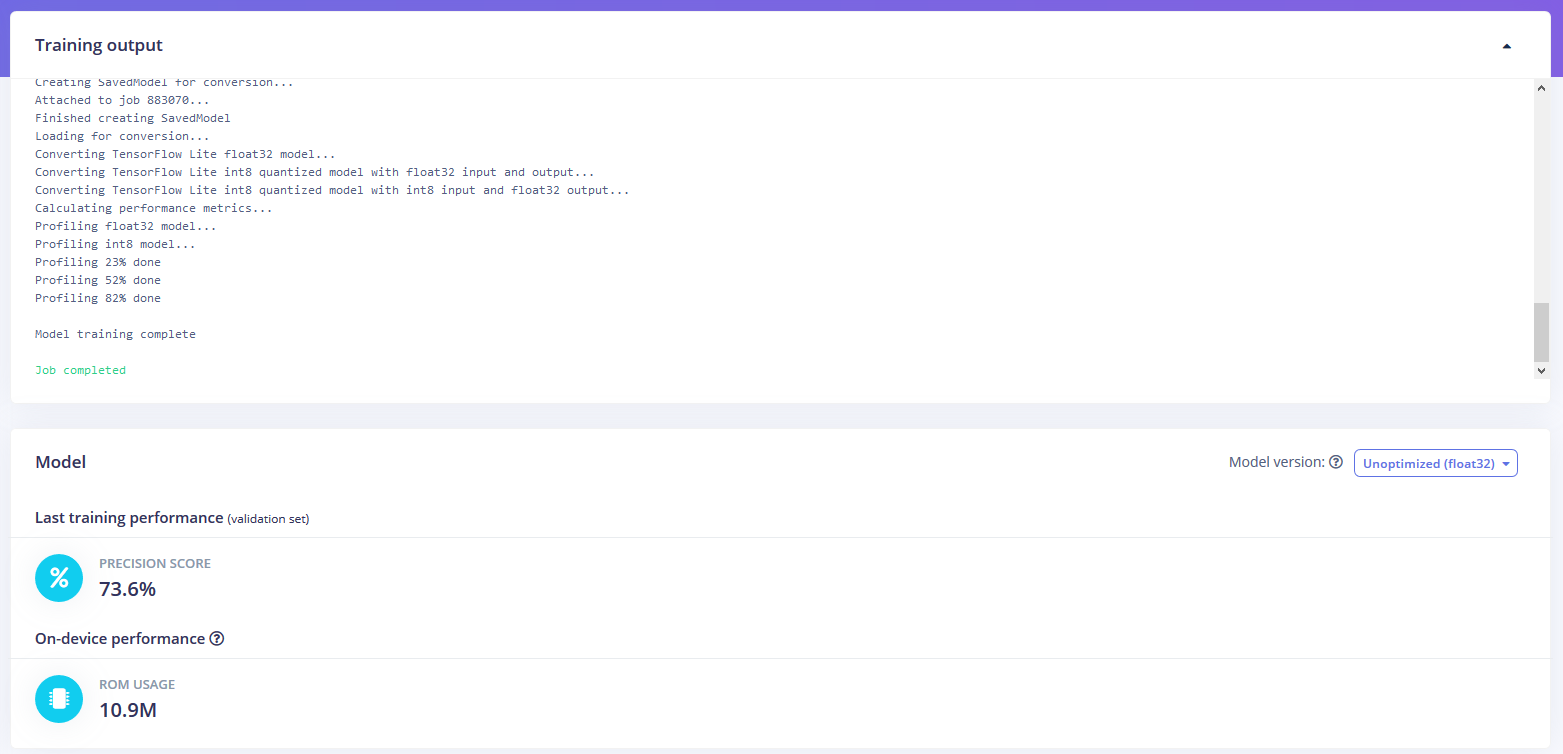
Finally, these features are sent to the Transfer Learning Object Detection model which learns to recognize the objects. I set my model to train for 30 cycles at a learning rate of .15, but this can be adjusted to fine-tune the accuracy.

As you can see from the screenshot below, the model I trained was able to achieve an initial accuracy of 35.4%, but after some fine-tuning, it was able to correctly recognize objects at an accuracy of 73.5%.

Edge Impulse Machine Learning screengrab

Testing and deploying your models

In order to verify that the model works correctly in the real world, we’ll need to deploy it to our Raspberry Pi 4. This is a simple task thanks to the Edge Impulse CLI, as all we have to do is run 

$ edge-impulse-linux-runner

which downloads the model and creates a local webserver. From here, we can open a browser tab and visit the address listed after we run the command to see a live camera feed and any objects that are currently detected. 

Integrating your models with Microsoft Azure IoT 

With the model working locally on the device, let’s add an integration with an Azure IoT Hub that will allow our Raspberry Pi to send messages to the cloud. First, make sure you’ve installed the Azure CLI and have signed in using az login. Then get the name of the resource group you’ll be using for the project. If you don’t have one, you can follow this guide on how to create a new resource group. After that, return to the terminal and run the following commands to create a new IoT Hub and register a new device ID:

$ az iot hub create --resource-group <your resource group> --name <your IoT Hub name>
$ az extension add --name azure-iot
$ az iot hub device-identity create --hub-name <your IoT Hub name> --device-id <your device id>

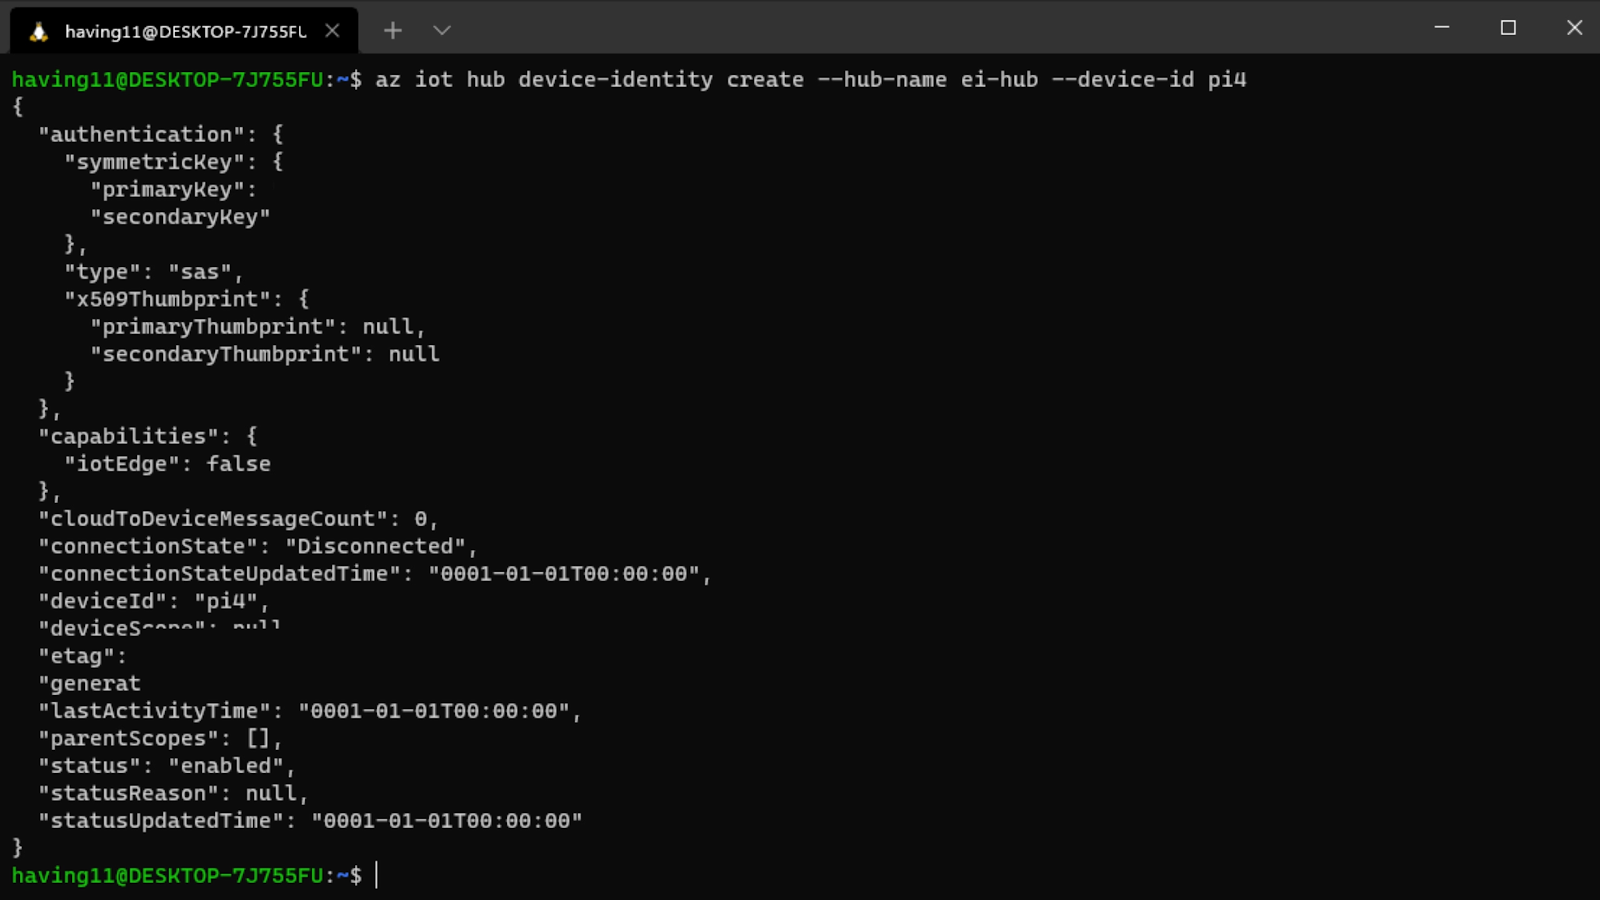
Retrieve the connection string with 

$ az iot hub device-identity connection-string show --device-id <your device id> --hub-name <your IoT Hub name>
Edge Impulse Machine Learning screengrab

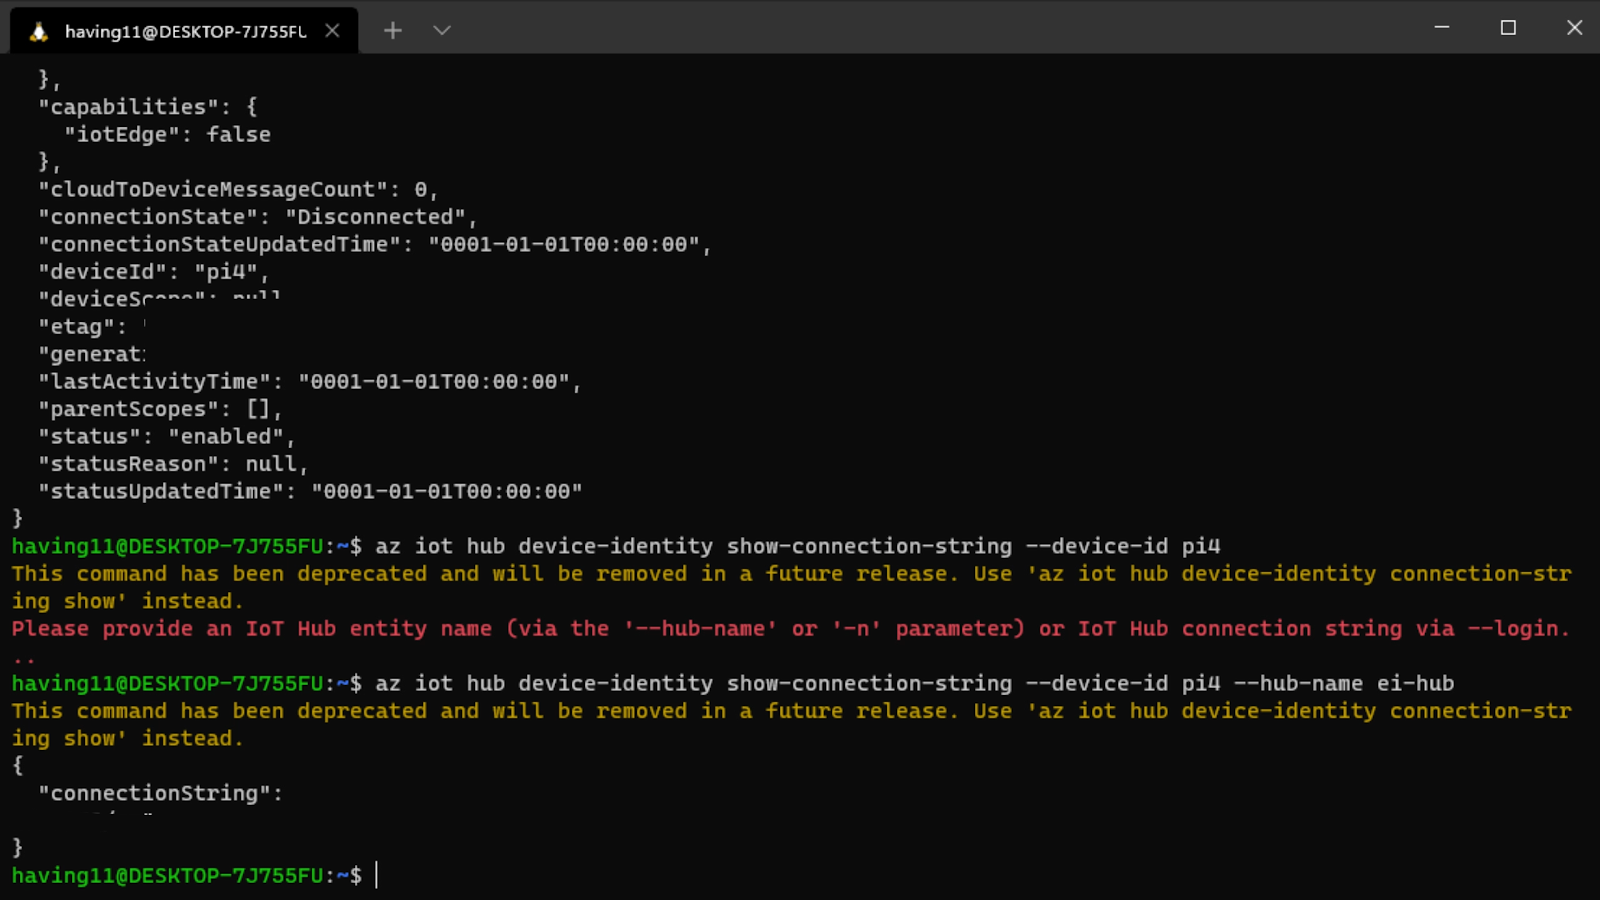
and set it as an environment variable with 

$ export IOTHUB_DEVICE_CONNECTION_STRING="<your connection string here>" 

in your Raspberry Pi’s SSH session, as well as 
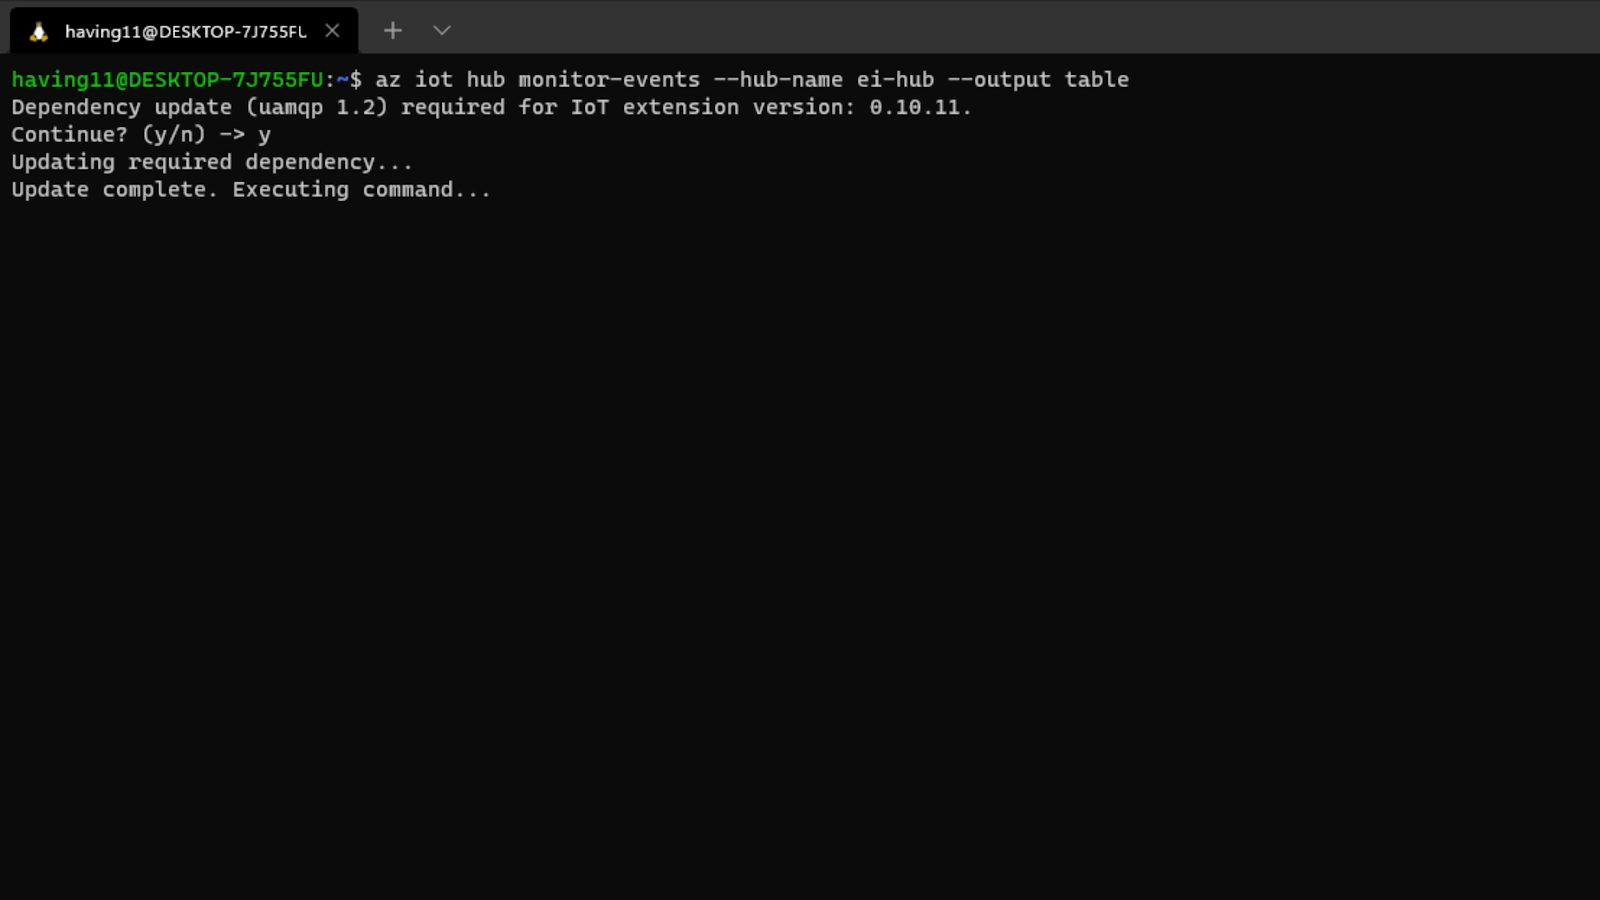
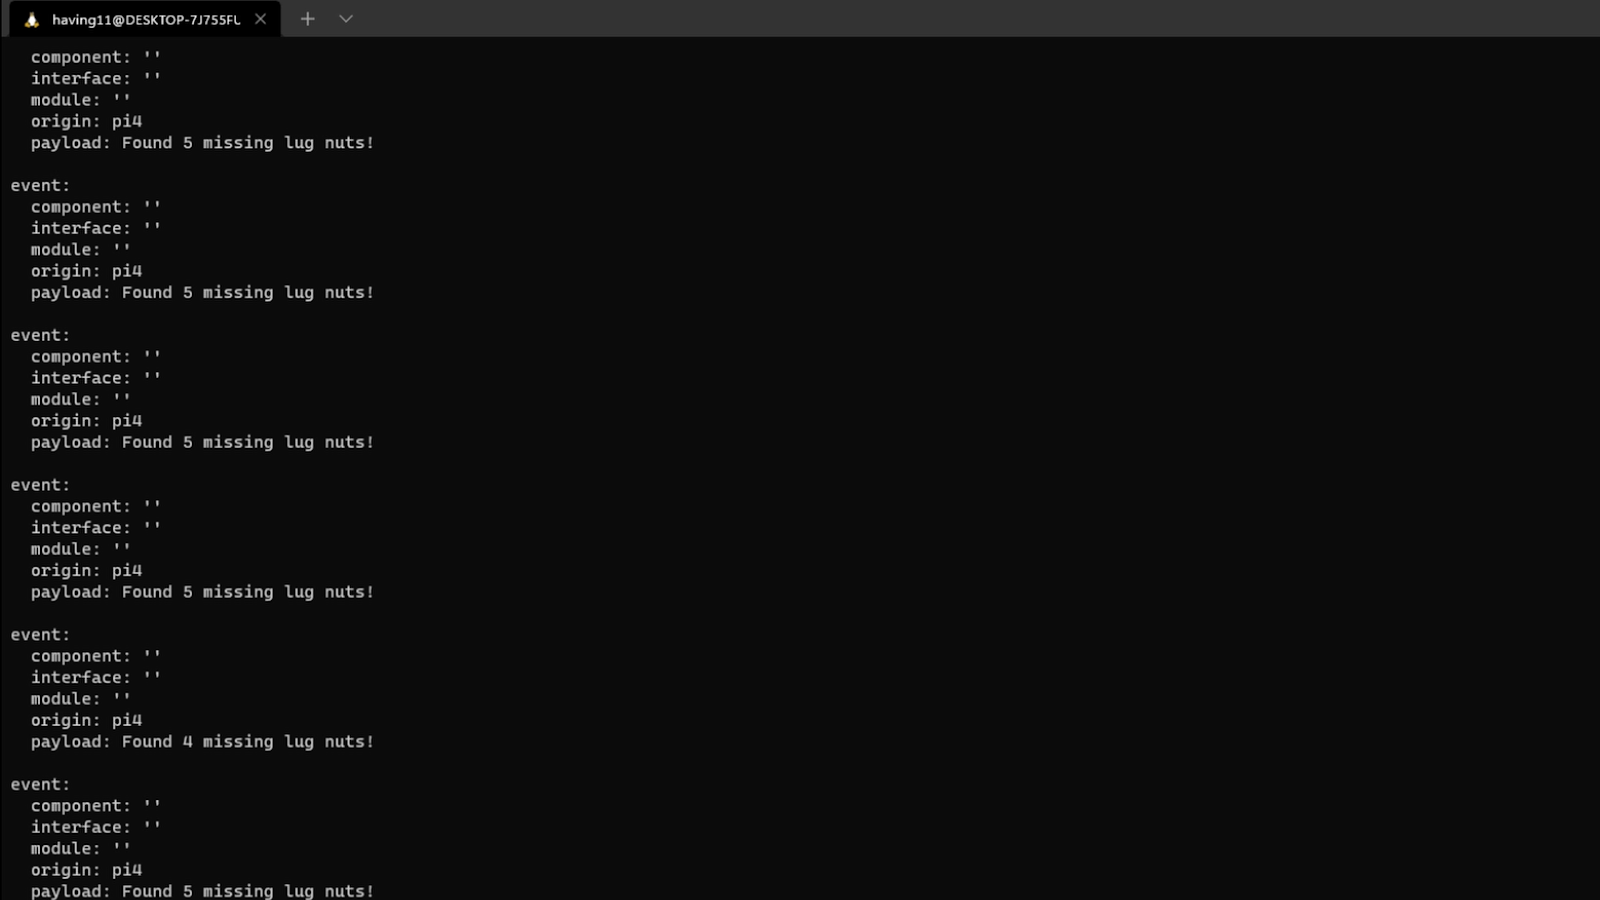
$ pip install azure-iot-device

to add the necessary libraries. (Note: if you do not set the environment variable or pass it in as an argument, the program will not work!) The connection string contains the information required for the device to establish a connection with the IoT Hub service and communicate with it. You can then monitor output in the Hub with 

$ az iot hub monitor-events --hub-name <your IoT Hub name> --output table

 or in the Azure Portal.

To make sure it works, download and run this example to make sure you can see the test message. For the second half of deployment, we’ll need a way to customize how our model is used within the code. Thankfully, Edge Impulse provides a Python SDK for this purpose. Install it with 

$ sudo apt-get install libatlas-base-dev libportaudio0 libportaudio2 libportaudiocpp0 portaudio19-dev
$ pip3 install edge_impulse_linux -i https://pypi.python.org/simple

There’s some simple code that can be found here on Github, and it works by setting up a connection to the Azure IoT Hub and then running the model.

Edge Impulse Machine Learning screengrab

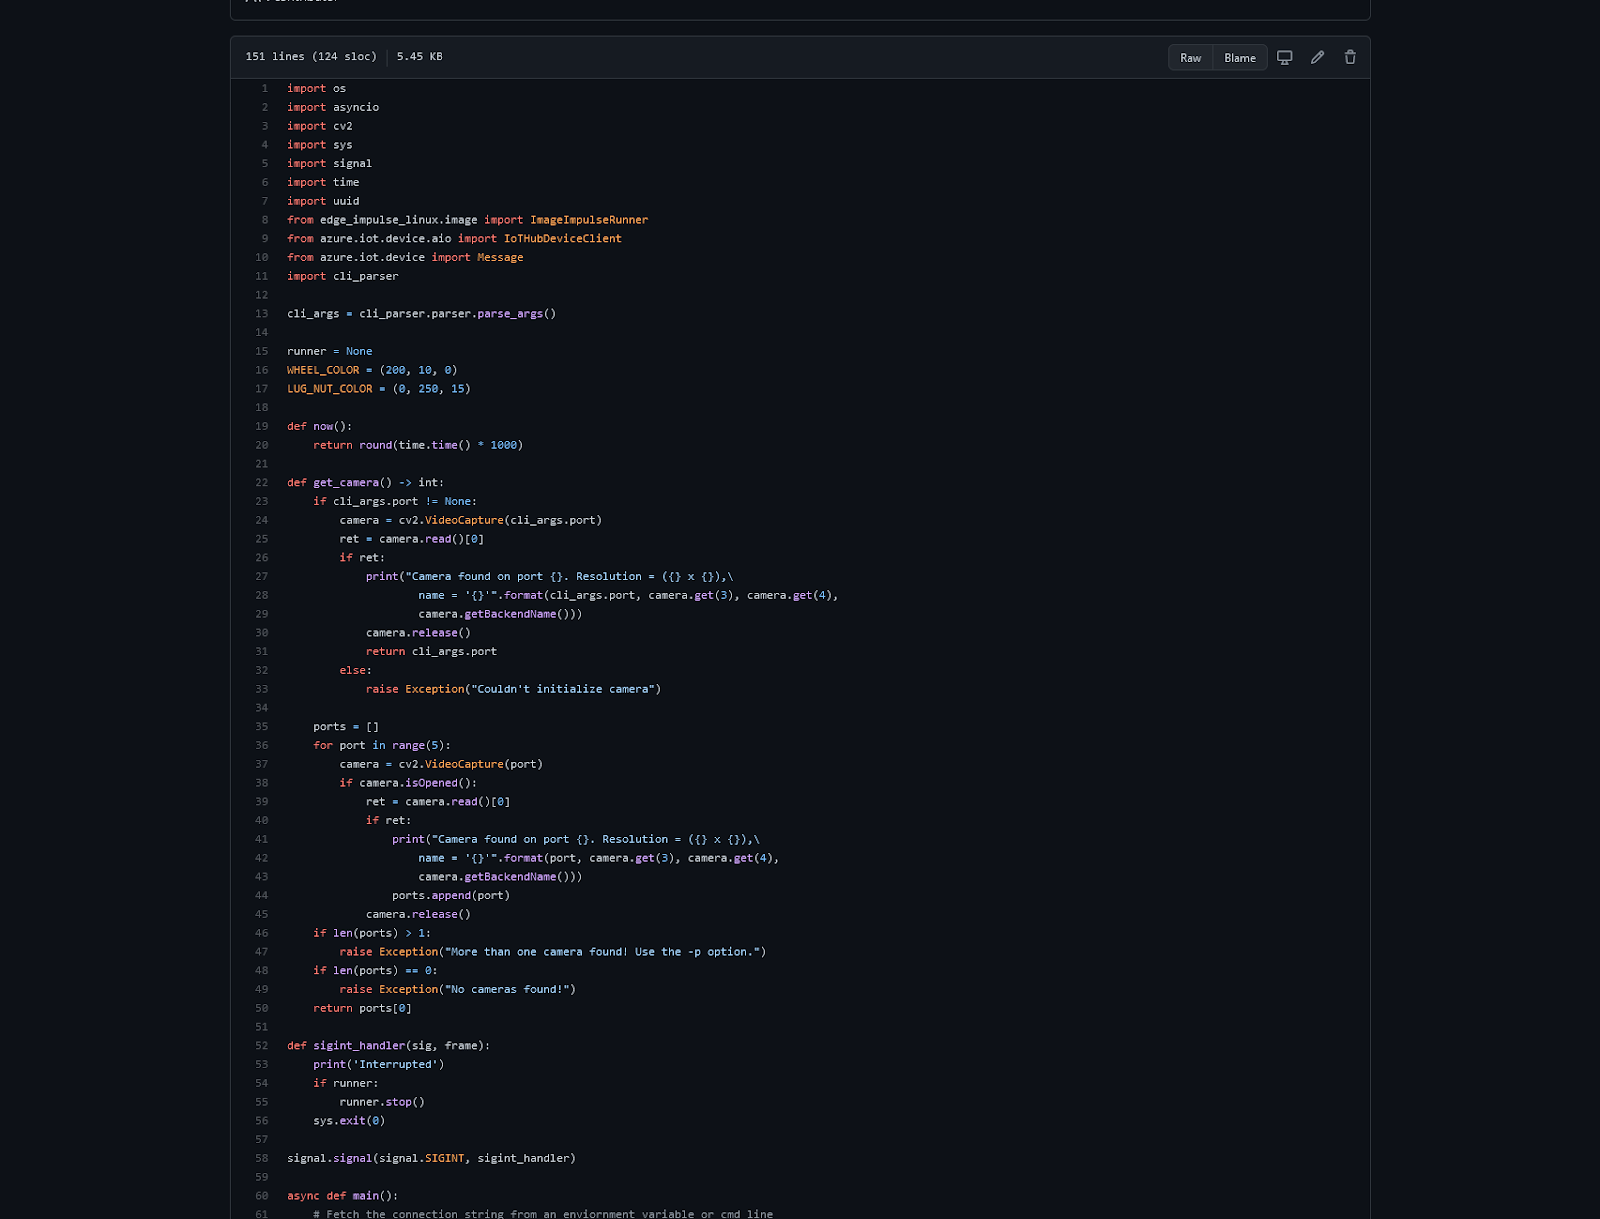
Once you’ve either downloaded the zip file or cloned the repo into a folder, get the model file by running

$ edge-impulse-linux-runner --download modelfile.eim

inside of the folder you just created from the cloning process. This will download a file called modelfile.eim. Now, run the Python program with 

$ python lug_nut_counter.py ./modelfile.eim -c <LUG_NUT_COUNT>

where <LUG_NUT_COUNT> is the correct number of lug nuts that should be attached to the wheel (you might have to use python3 if both Python 2 and 3 are installed).

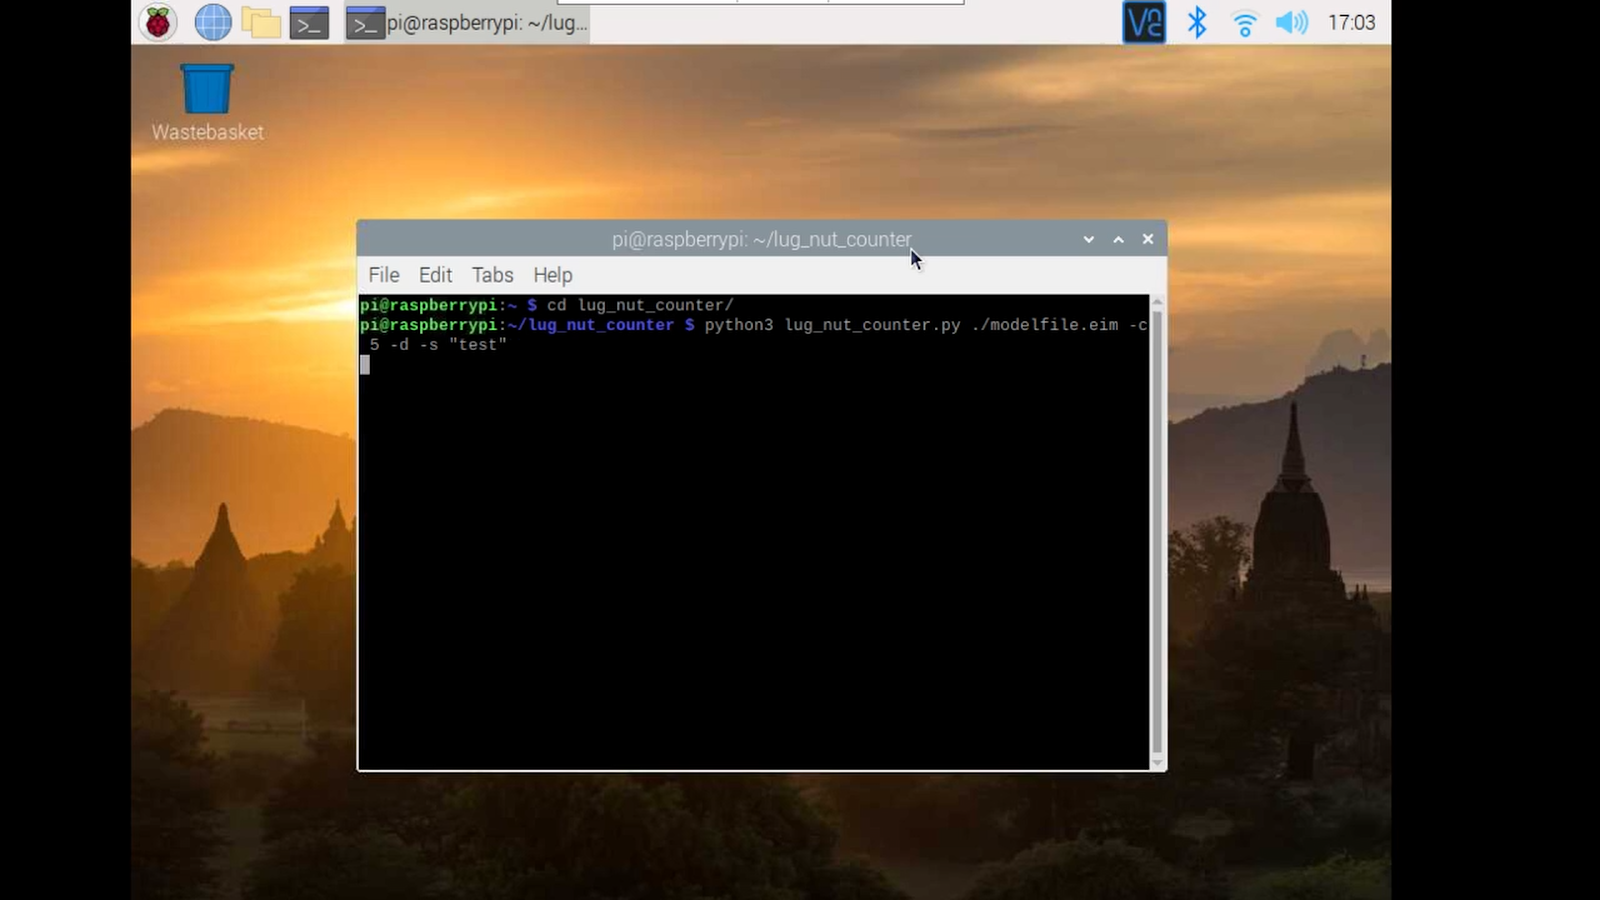
Now whenever a wheel is detected the number of lug nuts is calculated. If this number falls short of the target, a message is sent to the Azure IoT Hub.

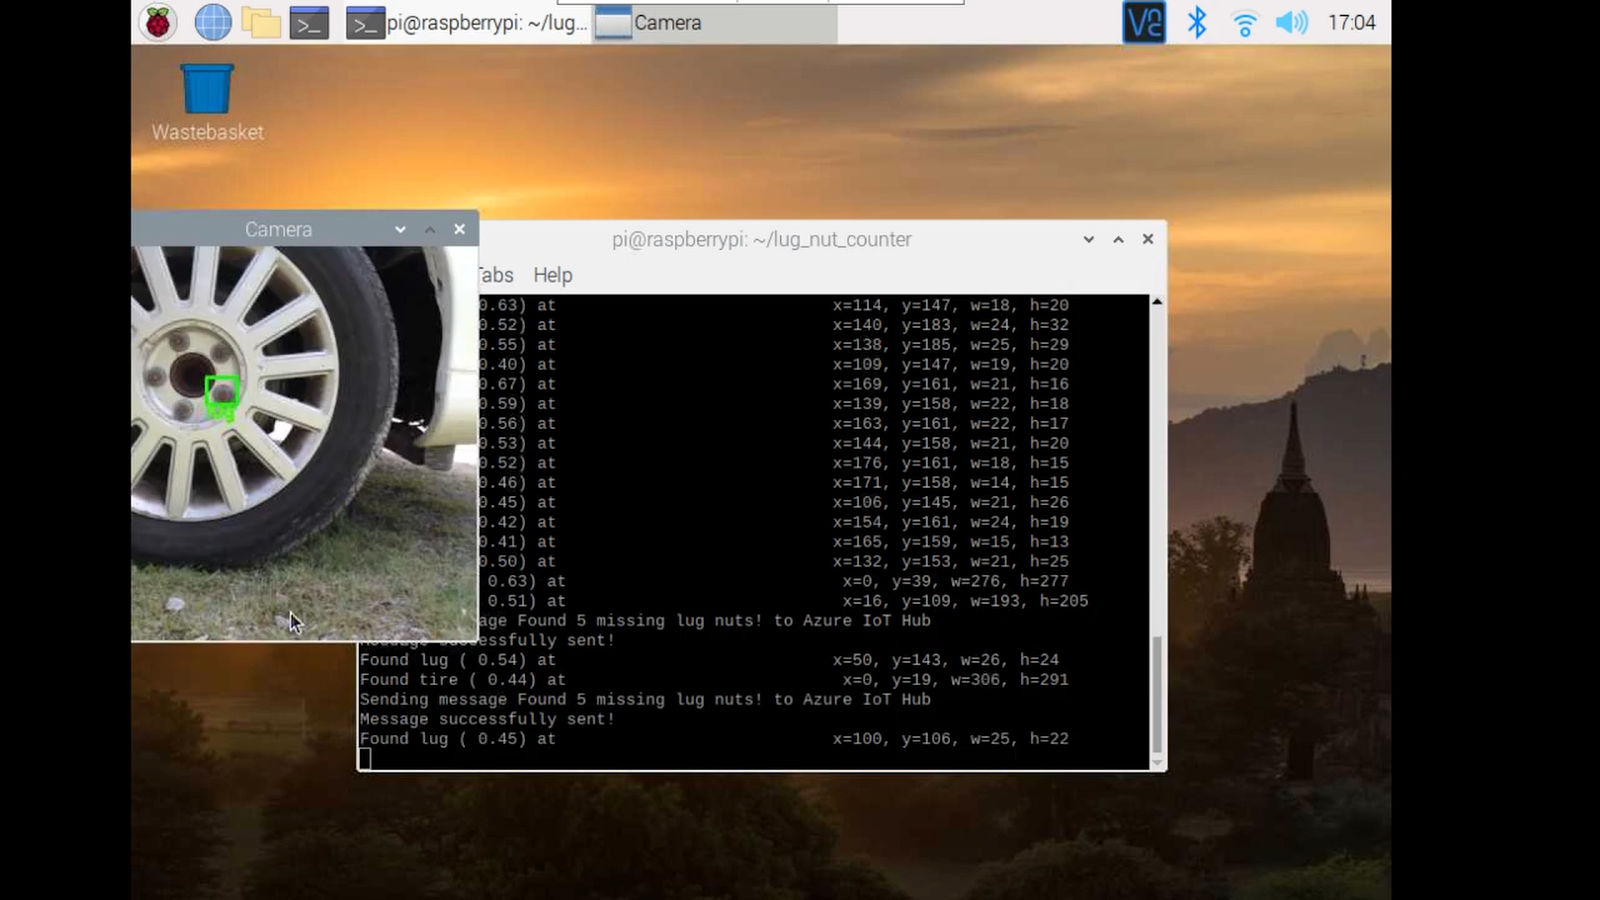
And by only sending messages when there’s something wrong, we can prevent an excess amount of bandwidth from being taken due to empty payloads.

The possibilities are endless

Imagine utilizing object detection for an industrial task such as quality control on an assembly line, or identifying ripe fruit amongst rows of crops, or detecting machinery malfunction, or remote, battery-powered inferencing devices. Between Edge Impulse, hardware like Raspberry Pi, and the Microsoft Azure IoT Hub, you can design endless models and deploy them on every device, while authenticating each and every device with built-in security.

You can set up individual identities and credentials for each of your connected devices to help retain the confidentiality of both cloud-to-device and device-to-cloud messages, revoke access rights for specific devices, transmit code and services between the cloud and the edge, and benefit from advanced analytics on devices running offline or with intermittent connectivity. And if you’re really looking to scale your operation and enjoy a complete dashboard view of the device fleets you manage, it is also possible to receive IoT alerts in Microsoft’s Connected Field Service from Azure IoT Central – directly.

Feel free to take the code for this project hosted here on GitHub and create a fork or add to it.

The complete project is available here. Let us know your thoughts at [email protected]. There are no limits, just your imagination at work.

The post IoT gets a machine learning boost, from edge to cloud appeared first on Raspberry Pi.

Learn the Internet of Things with “IoT for Beginners” and Raspberry Pi

Post Syndicated from Ashley Whittaker original https://www.raspberrypi.org/blog/learn-the-internet-of-things-with-iot-for-beginners-and-raspberry-pi/

Want to dabble in the Internet of Things but don’t know where to start? Well, our friends at Microsoft have developed something fun and free just for you. Here’s Senior Cloud Advocate Jim Bennett to tell you all about their brand new online curriculum for IoT beginners.

IoT — the Internet of Things — is one of the biggest growth areas in technology, and one that, to me, is very exciting. You start with a device like a Raspberry Pi, sprinkle some sensors, dust with code, mix in some cloud services and poof! You have smart cities, self-driving cars, automated farming, robotic supermarkets, or devices that can clean your toilet after you shout at Alexa for the third time.

robot detecting a shelf restock is required
Why doesn’t my local supermarket have a restocking robot?

It feels like every week there is another survey out on what tech skills will be in demand in the next five years, and IoT always appears somewhere near the top. This is why loads of folks are interested in learning all about it.

In my day job at Microsoft, I work a lot with students and lecturers, and I’m often asked for help with content to get started with IoT. Not just how to use whatever cool-named IoT services come from your cloud provider of choice to enable digital whatnots to add customer value via thingamabobs, but real beginner content that goes back to the basics.

IoT for Beginners logo
‘IoT for Beginners’ is totally free for anyone wanting to learn about the Internet of Things

This is why a few of us have spent the last few months locked away building IoT for Beginners. It’s a free, open source, 24-lesson university-level IoT curriculum designed for teachers and students, and built by IoT experts, education experts and students.

What will you learn?

The lessons are grouped into projects that you can build with a Raspberry Pi so that you can deep-dive into use cases of IoT, following the journey of food from farm to table.

collection of cartoons of eye oh tee projects

You’ll build projects as you learn the concepts of IoT devices, sensors, actuators, and the cloud, including:

  • An automated watering system, controlling a relay via a soil moisture sensor. This starts off running just on your device, then moves to a free MQTT broker to add cloud control. It then moves on again to cloud-based IoT services to add features like security to stop Farmer Giles from hacking your watering system.
  • A GPS-based vehicle tracker plotting the route taken on a map. You get alerts when a vehicle full of food arrives at a location by using cloud-based mapping services and serverless code.
  • AI-based fruit quality checking using a camera on your device. You train AI models that can detect if fruit is ripe or not. These start off running in the cloud, then you move them to the edge running directly on your Raspberry Pi.
  • Smart stock checking so you can see when you need to restack the shelves, again powered by AI services.
  • A voice-controlled smart timer so you have more devices to shout at when cooking your food! This one uses AI services to understand what you say into your IoT device. It gives spoken feedback and even works in many different languages, translating on the fly.

Grab your Raspberry Pi and some sensors from our friends at Seeed Studio and get building. Without further ado, please meet IoT For Beginners: A Curriculum!

The post Learn the Internet of Things with “IoT for Beginners” and Raspberry Pi appeared first on Raspberry Pi.

Building a business with VNC Connect on Raspberry Pi

Post Syndicated from Ashley Whittaker original https://www.raspberrypi.org/blog/building-a-business-with-vnc-connect-on-raspberry-pi/

Our friends over at RealVNC are having a whale of a time with Raspberry Pi, so they decided to write this guest blog for us. Here’s what they had to say about what their VNC Connect software can do, and how Raspberry Pi can be integrated into industry. Plus, hear about a real-life commercial example.

What is VNC Connect?

RealVNC’s VNC Connect is a secure way for you to control your Raspberry Pi from anywhere, as if you were sat in front of it. This is particularly useful for Raspberry Pis which are running ‘headless’ without monitor connected. The desktop can instead be presented in the VNC Connect Viewer app on, say, a wirelessly-connected iPad, from which you have full graphical control of the Raspberry Pi. The two devices do not even have to be on the same local network, so you can take remote control over the Internet. Which is great for roaming robots.

real vnc overview
VNC Connect is all of these things

You can read more about RealVNC for Raspberry Pi here. It’s free to get started for non-commercial use.

Commercial potential

RealVNC have seen an increase in the use of Raspberry Pi in business, not just at home and in education. Raspberry Pi, combined with VNC Connect, is helping businesses both to charge for a service that they couldn’t previously provide, and to improve/automate a service they already offer.

We’ll get to the solar panels next… (this photo makes sense, honestly)

For example, Raspberry Pi is a useful, as well as a cost effective, “edge device” in complex hardware environments that require monitoring – a real IoT use case! Add VNC Connect, and the businesses which perform these hardware installations can provide monitoring and support services on a subscription basis to customers, building repeat revenue and adding value.

With VNC Connect being offered at an affordable price (less than the price of a cup of coffee per month for a single device), it doesn’t take these businesses long to make a healthy return.

A commercial example: monitoring solar panels

Centurion Solar provides monitoring software for home solar panels. Each installation is hooked up via USB to a Raspberry Pi-powered monitoring system, and access is provided both to the customer and to Centurion Solar, who run a paid monitoring and support service.

Monitoring solar panels online with Centurion Solar

Having every new system leave the factory pre-installed with VNC Connect allows Centurion Solar to provide assistance quickly and easily for customers, no matter where they are, or how tech-savvy they are (or aren’t).

The software is currently being used in over 15,000 systems across 27 countries, with more new users every week.

“We’ve gone from being in limp mode to overdrive in one easy step, using RealVNC as the driving force to get us there.”

Johan Booysen, Founder at Centurion Solar

You can read more here.

Possibilities across many sectors

There are many more industry sectors which could be considering Raspberry Pi as a lightweight and convenient monitoring/edge compute solution, just like Centurion Solar do. For example:

  • Energy
  • Manufacturing
  • Healthcare
  • Transport
  • Agriculture
  • Critical National Infrastructure
raspberry pi use in biological sciences jolle jolle
Remember this blog about how Raspberry Pi is a versatile tool for biological sciences?

The possibilities are only limited by imagination, and the folks down the road at RealVNC are happy to discuss how using Raspberry Pi in your environment could be transformative. You can reach us here.

From the engineers to the CEO, we’re all Raspberry Pi enthusiasts who love nothing more than sharing our experience and solving problems (our CEO, Adam, even publishes a popular bare-metal Raspberry Pi operating system tutorial on Github).

The post Building a business with VNC Connect on Raspberry Pi appeared first on Raspberry Pi.

Machine Learning made easy with Raspberry Pi, Adafruit and Microsoft

Post Syndicated from Ashley Whittaker original https://www.raspberrypi.org/blog/machine-learning-made-easy-with-raspberry-pi-adafruit-and-microsoft/

Machine learning can sound daunting even for experienced Raspberry Pi hobbyists, but Microsoft and Adafruit Industries are determined to make it easier for everyone to have a go. Microsoft’s Lobe tool takes the stress out of training machine learning models, and Adafruit have developed an entire kit around their BrainCraft HAT, featuring Raspberry Pi 4 and a Raspberry Pi Camera, to get your own machine learning project off to a flying start.

adafruit lobe kit
Adafruit developed this kit especially for the BrainCraft HAT to be used with Microsoft Lobe on Raspberry Pi

Adafruit’s BrainCraft HAT

Adafruit’s BrainCraft HAT fits on top of Raspberry Pi 4 and makes it really easy to connect hardware and debug machine learning projects. The 240 x 240 colour display screen also lets you see what the camera sees. Two microphones allow for audio input, and access to the GPIO means you can connect things likes relays and servos, depending on your project.

Adafruit’s BrainCraft HAT in action detecting a coffee mug

Microsoft Lobe

Microsoft Lobe is a free tool for creating and training machine learning models that you can deploy almost anywhere. The hardest part of machine learning is arguably creating and training a new model, so this tool is a great way for newbies to get stuck in, as well as being a fantastic time-saver for people who have more experience.

Get started with one of three easy, medium, and hard tutorials featured on the lobe-adafruit-kit GitHub.

This is just a quick snippet of Microsoft’s full Lobe tutorial video.
Look how quickly the tool takes enough photos to train a machine learning model

‘Bakery’ identifies and prices different pastries

Lady Ada demonstrated Bakery: a machine learning model that uses an Adafruit BrainCraft HAT, a Raspberry Pi camera, and Microsoft Lobe. Watch how easy it is to train a new machine learning model in Microsoft Lobe from this point in the Microsoft Build Keynote video.

A quick look at Bakery from Adafruit’s delightful YouTube channel

Bakery identifies different baked goods based on images taken by the Raspberry Pi camera, then automatically identifies and prices them, in the absence of barcodes or price tags. You can’t stick a price tag on a croissant. There’d be flakes everywhere.

Extra functionality

Running this project on Raspberry Pi means that Lady Ada was able to hook up lots of other useful tools. In addition to the Raspberry Pi camera and the HAT, she is using:

  • Three LEDs that glow green when an object is detected
  • A speaker and some text-to-speech code that announces which object is detected
  • A receipt printer that prints out the product name and the price

All of this running on Raspberry Pi, and made super easy with Microsoft Lobe and Adafruit’s BrainCraft HAT. Adafruit’s Microsoft Machine Learning Kit for Lobe contains everything you need to get started.

full adafruit lobe kit
The full Microsoft Machine Learning Kit for Lobe with Raspberry Pi 4 kit

Watch the Microsoft Build keynote

And finally, watch Microsoft CTO Kevin Scott introduce Limor Fried, aka Lady Ada, owner of Adafruit Industries. Lady Ada joins remotely from the Adafruit factory in Manhattan, NY, to show how the BrainCraft HAT and Lobe work to make machine learning accessible.

The post Machine Learning made easy with Raspberry Pi, Adafruit and Microsoft appeared first on Raspberry Pi.

Adafruit guest post: Machine learning add-ons for Raspberry Pi

Post Syndicated from Ladyada original https://www.raspberrypi.org/blog/adafruit-guest-post-machine-learning-add-ons-for-raspberry-pi/

Hi folks, Ladyada here from Adafruit. The Raspberry Pi folks said we could do a guest post on our Adafruit BrainCraft HAT & Voice Bonnet, so here we go!

Adafruit BrainCraft HAT on top of a  Raspberry Pi
Adafruit BrainCraft HAT for Raspberry Pi

I’ve been engineering up a few Machine Learning devices that work with Raspberry Pi: BrainCraft HAT and the Voice Bonnet!

The idea behind the BrainCraft HAT is to enable you to “craft brains” for machine learning on the EDGE, with microcontrollers and microcomputers. On ASK AN ENGINEER, we chatted with Pete Warden, the technical lead of the mobile, embedded TensorFlow Group on Google’s Brain team about what would be ideal for a board like this.

BrainCraft HAT

And here’s what we designed! The BrainCraft HAT has a 240×240 TFT IPS display for inference output, slots for camera connector cable for imaging projects, a 5-way joystick, a button for UI input, left and right microphones, stereo headphone out, stereo 1W speaker out, three RGB DotStar LEDs, two 3-pin STEMMA connectors on PWM pins so they can drive NeoPixels or servos, and Grove/STEMMA/Qwiic I2C port.

This will let people build a wide range of audio/video AI projects while also allowing easy plug-in of sensors and robotics!

A controllable mini fan attaches to the bottom and can be used to keep your Raspberry Pi cool while it’s doing intense AI inference calculations. Most importantly, there’s an on/off switch that will completely disable the audio codec, so that when it’s off, there’s no way it’s listening to you.

Check it out here, and get all the learning guides.

Voice Bonnet

Adafruit Voice Bonnet atop a  Raspberry Pi
Adafruit Voice Bonnet for Raspberry Pi

Next up, the Adafruit Voice Bonnet for Raspberry Pi: two speakers plus two mics. Your Raspberry Pi computer is like an electronic brain — and with the Adafruit Voice Bonnet you can give it a mouth and ears as well! Featuring two microphones and two 1Watt speaker outputs using a high-quality I2S codec, this Raspberry Pi add-on will work with any Raspberry Pi with a 2×20 GPIO header, from Raspberry Pi Zero up to Raspberry Pi 4 and beyond (basically all models but the very first ones made).

The on-board WM8960 codec uses I2S digital audio for great quality recording and playback, so it sounds a lot better than the headphone jack on Raspberry Pi (or the no-headphone jack on Raspberry Pi Zero). We put ferrite beads and filter capacitors on every input and output to get the best possible performance, and all at a great price.

We specifically designed this bonnet for use when making machine learning projects such as DIY voice assistants. For example, see this guide on creating a DIY Google Assistant.

But you could do various voice-activated or voice recognition projects. With two microphones, basic voice position can be detected as well. Check it out here, and see the guides as well!

The post Adafruit guest post: Machine learning add-ons for Raspberry Pi appeared first on Raspberry Pi.

Raspberry Pi Christmas Shopping Guide 2020

Post Syndicated from Ashley Whittaker original https://www.raspberrypi.org/blog/raspberry-pi-christmas-shopping-guide-2020/

The most wonderful time of the year is approaching! “Most wonderful” meaning the time when you have to figure out what gift best expresses your level of affection for various individuals in your life. We’re here to take away some of that stress for you — provided your favourite individuals like Raspberry Pi, of course. Otherwise you’re on your own. Sorry.

We’ve got ideas for the gamers in your life, what to get for the Raspberry Pi “superfan” who has everything, and options that allow you to keep giving all year round.

Newest and hottest

If keeping up with the Joneses is your thing, why not treat your nearest Raspberry Pi fan to one of our newest products…

Raspberry Pi 400 | $70

Top view of a woman's hands using the Raspberry Pi 400 keyboard and official Raspberry Pi mouse

This year, we released Raspberry Pi 400: a complete personal computer, built into a compact keyboard, costing just $70. Our community went wild about the possibilities that Raspberry Pi 400 opens up for home learners and for those who don’t have expensive tech options at their fingertips.

You just plug in a mouse, a monitor (any semi-modern TV screen should work), and go. The Raspberry Pi 400 Personal Computer kit costs $100 and comes with a few extras to help get you started. Or you can buy the Raspberry Pi 400 unit on its own.

Depending on where you are in the world, you may need to pre-order or join a waiting list, as Raspberry Pi 400 is in such high demand. But you could give a homemade ‘IOU’ voucher letting the recipient know that they will soon get their hands on one of our newest and most popular bits of kit.

Our latest book of coding coolness | £10

We publish some cool books around these parts. Laura Sach and Martin O’Hanlon, who are both Learning Managers at the Raspberry Pi Foundation, have written the very newest one, which is designed to help you to get more out of your Python projects.

In Create Graphical User Interfaces with Python, you’ll find ten fun Python projects to create, including a painting program, an emoji match game, and a stop-motion animation creator. All for just £10.

So, if you’ve a keen coder in your midst, this book is the best choice to stretch their skills and keep them entertained throughout 2021. Buy it online from the official Raspberry Pi Press store.

Gamers

Raspberry Pi 4 Retro Gaming Kit | £88

Lovely image courtesy of The Pi Hut

The Pi Hut’s Raspberry Pi 4 Retro Gaming Kit costs £88 and includes everything you need to create your very own retro gaming console. All your lucky kit recipient has to find is a screen to plug into, and a keyboard to set up their new Raspberry Pi, which comes as part of the kit along with a case for it. The Pi Hut has also thrown in a 16GB microSD card, plus a reader for it, as well as our official micro HDMI cable. Job done.

Picade 8″ or 10″ display | from £165

Pretty picture courtesy of Pimoroni

How cool does Picade look?! It’s sold by Pimoroni and you can buy an 8″ display set for £165, or a 10″ display version for £225. Show me a self-respecting gamer who doesn’t want a desktop retro arcade machine in their own home.

Picade is a Raspberry Pi–powered mini arcade that you build yourself. All you’ll need to add is your own Raspberry Pi, a power supply, and a micro SD card.

Code the Classics, Volume 1 | £12

And if the gamer on your gift list prefers to create their own retro video games, send them a copy of Code the Classics, Volume 1. It’s a stunning-looking hardback book packed with 224 pages telling the stories of some of the seminal video games of the 1970s and 1980s, and showing you how to create your own. Putting hours of projects in the hands of your favourite gamer will only set you back £12. Buy it online from the official Raspberry Pi Press store.

Raspberry Pi superfans

Raspberry Pi Zero W | $10

For just $10 apiece, you can drop a couple Raspberry Pi Zero W into any tinkerer’s stocking and they’ll be set for their next few projects. They will LOVE you for allowing them try a new, risky build without having to tear down something else they created to retrieve an old Raspberry Pi.

Babbage Bear | $9

What to get the superfan who already has a desk full of Raspberry Pi? An official Babbage Bear to oversee the proceedings! Babbage only costs £9 and will arrive wearing their own Raspberry Pi–branded T-shirt. A special Raspberry Pi Towers inhabitant made our Babbage this Christmassy outfit before we photographed them.

Official t-shirts | $12

If you’ve a superfan on your gift list, then it’s likely they already own a t-shirt with the Raspberry Pi logo on it — so why not get them one of these new designs?

Both costing just £12, the black Raspberry Pi “Pi 4” t-shirt was released to celebrate the launch of Raspberry Pi 4 and features an illustration of the powerful $35 computer. The white Raspberry Pi “Make Cool Stuff” option was created by Raspberry Pi’s own illustrator/animator extraordinaire Sam Alder. Drop that inside fact on the gift tag for extra superfan points.

Wearable tech projects | £7

And if they’re the kind of superfan who would like to make their own Raspberry Pi-–themed clothing, gift them with our Wearable Tech Projects book. This 164-page book gathers up the best bits of wearable technology from HackSpace magazine, with tutorials such as adding lights to your favourite cosplay helmet, and creating a glowing LED skirt. It’s on sale for just £7 and you can buy it online from the official Raspberry Pi Press store.

Keep giving all year

What if you could give the joy of opening a Raspberry Pi–themed gift every single month for a whole year? Our magazine subscriptions let you do just that, AND they come with a few extra gifts when you sign up.

The MagPi magazine

The official Raspberry Pi magazine comes with a free Raspberry Pi Zero kit worth £20 when you sign up for a 12-month subscription. The magazine is packed with computing and electronics tutorials, how-to guides, and the latest news and reviews.

Check out subscription deals on the official Raspberry Pi Press store.

HackSpace magazine

HackSpace magazine is packed with projects for fixers and tinkerers of all abilities. 12-month subscriptions comes with a free Adafruit Circuit Playground Express, which has been specially developed to teach programming novices from scratch and is worth £25.

Check out subscription deals on the official Raspberry Pi Press store

Wireframe magazine

Wireframe magazine lifts the lid on video games. In every issue, you’ll find out how games are made, who makes them, and how you can make your own using detailed guides. The latest deal gets you three issues for just £10, plus your choice of one of our official books as a gift.

Check out more subscriptions deals on the official Raspberry Pi Press store.

Custom PC

Custom PC is the magazine for people who are passionate about PC technology and hardware. You can subscribe to receive three issues for just £10, and you’ll also receive a book as a gift.

Check out subscription offers on the official Raspberry Pi Press store.

That’s all folks. Have a holly jolly one. Drop a question in the comments box below if you’re after something Raspberry Pi–themed which isn’t mentioned here. I’m half elf and should be able to help.

The post Raspberry Pi Christmas Shopping Guide 2020 appeared first on Raspberry Pi.

Vulkan update: merged to Mesa

Post Syndicated from original https://www.raspberrypi.org/blog/vulkan-update-merged-to-mesa/

Today we have another guest post from Igalia’s Iago Toral, who has spent the past year working on the Mesa graphic driver stack for Raspberry Pi 4.

Four months ago we announced that work on the Vulkan effort for Raspberry Pi 4 (v3dv) was progressing well, and that we were moving the development to an open repository.

vkQuake3 on Raspberry Pi 4

This week, the Vulkan driver for Raspberry Pi 4 has been merged with Mesa upstream, becoming one of the official Vulkan Mesa drivers. This brings several advantages:

  • Easier to find: now anyone willing to test the driver just needs to go to the official Mesa repository
  • Bug tracking: issues/bugs can now be filed on the official Mesa repository bug tracker. If the problem affects other parts of the project, it will be easier for us to involve other Mesa developers.
  • Releasing: v3dv will be included in all Mesa releases. In due course, you will no longer need to go to an external repository to obtain the driver, as it will be included in the Mesa package for your distribution.
  • Maintenance: v3dv will be included in the Mesa Continuous Integration system, so every merge request will be tested to ensure that our driver still builds. More effort can go to new features and bug fixes rather than just keeping up with upstream changes.

Progress, and current status

We said back in June that we were passing over 70,000 tests from the Khronos Conformance Test Suite for Vulkan 1.0, and that we had an implementation for a significant subset of the Vulkan 1.0 API. Now we are passing over 100,000 tests, and have implemented the full Vulkan 1.0 API. Only a handful of CTS tests remain to be fixed.

Sascha Willems’ deferred multisampling demo

This doesn’t mean that our work is done, of course. Although the CTS is a really complete test suite, it is not the same as a real use case. As mentioned some of our updates, we have been testing the driver with Vulkan ports of the original Quake trilogy, but deeper and more detailed testing is needed. So the next step will be to test the driver with more use cases, and fixing any bugs or performance issues that we find during the process.

The post Vulkan update: merged to Mesa appeared first on Raspberry Pi.