Tag Archives: Vue.js

Building Serverless Land: Part 2 – An auto-building static site

Post Syndicated from Benjamin Smith original https://aws.amazon.com/blogs/compute/building-serverless-land-part-2-an-auto-building-static-site/

In this two-part blog series, I show how serverlessland.com is built. This is a static website that brings together all the latest blogs, videos, and training for AWS serverless. It automatically aggregates content from a number of sources. The content exists in a static JSON file, which generates a new static site each time it is updated. The result is a low-maintenance, low-latency serverless website, with almost limitless scalability.

A companion blog post explains how to build an automated content aggregation workflow to create and update the site’s content. In this post, you learn how to build a static website with an automated deployment pipeline that re-builds on each GitHub commit. The site content is stored in JSON files in the same repository as the code base. The example code can be found in this GitHub repository.

The growing adoption of serverless technologies generates increasing amounts of helpful and insightful content from the developer community. This content can be difficult to discover. Serverless Land helps channel this into a single searchable location. By collating this into a static website, users can enjoy a browsing experience with fast page load speeds.

The serverless nature of the site means that developers don’t need to manage infrastructure or scalability. The use of AWS Amplify Console to automatically deploy directly from GitHub enables a regular release cadence with a fast transition from prototype to production.

Static websites

A static site is served to the user’s web browser exactly as stored. This contrasts to dynamic webpages, which are generated by a web application. Static websites often provide improved performance for end users and have fewer or no dependant systems, such as databases or application servers. They may also be more cost-effective and secure than dynamic websites by using cloud storage, instead of a hosted environment.

A static site generator is a tool that generates a static website from a website’s configuration and content. Content can come from a headless content management system, through a REST API, or from data referenced within the website’s file system. The output of a static site generator is a set of static files that form the website.

Serverless Land uses a static site generator for Vue.js called Nuxt.js. Each time content is updated, Nuxt.js regenerates the static site, building the HTML for each page route and storing it in a file.

The architecture

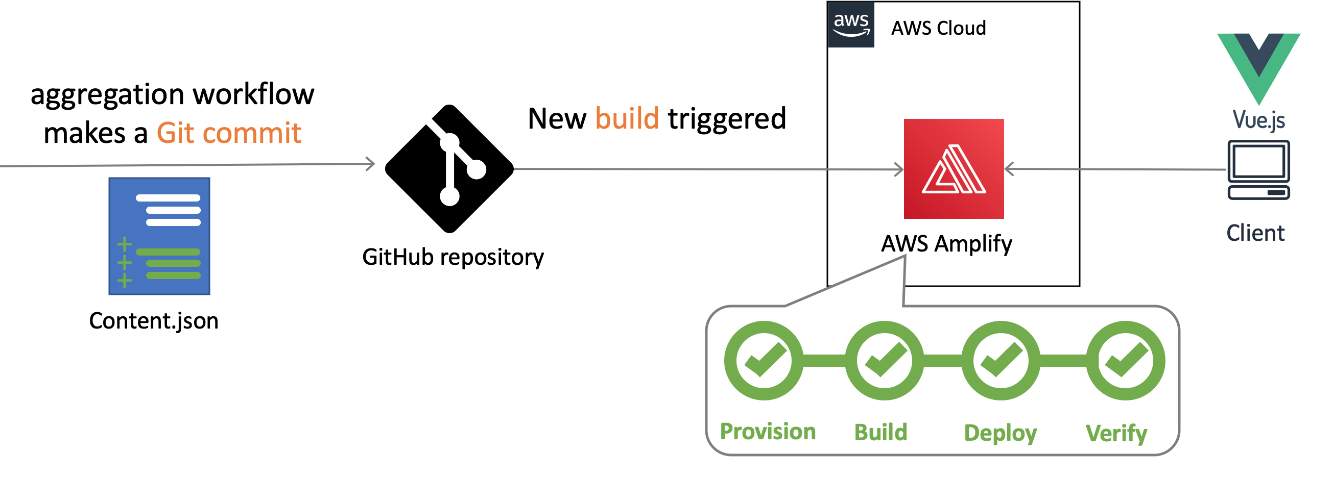
Serverless Land static website architecture

When the content.json file is committed to GitHub, a new build process is triggered in AWS Amplify Console.

Deploying AWS Amplify

AWS Amplify helps developers to build secure and scalable full stack cloud applications. AWS Amplify Console is a tool within Amplify that provides a user interface with a git-based workflow for hosting static sites. Deploy applications by connecting to an existing repository (GitHub, BitBucket Cloud, GitLab, and AWS CodeCommit) to set up a fully managed, nearly continuous deployment pipeline.

This means that any changes committed to the repository trigger the pipeline to build, test, and deploy the changes to the target environment. It also provides instant content delivery network (CDN) cache invalidation, atomic deploys, password protection, and redirects without the need to manage any servers.

Building the static website

  1. To get started, use the Nuxt.js scaffolding tool to deploy a boiler plate application. Make sure you have npx installed (npx is shipped by default with npm version 5.2.0 and above).
    $ npx create-nuxt-app content-aggregator

    The scaffolding tool asks some questions, answer as follows:Nuxt.js scaffolding tool inputs

  2. Navigate to the project directory and launch it with:
    $ cd content-aggregator
    $ npm run dev

    The application is now running on http://localhost:3000.The pages directory contains your application views and routes. Nuxt.js reads the .vue files inside this directory and automatically creates the router configuration.

  3. Create a new file in the /pages directory named blogs.vue:$ touch pages/blogs.vue
  4. Copy the contents of this file into pages/blogs.vue.
  5. Create a new file in /components directory named Post.vue :$ touch components/Post.vue
  6. Copy the contents of this file into components/Post.vue.
  7. Create a new file in /assets named content.json and copy the contents of this file into it.$ touch /assets/content.json

The blogs Vue component

The blogs page is a Vue component with some special attributes and functions added to make development of your application easier. The following code imports the content.json file into the variable blogPosts. This file stores the static website’s array of aggregated blog post content.

import blogPosts from '../assets/content.json'

An array named blogPosts is initialized:

data(){
    return{
      blogPosts: []
    }
  },

The array is then loaded with the contents of content.json.

 mounted(){
    this.blogPosts = blogPosts
  },

In the component template, the v-for directive renders a list of post items based on the blogPosts array. It requires a special syntax in the form of blog in blogPosts, where blogPosts is the source data array and blog is an alias for the array element being iterated on. The Post component is rendered for each iteration. Since components have isolated scopes of their own, a :post prop is used to pass the iterated data into the Post component:

<ul>
  <li v-for="blog in blogPosts" :key="blog">
     <Post :post="blog" />
  </li>
</ul>

The post data is then displayed by the following template in components/Post.vue.

<template>
    <div class="hello">
      <h3>{{ post.title }} </h3>
      <div class="img-holder">
          <img :src="post.image" />
      </div>
      <p>{{ post.intro }} </p>
      <p>Published on {{post.date}}, by {{ post.author }} p>
      <a :href="post.link"> Read article</a>
    </div>
</template>

This forms the framework for the static website. The /blogs page displays content from /assets/content.json via the Post component. To view this, go to http://localhost:3000/blogs in your browser:

The /blogs page

Add a new item to the content.json file and rebuild the static website to display new posts on the blogs page. The previous content was generated using the aggregation workflow explained in this companion blog post.

Connect to Amplify Console

Clone the web application to a GitHub repository and connect it to Amplify Console to automate the rebuild and deployment process:

  1. Upload the code to a new GitHub repository named ‘content-aggregator’.
  2. In the AWS Management Console, go to the Amplify Console and choose Connect app.
  3. Choose GitHub then Continue.
  4. Authorize to your GitHub account, then in the Recently updated repositories drop-down select the ‘content-aggregator’ repository.
  5. In the Branch field, leave the default as master and choose Next.
  6. In the Build and test settings choose edit.
  7. Replace - npm run build with – npm run generate.
  8. Replace baseDirectory: / with baseDirectory: dist

    This runs the nuxt generate command each time an application build process is triggered. The nuxt.config.js file has a target property with the value of static set. This generates the web application into static files. Nuxt.js creates a dist directory with everything inside ready to be deployed on a static hosting service.
  9. Choose Save then Next.
  10. Review the Repository details and App settings are correct. Choose Save and deploy.

    Amplify Console deployment

Once the deployment process has completed and is verified, choose the URL generated by Amplify Console. Append /blogs to the URL, to see the static website blogs page.

Any edits pushed to the repository’s content.json file trigger a new deployment in Amplify Console that regenerates the static website. This companion blog post explains how to set up an automated content aggregator to add new items to the content.json file from an RSS feed.

Conclusion

This blog post shows how to create a static website with vue.js using the nuxt.js static site generator. The site’s content is generated from a single JSON file, stored in the site’s assets directory. It is automatically deployed and re-generated by Amplify Console each time a new commit is pushed to the GitHub repository. By automating updates to the content.json file you can create low-maintenance, low-latency static websites with almost limitless scalability.

This application framework is used together with this automated content aggregator to pull together articles for http://serverlessland.com. Serverless Land brings together all the latest blogs, videos, and training for AWS Serverless. Download the code from this GitHub repository to start building your own automated content aggregation platform.

Building Serverless Land: Part 1 – Automating content aggregation

Post Syndicated from Benjamin Smith original https://aws.amazon.com/blogs/compute/building-serverless-land-part-1-automating-content-aggregation/

In this two part blog series, I show how serverlessland.com is built. This is a static website that brings together all the latest blogs, videos, and training for AWS Serverless. It automatically aggregates content from a number of sources. The content exists in static JSON files, which generate a new site build each time they are updated. The result is a low-maintenance, low-latency serverless website, with almost limitless scalability.

This blog post explains how to automate the aggregation of content from multiple RSS feeds into a JSON file stored in GitHub. This workflow uses AWS Lambda and AWS Step Functions, triggered by Amazon EventBridge. The application can be downloaded and deployed from this GitHub repository.

The growing adoption of serverless technologies generates increasing amounts of helpful and insightful content from the developer community. This content can be difficult to discover. Serverless Land helps channel this into a single searchable location. By automating the collection of this content with scheduled serverless workflows, the process robustly scales to near infinite numbers. The Step Functions MAP state allows for dynamic parallel processing of multiple content sources, without the need to alter code. On-boarding a new content source is as fast and simple as making a single CLI command.

The architecture

Automating content aggregation with AWS Step Functions

The application consists of six Lambda functions orchestrated by a Step Functions workflow:

  1. The workflow is triggered every 2 hours by an EventBridge scheduler. The schedule event passes an RSS feed URL to the workflow.
  2. The first task invokes a Lambda function that runs an HTTP GET request to the RSS feed. It returns an array of recent blog URLs. The array of blog URLs is provided as the input to a MAP state. The MAP state type makes it possible to run a set of steps for each element of an input array in parallel. The number of items in the array can be different for each execution. This is referred to as dynamic parallelism.
  3. The next task invokes a Lambda function that uses the GitHub REST API to retrieve the static website’s JSON content file.
  4. The first Lambda function in the MAP state runs an HTTP GET request to the blog post URL provided in the payload. The URL is scraped for content and an object containing detailed metadata about the blog post is returned in the response.
  5. The blog post metadata is compared against the website’s JSON content file in GitHub.
  6. A CHOICE state determines if the blog post metadata has already been committed to the repository.
  7. If the blog post is new, it is added to an array of “content to commit”.
  8. As the workflow exits the MAP state, the results are passed to the final Lambda function. This uses a single git commit to add each blog post object to the website’s JSON content file in GitHub. This triggers an event that rebuilds the static site.

Using Secrets in AWS Lambda

Two of the Lambda functions require a GitHub personal access token to commit files to a repository. Sensitive credentials or secrets such as this should be stored separate to the function code. Use AWS Systems Manager Parameter Store to store the personal access token as an encrypted string. The AWS Serverless Application Model (AWS SAM) template grants each Lambda function permission to access and decrypt the string in order to use it.

  1. Follow these steps to create a personal access token that grants permission to update files to repositories in your GitHub account.
  2. Use the AWS Command Line Interface (AWS CLI) to create a new parameter named GitHubAPIKey:
aws ssm put-parameter \
--name /GitHubAPIKey \
--value ReplaceThisWithYourGitHubAPIKey \
--type SecureString

{
    "Version": 1,
    "Tier": "Standard"
}

Deploying the application

  1. Fork this GitHub repository to your GitHub Account.
  2. Clone the forked repository to your local machine and deploy the application using AWS SAM.
  3. In a terminal, enter:
    git clone https://github.com/aws-samples/content-aggregator-example
    sam deploy -g
  4. Enter the required parameters when prompted.

This deploys the application defined in the AWS SAM template file (template.yaml).

The business logic

Each Lambda function is written in Node.js and is stored inside a directory that contains the package dependencies in a `node_modules` folder. These are defined for each function by its relative package.json file. The function dependencies are bundled and deployed using the sam build && deploy -g command.

The GetRepoContents and WriteToGitHub Lambda functions use the octokit/rest.js library to communicate with GitHub. The library authenticates to GitHub by using the GitHub API key held in Parameter Store. The AWS SDK for Node.js is used to obtain the API key from Parameter Store. With a single synchronous call, it retrieves and decrypts the parameter value. This is then used to authenticate to GitHub.

const AWS = require('aws-sdk');
const SSM = new AWS.SSM();


//get Github API Key and Authenticate
    const singleParam = { Name: '/GitHubAPIKey ',WithDecryption: true };
    const GITHUB_ACCESS_TOKEN = await SSM.getParameter(singleParam).promise();
    const octokit = await  new Octokit({
      auth: GITHUB_ACCESS_TOKEN.Parameter.Value,
    })

Lambda environment variables are used to store non-sensitive key value data such as the repository name and JSON file location. These can be entered when deploying with AWS SAM guided deploy command.

Environment:
        Variables:
          GitHubRepo: !Ref GitHubRepo
          JSONFile: !Ref JSONFile

The GetRepoContents function makes a synchronous HTTP request to the GitHub repository to retrieve the contents of the website’s JSON file. The response SHA and file contents are returned from the Lambda function and acts as the input to the next task in the Step Functions workflow. This SHA is used in final step of the workflow to save all new blog posts in a single commit.

Map state iterations

The MAP state runs concurrently for each element in the input array (each blog post URL).

Each iteration must compare a blog post URL to the existing JSON content file and decide whether to ignore the post. To do this, the MAP state requires both the input array of blog post URLs and the existing JSON file contents. The ItemsPath, ResultPath, and Parameters are used to achieve this:

  • The ItemsPath sets input array path to $.RSSBlogs.body.
  • The ResultPath states that the output of the branches is placed in $.mapResults.
  • The Parameters block replaces the input to the iterations with a JSON node. This contains both the current item data from the context object ($$.Map.Item.Value) and the contents of the GitHub JSON file ($.RepoBlogs).
"Type":"Map",
    "InputPath": "$",
    "ItemsPath": "$.RSSBlogs.body",
    "ResultPath": "$.mapResults",
    "Parameters": {
        "BlogUrl.$": "$$.Map.Item.Value",
        "RepoBlogs.$": "$.RepoBlogs"
     },
    "MaxConcurrency": 0,
    "Iterator": {
       "StartAt": "getMeta",

The Step Functions resource

The AWS SAM template uses the following Step Functions resource definition to create a Step Functions state machine:

  MyStateMachine:
    Type: AWS::Serverless::StateMachine
    Properties:
      DefinitionUri: statemachine/my_state_machine.asl.JSON
      DefinitionSubstitutions:
        GetBlogPostArn: !GetAtt GetBlogPost.Arn
        GetUrlsArn: !GetAtt GetUrls.Arn
        WriteToGitHubArn: !GetAtt WriteToGitHub.Arn
        CompareAgainstRepoArn: !GetAtt CompareAgainstRepo.Arn
        GetRepoContentsArn: !GetAtt GetRepoContents.Arn
        AddToListArn: !GetAtt AddToList.Arn
      Role: !GetAtt StateMachineRole.Arn

The actual workflow definition is defined in a separate file (statemachine/my_state_machine.asl.JSON). The DefinitionSubstitutions property specifies mappings for placeholder variables. This enables the template to inject Lambda function ARNs obtained by the GetAtt intrinsic function during template translation:

Step Functions mappings with placeholder variables

A state machine execution role is defined within the AWS SAM template. It grants the `Lambda invoke function` action. This is tightly scoped to the six Lambda functions that are used in the workflow. It is the minimum set of permissions required for the Step Functions to carry out its task. Additional permissions can be granted as necessary, which follows the zero-trust security model.

Action: lambda:InvokeFunction
Resource:
- !GetAtt GetBlogPost.Arn
- !GetAtt GetUrls.Arn
- !GetAtt CompareAgainstRepo.Arn
- !GetAtt WriteToGitHub.Arn
- !GetAtt AddToList.Arn
- !GetAtt GetRepoContents.Arn

The Step Functions workflow definition is authored using the AWS Toolkit for Visual Studio Code. The Step Functions support allows developers to quickly generate workflow definitions from selectable examples. The render tool and automatic linting can help you debug and understand the workflow during development. Read more about the toolkit in this launch post.

Scheduling events and adding new feeds

The AWS SAM template creates a new EventBridge rule on the default event bus. This rule is scheduled to invoke the Step Functions workflow every 2 hours. A valid JSON string containing an RSS feed URL is sent as the input payload. The feed URL is obtained from a template parameter and can be set on deployment. The AWS Compute Blog is set as the default feed URL. To aggregate additional blog feeds, create a new rule to invoke the Step Functions workflow. Provide the RSS feed URL as valid JSON input string in the following format:

{“feedUrl”:”replace-this-with-your-rss-url”}

ScheduledEventRule:
    Type: "AWS::Events::Rule"
    Properties:
      Description: "Scheduled event to trigger Step Functions state machine"
      ScheduleExpression: rate(2 hours)
      State: "ENABLED"
      Targets:
        -
          Arn: !Ref MyStateMachine
          Id: !GetAtt MyStateMachine.Name
          RoleArn: !GetAtt ScheduledEventIAMRole.Arn
          Input: !Sub
            - >
              {
                "feedUrl" : "${RssFeedUrl}"
              }
            - RssFeedUrl: !Ref RSSFeed

A completed workflow with step output

Conclusion

This blog post shows how to automate the aggregation of content from multiple RSS feeds into a single JSON file using serverless workflows.

The Step Functions MAP state allows for dynamic parallel processing of each item. The recent increase in state payload size limit means that the contents of the static JSON file can be held within the workflow context. The application decision logic is separated from the business logic and events.

Lambda functions are scoped to finite business logic with Step Functions states managing decision logic and iterations. EventBridge is used to manage the inbound business events. The zero-trust security model is followed with minimum permissions granted to each service and Parameter Store used to hold encrypted secrets.

This application is used to pull together articles for http://serverlessland.com. Serverless land brings together all the latest blogs, videos, and training for AWS Serverless. Download the code from this GitHub repository to start building your own automated content aggregation platform.

Using serverless backends to iterate quickly on web apps – part 3

Post Syndicated from James Beswick original https://aws.amazon.com/blogs/compute/using-serverless-backends-to-iterate-quickly-on-web-apps-part-3/

This series is about building flexible backends for web applications. The example is Happy Path, a web app that allows park visitors to upload and share maps and photos, to help replace printed materials.

In part 1, I show how the application works and walk through the backend architecture. In part 2, you deploy a basic image-processing workflow. To do this, you use an AWS Serverless Application Model (AWS SAM) template to create an AWS Step Functions state machine.

In this post, I show how to deploy progressively more complex workflow functionality while using minimal code. This solution in this web app is designed for 100,000 monthly active users. Using this approach, you can introduce more sophisticated workflows without affecting the existing backend application.

The code and instructions for this application are available in the GitHub repo.

Introducing image moderation

In the first version, users could upload any images to parks on the map. One of the most important feature requests is to enable moderation, to prevent inappropriate images from appearing on the app. To handle a large number of uploaded images, using human moderation would be slow and labor-intensive.

In this section, you use Amazon ML services to automate analyzing the images for unsafe content. Amazon Rekognition provides an API to detect if an image contains moderation labels. These labels are categorized into different types of unsafe content that would not be appropriate for this app.

Version 2 of the workflow uses this API to automate the process of checking images. To install version 2:

  1. From a terminal window, delete the v1 workflow stack:
    aws cloudformation delete-stack --stack-name happy-path-workflow-v1
  2. Change directory to the version 2 AWS SAM template in the repo:
    cd .\workflows\templates\v2
  3. Build and deploy the solution:
    sam build
    sam deploy --guided
  4. The deploy process prompts you for several parameters. Enter happy-path-workflow-v2 as the Stack Name. The other values are the outputs from the backend deployment process, detailed in the repo’s README. Enter these to complete the deployment.

From VS Code, open the v2 state machine in the repo from workflows/statemachines/v2.asl.json. Choose the Render graph option in the CodeLens to see the workflow visualization.

Serverless workflow visualization

This new workflow introduces a Moderator step. This invokes a Moderator Lambda function that uses the Amazon Rekognition API. If this API identifies any unsafe content labels, it returns these as part of the function output.

The next step in the workflow is a Moderation result choice state. This evaluates the output of the previous function – if the image passes moderation, the process continues to the Resizer function. If it fails, execution moves to the RecordFailState step.

Step Functions integrates directly with some AWS services so that you can call and pass parameters into the APIs of those services. The RecordFailState uses an Amazon DynamoDB service integration to write the workflow failure to the application table, using the arn:aws:states:::dynamodb:updateItem resource.

Testing the workflow

To test moderation, I use an unsafe image with suggestive content. This is an image that is not considered appropriate for this application. To test the deployed v2 workflow:

  1. Open the frontend application at https://localhost:8080 in your browser.
  2. Select a park location, choose Show Details, and then choose Upload images.
  3. Select an unsafe image to upload.
  4. Navigate to the Step Functions console. This shows the v2StateMachine with one successful execution:State machine result
  5. Select the state machine, and choose the execution to display more information. Scroll down to the Visual workflow panel.Visual workflow panel

This shows that the moderation failed and the path continued to log the failed state in the database. If you open the Output resource, this displays more details about why the image is considered unsafe.

Checking the image size and file type

The upload component in the frontend application limits file selection to JPG images but there is no check to reject images that are too small. It’s prudent to check and enforce image types and sizes on the backend API in addition to the frontend. This is because it’s possible to upload images via the API without using the frontend.

The next version of the workflow enforces image sizes and file types. To install version 3:

  1. From a terminal window, delete the v2 workflow stack:
    aws cloudformation delete-stack --stack-name happy-path-workflow-v2
  2. Change directory to the version 3 AWS SAM template in the repo:
    cd .\workflows\templates\v3
  3. Build and deploy the solution:
    sam build
    sam deploy --guided
  4. The deploy process prompts you for several parameters. Enter happy-path-workflow-v3 as the Stack Name. The other values are the outputs from the backend deployment process, detailed in the repo’s README. Enter these to complete the deployment.

From VS Code, open the v3 state machine in the repo from workflows/statemachines/v3.asl.json. Choose the Render graph option in the CodeLens to see the workflow visualization.

v3 state machine

This workflow changes the starting point of the execution, introducing a Check Dimensions step. This invokes a Lambda function that checks the size and types of the Amazon S3 object using the image-size npm package. This function uses environment variables provided by the AWS SAM template to compare against a minimum size and allowed type array.

The output is evaluated by the Dimension Result choice state. If the image is larger than the minimum size allowed, execution continues to the Moderator function as before. If not, it passes to the RecordFailState step to log the result in the database.

Testing the workflow

To test, I use an image that’s narrower than the mixPixels value. To test the deployed v3 workflow:

  1. Open the frontend application at https://localhost:8080 in your browser.
  2. Select a park location, choose Show Details, and then choose Upload images.
  3. Select an image with a width smaller than 800 pixels. After a few seconds, a rejection message appears:"Image is too small" message
  4. Navigate to the Step Functions console. This shows the v3StateMachine with one successful execution. Choose the execution to show more detail.Execution output

The execution shows that the Check Dimension step added the image dimensions to the event object. Next, the Dimensions Result choice state rejected the image, and logged the result at the RecordFailState step. The application’s DynamoDB table now contains details about the failed upload:

DynamoDB item details

Pivoting the application to a new concept

Until this point, the Happy Path web application is designed to help park visitors share maps and photos. This is the development team’s original idea behind the app. During the product-market fit stage of development, it’s common for applications to pivot substantially from the original idea. For startups, it can be critical to have the agility to modify solutions quickly to meet the needs of customers.

In this scenario, the original idea has been less successful than predicted, and park visitors are not adopting the app as expected. However, the business development team has identified a new opportunity. Restaurants would like an app that allows customers to upload menus and food photos. How can the development team create a new proof-of-concept app for restaurant customers to test this idea?

In this version, you modify the application to work for restaurants. While features continue to be added to the parks workflow, it now supports business logic specifically for the restaurant app.

To create the v4 workflow and update the frontend:

  1. From a terminal window, delete the v3 workflow stack:
    aws cloudformation delete-stack --stack-name happy-path-workflow-v3
  2. Change directory to the version 4 AWS SAM template in the repo:
    cd .\workflows\templates\v4
  3. Build and deploy the solution:
    sam build
    sam deploy --guided
  4. The deploy process prompts you for several parameters. Enter happy-path-workflow-v4 as the Stack Name. The other values are the outputs from the backend deployment process, detailed in the repo’s README. Enter these to complete the deployment.
  5. Open frontend/src/main.js and update the businessType variable on line 63. Set this value to ‘restaurant’.Change config to restaurants
  6. Start the local development server:
    npm run serve
  7. Open the application at http://localhost:8080. This now shows restaurants in the local area instead of parks.

In the Step Functions console, select the v4StateMachine to see the latest workflow, then open the Definition tab to see the visualization:

Workflow definition

This workflow starts with steps that apply to both parks and restaurants – checking the image dimensions. Next, it determines the place type from the placeId record in DynamoDB. Depending on place type, it now follows a different execution path:

  • Parks continue to run the automated moderator process, then resizer and publish the result.
  • Restaurants now use Amazon Rekognition to determine the labels in the image. Any photos containing people are rejected. Next, the workflow continues to the resizer and publish process.
  • Other business types go to the RecordFailState step since they are not supported.

Testing the workflow

To test the deployed v4 workflow:

  1. Open the frontend application at https://localhost:8080 in your browser.
  2. Select a restaurant, choose Show Details, and then choose Upload images.
  3. Select an image from the test photos dataset. After a few seconds, you see a message confirming the photo has been added.
  4. Next, select an image that contains one or more people. The new restaurant workflow rejects this type of photo:"Image rejected" message
  5. In the Step Functions console, select the last execution for the v4StateMachine to see how the Check for people step rejected the image:v4 workflow

If other business types are added later to the application, you can extend the Step Functions workflow accordingly. The cost of Step Functions is based on the number of transitions in a workflow, not the number of total steps. This means you can branch by business type in the Happy Path application. This doesn’t affect the overall cost of running an execution, if the total transitions are the same per execution.

Conclusion

Previously in this series, you deploy a simple workflow for processing image uploads in the Happy Path web application. In this post, you add progressively more complex functionality by deploying new versions of workflows.

The first iteration introduces image moderation using Amazon Rekognition, providing the ability to automate the evaluation of unsafe content. Next, the workflow is modified to check image size and file type. This allows you to reject any images that are too small or do not meet the type requirements. Finally, I show how to expand the logic further to accept other business types with their own custom workflows.

To learn more about building serverless web applications, see the Ask Around Me series.

Using serverless backends to iterate quickly on web apps – part 2

Post Syndicated from James Beswick original https://aws.amazon.com/blogs/compute/using-serverless-backends-to-iterate-quickly-on-web-apps-part-2/

This series is about building flexible solutions that can adapt as user requirements change. One of the challenges of building modern web applications is that requirements can change quickly. This is especially true for new applications that are finding their product-market fit. Many development teams start building a product with one set of requirements, and quickly find they must build a product with different features.

For both start-ups and enterprises, it’s often important to find a development methodology and architecture that allows flexibility. This is the surest way to keep up with feature requests in evolving products and innovate to delight your end-users. In this post, I show how to build sophisticated workflows using minimal custom code.

Part 1 introduces the Happy Path application that allows park visitors to share maps and photos with other users. In that post, I explain the functionality, how to deploy the application, and walk through the backend architecture.

The Happy Path application accepts photo uploads from users’ smartphones. The application architecture must support 100,000 monthly active users. These binary uploads are typically 3–9 MB in size and must be resized and optimized for efficient distribution.

Using a serverless approach, you can develop a robust low-code solution that can scale to handle millions of images. Additionally, the solution shown here is designed to handle complex changes that are introduced in subsequent versions of the software. The code and instructions for this application are available in the GitHub repo.

Architecture overview

After installing the backend in the previous post, the architecture looks like this:

In this design, the API, storage, and notification layers exist as one application, and the business logic layer is a separate application. These two applications are deployed using AWS Serverless Application Model (AWS SAM) templates. This architecture uses Amazon EventBridge to pass events between the two applications.

In the business logic layer:

  1. The workflow starts when events are received from EventBridge. Each time a new object is uploaded by an end-user, the PUT event in the Amazon S3 Upload bucket triggers this process.
  2. After the workflow is completed successfully, processed images are stored in the Distribution bucket. Related metadata for the object is also stored in the application’s Amazon DynamoDB table.

By separating the architecture into two independent applications, you can replace the business logic layer as needed. Providing that the workflow accepts incoming events and then stores processed images in the S3 bucket and DynamoDB table, the workflow logic becomes interchangeable. Using the pattern, this workflow can be upgraded to handle new functionality.

Introducing AWS Step Functions for workflow management

One of the challenges in building distributed applications is coordinating components. These systems are composed of separate services, which makes orchestrating workflows more difficult than working with a single monolithic application. As business logic grows more complex, if you attempt to manage this in custom code, it can become quickly convoluted. This is especially true if it handles retries and error handling logic, and it can be hard to test and maintain.

AWS Step Functions is designed to coordinate and manage these workflows in distributed serverless applications. To do this, you create state machine diagrams using Amazon States Language (ASL). Step Functions renders a visualization of your state machine, which makes it simpler to see the flow of data from one service to another.

Each state machine consists of a series of steps. Each step takes an input and produces an output. Using ASL, you define how this data progresses through the state machine. The flow from step to step is called a transition. All state machines transition from a Start state towards an End state.

The Step Functions service manages the state of individual executions. The service also supports versioning, which makes it easier to modify state machines in production systems. Executions continue to use the version of a state machine when they were started, so it’s possible to have active executions on multiple versions.

For developers using VS Code, the AWS Toolkit extension provides support for writing state machines using ASL. It also renders visualizations of those workflows. Combined with AWS Serverless Application Model (AWS SAM) templates, this provides a powerful way to deploy and maintain applications based on Step Functions. I refer to this IDE and AWS SAM in this walkthrough.

Version 1: Image resizing

The Happy Path application uses Step Functions to manage the image-processing part of the backend. The first version of this workflow resizes the uploaded image.

To see this workflow:

  1. In VS Code, open the workflows/statemachines folder in the Explorer panel.
  2. Choose the v1.asl.sjon file.v1 state machine
  3. Choose the Render graph option in the CodeLens. This opens the workflow visualization.CodeLens - Render graph

In this basic workflow, the state machine starts at the Resizer step, then progresses to the Publish step before ending:

  • In the top-level attributes in the definition, StartsAt sets the Resizer step as the first action.
  • The Resizer step is defined as a task with an ARN of a Lambda function. The Next attribute determines that the Publish step is next.
  • In the Publish step, this task defines a Lambda function using an ARN reference. It sets the input payload as the entire JSON payload. This step is set as the End of the workflow.

Deploying the Step Functions workflow

To deploy the state machine:

  1. In the terminal window, change directory to the workflows/templates/v1 folder in the repo.
  2. Execute these commands to build and deploy the AWS SAM template:
    sam build
    sam deploy –guided
  3. The deploy process prompts you for several parameters. Enter happy-path-workflow-v1 as the Stack Name. The other values are the outputs from the backend deployment process, detailed in the repo’s README. Enter these to complete the deployment.
  4. SAM deployment output

Testing and inspecting the deployed workflow

Now the workflow is deployed, you perform an integration test directly from the frontend application.

To test the deployed v1 workflow:

  1. Open the frontend application at https://localhost:8080 in your browser.
  2. Select a park location, choose Show Details, and then choose Upload images.
  3. Select an image from the sample photo dataset.
  4. After a few seconds, you see a pop-up message confirming that the image has been added:Upload confirmation message
  5. Select the same park location again, and the information window now shows the uploaded image:Happy Path - park with image data

To see how the workflow processed this image:

  1. Navigate to the Steps Functions console.
  2. Here you see the v1StateMachine with one execution in the Succeeded column.Successful execution view
  3. Choose the state machine to display more information about the start and end time.State machine detail
  4. Select the execution ID in the Executions panel to open details of this single instance of the workflow.

This view shows important information that’s useful for understanding and debugging an execution. Under Input, you see the event passed into Step Functions by EventBridge:

Event detail from EventBridge

This contains detail about the S3 object event, such as the bucket name and key, together with the placeId, which identifies the location on the map. Under Output, you see the final result from the state machine, shows a successful StatusCode (200) and other metadata:

Event output from the state machine

Using AWS SAM to define and deploy Step Functions state machines

The AWS SAM template defines both the state machine, the trigger for executions, and the permissions needed for Step Functions to execute. The AWS SAM resource for a Step Functions definition is AWS::Serverless::StateMachine.

Definition permissions in state machines

In this example:

  • DefinitionUri refers to an external ASL definition, instead of embedding the JSON in the AWS SAM template directly.
  • DefinitionSubstitutions allow you to use tokens in the ASL definition that refer to resources created in the AWS SAM template. For example, the token ${ResizerFunctionArn} refers to the ARN of the resizer Lambda function.
  • Events define how the state machine is invoked. Here it defines an EventBridge rule. If an event matches this source and detail-type, it triggers an execution.
  • Policies: the Step Functions service must have permission to invoke the services that perform tasks in the state machine. AWS SAM policy templates provide a convenient shorthand for common execution policies, such as invoking a Lambda function.

This workflow application is separate from the main backend template. As more functionality is added to the workflow, you deploy the subsequent AWS SAM templates in the same way.

Conclusion

Using AWS SAM, you can specify serverless resources, configure permissions, and define substitutions for the ASL template. You can deploy a standalone Step Functions-based application using the AWS SAM CLI, separately from other parts of your application. This makes it easier to decouple and maintain larger applications. You can visualize these workflows directly in the VS Code IDE in addition to the AWS Management Console.

In part 3, I show how to build progressively more complex workflows and how to deploy these in-place without affecting the other parts of the application.

To learn more about building serverless web applications, see the Ask Around Me series.