Post Syndicated from Rizel Scarlett original https://github.blog/2023-06-20-how-to-write-better-prompts-for-github-copilot/
Leia este artigo em português
As ferramentas de programação de IA generativa estão transformando a maneira como as pessoas desenvolvedoras abordam as tarefas diárias de programação. Desde a documentação de nossas bases de código até a geração de testes de unidade, essas ferramentas estão ajudando a acelerar nossos fluxos de trabalho. No entanto, assim como acontece com qualquer tecnologia emergente, sempre há uma curva de aprendizado. Como resultado, as pessoas desenvolvedoras — tanto iniciantes quanto experientes — às vezes se sentem frustradas quando os assistentes de programação baseados em IA não geram o resultado desejado. (Familiar com isso?)
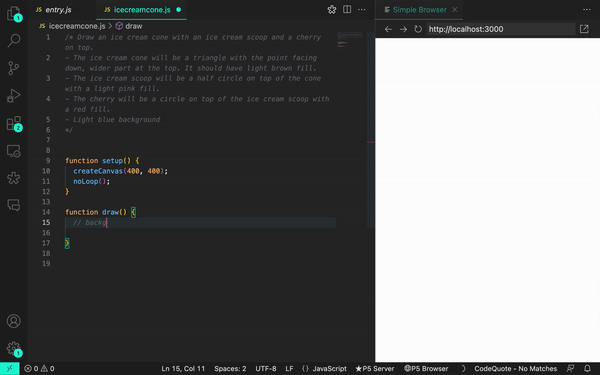
Por exemplo, ao pedir ao GitHub Copilot para desenhar uma casquinha de sorvete  usando p5.js, uma biblioteca JavaScript para código criativo, continuamos recebendo sugestões irrelevantes ou, às vezes, nenhuma sugestão. Mas quando aprendemos mais sobre a maneira como o GitHub Copilot processa as informações, percebemos que precisávamos ajustar a maneira como nos comunicamos com elas.
Aqui está um exemplo do GitHub Copilot gerando uma solução irrelevante:
Quando ajustamos nosso prompt, conseguimos gerar resultados mais precisos:
Somos desenvolvedoras e entusiastas de IA. Eu, Rizel, usei o GitHub Copilot para criar uma extensão de navegador; jogo de pedra, papel e tesoura; e para enviar um Tweet. E eu, Michele, abri uma empresa de AI em 2021. Somos ambas Developer Advocates no GitHub e adoramos compartilhar nossas principais dicas para trabalhar com o GitHub Copilot.
Neste guia do GitHub Copilot, abordaremos:
- O que exatamente é um prompt e o que é engenharia de prompt também (dica: depende se você está falando com uma pessoa desenvolvedora ou pesquisadora de machine learning)
- Três práticas recomendadas e três dicas adicionais para criação imediata com o GitHub Copilot
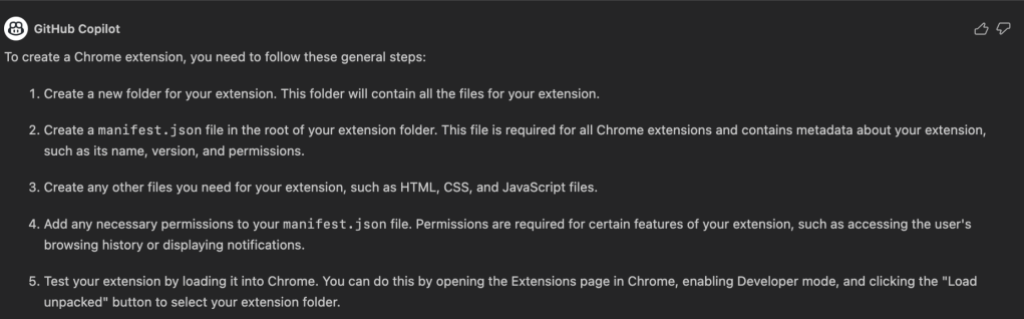
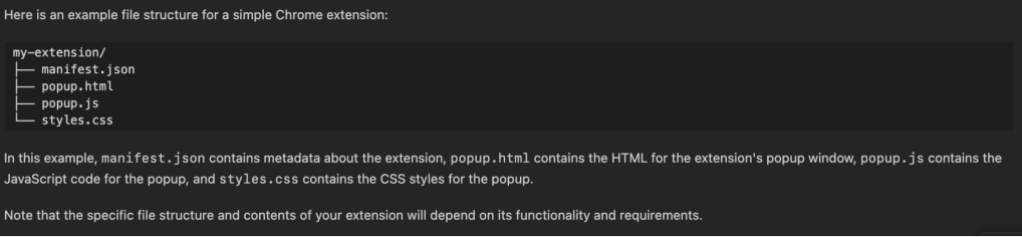
- Um exemplo em que você pode tentar solicitar ao GitHub Copilot para ajudá-lo a criar uma extensão de navegador
Progresso antes de perfeição
Mesmo com nossa experiência no uso de IA, reconhecemos que todes estão em uma fase de tentativa e erro com a tecnologia de IA generativa. Também conhecemos o desafio de fornecer dicas generalizadas de criação de prompts porque os modelos variam, assim como os problemas individuais nos quais as pessoas desenvolvedoras estão trabalhando. Este não é um guia definitivo. Em vez disso, estamos compartilhando o que aprendemos sobre criação de prompts para acelerar o aprendizado coletivo durante esta nova era de desenvolvimento de software.
O que é um prompt e o que é engenharia de prompt?
Depende de com quem você fala.
No contexto das ferramentas de programação de IA generativa, um prompt pode significar coisas diferentes, dependendo se você está perguntando a pessoas pesquisadoras de Machine Learning (ML) que estão construindo e ajustando essas ferramentas ou pessoas desenvolvedoras que as estão usando em seus IDEs.
Para este guia, definiremos os termos do ponto de vista de uma pessoa desenvolvedora que está usando uma ferramenta de programação AI generativa no IDE. Mas, para dar a você uma visão completa, também adicionamos as definições do pesquisador de ML abaixo em nosso gráfico.
|
Prompts |
Engenharia de Prompt |
Contexto |
| Pessoa Desenvolvedora |
Blocos de código, linhas individuais de código ou comentários em linguagem natural que uma pessoa desenvolvedora escreve para gerar uma sugestão específica do GitHub Copilot. |
Fornecer instruções ou comentários no IDE/strong> para gerar sugestões de código específicas. |
DDetalhes que são fornecidos por uma pessoa desenvolvedora para especificar a saída desejada de uma ferramenta de programação AI generativa. |
| Pessoa Pesquisadora de ML |
Compilação de código de IDE
e contexto relevante (comentários IDE, código em arquivos abertos, etc.) que são continuamente gerados por algoritmos e enviados para o modelo de uma ferramenta de programação AI generativa |
Criação de algoritmos que irão gerar prompts (compilações de código IDE e contexto) para um grande modelo de linguagem |
Detalhes (como dados de seus arquivos abertos e código que você escreveu antes e depois do cursor) que os algoritmos enviam para um modelo de linguagem grande (LLM) como informações adicionais sobre o código |
Isso é mais útil se você tiver um arquivo em branco ou uma base de código vazia. Em outras palavras, se o GitHub Copilot não tiver contexto do que você deseja criar ou realizar, definir o cenário para a programação em par AI pode ser realmente útil. Isso ajuda a preparar o GitHub Copilot com uma descrição geral do que você deseja gerar – antes de entrar nos detalhes.
Ao solicitar o GitHub Copilot, pense no processo como uma conversa com alguém: como devo detalhar o problema para que possamos resolvê-lo juntes? Como eu abordaria a programação em par com essa pessoa?
Por exemplo, ao construir um editor de markdown em Next.jst, poderíamos escrever um comentário como este:
/*
Crie um editor de markdown básico em Next.jcom as seguintes habilidades:
- Use react hooks
- Crie um estado para markdown com texto default "digite markdown aqui"
- Uma área de texto onde pessoas usuárias podem escrever markdown a
- Mostre uma demostração ao vivo do markdown enquando a pessoas digitaS
- Suporte para sintaxe básica de markdown como cabeçalhos, negrito, itálico
- Use React markdown npm package
- O texto markdown e resultado em HTML devem ser salvos no estado do componente e atualizado em tempo real
*/
Isso solicitará que o GitHub Copilot gere o código a seguir e produza um editor de markdown muito simples, sem estilo, mas funcional, em menos de 30 segundos. Podemos usar o tempo restante para estilizar o componente:
Observação: esse nível de detalhe ajuda a criar um resultado mais desejado, mas os resultados ainda podem ser não determinísticos. Por exemplo, no comentário, solicitamos ao GitHub Copilot que criasse um texto padrão que diz “digite markdown aqui”, mas, em vez disso, gerou “visualização de markdown” como as palavras padrão.
2. Faça sua pergunta simples e específica. Procure receber uma saída curta do GitHub Copilot.
Depois de comunicar seu objetivo principal ao Copilot, articule a lógica e as etapas que ele precisa seguir para atingir esse objetivo. O GitHub Copilot entende melhor seu objetivo quando você detalha as coisas. (Imagine que você está escrevendo uma receita. Você dividiria o processo de cozimento em etapas discretas – não escreveria um parágrafo descrevendo o prato que deseja fazer.)
Deixe o GitHub Copilot gerar o código após cada etapa, em vez de pedir que ele gere vários códigos de uma só vez.
Aqui está um exemplo de nós fornecendo ao GitHub Copilot instruções passo a passo para reverter uma função:
3. De alguns exemplos para o GitHub Copilot.
Aprender com exemplos não é útil apenas para humanos, mas também para seu programador Copilot. Por exemplo, queríamos extrair os nomes do array de dados abaixo e armazená-los em um novo array:
const data = [
  [
    { name: 'John', age: 25 },
    { name: 'Jane', age: 30 }
  ],
  [
    { name: 'Bob', age: 40 }
  ]
];
Quando você não mostra um exemplo para o GitHub Copilot …
// Map por um array de arrays de objetos para transformar dados
const data = [
  [
    { name: 'John', age: 25 },
    { name: 'Jane', age: 30 }
  ],
  [
    { name: 'Bob', age: 40 }
  ]
];
Isso gerou um uso incorreto do map:
const mappedData = data.map(x => [x.name](http://x.name/));

console.log(mappedData);

// Results: [undefined, undefined]
Em contraste, quando mostramos um exemplo …
// Map por um array de arrays de objetos
// Exemplo: Extraia nomes  array data
// Resultado desejado: ['John', 'Jane', 'Bob']
const data = [
  [{ name: 'John', age: 25 }, { name: 'Jane', age: 30 }],
  [{ name: 'Bob', age: 40 }]
];
Recebemos o resultado desejado.
const mappedData = data.flatMap(sublist => sublist.map(person => person.name));

console.log(mappedData);
// Results: ['John', 'Jane', 'Bob']
Leia mais sobre abordagens comuns para treinamento de IA, como aprendizado de disparo zero, disparo único e poucos disparos.
Aqui estão três dicas adicionais para ajudar a orientar sua conversa com o GitHub Copilot.
Assim como a conversa é mais uma arte do que uma ciência, o mesmo acontece com a criação imediata. Portanto, se você não receber o que deseja na primeira tentativa, reformule seu prompt seguindo as práticas recomendadas acima.
Por exemplo, o prompt abaixo é vago. Ele não fornece nenhum contexto ou limites para o GitHub Copilot gerar sugestões relevantes.
# Escreva algum código para grades.py
Repetimos o prompt para sermos mais específicos, mas ainda não obtivemos o resultado exato que procurávamos. Este é um bom lembrete de que adicionar especificidade ao seu prompt é mais difícil do que parece. É difícil saber, desde o início, quais detalhes você deve incluir sobre seu objetivo para gerar as sugestões mais úteis do GitHub Copilot. É por isso que encorajamos a experimentação.
A versão do prompt abaixo é mais específica que a anterior, mas não define claramente os requisitos de entrada e saída.
# Implemente uma função em grades.py para calcular a nota média
Experimentamos o prompt mais uma vez definindo limites e delineando o que queríamos que a função fizesse. Também reformulamos o comentário para que a função fosse mais clara (dando ao GitHub Copilot uma intenção clara de verificação).
Desta vez, obtivemos os resultados que procurávamos.
# Implemente a função calculate_average_grade em grades.py que recebe uma lista de notas como entrada e retorna a nota média como um número de ponto flutuante
2. Mantenha algumas abas abertas.
Não temos um número exato de abas que você deve manter abertas para ajudar o GitHub Copilot a contextualizar seu código, mas, com base em nossa experiência, descobrimos que uma ou duas são úteis.
O GitHub Copilot usa uma técnica chamada de abas vizinhas que permite que a ferramenta programadora em par AI contextualize seu código processando todos os arquivos abertos em seu IDE em vez de apenas um único arquivo em que você está trabalhando. No entanto, não é garantido que o GitHub Copilot considere todos os arquivos abertos como contexto necessário para o seu código.
3. Use boas práticas de programação.
Isso inclui fornecer nomes e funções de variáveis descritivas e seguir estilos e padrões de codificação consistentes. Descobrimos que trabalhar com o GitHub Copilot nos encoraja a seguir boas práticas de programação que aprendemos ao longo de nossas carreiras.
Por exemplo, aqui usamos um nome de função descritivo e seguimos os padrões da base de código para alavancar casos de cobra.
def authenticate_user(username, password):
Como resultado, GitHub Copilot gera uma sugestão de código relevante:
def authenticate_user(username, password):
    # Code for authenticating the user
    if is_valid_user(username, password):
        generate_session_token(username)
        return True
    else:
        return False
Compare isso com o exemplo abaixo, onde introduzimos um estilo de programação inconsistente e nomeamos mal nossa função.
def rndpwd(l):
Em vez de sugerir código, o GitHub Copilot gerou um comentário que dizia: “O código vai aqui”.
def rndpwd(l):
    # Code goes here
Fique esperto
Os LLMs por trás das ferramentas de programação de IA generativas são projetados para encontrar e extrapolar padrões de seus dados de treinamento, aplicar esses padrões à linguagem existente e, em seguida, produzir código que siga esses padrões. Dada a escala desses modelos, eles podem gerar uma sequência de código que ainda nem existe. Assim como você revisaria o código de um colega, você deve sempre avaliar, analisar e validar o código gerado por IA.
Um exemplo de prática
Tente solicitar ao GitHub Copilot para criar uma extensão de navegador.
Para começar, você precisará ter o GitHub Copilot instalado e aberto em seu IDE. Também temos acesso a uma prévia do bate-papo do GitHub Copilot, que é o que usamos quando tiver dúvidas sobre o nosso código. Se você não tem bate-papo no GitHub Copilot, inscreva-se na lista de espera. Até então, você pode emparelhar o GitHub Copilot com o ChatGPT.
Guias de criação de IA mais generativos (em inglês)
<0l>
Um guia para iniciantes sobre engenharia de prompt com o GitHub Copilot
Engenharia de alerta para IA
Como o GitHub Copilot está melhorando a compreensão do seu código
Lee este articulo en español
Las herramientas de codificación con IA generativa están transformando la forma en que los desarrolladores abordan las tareas de codificación diarias. Desde documentar nuestras bases de código hasta generar pruebas unitarias, estas herramientas están ayudando a acelerar nuestros flujos de trabajo. Sin embargo, como con cualquier tecnología emergente, siempre hay una curva de aprendizaje. Como resultado, los desarrolladores, tanto principiantes como experimentados, a veces se sienten frustrados cuando los asistentes de codificación impulsados por IA no generan el resultado que quieren. (¿Te suena familiar?)
Por ejemplo, al pedirle a GitHub Copilot que dibuje un cono de helado usando p5.js, una biblioteca de JavaScript para codificación creativa, seguimos recibiendo sugerencias irrelevantes, o a veces ninguna sugerencia en absoluto. Pero cuando aprendimos más sobre la forma en que GitHub Copilot procesa la información, nos dimos cuenta de que teníamos que ajustar la forma en que nos comunicábamos.
Aquí hay un ejemplo de GitHub Copilot generando una solución irrelevante:
Cuando ajustamos nuestra instrucción, pudimos generar resultados más precisos:
Somos tanto desarrolladoras como entusiastas de la IA. Yo, Rizel, he utilizado GitHub Copilot para construir una extensión de navegador; un juego de piedra, papel o tijera; y para enviar un tweet. Y yo, Michelle, lancé una compañía de IA en 2016. Ambas somos DevRel en GitHub y nos encanta compartir nuestros mejores consejos para trabajar con GitHub Copilot.
En esta guía para GitHub Copilot, cubriremos:
- Qué es exactamente un “prompt” y qué es la ingeniería de prompts (pista: depende de si estás hablando con un desarrollador o con un investigador de aprendizaje automático)
- Tres mejores prácticas y tres consejos adicionales para la creación de prompts con GitHub Copilot
- Un ejemplo donde puedes probar a GitHub Copilot para que te ayude en la construcción de una extensión de navegador
Progreso sobre perfección
Incluso con nuestra experiencia usando IA, reconocemos que todos están en una fase de prueba y error con la tecnología de IA generativa. También conocemos el desafío de proporcionar consejos generales de elaboración de prompts porque los modelos varían, al igual que los problemas individuales en los que los desarrolladores están trabajando. Esta no es una guía definitiva. En su lugar, estamos compartiendo lo que hemos aprendido sobre la elaboración de prompts para acelerar el aprendizaje colectivo durante esta nueva era del desarrollo de software.
¿Qué es un “prompt” y qué es la ingeniería de prompt?
Depende de con quién hables.
En el contexto de las herramientas de codificación de IA generativa, un prompt puede significar diferentes cosas, dependiendo de si está preguntando a los investigadores de aprendizaje automático (ML) que están construyendo y ajustando estas herramientas, o a los desarrolladores que las están usando en sus IDE.
Para esta guía, definiremos los términos desde el punto de vista de un desarrollador que utiliza una herramienta de codificación de IA generativa en el IDE. Pero para brindarle una imagen completa, también agregamos las definiciones de investigador de ML a continuación.
3 mejores prácticas para la elaboración de prompts con GitHub Copilot
1. Establecer el escenario con un objetivo de alto nivel.
Esto es más útil si tienes un archivo en blanco o una base de código vacía. En otras palabras, si GitHub Copilot no tiene ningún contexto de lo que quieres construir o lograr, establecer el escenario para el programador par de IA puede ser realmente útil. Ayuda a preparar a GitHub Copilot con una descripción general de lo que quieres que genere, antes de que te sumerjas en los detalles.
Al hacer prompts, GitHub Copilot, piensa en el proceso como si estuvieras teniendo una conversación con alguien: ¿Cómo debería desglosar el problema para que podamos resolverlo juntos? ¿Cómo abordaría la programación en pareja con esta persona?
Por ejemplo, al construir un editor de markdown en Next.js, podríamos escribir un comentario como este:
//
Crea un editor de markdown básico en Next.js con las siguientes características:
- Utiliza hooks de React
- Crea un estado para markdown con texto predeterminado "escribe markdown aquí"
- Un área de texto donde los usuarios pueden escribir markdown
- Muestra una vista previa en vivo del texto de markdown mientras escribo
- Soporte para la sintaxis básica de markdown como encabezados, negrita, cursiva
- Utiliza el paquete npm de React markdown
- El texto de markdown y el HTML resultante deben guardarse en el estado del componente y actualizarse en tiempo real
*/
Esto hará que GitHub Copilot genere el siguiente código y produzca un muy editor de rebajas simple, sin estilo pero funcional en menos de 30 segundos. Podemos usar el tiempo restante para diseñar el componente:
Nota: Este nivel de detalle te ayuda a crear una prompt más deseada, pero los resultados aún pueden ser no deterministas. Por ejemplo, en el comentario, solicitamos a GitHub Copilot que cree un texto predeterminado que diga “escribe markdown aquí”, pero en cambio generó “vista previa de markdown” como las palabras predeterminadas.
2. Haz tu solicitud simple y específica. Apunta a recibir una prompt corta de GitHub Copilot.
Una vez que comunicas tu objetivo principal al programador par AI, articula la lógica y los pasos que debe seguir para alcanzar ese objetivo. GitHub Copilot comprende mejor tu objetivo cuando desglosas las cosas. (Imagina que estás escribiendo una receta. Desglosarías el proceso de cocción en pasos discretos, no escribirías un párrafo describiendo el plato que quieres hacer.)
Deja que GitHub Copilot genere el código después de cada paso, en lugar de pedirle que genere un montón de código de una sola vez.
Aquí tienes un ejemplo de cómo proporcionamos a GitHub Copilot instrucciones paso a paso para invertir una función:
3. Proporciona a GitHub Copilot uno o dos ejemplos.
Aprender de ejemplos no solo es útil para los humanos, sino también para tu programador par AI. Por ejemplo, queríamos extraer los nombres del siguiente arreglo de datos y almacenarlos en un nuevo arreglo:
const data = [
  [
    { name: 'John', age: 25 },
    { name: 'Jane', age: 30 }
  ],
  [
    { name: 'Bob', age: 40 }
  ]
];
Cuando no le mostramos un ejemplo a GitHub Copilot …
// Mapee a través de una matriz de matrices de objetos para transformar datos
const data = [
  [
    { name: 'John', age: 25 },
    { name: 'Jane', age: 30 }
  ],
  [
    { name: 'Bob', age: 40 }
  ]
];
Generó un uso incorrecto del mapa:
const mappedData = data.map(x => [x.name](http://x.name/));

console.log(mappedData);

// Results: [undefined, undefined]
Por el contrario, cuando proporcionamos un ejemplo…
// Recorrer un array de arrays de objetos
// Ejemplo: Extraer los nombres del array de datos
// Resultado deseado: ['John', 'Jane', 'Bob']
const data = [
  [{ name: 'John', age: 25 }, { name: 'Jane', age: 30 }],
  [{ name: 'Bob', age: 40 }]
];
Recibimos nuestro resultado deseado.
const mappedData = data.flatMap(sublist => sublist.map(person => person.name));

console.log(mappedData);
// Results: ['John', 'Jane', 'Bob']
Lee más acerca de los enfoques comunes para el entrenamiento de IA, como el aprendizaje de zero-shot, one-shot, and few-shot learning.
Tres consejos adicionales para la elaboración de prompts con GitHub Copilot
Aquí tienes tres consejos adicionales para ayudarte a guiar tu conversación con GitHub Copilot.
1. Experimenta con tus prompts.
Al igual que la conversación es más un arte que una ciencia, también lo es la elaboración de prompts. Así que, si no recibes lo que quieres en el primer intento, reformula tu prompts siguiendo las mejores prácticas mencionadas anteriormente.
Por ejemplo, la prompts de abajo es vaga. No proporciona ningún contexto ni límites para que GitHub Copilot genere sugerencias relevantes.
# Escribe algo de código para grades.py
Iteramos en el prompt para ser más específicos, pero aún no obtuvimos el resultado exacto que estábamos buscando. Este es un buen recordatorio de que añadir especificidad a tu prompt es más difícil de lo que parece. Es difícil saber, desde el principio, qué detalles debes incluir sobre tu objetivo para generar las sugerencias más útiles de GitHub Copilot. Por eso animamos a la experimentación.
La versión del promopt de abajo es más específica que la de arriba, pero no define claramente los requisitos de entrada y salida.
# Implementar una función en grades.py para calcular la nota media
Experimentamos una vez más con el promopt estableciendo límites y delineando lo que queríamos que hiciera la función. También reformulamos el comentario para que la función fuera más clara (dándole a GitHub Copilot una intención clara contra la que verificar).
Esta vez, obtuvimos los resultados que estábamos buscando.
# Implementa la función calculate_average_grade en grades.py que toma una lista de calificaciones como entrada y devuelve la calificación media como un número flotante.
2. Mantén un par de pestañas relevantes abiertas.
No tenemos un número exacto de pestañas que debas mantener abiertas para ayudar a GitHub Copilot a contextualizar tu código, pero en nuestra experiencia, hemos encontrado que una o dos es útil.
GitHub Copilot utiliza una técnica llamada pestañas vecinas que permite al programador de pares de IA contextualizar su código procesando todos los archivos abiertos en su IDE en lugar de solo el archivo en el que está trabajando. Sin embargo, no se garantiza que GItHub Copilot considere todos los archivos abiertos como contexto necesario para su código.
3. Utilice buenas prácticas de codificación.
Eso incluye proporcionar nombres y funciones de variables descriptivas, y seguir estilos y patrones de codificación consistentes. Hemos descubierto que trabajar con GitHub Copilot nos anima a seguir las buenas prácticas de codificación que hemos aprendido a lo largo de nuestras carreras.
Por ejemplo, aquí usamos un nombre de función descriptiva y seguimos los patrones de la base de código para aprovechar el caso de la serpiente.
def authenticate_user(nombre de usuario, contraseña):
Como resultado, GitHub Copilot generó una sugerencia de código relevante:
def authenticate_user(nombre de usuario, contraseña):
    # Código para autenticar al usuario
    Si is_valid_user(nombre de usuario, contraseña):
        generate_session_token(nombre de usuario)
        return True
    más:
        return Falso
Compare esto con el siguiente ejemplo, donde introdujimos un estilo de codificación inconsistente y mal nombramos nuestra función.
def rndpwd(l):
En lugar de sugerir código, GitHub Copilot generó un comentario que decía: “El código va aquí”.
def rndpwd(l):
    # El código va aquí
Mantente inteligente
Los LLM detrás de las herramientas generativas de codificación de IA están diseñados para encontrar y extrapolar patrones de sus datos de entrenamiento, aplicar esos patrones al lenguaje existente y luego producir código que siga esos patrones. Dada la gran escala de estos modelos, podrían generar una secuencia de código que ni siquiera existe todavía. Al igual que revisaría el código de un colega, siempre debe evaluar, analizar y validar el código generado por IA.
Un ejemplo de práctica
Intenta pedirle a GitHub Copilot que cree una extensión del navegador.
Para comenzar, deberás tener GitHub Copilot instalado y abierto en tu IDE. También tenemos acceso a una vista previa temprana del chat de GitHub Copilot, que es lo que hemos estado usando cuando tenemos preguntas sobre nuestro código. Si no tienes el chat de GitHub Copilot, regístrate en la lista de espera. Hasta entonces, puede emparejar GitHub Copilot con ChatGPT.
Guías de elaboración de avisos de IA más generativas
Una guía para principiantes sobre ingeniería rápida con GitHub Copilot
Ingeniería rápida para IA
Cómo GitHub Copilot está mejorando en la comprensión de tu código
Generative AI coding tools are transforming the way developers approach daily coding tasks. From documenting our codebases to generating unit tests, these tools are helping to accelerate our workflows. However, just like with any emerging tech, there’s always a learning curve. As a result, developers—beginners and experienced alike— sometimes feel frustrated when AI-powered coding assistants don’t generate the output they want. (Feel familiar?)
For example, when asking GitHub Copilot to draw an ice cream cone using p5.js, a JavaScript library for creative coding, we kept receiving irrelevant suggestions—or sometimes no suggestions at all. But when we learned more about the way that GitHub Copilot processes information, we realized that we had to adjust the way we communicated with it.
Here’s an example of GitHub Copilot generating an irrelevant solution:
When we adjusted our prompt, we were able to generate more accurate results:
We’re both developers and AI enthusiasts ourselves. I, Rizel, have used GitHub Copilot to build a browser extension, rock, paper, scissors game, and to send a Tweet. And I, Michelle, launched an AI company in 2016. We’re both developer advocates at GitHub and love to share our top tips for working with GitHub Copilot.
In this guide for GitHub Copilot, we’ll cover:
Progress over perfection
Even with our experience using AI, we recognize that everyone is in a trial and error phase with generative AI technology. We also know the challenge of providing generalized prompt-crafting tips because models vary, as do the individual problems that developers are working on. This isn’t an end-all, be-all guide. Instead, we’re sharing what we’ve learned about prompt crafting to accelerate collective learning during this new age of software development.
What’s a prompt and what is prompt engineering?
It depends on who you talk to.
In the context of generative AI coding tools, a prompt can mean different things, depending on whether you’re asking machine learning (ML) researchers who are building and fine-tuning these tools, or developers who are using them in their IDEs.
For this guide, we’ll define the terms from the point of view of a developer who’s using a generative AI coding tool in the IDE. But to give you the full picture, we also added the ML researcher definitions below in our chart.
3 best practices for prompt crafting with GitHub Copilot
1. Set the stage with a high-level goal.
This is most helpful if you have a blank file or empty codebase. In other words, if GitHub Copilot has zero context of what you want to build or accomplish, setting the stage for the AI pair programmer can be really useful. It helps to prime GitHub Copilot with a big picture description of what you want it to generate—before you jump in with the details.
When prompting GitHub Copilot, think of the process as having a conversation with someone: How should I break down the problem so we can solve it together? How would I approach pair programming with this person?
For example, when building a markdown editor in Next.jst, we could write a comment like this
/*
Create a basic markdown editor in Next.js with the following features:
- Use react hooks
- Create state for markdown with default text "type markdown here"
- A text area where users can write markdown
- Show a live preview of the markdown text as I type
- Support for basic markdown syntax like headers, bold, italics
- Use React markdown npm package
- The markdown text and resulting HTML should be saved in the component's state and updated in real time
*/
This will prompt GitHub Copilot to generate the following code and produce a very simple, unstyled but functional markdown editor in less than 30 seconds. We can use the remaining time to style the component:
Note: this level of detail helps you to create a more desired output, but the results may still be non-deterministic. For example, in the comment, we prompted GitHub Copilot to create default text that says “type markdown here” but instead it generated “markdown preview” as the default words.
2. Make your ask simple and specific. Aim to receive a short output from GitHub Copilot.
Once you communicate your main goal to the AI pair programmer, articulate the logic and steps it needs to follow for achieving that goal. GitHub Copilot better understands your goal when you break things down. (Imagine you’re writing a recipe. You’d break the cooking process down into discrete steps–not write a paragraph describing the dish you want to make.)
Let GitHub Copilot generate the code after each step, rather than asking it to generate a bunch of code all at once.
Here’s an example of us providing GitHub Copilot with step-by-step instructions for reversing a function:
3. Give GitHub Copilot an example or two.
Learning from examples is not only useful for humans, but also for your AI pair programmer. For instance, we wanted to extract the names from the array of data below and store it in a new array:
const data = [
  [
    { name: 'John', age: 25 },
    { name: 'Jane', age: 30 }
  ],
  [
    { name: 'Bob', age: 40 }
  ]
];
When we didn’t show GitHub Copilot an example …
// Map through an array of arrays of objects to transform data
const data = [
  [
    { name: 'John', age: 25 },
    { name: 'Jane', age: 30 }
  ],
  [
    { name: 'Bob', age: 40 }
  ]
];

const mappedData = data.map(x => [x.name](http://x.name/));

console.log(mappedData);

// Results: [undefined, undefined]
It generated an incorrect usage of map:
const mappedData = data.map(x => [x.name](http://x.name/));

console.log(mappedData);

// Results: [undefined, undefined]
By contrast, when we did provide an example …
// Map through an array of arrays of objects
// Example: Extract names from the data array
// Desired outcome: ['John', 'Jane', 'Bob']
const data = [
  [{ name: 'John', age: 25 }, { name: 'Jane', age: 30 }],
  [{ name: 'Bob', age: 40 }]
];


const mappedData = data.flatMap(sublist => sublist.map(person => person.name));

console.log(mappedData);
We received our desired outcome.
const mappedData = data.flatMap(sublist => sublist.map(person => person.name));

console.log(mappedData);
// Results: ['John', 'Jane', 'Bob']
Read more about common approaches to AI training, such as zero-shot, one-shot, and few-shot learning.
Three additional tips for prompt crafting with GitHub Copilot
Here are three additional tips to help guide your conversation with GitHub Copilot.
1. Experiment with your prompts.
Just how conversation is more of an art than a science, so is prompt crafting. So, if you don’t receive what you want on the first try, recraft your prompt by following the best practices above.
For example, the prompt below is vague. It doesn’t provide any context or boundaries for GitHub Copilot to generate relevant suggestions.
# Write some code for grades.py
We iterated on the prompt to be more specific, but we still didn’t get the exact result we were looking for. This is a good reminder that adding specificity to your prompt is harder than it sounds. It’s difficult to know, from the start, which details you should include about your goal to generate the most useful suggestions from GitHub Copilot. That’s why we encourage experimentation.
The version of the prompt below is more specific than the one above, but it doesn’t clearly define the input and output requirements.
# Implement a function in grades.py to calculate the average grade
We experimented with the prompt once more by setting boundaries and outlining what we wanted the function to do. We also rephrased the comment so the function was more clear (giving GitHub Copilot a clear intention to verify against).
This time, we got the results we were looking for.
# Implement the function calculate_average_grade in grades.py that takes a list of grades as input and returns the average grade as a floating-point number
2. Keep a couple of relevant tabs open.
We don’t have an exact number of tabs that you should keep open to help GitHub Copilot contextualize your code, but from our experience, we’ve found that one or two is helpful.
GitHub Copilot uses a technique called neighboring tabs that allows the AI pair programmer to contextualize your code by processing all of the files open in your IDE instead of just the single file you’re working on. However, it’s not guaranteed that GItHub Copilot will deem all open files as necessary context for your code.
3. Use good coding practices.
That includes providing descriptive variable names and functions, and following consistent coding styles and patterns. We’ve found that working with GitHub Copilot encourages us to follow good coding practices we’ve learned throughout our careers.
For example, here we used a descriptive function name and followed the codebase’s patterns of leveraging snake case.
def authenticate_user(username, password):
As a result, GitHub Copilot generated a relevant code suggestion:
def authenticate_user(username, password):
    # Code for authenticating the user
    if is_valid_user(username, password):
        generate_session_token(username)
        return True
    else:
        return False
Compare this to the example below, where we introduced an inconsistent coding style and poorly named our function.
def rndpwd(l):
Instead of suggesting code, GitHub Copilot generated a comment that said, “Code goes here.”
def rndpwd(l):
    # Code goes here
Stay smart
The LLMs behind generative AI coding tools are designed to find and extrapolate patterns from their training data, apply those patterns to existing language, and then produce code that follows those patterns. Given the sheer scale of these models, they might generate a code sequence that doesn’t even exist yet. Just as you would review a colleague’s code, you should always assess, analyze, and validate AI-generated code.
A practice example
Try your hand at prompting GitHub Copilot to build a browser extension.
To get started, you’ll need to have GitHub Copilot installed and open in your IDE. We also have access to an early preview of GitHub Copilot chat, which is what we’ve been using when we have questions about our code. If you don’t have GitHub Copilot chat, sign up for the waitlist. Until then you can pair GitHub Copilot with ChatGPT.
More generative AI prompt crafting guides

 usando p5.js, uma biblioteca JavaScript para código criativo, continuamos recebendo sugestões irrelevantes ou, às vezes, nenhuma sugestão. Mas quando aprendemos mais sobre a maneira como o GitHub Copilot processa as informações, percebemos que precisávamos ajustar a maneira como nos comunicamos com elas.
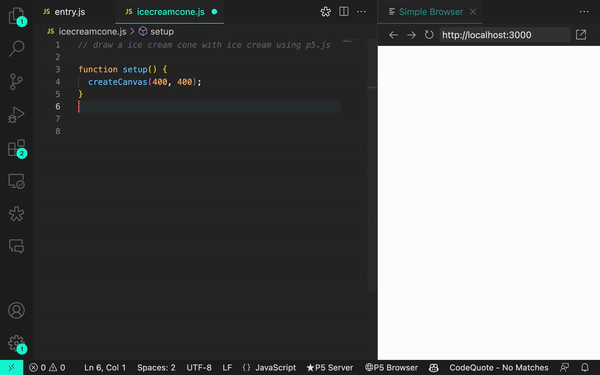


 de práctica
 .
.
 and the responses from GitHub Copilot


 Kachi Odoemene is an Applied Scientist at AWS AI. He builds AI/ML solutions to solve business problems for AWS customers.
 Taylor McNally is a Deep Learning Architect at Amazon Machine Learning Solutions Lab. He helps customers from various industries build solutions leveraging AI/ML on AWS. He enjoys a good cup of coffee, the outdoors, and time with his family and energetic dog.
 Austin Welch is a Data Scientist in the Amazon ML Solutions Lab. He develops custom deep learning models to help AWS public sector customers accelerate their AI and cloud adoption. In his spare time, he enjoys reading, traveling, and jiu-jitsu.