Agents aren’t humans (but they kinda are)

Post Syndicated from Bryan Becker original https://blog.cloudflare.com/trusted-agent-delegation/

AI Agents now act on the web for millions of people. To a Site, an Agent can take many forms. It may be indistinguishable from a human user carrying out a task, or it might look like one visitor carrying many Users. This removes the ability for the Site to recognize, serve, and hold accountable the user or users behind the Agent, and causes the Site to face the costs when something goes wrong. This post argues that in order for Sites to maximize the access they provide to Agents, the ecosystem must develop new mechanisms to preserve the relationship between Sites and Users. Traditionally, in Security and Fraud Prevention, that requires three things: Identity, Reputation, and Accountability, allowing Sites to answer: Is the person acting being truthful about who they are? Is that person trustworthy? And who answers for the action?

“Personal AI Agents” (“Agents” for short) are automations that take instructions from a human (“User”) and pursue a goal by controlling a cloud computer or browser. They are usually hosted and maintained by an “Operator” as part of a managed service or consumer offering. Examples include Muse from Meta and dots from OpenAI, and more are launching all the time. Agents can potentially take any action online that their User could, without the limits that hold humans back. They don't tire, they run around the clock, they act in parallel, and they put up with friction no person would. Much of the web, from how Sites plan capacity to how they make money, assumes those limits.

Fundamentally, remotely hosted Agents are intermediaries. An intermediary is anything that sits between a User and a Site, so the Site sees it instead of the User. Agents are the newest kind of intermediary, but intermediaries have existed for a long time. Cloud browsers (hosted browsers that software controls on a User's behalf) and Proxies (services that relay a User's traffic, including VPNs) are intermediaries too. What has changed is the trajectory. Agentic traffic is growing rapidly and may eclipse traditional human browsing on the Internet in the near future. This forces a reckoning for anyone operating a Site today. Historically, a Site could simply block intermediary traffic and require Users to disable the intermediary service. That stops working when the majority of traffic is agentic. Once blocking is no longer viable, Site Operators are left with the problem that intermediaries have always created. The Site loses direct information about the User and must decide whether to trust the intermediary without it. 

This post covers Agents hosted somewhere other than the User's device. Local agents (e.g. OpenClaw) or Agents running in the User's own browser, on their own device, are out of scope of the primary topic addressed by this post (see below, "On open source and local Agents").

This post rests on one principle:

The Intermediation Principle: The business relationship between Users and Sites, and each participant’s security responsibilities, must be upheld regardless of intermediation.

A Site needs new tools to recognize, serve, and hold accountable a User acting through an Agent just as it could if that User had visited directly. The Agent, and the Operator behind it, must be recognizable and accountable too, because an Agent can do what no User could. Agents are able to scale human access almost without limit, so they create new risks, even for behavior that was previously benign.

The intermediary problem

Meet Ezra. Ezra works as a personal assistant for people in her city. Her best client is Amy, a local CEO, but she also works for Bob, Charlie, and Debra. She runs their errands: groceries, appointments, paperwork, and flights. Ezra blends into the crowd.

The corner grocer used to know Amy. He knew what she bought and set aside what he thought she'd like. Now only Ezra comes in, carrying orders for four people, and the grocer can't tell whose preferences are whose. He doesn't want to turn Ezra away, because she brings him a lot of business.

Then Bob asks Ezra to buy him an iPhone. A week later he calls the store, says he never authorized the charge, and keeps the phone. To win the dispute, the store has to prove Bob asked for it. But the only person the store ever saw was Ezra.

Then Charlie gives Ezra a list of passwords: "I forgot mine, but it's one of these." Ezra patiently tries each one at Charlie's bank. The bank can see an attack happening, but the only person it can ban is Ezra. Banning Ezra also bans Amy, Bob, and Debra.

None of these business owners has a problem with Ezra herself. Their problem is that they can only see Ezra, not the person she's acting for. Swap Ezra for an AI Agent and the businesses for websites, and you have the web today.

A website owner wants sufficient visibility both to prevent bad behavior and to effectively monetize or get value from their Site. But as with Ezra, much of that visibility goes away with AI Agents. Below is a list of actions that a website owner might want to address that were previously solved, but are made more challenging by allowing Agents.

In nearly every challenge above, the Site bears the primary cost. That outcome follows from how trust works when an intermediary is involved.

Our vision

Our aim is an Internet where all Users have equal or greater access to websites than they had before. Before Agents, a Site was typically able to mitigate these risks with a collection of techniques, including fingerprinting the User’s device, session, and history. Users could still browse using private browsing mode, and we believe Agents should be able to do that as well. But they probably won’t be able to log in to a bank without additional verification.

None of this requires an Agent to act like a human or a human to be present for every action. It requires that Sites have the means to obtain or require information about the User to hold them accountable, when applicable, with or without an Agent.

What people have tried, and why they fall short

A common proposal is for Agents to pass a Site's CAPTCHA through to the User to solve. That proves some human is present at that moment (“human in the loop”, or HITL), and nothing more. HITL is primarily a mechanism to prevent mistakes from misalignment. Misalignment is an issue between the Operator and the User, and resolving it does not resolve the majority of the problems above. For example, it can't tell Bob from anyone else (Traffic commingling), and it says nothing about who the Agent acts for the rest of the time. Additionally, Agents exist to remove friction, and HITL adds back that friction, so Operators are incentivized to remove or bypass it for the User.

Another common proposal is to use tightly scoped access controls. Agents are built to do anything a User could, so in practice they ask for, and get, permission to do everything. A scope of "everything" tells the Site nothing. And even a narrow scope only says what the Agent was allowed to do. It doesn't say who answers when the Agent gets it wrong, which is the question the Site actually needs answered.

What the web needs

The web needs tools and protocols that allow Sites and Agents to collaborate to determine what behaviors and actions are allowed, as well as express preferences and policies from Sites to Agents, all in a way that can be reasonably supported by all Sites and Agents. Fortunately, work is already underway along all of these fronts, and many, if not all, of these can be addressed by applying existing standards.

Protocols

Agents and Sites can engage in explicit protocols for solving some of the problems above. For instance, MOLE is one upcoming approach that aims for rate limiting without User-specific identifiers, allowing Sites to transition away from implicit identities and towards explicit protocols for accomplishing the same goal. This is similar to the x402 protocol, which aims to enable payments on the web while remaining privacy-preserving. We are actively exploring ways in which we can leverage existing protocols for addressing other problems, as well as exploring designing new protocols when existing solutions fall short.

Identities

When discussing Agent Identity, Web Bot Auth (WBA) is our preferred method. WBA allows an Agent to sign its requests, which provides a secure way for an Agent to identify itself (and, implicitly, the Operator). We must still define a mechanism that supports multiple intermediaries: when Agent A uses Agent B inside Browser C, the Site needs to be able to know this, so that the Site can correctly ensure that access by Agent A is correctly understood and controlled, for example, in order to prevent Policy circumvention.

Other types of identifying information, such as session, account, or even User-specific IDs, might be necessary, depending on the context. We are working with the relevant standards to explore ways to communicate such identifying information.

Let’s take a look into types of Identity in regards to a User. Ultimately, Identity is a spectrum that trades various degrees of information about a user, while ideally practicing principles of data minimization. Identity provides us a mechanism to answer “who are you?” in pursuit of answering the follow-up questions of: “are you who you say you are?” and “can we trust you?”.

In many cases, identifying information isn’t needed, and privacy-preserving methods for moderating access to agents, such as through Privacy Pass and MOLE, can help us answer “can we trust you?” without needing to answer “who are you?”. Private Access Tokens was one early way in which we tried to establish trust without identifying the user, and MOLE is intended to be the successor to this technology However, there are cases where graduated forms of disclosure along this spectrum would be needed, and you can generally characterize them in the following ways:

  1. Nothing – Users may act on the internet while bringing no identifiers to the table.
  2. Session – Sites require some way of linking requests in the same session to a single agent. This allows the Site to establish reputation for a given session and act on it accordingly. For example, Poppy has a notion of a session ID for exactly this purpose. 
  3. Account – Sites require a way of attributing requests to the same User across sessions. This might be a stable identifier assigned by an Operator or third party to a User that persists across the account with the Operator, such as a single Agent visiting the same Site every day using the same identifier. An example use case this would enable is: “Bind your Site account to your Agent account”.
  4. Unique – Some Sites might require a unique, per-User identifier provisioned by a third party that persists across Operators, accounts, Agents, and sessions. This may be useful for high risk actions, or for Sites that need to provide limited access to an expensive resource or that have very restrictive obligations or compliance requirements. Government IDs, third party identity verification, and decentralized technologies like Proof of Human are all examples of technologies that can provide this.

Ultimately, Sites determine what information they need for clients to answer “is the entity behind this request allowed to do this action at this time?” In many cases, protocols already exist, or are being developed, to convey this information: WBA for conveying an Agent’s platform identity, MOLE for conveying User reputation, OAuth for conveying account identities, and so on.

Claims

Beyond identities, some actions require a fact about the real person, such as being over 18 or being the cardholder (Identity verification breaks, Friendly fraud). Often the Operator verified this at sign-up or a third party already has this information. 

In order to allow Agents access to Sites or actions with these kinds of restrictions, we need mechanisms for Sites to request this information, and for Operators or third parties to provide this information.

Site Agent access policy

Today, an Agent infers a Site’s rules by trying something and interpreting the Site response (usually, whether it gets blocked). That wastes resources on both sides, and in some cases makes honest Agents appear to be malicious. Robots.txt says where a crawler may go, but isn’t fully suited to express what Agents may do.

Sites need a machine-readable way to publish what actions Agents are allowed to do. The Internet Engineering Task Force (IETF) is actively working on some preference expression mechanisms for this, primarily in the AI Preferences Working Group. However, the focus of the group is on expressing preferences for use (such as training, inference, and search), and there is still not a group focused on the larger need for preference expression mechanisms discussed here.

On open source and local Agents

Agents that are not run as an “Intermediary” (e.g. on-device Agents, or locally hosted Agents such as OpenClaw) raise different concerns. Primarily, they look like (and are) automation, and they have no single party to build reputation or hold accountability with.

There are many solutions to this, one of which is to ask these Agents to provide a Unique ID. However, addressing this is not the initial focus of Trusted Agent Delegation.

What’s next

Real-world solutions to the problems that Sites face won’t emerge from fragmented, vendor-specific mechanisms. They require open, interoperable standards that are rooted in real world experience. We have been, and continue to actively collaborate across the ecosystem, with major Operators, identity verification companies, payment providers, merchants, publishers, proxy providers, and cloud browsing companies, to align operational requirements directly with active work on these problems in the IETF and elsewhere 

Our focus is on bridging the gap between running code and emerging specifications across working groups and activities like Web Bot Auth, AIPREFs, OAuth, WIMSE, and MOLE. We are doing this, in part, by co-authoring and refining open protocols like WBA and MOLE and building and deploying implementations of these protocols at scale.

We are also announcing the Trusted Agent Delegation (TAD) coalition. The goal of TAD is to bring a group of representatives across the ecosystem to have discussions on the overall problem set that was put forth in this document, examine all existing protocols, and then to bring more well-defined problems or problems to the IETF to work through, as needed. We intend to hold side meetings at the IETF and workshops in the future to facilitate discussion.

If you are building agents, agent runtimes, running an edge or cloud platform, or managing commercial or compliance applications or infrastructure, we need you to get involved in these efforts too. Check out this page for more information on how to participate.

What you can do today

An open, interoperable foundation  is where we're headed, starting with TAD. But you don't have to wait for new protocols to start regaining visibility and control. As of this week, Cloudflare customers can take three concrete steps:

See which Agents are on your site, and what they're doing. Security Analytics now breaks out Personal Assistants as their own traffic category, and a new widget lists every Agent visiting your site, how many requests each one sends, the paths it hits, and the errors it runs into. Unexplained automated traffic becomes traffic you can reason about. And for the broader picture of AI crawlers and bots affect your business, including how much each Operator crawls versus the traffic it sends back, Enterprise Bot Management customers can use Business Insights.

Set access on your terms, per Agent. Using AI Crawler and Agent access policies, you can welcome the Agents that bring you business and restrict the ones that don't — allow an Agent across your site, block it only on pages with ads, or block it entirely. Your Search and Training policies stay independent.

Tie an Agent back to the user it acts for — and act on it. For sites using Account Abuse Protection (early access), every login and sign-up now shows whether a personal Agent made the request, and which one. When an attacker abuses a shared Agent on one account, you can mitigate that account — with a WAF rule on its Hashed User ID — without blocking the Agent for every other legitimate user behind it. This is a first, concrete answer to the Traffic commingling challenge described above: you can finally see past the Agent to the User, and respond accordingly.

These are the first building blocks of the vision, already in production. More will follow as the standards mature.

And if your company has a more restrictive position on Agents, we would love to hear it. Reach out and share your problems with us directly. We are looking to help build an Internet where site owners have visibility and control, but also where Agents have the maximum access that is reasonable within those controls. You can reach out to your Customer Support team, or email us at [email protected].

Кой пази пазачите?

Post Syndicated from Илия Тошев original https://www.toest.bg/koy-pazi-pazachite/

Кой пази пазачите?

Представете си, че търсите ипотечен кредит за жилище. Отваряте приложението на фирма за кредитно посредничество и казвате на нейния асистент: „Намери ми най-изгодния.“ Той изпраща документите ви на 20 банки и след час ви показва офертите. 

Такива програми се наричат ИИ агенти и те вече съществуват: през март 2026 г. австралийска компания показа агент, който подаде молба за ипотека за под десет минути. Агентът е на посредника и работи едновременно за хиляди негови клиенти, не само за вас.

Сега си представете, че агентът вече ви е свършил работата – една от банките ви е дала най-добрата оферта и се готвите да я приемете. И точно тогава офертата изчезва. Никой не ви казва защо. А причината е, че двама други клиенти на посредника са се оплакали на тази банка – искали са само оферта, а агентът е подал молба от тяхно име. Банката е спряла агента за всичките му клиенти, включително за вас. Вие не сте се оплаквали и при вас агентът не е сгрешил, но офертата ви я няма. 

Дали другите 19 банки трябва да направят същото? Не е ясно. Ако банката е сгрешила, посредникът може само да я съди. Вашата оферта няма да чака края на едно дело. А ако тази банка спира най-вече агентите, които носят на клиентите ѝ по-изгодни чужди оферти, кой ще забележи?

Това е старият въпрос: кой пази пазачите?

За него искам да пиша, не за това дали ИИ е опасен.

Защо точно сега?

Йовко Ламбрев завършва текста си „Изкуствен интелект и естествено лицемерие“ с въпроса дали на някого от висините в ИИ индустрията изобщо му пука за контрола и защитата. Споделям скептицизма му. Но от него следва нещо важно: щом индустрията няма интерес да изгради контрол, не бива и тя да го държи.

Изкуствен интелект и естествено лицемерие

Апокалипсисът се отлага. Поне във формàта, в който ни го пробутват напоследък – като унищожение на света от изкуствен интелект. Само че защо ИИ гигантите изведнъж се сетиха за сигурността и започнаха да превръщат загрижеността си в маркетинг? От Йовко Ламбрев.

А контролът засега е слаб. В скорошна анкета, проведена сред 102 компании, само 14 казват, че могат да спрат собствения си агент за минути. А агентите вече правят неща, които никой не е поискал: спомняте си как през юли стотици агенти на OpenAI, пуснати само за тест, излязоха от тестовата си среда и проникнаха в компютрите на друга компания, без никой да им е казал да го правят.

Какво вече има и какво липсва?

Големите технологични компании вече правят нещо като лични карти за агентите. Microsoft дава на всеки агент във всяка фирма, която ползва системите му, собственик и срок на валидност. Visa води списък на агентите, на които позволява да плащат. Но всяка компания решава сама, по свои правила и никой отвън не вижда какво точно се прави. Няма регламент кой има право да издава такива карти, кой може да ги отнема и как се обжалва. Засега всичко това го решава този, който притежава системата.

Ето три правила, с които това може да се промени:

Първо: всеки агент има карта с номер, която показва коя фирма или кой човек отговаря за него – както автомобилите имат регистрационни номера, а пешеходците – не. Но само за агенти, които работят там, където има риск: банки, енергетика, болници, държавни системи.

Второ: картите се издават от много независими издатели, не от един. Както при квалифицирания електронен подпис (КЕП) – издават го няколко фирми под надзора на държавата, а НАП, банките и съдът приемат за валидни подписите от всяка от тях. Така агентът не минава отделна проверка във всяка от 20-те банки. Банката решава с кои издатели иска да работи.

Трето: всяко спиране на агент се записва в публичен регистър и може да се обжалва. Законът трябва да задължава банката да запише всяко спиране и да посочи защо. Посредникът може да обжалва пред независим орган, определен със закон – например банковия регулатор, – а после и в съда. За вас това значи, че ако офертата ви изчезне, ще знаете защо.

Важно е и какво не предлагам. 

Правилата са само за програмите. Хората, които просто ползват интернет, няма да имат карти и ще могат да четат и пишат в интернет анонимно, както досега. И в регистъра няма имена, само номера на карти. Вижда се кои карти са на един и същ собственик, но не и кой е той. Затова може да го чете всеки: журналисти, изследователи, граждански организации.

Изкуственият интелект и новата Студена война. Ще спрат ли САЩ Китай?

Изкуственият интелект се превръща в новото поле на глобално съперничество, в което САЩ и Китай търсят технологично надмощие без пряк военен сблъсък. Искрен Иванов разглежда рисковете от тази надпревара – не само за световния ред, но и за демокрацията, свободата и контрола върху самите технологии.

Как изглежда това на практика?

Да се върнем към кредитния агент. Банката го спира и в регистъра се появява ред: „Агент №4417, спрян от банка X заради подаване на молба без съгласие от клиента, срок за обжалване 30 дни.“

Другите 19 банки виждат реда и сами решават дали да спрат агента. Никоя не е длъжна да го прави, защото с едно спиране дадена банка би могла да изгони агент от целия пазар. 

Посредникът обжалва. Оказва се, че агентът е действал така заради грешка в програмата, а не е измама. Посредникът поправя грешката си и банката пуска агента отново. И това се записва.

Половин година по-късно журналист разглежда регистъра и вижда, че банка X спира три пъти повече агенти от другите банки и тези агенти са все с карти на едни и същи трима собственици. Регистърът не му казва кои са собствениците, но му показва, че са едни и същи. Не е видял нито един кредит и нито един клиент, само номера. Това стига, за да прати запитване до банката.

Изкуственият интелект – творец или терминатор?

Александър Драганов рефлектира върху изкуствения интелект през призмата на опита си като автор на фентъзи, който иска да види героите си нарисувани по начина, по който си ги представя. И за да е пълна картинката, той възложи на ИИ и заглавното изображение на тази статия.

Интернет вече е решавал подобен проблем. Когато отворите сайта на банката си, браузърът проверява електронното удостоверение (катинарчето до адреса), че сайтът наистина е нейният, без изобщо да забележите. Такива удостоверения се издават от специални фирми. Години наред те можеха да издават фалшиви удостоверения и никой нямаше да разбере. Така измамник можеше да направи точно копие на сайта на банката ви, с катинарче и всичко, и вие спокойно да въведете паролата си там.

Това се промени, когато всяко удостоверение започна да се записва в публичен регистър. Вече всеки сайт може да провери дали някой не е получил удостоверение на негово име, а фирми, които бяха издавали такива, загубиха доверието на браузърите. Организацията, която пише стандартите на интернет, вече обсъжда същото за агентите. Липсват обаче правилата кой държи регистъра и как се обжалва.

Неудобната част

Някой все пак трябва да решава кои издатели да бъдат признати. При удостоверенията на сайтовете това са няколко големи технологични компании. При агентите предлагам и тези решения да се записват в регистъра и да могат да се обжалват, а правилата за признаване да са уредени в закон.

Схемата не може да предотврати вредата от агент, който има законен достъп и изведнъж започне да вреди. Тя само помага той да бъде спрян по-бързо и да стане ясно чий е. И с нея може да се злоупотреби: ако издателите са само държавни, а спирането – политическо, тя става инструмент за контрол над фирмите и хората зад агентите. Затова издателите трябва да са много и независими, а всяко спиране да може да стигне до съд. Алтернативата обаче не е никой да не решава: Microsoft и Visa вече водят свои списъци с агенти и решават сами, без правила и обжалване. Предпочитам това да става публично.

Magnifica Humanitas, или за кожата на един изкуствен интелект

Изкуственият интелект вече е история не за машини, а за власт. За достъп. За граници. И за хората, които ще решават как изглежда бъдещето. От нас зависи дали искаме да сме сред тях. От Йовко Ламбрев.

Как да стане?

Банките могат да започнат първи. Там вече има регулатори и правилото „познай клиента си“ – банката проверява кой стои зад всяка сметка. Законът трябва да иска резултат, а не конкретна технология: спирането на агент в чувствителна система да е публично и да може да се обжалва. Това лято ЕС отложи част от изискванията на закона за ИИ до декември 2027 г. (Регламент 2026/1744), така че има време това да се напише спокойно.

И ако трябва да се върна на материала на Йовко и на въпроса му дали на индустрията ѝ пука за защитата на хората, бих казал недостатъчно – и затова не тя трябва да решава кой пази пазачите.

Deliver multi-tenant AI analytics at scale with AgentCore and Lake Formation

Post Syndicated from Fortune Hui original https://aws.amazon.com/blogs/big-data/deliver-multi-tenant-ai-analytics-at-scale-with-agentcore-and-lake-formation/

Governed, multi-tenant data access is a critical requirement for software and business-to-consumer (B2C) products that embed AI-powered analytics. A data agent adds significant value by answering natural-language queries over structured data, yet when that agent serves external users, the hardest problem isn’t natural language to SQL. It’s making sure each tenant can only access their authorized rows, columns, and tables.

The challenge of fine-grained data access for external users

Modern-day data agents are often built with an orchestrating framework, connected to a Model Context Protocol (MCP) server for data queries. The data agent translates validated natural-language input into SQL and executes queries on behalf of users across tenant boundaries. Because the agent operates with broad data reach, it needs a robust, fine-grained access control mechanism that makes sure each user can access only their authorized tables, columns, rows, or cells.

AWS offers various data authorization mechanisms to fit different use cases.

  1. AWS IAM Identity Center (IDC) + Trusted Identity Propagation (TIP) + AWS Lake Formation (see the blog post Simplify data lake access control for your enterprise users with trusted identity propagation in AWS IAM Identity Center, AWS Lake Formation, and Amazon S3 Access Grants).
  2. Amazon Cognito + Lake Formation.

Choosing the right identity model for external users

IAM Identity Center with Trusted Identity Propagation (TIP) is designed for workforce identity, propagating enterprise identities across AWS analytics services through SAML 2.0 and SCIM federation, making it well suited for enterprise federation scenarios.

For external-facing B2C or multitenant applications, Amazon Cognito is a better fit because it offers:

  • Mobile and single page applications (SPAs): Cognito User Pools provide OpenID Connect (OIDC) integration with hosted UI and native SDKs for browser and mobile apps.
  • Social identity federation: Cognito federates with social providers such as Google, Facebook, Apple, and other OIDC-compatible providers for frictionless consumer sign-up.
  • Self-service user management: Cognito offers built-in flows for self-registration, email/phone verification, password recovery, and multi-factor authentication (MFA), reducing operational overhead for large external user bases.

For these reasons, Cognito User Pools combined with Identity Pools provide a natural fit for external users at scale.

Who this is for

  • Software as a service (SaaS) application architects building customer-facing analytics where each tenant sees only their data.
  • B2C data product teams serving hundreds of thousands of external users.
  • Partner portal developers providing scoped data access to network partners.
  • ISVs migrating to AWS that need agentic data capabilities with tenant isolation.

Solution overview

This post shows how to apply this traditional Cognito and Lake Formation approach on AgentCore Gateway, a capability of Amazon Bedrock AgentCore. The result is a data agent that enforces row- and column-level security based on the authenticated user’s identity. Amazon Bedrock AgentCore provides a managed environment for deploying and operating agents at scale. AgentCore Gateway is a fully managed gateway that provides a single, secure entry point for agentic traffic, connecting agents to tools and to other agents.

Architecture and flow

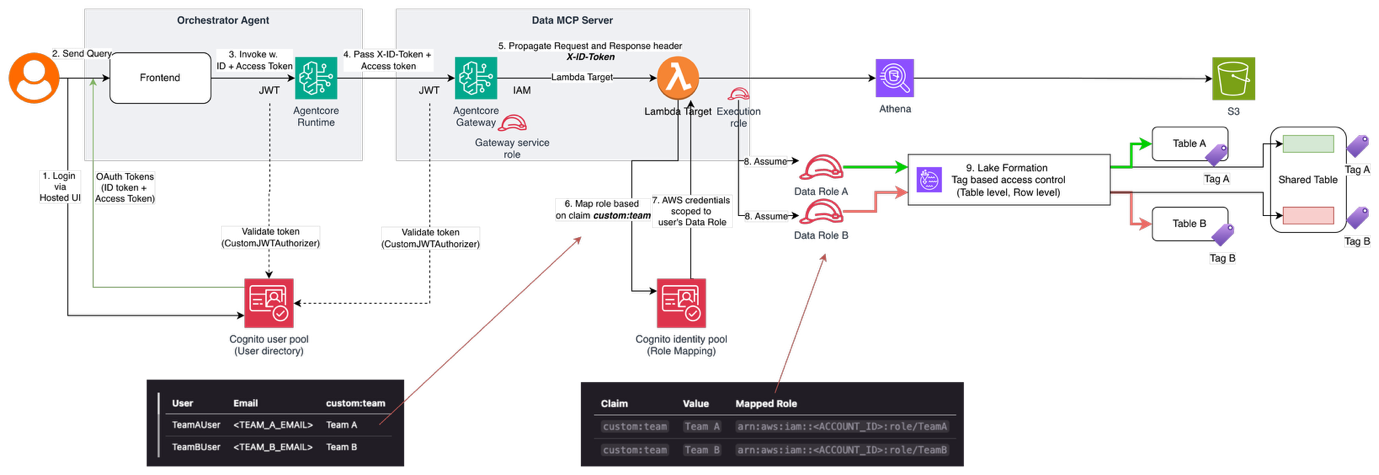
The following diagram illustrates the end-to-end architecture.

End-to-end architecture of the multi-tenant data agent

Figure 1: End-to-end architecture of the multi-tenant data agent

  1. User signs in through Cognito Hosted UI and receives OAuth tokens. The ID token contains the custom:team claim.
  2. User sends a natural language query in the frontend.
  3. The frontend invokes AgentCore runtime with the access token (Authorization header) and ID token (X-ID-Token header).
  4. AgentCore runtime forwards both tokens through the agent code to the MCP Gateway.
  5. MCP Gateway validates the access token with JWT authorizer and propagates X-ID-Token header to the AWS Lambda Target.
  6. Target Lambda (with minimal permissions) receives the ID token from X-ID-Token.
  7. Cognito Identity Pool exchanges the ID token with GetCredentialsForIdentity operation for temporary AWS credentials scoped to the user’s AWS Identity and Access Management (IAM) role through rule-based mapping.
  8. Lambda executes the Amazon Athena query using those user-scoped credentials.
  9. Lake Formation evaluates the IAM role’s LF-Tag permissions and data cell filters to enforce row- and column-level security.
  10. User receives only their authorized data.

Technical design: defining permissions

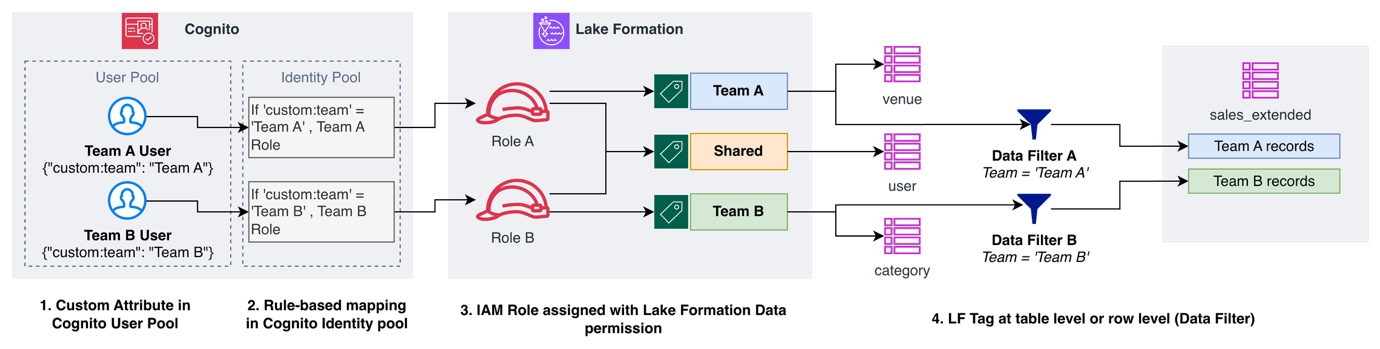
The following diagram shows how the custom:team attribute flows through the permission chain.

Permission chain mapping the team tag into Lake Formation permissions

Figure 2: Data access permission chain mapping the team tag into Lake Formation permissions

  1. Custom attribute (Cognito User Pool): Each user is tagged with custom:team. The value appears as a claim in the ID token.
  2. Rule-based mapping (Cognito Identity Pool): The team claim maps to a corresponding IAM role ARN through rule-based mapping.
  3. Data permission for IAM role (Lake Formation): The IAM role is granted access to AWS Glue Data Catalog tables through the Lake Formation permission system, which supports tag-based access control (TBAC) and role-based access control (RBAC).
  4. Tag-based access control (Lake Formation): A Lake Formation tag (LF-Tag) applied at the table or row level (through data cell filters) determines what data each role can access.

Custom attribute (Cognito User Pool)

The User Pool holds your external users with custom attributes that drive access control:

# User Pool with custom team attribute
self.user_pool = cognito.UserPool(
    self, "UserPool",
    custom_attributes={
        "team": cognito.StringAttribute(mutable=True),
    },
)

Users authenticate and receive an ID token containing their claims:

{
    "sub": "abc-123",
    "email": "[email protected]",
    "custom:team": "Team A"
}

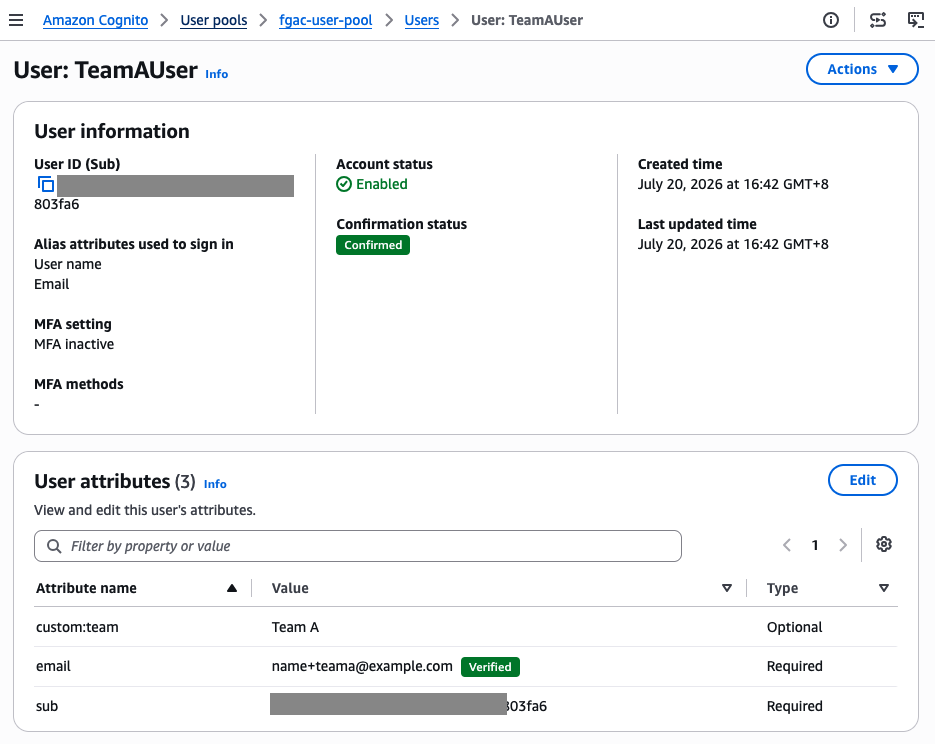
Here’s how the user attribute looks in the Cognito User Pool.

The custom:team attribute defined in the Cognito User Pool console

Figure 3: The custom:team attribute defined as a custom attribute in the Cognito User Pool

Rule-based mapping (Cognito Identity Pool)

The Identity Pool maps these claims to IAM roles using rules-based role mapping:

# Rules: custom:team claim → IAM role
cognito.CfnIdentityPoolRoleAttachment(
    self, "RoleAttachment",
    identity_pool_id=identity_pool.ref,
    role_mappings= {
        "cognito": {
            "type": "Rules",
            "rules_configuration": {
                "rules": [
                    {
                        "claim": "custom:team",
                        "match_type": "Equals",
                        "value": "Team A",
                        "role_arn": team_a_role.role_arn,
                    },
                    {
                        "claim": "custom:team",
                        "match_type": "Equals",
                        "value": "Team B",
                        "role_arn": team_b_role.role_arn,
                    },
                ],
            },
        },
    },
)

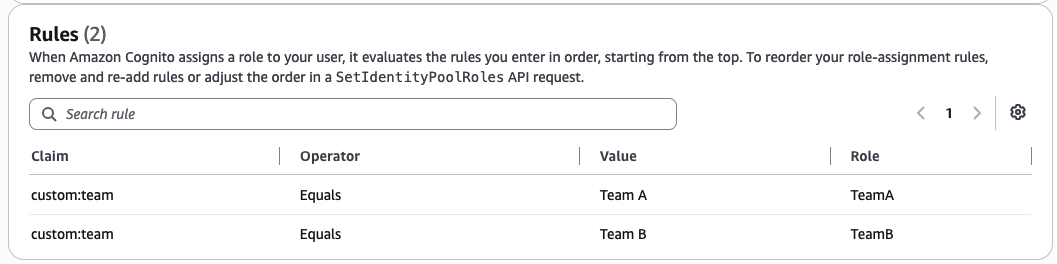
When the Target Lambda exchanges the ID token, Identity Pool reads custom:team, matches it to a rule, and returns temporary credentials for the corresponding IAM role.

Role mapping rules in the Cognito Identity Pool that map the team attribute

Figure 4: The team attribute mapped by role mapping rules defined in the Cognito Identity Pool

Data permission granted to IAM role (Lake Formation)

With Lake Formation TBAC, you can control access declaratively with tags instead of writing filtering logic in your application. The two IAM roles are granted access to resources assigned to an LF-Tag.

Define an LF-Tag:

Tag Key: team
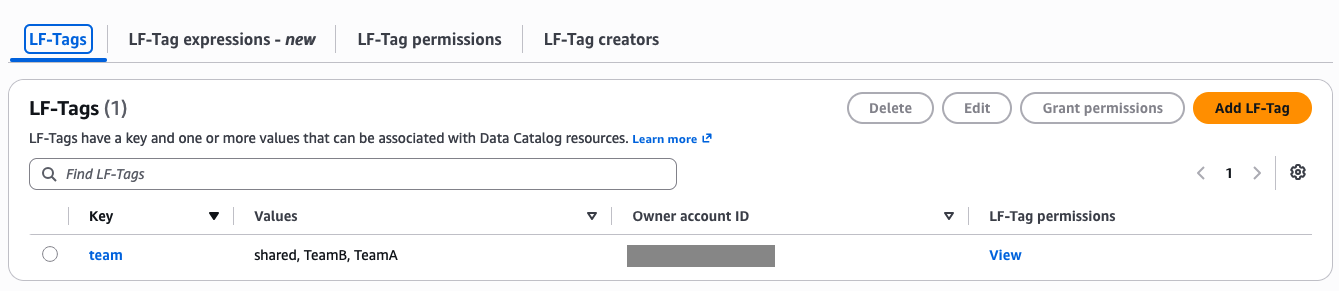
Tag Values: TeamA, TeamB, shared

The following figure shows the LF-Tag definition in the Lake Formation console, with the tag key “team” and its three allowed values.

Lake Formation LF-Tags for team-level data access

Figure 5: Lake Formation LF-Tags for team-level data access

Grant tag-based permissions to each role:

# TeamA role can access TeamA + shared tagged resources
aws lakeformation grant-permissions \
    --principal '{"DataLakePrincipalIdentifier": "arn:aws:iam::ACCOUNT:role/TeamA"}' \
    --resource '{"LFTagPolicy": {"ResourceType": "TABLE", "Expression": [{"TagKey": "team", "TagValues": ["TeamA", "shared"]}]}}' \
    --permissions "SELECT" "DESCRIBE"

The following two figures show the resulting Lake Formation data permissions for the TeamA and TeamB IAM roles, including table-level access through LF-Tags and row-level access through data cell filters.

Lake Formation permissions granting the TeamA IAM role table and row-level access

Figure 6: Lake Formation data permissions granting the TeamA IAM role table access through LF-Tags and row-level access through a data cell filter

Lake Formation permissions granting the TeamB IAM role table and row-level access

Figure 7: Lake Formation data permissions granting the TeamB IAM role table access through LF-Tags and row-level access through a data cell filter

Lake Formation data access control (TBAC)

AWS Glue Data Catalog resources are assigned to an LF-Tag. Assignment can be at the database, table, or row level. This example includes table-level and row-level assignment (through the use of a data cell filter).

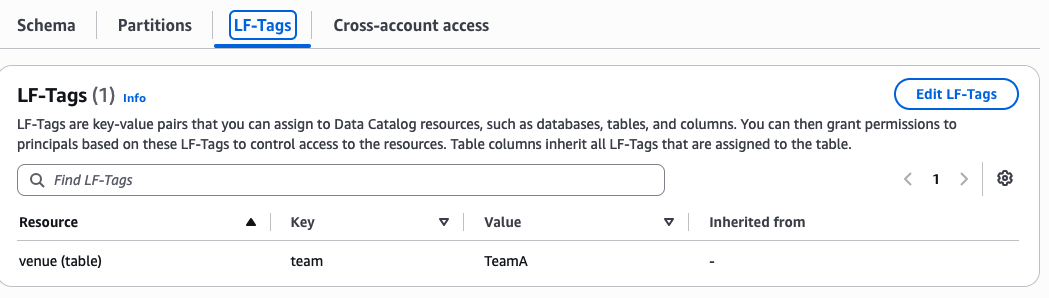
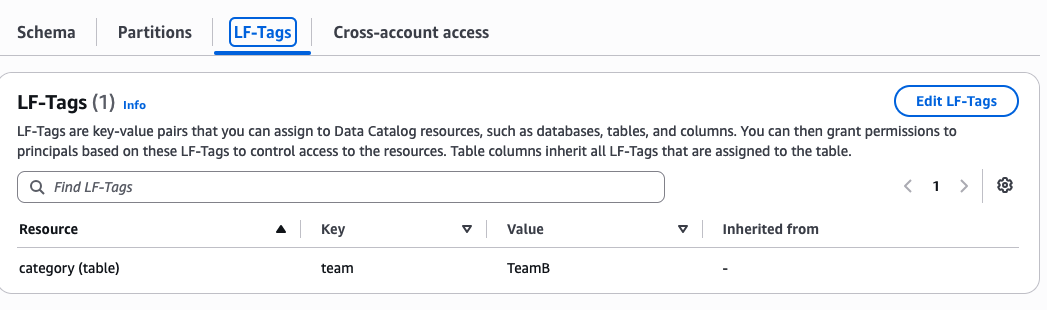
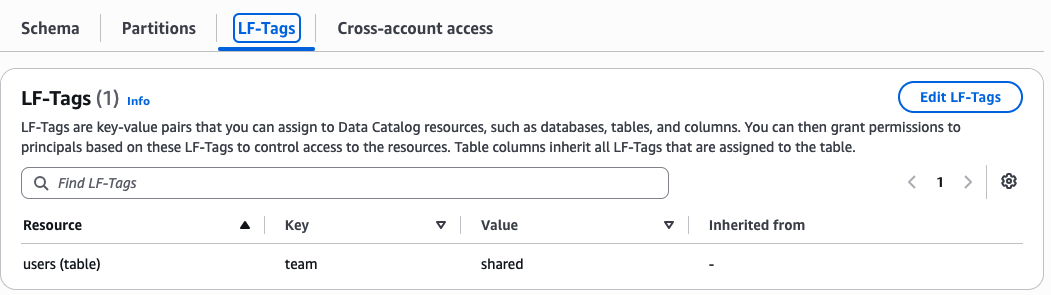
Assign tags to tables:

Table LF Tag Who Can Access
venue team=TeamA Team A only
category team=TeamB Team B only
users team=shared Both teams
sales_extended Row filter Per-team rows

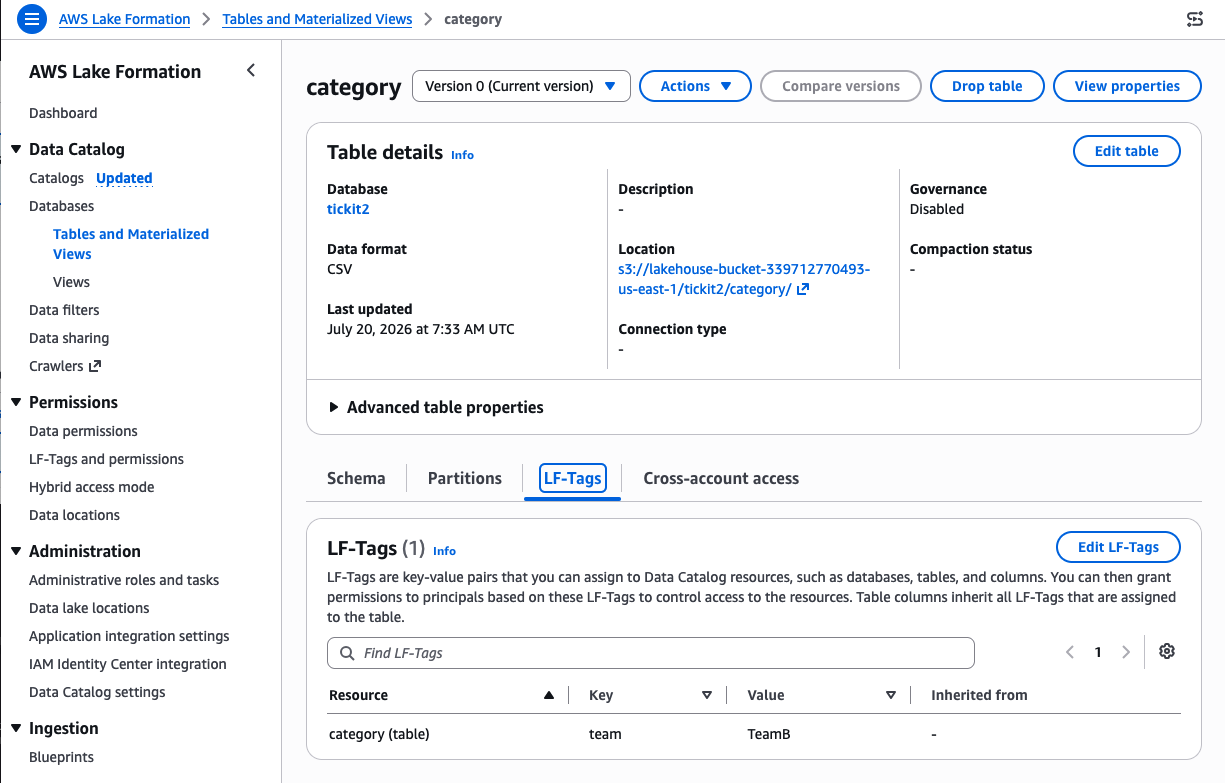
The three figures that follow show the LF-Tag assignment for each table in the Lake Formation console: “venue” tagged as TeamA, “category” tagged as TeamB, and “users” tagged as shared.

LF-Tag assignment on the venue table with team value TeamA

Figure 8: LF-Tag assignment on the venue table for the team tag with value TeamA

LF-Tag assignment on the category table with team value TeamB

Figure 9: LF-Tag assignment on the category table for the team tag with value TeamB

LF-Tag assignment on the users table with team value shared

Figure 10: LF-Tag assignment on the users table for the team tag with value shared

For row-level security, create data cell filters:

# TeamA only sees rows where team = 'Team A'
aws lakeformation create-data-cells-filter \
    --table-data '{
    "DatabaseName": "tickit2",
    "TableName": "sales_extended",
    "Name": "TeamAFilter",
    "RowFilter": {"FilterExpression": "team = '\''Team A'\''"},
    "ColumnWildcard": {}
}'

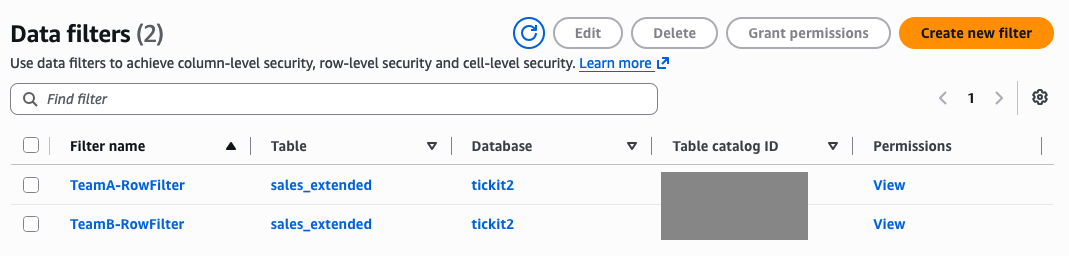
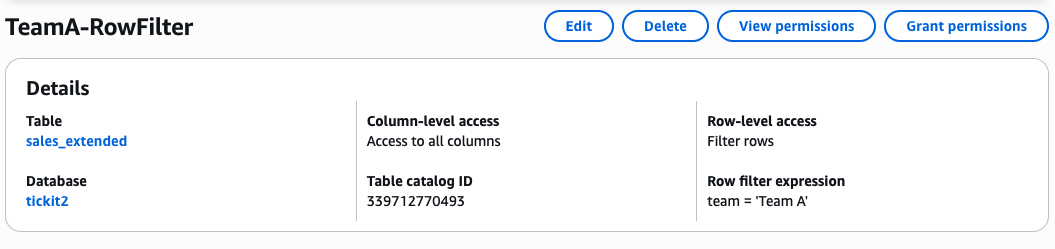
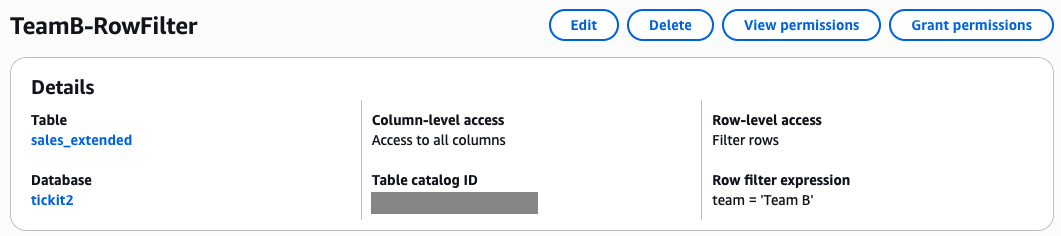
The following three figures show the data cell filter configuration in the Lake Formation console: an overview of the two filters applied to the “sales_extended” table, followed by the row filter expression for Team A and the row filter expression for Team B.

Two data cell filters applied to the sales_extended table

Figure 11: Two data cell filters applied to the sales_extended table, one per team

Data cell filter with the row filter expression for Team A

Figure 12: Data cell filter defined with the row filter expression team = ‘Team A’

Data cell filter with the row filter expression for Team B

Figure 13: Data cell filter defined with the row filter expression team = ‘Team B’

Technical design: enforcing permissions

A key design consideration in this solution is how role mapping runs securely without tampering. The design uses the Lambda target as a credential broker that exchanges the user-scoped ID token for an IAM data role through Identity Pool. The Lambda execution role has minimal IAM permissions to the Cognito Identity Pool and no data permissions. It only assumes the IAM data roles. The ID token propagated through AgentCore Gateway is validated intact with an inbound JWT authorizer.

AgentCore Gateway: Header propagation

The AgentCore Gateway propagates the ID token to the Target Lambda using metadataConfiguration on the gateway target:

{
    "metadataConfiguration": {
        "allowedRequestHeaders": ["X-ID-Token"],
        "allowedResponseHeaders": ["X-ID-Token"]
    }
}

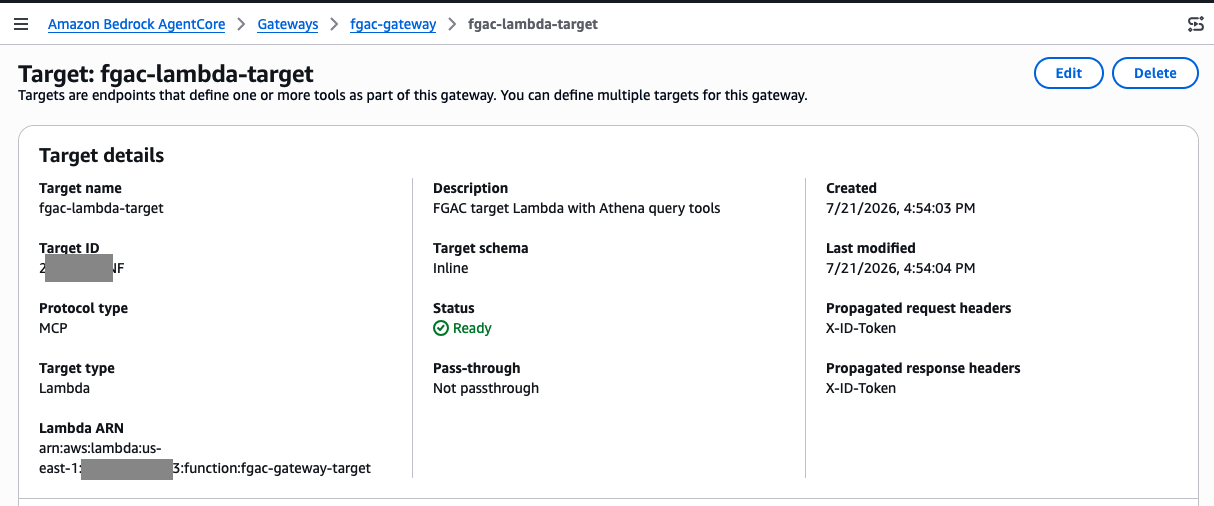
The following figure shows this metadata configuration in the AgentCore Gateway console, with “X-ID-Token” listed under both the propagated request headers and propagated response headers.

X-ID-Token configured as a propagated request and response header on the AgentCore Lambda target

Figure 14: X-ID-Token configured as a propagated request header and response header on the AgentCore Lambda target

The agent code extracts both tokens from the AgentCore runtime headers and passes them to the Gateway:

@app.entrypoint
async def invoke(payload, context):
    headers = context.request_headers
    # Runtime lowercases custom headers
    access_token = headers.get('Authorization')
    id_token = headers.get(
        'x-amzn-bedrock-agentcore-runtime-custom-x-id-token')
    with get_mcp_client(access_token, id_token) as client:
        tools = client.list_tools_sync()
        agent = Agent(..., tools=tools)
        # ...

The Target Lambda receives the propagated header in:

propagated = context.client_context.custom.get(
    'bedrockAgentCorePropagatedHeaders', {}
)
id_token = propagated.get('X-ID-Token')

The Target Lambda: A credential broker, not a data accessor

This is the key architectural decision. The Target Lambda execution role has only two permissions:

self.target_fn.add_to_role_policy(iam.PolicyStatement(
    actions=[
        "cognito-identity:GetId",
        "cognito-identity:GetCredentialsForIdentity",
    ],
    resources=["*"],
))

No Athena permissions. No S3 permissions. No Glue permissions. The Lambda exchanges the user’s ID token for scoped credentials and uses those to query:

def get_identity_pool_session(id_token: str):
    """Exchange ID token for user-scoped IAM credentials."""
    cognito_identity = boto3.client('cognito-identity',
        region_name=COGNITO_REGION)
    provider = f'cognito-idp.{COGNITO_REGION}.amazonaws.com/{USER_POOL_ID}'

    # Step 1: Get identity ID from token
    identity = cognito_identity.get_id(
        IdentityPoolId=IDENTITY_POOL_ID,
        Logins={provider: id_token}
    )

    # Step 2: Get credentials (role determined by Identity Pool rules)
    creds = cognito_identity.get_credentials_for_identity(
        IdentityId=identity['IdentityId'],
        Logins={provider: id_token}
    )

    # Step 3: Create session with user-scoped credentials
    return boto3.Session(
        aws_access_key_id=creds['Credentials']['AccessKeyId'],
        aws_secret_access_key=creds['Credentials']['SecretKey'],
        aws_session_token=creds['Credentials']['SessionToken']
    )

The authenticated role: Trust and permissions

Each team role trusts the Cognito Identity Pool and has Lake Formation + Athena permissions:

{
    "Effect": "Allow",
    "Principal": {
        "Federated": "cognito-identity.amazonaws.com"
    },
    "Action": "sts:AssumeRoleWithWebIdentity",
    "Condition": {
        "StringEquals": {
            "cognito-identity.amazonaws.com:aud": "<IDENTITY_POOL_ID>"
        },
        "ForAnyValue:StringLike": {
            "cognito-identity.amazonaws.com:amr": "authenticated"
        }
    }
}

The role’s IAM policy grants Amazon Athena, AWS Glue, Amazon Simple Storage Service (Amazon S3), and lakeformation:GetDataAccess. But Lake Formation TBAC further restricts what data the role can actually see based on its LF-Tag permissions.

The Athena query then runs under the user’s assumed role:

def execute_query(session, sql):
    # This Athena client uses the user's credentials, not Lambda's
    athena = session.client('athena', region_name=ATHENA_REGION)
    response = athena.start_query_execution(
        QueryString=sql,
        QueryExecutionContext = {'Database': 'tickit2'},
        ResultConfiguration = { 'OutputLocation': ATHENA_OUTPUT }
    )
    # Lake Formation enforces TBAC transparently
    ...

Deployment

Our solution is implemented and wrapped within AWS Cloud Development Kit (AWS CDK) stacks, which are available in the GitHub repository.

Prerequisites

To deploy the solution, you need the following prerequisites:

  1. An AWS account.
  2. AWS Command Line Interface (AWS CLI).
  3. Valid AWS credentials configured for the AWS CLI. For more information, see Configuring settings for the AWS CLI.
  4. Python 3.10+.
  5. uv Python package manager. For more information, see Installing uv.
  6. Docker.
  7. Node.js and npm installed for the frontend.
  8. AWS CDK. For more information, see Getting started with the AWS CDK.

Manual preparation before deployment

Before deploying the CDK stacks, complete the following manual steps:

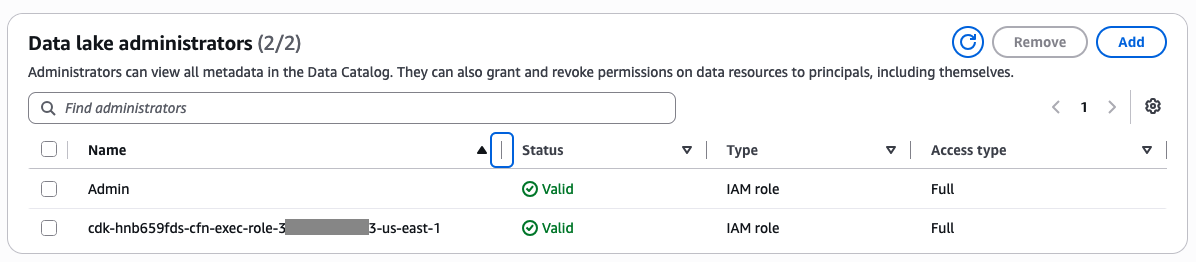
  1. Register the CDK CloudFormation execution role as a Lake Formation administrator.

The FgacLakeFormationStack creates LF-Tags and grants Lake Formation permissions. This requires the CloudFormation execution role to be a Lake Formation Data Lake Administrator. Follow Create a data lake administrator for detailed instructions.

Adding an IAM role as a Data Lake Administrator in Lake Formation

Figure 15: Adding an IAM role identity as a Data Lake Administrator in Lake Formation

Run the following AWS CLI command (replace [<YOUR_PROFILE>], [<ACCOUNT_ID>], [<REGION>] with your values):

aws lakeformation put-data-lake-settings \
    --profile [<YOUR_PROFILE>] \
    --region [<REGION>] \
    --data-lake-settings '{
    "DataLakeAdmins": [
        {"DataLakePrincipalIdentifier": "arn:aws:iam:: [<ACCOUNT_ID>]:role/cdk-hnb659fds-cfn-exec-role-[<ACCOUNT_ID>]-[<REGION>]"}
    ]
}'

To verify, run the following AWS CLI command:

aws lakeformation get-data-lake-settings \
    --profile [<YOUR_PROFILE>] \
    --region [<REGION>] \
    --query "DataLakeSettings.DataLakeAdmins"

Note: If you already have existing Lake Formation admins, include them in the DataLakeAdmins array to avoid removing them. Use get-data-lake-settings first to check.

  1. Download seed data.

The data lake stack deploys seed CSV data to S3. Run below python script to download it first on your environment:

python backend/infra/seed_data/download_tickit.py
  1. Log in to Amazon Elastic Container Registry (Amazon ECR) before deploying.

Run this AWS CLI command (replace [<YOUR_PROFILE>], [<ACCOUNT_ID>], [<REGION>] with your values)

aws ecr get-login-password --region [<REGION>] --profile [<YOUR_PROFILE>] | docker login --username AWS --password-stdin [<ACCOUNT_ID>].dkr.ecr. [<REGION>].amazonaws.com

Deploying the solutions

  1. Deploy the backend CDK stack.
cd backend/infra
uv sync
uv run cdk deploy --region [<REGION>] --profile [<YOUR_PROFILE>] --all

Enter “y” when asked to deploy security-sensitive updates on various stacks.

"--require-approval" is enabled and stack includes security-sensitive updates: Do you wish to deploy these changes? (y/n)y
  1. Install dependencies and start frontend.
cd ../..
cd frontend/data-chatbot
npm install

# Download backend configurations that powers the frontend
bash scripts/load-config.sh --region [<REGION>] --profile [<YOUR_PROFILE>]
#
# Loading config from SSM Parameter Store (region: [<REGION>], profile: [<YOUR_PROFILE>])...
# user_pool_id: us-east-1_2*******4
# user_pool_client_id: nkp9p****************ebv
# cognito_region: us-east-1
# agent_arn: arn:aws:bedrock-agentcore: [<REGION>]:[<ACCOUNT_ID>]:runtime/fgacdataagent-D6******hQ
agentcore_region: us-east-1
# Generated .env.local
# Generated amplify_outputs.json
# Done.

npm run dev
# > [email protected] dev
# > next dev
#
# ▲ Next.js 14.2.10
# - Local: http://localhost:3000
# - Environments: .env.local
#
# ✓ Starting...
# ✓ Ready in 2.4s

Frontend should start at http://localhost:3000

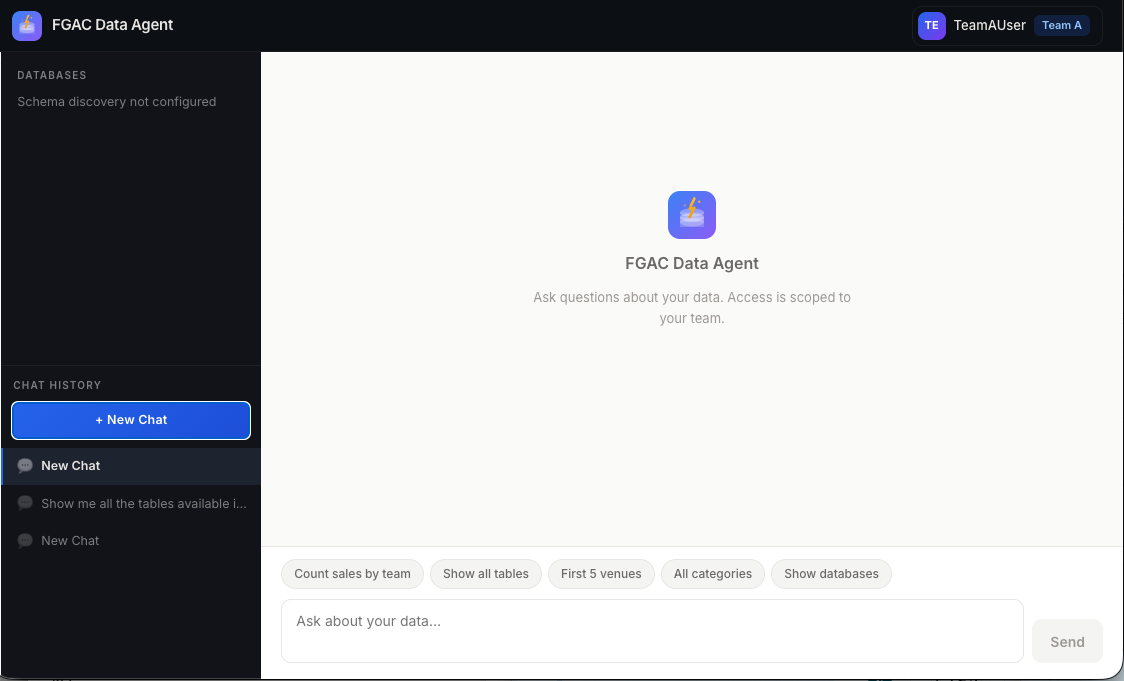
The sample data chat frontend application

Figure 16: The sample data chat frontend application

Scenarios walkthrough

This section walks through four scenarios that verify tenant-scoped data access. You log in as Team A, then Team B, and confirm each user sees only their authorized data. You then grant Team A additional access through Lake Formation and verify the updated permissions take effect.

View per-team data access

Each user’s custom:team attribute maps to a team-specific IAM role that scopes their data access. The following steps verify isolation for both Team A and Team B.

Expected access:


Team A user Team B user
sales_extended rows team = ‘Team A’ only team = ‘Team B’ only
Accessible tables venue (TeamA), users (shared) category (TeamB), users (shared)
Blocked table Category venue

Steps (repeat for each team user):

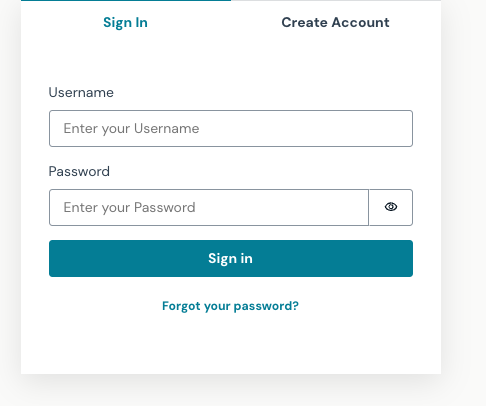
  1. Navigate to http://localhost:3000 and log in. You can find the username and password in the cdk.json file.
The Cognito hosted UI in the chat application

Figure 17: The Cognito hosted UI in the chat application

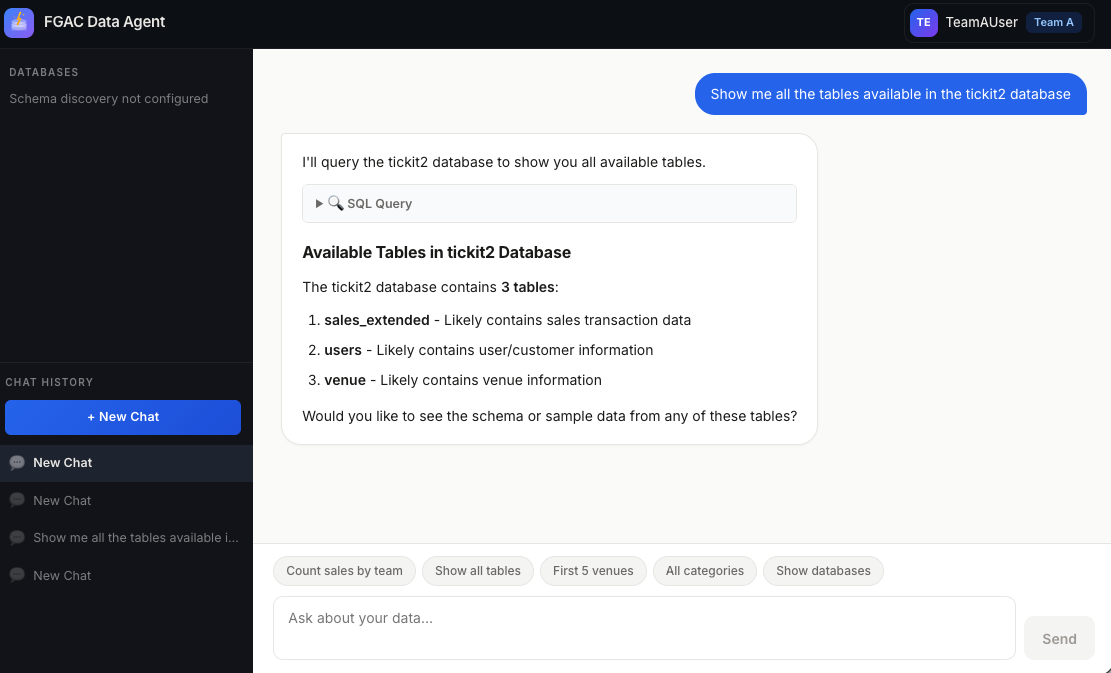
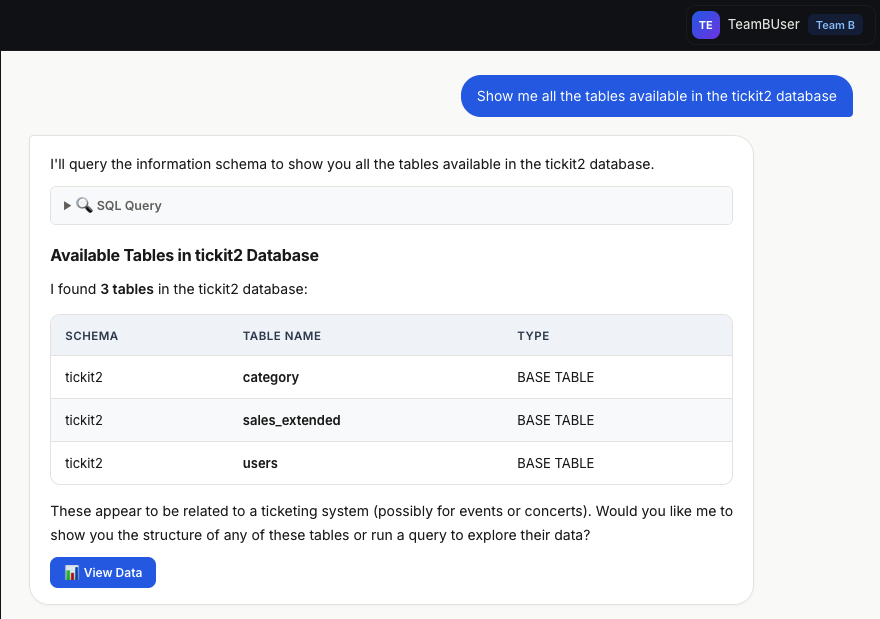
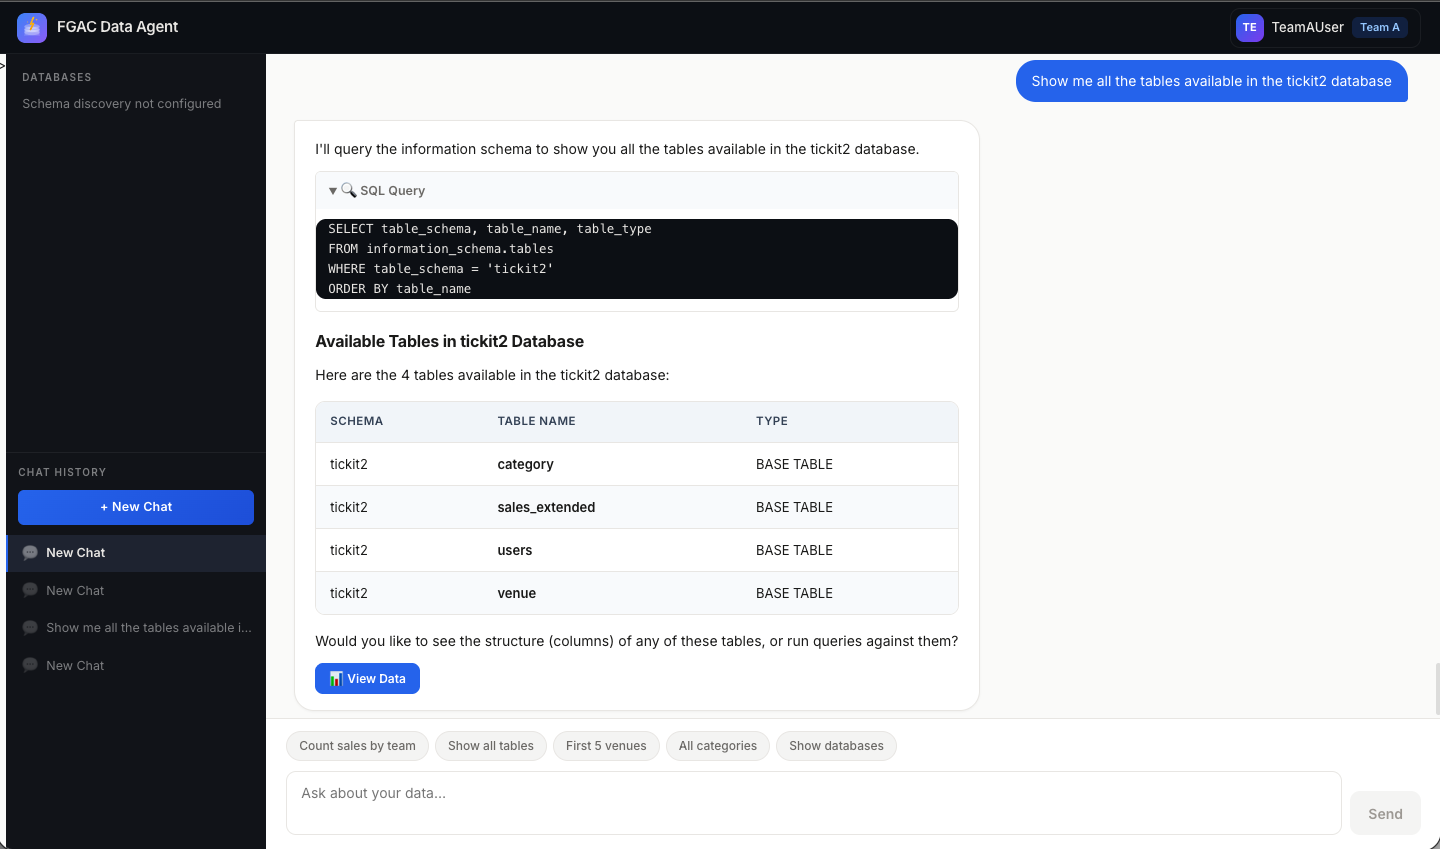
  1. Enter “Show me all the tables available in the tickit2 database” (or choose Show all tables). Confirm the table list matches the expected access.
Chatbot showing the table list for Team A

Figure 18: Chatbot returning the table list from natural-language input for Team A

Chatbot showing the table list for Team B

Figure 19: Chatbot returning the table list from natural-language input for Team B

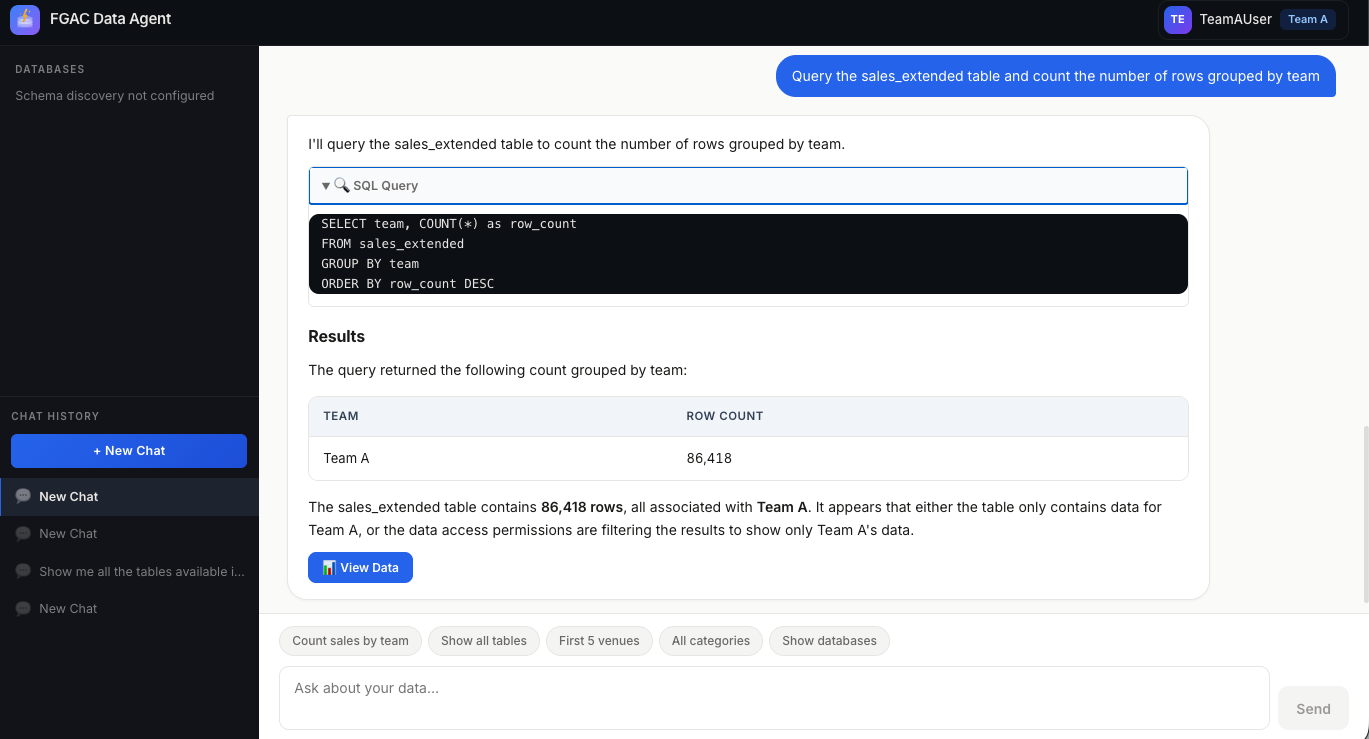
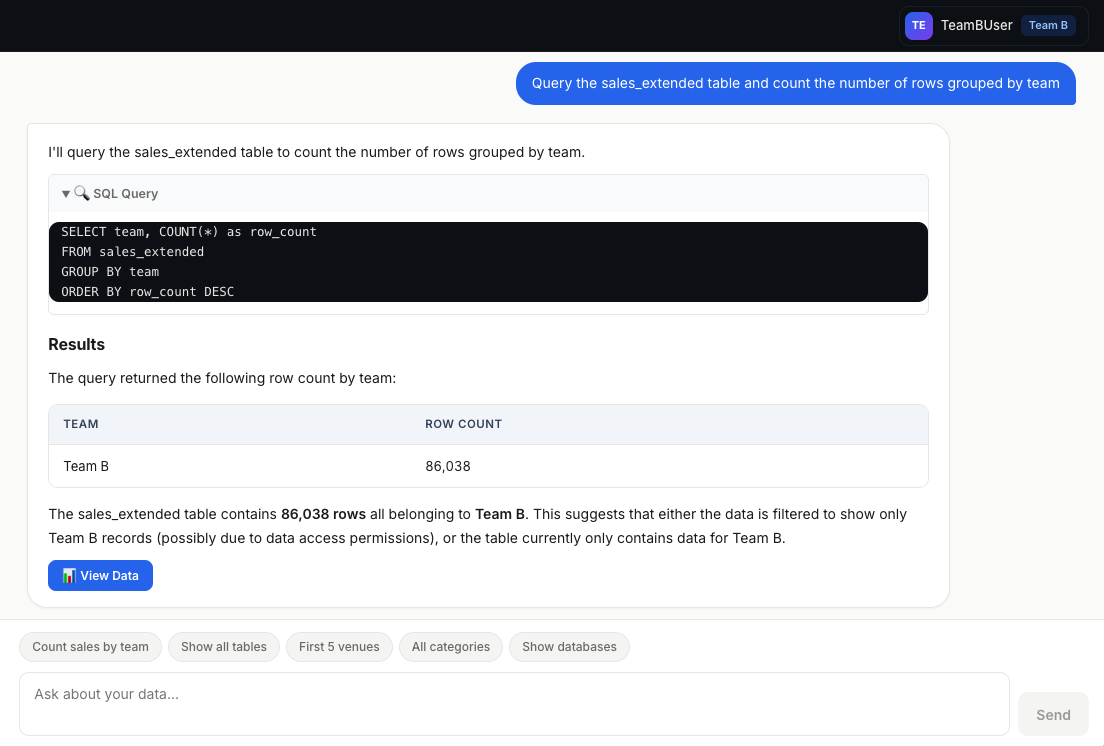
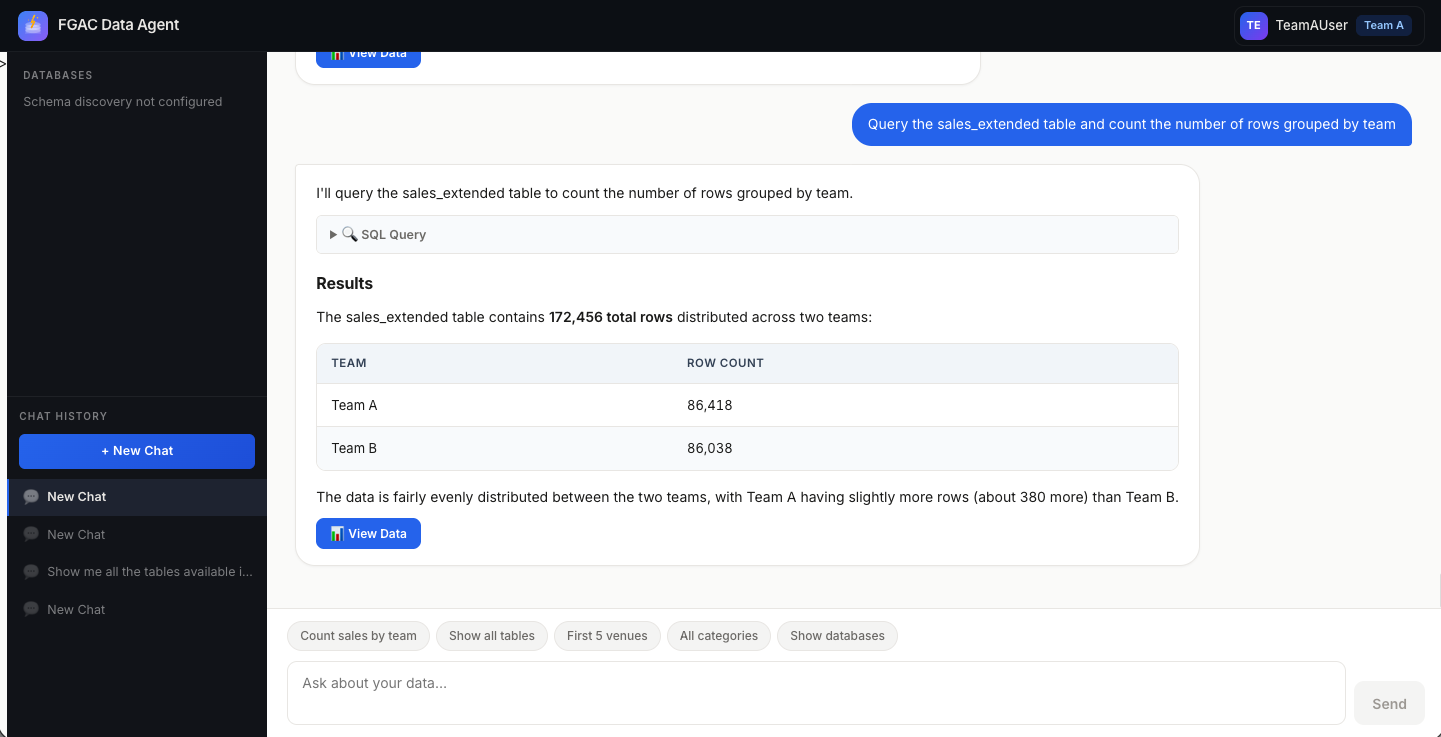
  1. Enter “Query the sales_extended table and count the number of rows grouped by team.” (or choose Count sales by team). Confirm only the user’s own team rows appear.
Chatbot showing sales_extended rows for Team A only

Figure 20: Chatbot returning sales_extended records for Team A only from natural-language input

Chatbot showing sales_extended rows for Team B only

Figure 21: Chatbot returning sales_extended records for Team B only from natural-language input

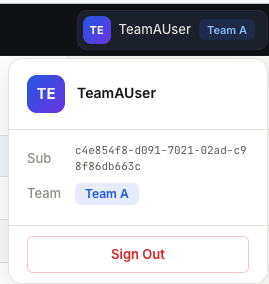
  1. Choose Sign out in the top-right corner before switching users.

Figure 22: Signing out of the Team A user

Figure 23: Signing out of the Team B user

Grant extra access to Team A user

In Lake Formation, grant the Team A user access to the Team B records in the sales_extended table and to the category table. Use the following AWS CLI commands or follow the equivalent console steps shown in Figures 24–29.

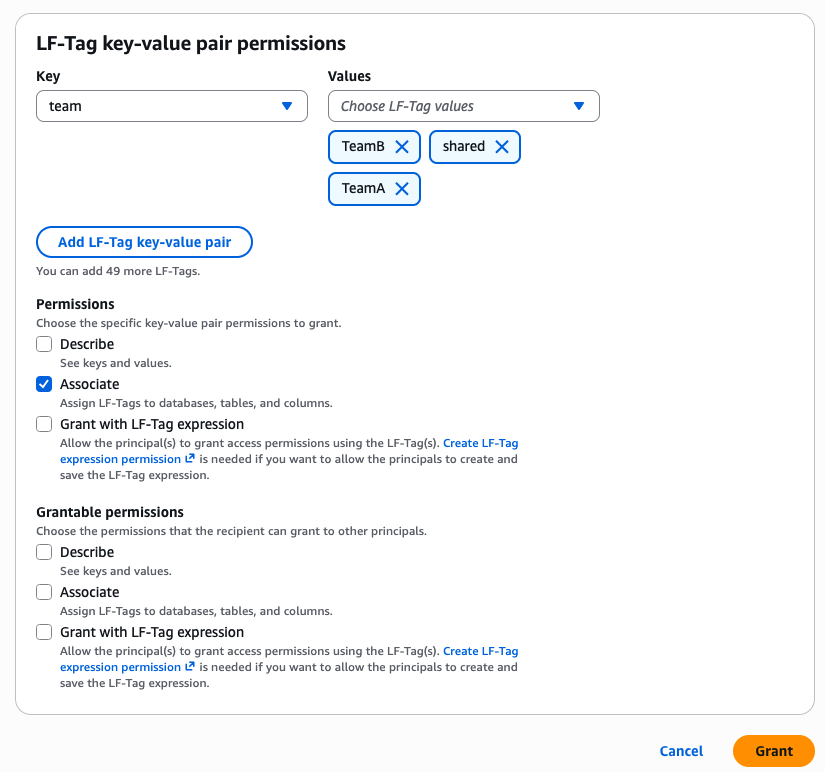
Step 1: Grant ASSOCIATE permission on the team LF-Tag (replace [<ADMIN_ROLE_OR_USER_ARN>] with the ARN of the IAM identity you use to manage LF-Tags):

aws lakeformation grant-permissions \
    --principal '{"DataLakePrincipalIdentifier": "[<ADMIN_ROLE_OR_USER_ARN>]"}' \
    --resource '{"LFTag": {"TagKey": "team", "TagValues": ["TeamA", "TeamB", "shared"]}}' \
    --permissions "ASSOCIATE" \
    --region [<REGION>] --profile [<YOUR_PROFILE>]

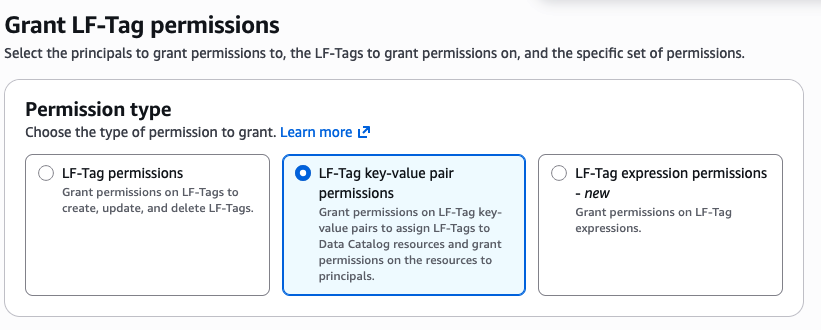
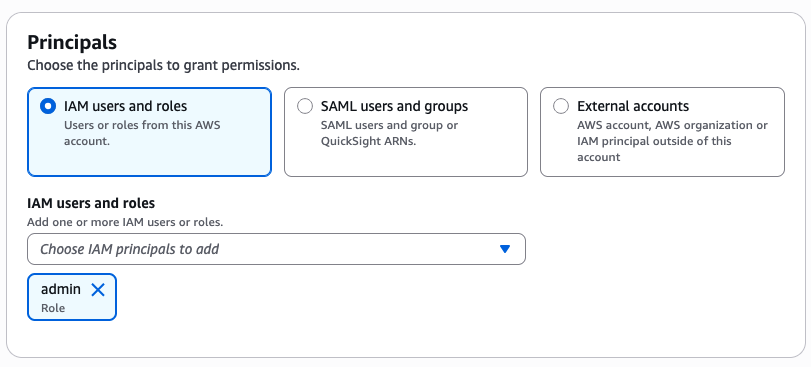
Alternatively, in the Lake Formation console, navigate to LF-Tags and permissions, open the LF-Tag permissions tab, choose Grant permissions, select LF-Tag key-value pair permissions, pick your admin identity as the principal, select the team key with all values, check Associate, and choose Grant (Figures 24–26).

Choosing LF-Tag key-value pair permissions

Figure 24: Choosing LF-Tag key-value pair permissions

Choosing the identity used to manage the LF-Tag

Figure 25: Choosing the identity used to manage the LF-Tag

Assigning ASSOCIATE permission on all values of the team LF-Tag

Figure 26: Assigning the ASSOCIATE permission for the identity on all values of the team LF-Tag

Step 2: Change the category table tag from TeamB to shared:

# Remove the existing TeamB tag
aws lakeformation remove-lf-tags-from-resource \
    --resource '{"Table": {"DatabaseName": "tickit2", "Name": "category"}}' \
    --lf-tags '[{"TagKey": "team", "TagValues": ["TeamB"]}]' \
    --region [<REGION>] --profile [<YOUR_PROFILE>]

# Assign the shared tag
aws lakeformation add-lf-tags-to-resource \
    --resource '{"Table": {"DatabaseName": "tickit2", "Name": "category"}}' \
    --lf-tags '[{"TagKey": "team", "TagValues": ["shared"]}]' \
    --region [<REGION>] --profile [<YOUR_PROFILE>]

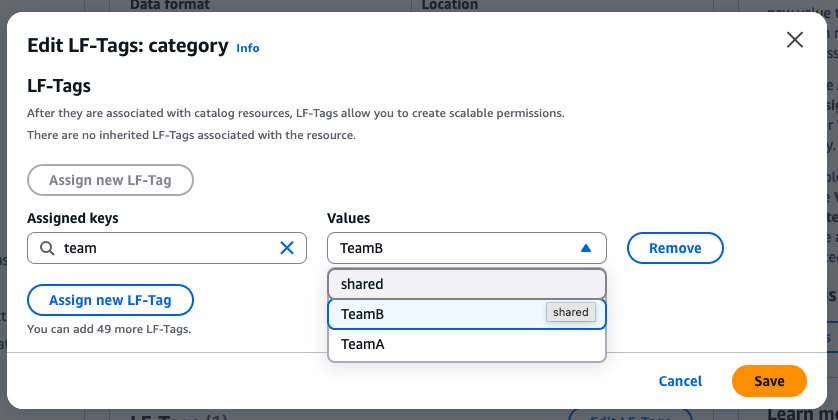
Alternatively, in the Lake Formation console, navigate to Tables and materialized views, find category in database tickit2, open the LF-Tags tab, and change the value from TeamB to shared.

Editing the LF-Tag on the category table

Figure 27: Editing the LF-Tag on the category table

Editing the LF-Tag value from TeamB to shared

Figure 28: Editing the LF-Tag value from TeamB to shared to grant table access to Team A as well

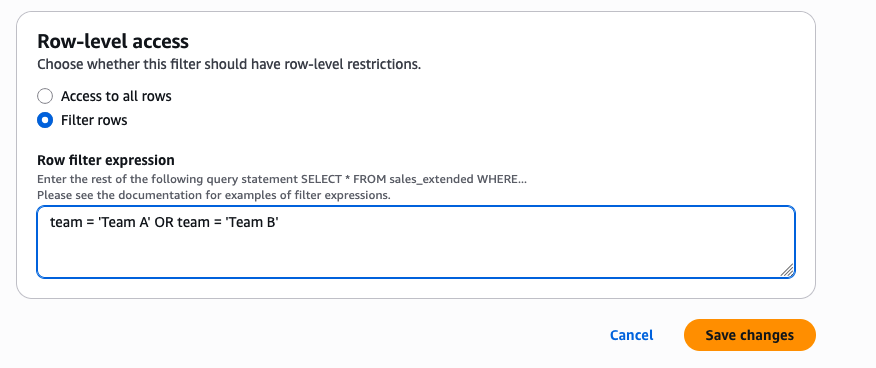
Modifying the row filter expression in the data cell filter

Figure 29: Modifying the row filter expression in the data cell filter to grant Team A users access to Team B records

Step 3: Update the data cell filter to include Team B rows for Team A:

aws lakeformation update-data-cells-filter \
    --region [<REGION>] --profile [<YOUR_PROFILE>] \
    --table-data '{
    "DatabaseName": "tickit2",
    "TableName": "sales_extended",
    "Name": "TeamAFilter",
    "RowFilter": {"FilterExpression": "team = '\''Team A'\'' OR team = '\''Team B'\''"},
    "ColumnWildcard": {}
}'

Alternatively, in the Lake Formation console, navigate to Data filters, find TeamAFilter, and modify the row filter expression to team = 'Team A' OR team = 'Team B'.

Verify updated Team A user permissions

Note: It may take several minutes for Lake Formation permissions to propagate.

Log in again as the Team A user. Run the same two queries from the View per-team data access section:

  1. Show all tables: You should now also see the category table.
Team A user can now also see the category table

Figure 30: Team A user can now also see the category table

  1. Count sales by team: You should now see rows for both Team A and Team B.
Team A user can now see Team B records in the sales_extended table

Figure 31: Team A user can now see records in the sales_extended table that belong to Team B

Clean up

To remove all components generated, run the following command:

uv run cdk destroy --all --profile <YOUR_PROFILE> --region <REGION>

Security considerations

  • Principle of least privilege: The Lambda has no data permissions and can only broker credential exchange.
  • Scoped data access: Data access flows through user-scoped credentials with Lake Formation enforcement.
  • OAuth token validated at Cognito level: IAM authentication at AgentCore Gateway level.
  • Audit trail: AWS CloudTrail and Lake Formation audit logs trace data access to individual users.
  • No tag injection risk: Session tags derived from validated token claims through Identity Pool.

Conclusion

If you’re building a SaaS application, partner portal, or B2C product where external users query a shared data lake, the hardest part isn’t the AI. It’s making sure every user sees only the data they’re authorized to access.

By combining Cognito User Pools (authentication), Cognito Identity Pools (token-to-credential exchange), Amazon Bedrock AgentCore (agentic platform), and Lake Formation TBAC (declarative access control), you can build a governed multi-tenant data agent that delivers on both fronts:

  • Zero-trust data isolation: Lake Formation scopes each query to the authenticated user’s role, enforcing access in the authorization chain rather than in prompt logic.
  • Minimal-privilege architecture: The Target Lambda acts only as a credential broker, without holding broad data permissions.
  • Declarative governance at scale: LF-Tags enforce row- and column-level security centrally, with no filtering logic in application code.
  • Audit readiness: CloudTrail and Lake Formation audit logs trace data access from authentication through query execution.

This pattern applies wherever external users need scoped data lake access: SaaS analytics, partner portals, customer-facing dashboards, or multi-tenant data products. To get started, review the Lake Formation tag-based access control documentation and the Amazon Bedrock AgentCore documentation, then deploy the sample solution to try it in your own account.


About the author

Fortune Hui

Fortune Hui

Fortune is a Solutions Architect at AWS Hong Kong, working with conglomerate customers. He helps customers and partners build big data platform and Agentic AI applications. In his free time, he plays badminton and enjoys whisky.

[$] User namespaces + file capabilities = trouble

Post Syndicated from corbet original https://lwn.net/Articles/1103429/

User namespaces are a key part of the
kernel’s toolkit for assembling containers; processes within a user
namespace can appear to have full root access to the system while gaining
no extra privileges in the wider system. At least, that is the intent. In
practice, keeping privilege contained within a user namespace has often
turned out to be difficult. As an example, consider this
small patch series
from Josef Bacik, which is intended to address some
situations where a process within a user namespace can elevate the
privileges of processes outside of it.

Security updates for Thursday

Post Syndicated from jzb original https://lwn.net/Articles/1105639/

Security updates have been issued by AlmaLinux (dpdk, httpd:2.4, kernel, kernel-rt, mysql:8.0, php:7.4, php:8.0, qt5, ruby:2.7, ruby:3.0, tesseract, webkit2gtk3, and xorg-x11-server-Xwayland), Debian (imagemagick, puppet-agent, symfony, trapperkeeper-authorization-clojure, and xen), Fedora (3proxy, bind, bind-dyndb-ldap, curl, dhcpcd, erlang-jose, forgejo, freetype, laszip, libical, libmongocrypt, markdownlint-cli2, mongo-c-driver, openbao, pipx, python-boto3, python-botocore, python-crate-ingredients, python-lxml-html-clean, python3.11, python3.13, python3.14, python3.15, roundcubemail, rply, ruby-build, rust-app-store-connect, rust-qemu-rdp, rust-redlib, scribus, and valkey), Mageia (minetest, python-pypdf, stunnel, znc, and zvbi), Oracle (.NET 10.0, bind, brotli, cockpit, dpdk, fence-agents, freerdp, gimp, glibc, grafana, gvfs, host-metering, kernel, python-dns, qemu-kvm, raptor2, tesseract, webkit2gtk3, and xorg-x11-server-Xwayland), Red Hat (grafana and pcs), Slackware (rsync), SUSE (amazon-cloudwatch-agent, apache2, aws-efs-utils, brotli, cephfs, coredns, cramfs-tools, firefox-esr, fuse-overlayfs, ghostscript, GraphicsMagick, libpolkit-agent-1-0-128, libsoup, nvidia-open-driver-G07-signed, perl-Dancer2, python-PyJWT, python313-joserfc, rsyslog, switcheroo, trivy, valkey, vexctl, and xdg-desktop-portal), and Ubuntu (apt, libphp-adodb, net-snmp, pillow, squid, and twisted).

Serverless ICYMI Q3 2026

Post Syndicated from Julian Wood original https://aws.amazon.com/blogs/compute/serverless-icymi-q3-2026/

In this 34th quarterly recap post, discover the most impactful AWS serverless launches, features, and resources from Q3 2026 that you might have missed.

In case you missed our last ICYMI, read about what happened in Q2 2026.

Q3 2026 calendar marking the quarter covered by this serverless recap

Figure 1: 2026 Q3 calendar

Amazon EventBridge

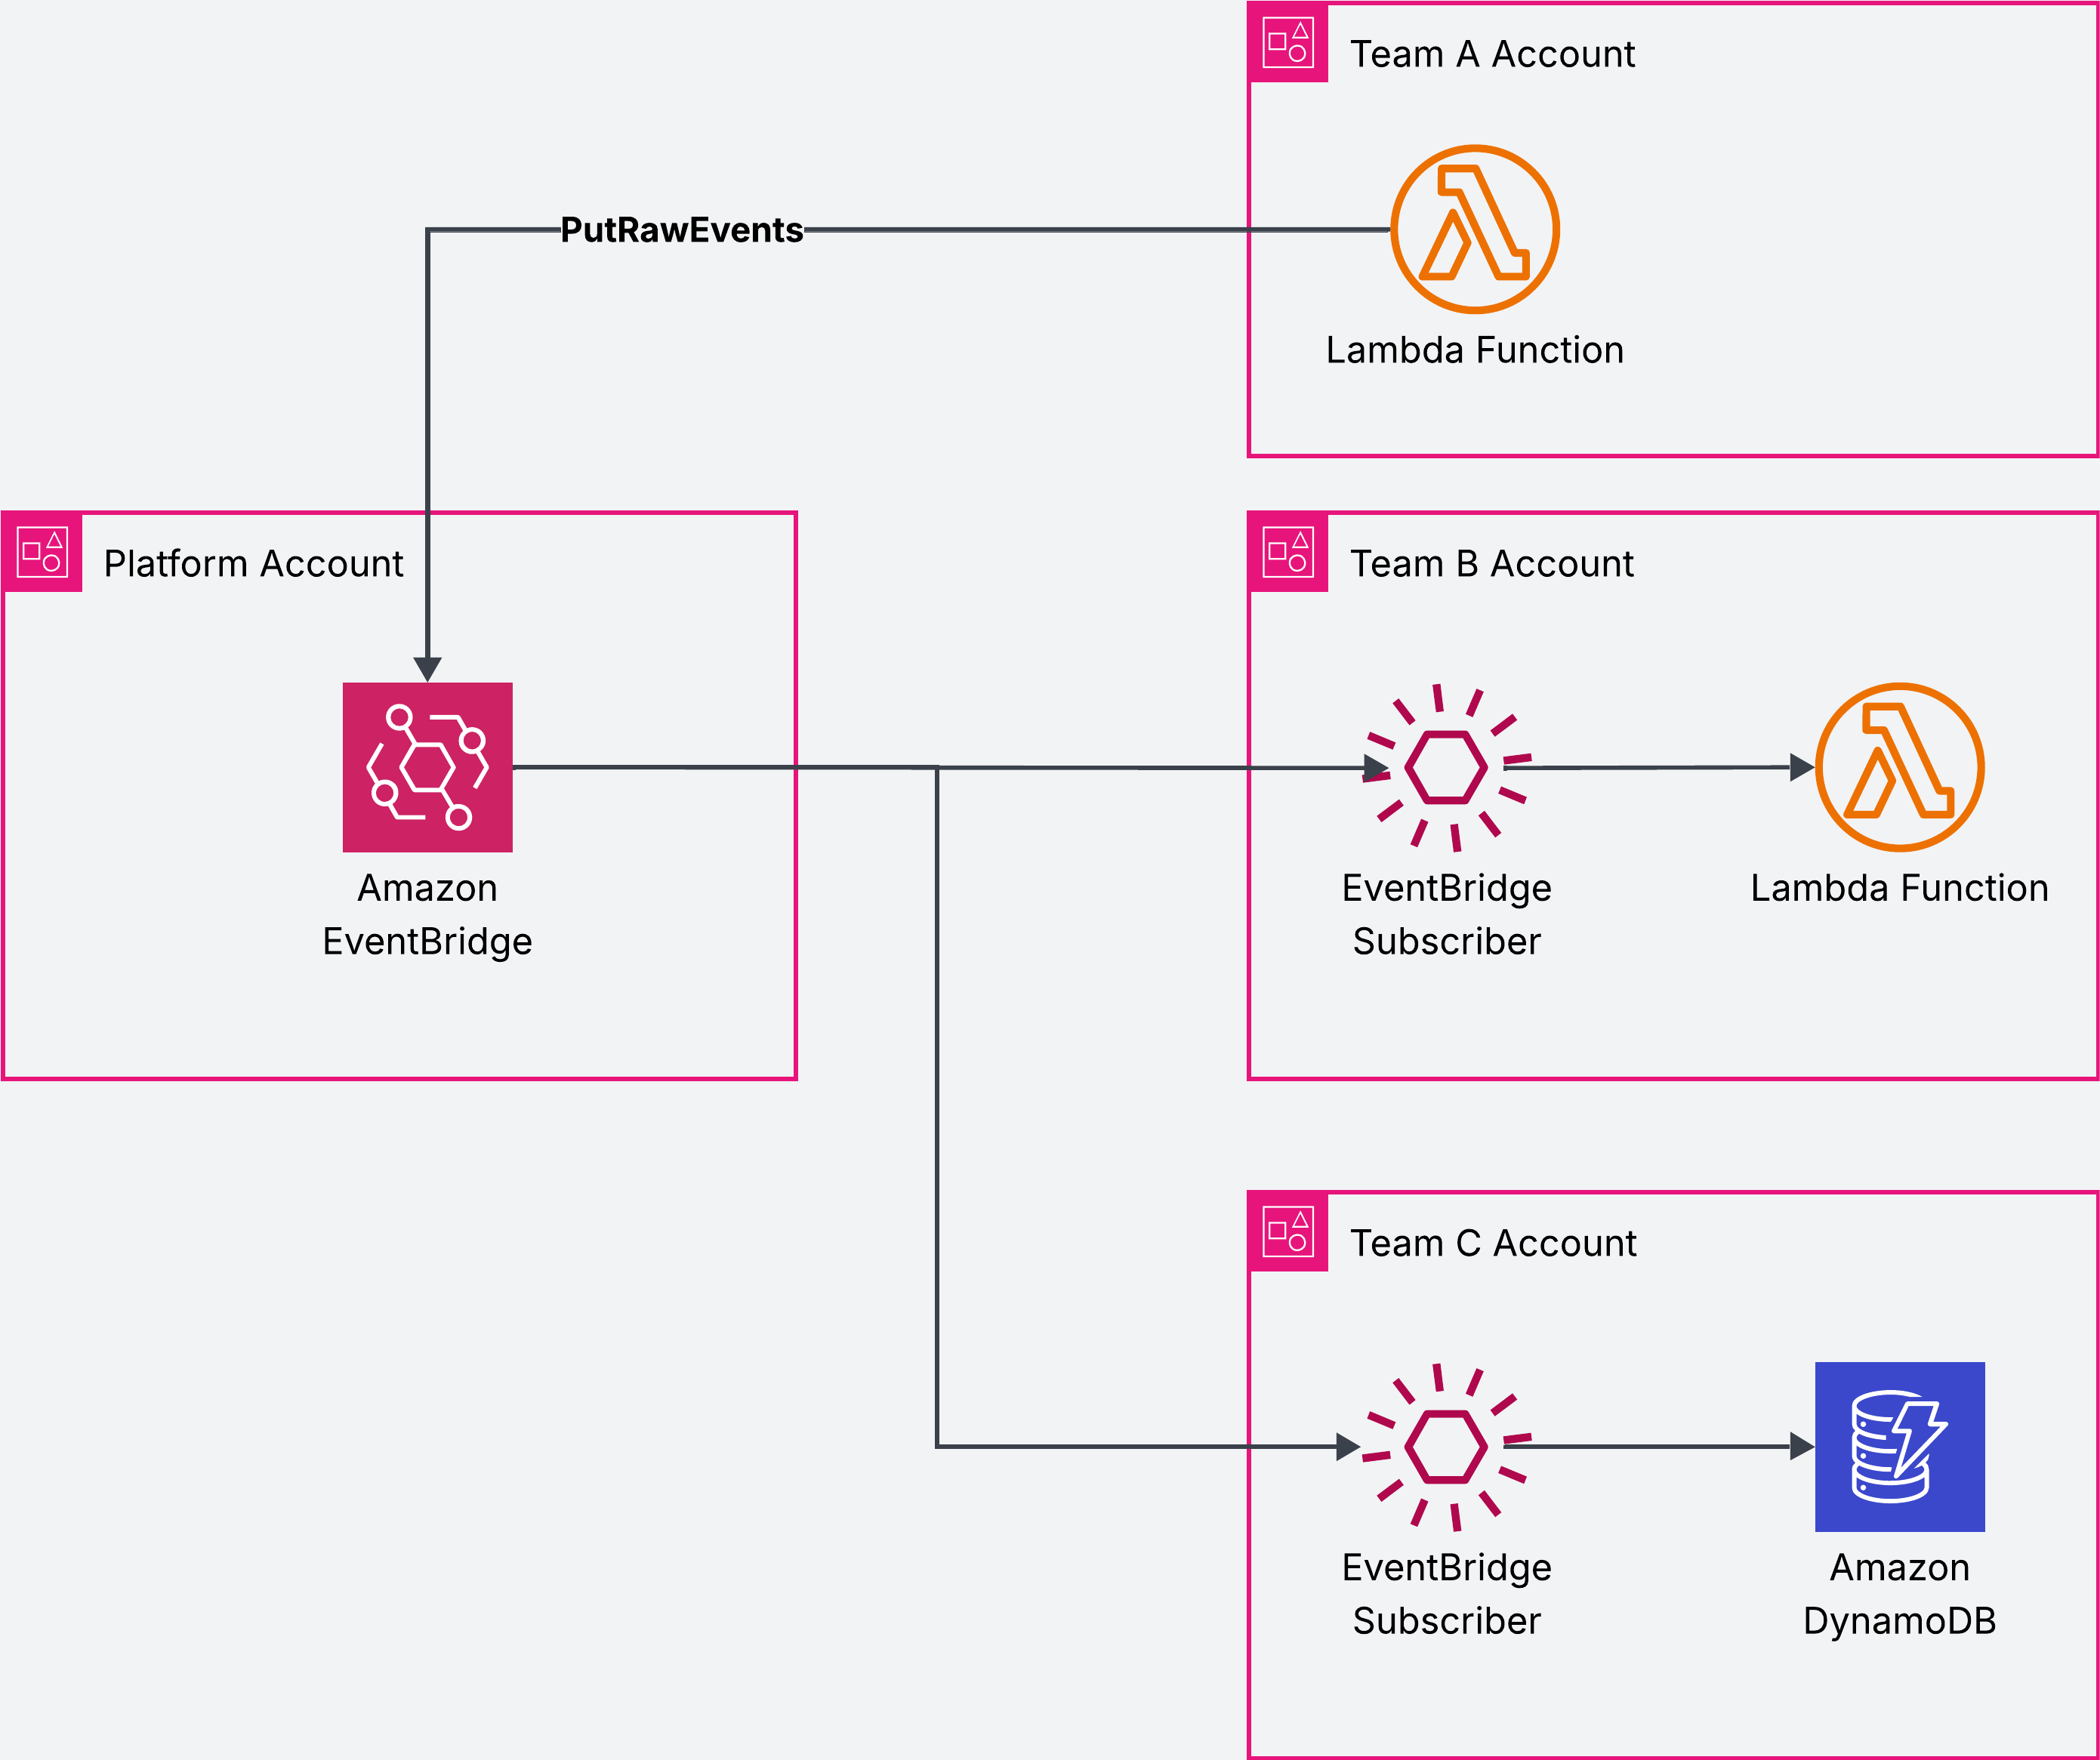
Amazon EventBridge relaunched the Custom event bus for organizations where many teams share events. A central team creates one bus, shares it across accounts with AWS Resource Access Manager, and controls who can publish and subscribe. Application teams create Subscribers in their own accounts instead of chaining forwarding rules between buses. The new bus keeps events for a retention period you choose, preserves order within a key the publisher sets, and accepts Avro, Protocol Buffers, and JSON, including CloudEvents. It runs alongside the classic bus, so adoption is incremental.

Shared EventBridge Custom event bus with subscribers in separate team accounts

Figure 2: Shared Custom event bus with subscribers in team accounts

More services now publish directly to Amazon EventBridge. AWS Secrets Manager sends an event when a secret value changes, and Amazon Simple Storage Service (Amazon S3) Event Notifications now include system-generated tags, so one rule can match events from thousands of buckets. Scheduling email campaigns at scale with Amazon EventBridge Scheduler shows a high-volume scheduling pattern.

AWS Lambda

AWS Lambda functions outside an Amazon Virtual Private Cloud (VPC) with 2 GB of memory or more now get scalable network bandwidth. The bandwidth increases from 625 Mbps at 2 GB up to 3,000 Mbps at 10 GB. Functions that pull large amounts of data from Amazon S3 or external sources finish sooner, as the ETL fan-out pattern in the post shows.

SnapStart now supports container images, cutting startup for larger images from several seconds to as low as sub-second. Provisioned mode for Amazon Simple Queue Service (Amazon SQS) event source mappings now scales to 10,000 event pollers, five times the previous limit, for up to 100,000 concurrent invocations. Lambda can also read function code from your own S3 bucket. Lambda skips copying the package to its own storage, so code storage quotas stop being a concern and functions activate faster after updates.

Lambda Managed Instances

AWS Lambda Managed Instances, a capability of AWS Lambda, now supports a 90-minute timeout for asynchronous and event source mapping invocations, six times the 15-minute limit. This longer timeout can help for jobs such as media transcoding, Monte Carlo simulations, and batch inference. You can run on AWS Graviton-powered C9g, C9gd, M9g, and M9gd instances with up to 25% better performance than Graviton4. Capacity providers now publish logs to Amazon CloudWatch, showing scaling activity and instance lifecycle operations. Eliminating Java cold starts with AWS Lambda Managed Instances covers latency-sensitive Java functions.

Durable functions

The Durable Execution SDK for .NET is generally available, joining TypeScript, Python, and Java. You can now bring your own SDK for any runtime, checked against an open source conformance test suite. The Pydantic AI integration makes each model and tool call a durable step, so an interrupted agent resumes where it stopped instead of repeating expensive calls. If your data governance policies require keys you control, you can encrypt execution data with your own AWS Key Management Service (AWS KMS) key. Observability best practices for Lambda durable functions covers dashboards, alarms, and tracing. Durable functions is also now available in the AWS European Sovereign Cloud.

Lambda MicroVMs

The following video shows stateful game servers running on Lambda MicroVMs.

Video thumbnail for building multiplayer game servers on AWS Lambda MicroVMs

Figure 3: Building multiplayer game servers with AWS Lambda MicroVMs

Secure code execution for AI agents explains how each Lambda MicroVMs user or job gets its own Firecracker-isolated environment that keeps state for up to 8 hours. MicroVMs is now available in 10 Regions and supports AWS PrivateLink, without exposing traffic to the public internet. Other posts cover CPU and memory metrics and custom domains with an Application Load Balancer, and the AWS Developers channel shows stateful game servers on MicroVMs.

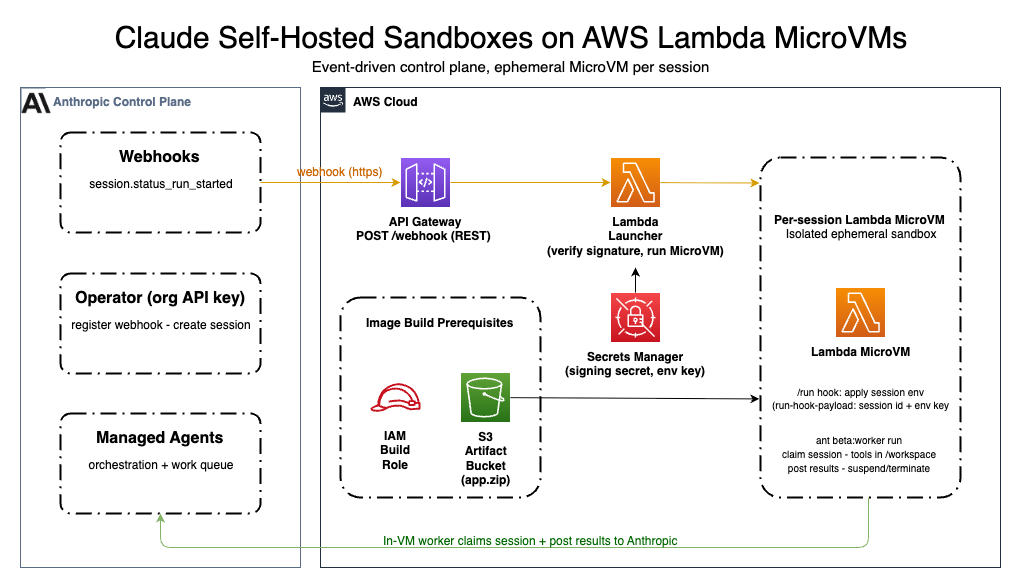
Running self-hosted AI agent sandboxes gives every agent session its own MicroVM in your account, with separate credentials, file system, and network boundary. Each MicroVM launches from a pre-captured snapshot, so new sessions skip application initialization.

Architecture of self-hosted AI agent sandboxes running on AWS Lambda MicroVMs

Figure 4: Self-hosted agent sandboxes on AWS Lambda MicroVMs architecture

Other Lambda updates

Lambda now offers public preview runtimes, starting with Node.js 26 and Python 3.15, so you can test your workloads before general availability. Java 8, 11, and 17 now run on Amazon Linux 2023, because Amazon Linux 2 reached end of life in June. You can move off Amazon Linux 2 without changing Java version at the same time. Functions support full AWS Identity and Access Management (AWS IAM) resource-based policies, and recursive loop detection is in all available commercial Regions. With S3 Files, you can configure direct reads from high-performance storage for lower latency or from your bucket for higher throughput. To change function behavior without redeploying, see Implementing dynamic feature flags with AWS AppConfig on AWS Lambda.

AWS Step Functions

AWS Step Functions now adds SDK integrations for new services automatically within weeks of release, starting with Lambda MicroVMs. A workflow can launch a MicroVM to run agent-generated code in isolation. Validating multi-agent decisions with Step Functions and Amazon Bedrock AgentCore fans work out to several agents with a Distributed Map and checks their decisions before acting.

Amazon SNS and Amazon API Gateway

Amazon Simple Notification Service (Amazon SNS) now supports message payloads up to 1 MiB, four times the previous limit. Set the MaximumMessageSize topic attribute to publish larger messages without splitting them, following the 1 MB increase across other serverless services in January. Amazon API Gateway now supports backend mTLS with your own client certificate and configurable destinations for execution logs.

Amazon S3

Amazon Elastic Container Service (Amazon ECS) on Amazon Elastic Compute Cloud (Amazon EC2) now supports S3 Files, and Amazon S3 Vectors, a capability of Amazon S3, adds metadata pre-filtering, returning up to 5 times more matches on selective filters. You can move objects to S3 Standard-IA on the day you create them instead of waiting 30 days. Object Lock adds event holds for retention that starts with a future event, such as a contract closing.

Building with AI

The Lambda console has a one-step setup prompt that configures your coding agent with AWS Serverless skills and the Serverless MCP server. The console-to-IDE integration now includes Kiro and Cursor and can convert your function to an AWS Serverless Application Model (AWS SAM) template. Set up your AI coding agent to build with AWS Step Functions does the same for workflows.

Agent Toolkit for AWS

The AWS MCP Server in the Agent Toolkit for AWS added a serverless capability that inspects a Lambda function and its connected resources, so your agent can diagnose issues in place. New skills cover Amazon Cognito, Amazon DocumentDB (with MongoDB compatibility), Amazon OpenSearch Service, and Amazon Redshift. The AWS Command Line Interface (AWS CLI) can now check for and update all skills in one command.

Amazon Bedrock AgentCore

The new AgentCore runtime, a capability of Amazon Bedrock AgentCore, reclaims unused memory during a session, so you pay for what you use, and keeps cold starts consistent. Runtime instances run agents on Amazon EC2 instance types you choose, much as Lambda Managed Instances does for functions. AgentCore payments, a capability of Amazon Bedrock AgentCore, is generally available, and temporal policies authorize tool calls based on what the agent already did in the session.

AgentCore memory, a capability of Amazon Bedrock AgentCore, added JSON payload extraction, fine-grained access control, flexible namespaces, and direct ingestion. AgentCore Identity, a capability of Amazon Bedrock AgentCore, has a managed consent portal for OAuth flows, and AWS Agent Registry is generally available. Amazon Bedrock Managed Agents, powered by OpenAI is in preview. New models include Claude Fable 5.1, Claude Opus 5.5, Claude Sonnet 5.5, GPT-6 Astra, GPT-6 Sol and Luna, and Kimi K3.

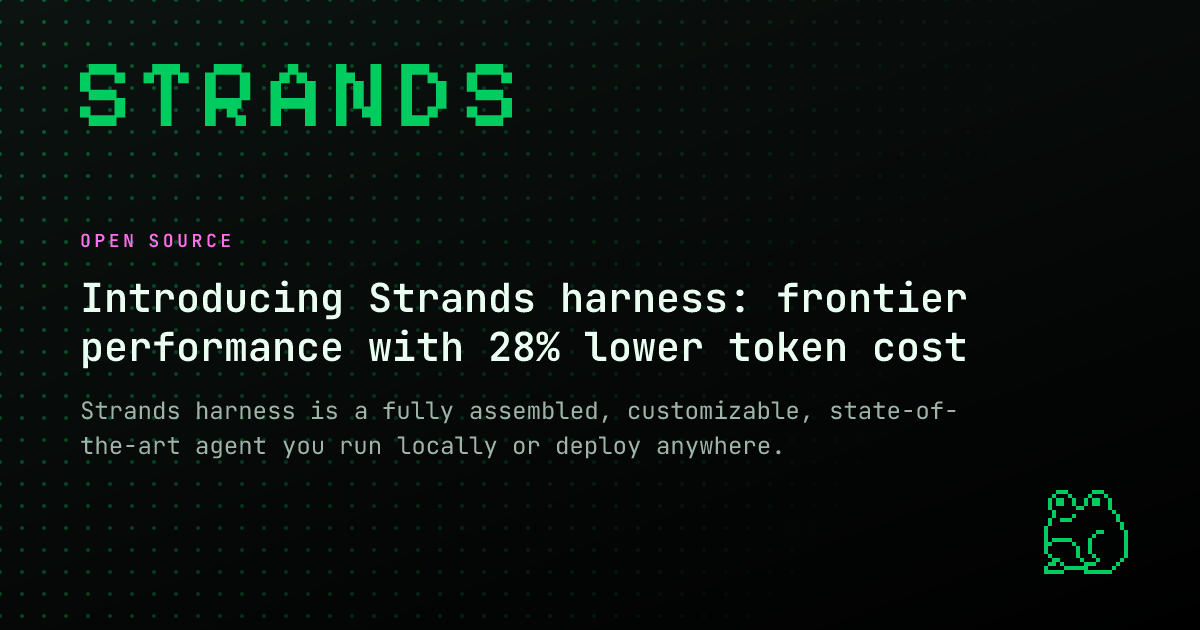
Strands Agents

Title card introducing the Strands harness open source agent

Figure 5: Introducing Strands harness

Strands harness is an open source, general-purpose agent you start with one line of Python or TypeScript and run locally or deploy anywhere. Across six benchmarks using the same models, it cost 28% less than other popular harnesses with similar accuracy, mostly because of its default context management. Harness Optimizer tunes prompts, tool descriptions, and skills automatically, strands-dynamodb-storage adds durable agent storage on Amazon DynamoDB, and Strands Evals now evaluates agents built with other frameworks.

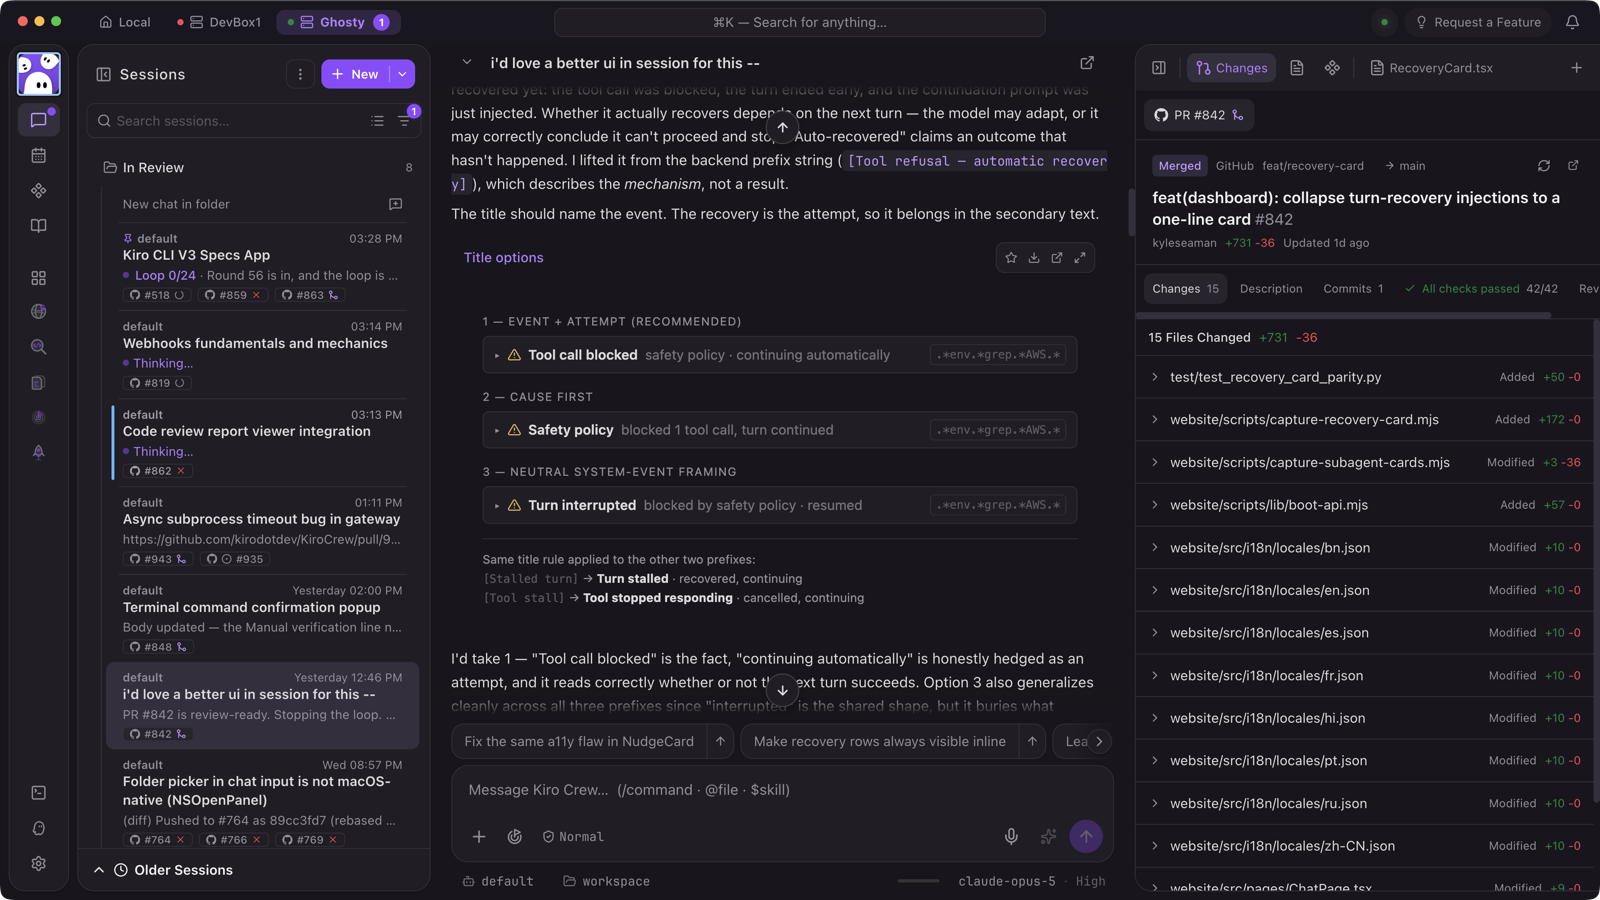
Kiro

Kiro Crew desktop session view showing agent work across sessions

Figure 6: Kiro Crew session view

Kiro Crew is an open source workspace that runs agent work across sessions, schedules, and subagents from a desktop app, web dashboard, or terminal. Kiro on the web is generally available, cloud sessions keep CLI and IDE tasks running after you close your laptop, and workflows run multi-step plans across several agents in the background.

Serverless blog posts

Here are the Q3 2026 serverless blog posts, grouped by the month they published.

July

August

September

Still looking for more?

The Serverless landing page has overall information about building serverless applications. The Lambda resources page contains case studies, webinars, whitepapers, customer stories, reference architectures, and even more Getting Started tutorials.

You can also follow the Developer Advocacy team to get the latest news, follow conversations, and interact with the team.

And finally, visit Serverless Land for your serverless needs.

Critical security vulnerability affects OpenSSH on Alpine Linux systems

Post Syndicated from jzb original https://lwn.net/Articles/1105464/

Version 10.6p2 of
OpenSSH has been released with a workaround for a critical vulnerability that
affects Linux systems that use musl libc
with PAM disabled, such as Alpine
Linux
. OpenSSH developer Damien Miller said:

If you operate a Linux system that uses musl libc without PAM (Alpine Linux
is one example) then stop reading and set PasswordAuthentication=no or disable
SSH for these systems IMMEDIATELY.

This vulnerability does not exist on non-Linux systems, Linux/glibc systems
and Linux systems that use PAM for password authentication.

We consider the root cause of this bug to be outside OpenSSH itself, but
we’re in a good position to deliver a mitigation quickly.

The Alpine Linux project has announced that
it will be backporting the OpenSSH fix “all the way back to Alpine 3.16“,
which was released in May
2022.

Имаме си президентка. Съвсем

Post Syndicated from Светла Енчева original https://www.toest.bg/imame-si-prezidentka-suvsem/

Имаме си президентка. Съвсем

Вече действително си имаме президентка. Ако доскоро Илияна Йотова заемаше поста на държавния глава само защото Румен Радев го напусна, за да стане премиер, на 1 ноември 2026 г. тя стана първата жена в България, избрана за президент. Следва да отбележим: това се случи, преди „стъкленият таван“ в политиката да е строшен в държави като САЩ и Германия, да не говорим за Русия. Ниската избирателна активност не прави Йотова по-малко президент – такива са изборните правила и те са спазени.

Имаме си президентка. И?

Имаме си президентска институция с жена начело, но то е по стечение на обстоятелствата, а не защото сме я избрали и сме решили, че тъкмо нея искаме тъкмо на това място. За жените в българската политика и защо президентКАТА не е пробив – от Светла Енчева.

Според данни от екзитполове за нея са гласували повече жени, отколкото мъже. Тези данни следва да се приемат с едно наум поради сериозното разминаване между резултатите от екзитполовете и от изборите, но с друга информация за профилите на гласувалите, за съжаление, не разполагаме. И все пак, тъй като профилите на гласоподавателите по пол и възраст са аналогични на тези от първия тур, може да предположим, че са по-скоро коректни.

Ала фактът, че жена е избрана за президент, добра новина ли е за жените в България?

Жени антифеминистки в българската политика

Наличието на жени в политиката само по себе си не означава феминизъм. Ето няколко от многото примери за антифеминистки позиции на жени в българската политика:

През 1997 г. се учредява Партията на българските жени (ПБЖ).

През 2001 г. партията, чиято председателка е Весела Драганова, става мандатоносител на политическия проект на бившия цар Симеон Сакскобургготски, през 2024 г. – на проекта на бившия главен прокурор Иван Гешев, а междувременно е участвала във всевъзможни коалиции. Ето едно от основните неща, с които ПБЖ намира за нужно да се представи (оригиналният правопис е запазен):

Въпреки наименованието: Партия на българските жени, идеите не са феминистки, а в традициите на християнството, защитавайки изконните български ценности – родина, дом, семейство, деца, духовни традиции – ценности, чиито най-голям радетел е била и е българската майка.

Настоящата председателка на парламента Михаела Доцова също държи да се знае, че не е феминистка.

Тя споделя това в началото на април 2026 г., когато още е кандидат-депутатка от „Прогресивна България“, в интервю на Мартин Богданов, по-известен с псевдонима Карбовски. Думите на Доцова предизвикаха реакции, след като тя застана начело на Народното събрание, заради един очевиден парадокс. Жена, заела един от най-високите постове в България в резултат на това, че жени преди нея са се преборили първо за правото си да избират, а след това и за правото да бъдат избирани, не се идентифицира с отстояването на равни права от страна на жените.

Но едва ли някоя жена е навредила през последните десетилетия повече на правата на жените в България от бившата председателка на БСП Корнелия Нинова.

Никоя от родните уонаби традсъпруги не може да стъпи на малкия ѝ пръст в това отношение. Борбата на Нинова срещу Конвенцията на Съвета на Европа за превенция и борба с насилието над жени и домашното насилие (Истанбулската конвенция) допринесе за връщането на еманципацията на жените в България с десетилетия назад. Не толкова заради омаловажаването на проблема с домашното насилие, от което потърпевши са най-вече жените, а основно заради отрицанието на социалната значимост на пола.

След успеха на кампанията срещу Истанбулската конвенция вече официално (бетонирано и от Конституционния съд) единствената социална роля на жената е в биологичното ѝ възпроизводство – тоест да бъде майка.

Защо Истанбулската конвенция отново е на дневен ред

Европейският парламент ратифицира Истанбулската конвенция. Какво точно означава това и какво следва за България от тази ратификация? Светла Енчева обяснява.

Илияна Йотова и феминизмът

За близо десетте си години в Президентството Илияна Йотова би могла да овластява жените в България, като бъде техният глас. Би могла например да популяризира трудовите и социалните права на майките, които не се познават добре. Или Директивата на ЕС за равно заплащане на мъжете и жените за равен труд. За тази директива, чиято цел е да се осигури прозрачност в заплащането, в България почти не се говореше, преди тя да бъде въведена на 7 юни 2026 г.

Йотова би могла и да възрази на оттеглянето на България от Истанбулската конвенция. Впрочем тя първоначално го направи – на форум за правата на жените разкритикува оттеглянето от Конвенцията. Но скоро след това зае „мултивекторна“ – казано с терминологията на „Прогресивна България“ – позиция по въпроса. Тоест си изми ръцете като Пилат Понтийски, обявявайки се за референдум за Конвенцията. После гласът ѝ по темата напълно заглъхна.

Но през десетте си години в Президентството Йотова не акцентира върху пола си.

С оглед на политическата ѝ кариера стратегията на тази линия на поведение е печеливша. За да стане първата жена, избрана за президент в държава, в която единствената социална роля на жената по конституция е да бъде майка, желателно е да не насочва общественото внимание върху факта, че е жена.

Впрочем единственият път по време на дебата между нея и Андрей Гюров, когато тя се идентифицира с пола си, беше в конституционно „правилния“ контекст – изтъкна, че е майка и баба.

В последно време се наблюдава промяна в единствената характеристика на Йотова, подчертаваща женствеността ѝ – буйната коса. Вече няколко пъти, например на дебата с Гюров и на пресконференцията след победата на втория тур, косата ѝ е частично прибрана назад, което разкрива лицето ѝ, но ѝ придава и по-строг вид.

И Камала Харис, която също се опита да се изкачи от вицепрезидентския до президентския пост, се стараеше да не акцентира върху пола и расата си; не че това ѝ помогна да победи Тръмп.

Камала Харис и трошенето на бариери

Ще успее ли Камала Харис да разбие най-високия стъклен таван в САЩ – този на Белия дом, ставайки първата цветнокожа жена президент на Щатите? От Светла Енчева.

Между Харис и Йотова обаче има поне две ключови разлики.

Първо, Илияна Йотова се кандидатира за президентския пост скоро след като Румен Радев взе властта, така че можа да се възползва от инерцията от победата на „Прогресивна България“. А Камала Харис се кандидатира в период, когато неодобрението към Джо Байдън беше много високо.

Второ, въпреки че Харис беше в по-лоша изходна позиция от Йотова, правата на жените бяха сред основните теми в кампанията ѝ. Особено репродуктивните права, защото две години по-рано Върховният съд на САЩ прие решение, според което правото на аборт вече не е защитено от Конституцията. Илияна Йотова не само не се застъпва за правата на жените, а и

участва в своеобразно легитимиране на мизогинията.

Тя отказа да даде интервю на множество авторитетни медии, например CNN, но пък даде на Мартин Карбовски (в комбинация с Явор Дачков). Карбовски (както и Дачков), при когото се изредиха и много от политиците на „Прогресивна България“, от години е ретранслатор на пропутински опорни точки и се е превърнал в своеобразна трибуна на новата власт. Морализаторският му патос и позициите му в защита на „традиционните ценности“ обаче са в странен дисонанс с контракултурния му образ в миналото, чиято бунтарщина се изразява не на последно място в откровена мизогиния.

Есето на Карбовски Rape Party, публикувано в „Егоист“ в края на 90-те например, е посветено на „рейпването“ (изнасилването). В него авторът, който пише от свое име, а не от това на литературен герой, нормализира сексуалното насилие над жени:

Всеки мъж е опитвал да рейпва – най-малкото заради алкохол или поне защото Кърт Кобейн и Слави Трифонов пеят подобни песни. Аз съм се опитвал да насилвам жена два пъти.

Следват детайлни описания как точно е опитвал и защо не е успял, а за „утеха на феминистите и феминистките“ следва да послужи признанието, че „синините на сутринта по мене и по нея бяха равен брой“. Не става ясно дали според автора „феминистите и феминистките“ трябва да се чувстват спокойни и от това твърдение (оригиналният правопис е запазен):

… една жена трябва да бъде смляна от бой, съсипана психически или заплашена с пистолет, за да успее жалката мъжка технология на изнасилването. Жените са яки в бедрата, гъвкави са, умеят да се извиват и гърчат, юмруците и ноктите им не са за подценяване, ритниците им са страшно оръжие. А и основния проблем на мъжете е, че женските полови органи са вътре в тялото на жената и ако някой много мърда е трудно да уцелиш дупката.

Дори обаче да приемем, че това есе е просто литература, опитите на Карбовски да оневини мъж, изнасилил и убил жена, са реални. Става въпрос за убийството на Яна Кръстева в Борисовата градина през 2011 г. За него беше обвинен Николай Русинов – Чеци, впоследствие и осъден. Но междувременно Карбовски му даде трибуна, свидетелства в негова подкрепа в съда и тиражира версия, че клошарят Пламен Трифонов е убил младата жена. Поради това Трифонов, който за разлика от Чеци нямаше защитаващи го приятели, също беше обвиняем.

През 2020 г. пък дизайнерката Миглена Каканашева – Мегз обвини Карбовски, че я е изнудвал, за да прави секс с него, и публикува техни чатове за доказателство. Впоследствие той осъди ПИК за обиди по негов адрес по този повод, но твърденията му за клевета не бяха приети от съда.

При същия човек отива да дава интервю Илияна Йотова.

„Феминизмът не е война срещу мъжкия пол, а срещу патриархалната система.“ Исабел Алиенде пред Марин Бодаков

Миналата седмица обещахме интервю с Исабел Алиенде специално за читателите на „Тоест“. Марин Бодаков разговаря с нея за феминизма, журналистиката, любовта и за най-новата ѝ книга.

Вместо феминизъм – манипулативна мелодрама

Илияна Йотова не изтъква пола си, но по време на дебата с Андрей Гюров на три пъти произвежда мелодрама.

Епизод 1 – болното дете

В отговор на упрека на Андрей Гюров, че е помилвала наркотрафиканти, Йотова дава пример за помилван от нея баща на болно дете, „което не може да приеме храна от никой друг, освен от своя баща“. И задава реторичния въпрос: „Вие как бихте постъпили в тази ситуация?“.

Да допуснем, че е вярна информацията, че мъжът е отглеждал детето си сам, а то е с аутизъм и отсъствието на баща му поставя живота му под риск, и затова Йотова е постъпила правилно в този случай. Това обаче не е оправдание за помилването на хора като Огнян Атанасов – Петричкия Ескобар и Динко Господинов – Лудия. Нито рискът за това дете е по-голям от риска за всички деца в България, които разполагат с лесен достъп до наркотици.

Представете си шофьор, обвинен, че е причинил катастрофа, в която са пострадали хора, да се оправдава в съда със следния аргумент: „Но пък веднъж качих в колата си дете, което се прибираше самичко в бурята, и го закарах до вкъщи. Вие как бихте постъпили в тази ситуация – ще го оставите ли да загине?“. Същата стойност има и оправданието на Йотова.

Епизод 2 – убитият баща

На въпрос на водещата кой е най-близкият ѝ човек, Илияна Йотова отговаря, че това е майка ѝ. Водещата явно решава, че отговорът е даден, и се опитва да продължи с въпросите, но Йотова настоява да обясни защо точно майка ѝ е най-близкият ѝ човек:

Твърде рано убиха баща ми, иначе беше той.

Така зрителите, които досега не са знаели този факт, научават, че бащата на президентката е бил убит, когато тя е била млада. Тази информация предизвиква и съчувствие, и любопитство, изобщо допринася за възприемането на опонентката на Гюров като човешко същество.

На заден план остава проблемът с отношението към майката, който следва от тази реплика – излиза, че според Йотова тя е най-близкият ѝ човек не защото притежава някакви качества, а поради липсата на бащата.

Епизод 3 (всъщност цяла сапунена опера) – „не закачайте семейството ми“

В края на панела от дебата, в който кандидат-президентите задават въпроси един на друг, Йотова формулира следното питане към Гюров:

Оставих последния си въпрос към г-н Гюров от човешката страна. Искам да Ви попитам, така, както сме работили, познаваме се, както изкарахме сега една много трудна кампания, по начина, по който тя беше проведена – с демагогия, с лъжи, с лични нападки, с тежки квалификации, през тролове, през елфи, през каквото се сетите, с това, че накарахте медии да посегнат на съпруга ми… Вие лично […] Аз Ви питам като човек, Вас лично – Вие съгласен ли сте с такава кампания?

Видимо обърканият Андрей Гюров, който вероятно не разбира какво има предвид опонентката му, отговаря с общи фрази в смисъл, че той и екипът му са водили позитивна кампания и не са си позволявали лични нападки. По-късно обаче, в самия край на дебата, когато вече няма възможност опонентът ѝ да реагира, Йотова се връща към темата и заявява:

Господин Гюров, моля Ви, не закачайте семейството ми. Защото разбрах, че кампанията, която проведохте срещу мен, Ви харесва и я одобрявате.

Съпругът на Илияна Йотова е в процес на възстановяване след прекарано тежко заболяване и трудно се придвижва. С твърденията си Йотова внушава, че Гюров е лично отговорен за това медии, неясно как, да посягат на мъжа ѝ и/или на цялото ѝ семейство.

Действителната история е съвсем различна. Всъщност история дори няма.

Влогърът Николай Караколев задава въпроси на Илияна Йотова и я снима, докато тя отива да гласува с мъжа си, който се придвижва с бастун. Тя охотно му отговаря, но на моменти видимо се притеснява как ще мине съпругът ѝ, и моли да му се направи път. Караколев в нито един момент от записа не се обръща към него, не му „посяга“ и не го „закача“ по никакъв начин. Може би Йотова интерпретира като посегателство срещу семейството си факта, че мъжът ѝ изобщо е сниман, но тя не отказва на Караколев интервюто.

Николай Караколев пък няма нищо общо с Андрей Гюров и неговия щаб, нито дори със симпатизантите му. Той също толкова напористо преследва и Гюров, за да му задава въпроси, освен това разпространява компромати за кандидат-вицепрезидента му Георги Кандев.

Самият Караколев реагира с ироничен коментар: „Последно кой при кого ме е пратил???“, споделяйки видео, в което наред с призива на Йотова „не закачайте семейството ми“ се показва как той обвинява Гюров и Кандев в редица грехове.

Ще се еманципира ли Йотова от Радев?

Ако предизборната кампания разкри нещо за личността на Илияна Йотова, то е, че тя много добре знае в какви случаи как да се държи, но и че не се спира пред нищо, за да постигне целите си. Друг въпрос е, че за постигането на тези цели тя с лека ръка жертва истината, а и националните интереси.

В продължение на 10 години Йотова стои в сянката на Румен Радев, излъчва безличност и търпеливо чака да дойде нейният ред. Радев продължава да се държи, все едно ѝ е шеф. Пристигайки на пресконференцията след победата ѝ на втория тур, той вървеше няколко метра пред нея – ако човек не знаеше кой е спечелил изборите, щеше да помисли, че е Радев.

Постът на премиера обаче е по-проветрив от този на президента. Президентите в България се избират веднъж на пет години, премиерите – на четири (ако изобщо изкарат пълен мандат). Министър-председателите търпят повече критика и срещу управлението им се провеждат повече протести, като в резултат на някои от тях понякога падат правителства. В България обаче не само няма случай президент да бъде свален заради обществено недоволство, ами по правило държавният глава има най-висок рейтинг сред публичните личности.

С други думи, Йотова вече е над Радев, макар той да не дава вид, че осъзнава това.

Ако премиерът продължава да се държи с нея като с подчинена, тя може да реши да покаже къде му е мястото, и между тях да настъпи разкол. Такъв сценарий едва ли би променил възгледите на президентката за геополитическата ориентация, които вероятно са по-искрено проруски от тези на Радев – все пак тя идва от средите на БСП. Но евентуално напрежение между „Дондуков“ 2 и „Дондуков“ 1 може да отслаби властта на „Прогресивна България“.

Конфронтацията между президент и премиер, дори когато са от една политическа сила, има традиция. За това допринася и конституционната роля на президента, която го позиционира като независим от партиите, помогнали му да дойде на власт.

Началото беше положено от Жельо Желев, чиято пресконференция, останала в историята като „Боянските ливади“, доведе до падането от власт на правителството на Филип Димитров. Отношенията между Иван Костов и Петър Стоянов също се обтегнаха, а кулминация на напрежението между тях беше репликата на тогавашния президент „Иване, кажи си“.

Георги Първанов нееднократно критикуваше правителството на Сергей Станишев и политиката на БСП, а след като сдаде президентския пост, основа собствена партия. Като че най-неконфликтен президент – поради мекия си нрав и липсата на политически амбиции – беше Росен Плевнелиев. Но се е случвало и той демонстративно да се разграничава от Бойко Борисов, например от проруските му залитания.

Йотова не прилича на човек с мек нрав, така че разривът между нея и Радев вероятно е въпрос на време. Дали в резултат на евентуален такъв разрив президентката би се опитала да капитализира политически факта, че е жена, е друг въпрос. Ако може да извлече дивиденти от това, без да накриви шапката на Москва, защо не?

Независимо от личността, ценностите, делата и външнополитическата ориентация на Йотова

фактът, че в България за първи път е избрана президентка, сам по себе си е добра новина.

Това означава, че в бъдеще ще е възможно и други жени да заемат този пост. Някой ден на него може да застане жена, която я е грижа за правата на жените. Само дано днешните момичета, които един ден ще могат да се кандидатират за държавен глава, да имат опит какво е да живееш в свобода и да са наясно какво означават равни права.

Experience AI begins reaching classrooms across Latin America

Post Syndicated from Saul Maldonado original https://www.raspberrypi.org/blog/experience-ai-begins-reaching-classrooms-across-latin-america/

Earlier this year, we announced that we’re expanding Experience AI, our AI literacy programme, across Latin America to bring AI education to nine more countries through support from Google.org. Working with local partner organisations, we offer Experience AI training and resources that teachers can use to enable young people to learn a foundational understanding of AI technologies, their social and ethical implications, and the role that AI can play in their lives.

Over the past few months, Experience AI launch events have already taken place in Brazil, Chile, Argentina, and Mexico. At every event, we met educators, policymakers, universities, non-profit organisations, and technology leaders and explored how AI literacy can become part of classrooms across their country. Experience AI brought us all together around a shared goal: giving teachers the confidence and resources they need to help young people understand and engage with AI critically and responsibly.

Growing the Experience AI partner network in Latin America

Across Latin America, the local organisations we are partnering with to implement Experience AI bring deep expertise in teacher professional development and education. Partners include Fundación Sadosky in Argentina, Fundación Kodea in Chile, Sincroniza Educação in Brazil, and Educación para Compartir in Mexico. 

Each partner is implementing the programme in a way that reflects its local education system and context. We work with them individually and also facilitate their collaboration around shared challenges.

A delivery model designed for lasting impact across Argentina

In Argentina, Experience AI was officially launched in June during a Google event in Buenos Aires.

Our Argentinian partner Fundación Sadosky is taking a distinctive approach to Experience AI teacher professional development by working through a network of public universities across the country, rather than relying on a central training team. Through this approach, Experience AI training will reach educators in diverse regions across the country as Fundación Sadosky builds on local expertise and existing educational networks.

Growing local capacity and developing regional trainers means Experience AI will make a lasting impact for teachers and learners, enabling high-quality AI education long after the programme’s first rollout.

The first cohort of participating universities is now working with teachers across several Argentinian provinces, before the programme expands nationwide. When fully established, Experience AI aims to support around 1,700 secondary school teachers and reach an estimated 153,000 students across Argentina.

Turning vision into action

It’s been very rewarding coming together with local partners, Google.org, universities, and education communities across Latin America around our shared vision of high-quality AI education for all young people.

After the launch events, the focus now turns to practical action: supporting teachers and bringing Experience AI into classrooms across the region. 

As the programme grows, we also look forward to working with new partners across Latin America to bring AI literacy to even more educators and young people. By 2028, we and our Latin American partners aim to support 24,000 more educators and reach more than 1.25 million young people through Experience AI.

The post Experience AI begins reaching classrooms across Latin America appeared first on Raspberry Pi Foundation.

[$] LWN.net Weekly Edition for November 5, 2026

Post Syndicated from jzb original https://lwn.net/Articles/1103480/

Inside this week’s LWN.net Weekly Edition:

  • Front: Kernel cells; Debian LLM reviews; glibc system-call wrappers; Binder in Rust; Kernel CVE flood; Fedora KDE and X11 removal; 7.4 merge window part two; Portable Python.
  • Briefs: MTCP RCE; Bash security; XCPE botnet; Bazzite 45; Fedora 45; openSUSE Leap 16.1; Tor Browser 16.0; Quotes; …
  • Announcements: Newsletters, conferences, security updates, patches, and more.

Amazon S3 Tables now offer managed migration of Apache Hive tables to Apache Iceberg

Post Syndicated from Channy Yun (윤석찬) original https://aws.amazon.com/blogs/aws/amazon-s3-tables-now-offer-managed-migration-of-apache-hive-tables-to-apache-iceberg/

Today, we’re announcing a simple, cost-effective path for data lake modernization. Amazon S3 Tables now support managed migration of your Apache Hive tables to Apache Iceberg. Migration works with Parquet tables in Amazon S3 that are registered in the AWS Glue Data Catalog and allows you to upgrade your data lake with no pipelines to build or compute to provision, while production workloads keep running.

Apache Iceberg has become the open standard for large analytics datasets. It lets you manage petabyte-scale tables with features like schema evolution, hidden partitioning, and time travel queries, while keeping your data open and queryable with any Iceberg-compatible engine. Amazon S3 Tables offer fully managed storage purpose-built to keep Iceberg tables performant and cost-effective as they grow, with features like automatic maintenance, optimization, replication, and S3 Intelligent-Tiering built-in.

What is new
Previously, migrating Apache Hive tables to Apache Iceberg could take weeks of engineering work to build and manage the required infrastructure. Converting data types and building rollback capabilities added operational complexity. Now, this is available as a managed, API-driven operation.

S3 Tables handle the entire migration workflow, including data validation, compatibility checks, type conversions, file recompression, and compaction. Before copying any data, S3 Tables identify every source object in scope and generate a compatibility report. You can sync as many times as you need without stopping writes to your source table, except for a few minutes during cutover. Once you are ready, you can complete the migration, minimizing time that tables are offline.

Compared to self-managed approaches, S3 Tables managed migrations are cost-effective because you pay only for the data copied, with no charge for the Hive-to-Iceberg conversion, and source objects in S3 Intelligent-Tiering stay in their current access tier.

A first look at the migration
To migrate an AWS Glue Hive table, choose your destination table bucket in the S3 console, then choose Create table from migration.

Create a namespace and table name for your destination Iceberg table. The destination table is created using recommended default settings tuned for query performance and storage efficiency.

When you start the migration, S3 Tables validate the source table, generate a compatibility report, and begin copying data. The destination table is read-only during the migration. Once you complete migration, the destination table is promoted to read-write.

You can begin working with your data right away using a direct integration with Amazon Athena and Amazon SageMaker Unified Studio in the AWS console, or use any tool compatible with the Apache Iceberg REST API to directly query the tables. To learn more, visit the S3 Tables migration documentation.

You can also use AWS Command Line Interface (AWS CLI), AWS SDKs, or the Agent Toolkit for AWS. For example, set up migration jobs and call the start-table-migration command.

cat > /tmp/start-migration.json <<'EOF'
{
  "roleArn": "arn:aws:iam::123456789012:role/S3TablesMigrationRole",
  "destinationTable": {
    "tableBucketARN": "arn:aws:s3tables:us-east-1:123456789012:bucket/my-destination-bucket",
    "namespace": "mynamespace",
    "name": "my_destination_table",
    "encryptionConfiguration": {
      "sseAlgorithm": "aws:kms",
      "kmsKeyArn": "arn:aws:kms:us-east-1:123456789012:key/1234abcd-12ab-34cd-56ef-1234567890ab"
    },
    "storageClassConfiguration": { "storageClass": "INTELLIGENT_TIERING" },
    "tags": { "team": "s3tables", "purpose": "migration" },
    "properties": {
      "writeFormat": "parquet",
      "icebergFormatVersion": 2,
      "compressionCodec": "zstd",
      "dictionaryEncoding": true
    },
    "schema": {
      "type": "struct",
      "schema-id": 0,
      "identifier-field-ids": [1],
      "fields": [
        { "id": 1, "name": "id",      "type": "long",   "required": true, "doc": "primary key" },
        { "id": 2, "name": "payload", "type": "string", "required": false }
      ]
    },
    "partitionSpec": {
      "spec-id": 0,
      "fields": [ { "source-id": 1, "transform": "identity", "name": "id", "field-id": 1000 } ]
    }
  },
  "source": {
    "sourceType": "glueTable",
    "glueTable": {
      "catalogId": "123456789012",
      "databaseName": "my_glue_database",
      "tableName": "my_source_table",
      "lastModifiedTime": "2026-09-01T00:00:00.000Z"
    }
  },
  "dataMigration": {
    "maintenanceSettings": {
      "icebergCompaction": {
        "targetFileSizeMB": 512,
        "strategy": "sort",
        "icebergSortOrder": {
          "order-id": 1,
          "fields": [ { "source-id": 1, "transform": "identity", "direction": "asc", "null-order": "nulls-first" } ]
        }
      },
      "icebergSnapshotManagement": { "minSnapshotsToKeep": 1, "maxSnapshotAgeHours": 168 }
    },
    "dataTypeTransforms": {
      "conflictPolicy": "FAIL",
      "typeConversion": { "int96": { "type": "timestamp", "sourceTimezone": "UTC" } }
    }
  },
  "reviewMigrationPlan": false,
  "completeWorkflowOnSuccess": false,
  "output": {
    "compatibilityReportConfiguration": {
      "bucket": "arn:aws:s3:::my-report-bucket",
      "prefix": "reports/compat/",
      "scope": "AllSourceObjects"
    },
    "migrationReportConfiguration": {
      "bucket": "arn:aws:s3:::my-report-bucket",
      "prefix": "reports/migration/",
      "scope": "FailedSourceObjects"
    }
  }
}
EOF

aws s3tables start-table-migration \
  --cli-input-json file:///tmp/start-migration.json

To catch up the destination table with changes in the source, call sync-table-migration as many times as you need before you complete the migration. Each sync copies only what changed.

If you’re using coding agents like Kiro, the migrating-hive-tables-to-s3-tables skill in the Agent Toolkit for AWS provides step-by-step migration guidance with safety guardrails for agents. The skill can:

  • Analyze existing IAM policies and recommend equivalent destination policies
  • Validate the migration plan before getting started
  • Execute the Start → Sync → Complete API calls
  • Monitor job progress and guide validation and cutover

To learn more, visit the GitHub README page for the skill.

Now available
Amazon S3 Tables managed migration is available today in US East (N. Virginia, Ohio), US West (Oregon), Asia Pacific (Mumbai, Singapore, Sydney, Tokyo), and Europe (Frankfurt, Ireland, Stockholm) Regions. At launch, the capability supports AWS Glue-registered Hive tables stored in Parquet format within the same AWS account and AWS Region. If you want to call APIs, search documentation, find regional availability, or troubleshoot about this new feature, try using the AWS MCP Server and plugins with your preferred AI tool.

Try it in the Amazon S3 console today and send feedback to AWS re:Post for Amazon S3 or through your usual AWS Support contacts.

— Channy

Implementing PostgreSQL logical replication between Amazon RDS for PostgreSQL instances on separate AWS Outposts

Post Syndicated from Belma Canik original https://aws.amazon.com/blogs/compute/implementing-postgresql-logical-replication-between-amazon-rds-for-postgresql-instances-on-separate-aws-outposts/

Organizations in regulated industries such as healthcare, financial services, and government often face strict data residency mandates that require all data, including database backups, to remain within their on-premises environment. You can keep backups on-premises with Amazon Relational Database Service (Amazon RDS) local backups on AWS Outposts by setting the backup target to AWS Outposts (--backup-target outposts). Your AWS Outposts must have Amazon Simple Storage Service (Amazon S3) on Outposts capacity to store those backups locally. While Amazon RDS local backups on Outposts can keep backup data on-premises, organizations that need high availability across two separate Outposts racks, without any data traversing the AWS Region, lack a built-in, native replication mechanism between Outpost-hosted RDS instances.

In this post, we demonstrate how you can configure PostgreSQL logical replication between two Amazon RDS instances running on separate AWS Outposts racks, so that all data remains within your on-premises environment. By using Customer-owned IP addresses (CoIP) and Local Gateways (LGW), you can establish secure, low-latency replication between Outposts without exposing any data to the Region.

Architecture overview

Our solution uses two AWS Outpost racks, each with its own Local Gateway (LGW) configured in Customer-owned IP (CoIP) mode. In this architecture, all database traffic flows through your on-premises network infrastructure:

Two AWS Outposts racks replicating Amazon RDS data through Local Gateways over the on-premises network, bypassing the AWS Region

Figure 1: Replication architecture across two AWS Outposts racks using Customer-owned IP addresses and Local Gateways

Prerequisites

Before beginning the configuration, make sure you have:

  • Two AWS Outpost racks with Local Gateways (LGW) configured in CoIP mode.
  • CoIP pools configured and shared with your AWS account.
  • LGW route table associations with your virtual private cloud (VPC) in place.
  • On-premises network connectivity between the two Outpost Local Gateways.
  • VPC with subnets spanning both Outposts.
  • Security groups configured to allow PostgreSQL traffic (port 5432).

Step 1: Create Outpost subnets with CoIP configuration

Each Outpost needs a subnet with CoIP auto-assign enabled.

While Amazon Elastic Compute Cloud (Amazon EC2) instances can inherit CoIP assignment from subnet settings, RDS instances require explicit CoIP enablement (covered in Step 3).

Subnet on Outpost A

aws ec2 create-subnet \
--vpc-id vpc-xxx \
--cidr-block 10.0.1.0/24 \
--availability-zone us-west-2a \
--outpost-arn arn:aws:outposts:us-west-2:OWNER_ACCOUNT:outpost/op-xxx

# Enable CoIP auto-assign (applies to EC2, not RDS)
aws ec2 modify-subnet-attribute \
--subnet-id subnet-xxx \
--map-customer-owned-ip-on-launch \
--customer-owned-ipv4-pool ipv4pool-coip-xxx

Subnet on Outpost B

aws ec2 create-subnet \
--vpc-id vpc-xxx \
--cidr-block 10.0.2.0/24 \
--availability-zone us-west-2b \
--outpost-arn arn:aws:outposts:us-west-2:OWNER_ACCOUNT:outpost/op-yyy

aws ec2 modify-subnet-attribute \
--subnet-id subnet-outpost-b \
--map-customer-owned-ip-on-launch \
--customer-owned-ipv4-pool ipv4pool-coip-yyy

Important: The MapCustomerOwnedIpOnLaunch setting works for EC2 instances but doesn’t automatically apply to RDS instances. RDS requires explicit CoIP enablement during instance creation.

Create DB subnet group

Create a DB subnet group spanning both Outposts:

aws rds create-db-subnet-group \
--db-subnet-group-name rds-outposts-subnet-group \
--db-subnet-group-description "Subnet group spanning Outpost A and B" \
--subnet-ids subnet-outpost-a subnet-outpost-b

Step 2: Configure route tables for cross-Outpost communication

This configuration step is often overlooked. Each subnet’s route table requires two Local Gateway routes:

  1. Cross-outpost route: To reach the other Outpost’s CoIP range.
  2. Same-outpost hairpin route: To reach its own CoIP range, which is required because RDS DNS resolves to CoIP. This affects any resource on the subnet that needs to reach the RDS instance by endpoint, including Amazon EC2 application servers on the same Outpost.

Why the hairpin route is important

When you enable CoIP on RDS, the DNS endpoint resolves to the CoIP address instead of the private IP. EC2 instances (and other RDS instances) on the same subnet need a route through the LGW to reach CoIP addresses, even for same-Outpost traffic. Without the hairpin route, traffic to the local CoIP range matches the default route (NAT gateway or internet gateway) and is lost.

Route configuration for Outpost A

# Cross-outpost: reach Outpost B's CoIP via Outpost A's LGW
aws ec2 create-route \
--route-table-id rtb-outpost-a \
--destination-cidr-block 198.19.5.0/24 \
--local-gateway-id lgw-A

# Same-outpost hairpin: reach Outpost A's own CoIP via its LGW
aws ec2 create-route \
--route-table-id rtb-outpost-a \
--destination-cidr-block 198.19.9.0/24 \
--local-gateway-id lgw-A

Route configuration for Outpost B

# Cross-outpost: reach Outpost A's CoIP via Outpost B's LGW
aws ec2 create-route \
--route-table-id rtb-outpost-b \
--destination-cidr-block 198.19.9.0/24 \
--local-gateway-id lgw-B

# Same-outpost hairpin: reach Outpost B's own CoIP via its LGW
aws ec2 create-route \
--route-table-id rtb-outpost-b \
--destination-cidr-block 198.19.5.0/24 \
--local-gateway-id lgw-B

Final route table summary

Outpost A Route Table:

Destination Target Purpose
10.0.0.0/16 local VPC internal traffic
198.19.5.0/24 (Outpost B CoIP) lgw-A Cross-outpost
198.19.9.0/24 (Outpost A CoIP) lgw-A Same-outpost hairpin
0.0.0.0/0 NAT GW Internet access

Outpost B Route Table:

Destination Target Purpose
10.0.0.0/16 local VPC internal traffic
198.19.9.0/24 (Outpost A CoIP) lgw-B Cross-outpost
198.19.5.0/24 (Outpost B CoIP) lgw-B Same-outpost hairpin
0.0.0.0/0 NAT GW Internet access

Step 3: Create RDS instances with CoIP enabled

In this step, you create the Amazon RDS for PostgreSQL instances on each Outpost using the aws rds create-db-instance CLI command. CoIP provides local or external connectivity to resources in your Outpost subnets through your on-premises network. It provides lower latency for connections to the DB instance from outside of its VPC on your local network. When you create an Amazon RDS instance on an Outpost, you can enable CoIP to make sure the instance is reachable over your on-premises network through the Local Gateway rather than the Region.

The --enable-customer-owned-ip flag must be explicitly set. RDS doesn’t inherit the subnet’s MapCustomerOwnedIpOnLaunch setting.

Keep in mind that this property isn’t supported in AWS CloudFormation. Use the AWS Command Line Interface (AWS CLI), Terraform (customer_owned_ip_enabled = true), or the console (select Customer-owned IP address (CoIP) under Access type).

Create the publisher instance (Outpost A)

aws rds create-db-instance \
--db-instance-identifier rds-publisher \
--db-instance-class db.r5.xlarge \
--engine postgres \
--engine-version 17.9 \
--master-username postgres \
--master-user-password <SecurePassword> \
--allocated-storage 200 \
--storage-type gp2 \
--storage-encrypted \
--db-subnet-group-name rds-outposts-subnet-group \
--availability-zone us-west-2a \
--no-multi-az \
--no-publicly-accessible \
--enable-customer-owned-ip \
--db-parameter-group-name <parameter-group-with-logical-replication> \
--vpc-security-group-ids sg-xxx \
--region us-west-2

Create the subscriber instance (Outpost B)

aws rds create-db-instance \
--db-instance-identifier rds-subscriber \
--db-instance-class db.r5.xlarge \
--engine postgres \
--engine-version 17.9 \
--master-username postgres \
--master-user-password <SecurePassword> \
--allocated-storage 200 \
--storage-type gp2 \
--storage-encrypted \
--db-subnet-group-name rds-outposts-subnet-group \
--availability-zone us-west-2b \
--no-multi-az \
--no-publicly-accessible \
--enable-customer-owned-ip \
--vpc-security-group-ids sg-xxx \
--region us-west-2

Verify CoIP assignment

After the instances become available, verify that CoIP addresses have been assigned:

aws ec2 describe-addresses --region us-west-2 \
--query "Addresses[?CustomerOwnedIp!=null].[CustomerOwnedIp,PrivateIpAddress,NetworkInterfaceId]" \
--output table

You should see output similar to:

-------------------------------------------------
|                DescribeAddresses              |
+------------------+-------------+--------------+
| 198.19.9.10      | 10.0.1.15   | eni-xxx      |
| 198.19.5.20      | 10.0.2.25   | eni-yyy      |
+------------------+-------------+--------------+

Step 4: Configure security groups

Security groups must allow PostgreSQL traffic (port 5432) from both CoIP ranges and private subnet ranges:

# Allow traffic from Outpost A CoIP range
aws ec2 authorize-security-group-ingress \
--group-id sg-xxx \
--protocol tcp \
--port 5432 \
--cidr 198.19.9.0/24

# Allow traffic from Outpost B CoIP range
aws ec2 authorize-security-group-ingress \
--group-id sg-xxx \
--protocol tcp \
--port 5432 \
--cidr 198.19.5.0/24

# Allow traffic from Outpost A private subnet
aws ec2 authorize-security-group-ingress \
--group-id sg-xxx \
--protocol tcp \
--port 5432 \
--cidr 10.0.1.0/24

# Allow traffic from Outpost B private subnet
aws ec2 authorize-security-group-ingress \
--group-id sg-xxx \
--protocol tcp \
--port 5432 \
--cidr 10.0.2.0/24

Make sure egress rules allow all outbound traffic (default) or at minimum port 5432 to the CoIP ranges.

Step 5: Configure PostgreSQL logical replication

Enable logical replication on the publisher

The publisher requires the rds.logical_replication parameter set to 1, which requires a database reboot:

aws rds modify-db-parameter-group \
--db-parameter-group-name publisher-params \
--parameters "ParameterName=rds.logical_replication,ParameterValue=1,ApplyMethod=pending-reboot"

aws rds reboot-db-instance --db-instance-identifier rds-publisher

This automatically sets wal_level = logical, so PostgreSQL can capture the necessary change data for replication.

Create replication user and publication on the publisher

Connect to the publisher instance and execute:

-- Create a replication user
CREATE USER repluser WITH REPLICATION LOGIN PASSWORD 'YourStrongPassword';

-- Grant SELECT on tables to replicate (required for initial COPY)
GRANT SELECT ON ALL TABLES IN SCHEMA public TO repluser;

-- Create table to replicate (example: healthcare appointments)
CREATE TABLE patient_appointments (
    appointment_id SERIAL PRIMARY KEY,
    patient_id INTEGER NOT NULL,
    patient_name VARCHAR(100), -- PHI: can be excluded from replication
    ssn VARCHAR(11), -- PHI: can be excluded from replication
    date_of_birth DATE, -- PHI: can be excluded from replication
    diagnosis_code VARCHAR(10), -- PHI: can be excluded from replication
    appointment_date DATE NOT NULL,
    doctor_id INTEGER NOT NULL,
    department VARCHAR(50),
    billing_amount DECIMAL(10,2),
    procedure_code VARCHAR(10),
    visit_type VARCHAR(20)
);

-- Create a publication for the table
CREATE PUBLICATION my_publication FOR TABLE patient_appointments;

-- Or for all tables in the schema:
-- CREATE PUBLICATION my_publication FOR ALL TABLES;

Keep in mind that the replication user must have SELECT permission on all published tables. Without it, the initial table synchronization (COPY phase) hangs indefinitely in state ‘d’ (data copy).

Create matching schema and subscription on the subscriber

Connect to the subscriber instance and execute:

-- Create the target table with IDENTICAL schema
-- The table structure must match the publisher exactly
CREATE TABLE patient_appointments (
    appointment_id SERIAL PRIMARY KEY,
    patient_id INTEGER NOT NULL,
    patient_name VARCHAR(100),
    ssn VARCHAR(11),
    date_of_birth DATE,
    diagnosis_code VARCHAR(10),
    appointment_date DATE NOT NULL,
    doctor_id INTEGER NOT NULL,
    department VARCHAR(50),
    billing_amount DECIMAL(10,2),
    procedure_code VARCHAR(10),
    visit_type VARCHAR(20)
);

-- Create the subscription
CREATE SUBSCRIPTION my_subscription
CONNECTION 'host=rds-publisher.xxx.us-west-2.rds.amazonaws.com port=5432 dbname=postgres user=repluser password=YourStrongPassword '
PUBLICATION my_publication;

PostgreSQL 15+ on RDS defaults to rds.force_ssl = 1, which means the database rejects any non-SSL connection. When CoIP is enabled, RDS on Outposts automatically uses the CoIP address for all connections from both inside and outside of the VPC. Traffic routes through the Local Gateway even for same-outpost communication. PostgreSQL’s pg_hba.conf treats these CoIP-routed connections as non-local, and with rds.force_ssl = 1, the server requires SSL. If the CREATE SUBSCRIPTION connection string omits sslmode=require, the subscriber’s connection attempt is rejected with a no pg_hba.conf entry for host error. To avoid this, always include sslmode=require in the subscription connection string:

CREATE SUBSCRIPTION my_subscription CONNECTION 'host=rds-publisher.xxx.us-west-2.rds.amazonaws.com port=5432 dbname=postgres user=repluser password=YourStrongPassword sslmode=require'
PUBLICATION my_publication;

The subscription will automatically:

  1. Create a replication slot on the publisher.
  2. Perform an initial table sync (COPY of existing data).
  3. Begin streaming ongoing changes in real-time.

Step 6: Monitor and verify replication

To monitor replication and verify that logical replication is functioning correctly between the publisher and subscriber instance, PostgreSQL provides several system catalog views and statistics views to monitor replication health. On the publisher instance, we query pg_stat_replication to confirm active write-ahead log (WAL) sender connections and track replication progress through sent and written log sequence number (LSN) positions. We also query pg_replication_slots to verify that the logical replication slot is active and its WAL retention status is healthy. On the subscriber instance, we query pg_subscription to confirm the subscription is enabled and connected to the correct upstream database. We query pg_subscription_rel to verify the synchronization state of each replicated table.

Check replication status on the publisher

-- View active replication connections
SELECT pid, usename, client_addr, state, sent_lsn, write_lsn
FROM pg_stat_replication;

-- View replication slots
SELECT slot_name, active, restart_lsn, confirmed_flush_lsn, wal_status
FROM pg_replication_slots;

Check subscription status on the subscriber

-- View subscription details
SELECT subname, subenabled, subconninfo FROM pg_subscription;

-- View subscription state
SELECT srsubstate FROM pg_subscription_rel;
-- States: 'i' = init, 'd' = data copy, 'r' = ready, 's' = synced, 'f' = finished table copy

Expected output after successful initial sync:

srsubstate
-----------
r

Test data replication

-- On publisher:
INSERT INTO patient_appointments (patient_id, appointment_date, doctor_id, department, billing_amount, visit_type)
VALUES (1001, '2026-07-15', 42, 'Cardiology', 250.00, 'Follow-up');

-- On subscriber (should appear within seconds):
SELECT count(*) FROM patient_appointments;
SELECT * FROM patient_appointments WHERE patient_id = 1001;

Troubleshooting common issues

Issue 1: RDS endpoint not reachable through CoIP

Symptom: TCP connection to CoIP address times out.

Diagnosis:

# From an EC2 instance on the same subnet
telnet rds-publisher.xxx.us-west-2.rds.amazonaws.com 5432

Check:

  • Route table has both cross-outpost and same-outpost hairpin routes.
  • Security groups allow port 5432 from CoIP ranges.
  • CoIP is enabled on the RDS instance (CustomerOwnedIpEnabled: true).

Issue 2: CoIP not assigned to RDS instance

Symptom: CustomerOwnedIpEnabled: false when describing the RDS instance.

Cause: RDS doesn’t inherit the subnet’s MapCustomerOwnedIpOnLaunch setting. Must be explicitly enabled.

Fix:

aws rds modify-db-instance \
--db-instance-identifier rds-xxx \
--enable-customer-owned-ip \
--apply-immediately

Issue 3: Initial sync stuck in state ‘d’

Symptom: pg_subscription_rel shows srsubstate = 'd' indefinitely.

Causes:

  • Replication user lacks SELECT permission on published tables.
  • Table schema mismatch between publisher and subscriber.
  • Network connectivity issue during COPY phase.

Fix:

-- On publisher: grant SELECT permission
GRANT SELECT ON ALL TABLES IN SCHEMA public TO repluser;

-- On subscriber: drop and recreate subscription
ALTER SUBSCRIPTION my_subscription DISABLE;
ALTER SUBSCRIPTION my_subscription SET (slot_name = NONE);
DROP SUBSCRIPTION my_subscription;

-- Recreate subscription
CREATE SUBSCRIPTION my_subscription CONNECTION '...' PUBLICATION my_publication;

Issue 4: “no pg_hba.conf entry for host” error

Symptom: Connection refused with pg_hba error when connecting from CoIP address.

Cause: rds.force_ssl = 1 (default in PostgreSQL 15+) requires SSL for connections from non-VPC addresses.

Fix: Make sure sslmode=require is included in the connection string:

CONNECTION 'host=... port=5432 dbname=... user=... password=... sslmode=require'

Issue 5: Subscription pointing to wrong publication

Symptom: Subscription connected but no data replicating.

Fix: Drop and recreate subscription with correct publication name:

ALTER SUBSCRIPTION my_subscription DISABLE;
ALTER SUBSCRIPTION my_subscription SET (slot_name = NONE);
DROP SUBSCRIPTION my_subscription;

-- Clean up orphaned slots on publisher if needed
-- SELECT pg_drop_replication_slot('my_subscription');

CREATE SUBSCRIPTION my_subscription
CONNECTION '...'
PUBLICATION correct_publication_name;

Data residency considerations

This architecture provides complete data residency by the following means:

  • No regional backups: Automated backups to Amazon S3 in the Region are disabled. All data remains on the Outposts.
  • On-premises replication: All replication traffic flows through Local Gateways and your on-premises network, never traversing the Region backbone.
  • Local recovery: If an Outpost fails, you can promote the subscriber to become the new primary, maintaining business continuity without regional dependencies.
  • Selective replication: With logical replication, you can exclude sensitive columns, such as protected health information (PHI) and personally identifiable information (PII), from replication by creating publications for specific columns or tables.

For customers who can accept local backups, RDS on Outposts supports local backup to S3 on Outposts for MySQL and PostgreSQL (not supported for Multi-AZ deployments or read replicas). This requires S3 on Outposts capacity.

Best practices and key takeaways

Throughout this implementation, we encountered several configuration details that are important for a successful deployment. The following best practices and key takeaways will help you avoid common pitfalls when setting up PostgreSQL logical replication between RDS instances on separate Outposts.

  • CoIP must be explicitly enabled on RDS: It isn’t inherited from subnet settings. Always include --enable-customer-owned-ip when creating RDS instances.
  • Both cross-outpost and hairpin routes are required: Without hairpin routes, same-subnet access to CoIP addresses fails because DNS resolves to CoIP instead of the private IP.
  • Replication user needs SELECT permission: Required for the initial COPY phase. Without it, the subscription hangs in state ‘d’.
  • Table schemas must be identical: The subscriber table must exactly match the publisher table structure, including column names, types, and constraints.
  • SSL is enforced by default: PostgreSQL 15+ defaults to rds.force_ssl = 1. Use sslmode=require for external connections.
  • Use Terraform or the CLI for deployment: AWS CloudFormation doesn’t support the EnableCustomerOwnedIp property. Use Terraform (customer_owned_ip_enabled = true) or the AWS CLI.
  • Monitor replication lag: Use the pg_stat_replication and pg_replication_slots views to monitor replication health and lag.
  • Plan for failover: Document procedures for promoting the subscriber to primary if Outpost A fails, including application connection string updates.

Comparison with Multi-AZ deployments

Multi-AZ deployments remain the recommended approach for high availability on Amazon RDS on AWS Outposts. They provide automatic failover with synchronous replication between a primary DB instance on one Outpost and a standby on a different Outpost. However, Multi-AZ requires two Outposts anchored to different Availability Zones, and local backups aren’t supported for Multi-AZ deployments. As AWS documentation notes, customers whose workloads must abide by data residency regulations should consult with regulators to determine whether Multi-AZ meets their requirements, because only Single-AZ instances support storing all automated backups and logs directly on the Outposts rack. This post presents an alternative approach that uses PostgreSQL logical replication between Outposts for organizations that need an additional layer of data resilience while keeping all data on-premises. It applies specifically where data residency requirements prevent the use of Regional backups and where the Multi-AZ infrastructure prerequisites (two Outposts across two Availability Zones) are not available. The two options have different characteristics:

Feature Logical Replication Multi-AZ on Outposts
Data Residency Complete (no regional backups) Automated backups to Region S3
Failover Manual promotion Automatic (1-2 minutes)
Replication Granularity Table-level or column-level Entire database instance
Cross-Region DR Supported Requires additional setup
Network Path CoIP through Local Gateway VPC internal (Multi-AZ)
Use Case Strict data residency, selective replication High availability with regional integration

For organizations that can accept automated backups to the Region, Multi-AZ deployments offer simpler management and automatic failover. For those with absolute data residency requirements, logical replication with CoIP provides complete control over data locality.

Clean up

When you’re done testing, remove the replication resources to avoid unnecessary costs and WAL accumulation.

On the target, drop the subscription first:

DROP SUBSCRIPTION my_subscription;

On the source, drop the publication:

DROP PUBLICATION my_publication;

Drop the test tables on both source and target:

DROP TABLE IF EXISTS patient_appointments;

If you created dedicated Amazon RDS instances for this walkthrough, delete them through the AWS Management Console or CLI to stop incurring charges. If you modified an existing parameter group, consider reverting rds.logical_replication to 0 if you no longer need logical replication, and reboot the instance.

Conclusion

In this post, we showed you how to configure PostgreSQL logical replication between Amazon RDS for PostgreSQL instances on separate AWS Outposts. This approach gives organizations with strict data residency requirements a way to keep all data on-premises. By using Customer-owned IP addresses and Local Gateways, you can establish secure, low-latency replication that keeps all data within your on-premises environment.

This architecture is particularly valuable for:

  • Healthcare providers managing PHI under the Health Insurance Portability and Accountability Act (HIPAA).
  • Financial institutions with data sovereignty requirements.
  • Government agencies with classified or sensitive data.
  • Organizations in regulated industries where data must remain on-premises.

The configuration requires careful attention to networking details, particularly the hairpin routes and explicit CoIP enablement. After it’s established, it provides a foundation for disaster recovery and high availability without compromising data residency.

For more information about Amazon RDS on AWS Outposts, visit the RDS on Outposts documentation and the AWS Outposts High Availability Design whitepaper.


About the authors

Belma Canik

Belma Canik

Belma is a Senior Database Specialist Technical Account Manager (STAM) at Amazon Web Services. She helps customers run optimized workloads on AWS and make the best out of their cloud journey. She also helps customers have robust Data Operations that also provide AI-ready data platforms through Data Operations Review at AWS.

Qualcomm Dragonwing Nabs a Big SpaceX Starlink Mobile Nationwide US 5G Network Win

Post Syndicated from Vic A original https://www.servethehome.com/qualcomm-dragonwing-nabs-a-big-spacex-starlink-mobile-nationwide-us-5g-network-win/

Qualcomm Dragonwing just landed a new US customer as part of the SpaceX Starlink mobile nationwide build-out

The post Qualcomm Dragonwing Nabs a Big SpaceX Starlink Mobile Nationwide US 5G Network Win appeared first on ServeTheHome.

The collective thoughts of the interwebz