Post Syndicated from xkcd.com original https://xkcd.com/3290/

Post Syndicated from xkcd.com original https://xkcd.com/3290/
Post Syndicated from Ryan Smith original https://www.servethehome.com/sambanovas-sn50-rdu-for-ai-at-hot-chips-2026/
This year’s Hot Chips conference includes a presentation from AI accelerator developer SambaNova, who is at the show to discuss their latest-generation RDU, the SN50
The post SambaNova’s SN50 RDU for AI at Hot Chips 2026 appeared first on ServeTheHome.
Post Syndicated from Ryan Smith original https://www.servethehome.com/microsofts-maia-200-accelerator-at-hot-chips-2026/
At Hot Chips 2026, Microsoft is going into new detail on Maia 200, their second-generation server AI inference processor
The post Microsoft’s Maia 200 AI Accelerator at Hot Chips 2026 appeared first on ServeTheHome.
Post Syndicated from Ryan Smith original https://www.servethehome.com/cerebras-talks-going-rack-scale-with-their-wses-at-hot-chips-2026/
At Hot Chips 2026, wafer scale engine developer Cerebras is talking about the next generation of their giant accelerators, as well as how the company is going rack-scale thanks to their Nexus platform architecture
The post Cerebras Talks Going Rack-Scale with Their WSEs at Hot Chips 2026 appeared first on ServeTheHome.
Post Syndicated from Kevin Donohue original https://aws.amazon.com/blogs/security/fast-track-ism-ready-cloud-environments-and-irap-assessments-with-landing-zone-accelerator-on-aws/
This post announces the availability of a new independent assessment report available on AWS Artifact analyzing how Landing Zone Accelerator on AWS (LZA) can automatically deploy multi-account environments in Amazon Web Services (AWS) with Australian Government Information Security Manual (ISM) security controls coverage at scale. The report includes findings from an independent third-party analysis conducted by AWS Partner gwi.digital. In addition to the report, we talk about ISM compliance applicability to LZA and a new testing mechanism for measuring configuration drift, which together can provide Australian customers with a documented and validated foundation to accelerate IRAP assessment readiness.
Australian organizations in public sector, defense, and critical infrastructure agencies must build cloud environments that meet (ISM requirements. The ISM defines 1,081 security control requirements across 22 guideline chapters. Demonstrating compliance is central to achieving an IRAP assessment outcome, but assessments typically require months of preparation, evidence gathering, and testing.
In October 2025, we introduced the LZA Universal Configuration and LZA Compliance Workbook. LZA provisions a multi-account security architecture that automates the deployment of nearly 200 security controls based on AWS Well-Architected pillars and AWS security best practices. The LZA Compliance Workbook, available on AWS Artifact, documents how the Universal Configuration (UC) maps to technical security requirements from 17 global compliance frameworks, with more being added. LZA is an ideal solution for customers with security and compliance obligations—both existing and anticipated—because the guardrails it deploys are applied automatically to new accounts as environments grow.
To see how LZA can help customers in Australia we teamed up with AWS Partner gwi.digital to run LZA as a customer would. gwi.digital is a consultancy partner specializing in cybersecurity and governance, risk, and compliance (GRC) and has deep experience in IRAP assessments and the ISM framework. The team conducted an independent analysis and evaluation of LZA UC against 1,081 ISM controls. The assessment was conducted in a greenfield AWS environment hosted in the ap-southeast-2 (Sydney) AWS Region, positioned within Phase 2 of the ASD Cloud Security Assessment and Authorization Framework and focused on cloud consumers building on already-authorized AWS services. It builds on existing AWS IRAP foundations: Underlying AWS services were most recently independently assessed at the PROTECTED level by CyberCX last year. While this report does not constitute an official IRAP authorization, certification, or accreditation, it provides a professional evaluation of evidence based on what LZA delivers out of the box (and what it does not), so organizations can make informed decisions.
Of the 1,081 ISM controls, 256 are within the addressable scope of LZA and include the technical infrastructure controls that a solution like LZA can meaningfully address. Of those 256, LZA achieves Full or Partial coverage for 234 (91%). The remaining 825 controls are outside the scope of LZA: physical security, personnel, organizational governance, and classification-level exclusions. A key contribution for the assessment was analysis of the shared responsibility model that goes beyond the traditional AWS/customer binary. It considers a three-tier view—AWS (provided), LZA (enabled), and Customer (responsibility)—and further categorizes the 825 out-of-scope controls into subcategories so customers can quickly determine which controls require their attention compared to which are already addressed at the infrastructure level. By combining automated deployment, ISM-specific compliance mappings, independent validation, and continuous evidence generation, Australian customers can reduce IRAP assessment timelines while achieving more reliable compliance outcomes.
Note: Results are based on the configuration as-provisioned based on the LZA version and during the time of this assessment. Results may vary depending on customer implementation and configuration choices.
Confirming controls are implemented and operating effectively across your environment is complex and often lacks complete coverage. To simplify testing your LZA deployment, we developed the Controls Acceptance Testing Suite (CATS). CATS is an automated compliance validation engine that runs purpose-built tests against the security configuration baseline deployed by LZA UC. For the ISM assessment, CATS executed over 3,600 individual tests across six AWS accounts, evaluating account structure, identity and access, network configuration, logging, encryption, and backup. For Australian customers, CATS enables:
Note: CATS availability is limited and currently accessible only through AWS Professional Services as a private beta solution and may be subject to change. Availability, features, and pricing are subject to change without notice. Contact your AWS account representative or reach out to a member of the LZA team for questions about CATS, or to provide feedback on the LZA ISM report.
Through the assessment, gwi-digital identified configuration adjustments that elevate specific control ratings from Partial to Full, with minimal effort; for example, increasing the default password length from 14 to 15 characters or adjusting log retention to align with Australian Federal Disposal Authority standards. These recommendations have been communicated to the LZA UC team for inclusion in a future ISM-specific guidance section in LZA GitHub documentation.
In addition to the LZA ISM report, you can also find the LZA Compliance Workbook available on AWS Artifact. It maps related ISM requirement identifiers to security implementation statements, giving you a starting point from which you can customize and enhance your compliance documentation for your unique use cases after deploying LZA.
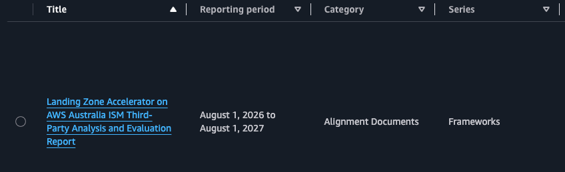
Figure 1: LZA report and workbook in AWS Artifact
If you have questions, contact a gwi.digitalexpert, AWS LZA team member, or your AWS account representative.
The combination of ISM mappings in the LZA Compliance Workbook, the gwi-digital analysis report, and CATS evidence gives Australian customers a head start on IRAP assessments.
The Landing Zone Accelerator team would like to thank Baden Hughes, Henrik Melkonyan, Iain Lindsay-German, and Ian Roderick from gwi.digital for their professionalism and expertise in performing an incredibly thorough assessment, helping us to make LZA better for customers, and for their contributions to this blog post.
If you have feedback about this post, submit comments in the Comments section below.
Post Syndicated from Ryan Smith original https://www.servethehome.com/nvidias-groq-3-lpu-accelerators-for-heterogeneous-ai-compute-at-hot-chips-2026/
The newest member of NVIDIA’s AI hardware family, at Hot Chips 2026 NVIDIA is diving into the use of LPUs as part of Vera Rubin clusters. The specialized chips from acquihire Groq are being tapped to offer significantly lower latency in the decode phase of inference
The post NVIDIA’s Groq 3 LPU Accelerators for Heterogeneous AI Compute at Hot Chips 2026 appeared first on ServeTheHome.
Post Syndicated from Ryan Smith original https://www.servethehome.com/metas-mtia-custom-ai-silicon-at-hot-chips-2026/
For Hot Chips 2026, Meta is at the show to discuss their AI inference accelerators. The MTIA family, the company has an ambitious roadmap to release 4 accelerators over the next couple of years
The post Meta’s MTIA Custom AI Silicon at Hot Chips 2026 appeared first on ServeTheHome.
Post Syndicated from corbet original https://lwn.net/Articles/1090582/
For people who would like to experiment with the multi-kernel Linux concept, Cong Wang has
announced the
release of mklinux v7.0-mk2.
mklinux lets one machine run several independent Linux kernels at
the same time on bare metal, without a hypervisor. A host kernel
owns a pool of CPUs, memory and PCI devices, carves that pool into
instances, and boots a spawn kernel into each instance through
kexec_file_load(). Every spawn kernel runs natively on its own
CPUs, its own physical memory and its own devices. Nothing is
emulated and nothing is trapped; the only thing shared is what you
choose to share.
Note that this is not the old MkLinux, which was a port to PowerPC
Macintosh systems.
Post Syndicated from Crosstalk Solutions original https://www.youtube.com/shorts/UFfNtMPb5YM
Post Syndicated from Pradeep Kumar Nalluri original https://aws.amazon.com/blogs/big-data/pythonoperator-and-bashoperator-now-available-on-amazon-managed-workflows-for-apache-airflow-amazon-mwaa-serverless/
If you run Apache Airflow workflows on Amazon MWAA Serverless, you can now use PythonOperator and BashOperator to run custom code directly in the serverless runtime. Previously, Amazon Managed Workflows for Apache Airflow (Amazon MWAA) Serverless only supported orchestration of AWS services through operators for scheduling tasks, managing dependencies, and handling retries. It did not support running your own Python functions or shell scripts natively. If you needed custom Python logic or shell commands, you had to wrap code in AWS Lambda functions, start Amazon Elastic Container Service (Amazon ECS) tasks, or use other AWS compute services. These alternatives add complexity, cost, and latency to your orchestration pipelines.
With this launch, you can run custom Python functions and shell scripts directly within the serverless task runtime, without requiring additional infrastructure. This means you can now use PythonOperator and BashOperator many data engineering teams rely on for ETL pipelines and data quality checks – without provisioning additional compute.
In this post, we walk through how this feature works and demonstrate a practical example: building a serverless pipeline that converts CSV files to JSON format using a PythonOperator, and verifies the output using a BashOperator. By the end, you will know how to:
With MWAA Serverless, you can package your custom code, upload it to an Amazon S3 bucket, and reference it when creating a workflow. The service snapshots your code at workflow creation time and uses that snapshot for all subsequent runs of the same workflow version.
A code bundle is the package that contains your custom logic. You package your Python modules or shell scripts and upload them to an Amazon S3 bucket. A code bundle can be:
When you create or update a workflow, MWAA Serverless snapshots your code bundle from an Amazon S3 bucket provided and stores it on the service side. At task execution time, the service uses this snapshot – not the object currently residing in your Amazon S3 bucket – to run your code in an isolated runtime environment.
Python and Bash tasks do not have internet access. They can reach only Amazon S3, Amazon Elastic Container Registry (Amazon ECR), and Amazon CloudWatch, which are the services the runtime requires to operate. To have internet access, configure the workflow with Amazon VPC so that it can go through the provided VPC.
The following table describes the two operators now available in MWAA Serverless.
| Operator | Description |
| PythonOperator | Executes a Python callable (function) from your code bundle |
| BashOperator | Runs shell commands or scripts |
AWS Key Management Service (AWS KMS) encrypts your code bundles at rest. IAM policies control who can create, update, and trigger the workflows. The execution role scopes what AWS resources your code can access at runtime.
Before getting started, verify that you have the following resources and tools configured in your AWS account:
In this walkthrough, we build a pipeline that converts CSV files to JSON format – a common data transformation for downstream APIs and analytics systems that consume JSON. The pipeline uses a PythonOperator for the conversion logic and a BashOperator to verify the output. Here is what the pipeline does:
Create an IAM role that your workflow assumes at runtime. The trust policy must allow the airflow-serverless.amazonaws.com service to assume the role:
Create the role and attach an inline policy granting least-privilege access to your S3 bucket:
Create a file called csv_to_json.py with the conversion logic:
This function uses boto3 (which comes pre-installed with the MWAA Serverless execution environment) and Python’s built-in csv and json modules. The conversion reads the CSV, infers numeric types, and writes a JSON lines file back to the S3 bucket.
Create a file called verify_output.sh. This script validates the pipeline output by comparing the record count in the source CSV against the output JSON file. If the counts do not match, the task fails with a non-zero exit code, which causes the workflow run to fail.
This script runs the AWS CLI, which is bundled as a dependency in the code package. The s3 cp streams the file content to stdout without writing to disk, allowing standard shell tools like wc -l and tail to process it. The execution role credentials are automatically available in the execution environment, so the CLI can access S3 without additional configuration.
Since the verification script uses the AWS CLI, bundle it as a dependency in the ZIP archive along with your Python module and shell script:
Upload a sample CSV file for testing:
MWAA Serverless uses a declarative YAML format for DAG definitions. Create a file called conversion_dag.yaml:
This DAG defines two tasks:
convert_to_json – Runs the convert function from the Python module to transform CSV to JSON lines.verify_output – Runs a shell script that validates the pipeline output by comparing source and output record counts, failing the task if they do not match.Upload the DAG definition to S3. Note: You can also run inline Bash commands directly without a shell script.
Create the MWAA Serverless workflow, referencing the DAG definition and the code bundle:
The response includes a WorkflowArn that you use to trigger runs:
Trigger a workflow run:
The response confirms the run has started:
Check the status of your run:
A successful run returns:
Confirm the JSON file was written to the S3 bucket:
You should see the JSON file:
You can also verify task-level output in Amazon CloudWatch Logs. Open the log group for your workflow and find the convert_to_json task log stream:
When planning your workloads on MWAA Serverless with these operators, keep the following considerations in mind:
To avoid ongoing charges, delete the resources you created in this walkthrough. The following commands remove the workflow, S3 objects, and IAM role:
Note: $WORKFLOW_ARN is defined in Step 7.
Note: $BUCKET is exported in Step 4. If appropriate, delete the bucket as well.
With native support for PythonOperator and BashOperator, you can now run the custom code execution patterns that many data engineering teams rely on daily directly in MWAA Serverless. Run data transformations, format conversions, validations, and shell scripts in the serverless runtime – without provisioning additional compute or managing containers.
If you are running Airflow workloads on MWAA Provisioned or self-managed infrastructure, your existing PythonOperator and BashOperator logic requires minimal changes. Convert your Python DAG files to the YAML format, package your code as a bundle, and you are ready to run on MWAA Serverless.
To get started, visit the Amazon MWAA Serverless documentation and try the walkthrough earlier in this post with your own data. For pricing details, visit the Amazon MWAA pricing page. We look forward to your feedback.
Post Syndicated from Patrick Kennedy original https://www.servethehome.com/nvidia-spectrum-x-ethernet-multiplane-network-architecture-at-hot-chips-2026/
At Hot Chips 2026, NVIDIA showed how Spectrum-X and a multiplane network is its vision for AI Factory networks
The post NVIDIA Spectrum-X Ethernet Multiplane Network Architecture at Hot Chips 2026 appeared first on ServeTheHome.
Post Syndicated from Patrick Kennedy original https://www.servethehome.com/nvidia-bluefield-4-processor-at-hot-chips-2026/
At Hot Chips 2026, NVIDIA is detailing the huge upgrades in its BlueField-4 DPU along with the reasons behind it and its scale-in networking
The post NVIDIA BlueField-4 DPU at Hot Chips 2026 appeared first on ServeTheHome.
Post Syndicated from Patrick Kennedy original https://www.servethehome.com/broadcom-thor-ultra-ethernet-nic-at-hot-chips-2026/
At Hot Chips 2026, we got a lot of detail on how the Broadcom Thor Ultra 800GbE NIC works and some of the performance views
The post Broadcom Thor Ultra Ethernet NIC at Hot Chips 2026 appeared first on ServeTheHome.
Post Syndicated from Bruno Giorgini original https://aws.amazon.com/blogs/messaging-and-targeting/setting-up-an-rcs-agent-with-an-ai-coding-assistant-and-aws-end-user-messaging/
Clone a repo, open it in your AI coding assistant, type “go,” and walk away with a working RCS agent.
Creating an RCS agent on AWS End User Messaging normally means juggling 23 registration fields, three different CLI parameter types, brand asset requirements, and a multi-step approval process. An AI coding assistant can handle all of that for you. With AWS End User Messaging, you can create RCS agents that send and receive rich messages complete with your brand’s logo, colors, and verified identity.
Setting up an RCS agent involves creating an agent container, uploading brand assets, configuring a 23-field registration, submitting for approval, adding verified testers, and testing both outbound and inbound messaging. Each field has a specific type (TEXT, SELECT, or ATTACHMENT) that requires a different CLI parameter, and getting any of them wrong means starting over.
We built an open-source sample repository that encodes all of this knowledge into an AGENTS.md file. When you open the repo in an AI coding assistant like Kiro, Cursor, or Windsurf, the assistant reads the instructions and walks you through the entire setup interactively. You provide a brand name and your phone number. The AI handles everything else.
The repository aws-samples/sample-rcs-agent-setup-and-send-messages contains:
AGENTS.md — A structured instruction file that AI coding assistants read automatically. It contains the complete RCS agent setup workflow: credential checks, brand asset generation, registration field configuration, tester management, and message testing.brand-assets/ — Template SVG files for the agent logo (224×224 px) and banner (1440×448 px), ready to be customized and converted to PNG..kiro/steering/rcs-agent-setup.md — A Kiro-specific steering file with the same instructions, using the inclusion: always frontmatter so Kiro loads it automatically.The AGENTS.md file is the key. It defines six skills that the AI assistant executes in sequence:
Before you start, you need:
pinpoint-sms-voice-v2:* permissions.AGENTS.md files (Kiro, Cursor, Windsurf, or similar).brew install librsvg on macOS).Follow these steps to go from zero to a working RCS agent. The entire process takes about five minutes.
Open the cloned directory in your preferred AI coding assistant. The assistant will automatically detect the AGENTS.md file (or .kiro/steering/rcs-agent-setup.md if you are using Kiro).
In the chat panel, type go. The AI assistant will:
aws sts get-caller-identity and asks how you authenticate if credentials are not configured. It supports named profiles, SSO, IAM user credentials, and environment variables.rsvg-convert is installed for brand asset generation.In quick mode, you provide a brand name and the AI generates everything else: a description, an accessible accent color, contact information with placeholder values, privacy and terms URLs, and custom SVG brand assets with your brand name and colors.
In interactive mode, the AI asks for each detail one section at a time: brand name, accent color, logo description, banner description, contact information, and policy URLs.
The AI assistant executes every AWS CLI command in sequence:
Once the agent is approved, the AI asks for your test phone number, registers it as a verified tester, and waits for you to accept the invitation. After verification, it checks for blockers (protect configuration and opt-out lists), then sends your first branded RCS message.
The AI configures an automatic keyword response and walks you through the console deep link flow to verify two-way messaging. When you send RCSINBOUNDTESTING to your agent, you receive an automatic reply confirming inbound messaging works.
The AGENTS.md file encodes several non-obvious behaviors that would otherwise require trial and error:
| Challenge | How the repo handles it |
create-rcs-agent takes no --display-name parameter |
The brand name comes from the registration, not the agent creation call. The instructions reflect this. |
| Three different field parameter types | The instructions include a field reference table mapping each of the 23 fields to its correct CLI parameter: --text-value, --select-choices, or --registration-attachment-id. |
--field-values does not exist |
The instructions explicitly warn against this non-existent parameter and use the correct alternatives. |
--attachment-body and --attachment-url conflict |
The instructions use --attachment-body only. |
| Accent color contrast requirements | The instructions include pre-validated color choices with 4.5:1 contrast ratio against white. |
| Field paths differ from what you might expect | The correct paths are agentDetails.logoImage and agentDetails.bannerImage, not logoAttachmentId or bannerAttachmentId. |
| New registration versions do not inherit field values | The troubleshooting section warns that all 23 fields must be re-populated when creating a new version. |
You can modify the AGENTS.md file to fit your workflow:
brand-assets/ with your own designs. Keep the logo at 224×224 px and the banner at 1440×448 px.To remove the resources created during testing:
Note: You must delete the registration before the agent. Skipping this step results in a ConflictException: RESOURCE_NOT_EMPTY error.
The aws-samples/sample-rcs-agent-setup-and-send-messages repository turns a multi-step, error-prone CLI workflow into a guided conversation. Clone the repo, open it in your AI coding assistant, type “go,” and you have a working RCS agent that can send and receive branded messages to verified testers.
The AGENTS.md pattern is reusable. Any complex AWS workflow with non-obvious API behavior can be encoded the same way: document the correct commands, parameter types, and pitfalls in a structured file, and let the AI assistant execute it interactively.
For a detailed manual walkthrough of the same process, see Creating and testing an RCS agent with AWS End User Messaging. For an overview of the business case for RCS, see Upgrade business messaging with RCS on AWS. For more information, see the AWS End User Messaging service page and the RCS documentation.
Post Syndicated from Patrick Kennedy original https://www.servethehome.com/xcena-mx1-cxl-computational-memory-device-at-hot-chips-2026/
At Hot Chips 2026, XCENA showed off how the MX1 combines a CXL memory controller with 3072 RISC-V cores and tiering to SSDs, and Samsung showed how it scales
The post XCENA MX1 CXL Computational Memory Device at Hot Chips 2026 with Samsung appeared first on ServeTheHome.
Post Syndicated from Patrick Kennedy original https://www.servethehome.com/samsung-lpddr5x-pim-at-hot-chips-2026/
Samsung has a new generation of its LPDDR5X-PIM solution at Hot Chips 2026. This processing in memory solution looks more polished this generation
The post Samsung LPDDR5X-PIM at Hot Chips 2026 appeared first on ServeTheHome.
Post Syndicated from Lakshmi Nair original https://aws.amazon.com/blogs/big-data/enable-cross-cloud-analytics-with-amazon-s3-tables-and-google-bigquery-part-1-iam-based-access-control/
Organizations running analytics workloads across multiple clouds often hit the same friction: the data lives on one cloud, but the engine querying it lives on another. Copying data across the boundary creates a second dataset that must be kept in sync, adding cost, latency, and reconciliation overhead. In this post, we address a specific instance of that pattern: your Google BigQuery users need to work with data that lives in Amazon S3 Tables, a capability of Amazon Simple Storage Service (Amazon S3), on AWS. The ideal outcome is a single, governed dataset that serves teams in both clouds without a standing replication pipeline between them.
With Amazon S3 Tables, you get managed Apache Iceberg tables with built-in compaction, snapshot management, and an integration with the AWS Glue Data Catalog. Because S3 Tables stores data in the open Iceberg format, supported external engines can read it directly if the right access path exists.
This two-part blog series demonstrates how you can connect Google BigQuery to Amazon S3 Tables using the cross-cloud lakehouse with AWS Glue. We cover two access control approaches:
This post focuses on the IAM-based approach. Part 2 covers the Lake Formation approach for organizations that need credential-vended access across multiple engines.
By the end, you will have BigQuery querying Iceberg tables stored on S3 Tables without data copy or duplication, providing live access to Iceberg data.
There are several scenarios where organizations benefit from cross-cloud querying capabilities. Here are some of the common patterns this architecture addresses:
When source schemas change frequently, streaming pipelines writing to BigQuery-managed store require coordinated DDL changes on the BigQuery table and downstream views. Teams often work around this challenge by storing payloads as untyped columns and parsing them later.
With Iceberg on S3 Tables, schema evolution is tracked in table metadata. When the writing engine adds a new column, BigQuery’s Lakehouse refresh picks up the updated schema automatically on the next sync cycle.
A company has its production data environment on AWS (data lakes, warehouses, streaming) but acquired a business unit that runs analytics exclusively on BigQuery. In-place querying from BigQuery keeps your data in Amazon S3 Tables, so you pay for one copy, work from live data, and avoid the operational overhead of a synchronized second store.
An organization has hundreds of datasets on AWS, but only a fraction is queried daily from BigQuery. Replicating all of them to Google Cloud Storage drives unnecessary storage and transfer costs. With Lakehouse catalog federation, you keep your data on S3 Tables. BigQuery reads data only when queried, so you pay per query rather than per-copy storage.
Data team wants storage on AWS with the flexibility for multiple engines to read the same data: BigQuery and Amazon Redshift for data warehousing use cases, Amazon Athena for interactive ad-hoc querying, Amazon SageMaker AI for machine learning (ML). With Apache Iceberg’s open format, you can use one storage layer, many compute engines, no data copies between them.
You use the AWS Glue Iceberg REST Catalog (IRC) as the bridge between BigQuery and S3 Tables. BigQuery’s cross-cloud Lakehouse creates a federated catalog that syncs metadata from the Glue IRC, then uses the synced metadata to read Iceberg data files directly.
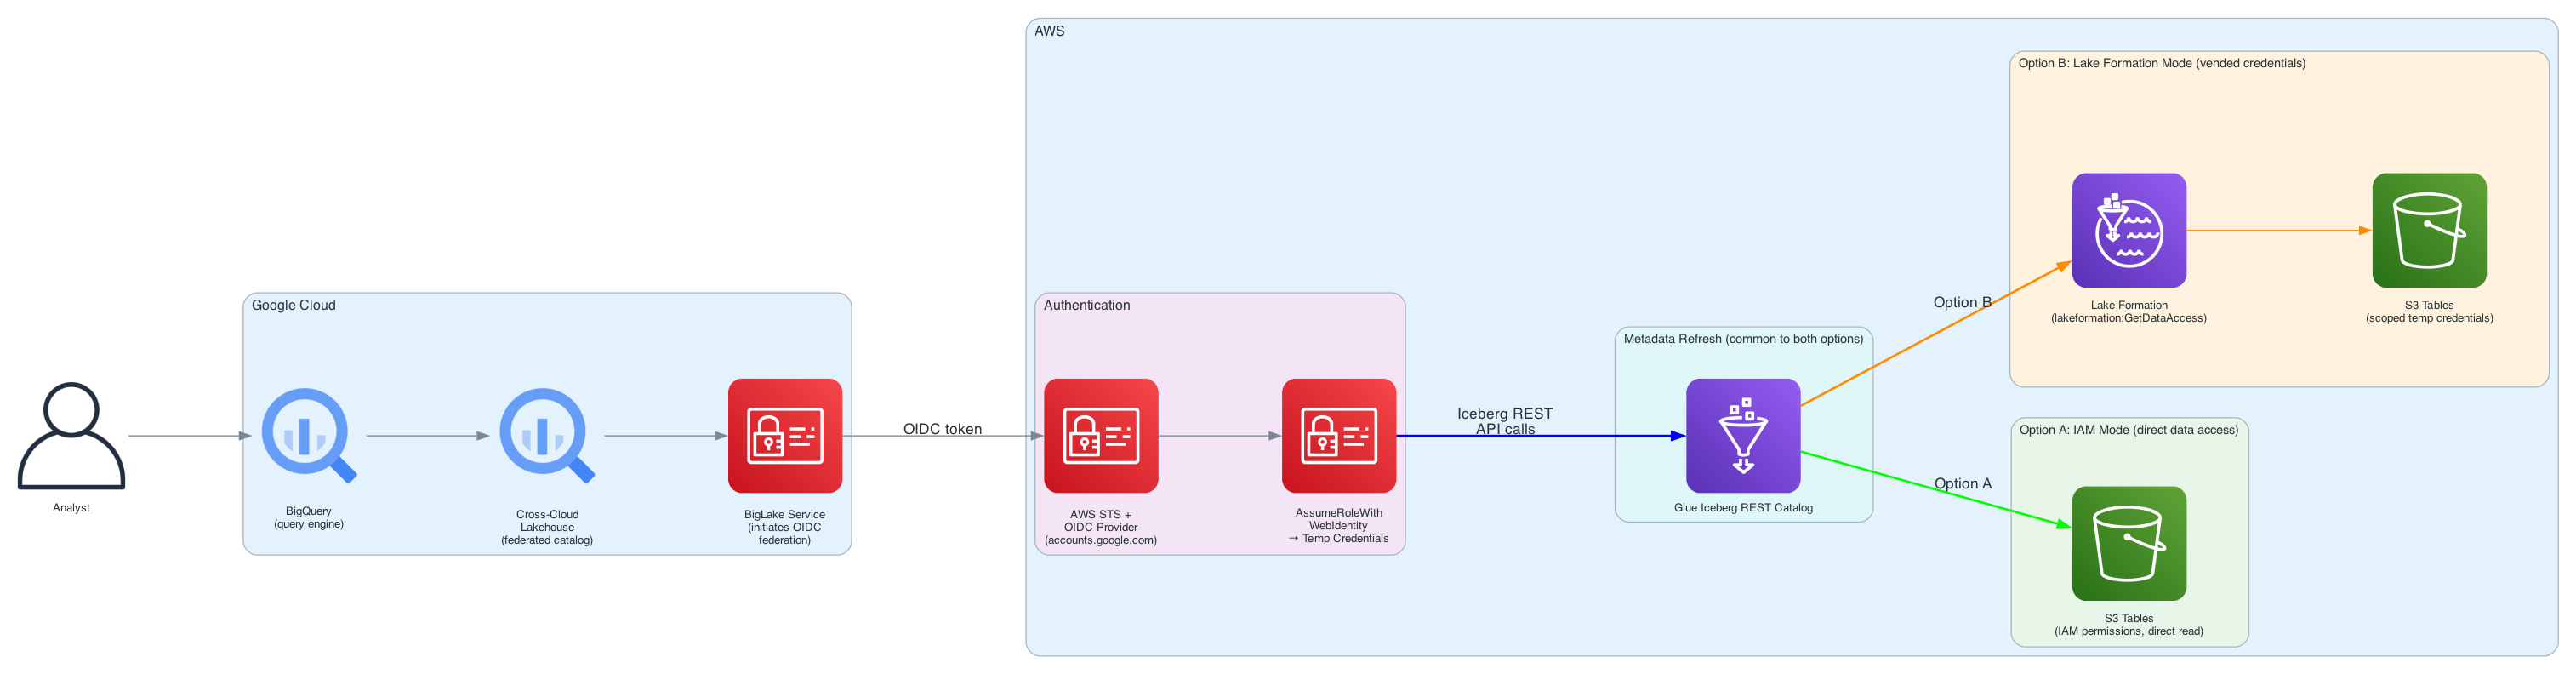
Figure 1: Architecture diagram showing BigQuery connecting to Amazon S3 Tables through the AWS Glue Iceberg REST Catalog
The key components in this architecture:
s3tablescatalog catalog that maps S3 Tables resources (table buckets, namespaces, tables) into a catalog hierarchy from supported analytics engines. The standard Iceberg REST endpoint of Glue Data Catalog serves table metadata to external engines. BigQuery connects through this endpoint.Before you begin, you need:
If you already have S3 Tables with data, skip to the next section. Otherwise, create a table bucket, namespace, and populate a table.
Use the AWS CLI to create resources as follows:
For BigQuery to access S3 Tables, the tables must be discoverable through the Glue Data Catalog. S3 Tables integrates with Glue through a federated catalog called s3tablescatalog.
Open the Amazon S3 console:
This creates the s3tablescatalog federated catalog in Glue, where access is controlled entirely by IAM policies on the calling role. This is a one-time setup per account and Region. After you enable it, the analytics integration applies to all table buckets in your account.

Figure 2: Enabling the S3 Tables integration in the Amazon S3 console
Alternatively, create the catalog using the AWS CLI:
Now, to create the table and insert data, open the Amazon Athena console. In the query editor, select s3tablescatalog/<TABLE_BUCKET_NAME> as your data source and <NAMESPACE> as the database. Then run the following SQL statements one by one:
BigQuery assumes an AWS IAM role via OIDC federation to access the Glue IRC. This section walks through creating the role, OIDC provider, and permissions.
Register Google as an OIDC identity provider in your AWS account. This allows AWS to validate tokens issued by Google’s identity service:
The –thumbprint-list parameter is optional. When omitted, IAM automatically retrieves the thumbprint from the OIDC provider’s certificate. See AWS documentation for details.
Login into AWS Console, and create the role with a placeholder trust policy. You will update it with the actual BigLake service account ID after you create the federated catalog in Google Cloud.
The --max-session-duration 43200 allows sessions up to 12 hours, which is needed for long-running BigQuery queries.
The permissions policy differs based on your access control approach. For the IAM-based approach, attach the following policy:
With the AWS side configured, create the federated catalog in Google Cloud that connects BigQuery to the Glue IRC.
Authenticate to Google Cloud using gcloud auth login, or use Cloud Shell, which is pre-authenticated. Verify that the BigLake API is enabled:
The --glue-warehouse parameter uses the format <AWS_ACCOUNT_ID>:s3tablescatalog/<TABLE_BUCKET>. This tells the Glue IRC to scope requests to your specific S3 Tables bucket within the federated catalog hierarchy.
The --primary-location refers to the Google Cloud region where the federated catalog metadata is stored. Use the AWS to Google Cloud region mapping to find the corresponding GCP region for your AWS Region. For example, AWS us-east-1 maps to GCP us-east4.
After catalog creation, Google provisions a dedicated service account for your federated catalog. Retrieve its numeric ID:
Back on AWS, replace the placeholder in the IAM role’s trust policy with the actual service account ID:
Register the service account ID in the OIDC provider’s audience list. Without this step, AWS rejects the token because the aud claim doesn’t match any registered client:
Wait 3–5 minutes for IAM changes to propagate globally, then set up background refresh:
The --refresh-interval (300 seconds in this example) determines how often BigQuery syncs metadata from the Glue IRC. New tables and schema changes appear in BigQuery within this interval.
After the catalog refresh completes, BigQuery automatically creates external datasets corresponding to the synced namespaces. No manual CREATE SCHEMA is required.
Verify the sync:
Run a query in BigQuery:
Sample Query Output:
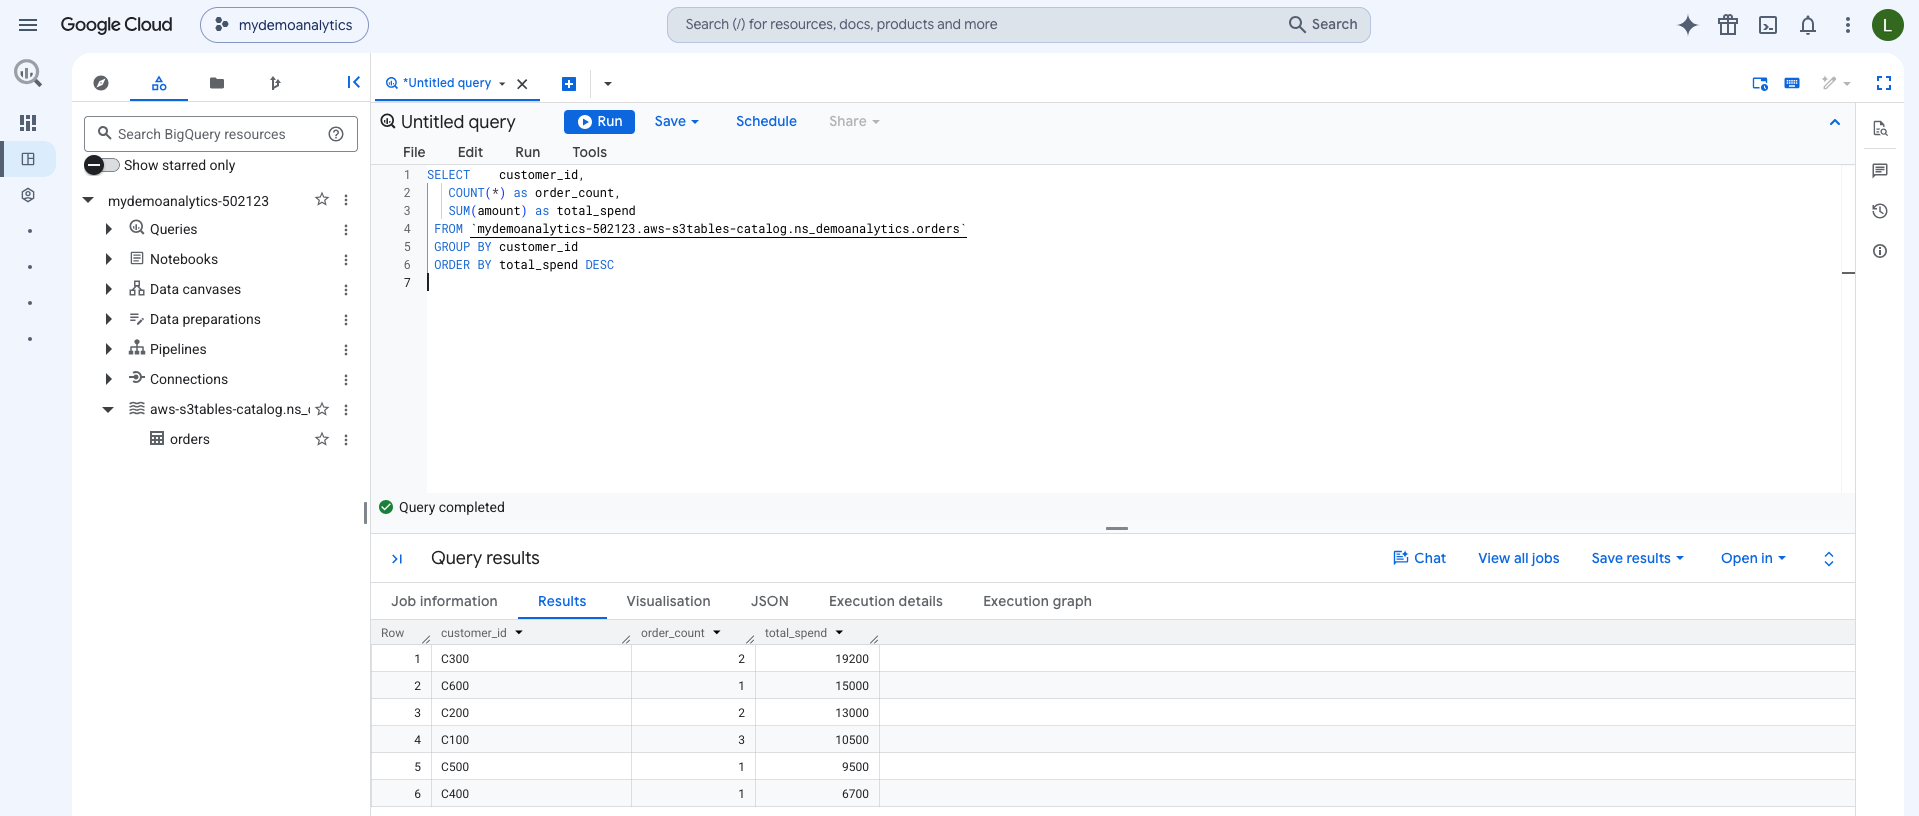
Figure 3: BigQuery query results returned directly from the Amazon S3 Tables data
BigQuery reads the Iceberg metadata to identify which Parquet data files contain relevant data. It also applies partition pruning where applicable, and fetches only the necessary files from S3 Tables managed storage.
When new columns are added to an Iceberg table on the AWS side (through Spark, Athena, or the Glue IRC), the schema change is captured in Iceberg’s metadata. On the next Lakehouse refresh cycle, BigQuery picks up the new columns automatically. No DDL changes are needed in BigQuery.
The s3tablescatalog in Glue is a federated catalog that resolves table metadata live from the S3 Tables service on each request. When a streaming job commits new data to an S3 Table, the latest metadata is immediately available through the AWS Glue IRC. BigQuery sees the update on its next refresh cycle (as configured by --refresh-interval).
The trust relationship between Google Cloud and AWS uses OpenID Connect. When BigQuery Lakehouse needs to access your data, it presents a signed JWT token containing:
iss: accounts.google.com (the issuer)sub: The BigLake service account ID (identifies which catalog is making the request)aud: The same service account ID (the intended audience)AWS validates this token against the registered OIDC provider and trust policy conditions before issuing temporary credentials. Each federated catalog receives a unique service account ID, providing per-catalog isolation and auditability through AWS CloudTrail.
By default, traffic between BigQuery and AWS travels over the public internet. For workloads requiring private connectivity, Google Cloud supports Cross-Cloud Interconnect or Partner Interconnect. This helps routing queries over a dedicated network path. Refer to the Google Cloud documentation for private interconnect configuration.
To avoid ongoing charges, remove the resources created in this walkthrough.
On AWS:
On Google Cloud:
This post demonstrated how to query Amazon S3 Tables from Google BigQuery using the open Apache Iceberg format and the AWS Glue Iceberg REST Catalog as the metadata bridge. Using Apache Iceberg’s open format, you can write data once on AWS and read it from supported engines that speak Iceberg, including BigQuery. We used IAM-based access control to govern access to both Glue Data Catalog metadata and the underlying Amazon S3 Tables data. This is the simpler configuration path with fewer components. In Part 2, we walk through configuring AWS Lake Formation to vend temporary, scoped credentials to BigQuery for data access.
To get started with this pattern in your environment:
Post Syndicated from Lakshmi Nair original https://aws.amazon.com/blogs/big-data/enable-cross-cloud-analytics-with-amazon-s3-tables-and-google-bigquery-part-2-access-control-with-lake-formation/
In Part 1, we showed how to connect Google BigQuery to Amazon Simple Storage Service (Amazon S3) Tables, a capability of Amazon S3, using access control based on AWS Identity and Access Management (IAM). A single IAM policy governs both table metadata and data access. We also walked through common cross-cloud analytics scenarios where this pattern adds value. This post covers the approach using AWS Lake Formation. Instead of relying solely on IAM policies for data access, Lake Formation manages fine-grained permissions and vends temporary, scoped credentials to the requesting engine. This is a better fit when multiple engines need different levels of access to the same tables, or when you want to manage grants centrally without touching IAM policies every time a new consumer comes along.
You use the AWS Glue Iceberg REST Catalog (IRC) as the bridge between BigQuery and S3 Tables. BigQuery’s cross-cloud Lakehouse creates a federated catalog that syncs metadata from the Glue IRC, then uses the synced metadata to read Iceberg data files directly.
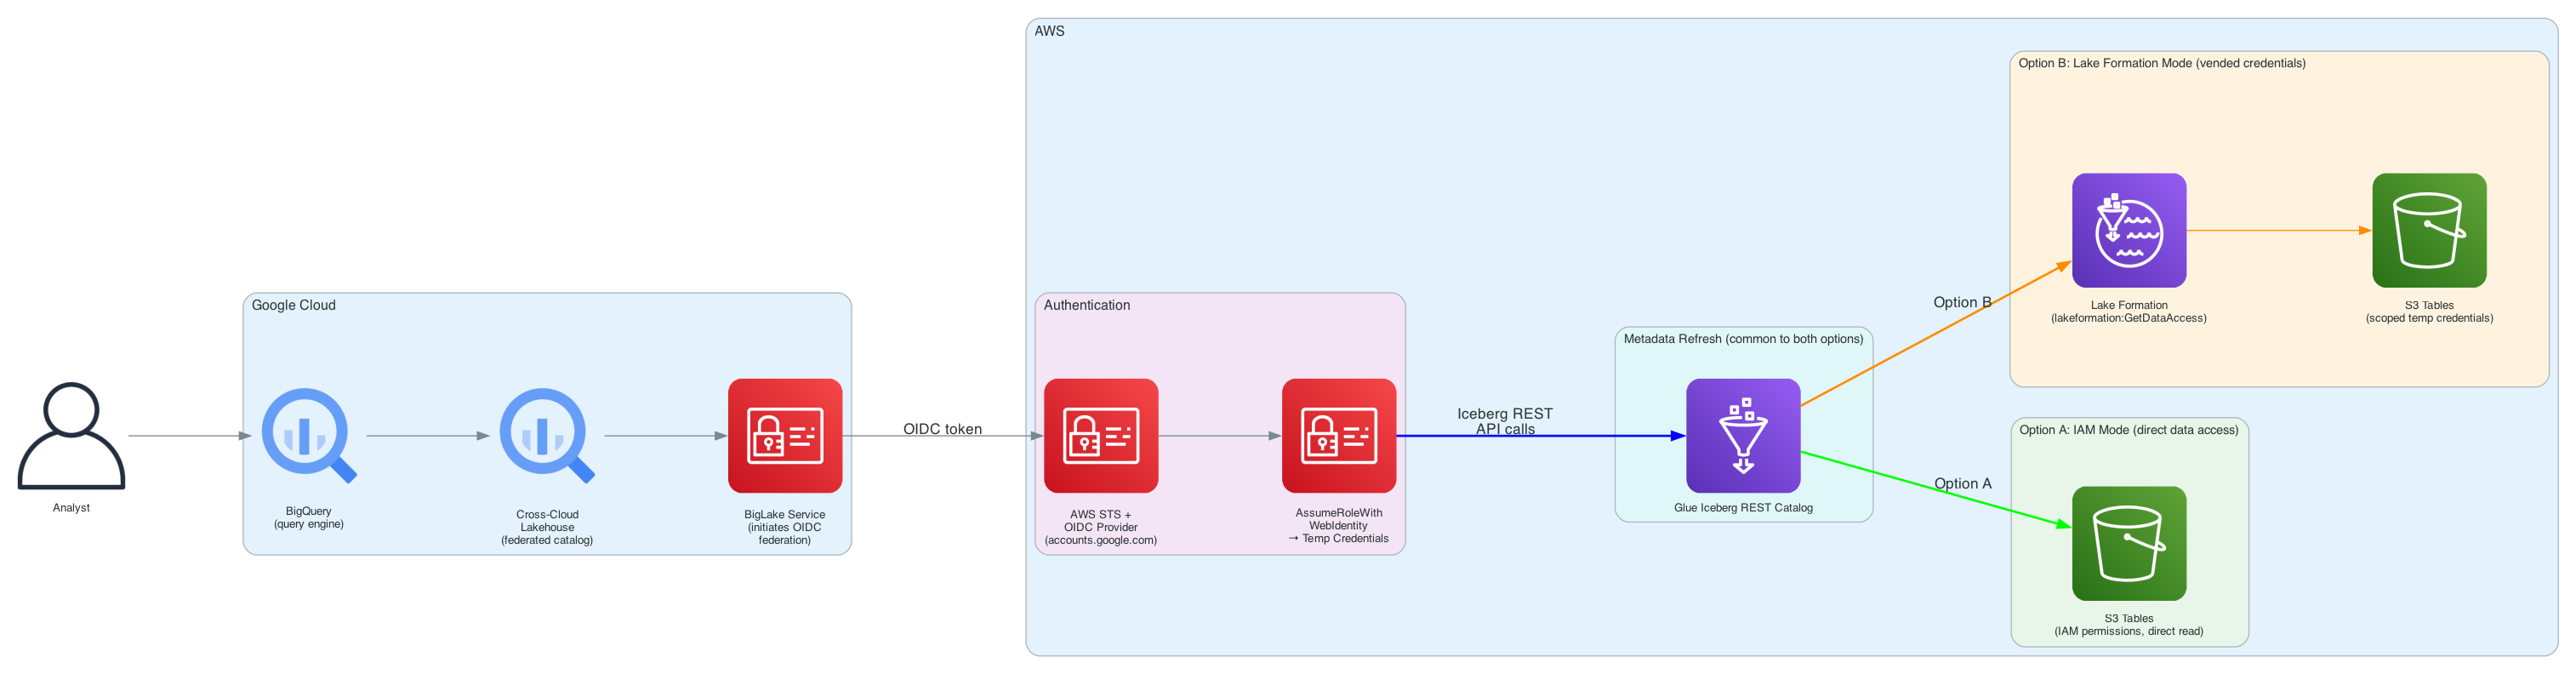
Figure 1: Architecture diagram showing BigQuery connecting to Amazon S3 Tables through the AWS Glue Iceberg REST Catalog
The key components in this architecture:
s3tablescatalog catalog that maps S3 Tables resources (table buckets, namespaces, tables) into a catalog hierarchy from supported analytics engines. The standard Iceberg REST endpoint of Glue Data Catalog serves table metadata to external engines. BigQuery connects through this endpoint.Before you begin, you need:
If you already have S3 Tables with data, skip to the next section. Otherwise, create a table bucket, namespace, and populate a table.
Use AWS CLI to create resources as follows:
Lake Formation needs its own service role to interact with S3 Tables on your behalf. This is the role Lake Formation assumes internally when it reads or writes data on behalf of authorized callers.
Create a Lake Formation service IAM role named LakeFormationS3TablesServiceRole with the following policy:
Attach the following trust relationship:
In the Lake Formation console, in the navigation pane, choose Catalogs, and then choose Enable S3 Table Integration.
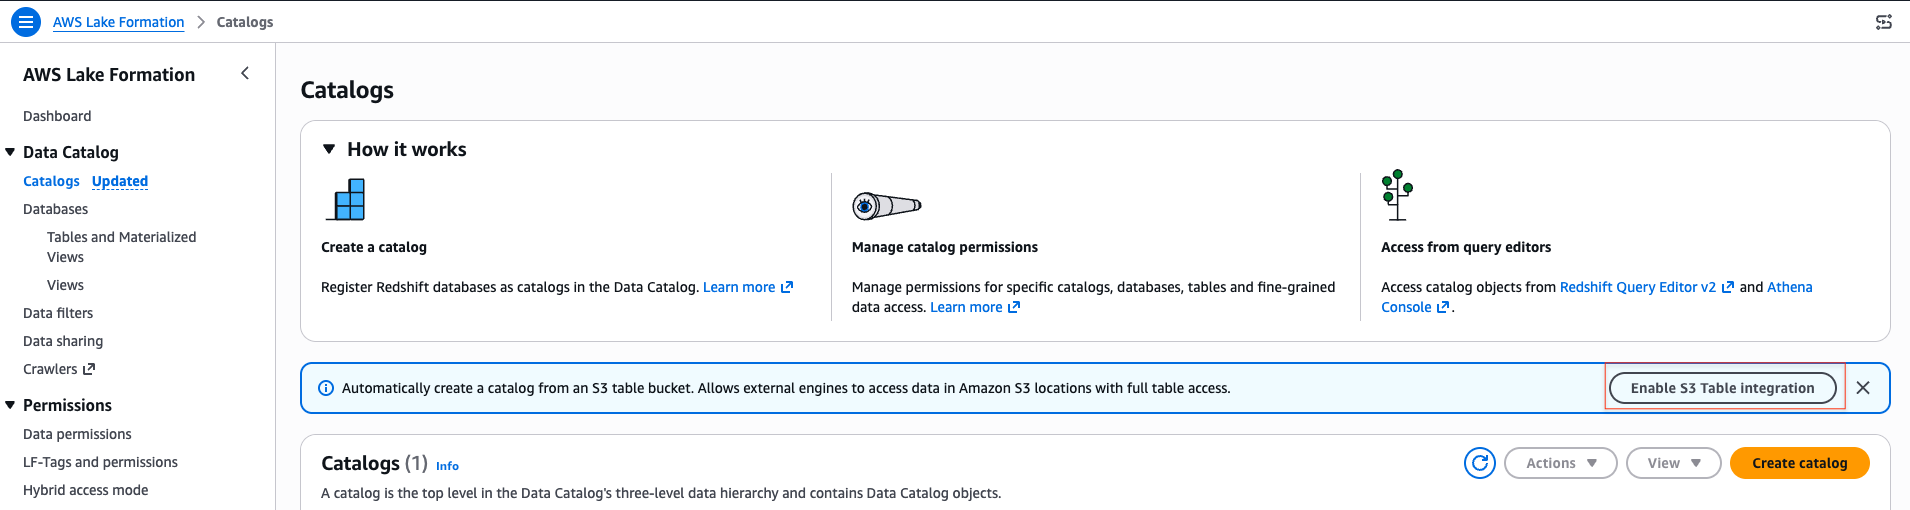
Figure 2: Enabling the S3 Tables integration in the Lake Formation console
Choose the role you created earlier when prompted for an IAM role, and select Allow external engines to access data in Amazon S3 locations with full table access.
S3 Tables integration performs the following:
s3tablescatalog federated catalog in Glue.Important: Before enabling the integration, verify your Lake Formation data lake settings have empty default permissions to prevent IAMAllowedPrincipals from being auto-granted on the catalog:
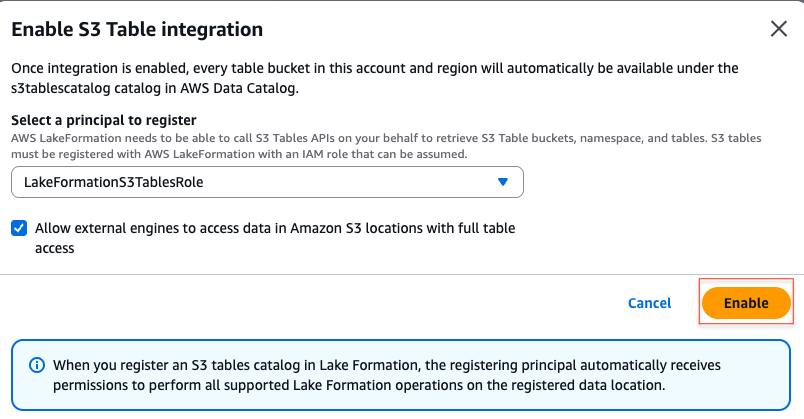
Figure 3: Selecting full table access for external engines during S3 Tables integration
When you select this option, you allow external engines to access data in Amazon S3 locations with full table access, and Lake Formation grants full table-level access to external engines. Column-level and row-level filtering are not enforced for external engine connections. Access is granted at the whole-table level.
Verify the integration by confirming the catalog in Lake Formation console.
Now, to create the table and insert data, open the Amazon Athena console. In the query editor, select s3tablescatalog/<TABLE_BUCKET_NAME> as your data source and <NAMESPACE> as the database. Then run the following SQL statements one by one:
BigQuery assumes an AWS IAM role using OIDC federation to access the AWS Glue IRC. This section walks through creating the role, OIDC provider, and permissions.
Register Google as an OIDC identity provider in your AWS account. This allows AWS to validate tokens issued by Google’s identity service:
The –thumbprint-list parameter is optional. When omitted, IAM automatically retrieves the thumbprint from the OIDC provider’s certificate. See AWS documentation for details.
Sign in to the AWS Management Console. Create the role with a placeholder trust policy. You will update it with the actual BigLake service account ID after you create the federated catalog in Google Cloud.
The --max-session-duration 43200 allows sessions up to 12 hours, which is needed for long-running BigQuery queries.
The permissions policy differs based on your access control approach. For the Lake Formation approach, attach the following policy:
Lake Formation permissions work as a layered grant model: you grant access at each level of the catalog hierarchy, from catalog down to table. The cross-cloud role needs DESCRIBE on the catalog and database so it can discover what exists, and SELECT plus DESCRIBE on the table so it can read the actual data. Without grants at every level, Lake Formation denies access even if the IAM policy allows it.
If using Lake Formation, grant the bigquery-cross-cloud-role access to your tables:
DESCRIBE.DESCRIBE.SELECT, DESCRIBE.Before granting Lake Formation permissions, revoke the default IAMAllowedPrincipals access. By default, Lake Formation grants IAMAllowedPrincipals full access to all databases and tables, so you first need to revoke this to enforce fine grain access. IAMAllowedPrincipals provides backward compatibility when you start using Lake Formation permissions to secure the Data Catalog resources that were earlier protected by IAM policies for AWS Glue.
For table metadata to sync from Glue to BigLake/BigQuery, the following Lake Formation settings are required. You might notice that a similar setting also appeared during the S3 Table integration setup. The first one registers the data location and enables external access at the catalog level, while this one enables the Lake Formation credential vending mechanism at the account level for all external engines. For a clean cross-cloud setup, we recommend that you enable both.
In the Lake Formation console, choose Administration, then Application integration settings, and then select Allow external engines to access data in Amazon S3 locations with full table access.
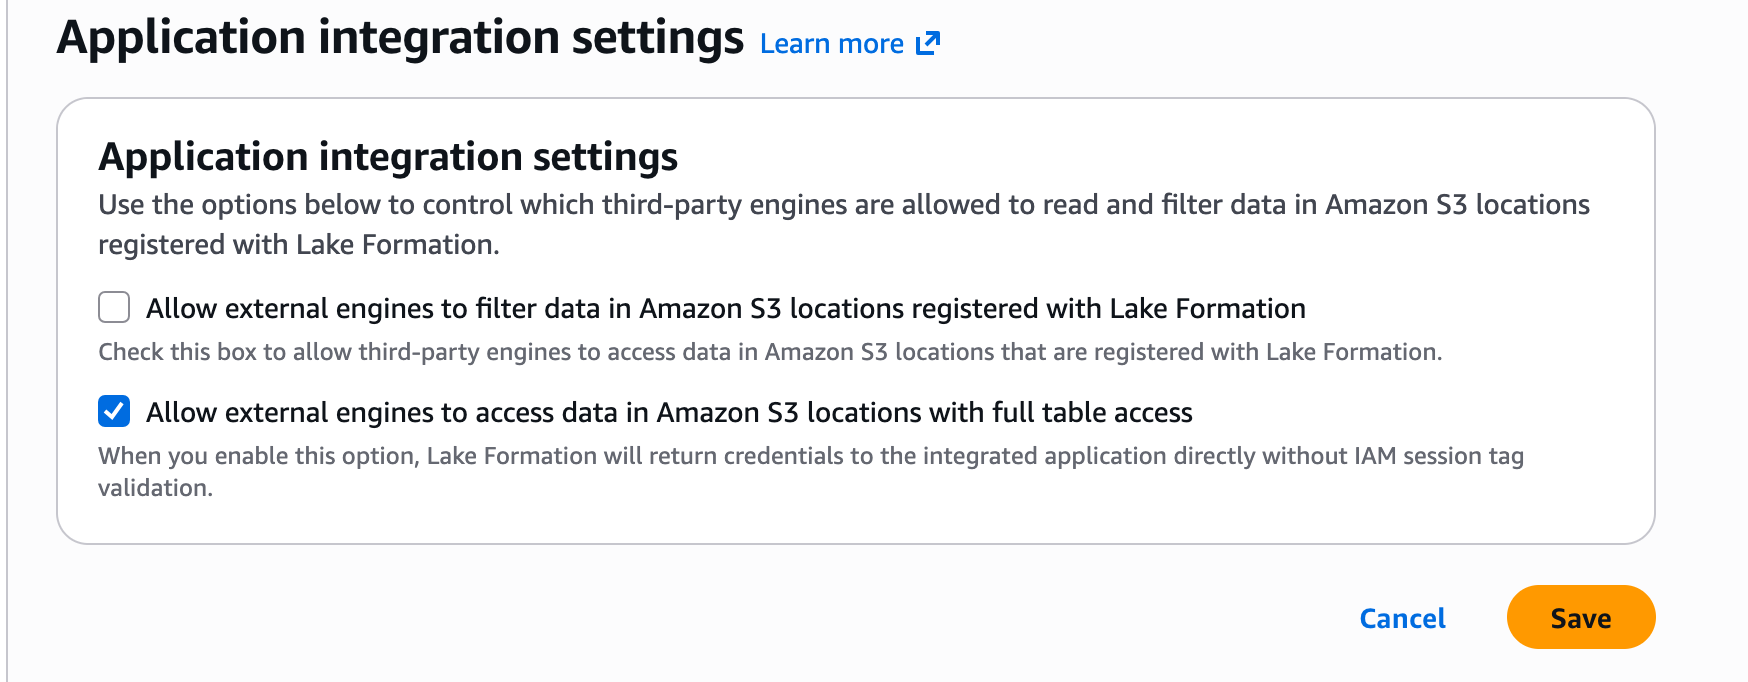
Figure 4: Enabling external-engine access in Lake Formation application integration settings
With the AWS side configured, create the federated catalog in Google Cloud that connects BigQuery to the AWS Glue IRC.
Authenticate to Google Cloud using gcloud auth login, or use Cloud Shell, which is pre-authenticated. Verify the BigLake API is enabled:
The --glue-warehouse parameter uses the format <AWS_ACCOUNT_ID>:s3tablescatalog/<TABLE_BUCKET>. This tells the AWS Glue IRC to scope requests to your specific S3 Tables bucket within the federated catalog hierarchy.
The --credential-mode=vended-credentials flag (Lake Formation mode) instructs BigQuery Lakehouse to request scoped temporary credentials from Lake Formation rather than using the role’s IAM permissions directly for data access.
The --primary-location refers to the Google Cloud region where the federated catalog metadata is stored. Use the AWS to Google Cloud region mapping to find the corresponding GCP region for your AWS Region. For example, AWS us-east-1 maps to GCP us-east4.
After catalog creation, Google provisions a dedicated service account for your federated catalog. Retrieve its numeric ID:
Back on AWS, replace the placeholder in the IAM role’s trust policy with the actual service account ID:
Register the service account ID in the OIDC provider’s audience list. Without this step, AWS rejects the token because the aud claim doesn’t match any registered client:
Wait 3–5 minutes for IAM changes to propagate globally, then set up background refresh:
The --refresh-interval (300 seconds in this example) determines how often BigQuery syncs metadata from the AWS Glue IRC. New tables and schema changes appear in BigQuery within this interval.
After the catalog refresh completes, BigQuery automatically creates external datasets corresponding to the synced namespaces. No manual CREATE SCHEMA is required.
Verify the sync:
Run a query in BigQuery:
Sample Query Output:
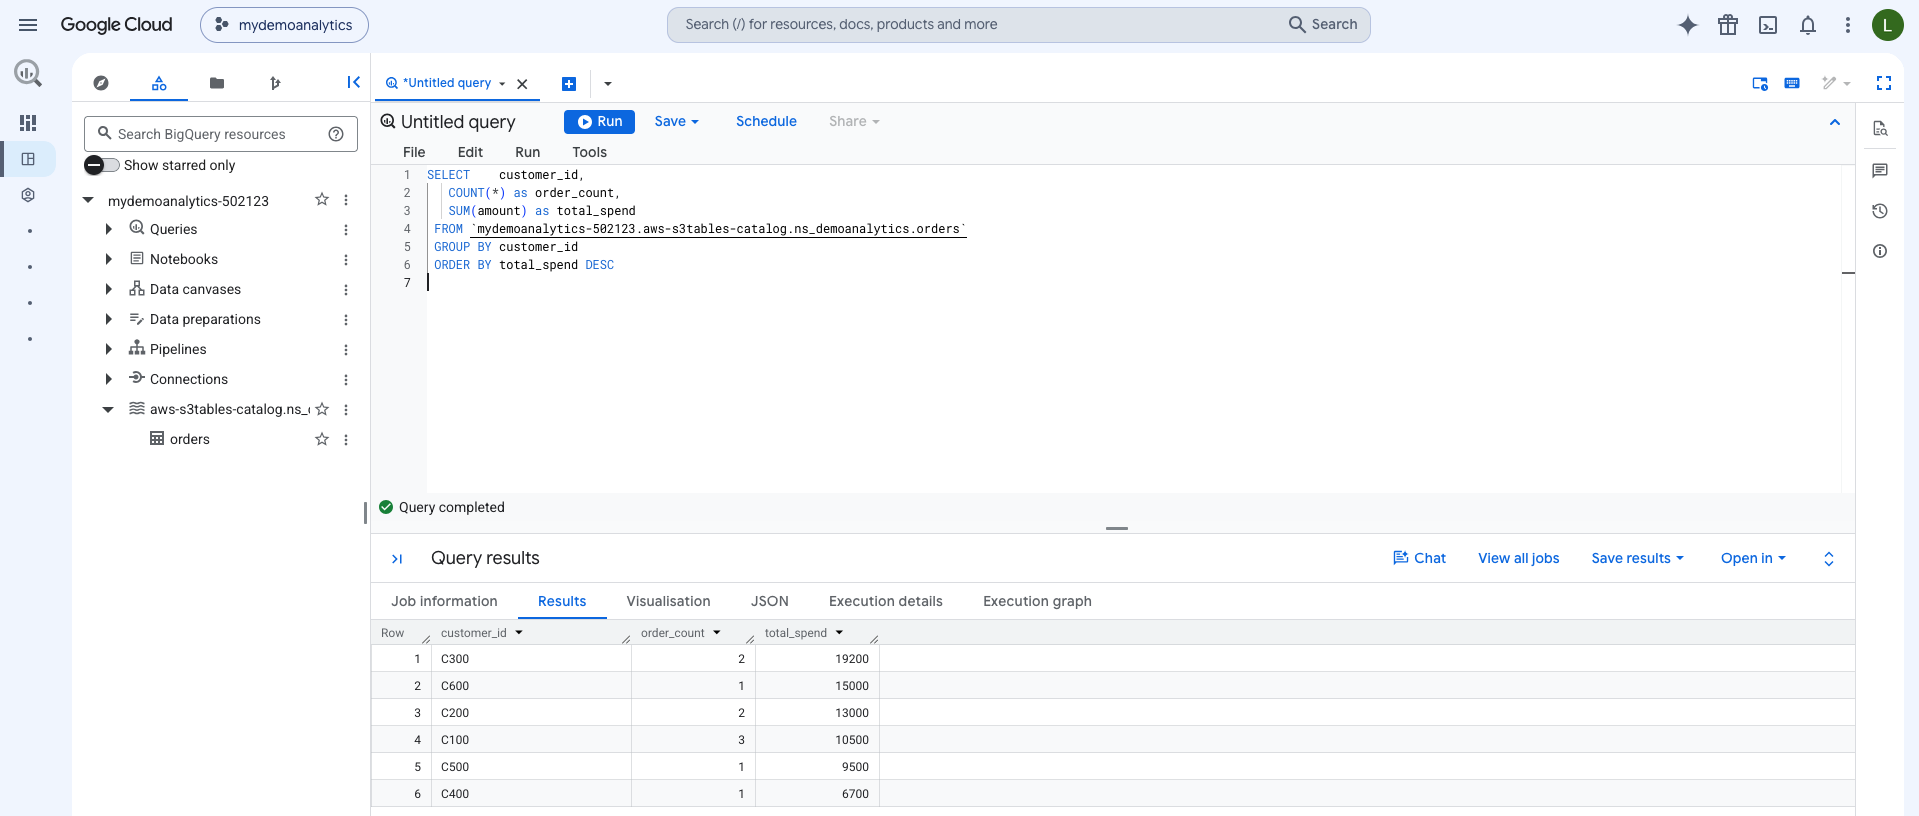
Figure 5: BigQuery query results returned through Lake Formation credential vending
BigQuery reads the Iceberg metadata to identify which Parquet data files contain relevant data. It also applies partition pruning where applicable, and fetches only the necessary files from S3 Tables managed storage.
When new columns are added to an Iceberg table on the AWS side (through Spark, Athena, or the AWS Glue IRC), the schema change is captured in Iceberg’s metadata. On the next Lakehouse refresh cycle, BigQuery picks up the new columns automatically. No DDL changes are needed in BigQuery.
The s3tablescatalog catalog in AWS Glue is a federated catalog that resolves table metadata live from the S3 Tables service on each request. When a streaming job commits new data to an S3 Table, the latest metadata is immediately available through the AWS Glue IRC. BigQuery sees the update on its next refresh cycle (as configured by --refresh-interval).
The trust relationship between Google Cloud and AWS uses OpenID Connect. When BigQuery Lakehouse needs to access your data, it presents a signed JWT token containing:
iss: accounts.google.com (the issuer)sub: The BigLake service account ID (identifies which catalog is making the request)aud: The same service account ID (the intended audience)AWS validates this token against the registered OIDC provider and trust policy conditions before issuing temporary credentials. Each federated catalog receives a unique service account ID, providing per-catalog isolation and auditability through AWS CloudTrail.
By default, traffic between BigQuery and AWS travels over the public internet. For workloads requiring private connectivity, Google Cloud supports Cross-Cloud Interconnect or Partner Interconnect. This helps routing queries over a dedicated network path. Refer to the Google Cloud documentation for private interconnect configuration.
To avoid ongoing charges, remove the resources created in this walkthrough.
On AWS:
On Google Cloud:
This post demonstrated how to query Amazon S3 Tables from Google BigQuery using AWS Lake Formation credential vending, where Lake Formation manages the permissions and issues temporary, scoped credentials for data access. With the open Iceberg format, you can write data once on AWS and read it from supported engines that speak Iceberg, including BigQuery.
Together with the IAM approach covered in Part 1, two access control modes provide flexibility: IAM for teams who want a straightforward setup and Lake Formation for organizations with complex governance requirements where multiple engines need centrally managed access to the same data.
To get started with this pattern in your environment:
Post Syndicated from Patrick Kennedy original https://www.servethehome.com/amd-versal-rf-series-at-hot-chips-2026/
The AMD Versal RF devices are getting there time on stage at Hot Chips 2026 with hardend IP blocks to flexible FPGA fabric
The post AMD Versal RF Series at Hot Chips 2026 appeared first on ServeTheHome.
Post Syndicated from McCall Peltier original https://aws.amazon.com/blogs/big-data/gpu-accelerated-apache-spark-with-amazon-emr-and-nvidia-rtx-pro-4500-on-amazon-ec2-g7-instances-runs-up-to-3-7x-faster/
For years, Apache Spark has been the backbone of large-scale data processing. However, as datasets grow and artificial intelligence and machine learning (AI/ML) pipelines become more complex, modern workloads demand more computational power. Feature engineering for machine learning models, large-scale extract, transform, and load (ETL) transformations, and real-time analytics workloads are computationally intensive by nature. GPU-accelerated instances improve performance and transform jobs that once took hours into minutes, so you can iterate on models faster and reduce operational costs. You can process larger datasets in single batches, make decisions in real time, and achieve strong performance without over-provisioning infrastructure.
We’re excited to share the benchmarking results on Amazon EMR with Amazon Elastic Compute Cloud (Amazon EC2) G7 instances, powered by NVIDIA RTX PRO 4500 Blackwell Server Edition GPUs. For data engineers and data scientists running Apache Spark workloads, this means faster pipelines, shorter iteration cycles, and more time spent on insights.
Amazon EMR on EKS natively supports the NVIDIA cuDF plugin for Apache Spark. This support is the result of joint engineering between AWS and NVIDIA to qualify the cuDF plugin for Amazon EMR, co-optimize Spark execution paths for RTX PRO 4500, and validate performance at scale through shared TPC-DS benchmarking on Amazon EC2 G7 instances. Now, Apache Spark workloads on Amazon EMR on EKS run up to 3.7x faster with Amazon EC2 G7 GPU instances than with comparable CPU instances, and require no changes to existing Spark code.
In the TPC-DS 3 TB benchmark, at the 64 GB memory tier, EC2 G7 instances with RTX PRO finished in 4.7 minutes. If you run large-scale data processing pipelines, you can cut job run times by more than two-thirds while maintaining full compatibility with the applications you already have in production.
The use cases that benefit most are those where speed directly unlocks business value. In AI/ML feature engineering, faster Spark jobs mean data science teams can iterate on features more quickly, reducing the time from raw data to trained model. In complex ETL pipelines, like financial transactions, clickstream aggregation, or supply chain data consolidation, GPU acceleration compresses multi-hour batch windows into near-real-time processing. For real-time analytics, teams running fraud detection, personalization engines, or operational dashboards can process larger volumes of data within tighter latency windows, without redesigning their architecture.
Beyond data analytics, the G7 instances will support a broad range of AI and graphics workloads, including conversational AI, content generation, recommender systems, and video streaming and rendering. Built on the AWS Nitro System, they deliver the security and resource efficiency that production AI, analytics, and graphics workloads demand.
The following sections walk through the cluster configuration, benchmark methodology, and performance results.
We benchmarked four instance types to measure the real-world performance of G7 GPU instances against comparable CPU instances for Spark SQL performance. The g7.4xlarge also provides 80 Gbps network bandwidth (compared to 15–17 Gbps on the CPU baselines) and uses RapidsShuffleManager. However, CPU runs showed no evidence of being network- or shuffle-bound at this cluster scale. All tests used Amazon EMR on EKS 7.12.0 with Apache Spark 3.5.6 and cuDF plugin 26.04.2, running the full TPC-DS benchmark at 3 TB scale across 103 queries. Each experiment ran 5 iterations. We report the median. Data was stored as Parquet on Amazon Simple Storage Service (Amazon S3) (same-region gateway endpoint). All instances were launched in a single Availability Zone.
All four instance types share the same compute footprint of 16 vCPUs and 64 GB system RAM. The g7.4xlarge additionally includes an NVIDIA RTX PRO 4500 Blackwell GPU with 32 GB of dedicated video memory (VRAM), which the cuDF plugin uses to accelerate Spark SQL operations. The baseline for all speedup and cost comparisons is m9gd.4xlarge (Graviton), the lowest-cost CPU instance in the group.
| . | g7.4xlarge | m9gd.4xlarge | m8id.4xlarge | m8a.4xlarge |
| Architecture | x86_64 | arm64 (Graviton) | x86_64 | x86_64 |
| vCPU | 16 | 16 | 16 | 16 |
| RAM | 64 GB | 64 GB | 64 GB | 64 GB |
| GPU | 1× RTX PRO 4500 Blackwell (32 GB VRAM) | – | – | – |
| NVMe | 875 GB | 950 GB | 950 GB | EBS only (GP3 16k IOPS and 2000 MB/s throughput to match NVMe |
| Network | 80 Gbps | Up to 17 Gbps | Up to 15 Gbps | Up to 15 Gbps |
The g7.4xlarge uses the RTX PRO 4500 Blackwell Server Edition GPU. The CPU baselines cover all three major architectures: m8id.4xlarge (Intel x86), m8a.4xlarge (AMD x86), and m9gd.4xlarge (Graviton arm64).
All instances used eight executor nodes with the following configuration:
| Configuration | GPU instances | CPU instances |
| Amazon EMR release | emr-7.12.0-spark-rapids-latest | emr-7.12.0-latest |
| executor.cores | 14 | 14 |
| executor.instances | 8 | 8 |
| executor.memory | 20G | 20G |
| executor.memoryOverhead | 30G | 30G |
| spark.plugins | com.nvidia.spark.SQLPlugin | – |
| rapids.memory.pinnedPool.size | 8G | – |
| rapids.sql.concurrentGpuTasks | 3 | – |
| shuffle.manager | RapidsShuffleManager | default (sort) |
| sql.adaptive.enabled | true | true |
| io.compression.codec | zstd | zstd |
CPU instances use the same 30 GB memoryOverhead as GPU to make sure that the memory comparison is apples-to-apples. This setting reserves off-heap memory for shuffle and caching on both sides.
For GPU instances, the cuDF plugin offloads Spark SQL operations to the GPU automatically. No code changes are required. The executor.memoryOverhead value is set higher on GPU instances to accommodate GPU memory management and the RAPIDS shuffle manager.
The cuDF plugin automatically falls back to CPU execution for unsupported operators and user-defined functions (UDFs). Your job still completes, but those stages run without GPU acceleration. To identify which operations run on GPU compared to CPU, set spark.rapids.sql.explain=NOT_ON_GPU in your Spark configuration. For a pre-migration assessment of your workloads, use the NVIDIA cuDF tool to estimate GPU acceleration potential before moving to G7 instances.
To tune settings like concurrentGpuTasks and pinnedPool.size, use the Spark History Server on Amazon EMR on EKS, which provides per-stage execution details to identify CPU fallback and shuffle bottlenecks.
Reference the Using cuDF Accelerator for Apache Spark with Amazon EMR on EKS for detailed setup instructions.
Before running GPU-accelerated Spark on Amazon EMR on EKS, make sure the following are in place:
emr-7.12.0-spark-rapids-latest).The
-spark-rapidsrelease variant ships the NVIDIA cuDF plugin pre-installed.
AL2023_x86_64_NVIDIA (Amazon EKS optimized accelerated AMI).To validate GPU availability on your nodes:
Note: Getting started with GPU-accelerated Spark on Amazon EMR is straightforward. To use the latest cuDF plugin, overlay the latest version (for example, 26.04.2 as of May 2026) onto the Amazon EMR RAPIDS image using an initContainer technique. This replaces the bundled cuDF JAR with a newer version while preserving all other Amazon EMR dependencies. We recommend using the latest Amazon EMR release to get the most up-to-date cuDF plugin for better performance. In our benchmarks, upgrading from cuDF plugin 25.08.0 to 26.04.2 reduced runtime by 36–38 percent. Download the latest cuDF plugin JAR from the NVIDIA repository. AWS Support covers Amazon EMR. For issues specific to a cuDF JAR, file a GitHub issue or contact NVIDIA at [email protected].
We ran the full TPC-DS benchmark suite (103 queries) at 3 TB scale on 8-node clusters in us-east-1. The following table summarizes the results:
| . | GPU instances | CPU instances |
| Cost per run | $2.06 | $2.93–$3.18 |
| Total time (103 queries) | 281s (4.7 min) | 1,010–1,043s (16.8–17.4 min) |
| Speedup compared to CPU instances | 3.7× | baseline |
Cost per run is the total cluster cost for the benchmark’s duration: Cluster $/hr × (median runtime ÷ 3,600). The hourly rate combines the EC2 On-Demand cost for all 8 nodes and the Amazon EMR on EKS charge for the vCPU and memory the Spark pods consume. Both are billed per second (one-minute minimum), so you pay only for what a job uses while it runs. All runs used Amazon EMR on EKS 7.12.0 in us-east-1, with 8 × 4xlarge nodes (128 vCPU) on both the GPU and CPU sides. The g7.4xlarge cluster runs at $26.35/hr (8 × $3.042 EC2 = $24.34, plus $2.01 for Amazon EMR on EKS) and finishes in 281 seconds, at $2.06 per run. The CPU clusters run at a lower hourly rate ($10.43–$10.99) but take 1,010–1,043 seconds, landing at $2.93–$3.18 per run. All prices reflect On-Demand pricing in us-east-1 as of May 2026. G7 instances are also eligible for EC2 Spot and Compute Savings Plans, which can further reduce costs for recurring batch workloads.
Cost-per-run calculations include EC2 and Amazon EMR charges only. They exclude the EKS control-plane fee, EBS volumes, S3 request and storage costs, and the driver pod.
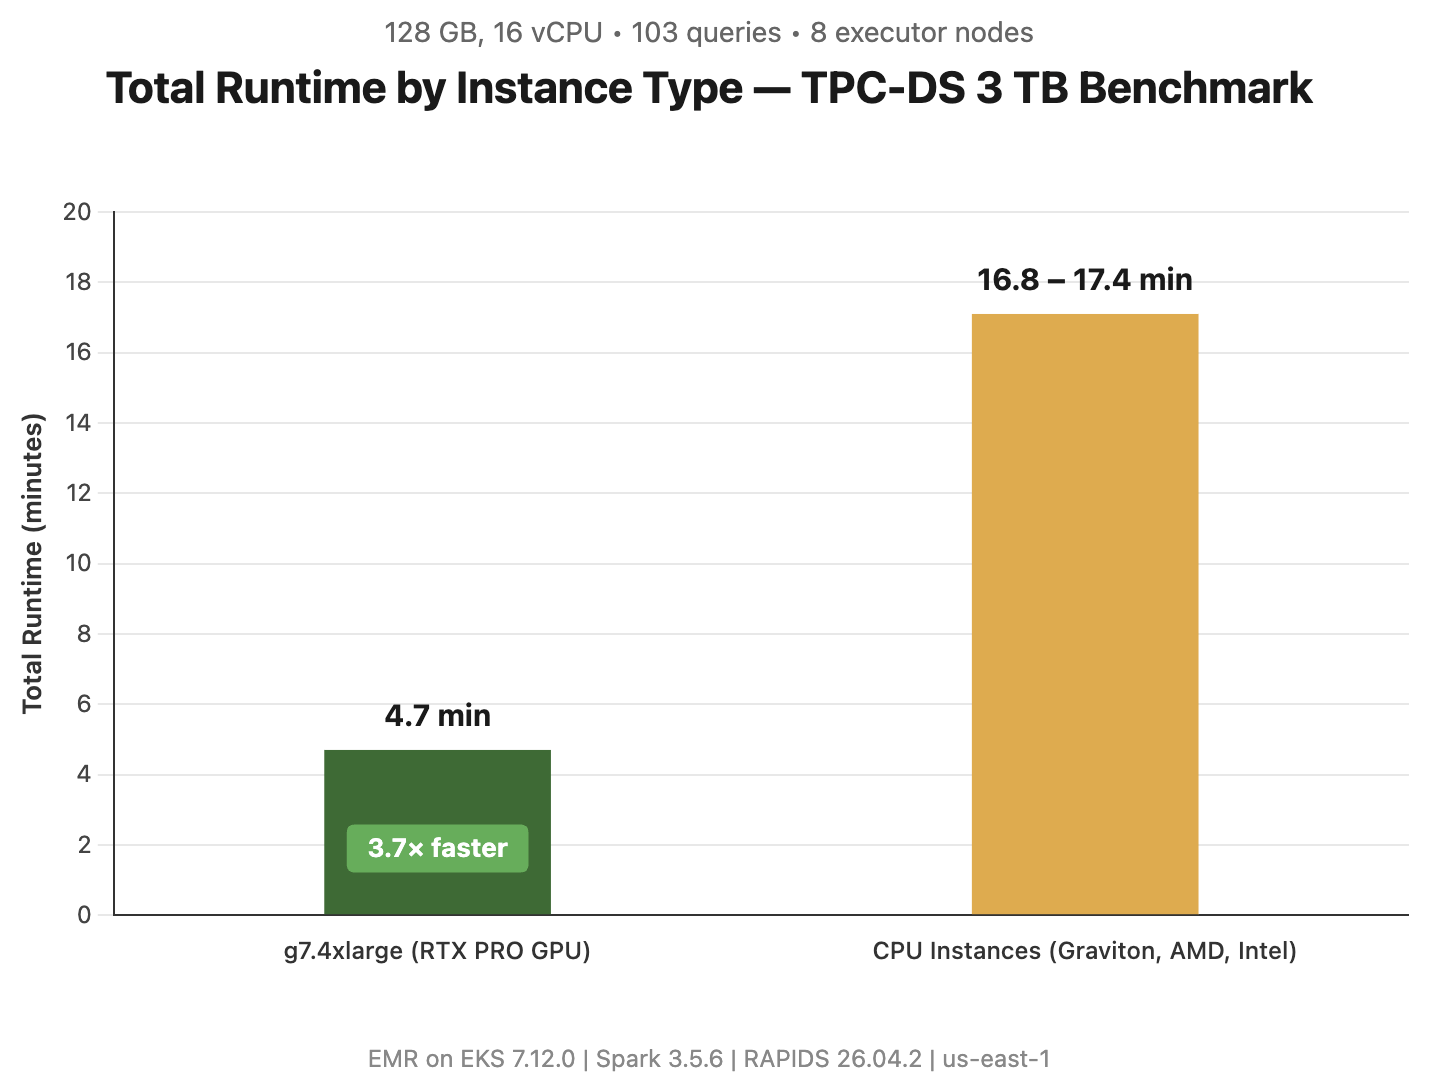
Figure 1: Total runtime by instance type for all 103 TPC-DS queries at 3 TB scale. The g7.4xlarge with GPU acceleration completed the benchmark in 4.7 minutes, 3.7× faster than CPU instances (16.8-17.4 minutes)
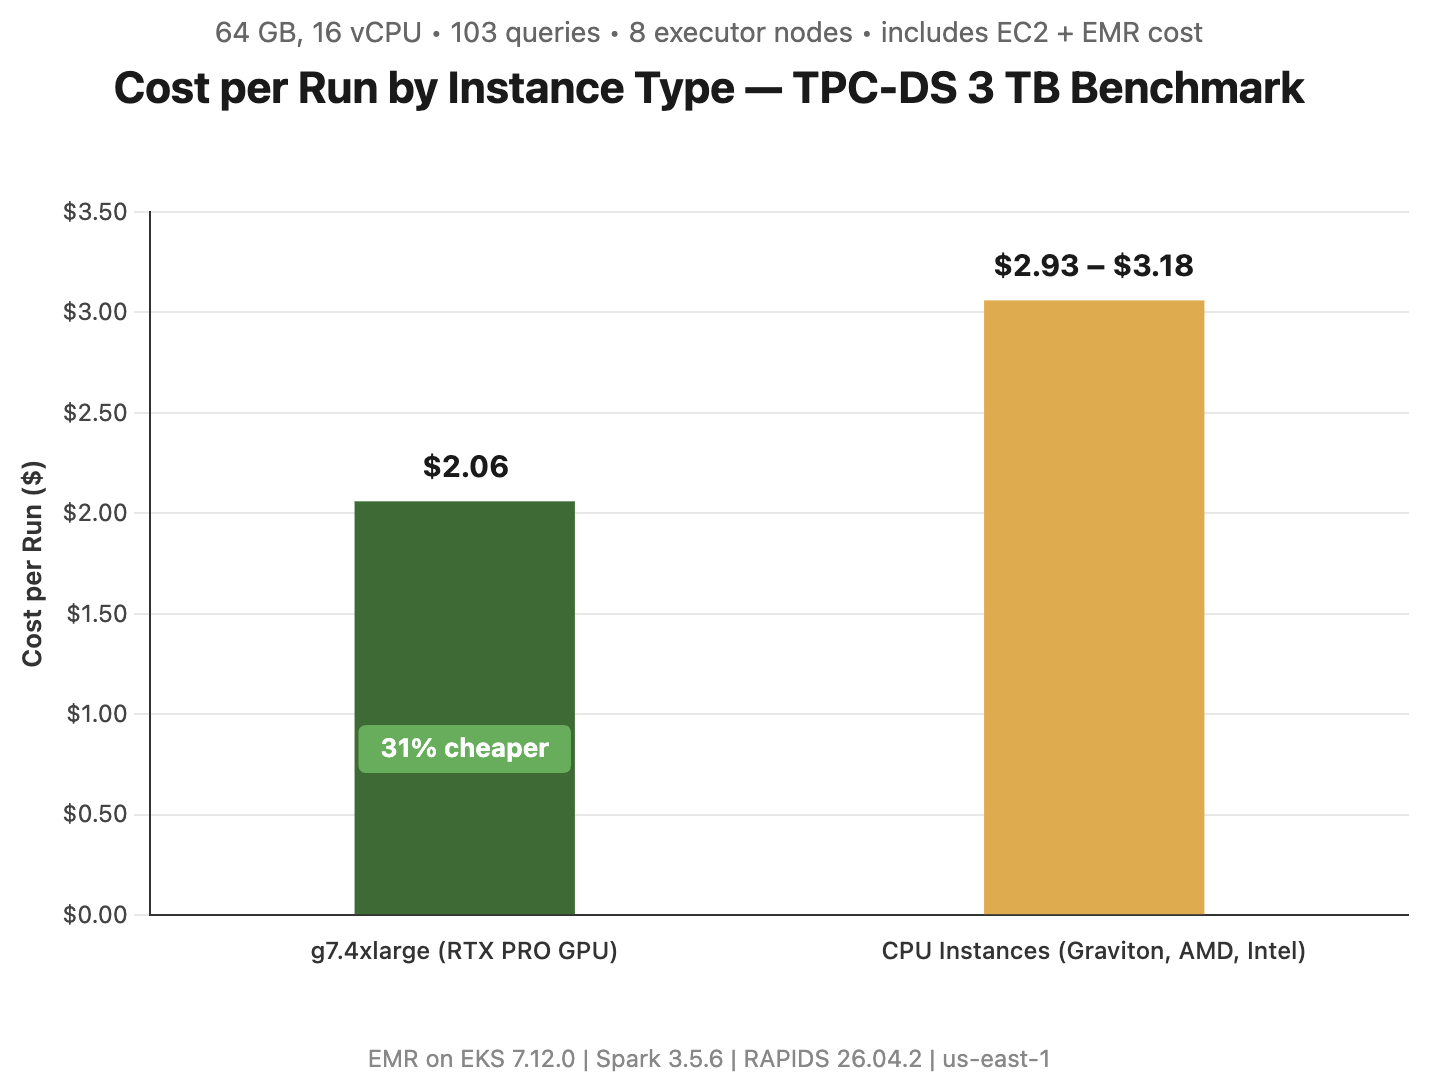
Figure 2: Total cost per benchmark run, including both Amazon EC2 instance and Amazon EMR on EKS cost across all 8 nodes. Despite a ~2.5× higher hourly rate, the g7.4xlarge GPU instance costs up to 31% less per run than Graviton because it finishes the workload 3.7× faster
GPU acceleration completed the 103-query power run in 281s compared to 1,032s on CPU, an overall 3.7× speedup that saves 750 seconds per run. GPU was faster on 102 of 103 query executions.
GPU acceleration delivers the largest gains on the long-running, compute- and shuffle-heavy queries where kernel throughput outweighs launch overhead. The biggest absolute time savings:
| Query | CPU time | GPU time | Speedup | Time saved |
| q24 (part 1+2) | 81.6s | 15.9s | ~5.1× | 65.7s |
| q23 (part 1+2) | 79.4s | 16.4s | ~4.9× | 63.1s |
| q93 | 63.7s | 5.6s | 11.4× | 58.1s |
| q76 | 30.4s | 3.4s | 9.0× | 27.0s |
| q64 | 35.4s | 8.5s | 4.2× | 26.9s |
| q50 | 27.6s | 3.5s | 7.9× | 24.0s |
Speedup distribution across all 103 executions:
| Speedup band | Queries |
| ≥5× | 15 |
| 4–5× | 13 |
| 3–4× | 21 |
| 2–3× | 26 |
| 1–2× | 27 |
| <1× (CPU faster) | 1 |
Median per-query speedup 2.94× (geomean 2.84×). The heaviest wins (q50, q76, q93) are aggregation- and shuffle-join-intensive queries that convert cleanly to GpuHashAggregate and GpuBroadcastHashJoin.
With RAPIDS 26.04.2, the following query showcases a workload pattern where CPU was faster:
| Query | CPU time | GPU time | Ratio | Root cause |
| q16 | 0.96s | 1.44s | CPU 1.5x faster | Trivial/near-empty scan. Sub-second runtime where GPU kernel-launch overhead is not amortized |
| Instance | Best for | Summary |
| g7.4xlarge (RTX PRO GPU) | Fastest and most cost-effective | Up to 3.7× faster than comparable CPU instances and up to 31% cheaper per run. Completes in 4.7 min compared to 17.2 min. Best choice for both speed and cost efficiency. |
| CPU instances (m8a / m8id / m9gd) | Flexibility, availability, and always-on workloads | Multiple architecture options deliver similar Spark SQL performance. Choose CPU when GPUs are unavailable, when clusters need to remain running continuously (for example, overnight jobs ready for next-day analysis), or when workloads cannot use GPU acceleration. CPU instances offer broad availability and predictable capacity without startup delays. |
G7 instances require a G-instance vCPU service quota in your account (default is often 0 for GPU types). Request a quota increase through the Service Quotas console, or use On-Demand Capacity Reservations (ODCRs) to guarantee availability for recurring batch jobs.
Based on these benchmark results, consider evaluating GPU acceleration for your own Apache Spark workloads. Start by identifying compute-intensive operations in your current pipelines, particularly those involving large-scale aggregations, joins, or machine learning feature engineering that could benefit from the performance improvements demonstrated here.
Amazon EMR on EKS with NVIDIA RTX PRO 4500 together provide a meaningful step forward for teams running data-intensive Spark workloads at scale. Whether you’re building ML pipelines that demand rapid feature iteration, running complex ETL transformations across massive datasets, or powering real-time analytics that can’t afford to wait on slow batch jobs, GPU-accelerated Spark on G7 delivers the performance and speed to do more. As data and AI workloads continue to evolve, GPU-accelerated analytics on Amazon EMR is becoming the foundation for data teams. Get started with GPU-accelerated Spark on Amazon EMR on EKS today by visiting Amazon EMR documentation to launch your first G7-powered cluster and see the performance gains for yourself.