On 14 April, the Trump administration quietly acknowledged the widespread use of AI to automate government processes. The office of management and budget (OMB) disclosed a staggering 3,611 active or planned use cases for AI across the federal government. The list has ballooned by 70% from the one published in the final year of the Biden administration, and includes many disturbing-seeming plans to hand over sensitive governmental functions to AI.
Scanning this list, many readers may find many causes for alarm. It represents a transfer of decision processes from human to machine on a massive scale over matters of individual freedom, public health and well-being, nuclear reactor safety and more.
Consider these examples. The Health and Human Services’ (HHS) office of administration for children and families hired the world’s “scariest AI company,” Palantir—notorious for its work on behalf of the military, the CIA and ICE—to scan all grant applications to flag those not ideologically aligned with the administration’s dictates. The Federal Bureau of Prisons is developing an AI system to assess the “potential for misconduct for newly admitted inmates,” routing people into high-security confinement before they have actually done anything wrong in their custody. These read like programs fit for a Philip K Dick or George Orwell novel.
Other use cases insert AI into life-and-death decision making. The Department of Veterans Affairs is developing an AI that will listen in on calls to the veterans crisis line, and then gather information from external databases to assess the mental state and suicide risk of the caller.
The Department of Energy is testing the use of AI to control nuclear reactors, targeting a way to autonomously respond to potential nuclear safety incidents. Here’s one that’s disturbing for its retirement, rather than its deployment: the state department has ended a program to use AI to forecast mass civilian killings, which had been intended to aid conflict prevention.
While it’s easy to raise questions about these and similar uses of AI, the reality is that any of these programs could be implemented responsibly. In some cases, like the HHS system, the AI might be enforcing alignment to a policy prescription that opponents abhor. But that concern is more about the policy itself rather than the idea that agencies should comply with executive orders.
In other cases, there may even be bipartisan agreement on the goal, like taking urgent action to help veterans at risk of self-harm. Lots of work and validation is needed to prove AI safe and effective for these use cases and convince the public it is appropriate, but the idea is plausible.
In other cases, a scary-sounding AI use may not even be new. The use of predictive methods and statistics to assign prisoner security classifications goes back decades, even if such systems are often biased and ineffective.
Using autonomous systems for model predictive control (MPC) of nuclear reactors is a well studied, and a widely applied aspect of nuclear plant management. And the recently disclosed addition of AI was initiated under the Biden administration.
But anyone reviewing the 2025 inventory could be forgiven for leaping to severe conclusions. What matters are the details of how the AI system is used, and here the inventory is severely lacking.
The disclosures carry minimal information, and lack the context necessary to understand their purpose and approach. The descriptions are typically just a sentence, and rarely more than a paragraph.
And while the process theoretically involves some form of public consultation, in reality there is generally none. It would take an eagle-eyed citizen to even come across this disclosure. Unless you read FedScoop regularly, or watch the OMB’s federal chief information officer’s GitHub account, you probably missed it.
Only one of the examples cited above (the DoJ) even proposes to involve the public. Under the administration’s policy, it’s not required for the rest because they are not classified as “high impact” use cases—a label that is applied inconsistently across agencies.
We wrote a book surveying applications of AI to democratic processes worldwide, including executive agencies as well as the courts, legislatures and politics. Our conclusion was that, while there are inappropriate applications of AI in governance that should be resisted, an urgent need to reform the economics of AI, and an imperative for renovating the democratic systems it is being unleashed on, there are also valuable and beneficial use cases for AI in government.
Machine translation is a good example. Customs and Border Protection (CBP) has deployed an AI translation system to help officers when human interpreters are not available. The idea that CBP, an agency under heavy scrutiny for reported abuses of human rights, would direct people to talk to a machine instead of a person may strike many as inhumane.
It’s true that human interpreters have very real advantages when it comes to understanding nuance from physical cues and social context. But an officer with a competent AI translator available immediately is better than one who cannot communicate with the person in front of them.
The Trump administration’s AI use case inventory has 70 such translation use cases, up from 58 in the Biden administration’s 2024 disclosure.
Disclosure of AI use cases could be a means to build public confidence and trust, but only if paired with consistent, meaningful public consultation. Washington DC and California are actively engaging the public to determine where and how it’s appropriate to use AI in government processes, or for government to regulate AI use in society.
Both have held public deliberations on this topic at a wide scale, using AI platforms. These examples demonstrate the potential for capturing broad-based public input to steer AI policy.
The international gold standard was arguably set by the French in 2016, via their Digital Republic Act. The law, itself informed by an online citizen consultation, requires all algorithms used to automate government administrative decisions to be subject to public records requests, to be appealable to a human reviewer, and to have mandatory notification of the use of automation to those affected by the decisions.
Canada offers another example of what more rigorous and participatory disclosure might look like. In 2025, they launched an AI use case registry, not unlike the US inventory. However, Canada also has a federal directive mandating a transparent risk-scoring and impact assessment process for automated systems that make administrative decisions about citizens.
That longstanding directive requires a detailed explanation of risks and benefits as well as consultation with certain stakeholders from the conception of the AI use case. The Canadian system could be improved; it could require a public comment period and an obligation for agencies to respond substantively to feedback before engaging in sensitive uses of AI.
AI offers real potential to improve the efficacy, efficiency and accessibility of government. But, equally, there is legitimate reason for public concern and distrust that can only be addressed through transparency and dialog. The US should adopt, at the federal and state level, algorithmic impact risk assessment procedures and public comment processes to facilitate a safe, trusted, equitable transformation of government agencies to take advantage of modern technology.
This essay was written with Nathan E. Sanders, and originally appeared in The Guardian.
Вчера кабинетът обяви Сигма – инструмент за разглеждане на обществените поръчки. Прегледах какво показва, прегледах кода. Похвално е, че публикуват такъв портал, че е с отворен код, че е описана доста добре методологията и използва отворени данни. Взимат пример поне частично от служебния кабинет.
Трябва да се уточни обаче, че това не е нищо ново или различно. Всъщност, има редица такива портали конкретно за обществени поръчки. Преди години BIRD пуснаха търсачка за такива свързана с данните от търговския регистър и десетина други. Дори на картата ми със застрояването на София съм включил данни от обществени поръчки свързани с конкретни физически обекти и имоти. Такива портали за изследване на данни или dashboards правя от 15 години, а в последните две години аналогични със същата сложност виждаме да се правят от ученици и студенти за 1-2 седмици използвайки AI инструменти за генериране на код. И не, Сигма поне на този етап не използва никакъв изкуствен интелект да анализира поръчките – написан е просто с AI генератор.
780 обществени поръчки от последните 10 години, които споменават имоти в София
Разликата тук е, че е официален държавен dashboard по подобие на няколкото, които служебния кабинет публикува за кратко за парите на АПИ, данните от натовареността на пътищата и други.
По-важното обаче е, че със Сигма правителството не публикува нови отворени данни. Разчита изцяло на това, което от години има в портала за обществени поръчки. Да, по-прегледно е, но на много други места също е прегледно. Месеци по-рано видяхме осветлени договори за стотици милиони крити до тогава, масиви с огромна стойност за обществото като данните за времето и от енергийната система. Тук кабинета не отваря и не изсветлява нищо ново.
В този смисъл, може да сравним Сигма с картата за катастрофите по пътищата, но онази на МВР. Излезе първо Черна писта и после МВР реши да пусне някаква своя. Да се надяваме поне, че този път няма да заключат данните за обществените поръчки както направиха с катастрофите отказвайки изведнъж по-детайлни справки по ЗДОИ.
Сигма е добър ПР ход и по принцип полезен инструмент. Не бих се учудил, ако до края на седмицата видим още няколко дори по-добри от ученици, каквито виждаме всяка седмица с различни публични данни.
Бих се учудил, ако правителството публикува повече отворени данни и бъде прозрачно за нещата, които говори. Не, не трябва време – видяхме как служебния кабинет го прави за дни и седмици.
Ето няколко идеи – имат на масата проект за регистъра по ЗУТ, с които ще се изсветли много сектора и измами като тази в Баба Алино ще станат много по-трудни. Само трябва да го подпишат. Могат лесно да отменят и промените ограничаващи достъпа до нотариалните актове, които се видя, че само защитават корумпирани нотариуси и политици. Могат да затворят дупката за точене на НЗОК през прескъпите лекарства и да улеснят гражданите да разбират, че лекари и болници ги използват за измама. Лесни стъпки, които до сега коалицията НН спъваше.
Всяка от тези точки и много други идват с много данни. Подобни dashboards като Сигма се правят лесно. Данните са ни нужни. Нека най-напред спрат да ги отказват.
Today, we’re announcing a new metadata capability for Amazon Simple Storage Service (Amazon S3) called annotations, enabling you to attach rich, large-scale business context directly to your objects. You can store up to 1,000 named annotations per object, each up to 1 MB in size, totaling up to 1 GB per object, in flexible formats like JSON, XML, YAML, or plain text. You can modify or delete an annotation at any time, without re-writing your objects, making it easy to keep your object context current.
Organizations are building AI agents and autonomous workflows that need to find, understand, and act on data without human intervention. To support these agentic workflows, you need metadata that can evolve alongside the data, scale to petabytes of objects, and remain queryable without expensive retrieval.
With S3 annotations, you can store context such as AI-generated transcripts, content ratings, or technical specifications directly alongside your objects. Your context moves automatically with the object during copy, replication, and cross-region transfers, and S3 removes it when you delete the object. When you enable S3 Metadata, annotations automatically flow into fully managed annotation tables that you can query with Amazon Athena and other analytics engines.
Common use cases Annotations solve complex metadata challenges across industries:
Media & Entertainment: Track transcripts, content moderation results, subtitle files, and licensing metadata as separate annotations on video assets, eliminating the need to synchronize metadata across multiple media asset management systems.
Financial Services: Attach AI-generated investment summaries and sentiment analysis to research documents, enabling autonomous research agents to discover relevant datasets through natural-language queries without maintaining separate metadata databases.
Life Sciences: Annotate clinical trial data with regulatory status, patient cohort details, and approval chains, making compliance audits faster while keeping full context accessible for archived data in Amazon S3 Glacier storage classes without retrieval charges.
How annotations address metadata challenges Amazon S3 already supports several ways to describe your objects. System-defined metadata captures properties like size and storage class. Object tags support operational tasks like access control and lifecycle management. User-defined metadata lets you add small amounts of custom information at upload time.
While these capabilities work well for their intended purposes, they have limitations when you need to attach much richer context without building and maintaining separate metadata systems. Annotations address these needs by providing metadata capabilities at a fundamentally different scale and flexibility, offering mutable, queryable context per object compared to 10 immutable tags or 2 KB of headers.
Rich business context (JSON, XML, YAML, plain text)
Today, metadata describing S3 objects often lives in separate databases or sidecar files, requiring complex synchronization workflows that can exceed data storage costs. When you enable S3 Metadata annotation tables, this context becomes queryable at scale through Amazon Athena. AI agents can discover your data through natural language with the S3 Tables MCP server, which provides a standardized interface for AI models to query your annotations. You can query annotations for objects in any storage class, without restoring the objects or paying retrieval charges.
Getting started with annotations To start using annotations, make sure your AWS Identity and Access Management (IAM) policy or bucket policy grants permissions for the s3:PutObjectAnnotation and s3:GetObjectAnnotation actions. You can then add annotations to any existing or new S3 object using the PutObjectAnnotation API.
For example, a media company can attach technical specifications and AI-produced summaries to a video asset using the AWS Command Line Interface (AWS CLI):
# Create a JSON file with technical metadata
cat > mediainfo.json << 'EOF'
{"codec":"H.265","resolution":"3840x2160","audio_tracks":8,"frame_rate":29.97}
EOF

# Attach it as an annotation
aws s3api put-object-annotation \
  --bucket my-media-bucket \
  --key videos/documentary-2026.mp4 \
  --annotation-name mediainfo \
  --annotation-payload ./mediainfo.json
# Attach a plain-text AI-generated summary as a separate annotation
echo "A 90-minute nature documentary covering wildlife migration patterns across three continents, featuring aerial footage and underwater sequences. Languages: English, Spanish, Portuguese." > ai_summary.txt

aws s3api put-object-annotation \
  --bucket my-media-bucket \
  --key videos/documentary-2026.mp4 \
  --annotation-name ai_summary \
  --annotation-payload ./ai_summary.txt
These commands attach two separate annotations to the same video object. The mediainfo annotation stores structured technical specifications as JSON, while the ai_summary annotation stores a text description. Each annotation is identified by a unique name, and you can read and modify each one independently. With unique names for each annotation, you can use different annotations to support multiple concurrent enrichment workflows, for example, one team adding technical metadata while another team adds content classifications, without interfering with each other.
Retrieve a specific annotation using the GetObjectAnnotation API:
You can update an existing annotation at any time by calling PutObjectAnnotation again with the same annotation name. For large objects uploaded using multipart upload, attach annotations after completing the multipart upload using the PutObjectAnnotation API.
Querying annotations at scale with S3 Metadata tables Attaching annotations to individual objects is useful, but the real power comes when you query across all your annotations at scale. When you enable S3 Metadata annotation tables on your bucket, S3 automatically indexes your annotations into a fully managed Apache Iceberg table, called an annotation table. You can query annotation tables with Amazon Athena or any Iceberg-compatible engine.
To enable annotation tables, use the S3 console or the CreateBucketMetadataConfiguration API. The following example creates a new metadata configuration with annotation tables enabled while keeping journal tables for change tracking and disabling the live inventory table:
This configuration tells S3 to automatically capture all your annotations in a queryable table. Once applied, any annotation you attach to objects in this bucket will appear in the table within approximately one hour.
If the bucket already has a metadata configuration, use the UpdateBucketMetadataAnnotationTableConfiguration API:
Once enabled, your annotations automatically flow into the annotation table. Journal tables update in near real time, while annotation tables refresh within an hour. Unlike traditional metadata tables that require predefined schemas, annotation tables automatically adapt to any JSON, XML, or YAML structure you write. Each annotation becomes a row in the table with its content stored in a text_value column, letting you query across all annotations without schema migrations.
If you enable annotation tables on a bucket that already has annotated objects, S3 automatically backfills existing annotations into the table. The backfill process runs in the background and can take several hours to days depending on the number of objects.
For example, to find all video assets with more than 8 audio tracks across your entire bucket using Amazon Athena:
SELECT DISTINCT bucket, object_key
FROM "s3tablescatalog/aws-s3"."b_my_media_bucket"."annotation"
WHERE name = 'mediainfo'
AND CAST(json_extract_scalar(text_value, '$.audio_tracks') AS INTEGER) > 8
This query scans the annotation table for all annotations named mediainfo, extracts the audio_tracks field from the JSON content, and returns objects where the count exceeds 8.
Or to find all objects that received new annotations in the last 24 hours through the journal table:
SELECT bucket, key, version_id, record_timestamp, annotation.name
FROM "s3tablescatalog/aws-s3"."b_my_media_bucket"."journal"
WHERE record_timestamp >= (current_date - interval '1' day)
AND annotation.name IS NOT NULL
AND record_type IN ('CREATE_ANNOTATION', 'DELETE_ANNOTATION')
This query uses the journal table to track annotation changes in near real time, which is ideal for building event-driven workflows that respond to new or deleted annotations.
You can also use natural language to search objects by their annotations using agents in Amazon SageMaker Unified Studio or any IDE with the S3 Tables MCP server. For example, asking “find all PG-rated movies with Spanish subtitles from 2023” returns results in seconds instead of the hours it would take querying multiple disconnected systems.
Get started today You can start using Amazon S3 annotations today in all AWS Regions, including the AWS China Regions. Annotation tables are available in all AWS Regions where S3 Metadata is available.
Whether you’re building AI agents that need to discover data autonomously, managing petabytes of media assets with complex metadata, or tracking compliance context for archived datasets, annotations give you the scale and flexibility to attach rich metadata directly to your objects without managing separate systems.
Annotation storage is always billed at S3 Standard rates, even if the parent object is in S3 Glacier or another storage class. For full pricing details, visit the Amazon S3 pricing page.
… В Балтийско море има островче на име Маркет. Малко над 300 метра дълго, малко над 100 широко, 2 м над морето, необитаема гола скала. Разделена преди повече от 200 години с договор между Финландия и Швеция. През 1885 г. обаче Финландия построява на острова фар – мястото наоколо е опасно, засядали са десетки кораби годишно. Швеция ѝ отдава дължимата благодарност.
Но се оказва, че по погрешка фарът е построен от шведската страна на границата. Към 100 години проблемът е просто игнориран. Преди 40-тина години страните се споразумяват да преместят границата така, че фарът да е във финландската част, но никоя от тях да не изгуби територия и разделението на бреговата линия да не се промени (от него зависят правата за риболов наоколо). И в момента по тая 300 метра дълга и 100 метра широка скала минава близо 500 метра безумно криволичеща граница. Което не смущава нито шведи, нито финландци и на грам. Що да се косят за всъщност безумна дреболия?!
… Между Гренландия и Канада има подобно островче – остров Ханс. Също необитаема гола скала. И двете страни са го смятали за свой. В продължение на почти 40 години на него се води „война“, известна като „Войната на уискито“. По веднъж годишно делегация от едната от страните посещава острова, маха оттам флага на другата, поставя своя и оставя за делегацията от другата страна (която ще дойде след 6 месеца) бутилка канадско уиски или датски шнапс. На срещи дипломатите от двете страни се шегуват и веселят по повод „войната“ между тях, разменят си комични ноти, рекламират своя суверенитет в Google…
През 2005 г. се договарят да създадат комисия по темата. Която след почти 20 години работа – приоритетът на такава „война“ хич не е висок – постига договореност как точно да си поделят острова. Като резултат, светът остава без още една война – най-веселата и добродушна в историята на човечеството. А Канада и ЕС се сдобиват със сухоземна граница.
… Насред река Бидасоа, която разделя Франция и Испания, лежи Фазановият остров. Необитаем и без фазани. Но за сметка на това споделен между двете държави, още от 1659 г. Всяка го управлява по 6 месеца в годината, предават си го една на друга на церемониални тържества. До война за него, дори подобна на „войната на уискито“, никога не са стигали. Така или иначе островчето е природен резерват – нужно ли е хора да умират за него?!
(Весела подробност: според договора, с който е установено това споделяне, по време на френско управление той е под властта на вицекраля на Франция. И тъй като документът е международен и обвързващ, френският администратор, който отговаря за него 6 месеца годишно, се налага да носи за това време титлата вицекрал на Франция. Въпреки че тя е една от най-агресивно републиканските държави в света…)
… През 2000 г. в делтата на Дунав, точно между Румъния и Украйна, започва да се образува от наносите на реката ново островче. Румънците го кръщават остров К, украинците – Новая Земля. И двете държави претендират за него – с количество хумор, доста подобно на това около остров Ханс. През 2009 г. накрая се разбират да си го поделят. А междувременно островът непрекъснато се променя – реката ту ще го подяде отнякъде, ту ще остави нови наноси отдругаде… Към момента около 60% от територията му е украинска, около 40% – румънска. И това със сигурност ще се променя за в бъдеще. Но нито на румънците, нито на украинците им пука особено.
… В Холандия, точно до белгийската граница, е градчето Баарле-Насау. Отвъд границата срещу него е белгийското градче Баарле-Хертог; реално са един град. Границата между тях е безумна. В и около Баарле-Насау има 22 енклава, които принадлежат на Баарле-Хертог – белгийски енклави в Холандия. (В най-големия от тях пък има 6 холандски енклава; още 2 холандски енклава са вътре пък в два други белгийски енклава.) Отделно пък в Баарле-Хертог има енклави на Баарле-Насау – холандски в Белгия… Много неща в двата града са общи – библиотеката и т.н.
Границата минава през магазини, улици, дворове, къщи. Маркирана е, да е информиран туристът в коя държава е в момента. Ако границата минава през магазин, той е в държавата, където е входът за клиенти. (Качат ли ти данъците, си местиш вратата – и си в другата държава.) Ако минава през двор, той е в която държава е къщата. Ако минава през нея – в която държава е спалнята. Ако минава през нея – в която държава е леглото. Местиш си леглото една педя – и дворът и домът ти са вече в другата държава.) Познайте дали там има като у нас враждебна агентура, представяща се за националисти, великопатриоти и подобни, и опитваща се да накара местните холандци и белгийци да се мразят помежду си.
… Историята на Европа е пълна с ужаси. Кланета между държави, масови избивания, стогодишни войни – реки от кръв. Омрази между нации, които са нямали равни другаде. Но малко по малко този ад се успокоява и на негово място, постепенно и бавно, се създават търпимост, приятелство и усещане за едно цяло. Омразата между прусаци и баварци е минало – вече и едните, и другите са германци. Между бургундци и гасконци също – вече са французи… И до днес баварците често уреждат сватби в национални костюми, използват баварски диалект и прочее. Гасконците – също. Запазили са културата си, но са изгубили омразата си. Изхвърлили са злото, но са запазили ценното.
Малко по малко върви натам цяла Европа. Въпреки че враговете ѝ се съдират от желание да сеят омраза и неразбирателство в нея, за да могат да я поробят парче по парче. Вместо инструмент за отприщване на властници и поробване на обикновените хора, ЕС се оказа могъщ инструмент за свобода на хората и озаптяване на властниците. Границите в Европа стават все по-символични – пресичаме ги, често без да можем да различим къде точно минават. Точно както пътуваме през България, без да ни е грижа, че пресичаме границата между Търновското и Видинското царства. Не просто граничари ни позволяват да излезем или влезем някъде – граничари няма. Намаляваме скоростта на границата единствено заради остри завои или неравности по пътя.
Вече къде ли не по света – видях го с очите си преди дни в САЩ и в Турция – не питат дали паспортът ми е български, питат дали е европейски. И видят ли, че е, ме гледат с уважение. Да си европеец постепенно се превръща в най-уважаваната националност на света. Дори в държави, изстрадали в миналото много от европейците. Заслужаваме го вече не с железен юмрук и оръжие, а с помощ и подкрепа. Истински.
И това е съградено именно върху разбирателството и приятелството между европейските народи и държави. Успеем ли да се опазим от отровата на омразата, която Клавдиевци наливат в ушите ни докато спим, след поколение-две ще сме най-първо европейци. Ще пазим националностите, езиците и културите си, и ще се гордеем с тях. Но и ще знаем, че сме едно цяло, и че бъде ли малтретиран един от нас, го подкрепяме всички. Че нашето единство е нашата сила – и именно затова тези, които ни смятат за врагове и искат да им станем роби, правят всичко, за да го разрушат.
Че Европа не е съвършена и никога няма да бъде. Демокрациите винаги могат да се променят към още по-добро. Съвършени са диктатурите – те не могат. Точно както животът винаги е несъвършен, съвършена е само смъртта… И точно както нормалният човек избира живота пред смъртта, колкото и да е несъвършен, така избира и демокрацията пред „суверенната демокрация“, „патриотичната демокрация“ и другите видове диктатура.
Че химнът на Европа се нарича „Ода на радостта“, но истинското му име е „Ода на свободата“. Радостта може чудеса, но свободата е, повеят на чието крило прави хората братя. Тези, които преживяхме 10 ноември, го помним. Някои – с усещането, че всички околни са ни близки и искаме да им помагаме и да ги подкрепяме, че сме получили криле и сили да въплътим мечтите си. Други – с беса от гледката как ние си вярваме и се подкрепяме, с провала на мечтата им да ни поддържат безсилни, за да са ни господари.
(По това и ще ни различите. За нас 10 ноември е денят на свободата ни, когато получихме най-ценното ни – сила и достойнство. За другите е „банановден“ – денят на ненавистта им, когато изгубиха най-ценното си, свободата да отнемат нашата свобода.)
… Преди почти година си говорих в Холандия със специалист по AI от карибски (и очевидно и африкански) произход. Засегнахме и тези теми – и думите му бяха, по памет: „Ти си европеец просто защото си се родил тук. Аз съм европеец, защото съм избрал да бъда и съм положил огромни усилия, за да стана. Ти не знаеш колко по-малко нещо е да не си, аз го знам – знам по-добре от теб колко ценно и велико е да си. Ако Европа бъде нападната, колкото и да бързаш да се запишеш в армията й, аз ще се запиша преди теб. Защото знам по-добре от теб колко много ще изгубят децата ми, ако Европа бъде победена и направена на не-Европа.“
Мисля си – това е, което имаме нужда да разберем всички сега. Колко безценно е, че сме част от Европа. Какво всъщност целят тези, които искат да ни излъжат да се откажем от това. И защо не бива да им го позволяваме, за нищо на света.
In this blog post you’ll learn how to detect and prevent subdomain takeover – a tactic where threat actors exploit dangling DNS records to redirect traffic to attacker-controlled resources. We’ll explain the issue, how the situation arises, and how you can use various AWS features and services to help mitigate the impact of this tactic.
Under the shared responsibility model, securing configurations in the cloud is your responsibility. AWS supports you through strong defaults, guidance in the Security Pillar of the Well-Architected Framework, and security services to help you meet that responsibility. The AWS Customer Incident Response Team (AWS CIRT) also monitors for new and trending tactics that threat actors use to exploit specific customer configurations, so that you can make informed design decisions and improve your response plans.
AWS CIRT has observed threat actors actively scanning for public DNS CNAME records that point to resources that no longer exist, looking for subdomain takeover opportunities.
Note: The subdomain takeover tactic does not leverage vulnerabilities of AWS services. It exploits a dangling DNS record to redirect traffic to an attacker-controlled resource.
Quick DNS Primer
CNAME Records: A CNAME (Canonical Name) record is a DNS entry that points one domain name to another. For example, api.example.com can be configured to point to api.example.s3-website-us-east-1.amazonaws.com. This feature of DNS enables users to configure a memorable, human-friendly domain name while the actual resource lives at a longer, machine-generated AWS hostname. A security issue emerges when the target resource is deleted but the CNAME record pointing to it remains – creating a “dangling” record.
Dangling Records: When a resource (like an S3 bucket) is deleted but the DNS record pointing to it is left behind, that DNS record becomes “dangling”, pointing to a resource that no longer exists. For resources in globally shared namespaces, threat actors can potentially reclaim the name of your deleted resource and serve malicious content through your DNS record.
What is subdomain takeover?
A subdomain is a prefix added to a domain that allows you to organize access to your resources. A subdomain takeover occurs when you delete the underlying resource and a threat actor creates a new resource with the same name to take advantage of the DNS records still pointing to it.
A subdomain takeover is possible when a CNAME record points to an AWS resource that uses a globally shared DNS namespace where the resource name can be chosen by any AWS customer. The following AWS resources meet these criteria:
Amazon S3 (global namespace): Bucket names like mybucket.s3.amazonaws.com are globally unique and can be claimed by any account if the bucket is deleted. Note: S3 buckets created with account regional namespaces (launched March 2026) are scoped to your account and are not subject to this issue.
Amazon CloudFront: Distribution domain names like d111111abcdef8.cloudfront.net are assigned by AWS and cannot be chosen by an attacker. However, if you delete a distribution and another customer creates one that happens to receive the same domain name, a dangling CNAME could resolve to their content.
AWS Elastic Beanstalk: Environment names like myapp.elasticbeanstalk.com are globally unique and can be claimed by any account if the environment is terminated.
Resources like Amazon VPC, Amazon EC2 instances, or private hosted zones are not subject to this tactic because they do not expose globally claimable DNS namespaces.
You create a DNS CNAME record pointing to your S3 website endpoint. The subdomain subdomain.example.com now resolves to subdomain.example.s3-website-us-east-1.amazonaws.com, which serves content from the S3 bucket named subdomain.example. If your team deletes the bucket and forgets to delete the DNS record, users that navigate to the site will see an error stating that the bucket doesn’t exist. However, at this point, if a threat actor sees this error and moves in to claim the bucket name, they will be able to set up their own site that users will see when they navigate to the subdomain.example.com site.
Figure 1 shows an S3 bucket named subdomain.example (a globally unique bucket name) configured to host a static website, with the S3 website endpoint subdomain.example.s3-website-us-east-1.amazonaws.com.
Figure 1: S3 bucket configured as a static website
As shown in Figure 2, we use Amazon Route 53 to create a CNAME record to resolve to our Amazon domain name; to give users a friendly name and so they do not have to remember the long S3 website name in URLs.
Figure 2: DNS Resolver configured with CNAME record pointing to origin bucket
The customer’s AWS administrator decides to stop serving content from the S3 bucket and deletes it, as shown in Figure 3.
Figure 3: Resource deleted without removing the CNAME record
With the S3 bucket deleted and the CNAME record still in place, the DNS record is now dangling. A threat actor identifies this situation and creates a new S3 bucket with the same global name subdomain.example in an AWS account that the threat actor controls, as shown in Figure 4. The threat actor can now serve content from this new bucket, including potentially malicious content. End users remain unaware of this switch and continue to access subdomain.example.com, trusting the content because it appears to originate from a URL they recognize.
Figure 4: Subdomain takeover happens
Potential impacts of a sub-domain takeover
Consider these potential impacts:
Reputation risk: There is a potential risk to your organization’s reputation, because you don’t control the content being served from the threat actor’s site that your DNS record points to.
Potential exposure to phishing campaigns: Users within your organization might have the subdomain bookmarked in their browser, not knowing the resource is no longer available, then unsuspectingly navigate to the site that now hosts malware or is used to phish user credentials.
Blocking: If the subdomain is flagged by security vendors for malicious activity, it could impact your business operations.
Financial loss: Subdomain takeover incidents can result in a financial impact due to the potential disruption to service delivery as you deal with the event.
Proactive detection
AWS Config for proactive detection
For proactive detection, you can use AWS Config to continuously monitor your Route 53 CNAME records and verify that the target resources exist in your account.
Prerequisite: This approach requires AWS Config recorder to be enabled for the resource types you want to monitor (S3 buckets, CloudFront distributions, Elastic Beanstalk environments). If Config isn’t recording a resource type, it won’t appear in the inventory check. For more information, see Setting up AWS Config with the console.
Why use AWS Config inventory instead of DNS resolution checks?
A common approach is to check whether a CNAME resolves to a valid endpoint. However, this method has a critical flaw: if an attacker has already claimed the resource, DNS resolution will succeed – to their resource, not yours. You would have no indication that you don’t own what’s responding.
By querying AWS Config’s recorded configuration items, you’re checking whether the resource exists in your account inventory, not just whether something responds at that DNS name. This approach correctly identifies dangling CNAMEs even after a takeover has occurred.
Implementation approach:
Account-level vs. organization-level scope
The reference implementation queries AWS Config inventory within a single account. This means that if a CNAME record in Account A points to a resource that legitimately exists in Account B within the same AWS organization, the rule will flag it as NON_COMPLIANT.
For organizations that share resources across accounts, you can modify the solution to use an AWS Config Aggregator, which queries resource inventory across all accounts in your organization. This is similar to how IAM Access Analyzer supports both account-level and organization-level scopes. To use this approach, you need an organization-level Config Aggregator already configured, and the Lambda function’s IAM role needs the config:SelectAggregateResourceConfig permission.
We recommend starting with account-level scope for simplicity, then expanding to organization-level if your environment includes cross-account resource sharing.
The main idea is to create a custom AWS Config rule that queries your Route 53 hosted zones for CNAME records, then parses each CNAME target to determine whether it points to a known AWS resource pattern such as S3, CloudFront, or Elastic Beanstalk. For each match, the rule cross-references the target against your AWS Config inventory to verify that the resource actually exists in your account. If the resource isn’t found, the rule marks the CNAME record as NON_COMPLIANT, surfacing it for review.
The Config rule should focus on known AWS resource patterns:
Note: CNAME records pointing to external third-party services are outside the scope of this detection mechanism, as those resources won’t appear in your AWS Config inventory.
NON_COMPLIANT findings from your Config rule can be routed to AWS Security Hub for centralized visibility, or trigger SNS notifications to alert your security team.
Figure 5: Dangling DNS Detection Solution
Reference implementation:
We’ve published a complete implementation of this detection approach as an open-source solution. The solution deploys a Lambda function that discovers CNAME records across all your Route 53 hosted zones and uses pattern matching to identify targets pointing to S3, CloudFront, and Elastic Beanstalk. It then queries your AWS Config inventory to verify whether each target resource still exists in your account. When a dangling record is detected, the solution generates a HIGH severity finding in Security Hub and can optionally send SNS notifications to alert your security team. A CloudWatch metrics dashboard is also included for ongoing compliance tracking.
Deployment:
# Clone the repository
git clone https://github.com/aws-samples/sample-dangling-dns-detection
cd sample-dangling-dns-detection

# Build the Lambda deployment package
./scripts/package.sh

# Upload to S3
aws s3 cp dist/dangling-dns-detection.zip s3://YOUR_BUCKET/

# Deploy the CloudFormation stack
aws cloudformation deploy \
  --template-file infrastructure/template.yaml \
  --stack-name dangling-dns-detection \
  --parameter-overrides \
      LambdaCodeS3Bucket=YOUR_BUCKET \
      EvaluationFrequency=TwentyFour_Hours \
  --capabilities CAPABILITY_NAMED_IAM
The stack creates an AWS Config custom rule that runs on your specified schedule (default: every 24 hours), evaluating all CNAME records and reporting compliance status.
Mitigating the effects
Mitigating subdomain takeover requires both preventive procedures and responsive capabilities.
Prevention: Standard operating procedure
The most effective mitigation is a standard operating procedure for resource deprovisioning that ensures DNS records are removed before the underlying resource:
Within your DNS zone, delete the CNAME record that points to the fully qualified domain name (FQDN) of the resource that you plan to deprovision.
Wait for the DNS TTL to expire before deleting the resource. DNS resolvers cache records for the duration of the TTL (for example, a TTL of 3600 means resolvers may serve the old record for up to one hour). If you delete the resource before the TTL expires, a threat actor could claim the resource name while cached CNAME entries are still directing traffic to it.
Deprovision the resource that you no longer want to use.
Run a DNS check of the CNAME record that you removed to verify that the resource is no longer resolving.
Key principle: Always delete DNS first, wait for the TTL to expire, then delete the resource. This order eliminates the window where a dangling record could be exploited.
Prevention: S3 account regional namespaces
As mentioned earlier, AWS introduced account regional namespaces for Amazon S3 general purpose buckets in March 2026. While this is a meaningful step toward mitigating the S3-specific takeover vector, there are important operational limitations to be aware of:
Existing buckets are unaffected. Buckets already created in the global namespace cannot be migrated to an account regional namespace. The bucket names remain globally unique and claimable by anyone if the bucket is deleted.
Global namespace is still the default. When creating a new bucket through the console, CLI, or SDK, the global namespace remains the default selection. Users who aren’t aware of the new option will continue creating globally-scoped buckets.
Existing IaC templates require updates. Existing infrastructure-as-code templates (CloudFormation, CDK, Terraform) that don’t explicitly opt in to the account regional namespace will continue provisioning buckets in the global namespace. For CloudFormation, this means setting the BucketNamespace property to account-regional. For other IaC tools, consult their documentation for the equivalent configuration. Organizations need to audit and update their templates to opt in.
For these reasons, the dangling DNS detection approach described in this post remains critical – particularly for organizations with existing S3 infrastructure, and for CloudFront, and Elastic Beanstalk resources where no equivalent namespace scoping exists.
Response: Notification and remediation
When a dangling DNS record is detected, the reference solution described in the Detection section automatically creates a HIGH severity finding in AWS Security Hub and reports the CNAME record as NON_COMPLIANT in AWS Config. If you provide an SNS topic ARN during deployment, the solution also sends notifications to alert your security or operations team via email, Slack, or other channels. For production environments, consider a human-in-the-loop workflow where these notifications are reviewed by a team member who approves the DNS record deletion before it’s executed. This prevents accidental deletion of legitimate records during transient issues.
The reference solution also includes a CloudWatch dashboard for tracking compliance status and evaluation metrics over time, giving your team ongoing visibility into DNS health across your hosted zones.
Note: Fully automated remediation (auto-deleting DNS records) carries risk – a false positive could disrupt legitimate services. We recommend starting with detection and notification, then evaluating automation based on your detection accuracy and operational maturity.
Conclusion
Subdomain takeover is a preventable misconfiguration that can have significant impact on your organization. A layered defense approach provides the best protection:
Prevention: Implement a standard operating procedure that deletes DNS records before deprovisioning the underlying resource.
Detection: Use AWS Config custom rules to proactively identify CNAME records pointing to resources that no longer exist in your account.
Response: Configure notifications through SNS or Security Hub so your team can respond quickly when dangling records are detected.
Monitoring: Maintain ongoing visibility through CloudWatch dashboards to track DNS health and compliance status.
The key insight is that good DNS hygiene – knowing when your CNAME records point to a nonexistent resource – is your first line of defense. Automated detection through AWS Config provides a safety net when operational procedures fail. And if you detect an issue, having a playbook ready to enact your response can lower the impact and your mean time to recovery.
If you have feedback about this post, submit comments in the Comments section below.
AI coding assistants are transforming software development, but data engineering presents unique challenges: governed data access, shared compute environments, and compliance controls that are designed to remain in place. How do you bring the power of agentic AI development into a governed data environment? With the AWS Toolkit for Visual Studio Code, you can connect Kiro, VS Code, or Cursor directly to Amazon SageMaker Unified Studio.
When you connect your editor to a SageMaker Unified Studio Space (a cloud-based compute environment inside your project), you get AI-assisted development with your preferred tools while your data governance, project permissions, and compute are managed by SageMaker Unified Studio. Additionally, SageMaker Unified Studio automatically generates steering files (like AGENTS.md) that provide your AI assistant with context about your project environment, so it understands your data and project configuration from the first prompt.
This post demonstrates the integration using Kiro. The same Remote Access connection works with VS Code and Cursor. The post starts by showing what you can do with this integration: using natural language to explore and analyze data in a governed environment. We then walk through the setup so you can try it yourself.
What’s new
With the AWS Toolkit, you can connect Kiro, VS Code, and Cursor to your SageMaker Space over a secure SSH tunnel. No additional extensions or SSH key management required. After the connection is established, your IDE has full access to your Space’s file system, compute, and data services.
Two capabilities make this especially powerful for data work:
Automatic AI steering – When connecting Kiro to SageMaker Unified Studio, Kiro generates AGENTS.md and smus-context.md files that provide your AI assistant with context about your environment, including project configuration, environment details, and utilities for discovering your data catalog and project structure. Kiro detects these files automatically; other editors can use them as context for their own AI features.
MCP server support – have Kiro discover and configure itself for the Model Context Protocol servers on your remote SageMaker space ( like smus_local and aws-dataprocessing) to give your agent direct access to your AWS Glue Data Catalog, Amazon Athena queries, and SageMaker Unified Studio project metadata.
The following diagram shows how the components connect:
Architecture diagram: How the components connect
See it in action: AI-assisted development with governed data
Before walking through the setup, we explain what you can do with this integration. This walkthrough uses Kiro as the editor. With Kiro connected to a SageMaker Unified Studio Space, MCP servers configured, and steering documents in place, we can use natural language to explore data and build analytics. The AI assistant has all the context it needs to do this well.
Note: Agentic AI output is nondeterministic. The exact code, tool choices, and responses Kiro produces will vary between sessions, even with the same prompt. The following walkthrough shows one representative session. Your experience will differ in the specifics, but the patterns and capabilities demonstrated here are consistent.
Step 1: Explore the data
Start with a simple prompt:
show my databases and the tables I have access to
Even with native MCP tools available, Kiro often prefers the AWS Command Line Interface (AWS CLI) and bash to retrieve information. This is expected and typically does not affect the outcome. If you prefer MCP tools for every operation, you can add that preference to a steering document.
Kiro used the sagemaker_studio SDK to discover the catalog:
python3 -c "
from sagemaker_studio import Project
project = Project()
conn = project.connection()
catalog = conn.catalog()
print('Databases:')
for db in catalog.databases:
    print(f'  - {db.name}')
"
Databases:
  - default
  - sagemaker_sample_db
Then it drilled into the table schema:
python3 -c "
from sagemaker_studio import Project
project = Project()
conn = project.connection()
catalog = conn.catalog()
db = catalog.database('sagemaker_sample_db')
print('Tables in sagemaker_sample_db:')
for t in db.tables:
    print(f'  - {t.name}')
    print(f'    Columns: {[(c.name, c.type) for c in t.columns]}')
"
Kiro discovered the sagemaker_sample_db.churn dataset, a sample dataset that ships with SageMaker Unified Studio containing 10,000 rows and 21 columns of customer churn data (state, account length, call minutes, service calls, churn flag, and more). Notice that we did not write any of this code. We asked a question in natural language, and Kiro chose the right SDK calls, explored the catalog, and surfaced the results.
Another, more natural way to get the same answer is to ask directly. Prompting “Let us sample the churn table.” yields the same catalog paths and schema output, along with additional metrics like row count and a data sample, all from a single conversational prompt:
Figure 1 — The sagemaker_sample_db.churn dataset in the catalog
Figure 2 — Churn dataset schema with 21 columns
from sagemaker_studio import sqlutils
result = sqlutils.sql(
    'SELECT COUNT(*) AS total_rows FROM sagemaker_sample_db.churn',
    connection_name='default.sql'
)
print('=== Total Row Count ===')
print(result)
=== Total Row Count ===
   total_rows
0       10000
With the schema and row count in hand, Kiro sampled the data to round out its understanding of the dataset:
Figure 3 — Comprehensive data sample after Kiro catalog exploration
Step 2: Run analytics with full context
With the data explored, ask Kiro to run a data quality evaluation:
Can we run basic statistical evaluations for data quality?
Because Kiro had already explored the catalog and sampled the data, it made smart choices about how to run the analysis. Instead of using PySpark for this 10,000-row table, Kiro used Athena using sqlutils to run the evaluation directly. It produced a thorough data quality report:
10,000 rows, 21 columns, zero nulls across all columns. Clean on that front.
5,000 duplicate rows (50 percent). Significant, worth investigating before modeling.
Outliers minimal. Most columns have less than 1 percent outlier rate by IQR.
Clear signal in key features. Churners and non-churners show differences in day_mins (7.52 vs. 3.52), eve_mins (5.95 vs. 4.11), and vmail_message (175 vs. 278).
State distribution roughly uniform (~2% each), intl_plan and vmail_plan near 50/50.
The key insight here is what Kiro did not do. It did not default to PySpark because the environment supports Spark. Having explored the data first, understanding the table size, column types, and that churn is a proper Boolean (not a string), Kiro independently chose the right engine for the workload and produced correct analytics on the first pass.
Best practice: Explore first, code second
Start every AI-assisted development session with data exploration. Ask your AI assistant to discover your catalog, sample your tables, and understand the schema before asking it to build anything. This single step helps reduce a common source of errors in AI-assisted data work: the LLM making assumptions about data it has not seen.
Exploring your data gives the large language model (LLM) the context it needs to properly help with your project. It saves hallucinations and rework, results in faster development time, and reduces token costs.
Ready to try it yourself? The following sections walk through the full setup: prerequisites, connecting your editor to your SageMaker Space, configuring MCP servers, and working with notebooks.
Prerequisites
Before you begin, make sure you have the following:
A SageMaker Unified Studio domain and project with at least one project that has a compute environment provisioned (Tooling or ToolingLight). These should come standard with every SageMaker project except those provisioned with the SQL & Gen AI blueprints. If you need to set up SageMaker Unified Studio, see Getting started with Amazon SageMaker Unified Studio.
A Space with Remote Access enabled. Either a JupyterLab or Code Editor Space works. The instance must have at least 8 GiB of memory (for example, ml.t3.large or larger). The default ml.t3.medium (4 GiB) can’t enable Remote Access. You must upgrade the instance type first, then toggle Remote Access to Enabled in the Configure Space dialog.
A VS Code-compatible editor. Kiro, VS Code, Cursor, or another VS Code-based IDE installed on your local machine. This walkthrough uses Kiro, but the Remote Access connection has been tested with VS Code and Cursor as well.
AWS Toolkit v4.1.0 or later. Kiro ships with the AWS Toolkit pre-installed. For VS Code and Cursor, install the AWS Toolkit extension and verify your version is 4.1.0 or later (Cmd+Shift+X and search for “AWS Toolkit”).
AWS credentials. You must be authenticated in the SageMaker Unified Studio panel of the AWS Toolkit with the same identity (AWS IAM Identity Center or AWS Identity and Access Management (IAM)) that you use to access SageMaker Unified Studio in the browser.
Network connectivity. Your Space must have internet access (PublicInternetOnly mode, or virtual private cloud (VPC) with a NAT gateway or HTTP proxy that allows VS Code and Open VSX endpoints).
The following screenshots show the SageMaker Unified Studio portal and the Configure Space dialog. Navigate to your project, select your Space, and verify the configuration. Remote Access is disabled when the instance has less than 8 GiB of memory. Select an instance with at least 8 GiB, such as ml.t3.large, then enable Remote Access. This is a one-time configuration per Space.
Figure 4 — SMUS project Spaces overview in the portal
Figure 5 — Configure Space dialog showing instance type selection
Figure 6 — Enabling Remote Access on a Space with 8 GiB or more
Connecting your editor to your SageMaker Space
There are two ways to connect: directly from the SageMaker Unified Studio portal, or from your local IDE using the AWS Toolkit.
Method 1: Connect from the SageMaker Unified Studio portal
To launch your IDE directly from the portal, navigate to your project’s Code Spaces page, find your Space, and choose Open in to select your editor (Kiro, VS Code, or Cursor):
Figure 7 — Open in Local IDE from the Code Spaces list
You can also launch from within a Space’s details page:
Figure 8 — Open in Local IDE from the Space details page
Or from within the JupyterLab or Code Editor browser environment:
Figure 9 — Open in Local IDE from JupyterLab
Your browser will prompt you to allow opening the IDE. Confirm, and the editor launches with an SSH connection to your Space already established via the AWS Toolkit. No additional configuration is typically required.
Method 2: Connect from your IDE via the AWS Toolkit
Open your editor on your local machine. Then, in the AWS Toolkit panel, choose Sign in. Authenticate with your IAM Identity Center or IAM credentials, the same identity you use to access SageMaker Unified Studio in the browser. The following screenshots show Kiro, but the steps are the same in VS Code and Cursor. Figure 10 — AWS Toolkit button in Kiro
Figure 11 — AWS Toolkit panel expanded
Figure 12 — AWS Toolkit Sign in dialog
Choose your AWS profile. You must have a profile configured in the AWS CLI with the correct account and AWS Region set.
In the Toolkit panel, browse your SageMaker Unified Studio domains and projects. Select the project that you want to work in.
Figure 13 — Browsing SMUS domains and projects in Kiro
Important: The credentials that you use in the AWS Toolkit must match the identity that you use in the SageMaker Unified Studio portal. The Toolkit validates that your identity has access to the Space.
AI steering: How SageMaker Unified Studio pre-seeds AI context
The real value of the feature comes from what you don’t need to do. When connected to Kiro SageMaker Unified Studio automatically generates steering files that guide your AI assistant with project context, so you can focus on building analytics rather than configuring connections. When you open a SageMaker Unified Studio project, SageMaker Unified Studio presents a prompt to create steering files: an AGENTS.md file that references a newly created smus-context.md. These files provide context about your project environment, such as project configuration, environment details, and utilities for discovering your data catalog and project structure. Kiro detects and applies these files automatically; in other editors, you can reference them as context for your AI features.
Figure 14 — SMUS popup offering to create steering files
Figure 15 — Generated AGENTS.md and smus-context.md steering files
Without these steering files, your AI assistant would need several back-and-forth prompts to discover what data you have and how to access it. With them, the assistant understands your project from the first prompt: how to discover your databases, how your environment is configured, and what tools are available. The steering files also help properly configure MCP servers, which you set up in the next section.
Exploring your project
After you’re connected, the project structure expands into Data and Compute sections in the sidebar, as it would in the SageMaker Unified Studio portal.
Figure 16 — Project Data and Compute sections in the Kiro sidebar
You can explore your data catalog and S3 buckets directly from the sidebar:
Figure 17 — Exploring the data catalog and S3 buckets from the sidebar
You can also remote into a compatible Space for direct development. Hover over a Space and select the remote icon on the right:
Figure 18 — Remote connection icon on a compatible Space
After a moment, the Space opens in a new Kiro window:
Figure 19 — Space opened in a new Kiro window
You must sign in again, and then trust the authors of the files in the Space:
Figure 20 — Trust authors dialog for the Space files
You’re now connected to your Space. The Toolkit works on the Space the way it does locally, except the resources are scoped to the project’s permissions.
Figure 21 — Connected to the SMUS Space with the Toolkit active
Setting up MCP servers
Before you can use AI-assisted development effectively, you must give Kiro access to your data services through Model Context Protocol (MCP) servers. MCP servers extend the Kiro agent with tools: the ability to query catalogs, run SQL, manage credentials, and more.
Out of the box, Kiro has no MCP servers configured:
Figure 22 — Kiro MCP servers panel with no servers configured
Prompt Kiro to find and configure the MCP servers that ship pre-installed on your SageMaker Space. Using the steering file context, Kiro located the servers and generated the configuration. If a server fails to connect, select the failed entry and Kiro will suggest fixes. You might need additional prompts to get the smus_spark_upgrade server (a pre-installed MCP server for managing Spark session upgrades) working correctly.
Figure 23 — Kiro discovering and configuring SMUS MCP servers
Figure 24 — MCP servers after iterating on configuration fixes
For more deterministic results, you can also configure the MCP servers manually. Here is a sample configuration:
Note: Your MCP configuration might vary depending on your SageMaker Unified Studio environment. Use the preceding configuration as a starting point and let your editor adjust if a server fails to connect.
Next, add the AWS Data Processing MCP server to get catalog information and Athena query capabilities. This isn’t strictly required (Kiro can use Python or AWS CLI for the same tasks), but it gives the agent native tools for catalog and query operations.
Figure 25 — AWS Data Processing MCP server tools with Amazon EMR tools disabled
You can list the tools that each MCP server provides. Because the AWS Data Processing MCP server includes tools for many services, we recommend disabling tools that you don’t need for a given project to save model context. For this walkthrough, disable the Amazon EMR tools to focus on AWS Glue and Amazon Athena.
Exploring data with notebooks
Kiro supports Jupyter notebooks in your SageMaker Space with the same language and connection selectors that you would find in SageMaker JupyterLab or Code Editor. Open the command palette (Cmd+Shift+P) and create a new Jupyter notebook:
Figure 26 — Command palette to create a new Jupyter notebook
Figure 27 — New Jupyter notebook opened in Kiro with language and connection selectors in a notebook cell
As in SageMaker JupyterLab, you get language and connection selectors in the bottom right of each cell. Choose the connection selector to see your available connections:
Figure 28 — SageMaker connection selector
Select PySpark to fill in the magic commands for your cell. Write your code (in this case, enter spark and press Shift+Enter) to verify the session starts:
Figure 29 — PySpark magic command and spark verification code
Figure 30 — Running the PySpark cell
If this is your first time using Jupyter with Kiro, you’re prompted to install the Jupyter extension. After it’s installed, select the kernel from Python Environments → Base:
Figure 31 — Jupyter kernel selection prompt
Figure 32 — Selecting the Python kernel from the Base environment
Re-run your cell. After a few moments, AWS Glue provisions a PySpark session:
Figure 33 — AWS Glue provisioning a PySpark session in a Jupyter notebook in Kiro
You see results the way you would in JupyterLab in the SageMaker Unified Studio portal:
Figure 34 — PySpark code running in a Jupyter notebook in Kiro
The notebook generate button
You will notice a Generate button underneath notebook cells. Let’s test it with a simple prompt:
looking at the above cell for reference, show me the accounts where state = california
using pyspark prefixing the cell with `%%pyspark default.spark` and sorting by
account_length
Figure 35 — Using the Generate button with a natural language prompt
Figure 36 — Generated PySpark code from the prompt
This prompt builder, like other notebook generation features, doesn’t have good context on the surrounding cells. You must be explicit about what you want because it won’t read other code or cells as input.
While the Kiro notebook generate button works for straightforward edits, for serious code generation, we recommend that you use Kiro agent mode. This mode has full project and SageMaker context, as demonstrated in the “See it in action” walkthrough earlier in this post.
What’s happening under the hood
When you connect your editor to a SageMaker Unified Studio Space, the AWS Toolkit extension establishes a secure SSH tunnel between your local IDE and your cloud-based Space.
Key details:
SSH tunnel. The connection is managed entirely by the AWS Toolkit (v4.1.0+) or VS Code’s built-in SSH extension. No separate Remote SSH extension is needed; the capability is built in.
File system access. Your editor sees the Space’s persistent storage at /home/sagemaker-user/, including shared project files and notebooks or scripts you create.
SageMaker Unified Studio steering context. The integration generates AGENTS.md and smus-context.md files that provide your AI assistant with context about your project environment and utilities for understanding your data. This is what makes the assistant effective from the first prompt.
MCP server integration. MCP servers like smus_local (for project metadata and environment utilities) and aws-dataprocessing (for AWS Glue Data Catalog and Amazon Athena) extend your editor’s AI with direct access to your data services. Your own MCP servers will be equally valuable here.
Credential flow. The Toolkit uses your existing AWS identity (IAM Identity Center or IAM) to authenticate to the Space. No separate SSH keys to manage. The aws_context_provider tool from the smus_local MCP server handles credential discovery for agent operations.
Best practices
To work effectively with your IDE and SageMaker Unified Studio:
Explore your data before building. Start every session by asking your AI assistant to discover your catalog, sample your data, and understand the schema. This single step helps reduce the most common source of errors in AI-assisted data work: the LLM making assumptions about data it has not seen. See the “See it in action” walkthrough earlier in this post for a concrete example of the difference this makes.
Use the SageMaker Unified Studio steering files. When prompted to create AGENTS.md and smus-context.md, accept. These files are the foundation that makes everything else work: environment context, MCP server configuration, and project understanding. Without them, your AI assistant starts from zero on every prompt. Kiro detects these automatically; in other editors, add them as context.
Disable unused MCP tools. The AWS Data Processing MCP server includes tools for AWS Glue, Amazon EMR, Amazon Athena, and more. Disable the services that you’re not using for a given project to save model context and reduce noise.
Be specific in your prompts. The more detail you give your AI (column names, query patterns you prefer, output formats), the closer the first pass will be. “Run data quality evaluation using Athena SQL” gets you better code than “check my data.”
Always test interactively first. Whether in notebooks or the terminal, validate code before deploying it. AI agents can iterate quickly, but catching issues in an interactive session is faster than debugging a failed AWS Glue job. Athena PySpark and the SageMaker sqlutils and sparkutils packages are great for this.
Stop your Space when idle. Your Space runs on compute (the same instance types as Code Editor and JupyterLab). If idle, the Space will terminate after 60 minutes and close your remote connection. Close the remote window and reconnect to continue.
Things to know
Notebook agent mode. For notebook-heavy analytics workflows where you want agentic AI to generate and run cells directly, SageMaker Notebooks with Data Agent in SageMaker Unified Studio is the recommended option today. Current notebook support in local editors covers editing, running, and generating code in individual cells.
MCP setup takes iteration. Configuring MCP servers may require iteration, especially for servers with complex authentication. Many AI-enabled editors can self-correct when a server fails. For more deterministic results, use the preceding MCP configuration JSON as a starting point rather than relying solely on auto-discovery.
CLI preference. AI agents often prefer the AWS CLI and bash even when MCP tools are available. This doesn’t affect outcomes, but you can steer your assistant toward MCP tools using a steering document if you prefer consistency.
Security and governance boundaries
A core benefit of this integration is that your existing security and governance controls remain enforced. Your editor connects to your SageMaker Space through a secure SSH tunnel managed by the AWS Toolkit. It does not bypass your organization’s access controls. Data access is governed by the same AWS Lake Formation permissions and IAM Identity Center authentication that apply when you work in the SageMaker Unified Studio portal directly. Your project-level permissions, database grants, and column-level security policies apply consistently whether a query originates from an AI agent, a notebook cell, or the SageMaker console. Data access is governed by the boundaries you define in your SageMaker Unified Studio domain and project configuration.
Clean up
To avoid ongoing charges from billable resources (SageMaker Space compute charges per hour, AWS Glue sessions charge per DPU-hour, Amazon Athena queries charge per TB scanned):
Stop your Space – In the SageMaker Unified Studio portal, navigate to your project’s Spaces and stop the Space you used for this walkthrough.
Disconnect: Close the remote connection in your editor (File → Close Remote Connection).
Verify AWS Glue sessions are terminated – If you ran PySpark queries during this walkthrough, verify that the sessions are stopped. In the SageMaker Unified Studio portal, navigate to Data processing and confirm no active AWS Glue sessions remain. Sessions auto-terminate when the Space stops, but verify to avoid unexpected charges.
Delete demo resources (optional) – File deletion is permanent and cannot be undone. Back up any work that you want to retain before proceeding. If you created scripts or files during this walkthrough that you no longer need, delete them from /home/sagemaker-user/. For example, delete any test notebooks, Python scripts, or generated data files. The sample sagemaker_sample_db.churn dataset is read-only and doesn’t need cleanup.
Conclusion
This post showed what happens when agentic AI meets governed data, and walked through how to set it up yourself.
Three key insights emerged from this hands-on experience:
SageMaker Unified Studio steering files transform the developer experience. Your AI assistant is project-aware from the first prompt, understanding your environment and available data without manual setup.
MCP servers bridge “AI that writes code” with “AI that queries your data”. The smus_local and aws-dataprocessing servers are essential for effective agentic data work.
The “explore first” pattern pays immediate dividends. When your AI assistant understands your data before writing code, it makes smarter engine choices and produces correct analytics on the first pass.
This integration brings together two capabilities that are stronger together: your IDE handles the AI-assisted coding and iteration, while SageMaker Unified Studio handles data governance, access control, and compute management. You get the productivity of an agentic AI coding assistant without compromising on the controls your organization requires.
Part of running LWN is keeping a list of potentially interesting topics
that may merit the effort to turn into articles. As an experiment, we are now exposing that list to our subscribers at the
Project Leader and Supporter levels. The hope is that this list will
provide useful insights into what is on our radar and which might be coming
to LWN in the near future.
With this feature, we hope to give our most committed subscribers a look
behind the curtain and the ability to provide input on the topics they are
most interested in reading about. There, is, thus, a simple voting
mechanism built into this list. No topic will be chosen (or rejected)
solely on the basis of votes; there are a lot of considerations that go
into topic selection, and that will not change. But more information about
where our readers’ interests lie will, hopefully, be helpful.
For all readers: we are always happy to welcome topic suggestions sent to [email protected].
Amazon Redshift is a fully managed, AI-powered cloud data warehouse used by tens of thousands of customers to analyze exabytes of data with industry-leading price-performance. Amazon Redshift delivers SQL analytics across your entire lakehouse in Amazon SageMaker Unified Studio, unifying data from multiple sources. Zero-ETL integrations remove complex pipelines by connecting streaming, databases, and enterprise applications for near real-time insights.
On May 12, 2026, Amazon Redshift launched Graviton-based RG instances, a new generation of provisioned nodes. RG instances deliver up to 2.2x as fast for data warehouse workloads and up to 2.4x as fast for data lake workloads, at 30 percent lower price per vCPU compared to RA3 instances. RG instances support all data lake formats supported by RA3 and remove the per-TB scanning charges for Amazon Redshift Spectrum.
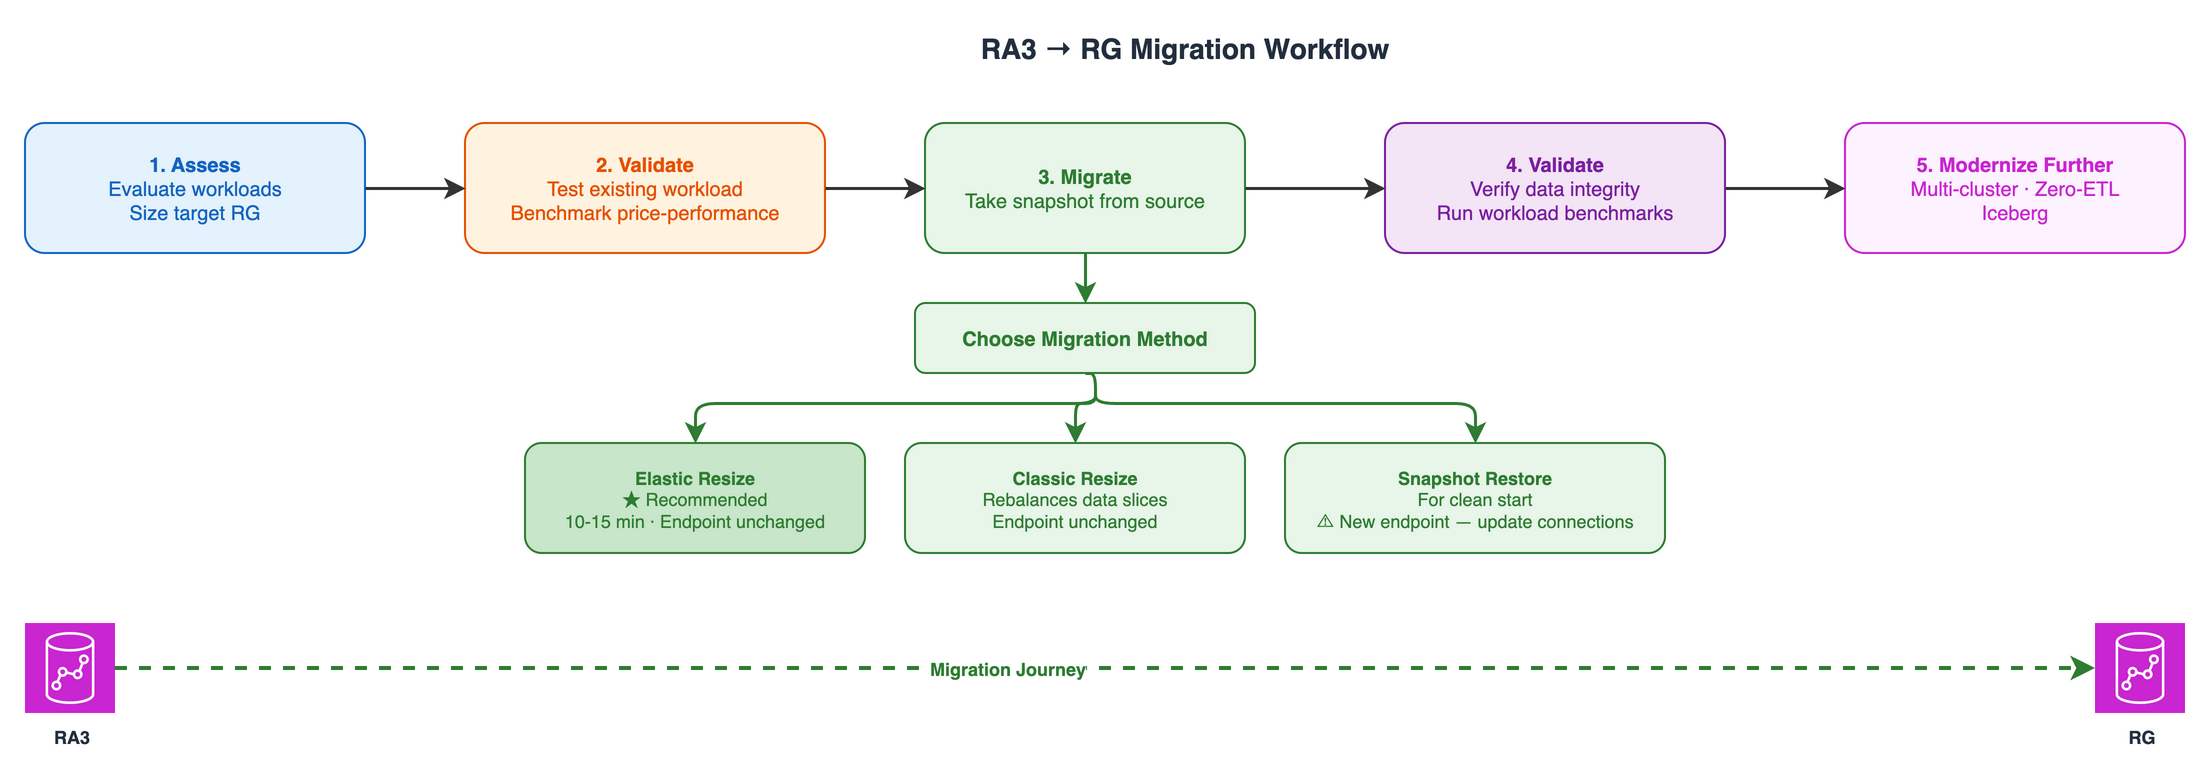
In this post, you learn how to migrate Amazon Redshift RA3 clusters to Graviton-based RG instances. We compare the Elastic Resize, Classic Resize, and Snapshot/Restore migration strategies, with key considerations and best practices to support a smooth migration. We also provide mapping guidance from RA3 to RG to help you right-size your cluster.
Who should migrate to RG?
We recommend that all RA3 customers plan their migration to RG to maximize price-performance. RG is designed to deliver improved performance for both compute-intensive and I/O-intensive workloads compared to RA3, so regardless of your workload pattern, you might see performance improvements. Amazon Redshift Graviton RG instances maintain feature parity with prior-generation RA3 instances, so you can migrate without loss of functionality.
RG node types
The RG instance family currently has two node types available. The following table shows the RG instance types, hardware specifications, and the equivalent RA3 node types. Use these specifications to inform sizing decisions when migrating from RA3.
Node type
Configuration
vCPU
Memory
Max storage/node
Node range
Status
RA3 equivalent
RG.xlarge
Multi Node
4
32 GB
16 TB
2-32
GA (05/12/2026)
Direct equivalent to RA3.xlplus.
RG.4xlarge
Multi Node Only
16
128 GB
128 TB
2-64
GA (05/12/2026)
1.33x more vCPUs and memory vs RA3.4xlarge
Note: We plan to extend support for additional instance types in the future to provide an optimal price/performance fit for your Amazon Redshift workloads.
3 RG nodes per 4 RA3.4xl nodes (round up to nearest even)
Note: These are starting recommendations. Depending on your specific workloads, you might need to adjust the target RG node configurations. We recommend testing your workload in a lower environment and validating performance before committing to a target configuration. To test a full production workload, you can also use the Amazon Redshift Test Drive utility.
Mapping consideration: Within the RG family, 1 node of RG.4xlarge equals 4 nodes of RG.xlarge.
Choosing between RG node types: When sizing your Amazon Redshift cluster, a key decision is whether to use fewer large nodes or a greater number of smaller nodes. The key differentiator between RG node types is local SSD cache capacity. Larger nodes provide more local cache per node, which reduces the need to fetch data from managed storage and improves performance for I/O-intensive queries.
Consider larger node types when your workload involves:
Significant disk spill – complex queries with large intermediate result sets that exceed available memory.
Leader node-heavy processing – high numbers of concurrent client connections, complex query compilation with many joins and subqueries, or heavy final-stage aggregation.
Large volumes of frequently accessed data – hot datasets that benefit from local SSD cache to minimize fetches from managed storage.
Large result sets – queries returning substantial data volumes back to the client application.
Frequent metadata operations – workloads with high catalog lookup activity or CURSOR-based fetches with many small batches.
Prerequisites
You must have the following prerequisites to follow along with this post.
An existing Amazon Redshift cluster running RA3 node types.
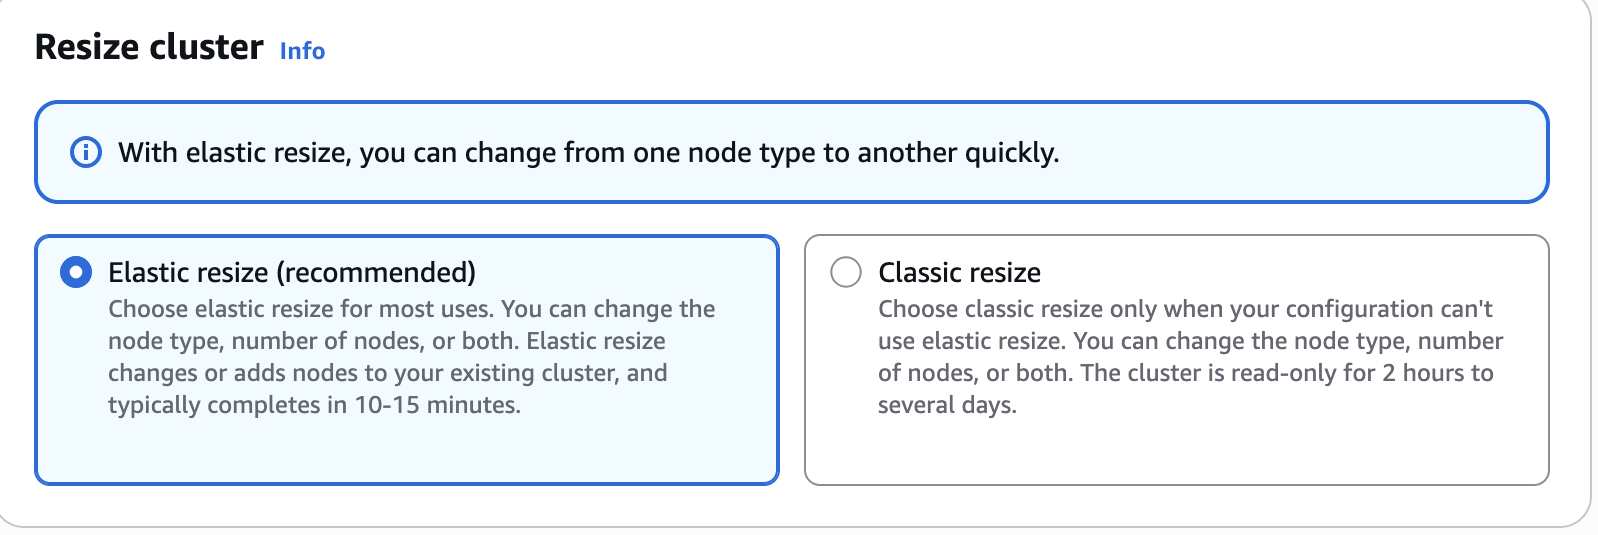
Elastic Resize is the recommended method for performing the node upgrade when the target RG node configuration falls within the supported bounds of Elastic Resize. You can use it to change the node type (for example, from RA3 to RG) and to add or remove nodes from an Amazon Redshift cluster.
When an Elastic Resize is performed, Amazon Redshift first creates a snapshot of the source cluster. A new target cluster is provisioned with the latest data from the snapshot, and data is transferred to the new cluster in the background. During this period, data is read-only. When the resize nears completion, Amazon Redshift updates the endpoint to point to the new cluster and drops all connections to the source cluster. Although unlikely, in case of a failure, rollback happens automatically in most cases without manual intervention.
Advantages
Typically completes quickly, taking approximately 10–15 minutes on average. We recommend it as your first option.
Minimal downtime, because the cluster remains in a read-only state during the resize operation.
Cluster endpoint remains the same, so no connection string changes are required.
Can be run on demand or scheduled during a maintenance window.
Considerations
When performing an Elastic Resize to change the node type on a producer cluster, data sharing is unavailable while connections are dropped and transferred to the new target cluster.
Verify that your target node configuration has enough storage for your existing data.
Not all target configurations are available under Elastic Resize. Consider Classic Resize or Snapshot/Restore in those cases.
An Elastic Resize operation can’t be canceled after it’s initiated.
Data slices remain unchanged. This can potentially cause some data or CPU skew.
You can use either the AWS Management Console or the AWS CLI to initiate an Elastic Resize.
To resize a cluster using the console, follow these steps
Classic Resize is recommended when the change in cluster size or node type isn’t supported by Elastic Resize. It’s also required for single-node to multi-node conversions.
When you perform a Classic Resize, Amazon Redshift creates a target cluster and migrates your data and metadata from the source cluster using a backup and restore operation. This makes sure that all data, including database schemas and user configurations, is accurately transferred. The source cluster restarts initially and is unavailable for a few minutes. After that, the cluster becomes available for read and write operations while the resize continues in the background.
Enhanced Classic Resize comprises two stages:
Stage 1 (critical path): Migrating the metadata from the source cluster to the target cluster. During this stage, the source cluster is in read-only mode. This is typically a very short duration. The cluster is then made available for read and write queries. All tables with KEY distribution style are temporarily stored with EVEN distribution and are redistributed to KEY style in Stage 2.
Stage 2 (off critical path): Redistributing the data per the previous distribution style. This runs in the background. Duration depends on data volume, cluster workload, and node type.
Allows for comprehensive reconfiguration of the source cluster.
Rebalances data slices to the default per node, which leads to even data distribution across nodes.
Considerations
The size of the data on the source cluster must be below 2 petabytes (PB). Use the Snapshot/Restore approach for data larger than 2 PB.
Before initiating, make sure a manual snapshot is available that is no more than 10 hours old. If not, take a new manual snapshot.
The snapshot used to perform the Classic Resize can’t be used for a table restore or other purpose.
The cluster must be in a virtual private cloud (VPC).
While the resize is in progress, queries can take longer to complete. Consider enabling concurrency scaling.
Drop tables that aren’t needed before performing a Classic Resize to accelerate data distribution.
Classic Resize takes more time to complete than Elastic Resize.
Plan and schedule the resize operation during off-peak hours or maintenance windows.
You can use either the console or the following AWS CLI command to initiate a Classic Resize.
To run a Classic Resize through the console, follow the resize instructions in the preceding section and choose Classic resize, as shown in the following screenshot.
To monitor a Classic Resize of a provisioned cluster in progress, including KEY distribution, use SYS_RESTORE_STATE. It shows the percentage completed for the table being converted. You must be a superuser to access the data.
Elastic Resize vs. Classic Resize
Behavior
Elastic Resize
Classic Resize
System tables
Elastic Resize retains system log data.
Classic Resize doesn’t retain system tables and data.
Changing node types
When the node type doesn’t change, Elastic Resize is an in-place resize and most queries are held. With a new node type selected, a new cluster is created and queries are dropped as the resize completes.
A new cluster is created. Queries are dropped during the resize.
Session and query retention
Elastic Resize retains sessions and queries when the node type is the same in the source and target. If you choose a new node type, queries are dropped.
Classic Resize doesn’t retain sessions and queries. Queries are dropped, and you can expect some performance degradation. Run the resize during a period of light use.
Canceling a resize operation
You can’t cancel an Elastic Resize.
For a Classic Resize to an RG or RA3 cluster, you can’t cancel.
Use this method when you need near-constant write access during the migration, or when you want to validate the new RG setup without affecting the existing cluster.
Steps
In the Amazon Redshift console, choose Provisioned clusters dashboard, select your source cluster, choose Actions, then choose Create manual snapshot. Specify a snapshot name and choose Create snapshot.
Select your snapshot.
Choose Restore from snapshot.
Specify the cluster ID and configuration (target cluster).
Verify that the sample data exists in the target cluster by following these steps:
Connect to the target cluster using the new endpoint.
Run SELECT COUNT(*) FROM <table_name> for key tables and compare counts with the source cluster.
Verify that all schemas exist.
Validate that user permissions were restored correctly.
If you write data to the source cluster after taking the snapshot, manually copy the data to the target cluster.
Update your application connection strings to use the new cluster endpoint.
Advantages
Allows validation of the new RG setup without affecting the existing cluster.
Offers flexibility to restore to different Regions or Availability Zones, which provides additional disaster recovery options.
Minimizes the amount of time that the cluster is unavailable for write operations.
Considerations
Setting up the new cluster and restoring data can take longer than Elastic Resize.
Any data written to the source cluster after the snapshot must be copied manually to the target cluster.
A new Amazon Redshift endpoint is created, so connection string changes are required.
To keep the cluster endpoint the same, consider renaming both clusters so the new target cluster has the same name as the original source cluster.
Fallback
You can revert to RA3 at any time using any of the migration approaches described earlier.
DMS, Zero-ETL, and data sharing considerations during migration
If your Amazon Redshift cluster is an AWS Database Migration Service (AWS DMS) target, has Zero-ETL integrations, or is a data sharing producer, keep the following in mind when resizing from RA3 to RG.
AWS DMS change data capture (CDC) tasks aren’t impacted by the resize. The replication instance operates independently and resumes writing after the cluster is available. No task restart is required.
Zero-ETL tables temporarily become unavailable during the resize and enter a resync state. How long the resync takes depends on data volume. Use svv_integration_table_state to check when all tables are back to Synced. For additional details, see Zero-ETL considerations.
When you resize a producer cluster, data sharing is temporarily unavailable while connections transfer to the new cluster. This typically lasts several minutes. Consumer clusters can’t access shared data during this period. After the resize completes, data sharing resumes automatically with no reconfiguration needed. Plan a brief outage window for consumer workloads that depend on the producer being resized.
Snapshot/Restore impact on DMS, Zero-ETL, and data sharing
Zero-ETL integrations are tied to the original cluster. A restored cluster is treated as a new cluster, so replication doesn’t automatically resume. After the restore, you need to create a new Zero-ETL integration pointing to the restored cluster. It performs an initial sync to bring the data current.
AWS DMS connections are endpoint-based. A restored cluster receives a new endpoint, so AWS DMS tasks won’t automatically connect to it. After the restore, you must update the AWS DMS endpoint configuration with the new cluster address and restart the migration tasks.
Data sharing is tied to the cluster namespace. A restored cluster has a different namespace, so existing data shares don’t carry over. As a producer, you need to create new data shares and re-share them with consumer clusters. As a consumer, you lose access until the producer reestablishes the share from the new cluster.
Migration best practices
Inform downstream teams before the migration. This includes data sharing consumers, Zero-ETL applications, and BI/ETL pipelines.
Schedule the migration during a maintenance window to reduce impact on production.
Take a manual snapshot before starting the resize. This serves as your rollback point.
Test your target RG configuration with a representative workload before migrating production.
Confirm that downstream applications are working after completion.
Clean up
To avoid incurring future charges, delete the RG provisioned cluster and any manual snapshots created during migration testing. Deleting a cluster permanently removes all data. Make sure you are deleting only the test cluster. Consider taking a final snapshot before deletion if you need to retain any test data.
Conclusion
In this post, we covered the migration options, considerations, and best practices for upgrading Amazon Redshift RA3 instances to Graviton-based RG instances. For more details on the performance benefits of RG, see the announcement blog post.
Start upgrading to Amazon Redshift RG instances today and take advantage of better price-performance with the guidance in this post. For architectural support or proof of concept (POC) assistance, contact AWS Support.
On June 15 at Fedora’s Flock conference, held in
Prague, Fedora Project Leader (FPL) Jef Spaleta delivered a short “State of
Fedora” keynote that provided a bit of insight into the status of the
project. Topics included the overall growth for Fedora usage, ways to increase
contributions, and an alarming decline in the number of active packagers working
on the project.
Version
152.0 of the Firefox web browser has been released. Notable
changes in this release include a brand-new look for the Firefox
Settings interface, the ability to disable tracker blocking in private
browsing tabs, a feature to mute browser sound from the address bar,
experimental support for the JPEG
XL image format, and more.
Version
6.7 of KDE’s Plasma desktop has been released. Notable changes in
this release include per-screen virtual desktops, faster desktop
switching, introduction of the Union
theming system as a tech preview, as well as many other improvements and bug
fixes. The release is dedicated to Eric Laffoon, a longtime KDE
supporter, who passed away in May.
See the KDE
wiki for a full list of new features, and the Changelog
for a list of all commits in this release.
Оказах се в Албания точно в началото на т.нар. Фламингова революция. На 30 май протестиращ беше влачен от охраната на заградена зона в природния резерват до Звърнец, а аз преминах границата с Гърция на път за Тирана и две важни архитектурни събития, които предстояха там през първата седмица на юни. Тогава все още не беше ясно, че протестите ще станат това, което са в момента, а архитектурата ще се окаже буквално в центъра им.
И все пак още в първите дни нещо го подсказваше.
„Аз съм родом от Вльора. Трябва да отидете до Звърнец, там е прекрасно. Искат да го застрояват“, каза ми Арта, собственичка на малък семеен хотел на крайбрежието в Южна Албания. „Е, не протестирате ли?“, попитах аз. „Да, но нищо няма да стане“, отговори тя и се върна в кухнята, където всичко се готвеше с продукти от градината им.
От 15 години само строим. Най-големият ни страх е да не изгоним чуждите инвеститори,
каза ми няколко дни по-късно приятел архитект, вече в Тирана. Протестите бяха започнали, а ние се качвахме по стъпалата на Пирамидата в центъра на града, бивш музей на комунистическия диктатор Енвер Ходжа, а днес стартъп хъб, реконструиран през 2023 г. по проект на холандското суперстудио MVRDV. Беше третият ден на протести, а от върха на пирамидата се виждаше, че хората са наистина много.
„Видя ли интервюто на Иванка? Скандално. Мисля, че то вбеси хората най-много“, отбеляза Виола, също архитектка, на другата вечер пак в Тирана. Виола е албанка, израснала в Канада, дете на емигранти от 90-те. В момента е университетска преподавателка в Торонто, дошла за същата конференция за опазване на модернизма в Албания като мен. Имаше предвид интервюто на Иванка Тръмп за Дейвид Сенра от края на май, в което дъщерята на американския президент описва своята находка в Средиземно море – необитаемия остров Сазан, на запад от албанския бряг, който със съпруга си Джаред Къшнър „откриват“ съвсем случайно, докато са на яхта на приятели и спират да поплуват. „Плувахме до острова. Изкачихме се пеша, боси чак до върха и просто бяхме очаровани“, казва Иванка. Действително скандално, особено като се има предвид, че островът не е частен, както тя го нарича, а бивша държавна военна база с много стар бетон, по който, освен всичко друго, доста трудно се ходи бос.
Сега ще се опитам да обясня как и защо именно архитектурата е толкова тясно преплетена с политическите вълнения в Албания в момента и всъщност до огромна степен е тяхна първопричина.
Застрояването и Албания
В Албания се строи много – и навсякъде. Усещането е като в България в началото на по-миналото десетилетие, онзи пръв строителен бум, който преживяхме след 2000 г., преди да влезем в Европейския съюз, и който де факто съсипа градовете, планините и черноморското ни крайбрежие.
Строителството е свързано с непоклатимата неолиберална вяра в трансформиращата роля на свободния пазар, която всички бивши комунистически държави в Европа споделят. Разбираемо – след провала на държавния социализъм и сивата пустош, която той оставя навсякъде в края на 80-те. И после идват 90-те, с цялата им мътилка, липса на правила и регулации, с неясния произход на частния капитал, с всички балкански войни, мутри, бедност и кич. Най-неподходящото време, в което да се говори за публично пространство, общество и колективна (архитектурна) отговорност. Строителството е и много успешен начин за пране на пари.
Албания обаче е преживяла много, много повече от България. Страната получава независимост от Османската империя едва през 1912 г. През 1939 г. вече е окупирана от фашистка Италия на Мусолини (италианските архитектурни влияния са видими и до днес). Партизаните комунисти на Енвер Ходжа вземат властта в края на Втората световна война, флиртуват със Сталин, после с Тито, най-дълго с Мао и Китай, за да изолират държавата в края на 60-те от целия свят, включително от Източния блок. И да построят близо 200 000 бункера из цялата страна в параноичен опит да се отбраняват от всички на всяка цена. Балканска версия на Северна Корея, както гласи любимото клише на западните медии, когато пишат за Албания.
Комунистическият режим тук пада най-късно – чак през 1992 г.,
и албанците се втурват да емигрират – първо към Италия, а оттам и към целия най-после отворен свят. Останалите в страната първо започват да купуват коли (през 1992 г. в Тирана има само 200 леки автомобила), а после да строят – навсякъде. Приватизацията на държавната собственост е още по-тъмна и хаотична, отколкото в България, и през 90-те не е ясно коя земя на кого е, затова всички строят където им падне – магазини, бараки, къщи, ресторанти – всичко. Качеството е ужасно, градовете (и особено Тирана) не приличат на нищо.
И тук на сцената излиза главният герой в албанския политически живот и до днес – художникът Еди Рама, който става кмет на Тирана през 2000 г. Той заварва посткомунистически хаос с куп незаконни сгради, висока престъпност, никакви публични пространства, проблеми с боклука и канализацията и много сиви сгради навсякъде. Рама става международно популярен с радикалното си решение да боядиса целия град в ярки цветове – евтино и ефектно, а и логично за един художник, който познава психологията на цветовете. Отделно, той събаря хиляди незаконни постройки и изчиства от тях бреговете на река Лана, за да създаде нови паркове и обществени зони. Няколко пъти го пребиват.
Изобщо – герой. Рама става любимец на световните медии, на лъскавите списания за архитектура, дизайн и градски живот, а през 2004 г. печели международната награда „Кмет на годината“. Той е лице на неолиберализма на Балканите, оглавява Социалистическата партия на Албания, приятел е с Тони Блеър, обявява, че страната ще се развива прогресивно и по трети път – без ляво и дясно.
През 2020 г. албанският архитект и преподавател Саймир Кристо много добре описва ситуацията с Тирана и цветовете на Рама в една своя статия за холандския архитектурен портал Archined:
Това не е наивен опит да се разведрят жителите на Тирана, за да забравят авторитарния режим, който е властвал почти половин век. В крайна сметка никога не се започва от нулата след падането на един режим. Днес в Тирана по-скоро наблюдаваме директния западен маниер да се представят посткомунистическите страни като сиви, а капитализмът и развитието – като „жизнени“ и „цветни“.
Еди Рама и архитектурата
Днес Еди Рама е министър-председател на Албания за четвърти пореден мандат и е обещал страната да влезе в Европейския съюз до 2030 г. А основното му оръжие за международен престиж, привличане на чуждестранни инвеститори, развитие на туризма и икономиката и преобразяване на страната е едно – архитектурата. Еди Рама обича архитектурата и обожава световноизвестните архитекти.
От 2008 г., когато белгийското студио 51N4E печели международния архитектурен конкурс за реконструкция на централния площад „Скендербег“ в Тирана, до ден днешен градът е истинска площадка за игра на архитектите от цял свят. И нямам предвид само поувехналите стархитекти (т.нар. архитекти звезди на миналото), а всички, включително „социално отговорните“ сред тях. През 2019 г. Общинският съвет на Тирана одобрява новия общ устройствен план на града, разработен от италианското студио Stefano Boeri Architetti и кръстен неслучайно „Тирана 2030“. Планът предвижда компактен полицентричен град с много нови публични пространства, линейни паркове и екологични коридори, 2 млн. нови дървета и всички модни думи на съвременното градоустройство. Той отприщва безпрецедентен строителен бум, който превръща Тирана в град на кули и купища нови строежи, докато се задъхва в задръствания и липса на паркоместа.
В момента в столицата се проектират, строят или имат разрешение за строеж над 140 небостъргача
на принципа на наложеното от Еди Рама публично-частно партньорство. Албанските архитекти са изключени от процеса. Те чертаят техническите проекти, обслужват разрешенията за строеж и критикуват властта, че инвестира в нови публични пространства не заради жителите на Тирана, а за да повишава пазарната стойност на новите частни инвестиции из града. Легендарен е списъкът на Еди Рама с над 150 чуждестранни архитектурни студиа, измежду които той избира на кого какви проекти да възлага. Особена е слабостта му към популярни архитекти и носители на наградата „Прицкер“, а всички те нямат нищо против да играят ролята на придворни проектанти на албанския „владетел“.
В интерес на истината, всички тези нови сгради са безкрайно интересни и в момента Тирана е колоритна мозайка от всякакви стилове и архитектурни похвати на фона на хаотично-еклектичното си постсоциалистическо наследство. На всичко отгоре новите сгради и пространства са проектирани добре, повечето са изпълнени отлично. Взети сами за себе си, са чудесни примери за съвременна архитектура с ниво на детайл и качество на изпълнение, за които съвременната българска архитектура може само да мечтае. Всъщност тя си мечтаеше точно за същото някъде около 2008 г., когато стартира първата Седмица на архитектурата у нас (т.нар. Sofia Architecture Week – SAW) – затворено платено събитие за инвеститори, институции и международни архитекти, което да даде старт на една друга София на визии, конкурси и чуждестранни архитектурни проекти.
Но не се получи. За добро или за лошо, в София така и няма сграда или примерно площад на „световноизвестен архитект“. А усилията на целия екип на списание ЕДНО и SAW да убедят българската власт, че си струва да се инвестира в звездна архитектура и дизайн, така и не хванаха на каменистата българска почва поради липса на местен Еди Рама. Може би е било за добро.
Защото през първата седмица на юни в Тирана ме беше срам, че съм архитект от чужбина.
Точно тогава Еди Рама посрещна световния архитектурен елит – буквално всички, за които човек може да се сети – на второто поредно издание на фестивала Bread and Heart. Събитието беше в Book Building, последната кула, проектирана от белгийските любимци на Рама 51N4E до площада „Скендербег“. Албанските архитекти по принцип бойкотираха форума. И как не – от години те се чувстват сведени до чертожници на чужденците. Намерих само една местна позната, която беше посетила целия форум и която сподели:
Аз ги питах какво мислят за корупцията и за протестите, за презастрояването и проблемите, а те ми казаха: „Ние какво можем да направим, дошли сме тук да проектираме и да строим. Вашите неща си ги оправяйте вие, ние нищо не можем да направим.“
Интересното беше, че достъпът до цялата сграда беше блокиран, ограждения прекъсваха пешеходното движение към площада, а полицаи пазеха архитектурния елит от любовта на тълпата. Защото през първите дни на протестите в Тирана те завършваха именно пред Book Building и освиркваха не само екрана с образа на Рама, опънат на един от ъглите на сградата и предаващ на живо, но и архитектите вътре. Архитектите, които обслужват чужденците, които ще застроят тяхната Албания. „Еди Рама е свършен!“ беше единият от най-популярните възгласи тогава. Другият – „Албания не е за продан!“.
А сега да се върнем на протестите.
Edi Rama ka mbaru, ka mbaru!1
Големите протести в Албания започнаха в началото на юни като екологични – срещу намеренията за строителство на луксозен курорт в защитените природни зони на остров Сазан и лагуната Вьоса-Нарта – ценна средиземноморска влажна зона, която предоставя убежище на над 200 вида птици и повече от 70 застрашени вида. Инвестицията се свързва с имената на Иванка Тръмп и съпруга ѝ Джаред Къшнър. Зад нея стоят няколко компании с неясни или криминални собственици, а проектът получава предварително одобрение като стратегическа инвестиция от албанското правителство през декември 2025 г. Междувременно защитената зона е намалена като обхват, а през 2021 г. е разрешено в района да се изгради летище. Еди Рама подкрепя проекта, който е оформен като обичайното публично-частно партньорство, тъй като островът все още е държавен, но брегът вече е частен.
Следват разкрития за устройствени и архитектурни планове за курорта от ноември 2025 г., които вбесяват още повече протестиращите заради стотиците хиляди квадратни метри застроена площ, които се предвиждат, хилядите жилища и хотелски стаи и визията за затворен ултралуксозен резерват само за свръхбогати. За няколко дни протестите се разраснаха в пъти, състояха се и в други градове освен Тирана и Звърнец, хората излизат на улицата ежедневно, а тълпата в Тирана расте с всеки следващ ден. Това вече са политически протести – за оставката на Еди Рама и цялото правителство, срещу целия управляващ елит, включително срещу опозиционния лидер Сали Бериша, който подкрепя курорта.
Архитекти в Тирана ми пишат, че последните дни протестите са станали и националистически – именно като реакция срещу чуждестранните инвеститори, които правителството на Рама толкова цени, и защото „Албания не е за продан“.
Архитектурата и властта
За мен е важно да осъзнаем ролята на архитектурата като инструмент на властта – за пореден път болезнено оголена и в този албански случай.
Еди Рама е лицето на либералната демокрация – такава, каквато я познаваме от Клинтън и Обама, на онази американска Демократическа партия, която загуби последните избори и отвори път към една съвсем различна Америка. Това, което се случва в Тирана и Албания в момента, е като надгробен камък на неолиберализма от първите две десетилетия на нашия век. Точно като библиотеката „кенотаф“ на Барак Обама в Чикаго, която отвори врати този същия юни под канонада от критики. Стархитектите вече са в миналото. Големите студиа отмират. Необходимо е адаптивно преизползване на ресурси. В същото време има потребност от качество и отношение – към средата, към хората, към контекста. Арогантната архитектурна самоувереност е неадекватна за времето ни, архитектурното его само пречи, а лицемерието винаги излиза наяве – рано или късно.
Именно срещу това реагираха ожесточено албанските архитекти по време на фестивала Bread and Heart в Тирана. Под бляскавите постове в социалните мрежи за изминалите дни на „вдъхновение и споделени идеи“, чиито автори очевидно не чуваха гласовете на тълпата под прозорците на Book Building, те пишеха гневни коментари в социалните мрежи, които биваха изтривани.
Завършвам с един такъв изтрит коментар на албанската архитектка и преподавателка Мамица Бурда:
Всички говорят за деколонизация, отстояване на пространства, отказ от растежа, регенерация, пространствена справедливост, колективна грижа, общи блага, общности, адаптивно преизползване, бъдеще без въглеродни емисии и други модни концепции. Веднага щом човек започне да работи в бедни страни с висока степен на корупция и пране на пари обаче, принципите изведнъж се променят. Албания определено е лакмус за съвременната архитектурна практика. Тя показва дали архитектите наистина отстояват ценностите, които пропагандират – социална отговорност, устойчивост и обществен интерес, – или тези принципи изчезват, когато се сблъскат с възможност за печалба и популярност.
1 „Еди Рама е свършен, свършен е!“ (алб.) – най-често скандираният възглас в първите дни на протестите в Тирана.
When we first launched DMARC Management, it was driven by a simple belief: every domain on the Internet deserves strong email authentication, and cost should never be the reason it doesn’t happen. As part of our mission to help build a better Internet, we made DMARC Management available for free to every Cloudflare customer. We wanted to give everyone the tools to understand and improve their DMARC posture without needing to hire an email security consultant or parse XML report files by hand.
Today, we are taking that commitment further. Cloudflare DMARC Management is now generally available, with a redesigned experience built to help you reach full DMARC enforcement as easily as possible.
The DMARC Management dashboard offers a unified view of your email authentication posture.
What email authentication actually does for you
Every time someone receives an email “from” your domain, their email provider asks a simple question: did the real owner of this domain actually send this? Without a way to answer that question, anyone can send an email pretending to be you and your recipients will have no way to tell the difference.
Email authentication is the set of DNS records that answers that question. There are four protocols that protect your domain:
SPF (Sender Policy Framework) tells receiving mail servers which IP addresses and services are allowed to send email on behalf of your domain.
DKIM (DomainKeys Identified Mail) attaches a cryptographic signature to every email you send, so receiving servers can verify the message hasn’t been tampered with in transit.
DMARC (Domain-based Message Authentication, Reporting, and Conformance) ties SPF and DKIM together and tells receiving servers what to do when an email fails authentication: let it through, quarantine it, or reject it outright. It also sends you reports on who is sending email as your domain.
BIMI (Brand Indicators for Message Identification) lets you display your brand logo next to your emails in supported inboxes, but only if your DMARC policy is strong enough.
When all four are configured correctly, spoofed emails get blocked before they reach anyone’s inbox and your legitimate emails are far more likely to be delivered. When they’re missing or misconfigured, you’re exposed to brand impersonation and deliverability penalties from the large email mailbox providers.
DMARC is no longer optional
DMARC has always been important. But over the past two years, the stakes have gotten significantly higher. Google, Microsoft, and Yahoo have all announced or implemented stricter email authentication enforcement. Domains that do not have proper DMARC, SPF, and DKIM records configured (or worse, have them configured incorrectly) are increasingly seeing their legitimate emails land in spam folders or get rejected outright. What was once a best practice is now a requirement. Poor email hygiene directly translates to poor deliverability, and for many businesses, that means lost revenue and missed communications.
The message from the industry is clear: if you send email from your domain, you need these records configured correctly. The grace period is over.
The problem: DMARC is confusing, and mistakes are costly
Here is the challenge. The journey from p=none (monitor only, no emails are blocked) to p=quarantine (suspicious emails are sent to spam) to p=reject (unauthenticated emails are blocked outright) is filled with uncertainty. Enable enforcement too early, and you risk breaking legitimate email flows from third-party services you forgot were sending on your behalf. Move too slowly, and you leave your domain exposed to spoofing, and now, to deliverability penalties from the very providers your customers use.
Most organizations know they need DMARC enforcement. But actually getting there requires understanding aggregate XML reports, identifying every legitimate sending source across your infrastructure, and building enough confidence that tightening your policy will not break anything.
We built Cloudflare DMARC Management so that any customer can navigate this journey on their own. No need for professional services engagement. No spreadsheet analysis of aggregate reports. No guessing which IP address belongs to which vendor. The goal is to make the path to full DMARC enforcement as self-service as possible, giving you the visibility and confidence to tighten your policy without breaking anything.
DMARC reports show sending source alignment across your domain.
What we shipped
Deeper report visibility with source investigation
We redesigned the reporting experience to make it easier to understand what is happening with your email traffic. You can now see at a glance which sending sources are passing or failing DMARC, SPF, and DKIM alignment and drill deeper than ever before.
Every report now surfaces the source IP address alongside the sending service, giving you the granularity to distinguish between legitimate infrastructure and unauthorized senders. You can now open any IP address directly in our Investigate tab, which surfaces all the threat intelligence Cloudflare has on that address — reputation data, geolocation, autonomous system number (ASN) details, and any known associations with malicious activity.
This turns your DMARC reports from a passive data feed into an active investigation tool.
Drilling into a sending source reveals IP-level detail and Cloudflare threat intelligence in the Investigate tab.
What you see
What it tells you
Source IP address
The specific infrastructure sending email on behalf of your domain
Sending service name
The organization or provider behind the IP
DMARC / SPF / DKIM alignment
Whether each authentication check passed or failed for that source
Investigate tab
Cloudflare threat intelligence: reputation, geolocation, ASN, and known threat associations
Email authentication record status
One of the most common questions customers ask is: “Are my records set up correctly?”
Until now, answering that question required manually inspecting DNS TXT records and understanding what each tag and value means across multiple specifications. With this release, you can see the status of every email authentication record you need: DMARC, DKIM, SPF, and BIMI, in a single view.
Each record type gets a clear pass, warning, or fail status based on automated analysis. You can drill into any record to see specific findings about what we detected and recommendations for how to fix it. If your DKIM key is malformed, we flag it. If you are missing a BIMI record and your DMARC policy is strong enough to support one, we let you know that too.
Record analysis cards show pass, warning, or fail status for each email authentication record, with actionable recommendations.
The recommendations are written in plain language, not RFC jargon. The goal is to make it obvious what action to take next, regardless of your email security expertise.
Policy strength, monitoring vs. enforcement, reporting configuration
BIMI
Logo URL format, Verified Mark Certificate (VMC) presence
SPF lookup audit
This one addresses a problem that silently breaks email for more organizations than you would expect. The SPF specification (RFC 7208) imposes a hard limit of 10 DNS lookups per SPF evaluation. Every include:, a, mx, redirect, and exists mechanism in your SPF record counts toward that limit, and so do the nested lookups inside each include:. Exceed 10 and receiving mail servers return a permerror, which means your SPF check fails entirely.
Most people have no idea they are over the limit until their email starts getting rejected.
DMARC Management now lets you audit your SPF record and see exactly how many lookups it incurs. You can drill into every mechanism in the record, see which include:chains are the most expensive, and identify where to consolidate or flatten your record to get back under the limit.
The SPF lookup audit traces every DNS lookup in your SPF record, showing exactly where you are against the 10-lookup limit.
Getting started
To use DMARC Management, you need to have your domain’s DNS on Cloudflare. Then you can turn on DMARC Management under the Email tab for that domain in the Cloudflare dashboard.
1. Navigate to your domain in the Cloudflare dashboard.
2. Go to Email > DMARC Management.
3. Follow the setup wizard to start receiving DMARC reports.
4. Review your record analysis and recommendations.
5. Work toward p=quarantine (suspicious emails go to spam) or p=reject (unauthenticated emails are blocked entirely) at your own pace.
What’s next
We are going to continue building on top of DMARC Management, and our goal is to keep it accessible. We have several things planned that we are excited to ship: deeper forensic reporting, smarter recommendations, and tighter integration with the rest of the Cloudflare platform.
If you are not yet using Cloudflare for your DNS, you can get started here. Once your domain is on Cloudflare, DMARC Management is available immediately with no additional configuration or cost required.
Your domain is either protected or it isn’t. Head to Email > DMARC Management in your Cloudflare dashboard to get started.
The collective thoughts of the interwebz
Manage Consent
To provide the best experiences, we use technologies like cookies to store and/or access device information. Consenting to these technologies will allow us to process data such as browsing behavior or unique IDs on this site. Not consenting or withdrawing consent, may adversely affect certain features and functions.
Functional
Always active
The technical storage or access is strictly necessary for the legitimate purpose of enabling the use of a specific service explicitly requested by the subscriber or user, or for the sole purpose of carrying out the transmission of a communication over an electronic communications network.
Preferences
The technical storage or access is necessary for the legitimate purpose of storing preferences that are not requested by the subscriber or user.
Statistics
The technical storage or access that is used exclusively for statistical purposes.The technical storage or access that is used exclusively for anonymous statistical purposes. Without a subpoena, voluntary compliance on the part of your Internet Service Provider, or additional records from a third party, information stored or retrieved for this purpose alone cannot usually be used to identify you.
Marketing
The technical storage or access is required to create user profiles to send advertising, or to track the user on a website or across several websites for similar marketing purposes.
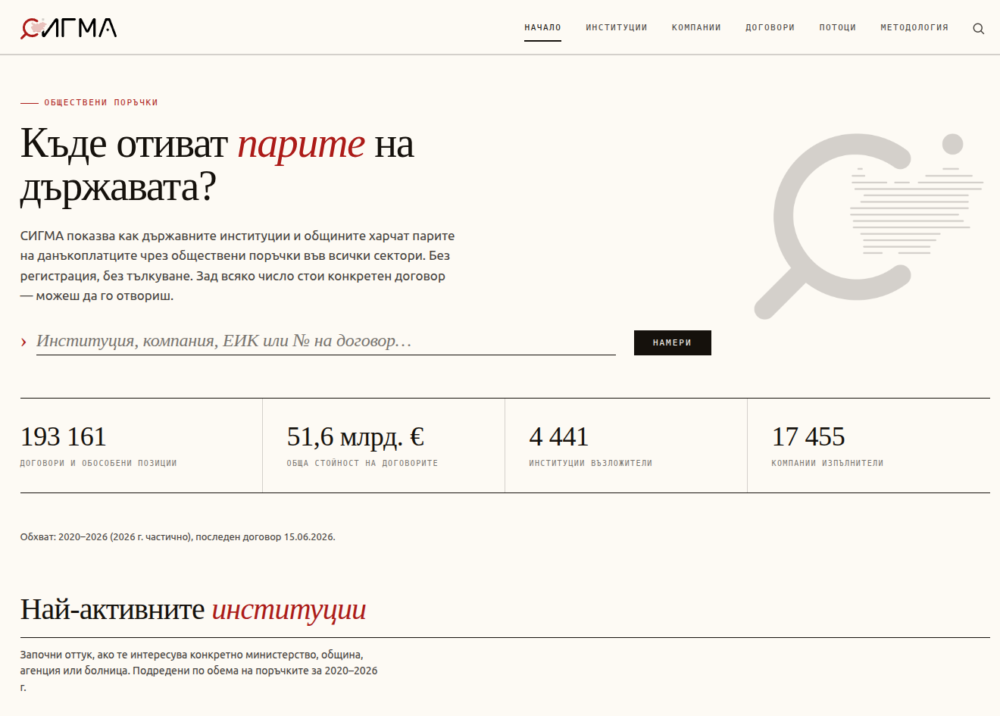
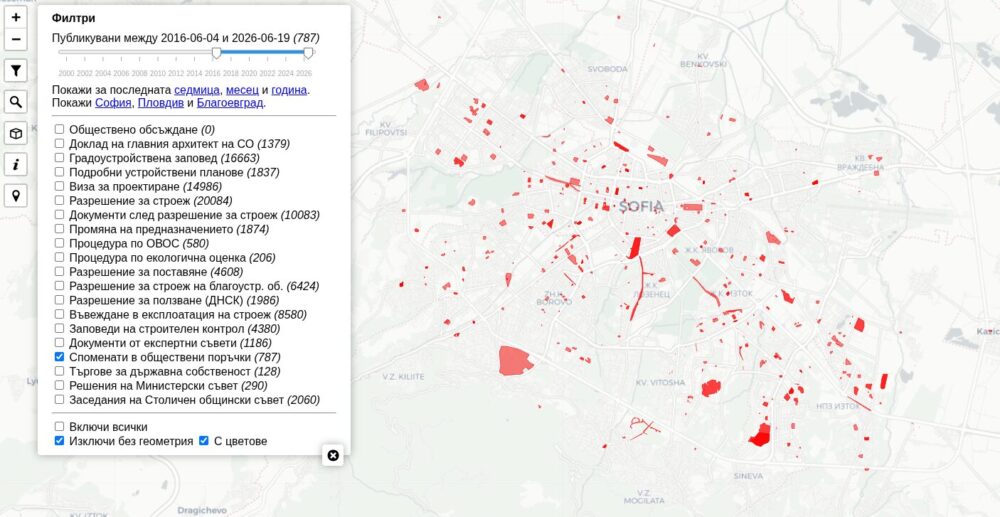
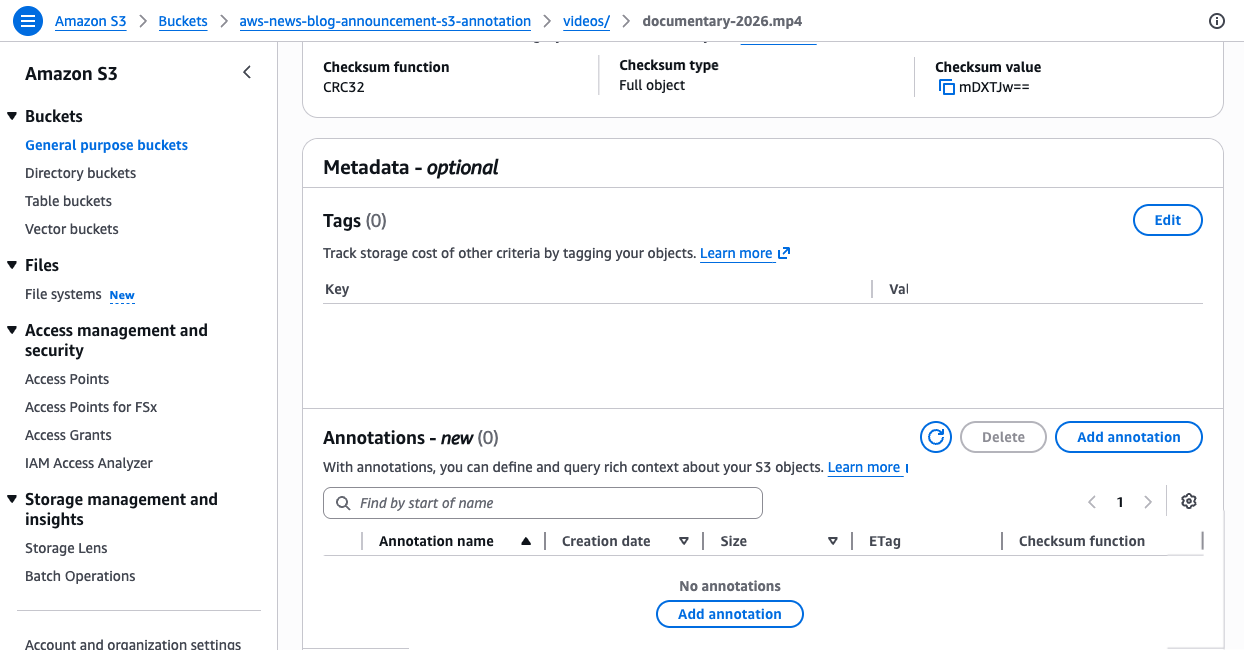
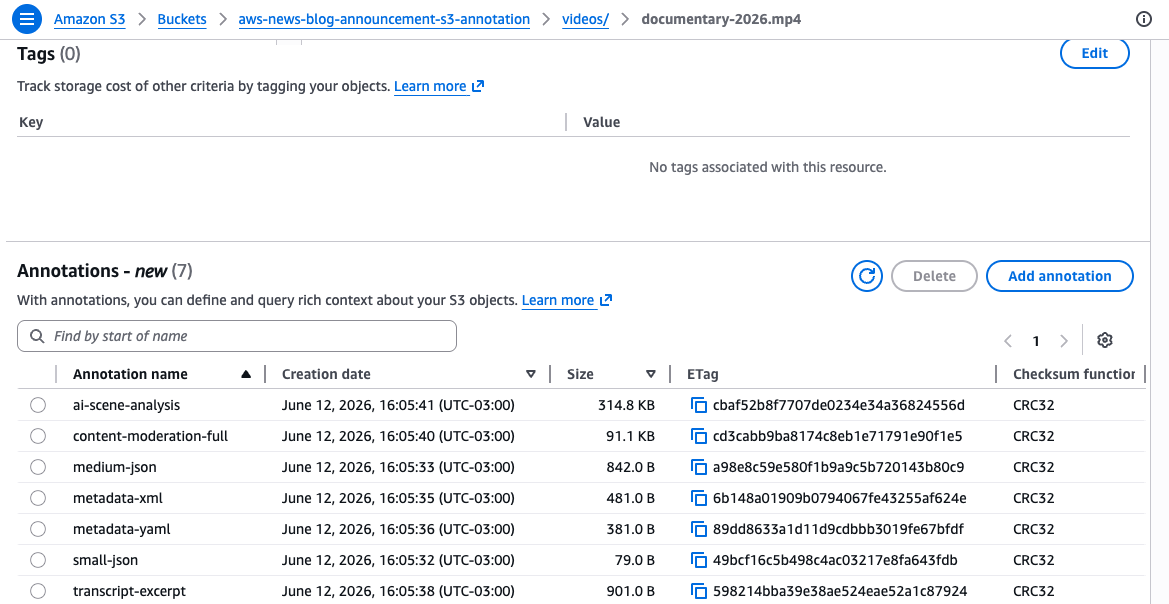

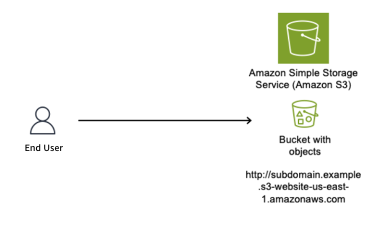
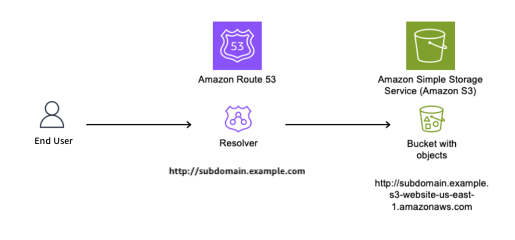
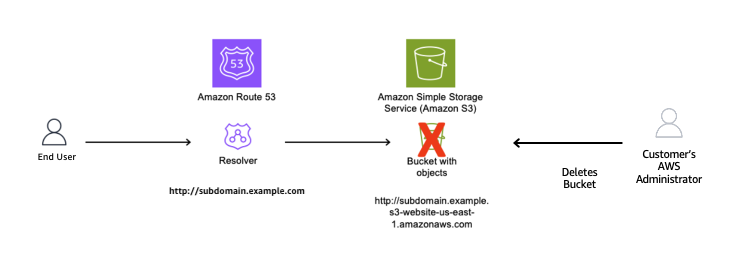
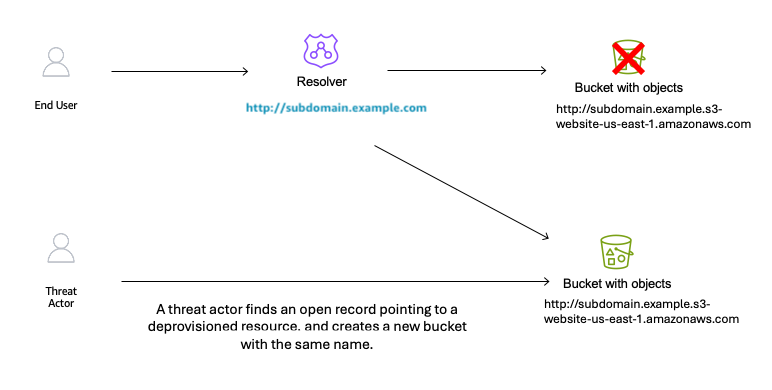
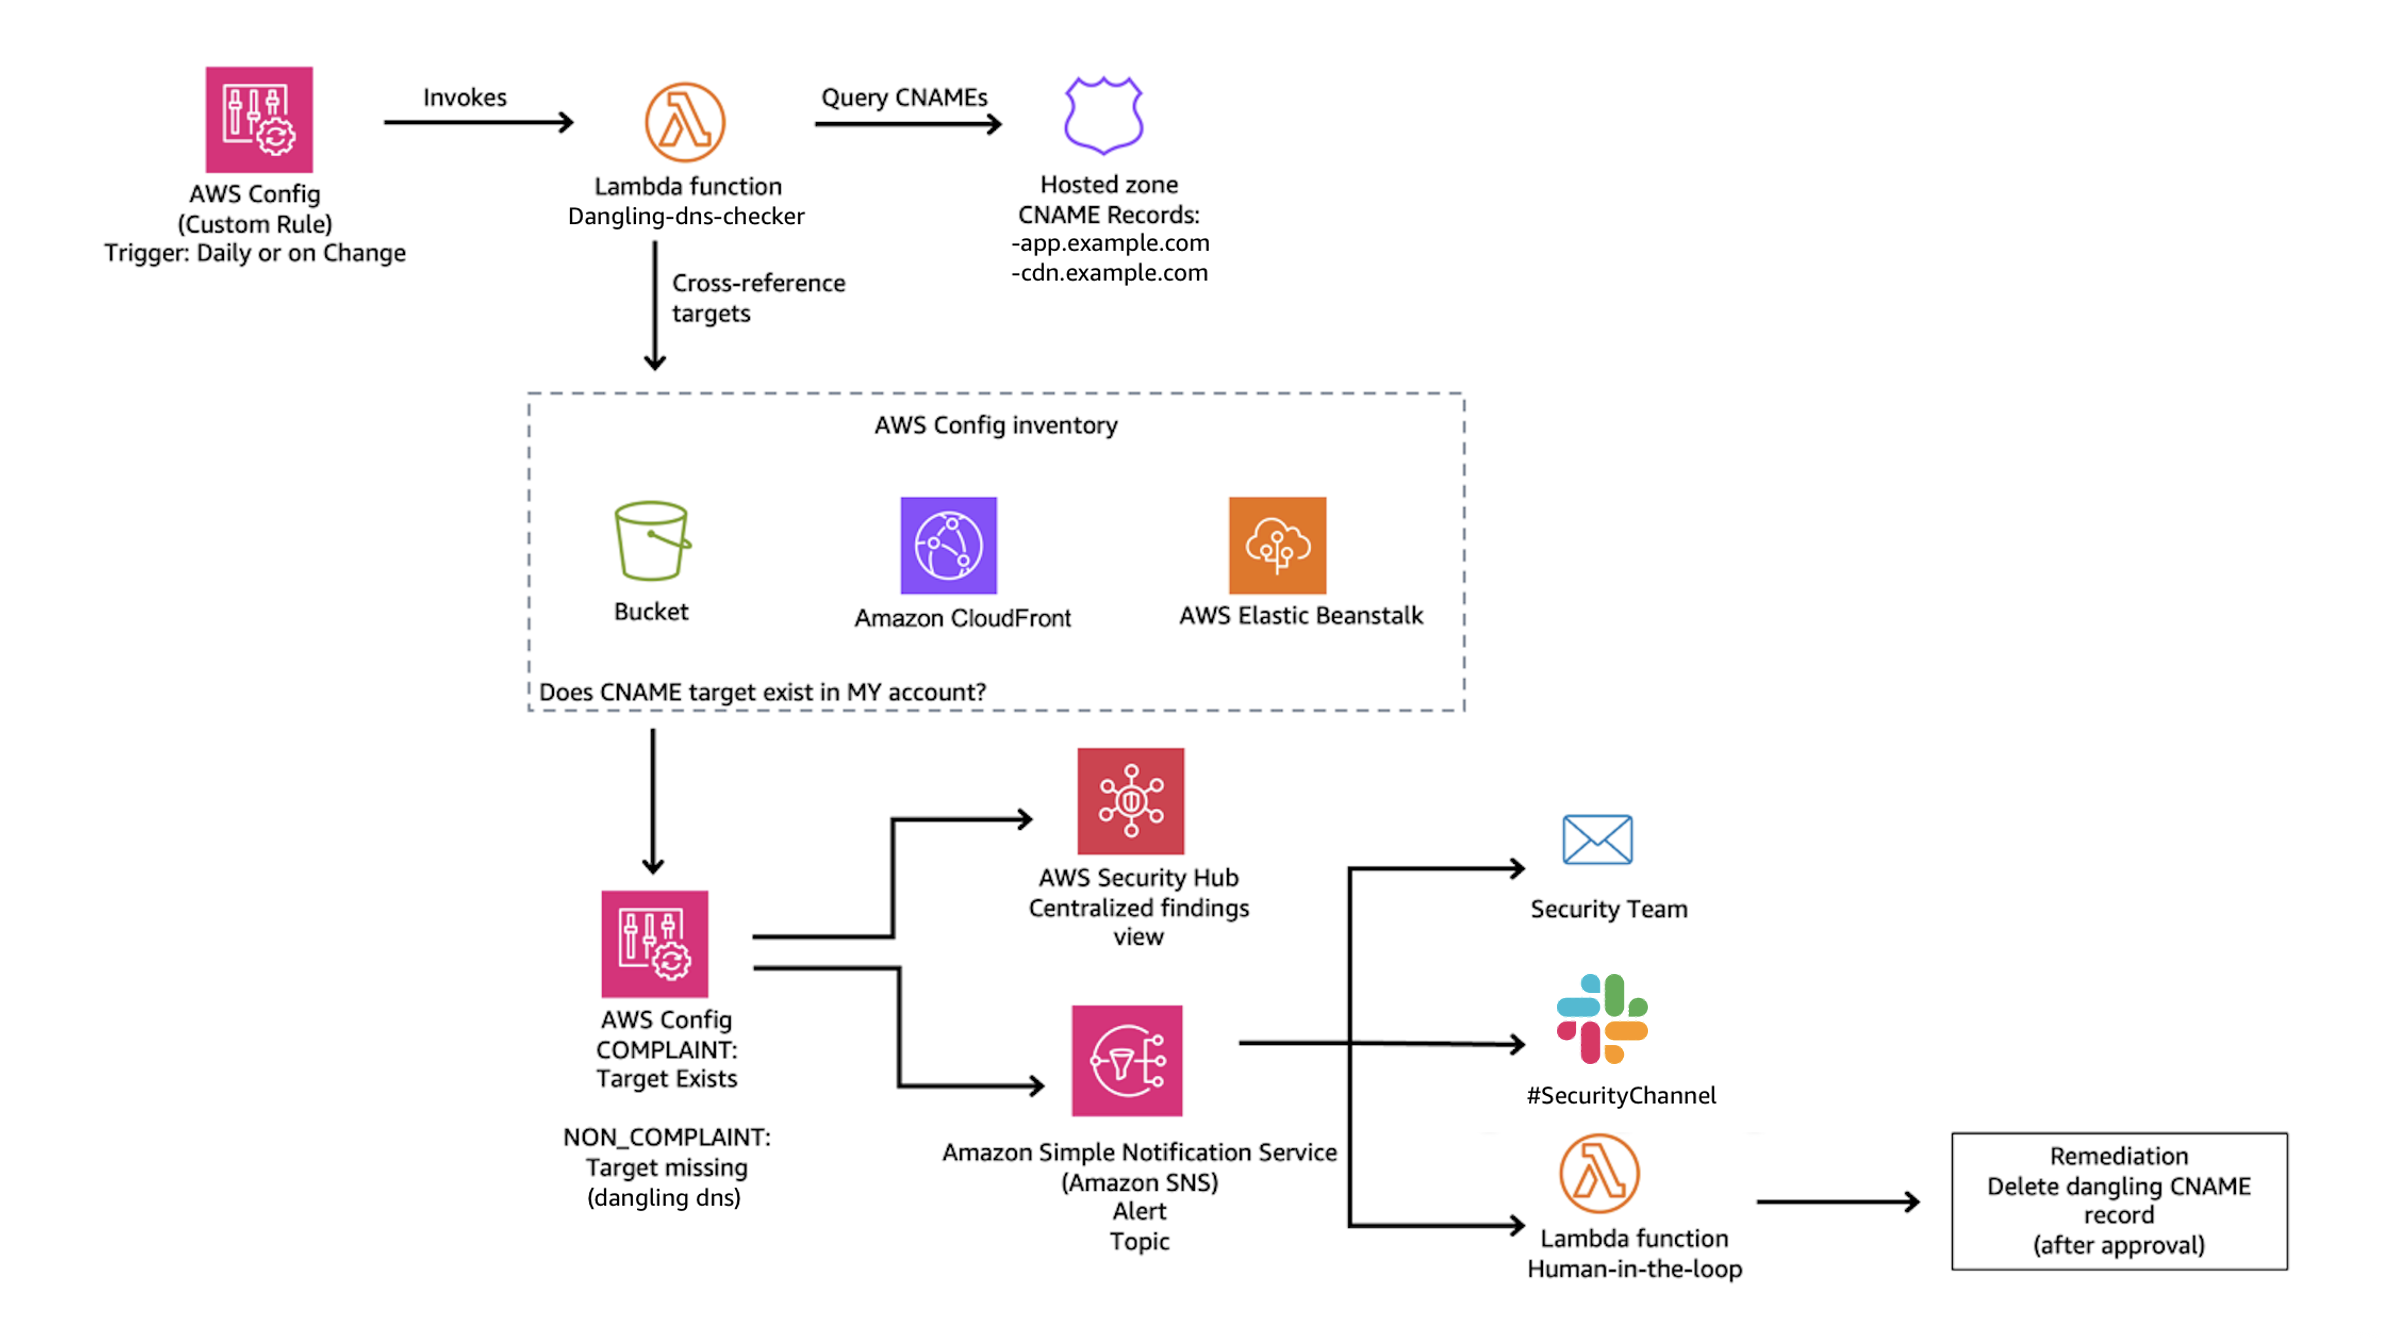
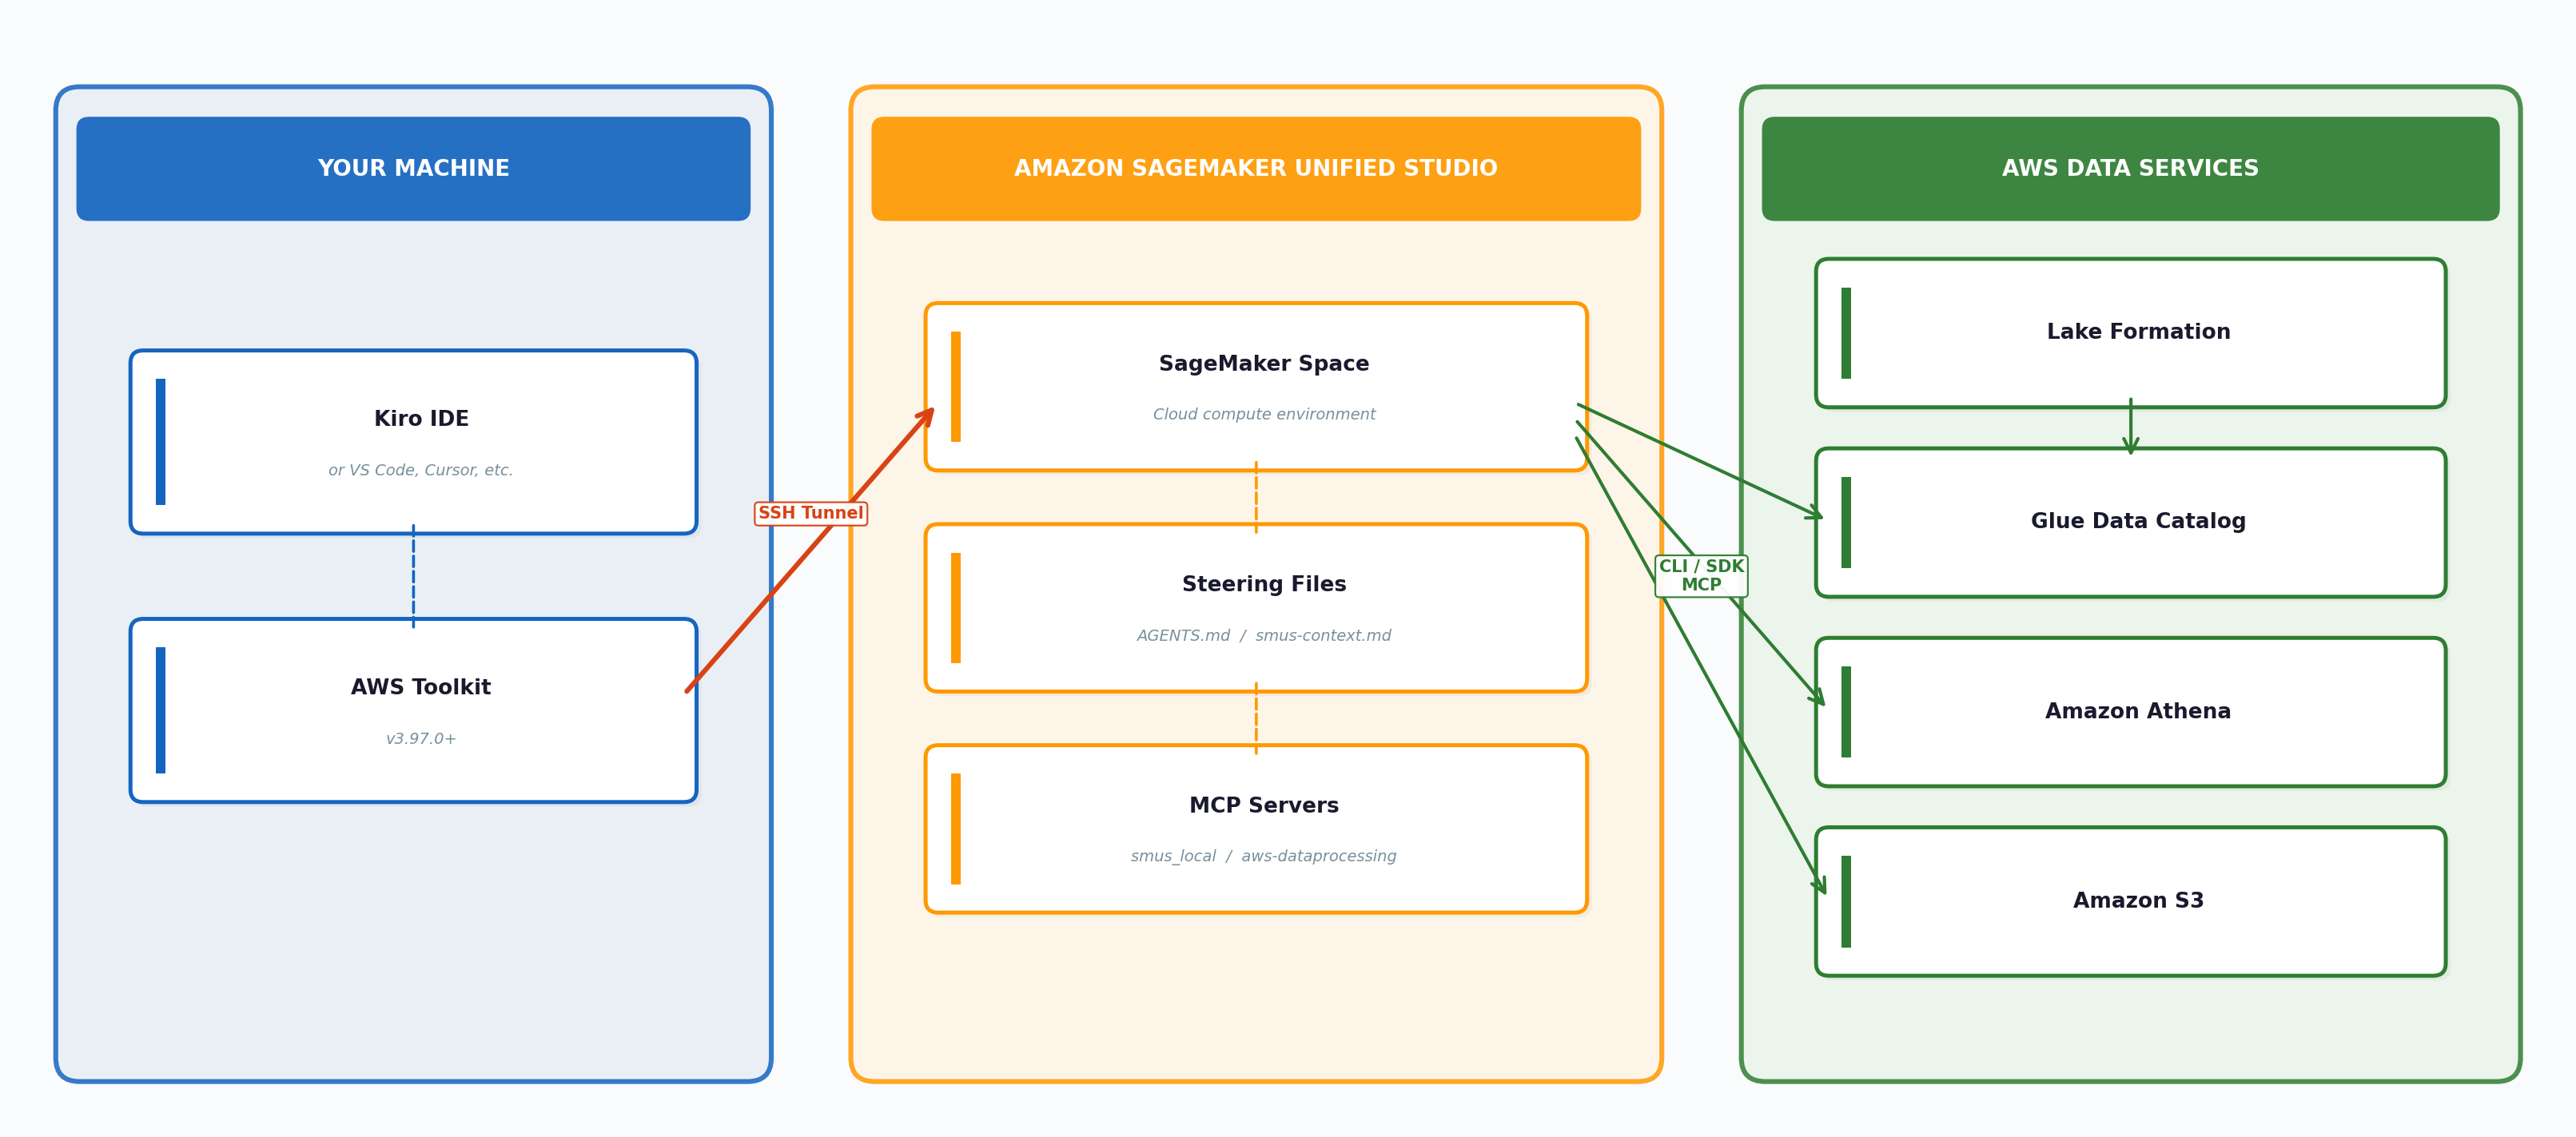
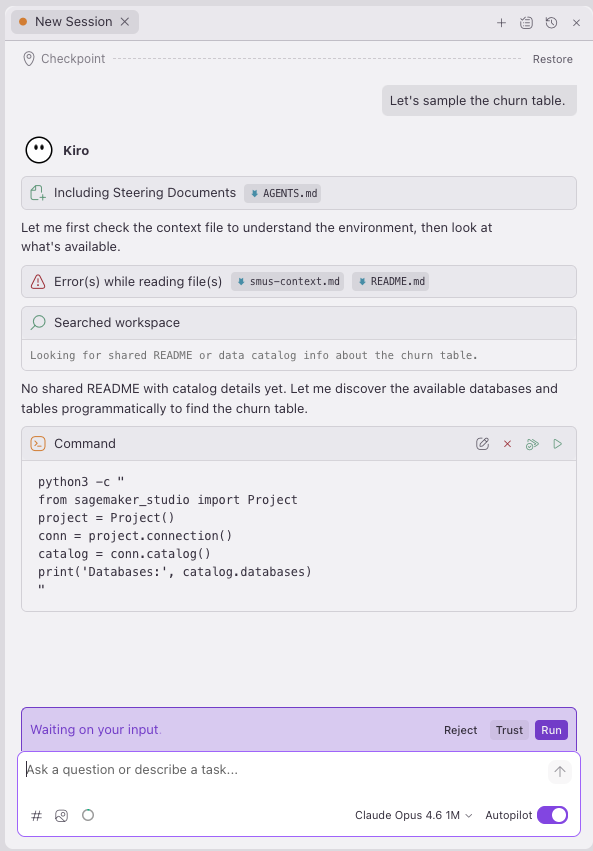
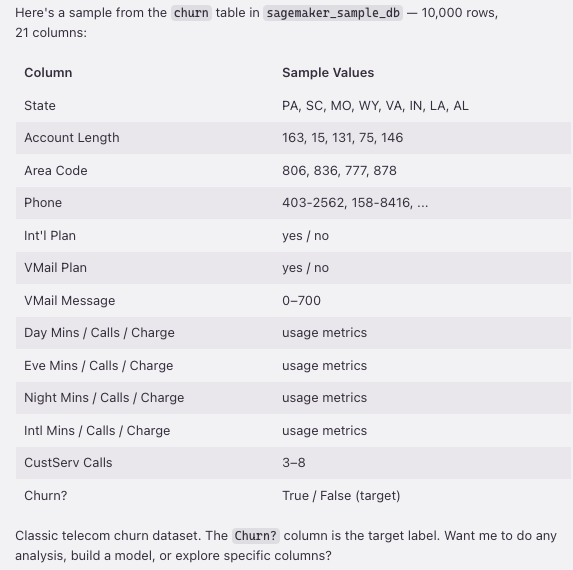
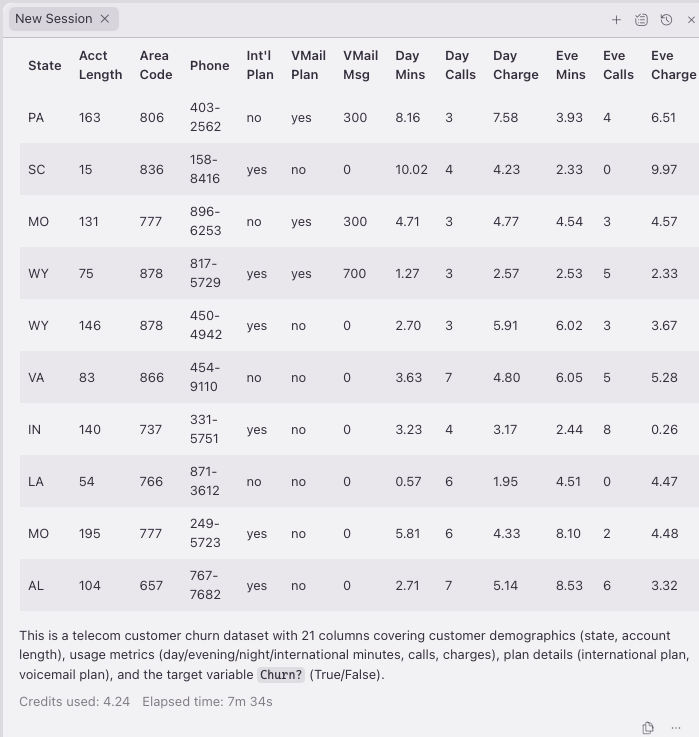
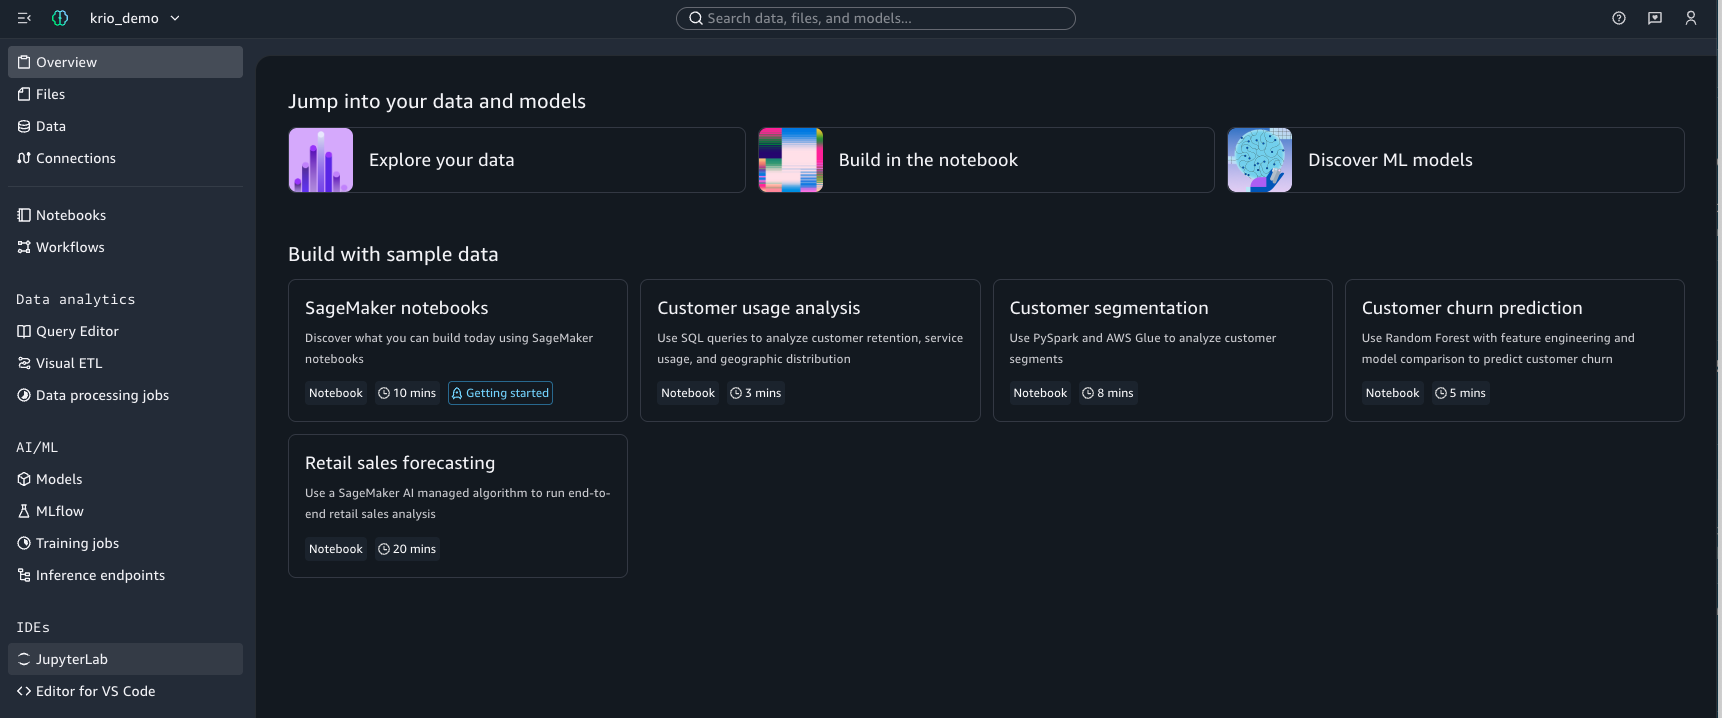
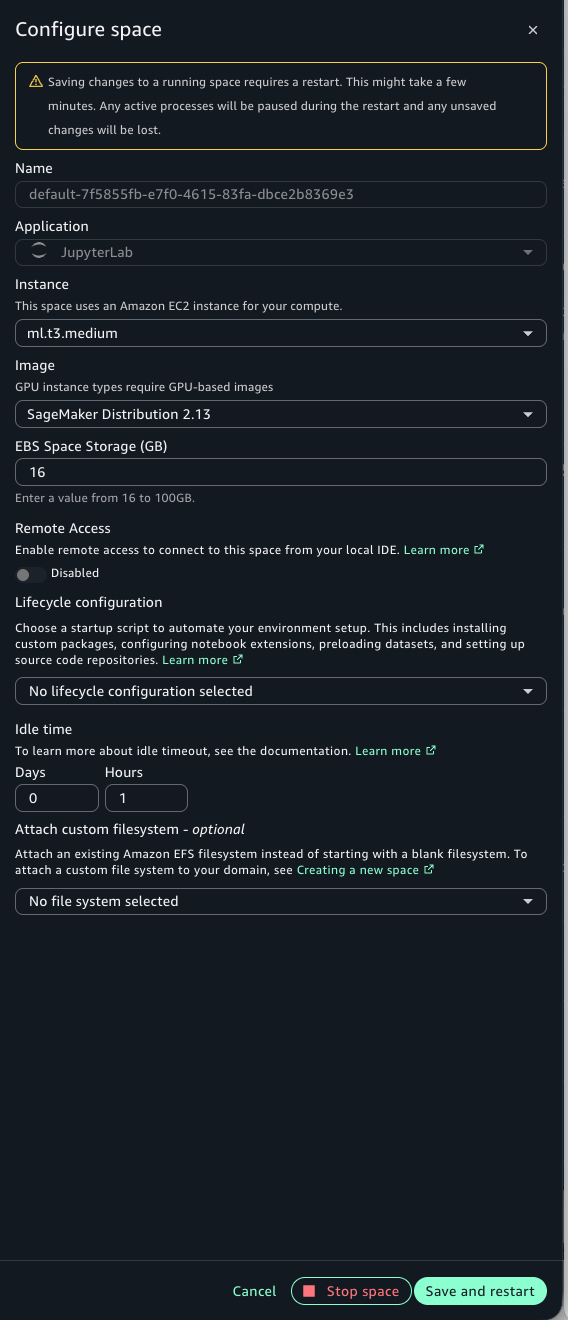
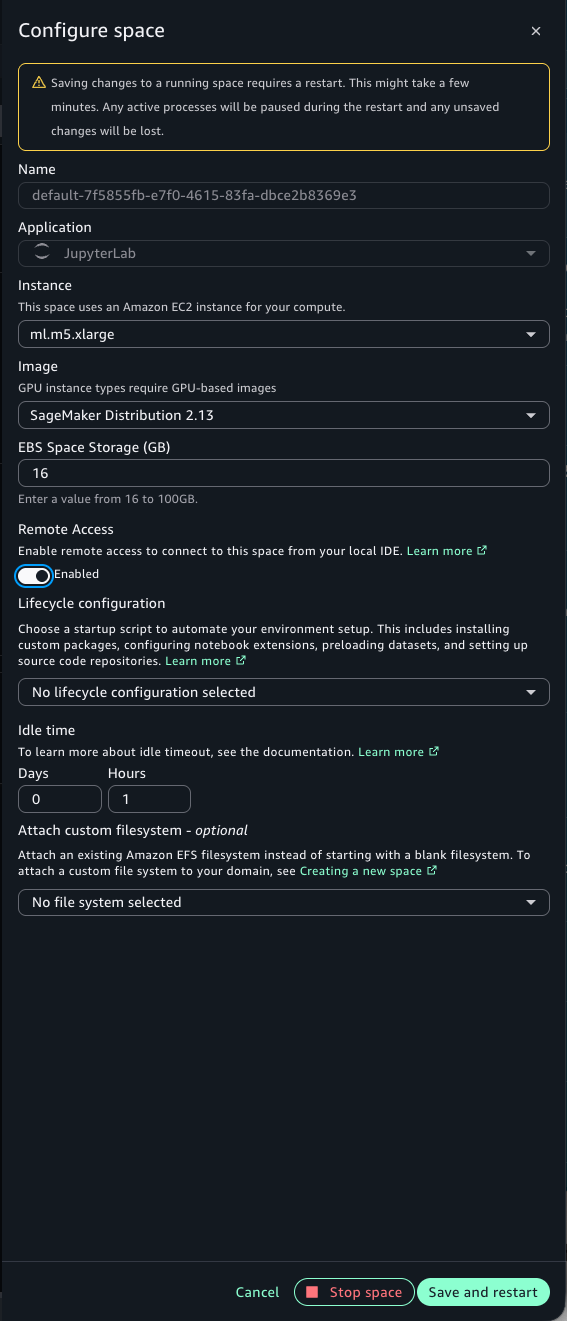
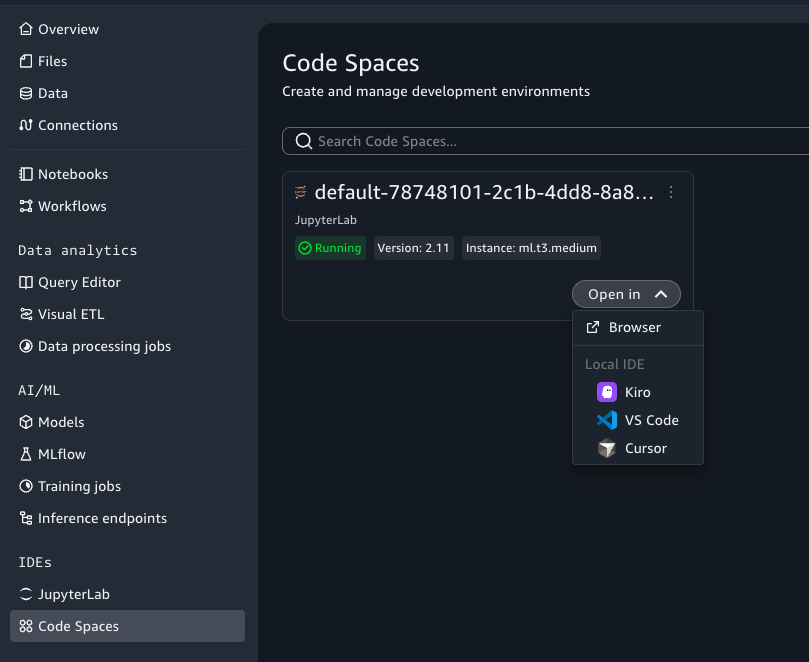
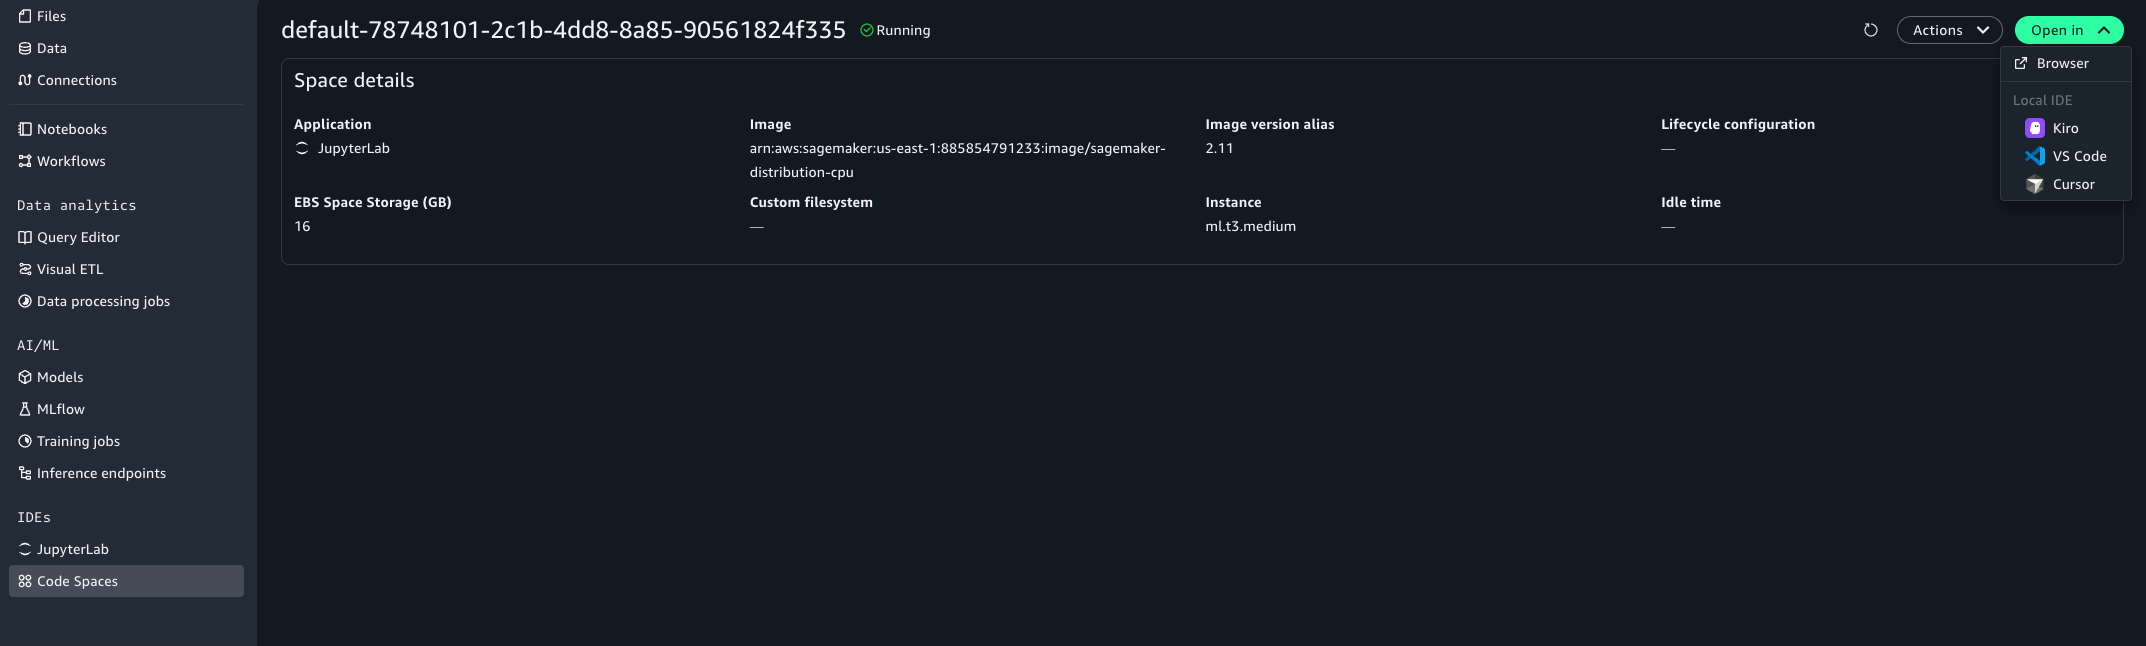
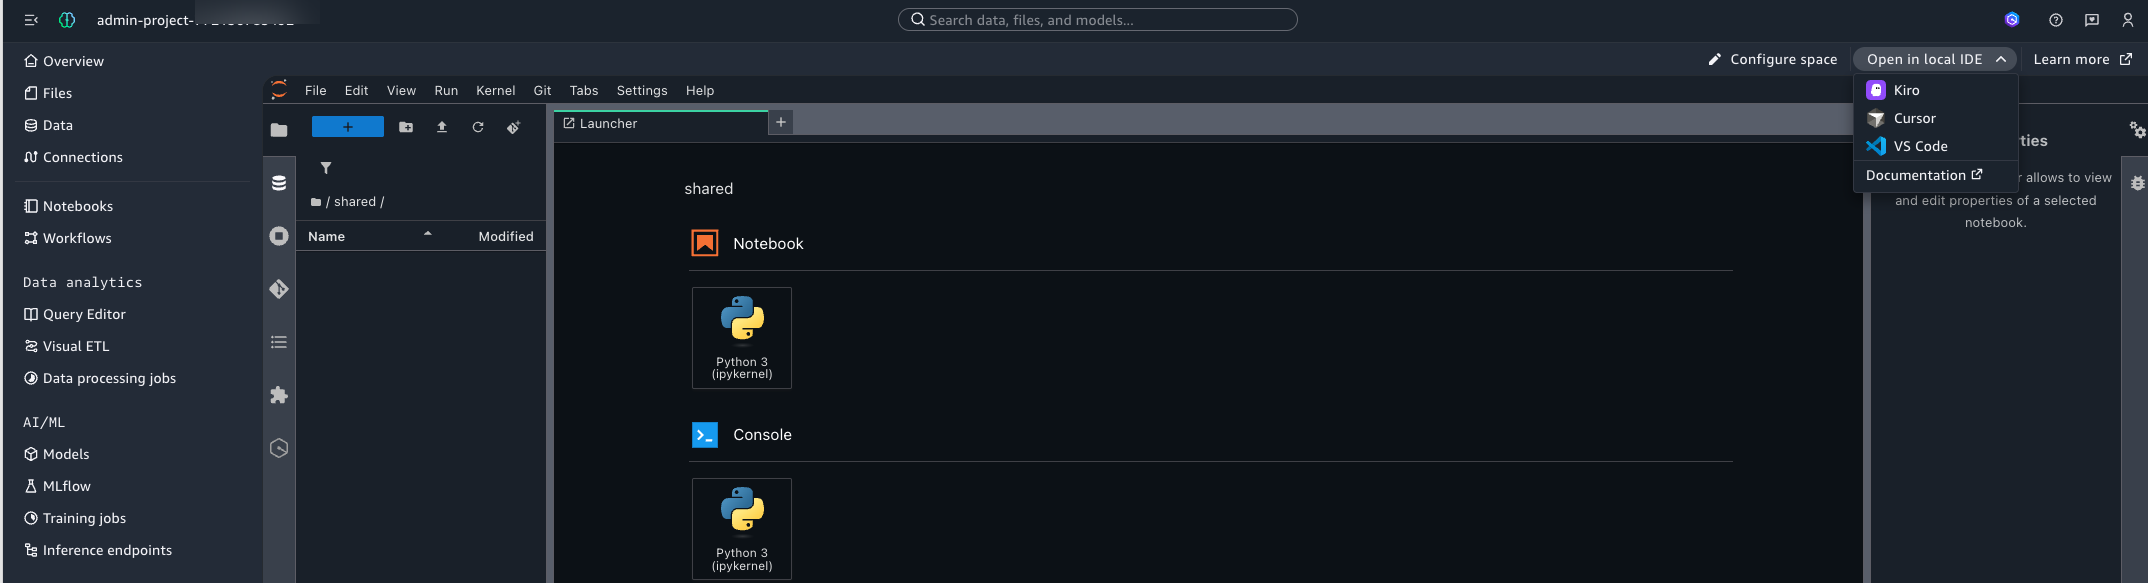
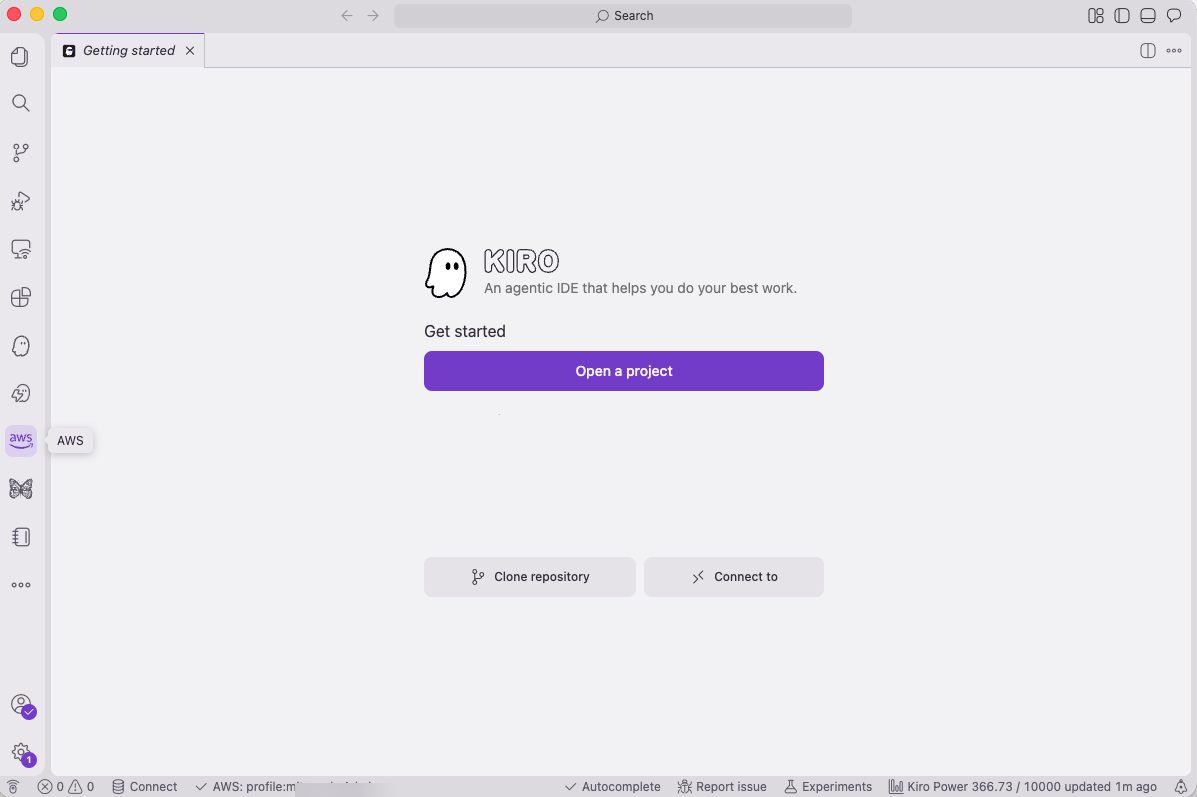
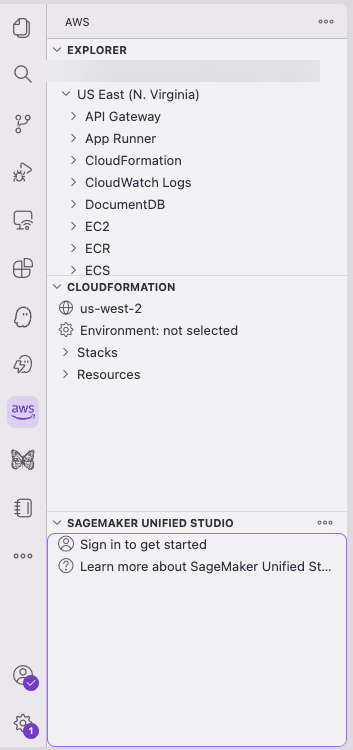

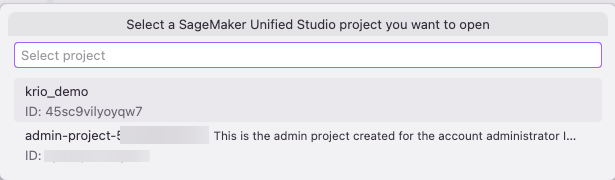
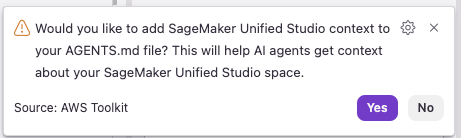
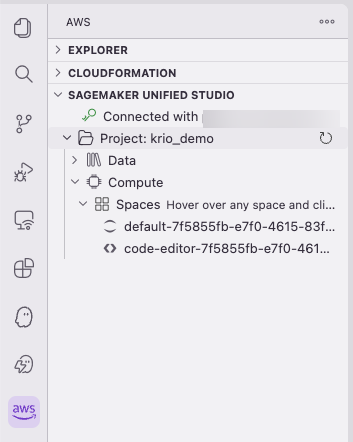
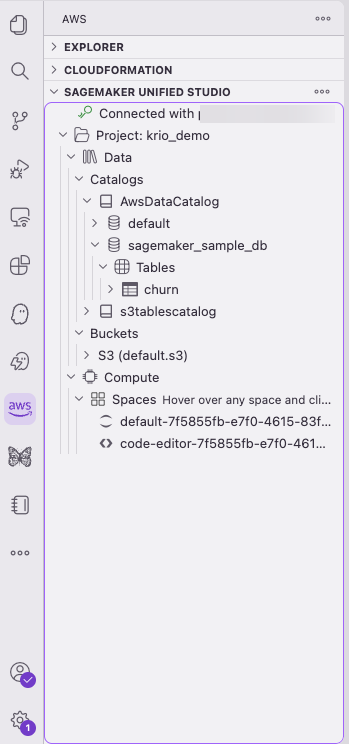

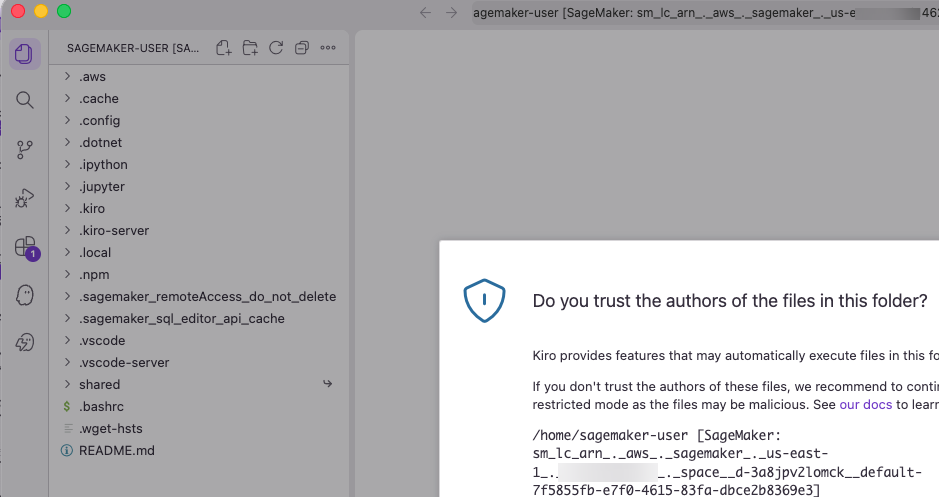
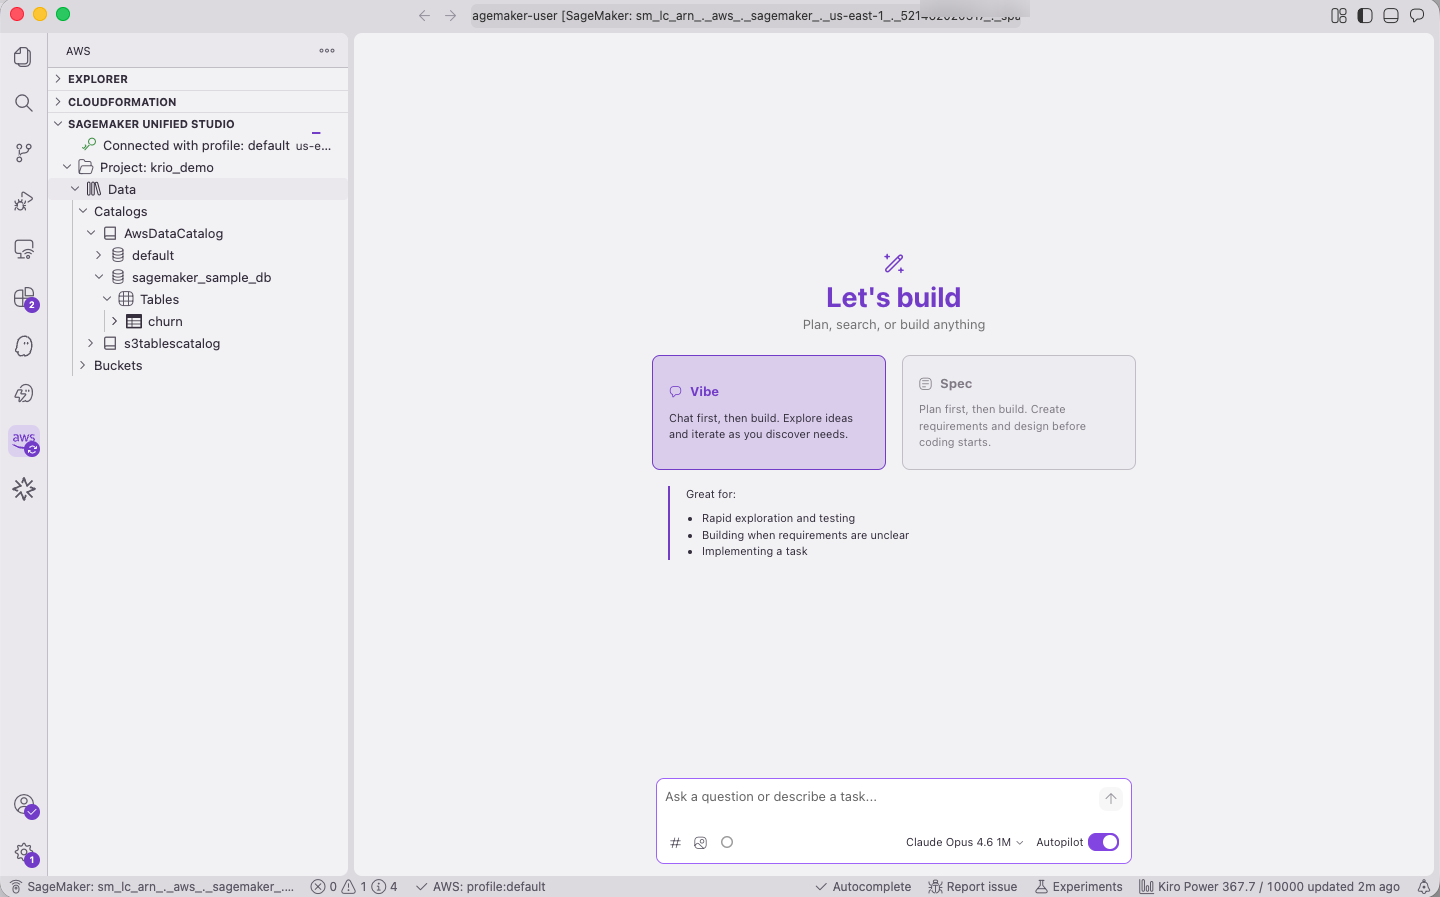
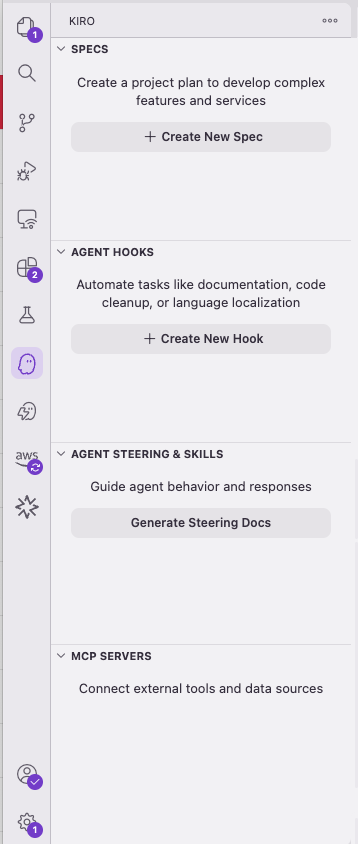
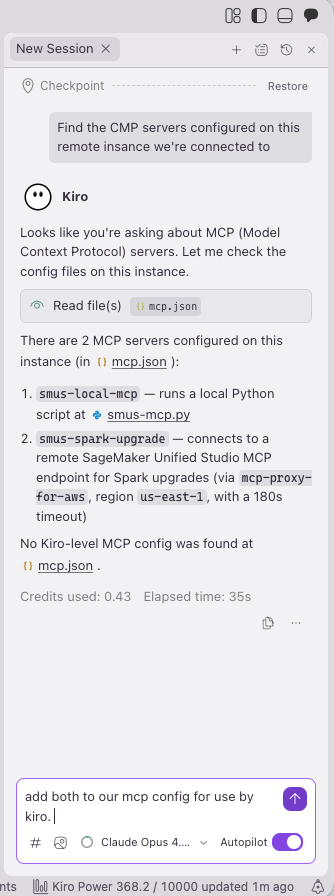

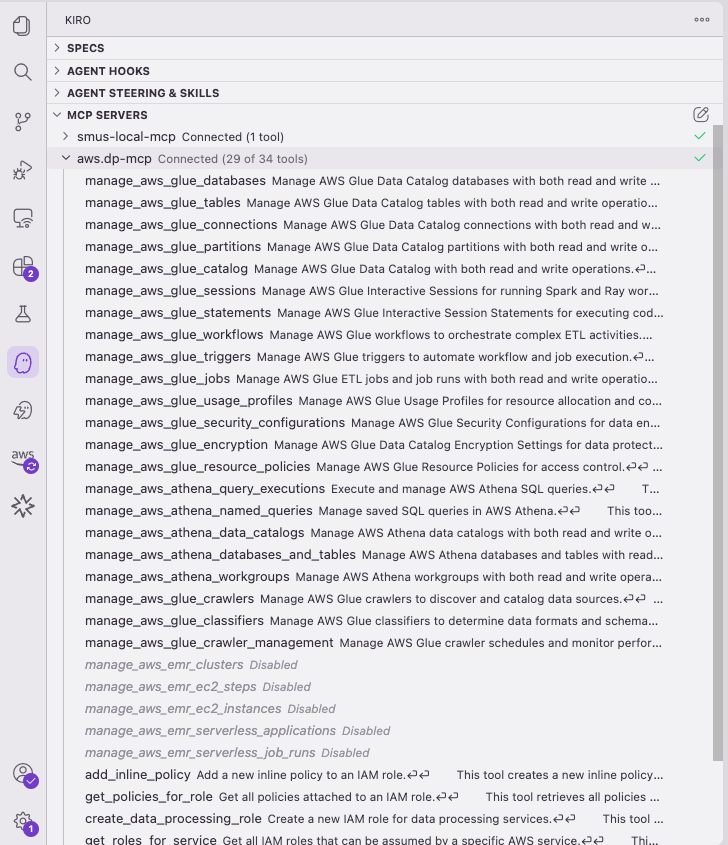

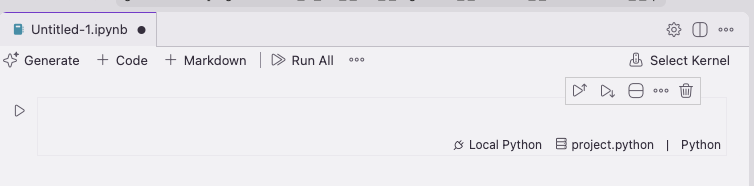
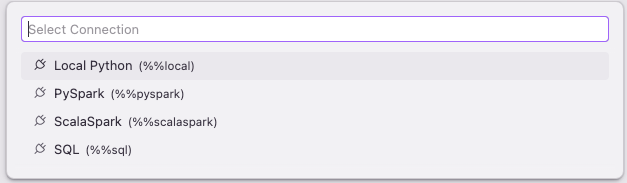
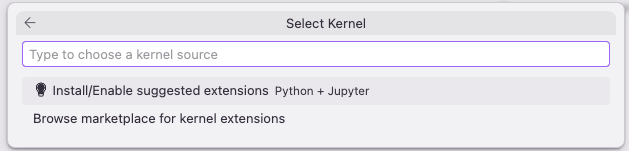
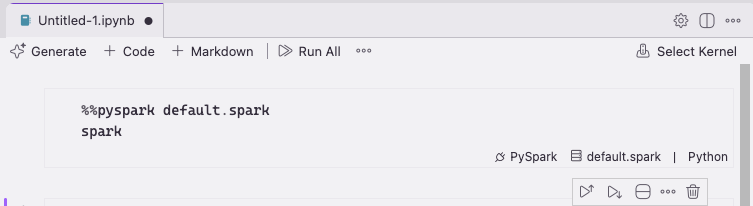
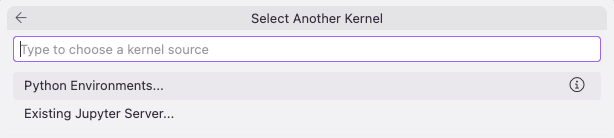
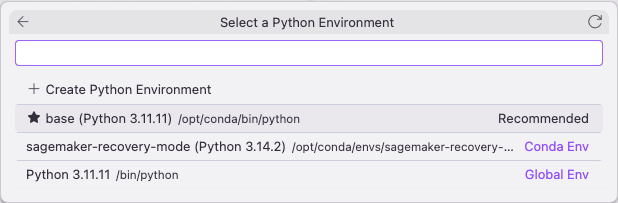
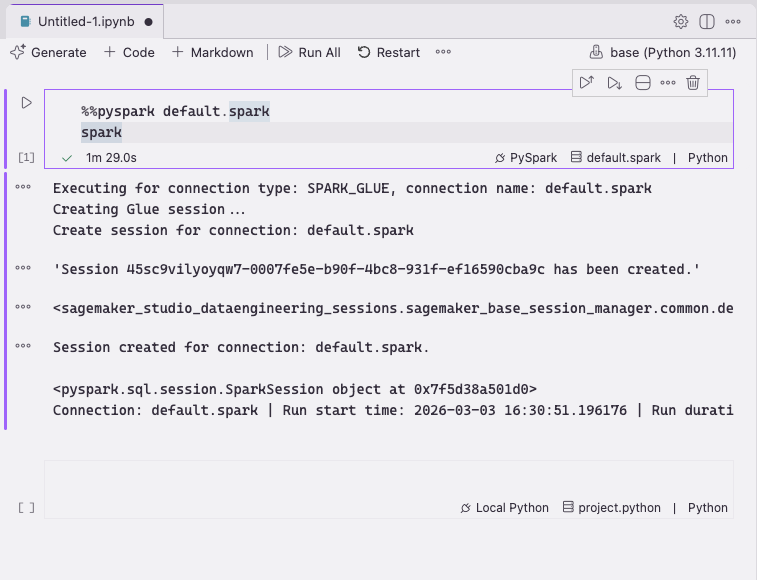
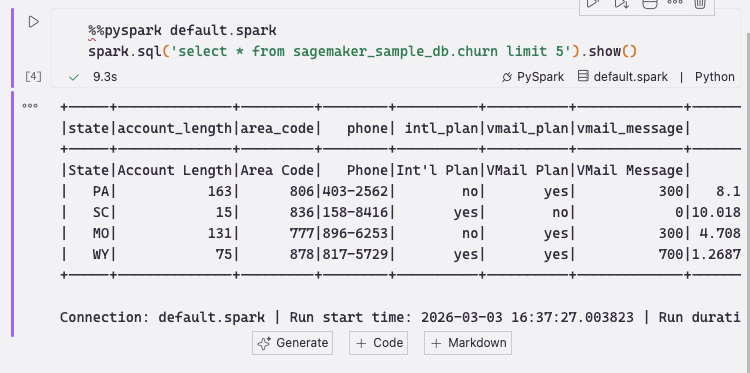
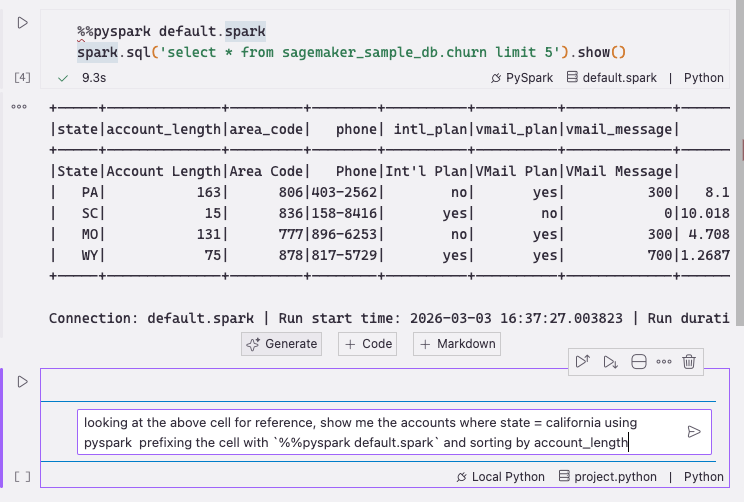
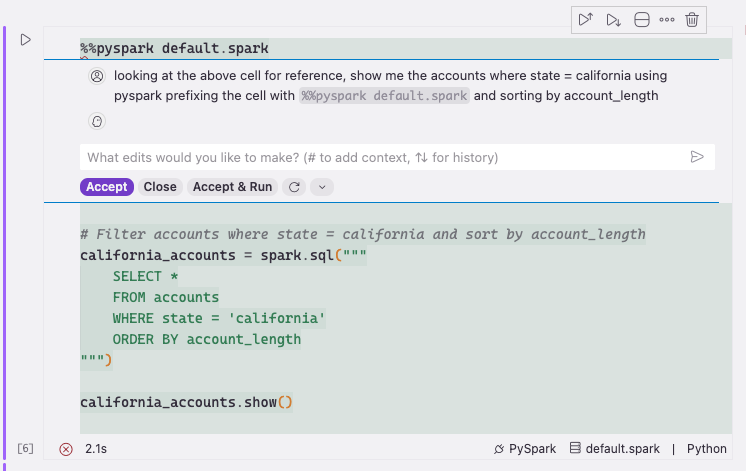
![[Topic
list screenshot]](https://lwn.net/images/2026/topiclist.png)