4 Reasons Why MSPs & MSSPs Need to Enhance Attack Surface Management

Post Syndicated from Sid Nanda original https://blog.rapid7.com/2025/02/06/4-reasons-why-msps-and-mssps-need-attack-surface-management/

4 Reasons Why MSPs & MSSPs Need to Enhance Attack Surface Management

In today’s rapidly evolving digital landscape, Managed Service Providers (MSPs) and Managed Security Service Providers (MSSPs) face increasing challenges. As businesses expand their digital footprints, MSPs and MSSPs are under pressure to deliver comprehensive security services while managing costs, streamlining operations, and addressing client-specific vulnerabilities. Operating without a robust Attack Surface Management (ASM) solution can leave significant gaps in security, efficiency, and scalability—limiting growth and leaving clients vulnerable to modern threats.

Here are four key reasons why enhancing attack surface management should be a top priority for MSPs and MSSPs:

1. Streamlined Onboarding with Automated Asset Discovery

The Challenge: For many MSPs and MSSPs, onboarding new clients can be a time-consuming process, particularly when it comes to manual asset discovery and correlation. Without automation, teams often spend weeks sorting, deduplicating, and organizing data across different tools, delaying time-to-value for clients.

Why ASM Matters: An effective ASM solution automates asset discovery and provides near real-time insights into a client’s digital footprint. This reduces onboarding times significantly, allowing MSPs and MSSPs to bring more clients on board faster. By eliminating manual inefficiencies, teams can focus on delivering strategic services, enhancing client satisfaction, and scaling operations.

2. Improved Risk Assessment and Cost Predictability

The Challenge: Accurately predicting operational expenditures (OpEx) can be challenging  without full visibility into a client’s vulnerabilities and risks. This uncertainty often leads to unexpected costs during service delivery, affecting both profitability and client relationships.

Why ASM Matters: With a comprehensive ASM solution, MSPs and MSSPs can assess risks upfront and forecast potential costs with greater accuracy. Knowing the full scope of vulnerabilities before committing to a client engagement allows for better resource allocation and informed decision-making.

The Opportunity: Risk assessment powered by ASM not only helps avoid financial surprises but also builds trust with clients. By providing clear, data-driven projections, MSPs and MSSPs can confidently structure pricing, demonstrating their value as proactive and reliable partners.

3. Enhanced Service Offerings and Revenue Opportunities

The Challenge: Many MSPs and MSSPs struggle to differentiate their services in a crowded market. Without advanced tools to uncover vulnerabilities or prioritize remediation efforts, security offerings may appear standardized , making it harder to justify premium pricing.

Why ASM Matters: An ASM solution enables providers to offer more advanced, proactive services such as continuous monitoring, exposure mitigation, and tailored remediation plans. These capabilities not only enhance the value of core services but also create opportunities to upsell additional offerings like managed detection and response (MDR) or threat intelligence services.

The Opportunity: By leveraging ASM, MSPs and MSSPs can position themselves as strategic partners, delivering measurable results that align with client objectives. This differentiation fosters client loyalty and opens the door to new revenue streams.

4. Breaking Down Operational Silos for Better Collaboration

The Challenge: Operational silos between NetOps, SecOps, and CloudOps can hinder effective communication and delay incident response. When teams work in isolation, identifying and addressing vulnerabilities becomes a fragmented process, increasing response times and risks.

Why ASM Matters: A unified ASM platform provides a single pane of glass for all operational teams, enabling seamless collaboration. With shared access to real-time data, teams can align on priorities, streamline workflows, and coordinate remediation efforts effectively.

The Opportunity: Better collaboration leads to faster response times, reduced operational friction, and stronger client outcomes. By eliminating silos, MSPs and MSSPs can deliver a more cohesive and reliable service, strengthening their reputation and competitiveness.

Why Consider Rapid7 Exposure Command?

While the need for a robust ASM solution is clear, not all platforms are created equal. Rapid7’s Exposure Command delivers advanced capabilities designed to meet the unique challenges faced by MSPs and MSSPs, including:

  • Comprehensive Visibility: A continuous 360° view of attack surfaces across hybrid environments.
  • Proactive Mitigation: Threat-aware risk context to prioritize and eliminate high-priority exposures.
  • Enhanced Scalability: Automation and integrations that support efficient scaling as your business grows.

By adopting these solutions, MSPs and MSSPs can future-proof their services, providing clients with the security and reliability they need in today’s threat landscape.

The Bottom Line

Incorporating a strong ASM strategy is no longer optional for MSPs and MSSPs. It’s a necessity for staying competitive, delivering exceptional client value, and unlocking new revenue opportunities. By addressing onboarding inefficiencies, improving risk predictability, enhancing service offerings, and fostering cross-functional collaboration, ASM empowers providers to rise to the challenges of modern cybersecurity.

If you’re ready to take your attack surface management capabilities to the next level, consider Rapid7’s Exposure Command. With this tool, you can confidently navigate today’s complex threat landscape and set your business apart as a leader in managed security services.

Близнаците от NASA и ключът към живота ни в Космоса

Post Syndicated from original https://www.toest.bg/bliznatsite-ot-nasa-i-klyuchut-kum-zhivota-ni-v-kosmosa/

Изследването с близнаците

Близнаците от NASA и ключът към живота ни в Космоса

Засега познанията ни за взаимодействията на човешкото тяло с космическата околна среда на молекулярно ниво са сравнително ограничени. Космическата радиация, специфичната диета в Космоса, намалената физическа активност, нарушеният биологичен часовник и безтегловността влияят на имунитета и метаболизма на човека.

Информация за здравословното състояние на астронавтите биха дали биомаркерите (​​гени, свързани с функциите на имунната система, с поправката на ДНК, с развитието на рак – т.нар. протоонкогени, и др.). Биомаркерите, които представляват научен интерес, са част от генома, епигенома и метаболома. Освен за здравето на астронавтите, те биха могли да дадат и насоки за изготвяне на персонализирани планове за превенция на заболявания, свързани със средата в Космоса.

Въпреки че познанията ни за последствията от престоя в Космоса на физиологично ниво се увеличават непрекъснато през последните над 20 години, те са в резултат на краткосрочни мисии – 4 до 6 месеца престой на Международната космическа станция (МКС). До момента само четирима души са участвали в космически мисии с голяма продължителност (една година и повече). Погледът към бъдещето предполага по-дълги космически мисии (до три години), включително и до Марс, за които е необходима сериозна подготовка.

NASA избира еднояйчните близнаци Скот и Марк Кели за уникална мисия, за да се проучи влиянието на околната среда в Космоса (микрогравитацията и радиацията) при дълги космически полети (над една година). Двамата близнаци са астронавти на NASA, но не са били изпращани на мисии в Космоса четири години преди проучването. Скот е избран да престои една година на Международната космическа станция, а неговото генетично копие – брат му Марк, е т.нар. контрола на експеримента и остава на Земята. Мисията е с продължителност почти година – от 27 март 2015 г. до 1 март 2016 г.

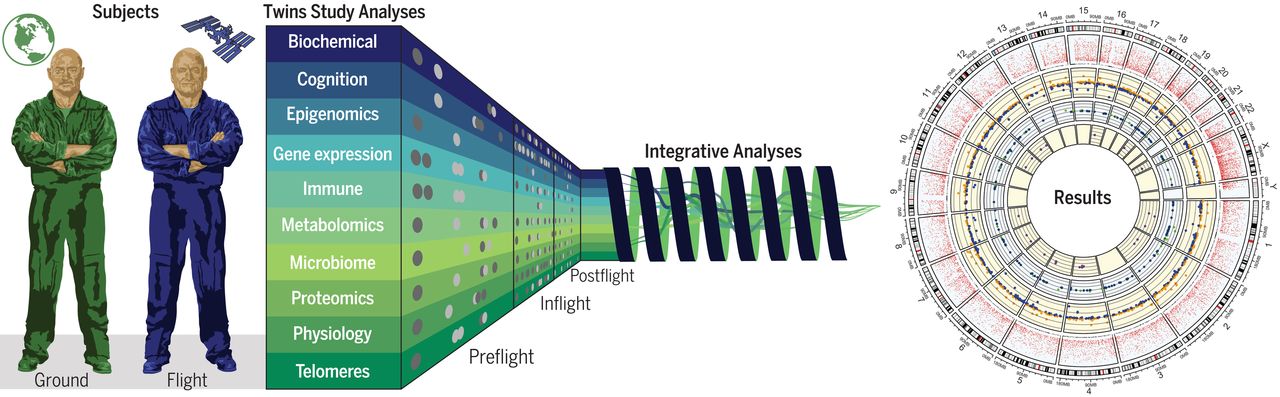
Биологичните проби от близнаците, събрани за периода на експеримента са 317 (кръв, урина, изпражнения). Проведени са изследвания, свързани с епигенетични промени, и са подложени на молекулярна диагностика на различни омикс нива – метаболом, транскриптом, протеом, микробиом и геном (виж фиг. 1). Освен това Скот и Марк Кели са били тествани преди и след космическата мисия.

Близнаците от NASA и ключът към живота ни в Космоса
Фигура 1. Мултидисциплинарно изследване на NASA с близнаци. Еднояйчните близнаци са изследвани на 10 биологични нива преди, по време и след космическия полет на единия близнак (другият служи за контрола). Източник: Francine E. Garrett-Bakelman et al. ,The NASA Twins Study: A multidimensional analysis of a year-long human spaceflight. Science 364, eaau8650(2019). DOI:10.1126/science.aau8650

Човешкият геном в космически условия

Част от изследванията са фокусирани върху нарушения в хромозомите в резултат на излагане на йонизираща радиация по време на полет в Космоса. Нарушенията могат да бъдат транслокации вътре в хромозомата (пренареждане на сегменти от хромозомите) и инверсии (сегменти от хромозомата с обърната посока). Транслокациите са отговорни за развитието на заболявания като рак, стерилитет, синдром на Даун и др. Инверсиите могат да доведат до промени в експресията на гените, например някои протеини да не се произвеждат, както и до генетични заболявания, като хемофилия.

Резултатите от изследването сочат, че при Скот Кели (близнака в Космоса) инверсиите се увеличават в сравнение с транслокациите. Тези данни съвпадат със силата на излагането на радиация в Космоса, тоест знаем, че при излагането на космическа радиация се случва именно това.

Наблюдават се и промени в експресията на някои гени. С повишена експресия са гените, отговорни за поправка на ДНК. Причината е, че е необходимо да произвеждат повече белтъци, които отговарят за поправката на ДНК при възникнали грешки. Това означава, че тялото е изложено на по-голямо количество мутагенни фактори. Честотата на хромозомните инверсии се повишава дори и след полета, което би могло да се обясни с повреди в ДНК на стволовите клетки след излагане на космическа радиация. Други данни от изследването сочат, че втората половина на полета (от 6-тия до 12-тия месец) води до увеличаване на промените в генома.

Част от гените не възстановяват нормалната си експресия шест месеца след връщането на Скот на Земята. Тези гени (811 на брой в различни видове клетки) са свързани с функциите на имунната система и поправката на ДНК.

Стареенето на Земята и в Космоса

Теломерите са повтарящи се структури в краищата на хромозомите. Те са изключително важни за поддържането на целостта на генома, тъй като защитават физическите краища на ДНК от разграждане. Теломерите се скъсяват с клетъчното делене и с възрастта, както и при различни фактори на начина на живот, като стрес, замърсяване на въздуха и радиация.

В изследването на близнаците от NASA средната дължина на теломерите е оценена преди, по време и след космическия полет на Скот Кели. Най-съществено увеличение на дължината на теломерите се наблюдава по време на космическия полет (в сравнение с дължината им преди и след него, както и в сравнение с теломерите на Марк, който остава на Земята). Изненадващо, при завръщането на Скот дължината на теломерите се скъсява до средните стойности преди полета само за 48 часа. С други думи, в Космоса стареенето се е забавило и после за 48 часа се е върнало към обичайното за Земята, което при всички положения е страшно интересно, и предстои да научим защо става точно така.

Специфичното за космическите полети удължаване на теломерите, наблюдавано в това проучване, е в съответствие с подобни открития при астронавти, които са имали по-кратък престой (около 6 месеца) на МКС. Въпреки това механизмите и последиците от удължаването на теломерите в космически условия не са изяснени. С по-дълги теломери се свързват здравословният начин на живот, включващ състоянието на метаболизма, диетата, физическата активност и телесното тегло. В тази връзка, по време на полета Скот Кели е бил с намалено телесно тегло и повишени нива на фолат в серума, което може да обясни удължаването на теломерите.

Изводи от проучването и поглед към бъдещето

Установените промени в човешкото тяло на молекулярно ниво при продължителен престой в Космоса биха могли да дадат насоки за предпазване на здравето при дълги мисии. Недостатък на изследването с близнаците е, че не e статистически значимо, защото в него участват само един обект и една контрола и не е изключено установените различия да се дължат на случайни събития.

Изследването е първа крачка към още подобни проучвания с други астронавти. От NASA планират да изпращат по десет астронавти за различни периоди (шест месеца, една година), а на Земята да има контролни индивиди в изолирана среда.

Междувременно Скот Кели ще бъде наблюдаван и тестван веднъж годишно, докато е жив, с надеждата да получим отговор на непрекъснато възникващите въпроси, свързани с живота на човека в Космоса.

AIs and Robots Should Sound Robotic

Post Syndicated from Bruce Schneier original https://www.schneier.com/blog/archives/2025/02/ais-and-robots-should-sound-robotic.html

Most people know that robots no longer sound like tinny trash cans. They sound like Siri, Alexa, and Gemini. They sound like the voices in labyrinthine customer support phone trees. And even those robot voices are being made obsolete by new AI-generated voices that can mimic every vocal nuance and tic of human speech, down to specific regional accents. And with just a few seconds of audio, AI can now clone someone’s specific voice.

This technology will replace humans in many areas. Automated customer support will save money by cutting staffing at call centers. AI agents will make calls on our behalf, conversing with others in natural language. All of that is happening, and will be commonplace soon.

But there is something fundamentally different about talking with a bot as opposed to a person. A person can be a friend. An AI cannot be a friend, despite how people might treat it or react to it. AI is at best a tool, and at worst a means of manipulation. Humans need to know whether we’re talking with a living, breathing person or a robot with an agenda set by the person who controls it. That’s why robots should sound like robots.

You can’t just label AI-generated speech. It will come in many different forms. So we need a way to recognize AI that works no matter the modality. It needs to work for long or short snippets of audio, even just a second long. It needs to work for any language, and in any cultural context. At the same time, we shouldn’t constrain the underlying system’s sophistication or language complexity.

We have a simple proposal: all talking AIs and robots should use a ring modulator. In the mid-twentieth century, before it was easy to create actual robotic-sounding speech synthetically, ring modulators were used to make actors’ voices sound robotic. Over the last few decades, we have become accustomed to robotic voices, simply because text-to-speech systems were good enough to produce intelligible speech that was not human-like in its sound. Now we can use that same technology to make robotic speech that is indistinguishable from human sound robotic again.

A ring modulator has several advantages: It is computationally simple, can be applied in real-time, does not affect the intelligibility of the voice, and—most importantly—is universally “robotic sounding” because of its historical usage for depicting robots.

Responsible AI companies that provide voice synthesis or AI voice assistants in any form should add a ring modulator of some standard frequency (say, between 30-80 Hz) and of a minimum amplitude (say, 20 percent). That’s it. People will catch on quickly.

Here are a couple of examples you can listen to for examples of what we’re suggesting. The first clip is an AI-generated “podcast” of this article made by Google’s NotebookLM featuring two AI “hosts.” Google’s NotebookLM created the podcast script and audio given only the text of this article. The next two clips feature that same podcast with the AIs’ voices modulated more and less subtly by a ring modulator:

Raw audio sample generated by Google’s NotebookLM

Audio sample with added ring modulator (30 Hz-25%)

Audio sample with added ring modulator (30 Hz-40%)

We were able to generate the audio effect with a 50-line Python script generated by Anthropic’s Claude. One of the most well-known robot voices were those of the Daleks from Doctor Who in the 1960s. Back then robot voices were difficult to synthesize, so the audio was actually an actor’s voice run through a ring modulator. It was set to around 30 Hz, as we did in our example, with different modulation depth (amplitude) depending on how strong the robotic effect is meant to be. Our expectation is that the AI industry will test and converge on a good balance of such parameters and settings, and will use better tools than a 50-line Python script, but this highlights how simple it is to achieve.

Of course there will also be nefarious uses of AI voices. Scams that use voice cloning have been getting easier every year, but they’ve been possible for many years with the right know-how. Just like we’re learning that we can no longer trust images and videos we see because they could easily have been AI-generated, we will all soon learn that someone who sounds like a family member urgently requesting money may just be a scammer using a voice-cloning tool.

We don’t expect scammers to follow our proposal: They’ll find a way no matter what. But that’s always true of security standards, and a rising tide lifts all boats. We think the bulk of the uses will be with popular voice APIs from major companies—and everyone should know that they’re talking with a robot.

This essay was written with Barath Raghavan, and originally appeared in IEEE Spectrum.

На второ четене: „Коларят на Смъртта“

Post Syndicated from Стефан Иванов original https://www.toest.bg/na-vtoro-chetene-kolaryat-na-smurtta/

„Коларят на Смъртта“ от Селма Лагерльоф

На второ четене: „Коларят на Смъртта“

превод от шведски Меглена Боденска, София: изд. „Лист“, 2021

Вместо въведение – писателски спиритичен сеанс. Представете си, че сте на вечеря с духовете на Достоевски, Дикенс и Едгар Алън По. Те пият тежко червено вино, обсъждат моралните падения на човечеството и някъде между диалектиката на вината и херменевтиката на покаянието изведнъж влиза една фина, но неумолима и волева скандинавка – Селма Лагерльоф. Оставя на масата тънък том със заглавието Körkarlen („Коларят на Смъртта“), оглежда всички с онзи особен поглед на човек, който знае, че разказът му е по-силен от тяхната логорея (надменно и снизходително, но може да си го позволи, знае си цената), и сяда, оставяйки произведението си да говори вместо нея.

Но защо този роман, публикуван през 1912 г., продължава да резонира и в XXI век? Защо той се нарежда сред тези литературни произведения, които не само разказват история, а изискват читателят да се превърне в техен съучастник?

Лагерльоф оставя след себе си внушително творчество, което смесва фолклор, мистицизъм и социална критика. Тя често изследва границите между реалността и фантастичното, превръщайки я в нещо като северен еквивалент на Габриел Гарсия Маркес, но с далеч по-суров климат и без тропически плодове.

Нужен е малко биографичен фон, който да препотвърди за пореден път, че с лични демони почти винаги се пише по-добре. Селма Лагерльоф не е единствено писателка от канона – тя е явление. В края на XIX и началото на XX век шведската литература изпитва силна нужда от нови гласове, които да избягат от натурализма и неговата непоколебима обсесия с мизерията и клетостта.

Влиза Лагерльоф, която – въпреки че разказва истории за несретници – ги превръща във всекидневни и архетипни герои, способни на трансформация в една магическа реалност.

„Коларят на Смъртта“ до голяма степен черпи вдъхновение от личния ѝ живот. Алкохолизмът на баща ѝ, смъртта на нейната сестра Анна от туберкулоза, както и дълбокият ѝ интерес към социалните проблеми на времето са вградени в тъканта на романа. И ако се замислим, цялата ѝ кариера е един бунт срещу структурите, които потискат индивидуалния дух: тя е първата жена, получила Нобелова награда за литература (1909), активно се бори за правата на жените, а като автор не се побира в удобните рамки на шведската академична традиция​.

Но да се върнем на сюжета. Той е чист, ясен и мрачен – Смъртта кара нощна смяна. В медийното пространство е новина кое е първото бебе за годината, а в литературното пространство е важно кой е последният покойник за годината.

Историята започва с класическата сцена на умираща светица – сестра Едит, член на Армията на спасението, която на смъртния си одър настоява да повикат най-големия грешник, когото някога е срещала: пияницата и побойник Давид Холм. Само че съдбата – както знаем – обича добрите обрати и вместо да се разиграе стандартната драматична среща, Холм умира точно в полунощ на Нова година, ставайки новият Колар на Смъртта. Това означава, че ще трябва цяла година да събира душите на починалите – точно както предишният колар, негов стар познайник, е правил преди него​.

В този момент Лагерльоф натиска бутона „свръхестествено“ и разказът се превръща в бавна разходка през моралния разпад на героя. Холм е класически персонаж от епохата на реализма – паднал мъж, който, по всички канони на литературата, е обречен. Но тук идва голямото „но“: чрез поредица от видения, връщания в миналото и финален акт на осъзнаване той намира спасение.

Темите и мотивите, с които Лагерльоф джазира виртуозно, варират от Данте до Дикенс и обратно. Тя представя изкуплението и вината като екзистенциален и жизненонеобходим душевен аксесоар. Лагерльоф се заиграва с християнската концепция за покаянието, но го прави по начин, който би накарал дори и най-закоравелия атеист да преглътне тежко. Холм е повече от типичен грешник – той е прамъжът, изгубил себе си в разрушителната сила на алкохола, насилието и безразличието. Но романът отказва да го демонизира напълно. Вместо това го оставя да страда, докато сам не разбере, че вината е безполезна, ако не води до действие​.

Смъртта от своя страна е разгледана като бюрократична институция. Коларят, освен митична фигура, е и работник. Един уморен, леко отчаян, но неизменно задължен към своята работа персонаж, който напомня за готическите видения на По, но с нотка на институционален цинизъм. Лагерльоф не представя смъртта като трагичен или епичен акт – тя е неотменна част от процеса.

На второ четене: „Коларят на Смъртта“

Романът се занимава с два основни социални кошмара на своето време – туберкулозата и алкохолизма.

И двете са представени като епидемии, но с една съществена разлика – докато болестта е безмилостна, пиянството е и избор. Давид Холм не е жертва, той е активен участник в своята деградация​.

Но на кого му пука за още един алкохолизиран неудачник, би си казал някой читател, след като вече е чел Лоури, Буковски, Селби и Венедикт Ерофеев? Ако сложим „Коларят на Смъртта“ в диалог с други произведения, ще видим, че той си комуникира с класики от различни традиции. И изпъква. Скрудж от „Коледна песен“ на Дикенс и Давид Холм са братовчеди по дух, но докато Скрудж намира спасение чрез духове, Холм го намира чрез смъртта си. Холм може да се разглежда и като по-лузърска версия на герой на Достоевски или дори на Фауст – човек, който без много размисъл продава душата си, но за бутилка ракия, а не за вселенската мъдрост.

Нужно е да се припомни и че филмовата адаптация на Виктор Шьострьом (1921) е сред най-влиятелните филми на нямото кино и любима творба на Ингмар Бергман. Мотиви от романа присъстват и в пиесата „Майсторите на образи“ на П. У. Енквист, поставена от Бергман през 1998 г.

Това очевидно е разказ за смъртта, но и разказ за живота, за границите на човешката промяна и за това, че дори най-изгубените души може би не са толкова изгубени. В този смисъл романът е нещо повече от готическа притча. Той е метафора за неизбежния сблъсък между миналото и бъдещето, между греха и опрощението, между човека и самия него.

Или казано по-просто: ако някога чуете скрибуцането на стара каруца в новогодишната нощ, може би е време да преразгледате житейските си решения и да си кажете:

Боже, позволи на душата ми да узрее, преди да бъде прибрана!“


 Активните дарители на „Тоест“ получават постоянна отстъпка в размер нa 20% от коричната цена на всички заглавия от каталога на издателство „Лист“, както и на няколко други български издателства в рамките на партньорската програма Читателски клуб „Тоест“. За повече информация прочетете на toest.bg/club.

Никой от нас не чете единствено най-новите книги. Тогава защо само за тях се пише? „На второ четене“ е рубрика, в която отваряме списъците с книги, публикувани преди поне година, четем ги и препоръчваме любимите си от тях. Рубриката е част от партньорската програма Читателски клуб „Тоест“. Изборът на заглавия обаче е единствено на авторите – Стефан Иванов и Антония Апостолова, които биха ви препоръчали тези книги и ако имаше как веднъж на две седмици да се разходите с тях в книжарницата.

[$] LWN.net Weekly Edition for February 6, 2025

Post Syndicated from corbet original https://lwn.net/Articles/1007000/

Inside this week’s LWN.net Weekly Edition:

  • Front: Finding concurrency bugs with sched_ext; Rust abstractions; 6.14 Merge window; Sealed system mappings; OpenSUSE board; Julia; Site tour.
  • Briefs: Binutils 2.44; Firefox 135.0; Freedesktop GitLab; GNU C Library 2.41; GTK; Servo; Thunderbird updates; Sanctions; Quotes; …
  • Announcements: Newsletters, conferences, security updates, patches, and more.

AWS CodeBuild for macOS adds support for Fastlane

Post Syndicated from Sébastien Stormacq original https://aws.amazon.com/blogs/aws/codebuild-for-macos-adds-support-for-fastlane/

I’m pleased to announce the availability of Fastlane in your AWS CodeBuild for macOS environments. AWS CodeBuild is a fully managed continuous integration service that compiles source code, runs tests, and produces ready-to-deploy software packages.

Fastlane is an open source tool suite designed to automate various aspects of mobile application development. It provides mobile application developers with a centralized set of tools to manage tasks such as code signing, screenshot generation, beta distribution, and app store submissions. It integrates with popular continuous integration and continuous deployment (CI/CD) platforms and supports both iOS and Android development workflows. Although Fastlane offers significant automation capabilities, developers may encounter challenges during its setup and maintenance. Configuring Fastlane can be complex, particularly for teams unfamiliar with the syntax and package management system of Ruby. Keeping Fastlane and its dependencies up to date requires ongoing effort, because updates to mobile platforms or third-party services may necessitate adjustments to existing workflows.

When we introduced CodeBuild for macOS in August 2024, we knew that one of your challenges was to install and maintain Fastlane in your build environment. Although it was possible to manually install Fastlane in a custom build environment, at AWS, we remove the undifferentiated heaving lifting from your infrastructure so you can spend more time on the aspects that matter for your business. Starting today, Fastlane is installed by default, and you can use the familiar command fastlane buildin your buildspec.yaml file.

Fastlane and code signing
To distribute an application on the App Store, developers must sign their binary with a private key generated on the Apple Developer portal. This private key, along with the certificate that validates it, must be accessible during the build process. This can be a challenge for development teams because they need to share the development private key (which allows deployment on selected test devices) among team members. Additionally, the distribution private key (which enables publishing on the App Store) must be available during the signing process before uploading the binary to the App Store.

Fastlane is a versatile build system in that it also helps developers with the management of development and distribution keys and certificates. Developers can use fastlane match to share signing materials in a team and make them securely and easily accessible on individual developers’ machines and on the CI environment. match allows the storage of private keys, the certificates, and the mobile provisioning profiles on a secured share storage. It makes sure that the local build environment, whether it’s a developer laptop or a server machine in the cloud, stays in sync with the shared storage. At build time, it securely downloads the required certificates to sign your app and configures the build machine to allow the codesign utility to pick them up.

match allows the sharing of signing secrets through GitHub, GitLab, Google Cloud Storage, Azure DevOps, and Amazon Simple Storage Service (Amazon S3).

If you already use one of these and you’re migrating your projects to CodeBuild, you don’t have much to do. You only need to make sure your CodeBuild build environment has access to the shared storage (see step 3 in the demo).

Let’s see how it works
If you’re new to Fastlane or CodeBuild, let’s see how it works.

For this demo, I start with an existing iOS project. The project is already configured to be built on CodeBuild. You can refer to my previous blog post, Add macOS to your continuous integration pipelines with AWS CodeBuild, to learn more details.

I’ll show you how to get started in three steps:

  • Import your existing signing materials to a shared private GitHub repository
  • Configure fastlane to build and sign your project
  • Use fastlanewith CodeBuild

Step 1: Import your signing materials

Most of the fastlane documentation I read explains how to create a new key pair and a new certificate to get started. Although this is certainly true for new projects, in real life, you probably already have your project and your signing keys. So, the first step is to import these existing signing materials.

Apple App Store uses different keys and certificates for development and distribution (there are also ad hoc and enterprise certificates, but these are outside the scope of this post). You must have three files for each usage (that’s a total of six files):

  • A .mobileprovision file that you can create and download from the Apple developer console. The provisioning profile links your identity, the app identity, and the entitlements the app might have.
  • A .cer file, which is the certificate emitted by Apple to validate your private key. You can download this from the Apple Developer portal. Select the certificate, then select Download.
  • A .p12 file, which contains your private key. You can download the key when you create it in the Apple Developer portal. If you didn’t download it but have it on your machine, you can export it from the Apple Keychain app. Note that the KeyChain.app is hidden in macOS 15.x. You can open it with open /System/Library/CoreServices/Applications/Keychain\ Access.app. Select the key you want to export and right click to select Export.
Export p12 files from Keychain

When you have these files, create a fastlane/Matchfile file with the following content:

git_url("https://github.com/sebsto/secret.git")
storage_mode("git")
type("development")
# or use appstore to use the distribution signing key and certificate
# type("appstore")

Be sure to replace the URL of your GitHub repository and make sure this repository is private. It will serve as a storage for your signing key and certificate.

Then, I import my existing files with the fastlane match import --type appstore command. I repeat the command for each environment: appstore and development.

The very first time, fastlane prompts me for my Apple Id username and password. It connects to App Store Connect to verify the validity of the certificates or to create new ones when necessary. The session cookie is stored in ~/.fastlane/spaceship/<your apple user id>/cookie.

fastlane match also asks for a password. It uses this password to generate a key to crypt the signing materials on the storage. Don’t forget this password because it will be used at build time to import the signing materials on the build machine.

Here is the command and its output in full:

 fastlane match import --type appstore

[✔] 🚀
[16:43:54]: Successfully loaded '~/amplify-ios-getting-started/code/fastlane/Matchfile' 📄

+-----------------------------------------------------+
| Detected Values from './fastlane/Matchfile'         |
+--------------+--------------------------------------+
| git_url.     | https://github.com/sebsto/secret.git |
| storage_mode | git                                  |
| type         | development                          |
+--------------+--------------------------------------+

[16:43:54]: Certificate (.cer) path:
./secrets/sebsto-apple-dist.cer
[16:44:07]: Private key (.p12) path:
./secrets/sebsto-apple-dist.p12
[16:44:12]: Provisioning profile (.mobileprovision or .provisionprofile) path or leave empty to skip
this file:
./secrets/amplifyiosgettingstarteddist.mobileprovision
[16:44:25]: Cloning remote git repo...
[16:44:25]: If cloning the repo takes too long, you can use the `clone_branch_directly` option in match.
[16:44:27]: Checking out branch master...
[16:44:27]: Enter the passphrase that should be used to encrypt/decrypt your certificates
[16:44:27]: This passphrase is specific per repository and will be stored in your local keychain
[16:44:27]: Make sure to remember the password, as you'll need it when you run match on a different machine
[16:44:27]: Passphrase for Match storage: ********
[16:44:30]: Type passphrase again: ********
security: SecKeychainAddInternetPassword <NULL>: The specified item already exists in the keychain.
[16:44:31]: 🔓 Successfully decrypted certificates repo
[16:44:31]: Repo is at: '/var/folders/14/nwpsn4b504gfp02_mrbyd2jr0000gr/T/d20250131-41830-z7b4ic'
[16:44:31]: Login to App Store Connect ([email protected])
[16:44:33]: Enter the passphrase that should be used to encrypt/decrypt your certificates
[16:44:33]: This passphrase is specific per repository and will be stored in your local keychain
[16:44:33]: Make sure to remember the password, as you'll need it when you run match on a different machine
[16:44:33]: Passphrase for Match storage: ********
[16:44:37]: Type passphrase again: ********
security: SecKeychainAddInternetPassword <NULL>: The specified item already exists in the keychain.
[16:44:39]: 🔒 Successfully encrypted certificates repo
[16:44:39]: Pushing changes to remote git repo...
[16:44:40]: Finished uploading files to Git Repo [https://github.com/sebsto/secret.git]

I verify that Fastlane imported my signing material to my Git repository.

Fastlane match - github repo after import

I can also configure my local machine to use these signing materials during the next build:

» fastlane match appstore 

[✔] 🚀 
[17:39:08]: Successfully loaded '~/amplify-ios-getting-started/code/fastlane/Matchfile' 📄

+-----------------------------------------------------+
|   Detected Values from './fastlane/Matchfile'       |
+--------------+--------------------------------------+
| git_url      | https://github.com/sebsto/secret.git |
| storage_mode | git                                  |
| type         | development                          |
+--------------+--------------------------------------+


+-------------------------------------------------------------------------------------------+
|                                 Summary for match 2.226.0                                 |
+----------------------------------------+--------------------------------------------------+
| type                                   | appstore                                         |
| readonly                               | false                                            |
| generate_apple_certs                   | true                                             |
| skip_provisioning_profiles             | false                                            |
| app_identifier                         | ["com.amazonaws.amplify.mobile.getting-started"] |
| username                               | xxxx@xxxxxxxxx                                   |
| team_id                                | XXXXXXXXXX                                       |
| storage_mode                           | git                                              |
| git_url                                | https://github.com/sebsto/secret.git             |
| git_branch                             | master                                           |
| shallow_clone                          | false                                            |
| clone_branch_directly                  | false                                            |
| skip_google_cloud_account_confirmation | false                                            |
| s3_skip_encryption                     | false                                            |
| gitlab_host                            | https://gitlab.com                               |
| keychain_name                          | login.keychain                                   |
| force                                  | false                                            |
| force_for_new_devices                  | false                                            |
| include_mac_in_profiles                | false                                            |
| include_all_certificates               | false                                            |
| force_for_new_certificates             | false                                            |
| skip_confirmation                      | false                                            |
| safe_remove_certs                      | false                                            |
| skip_docs                              | false                                            |
| platform                               | ios                                              |
| derive_catalyst_app_identifier         | false                                            |
| fail_on_name_taken                     | false                                            |
| skip_certificate_matching              | false                                            |
| skip_set_partition_list                | false                                            |
| force_legacy_encryption                | false                                            |
| verbose                                | false                                            |
+----------------------------------------+--------------------------------------------------+

[17:39:08]: Cloning remote git repo...
[17:39:08]: If cloning the repo takes too long, you can use the `clone_branch_directly` option in match.
[17:39:10]: Checking out branch master...
[17:39:10]: Enter the passphrase that should be used to encrypt/decrypt your certificates
[17:39:10]: This passphrase is specific per repository and will be stored in your local keychain
[17:39:10]: Make sure to remember the password, as you'll need it when you run match on a different machine
[17:39:10]: Passphrase for Match storage: ********
[17:39:13]: Type passphrase again: ********
security: SecKeychainAddInternetPassword <NULL>: The specified item already exists in the keychain.
[17:39:15]: 🔓  Successfully decrypted certificates repo
[17:39:15]: Verifying that the certificate and profile are still valid on the Dev Portal...
[17:39:17]: Installing certificate...

+-------------------------------------------------------------------------+
|                          Installed Certificate                          |
+-------------------+-----------------------------------------------------+
| User ID           | XXXXXXXXXX                                          |
| Common Name       | Apple Distribution: Sebastien Stormacq (XXXXXXXXXX) |
| Organisation Unit | XXXXXXXXXX                                          |
| Organisation      | Sebastien Stormacq                                  |
| Country           | US                                                  |
| Start Datetime    | 2024-10-29 09:55:43 UTC                             |
| End Datetime      | 2025-10-29 09:55:42 UTC                             |
+-------------------+-----------------------------------------------------+

[17:39:18]: Installing provisioning profile...

+-------------------------------------------------------------------------------------------------------------------+
|                                          Installed Provisioning Profile                                           |
+---------------------+----------------------------------------------+----------------------------------------------+
| Parameter           | Environment Variable                         | Value                                        |
+---------------------+----------------------------------------------+----------------------------------------------+
| App Identifier      |                                              | com.amazonaws.amplify.mobile.getting-starte  |
|                     |                                              | d                                            |
| Type                |                                              | appstore                                     |
| Platform            |                                              | ios                                          |
| Profile UUID        | sigh_com.amazonaws.amplify.mobile.getting-s  | 4e497882-d80f-4684-945a-8bfec1b310b9         |
|                     | tarted_appstore                              |                                              |
| Profile Name        | sigh_com.amazonaws.amplify.mobile.getting-s  | amplify-ios-getting-started-dist             |
|                     | tarted_appstore_profile-name                 |                                              |
| Profile Path        | sigh_com.amazonaws.amplify.mobile.getting-s  | /Users/stormacq/Library/MobileDevice/Provis  |
|                     | tarted_appstore_profile-path                 | ioning                                       |
|                     |                                              | Profiles/4e497882-d80f-4684-945a-8bfec1b310  |
|                     |                                              | b9.mobileprovision                           |
| Development Team ID | sigh_com.amazonaws.amplify.mobile.getting-s  | XXXXXXXXXX                                   |
|                     | tarted_appstore_team-id                      |                                              |
| Certificate Name    | sigh_com.amazonaws.amplify.mobile.getting-s  | Apple Distribution: Sebastien Stormacq       |
|                     | tarted_appstore_certificate-name             | (XXXXXXXXXX)                                 |
+---------------------+----------------------------------------------+----------------------------------------------+

[17:39:18]: All required keys, certificates and provisioning profiles are installed 🙌

Step 2: Configure Fastlane to sign your project

I create a Fastlane build configuration file in fastlane/Fastfile (you can use fastlane init command to get started):

default_platform(:ios)

platform :ios do
  before_all do
    setup_ci
  end

  desc "Build and Sign the binary"
  lane :build do
    match(type: "appstore", readonly: true)
    gym(
      scheme: "getting started",
      export_method: "app-store"
    )
  end
end

Make sure that the setup_ci action is added to the before_all section of Fastfile for the match action to function correctly. This action creates a temporary Fastlane keychain with correct permissions. Without this step, you may encounter build failures or inconsistent results.

And I test a local build with the command fastlane build. I enter the password I used when importing my keys and certificate, then I let the system build and sign my project. When everything is correctly configured, it produces a similar output.

...
[17:58:33]: Successfully exported and compressed dSYM file
[17:58:33]: Successfully exported and signed the ipa file:
[17:58:33]: ~/amplify-ios-getting-started/code/getting started.ipa

+---------------------------------------+
|           fastlane summary            |
+------+------------------+-------------+
| Step | Action           | Time (in s) |
+------+------------------+-------------+
| 1    | default_platform | 0           |
| 2    | setup_ci         | 0           |
| 3    | match            | 36          |
| 4    | gym              | 151         |
+------+------------------+-------------+

[17:58:33]: fastlane.tools finished successfully 🎉

Step 3: Configure CodeBuild to use Fastlane

Next, I create a project on CodeBuild. I’m not going into the step-by-step guide to help you to do so. You can refer to my previous post or to the CodeBuild documentation.

There is just one Fastlane-specific configuration. To access the signing materials, Fastlane requires access to three secret values that I’ll pass as environment variables:

  • MATCH_PASSWORD, the password I entered when importing the signing material. Fastlane uses this password to decipher the encrypted files in the GitHub repository
  • FASTLANE_SESSION, the value of the Apple Id session cookie, located at ~/.fastlane/spaceship/<your apple user id>/cookie. The session is valid from a couple of hours to multiple days. When the session expires, reauthenticate with the command fastlane spaceauth from your laptop and update the value of FASTLANE_SESSION with the new value of the cookie.
  • MATCH_GIT_BASIC_AUTHORIZATION, a base 64 encoding of your GitHub username, followed by a colon, followed by a personal authentication token (PAT) to access your private GitHub repository. You can generate PAT on the GitHub console in Your Profile > Settings > Developers Settings > Personal Access Token. I use this command to generate the value of this environment variable: echo -n my_git_username:my_git_pat | base64.

Note that for each of these three values, I can enter the Amazon Resource Name (ARN) of the secret on AWS Secrets Manager or the plain text value. We strongly recommend using Secrets Manager to store security-sensitive values.

I’m a security-conscious user, so I store the three secrets in Secrets Manager with these commands:

aws --region $REGION secretsmanager create-secret --name /CodeBuild/MATCH_PASSWORD --secret-string MySuperSecretPassword
aws --region $REGION secretsmanager create-secret --name /CodeBuild/FASTLANE_SESSION --secret-string $(cat ~/.fastlane/spaceship/my_appleid_username/cookie)
aws --region $REGION secretsmanager create-secret --name /CodeBuild/MATCH_GIT_BASIC_AUTHORIZATION --secret-string $(echo -n my_git_username:my_git_pat | base64)

If your build project refers to secrets stored in Secrets Manager, the build project’s service role must allow the secretsmanager:GetSecretValue action. If you chose New service role when you created your project, CodeBuild includes this action in the default service role for your build project. However, if you chose Existing service role, you must include this action to your service role separately.

For this demo, I use this AWS Identity and Access Management (IAM) policy:

{
	"Version": "2012-10-17",
	"Statement": [
		{
			"Effect": "Allow",
			"Action": [
				"secretsmanager:GetSecretValue"
			],
			"Resource": [
				"arn:aws:secretsmanager:us-east-2:012345678912:secret:/CodeBuild/*"
			]
		}
	]
}

After I created the project in the CodeBuild section of the AWS Management Console, I enter the three environment variables. Notice that the value is the name of the secret in Secrets Manager.

Codebuild - environment variables for Fastlane match

You can also define the environment variables and their Secrets Manager secret name in your buildpsec.yaml file.

Next, I modify the buildspec.yaml file at the root of my project to use fastlane to build and sign the binary. My buildspec.yaml file now looks like this one:

# buildspec.yml
version: 0.2
phases:
  install:
    commands:
      - code/ci_actions/00_install_rosetta.sh
  pre_build:
    commands:
      - code/ci_actions/02_amplify.sh
  build:
    commands:
      - (cd code && fastlane build)
artifacts:
  name: getting-started-$(date +%Y-%m-%d).ipa
  files:
    - 'getting started.ipa'
  base-directory: 'code'

The Rosetta and Amplify scripts are required to receive the Amplify configuration for the backend. If you don’t use AWS Amplify in your project, you don’t need these.

Notice that there is nothing in the build file that downloads the signing key or prepares the keychain in the build environment; fastlane match will do that for me.

I add the new buildspec.yaml file and my ./fastlane directory to Git. I commit and push these files. git commit -m "add fastlane support" && git push

When everything goes well, I can see the build running on CodeBuild and the Succeeded message.

Codebuild - succeed message

Pricing and availability
Fastlane is now pre-installed at no extra cost on all macOS images that CodeBuild uses, in all Regions where CodeBuild for macOS is available. At the time of this writing, these are US East (Ohio, N. Virginia), US West (Oregon), Asia Pacific (Sydney), and Europe (Frankfurt).

In my experience, it takes a bit of time to configure fastlane match correctly. When it’s configured, having it working on CodeBuild is pretty straightforward. Before trying this on CodeBuild, be sure it works on your local machine. When something goes wrong on CodeBuild, triple-check the values of the environment variables and make sure CodeBuild has access to your secrets on AWS Secrets Manager.

Now go build (on macOS)!

AWS renews MTCS Level 3 certification under the SS584:2020 standard

Post Syndicated from Joseph Goh original https://aws.amazon.com/blogs/security/aws-renews-mtcs-level-3-certification-under-the-ss5842020-standard/

Amazon Web Services (AWS) is pleased to announce the renewal of the Multi-Tier Cloud Security (MTCS) Level 3 certification under the SS584:2020 standard in December 2024 for the Asia Pacific (Singapore), Asia Pacific (Seoul), and United States AWS Regions, excluding AWS GovCloud (US) Regions. This achievement reaffirms our commitment to maintaining the highest security standards for our global customers, particularly those in Singapore and the Asia-Pacific.

AWS was the first cloud service provider (CSP) to attain MTCS Level 3 certification for Singapore in 2014. We continued this leadership by being among the first CSPs certified under the updated SS584:2020 Level 3 standard in 2021. Our dedication to expanding our security coverage is evident in the significant increase of in-scope services from 145 to 184, representing a 27% growth since 2021.

The MTCS standard is recognized as the world’s first cloud security standard to specify a multi-tiered management system for cloud security. This standard can be applied by CSPs to support differing cloud user needs for data sensitivity and business criticality, and the use of MTCS is mandated by the Singapore government as a requirement for public sector agencies and regulated organizations.

As part of our commitment to transparency, AWS fulfills the self-disclosure requirement for CSPs, providing detailed service-oriented information typically found in service level agreements. This allows our customers to make informed decisions about their cloud security needs.

The MTCS framework establishes three levels of security, with Level 3 being the most stringent:

  1. Level 1: Designed for non-business-critical data and systems with baseline security controls.
  2. Level 2: Addresses the needs of organizations that run business-critical data and systems in public or third-party cloud systems.
  3. Level 3: Tailored for regulated organizations with specific and more stringent security requirements, including industry-specific regulations.

Benefits of the MTCS Level 3 certification

By achieving MTCS Level 3 certification, AWS helps Singapore customers in regulated industries to securely host applications and systems with highly sensitive information. This includes confidential business data, financial records, and medical records in a Level-3-compliant MTCS environment.

As cloud technology continues to evolve, AWS remains dedicated to maintaining and exceeding the highest security standards. Our renewed MTCS Level 3 certification under the SS584:2020 standard is a testament to this commitment, enabling our customers in Singapore and around the world to use AWS services with confidence for their most sensitive and critical workloads.

You can now download the latest MTCS certificates and the MTCS Self-Disclosure Form in AWS Artifact. Sign in to AWS Artifact in the AWS Management Console, or learn more at Getting Started with AWS Artifact. For a full list of AWS services that are certified under MTCS, see the AWS Multi-Tier Cloud Security (MTCS) page

To learn more about our compliance and security programs, see AWS Compliance Programs. As always, we value your feedback and questions; reach out to the AWS Compliance team through the Contact Us page.

If you have feedback about this post, submit comments in the Comments section below.

Joseph Goh

Joseph Goh
Joseph is the APJ ASEAN Lead at AWS, based in Singapore. He leads security audits, certifications, and regulatory compliance programs across the unique regulatory landscapes in the Asia Pacific region. Joseph is passionate about delivering programs that strengthen trust with customers and providing them assurance on cloud security.

Servo in 2024: stats, features and donations

Post Syndicated from jzb original https://lwn.net/Articles/1008137/

The Servo Rust-based rendering
engine project has published
an article summarizing its progress in 2024, and plans for the
future:

Servo main dependencies (SpiderMonkey, Stylo and WebRender) have been
upgraded, the new layout engine has kept evolving adding support for
floats, tables, flexbox, fonts, etc. By the end of 2024 Servo passes 1,515,229 WPT subtests (79%). Many other new features have been under
active development: WebGPU, Shadow DOM, ReadableStream, WebXR, … Servo
now supports two new platforms: Android and OpenHarmony. And we have
got the first experiments of applications using Servo as a web engine
(like Tauri,
Blitz, QtWebView,
Cuervo,
Verso and Moto).

Use generative AI on AWS for efficient clinical document analysis

Post Syndicated from Alex Boudreau original https://aws.amazon.com/blogs/architecture/use-generative-ai-on-aws-for-efficient-clinical-document-analysis/

Clinical trials involve the ingestion and processing of vast amounts of highly regulated data, including complex protocol documents that describe how the trial will be conducted. Managing this volume of information can be overwhelming, but generative AI offers a solution by helping automate the process and enabling clinical researchers to quickly focus on the most relevant information. Currently, the drug approval process takes on average 10–12 years, with clinical trial study startup time accounting for 1 year of that timeframe. Much of the challenge with study startup lies in the complex and non-standard nature of protocol documents. These often require weeks or months of effort to review and assess. This review time adds to the already long cycle time to bring a new drug to market.

In this post, we show how Clario uses the AWS platform to accelerate clinical document analysis.

About Clario

Clario is a leading provider of endpoint data solutions to the clinical trials industry providing regulatory-grade clinical evidence for pharmaceutical, biotech, and medical device partners. Since Clario’s founding more than 50 years ago, their endpoint data solutions have supported clinical trials more than 26,000 times with over 700 regulatory approvals across more than 100 countries. One of the critical challenges Clario faces is the time-consuming process of generating documentation for clinical trials, which can take weeks or months.

The business challenge

Clinical trials are essential for the approval of new health innovations, including treatments, procedures, and medical devices. They require the collection of vast quantities of complex data from dispersed clinical trial sites to support assessments of medical benefits and risks, all while maintaining privacy and regulatory compliance. To make matters even more challenging, capturing data in clinical trial occurs not only in healthcare centers but also through remote capture through various aspects of trial participants’ daily activities.

Partners like Clario understand the challenges faced by life sciences companies when it comes to analyzing large volumes of complex clinical documents, such as study protocols. These documents often contain a mix of structured and unstructured data, including tables, images, and diagrams, making it difficult to accurately interpret and extract key information at scale. In this post, we explore how Clario has used the power of generative AI on AWS to efficiently analyze clinical documents and drive better outcomes for its clients.

Harnessing the power of large language models

The rapid progress in large language models (LLMs) has expanded the potential applications of natural language processing beyond simple conversational AI assistants. Clario has experimented with various techniques, such as zero-shot learning, few-shot learning, classification, entity extraction, and summarization, for the effective use of LLMs in specialized use cases. By employing prompt engineering, AI orchestration, and content retrieval, Clario can guide the models to accurately generate insights and extract relevant information from key clinical research documents, including complex clinical trial protocols.

Four pillars of effective document analysis on AWS

Through its research and development efforts, Clario has identified four core pillars that enable effective document analysis using generative AI on AWS:

  • Parsing – Clario uses AWS services such as Amazon Textract and Amazon Comprehend to extract text, images, and tables from clinical documents, maintaining both data privacy and security.
  • Retrieval – By using embedding models and vector databases like Amazon OpenSearch Service, Clario efficiently stores and retrieves relevant information from large document collections based on similarity search. The team has experimented with various chunking and retrieval strategies to optimize accuracy and performance.
  • Prompting – Using techniques like zero-shot and few-shot learning, Clario has enhanced the accuracy of LLMs for classifying and extracting information . AWS services such as and Amazon Bedrock simplify experimentation with different prompting strategies and the evaluation of model performance.
  • Generation – Clario carefully considers factors such as context size, reasoning capabilities, and latency when selecting the appropriate LLMs for generating structured outputs. AWS offers a range of pre-trained models and frameworks that seamlessly integrate into Clario’s pipeline.

Solution overview

To tackle the unique challenges associated with analyzing clinical documents, Clario has built a custom generative AI platform on AWS. This platform incorporates an orchestration engine that combines multiple LLMs and deep learning models, enabling it to extract key information accurately and at scale. By using AWS services such as Amazon Elastic Compute Cloud (Amazon EC2), Amazon Elastic Kubernetes Service (Amazon EKS), Amazon Simple Storage Service (Amazon S3), SageMaker, and AWS Lambda, Clario can efficiently process thousands of documents in a matter of seconds.

The following diagram illustrates the solution architecture.

Solution Overview

The workflow consists of the following steps:

  • Documents are collected on premises (1) and uploaded using AWS Direct Connect (2) with encryption in transit to Amazon S3 (3). All uploaded documents are then automatically and securely stored with server-side object-level encryption.
  • After the documents are uploaded and the user has reviewed them, the Clario AI Orchestration Engine (4) determines the best document parsing strategy based on file type, and extracts text using Amazon Textract (5). Once extracted, the text is vectorized and stored in the Amazon OpenSearch Service vector engine (6) for later semantic retrieval.
  • After vectorization, the Clario AI Orchestration Engine (4), which runs as a distributed service in Amazon EKS, launches a document classification async task using Amazon MQ. Amazon EC2 and Lambda are used for additional processing if needed. This triggers the Document Classification Agent, which uses Amazon Bedrock LLMs (8), for automatically determining the document type.
  • After the documents are classified, the Clario AI Orchestration Engine (4) launches the appropriate document analysis agent for further background processing. In the case of study protocols, the engine launches the Protocol Analysis agent, which uses a predefined analysis graph configuration stored in Amazon Relational Database Service (Amazon RDS) (7), as well as a combination of retrieval strategies and AI models, including custom deep learning models on SageMaker (9), and pre-trained LLMs on Amazon Bedrock (8). This orchestration powers advanced document analysis, transforming massive amounts of unstructured multi-modal data into structured data and insights.
  • Following the analysis, all structured data is then persisted to Amazon RDS (7) for later visualization, review, and querying.

Recommendations and best practices

Based on their experience developing and deploying generative AI solutions on AWS, Clario learned the following best practices:

  • Adopt an incremental and iterative development approach to gradually build and refine your models
  • Follow a standard machine learning approach for evaluating and validating model performance using representative test sets
  • Optimize the four pillars of document analysis before investing in fine-tuning and continuous pre-training of LLMs
  • Tailor your approaches to specific use cases, because not all problems require the same models or techniques

Conclusion

By using the power of generative AI on AWS, Clario has been able to efficiently analyze complex clinical trial documents and extract valuable insights for its clients in the life sciences industry. Through a combination of careful model selection, iterative development, and adherence to best practices, Clario has built a scalable and accurate document analysis pipeline using AWS. Unlock the full potential of your clinical trial data by applying these best practices with an AWS generative AI solution today.


About the Authors

LWN site tour 2025

Post Syndicated from jzb original https://lwn.net/Articles/1006001/

Over the past year or so, LWN has added a number of useful new
features for our subscribers to enhance the experience of reading and
commenting on our content. Those features are of little use, however,
to readers who do not know about them. It has been more than a decade
since we last provided a
tour of the site
—it seems that another is in
order. Walk this way for a look at the LWN kernel source database (KSDB),
enhanced commenting features, EPUB downloads, and more.

AI Reasoning Models: OpenAI o3-mini, o1-mini, and DeepSeek R1

Post Syndicated from Molly Clancy original https://www.backblaze.com/blog/ai-reasoning-models-openai-o3-mini-o1-mini-and-deepseek-r1/

A decorative image showing an AI chip connecting icons of representing different files.

If you haven’t been able to keep pace with the AI news cycle, you’d be forgiven. I work at a tech company, and it’s felt like bailing water with a teacup over the past few weeks. But the term that keeps rising to the top of the flotsam in the boat is this: reasoning models. The regular ol’ models that power ChatGPT, Gemini, and Claude are cool and all, but reasoning models are what you should keep an eye on as an enterprise tech leader, specifically DeepSeek and OpenAI.

In the spirit of our AI 101 series, I’ll do my level best to recap the finer points and decode some of the more esoteric terms you’re likely to encounter (Like: WTH is a “mixture of experts”? That sounds like a party I want to be invited to, but will definitely skip at the last minute.)

The reasoning model releases: OpenAI o1-mini, DeepSeek R1, and OpenAI o3-mini

The last few weeks and months have seen a flurry of activity in the AI space, with reasoning models taking center stage. The TL/DR is that reasoning models are LLMs that can self-correct before delivering a response to a prompt, though their turn time is a little longer than your standard LLM. 

Here are the releases that you should know about.

OpenAI o1-mini: September 12, 2024

It seems like a lifetime ago, but OpenAI released its o1-mini model back in September. o1-mini wasn’t the first reasoning model to go to market (models from Google, DeepMind, Anthropic, and Meta dabbled in reasoning for specific tasks). But, it was more cost-efficient at inference—80% cheaper than the o1-preview model. What you need to know:

  • Yes, o1-preview and o1-mini were released at the same time—it’s confusing. Without getting into the weeds, here’s the difference: pricing. o1-preview was the most expensive OpenAI model on offer at $15/1M input tokens and $60/1M output tokens versus mini’s $3/1M input and $12/1M output. (You can think of tokens as units of data, like a prompt or a response, that are processed by the ML model.)
  • o1-preview (the expensive one) was purported at the time to perform “similarly to PhD students on challenging benchmark tasks in physics, chemistry, and biology.”
  • o1-mini (the 80% cheaper one) was designed to be particularly well-suited for coding tasks.

DeepSeek R1: January 20, 2025

Unless you’ve been under a rock, you’ve heard about this one. DeepSeek rattled the AI industry and financial markets with its release of R1, challenging OpenAI’s models on performance, pricing, and open-source availability. (We love a good open-source release.) What you need to know:

  • DeepSeek R1 delivers comparable results to OpenAI’s o1 models, both preview and mini, on math and coding benchmarks, while being trained on fewer GPUs—orders of magnitude fewer. Best guess estimates put it at around 60,000 GPUs, while industry leaders like OpenAI and Anthropic exceed 500k each.
  • This makes R1 much cheaper at $0.14/1M input tokens and $2.19/1M output tokens.
  • These efficiency claims could have far-reaching impacts for enterprises looking to build AI at a fraction of the cost. (The DeepSeek platform page has been down since we tasked one of our favorite tech evangelists with testing it, but stay tuned for a deep dive on how it works.)

OpenAI o3-mini: January 31, 2025

OpenAI previewed o3 in December, and brought it to GA just 11 days after DeepSeek joined the party. What you need to know:

I’m admittedly cherry picking these releases a bit to keep things simple. Suffice it to say, there are a lot of models, even within OpenAI’s o-series, but these are the ones of note at least as it pertains to recent events. 

What is reasoning anyway?

You might see reasoning described as “thinking” before it delivers an answer, but do not be fooled. AI cannot yet “think” or, to be fair, “reason” in the ways that we apply those terms to humans. To describe what they actually do, I need to use a word salad of jargon. I’m sorry—definitions follow. Reasoning models leverage chain-of-thought prompting to guide decision-making, incorporating self-improvement mechanisms and using test-time thinking to make real-time adjustments.

  • Chain-of-thought (CoT) prompting: Models break problems into logical steps (e.g., solving math problems via intermediate equations)
  • Self-improvement mechanisms: Techniques like the Self-Taught Reasoner (STaR) enable iterative refinement of reasoning through automated feedback loops.
  • Test-time thinking: Models can make decisions during deployment based on real-time inputs, rather than relying solely on pre-trained models or fixed strategies.

Here are a few more terms you might come across for good measure: 

  • Inference compute: The computational power needed to run a reasoning model and generate predictions or outputs based on new data after the model has been trained.
  • Mixture of experts approach: Using multiple specialized models (“experts”) that handle different tasks, and applying a gating mechanism to select the most relevant expert to use to make predictions based on the input data. Of note: DeepSeek used this approach to create efficiencies.
  • Distillation: Using inputs and outputs from one model to train another model. Of note: OpenAI alleges this is how DeepSeek “stole” its IP.

This is all pretty cool, if linguistically painful, stuff, and it means that reasoning models are shifting perceptions of model capabilities. But they’re not without persistent challenges. Like other LLMs, they still struggle with complex reasoning failures, lack of training transparency, and cognitive biases.

Why should you care?

If the past two weeks (and, really, the past two years) are any indication, AI innovation will continue its blistering pace. Reasoning models, and LLMs in general, will become diverse and specialized for narrower tasks as the core technology is increasingly commoditized and cheapened. And, it’s worth noting that this is a totally normal—and expected—lifecycle when it comes to new technology. 

What does it all mean for enterprises looking to build AI into their operations? Two key takeaways:

  • Don’t overcommit on any one toolset or investment: Test out OpenAI, DeepSeek, Gemini, Alibaba’s Qwen, and others. And, stay ahead of the changing landscape and new models—stay nimble, and keep experimenting. 
  • Take care of your data: What makes these models valuable for your company isn’t so much their capabilities, but your data. You need to retain it in storage that’s reliable, easy to access, and doesn’t lock you out of AI experimentation with exorbitant egress fees. 

Even as AI models get better, having those fundamentals in place can only help your business and set you up to better leverage AI when it’s right for your operations.

The post AI Reasoning Models: OpenAI o3-mini, o1-mini, and DeepSeek R1 appeared first on Backblaze Blog | Cloud Storage & Cloud Backup

Take Command | Rapid7’s 2025 Cybersecurity Summit: Own Your Attack Surface on April 9

Post Syndicated from Rapid7 original https://blog.rapid7.com/2025/02/05/take-command-rapid7s-2025-cybersecurity-summit/

Take Command | Rapid7’s 2025 Cybersecurity Summit: Own Your Attack Surface on April 9

Save the date: April 9, 2025

Take Command is back. After a hugely successful event last year, Rapid7’s cybersecurity summit returns with another stellar lineup to equip security teams with the latest threat intelligence, expert insights, and real-world strategies to take control of an evolving attack landscape.

At Take Command 2025, leading security experts, practitioners, and Rapid7’s own research teams will break down the latest attacker tactics, showcase cutting-edge defensive strategies, and explore how AI, MDR, and exposure management are reshaping cybersecurity. Taking command means shutting down threats before they can disrupt your business, staying ahead of adversaries, and constantly refining your defences—and that’s exactly what this year’s event is all about.

Why Attend?

Expert Research and Intelligence

Gain insights from Rapid7 Labs, the curators of Metasploit and our renowned open-source community. Learn how to safeguard against emerging ransomware threats, state-sponsored tactics, and critical vulnerabilities with cutting-edge research you can act on immediately.

Inside the SOC & Real-World Security Insights

Go inside Rapid7’s always-on SOC and hear how security leaders are tackling attack detection, response, and board-level expectations. Learn from peers and industry experts about managing today’s cybersecurity challenges.

Take Command of Your Attack Surface

Discover how MDR, AI, and exposure management can help you proactively reduce risk and outpace attackers. Eliminate silos, enhance visibility, and take decisive action to secure your organization.

What’s on the Agenda?

Building on last year’s high-impact sessions—including “Ready and Resilient: Before, During, & After Ransomware Attacks” and “Control the Chaos: Building Resilient Cyber Defenses Through AI”—Take Command 2025 will deliver even more insights into today’s most urgent cybersecurity challenges.

This year’s event will focus on:

  • The evolving threat landscape – Understanding adversaries’ latest techniques and how to stay ahead
  • AI and security automation – How AI is transforming detection, response, and cyber resilience
  • Cloud security and MDR – Strengthening defences in modern, hybrid environments
  • Proactive risk and exposure management – Strategies to continuously assess and reduce attack surface risk
  • Security operations in action – Expert insights on threat hunting, red teaming, and real-world SOC strategies

Mark Your Calendar & Save Your Spot

Take Command Summit 2025 takes place on April 9, 2025. This one-day virtual event is completely free and designed to give security professionals the insights they need to stay ahead of attackers.

[Save your spot now]

To see what you missed last year, watch 2024’s sessions here.

How AWS Network Firewall session state replication maximizes high availability for your application traffic

Post Syndicated from Tushar Jagdale original https://aws.amazon.com/blogs/security/how-aws-network-firewall-session-state-replication-maximizes-high-availability-for-your-application-traffic/

AWS Network Firewall is a managed, stateful network firewall and intrusion protection service that you can use to implement firewall rules for fine grained control over your network traffic. With Network Firewall, you can filter traffic at the perimeter of your virtual private cloud (VPC); including filtering traffic going to and coming from an internet gateway, NAT gateway, over VPN or AWS Direct Connect. In this post, we show you how AWS Network Firewall uses session state replication to help maintain high availability for your application traffic.

Network Firewall session state replication

The stateful engine used by Network Firewall applies network security policies according to customer-defined rules. When inspecting stateful flows, Network Firewall maintains a reconstructed state—stored in a flow table—for each connection. Network Firewall is a distributed service, spreading traffic and the connection state over many backend firewall hosts using Gateway Load Balancer endpoints.

There are several operational reasons why backend hosts might be brought in and out of service, such as autoscaling events to adjust for changing traffic levels or installing software for security and other service updates. During these operations, if the traffic contains long-lived traffic flows, Network Firewall allows these flows to drain for several minutes before replacing the hosts and re-balancing them to the newer hosts.

When an existing flow is rebalanced onto a new host that doesn’t contain its connection state, the connection is handled according to the firewall policy’s configured stream exception policy. Network Firewall will either drop or reject these connections, or Network Firewall can be configured to continue applying the firewall policy’s rules without the context from earlier in the connection. Both choices have implications: using the drop or reject action maintains security by forcing connections to be restarted and re-inspected but at the cost of some broken connections, while the continue action requires writing firewall rules that can accept connections that are broken midstream.

In December 2024, AWS introduced the ability for Network Firewall to replicate the session state between backend hosts, reducing the number of cases where the stream exception policy needs to be applied to broken connections. Now, the majority of these failed-over flows go to a new host that already contains the correct flow state, allowing those connections to continue without interruption. This feature is automatically enabled by default on all firewalls and no action is required by you. The stream exception policy will continue to be applied in rare cases where the state cannot automatically be replicated or when connections are broken for other reasons such as routing changes in the network.

Figure 1: Session state replication flowFigure 1: Session state replication flow

Figure 1 shows the sequence of events to maintain persistent connection during operations to replace a backend firewall host:

  1. A network flow arrives at the Network Firewall endpoint and is forwarded to a firewall backend host (firewall host 1) by Gateway Load Balancer.
  2. Firewall host 1 is de-registered from the Gateway Load Balancer target group, which causes Gateway Load Balancer to stop assigning new flows to the host but maintains existing ones.
  3. The service exports the remaining session state table from backend firewall host 1.
  4. The service replicates the session table data to other healthy backend hosts.
  5. A flow flush operation causes Gateway Load Balancer to reassign the remaining flows on host 1 to other in-service hosts, where the ongoing flows will continue being inspected by the stateful inspection rules configured on the firewall.

Some of the key considerations for your own workloads:

Conclusion

In this post, we outlined how AWS Network Firewall uses its ability to replicate connection state across multiple backend firewall hosts to maintain high availability for your application traffic. This feature is enabled by default for existing and new customers and there are no additional costs or configuration changes required to use this feature.

To learn more about AWS Network Firewall, see the AWS Network Firewall product page and the service documentation. To see which AWS Regions AWS Network Firewall is available in, see AWS Services by Region.

 
If you have feedback about this post, submit comments in the Comments section below. If you have questions about this post, contact AWS Support.
 

Tushar Jagdale
Tushar Jagdale

Tushar is a Specialist Solutions Architect focused on Networking at AWS, where he helps customers build and design scalable, highly available, secure, resilient, and cost effective networks. He has over 15 years of experience building and securing data center and cloud networks.
Amish Shah
Amish Shah

Amish is a seasoned product leader with over 15 years’ experience developing innovative and scalable solutions for networking, security, and cloud use cases. He currently leads the AWS Network Firewall service, where he helps develop security solutions that protect AWS workloads. Outside of work, Amish enjoys playing cricket and soccer, loves to travel, and has recently started collecting niche fragrances.
Vikram Saurabh
Vikram Saurabh

Vikram is an experienced engineering leader with 20 years of experience in software engineering, primarily in building firewall products and services. He currently leads the AWS Network Firewall engineering team and has previously led the engineering team of Route53 DNS Firewall. Outside of work, Vikram enjoys playing cricket, hiking, and solving math puzzles.
Jamie Lavigne
Jamie Lavigne

Jamie is a Principal Software Dev Engineer with over 10 years of experience building and operating highly resilient network security services at AWS. Jamie has been a technical lead of the AWS Network Firewall service since its inception and continues to focus on ensuring that it meets the security, compliance, and availability needs of its internal and external customers.

The collective thoughts of the interwebz