The Network & Information System (NIS2) Directive represents a significant shift in the European Union’s approach to bolstering digital infrastructure security, aiming to strengthen the defenses of network and information systems across key sectors. This directive, building upon the foundations laid by the original NIS Directive, introduces more stringent compliance requirements to combat the escalating cyber threats that pose risks to essential societal and economic services. This guide provides a succinct overview for businesses navigating the intricacies of the NIS2 Directive, ensuring readiness and compliance through a structured 10-step process.
Understanding the NIS2 Directive
Adopted on December 14, 2022, as Directive (EU) 2022/2555, the NIS2 Directive embodies a significant advancement in the EU’s cybersecurity efforts. It aims to bolster the resilience and reliability of essential network and information systems against cyber threats, which are integral to daily life and economic stability. By 17 October 2024, EU member states will have to transpose NIS2 into their national legislation. The directive’s development reflects a response to both current and anticipated cybersecurity challenges, emphasizing the vital role these systems play in maintaining societal and economic well-being.
Key Objectives and Broadened Scope
The primary aim of the NIS2 Directive is to reduce the risks posed to entities deemed ‘essential’ and ‘important’ within crucial network and information systems. These systems are pivotal for the smooth functioning of societal and economic activities. The directive seeks innovative and coordinated measures to counter the increasingly frequent, sophisticated, and impactful cyber threats. Notably, the NIS2 Directive widens its purview to include additional sectors, enforcing stringent requirements to achieve a uniformly high level of cybersecurity throughout the EU.
Applicability and Classification of Entities
The NIS2 Directive categorizes entities as either ‘essential’ or ‘important’, considering their significance to the economy and society as well as their size. This classification extends the directive’s applicability to a broader range of sectors critical to key societal functions and economic activities, aiming for a more inclusive coverage than what was provided by the original NIS Directive.
Steps Toward NIS2 Directive Compliance
To align with the NIS2 Directive and enhance cybersecurity frameworks, businesses could follow a systematic 10-step approach, ensuring compliance and strengthening defenses.
Step 1: Assessing Applicability
Assess whether your company falls within the scope of the sectors outlined by the NIS2 Directive to determine its relevance. Consider the potential impact of operational disruptions on societal and economic stability. For a detailed understanding, refer to our NIS2 Directive Compliance Checklist for Companies, which is intended to assist in determining if your business is impacted.
Step 2: Conducting Risk Assessments
A cornerstone of compliance is the execution of detailed risk assessments. This process entails identifying the vital components of your network and information systems and scrutinizing them for vulnerabilities that could be exploited by cyber threats. Assessing the severity and probability of these risks is crucial for prioritizing security measures. It’s not just about finding weaknesses but understanding their potential impact on your operations and the broader network, guiding a targeted approach to mitigating the most critical threats.
Step 3: Developing Cybersecurity Policies
The foundation of a resilient cybersecurity posture lies in the establishment of robust policies. These policies should encompass critical security domains, including but not limited to, access control mechanisms, data protection protocols and structured incident response strategies. The success of these policies depends on transparent communication and thorough training across the organization, guaranteeing that each member recognizes their part in maintaining cybersecurity standards
Achieving NIS2 compliance requires the deployment of both technical and organizational measures, such as firewalls, encryption and access control, supplemented by organizational strategies like employee training and clear communication protocols. Explore our cybersecurity solutions to find the right strategies and tools to enhance your cybersecurity posture.
Step 5: Enhancing Supply Chain Security
The security of your supply chain is integral to your overall cybersecurity health. Evaluating the security practices of your suppliers and ensuring that cybersecurity expectations are explicitly stated in contracts with third-party vendors are essential steps. This not only protects your company but also contributes to the elevation of security standards across your entire supply network.
Step 6: Fostering Cybersecurity Awareness
Building a strong culture of cybersecurity awareness is crucial. Implementing consistent and interactive training programs, along with awareness initiatives, is key to ensuring staff are up-to-date on emerging threats and best practices. Equipping your employees with the necessary understanding and resources to identify and respond to security challenges can greatly reduce vulnerabilities.
Step 7: Establishing Incident Response Plans
Preparedness for potential cybersecurity incidents involves setting up clear, actionable response protocols. These plans should detail the steps to be taken in the event of a breach, including containment, eradication, and recovery processes. Equally important is establishing procedures for notifying the relevant authorities in a timely manner, in accordance with the Directive’s stipulations.
Step 8: Documentation and Reporting
Comprehensive record-keeping is a critical aspect of demonstrating compliance. Detailed documentation of risk assessments, policy updates, training sessions, and incident responses not only serves as evidence of compliance but also as a valuable resource for continuous improvement. Regular compliance reporting, as mandated by the NIS2 Directive, must be integrated into your organizational processes.
Step 9: Regular Review and Updates
The cybersecurity landscape is perpetually evolving, necessitating the ongoing evaluation and refinement of your cybersecurity strategies. This entails regularly revisiting your risk assessments, policies, and defensive measures to ensure they remain effective against emerging threats and align with the latest technological advancements.
Step 10: Engaging with Authorities
Active engagement with national and sector-specific cybersecurity authorities provides valuable insights and guidance. Participation in industry forums and information-sharing platforms facilitates a collaborative approach to cybersecurity, keeping you abreast of regulatory developments, best practices and sector-specific threats.
Conclusion
The NIS2 Directive offers an extensive framework for enhancing EU cybersecurity, addressing the dynamic digital threat landscape. By adhering to the outlined 10-step guide, companies could ensure compliance with the directive, contributing to the EU’s digital infrastructure’s resilience and security and safeguarding critical societal and economic functions against cyber threats.
Navigate the complexities of NIS2 compliance with confidence alongside Nebosystems. Let our seasoned cybersecurity experts lead the way, ensuring your company not only adheres to compliance mandates but also builds a strong cybersecurity infrastructure. Reach out to us now to enhance your defenses and protect your business from the ever-changing cyber threats.
Още в края на предходната седмица станаха публично известни документи, изтекли от пощата на сътрудник на руския политик Александър Бабаков. Те показват как тогавашните управляващи на България са взели присърце осъществяването на мечтата на Путин за нов газопровод към Европа, който не минава през Украйна. От документите може да се съди и че проектът „Турски поток“ е бил на директно управление от Москва. Сред въпросните документи се оказа и последната чернова на загубената пътна карта, подписана от българска страна от Теменужка Петкова – бивша министърка на енергетиката от ГЕРБ. Вече втора седмица по щекотливата тема упорито се мълчи, прокуратурата бездейства, а големите национални медии разсейват общественото мнение с раздухване на лепкави теми като тази за уж увеличения мигрантски натиск. Всички сме гледали „Да разлаем кучетата“, но въпреки това… този подход винаги работи.
Иначе, всички документи са публикувани и на нарочен сайт:
А докато сред хората се нагнетява страх от мигранти, Държавната агенция за бежанците за пореден път демонстрира безполезност и неадекватност. Разбира се, съвсем не непредубедено. Агенцията е отказала убежище на саудитския дисидент Абдулрахман ал-Халиди и възнамерява да го депортира, въпреки че той най-вероятно ще бъде затворен или убит, ако това се случи. А в нарушение на куп правила и международни документи, които България се е ангажирала да спазва, този човек е принудително задържан в Бусманци от октомври 2021 г. Светла Енчева успя да вземе писмено интервю от него. Прочетете го.
През седмицата стана известно и че Еврокомисията започва четири процедури срещу България, тъй като ключови решения на ЕС за борба с тероризма, расизма, ксенофобията и езика на омразата не са адекватно привнесени в местното ни законодателство.
Затова пък, случайно или не, в третата част на текста си за турската гастарбайтерска песен Емине Садкъ ни предлага да чуем музиката на съвременни групи, вече утвърдени и любими на европейската сцена. Защото музиката не търпи ксенофобски изпълнения, ползва се от безвизов режим и предлага универсален език на общуване.
Междувременно в сряда почина главата на Българската православна църква патриарх Неофит. Това стана повод президентът Радев да отложи връчването на мандата за съставяне на ново правителство с няколко дни, което дава глътка въздух и на преговорите за правителство на Мария Габриел. Какво е известно до този момент и как се очертава да бъдат разпределени министерствата и съответно ресорите на влияние, прочетете в материала на Емилия Милчева „Защо ГЕРБ иска точно тези (шест) министерства“.
В четвъртък парламентът в крайна сметка гласува по-малко лоши текстове относно дистанционната работа от тези, които първоначално бяха предложени от Министерството на труда и социалната политика. Заслугата е на депутата от „Да, България“ Божидар Божанов.
Днес в пленарна зала значително подобрихме измененията в Кодекса на труда за дистанционната работа. Прие се нова алинея, която предложих, с която повечето случаи на работа от разстояние, които се случват в реалния живот, стават законосъобразни.
От тази седмица вече е ясно, че кандидатите за президент на двете големи партии в САЩ са Джо Байдън и Доналд Тръмп. И двамата натрупаха достатъчно гласове в предварителните избори, за да останат единствените възможни опции за съпартийците си. Защо това е така, може да прочетете в текста на Йоанна Елми, която обяснява как се става кандидат-президент в САЩ. Това е и началото на поредица статии, в които Йоанна ще разказва за най-важното и най-интересното около вота отвъд океана.
Ако с любопитство следите поредицата „Ориент кафе“ на Атанас Шиников, сега може да прочетете и продължението на темата му за жените калиграфи и вълнуващите истории на тези художнички, чиито имена са останали във времето.
Но преди да си кажем довиждане за тази седмица, искам да споделя един призив за помощ, защото нашите приятели от Розовата къща са в риск да останат без покрив в най-буквалния смисъл. Нужни са 100 000 лв. и добрата новина е, че само за няколко дни се събраха повече от 70 000. А защо има смисъл и полза да ги подкрепим, може да си припомните от материалите на Юлия Георгиева в „Тоест“, озаглавени „Славчо“ и „Позитивно за Розовата къща“.
На датата, на която се публикува настоящият текст (16 март 2024 г.), се навършват десет години от формалното начало на руската агресия срещу Украйна. Тя започва с прииждането на „малки зелени човечета“ и инсцениран референдум в Крим на 16 март 2014 г., служещ като параван за анексията на автономната република на следващия ден. Паралелно Кремъл подстрекава размирици в градове като Одеса, Харков, Донецк, Луганск в Югоизточна Украйна. Безредиците и неуспешната симулация на гражданска война прерастват впоследствие в зле прикрито руско военно вмешателство в Донбас. Международно забравената война, съсредоточена в тази част на Украйна, ескалира през 2022 г. в открита пълномащабна руска инвазия.
Моментът, избран за начална точка на тези действия, не оставя никакво съмнение, че те са директна реакция на Кремъл срещу украинската революция, която започва през ноември 2013 г. и кулминира в края на февруари 2014-та. Самият Путин разказва в интервю, че е взел решението да анексира Крим в нощта срещу 23 февруари 2014 г., един ден след като украинският президент Виктор Янукович бяга заедно с покъщнината си от Украйна. Но тук причинно-следствената връзка се губи за много хора.
Какво толкова се случва на Майдана, че кремълският самодържец така да възненавиди цял един народ и цяла една страна?
Както причините, довели до протестите в Киев и описани в първата част на тази тема, така и самата революция са покрити с пластове от пропагандни наративи, опростено представяне и умишлено недоразбиране. Диференцираният разбор на събитията около Евромайдана по необходимост прилича на археологически разкопки, в които с фина четка трябва да се отстраняват натрупванията на времето, за да се стигне до самите артефакти. Трагедията на Украйна не е просто в това, че тя е жертва на агресия; най-печалното е, че агресорът зададе терминологията и маниера, с които светът говори и мисли за нея.
Митовете, култивирани по отношение на Евромайдана, са безчет и не могат да бъдат изчерпателно адресирани в един текст. Но най-главните са два и те по един издайнически начин са огледални един на друг, защото игнорират променливата динамика на революционните събития и представят кратки отрязъци от тях като цялостна картина. Първият мит се фокусира единствено върху началото на протестите и приписва на участниците в тях „геополитически“ мотиви: те уж са „против“ Русия и „за“ Европа. Вторият пък е фиксиран върху края на революцията и гласи, че Майданът е насилствен преврат на крайнодесни „бандеровци“. Тези два статични погледа на свой ред пък обслужват шаблонния медиен имидж на Украйна като страна, която езиково, етнически, и идеологически е разделена на „изток“ и „запад“.
Фазите на революцията
Протестите на киевския „Майдан Незалежності“ („Площад на независимостта“) продължават три месеца и протичат през няколко фази на мобилизация. Тези фази, както показват детайлни изследвания, базирани на представителни извадки и интервюта с фокус групи, се различават една от друга по отношение на исканията и лозунгите, демографската си композиция и протестния си репертоар.
Първата мобилизационна вълна започва на 21 ноември 2013 г., броени часове след като президентът Янукович обявява, че няма да подпише Споразумението за асоцииране с Европейския съюз. Тя се състои най-вече от млади хора, студенти, представители на творческите професии, ученици. Те развяват европейския флаг редом с украинския и скандират „Україна – це Європа“ („Украйна е Европа“), а мобилизацията в интернет се осъществява през хаштага #Євромайдан, откъдето протестите добиват международно популярното си название.
Съществен първоначален организационен тласък е даден от широко споделяна публикация на активиста и журналиста от афганистански произход Мустафа Найем, който приканва съгражданите си да излязат на площада с напомнянето, че „лайковете не се броят“. Впрочем публикацията е написана на руски език.
Демонстрациите бързо се разрастват след 29–30 ноември, когато специалните полицейски части „Беркут“ се нахвърлят върху протестиращите и ги пребиват. Втората мобилизационна вълна вече обхваща много по-широки възрастови и класови групи. На помощ на „студентския“ Майдан се притичва „родителският“: на площадите из цялата страна се стичат и хора на средна възраст с всякакви професии, които се обединяват срещу полицейския произвол. „Кои си въобразявате, че сте? Защо биете нашите деца?“, скандират те.
Оттук нататък евроинтеграцията остава на заден план като мобилизационен мотив. Както констатира изследователката Олга Онух в серия от интервюта, „медианният“ демонстрант е най-разтревожен от нарастващото ниво на репресия и потъпкването на гражданските свободи, а не от мнимото сближаване с Русия. Това схващане се потвърждава в представително социологическо запитване в началото на февруари 2014 – най-големият дял от запитаните демонстранти (около 70%) посочват именно репресиите като една от трите си главни подбуди за участието в митинга, а отказа от Споразумението с ЕС – едва 53,5%. Тази нова фаза на протестите измества фокуса на мобилизационния дискурс към по-универсални категории: граждански права, прогрес и човешко достойнство. Именно тогава Евромайданът се ребрандира като Революция на достойнството – наименованието, с което ще остане в украинската колективна памет.
Режимът на Янукович реагира на протестите по репресивен, насилствен и същевременно непостоянен начин, който подклажда нови и нови вълни на мобилизация и радикализация. Масови арести се редуват с масови амнистии. Платени провокатори – т.нар. титушки (по фамилното име на Вадим Титушко, платен демонстрант, който през пролетта на 2013 г. пребива журналисти) – се смесват с тълпата и всячески се стремят да я тласнат към насилие. Полицията и други силови структури, работещи за режима, получават все по-често зелена светлина за побой над протестиращите. Маскирани мъже похищават ранени революционери от болниците и се налага доброволци да бдят над тях на смени.
На 16 януари 2014 г. репресиите кулминират в пакет от „антипротестни“ закони, които имат за цел радикално да ограничат свободния печат и правото на демонстрация. Те са прокарани скорострелно през парламента и развързват ръцете на „Беркут“. Няколко дни по-късно следва втора вълна от побои и за първи път протестиращи загиват в резултат на полицейските действия.
„След първия изстрел вече нищо не беше същото“
Пролятата кръв маркира радикален нов период в историята на независима Украйна. Въпреки хаотичния мафиотски характер на прехода, украинският държавен апарат, за разлика от руския и беларуския, до този момент не си е позволявал да прибегне до масово насилие като инструмент за саморазправа със собствените си граждани. А те ясно показват, че не са склонни да търпят прекрачването на тази граница.
Властта подценява масовия характер на протестите, както и капацитета на участниците в тях за иновация и самоорганизация. Първоначално протестният репертоар се състои предимно от символни и културни практики – концерти, джемсесии (някой е домъкнал пиано отнякъде), речи, открити лекции. Но след всяка проява на полицейщина той се обновява и допълва. Изграждат се барикади; кримските татари спретват полева кухня; организират се доброволчески медицински пунктове; пенсионери, бездомни хора, майки с малки деца, ветерани от войната в Афганистан окупират площада на смени, докато по-младите ходят на работа. Заражда се „Автомайдан“ – мобилно подразделение на протестите, което препречва пътя на полицията, блокира административни сгради, евакуира пострадали. Майданът се превръща в град в града, в карнавал на свободата, в паралелно измерение, където времето и пространството са кондензирани, а общоприетите практики за политика и социализация са преобърнати с главата надолу. Писателката Катерина Мишченко описва тези моменти на радикална солидарност така:
Майданът се роди от нуждата да даваш и да споделяш. В тези нови качества на взаимоотношенията се криеше подривният характер на нашия протест, неговият огромен потенциал, който нямаше нищо общо с партиите или опозиционните политици.
В същото време зачестяващите сблъсъци с държавните силови структури водят до поредна и този път предвидима промяна в композицията на протестиращите: рязко спада пропорционалният брой на жените, който дотогава е почти 50%. Увеличава се и сравнителният дял на националистическите организации и радикално настроените демонстранти, готови да използват насилие като ultima ratio (двете групи се припокриват само отчасти). Особено последните изиграват роля във финалните дни на революцията, макар че до самия край представляват много малка част от протестиращите.
От 18 до 21 февруари революцията излиза от контрол и на места се стига до екстремно насилие. В последната вълна на ескалация „Беркут“ и други специализирани части – „Алфа“, използват драстични методи на репресии срещу демонстрантите: бойни патрони, гранати и снайпери. Някои от радикалните демонстранти, които се самовъоръжават, отвръщат на огъня. Загиват около 90 души. Неколцина от тях са полицаи, а повечето са демонстранти под 25-годишна възраст. Стотици са ранени. Детайлите на този кървав епизод до ден днешен не са напълно изяснени от украинското правосъдие и дават повод за множество взаимни обвинения, както и за конспиративни теории през годините. „След първия изстрел, след първия коктейл „Молотов“ вече нищо не беше същото“, спомня си Сергий Жадан, писател и централна фигура на харковския Майдан.
През цялото време Янукович не показва ни най-малка готовност за пълноценен диалог или компромис. Това го превръща в най-одиозната фигура в украинската политика. Всеобщата непоносимост към неговата власт се превръща в основен мобилизационен мотив към края на протестите. „Банду геть!“ („Бандата вън!“) става доминиращият лозунг, отправен към Партията на регионите, която наистина е трудно различима от вертикално интегрирана криминална организация.
Едва след февруарското клане и с посредничеството на външните министри на Германия, Полша и Франция Янукович склонява да подпише споразумение с лидерите на опозицията. То предполага служебно правителство и предсрочни президентски избори. Майданът обаче, неконтролируем и отчужден от официалните политически играчи, включително и от опозицията, спонтанно отхвърля споразумението. А Янукович… натоварва съществена част от имàнето си на хеликоптери и бяга от Киев, а впоследствие и от страната.
Междувременно протестиращи и репортери щурмуват президентската резиденция в Межигирия, превърнала се в символ на вулгарния мафиозен материализъм. Резиденцията шокира със своя кич. Протестиращите се натъкват на всевъзможни реликви на мутробарока. „Каква логика може да се очаква от човек, който използва златна тоалетна?“, пише Сергий Жадан.
Както се оказва впоследствие, украинският президент е планирал бягството си още преди споразумението. Тази стъпка хвърля страната в конституционна криза, тъй като няма правна норма или прецедент, които да регулират такъв извънреден случай. Ново служебно правителство и предсрочни избори се назначават ad hoc заради странната фактическа абдикация на действащия президент.
Митът за разделената Украйна
Колективната памет за Майдана в много страни е доминирана от медийните изображения на насилие и десен радикализъм. Динамиката на протестите през 2013–2014 г. обаче не може да бъде описана от тези статични картини. Евромайданът се различава коренно и от предшестващата го Оранжева революция през 2004 г. Както показват количествените изследвания, оранжевият бунт е демографски доминиран от западните региони на страната, а национално-езиковите мотивации са по-широко застъпени от демократичните.
На фона на това Евромайданът е много по-плуралистичен и много по-граждански ориентиран. Протестиращите тълпи са изключително разнообразни – съставът им преминава през всякакви етнически, класови, политически, възрастови и географски граници. В революцията участват етнически украинци, руснаци, арменци, беларуси, грузинци, кримски татари, евреи, афганистанци. Автомонтьорът от Житомир гради барикади рамо до рамо с програмистите от Киев; пенсионери лагеруват до ученици и студенти; леви и десни активисти временно заравят томахавката.
Още по-важно е, че революцията изхвърля през прозореца медийните клишета за „разделената между изток и запад Украйна“. Дихотомията между „русофони“ и „украиноговорещи“ не играе никаква роля в протестите. Руският и т.нар. суржик – битово наречие на украинския, лексикално доминирано от руски заемки – са точно толкова lingua franca на демонстрантите, колкото и книжовният украински. Регионалните различия също играят много по-малка роля в сравнение с предишните протести, въпреки че протестната активност е по-ниска на юг и на югоизток. Донецк и Луганск също имат своите по-малки Майдани, както и градове като Харков, Суми, Днипро, Полтава, Одеса, дори кримските Севастопол и Симферопол.
Разбира се, всяка революция по дефиниция е поляризиращо събитие и тази не прави изключение. Далеч не всички в Украйна я подкрепят. Много хора, особено в Донбас, също изпитват неприязън към Янукович, но гледат скептично на Майдана, не споделят лозунгите му, не разбират целите му или пък просто са отблъснати от атмосферата на хаос и противопоставяне. Равнодушните, дори негативните нагласи към промяната са разбираеми с оглед на колективните травми в паметта на региона, страдащ от болезнена деиндустриализация, престъпна приватизация и всекидневие в патримониални структури, доминирани от местни олигарси.
Този скептицизъм в Донбас обаче не трябва да се бърка със сепаратистки настроения, които тогава, както и в предходните години, не са широко разпространени. Представителни запитвания от март 2014 г. показват, че исканията за „присъединяване“ към Русия в страната остават в едно ограничено малцинство при все регионалните вариации. Дори в Крим, регион със специфична история и демографски състав, изменен от столетия на русификация и етнически чистки на коренното население – кримските татари, такова желание изразява около 1/3 от населението – далеч от нарисуваните по-късно на псевдореферендума 96,57%.
Реакция и последствия
„Геополитическият“ елемент в цялата история в крайна сметка се привнася от Путин и неговия антураж, които от самото начало привиждат в Майдана антируска конспирация и системен конфликт между „Запада“ и „Изтока“, който се възпроизвежда в миниатюра на украинска територия, мислено разделена по поречието на Днепър. Идеята за народно въстание за тях е оксиморон: ако някъде по света избухват размирици, те по дефиниция трябва да са контролирани от „нечий щаб“. Тук не мога да се изразя по-добре от беларуския журналист Артьом Шрайбман:
Тези хора не могат и да си представят, че някакви групи от хора са способни да взаимодействат хоризонтално, да живеят без пастир. За тях има само вертикал, само казарма. Само елитите и стадото овце под тях. Щом сме свикнали да живеем в такова общество и да го управляваме, значи всички общества са такива.
Владимир Владимирович дотолкова се опиянява от геополитическите си фантазии, че пристъпва към възможно най-крайните политически действия – военно насилие, инсцениране на спонтанен сепаратизъм, инвазия. Речта, която той държи на 18 март 2014 г. по повод анексирането на Крим, е пълна със злостни коментари за „управляеми“ революции, „неонацисти, русофоби и антисемити“, както и с мракобесни исторически спекулации – дословно същите тропи, с които светът ще бъде облъчен още веднъж на сутринта на 24 февруари 2022 г.
В този момент вече въобще не става дума за икономическите интереси на Русия – евразийският интеграционен проект, а и самата Украйна имат ограничено значение за руската външна търговия. Основната мотивация е за реванш срещу украинския народ и решението на голямата част от него да се опълчи на плячкосването на страната и затягането на авторитарните гайки.
Още тогава беше видимо с просто око, че всъщност официалната идеология на Кремъл е тази, която залита в крайнодясното, неумело маскирайки империалисткия си милитаризъм с псевдолява антизападна реторика. Но през 2014 г. за мнозина в Европа беше по-удобно безкритично да се възприемат великоруската гледна точка и путинският разказ за „управляемата революция“. Когато не знаеш почти нищо за една страна, най-лесно е да я гледаш през призмата на имперската арогантност и да смяташ нейните граждани за същества без собствена воля, за пешки в геополитическия шахмат.
Така украинският народ се превърна в проекционно поле за всякакви постимперски шовинизми, национални комплекси и идеологически клишета. Политически предприемачи от всякакъв тип – десни, леви, прогресивни, консерватори, самодоволни моралисти и обикновени циници – вкупом се втурнаха да заклеймяват жертвата и да амнистират насилника. И от българска страна имаше много такива гласове. Но тези необуздани инсинуации по адрес на украинската революция говорят много повече за самите нас, отколкото за нея.
Авторът благодари на Елен Будинова за полезните коментари и подобрения по текста.
Cranelift is an Apache-2.0-licensed
code-generation backend being developed as part
of the Wasmtime runtime for WebAssembly.
In October 2023, the Rust project made Cranelift available as an optional
component in its nightly toolchain.
Users can now use Cranelift as the code-generation backend for debug builds of
projects written in Rust,
making it an opportune time to look at what makes Cranelift different.
Cranelift is designed to compete with existing compilers by generating
code more quickly than they can, thanks to a stripped-down design that prioritizes
only the most important optimizations.
Zach Mitchell has announced the 1.0 release of Flox, a tool that lets its users install packages from nixpkgs inside portable virtual environments, and share those virtual environments with others as an alternative to Docker-style containers. Flox is based on Nix but allows users to skip learning how to work with the Nix language:
With Flox we’re providing a substantially better user experience. We provide the suite of package manager functionality with install, uninstall, etc, but we also provide an entire new suite of functionality with the ability to share environments via flox push, flox pull, and flox activate --remote.
Flox is GPLv2-licensed, and releases are available as RPMs and Debian packages for x86_64 and arm64 systems.
Sasha Levin has announced the release of the 6.8.1, 6.7.10, 6.6.22, 6.1.82, 5.15.152, 5.10.213, 5.4.272,
and 4.19.310 stable kernels. As always, they contain important fixes throughout the tree. Users of those kernels should upgrade.
Authors: asterion04 and h00die
Type: Auxiliary
Pull request: #18716 contributed by h00die
Path: admin/http/gitlab_password_reset_account_takeover
AttackerKB reference: CVE-2023-7028
Description: This adds an exploit module that leverages an account-take-over vulnerability to take control of a GitLab account without user interaction. The vulnerability lies in the password reset functionality as it’s possible to provide two email addresses so that
the reset code will be sent to both. It is therefore possible to provide the email
address of the target account as well as that of one we control, and to reset the password.
MinIO Bootstrap Verify Information Disclosure
Authors: RicterZ and joel <joel @ ndepthsecurity>
Type: Auxiliary
Pull request: #18775 contributed by 6a6f656c
Path: gather/minio_bootstrap_verify_info_disc
AttackerKB reference: CVE-2023-28432
Description: This adds an auxiliary module that leverages an information disclosure (CVE-2023-28432) in a cluster deployment of MinIO versions from RELEASE.2019-12-17T23-16-33Z and prior to RELEASE.2023-03-20T20-16-18Z. This retrieves all environment variables, including MINIO_SECRET_KEY and MINIO_ROOT_PASSWORD.
Description: This adds an exploit module that leverages an authentication bypass vulnerability in JetBrains TeamCity (CVE-2024-27198) to achieve unauthenticated RCE. The authentication bypass enables access to the REST API and creates a new administrator access token. This token can be used to upload a plugin which contains a Metasploit payload.
Enhancements and features (5)
#18835 from zgoldman-r7 – This PR reduces code duplication in the modules/exploits/windows/mssql/mssql_payload module.
#18899 from zeroSteiner – Updates the tools/payloads/ysoserial/dot_net.rb tool to add options for encoding the resulting payload as a viewstate.
#18930 from dwelch-r7 – This PR adds the ability to run a help command from within the interactive SQL prompt.
#18931 from cgranleese-r7 – Adds additional help information when interacting with an SQL session.
#18932 from adfoster-r7 – This PR adds PostgreSQL session type acceptance tests using Allure report generation as well as a local test module.
Bugs fixed (5)
#18944 from zeroSteiner – This fixes an issue when saving and loading DNS rules from the config.
#18945 from adfoster-r7 – Fixes an issue that caused a crash when running http crawler with database connected.
#18949 from zeroSteiner – This updates the DNS feature to notify the user a restart is required when the feature is enabled or disabled.
#18952 from cgranleese-r7 – Updates Postgres hashdump module to now work with newer versions of Postgres.
#18954 from adfoster-r7 – This PR fixes an issue where modules were not honoring spooler settings.
Documentation added (3)
#18868 from zeroSteiner – This adds documentation for the new DNS command.
#18937 from jjoshm – Fixes a typo in the Kerberos documentation.
#18951 from adfoster-r7 – This PR improves documentation on running Postgres acceptance tests locally.
You can always find more documentation on our docsite at docs.metasploit.com.
Get it
As always, you can update to the latest Metasploit Framework with msfupdate
and you can get more details on the changes since the last blog post from
GitHub:
In the second half of 2023, OpenSearch Service added the support of two new OpenSearch versions: 2.9 and 2.11 These two versions introduce new features in the search space, machine learning (ML) search space, migrations, and the operational side of the service.
With the release of zero-ETL integration with Amazon Simple Storage Service (Amazon S3), you can analyze your data sitting in your data lake using OpenSearch Service to build dashboards and query the data without the need to move your data from Amazon S3.
OpenSearch Service also announced a new zero-ETL integration with Amazon DynamoDB through the DynamoDB plugin for Amazon OpenSearch Ingestion. OpenSearch Ingestion takes care of bootstrapping and continuously streams data from your DynamoDB source.
OpenSearch Serverless announced the general availability of the Vector Engine for Amazon OpenSearch Serverless along with other features to enhance your experience with time series collections, manage your cost for development environments, and quickly scale your resources to match your workload demands.
In this post, we discuss the new releases in OpenSearch Service to empower your business with search, observability, security analytics, and migrations.
Build cost-effective solutions with OpenSearch Service
With the zero-ETL integration for Amazon S3, OpenSearch Service now lets you query your data in place, saving cost on storage. Data movement is an expensive operation because you need to replicate data across different data stores. This increases your data footprint and drives cost. Moving data also adds the overhead of managing pipelines to migrate the data from one source to a new destination.
OpenSearch Service also added new instance types for data nodes—Im4gn and OR1—to help you further optimize your infrastructure cost. With a maximum 30 TB non-volatile memory (NVMe) solid state drives (SSD), the Im4gn instance provides dense storage and better performance. OR1 instances use segment replication and remote-backed storage to greatly increase throughput for indexing-heavy workloads.
Zero-ETL from DynamoDB to OpenSearch Service
In November 2023, DynamoDB and OpenSearch Ingestion introduced a zero-ETL integration for OpenSearch Service. OpenSearch Service domains and OpenSearch Serverless collections provide advanced search capabilities, such as full-text and vector search, on your DynamoDB data. With a few clicks on the AWS Management Console, you can now seamlessly load and synchronize your data from DynamoDB to OpenSearch Service, eliminating the need to write custom code to extract, transform, and load the data.
Direct query (zero-ETL for Amazon S3 data, in preview)
OpenSearch Service announced a new way for you to query operational logs in Amazon S3 and S3-based data lakes without needing to switch between tools to analyze operational data. Previously, you had to copy data from Amazon S3 into OpenSearch Service to take advantage of OpenSearch’s rich analytics and visualization features to understand your data, identify anomalies, and detect potential threats.
However, continuously replicating data between services can be expensive and requires operational work. With the OpenSearch Service direct query feature, you can access operational log data stored in Amazon S3, without needing to move the data itself. Now you can perform complex queries and visualizations on your data without any data movement.
Support of Im4gn with OpenSearch Service
Im4gn instances are optimized for workloads that manage large datasets and need high storage density per vCPU. Im4gn instances come in sizes large through 16xlarge, with up to 30 TB in NVMe SSD disk size. Im4gn instances are built on AWS Nitro System SSDs, which offer high-throughput, low-latency disk access for best performance. OpenSearch Service Im4gn instances support all OpenSearch versions and Elasticsearch versions 7.9 and above. For more details, refer to Supported instance types in Amazon OpenSearch Service.
Introducing OR1, an OpenSearch Optimized Instance family for indexing heavy workloads
In November 2023, OpenSearch Service launched OR1, the OpenSearch Optimized Instance family, which delivers up to 30% price-performance improvement over existing instances in internal benchmarks and uses Amazon S3 to provide 11 9s of durability. A domain with OR1 instances uses Amazon Elastic Block Store (Amazon EBS) volumes for primary storage, with data copied synchronously to Amazon S3 as it arrives. OR1 instances use OpenSearch’s segment replication feature to enable replica shards to read data directly from Amazon S3, avoiding the resource cost of indexing in both primary and replica shards. The OR1 instance family also supports automatic data recovery in the event of failure. For more information about OR1 instance type options, refer to Current generation instance types in OpenSearch Service.
Enable your business with security analytics features
The Security Analytics plugin in OpenSearch Service supports out-of-the-box prepackaged log types and provides security detection rules (SIGMA rules) to detect potential security incidents.
In OpenSearch 2.9, the Security Analytics plugin added support for customer log types and native support for Open Cybersecurity Schema Framework (OCSF) data format. With this new support, you can build detectors with OCSF data stored in Amazon Security Lake to analyze security findings and mitigate any potential incident. The Security Analytics plugin has also added the possibility to create your own custom log types and create custom detection rules.
Build ML-powered search solutions
In 2023, OpenSearch Service invested in eliminating the heavy lifting required to build next-generation search applications. With features such as search pipelines, search processors, and AI/ML connectors, OpenSearch Service enabled rapid development of search applications powered by neural search, hybrid search, and personalized results. Additionally, enhancements to the kNN plugin improved storage and retrieval of vector data. Newly launched optional plugins for OpenSearch Service enable seamless integration with additional language analyzers and Amazon Personalize.
Search pipelines
Search pipelines provide new ways to enhance search queries and improve search results. You define a search pipeline and then send your queries to it. When you define the search pipeline, you specify processors that transform and augment your queries, and re-rank your results. The prebuilt query processors include date conversion, aggregation, string manipulation, and data type conversion. The results processor in the search pipeline intercepts and adapts results on the fly before rendering to next phase. Both request and response processing for the pipeline are performed on the coordinator node, so there is no shard-level processing.
Optional plugins
OpenSearch Service lets you associate preinstalled optional OpenSearch plugins to use with your domain. An optional plugin package is compatible with a specific OpenSearch version, and can only be associated to domains with that version. Available plugins are listed on the Packages page on the OpenSearch Service console. The optional plugin includes the Amazon Personalize plugin, which integrates OpenSearch Service with Amazon Personalize, and new language analyzers such as Nori, Sudachi, STConvert, and Pinyin.
Support for new language analyzers
OpenSearch Service added support for four new language analyzer plugins: Nori (Korean), Sudachi (Japanese), Pinyin (Chinese), and STConvert Analysis (Chinese). These are available in all AWS Regions as optional plugins that you can associate with domains running any OpenSearch version. You can use the Packages page on the OpenSearch Service console to associate these plugins to your domain, or use the Associate Package API.
Neural search feature
Neural search is generally available with OpenSearch Service version 2.9 and later. Neural search allows you to integrate with ML models that are hosted remotely using the model serving framework. When you use a neural query during search, neural search converts the query text into vector embeddings, uses vector search to compare the query and document embedding, and returns the closest results. During ingestion, neural search transforms document text into vector embedding and indexes both the text and its vector embeddings in a vector index.
Integration with Amazon Personalize
OpenSearch Service introduced an optional plugin to integrate with Amazon Personalize in OpenSearch versions 2.9 or later. The OpenSearch Service plugin for Amazon Personalize Search Ranking allows you to improve the end-user engagement and conversion from your website and application search by taking advantage of the deep learning capabilities offered by Amazon Personalize. As an optional plugin, the package is compatible with OpenSearch version 2.9 or later, and can only be associated to domains with that version.
Efficient query filtering with OpenSearch’s k-NN FAISS
OpenSearch Service introduced efficient query filtering with OpenSearch’s k-NN FAISS in version 2.9 and later. OpenSearch’s efficient vector query filters capability intelligently evaluates optimal filtering strategies—pre-filtering with approximate nearest neighbor (ANN) or filtering with exact k-nearest neighbor (k-NN)—to determine the best strategy to deliver accurate and low-latency vector search queries. In earlier OpenSearch versions, vector queries on the FAISS engine used post-filtering techniques, which enabled filtered queries at scale, but potentially returning less than the requested “k” number of results. Efficient vector query filters deliver low latency and accurate results, enabling you to employ hybrid search across vector and lexical techniques.
Byte-quantized vectors in OpenSearch Service
With the new byte-quantized vector introduced with 2.9, you can reduce memory requirements by a factor of 4 and significantly reduce search latency, with minimal loss in quality (recall). With this feature, the usual 32-bit floats that are used for vectors are quantized or converted to 8-bit signed integers. For many applications, existing float vector data can be quantized with little loss in quality. Comparing benchmarks, you will find that using byte vectors rather than 32-bit floats results in a significant reduction in storage and memory usage while also improving indexing throughput and reducing query latency. An internal benchmark showed the storage usage was reduced by up to 78%, and RAM usage was reduced by up to 59% (for the glove-200-angular dataset). Recall values for angular datasets were lower than those of Euclidean datasets.
AI/ML connectors
OpenSearch 2.9 and later supports integrations with ML models hosted on AWS services or third-party platforms. This allows system administrators and data scientists to run ML workloads outside of their OpenSearch Service domain. The ML connectors come with a supported set of ML blueprints—templates that define the set of parameters you need to provide when sending API requests to a specific connector. OpenSearch Service provides connectors for several platforms, such as Amazon SageMaker,Amazon Bedrock, OpenAI ChatGPT, and Cohere.
OpenSearch Service console integrations
OpenSearch 2.9 and later added a new integrations feature on the console. Integrations provides you with an AWS CloudFormation template to build your semantic search use case by connecting to your ML models hosted on SageMaker or Amazon Bedrock. The CloudFormation template generates the model endpoint and registers the model ID with the OpenSearch Service domain you provide as input to the template.
Hybrid search and range normalization
The normalization processor and hybrid query builds on top of the two features released earlier in 2023—neural search and search pipelines. Because lexical and semantic queries return relevance scores on different scales, fine-tuning hybrid search queries was difficult.
OpenSearch Service 2.11 now supports a combination and normalization processor for hybrid search. You can now perform hybrid search queries, combining a lexical and a natural language-based k-NN vector search queries. OpenSearch Service also enables you to tune your hybrid search results for maximum relevance using multiple scoring combination and normalization techniques.
Multimodal search with Amazon Bedrock
OpenSearch Service 2.11 launches the support of multimodal search that allows you to search text and image data using multimodal embedding models. To generate vector embeddings, you need to create an ingest pipeline that contains a text_image_embedding processor, which converts the text or image binaries in a document field to vector embeddings. You can use the neural query clause, either in the k-NN plugin API or Query DSL queries, to do a combination of text and images searches. You can use the new OpenSearch Service integration features to quickly start with multimodal search.
Neural sparse retrieval
Neural sparse search, a new efficient method of semantic retrieval, is available in OpenSearch Service 2.11. Neural sparse search operates in two modes: bi-encoder and document-only. With the bi-encoder mode, both documents and search queries are passed through deep encoders. In document-only mode, only documents are passed through deep encoders, while search queries are tokenized. A document-only sparse encoder generates an index that is 10.4% of the size of a dense encoding index. For a bi-encoder, the index size is 7.2% of the size of a dense encoding index. Neural sparse search is enabled by sparse encoding models that create sparse vector embeddings: a set of <token: weight> pairs representing the text entry and its corresponding weight in the sparse vector. To learn more about the pre-trained models for sparse neural search, refer to Sparse encoding models.
Neural sparse search reduces costs, improves search relevance, and has lower latency. You can use the new OpenSearch Service integrations features to quickly start with neural sparse search.
OpenSearch Ingestion updates
OpenSearch Ingestion is a fully managed and auto scaled ingestion pipeline that delivers your data to OpenSearch Service domains and OpenSearch Serverless collections. Since its release in 2023, OpenSearch Ingestion continues to add new features to make it straightforward to transform and move your data from supported sources to downstream destinations like OpenSearch Service, OpenSearch Serverless, and Amazon S3.
New migration features in OpenSearch Ingestion
In November 2023, OpenSearch Ingestion announced the release of new features to support data migration from self-managed Elasticsearch version 7.x domains to the latest versions of OpenSearch Service.
OpenSearch Ingestion also supports the migration of data from OpenSearch Service managed domains running OpenSearch version 2.x to OpenSearch Serverless collections.
In November 2023, OpenSearch Ingestion introduced persistent buffering for push-based sources likes HTTP sources (HTTP, Fluentd, FluentBit) and OpenTelemetry collectors.
By default, OpenSearch Ingestion uses in-memory buffering. With persistent buffering, OpenSearch Ingestion stores your data in a disk-based store that is more resilient. If you have existing ingestion pipelines, you can enable persistent buffering for these pipelines, as shown in the following screenshot.
OpenSearch Serverless continued to enhance your serverless experience with OpenSearch by introducing the support of a new collection of type vector search to store embeddings and run similarity search. OpenSearch Serverless now supports shard replica scaling to handle spikes in query throughput. And if you are using a time series collection, you can now set up your custom data retention policy to match your data retention requirements.
Vector Engine for OpenSearch Serverless
In November 2023, we launched the vector engine for Amazon OpenSearch Serverless. The vector engine makes it straightforward to build modern ML-augmented search experiences and generative artificial intelligence (generative AI) applications without needing to manage the underlying vector database infrastructure. It also enables you to run hybrid search, combining vector search and full-text search in the same query, removing the need to manage and maintain separate data stores or a complex application stack.
OpenSearch Serverless lower-cost dev and test environments
OpenSearch Serverless now supports development and test workloads by allowing you to avoid running a replica. Removing replicas eliminates the need to have redundant OCUs in another Availability Zone solely for availability purposes. If you are using OpenSearch Serverless for development and testing, where availability is not a concern, you can drop your minimum OCUs from 4 to 2.
OpenSearch Serverless supports automated time-based data deletion using data lifecycle policies
In December 2023, OpenSearch Serverless announced support for managing data retention of time series collections and indexes. With the new automated time-based data deletion feature, you can specify how long you want to retain data. OpenSearch Serverless automatically manages the lifecycle of the data based on this configuration. To learn more, refer to Amazon OpenSearch Serverless now supports automated time-based data deletion.
OpenSearch Serverless announced support for scaling up replicas at shard level
At launch, OpenSearch Serverless supported increasing capacity automatically in response to growing data sizes. With the new shard replica scaling feature, OpenSearch Serverless automatically detects shards under duress due to sudden spikes in query rates and dynamically adds new shard replicas to handle the increased query throughput while maintaining fast response times. This approach proves to be more cost-efficient than simply adding new index replicas.
AWS user notifications to monitor your OCU usage
With this launch, you can configure the system to send notifications when OCU utilization is approaching or has reached maximum configured limits for search or ingestion. With the new AWS User Notification integration, you can configure the system to send notifications whenever the capacity threshold is breached. The User Notification feature eliminates the need to monitor the service constantly. For more information, see Monitoring Amazon OpenSearch Serverless using AWS User Notifications.
Enhance your experience with OpenSearch Dashboards
OpenSearch 2.9 in OpenSearch Service introduced new features to make it straightforward to quickly analyze your data in OpenSearch Dashboards. These new features include the new out-of-the box, preconfigured dashboards with OpenSearch Integrations, and the ability to create alerting and anomaly detection from an existing visualization in your dashboards.
OpenSearch Dashboard integrations
OpenSearch 2.9 added the support of OpenSearch integrations in OpenSearch Dashboards. OpenSearch integrations include preconfigured dashboards so you can quickly start analyzing your data coming from popular sources such as AWS CloudFront, AWS WAF, AWS CloudTrail, and Amazon Virtual Private Cloud (Amazon VPC) flow logs.
Alerting and anomalies in OpenSearch Dashboards
In OpenSearch Service 2.9, you can create a new alerting monitor directly from your line chart visualization in OpenSearch Dashboards. You can also associate the existing monitors or detectors previously created in OpenSearch to the dashboard visualization.
This new feature helps reduce context switching between dashboards and both the Alerting or Anomaly Detection plugins. Refer to the following dashboard to add an alerting monitor to detect drops in average data volume in your services.
OpenSearch expands geospatial aggregations support
With OpenSearch version 2.9, OpenSearch Service added the support of three types of geoshape data aggregation through API: geo_bounds, geo_hash, and geo_tile.
The geoshape field type provides the possibility to index location data in different geographic formats such as a point, a polygon, or a linestring. With the new aggregation types, you have more flexibility to aggregate documents from an index using metric and multi-bucket geospatial aggregations.
OpenSearch Service operational updates
OpenSearch Service removed the need to run blue/green deployment when changing the domain managed nodes. Additionally, the service improved the Auto-Tune events with the support of new Auto-Tune metrics to track the changes within your OpenSearch Service domain.
OpenSearch Service now lets you update domain manager nodes without blue/green deployment
As of early H2 of 2023, OpenSearch Service allowed you to modify the instance type or instance count of dedicated cluster manager nodes without the need for blue/green deployment. This enhancement allows quicker updates with minimal disruption to your domain operations, all while avoiding any data movement.
Previously, updating your dedicated cluster manager nodes on OpenSearch Service meant using a blue/green deployment to make the change. Although blue/green deployments are meant to avoid any disruption to your domains, because the deployment utilizes additional resources on the domain, it is recommended that you perform them during low-traffic periods. Now you can update cluster manager instance types or instance counts without requiring a blue/green deployment, so these updates can complete faster while avoiding any potential disruption to your domain operations. In cases where you modify both the domain manager instance type and count, OpenSearch Service will still use a blue/green deployment to make the change. You can use the dry-run option to check whether your change requires a blue/green deployment.
Enhanced Auto-Tune experience
In September 2023, OpenSearch Service added new Auto-Tune metrics and improved Auto-Tune events that give you better visibility into the domain performance optimizations made by Auto-Tune.
Auto-Tune is an adaptive resource management system that automatically updates OpenSearch Service domain resources to improve efficiency and performance. For example, Auto-Tune optimizes memory-related configuration such as queue sizes, cache sizes, and Java virtual machine (JVM) settings on your nodes.
With this launch, you can now audit the history of the changes, as well as track them in real time from the Amazon CloudWatch console.
Additionally, OpenSearch Service now publishes details of the changes to Amazon EventBridge when Auto-Tune settings are recommended or applied to an OpenSearch Service domain. These Auto-Tune events will also be visible on the Notifications page on the OpenSearch Service console.
Accelerate your migration to OpenSearch Service with the new Migration Assistant solution
In November 2023, the OpenSearch team launched a new open-source solution—Migration Assistant for Amazon OpenSearch Service. The solution supports data migration from self-managed Elasticsearch and OpenSearch domains to OpenSearch Service, supporting Elasticsearch 7.x (<=7.10), OpenSearch 1.x, and OpenSearch 2.x as migration sources. The solution facilitates the migration of the existing and live data between source and destination.
Conclusion
In this post, we covered the new releases in OpenSearch Service to help you innovate your business with search, observability, security analytics, and migrations. We provided you with information about when to use each new feature in OpenSearch Service, OpenSearch Ingestion, and OpenSearch Serverless.
Learn more about OpenSearch Dashboards and OpenSearch plugins and the new exciting OpenSearch assistant using OpenSearch playground.
Check out the features described in this post, and we appreciate you providing us your valuable feedback.
About the Authors
Jon Handler is a Senior Principal Solutions Architect at Amazon Web Services based in Palo Alto, CA. Jon works closely with OpenSearch and Amazon OpenSearch Service, providing help and guidance to a broad range of customers who have search and log analytics workloads that they want to move to the AWS Cloud. Prior to joining AWS, Jon’s career as a software developer included 4 years of coding a large-scale, ecommerce search engine. Jon holds a Bachelor of the Arts from the University of Pennsylvania, and a Master of Science and a PhD in Computer Science and Artificial Intelligence from Northwestern University.
Hajer Bouafif is an Analytics Specialist Solutions Architect at Amazon Web Services. She focuses on Amazon OpenSearch Service and helps customers design and build well-architected analytics workloads in diverse industries. Hajer enjoys spending time outdoors and discovering new cultures.
Aruna Govindaraju is an Amazon OpenSearch Specialist Solutions Architect and has worked with many commercial and open source search engines. She is passionate about search, relevancy, and user experience. Her expertise with correlating end-user signals with search engine behavior has helped many customers improve their search experience.
Prashant Agrawal is a Sr. Search Specialist Solutions Architect with Amazon OpenSearch Service. He works closely with customers to help them migrate their workloads to the cloud and helps existing customers fine-tune their clusters to achieve better performance and save on cost. Before joining AWS, he helped various customers use OpenSearch and Elasticsearch for their search and log analytics use cases. When not working, you can find him traveling and exploring new places. In short, he likes doing Eat → Travel → Repeat.
Muslim Abu Taha is a Sr. OpenSearch Specialist Solutions Architect dedicated to guiding clients through seamless search workload migrations, fine-tuning clusters for peak performance, and ensuring cost-effectiveness. With a background as a Technical Account Manager (TAM), Muslim brings a wealth of experience in assisting enterprise customers with cloud adoption and optimize their different set of workloads. Muslim enjoys spending time with his family, traveling and exploring new places.
Amazon Simple Email Service (SES) is a cloud-based email sending service that helps businesses and developers send marketing and transactional emails. We introduced the SESv1 API in 2011 to provide developers with basic email sending capabilities through Amazon SES using HTTPS. In 2020, we introduced the redesigned Amazon SESv2 API, with new and updated features that make it easier and more efficient for developers to send email at scale.
This post will compare Amazon SESv1 API and Amazon SESv2 API and explain the advantages of transitioning your application code to the SESv2 API. We’ll also provide examples using the AWS Command-Line Interface (AWS CLI) that show the benefits of transitioning to the SESv2 API.
Amazon SESv1 API
The SESv1 API is a relatively simple API that provides basic functionality for sending and receiving emails. For over a decade, thousands of SES customers have used the SESv1 API to send billions of emails. Our customers’ developers routinely use the SESv1 APIs to verify email addresses, create rules, send emails, and customize bounce and complaint notifications. Our customers’ needs have become more advanced as the global email ecosystem has developed and matured. Unsurprisingly, we’ve received customer feedback requesting enhancements and new functionality within SES. To better support an expanding array of use cases and stay at the forefront of innovation, we developed the SESv2 APIs.
While the SESv1 API will continue to be supported, AWS is focused on advancing functionality through the SESv2 API. As new email sending capabilities are introduced, they will only be available through SESv2 API. Migrating to the SESv2 API provides customers with access to these, and future, optimizations and enhancements. Therefore, we encourage SES customers to consider the information in this blog, review their existing codebase, and migrate to SESv2 API in a timely manner.
Amazon SESv2 API
Released in 2020, the SESv2 API and SDK enable customers to build highly scalable and customized email applications with an expanded set of lightweight and easy to use API actions. Leveraging insights from current SES customers, the SESv2 API includes several new actions related to list and subscription management, the creation and management of dedicated IP pools, and updates to unsubscribe that address recent industry requirements.
One example of new functionality in SESv2 API is programmatic support for the SES Virtual Delivery Manager. Previously only addressable via the AWS console, VDM helps customers improve sending reputation and deliverability. SESv2 API includes vdmAttributes such as VdmEnabled and DashboardAttributes as well as vdmOptions. DashboardOptions and GaurdianOptions.
To improve developer efficiency and make the SESv2 API easier to use, we merged several SESv1 APIs into single commands. For example, in the SESv1 API you must make separate calls for createConfigurationSet, setReputationMetrics, setSendingEnabled, setTrackingOptions, and setDeliveryOption. In the SESv2 API, however, developers make a single call to createConfigurationSet and they can include trackingOptions, reputationOptions, sendingOptions, deliveryOptions. This can result in more concise code (see below).
Another example of SESv2 API command consolidation is the GetIdentity action, which is a composite of SESv1 API’s GetIdentityVerificationAttributes, GetIdentityNotificationAttributes, GetCustomMailFromAttributes, GetDKIMAttributes, and GetIdentityPolicies. See SESv2 documentation for more details.
Why migrate to Amazon SESv2 API?
The SESv2 API offers an enhanced experience compared to the original SESv1 API. Compared to the SESv1 API, the SESv2 API provides a more modern interface and flexible options that make building scalable, high-volume email applications easier and more efficient. SESv2 enables rich email capabilities like template management, list subscription handling, and deliverability reporting. It provides developers with a more powerful and customizable set of tools with improved security measures to build and optimize inbox placement and reputation management. Taken as a whole, the SESv2 APIs provide an even stronger foundation for sending critical communications and campaign email messages effectively at a scale.
Migrating your applications to SESv2 API will benefit your email marketing and communication capabilities with:
New and Enhanced Features: Amazon SESv2 API includes new actions as well as enhancements that provide better functionality and improved email management. By moving to the latest version, you’ll be able to optimize your email sending process. A few examples include:
Increase the maximum message size (including attachments) from 10Mb (SESv1) to 40Mb (SESv2) for both sending and receiving.
Access key actions for the SES Virtual Deliverability Manager (VDM) which provides insights into your sending and delivery data. VDM provides near-realtime advice on how to fix the issues that are negatively affecting your delivery success rate and reputation.
Meet Google & Yahoo’s June 2024 unsubscribe requirements with the SES v2 SendEmail action. For more information, see the “What’s New blog”
Future-proof Your Application: Avoid potential compatibility issues and disruptions by keeping your application up-to-date with the latest version of the Amazon SESv2 API via the AWS SDK.
Improve Usability and Developer Experience: Amazon SESv2 API is designed to be more user-friendly and consistent with other AWS services. It is a more intuitive API with better error handling, making it easier to develop, maintain, and troubleshoot your email sending applications.
Migrating to the latest SESv2 API and SDK positions customers for success in creating reliable and scalable email services for their businesses.
What does migration to the SESv2 API entail?
While SESv2 API builds on the v1 API, the v2 API actions don’t universally map exactly to the v1 API actions. Current SES customers that intend to migrate to SESv2 API will need to identify the SESv1 API actions in their code and plan to refactor for v2. When planning the migration, it is essential to consider several important considerations:
Customers with applications that receive email using SESv1 API’s CreateReceiptFilter, CreateReceiptRule or CreateReceiptRuleSet actions must continue using the SESv1 API client for these actions. SESv1 and SESv2 can be used in the same application, where needed.
We recommend all customers follow the security best practice of “least privilege” with their IAM policies. As such, customers may need to review and update their policies to include the new and modified API actions introduced in SESv2 before migrating. Taking the time to properly configure permissions ensures a seamless transition while maintaining a securely optimized level of access. See documentation.
Below is an example of an IAM policy with a user with limited allow privileges related to several SESv1 Identity actions only:
When calling delete- with SESv1, SES returns 200 (or no response), even if the identity was previously deleted or doesn’t exist:
aws ses delete-identity --identity example.com
SESv2 provides better error handling and responses when calling the delete API:
aws sesv2 delete-email-identity --email-identity example.com

An error occurred (NotFoundException) when calling the DeleteEmailIdentity operation: Email identity example.com does not exist.
Hands-on with SESv1 API vs. SESv2 API
Below are a few examples you can use to explore the differences between SESv1 API and the SESv2 API. To complete these exercises, you’ll need:
AWS Account (setup) with enough permission to interact with the SES service via the CLI
SES enabled, configured and properly sending emails
A recipient email address with which you can check inbound messages (if you’re in the SES Sandbox, this email must be verified email identity). In the following examples, replace [email protected] with the verified email identity.
Your preferred IDE with AWS credentials and necessary permissions (you can also use AWS CloudShell)
Open the AWS CLI (or AWS CloudShell) and:
Create a test directory called v1-v2-test.
Create the following (8) files in the v1-v2-test directory:
destination.json (replace [email protected] with the verified email identity):
{
   "Subject": {
       "Data": "SESv1 API email sent using the AWS CLI",
       "Charset": "UTF-8"
   },
   "Body": {
       "Text": {
           "Data": "This is the message body from SESv1 API in text format.",
           "Charset": "UTF-8"
       },
       "Html": {
           "Data": "This message body from SESv1 API, it contains HTML formatting. For example - you can include links: <a class=\"ulink\" href=\"http://docs.aws.amazon.com/ses/latest/DeveloperGuide\" target=\"_blank\">Amazon SES Developer Guide</a>.",
           "Charset": "UTF-8"
       }
   }
}
ses-v1-raw-message.json (replace [email protected] with the verified email identity):
{
     "Data": "From: [email protected]\nTo: [email protected]\nSubject: Test email sent using the SESv1 API and the AWS CLI \nMIME-Version: 1.0\nContent-Type: text/plain\n\nThis is the message body from the SESv1 API SendRawEmail.\n\n"
}
ses-v1-template.json (replace [email protected] with the verified email identity):
my-template.json (replace [email protected] with the verified email identity):
{
  "Template": {
    "TemplateName": "my-template",
    "SubjectPart": "Greetings SES Developer, {{name}}!",
    "HtmlPart": "<h1>Hello {{name}},</h1><p>Your favorite animal is {{favoriteanimal}}.</p>",
    "TextPart": "Dear {{name}},\r\nYour favorite animal is {{favoriteanimal}}."
  }
}
ses-v2-simple.json (replace [email protected] with the verified email identity):
{
    "FromEmailAddress": "[email protected]",
    "Destination": {
        "ToAddresses": [
            "[email protected]"
        ]
    },
    "Content": {
        "Simple": {
            "Subject": {
                "Data": "SESv2 API email sent using the AWS CLI",
                "Charset": "utf-8"
            },
            "Body": {
                "Text": {
                    "Data": "SESv2 API email sent using the AWS CLI",
                    "Charset": "utf-8"
                }
            },
            "Headers": [
                {
                    "Name": "List-Unsubscribe",
                    "Value": "insert-list-unsubscribe-here"
                },
				{
                    "Name": "List-Unsubscribe-Post",
                    "Value": "List-Unsubscribe=One-Click"
                }
            ]
        }
    }
}
ses-v2-raw.json (replace [email protected] with the verified email identity):
{
     "FromEmailAddress": "[email protected]",
     "Destination": {
            "ToAddresses": [
                       "[email protected]"
              ]
       },
      "Content": {
             "Raw": {
                     "Data": "Subject: Test email sent using SESv2 API via the AWS CLI \nMIME-Version: 1.0\nContent-Type: text/plain\n\nThis is the message body from SendEmail Raw Content SESv2.\n\n"
              }
      }
}
ses-v2-tempate.json (replace [email protected] with the verified email identity):
As mentioned above, customers who are using least privilege permissions with SESv1 API must first update their IAM policies before running the SESv2 API examples below. See documentation for more info.
As you can see from the .json files we created for SES v2 API (above), you can modify or remove sections from the .json files, based on the type of email content (simple, raw or templated) you want to send.
As you can see from the examples above, SESv2 API shares much of its syntax and actions with the SESv1 API. As a result, most customers have found they can readily evaluate, identify and migrate their application code base in a relatively short period of time. However, it’s important to note that while the process is generally straightforward, there may be some nuances and differences to consider depending on your specific use case and programming language.
Regardless of the language, you’ll need anywhere from a few hours to a few weeks to:
Update your code to use SESv2 Client and change API signature and request parameters
Update permissions / policies to reflect SESv2 API requirements
Test your migrated code to ensure that it functions correctly with the SESv2 API
Stage, test
Deploy
Summary
As we’ve described in this post, Amazon SES customers that migrate to the SESv2 API will benefit from updated capabilities, a more user-friendly and intuitive API, better error handling and improved deliverability controls. The SESv2 API also provide for compliance with the industry’s upcoming unsubscribe header requirements, more flexible subscription-list management, and support for larger attachments. Taken collectively, these improvements make it even easier for customers to develop, maintain, and troubleshoot their email sending applications with Amazon Simple Email Service. For these, and future reasons, we recommend SES customers migrate their existing applications to the SESv2 API immediately.
For more information regarding the SESv2 APIs, comment on this post, reach out to your AWS account team, or consult the AWS SESv2 API documentation:
Zip is an Amazon Pinpoint and Amazon Simple Email Service Sr. Specialist Solutions Architect at AWS. Outside of work he enjoys time with his family, cooking, mountain biking and plogging.
Vinay Ujjini
Vinay is an Amazon Pinpoint and Amazon Simple Email Service Worldwide Principal Specialist Solutions Architect at AWS. He has been solving customer’s omni-channel challenges for over 15 years. He is an avid sports enthusiast and in his spare time, enjoys playing tennis and cricket.
Dmitrijs Lobanovskis
Dmitrijs is a Software Engineer for Amazon Simple Email service. When not working, he enjoys traveling, hiking and going to the gym.
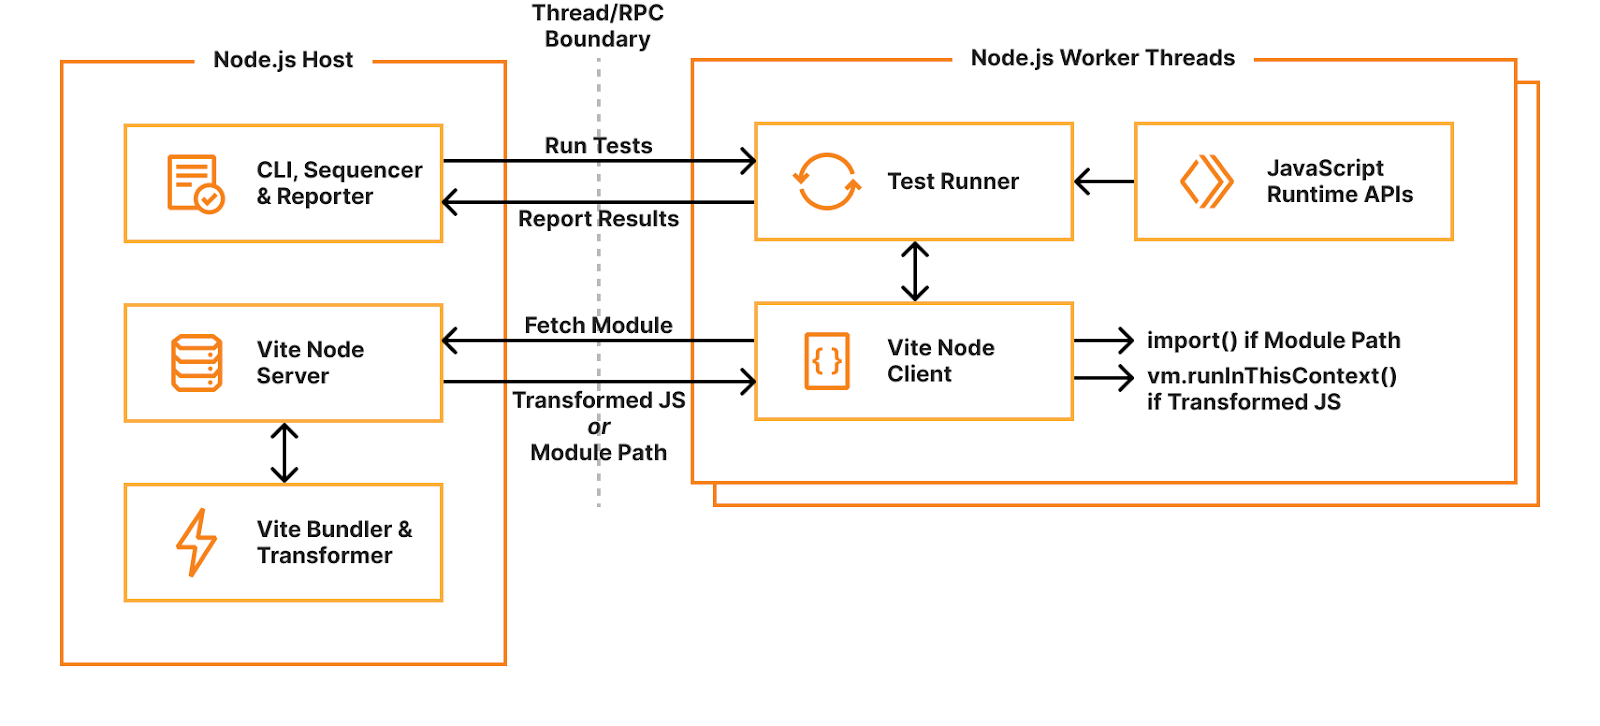
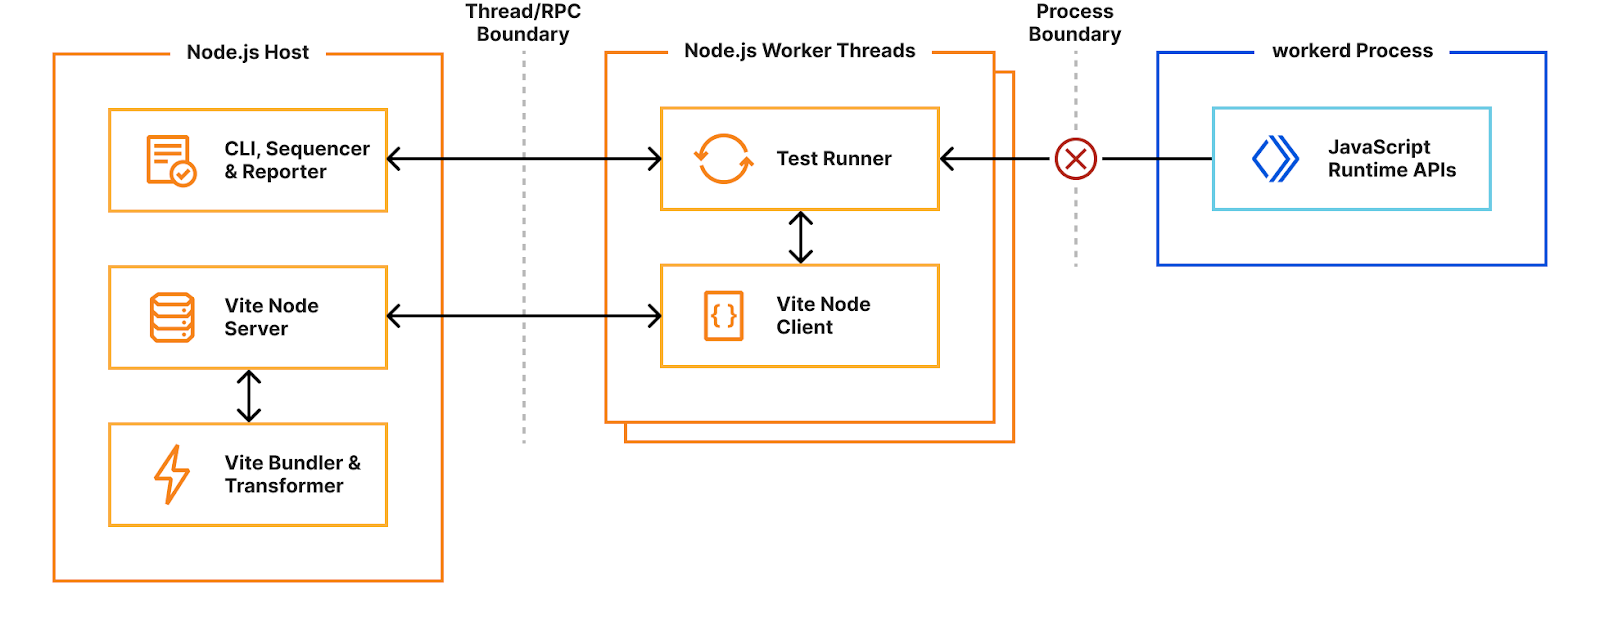
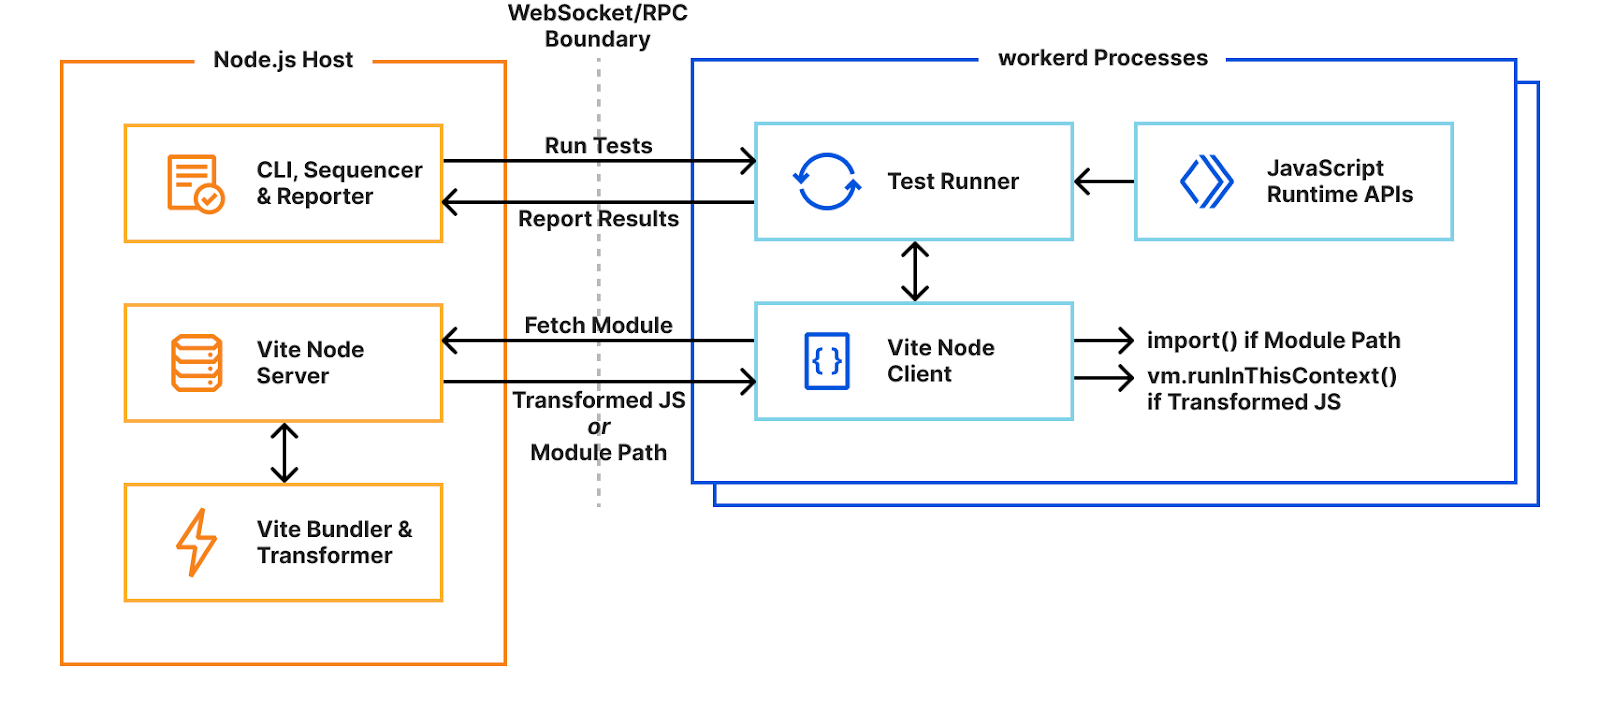
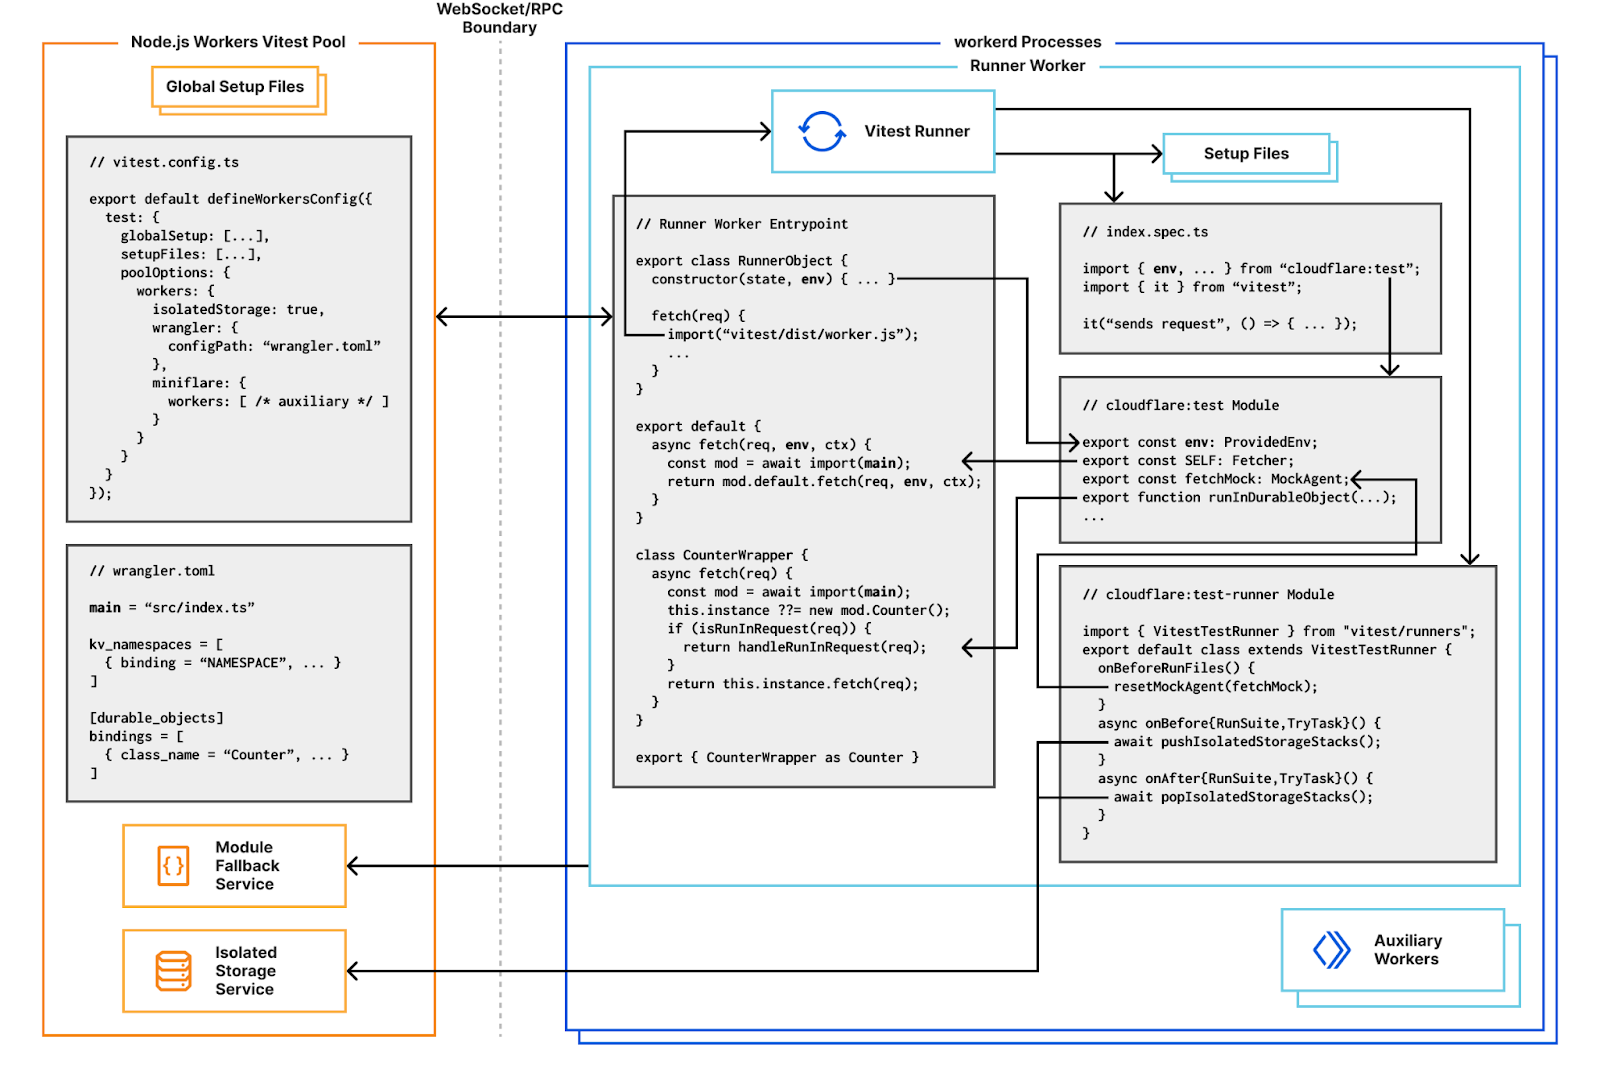
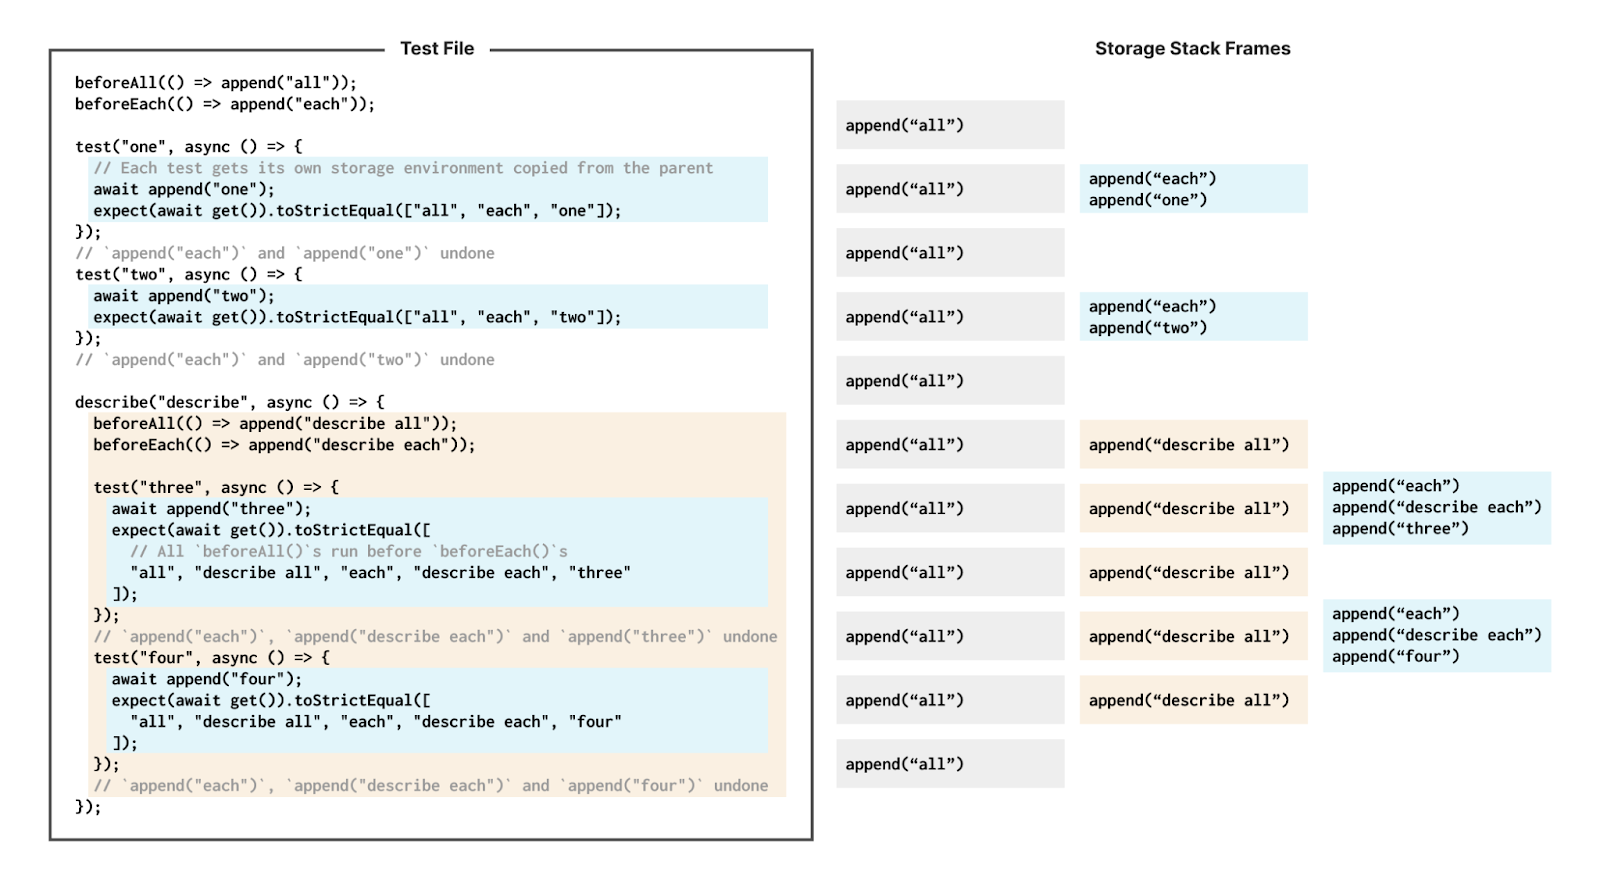
Today, we’re excited to announce a new Workers Vitest integration – allowing you to write unit and integration tests via the popular testing framework, Vitest, that execute directly in our runtime, workerd!
This integration provides you with the ability to test anything related to your Worker!
For the first time, you can write unit tests that run within the same runtime that Cloudflare Workers run on in production, providing greater confidence that the behavior of your Worker in tests will be the same as when deployed to production. For integration tests, you can now write tests for Workers that are triggered by Cron Triggers in addition to traditional fetch() events. You can also more easily test complex applications that interact with KV, R2, D1, Queues, Service Bindings, and more Cloudflare products.
For all of your tests, you have access to Vitest features like snapshots, mocks, timers, and spies.
In addition to increased testing and functionality, you’ll also notice other developer experience improvements like hot-module-reloading, watch mode on by default, and per-test isolated storage. Meaning that, as you develop and edit your tests, they’ll automatically re-run, without you having to restart your test runner.
Get started testing Workers with Vitest
The easiest way to get started with testing your Workers via Vitest is to start a new Workers project via our create-cloudflare tool:
Running this command will scaffold a new project for you with the Workers Vitest integration already set up. An example unit test and integration test are also included.
Manual install and setup instructions
If you prefer to manually install and set up the Workers Vitest integration, begin by installing @cloudflare/vitest-pool-workers from npm:
@cloudflare/vitest-pool-workers has a peer dependency on a specific version of vitest. Modern versions of npm will install this automatically, but we recommend you install it explicitly too. Refer to the getting started guide for the current supported version. If you’re using TypeScript, add @cloudflare/vitest-pool-workers to your tsconfig.json’s types to get types for the cloudflare:test module:
@cloudflare/vitest-pool-workers has a peer dependency on a specific version of vitest. Modern versions of npm will install this automatically, but we recommend you install it explicitly too. Refer to the getting started guide for the current supported version. If you’re using TypeScript, add @cloudflare/vitest-pool-workers to your tsconfig.json’s types to get types for the cloudflare:test module:
With the new Workers Vitest Integration, you can test anything exported from your Worker in both unit and integration-style tests. Within these tests, you can also test connected resources like R2, KV, and Durable Objects, as well as applications involving multiple Workers.
Writing unit tests
In a Workers context, a unit test imports and directly calls functions from your Worker then asserts on their return values. Let’s say you have a Worker that looks like this:
export function add(a, b) {
  return a + b;
}

export default {
  async fetch(request) {
    const url = new URL(request.url);
    const a = parseInt(url.searchParams.get("a"));
    const b = parseInt(url.searchParams.get("b"));
    return new Response(add(a, b));
  }
}
After you’ve setup and installed the Workers Vitest integration, you can unit test this Worker by creating a new test file called index.spec.js with the following code:
Using the Workers Vitest integration, you can write unit tests like these for any of your Workers.
Writing integration tests
While unit tests are great for testing individual parts of your application, integration tests assess multiple units of functionality, ensuring that workflows and features work as expected. These are usually more complex than unit tests, but provide greater confidence that your app works as expected. In the Workers context, an integration test sends HTTP requests to your Worker and asserts on the HTTP responses.
With the Workers Vitest Integration, you can run integration tests by importing SELF from the new cloudflare:test utility like this:
// test/index.spec.ts
import { SELF } from "cloudflare:test";
import { it, expect } from "vitest";
import "../src";

// an integration test using SELF
it("sends request (integration style)", async () => {
   const response = await SELF.fetch("http://example.com/?a=3&b=4");
   expect(await response.text()).toMatchInlineSnapshot(`"7"`);
});
When using SELF for integration tests, your Worker code runs in the same context as the test runner. This means you can use mocks to control your Worker.
Testing different scenarios
Whether you’re writing unit or integration tests, if your application uses Cloudflare Developer Platform products (e.g. KV, R2, D1, Queues, or Durable Objects), you can test them. To demonstrate this, we have created a set of examples to help get you started testing.
Better testing experience === better testing
Having better testing tools makes it easier to test your projects right from the start, which leads to better overall quality and experience for your end users. The Workers Vitest integration provides that better experience, not just in terms of developer experience, but in making it easier to test your entire application.
The rest of this post will focus on how we built this new testing integration, diving into the internals of how Vitest works, the problems we encountered trying to get a framework to work within our runtime, and ultimately how we solved it and the improved DX that it unlocked.
How Vitest traditionally works
When you start Vitest’s CLI, it first collects and sequences all your test files. By default, Vitest uses a “threads” pool, which spawns Node.js worker threads for isolating and running tests in parallel. Each thread gets a test file to run, dynamically requesting and evaluating code as needed. When the test runner imports a module, it sends a request to the host’s “Vite Node Server” which will either return raw JavaScript code transformed by Vite, or an external module path. If raw code is returned, it will be executed using the node:vmrunInThisContext() function. If a module path is returned, it will be imported using dynamic import(). Transforming user code with Vite allows hot-module-reloading (HMR) — when a module changes, it’s invalidated in the module cache and a new version will be returned when it’s next imported.
Miniflare is a fully-local simulator for Cloudflare’s Developer Platform. Miniflare v2 provided a custom environment for Vitest that allowed you to run your tests inside the Workers sandbox. This meant you could import and call any function using Workers runtime APIs in your tests. You weren’t restricted to integration tests that just sent and received HTTP requests. In addition, this environment provided per-test isolated storage, automatically undoing any changes made at the end of each test. In Miniflare v2, this environment was relatively simple to implement. We’d already reimplemented Workers Runtime APIs in a Node.js environment, and could inject them using Vitest’s APIs into the global scope of the test runner.
By contrast, Miniflare v3 runs your Worker code inside the same workerd runtime that Cloudflare uses in production. Running tests directly in workerd presented a challenge — workerd runs in its own process, separate from the Node.js worker thread, and it’s not possible to reference JavaScript classes across a process boundary.
Solving the problem with custom pools
Instead, we use Vitest’s custom pools feature to run the test runner in Cloudflare Workers running locally with workerd. A pool receives test files to run and decides how to execute them. By executing the runner inside workerd, tests have direct access to Workers runtime APIs as they’re running in a Worker. WebSockets are used to send and receive serialisable RPC messages between the Node.js host and workerd process. Note we’re running the exact same test runner code originally designed for a Node-context inside a Worker here. This means our Worker needs to provide Node’s built-in modules, support for dynamic code evaluation, and loading of arbitrary modules from disk with Node-resolution behavior. The nodejs_compat compatibility flag provides support for some of Node’s built-in modules, but does not solve our other problems. For that, we had to get creative…
Dynamic code evaluation
For security reasons, the Cloudflare Workers runtime does not allow dynamic code evaluation via eval() or new Function(). It also requires all modules to be defined ahead-of-time before execution starts. The test runner doesn’t know what code to run until we start executing tests, so without lifting these restrictions, we have no way of executing the raw JavaScript code transformed by Vite nor importing arbitrary modules from disk. Fortunately, code that is only meant to run locally – like tests – has a much more relaxed security model than deployed code. To support local testing and other development-specific use-cases such as Vite’s new Runtime API, we added “unsafe-eval bindings” and “module-fallback services” to workerd.
Unsafe-eval bindings provide local-only access to the eval() function, and new Function()/new AsyncFunction()/new WebAssembly.Module() constructors. By exposing these through a binding, we retain control over which code has access to these features.
Using the unsafe-eval binding eval() method, we were able to implement a polyfill for the required vm.runInThisContext() function. While we could also implement loading of arbitrary modules from disk using unsafe-eval bindings, this would require us to rebuild workerd’s module resolution system in JavaScript. Instead, we allow workers to be configured with module fallback services. If enabled, imports that cannot be resolved by workerd become HTTP requests to the fallback service. These include the specifier, referrer, and whether it was an import or require. The service may respond with a module definition, or a redirect to another location if the resolved location doesn’t match the specifier. Requests originating from synchronous requires will block the main thread until the module is resolved. The Workers Vitest pool’s fallback service implements Node-like resolution with Node-style interoperability between CommonJS and ES modules.
Durable Objects as test runners
Now that we can run and import arbitrary code, the next step is to get Vitest’s thread worker running inside workerd. Every incoming request has its own request context. To improve overall performance, I/O objects such as streams, request/response bodies and WebSockets created in one request context cannot be used from another. This means if we want to use a WebSocket for RPC between the pool and our workerd processes, we need to make sure the WebSocket is only used from one request context. To coordinate this, we define a singleton Durable Object for accepting the RPC connection and running tests from. Functions using RPC such as resolving modules, reporting results and console logging will always use this singleton. We use Miniflare’s “magic proxy” system to get a reference to the singleton’s stub in Node.js, and send a WebSocket upgrade request directly to it. After adding a few more Node.js polyfills, and a basic cloudflare:test module to provide access to bindings and a function for creating ExecutionContexts, we’re able to write basic Workers unit tests! 🎉
Integration tests with hot-module-reloading
In addition to unit tests, we support integration testing with a special SELF service binding in the cloudflare:test module. This points to a special export default { fetch(...) {...} } handler which uses Vite to import your Worker’s main module.
Using Vite’s transformation pipeline here means your handler gets hot-module-reloading (HMR) for free! When code is updated, the module cache is invalidated, tests are rerun, and subsequent requests will execute with new code. The same approach of wrapping user code handlers applies to Durable Objects too, providing the same HMR benefits.
Integration tests can be written by calling SELF.fetch(), which will dispatch a fetch() event to your user code in the same global scope as your test, but under a different request context. This means global mocks apply to your Worker’s execution, as do request context lifetime restrictions. In particular, if you forget to call ctx.waitUntil(), you’ll see an appropriate error message. This wouldn’t be the case if you called your Worker’s handler directly in a unit test, as you’d be running under the runner singleton’s Durable Object request context, whose lifetime is automatically extended.
Most Workers applications will have at least one binding to a Cloudflare storage service, such as KV, R2 or D1. Ideally, tests should be self-contained and runnable in any order or on their own. To make this possible, writes to storage need to be undone at the end of each test, so reads by other tests aren’t affected. Whilst it’s possible to do this manually, it can be tricky to keep track of all writes and undo them in the correct order. For example, take the following two functions:
// helpers.ts
interface Env {
  NAMESPACE: KVNamespace;
}
// Get the current list stored in a KV namespace
export async function get(env: Env, key: string): Promise<string[]> {
  return await env.NAMESPACE.get(key, "json") ?? [];
}
// Add an item to the end of the list
export async function append(env: Env, key: string, item: string) {
  const value = await get(env, key);
  value.push(item);
  await env.NAMESPACE.put(key, JSON.stringify(value));
}
If we wanted to test these functions, we might write something like below. Note we have to keep track of all the keys we might write to, and restore their values at the end of tests, even if those tests fail.
// helpers.spec.ts
import { env } from "cloudflare:test";
import { beforeAll, beforeEach, afterEach, it, expect } from "vitest";
import { get, append } from "./helpers";

let startingList1: string | null;
let startingList2: string | null;
beforeEach(async () => {
  // Store values before each test
  startingList1 = await env.NAMESPACE.get("list 1");
  startingList2 = await env.NAMESPACE.get("list 2");
});
afterEach(async () => {
  // Restore starting values after each test
  if (startingList1 === null) {
    await env.NAMESPACE.delete("list 1");
  } else {
    await env.NAMESPACE.put("list 1", startingList1);
  }
  if (startingList2 === null) {
    await env.NAMESPACE.delete("list 2");
  } else {
    await env.NAMESPACE.put("list 2", startingList2);
  }
});

beforeAll(async () => {
  await append(env, "list 1", "one");
});

it("appends to one list", async () => {
  await append(env, "list 1", "two");
  expect(await get(env, "list 1")).toStrictEqual(["one", "two"]);
});

it("appends to two lists", async () => {
  await append(env, "list 1", "three");
  await append(env, "list 2", "four");
  expect(await get(env, "list 1")).toStrictEqual(["one", "three"]);
  expect(await get(env, "list 2")).toStrictEqual(["four"]);
});
This is slightly easier with the recently introduced onTestFinished() hook, but you still need to remember which keys were written to, or enumerate them at the start/end of tests. You’d also need to manage this for KV, R2, Durable Objects, caches and any other storage service you used. Ideally, the testing framework should just manage this all for you.
That’s exactly what the Workers Vitest pool does with the isolatedStorage option which is enabled by default. Any writes to storage performed in a test are automagically undone at the end of the test. To support seeding data in beforeAll() hooks, including those in nested describe()-blocks, a stack is used. Before each suite or test, a new frame is pushed to the storage stack. All writes performed by the test or associated beforeEach()/afterEach() hooks are written to the frame. After each suite or test, the top frame is popped from the storage stack, undoing any writes.
Miniflare implements simulators for storage services on top of Durable Objects with a separate blob store. When running locally, workerd uses SQLite for Durable Object storage. To implement isolated storage, we implement an on-disk stack of .sqlite database files by backing up the databases when “pushing”, and restoring backups when “popping”. Blobs stored in the separate store are retained through stack operations, and cleaned up at the end of each test run. Whilst this works, it involves copying lots of .sqlite files. Looking ahead, we’d like to explore using SQLite SAVEPOINTS for a more efficient solution.
Declarative request mocking
In addition to storage, most Workers will make outbound fetch() requests. For tests, it’s often useful to mock responses to these requests. Miniflare already allows you to specify an undiciMockAgent to route all requests through. The MockAgent class provides a declarative interface for specifying requests to mock and the corresponding responses to return. This API is relatively simple, whilst being flexible enough for advanced use cases. We provide an instance of MockAgent as fetchMock in the cloudflare:test module.
import { fetchMock } from "cloudflare:test";
import { beforeAll, afterEach, it, expect } from "vitest";

beforeAll(() => {
  // Enable outbound request mocking...
  fetchMock.activate();
  // ...and throw errors if an outbound request isn't mocked
  fetchMock.disableNetConnect();
});
// Ensure we matched every mock we defined
afterEach(() => fetchMock.assertNoPendingInterceptors());

it("mocks requests", async () => {
  // Mock the first request to `https://example.com`
  fetchMock
    .get("https://example.com")
    .intercept({ path: "/" })
    .reply(200, "body");

  const response = await fetch("https://example.com/");
  expect(await response.text()).toBe("body");
});
To implement this, we bundled a stripped down version of undici containing just the MockAgent code. We then built a custom undiciDispatcher that used the Worker’s global fetch() function instead of undici’s built-in HTTP implementation based on llhttp and node:net.
Testing Durable Objects directly
Finally, Miniflare v2’s custom Vitest environment provided support for accessing the instance methods and state of Durable Objects in tests directly. This allowed you to unit test Durable Objects like any other JavaScript class—you could mock particular methods and properties, or immediately call specific handlers like alarm(). To implement this in workerd, we rely on our existing wrapping of user Durable Objects for Vite transforms and hot-module reloading. When you call the runInDurableObject(stub, callback) function from cloudflare:test, we store callback in a global cache and send a special fetch() request to stub which is intercepted by the wrapper. The wrapper executes the callback in the request context of the Durable Object, and stores the result in the same cache. runInDurableObject() then reads from this cache, and returns the result.
Note that this assumes the Durable Object is running in the same isolate as the runInDurableObject() call. While this is true for same-Worker Durable Objects running locally, it means Durable Objects defined in auxiliary workers can’t be accessed directly.
Try it out!
We are excited to release the @cloudflare/vitest-pool-workers package on npm, and to provide an improved testing experience for you.
Make sure to read the Write your first test guide and begin writing unit and integration tests today! If you’ve been writing tests using one of our previous options, our unstable_devmigration guide or our Miniflare 2 migration guide should explain key differences and help you move your tests over quickly.
If you run into issues or have suggestions for improvements, please file an issue in our GitHub repo or reach out via our Developer Discord.
The collective thoughts of the interwebz
Manage Consent
To provide the best experiences, we use technologies like cookies to store and/or access device information. Consenting to these technologies will allow us to process data such as browsing behavior or unique IDs on this site. Not consenting or withdrawing consent, may adversely affect certain features and functions.
Functional
Always active
The technical storage or access is strictly necessary for the legitimate purpose of enabling the use of a specific service explicitly requested by the subscriber or user, or for the sole purpose of carrying out the transmission of a communication over an electronic communications network.
Preferences
The technical storage or access is necessary for the legitimate purpose of storing preferences that are not requested by the subscriber or user.
Statistics
The technical storage or access that is used exclusively for statistical purposes.The technical storage or access that is used exclusively for anonymous statistical purposes. Without a subpoena, voluntary compliance on the part of your Internet Service Provider, or additional records from a third party, information stored or retrieved for this purpose alone cannot usually be used to identify you.
Marketing
The technical storage or access is required to create user profiles to send advertising, or to track the user on a website or across several websites for similar marketing purposes.


 Jon Handler is a Senior Principal Solutions Architect at Amazon Web Services based in Palo Alto, CA. Jon works closely with OpenSearch and Amazon OpenSearch Service, providing help and guidance to a broad range of customers who have search and log analytics workloads that they want to move to the AWS Cloud. Prior to joining AWS, Jon’s career as a software developer included 4 years of coding a large-scale, ecommerce search engine. Jon holds a Bachelor of the Arts from the University of Pennsylvania, and a Master of Science and a PhD in Computer Science and Artificial Intelligence from Northwestern University.
 Hajer Bouafif is an Analytics Specialist Solutions Architect at Amazon Web Services. She focuses on Amazon OpenSearch Service and helps customers design and build well-architected analytics workloads in diverse industries. Hajer enjoys spending time outdoors and discovering new cultures.
 Aruna Govindaraju is an Amazon OpenSearch Specialist Solutions Architect and has worked with many commercial and open source search engines. She is passionate about search, relevancy, and user experience. Her expertise with correlating end-user signals with search engine behavior has helped many customers improve their search experience.
 Prashant Agrawal is a Sr. Search Specialist Solutions Architect with Amazon OpenSearch Service. He works closely with customers to help them migrate their workloads to the cloud and helps existing customers fine-tune their clusters to achieve better performance and save on cost. Before joining AWS, he helped various customers use OpenSearch and Elasticsearch for their search and log analytics use cases. When not working, you can find him traveling and exploring new places. In short, he likes doing Eat → Travel → Repeat.
 Muslim Abu Taha is a Sr. OpenSearch Specialist Solutions Architect dedicated to guiding clients through seamless search workload migrations, fine-tuning clusters for peak performance, and ensuring cost-effectiveness. With a background as a Technical Account Manager (TAM), Muslim brings a wealth of experience in assisting enterprise customers with cloud adoption and optimize their different set of workloads. Muslim enjoys spending time with his family, traveling and exploring new places.