I had to rent a house for a couple of months recently, which is long enough in California that it pushes you into proper tenant protection law. As landlords tend to do, they failed to return my security deposit within the 21 days required by law, having already failed to provide the required notification that I was entitled to an inspection before moving out. Cue some tedious argumentation with the letting agency, and eventually me threatening to take them to small claims court.
This post is not about that.
Now, under Californian law, the onus is on the landlord to hold and return the security deposit – the agency has no role in this. The only reason I was talking to them is that my lease didn’t mention the name or address of the landlord (another legal violation, but the outcome is just that you get to serve the landlord via the agency). So it was a bit surprising when I received an email from the owner of the agency informing me that they did not hold the deposit and so were not liable – I already knew this.
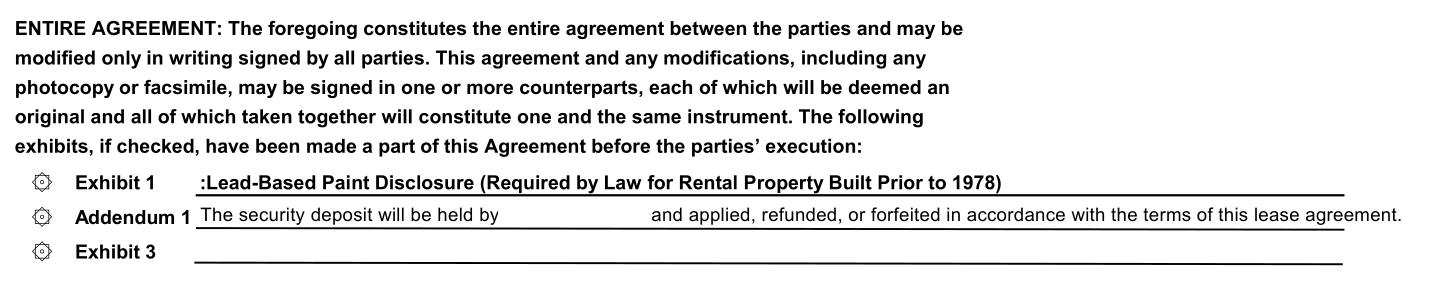
The odd bit about this, though, is that they sent me another copy of the contract, asserting that it made it clear that the landlord held the deposit. I read it, and instead found a clause reading SECURITY: The security deposit will secure the performance of Tenant’s obligations. IER may, but will not be obligated to, apply all portions of said deposit on account of Tenant’s obligations. Any balance remaining upon termination will be returned to Tenant. Tenant will not have the right to apply the security deposit in payment of the last month’s rent. Security deposit held at IER Trust Account., where IER is International Executive Rentals, the agency in question. Why send me a contract that says you hold the money while you’re telling me you don’t? And then I read further down and found this: Ok, fair enough, there’s an addendum that says the landlord has it (I’ve removed the landlord’s name, it’s present in the original).
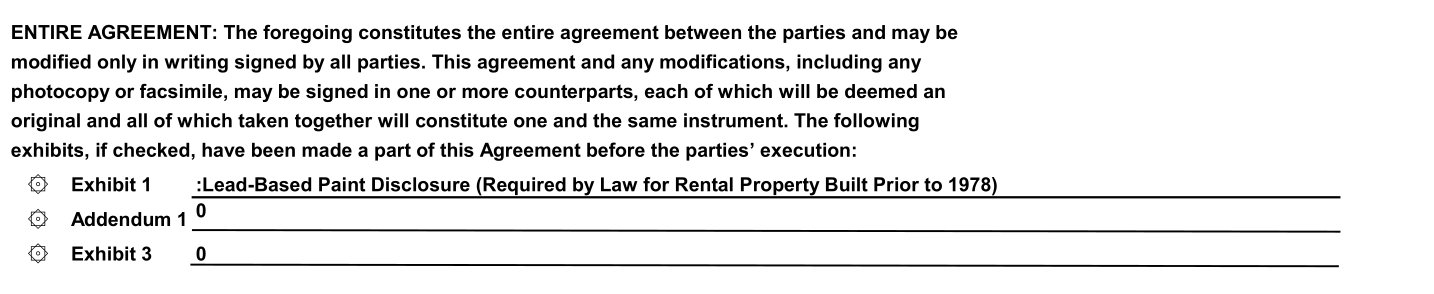
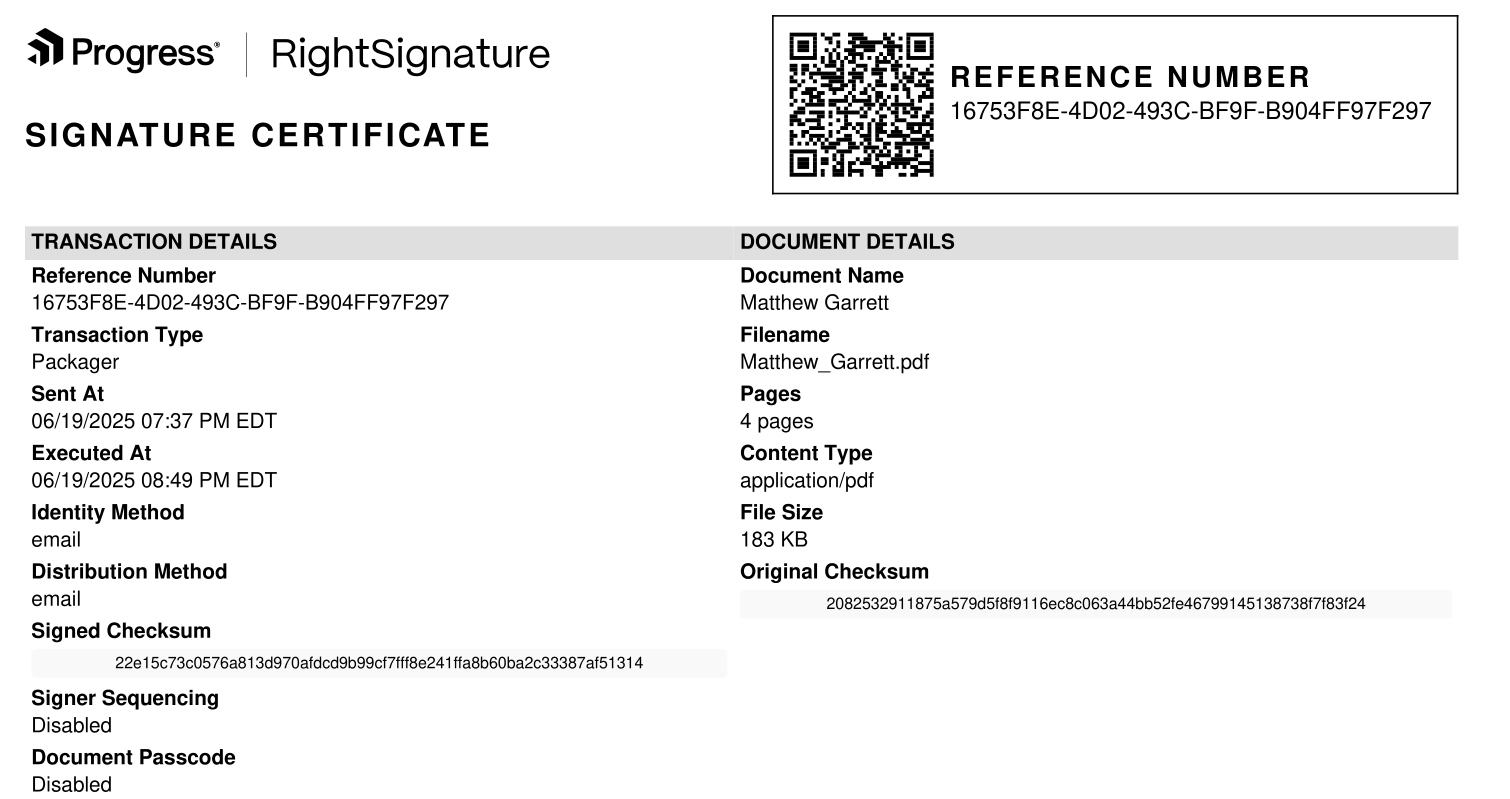
Except. I had no recollection of that addendum. I went back to the copy of the contract I had and discovered: Huh! But obviously I could just have edited that to remove it (there’s no obvious reason for me to, but whatever), and then it’d be my word against theirs. However, I’d been sent the document via RightSignature, an online document signing platform, and they’d added a certification page that looked like this: Interestingly, the certificate page was identical in both documents, including the checksums, despite the content being different. So, how do I show which one is legitimate? You’d think given this certificate page this would be trivial, but RightSignature provides no documented mechanism whatsoever for anyone to verify any of the fields in the certificate, which is annoying but let’s see what we can do anyway.
First up, let’s look at the PDF metadata. pdftk has a dump_data command that dumps the metadata in the document, including the creation date and the modification date. My file had both set to identical timestamps in June, both listed in UTC, corresponding to the time I’d signed the document. The file containing the addendum? The same creation time, but a modification time of this Monday, shortly before it was sent to me. This time, the modification timestamp was in Pacific Daylight Time, the timezone currently observed in California. In addition, the data included two ID fields, ID0 and ID1. In my document both were identical, in the one with the addendum ID0 matched mine but ID1 was different.
These ID tags are intended to be some form of representation (such as a hash) of the document. ID0 is set when the document is created and should not be modified afterwards – ID1 initially identical to ID0, but changes when the document is modified. This is intended to allow tooling to identify whether two documents are modified versions of the same document. The identical ID0 indicated that the document with the addendum was originally identical to mine, and the different ID1 that it had been modified.
Well, ok, that seems like a pretty strong demonstration. I had the “I have a very particular set of skills” conversation with the agency and pointed these facts out, that they were an extremely strong indication that my copy was authentic and their one wasn’t, and they responded that the document was “re-sealed” every time it was downloaded from RightSignature and that would explain the modifications. This doesn’t seem plausible, but it’s an argument. Let’s go further.
My next move was pdfalyzer, which allows you to pull a PDF apart into its component pieces. This revealed that the documents were identical, other than page 3, the one with the addendum. This page included tags entitled “touchUp_TextEdit”, evidence that the page had been modified using Acrobat. But in itself, that doesn’t prove anything – obviously it had been edited at some point to insert the landlord’s name, it doesn’t prove whether it happened before or after the signing.
But in the process of editing, Acrobat appeared to have renamed all the font references on that page into a different format. Every other page had a consistent naming scheme for the fonts, and they matched the scheme in the page 3 I had. Again, that doesn’t tell us whether the renaming happened before or after the signing. Or does it?
You see, when I completed my signing, RightSignature inserted my name into the document, and did so using a font that wasn’t otherwise present in the document (Courier, in this case). That font was named identically throughout the document, except on page 3, where it was named in the same manner as every other font that Acrobat had renamed. Given the font wasn’t present in the document until after I’d signed it, this is proof that the page was edited after signing.
But eh this is all very convoluted. Surely there’s an easier way? Thankfully yes, although I hate it. RightSignature had sent me a link to view my signed copy of the document. When I went there it presented it to me as the original PDF with my signature overlaid on top. Hitting F12 gave me the network tab, and I could see a reference to a base.pdf. Downloading that gave me the original PDF, pre-signature. Running sha256sum on it gave me an identical hash to the “Original checksum” field. Needless to say, it did not contain the addendum.
Why do this? The only explanation I can come up with (and I am obviously guessing here, I may be incorrect!) is that International Executive Rentals realised that they’d sent me a contract which could mean that they were liable for the return of my deposit, even though they’d already given it to my landlord, and after realising this added the addendum, sent it to me, and assumed that I just wouldn’t notice (or that, if I did, I wouldn’t be able to prove anything). In the process they went from an extremely unlikely possibility of having civil liability for a few thousand dollars (even if they were holding the deposit it’s still the landlord’s legal duty to return it, as far as I can tell) to doing something that looks extremely like forgery.
There’s a hilarious followup. After this happened, the agency offered to do a screenshare with me showing them logging into RightSignature and showing the signed file with the addendum, and then proceeded to do so. One minor problem – the “Send for signature” button was still there, just below a field saying “Uploaded: 09/22/25”. I asked them to search for my name, and it popped up two hits – one marked draft, one marked completed. The one marked completed? Didn’t contain the addendum.
With the Amazon EMR 7.10 runtime, Amazon EMR has introduced EMR S3A, an improved implementation of the open source S3A file system connector. This enhanced connector is now automatically set as the default S3 file system connector for Amazon EMR deployment options, including Amazon EMR on EC2, Amazon EMR Serverless, Amazon EMR on Amazon EKS, and Amazon EMR on AWS Outposts, maintaining complete API compatibility with open source Apache Spark.
In the Amazon EMR 7.10 runtime for Apache Spark, the EMR S3A connector exhibits performance comparable to EMRFS for read workloads, as demonstrated by TPC-DS query benchmark. The connector’s most significant performance gains are evident in write operations, with a 7% improvement in static partition overwrites and a 215% improvement for dynamic partition overwrites when compared to EMRFS. In this post, we showcase the enhanced read and write performance advantages of using Amazon EMR 7.10.0 runtime for Apache Spark with EMR S3A as compared to EMRFS and the open source S3A file system connector.
Read workload performance comparison
To evaluate the read performance, we used a test environment based on Amazon EMR runtime version 7.10.0 running Spark 3.5.5 and Hadoop 3.4.1. Our testing infrastructure featured an Amazon Elastic Compute Cloud (Amazon EC2) cluster comprised of nine r5d.4xlarge instances. The primary node has 16 vCPU and 128 GB memory, and the eight core nodes have a total of 128 vCPU and 1024 GB memory.
The performance evaluation was conducted using a comprehensive testing methodology designed to provide accurate and meaningful results. For the source data, we chose the 3 TB scale factor, which contains 17.7 billion records, approximately 924 GB of compressed data partitioned in Parquet file format. The setup instructions and technical details can be found in the GitHub repository. We used Spark’s in-memory data catalog to store metadata for TPC-DS databases and tables.
To produce a fair and accurate comparison between EMR S3A vs. EMRFS and open source S3A implementations, we implemented a three-phase testing approach:
Phase 1: Baseline performance:
Established a baseline using default Amazon EMR configuration with EMR’s S3A connector
Created a reference point for subsequent comparisons
Phase 2: EMRFS analysis:
Maintained the default file system as EMRFS
Preserved other configuration settings
Phase 3: Open source S3A testing:
Modified only the hadoop-aws.jar file by replacing it with the open source Hadoop S3A 3.4.1 version
Maintained identical configurations across other components
This controlled testing environment was crucial for our evaluation for the following reasons:
We could isolate the performance impact specifically to the S3A connector implementation
It removed potential variables that could skew the results
It provided accurate measurements of performance improvements between Amazon’s S3A implementation and the open source alternative
Test execution and results
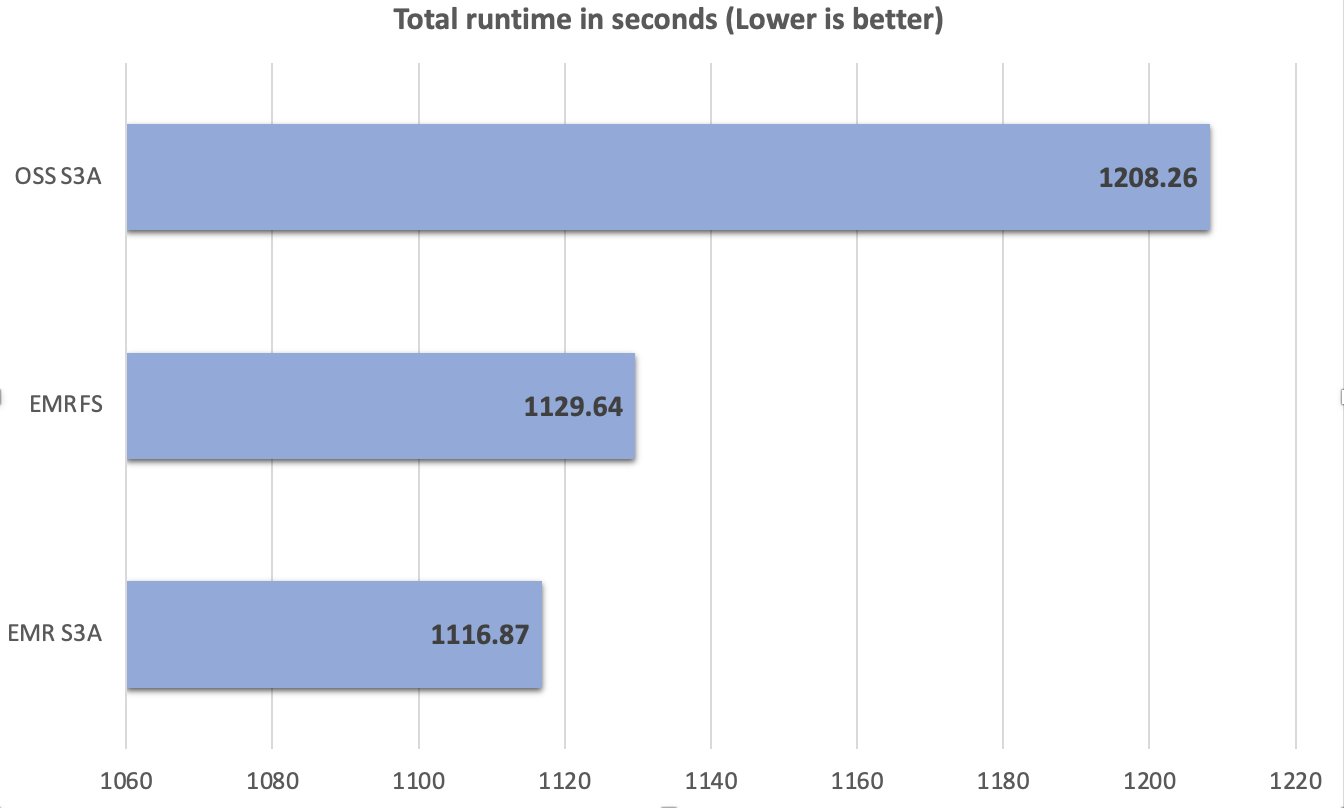
Throughout the testing process, we maintained consistency in test conditions and configurations, making sure any observed performance differences could be directly attributed to the S3A connector implementation variations. A total of 104 SparkSQL queries were run in 10 iterations sequentially, and an average of each query’s runtime in these 10 iterations was used for comparison. The average of the 10 iterations’ runtime on the Amazon EMR 7.10 runtime for Apache Spark with EMR S3A was 1116.87 seconds, which is 1.08 times faster than open source S3A and comparable with EMRFS. The following figure illustrates the total runtime in seconds.
The following table summarizes the metrics.
Metric
OSS S3A
EMRFS
EMR S3A
Average runtime in seconds
1208.26
1129.64
1116.87
Geometric mean over queries in seconds
7.63
7.09
6.99
Total cost *
$6.53
$6.40
$6.15
*Detailed cost estimates are discussed later in this post.
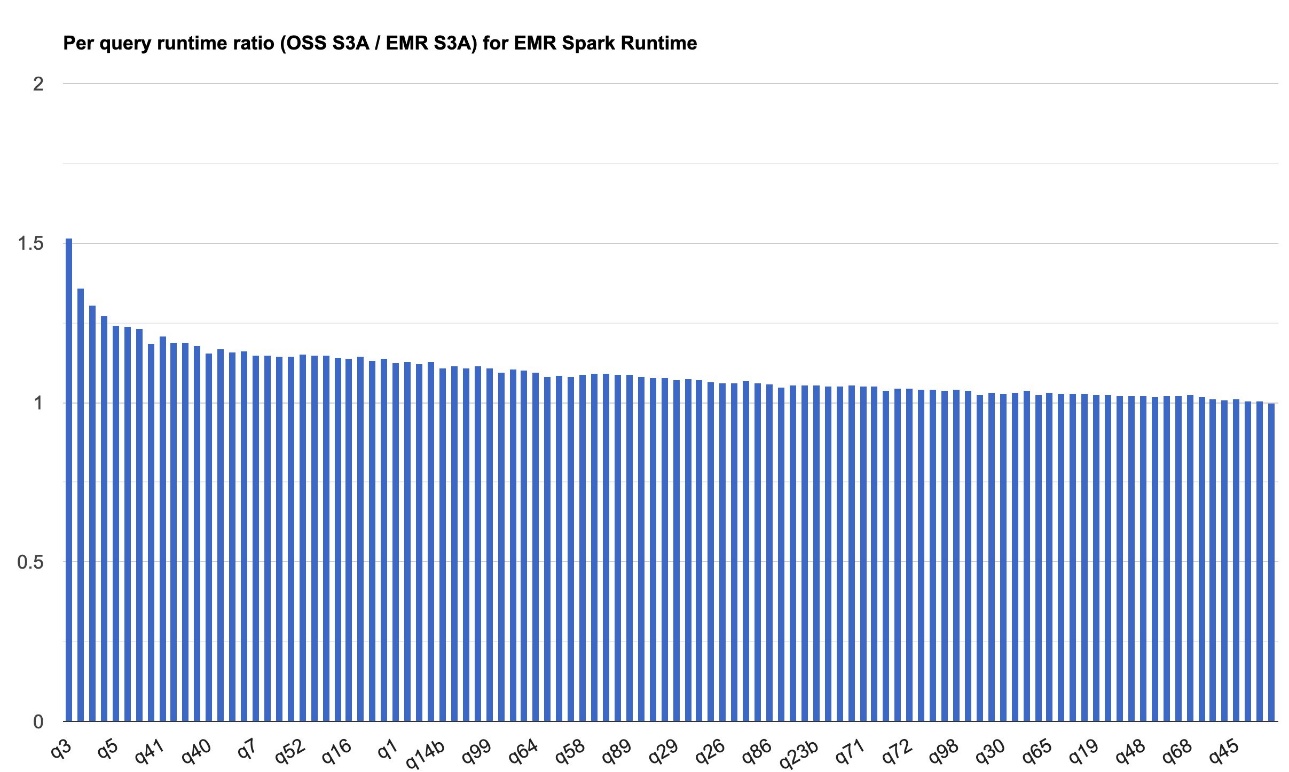
The following chart demonstrates the per-query performance improvement of EMR S3A relative to open source S3A on the Amazon EMR 7.10 runtime for Apache Spark. The extent of the speedup varies from one query to another, with the fastest up to 1.51 times faster for q3, with Amazon EMR S3A outperforming open source S3A. The horizontal axis arranges the TPC-DS 3TB benchmark queries in descending order based on the performance improvement seen with Amazon EMR, and the vertical axis depicts the magnitude of this speedup as a ratio.
Read cost comparison
Our benchmark outputs the total runtime and geometric mean figures to measure the Spark runtime performance. The cost metric can provide us with additional insights. Cost estimates are computed using the following formulas. They factor in Amazon EC2, Amazon Elastic Block Store (Amazon EBS), and Amazon EMR costs, but don’t include Amazon Simple Storage Service (Amazon S3) GET and PUT costs.
Amazon EC2 cost (include SSD cost) = number of instances * r5d.4xlarge hourly rate * job runtime in hours
r5d.4xlarge hourly rate = $1.152 per hour
Root Amazon EBS cost = number of instances * Amazon EBS per GB-hourly rate * root EBS volume size * job runtime in hours
Amazon EMR cost = number of instances * r5d.4xlarge Amazon EMR cost * job runtime in hours
We conducted benchmark tests to assess the write performance of the Amazon EMR 7.10 runtime for Apache Spark.
Static table/partition overwrite
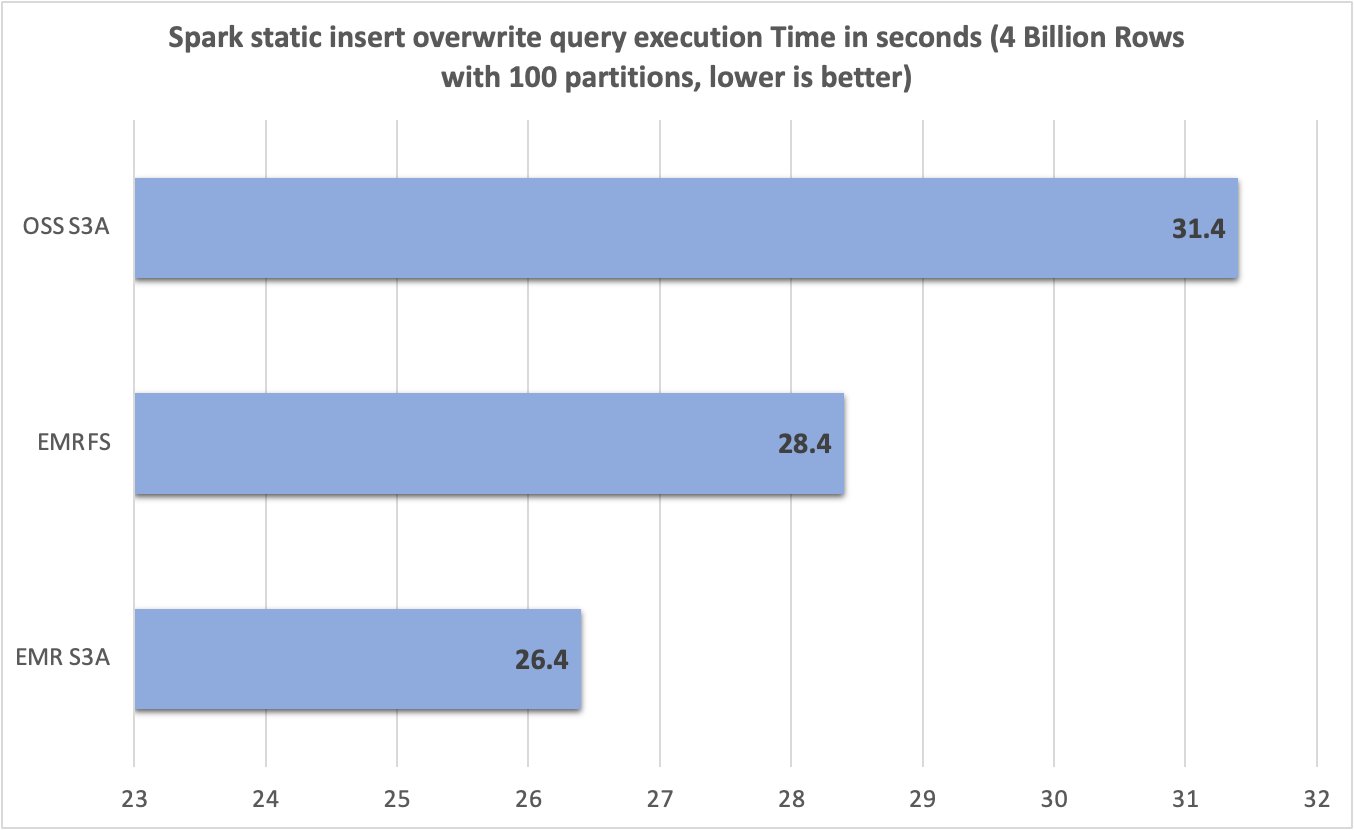
We evaluated the static table/partition overwrite write performance of the different file system by executing the following INSERT OVERWRITE Spark SQL query. The SELECT * FROM range(...) clause generated data at execution time. This produced approximately 15 GB of data across exactly 100 Parquet files in Amazon S3.
SET rows=4e9; -- 4 Billion
SET partitions=100;
INSERT OVERWRITE DIRECTORY 's3://${bucket}/perf-test/${trial_id}'
USING PARQUET SELECT * FROM range(0, ${rows}, 1, ${partitions});
The test environment was configured as follows:
EMR cluster with emr-7.10.0 release label
Single m5d.2xlarge instance (primary group)
Eight m5d.2xlarge instances (core group)
S3 bucket in the same AWS Region as the EMR cluster
The trial_id property used a UUID generator to avoid conflict between test runs
Results
After running 10 trials for each file system, we captured and summarized query runtimes in the following chart. Whereas EMR S3A averaged only 26.4 seconds, the EMRFS and open source S3A averaged 28.4 seconds and 31.4 seconds—a 1.07 times and 1.19 times improvement, respectively.
Dynamic partition overwrite
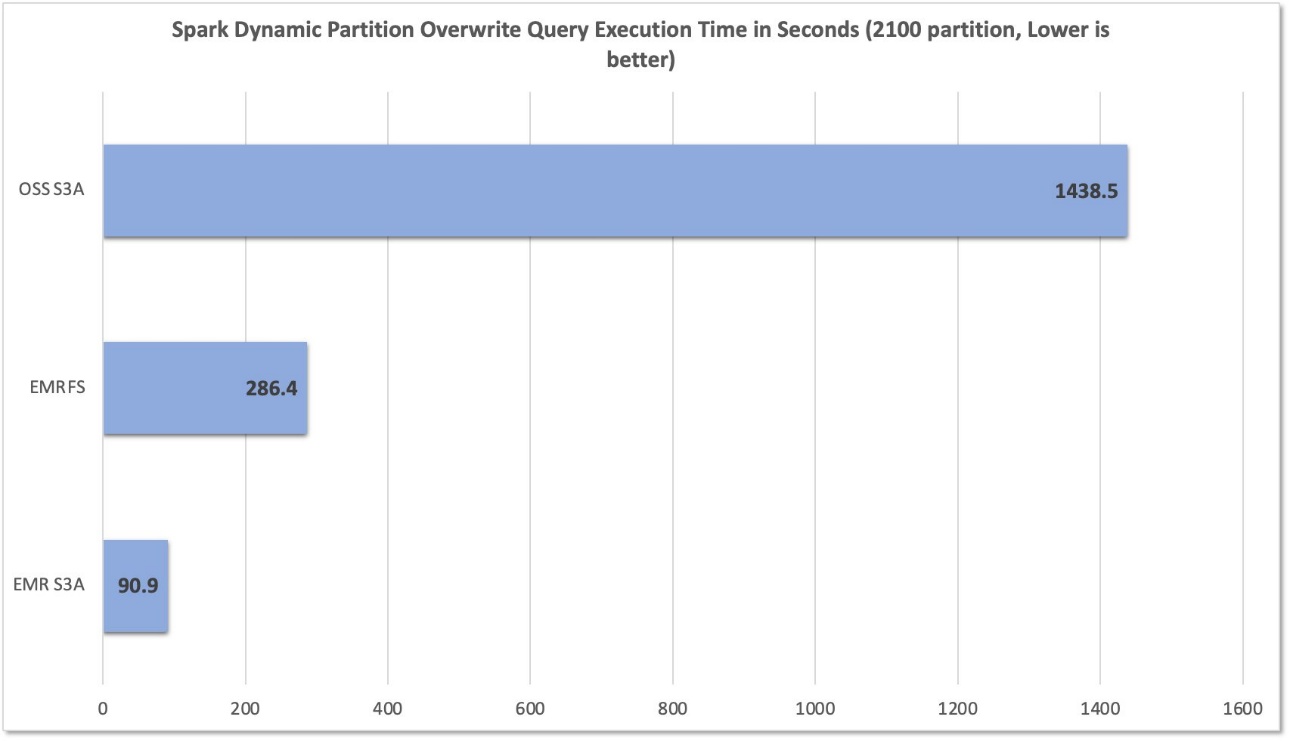
We also evaluated the write performance by executing the following INSERT OVERWRITE dynamic partition Spark SQL query, which joins TPC-DS 3TB partitioned Parquet data of the table web_sales and date_dim tables, which inserts approximately 2,100 partitions, where each partition contains one Parquet file with a combined size of approximately 31.2 GB in Amazon S3.
SET spark.sql.sources.partitionOverwriteMode=DYNAMIC;
INSERT OVERWRITE TABLE <TABLE_NAME> PARTITION(wsdt_year,wsdt_month, wsdt_day)
SELECT ws_order_number,ws_quantity,ws_list_price,ws_sales_price,
ws_net_paid_inc_ship_tax,ws_net_profit,dt.d_year as wsdt_year,dt.d_moy
as wsdt_month,dt.d_dom as wsdt_day FROM web_sales, date_dim dt
WHERE ws_sold_date_sk = d_date_sk;
The test environment was configured as follows:
EMR cluster with emr-7.10.0 release label
Single r5d.4xlarge instance (master group)
Five r5d.4xlarge instances (core group)
Approximately 2,100 partitions with one Parquet file each
Combined size of approximately 31.2 GB in Amazon S3
Results
After running 10 trials for each file system, we captured and summarized query runtimes in the following chart. Whereas EMR S3A averaged only 90.9 seconds, the EMRFS and open source S3A averaged 286.4 seconds and 1,438.5 seconds—a 3.15 times and 15.82 times improvement, respectively.
Summary
Amazon EMR consistently enhances its Apache Spark runtime and S3A connector, delivering continuous performance improvements that help big data customers execute analytics workloads more cost-effectively. Beyond performance gains, the strategic shift to S3A introduces critical advantages, including enhanced standardization, improved cross-platform portability, and robust community-driven support—all while maintaining or surpassing the performance benchmarks established by the previous EMRFS implementation.
We recommend that you stay up-to-date with the latest Amazon EMR release to take advantage of the latest performance and feature benefits. Subscribe to the AWS Big Data Blog’s RSS feed to learn more about the Amazon EMR runtime for Apache Spark, configuration best practices, and tuning advice.
Amazon OpenSearch Serverless simplifies the deployment and management of OpenSearch workloads by automatically scaling based on your usage patterns. The service considers key metrics such as shard utilization, storage consumption, and CPU usage while maintaining millisecond-level response times, with the simplicity of a serverless environment.
While OpenSearch Serverless handles scaling automatically, implementing robust monitoring remains crucial for understanding usage patterns, optimizing costs, helping to ensure performance, and maintaining reliability. Proactive monitoring helps organizations detect critical issues with the applications or infrastructure in real time and identify root causes quickly.
This post is part of our Amazon OpenSearch service monitoring series, focusing on OpenSearch Serverless workloads and deployments. In this post, we explore commonly used Amazon CloudWatch metrics and alarms for OpenSearch Serverless, walking through the process of selecting relevant metrics, setting appropriate thresholds, and configuring alerts. This guide will provide you with a comprehensive monitoring strategy that complements the serverless nature of your OpenSearch deployment while maintaining full operational visibility.
Key benefits of CloudWatch monitoring for OpenSearch Serverless
Implementing CloudWatch monitoring for your OpenSearch Serverless collections offers several key advantages:
Near real-time performance monitoring – CloudWatch provides near real-time monitoring, enabling you to track your OpenSearch Serverless collections’ performance as they operate. This immediate visibility allows for swift detection of anomalies or performance issues, enabling prompt response to potential problems.
Efficient error diagnosis – You can quickly identify and address common errors without extensive log analysis. For instance, by monitoring ingestion request errors, you can preemptively mitigate bulk indexing request failures.
Proactive alerting system – Use the CloudWatch alarm functionality in conjunction with Amazon Simple Notification Service (SNS) to set up custom alerts. By defining specific thresholds for critical metrics, you can receive instant notifications through email or SMS when your OpenSearch Serverless collections approach or exceed these limits.
Comprehensive historical analysis – The data retention capabilities of CloudWatch allow for in-depth historical analysis. This helps you to identify long-term performance trends, recognize recurring patterns in resource utilization and optimize workload distribution based on historical insights.
Solution overview
Understanding which metrics to monitor in OpenSearch Serverless helps optimize your system’s performance and reliability. This guide explains the key metrics to monitor, their significance, how to determine appropriate thresholds, and the step-by-step process for setting up alarms. Understanding these fundamentals will help you establish effective monitoring for your OpenSearch Serverless collections and help maintain optimal performance and reliability.
Prerequisites
Before getting started, you must have the following prerequisites:
An AWS account that provides access to AWS services.
CloudWatch metrics and recommended alarms for OpenSearch Serverless
The following table summarizes key CloudWatch metrics for OpenSearch Serverless, including recommended alarm thresholds, metric descriptions, and applicable workload types.
Alarm
Metric Level
Metric Description
Alarm Description
Use case
IndexingOCU maximum is >= 10 for 5 minutes, three consecutive times
Account Level
Serverless compute capacity is measured in OpenSearch Compute Units (OCUs). Each OCU is a combination of 6 GiB of memory and corresponding virtual CPU (vCPU), in addition to data transfer to Amazon Simple Storage Service (Amazon S3).
The IndexingOCU metric reports the number of OCUs used for data ingestion across all collections.
This alarm will alert you when Indexing OCUs scale upto / beyond 10 for more than 15 minutes.
Monitor and Optimize Costs
SearchOCU maximum is >= 10 for 5 minutes, three consecutive times
Account Level
Serverless compute capacity is measured in OCUs. Each OCU is a combination of 6 GiB of memory and corresponding virtual CPU (vCPU), in addition to data transfer to Amazon S3.
The SearchOCU metric reports the number of OCUs used to search collection data across all collections.
This alarm will alert you when Search OCUs scale upto / beyond 10 for more than 15 minutes.
Monitor and Optimize Costs
IngestionRequestLatency maximum is >= 3 secs for 1 minutes, five consecutive times.
Collection Level
The IngestionRequestLatency metric reports the latency, in seconds, for bulk write operations to a collection.
This alarm monitors the maximum latency of bulk write operations to a collection. It triggers when the maximum IngestionRequestLatency exceeds 3 seconds for five consecutive 1-minute intervals (for a total of 5 minutes). This indicates a sustained performance degradation in data ingestion operations, which could impact application performance and data availability.
This metric might be crucial to monitor for log-based workloads, where indexing time is critical.
SearchRequestLatency maximum is >= 2 secs for 1 minutes, five consecutive times.
Collection Level
The SearchRequestLatency metric reports the latency, in seconds, that it takes to complete a search operation against a collection.
This alarm monitors the maximum latency of search operations against a collection. It triggers when the maximum SearchRequestLatency exceeds 2 seconds for five consecutive 1-minute intervals (for a total of 5 minutes). Consistently high search latency indicates performance issues that could degrade user experience and application responsiveness.
This metric might be crucial to monitor for vector and search-based workloads, where search time is critical.
IngestionRequestErrors sum is >= 100 errors for 1 minute, five consecutive times
Collection Level
The IngestionRequestErrors metric reports the total number of bulk indexing request errors to a collection. OpenSearch Serverless emits this metric when there are bulk indexing request failures, such as an authentication or availability issue.
This alarm monitors the total count of failed bulk indexing operations to a collection. It triggers when the number of IngestionRequestErrors equals or exceeds 100 errors for five consecutive 1-minute intervals (for a total of 5 minutes).
Persistent ingestion errors indicate systemic issues that could lead to data loss or inconsistency.
SearchRequestErrors sum is >= 50 errors for 1 minute, five consecutive times
Collection Level
The SearchRequestErrors metric reports the total number of query errors per minute for a collection.
This alarm monitors the total count of failed search query operations in a collection. It triggers when the number of SearchRequestErrors equals or exceeds 50 errors for five consecutive 1-minute intervals (for a total of 5 minutes).
Persistent search errors indicate potential issues that could impact application functionality and user experience.
ActiveCollection minimum is 0 for 1 minutes, three consecutive times.
Collection Level
This metric indicates whether a collection is active. A value of 1 means that the collection is in an ACTIVE state. This value is emitted upon successful creation of a collection and remains 1 until you delete the collection. The metric can’t have a value of 0.
The alarm triggers when the metric is missing for three consecutive 1-minute intervals (for a total of 3 minutes). Because an active collection always emits a value of 1, missing data indicates the collection has been deleted or is experiencing serious issues. Note: Make sure to setup the CloudWatch alarm so that it will treat missing data as breaching.
Monitor Availability of Collection
The specific threshold values mentioned are examples. However, you may need to adjust these thresholds based on the unique requirements and SLAs of your own applications and workloads running on OpenSearch Serverless.
To decide when to raise the global OCU limits, you should regularly review the IndexingOCU and SearchOCU metrics at the account level. If you notice the metrics consistently approaching the set threshold, it’s a good indication that you should consider increasing the overall account limits to accommodate your growing usage.
Additionally, monitor the collection-level metrics like IngestionRequestLatency and SearchRequestLatency. If you notice certain collections have consistently high latency, it might be a sign that the OCU allocation for those specific collections is insufficient. In such cases, you could consider increasing the OCU limits for those high-usage collections, rather than raising the global account limits.
By closely monitoring both the account-level and collection-level metrics, you can make informed decisions about when and how to adjust your OCU limits to maintain optimal performance and cost efficiency for your OpenSearch Serverless deployment.
Steps to create a CloudWatch alarm
CloudWatch Alarms can be created using any of the following methods:
Detailed steps and a / sample code snippet for each method are provided in the following sections.
Using the console
The AWS Management Console provides a user-friendly, visual interface for creating CloudWatch alarms. Follow these step-by-step instructions to set up your alarm through the console.
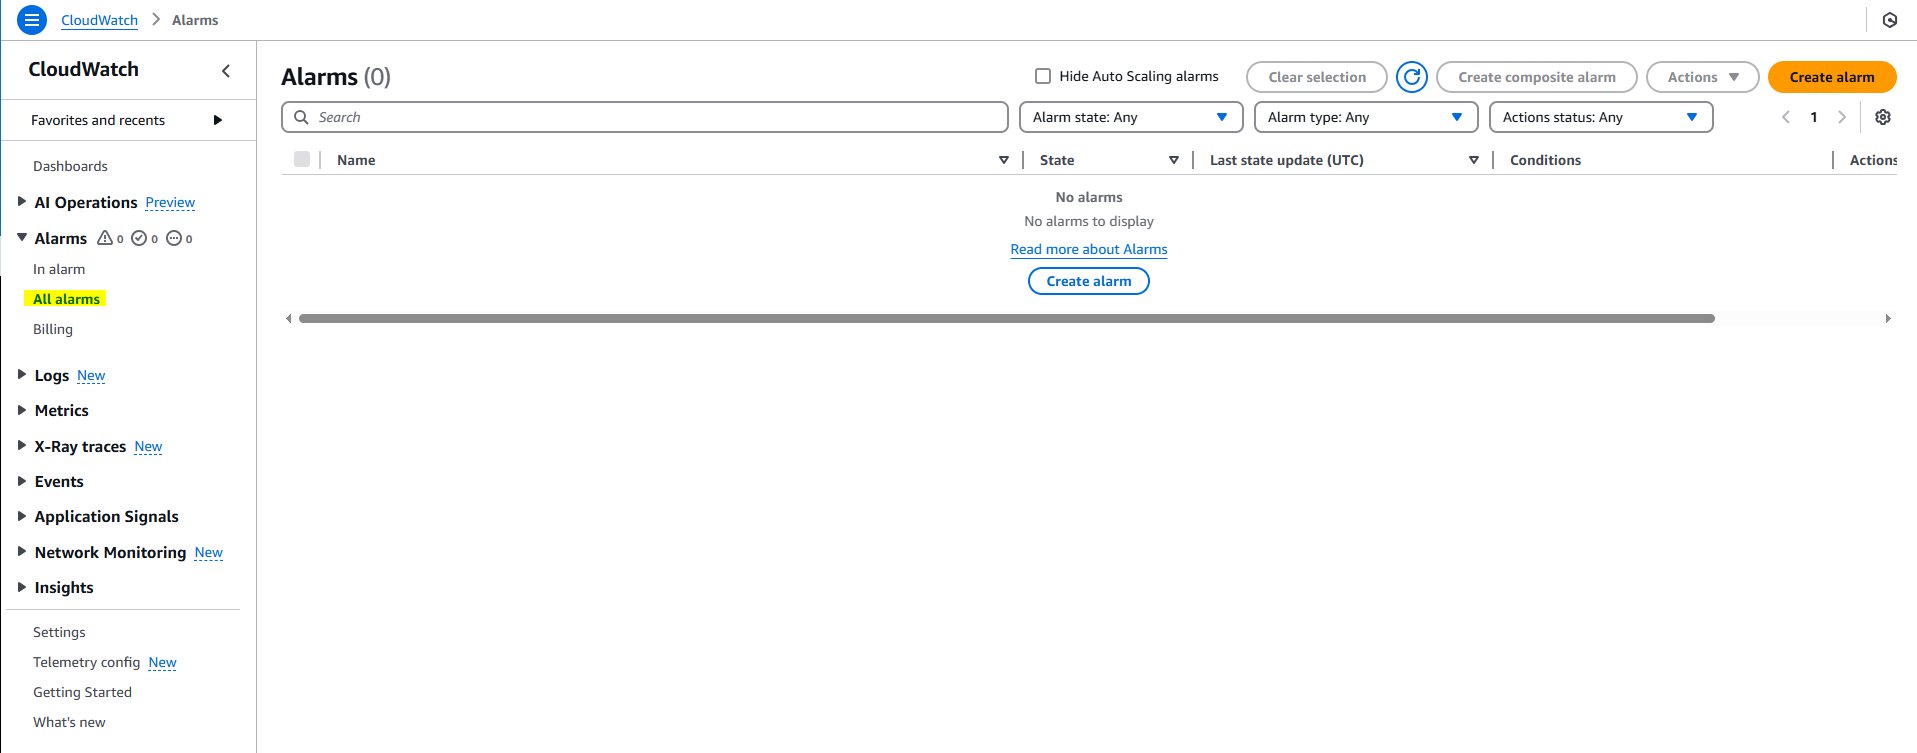
In the navigation pane, choose Alarms and then, All alarms.
Choose Create alarm.
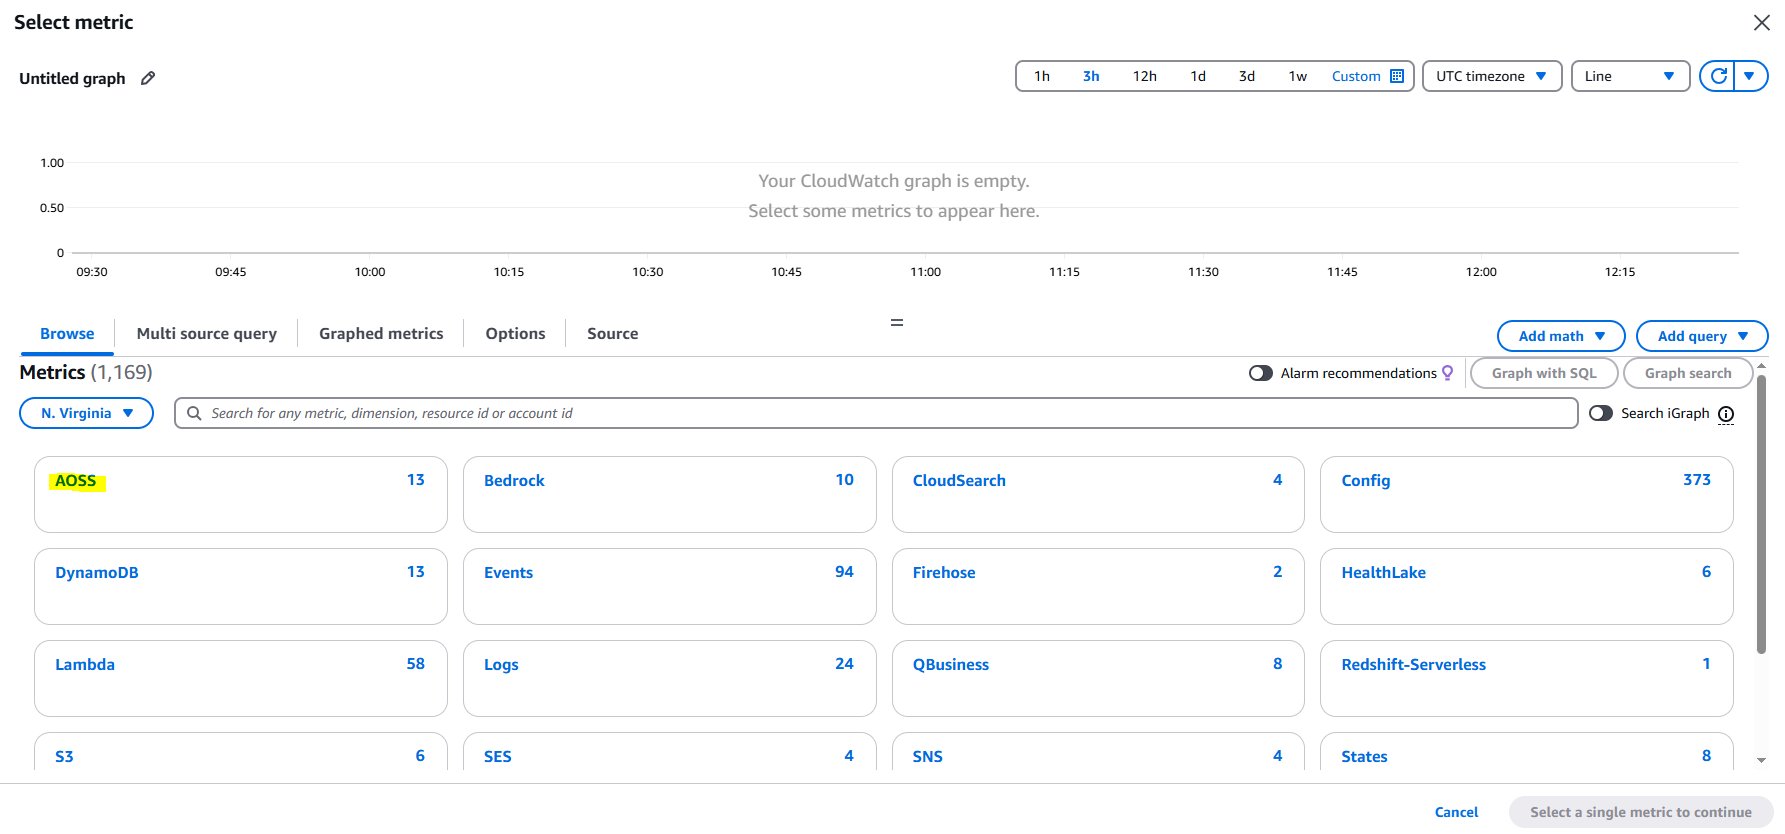
Choose Select Metric.
Select the namespace AOSS
To setup alerting on IndexingOCU across all collections, navigate to ClientId and select the metric.
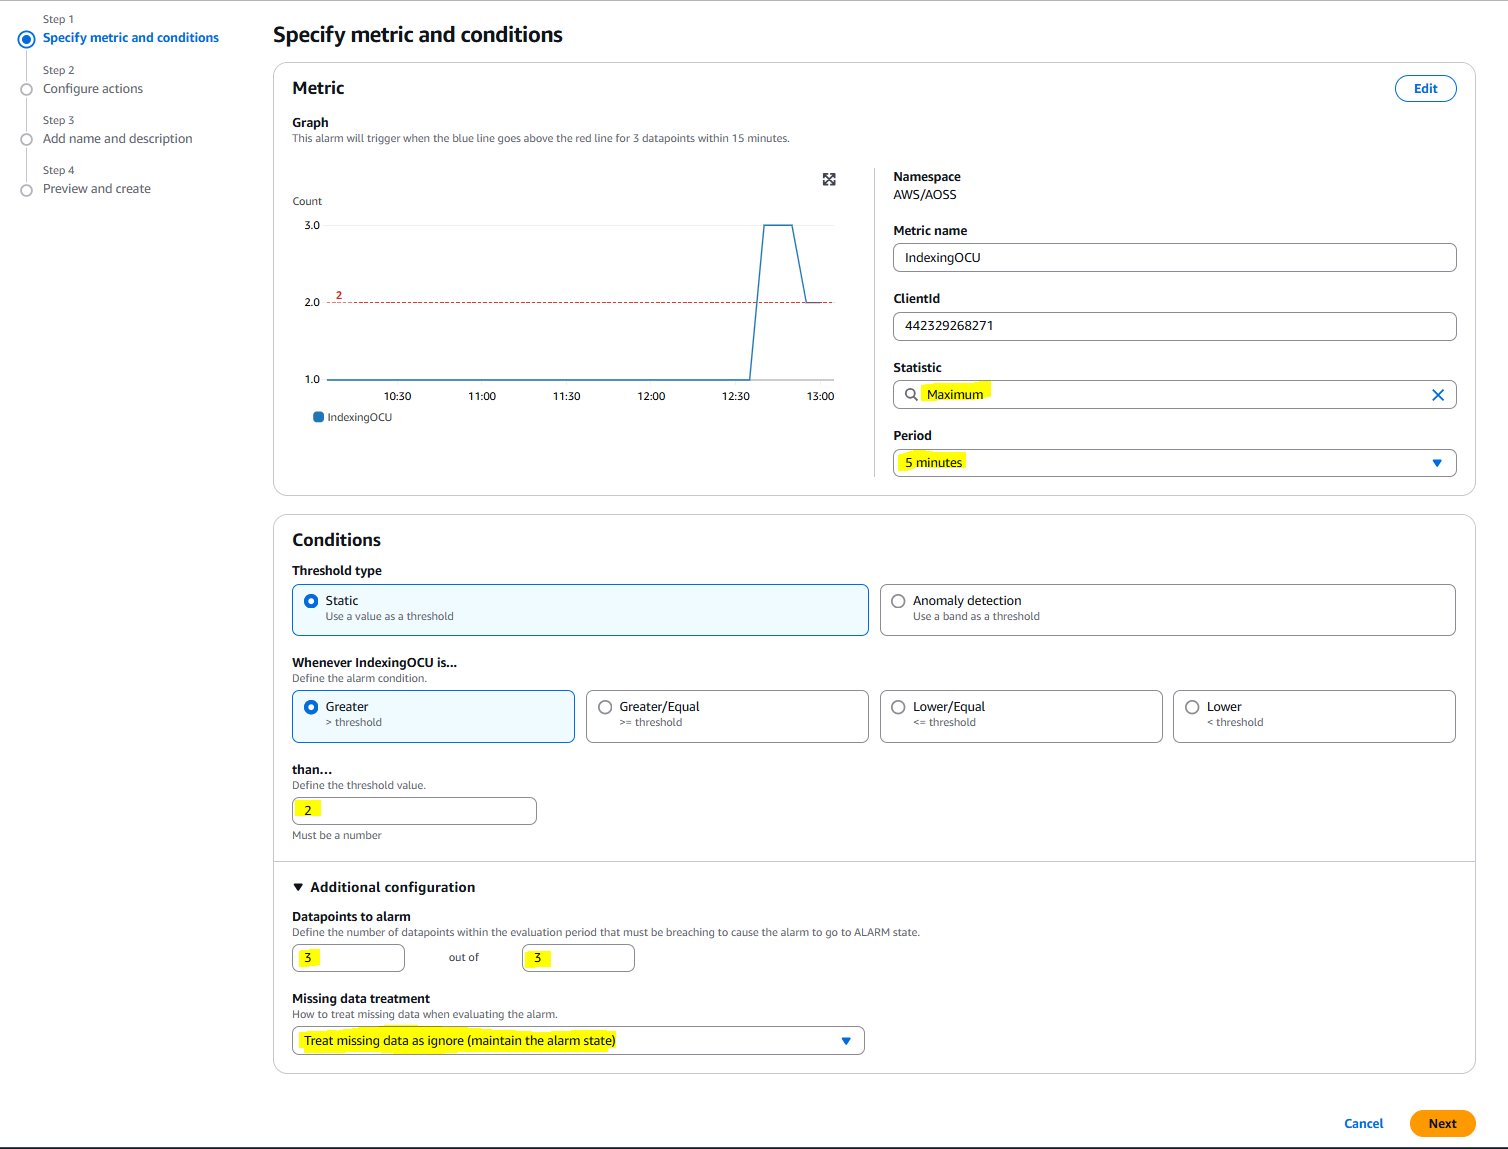
Under Conditions:
For Statistic: Select Maximum.
For Period: Select 5 minutes.
For Threshold type: Choose Static and Greater.
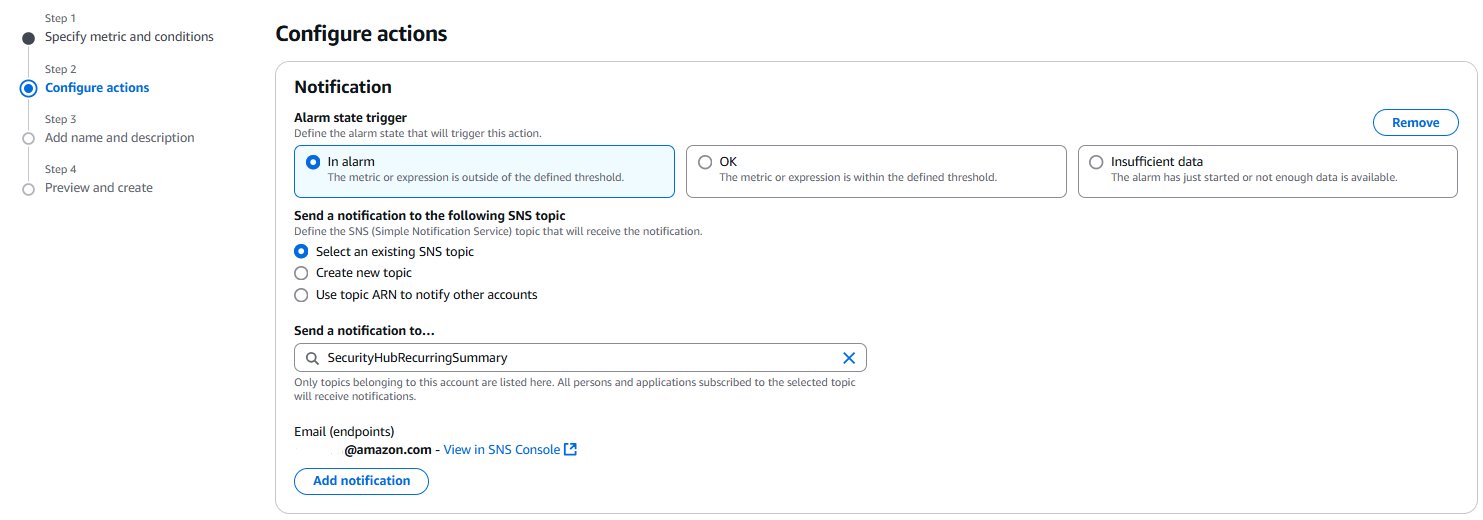
Choose Next. Under Notification, select an SNS topic to notify when the alarm is in ALARM state, OK state, or INSUFFICIENT_DATA state.
When finished, choose Next. Enter a name and description for the alarm. The name must contain only UTF-8 characters, and can’t contain ASCII control characters. The description can include markdown formatting, which is displayed only in the alarm Details tab in the CloudWatch console. The markdown can be useful to add links to runbooks or other internal resources. Then choose Next.
Under Preview and create, confirm that the information and conditions are what you want, then choose Create alarm.
For those who prefer command-line interfaces or need to automate alarm creation, the AWS CLI offers an efficient alternative. This section demonstrates how to create a CloudWatch alarm using a single CLI command.
To set up a CloudWatch alarm using the AWS CLI, you can use the put-metric-alarm command. The following example demonstrates how to create an alarm that sends an Amazon SNS email when the IndexingOCU exceeds 2 for 15 minutes at the account level. Replace [region] and [account-id] with your AWS Region and account ID.
Infrastructure as Code (IaC) enables version-controlled, repeatable deployments. This JSON template shows how to define a CloudWatch alarm using AWS CloudFormation, suitable for those who prefer JSON syntax for their IaC implementations.
Replace [region] and [account-id] with your AWS Region and account ID.
For teams that prefer YAML’s more readable format, this section provides the equivalent CloudFormation template in YAML. The template creates the same CloudWatch alarm with identical configurations as the JSON version.
Replace [region] and [account-id] with your AWS Region and account ID.
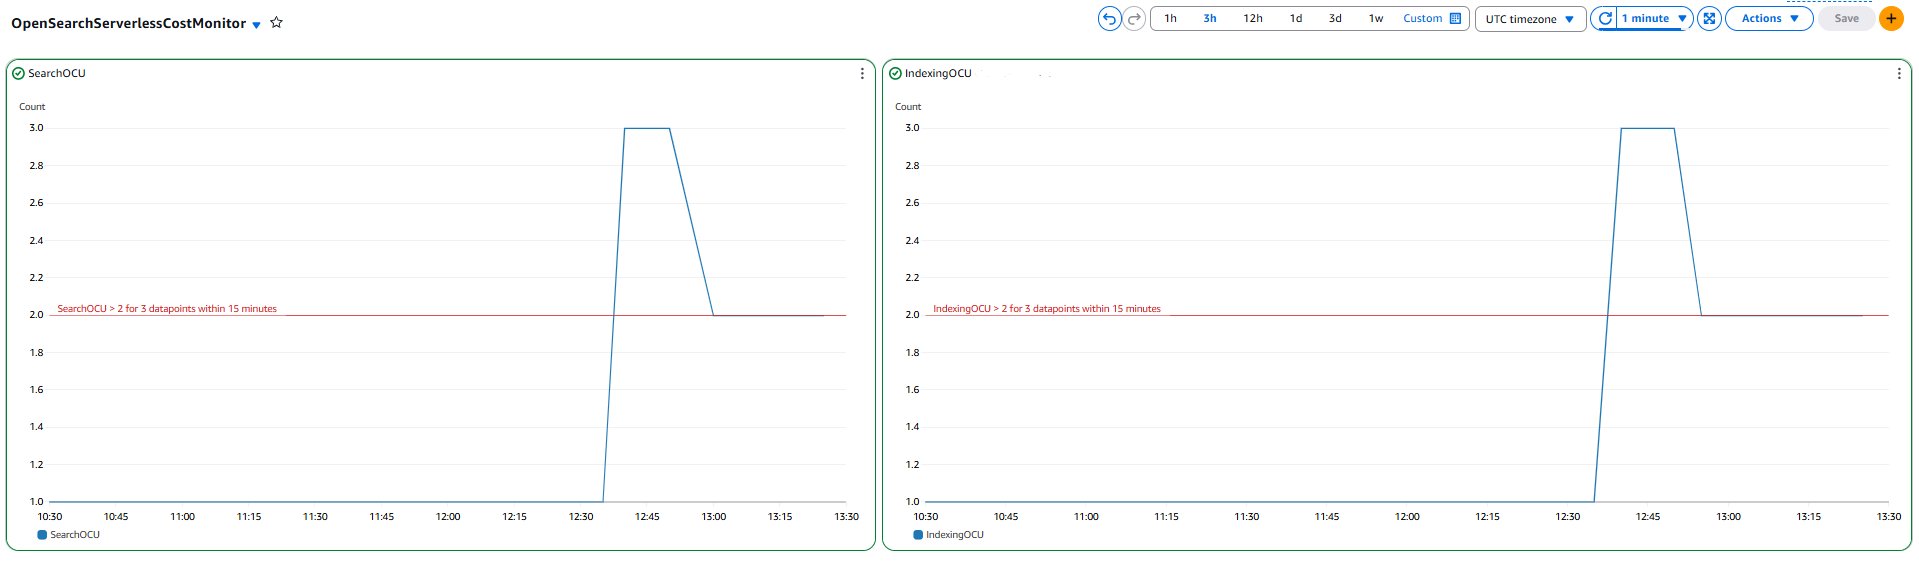
You can use Amazon CloudWatch dashboards to monitor multiple resources in a unified view. For example, the following dashboard provides a consolidated view of OpenSearch Serverless OCU usage, helping you track and manage costs.
Clean up
To avoid incurring unintended future charges, delete the following resources that were created as part of solution walk-through of this post:
CloudWatch alarms
CloudFormation stacks
SNS topics
Conclusion
Effective monitoring helps maintain optimal performance and reliability of your OpenSearch Serverless collections. By implementing the CloudWatch alarms and monitoring strategies outlined in this post, you can work towards proactively identifying and responding to performance issues before they impact your applications, optimize costs by tracking OCU usage patterns, support high availability objectives by monitoring collection health and error rates, and help maintain consistent performance through latency monitoring. Remember that the thresholds suggested in this guide serve as a starting point, you should adjust them based on your specific use cases, performance requirements, and budget constraints. Regular review and refinement of these alarms will help you maintain an efficient and cost-effective OpenSearch Serverless deployment.
Asynchronous Rust code has what Rain Paharia calls a “universal cancellation
protocol“, meaning that any asynchronous code can be interrupted in the same
way. They claim
that this is both a useful feature when used deliberately, and a source of
errors when done by accident. They presented
about this problem at
RustConf 2025, offering a handful of techniques to avoid introducing bugs into
asynchronous Rust code.
The Capability
Hardware Enhanced RISC Instructions (CHERI) project is a rethinking of
computer architecture in order to improve system security. Carl Shaw gave
a presentation at Linux
Security Summit Europe (LSS EU) about CHERI and the efforts to get
Linux running on it. He introduced capabilities,
which are a mechanism for access control, and outlined their
history, which goes back many decades at this point, then looked more
specifically at the CHERI project and what it will take to apply the security constraints of capabilities to an operating system like Linux.
The Internet is in constant motion. Sites scale, traffic shifts, and attackers adapt. Security that worked yesterday may not be enough tomorrow. That’s why the technologies that protect the web — such as Transport Layer Security (TLS) and emerging post-quantum cryptography (PQC) — must also continue to evolve. We want to make sure that everyone benefits from this evolution automatically, so we enabled the strongest protections by default.
During Birthday Week 2024, we announced Automatic SSL/TLS: a service that scans origin server configurations of domains behind Cloudflare, and automatically upgrades them to the most secure encryption mode they support. In the past year, this system has quietly strengthened security for more than 6 million domains — ensuring Cloudflare can always connect to origin servers over the safest possible channel, without customers lifting a finger.
Now, a year after we started enabling Automatic SSL/TLS, we want to talk about these results, why they matter, and how we’re preparing for the next leap in Internet security.
The Basics: TLS protocol
Before diving in, let’s review the basics of Transport Layer Security (TLS). The protocol allows two strangers (like a client and server) to communicate securely.
Every secure web session begins with a TLS handshake. Before a single byte of your data moves across the Internet, servers and clients need to agree on a shared secret key that will protect the confidentiality and integrity of your data. The key agreement handshake kicks off with a TLS ClientHello message. This message is the browser/client announcing, “Here’s who I want to talk to (via SNI), and here are the key agreement methods I understand.” The server then proves who it is with its own credentials in the form of a certificate, and together they establish a shared secret key that will protect everything that follows.
TLS 1.3 added a clever shortcut: instead of waiting to be told which method to use for the shared key agreement, the browser can guess what key agreement the server supports, and include one or more keyshares right away. If the guess is correct, the handshake skips an extra round trip and the secure connection is established more quickly. If the guess is wrong, the server responds with a HelloRetryRequest (HRR), telling the browser which key agreement method to retry with. This speculative guessing is a major reason TLS 1.3 is so much faster than TLS 1.2.
Once both sides agree, the chosen keyshare is used to create a shared secret that encrypts the messages they exchange and allows only the right parties to decrypt them.
The nitty-gritty details of key agreement
Up until recently, most of these handshakes have relied on elliptic curve cryptography (ECC) using a curve known as X25519. But looming on the horizon are quantum computers, which could one day break ECC algorithms like X25519 and others. To prepare, the industry is shifting toward post-quantum key agreement with MLKEM, deployed in a hybrid mode (X25519 + MLKEM). This ensures that even if quantum machines arrive, harvested traffic today can’t be decrypted tomorrow. X25519 + MLKEM is steadily rising to become the most popular key agreement for connections to Cloudflare.
The TLS handshake model is the foundation for how we encrypt web communications today. The history of TLS is really the story of iteration under pressure. It’s a protocol that had to keep evolving, so trust on the web could keep pace with how Internet traffic has changed. It’s also what makes technologies like Cloudflare’s Automatic SSL/TLS possible, by abstracting decades of protocol battles and crypto engineering into a single click, so customer websites can be secured by default without requiring every operator to be a cryptography expert.
History Lesson: Stumbles and Standards
Early versions of TLS (then called SSL) in the 1990s suffered from weak keys, limited protection against attacks like man-in-the-middle, and low adoption on the Internet. To stabilize things, the IETF stepped in and released TLS 1.0, followed by TLS 1.1 and 1.2 through the 2000s. These versions added stronger ciphers and patched new attack vectors, but years of fixes and extensions left the protocol bloated and hard to evolve.
The early 2010s marked a turning point. After the Snowden disclosures, the Internet doubled down on encryption by default. Initiatives like Let’s Encrypt, the mass adoption of HTTPS, and Cloudflare’s own commitment to offer SSL/TLS for free turned encryption from optional, expensive, and complex into an easy baseline requirement for a safer Internet.
All of this momentum led to TLS 1.3 (2018), which cut away legacy baggage, locked in modern cipher suites, and made encrypted connections nearly as fast as the underlying transport protocols like TCP—and sometimes even faster with QUIC.
The CDN Twist
As Content Delivery Networks (CDNs) rose to prominence, they reshaped how TLS was deployed. Instead of a browser talking directly to a distant server hosting content (what Cloudflare calls an origin), it now spoke to the nearest edge data center, which may in-turn speak to an origin server on the client’s behalf.
This created two distinct TLS layers:
Edge ↔ Browser TLS: The front door, built to quickly take on new improvements in security and performance. Edges and browsers adopt modern protocols (TLS 1.3, QUIC, session resumption) to cut down on latency.
Edge ↔ Origin TLS: The backhaul, which must be more flexible. Origins might be older, more poorly maintained, run legacy TLS stacks, or require custom certificate handling.
In practice, CDNs became translators: modernizing encryption at the edge while still bridging to legacy origins. It’s why you can have a blazing-fast TLS 1.3 session from your phone, even if the origin server behind the CDN hasn’t been upgraded in years.
This is where Automatic SSL/TLS sits in the story of how we secure Internet communications.
Automatic SSL/TLS
Automatic SSL/TLS grew out of Cloudflare’s mission to ensure the web was as encrypted as possible. While we had initially spent an incredibly long time developing secure connections for the “front door” (from browsers to Cloudflare’s edge) with Universal SSL, we knew that the “back door” (from Cloudflare’s edge to origin servers) would be slower and harder to upgrade.
One option we offered was Cloudflare Tunnel, where a lightweight agent runs near the origin server and tunnels traffic securely back to Cloudflare. This approach ensures the connection always uses modern encryption, without requiring changes on the origin itself.
But not every customer uses Tunnel. Many connect origins directly to Cloudflare’s edge, where encryption depends on the origin server’s configuration. Traditionally this meant customers had to either manually select an encryption mode that worked for their origin server or rely on the default chosen by Cloudflare.
To improve the experience of choosing an encryption mode, we introduced our SSL/TLS Recommender in 2021.
The Recommender scanned customer origin servers and then provided recommendations for their most secure encryption mode. For example, if the Recommender detected that an origin server was using a certificate signed by a trusted Certificate Authority (CA) such as Let’s Encrypt, rather than a self-signed certificate, it would recommend upgrading from Full encryption mode to Full (Strict) encryption mode.
Based on how the origin responded, Recommender would tell customers if they could improve their SSL/TLS encryption mode to be more secure. The following encryption modes represent what the SSL/TLS Recommender could recommend to customers based on their origin responses:
However, in the three years after launching our Recommender we discovered something troubling: of the over two million domains using Recommender, only 30% of the recommendations that the system provided were followed. A significant number of users would not complete the next step of pushing the button to inform Cloudflare that we could communicate with their origin over a more secure setting.
We were seeing sub-optimal settings that our customers could upgrade from without risk of breaking their site, but for various reasons, our users did not follow through with the recommendations. So we pushed forward by building a system that worked with Recommender and actioned the recommendations by default.
How does Automatic SSL/TLS work?
Automatic SSL/TLSworks by crawling websites, looking for content over both HTTP and HTTPS, then comparing the results for compatibility. It also performs checks against the TLS certificate presented by the origin and looks at the type of content that is served to ensure it matches. If the downloaded content matches, Automatic SSL/TLS elevates the encryption level for the domain to the compatible and stronger mode, without risk of breaking the site.
More specifically, these are the steps that Automatic SSL/TLS takes to upgrade domain’s security:
Each domain is scheduled for a scan once per month (or until it reaches the maximum supported encryption mode).
The scan evaluates the current encryption mode for the domain. If it’s lower than what the Recommender thinks the domain can support based on the results of its probes and content scans, the system begins a gradual upgrade.
Automatic SSL/TLS begins to upgrade the domain by connecting with origins over the more secure mode starting with just 1% of its traffic.
If connections to the origin succeed, the result is logged as successful.
If they fail, the system records the failure to Cloudflare’s control plane and aborts the upgrade. Traffic is immediately downgraded back to the previous SSL/TLS setting to ensure seamless operation.
If no issues are found, the new SSL/TLS encryption mode is applied to traffic in 10% increments until 100% of traffic uses the recommended mode.
Once 100% of traffic has been successfully upgraded with no TLS-related errors, the domain’s SSL/TLS setting is permanently updated.
Special handling for Flexible → Full/Strict: These upgrades are more cautious because customers’ cache keys are changed (from http to https origin scheme).
In this situation, traffic ramps up from 1% to 10% in 1% increments, allowing customers’ cache to warm-up.
After 10%, the system resumes the standard 10% increments until 100%.
We know that transparency and visibility are critical, especially when automated systems make changes. To keep customers informed, Automatic SSL/TLS sends a weekly digest to account Super Administrators whenever updates are made to domain encryption modes. This way, you always have visibility into what changed and when.
In short, Automatic SSL/TLS automates what used to be trial and error: finding the strongest SSL/TLS mode your site can support while keeping everything working smoothly.
How are we doing so far?
So far we have onboarded all Free, Pro, and Business domains to use Automatic SSL/TLS. We also have enabled this for all new domains that will onboard onto Cloudflare regardless of plantype. Soon, we will start onboarding Enterprise customers as well. If you already have an Enterprise domain and want to try out Automatic SSL/TLS we encourage you to enable it in the SSL/TLS section of the dashboard or via the API.
As of the publishing of this blog, we’ve upgraded over 6 million domains to be more secure without the website operators needing to manually configure anything on Cloudflare.
Previous Encryption Mode
Upgraded Encryption Mode
Number of domains
Flexible
Full
~ 2,200,000
Flexible
Full (strict)
~ 2,000,000
Full
Full (strict)
~ 1,800,000
Off
Full
~ 7,000
Off
Full (strict)
~ 5,000
We’re most excited about the over 4 million domains that moved from Flexible or Off, which uses HTTP to origin servers, to Full or Strict, which uses HTTPS.
If you have a reason to use a particular encryption mode (e.g., on a test domain that isn’t production ready) you can always disable Automatic SSL/TLS and manually set the encryption mode that works best for your use case.
Today, SSL/TLS mode works on a domain-wide level, which can feel blunt. This means that one suboptimal subdomain can keep the entire domain in a less secure TLS setting, to ensure availability. Our long-term goal is to make these controls more precise, so that Automatic SSL/TLS and encryption modes can optimize security per origin or subdomain, rather than treating every hostname the same.
Impact on origin-facing connections
Since we began onboarding domains to Automatic SSL/TLS in late 2024 and early 2025, we’ve been able to measure how origin connections across our network are shifting toward stronger security. Looking at the ratios across all origin requests, the trends are clear:
Encryption is rising. Plaintext connections are steadily declining, a reflection of Automatic SSL/TLS helping millions of domains move to HTTPS by default. We’ve seen a correlated 7-8% reduction in plaintext origin-bound connections. Still, some origins remain on outdated configurations, and these should be upgraded to keep pace with modern security expectations.
TLS 1.3 is surging. Since late 2024, TLS 1.3 adoption has climbed sharply, now making up the majority of encrypted origin traffic (almost 60%). While Automatic SSL/TLS doesn’t control which TLS version an origin supports, this shift is an encouraging sign for both performance and security.
Older versions are fading. Month after month, TLS 1.2 continues to shrink, while TLS 1.0 and 1.1 are now so rare they barely register.
The decline in plaintext connections is encouraging, but it also highlights a long tail of servers still relying on outdated packages or configurations. Sites like SSL Labs can be used, for instance, to check a server’s TLS configuration. However, simply copy-pasting settings to achieve a high rating can be risky, so we encourage customers to review their origin TLS configurations carefully. In addition, Cloudflare origin CA or Cloudflare Tunnel can help provide guidance for upgrading origin security.
Upgraded domain results
Instead of focusing on the entire network of origin-facing connections from Cloudflare, we’re now going to drill into specific changes that we’ve seen from domains that have been upgraded by Automatic SSL/TLS.
By January 2025, most domains had been enrolled in Automatic SSL/TLS, and the results were dramatic: a near 180-degree shift from plaintext to encrypted communication with origins. After that milestone, traffic patterns leveled off into a steady plateau, reflecting a more stable baseline of secure connections across the network. There is some drop in encrypted traffic which may represent some of the originally upgraded domains manually turning off Automatic SSL/TLS.
But the story doesn’t end there. In the past two months (July and August 2025), we’ve observed another noticeable uptick in encrypted origin traffic. This likely reflects customers upgrading outdated origin packages and enabling stronger TLS support—evidence that Automatic SSL/TLS not only raised the floor on encryption but continues nudging the long tail of domains toward better security.
To further explore the “encrypted” line above, we wanted to see what the delta was between TLS 1.2 and 1.3. Originally we wanted to include all TLS versions we support but the levels of 1.0 and 1.1 were so small that they skewed the graph and were taken out. We see a noticeable rise in the support for both TLS 1.2 and 1.3 between Cloudflare and origin servers. What is also interesting to note here is the network-wide decrease in TLS 1.2 but for the domains that have been automatically upgraded a generalized increase, potentially also signifying origin TLS stacks that could be updated further.
Finally, for Full (Strict) mode,we wanted to investigate the number of successful certificate validations we performed. This line shows a dramatic, approximately 40%, increase in successful certificate validations performed for customers upgraded by Automatic SSL/TLS.
We’ve seen a largely successful rollout of Automatic SSL/TLS so far, with millions of domains upgraded to stronger encryption by default. We’ve seen help Automatic SSL/TLS improve origin-facing security, safely pushing connections to stronger modes whenever possible, without risking site breakage. Looking ahead, we’ll continue to expand this capability to more customer use cases as we help to build a more encrypted Internet.
What will we build next for Automatic SSL/TLS?
We’re expanding Automatic SSL/TLS with new features that give customers more visibility and control, while keeping the system safe by default. First, we’re building an ad-hoc scan option that lets you rescan your origin earlier than the standard monthly cadence. This means if you’ve just rotated certificates, upgraded your origin’s TLS configuration, or otherwise changed how your server handles encryption, you won’t need to wait for the next scheduled pass—Cloudflare will be able to re-evaluate and move you to a stronger mode right away.
In addition, we’re working on error surfacing that will highlight origin connection problems directly in the dashboard and provide actionable guidance for remediation. Instead of discovering after the fact that an upgrade failed, or a change on the origin resulted in a less secure setting than what was set previously, customers will be able to see where the issue lies and how to fix it.
Finally, for newly onboarded domains, we plan to add clearer guidance on when to finish configuring the origin before Cloudflare runs its first scan and sets an encryption mode. Together, these improvements are designed to reduce surprises, give customers more agency, and ensure smoother upgrades. We expect all three features to roll out by June 2026.
Post Quantum Era
Looking ahead, quantum computers introduce a serious risk: data encrypted today can be harvested and decrypted years later once quantum attacks become practical. To counter this harvest-now, decrypt-later threat, the industry is moving towards post-quantum cryptography (PQC)—algorithms designed to withstand quantum attacks. We have extensively written on this subject in our previous blogs.
In August 2024, NIST finalized its PQC standards: ML-KEM for key agreement, and ML-DSA and SLH-DSA for digital signatures. In collaboration with industry partners, Cloudflare has helped drive the development and deployment of PQC. We have deployed the hybrid key agreement, combining ML-KEM (post-quantum secure) and X25519 (classical), to secure TLS 1.3 traffic to our servers and internal systems. As of mid-September 2025, around 43% of human-generated connections to Cloudflare are already protected with the hybrid post-quantum secure key agreement – a huge milestone in preparing the Internet for the quantum era.
But things look different on the other side of the network. When Cloudflare connects to origins, we act as the client, navigating a fragmented landscape of hosting providers, software stacks, and middleboxes. Each origin may support a different set of cryptographic features, and not all are ready for hybrid post-quantum handshakes.
To manage this diversity without the risk of breaking connections, we relied on HelloRetryRequest. Instead of sending post-quantum keyshare immediately in the ClientHello, we only advertise support for it. If the origin server supports the post-quantum key agreement, it uses HelloRetryRequest to request it from Cloudflare, and creates the post-quantum connection. The downside is this extra round trip (from the retry) cancels out the performance gains of TLS 1.3 and makes the connection feel closer to TLS 1.2 for uncached requests.
Back in 2023, we launched an API endpoint, so customers could manually opt their origins into preferring post-quantum connections. If set, we avoid the extra roundtrip and try to create a post-quantum connection at the start of the TLS session. Similarly, we extended post-quantum protection to Cloudflare tunnel, making it one of the easiest ways to get origin-facing PQ today.
Starting Q4 2025, we’re taking the next step – making it automatic. Just as we’ve done with SSL/TLS upgrades, Automatic SSL/TLS will begin testing, ramping, and enabling post-quantum handshakes with origins—without requiring customers to change a thing, as long as their origins support post-quantum key agreement.
Behind the scenes, we’re already scanning active origins about every 24 hours to test support and preferences for both classical and post-quantum key agreements. We’ve worked directly with vendors and customers to identify compatibility issues, and this new scanning system will be fully integrated into Automatic SSL/TLS.
And the benefits won’t stop at post-quantum. Even for classical handshakes, optimization matters. Today, the X25519 algorithm is used by default, but our scanning data shows that more than 6% of origins currently prefer a different key agreement algorithm, which leads to unnecessary HelloRetryRequests and wasted round trips. By folding this scanning data into Automatic SSL/TLS, we’ll improve connection establishment for classical TLS as well—squeezing out extra speed and reliability across the board.
As enterprises and hosting providers adopt PQC, our preliminary scanning pipeline has already found that around 4% of origins could benefit from a post-quantum-preferred key agreement even today, as shown below. This is an 8x increase since we started our scans in 2023. We expect this number to grow at a steady pace as the industry continues to migrate to post-quantum protocols.
As part of this change, we will also phase out support for the pre-standard version X25519Kyber768 to support the final ML-KEM standard, again using a hybrid, from edge to origin connections.
With Automatic SSL/TLS, we will soon by default scan your origins proactively to directly send the most preferred keyshare to your origin removing the need for any extra roundtrip, improving both security and performance of your origin connections collectively.
At Cloudflare, we’ve always believed security is a right, not a privilege. From Universal SSL to post-quantum cryptography, our mission has been to make the strongest protections free and available to everyone. Automatic SSL/TLS is the next step—upgrading every domain to the best protocols automatically. Check the SSL/TLS section of your dashboard to ensure it’s enabled and join the millions of sites already secured for today and ready for tomorrow.
Launching a website or an online community brings people together to create and share. The operators of these platforms, sadly, also have to navigate what happens when bad actors attempt to misuse those destinations to spread the most heinous content like child sexual abuse material (CSAM).
We are committed to helping anyone on the Internet protect their platform from this kind of misuse. We first launched a CSAM Scanning Tool several years ago to give any website on the Internet the ability to programmatically scan content uploaded to their platform for instances of CSAM in partnership with National Center for Missing and Exploited Children (NCMEC), Interpol, and dozens of other organizations committed to protecting children. That release took technology that was only available to the largest social media platforms and provided it to any website.
However, the tool we offered still required setup work that added friction to its adoption. To help our customers file reports to NCMEC, they needed to create their own credentials. That step of creating credentials and sharing them was too confusing or too much work for small site owners. We did our best helping them with secondary reports, but we needed a method that made this seamless to encourage adoption.
Today’s announcement makes that process significantly easier for site owners, helping them contribute to keeping the Internet safer with even less manual effort. The tool no longer requires website operators to create and provide their own unique NCMEC credentials. The result is that we have seen monthly adoption of the tool increase by 1,600% since the introduction of this change in February.
How does it work?
Services that attempt to flag and stop the spread of CSAM rely on partner organizations, like NCMEC, who maintain lists of hashes of known CSAM. These hashes are numerical representations of images that rely on an algorithm to create a kind of digital fingerprint for a photo. Partners who operate these tools, like Cloudflare, check hashes of content provided against the list maintained by organizations like NCMEC to see if there is a match. You can read about the operation in detail in our previous announcement here.
We rely on fuzzy hashing, a technique that goes beyond simple one-to-one matches. If a photo of CSAM is altered even slightly — by adding a filter, cropping it, or adding some noise — the fingerprint changes completely.
A fuzzy hash, on the other hand, creates a “perceptual fingerprint.” Even if an image is modified, its fuzzy hash will remain similar to the original. This allows our tool to identify matches with a high degree of confidence, even if the abuser tries to disguise the content.
The removal of the requirement to share the credential with Cloudflare removes one additional step to deploying and enabling our tool, but site operators are still expected to continue to file their own reports with NCMEC or their regional equivalent.
What is the process now?
The process for using the tool is now straightforward and simple:
Enable the Tool: Activate the CSAM Scanning Tool on your Cloudflare zone and verify your notification email address.
Scan and Detect: Our tool scans your cached content for potential CSAM, creating a fuzzy hash of each image. If a match is found with a known bad hash, a detection event is created.
Remediate: Cloudflare blocks the URL to any identified matches and notifies you so that you may take further action.
What is next?
We believe that the tools for a safer Internet should be available for everyone — not just a few large companies.
We invite you to enable the CSAM Scanning Tool on your website today. For more technical details on how it works, please visit our developer documentation. We also welcome you to join our community to discuss the technology and help us continue to build a better Internet.
Security updates have been issued by AlmaLinux (kernel and kernel-rt), Fedora (expat), Red Hat (kernel and multiple packages), SUSE (avahi, busybox, busybox-links, kernel, sevctl, tcpreplay, thunderbird, and tor), and Ubuntu (isc-kea, linux, linux-aws, linux-gcp, linux-gke, linux-gkeop, linux-lowlatency, linux-lowlatency-hwe-6.8, linux-aws-6.8, linux-gcp-6.8, linux-aws-fips, linux-nvidia, linux-nvidia-6.8, linux-nvidia-lowlatency, linux-realtime, python-pip, and rabbitmq-server).
Cloudflare has a unique vantage point: we see not only how changes in technology shape the Internet, but also how new technologies can unintentionally impact different stakeholders. Take, for instance, the increasing reliance by everyday Internet users on AI–powered chatbots and search summaries. On the one hand, end users are getting information faster than ever before. On the other hand, web publishers, who have historically relied on human eyeballs to their website to support their businesses, are seeing a dramaticdecrease in those eyeballs, which can reduce their ability to create original high-quality content. This cycle will ultimately hurt end users and AI companies (whose success relies on fresh, high-quality content to train models and provide services) alike.
We are indisputably at a point in time when the Internet needs clear “rules of the road” for AI bot behavior (a note on terminology: throughout this blog we refer to AI bots and crawlers interchangeably). We have had ongoing cross-functional conversations, both internally and with stakeholders and partners across the world, and it’s clear to us that the Internet at large needs key groups — publishers and content creators, bot operators, and Internet infrastructure and cybersecurity companies — to reach a consensus on certain principles that AI bots should follow.
Of course, agreeing on what exactly those principles are will take time and require continued discussion and collaboration, and a policy framework can’t perfectly capture every technical concern. Nevertheless, we think it’s important to start a conversation that we hope others will join. After all, a rough draft is better than a blank page.
That is why we are proposing the following responsible AI bot principles as starting points:
Public disclosure: Companies should publicly disclose information about their AI bots;
Self-identification: AI bots should truthfully self-identify, eventually replacing less reliable methods, like user agent and IP address verification, with cryptographic verification;
Declared single purpose: AI bots should have one distinct purpose and declare it;
Respect preferences: AI bots should respect and comply with preferences expressed by website operators where proportionate and technically feasible;
Act with good intent: AI bots must not flood sites with excessive traffic or engage in deceptive behavior.
Each principle is discussed in greater detail below. These principles focus on AI bots because of the impact generative AI is having on the Internet, but we have already seen these practices in action with other types of (non-AI) bots as well. We believe these principles will help move the Internet in a better direction. That said, we acknowledge that they are a starting point for this conversation, which requires input from other stakeholders. The Internet has always been a collaborative place for innovation, and these principles should be seen as equally dynamic and evolving.
While we have recently focused our attention on AI crawlers, Cloudflare has long been a leader in the bot management space, helping our customers protect their websites from unwanted — and even malicious —traffic. We also want to make sure that anyone — whether they’re our customer or not — can see which AI bots are abiding by all, some, or none of these best practices.
But we aren’t ignorant to the fact that companies operating crawlers are also adapting to a new Internet landscape — and we genuinely believe that most players in this space want to do the right thing, while continuing to innovate and propel the Internet in an exciting direction. Our hope is that we can use our expertise and unique vantage point on the Internet to help bring seemingly incompatible parties together and find a path forward — continuing our mission of helping to build a better Internet for everyone.
Responsible AI bot principles
The following principles are a launchpad for a larger conversation, and we recognize that there is work to be done to address many nuanced perspectives. We envision these principles applying to AI bots but understand that technical complexity may require flexibility. Ultimately, our goal is to emphasize transparency, accountability, and respect for content access and use preferences. If these principles fall short of that — or fail to consider other important priorities — we want to know.
Principle #1: Public disclosure
Companies should publicly disclose information about their AI bots. The following information should be publicly available and easy to find:
Identity: information that helps external parties identify a bot, e.g., user agent, relevant IP address(es), and/or individual cryptographic identification (more on this below, in Principle #2: Self-identification).
Operator: the legal entity responsible for the AI bot, including a point of contact (e.g., for reporting abuse);
Purpose: for which purpose the accessed data will be used, i.e., search, AI-input, or training (more on this below, in Principle #3: Declared Single Purpose).
OpenAI is an example of a leading AI company that clearly discloses their bots, complete with detailed explanations of each bot’s purpose. The benefits of this disclosure are apparent in the subsequent principles. It helps website operators validate that a given request is in fact coming from OpenAI and what its purpose is (e.g., search indexing or AI model training). This, in turn, enables website operators to control access to and use of their content through preference expression mechanisms, like robots.txt files.
Principle #2: Self-identification
AI bots should truthfully self-identify. Not only should information about bots be disclosed in a publicly accessible location, this information should also be clearly communicated by bots themselves, e.g., through an HTTP request that conveys the bot’s official user agent and comes from an IP address that the bot claims to send traffic from. Admittedly, this current approach is flawed, as we discuss in more detail below. But until cryptographic verification is more widely adopted, we think relying on user agent and IP verification is better than nothing.
OpenAI’s GPTBot is an example of this principle in action. OpenAI publicly shares the expected full user-agent string for this bot and includes it in its requests. OpenAI also explains this bot’s purpose (“used to make [OpenAI’s] generative AI foundation models more useful and safe” and “to crawl content that may be used in training [their] generative AI foundation models”). And we have observed this bot sending traffic from IP addresses reported by OpenAI. Because site operators see GPTBot’s user agent and IP addresses matching what is publicly disclosed and expected, and they know information about the bot is publicly documented, they can confidently recognize the bot. This enables them to make informed decisions about whether they want to allow traffic from it.
Unfortunately, not all bots uphold this principle, making it difficult for website owners to know exactly which bot operators respect their crawl preferences, much less enforce them. For example, while Anthropic publishes its user agent alone, absent other verifiable information, it’s unclear which requests are truly from Anthropic. And xAI’s bot, grok, does not self-identify at all, making it impossible for website operators to block it. Anthropic and xAI’s lack of identification undermines trust between them and website owners, yet this could be fixed with minimal effort on their parts.
A note on cryptographic verification and the future of Principle #2
Truthful declaration of user agent and dedicated IP lists have historically been a functional way to verify. But in today’s rapidly-evolving bot climate, bots are increasingly vulnerable to being spoofed by bad actors. These bad actors, in turn, ignore robots.txt, which communicates allow/disallow preferences only on a user agent basis (so, a bad bot could spoof a permitted user agent and circumvent that domain’s preferences).
Ultimately, every AI bot should be cryptographically verified using an accepted standard. This would protect them against spoofing and ensure website operators have the accurate and reliable information they need to properly evaluate access by AI bots. At this time, we believe that Web Bot Auth is sufficient proof of compliance with Principle #2. We recognize that this standard is still in development, and, as a result, this principle may evolve accordingly.
Web Bot Auth uses cryptography to verify bot traffic; cryptographic signatures in HTTP messages are used as verification that a given request came from an automated bot. Our implementation relies on proposed IETF directory and protocol drafts. Initial reception of Web Bot Auth has been very positive, and we expect even more adoption. For example, a little over a month ago, Vercel announced that its bot verification now supports Web Bot Auth. And OpenAI’s ChatGPT agent now signs its requests using Web Bot Auth, in addition to using the HTTP Message Signatures standard.
We envision a future where cryptographic authentication becomes the norm, as we believe this will further strengthen the trustworthiness of bots.
Principle #3: Declared single purpose
AI bots should have one distinct purpose and declare it. Today, some bots self-identify their purpose as Training, Search, or User Action (i.e., accessing a web page in response to a user’s query).
However, these purposes are sometimes combined without clear distinction. For example, content accessed for search purposes might also be used to train the AI model powering the search engine. When a bot’s purpose is unclear, website operators face a difficult decision: block it and risk undermining search engine optimization (SEO), or allow it and risk content being used in unwanted ways.
When operators deploy bots with distinct purposes, website owners are able to make clear decisions over who can access their content. What those purposes should be is up for debate, but we think the following breakdown is a starting point based on bot activity we see. We recognize this is an evolving space and changes may be required as innovation continues:
Search: building a search index and providing search results (e.g., returning hyperlinks and short excerpts from your website’s contents). Search does not include providing AI-generated search summaries;
AI-input: inputting content into one or more AI models, e.g., retrieval-augmented generation (RAG), grounding, or other real-time taking of content for generative AI search answers; and
Training: training or fine-tuning AI models.
Relatedly, bots should not combine purposes in a way that prevents web operators from deliberately and effectively deciding whether to allow crawling.
Let’s consider two AI bots, OAI-SearchBot and Googlebot, from the perspective of Vinny, a website operator trying to make a living on the Internet. OAI-SearchBot has a single purpose: linking to and surfacing websites in ChatGPT’s search features. If Vinny takes OpenAI at face value (which we think it makes sense to do), he can trust that OAI-SearchBot does not crawl his content for training OpenAI’s generative AI models rather, a separate bot (GPTBot, as discussed in Principle #2: Self-identification) does. Vinny can decide how he wants his content used by OpenAI, e.g., permitting its use for search but not for AI training, and feel confident that his choices are respected because OAI-SearchBot only crawls for search purposes, while GPTBot is not granted access to the content in the first place (and therefore cannot use it).
On the other hand, while Googlebot scrapes content for traditional search-indexing (not model training), it also uses that content for inference purposes, such as for AI Overviews and AI Mode. Why is this a problem for Vinny? While he almost certainly wants his content appearing in search results, which drive the human eyeballs that fund his site, Vinny is forced to also accept that his content will appear in Google’s AI-generated summaries. If eyeballs are satisfied by the summary then they never visit Vinny’s website, which leads to “zero-click” searches and undermines Vinny’s ability to financially benefit from his content.
This is a vicious cycle: creating high-quality content, which typically leads to higher search rankings, now inadvertently also reduces the chances an eyeball will visit the site because that same valuable content is surfaced in an AI Overview (if it is even referenced as a source in the summary). To prevent this, Vinny must either opt out of search completely or use snippet controls (which risks degrading how his content appears in search results). This is because the only available signal to opt-out of AI, disallowing Google-Extended, is limited to training and does not apply to AI Overview, which is attached to search. Whether by accident or by design, this setup forces an impossible choice onto website owners.
Finally, the prominent technical argument in favor of combining multiple purposes — that this reduces the crawler operator’s costs — needs to be debunked. To reason by analogy: it’s like arguing that placing one call to order two pizzas is cheaper than placing two calls to order two pizzas. In reality, the cost of the two pizzas (both of which take time and effort to make) remains the same. The extra phone call may be annoying, but its costs are negligible.
Similarly, whether one bot request is made for two purposes (e.g., search indexing and AI model training) or a separate bot request is made for each of two purposes, the costs basically remain the same. For the crawler, the cost of compute is the same because the content still needs to be processed for each purpose. And the cost of two connections (i.e., for two requests) is virtually the same as one. We know this because Cloudflare runs one of the largest networks in the world, handling on average 84 million requests per second, so we understand the cost of requests at Internet scale. (As an aside, while additional crawls incur costs on website operators, they have the ability to choose whether the crawl is worth the cost, especially when bots have a single purpose.)
Principle # 4: Respect preferences
AI bots should respect and comply with preferences expressed by website operators where proportionate and technically feasible. There are multiple options for expressing preferences. Prominent examples include the longstanding and familiar robots.txt, as well as newly emerging HTTP headers.
Given the widespread use of robots.txt files, bots should make a good faith attempt to fetch a robots.txt file first, in accordance with RFC 9309, and abide by both the access and use preferences specified therein. AI bot operators should also stay up to date on how those preferences evolve as a result of a draft vocabulary currently under development by an IETF working group. The goal of the proposed vocabulary is to improve granularity in robots.txt files, so that website operators are empowered to control how their assets are used.
At the same time, new industry standards under discussion may involve the attachment of machine-readable preferences to different formats, such as individual files. AI bot operators should eventually be prepared to comply with these standards, too. One idea currently being explored is a way for site owners to list preferences via HTTP headers, which offer a server-level method of declaring how content should be used.
Principle #5: Act with good intent
AI bots must not flood sites with excessive traffic or engage in deceptive behavior. AI bot behavior should be benign or helpful to website operators and their users. It is also incumbent on companies that operate AI bots to monitor their networks and resources for breaches and patch vulnerabilities. Jeopardizing a website’s security or performance or engaging in harmful tactics is unacceptable.
Nor is it appropriate to appear to comply with the principles, only to secretly circumvent them. Reaffirming a long-standing principle of acceptable bot behavior, AI bots must never engage in stealth crawling or use other stealth tactics to try and dodge detection, such as modifying their user agent, changing their source ASNs to hide their crawling activity, or ignoring robots.txt files. Doing so would undermine the preceding four principles, hurting website operators and worsening the Internet for all.
The road ahead: multi-stakeholder efforts to bring these principles to life
As we continue working on these principles and soliciting feedback, we strive to find a balance: we want the wishes of content creators respected while still encouraging AI innovation. It’s a privilege to sit at the intersection of these important interests and to play a crucial role in developing an agreeable path forward.
We are continuing to engage with right holders, AI companies, policy-makers, and regulators to shape global industry standards and regulatory frameworks accordingly. We believe that the influx of generative AI use need not threaten the Internet’s place as an open source of quality content. Protecting its integrity requires agreement on workable technical standards that reflect the interests of web publishers, content creators, and AI companies alike.
The whole ecosystem must continue to come together and collaborate towards a better Internet that truly works for everyone. Cloudflare advocates for neutral forums where all affected parties can discuss the impact of AI developments on the Internet. One such example is the IETF, which has current work focused on some of the technical aspects being considered. Those efforts attempt to address some, but not all, of the issues in an area that deserves holistic consideration. We believe the principles we have proposed are a step in the right direction — but we hope others will join this complex and important conversation, so that norms and behavior on the Internet can successfully adapt to this exciting new technological age.
The recent Salesloft breach taught us one thing: connections between SaaS applications are hard to monitor and create blind spots for security teams with disastrous side effects. This will likely not be the last breach of this type.
To fix this, Cloudflare is working towards a set of solutions that consolidates all SaaS connections via a single proxy, for easier monitoring, detection and response. A SaaS to SaaS proxy for everyone.
As we build this, we need feedback from the community, both data owners and SaaS platform providers. If you are interested in gaining early access, please sign up here.
SaaS platform providers, who often offer marketplaces for additional applications, store data on behalf of their customers and ultimately become the trusted guardians. As integrations with marketplace applications take place, that guardianship is put to the test. A key breach in any one of these integrations can lead to widespread data exfiltration and tampering. As more apps are added the attack surface grows larger. Security teams who work for the data owner have no ability, today, to detect and react to any potential breach.
In this post we explain the underlying technology required to make this work and help keep your data on the Internet safe.
SaaS to SaaS integrations
No one disputes the value provided by SaaS applications and their integrations. Major SaaS companies implement flourishing integration ecosystems, often presented as marketplaces. For many, it has become part of their value pitch. Salesforce provides an AppExchange. Zendesk provides a marketplace. ServiceNow provides an Integration Hub. And so forth.
These provide significant value to any organisation and complex workflows. Data analysis or other tasks that are not supported natively by the SaaS vendor are easily carried out via a few clicks.
On the other hand, SaaS applications present security teams with a growing list of unknowns. Who can access this data? What security processes are put in place? And more importantly: how do we detect data leak, compromise, or other malicious intent?
Following the Salesloft breach, which compromised the data of hundreds of companies, including Cloudflare, the answers to these questions are top of mind.
The power of the proxy: seamless observability
There are two approaches Cloudflare is actively prototyping to address the growing security challenges SaaS applications pose, namely visibility into SaaS to SaaS connections, including anomaly detection and key management in the event of a breach. Let’s go over each of these, both relying on proxying SaaS to SaaS traffic.
1) Giving control back to the data owner
Cloudflare runs one of the world’s largest reverse proxy networks. As we terminate L7 traffic, we are able to perform security-related functions including blocking malicious requests, detecting anomalies, detecting automated traffic and so forth. This is one of the main use cases customers approach us for.
Cloudflare can proxy any hostname under the customer’s control.
It is this specific ability, often referred to as “vanity”, “branded” or “custom” hostnames, that allows us to act as a front door to the SaaS vendor on behalf of a customer. Provided a marketplace app integrates via a custom domain, the data owner can choose to use Cloudflare’s new SaaS integration protection capabilities.
For a customer (Acme Corp in this example) to access, say SaaS Application, the URL needs to become saas.acme.com as that is under Acme’s control (and not acme.saas.com).
This setup allows Cloudflare to be placed in front of SaaS Corp as the customer controls the DNS hostname. By proxying traffic, Cloudflare can be the only integration entity with programmatic access to SaaS Corp’s APIs and data and transparently “swap” authorisation tokens with valid ones and issue separate tokens, using key splitting, to any integrations.
Note that in many cases, authorization and authentication flows fall outside any vanity/branded hostname. It is in fact very common for an OAuth flow to still hit the SaaS provider url oauth.saas.com. It is therefore required, in this setup, for marketplace applications to provide the ability to support vanity/branded URLs for their OAuth and similar flows, oauth.saas.acme.com in the diagram above.
Ultimately Cloudflare provides a full L7 reverse proxy for all traffic inbound/outbound to the given SaaS provider solving for the core requirements that would lessen the impact of a similar breach to the Salesloft example. Had Salesloft integrated via a Cloudflare-proxied domain, then data owners would be able to:
Gain visibility into who or what can access data, and where it’s accessed from, in the SaaS platform. Cloudflare already provides analytics and filtering tools to identify traffic sources, including hosting locations, IPs, user agents and other tools.
Instantly shut off access to the SaaS provider without the need to rotate credentials on the SaaS platform, as Cloudflare would be able to block access from the proxy.
Detects anomalies in data access by observing baselines and traffic patterns. For example a change in data exfiltration traffic flows would trigger an alert.
2) Improve SaaS platform security
The approach listed above assumes the end user is the company whose data is at risk. However, SaaS platforms themselves are now paying a lot of attention to marketplace applications and access patterns. From a deployment perspective, it’s actually easier to provide additional visibility to a SaaS provider as it is a standard reverse proxy deployment and we have tools designed for SaaS applications, such as Cloudflare for SaaS.
This deployment model allows Cloudflare to proxy all traffic to the SaaS vendor, including to all API endpoints therefore gaining visibility into any SaaS to SaaS connections. As part of this, we are building improvements to our API Shield solution to provide SaaS security teams with additional controls:
Token / session logging: Ability to keep track of OAuth tokens and provide session logs for audit purposes.
Session anomaly detection: Ability to warn when a given OAuth (or other session) shows anomalous behavior.
Token / session replacement: Ability to substitute SaaS-generated tokens with Cloudflare-generated tokens to allow for fast rotation and access lock down.
The SaaS vendor may of course expose some of the affordances to their end customer as part of their dashboard.
How key splitting enables secure token management
Both deployment approaches described above rely on our ability to control access without storing complete credentials. While we already store SSL/TLS private keys for millions of web applications, storing complete SaaS bearer tokens would create an additional security burden. To solve this, and enable the token swapping and instant revocation capabilities mentioned above, we use key splitting.
Key splitting cryptographically divides bearer tokens into two mathematically interdependent fragments called Part A and Part B. Part A goes to the fourth-party integration (like Drift or Zapier) while Part B stays in Cloudflare’s edge storage. Part A is just random noise that won’t authenticate to Salesforce or any SaaS platform expecting complete tokens, so neither fragment is usable alone.
This creates an un-bypassable control point. Integrations cannot make API calls without going through Cloudflare’s proxy because they only possess Part A. When an integration needs to access data, it must present Part A to our edge where we retrieve Part B, reconstruct the token in memory for microseconds, forward the authenticated request, and then immediately clear the token. This makes sure that the complete bearer token never exists in any database or log.
This forced cooperation means every API call flows through Cloudflare where we can monitor for anomalies, delete Part B to instantly revoke access (transforming incident response from hours to seconds), and maintain complete audit trails. Even more importantly, this approach minimizes our burden of storing sensitive credentials since a breach of our systems wouldn’t yield usable tokens.
If attackers compromise the integration and steal Part A, or somehow breach Cloudflare’s storage and obtain Part B, neither fragment can authenticate on its own. This fundamentally changes the security model from protecting complete tokens to managing split fragments that are individually worthless. It also gives security teams unprecedented visibility and control over how their data is accessed across third-party integrations.
Regaining control of your data
We are excited to develop solutions mentioned above to give better control and visibility around data stored in SaaS environments, or more generally, outside a customer’s network.
If you are a company worried about this risk, and would like to be notified to take part in our early access, please sign up here.
If you are a SaaS vendor who would like to provide feedback and take part in developing better API security tooling for third party integrations towards your platform, sign up here.
We are looking forward to helping you get better control of your data in SaaS to SaaS environments.
The collective thoughts of the interwebz
Manage Consent
To provide the best experiences, we use technologies like cookies to store and/or access device information. Consenting to these technologies will allow us to process data such as browsing behavior or unique IDs on this site. Not consenting or withdrawing consent, may adversely affect certain features and functions.
Functional
Always active
The technical storage or access is strictly necessary for the legitimate purpose of enabling the use of a specific service explicitly requested by the subscriber or user, or for the sole purpose of carrying out the transmission of a communication over an electronic communications network.
Preferences
The technical storage or access is necessary for the legitimate purpose of storing preferences that are not requested by the subscriber or user.
Statistics
The technical storage or access that is used exclusively for statistical purposes.The technical storage or access that is used exclusively for anonymous statistical purposes. Without a subpoena, voluntary compliance on the part of your Internet Service Provider, or additional records from a third party, information stored or retrieved for this purpose alone cannot usually be used to identify you.
Marketing
The technical storage or access is required to create user profiles to send advertising, or to track the user on a website or across several websites for similar marketing purposes.