Post Syndicated from digiblurDIY original https://www.youtube.com/watch?v=UIfCi06-xao
Metasploit Weekly Wrap-Up
Post Syndicated from Brendan Watters original https://blog.rapid7.com/2023/06/09/metasploit-weekly-wrap-up-14/
MOVEit
It has been a busy few weeks in the security space; the MOVEit vulnerability filling our news feeds with dancing lemurs and a Barracuda vulnerability that has us all wondering how many shredders out there can handle a 1U appliance. Despite those very worthwhile distractions, Metasploit has made another strong release, with 3 new exploits, 1 new auxiliary module, and 2 new payloads!
New module content (6)
GitLab Authenticated File Read
Authors: Vitellozzo, h00die, and pwnie
Type: Auxiliary
Pull request: #18039 contributed by h00die
AttackerKB reference: CVE-2023-2825
Description: This adds an exploit that leverages an authenticated arbitrary file read on Github 16.0.0. This vulnerability is identified as CVE-2023-2825.
PaperCut PaperCutNG Authentication Bypass
Author: catatonicprime
Type: Exploit
Pull request: #17936 contributed by catatonicprime
AttackerKB reference: CVE-2023-27350
Description: This adds an exploit module that leverages an authentication bypass to get remote code execution on PaperCut NG version 8.0.0 to 19.2.7 (inclusive), version 20.0.0 to 20.1.6 (inclusive), version 21.0.0 to 21.2.10 (inclusive) and version 22.0.0 to 22.0.8 (inclusive). This vulnerability is identified as CVE-2023-27350. Due to an improper access control in the SetupCompleted class, it is possible to bypass authentication and abuse the built-in scripting functionality for printers to obtain code execution as the SYSTEM user on Windows and the less privileged papercut user on Linux.
ManageEngine ADManager Plus ChangePasswordAction Authenticated Command Injection
Authors: Dinh Hoang, Grant Willcox, and Simon Humbert
Type: Exploit
Pull request: #18018 contributed by gwillcox-r7
AttackerKB reference: CVE-2023-29084
Description: This adds an exploit module for CVE-2023-29084 which is an authenticated RCE in Zoho ManageEngine ADManager Plus. A remote attacker can leverage this vulnerability to execute OS commands by crafting a request to update the server’s configuration. The modified configuration’s value is restored by the exploit once it is completed. This exploit is incompatible with HTTP payloads due to the exploit modifying the HTTP proxy configuration of the server during exploitation.
Delta Electronics InfraSuite Device Master Deserialization
Authors: Anonymous and Shelby Pace
Type: Exploit
Pull request: #18072 contributed by space-r7
AttackerKB reference: CVE-2023-1133
Description: A module has been added for CVE-2023-1133, an unauthenticated .NET deserialization vulnerability in Delta Electronics InfraSuite Device Master versions below v1.0.5 in the ParseUDPPacket() method of the ‘Device-Gateway-Status’ process. Successful exploitation leads to unauthenticated code execution as the user running the ‘Device-Gateway-Status’ process.
New MIPS64 Fetch Payload
Author: zeroSteiner
Type: Payload
Pull request: #18044 contributed by zeroSteiner
Description: Add MIPS64 Linux Fetch Payloads
New *nix Adduser Payload
Author: rad10
Type: Payload
Pull request: #18002 contributed by rad10
Description: This adds a command payload module that creates a new privileged user on a *nix target system.
Enhancements and features (4)
- #17868 from Ryuuuuu – The
ms15_034_http_sys_memory_dump.rbmodule has been updated to improve its handling of thecheck_hostfunction so that the information about target exploitability is more accurate. - #18062 from smashery – A new mixin has been added to support detecting the architecture of the host OS on Windows systems. Support for other OSes will be added at a later date.
- #18064 from ErikWynter – The
grafana_plugin_traversalmodule has been updated to support beta and pre-release versions of Grafana. - #18066 from jmartin-r7 – The archer_c7_traversal module has been converted to a gather module and updated to include a
checkmethod so that users can appropriately check if a target is an Archer router or not.
Bugs fixed (5)
- #17917 from bcoles – Two bugs have been fixed in
post/multi/manage/shell_to_meterpreter: one was caused by a lack of validation on the payload being used when using thePAYLOAD_OVERRIDEoption to ensure the payload was valid, and one was caused by the module creating a handler but failing to pass the RHOST information along, causing the handler to run with an invalid configuration. - #18040 from manishkumarr1017 – This fixes a Python’s payload issue with Windows where it was failing due to
bytes args is not allowed on Windows. - #18055 from adfoster-r7 – This updates the
post/multi/gather/aws_keysmodule to mark the platforms it is compatible with. - #18056 from zgoldman-r7 – A bug has been fixed whereby command stager progress could go over 100%. This has now been fixed so that command stager progress should never go over 100%.
- #18074 from cdelafuente-r7 – A typo has been fixed in the
exploits/multi/http/gitlab_github_import_rce_cve_2022_2992module that prevent proper exception handling from occurring, and additional YARD documentation has been added for some related functions that were missing appropriate documentation on the exceptions they might throw.
Documentation
You can find the latest Metasploit documentation on our docsite at docs.metasploit.com.
Get it
As always, you can update to the latest Metasploit Framework with msfupdate
and you can get more details on the changes since the last blog post from
GitHub:
If you are a git user, you can clone the Metasploit Framework repo (master branch) for the latest.
To install fresh without using git, you can use the open-source-only Nightly Installers or the
binary installers (which also include the commercial edition).
Let’s stream and have fun!
Post Syndicated from BeardedTinker original https://www.youtube.com/watch?v=vLuvPqu8RNk
Friday Squid Blogging: Light-Emitting Squid
Post Syndicated from Bruce Schneier original https://www.schneier.com/blog/archives/2023/06/friday-squid-blogging-light-emitting-squid.html
It’s a Taningia danae:
Their arms are lined with two rows of sharp retractable hooks. And, like most deep-sea squid, they are adorned with light organs called photophores. They have some on the underside of their mantle. There are more facing upward, near one of their eyes. But it’s the photophores at the tip of two stubby arms that are truly unique. The size and shape of lemons—each nestled within a retractable lid like an eyeball in a socket—they are by far the largest photophores known to science.
As usual, you can also use this squid post to talk about the security stories in the news that I haven’t covered.
Read my blog posting guidelines here.
My thoughts on GM and Ford’s move to abandon the CCS connector in favor of "NACS"
Post Syndicated from Technology Connextras original https://www.youtube.com/watch?v=wjny4u5THpU
Should I use managed login or create a custom UI in Amazon Cognito?
Post Syndicated from Joshua Du Lac original https://aws.amazon.com/blogs/security/use-the-hosted-ui-or-create-a-custom-ui-in-amazon-cognito/
October 8, 2025: This blog post has been updated to include the Amazon Cognito managed login experience. The managed login experience has an updated look, additional features, and enhanced customization options.
September 8, 2023: It’s important to know that if you activate user sign-up in your user pool, anyone on the internet can sign up for an account and sign in to your apps. Don’t enable self-registration in your user pool unless you want to open your app to allow users to sign up.
June 9, 2023: Original publication date.
Amazon Cognito is an authentication, authorization, and user management service for your web and mobile applications. Your users can sign in directly through many different authentication methods, such as user accounts within Amazon Cognito or through social providers such as Facebook, Amazon, Apple, or Google. You can also configure federation through a third-party OpenID Connect (OIDC) or SAML 2.0 identity provider (IdP).
Amazon Cognito user pools are user directories that provide sign-up and sign-in functions for your application users, including federated authentication capabilities. A Cognito user pool has two primary UI options:
- Managed login: AWS hosts, preconfigures, maintains, and scales the UI—including managed login branding and classic Hosted UI branding—with a set of options that you can customize or configure for sign-up and sign-in for app users.
- Custom UI: You can configure an Amazon Cognito user pool with a completely custom UI by using the SDK. You’re accountable for hosting, configuring, maintaining, and scaling your custom UI as a part of your responsibility in the AWS Shared Responsibility Model.
In this blog post, we review the benefits of using the managed login or creating a custom UI with the SDK and things to consider in determining which to choose for your application.
Managed login
Managed login provides web interfaces for sign-up, sign-in, multi-factor authentication (MFA), password management, and passwordless and passkey sign-in capabilities in your user pool. The managed login provides an authorization server based on the OAuth 2.0 specification, and has a default implementation of user flows for sign-up and sign-in. Your application can redirect to the managed login, which will handle the user flows through the authorization code grant flow. The managed login also supports sign-in through social providers and federation from OIDC-compliant and SAML 2.0 providers. Amazon Cognito offers two visual modes and branding and customization experiences: managed login branding with branding editor and hosted UI (classic) branding.
Managed login branding with branding editor
Managed login branding provides an improved user experience with the most up-to-date authentication options for the user pool UI experience. Figure 1 shows managed login using the default branding settings.
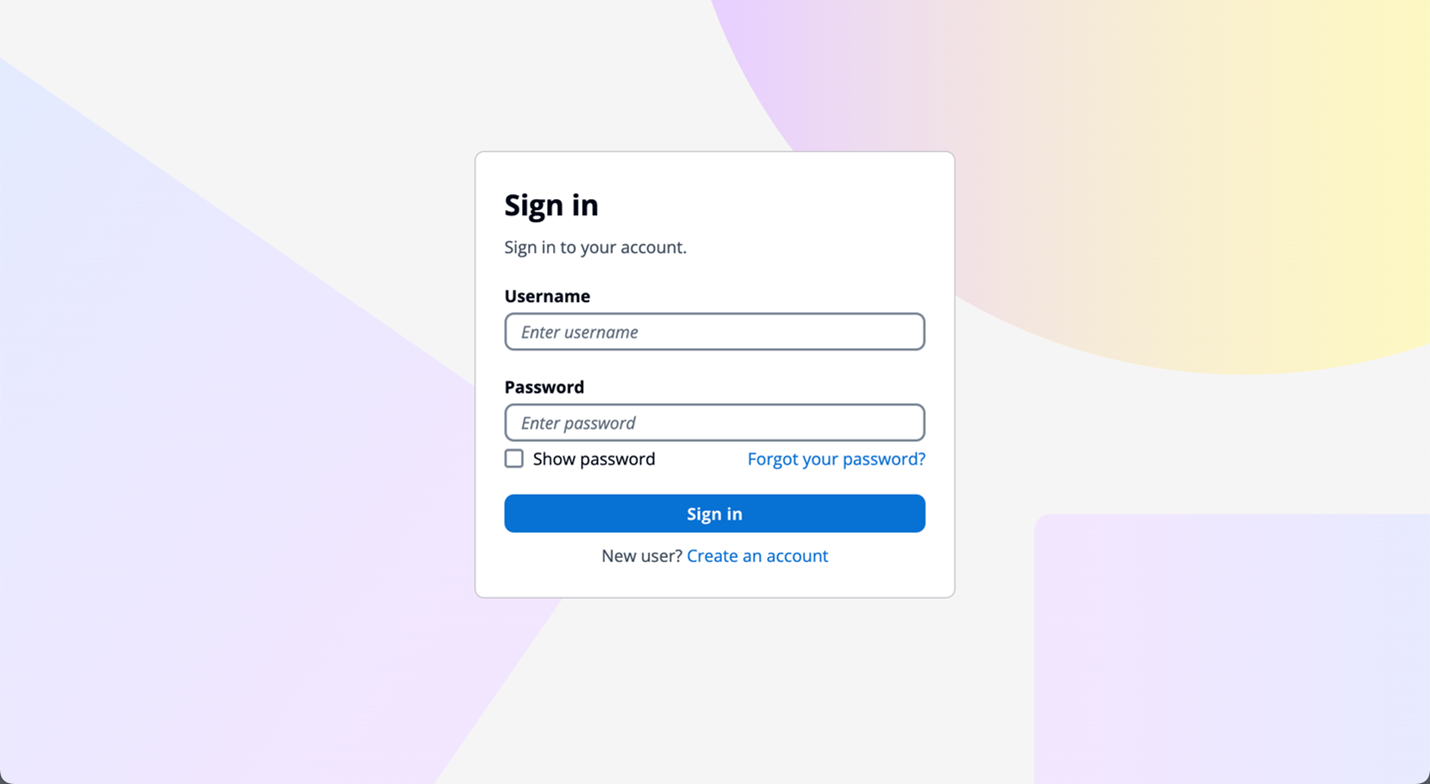
Figure 1: Managed login default branding settings
The branding editor is a no-code visual editor that you can use to customize the look and feel of the entire user journey. You can customize each user pool application client individually, and preview screens in real-time with different screen sizes, as shown in Figure 2.
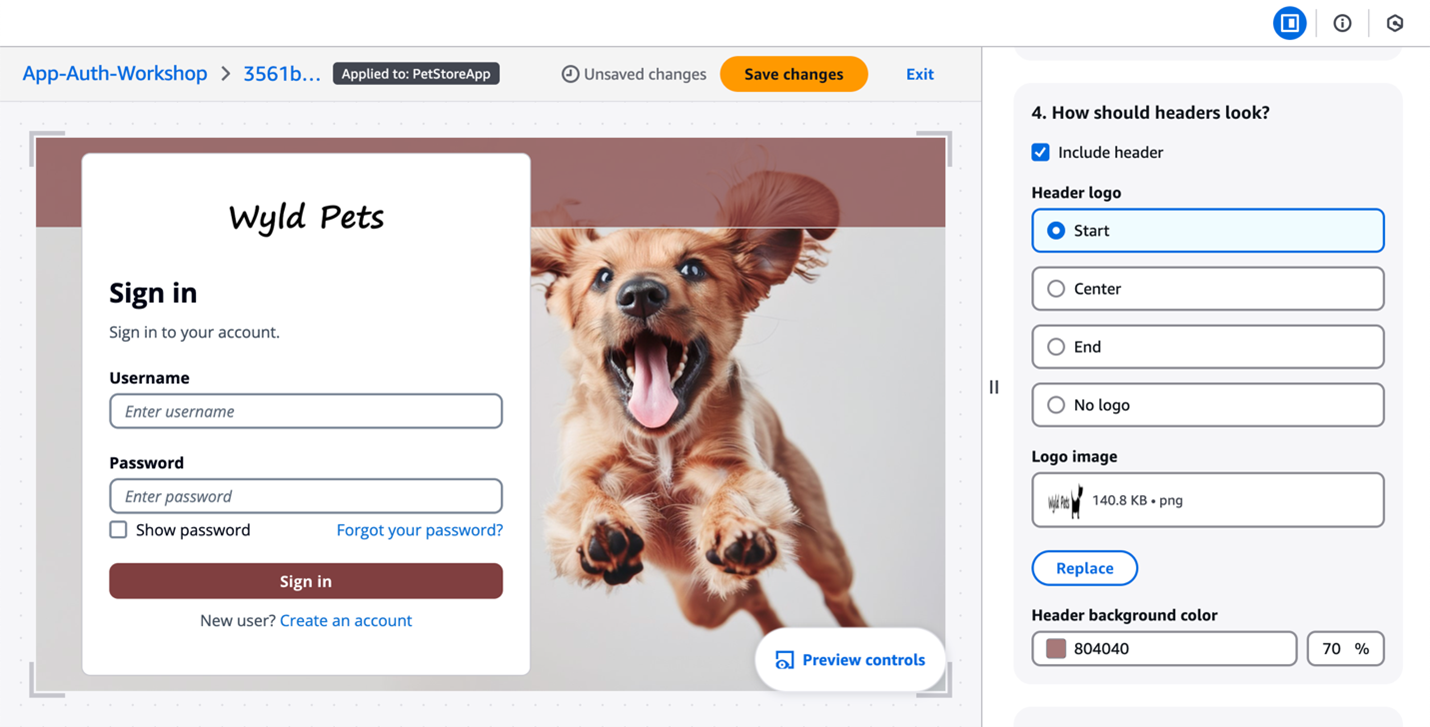
Figure 2: Customization in the Amazon Cognito branding editor (Image credits)
As shown in Figure 3, You can customize various components using the branding editor, including background, header and footer, buttons, focus state, icons, and more.
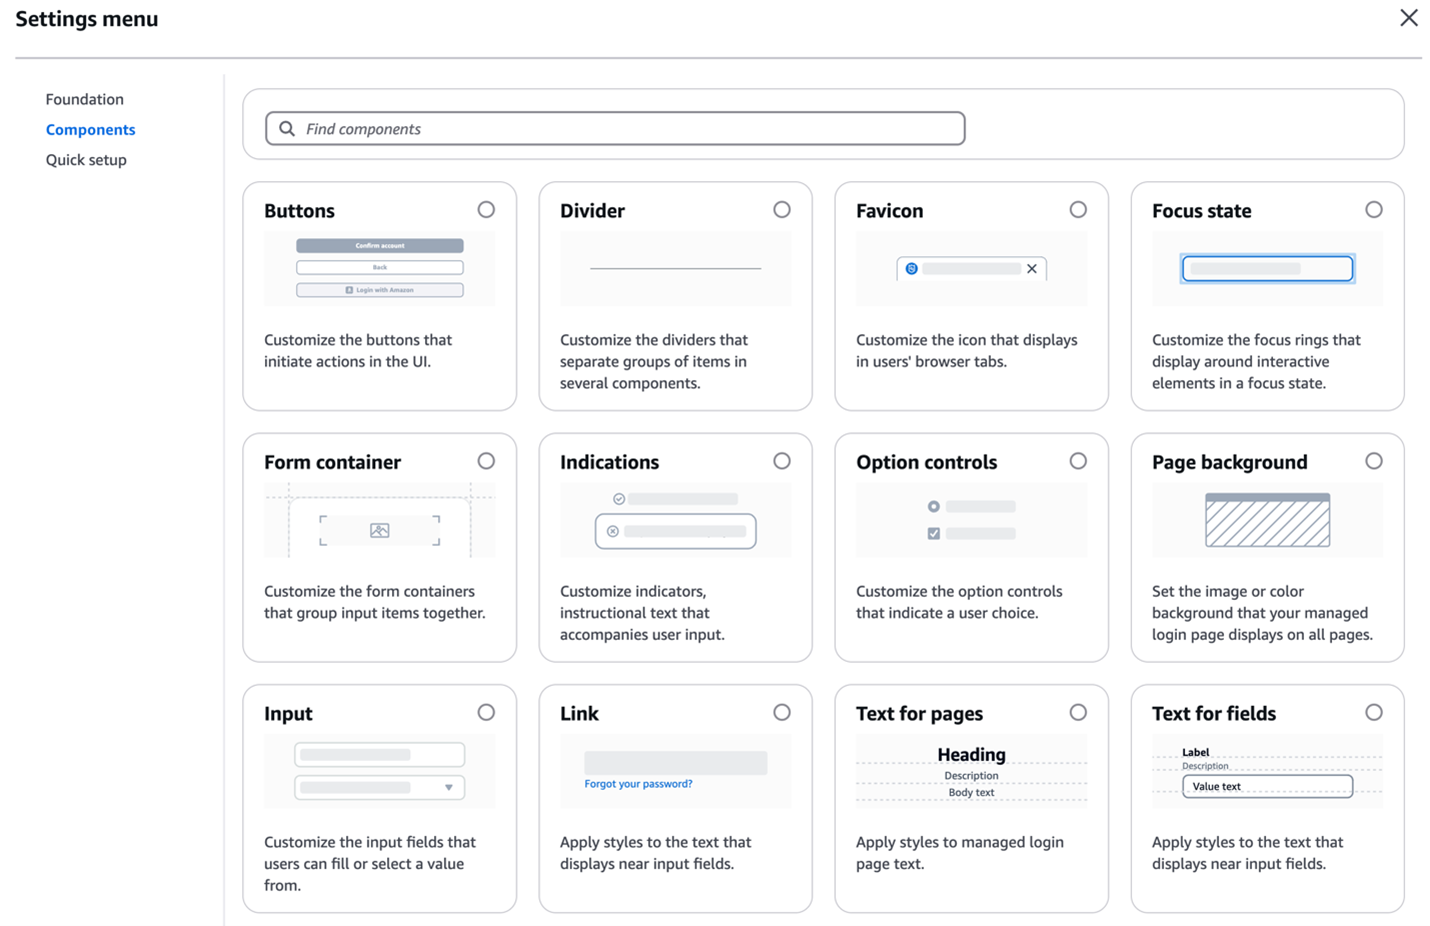
Figure 3: Various components customization options
Additionally, managed login branding adds support for passwordless sign-in with passkeys, email one-time-passwords (OTP) and SMS OTPs, as shown in Figure 4. After you enable passwordless login in your user pool, managed login branding adapts to curated user flows with users’ preferred authentication methods.
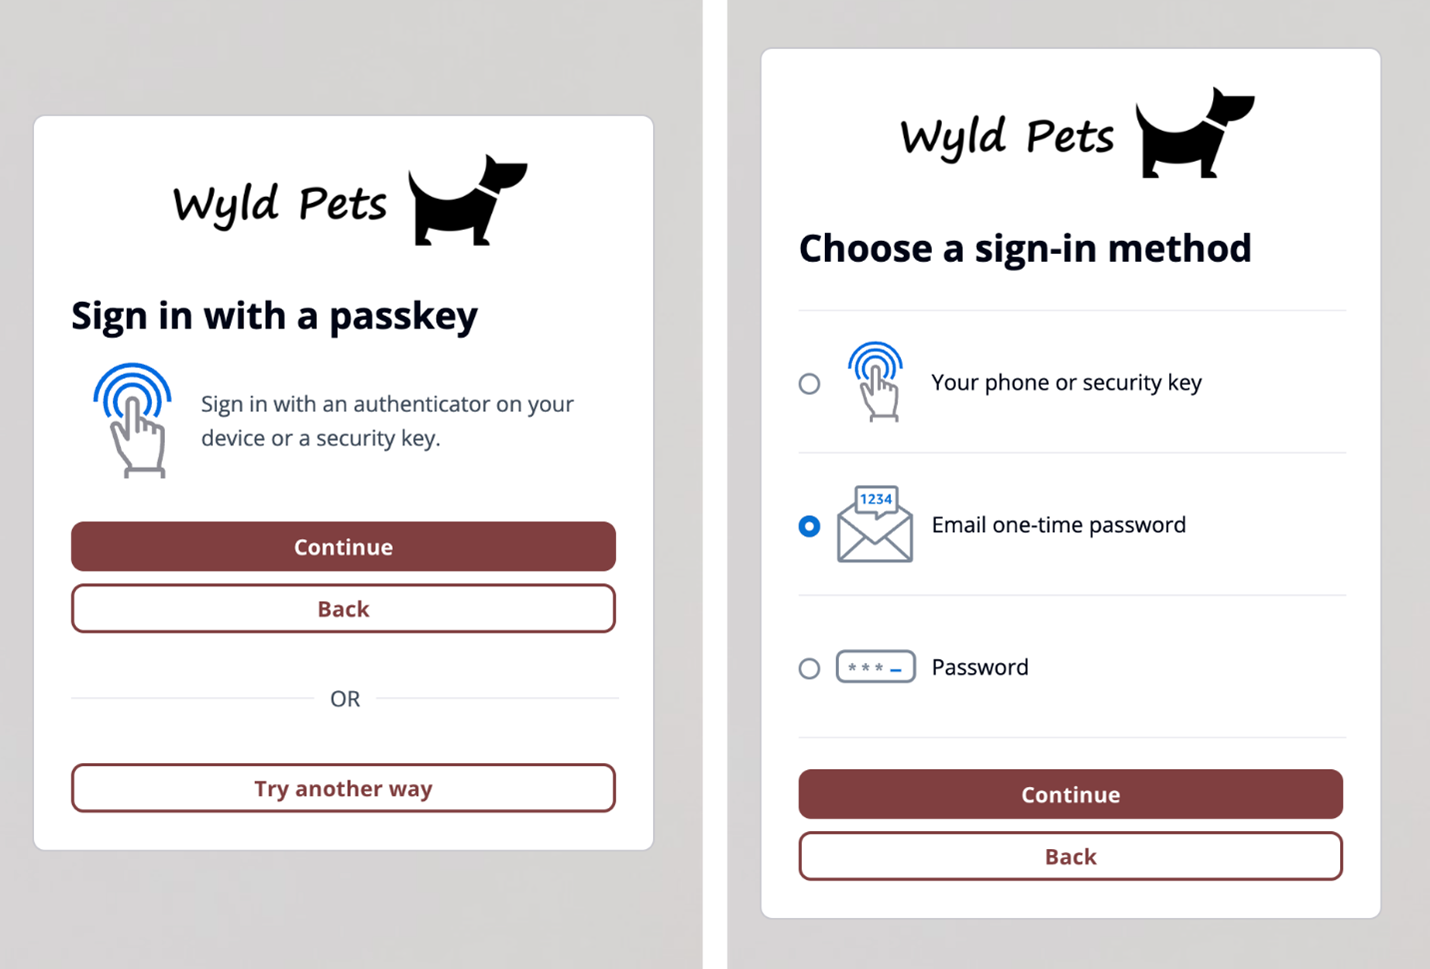
Figure 4: Sign in with passkey flow (left) and user-selected sign-in method flow (right)
Managed login branding also offers localization options in several languages (two are shown in Figure 5). You can add a lang query parameter in the link you distribute to users, and Amazon Cognito will set a cookie in users’ browsers with their language preference after the initial request.
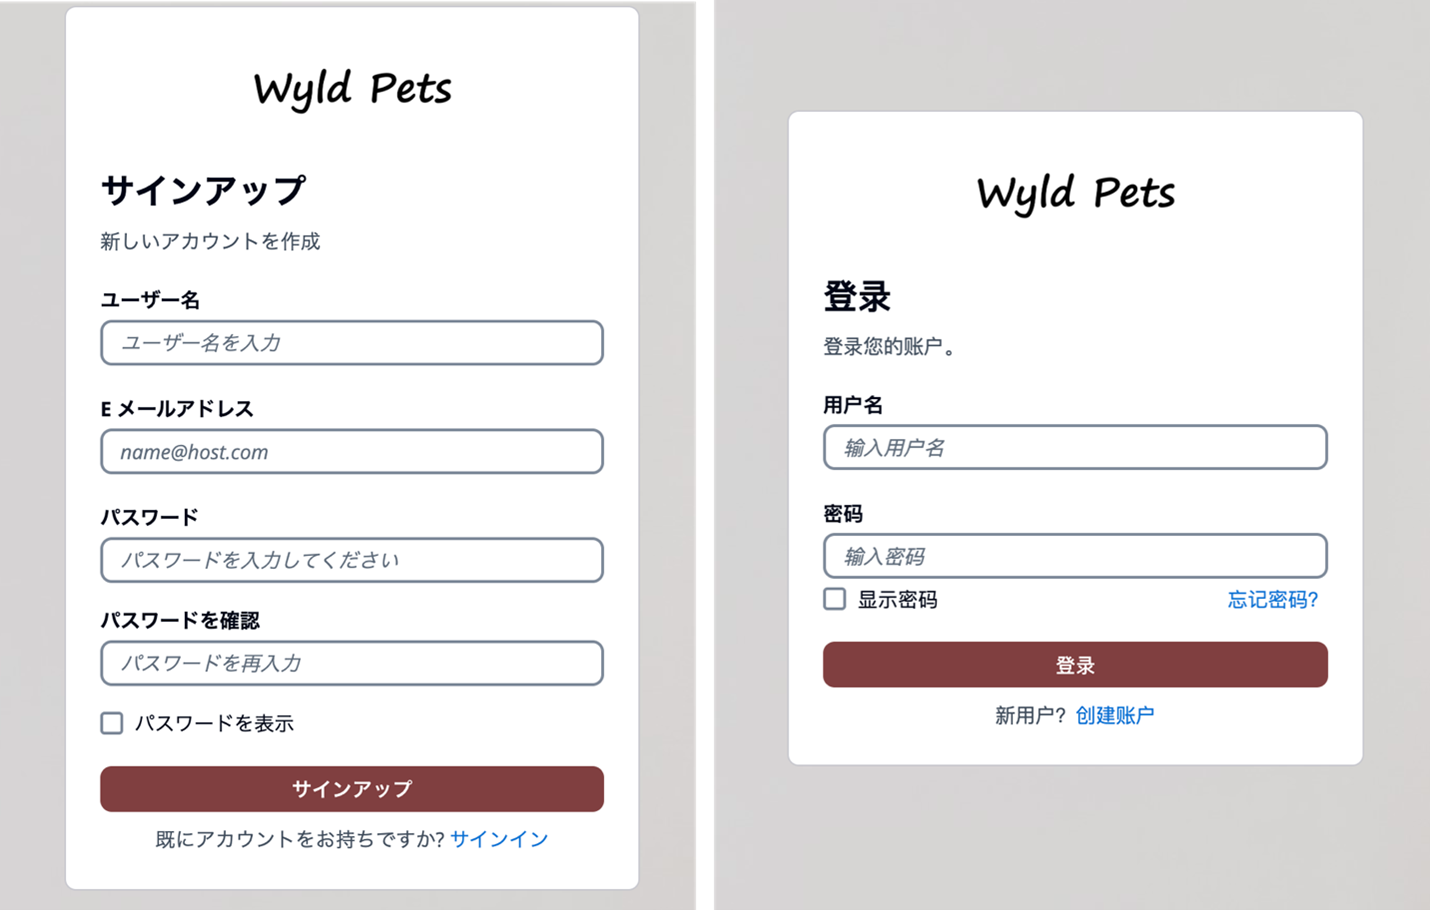
Figure 5: Cognito user sign up page in Japanese (left) and user sign in page in Simplified Chinese (right)
Hosted UI (classic) branding
For customers who prefer a traditional approach, Amazon Cognito continues to support the Hosted UI (classic) branding (shown in Figure 6) with basic customization where you can upload a CSS file to design the UI styling and upload a brand-specific logo. Hosted UI (classic) supports standard authentication flows with MFA and self-service sign up.

Figure 6: Hosted UI (classic) branding
The managed login branding with branding editor is available to Amazon Cognito user pools with Essentials and Plus feature tiers, and Hosted UI (classic) branding is available to most Cognito user pools including Lite tier. To learn more about Cognito feature tiers, visit Amazon Cognito pricing.
Security and compliance capabilities
Both managed login branding and Hosted UI (classic) branding are designed to help you meet your compliance and security requirements and your users’ needs. Managed login supports custom OAuth scopes and OAuth 2.0 flows. If you want single sign-on (SSO), you can use managed login to support a single login across many application clients, with browser session cookies for the same domain. Actions are logged in AWS CloudTrail, and you can use the logs for audit and reactionary automation. The managed login experience also supports the full suite of threat protection features for Amazon Cognito. For additional protection, managed login has support for AWS WAF web ACLs and for AWS WAF CAPTCHA, which can help protect your Cognito user pools from web-based exploits and unwanted bots.
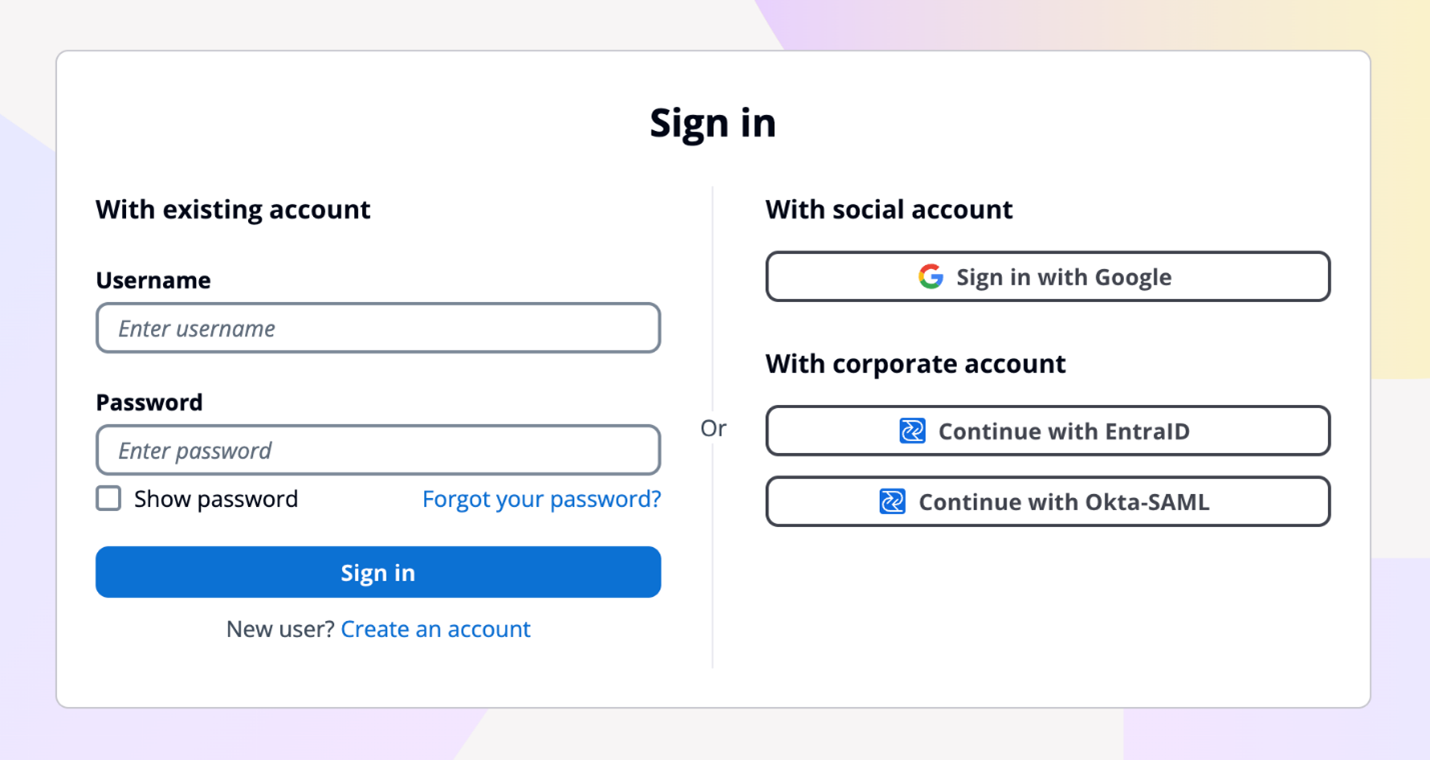
Figure 7: Example default managed login with several login providers enabled
For federation, managed login supports federation with third-party IdPs that support OIDC and SAML 2.0, as well as social IdPs, as shown in Figure 7. Identity providers are connected to your Amazon Cognito user pool. In managed login, users use a button to select the federation source, and redirection is automatic. With SAML and OIDC IdPs, you can also configure mapping by using the domain in the user’s email address. In this case, a single text field is visible to your application users to enter an email address, as shown in Figure 8, and the lookup and redirect to the appropriate SAML IdP is automatic, as described in Choosing SAML identity provider names.
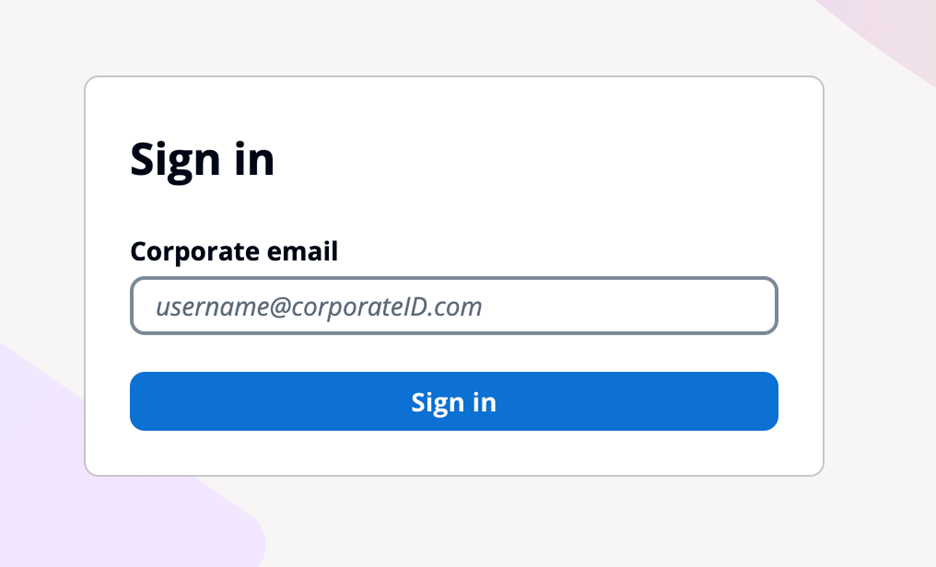
Figure 8: Managed login that links to corporate IdP through an email domain
Managed login integrates with Application Load Balancer (ALB) for web applications and works with AWS Amplify to enable social identity provider and enterprise federation (SAML and OIDC) capabilities. Beyond these integrations, Amazon Cognito user pools integrate with various AWS services (such as AWS AppSync), that require user authentication and authorization, and Amazon API Gateway through Cognito authorizers to secure your REST and HTTP endpoints.
You might choose to use managed login for many reasons. AWS fully manages the hosting, maintenance, and scaling of the managed login, which can contribute to the speed of go-to-market for customers. If your app requires OAuth 2.0 custom scopes, federation, social login, or native users with basic but customized branding and potentially numerous Amazon Cognito user pools, you might benefit from using managed login.
For more information about how to configure and use the hosted UI, see Using the Amazon Cognito hosted UI for sign-up and sign-in.
Create a custom UI
Creating a custom UI using the SDK for Amazon Cognito provides a host of benefits and features that can help you completely customize the UI for your application users. With a custom UI, you have complete control over the look and feel of the UI that your application users will land on, including designing your app to support multiple languages, and you can build and design custom authentication flows.
There are numerous features that are supported when you build a custom UI. As with the managed login, the APIs invoked from a custom UI using the SDK will create log entries in CloudTrail, and you can use the logs for audit and automation. You can also create a custom authentication flow for your users with a fully custom authentication experience beyond the those available in managed login.
In a custom UI, you can build custom session management and integrate with AWS WAF. A custom UI also works with the threat protection features of Amazon Cognito.

Figure 9: Example of a custom user interface
With a custom UI, such as the one shown in Figure 10, you can orchestrate a suite of sign-in options and sign-in flows for your users. For example, you can collect a user or tenant identifier at the beginning of the authentication flow and apply your own logic for user authentication flow, such as redirecting federated users to external IdPs, displaying a password prompt for local users, or directing users to create a new account if they don’t exist. You can also build flows to let a user choose alternative MFA methods if their preferred choices aren’t available.
Figure 10: Custom UI example
When you build a custom UI, there is support for custom endpoints and proxies so that you have a wider range of options for management and consistency across application development as it relates to authentication. Custom authentication flows are only available in applications with a custom UI, which gives you the ability to make customized challenge prompts and answers to help you meet custom security requirements by using AWS Lambda triggers. For example, you could use it to implement OAuth 2.0 device grant flows. Lastly, a custom UI supports a remember device feature where you can add low-effort sign-in from trusted devices.
You might choose to build a custom UI with an SDK when full customization is a requirement or where you want to incorporate customized authentication flows using the custom authentication challenge Lambda triggers. A custom UI is a great choice if you aren’t required to use OAuth 2.0 flows and you have the resources to develop and implement a unique UI for your application users.
For more information about how to configure and use a custom UI, see Using the Amazon Cognito managed login for sign-up and sign-in. You can also visit the documentation on Building custom UIs with Amplify.
Decision criteria matrix
When deciding between Amazon Cognito managed login branding options and a custom UI, there are some unique differences that can help you determine which UI is best for your application needs. Managed login offers a modern, customizable authentication experience with advanced features like no-code visual customization, dark mode themes, and support for passwordless options. It supports OAuth 2.0 flows, custom OAuth scopes, the ability to sign in one time and access many Cognito application clients (using SSO), and full use of the Cognito threat protection features. For applications requiring complete control over the authentication experience and UX—including custom authentication flows, device fingerprinting, and reduced token expiration—a custom UI is the better choice. This option allows for full UI customization, implementation of custom authentication flows, and integration with specific frameworks or libraries not supported by managed login.
When making your decision, consider factors such as the level of customization required, specific authentication features needed, development resources available, integration requirements with other AWS services, security and compliance needs, and user experience priorities. Remember that your application authentication requirements and customer experience should take precedence over other considerations. You can use the following table to help select the best UI for your requirements.
|
Requirements |
Managed login |
Hosted UI (classic) |
Custom UI (SDK) |
|
OAuth 2.0 flows |
Supported |
Supported |
Not available |
|
Custom OAuth scopes |
Supported |
Supported |
Supported |
|
Customization of UI |
No-code branding designer |
Limited CSS customization |
Full custom control |
|
Custom user input forms |
Not available |
Not available |
Supported |
|
Custom authentication flow |
Not available |
Not available |
Supported |
|
Passwordless authentication flow |
Supported |
Not available |
Custom implementation available |
|
Localization with multiple languages |
Supported |
Not available |
Supported |
|
Login once across many app clients |
Supported |
Supported |
Not available |
|
Session expiration configurable under 1 hour |
Not available |
Not available |
Supported |
|
Trusted-device authentication |
Not available |
Not available |
Supported |
|
AWS WAF integration |
Supported |
Supported |
Supported |
|
Support for AWS WAF CAPTCHA |
Supported |
Supported |
Not available |
|
Ability to use a custom endpoint or proxy |
Not available |
Not available |
Supported |
|
AWS Application Load Balancer integration |
Supported |
Supported |
Not available |
Figure 11: Decision criteria matrix
Conclusion
In this post, you learned about using managed login, including its two branding options and creating a custom UI in Amazon Cognito and the many supported features and benefits of each. Each UI option targets a specific need. Choose from available options based on your list of requirements for authentication and the user sign-up and sign-in experience. You can use the information in this post as a reference as you add Amazon Cognito to your mobile and web applications for authentication.
Have a question? Contact us for general support services.
Cost monitoring for Amazon EMR on Amazon EKS
Post Syndicated from Lotfi Mouhib original https://aws.amazon.com/blogs/big-data/cost-monitoring-for-amazon-emr-on-amazon-eks/
Amazon EMR is the industry-leading cloud big data solution, providing a collection of open-source frameworks such as Spark, Hive, Hudi, and Presto, fully managed and with per-second billing. Amazon EMR on Amazon EKS is a deployment option allowing you to deploy Amazon EMR on the same Amazon Elastic Kubernetes Service (Amazon EKS) clusters that is multi-tenant and used by other applications, improving resource utilization, reducing cost, and simplifying infrastructure management. EMR on EKS provide you up to 5.37 times better performance than OSS Spark v3.3.1 with 76.8% cost savings. It also provides a wide variety of job submission methods, like an AWS API called StartJobRun, or through a declarative way with a Kubernetes controller through the AWS Controllers for Kubernetes for Amazon EMR on EKS.
This consolidation comes with a trade-off of increased difficulty measuring fine-grained costs for showback or chargeback by team or application. According to a CNCF and FinOps Foundation survey, 68% of Kubernetes users either rely on monthly estimates or don’t monitor Kubernetes costs at all. And for respondents reporting active Kubernetes cost monitoring, AWS Cost Explorer and Kubecost were ranked as the most popular tools being used.
Currently, you can distribute costs per tenant using a hard multi-tenancy with separate EKS clusters in dedicated AWS accounts or a soft multi-tenancy using separate node groups in a shared EKS cluster. To reduce costs and improve resource utilization, you can use namespace-based segregation, where nodes are shared across different namespaces. However, calculating and attributing costs to teams by workload or namespaces while taking into account compute optimization (like Saving Plans or Spot Instance cost) and the cost of AWS services like EMR on EKS is a challenging and non-trivial task.
In this post, we present a cost chargeback solution for EMR on EKS that combines the AWS-native capabilities of AWS Cost and Usage Reports (AWS CUR) alongside the in-depth Kubernetes cost visibility and insights using Kubecost on Amazon EKS.
Solution overview
A job in EMR on EKS incur costs mainly on two dimensions: compute resources and a marginal uplift charge for EMR on EKS usage. To track the cost associated with each of the dimensions, we use data from three sources:
- AWS CUR – We use this to get the EMR on EKS cost uplift per job and for Kubecost to reconcile the compute cost with any saving plans or reserved instance used. The supporting infrastructure for CUR is deployed as defined in Setting up Athena using AWS CloudFormation templates.
- Kubecost – We use this to get the compute cost incurred by the executor and driver pods.
The cost allocation process includes the following components:
- The compute cost is provided by Kubecost. However, in order to do an in-depth analysis, we define an hourly Kubernetes CronJob on it that starts a pod to retrieve data from Kubecost and stores it in Amazon Simple Storage Service (Amazon S3).
- CUR files are stored in an S3 bucket.
- We use Amazon Athena to create a view and provide a consolidated view of the total cost to run an EMR on EKS job.
- Finally, you can connect your preferred business intelligence tools using the JDBC or ODBC connections to Athena. In this post, we use Amazon QuickSight native integration for visualization purposes.
The following diagram shows the overall architecture as well as how the different components interact with each other.
We provide a shell script to deploy our the tracking solution. The shell script configures the infrastructure using an AWS CloudFormation template, the AWS Command Line Interface (AWS CLI), and eksctl and kubectl commands. This script runs the following actions:
- Start the CloudFormation deployment.
- Create and configure an AWS Cost and Usage Report.
- Configure and deploy Kubecost backed by Amazon Managed Service for Prometheus.
- Deploy a Kubernetes CronJob.
Prerequisites
You need the following prerequisites:
- The following tools installed: Helm 3.9+, kubectl, and eksctl
- Docker
- An EKS cluster with the Amazon EBS CSI driver deployed
- Your EKS cluster enabled to use AWS Identity and Access Management (IAM) roles for service accounts
This post assumes you already have an EKS cluster and run EMR on EKS jobs. If you don’t have an EKS cluster ready to test the solution, we suggest starting with a standard EMR on EKS blueprint that configures a cluster to submit EMR on EKS jobs.
Set up the solution
To run the shell script, complete the following steps:
- Clone the following GitHub repository.
- Go to the folder
cost-trackingwith the following command:
cd cost-tracking
- Run the script with following command :
sh deploy-emr-eks-cost-tracking.sh REGION KUBECOST-VERSION EKS-CLUSTER-NAME ACCOUNT-ID
After you run the script, you’re ready to use Kubecost and the CUR data to understand the cost associated with your EMR on EKS jobs.
Tracking cost
In this section, we show you how to analyze the compute cost that is retrieved from Kubecost, how to query EMR on EKS uplift data, and how to combine them to have a single consolidated view for the cost.
Compute cost
Kubecost offers various ways to track cost per Kubernetes object. For example, you can track cost by pod, controller, job, label, or deployment. It also allows you to understand the cost of idle resources, like Amazon Elastic Compute Cloud (Amazon EC2) instances that aren’t fully utilized by pods. In this post, we assume that no nodes are provisioned if no EMR on EKS job is running, and we use the Karpenter Cluster Autoscaler to provision nodes when jobs are submitted. Karpenter also does bin packing, which optimizes the EC2 resource utilization and in turn reduces the cost of idle resources.
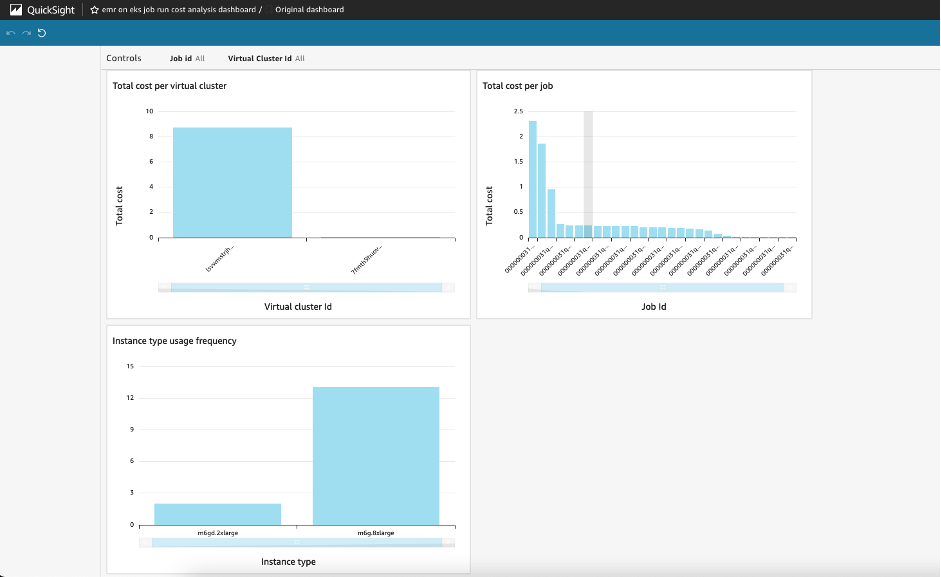
To track compute cost associated with EMR on EKS pods, we query the Kubecost allocation API by passing pod and labels in the aggregate parameter. We use the emr-containers.amazonaws.com/job.id and emr-containers.amazonaws.com/virtual-cluster-id labels that are always present in executor and driver pods. The labels are used to filter Kubecost data to get only the cost associated with EMR on EKS pods. You can review various levels of granularity at the pod, job, and virtual cluster level to understand the cost of a driver vs. executor, or of using Spot Instances in jobs. You can also use the virtual cluster cost to understand the overall cost of a EMR on EMR when it’s used in a namespace that is used by applications other than EMR on EKS.
We also provide the instance_id, instance size, and capacity type (On-Demand or Spot) that was used to run the pod. This is retrieved through querying the Kubecost assets API. This data can be useful to understand how you run your jobs and which capacity you use more often.
The data about the cost of running the pods as well as the assets is retrieved with a Kubernetes CronJob that submits the request to the Kubecost API, joins the two data sources (allocation and assets data) on the instance_id, cleans the data, and stores it in Amazon S3 in CSV format.
The compute cost data has multiple fields that are of interest, including cpucost, ramcost (cost of memory), pvcost (cost of Amazon EBS storage), efficiency of use of CPU and RAM, as well as total cost, which represents the aggregate cost of all the resources used, either at pod, job, or virtual cluster level.
To view this data, complete the following steps:
- On the Athena console, navigate to the query editor.
- Choose
athenacurcfn_c_u_rfor the database andcost_datafor the table. - Run the following query:
The following screenshot shows the query results.
To query the data about information at the pod level, you can run the following SQL statement:

EMR on EKS uplift
The cost associated with EMR on EKS uplift is available through AWS CUT and is stored in an S3 bucket. The script you ran in the setup step created an Athena table associated to the data in the S3 bucket. The following steps take you through how you can query the data:
- On the Athena console, navigate to the query editor.
- Choose
athenacurcfn_c_u_rfor the database andcur_datafor the table. - Run the following query:
This query provides you with the cost per job. The following screenshot shows the results.
You will have to wait up to 24 hours for the CUR data to be available. As such, you should only run the preceding query after the CUR data is available and you have run the EMR on EKS jobs.
Overall cost
To view the overall cost and perform analysis on it, create a view in Athena as follows:
Now that the view is created, you can query and analyze the cost of running your EMR on EKS jobs:
The following screenshot shows an example output of the query on the created view.

Lastly, you can use QuickSight for a graphical high-level view on your EMR on EKS spend. The following screenshot shows an example dashboard.
You can now adapt this solution to your specific needs and build your custom analysis.
Clean up
Throughout this post, you deployed and configured the required infrastructure components to track cost for your EMR on EKS workloads. To avoid incurring additional charges for this solution, delete all the resources you created:
- Empty the S3 buckets
cost-data-REGION-ACCOUNT_IDandaws-athena-query-results-cur-REGION-ACCOUNT_ID. - Delete the Athena workgroup
kubecost-cur-workgroup. - Empty and delete the ECR repository
emreks-compute-cost-exporter. - Run the script destroy-emr-eks-cost-tracking.sh, which will delete the AWS CloudFormation deployment, uninstall Kubecost, delete the CronJob, and delete the Cost and Usage Reports.
Conclusion
In this post, we showed how you can use Kubecost capabilities alongside Cost and Usage Reports to closely monitor the costs for Amazon EMR on EKS per virtual cluster or per job. This solution allows you to achieve more granular costs for chargebacks using Athena, Amazon Managed Service for Prometheus, and QuickSight.
The solution presented steps to set up Cost and Usage Reports and Kubecost, and configure a CronJob on an hourly basis to get the cost of running pods spun by EMR on EKS. You can modify the presented solution to run at longer intervals or to collect data on different EKS clusters. You can also modify the Python script run by the CronJob to further clean data or reduce the amount of data stored by eliminating fields you don’t need. You can use the insights provided to drive cost optimization efforts over time, detect any increase of costs, and measure the impact of new deployments or particular events on resource usage and cost performance. For more information about integrating EMR on EKS in your existing Amazon EKS deployment, refer to Design considerations for Amazon EMR on EKS in a multi-tenant Amazon EKS environment
About the Authors
 Lotfi Mouhib is a Senior Solutions Architect working for the Public Sector team with Amazon Web Services. He helps public sector customers across EMEA realize their ideas, build new services, and innovate for citizens. In his spare time, Lotfi enjoys cycling and running.
 Hamza Mimi Principal Solutions Architect in the French Public sector team at Amazon Web Services (AWS). With a long experience in the telecommunications industry. He is currently working as a customer advisor on topics ranging from digital transformation to architectural guidance.
Choosing an open table format for your transactional data lake on AWS
Post Syndicated from Shana Schipers original https://aws.amazon.com/blogs/big-data/choosing-an-open-table-format-for-your-transactional-data-lake-on-aws/
A modern data architecture enables companies to ingest virtually any type of data through automated pipelines into a data lake, which provides highly durable and cost-effective object storage at petabyte or exabyte scale. This data is then projected into analytics services such as data warehouses, search systems, stream processors, query editors, notebooks, and machine learning (ML) models through direct access, real-time, and batch workflows. Data in customers’ data lakes is used to fulfil a multitude of use cases, from real-time fraud detection for financial services companies, inventory and real-time marketing campaigns for retailers, or flight and hotel room availability for the hospitality industry. Across all use cases, permissions, data governance, and data protection are table stakes, and customers require a high level of control over data security, encryption, and lifecycle management.
This post shows how open-source transactional table formats (or open table formats) can help you solve advanced use cases around performance, cost, governance, and privacy in your data lakes. We also provide insights into the features and capabilities of the most common open table formats available to support various use cases.
You can use this post for guidance when looking to select an open table format for your data lake workloads, facilitating the decision-making process and potentially narrowing down the available options. The content of this post is based on the latest open-source releases of the reviewed formats at the time of writing: Apache Hudi v0.13.0, Apache Iceberg 1.2.0, and Delta Lake 2.3.0.
Contents
Advanced use cases in modern data lakes
Data lakes offer one of the best options for cost, scalability, and flexibility to store data, allowing you to retain large volumes of structured and unstructured data at a low cost, and to use this data for different types of analytics workloads—from business intelligence reporting to big data processing, real-time analytics, and ML—to help guide better decisions.
Despite these capabilities, data lakes are not databases, and object storage does not provide support for ACID processing semantics, which you may require to effectively optimize and manage your data at scale across hundreds or thousands of users using a multitude of different technologies. For example:
- Performing efficient record-level updates and deletes as data changes in your business
- Managing query performance as tables grow to millions of files and hundreds of thousands of partitions
- Ensuring data consistency across multiple concurrent writers and readers
- Preventing data corruption from write operations failing partway through
- Evolving table schemas over time without (partially) rewriting datasets
These challenges have become particularly prevalent in use cases such as CDC (change data capture) from relational database sources, privacy regulations requiring deletion of data, and streaming data ingestion, which can result in many small files. Typical data lake file formats such as CSV, JSON, Parquet, or Orc only allow for writes of entire files, making the aforementioned requirements hard to implement, time consuming, and costly.
To help overcome these challenges, open table formats provide additional database-like functionality that simplifies the optimization and management overhead of data lakes, while still supporting storage on cost-effective systems like Amazon Simple Storage Service (Amazon S3). These features include:
- ACID transactions – Allowing a write to completely succeed or be rolled back in its entirety
- Record-level operations – Allowing for single rows to be inserted, updated, or deleted
- Indexes – Improving performance in addition to data lake techniques like partitioning
- Concurrency control – Allowing for multiple processes to read and write the same data at the same time
- Schema evolution – Allowing for columns of a table to be added or modified over the life of a table
- Time travel – Enabling you to query data as of a point in time in the past
In general, open table formats implement these features by storing multiple versions of a single record across many underlying files, and use a tracking and indexing mechanism that allows an analytics engine to see or modify the correct version of the records they are accessing. When records are updated or deleted, the changed information is stored in new files, and the files for a given record are retrieved during an operation, which is then reconciled by the open table format software. This is a powerful architecture that is used in many transactional systems, but in data lakes, this can have some side effects that have to be addressed to help you align with performance and compliance requirements. For instance, when data is deleted from an open table format, in some cases only a delete marker is stored, with the original data retained until a compaction or vacuum operation is performed, which performs a hard deletion. For updates, previous versions of the old values of a record may be retained until a similar process is run. This can mean that data that should be deleted isn’t, or that you store a significantly larger number of files than you intend to, increasing storage cost and slowing down read performance. Regular compaction and vacuuming must be run, either as part of the way the open table format works, or separately as a maintenance procedure.
The three most common and prevalent open table formats are Apache Hudi, Apache Iceberg, and Delta Lake. AWS supports all three of these open table formats, and in this post, we review the features and capabilities of each, how they can be used to implement the most common transactional data lake use cases, and which features and capabilities are available in AWS’s analytics services. Innovation around these table formats is happening at an extremely rapid pace, and there are likely preview or beta features available in these file formats that aren’t covered here. All due care has been taken to provide the correct information as of time of writing, but we also expect this information to change quickly, and we’ll update this post frequently to contain the most accurate information. Also, this post focuses only on the open-source versions of the covered table formats, and doesn’t speak to extensions or proprietary features available from individual third-party vendors.
How to use this post
We encourage you to use the high-level guidance in this post with the mapping of functional fit and supported integrations for your use cases. Combine both aspects to identify what table format is likely a good fit for a specific use case, and then prioritize your proof of concept efforts accordingly. Most organizations have a variety of workloads that can benefit from an open table format, but today no single table format is a “one size fits all.” You may wish to select a specific open table format on a case-by-case basis to get the best performance and features for your requirements, or you may wish to standardize on a single format and understand the trade-offs that you may encounter as your use cases evolve.
This post doesn’t promote a single table format for any given use case. The functional evaluations are only intended to help speed up your decision-making process by highlighting key features and attention points for each table format with each use case. It is crucial that you perform testing to ensure that a table format meets your specific use case requirements.
This post is not intended to provide detailed technical guidance (e.g. best practices) or benchmarking of each of the specific file formats, which are available in AWS Technical Guides and benchmarks from the open-source community respectively.
Choosing an open table format
When choosing an open table format for your data lake, we believe that there are two critical aspects that should be evaluated:
- Functional fit – Does the table format offer the features required to efficiently implement your use case with the required performance? Although they all offer common features, each table format has a different underlying technical design and may support unique features. Each format can handle a range of use cases, but they also offer specific advantages or trade-offs, and may be more efficient in certain scenarios as a result of its design.
- Supported integrations – Does the table format integrate seamlessly with your data environment? When evaluating a table format, it’s important to consider supported engine integrations on dimensions such as support for reads/writes, data catalog integration, supported access control tools, and so on that you have in your organization. This applies to both integration with AWS services and with third-party tools.
General features and considerations
The following table summarizes general features and considerations for each file format that you may want to take into account, regardless of your use case. In addition to this, it is also important to take into account other aspects such as the complexity of the table format and in-house skills.
| . | Apache Hudi | Apache Iceberg | Delta Lake | |
|---|---|---|---|---|
| Primary API |
|
|
|
|
| Write modes |
|
|
|
|
| Supported data file formats |
|
|
|
|
| File layout management |
|
|
|
|
| Query optimization |
|
|
|
|
| S3 optimizations |
|
|
|
|
| Table maintenance |
|
|
|
|
| Time travel |
|
|
|
|
| Schema evolution |
|
|
|
|
| Operations |
|
|
|
|
| Monitoring |
|
|
|
|
| Data Encryption |
|
|
|
|
| Configuration Options |
Extensive configuration options for customizing read/write behavior (such as index type or merge logic) and automatically performed maintenance and optimizations (such as file sizing, compaction, and cleaning) |
Configuration options for basic read/write behavior (Merge On Read or Copy On Write operation modes) |
Limited configuration options for table properties (for example, indexed columns) |
|
| Other |
|
|
|
|
| AWS Analytics Services Support* | ||||
| Amazon EMR | Read and write | Read and write | Read and write | |
| AWS Glue | Read and write | Read and write | Read and write | |
| Amazon Athena (SQL) | Read | Read and write | Read | |
| Amazon Redshift (Spectrum) | Read | Currently not supported | Read† | |
| AWS Glue Data Catalog‡ | Yes | Yes | Yes | |
* For table format support in third-party tools, consult the official documentation for the respective tool.
† Amazon Redshift only supports Delta Symlink tables (see Creating external tables for data managed in Delta Lake for more information).
‡ Refer to Working with other AWS services in the Lake Formation documentation for an overview of table format support when using Lake Formation with other AWS services.
Functional fit for common use cases
Now let’s dive deep into specific use cases to understand the capabilities of each open table format.
Getting data into your data lake
In this section, we discuss the capabilities of each open table format for streaming ingestion, batch load and change data capture (CDC) use cases.
Streaming ingestion
Streaming ingestion allows you to write changes from a queue, topic, or stream into your data lake. Although your specific requirements may vary based on the type of use case, streaming data ingestion typically requires the following features:
- Low-latency writes – Supporting record-level inserts, updates, and deletes, for example to support late-arriving data
- File size management – Enabling you to create files that are sized for optimal read performance (rather than creating one or more files per streaming batch, which can result in millions of tiny files)
- Support for concurrent readers and writers – Including schema changes and table maintenance
- Automatic table management services – Enabling you to maintain consistent read performance
In this section, we talk about streaming ingestion where records are just inserted into files, and you aren’t trying to update or delete previous records based on changes. A typical example of this is time series data (for example sensor readings), where each event is added as a new record to the dataset. The following table summarizes the features.
| . | Apache Hudi | Apache Iceberg | Delta Lake |
| Functional fit |
|
|
|
| Considerations | Hudi’s default configurations are tailored for upserts, and need to be tuned for append-only streaming workloads. For example, Hudi’s automatic file sizing in the writer minimizes operational effort/complexity required to maintain read performance over time, but can add a performance overhead at write time. If write speed is of critical importance, it can be beneficial to turn off Hudi’s file sizing, write new data files for each batch (or micro-batch), then run clustering later to create better sized files for read performance (using a similar approach as Iceberg or Delta). |
|
|
| Supported AWS integrations |
|
|
|
| Conclusion | Good functional fit for all append-only streaming when configuration tuning for append-only workloads is acceptable. | Good fit for append-only streaming with larger micro-batch windows, and when operational overhead of table management is acceptable. | Good fit for append-only streaming with larger micro-batch windows, and when operational overhead of table management is acceptable. |
When streaming data with updates and deletes into a data lake, a key priority is to have fast upserts and deletes by being able to efficiently identify impacted files to be updated.
| . | Apache Hudi | Apache Iceberg | Delta Lake |
| Functional fit |
|
|
|
| Considerations |
|
|
|
| Supported AWS integrations |
|
|
|
| Conclusion | Good fit for lower-latency streaming with updates and deletes thanks to native support for streaming upserts, indexes for upserts, and automatic file sizing and compaction. | Good fit for streaming with larger micro-batch windows and when the operational overhead of table management is acceptable. | Can be used for streaming data ingestion with updates/deletes if latency is not a concern, because a Copy-On-Write strategy may not deliver the write performance required by low latency streaming use cases. |
Change data capture
Change data capture (CDC) refers to the process of identifying and capturing changes made to data in a database and then delivering those changes in real time to a downstream process or system—in this case, delivering CDC data from databases into Amazon S3.
In addition to the aforementioned general streaming requirements, the following are key requirements for efficient CDC processing:
- Efficient record-level updates and deletes – With the ability to efficiently identify files to be modified (which is important to support late-arriving data).
- Native support for CDC – With the following options:
- CDC record support in the table format – The table format understands how to process CDC-generated records and no custom preprocessing is required for writing CDC records to the table.
- CDC tools natively supporting the table format – CDC tools understand how to process CDC-generated records and apply them to the target tables. In this case, the CDC engine writes to the target table without another engine in between.
Without support for the two CDC options, processing and applying CDC records correctly into a target table will require custom code. With a CDC engine, each tool likely has its own CDC record format (or payload). For example, Debezium and AWS Database Migration Service (AWS DMS) each have their own specific record formats, and need to be transformed differently. This must be considered when you are operating CDC at scale across many tables.
All three table formats allow you to implement CDC from a source database into a target table. The difference for CDC with each format lies mainly in the ease of implementing CDC pipelines and supported integrations.
| . | Apache Hudi | Apache Iceberg | Delta Lake |
| Functional fit |
|
|
|
| Considerations |
|
|
|
| Natively supported CDC formats |
|
|
|
| CDC tool integrations |
|
|
|
| Conclusion | All three formats can implement CDC workloads. Apache Hudi offers the best overall technical fit for CDC workloads as well as the most options for efficient CDC pipeline design: no-code/low-code with DeltaStreamer, third-party CDC tools offering native Hudi integration, or a Spark/Flink engine using CDC record payloads offered in Hudi. | ||
Batch loads
If your use case requires only periodic writes but frequent reads, you may want to use batch loads and optimize for read performance.
Batch loading data with updates and deletes is perhaps the simplest use case to implement with any of the three table formats. Batch loads typically don’t require low latency, allowing them to benefit from the operational simplicity of a Copy On Write strategy. With Copy On Write, data files are rewritten to apply updates and add new records, minimizing the complexity of having to run compaction or optimization table services on the table.
| . | Apache Hudi | Apache Iceberg | Delta Lake |
| Functional fit |
|
|
|
| Considerations |
|
|
|
| Supported AWS integrations |
|
|
|
| Conclusion | All three formats are well suited for batch loads. Apache Hudi supports the most configuration options and may increase the effort to get started, but provides lower operational effort due to automatic table management. On the other hand, Iceberg and Delta are simpler to get started with, but require some operational overhead for table maintenance. | ||
Working with open table formats
In this section, we discuss the capabilities of each open table format for common use cases when working with open table formats: optimizing read performance, incremental data processing and processing deletes to comply with privacy regulations.
Optimizing read performance
The preceding sections primarily focused on write performance for specific use cases. Now let’s explore how each open table format can support optimal read performance. Although there are some cases where data is optimized purely for writes, read performance is typically a very important dimension on which you should evaluate an open table format.
Open table format features that improve query performance include the following:
- Indexes, (column) statistics, and other metadata – Improves query planning and file pruning, resulting in reduced data scanned
- File layout optimization – Enables query performance:
- File size management – Properly sized files provide better query performance
- Data colocation (through clustering) according to query patterns – Reduces the amount of data scanned by queries
| . | Apache Hudi | Apache Iceberg | Delta Lake |
| Functional fit |
|
|
|
| Considerations |
|
|
|
| Optimization & Maintenance Processes |
|
|
|
| Conclusion | For achieving good read performance, it’s important that your query engine supports the optimization features offered by the table formats. When using Spark, all three formats provide good read performance when properly configured. When using Trino (and therefore Athena as well), Iceberg will likely provide better query performance because the data skipping feature of Hudi and Delta is not supported in the Trino engine. Make sure to evaluate this feature support for your query engine of choice. | ||
Incremental processing of data on the data lake
At a high level, incremental data processing is the movement of new or fresh data from a source to a destination. To implement incremental extract, transform, and load (ETL) workloads efficiently, we need to be able to retrieve only the data records that have been changed or added since a certain point in time (incrementally) so we don’t need to reprocess unnecessary data (such as entire partitions). When your data source is an open table format table, we can take advantage of incremental queries to facilitate more efficient reads in these table formats.
| . | Apache Hudi | Apache Iceberg | Delta Lake |
| Functional fit |
|
|
|
| Considerations |
|
|
|
| Supported AWS integrations | Incremental queries are supported in:
|
Incremental queries supported in:
CDC view supported in:
|
CDF supported in:
|
| Conclusion | Best functional fit for incremental ETL pipelines using a variety of engines, without any storage overhead. | Good fit for implementing incremental pipelines using Spark if the overhead of creating views is acceptable. | Good fit for implementing incremental pipelines using Spark if the additional storage overhead is acceptable. |
Processing deletes to comply with privacy regulations
Due to privacy regulations like the General Data Protection Regulation (GDPR) and California Consumer Privacy Act (CCPA), companies across many industries need to perform record-level deletes on their data lake for “right to be forgotten” or to correctly store changes to consent on how their customers’ data can be used.
The ability to perform record-level deletes without rewriting entire (or large parts of) datasets is the main requirement for this use case. For compliance regulations, it’s important to perform hard deletes (deleting records from the table and physically removing them from Amazon S3).
| . | Apache Hudi | Apache Iceberg | Delta Lake |
| Functional fit | Hard deletes are performed by Hudi’s automatic cleaner service. | Hard deletes can be implemented as a separate process. | Hard deletes can be implemented as a separate process. |
| Considerations | Hudi cleaner needs to be configured according to compliance requirements to automatically remove older file versions in time (within a compliance window), otherwise time travel or rollback operations could recover deleted records. | Previous snapshots need to be (manually) expired after the delete operation, otherwise time travel operations could recover deleted records. | The vacuum operation needs to be run after the delete, otherwise time travel operations could recover deleted records. |
| Conclusion | This use case can be implemented using all three formats, and in each case, you must ensure that your configuration or background pipelines implement the cleanup procedures required to meet your data retention requirements. | ||
Conclusion
Today, no single table format is the best fit for all use cases, and each format has its own unique strengths for specific requirements. It’s important to determine which requirements and use cases are most crucial and select the table format that best meets those needs.
To speed up the selection process of the right table format for your workload, we recommend the following actions:
- Identify what table format is likely a good fit for your workload using the high-level guidance provided in this post
- Perform a proof of concept with the identified table format from the previous step to validate its fit for your specific workload and requirements
Keep in mind that these open table formats are open source and rapidly evolve with new features and enhanced or new integrations, so it can be valuable to also take into consideration product roadmaps when deciding on the format for your workloads.
AWS will continue to innovate on behalf of our customers to support these powerful file formats and to help you be successful with your advanced use cases for analytics in the cloud. For more support on building transactional data lakes on AWS, get in touch with your AWS Account Team, AWS Support, or review the following resources:
About the Authors
 Shana Schipers is an Analytics Specialist Solutions Architect at AWS, focusing on big data. She supports customers worldwide in building transactional data lakes using open table formats like Apache Hudi, Apache Iceberg and Delta Lake on AWS.
 Ian Meyers is a Director of Product Management for AWS Analytics Services. He works with many of AWS largest customers on emerging technology needs, and leads several data and analytics initiatives within AWS including support for Data Mesh.

Carlos Rodrigues is a Big Data Specialist Solutions Architect at AWS. He helps customers worldwide building transactional data lakes on AWS using open table formats like Apache Hudi and Apache Iceberg.
[$] Two VFS topics
Post Syndicated from original https://lwn.net/Articles/934094/
Two different topics concerning the virtual filesystem (VFS) layer were the
subject of a session led by VFS co-maintainer Christian Brauner at the
2023 Linux Storage, Filesystem,
Memory-Management and BPF Summit. As might be guessed, it was a
filesystem-track session; Brauner had three separate items he planned on
bringing up, but the discussion on the first two consumed the whole
half-hour—and then some. A mechanism to avoid media-change races when
mounting loop (or loopback) and other devices was disposed of fairly
quickly, but the
discussion around the mount-beneath feature went on at length.
[$] Addressing priority inversion with proxy execution
Post Syndicated from original https://lwn.net/Articles/934114/
Priority inversion comes about when a low-priority task holds a resource
that is needed by a higher-priority task, with the result that the wrong
task is the only one that can run. This problem is arguably most acute in
realtime settings, but it can happen in just about any system that has
multiple tasks running. The variety of
scheduling classes provided by the Linux kernel make handling priority
inversion a difficult problem; the latest version of the proxy
execution patch series points toward a possible solution.
2-Phase Immersion Cooling Halted Over Multi-Billion Dollar Health Hazard Lawsuits
Post Syndicated from Patrick Kennedy original https://www.servethehome.com/2-phase-immersion-cooling-halted-over-multi-billion-dollar-health-hazard-lawsuits/
Two-phase immersion cooling for servers offers high efficiency, but major hyperscalers have halted projects over fluid safety and availability
The post 2-Phase Immersion Cooling Halted Over Multi-Billion Dollar Health Hazard Lawsuits appeared first on ServeTheHome.
Take a Trip with The History Guy: Signup now!
Post Syndicated from The History Guy: History Deserves to Be Remembered original https://www.youtube.com/watch?v=GGpt0qgzcwE
Seeing Ourselves through Dark Moods | Mariana Alessandri | Talks at Google
Post Syndicated from Talks at Google original https://www.youtube.com/watch?v=ib21lMQiwe8
Comic for 2023.06.09 – Doctor Call
Post Syndicated from Explosm.net original https://explosm.net/comics/doctor-call
New Cyanide and Happiness Comic
Simulating Kubernetes-workload AZ failures with AWS Fault Injection Simulator
Post Syndicated from Siva Guruvareddiar original https://aws.amazon.com/blogs/architecture/simulating-kubernetes-workload-az-failures-with-aws-fault-injection-simulator/
In highly distributed systems, it is crucial to ensure that applications function correctly even during infrastructure failures. One common infrastructure failure scenario is when an entire Availability Zone (AZ) becomes unavailable. Applications are often deployed across multiple AZs to ensure high availability and fault tolerance in cloud environments such as Amazon Web Services (AWS).
Kubernetes helps manage and deploy applications across multiple nodes and AZs, though it can be difficult to test how your applications will behave during an AZ failure. This is where fault injection simulators come in. The AWS Fault Injection Simulator (AWS FIS) service can intentionally inject faults or failures into a system to test its resilience. In this blog post, we will explore how to use an AWS FIS to simulate an AZ failure for Kubernetes workloads.
Solution overview
To ensure that Kubernetes cluster workloads are architected to handle failures, you must test their resilience by simulating real-world failure scenarios. Kubernetes allows you to deploy workloads across multiple AZs to handle failures, but it’s still important to test how your system behaves during AZ failures. To do this, we use a microservice for product details with the aim of running this microservice using auto-scaling with both Cluster Autoscaler (CA, from Kubernetes community) and Karpenter and test how the system responds to varying traffic levels.
This blog post explores a load test to mimic the behavior of hundreds of users accessing the service concurrently to simulate a realistic failure scenario. This test uses AWS FIS to disrupt network connectivity, and simulate AZ failure in a controlled manner. This allows us to measure how users are impacted when using CA and then with Karpenter.
Both CA and Karpenter automatically adjust the size of a cluster based on the resource requirements of the running workloads. By comparing the performance of the microservice under these two autoscaling tools, we can determine which tool is better-suited to handle such scenarios.
Figure 1 demonstrates the solution’s architecture.

Figure 1. Architecture flow for microservices to simulate a realistic failure scenario
Prerequisites
Install the following utilities on a Linux-based host machine, which can be an Amazon Elastic Compute Cloud (Amazon EC2) instance, AWS Cloud9 instance, or a local machine with access to your AWS account:
- AWS CLI version 2 to interact with AWS services using CLI commands
- Node.js (v16.0.0 or later) and npm (8.10.0 or later)
- AWS CDK v2.70.0 or later to build and deploy cloud infrastructure and Kubernetes resources programmatically
- Kubectl to communicate with the Kubernetes API server
- Helm to manage Kubernetes applications
- eks-node-viewer to visualize dynamic node usage within an Amazon Elastic Kubernetes Service (Amazon EKS) cluster
Setting up a microservice environment
This blog post consists of two major parts: Bootstrap and experiment. The bootstrap section provides step-by-step instructions for:
- Creating and deploying a sample microservice
- Creating an AWS IAM role for the FIS service
- Creating an FIS experiment template
By following these bootstrap instructions, you can set up your own environment to test the different autoscaling tools’ performance in Kubernetes.
In the experiment section, we showcase how the system behaves with CA, then Karpenter.
Let’s start by setting a few environment variables using the following code:
export FIS_ACCOUNT_ID=$(aws sts get-caller-identity --query 'Account' --output text)
export FIS_AWS_REGION=us-west-2
export FIS_CLUSTER_NAME="fis-simulation-cluster"
Next, clone the sample repository which contains the code for our solution:
git clone https://github.com/aws-samples/containers-blog-maelstrom.git
cd ./containers-blog-maelstrom/fis-simulation-blog
Step 1. Bootstrap the environment
This solution uses Amazon EKS for AWS Cloud Development Kit (AWS CDK) Blueprints to provision our Amazon EKS cluster.
The first step to any AWS CDK deployment is bootstrapping the environment. cdk bootstrap is an AWS Command Line Interface (AWS CLI) tool that prepares the environment with resources required by AWS CDK to perform deployments into that environment (for example, a combination of AWS account and AWS Region).
Let’s run the below commands to bootstrap your environment and install all node dependencies required for deploying the solution:
npm install
cdk bootstrap aws://$FIS_ACCOUNT_ID/$FIS_AWS_REGION
We’ll use Amazon EKS Blueprints for CDK to create an Amazon EKS cluster and deploy add-ons. This stack deploys the following add-ons into the cluster:
- AWS Load Balancer Controller
- AWS VPC CNI
- Core DNS
- Kube-proxy
Step 2. Create an Amazon EKS cluster
Run the below command to deploy the Amazon EKS cluster:
npm install
cdk deploy "*" --require-approval never
Deployment takes approximately 20-30 minutes; then you will have a fully functioning Amazon EKS cluster in your account.
fis-simulation-cluster
Deployment time: 1378.09s
Copy and run the aws eks update-kubeconfig ... command from the output section to gain access to your Amazon EKS cluster using kubectl.
Step 3. Deploy a microservice to Amazon EKS
Use the code from the following Github repository and deploy using Helm.
git clone https://github.com/aws-containers/eks-app-mesh-polyglot-demo.git
helm install workshop eks-app-mesh-polyglot-demo/workshop/helm-chart/
Note: You are not restricted to this one as a mandate. If you have other microservices, use the same. This command deploys the following three microservices:
- Frontend-node as the UI to the product catalog application
- Catalog detail backend
- Product catalog backend
To test the resiliency, let’s take one of the microservice viz productdetail, the backend microservice as an example. When checking the status of a service like the following, you will see that proddetail is of type ClusterIP, which is accessible only within the cluster. To access this outside of the cluster, perform the following steps.
kubectl get service proddetail -n workshop
NAME TYPE CLUSTER-IP EXTERNAL-IP PORT(S) AGE 5000/TCP 11h
proddetail ClusterIP 10.100.168.219 <none> 3000/TCP 11m
Create ingress class
cat <<EOF | kubectl create -f -
apiVersion: networking.k8s.io/v1
kind: IngressClass
metadata:
name: aws-alb
spec:
controller: ingress.k8s.aws/alb
EOF
Create ingress resource
cat <<EOF | kubectl create -f -
apiVersion: networking.k8s.io/v1
kind: Ingress
metadata:
namespace: workshop
name: proddtl-ingress
annotations:
alb.ingress.kubernetes.io/scheme: internet-facing
alb.ingress.kubernetes.io/target-type: ip
spec:
ingressClassName: aws-alb
rules:
- http:
paths:
- path: /
pathType: Prefix
backend:
service:
name: proddetail
port:
number: 3000
EOF
After this, your web URL is ready:
kubectl get ingress -n workshop
NAME CLASS HOSTS ADDRESS PORTS AGE
proddtl-ingress aws-alb * k8s-workshop-proddtli-166014b35f-354421654.us-west-1.elb.amazonaws.com 80 14s
Test the connectivity from your browser:

Figure 2. Testing the connectivity from your browser
Step 4. Create an IAM Role for AWS FIS
Before an AWS FIS experiment, create an IAM role. Let’s create a trust policy and attach as shown here:
cat > fis-trust-policy.json << EOF
{
"Version": "2012-10-17",
"Statement": [
{
"Effect": "Allow",
"Principal": {
"Service": [
"fis.amazonaws.com"
]
},
"Action": "sts:AssumeRole"
}
]
}
EOF
aws iam create-role --role-name my-fis-role --assume-role-policy-document file://permissons/fis-trust-policy.json
Create an AWS FIS policy and attach
aws iam attach-role-policy --role-name my-fis-role --policy-arn arn:aws:iam::aws:policy/service-role/AWSFaultInjectionSimulatorNetworkAccess
aws iam attach-role-policy --role-name my-fis-role --policy-arn arn:aws:iam::aws:policy/CloudWatchAgentServerPolicy
aws iam attach-role-policy --role-name my-fis-role --policy-arn arn:aws:iam::aws:policy/service-role/AWSFaultInjectionSimulatorEKSAccess
aws iam attach-role-policy --role-name my-fis-role --policy-arn arn:aws:iam::aws:policy/service-role/AWSFaultInjectionSimulatorEC2Access
aws iam attach-role-policy --role-name my-fis-role --policy-arn arn:aws:iam::aws:policy/service-role/AWSFaultInjectionSimulatorSSMAccess
Step 5: Create an AWS FIS experiment
Use AWS FIS to create an experiment to disrupt the network connectivity as below. Use the following experiment template with the IAM role created from the previous step:

Figure 3. Experiment template
Step 6. Failure simulation with AWS FIS on CA and Karpenter
We’ve completed microservice setup, made it internet-accessible, and created an AWS FIS template to simulate failures. Now let’s experiment with how the system behaves with different autoscalers: CA and Karpenter.
With the microservice available within Amazon EKS cluster, we’ll use Locust to simulate user behavior with a total of 100 users trying to access the URLs concurrently.
For the following experiments, Run 1 shows 100 users trying to access the service without any system disruptions. We’ll then move to AWS FIS and disrupt network connectivity in Run 2. Measuring the user impact and comparing it to the results from the first run provides insights on how the system responds to failures and can be improved for greater reliability and performance.
Simulating failures with Cluster Autoscaler (CA)
To perform this experiment, select your experiment template and click Start experiment, then enter start in the field. Currently 12 replicas of the proddetail microservice are running.
As the following Locust charts detail, Run 1 completed without failures. Run 2 simulated network connectivity disruption, resulting in a visible failure rate of 4 percent, with a peak of 7 failures at one time.
For this experiment, we used a total of seven nodes of type t3.small. Use eks-node-viewer to visualize dynamic node usage within a cluster.

Figure 4. CA experiment results

Figure 5. Dynamic node usage within cluster
Simulating failures with Karpenter
Continuing the same experiment with 12 replicas of the proddetail microservice, this time we are using Karpenter. As in the following figures, the cluster uses a combination of t3.small and “C” and “M” instances provided in Karpenter’s provisioner configuration.
In Run 1, we observe 0 failures. In Run 2, when network connectivity was disrupted by AWS FIS, Karpenter was able to maintain user requests with almost 0 percent failure. This outcome highlights the effectiveness of Karpenter as an autoscaler for maintaining high availability by carefully configuring the provisioner.

Figure 6. Karpenter experiment results

Figure 7. Dynamic node usage within cluster
Cleanup
Use the following commands to clean up your experiment environment.
#delete Ingress resources
kubectl delete ingress proddtl-ingresss -n workshop
kubectl delete ingressclass aws-alb
#delete IAM resources
aws iam delete-role --role-name my-fis-role
#delete FIS resources
fis_template_id=`aws fis list-experiment-templates --region $FIS_AWS_REGION |jq ".experimentTemplates[0].id"`
aws fis delete-experiment-template --id $fis_template_id --region $FIS_AWS_REGION
#delete application resources and cluster
helm uninstall workshop
cdk destroy
Conclusion
This experiment results show that Karpenter performs better and recovers quicker from network disrupt connectivity than Cluster Autoscaler. The figures in this blog post highlight Karpenter’s resiliency and ability to scale and recover from failures quickly.
While this experiment provides valuable insights into the performance and reliability of Kubernetes workloads in the face of failures, it’s important to acknowledge that this is not a true test of an AZ unavailable situation. In a real-world scenario, an AZ failure can have a cascading effect, potentially impacting other services that workloads depend upon. But simulating an AZ failure in a controlled environment helps you better understand how your Kubernetes cluster and applications will behave in an actual failure scenario. This knowledge can help you identify and address any issues before they occur in production, ensuring that your applications remain highly available and resilient.
In summary, this experiment provides good insights into the performance and resilience of Kubernetes workloads. It is not a perfect representation of a real-world AZ failure, but by leveraging tools such as AWS FIS and carefully configuring autoscaling policies, you can take proactive steps to optimize performance and ensure high availability for critical applications.
Seven stable kernels
Orpheus II: The Best Retro PC Sound Card in 2023? Perhaps!
Post Syndicated from LGR original https://www.youtube.com/watch?v=vQfyQqo1644
Security updates for Friday
Post Syndicated from original https://lwn.net/Articles/934316/
Security updates have been issued by Debian (jupyter-core, openssl, and ruby2.5), Fedora (firefox), Mageia (libreoffice, openssl, and python-flask), Red Hat (python and python3), Slackware (mozilla, php8, and python3), SUSE (java-1_8_0-ibm, libcares2, mariadb, and python36), and Ubuntu (linux, linux-aws, linux-kvm, linux-lts-xenial, linux-gke, linux-intel-iotg, linux-raspi, linux-xilinx-zynqmp, and mozjs102).
Борисов бил бащата на детето на Йовчева Прокуратурата за Барселонагейт: Има ОПГ за пране на пари с участието на Бойко Борисов. Документи
Post Syndicated from Екип на Биволъ original https://bivol.bg/barcelonagate-files.html
петък 9 юни 2023

“Разследването идентифицира като действителен източник на средствата за придобиване на имота БОЙКО МЕТОДИЕВ БОРИСОВ, ЕГН: XXXXXXXXXX, който през периода 2009 г. – 2013 г. е заемал висша публична длъжност в…
The Irish Divisions in the 1918 Spring Offensive
Post Syndicated from The History Guy: History Deserves to Be Remembered original https://www.youtube.com/watch?v=u3yR01D5VWE