Tag Archives: Application Services*

Introducing Amazon API Gateway service integration for AWS Step Functions

Post Syndicated from Benjamin Smith original https://aws.amazon.com/blogs/compute/introducing-amazon-api-gateway-service-integration-for-aws-step-functions/

AWS Step Functions now integrates with Amazon API Gateway to enable backend orchestration with minimal code and built-in error handling.

API Gateway is a fully managed service that makes it easy for developers to create, publish, maintain, monitor, and secure APIs at any scale. These APIs enable applications to access data, business logic, or functionality from your backend services.

Step Functions allows you to build resilient serverless orchestration workflows with AWS services such as AWS Lambda, Amazon SNS, Amazon DynamoDB, and more. AWS Step Functions integrates with a number of services natively. Using Amazon States Language (ASL), you can coordinate these services directly from a task state.

What’s new?

The new Step Functions integration with API Gateway provides an additional resource type, arn:aws:states:::apigateway:invoke and can be used with both Standard and Express workflows. It allows customers to call API Gateway REST APIs and API Gateway HTTP APIs directly from a workflow, using one of two integration patterns:

  1. Request-Response: calling a service and let Step Functions progress to the next state immediately after it receives an HTTP response. This pattern is supported by Standard and Express Workflows.
  2. Wait-for-Callback: calling a service with a task token and have Step Functions wait until that token is returned with a payload. This pattern is supported by Standard Workflows.

The new integration is configured with the following Amazon States Language parameter fields:

  • ApiEndpoint: The API root endpoint.
  • Path: The API resource path.
  • Method: The HTTP request method.
  • HTTP headers: Custom HTTP headers.
  • RequestBody: The body for the API request.
  • Stage: The API Gateway deployment stage.
  • AuthType: The authentication type.

Refer to the documentation for more information on API Gateway fields and concepts.

Getting started

The API Gateway integration with Step Functions is configured using AWS Serverless Application Model (AWS SAM), the AWS Command Line Interface (AWS CLI), AWS CloudFormation or from within the AWS Management Console.

To get started with Step Functions and API Gateway using the AWS Management Console:

  1. Go to the Step Functions page of the AWS Management Console.
  2. Choose Run a sample project and choose Make a call to API Gateway.The Definition section shows the ASL that makes up the example workflow. The following example shows the new API Gateway resource and its parameters:
  3. Review example Definition, then choose Next.
  4. Choose Deploy resources.

This deploys a Step Functions standard workflow and a REST API with a /pets resource containing a GET and a POST method. It also deploys an IAM role with the required permissions to invoke the API endpoint from Step Functions.

The RequestBody field lets you customize the API’s request input. This can be a static input or a dynamic input taken from the workflow payload.

Running the workflow

  1. Choose the newly created state machine from the Step Functions page of the AWS Management Console
  2. Choose Start execution.
  3. Paste the following JSON into the input field:
    {
      "NewPet": {
        "type": "turtle",
        "price": 74.99
      }
    }
  4. Choose Start execution
  5. Choose the Retrieve Pet Store Data step, then choose the Step output tab.

This shows the successful responseBody output from the “Add to pet store” POST request and the response from the “Retrieve Pet Store Data” GET request.

Access control

The API Gateway integration supports AWS Identity and Access Management (IAM) authentication and authorization. This includes IAM roles, policies, and tags.

AWS IAM roles and policies offer flexible and robust access controls that can be applied to an entire API or individual methods. This controls who can create, manage, or invoke your REST API or HTTP API.

Tag-based access control allows you to set more fine-grained access control for all API Gateway resources. Specify tag key-value pairs to categorize API Gateway resources by purpose, owner, or other criteria. This can be used to manage access for both REST APIs and HTTP APIs.

API Gateway resource policies are JSON policy documents that control whether a specified principal (typically an IAM user or role) can invoke the API. Resource policies can be used to grant access to a REST API via AWS Step Functions. This could be for users in a different AWS account or only for specified source IP address ranges or CIDR blocks.

To configure access control for the API Gateway integration, set the AuthType parameter to one of the following:

  1. {“AuthType””: “NO_AUTH”}
    Call the API directly without any authorization. This is the default setting.
  2. {“AuthType””: “IAM_ROLE”}
    Step Functions assumes the state machine execution role and signs the request with credentials using Signature Version 4.
  3. {“AuthType””: “RESOURCE_POLICY”}
    Step Functions signs the request with the service principal and calls the API endpoint.

Orchestrating microservices

Customers are already using Step Functions’ built in failure handling, decision branching, and parallel processing to orchestrate application backends. Development teams are using API Gateway to manage access to their backend microservices. This helps to standardize request, response formats and decouple business logic from routing logic. It reduces complexity by allowing developers to offload responsibilities of authentication, throttling, load balancing and more. The new API Gateway integration enables developers to build robust workflows using API Gateway endpoints to orchestrate microservices. These microservices can be serverless or container-based.

The following example shows how to orchestrate a microservice with Step Functions using API Gateway to access AWS services. The example code for this application can be found in this GitHub repository.

To run the application:

  1. Clone the GitHub repository:
    $ git clone https://github.com/aws-samples/example-step-functions-integration-api-gateway.git
    $ cd example-step-functions-integration-api-gateway
  2. Deploy the application using AWS SAM CLI, accepting all the default parameter inputs:
    $ sam build && sam deploy -g

    This deploys 17 resources including a Step Functions standard workflow, an API Gateway REST API with three resource endpoints, 3 Lambda functions, and a DynamoDB table. Make a note of the StockTradingStateMachineArn value. You can find this in the command line output or in the Applications section of the AWS Lambda Console:


  3. Manually trigger the workflow from a terminal window:
    aws stepFunctions start-execution \
    --state-machine-arn <StockTradingStateMachineArnValue>

The response looks like:


When the workflow is run, a Lambda function is invoked via a GET request from API Gateway to the /check resource. This returns a random stock value between 1 and 100. This value is evaluated in the Buy or Sell choice step, depending on if it is less or more than 50. The Sell and Buy states use the API Gateway integration to invoke a Lambda function, with a POST method. A stock_value is provided in the POST request body. A transaction_result is returned in the ResponseBody and provided to the next state. The final state writes a log of the transition to a DynamoDB table.

Defining the resource with an AWS SAM template

The Step Functions resource is defined in this AWS SAM template. The DefinitionSubstitutions field is used to pass template parameters to the workflow definition.

StockTradingStateMachine:
    Type: AWS::Serverless::StateMachine # More info about State Machine Resource: https://docs.aws.amazon.com/serverless-application-model/latest/developerguide/sam-resource-statemachine.html
    Properties:
      DefinitionUri: statemachine/stock_trader.asl.json
      DefinitionSubstitutions:
        StockCheckPath: !Ref CheckPath
        StockSellPath: !Ref SellPath
        StockBuyPath: !Ref BuyPath
        APIEndPoint: !Sub "${ServerlessRestApi}.execute-api.${AWS::Region}.amazonaws.com"
        DDBPutItem: !Sub arn:${AWS::Partition}:states:::dynamodb:putItem
        DDBTable: !Ref TransactionTable

The workflow is defined on a separate file (/statemachine/stock_trader.asl.json).

The following code block defines the Check Stock Value state. The new resource, arn:aws:states:::apigateway:invoke declares the API Gateway service integration type.

The parameters object holds the required fields to configure the service integration. The Path and ApiEndpoint values are provided by the DefinitionsSubstitutions field in the AWS SAM template. The RequestBody input is defined dynamically using Amazon States Language. The .$ at the end of the field name RequestBody specifies that the parameter use a path to reference a JSON node in the input.

"Check Stock Value": {
  "Type": "Task",
  "Resource": "arn:aws:states:::apigateway:invoke",
  "Parameters": {
      "ApiEndpoint":"${APIEndPoint}",
      "Method":"GET",
      "Stage":"Prod",
      "Path":"${StockCheckPath}",
      "RequestBody.$":"$",
      "AuthType":"NO_AUTH"
  },
  "Retry": [
      {
          "ErrorEquals": [
              "States.TaskFailed"
          ],
          "IntervalSeconds": 15,
          "MaxAttempts": 5,
          "BackoffRate": 1.5
      }
  ],
  "Next": "Buy or Sell?"
},

The deployment process validates the ApiEndpoint value. The service integration builds the API endpoint URL from the information provided in the parameters block in the format https://[APIendpoint]/[Stage]/[Path].

Conclusion

The Step Functions integration with API Gateway provides customers with the ability to call REST APIs and HTTP APIs directly from a Step Functions workflow.

Step Functions’ built in error handling helps developers reduce code and decouple business logic. Developers can combine this with API Gateway to offload responsibilities of authentication, throttling, load balancing and more. This enables developers to orchestrate microservices deployed on containers or Lambda functions via API Gateway without managing infrastructure.

This feature is available in all Regions where both AWS Step Functions and Amazon API Gateway are available. View the AWS Regions table to learn more. For pricing information, see Step Functions pricing. Normal service limits of API Gateway and service limits of Step Functions apply.

For more serverless learning resources, visit Serverless Land.
Building Serverless Land: Part 2 – An auto-building static site

Post Syndicated from Benjamin Smith original https://aws.amazon.com/blogs/compute/building-serverless-land-part-2-an-auto-building-static-site/

In this two-part blog series, I show how serverlessland.com is built. This is a static website that brings together all the latest blogs, videos, and training for AWS serverless. It automatically aggregates content from a number of sources. The content exists in a static JSON file, which generates a new static site each time it is updated. The result is a low-maintenance, low-latency serverless website, with almost limitless scalability.

A companion blog post explains how to build an automated content aggregation workflow to create and update the site’s content. In this post, you learn how to build a static website with an automated deployment pipeline that re-builds on each GitHub commit. The site content is stored in JSON files in the same repository as the code base. The example code can be found in this GitHub repository.

The growing adoption of serverless technologies generates increasing amounts of helpful and insightful content from the developer community. This content can be difficult to discover. Serverless Land helps channel this into a single searchable location. By collating this into a static website, users can enjoy a browsing experience with fast page load speeds.

The serverless nature of the site means that developers don’t need to manage infrastructure or scalability. The use of AWS Amplify Console to automatically deploy directly from GitHub enables a regular release cadence with a fast transition from prototype to production.

Static websites

A static site is served to the user’s web browser exactly as stored. This contrasts to dynamic webpages, which are generated by a web application. Static websites often provide improved performance for end users and have fewer or no dependant systems, such as databases or application servers. They may also be more cost-effective and secure than dynamic websites by using cloud storage, instead of a hosted environment.

A static site generator is a tool that generates a static website from a website’s configuration and content. Content can come from a headless content management system, through a REST API, or from data referenced within the website’s file system. The output of a static site generator is a set of static files that form the website.

Serverless Land uses a static site generator for Vue.js called Nuxt.js. Each time content is updated, Nuxt.js regenerates the static site, building the HTML for each page route and storing it in a file.

The architecture

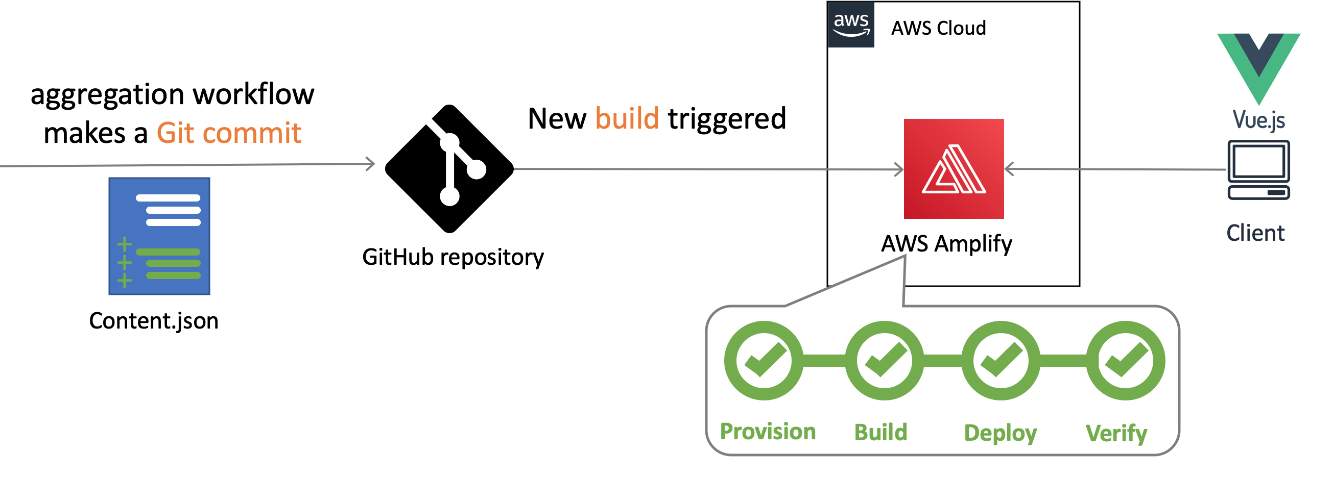
Serverless Land static website architecture

When the content.json file is committed to GitHub, a new build process is triggered in AWS Amplify Console.

Deploying AWS Amplify

AWS Amplify helps developers to build secure and scalable full stack cloud applications. AWS Amplify Console is a tool within Amplify that provides a user interface with a git-based workflow for hosting static sites. Deploy applications by connecting to an existing repository (GitHub, BitBucket Cloud, GitLab, and AWS CodeCommit) to set up a fully managed, nearly continuous deployment pipeline.

This means that any changes committed to the repository trigger the pipeline to build, test, and deploy the changes to the target environment. It also provides instant content delivery network (CDN) cache invalidation, atomic deploys, password protection, and redirects without the need to manage any servers.

Building the static website

  1. To get started, use the Nuxt.js scaffolding tool to deploy a boiler plate application. Make sure you have npx installed (npx is shipped by default with npm version 5.2.0 and above).
    $ npx create-nuxt-app content-aggregator

    The scaffolding tool asks some questions, answer as follows:Nuxt.js scaffolding tool inputs
  2. Navigate to the project directory and launch it with:
    $ cd content-aggregator
    $ npm run dev

    The application is now running on http://localhost:3000.The pages directory contains your application views and routes. Nuxt.js reads the .vue files inside this directory and automatically creates the router configuration.

  3. Create a new file in the /pages directory named blogs.vue:$ touch pages/blogs.vue
  4. Copy the contents of this file into pages/blogs.vue.
  5. Create a new file in /components directory named Post.vue :$ touch components/Post.vue
  6. Copy the contents of this file into components/Post.vue.
  7. Create a new file in /assets named content.json and copy the contents of this file into it.$ touch /assets/content.json

The blogs Vue component

The blogs page is a Vue component with some special attributes and functions added to make development of your application easier. The following code imports the content.json file into the variable blogPosts. This file stores the static website’s array of aggregated blog post content.

import blogPosts from '../assets/content.json'

An array named blogPosts is initialized:

data(){
    return{
      blogPosts: []
    }
  },

The array is then loaded with the contents of content.json.

 mounted(){
    this.blogPosts = blogPosts
  },

In the component template, the v-for directive renders a list of post items based on the blogPosts array. It requires a special syntax in the form of blog in blogPosts, where blogPosts is the source data array and blog is an alias for the array element being iterated on. The Post component is rendered for each iteration. Since components have isolated scopes of their own, a :post prop is used to pass the iterated data into the Post component:

<ul>
  <li v-for="blog in blogPosts" :key="blog">
     <Post :post="blog" />
  </li>
</ul>

The post data is then displayed by the following template in components/Post.vue.

<template>
    <div class="hello">
      <h3>{{ post.title }} </h3>
      <div class="img-holder">
          <img :src="post.image" />
      </div>
      <p>{{ post.intro }} </p>
      <p>Published on {{post.date}}, by {{ post.author }} p>
      <a :href="post.link"> Read article</a>
    </div>
</template>

This forms the framework for the static website. The /blogs page displays content from /assets/content.json via the Post component. To view this, go to http://localhost:3000/blogs in your browser:

The /blogs page

Add a new item to the content.json file and rebuild the static website to display new posts on the blogs page. The previous content was generated using the aggregation workflow explained in this companion blog post.

Connect to Amplify Console

Clone the web application to a GitHub repository and connect it to Amplify Console to automate the rebuild and deployment process:

  1. Upload the code to a new GitHub repository named ‘content-aggregator’.
  2. In the AWS Management Console, go to the Amplify Console and choose Connect app.
  3. Choose GitHub then Continue.
  4. Authorize to your GitHub account, then in the Recently updated repositories drop-down select the ‘content-aggregator’ repository.
  5. In the Branch field, leave the default as master and choose Next.
  6. In the Build and test settings choose edit.
  7. Replace - npm run build with – npm run generate.
  8. Replace baseDirectory: / with baseDirectory: dist

    This runs the nuxt generate command each time an application build process is triggered. The nuxt.config.js file has a target property with the value of static set. This generates the web application into static files. Nuxt.js creates a dist directory with everything inside ready to be deployed on a static hosting service.
  9. Choose Save then Next.
  10. Review the Repository details and App settings are correct. Choose Save and deploy.

    Amplify Console deployment

Once the deployment process has completed and is verified, choose the URL generated by Amplify Console. Append /blogs to the URL, to see the static website blogs page.

Any edits pushed to the repository’s content.json file trigger a new deployment in Amplify Console that regenerates the static website. This companion blog post explains how to set up an automated content aggregator to add new items to the content.json file from an RSS feed.

Conclusion

This blog post shows how to create a static website with vue.js using the nuxt.js static site generator. The site’s content is generated from a single JSON file, stored in the site’s assets directory. It is automatically deployed and re-generated by Amplify Console each time a new commit is pushed to the GitHub repository. By automating updates to the content.json file you can create low-maintenance, low-latency static websites with almost limitless scalability.

This application framework is used together with this automated content aggregator to pull together articles for http://serverlessland.com. Serverless Land brings together all the latest blogs, videos, and training for AWS Serverless. Download the code from this GitHub repository to start building your own automated content aggregation platform.

Building Serverless Land: Part 1 – Automating content aggregation

Post Syndicated from Benjamin Smith original https://aws.amazon.com/blogs/compute/building-serverless-land-part-1-automating-content-aggregation/

In this two part blog series, I show how serverlessland.com is built. This is a static website that brings together all the latest blogs, videos, and training for AWS Serverless. It automatically aggregates content from a number of sources. The content exists in static JSON files, which generate a new site build each time they are updated. The result is a low-maintenance, low-latency serverless website, with almost limitless scalability.

This blog post explains how to automate the aggregation of content from multiple RSS feeds into a JSON file stored in GitHub. This workflow uses AWS Lambda and AWS Step Functions, triggered by Amazon EventBridge. The application can be downloaded and deployed from this GitHub repository.

The growing adoption of serverless technologies generates increasing amounts of helpful and insightful content from the developer community. This content can be difficult to discover. Serverless Land helps channel this into a single searchable location. By automating the collection of this content with scheduled serverless workflows, the process robustly scales to near infinite numbers. The Step Functions MAP state allows for dynamic parallel processing of multiple content sources, without the need to alter code. On-boarding a new content source is as fast and simple as making a single CLI command.

The architecture

Automating content aggregation with AWS Step Functions

The application consists of six Lambda functions orchestrated by a Step Functions workflow:

  1. The workflow is triggered every 2 hours by an EventBridge scheduler. The schedule event passes an RSS feed URL to the workflow.
  2. The first task invokes a Lambda function that runs an HTTP GET request to the RSS feed. It returns an array of recent blog URLs. The array of blog URLs is provided as the input to a MAP state. The MAP state type makes it possible to run a set of steps for each element of an input array in parallel. The number of items in the array can be different for each execution. This is referred to as dynamic parallelism.
  3. The next task invokes a Lambda function that uses the GitHub REST API to retrieve the static website’s JSON content file.
  4. The first Lambda function in the MAP state runs an HTTP GET request to the blog post URL provided in the payload. The URL is scraped for content and an object containing detailed metadata about the blog post is returned in the response.
  5. The blog post metadata is compared against the website’s JSON content file in GitHub.
  6. A CHOICE state determines if the blog post metadata has already been committed to the repository.
  7. If the blog post is new, it is added to an array of “content to commit”.
  8. As the workflow exits the MAP state, the results are passed to the final Lambda function. This uses a single git commit to add each blog post object to the website’s JSON content file in GitHub. This triggers an event that rebuilds the static site.

Using Secrets in AWS Lambda

Two of the Lambda functions require a GitHub personal access token to commit files to a repository. Sensitive credentials or secrets such as this should be stored separate to the function code. Use AWS Systems Manager Parameter Store to store the personal access token as an encrypted string. The AWS Serverless Application Model (AWS SAM) template grants each Lambda function permission to access and decrypt the string in order to use it.

  1. Follow these steps to create a personal access token that grants permission to update files to repositories in your GitHub account.
  2. Use the AWS Command Line Interface (AWS CLI) to create a new parameter named GitHubAPIKey:
aws ssm put-parameter \
--name /GitHubAPIKey \
--value ReplaceThisWithYourGitHubAPIKey \
--type SecureString

{
    "Version": 1,
    "Tier": "Standard"
}

Deploying the application

  1. Fork this GitHub repository to your GitHub Account.
  2. Clone the forked repository to your local machine and deploy the application using AWS SAM.
  3. In a terminal, enter:
    git clone https://github.com/aws-samples/content-aggregator-example
    sam deploy -g
  4. Enter the required parameters when prompted.

This deploys the application defined in the AWS SAM template file (template.yaml).

The business logic

Each Lambda function is written in Node.js and is stored inside a directory that contains the package dependencies in a `node_modules` folder. These are defined for each function by its relative package.json file. The function dependencies are bundled and deployed using the sam build && deploy -g command.

The GetRepoContents and WriteToGitHub Lambda functions use the octokit/rest.js library to communicate with GitHub. The library authenticates to GitHub by using the GitHub API key held in Parameter Store. The AWS SDK for Node.js is used to obtain the API key from Parameter Store. With a single synchronous call, it retrieves and decrypts the parameter value. This is then used to authenticate to GitHub.

const AWS = require('aws-sdk');
const SSM = new AWS.SSM();


//get Github API Key and Authenticate
    const singleParam = { Name: '/GitHubAPIKey ',WithDecryption: true };
    const GITHUB_ACCESS_TOKEN = await SSM.getParameter(singleParam).promise();
    const octokit = await  new Octokit({
      auth: GITHUB_ACCESS_TOKEN.Parameter.Value,
    })

Lambda environment variables are used to store non-sensitive key value data such as the repository name and JSON file location. These can be entered when deploying with AWS SAM guided deploy command.

Environment:
        Variables:
          GitHubRepo: !Ref GitHubRepo
          JSONFile: !Ref JSONFile

The GetRepoContents function makes a synchronous HTTP request to the GitHub repository to retrieve the contents of the website’s JSON file. The response SHA and file contents are returned from the Lambda function and acts as the input to the next task in the Step Functions workflow. This SHA is used in final step of the workflow to save all new blog posts in a single commit.

Map state iterations

The MAP state runs concurrently for each element in the input array (each blog post URL).

Each iteration must compare a blog post URL to the existing JSON content file and decide whether to ignore the post. To do this, the MAP state requires both the input array of blog post URLs and the existing JSON file contents. The ItemsPath, ResultPath, and Parameters are used to achieve this:

  • The ItemsPath sets input array path to $.RSSBlogs.body.
  • The ResultPath states that the output of the branches is placed in $.mapResults.
  • The Parameters block replaces the input to the iterations with a JSON node. This contains both the current item data from the context object ($$.Map.Item.Value) and the contents of the GitHub JSON file ($.RepoBlogs).
"Type":"Map",
    "InputPath": "$",
    "ItemsPath": "$.RSSBlogs.body",
    "ResultPath": "$.mapResults",
    "Parameters": {
        "BlogUrl.$": "$$.Map.Item.Value",
        "RepoBlogs.$": "$.RepoBlogs"
     },
    "MaxConcurrency": 0,
    "Iterator": {
       "StartAt": "getMeta",

The Step Functions resource

The AWS SAM template uses the following Step Functions resource definition to create a Step Functions state machine:

  MyStateMachine:
    Type: AWS::Serverless::StateMachine
    Properties:
      DefinitionUri: statemachine/my_state_machine.asl.JSON
      DefinitionSubstitutions:
        GetBlogPostArn: !GetAtt GetBlogPost.Arn
        GetUrlsArn: !GetAtt GetUrls.Arn
        WriteToGitHubArn: !GetAtt WriteToGitHub.Arn
        CompareAgainstRepoArn: !GetAtt CompareAgainstRepo.Arn
        GetRepoContentsArn: !GetAtt GetRepoContents.Arn
        AddToListArn: !GetAtt AddToList.Arn
      Role: !GetAtt StateMachineRole.Arn

The actual workflow definition is defined in a separate file (statemachine/my_state_machine.asl.JSON). The DefinitionSubstitutions property specifies mappings for placeholder variables. This enables the template to inject Lambda function ARNs obtained by the GetAtt intrinsic function during template translation:

Step Functions mappings with placeholder variables

A state machine execution role is defined within the AWS SAM template. It grants the `Lambda invoke function` action. This is tightly scoped to the six Lambda functions that are used in the workflow. It is the minimum set of permissions required for the Step Functions to carry out its task. Additional permissions can be granted as necessary, which follows the zero-trust security model.

Action: lambda:InvokeFunction
Resource:
- !GetAtt GetBlogPost.Arn
- !GetAtt GetUrls.Arn
- !GetAtt CompareAgainstRepo.Arn
- !GetAtt WriteToGitHub.Arn
- !GetAtt AddToList.Arn
- !GetAtt GetRepoContents.Arn

The Step Functions workflow definition is authored using the AWS Toolkit for Visual Studio Code. The Step Functions support allows developers to quickly generate workflow definitions from selectable examples. The render tool and automatic linting can help you debug and understand the workflow during development. Read more about the toolkit in this launch post.

Scheduling events and adding new feeds

The AWS SAM template creates a new EventBridge rule on the default event bus. This rule is scheduled to invoke the Step Functions workflow every 2 hours. A valid JSON string containing an RSS feed URL is sent as the input payload. The feed URL is obtained from a template parameter and can be set on deployment. The AWS Compute Blog is set as the default feed URL. To aggregate additional blog feeds, create a new rule to invoke the Step Functions workflow. Provide the RSS feed URL as valid JSON input string in the following format:

{“feedUrl”:”replace-this-with-your-rss-url”}

ScheduledEventRule:
    Type: "AWS::Events::Rule"
    Properties:
      Description: "Scheduled event to trigger Step Functions state machine"
      ScheduleExpression: rate(2 hours)
      State: "ENABLED"
      Targets:
        -
          Arn: !Ref MyStateMachine
          Id: !GetAtt MyStateMachine.Name
          RoleArn: !GetAtt ScheduledEventIAMRole.Arn
          Input: !Sub
            - >
              {
                "feedUrl" : "${RssFeedUrl}"
              }
            - RssFeedUrl: !Ref RSSFeed

A completed workflow with step output

Conclusion

This blog post shows how to automate the aggregation of content from multiple RSS feeds into a single JSON file using serverless workflows.

The Step Functions MAP state allows for dynamic parallel processing of each item. The recent increase in state payload size limit means that the contents of the static JSON file can be held within the workflow context. The application decision logic is separated from the business logic and events.

Lambda functions are scoped to finite business logic with Step Functions states managing decision logic and iterations. EventBridge is used to manage the inbound business events. The zero-trust security model is followed with minimum permissions granted to each service and Parameter Store used to hold encrypted secrets.

This application is used to pull together articles for http://serverlessland.com. Serverless land brings together all the latest blogs, videos, and training for AWS Serverless. Download the code from this GitHub repository to start building your own automated content aggregation platform.

Introducing AWS X-Ray new integration with AWS Step Functions

Post Syndicated from Benjamin Smith original https://aws.amazon.com/blogs/compute/introducing-aws-x-ray-new-integration-with-aws-step-functions/

AWS Step Functions now integrates with AWS X-Ray to provide a comprehensive tracing experience for serverless orchestration workflows.

Step Functions allows you to build resilient serverless orchestration workflows with AWS services such as AWS Lambda, Amazon SNS, Amazon DynamoDB, and more. Step Functions provides a history of executions for a given state machine in the AWS Management Console or with Amazon CloudWatch Logs.

AWS X-Ray is a distributed tracing system that helps developers analyze and debug their applications. It traces requests as they travel through the individual services and resources that make up an application. This provides an end-to-end view of how an application is performing.

What is new?

The new Step Functions integration with X-Ray provides an additional workflow monitoring experience. Developers can now view maps and timelines of the underlying components that make up a Step Functions workflow. This helps to discover performance issues, detect permission problems, and track requests made to and from other AWS services.

The Step Functions integration with X-Ray can be analyzed in three constructs:

Service map: The service map view shows information about a Step Functions workflow and all of its downstream services. This enables developers to identify services where errors are occurring, connections with high latency, or traces for requests that are unsuccessful among the large set of services within their account. The service map aggregates data from specific time intervals from one minute through six hours and has a 30-day retention.

Trace map view: The trace map view shows in-depth information from a single trace as it moves through each service. Resources are listed in the order in which they are invoked.

Trace timeline: The trace timeline view shows the propagation of a trace through the workflow and is paired with a time scale called a latency distribution histogram. This shows how long it takes for a service to complete its requests. The trace is composed of segments and sub-segments. A segment represents the Step Functions execution. Subsegments each represent a state transition.

Getting Started

X-Ray tracing is enabled using AWS Serverless Application Model (AWS SAM), AWS CloudFormation or from within the AWS Management Console. To get started with Step Functions and X-Ray using the AWS Management Console:

  1. Go to the Step Functions page of the AWS Management Console.
  2. Choose Get Started, review the Hello World example, then choose Next.
  3. Check Enable X-Ray tracing from the Tracing section.

Workflow visibility

The following Step Functions workflow example is invoked via Amazon EventBridge when a new file is uploaded to an Amazon S3 bucket. The workflow uses Amazon Textract to detect text from an image file. It translates the text into multiple languages using Amazon Translate and saves the results into an Amazon DynamoDB table. X-Ray has been enabled for this workflow.

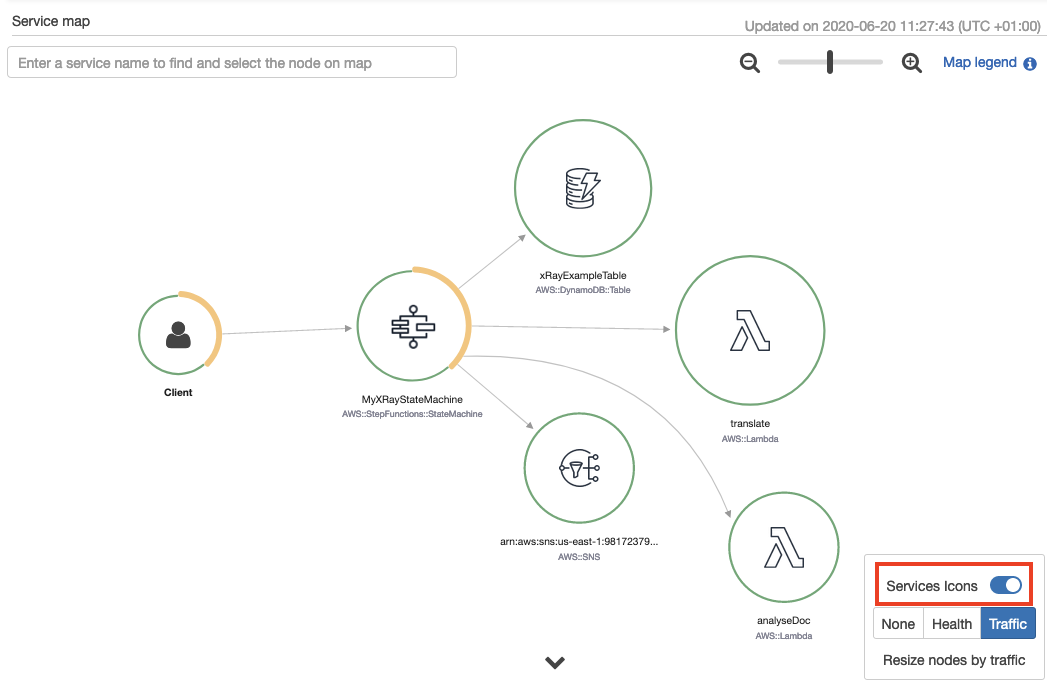
To view the X-Ray service map for this workflow, I choose the X-Ray trace map link at the top of the Step Functions Execution details page:

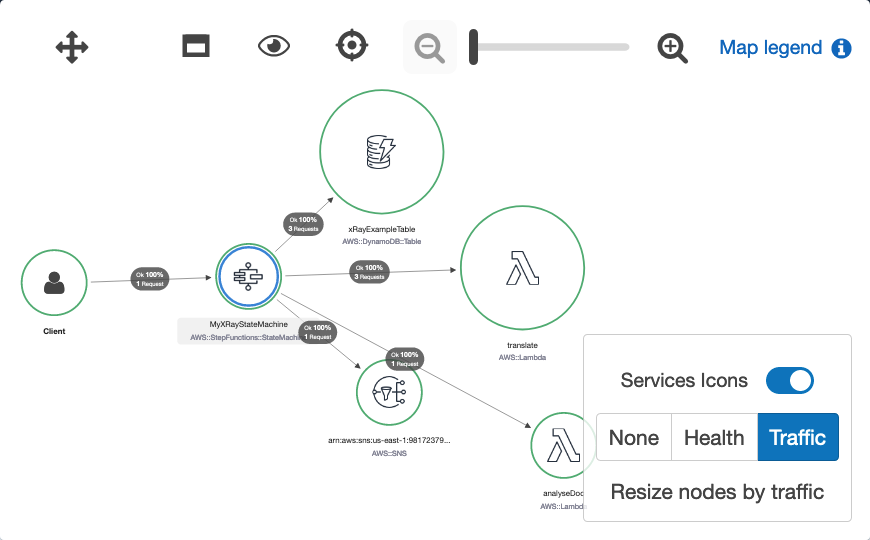
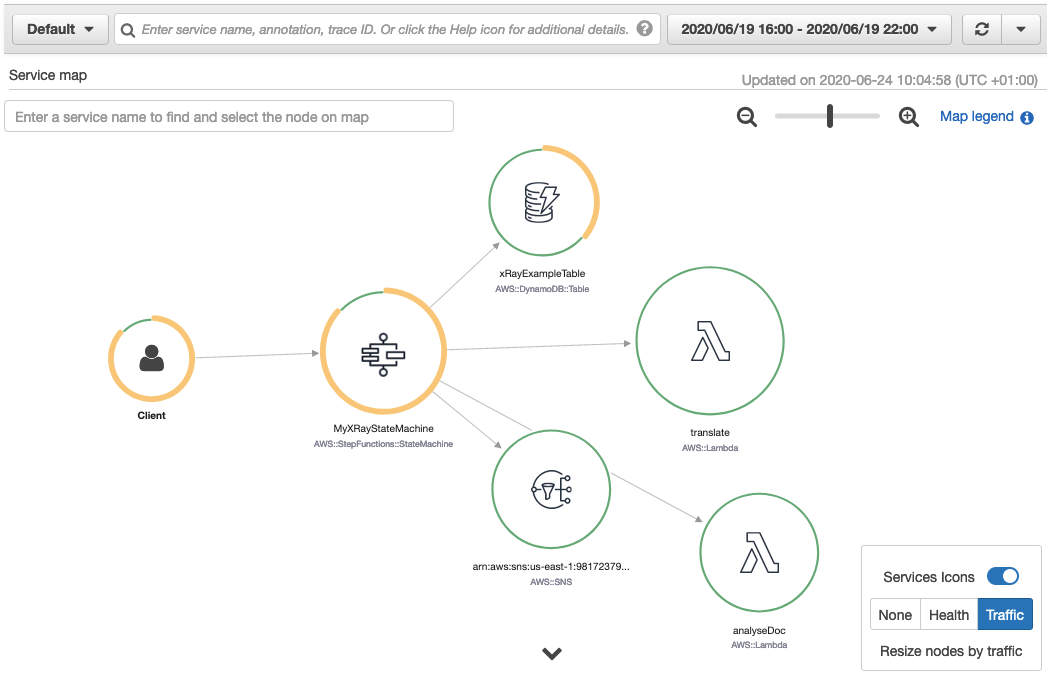
The service map is generated from trace data sent through the workflow. Toggling the Service Icons displays each individual service in this workload. The size of each node is weighted by traffic or health, depending on the selection.

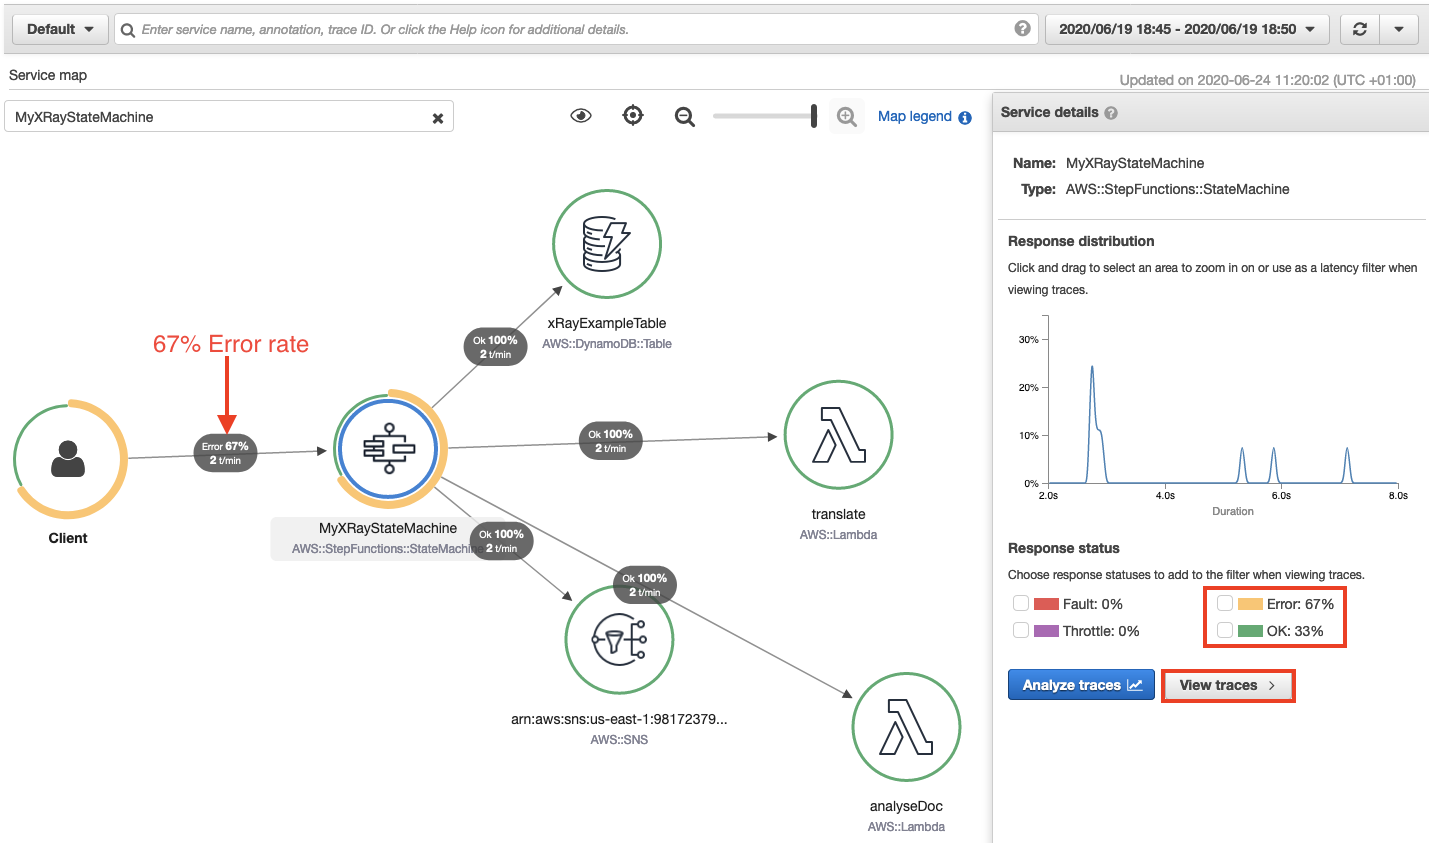
This shows the error percentage and average response times for each downstream service. T/min is the number of traces sent per minute in the selected time range. The following map shows a 67% error rate for the Step Functions workflow.

Accelerated troubleshooting

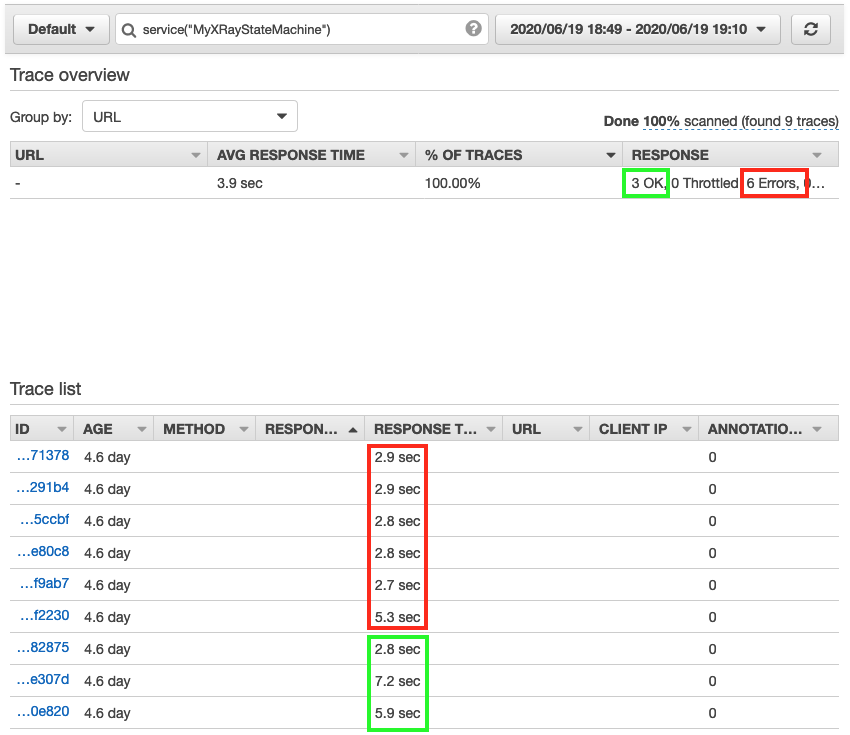
By drilling down through the service map, to the individual trace map, I quickly pinpoint the error in this workflow. I choose the Step Functions service from the trace map. This opens the service details panel. I then choose View traces. The trace data shows that from a group of nine responses, 3 completed successfully and 6 completed with error. This correlates with the response times listed for each individual trace. Three traces complete in over 5 seconds, while 6 took less than 3 seconds.

Choosing one of the faster traces opens the trace timeline map. This illustrates the aggregate response time for the workflow and each of its states. It shows a state named Read text from image invoked by a Lambda Function. This takes 2.3 seconds of the workflow’s total 2.9 seconds to complete.

A warning icon indicates that an error has occurred in this Lambda function. Hovering the curser over the icon, reveals that the property “Blocks” is undefined. This shows that an error occurred within the Lambda function (no text was found within the image). The Lambda function did not have sufficient error handling to manage this error gracefully, so the workflow exited.

Here’s how that same state execution failure looks in the Step Functions Graph inspector.

Performance profiling

The visualizations provided in the service map are useful for estimating the average latency in a workflow, but issues are often indicated by statistical outliers. To help investigate these, the Response distribution graph shows a distribution of latencies for each state within a workflow, and its downstream services.

Latency is the amount of time between when a request starts and when it completes. It shows duration on the x-axis, and the percentage of requests that match each duration on the y-axis. Additional filters are applied to find traces by duration or status code. This helps to discover patterns and to identify specific cases and clients with issues at a given percentile.

Sampling

X-Ray applies a sampling algorithm to determine which requests to trace. A sampling rate of 100% is used for state machines with an execution rate of less than one per second. State machines running at a rate greater than one execution per second default to a 5% sampling rate. Configure the sampling rate to determine what percentage of traces to sample. Enable trace sampling with the AWS Command Line Interface (AWS CLI) using the CreateStateMachine and UpdateStateMachine APIs with the enable-Trace-Sampling attribute:

--enable-trace-sampling true

It can also be configured in the AWS Management Console.

Trace data retention and limits

X-Ray retains tracing data for up to 30 days with a single trace holding up to 7 days of execution data. The current minimum guaranteed trace size is 100Kb, which equates to approximately 80 state transitions.   The actual number of state transitions supported will depend on the upstream and downstream calls and duration of the workflow. When the trace size limit is reached, the trace cannot be updated with new segments or updates to existing segments. The traces that have reached the limit are indicated with a banner in the X-Ray console.

For a full service comparison of X-Ray trace data and Step Functions execution history, please refer to the documentation.

Conclusion

The Step Functions integration with X-Ray provides a single monitoring dashboard for workflows running at scale. It provides a high-level system overview of all workflow resources and the ability to drill down to view detailed timelines of workflow executions. You can now use the orchestration capabilities of Step Functions with the tracing, visualization, and debug capabilities of AWS X-Ray.

This enables developers to reduce problem resolution times by visually identifying errors in resources and viewing error rates across workflow executions. You can profile and improve application performance by identifying outliers while analyzing and debugging high latency and jitter in workflow executions.

This feature is available in all Regions where both AWS Step Functions and AWS X-Ray are available. View the AWS Regions table to learn more. For pricing information, see AWS X-Ray pricing.

To learn more about Step Functions, read the Developer Guide. For more serverless learning resources, visit https://serverlessland.com.

Introducing larger state payloads for AWS Step Functions

Post Syndicated from Rob Sutter original https://aws.amazon.com/blogs/compute/introducing-larger-state-payloads-for-aws-step-functions/

AWS Step Functions allows you to create serverless workflows that orchestrate your business processes. Step Functions stores data from workflow invocations as application state. Today we are increasing the size limit of application state from 32,768 characters to 256 kilobytes of data per workflow invocation. The new limit matches payload limits for other commonly used serverless services such as Amazon SNS, Amazon SQS, and Amazon EventBridge. This means you no longer need to manage Step Functions payload limitations as a special case in your serverless applications.

Faster, cheaper, simpler state management

Previously, customers worked around limits on payload size by storing references to data, such as a primary key, in their application state. An AWS Lambda function then loaded the data via an SDK call at runtime when the data was needed. With larger payloads, you now can store complete objects directly in your workflow state. This removes the need to persist and load data from data stores such as Amazon DynamoDB and Amazon S3. You do not pay for payload size, so storing data directly in your workflow may reduce both cost and execution time of your workflows and Lambda functions. Storing data in your workflow state also reduces the amount of code you need to write and maintain.

AWS Management Console and workflow history improvements

Larger state payloads mean more data to visualize and search. To help you understand that data, we are also introducing changes to the AWS Management Console for Step Functions. We have improved load time for the Execution History page to help you get the information you need more quickly. We have also made backwards-compatible changes to the GetExecutionHistory API call. Now if you set includeExecutionData to false, GetExecutionHistory excludes payload data and returns only metadata. This allows you to debug your workflows more quickly.

Doing more with dynamic parallelism

A larger payload also allows your workflows to process more information. Step Functions workflows can process an arbitrary number of tasks concurrently using dynamic parallelism via the Map State. Dynamic parallelism enables you to iterate over a collection of related items applying the same process to each item. This is an implementation of the map procedure in the MapReduce programming model.

When to choose dynamic parallelism

Choose dynamic parallelism when performing operations on a small collection of items generated in a preliminary step. You define an Iterator, which operates on these items individually. Optionally, you can reduce the results to an aggregate item. Unlike with parallel invocations, each item in the collection is related to the other items. This means that an error in processing one item typically impacts the outcome of the entire workflow.

Example use case

Ecommerce and line of business applications offer many examples where dynamic parallelism is the right approach. Consider an order fulfillment system that receives an order and attempts to authorize payment. Once payment is authorized, it attempts to lock each item in the order for shipment. The available items are processed and their total is taken from the payment authorization. The unavailable items are marked as pending for later processing.

The following Amazon States Language (ASL) defines a Map State with a simplified Iterator that implements the order fulfillment steps described previously.


    "Map": {
      "Type": "Map",
      "ItemsPath": "$.orderItems",
      "ResultPath": "$.packedItems",
      "MaxConcurrency": 40,
      "Next": "Print Label",
      "Iterator": {
        "StartAt": "Lock Item",
        "States": {
          "Lock Item": {
            "Type": "Pass",
            "Result": "Item locked!",
            "Next": "Pull Item"
          },
          "Pull Item": {
            "Type": "Pass",
            "Result": "Item pulled!",
            "Next": "Pack Item"
          },
          "Pack Item": {
            "Type": "Pass",
            "Result": "Item packed!",
            "End": true
          }
        }
      }
    }

The following image provides a visualization of this workflow. A preliminary state retrieves the collection of items from a data store and loads it into the state under the orderItems key. The triple dashed lines represent the Map State which attempts to lock, pull, and pack each item individually. The result of processing each individual item impacts the next state, Print Label. As more items are pulled and packed, the total weight increases. If an item is out of stock, the total weight will decrease.

A visualization of a portion of an AWS Step Functions workflow that implements dynamic parallelism

Dynamic parallelism or the “Map State”

Larger state payload improvements

Without larger state payloads, each item in the $.orderItems object in the workflow state would be a primary key to a specific item in a DynamoDB table. Each step in the “Lock, Pull, Pack” workflow would need to read data from DynamoDB for every item in the order to access detailed item properties.

With larger state payloads, each item in the $.orderItems object can be a complete object containing the required fields for the relevant items. Not only is this faster, resulting in a better user experience, but it also makes debugging workflows easier.

Pricing and availability

Larger state payloads are available now in all commercial and AWS GovCloud (US) Regions where Step Functions is available. No changes to your workflows are required to use larger payloads, and your existing workflows will continue to run as before. The larger state is available however you invoke your Step Functions workflows, including the AWS CLI, the AWS SDKs, the AWS Step Functions Data Science SDK, and Step Functions Local.

Larger state payloads are included in existing Step Functions pricing for Standard Workflows. Because Express Workflows are priced by runtime and memory, you may see more cost on individual workflows with larger payloads. However, this increase may also be offset by the reduced cost of Lambda, DynamoDB, S3, or other AWS services.

Conclusion

Larger Step Functions payloads simplify and increase the efficiency of your workflows by eliminating function calls to persist and retrieve data. Larger payloads also allow your workflows to process more data concurrently using dynamic parallelism.

With larger payloads, you can minimize the amount of custom code you write and focus on the business logic of your workflows. Get started building serverless workflows today!