Tag Archives: AWS CloudShell

Migrate production SMS traffic to a short code with AWS End User Messaging

Post Syndicated from Harshvardhan Chunawala original https://aws.amazon.com/blogs/messaging-and-targeting/migrate-production-sms-traffic-to-a-short-code-with-aws-end-user-messaging/

Your new short code just went active, and you’re ready to migrate production SMS traffic to it from a toll-free number or 10-digit long code (10DLC) where you have collected two years of opt-outs. Those recipients still expect to stay opted out. Your STOP and HELP keywords, along with any custom keywords, must work on the new number from the first message. Carriers also treat the short code as a brand-new sender, with no record of the consent history attached to your old number. A misstep can result in messages blocked at the carrier level or, worse, messages delivered to recipients who believe they already unsubscribed.

This post walks through the operational mechanics of cutting over production SMS traffic to a short code using AWS End User Messaging SMS. It applies whether you’re migrating from a toll-free number, a 10DLC, or consolidating multiple originators into a single pool. It covers opt-out list migration, keyword handoff, carrier behavior while both originators are active, and validation steps to verify recipients are not disrupted.

Prerequisites

Before starting the migration, verify the following:

  • You send SMS through AWS End User Messaging SMS, using the SendTextMessage API in the pinpoint-sms-voice-v2 namespace.
  • Your new short code is in Active status in the AWS End User Messaging SMS console.
  • You have completed the short code registration and the carriers have approved it. Short code provisioning can take several weeks to months depending on carrier review, so plan accordingly.
  • You have AWS Identity and Access Management (IAM) permissions for the pinpoint-sms-voice-v2 API actions used in this post: DescribePhoneNumbers, DescribeOptedOutNumbers, CreateOptOutList, PutOptedOutNumber, UpdatePhoneNumber, UpdatePool, DescribeOptOutLists, DescribeKeywords, PutKeyword, CreateConfigurationSet, CreateEventDestination, CreatePool, AssociateOriginationIdentity, DisassociateOriginationIdentity, SendTextMessage, ReleasePhoneNumber, and DeleteOptOutList. The export and backfill scripts also need s3:PutObject and s3:GetObject on the Amazon Simple Storage Service (Amazon S3) bucket that holds the export, and creating the event destination requires iam:PassRole for the Amazon CloudWatch Logs role.
  • The AWS Command Line Interface (AWS CLI) version 2 and jq are installed. Both are available in AWS CloudShell.
  • The new short code is not yet associated with a pool. The UpdatePhoneNumber API returns an error if the phone number is already in a pool. Complete all per-number configuration (opt-out list, keywords, two-way messaging) before adding the short code to any pool.
  • If you use self-managed opt-outs, your application already handles STOP and HELP responses and logs opt-out state externally.

The migration surface area

Three data structures travel with an origination identity in AWS End User Messaging SMS, and all three must be accounted for during a migration:

Opt-out lists. Each origination identity is associated with one opt-out list containing phone numbers that have sent STOP (or an equivalent keyword) to that originator. When you provision a phone number, AWS End User Messaging SMS assigns it to the account’s Default opt-out list, so in many accounts every originator shares that single list. If you created custom opt-out lists to separate opt-outs by use case, you need to associate the new originator with the same list.

Keyword configurations. Keywords like STOP, HELP, UNSTOP, and any custom keywords you defined (for example, JOIN or PROMO) each carry an action (OPT_OUT, OPT_IN, or AUTOMATIC_RESPONSE) and a response message. These are configured per origination identity or per phone pool.

Two-way messaging configuration. If your application processes inbound messages through an Amazon Simple Notification Service (Amazon SNS) topic, the new originator must be wired to the same (or equivalent) topic before cutover.

Migrating opt-out lists

The opt-out list is the most critical piece of the migration. Sending a message to someone who previously opted out is a compliance violation in most jurisdictions, and US carriers impose fines for it.

Start by confirming which opt-out list your current originator and your new short code are associated with. The following command returns both in one call. The --phone-number-ids parameter takes the phone number ID or Amazon Resource Name (ARN), not the E.164 number. You can find the ID in the AWS End User Messaging SMS console or by running describe-phone-numbers without parameters.

aws pinpoint-sms-voice-v2 describe-phone-numbers \
    --phone-number-ids "old-number-id" "short-code-id" \
    --query "PhoneNumbers[].[PhoneNumber,NumberType,MessageType,OptOutListName]" \
    --output table

The result determines your migration path:

  • Both originators use the Default list. Opt-outs are already shared. A recipient who opted out on the old number is also blocked on the new short code, so no backfill is needed. Run the export in the next step to create a baseline for validation, then skip ahead to Replicating keyword configurations section.
  • The old originator uses a custom list. Associate the short code with the same list, or create a dedicated list and backfill it. Both options are described later in this section.
  • You want the short code on its own list. Create a dedicated list and backfill it from whichever list the old originator uses today.

If self-managed opt-outs are turned on for your old originator, AWS End User Messaging SMS doesn’t add STOP replies to the opt-out list automatically. In that case, your application’s opt-out records are the source of truth. Import them into the list associated with the short code before cutover.

Next, export every opted-out number from the opt-out list associated with your current origination identity. If you are using the Default opt-out list, invoke DescribeOptedOutNumbers with the opt-out list name set to Default. For custom opt-out lists, specify the list name you associated with your toll-free or 10DLC number.

aws pinpoint-sms-voice-v2 describe-opted-out-numbers \
    --opt-out-list-name "my-marketing-optout-list" \
    --max-results 100 \
    --output json > opted-out-numbers.json

If the response contains a NextToken, the list has more entries. Paginate until NextToken is no longer present. The following script automates the full export:

OPT_OUT_LIST="my-marketing-optout-list" # replace with your opt-out list name
S3_BUCKET="s3://amzn-s3-demo-sms-blog-example" # replace with your S3 bucket
NEXT_TOKEN=""
OUTPUT_FILE=$(mktemp)
export AWS_RETRY_MODE=adaptive # back off automatically when throttled
export AWS_MAX_ATTEMPTS=10

while true; do
    RESPONSE=$(aws pinpoint-sms-voice-v2 describe-opted-out-numbers \
        --opt-out-list-name "$OPT_OUT_LIST" \
        --max-results 100 \
        ${NEXT_TOKEN:+--next-token "$NEXT_TOKEN"} \
        --cli-read-timeout 120 \
        --output json)
    echo "$RESPONSE" | jq -c '.OptedOutNumbers[]' >> "$OUTPUT_FILE"
    NEXT_TOKEN=$(echo "$RESPONSE" | jq -r '.NextToken // empty')
    [ -z "$NEXT_TOKEN" ] && break
    sleep 1 # respect the 1 RPS rate limit
done

# Upload to S3 for durable storage
aws s3 cp "$OUTPUT_FILE" "${S3_BUCKET}/opted-out-numbers.jsonl"
rm "$OUTPUT_FILE"
echo "Exported to ${S3_BUCKET}/opted-out-numbers.jsonl"

The script writes to a temporary file and then uploads it to Amazon S3. This keeps the export durable regardless of where you run the command (a local workstation, an Amazon Elastic Compute Cloud (Amazon EC2) instance, or AWS CloudShell). You will reference this file during the backfill step.

The --cli-read-timeout flag raises the per-request read timeout above the 60-second default, which helps over slow connections, and adaptive retry mode keeps a long export running through brief throttling.

If your old originator uses a custom list, or you want the short code on its own list, choose one of the following approaches.

Sharing the same opt-out list

If your old and new originators serve the same use case and you want a single source of truth, associate the new short code with the same custom opt-out list your old number used. Use UpdatePhoneNumber to set the OptOutListName on the new short code:

aws pinpoint-sms-voice-v2 update-phone-number \
    --phone-number-id "short-code-id" \
    --opt-out-list-name "my-marketing-optout-list"

This approach means both originators honor the same opt-out entries during the transition period while you run them in parallel.

Important: The UpdatePhoneNumber API returns an error if the phone number is already associated with a pool. You must set the opt-out list on the short code before adding it to any pool. If the short code is already in a pool, use UpdatePool with the --opt-out-list-name parameter instead.

Creating a dedicated opt-out list and backfilling

If you want the new short code to have its own opt-out list (recommended when you plan to decommission the old number entirely), create a new list and import the exported numbers:

aws pinpoint-sms-voice-v2 create-opt-out-list \
    --opt-out-list-name "shortcode-marketing-optout"

Then import each opted-out number:

aws pinpoint-sms-voice-v2 put-opted-out-number \
    --opt-out-list-name "shortcode-marketing-optout" \
    --opted-out-number "+12065550123"

Production opt-out lists often hold 100,000 numbers or more, so plan the backfill as a batch job. PutOptedOutNumber has a default quota of 10 requests per second (RPS), and DescribeOptedOutNumbers, which the export uses, has a default of 1 RPS. At those defaults, exporting 100,000 numbers takes at least 17 minutes (1,000 pages of 100 results). Importing them takes at least 2 hours and 45 minutes, and longer in practice because each AWS CLI call adds startup time.

The following script reads the export from Amazon S3 and imports numbers in batches of 10. It runs each batch in parallel, waits for the batch to finish, and then sleeps for one second before starting the next one, which keeps the import at or below the default quota. Numbers that still fail after retries are written to a file so you can rerun them.

OPT_OUT_LIST="shortcode-marketing-optout" # replace with your new opt-out list name
S3_EXPORT="s3://amzn-s3-demo-sms-blog-example/opted-out-numbers.jsonl" # export file from the previous step
BATCH_SIZE=10 # default PutOptedOutNumber quota is 10 RPS
export AWS_RETRY_MODE=adaptive # back off automatically when throttled
export AWS_MAX_ATTEMPTS=10

aws s3 cp "$S3_EXPORT" - | jq -r '.OptedOutNumber' > numbers.txt
: > failed-numbers.txt
TOTAL=$(wc -l < numbers.txt | tr -d ' ')
COUNT=0

while read -r NUMBER; do
    aws pinpoint-sms-voice-v2 put-opted-out-number \
        --opt-out-list-name "$OPT_OUT_LIST" \
        --opted-out-number "$NUMBER" \
        < /dev/null > /dev/null 2>&1 \
        || echo "$NUMBER" >> failed-numbers.txt &
    COUNT=$((COUNT + 1))
    if [ $((COUNT % BATCH_SIZE)) -eq 0 ]; then
        wait # let the current batch finish
        sleep 1 # stay within the per-second quota
        echo "Imported $COUNT of $TOTAL"
    fi
done < numbers.txt
wait
echo "Done. $(wc -l < failed-numbers.txt | tr -d ' ') numbers failed. See failed-numbers.txt"

The AWS_RETRY_MODE and AWS_MAX_ATTEMPTS settings tell the AWS CLI to back off and retry when a request is throttled, instead of stopping at the first ThrottlingException. If you raise BATCH_SIZE after a quota increase, keep the one-second sleep so each batch stays within your approved rate. When the import finishes, rerun any numbers in failed-numbers.txt, then compare the count against your export as described in Validating the migration section.

If the backfill window is too long for your migration plan, request a higher rate for PutOptedOutNumber and DescribeOptedOutNumbers. Every action in the pinpoint-sms-voice-v2 API is eligible for a rate increase through the Service Quotas console or an AWS Support case, as described in Quotas for AWS End User Messaging SMS. AWS Support provides an initial response within 24 hours, so submit the request several days before your migration window.

After backfilling, associate the new list with the short code using UpdatePhoneNumber (before the short code is added to a pool).

One important nuance: Nothing outside your AWS opt-out list carries over to the short code. For US toll-free numbers, carriers also block STOP senders at the network level, but that block is tied to the specific toll-free number and does not transfer. Opt-outs recorded against a 10DLC campaign likewise stay with that campaign. From the carrier’s perspective the short code is a new sender, so the opt-out list associated with it, whether shared with your old number or backfilled from your export, is the only mechanism that honors prior opt-out requests.

Replicating keyword configurations

Keywords define how your originator responds to inbound messages. If a recipient texts HELP to your current toll-free number and receives a support message, the same behavior must exist on the new short code before any traffic shifts.

Export the keyword configuration from your existing originator:

aws pinpoint-sms-voice-v2 describe-keywords \
    --origination-identity "old-number-id"

For each keyword returned, replicate it on the new short code with the same action and response message:

aws pinpoint-sms-voice-v2 put-keyword \
    --origination-identity "short-code-id" \
    --keyword "STOP" \
    --keyword-message "You have been unsubscribed. No more messages will be sent. Reply START to re-subscribe." \
    --keyword-action "OPT_OUT"

Repeat for HELP, any OPT_IN keywords (like START or UNSTOP), and custom AUTOMATIC_RESPONSE keywords. Verify each one by invoking DescribeKeywords on the new originator and comparing the output against your source configuration.

If your existing originator also routes inbound messages to an Amazon SNS topic for two-way processing, configure the same on the new short code:

aws pinpoint-sms-voice-v2 update-phone-number \
    --phone-number-id "short-code-id" \
    --two-way-enabled \
    --two-way-channel-arn "arn:aws:sns:us-east-1:123456789012:sms-inbound-topic"

For self-managed opt-out configurations where your application handles STOP and HELP logic rather than the service, turn on that setting for the new originator as well. Two-way messaging must be turned on before you can turn on self-managed opt-outs:

aws pinpoint-sms-voice-v2 update-phone-number \
    --phone-number-id "short-code-id" \
    --self-managed-opt-outs-enabled

With self-managed opt-outs enabled, AWS End User Messaging SMS stops automatically processing STOP and HELP keywords. Your application receives these messages through the SNS topic and must handle opt-out logic, respond to the sender, and maintain compliance records.

Order of operations. UpdatePhoneNumber returns an error after a phone number is associated with a pool, and CreatePool copies the short code’s keywords, opt-out list, two-way settings, and self-managed opt-out setting into the new pool. Complete the per-number configuration on the short code in this order:

  1. Set the opt-out list (UpdatePhoneNumber --opt-out-list-name). Skip this step if both originators use the Default opt-out list.
  2. Replicate keywords (PutKeyword).
  3. Turn on two-way messaging (UpdatePhoneNumber --two-way-enabled).
  4. Turn on self-managed opt-outs, if you use them (UpdatePhoneNumber --self-managed-opt-outs-enabled). This step requires two-way messaging from step 3.
  5. Add the short code to a pool (CreatePool with the short code as the origination identity, or AssociateOriginationIdentity for an existing pool).

If you need to change a setting after step 5, use UpdatePool to change the pool-level configuration instead.

Carrier behavior during transitions

Carriers treat each originator type as an independent entity. This is the operational reality that makes originator migrations more complex than a configuration change.

Toll-free to short code. US carriers manage toll-free opt-outs at the carrier network level. When a recipient sends STOP to your toll-free number, the carrier blocks future messages from that specific toll-free number. This block does not carry over to your short code. From the carrier perspective, the short code is an entirely new sender. Your responsibility is to honor prior opt-outs through the short code’s opt-out list, either by sharing the list your toll-free number uses or by importing its entries, even though the carrier won’t enforce them automatically.

10DLC to short code. 10DLC numbers and short codes go through separate registration processes. Your 10DLC campaign is registered with The Campaign Registry (TCR). A US short code goes through its own brand vetting by the US Short Code Registry and approval by each carrier. Moving traffic to the short code doesn’t change your 10DLC campaign. The campaign stays active, and the old number stays associated with it, until you release the number and delete the campaign as described in Cleaning up section. Opt-outs recorded against your 10DLC campaign also don’t carry over to the short code. The opt-out list associated with your short code, whether shared with your old number or backfilled from your export, is the authoritative source of truth.

Behavior while both originators are active. During the transition window when both your old and new originators are sending to the same recipient pool, a recipient might receive messages from both numbers in the same day. As a general practice, avoid sending identical content from both originators to the same recipient, because carriers might interpret this as duplicate messaging.

Grace period considerations. There is no industry-standard grace period for originator transitions. After you stop sending from the old originator, recipients can no longer text STOP to it (since the number will eventually be decommissioned or reassigned). This creates a gap: a recipient who wants to opt out during the transition might not know which number to text. The mitigation is to communicate the number change proactively. Send a one-time notification from the old originator informing recipients that future messages will come from the new short code, and include opt-out instructions for the new number.

Configuring delivery event monitoring

Before any production traffic reaches the short code, set up a configuration set with an event destination so you can compare delivery results between your old and new originators. AWS End User Messaging SMS sends basic events to Amazon EventBridge by default, but those events omit the recipient phone number and identify the sender by phone number ID, which makes side-by-side comparison and alarming difficult. A configuration set with an event destination streams full event records to Amazon CloudWatch Logs, Amazon Data Firehose, or Amazon SNS.

If you already send with a configuration set that has an event destination, keep using it for both originators and skip to the query later in this section. Otherwise, create a configuration set and a CloudWatch Logs event destination. The event destination requires an existing log group and an IAM role that allows AWS End User Messaging SMS to write to it, as described in Set up an Amazon CloudWatch event destination.

aws pinpoint-sms-voice-v2 create-configuration-set \
    --configuration-set-name "shortcode-migration"

aws pinpoint-sms-voice-v2 create-event-destination \
    --configuration-set-name "shortcode-migration" \
    --event-destination-name "migration-delivery-logs" \
    --matching-event-types TEXT_ALL \
    --cloud-watch-logs-destination IamRoleArn=arn:aws:iam::123456789012:role/SMSEventsToCloudWatch,LogGroupArn=arn:aws:logs:us-east-1:123456789012:log-group:/aws/sms/shortcode-migration

Configuration sets apply per message, not per originator. Pass --configuration-set-name on every SendTextMessage request during the transition, whether the request goes to the old number, the short code, or a pool that contains both. Messages sent without it don’t reach the event destination.

Each event record includes an originationPhoneNumber field, so a single configuration set covers both originators. To compare them, run the following query in CloudWatch Logs Insights against your log group:

fields originationPhoneNumber, eventType
| stats count(*) as events by originationPhoneNumber, eventType
| sort originationPhoneNumber asc

Run the query once before cutover to record a baseline for the old originator, then again throughout the transition window.

Cutover strategy

A hard cutover (switching 100% of traffic instantly) introduces risk you can avoid. Two approaches work well for phased migrations.

Pool-based routing. Create a phone pool containing both your old originator and the new short code. When you send through a pool, AWS End User Messaging SMS selects an originator from the pool. Start with a 48- to 72-hour validation window where both originators serve traffic. Monitor delivery events in the log group you configured in Configuring delivery event monitoring section, comparing delivery rates and carrier failure events per originator, and track new opt-outs in your opt-out list. After the short code’s delivery success rate is consistent with the old number’s rate, begin the final cutover by removing the old originator from the pool.

When creating the pool, understand that the pool inherits its configuration (keywords, message type, opt-out list, two-way settings, and self-managed opt-out configuration) from the origination identity you specify in the CreatePool request. Deletion protection isn’t inherited and defaults to false regardless of the source originator’s setting. Because this pool carries production traffic, turn on deletion protection explicitly when you create the pool, or later with UpdatePool. If you want the short code’s configuration to be the pool default, use it as the origination identity when creating the pool, then associate the old number afterward using AssociateOriginationIdentity.

aws pinpoint-sms-voice-v2 create-pool \
    --origination-identity "short-code-id" \
    --iso-country-code "US" \
    --message-type "TRANSACTIONAL" \
    --deletion-protection-enabled

Set --message-type to the message type of your short code.

Three constraints apply:

  1. Configuration match required. Every phone number you add to a pool must have the same configuration as the first number specified when the pool was created, and AssociateOriginationIdentity returns an error if it doesn’t. For example, if the pool was created with a number that has two-way messaging enabled, the other number must also have two-way messaging enabled before you can add it to the pool. The same applies to opt-out lists: both numbers must use the same list. If you created a dedicated opt-out list for the short code, either use application-layer routing during the parallel run, or keep both numbers on the shared list while they are in the pool and switch the pool to the dedicated list with UpdatePool after you remove the old number.
  2. Matching message type. The pool’s message type (TRANSACTIONAL or PROMOTIONAL) comes from the number you create it with and can’t be changed after the pool is created. You can’t add a TRANSACTIONAL number to a pool created from a PROMOTIONAL number, or the reverse. A phone number’s message type is set when you request the number, and UpdatePhoneNumber doesn’t change it. If your old number and short code have different message types, use application-layer routing instead.
  3. One pool per phone number. A phone number can only be associated with one pool at a time. If your old originator is already in a different pool, you must disassociate it first using DisassociateOriginationIdentity.

Application-layer routing. If pool-based routing does not fit your architecture (for example, if you need deterministic control over which recipients see which originator), implement the split at the application layer. Route a percentage of recipients to the new short code using a feature flag or weighted distribution. Increase the percentage gradually over several days as delivery metrics hold. This gives you granular control, and you can roll back instantly by setting the weight back to zero.

Rollback. If delivery rates on the short code drop significantly below the old originator’s baseline, or you observe a spike in TEXT_CARRIER_UNREACHABLE events, revert immediately. For pool-based routing, remove the short code from the pool. For application-layer routing, set the short code weight to zero. Investigate the root cause before resuming.

Timing. Plan the cutover during business hours on a weekday when your team and carrier support are available, in case issues arise that require investigation.

Whichever approach you choose, send the recipient transition notification from the old originator before beginning the cutover. In this message, tell recipients that future messages will arrive from the new short code number, and remind them they can reply STOP at any time.

Validating the migration

Before decommissioning the old originator, verify four things.

Opt-out list completeness. Compare the count of entries in the new opt-out list against your exported baseline. Paginate through DescribeOptedOutNumbers for both the original export and the new list, and compare the totals. If you backfilled a dedicated list, the numbers should match exactly. If you shared a list between both originators, verify that new opt-outs received during the transition period are being recorded.

Keyword responses. Send test messages containing each keyword (STOP, HELP, custom keywords) to the new short code from a test handset. Verify that the response messages match your expected content and that the opt-out or opt-in actions fire correctly in your opt-out list.

Inbound message routing. Send a non-keyword message to the new short code and verify it arrives at your SNS topic and is processed by your application. This validates the two-way messaging path end to end.

Delivery metrics. Compare delivery success rates on the new short code against the old originator over your transition window. Use the event destination configured on your configuration set to track per-originator delivery events in Amazon CloudWatch. Watch for elevated failure rates that might indicate a carrier-side issue with the short code registration that needs resolution before you complete the cutover.

Cleaning up

After the migration is validated and the old originator is no longer receiving traffic:

  • Remove the old origination identity from any phone pools using DisassociateOriginationIdentity.
  • If the old number was a toll-free or 10DLC you no longer need, release it through the AWS End User Messaging SMS console or by using the ReleasePhoneNumber API to stop incurring monthly lease charges. Releasing a number is permanent and removes your rollback path, so wait until the short code has carried production traffic through your validation window.
  • If you moved off a 10DLC number, delete the 10DLC campaign after every number associated with it is released. The campaign’s recurring registration fee continues until you delete it. You can delete the campaign under Registrations in the AWS End User Messaging SMS console, as described in Delete a registration. Deleted campaigns can’t be restored. If other 10DLC numbers still send under the campaign, keep it.
  • If the old originator used a custom opt-out list that no other originator or pool references, delete it with DeleteOptOutList. Keep the Default opt-out list, which every account requires.
  • Update any IAM policies, alarm configurations, or configuration sets that referenced the old originator’s ARN.

Conclusion

In this post, we showed how to migrate production SMS traffic from a toll-free number or 10DLC to a short code using AWS End User Messaging SMS. The critical areas are opt-out list portability, keyword configuration replication, carrier-level opt-out isolation between originator types, and a phased cutover with rollback readiness.

Carriers treat your short code as a brand-new sender, so carrier-level STOP blocks on a toll-free number and opt-outs recorded against a 10DLC campaign stay with the old number. The opt-out list associated with your short code is the only record that protects recipients who already unsubscribed. By confirming which opt-out list each originator uses, migrating consent records where needed, validating behavior on the new originator, and monitoring delivery metrics against a defined baseline before completing the cutover, you reduce the risk of compliance violations and delivery disruptions.

To begin, run the opt-out list check in Migrating opt-out lists section against your current originator and your short code, and set up the configuration set described in “Configuring delivery event monitoring” so you have a baseline before cutover. If your short code is still being provisioned, see Getting your SMS short code production-ready with AWS End User Messaging. For consent requirements and registration planning, see A Guide to SMS Short Codes with AWS End User Messaging. If you send from multiple AWS accounts and want them to share the short code, a pool, or an opt-out list, see A Complete Guide to Resource Sharing for AWS End User Messaging. For the full API reference, see the AWS End User Messaging SMS and Voice v2 API documentation, or visit the AWS End User Messaging SMS detail page.

About the authors

Harshvardhan Chunawala

Harshvardhan Chunawala

Harshvardhan Chunawala is an AWS Golden Jacket awardee, a Solutions Architect at AWS, and an AWS Academy Authorized Educator. A globally recognized thought leader in cloud security with over a decade of experience, he leads cross-functional efforts across Amazon teams to shape frontier capabilities in cloud security, aerospace and trustworthy AI services. Harshvardhan is an advisory board member, Visiting Faculty, and cybersecurity researcher at Carnegie Mellon University, where he served as Space Mission Engineering Lead for the United States’ first lunar mission since Apollo 17 under NASA’s CLPS program. He is a former lead research fellow at Stanford’s SLAC National Accelerator Laboratory for U.S. Department of Energy projects in secure distributed computing and smart electric grids. Away from the keyboard, Harshvardhan pursues his love of the skies through skydiving and flying planes.

Zip Zieper

Zip Zieper

Zip is a Senior Worldwide Specialist Solutions Architect at AWS focused on messaging and communications services. He helps customers design compliant, high-throughput SMS architectures across industries.

Brett Ezell

Brett Ezell

Brett is a Solutions Architect for AWS End User Messaging and Amazon Simple Email Service. Outside of work, Brett spends his time collecting vinyl, comic books, catching live shows, and training at the gym.

AWS Weekly Roundup: Student Rewards on AWS Builder Center, Local Zone in Las Vegas, and more (August 24, 2026)

Post Syndicated from Esra Kayabali original https://aws.amazon.com/blogs/aws/aws-weekly-roundup-student-rewards-on-aws-builder-center-local-zone-in-las-vegas-and-more-august-24-2026/

During my time at AWS, I have always looked for opportunities to work with students. I have delivered over 50 talks at universities across the region, and watching the potential in the room is always a strong motivator. It reminds me of why I do this work, and that the students I meet today may well become our customers and collaborators tomorrow. That is why I am happy to open this week with Student Rewards on AWS Builder Center.

Rick Suttles published Introducing Student Rewards on AWS Builder Center, a new benefit for verified higher education students. When you verify your enrollment through SheerID and complete your Builder Center profile, you unlock 12 months of premium AWS Skill Builder access (900+ courses, hands-on labs, certification exam prep, and game-based learning). From there, you earn badges through actions on Builder Center: publishing articles, commenting, and maintaining engagement. At 7 badges, you unlock $10 in AWS Credits. At 14 badges, another $20 in credits. At 21 badges, you earn an AWS Foundational Certification exam voucher ($100 value).

This represents a commitment of over $500 million in resources during this back-to-school season, providing students with the training, tools, and certification needed to start building their careers in cloud and AI. Student Rewards is available to students 18 years or older and enrolled at accredited higher education institutions worldwide, subject to verification and applicable terms.

Verify your student status and start learning, earning badges, and unlocking rewards!

Last week’s launches
Here’s what else happened this week.

  • A new AWS Local Zone in Las Vegas, Nevada – This new Local Zone supports Amazon EC2 C7i, M7i, R7i, and C8gn instances, Amazon EBS, Amazon ECS, Amazon EKS, Application Load Balancer, and AWS Direct Connect. AWS Local Zones are now available in more than 30 metropolitan areas worldwide. In addition, AWS added a fourth Availability Zone to the Europe (London) Region, delivering next-generation AI and ML capacity with Trn3 and P6 accelerated instances alongside general-purpose compute.
  • Amazon EC2 Auto Scaling now supports batch instance termination – You can now pass up to 100 instance IDs to the TerminateInstanceInAutoScalingGroup API to terminate them as a batch, reducing the number of API calls needed to scale down your Auto Scaling groups. Batch termination is designed for workloads that need to rapidly scale down, such as AI/ML training jobs, container orchestrators, or event-driven architectures that spin up large fleets temporarily.
  • AWS CloudShell now includes a built-in visual file editor – CloudShell now includes a visual file editor that you can launch directly from your shell session using a single edit command. The editor supports syntax highlighting, find-and-replace, multi-line selection, copy-paste, and undo-redo in a single browser session. Whether you are updating a deployment script, modifying an agent steering file, editing a CloudFormation template, or fixing a Lambda function, the editor provides a seamless edit-and-run experience without leaving CloudShell.
  • Amazon Bedrock now supports SpaceXAI Grok 4.6 with cross-Region inference – Grok 4.6, a frontier model built for coding, agentic tasks, and knowledge work, is now available on Amazon Bedrock. The model runs on the bedrock-runtime endpoint with support for the Responses, Chat Completions, and Converse APIs, and works with existing account-level controls including model invocation logging, Amazon CloudWatch metrics, and cost itemization in AWS Cost Explorer.
  • Amazon Bedrock expands API support and introduces cross-Region inference for OpenAI models – Amazon Bedrock now supports OpenAI GPT-5.6 models (Sol, Terra, and Luna) with the Responses, Converse, and Chat Completions APIs, and adds cross-Region inference. Geo cross-Region inference routes requests within a predefined geography (including new US Geo support with this launch), while Global cross-Region inference serves requests from any commercial AWS Region at a lower per-token cost.
  • AgentCore payments is now generally available in Amazon Bedrock AgentCore – At general availability, AgentCore payments includes Quick Create for Coinbase credential provisioning directly within the AgentCore console, a curated Coinbase Bazar MCP server of pay-per-use x402 endpoints via AgentCore gateway, support for the Machine Payment Protocol (MPP), and the “upto” scheme in the x402 protocol for pay-per-inference and dynamic pricing use cases. To learn more, visit the AI Blog post.
  • AWS Glue 6.0 delivers 30% price reduction and Iceberg v3 support – AWS Glue 6.0 is built on a fully modernized runtime, Apache Spark 4.1, Python 3.13, and Scala 2.13, delivering 30% lower pricing than previous AWS Glue versions. With Iceberg v3, Glue 6.0 adds the VARIANT data type with automatic shredding for faster reads on semi-structured data, deletion vectors for high-performance row-level updates, geometry and geography data types for spatial processing, and flexible schema evolution.

For a full list of AWS announcements, be sure to keep an eye on the What’s New with AWS page.

Other AWS news
Here are some additional posts you may find useful:

  • Updates to your AWS Sign-In experience – AWS is gradually introducing updates to the sign-in and sign-up experience. The redesigned sign-in page introduces a unified email entry point for root users and customers using the new email-based sign-in method, while IAM users continue signing in with their account ID, username, and password. The page also includes sign-in options for customers whose AWS account was created using a supported identity provider (Google, GitHub, Apple, or Amazon.com). A redesigned session selection page simplifies viewing and managing multiple active account and role sessions. If your organization relies on browser automation or scripted workflows that interact with the sign-in page, review the post to understand how these changes might affect your configuration.
  • In the works: AWS Builder Lofts in Berlin, Hyderabad, and São Paulo – My colleague Channy announced plans to open new Builder Lofts in three cities. Since the first Builder Loft opened in San Francisco in July 2025, it has welcomed more than 22,500 developers through its doors. Each new location will be a permanent community space offering free workshops, networking events, pitch nights, content creation spaces, and co-working areas. Berlin will focus on digital sovereignty and security-readiness, Hyderabad on AI and cloud-native architecture, and São Paulo on supporting Latin America’s developer ecosystem.
  • AWS and Amazon WorkSpaces recognized as a Leader in the 2026 Gartner Magic Quadrant for Desktop as a Service – AWS has been named a Leader in the 2026 Gartner Magic Quadrant for Desktop as a Service (DaaS) for the third consecutive year, evaluated on Completeness of Vision and Ability to Execute. Gartner noted strengths in operations, geographic strategy, and overall viability. This is also the first year the evaluation includes Amazon WorkSpaces for AI agents, a capability that runs AI agents within the same desktop environment, security perimeter, and audit trail as human users.

For a full list of AWS blog posts, be sure to keep an eye on the AWS Blogs page.

Upcoming AWS events
Check your calendar and sign up for upcoming AWS events:

Visit the AWS Builder Center to meet other builders, contribute solutions, and find resources that help you keep building.

Summer is slowly coming to an end, and I am already planning a few days off in the coming months to keep me motivated through the rainy autumn ahead. I hope you are doing the same. Come back next week for more!

— Esra

How to migrate from AWS Cloud9 to AWS IDE Toolkits or AWS Cloudshell

Post Syndicated from Rodney Bozo original https://aws.amazon.com/blogs/devops/how-to-migrate-from-aws-cloud9-to-aws-ide-toolkits-or-aws-cloudshell/

Building with AWS requires you to interact with and manipulate your AWS resources, whether it’s to manage infrastructure, deploy applications, or troubleshoot issues and many AWS customers use AWS Cloud9 to do so today. However, developers want the ability to work with AWS resources within their own Integrated Development Environment (IDE) because it allows them to streamline their workflows and leverage familiar tools. Other customers still want the security and flexibility of working with their resources in the AWS Management Console, but with quicker access and portability across different pages. In this blog, we will discuss two solutions, the AWS IDE Toolkits and AWS CloudShell, and why you may want to migrate from AWS Cloud9 to one of these solutions.

Overview

The AWS IDE Toolkits are a set of open-source plugins that integrate AWS services directly into popular IDEs like Visual Studio Code, IntelliJ, and PyCharm. With these toolkits, you can manage AWS resources, deploy applications, and debug code without leaving your familiar development environment. Key features of the AWS IDE Toolkits include seamless access to AWS services, resource exploration and management, local debugging capabilities, and integration with AWS deployment tools like AWS CloudFormation and AWS SAM. The AWS IDE Toolkits saves you the hassle of deploying and managing an AWS Cloud9 EC2 instance in your account and allows you to interact with AWS services in the context of your IDE’s source code.

AWS CloudShell is a browser-based shell available directly in the AWS Management Console that provides a pre-authenticated and pre-configured environment for running interacting with AWS resources. AWS CLI is pre-installed in the AWS CloudShell environment, eliminating the need for you to install and configure the AWS CLI locally, making it easier to interact with AWS resources from anywhere. You can use AWS CloudShell to check or adjust a configuration file, make a quick fix to a production environment, or even experiment with new AWS services or features. Best of all, usage of AWS CloudShell is free. CloudShell’s accessibility from anywhere in the AWS Management Console makes it an ideal alternative when you want to interact with AWS resources via the command line over the web because you have limitations doing so on your local desktop.

Getting started

If you’re interested in leveraging the AWS IDE Toolkits, the onboarding process is straightforward. In many popular IDE’s like Visual Studio Code, you can simply install the AWS Toolkits extension in the IDE’s extension marketplace and authenticate with your AWS credentials to begin taking advantage of all of the AWS Toolkits features. For more detailed information about installation, you can see the onboarding steps for each supported IDE. To begin using AWS CloudShell, simply click the CloudShell icon in the AWS Management Console and follow the prompts to launch your shell environment. CloudShell leverages the credentials from your AWS Management Console sessions to provide a pre-authenticated shell environment. You can also explore detailed user guides and sample use cases to help you get familiar with the tool.


Figure 1: Click on the AWS CloudShell icon

Summary

Both the AWS IDE Toolkits and AWS CloudShell offer powerful capabilities for interacting with AWS resources. Whether you prefer working within your local IDE or a web-based terminal directly in the AWS Management Console, these solutions provide a seamless and efficient way to manage your AWS infrastructure and applications. Take the time to explore these options and see how they can enhance your development workflows. Finally, don’t forget to delete your AWS Cloud9 EC2 instances once you migrate to avoid incurring unnecessary future costs.

AWS Week in Review – Amazon EC2 Instance Connect Endpoint, Detective, Amazon S3 Dual Layer Encryption, Amazon Verified Permission – June 19, 2023

Post Syndicated from Sébastien Stormacq original https://aws.amazon.com/blogs/aws/aws-week-in-review-amazon-ec2-instance-connect-endpoint-detective-amazon-s3-dual-layer-encryption-amazon-verified-permission-june-19-2023/

This week, I’ll meet you at AWS partner’s Jamf Nation Live in Amsterdam where we’re showing how to use Amazon EC2 Mac to deploy your remote developer workstations or configure your iOS CI/CD pipelines in the cloud.Mac in an instant

Last Week’s Launches
While I was traveling last week, I kept an eye on the AWS News. Here are some launches that got my attention.

Amazon EC2 Instance Connect Endpoint. Endpoint for EC2 Instance Connect allows you to securely access Amazon EC2 instances using their private IP addresses, making the use of bastion hosts obsolete. Endpoint for EC2 Instance Connect is by far my favorite launch from last week. With EC2 Instance Connect, you use AWS Identity and Access Management (IAM) policies and principals to control SSH access to your instances. This removes the need to share and manage SSH keys. We also updated the AWS Command Line Interface (AWS CLI) to allow you to easily connect or open a secured tunnel to an instance using only its instance ID. I read and contributed to a couple of threads on social media where you pointed out that AWS Systems Manager Session Manager already offered similar capabilities. You’re right. But the extra advantage of EC2 Instance Connect Endpoint is that it allows you to use your existing SSH-based tools and libraries, such as the scp command.

Amazon Inspector now supports code scanning of AWS Lambda functions. This expands the existing capability to scan Lambda functions and associated layers for software vulnerabilities in application package dependencies. Amazon Detective also extends finding groups to Amazon Inspector. Detective automatically collects findings from Amazon Inspector, GuardDuty, and other AWS security services, such as AWS Security Hub, to help increase situational awareness of related security events.

Amazon Verified Permissions is generally available. If you’re designing or developing business applications that need to enforce user-based permissions, you have a new option to centrally manage application permissions. Verified Permissions is a fine-grained permissions management and authorization service for your applications that can be used at any scale. Verified Permissions centralizes permissions in a policy store and helps developers use those permissions to authorize user actions within their applications. Similarly to the way an identity provider simplifies authentication, a policy store lets you manage authorization in a consistent and scalable way. Read Danilo’s post to discover the details.

Amazon S3 Dual-Layer Server-Side Encryption with keys stored in AWS Key Management Service (DSSE-KMS). Some heavily regulated industries require double encryption to store some type of data at rest. Amazon Simple Storage Service (Amazon S3) offers DSSE-KMS, a new free encryption option that provides two layers of data encryption, using different keys and different implementation of the 256-bit Advanced Encryption Standard with Galois Counter Mode (AES-GCM) algorithm. My colleague Irshad’s post has all the details.

AWS CloudTrail Lake Dashboards provide out-of-the-box visibility and top insights from your audit and security data directly within the CloudTrail Lake console. CloudTrail Lake features a number of AWS curated dashboards so you can get started right away – with no required detailed dashboard setup or SQL experience.

AWS IAM Identity Center now supports automated user provisioning from Google Workspace. You can now connect your Google Workspace to AWS IAM Identity Center (successor to AWS Single Sign-On) once and manage access to AWS accounts and applications centrally in IAM Identity Center.

AWS CloudShell is now available in 12 additional regions. AWS CloudShell is a browser-based shell that makes it easier to securely manage, explore, and interact with your AWS resources. The list of the 12 new Regions is detailed in the launch announcement.

For a full list of AWS announcements, be sure to keep an eye on the What’s New at AWS page.

Other AWS News
Here are some other updates and news that you might have missed:

  • AWS Extension for Stable Diffusion WebUI. WebUI is a popular open-source web interface that allows you to easily interact with Stable Diffusion generative AI. We built this extension to help you to migrate existing workloads (such as inference, train, and ckpt merge) from your local or standalone servers to the AWS Cloud.
  • GoDaddy developed a multi-Region, event-driven system. Their system handles 400 millions events per day. They plan to scale it to process 2 billion messages per day in a near future. My colleague Marcia explains the detail of their architecture in her post.
  • The Official AWS Podcast – Listen each week for updates on the latest AWS news and deep dives into exciting use cases. There are also official AWS podcasts in several languages. Check out the podcasts in French, German, Italian, and Spanish.
  • AWS Open Source News and Updates – This is a newsletter curated by my colleague Ricardo to bring you the latest open source projects, posts, events, and more.

Upcoming AWS Events
Check your calendars and sign up for these AWS events:

  • AWS Silicon Innovation Day (June 21) – A one-day virtual event that will allow you to better understand AWS Silicon and how you can use the Amazon EC2 chip offerings to your benefit. My colleague Irshad shared the details in this post. Register today.
  • AWS Global Summits – There are many AWS Summits going on right now around the world: Milano (June 22), Hong Kong (July 20), New York (July 26), Taiwan (Aug 2 & 3), and Sao Paulo (Aug 3).
  • AWS Community Day – Join a community-led conference run by AWS user group leaders in your region: Manila (June 29–30), Chile (July 1), and Munich (September 14).
  • AWS User Group Perú Conf 2023 (September 2023). Some of the AWS News blog writer team will be present: Marcia, Jeff, myself, and our colleague Startup Developer Advocate Mark. Save the date and register today.
  • CDK Day – CDK Day is happening again this year on September 29. The call for papers for this event is open, and this year we’re also accepting talks in Spanish. Submit your talk here.

That’s all for this week. Check back next Monday for another Week in Review!

This post is part of our Week in Review series. Check back each week for a quick roundup of interesting news and announcements from AWS!
— seb

AWS Week in Review: Public Preview of Amazon DataZone and AWS DataSync Updates – April 3, 2023

Post Syndicated from Channy Yun original https://aws.amazon.com/blogs/aws/aws-week-in-review-public-preview-of-amazon-datazone-and-aws-datasync-updates-april-3-2023/

Last weekend, I enjoyed the spring vibes at Seoul Forest, a large park in the middle of Seoul city, where cherry blossoms are in full bloom.
Compared to last year, there were crowds of people, so I realized that it was really back to normal after the pandemic. I hope you all enjoy the season of spring or fall with your family.

Last Week’s Launches
Like an April Fool’s Day joke, there were 65 launches last week, far more than usual. AWS product teams are working hard with a customer obsession.

So, I had a lot of trouble choosing the important ones. Other than the ones I’ve picked out, there may be important feature releases that fit your needs. Be sure to take a look at the full launches list in the last week.

First, here is a list of the general availability of AWS services and features treated by AWS News Blog:

Let’s take a look at some launches from the last week that I want to remind you of:

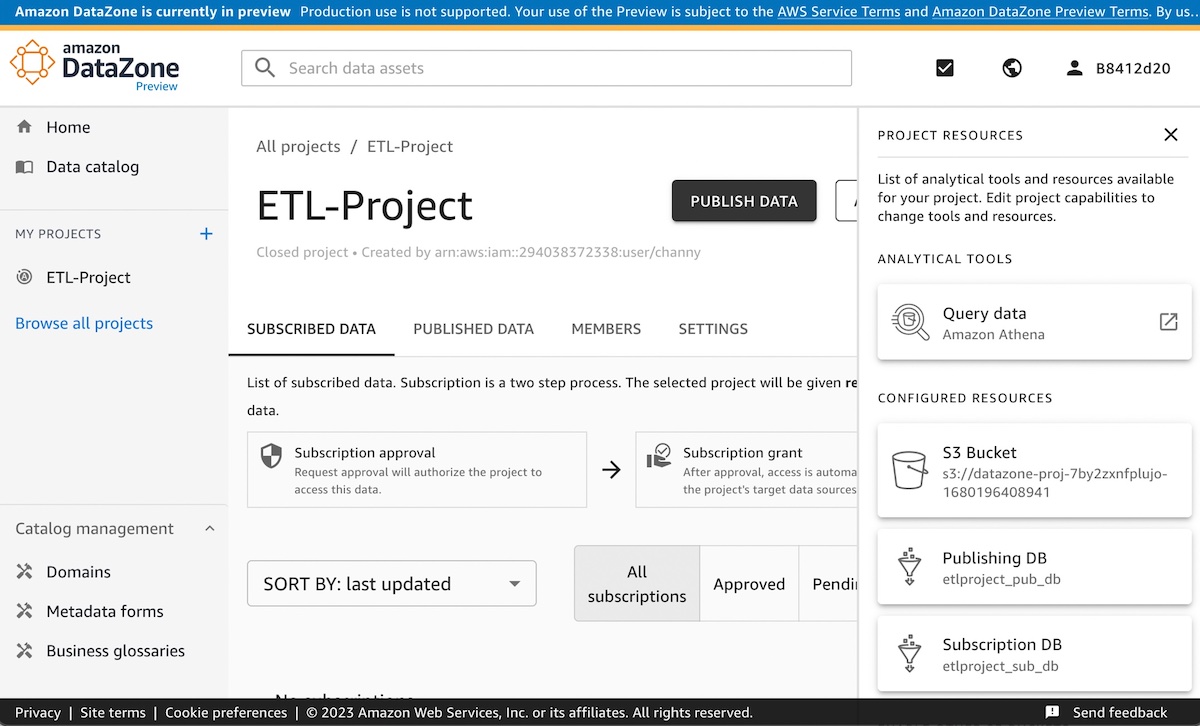
The Preview of Amazon DataZone – At AWS re:Invent 2022, we preannounced Amazon DataZone, a new data management service to catalog, discover, analyze, share, and govern data between data producers and consumers in the organization. You can now try out the public preview of Amazon DataZone.

Data producers populate the business data catalog from AWS Glue Data Catalog and Amazon Redshift tables. Data consumers search for and subscribe to data assets in the data catalog and analyze with tools such as Amazon Athena query editors in the Amazon DataZone portal. To get started with Amazon DataZone, see our Quick Start Guide to include sample datasets to implement a complete use case.

AWS DataSync Supports Azure Blob Storage in Preview – AWS DataSync supports copying your object data at scale from Azure Blob Storage to AWS storage services such as Amazon S3. AWS DataSync supports all blob types within Azure Blob Storage and can also be used with Azure Data Lake Storage (ADLS) Gen 2.

In addition to Azure Blob Storage, DataSync supports Google Cloud Storage and Azure Files storage locations as well as various general storage systems and AWS storage services. To learn more, see Migrating Azure Blob Storage to Amazon S3 using AWS DataSync in the AWS Storage Blog.

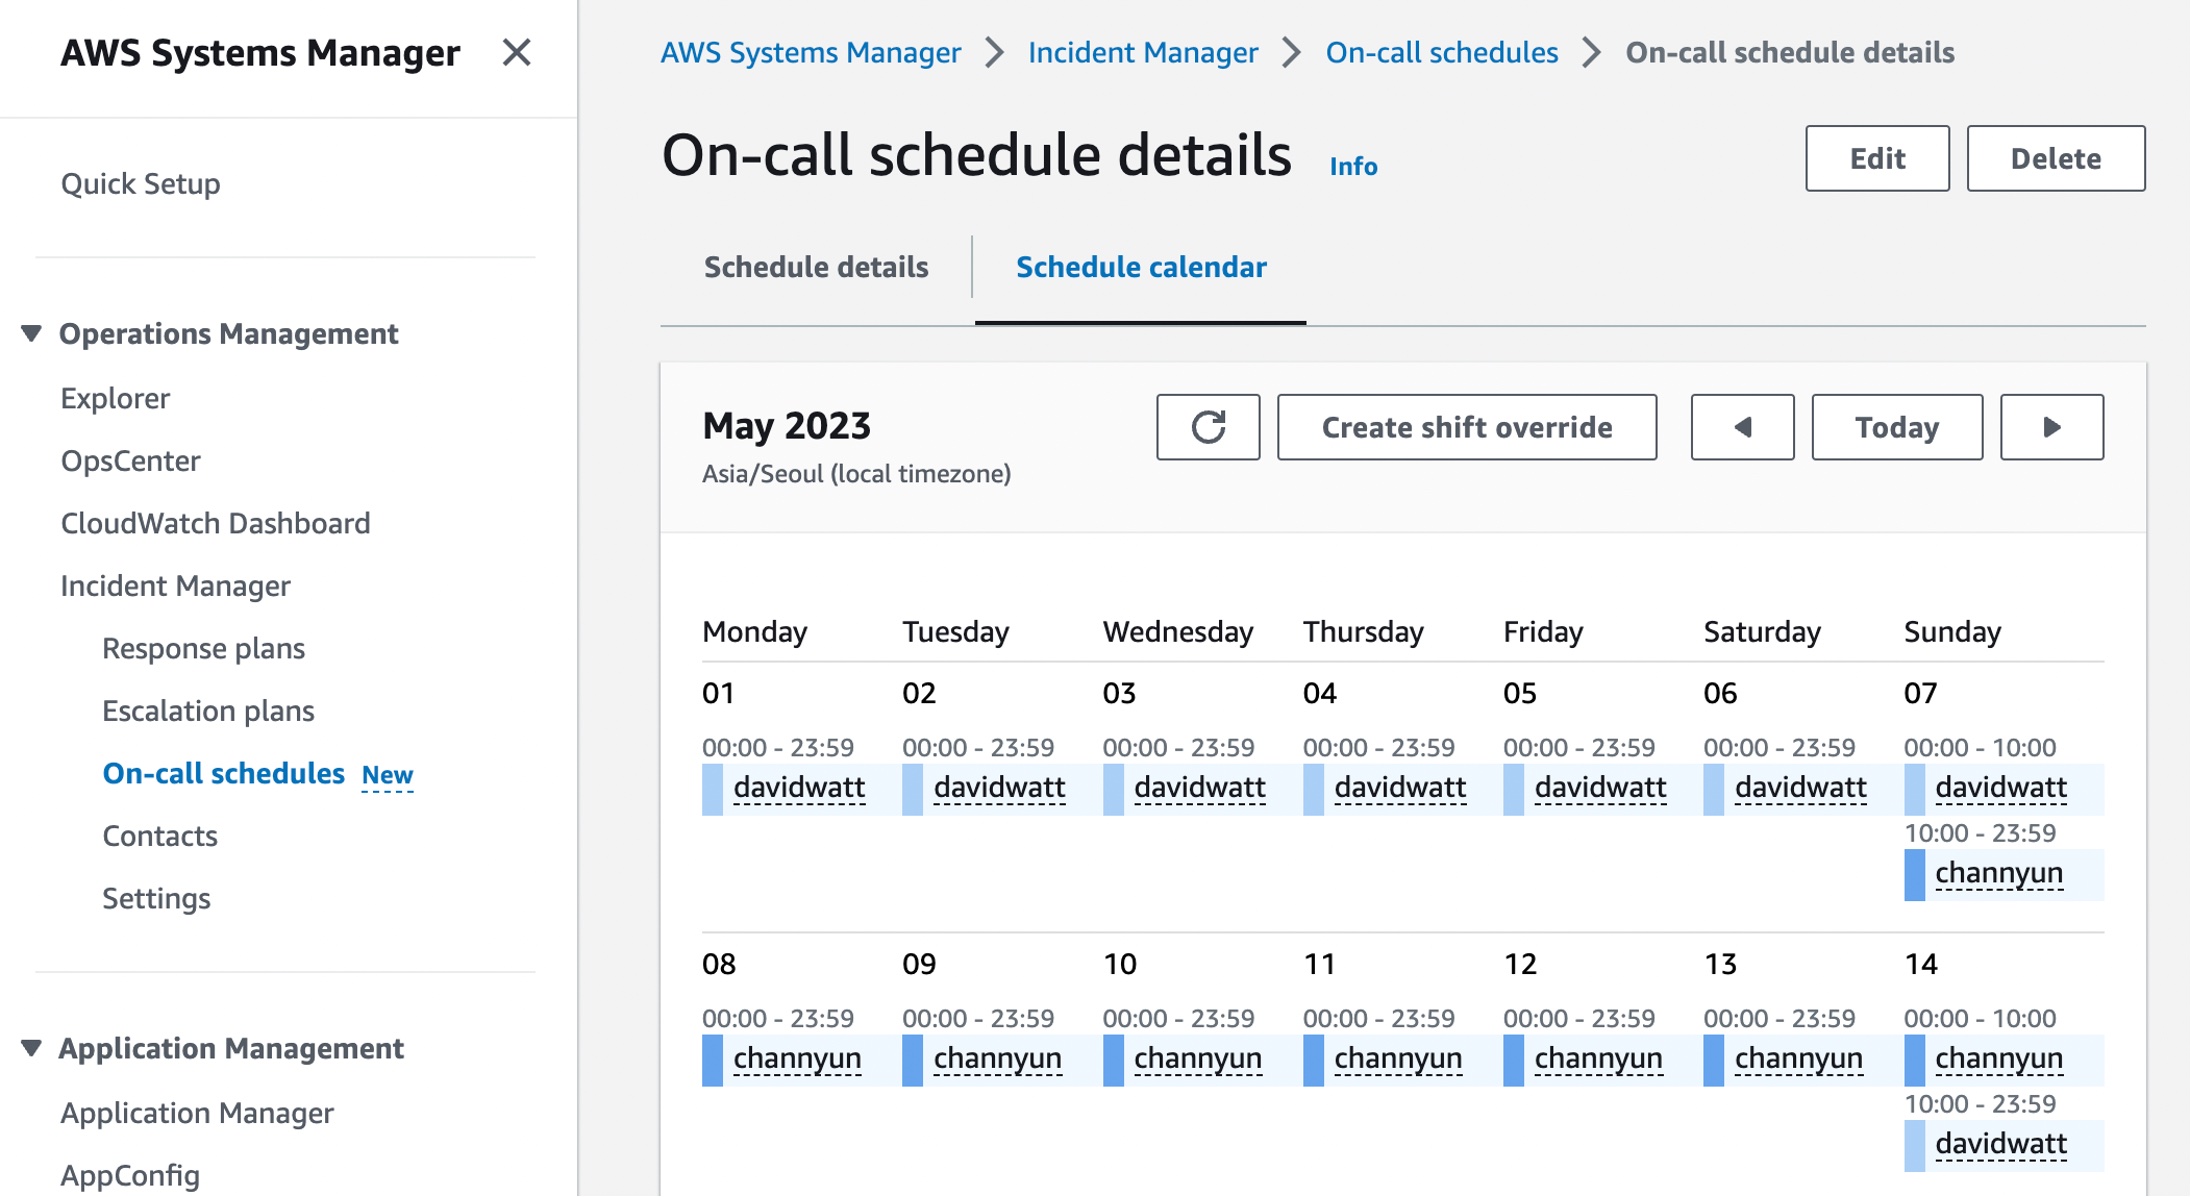
On-call schedules with AWS Systems Manager Incident Manager – You can now configure or change on-call rotation schedules with a group of contacts and have 24/7 coverage and responsiveness for critical issues in the Incident Manager console.

AWS Incident Manager helps you bring the right people and information together when a critical issue is detected, activating preconfigured response plans to engage responders using SMS, phone calls, and chat channels, as well as to run AWS Systems Manager Automation runbooks. To learn how to get started with an-call schedules in Incident Manager, see our Working with on-call schedules in Incident Manager in the AWS documentation.

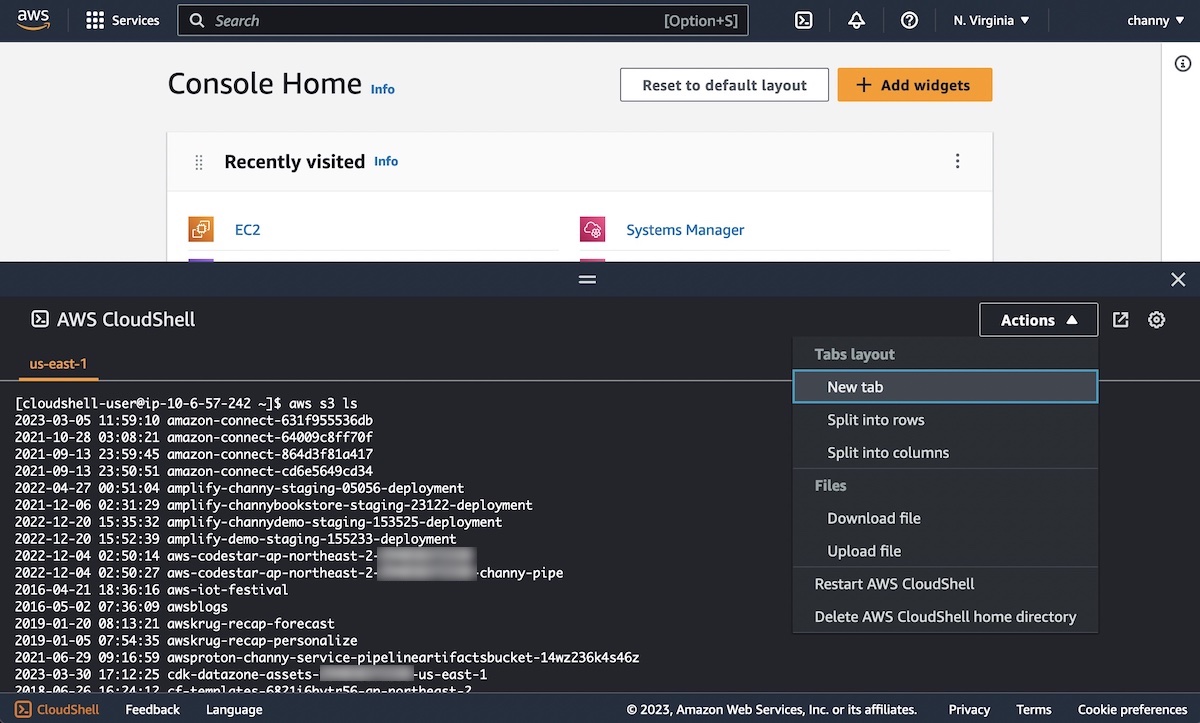
AWS CloudShell Colsone Toolbar – You can now use AWS Cloudshell Console Toolbar with AWS Management Console in a single view. The Console Toolbar maintains its state (e.g., open, closed) and commands will continue to run in CloudShell as you navigate between services in the Console. For example, it allows you to run a command in CloudShell and view a CloudWatch alarm in the Console at the same time.

After signing into the Console, you can access CloudShell in the lower left of the Console by selecting the CloudShell icon in the Console Toolbar.

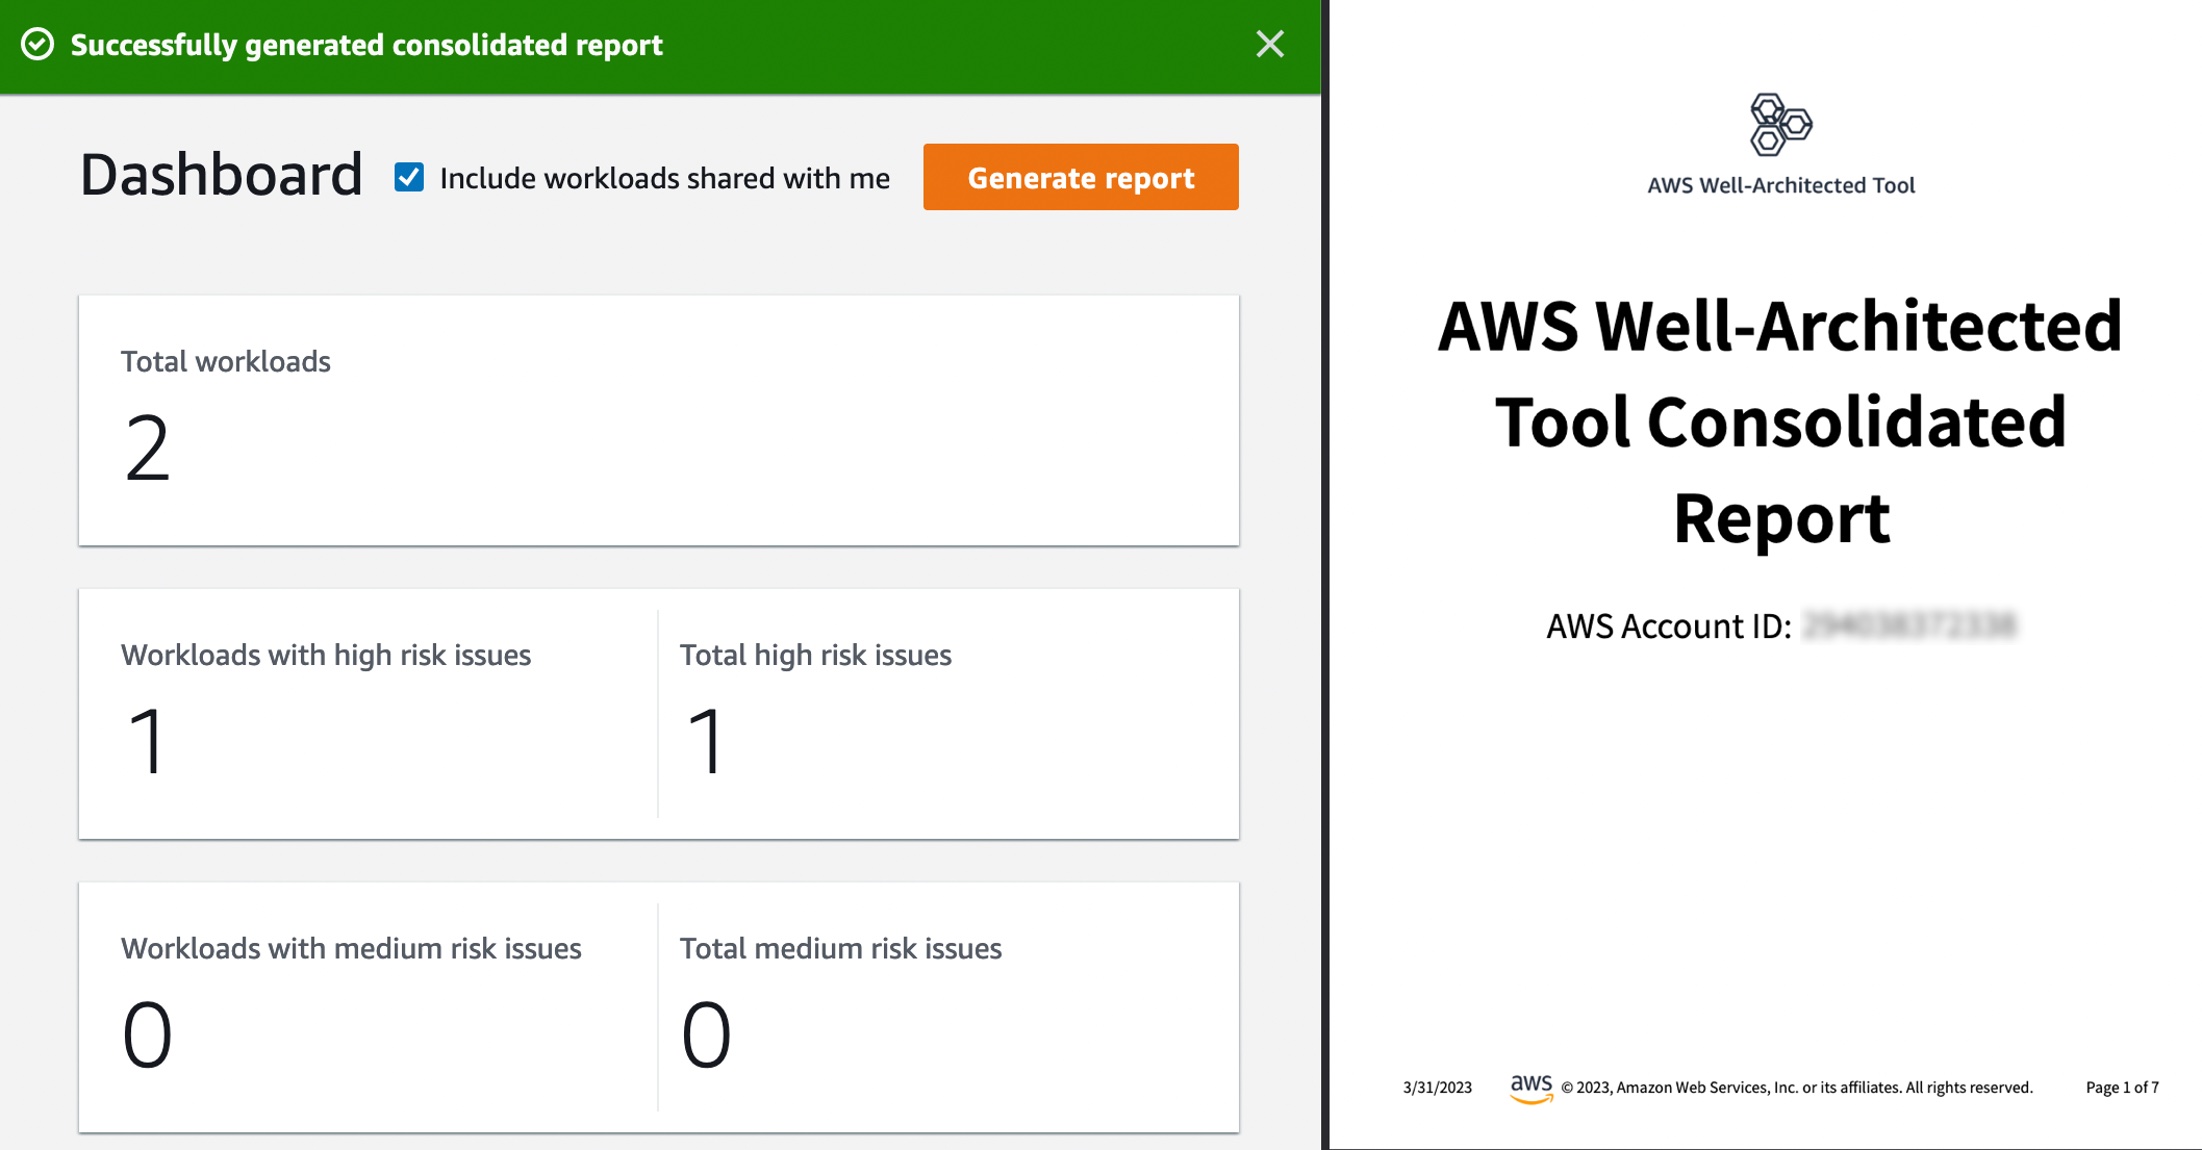
New Features of AWS Well-Architected Tool – The Consolidated Report and Enhanced Search enable customers to quickly identify risk themes across their workloads and scale improvements across their organization. This macro-level view helps executive stakeholders understand where common issues lie and prioritize team resources to drive widespread improvement. To learn more, see AWS Well-Architected Tool Dashboard in the AWS documentation.

For a full list of AWS announcements, be sure to keep an eye on the What’s New at AWS page.

Other AWS News
Here are some other news items that you may find interesting from the last week:

Welcome to the .NET on AWS Blog – We launched a new blog channel for millions of .NET developers across the world. Blog posts will also cover built-for-the-cloud development, modernizing .NET Framework applications, and how to deploy .NET workloads on different AWS services. We will use this channel to share news on the work we’ve done with the .NET open-source community, post follow-ups from important events, and post announcements about upcoming presentations from our .NET developer advocates. To learn more, visit our .NET on AWS website and follow us on Twitter at @dotnetonAWS.

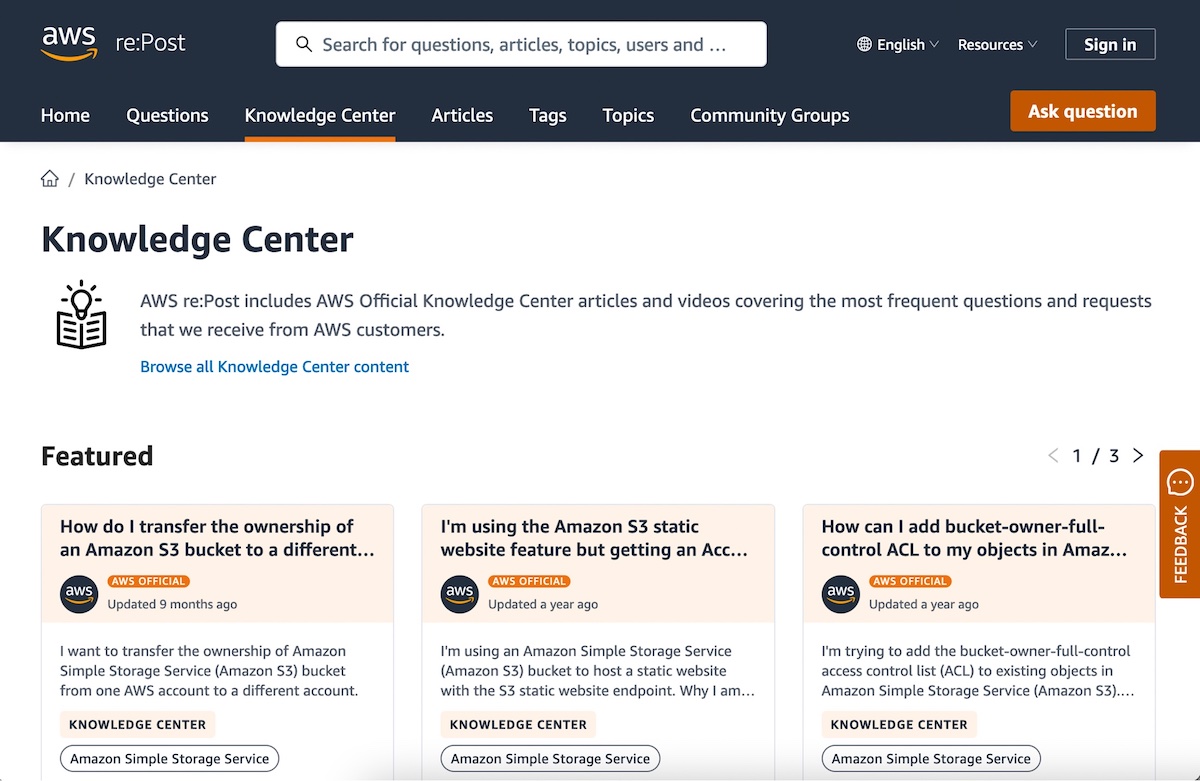
AWS Knowledge Center in AWS re:Post – You can now access trusted, authoritative articles and videos of AWS Knowledge Center on AWS re:Post to get answers to technical questions. Knowledge Center content is produced by an AWS team and covers the most frequent questions and requests from AWS customers. These articles are available in 10 localized languages: English, French, German, Italian, Japanese, Korean, Portuguese, Simplified Chinese, Spanish, and Traditional Chinese.

TF1’s FIFA Worldcup Digital Broadcasting Story – Sébastien shared an awesome story about how the French broadcaster TF1 use AWS Cloud technology and expertise to bring the FIFA World Cup to millions of people. He shared the history of redesigning its digital broadcasting architecture on AWS, testing the new platform on large-scale sporting events. For the preparation of the FIFA Worldcup event, TF1 enhanced monitoring to detect anomalies during the event and established the backup plan in a “war room” for the worst scenario. Even if you’re not a fan of football, I recommend reading the behind-the-scenes of the FIFA Worldcup Finals. It’s long but really fun!

Upcoming AWS Events
Check your calendars and sign up for these AWS-led events:

AWS re:Inforce 2023 – Now register AWS re:Inforce, in Anaheim, California, June 13–14. AWS Chief Information Security Officer CJ Moses will share the latest innovations in cloud security and what AWS Security is focused on. The breakout sessions will provide real-world examples of how security is embedded into the way businesses operate. To learn more and get the limited discount code to register, see CJ’s blog post of Gain insights and knowledge at AWS re:Inforce 2023 in the AWS Security Blog.

AWS Global Summits – Check your calendars and sign up for the AWS Summit closest to your city: Paris and Sydney (April 4), Seoul (May 3-4), Berlin and Singapore (May 4), Stockholm (May 11), Hong Kong (May 23), Amsterdam (June 1), London (June 7), Madrid (June 15), and Milano (June 22).

AWS Community Day – Join community-led conferences driven by AWS user group leaders closest to your city: Peru (April 15), Helsinki (April 20), Chicago (June 15), Philippines (June 29–30), and Munich (September 14). Recently, we are bringing together AWS user groups from around the world into Meetup Pro accounts. Find your group and its meetups in your city!

You can browse all upcoming AWS-led in-person and virtual events, and developer-focused events such as AWS DevDay.

That’s all for this week. Check back next Monday for another Week in Review!

— Channy

This post is part of our Week in Review series. Check back each week for a quick roundup of interesting news and announcements from AWS!

Using API destinations with Amazon EventBridge

Post Syndicated from James Beswick original https://aws.amazon.com/blogs/compute/using-api-destinations-with-amazon-eventbridge/

Amazon EventBridge enables developers to route events between AWS services, integrated software as a service (SaaS) applications, and your own applications. It can help decouple applications and produce more extensible, maintainable architectures. With the new API destinations feature, EventBridge can now integrate with services outside of AWS using REST API calls.

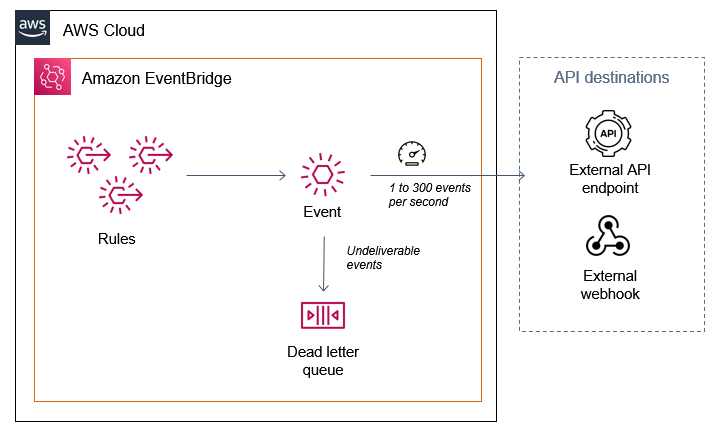
API destinations architecture

This feature enables developers to route events to existing SaaS providers that integrate with EventBridge, like Zendesk, PagerDuty, TriggerMesh, or MongoDB. Additionally, you can use other SaaS endpoints for applications like Slack or Contentful, or any other type of API or webhook. It can also provide an easier way to ingest data from serverless workloads into Splunk without needing to modify application code or install agents.

This blog post explains how to use API destinations and walks through integration examples you can use in your workloads.

How it works

API destinations are third-party targets outside of AWS that you can invoke with an HTTP request. EventBridge invokes the HTTP endpoint and delivers the event as a payload within the request. You can use any preferred HTTP method, such as GET or POST. You can use input transformers to change the payload format to match your target.

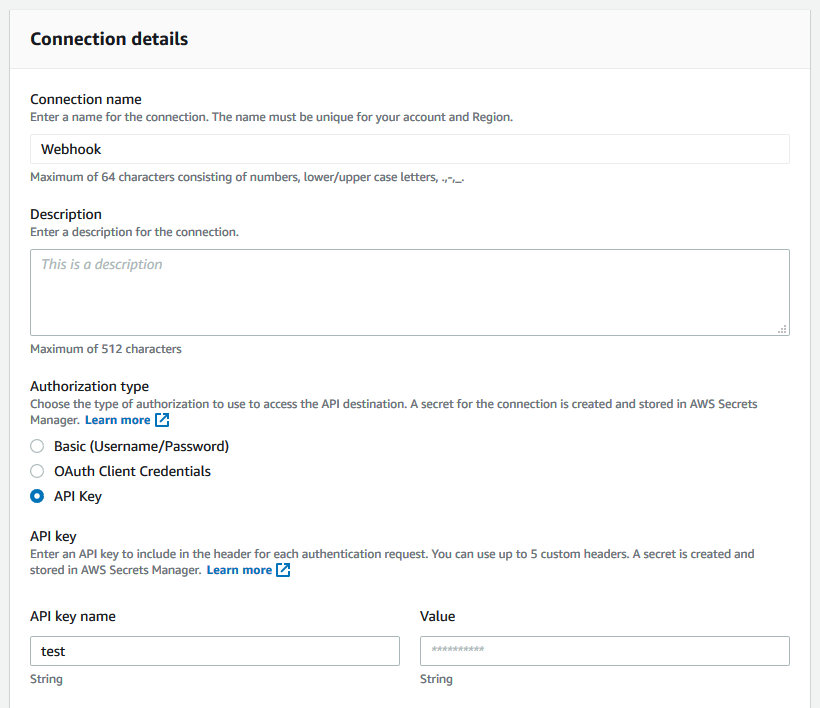
An API destination uses a Connection to manage the authentication credentials for a target. This defines the authorization type used, which can be an API key, OAuth client credentials grant, or a basic user name and password.

Connection details

The service manages the secret in AWS Secrets Manager and the cost of storing the secret is included in the pricing for API destinations.

You create a connection to each different external API endpoint and share the connection with multiple endpoints. The API destinations console shows all configured connections, together with their authorization status. Any connections that cannot be established are shown here:

Connections list

To create an API destination, you provide a name, the HTTP endpoint and method, and the connection:

Create API destination

When you configure the destination, you must also set an invocation rate limit between 1 and 300 events per second. This helps protect the downstream endpoint from surges in traffic. If the number of arriving events exceeds the limit, the EventBridge service queues up events. It delivers to the endpoint as quickly as possible within the rate limit.

It continues to do this for 24 hours. To make sure you retain any events that cannot be delivered, set up a dead-letter queue on the event bus. This ensures that if the event is not delivered within this timeframe, it is stored durably in an Amazon SQS queue for further processing. This can also be useful if the downstream API experiences an outage for extended periods of time.

Throttling and retries

Once you have configured the API destination, it becomes available in the list of targets for rules. Matching events are sent to the HTTP endpoint with the event serialized as part of the payload.

Select targets

As with API Gateway targets in EventBridge, the maximum timeout for API destination is 5 seconds. If an API call exceeds this timeout, it is retried.

Debugging the payload from API destinations

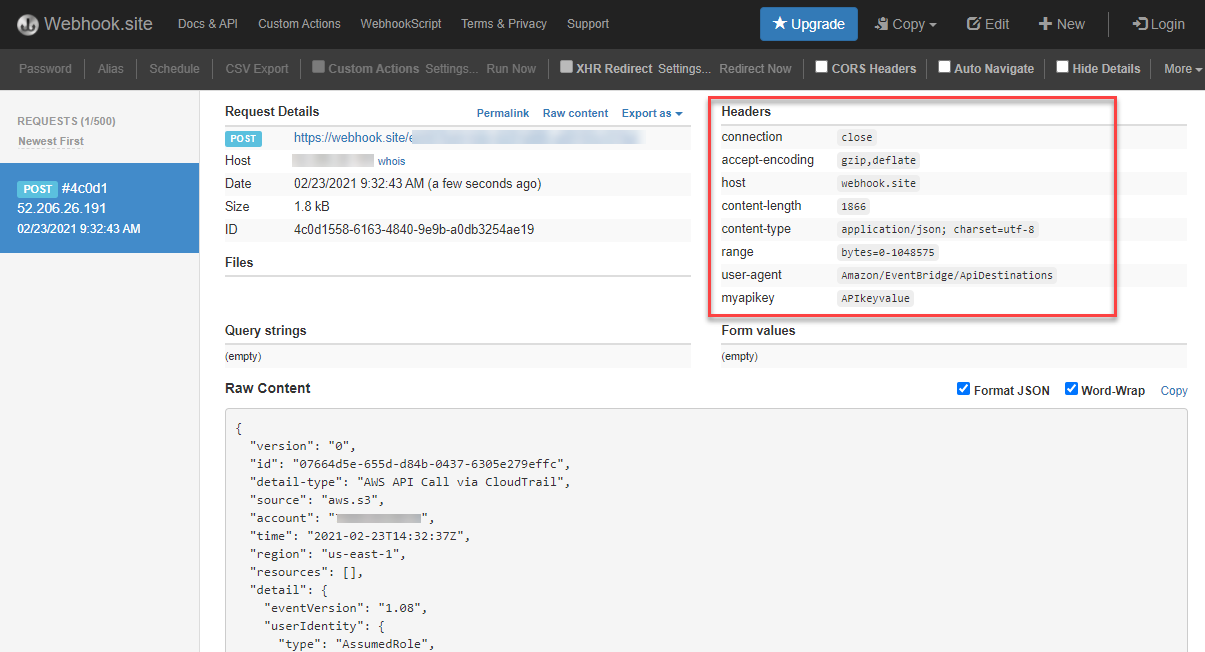
You can send an event via API Destinations to debugging tools like Webhook.site to view the headers and payload of the API call:

  1. Create a connection with the credential, such as an API key.Connection details
  2. Create an API destination with the webhook URL endpoint and then create a rule to match and route events.Target configuration
  3. The Webhook.site testing service shows the headers and payload once the webhook is triggered. This can help you test rules if you are adding headers or manipulating the payload using an input transformer.Webhook.site testing service

Customizing the payload

Third-party APIs often require custom headers or payload formats when accepting data. EventBridge rules allow you to customize header parameters, query strings, and payload formats without the need for custom code. Header parameters and query strings can be configured with static values or attributes from the event:

Header parameters

To customize the payload, configure an input transformer, which consists of an Input Path and Input template. You use an Input Path to define variables and use JSONPath query syntax to identify the variable source in the event. For example, to extract two attributes from an Amazon S3 PutObject event, the Input Path is:

{
  "key" : "$.[0].s3.object.key", 
  "bucket" : " $.[0].s3.bucket.name "
}

Next, the Input template defines the structure of the data passed to the target, which references the variables. With this release you can now use variables inside quotes in the input transformer. As a result, you can pass these values as a string or JSON, for example:

{
  "filename" : "<key>", 
  "container" : "mycontainer-<bucket>"
}

Sending AWS events to DataDog

Using API destinations, you can send any AWS-sourced event to third-party services like DataDog. This approach uses the DataDog API to put data into the service. To do this, you must sign up for an account and create an API key. In this example, I send S3 events via CloudTrail to DataDog for further analysis.

  1. Navigate to the EventBridge console, select API destinations from the menu.
  2. Select the Connections tab and choose Create connection:Connections UI
  3. Enter a connection name, then select API Key for Authorization Type. Enter the API key name DD-API-KEY and paste your secret API key as the value. Choose Create.Create new connection UI
  4. In the API destinations tab, choose Create API destination.Create API destination UI
  5. Enter a name, set the API destination endpoint to https://http-intake.logs.datadoghq.com/v1/input, and the HTTP method to POST. Enter 300 for Invocation rate limit and select the DataDog connection from the dropdown. Choose Create.API destination detail UI
  6. From the EventBridge console, select Rules and choose Create rule. Enter a name, select the default bus, and enter this event pattern:
    {
      "source": ["aws.s3"]
    }
  7. In Select targets, choose API destination and select DataDog for the API destination. Expand, Configure Input.
  8. In the Input transformer section, enter {"detail":"$.detail"} in the Input Path field and enter {"message": <detail>} in the Input Template.Select targets UI
  9. You can optionally add a dead letter queue. To do this, open the Retry policy and dead-letter queue section. Under Dead-letter queue, select an existing SQS queue.
    Retry policy and DLQ
  10. Choose Create.
  11. Open AWS CloudShell and upload an object to an S3 bucket in your account to trigger an event:
    echo "test" > testfile.txt
    aws s3 cp testfile.txt s3://YOUR_BUCKET_NAME

    CloudShell output

  12. The logs appear in the DataDog Logs console, where you can process the raw data for further analysis:Datadog Logs console

Sending AWS events to Zendesk

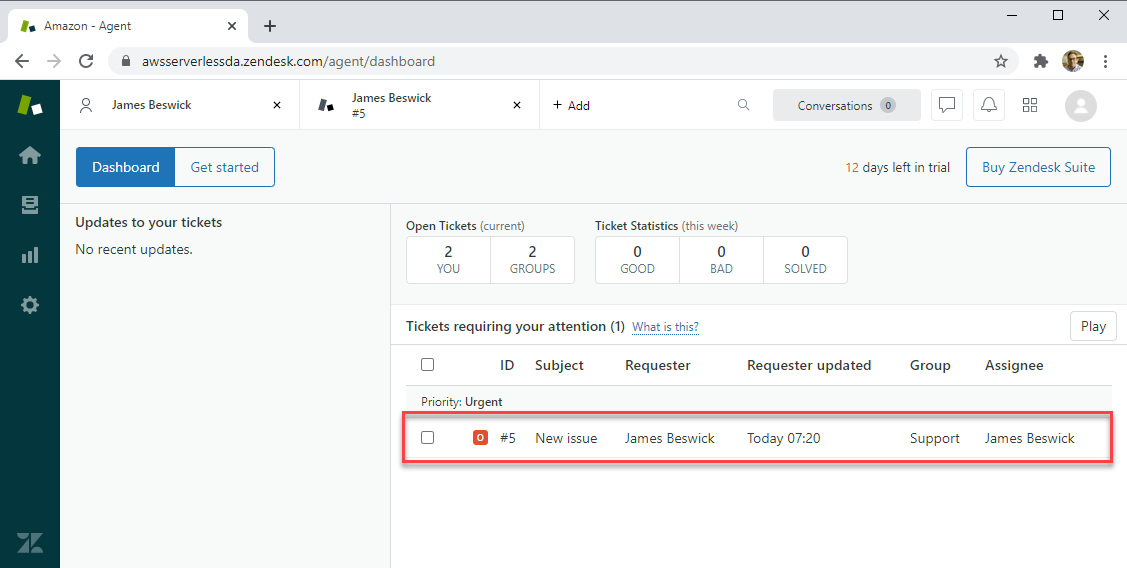
Zendesk is a SaaS provider that provides customer support solutions. It can already send events to EventBridge using a partner integration. This post shows how you can consume ticket events from Zendesk and run a sentiment analysis using Amazon Comprehend.

With API destinations, you can now use events to call the Zendesk API to create and modify tickets and interact with chats and customer profiles.

To create an API destination for Zendesk:

  1. Log in with an existing Zendesk account or register for a trial account.
  2. Navigate to the EventBridge console, select API destinations from the menu and choose Create API destination.
  3. On the Create API destination, page:
    1. Enter a name for the destination (e.g. “SendToZendesk”).
    2. For API destination endpoint, enter https://<<your-subdomain>>.zendesk.com/api/v2/tickets.json.
    3. For HTTP method, select POST.
    4. For Invocation rate, enter 10.
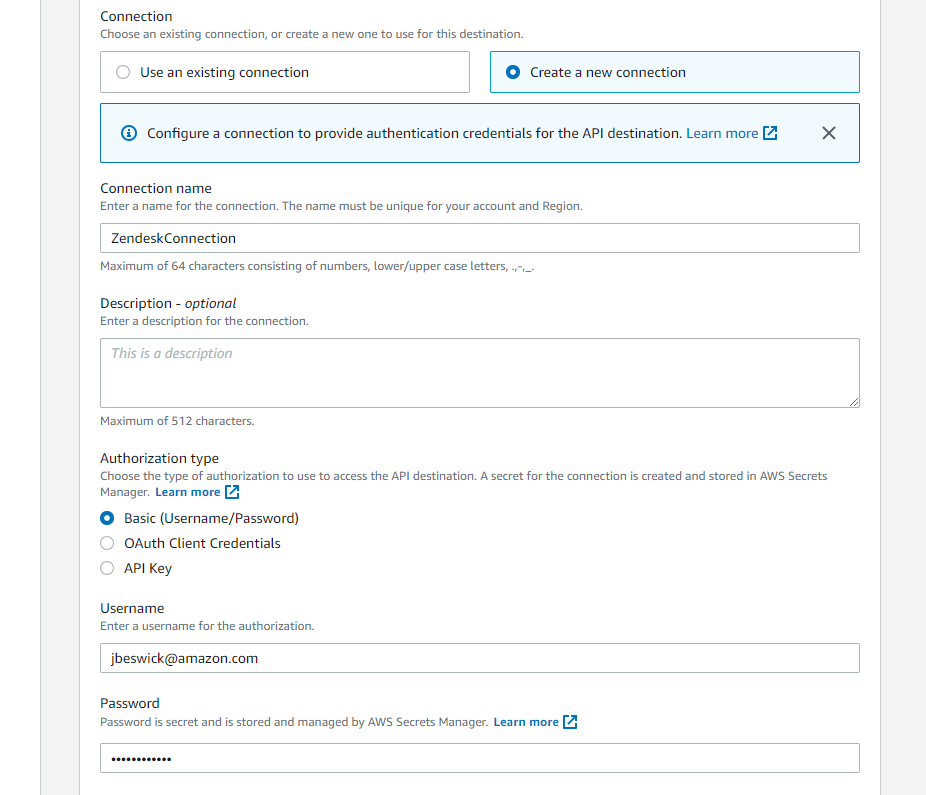
  4. In the connection section:
    1. Select the Create a new connection radio button.
    2. For Connection name, enter ZendeskConnection.
    3. For Authorization type, select Basic (Username/Password).
    4. Enter your Zendesk username and password.
  5. Choose Create.
    Connection configuration with basic auth

When you create a rule to route to this API destination, use the Input transformer to build the defined JSON payload, as shown in the previous DataDog example. When an event matches the rule, EventBridge calls the Zendesk Create Ticket API. The new ticket appears in the Zendesk dashboard:

Zendesk dashboard

For more information on the Zendesk API, visit the Zendesk Developer Portal.

Building an integration with AWS CloudFormation and AWS SAM

To support this new feature, there are two new AWS CloudFormation resources available. These can also be used in AWS Serverless Application Model (AWS SAM) templates:

The connection resource defines the connection credential and optional invocation HTTP parameters:

Resources:
  TestConnection:
    Type: AWS::Events::Connection
    Properties:
      AuthorizationType: API_KEY
      Description: 'My connection with an API key'
      AuthParameters:
        ApiKeyAuthParameters:
          ApiKeyName: VHS
          ApiKeyValue: Testing
        InvocationHttpParameters:
          BodyParameters:
          - Key: 'my-integration-key'
            Value: 'ABCDEFGH0123456'

Outputs:
  TestConnectionName:
    Value: !Ref TestConnection
  TestConnectionArn:
    Value: !GetAtt TestConnection.Arn

The API destination resource provides the connection, endpoint, HTTP method, and invocation limit:

Resources:
  TestApiDestination:
    Type: AWS::Events::ApiDestination
    Properties:
      Name: 'datadog-target'
      ConnectionArn: arn:aws:events:us-east-1:123456789012:connection/datadogConnection/2
      InvocationEndpoint: 'https://http-intake.logs.datadoghq.com/v1/input'
      HttpMethod: POST
      InvocationRateLimitPerSecond: 300

Outputs:
  TestApiDestinationName:
    Value: !Ref TestApiDestination
  TestApiDestinationArn:
    Value: !GetAtt TestApiDestination.Arn
  TestApiDestinationSecretArn:
    Value: !GetAtt TestApiDestination.SecretArn

You can use the existing AWS::Events::Rule resource to configure an input transformer for API destination targets:

ApiDestinationDeliveryRule:
  Type: AWS::Events::Rule
  Properties:
    EventPattern:
      source:
        - "EventsForMyAPIdestination"
    State: "ENABLED"
    Targets:
      -
        Arn: !Ref TestApiDestinationArn
        InputTransformer:
          InputPathsMap:
            detail: $.detail
          InputTemplate: >
            {
                    "message": <detail>
            }

Conclusion

The API destinations feature of EventBridge enables developers to integrate workloads with third-party applications using REST API calls. This provides an easier way to build decoupled, extensible applications that work with applications outside of the AWS Cloud.

To use this feature, you configure a connection and an API destination. You can use API destinations in the same way as existing targets for rules, and also customize headers, query strings, and payloads in the API call.

Learn more about using API destinations with the following SaaS providers: Datadog, Freshworks, MongoDB, TriggerMesh, and Zendesk.

For more serverless learning resources, visit Serverless Land.

AWS CloudShell – Command-Line Access to AWS Resources

Post Syndicated from Jeff Barr original https://aws.amazon.com/blogs/aws/aws-cloudshell-command-line-access-to-aws-resources/

No matter how much automation you have built, no matter how great you are at practicing Infrastructure as Code (IAC), and no matter how successfully you have transitioned from pets to cattle, you sometimes need to interact with your AWS resources at the command line. You might need to check or adjust a configuration file, make a quick fix to a production environment, or even experiment with some new AWS services or features.

Some of our customers feel most at home when working from within a web browser and have yet to set up or customize their own command-line interface (CLI). They tell is that they don’t want to deal with client applications, public keys, AWS credentials, tooling, and so forth. While none of these steps are difficult or overly time-consuming, they do add complexity and friction and we always like to help you to avoid both.

Introducing AWS CloudShell
Today we are launching AWS CloudShell, with the goal of making the process of getting to an AWS-enabled shell prompt simple and secure, with as little friction as possible. Every shell environment that you run with CloudShell has the AWS Command Line Interface (CLI) (v2) installed and configured so you can run aws commands fresh out of the box. The environments also include the Python and Node runtimes, with many more to come in the future.

To get started, I simply click the CloudShell icon in the AWS Management Console:

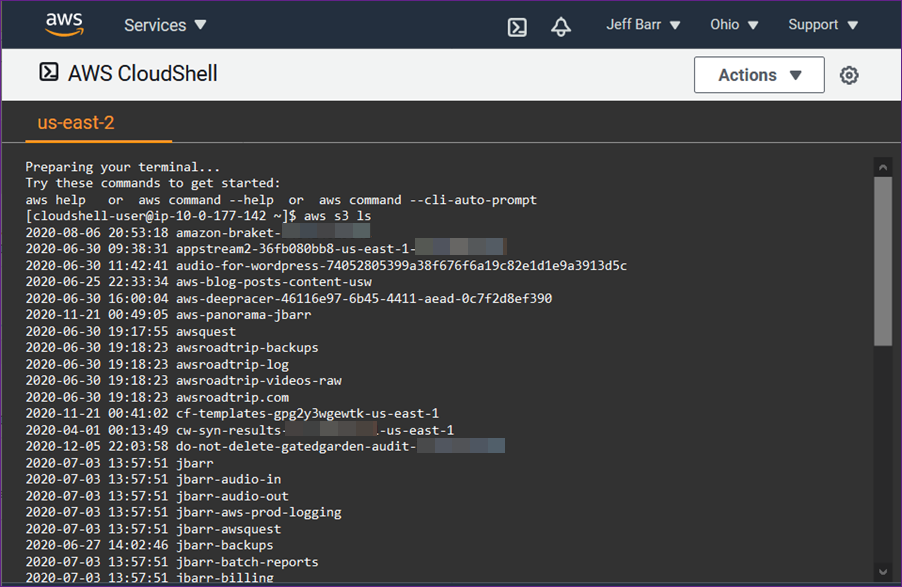
My shell sets itself up in a matter of seconds and I can issue my first aws command immediately:

The shell environment is based on Amazon Linux 2. I can store up to 1 GB of files per region in my home directory and they’ll be available each time I open a shell in the region. This includes shell configuration files such as .bashrc and shell history files.

I can access the shell via SSO or as any IAM principal that can login to the AWS Management Console, including federated roles. In order to access CloudShell, the AWSCloudShellFullAccess policy must be in effect. The shell runs as a normal (non-privileged) user, but I can sudo and install packages if necessary.

Here are a couple of features that you should know about:

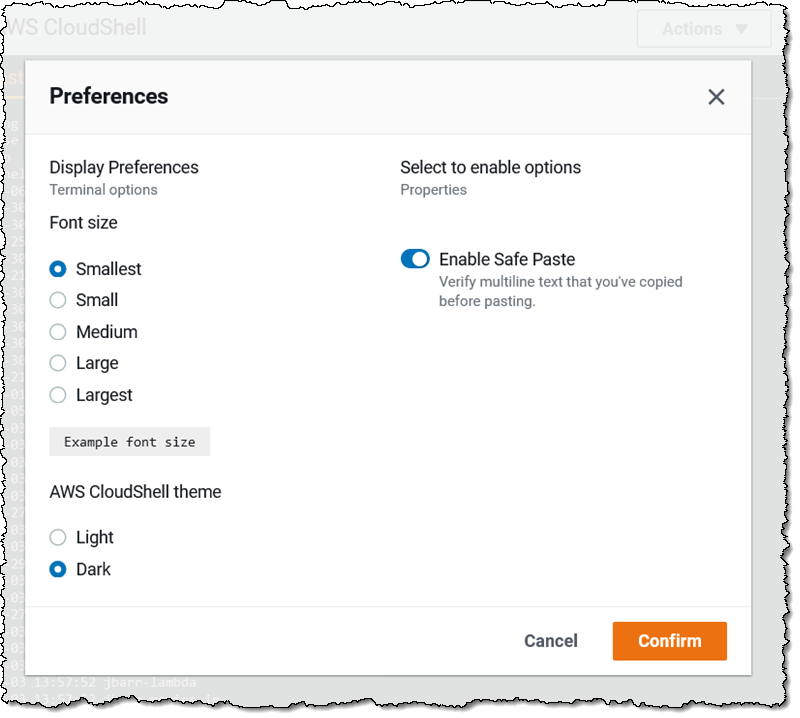
Themes & Font Sizes – You can switch between light and dark color themes, and choose any one of five font sizes:

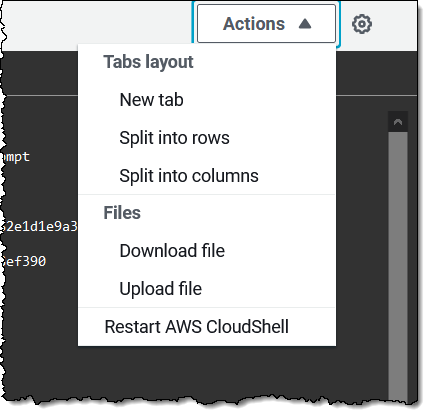
Tabs and Sessions – You can have multiple sessions open within the same region, and you can control the tabbing behavior, with options to split horizontally and vertically:

You can also download files from the shell environment to your desktop, and upload them from your desktop to the shell.

Things to Know
Here are a couple of important things to keep in mind when you are evaluating CloudShell:

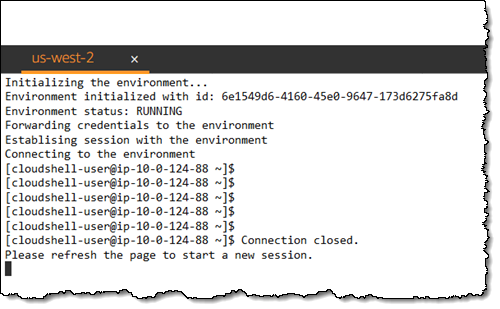
Timeouts & Persistence – Each CloudShell session will timeout after 20 minutes or so of inactivity, and can be reestablished by refreshing the window:

Regions – CloudShell is available today in the US East (N. Virginia), US East (Ohio), US West (Oregon), Europe (Ireland), and Asia Pacific (Tokyo) Regions, with the remaining regions on the near-term roadmap.

Persistent Storage – Files stored within $HOME persist between invocations of CloudShell with a limit of 1 GB per region; all other storage is ephemeral. This means that any software that is installed outside of $HOME will not persist, and that no matter what you change (or break), you can always begin anew with a fresh CloudShell environment.

Network Access – Sessions can make outbound connections to the Internet, but do not allow any type of inbound connections. Sessions cannot currently connect to resources inside of private VPC subnets, but that’s also on the near-term roadmap.

Runtimes – In addition to the Python and Node runtimes, Bash, PowerShell, jq, git, the ECS CLI, the SAM CLI, npm, and pip already installed and ready to use.

Pricing – You can use up to 10 concurrent shells in each region at no charge. You only pay for other AWS resources you use with CloudShell to create and run your applications.

Try it Out
AWS CloudShell is available now and you can start using it today. Launch one and give it a try, and let us know what you think!

— Jeff;