Tag Archives: AWS re:Invent

New- Amazon DevOps Guru Helps Identify Application Errors and Fixes

Post Syndicated from Harunobu Kameda original https://aws.amazon.com/blogs/aws/amazon-devops-guru-machine-learning-powered-service-identifies-application-errors-and-fixes/

Today, we are announcing Amazon DevOps Guru, a fully managed operations service that makes it easy for developers and operators to improve application availability by automatically detecting operational issues and recommending fixes. DevOps Guru applies machine learning informed by years of operational excellence from Amazon.com and Amazon Web Services (AWS) to automatically collect and analyze data such as application metrics, logs, and events to identify behavior that deviates from normal operational patterns.

Once a behavior is identified as an operational problem or risk, DevOps Guru alerts developers and operators to the details of the problem so they can quickly understand the scope of the problem and possible causes. DevOps Guru provides intelligent recommendations for fixing problems, saving you time resolving them. With DevOps Guru, there is no hardware or software to deploy, and you only pay for the data analyzed; there is no upfront cost or commitment.

Distributed/Complex Architecture and Operational Excellence
As applications become more distributed and complex, operators need more automated practices to maintain application availability and reduce the time and effort spent on detecting, debugging, and resolving operational issues. Application downtime, for example, as caused by misconfiguration, unbalanced container clusters, or resource depletion, can result in significant revenue loss to an enterprise.

In many cases, companies must invest developer time in deploying and managing multiple monitoring tools, such as metrics, logs, traces, and events, and storing them in various locations for analysis. Developers or operators also spend time developing and maintaining custom alarms to alert them to issues such as sudden spikes in load balancer errors or unusual drops in application request rates. When a problem occurs, operators receive multiple alerts related to the same issue and spend time combining alerts to prioritize those that need immediate attention.

How DevOps Guru Works
The DevOps Guru machine learning models leverages AWS expertise in running highly available applications for the world’s largest e-commerce business for the past 20 years. DevOps Guru automatically detects operational problems, details the possible causes, and recommends remediation actions. DevOps Guru provides customers with a single console experience to search and visualize operational data by integrating data across multiple sources supporting Amazon CloudWatch, AWS Config, AWS CloudTrail, AWS CloudFormation, and AWS X-Ray and reduces the need to use multiple tools.

Getting Started with DevOps Guru
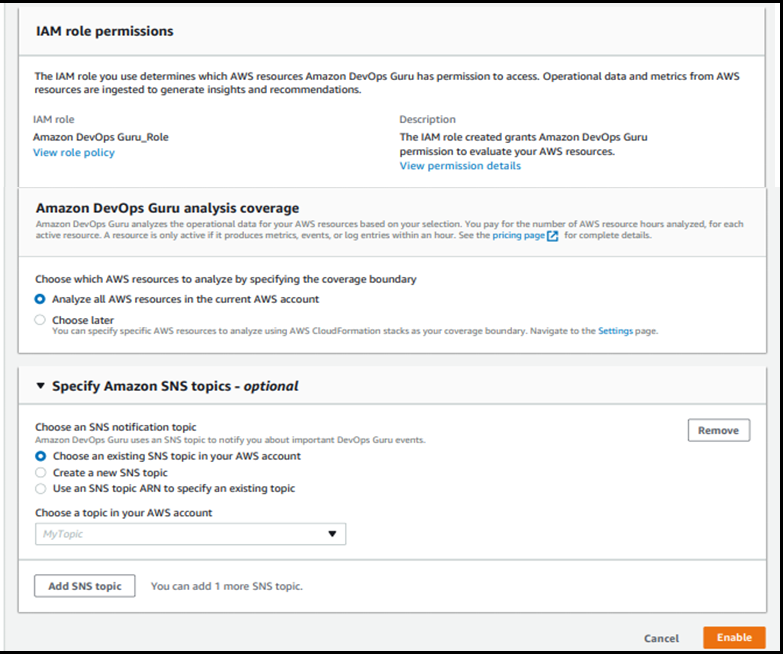
Activating DevOps Guru is as easy as accessing the AWS Management Console and clicking Enable. When enabling DevOps Guru, you can select the IAM role. You’ll then choose the AWS resources to analyze, which may include all resources in your AWS account or just specified CloudFormation StackSets. Finally, you can set an Amazon SNS topic if you want to send notifications from DevOps Guru via SNS.

DevOps Guru starts to accumulate logs and analyze your environment; it can take up to several hours. Let’s assume we have a simple serverless architecture as shown in this illustration.

When the system has an error, the operator needs to investigate if the error came from Amazon API Gateway, AWS Lambda, or AWS DynamoDB. They must then determine the root cause and how to fix the issue. With DevOps Guru, the process is now easy and simple.

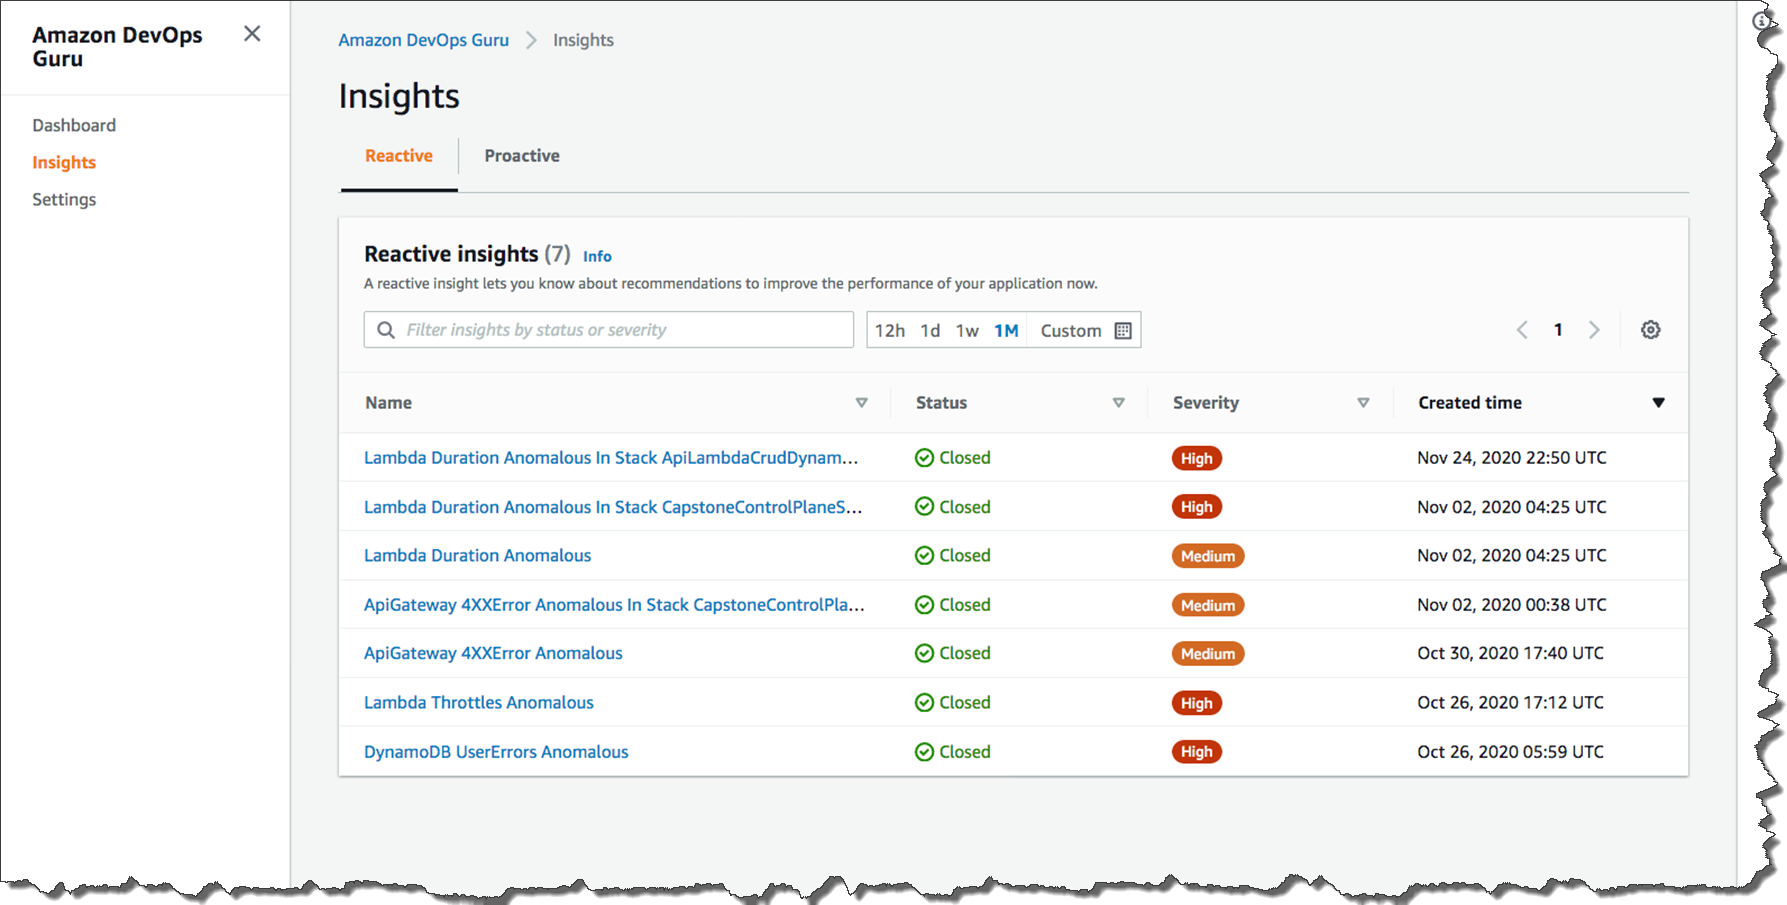
When a developer accesses the management console of DevOps Guru, they will see a list of insights which is a collection of anomalies that are created during the analysis of the AWS resources configured within your application. In this case, Amazon API Gateway, AWS Lambda, and Amazon DynamoDB. Each insight contains observations, recommendations, and contextual data you can use to better understand and resolve the operational problem.

The list below shows the insight name, the status (closed or ongoing), severity, and when the insight was created. Without checking any logs, you can immediately see that in the most recent issue (line1), a problem with a Lambda function within your stack was the cause of the issue, and it was related to duration. If the issue was still occurring, the status would be listed as Ongoing. Since this issue was temporary, the status is showing Closed.

Insights

Let’s look deeper at the most recent anomaly by clicking through the first insight link. There are two tabs: Aggregated metrics and Graphed anomalies.

Aggregated metrics display metrics that are related to the insight. Operators can see which AWS CloudFormation stack created the resource that emitted the metric, the name of the resource, and its type. The red lines on a timeline indicate spans of time when a metric emitted unusual values. In this case, the operator can see the specific time of day on Nov 24 when the anomaly occurred for each metric.

Graphed anomalies display detailed graphs for each of the insight’s anomalies. Operators can investigate and look at an anomaly at the resource level and per statistic. The graphs are grouped by metric name.

metrics

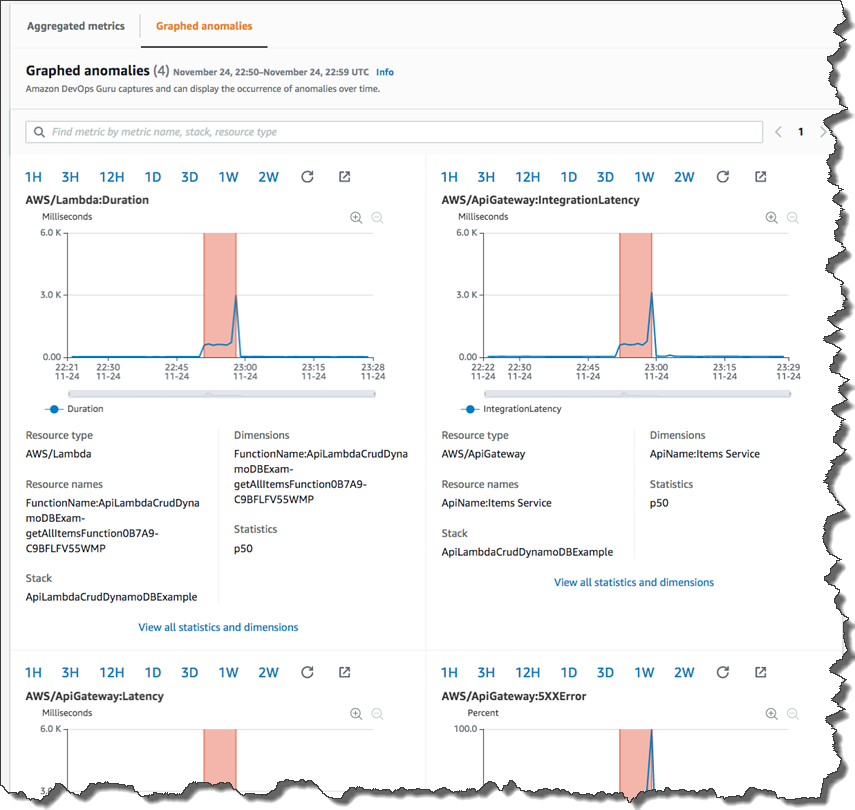
By reviewing aggregated and graphed anomalies, an operator can see when the issue occurred, whether it is still ongoing, as well as the resources impacted. It appears the increased Lambda duration had a corresponding impact on API Gateway causing timeouts and resulted in 5XX errors in API Gateway.

Dev Ops Guru also provides Relevant events which are related to activities that changed your application’s configuration as illustrated below.

Events

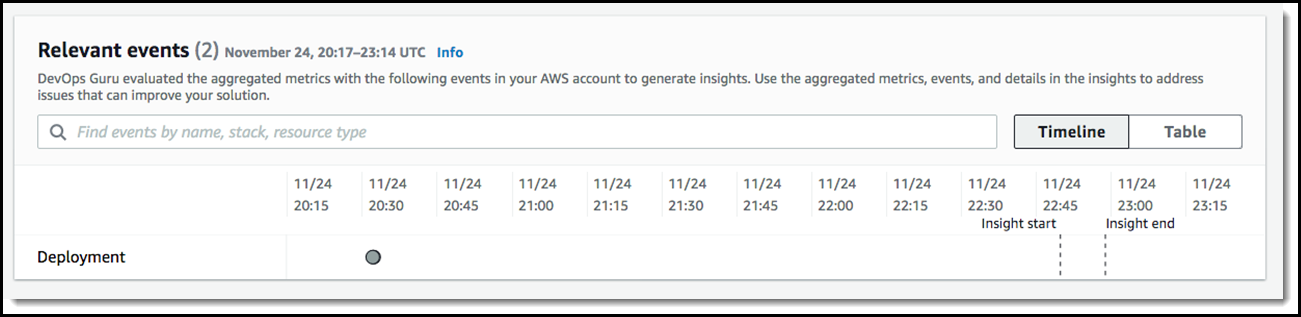
We can now see that a configuration change happened 2 hours before this issue occurred. If we click the point on the graph at 20:30 on 11/24, we can learn more and see the details of that change.

If you click through to the Ops event, the AWS CloudTrail logs would show that the configuration change was twofold: 1) a change in the concurrency provisioned capacity on a Lambda function and 2) the reduction in the integration timeout on an API integration latency.

recommendations to fix

The recommendations tell the operator to evaluate the provisioned concurrency for Lambda and how to troubleshoot errors in API Gateway. After further evaluation, the operator will discover this is exactly correct. The root cause is a mismatch between the Lambda provisioned concurrency setting and the API Gateway integration latency timeout. When the Lambda configuration was updated in the last deployment, it altered how this application responded to burst traffic, and it no longer fit within the API Gateway timeout window. This error is unlikely to have been found in unit testing and will occur repeatedly if the configurations are not updated.

DevOps Guru can send alerts of anomalies to operators via Amazon SNS, and it is integrated with AWS Systems Manager OpsCenter, enabling customers to receive insights directly within OpsCenter as quickly diagnose and remediate issues.

Available for Preview Today
Amazon DevOps Guru is available for preview in US East (N. Virginia), US East (Ohio), US West (Oregon), Europe (Ireland), and Asia Pacific (Tokyo). To learn more about DevOps Guru, please visit our web site and technical documentation, and get started today.

– Kame


New for AWS Lambda – Container Image Support

Post Syndicated from Danilo Poccia original https://aws.amazon.com/blogs/aws/new-for-aws-lambda-container-image-support/

With AWS Lambda, you upload your code and run it without thinking about servers. Many customers enjoy the way this works, but if you’ve invested in container tooling for your development workflows, it’s not easy to use the same approach to build applications using Lambda.

To help you with that, you can now package and deploy Lambda functions as container images of up to 10 GB in size. In this way, you can also easily build and deploy larger workloads that rely on sizable dependencies, such as machine learning or data intensive workloads. Just like functions packaged as ZIP archives, functions deployed as container images benefit from the same operational simplicity, automatic scaling, high availability, and native integrations with many services.

We are providing base images for all the supported Lambda runtimes (Python, Node.js, Java, .NET, Go, Ruby) so that you can easily add your code and dependencies. We also have base images for custom runtimes based on Amazon Linux that you can extend to include your own runtime implementing the Lambda Runtime API.

You can deploy your own arbitrary base images to Lambda, for example images based on Alpine or Debian Linux. To work with Lambda, these images must implement the Lambda Runtime API. To make it easier to build your own base images, we are releasing Lambda Runtime Interface Clients implementing the Runtime API for all supported runtimes. These implementations are available via native package managers, so that you can easily pick them up in your images, and are being shared with the community using an open source license.

We are also releasing as open source a Lambda Runtime Interface Emulator that enables you to perform local testing of the container image and check that it will run when deployed to Lambda. The Lambda Runtime Interface Emulator is included in all AWS-provided base images and can be used with arbitrary images as well.

Your container images can also use the Lambda Extensions API to integrate monitoring, security and other tools with the Lambda execution environment.

To deploy a container image, you select one from an Amazon Elastic Container Registry repository. Let’s see how this works in practice with a couple of examples, first using an AWS-provided image for Node.js, and then building a custom image for Python.

Using the AWS-Provided Base Image for Node.js
Here’s the code (app.js) for a simple Node.js Lambda function generating a PDF file using the PDFKit module. Each time it is invoked, it creates a new mail containing random data generated by the faker.js module. The output of the function is using the syntax of the Amazon API Gateway to return the PDF file.

const PDFDocument = require('pdfkit');
const faker = require('faker');
const getStream = require('get-stream');

exports.lambdaHandler = async (event) => {

    const doc = new PDFDocument();

    const randomName = faker.name.findName();

    doc.text(randomName, { align: 'right' });
    doc.text(faker.address.streetAddress(), { align: 'right' });
    doc.text(faker.address.secondaryAddress(), { align: 'right' });
    doc.text(faker.address.zipCode() + ' ' + faker.address.city(), { align: 'right' });
    doc.moveDown();
    doc.text('Dear ' + randomName + ',');
    doc.moveDown();
    for(let i = 0; i < 3; i++) {
        doc.text(faker.lorem.paragraph());
        doc.moveDown();
    }
    doc.text(faker.name.findName(), { align: 'right' });
    doc.end();

    pdfBuffer = await getStream.buffer(doc);
    pdfBase64 = pdfBuffer.toString('base64');

    const response = {
        statusCode: 200,
        headers: {
            'Content-Length': Buffer.byteLength(pdfBase64),
            'Content-Type': 'application/pdf',
            'Content-disposition': 'attachment;filename=test.pdf'
        },
        isBase64Encoded: true,
        body: pdfBase64
    };
    return response;
};

I use npm to initialize the package and add the three dependencies I need in the package.json file. In this way, I also create the package-lock.json file. I am going to add it to the container image to have a more predictable result.

$ npm init
$ npm install pdfkit
$ npm install faker
$ npm install get-stream

Now, I create a Dockerfile to create the container image for my Lambda function, starting from the AWS provided base image for the nodejs12.x runtime:

FROM amazon/aws-lambda-nodejs:12
COPY app.js package*.json ./
RUN npm install
CMD [ "app.lambdaHandler" ]

The Dockerfile is adding the source code (app.js) and the files describing the package and the dependencies (package.json and package-lock.json) to the base image. Then, I run npm to install the dependencies. I set the CMD to the function handler, but this could also be done later as a parameter override when configuring the Lambda function.

I use the Docker CLI to build the random-letter container image locally:

$ docker build -t random-letter .

To check if this is working, I start the container image locally using the Lambda Runtime Interface Emulator:

$ docker run -p 9000:8080 random-letter:latest

Now, I test a function invocation with cURL. Here, I am passing an empty JSON payload.

$ curl -XPOST "http://localhost:9000/2015-03-31/functions/function/invocations" -d '{}'

If there are errors, I can fix them locally. When it works, I move to the next step.

To upload the container image, I create a new ECR repository in my account and tag the local image to push it to ECR. To help me identify software vulnerabilities in my container images, I enable ECR image scanning.

$ aws ecr create-repository --repository-name random-letter --image-scanning-configuration scanOnPush=true
$ docker tag random-letter:latest 123412341234.dkr.ecr.sa-east-1.amazonaws.com/random-letter:latest
$ aws ecr get-login-password | docker login --username AWS --password-stdin 123412341234.dkr.ecr.sa-east-1.amazonaws.com
$ docker push 123412341234.dkr.ecr.sa-east-1.amazonaws.com/random-letter:latest

Here I am using the AWS Management Console to complete the creation of the function. You can also use the AWS Serverless Application Model, that has been updated to add support for container images.

In the Lambda console, I click on Create function. I select Container image, give the function a name, and then Browse images to look for the right image in my ECR repositories.

Screenshot of the console.

After I select the repository, I use the latest image I uploaded. When I select the image, the Lambda is translating that to the underlying image digest (on the right of the tag in the image below). You can see the digest of your images locally with the docker images --digests command. In this way, the function is using the same image even if the latest tag is passed to a newer one, and you are protected from unintentional deployments. You can update the image to use in the function code. Updating the function configuration has no impact on the image used, even if the tag was reassigned to another image in the meantime.

Screenshot of the console.

Optionally, I can override some of the container image values. I am not doing this now, but in this way I can create images that can be used for different functions, for example by overriding the function handler in the CMD value.

Screenshot of the console.

I leave all other options to their default and select Create function.

When creating or updating the code of a function, the Lambda platform optimizes new and updated container images to prepare them to receive invocations. This optimization takes a few seconds or minutes, depending on the size of the image. After that, the function is ready to be invoked. I test the function in the console.

Screenshot of the console.

It’s working! Now let’s add the API Gateway as trigger. I select Add Trigger and add the API Gateway using an HTTP API. For simplicity, I leave the authentication of the API open.

Screenshot of the console.

Now, I click on the API endpoint a few times and download a few random mails.

Screenshot of the console.

It works as expected! Here are a few of the PDF files that are generated with random data from the faker.js module.

Output of the sample application.


Building a Custom Image for Python
Sometimes you need to use your custom container images, for example to follow your company guidelines or to use a runtime version that we don’t support.

In this case, I want to build an image to use Python 3.9. The code (app.py) of my function is very simple, I just want to say hello and the version of Python that is being used.

import sys
def handler(event, context): 
    return 'Hello from AWS Lambda using Python' + sys.version + '!'

As I mentioned before, we are sharing with you open source implementations of the Lambda Runtime Interface Clients (which implement the Runtime API) for all the supported runtimes. In this case, I start with a Python image based on Alpine Linux. Then, I add the Lambda Runtime Interface Client for Python (link coming soon) to the image. Here’s the Dockerfile:

# Define global args
ARG FUNCTION_DIR="/home/app/"
ARG RUNTIME_VERSION="3.9"
ARG DISTRO_VERSION="3.12"

# Stage 1 - bundle base image + runtime
# Grab a fresh copy of the image and install GCC
FROM python:${RUNTIME_VERSION}-alpine${DISTRO_VERSION} AS python-alpine
# Install GCC (Alpine uses musl but we compile and link dependencies with GCC)
RUN apk add --no-cache \
    libstdc++

# Stage 2 - build function and dependencies
FROM python-alpine AS build-image
# Install aws-lambda-cpp build dependencies
RUN apk add --no-cache \
    build-base \
    libtool \
    autoconf \
    automake \
    libexecinfo-dev \
    make \
    cmake \
    libcurl
# Include global args in this stage of the build
ARG FUNCTION_DIR
ARG RUNTIME_VERSION
# Create function directory
RUN mkdir -p ${FUNCTION_DIR}
# Copy handler function
COPY app/* ${FUNCTION_DIR}
# Optional – Install the function's dependencies
# RUN python${RUNTIME_VERSION} -m pip install -r requirements.txt --target ${FUNCTION_DIR}
# Install Lambda Runtime Interface Client for Python
RUN python${RUNTIME_VERSION} -m pip install awslambdaric --target ${FUNCTION_DIR}

# Stage 3 - final runtime image
# Grab a fresh copy of the Python image
FROM python-alpine
# Include global arg in this stage of the build
ARG FUNCTION_DIR
# Set working directory to function root directory
WORKDIR ${FUNCTION_DIR}
# Copy in the built dependencies
COPY --from=build-image ${FUNCTION_DIR} ${FUNCTION_DIR}
# (Optional) Add Lambda Runtime Interface Emulator and use a script in the ENTRYPOINT for simpler local runs
COPY https://github.com/aws/aws-lambda-runtime-interface-emulator/releases/latest/download/aws-lambda-rie /usr/bin/aws-lambda-rie
RUN chmod 755 /usr/bin/aws-lambda-rie
COPY entry.sh /
ENTRYPOINT [ "/entry.sh" ]
CMD [ "app.handler" ]

The Dockerfile this time is more articulated, building the final image in three stages, following the Docker best practices of multi-stage builds. You can use this three-stage approach to build your own custom images:

  • Stage 1 is building the base image with the runtime, Python 3.9 in this case, plus GCC that we use to compile and link dependencies in stage 2.
  • Stage 2 is installing the Lambda Runtime Interface Client and building function and dependencies.
  • Stage 3 is creating the final image adding the output from stage 2 to the base image built in stage 1. Here I am also adding the Lambda Runtime Interface Emulator, but this is optional, see below.

I create the entry.sh script below to use it as ENTRYPOINT. It executes the Lambda Runtime Interface Client for Python. If the execution is local, the Runtime Interface Client is wrapped by the Lambda Runtime Interface Emulator.

#!/bin/sh
if [ -z "${AWS_LAMBDA_RUNTIME_API}" ]; then
    exec /usr/bin/aws-lambda-rie /usr/local/bin/python -m awslambdaric
else
    exec /usr/local/bin/python -m awslambdaric
fi

Now, I can use the Lambda Runtime Interface Emulator to check locally if the function and the container image are working correctly:

$ docker run -p 9000:8080 lambda/python:3.9-alpine3.12

Not Including the Lambda Runtime Interface Emulator in the Container Image
It’s optional to add the Lambda Runtime Interface Emulator to a custom container image. If I don’t include it, I can test locally by installing the Lambda Runtime Interface Emulator in my local machine following these steps:

  • In Stage 3 of the Dockerfile, I remove the commands copying the Lambda Runtime Interface Emulator (aws-lambda-rie) and the entry.sh script. I don’t need the entry.sh script in this case.
  • I use this ENTRYPOINT to start by default the Lambda Runtime Interface Client:
    ENTRYPOINT [ "/usr/local/bin/python", “-m”, “awslambdaric” ]
  • I run these commands to install the Lambda Runtime Interface Emulator in my local machine, for example under ~/.aws-lambda-rie:
mkdir -p ~/.aws-lambda-rie
curl -Lo ~/.aws-lambda-rie/aws-lambda-rie https://github.com/aws/aws-lambda-runtime-interface-emulator/releases/latest/download/aws-lambda-rie
chmod +x ~/.aws-lambda-rie/aws-lambda-rie

When the Lambda Runtime Interface Emulator is installed on my local machine, I can mount it when starting the container. The command to start the container locally now is (assuming the Lambda Runtime Interface Emulator is at ~/.aws-lambda-rie):

docker run -d -v ~/.aws-lambda-rie:/aws-lambda -p 9000:8080 \
       --entrypoint /aws-lambda/aws-lambda-rie lambda/python:3.9-alpine3.12
       /lambda-entrypoint.sh app.handler

Testing the Custom Image for Python
Either way, when the container is running locally, I can test a function invocation with cURL:

curl -XPOST "http://localhost:9000/2015-03-31/functions/function/invocations" -d '{}'

The output is what I am expecting!

"Hello from AWS Lambda using Python3.9.0 (default, Oct 22 2020, 05:03:39) \n[GCC 9.3.0]!"

I push the image to ECR and create the function as before. Here’s my test in the console:

Screenshot of the console.

My custom container image based on Alpine is running Python 3.9 on Lambda!

Available Now
You can use container images to deploy your Lambda functions today in US East (N. Virginia), US East (Ohio), US West (Oregon), Asia Pacific (Tokyo), Asia Pacific (Singapore), Europe (Ireland), Europe (Frankfurt), South America (São Paulo). We are working to add support in more Regions soon. The container image support is offered in addition to ZIP archives and we will continue to support the ZIP packaging format.

There are no additional costs to use this feature. You pay for the ECR repository and the usual Lambda pricing.

You can use container image support in AWS Lambda with the console, AWS Command Line Interface (CLI), AWS SDKs, AWS Serverless Application Model, and solutions from AWS Partners, including Aqua Security, Datadog, Epsagon, HashiCorp Terraform, Honeycomb, Lumigo, Pulumi, Stackery, Sumo Logic, and Thundra.

This new capability opens up new scenarios, simplifies the integration with your development pipeline, and makes it easier to use custom images and your favorite programming platforms to build serverless applications.

Learn more and start using container images with AWS Lambda.

Danilo

New – Amazon EBS gp3 Volume Lets You Provision Performance Apart From Capacity

Post Syndicated from Harunobu Kameda original https://aws.amazon.com/blogs/aws/new-amazon-ebs-gp3-volume-lets-you-provision-performance-separate-from-capacity-and-offers-20-lower-price/

Amazon Elastic Block Store (EBS) is an easy-to-use, high-performance block storage service designed for use with Amazon EC2 instances for both throughput and transaction-intensive workloads of all sizes. Using existing general purpose solid state drive (SSD) gp2 volumes, performance scales with storage capacity. By provisioning larger storage volume sizes, you can improve application input / output operations per second (IOPS) and throughput.

However some applications, such as MySQL, Cassandra, and Hadoop clusters, require high performance but not high storage capacity. Customers want to meet the performance requirements of these types of applications without paying for more storage volumes than they need.

Today I would like to tell you about gp3, a new type of SSD EBS volume that lets you provision performance independent of storage capacity, and offers a 20% lower price than existing gp2 volume types.

New gp3 Volume Type

With EBS, customers can choose from multiple volume types based on the unique needs of their applications. We introduced general purpose SSD gp2 volumes in 2014 to offer SSD performance at a very low price. gp2 provides an easy and cost-effective way to meet the performance and throughput requirements of many applications our customers use such as virtual desktops, medium-sized databases such as SQLServer and OracleDB, and development and testing environments.

That said, some customers need higher performance. Because the basic idea behind gp2 is that the larger the capacity, the faster the IOPS, customers may end up provisioning more storage capacity than desired. Even though gp2 offers a low price point, customers end up paying for storage they don’t need.

The new gp3 is the 7th variation of EBS volume types. It lets customers independently increase IOPS and throughput without having to provision additional block storage capacity, paying only for the resources they need.

gp3 is designed to provide predictable 3,000 IOPS baseline performance and 125 MiB/s regardless of volume size. It is ideal for applications that require high performance at a low cost such as MySQL, Cassandra, virtual desktops and Hadoop analytics. Customers looking for higher performance can scale up to 16,000 IOPS and 1,000 MiB/s for an additional fee. The top performance of gp3 is 4 times faster than max throughput of gp2 volumes.

How to Switch From gp2 to gp3

If you’re currently using gp2, you can easily migrate your EBS volumes to gp3 using Amazon EBS Elastic Volumes, an existing feature of Amazon EBS. Elastic Volumes allows you to modify the volume type, IOPS, and throughput of your existing EBS volumes without interrupting your Amazon EC2 instances. Also, when you create a new Amazon EBS volume, Amazon EC2 instance, or Amazon Machine Image (AMI), you can choose the gp3 volume type. New AWS customers receive 30GiB of gp3 storage with the baseline performance at no charge for 12 months.

Available Today

The gp3 volume type is available for all AWS Regions. You can access the AWS Management Console to launch your first gp3 volume.

For more information, see Amazon Elastic Block Store and get started with gp3 today.

– Kame


Preview: AWS Proton – Automated Management for Container and Serverless Deployments

Post Syndicated from Alex Casalboni original https://aws.amazon.com/blogs/aws/preview-aws-proton-automated-management-for-container-and-serverless-deployments/

Today, we are excited to announce the public preview of AWS Proton, a new service that helps you automate and manage infrastructure provisioning and code deployments for serverless and container-based applications.

Maintaining hundreds – or sometimes thousands – of microservices with constantly changing infrastructure resources and configurations is a challenging task for even the most capable teams.

AWS Proton enables infrastructure teams to define standard templates centrally and make them available for developers in their organization. This allows infrastructure teams to manage and update infrastructure without impacting developer productivity.

How AWS Proton Works
The process of defining a service template involves the definition of cloud resources, continuous integration and continuous delivery (CI/CD) pipelines, and observability tools. AWS Proton will integrate with commonly used CI/CD pipelines and observability tools such as CodePipeline and CloudWatch. It also provides curated templates that follow AWS best practices for common use cases such as web services running on AWS Fargate or stream processing apps built on AWS Lambda.

Infrastructure teams can visualize and manage the list of service templates in the AWS Management Console.

This is what the list of templates looks like.

AWS Proton also collects information about the deployment status of the application such as the last date it was successfully deployed. When a template changes, AWS Proton identifies all the existing applications using the old version and allows infrastructure teams to upgrade them to the most recent definition, while monitoring application health during the upgrade so it can be rolled-back in case of issues.

This is what a service template looks like, with its versions and running instances.

Once service templates have been defined, developers can select and deploy services in a self-service fashion. AWS Proton will take care of provisioning cloud resources, deploying the code, and health monitoring, while providing visibility into the status of all the deployed applications and their pipelines.

This way, developers can focus on building and shipping application code for serverless and container-based applications without having to learn, configure, and maintain the underlying resources.

This is what the list of deployed services looks like.

Available in Preview
AWS Proton is now available in preview in US East (N. Virginia), US East (Ohio), US West (Oregon), Asia Pacific (Tokyo), and Europe (Ireland); it’s free of charge, as you only pay for the underlying services and resources. Check out the technical documentation.

You can get started using the AWS Management Console here.

Alex

New for AWS Lambda – Functions with Up to 10 GB of Memory and 6 vCPUs

Post Syndicated from Danilo Poccia original https://aws.amazon.com/blogs/aws/new-for-aws-lambda-functions-with-up-to-10-gb-of-memory-and-6-vcpus/

AWS Lambda runs your code on an highly available and scalable compute infrastructure so that you can focus on what you want to build. Do you want to get the advantages of Lambda for workloads that are memory or computationally intensive? Wait no more!

Starting today, you can allocate up to 10 GB of memory to a Lambda function. This is more than a 3x increase compared to previous limits. Lambda allocates CPU and other resources linearly in proportion to the amount of memory configured. That means you can now have access to up to 6 vCPUs in each execution environment. In this way, your multithreaded and multiprocess applications run faster. Since Lambda charges are proportional to memory configured and function duration (GB-seconds), the additional costs for using more memory may be offset by lower duration. I have more on this in the example below.

With more memory and CPU power, and support for the AVX2 instruction set, new use cases — such as machine learning applications; batch and extract, transform, load (ETL) jobs; modelling; genomics; gaming; high-performance computing (HPC); and media processing — become easier to implement and scale with Lambda functions.

Let’s see how this works in practice!

Lambda Function Performance as Memory Increases
When I first wrote about the capability of mounting a shared Amazon Elastic File System (EFS) for Lambda functions, one of the examples I used was a function doing machine learning inference to classify images of birds. The function is using PyTorch to run the inference, applying a pre-trained machine learning model.

Now, I can execute the same function in the updated Lambda execution environment. Let’s see how increasing memory affects the duration of the function. Here are the results of using memory configurations between 1 and 10 GB. To get these numbers, I ran 20 invocations for each memory configuration. Then, I computed the average duration, discarding function initializations. To avoid possible outliers, I also excluded from the average the top and bottom 10% of reported durations. Based on the results, I estimated the charges I would have for 1 million invocations with each configuration.

Graph showing Function Duration and Charges for 1M Invocations as Memory Increases

As you can see, the function is able to use the additional CPU power that comes with more memory, decreasing the duration of the invocations. What is interesting is the impact of increasing memory on my costs.

Lambda charges are related to memory and duration, so if I increase memory and this is reducing duration by the same proportion, the overall charges are about the same. For example, looking at the graph above, when I configure 5 GB of memory, I have the same costs as when I have 1 GB of memory (about $61 for one million invocations), but the function is 5x faster. If I need lower latency, I can increase memory up to 10 GB, where the function is 7.6x faster and I pay a little more ($80 for one million invocations).

Depending on your code and business case, you can find out which memory configuration gives the optimal trade-off between cost and performance. To help you with that, my colleague and friend Alex Casalboni started the AWS Lambda Power Tuning project to help you optimize your Lambda functions in a data-driven way. This open source tool is really useful and has been improved by the support of many contributors. Give it a try!

In my tests, PyTorch is also using the optimizations of the Advanced Vector Extensions 2 (AVX2) instruction set, now available in the Lambda execution environment. With the AVX2 instruction set, the processor allows running a certain set of operations simultaneously. This is extremely beneficial for applications with operations that can run in parallel such as matrix multiplication. As a result, using AVX2 can improve performance by increasing CPU throughput per cycle. This typically helps compute intensive workloads such as machine learning inference, multimedia processing, scientific simulations, and financial modeling applications.

Available Now
AWS Lambda support for larger functions is available in Africa (Cape Town), Asia Pacific (Mumbai), Asia Pacific (Seoul), Asia Pacific (Singapore), Asia Pacific (Sydney), Asia Pacific (Tokyo), Canada (Central), EU (Frankfurt), EU (Ireland), EU (London), EU (Milano), EU (Paris), EU (Stockholm), South America (Sao Paulo), US East (N. Virginia), US East (Ohio), US West (N. California), US West (Oregon).

You can configure up to 10 GB of memory for new or existing Lambda functions using the AWS Management Console, AWS Command Line Interface (CLI), AWS SDKs, and Serverless Application Model.

Here’s a snapshot of the new console experience. We replaced the slider with a field, and you can now configure memory in 1 MB increments (it was 64MB increments before). In this way, the console works similarly to the Lambda API that always accepted memory configurations with 1MB granularity.

There is no change in Lambda pricing, you pay for requests and usage, with duration and Provisioned Concurrency charged at a rate proportional to the amount of memory configured.

Start using Lambda functions with up to 10 GB of memory and 6 vCPUs today.

Danilo

New for AWS Lambda – 1ms Billing Granularity Adds Cost Savings

Post Syndicated from Danilo Poccia original https://aws.amazon.com/blogs/aws/new-for-aws-lambda-1ms-billing-granularity-adds-cost-savings/

What I like about AWS Lambda is that it lets you run code without provisioning or managing servers, and you pay only for what you use. Since we launched Lambda in 2014, you have been charged for the number of times your code is triggered (requests) and for the time your code executes, rounded up to the nearest 100ms (duration).

Starting today, we are rounding up duration to the nearest millisecond with no minimum execution time.

With this new pricing, you are going to pay less most of the time, but it’s going to be more noticeable when you have functions whose execution time is much lower than 100ms, such as low latency APIs.

For example, let’s look at a simple web app that I have running. In the Amazon CloudWatch Logs, for each invocation there is a REPORT line. To improve readability, I am breaking the REPORT line into three lines here:

REPORT RequestId: 35a7e0cb-4902-490d-b8d3-eb315dded660
Duration: 27.40 ms  Billed Duration: 100 ms Memory Size: 1024 MB  Max Memory Used: 472 MB

With 1ms billing granularity that becomes:

REPORT RequestId: a24d03b5-429d-4ca3-a490-878a52a0182f
Duration: 27.55 ms  Billed Duration: 28 ms Memory Size: 1024 MB  Max Memory Used: 472 MB

My application doesn’t have a lot of traffic, so let’s do a simple production scenario. Let’s say I have 100,000 users for a web/mobile app. I expect each user to call this function via the web/mobile app about 20 times per day. The duration of those invocations is on average 28ms. Each month, I should expect:

  • 100,000 users * 20 invocations * 30 days = 60 million invocations.

Let’s estimate the costs in US East (N. Virginia). For simplicity, I am not considering the Lambda free tier.

The Lambda monthly request charges are unchanged:

  • 60 million invocations * $0.20 per 1M requests = $12

To that, I have to add compute charges based on duration.

The Lambda monthly compute charges with the old 100ms rounded up pricing would have been:

  • 60 million invocations* 100ms * 1G memory * $0.0000166667 for every GB-second = $100

With the new 1ms billing granularity, the duration costs are:

  • 60 million invocations * 28ms * 1G memory * $0.0000166667 for every GB-second = $28

For this scenario, overall costs including request and compute charges are much cheaper ($40) than before ($112).

With this pricing, there is now more of an incentive to optimize the duration of functions even if it is already well below 100ms. Your engineering efforts can reduce costs even more.

If you increase memory to get more CPU power and speed up your functions, you now get the benefit of a lower billed duration below 100ms as well. That means that increasing performance and reducing latency is going to be cheaper than before.

We are applying 1ms billing granularity for duration, including when you have Provisioned Concurrency enabled, in all AWS Regions with the exception of those based in China starting with the December 2020 billing period. Regions in China will get the change from January.

Enjoy the new pricing!

Danilo

Amazon Elastic Container Registry Public: A New Public Container Registry

Post Syndicated from Martin Beeby original https://aws.amazon.com/blogs/aws/amazon-ecr-public-a-new-public-container-registry/

In November, we announced that we intended to create a public container registry, and today at AWS re:Invent, we followed through on that promise and launched Amazon Elastic Container Registry Public (ECR Public).

ECR Public allows you to store, manage, share, and deploy container images for anyone to discover and download globally. You have long been able to host private container images on AWS with Amazon Elastic Container Registry, and now with the release of ECR Public, you can host public ones too, enabling anyone (with or without an AWS account) to browse and pull your published container artifacts.

As part of the announcement, a new website allows you to browse and search for public container images, view developer provided details, and discover the commands you need to pull containers.

If you check the website out now, you will see we have hosted some of our container images on the registry, including including the Amazon EKS Distro images. We also have hundreds of images from partners such as Bitnami, Canonical and HashiCorp.

Publishing A Container
Before I can upload a container, I need to create a repository. There is now a Public tab in the Repositories section of the Elastic Container Registry console. In this tab, I click the button Create repository.

I am taken to the Create repository screen, where I select that I would like the repository to be public.

I give my repository the name news-blog and upload a logo that will be used on the gallery details page. I provide a description and select Linux as the Content type, There is also an option to select the CPU architectures that the image supports, if you have a multi-architecture image you can select more than one architecture type. The content types are used for filtering on the gallery website, this will enable people using the gallery to filter their searches by architecture and operating system support.

I enter some markdown in the About section. The text I enter here will be displayed on the gallery page and would ordinarily explain what’s included in the repository, any licensing details, or other relevant information. There is also a Usage section where I enter some sample text to explain how to use my image and that I created the repository for a demo. Finally, I click Create repository.

Back at the repository page, I now have one public repository. There is also a button that says View push commands. I click on this so I can learn more about how to push containers to the repository.

I follow the four steps contained in this section. The first step helps me authenticate with ECR Public so that I can push containers to my repository. Steps two, three, and four show me how to build, tag, and push my container to ECR Public.

The application that I have containerized is a simple app that runs and outputs a terminal message. I use the docker CLI to push my container to my repository, it’s quite a small container, so it only takes a minute or two.

Once complete, I head over to the ECR Public gallery and can see that my image is now publicly available for anyone to pull.

Pulling A Container
You pull containers from ECR Public using the familiar docker pull command with the URL of the image.

You can easily find this URL on the ECR Public website, where the image URL is displayed along with other published information. Clicking on the URL copies the image URL to your clipboard for an easy copy-paste.

ECR Public image URLs are in the format public.ecr.aws/<namespace>/<image>:<tag>

For example, if I wanted to pull the image I uploaded earlier, I would open my terminal and run the following command (please note: you will need docker installed locally to run these commands).

docker pull public.ecr.aws/r6g9m2o3/news-blog:latest

I have now download the Docker Image onto my machine, and I can run the container using the following command:

docker run public.ecr.aws/r6g9m2o3/news-blog:latest

My application runs and writes a message from Jeff Barr. If you are wondering about the switches and parameters I have used on my docker run command, it’s to make sure that the log is written in color because we wouldn’t want to miss out on Jeff’s glorious purple hair.

Nice to Know
ECR Public automatically replicates container images across two AWS Regions to reduce download times and improve availability. Therefore, using public images directly from ECR Public may simplify your build process if you were previously creating and managing local copies. ECR Public caches image layers in Amazon CloudFront, to improve pull performance for a global audience, especially for popular images.

ECR Public also has some nice integrations that will make working with containers easier on AWS. For example, ECR Public will automatically notify services such as AWS CodeBuild to rebuild an application when a public container image changes.

Pricing
All AWS customers will get 50 GB of free storage each month, and if you exceed that limit, you will pay nominal charges. Check out the pricing page for details.

Anyone who pulls images anonymously will get 500 GB of free data bandwidth each month, after which they can sign up or sign in to an AWS account to get more. Simply authenticating with an AWS account increases free data bandwidth up to 5 TB each month when pulling images from the internet.

Finally, workloads running in AWS will get unlimited data bandwidth from any region when pulling publicly shared images from ECR Public.

Verification and Namespaces
You can create a custom namespace such as your organization or project name to be used in a ECR Public URL subdomain unless it’s a reserved namespace. Namespaces such as sagemaker and eks that identify AWS services are reserved. Namespaces that identify AWS Marketplace sellers are also reserved.

Available Today
ECR Public is available today and you can find out more over on the product page. Visit the gallery to explore and use available public container software and log into the ECR Console to share containers publicly.

Happy Containerizing!

— Martin

Coming Soon – Amazon EC2 G4ad Instances Featuring AMD GPUs for Graphics Workloads

Post Syndicated from Steve Roberts original https://aws.amazon.com/blogs/aws/new-amazon-ec2-g4ad-instances-featuring-amd-gpus-for-graphics-workloads/

Customers with high performance graphic workloads, such as game streaming, animation, and video rendering for example, are always looking for higher performance with less cost. Today, I’m happy to announce new Amazon Elastic Compute Cloud (EC2) instances in the G4 instance family are in the works and will be available soon, to improve performance and reduce cost for graphics-intensive workloads. The new G4ad instances feature AMD’s latest Radeon Pro V520 GPUs and 2nd generation EPYC processors, and are the first in EC2 to feature AMD GPUs.

G4dn instances, released in 2019 and featuring NVIDIA T4 GPUs, were previously the most cost-effective GPU-based instances in EC2. G4dn instances are ideal for deploying machine learning models in production and also graphics-intensive applications. However, when compared to G4dn the new G4ad instances enable up to 45% better price performance for graphics-intensive workloads, including the aforementioned game streaming, remote graphics workstations, and rendering scenarios. Compared to an equally-sized G4dn instance, G4ad instances offer up to 40% improvement in performance.

G4dn instances will continue to be the best option for small-scale machine learning (ML) training and GPU-based ML inference due to included hardware optimizations like Tensor Cores. Additionally, G4dn instances are still best suited for graphics applications that need access to NVIDIA libraries such as CUDA, CuDNN, and NVENC. However, when there is no dependency on NVIDIA’s libraries, we recommend customers try the G4ad instances to benefit from the improved price and performance.

AMD Radeon Pro V520 GPUs in G4ad instances support DirectX 11/12, Vulkan 1.1, and OpenGL 4.5 APIs. For operating systems, customers can choose from Windows Server 2016/2019, Amazon Linux 2, Ubuntu 18.04.3, and CentOS 7.7. Instances using G4ad can be purchased as On-Demand, Savings Plan, Reserved Instances, or Spot Instances. Three instance sizes are available, from G4ad.4xlarge, with 1 GPU, to G4ad.16xlarge with 4 GPUs, as shown below.

Instance Size GPUs GPU Memory (GB) vCPUs Memory (GB) Storage EBS Bandwidth (Gbps) Network Bandwidth (Gbps)
g4ad.4xlarge 1 8 16 64 600 Up to 3 Up to 10
g4ad.8xlarge 2 16 32 128 1200 3 15
g4ad.16xlarge 4 32 64 256 2400 6 25

The new G4ad instances will be available soon in US East (N. Virginia), US West (Oregon), and Europe (Ireland).

Learn more about G4ad instances.

— Steve

Coming Soon – EC2 C6gn Instances – 100 Gbps Networking with AWS Graviton2 Processors

Post Syndicated from Danilo Poccia original https://aws.amazon.com/blogs/aws/coming-soon-ec2-c6gn-instances-100-gbps-networking-with-aws-graviton2-processors/

Based on the amazing feedback from customers such as Snap, NextRoll, Intuit, SmugMug, and Honeycomb who are running their workloads on Amazon Elastic Compute Cloud (EC2) instances powered by AWS Graviton2, today we are announcing an addition to our broad Arm-based Graviton2 portfolio with C6gn instances that deliver up to 100 Gbps network bandwidth, up to 38 Gbps Amazon Elastic Block Store (EBS) bandwidth, up to 40% higher packet processing performance, and up to 40% better price/performance versus comparable current generation x86-based network optimized instances.

Compared to C6g instances, this new instance type provides 4x higher network bandwidth, 4x higher packet processing performance, and 2x higher EBS bandwidth. This means that customers with workloads that need high networking bandwidth such as high performance computing (HPC), network appliance, real-time video communications, and data analytics, will be able to bring their biggest and most challenging applications to Arm and take advantage of the performance and cost-optimization.

C6gn instances will be available in 8 sizes:

Name vCPUs Memory
(GiB)
Network Bandwidth
(Gbps)
EBS Throughput
(Gbps)
c6gn.medium 1 2 Up to 25 Up to 9.5
c6gn.large 2 4 Up to 25 Up to 9.5
c6gn.xlarge 4 8 Up to 25 Up to 9.5
c6gn.2xlarge 8 16 Up to 25 Up to 9.5
c6gn.4xlarge 16 32 25 9.5
c6gn.8xlarge 32 64 50 19
c6gn.12xlarge 48 96 75 28.5
c6gn.16xlarge 64 128 100 38

The new instances are built on the AWS Nitro System, a collection of AWS-designed hardware and software innovations that maximize resource efficiency. C6gn instances support Elastic Fabric Adapter (EFA) on the c6gn.16xlarge sizes for workloads that can take advantage of lower network latency (such as HPC and video processing) and use Message Passing Interface (MPI) for highly scalable clusters. These new instances also fully support network frameworks like Data Plane Development Kit (DPDK), making it easier to migrate network appliance workloads.

Coming Soon
EC2 C6gn instances will be available later this month and make it easier to optimize costs for HPC and workloads that require high network bandwidth and low latency. Let me know what you are going to build with them!

To get practice with the AWS Graviton2 architecture, you can try t4g.micro instances for free for up to 750 hours per month until March 31st, 2021.

Learn more about EC2 C6gn instances today.

Danilo

AWS On Air – re:Invent Weekly Streaming Schedule

Post Syndicated from Nicholas Walsh original https://aws.amazon.com/blogs/aws/reinvent-2020-streaming-schedule/

Last updated: 11:00 am (PST), November 30

Join AWS On Air throughout re:Invent (Dec 1 – Dec 17) for daily livestreams with news, announcements, demos, and interviews with experts across industry and technology. To get started, head over to register for re:Invent. Then, after Andy Jassy’s keynote (Tuesday, Dec 1 at 8-11 am PST) check back here for the latest livestreams and where to tune-in.

Time (PST) Tuesday 12/1 Wednesday 12/2 Thursday (12/3) 12/3
12:00 AM
1:00 AM
2:00 AM Daily Recap (Italian) Daily Recap (Italian)
3:00 AM Daily Recap (German) Daily Recap (German)
4:00 AM Daily Recap (French) Daily Recap (French)
5:00 AM
6:00 AM Daily Recap
(Portuguese)
7:00 AM Daily Recap (Spanish)
8:00 AM
9:00 AM
9:30 AM
10:00 AM AWS What’s Next AWS What’s Next
10:30 AM AWS What’s Next AWS What’s Next
11:00 AM Voice of the Customer AWS What’s Next
11:30 AM Keynoteworthy Voice of the Customer Keynoteworthy
12:00 PM
12:30 PM
1:00 PM Industry Live Session – Energy AWS What’s Next
1:30 PM
2:00 PM AWS What’s Next AWS What’s Next AWS What’s Next
2:30 PM AWS What’s Next AWS What’s Next AWS What’s Next
3:00 PM Howdy Partner Howdy Partner
3:30 PM This Is My
Architecture
All In The Field This Is My
Architecture
4:00 PM
4:30 PM AWS What’s Next
5:00 PM Daily Recap (English) Daily Recap (English) Daily Recap (English)
5:30 PM Certification Quiz
Show
Certification Quiz
Show
Certification Quiz
Show
6:00 PM Industry Live
Sessions
Industry Live
Sessions
6:30 PM
7:00 PM Daily Recap
(Japanese)
Daily Recap
(Japanese)
Daily Recap
(Japanese)
8:00 PM Daily Recap (Korean) Daily Recap (Korean) Daily Recap (Korean)
9:00 PM
10:00 PM Daily Recap
(Cantonese)
Daily Recap
(Cantonese)
Daily Recap
(Cantonese)
11:00 PM

Show synopses

AWS What’s Next. Dive deep on the latest launches from re:Invent with AWS Developer Advocates and members of the service teams. See demos and get your questions answered live during the show.

Keynoteworthy. Join hosts Robert Zhu and Nick Walsh after each re:Invent keynote as they chat in-depth on the launches and announcements.

AWS Community Voices. Join us each Thursday at 11:00AM (PST) during re:Invent to hear from AWS community leaders who will share their thoughts on re:Invent and answer your questions live!

Howdy Partner. Howdy Partner highlights AWS Partner Network (APN) Partners so you can build with new tools and meet the people behind the companies. Experts and newcomers alike can learn how AWS Partner solutions enable you to drive faster results and how to pick the right tool when you need it.

re:Invent Recaps. Tune in for daily and weekly recaps about all things re:Invent—the greatest launches, events, and more! Daily recaps are available Tuesday through Thursday in English and Wednesday through Friday in Japanese, Korean, Italian, Spanish, French, and Portuguese. Weekly recaps are available Thursday in English.

This Is My Architecture.Designed for a technical audience, this popular series highlights innovative architectural solutions from customers and AWS Partners. Our hosts, Adrian DeLuca, Aarthi Raju, and Boaz Ziniman, will showcase the most interesting and creative elements of each architecture. #thisismyarchitecture

All in the Field: AWS Agriculture Live. Our expert AgTech hosts Karen Hildebrand and Matt Wolff review innovative applications that bring food to your table using AWS technology. They are joined by industry guests who walk through solutions from under the soil to low-earth-orbit satellites. #allinthefield

IoT All the Things: Special Projects Edition. Join expert hosts Erin McGill and Tim Mattison as they showcase exploratory “side projects” and early stage use cases from guest solution architects. These episodes let developers and IT professionals at any level jump in and experiment with AWS services in a risk-free environment. #alltheexperiments

Certification Quiz Show. Test your AWS knowledge on our fun, interactive AWS Certification Quiz Show! Each episode covers a different area of AWS knowledge that is ideal for preparing for AWS Certification. We also deep-dive into how best to gain AWS skills and how to become AWS Certified.

AWS Industry Live. Join AWS Industry Live for a comprehensive look into 14 different industries. Attendees will get a chance to join industry experts for a year in review, a review of common use cases, and learning about customer success stories from 2020.

Voice of the Customer. Tune in for one-on-one interviews with AWS industry customers to learn about their AWS journey, the technology that powers their products, and the innovation they are bringing to their industry.

re:Invent 2020 Liveblog: Andy Jassy Keynote

Post Syndicated from Jeff Barr original https://aws.amazon.com/blogs/aws/reinvent-2020-liveblog-andy-jassy-keynote/

I’m always ready to try something new! This year, I am going to liveblog Andy Jassy‘s AWS re:Invent keynote address, which takes place from 8 a.m. to 11 a.m. on Tuesday, December 1 (PST). I’ll be updating this post every couple of minutes as I watch Andy’s address from the comfort of my home office. Stay tuned!

Jeff;