Tag Archives: AWS

Auto-reply to incoming emails using Amazon Simple Email Service (SES)

Post Syndicated from Ilya Pupko original https://aws.amazon.com/blogs/messaging-and-targeting/auto-reply-to-incoming-emails-using-amazon-simple-email-service-ses/

Both Amazon Pinpoint and Amazon Simple Email Service (SES) are known for their ability to send out transactional and promotional emails at scale and with ease. However, both are often not set up to receive email replies. Owners often assume that the “no-reply” addresses they are using do not require much consideration. This means that if a customer does reply, they would get an unhelpful server rejection indicating that the address is invalid. They would also not be able to unsubscribe via the simple reply, which is an otherwise established common practice. Automated guidance that the address is not monitored and who and how to reach for assistance would never be provided. In summary, a very unprofessional experience.

If you do have full control over the DNS and are not already receiving emails at the subdomain used for these emails, you can follow this short guide. It walks you through all the setup needed to have automated and templated responses to any address at the domain. This includes the address you use to send emails. Follow this post to ensure that your Amazon SES and Amazon Pinpoint are set up in accordance with common configuration and best business practices to have professional auto-reply to emails sent to the configured sending email addresses.

Solution overview

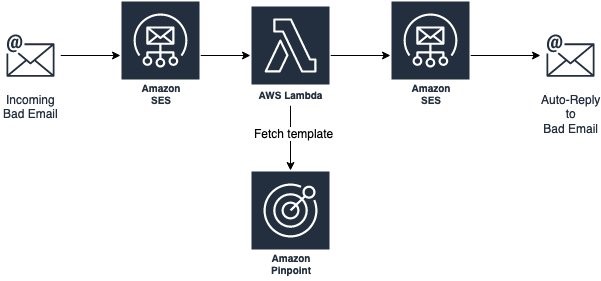
The proposed solution does not rely on any additional services. It does not add any additional charges beyond the cost directly associated with receiving and sending the emails and the minimal AWS Lambda function for the automated logic. It relies on SES built-in capability to receive emails, Amazon Pinpoint native templates, and uses Lambda for basic orchestration.

lambda diagram for response

Note, in this walkthrough and related code, we are using Amazon Pinpoint templates as they can be managed and maintained directly via the console, but you can choose to use SES templates (via the CreateTemplate API) or, if it makes better sense in your scenario, even just hardcode the template into the AWS Lambda function itself.

To complete the setup, all you must do is follow these steps:

      1. Confirm (Sub-) Domain setup in SES (even if you use Amazon Pinpoint to send your emails out, the SES portion of the console should show the validated domain as well). See SES Developer Guide.
      2. Ensure that your SES domain is verified and you are out of the sandbox. If still in the sandbox, you can only send emails to the Amazon SES mailbox simulator addresses and email addresses/domains that you have pre-verified. See Moving out of the Amazon SES sandbox.
      3. Configure SES to receive incoming emails. Please note that this must be done on the whole subdomain you use, not just a single email address. See Setting up Amazon SES email receiving.
      4. Create/add a new template you want to use via Amazon Pinpoint. Simply switch the console over to Amazon Pinpoint, select Message templates, click Create, select Email, and fill out the rest of the self-explanatory field.
        1. Plaintext portion is optional – you can either skip it or fill it out and enable in the Lambda function we are deploying in the next step.
        2. Similarly, if you prefer to use the SES template, you can instead. Just use the associated line in that same code.
        3. Same with a hardcoded template, if you prefer that for some reason.
      5. Have this pre-defined CloudFormation create the required SES receive rule, and Lambda function. This processes the incoming email and sends back the response, all using the code shared in the dedicated portion of our GitHub, AWS Digital User Engagement Reference Architectures repository. Specifically:
          1. Download the YAML from SES_Auto_Reply.yaml.
          2. Go to CloudFormation in AWS Management Console. (Remember to choose the region you want it deployed on)
          3. Click Create Stack and then choose With new resources
          4. Leave the default “Template is ready“, but switch to ”Upload a template file“ and choose the file you just downloaded
          5. Follow the wizard to give the “stack” a new name and enter the name of the template you created in step 4.
          6. Optionally you can also set the default response address, the addresses and/or domains you want to limit the auto-response to, and adjust the incoming email rule-set it should be stored under (the default should be fine, unless you have manually adjusted it in the past)
      6. Once deployed, the behavior is immediately active and you can further adjust any of these elements.


Conclusion and what’s next?

This architecture, once deployed, sends out the templated auto-response using the SES/Pinpoint domain/email address it received the original email on.

The new rule is added to the SES email receiving rule set to allow further customization:

  1. The rule can be limited to specific email address, specific domain, or just be set to be across all domains.
  2. It can also have the default response address set or reuse the address that the original rejected email was sent to.
  3. It can be moved down on the priority with other rules taking precedence and possibly even overriding it.
  4. It can have other actions added to it, like notifying SNS for additional tracking.

The Lambda function looks up the chosen Amazon Pinpoint template and uses it to reply. Here are some of the customizations you may want to consider within this function and the template:

  1. When sending the automated reply, by default, the template’s configured subject is appended with the original incoming email subject. You can adjust this to fit your company’s brand better.
  2. By default, the function supports an optional template tag %%NAME%% and %%ID%%. If the first appears in the template, it is automatically replaced with the original email’s FROM address. And if %%ID%% appears in the template, it is replaced with the SES’s original email message id, to help with any required audits.
  3. It is assumed that no additional tracking and actions are needed on such rejected and auto-replied emails, but you can further modify the flow by moving the rule around and adding more actions (as mentioned above), and even specify a particular/different SES Configuration Set for the outgoing emails.

Are you using this flow as a baseline for a more complex business flow or have other questions about it? We want to hear back – please comment here or file an issue in the GitHub repository. If you want to file a pull request to make it even more useful for others, please do so, we do appreciate community participation.

If you liked this article, we are continually expanding our Amazon Pinpoint and SES Architecture References and publish new solutions for these and other services. For most recent SES documentation, please see official SES documentation site, and for Amazon Pinpoint, please see Amazon Pinpoint documentation site.


Why AWS Dominates The Cloud Services Marketplace

Post Syndicated from Laurent Harvey original https://www.anchor.com.au/blog/2020/11/why-aws-dominates-the-cloud-services-marketplace/

Year after year, AWS maintains a very significant lead in the cloud marketplace over its closest competitors, including Microsoft Azure, Google Cloud Platform, as well as a number of other smaller cloud providers.

According to recent research published by Synergy Research Group, Amazon has 33% of the cloud infrastructure market share, with Microsoft trailing behind at 18%, and Google sitting at 9%.

So why has Amazon always been the leader of the pack when it comes to the major cloud service providers? The reasons for AWS’ significant lead may be more simple than you would first think. Below, we will go into just a few of the many reasons AWS has maintained such a dominant lead since its conception.

It’s Been Around The Longest

In any race, one of the most valuable things you can have is a head start. Amazon launched Amazon Web Services (AWS) back in 2006 and began offering their initial cloud computing service offerings to, primarily, developers. Their initial service offerings included Amazon S3 cloud storage, SQS, and EC2.

Google and Microsoft had dabbled in their own Cloud offerings at the time, but didn’t put the same resources into it that Amazon did. Google launched their Cloud Platform in 2008, and Microsoft Azure later followed them and launched in 2010. However, neither Google nor Microsoft invested the same amount of resources early on. As a result, Amazon was able to establish a firm lead in the cloud services market. Other providers have been playing a never-ending battle of catch-up ever since.

Constant Innovation

Although we can attribute a lot of AWS’ success to their early foothold, they wouldn’t be able to maintain such a significant market share on that alone. Since the beginning, Amazon has continually innovated year after year.

Since 2006, Amazon have greatly increased their service offerings and created many innovative services. In fact, at the time of writing, AWS offers an astounding 175 individual products and services to consumers. Many of these services are original Amazon innovations. You would be hard-pressed to find a task you can’t accomplish with one of Amazon’s many services, and they’re only adding more and more to their catalogue each year. We expect to see a specific focus on Artificial Intelligence Services from Amazon in the next few years, as it’s one of the fastest-growing areas of cloud computing.

Price Cuts

One of the greatest reasons AWS stays not only incredibly competitive, while still leading the market, is their constant efforts to reduce consumer costs. In fact, research published in 2018 by TSO Logic found that AWS costs get lower every year. AWS has no problem maintaining their existing customer base with increasingly diminishing prices, while also attracting new customers. Plus, the larger AWS gets, the more ability they have to achieve even higher economies of scale, thus passing more price cuts onto their customers.

In Amazon’s own words, they state the following on their website:

“Benefit from massive economies of scale – By using cloud computing, you can achieve a lower variable cost than you can get on your own. Because usage from hundreds of thousands of customers is aggregated in the cloud, providers such as AWS can achieve higher economies of scale, which translates into lower pay as-you-go prices.”

Backed by Amazon

With the full long-term backing of Amazon, which comes in at #3 worldwide of all public corporations by market capitalization, AWS is quite simply a juggernaut of resources and capability. At the time of writing, Amazon has an estimated net value of $1.14 trillion. Amazon’s founder, Jeff Bezos, has an estimated worth of $190 billion.

With these kinds of numbers, Amazon are of course a formidable opponent for any newcomers to the cloud services marketplace. They also don’t look to be slowing down anytime soon in terms of their vision for the future and upcoming technological innovations.

Conclusion

AWS provides a platform which is ever-evolving and constantly becoming more financially accessible for businesses of all sizes. With new offerings, technology, features and opportunities for performance improvements every year, AWS provides a solid and proven platform for businesses who are looking to bring their business into the cloud.

If you think your business may benefit from taking advantage of AWS’ huge range of services, get in touch with us today for an expert consultation on how we can assist you in your journey to the cloud.

The post Why AWS Dominates The Cloud Services Marketplace appeared first on AWS Managed Services by Anchor.

3 Common Problems Businesses Face Which Can Be Solved By AWS Cloud.

Post Syndicated from Andy Haine original https://www.anchor.com.au/blog/2020/11/3-common-problems-businesses-face-which-can-be-solved-by-aws-cloud/

Business leaders know all too well the long list of challenges involved in taking any business to the next level. Cash flow, human resources, infrastructure, growing marketing spend, refining or expanding on processes, and company culture are just a few of the many considerations. One particularly important challenge is choosing the right software and tools early on, to allow your business to provide its products or services efficiently and cost-effectively.

One of the greatest ways to achieve reliable and harmonious business practices is to ensure the technological infrastructure that your business is built upon is carefully planned to not only cater to your immediate business needs but also to be flexible for future growth.

Cloud computing services are more popular than ever before, and even in the face of the COVID-19 pandemic, have continued to grow just as steadily. Below, we’ve outlined 5 common business problems that are solved by migration to AWS cloud. If you’ve been considering the potential advantages of AWS for your business, read on!

Common problem: Convoluted/expensive/unnecessary services within pre-packaged traditional hosting plans.

With traditional hosting services, products tend to be pre-packaged with a selection of commonly required services as well as tiered/set resources. As a business grows larger and requires more heavy-duty online infrastructure, the cost of pre-packaged services can become much more expensive than it needs to be. That is because you may not be using some of the inclusions provided with these services, or require less of one resource or more of another. Pre-packaged service pricing also generally has factored in the cost of software licences needed to deliver all of the inclusions offered. If you’re not using these services, why should you be paying for them?

How AWS cloud computing services solves this: With AWS cloud hosting, each individual service is billed separately, and charges are based on different metrics such as the number of hours or seconds a service is online, or how much data transfer takes place. This allows a business to have very granular control over where they are directing their spend, as well as offering the ability to avoid paying for service inclusions that they are simply not using.

Common problem: Cost creep over time.

Cost creep is a common problem both in traditional hosting services and cloud computing services. As your business grows and evolves, your online infrastructure may need access to more services, features or integrations, as well as more computing resources. Each of these things almost always comes with an additional cost.

How AWS cloud computing services solves this: Between traditional hosting services and cloud computing, cloud is the only one that offers a plethora of ways to prevent, monitor and even reverse cost creep over time. Cost creep is a common occurrence for many businesses, especially in the early deployment stages when traffic is the least predictable and resource requirements are difficult to allocate in advance. This is something that can be greatly improved over time as usage data becomes available, along with traffic and resource usage patterns of your website or application. With proper maintenance and the utilisation of AWS reserved instances (which can provide the same resources at a greatly lower cost), there are many opportunities to minimise, and even reverse cost creep over time with cloud services.

Common problem: Infrastructure that offers a lack of horizontal scaling.

Horizontal scaling can translate to cost efficiencies, by adding or removing computing resources, and only paying for them while you are actually using them. For example, say you were running a food delivery application where you required a lot of computing resources to handle traffic during the lunch and dinner rush. If you were to purchase a computing instance with enough power to handle the rush hour, that might become an expensive waste of resources to still be running when business is quiet at 4 am. This is where horizontal scaling can come in to maximise efficiency through the addition and reduction of additional computing power, as needed.

Traditional hosting services rarely offer horizontal scalability, meaning you will be overpaying for resources or services that you aren’t utilising a lot of the time.

How AWS cloud computing services solves this: AWS offers powerful options when it comes to horizontally scaling computing power on demand. Scaling horizontally means adding additional computing instances to support an application running on an existing instance, as needed.

One of the greatest advantages of cloud computing services such as AWS is that their range of services are billed by the amount of time you are using them. So horizontal scaling can translate to cost efficiencies, by adding or removing computing resources, and only paying for them while you are actually using them.

The post 3 Common Problems Businesses Face Which Can Be Solved By AWS Cloud. appeared first on AWS Managed Services by Anchor.

Why is it vital for businesses to outsource AWS management?

Post Syndicated from Andy Haine original https://www.anchor.com.au/blog/2020/10/why-is-it-vital-for-businesses-to-outsource-aws-management/

Some of us may have learnt during 2020 that there are simply some things that one cannot DIY without proper skills and expertise. Perhaps during the pandemic lockdown, your local hairdresser was closed, and you turned to a DIY YouTube tutorial and learnt this the hardest way of all. But, even if you survived 2020 without a fringe 2 inches too short, managing AWS services is a whole other ball game that requires years of training and dedicated skill to properly deploy, manage and keep expenses under control.

As powerful as AWS is, and as much as it can do for your business, it can be all-but impossible to do it right if you have never set foot in the AWS Management console before. AWS is complex, and requires expertise to truly get the most from it. While you may be able to perform basic provisioning tasks and perhaps get a service up and running, ensuring that that service is performing optimally and cost-efficiently is where professional AWS management can truly revolutionise your infrastructure strategy and budget.

Managed AWS services is one of the largest outsourced areas of the IT industry. According to a recent Gartner forecast, almost 19% of cloud budgets are spent on cloud management-related services, such as cloud consulting, implementation, migration and managed services – with this percentage expected to increase in the next few years (and for good reason). In this article we will delve into just a few of the reasons why you’re far better off putting your AWS management in the hands of experts.

Cost Savings

Wasted cloud spend is a very common occurrence within the cloud services industry, with many cloud users not optimising costs where they can. In a 2019 report from Flexera, they measured the actual waste of cloud spending at 35 percent.

One of the most beneficial things an AWS management service provider can offer your business is ensuring that you’re only paying for what your business needs. It may save your business significantly more money in the long run, even when factoring in management fees.

Free Up Your Time

You should focus on what you and your business do best. Sure, you could put in many hours to understand as much as possible and get up and running yourself, but many businesses find that time is much better spent on focussing on your core service offerings and leaving management to your managed service provider.

On top of the initial learning curve, there is also the time investment needed for ongoing training as new AWS cloud services are released and new management tools are developed. Best practice changes very frequently, and it can be a significant undertaking to try and keep your finger on the pulse while simultaneously trying to handle every other area of your business.

Proactive Management

Ensuring that your business leverages AWS’ ability to scale and adjust depending on your current needs is essential. An AWS partner and managed service provider can help you understand your businesses needs, and adjust course as necessary to meet each new scenario.

A good example of scaling to meet current needs is the COVID-19 pandemic. The cloud services industry has seen significant growth during 2020 due to its ability to rapidly scale and support sudden growth. For example, web traffic and bandwidth requirements skyrocketed in 2020 with more people turning to eCommerce to acquire their everyday household items as well as remotely attend school and work.

Avoiding Downtime and Increasing Stability

Any number of things can happen to your hosted services, and when they do, it’s crucial that you have an experienced team on hand to tackle whatever comes your way. There’s nothing worse than hosting your mission-critical services on AWS and not having the experience to get services up and running as soon as possible when things go wrong.

A qualified AWS management team will also put best practice measures into place to improve the resilience of your configuration, and minimise the chance of anything going wrong in the first place.

Conclusion

When deciding what is the best course of action for your business, it’s imperative to ensure that your mission-critical cloud services are in good hands. It can be shown that in many cases, having AWS experts handle your businesses cloud needs can more than repay the associated management fees, leaving you better off both in terms of support and costs.

If you’re looking for advice on AWS cloud migration best practices, don’t hesitate to get in touch with one of our expert cloud architects today.

The post Why is it vital for businesses to outsource AWS management? appeared first on AWS Managed Services by Anchor.

Anchor Joins AWS Service Delivery Program: Amazon EC2 for Windows Server

Post Syndicated from Andy Haine original https://www.anchor.com.au/blog/2020/10/anchor-joins-aws-service-delivery-program-amazon-ec2-for-windows-server/

We are excited to announce that Anchor has joined the Amazon EC2 for Windows Service Delivery Program (SPD). This new SDP classification complements an expanding portfolio of AWS certifications, substantiating our commitment to both our AWS partnership and enabling the cloud for Australian businesses.

The AWS Service Delivery Program acknowledges select partners within the AWS Partner Network (APN) who have demonstrated technical proficiency across specialised solution areas. Achieving SDP status involves a stringent validation process to certify a deep understanding of, and adherence to, AWS architectural best practices. 

Amazon EC2 for Windows Server Partners are certified for delivering Windows Server environments on Amazon Elastic Compute Cloud (Amazon EC2). They are recommended by AWS for managing secure, reliable, and high-performance environments for deploying Windows-based applications and workloads. 

As part of the validation process for this competency, Anchor was required to demonstrate proven customer success through real customer engagement to validate that we had the technical proficiency and resources to help customers migrate, manage, or deploy Microsoft Workloads to AWS.

This AWS SDP reinforces Anchors expertise in helping businesses both modernise and future-proof legacy windows applications by replatforming onto AWS Cloud. 

“Our new SDP status for Amazon EC2 for Windows provides our customers with the highest level of confidence in our technical aptitude and alignment to AWS best practices.” – Josh Chiswell, Director of Architecture and Professional Services, APAC, Anchor Systems.

The proficiency also provides exclusive access to service-specific funding programs which partners can pass on to customers. If your business is looking to modernise or replatform old windows workloads, contact our cloud consultants for a complimentary cloud assessment.


Why Anchor? We exist to help SMBs and emerging enterprises who need managed AWS and cloud engineering services. Anchor enables the cloud by deeply engaging with your business. We architect, deploy, run and optimise cloud workloads and advocate for cloud best practices. Anchor’s team of certified engineers can support your workloads in three different time zones with 24x7x365 coverage from Sydney.

The post Anchor Joins AWS Service Delivery Program: Amazon EC2 for Windows Server appeared first on AWS Managed Services by Anchor.

Analyze and improve email campaigns with Amazon Simple Email Service and Amazon QuickSight

Post Syndicated from Apoorv Gakhar original https://aws.amazon.com/blogs/messaging-and-targeting/analyze-and-improve-email-campaigns-with-amazon-simple-email-service-and-amazon-quicksight/

Email is a popular channel for applications, used in both marketing campaigns and other outbound customer communications. The challenge with email is that it can become increasingly complex to manage for companies that must send large quantities of messages per month. This complexity is especially true when companies need to measure detailed email engagement metrics to track campaign success.

As a marketer, you want to monitor several metrics, including open rates, click-through rates, bounce rates, and delivery rates. If you do not track your email results, you could potentially be wasting your campaign resources. Monitoring and interpreting your sending results can help you deliver the best content possible to your subscribers’ inboxes, and it can also ensure that your IP reputation stays high. Mailbox providers prioritize inbox placement for senders that deliver relevant content. As a business professional, tracking your emails can also help you stay on top of hot leads and important clients. For example, if someone has opened your email multiple times in one day, it might be a good idea to send out another follow-up email to touch base.

Building a large-scale email solution is a complex and expensive challenge for any business. You would need to build infrastructure, assemble your network, and warm up your IP addresses. Alternatively, working with some third-party email solutions require contract negotiations and upfront costs.

Fortunately, Amazon Simple Email Service (SES) has a highly scalable and reliable backend infrastructure to reduce the preceding challenges. It has improved content filtering techniques, reputation management features, and a vast array of analytics and reporting functions. These features help email senders reach their audiences and make it easier to manage email channels across applications. Amazon SES also provides API operations to monitor your sending activities through simple API calls. You can publish these events to Amazon CloudWatch, Amazon Kinesis Data Firehose, or by using Amazon Simple Notification Service (SNS).

In this post, you learn how to build and automate a serverless architecture that analyzes email events. We explore how to track important metrics such as open and click rate of the emails.

Solution overview


The metrics that you can measure using Amazon SES are referred to as email sending events. You can use Amazon CloudWatch to retrieve Amazon SES event data. You can also use Amazon SNS to interpret Amazon SES event data. However, in this post, we are going to use Amazon Kinesis Data Firehose to monitor our user sending activity.

Enable Amazon SES configuration sets with open and click metrics and publish email sending events to Amazon Kinesis Data Firehose as JSON records. A Lambda function is used to parse the JSON records and publish the content in the Amazon S3 bucket.

Ingested data lands in an Amazon S3 bucket that we refer to as the raw zone. To make that data available, you have to catalog its schema in the AWS Glue data catalog. You create and run the AWS Glue crawler that crawls your data sources and construct your Data Catalog. The Data Catalog uses pre-built classifiers for many popular source formats and data types, including JSON, CSV, and Parquet.

When the crawler is finished creating the table definition and schema, you analyze the data using Amazon Athena. It is an interactive query service that makes it easy to analyze data in Amazon S3 using SQL. Point to your data in Amazon S3, define the schema, and start querying using standard SQL, with most results delivered in seconds.

Now you can build visualizations, perform ad hoc analysis, and quickly get business insights from the Amazon SES event data using Amazon QuickSight. You can easily run SQL queries using Amazon Athena on data stored in Amazon S3, and build business dashboards within Amazon QuickSight.


Deploying the architecture:

Configuring Amazon Kinesis Data Firehose to write to Amazon S3:

  1. Navigate to the Amazon Kinesis in the AWS Management Console. Choose Kinesis Data Firehose and create a delivery stream.
  2. Enter delivery stream name as “SES_Firehose_Demo”.
  3. Under the source category, select “Direct Put or other sources”.
  4. On the next page, make sure to enable Data Transformation of source records with AWS Lambda. We use AWS Lambda to parse the notification contents that we only process the required information as per the use case.
  5. Click the “Create New” Lambda function.
  6. Click on “General Kinesis Data FirehoseProcessing” Lambda blueprint and this opens up the Lambda console. Enter following values in Lambda
    • Name: SES-Firehose-Json-Parser
    • Execution role: Create a new role with basic Lambda permissions.
  7. Click “Create Function”. Now replace the Lambda code with the following provided code and save the function.
    • 'use strict';
      console.log('Loading function');
      exports.handler = (event, context, callback) => {
         /* Process the list of records and transform them */
          const output = event.records.map((record) => {
              console.log(record.recordId);
              const payload =JSON.parse((Buffer.from(record.data, 'base64').toString()))
              console.log("payload : " + payload);
              
              if (payload.eventType == "Click") {
              const resultPayLoadClick = {
                      eventType : payload.eventType,
                      destinationEmailId : payload.mail.destination[0],
                      sourceIp : payload.click.ipAddress,
                  };
              console.log("resultPayLoad : " + resultPayLoadClick.eventType + resultPayLoadClick.destinationEmailId + resultPayLoadClick.sourceIp);
              
              //const parsed = resultPayLoad[0];
              //console.log("parsed : " + (Buffer.from(JSON.stringify(resultPayLoad))).toString('base64'));
              
              
              return{
                  recordId: record.recordId,
                  result: 'Ok',
                  data: (Buffer.from(JSON.stringify(resultPayLoadClick))).toString('base64'),
              };
              }
              else {
                  const resultPayLoadOpen = {
                      eventType : payload.eventType,
                      destinationEmailId : payload.mail.destination[0],
                      sourceIp : payload.open.ipAddress,
                  };
              console.log("resultPayLoad : " + resultPayLoadOpen.eventType + resultPayLoadOpen.destinationEmailId + resultPayLoadOpen.sourceIp);
              
              //const parsed = resultPayLoad[0];
              //console.log("parsed : " + (Buffer.from(JSON.stringify(resultPayLoad))).toString('base64'));
              
              
              return{
                  recordId: record.recordId,
                  result: 'Ok',
                  data: (Buffer.from(JSON.stringify(resultPayLoadOpen))).toString('base64'),
              };
              }
          });
          console.log("Output : " + output.data);
          console.log(`Processing completed.  Successful records ${output.length}.`);
          callback(null, { records: output });
      };

      Please note:

      For this blog, we are only filtering out three fields i.e. Eventname, destination_Email, and SourceIP. If you want to store other parameters you can modify your code accordingly. For the list of information that we receive in notifications, you may check out the following document.

      https://docs.aws.amazon.com/ses/latest/DeveloperGuide/event-publishing-retrieving-firehose-examples.html

  8. Now, navigate back to your Amazon Kinesis Data Firehose console and choose the newly created Lambda function.
  9. Keep the convert record format disabled and click “Next”.
  10. In the destination, choose Amazon S3 and select a target Amazon S3 bucket. Create a new bucket if you do not want to use the existing bucket.
  11. Enter the following values for Amazon S3 Prefix and Error Prefix. When event data is published.
    • Prefix:
      fhbase/year=!{timestamp:yyyy}/month=!{timestamp:MM}/day=!{timestamp:dd}/hour=!{timestamp:HH}/
    • Error Prefix:
      fherroroutputbase/!{firehose:random-string}/!{firehose:error-output-type}/!{timestamp:yyyy/MM/dd}/
  12. You may utilize the above values in the Amazon S3 prefix and error prefix. If you use your own prefixes make sure to accordingly update the target values in AWS Glue which you will see in further process.
  13. Keep the Amazon S3 backup option disabled and click “Next”.
  14. On the next page, under the Permissions section, select create a new role. This opens up a new tab and then click “Allow” to create the role.
  15. Navigate back to the Amazon Kinesis Data Firehose console and click “Next”.
  16. Review the changes and click on “Create delivery stream”.

Configure Amazon SES to publish event data to Kinesis Data Firehose:

  1. Navigate to Amazon SES console and select “Email Addresses” from the left side.
  2. Click on “Verify a New Email Address” on the top. Enter your email address to which you send a test email.
  3. Go to your email inbox and click on the verify link. Navigate back to the Amazon SES console and you will see verified status on the email address provided.
  4. Open the Amazon SES console and select Configuration set from the left side.
  5. Create a new configuration set. Enter “SES_Firehose_Demo”  as the configuration set name and click “Create”.
  6. Choose Kinesis Data Firehose as the destination and provide the following details.
    • Name: OpenClick
    • Event Types: Open and Click
  7. In the IAM Role field, select ‘Let SES make a new role’. This allows SES to create a new role and add sufficient permissions for this use case in that role.
  8. Click “Save”.

Sending a Test email:

  1. Navigate to Amazon SES console, click on “Email Addresses” on the left side.
  2. Select your verified email address and click on “Send a Test email”.
  3. Make sure you select the raw email format. You may use the following format to send out a test email from the console. Make sure you send out this email to a recipient inbox to which you have the access.
    • X-SES-CONFIGURATION-SET: SES_Firehose_Demo
      X-SES-MESSAGE-TAGS: Email=NULL
      From: [email protected]
      To: [email protected]
      Subject: Test email
      Content-Type: multipart/alternative;
          		boundary="----=_boundary"
      
      ------=_boundary
      Content-Type: text/html; charset=UTF-8
      Content-Transfer-Encoding: 7bit
      This is a test email.
      
      <a href="https://aws.amazon.com/">Amazon Web Services</a>
      ------=_boundary
  4. Once the email is received in the recipient’s inbox, open the email and click the link present in the same. This generates a click and open event and send the response back to SES.

Creating Glue Crawler:

  1. Navigate to the AWS Glue console, select “crawler” from the left side, and then click on “Add crawler” on the top.
  2. Enter the crawler name as “SES_Firehose_Crawler” and click “Next”.
  3. Under Crawler source type, select “Data stores” and click “Next”.
  4. Select Amazon S3 as the data source and prove the required path. Include the path until the “fhbase” folder.
  5. Select “no” under Add another data source section.
  6. In the IAM role, select the option to ‘Create an IAM role’. Enter the name as “SES_Firehose-Crawler”. This provides the necessary permissions automatically to the newly created role.
  7. In the frequency section, select run on demand and click “Next”. You may choose this value as per your use case.
  8. Click on add Database and provide the name as “ses_firehose_glue_db”. Click on create and then click “Next”.
  9. Review your Glue crawler setting and click on “Finish”.
  10. Run the above-created crawler. This crawls the data from the specified Amazon S3 bucket and create a catalog and table definition.
  11. Now navigate to “tables” on the left, and verify a “fhbase” table is created after you run the crawler.

If you want to analyze the data stored until now, you can use Amazon Athena and test the queries. If not, you can move to the Amazon Quicksight directly.

Analyzing the data using Amazon Athena:

  1. Open Athena console and select the database, which is created using AWS Glue
  2. Click on “setup a query result location in Amazon S3” as shown in the following screenshot.
  3. Navigate to the Amazon S3 bucket created in earlier steps and create a folder called “AthenaQueryResult”. We store our Athena query result in this bucket.
  4. Now navigate back to Amazon Athena and select the Amazon S3 bucket with the folder location as shown in the following screenshot and click “Save”.
  5. Run the following query to test the sample output and accordingly modify your SQL query to get the desired output.
    • Select * from “ses_firehose_glue_db”.”fhbase”

Note: If you want to track the opened emails by unique Ip addresses then you can modify your SQL query accordingly. This is because every time an email gets opened, you will receive a notification even if the same email was previously opened.


Visualizing the data in Amazon QuickSight dashboards:

  1. Now, let’s analyze this data using Amazon Athena via Amazon Quicksight.
  2. Log into Amazon Quicksight and choose Manage data, New dataset. Choose Amazon Athena as a new data source.
  3. Enter the data source name as “SES-Demo” and click on “Create the data source”.
  4. Select your database from the drop-down as “ses_firehose_glue_db” and table “fhbase” that you have created in AWS Glue.
  5. And add a custom SQL based on your use case and click on “Confirm query”. Refer to the example below.
  6. You can perform ad hoc analysis and modify your query according to your business needs as shown in the following image. Click “Save & Visualize”.
  7. You can now visualize your event data on Amazon Quicksight dashboard. You can use various graphs to represent your data. For this demo, the default graph is used and two fields are selected to populate on the graph, as shown below.


Conclusion:

This architecture shows how to track your email sending activity at a granular level. You set up Amazon SES to publish event data to Amazon Kinesis Data Firehose based on fine-grained email characteristics that you define. You can also track several types of email sending events, including sends, deliveries, bounces, complaints, rejections, rendering failures, and delivery delays. This information can be useful for operational and analytical purposes.

To get started with Amazon SES, follow this quick start guide and you can learn more about monitoring sending activity here.

About the Authors

Chirag Oswal is a solutions architect and AR/VR specialist working with the public sector India. He works with AWS customers to help them adopt the cloud operating model on a large scale.

Apoorv Gakhar is a Cloud Support Engineer and an Amazon SES Expert. He is working with AWS to help the customers integrate their applications with various AWS Services.


Additional Resources:

Amazon SES Dedicated IP Pools

Amazon Personalize optimizer using Amazon Pinpoint events

Template Personalization using Amazon Pinpoint


Complete CI/CD with AWS CodeCommit, AWS CodeBuild, AWS CodeDeploy, and AWS CodePipeline

Post Syndicated from Nitin Verma original https://aws.amazon.com/blogs/devops/complete-ci-cd-with-aws-codecommit-aws-codebuild-aws-codedeploy-and-aws-codepipeline/

Many organizations have been shifting to DevOps practices, which is the combination of cultural philosophies, practices, and tools that increases your organization’s ability to deliver applications and services at high velocity; for example, evolving and improving products at a faster pace than organizations using traditional software development and infrastructure management processes.

DevOps-Feedback-Flow

An integral part of DevOps is adopting the culture of continuous integration and continuous delivery/deployment (CI/CD), where a commit or change to code passes through various automated stage gates, all the way from building and testing to deploying applications, from development to production environments.

This post uses the AWS suite of CI/CD services to compile, build, and install a version-controlled Java application onto a set of Amazon Elastic Compute Cloud (Amazon EC2) Linux instances via a fully automated and secure pipeline. The goal is to promote a code commit or change to pass through various automated stage gates all the way from development to production environments, across AWS accounts.

AWS services

This solution uses the following AWS services:

  • AWS CodeCommit – A fully-managed source control service that hosts secure Git-based repositories. CodeCommit makes it easy for teams to collaborate on code in a secure and highly scalable ecosystem. This solution uses CodeCommit to create a repository to store the application and deployment codes.
  • AWS CodeBuild – A fully managed continuous integration service that compiles source code, runs tests, and produces software packages that are ready to deploy, on a dynamically created build server. This solution uses CodeBuild to build and test the code, which we deploy later.
  • AWS CodeDeploy – A fully managed deployment service that automates software deployments to a variety of compute services such as Amazon EC2, AWS Fargate, AWS Lambda, and your on-premises servers. This solution uses CodeDeploy to deploy the code or application onto a set of EC2 instances running CodeDeploy agents.
  • AWS CodePipeline – A fully managed continuous delivery service that helps you automate your release pipelines for fast and reliable application and infrastructure updates. This solution uses CodePipeline to create an end-to-end pipeline that fetches the application code from CodeCommit, builds and tests using CodeBuild, and finally deploys using CodeDeploy.
  • AWS CloudWatch Events – An AWS CloudWatch Events rule is created to trigger the CodePipeline on a Git commit to the CodeCommit repository.
  • Amazon Simple Storage Service (Amazon S3) – An object storage service that offers industry-leading scalability, data availability, security, and performance. This solution uses an S3 bucket to store the build and deployment artifacts created during the pipeline run.
  • AWS Key Management Service (AWS KMS) – AWS KMS makes it easy for you to create and manage cryptographic keys and control their use across a wide range of AWS services and in your applications. This solution uses AWS KMS to make sure that the build and deployment artifacts stored on the S3 bucket are encrypted at rest.

Overview of solution

This solution uses two separate AWS accounts: a dev account (111111111111) and a prod account (222222222222) in Region us-east-1.

We use the dev account to deploy and set up the CI/CD pipeline, along with the source code repo. It also builds and tests the code locally and performs a test deploy.

The prod account is any other account where the application is required to be deployed from the pipeline in the dev account.

In summary, the solution has the following workflow:

  • A change or commit to the code in the CodeCommit application repository triggers CodePipeline with the help of a CloudWatch event.
  • The pipeline downloads the code from the CodeCommit repository, initiates the Build and Test action using CodeBuild, and securely saves the built artifact on the S3 bucket.
  • If the preceding step is successful, the pipeline triggers the Deploy in Dev action using CodeDeploy and deploys the app in dev account.
  • If successful, the pipeline triggers the Deploy in Prod action using CodeDeploy and deploys the app in the prod account.

The following diagram illustrates the workflow:

cicd-overall-flow


Failsafe deployments

This example of CodeDeploy uses the IN_PLACE type of deployment. However, to minimize the downtime, CodeDeploy inherently supports multiple deployment strategies. This example makes use of following features: rolling deployments and automatic rollback.

CodeDeploy provides the following three predefined deployment configurations, to minimize the impact during application upgrades:

  • CodeDeployDefault.OneAtATime – Deploys the application revision to only one instance at a time
  • CodeDeployDefault.HalfAtATime – Deploys to up to half of the instances at a time (with fractions rounded down)
  • CodeDeployDefault.AllAtOnce – Attempts to deploy an application revision to as many instances as possible at once

For OneAtATime and HalfAtATime, CodeDeploy monitors and evaluates instance health during the deployment and only proceeds to the next instance or next half if the previous deployment is healthy. For more information, see Working with deployment configurations in CodeDeploy.

You can also configure a deployment group or deployment to automatically roll back when a deployment fails or when a monitoring threshold you specify is met. In this case, the last known good version of an application revision is automatically redeployed after a failure with the new application version.

How CodePipeline in the dev account deploys apps in the prod account

In this post, the deployment pipeline using CodePipeline is set up in the dev account, but it has permissions to deploy the application in the prod account. We create a special cross-account role in the prod account, which has the following:

  • Permission to use fetch artifacts (app) rom Amazon S3 and deploy it locally in the account using CodeDeploy
  • Trust with the dev account where the pipeline runs

CodePipeline in the dev account assumes this cross-account role in the prod account to deploy the app.

Do I need multiple accounts?
If you answer “yes” to any of the following questions you should consider creating more AWS accounts:

  • Does your business require administrative isolation between workloads? Administrative isolation by account is the most straightforward way to grant independent administrative groups different levels of administrative control over AWS resources based on workload, development lifecycle, business unit (BU), or data sensitivity.
  • Does your business require limited visibility and discoverability of workloads? Accounts provide a natural boundary for visibility and discoverability. Workloads cannot be accessed or viewed unless an administrator of the account enables access to users managed in another account.
  • Does your business require isolation to minimize blast radius? Separate accounts help define boundaries and provide natural blast-radius isolation to limit the impact of a critical event such as a security breach, an unavailable AWS Region or Availability Zone, account suspensions, and so on.
  • Does your business require a particular workload to operate within AWS service limits without impacting the limits of another workload? You can use AWS account service limits to impose restrictions on a business unit, development team, or project. For example, if you create an AWS account for a project group, you can limit the number of Amazon Elastic Compute Cloud (Amazon EC2) or high performance computing (HPC) instances that can be launched by the account.
  • Does your business require strong isolation of recovery or auditing data? If regulatory requirements require you to control access and visibility to auditing data, you can isolate the data in an account separate from the one where you run your workloads (for example, by writing AWS CloudTrail logs to a different account).

Prerequisites

For this walkthrough, you should complete the following prerequisites:

  1. Have access to at least two AWS accounts. For this post, the dev and prod accounts are in us-east-1. You can search and replace the Region and account IDs in all the steps and sample AWS Identity and Access Management (IAM) policies in this post.
  2. Ensure you have EC2 Linux instances with the CodeDeploy agent installed in all the accounts or VPCs where the sample Java application is to be installed (dev and prod accounts).
    • To manually create EC2 instances with CodeDeploy agent, refer Create an Amazon EC2 instance for CodeDeploy (AWS CLI or Amazon EC2 console). Keep in mind the following:
      • CodeDeploy uses EC2 instance tags to identify instances to use to deploy the application, so it’s important to set tags appropriately. For this post, we use the tag name Application with the value MyWebApp to identify instances where the sample app is installed.
      • Make sure to use an EC2 instance profile (AWS Service Role for EC2 instance) with permissions to read the S3 bucket containing artifacts built by CodeBuild. Refer to the IAM role cicd_ec2_instance_profile in the table Roles-1 below for the set of permissions required. You must update this role later with the actual KMS key and S3 bucket name created as part of the deployment process.
    • To create EC2 Linux instances via AWS Cloudformation, download and launch the AWS CloudFormation template from the GitHub repo: cicd-ec2-instance-with-codedeploy.json
      • This deploys an EC2 instance with AWS CodeDeploy agent.
      • Inputs required:
        • AMI : Enter name of the Linux AMI in your region. (This template has been tested with latest Amazon Linux 2 AMI)
        • Ec2SshKeyPairName: Name of an existing SSH KeyPair
        • Ec2IamInstanceProfile: Name of an existing EC2 instance profile. Note: Use the permissions in the template cicd_ec2_instance_profile_policy.json to create the policy for this EC2 Instance Profile role. You must update this role later with the actual KMS key and S3 bucket name created as part of the deployment process.
        • Update the EC2 instance Tags per your need.
  3. Ensure required IAM permissions. Have an IAM user with an IAM Group or Role that has the following access levels or permissions:

    AWS Service / Components  Access Level Accounts Comments
    AWS CodeCommit Full (admin) Dev Use AWS managed policy AWSCodeCommitFullAccess.
    AWS CodePipeline Full (admin) Dev Use AWS managed policy AWSCodePipelineFullAccess.
    AWS CodeBuild Full (admin) Dev Use AWS managed policy AWSCodeBuildAdminAccess.
    AWS CodeDeploy Full (admin) All

    Use AWS managed policy

    AWSCodeDeployFullAccess.

    Create S3 bucket and bucket policies Full (admin) Dev IAM policies can be restricted to specific bucket.
    Create KMS key and policies Full (admin) Dev IAM policies can be restricted to specific KMS key.
    AWS CloudFormation Full (admin) Dev

    Use AWS managed policy

    AWSCloudFormationFullAccess.

    Create and pass IAM roles Full (admin) All Ability to create IAM roles and policies can be restricted to specific IAM roles or actions. Also, an admin team with IAM privileges could create all the required roles. Refer to the IAM table Roles-1 below.
    AWS Management Console and AWS CLI As per IAM User permissions All To access suite of Code services.


  4. Create Git credentials for CodeCommit in the pipeline account (dev account). AWS allows you to either use Git credentials or associate SSH public keys with your IAM user. For this post, use Git credentials associated with your IAM user (created in the previous step). For instructions on creating a Git user, see Create Git credentials for HTTPS connections to CodeCommit. Download and save the Git credentials to use later for deploying the application.
  5. Create all AWS IAM roles as per the following tables (Roles-1). Make sure to update the following references in all the given IAM roles and policies:
    • Replace the sample dev account (111111111111) and prod account (222222222222) with actual account IDs
    • Replace the S3 bucket mywebapp-codepipeline-bucket-us-east-1-111111111111 with your preferred bucket name.
    • Replace the KMS key ID key/82215457-e360-47fc-87dc-a04681c91ce1 with your KMS key ID.

Table: Roles-1

Service IAM Role Type Account IAM Role Name (used for this post) IAM Role Policy (required for this post) IAM Role Permissions
AWS CodePipeline Service role Dev (111111111111)

cicd_codepipeline_service_role

Select Another AWS Account and use this account as the account ID to create the role.

Later update the trust as follows:
“Principal”: {“Service”: “codepipeline.amazonaws.com”},

Use the permissions in the template cicd_codepipeline_service_policy.json to create the policy for this role. This CodePipeline service role has appropriate permissions to the following services in a local account:

  • Manage CodeCommit repos
  • Initiate build via CodeBuild
  • Create deployments via CodeDeploy
  • Assume cross-account CodeDeploy role in prod account to deploy the application
AWS CodePipeline IAM role Dev (111111111111)

cicd_codepipeline_trigger_cwe_role

Select Another AWS Account and use this account as the account ID to create the role.

Later update the trust as follows:
“Principal”: {“Service”: “events.amazonaws.com”},

Use the permissions in the template cicd_codepipeline_trigger_cwe_policy.json to create the policy for this role. CodePipeline uses this role to set a CloudWatch event to trigger the pipeline when there is a change or commit made to the code repository.
AWS CodePipeline IAM role Prod (222222222222)

cicd_codepipeline_cross_ac_role

Choose Another AWS Account and use the dev account as the trusted account ID to create the role.

Use the permissions in the template cicd_codepipeline_cross_ac_policy.json to create the policy for this role. This role is created in the prod account and has permissions to use CodeDeploy and fetch from Amazon S3. The role is assumed by CodePipeline from the dev account to deploy the app in the prod account. Make sure to set up trust with the dev account for this IAM role on the Trust relationships tab.
AWS CodeBuild Service role Dev (111111111111)

cicd_codebuild_service_role

Choose CodeBuild as the use case to create the role.

Use the permissions in the template cicd_codebuild_service_policy.json to create the policy for this role. This CodeBuild service role has appropriate permissions to:

  • The S3 bucket to store artefacts
  • Stream logs to CloudWatch Logs
  • Pull code from CodeCommit
  • Get the SSM parameter for CodeBuild
  • Miscellaneous Amazon EC2 permissions
AWS CodeDeploy Service role Dev (111111111111) and Prod (222222222222)

cicd_codedeploy_service_role

Choose CodeDeploy as the use case to create the role.

Use the built-in AWS managed policy AWSCodeDeployRole for this role. This CodeDeploy service role has appropriate permissions to:

  • Miscellaneous Amazon EC2 Auto Scaling
  • Miscellaneous Amazon EC2
  • Publish Amazon SNS topic
  • AWS CloudWatch metrics
  • Elastic Load Balancing
EC2 Instance Service role for EC2 instance profile Dev (111111111111) and Prod (222222222222)

cicd_ec2_instance_profile

Choose EC2 as the use case to create the role.

Use the permissions in the template cicd_ec2_instance_profile_policy.json to create the policy for this role.

This is set as the EC2 instance profile for the EC2 instances where the app is deployed. It has appropriate permissions to fetch artefacts from Amazon S3 and decrypt contents using the KMS key.


You must update this role later with the actual KMS key and S3 bucket name created as part of the deployment process.


Setting up the prod account

To set up the prod account, complete the following steps:

  1. Download and launch the AWS CloudFormation template from the GitHub repo: cicd-codedeploy-prod.json
    • This deploys the CodeDeploy app and deployment group.
    • Make sure that you already have a set of EC2 Linux instances with the CodeDeploy agent installed in all the accounts where the sample Java application is to be installed (dev and prod accounts). If not, refer back to the Prerequisites section.
  2. Update the existing EC2 IAM instance profile (cicd_ec2_instance_profile):
    • Replace the S3 bucket name mywebapp-codepipeline-bucket-us-east-1-111111111111 with your S3 bucket name (the one used for the CodePipelineArtifactS3Bucket variable when you launched the CloudFormation template in the dev account).
    • Replace the KMS key ARN arn:aws:kms:us-east-1:111111111111:key/82215457-e360-47fc-87dc-a04681c91ce1 with your KMS key ARN (the one created as part of the CloudFormation template launch in the dev account).

Setting up the dev account

To set up your dev account, complete the following steps:

  1. Download and launch the CloudFormation template from the GitHub repo: cicd-aws-code-suite-dev.json
    The stack deploys the following services in the dev account:

    • CodeCommit repository
    • CodePipeline
    • CodeBuild environment
    • CodeDeploy app and deployment group
    • CloudWatch event rule
    • KMS key (used to encrypt the S3 bucket)
    • S3 bucket and bucket policy
  2. Use following values as inputs to the CloudFormation template. You should have created all the existing resources and roles beforehand as part of the prerequisites.

    Key Example Value Comments
    CodeCommitWebAppRepo MyWebAppRepo Name of the new CodeCommit repository for your web app.
    CodeCommitMainBranchName master Main branch name on your CodeCommit repository. Default is master (which is pushed to the prod environment).
    CodeBuildProjectName MyCBWebAppProject Name of the new CodeBuild environment.
    CodeBuildServiceRole arn:aws:iam::111111111111:role/cicd_codebuild_service_role ARN of an existing IAM service role to be associated with CodeBuild to build web app code.
    CodeDeployApp MyCDWebApp Name of the new CodeDeploy app to be created for your web app. We assume that the CodeDeploy app name is the same in all accounts where deployment needs to occur (in this case, the prod account).
    CodeDeployGroupDev MyCICD-Deployment-Group-Dev Name of the new CodeDeploy deployment group to be created in the dev account.
    CodeDeployGroupProd MyCICD-Deployment-Group-Prod Name of the existing CodeDeploy deployment group in prod account. Created as part of the prod account setup.

    CodeDeployGroupTagKey


    Application Name of the tag key that CodeDeploy uses to identify the existing EC2 fleet for the deployment group to use.

    CodeDeployGroupTagValue


    MyWebApp Value of the tag that CodeDeploy uses to identify the existing EC2 fleet for the deployment group to use.
    CodeDeployConfigName CodeDeployDefault.OneAtATime

    Desired Code Deploy config name. Valid options are:

    CodeDeployDefault.OneAtATime

    CodeDeployDefault.HalfAtATime

    CodeDeployDefault.AllAtOnce

    For more information, see Deployment configurations on an EC2/on-premises compute platform.

    CodeDeployServiceRole arn:aws:iam::111111111111:role/cicd_codedeploy_service_role

    ARN of an existing IAM service role to be associated with CodeDeploy to deploy web app.


    CodePipelineName MyWebAppPipeline Name of the new CodePipeline to be created for your web app.
    CodePipelineArtifactS3Bucket mywebapp-codepipeline-bucket-us-east-1-111111111111 Name of the new S3 bucket to be created where artifacts for the pipeline are stored for this web app.
    CodePipelineServiceRole arn:aws:iam::111111111111:role/cicd_codepipeline_service_role ARN of an existing IAM service role to be associated with CodePipeline to deploy web app.
    CodePipelineCWEventTriggerRole arn:aws:iam::111111111111:role/cicd_codepipeline_trigger_cwe_role ARN of an existing IAM role used to trigger the pipeline you named earlier upon a code push to the CodeCommit repository.
    CodeDeployRoleXAProd arn:aws:iam::222222222222:role/cicd_codepipeline_cross_ac_role ARN of an existing IAM role in the cross-account for CodePipeline to assume to deploy the app.

    It should take 5–10 minutes for the CloudFormation stack to complete. When the stack is complete, you can see that CodePipeline has built the pipeline (MyWebAppPipeline) with the CodeCommit repository and CodeBuild environment, along with actions for CodeDeploy in local (dev) and cross-account (prod). CodePipeline should be in a failed state because your CodeCommit repository is empty initially.

  3. Update the existing Amazon EC2 IAM instance profile (cicd_ec2_instance_profile):
    • Replace the S3 bucket name mywebapp-codepipeline-bucket-us-east-1-111111111111 with your S3 bucket name (the one used for the CodePipelineArtifactS3Bucket parameter when launching the CloudFormation template in the dev account).
    • Replace the KMS key ARN arn:aws:kms:us-east-1:111111111111:key/82215457-e360-47fc-87dc-a04681c91ce1 with your KMS key ARN (the one created as part of the CloudFormation template launch in the dev account).

Deploying the application

You’re now ready to deploy the application via your desktop or PC.

  1. Assuming you have the required HTTPS Git credentials for CodeCommit as part of the prerequisites, clone the CodeCommit repo that was created earlier as part of the dev account setup. Obtain the name of the CodeCommit repo to clone, from the CodeCommit console. Enter the Git user name and password when prompted. For example:
    $ git clone https://git-codecommit.us-east-1.amazonaws.com/v1/repos/MyWebAppRepo my-web-app-repo
    Cloning into 'my-web-app-repo'...
    Username for 'https://git-codecommit.us-east-1.amazonaws.com/v1/repos/MyWebAppRepo': xxxx
    Password for 'https://[email protected]/v1/repos/MyWebAppRepo': xxxx

  2. Download the MyWebAppRepo.zip file containing a sample Java application, CodeBuild configuration to build the app, and CodeDeploy config file to deploy the app.
  3. Copy and unzip the file into the my-web-app-repo Git repository folder created earlier.
  4. Assuming this is the sample app to be deployed, commit these changes to the Git repo. For example:
    $ cd my-web-app-repo 
    $ git add -A 
    $ git commit -m "initial commit" 
    $ git push

For more information, see Tutorial: Create a simple pipeline (CodeCommit repository).

After you commit the code, the CodePipeline will be triggered and all the stages and your application should be built, tested, and deployed all the way to the production environment!

The following screenshot shows the entire pipeline and its latest run:


Troubleshooting

To troubleshoot any service-related issues, see the following:

Cleaning up

To avoid incurring future charges or to remove any unwanted resources, delete the following:

  • EC2 instance used to deploy the application
  • CloudFormation template to remove all AWS resources created through this post
  •  IAM users or roles

Conclusion

Using this solution, you can easily set up and manage an entire CI/CD pipeline in AWS accounts using the native AWS suite of CI/CD services, where a commit or change to code passes through various automated stage gates all the way from building and testing to deploying applications, from development to production environments.

FAQs

In this section, we answer some frequently asked questions:

  1. Can I expand this deployment to more than two accounts?
    • Yes. You can deploy a pipeline in a tooling account and use dev, non-prod, and prod accounts to deploy code on EC2 instances via CodeDeploy. Changes are required to the templates and policies accordingly.
  2. Can I ensure the application isn’t automatically deployed in the prod account via CodePipeline and needs manual approval?
  3. Can I use a CodeDeploy group with an Auto Scaling group?
    • Yes. Minor changes required to the CodeDeploy group creation process. Refer to the following Solution Variations section for more information.
  4. Can I use this pattern for EC2 Windows instances?

Solution variations

In this section, we provide a few variations to our solution:

Author bio

author-pic

 Nitin Verma

Nitin is currently a Sr. Cloud Architect in the AWS Managed Services(AMS). He has many years of experience with DevOps-related tools and technologies. Speak to your AWS Managed Services representative to deploy this solution in AMS!