Post Syndicated from binpazho original https://aws.amazon.com/blogs/messaging-and-targeting/customize-marketing-messages-and-promotions-for-personalized-outreach/
Introduction
Amazon Pinpoint is widely used by many customers for their various user engagement use cases like marketing campaigns, scheduled communications (newsletters, reminders, etc.), and transactional messaging. By using the message template feature in Amazon Pinpoint, customers can design messages personalized to the specific end users, by using variable attributes. While Amazon Pinpoint enables customers to include up to 250 attributes for each user, often times there might be need to pick and choose from a wide range of attributes about a user, that can lead to needing more than the allowed number of attributes.
The CampaignHook feature of Amazon Pinpoint can come to rescue for a situation like this. Using the CampainHook feature, we can filter out attributes that are not applicable to a specific user, while allowing to add new attributes, right before of sending the message. In this blog, I will walk you through how I have implemented the CampaignHook feature for a similar use case.
Sample Use-Cases
When setting up your Pinpoint campaign, following are the use cases where a CampaignHook can be enabled:
- Retrieving data and perform custom compute logic in real time from third party data stores.
- Filter endpoints out of the send: This is useful if you need to do some type of custom logic that you can’t do in Segmentation (custom opt-out, quiet time, campaign prioritization, etc.)
- Avoid costly and time consuming Extract, Transform & Load (ETL) processes by accessing the data sources directly and applying custom compute logic in real-time.
Solution overview

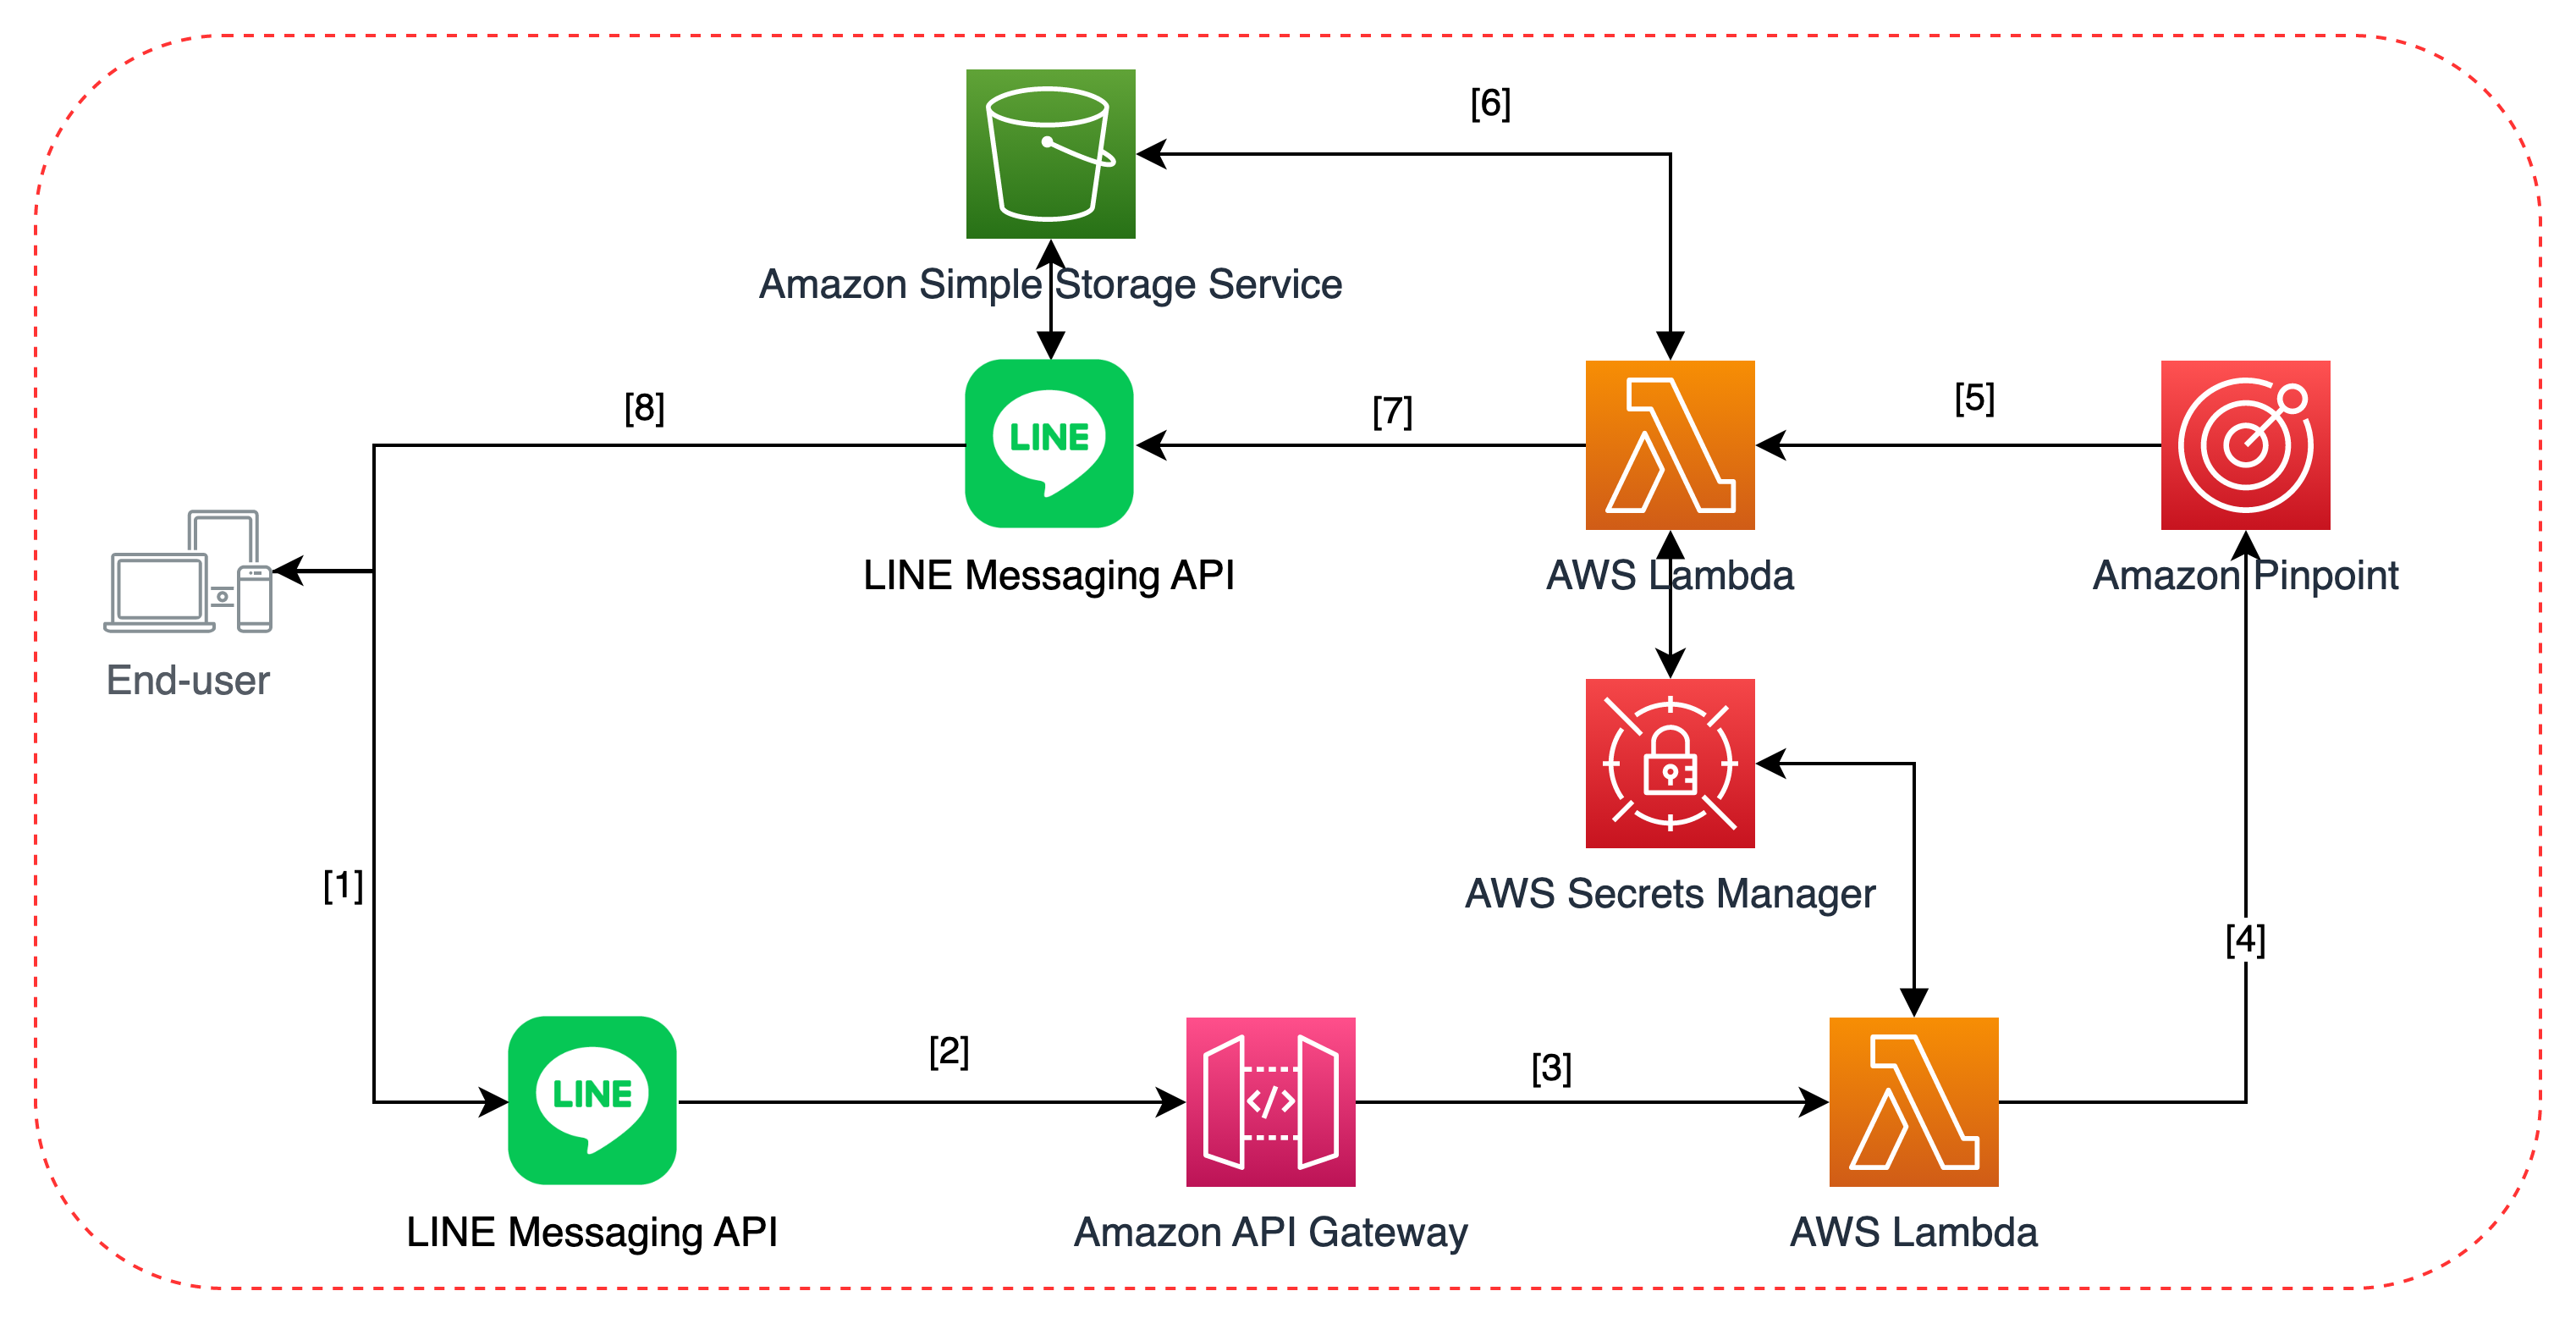
The diagram above shows the solution that we will setup in this blog. As you can see, the Campaign event will trigger the Amazon Pinpoint Campaign. The event can be triggered from your web or mobile app that are accessed by your end-users, and can be setup to be triggered when the user performs a certain action. You can read more about setting up Amazon Pinpoint campaign in the user guide. By having the CampaignHook enabled on your Amazon Pinpoint campaign, the Lambda function that is configured with the CampaignHook will be triggered. This function will have access to the endpoint attributes passed by the Campaign event, and perform additional logic to derive new attributes for the user. Once all the new fields are derived, the function will update the user endpoint. Amazon pinpoint will then perform the next steps in the Campaign, and substitute the variables in the message template, before the personalized message is sent to the end user.
Prerequisites
- AWS Account with Console and Programmatic access
- Access to AWS CloudShell
- Email channel enabled in Amazon Pinpoint
Building the demo
Build the Amazon Pinpoint Project
From the AWS Management console, go to Amazon Pinpoint and create a new project called “PinpointCampaignHookDemo”, and choose the option to enable the email channel. For more information about creating a project see the user guide, and follow the instructions here to setup your email channel.
If your account is in the Sandbox account, you will need to verify the email address, before you can send the email. You can follow the steps here to upgrade your account to a Production status if you are ready to deploy this solution to production.
Create the segment.
A segment is a group of your users that share certain attributes. For example, a segment might contain all of your users who use version 2.0 of your app on an Android device, or all users who live in the city of Los Angeles. You can send multiple campaigns to a single segment, and you can send a single campaign to multiple segments.
For this demo, let’s create a Dynamic Segment. Let’s call it ‘CampaignHookDemoSegment’. Follow the steps here to create your Dynamic Segment.

Setup message template
Let’s create our first template and call it “CampaignHookDemoTemplate”. You can read more about Amazon Pinpoint templates in the user guide.
For this demo, I have used the HTML template shown below, and I have 3 endpoint attribute variables: 2 that are passed from the campaign event trigger, and the third one (Company) that will be generated by the CampaignHook lambda function. For the subject of the email, I used “Campaign Hook Demo Campaign“.

The email template can be found in this GitHub repository.
Create Campaign
Next, create your campaign and use the Segment and email Template that you created in the previous steps by following the instructions here.
Select the ‘when an event occurs’ option to trigger the campaign when an event occurs. (This option will trigger the campaign when a specific event occurs). Yoy may also schedule your campaign to run on a scheduled bases as available in the setup screen. I used ‘CampaignHookTrigger’ as my event name.

Set your Campaign Start date, time and end date. I have left all the other settings to default and saved the campaign. Now that you have successfully created your first Campaign, you are ready for the next steps.

Create the Lambda function
This is the function that we will configure to trigger the Amazon pinpoint campaign event . From the Lambda console page, create a new function by clicking on the ‘Create function’ button. You can then pick the following options and create the function.
Name: Campaign_event_trigger_function
Runtime: Python 3.9 or higher.
Replace the default script with the code from the GitHub repository, and then deploy your code by clicking on the “Deploy” button.
Assign permissions
In-order for the Lambda function trigger to trigger the Pinpoint Campaign, you will need to add an inline policy to the IAM role that is attached to your Lambda function, by selecting Pinpoint as the service and PutEvents from the Write options. You can select the Lambda function as the resource to which the access will be granted.
{
"Version" :"2012-10-17",
"Statement":[
{
"Sid": "VisualEditor0",
"Effect": "Allow",
"Action": [
"mobiletargeting:PutEvents"
],
"Resource":"ARN of your Lambda function goes here."
}
]
}
Create the CampaignHook Lambda function
This is the function that we will triggered from the CampaignHook. From your Lambda console, click on “Create function” and enter the basic information as shown below to create your function.
Name: CampaignHookFunction
Runtime: Python 3.9 or higher.
Next replace your default code with the sample GitHub code, and then deploy your code by clicking on the “Deploy” button.
Assign permissions
Next add permissions for Amazon Pinpoint to invoke the Lambda function by running the command below from your Command Shell. Replace the Lambda function name and Account number with yours.
aws lambda add-permission \
--function-name [YourCampaignHookLambdaFunctionName] \
--statement-id my-hook-id1 \
--action lambda:InvokeFunction \
--principal pinpoint.us-east-1.amazonaws.com \
--source-arn 'arn:aws:mobiletargeting:us-east-1:[YourAccountNumber]:apps/*'
You can also do this from the Lambda console, by clicking on “Configuration” and then scrolling down to “Resource based Policy” and by clicking on “Add permissions“.

Update Campaign settings to add the Campaign Hook
Now that you have the Lambda function that needs to act as the hook is created, and granted Amazon Pinpoint service to invoke that function, run the command below to update the Campaign settings to add the Campaign Hook. You can also set a default CampaignHook for ALL campaigns in the project by setting the CampaignHook property on the Project Settings via this API.
Replace the application-id (project id), campaign-id, and the arn of the Campaign Hook lambda function and run the command below. (You can find the Project ID by clicking on All Projects at the top-left of the Pinpoint Console. The Campaign ID can be found by opening your Pinpoint Project and then clicking Campaigns in the Pinpoint Console.)
aws pinpoint update-campaign --application-id /
[your-application-id-goes-here] –campaign-id /
[your-campaign-id-goes-here] --cli-input-json '{"ApplicationId": /
"","CampaignId": "","WriteCampaignRequest": {"Hook": {"LambdaFunctionName": /
"your-CampaignHook-Function-goes-here","Mode": "FILTER","WebUrl": ""}}}'
You can optionally run the command below to make sure that the campaign settings have been updated:
aws pinpoint get-campaign –application-id [your-application-id-goes-here] –campaign-id [your-campaign-id-goes-here]
Test your Campaign.
Go back to your Lambda function that you have created to trigger the Campaign in the “Create the Lambda function” step above. I have used the test event as shown below. Update the Application id to reflect your Project id and change the email address to the email you verified earlier and click on “Test” button.
{
"application_id": "your application id",
"endpoint_id": "223",
"event_type": "CampaignHookEvent",
"nextTestDate": "12/15/2025",
"FirstName": "Jack",
"email": "[email protected]",
"userid": "Jack123"
}
You should now receive an email with the variables replaced with the values that was passed from your json payload. Further you can see the Company name was added to the endpoint from the CampaignHook Lambda, which is passed to the email template. If you have not received the email, please check the following:
- The Lambda function ran without any errors
- The LambdaHook function has the proper rights assigned to be invoked from Pinpoint
- The From and To email id that you have used are verified in SES.

Clean up resources
Once you are satisfied with your setup and testing, you can now clean up the resources by following the steps below:
- Delete your Amazon Pinpoint Project, Campaign and Segment.
- aws pinpoint delete-campaign –application-id [your appl id] –campaign-id [your campaign id]
- aws pinpoint delete-segment –application-id [your app id] –segment-id [your segment id]
- aws pinpoint delete-app –application-id [your app id]
- Delete you Lambda functions
- aws lambda delete-function –function-name CampaignHookFunction
- aws lambda delete-function –function-name Campaign_event_Trigger_Function
Conclusion
By dynamically generating the attributes in real-time, customers can now add greater levels of personalization within a single user message template. By invoking a Lambda function, you can perform custom compute logic, calculate new attribute values, and access external data stores, to modify the campaign’s segment, right before Amazon Pinpoint sends the message. Campaign Hook feature makes this possible as explained in this blog by running few basic CLI commands to enable the feature on your Amazon Pinpoint Campaign. You can read more about Amazon Pinpoint Campaign from the user guide documentation”.


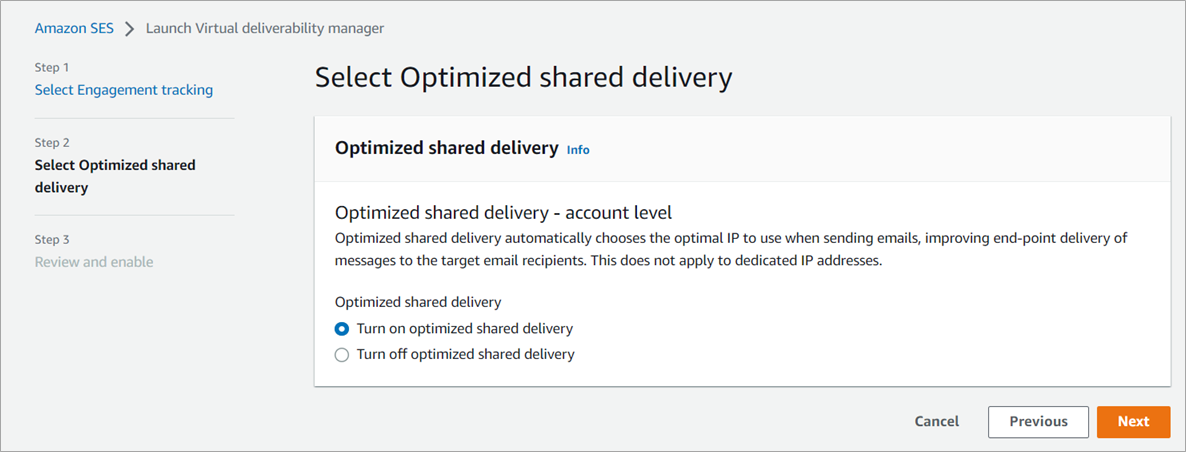
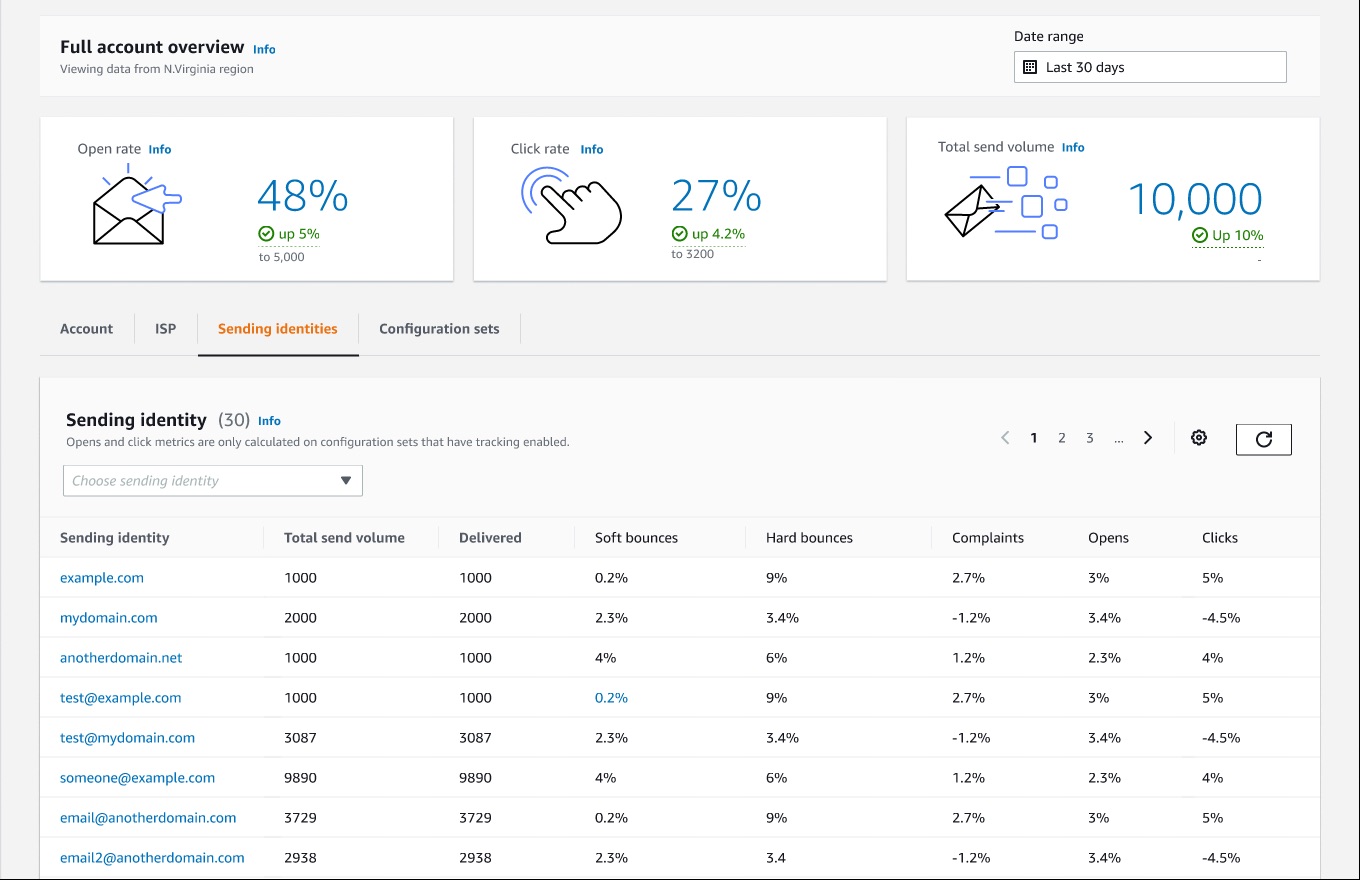
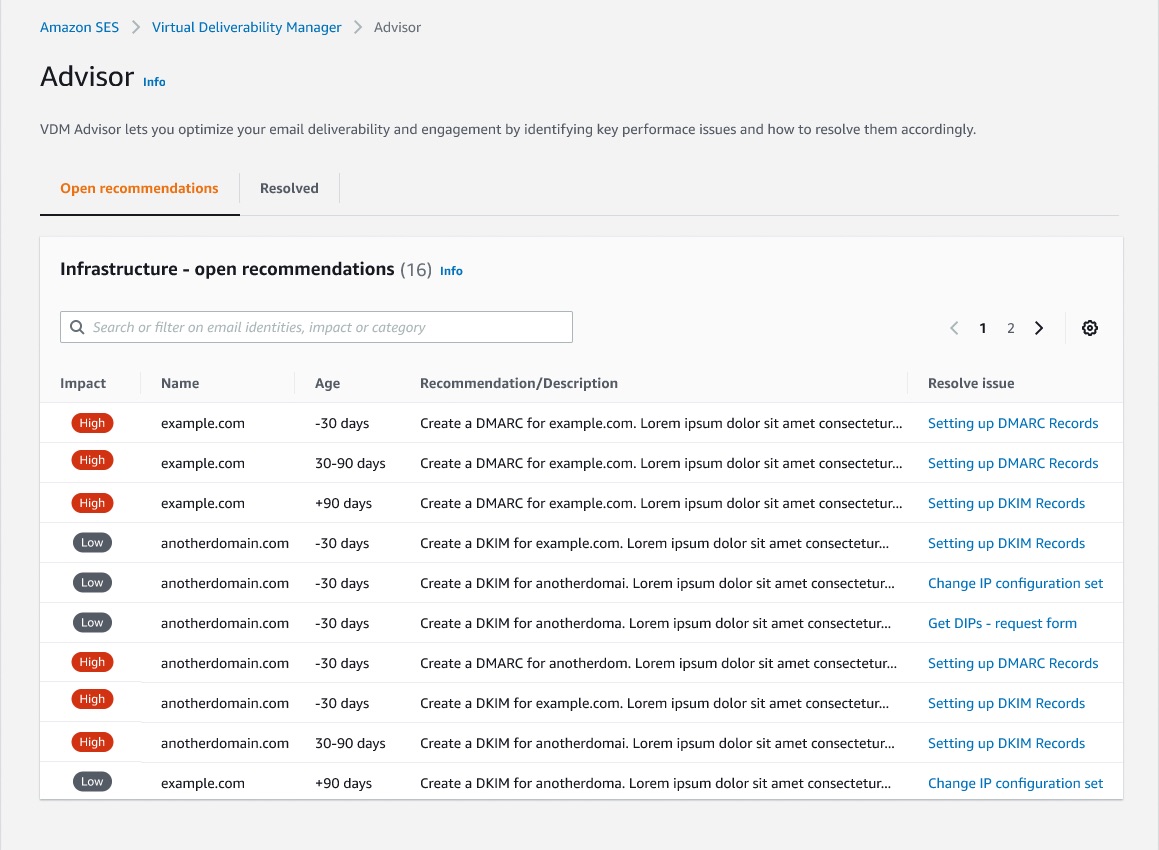 Applying new deliverability features is simple in the AWS console. Senders can log into their SES account dashboard to enable the virtual deliverability manager features. The features are billed as monthly subscription and can be turned on or off at any time. Once the features are activated, SES provides deliverability insights and recommendations in real time, allowing senders to improve performance of future sending batches or campaigns. Senders using Simple Email Service (SES) get reliable, scalable email at the lowest industry prices. SES is backed by AWS’ data security, and email through SES supports compliance with HIPAA-eligible, FedRAMP-, GDPR-, and ISO-certified options.


 Do not delete unsent messages from the queues. These messages will become visible after their queue’s visibility timeout is reached.


 Satyasovan Tripathy works as a Senior Specialist Solution Architect at AWS. He is situated in Bengaluru, India, and focuses on the AWS Digital User Engagement product portfolio. He enjoys reading and travelling outside of work.
 Nikhil Khokhar is a Solutions Architect at AWS. He specializes in building and supporting data streaming solutions that help customers analyze and get value out of their data. In his free time, he makes use of his 3D printing skills to solve everyday problems.