Back in 2008, Netflix was facing scaling challenges: service outages, database corruption, a three-day lapse in DVD shipments. (Remember when Netflix still shipped DVDs?) Netflix solved these problems by refactoring their monolithic application to avoid the single points of failure that caused these issues. They implemented a microservices architecture before the term “microservices” even existed, making them pioneers in the field.
Today, almost all of the most popular applications—Uber, Amazon, Etsy—run in a microservices environment. If you’ve ever wondered what that means, you’re not alone. In this post, we’re digging into this popular method for developing web applications: the benefits, drawbacks, and considerations for choosing a cloud provider to support your microservices approach.
First, Some History: Monolithic Software Development
How would you develop a large, complex software system before the age of microservices? For developers who learned their craft in the dot com boom, it meant a large and complex development process, with tightly interlocking subsystems, a waterfall development model, and an extensive QA phase. Most of the code was built from scratch. There was a lot of focus on developing extremely reliable code, since it was very difficult and expensive to update products in the field. This is how software was developed for many years. The approach works, but it has some major issues. It’s slower, and it tends to produce complex software monoliths that are tough to maintain and upgrade.
What Are Microservices?
Current software engineering practices encourage a DevOps model using small, reusable units of functionality, or microservices. Microservices run essentially as a standalone process, carrying whatever information or intelligence they need to do their job. Their interfaces are limited and standardized to encourage reuse. This restricted access to internal logic very effectively implements the information-hiding practices that prevent other code from “peeking inside” your modules and making internal tweaks that destabilize your code. The result is (hopefully) an assortment of tools (databases, web servers, etc.) that can be snapped together like Legos to greatly reduce the development effort.
Microservices: Pros and Cons
This newer approach has many advantages:
It encourages and supports code reuse. Developers usually have access to an extensive library of microservices that can easily be plugged into their application.
It enforces logical module isolation to simplify the architecture and improve reliability. This makes initial design, implementation, product updates, enhancements, and bug fixes much easier and less error-prone.
It enables much more nimble development and delivery techniques, like DevOps and Agile. It’s much easier to add new functionality when you can just tweak a small piece of code (not worrying about potential invisible linkages to other modules), and then instantly push out an update to your users. You can improve your time to market by getting a “good enough” solution out there, and improve it to “ultimate” through ongoing updates.
It’s inherently scalable. By implementing microservices with containers, you can use an orchestration tool like Kubernetes or Cycle.io to handle scaling, failover, and load balancing. Each microservice component is independently scalable—if one part of your application experiences high load, it can respond to that demand without impacting other components.
However, like anything else, there are drawbacks. For one, moving from a monolithic architecture to a microservices architecture requires not just a change to the way your software is built but also the way your software team functions. And while a microservices architecture is more nimble, it also introduces complexity where none may have existed before in a monolithic deployment.
Microservices Use Cases
Microservices, and especially the containers and orchestration used to structure them, enable a number of different use cases that could benefit your organization, including:
Making a legacy application cloud-ready. If you want to modernize a legacy application and move it to the cloud, taking a microservices approach to your architecture is helpful. Refactoring a monolithic application and moving it to the cloud allows you to achieve the cost savings associated with the cloud’s pay-as-you-go model.
Cloud-native development. Similarly, if you want to take a cloud-first approach, it can help to start with a microservices architecture as it will serve you well later as your application scales.
Moving to DevOps. Microservices as an architectural model lend themselves to, and in many cases require, a change to a DevOps or Agile operational model. If you’re interested in moving from Waterfall to Agile development, microservices go hand in hand.
Running big data applications. Applications that ingest and process large amounts of data benefit from being broken down into microservices where each step in the data processing pipeline is handled independently.
When NOT to Use Microservices
The microservices model can introduce unnecessary complexity into an otherwise simple solution. If you have a simple or monolithic implementation and it’s meeting your needs just fine, then there is no need to throw it away and microservice-ize it. But if (when) it becomes difficult to update or maintain it, or when you’re planning new development, consider a more modular architecture for the new implementation.
Microservices + Cloud Storage: Considerations for Choosing a Cloud Provider
One impact of moving to a containerized, microservices model is the need for persistent storage. The state of a container can be lost at any time due to situations like hardware/software crashes or spinning down excess containers when load drops. The application running in the container should store its state in external (usually cloud) storage, and read the current state when it starts up.
Thus, administrators should carefully consider different providers before selecting one to trust with their data. Consider the following factors in an evaluation of any cloud provider:
Integrations/partner network: One of the risks of moving to the cloud is vendor lock-in. Avoid getting stuck in one cloud ecosystem by researching the providers’ partner network and integrations. Does the provider already work with software you have in place? Will it be easy to change vendors should you need to? Consider the provider’s egress fees both in general and between partners, especially if you have a high-bandwidth use case.
Interoperability and API compatibility: Similarly, make sure the cloud provider you’re considering favors an open ecosystem and offers APIs that are compatible with your architecture.
Security: What protections does the provider have against ransomware and other data corruption? Does the provider include features like Object Lock to make data immutable? Protection like this is recommended considering the rising threat of ransomware attacks.
Infrastructure as Code capability: Does the provider enable you to use infrastructure as code (IaC) to provision storage automatically? Using IaC to provision storage enables you to scale your storage without manually managing the process.
Pricing transparency: With varying data retention requirements, transparent pricing tiers will help you budget more easily. Understand how the provider prices their service including fees for things like egress, retention minimums, and other fine print. Look for backup providers that offer pricing compatible with your organization’s needs.
Are You Using Microservices?
Are you using microservices to build your applications? According to a TechRepublic survey, 73% of organizations have integrated microservices into their application architectures. If you’re one of them, we’d love to know how it’s going. Let us know in the comments.
Network attached storage (NAS) devices are a popular solution for data storage, sharing files for remote collaboration purposes, syncing files that are part of a workflow, and more. QNAP, one of the leading NAS manufacturers, makes it incredibly easy to backup and/or sync your business or personal data for these purposes with the inclusion of its application, Hybrid Backup Sync (HBS). HBS consolidates backup, restoration, and synchronization functions into a single application.
Protecting your data with a NAS is a great first step, but you shouldn’t stop there. NAS devices are still vulnerable to any kind of on-premises disaster like fires, floods, and tornados. They’re also not safe from ransomware attacks that might hit your network. To truly protect your data, it’s important to back up or sync to an off-site cloud storage destination like Backblaze B2 Cloud Storage. Backblaze B2 offers a geographically distanced location for your data for $5/TB per month, and you can also embed it into your NAS-based workflows to streamline access across multiple locations.
Read on for more information on whether you should use backup or sync for your purposes and how to connect your QNAP NAS to Backblaze B2 step-by-step. We’ve even provided videos that show you just how easy it is—it typically takes less than 15 minutes!
Should I Back Up or Sync?
It’s easy to confuse backup and sync. They’re essentially both making a copy of your data, but they have different use cases. It’s important to understand the difference so you’re getting the right protection and accessibility for your data.
Check out the table below. You’ll see that backup is best for being able to recover from a data disaster, including the ability to access previous versions of data. However, if you’re just looking for a mirror copy of your data, sync functionality is all you need. Sync is also useful as part of remote workflows: you can sync your data between your QNAP and Backblaze B2, and then remote workers can pull down the most up-to-date files from the B2 cloud.
Because Hybrid Backup Sync provides both functions in one application, you should first identify which feature you truly need. The setup process is similar, but you will need to take different steps to configure backup vs. sync in HBS.
How to Set Up Your Backblaze B2 Account
Now that you’ve determined whether you want to back up or sync your data, it’s time to create your Backblaze B2 Cloud Storage account to securely protect your on-premises data.
If you already have a B2 Cloud Storage account, feel free to skip ahead. Otherwise, you can sign up for an account and get started with 10GB of free storage to test it out.
Ready to get started? You can follow along with the directions in this blog or take a look at our video guides. Greg Hamer, Senior Technical Evangelist, demonstrates how to get your data into B2 Cloud Storage in under 15 minutes using HBS for either backup or sync.
Video: Back Up QNAP to Backblaze B2 Cloud Storage with QNAP Hybrid Backup Sync
Video: Sync QNAP to Backblaze B2 Cloud Storage with QNAP Hybrid Backup Sync
How to Set Up a Bucket, Application Key ID, and Application Key
Once you’ve signed up for a Backblaze B2 Account, you’ll need to create a bucket, Application Key ID, and Application Key. This may sound like a lot, but all you need are a few clicks, a couple names, and less than a minute!
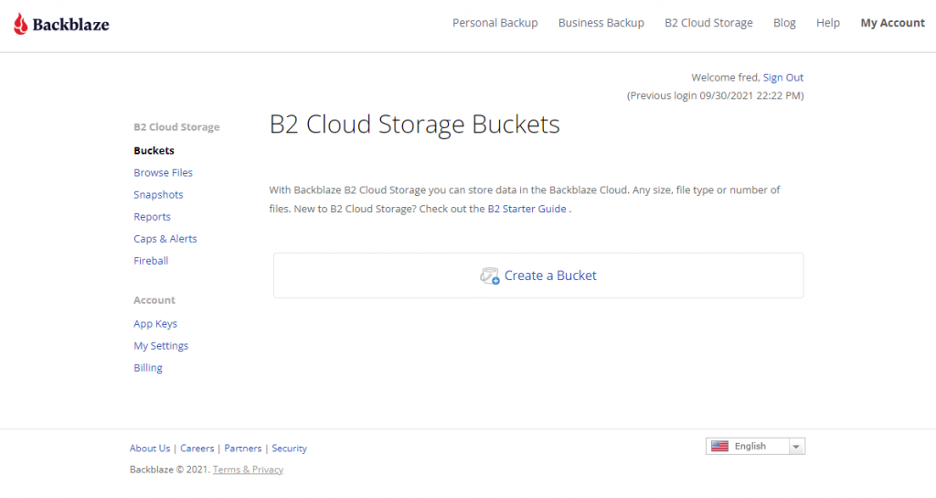
On the Buckets page of your account, click the Create a Bucket button.
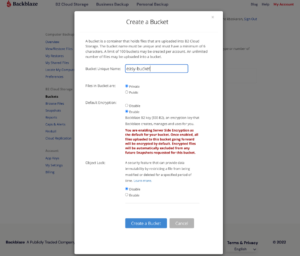
Give your bucket a name and enable encryption for added security.
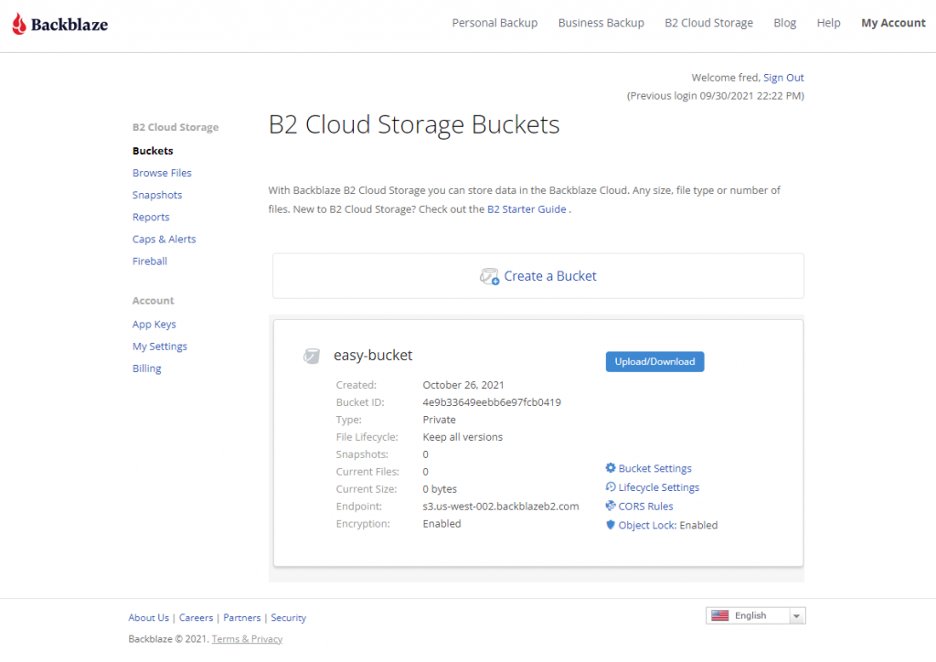
Click the Create a Bucket button and you should see your new bucket on the Buckets page.
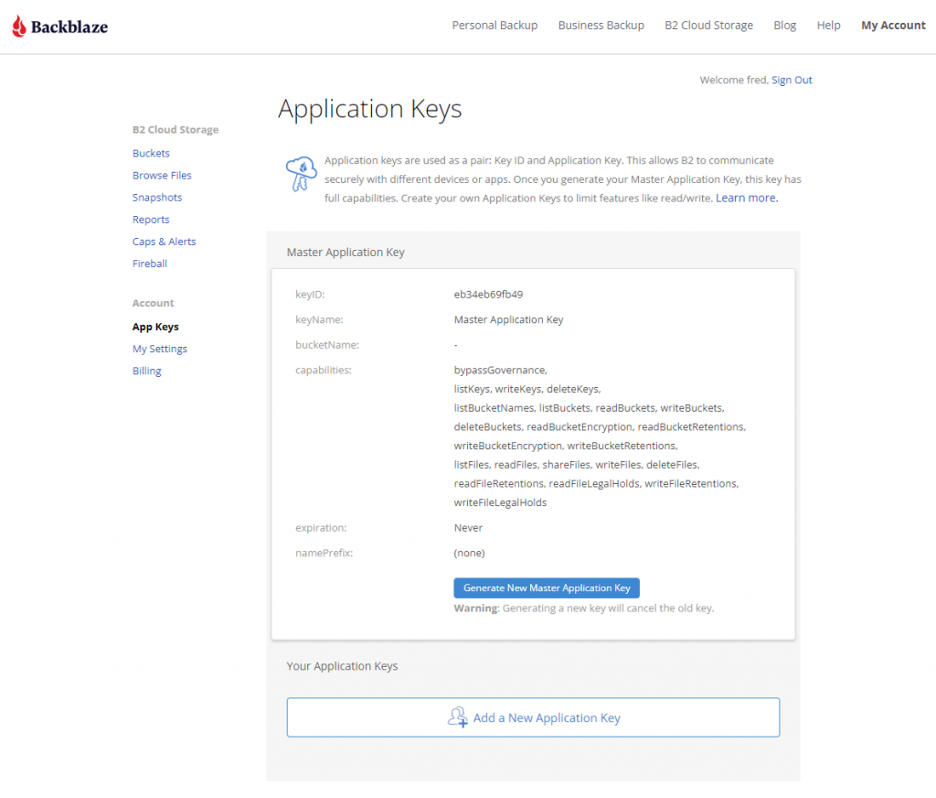
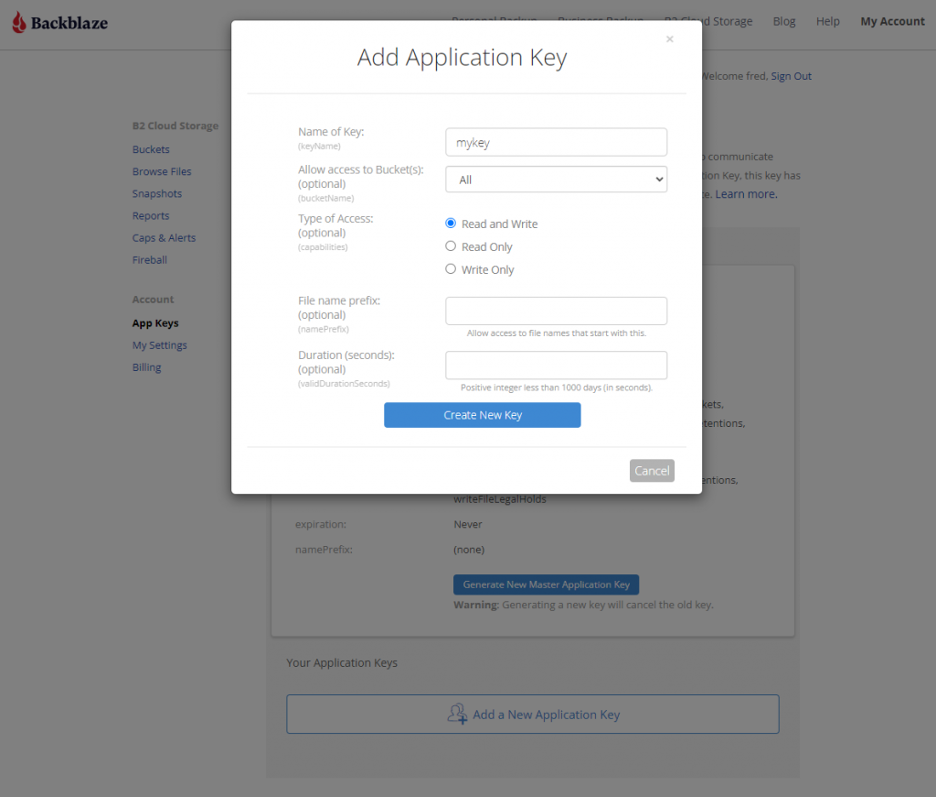
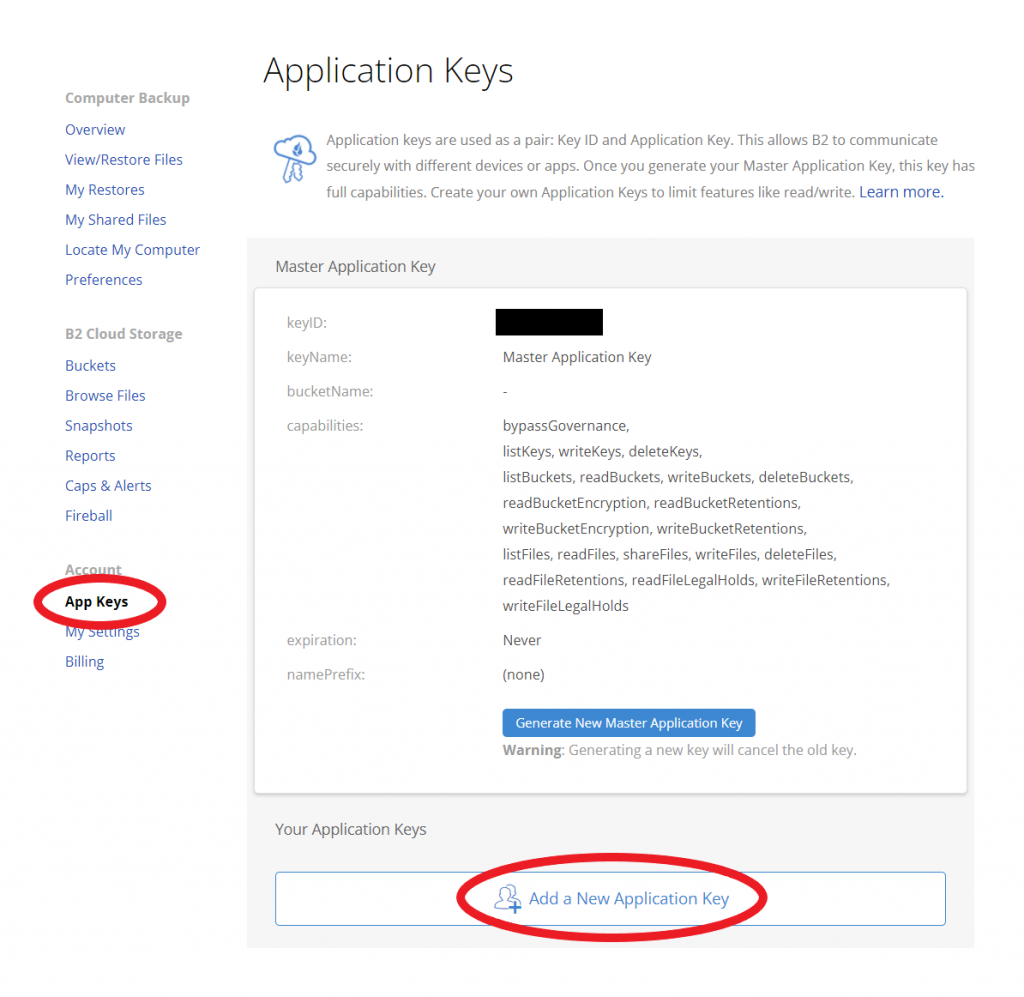
Navigate to the App Keys page of your account and click Add a New Application Key.
Name your Application Key and click the Create New Key button. Make sure that your key has both read and write permissions (the default option).
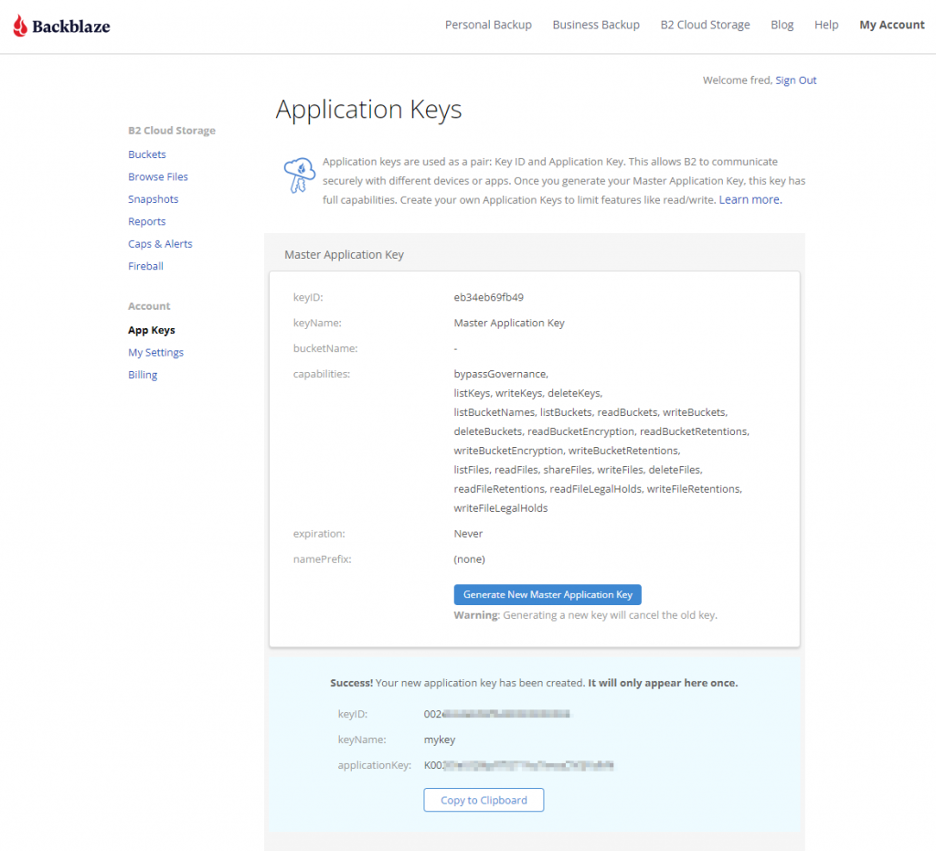
Your Application Key ID and Application Key will appear on your App Keys page. Important: Make sure to copy these somewhere secure as the Application Key will not appear again!
How to Set Up QNAP’s Hybrid Backup Sync to Work With B2 Cloud Storage
To set up your QNAP with Backblaze B2 sync support, you’ll need access to your B2 Cloud Storage account. You’ll also need your B2 Cloud Storage account ID, Application Key, and bucket name—all of which are available after you log in to your Backblaze account. Finally, you’ll need the Hybrid Backup Sync application installed in QTS. You’ll need QTS 4.3.3 or later and Hybrid Backup Sync v2.1.170615 or later.
To configure a backup or sync job, simply follow the rest of the steps in this integration guide or reference the videos posted above. Once you follow the rest of the configuration steps, you’ll have a set-it-and-forget-it solution in place.
What Can You Do With Backblaze B2 and QNAP Hybrid Backup Sync?
With QNAP’s Hybrid Backup Sync software, you can easily back up and sync data to the cloud. Here’s some more information on what you can do to make the most of your setup.
Hybrid Backup Sync 3.0
QNAP and Backblaze B2 users can take advantage of Hybrid Backup Sync, as explained above. Hybrid Backup Sync is a powerful tool that provides true backup capability with features like version control, client-side encryption, and block-level deduplication. QNAP’s operating system, QTS, continues to deliver innovation and add thrilling new features. The ability to preview backed up files using the QuDedup Extract Tool, a feature first released in QTS 4.4.1, allowed QNAP users to save on bandwidth costs.
You can download the latest QTS update here and Hybrid Backup Sync is available in the App Center on your QNAP device.
Hybrid Mount and VJBOD Cloud
The Hybrid Mount and VJBOD Cloud apps allow QNAP users to designate a drive in their system to function as a cache while accessing B2 Cloud Storage. This allows users to interact with Backblaze B2 just like you would a folder on your QNAP device while using Backblaze B2 as an active storage location.
Hybrid Mount and VJBOD Cloud are both included in the QTS 4.4.1 versions and higher, and function as a storage gateway on a file-based or block-based level, respectively. Hybrid Mount enables Backblaze B2 to be used as a file server and is ideal for online collaboration and file-level data analysis. VJBOD Cloud is ideal for a large number of small files or singular massively large files (think databases!) since it’s able to update and change files on a block-level basis. Both apps offer the ability to connect to B2 Cloud Storage via popular protocols to fit any environment, including server message block (SMB), Apple Filing Protocol (AFP), network file sharing (NFS), file transfer protocol (FTP), and WebDAV.
QuDedup
QuDedup introduces client-side deduplication to the QNAP ecosystem. This helps users at all levels save on space on their NAS by avoiding redundant copies in storage. Backblaze B2 users have something to look forward to as well since these savings carry over to cloud storage via the HBS 3.0 update.
Why Backblaze B2?
QNAP continues to innovate and unlock the potential of B2 Cloud Storage in the NAS ecosystem. If you haven’t given B2 Cloud Storage a try yet, now is the time. You can get started with Backblaze B2 and your QNAP NAS right now, and make sure your NAS is synced securely and automatically to the cloud.
Do you remember when “Pokémon Go” came out in 2016? Suddenly it was everywhere. It was a world-wide obsession, with over 10 million downloads in its first week and 500 million downloads in six months. System load rapidly escalated to 50 times the anticipated demand. How could the game architecture support such out-of-control hypergrowth?
In this post, we’ll take a look at what Kubernetes does, how it works, and how it could be applicable in your environment.
What Is Kubernetes?
You may be familiar with containers. They’re conceptually similar to lightweight virtual machines. Instead of simulating computer hardware and running an entire operating system (OS) on that simulated computer, the container runs applications under a parent OS with almost no overhead. Containers allow developers and system administrators to develop, test, and deploy software and applications much faster than VMs, and most applications today are built with them.
But what happens if one of your containers goes down, or your ecommerce store experiences high demand, or if you release a viral sensation like “Pokémon Go”? You don’t want your application to crash, and you definitely don’t want your store to go down during the Christmas crush. Unfortunately, containers don’t solve those problems. You could implement intelligence in your application to scale as needed, but that would make your application a lot more complex and expensive to implement. It would be simpler and faster if you could use a drop-in layer of management—a “fleet manager” of sorts—to coordinate your swarm of containers. That’s Kubernetes.
Kubernetes Architecture: How Does Kubernetes Work?
Kubernetes implements a fairly straightforward hierarchy of components and concepts:
Containers: Virtualized environments where the application code runs.
Pods: “Logical hosts” that contain and manage containers, and potentially local storage.
Nodes: The physical or virtual compute resources that run the container code.
Cluster: A grouping of one or more nodes.
Control Plane: Manages the worker nodes and Pods in the cluster.
You have a few options to run Kubernetes. The minikube utility launches and runs a small single-node cluster locally for testing purposes. And you can control Kubernetes with any of several control interfaces: the kubectl command provides a command-line interface, and library APIs and REST endpoints provide programmable interfaces.
What Does Kubernetes Do?
Modern web-based applications are commonly implemented with “microservices,” each of which embodies one part of the desired application behavior. Kubernetes distributes the microservices across Pods. Pods can be used two ways—to run a single container (the most common use case) or to run multiple containers (like a pod of peas or a pod of whales—a more advanced use case). Kubernetes operates on the Pods, which act as a sort of wrapper around the container(s) rather than the containers themselves. As the microservices run, Kubernetes is responsible for managing the application’s execution. Kubernetes “orchestrates” the Pods, including:
Autoscaling: As more users connect to the application’s website, Kubernetes can start up additional Pods to handle the load.
Self-healing: If the code in a Pod crashes, or if there is a hardware failure, Kubernetes will detect it and restart the code in a new Pod.
Parallel worker processes: Kubernetes distributes the Pods across multiple nodes to benefit from parallelism.
Load balancing: If one server gets overloaded, Kubernetes can balance the load by migrating Pods to other nodes.
Storage orchestration: Kubernetes lets you automatically mount persistent storage, say a local device or cloud-based object storage.
The beauty of this model is that the applications don’t have to know about the Kubernetes management. You don’t have to write load-balancing functionality into every application, or autoscaling, or other orchestration logic. The applications just run simplified microservices in a simple environment, and Kubernetes handles all the management complexity.
As an example: You write a small reusable application (say, a simple database) on a Debian Linux system. Then you could transfer that code to an Ubuntu system and run it, without any changes, in a Debian container. (Or, maybe you just download a database container from the Docker library.) Then you create a new application that calls the database application. When you wrote the original database on Debian, you might not have anticipated it would be used on an Ubuntu system. You might not have known that the database would be interacting with other application components. Fortunately, you didn’t have to anticipate the new usage paradigm. Kubernetes and containers isolate your code from the messy details.
Keep in mind, Kubernetes is not the only orchestration solution—there’s Docker Swarm, Hashicorp’s Nomad, and others. Cycle.io, for example, offers a simple container orchestration solution that focuses on ease for the most common container use cases.
Kubernetes spins up and spins down Pods as needed. Each Pod can host its own internal storage (as shown in the diagram above), but that’s not often used. A Pod might get discarded because the load has dropped, or the process crashed, or for other reasons. The Pods (and their enclosed containers and volumes) are ephemeral, meaning that their state is lost when they are destroyed. But most applications are stateful. They couldn’t function in a transitory environment like this. In order to work in a Kubernetes environment, the application must store its state information externally, outside the Pod. A new instance (a new Pod) must fetch the current state from the external storage when it starts up, and update the external storage as it executes.
You can specify the external storage when you create the Pod, essentially mounting the external volume in the container. The container running in the Pod accesses the external storage transparently, like any other local storage. Unlike local storage, though, cloud-based object storage is designed to scale almost infinitely right alongside your Kubernetes deployment. That’s what makes object storage an ideal match for applications running Kubernetes.
When you start up a Pod, you can specify the location of the external storage. Any container in the Pod can then access the external storage like any other mounted file system.
Kubernetes in Your Environment
While there’s no doubt a learning curve involved (Kubernetes has sometimes been described as “not for normal humans”), container orchestrators like Kubernetes, Cycle.io, and others can greatly simplify the management of your applications. If you use a microservice model, or if you work with similar cloud-based architectures, a container orchestrator can help you prepare for success from day one by setting your application up to scale seamlessly.
Today is a big day for Backblaze—we became a public company listed on the Nasdaq Stock Exchange under the ticker symbol BLZE!
Before I explain what this means for us and for you, I want to give my thanks. Going public is an important milestone and one we couldn’t have accomplished without your support. Thank you.
Whether you have believed in us from the beginning and have been a customer for over a decade, or joined us yesterday; whether you entrust us to back up a single computer or to run your entire company’s infrastructure on the Backblaze Storage Cloud; whether you’ve partnered with us to bring our services to one individual or thousands of companies, whether you’re a first-time visitor to our site or you’ve been a reader all along: Thank you. We really appreciate you working with us and supporting us.
What Does Becoming a Public Company Mean for Backblaze?
It means we have more resources with IPO proceeds to increase investment in the development of our Storage Cloud platform and the B2 Cloud Storage and Computer Backup services that run on it.
The future is being built on independent cloud platforms, and ours has been 14 years in the making. Today, we take the next big step in being the leading independent cloud for data storage.
Additionally, while we help about 500,000 customers already, we plan to expand our sales and marketing efforts to bring Backblaze to more businesses, developers, and individuals that would benefit from easy and affordable data storage that they can trust.
Finally, we have built Backblaze with not only a focus on the products we provide, but with a deep care for what it is like to work here. With these proceeds, we plan to continue to significantly grow our team, and are looking for many more kind, smart, talented people to join us. (Is that you? We’re hiring!)
And Most Importantly, What Does It Mean for You?
My short answer is: It means more of the good things you’ve come to expect from us at Backblaze.
I want to emphasize that while we’ll be doing “more” for you, today’s events don’t mean that we’re “different” on any fundamental level. We’re still guided by the same principles and the same team. As a reminder, here’s the core of the values that we’ve been committed to since our founding (as written by Brian Wilson, Co-founder and CTO):
“At Backblaze, we want to provide a quality product for a fair price. We want to be honest and up front with our customers as to what we can and cannot do, and we want to be paid only the money honestly owed to us, and never engage in sleazy or misleading business practices where customers are misled in any way or pay for a service they do not receive. We are the ‘good guys,’ and we act like it.”
The only thing that’s changing today is we now have a more robust structure and additional funding to deliver on these values for more customers and partners.
If you’d like to share your thoughts, we’d love to hear from you in the comments section below. In the coming weeks, I’ll share more about where we started, why we decided to go public, how we did it, and more. Stay tuned and for now…
Every business faces an ongoing IT question—when to manage some or all IT services or projects in-house and when to outsource them. Maybe you’re facing a new challenge, be it safeguarding against next-gen threats or deploying a new tech stack. Maybe a windfall of growth makes small IT problems bigger. Maybe your IT manager leaves suddenly, and you’re left in the lurch (true story). Or it may just be a desire to focus headcount elsewhere, difficulty finding the right talent, or a push for more efficiency.
If you’re nodding your head yes to any of the above, the answer may be to consider outsourcing a part of the project, or all of it, to a managed service provider. Especially as technologies and threats evolve, how you manage IT resources matters.
In this post, we explain why businesses should be thinking about IT management early on, and when and why hiring a managed service provider (MSP) makes sense when you don’t want to resource IT in-house.
What Is a MSP?
MSPs are companies that provide outsourced IT services to businesses. These services can range from offering light support as needed to installing and running new workflows and scalable systems ongoing. They can even help by leading technical build-outs as companies grow and move into new facilities.
A business can hire a MSP to provide help with one task that they would prefer not to be handled in-house, like data backup or disaster recovery, or they can outsource to an MSP to run their entire IT infrastructure.
When You Need More Than a Band-aid to Fix the Problem
Back to that true story I hinted at above, here’s a personal example from my past when I decided to hire a MSP: Many years ago, I was director of strategy and operations for a boutique management consulting firm when our sole IT manager rather abruptly decided to exit the organization. Before leaving, he emailed me—a fairly non-technical person at the time—instructions for maintaining on-premises servers and laptops in various states of readiness, along with advice that I shouldn’t let company leadership switch from PCs to Macs because it would wreak havoc. At this time, we had also recently deployed Microsoft Sharepoint for document management and storage, but the team hadn’t gotten used to it yet—they still relied on hard drives and emailing copies of important documents to themselves to back them up. What could we do?
My first thought had been to backfill IT management. Yet the team and I didn’t feel we had the knowledge to effectively assess candidates’ skills. We also saw the need and skillset evolving over time, so calling upon a trusted advisor to help vet candidates likely wasn’t the solution. Here were our key criteria:
Competence to solve immediate problems.
Vision to plan and execute for the future.
Internal customer orientation.
Cultural fit.
Willingness to be called upon nights and weekends.
It was a big ask.
And we also weren’t sure if we needed a full-time resource forever. So instead of going that route, I started to explore outsourcing our IT infrastructure management and was happy to find MSPs that could effectively handle the organization’s requirements. The MSP that we ultimately chose brought executional excellence, strategic thinking, and high-quality service. I heard nothing but positive feedback from the greater consulting team—team members felt more supported and confident in using technology solutions. As a bonus, choosing a MSP to handle our IT management yielded around 25% IT budget savings compared to hiring a full-time employee and buying or deploying tools ourselves.
The MSP support model is a great choice both in the short or long term depending on a company’s needs, but it might not be right for every business. How do you know if hiring a MSP is right for you?
What to Consider When Hiring a MSP
There are a number of reasons that a company could outsource their IT management to a MSP. When weighing the options, consider the following:
What services do you need?
What skills do you have or wish to have in-house?
How important are the services and skills you need (e.g. security versus less consequential services)?
How long will you need support for these services and skills (e.g. ongoing versus one time)?
What are your other considerations (e.g. budget, headcount, etc.)?
Services and Skills
MSPs offer a wide range of services and specialties, from isolated tasks like disaster recovery to ongoing projects like IT infrastructure management. The scope of your needs can help you decide whether hiring or relying on internal support can provide you with appropriate coverage, or whether outsourcing to a MSP will provide the necessary expertise. Some MSPs also specialize in specific industries with specific IT needs.
Security
Data security has never been more important, and the consequences of recovering from a cybersecurity attack are costly. If you already have a ransomware protection and disaster recovery system covered in-house, then you’re all set. On the other hand, if you’re not entirely confident that there is a system in place protecting your company data and backing it up, or if you feel that you or your team aren’t able to keep up with threats as they are evolving, a MSP can help take over that effort for you.
A MSP can identify any preventative or maintenance issues and address them before any data loss occurs. MSPs can also offer ongoing security monitoring and scan for vulnerabilities in your network, keeping your business ahead of a possible attack. Additionally, MSPs can help with regularly maintaining a company’s network so these important security measures don’t fall to the wayside.
MSPs in Action
Continuity Centers is a New York area-based MSP specializing in business continuity and disaster recovery.
In 2020, Continuity Centers implemented Veeam backup software to offer their customers added security and recovery support. They chose to implement Backblaze’s immutable backups feature with Veeam, so they are able to protect data in Backblaze B2 Cloud Storage from ransomware attacks or data loss. The savings that Continuity Centers gained from choosing Backblaze B2 as their cloud provider allowed them to offer enhanced data protection services without raising prices for their customers.
Support Duration
A MSP can provide one-time assistance or setup for a specific service you need, or longer-term management depending on the scope of the project. If your business requires 24/7 support, some remote MSP services are available for continuous assistance. Many MSPs offer real-time monitoring and management to ensure that any issues can be identified and fixed before they pose a threat to business operations.
Budget
Hiring an expert to handle IT management in-house can be costly—not to mention building and maintaining a team. Hiring a MSP can free up resources and save money in the long run with predictable, fixed prices.
Another important budgetary factor to consider is the cost of downtime in the case of a ransomware attack. While ransom payments continue to be one of the highest costs to businesses, the true cost of ransomware includes downtime, people hours, device costs, network costs, lost opportunities, and more. MSPs that provide business continuity services can help minimize these costs and ensure they’re avoided in the future.
MSPs in Action
Clicpomme is a Montréal, Québec-based MSP specializing in IT services and solutions for Apple products.
Their solutions range from device and IT infrastructure management to server deployment and off-site backup. Clicpomme uses the Backblaze mass deployment feature to easily deploy Backblaze software on customers’ endpoints at scale, so customers don’t have to handle deployment or backup management themselves.
Is a MSP Right for Your Business?
Are you considering getting help from a MSP with your IT management, or have you turned to one in the past? Comment with your questions or experience working with a MSP below.
As of September 30, 2021, Backblaze had 194,749 drives spread across four data centers on two continents. Of that number, there were 3,537 boot drives and 191,212 data drives. The boot drives consisted of 1,557 hard drives and 1,980 SSDs. This report will review the quarterly and lifetime failure rates for our data drives, as well as compare failure rates for our SSD and HDD boot drives. Along the way, we’ll share our observations and insights of the data presented and, as always, we look forward to your comments below.
Q3 2021 Hard Drive Failure Rates
At the end of September 2021, Backblaze was monitoring 191,212 hard drives used to store data. For our evaluation, we removed from consideration 386 drives which were used for either testing purposes or were drive models for which we did not have at least 60 drives. This leaves us with 190,826 hard drives for the Q3 2021 quarterly report, as shown below.
Notes and Observations on the Q3 2021 Stats
The data for all of the drives in our data centers, including the 386 drives not included in the list above, is available for download on the Hard Drive Test Data webpage.
Five drive models recorded one drive failure during the quarter:
HGST 12TB drive (model: HUH728080ALE600).
Seagate 6TB drive (model: ST6000DX000).
Toshiba 4TB drive (model: MD04ABA400V).
Toshiba 14TB drive (model: MG07ACA14TEY).
WDC 16TB drive (model: WUH721816ALE6L0).
While one failure is good, the number of drive days for each of these drives is 100,256 or less for the quarter. This leads to a wide confidence interval for the annualized failure rate (AFR) for these drives. Still, kudos to the Seagate 6TB drives (average age 77.8 months) and Toshiba 4TB drives (average age 75.6 months) as they have been good for a long time.
What’s New
We added a new Toshiba 16TB drive this quarter (model: MG08ACA16TE). There were a couple of early drive failures, but they’ve only been installed a little over a month. This drive is similar to model MG08ACA16TEY, with the difference purportedly being the latter having the Sanitize Instant Erase (SIE) feature, which shouldn’t be in play in our environment. It will be interesting to see how they compare over time.
Outliers
There are two drives in the quarterly results which require additional information beyond the raw numbers presented. Let’s start with the Seagate 12TB drive (model: ST12000NM0007). Back in January of 2020, we noted that these drives were not working optimally in our environment and higher failure rates were predicted. Together with Seagate, we decided to remove these drives from service over the coming months. Covid-19 delayed the project some and the results are the predicted higher failure rates. We expect all of the remaining drives to be removed during Q4.
The second outlier is the Seagate 14TB drive (model: ST14000NM0138). As noted in the Q2 Drive Stats report, these drives, while manufactured by Seagate, were provisioned in Dell storage servers. As noted, both Seagate and Dell were looking into the possible causes for the unexpected failure rate. The limited number of failures, 26 this quarter, have made failure analysis challenging. As we learn more, we will let you know.
HDDs versus SSDs
As a reminder, we use both SSDs and HDDs as boot drives in our storage servers. The workload for a boot drive includes regular reading, writing, and deleting of files (log files typically) along with booting the server when needed. In short, the workload for each type of drive is similar.
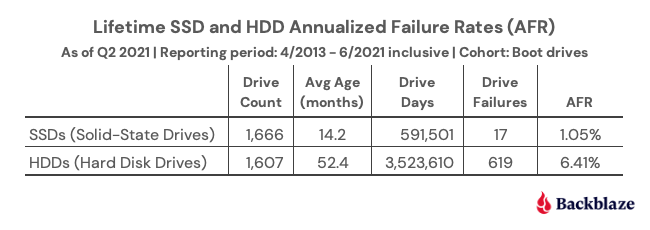
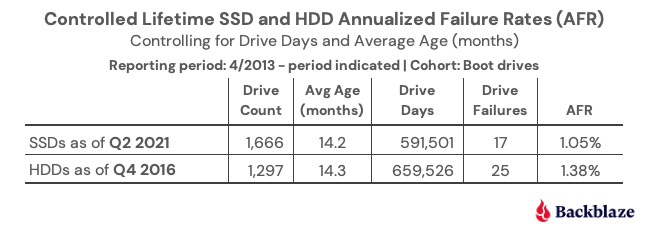
In our recent post, “Are SSDs Really More Reliable Than Hard Drives?” we compared the failure rates of our HDD and SSD boot drives using data through Q2 2021. In that post, we found that if we controlled for the average age and drive days for each cohort, we were able to compare failure rates over time.
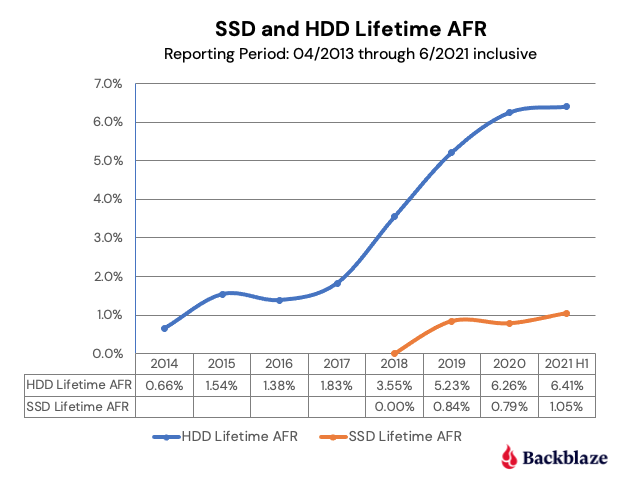
We’ll continue that comparison, and we have updated the chart below through Q3 2021 to reflect the latest data.
The first four points of each drive type create lines that are very similar, albeit the SSD failures rates are slightly lower. The HDD failure rates began to spike in year five (2018) as the HDD drive fleet started to age. Given what we know about drive failure over time, it is reasonable to assume that the failure rates of the SSDs will rise as they get older. The question to answer is: Will it be higher, lower, or the same? Stay tuned.
Data Storage Changes
Over the last year, we’ve added 40,129 new hard drives. Actually, we installed 67,990 new drives and removed 27,861 old drives. The removed drives included failed drives (1,674) and migrations (26,187). That works out to installing about 187 drives a day, which over the course of the last year, totaled just over 600PB of new data storage.
The following chart breaks down the efforts of our intrepid data center teams.
Lifetime Hard Drive Stats
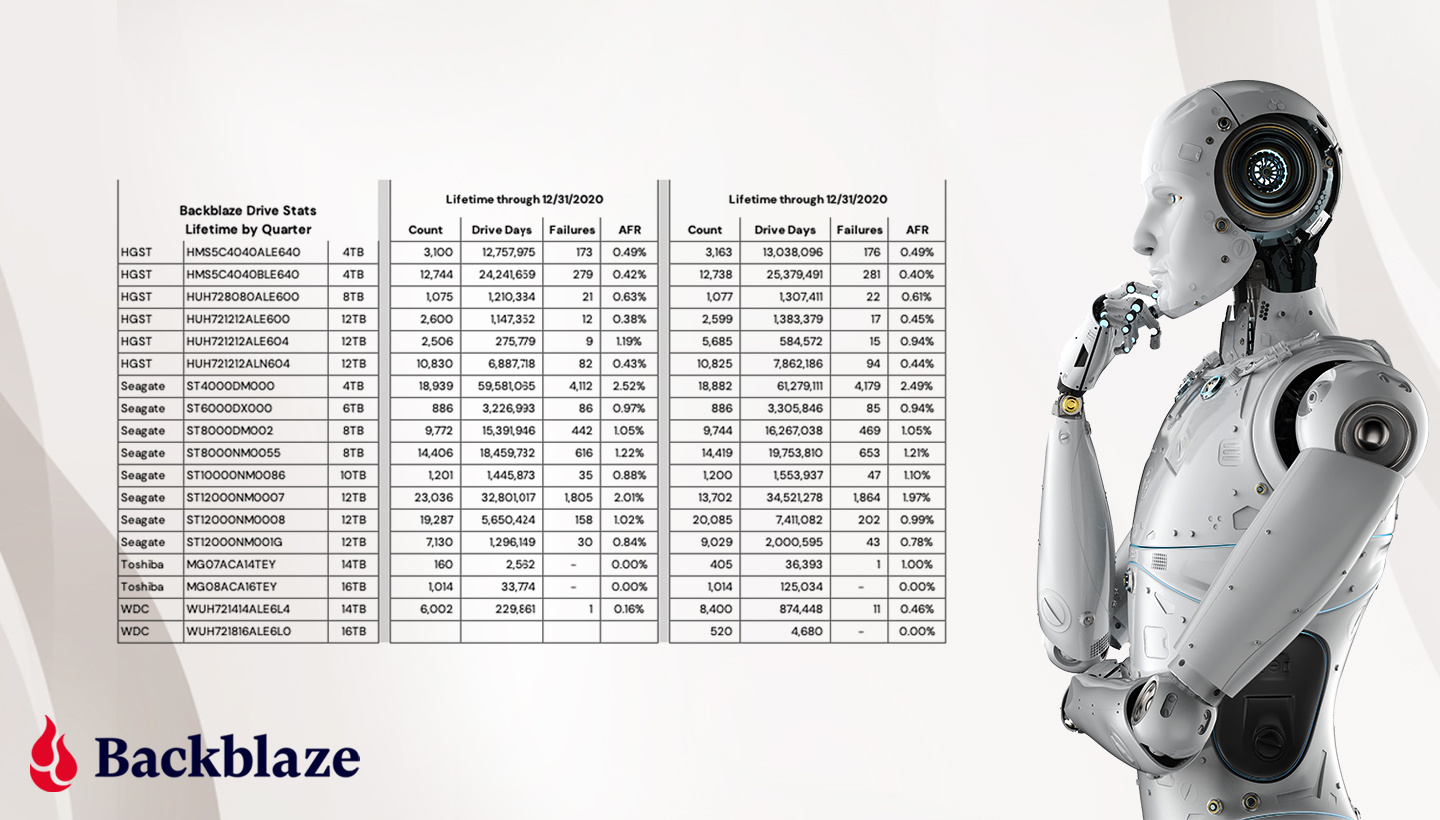
The chart below shows the lifetime AFRs of all the hard drive models in production as of September 30, 2021.
Notes and Observations on the Lifetime Stats
The lifetime AFR for all of the drives in our farm continues to decrease. The 1.43% AFR is the lowest recorded value since we started back in 2013. The drive population spans drive models from 4TB to 16TB and varies in average age from one month (Toshiba 16TB) to over six years (Seagate 6TB).
Our best performing drive models in our environment by drive size are listed in the table below.
Notes:
The WDC 16TB drive (model: WUH721816ALE6L0) does not appear to be available in the U.S. through retail channels. It is available in Europe for 549,00 EUR.
Status is based on what is stated on the website. Further investigation may be required to ensure you are purchasing a new drive versus a refurbished drive marked as new.
The source and price columns were as of 10/23/2021.
Interested in learning more? Join our webinar on November 4th at 10 a.m. PT with Drive Stats author, Andy Klein, to gain unique and valuable insights into why drives fail, how often they fail, and which models work best in our environment of 190,000+ drives. Register today.
The Hard Drive Stats Data
The complete data set used to create the information used in this review is available on our Hard Drive Test Data page. You can download and use this data for free for your own purpose. All we ask are three things: 1) you cite Backblaze as the source if you use the data, 2) you accept that you are solely responsible for how you use the data, and 3) you do not sell this data to anyone; it is free.
If you just want the summarized data used to create the tables and charts in this blog post, you can download the ZIP file containing the Excel XLXS files for each chart.
Good luck and let us know if you find anything interesting.
You’ve added a Synology Network Attached Storage (NAS) Device to your tech stack, but you may be wondering how to protect your files from ransomware, natural disasters, or accidental deletion. Saving your data to cloud storage can help protect you from the painful consequences of data loss. But now you may be wondering whether to backup or sync your data to the cloud. The answer to that question will largely depend on your own individual needs. If you are looking to keep an additional copy of your regularly changing data at an off-premise location to maintain the 3-2-1 backup strategy, then backing up your data to the cloud is the way to go.
If, however, you need your files in a place where everyone in the organization can access them at any moment, where edits to any files can be shown across all devices in real time or you need up-to-the-minute versions of your files off-site, then syncing your files to the cloud will be sufficient.
Your Synology NAS has applications for either backup—Hyper Backup—or sync—Cloud Sync—which we will explain in greater detail below. Understanding the distinction between the two functions is an important part of setting your tech stack up for success. And setting your tech stack up to connect to Backblaze B2 Cloud Storage, gives you greater security, accessibility and off-site peace of mind at a fifth of the cost of other cloud providers.
Read on to learn the differences between backup and sync, how they work with your Synology NAS, and how to connect your NAS to Backblaze B2.
Backup vs. Sync
As mentioned before, understanding the difference between backup and sync is a crucial step in determining how you will pair your NAS with an offsite cloud storage solution like Backblaze B2. As such, it may help you to have a full understanding of the difference between the two.
A backup lets you create copies of files and other digital assets, which are then sent from a NAS to another device or an off-site storage location such as a public cloud. Allowing for either incremental or full backups of the contents of your NAS on a customized schedule, this method allows you to retain a copy of the most recent version of a file, while also being able to retain previous versions. This can also be an effective strategy to combat malware or ransomware, as you can simply delete infected files and restore from a clean backup. In addition, maintaining storage off-site protects your data from any natural disasters that might befall your immediate vicinity.
By contrast, a sync strategy consists of one or more devices working in unison, updating files in the same way across each device and/or a cloud storage location. The benefits of syncing files come from the ability to instantly see updates on files and provide easy access to changes in files to people across your organization. If you connect your NAS to Backblaze B2, you can easily access and download files anywhere you are through native applications or another Backblaze partner integration like Veeam, Iconik, and Cyberduck. The drawback of syncing is that it does not offer effective protections against accidental deletions, unauthorized access or malware.
There are essentially two different ways to sync your files: one-way or two-way. In a one-way sync, when a file from Location A changes, the same file at Location B is updated; however, if something on the file changes in Location B, the file in Location A will not be updated. On the other hand, in a two-way sync, regardless of where the file changes, the other location will automatically update to mirror the other. And in most cases, this means the entire file will be re-uploaded.
It is not uncommon for an organization to use both backup and sync strategies simultaneously, relying on one over the other as needs change. Thankfully, Synology has two relevant proprietary applications that serve the various needs of backing up and syncing data which can be seen in the table below. Whether you plan to utilize the backup and sync features Synology offers via Hyper Backup and Cloud Sync, securing your files to the cloud will help you create an effective 3-2-1 Backup Strategy, protecting your digital assets. Now we’ll take a closer look at how you can connect your Synology NAS to Backblaze B2 Cloud Storage.
Setting Up Your B2 Cloud Storage Account
Regardless of whether you use Hyper Backup or Cloud Sync, you can get set up in minutes with B2 Cloud Storage. You can follow along with the directions in this blog or take a look at our video guides. Pat Patterson, Chief Technical Evangelist, demonstrates how to get your data into B2 Cloud Storage in under 10 minutes using either Hyper Backup or Cloud Sync.
Here’s a video tutorial for Hyper Backup:
And here’s one for Cloud Sync:
The first step is to create a Backblaze B2 Cloud Storage account so your data has a location to be securely stored. You can sign up for an account and get started with 10GB of storage for free.
We’ll continue to show the steps after you’ve signed up for a Backblaze B2 Account in order to access your new bucket, Application Key ID, and Application Key. This will only take a few clicks, a couple names, and less than a minute.
On the Buckets page of your account, click the Create a Bucket button.
Give your bucket a name and enable encryption for added security.
Click the Create a Bucket button and you should see your new Bucket on the Buckets page.
Navigate to the App Keys page of your account and click the Add a New Application Key button.
Name your Application Key and click the Create New Key button—make sure that your key has both Read and Write permissions (the default option).
Your Application Key ID and Application Key will appear on your App Keys page. Make sure to copy these somewhere secure as the Application Key will not appear again!
Backing Up or Syncing Your Synology to Backblaze B2
By now you have created the location for your data to be either backed up or synced to and obtained your Application Key.
If you want to backup your data, then follow this integration guide or the video mentioned above that takes you step-by-step on how you can use Hyper Backup to backup your data from your Synology to B2 Cloud Storage.
If syncing your data is what you need, then follow this integration guide or the video mentioned above that takes you through how you can use Cloud Sync to sync your data from your Synology to B2 Cloud Storage.
Once you have built the connection between your Synology to B2 Cloud Storage either through Hyper Backup or Cloud Sync (or both!), you can begin backing up or syncing your data for greater protection and accessibility no matter the location.
Summary
Creating and implementing an effective backup strategy, sync strategy or hybrid of the two can be an effective way to protect your data. A thorough understanding of the benefits, drawbacks and strategies involved, and the ways your Synology NAS can utilize both Hyper Backup and Cloud Sync, will hopefully get you on your way to securing your data.
At a fifth of the price of competitors, with setup that takes less than 10 minutes, Backblaze B2 Cloud Storage is a great complement to your Synology NAS.
You’re probably familiar with containers if you’re even remotely involved in software development or systems administration. In their 2023 survey, the Cloud Native Computing Foundation found that over 90% organizations use containers in production. Additionally, more than 90% of organizations that rely on cloud native practices for most or all of their application development and deployment also depend on containers.
But, whether orchestrating containers is a regular part of your day-to-day life, or you are just trying to understand what an operating system kernel is, it helps to have an understanding of some container basics.
Today, we’re explaining what containers are, how they’re used, and how cloud storage fits into the container picture—all in one neat and tidy containerized blog post package. (And, yes, the kernel is important, so we’ll get to that, too).
What are containers?
Containers are packaged units of software that contain all of the dependencies (e.g. binaries, libraries, programming language versions, etc.) they need to run no matter where they live—on a laptop, in the cloud, or in an on-premises data center. That’s a fairly technical definition, so you might be wondering, “OK, but what are they really?”
The generally accepted definition of the term applies almost exactly to what the technology does.
A container, generally = a receptacle for holding goods; a portable compartment in which freight is placed (as on a train or ship) for convenience of movement.
A container in software development = a figurative “receptacle” for holding software. The second part of the definition applies even better—shipping containers are often used as a metaphor to describe what containers do. In shipping, instead of stacking goods in a jumbled pile, goods are packed into standard-sized containers that fit on whatever is hauling them—a ship, a train, or a trailer.
Likewise, instead of “shipping” an unwieldy mess of code, including the required operating system, containers package software into lightweight units that share the same operating system (OS) kernel and can run anywhere—on a laptop, on a server, in the cloud, etc.
What’s an OS kernel?
As promised, here’s where the OS kernel becomes important. The kernel is the core programming at the center of the OS that controls all other parts of the OS. The term makes sense if you consider the definition of “kernel” as “the central or essential part” as in “a kernel of truth.” (It also begs the question, “Why didn’t they just call it a colonel?” especially because it’s in charge of so many things… But that’s neither here nor there.) And now you know what an OS kernel does.
Compared to older virtualization technology, namely virtual machines which are measured in gigabytes, containers are only megabytes in size. That means you can run quite a few of them on a given computer or server much like you can stack many containers onto a ship.
Indeed, the founders of Docker, the software that sparked widespread container adoption, looked to the port of Oakland, California for inspiration. Former Docker CEO, Ben Golub, explained in an interview with InfoWorld, “We could see all the container ships coming into the port of Oakland, and we were talking about the value of the container in the world of shipping. The fact it was easier to ship a car from one side of the world than to take an app from one server to another, that seemed like a problem ripe for solving.” In fact, it’s right there in their logo.
And that is exactly what containers, mainly via Docker’s popularity, did—they solved the problem of environment inconsistency for developers. Before containers became widely used, moving software between environments meant things broke, a lot. If a developer wrote an app on their laptop, then moved it into a testing environment on a server, for example, everything had to be the same—same versions of the programming language, same permissions, same database access, etc. If not, you had a very sad app.
Virtualization 101
Containers work their magic by way of virtualization. Virtualization is the process of creating a simulated computing environment that’s abstracted from the physical computing hardware—essentially a computer-generated computer, also referred to as a software-defined computer.
The first virtualization technology to really take off was the virtual machine (VM). A VM sits atop a hypervisor—a lightweight software layer that allows multiple operating systems to run in tandem on the same hardware. VMs allow developers and system administrators to make the most of computing hardware. Before VMs, each application had to run on its own server, and it probably didn’t use the server’s full capacity. After VMs, you could use the same server to run multiple applications, increasing efficiency and lowering costs.
Containers vs. virtual machines
While VMs increase hardware efficiency, each VM requires its own OS and a virtualized copy of the underlying hardware. Because of this, VMs can take up a lot of system resources, and they’re slow to start up.
Containers, on the other hand, do not virtualize the hardware. Instead, they share the host operating system’s kernel, making them much smaller and faster than VMs. Want to know more? Check out our deep dive into the differences between VMs and containers.
The benefits of containers
Containers allow developers and system administrators to develop, test, and deploy software and applications faster and more efficiently than older virtualization technologies like VMs. The benefits of containers include:
Portability: Containers include all of the dependencies they need to run in any environment, provided that environment includes the appropriate OS. This reduces the errors and bugs that arise when moving applications between different environments, increasing portability.
Size: Containers share OS resources and don’t include their own OS image, making them lightweight—megabytes compared to VMs’ gigabytes. As such, one machine or server can support many containers.
Speed: Again, because they share OS resources and don’t include their own OS image, containers can be spun up in seconds compared to VMs which can take minutes to spin up.
Resource efficiency: Similar to VMs, containers allow developers to make the best use of hardware and software resources.
Isolation: Also similar to VMs, with containers, different applications or even component parts of a singular application can be isolated such that issues like excessive load or bugs on one don’t impact others.
Container use cases
Containers are nothing if not versatile, so they can be used for a wide variety of use cases. However, there are a few instances where containers are especially useful:
Enabling microservices architectures: Before containers, applications were typically built as all-in-one units or “monoliths.” With their portability and small size, containers changed that, ushering in the era of microservices architecture. Applications could be broken down into their component “services,” and each of those services could be built in its own container and run independently of the other parts of the application. For example, the code for your application’s search bar can be built separately from the code for your application’s shopping cart, then loosely coupled to work as one application.
Supporting modern development practices: Containers and the microservices architectures they enable paved the way for modern software development practices. With the ability to split applications into their component parts, each part could be developed, tested, and deployed independently. Thus, developers can build and deploy applications using modern development approaches like DevOps, continuous integration/continuous deployment (CI/CD), and agile development.
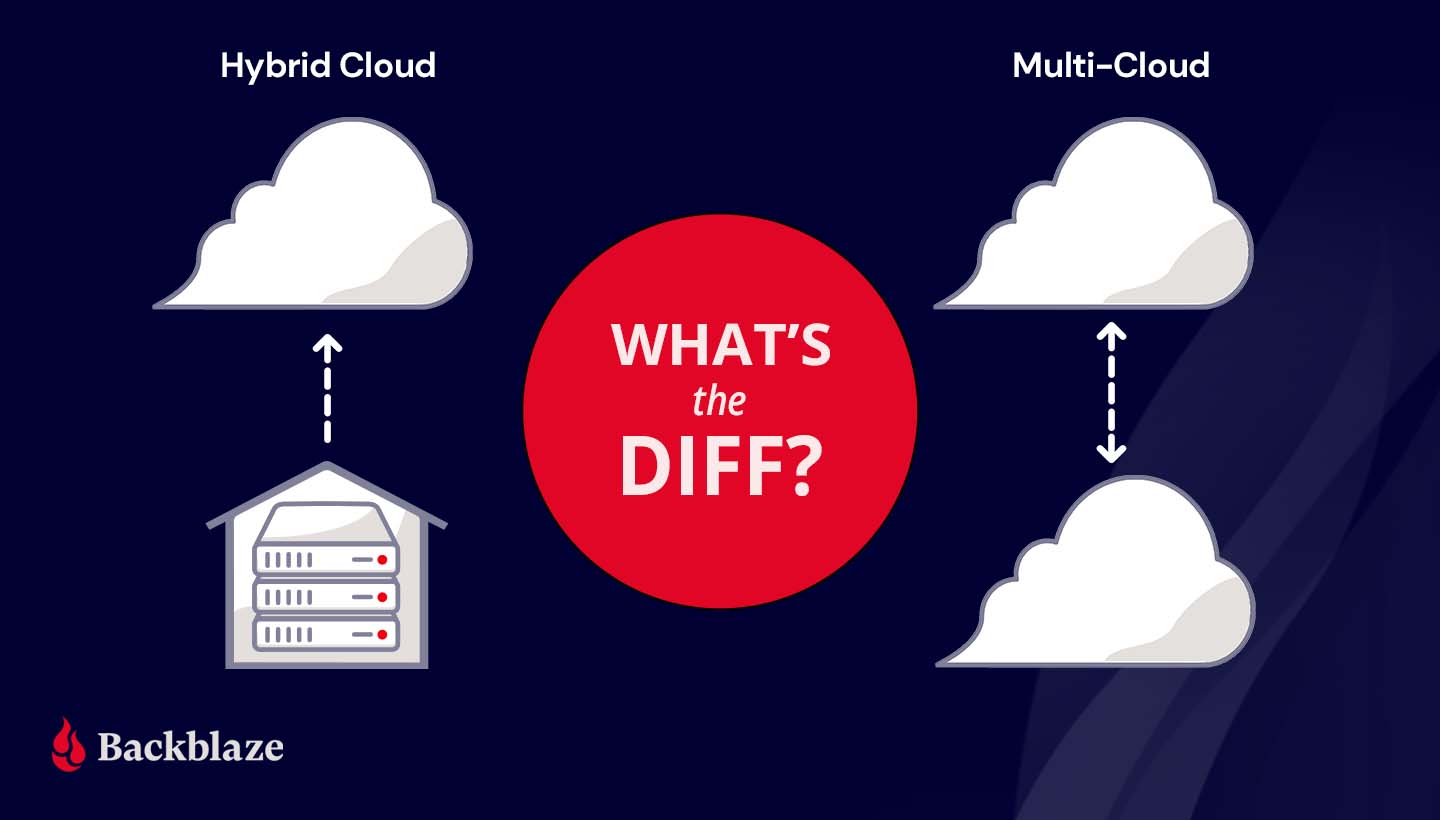
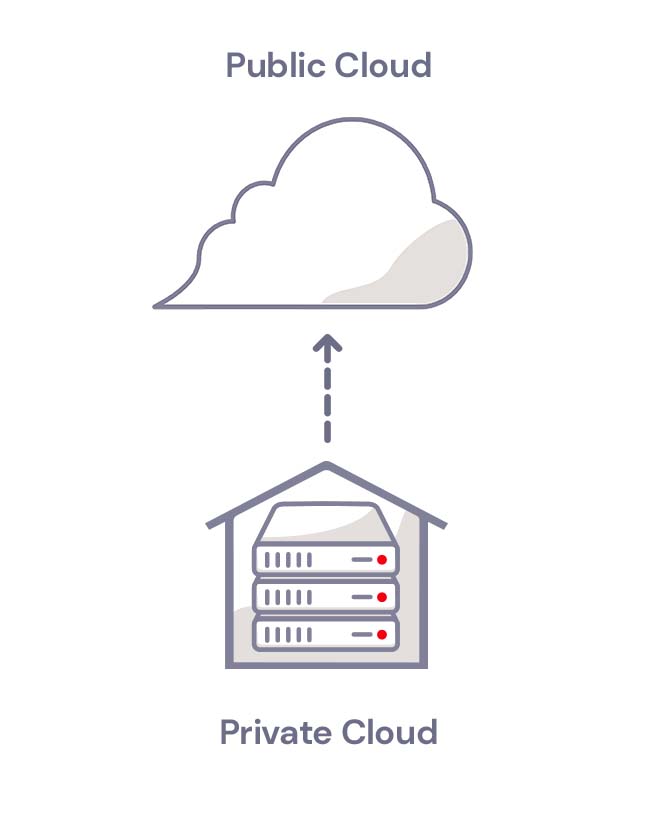
Facilitating hybrid cloud and multi-cloud approaches: Because of their portability, containers enable developers to utilize hybrid cloud and/or multi-cloud approaches. Containers allow applications to move easily between environments—from on-premises to the cloud or between different clouds.
Accelerating cloud migration or cloud-native development: Existing applications can be refactored using containers to make them easier to migrate to modern cloud environments. Containers also enable cloud-native development and deployment.
The role of software containers in AI application development
In addition to enabling microservices architectures and supporting modern development practices, containers play a role in AI application development. Their ability to provide consistent, reproducible environments makes them ideal for AI, where managing complex dependencies and ensuring uniform performance across different platforms are essential.
AI projects often rely on specific versions of libraries, drivers, and runtimes, which can lead to compatibility issues and errors. Containers solve this problem by encapsulating all necessary dependencies, libraries, and runtime environments to provide a consistent and reproducible platform for AI development. This encapsulation ensures that AI models and applications run the same way, regardless of the underlying infrastructure and provides consistency from development through production.
The portability of containers also offers advantages for deploying AI workloads across diverse environments. They can be easily moved between local development machines, on-premises servers, and cloud platforms without requiring code or configuration changes. This flexibility supports easy scalability of AI applications to meet changing demands—such as increased user loads or the need for more intensive data processing.
Additionally, containers enable organizations to leverage the most cost effective and powerful computing resources available, whether it’s local hardware for testing and development or cloud-based GPU clusters for training large-scale models. This ability moves workloads efficiently across different environments and also supports hybrid and multi-cloud strategies to provide organizations with greater agility, while reducing costs and avoiding vendor lock-in.
Container tools
The two most widely recognized container tools are Docker and Kubernetes. They’re not the only options out there, but in their 2023 developer survey, Stack Overflow found that nearly 52% out of 90,000+ respondents use Docker and 19% use Kubernetes. But what do they do?
1. What is Docker?
Container technology had been around for a while in the form of Linux containers or LXC, but the widespread adoption of containers happened only in the past decade with the introduction of Docker.
Docker was launched in 2013 as a project to build single-application LXC containers, introducing several changes to LXC that make containers more portable and flexible to use. It later morphed into its own container runtime environment. At a high level, Docker is a Linux utility that can efficiently create, ship, and run containers.
Docker introduced more standardization to containers than previous technologies and focused on developers, specifically, making it the de facto standard in the developer world for application development.
2. What is Kubernetes?
As containerization took off, many early adopters found themselves facing a new problem: how to manage a whole bunch of containers. Enter: Kubernetes. Kubernetes is an open-source container orchestrator. It was developed at Google (deploying billions of containers per week is no small task) as a “minimum viable product” version of their original cluster orchestrator, ominously named Borg. Today, it is managed by the Cloud Native Computing Foundation, and it helps automate management of containers including provisioning, load balancing, basic health checks, and scheduling.
Kubernetes allows developers to describe the desired state of a container deployment using YAML files (YAML stands for Yet Another Markup Language, which is yet another winning tech acronym.). The YAML file uses declarative language to tell Kubernetes “this is what this container deployment should look like” and Kubernetes does all the grunt work of creating and maintaining that state.
Containers + storage: What you need to know
Containers are inherently ephemeral or stateless. They get spun up, and they do their thing. When they get spun down, any data that was created while they were running is destroyed with them. But most applications are stateful, and need data to live on even after a given container goes away.
Object storage is inherently scalable. It enables the storage of massive amounts of unstructured data while still maintaining easy data accessibility. For containerized applications that depend on data scalability and accessibility, it’s an ideal solution for keeping stateful data stateful.
There are three essential use cases where object storage works hand in hand with containerized applications:
Backup and disaster recovery: Tools like Docker and Kubernetes enable easy replication of containers, but replication doesn’t replace traditional backup and disaster recovery just as sync services aren’t a good replacement for backing up the data on your laptop, for example. With object storage, you can replicate your entire environment and back it up to the cloud. There’s just one catch: some object storage providers have retention minimums, sometimes up to 90 days. If you’re experimenting and iterating on your container architecture, or if you use CI/CD methods, your environment is constantly changing. With retention minimums, that means you might be paying for previous iterations much longer than you want to. (Shameless plug: Backblaze B2 Cloud Storage is calculated hourly, with no minimum retention requirement.)
Primary storage: You can use a cloud object storage repository to store your container images, then when you want to deploy them, you can pull them into the compute service of your choice.
Origin storage: If you’re serving out high volumes of media, or even if you’re just hosting a simple website, object storage can serve as your origin store coupled with a CDN for serving out content globally. For example, CloudSpot, a SaaS platform that serves professional photographers, moved to a Kubernetes cluster environment and connected it to their origin store in Backblaze B2, where they now keep 120+ million files readily accessible for their customers.
Need object storage for your containerized application?
Now that you have a handle on what containers are and what they can do, you can make decisions about how to build your applications or structure your internal systems. Whether you’re contemplating moving your application to the cloud, adopting a hybrid or multi-cloud approach, or going completely cloud native, containers can help you get there. And with object storage, you have a data repository that can keep up with your containerized workloads.
Ready to connect your application to scalable, S3-compatible object storage? You can get started today for free.
From time to time, we will reference the “bathtub curve” when talking about hard drive and SSD failure rates. This normally includes a reference or link back to a post we did in 2013 which discusses the topic. It’s time for an update. Not because the bathtub curve itself has changed, but because we have nearly seven times the number of drives and eight more years of data than we did in 2013.
In today’s post, we’ll take an updated look at how well hard drive failure rates fit the bathtub curve, and in a few weeks we’ll delve into the specifics for different drive models and even do a little drive life expectancy analysis.
Once Upon a Time, There Was a Bathtub Curve
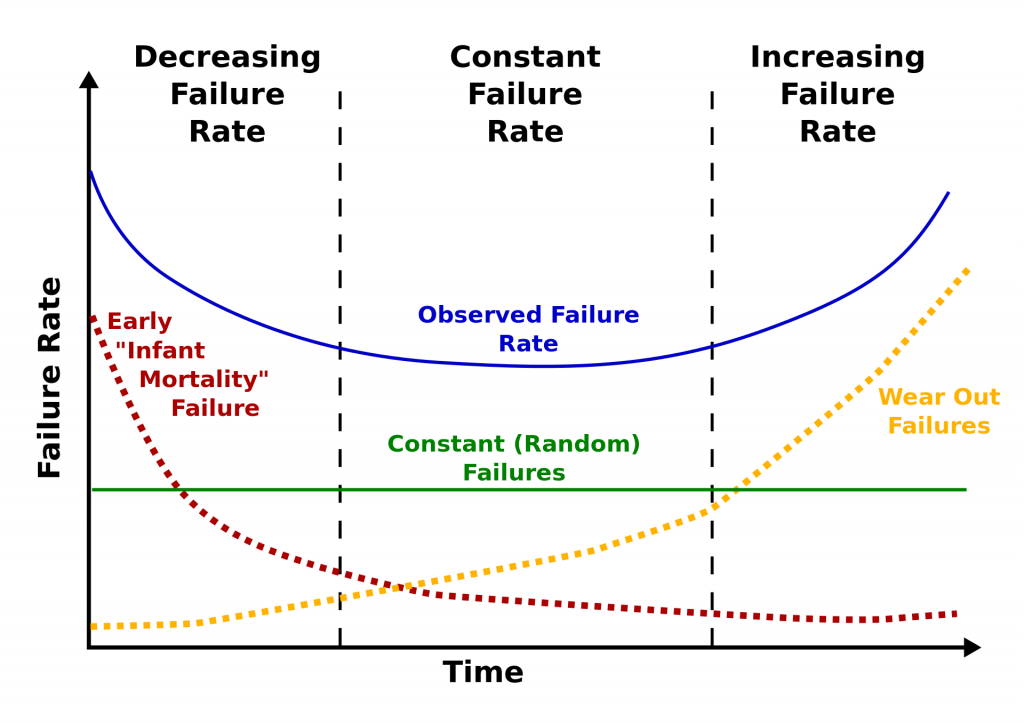
Here is the classic version of the bathtub curve.
Source: Public domain, https://commons.wikimedia.org/w/index.php?curid=7458336.
The curve is divided into three sections: decreasing failure rate, constant failure rate, and increasing failure rate. Using our 2013 drive stats data, we computed a failure rate and a timeframe for each of the three sections as follows:
2013 Drive Failure Rates
Curve Section
Failure Rate
Length
Decreasing
5.1%
0 to 18 Months
Constant
1.4%
18 Months to 3 Years
Increasing
11.8%
3 to 4 Years
Furthermore, we computed that at four years, the life expectancy of a hard drive in our system was about 80%, and forecasting that out, at six years, the life expectancy was 50%. In other words, we would expect a hard drive we installed to have a 50% chance of being alive after six years.
Drive Failure and the Bathtub Curve Today
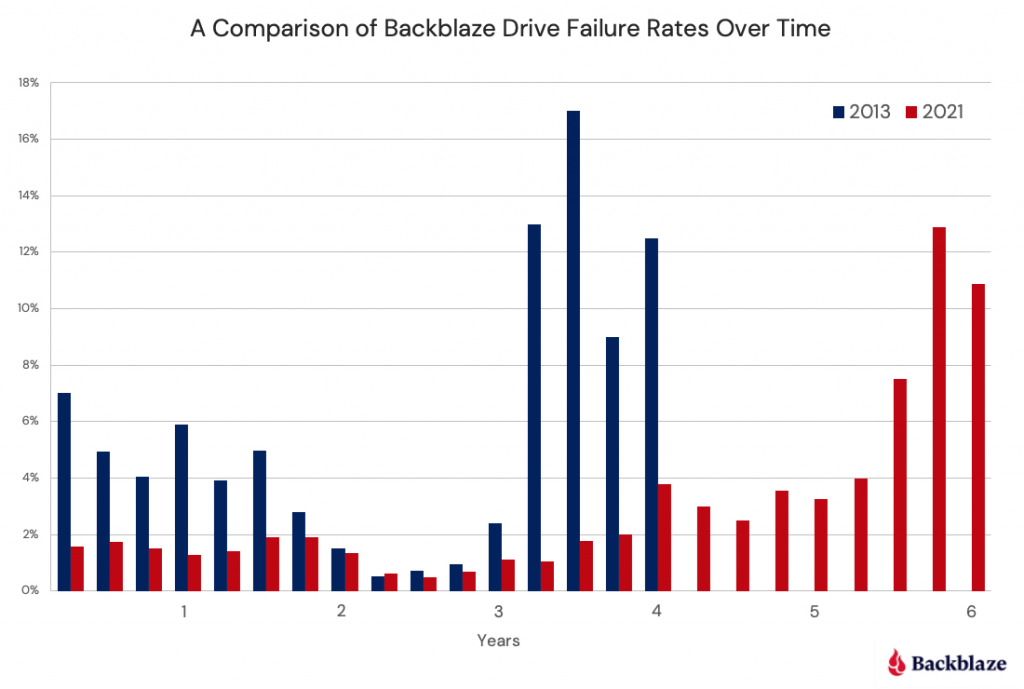
Let’s begin by comparing the drive failure rates over time based on the data available to us in 2013 and the data available to us today in 2021.
Observations and Thoughts
Let’s start with an easy one: We have six years worth of data for 2021 versus four years for 2013. We have a wider bathtub. In reality, it is even wider, as we have more than six years of data available to us, but after six years the number of data points (drive failures) is small, less than 10 failures per quarter.
The left side of the bathtub, the area of “decreasing failure rate,” is dramatically lower in 2021 than in 2013. In fact, for our 2021 curve, there is almost no left side of the bathtub, making it hard to take a bath, to say the least. We have reported how Seagate breaks in and tests their newly manufactured hard drives before shipping in an effort to lower the failure rates of their drives. Assuming all manufacturers do the same, that may explain some or all of this observation.
The right side of the bathtub, the area of “increasing failure rate,” moves right in 2021. Obviously, drives installed after 2013 are not failing as often in years three and four, or most of year five for that matter. We think this may have something to do with the aftermath of the Thailand drive crisis back in 2011. Drives got expensive, and quality (in the form of reduced warranty periods) went down. In addition, there was a fair amount of manufacturer consolidation as well.
It is interesting that for year two, the two curves, 2013 and 2021, line up very well. We think this is so because there really is a period in the middle in which the drives just work. It was just shorter in 2013 due to the factors noted above.
The Life Expectancy of Drives Today
As noted earlier, back in 2013, the 80% of the drives installed would be expected to survive four years. That fell to 50% after six years. In 2021, the life expectancy of a hard drive being alive at six years is 88%. That’s a substantial increase, but it basically comes down to the fact that hard drives are failing less in our system. We think it is a combination of better drives, better storage servers, and better practices by our data center teams.
What’s Next
For 2021, our bathtub curve looks more like a hockey stick, although saying, “When you review our hockey stick curve…” doesn’t sound quite right. We’ll try to figure out something by our next post on the topic. One thing we also want to do in that next post is to break down the drive failure data by model and see if the different drive models follow the bathtub curve, the hockey stick curve, or some other unnamed curve. We’ll also chart out the life expectancy curves for all the drives as a whole and by drive model as well.
Well, time to get back to the data, our next Drive Stats report is coming up soon.
Object Lock is a powerful backup protection tool that makes data immutable. It allows you to store objects using a Write Once, Read Many (WORM) model, meaning after it’s written, data cannot be modified or deleted for a defined period of time. Any attempts to manipulate, copy, encrypt, change, or delete the file will fail during that time. The files may be accessed, but no one can change them, including the file owner or whoever set the Object Lock.
This makes Object Lock a great tool as part of a robust cybersecurity program. However, when Object Lock is used inconsistently, it can consume unnecessary storage resources. For example, if you set a retention period of one year, but you don’t end up needing to keep the data that long, you’re out of luck. Once the file is locked, it cannot be deleted. That’s why it’s important to develop a consistent approach.
In this post, we’ll outline five different use cases for Object Lock and explain how to add Object Lock to your IT security policies to ensure your company gets all the protection Object Lock offers while managing your storage footprint.
When to Use Object Lock: Five Use Cases
There are at least five situations where Object Lock is helpful. Keep in mind that these requirements may change over time. Compliance requirements, for example, might be relatively simple today. However, those requirements may become more complex if your company onboards customers in a highly regulated sector like finance or health care.
1. Reducing Cybersecurity Risk
Cybersecurity threats are increasing. In 2015, there were approximately 1,000 ransomware attacks per day, but this figure has increased to more than 4,000 per day since 2016, according to the U.S. government. To be clear, using Object Lock does not prevent a ransomware attack. Instead, data protected by Object Lock is immutable. In the event of a ransomware attack, it cannot be altered by malicious software. Ultimately, your organization may be able to recover from a cyber attack more quickly by restoring data protected by Object Lock.
2. Meet Compliance Requirements With Object Lock
Some industries have extensive record retention requirements. Preserving digital records with Object Lock is one way to fulfill those expectations. Several regulatory and legal requirements direct companies to retain records for a certain period of time.
Banks insured by FDIC generally must retain account records for five years after the “account is closed or becomes dormant.” Beyond FDIC, there are many other state and federal compliance requirements on the financial industry. Preserving data with Object Lock can be helpful in these situations.
In the health care field, requirements vary across the country. The American Health Information Management Association points out that retaining health records for up to 10 years or longer may be needed.
You may also have to retain data for tax purposes. The IRS generally suggests keeping tax-related records for up to seven years. However, there are nuances to these requirements (i.e., shorter retention periods in some cases and potentially longer retention periods for property records).
3. Fulfilling a Legal Hold
When a company is sued, preserving all relevant records is wise. An article published by the American Bar Association points out that failing to preserve records may “undermine a litigant’s claims and defenses.” Given that many companies keep many (if not all) of their records in digital form, preserving digital records is essential. In this situation, using Object Lock to preserve records may be beneficial.
4. Meeting a Retention Period for Other Needs
Higher-risk business activities may benefit from preserving data with Object Lock. For example, an engineering company working on designing a bridge might use Object Lock to maintain records during the project. In software development, new versions of software may become unstable. Restoring to a previous version of the software, preserved from tampering or accidental deletion with Object Lock, can be valuable.
5. Replacing an LTO Tape System
In an LTO tape system, data immutability is conferred by a physical “air gap,” meaning there’s a literal gap of air between production data and backups stored on tape—the two are not physically connected in any way. Object Lock creates a virtual air gap, replacing the need for expensive physical infrastructure.
How to Add Object Lock to Your Security Policy
No matter the reason for implementing Object Lock, consistent usage is key. To encourage consistent usage, consider adding Object Lock as an option in your company’s security policy. Use the following tips as a guide on when and how to use Object Lock.
Set Up Object Lock Governance: Assign responsibility to a single manager in IT or IT security to develop Object Lock governance policies. Then, periodically review Object Lock governance and update retention policies as necessary as the security landscape evolves.
Evaluate the Application of Object Lock in Your Context: Are you subject to retention regulations? Do you have certain data you need to keep for an extended period of time? Take an inventory of your data and any specific retention considerations you may want to keep in mind when implementing Object Lock.
Document Object Lock Requirements: There are different ways to explain and communicate Object Lock guidelines. If your IT security policy focuses on high-level principles, consider adding Object Lock to a data management procedure instead.
Add Object Lock to Your Policy for Cloud Tools: Review your cloud solutions to see which providers support Object Lock. Only a few storage platforms currently offer the feature, but if your provider is one of them, you can enable Object Lock and specify the length of time an object should be locked in the storage provider’s user interface, via your backup software, or by using API calls.
Use Change Management to Promote the Change to the Policy Internally: Writing Object Lock into your policy is a good step, but it is not the end of the process. You also need to communicate the change internally and ensure employees who need to use Object Lock are trained on the Object Lock policies and procedures.
Testing and Monitoring: Periodically review if Object Lock is being used per the established policies and if data is being properly protected as outlined. As a starting point, review Object Lock usage quarterly and spot check data to ensure it’s locked.
Adding Object Lock to Your Security Tool Kit
Object Lock is a helpful way to protect data from being changed. It can help your organization meet records retention requirements and make it easier to recover from a cyber attack. It’s one tool that can strengthen a robust IT security practice, but you first need a well-developed backup program to keep your company operating in the event of a disruption. To find out more about emerging backup strategies, check out our explainer, “What’s the Diff: 3-2-1 vs. 4-3-2-1-0 vs. 4-3-2” to keep your valuable company data safe. And, for a comprehensive ransomware prevention playbook, check out our Complete Guide to Ransomware.
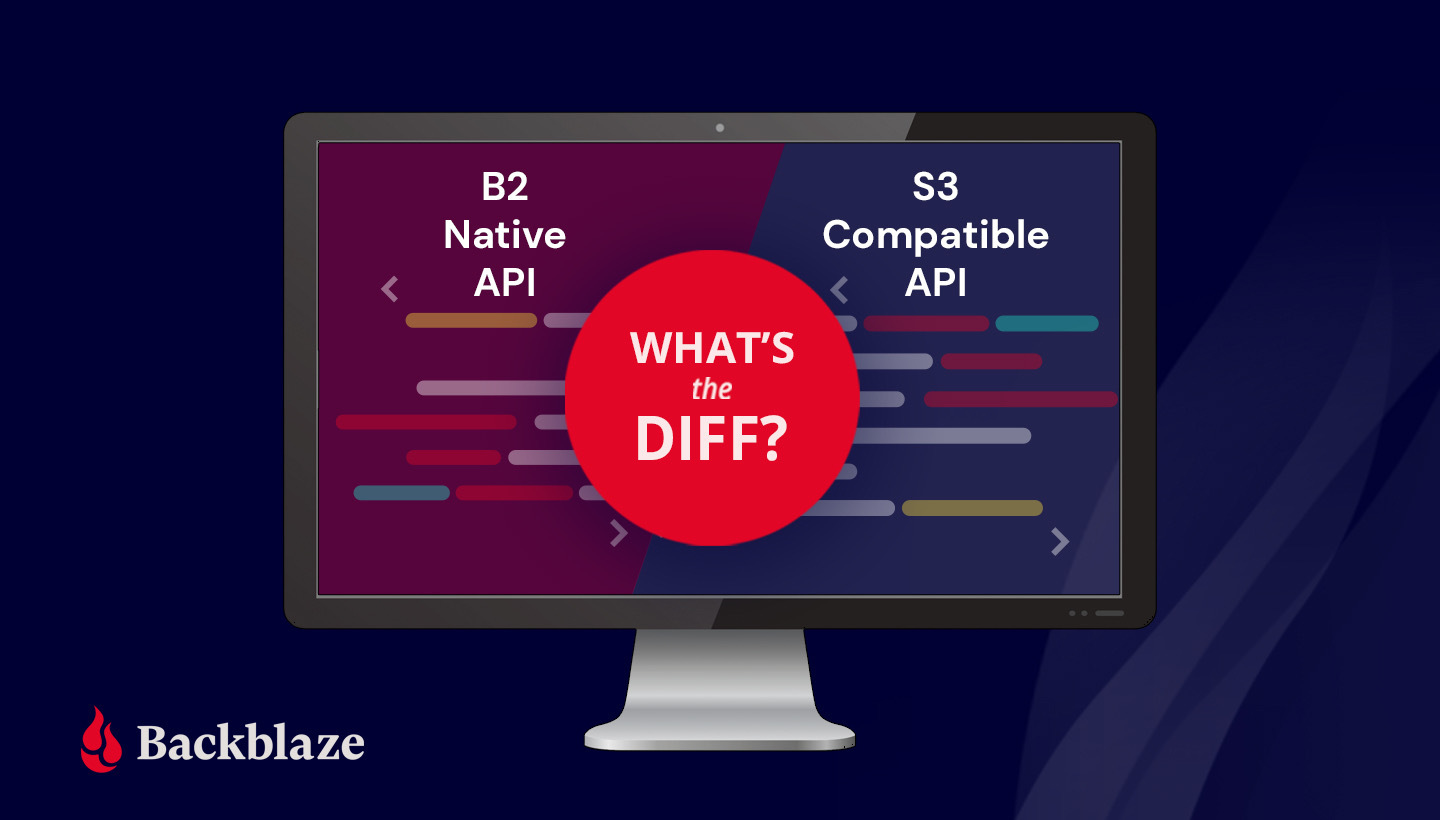
The dreaded CORS error is the bane of many a web developer’s day-to-day life. Even for experts, it can be eternally frustrating. Today, we’re digging into CORS, starting with the basics and working up to sharing specific code samples to help you enable CORS for your web development project. What is CORS? Why do you need it? And how can you enable it to save time and resources?
We’ll answer those questions so you can put the CORS bane behind you.
What Is CORS?
CORS stands for cross-origin resource sharing. To define CORS, we first need to explain its counterpoint—the same-origin policy, or SOP. The SOP is a policy that all modern web browsers use for security purposes, and it dictates that a web address with a given origin can only request data from the same origin. CORS is a mechanism that allows you to bypass the SOP so you can request data from websites with different origins.
Let’s break that down piece by piece, then we’ll get into why you’d want to bypass the same-origin policy in the first place.
What Is an Origin?
All websites have an origin, and it is defined by the protocol, domain, and port of its URL.
You’re probably familiar with the working parts of a URL, but they each have a different function. The protocol, also known as the scheme, identifies the method for exchanging data. Typical protocols are http, https, or mailto. The domain, also known as the hostname, is a specific webpage’s unique identifier. You may not be as familiar with the port as it’s not normally visible in a typical web address. Just like a port on the water, it’s the connection point where information comes in and out of a server. Different port numbers specify the types of information the port handles.
When you understand what an origin is, the “cross-origin” part of CORS makes a bit more sense. It simply means web addresses with different origins. In web addresses with the same origin, the protocol, domain, and port all match.
What Is the Same-origin Policy?
The same-origin policy was developed and implemented as a security measure against a specific website vulnerability that was discovered and exploited in the 2000s. Before the same-origin policy was in place, bad actors could use cookies stored in people’s browsers to make requests to other websites illicitly. This is known as cross-site request forgery, or CSRF, pronounced “sea surf.” It’s also known as “session riding.” Tubular.
Let’s say you log in to Netflix on your laptop to add Ridley Scott’s 1982 classic, “Blade Runner” to your queue, as one does. You click “Remember Me” so you don’t have to log in every time, and your browser keeps your credentials stored in a cookie so that the Netflix site knows you are logged in no matter where you navigate within their site.
Afterwards, you’re bored, so you fall down an internet rabbit hole wondering why “Blade Runner” is called “Blade Runner” when there are few blades and little running. You end up on a site about samurai swords that happens to be malicious—it has a script in its code that uses your authentication credentials stored in that cookie to make a request to Netflix that can change your address and add a bunch of DVDs to your queue (also, it’s 2006, and this actually happened). You’ve become a victim of cross-site request forgery.
To thwart this threat, browsers enabled the same-origin policy to prohibit requests from one origin to another.
Why Do You Need CORS?
While the same-origin policy helped stop bad actors from nefariously accessing websites, it posed a problem—sometimes you need or want assets and data from different origins. This is where the “resource sharing” part of cross-origin resource sharing comes in.
CORS allows you to set rules governing which origins are allowed to bypass the same-origin policy so you can share resources from those origins.
For example, you might host your website’s front end at www.catblaze.com, but you host your back-end API at api.catblaze.com. Or, you might need to display a bunch of cat videos stored in Backblaze B2 Cloud Storage on your website, www.catblaze.com (more on that below).
Do I Need CORS?
Let’s say you have a website, and you dabble in some coding. You’re probably thinking, “I can already use images and stuff from other websites. Do I need CORS?” And you’re right to ask. Most browsers allow simple http requests like get, head, and post without requiring CORS rules to be set in advance. Embedding images from other sites, for example, typically requires a get request to grab that data from a different origin. If that’s all you need, you’re good to go. You can use simple requests to embed images and other data from other websites without worrying about CORS.
But some assets, like fonts or iframes, might not work—then, you can use CORS—but if you’re a casual user, you can probably stop here.
Coding Explainer: What Is an http Request?
An http request is the way you, the client, use code to talk to a server. A complete http request includes a request line, request headers, and a message body if necessary. The request line specifies the method of the request. There are generally eight types:
get: “I want something from the server.”
head: “I want something from the server, but only give me the headers, not the content.”
post: “I want to send something to the server.”
put: “I want to send something to the server that replaces something else.”
delete: …self-explanatory.
patch: “I want to change something on the server.”
options: “Is this request going to go through?” (This one is important for CORS!)
trace: “Show me what you just did.” Useful for debugging.
After the method, the request line also specifies the path of the URL the method applies to as well as the http version.
The request headers communicate some specifics around how you want to receive the information. There are usually a whole bunch of these. (Wikipedia has a good list.) They’re typically formatted thusly: name:value. For example:
accept:text/plain means you want the response to be in text format.
Finally, the message body contains anything you might want to send. For example, if you use the method post, the message body would contain what you want to post.
Do I Need CORS With Cloud Storage?
People use cloud storage for all manner of data storage purposes, and most do not need to use CORS to access resources stored in a cloud instance. For example, you can make API calls to Backblaze B2 from any computer to use the resources you have stored in your storage buckets. If you’re running a mobile application and transferring data back and forth to Backblaze B2, for instance, you don’t need CORS. The mobile application doesn’t rely on a web browser.
You only need CORS if you’re specifically running code inside of a web browser and you need to make API calls from the browser to Backblaze B2. For example, if you’re using an in-browser video player and want to play videos stored in Backblaze B2.
Fortunately, if you do need CORS, Backblaze B2 allows you to configure CORS to your exact specifications while other cloud providers may have completely open CORS policies. Why is that important? An open CORS policy makes you vulnerable to CSRF attacks. To continue with the video example, let’s say you’re storing a bunch of videos that you want to make available on your website. If they’re stored with a cloud provider that has an open CORS policy, you have two choices—open or closed. You pick open so that your website visitors can call up those videos on demand, but that leaves you vulnerable to a CSRF that could allow a bad actor to download your videos. With Backblaze, you can specify the exact CORS rules you need.
If you are using Backblaze B2 to store data that will be displayed in a browser, or you’re just curious, read on to learn more about using CORS. CORS has saved developers lots of time and money by reducing maintenance effort and code complexity.
How Does CORS Work?
Unlike simple get, head, and post requests, some types of requests can alter the origin’s data. These include requests like delete, put, and patch. Any type of request that could alter the origin’s data will trigger CORS, as will simple requests that have non-standard http headers or requests in certain programming languages like AJAX. When CORS is triggered, the browser sends what’s called a preflight request to see if the CORS rules allow the request.
What Is a Preflight Request?
A preflight request, also known as an options request, asks the server if it’s okay to make the CORS request. If the preflight request comes back successfully, then the browser will complete the actual request. Few other systems in computing do this by default, so it’s important to understand when using CORS.
A preflight request has the following headers:
origin: Identifies the origin from which the CORS request originates.
access-control-request-method: Identifies the method of the CORS request.
access-control-request-headers: Lists the headers that will be included in the CORS request.
The web server then responds with the following headers:
access-control-allow-origin: Confirms the origin is allowed.
access-control-allow-method: Confirms the methods are allowed.
access-control-allow-headers: Confirms the headers are allowed.
The values that follow these headers must match the values specified in the preflight request. If so, the browser will permit the actual CORS request to come through.
Setting CORS Up: An Example
To provide an example for setting CORS up, we’ll use Backblaze B2. By default, the Backblaze B2 servers will say “no” to preflight requests. Adding CORS rules to your bucket tells Backblaze B2 which preflight requests to approve. You can enable CORS in the Backblaze B2 UI if you only need to allow one, specific origin or if you want to be able to share the bucket with all origins.
Click the CORS rules link to configure CORS.In the CORS rules pop-up, you can choose how you want to configure CORS rules.
If you need more specificity than that, you can select the option for custom rules and use the Backblaze B2 command line tool.
When a CORS preflight or cross-origin download is requested, Backblaze B2 evaluates the CORS rules on the file’s bucket. Rules may be set at the time you create the bucket with b2_create_bucket or updated on an existing bucket using b2_update_bucket.
CORS rules only affect Backblaze B2 operations in their “allowedOperations” list. Every rule must specify at least one in their allowedOperations.
CORS Rule Structure
Each CORS rule may have the following parameters:
Required:
corsRuleName: A name that humans can recognize to identify the rule.
allowedOrigins: A list of the origins you want to allow.
allowedOperations: A list that specifies the operations you want to allow, including:
B2 Native API Operations:
B2_download_file_by_name
B2_download_file_by_id
B2_upload_file
B2_upload_part
S3 Compatible Operations:
S3_delete
S3_get
S3_head
S3_post
S3_put
Optional:
allowedHeaders: A list of headers that are allowed in a preflight request’s Access-Control-Request-Headers value.
exposeHeaders: A list of headers that may be exposed to an application inside the client.
maxAgeSeconds: The maximum number of seconds that a browser can cache the response to a preflight request.
The following sample configuration allows downloads, including range requests, from any https origin and will tell browsers that it’s okay to expose the ‘x-bz-content-sha1’ header to the web page.
You may add up to 100 CORS rules to each of your buckets. Backblaze B2 uses the first rule that matches the request. A CORS preflight request matches a rule if the origin header matches one of the rule’s allowedOrigins, if the operation is in the rule’s allowedOperations, and if every value in the Access-Control-Request-Headers is in the rule’s allowedHeaders.
Using CORS: Examples in Action
Using your browser’s console, you can copy and paste the following examples to see CORS requests succeed or fail. As a handy guide for you, the text files we’ll be requesting include the bucket configuration of the Backblaze B2 buckets we’re calling.
In the first example, we’ll make a request to get the text file bucket_info.txt from a bucket named “cors-allow-none” that does not allow CORS requests:
When you run the code, you will see some text output to the console indicating that, indeed, the bucket allows CORS with all origins, but specific headers:
We didn’t include any headers in our request, so the request was successful and the text file we wanted—bucket_info.txt—appears below the text output in the console. As you can see in the text output, the bucket is configured with an asterisk “*,” also known as a “wildcard,” to allow all origins (more on that later).
Next, we’ll try the same thing on the bucket that allows CORS with all origins, but this time triggers a pre-flight check for a header that is not allowed:
Our bucket is configured to only allow the headers authorization and range, but we’ve included the header X-Fake-Header with the value breaking-cors-for-fun—definitely not allowed—in the request.
When we run this request, we can see another type of failure:
Below the request, but above the CORS errors, you’ll see that the browser sent an options request. As we mentioned earlier, this is the pre-flight request that asks the server if it’s okay to make the get request. In this case, the pre-flight request failed.
However, this request will succeed if we change our bucket settings to allow all headers.
Below, you can see the text output “This bucket allows CORS with all origins and any header values.”
The request was successful, and the text file we requested appears in the console.
At this point, it’s important to note that when configuring your own buckets, you should use caution when using the wildcard “*” to allow any origin or header. It’s probably best to avoid the wildcard if possible. It’s okay to allow any origin to access your bucket, but, if so, you’ll probably want to enumerate the headers that matter to avoid CSRF attacks.
For more information on using CORS with Backblaze B2, including some tips on using CORS with the Backblaze S3 Compatible API, check out our documentation here.
Stay on CORS
Ah, another inevitable CORS pun. Did you see it coming? I hope so. In conclusion, here are a few things to remember about CORS and how you can use it to avoid CORS errors in the future:
The same-origin policy was developed to make websites less vulnerable to threats, and it prevents requests between websites with different origins.
CORS bypasses the same-origin policy so that you can share and use data from different origins.
You only need to configure CORS rules for your Backblaze B2 data if you are making calls to Backblaze B2 from code within a web browser.
By setting CORS rules, you can specify which origins are allowed to request data from your Backblaze B2 buckets.
Are you using CORS? Do you have any other questions? Let us know in the comments.
Containers have changed the way development teams build, deploy, and scale their applications. Unfortunately, the adoption of containers often brings with it ever-growing complexity and fragility that leads to developers spending more time managing their deployment rather than developing applications.
Today’s announcement offers developers a path to easier container orchestration. The Cycle and Backblaze B2 Cloud Storage integration enables companies that utilize containers to seamlessly automate and control stateful data across multiple providers—all from one dashboard.
This partnership empowers developers to:
Easily deploy containers without dealing with complex solutions like Kubernetes.
Unify their application management, including automating or scheduling backups via an API-connected portal.
Choose the microservices and technologies they need without compromising on functionality.
Getting started with Cycle and Backblaze is simple:
Sign up for B2 Cloud Storage and create a bucket and Application Key.
Associate your Backblaze Application Key with your Cycle hub via the Integrations menu.
Utilize the backup settings within a container config.
For more in-depth information on the integration, check out the documentation.
We recently sat down with Jake Warner, Co-founder and CEO of Cycle, to dig a little deeper into the major cloud orchestration challenges today’s developers face. You can find Jake’s responses below, or you can check out a conversation between Jake and Elton Carneiro, Backblaze Director of Partnerships, on Jake’s podcast.
About Cycle
Cycle set out to become the most developer-friendly container orchestration platform. By simplifying the processes around container and infrastructure deployments, Cycle enables developers to spend more time building and less time managing. With automatic platform updates, standardized deployments, a powerful API, and bottleneck crushing automation—the platform empowers organizations to have the capabilities of an elite DevOps team at one-tenth the cost. Founded in 2015, the company is headquartered in Reno, NV. To learn more, please visit https://cycle.io.
A Q&A With Cycle
Q: Give us a background on Cycle and what problem you are trying to solve? What is the problem with existing infrastructure like Kubernetes and/or similar?
A: We believe that cloud orchestration, and more specifically, container orchestration, is broken. Instead of focusing on the most common use cases, too many companies within this space end up chasing a never-ending list of edge cases and features. This lack of focus yields overly complex, messy, and fragile deployments that cause more stress than peace-of-mind.
Cycle takes a bold approach on container orchestration: focus on the 80%. Most companies don’t require, or need, a majority of the features and capabilities that come with platforms like Kubernetes. By staying hyper-focused on where we spend our time, and prioritizing quality over quantity of features, the Cycle platform has become an incredibly stable and powerful foundation for companies of all sizes.
The goal for Cycle is simple: Be the most developer-friendly container platform for businesses.
We believe that developers should be able to easily utilize containers on their own infrastructure without having to deal with the mundane tasks commonly involved with managing infrastructure and orchestration platforms. Cycle makes that a reality.
Q: What are the major challenges developers face today with container orchestration?
Complexity. Most deployments today require piecing together a wide variety of different tools and technologies for even the most basic deployments. Instead of adopting solutions that empower development teams without increasing bloat, too many organizations are chasing hype and increasing their ever-growing pile of technical debt.
Additionally, most of today’s platforms require constant hand-holding. While there are many tools that help reduce the amount of time to get a first deployment online, we see a major drop-off when it comes to “day two operations.” What happens when there’s a new update, or security patch? How often are these updates released? How many developers/DevOps personnel are needed to apply these updates? How much downtime should be expected?
With Cycle, we reduce complexity by providing a single turnkey solution for developers—no extra tools required. Additionally, our platform is built around the idea that everything should be capable of automatically updating. On average, we deploy platform updates to our customer infrastructure once every 10-14 days.
Q: Before announcing our integration, had you implemented Backblaze internally? Could you expand on that?
Absolutely! In the early days of Cycle, we made the decision to standardize and flatten all container images into raw OCI images. This was our way of hedging against different technologies going through hype waves. At the time, Docker was the “top dog” in the container space but there was also CoreOS and a number of others.
In an effort to control as much of the vertical stack as possible, we decided that, beyond flattening images, we should also store the resulting images ourselves. This way, if Docker Hub or another container registry unexpectedly changed their APIs or pricing, our platform and users would be insulated from those changes. As you can see, we put a lot of thought into limiting external variables.
Given the above, we knew that having an infinitely scalable storage solution was critical for the platform. After testing a number of providers, Backblaze B2 was the perfect fit for our needs.
Fast-forward to today, where all base images are stored on Backblaze.
Q: As alluded to above, you’re currently building a customer-facing integration. What’s the new feature? Have customers been asking for this?
We’re excited to announce that Cycle now supports automatic backups for stateful containers. A number of customers have been requesting this feature for a while and we’re thrilled to finally release it.
At Cycle, data ownership is very important to us—our platform was built specifically to empower developers while ensuring they, and their employers, still retain full ownership and control of their data. This automated backups feature is no different. By associating a Backblaze B2 API Key with Cycle, organizations can maintain ownership of their backups.
Q: What sparked the decision to partner and integrate with Backblaze specifically?
While there are a number of reasons this partnership makes a ton of sense, narrowing it down to a top three would be:
Performance: As we were testing different Object Storage providers, Backblaze B2 routinely was one of the most reliable while also offering solid upload and download speeds. We also liked that Backblaze B2 wasn’t overly bloated with features—it had exactly what we needed.
Cost: As Cycle continues to grow, and our storage needs increase, it’s incredibly important to keep costs in check. Beyond predictable and transparent pricing, the base cost per terabyte of data is impressive.
Team: Working with the Backblaze team has been incredible. From our early conversations with Nilay, Backblaze’s VP of Sales, to the expanded conversations with much of the Backblaze team today, everyone has been super eager to help.
Q: Backblaze and Cycle share a similar vision in making life easier for developers. It goes beyond just dollars saved, though that is a bonus, but what is it about “simple” that is so important? Infrastructure of the future?
Good question! There are a number of different ways to answer this, but for the sake of not turning this into an essay, let’s focus purely on what we, the Cycle team, refer to as “think long term.”
Anyone can make a process complex, but it takes a truly focused effort to keep things simple. Rules and guidelines are needed. You need to be able to say “No” to certain feature requests and customer demands. To be able to provide a polished and clean experience, you have to be purposeful in what you’re building. Far too often, companies will chase short term wins while sacrificing long-term gains, but true innovation takes time. In a world where most tech companies are built off venture capital, long-term gambles and innovations are deprioritized.
From the way both Cycle and Backblaze have been funded, to a number of other aspects, we’ve both positioned our companies to take those long term risks and focus on simplifying otherwise complex processes. It’s part of our culture, it’s who we are as teams and organizations.
As we talk about developers, we see a common pattern. Developers always love testing new technologies, they enjoy getting into the weeds and tweaking all of the variables. But, as time goes on, developers shift away from “I want to control every variable” into more of a “I just want something that works and gets out of the way.” This is where Cycle and Backblaze both excel.
Q: What can we look forward to as this partnership matures? Anything exciting on the horizon for Cycle that you’d like to share?
We’re really looking forward to expanding our partnership with Backblaze as the Cycle platform continues to grow. Combining powerful container orchestration with a seamless object storage solution can empower developers to more easily build the next generation of products and services.
While we now host our base container images and customer backups on Backblaze, this is still just the start. We have a number of really exciting features launching in 2022 that’ll further strengthen the partnership between our companies and the value we can provide to developers around the world.
Interested in learning more about the developer solutions available with Backblaze B2 Cloud Storage? Join us, free, for Developer Day on October 21 for announcements, tech talks, lessons, SWAG, and more to help you understand how B2 Cloud Storage can work for you. Register today.
When we first published our Drive Stats data back in February 2015, we did it because it seemed like the Backblaze thing to do. We had previously open-sourced our Storage Pod designs, so publishing the Drive Stats data made sense for two reasons. The first was transparency. We were publishing our Drive Stats reports based on that data and we wanted people to trust the accuracy of those reports.
The second reason was that it gave people, many of whom are much more clever than us, the ability to play with the data, and that’s what they did. Over the years, the Drive Stats data has been used in projects ranging from training sets for college engineering and statistics students to being a source for scientific and academic papers and articles. In fact, using Google Scholar, you will find 105 papers and articles since 2018 where the Drive Stats data was cited as a source.
One of those papers is “Interpretable predictive maintenance for hard drives” by Maxime Amram et al., which describes methodology for predicting hard drive failure using various machine learning techniques. At the center of the research team’s analysis is the Drive Stats data, but before we dive into that paper, let’s take a minute or two to understand the data itself.
Join us for a live webinar on October 14th at 10 a.m. PST to hear directly from Daisy Zhuo, PhD, co-founding partner of Interpretable AI, and Drive Stats author, Andy Klein, as they discuss the findings from the research paper. Register today.
The Hard Drive Stats Data
Each day, we collect operational data from all of the drives in our data centers worldwide. There is one record per drive per day. As of September 30, 2021, there were over 191,000 drives reporting each day. In total, there are over 266 million records going back to April 2013, and each data record consists of basic drive information (model, serial number, etc.) and any SMART attributes reported by a given drive. There are 255 pairs of SMART attributes possible for each drive model, but only 20 to 40 are reported by any given drive model.
Example of Drive Stats data collected for each drive.
The data reported comes from each drive itself and the only fields we’ve added manually are the date and the “failure” status: zero for operational and one if the drive has failed and been removed from service.
Predicting Drive Failure
Using the SMART data to predict drive failure is not new. Drive manufacturers have been trying to use various drive-reported statistics to identify pending failure since the early 1990s. The challenge is multifold, as you need to be able to:
Determine a SMART attribute or group of attributes which predict failure is imminent in a given drive model.
Keep the false positive rate to a minimum.
Be able to test the hypothesis on a large enough data set with both failed and operational drives.
Even if you can find a combination of SMART attributes which fit the bill, you are faced with two other realities:
By the time you determine and test your hypothesis, is the drive model being tested still being manufactured?
Is the prediction really useful? For example, what is the value of an attribute that is 95% accurate at predicting failure, but only occurs in 1% of all failures.
The paper sets out to examine whether the application of algorithms for interpretable machine learning would provide meaningful insights about short-term and long-term drive health and accurately predict drive failure in the process.
Analysis of Backblaze and Google Methodologies
Backblaze (Beach/2014 and Klein/2016) and Google (Pinheiro et al./2007) analyzed SMART data they collected to determine drive failure in a population of hard drives. Each identified similar SMART attributes which correlated to some degree to drive failure:
5 (Reallocated Sectors Count).
187 (Reported Uncorrectable Errors).
188 (Command Timeout)—Backblaze only.
197 (Current Pending Sectors Count).
198 (Offline Uncorrectable Sectors Count).
Given that both were univariate analyses i.e., only considering correlation between drive failure and a single metric at a time, the results, while useful, left open the opportunity for validation using more advanced methods. That’s where machine learning comes in.
Predicting Long-term Drive Health
For their analysis in the paper, Interpretable AI focused on the Seagate 12TB drive, model: ST12000NM0007, for the period ending Q1 2020, and analyzed daily records of over 35,000 drives.
An overview of the methodology used by Interpretable AI to predict long-term drive health is as follows:
Compute the remaining useful life of each drive until failure for each drive, each day.
Use that data combined with the daily SMART data to train an Optimal Survival Tree that models how the remaining life of each drive is affected by the SMART values.
Each SMART attribute is represented by one node in the Optimal Survival Tree. Each node splits in two leaf nodes as determined by the analysis. Hard drives are recursively routed down the tree based on their SMART values, with the node value and hierarchy adjusting for each drive that passes through. The model learns the best values for each node as more drives pass through until all the drives are divided into collections which best represent their collective data. Below is the Optimal Decision Tree for predicting long-term health (“Interpretable predictive maintenance for hard drives,” Figure 3).
Optimal Survival Tree for predicting long-term health.
At the top of the tree is SMART 5 (raw value), which is deemed the most important SMART value to determine drive failure in this case, but it is not alone. Traveling down the branches of the tree, other SMART attributes become part of a given branch, adding or subtracting their value towards predicting drive health along the way. The analysis leads to some interesting results that univariate analysis cannot see:
Poor Drive Health: The path to Node 11 is the set of conditions (SMART attribute values) that if present, predicts the failure of the drive within 50 days.
Healthy Drives: The path to Node 18 is the set of conditions (SMART attribute values) that predicts that at least half of the drives that meet those conditions will not fail within two years.
Predicting Short-term Drive Health
The same methodology used on predicting long-term drive health is used for predicting short-term drive health as well. The difference is that for the short-term use case, only data for a 90-day period is used. In this case, this is the data from Q1 2020 for the same Seagate drives analyzed in the previous section. The goal is to determine the ability to predict hard drives failures 30, 60, and 90 days out.
The paper also discussed a second methodology which treats the analysis as a classification problem that occurs in a specific time window. The results are similar to the Optimal Survival Tree methodology for the period and as such, that methodology is not discussed here. Please refer to the paper for additional details.
Applying the Optimal Survival Tree methodology to the Q1 2020 data, we find that while SMART 5 is still the primary factor, the contribution of other SMART attributes has changed versus the long-term health process. For example, SMART 187 is more important, while SMART 197 has diminished in value so much that it is not considered important in assessing the short-term health of the drives. Below is the Optimal Decision Tree for predicting short-term health (“Interpretable predictive maintenance for hard drives,” Figure 6).
Optimal Survival Tree for predicting short-term health.
Traveling down the branches of the tree, we can once again see some interesting results that univariate analysis cannot see:
Poor Drive Health: Nodes 21 and 24 identify a set of conditions (SMART attribute values) that, if present, predict almost certain failure within 90 days.
Healthy Drives: Nodes 12 and 15 identify a set of conditions (SMART attribute values) that, if present, identify healthy drives with little chance of failure within 90 days.
How Much Data Do You Need?
One of the challenges we noted earlier with predicting drive failure was the amount of data needed to achieve the results. In predicting the long-term health of the drives, the Interpretable AI researchers first used three years of drive data. Once they determined their results, they reduced the data used to one year, 557,936 observations, and then randomly resampled 50,000 observations from that initial data set to train their model with the remainder used for testing.
The resulting Optimized Survival Tree was similar to that of the long-term health survival tree in that they were still able to identify nodes where accelerated failure was evident.
There have been many other papers attempting to apply machine learning techniques to predicting hard drive failure. The Interpretable paper was the focus of this post as I found their paper to be approachable and transparent, two traits I admire in writing. Those two traits are also defining characteristics of the word, “interpretable,” so there’s that. As for the other papers, a majority are able to predict drive failure at various levels of accuracy and confidence using a wide variety of techniques.
Hopefully it is obvious that predicting drive failure is possible, but will never be perfect. We at Backblaze don’t need it to be. If a drive fails in our environment, there are a multitude of backup strategies in place. We manage failure every day, but tools like those described in the Interpretable paper make our lives a little easier. On the flip side, if you trust your digital life to one hard drive or SSD, forget about predicting drive failure—assume it will happen today and back up your data somewhere, somehow before it does.
92% time savings. 71% storage cost savings. 3.7 times lower total cost than the competition.
These are just some of the findings Enterprise Strategy Group (ESG) reported in a proprietary, economic validation analysis of Backblaze B2 Cloud Storage. To develop these findings, the ESG analysts did their proverbial research. They talked to customers. They validated use cases. They used our product and verified the accuracy of our listed pricing and cost calculator. And then, they took those results along with the knowledge they’ve gathered over 20 years of experience to quantify the bonafide benefits that organizations can expect by using the Backblaze B2 Cloud Storage platform.
Their findings are now available to the public in the new ESG Economic Validation report, “Analyzing the Economic Benefits of the Backblaze B2 Cloud Storage Platform.”
ESG’s models predicted that the Backblaze B2 Cloud Storage platform will give users an expected total cost of cloud storage that is 3.7 times lower than alternative cloud storage providers, including:
Predicted savings of up to:
92% less time to manage data.
72% lower cost of storage.
91% lower cost of downloads and transactions.
89% lower cost of migration.
If you don’t have time to read the full report, the infographic below illustrates the key findings. Click on the image to see it in full size.
If you want to share this infographic on your site, copy the code below and paste into a Custom HTML block.
<div><div><strong>Analyst Firm Validates B2 Cloud Storage Platform’s Time and Budget Savings</strong></div><a href="https://www.backblaze.com/blog/analyst-firm-validates-b2-cloud-storage-platforms-time-and-budget-savings/"><img src="https://www.backblaze.com/blog/wp-content/uploads/2021/10/ESG-Infographic-scaled.jpg" border="0" alt="The Economic Value of Backblaze B2 Cloud Storage" title="The Economic Value of Backblaze B2 Cloud Storage" /></a></div>
The findings cut through the marketing noise to announce that by choosing Backblaze B2, customers benefit in both time and cost savings, and you don’t have to take it from us.
If that sounds like something you’d appreciate from a cloud partner, getting started couldn’t be easier. Sign up today to begin using Backblaze B2—your first 10GB are free.
If you’re already a B2 Cloud Storage customer—first, thank you! You can feel even more confident in your choice to work with Backblaze. Have a colleague or contact who you think would benefit from working with Backblaze, too? Feel free to share the report with your network.
Backblaze B2 Cloud Storage enables thousands of developers—from video streaming applications like Kanopy to gaming platforms like Nodecraft—to easily store and use data in the cloud. Those files are always available for download either through a browser-compatible URL or APIs.
Backblaze supports two different suites of APIs—the Backblaze B2 Native API and the Backblaze S3 Compatible API. Sometimes, folks come to our platform knowing exactly which API they need to use, but the differences between the two are not always immediately apparent. If you’re not sure which API is best for you and your project, we’re explaining the difference today.
B2 Native API vs. S3 Compatible API: What’s the Diff?
Put simply, an application programming interface, or API, is a set of protocols that lets one application or service talk to another. They typically include a list of operations or calls developers can use to interact with said application (inputs) and a description of what happens when those calls are used (outputs). Both the B2 Native and S3 Compatible APIs handle the same basic functions:
Bucket Management: Creating and managing the buckets that hold files.
Upload: Sending files to the cloud.
Download: Retrieving files from the cloud.
List: Data checking/selection/comparison.
The main difference between the two APIs is that they use different syntax for the various calls. We’ll dig into other key differences in more detail below.
The Backblaze B2 Native API
The B2 Native API is Backblaze’s custom API that enables you to interact with Backblaze B2 Cloud Storage. We’ve written in detail about why we developed our own custom API instead of just implementing an S3-compatible interface from the beginning. In a nutshell, we developed it so our customers could easily interact with our cloud while enabling Backblaze to offer cloud storage at a quarter of the price of S3.
To get started, simply create a Backblaze account and enable Backblaze B2. You’ll then get access to your Application Key and Application Key ID. These let you call the B2 Native API.
The Backblaze S3 Compatible API
Over the years since we launched Backblaze B2 and the B2 Native API, S3 compatibility was one of our most requested features. When S3 launched in 2006, it solved a persistent problem for developers—provisioning and maintaining storage hardware. Prior to S3, developers had to estimate how much storage hardware they would need for their applications very accurately or risk crashes from having too little or, on the flip side, paying too much as a result of over-provisioning storage for their needs. S3 gave them unlimited, scalable storage that eliminated the need to provision and buy hardware. For developers, the service was a game-changer, and in the years that followed, the S3 API essentially became industry standard for object storage.
In those years as well, other brands (That’s us!) entered the market. AWS was no longer the only game in town. Many customers wanted to move from Amazon S3 to Backblaze B2, but didn’t want to rewrite code that already worked with the S3 API.
The Backblaze S3 Compatible API does the same thing as the B2 Native API—it allows you to interact with B2 Cloud Storage—but it follows the S3 syntax. With the S3 Compatible API, if your application is already written to use the S3 API, B2 Cloud Storage will just work, with minimal code changes on your end. The launch of the S3 Compatible API provides developers with a number of benefits:
You don’t have to learn a new API.
You can use your existing tools that are written to the S3 API.
Performance will be just as good and you’ll get all the benefits of B2 Cloud Storage.
To get started, create a Backblaze account and head to the App Keys page. The Master Application Key will not be S3 compatible, so you’ll want to create a new key and key ID by clicking the “Add a New Application Key” button. Your new key and key ID will work with both the B2 Native API and S3 Compatible API. Just plug this information into your application to connect it to Backblaze B2.
Find the App Keys page in your Backblaze account to create your S3-compatible key and key ID.
If your existing tools are written to the S3 API—for example, tools like Cohesity, rclone, and Veeam—they’ll work automatically once you enter this information. Additionally, many tools—like Arq, Synology, and MSP360—were already integrated with Backblaze B2 via the B2 Native API, but now customers can choose to connect with them via either API suite.
B2 Native and S3 Compatible APIs: How Do They Compare?
Beyond the syntax, there are a few key differences between the B2 Native and Backblaze S3 Compatible APIs, including:
Key management.
SDKs.
Pre-signed URLs.
File uploads.
Key Management
Key management is unique to the B2 Native API. The S3 Compatible API does not support key management. With key management, you can create, delete, and list keys using the following calls:
b2_create_key
b2_delete_key
b2_list_keys
SDKs
Some of our Alliance Partners asked us if we had an SDK they could use. To answer that request, we developed an official Java SDK and Python SDK on GitHub so you can manage and configure your cloud resources via the B2 Native API.
Meanwhile, long-standing, open-sourced SDKs for S3 Compatible APIs are available in any language including Go, PHP, Javascript, Ruby, etc. These SDKs make it easy to integrate your application no matter what language it’s written in.
What Is an SDK?
SDK stands for software development kit. It is a set of software development tools, documentation, libraries, code snippets, and guides that come in one package developers can install. Developers use SDKs to build applications for the specific platform, programming language, or system the SDK serves.
Pre-signed URLs
By default, access to private buckets is restricted to the account owner. If you want to grant access to a specific object in that bucket to anyone else—for example, a user or a different application or service—they need proper authorization. The S3 Compatible API and the B2 Native API handle access to private buckets differently.
The S3 Compatible API handles authorization using pre-signed URLs. It requires the user to calculate a signature (code that says you are who you say you are) before sending the request. Using the URL, a user can either read an object, write an object, or update an existing object. The URL also contains specific parameters like limitations or expiration dates to manage their usage.
The S3 Compatible API supports pre-signed URLs for downloading and uploading. Pre-signed URLs are built into AWS SDKs. They can also be generated in a number of other ways including the AWS CLI and AWS Tools for PowerShell. You can find guides for configuring those tools here. Many integrations, for example, Cyberduck, also offer a simple share functionality that makes providing temporary access possible utilizing the underlying pre-signed URL.
The B2 Native API figures out the signature for you. Instead of a pre-signed URL, the B2 Native API requires an authorization token to be part of the API request itself. The b2_authorize_account request gets the authorization token that you can then use for account-level operations. If you only want to authorize downloads instead of all account-level operations, you can use the request b2_get_download_authorization to generate an authorization token, which can then be used in the URL to authenticate the request.
Uploading Files
With the S3 Compatible API, you upload files to a static URL that never changes. Our servers automatically pick the best route for you that delivers the best possible performance on our backend.
The B2 Native API requires a separate call to get an upload URL. This URL can be used until it goes stale (i.e. returns a 50X error), at which point another upload URL must be requested. In the event of a 50X error, you simply need to retry the request with the new URL. The S3 Compatible API does this for you in the background on our servers, which makes the experience of using the S3 Compatible API smoother.
This difference in the upload process is what enabled Backblaze B2 to offer substantially lower prices at the expense of a little bit more complexity. You can read more about that here.
Try It Out for Yourself
So, which API should you use? In a nutshell, if your app is already written to work with S3, if you’re using tools that are written to S3, or if you’re just unsure, the S3 Compatible API is a good choice. If you’re looking for more control over access and key management, the B2 Native API is the way to go. Either way, now that you understand the differences between the two APIs you can use to work with B2 Cloud Storage, you can align your use cases to the functionality that best suits them and get started with the API that works best for you.
If you’re ready to try out the B2 Native or S3 Compatible APIs for yourself, check out our documentation:
Of course, if you have any questions, fire away in the comments or reach out to our Sales team. And if you’re interested in trying Backblaze, get started today and your first 10GB of storage are free.
Solid-state drives (SSDs) continue to become more and more a part of the data storage landscape. And while our SSD 101 series has covered topics like upgrading, troubleshooting, and recycling your SSDs, we’d like to test one of the more popular declarations from SSD proponents: that SSDs fail much less often than our old friend, the hard disk drive (HDD). This statement is generally attributed to SSDs having no moving parts and is supported by vendor proclamations and murky mean time between failure (MTBF) computations. All of that is fine for SSD marketing purposes, but for comparing failure rates, we prefer the Drive Stats way: direct comparison. Let’s get started.
What Does Drive Failure Look Like for SSDs and HDDs?
In our quarterly Drive Stats reports, we define hard drive failure as either reactive, meaning the drive is no longer operational, or proactive, meaning we believe that drive failure is imminent. For hard drives, much of the data we use to determine a proactive failure comes from the SMART stats we monitor that are reported by the drive.
SMART, or S.M.A.R.T., stands for Self-monitoring, Analysis, and Reporting Technology and is a monitoring system included in HDDs and SSDs. The primary function of SMART is to report on various indicators related to drive reliability with the intent being to anticipate drive failures. Backblaze records the SMART attributes for every data and boot drive in operation each day.
As with HDDs, we also record and monitor SMART stats for SSD drives. Different SSD models report different SMART stats, with some overlap. To date, we record 31 SMART stats attributes related to SSDs. 25 are listed below.
#
Description
#
Description
1
Read Error Rate
194
Temperature Celsius
5
Reallocated Sectors Count
195
Hardware ECC Recovered
9
Power-on Hours
198
Uncorrectable Sector Count
12
Power Cycle Count
199
UltraDMA CRC Error Count
13
Soft Read Error Rate
201
Soft Read Error Rate
173
SSD Wear Leveling Count
202
Data Address Mark Errors
174
Unexpected Power Loss Count
231
Life Left
177
Wear Range Delta
232
Endurance Remaining
179
Used Reserved Block Count Total
233
Media Wearout Indicator
180
Unused Reserved Block Count Total
235
Good Block Count
181
Program Fail Count Total
241
Total LBAs Written
182
Erase Fail Count
242
Total LBAs Read
192
Unsafe Shutdown Count
For the remaining six (16, 17, 168, 170, 218, and 245), we are unable to find their definitions. Please reach out in the comments if you can shed any light on the missing attributes.
All that said, we are just at the beginning of using SMART stats to proactively fail a SSD. Many of the attributes cited are drive model or vendor dependent. In addition, as you’ll see, there are a limited number of SSD failures. This limits the amount of data we have for research. As we add and monitor more SSDs to our farm, we intend on building out our rules for proactive SSD drive failure. In the meantime, all of the SSDs which have failed to date are reactive failures, that is: They just stopped working.
Comparing Apples to Apples
In the Backblaze data centers, we use both SSDs and HDDs as boot drives in our storage servers. In our case, describing these drives as boot drives is a misnomer as boot drives are also used to store log files for system access, diagnostics, and more. In other words, these boot drives are regularly reading, writing, and deleting files in addition to their named function of booting a server at startup.
In our first storage servers, we used hard drives as boot drives as they were inexpensive and served the purpose. This continued until mid-2018 when we were able to buy 200GB SSDs for about $50, which was our top-end price point for boot drives for each storage server. It was an experiment, but things worked out so well that beginning in mid-2018 we switched to only using SSDs in new storage servers and replaced failed HDD boot drives with SSDs as well.
What we have are two groups of drives, SSDs and HDDs, which perform the same functions, have the same workload, and operate in the same environment over time. So naturally, we decided to compare the failure rates of the SSD and HDD boot drives. Below are the lifetime failure rates for each cohort as of Q2 2021.
SSDs Win… Wait, Not So Fast!
It’s over, SSDs win. It’s time to turn your hard drives into bookends and doorstops and buy SSDs. Although, before you start playing dominoes with your hard drives, there are a couple of things to consider which go beyond the face value of the table above: average age and drive days.
The average age of the SSD drives is 14.2 months, and the average age of the HDD drives is 52.4 months.
The oldest SSD drives are about 33 months old and the youngest HDD drives are 27 months old.
Basically, the timelines for the average age of the SSDs and HDDs don’t overlap very much. The HDDs are, on average, more than three years older than the SSDs. This places each cohort at very different points in their lifecycle. If you subscribe to the idea that drives fail more often as they get older, you might want to delay your HDD shredding party for just a bit.
By the way, we’ll be publishing a post in a couple of weeks on how well drive failure rates fit the bathtub curve; SPOILER ALERT: old drives fail a lot.
The other factor we listed was drive days, the number of days all the drives in each cohort have been in operation without failing. The wide disparity in drive days causes a big difference in the confidence intervals of the two cohorts as the number of observations (i.e. drive days) varies significantly.
To create a more accurate comparison, we can attempt to control for the average age and drive days in our analysis. To do this, we can take the HDD cohort back in time in our records to see where the average age and drive days are similar to those of the SDDs from Q2 2021. That would allow us to compare each cohort at the same time in their life cycles.
Turning back the clock on the HDDs, we find that using the HDD data from Q4 2016, we were able to create the following comparison.
Suddenly, the annualized failure rate (AFR) difference between SSDs and HDDs is not so massive. In fact, each drive type is within the other’s 95% confidence interval window. That window is fairly wide (plus or minus 0.5%) because of the relatively small number of drive days.
Where does that leave us? We have some evidence that when both types of drives are young (14 months on average in this case), the SSDs fail less often, but not by much. But you don’t buy a drive to last 14 months, you want it to last years. What do we know about that?
Failure Rates Over Time
We have data for HDD boot drives that go back to 2013 and for SSD boot drives going back to 2018. The chart below is the lifetime AFR for each drive type through Q2 2021.
As the graph shows, beginning in 2018, the HDD boot drive failure rate accelerated. This continued in 2019 and 2020 before leveling off in 2021 (so far). To state the obvious, as the age of the HDD boot drive fleet increased, so did the failure rate.
One point of interest is the similarity in the two curves through their first four data points. For the HDD cohort, year five (2018) was where the failure rate acceleration began. Is the same fate awaiting our SSDs as they age? While we can expect some increase in the AFR as the SSD age, will it be as dramatic as the HDD line?
Decision Time: SSD or HDD
Where does that leave us in choosing between buying a SSD or a HDD? Given what we know to date, using the failure rate as a factor in your decision is questionable. Once we controlled for age and drive days, the two drive types were similar and the difference was certainly not enough by itself to justify the extra cost of purchasing a SSD versus a HDD. At this point, you are better off deciding based on other factors: cost, speed required, electricity, form factor requirements, and so on.
Over the next couple of years, as we get a better idea of SSD failure rates, we will be able to decide whether or not to add the AFR to the SSD versus HDD buying guide checklist. Until then, we look forward to continued debate.
Join us for our inaugural Backblaze Developer Day on October 21st. This event is jam-packed with announcements, tech talks, lessons, SWAG, and more to help you understand how Backblaze B2 Cloud Storage can work for you. And it’s free, the good news just keeps coming.
What’s New: Learn about brand new and recent partner alliances and integrations to serve more of your development needs.
Tour With Some Legends: Join Co-founder and CTO, Brian Wilson, and our Director of Evangelism, Andy Klein (of Drive Stats fame), for a decidedly unscripted, sure-to-be unexpected tour through the B2 Cloud Storage architecture, including APIs, SDKs, and CLI.
How to Put It Together: Get a rapid demo on one of our popular B2 Cloud Storage + compute + CDN combinations to meet functionality that will free your budget and your tech to do more.
A Panel on Tomorrow’s Development: The sunset of monolithic, closed ecosystems is here, so join us to discuss the future of microservices and interoperability.
What Comes Next: Finally, hear what’s next on the B2 Cloud Storage roadmap—and tell our head of product what you think should come next.
And so much more: We’ll be posting updates on partners and friends that will be joining us, as well as information about getting SWAG from the inaugural Backblaze Developer Day. Keep an eye on this space… So register today for free to grab your spot and we’ll see you on October 21st.
According to the latest State of Ransomware report from security firm Sophos, most organizations (73%) use backups to recover from a ransomware attack. In fact, only 4% of victims who paid ransoms actually got all of their data back, so companies are likely using backups to recover after attacks whether they pay ransoms or not.
Still, Sophos found that it took ransomware victims a month on average to recover from an attack. The lesson here: Backups are vital as part of a disaster recovery plan, but the actual “recovery”—how you get your business back online using that backup data—is just as important. Few businesses can survive the hit of weeks or months spent offline.
If you use Veeam to manage backups, recovering from ransomware is a whole lot easier. Using Backblaze Instant Recovery in Any Cloud, you can consider your disaster recovery playbook complete.
Enter: Backblaze Instant Recovery in Any Cloud
Backblaze Instant Recovery in Any Cloud is an infrastructure as code (IaC) package that makes ransomware recovery into a VMware/Hyper-V based cloud easy to plan for and execute.
Disaster recovery and business continuity planning typically elude otherwise savvy IT teams for one of two reasons:
The lift of recovery planning is put on the back burner by more immediate demands.
Disaster recovery solutions aren’t rightsized for your business.
With Instant Recovery in Any Cloud, businesses have an easy, flexible path to as-soon-as-possible disaster recovery, putting fast, affordable disaster recovery within reach for any IT team.
You can run a single command using an industry-standard automation tool to quickly bring up an orchestrated combination of on-demand servers, firewalls, networking, storage, and other infrastructure in phoenixNAP. The command draws data from Veeam® Backup & Replication backups immediately to your VMware/Hyper-V based environment, so businesses can get back online with minimal disruption or expense. Put simply, it’s an on-demand path to a rock solid disaster recovery plan that makes recovery planning accessible and appropriately provisioned for your business.
We’ll explain the why and how of this solution below.
“Most businesses know that backing up is critical for disaster recovery. But we see time and again that organizations under duress struggle with getting their systems back online, and that’s why Backblaze’s new solution can be a game changer.”
—Mark Potter, CISO, Backblaze
From 3-2-1 to Immutable Backups to Disaster Recovery
For many years, the 3-2-1 backup strategy was the gold standard for data protection, and its core principles remain true—keep multiple copies of data, maintain on-site copies for fast restores, and keep off-site copies for disaster recovery. However, bad actors have become much more sophisticated, targeting not just production data but backups as well.
The introduction of Object Lock functionality allowed businesses to protect their cloud backups from ransomware by making them immutable, meaning even the administrator who set the lock can’t modify, encrypt, or delete files. With immutable backups, you can access a working, uncorrupted copy of your data in case of an attack.
But implementing immutable backups is only the first step. The critical second step is using that data to get your business back up and running. The time to get back to business after an attack often depends on how quickly backup data can be brought online—more than any other factor. That’s what makes disaster recovery planning so important, even though it’s one of those tasks that often gets put off when you’re putting out the next fire.
“For more than 400,000 Veeam customers, flexibility around disaster recovery options is essential. They need to know not only that their backups are safe, but that they’re practically usable in their time of need. We’re very happy to see Backblaze offering instant restore for all backups to VMware and Hyper-V based cloud offerings to help our joint customers thrive during challenging times.”
—Andreas Neufert, Vice President of Product Management, Alliances, Veeam.
Disaster Recovery That Fits Your Needs
If you’ve done any research into disaster recovery planning services, you’ve probably noticed that most plans are built for enterprise customers with enterprise budgets. You typically pay for compute functionality on an ongoing basis so you can quickly spin up a server in case of an attack. Those compute servers essentially sit idle as an “insurance policy.” Instant Recovery in Any Cloud opens disaster recovery to a huge number of businesses that were left without affordable solutions.
Instead of paying for compute servers you’re not using, Backblaze Instant Recovery in Any Cloud allows you to provision compute power on demand in a VMware and Hyper-V based cloud. The capacity is always there from Backblaze and phoenixNAP, but you don’t pay for it until you need it.
You can also spin up a server in any compute environment you prefer, allowing you to implement a multi-cloud, vendor-agnostic disaster recovery approach rather than relying on just one platform or vendor. The solution is written to work with phoenixNAP, and can be customized for other compute providers without difficulty.
Finally, because the recovery is entirely cloud based, you can execute your recovery plan from anywhere you’re able to access your accounts. Even if your whole network is down, you can still get your recovery plan rolling.
For busy IT teams, this is essentially a cut and paste setup—an incredibly small amount of work to architect a recovery plan.
How It Works and What You Need
Instant Recovery in Any Cloud works through a pre-built code package your staff can use to create a digital mirror image of your on-premises infrastructure. The code package is built in Ansible, an open-source tool which enables IaC. Running an Ansible playbook allows you to provision and configure infrastructure and deploy applications as needed. All components are pre-configured within the script. In order to get started, you can find the appropriate instructions on our GitHub page.
If you haven’t already, you also need to set up Backblaze B2 Cloud Storage as part of a Scale-out Backup Repository with Immutability in Veeam using the Backblaze S3 Compatible API, and your data needs to be backed up securely before deploying the command.
If you follow the latest ransomware developments, you know disaster recovery is something your business needs now more than ever. With tools like Object Lock and Backblaze Instant Recovery in Any Cloud, it doesn’t have to be complicated and costly. Protect your backups with Object Lock immutability, and keep the Ansible playbook and instructions on hand as part of a bigger ransomware recovery plan so that you’re ready in the event of an attack. Simply spin up servers and restore backups in a safe environment to minimize disruption to your business.
For as often as the terms multi-cloud and hybrid cloud get misused, it’s no wonder the concepts put a lot of very smart heads in a spin. The differences between a hybrid cloud and a multi-cloud strategy are simple, but choosing between the two models can have big implications for your business.
In this post, we’ll explain the difference between hybrid cloud and multi-cloud, describe some common use cases, and walk through some ways to get the most out of your cloud deployment.
What’s the Diff: Hybrid Cloud vs. Multi-cloud
Both hybrid cloud and multi-cloud strategies spread data over, you guessed it, multiple clouds. The difference lies in the type of cloud environments—public or private—used to do so. To understand the difference between hybrid cloud and multi-cloud, you first need to understand the differences between the two types of cloud environments.
A public cloud is operated by a third party vendor that sells data center resources to multiple customers over the internet. Much like renting an apartment in a high rise, tenants rent computing space and benefit from not having to worry about upkeep and maintenance of computing infrastructure. In a public cloud, your data may be on the same server as another customer, but it’s virtually separated from other customers’ data by the public cloud’s software layer. Companies like Amazon, Microsoft, Google, and us here at Backblaze are considered public cloud providers.
A private cloud, on the other hand, is akin to buying a house. In a private cloud environment, a business or organization typically owns and maintains all the infrastructure, hardware, and software to run a cloud on a private network.
Private clouds are usually built on-premises, but can be maintained off-site at a shared data center. You may be thinking, “Wait a second, that sounds a lot like a public cloud.” You’re not wrong. The key difference is that, even if your private cloud infrastructure is physically located off-site in a data center, the infrastructure is dedicated solely to you and typically protected behind your company’s firewall.
What Is Hybrid Cloud Storage?
A hybrid cloud strategy uses a private cloud and public cloud in combination. Most organizations that want to move to the cloud get started with a hybrid cloud deployment. They can move some data to the cloud without abandoning on-premises infrastructure right away.
A hybrid cloud deployment also works well for companies in industries where data security is governed by industry regulations. For example, the banking and financial industry has specific requirements for network controls, audits, retention, and oversight. A bank may keep sensitive, regulated data on a private cloud and low-risk data on a public cloud environment in a hybrid cloud strategy. Like financial services, health care providers also handle significant amounts of sensitive data and are subject to regulations like the Health Insurance Portability and Accountability Act (HIPAA), which requires various security safeguards where a hybrid cloud is ideal.
A hybrid cloud model also suits companies or departments with data-heavy workloads like media and entertainment. They can take advantage of high-speed, on-premises infrastructure to get fast access to large media files and store data that doesn’t need to be accessed as frequently—archives and backups, for example—with a scalable, low-cost public cloud provider.
Hybrid Cloud
What Is Multi-cloud Storage?
A multi-cloud strategy uses two or more public clouds in combination. A multi-cloud strategy works well for companies that want to avoid vendor lock-in or achieve data redundancy in a failover scenario. If one cloud provider experiences an outage, they can fall back on a second cloud provider.
Companies with operations in countries that have data residency laws also use multi-cloud strategies to meet regulatory requirements. They can run applications and store data in clouds that are located in specific geographic regions.
Whether you use hybrid cloud storage or multi-cloud storage, it’s vital to manage your cloud deployment efficiently and manage costs. To get the most out of your cloud strategy, we recommend the following:
Know your cost drivers. Cost management is one of the biggest challenges to a successful cloud strategy. Start by understanding the critical elements of your cloud bill. Track cloud usage from the beginning to validate costs against cloud invoices. And look for exceptions to historical trends (e.g., identify departments with a sudden spike in cloud storage usage and find out why they are creating and storing more data).
Identify low-latency requirements. Cloud data storage requires transmitting data between your location and the cloud provider. While cloud storage has come a long way in terms of speed, the physical distance can still lead to latency. The average professional who relies on email, spreadsheets, and presentations may never notice high latency. However, a few groups in your company may require low latency data storage (e.g., HD video editing). For those groups, it may be helpful to use a hybrid cloud approach.
Optimize your storage. If you use cloud storage for backup and records retention, your data consumption may rise significantly over time. Create a plan to regularly clean your data to make sure data is being correctly deleted when it is no longer needed.
Prioritize security. Investing up-front time and effort in a cloud security configuration pays off. At a minimum, review cloud provider-specific training resources. In addition, make sure you apply traditional access management principles (e.g., deleting inactive user accounts after a defined period) to manage your risks.
How to Choose a Cloud Strategy
To decide between hybrid cloud storage and multi-cloud storage, consider the following questions:
Low latency needs. Does your business need low latency capabilities? If so, a hybrid cloud solution may be best.
Geographical considerations. Does your company have offices in multiple locations and countries with data residency regulations? In that case, a multi-cloud storage strategy with data centers in several countries may be helpful.
Regulatory concerns. If there are industry-specific requirements for data retention and storage, these requirements may not be fulfilled equally by all cloud providers. Ask the provider how exactly they help you meet these requirements.
Cost management. Pay close attention to pricing tiers at the outset, and ask the provider what tools, reports, and other resources they provide to keep costs well managed.
Still wondering what type of cloud strategy is right for you? Ask away in the comments.
Storage technology has certainly changed over time, with new storage mediums taking aim at what’s become the industry standard: the hard disk drive (HDD). Of all the challengers, solid state drives (SSDs) are the most widely-adopted and likely to take the top spot—they’re fast, quiet, and retain information when they’re powered off (so you can just pop open your laptop and get back in the groove).
Yes, they’re more expensive than traditional hard disk drives, but there’s value in their much faster read/write speeds, and they’re arguably more reliable depending on your use case in the long term. Even with those benefits, that’s not to say HDDs are obsolete, just that there is good reason to upgrade to SSDs in many cases. The decision from the judges: These two contenders get to share the spotlight, and you get to decide which drive works best for your needs.
Once you’ve made the decision to invest in an SSD, you’ll have to choose the form factor and possibly the interface. In this post we’ll cover some basics about SSDs that should help you choose which type of SSD is best for you, including:
What is an SSD?
What is a SATA SSD?
What is an M.2 SSD?
What is an MSATA SSD?
What is an U.2 SSD?
What is an NVMe SSD?
Which SSD is right for you?
A Brief Introduction to SSDs
SSDs are storage devices that use NAND-based flash memory to store data. They are now standard issue for most computers, as is the case across Apple’s line of Macs. Unlike traditional hard disk drives (HDDs), which store data on spinning disks, SSDs have no moving parts, which makes them faster, more reliable, and less prone to mechanical failures.
SSDs have become so common mainly because they are faster in terms of read/write speeds versus hard drives. This means that they can access and transfer data much more quickly. This makes them an ideal choice for use in high-performance computers, servers, and other devices that require fast data access and transfer speeds. They also use less power and are available at different form factors, such as 2.5” and M.2, so they can be used in a range of devices. You can read more about the difference between SSDs and HDDs in this post.
One downside of SSDs is that they tend to be more expensive than HDDs, especially when it comes to larger storage capacities. However, as the cost of flash memory continues to decrease, SSDs are becoming more affordable and accessible for everyday consumers. Comparatively speaking, they also have a more limited write cycle. While you usually don’t run into this limitation as a typical computer user, if you’re constantly saving large files like you would if you’re working with media files, for instance, it’s something to consider.
Additionally, it can be harder to tell when an SSD is failing (no spinning disks to whir furiously at you), which means you’ll want to make sure you’re effectively monitoring your drives and backing up.
What Is a SATA SSD?
A Serial Advanced Technology Attachment (SATA) is the standard storage interface used in many computers. A SATA SSD is an SSD equipped with a SATA interface to connect the storage device to a computer’s motherboard. The SATA SSD comes in the standard 2.5 inch form factor and has both power and data (SATA) connectors. If you buy an SSD external drive to connect to your PC, there will most likely be a SATA SSD inside.
Generally, the SATA SSD is the least expensive type of SSD, all other factors being equal. This makes a great choice to get an instant performance boost out of your HDD-based computer, or add an external drive that can read and write data more quickly.
One thing to know about external SSD drives is that they should not be disconnected from your computer and stored away for long periods of time. Anything over a year is too long, and as the drive gets older it needs to be plugged in even more often. If you do want to use your SSD for long-term archival storage and have it disconnected from your main devices (air gap, anyone?), then it’s a good idea to either store them with about 50% charge, or power on the SSD every few months to refresh the charge.
What Is an NVMe?
Non-Volatile Memory Express (NVMe) is a storage protocol that offers high-speed and efficient communication between a computer’s CPU and SSDs. Drives that use NVMe were introduced in 2013 to attach to the Peripheral Component Interconnect Express (PCIe) slot directly on a motherboard instead of using the traditional SATA interface typically used by HDDs and older SSDs. Unlike SATA, which was originally designed for slower HDDs, NVMe takes advantage of the low-latency and high-speed capabilities of SSDs. NVMe drives can usually deliver a sustained read-write speed of 4.0 GB/s in contrast with SATA SSDs that limit at 600 MB/s. Since NVMe SSDs can reach higher speeds and handle multiple data transfers simultaneously, it makes them ideal for gaming, high-resolution video editing, and applications that require high-performance storage, such as enterprise databases, virtualization, and data analytics.
Their high speeds come at a high cost, however: NVMe drives are some of the more expensive drives on the market.
To sum up our analysis on storage protocols in SSDs, here’s a handy chart:
Feature
SATA
NVMe
Interface
Serial Advancement Technology Attachment
Non-Volatile Memory Express
Bus
SATA bus
PCIe bus
Data Transfer Speeds
Slower (up to 600 MB/s)
Faster (typically 3000 MB/s and up to 7,500 MB/s)
Latency
Higher
Lower
Scalability
Limited
Scalable
What Are M.2 Drives?
M.2 drives, also known as Next Generation Form Factor (NGFF) drives, are a type of SSD that uses the M.2 interface to connect directly into a computer’s motherboard without the need for cables. M.2 is a form factor, which refers to the standard size of a component. So, while we’re comparing NVMe to SATA in storage protocol above, a direct comparison for the M.2 SSD is a traditional, 2.5 inch SSD.
M.2 SSDs are significantly smaller than traditional, 2.5 inch SSDs. Because they can use either SATA or NVMe to connect to the motherboard, they have the potential to be much faster when they’re utilizing the latter. They’re also more power-efficient than other types of SSDs, which improves battery life in portable devices. Because they take up less space while delivering all of the above, M.2 drives have become popular in gaming setups. (Game on, friends.)
Even at this smaller size, M.2 SSDs are able to hold as much data as other SSDs, ranging up to 8TB in storage size. But, while they can hold just as much data and are generally faster than other SSDs, they also come at a higher cost. As the old adage goes, you can only have two of the following things: cheap, fast, or good.
M.2 drives are easy to install, and they can be added to most modern motherboards that have an M.2 slot. If your motherboard does not have an M.2 slot, you may be able to use an M.2 drive by using an adapter card that fits into a PCIe slot. So, before you run out and buy an M.2 SSD, you’ll need to know which interface your computer will accept, M.2 SATA or M.2 PCIe.
What Are mSATA Drives?
mSATA, or mini-SATA, is basically a smaller version of the full-size SATA SSD that is designed for smaller form factor systems where space is limited. The mSATA form factor is compact like M.2, but they are not interchangeable. Currently, mSATA drives only support the SATA interface.
What Are U.2 Drives?
U.2 drives look like a 2.5” drive but are a bit thicker, and they use a different connector that sends data through a PCIe interface. The U.2 SSD was developed to enable the newer and faster NVMe-based PCIe SSDs to plug into the same drive backplane as older SAS and SATA drives. This allows the drives to be hot-swappable, an especially useful feature in enterprise server and storage systems.
Which SSD Is Best to Use?
There are a few factors to consider in choosing which drive is best for you. As you compare the different components of your build, consider your technical constraints, budget, capacity needs, and speed priority.
Technical Constraints
Check the capability of your system before choosing a drive, as some older devices don’t have the components needed for NVMe connections. Also, check that you have enough PCIe connections to support multiple PCIe devices. Not enough lanes, or only specific lanes, means you may have to choose a different drive or that only one of your lanes will be able to connect to the NVMe drive at full speed.
The same advice holds if you’re adding an SSD to your NAS array. Most newer models will be compatible with adding an SSD, but you should always double check your NAS specs before you commit to a purchase. And remember: even though SSDs offer many benefits, especially when you’re looking to add caching or using your NAS for media workflows, there are several use cases where you’d see minimal advantage compared with an HDD, such as if you want a NAS to store large amounts of infrequently accessed files (i.e. in backup/archive scenarios).
Budget
If you plan to be making a lot of large file transfers or want to have the highest speeds for gaming, then an NVMe SSD is what you want. Until recently SATA SSDs were much more affordable options compared with NVMe drives, but that is changing rapidly. For example, at the time of publication, a Samsung 1TB SATA SSD (870 EVO) retails for $990 on Amazon, while a Samsung 1TB NVMe drive (970 EVO) is listed for $150only $98 on sale on Amazon. That said, those 8TB NVMe drives we talked about are running about $850+, depending on the manufacturer.
Drive Capacity
SATA drives usually range from 500GB to 16TB in storage capacity. Most M.2 drives top out at 2TB, although some may be available at 4TB and 8TB models at much higher prices.
Drive Speed
When choosing the right drive for your setup, remember that SATA M.2 drives and 2.5 inch SSDs provide the same level of speed, so to gain a performance increase, you will have to opt for the NVMe-connected drives. While NVMe SSDs are going to be much faster than SATA drives, you may also need to upgrade your processor to keep up or you may experience worse performance. Finally, remember to check read and write speeds on a drive as some earlier generations of NVMe drives can have different speeds.
Whatever You Choose, Back It Up
Before choosing a new drive, remember to back up all of your data. Backing up is essential as every drive will eventually fail and need to be replaced. The basis of a solid backup plan requires three copies of your data: one on your device, one backup saved locally, and one stored off-site. Storing a copy of your data in the cloud ensures that you’re able to retrieve it if any data loss occurs on your device.
Interested in learning more about other drive types or best ways to optimize your setup? Let us know in the comments below.
FAQs about NVMe vs. M.2 drives
What is the difference between NVMe and M.2 drives?
NVMe and M.2 are often used interchangeably, but they refer to different aspects of storage technology. Non-Volatile Memory Express (NVMe) drives attach to the Peripheral Component Interconnect Express (PCIe) slot directly on a motherboard instead of using the traditional SATA interface, resulting in higher data transfer speeds. M.2, on the other hand, is a physical form factor or connector used for SSDs. M.2 drives can support various storage interfaces, including NVMe, SATA, and others, providing flexibility in terms of compatibility and speed.
Which is faster, NVMe or M.2 drives?
NVMe and M.2 drives are not directly comparable in terms of speed because they refer to different aspects of storage technology. NVMe (Non-Volatile Memory Express) is a storage protocol that provides high-speed communication between the computer’s CPU and SSDs. It is designed to take full advantage of the capabilities of SSDs and can offer significantly faster data transfer speeds compared to traditional interfaces like SATA.
M.2, on the other hand, refers to a physical form factor or connector used for storage devices, including SSDs. M.2 drives can support various interfaces, including NVMe, SATA, and others. The speed of an M.2 drive depends on the specific interface it uses. NVMe M.2 drives, which utilize the NVMe protocol, can provide faster speeds compared to M.2 drives that use the SATA interface.
In summary, NVMe is a storage protocol that can be implemented in various form factors, including M.2, and NVMe drives tend to offer faster speeds compared to M.2 drives that utilize the SATA interface.
Can NVMe be used in any M.2 slot?
NVMe drives can generally be used in M.2 slots, but it is important to ensure compatibility with the specific M.2 slot on your motherboard. M.2 slots can support different types of interfaces, including SATA and NVMe.
What are the advantages of NVMe in M.2 drives?
NVMe (Non-Volatile Memory Express) is a storage protocol that can be implemented through various form factors, one of which is M.2.
The main advantage of NVMe technology is its high-speed data transfer capabilities. Compared to traditional storage interfaces like SATA, NVMe provides significantly faster performance. It leverages the Peripheral Component Interconnect Express (PCIe) interface, allowing for direct communication between the CPU and the SSD. This results in reduced latency and improved overall system responsiveness.
M.2, on the other hand, is a physical form factor or connector that can support various interfaces, including SATA and NVMe. M.2 drives can accommodate NVMe SSDs, allowing them to take advantage of the faster speeds provided by the NVMe protocol. In addition to the ability to utilize a faster NVMe protocol, the advantages of an M.2 size are its small size and easy direct-to-motherboard installation.
Are NVMe drives more expensive than SATA drives?
Until recently SATA SSDs were much more affordable options compared with NVMe drives, but that is changing rapidly. For example, as of June 2023, a Samsung 1TB SATA SSD (870 EVO) retails for $90 on Amazon, while a Samsung 1TB NVMe drive (970 EVO) is listed for only $98 on sale on Amazon. Prices are now comparable.
To provide the best experiences, we use technologies like cookies to store and/or access device information. Consenting to these technologies will allow us to process data such as browsing behavior or unique IDs on this site. Not consenting or withdrawing consent, may adversely affect certain features and functions.
Functional
Always active
The technical storage or access is strictly necessary for the legitimate purpose of enabling the use of a specific service explicitly requested by the subscriber or user, or for the sole purpose of carrying out the transmission of a communication over an electronic communications network.
Preferences
The technical storage or access is necessary for the legitimate purpose of storing preferences that are not requested by the subscriber or user.
Statistics
The technical storage or access that is used exclusively for statistical purposes.The technical storage or access that is used exclusively for anonymous statistical purposes. Without a subpoena, voluntary compliance on the part of your Internet Service Provider, or additional records from a third party, information stored or retrieved for this purpose alone cannot usually be used to identify you.
Marketing
The technical storage or access is required to create user profiles to send advertising, or to track the user on a website or across several websites for similar marketing purposes.
 to greatly reduce the development effort.
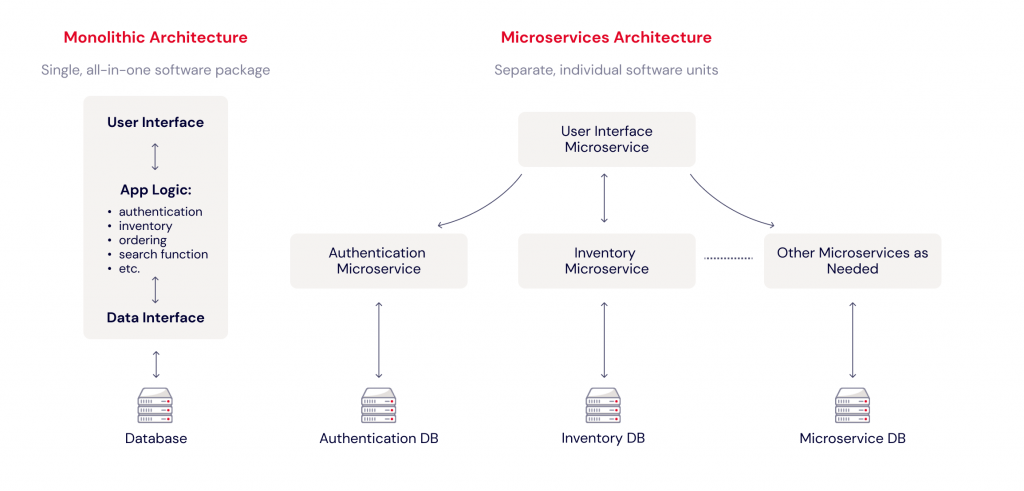

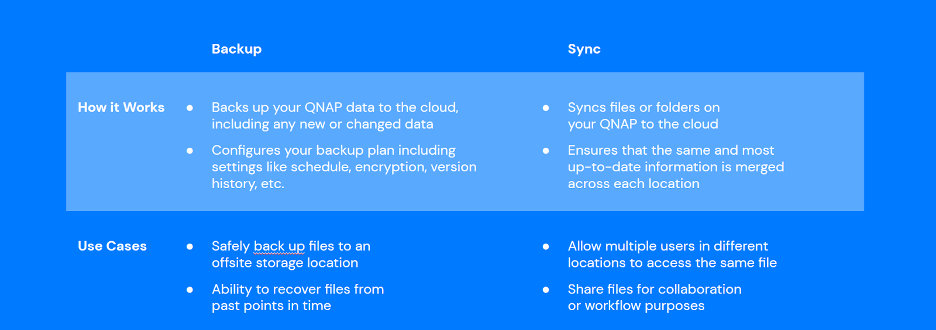
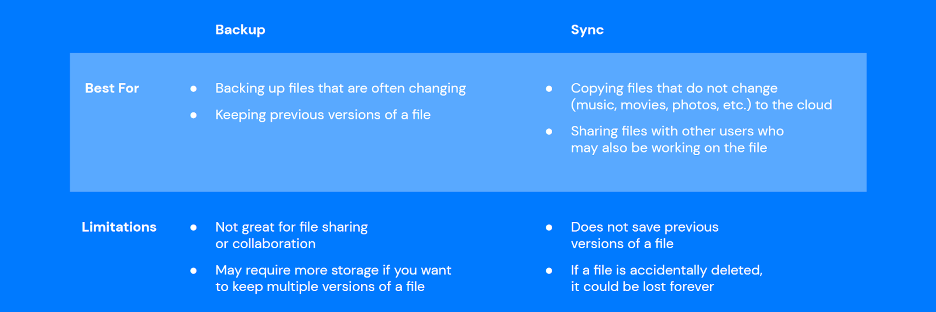

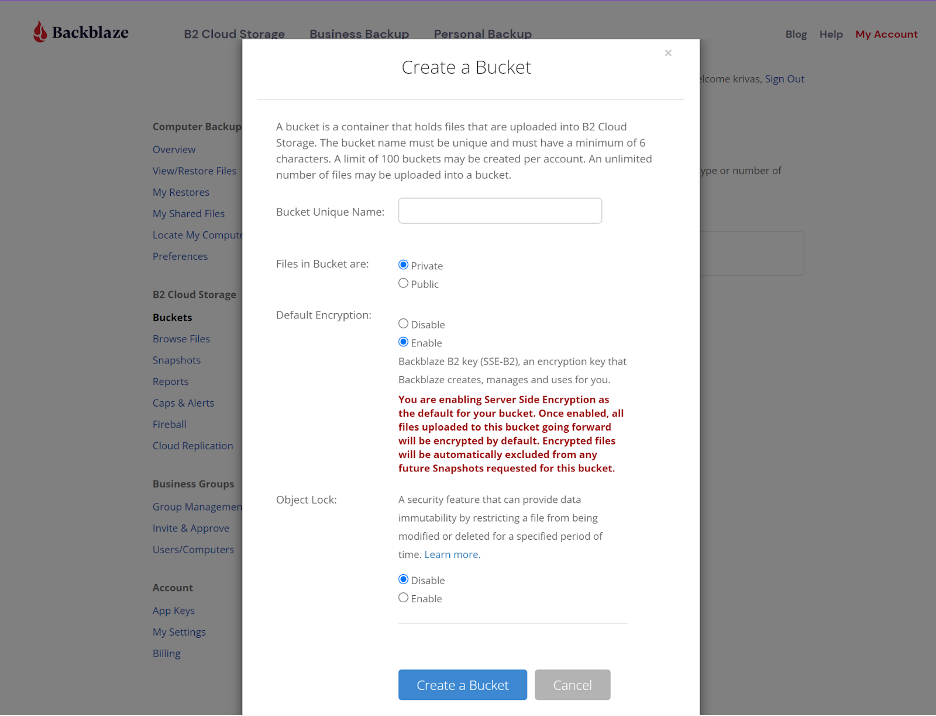
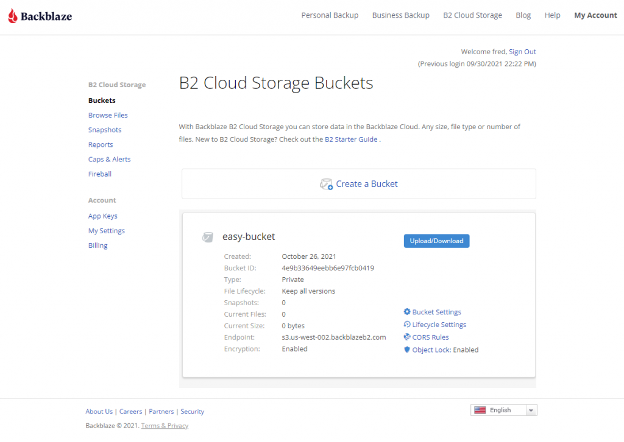
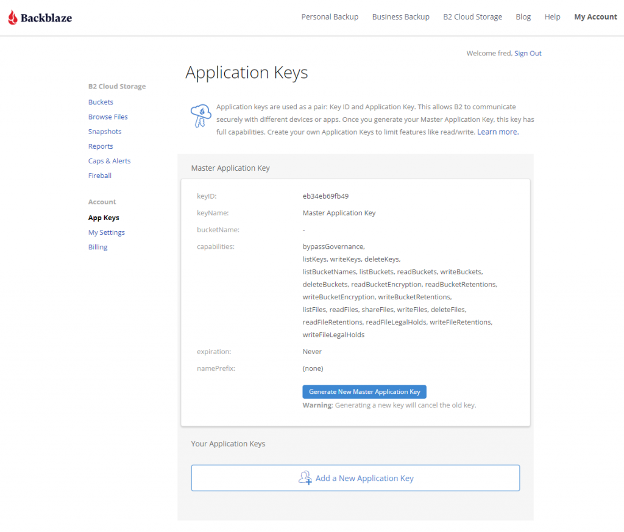


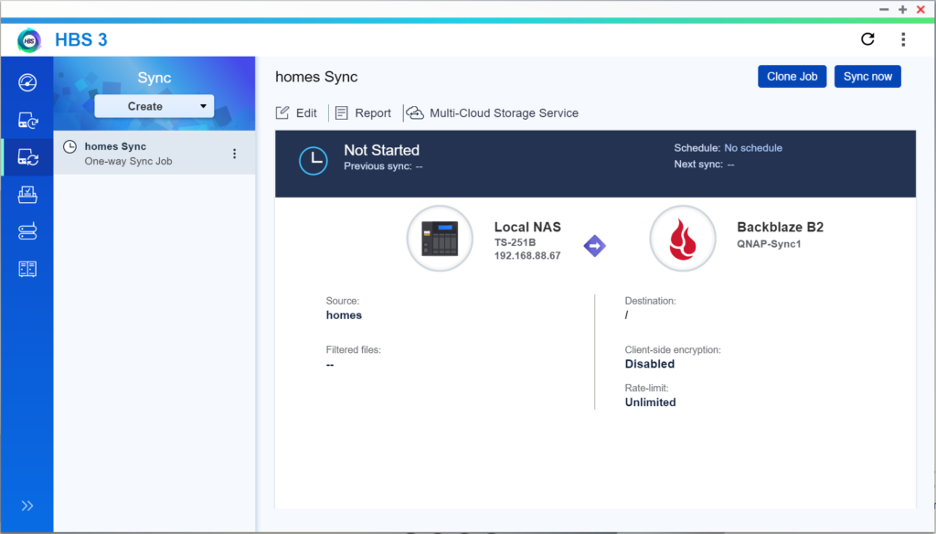
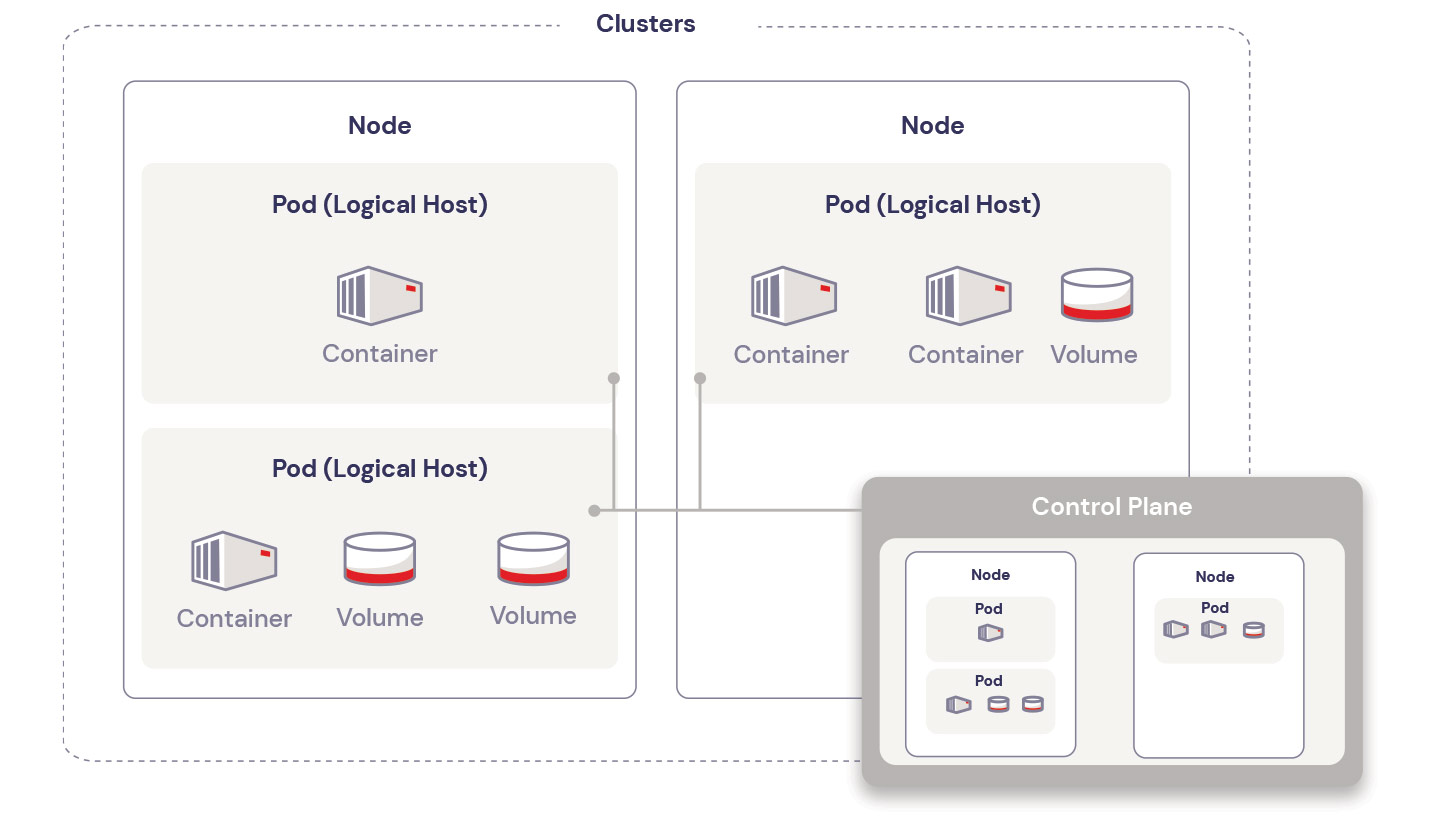


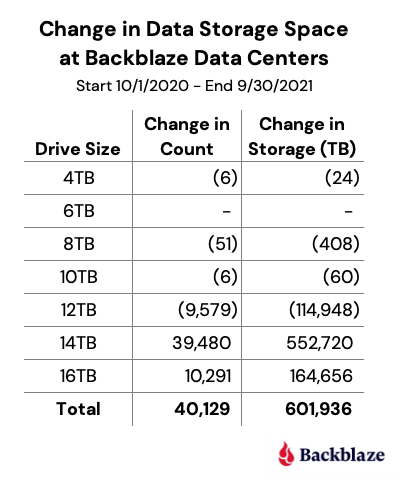

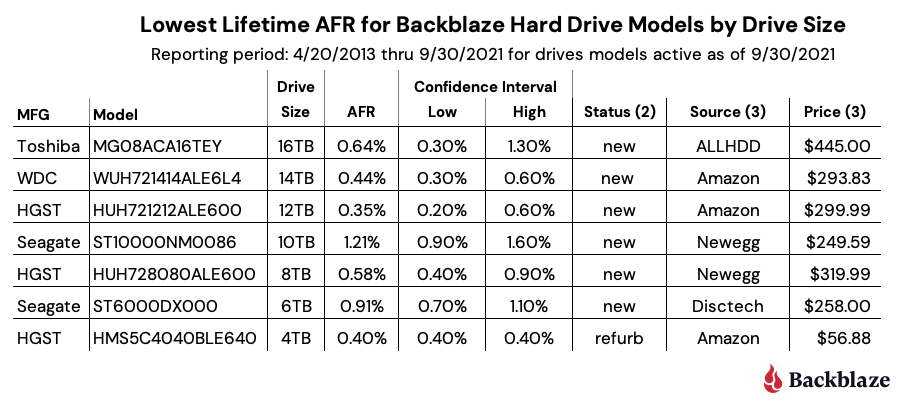
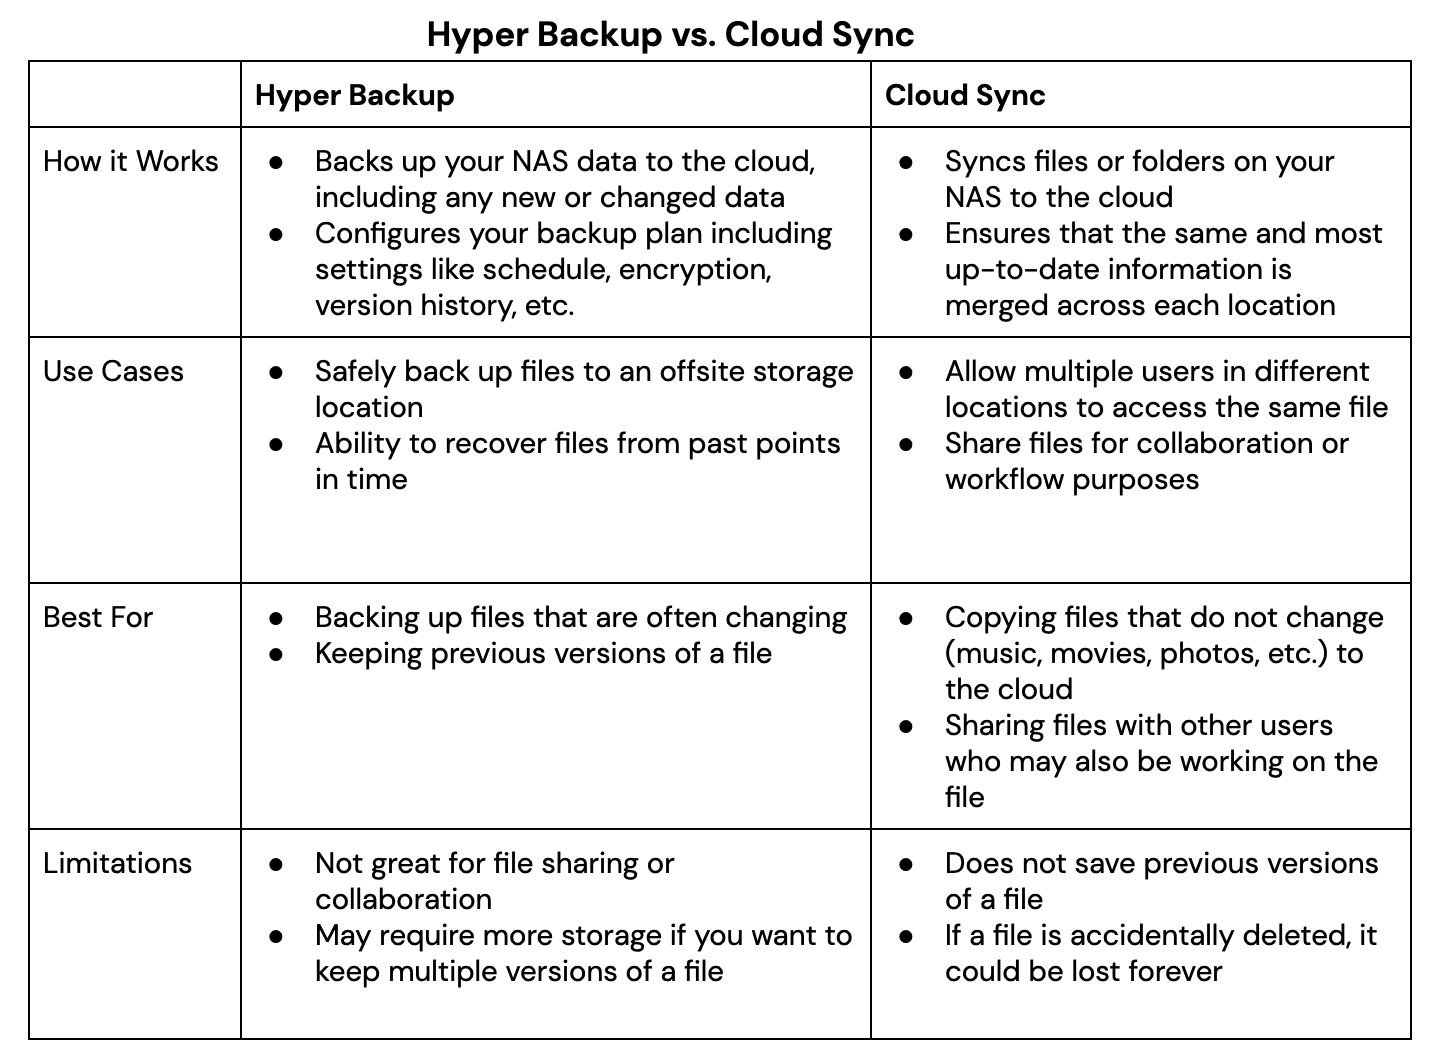 Whether you plan to utilize the backup and sync features Synology offers via Hyper Backup and Cloud Sync, securing your files to the cloud will help you create an effective