Tag Archives: Golang

One small step closer to containerising service binaries

Post Syndicated from Grab Tech original https://engineering.grab.com/reducing-your-go-binary-size

Grab’s engineering teams currently own and manage more than 250+ microservices. Depending on the business problems that each team tackles, our development ecosystem ranges from Golang, Java, and everything in between.

Although there are centralised systems that help automate most of the build and deployment tasks, there are still some teams working on different technologies that manage their own build, test and deployment systems at different maturity levels. Managing a varied build and deploy ecosystems brings their own challenges.

Build challenges

  • Broken external dependencies.
  • Non-reproducible builds due to changes in AMI, configuration keys and other build parameters.
  • Missing security permissions between different repositories.

Deployment challenges

  • Varied deployment environments necessitating a bigger learning curve.
  • Managing the underlying infrastructure as code.
  • Higher downtime when bringing the systems up after a scale down event.

Grab’s appetite for customer obsession and quality drives the engineering teams to innovate and deliver value rapidly. The time that the team spends in fixing build issues or deployment-related tasks has a direct impact on the time they spend on delivering business value.

Introduction to containerisation

Using the Container architecture helps the team deploy and run multiple applications, isolated from each other, on the same virtual machine or server and with much less overhead.

At Grab, both the platform and the core engineering teams wanted to move to the containerisation architecture to achieve the following goals:

  • Support to build and push container images during the CI process.
  • Create a standard virtual machine image capable of running container workloads. The AMI is maintained by a central team and comes with Grab infrastructure components such as (DataDog, Filebeat, Vault, etc.).
  • A deployment experience which allows existing services to migrate to container workload safely by initially running both types of workloads concurrently.

The core engineering teams wanted to adopt container workloads to achieve the following benefits:

  • Provide a containerised version of the service that can be run locally and on different cloud providers without any dependency on Grab’s internal (runtime) tooling.
  • Allow reuse of common Grab tools in different projects by running the zero dependency version of the tools on demand whenever needed.
  • Allow a more flexible staging/dev/shadow deployment of new features.

Adoption of containerisation

Engineering teams at Grab use the containerisation model to build and deploy services at scale. Our containerisation effort helps the development teams move faster by:

  • Providing a consistent environment across development, testing and production
  • Deploying software efficiently
  • Reducing infrastructure cost
  • Abstracting OS dependency
  • Increasing scalability between cloud vendors

When we started using containers we realised that building smaller containers had some benefits over bigger containers. For example, smaller containers:

  • Include only the needed libraries and therefore are more secure.
  • Build and deploy faster as they can be pulled to the running container cluster quickly.
  • Utilise disk space and memory efficiently.

During the course of containerising our applications, we noted that some service binaries appeared to be bigger (~110 MB) than they should be. For a statically-linked Golang binary, that’s pretty big! So how do we figure out what’s bloating the size of our binary?

Go binary size visualisation tool

In the course of poking around for tools that would help us analyse the symbols in a Golang binary, we found go-binsize-viz based on this article. We particularly liked this tool, because it utilises the existing Golang toolchain (specifically, Go tool nm) to analyse imports, and provides a straightforward mechanism for traversing through the symbols present via treemap. We will briefly outline the steps that we did to analyse a Golang binary here.

  1. First, build your service using the following command (important for consistency between builds):

    $ go build -a -o service_name ./path/to/main.go
    
  2. Next, copy the binary over to the cloned directory of go-binsize-viz repository.
  3. Run the following script that covers the steps in the go-binsize-viz README.

    #!/usr/bin/env bash
    #
    # This script needs more input parsing, but it serves the needs for now.
    #
    mkdir dist
    # step 1
    go tool nm -size $1 | c++filt > dist/$1.symtab
    # step 2
    python3 tab2pydic.py dist/$1.symtab > dist/$1-map.py
    # step 3
    # must be data.js
    python3 simplify.py dist/$1-map.py > dist/$1-data.js
    rm data.js
    ln -s dist/$1-data.js data.js
    

    Running this script creates a dist folder where each intermediate step is deposited, and a data.js symlink in the top-level directory which points to the consumable .js file by treemap.html.

    # top-level directory
    $ ll
    -rw-r--r--   1 stan.halka  staff   1.1K Aug 20 09:57 README.md
    -rw-r--r--   1 stan.halka  staff   6.7K Aug 20 09:57 app3.js
    -rw-r--r--   1 stan.halka  staff   1.6K Aug 20 09:57 cockroach_sizes.html
    lrwxr-xr-x   1 stan.halka  staff        65B Aug 25 16:49 data.js -> dist/v2.0.709356.segments-paxgroups-macos-master-go1.13-data.js
    drwxr-xr-x   8 stan.halka  staff   256B Aug 25 16:49 dist
    ...
    # dist folder
    $ ll dist
    total 71728
    drwxr-xr-x   8 stan.halka  staff   256B Aug 25 16:49 .
    drwxr-xr-x  21 stan.halka  staff   672B Aug 25 16:49 ..
    -rw-r--r--   1 stan.halka  staff   4.2M Aug 25 16:37 v2.0.709356.segments-paxgroups-macos-master-go1.13-data.js
    -rw-r--r--   1 stan.halka  staff   3.4M Aug 25 16:37 v2.0.709356.segments-paxgroups-macos-master-go1.13-map.py
    -rw-r--r--   1 stan.halka  staff    11M Aug 25 16:37 v2.0.709356.segments-paxgroups-macos-master-go1.13.symtab
    

    As you can probably tell from the file names, these steps were explored on the segments-paxgroups service, which is a microservice used for segment information at Grab. You can ignore the versioning metadata, branch name, and Golang information embedded in the name.

  4. Finally, run a local python3 server to visualise the binary components.

    $ python3 -m http.server
    Serving HTTP on 0.0.0.0 port 8000 (http://0.0.0.0:8000/) ...
    

    So now that we have a methodology to consistently generate a service binary, and a way to explore the symbols present, let’s dive in!

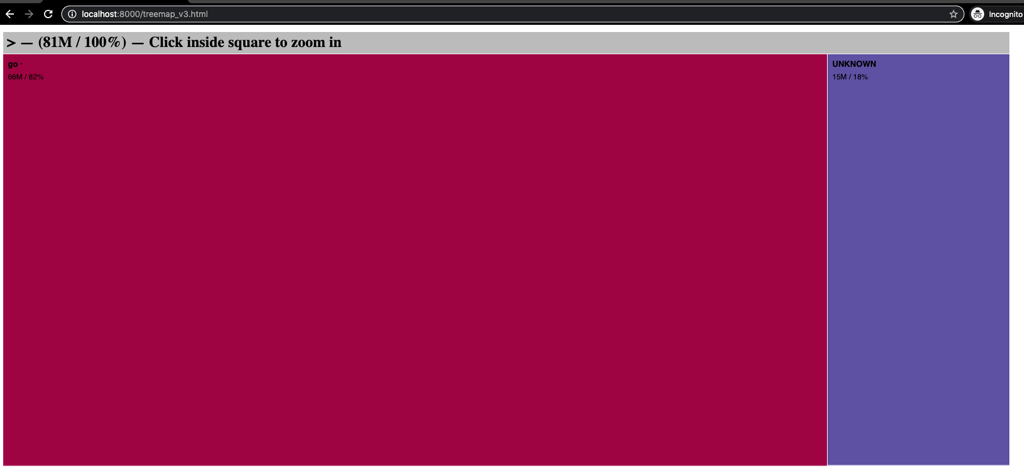
  5. Open your browser and visit http://localhost:8000/treemap_v3.html:

    Of the 103MB binary produced, 81MB are recognisable, with 66MB recognised as Golang (UNKNOWN is present, and also during parsing there were a fair number of warnings. Note that we haven’t spent enough time with the tool to understand why we aren’t able to recognise and index all the symbols present).

    Treemap

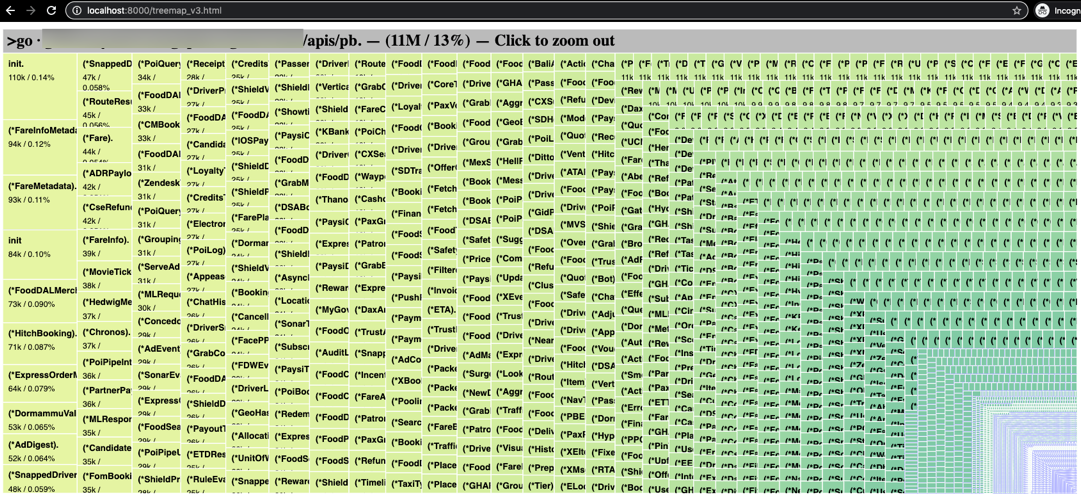
    The next step is to figure out where the symbols are coming from. There’s a bunch of Grab-internal stuff that for the sake of this blog isn’t necessary to go into, and it was reasonably easy to come to the right answer based on the intuitiveness of the go-binsize-viz tool.

    This visualisation shows us the source of how 11 MB of symbols are sneaking into the segments-paxgroups binary.

    Visualisation

    Every message format for any service that reads from, or writes to, streams at Grab is included in every service binary! Not cloud native!

How did this happen?

The short answer is that Golang doesn’t import only the symbols that it requires, but rather all the symbols defined within an imported directory and transitive symbols as well. So, when we think we’re importing just one directory, if our code structure doesn’t follow principles of encapsulation or isolation, we end up importing 11 MB of symbols that we don’t need! In our case, this occurred because a generic Message interface was included in the same directory with all the auto-generated code you see in the pretty picture above.

The Streams team did an awesome job of restructuring the code, which when built again, led to this outcome:

$$ ll | grep paxgroups
-rwxr-xr-x   1 stan.halka  staff   110M Aug 21 14:53 v2.0.709356.segments-paxgroups-macos-master-go1.12
-rwxr-xr-x   1 stan.halka  staff   103M Aug 25 16:34 v2.0.709356.segments-paxgroups-macos-master-go1.13
-rwxr-xr-x   1 stan.halka  staff        80M Aug 21 14:53 v2.0.709356.segments-paxgroups-macos-tinkered-go1.12
-rwxr-xr-x   1 stan.halka  staff        78M Aug 25 16:34 v2.0.709356.segments-paxgroups-macos-tinkered-go1.13

Not a bad reduction in service binary size!

Lessons learnt

The go-binsize-viz utility offers a treemap representation for imported symbols, and is very useful in determining what symbols are contributing to the overall size.

Code architecture matters: Keep binaries as small as possible!

To reduce your binary size, follow these best practices:

  • Structure your code so that the interfaces and common classes/utilities are imported from different locations than auto-generated classes.
  • Avoid huge, flat directory structures.
  • If it’s a platform offering and has too many interwoven dependencies, try to decouple the actual platform offering from the company specific instantiations. This fosters creating isolated, minimalistic code.

Join us

Grab is more than just the leading ride-hailing and mobile payments platform in Southeast Asia. We use data and technology to improve everything from transportation to payments and financial services across a region of more than 620 million people. We aspire to unlock the true potential of Southeast Asia and look for like-minded individuals to join us on this ride.

If you share our vision of driving South East Asia forward, apply to join our team today.

Building, bundling, and deploying applications with the AWS CDK

Post Syndicated from Cory Hall original https://aws.amazon.com/blogs/devops/building-apps-with-aws-cdk/

The AWS Cloud Development Kit (AWS CDK) is an open-source software development framework to model and provision your cloud application resources using familiar programming languages.

The post CDK Pipelines: Continuous delivery for AWS CDK applications showed how you can use CDK Pipelines to deploy a TypeScript-based AWS Lambda function. In that post, you learned how to add additional build commands to the pipeline to compile the TypeScript code to JavaScript, which is needed to create the Lambda deployment package.

In this post, we dive deeper into how you can perform these build commands as part of your AWS CDK build process by using the native AWS CDK bundling functionality.

If you’re working with Python, TypeScript, or JavaScript-based Lambda functions, you may already be familiar with the PythonFunction and NodejsFunction constructs, which use the bundling functionality. This post describes how to write your own bundling logic for instances where a higher-level construct either doesn’t already exist or doesn’t meet your needs. To illustrate this, I walk through two different examples: a Lambda function written in Golang and a static site created with Nuxt.js.

Concepts

A typical CI/CD pipeline contains steps to build and compile your source code, bundle it into a deployable artifact, push it to artifact stores, and deploy to an environment. In this post, we focus on the building, compiling, and bundling stages of the pipeline.

The AWS CDK has the concept of bundling source code into a deployable artifact. As of this writing, this works for two main types of assets: Docker images published to Amazon Elastic Container Registry (Amazon ECR) and files published to Amazon Simple Storage Service (Amazon S3). For files published to Amazon S3, this can be as simple as pointing to a local file or directory, which the AWS CDK uploads to Amazon S3 for you.

When you build an AWS CDK application (by running cdk synth), a cloud assembly is produced. The cloud assembly consists of a set of files and directories that define your deployable AWS CDK application. In the context of the AWS CDK, it might include the following:

  • AWS CloudFormation templates and instructions on where to deploy them
  • Dockerfiles, corresponding application source code, and information about where to build and push the images to
  • File assets and information about which S3 buckets to upload the files to

Use case

For this use case, our application consists of front-end and backend components. The example code is available in the GitHub repo. In the repository, I have split the example into two separate AWS CDK applications. The repo also contains the Golang Lambda example app and the Nuxt.js static site.

Golang Lambda function

To create a Golang-based Lambda function, you must first create a Lambda function deployment package. For Go, this consists of a .zip file containing a Go executable. Because we don’t commit the Go executable to our source repository, our CI/CD pipeline must perform the necessary steps to create it.

In the context of the AWS CDK, when we create a Lambda function, we have to tell the AWS CDK where to find the deployment package. See the following code:

new lambda.Function(this, 'MyGoFunction', {
  runtime: lambda.Runtime.GO_1_X,
  handler: 'main',
  code: lambda.Code.fromAsset(path.join(__dirname, 'folder-containing-go-executable')),
});

In the preceding code, the lambda.Code.fromAsset() method tells the AWS CDK where to find the Golang executable. When we run cdk synth, it stages this Go executable in the cloud assembly, which it zips and publishes to Amazon S3 as part of the PublishAssets stage.

If we’re running the AWS CDK as part of a CI/CD pipeline, this executable doesn’t exist yet, so how do we create it? One method is CDK bundling. The lambda.Code.fromAsset() method takes a second optional argument, AssetOptions, which contains the bundling parameter. With this bundling parameter, we can tell the AWS CDK to perform steps prior to staging the files in the cloud assembly.

Breaking down the BundlingOptions parameter further, we can perform the build inside a Docker container or locally.

Building inside a Docker container

For this to work, we need to make sure that we have Docker running on our build machine. In AWS CodeBuild, this means setting privileged: true. See the following code:

new lambda.Function(this, 'MyGoFunction', {
  code: lambda.Code.fromAsset(path.join(__dirname, 'folder-containing-source-code'), {
    bundling: {
      image: lambda.Runtime.GO_1_X.bundlingDockerImage,
      command: [
        'bash', '-c', [
          'go test -v',
          'GOOS=linux go build -o /asset-output/main',
      ].join(' && '),
    },
  })
  ...
});

We specify two parameters:

  • image (required) – The Docker image to perform the build commands in
  • command (optional) – The command to run within the container

The AWS CDK mounts the folder specified as the first argument to fromAsset at /asset-input inside the container, and mounts the asset output directory (where the cloud assembly is staged) at /asset-output inside the container.

After we perform the build commands, we need to make sure we copy the Golang executable to the /asset-output location (or specify it as the build output location like in the preceding example).

This is the equivalent of running something like the following code:

docker run \
  --rm \
  -v folder-containing-source-code:/asset-input \
  -v cdk.out/asset.1234a4b5/:/asset-output \
  lambci/lambda:build-go1.x \
  bash -c 'GOOS=linux go build -o /asset-output/main'

Building locally

To build locally (not in a Docker container), we have to provide the local parameter. See the following code:

new lambda.Function(this, 'MyGoFunction', {
  code: lambda.Code.fromAsset(path.join(__dirname, 'folder-containing-source-code'), {
    bundling: {
      image: lambda.Runtime.GO_1_X.bundlingDockerImage,
      command: [],
      local: {
        tryBundle(outputDir: string) {
          try {
            spawnSync('go version')
          } catch {
            return false
          }

          spawnSync(`GOOS=linux go build -o ${path.join(outputDir, 'main')}`);
          return true
        },
      },
    },
  })
  ...
});

The local parameter must implement the ILocalBundling interface. The tryBundle method is passed the asset output directory, and expects you to return a boolean (true or false). If you return true, the AWS CDK doesn’t try to perform Docker bundling. If you return false, it falls back to Docker bundling. Just like with Docker bundling, you must make sure that you place the Go executable in the outputDir.

Typically, you should perform some validation steps to ensure that you have the required dependencies installed locally to perform the build. This could be checking to see if you have go installed, or checking a specific version of go. This can be useful if you don’t have control over what type of build environment this might run in (for example, if you’re building a construct to be consumed by others).

If we run cdk synth on this, we see a new message telling us that the AWS CDK is bundling the asset. If we include additional commands like go test, we also see the output of those commands. This is especially useful if you wanted to fail a build if tests failed. See the following code:

$ cdk synth
Bundling asset GolangLambdaStack/MyGoFunction/Code/Stage...
✓  . (9ms)
✓  clients (5ms)

DONE 8 tests in 11.476s
✓  clients (5ms) (coverage: 84.6% of statements)
✓  . (6ms) (coverage: 78.4% of statements)

DONE 8 tests in 2.464s

Cloud Assembly

If we look at the cloud assembly that was generated (located at cdk.out), we see something like the following code:

$ cdk synth
Bundling asset GolangLambdaStack/MyGoFunction/Code/Stage...
✓  . (9ms)
✓  clients (5ms)

DONE 8 tests in 11.476s
✓  clients (5ms) (coverage: 84.6% of statements)
✓  . (6ms) (coverage: 78.4% of statements)

DONE 8 tests in 2.464s

It contains our GolangLambdaStack CloudFormation template that defines our Lambda function, as well as our Golang executable, bundled at asset.01cf34ff646d380829dc4f2f6fc93995b13277bde7db81c24ac8500a83a06952/main.

Let’s look at how the AWS CDK uses this information. The GolangLambdaStack.assets.json file contains all the information necessary for the AWS CDK to know where and how to publish our assets (in this use case, our Golang Lambda executable). See the following code:

{
  "version": "5.0.0",
  "files": {
    "01cf34ff646d380829dc4f2f6fc93995b13277bde7db81c24ac8500a83a06952": {
      "source": {
        "path": "asset.01cf34ff646d380829dc4f2f6fc93995b13277bde7db81c24ac8500a83a06952",
        "packaging": "zip"
      },
      "destinations": {
        "current_account-current_region": {
          "bucketName": "cdk-hnb659fds-assets-${AWS::AccountId}-${AWS::Region}",
          "objectKey": "01cf34ff646d380829dc4f2f6fc93995b13277bde7db81c24ac8500a83a06952.zip",
          "assumeRoleArn": "arn:${AWS::Partition}:iam::${AWS::AccountId}:role/cdk-hnb659fds-file-publishing-role-${AWS::AccountId}-${AWS::Region}"
        }
      }
    }
  }
}

The file contains information about where to find the source files (source.path) and what type of packaging (source.packaging). It also tells the AWS CDK where to publish this .zip file (bucketName and objectKey) and what AWS Identity and Access Management (IAM) role to use (assumeRoleArn). In this use case, we only deploy to a single account and Region, but if you have multiple accounts or Regions, you see multiple destinations in this file.

The GolangLambdaStack.template.json file that defines our Lambda resource looks something like the following code:

{
  "Resources": {
    "MyGoFunction0AB33E85": {
      "Type": "AWS::Lambda::Function",
      "Properties": {
        "Code": {
          "S3Bucket": {
            "Fn::Sub": "cdk-hnb659fds-assets-${AWS::AccountId}-${AWS::Region}"
          },
          "S3Key": "01cf34ff646d380829dc4f2f6fc93995b13277bde7db81c24ac8500a83a06952.zip"
        },
        "Handler": "main",
        ...
      }
    },
    ...
  }
}

The S3Bucket and S3Key match the bucketName and objectKey from the assets.json file. By default, the S3Key is generated by calculating a hash of the folder location that you pass to lambda.Code.fromAsset(), (for this post, folder-containing-source-code). This means that any time we update our source code, this calculated hash changes and a new Lambda function deployment is triggered.

Nuxt.js static site

In this section, I walk through building a static site using the Nuxt.js framework. You can apply the same logic to any static site framework that requires you to run a build step prior to deploying.

To deploy this static site, we use the BucketDeployment construct. This is a construct that allows you to populate an S3 bucket with the contents of .zip files from other S3 buckets or from a local disk.

Typically, we simply tell the BucketDeployment construct where to find the files that it needs to deploy to the S3 bucket. See the following code:

new s3_deployment.BucketDeployment(this, 'DeployMySite', {
  sources: [
    s3_deployment.Source.asset(path.join(__dirname, 'path-to-directory')),
  ],
  destinationBucket: myBucket
});

To deploy a static site built with a framework like Nuxt.js, we need to first run a build step to compile the site into something that can be deployed. For Nuxt.js, we run the following two commands:

  • yarn install – Installs all our dependencies
  • yarn generate – Builds the application and generates every route as an HTML file (used for static hosting)

This creates a dist directory, which you can deploy to Amazon S3.

Just like with the Golang Lambda example, we can perform these steps as part of the AWS CDK through either local or Docker bundling.

Building inside a Docker container

To build inside a Docker container, use the following code:

new s3_deployment.BucketDeployment(this, 'DeployMySite', {
  sources: [
    s3_deployment.Source.asset(path.join(__dirname, 'path-to-nuxtjs-project'), {
      bundling: {
        image: cdk.BundlingDockerImage.fromRegistry('node:lts'),
        command: [
          'bash', '-c', [
            'yarn install',
            'yarn generate',
            'cp -r /asset-input/dist/* /asset-output/',
          ].join(' && '),
        ],
      },
    }),
  ],
  ...
});

For this post, we build inside the publicly available node:lts image hosted on DockerHub. Inside the container, we run our build commands yarn install && yarn generate, and copy the generated dist directory to our output directory (the cloud assembly).

The parameters are the same as described in the Golang example we walked through earlier.

Building locally

To build locally, use the following code:

new s3_deployment.BucketDeployment(this, 'DeployMySite', {
  sources: [
    s3_deployment.Source.asset(path.join(__dirname, 'path-to-nuxtjs-project'), {
      bundling: {
        local: {
          tryBundle(outputDir: string) {
            try {
              spawnSync('yarn --version');
            } catch {
              return false
            }

            spawnSync('yarn install && yarn generate');

       fs.copySync(path.join(__dirname, ‘path-to-nuxtjs-project’, ‘dist’), outputDir);
            return true
          },
        },
        image: cdk.BundlingDockerImage.fromRegistry('node:lts'),
        command: [],
      },
    }),
  ],
  ...
});

Building locally works the same as the Golang example we walked through earlier, with one exception. We have one additional command to run that copies the generated dist folder to our output directory (cloud assembly).

Conclusion

This post showed how you can easily compile your backend and front-end applications using the AWS CDK. You can find the example code for this post in this GitHub repo. If you have any questions or comments, please comment on the GitHub repo. If you have any additional examples you want to add, we encourage you to create a Pull Request with your example!

Our code also contains examples of deploying the applications using CDK Pipelines, so if you’re interested in deploying the example yourself, check out the example repo.


About the author

Cory Hall

Cory is a Solutions Architect at Amazon Web Services with a passion for DevOps and is based in Charlotte, NC. Cory works with enterprise AWS customers to help them design, deploy, and scale applications to achieve their business goals.