Post Syndicated from Harshvardhan Chunawala original https://aws.amazon.com/blogs/security/quantum-resistant-signing-on-aws-part-1-build-a-software-supply-chain-with-ml-dsa/
Software supply chain attacks have grown in both frequency and sophistication. Recent high-profile compromises of build systems and open source dependencies demonstrate that attackers increasingly target the trust mechanisms that verify software integrity. Those trust mechanisms rely on digital signature algorithms, and today many use traditional algorithms such as Rivest-Shamir-Adleman (RSA) and the Elliptic Curve Digital Signature Algorithm (ECDSA). If a sufficiently powerful quantum computer could forge these signatures, an attacker could potentially inject unauthorized code into signed artifacts, fabricate build attestations, or impersonate legitimate publishers. Using quantum-resistant signatures today defends against threats that might emerge in the future.
Since 2025, the Commercial National Security Algorithm Suite 2.0 (CNSA 2.0), published by the US National Security Agency (NSA), has required US National Security Systems (NSS) to “support and prefer” quantum-resistant signatures for software and firmware, with exclusive use mandated by 2030. The EU Cyber Resilience Act (CRA) takes full effect in December 2027. It requires manufacturers to maintain verifiable software integrity throughout a product’s lifecycle. Organizations that ship software to US federal agencies or sell products in the European market face converging deadlines that demand action now.
Amazon Web Services (AWS) provides the building blocks to construct a quantum-resistant software supply chain today using production-ready, generally available services. In this post, I show you how to combine Module-Lattice-Based Digital Signature Algorithm (ML-DSA) keys in AWS Key Management Service (AWS KMS), ML-DSA certificate hierarchies in AWS Private Certificate Authority, and ML-DSA trust anchors in AWS Identity and Access Management (IAM) Roles Anywhere into an end-to-end signing architecture for binaries, container images, and software bills of materials (SBOMs).
This post is Part 1 of a two-part series on adopting ML-DSA signatures, standardized in NIST FIPS 204 (ML-DSA) signatures, on AWS. As of Oct 2026, this series is the first end-to-end guide from any cloud provider for post-quantum signing across the software supply chain, from establishing an ML-DSA root of trust to enforcing algorithm policy across an organization. This part is for builders and walks through constructing and operating the signing pipeline. Part 2, Enforce your ML-DSA algorithm policy with SCPs and IAM, is for security and governance teams and shows how to turn the algorithm choices made here into preventive and detective controls across an organization.
Understanding the harvest now, forge later threat
After a cryptographically relevant quantum computer (CRQC) exists, the mathematical problems protecting today’s public-key cryptography can be solved efficiently. Attacks that are impractical today because of the computational complexity suddenly become practical using a CRQC. Most discussions of post-quantum cryptography (PQC) focus on the harvest now, decrypt later threat to data confidentiality. The asymmetric keys protecting data in transit can be efficiently derived using a CRQC, exposing the data that was meant to be protected. Digital signatures rely on the same asymmetric mathematical problems that a CRQC would break. This means that software supply chains face a parallel threat that targets integrity rather than confidentiality. An attacker who records signed artifacts today can forge those signatures in the future on a totally different artifact, using a CRQC.
Consider firmware signed with ECDSA P-256 and deployed to a fleet of embedded devices in 2026. These devices verify the firmware signature on every boot for their 15-year operational lifetime and can’t be recalled to re-sign after deployment. If a CRQC becomes operational in 2035, an attacker could produce a valid-looking signature over tampered firmware, and every device in the fleet would accept it as authentic on next restart. For organizations that rely on classical digital signatures as the primary mechanism for verifying software integrity, this weakens a critical link in the verification chain. This is why CNSA 2.0 specifies aggressive timelines for digital signatures: the artifacts you sign today must remain trustworthy for their full operational lifetime.
ML-DSA is designed to resist attacks from both classical and quantum computers. AWS KMS, AWS Private CA, and AWS IAM Roles Anywhere all support ML-DSA, making it possible to address the forge-later threat across your supply chain today without additional tooling.
Architecture overview: Five pillars of a quantum-resistant supply chain
The architecture comprises five trust pillars that together protect your software delivery pipeline:
- ML-DSA key management in AWS KMS – All signing keys are generated and protected in FIPS 140-3 Security Level 3 hardware security modules (HSMs). Private keys never leave the HSM boundary.
- ML-DSA public key infrastructure (PKI) through AWS Private CA – A certificate hierarchy (root CA, subordinate CA, end-entity certificates) binds ML-DSA public keys to identities, establishing who signed what. CA private keys are generated and stored in hardware-protected HSMs managed by the service and never leave the HSM boundary.
- Quantum-resistant workload identity (for external build agents) – For continuous integration and delivery (CI/CD) agents running outside AWS that authenticate through X.509 certificates, IAM Roles Anywhere with ML-DSA certificates ties the signer’s identity back to the same quantum-resistant root of trust.
- ML-DSA artifact signing – Build outputs (binaries, container image manifests, packages) are signed using AWS KMS ML-DSA keys. Signatures are stored alongside artifacts in Amazon Simple Storage Service (Amazon S3) or Amazon Elastic Container Registry (Amazon ECR).
- ML-DSA SBOM integrity attestation – The SBOM for each release is wrapped in an in-toto Statement that names the artifact it describes by digest, and the Statement is signed with the same ML-DSA code-signing key. This provides quantum-resistant proof that the dependency manifest hasn’t been tampered with and that it belongs to the artifact it accompanies.
These pillars create a chain of trust: AWS Private CA protects the root CA key in its own HSMs, issues certificates that bind identities to AWS KMS code-signing keys, IAM Roles Anywhere uses those certificates to authenticate build agents, and authenticated agents sign every artifact and SBOM they produce.
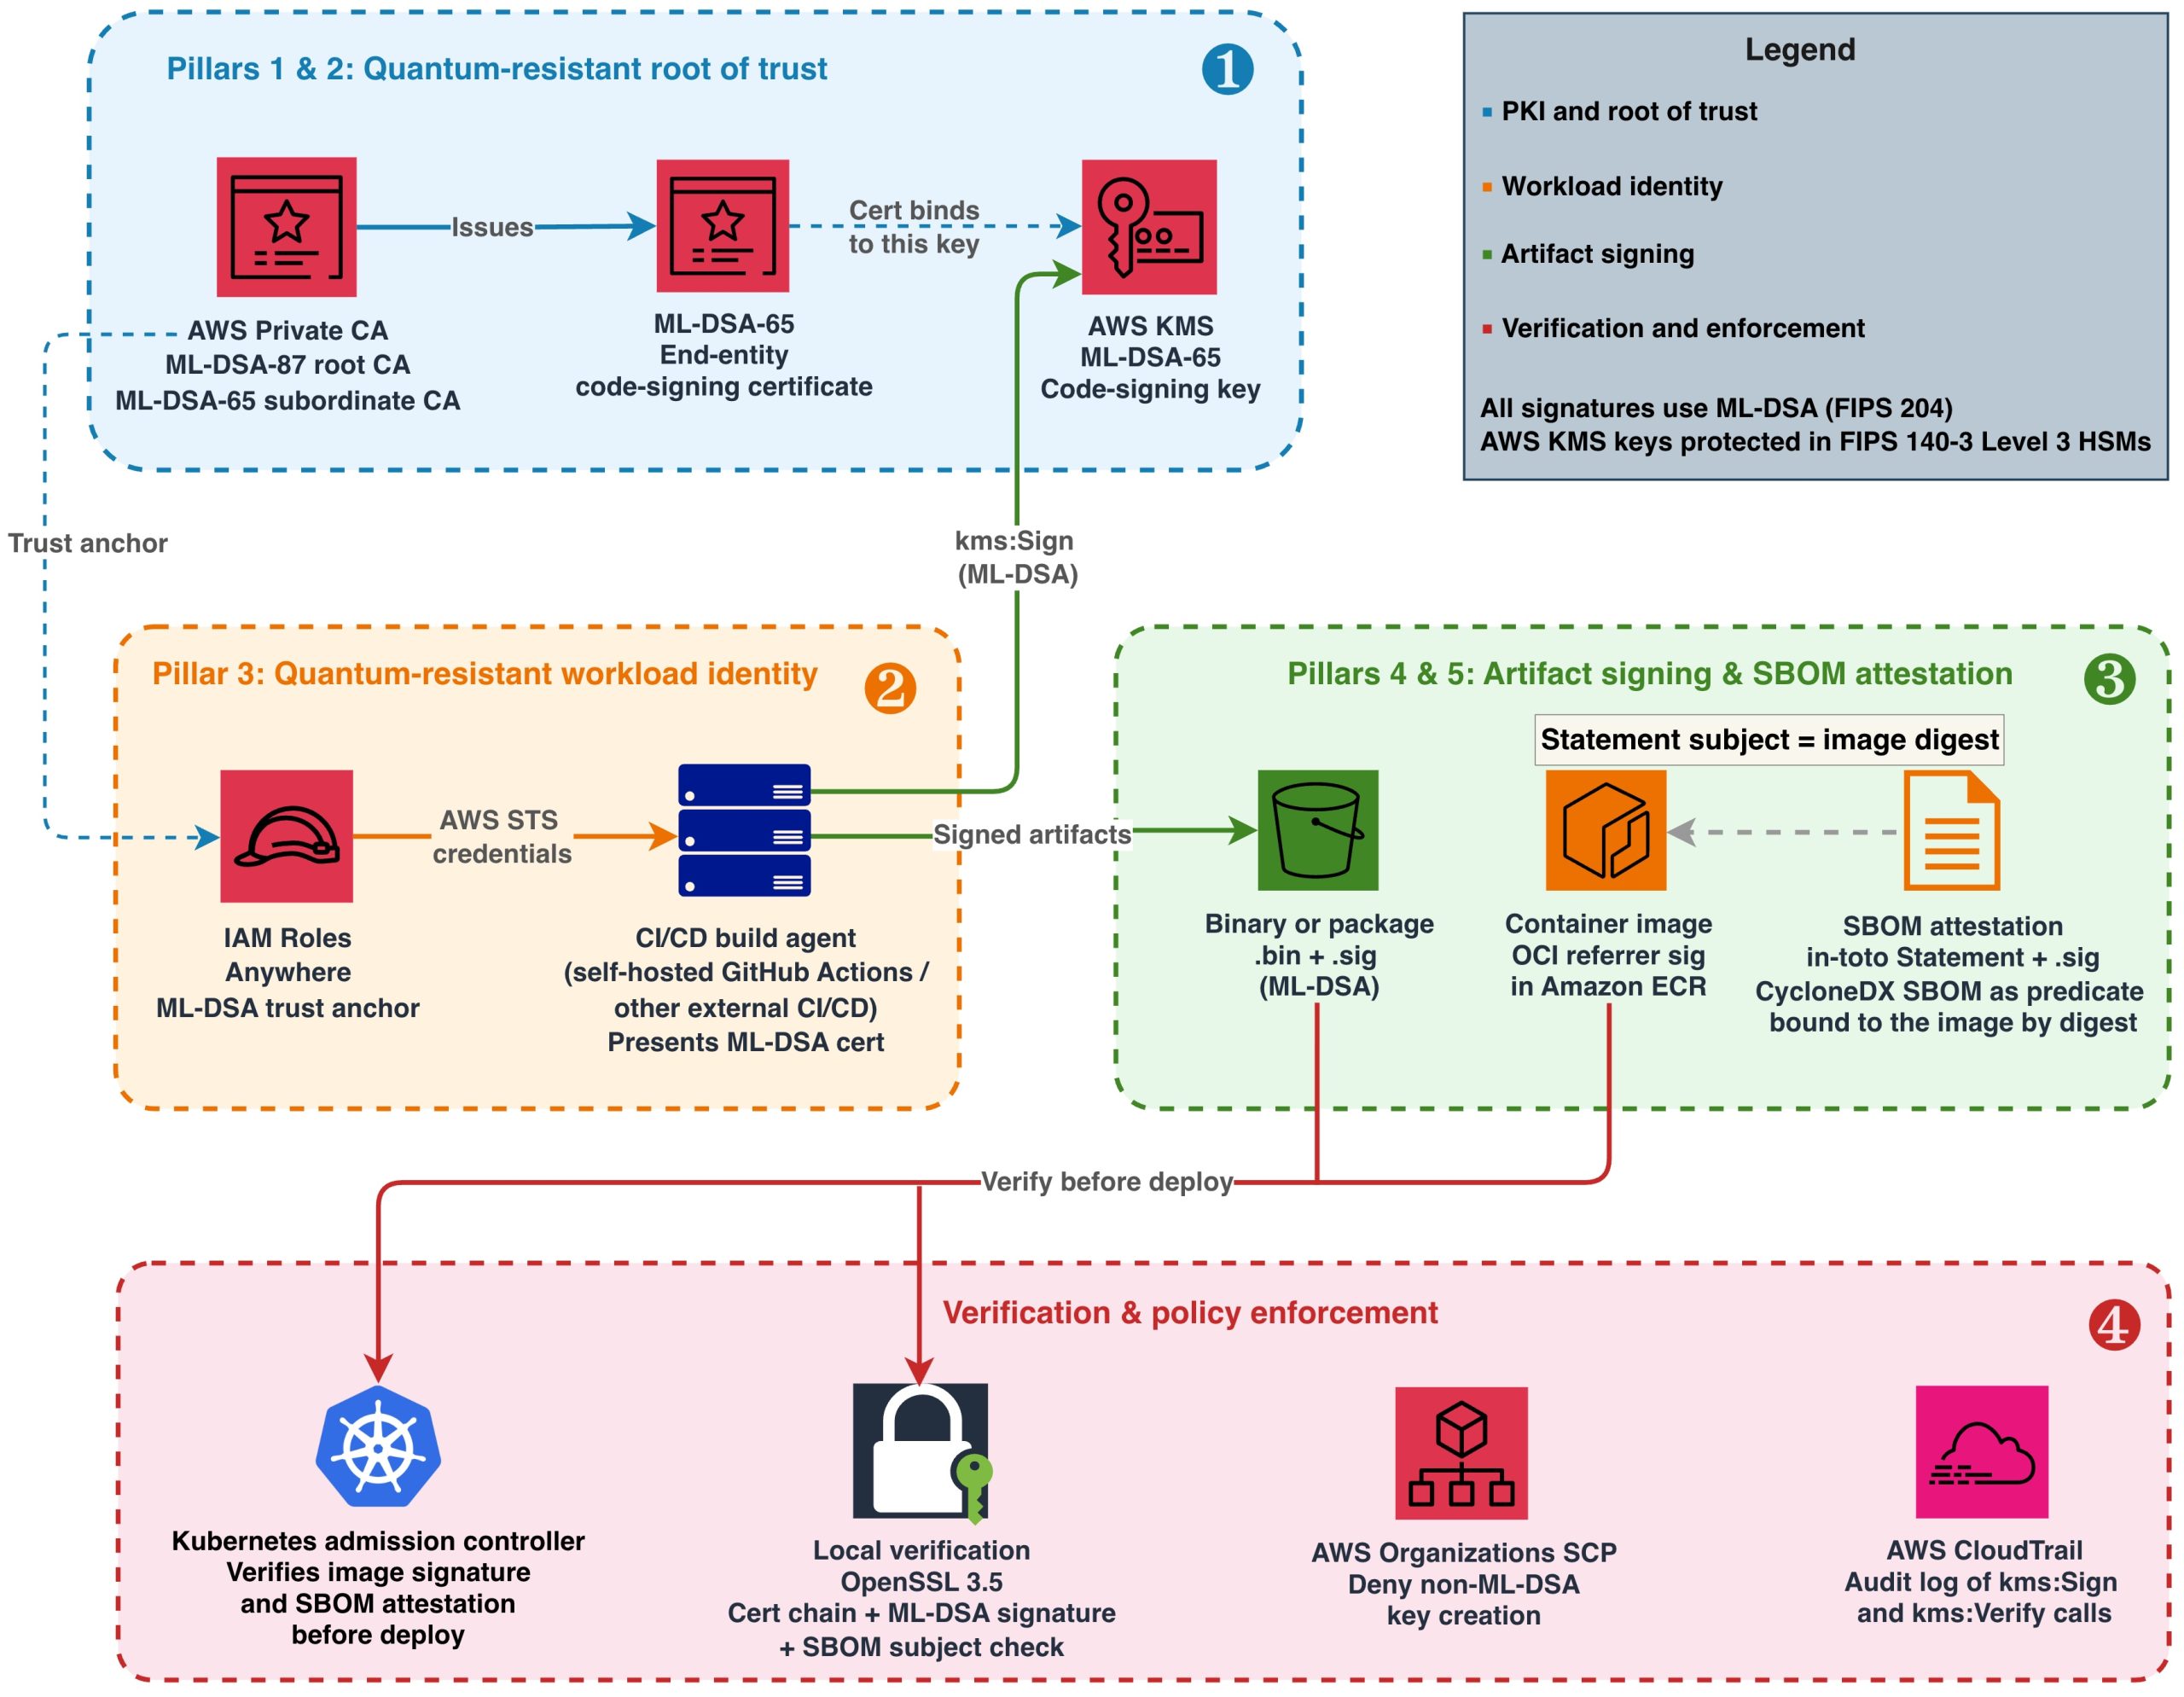
Figure 1: End-to-end quantum-resistant software supply chain on AWS
Figure 1 illustrates this architecture in four layers, numbered in the order you build them:
- Root of trust (Pillars 1 and 2) – Establish your AWS Private CA hierarchy and create your code-signing key in AWS KMS.
- Workload identity (Pillar 3) – Register the CA as an IAM Roles Anywhere trust anchor and issue ML-DSA certificates to build agents, ensuring the signer’s identity chains back to the same quantum-resistant root of trust.
- Artifact signing (Pillars 4 and 5) – Sign binaries, container images, and SBOMs using the authenticated build agent.
- Verification and enforcement – Validate signatures at deployment and enforce ML-DSA-only policies.
Prerequisites
To follow along, you need:
- An AWS account with permissions to create resources in AWS KMS, AWS Private CA, IAM Roles Anywhere, and Amazon ECR.
- AWS Command Line Interface (AWS CLI) v2 configured with appropriate credentials.
- IAM Roles Anywhere credential helper (
aws_signing_helper) v1.8.0 or later, the first release that supports ML-DSA keys and certificates, for workload authentication. Download from the IAM Roles Anywhere documentation. - OpenSSL 3.5 or later (required for ML-DSA signature verification and mu computation).
- ORAS CLI v1.2 or later (for attaching Open Container Initiative (OCI) referrer artifacts to container images). Alternatively, you can use the Notation CLI with a custom plugin or any OCI-compliant client that supports the OCI Referrers API.
jq, for constructing and parsing the in-toto Statements used for SBOM attestation and for parsing ORAS output.- Amazon Inspector SBOM Generator (Sbomgen), or another tool that produces a CycloneDX JSON SBOM, for the SBOM example. Sbomgen runs only on Linux (x86-64 and ARM64), so run that step on a Linux build agent or container. It uses the registry credentials that
oras loginstores in the Docker config file, and it also accepts them through--usernameor theINSPECTOR_SBOMGEN_USERNAMEandINSPECTOR_SBOMGEN_PASSWORDenvironment variables. - Java 11 or later and Apache Maven, to run the diy-code-signing-kms-private-ca sample that produces the code-signing CSR in Step 4 of Building the ML-DSA PKI foundation.
- A container image pushed to Amazon ECR (for the container signing example).
Building the ML-DSA PKI foundation
Start by creating the certificate hierarchy that will anchor your supply chain trust. AWS Private CA generates and stores its own CA signing keys internally in hardware-protected HSMs when you create a certificate authority. Use ML-DSA-87 (NIST security category 5, defined as at least as hard to break as exhaustive key search on AES-256) for the root CA because it protects the longest-lived trust anchor. Use ML-DSA-65 (NIST security category 3) for the subordinate CA to balance security with smaller signature sizes for frequently issued certificates.
The parameter sets used here, ML-DSA-87 and ML-DSA-65, are also the approved set in the example algorithm policy that Part 2 of this series turns into enforceable controls. If your organization has standardized on a different set, substitute it in the commands that follow; the build steps don’t change.
Step 1: Create the root CA in AWS Private CA
When you specify KeyAlgorithm: ML_DSA_87, Private CA generates an ML-DSA-87 key pair internally. You don’t need to create a separate AWS KMS key for the CA.
After creation, the root CA is in PENDING_CERTIFICATE state. Activate it by self-signing its certificate. This is where you set the root CA’s validity period (10 years is typical for a root):
Step 2: Create a subordinate CA for code signing
After creation, the subordinate CA enters PENDING_CERTIFICATE state with no link to the root. Activate it by signing its certificate signing request (CSR) with the root CA:
Step 3: Create the code-signing key in AWS KMS
Your build agents use this key to sign artifacts, so their IAM roles need the kms:Sign permission on it. The end-entity certificate issued by your subordinate CA binds an identity to this key’s public key.
Create an alias for convenient reference in your CI/CD scripts:
Step 4: Issue the end-entity code signing certificate
To issue a certificate, you need a CSR. Because the ML-DSA private key never leaves the AWS KMS HSM, you can’t generate the CSR locally with OpenSSL. Instead, you construct the CSR’s TBS (to-be-signed) structure containing your subject name and public key, sign it remotely by calling aws kms sign, and assemble the final CSR from those components.
For a working implementation that assembles an ML-DSA CSR around a KMS-managed private key and signs it with AWS KMS, see Post-quantum (ML-DSA) code signing with AWS Private CA and AWS KMS and its diy-code-signing-kms-private-ca sample on GitHub (Java, built with Maven). There is no AWS CLI-only path for this step: the CSR must be constructed and signed in code, and the sample is the reference implementation.
After you have the code-signing.csr file, issue the certificate from your subordinate CA:
This certificate binds the signer identity to the AWS KMS code-signing key material. Note that the certificate validity period (365 days in this example) determines how long verifiers can validate signatures by checking the certificate alone. AWS Private CA lets you choose the validity period of an issued certificate, as long as it ends no later than the issuing CA’s own certificate; in this example the subordinate CA certificate from Step 2 is valid for 1,825 days, so the three-year option below fits inside it. For artifacts that must remain verifiable beyond the certificate’s expiry, consider these approaches:
- Longer certificate validity – For private PKI, code-signing certificates are commonly issued with multi-year validity (for example,
Value=1095,Type=DAYSfor 3 years) because you control the issuance policy. - Trusted timestamping (RFC 3161) – Countersign each signature with an RFC 3161 timestamp from a Time Stamping Authority (TSA) at signing time. The timestamp proves the signature was created while the certificate was valid, allowing verification indefinitely. AWS doesn’t provide a managed TSA; use a third-party TSA or operate your own.
- Re-signing – Before a certificate expires, re-sign active artifacts with a newly issued certificate.
Distribute the certificate chain (root CA certificate, subordinate CA certificate, and end-entity certificate) to systems that need to verify your signatures.
Signing artifacts with ML-DSA in your CI/CD pipeline
With the PKI hierarchy in place, integrate ML-DSA signing into your build process. The approach depends on artifact type. ML-DSA-65 signatures are 3,309 bytes (compared to 64 bytes for ECDSA P-256), and the latency of the AWS KMS Sign operation for ML-DSA is comparable to existing asymmetric operations. The larger signature size has negligible impact when stored alongside multi-megabyte container images or packages, but is worth accounting for in size-constrained environments like embedded device images transmitted over low-bandwidth links.
Binary and package signing
Most build outputs, including compiled binaries and packages, are far larger than the 4,096-byte limit that AWS KMS places on the message passed to aws kms sign. Make the EXTERNAL_MU method your pipeline’s default: compute the 64-byte message representative (mu) externally with OpenSSL 3.5, then pass only mu to AWS KMS. This handles an artifact of any size and never needs to change as your artifacts grow. AWS KMS also accepts content directly with --message-type RAW, up to 4,096 bytes. Use RAW only for inputs whose size is fixed by construction, such as the 71-character manifest digest in the container image example that follows. An artifact that fits today is likely to outgrow the limit later, and a pipeline that depends on RAW fails when it does. Both methods produce cryptographically identical signatures. The verifier doesn’t need to know which method was used; standard ML-DSA verification applies in either case.
Store the .sig file alongside the artifact in Amazon S3 or your package repository. Protect the integrity of both the artifact and its signature by enabling S3 Object Lock (WORM protection) or at minimum S3 Versioning with restricted write access. If an attacker can modify or delete either file, verification can’t be trusted. For comprehensive guidance, see Security best practices for Amazon S3.
Container image signing
For container image signing, use the OCI referrer pattern, defined in the OCI Image and Distribution Specifications v1.1. A referrer is an artifact, such as a signature or an SBOM, whose manifest names another image in its subject field. Registries that support the pattern, including Amazon ECR, return these artifacts when a client asks for an image’s referrers. This approach uses AWS KMS ML-DSA keys to generate the signature and stores it as a referrer of the image:
At deployment time, your admission controller retrieves the referrer artifact and verifies the ML-DSA signature before allowing the image to run. See Verifying a container image signature before deployment later in this post for the full verification workflow and admission control implementation.
SBOM signing
A software bill of materials (SBOM) is a structured inventory of every component, library, and dependency included in a software release. It lists package names, versions, suppliers, and dependency relationships. Organizations use SBOMs to track vulnerabilities, verify license compliance, and respond quickly when a compromised component is disclosed.
Signing the SBOM file on its own proves that the inventory hasn’t been tampered with since it was signed, but not which artifact it describes. If the image signature and the SBOM signature are independent of each other, an attacker who holds a legitimately signed SBOM for a clean image can present it alongside a different signed image and claim that the two correspond. Attaching the SBOM to the image as an OCI referrer doesn’t close this gap by itself, because the subject field of a referrer manifest is set by whoever pushes the referrer; it’s a discovery mechanism, not a cryptographic binding. The binding must be inside the bytes that the signature covers.
To create that binding, wrap the SBOM in an in-toto Statement before signing it. A Statement names the artifacts it describes in its subject field, by digest, and carries the SBOM as its predicate. Because the image manifest digest is part of the signed content, a verifier can confirm that the SBOM in hand was issued for exactly the image it is about to deploy, and a swapped SBOM or a swapped digest fails verification. Embedding the SBOM in the image filesystem is another way to bind the two, because the image digest then covers the SBOM bytes. This post uses the Statement approach because it also works for SBOMs generated by scanning a finished image, for artifacts that have no filesystem such as binaries and firmware, and for images that are already in your registry, and because the SBOM stays readable from the registry without pulling the image.
Generate the SBOM with your preferred tool (such as Amazon Inspector SBOM Generator (Sbomgen) for container images), wrap it in a Statement, and sign the Statement with the same EXTERNAL_MU step you use for binaries:
Ship the Statement and its .sig file together; the SBOM itself is the Statement’s predicate field, and verifiers extract it after verification. The same pattern binds an SBOM to a binary or package: set the subject digest to the SHA-256 of the file instead of an image manifest digest. The Verifying a binary or SBOM signature section later in this post walks through the full verification workflow, including the subject check that completes the binding.
Quantum-resistant workload identity for build agents
Signing artifacts with ML-DSA keys addresses the integrity of the artifacts themselves. Separately, build agents running outside AWS (on-premises Jenkins, self-hosted GitHub Actions runners, or third-party CI/CD systems) authenticate using X.509 certificates or OIDC tokens typically signed with RSA or ECDSA. These authentication credentials represent a classical cryptographic dependency in the pipeline. IAM Roles Anywhere with ML-DSA certificates replaces that dependency: the credential that the external build agent presents, and the CA that vouches for it, no longer rely on algorithms that are vulnerable to quantum attack. (The TLS connection that carries the request still authenticates the AWS endpoint with a traditional certificate, as public TLS does today; that is a transport concern separate from the signing identity this post is about.) Build agents running on AWS with an attached IAM role don’t have this dependency: their API requests are authenticated with AWS Signature Version 4 (SigV4), which uses a symmetric hash-based message authentication code (HMAC-SHA256). Symmetric schemes like this are already considered quantum-resistant, so no additional action is needed.
Step 1: Register a workload identity CA as a trust anchor
For this walkthrough, reuse the subordinate CA that you created earlier; that avoids the monthly charge for a second CA, and the commands that follow assume it. In production, use a dedicated subordinate CA for workload identity certificates, separate from your code-signing CA. This limits the blast radius if either CA is compromised and has to be revoked, and it lets you apply different issuance policies to the two certificate types.
Step 2: Create the build agent role and a profile that references it
An IAM Roles Anywhere profile specifies which IAM roles a workload can assume after it authenticates with a certificate from your trust anchor. Create the role first. Its trust policy lets IAM Roles Anywhere assume it only through your trust anchor and only for a certificate whose subject common name identifies the build agent; without those conditions, any certificate that the trust anchor CA issues could assume the role. Its permissions policy grants only what signing requires, on only the code-signing key. Save the trust policy as build-agent-trust.json, replacing the trust anchor ARN with the one that create-trust-anchor returned in Step 1:
Save the permissions policy as build-agent-permissions.json, replacing the resource with your key’s ARN (aws kms describe-key --key-id alias/pqc-code-signing --query KeyMetadata.Arn --output text):
Create the role, attach the policy, and then create a profile that references the role:
Step 3: Issue the build agent certificate and configure the credential helper
Generate the build agent’s ML-DSA-65 key pair and CSR locally with OpenSSL, have the subordinate CA issue a client authentication certificate for it, and then configure the IAM Roles Anywhere credential helper to present that certificate:
The helper produces short-lived AWS Security Token Service (AWS STS) credentials scoped to the build role, replacing long-lived AWS access keys. In production, protect the ML-DSA private key with hardware-backed storage such as a Trusted Platform Module (TPM), an HSM, or an encrypted credential store with restricted file permissions. The plaintext file path shown here is for demonstration purposes. The private key authorizes access to your code-signing infrastructure and should be treated with the same protection level as any signing key. On Linux build agents, at minimum restrict the file to chmod 400 owned by the service account and consider using a PKCS#11 provider to avoid storing the raw key on disk entirely.
Verification and policy enforcement
A signing architecture is only as strong as its verification. Producing signatures is half the story. The other half is giving the systems and people that deploy your artifacts, such as deployment pipelines, Kubernetes admission controllers, and engineers installing a package, a concrete way to verify those signatures and make trust decisions before an artifact is deployed or run.
Distributing your trust chain
Before any verifier can check a signature, it needs to trust the CA that issued the code-signing certificate. This trust is established through a trust store: a local collection of root CA certificates that a system treats as authoritative. Trust stores exist in operating systems (such as /etc/pki/ca-trust/ on Linux, Keychain on macOS), language run-times (Java cacerts), container base images, and custom application configurations.
For private PKI hierarchies like the one in this post, your root CA certificate isn’t in any default public trust store. You must explicitly add it to the trust stores of every system that will verify your signatures. Common approaches include:
- Baking the root CA certificate into your container base images during the build process
- Distributing it through configuration management (AWS Systems Manager Parameter Store, AWS Secrets Manager, or your existing configuration tooling)
- Publishing it to an internal S3 bucket with versioning and access logging
- Storing it as an OCI artifact in Amazon ECR alongside the images it protects
Treat trust store management with the same rigor as credential management. If an attacker can inject a rogue root certificate into your trust stores, they can make forged signatures appear valid. Restrict write access to trust stores and audit changes through AWS CloudTrail or your system-level audit logs.
Exporting your certificate chain requires exporting the root CA, and then any subordinate CAs that issue certificates that will be involved in verifying signatures:
Verifiers use this chain to confirm that the code-signing public key was issued by a CA they trust.
The CAs in this post are created without a revocation configuration, and the verification commands that follow don’t check revocation status, which keeps the walkthrough short. In production, configure a certificate revocation list (CRL) or an Online Certificate Status Protocol (OCSP) responder on the subordinate CA (see Plan your AWS Private CA certificate revocation method in the AWS Private CA User Guide; both work with ML-DSA CAs). If you use a CRL, distribute it alongside the trust chain and add -crl_check -CRLfile <crl-file> to the openssl verify command below, where <crl-file> is the CRL that AWS Private CA publishes to your S3 bucket, so that a revoked code-signing certificate fails verification.
Verifying a binary or SBOM signature
Verify the code-signing certificate against the trust chain, confirm that it is a code-signing certificate issued to the signer you expect, extract its public key, and then verify the signature with OpenSSL 3.5. The second check matters: a chain check alone accepts every certificate that the CA hierarchy has issued, including the build agent client certificates from the previous section, so pin the expected subject in your verifier configuration:
A successful verification prints Signature Verified Successfully and returns an exit status of 0. A failed verification prints Signature Verification Failure and returns a nonzero exit status. In shell scripts, check the exit status of each command, or run the block with set -e, so that a failed certificate chain check stops the script before signature verification and a failed signature check blocks downstream actions.
For an SBOM, run the same three steps with sbom.statement.json as the -in file and sbom.statement.json.sig as the -sigfile, then add a fourth: confirm that the subject digest inside the verified Statement is the digest of the artifact you are about to deploy. Signature verification proves the Statement is authentic; the subject check proves it describes this artifact and not another one. The digest you compare against must come from the artifact itself, resolved from the registry for an image or computed from the file for a binary, never from the Statement. For an image, this is the same digest you verify the image signature against, so the two checks together establish that this SBOM describes this signed image.
For a binary, compare the subject digest to the output of sha256sum artifact.bin instead. Reject the SBOM if either the signature or the subject check fails.
Verifying a container image signature before deployment
Pull the ML-DSA signature from the OCI referrer artifact in Amazon ECR, then verify it against the image manifest digest:
The same oras discover command with --artifact-type "application/vnd.example.mldsa-sbom-attestation.v1" retrieves the SBOM attestation and its signature; verify them as described in the previous section, including the subject check. The jq filter shown takes the first referrer of the requested type. Don’t rely on the order in which a registry lists referrers, and expect more than one after an image has been re-signed: a production verifier should check every referrer of that type and accept the image if at least one signature verifies against a certificate that chains to your trust store. Taking only the first can reject a correctly signed image, but it can never accept an unsigned one.
To enforce these checks at deployment time, run them in a Kubernetes admission controller, a component that the API server calls before it accepts a pod and that can reject the request. You can write one as a validating admission webhook (see Dynamic Admission Control in the Kubernetes documentation), or use Open Policy Agent (OPA) Gatekeeper, an admission webhook that enforces policies evaluated by the OPA policy engine, and package the verification steps as a Gatekeeper external data provider that a constraint calls. For a worked example of gating Amazon EKS deployments on image signatures, see Announcing Container Image Signing with AWS Signer and Amazon EKS, which verifies AWS Signer signatures at admission with Kyverno and discusses the Gatekeeper and custom webhook alternatives. The ML-DSA signature referrer in this post is a custom artifact type that those tools don’t verify out of the box, so the verification steps in this section run in code you supply. In either design, the controller runs before any pod is scheduled, rejecting images that lack a valid ML-DSA signature referrer in Amazon ECR or whose SBOM attestation doesn’t name the image being deployed.
Preventive and detective controls
Signature verification stops the use of an untrusted artifact at deployment. Organization-level controls apply earlier and more broadly: preventive controls stop teams from creating new traditional signing keys, and detective controls record every signing operation so you can audit which principal signed each artifact and when.
Preventive guardrails. Use an AWS Organizations Service control policy (SCP) to block creation of traditional signing keys in security-critical accounts, forcing all new signing workloads to use ML-DSA:
This SCP prevents teams from creating new RSA or ECDSA signing keys, enforcing quantum-resistant signatures as the only option for new workloads. Note that this SCP constrains the algorithm family, not the parameter set: it would still permit an ML-DSA-44 key, which this architecture doesn’t use. Part 2 of this series picks up at exactly this point. It shows how to express a complete algorithm policy (in its example, approve ML-DSA-65 and ML-DSA-87 and exclude ML-DSA-44) as layered controls using the kms:KeySpec condition key in SCPs, IAM permission boundaries, and AWS KMS key policies; how to restrict the use of keys that already exist; and how to govern surfaces such as AWS Private CA that have no algorithm condition key. This SCP and the parameter-set SCP in Part 2 work together: attach both, and every new signing key must use an approved parameter set.
Audit trail. AWS CloudTrail logs every kms:Sign and kms:Verify API call, providing an immutable record of when each artifact was signed and by which principal. Use an organization trail and query its logs with Amazon Athena to analyze signing activity across accounts and correlate it with your deployment events.
Regulatory timeline and recommended actions
The following table maps regulatory milestones to specific actions you can take today using the architecture described in this post. This information is provided for general awareness only and does not constitute legal or compliance advice. Consult your legal and compliance teams to determine your organization’s specific obligations. For a broader overview of global PQC regulatory timelines, see Migrating to Post-Quantum Cryptography.
| Regulation | Deadline | Regulatory language | Action on AWS |
| CNSA 2.0: Support and prefer | 2025 (in effect) | CNSA 2.0 timeline (Sep 2022, FAQ v2.1 Dec 2024): Software and firmware signing must “support and prefer” CNSA 2.0 algorithms by 2025 | Create ML-DSA keys in AWS KMS, begin signing artifacts with ML-DSA alongside existing traditional signatures |
| CNSA 2.0: New system acquisitions | January 2027 | CNSA 2.0 FAQ v2.1 (Dec 2024): “All new NSS acquisitions must be CNSA 2.0 compliant at deployment, effective 1 January 2027” | Full ML-DSA PKI operational, IAM Roles Anywhere trust anchors using ML-DSA, all new builds carry ML-DSA signatures |
| EU Cyber Resilience Act | 11 December 2027 | Regulation (EU) 2024/2847, Annex I, Part I(2)(f): Products must “protect the integrity of stored, transmitted or otherwise processed data, personal or other, commands, programs and configuration against any manipulation or modification not authorised by the user, and report on corruptions”; Part II(7): Manufacturers must “provide for mechanisms to securely distribute updates” | ML-DSA code signing for all software updates shipped to EU markets, signed SBOMs accompany every release |
| CNSA 2.0: Exclusive use | 2030 | CNSA 2.0 timeline: Software and firmware signing must “exclusively use” CNSA 2.0 algorithms by 2030 | Remove traditional signing keys from supply chain, SCP enforcement of ML-DSA-only key creation |
| PCI DSS 4.0 Req 12.3.3 | Mandatory since March 2025 | PCI DSS v4.0.1, Requirement 12.3.3: “Cryptographic cipher suites and protocols in use are documented and reviewed at least once every 12 months”, including an up-to-date inventory of the cipher suites and protocols in use | Document cryptographic inventory in AWS KMS, tag ML-DSA versus traditional keys, maintain migration progress tracking |
Note for NSS customers and other CNSA 2.0 adopters: CNSA 2.0 is the quantum-resistant algorithm suite that the NSA requires for NSS, the federal systems that carry classified information or support intelligence, cryptologic, military command and control, and weapons functions. When ML-DSA is used for any signature purpose, including software and firmware signing, CNSA 2.0 permits only the ML-DSA-87 parameter set. (For software and firmware signing it also approves the stateful hash-based schemes LMS and XMSS, which this post doesn’t cover.) The ML-DSA-65 parameter set used in this post’s code-signing examples is appropriate for commercial workloads but isn’t permitted on NSS. CNSA 2.0 is binding only for NSS, but it’s followed voluntarily well beyond that boundary: by suppliers to the US defense and intelligence market, in the United States and allied countries, whose products must meet NSS requirements, and by commercial organizations in and outside the United States that adopt it as a conservative baseline because it specifies the highest NIST security category and removes the need to revisit parameter choices later. If your systems fall under CNSA 2.0 scope, or you’ve chosen to align with it, substitute ML-DSA-87 for all signing keys and certificates. Part 2 of this series shows how to make that substitution enforceable: the same kms:KeySpec controls that exclude ML-DSA-44 in its example can be pointed at ML_DSA_87 as the only approved key spec.
For organizations serving both US government and EU commercial markets, the January 2027 and December 2027 deadlines converge into a single migration window. Starting now provides margin for testing, key rotation planning, and certificate chain validation.
Clean up
You created a number of cryptographic resources in the prior steps and examples. AWS Private CA charges a monthly fee per CA and AWS KMS charges per key per month. To avoid ongoing charges, delete them if you aren’t actively using them. Start by listing what exists, so that you catch every resource you created, including duplicates from repeated runs. These commands list one Region; if you worked in more than one, repeat them with --region for each.
AWS Private CA has no command that lists the certificates a CA has issued. If you need serial numbers for the revocation step that follows, generate an audit report with aws acm-pca create-certificate-authority-audit-report, which writes a list of every certificate the CA has issued or revoked to an S3 bucket that grants the service write access.
Delete each resource that you don’t need, including any extra copies that the listing revealed, then run the listing again to confirm that nothing is left:
If you are adapting this for long-term use, plan for log retention. CloudTrail Event History keeps only the last 90 days of management events and is not a substitute for a trail. For the audit trail described earlier, create a trail that delivers to an S3 bucket with the lifecycle policy and access controls your retention requirements call for.
Conclusion
In this post, I showed you how to build a quantum-resistant software supply chain on AWS by combining ML-DSA signing in AWS KMS, ML-DSA certificate hierarchies in AWS Private CA, and ML-DSA workload authentication through IAM Roles Anywhere. The architecture covers the full pipeline; from authenticated build agents through signed binaries, container images, and SBOMs, to verification and policy enforcement at deployment.
Every ML-DSA capability used in this post is generally available. AWS Private CA and IAM Roles Anywhere support ML-DSA in all commercial AWS Regions, the AWS GovCloud (US) Regions, and the China Regions, and AWS KMS supports ML-DSA in commercial AWS Regions. You don’t need to wait for a standards body or third-party tool to finalize PQC support. The primitives are ready.
To get started, create your first ML-DSA key in AWS KMS and sign a test artifact. From there, extend to your PKI hierarchy, integrate IAM Roles Anywhere for your build agents, and add ML-DSA signatures to your container and SBOM workflows.
Building the pipeline is half the work. The other half is making sure the algorithm choices you made stay in force as accounts, teams, and standards change. That’s the subject of Part 2 of this series, Enforce your ML-DSA algorithm policy with SCPs and IAM, written for the security and governance teams who own that problem.
For more information, see:
- Quantum-resistant signing on AWS, Part 2: Enforce your ML-DSA algorithm policy with SCPs and IAM
- Post-quantum cryptography on AWS
- ML-DSA keys in AWS KMS
- Post-quantum ML-DSA code signing with AWS Private CA and AWS KMS
- IAM Roles Anywhere post-quantum digital certificates
- AWS post-quantum cryptography migration plan
If you have feedback about this post, submit comments in the Comments section below.