Post Syndicated from Explosm.net original https://explosm.net/comics/millennial-criminal
New Cyanide and Happiness Comic
Post Syndicated from Explosm.net original https://explosm.net/comics/millennial-criminal
New Cyanide and Happiness Comic
Post Syndicated from xkcd.com original https://xkcd.com/2857/

Post Syndicated from digiblurDIY original https://www.youtube.com/watch?v=VxxNBGVJrQs
Post Syndicated from Talks at Google original https://www.youtube.com/watch?v=JQHnT4Q9ZzE
Post Syndicated from BeardedTinker original https://www.youtube.com/watch?v=wLyXUIhfA-8
Post Syndicated from Григор original http://www.gatchev.info/blog/?p=2611
Една статия в BBC (https://www.bbc.com/news/world-europe-67427422) ме върна към спомен, който може би беше по-добре да бях забравил… Но пък може би ще е от полза за някого.
(Ако статията в BBC един ден не е достъпна: разказва за една съвременна руска доносничка, под името Анна Коробкова, и за жертвите ѝ. Топени, вероятно често и клеветени, че не подкрепят „специалната военна операция“ – руската агресия в Украйна. Тъй де, ако агресията не успее, може да се наложи Русия да изплаща репарации. Стандартът и доходите на Коробкова ще спаднат, може дори да ѝ се наложи да мине на пълно работно време. Така че тя не само има тези възгледи, има и интерес…)
Познавах такава „Анна Коробкова“ тук, в България. И за нея донасянето беше и доход, и смисълът на живота ѝ. Очите ѝ блестяха и пръскаше слюнки от кеф, докато разказваше. Как е пращала „където им е мястото“ всякакви „изроди“. „Капиталистически агенти“, разказвали политически вицове. „Безсрамни хлапета“, целували се на обществено място. „Смотаняк“ съсед, който не ѝ позволил да си свърже кухнята към неговия електромер. „Пижони“ с бради или къси полички. „Градска кокона“, която слагала саксии с цветя по стълбището на входа. „Пияница“, който се „скатавал“ от манифестация на 9 септември. „Забравил се“ съсед по вилно място, не разбрал, че мястото му се полага на нея и мъжа ѝ, а не на такива като него…
Тя нямаше компютър и база данни кого е натопила и какво му се е случило, като Коробкова. Имаше картотека с листче в нея за всяка жертва. „Ейййй такава!“, показваше гордо с ръце близо метър дължина. „Когото съм почнала, доде не го свърша, не съм го оставяла! Един няма да съм помилвала! Всичко си пишех там – кога за кого съм писала, какво съм написала, какво кога съм му докарала…“
Ненавистта ѝ към промените нямаше как да бъде предадена с думи. Те ѝ бяха отнели абсолютно всичко. Не, не хубавия апартамент, нито пък вилата. Нито дори бижутата на „градската кокона“, оказали се незнайно как у нея. Заради тези неща тя беше съсипвала и смазвала хора, но всъщност те бяха само израз на истински ценното ѝ – възможността да тъпче и съсипва който поиска. Промените ѝ бяха отнели именно него – отмъщаването на по-свестните от нея за това, че са по-свестни…
Гледах я, стопена от болестта до скелет в кожа, пръскащ ненавист, и изведнъж си я представих като Ам-гъл. Сдобил се с Пръстена на всевластието, но поискал и получил от него по своята нищожна мяра. Да може безнаказано да хапе по краката и да стиска за гушите по-читавите от него…
Беше стигнала дотам в последните си часове да може единствено да сподели, и така преживее отново, това си щастие. С човек, за който не знаеше на практика нищо, освен че се е опитал преди години да спаси мъжа ѝ. Сигурно в изнемощението си приравняваше това до споделяне на „ценностите“ ѝ… Едва се сдържах да не избухна, да си тръгна и да не я видя никога повече. Спираше ме единствено някакво едва доловимо усещане в дъното на ума ми, че дори такъв човек заслужава една последна милост. Някой да го изслуша, преди да си е тръгнал. Да му даде възможността да си припомни и преживее пак каквото е имал за щастие. И заради него, и още повече заради собствената си съвест…
… Дълго време си мислех – какво ли е подходящото определение за такъв човек. Чак когато статията в BBC ми върна спомена, името „Коробкова“ изведнъж намери мястото си в пъзела. Тази жена беше нашенска тоталитарна Коробочка. Изкривена дотам да събира в картотека – материален израз на истинската ѝ същност, точно както заключените шкафове с натрупани неща са истинската същност на Гоголевата Коробочка – единственото щастие, което е могла да има. Ужасяващо с безчовечността си..
Чудех се – какво ли я е направило такава? Може би произход или преживяно – и до днес не зная нищичко и за двете, нито има вече как да науча. Но знам за устройството и работата на мозъка повече от немалко неврофизиолози. Вероятно дефицит в латералния стриатум, по-точно в еферентите на кортико-таламо-стриато-кортикалния кръг. Водещ до неоснователно, но безмилостно усещане за собствена незначимост. Което причинява страдание, силно като това от жестока болка, ако и с различен източник. (За който не знае – усещането за болка и изпитването на страдание от нея са два различни механизма. Подобно страдание може да носи всяко усещане, което говори за някаква опасност, ако е достатъчно силно.)
И тя е търсела как да облекчи това усещане, според каквото е знаела и виждала. А комунистическото общество е имало нужда и е предлагало нужното ѝ облекчение срещу писане на доноси… Но тъй като усещането е болестно, няма как да се задоволи трайно. И в търсене на облекчение тя е слизала все по-надолу по спиралата. Научила се е да вярва в глупости, да мрази каквото всъщност не ѝ вреди. Да се самооправдава за причинявана на другите болка – тоест, отначало вероятно дори е изпитвала угризения… Всъщност тя беше пациент, страдалец, не злодей по същност. Злодей я бяха направили болестта ѝ и болното общество.
Да, сигурно всеки злодей си има причина да е такъв. Да, злодеите трябва да бъдат спирани непоколебимо, преди да причинят зло на други хора и може би да ги превърнат също в злодеи. Но в същността си те имат нужда от лечение, от помощ. Наказанието може би понякога е нужната им помощ, но сигурно не винаги.
Глупости? Може би. Но един лекар е длъжен да мисли така. Юридическото право да бъдеш лекар го дава дипломата, но моралното право го дава този начин на мислене.
Post Syndicated from Explosm.net original https://explosm.net/comics/no-nut
New Cyanide and Happiness Comic
Post Syndicated from Oglaf! -- Comics. Often dirty. original https://www.oglaf.com/eyeroll/


Post Syndicated from The Hook Up original https://www.youtube.com/watch?v=F7IhSKJ41rU
Post Syndicated from Will Taillac original https://www.servethehome.com/silicon-power-ud90-4tb-nvme-ssd-review/
In our Silicon Power UD90 review, we see how this 4TB NVMe SSD performs since it is the cheapest 4TB NVMe SSD we could find
The post Silicon Power UD90 Review The Cheapest 4TB M.2 NVMe SSD appeared first on ServeTheHome.
Post Syndicated from Techmoan original https://www.youtube.com/watch?v=xRWFH3tnWaY
Post Syndicated from Йовко Ламбрев original https://www.toest.bg/sedmitsata-13-18-noemvri/

Не лесно да бъдат изброени темите на седмицата, които ангажираха обществената енергия във вътрешнополитически план. Отзвукът от местните избори още не е отшумял и ще продължи да определя контекста и посоката на много от събитията и през идните няколко седмици.
Може би само драмата с властта в БФС няма връзка с изборите, защото продължава отдавна и беше очаквано да ескалира. Иначе, сблъсъците в София между полицията и футболните фенове показаха за пореден път, че МВР отдавна има нужда от сериозна реформа и някак естествено му идва да залита към полицейски произвол. Разбира се, от окървавените кадри не пропуснаха да се възползват политиците.
В крайна сметка сякаш най-важното от седмицата за България в политическата плоскост е напрежението в т.нар. сглобка, породено от разместванията на пластовете след изборите и наближаващата ротация на премиерите и силите. Емилия Милчева подробно обследва по-важните детайли по темата в анализа си „Игрите с дерогацията и „Лукойл“.
„Счупеното правосъдие и прекършената хуманност“ пък е заглавието на материала на Светла Енчева, която чрез няколко нашумели случая доказва общото впечатление, че правосъдната система е майка за едни, но мащеха за други. И ни връща към темата за възстановителното правосъдие, което, уви, е почти невъзможен инструмент в среда с все по-голям дефицит на хуманност.
В новия си разговор за здравеопазването Надежда Цекулова ни запознава както с д-р Антоанета Тончева, така и с проблемите с достъпа до медицински храни в България. В интервюто се разказва за дългогодишните усилия на лекари, пациенти, семействата им и няколко граждански организации, които успяват да обърнат ситуацията у нас от „тук няма нищо“ до това НЗОК да включи по-тежките форми на малнутриция в списъка със заболявания, за които се заплащат терапии.
Преходът от здравеопазване към научни новини би трябвало да е някак естествен. Още повече че Михаил Ангелов тази седмица е подготвил много интересен материал, пълен с прелюбопитни теми. Дали наистина знаете какво гледат слънчогледите, следвайки слънцето? Понеже се оказва, че това не е толкова очевидно, както и някои детайли около изчезването на динозаврите. А знаете ли за кризата на възпроизводимостта в науката или как ще се борим със застрашаващи ни астероиди? Всичко това ще научите в най-новия текст в рубриката ни „Научни новини“.
Тазседмичната ни препоръка в „На второ четене“ е някак едновременно в политиката и литературата, по същия начин, по който самата книга е едновременно литература и журналистика. Стефан Иванов ни връща към пътешествието на полския репортер Яцек Хуго-Бадер от Варшава до Владивосток, описано в солидното му изследване „Алкохолен делир“ с подзаглавие „Литературни репортажи за Русия от XXI век“. Текстът на Стефан е много интересен и затова не бих искал да издавам нищо повече за него. Но споделям напълно оценката, че адски много липсват такива книги и такива репортажи за България.
И разбира се, накрая една голяма изненада. Нева Мичева се завръща на (уеб)страниците на „Тоест“ със страхотен материал за нов музей в Барселона, който показва над 200 цензурирани и заклеймени творби. А Нева ни разхожда задочно сред експозицията, споделяйки толкова много детайли, че проследяването им ще ви разкаже със сигурност неща, които не сте знаели. Не пропускайте препратките в нейните текстове. Никога!
Приятно четене!
Post Syndicated from Raghu Kuppala original https://aws.amazon.com/blogs/big-data/use-custom-domain-names-with-amazon-redshift/
Amazon Redshift is a fully managed, petabyte-scale data warehouse service in the cloud. With Amazon Redshift, you can analyze all your data to derive holistic insights about your business and your customers.
Amazon Redshift now supports custom URLs or custom domain names for your data warehouse. You might want to use a custom domain name or CNAME (Canonical Name) for the following reasons:
In this post, we discuss how you can modify your data warehouse to use custom domain names and how to connect to a data warehouse that has been configured with a custom URL.
To get started, you need a registered domain name. You can use Amazon Route 53 or a third-party domain registrar to register a domain.
You also need a validated Secure Sockets Layer (SSL) certificate for your custom endpoints. This is to verify ownership of the domain name and secure communication. You can use AWS Certificate Manager (ACM) to provision, manage, and deploy public SSL/TLS certificates. You need to use verify-full mode, which ensures that the connections are encrypted and verifies that the hostname of the server matches the hostname in the certificate.
Lastly, you need to attach the necessary permissions to the AWS Identity and Access Management (IAM) role that’s assigned to the relevant users and groups that will manage your Redshift data warehouse. These vary depending on if you’re using Amazon Redshift provisioned or Amazon Redshift Serverless. The permissions needed for the required actions are listed in the following table.
| Action | IAM Permission | |
| Redshift Provisioned | Redshift Serverless | |
| Create custom domain for datawarehouse |
redshift:CreateCustomDomainAssociation acm:DescribeCertificate |
redshiftServerless:CreateCustomDomainAssociation acm:DescribeCertificate |
| Renaming cluster that has custom domain name | acm:DescribeCertificate | Not needed |
| Changing certificate for association |
redshift:ModifyCustomDomainAssociation acm:DescribeCertificate |
redshiftServerless:UpdateCustomDomainAssociation acm:DescribeCertificate |
| Deleting custom domain | redshift:DeleteCustomDomainAssociation | redshiftServerless:DeleteCustomDomainAssociation |
| Connecting to the data warehouse using custom domain name | redshift:DescribeCustomDomainAssociations | Not needed |
The following screenshot shows an example of creating an IAM policy on the IAM console.

The custom domain name typically includes the root domain and a subdomain, like mycluster.mycompany.com. You can either register a new root domain or use an existing one. For more information about registering a new domain with Route 53, refer to Registering a new domain.
After you set that up, you can add a DNS record that points your custom CNAME to the Redshift endpoint. You can find the data warehouse endpoint on the Amazon Redshift console on the cluster detail page.
The following screenshot illustrates locating a provisioned endpoint.

The following screenshot illustrates locating a serverless endpoint.

Now that you have created the CNAME entry, you can request a certificate from ACM. Complete the following steps:


The status should be Issued.

Now that you have created the CNAME record and certificate, you can create the custom domain URL for your Redshift cluster using the Amazon Redshift console.
To create a custom domain for a provisioned instance, complete the following steps:


You should now have a custom domain name associated to your provisioned data warehouse. The custom domain name and custom domain certificate ARN values should now be populated with your entries.

Note that sslmode=verify-full will only work for the new custom endpoint. You can’t use this mode with the default endpoint; you can connect to the default endpoint by using other SSL modes like sslmode=verify-ca.
To create a custom domain for a serverless instance, complete the following steps:


You should now have a custom domain name associated to your serverless workgroup. The custom domain name and custom domain certificate ARN values should now be populated with your entries.

Note that, as with a provisioned instance, sslmode=verify-full will only work for the new custom endpoint. You can’t use this mode with the default endpoint; you can connect to the default endpoint by using other SSL modes like sslmode=verify-ca.
You can now connect to your cluster using the custom domain name. The JDBC URL would be similar to jdbc:redshift://prefix.rootdomain.com:5439/dev?sslmode=verify-full, where prefix.rootdomain.com is your custom domain name and dev is the default database. Use your preferred editor to connect to this URL using your user name and password.
To update the certificate association using the Amazon Redshift console, navigate to your provisioned cluster details page and on the Actions menu, choose Edit custom domain name. Update the domain name and ACM certificate, then choose Save changes.

To change the cluster’s ACM certificate associated to the custom domain using the AWS Command Line Interface (AWS CLI), use the following command:
To update the certificate using the Amazon Redshift console, navigate to your serverless workgroup details page and on the Actions menu, choose Edit custom domain name. Update the domain name and ACM certificate, then choose Save changes.

To change the serverless workgroup’s ACM certificate associated to the custom domain using the AWS CLI, use the following command:
To delete your custom domain, navigate to the provisioned cluster details page. On the Actions menu, choose Delete custom domain name. Enter delete to confirm, then choose Delete.

To use the AWS CLI, use the following code:
To delete your custom domain, navigate to the serverless workgroup details page. On the Actions menu, choose Delete custom domain name. Enter delete to confirm, then choose Delete.

To use the AWS CLI, use the following code:
In this post, we discussed the benefits of using custom domain names for your Redshift data warehouse and the steps needed to associate a custom domain name with the Redshift endpoint. For more information, refer to Using a custom domain name for client connections.
 Raghu Kuppala is an Analytics Specialist Solutions Architect experienced working in the databases, data warehousing, and analytics space. Outside of work, he enjoys trying different cuisines and spending time with his family and friends.
 Sam Selvan is a Principal Analytics Solution Architect with Amazon Web Services.
 Yanzhu Ji is a Product Manager in the Amazon Redshift team. She has experience in product vision and strategy in industry-leading data products and platforms. She has outstanding skill in building substantial software products using web development, system design, database, and distributed programming techniques. In her personal life, Yanzhu likes painting, photography, and playing tennis.
 Nikhitha Loyapally is a Senior Software Development Engineer for Amazon Redshift.
Post Syndicated from Explosm.net original https://explosm.net/comics/spiders
New Cyanide and Happiness Comic
Post Syndicated from Eric Johnson original https://aws.amazon.com/blogs/compute/introducing-support-for-read-only-management-events-in-amazon-eventbridge/
This post is written by Pawan Puthran, Principal Specialist TAM, Serverless and Heeki Park, Principal Solutions Architect, Serverless
Today, AWS is announcing support for read-only management events in Amazon EventBridge. This feature enables customers to build rich event-driven responses from any action taken on AWS infrastructure to detect security vulnerabilities or identify suspicious activity in near real-time. You can now gain insight into all activity across all your AWS accounts and respond to those events as is appropriate.
EventBridge is a serverless event bus used to decouple event producers and consumers. Event producers publish events onto an event bus, which then uses rules to determine where to send those events. The rules determine the downstream targets that receive and process the events, and EventBridge routes the events accordingly.
EventBridge allows customers to monitor, audit, and react, in near real-time, to changes in their AWS environments through events generated by AWS CloudTrail for AWS API calls. CloudTrail records actions taken by a user, role, or an AWS service as events in a trail. Events include actions taken in the AWS Management Console, AWS Command Line Interface (CLI), and AWS SDKs and APIs.
Previously, only mutating API calls are published from CloudTrail to EventBridge for control plane changes. Events for mutating API calls include those that create, update, or delete resources. Control plane changes are also referred to as management events. EventBridge now supports non-mutating or read-only API calls for management events at no additional cost. These include those that list, get, or describe resources.
CloudTrail events in EventBridge enable you to build rich event-driven responses from any action taken on AWS infrastructure in real time. Previously, customers and partners often used a polling model to iterate over a batch of CloudTrail logs from Amazon S3 buckets to detect issues, making it slower to respond. The launch of read-only management events enables you to detect and remediate issues in near real-time and thus improve the overall security posture.
You can start receiving read-only management events if a CloudTrail is configured in your account and if the event selector for that CloudTrail is configured with ReadWriteType of either All or ReadOnly. This ensures that the read-only management events are logged in the CloudTrail and are then passed to EventBridge.
For example, you can receive an alert if a production account lists resources from an IP address outside of your VPC. Another example could be if an entity, such as a principal (AWS account root user, IAM role, or IAM user), calls the ListInstanceProfilesForRole or DescribeInstances APIs without any prior record of doing so. A malicious actor could use stolen credentials for conducting this reconnaissance to find more valuable credentials or determine the capabilities of the credentials they have.
To enable read-only management events with an EventBridge rule, in addition to the existing mutating events, use the new ENABLED_WITH_ALL_CLOUDTRAIL_MANAGEMENT_EVENTS state when creating the rule.
Resources:
  SampleMgmtRule:
    Type: 'AWS::Events::Rule'
    Properties:
      Description: 'Example for enabling read-only management events'
      State: ENABLED_WITH_ALL_CLOUDTRAIL_MANAGEMENT_EVENTS
      EventPattern:
        source:
          - aws.s3
        detail:
          - AWS API Call via CloudTrail
      Targets:
        - Arn: 'arn:aws:sns:us-east-1:123456789012:notificationTopic'
          Id: 'NotificationTarget'
You can also create a rule on an event bus to specify a particular API action by using the eventName attribute under the detail key:
aws events put-rule --name "SampleTestRule" \
--event-pattern '{"detail": {"eventName": ["ListBuckets"]}}' \
--state ENABLED_WITH_ALL_CLOUDTRAIL_MANAGEMENT_EVENTS --region us-east-1
The following section describes a couple of the scenarios where you can set up EventBridge rules and take actions on non-mutating or read-only management events.
Consider the security team of your organization that wants a notification whenever GetSecretValue API calls for AWS Secrets Manager are made through the CLI. They can then investigate if these calls are made by entities outside their organization or by an unauthorized user and take corrective actions to deny such requests.
When the application calls the GetSecretValue API to retrieve the secrets via a CLI, it generates an event like this:
{
    "version": "0",
    "id": "d3368cc1-e6d6-e4bf-e58e-030f03b6eae3",
    "detail-type": "AWS API Call via CloudTrail",
    "source": "aws.secretsmanager",
    "account": "111111111111",
    "time": "2023-11-08T19:58:38Z",
    "region": "us-east-1",
    "resources": [],
    "detail": {
        "eventVersion": "1.08",
        "userIdentity": {
            "type": "IAMUser",
            "principalId": "AAAAAAAAAAAAA",
            "arn": "arn:aws:iam:: 111111111111:user/USERNAME"
            // ... additional detail fields
        },
        "eventTime": "2023-11-08T19:58:38Z",
        "eventSource": "secretsmanager.amazonaws.com",
        "eventName": "GetSecretValue",
        "awsRegion": "us-east-1",
        "userAgent": "aws-cli/2.13.15 Python/3.11.4 Darwin/22.6.0 exe/x86_64 prompt/off command/secretsmanager.get-secret-value"
        // ... additional detail fields
    }
}
You set the following event pattern on the rule to filter incoming events to specific consumers. This example also uses the recently launched wildcard filter for event matching.
{
    "source": [
        "aws.secretsmanager"
    ],
    "detail-type": [
        "AWS API Call via CloudTrail"
    ],
    "detail": {
        "eventName": [
            "GetSecretValue"
        ],
        "userAgent": [
            {
                "wildcard": "aws-cli/*"
            }
        ]
    }
}
You can create a rule matching a combination of these event properties. In this case, you are matching for aws.secretsmanager as source, AWS API Call via CloudTrail as detail-type, GetSecretValue as detail.eventName and wildcard pattern on detail.userAgent for aws-cli/*. You can filter detail.userAgent with a wildcard to catch events that come from a particular application or user.
You can then route these events to a target like an Amazon CloudWatch Logs stream to record the change. You can also route them to Amazon SNS to get notified via email subscription. You can alternatively route them to an AWS Lambda function in which you perform custom business logic.
aws events put-rule --name "monitor-secretsmanager" \
--event-pattern '{"source": ["aws.secretsmanager"], "detail-type": ["AWS API Call via CloudTrail"], "detail": {"eventName": ["GetSecretValue"], "userAgent": [{ "wildcard": "aws-cli/*"} ]}}' \
--state ENABLED_WITH_ALL_CLOUDTRAIL_MANAGEMENT_EVENTS --region us-east-1
Rule details
aws events put-targets --rule monitor-secretsmanager --targets Id=1,Arn=arn:aws:logs:us-east-1:ACCOUNT_ID:log-group:/aws/events/getsecretvaluelogs --region us-east-1
Target details
You can then use CloudWatch Log Insights to search and analyze log data using the CloudWatch Log Insights query syntax where you can retrieve the user who performed these calls.
Consider the security or data perimeter team who wants to secure data residing in Amazon S3 buckets. The team requires notifications whenever API calls to list S3 buckets or to list S3 objects are made.
When a user or application calls the ListBuckets API to discover the available buckets, it generates the following CloudTrail event:
{
    "version": "0",
    "id": "345ca690-6510-85b2-ff02-090493a33cf1",
    "detail-type": "AWS API Call via CloudTrail",
    "source": "aws.s3",
    "account": "111111111111",
    "time": "2023-11-14T17:25:30Z",
    "region": "us-east-1",
    "resources": [],
    "detail": {
        "eventVersion": "1.09",
        "userIdentity": {
            "type": "IAMUser",
            "principalId": "principal-identity-uuid",
            "arn": "arn:aws:iam::111111111111:user/exploited-user",
            "accountId": "111111111111",
            "accessKeyId": "AAAABBBBCCCCDDDDEEEE",
            "userName": "exploited-user"
        },
        "eventTime": "2023-11-14T17:25:30Z",
        "eventSource": "s3.amazonaws.com",
        "eventName": "ListBuckets",
        "awsRegion": "us-east-1",
        "sourceIPAddress": "11.22.33.44",
        "userAgent": "[aws-cli/2.13.29 Python/3.11.6 Darwin/22.6.0 exe/x86_64 prompt/off command/s3api.list-buckets]",
        "requestParameters": {
            "Host": "s3.us-east-1.amazonaws.com"
        },
        "readOnly": true,
        "eventType": "AwsApiCall",
        "managementEvent": true
        // additional detail fields
    }
}
In this scenario, you can create an EventBridge rule matching for aws.s3 for the source field, and ListBuckets for the eventName.
{
    "source": [
        "aws.s3"
    ],
    "detail-type": [
        "AWS API Call via CloudTrail"
    ],
    "detail": {
        "eventName": [
            "ListBuckets "
        ]
    }
}
However, listing objects alone might only be the beginning of a potential data exfiltration attempt. You may also want to check for ListObjects or ListObjectsV2 as the next action, followed by a large number of GetObject API calls. You can create the following rule to match those actions.
{
    "source": [
        "aws.s3"
    ],
    "detail-type": [
        "AWS API Call via CloudTrail"
    ],
    "detail": {
        "eventName": [
            "ListObjects",
            "ListObjectsV2",
            "GetObject"
        ]
    }
}
You could potentially forward this log information to your central security logging solution or use anomaly detection machine learning models to evaluate these events to determine the appropriate response to these events.
You can also create rules to receive the read-only events to cross account or cross-Region to centralize your AWS events into one Region or one AWS account for auditing and monitoring purposes. For example, capture all workload events from multiple Regions in eu-west-1 for compliance reporting.

Cross Account example for default event bus and custom event bus
To do this, create a rule using the new ENABLED_WITH_ALL_CLOUDTRAIL_MANAGEMENT_EVENTS state on the default bus of the source account or the Region, targeting either default event bus or a custom event bus of the target account or Region. You must also ensure you have a rule configured with ENABLED_WITH_ALL_CLOUDTRAIL_MANAGEMENT_EVENTS to be able to invoke the targets in the destination account or Region.

Cross-Region setup for CloudTrail read-only events
This blog shows how customers can build rich event-driven responses with the newly launched support for read-only events. You can now observe events as potential signals of reconnaissance and data exfiltration activities from any action taken on AWS infrastructure in near real time. You can also use the cross-Region and cross-account functionality to deliver the read-only events to a centralized AWS account or Region, enhancing the capability for auditing and monitoring across all your AWS environments.
For more serverless learning resources, visit Serverless Land.
Post Syndicated from Brian Beach original https://aws.amazon.com/blogs/devops/using-amazon-codecatalyst-with-amazon-virtual-private-cloud/
Amazon CodeCatalyst is an integrated service for software development teams adopting continuous integration and deployment practices into their software development process. CodeCatalyst puts the tools you need all in one place. You can plan work, collaborate on code, and build, test, and deploy applications with continuous integration/continuous delivery (CI/CD) tools. You can also integrate AWS resources with your projects by connecting your AWS accounts to CodeCatalyst spaces.
CodeCatalyst recently announced support for Amazon Virtual Private Cloud (Amazon VPC). Amazon VPC is a logically isolated virtual network that you’ve defined. This virtual network closely resembles a traditional network that you’d operate in your own data center, with the benefits of using the scalable infrastructure of AWS. VPC connectivity from CodeCatalyst allows you to publish a package to an artifact repository in a private subnet, query an Amazon Relational Database Service (Amazon RDS) in a private subnet, deploy an update to Amazon Elastic Kubernetes Service (Amazon EKS) in a private subnet, and much more. In this post I will show you how to deploy changes to an Amazon Aurora database in a private Subnet using CodeCatalyst.
CodeCatalyst now allows you to create a VPC connection associated with an AWS Account. A VPC connection is a CodeCatalyst resource which contains all of the configuration needed to access a VPC. Space administrators can add their own VPC connections in the Amazon CodeCatalyst console on behalf of space members. Once created, members of the space can use the VPC connection in their projects.
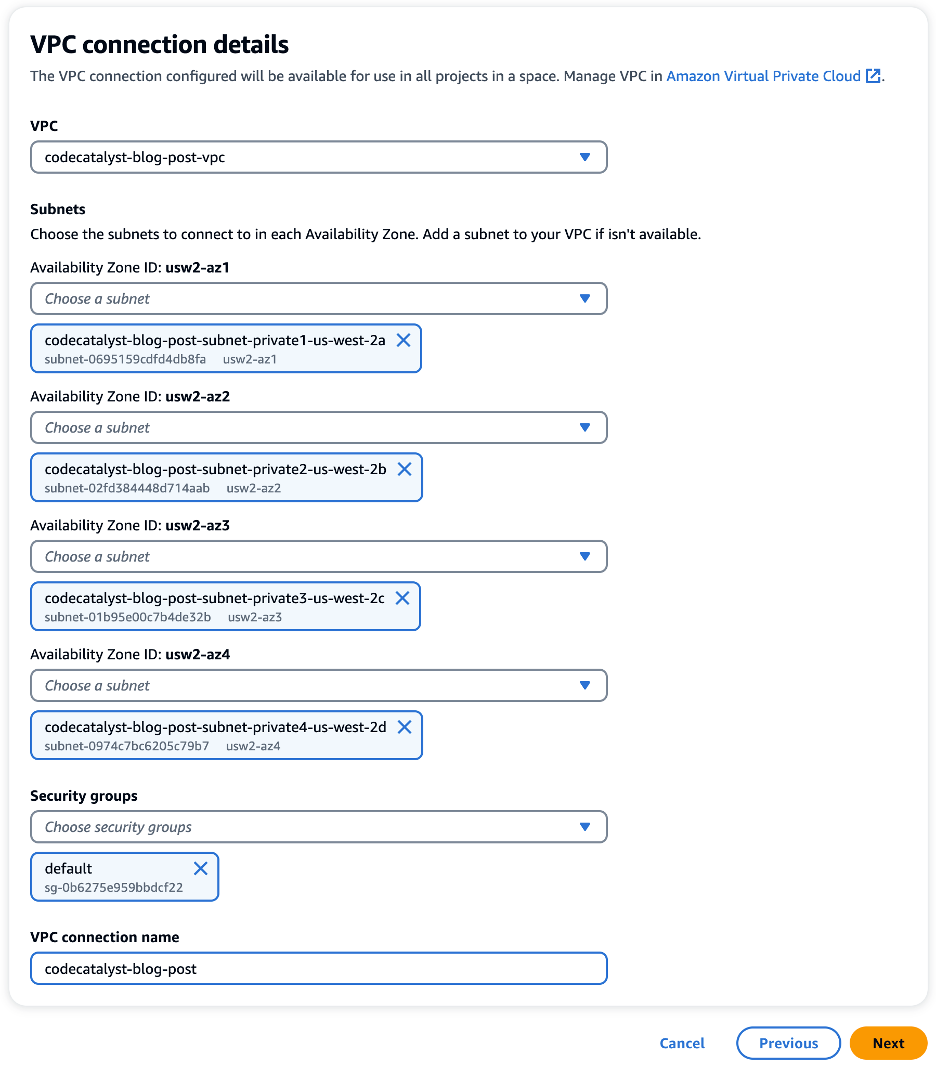
For this walkthrough, I have created a VPC in the us-west-2 region. My VPC has both a private and public subnet in each Availability Zone (AZ) . Next, I created a VPC connection in CodeCatalyst. In the following image, I have configured a VPC connection with a private subnet in each of the four AZs. In addition, I have added a security group that will be associated with resources that use this VPC connection allowing me to controls the traffic that is allowed to reach and leave the resources.
Before we move on, let’s take a moment to discuss how CodeCatalyst VPC connections work. When CodeCatalyst creates a workflow, an elastic network interface (ENI) is added to your VPC as shown in the following image. Note that the image shows two subnets a single availability zone for simplicity. However, as discussed earlier, the VPC used in this walkthrough has eight subnets in four availability zones.
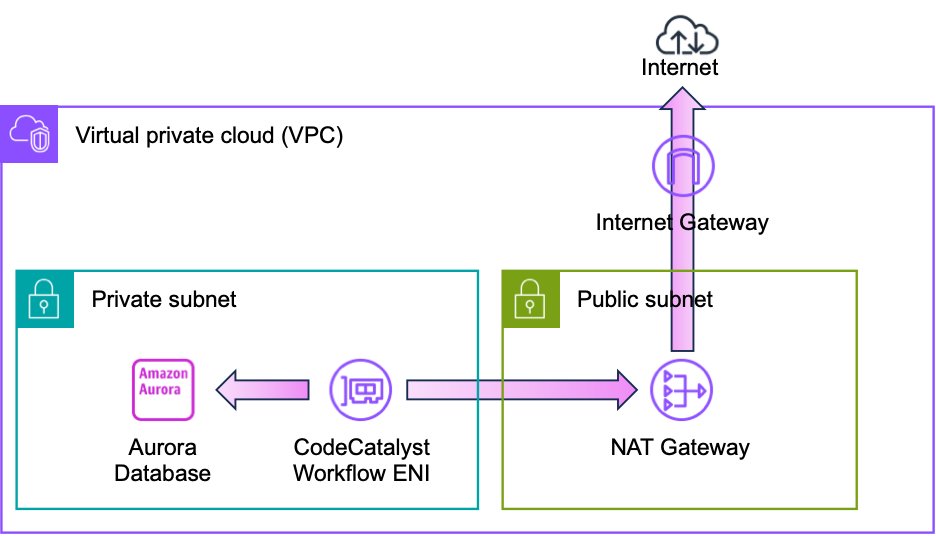
CodeCatalyst can now use this ENI to access private resources in the VPC. For example, an Amazon Aurora database. It is important to note that the ENI does not have a public IP address. Therefore, I have provided a path to the internet. Internet connectivity allows CodeCatalyst to access the APIs as well as publicly available repositories such as GitHub, PyPI, NPM, Docker Hub, et cetera. In this example, I use a NAT gateway for internet access, but I will discuss advanced network topologies later in this post.
With the VPC connection in place, I can also use the VPC connection in a workflow. Amazon CodeCatalyst workflows are continuous integration and continuous delivery (CI/CD) pipelines that enable you to easily build, test and deploy applications. CodeCatalyst Workflows help you reliably deliver high-quality application updates frequently, quickly and securely. CodeCatalyst allows you to quickly assemble and configure actions – including GitHub Actions – to compose workflows that automate your CI/CD pipeline, test reporting, and other manual processes. You can learn more about CodeCatalyst workflows in the CodeCatalyst User Guide.
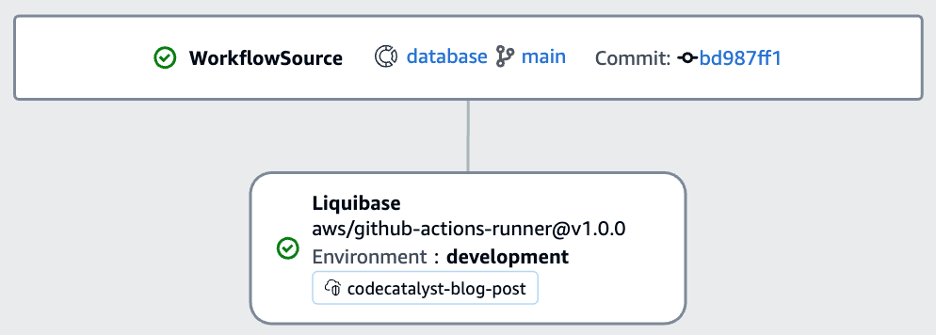
As a database developer, my workflow often needs to update the schema of the Aurora database. For this walkthrough, I will use Liquibase to deploy a schema change to the Aurora PostgreSQL database. If you are not familiar with Liquibase, you can refer to my prior post on Running GitHub Actions in a private Subnet with AWS CodeBuild for an overview. CodeCatalyst allows you to use GitHub Actions alongside native CodeCatalyst actions in a CodeCatalyst workflow. I will use the Liquibase Update GitHub Action as shown in the following image.
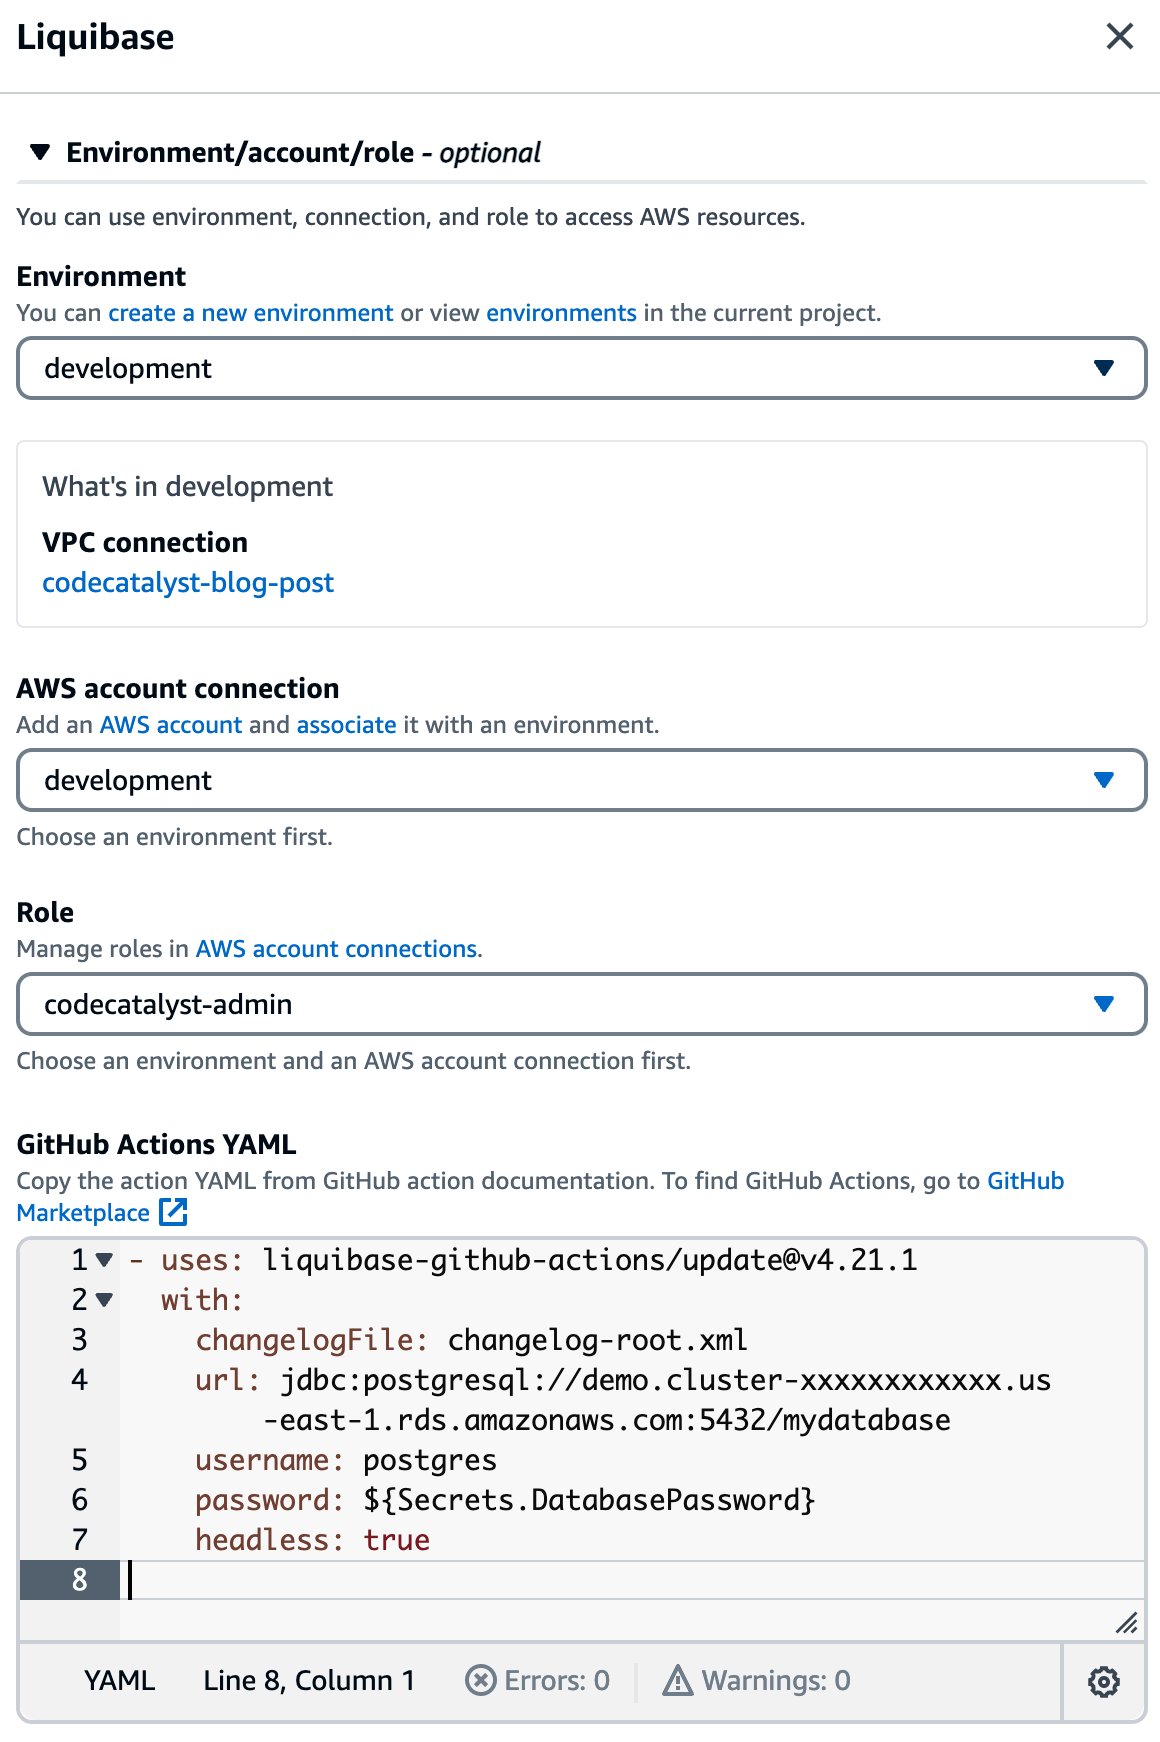
If I edit the Liquibase action, I can see the details of the configuration as shown in the following image. You will notice that I have selected the codecatalyst-blog-post VPC connection in the environment configuration. This will allow the Liquibase action to access private resources in my VPC including the Aurora database. Also notice how easy it is to incorporate a GitHub action in my workflow through the YAML configuration. Finally, notice that I can access CodeCatalyst secrets, such as the password, in my configuration.
When I save the workflow and run it, you can see that the Liquibase action is able to successfully connect to the database. Note that in this example, there were no pending changes, so Liquibase reports “Database is up to date, no changesets to execute.”
####################################################
##   _     _             _ _                      ##
##  | |   (_)           (_) |                     ##
##  | |    _  __ _ _   _ _| |__   __ _ ___  ___   ##
##  | |   | |/ _` | | | | | '_ \ / _` / __|/ _ \  ##
##  | |___| | (_| | |_| | | |_) | (_| \__ \  __/  ##
##  \_____/_|\__, |\__,_|_|_.__/ \__,_|___/\___|  ##
##              | |                               ##
##              |_|                               ##
##                                                ##
##  Get documentation at docs.liquibase.com       ##
##  Get certified courses at learn.liquibase.com  ##
##  Free schema change activity reports at        ##
##      https://hub.liquibase.com                 ##
##                                                ##
####################################################
Starting Liquibase at 13:04:37 (version 4.21.1 #9070)
Liquibase Version: 4.21.1
Liquibase Open Source 4.21.1 by Liquibase
Database is up to date, no changesets to execute

UPDATE SUMMARY
Run:                          0
Previously run:               2
Filtered out:                 0
-------------------------------
Total change sets:            2

Liquibase command 'update' was executed successfully.
Obviously, a database is just one possible example. There are many private resources that I may need to access as a developer. A few more examples include: Amazon Elastic Compute Cloud (Amazon EC2) instances, Amazon Elastic File System (EFS) shares, and Amazon ElastiCache clusters among many others.
At the beginning of this post, I introduced a simple VPC with public and private subnets, and a NAT gateway. However, CodeCatalyst will work with more complex VPC topologies that are common among enterprise customers. For example, imagine that my application is deployed across multiple regions for both improved availability and lower latency. However, I prefer to manage all of CodeCatalyst projects in a single region, us-west-2, close to the developers.
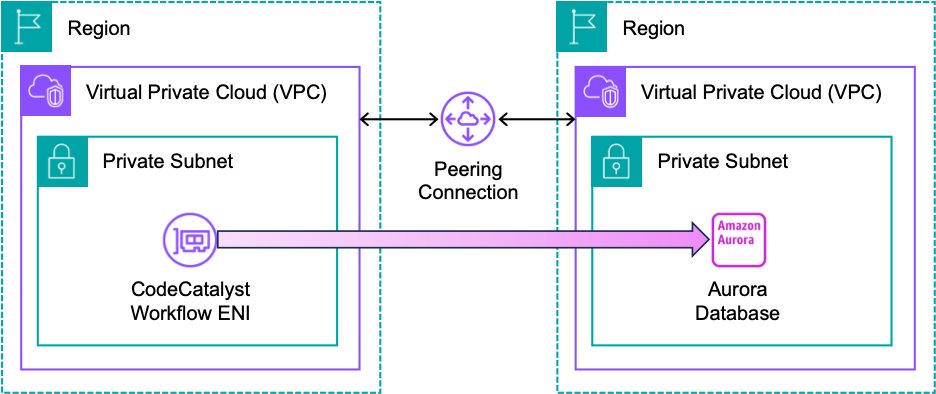
As a result, CodeCatalyst workflows all run in us-west-2. This does not mean that I can only deploy changes to the same region as the CodeCatalyst project. CodeCatalyst can use the full complement of VPC features. For example, in the following architecture, I am using VPC peering to allow CodeCatalyst to update an Aurora database in another region. The workflow is identical to the version I created previously, other than changing the Aurora endpoint, and possibly the username and password. Note that I still have an internet connection which I have omitted from this diagram for simplicity.
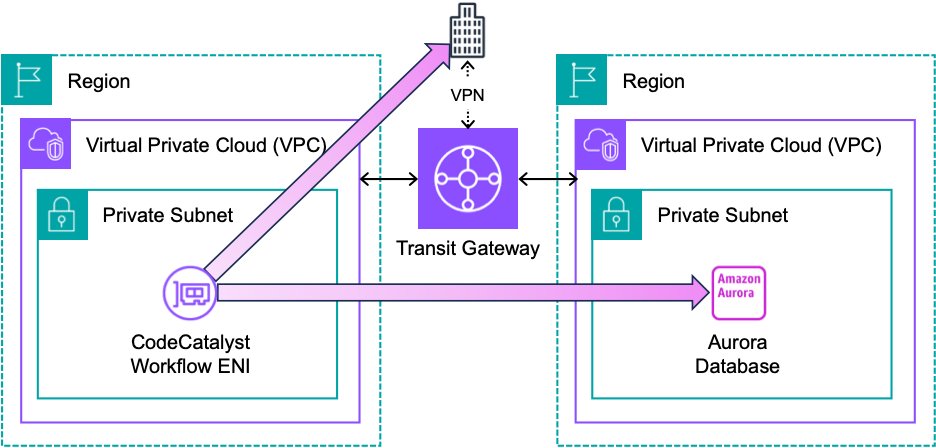
Alternatively, I could use an AWS Transit Gateway (TGW) rather than a peering connection as shown in the following architecture. CodeCatalyst can use the TGW to update resources in another region. Furthermore, CodeCatalyst can leverage a VPN connection associated with the TGW to update resources hosted outside of AWS. For example, I could deploy a change to a database hosted in an on-prem datacenter. Note that I have omitted the internet connection from this diagram for simplicity.
These are just a few examples of the advanced networking topologies that you can use with CodeCatalyst. You can read more about planning your network topology in the Reliability Pillar of the AWS Well-Architected Framework.
Amazon CodeCatalyst VPC connections allow you to access resources in a private subnet from your workflows. In this post, I configured a VPC connection to deploy schema changes using Liquibase. I also discussed some advanced network topologies that allow you to update resources in other regions. You can learn more about CodeCatalyst VPC connections in the CodeCatalyst User Guide
Post Syndicated from Bruce Schneier original https://www.schneier.com/blog/archives/2023/11/friday-squid-blogging-unpatched-vulnerabilities-in-the-squid-caching-proxy.html
In a rare squid/security post, here’s an article about unpatched vulnerabilities in the Squid caching proxy.
As usual, you can also use this squid post to talk about the security stories in the news that I haven’t covered.
Read my blog posting guidelines here.
Post Syndicated from Pablo Pagani original https://aws.amazon.com/blogs/security/download-aws-security-hub-csv-report/
AWS Security Hub provides a comprehensive view of your security posture in Amazon Web Services (AWS) and helps you check your environment against security standards and best practices. In this post, I show you a solution to export Security Hub findings to a .csv file weekly and send an email notification to download the file from Amazon Simple Storage Service (Amazon S3). By using this solution, you can share the report with others without providing access to your AWS account. You can also use it to generate assessment reports and prioritize and build a remediation roadmap.
When you enable Security Hub, it collects and consolidates findings from AWS security services that you’re using, such as threat detection findings from Amazon GuardDuty, vulnerability scans from Amazon Inspector, S3 bucket policy findings from Amazon Macie, publicly accessible and cross-account resources from AWS Identity and Access Management Access Analyzer, and resources missing AWS WAF coverage from AWS Firewall Manager. Security Hub also consolidates findings from integrated AWS Partner Network (APN) security solutions.
Cloud security processes can differ from traditional on-premises security in that security is often decentralized in the cloud. With traditional on-premises security operations, security alerts are typically routed to centralized security teams operating out of security operations centers (SOCs). With cloud security operations, it’s often the application builders or DevOps engineers who are best situated to triage, investigate, and remediate security alerts.
This solution uses the Security Hub API, AWS Lambda, Amazon S3, and Amazon Simple Notification Service (Amazon SNS). Findings are aggregated into a .csv file to help identify common security issues that might require remediation action.
This solution assumes that Security Hub is enabled in your AWS account. If it isn’t enabled, set up the service so that you can start seeing a comprehensive view of security findings across your AWS accounts.
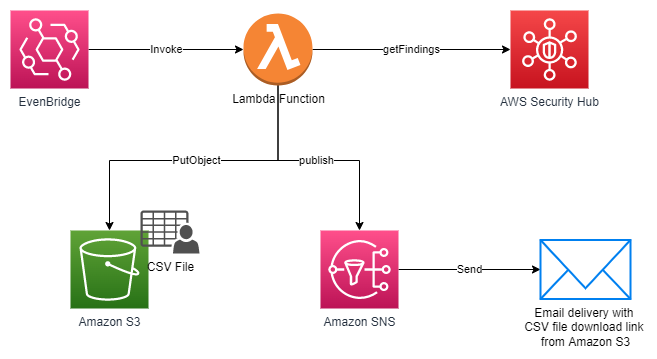
Figure 1: Solution overview, deployed through AWS CloudFormation
Note: You can extend the report by modifying the Lambda function to add fields as needed.
The solution provided with this blog post consists of an AWS CloudFormation template named security-hub-full-report-email.json that deploys the following resources:

Figure 2: SNS topic created by the solution

Figure 3: SNS email subscription

Figure 4: Lambda function created by the solution

Figure 5: Permissions policy for the Lambda function

Figure 6: Example of the EventBridge schedule created by the solution
Use the following steps to deploy this solution in a single AWS account. If you have a Security Hub administrator account or are using Security Hub cross-Region aggregation, the report will get the findings from the linked AWS accounts and Regions.

Figure 7: Create stack with new resources

Figure 8: Specify S3 URL for CloudFormation template

Figure 9: Enter stack name and parameters
You can send a test email after the deployment is complete. To do this, open the Lambda console and locate the SendSecurityHubFullReportEmail Lambda function. Perform a manual invocation with an event payload to receive an email within a few minutes. You can repeat this procedure as many times as you want.
In this post I’ve shown you an approach for rapidly building a solution for sending weekly findings report of the security posture of your AWS account as evaluated by Security Hub. This solution helps you to be diligent in reviewing outstanding findings and to remediate findings in a timely way based on their severity. You can extend the solution in many ways, including:
To learn more about how to set up and customize Security Hub, see these additional blog posts.
If you have feedback about this post, submit comments in the Comments section below. If you have any questions about this post, start a thread on the AWS Security Hub re:Post forum.
Want more AWS Security news? Follow us on Twitter.
Post Syndicated from Darshit Thakkar original https://aws.amazon.com/blogs/big-data/speed-up-queries-with-cost-based-optimizer-in-amazon-athena/
Amazon Athena is a serverless, interactive analytics service built on open source frameworks, supporting open table file formats. Athena provides a simplified, flexible way to analyze petabytes of data where it lives. You can analyze data or build applications from an Amazon Simple Storage Service (Amazon S3) data lake and 30 data sources, including on-premises data sources or other cloud systems using SQL or Python. Athena is built on open source Trino and Presto engines and Apache Spark frameworks, with no provisioning or configuration effort required.
Starting today, the Athena SQL engine uses a cost-based optimizer (CBO), a new feature that uses table and column statistics stored in the AWS Glue Data Catalog as part of the table’s metadata. By using these statistics, CBO improves query run plans and boosts the performance of queries run in Athena. Some of the specific optimizations CBO can employ include join reordering and pushing aggregations down based on the statistics available for each table and column.
TPC-DS benchmarks These benchmarks demonstrate the power of the cost-based optimizer—queries run up to 2x times faster with CBO enabled compared to running the same TPC-DS queries without CBO.
We used the industry-standard TPC-DS 3 TB to represent different customer use cases. These are representative of workloads with 10 times the stated benchmark size. This means a 3 TB benchmark dataset accurately represents customer workloads on 30–50 TB datasets.
In our testing, the dataset was stored in Amazon S3 in non-compressed Parquet format and the AWS Glue Data Catalog was used to store metadata for databases and tables. Fact tables were partitioned on the date column used for join operations, and each fact table consisted of 2,000 partitions. To help illustrate the performance of CBO, we compare the behavior of various queries and highlight the performance differences between running with CBO enabled vs. disabled.
The following graph illustrates the runtime of queries on the engine with and without CBO.

The following graph presents the top 10 queries from the TPC-DS benchmark with the greatest performance improvement.

Let’s discuss some of the cost-based optimization techniques that contributed to improved query performance.
Join reordering, an optimization technique used by cost-based SQL optimizers, analyzes different join sequences to select the order that minimizes query runtime by reducing intermediate data processed at each step, lowering memory and CPU requirements.
Let’s talk about query 82 of the TPC-DS 3TB dataset. The query performs inner joins on four tables: item, inventory, date_dim, and store_sales. The store_sales table has 8.6 billion rows and is partitioned by date. The inventory table has 1 billion rows and is also partitioned by date. The item table contains 360,000 rows, and the date_dim table holds 73,000 rows.
Query 82
Without using CBO, the engine will determine the join order based on the sequence of tables defined in the input query with internal heuristics. The FROM clause of the input query is "from item, inventory, date_dim, store_sales" (all inner joins). After passing through internal heuristics, Athena chose the join order as ((item ⋈ (inventory ⋈ date_dim)) ⋈ store_sales). Despite store_sales being the largest fact table, it’s defined last in the FROM clause and therefore gets joined last. This plan fails to reduce the intermediate join sizes as early as possible, resulting in an increased query runtime. The following diagram shows the join order without CBO and the number of rows flowing through different stages.

When using CBO, the optimizer determines the best join order using a variety of data, including statistics as well as join size estimation, join build side, and join type. In this instance, Athena’s selected join order is ((store_sales ⋈ item) ⋈ (inventory ⋈ date_dim)). The largest fact table, store_sales, without being shuffled, is first joined with the item dimension table. The other partitioned table, inventory, is also first joined in-place with the date_dim dimension table. The join with the dimension table acts as a filter on the fact table, which dramatically reduces the input data size of the join that follows. Note that which side a table resides for a join is significant in Athena, because it’s the table on the right that will be built into memory for the join operation. Therefore, we always want to keep the larger table on the left and the smaller table on the right. CBO chose a plan that the left side was 8.6 billion before, and now it’s 13.6 million.
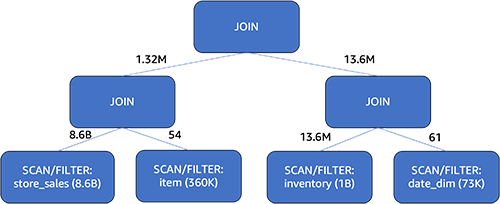
With CBO, the query runtime improved by 25% (from 15 seconds down to 11 seconds) by choosing the optimal join order.
Next, let’s discuss another CBO technique.
Aggregation pushdown is an optimization technique used by query optimizers to improve performance. It involves pushing aggregation operations like SUM, COUNT, and AVG into an earlier stage in the query plan, while maintaining the same query semantics. This reduces the amount of data transferred between the stages. By minimizing data processing, aggregation pushdown decreases memory usage, I/O costs, and network traffic.
However, pushing down aggregation is not always beneficial. It depends on the data distribution. For example, grouping on a column with many rows but few distinct values (like gender) before joins works better. Grouping first means aggregating a large number of records into fewer records (just male, female, for example). Grouping after joining means a large number of records have to participate the join before being aggregated. On the other hand, grouping on a high cardinality column is better done after joins. Doing it before risks unnecessary aggregation overhead because each value is likely unique anyway and that step will not result in an earlier reduction in the amount of data transferred between intermediate stages.
Therefore, whether to push down aggregation should be a cost-based decision. Let’s take example of the query 2 run on a 3TB TPC-DS dataset, showing how the aggregation pushdown’s value depends on data distribution. The web_sales table has 2.1 billion rows and the catalog_sales table has 4.23 billion rows. Both tables are partitioned on the date column.
Query 2
Athena first joins the result of the union all operation on the web_sales table and the catalog_sales table with another table. Only then does it perform aggregation on the joined results. In this example, the amount of data that needed to be joined was huge, resulting in a longer query runtime.

Athena utilizes one of the statistics values, the distinct value count, to evaluate the cost implications of pushing down the aggregation vs. not doing so. When a column has many rows but few distinct values, CBO is more likely to push aggregation down. This shrank the qualified rows from web_sales and catalog_sales tables to 2,590 and 3,590 rows, respectively. These aggregated records were then unioned and used to join with the tables. Comparing to the plan without CBO, the records participating in the join from the two large tables dropped from 6.33 billion rows (2.1 billion + 4.23 billion) to just 6,180 rows (2,590 + 3,590). This significantly decreased query runtime.
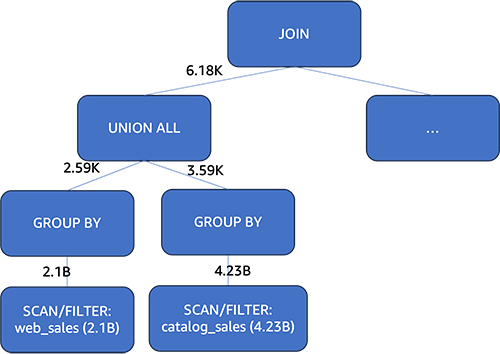
With CBO, the query runtime improved by 50% (from 37 seconds down to 18 seconds). In summary, CBO helped Athena choose an optimal aggregation pushdown plan, cutting the query time in half compared to not using cost-based optimization.
In this post, we discussed how Athena uses a cost-based optimizer (CBO) in its engine v3 to use table statistics for generating more efficient query run plans. Testing on the TPC-DS benchmark showed an 11% improvement in overall query performance when using CBO compared to without it.
Two key optimization employed by CBO are join reordering and aggregate pushdown. Join reordering reduces intermediate data by intelligently picking the order to join tables based on statistics. Aggregate pushdown decreases intermediate data by pushing aggregations earlier in the plan when beneficial.
In summary, Athena’s new cost-based optimizer significantly speeds up queries by choosing superior run plans. CBO optimizes based on table statistics stored in the AWS Glue Data Catalog. This automatic optimization improves productivity for Athena users through more responsive query performance. To take advantage of optimization techniques of CBO, refer to working with column statistics to generate statistics on the tables and columns in the AWS Glue Data Catalog.
 Darshit Thakkar is a Technical Product Manager with AWS and works with the Amazon Athena team based out of Boston, Massachusetts.
 Wei Zheng is a Sr. Software Development Engineer with Amazon Athena. He joined AWS in 2021 and has been working on multiple performance improvements on Athena.
 Chuho Chang is a Software Development Engineer with Amazon Athena. He has been working on query optimizers for over a decade.
 Pathik Shah is a Sr. Analytics Architect on Amazon Athena. He joined AWS in 2015 and has been focusing in the big data analytics space since then, helping customers build scalable and robust solutions using AWS analytics services.
Post Syndicated from Spencer McIntyre original https://blog.rapid7.com/2023/11/17/metasploit-weekly-wrap-up-36/
Metasploit has support for running with a local database, or from a remote web service which can be initialized with msfdb init --component webservice. Future versions of Metasploit Framework may remove the msfdb remote webservice. Users that leverage this functionality are invited to react on an issue currently on GitHub to inform the maintainers that the feature is used.
Authors: UnblvR and whotwagner
Type: Exploit
Pull request: #18434 contributed by whotwagner
Path: unix/webapp/zoneminder_snapshots
Description: This PR adds an exploit module for an unauthenticated remote code execution vulnerability in the video surveillance software Zoneminder (CVE-2023-26035).
modules/payload/android/meterpreter/reverse_tcp.md example to use the correct flags when generating a payload.You can always find more documentation on our docsite at docs.metasploit.com.
As always, you can update to the latest Metasploit Framework with msfupdate
and you can get more details on the changes since the last blog post from
GitHub:
If you are a git user, you can clone the Metasploit Framework repo (master branch) for the latest.
To install fresh without using git, you can use the open-source-only Nightly Installers or the
binary installers (which also include the commercial edition).