Днес участвах на срещата на премиера Денков, МЗ, МЕУ и Информационно обслужване със съсловните организации в сектор „здравеопазване“ на тема „електронна рецепта“.
Предложението на МЗ задължението за изцяло електронни рецепти да се премести за април има своите рискове, но дава възможност за повишаване на доверието в системата.
Аз предложих пет неща на срещата:
1. Мека прогенерична политика чрез промяна на опциите по подразбиране – чрез софтуерите, по подразбиране да се позволява генерично заместване, а ако лекарят смята, че трябва да се отпусне лекарство от конкретен производител (има легитимни причини за това), да трябва да отбележи „забранявам заместване“. По този начин фармацевтите ще могат да отпускат еквивалентни лекарства в повечето случаи, ако няма от предписаното – това беше един от основните проблеми при старта на е-рецептите. С това предложение се оставя решението у лекаря.
2. Ясно дефиниране на изключенията, при които могат да се ползват хартиени рецепти – домашни посещения, лекари, които не могат използват технологии, чуждестранни лекар. Също: срив в системата. Това го предложих миналата година на служебния кабинет, когато отмениха електронната рецепта, но се го възприеха.
3. Въвеждане на стандарт за удобство/потребителско изживяване/UX на софтуерите, с които се изписват рецептите. Според мен немалка част от недоволството в лекарското съсловие е поради по-бавното и по-неудобно изписване чрез софтуер. В стандарта може да се включат конкретни тестове и засичане на време за изписване.
4. В „гратисния период“ да се отстранят всички оставащи технически проблеми, с много оперативен процес между МЗ и Информационно обслужване, като големите болници и ДКЦ-тата да се включат активно в тестовете.
5. При отпускане на лекарства по хартиени рецепти (след април) да има улеснено въвеждане на данните от фармацевтите, напр. автоматично при верификация на лекарството.
Тези предложения могат да бъдат включени в Наредба 4, за да бъдат реализирани до април.
Електронните рецепти намаляват порочните практики в системата. Дават повече видимост и възможност за провеждане на здравни политики. Помагат с преодоляването на проблема с антибиотичната резистентност. Затова тези усилия на всички страни си струват.
Designing a system to be either stateful or stateless is an important choice with tradeoffs regarding its performance and scalability. In a stateful system, data from one session is carried over to the next. A stateless system doesn’t preserve data between sessions and depends on external entities such as databases or cache to manage state.
Stateful and stateless architectures are both widely adopted.
Stateful applications are typically simple to deploy. Stateful applications save client session data on the server, allowing for faster processing and improved performance. Stateful applications excel in predictable workloads and offer consistent user experiences.
Stateless architectures typically align with the demands of dynamic workload and changing business requirements. Stateless application design can increase flexibility with horizontal scaling and dynamic deployment. This flexibility helps applications handle sudden spikes in traffic, maintain resilience to failures, and optimize cost.
Figure 1 provides a conceptual comparison of stateful and stateless architectures.
Figure 1. Conceptual diagram for stateful vs stateless architectures
For example, an eCommerce application accessible from web and mobile devices manages several aspects of the customer transaction life cycle. This lifecycle starts with account creation, then moves to placing items in the shopping cart, and proceeds through checkout. Session and user profile data provide session persistence and cart management, which retain the cart’s contents and render the latest updated cart from any device. A stateless architecture is preferable for this application because it decouples user data and offloads the session data. This provides the flexibility to scale each component independently to meet varying workloads and optimize resource utilization.
In this blog, we outline the process and benefits of converting from a stateful to stateless architecture.
Solution overview
This section walks you through the steps for converting stateful to stateless architecture:
Identifying and understanding the stateful requirements
Decoupling user profile data
Offloading session data
Scaling each component dynamically
Designing a stateless architecture
Step 1: Identifying and understanding the stateful components
Transforming a stateful architecture to a stateless architecture starts with reviewing the overall architecture and source code of the application, and then analyzing dataflow and dependencies.
Review the architecture and source code
It’s important to understand how your application accesses and shares data. Pay attention to components that persist state data and retain state information. Examples include user credentials, user profiles, session tokens, and data specific to sessions (such as shopping carts). Identifying how this data is handled serves as the foundation for planning the conversion to a stateless architecture.
Analyze dataflow and dependencies
Analyze and understand the components that maintain state within the architecture. This helps you assess the potential impact of transitioning to a stateless design.
You can use the following questionnaire to assess the components. Customize the questions according to your application.
What data is specific to a user or session?
How is user data stored and managed?
How is the session data accessed and updated?
Which components rely on the user and session data?
Are there any shared or centralized data stores?
How does the state affect scalability and tolerance?
Can the stateful components be decoupled or made stateless?
Step 2: Decoupling user profile data
Decoupling user data involves separating and managing user data from the core application logic. Delegate responsibilities for user management and secrets, such as application programming interface (API) keys and database credentials, to a separate service that can be resilient and scale independently. For example, you can use:
AWS Secrets Manager to decouple user data by storing secrets in a secure, centralized location. This means that the application code doesn’t need to store secrets, which makes it more secure.
Amazon S3 to store large, unstructured data, such as images and documents. Your application can retrieve this data when required, eliminating the need to store it in memory.
Amazon DynamoDB to store information such as user profiles. Your application can query this data in near-real time.
Step 3: Offloading session data
Offloading session data refers to the practice of storing and managing session related data external to the stateful components of an application. This involves separating the state from business logic. You can offload session data to a database, cache, or external files.
Factors to consider when offloading session data include:
Stateless architecture gives the flexibility to scale each component independently, allowing the application to meet varying workloads and optimize resource utilization. While planning for scaling, consider using:
AWS Autoscaling, which supports automatic scaling of resources based on predefined policies and metrics.
AWS Load Balancer, which supports dynamic scaling by automatically adding or removing instances based on the configured scaling policies and health checks.
After you identify which state and user data need to be persisted, and your storage solution of choice, you can begin designing the stateless architecture. This involves:
Understanding how the application interacts with the storage solution.
Planning how session creation, retrieval, and expiration logic work with the overall session management.
Refactoring application logic to remove references to the state information that’s stored on the server.
Rearchitecting the application into smaller, independent services, as described in steps 2, 3, and 4.
Performing thorough testing to ensure that all functionalities produce the desired results after the conversion.
The following figure is an example of a stateless architecture on AWS. This architecture separates the user interface, application logic, and data storage into distinct layers, allowing for scalability, modularity, and flexibility in designing and deploying applications. The tiers interact through well-defined interfaces and APIs, ensuring that each component focuses on its specific responsibilities.
Figure 2. Example of a stateless architecture
Benefits
Benefits of adopting a stateless architecture include:
Scalability: Stateless components don’t maintain a local state. Typically, you can easily replicate and distribute them to handle increasing workloads. This supports horizontal scaling, making it possible to add or remove capacity based on fluctuating traffic and demand.
Reliability and fault tolerance: Stateless architectures are inherently resilient to failures. If a stateless component fails, it can be replaced or restarted without affecting the overall system. Because stateless applications don’t have a shared state, failures in one component don’t impact other components. This helps ensure continuity of user sessions, minimizes disruptions, and improves fault tolerance and overall system reliability.
Cost-effectiveness: By leveraging on-demand scaling capabilities, your application can dynamically adjust resources based on actual demand, avoiding overprovisioning of infrastructure. Stateless architectures lend themselves to serverless computing models, paying for the actual run time and resulting in cost savings.
Performance: Externalizing session data by using services optimized for high-speed access, such as in-memory caches, can reduce the latency compared to maintaining session data internally.
Flexibility and extensibility: Stateless architectures provide flexibility and agility in application development. Offloaded session data provides more flexibility to adopt different technologies and services within the architecture. Applications can easily integrate with other AWS services for enhanced functionality, such as analytics, near real-time notifications, or personalization.
Conclusion
Converting stateful applications to stateless applications requires careful planning, design, and implementation. Your choice of architecture depends on your application’s specific needs. If an application is simple to develop and debug, then a stateful architecture might be a good choice. However, if an application needs to be scalable and fault tolerant, then a stateless architecture might be a better choice. It’s important to understand the current application thoroughly before embarking on a refactoring journey.
At Amazon Web Services (AWS), we are committed to providing continued assurance to our customers through assessments, certifications, and attestations that support the adoption of current and new AWS services and features. We are pleased to announce the availability of the 2023 Canadian Centre for Cyber Security (CCCS) assessment summary report for AWS. With this assessment, a total of 150 AWS services and features are assessed in the Canada (Central) Region, including 20 additional AWS services and features. The assessment report is available for review and download on demand through AWS Artifact.
The full list of services in scope for the CCCS assessment is available on the Services in Scope page. The 20 new services and features are the following:
The CCCS is Canada’s authoritative source of cyber security expert guidance for the Canadian government, industry, and the general public. Public and commercial sector organizations across Canada rely on CCCS’s rigorous Cloud Service Provider (CSP) IT Security (ITS) assessment in their decision to use CSP services. In addition, CCCS’s ITS assessment process is a mandatory requirement for AWS to provide cloud services to Canadian federal government departments and agencies.
The CCCS cloud service provider information technology security assessment process determines if the Government of Canada (GC) ITS requirements for the CCCS Medium cloud security profile (previously referred to as GC’s PROTECTED B/Medium Integrity/Medium Availability [PBMM] profile) are met as described in ITSG-33 (IT security risk management: A lifecycle approach, Annex 3 – Security control catalogue). As of November 2023, 150 AWS services in the Canada (Central) Region have been assessed by CCCS and meet the requirements for the Medium cloud security profile. Meeting the Medium cloud security profile is required to host workloads that are classified up to and including Medium categorization. On a periodic basis, CCCS assesses new or previously unassessed services and re-assesses the AWS services that were previously assessed to verify that they continue to meet the GC’s requirements. CCCS prioritizes the assessment of new AWS services based on their availability in Canada, and customer demand for the AWS services. The full list of AWS services that have been assessed by CCCS is available on our Services in Scope for CCCS Assessment page.
To learn more about the CCCS assessment or our other compliance and security programs, visit AWS Compliance Programs. As always, we value your feedback and questions; reach out to the AWS Compliance team through the Contact Us page.
If you have feedback about this post, submit comments in the Comments section below. If you have questions about this post, contact AWS Support.
Want more AWS Security news? Follow us on Twitter.
A ransomware gang, annoyed at not being paid, filed an SEC complaint against its victim for not disclosing its security breach within the required four days.
This is over the top, but is just another example of the extreme pressure ransomware gangs put on companies after seizing their data. Gangs are now going through the data, looking for particularly important or embarrassing pieces of data to threaten executives with exposing. I have heard stories of executives’ families being threatened, of consensual porn being identified (people regularly mix work and personal email) and exposed, and of victims’ customers and partners being directly contacted. Ransoms are in the millions, and gangs do their best to ensure that the pressure to pay is intense.
Amazon DynamoDB is a fully managed, serverless, key-value NoSQL database designed to run high-performance applications at any scale. DynamoDB offers built-in security, continuous backups, automated multi-Region replication, in-memory caching, and data import and export tools. The scalability and flexible data schema of DynamoDB make it well-suited for a variety of use cases. These include internet-scale web and mobile applications, low-latency metadata stores, high-traffic retail websites, Internet of Things (IoT) and time series data, online gaming, and more.
Data stored in DynamoDB is the basis for valuable business intelligence (BI) insights. To make this data accessible to data analysts and other consumers, you can use Amazon Athena. Athena is a serverless, interactive service that allows you to query data from a variety of sources in heterogeneous formats, with no provisioning effort. Athena accesses data stored in DynamoDB via the open source Amazon Athena DynamoDB connector. Table metadata, such as column names and data types, is stored using the AWS Glue Data Catalog.
Finally, to visualize BI insights, you can use Amazon QuickSight, a cloud-powered business analytics service. QuickSight makes it straightforward for organizations to build visualizations, perform ad hoc analysis, and quickly get business insights from their data, anytime, on any device. Its generative BI capabilities enable you to ask questions about your data using natural language, without having to write SQL queries or learn a BI tool.
This post shows how you can use the Athena DynamoDB connector to easily query data in DynamoDB with SQL and visualize insights in QuickSight.
Solution overview
The following diagram illustrates the solution architecture.
The Athena DynamoDB connector runs in a pre-built, serverless AWS Lambda function. You don’t need to write any code.
AWS Glue provides supplemental metadata from the DynamoDB table. In particular, an AWS Glue crawler is run to infer and store the DynamoDB table format, schema, and associated properties in the Glue Data Catalog.
The Athena editor is used to test the connector and perform analysis via SQL queries.
QuickSight uses the Athena connector to visualize BI insights from DynamoDB.
The Athena DynamoDB connector comprises a pre-built, serverless Lambda function provided by AWS that communicates with DynamoDB so you can query your tables with SQL using Athena. The connector is available in the AWS Serverless Application Repository, and is used to create the Athena data source for later use in data analysis and visualization. To set up the connector, complete the following steps:
On the Athena console, choose Data sources in the navigation pane.
Choose Create data source.
In the search bar, search for and choose Amazon DynamoDB.
Choose Next.
Under Data source details, enter a name. Note that this name should be unique and will be referenced in your SQL statements when you query your Athena data source.
Under Connection details, choose Create Lambda function.
This will take you to the Lambda applications page on the Lambda console. Do not close the Athena data source creation tab; you will return to it in a later step.
Scroll down to Application settings and enter a value for the following parameters (leave the other parameters as default):
SpillBucket – Specifies the Amazon Simple Storage Service (Amazon S3) bucket name for storing data that exceeds Lambda function response size limits. To create an S3 bucket, refer to Creating a bucket.
AthenaCatalogName – A lowercase name for the Lambda function to be created.
Select the acknowledgement check box and choose Deploy.
Wait for deployment to complete before moving to the next step.
Return to the Athena data source creation tab.
Under Connection details, choose the refresh icon and choose the Lambda function you created.
Choose Next.
Review and choose Create data source.
Provide supplemental metadata via AWS Glue
The Athena connector already comes with a built-in inference capability to discover the schema and table properties of your data source. However, this capability is limited. To accurately discover the metadata of your DynamoDB table and centralize schema management as your data evolves over time, the connector integrates with AWS Glue.
To achieve this, an AWS Glue crawler is run to automatically determine the format, schema, and associated properties of the raw data stored in your DynamoDB table, writing the resulting metadata to a Glue database. Glue databases contain tables, which hold metadata from different data stores, independent from the actual location of the data. The Athena connector then references the Glue table and retrieves the corresponding DynamoDB metadata to enable queries.
Create the AWS Glue database
Complete the following steps to create the Glue database:
On the AWS Glue console, under Data Catalog in the navigation pane, choose Databases.
Choose Add database (you can also edit an existing database if you already have one).
For Name, enter a database name.
For Location, enter the string literal dynamo-db-flag. This keyword indicates that the database contains tables that the connector can use for supplemental metadata.
Choose Create database.
Following security best practices, it is also recommended that you enable encryption at rest for your Data Catalog. For details, refer to Encrypting your Data Catalog.
Create the AWS Glue crawler
Complete the following steps to create and run the Glue crawler:
On the AWS Glue console, under Data Catalog in the navigation pane, choose Crawlers.
Choose Create crawler.
Enter a crawler name and choose Next.
For Data sources, choose Add a data source.
On the Data source drop-down menu, choose DynamoDB. For Table name, enter the name of your DynamoDB table (string literal).
Choose Add a DynamoDB data source.
Choose Next.
For IAM Role, choose Create new IAM role.
Enter a role name and choose Create. This will automatically create an IAM role that trusts AWS Glue and has permissions to access the crawler targets.
Choose Next.
For Target database, choose the database previously created.
Choose Next.
Review and choose Create crawler.
On the newly created crawler page, choose Run crawler.
Crawler runtimes depend on your DynamoDB table size and properties. You can find crawler run details under Crawler runs.
Validate the output metadata
When your crawler run status shows as Completed, follow the below steps to validate the output metadata:
On the AWS Glue console, choose Tables in the navigation pane. Here, you can confirm a new table has been added to the database as a result of the crawler run.
Navigate to the newly created table and take a look at the Schema tab. This tab shows the column names, data types, and other parameters inferred from your DynamoDB table.
If needed, edit the schema by choosing Edit schema.
Choose Advanced properties.
Under Table properties, verify the crawler automatically created and set the classification key to dynamodb. This indicates to the Athena connector that the table can be used for supplemental metadata.
Optionally, add the following properties to correctly catalog and reference DynamoDB data in AWS Glue and Athena queries. This is due to capital letters not being permitted in AWS Glue table and column names, but being permitted in DynamoDB table and attribute names.
If your DynamoDB table name contains any capital letters, choose Actions and Edit Table and add an extra table property as follows:
Key: sourceTable
Value: YourDynamoDBTableName
If your DynamoDB table has attributes that contain any capital letters, add an extra table property as follows:
After the Athena DynamoDB connector is deployed and the AWS Glue table is populated with supplemental metadata, the DynamoDB table is ready for analysis. The example in this post uses the Athena editor to make SQL queries to the ProductCatalog table. For further options to interact with Athena, see Accessing Athena.
Complete the following steps to test the connector:
If this is your first time visiting the Athena console in your current AWS Region, complete the following steps. This is a prerequisite before you can run Athena queries. See Getting Started for more details.
Choose Query editor in the navigation pane to open the editor.
Navigate to Settings and choose Manage to set up a query result location in Amazon S3.
Under Data, select the data source and database you created (you may need to choose the refresh icon for them to sync up with Athena).
Tables belonging to the selected database appear under Tables. You can choose a table name for Athena to show the table column list and data types.
Test the connector by pulling data from your table via a SELECT statement. When you run Athena queries, you can reference Athena data sources, databases, and tables as <datasource_name>.<database>.<table_name>. Retrieved records are shown under Results.
For this post, we run a SELECT statement to validate the process. You can refer to the SQL reference for Athena to build more complex queries and analyses.
Visualize in QuickSight
QuickSight allows for building modern interactive dashboards, paginated reports, embedded analytics, and natural language queries through a unified BI solution. In this step, we use QuickSight to generate visual insights from the DynamoDB table by connecting to the Athena data source previously created.
Allow QuickSight to access to resources
Complete the following steps to grant QuickSight access to resources:
On the QuickSight console, choose the profile icon and choose Manage QuickSight.
In the navigation pane, choose Security & Permissions.
Under QuickSight access to AWS services, choose Manage.
QuickSight may ask you to switch to the Region in which users and groups in your account are managed. To change the current Region, navigate to the profile icon on the QuickSight console and choose the Region you want to switch to.
For IAM Role, choose Use QuickSight-managed role (default).
Subsequent instructions assume that the default QuickSight-managed role is being used. If this is not the case, make sure to update the existing role to the same effect.
Under Allow access and autodiscovery for these resources, select IAM and Amazon S3.
For Amazon S3, choose Select S3 buckets.
Choose the spill bucket you specified in earlier when deploying the Lambda function for the connector and the bucket you specified as the Athena query result location in Amazon S3.
For both buckets, select Write permission for Athena Workgroup.
Choose Amazon Athena.
In the pop-up window, choose Next.
Choose Lambda and choose the Amazon Resource Name (ARN) of the Lambda function previously used for the Athena data source connector.
Choose Finish.
Choose Save.
Create the Athena dataset
To create the Athena dataset, complete the following steps:
On the QuickSight console, choose the user profile and switch to the Region you deployed the Athena data source to.
Return to the QuickSight home page.
In the navigation pane, choose Datasets.
Choose New dataset.
For Create a Dataset, select Athena.
For Data source name, enter a name and choose Validate connection.
When the connection shows as Validated, choose Create data source.
Under Catalog, Database, and Tables, select the Athena data source, AWS Glue database, and AWS Glue table previously created.
Choose Select.
On the Finish dataset creation page, select Import to SPICE for quicker analytics.
Once the DynamoDB data is available in QuickSight via the Athena DynamoDB connector, it is ready to be visualized. The QuickSight analysis in the below example shows a vertical stacked bar chart with the average price per product category for the ProductCatalog sample dataset. In addition, it shows a donut chart with the proportion of products by product category, and a tree map containing the count of bicycles per bicycle type.
If you use data imported to SPICE in a QuickSight analysis, the dataset will only be available after the import is complete. For further details, see Using SPICE data in an analysis.
If you no longer need the Athena data source to create other datasets, delete the data source.
Summary
This post demonstrated how you can use the Athena DynamoDB connector to query data in DynamoDB with SQL and build visualizations in QuickSight.
Learn more about the Athena DynamoDB connector in the Amazon Athena User Guide. Discover more available data source connectors to query and visualize a variety of data sources without setting up or managing any infrastructure while only paying for the queries you run.
Antonio Samaniego Jurado is a Solutions Architect at Amazon Web Services. With a strong passion for modern technology, Antonio helps customers build state-of-the-art applications on AWS. A creator at heart, he loves community-driven learning and sharing of best practices across the AWS service portfolio to make the best of customers cloud journey.
Pascal Vogel is a Solutions Architect at Amazon Web Services. Pascal helps startups and enterprises build cloud-native solutions. As a cloud enthusiast, Pascal loves learning new technologies and connecting with like-minded customers who want to make a difference in their cloud journey.
Amazon Redshift is a cloud data warehousing service that provides high-performance analytical processing based on a massively parallel processing (MPP) architecture. Building and maintaining data pipelines is a common challenge for all enterprises. Managing the SQL files, integrating cross-team work, incorporating all software engineering principles, and importing external utilities can be a time-consuming task that requires complex design and lots of preparation.
dbt (DataBuildTool) offers this mechanism by introducing a well-structured framework for data analysis, transformation and orchestration. It also applies general software engineering principles like integrating with git repositories, setting up DRYer code, adding functional test cases, and including external libraries. This mechanism allows developers to focus on preparing the SQL files per the business logic, and the rest is taken care of by dbt.
How does the dbt framework work with Amazon Redshift?
dbt has an Amazon Redshift adapter module named dbt-redshift that enables it to connect and work with Amazon Redshift. All the connection profiles are configured within the dbt profiles.yml file. In an optimal environment, we store the credentials in AWS Secrets Manager and retrieve them.
The following code shows the contents of profile.yml:
The following diagram illustrates the key components of the dbt framework:
The primary components are as follows:
Models – These are written as a SELECT statement and saved as a .sql file. All the transformation queries can be written here which can be materialized as a table or view. The table refresh can be full or incremental based on the configuration. For more information, refer SQL models.
Snapshots – These implements type-2 slowly changing dimensions (SCDs) over mutable source tables. These SCDs identify how a row in a table changes over time.
Seeds – These are CSV files in your dbt project (typically in your seeds directory), which dbt can load into your data warehouse using the dbt seed command.
Tests – These are assertions you make about your models and other resources in your dbt project (such as sources, seeds, and snapshots). When you run dbt test, dbt will tell you if each test in your project passes or fails.
Macros – These are pieces of code that can be reused multiple times. They are analogous to “functions” in other programming languages, and are extremely useful if you find yourself repeating code across multiple models.
These components are stored as .sql files and are run by dbt CLI commands. During the run, dbt creates a Directed Acyclic Graph (DAG) based on the internal reference between the dbt components. It uses the DAG to orchestrate the run sequence accordingly.
Multiple profiles can be created within the profiles.yml file, which dbt can use to target different Redshift environments while running. For more information, refer to Redshift set up.
Solution overview
The following diagram illustrates our solution architecture.
The workflow contains the following steps:
The open source dbt-redshift connector is used to create our dbt project including all the necessary models, snapshots, tests, macros and profiles.
A Docker image is created and pushed to the ECR repository.
The Docker image is run by Fargate as an ECS task triggered via AWS Step Functions. All the Amazon Redshift credentials are stored in Secrets Manager, which is then used by the ECS task to connect with Amazon Redshift.
During the run, dbt converts all the models, snapshots, tests and macros to Amazon Redshift compliant SQL statements and it orchestrates the run based on the internal data lineage graph maintained. These SQL commands are run directly on the Redshift cluster and therefore the workload is pushed to Amazon Redshift directly.
When the run is complete, dbt will create a set of HTML and JSON files to host the dbt documentation, which describes the data catalog, compiled SQL statements, data lineage graph, and more.
Prerequisites
You should have the following prerequisites:
A good understanding of the dbt principles and implementation steps.
An AWS account with user role permission to access the AWS services used in this solution.
Security groups for Fargate to access the Redshift cluster and Secrets Manager from Amazon ECS.
A Redshift cluster. For creation instructions, refer to Create a cluster.
A Secrets Manager secret containing all the credentials for connecting to Amazon Redshift. This includes the host, port, database name, user name, and password. For more information, refer to Create an AWS Secrets Manager database secret.
We are using dbt CLI so all commands are run in the command line. Therefore, install pip if not already installed. Refer to installation for more information.
To create a dbt project, complete the following steps:
Initialize a dbt project using the dbt init <project_name> command, which creates all the template folders automatically.
Add all the required DBT artifacts. Refer to the dbt-redshift-etlpattern repo which includes a reference dbt project. For more information about building projects, refer to About dbt projects.
In the reference project, we have implemented the following features:
SCD type 1 using incremental models
SCD type 2 using snapshots
Seed look-up files
Macros for adding reusable code in the project
Tests for analyzing inbound data
The Python script is prepared to fetch the credentials required from Secrets Manager for accessing Amazon Redshift. Refer to the export_redshift_connection.py file.
Prepare the run_dbt.sh script to run the dbt pipeline sequentially. This script is placed in the root folder of the dbt project as shown in sample repo.
-- Import the dependent external libraries
dbt deps --profiles-dir . --project-dir .

-- Create tables based on the seed files
dbt seed --profiles-dir . --project-dir .

-- Run all the model files
dbt run --profiles-dir . --project-dir .

-- Run all the snapshot files
dbt snapshot --profiles-dir . --project-dir .

-- Run all inbuilt and custom test cases prepared
dbt test --profiles-dir . --project-dir .

-- Generate dbt documentation files
dbt docs generate --profiles-dir . --project-dir .

--Copying dbt outputs to s3 bucket - for hosting
aws s3 cp --recursive --exclude="*" --include="*.json" --include="*.html" dbt/target/ s3://<bucketName>/REDSHIFT_POC/
Create a Docker file in the parent directory of the dbt project folder. This step builds the image of the dbt project to be pushed to the ECR repository.
FROM python:3

ADD dbt_src /dbt_src

RUN pip install -U pip

# Install DBT libraries
RUN pip install --no-cache-dir dbt-core

RUN pip install --no-cache-dir dbt-redshift

RUN pip install --no-cache-dir boto3

RUN pip install --no-cache-dir awscli

WORKDIR /dbt_src

RUN chmod -R 755 .

ENTRYPOINT [ "/bin/sh", "-c" ]

CMD ["./run_dbt.sh"]
Upload the image to Amazon ECR and run it as an ECS task
To push the image to the ECR repository, complete the following steps:
Retrieve an authentication token and authenticate your Docker client to your registry:
Build your Docker image using the following command:
docker build -t <image tag> .
After the build is complete, tag your image so you can push it to the repository:
docker tag <image tag>:latest <repository_name>:latest
Run the following command to push the image to your newly created AWS repository:
docker push <repository_name>/<image tag>:latest
On the Amazon ECS console, create a cluster with Fargate as an infrastructure option.
Provide your VPC and subnets as required.
After you create the cluster, create an ECS task and assign the created dbt image as the task definition family.
In the networking section, choose your VPC, subnets, and security group to connect with Amazon Redshift, Amazon S3 and Secrets Manager.
This task will trigger the run_dbt.sh pipeline script and run all the dbt commands sequentially. When the script is complete, we can see the results in Amazon Redshift and the documentation files pushed to Amazon S3.
This post covered the basic implementation of using dbt with Amazon Redshift in a cost-efficient way by using Fargate in Amazon ECS. We described the key infrastructure and configuration set-up with a sample project. This architecture can help you take advantage of the benefits of having a dbt framework to manage your data warehouse platform in Amazon Redshift.
For more information about dbt macros and models for Amazon Redshift internal operation and maintenance, refer to the following GitHub repo. In subsequent post, we’ll explore the traditional extract, transform, and load (ETL) patterns that you can implement using the dbt framework in Amazon Redshift. Test this solution in your account and provide feedback or suggestions in the comments.
About the Authors
Seshadri Senthamaraikannan is a data architect with AWS professional services team based in London, UK. He is well experienced and specialised in Data Analytics and works with customers focusing on building innovative and scalable solutions in AWS Cloud to meet their business goals. In his spare time, he enjoys spending time with his family and play sports.
Mohamed Hamdy is a Senior Big Data Architect with AWS Professional Services based in London, UK. He has over 15 years of experience architecting, leading, and building data warehouses and big data platforms. He helps customers develop big data and analytics solutions to accelerate their business outcomes through their cloud adoption journey. Outside of work, Mohamed likes travelling, running, swimming and playing squash.
One of the core constraints when programming in the kernel is the need to
avoid sleeping when running in atomic context. For the most part, the
responsibility for adherence to this rule is placed on the developer’s
shoulders; Rust developers, though, want the compiler to ensure that code
is safe whenever possible. At the 2023 Linux
Plumbers Conference, Gary Guo presented (via a remote link) the klint
tool, which can find
and flag many atomic-context violations before they turn into
user-affecting bugs.
This post by Art Baudo – Principal Product Marketing Manager – AWS EC2, and Pranaya Anshu – Product Marketing Manager – AWS EC2
We are just a few weeks away from AWS re:Invent 2023, AWS’s biggest cloud computing event of the year. This event will be a great opportunity for you to meet other cloud enthusiasts, find productive solutions that can transform your company, and learn new skills through 2000+ learning sessions.
Even if you are not able to join in person, you can catch-up with many of the sessions on-demand and even watch the keynote and innovation sessions live.
If you’re able to join us, just a reminder we offer several types of sessions which can help maximize your learning in a variety of AWS topics. Breakout sessions are lecture-style 60-minute informative sessions presented by AWS experts, customers, or partners. These sessions are recorded and uploaded a few days after to the AWS Events YouTube channel.
re:Invent attendees can also choose to attend chalk-talks, builder sessions, workshops, or code talk sessions. Each of these are live non-recorded interactive sessions.
Chalk-talk sessions: Attendees will interact with presenters, asking questions and using a whiteboard in session.
Builder Sessions: Attendees participate in a one-hour session and build something.
Workshops sessions: Attendees join a two-hour interactive session where they work in a small team to solve a real problem using AWS services.
Code talk sessions: Attendees participate in engaging code-focused sessions where an expert leads a live coding session.
To start planning your re:Invent week, check-out some of the Compute track sessions below. If you find a session you’re interested in, be sure to reserve your seat for it through the AWS attendee portal.
Explore some of these latest and greatest innovations in the following sessions:
CMP102 | What’s new with Amazon EC2 Provides an overview on the latest Amazon EC2 innovations. Hear about recent Amazon EC2 launches, learn how about differences between Amazon EC2 instances families, and how you can use a mix of instances to deliver on your cost, performance, and sustainability goals.
CMP219-INT | Compute innovation for any application, anywhere Provides you with an understanding of the breadth and depth of AWS compute offerings and innovation. Discover how you can run any application, including enterprise applications, HPC, generative artificial intelligence (AI), containers, databases, and games, on AWS.
Customer experiences and applications with machine learning
Machine learning (ML) has been evolving for decades and has an inflection point with generative AI applications capturing widespread attention and imagination. More customers, across a diverse set of industries, choose AWS compared to any other major cloud provider to build, train, and deploy their ML applications. Learn about the generative AI infrastructure at Amazon or get hands-on experience building ML applications through our ML focused sessions, such as the following:
CMP206 | Behind-the-scenes look at generative AI infrastructure at Amazon Learn how to power performant generative AI applications while keeping costs under control. Get a behind-the-scenes look at how purpose-built infrastructure from AWS including AWS Trainium and AWS Inferentia2 are used by Amazon teams.
AWS has invested years designing custom silicon optimized for the cloud to deliver the best price performance for a wide range of applications and workloads using AWS services. Learn more about the AWS Nitro System, processors at AWS, and ML chips.
CMP309 | Compute innovations enabled by the AWS Nitro System Deep dive in to the AWS Nitro System, the underlying platform for modern EC2 instances, the Nitro System, which has allowed AWS to innovate faster, further reduce your costs, and deliver increased security.
At AWS, we focus on delivering the best possible cost structure for our customers. Frugality is one of our founding leadership principles. Cost effective design continues to shape everything we do, from how we develop products to how we run our operations. Come learn of new ways to optimize your compute costs through AWS services, tools, and optimization strategies in the following sessions:
CMP207 | Capacity, availability, cost efficiency: Pick three Use AWS strategies such as using attribute-based instance type selection, prioritizing operational flexibility, and Amazon EC2 Flex instances to help you get compute resources, when you need them, while keeping cost under control.
Amazon EC2 offers the broadest and deepest compute platform to help you best match the needs of your workload. More SAP, high performance computing (HPC), ML, and Windows workloads run on AWS than any other cloud. Join sessions focused around your specific workload to learn about how you can leverage AWS solutions to accelerate your innovations.
CMP203 | Scaling SAP HANA workloads on AWS Discover how AWS SAP HANA customers benefit from the flexibility and reliability of the AWS Cloud. learn how you can migrate your mission-critical SAP HANA workloads.
CMP213 | Confidently run your production HPC workloads on AWS Explore the HPC portfolio of services and products available in the AWS Cloud. Learn how customers can scale simulations and modeling and other memory- and data-intensive technical workloads.
CMP318 | Build a spatial data lake with Visual Asset Management System Get a hands-on look at how to use the open source Visual Asset Management System (VAMS), built by AWS, to deploy a foundation for spatial data lakes, helping business units better collaborate and use 3D data while avoiding redundancies.
AWS serves millions of customers of all sizes across thousands of use cases, every industry, and around the world. Hear customers dive into how AWS compute solutions have helped them transform their businesses.
CMP320 | Powering Peloton’s journey to personalization with AWS Learn how Peloton’s solution architecture and technology stack uses Amazon EC2, Amazon S3, and Amazon EKS to build and serve individualized class recommendations in real time with low latency for a great user experience.
Ready to unlock new possibilities?
The AWS Compute team looks forward to seeing you in Las Vegas. Come meet us at the Compute Booth in the Expo. And if you’re looking for more session recommendations, check-out additional re:Invent attendee guides curated by experts.
Amazon Pinpoint is a multichannel communication service that helps application developers engage their customers through communication channels such as SMS or text messaging, email, mobile push, voice, and in-app messaging.
Amazon Pinpoint SMS provides the global scale, resiliency, and flexibility required to deliver SMS and voice messaging in web, mobile, or business applications. SMS messaging is used for use cases like one-time passcode validation, time sensitive alerts, and two-way chat due to its global reach and ubiquity. Today Amazon Pinpoint SMS sends messages to over 240 countries and regions. In this post, we will review how to use the new Pinpoint SMS management console to get your SMS resources setup correctly the first time.
This blog walks through the setup and configuration steps for Pinpoint SMS using the management console. Additionally, all setup and configurations can also be completed using Pinpoint SMS APIs. For more information visit the Pinpoint SMS documentation, or complete the Amazon Pinpoint SMS workshop.
The Pinpoint SMS management console provides control for the existing functionality of the Pinpoint SMS APIs to create, and manage your SMS and voice resources. In addition, the Pinpoint SMS console has a Quick start – SMS setup guide or Request originator flow to guide you through the setup process and for requesting and managing your SMS resources.
Phone pool: The phone pool resource is a collection of phone numbers and sender IDs that all share the same settings and provide failover if a number becomes unavailable.
Originator: An originator refers to either a phone number or sender ID.
Phone number: Also called originator number, a phone number is a numeric string of numbers that identifies the sender. This can be a long code, short code, toll-free number (TFN), or 10-digit long code (10DLC). For more information see choosing a phone number or sender ID.
Verified destination phone number: When your account is in Sandbox you can only send SMS messages to phone numbers that have gone through the verification process. The phone number receives an SMS message with a verification code. The received code must be entered into the console to complete the process.
Simulator phone number: A simulator phone number behaves as any other origination and destination phone number without sending the SMS message to mobile carriers. Simulator phone numbers do not require registration and are used for testing scenarios.
Sender ID: Also called originator ID, a sender ID is an alphanumeric string that identifies the sender. For more information see choosing a phone number or sender ID.
Registered phone number: Some countries require you to register your company’s identity before you can purchase phone numbers or sender IDs. They also require a review of the messages that you send to recipients in their country. Registrations are processed by external third parties, so the amount of time to process a registration varies by phone number type and country. After all required registrations are complete, the status of your phone numbers changes to Active and is available for use. For more information about which countries require registration see, supported countries and regions (SMS channel).
Getting started
Sign-in to the AWS management console and search for Amazon Pinpoint. If you don’t have an existing AWS account, complete the following steps to create one.
In the Amazon Pinpoint console, you can choose between managing Pinpoint SMS and Pinpoint campaign orchestration. Pinpoint SMS is the place where applications developers go to setup and configure their associated resources for SMS sending through any AWS service. Pinpoint campaign orchestration is for builders who want to manage their customer segments and send messages using campaigns, or multi-step journeys. Campaign orchestration utilizes communication channels like Pinpoint SMS or Amazon SES (simple email service) to deliver its messages. In this blog, we will discuss how to configure Pinpoint SMS using its management console.
Quick start – SMS setup guide
Once you’ve selected the Amazon Pinpoint SMS console, you will land on the Overview page. On this page, you get a summary of your SMS resources and the Quick start – SMS setup guide. This guide will walk you through creating the appropriate SMS resources to start sending SMS messages. The steps outlined in the Quick start guide are recommended but not required.
Step 1: Create a phone pool
A phone pool is a collection of phone numbers and sender IDs that all share the same settings and provide failover if a number becomes unavailable. Phone pools provide the benefit of managing for number resiliency, removes the complexity from sending applications, and provides a logical grouping to manage phone numbers and sender IDs. For example, phone pools can be grouped by use-case such as having a phone pool for OTP (one-time password) messages.
In the navigation pane, under Overview, in the Quick start section, choose Create pool. Under the pool setup section, enter a name for your pool in Pool name. To create a pool, you will need to select an origination identity, either a phone number or sender ID to associate with the pool. Additional origination identities can be added once the pool is created on the Phone pools page. If you don’t have an active phone number or sender ID in your account, we recommend selecting a simulator number, which can be used for testing and does not require any registration. Once you’ve selected an origination identity, you can choose Create phone pool to complete step 1.
Step 2: Create a configuration set
A configuration set is a set of rules that are applied when you send a message. For example, a configuration set can specify a destination for events related to a message. When SMS events occur (such as delivery or failure events), they are routed to the destination associated with the configuration set that you specified when you sent the message. You’re not required to use configuration sets when you send messages, but we recommend that you do. We support sending SMS and voice events to Amazon CloudWatch, Amazon Kinesis DataFirehose, and Amazon SNS.
In the navigation pane, under Overview, in the Quick start section, choose Create set. Under the Configuration set details section, enter a name in Configuration set name. For Event Destination setup, choose either the quick start option to create a Cloud formation stack to automatically create and configure CloudWatch, Kinesis DataFirehose, and SNS to log all events or the advanced option to manually select which event destinations you would like to setup. Once you’ve made the selection, choose Create Configuration set to complete step 2.
Step 3: Test SMS sending
Send a test message using the SMS simulator. Select an originator to send from, and a destination number to send to. To track the status of your message, add a configuration set to publish SMS events.
In the navigation pane, under Overview, in the Quick start section, choose Test SMS sending. Under the Originator section, select either a phone pool, phone number, or sender ID in your account to send test messages from. Next, under the Destination phone number section, select either a simulator number or active destination number to send test messages to. If your account is in Sandbox, you can only send messages to simulator numbers or verified destination numbers. Once your account is in Production you can send messages to simulator numbers or any active destination number. You can (optionally) select a configuration set to track your SMS events. Next, under the Message body section, enter a sample message and send the test message.
Note – If you are sending from a US simulator number (or using a phone pool that only contains a US simulator number) you can only send messages to US simulator destination numbers. A simulator phone number behaves like any other phone number without sending the SMS message to mobile carriers.
Step 4: Request production Access
Finally, if your account is in Sandbox there are limits to the amount you can spend and can only send to verified destination phone numbers. Request moving your account from Sandbox to Production to remove these limits. To move to Production, open a case with AWS Support Center.
Conclusion
After following the request for Production access, you’ve completed the recommended steps to get your account configuration setup. You have now tested and configured the following resources in your account:
Phone pool: A phone pool is a collection of phone numbers and sender IDs that all share the same settings and provide failover if a number becomes unavailable. Phone pools provide the benefit of managing for number resiliency, removes the complexity from sending applications, and provides a logical grouping to manage phone numbers and sender IDs.
Originator: As part of the pool setup, you are required to associate at least one originator to the phone pool. An originator refers to either a phone number or sender ID. If you’ve selected a simulator number and would like to now request a new phone number or sender ID, you can do so following Request originator flow.
Configuration set: A configuration set allows you to organize, track, and configure logging of your SMS events, specifying where to publish them by adding event destinations.
Next steps
To request additional originators such as phone numbers or sender IDs, you can follow the Request Originator flow in the management console. If your originator requires registrations and is supported, you can self-service the phone number or sender ID registration in the management console.
Early-feedback loops exist to provide developers with ongoing feedback through automated checks. This enables developers to take early remedial action while increasing the efficiency of the code review process and, in turn, their productivity.
Early-feedback loops help provide confidence to reviewers that fundamental security and compliance requirements were validated before review. As part of this process, common expectations of code standards and quality can be established, while shifting governance mechanisms to the left.
In this post, we will show you how to use AWS developer tools to implement a shift-left approach to security that empowers your developers with early feedback loops within their development practices. You will use AWS CodeCommit to securely host Git repositories, AWS CodePipeline to automate continuous delivery pipelines, AWS CodeBuild to build and test code, and Amazon CodeGuru Reviewer to detect potential code defects.
Why the shift-left approach is important
Developers today are an integral part of organizations, building and maintaining the most critical customer-facing applications. Developers must have the knowledge, tools, and processes in place to help them identify potential security issues before they release a product to production.
This is why the shift-left approach is important. Shift left is the process of checking for vulnerabilities and issues in the earlier stages of software development. By following the shift-left process (which should be part of a wider application security review and threat modelling process), software teams can help prevent undetected security issues when they build an application. The modern DevSecOps workflow continues to shift left towards the developer and their practices with the aim to achieve the following:
Drive accountability among developers for the security of their code
Empower development teams to remediate issues up front and at their own pace
Improve risk management by enabling early visibility of potential security issues through early feedback loops
You can use AWS developer tools to help provide this continual early feedback for developers upon each commit of code.
Solution prerequisites
To follow along with this solution, make sure that you have the following prerequisites in place:
Make sure that you have a general working knowledge of the listed services and DevOps practices.
Solution overview
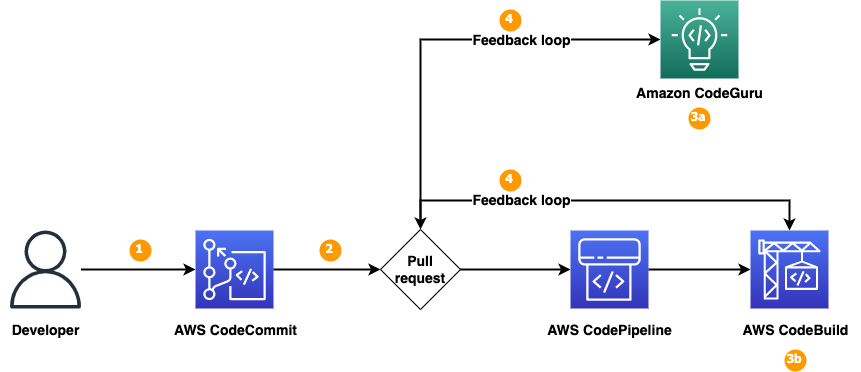
The following diagram illustrates the architecture of the solution.
Figure 1: Solution overview
We will show you how to set up a continuous integration and continuous delivery (CI/CD) pipeline by using AWS developer tools—CodeCommit, CodePipeline, CodeBuild, and CodeGuru—that you will integrate with the code repository to detect code security vulnerabilities. As shown in Figure 1, the solution has the following steps:
The developer commits the new branch into the code repository.
The developer creates a pull request to the main branch.
CodeGuru Reviewer uses program analysis and machine learning to help detect potential defects in your Java and Python code, and provides recommendations to improve the code. CodeGuru Reviewer helps detect security vulnerabilities, secrets, resource leaks, concurrency issues, incorrect input validation, and deviation from best practices for using AWS APIs and SDKs.
You can configure the CodeBuild deployment with third-party tools, such as Bandit for Python to help detect security issues in your Python code.
CodeGuru Reviewer or CodeBuild writes back the findings of the code scans to the pull request to provide a single common place for developers to review the findings that are relevant to their specific code updates.
The following table presents some other tools that you can integrate into the early-feedback toolchain, depending on the type of code or artefacts that you are evaluating:
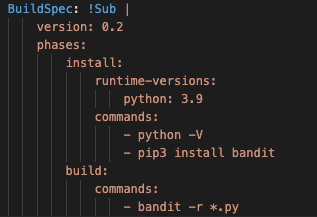
When you deploy the solution in your AWS account, you can review how Bandit for Python has been built into the deployment pipeline by using AWS CodeBuild with a configured buildspec file, as shown in Figure 2. You can implement the other tools in the table by using a similar approach.
Figure 2: Bandit configured in CodeBuild
Walkthrough
To deploy the solution, you will complete the following steps:
The first step is to deploy the required resources into your AWS environment by using CloudFormation.
To deploy the solution
Choose the following Launch Stack button to deploy the solution’s CloudFormation template:
The solution deploys in the AWS US East (N. Virginia) Region (us-east-1) by default because each service listed in the Prerequisites section is available in this Region. To deploy the solution in a different Region, use the Region selector in the console navigation bar and make sure that the services required for this walkthrough are supported in your newly selected Region. For service availability by Region, see AWS Services by Region.
On the Quick Create Stack screen, do the following:
Leave the provided parameter defaults in place.
Scroll to the bottom, and in the Capabilities section, select I acknowledge that AWS CloudFormation might create IAM resources with custom names.
Choose Create Stack.
When the CloudFormation template has completed, open the AWS Cloud9 console.
In the Environments table, for the provisioned shift-left-blog-cloud9-ide environment, choose Open, as shown in Figure 3.
Figure 3: Cloud9 environments
The provisioned Cloud9 environment opens in a new tab. Wait for Cloud9 to initialize the two sample code repositories: shift-left-sample-app-java and shift-left-sample-app-python, as shown in Figure 4. For this post, you will work only with the Python sample repository shift-left-sample-app-python, but the procedures we outline will also work for the Java repository.
Figure 4: Cloud9 IDE
Associate CodeGuru Reviewer with a code repository
The next step is to associate the Python code repository with CodeGuru Reviewer. After you associate the repository, CodeGuru Reviewer analyzes and comments on issues that it finds when you create a pull request.
To associate CodeGuru Reviewer with a repository
Open the CodeGuru console, and in the left navigation pane, under Reviewer, choose Repositories.
In the Repositories section, choose Associate repository and run analysis.
In the Associate repository section, do the following:
For Select source provider, select AWS CodeCommit.
For Repository location,select shift-left-sample-app-python.
In the Run a repository analysis section, do the following, as shown in Figure 5:
For Source branch, select main.
For Code review name – optional, enter a name.
For Tags – optional, leave the default settings.
Choose Associate repository and run analysis.
Figure 5: CodeGuru repository configuration
CodeGuru initiates the Full repository analysis and the status is Pending, as shown in Figure 6. The full analysis takes about 5 minutes to complete. Wait for the status to change from Pending to Completed.
Figure 6: CodeGuru full analysis pending
Create a pull request
The next step is to create a new branch and to push sample code to the repository by creating a pull request so that the code scan can be initiated by CodeGuru Reviewer and the CodeBuild job.
To create a new branch
In the Cloud9 IDE, locate the terminal and create a new branch by running the following commands.
cd ~/environment/shift-left-sample-app-python
git checkout -b python-test
Confirm that you are working from the new branch, which will be highlighted in the Cloud9 IDE terminal, as shown in Figure 7.
git branch -v
Figure 7: Cloud9 IDE terminal
To create a new file and push it to the code repository
Create a new file called sample.py.
touch sample.py
Copy the following sample code, paste it into the sample.py file, and save the changes, as shown in Figure 8.
import requests

data = requests.get("https://www.example.org/", verify = False)
print(data.status_code)
Figure 8: Cloud9 IDE noncompliant code
Commit the changes to the repository.
git status
git add -A
git commit -m "shift left blog python sample app update"
Note: if you receive a message to set your name and email address, you can ignore it because Git will automatically set these for you, and the Git commit will complete successfully.
Push the changes to the code repository, as shown in Figure 9.
git push origin python-test
Figure 9: Git push
To create a new pull request
Open the CodeCommit console and select the code repository called shift-left-sample-app-python.
From the Branches dropdown, select the new branch that you created and pushed, as shown in Figure 10.
Figure 10: CodeCommit branch selection
In your new branch, select the file sample.py, confirm that the file has the changes that you made, and then choose Create pull request, as shown in Figure 11.
Figure 11: CodeCommit pull request
A notification appears stating that the new code updates can be merged.
In the Source dropdown, choose the new branch python-test. In the Destination dropdown, choose the main branch where you intend to merge your code changes when the pull request is closed.
To have CodeCommit run a comparison between the main branch and your new branch python-test, choose Compare. To see the differences between the two branches, choose the Changes tab at the bottom of the page. CodeCommit also assesses whether the two branches can be merged automatically when the pull request is closed.
When you’re satisfied with the comparison results for the pull request, enter a Title and an optional Description, and then choose Create pull request. Your pull request appears in the list of pull requests for the CodeCommit repository, as shown in Figure 12.
Figure 12: Pull request
The creation of this pull request has automatically started two separate code scans. The first is a CodeGuru incremental code review and the second uses CodeBuild, which utilizes Bandit to perform a security code scan of the Python code.
Review code scan results and resolve detected security vulnerabilities
The next step is to review the code scan results to identify security vulnerabilities and the recommendations on how to fix them.
To review the code scan results
Open the CodeGuru console, and in the left navigation pane, under Reviewer, select Code reviews.
On the Incremental code reviews tab, make sure that you see a new code review item created for the preceding pull request.
Figure 13: CodeGuru Code review
After a few minutes, when CodeGuru completes the incremental analysis, choose the code review to review the CodeGuru recommendations on the pull request. Figure 14 shows the CodeGuru recommendations for our example.
Figure 14: CodeGuru recommendations
Open the CodeBuild console and select the CodeBuild job called shift-left-blog-pr-Python. In our example, this job should be in a Failed state.
Open the CodeBuild run, and under the Build history tab, select the CodeBuild job, which is in Failed state. Under the Build Logs tab, scroll down until you see the following errors in the logs. Note that the severity of the finding is High, which is why the CodeBuild job failed. You can review the Bandit scanning options in the Bandit documentation.
Test results:
>> Issue: [B501:request_with_no_cert_validation] Call to requests with verify=False disabling SSL certificate checks, security issue.
   Severity: High   Confidence: High
   CWE: CWE-295 (https://cwe.mitre.org/data/definitions/295.html)
   More Info: https://bandit.readthedocs.io/en/1.7.5/plugins/b501_request_with_no_cert_validation.html
   Location: sample.py:3:7

2
3   data = requests.get("https://www.example.org/", verify = False)
4   print(data.status_code)
Navigate to the CodeCommit console, and on the Activity tab of the pull request, review the CodeGuru recommendations. You can also review the results of the CodeBuild jobs that Bandit performed, as shown in Figure 15.
Figure 15: CodeGuru recommendations and CodeBuild logs
This demonstrates how developers can directly link the relevant information relating to security code scans with their code development and associated pull requests, hence shifting to the left the required security awareness for developers.
To resolve the detected security vulnerabilities
In the Cloud9 IDE, navigate to the file sample.py in the Python sample repository, as shown in Figure 16.
Figure 16: Cloud9 IDE sample.py
Copy the following code and paste it in the sample.py file, overwriting the existing code. Save the update.
import requests

data = requests.get("https://www.example.org", timeout=5)
print(data.status_code)
Commit the changes by running the following commands.
git status
git add -A
git commit -m "shift left python sample.py resolve security errors"
git push origin python-test
Open the CodeCommit console and choose the Activity tab on the pull request that you created earlier. You will see a banner indicating that the pull request was updated. You will also see new comments indicating that new code scans using CodeGuru and CodeBuild were initiated for the new pull request update.
In the CodeGuru console, on the Incremental code reviews page, check that a new code scan has begun. When the scans are finished, review the results in the CodeGuru console and the CodeBuild build logs, as described previously. The previously detected security vulnerability should now be resolved.
In the CodeCommit console, on the Activity tab, under Activity history, review the comments to verify that each of the code scans has a status of Passing, as shown in Figure 17.
Figure 17: CodeCommit activity history
Now that the security issue has been resolved, merge the pull request into the main branch of the code repository. Choose Merge, and under Merge strategy, select Fast Forward merge.
AWS account clean-up
Clean up the resources created by this solution to avoid incurring future charges.
To clean up your account
Start by deleting the CloudFormation stacks for the Java and Python sample applications that you deployed. In the CloudFormation console, in the Stacks section, select one of these stacks and choose Delete; then select the other stack and choose Delete.
Figure 18: Delete repository stack
To initiate deletion of the Cloud9 CloudFormation stack, select it and choose Delete.
Open the Amazon S3 console, and in the search box, enter shift-left to search for the S3 bucket that CodePipeline used.
Figure 19: Select CodePipeline S3 bucket
Select the S3 bucket, select all of the object folders in the bucket, and choose Delete
Figure 20: Select CodePipeline S3 objects
To confirm deletion of the objects, in the section Permanently delete objects?, enter permanently delete, and then choose Delete objects. A banner message that states Successfully deleted objects appears at the top confirming the object deletion.
Navigate back to the CloudFormation console, select the stack named shift-left-blog, and choose Delete.
Conclusion
In this blog post, we showed you how to implement a solution that enables early feedback on code development through status comments in the CodeCommit pull request activity tab by using Amazon CodeGuru Reviewer and CodeBuild to perform automated code security scans on the creation of a code repository pull request.
We configured CodeBuild with Bandit for Python to demonstrate how you can integrate third-party or open-source tools into the development cycle. You can use this approach to integrate other tools into the workflow.
Shifting security left early in the development cycle can help you identify potential security issues earlier and empower teams to remediate issues earlier, helping to prevent the need to refactor code towards the end of a build.
This solution provides a simple method that you can use to view and understand potential security issues with your newly developed code and thus enhances your awareness of the security requirements within your organization.
It’s simple to get started. Sign up for an AWS account, deploy the provided CloudFormation template through the Launch Stack button, commit your code, and start scanning for vulnerabilities.
If you have feedback about this post, submit comments in the Comments section below. If you have questions about this post, start a new thread on AWS re:Post or contact AWS Support.
Want more AWS Security news? Follow us on Twitter.
Translating source code written in a high-level programming language into an executable binary typically involves a series of steps, namely compiling and assembling the code into object files, and then linking those object files into the final executable. However, there are certain scenarios where it can be useful to apply an alternate approach that involves executing object files directly, bypassing the linker. For example, we might use it for malware analysis or when part of the code requires an incompatible compiler. We’ll be focusing on the latter scenario: when one of our libraries needed to be compiled differently from the rest of the code. Learning how to execute an object file directly will give you a much better sense of how code is compiled and linked together.
To demonstrate how this was done, we have previously published a series of posts on executing an object file:
The initial posts are dedicated to the x86 architecture. Since then the fleet of our working machines has expanded to include a large and growing number of ARM CPUs. This time we’ll repeat this exercise for the aarch64 architecture. You can pause here to read the previous blog posts before proceeding with this one, or read through the brief summary below and reference the earlier posts for more detail. We might reiterate some theory as working with ELF files can be daunting, if it’s not your day-to-day routine. Also, please be mindful that for simplicity, these examples omit bounds and integrity checks. Let the journey begin!
Introduction
In order to obtain an object file or an executable binary from a high-level compiled programming language the code needs to be processed by three components: compiler, assembler and linker. The compiler generates an assembly listing. This assembly listing is picked up by the assembler and translated into an object file. All source files, if a program contains multiple, go through these two steps generating an object file for each source file. At the final step the linker unites all object files into one binary, additionally resolving references to the shared libraries (i.e. we don’t implement the printf function each time, rather we take it from a system library). Even though the approach is platform independent, the compiler output varies by platform as the assembly listing is closely tied to the CPU architecture.
GCC (GNU Compiler Collection) can run each step: compiler, assembler and linker separately for us:
main.c:
#include <stdio.h>

int main(void)
{
	puts("Hello, world!");
	return 0;
}
$ gcc main.o -o main
$ ls
main  main.c  main.o  main.s
$ ./main
Hello, world!
All the examples assume gcc is running on a native aarch64 architecture or include a cross compilation flag for those who want to reproduce and have no aarch64.
We have two object files in the output above: main.o and main. Object files are files encoded with the ELF (Executable and Linkable Format) standard. Although, main.o is an ELF file, it doesn’t contain all the information to be fully executable.
$ file main.o
main.o: ELF 64-bit LSB relocatable, ARM aarch64, version 1 (SYSV), not stripped

$ file main
main: ELF 64-bit LSB pie executable, ARM aarch64, version 1 (SYSV), dynamically
linked, interpreter /lib/ld-linux-aarch64.so.1,
BuildID[sha1]=d3ecd2f8ac3b2dec11ed4cc424f15b3e1f130dd4, for GNU/Linux 3.7.0, not stripped
The ELF File
The central idea of this series of blog posts is to understand how to resolve dependencies from object files without directly involving the linker. For illustrative purposes we generated an object file based on some C-code and used it as a library for our main program. Before switching to the code, we need to understand the basics of the ELF structure.
Each ELF file is made up of one ELF header, followed by file data. The data can include: a program header table, a section header table, and the data which is referred to by the program or section header tables.
The ELF Header
The ELF header provides some basic information about the file: what architecture the file is compiled for, the program entry point and the references to other tables.
The ELF Header:
$ readelf -h main
ELF Header:
  Magic:   7f 45 4c 46 02 01 01 00 00 00 00 00 00 00 00 00
  Class:                             ELF64
  Data:                              2's complement, little endian
  Version:                           1 (current)
  OS/ABI:                            UNIX - System V
  ABI Version:                       0
  Type:                              DYN (Position-Independent Executable file)
  Machine:                           AArch64
  Version:                           0x1
  Entry point address:               0x640
  Start of program headers:          64 (bytes into file)
  Start of section headers:          68576 (bytes into file)
  Flags:                             0x0
  Size of this header:               64 (bytes)
  Size of program headers:           56 (bytes)
  Number of program headers:         9
  Size of section headers:           64 (bytes)
  Number of section headers:         29
  Section header string table index: 28
The ELF Program Header
The execution process of almost every program starts from an auxiliary program, called loader, which arranges the memory and calls the program’s entry point. In the following output the loader is marked with a line “Requesting program interpreter: /lib/ld-linux-aarch64.so.1”. The whole program memory is split into different segments with associated size, permissions and type (which instructs the loader on how to interpret this block of memory). Because the execution process should be performed in the shortest possible time, the sections with the same characteristics and located nearby are grouped into bigger blocks — segments — and placed in the program header. We can say that the program header summarizes the types of data that appear in the section header.
The ELF Program Header:
$ readelf -Wl main

Elf file type is DYN (Position-Independent Executable file)
Entry point 0x640
There are 9 program headers, starting at offset 64

Program Headers:
  Type           Offset   VirtAddr           PhysAddr           FileSiz  MemSiz   Flg Align
  PHDR           0x000040 0x0000000000000040 0x0000000000000040 0x0001f8 0x0001f8 R   0x8
  INTERP         0x000238 0x0000000000000238 0x0000000000000238 0x00001b 0x00001b R   0x1
      [Requesting program interpreter: /lib/ld-linux-aarch64.so.1]
  LOAD           0x000000 0x0000000000000000 0x0000000000000000 0x00088c 0x00088c R E 0x10000
  LOAD           0x00fdc8 0x000000000001fdc8 0x000000000001fdc8 0x000270 0x000278 RW  0x10000
  DYNAMIC        0x00fdd8 0x000000000001fdd8 0x000000000001fdd8 0x0001e0 0x0001e0 RW  0x8
  NOTE           0x000254 0x0000000000000254 0x0000000000000254 0x000044 0x000044 R   0x4
  GNU_EH_FRAME   0x0007a0 0x00000000000007a0 0x00000000000007a0 0x00003c 0x00003c R   0x4
  GNU_STACK      0x000000 0x0000000000000000 0x0000000000000000 0x000000 0x000000 RW  0x10
  GNU_RELRO      0x00fdc8 0x000000000001fdc8 0x000000000001fdc8 0x000238 0x000238 R   0x1

 Section to Segment mapping:
  Segment Sections...
   00
   01     .interp
   02     .interp .note.gnu.build-id .note.ABI-tag .gnu.hash .dynsym .dynstr .gnu.version .gnu.version_r .rela.dyn .rela.plt .init .plt .text .fini .rodata .eh_frame_hdr .eh_frame
   03     .init_array .fini_array .dynamic .got .got.plt .data .bss
   04     .dynamic
   05     .note.gnu.build-id .note.ABI-tag
   06     .eh_frame_hdr
   07
   08     .init_array .fini_array .dynamic .got
The ELF Section Header
In the source code of high-level languages, variables, functions, and constants are mixed together. However, in assembly you might see that the data and instructions are separated into different blocks. The ELF file content is divided in an even more granular way. For example, variables with initial values are placed into different sections than the uninitialized ones. This approach optimizes for space, otherwise the values for uninitialized variables would be filled with zeros. Along with the space efficiency, there are security reasons for stratification — executable instructions can’t have writable permissions, while memory containing variables can’t be executable. The section header describes each of these sections.
The ELF Section Header:
$ readelf -SW main
There are 29 section headers, starting at offset 0x10be0:

Section Headers:
  [Nr] Name              Type            Address          Off    Size   ES Flg Lk Inf Al
  [ 0]                   NULL            0000000000000000 000000 000000 00      0   0  0
  [ 1] .interp           PROGBITS        0000000000000238 000238 00001b 00   A  0   0  1
  [ 2] .note.gnu.build-id NOTE            0000000000000254 000254 000024 00   A  0   0  4
  [ 3] .note.ABI-tag     NOTE            0000000000000278 000278 000020 00   A  0   0  4
  [ 4] .gnu.hash         GNU_HASH        0000000000000298 000298 00001c 00   A  5   0  8
  [ 5] .dynsym           DYNSYM          00000000000002b8 0002b8 0000f0 18   A  6   3  8
  [ 6] .dynstr           STRTAB          00000000000003a8 0003a8 000092 00   A  0   0  1
  [ 7] .gnu.version      VERSYM          000000000000043a 00043a 000014 02   A  5   0  2
  [ 8] .gnu.version_r    VERNEED         0000000000000450 000450 000030 00   A  6   1  8
  [ 9] .rela.dyn         RELA            0000000000000480 000480 0000c0 18   A  5   0  8
  [10] .rela.plt         RELA            0000000000000540 000540 000078 18  AI  5  22  8
  [11] .init             PROGBITS        00000000000005b8 0005b8 000018 00  AX  0   0  4
  [12] .plt              PROGBITS        00000000000005d0 0005d0 000070 00  AX  0   0 16
  [13] .text             PROGBITS        0000000000000640 000640 000134 00  AX  0   0 64
  [14] .fini             PROGBITS        0000000000000774 000774 000014 00  AX  0   0  4
  [15] .rodata           PROGBITS        0000000000000788 000788 000016 00   A  0   0  8
  [16] .eh_frame_hdr     PROGBITS        00000000000007a0 0007a0 00003c 00   A  0   0  4
  [17] .eh_frame         PROGBITS        00000000000007e0 0007e0 0000ac 00   A  0   0  8
  [18] .init_array       INIT_ARRAY      000000000001fdc8 00fdc8 000008 08  WA  0   0  8
  [19] .fini_array       FINI_ARRAY      000000000001fdd0 00fdd0 000008 08  WA  0   0  8
  [20] .dynamic          DYNAMIC         000000000001fdd8 00fdd8 0001e0 10  WA  6   0  8
  [21] .got              PROGBITS        000000000001ffb8 00ffb8 000030 08  WA  0   0  8
  [22] .got.plt          PROGBITS        000000000001ffe8 00ffe8 000040 08  WA  0   0  8
  [23] .data             PROGBITS        0000000000020028 010028 000010 00  WA  0   0  8
  [24] .bss              NOBITS          0000000000020038 010038 000008 00  WA  0   0  1
  [25] .comment          PROGBITS        0000000000000000 010038 00001f 01  MS  0   0  1
  [26] .symtab           SYMTAB          0000000000000000 010058 000858 18     27  66  8
  [27] .strtab           STRTAB          0000000000000000 0108b0 00022c 00      0   0  1
  [28] .shstrtab         STRTAB          0000000000000000 010adc 000103 00      0   0  1
Key to Flags:
  W (write), A (alloc), X (execute), M (merge), S (strings), I (info),
  L (link order), O (extra OS processing required), G (group), T (TLS),
  C (compressed), x (unknown), o (OS specific), E (exclude),
  D (mbind), p (processor specific)
Let’s have a quick summary about what was done in the code:
We need to find the code of two functions (add5 and add10) in the .text section of our object file (obj.o)
Load the functions in the executable memory
Return the memory locations of the functions to the main program
There is one nuance: even though all the sections are in the section header, neither of them have a string name. Without the names we can’t identify them. However, having an additional character field for each section in the ELF structure would be inefficient for the space — it must be limited by some maximum length and those names which are shorter would leave the space unfilled. Instead, ELF provides an additional section, .shstrtab. This string table concatenates all the names where each name ends with a null terminated byte. We can iterate over the names and match with an offset held by other sections to reference their name. But how do we find .shstrtab itself if we don’t have a name? To solve this chicken and egg problem, the ELF program header provides a direct pointer to .shstrtab. The similar approach is applied to two other sections: .symtab and .strtab. Where .symtab contains all information about the symbols and .strtab holds the list of symbol names. In the code we work with these tables to resolve all their dependencies and find our functions.
Executing example from Part 2 on aarch64
At the beginning of the second blog post we made the function add10 depend on add5 instead of being self-contained. This is the first time when we faced relocations. Relocations is the process of loading symbols defined outside the current scope. The relocated symbols can present global or thread-local variables, constant, functions, etc. We’ll start from checking assembly instructions which trigger relocations and uncovering how the ELF format handles them in a more general way.
After making add10 depend on add5 our aarch64 version stopped working as well, similarly to the x86. Let’s take a look at assembly listing:
Have you noticed that all the hex values in the second column are exactly the same length, in contrast with the instructions lengths seen for x86 in Part 2 of our series? This is because all Armv8-A instructions are presented in 32 bits. Since it is impossible to encode every immediate value into less than 32 bits, some operations require more than one instruction, as we’ll see later. For now, we’re interested in one instruction - bl (branch with link) on rows 28 and 34. The bl is a “jump” instruction, but before the jump it preserves the next instruction after the current one in the link register (lr). When the callee finishes execution the caller address is recovered from lr. Usually, the aarch64 instructions reserve the last 6 bits [31:26] for opcode and some auxiliary fields such as running architecture (32 or 64 bits), condition flag and others. Remaining bits are shared between arguments like source register, destination register and immediate value. Since the bl instruction does not require a source or destination register, the full 26 bits can be used to encode the immediate offset instead. However, 26 bits can only encode a small range (+/-32 MB), but because the jump can only target a beginning of an instruction, it must always be aligned to 4 bytes, which increases the effective range of the encoded immediate fourfold, to +/-128 MB.
Similarly to what we did in Part 2 we’re going to resolve our relocations – first by manually calculating the correct addresses and then by using an approach similar to what the linker does. The current value of our bl instruction is 94000000 or in binary representation 10010100000000000000000000000000. All 26 bits are zeros, so we don’t jump anywhere. The address is calculated by an offset from the current program counter (pc), which can be positive or negative. In our case we expect it to be -0x28 and -0x34. As described above, it should be divided by 4 and taken as two’s complements: -0x28 / 4 = -0xA == 0xFFFFFFF6 and -0x34 / 4 = -0xD == 0xFFFFFFF3. From these values we need to take the lower 26 bits and concatenate them with the initial 6 bits to get the final instruction. So, the final ones will be: 10010111111111111111111111110110 == 0x97FFFFF6 and 10010111111111111111111111110011 == 0x97FFFFF3. Have you noticed that all the distance calculations are done relative to the bl (or current pc), not the next instruction as in x86?
Let’s add to the code and execute:
...

static void parse_obj(void)
{
	...
	/* copy the contents of `.text` section from the ELF file */
	memcpy(text_runtime_base, obj.base + text_hdr->sh_offset, text_hdr->sh_size);

	*((uint32_t *)(text_runtime_base + 0x28)) = 0x97FFFFF6;
	*((uint32_t *)(text_runtime_base + 0x34)) = 0x97FFFFF3;

	/* make the `.text` copy readonly and executable */
	if (mprotect(text_runtime_base, page_align(text_hdr->sh_size), PROT_READ | PROT_EXEC)) {
	...
It works! But this is not how the linker handles the relocations. The linker resolves relocation based on the type and formula assigned to this type. In our Part 2 we investigated it quite well. Here again we need to find the type and check the formula for this type:
$ readelf --relocs obj.o

Relocation section '.rela.text' at offset 0x228 contains 2 entries:
  Offset          Info           Type           Sym. Value    Sym. Name + Addend
000000000028  000a0000011b R_AARCH64_CALL26  0000000000000000 add5 + 0
000000000034  000a0000011b R_AARCH64_CALL26  0000000000000000 add5 + 0

Relocation section '.rela.eh_frame' at offset 0x258 contains 2 entries:
  Offset          Info           Type           Sym. Value    Sym. Name + Addend
00000000001c  000200000105 R_AARCH64_PREL32  0000000000000000 .text + 0
000000000034  000200000105 R_AARCH64_PREL32  0000000000000000 .text + 18
Our Type is R_AARCH64_CALL26 and the formula for it is:
ELF64 Code
Name
Operation
283
R_<CLS>_CALL26
S + A – P
where:
S (when used on its own) is the address of the symbol
A is the addend for the relocation
P is the address of the place being relocated (derived from r_offset)
Here are the relevant changes to loader.c:
/* Replace `#define R_X86_64_PLT32 4` with our Type */
#define R_AARCH64_CALL26 283
...

static void do_text_relocations(void)
{
	...
	uint32_t val;

	switch (type)
	{
	case R_AARCH64_CALL26:
		/* The mask separates opcode (6 bits) and the immediate value */
		uint32_t mask_bl = (0xffffffff << 26);
		/* S+A-P, divided by 4 */
		val = (symbol_address + relocations[i].r_addend - patch_offset) >> 2;
		/* Concatenate opcode and value to get final instruction */
		*((uint32_t *)patch_offset) &= mask_bl;
		val &= ~mask_bl;
		*((uint32_t *)patch_offset) |= val;
		break;
	}
	...
}
We have even two new relocations: R_AARCH64_ADD_ABS_LO12_NC and R_AARCH64_ADR_PREL_PG_HI21. Their formulas are:
ELF64 Code
Name
Operation
275
R_<CLS>_ ADR_PREL_PG_HI21
Page(S+A) – Page(P)
277
R_<CLS>_ ADD_ABS_LO12_NC
S + A
where:
Page(expr) is the page address of the expression expr, defined as (expr & ~0xFFF). (This applies even if the machine page size supported by the platform has a different value.)
It’s a bit unclear why we have two new types, while in x86 we had only one. Let’s investigate the assembly code:
We see that all adrp instructions are followed by add instructions. The add instruction adds an immediate value to the source register and writes the result to the destination register. The source and destination registers can be the same, the immediate value is 12 bits. The adrp instruction generates a pc-relative (program counter) address and writes the result to the destination register. It takes pc of the instruction itself and adds a 21-bit immediate value shifted left by 12 bits. If the immediate value weren’t shifted it would lie in a range of +/-1 MB memory, which isn’t enough. The left shift increases the range up to +/-1 GB. However, because the 12 bits are masked out with the shift, we need to store them somewhere and restore later. That’s why we see add instruction following adrp and two types instead of one. Also, it’s a bit tricky to encode adrp: 2 low bits of immediate value are placed in the position 30:29 and the rest in the position 23:5. Due to size limitations, the aarch64 instructions try to make the most out of 32 bits.
In the code we are going to use the formulas to calculate the values and description of adrp and add instructions to obtain the final opcode:
#define R_AARCH64_CALL26 283
#define R_AARCH64_ADD_ABS_LO12_NC 277
#define R_AARCH64_ADR_PREL_PG_HI21 275
...

{
case R_AARCH64_CALL26:
	/* The mask separates opcode (6 bits) and the immediate value */
	uint32_t mask_bl = (0xffffffff << 26);
	/* S+A-P, divided by 4 */
	val = (symbol_address + relocations[i].r_addend - patch_offset) >> 2;
	/* Concatenate opcode and value to get final instruction */
	*((uint32_t *)patch_offset) &= mask_bl;
	val &= ~mask_bl;
	*((uint32_t *)patch_offset) |= val;
	break;
case R_AARCH64_ADD_ABS_LO12_NC:
	/* The mask of `add` instruction to separate
	* opcode, registers and calculated value
	*/
	uint32_t mask_add = 0b11111111110000000000001111111111;
	/* S + A */
	uint32_t val = *(symbol_address + relocations[i].r_addend);
	val &= ~mask_add;
	*((uint32_t *)patch_offset) &= mask_add;
	/* Final instruction */
	*((uint32_t *)patch_offset) |= val;
case R_AARCH64_ADR_PREL_PG_HI21:
	/* Page(S+A)-Page(P), Page(expr) is defined as (expr & ~0xFFF) */
	val = (((uint64_t)(symbol_address + relocations[i].r_addend)) & ~0xFFF) - (((uint64_t)patch_offset) & ~0xFFF);
	/* Shift right the calculated value by 12 bits.
	 * During decoding it will be shifted left as described above,
	 * so we do the opposite.
	*/
	val >>= 12;
	/* Separate the lower and upper bits to place them in different positions */
	uint32_t immlo = (val & (0xf >> 2)) << 29 ;
	uint32_t immhi = (val & ((0xffffff >> 13) << 2)) << 22;
	*((uint32_t *)patch_offset) |= immlo;
	*((uint32_t *)patch_offset) |= immhi;
	break;
}
Our Part 3 is about resolving external dependencies. When we write code we don’t think much about how to allocate memory or print debug information to the console. Instead, we involve functions from the system libraries. But the code of system libraries needs to be passed through to our programs somehow. Additionally, for optimization purposes, it would be nice if this code would be stored in one place and shared between all programs. And another wish — we don’t want to resolve all the functions and global variables from the libraries, only those which we need and at those times when we need them. To solve these problems, ELF introduced two sections: PLT (the procedure linkage table) and GOT (the global offset table). The dynamic loader creates a list which contains all external functions and variables from the shared library, but doesn’t resolve them immediately; instead they are placed in the PLT section. Each external symbol is presented by a small function, a stub, e.g. puts@plt. When an external symbol is requested, the stub checks if it was resolved previously. If not, the stub searches for an absolute address of the symbol, returns to the requester and writes it in the GOT table. The next time, the address returns directly from the GOT table.
In Part 3 we implemented a simplified PLT/GOT resolution. Firstly, we added a new function say_hello in the obj.c, which calls unresolved system library function puts. Further we added an optional wrapper my_puts in the loader.c. The wrapper isn’t required, we could’ve resolved directly to a standard function, but it’s a good example of how the implementation of some functions can be overwritten with custom code. In the next steps we added our PLT/GOT resolution:
Basically, we created a small stub with assembly code (our jumptable) to resolve the global address of our my_puts wrapper and jump to it.
The approach for aarch64 is the same. But the jumptable is very different as it consists of different assembly instructions.
The big difference here compared to the other parts is that we need to work with a 64-bit address for the GOT resolution. Our custom PLT or jumptable is placed close to the main code of obj.c and can operate with the relative addresses as before. For the GOT or referencing my_puts wrapper we’ll use different branch instructions — br or blr. These instructions branch to the register, where the aarch64 registers can hold 64-bit values.
We can check how it resolves with the native PLT/GOT in our loader assembly code:
The first instruction is bl jump to puts@plt stub. The next ldr instruction tells us that some value was loaded into the register x0 from the stack. Each function has its own stack frame to hold the local variables. The last blr instruction makes a jump to the address stored in x0 register. There is an agreement in the register naming: if the stored value is 64-bits then the register is called x0-x30; if only 32-bits are used then it’s called w0-w30 (the value will be stored in the lower 32-bits and upper 32-bits will be zeroed).
We need to do something similar — place the absolute address of our my_puts wrapper in some register and call br on this register. We don’t need to store the link before branching, the call will be returned to say_hello from obj.c, which is why a plain br will be enough. Let’s check an assembly of simple C-function:
The number 0x555555550c14 is the address returned by lookup_ext_function. We’ve printed it out to use as an example, but any 48-bits hex value can be used.
In our output we see that the value was split in three sections and written in x0 register with three instructions: one mov and two movk. The documentation says that there are only 16 bits for the immediate value, but a shift can be applied (in our case left shift lsl).
However, we can’t use x0 in our context. By convention the registers x0-x7 are caller-saved and used to pass function parameters between calls to other functions. Let’s use x9 then.
We need to modify our loader. Firstly let’s change the jumptable structure.
loader.c:
...
struct ext_jump {
	uint32_t instr[4];
};
...
As we saw above, we need four instructions: mov, movk, movk, br. We don’t need a stack frame as we aren’t preserving any local variables. We just want to load the address into the register and branch to it. But we can’t write human-readable code
e.g. mov x0, #0xc14 into instructions, we need machine binary or hex representation, e.g. d2818280.
Almost done! But there’s one more thing to consider. Even if the value 0x555555550c14 is a real my_puts wrapper address, it will be different on each run if ASLR(Address space layout randomization) is enabled. We need to patch these instructions to put the value which will be returned by lookup_ext_function on each run. We’ll split the obtained value in three parts, 16-bits each, and replace them in our mov and movk instructions according to the documentation, similar to what we did before for our second part.
In the code we took the address of the first instruction &jumptable[curr_jmp_idx].instr[0] and wrote it in the symbol_address, further because the type is still R_AARCH64_CALL26 it will be put into bl – jump to the relative address. Where our relative address is the first mov instruction. The whole jumptable code will be executed and finished with the blr instruction.
There are several things we covered in this blog post. We gave a brief introduction on how the binary got executed on Linux and how all components are linked together. We saw a big difference between x86 and aarch64 assembly. We learned how we can hook into the code and change its behavior. But just as it was said in the first blog post of this series, the most important thing is to remember to always think about security first. Processing external inputs should always be done with great care. Bounds and integrity checks have been omitted for the purposes of keeping the examples short, so readers should be aware that the code is not production ready and is designed for educational purposes only.
Security updates have been issued by Debian (webkit2gtk), Fedora (microcode_ctl, pack, and tigervnc), Slackware (gimp), SUSE (frr, gcc13, go1.20, go1.20-openssl, go1.21, go1.21-openssl, libnbd, libxml2, python-Pillow, python-urllib3, and xen), and Ubuntu (intel-microcode and openvpn).
Политиката и петролът винаги са били скачени съдове и България, на чиято територия е най-голямата рафинерия в Югоизточна Европа, не прави изключение. За бургаското предприятие, собственост на най-голямата частна руска компания – „Лукойл“, но главно за българските потребители и държавата, въпросът е кой ще го притежава в близко бъдеще и кой ще се възползва при евентуална сделка и/или необходимостта от бърз внос на горива.
Смяна на собствеността
Темата излезе на дневен ред след европейското ембарго за внос на руски суров петрол по море, но също и в контекста на засилващите се европейски санкции срещу Русия. Целите на Европейския съюз са до 2030 г. да премахне изцяло енергийната си зависимост от Русия от нефт и газ. България получи изключение от петролното ембарго за две години и половина – до края на 2024 г., по искане на тогавашния премиер Кирил Петков („Продължаваме промяната“) миналото лято. Но в Италия се наложи „Лукойл“ да продаде рафинерията си в Сицилия буквално за няколко месеца – за 1,5 млрд. евро по информация на Financial Times.
Тези обстоятелства създадоха обосновани предположения, че същата съдба ще сполети и „Лукойл Нефтохим“ – и премиерът Николай Денков, и министърът на финансите Асен Василев неслучайно обявиха, че е проявен инвеститорски интерес. От Litasco – швейцарската компания, собственик на „Лукойл“, отрекоха, но неписаното правило е, че шумът при такива сделки вреди. Освен рафинерията, „Лукойл“ притежава и над 220 бензиностанции, нефтобази, складове, продуктопровод и др. („Газпром“, който миналата пролет прекрати едностранно доставките на газ за България, вече продава бензиностанциите си.) Запитан за евентуална сделка, тази седмица министър-председателят каза, че знае за интерес от различни страни, но правителството не е част от преговорния процес.
Интерес има, но дали са напреднали преговорите, никой от нас не може да каже.
Схемите са две: едната е Litasco да продаде българската си компания, другата – най-напред в рафинерията да влезе особен търговски управител, на когото се разрешава да управлява максимум 12 месеца според Закона за контрол по прилагане на ограничителните мерки с оглед на действията на Русия, дестабилизиращи положението в Украйна. Този управител се избира по предложение на правителството, отговорен е пред Народното събрание и е контролиран от парламентарната Комисия по икономическа политика и иновации. Неин председател е Хамид Хамид от ДПС.
Законът не дава право на особения търговски управител да се разпорежда със собствеността, но чрез него държавата би могла да повлияе на евентуални инвеститори. Той поема оперативното управление, когато има опасност от засягане на националната сигурност или от нарушаване на ограничителни мерки от международни организации, задължителни за България.
Ето че тази седмица председателят на парламентарната група на ДПС Делян Пеевски и председателят на енергийната комисия в 49-тото НС Делян Добрев от ГЕРБ сезираха прокуратурата, че „Лукойл“ нарушава европейските санкции. Повод стана разследване на изданието „Политико“, според което рафинерията e преработвала и продавала в чужбина, включително и в страните от ЕС, горива, произведени от руски петрол. Според ДПС компанията го е правила под прикритието на износ за трети страни, претоварвайки ги в открито море. „Лукойл“ отрече и заяви, че ще съдейства на прокуратурата. Агенция „Митници“ в публично изявление опроверга твърденията на политиците, че бургаската рафинерия нарушава условията на получената дерогация за износ на нефтопродукти. Премиерът Денков също каза, че няма данни за нарушения на санкциите.
Пресата се засилва
Властта обаче постепенно увеличава натиска върху руската компания. През септември концесията на руската компания за пристанище „Росенец“, откъдето влиза целият суров петрол, който рафинерията преработва, бе прекратена. Сега държавата оперира порта чрез предприятието си „Пристанищна инфраструктура“.
Парламентът прие и законова промяна в срок от 12 месеца 100% от задължителните запаси на нефт и нефтопродукти да се съхраняват на територията на страната. Преди това ограничението за съхраняване на горива за извънредни ситуации в друга държава членка на ЕС бе 50%.
Подобно изискване означава, че са необходими нови складови бази, а това ще рече и инвестиции за строителството им – 300 млн. евро според министъра на финансите Асен Василев.
След като възроптаха търговците на горива, според които срокът е твърде кратък, за да успеят, се ядосаха и от ГЕРБ и ДПС. Те поискаха да се върне ограничението за 50-те процента до 30 юни 2024 г., а след това до 30% от всички запаси да бъдат държани в чужбина, както и Държавният резерв да поеме управлението на базите за съхранение на горива на „Лукойл Нефтохим“ в страната. Така дни след обнародването на първоначалната промяна в Държавен вестник бе върнато старото положение с аргумента, че предишната разпоредба обслужва „Лукойл“, който държи 92% от складовете.
„Лукойл Нефтохим“ трябва да внесе и още 270 млн. лв. данък печалба в добавка към авансовата вноска от 89 млн. лв., направена по-рано през годината. Служебният премиер Гълъб Донев обещаваше постъпления от поне 600 млн. лв. годишно, след като компанията премести дейността си в България от 2023 г., но няма и помен от тях. Причината за очакваните милиони е, че от тази година освен 10% данък печалба „Лукойл“ трябва да плаща и „солидарна вноска“, определена от Европейската комисия на 33% от реализираната свръхпечалба на петролните и газовите компании в ЕС заради високите цени на горивата. Но със законови промени 33-те процента бяха повишени на 50 за последното тримесечие на 2023 г. Правителството разчита на тези средства, тъй като милионите по Плана за възстановяване и устойчивост може и да не бъдат получени до края на годината (на тяхната липса се дължи и дефицитът в бюджета).
Рафинерията е задължена да прави и вноски във фонд „Сигурност на електроенергийната система“, които се равняват на ценовата разлика между евтиния руски петрол „Уралс“ и европейския сорт „Брент“. Мярката беше предложена от Делян Добрев – за да се финансира подпомагането на транспортните разходи на уязвимите групи, но санкцията за неизпълнението ѝ е нищожна – 10 000 лв. Законът така и не бе задействан заради заложеното в него изискване за нотификация от ЕК, макар да не бе необходима, а служебното правителство така и не я поиска от Брюксел. Кабинетът на ПП–ДБ поиска такава нотификация и разработи и схеми за подпомагане.
Въпреки това Добрев непрекъснато атакува кабинета на Денков с любимите си въпроси защо не прибира 73 стотинки (най-напред беше левче) от цените на горивата. България потребява годишно около 2,5–3 млн. тона от произвежданите от рафинерията близо 7 млн. тона горива, останалата продукция е за износ. Но не и за Украйна. Украинските спецслужби вкараха в забранителен списък петролните бази в Бургас, Варна, Пловдив, Бяла, също и на „Инса Ойл“ в Белозем, тъй като Киев прекратява вноса на руски горива. Всеки търговец, който иска да вкара петролни продукти, трябва да представи пълна документация за произхода им.
Пеевски се подготвя отрано
През септември 49-тият парламент прие на първо четене законопроект за скрининг на преките чуждестранни инвестиции от над 1 млн. лв. Като негов основен автор е представен Пеевски. Ако законопроектът бъде приет, това означава, че инвестиции от над 1 млн. евро (колкото луксозна къща в София), свързани със сигурността и обществения ред, ще се разрешават от специално създаден за целта Междуведомствен съвет. Енергетиката попада в обхвата. Председател на Съвета би следвало да е един от заместник-министрите на иновациите и растежа, а десет министерства и спецслужби да имат представители в него.
Чуждестранните инвеститори са длъжни да подават заявление за разрешение чрез Българската агенция за инвестиции (БАИ). Механизмът, макар и изискван от ЕС по силата на Регламент 2019/452 и мотивиран с бариера пред проникването на руски капитали, до голяма степен повтаря схемата, действала за „златните паспорти“. И при нея БАИ издаваше сертификати за инвестиции и така гарантираше, че са направени. Приеме ли се скринингът, през него ще мине и кандидатът за „Лукойл“, а властта ще определи става или не става.
Сега обаче отпадането на дерогацията е инструментът за извиването на ръцете на правителството. Отново тандемът „Деляновците“ иска премахването ѝ в 3-дневен срок. Предупрежденията в доклад на ДАНС, че горивата ще поскъпнат, обаче бяха чути от парламента, който отхвърли законопроекта им на първо четене. Интересно е, че правителството и ПП–ДБ приемат аргументи от ДАНС, чийто шеф настояват да бъде сменен. Едва ли Пеевски и Добрев са вярвали, че законопроектът им ще бъде приет – така ще предизвикат гражданско недоволство при хаос на пазара и повишение на цените. Но пък продължават с натиска върху правителството и премиерът Денков свика дори Съвета по сигурността заради искането им.
Няма съмнение, че срокът, договорен от правителството с „Лукойл Нефтохим Бургас“, ще бъде съкратен – парламентът беше приел отпадането на дерогацията да стане по график до 1 октомври догодина. Предложението на ПП–ДБ е това да бъде през март – тогава е насрочена и ротацията между ГЕРБ и ПП–ДБ. Начело на правителството ще застане Мария Габриел, Денков поема поста министър на образованието, а най-вероятно ще има и смени на министри.
До отпадането на дерогацията, когато и да е тя, рафинерията трябва да е готова да премине изцяло към преработване на неруски петрол. Пред bTV съпредседателят на ПП Кирил Петков заяви, че към момента тя преработва около 48% неруски нефт – останалата част е руски. Цялостното му премахване не може да стане изведнъж, тъй като може да предизвика повреди и аварии. Тестването на различните сортове отнема време, а след определянето им следва и сключване на договори за доставка. Преминаването към преработка на неруски нефт означава, че вече няма да има танкери от Новоросийск, които стигат за 36 часа до порт „Росенец“, а за поне 600 часа и преминават през Босфора, както обясниха наскоро от „Лукойл“.
Пропагандни балони
Излиза, че ГЕРБ и ДПС са евроатлантическо(то) мнозинство в 49-тия парламент, защото настояват незабавно да отпадне дерогацията – за да не финансират руските пари от петрол войната срещу Украйна. Пеевски предупреди ПП–ДБ да прочетат знаците и да не рушат това евроатлантическо мнозинство. Може ли да се вярва на тази формална истина, твърдяна от санкциониран по Глобалния закон „Магнитски“?
Регулярно е участвал в корупция, като си е служил с търговия с влияние и подкупи, за да се защити от обществен контрол и за да упражнява контрол върху ключови институции и сектори в българското общество.
Не може да ѝ се вярва, защото през вече продадената медийна група на Пеевски нахлу проруската пропаганда. Защото в съюз с Цветан Василев и руски капитали бе наложена КТБ. Защото нищо от делата му не потвърждава евроатлантическата каузалност. Конверсията на Пеевски е възможна само ако има бизнес интереси.
И той, и БСП обаче твърдят, че управлява „прокремълски кабинет“. Пеевски дори отиде по-далеч, наричайки гласувалите срещу светкавичното отпадане БСП и „Възраждане“ и въздържалите се от ПП–ДБ „коалиция Путин“. Съидейникът му Делян Добрев пък отсъстваше от пленарната зала.
Става дума за един по-цялостен пазарлък от страна на ГЕРБ и ДПС – значителна част от икономическите лостове на държавата да дойдат пак при тях.
Подготвяйки ротацията, те се пазарят както и за бюджета за догодина, а стрелите са насочени към финансовия министър, смята той.
Радикализирането на ГЕРБ и ДПС по отношение на „Лукойл“ е повече от странно. От приватизацията на „Нефтохим“ досега „Лукойл“ се е превърнал в синоним на обгрижван от държавата монопол, успешно и законово избягвал плащането на данък печалба в България повече от 15 години. За първи път го направи през 2022 г. с едни 75 млн. лева. (Без)действието на българските регулатори в лицето на Комисията за защита на конкуренцията (КЗК) спомогна за диктатурата на пазара на едро. Едва в края на 2021 г., когато политическата конюнктура се беше променила и ГЕРБ и Бойко Борисов вече не управляваха, КЗК изведнъж забеляза, че „Лукойл“ злоупотребява с господстващо положение, тъй като не допуска други до данъчните си складове за горива и до продуктопроводите си – така пречи на вноса на горива и на конкуренцията на пазара. Комисията, начело на която е кадър на ГЕРБ, санкционира „Лукойл“ с близо 68 млн. лв. и заради ценови натиск върху конкурентите на пазара.
Демонстрирайки сила, ГЕРБ и ДПС провалиха гласуването на втория вот на недоверие към правителството, поискан от БСП заради провал в политиките по сигурността. Сега парламентът се намира в безпрецедентната ситуация на неприключило прегласуване на вот на недоверие, тъй като кворумът в пленарната зала беше провален. Лидерът на ГЕРБ Бойко Борисов, чийто партньор на карти дълги години бе директорът на „Лукойл България“ Валентин Златев, заяви в кулоарите, че „Лукойл“ е частна компания, пряко подчинена на Кремъл, след като по-рано БСП обвиниха мнозинството, че искат да си я разделят.
Как така заради тоя петрол пусти и тези пари явно са готови да падне правителството, да се съберат с опозиционните уж партии – „Възраждане“, ИТН и БСП, и това да е по-важно от правителството.
Ако Борисов желаеше правителството да падне, ГЕРБ щяха да участват в гласуването, но те не искат – искат си такса спокойствие от ПП–ДБ. До насрочения пети опит за гласуване на вота на недоверие в сряда, 22 ноември, има няколко дни за договаряне с лидерите на ПП–ДБ.
В края на октомври в центъра на Барселона отвори врати изложбено пространство без аналог в света – Музей на забраненото изкуство. На два етажа в елегантната стара къща, намираща се на крачка от преливащия от туристи булевард „Паседж де Грасия“, на първо време са подредени 42 творби от частната колекция на журналиста и предприемач Жузеп Мария (Тачо) Бенет. Колекцията датира от неотдавна, но вече наброява
над 200 „цензурирани, забранени или заклеймени по политически, социални или религиозни причини“ работи.
Всичко започва през 2018 г., когато международното изложение за съвременно изкуство ARCO в Мадрид сваля вече обявената инсталация „Политически затворници в Испания“ на Сантяго Сиера – 24 черно-бели фотографии на хора, попаднали под ударите на испанските закони заради убежденията си (въпреки че лицата са пикселирани, сред тях лесно се разпознават и няколко радетели на каталунската независимост). Каталунецът Бенет купува произведението и започва да го показва из страната. После се разравя в интернет, научава за други атакувани по света творби и придобива и някои от тях – отначало без намерение да прави сбирка, а просто защото така „се чувства добър човек“.
Фокус върху зачеркнатото
„Политическите затворници“ на Сиера не влизат в първата подборка на барселонския „експериментален музей“, но импулсът зад съдържанието му в момента е сходен: реакция на реакцията, връщане на премахнатото, светлина зад дръпнатите завеси. Всеки от разяснителните текстове към 42-та експоната носи в горната си част вестникарско заглавие, свързано със съответната полемика („Изкуството на затворниците от Гуантанамо се сблъсква с цензурата на Пентагона“; „С викове „Не на обратните!“ тълпа нахлува в Музея за изящни изкуства, удря и заплашва платно, изобразяващо феминизиран Сапата“ и пр.)
Неизбежната донякъде статика в пространството, заето с предмети на изкуството, е успешно разчупена с видеоматериали – протести за и срещу артисти; свидетелства на автори, засегнати от нечий официален или неофициален, но агресивен контрол. По думите на директорката на музея Роса Родриго (с десетилетен опит от мадридския „Кралица София“), идеята е акцентът да пада върху произведения, „откъснати [насила] от диалога с обществото, който е основната цел на изкуството“. И действително – макар изкушението да се наблегне на вече състояли се скандали да е голямо, кураторите са оставили луфт за самостоятелни бъдещи преживявания: взаимодействието на посетителите с творбите е нееднакво; срещата между неравните таланти и идеи на авторите и специфичния багаж на гледащите ги предизвиква интересна игра на културни и лични граници.
Най-старите експонати са 15 „прищевки“ на Гоя от ХVIII в. (плюс една гола жена на Климт и няколко еротични сцени на Пикасо за цвят), но повечето са от новото хилядолетие и на фона им дори уличните артисти Кийт Харинг (с една неозаглавена рисунка) и Банкси (с „Веселото ченге“) стоят като признати класици. Първото произведение, разположено още на входа на музея, е сив таен агент от папиемаше, седнал срещу влизащите и шпиониращ ги през тъмните си очила. „Зрител на зрителите“ (1972) на валенсианските дисиденти Екип „Хроника“ е смешен и страшен като истинските арбитри на правилността – хем нелепи, хем опасни.
свят без майки“, се казва на едно място в „Машината Хамлет“. Скоро след тази реплика на сцената излизат „три голи жени: Маркс, Ленин и Мао“. Налудничаво е, но чета пиесата на Хайнер Мюлер точно преди да посетя музея, а вътре виждам: една съшита жена, една раздрана жена, един гримиран Мао.
Съшитата жена е Evermust („вечно длъжна“) на Зоя Фалкова от Казахстан: по тертипа на Everlast, марка за боксово оборудване, Фалкова шие боксова круша с формите на женски торс в червено и черно. Първият отклик на този явен коментар върху домашното насилие е на първата феминистка изложба в Киргизстан през 2019-та. Деца се опитват да се гушнат в майчинската солидност на коженото тяло, мъже посягат да го ударят, а един големец директно го забранява:
Днес, 3 декември, министърът на културата А. Жаманкулов посети музея за изящни изкуства „Гапар Айтиев“, разгледа феминалето и назова работите, които следва да се отстранят,
пишат в местната преса. Малко след вернисажа директорката на музея е принудена да подаде оставка, а три седмици по-късно кураторката е пребита от двама мъже на улицата…
Раздраната жена е в „С цветя за Мария“ на Чаро Коралес, която – дали с голите си крака, дали с дланта между тях, дали с факта, че художничката си е направила автопортрет в синия плащ на Богородица – дотолкова засяга чувствата на млад испанец, че той влиза в залата, където е изложена картината, и я разпорва.
Изумително е колко ненавист към женското (от очертанията през сексуалността до всички атрибути на социалната роля) битува в съвремието и колко ясно си проличава тя в малтретирането на определени творби.
Едно от най-въздействащите места в Музея на забраненото изкуство е и едно от най-тихите, пред многократно цензурираната„Статуя на мира“ на Ким Сеокюн и Ким Юнсан. Два стола – на единия седи примерно девойче с миловидно лице, на другия си поканен да седнеш ти. Девойчето е обобщение на сексуалните робини на японската армия по време на Втората световна война. Частите му са символи: надигнатите петички (нестабилността), птичето на рамото (мирът и освобождението), свитите юмруци (нежеланието на оцелелите жертви – корейки, китайки, филипинки – да мълчат и да бъдат отпращани с половинчати извинения)…
В шедьовъра на Елио Петри „Разследване на един гражданин извън всяко подозрение“ героят от заглавието на филма е и полицай, и търсен от полицията убиец. Най-притеснителното му качество обаче е не жестокостта, а убедеността в правото да упражнява власт над плебса.
Употребата на свободата застрашава отвсякъде традиционния строй и установените власти –
казва той в една своя реч пред колеги; –
употребата на свободата предразполага всеки гражданин да се превърне в съдник, което ни пречи да изпълняваме свободно свещените си функции. Ние пазим закона и го искаме непроменен, издялан във времето. Народът е малолетен, градът е болен. На други се полага да лекуват и да образоват, а на нас – дългът да възпираме. Репресията е нашата ваксина! Репресията е култура!
Неизбежно си спомням за този цинизъм в залите на барселонския музей, събрали истории, в които пулсира същата лудост: убийствената страст на индивиди и институции да властват над презрените други и необходимостта на другите да се опълчват. Темите кръжат около светски и религиозни диктатури; желанията за бунт и скъсване са срещу неизменчиви модели, от които се възползва само малка върхушка.
Неслучайно разпятията са най-честият мотив.
В Музея те са четири и не е за вярване колко различни са пътищата, които са извървели и по които отвеждат. Piss Christ (1987) на работещия с телесни течности американец Андрес Серано е красив Христос на кръста в мътно червено и жълто, който, разбираме миг по-късно, е фотография на пластмасова фигурка, потопена в урината на автора. Финландецът Яни Лейнонен е разпнал на кръста изпосталелия клоун Роналд Макдоналд (кураторите съобразително са го „вързали“ с огромното голо тяло в „Макдоналдс“ от видеото на Йошуа Окон „Картофки на свободата: натюрморт“), а британецът Тери О’Нийл – Ракел Уелч в оскъдно облекло. Най-понятен сякаш е Христосът на самоукия аржентинец Леон Ферари от „Западната и християнска цивилизация“, прикован върху американски изтребител (творбата е класическа критика на милитаризма от времето на нашествието във Виетнам).
„Амин“ на Абел Аскона е надпис от 242 просфори, „заети“ от съответния брой реални комкания. Надписът гласи PEDERASTIA (значението на испанската дума съответства на българското „педофилия“ – „сексуално влечение/злоупотреба спрямо деца“) и предизвиква брутален отпор от Католическата църква, какъвто чудовищните ѝ издевателства над стотици хиляди деца никога не е имал. Аскона е съден многократно (вж. триметровото му произведение, наречено „Кулата“ и състоящо се от документи по делата, водени срещу него) и му се налага да емигрира от родната си Испания в Португалия.
Там емигрант е и Ай Уейуей, представен в музея с „Филипо Строци от лего“ – когато през 2015 г. в „Лего“ научават, че китайският артист се кани с поредната си огромна поръчка да прави политическа инсталация, отказват да му продадат нужните „тухлички“ и се налага той да ги събере от лего запасите на своите почитатели и с покупка на китайски имитации на датските конструктори. (Детайл от последната минута: току-що четири изложби на Ай Уейуей в различни градове бяха отменени заради негов туит.)
Цензурата понякога е самоналожена, а понякога предизвиква толкова силен обратен ефект, че чак можем да си я пожелаем. Инсталацията „Червено-синьо мълчание“на Зулиха Буабдела е „комплимент към силните жени в арабския свят“ и представлява 30 мюсюлмански молитвени килимчета с по чифт лъскави женски обувки върху всяко. Буабдела сама я оттегля малко след нападението в редакцията на „Шарли Ебдо“…
Късометражката на Наталия ЛЛ от 70-те „Консуматорско изкуство“ показва симпатична млада жена, която съблазнително облизва наденички, банани, пръстите си. През 2019 г. видеото е изложено, а после и махнато от Националната художествена галерия в Полша, което вдига цунами в социалните мрежи, бързо залети от селфита на хора, ядящи банани…
От музея няма как да отсъства нашият национален приятел – чехът Давид Черни, и неговата „Акула“ е един от най-смущаващите експонати – жесток реприз на прочутата акула във формалдехид на Деймиън Хърст. Тук в центъра на огромен „аквариум“ обаче плува не животно, а владетел: скулптура на Саддам Хюсеин във финалните му мигове – разрошен, оголен, завързан, беззащитен.
Впрочем именно „Животното и владетелят“ (по Дерида) е надсловът на изложбата в барселонския MACBA, от която преди няколко години спешно е изключена Not Dressed for Conquering/Haute Couture 04 Transport на австрийката Инес Дуяк – скулптурна група от папиемаше, в която радостен вълк обладава боливийска синдикалистка, която на свой ред обладава бившия крал на Испания Хуан Карлос I, повръщащ зелена растителност върху германски каски. Докато вилнеенето над безкрайно компрометирания монарх ми е някак разбираемо, това над смелата Домитила Чунгара, изтезавана за възгледите си и починала от рак, ме обърква и се налага да търся информация извън музея (едно от големите му предимства – дава хляб за размисъл и отваря апетит за още).
Превратното тълкуване и вулгарният редукционизъм са все по-обичайни форми на цензура в Европа,
започва Дуяк един свой прелюбопитен текст по въпроса, в който обяснява, че творбата ѝ се занимава с късата памет на неолиберализма и с връзките между европейския нацизъм и Латинска Америка, между модата и колониализма.
Съдници в мрака
Един от най-разпространените кошмари е да се видиш насън гол, изтъпанен пред хора, които те гледат и преценяват – все едно дали случайни минувачи, роднини, или изпитни комисии. Любопитното в един музей, обусловен от активната намеса в чуждите работи, е, че докато съди съдещите (избира определени творби и ги излага напук на опита да бъдат потулени, което вече е позиция), те заставя да реагираш колкото на експонатите, толкова и на евентуалната си негативност към някои от тях. Хвърля те гол пред собствения ти вътрешен трибунал, който те обсипва с коварни въпроси.
Какво е редно и нередно в изкуството и съвпада ли то с редното и нередното извън него?
Ако някое произведение ме отблъсква до степен да си мисля, че съществуването му е излишно, лош човек ли съм? Който вижда в еротичното „Портфолио Х“ на Мейпълторп повече насилие, отколкото поезия, дребен невежа ли е на фона на историческата фигура на автора? Защо е проблем да отхвърлиш като неадекватен плаката с тореадор, рисуван за тенис шампионата „Ролан Гарос“ от Микел Барсело? Ако определена група не иска да те чува и вижда, ще рече ли непременно, че си прав или имаш нещо смислено за (по)казване? Ако си прав, ще рече ли, че ще съумееш да се изразиш? Действително ли артистът трябва да е активист, както казва Зулиха Буабдела?
Музеят на забраненото изкуство в Барселона дава възможност за тези и други въпроси, за някои отговори (има образователна програма за по-младите), както и за много обсъждания насън и наяве, на глас и наум.
Фототропизмът (растеж по посока на светлината) е механизъм, който се среща при повечето растения и е добре проучен. Основни за функцията му са специални молекули, наречени фототропини, които са чувствителни към светлина в синята част на спектъра. Те насочват растежните хормони към тази страна на растението, която е в сянка, и тя расте по-бързо. Това кара растението да се наклони на другата страна и така се насочва към светлината.
Хелиотропизмът при слънчогледите (следенето на слънцето) е сходен и познат на всички феномен – сутрин питите се обръщат на изток, за да посрещнат слънцето, а през деня плавно се накланят на запад, към залеза. В началото на годината беше описано наличието на вътрешен часовник, който казва на слънчогледите, че изгревът наближава и е време да се обърнат и да отворят цветчетата си в очакване на насекомите, които ще ги опрашат. Но това е само част от процеса.
До момента се смяташе, че движението на растенията също е базирано на фототропини, което може да се окаже невярно. Това сочи нова публикация, която сравнява генната експресия при слънчогледи, отгледани в специализирани растежни стаи и на полето. В растежните камери те не се движат през деня, а растат директно към неподвижния светлинен източник, при което се активират само гени, свързани с фототропизма, докато в слънчогледите на полето се наблюдава експресия на напълно различни гени.
За да разберат дали спектърът на светлината има значение за хелиотропизма, учените са поставили специални засенчващи филтри над растенията, които спират само определена част от спектъра. Това не е повлияло на движението на питите, което най-вероятно значи, че процесът се базира на множество механизми, действащи в синхрон и активирани от различни дължини на вълната.
Въпреки че не дава отговор как точно работи механизмът за насочване към слънцето, публикацията показва, че процесът е по-сложен, отколкото се смяташе до момента, и описва нови начини, по които растенията реагират на светлината. Статията е интересна и защото от нея се вижда ефектът на контролираните условия – невинаги между полученото в лабораторията и реалните условия може да се направи паралел.
Следа в изчезването на динозаврите
Изчезването на динозаврите вследствие на сблъсък на гигантски метеорит със Земята преди около 66 млн. години е добре приета хипотеза. Тя е предложена през 1980 г. от геолога Уолтър Алварес и баща му, носителя на Нобелова награда за физика Луис Уолтър Алварес, заради което е наричана и хипотеза на Алварес.
Всички доказателства, налични към момента, сочат, че мястото на удара е 180-километровият кратер Чиксулуб, намиращ се в днешен Юкатан, Мексико, който тогава е бил плитко море с дълбочина от няколкостотин метра. Най-вероятно астероидът е бил с диаметър между 10 и 15 км, сходен по големина с по-малкия спътник на Марс – Деймос. Освен експлозия и огромни приливни вълни, ударът му бързо е предизвикал рязко понижаване на температурата, което е довело до измирането на мегафауната. Смята се, че вследствие на това са загинали около 75% от всички видове на планетата, като най-засегнати са били по-големите животни, особено тревопасните и хищниците.
Причината за спадането на температурите все още е обект на дебати. Една от водещите хипотези до момента беше, че изгарянето на частици в атмосферата е довело до многократно увеличение на концентрацията на серен диоксид в нея. Комбинацията със саждите от пожарите по цялата планета е довела до рязко намаляване на количеството слънчева светлина, което е понижило температурата. Възможно е обаче основната причина за тъмната зима, покрила Земята, да се окаже друга – фин прах, изхвърлен при удара.
Това показват резултатите от измерването на силикатни частици, отложени в находището „Танис“ в Северна Дакота. С помощта на лазернодифракционен апарат размерът на частиците е определен между 0,8 и 8 µм – многократно по-малък от предполагания до момента. Това е от значение както за разпространението им в атмосферата, така и за взаимодействието им със слънчевата светлина. Най-вероятно те са били и основният компонент на материала, изхвърлен от удара.
След въвеждането на тези данни в климатична симулация се установява, че частици с такъв размер могат да се задържат във въздуха около 15 години и в зависимост от сезона да понижат глобалната температура с 15–19°C. В комбинация със серния диоксид и саждите моделът е показал потенциал за спад с до 25°C, като най-вероятно температурите са се задържали по-ниски от тези преди удара в продължение на поне 20 години.
Според модела запрашването на въздуха е довело и до пълно спиране на фотосинтетичните процеси, като това най-вероятно е станало само в рамките на две седмици, причинявайки колапс на хранителните вериги. Кризата е продължила почти две години, а възстановяването е започнало от Южното полукълбо, което се доказва от по-малкия брой изчезнали видове там.
Работата на палеоклиматолозите е трудна, тъй като нямат пряк поглед върху промените и трябва да правят изводите си въз основа на косвени доказателства. Но откритията им за предишни масови измирания и драстични промени в климата са важни, защото могат да ни помогнат да разберем по-добре процесите, протичащи в момента.
Борба с астероиди
Съдбата на динозаврите служи за напомняне, че опасността от подобни събития е реална, макар и малко вероятна. Само преди няколко месеца покрай Земята премина астероид 2023 NT1 с диаметър между 30 и 60 м. Той е прелетял изключително близо, на по-малко от 100 000 км от нас, което е около четвърт от разстоянието до Луната. Въпреки че не би причинил глобална катастрофа, размерът му е достатъчен да унищожи голям град при директен удар. Най-притеснителното е, че следенето на подобни по-малки обекти е трудно – 2023 NT1 е забелязан два дни след като е преминал покрай Земята. Той ще посети Слънчевата система отново през 2044 г., но този път на повече от 1 AU (разстоянието до Слънцето, или 150 млн. км), поради което е премахнат от списъка с потенциално опасни обекти.
Най-доброто решение за опасни астероиди е отклоняването им в нова траектория, която ги отдалечава от Земята. Но това е възможно само ако има достатъчно време. В случай че обектът бъде открит само дни преди сблъсъка, единственото решение е раздробяването му на малки парчета, които или ще подминат планетата, или ще изгорят в атмосферата. Въпреки че звучи като филмов сценарий, е научно издържано.
Това показват доводите, изложени от американски учени в скорошна публикация, предизвикана от преминаването на 2023 NT1. Според тях ракета, която е подготвена да бъде изстреляна в рамките на няколко часа, може да се използва за фрагментиране на астероида. Вариантите са да се действа с пасивни (кинетични) импактори, освободени под формата на облак към астероида, или с активни (експлозивни) импактори – това най-вероятно ще се наложи за някои по-плътни астероиди.
Ако астероидът е от камък (или агрегати), симулациите показват, че той може да бъде обезвреден с разбиване само ден преди удара, като е най-добре фрагментите да са поне 1000, за да може да се намалят ефектите върху атмосферата и да няма щети на повърхността на Земята. При плътни метални астероиди парчетата трябва да с по-малък размер и по-разпръснати, за да се избегне припокриване при изгарянето им.
Отклоняването на астероид с размерите на 2023 NT1 също е възможно и за това ще е нужен само кинетичен импактор с тегло 100 кг, но той трябва да бъде изстрелян няколко дни преди удара. Затова учените смятат, че при предупреждение от около седмица фрагментацията е по-подходящ метод. Тези симулации се базират на данните от сондата DART на NASA, която се сблъска с астероида Диморфос.
Към момента повечето програми за наблюдение и ранно известяване са американски с европейско партньорство. Поради това е най-вероятно и първите противоастероидни ракети да бъдат разработени там. Въпреки това, ако времето за реакция е кратко, местоположението за изстрелване на ракетата може да се окаже ключово, което предполага разполагането на подобен арсенал равномерно по цялата планета. Доколко това е възможно, е въпрос, на който по-скоро трябва да отговорят политиците. Учените показват, че имат решение, което е много вероятно да проработи.
Възпроизводимост в науката
Понякога и в контролирани условия е невъзможно да се повторят конкретни резултати. Тази тема се дискутира активно от дълго време, като се започне от областта на психологията, където е въведен терминът криза на възпроизводимостта. Основната причина са ограничените финансови средства, отпускани за изследвания, чиято цел е да повторят публикувани вече резултати.
В повечето случаи се разчита на изготвянето на проекти със силна „история“, а данните понякога остават на второ място. Донякъде това се дължи на натиска за постоянно публикуване, на който са подложени учените, а отрицателните резултати се приемат изключително трудно от научните издания. Но след като изследванията са вече публикувани, е много трудно да бъдат оборени и тъй като често става въпрос за репутация и его, възниква напрежение между авторите на първоначалните статии и тези, които не могат да повторят резултатите и да публикуват откритието си. Това води до погрешното впечатление, че единични изследвания са абсолютната истина по даден въпрос, а всъщност те са малка част от големия научен пъзел.
Ново проучване представя интересен поглед към проблема и показва колко важно е как ще бъдат обработени данните. То е достъпно в предпечатна версия и все още не е рецензирано, но с оглед на подхода към анализа заслужава да се обсъди, затова и редица публикации обърнаха внимание на представените резултати.
Авторите дават два набора данни на 146 учени в областта на екологията и еволюционната биология. Данните са свързани с два въпроса: доколко размерът на сините синигери се влияе от конкуренцията с другите малки в гнездото и дали тревната покривка пречи, или помага на евкалиптовите фиданки да прорастват. Получените 137 отговора (някои са работили в екип) са многозначителни.
Повечето от 74-те резултата, получени от първия набор данни, показват негативен ефект – колкото по-голяма е конкуренцията в гнездото, толкова по-малки са пиленцата. Но от тези 74 само половината смятат резултата за убедителен. Пет от отговорите са, че данните не показват ясна връзка между двата фактора. А според други пет конкуренцията в гнездото няма ефект. По-ярко разграничаване има при евкалиптовите фиданки. От 63 отговорили 6 откриват позитивен ефект от наличието на тревна покривка, 18 – негативен, а 8 не са сигурни в ефекта. Най-голямата група отговорили смята, че между двете няма връзка.
След получаването на резултатите те са дадени на трета група, която е симулирала рецензионния процес. При него резултатите, показващи най-голям ефект от тревната покривка върху евкалиптовите фиданки, са отхвърлени, но това не променя съществено анализа. При синигерите дори и най-крайните резултати са одобрени. Това показва колко голямо влияние имат подходът при обработка на данните и използваните статистически методи. Особено в биологията, където данните често са изключително хетерогенни, дори малки промени в анализа могат да доведат до абсолютно различен резултат. И въпреки че статиите преминават през рецензиране, това не е гаранция, че статистическият подход ще бъде оценен подобаващо.
Изследването е вдъхновено от друго проучване, при което на 29 екипа, работещи в областта на социалните науки, е даден набор от данни, свързан с цвета на кожата на футболисти и броя червени картони, които получават. Въпреки че 20 от групите откриват статистическа връзка между двете – медианата на вероятността тъмнокож играч да получи картон е около 1,3 пъти по-висока, – абсолютната им стойност варира в широки граници. И както авторите отбелязват, ако всеки един от тези 29 резултата се публикува като отделна статия, изводите може да са коренно различни – от пълна липса на връзка между двете до много силна, с вероятност почти три пъти по-висока в сравнение с играч със светла кожа.
Разпределената обработка на данните не е възможна винаги и крие своите рискове, така че най-вероятно ще остане по-рядко използван подход. Въпреки това, както отбелязват и авторите на изследването с футболните данни, е добра идея да се прилага, когато решенията засягат законодателни промени и други свързани процеси.
Но всичко това не трябва да се приема като сигнал, че науката не работи и не следва да се вярва на резултатите и експертите. Тази дискусия показва, че научният подход работи дори когато е приложен върху себе си. Основният извод за широката публика е, че единични изследвания не трябва да се приемат за абсолютен факт и не е лошо да сме мнителни към шокиращи заглавия в медиите. Това е особено важно при теми като здраве, хранене и икономика, в които сензационните новини не са рядкост.
Д-р Антоанета Тончева е генетик – молекулярен биолог. Работила е 14 години в германски университетски детски болници, където прави докторантурата си и трупа постдокторантски опит. От 5 години е член на сдружение „Общност Мостове“. Тя е един от активистите, допринесли за осветляване на проблемите с достъпа до медицински храни в България.
Срещаме се с нея в последните дни на Международната седмица за повишаване на информираността за малнутрицията и скоро след като българските здравни власти след години публичен натиск най-после предприеха стъпки за заплащане на медицинските храни с публични средства.
Поводът да си говорим е продължаващото усилие медицинските храни, лечебните храни да станат част от портфолиото на Националната здравноосигурителна каса и да са достъпни за всички пациенти, които се нуждаят от тях. Относително добрата новина е, че може би от пролетта на следващата година това ще бъде факт. Но преди да стигнем до този момент, да тръгнем от въпроса защо Вие се занимавате с темата къде молекулярната биология се свързва с проблема с достъпа до медицински храни за българските пациенти?
Причините са и професионални, и лични. Всеки от нас, който е станал част от някакво движение, сдружение, неформална организация, пациентска или на хора с увреждания, е бил провокиран от пробойните в здравната и социалната система, често и от лични случки. В семейството си аз имам няколко души, които в последните 20 години са се нуждаели или се нуждаят в момента от специалните храни. Връзката с молекулярната биология и генетиката е, че редица редки заболявания, с каквито аз се занимавам, водят до невъзможност човек или да усвоява хранителните вещества (например едно такова заболяване е муковисцидозата), или пък до състояния, свързани с нисък мускулен тонус, до степен на невъзможност човек да преглъща и стомахът му да обработва храната – чисто физиологична невъзможност да се храни по обичайния начин. Също след онкологични заболявания, голяма част от които са тясно свързани с генетиката. Та това ме тласна да се занимавам с темата – поредицата от случаи, на които станах свидетел. Сред тях и на хора, които си отидоха от глад, не от заболяването си.
Да си представим, че част от хората, които ще прочетат този разговор, никога не са чували за проблема с достъпа до медицински храни. Затова да се върнем малко назад. Какво трябва да им разкажем? Вие споменахте някои от заболяванията, които може да доведат до недохранване, или малнутриция. Какво е това?
Малнутрицията е състояние, при което тялото системно не получава нужните му хранителни вещества. Тя може да се дължи на огромен набор от основни заболявания.
Може ли да ги групирате, за да дадем някаква представа на читателите?
Заболяванията и състоянията са най-разнообразни. Най-честият пример, за който може би обикновеният читател ще се сети, са хората след инсулт. Те често са парализирани частично, в по-малка или по-голяма степен, дълго време се залежават, буквално изпосталяват. На английски този процес се нарича wasting, защото тялото изразходва много енергия с цел да се възстанови от уврежданията, настъпили вследствие на инсулта, и когато в такава ситуация човек няма достъп до пълния спектър от хранителни вещества, изразходва каквито подкожни мазнини има. В един момент се стига до толкова критично ниско тегло, че тялото започва да разгражда собствените си белтъци, един вид да „се самоизяжда“. Това може да се види при хора с хранителни разстройства, с генетични синдроми, при страдащи от парализа на стомаха или парализа на червата. Пациентите на активна химиотерапия са също пример за хора в такава нужда и страшно пренебрегвана група – тялото ти се бори с тумора, бори се с нежеланите ефекти от самите лекарства и така то изразходва много повече енергия, отколкото чисто физически може да приеме. Толкова са разнообразни тези състояния, че е трудно да се изброят. Но всеки от нас на практика е потенциален пациент, който може да има нужда за по-малко или повече време от медицинска храна.
Медицинската храна за различните заболявания различава ли се?
Има различни варианти, да. Основната идея на медицинските храни е, че те са със специална формула, според която в малък обем се съдържа много енергия. Така изпиваш едно шишенце от, да кажем, 200 мл и това е равно на две пържоли, образно казано. Вече има храна и под формата на кремчета. Има и много концентрирани храни, които се вкарват с тръбичка в тялото през сонда или през стома. Те са вече за доста по-специфични състояния.
Знае ли се приблизително годишно колко души в България биха имали нужда от медицинска храна?
За съжаление, към днешна дата такива данни не се събират. Ако запитате Здравната каса, ще отговорят може би само за тези хора, които получават специални обеднени медицински храни. При тях липсва някакъв компонент, защото пациентите не могат да го преработват. Състояния, които изискват такова хранене, са, да кажем, фенилкетонурия и сродни вродени грешки на обмяната. Но никой никога не е опитвал да преброи пациентите с недохранване и критично ниско тегло.
Как са се хранили до момента (а и в момента) тези хора, между които и много деца?
С дарителски средства, кампании, дарени храни… Има активисти, които се занимават с набиране на средства и купуване на храни. Понякога компаниите вносителки даряват храни с изтичащ срок на годност. Когато съм в Германия аз, а и други българи в чужбина, купуваме оттам и пращаме, защото са по-евтини. Отделно от това семействата продават каквото имат за продаване – имоти, коли… Всичко това при тотално отсъствие на държавните здравни институции. Казано накратко – чрез волни пожертвования. Едно от децата от кампаниите ни – Веско, днес на 25 – от 22 години е със стома и семейството му се справя без никаква подкрепа.
Вие имате дългогодишна практика в друга система, за която сме свикнали да смятаме, че е доста по-хуманна към пациентите. Може ли да разкажете как е решен този въпрос в Германия?
Системата е наистина драстично различна. Имам преки наблюдения върху пациенти с муковисцидоза, защото работих в детската клиника на Университетската болница в Регенсбург, където има център по муковисцидоза. Там съм и преводач на български пациенти и познавам случаите им в детайли. Всичко, което е необходимо за тези деца, включително витамините им, се изписва по каса – инхалаторът, резервните му части, всички видове изследвания, всички антибиотици за орален или венозен прием, т.нар. генни терапии за муковисцидоза също… И медицинските храни се изписват по този ред, когато са необходими. Те се назначават от диетолога в болницата, при когото пациентите минават задължително на консултация на всеки три или шест месеца, в зависимост от нуждата.
Познавам детенце с булозна епидермолиза, т.нар. пеперудена болест, при която кожата е много лесно ранима и при обикновен допир се получават сериозни рани. Тялото има нужда от много енергия, за да може оздравителните процеси в тази крехка кожа да вървят гладко и раните да зарастват. Това намалява болката, намалява и риска от тежки инфекции, които могат да бъдат дори смъртоносни. За това момиченце палиативният екип е изписал медицинска храна и тя пристига в кашонче на вратата на дома му. Не е нужно да се чака за протокол, да се лежи в болница, да се обикалят аптечни складове. При това дете медицинската храна се прилага като добавъчно хранене, то не е лишено от възможността да яде и нормална храна, какъвто понякога е случаят при други пациенти.
А в България какъв е процесът?
Тук няма нищо, но вече сме обнадеждени, че ще има, след едно решение на Здравната каса.
Как се стигна до това решение?
Проблемът с медицинските храни стои на масата от години. От 13, за да сме по-точни. Преди нашия разговор погледнах най-старата си кореспонденция. Това са едни препратени писма от майката на Веско, която през 2010 г. може би за първи път вдигна голям шум по темата. Веско е емблематична личност за нашата общност. Той е един много сладък младеж – вече младеж, преди 13 години е бил дете – с доста рядък генетичен синдром, който остава невидим по всички параграфи за българската здравна система. От 9 години никой не се е интересувал дали е жив. От тригодишен с гастростома. Неговият рядък генетичен синдром е направил така, че да не може да преглъща добре и в даден момент вече съвсем да не може. Това налага майка му да готви кашички, да ги пасира и да ги вкарват през гастростомата. Сега Веско е на 25 – сагата продължава от 22 години. Първото писмо, което майка му пази, а вероятно има и по-ранни, е от юни 2010-та. Написала го е до президента, до дарителски организации, до Здравната каса, до Министерството на здравеопазването…. Няколко месеца по-късно Министерството обещава, че ще дискутират проблема много подробно. Оттогава са минали 13 години.
Сега си спомних, че след това „Българската Коледа“ започна да плаща храните.
Да. „Българската Коледа“ започна да плаща някои от храните за някои от екзотичните метаболитни заболявания, но само за деца до 18 години. Това какво означава? Добутал си ги живи и колкото е възможно здрави до 18, после оставяме семействата да се оправят. Довиждане.
Но да се върнем на тази сага, която се точи над 13 години, само нашето сдружение работи по нея над 5. В целия този промеждутък от време сме наясно, че са нужни данни, за да можем да изпълним всички критерии на списъците, наредбите и другите подзаконови нормативни актове. Никой обаче не започна да събира данни. И до ден днешен не е ясно колко са хората с малнутриция. След поредица от разговори, писма до здравни комисии, срещи с депутати, акции в Народното събрание с картини, рисувани от деца с увреждания, пускане на картички в пощенските кутии на депутатите и прочее те така и не ни обърнаха внимание. Докато не обединихме усилия с Националната мрежа за децата и още над 20 организации, които да ни подкрепят, и не започнахме системно да се развяваме по медиите, с извинение за грубия израз, за да се забележи проблемът с недохранването и липсата на медицински храни.
Най-накрая през 2022 г. се сформира работна група. Бяхме включени трима души от НПО сектора – аз, Аделина Банакиева от сдружение „Общност Мостове“ и Антоанета Иванова от НМД. Уведомиха ни за първото заседание на тази група три часа преди провеждането му. Това беше отношението на институциите към процеса и към нас.
В крайна сметка ние сами събрахме подкрепа от лекари, направихме списък на Министерството на здравеопазването от кои експертни съвети по специалности да поискат становища. Седем експертни съвета бяха попитани, тези по онкология и онкохематологични заболявания не пожелаха да отговорят. Дълго време ведомството отказваше да ни даде становищата, за да видим какво пише в тях.
Минаха месеци, докато получим всички документи и разберем, че част от експертните съвети са дали негативни становища. На една от срещите представители на НЗОК си позволиха да ни заплашват, че ако не се съгласим да приемем НЗОК да включи в списъка си само три заболявания, за които да започне да плаща храна, няма да видим медицински храни за никого още десет години. Стана медиен скандал, после отново имаше затишие, избори, смяна на хора на ръководни позиции.
На поредна среща след още месеци ние отново настояхме, че единственото решение, което ще приемем, е малнутрицията да се впише в нормативната уредба като самостоятелно заболяване, за да може всички с този проблем, независимо от основната си диагноза, да имат право на храна. Обосновахме се с европейски данни и със становищата на лекарите, които ни подкрепят през цялото време.
След всичко разказано дотук ми се вижда важно да ги назовете. Кои са те?
Да, това са проф. Миглена Георгиева и проф. Ружа Панчева от Варна, доц. Янков от Университетската болница „Св. Георги“ в Пловдив, д-р Мила Байчева от СБАЛДБ „Проф. Иван Митев“ в София и проф. Красимир Антонов от УМБАЛ „Св. Иван Рилски“ в София. Те са неотлъчно до нас през цялото това време.
Историята стана доста дълга, но нека я довършим; близо сме до развръзката.
Съвсем близо. Така след още шест седмици мълчание, на 17 октомври, Надзорният съвет на НЗОК излезе с решение средно тежката и тежката форма на малнутриция да влязат в този заветен списък със заболявания, за които се заплащат терапии.
Какви са следващите стъпки?
Двете с Антоанета Иванова от НМД бяхме част от работната група, която изготви спецификация на храните, които Касата ще заплаща. Сега тази спецификация трябва да се приеме от Надзорния съвет на НЗОК, да се изготвят методическите указания как да се оцени дали даден пациент има нужда от медицинска храна, която, доколкото разбирам, ще се изписва с протокол. После ще се обявят обществени поръчки. Реално очакваме първите пациенти да започнат да получават храни не по-рано от 1 април 2024 г. След 13 години чакане обаче това е някакъв лъч надежда.
Имам един деликатен въпрос. Ако дори експерти от експертните съвети не смятат, че част от пациентите им биха имали нужда от медицински храни, кой и как ще обучи лекарите да припознаят състоянието малнутриция като част от своите ангажименти и да предписват правилно медицинските храни?
Наясно сме, че ще има нужда от обучения и че както при всички информационни кампании под шапката на МЗ, така и при тази ще се окаже, че вероятно Министерството ще има нужда от помощ, тоест ние ще трябва да си проведем обученията сами.
Кои са специалистите, които според вас най-често ще изписват тези храни? Защото германската практика, за която разказахте по-горе, засега е неприложима у нас. Каква би била работещата практика в български условия?
Всъщност гастроентеролозите и педиатрите, които сега ще изработят критериите, вероятно ще обърнат внимание на няколко биохимични параметъра, плюс индекса на телесната маса и основното заболяване, ако то е известно. На базата на тези критерии комисия от типа на ЛКК би следвало да направи оценка и да назначи официално храната, за да може да се издаде протокол и пациентът да си я получи.
А кой ще насочва към тази комисия?
За новата възможност трябва да бъдат информирани както общопрактикуващите лекари, така и лекуващите специалисти от други медицински направления. Но се опасявам, че без усилията на НПО сектора информационна кампания в нужния мащаб едва ли ще има.
Вие какво ще правите до 1 април?
Ще следим дали се правят нужните стъпки. Докато не видим с очите си първия пациент, който си взема храната по Здравна каса, и не се уверим, че този алгоритъм работи, няма да се откажем.
Аз съм оптимист, че въпросът с храните ще бъде решен.
В рубриката „Разговори за здравеопазването“ Надежда Цекулова кани своите събеседници да поговорят без клишета и празнодумие за проблемите и решенията, болката и оздравяването, медицината и политиката.
The collective thoughts of the interwebz
Manage Consent
To provide the best experiences, we use technologies like cookies to store and/or access device information. Consenting to these technologies will allow us to process data such as browsing behavior or unique IDs on this site. Not consenting or withdrawing consent, may adversely affect certain features and functions.
Functional
Always active
The technical storage or access is strictly necessary for the legitimate purpose of enabling the use of a specific service explicitly requested by the subscriber or user, or for the sole purpose of carrying out the transmission of a communication over an electronic communications network.
Preferences
The technical storage or access is necessary for the legitimate purpose of storing preferences that are not requested by the subscriber or user.
Statistics
The technical storage or access that is used exclusively for statistical purposes.The technical storage or access that is used exclusively for anonymous statistical purposes. Without a subpoena, voluntary compliance on the part of your Internet Service Provider, or additional records from a third party, information stored or retrieved for this purpose alone cannot usually be used to identify you.
Marketing
The technical storage or access is required to create user profiles to send advertising, or to track the user on a website or across several websites for similar marketing purposes.


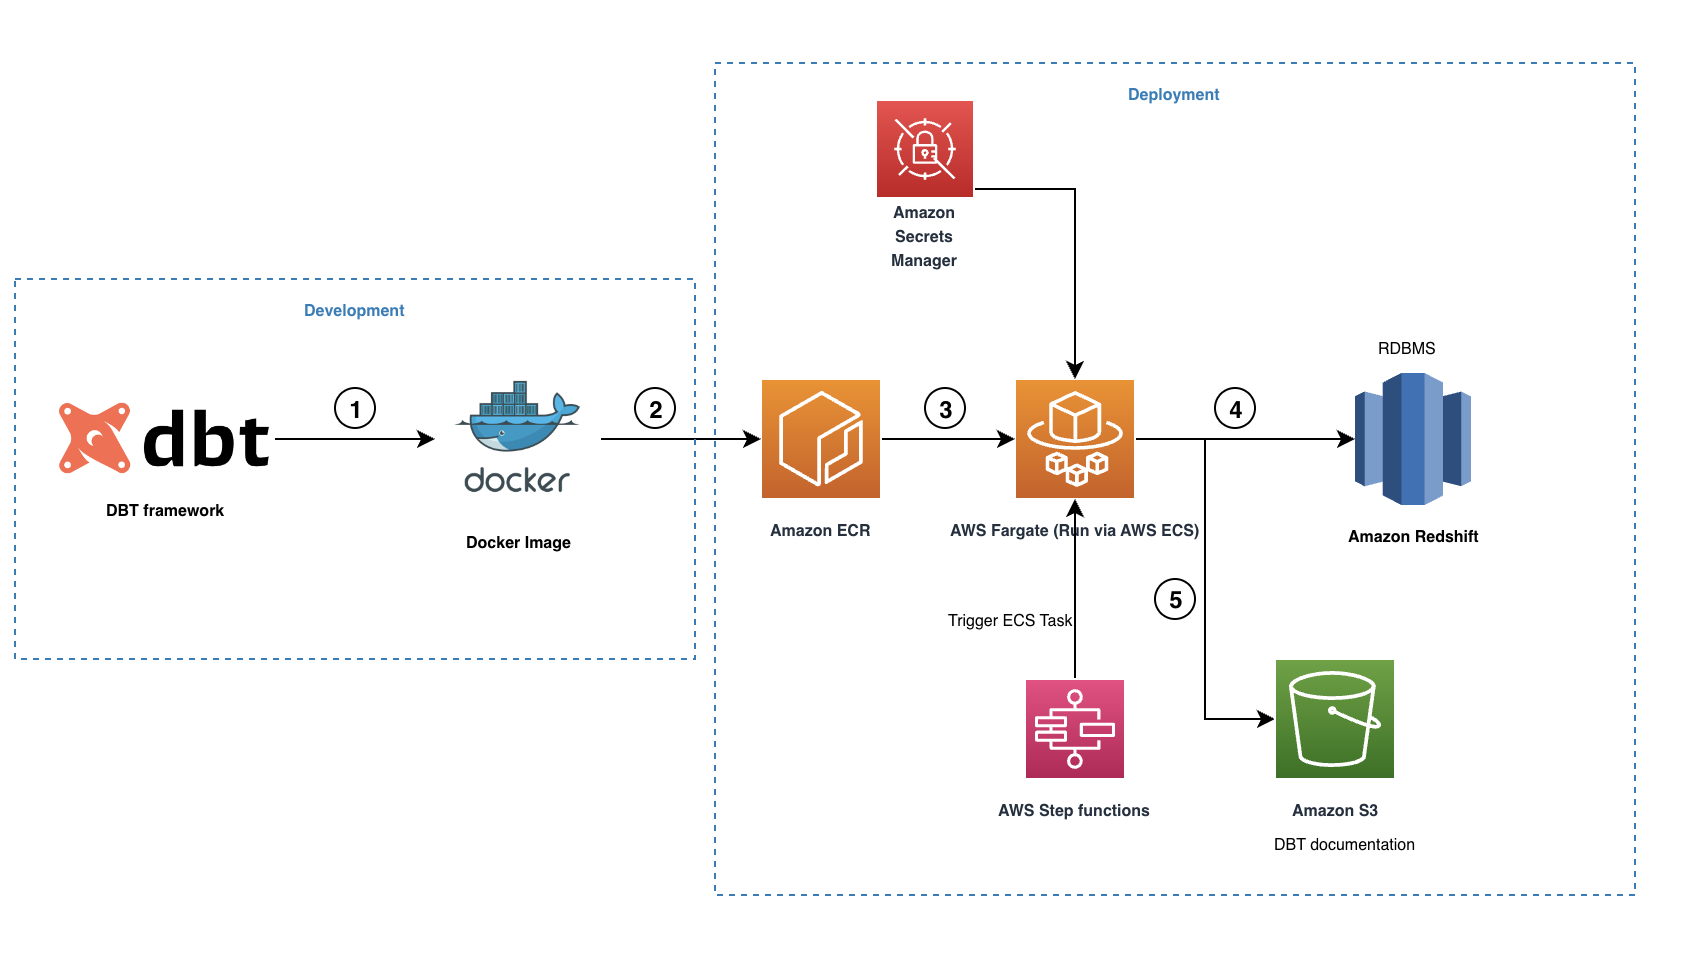
 Seshadri Senthamaraikannan is a data architect with AWS professional services team based in London, UK. He is well experienced and specialised in Data Analytics and works with customers focusing on building innovative and scalable solutions in AWS Cloud to meet their business goals. In his spare time, he enjoys spending time with his family and play sports.
 Mohamed Hamdy is a Senior Big Data Architect with AWS Professional Services based in London, UK. He has over 15 years of experience architecting, leading, and building data warehouses and big data platforms. He helps customers develop big data and analytics solutions to accelerate their business outcomes through their cloud adoption journey. Outside of work, Mohamed likes travelling, running, swimming and playing squash.