When Let’s Encrypt first launched, we needed to ensure that our certificates were widely trusted. To that end, we arranged to have our intermediate certificates cross-signed by IdenTrust’s DST Root CA X3. This meant that all certificates issued by those intermediates would be trusted, even while our own ISRG Root X1 wasn’t yet. During subsequent years, our Root X1 became widely trusted on its own.
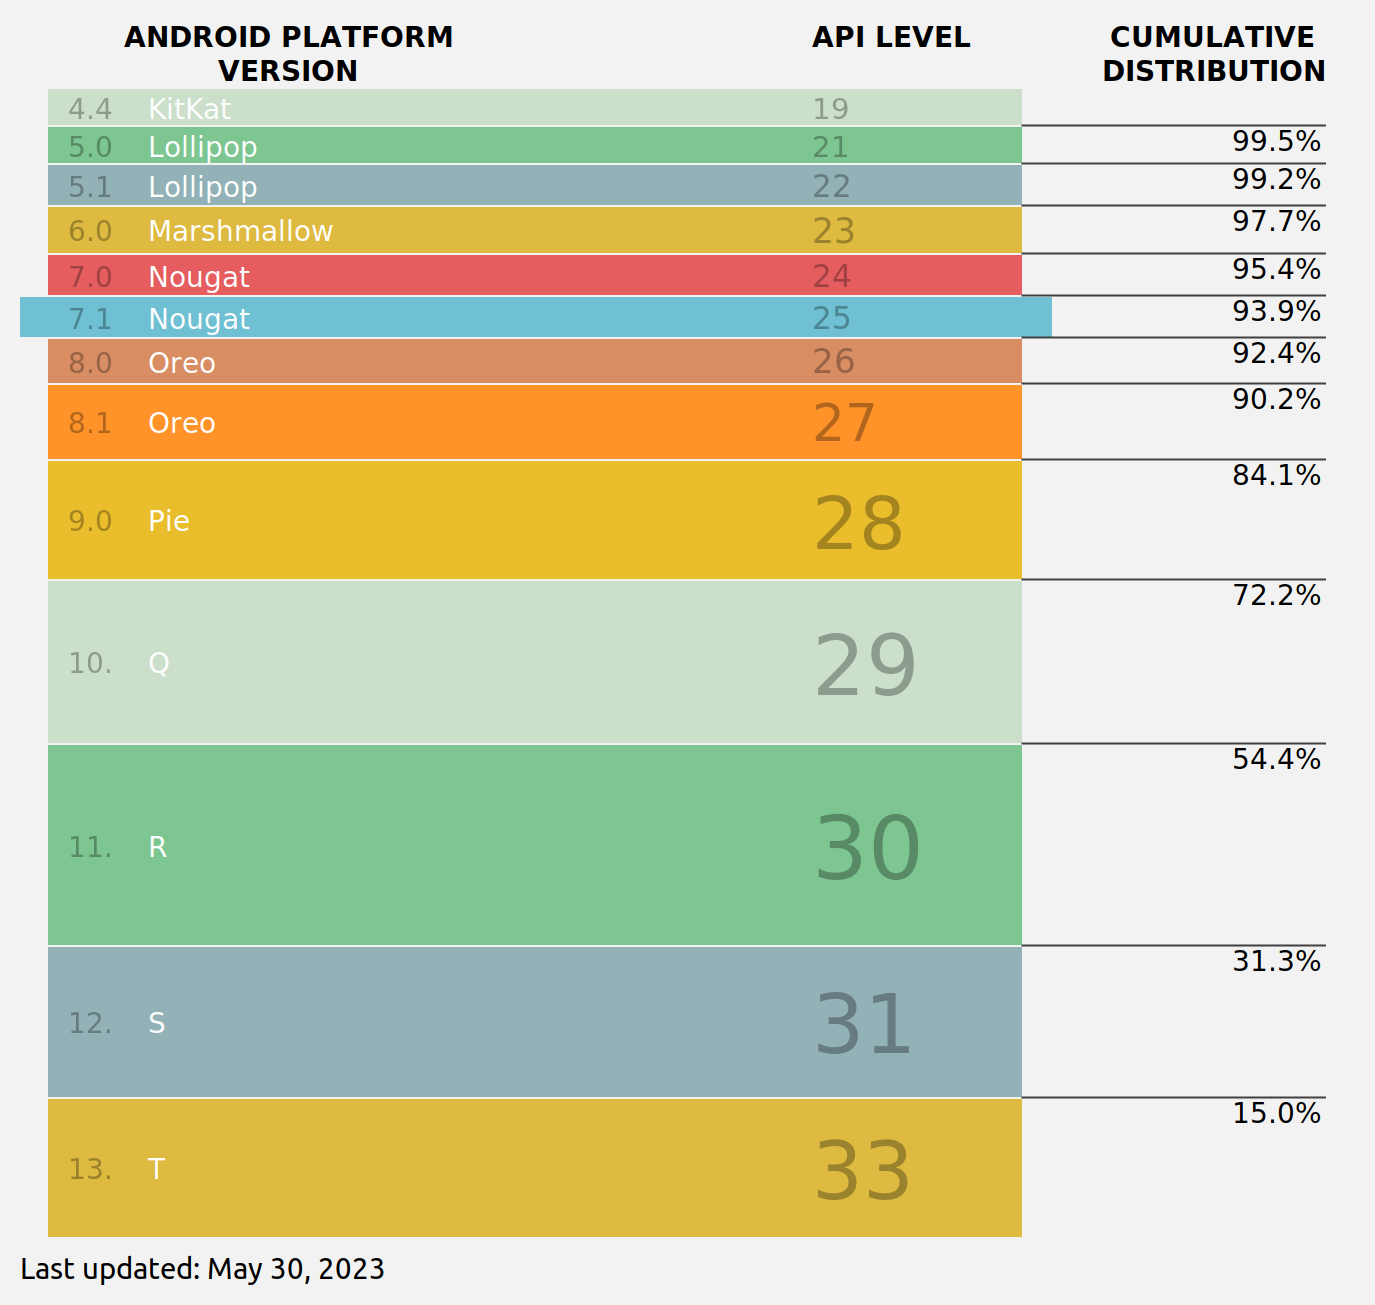
Come late 2021, our cross-signed intermediates and DST Root CA X3 itself were expiring. And while all up-to-date browsers at that time trusted our root, over a third of Android devices were still running old versions of the OS which would suddenly stop trusting websites using our certificates. That breakage would have been too widespread, so we arranged for a new cross-sign – this time directly onto our root rather than our intermediates – which would outlive DST Root CA X3 itself. This stopgap allowed those old Android devices to continue trusting our certificates for three more years.
On September 30th, 2024, that cross-sign too will expire.
In the last three years, the percentage of Android devices which trust our ISRG Root X1 has risen from 66% to 93.9%. That percentage will increase further over the next year, especially as Android releases version 14, which has the ability to update its trust store without a full OS update. In addition, dropping the cross-sign will reduce the number of certificate bytes sent in a TLS handshake by over 40%. Finally, it will significantly reduce our operating costs, allowing us to focus our funding on continuing to improve your privacy and security.
For these reasons, we will not be getting a new cross-sign to extend compatibility any further.
The transition will roll out as follows:
On Thursday, Feb 8th, 2024, we will stop providing the cross-sign by default in requests made to our /acme/certificate API endpoint. For most Subscribers, this means that your ACME client will configure a chain which terminates at ISRG Root X1, and your webserver will begin providing this shorter chain in all TLS handshakes. The longer chain, terminating at the soon-to-expire cross-sign, will still be available as an alternate chain which you can configure your client to request.
On Thursday, June 6th, 2024, we will stop providing the longer cross-signed chain entirely. This is just over 90 days (the lifetime of one certificate) before the cross-sign expires, and we need to make sure subscribers have had at least one full issuance cycle to migrate off of the cross-signed chain.
On Monday, September 30th, 2024, the cross-signed certificate will expire. This should be a non-event for most people, as any client breakages should have occurred over the preceding six months.
If you use Android 7.0 or earlier, you may need to take action to ensure you can still access websites secured by Let’s Encrypt certificates. We recommend installing and using Firefox Mobile, which uses its own trust store instead of the Android OS trust store, and therefore trusts ISRG Root X1.
If you are a site operator, you should keep an eye on your website usage statistics and active user-agent strings during Q2 and Q3 of 2024. If you see a sudden drop in visits from Android, it is likely because you have a significant population of users on Android 7.0 or earlier. We encourage you to provide the same advice to them as we provided above.
If you are an ACME client author, please make sure that your client correctly downloads and installs the certificate chain provided by our API during every certificate issuance, including renewals. Failure modes we have seen in the past include a) never downloading the chain at all and only serving the end-entity certificate; b) never downloading the chain and instead serving a hard-coded chain; and c) only downloading the chain at first issuance and not re-downloading during renewals. Please ensure that your client does not fall into any of these buckets.
We appreciate your understanding and support, both now and in the years to come as we provide safe and secure communication to everyone who uses the web. If you have any questions about this transition or any of the other work we do, please ask on our community forum.
We’d like to thank IdenTrust for their years of partnership. They played an important role in helping Let’s Encrypt get to where we are today and their willingness to arrange a stopgap cross sign in 2021 demonstrated a true commitment to creating a secure Web.
We depend on contributions from our supporters in order to provide our services. If your company or organization can help our work by becoming a sponsor of Let’s Encrypt please email us at [email protected]. We ask that you make an individual contribution if it is within your means.
Linus has released 6.5-rc1 and closed the
merge window for this release.
Anyway, none of it looks hugely unusual. The biggest single mention
probably goes to what wasn’t merged, with the bcachefs pull request
resulting in a long thread (we didn’t hit a hundred emails yet, but
it’s not far away).
The curious can read that long
thread in the list archives.
Изминалата седмица ще се помни заради първото посещение на украинския президент Володимир Зеленски в България. То беше съпроводено с важни решения на парламента, свързани с различни форми на истинска, а не декларативна подкрепа за Украйна. Ето че се случват и събития в настоящето ни, от които да бъдем горди. В една съвременна демократична страна повод за гордост би следвало да са нещата, които правим, а не идеализираната история или високи колци със знаме на върха – като този на Рожен, чийто строеж междувременно тече с пълна пара.
За измиването на срама от челото трябва да благодарим на крепящото се с цената на нелеки компромиси ротационно правителство на Николай Денков и Мария Габриел. Що се отнася до президента Румен Радев, в разговора си със Зеленски той показа по-ясно от всякога, че не изпълнява основната си конституционна функция – да олицетворява единството на нацията.
В „Тоест“ също имаме не един, а два повода за радост. Единият е, че можем да представим и втория продукт от съвместното ни начинание с шоколадовата фабрика „Гайо“, при което един лев от всеки шоколад отива за „Тоест“. Извадих късмет, че тази седмица съм дежурна по бюлетин, така че на мен се падна честта да представя шоколада, който е черен (70% какао от Венецуела), с пеканови ядки, карамелизирани в кленов сироп. Пък аз тъкмо черен шоколад обичам. Кутия с шест шоколада на цена без търговска надценка можете да поръчате директно от производителя. Имате избор от кутии само с черни шоколади, само с млечни или наполовина и от двата вида. Ако искате единични бройки, засега вариантът е да ги купите от Laika.bg. Надяваме се много скоро да ги има и на други места.
Вторият повод за радост е, че към Читателския клуб на „Тоест“ се присъединиха още две издателства – „Кръг“ и „Рижко“. За активните ни дарители това означава, че ще могат да купуват книги от тези и още 14 български издателства с 20% отстъпка от коричната цена.
И тъй като сме на вълна радостни събития, ще започна прегледа на публикациите в „Тоест“ от последната седмица с дебюта на Габриела Манова при нас. Тя разговаря с Анджела Родел, преводачката на английски език на романа „Времеубежище“ на Георги Господинов. На 23 май вечерта романът спечели престижната награда Booker International, като тя беше поделена между Господинов и Родел. В интервюто тя разказва за живота си на американка, дошла в България в много труден за страната ни период, и споделя възгледите си за преводаческата работа.
Връщаме се на политическа вълна. Статията на Емилия Милчева „Гешев вдига дървен меч“ е по повод новото НПО „Справедливост за България“ на доскорошния главен прокурор Иван Гешев, което има амбицията да се превърне в политически проект. Има ли обаче кой да му повярва на Гешев, че се бори за справедливост, след като беше три години на позицията с най-много власт да я въздава, пък справедливост не видяхме? Емилия обръща внимание и върху логото на организацията на Гешев, в което има меч, силно напомнящ на меча на логото на ДС, правен по образец на това на КГБ, както и на меча от логото на фирмата на Слави Трифонов – „Седем-осми“.
Като стана дума за ДС – през последните седмици най-големият проблем се оказаха не бившите агенти и служители на социалистическия репресивен апарат, които продължават да са активни в социално-политическия живот в България и да са редовни гости в телевизионните студиа, а кандидатът за кмет на София Васил Терзиев, издигнат с подкрепата на ПП, ДБ, „Спаси София“ и „Екипът на София“. Защо? Защото дядо му, баща му и чичо му били служители на ДС. За тези двойни стандарти разсъждавам в статията си „Васил Терзиев, Арнолд Шварценегер и непреработеното минало“.
Оставаме на вълна ДС и с интервюто на Боряна Телбис с разследващата журналистка Миролюба Бенатова „Истинският разговор за ролята на ДС в Прехода никога не е започвал“. Според Бенатова, която изследва темата не от вчера, имената на хората с прякори и техните връзки с властта не бива да се забравят, защото са анамнеза на Прехода. И на политическия, и на икономическия преход. Затова границите между държава, организирана престъпност и контрабанда са доста условни. А службите, неизчистени от кадри от времето на тоталитарния режим, продължават да си работят и след 1989 г. – достатъчно е да си спомним агентурния псевдоним на Бойко Борисов „Буда“. Бенатова засяга и темата за агентурното потекло на Васил Терзиев и привилегиите, с които той е отраснал.
Крайно време е да погледнем и извън България. Знаете ли коя е най-голямата етническа група в света, която си няма държава? Не, не са ромите, а кюрдите, казва Александър Нуцов в статията си „Кюрдският въпрос и „бездомността“ на 30 милиона души“. Той разказва как е станало така, че население, няколко пъти по-голямо от българското, е разпръснато между границите на Турция, Ирак, Иран и Сирия, и каква е връзката на управлението на Кемал Ататюрк с това.
Дойде време и за личната ми препоръка. Този път обаче тя не е песен или филм, а покана за размисъл. Идеята ми дойде преди да съм прочела интервюто на Боряна с Миролюба Бенатова и затова няма връзка с него.
Предложението ми е да помислим за привилегиите. В България сме свикнали да се възприемаме като лишени от привилегии, които други притежават. Затова рядко се замисляме за собствените си привилегии.
Ние, авторите и читателите на „Тоест“, със сигурност сме грамотни. Имаме достъп до електричество, вода и интернет, които спират само по изключение, и тогава вдигаме шум до небето. Ако живеем в България, а не в някоя по-добра за живеене от България страна, и разчитаме на някоя от топлофикациите да ни снабдява с топла вода, годишната профилактика е винаги голяма драма. Имаме покрив над главата си, върху който не очакваме всеки момент да падне бомба. Нито сме в постоянен страх домовете ни да бъдат съборени като „незаконни постройки“.
За по-голямата част от хората по света комбинацията от всички тези неща, които приемаме като саморазбиращи се, изобщо не е даденост. Включително и в България има социални групи, достъпът на членовете на които до образование, ток, вода и дом не е гарантиран.
Преди няколко месеца се запознах с германка, която от 30 години живее в Ямайка. Там обитава къща, която с мъжа ѝ така и не са достроили. Седем години са нямали ток. После са проимали, защото са се научили да го крадат. Топла вода пък нямат изобщо – къпят се със студена. Нямат и водопровод – разчитат на дъждовна вода. Здравни осигуровки не могат да си позволят. Като тях живее голяма част от населението на Ямайка и региона. Жената каза, че човек всъщност има нужда от много малко, а аз се засрамих заради всичко, което имам, без да го оценявам.
България може да е най-бедната страна в ЕС, но пък ЕС е едно от най-добрите места за живеене в света. Ние нямаме заслуга, че сме се родили на привилегировано място. А онези, които от наша гледна точка пък имат всичко, са загубили привилегията да имат нормален частен живот.
This post is written by Archana Srikanta, Principal Engineer, AWS Lambda.
When you call AWS Lambda’s Invoke API, a series of throttle limits are evaluated to decide if your call is let through or throttled with a 429 “Too Many Requests” exception. This blog post explains the most common invoke throttle limits and the relationship between them, so you can better understand scaling workloads on Lambda.
Overview
The throttle limits exist to protect the following components of Lambda’s internal service architecture, and your workload, from noisy neighbors:
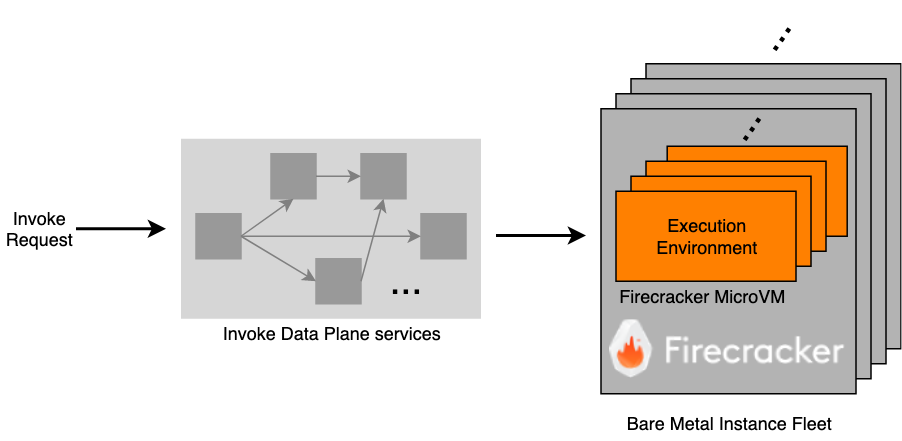
Execution environment: An execution environment is a Firecracker microVM where your function code runs. A given execution environment only hosts one invocation at a time, but it can be reused for subsequent invocations of the same function version.
Invoke data plane: These are a series of internal web services that, on an invoke, select (or create) a sandbox and route your request to it. This is also responsible for enforcing the throttle limits.
When you make an Invoke API call, it transits through some or all of the Invoke Data Plane services, before reaching an execution environment where your function code is downloaded and executed.
There are three distinct but related throttle limits which together decide if your invoke request is accepted by the data plane or throttled.
Concurrency
Concurrent means “existing, happening, or done at the same time”. Accordingly, the Lambda concurrency limit is a limit on the simultaneous in-flight invocations allowed at any given time. It is not a rate or transactions per second (TPS) limit in and of itself, but instead a limit on how many invocations can be inflight at the same time. This documentation visually explains the concept of concurrency.
Under the hood, the concurrency limit roughly translates to a limit on the maximum number of execution environments (and thus Firecracker microVMs) that your account can claim at any given point in time. Lambda runs a fleet of multi-tenant bare metal instances, on which Firecracker microVMs are carved out to serve as execution environments for your functions. AWS constantly monitors and scales this fleet based on incoming demand and shares the available capacity fairly among customers.
The concurrency limit helps protect Lambda from a single customer exhausting all the available capacity and causing a denial of service to other customers.
Transactions per second (TPS)
Customers often ask how their concurrency limit translates to TPS. The answer depends on how long your function invocations last.
The diagram above considers three cases, each with a different function invocation duration, but a fixed concurrency limit of 1000. In the first case, invocations have a constant duration of 1 second. This means you can initiate 1000 invokes and claim all 1000 execution environments permitted by your concurrency limit. These execution environments remain busy for the entire second, and you cannot start any more invokes in that second because your concurrency limit prevents you from claiming any more execution environments. So, the TPS you can achieve with a concurrency limit of 1000 and a function duration of 1 second is 1000 TPS.
In case 2, the invocation duration is halved to 500ms, with the same concurrency limit of 1000. You can initiate 1000 concurrent invokes at the start of the second as before. These invokes keep the execution environments busy for the first half of the second. Once finished, you can start an additional 1000 invokes against the same execution environments while still being within your concurrency limit. So, by halving the function duration, you doubled your TPS to 2000.
Similarly, in case 3, if your function duration is 100ms, you can initiate 10 rounds of 1000 invokes each in a second, achieving a TPS of 10K.
Codifying this as an equation, the TPS you can achieve given a concurrency limit is:
TPS = concurrency / function duration in seconds
Taken to an extreme, for a function duration of only 1ms and at a concurrency limit of 1000 (the default limit), an account can drive an invoke TPS of one million. For every additional unit of concurrency granted via a limit increase, it implicitly grants an additional 1000 TPS per unit of concurrency increased. The high TPS doesn’t require any additional execution environments (Firecracker microVMs), so it’s not problematic from a fleet capacity perspective. However, driving over a million TPS from a single account puts stress on the Invoke Data Plane services. They must be protected from noisy neighbor impact as well so all customers have a fair share of the services’ bandwidth. A concurrency limit alone isn’t sufficient to protect against this – the TPS limit provides this protection.
As of this writing, the invoke TPS is capped at 10 times your concurrency. Added to the previous equation:
TPS = min( 10 x concurrency, concurrency / function duration in seconds)
The concurrency factor is common across both terms in the min function, so the key comparison is:
min(10, 1 / function duration in seconds)
If the function duration is exactly 100ms (or 1/10th of a second), both terms in the min function are equal. If the function duration is over 100ms, the second term is lower and TPS is limited as per concurrency/function duration. If the function duration is under 100ms, the first term is lower and TPS is limited as per 10 x concurrency.
To summarize, the TPS limit exists to protect the Invoke Data Plane from the high churn of short-lived invocations, for which the concurrency limit alone affords too high of a TPS. If you drive short invocations of under 100ms, your throughput is capped as though the function duration is 100ms (at 10 x concurrency) as shown in the diagram above. This implies that short lived invocations may be TPS limited, rather than concurrency limited. However, if your function duration is over 100ms you can effectively ignore the 10 x concurrency TPS limit and calculate your available TPS as concurrency/function duration.
Burst
The third throttle limit is the burst limit. Lambda does not keep execution environments provisioned for your entire concurrency limit at all times. That would be wasteful, especially if usage peaks are transient, as is the case with many workloads. Instead, the service spins up execution environments just-in-time as the invoke arrives, if one doesn’t already exist. Once an execution environment is spun up, it remains “warm” for some period of time and is available to host subsequent invocations of the same function version.
However, if an invoke doesn’t find a warm execution environment, it experiences a “cold start” while we provision a new execution environment. Cold starts involve certain additional operations over and above the warm invoke path, such as downloading your code or container and initializing your application within the execution environment. These initialization operations are typically computationally heavy and so have a lower throughput compared to the warm invoke path. If there are sudden and steep spikes in the number of cold starts, it can put pressure on the invoke services that handle these cold start operations, and also cause undesirable side effects for your application such as increased latencies, reduced cache efficiency and increased fan out on downstream dependencies. The burst limit exists to protect against such surges of cold starts, especially for accounts that have a high concurrency limit. It ensures that the climb up to a high concurrency limit is gradual so as to smooth out the number of cold starts in a burst.
The algorithm used to enforce the burst limit is the Token Bucket rate-limiting algorithm. Consider a bucket that holds tokens. The bucket has a maximum capacity of B tokens (burst). The bucket starts full. Each time you send an invoke request that requires an additional unit of concurrency, it costs a token from the bucket. If the token exists, you are granted the additional concurrency and the token is removed from the bucket. The bucket is refilled at a constant rate of r tokens per minute (rate) until it reaches its maximum capacity.
What this means is that the rate of climb of concurrency is limited to r tokens per minute. Even though the algorithm allows you to collect up to B tokens and burst, you must wait for the bucket to refill before you can burst again, effectively limiting your average rate to r per minute.
The chart above shows the burst limit in action with a maximum concurrency limit of 3000, a maximum burst(B) of 1000 and a refill rate(r) of 500/minute. The token bucket starts full with 1000 tokens, as is the available burst headroom.
There is a burst activity between minute one and two, which consumes all tokens in the bucket and claims all 1000 concurrent execution environments allowed by the burst limit. At this point the bucket is empty and any attempt to claim additional concurrent execution environments is burst throttled, in spite of max concurrency not being reached yet.
The token bucket and the burst headroom are replenished at minutes two and three with 500 tokens each minute to bring it back up to its maximum capacity of 1000. At minute four, there is no additional refill because the bucket is at maximum capacity. Between minutes four and five, there is a second burst activity which empties the bucket again and claims an additional 1000 execution environments, bringing the total number of active execution environments to 2000.
The bucket continues to replenish at a rate of 500/minute at minutes five and six. At this point, sufficient tokens have been accumulated to cover the entire concurrency limit of 3000, and so the bucket isn’t refilled anymore even when you have the third burst activity at minute seven. At minute ten, when all the usage ramps down, the available burst headroom slowly stair steps back down to the maximum initial burst of 1K.
The actual numbers for maximum burst and refill rate vary by Region and are subject to change, please visit the Lambda burst limits page for specific values.
It is important to distinguish that the burst limit isn’t a rate limit on the invoke itself, but a rate limit on how quickly concurrency can rise. However, since invoke TPS is a function of concurrency, it also clamps how quickly TPS can rise (a rate limit for a rate limit). The following chart shows how the TPS burst headroom follows a similar stair step pattern as the concurrency burst headroom, only with a multiplier.
Conclusion
This blog explains three key throttle limits applied on Lambda invokes: the concurrency limit, TPS limit and burst limit. It outlines the relationship between these limits and how each one protects the system and your workload from noisy neighbors. Equipped with this knowledge you can better interpret any 429 throttling exceptions you may receive while scaling your applications on Lambda. For more information on getting started with Lambda visit the Developer Guide.
For more serverless learning resources, visit Serverless Land.
A mysterious squid-like cosmic cloud, this nebula is very faint, but also very large in planet Earth’s sky. In the image, composed with 30 hours of narrowband image data, it spans nearly three full moons toward the royal constellation Cepheus. Discovered in 2011 by French astro-imager Nicolas Outters, the Squid Nebula’s bipolar shape is distinguished here by the telltale blue-green emission from doubly ionized oxygen atoms. Though apparently surrounded by the reddish hydrogen emission region Sh2-129, the true distance and nature of the Squid Nebula have been difficult to determine. Still, a more recent investigation suggests Ou4 really does lie within Sh2-129 some 2,300 light-years away. Consistent with that scenario, the cosmic squid would represent a spectacular outflow of material driven by a triple system of hot, massive stars, cataloged as HR8119, seen near the center of the nebula. If so, this truly giant squid nebula would physically be over 50 light-years across.
As usual, you can also use this squid post to talk about the security stories in the news that I haven’t covered.
We saw some great teamwork this week from jheysel-r7 and h00die to bring you an exploit module for CVE-2023-33246.
In Apache RocketMQ version 5.1.0 and under, there is an access control issue which the module leverages to update the broker’s configuration file without authentication. From here we can gain remote code execution as whichever user is running the service.
New module content (1)
Apache RocketMQ update config RCE
Authors: Malayke, h00die, and jheysel-r7
Type: Exploit
Pull request: #18082 contributed by jheysel-r7
AttackerKB reference: CVE-2023-33246
Description: This adds an exploit module that leverages an RCE in Apache RocketMQ. Due to an access control issue, one can update the Broker’s configuration file without authentication and obtain remote code execution in the context of the user running Apache RocketMQ. This vulnerability is identified as CVE-2023-33246.
Enhancements and features (4)
#18122 from h00die – This adds a library that provides methods for working with Apache RocketMQ.
#18144 from rorymckinley – Updates the capture plugin to be more helpful, and adds additional documentation. This passive capture plugin can be used with load capture and run with captureg --help.
#18153 from adfoster-r7 – Removes Ruby 2.7 from Metasploit’s automated test suite. Ruby 2.7 has been officially marked as end-of-life by the maintainers. Users are recommended to upgrade to Ruby 3.x with a Ruby version manager or similar.
Bugs fixed (2)
#18152 from adfoster-r7 – This fixes a bug where the PHP Meterpreter would show the incorrect file size for very large files.
#18166 from dwelch-r7 – Fixes a crash when running the show payloads command for a module that supports encrypted payloads on a machine that doesn’t have a Mingw compiler available.
Documentation added (1)
#18169 from adfoster-r7 – Additional documentation has been added to the Metasploit Wiki to explain how plugins work.
You can always find more documentation on our docsite at docs.metasploit.com.
Get it
As always, you can update to the latest Metasploit Framework with msfupdate
and you can get more details on the changes since the last blog post from
GitHub:
If you are a git user, you can clone the Metasploit Framework repo (master branch) for the latest.
To install fresh without using git, you can use the open-source-only Nightly Installers or the binary installers (which also include the commercial edition).
After an initial foray into the ways that open-source software has failed
to live up to its early hype, this Digital
Antiquarian article covers the history of rogue-like games in great
detail.
This brings us back around to a statement I made at the outset:
that roguelikes are the exception that proves the rule of
open-source game development — and just possibly of open-source
software development in general. The cast of thousands who
contribute to them do so in order to make exactly the games that
they want to play, which in the abstract is the best of all
possible reasons to make a game. The experience they end up with
is, unsurprisingly, much like high-wire programming at its most
advanced, presenting players with an immense, multi-faceted system
to be explored and mastered.
Updated on July 6, 2023: This post has been updated to reflect the current guidance around the usage of S3 ACL and to include S3 Access Points and the Block Public Access for accounts and S3 buckets.
Updated on April 27, 2023: Amazon S3 now automatically enables S3 Block Public Access and disables S3 access control lists (ACLs) for all new S3 buckets in all AWS Regions.
Updated on January 8, 2019: Based on customer feedback, we updated the third paragraph in the “What about S3 ACLs?” section to clarify permission management.
In this post, we will discuss Amazon S3 Bucket Policies and IAM Policies and its different use cases. This post will assist you in distinguishing between the usage of IAM policies and S3 bucket policies. We will also discuss how these policies integrate with some default S3 bucket security settings like automatically enabling S3 Block Public Access and disabling S3 access control lists (ACLs).
IAM policies vs. S3 bucket policies
AWS access is managed by setting IAM policies and linking them to IAM identities (users, groups of users, or roles) or AWS resources. A policy is an object in AWS that when associated with an identity or resource, defines their permissions. IAM policies specify what actions are allowed or denied on what AWS resources (e.g. user Alice can read objects from the “Production” bucket but can’t write objects in the “Dev” bucket whereas user Bob can have full access to S3).
S3 bucket policies, on the other hand, are resource-based policies that you can use to grant access permissions to your Amazon S3 buckets and the objects in it. S3 bucket policies can allow or deny requests based on the elements in the policy.(e.g. allow user Alice to PUT but not DELETE objects in the bucket).
Note: You attach S3 bucket policies at the bucket level (i.e. you can’t attach a bucket policy to an S3 object), but the permissions specified in the bucket policy apply to all the objects in the bucket. You can also specify permissions at the object level by putting an object as the resource in the Bucket policy.
IAM policies and S3 bucket policies are both used for access control and they’re both written in JSON using the AWS access policy language. Let’s look at an example policy of each type:
Sample S3 Bucket Policy
This S3 bucket policy enables any IAM principal (user or role) in account 111122223333 to use the Amazon S3 GET Bucket (List Objects) operation.
Note that the S3 bucket policy includes a “Principal” element, which lists the principals that bucket policy controls access for. The “Principal” element is unnecessary in an IAM policy, because the principal is by default the entity that the IAM policy is attached to.
S3 bucket policies (as the name would imply) only control access to S3 resources for the bucket they’re attached to, whereas IAM policies can specify nearly any AWS action. One of the neat things about AWS is that you can actually apply both IAM policies and S3 bucket policies simultaneously, with the ultimate authorization being the least-privilege union of all the permissions (more on this in the section below titled “How does authorization work with multiple access control mechanisms?”).
When to use IAM policies vs. S3 policies
Use IAM policies if:
You need to control access to AWS services other than S3. IAM policies will be easier to manage since you can centrally manage all of your permissions in IAM, instead of spreading them between IAM and S3.
You have numerous S3 buckets each with different permissions requirements. IAM policies will be easier to manage since you don’t have to define a large number of S3 bucket policies and can instead rely on fewer, more detailed IAM policies.
You prefer to keep access control policies in the IAM environment.
Your IAM policies bump up against the size limit (up to 2 kb for users, 5 kb for groups, and 10 kb for roles). S3 supports bucket policies of up 20 kb.
You prefer to keep access control policies in the S3 environment.
You want to apply common security controls to all principals who interact with S3 buckets, such as restricting the IP addresses or VPC a bucket can be accessed from.
If you’re still unsure of which to use, consider which audit question is most important to you:
If you’re more interested in “What can this user do in AWS?” then IAM policies are probably the way to go. You can easily answer this by looking up an IAM user and then examining their IAM policies to see what rights they have.
If you’re more interested in “Who can access this S3 bucket?” then S3 bucket policies will likely suit you better. You can easily answer this by looking up a bucket and examining the bucket policy.
Whichever method you choose, we recommend staying as consistent as possible. Auditing permissions becomes more challenging as the number of IAM policies and S3 bucket policies grows.
What about S3 ACLs?
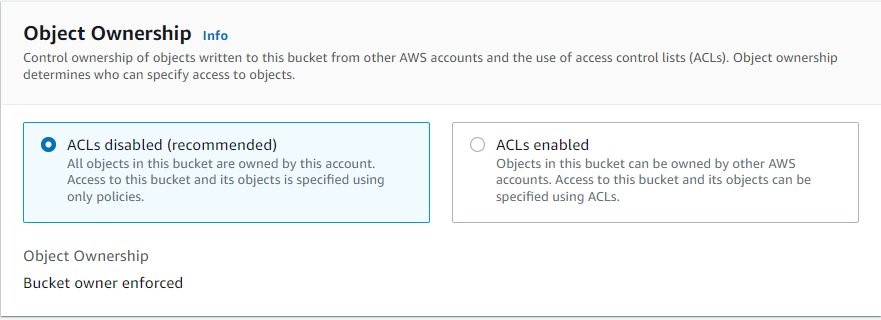
An S3 ACL is a sub-resource that’s attached to every S3 bucket and object. It defines which AWS accounts or groups are granted access and the type of access. You can attach S3 ACLs to both buckets and individual objects within a bucket to manage permissions for those objects. As a general rule, AWS recommends using S3 bucket policies or IAM policies for access control. S3 ACLs is a legacy access control mechanism that predates IAM. By default, Object Ownership is set to the Bucket owner enforced setting and all ACLs are disabled, as can be seen below.
A majority of modern use cases in Amazon S3 no longer require the use of ACLs, and we recommend that you keep ACLs disabled by applying the Bucket owner enforced setting. This approach simplifies permissions management: you can use policies to more easily control access to every object in your bucket, regardless of who uploaded the objects in your bucket. When ACLs are disabled, the bucket owner owns all the objects in the bucket and manages access to data exclusively using access management policies.
S3 bucket policies and IAM policies define object-level permissions by providing those objects in the Resource element in your policy statements. The statement will apply to those objects in the bucket. Consolidating object-specific permissions into one policy (as opposed to multiple S3 ACLs) makes it simpler for you to determine effective permissions for your users and roles.
You can disable ACLs on both newly created and already existing buckets. For newly created buckets, ACLs are disabled by default. In the case of an existing bucket that already has objects in it, after you disable ACLs, the object and bucket ACLs are no longer part of an access evaluation, and access is granted or denied on the basis of policies.
S3 Access Points and S3 Access
In some cases customers have use cases with complex entitlement: Amazon s3 is used to store shared datasets where data is aggregated and accessed by different applications, individuals or teams for different use cases. Managing access to this shared bucket requires a single bucket policy that controls access for dozens to hundreds of applications with different permission levels. As an application set grows, the bucket policy becomes more complex, time consuming to manage, and needs to be audited to make sure that changes don’t have an unexpected impact on another application.
These customers need additional policy space for access to their data, and that buckets. To support these use cases, Amazon S3 provides a feature called Amazon S3 Access Points. Amazon S3 access points simplify data access for any AWS service or customer application that stores data in S3.
Access points are named network endpoints that are attached to buckets that you can use to perform S3 object operations, such as GetObject and PutObject. Each access point has distinct permissions and network controls that S3 applies for any request that is made through that access point. Each access point enforces a customized access point policy that works in conjunction with the bucket policy that is attached to the underlying bucket.
Amazon S3 access points support AWS Identity and Access Management (IAM) resource policies that allow you to control the use of the access point by resource, user, or other conditions. For an application or user to be able to access objects through an access point, both the access point and the underlying bucket must permit the request.
Note that Adding an S3 access point to a bucket doesn’t change the bucket’s ehaviour when the bucket is accessed directly through the bucket’s name or Amazon Resource Name (ARN). All existing operations against the bucket will continue to work as before. Restrictions that you include in an access point policy apply only to requests made through that access point.
Sample Access point policy
This access point policy grants the IAM user Alice permissions to GET and PUT objects through the access point ‘my-access-point’ in account 111122223333.
Public access is granted to buckets and objects through access control lists (ACLs), bucket policies, access point policies, or all. In order to ensure that public access to this bucket and its objects is blocked, you can turn on Block all public on both the bucket level or the account level.
The Amazon S3 Block Public Access feature provides settings for access points, buckets, and accounts to help you manage public access to Amazon S3 resources. By default, new buckets, access points, and objects don’t allow public access. However, users can modify bucket policies, access point policies, or object permissions to allow public access. S3 Block Public Access settings override these policies and permissions so that you can limit public access to these resources.
With S3 Block Public Access, account administrators and bucket owners can easily set up centralized controls to limit public access to their Amazon S3 resources that are enforced regardless of how the resources are created.
If you apply a setting to an account, it applies to all buckets and access points that are owned by that account. Similarly, if you apply a setting to a bucket, it applies to all access points associated with that bucket.
Block Public Access for buckets
These settings apply only to this bucket and its access points. AWS recommends that you turn on Block all public access, but before applying any of these settings, ensure that your applications will work correctly without public access. If you require some level of public access to this bucket or objects within, you can customize the individual settings below to suit your specific storage use cases.
You can use the S3 console, AWS CLI, AWS SDKs, and REST API to grant public access to one or more buckets. This setting is on by default at the account creation, as can be seen below (using the S3 console).
Turning off this session will create a warning in the account, as AWS recommends this setting to be turned un unless public access is required for specific and verified use cases such as static website hosting.
This setting can also be turned on for existing buckets. In the AWS Management Console this is done by opening the Amazon S3 console at https://console.aws.amazon.com/s3/, choosing the name of the bucket you want, choosing the Permissions tab. And Choosing Edit to change the public access settings for the bucket.
Block Public Access for accounts
In order to ensure that public access to all your S3 buckets and objects is blocked, turn on Block all public access. These settings apply account-wide for all current and future buckets and access points. AWS recommends that you turn on Block all public access, but before applying any of these settings, ensure that your applications will work correctly without public access. If you require some level of public access to your buckets or objects, you can customize the individual settings below to suit your specific storage use cases.
You can use the S3 console, AWS CLI, AWS SDKs, and REST API to configure block public access settings for all the buckets in your account. This setting can be turned on in the AWS Management Console by opening the Amazon S3 console at https://console.aws.amazon.com/s3/, and clicking Block Public Access setting for this account on the left panel. And Choosing Edit to change the public access settings for the bucket.
When working with AWS organizations, you can prevent people from modifying the Block Public Access on the account level by adding a Service control policy (SCP) that denies editing this. An example of such a SCP can be seen below:
How does authorization work with multiple access control mechanisms?
Whenever an AWS principal issues a request to S3, the authorization decision depends on the union of all the IAM policies, S3 bucket policies, and S3 ACLs that apply as well as if Block Public Access is enabled on either the account, bucket or access point.
In accordance with the principle of least-privilege, decisions default to DENY and an explicit DENY always trumps an ALLOW. For example, if an IAM policy grants access to an object, the S3 bucket policies denies access to that object, and there is no S3 ACL, then access will be denied. Similarly, if no method specifies an ALLOW, then the request will be denied by default. Only if no method specifies a DENY and one or more methods specify an ALLOW will the request be allowed.
When Amazon S3 receives a request to access a bucket or an object, it determines whether the bucket or the bucket owner’s account has a block public access setting applied. If the request was made through an access point, Amazon S3 also checks for block public access settings for the access point. If there is an existing block public access setting that prohibits the requested access, Amazon S3 rejects the request.
This diagram illustrates the authorization process.
We hope that this post clarifies some of the confusion around the various ways you can control access to your S3 environment.
Using IAM Access Analyzer for S3 to review bucket access
Another interesting feature that can be used is IAM Access Analyzer for S3 to review bucket access. You can use IAM Access Analyzer for S3 to review buckets with bucket ACLs, bucket policies, or access point policies that grant public access. IAM Access Analyzer for S3 alerts you to buckets that are configured to allow access to anyone on the internet or other AWS accounts, including AWS accounts outside of your organization. For each public or shared bucket, you receive findings that report the source and level of public or shared access.
In IAM Access Analyzer for S3, you can block all public access to a bucket with a single click. You can also drill down into bucket-level permission settings to configure granular levels of access. For specific and verified use cases that require public or shared access, you can acknowledge and record your intent for the bucket to remain public or shared by archiving the findings for the bucket.
Starting today, you can deploy on your AWS account an end-to-end solution to capture, ingest, store, analyze, and visualize your customers’ clickstreams inside your web and mobile applications (both for Android and iOS). The solution is built on top of standard AWS services.
This new solution Clickstream Analytics on AWS allows you to keep your data in the security and compliance perimeter of your AWS account and customize the processing and analytics as you require, giving you the full flexibility to extract value for your business. For example, many business line owners want to combine clickstream analytics data with business system data to gain more comprehensive insights. Storing clickstream analysis data in your AWS account allows you to cross reference the data with your existing business system, which is complex to implement when you use a third-party analytics solution that creates an artificial data silo.
Why Analyze Your Applications Clickstreams? Organizations today are in search of vetted solutions and architectural guidance to rapidly solve business challenges. Whether you prefer off-the-shelf deployments or customizable architectures, the AWS Solutions Library carries solutions built by AWS and AWS Partners for a broad range of industry and technology use cases.
When I talk with mobile and web application developers or product owners, you often tell me that you want to use a clickstream analysis solution to understand your customers’ behavior inside your application. Click stream analysis solutions help you to identify popular and frequently visited screens, analyze navigation patterns, identify bottlenecks and drop-off points, or perform A/B testing of functionalities such as the pay wall, but you face two challenges to adopt or build a click stream analysis solution.
Either you use a third-party library and analytics solution that sends all your application and customer data to an external provider, which causes security and compliance risks and makes it more difficult to reference your existing business data to enrich the analysis, or you dedicate time and resources to build your own solution based on AWS services, such as Amazon Kinesis (for data ingestion), Amazon EMR (for processing), Amazon Redshift (for storage), and Amazon QuickSight (for visualization). Doing so ensures your application and customer data stay in the security perimeter of your AWS account, which is already approved and vetted by your information and security team. Often, building such a solution is an undifferentiated task that drives resources and budget away from developing the core business of your application.
Introducing Clickstream Analytics on AWS The new solution Clickstream Analytics on AWS provides you with a backend for data ingestion, processing, and visualization of click stream data. It’s shipped as an AWS CloudFormation template that you can easily deploy into the AWS account of your choice.
In addition to the backend component, the solution provides you with purpose-built Java and Swift SDKs to integrate into your mobile applications (for both Android and iOS). The SDKs automatically collects data and provide developers with an easy-to-use API to collect application-specific data. They manage the low-level tasks of buffering the data locally, sending them to the backend, managing the retries in case of communication errors, and more.
The following diagram shows you the high-level architecture of the solution.
The solution comes with an easy-to-use console to configure your solution. For example, it allows you to choose between three AWS services to ingest the application clickstream data: Amazon Managed Streaming for Apache Kafka, Amazon Kinesis Data Streams, or Amazon Simple Storage Service (Amazon S3). You can create multiple data pipelines for multiple applications or teams, each using a different configuration. This allows you to adjust the backend to the application user base and requirements.
You can use plugins to transform the data during the processing phase. The solution comes with two plugins preinstalled: User-Agent enrichment and IP address enrichment to add additional data that’s related to the User-Agent and the geolocation of the IP address used by the client applications.
By default, it provides a Amazon Redshift Serverless cluster to minimize the costs, but you can select a provisionedAmazon Redshift configuration to meet your performance and budget requirements.
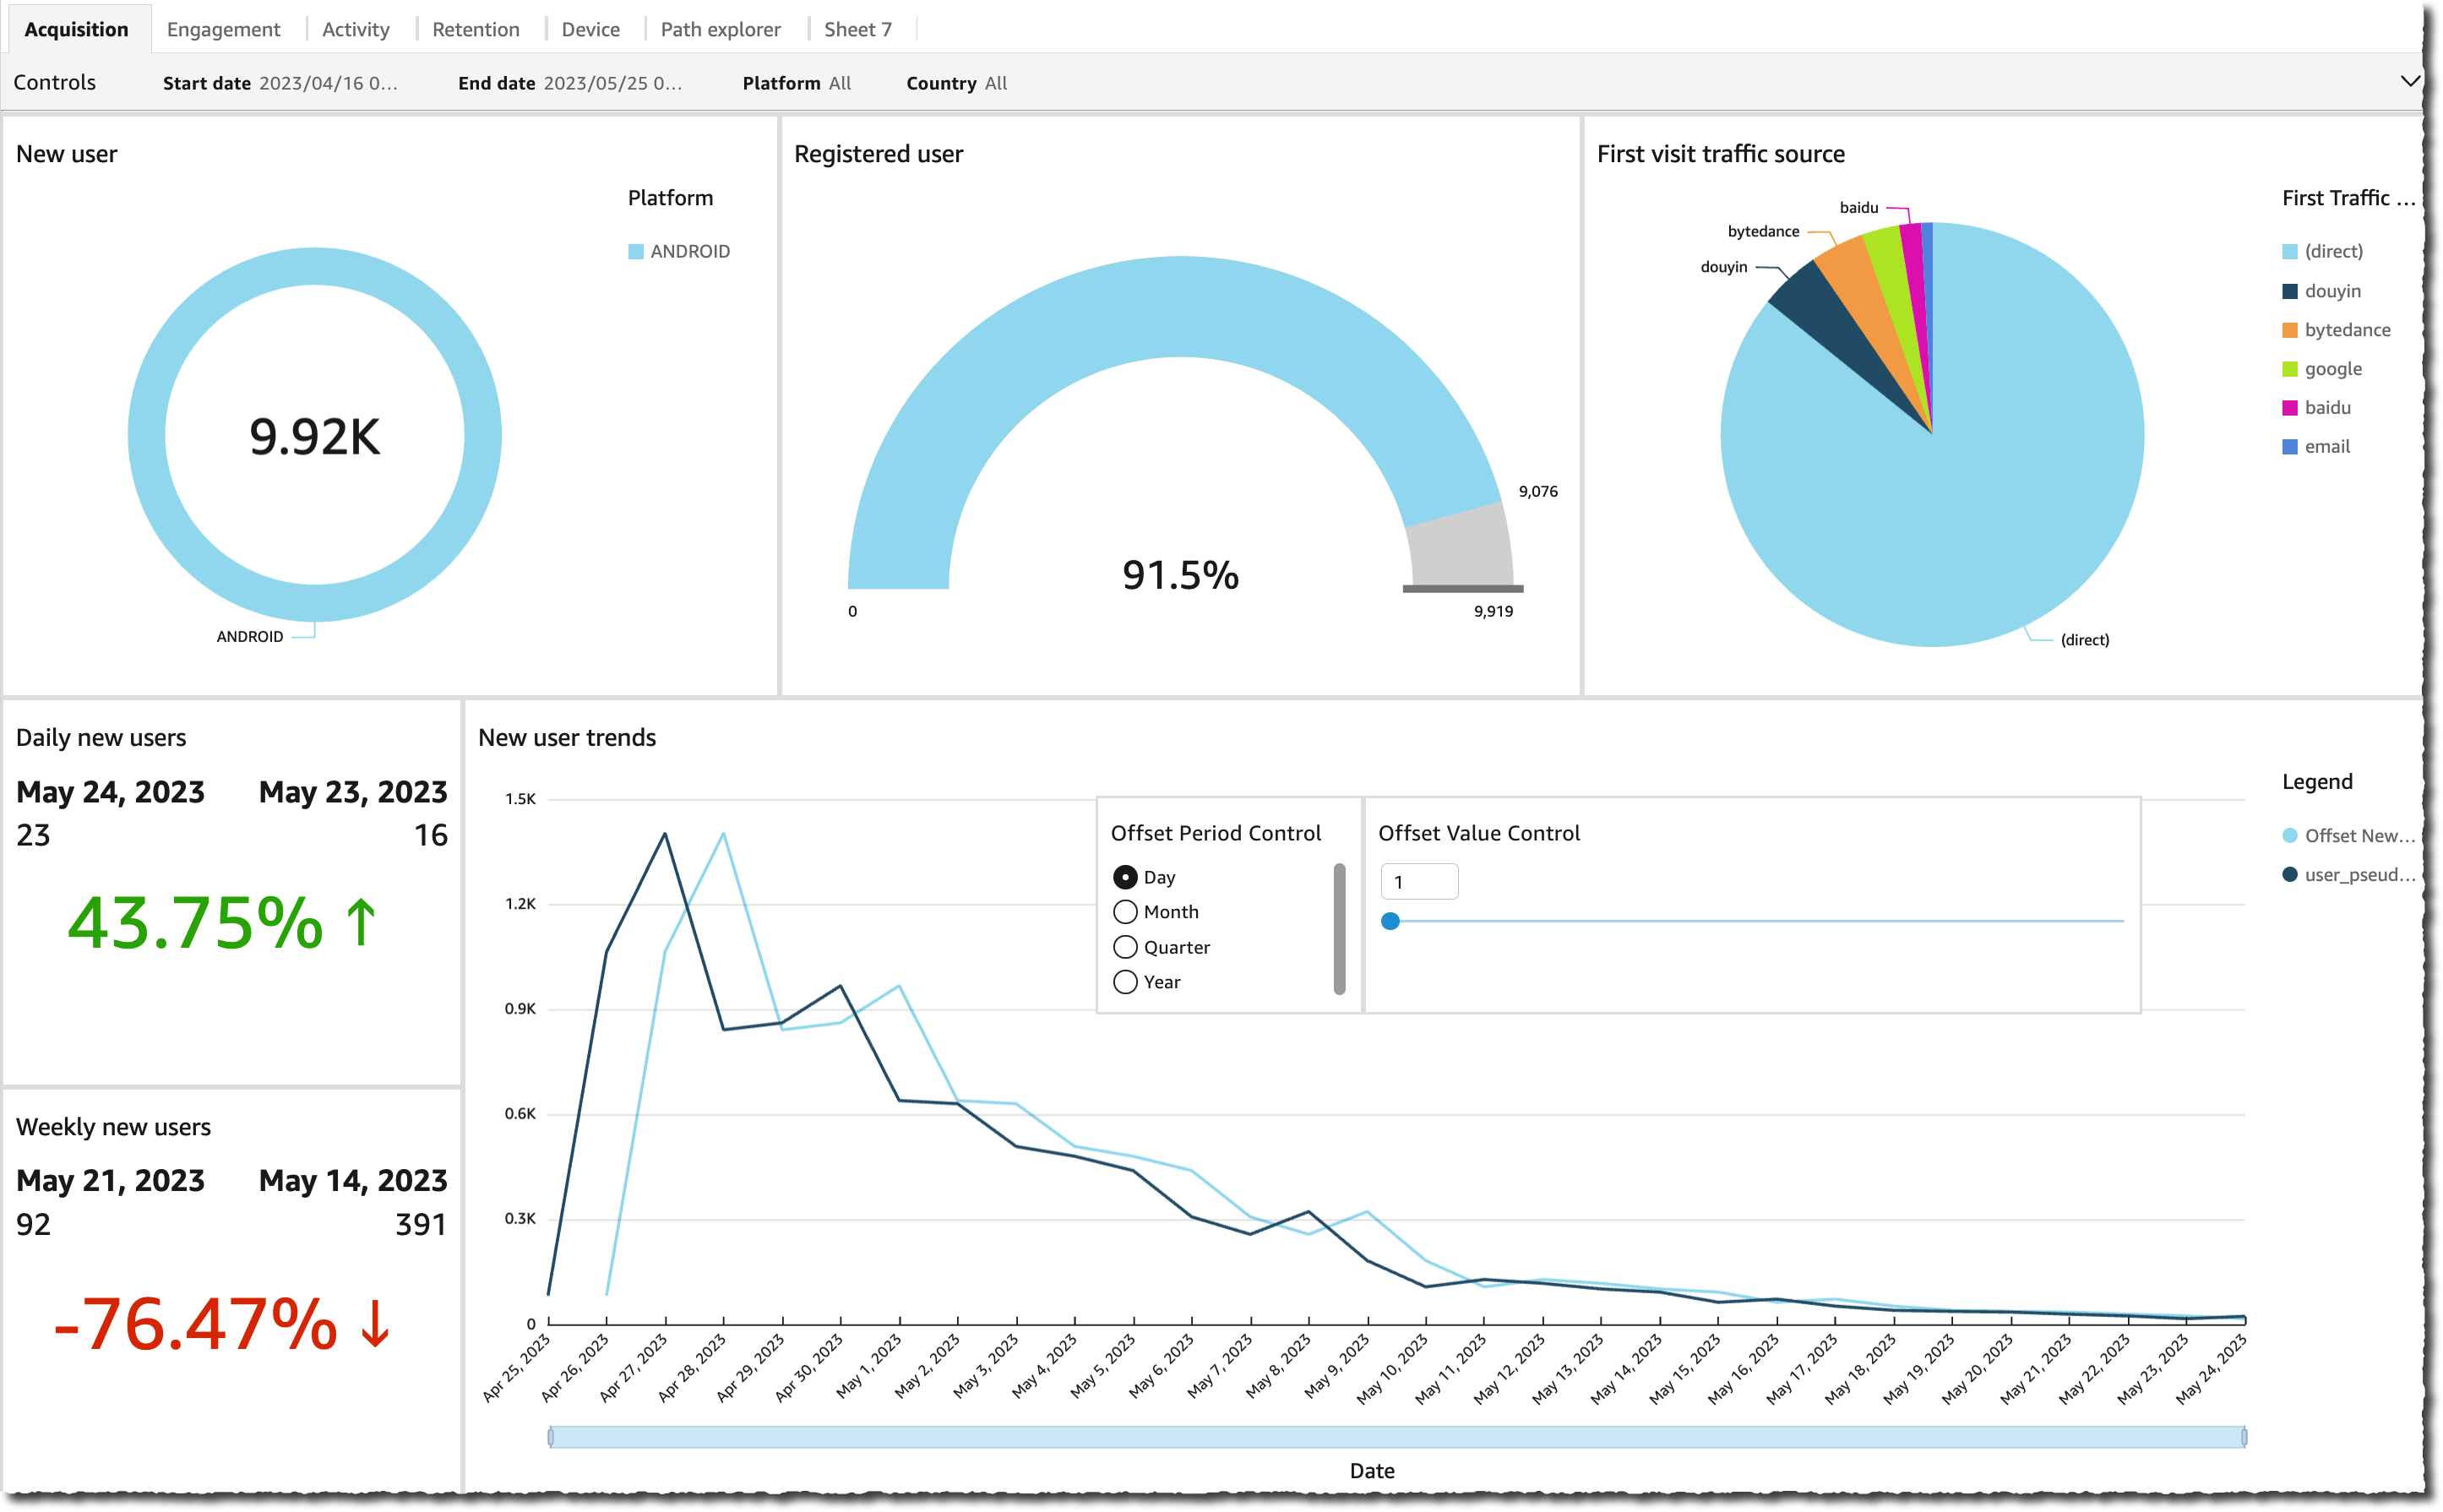
Finally, the solution provides you with a set of pre-assembled visualization dashboards to report on user acquisition, user activity, and user engagement. The dashboard consumes the data available in Amazon Redshift. You’re free to develop other analytics and other dashboards using the tools and services of your choice.
Let’s See It in Action The best way to learn how to deploy and to configure Clickstream Analytics on AWS is to follow the tutorial steps provided by the Clickstream Analytics on AWS workshop.
The workshop goes into great detail about each step. Here are the main steps I did to deploy the solution:
1. I create the control plane (the management console) of the solution using this CloudFormation template. The output of the template contains the URL to the management console. I later receive an email with a temporary password for the initial connection.
2. On the Clickstream Analytics console, I create my first project and define various network parameters such as the VPC, subnets, and security groups. I also select the service to use for data ingestion and my choice of configuration for Amazon Redshift.
3. When I enter all configuration data, the console creates the data plane for my application.
AWS services and solutions are usually built around a control plane and one or multiple data planes. In the context of Clickstream Analytics, the control plane is the console that I use to define my data acquisition and analysis project. The data plane is the infrastructure to receive, analyze, and visualize my application data. Now that I define my project, the console generates and launches another CloudFormation template to create and manage the data plane.
4. The Clickstream Analytics console generates a JSON configuration file to include into my application and it shares the Java or Swift code to include into my Android or iOS application. The console provides instructions to add the clickstream analysis as a dependency to my application. I also update my application code to insert the code suggested and start to deploy.
5. After my customers start to use the mobile app, I access the Clickstream Analytics dashboard to visualize the data collected.
The Dashboards Clickstream Analytics dashboards are designed to provide a holistic view of the user lifecycle: the acquisition, the engagement, the activity, and the retention. In addition, it adds visibility into user devices and geographies. The solution automatically generates visualizations in these six categories: Acquisition, Engagement, Activity, Retention, Devices, and Navigation path. Here are a couple of examples.
The Acquisition dashboard reports the total number of users, the registered number of users (the ones that signed in), and the number of users by traffic source. It also computes the new users and registered users’ trends.
The Engagement dashboard reports the user engagement level (the number of user sessions versus the time users spent on my application). Specifically, I have access to the number of engaged sessions (sessions that last more than 10 seconds or have at least two screen views), the engagement rate (the percentage of engaged sessions from the total number of sessions), and the average engagement time.
The Activity dashboard shows the event and actions taken by my customers in my application. It reports data, such as the number of events and number of views (or screens) shown, with the top events and views shown for a given amount of time.
The Retention tab shows user retention over time: the user stickiness for your daily, weekly, and monthly active users. It also shows the rate of returning users versus new users.
The Device tab shows data about your customer’s devices: operating systems, versions, screen sizes, and language.
And finally, the Path explorer dashboard shows your customers’ navigation path into the screens of your applications.
As I mentioned earlier, all the data are available in Amazon Redshift, so you’re free to build other analytics and dashboards.
Pricing and Availability The Clickstream Analytics solution is available free of charge. You pay for the AWS services provisioned for you, including Kinesis or Amazon Redshift. Cost estimates depend on the configuration that you select. For example, the size of the Kinesis and Amazon Redshift cluster you select for your data ingestion and analytics needs, or the volume of data your applications send to the pipeline both affect the monthly cost of the solution.
To learn how to get started with this solution, take the Clickstream Analytics workshop today and stop sharing your customer and application clickstream data with third-party solutions.
For regulatory reasons, decommissioning core business systems in financial services and insurance (FSI) markets requires data to remain accessible years after the application is retired. Traditionally, FSI companies either outsourced data archiving to third-party service providers, which maintained application replicas, or purchased vendor software to query and visualize archival data.
In this blog post, we present a more cost-efficient option with serverless data archiving on Amazon Web Services (AWS). In our experience, you can build your own cloud-native solution on Amazon Simple Storage Service (Amazon S3) at one-fifth of the price of third-party alternatives. If you are retiring legacy core business systems, consider serverless data archiving for cost-savings while keeping regulatory compliance.
Serverless data archiving and retrieval
Modern archiving solutions follow the principles of modern applications:
Serverless-first development, to reduce management overhead.
Cloud-native, to leverage native capabilities of AWS services, such as backup or disaster recovery, to avoid custom build.
Consumption-based pricing, since data archival is consumed irregularly.
Speed of delivery, as both implementation and archive operations need to be performed quickly to fulfill regulatory compliance.
Flexible data retention policies can be enforced in an automated manner.
AWS Storage and Analytics services offer the necessary building blocks for a modern serverless archiving and retrieval solution.
Data archiving can be implemented on top of Amazon S3) and AWS Glue.
Amazon S3 storage tiers enable different data retention policies and retrieval service level agreements (SLAs). You can migrate data to Amazon S3 using AWS Database Migration Service; otherwise, consider another data transfer service, such as AWS DataSync or AWS Snowball.
AWS Glue crawlers automatically infer both database and table schemas from your data in Amazon S3 and store the associated metadata in the AWS Glue Data Catalog.
Amazon CloudWatch monitors the execution of AWS Glue crawlers and notifies of failures.
Figure 1 provides an overview of the solution.
Figure 1. Serverless data archiving and retrieval
Once the archival data is catalogued, Amazon Athena can be used for serverless data query operations using standard SQL.
Amazon API Gateway receives the data retrieval requests and eases integration with other systems via REST, HTTPS, or WebSocket.
AWS Lambda reads parametrization data/templates from Amazon S3 in order to construct the SQL queries. Alternatively, query templates can be stored as key-value entries in a NoSQL store, such as Amazon DynamoDB.
Lambda functions trigger Athena with the constructed SQL query.
Athena uses the AWS Glue Data Catalog to retrieve table metadata for the Amazon S3 (archival) data and to return the SQL query results.
How we built serverless data archiving
An early build-or-buy assessment compared vendor products with a custom-built solution using Amazon S3, AWS Glue, and a user frontend for data retrieval and visualization.
The total cost of ownership over a 10-year period for one insurance core system (Policy Admin System) was $0.25M to build and run the custom solution on AWS compared with >$1.1M for third-party alternatives. The implementation cost advantage of the custom-built solution was due to development efficiencies using AWS services. The lower run cost resulted from a decreased frequency of archival usage and paying only for what you use.
The data archiving solution was implemented with AWS services (Figure 2):
Amazon S3 is used to persist archival data in Parquet format (optimized for analytics and compressed to reduce storage space) that is loaded from the legacy insurance core system. The archival data source was AS400/DB2 and moved with Informatica Cloud to Amazon S3.
AWS Glue crawlers infer the database schema from objects in Amazon S3 and create tables in AWS Glue for the decommissioned application data.
Lambda functions (Python) remove data records based on retention policies configured for each domain, such as customers, policies, claims, and receipts. A daily job (Control-M) initiates the retention process.
Figure 2. Exemplary implementation of serverless data archiving and retrieval for insurance core system
Retrieval operations are formulated and executed via Python functions in Lambda. The following AWS resources implement the retrieval logic:
Athena is used to run SQL queries over the AWS Glue tables for the decommissioned application.
Lambda functions (Python) build and execute queries for data retrieval. The functions render HMTL snippets using Jinja templating engine and Athena query results, returning the selected template filled with the requested archive data. Using Jinja as templating engine improved the speed of delivery and reduced the heavy lifting of frontend and backend changes when modeling retrieval operations by ~30% due to the decoupling between application layers. As a result, engineers only need to build an Athena query with the linked Jinja template.
Amazon S3 stores templating configuration and queries (JSON files) used for query parametrization.
Amazon API Gateway serves as single point of entry for API calls.
The user frontend for data retrieval and visualization is implemented as web application using React JavaScript library (with static content on Amazon S3) and Amazon CloudFront used for web content delivery.
The archiving solution enabled 80 use cases with 60 queries and reduced storage from three terabytes on source to only 35 gigabytes on Amazon S3. The success of the implementation depended on the following key factors:
Appropriate sponsorship from business across all areas (claims, actuarial, compliance, etc.)
Definition of SLAs for responding to courts, regulators, etc.
Minimum viable and mandatory approach
Prototype visualizations early on (fail fast)
Conclusion
Traditionally, FSI companies relied on vendor products for data archiving. In this post, we explored how to build a scalable solution on Amazon S3 and discussed key implementation considerations. We have demonstrated that AWS services enable FSI companies to build a serverless archiving solution while reaching and keeping regulatory compliance at a lower cost.
Learn more about some of the AWS services covered in this blog:
Over the years, the kernel has developed a number of deferred-execution
mechanisms to take care of work that cannot be done immediately. For many
(or most) needs, the workqueue
subsystem is the tool that developers reach for first. Workqueues took their current form over a dozen years
ago, but that does not mean that there are not improvements to be made.
Two sets of patches from Tejun Heo show the pressures being felt by the
workqueue subsystem and the solutions that are being tried — with varying
degrees of success.
The collective thoughts of the interwebz
Manage Consent
To provide the best experiences, we use technologies like cookies to store and/or access device information. Consenting to these technologies will allow us to process data such as browsing behavior or unique IDs on this site. Not consenting or withdrawing consent, may adversely affect certain features and functions.
Functional
Always active
The technical storage or access is strictly necessary for the legitimate purpose of enabling the use of a specific service explicitly requested by the subscriber or user, or for the sole purpose of carrying out the transmission of a communication over an electronic communications network.
Preferences
The technical storage or access is necessary for the legitimate purpose of storing preferences that are not requested by the subscriber or user.
Statistics
The technical storage or access that is used exclusively for statistical purposes.The technical storage or access that is used exclusively for anonymous statistical purposes. Without a subpoena, voluntary compliance on the part of your Internet Service Provider, or additional records from a third party, information stored or retrieved for this purpose alone cannot usually be used to identify you.
Marketing
The technical storage or access is required to create user profiles to send advertising, or to track the user on a website or across several websites for similar marketing purposes.