How to configure rotation and rotation windows for secrets stored in AWS Secrets Manager

Post Syndicated from Fatima Ahmed original https://aws.amazon.com/blogs/security/how-to-configure-rotation-windows-for-secrets-stored-in-aws-secrets-manager/

November 21, 2022: We updated this post to reflect the fact that AWS Secrets Manager now supports rotating secrets as often as every four hours.

AWS Secrets Manager helps you manage, retrieve, and rotate database credentials, API keys, and other secrets throughout their lifecycles. You can specify a rotation window for your secrets, allowing you to rotate secrets during non-critical business hours or scheduled maintenance windows for your application. Secrets Manager now supports rotation of secrets as often as every four hours, on a predefined schedule you can configure to conform to your existing maintenance windows. Previously, you could only specify the rotation interval in days. AWS Secrets Manager would then rotate the secret within the last 24 hours of the scheduled rotation interval. You can rotate your secrets using an AWS Lambda rotation function provided by AWS, or create a custom Lambda rotation function.

With this release, you can now use Secrets Manager to automate the rotation of credentials and access tokens that must be refreshed more than once per day. This enables greater flexibility for common developer workflows through a single managed service. Additionally, you can continue to use integrations with AWS Config and AWS CloudTrail to manage and monitor your secret rotation configurations in accordance with your organization’s security and compliance requirements. Support for secrets rotation as often as every four hours is provided at no additional cost.

Why might you want to rotate secrets more than once a day? Rotating secrets more frequently can provide a number of benefits, including: discouraging the use of hard-coded credentials in your applications, reducing the scope of impact of a stolen credential, or helping you meet organizational requirements around secret rotation.

Hard-coding application secrets is not recommended, because it can increase the risk of credentials being written in logs, or accidentally exposed in code repositories. Using short-lived secrets limits your ability to hard-code credentials in your application. Short-lived secrets are rotated on a frequent basis: for example, every four hours – meaning even a hard-coded credential can only be used for a short period of time before it needs to be refreshed. This also means that if a credential is compromised, the impact is much smaller — the secret is only valid for a short period of time before the secret is rotated.

Secrets Manager supports familiar cron and rate expressions to specify rotation frequency and rotation windows. In this blog post, we will demonstrate how you can configure a secret to be rotated every four hours, how to specify a custom rotation window for your secret using a cron expression, and how you can set up a custom rotation window for existing secrets. This post describes the following processes:

  1. Create a new secret and configure it to rotate every four hours using the schedule expression builder
  2. Set up rotation window by directly specifying a cron expression
  3. Enabling a custom rotation window for an existing secret

Use case 1: Create a new secret and configure it to rotate every four hours using the schedule expression builder

Let’s assume that your organization has a requirement to rotate GitHub credentials every four hours. To meet this requirement, we will create a new secret in Secrets Manager to store the GitHub credentials, and use the schedule expression builder to configure rotation of the secret at a four-hour interval.

The schedule expression builder enables you to configure your rotation window to help you meet your organization’s specific requirements, without requiring knowledge of cron expressions. AWS Secrets Manager also supports directly entering a cron expression to configure the rotation window, which we will demonstrate later in this post.

To create a new secret and configure a four-hour secret rotation schedule

  1. Sign in to the AWS Management Console, and navigate to the Secrets Manager service.
  2. Choose Store a new secret.
    Figure 1: Store a secret in AWS Secrets Manager

    Figure 1: Store a secret in AWS Secrets Manager

  3. In the Secret type section, choose Other type of secret.
    Figure 2: Choose a secret type in Secrets Manager

    Figure 2: Choose a secret type in Secrets Manager

  4. In the Key/value pairs section, enter the GitHub credentials that you wish to store.
  5. Select your preferred encryption key to protect the secret, and then choose Next. In this example, we are using an AWS managed key.

    Note: Find more information to help you decide what encryption key is right for you.

  6. Enter a secret name of your choice in the Secret name field. You can optionally provide a Description of the secret, create tags, and add resource permissions to the secret. If desired, you can also replicate the secret to another region to help you meet your organization’s disaster recovery requirements by following the procedure in this blog post.
  7. Choose Next.
    Figure 3:Create a secret to store your Git credentials

    Figure 3:Create a secret to store your Git credentials

  8. Turn on Automatic rotation to enable rotation for the secret.
  9. Under Rotation schedule, choose Schedule expression builder.
    1. For Time unit, choose Hours, then enter a value of 4.
    2. Leave the Window duration field blank as the secret is to be rotated every 4 hours.
    3. For this example, keep the Rotate immediately when the secret is stored check box selected to rotate the secret immediately after creation
      Figure 4: Enable automatic rotation using the schedule expression builder

      Figure 4: Enable automatic rotation using the schedule expression builder

    4. Under Rotation function, choose your Lambda rotation function from the drop down menu.
    5. Choose Next.
    6. On the Secret review page, you are provided with an overview of the secret. Review the secret and scroll down to the Rotation schedule section.
    7. Confirm the Rotation schedule and Next rotation date meet your requirements.
      Figure 5:  Rotation schedule with a summary of the configured custom rotation window

      Figure 5: Rotation schedule with a summary of the configured custom rotation window

    8. Choose Store secret.
    9. To view the Rotation configuration for the secret, select the secret you created.
    10. On the Secrets details page, scroll down to the Rotation configuration section. The Rotation status is Enabled and the Rotation schedule is rate(4 hours). The name of your Lambda function being used for rotation is displayed.
      Figure 6: Rotation configuration of your secret

      Figure 6: Rotation configuration of your secret

You have now successfully stored a secret using the interactive schedule expression builder. This option provides a simple mechanism to configure rotation windows, and does not require expertise with cron expressions.

In the next example, we will be using the schedule expression option to directly enter a cron expression, to achieve a more complex rotation interval.

Use case 2: Set up a custom rotation window using a cron expression

The procedures described in the next two sections of this blog post require that you complete the following prerequisites:

  1. Configure an Amazon Relational Database Service (Amazon RDS) DB instance, including creating a database user.
  2. Sign in to the AWS Management Console using a role that has SecretsManagerReadWrite permission.
  3. Configure the Lambda function to connect with the Amazon RDS database and Secrets Manager by following the procedure in this blog post.

Configuring complicated rotation windows for secrets may be more effective using the schedule expression option, rather than the schedule expression builder. The schedule expression option allows you to directly enter a cron expression using a string of six inputs. Directly entering cron expressions provides more flexibility when defining a rotation schedule that is more complex.

Let’s suppose you have another secret in your organization which does not need to be rotated as frequently as others. Consequently, you’ve been asked to set up rotation for every last Sunday of the quarter and during the off-peak hours of 1:00 AM to 4:00 AM UTC to avoid application downtime. Due to the complex nature of the requirements, you will need to use the schedule expression option to write a cron job to achieve your use case.

Cron expressions consist of the following 6 required fields which are separated by a white space; Minutes, Hours, Day of month, Month, Day of week, and Year. Each required field has the following values using the syntax cron(fields).

Fields Values Wildcards
Minutes Must be 0 None
Hours 0-23 /
Day-of-month 1 – 31 , – * ? / L
Month 1-12 or JAN-DEC , – * /
Day-of-week 1-7 or SUN-SAT , – * ? L #
Year * accepts * only

Table 1: Secrets Manager supported cron expression fields and corresponding values

Wildcard Description
, The , (comma) wildcard includes additional values. In the Month field, JAN,FEB,MAR would include January, February, and March.
– The – (dash) wildcard specifies ranges. In the Day field, 1-15 would include days 1 through 15 of the specified month.
* The * (asterisk) wildcard includes all values in the field. In the Month field, * would include every month.
/ The / (forward slash) wildcard specifies increments In the Month field, you could enter 1/3 to specify every 3rd month, starting from January. So 1/3 specifies the January, April, July, Oct.
? The ? (question mark) wildcard specifies one or another. In the day-of-month field you could enter 7 and then enter ? in the day-of-week field since the 7th of a month could be any day of a given week.
L The L wildcard in the Day-of-month or Day-of-week fields specifies the last day of the month or week. For example, in the week Sun-Sat, you can state 5L to specify the last Thursday in the month.
# The # wildcard in the Day-of-week field specifies a certain instance of the specified day of the week within a month. For example, 3#2 would be the second Tuesday of the month: the 3 refers to Tuesday because it is the third day of each week, and the 2 refers to the second day of that type within the month.

Table 2: Description of supported wilds cards for cron expression

As the use case is to setup a custom rotation window for the last Sunday of the quarter from 1:00 AM to 4:00 AM UTC, you’ll need to carry out the following steps:

To deploy the solution

  1. To store a new secret in Secrets Manager repeat steps 1-6 above.
  2. Once you’re on the Secret Rotation section of the Store a new secret screen, click on Automatic rotation to enable rotation for the secret.
  3. Under Rotation schedule, choose Schedule expression.
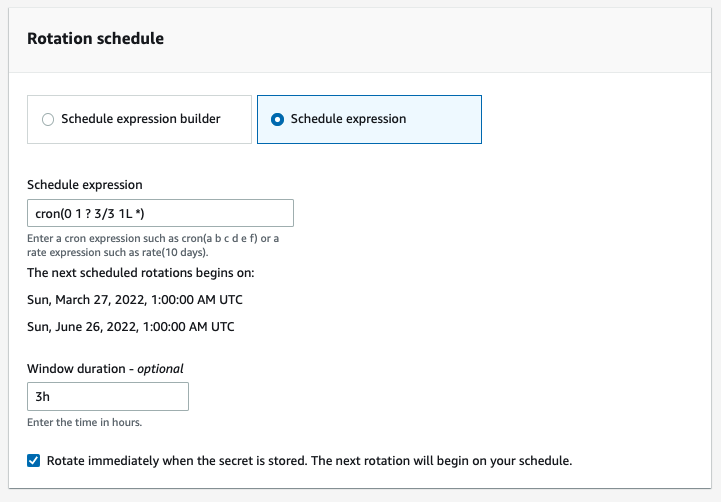
  4. In the Schedule expression field box, enter cron(0 1 ? 3/3 1L *).

    Fields Values Explanation
    Minutes 0 The use case does not have a specific minute requirement
    Hours 1 Ensures the rotation window starts from 1am UTC
    Day-of-month ? The use case does not require rotation to occur on a specific date in the month
    Month 3/3 Sets rotation to occur on the last month in a quarter
    Day-of-week 1L Ensures rotation occurs on the last Sunday of the month
    Year * Allows the rotation window pattern to be repeated yearly

    Table 3: Using cron expressions to achieve your rotation requirements

Figure 7: Enable automatic rotation using the schedule expression

Figure 7: Enable automatic rotation using the schedule expression

  1. On the Rotation function section choose your Lambda rotation function from the drop down menu.
  2. Choose Next.
  3. On the Secret review page, review the secret and scroll down to the Rotation schedule section. Confirm the Rotation schedule and Next rotation date meets your requirements.
    Figure 8: Rotation schedule with a summary of your custom rotation window

    Figure 8: Rotation schedule with a summary of your custom rotation window

  4. Choose Store.
  5. To view the Rotation configuration for this secret, select it from the Secrets page.
  6. On the Secrets details page, scroll down to the Rotation configuration section. The Rotation status is Enabled, the Rotation schedule is cron(0 1 ? 3/3 1L *) and the name of your Lambda function being used for your custom rotation is displayed.
    Figure 9: Rotation configuration section with a rotation status of Enabled

    Figure 9: Rotation configuration section with a rotation status of Enabled

Use case 3: Enabling a custom rotation window for an existing secret

If you already use AWS Secrets Manager as a way to store and rotate secrets for your Organization, you might want to take advantage of custom scheduled rotation on existing secrets. For this use case, to meet your business needs the secret must be rotated bi-weekly, every Saturday from 12am to 5am.

To deploy the solution

  1. On the Secrets page of the Secrets Manager console, chose the existing secret you want to configure rotation for.
  2. Scroll down to the Rotation configuration section of the Secret details page, choose Edit rotation.
    Figure 10: Rotation configuration section with a rotation status of Disabled

    Figure 10: Rotation configuration section with a rotation status of Disabled

  3. On the Edit rotation configuration pop-up window, turn on Automatic rotation to enable rotation for the secret.
  4. Under Rotation Schedule choose Schedule expression builder, optionally you can use the Schedule expression to create the custom rotation window.
    1. For the Time Unit choose Weeks, then enter a value of 2.
    2. For the Day of week choose Saturday from the drop-down menu.
    3. In the Start time field type 00. This ensures rotation does not start until 00:00 AM UTC.
    4. In the Window duration field type 5h. This provides Secrets Manager with a 5hr period to rotate the secret.
    5. For this example, keep the check box marked to rotate the secret immediately.
      Figure 11: Edit rotation configuration pop-up window

      Figure 11: Edit rotation configuration pop-up window

    6. Under Rotation function, choose the Lambda function which will be used to rotate the secret.
    7. Choose Save.
    8. On the Secrets details page, scroll down to the Rotation configuration section. The Rotation status is Enabled, the Rotation schedule is cron(0 00 ? * 7#2,7#4 *) and the name of the custom rotation Lambda function is visible.
      Figure 12:Rotation configuration section with a rotation status of Enabled

      Figure 12:Rotation configuration section with a rotation status of Enabled

Summary

Regular rotation of secrets is a Secrets Manager best practice that helps you to meet compliance requirements, for example for PCI DSS, which mandates the rotation of application secrets every 90 days, and to improve your security posture for databases and credentials. The ability to rotate secrets as often as every four hours helps you rotate secrets more frequently, and the rotation window feature helps you adhere to rotation best practices while still having the flexibility to choose a rotation window that suits your organizational needs. This allows you to use AWS Secrets Manager as a centralized location to store, retrieve, and rotate your secrets regardless of their lifespan, providing a uniform approach for secrets management. At the same time, the custom rotation window feature alleviates the need for applications to continuously refresh secret caches and manage retries for secrets that were rotated, as rotation will occur during your specified window when the application usage is low.

In this blog post, we showed you how to create a secret and configure the secret to be rotated every four hours using the schedule expression builder. The use case examples show how each feature can be used to achieve different rotation requirements within an organization, including using the schedule expression builder option to create your cron expression, as well as using the schedule expression feature to help meet more specific rotation requirements.

You can start using this feature through the AWS Secrets Manager console, AWS Command Line Interface (AWS CLI), AWS SDK, or AWS CloudFormation. To learn more about this feature, see the AWS Secrets Manager documentation. If you have feedback about this blog post, submit comments in the Comments section below. If you have questions about this blog post, start a new thread on AWS Secrets Manager re:Post or contact AWS Support.

Want more AWS Security news? Follow us on Twitter.

Faith Isichei

Faith Isichei

Faith is a Premium Support Security Engineer at AWS. She helps provide tailored secure solutions for a broad spectrum of technical issues faced by customers. She is interested in cybersecurity, cryptography, and governance. Outside of work, she enjoys travel, spending time with family, wordsearches, and sudoku.

Zach Miller

Zach Miller

Zach is a Senior Security Specialist Solutions Architect at AWS. His background is in data protection and security architecture, focused on a variety of security domains, including cryptography, secrets management, and data classification. Today, he is focused on helping enterprise AWS customers adopt and operationalize AWS security services to increase security effectiveness and reduce risk.

Fatima Ahmed

Fatima is a Global Security Solutions Architect at AWS. She is passionate about cybersecurity and helping customers build secure solutions in the AWS Cloud. When she is not working, she enjoys time with her cat or solving cryptic puzzles.

Build a modern data architecture on AWS with Amazon AppFlow, AWS Lake Formation, and Amazon Redshift: Part 2

Post Syndicated from Dr. Yannick Misteli original https://aws.amazon.com/blogs/big-data/part-2-build-a-modern-data-architecture-on-aws-with-amazon-appflow-aws-lake-formation-and-amazon-redshift/

In Part 1 of this post, we provided a solution to build the sourcing, orchestration, and transformation of data from multiple source systems, including Salesforce, SAP, and Oracle, into a managed modern data platform. Roche partnered with AWS Professional Services to build out this fully automated and scalable platform to provide the foundation for their machine learning goals. This post continues the data journey to include the steps undertaken to build an agile and extendable Amazon Redshift data warehouse platform using a DevOps approach.

The modern data platform ingests delta changes from all source data feeds once per night. The orchestration and transformations of the data is undertaken by dbt. dbt enables data analysts and engineers to write data transformation queries in a modular manner without having to maintain the run order manually. It compiles all code into raw SQL queries that run against the Amazon Redshift cluster. It also controls the dependency management within your queries and runs it in the correct order. dbt code is a combination of SQL and Jinja (a templating language); therefore, you can express logic such as if statements, loops, filters, and macros in your queries. dbt also contains automatic data validation job scheduling to measure the data quality of the data loaded. For more information about how to configure a dbt project within an AWS environment, see Automating deployment of Amazon Redshift ETL jobs with AWS CodeBuild, AWS Batch, and DBT.

Amazon Redshift was chosen as the data warehouse because of its ability to seamlessly access data stored in industry standard open formats within Amazon Simple Storage Service (Amazon S3) and rapidly ingest the required datasets into local, fast storage using well-understood SQL commands. Being able to develop extract, load, and transform (ELT) code pipelines in SQL was important for Roche to take advantage of the existing deep SQL skills of their data engineering teams.

A modern ELT platform requires a modern, agile, and highly performant data model. The solution in this post builds a data model using the Data Vault 2.0 standards. Data Vault has several compelling advantages for data-driven organizations:

  • It removes data silos by storing all your data in reusable source system independent data stores keyed on your business keys.
  • It’s a key driver for data integration at many levels, from multiple source systems, multiple local markets, multiple companies and affiliates, and more.
  • It reduces data duplication. Because data is centered around business keys, if more than one system sends the same data, then multiple data copies aren’t needed.
  • It holds all history from all sources; downstream you can access any data at any point in time.
  • You can load data without contention or in parallel, and in batch or real time.
  • The model can adapt to change with minimal impact. New business relationships can be made independently of the existing relationships
  • The model is well established in the industry and naturally drives templated and reusable code builds.

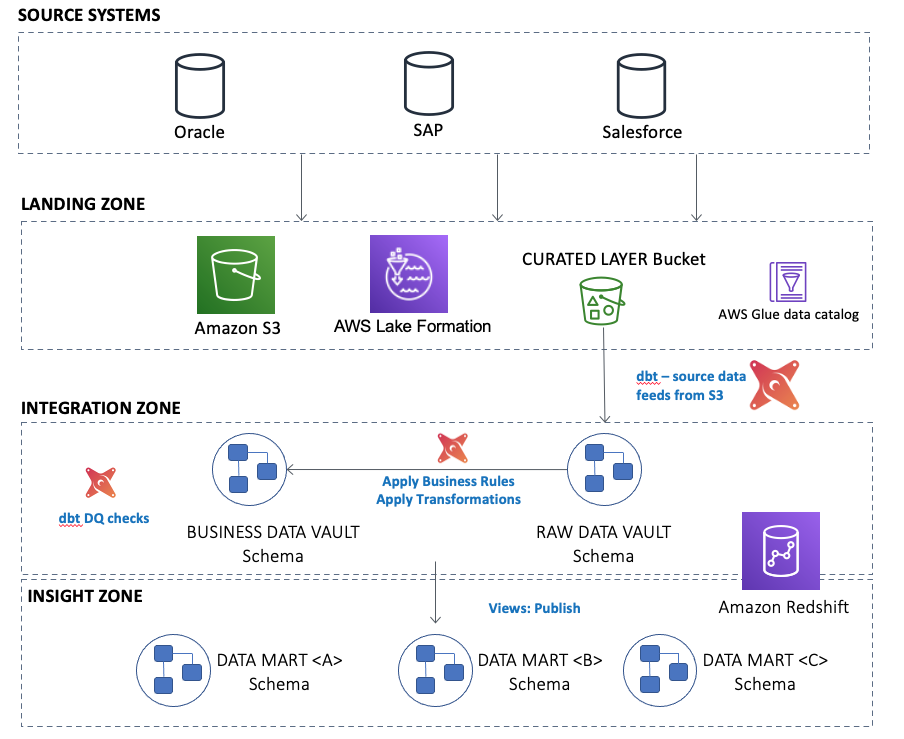
The following diagram illustrates the high-level overview of the architecture:

Amazon Redshift has several methods for ingesting data from Amazon S3 into the data warehouse cluster. For this modern data platform, we use a combination of the following methods:

  • We use Amazon Redshift Spectrum to read data directly from Amazon S3. This allows the project to rapidly load, store, and use external datasets. Amazon Redshift allows the creation of external schemas and external tables to facilitate data being accessed using standard SQL statements.
  • Some feeds are persisted in a staging schema within Amazon Redshift, for example larger data volumes and datasets that are used multiple times in subsequent ELT processing. dbt handles the orchestration and loading of this data in an incremental manner to cater to daily delta changes.

Within Amazon Redshift, the Data Vault 2.0 data model is split into three separate areas:

  • Raw Data Vault within a schema called raw_dv
  • Business Data Vault within a schema called business_dv
  • Multiple Data Marts, each with their own schema

Raw Data Vault

Business keys are central to the success of any Data Vault project, and we created hubs within Amazon Redshift as follows:

CREATE TABLE IF NOT EXISTS raw_dv.h_user
(
 user_pk          VARCHAR(32)   			 
,user_bk          VARCHAR(50)   			 
,load_dts         TIMESTAMP  	 
,load_source_dts  TIMESTAMP  	 
,bookmark_dts     TIMESTAMP  	 
,source_system_cd VARCHAR(10)   				 
) 
DISTSTYLE ALL;

Keep in mind the following:

  • The business keys from one or more source feeds are written to the reusable _bk column; compound business keys should be concatenated together with a common separator between each element.
  • The primary key is stored in the _pk column and is a hashed value of the _bk column. In this case, MD5 is the hashing algorithm used.
  • Load_Dts is the date and time of the insertion of this row.
  • Hubs hold reference data, which is typically smaller in volume than transactional data, so you should choose a distribution style of ALL for the most performant joining to other tables at runtime.

Because Data Vault is built on a common reusable notation, the dbt code is parameterized for each target. The Roche engineers built a Yaml-driven code framework to parameterize the logic for the build of each target table, enabling rapid build and testing of new feeds. For example, the preceding user hub contains parameters to identify source columns for the business key, source to target mappings, and physicalization choices for the Amazon Redshift target:

name: h_user
    type: hub
    materialized: incremental
    schema: raw_dv
    dist: all
    pk_name: user_pk
    bk:
      name: user_bk
      type: varchar(50)
    sources:
      - name: co_rems_invitee
        schema: re_rems_core
        key:
          - dwh_source_country_cd
          - employee_user_id
        columns:
          - source: "'REMS'"
            alias: source_system_cd
            type: varchar(10)
        load_source_dts: glue_dts
        bookmark_dts: bookmark_dts        
      - name: co_rems_event_users
        schema: re_rems_core
        key:
          - dwh_source_country_cd
          - user_name
        columns:
          - source: "'REMS'"
            alias: source_system_cd
            type: varchar(10)
        load_source_dts: glue_dts
        bookmark_dts: bookmark_dts        
      - name: user
        alias: user_by_id
        schema: roche_salesforce_we_prod
        key:
          - id
        columns:
          - source: "'SFDC_WE'"
            alias: source_system_cd
            type: varchar(10)
        load_source_dts: to_date(appflow_date_str,'YYYYMMDD')
        bookmark_dts: to_date(systemmodstamp,'YYYY-MM-DD HH24.mi.ss')
        where: id > 0 and id <> '' and usertype = 'Standard'
      - name: activity_g__c
        schema: roche_salesforce_we_prod
        key:
          - ownerid
        columns:
          - source: "'SFDC_WE'"
            alias: source_system_cd
            type: varchar(10)
        load_source_dts: to_date(appflow_date_str,'YYYYMMDD')
        bookmark_dts: to_date(systemmodstamp,'YYYY-MM-DD HH24.mi.ss')        
      - name: user_territory_g__c
        schema: roche_salesforce_we_prod
        key:
          - user_ref_g__c
        columns:
          - source: "'SFDC_WE'"
            alias: source_system_cd
            type: varchar(10)
        load_source_dts: to_date(appflow_date_str,'YYYYMMDD')
        bookmark_dts: to_date(systemmodstamp,'YYYY-MM-DD HH24.mi.ss')

On reading the YAML configuration, dbt outputs the following, which is run against the Amazon Redshift cluster:

{# Script generated by dbt model generator #}

{{
	config({
	  "materialized": "incremental",
	  "schema": "raw_dv",
	  "dist": "all",
	  "unique_key": "user_pk",
	  "insert_only": {}
	})
}}

with co_rems_invitee as (

	select
		{{ hash(['dwh_source_country_cd', 'employee_user_id'], 'user_pk') }},
		cast({{ compound_key(['dwh_source_country_cd', 'employee_user_id']) }} as varchar(50)) as user_bk,
		{{ dbt_utils.current_timestamp() }} as load_dts,
		glue_dts as load_source_dts,
		bookmark_dts as bookmark_dts,
		cast('REMS' as varchar(10)) as source_system_cd
	from
		{{ source('re_rems_core', 'co_rems_invitee') }}
	where
		dwh_source_country_cd is not null 
		and employee_user_id is not null

		{% if is_incremental() %}
			and glue_dts > (select coalesce(max(load_source_dts), to_date('20000101', 'yyyymmdd', true)) from {{ this }})
		{% endif %}

), 
co_rems_event_users as (

	select
		{{ hash(['dwh_source_country_cd', 'user_name'], 'user_pk') }},
		cast({{ compound_key(['dwh_source_country_cd', 'user_name']) }} as varchar(50)) as user_bk,
		{{ dbt_utils.current_timestamp() }} as load_dts,
		glue_dts as load_source_dts,
		bookmark_dts as bookmark_dts,
		cast('REMS' as varchar(10)) as source_system_cd
	from
		{{ source('re_rems_core', 'co_rems_event_users') }}
	where
		dwh_source_country_cd is not null 
		and user_name is not null

		{% if is_incremental() %}
			and glue_dts > (select coalesce(max(load_source_dts), to_date('20000101', 'yyyymmdd', true)) from {{ this }})
		{% endif %}

), 
all_sources as (

	select * from co_rems_invitee
	union
	select * from co_rems_event_users

),
unique_key as (

	select
		row_number() over(partition by user_pk order by bookmark_dts desc) as rn,
		user_pk,
		user_bk,
		load_dts,
		load_source_dts,
		bookmark_dts,
		source_system_cd
	from
		all_sources

)
select
	user_pk,
	user_bk,
	load_dts,
	load_source_dts,
	bookmark_dts,
	source_system_cd
from
	unique_key
where
	rn = 1

dbt also has the capability to add reusable macros to allow common tasks to be automated. The following example shows the construction of the business key with appropriate separators (the macro is called compound_key):

{% macro single_key(field) %}
  {# Takes an input field value and returns a trimmed version of it. #}
  NVL(NULLIF(TRIM(CAST({{ field }} AS VARCHAR)), ''), '@@')
{% endmacro %}

{% macro compound_key(field_list,sort=none) %}
  {# Takes an input field list and concatenates it into a single column value.
     NOTE: Depending on the sort parameter [True/False] the input field
     list has to be passed in a correct order if the sort parameter
     is set to False (default option) or the list will be sorted 
     if You will set up the sort parameter value to True #}
  {% if sort %}
    {% set final_field_list = field_list|sort %}
  {%- else -%}
    {%- set final_field_list = field_list -%}
  {%- endif -%}        
  {% for f in final_field_list %}
    {{ single_key(f) }}
    {% if not loop.last %} || '^^' || {% endif %}
  {% endfor %}
{% endmacro %}

{% macro hash(columns=none, alias=none, algorithm=none) %}
    {# Applies a Redshift supported hash function to the input string 
       or list of strings. #}

    {# If single column to hash #}
    {% if columns is string %}
        {% set column_str = single_key(columns) %}
        {{ redshift__hash(column_str, alias, algorithm) }}
    {# Else a list of columns to hash #}
    {% elif columns is iterable %}        
        {% set column_str = compound_key(columns) %}
        {{ redshift__hash(column_str, alias, algorithm) }}
    {% endif %}
   
{% endmacro %}

{% macro redshift__hash(column_str, alias, algorithm) %}
    {# Applies a Redshift supported hash function to the input string. #}

    {# If the algorithm is none the default project configuration for hash function will be used. #}
    {% if algorithm == none or algorithm not in ['MD5', 'SHA', 'SHA1', 'SHA2', 'FNV_HASH'] %}
        {# Using MD5 if the project variable is not defined. #}
        {% set algorithm = var('project_hash_algorithm', 'MD5') %}
    {% endif %}

    {# Select hashing algorithm #}
    {% if algorithm == 'FNV_HASH' %}
        CAST(FNV_HASH({{ column_str }}) AS BIGINT) AS {{ alias }}
    {% elif algorithm == 'MD5' %}
        CAST(MD5({{ column_str }}) AS VARCHAR(32)) AS {{ alias }}
    {% elif algorithm == 'SHA' or algorithm == 'SHA1' %}
        CAST(SHA({{ column_str }}) AS VARCHAR(40)) AS {{ alias }}
    {% elif algorithm == 'SHA2' %}
        CAST(SHA2({{ column_str }}, 256) AS VARCHAR(256)) AS {{ alias }}
    {% endif %}

{% endmacro %}

Historized reference data about each business key is stored in satellites. The primary key of each satellite is a compound key consisting of the _pk column of the parent hub and the Load_Dts. See the following code:

CREATE TABLE IF NOT EXISTS raw_dv.s_user_reine2
(
 user_pk             VARCHAR(32)   			 
,load_dts            TIMESTAMP    	 
,hash_diff           VARCHAR(32)   			 
,load_source_dts     TIMESTAMP  	 
,bookmark_dts        TIMESTAMP    	 
,source_system_cd    VARCHAR(10)				 
,is_deleted          VARCHAR(1)   				 
,invitee_type        VARCHAR(10)   			 
,first_name          VARCHAR(50)   			 
,last_name           VARCHAR(10)   			 
)
DISTSTYLE ALL
SORTKEY AUTO;

CREATE TABLE IF NOT EXISTS raw_dv.s_user_couser
(
 user_pk                VARCHAR(32)   			 
,load_dts               TIMESTAMP  	 
,hash_diff              VARCHAR(32)   			 
,load_source_dts        TIMESTAMP  	 
,bookmark_dts           TIMESTAMP  	 
,source_system_cd       VARCHAR(10)   			 
,name                   VARCHAR(150)   			 
,username               VARCHAR(80)   			 
,firstname              VARCHAR(40)   			 
,lastname               VARCHAR(80)   			 
,alias                  VARCHAR(8)   				 
,community_nickname     VARCHAR(30)   			 
,federation_identifier  VARCHAR(50)   			 
,is_active              VARCHAR(10)   			 
,email                  VARCHAR(130)   			 
,profile_name           VARCHAR(80)   			 
)
DISTSTYLE ALL
SORTKEY AUTO;

Keep in mind the following:

  • The feed name is saved as part of the satellite name. This allows the loading of reference data from either multiple feeds within the same source system or from multiple source systems.
  • Satellites are insert only; new reference data is loaded as a new row with an appropriate Load_Dts.
  • The HASH_DIFF column is a hashed concatenation of all the descriptive columns within the satellite. The dbt code uses it to decide whether reference data has changed and a new row is to be inserted.
  • Unless the data volumes within a satellite become very large (millions of rows), you should choose a distribution choice of ALL to enable the most performant joins at runtime. For larger volumes of data, choose a distribution style of AUTO to take advantage of Amazon Redshift automatic table optimization, which chooses the most optimum distribution style and sort key based on the downstream usage of these tables.

Transactional data is stored in a combination of link and link satellite tables. These tables hold the business keys that contribute to the transaction being undertaken as well as optional measures describing the transaction.

Previously, we showed the build of the user hub and two of its satellites. In the following link table, the user hub foreign key is one of several hub keys in the compound key:

CREATE TABLE IF NOT EXISTS raw_dv.l_activity_visit
(
 activity_visit_pk         VARCHAR(32)   			 
,activity_pk               VARCHAR(32)   			 
,activity_type_pk          VARCHAR(32)   			
,hco_pk                    VARCHAR(32)   			
,address_pk                VARCHAR(32)   			
,user_pk                   VARCHAR(32)   			
,hcp_pk                    VARCHAR(32)   			
,brand_pk                  VARCHAR(32)   			
,activity_attendee_pk      VARCHAR(32)   			
,activity_discussion_pk    VARCHAR(32)				
,load_dts                  TIMESTAMP  	
,load_source_dts           TIMESTAMP  				
,bookmark_dts              TIMESTAMP  				
,source_system_cd          VARCHAR(10)   				
)
DISTSTYLE KEY
DISTKEY (activity_visit_pk)
SORTKEY (activity_visit_pk);

Keep in mind the following:

  • The foreign keys back to each hub are a hash value of the business keys, giving a 1:1 join with the _pk column of each hub.
  • The primary key of this link table is a hash value of all of the hub foreign keys.
  • The primary key gives direct access to the optional link satellite that holds further historized data about this transaction. The definition of the link satellites is almost identical to satellites; instead of the _pk from the hub being part of the compound key, the _pk of the link is used.
  • Because data volumes are typically larger for links and link satellites than hubs or satellites, you can again choose AUTO distribution style to let Amazon Redshift choose the optimum physical table distribution choice. If you do choose a distribution style, then choose KEY on the _pk column for both the distribution style and sort key on both the link and any link satellites. This improves downstream query performance by co-locating the datasets on the same slice within the compute nodes and enables MERGE JOINS at run time for optimum performance.

In addition to the dbt code to build all the preceding targets in the Amazon Redshift schemas, the product contains a powerful testing tool that makes assertions on the underlying data contents. The platform continuously tests the results of each data load.

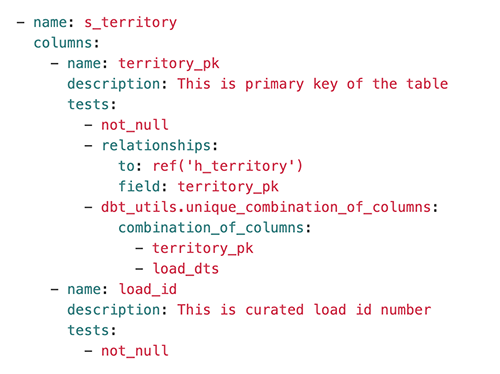
Tests are specified using a YAML file called schema.yml. For example, taking the territory satellite (s_territory), we can see automated testing for conditions, including ensuring the primary key is populated, its parent key is present in the territory hub (h_territory), and the compound key of this satellite is unique:

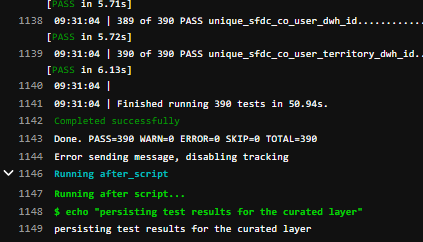
As shown in the following screenshot, the tests are clearly labeled as PASS or FAILED for quick identification of data quality issues.

Business Data Vault

The Business Data Vault is a vital element of any Data Vault model. This is the place where business rules, KPI calculations, performance denormalizations, and roll-up aggregations take place. Business rules can change over time, but the raw data does not, which is why the contents of the Raw Data Vault should never be modified.

The type of objects created in the Business Data Vault schema include the following:

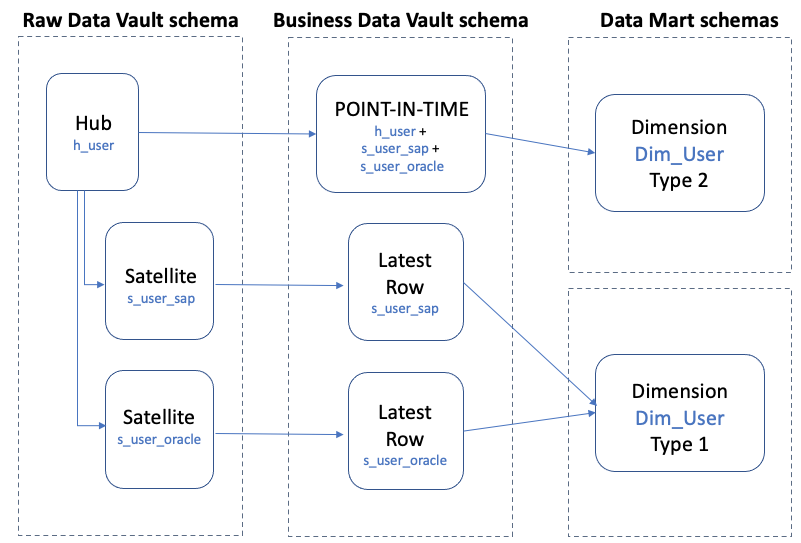
  • Type 2 denormalization based on either the latest load date timestamp or a business-supplied effective date timestamp. These objects are ideal as the base for a type 2 dimension view within a data mart.
  • Latest row filtering based on either the latest load date timestamp or a business-supplied effective date timestamp. These objects are ideal as the base for a type 1 dimension within a data mart.
  • For hubs with multiple independently loaded satellites, point-in-time (PIT) tables are created with the snapshot date set to one time per day.
  • Where the data access requirements span multiple links and link satellites, bridge tables are created with the snapshot date set to one time per day.

In the following diagram, we show an example of user reference data from two source systems being loaded into separate satellite targets.

In this example, we show User reference data from two source systems being loaded into separate Satellite targets

Keep in mind the following:

  • You should create a separate schema for the Business Data Vault objects
  • You can build several object types in the Business Data Vault:
    • PIT and bridge targets are typically either tables or materialized views can be used for data that incrementally changes due to the auto refresh capabilities
    • The type 2 and latest row selections from an underlying satellite are typically views because of the lower data volumes typically found in reference datasets
  • Because the Raw Data Vault tables are insert only, to determine a timeline of changes, create a view similar to the following:
CREATE OR REPLACE VIEW business_dv.ref_user_type2 AS
SELECT 
  s.user_pk,
  s.load_dts from_dts,
  DATEADD(second,-1,COALESCE(LEAD(s.load_dts) OVER (PARTITION BY s.user_pk ORDER BY s.load_dts),'2200-01-01 00:00:00')) AS to_dts
  FROM raw_dv.s_user_reine2 s
  INNER JOIN raw_dv.h_user h ON h.user_pk = s.user_pk
  WITH NO SCHEMA BINDING;

Data Marts

The work undertaken in the Business Data Vault means that views can be developed within the Data Marts to directly access the data without having to physicalize the results into another schema. These views may apply filters to the Business Vault objects, for example to filter only for data from specific countries, or the views may choose a KPI that has been calculated in the Business Vault that is only useful within this one data mart.

Conclusion

In this post, we detailed how you can use dbt and Amazon Redshift for continuous build and validation of a Data Vault model that stores all data from multiple sources in a source-independent manner while offering flexibility and choice of subsequent business transformations and calculations.

Special thanks go to Roche colleagues Bartlomiej Zalewski, Wojciech Kostka, Michalina Mastalerz, Kamil Piotrowski, Igor Tkaczyk, Andrzej Dziabowski, Joao Antunes, Krzysztof Slowinski, Krzysztof Romanowski, Patryk Szczesnowicz, Jakub Lanski, and Chun Wei Chan for their project delivery and support with this post.


About the Authors

Dr. Yannick Misteli, Roche – Dr. Yannick Misteli is leading cloud platform and ML engineering teams in global product strategy (GPS) at Roche. He is passionate about infrastructure and operationalizing data-driven solutions, and he has broad experience in driving business value creation through data analytics.

Simon Dimaline, AWS – Simon Dimaline has specialised in data warehousing and data modelling for more than 20 years. He currently works for the Data & Analytics team within AWS Professional Services, accelerating customers’ adoption of AWS analytics services.

Matt Noyce, AWS – Matt Noyce is a Senior Cloud Application Architect in Professional Services at Amazon Web Services. He works with customers to architect, design, automate, and build solutions on AWS for their business needs.

Chema Artal Banon, AWS – Chema Artal Banon is a Security Consultant at AWS Professional Services and he works with AWS’s customers to design, build, and optimize their security to drive business. He specializes in helping companies accelerate their journey to the AWS Cloud in the most secure manner possible by helping customers build the confidence and technical capability.

Finding Vulnerabilities in Open Source Projects

Post Syndicated from Bruce Schneier original https://www.schneier.com/blog/archives/2022/02/finding-vulnerabilities-in-open-source-projects.html

The Open Source Security Foundation announced $10 million in funding from a pool of tech and financial companies, including $5 million from Microsoft and Google, to find vulnerabilities in open source projects:

The “Alpha” side will emphasize vulnerability testing by hand in the most popular open-source projects, developing close working relationships with a handful of the top 200 projects for testing each year. “Omega” will look more at the broader landscape of open source, running automated testing on the top 10,000.

This is an excellent idea. This code ends up in all sorts of critical applications.

Log4j would be a prototypical vulnerability that the Alpha team might look for ­– an unknown problem in a high-impact project that automated tools would not be able to pick up before a human discovered it. The goal is not to use the personnel engaged with Alpha to replicate dependency analysis, for example.

Demystifying XDR: Where SIEM and XDR Collide

Post Syndicated from Jesse Mack original https://blog.rapid7.com/2022/02/02/demystifying-xdr-where-siem-and-xdr-collide/

Demystifying XDR: Where SIEM and XDR Collide

Innovations solve longstanding problems in creative, impactful ways — but they also raise new questions, especially when they’re in the liminal space between being an emerging idea and a fully fledged, widely adopted reality. One of the still-unanswered questions about extended detection and response (XDR) is what its relationship is with security information and event management (SIEM), a more broadly understood and implemented product category that most security teams have already come to rely on.

When looking at the foundations of XDR, it seems like it could be a replacement for, or an alternative to, SIEM. But as Forrester analyst Allie Mellen noted in her recent conversation with Rapid7’s Sam Adams, VP for Detection and Response, the picture isn’t quite that simple.

“Some SIEM vendors are repositioning themselves as XDR,” Allie said, “kind of trying to latch onto that new buzzword.” She added, “The challenge with that is it’s very hard to see what they’re able to offer that’s actually differentiating from SIEM.”

Where SIEM stands today

To really understand how the rise of XDR is impacting SIEM and what relationship we should expect between the two product types, we first need to ask a key question: How are security operations center (SOC) teams actually using their SIEMs today?

At Forrester, Allie recently conducted a survey asking SOC teams this very question. While some have focused on the compliance use case as a main driver for SIEM adoption, Allie found that just wasn’t the case with her survey respondents. Overwhelmingly, security analysts are using their SIEMs for detection and response, making it the core tool within the SOC.

More than that, Allie’s survey actually found the old adage that security teams hate their SIEMs just isn’t true. The vast majority of analysts she surveyed love using their SIEMs (even if they wish it cost them less).


Demystifying XDR: Where SIEM and XDR Collide

Together, for now

With SIEM claiming such an integral role in the SOC, Allie acknowledged that we likely shouldn’t expect it to be simply replaced by XDR in the near term.

“For the time being, I definitely see XDR and SIEM living together in a very cohesive fashion,” she said.

She went on to suggest that maybe in 5 years or so, we’ll start to see XDR offerings that truly tackle all SIEM use cases and fully deliver on some capabilities that are only in the realm of possibility today. But until XDR can fully address compliance, for example, we’re likely to see it exist alongside and, ideally, in harmony with SIEM.

The XDR opportunity

So, what will that coexistence of SIEM and XDR look like? Sam suggested it might be the fulfillment of the original vision of SIEM solutions like InsightIDR: to make the security analyst superhuman by enabling them to be hyper-efficient at detecting and responding to threats. Allie echoed this sentiment, noting that XDR is all about elevating the role of the SOC analyst rather than automating their tasks away.

“I am not a big believer in the autonomous SOC or this idea that we’re going to take away all the humans from this process,” she said. “At the end of the day, it’s a human-to-human fight. The attackers are not automating themselves away, so it’s very unlikely that we’ll be able to create a product that can keep up with as many human beings as there are attacking us all the time.”

For Allie, the really exciting thing about XDR is its potential to humanize security operations. By reducing the amount of repetitive work analysts have to do, it frees them up to be truly creative and visionary in their threat detection efforts. This can also help improve retention rates among security pros as organizations scramble to fill the cybersecurity skills gap.

“It’s a lofty dream, a lofty vision,” Allie acknowledged, “but XDR is definitely pushing down that path.”

Want more XDR insights from our conversation with Allie? Check out the full talk.

Additional reading

LibreOffice 7.3 released

Post Syndicated from original https://lwn.net/Articles/883542/rss

Version 7.3 of the LibreOffice “Community” edition is out.
“In addition to the majority of code commits being focused on
interoperability with Microsoft's proprietary file formats, there is a
wealth of new features targeted at users migrating from Office, to simplify
the transition
“.

Security updates for Wednesday

Post Syndicated from original https://lwn.net/Articles/883541/rss

Security updates have been issued by CentOS (samba), Debian (apache2 and python-django), Fedora (kernel and phpMyAdmin), Mageia (kernel and kernel-linus), openSUSE (samba), Oracle (nginx:1.20 and samba), Red Hat (cryptsetup, java-1.8.0-ibm, kernel, nodejs:14, rpm, and vim), SUSE (kernel, python-Django, python-Django1, and samba), and Ubuntu (cron).

ДАНС и КПКОНПИ работят по случая Уволнен е директорът, пробутвал тайно турска банка в пристанищата ни

Post Syndicated from Николай Марченко original https://bivol.bg/%D1%83%D0%B2%D0%BE%D0%BB%D0%BD%D0%B5%D0%BD-%D0%B5-%D0%B4%D0%B8%D1%80%D0%B5%D0%BA%D1%82%D0%BE%D1%80%D1%8A%D1%82-%D0%BF%D1%80%D0%BE%D0%B1%D1%83%D1%82%D0%B2%D0%B0%D0%BB-%D1%82%D0%B0%D0%B9%D0%BD%D0%BE.html

сряда 2 февруари 2022


Миналата есен офис на турска банка в България получава по мейл офертите на други банки в страната към едно държавно дружество, подадени в рамки на конкурс за избор на обслужващи…

How to stop running out of ephemeral ports and start to love long-lived connections

Post Syndicated from Marek Majkowski original https://blog.cloudflare.com/how-to-stop-running-out-of-ephemeral-ports-and-start-to-love-long-lived-connections/

How to stop running out of ephemeral ports and start to love long-lived connections

Often programmers have assumptions that turn out, to their surprise, to be invalid. From my experience this happens a lot. Every API, technology or system can be abused beyond its limits and break in a miserable way.

It’s particularly interesting when basic things used everywhere fail. Recently we’ve reached such a breaking point in a ubiquitous part of Linux networking: establishing a network connection using the connect() system call.

Since we are not doing anything special, just establishing TCP and UDP connections, how could anything go wrong? Here’s one example: we noticed alerts from a misbehaving server, logged in to check it out and saw:

marek@:~# ssh 127.0.0.1
ssh: connect to host 127.0.0.1 port 22: Cannot assign requested address

You can imagine the face of my colleague who saw that. SSH to localhost refuses to work, while she was already using SSH to connect to that server! On another occasion:

marek@:~# dig cloudflare.com @1.1.1.1
dig: isc_socket_bind: address in use

This time a basic DNS query failed with a weird networking error. Failing DNS is a bad sign!

In both cases the problem was Linux running out of ephemeral ports. When this happens it’s unable to establish any outgoing connections. This is a pretty serious failure. It’s usually transient and if you don’t know what to look for it might be hard to debug.

The root cause lies deeper though. We can often ignore limits on the number of outgoing connections. But we encountered cases where we hit limits on the number of concurrent outgoing connections during normal operation.

In this blog post I’ll explain why we had these issues, how we worked around them, and present an userspace code implementing an improved variant of connect() syscall.

Outgoing connections on Linux part 1 – TCP

Let’s start with a bit of historical background.

Long-lived connections

Back in 2014 Cloudflare announced support for WebSockets. We wrote two articles about it:

If you skim these blogs, you’ll notice we were totally fine with the WebSocket protocol, framing and operation. What worried us was our capacity to handle large numbers of concurrent outgoing connections towards the origin servers. Since WebSockets are long-lived, allowing them through our servers might greatly increase the concurrent connection count. And this did turn out to be a problem. It was possible to hit a ceiling for a total number of outgoing connections imposed by the Linux networking stack.

In a pessimistic case, each Linux connection consumes a local port (ephemeral port), and therefore the total connection count is limited by the size of the ephemeral port range.

Basics – how port allocation works

When establishing an outbound connection a typical user needs the destination address and port. For example, DNS might resolve cloudflare.com to the ‘104.1.1.229’ IPv4 address. A simple Python program can establish a connection to it with the following code:

cd = socket.socket(AF_INET, SOCK_STREAM)
cd.connect(('104.1.1.229', 80))

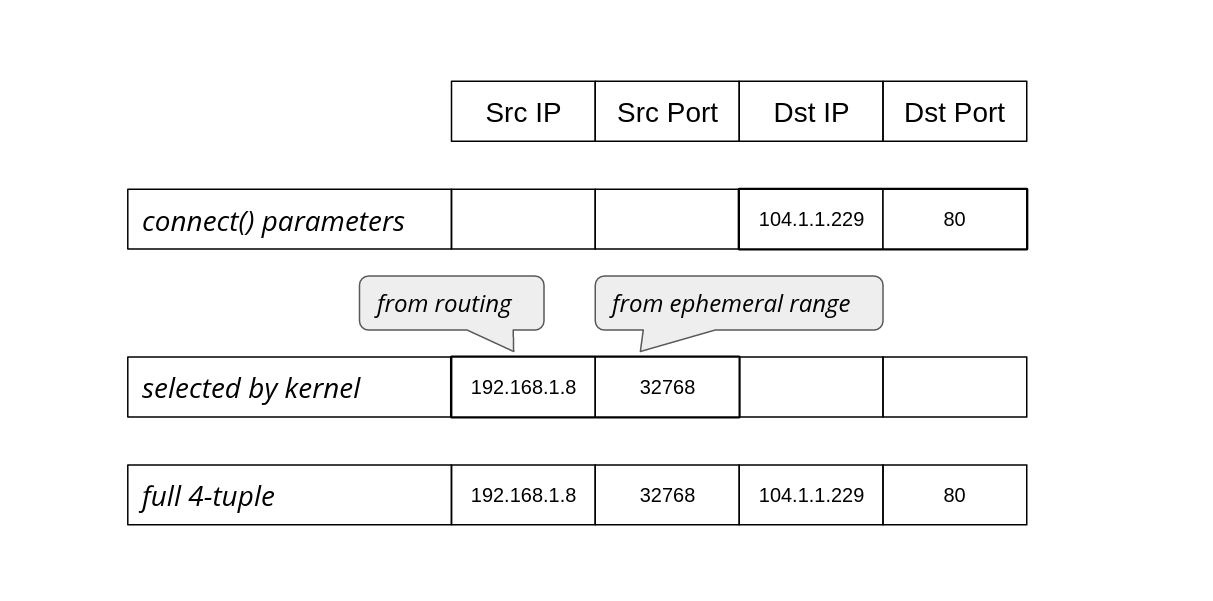
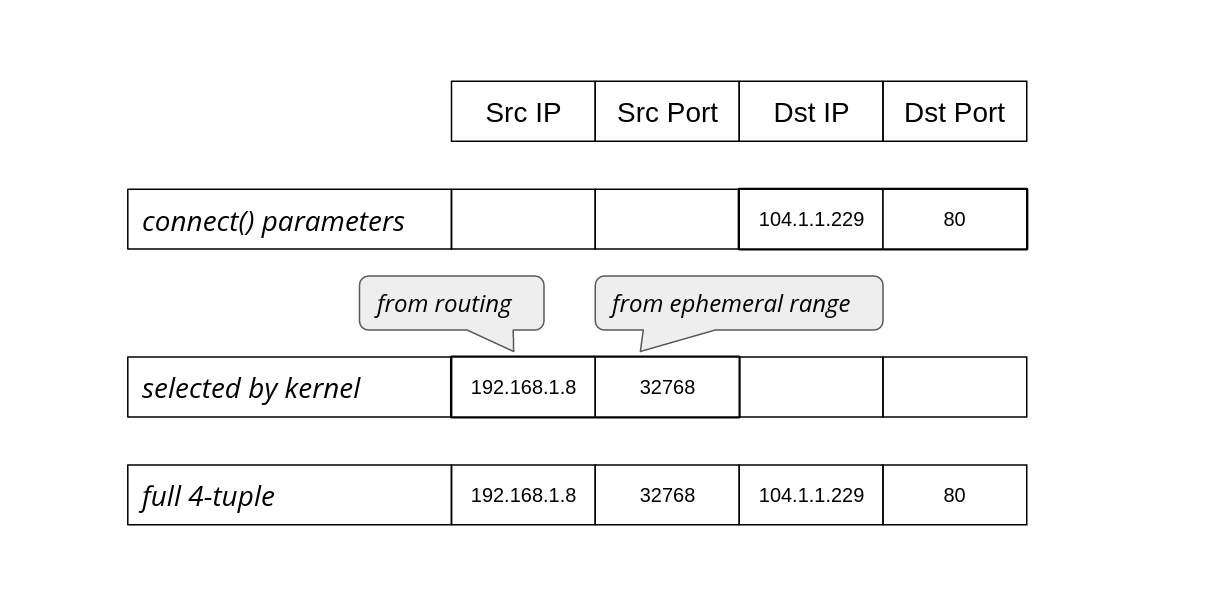
The operating system’s job is to figure out how to reach that destination, selecting an appropriate source address and source port to form the full 4-tuple for the connection:

How to stop running out of ephemeral ports and start to love long-lived connections

The operating system chooses the source IP based on the routing configuration. On Linux we can see which source IP will be chosen with ip route get:

$ ip route get 104.1.1.229
104.1.1.229 via 192.168.1.1 dev eth0 src 192.168.1.8 uid 1000
	cache

The src parameter in the result shows the discovered source IP address that should be used when going towards that specific target.

The source port, on the other hand, is chosen from the local port range configured for outgoing connections, also known as the ephemeral port range. On Linux this is controlled by the following sysctls:

$ sysctl net.ipv4.ip_local_port_range net.ipv4.ip_local_reserved_ports
net.ipv4.ip_local_port_range = 32768    60999
net.ipv4.ip_local_reserved_ports =

The ip_local_port_range sets the low and high (inclusive) port range to be used for outgoing connections. The ip_local_reserved_ports is used to skip specific ports if the operator needs to reserve them for services.

Vanilla TCP is a happy case

The default ephemeral port range contains more than 28,000 ports (60999+1-32768=28232). Does that mean we can have at most 28,000 outgoing connections? That’s the core question of this blog post!

In TCP the connection is identified by a full 4-tuple, for example:

full 4-tuple 192.168.1.8 32768 104.1.1.229 80

In principle, it is possible to reuse the source IP and port, and share them against another destination. For example, there could be two simultaneous outgoing connections with these 4-tuples:

full 4-tuple #A 192.168.1.8 32768 104.1.1.229 80
full 4-tuple #B 192.168.1.8 32768 151.101.1.57 80

This “source two-tuple” sharing can happen in practice when establishing connections using the vanilla TCP code:

sd = socket.socket(SOCK_STREAM)
sd.connect( (remote_ip, remote_port) )

But slightly different code can prevent this sharing, as we’ll discuss.

In the rest of this blog post, we’ll summarise the behaviour of code fragments that make outgoing connections showing:

  • The technique’s description
  • The typical `errno` value in the case of port exhaustion
  • And whether the kernel is able to reuse the {source IP, source port}-tuple against another destination

The last column is the most important since it shows if there is a low limit of total concurrent connections. As we’re going to see later, the limit is present more often than we’d expect.

technique description errno on port exhaustion possible src 2-tuple reuse
connect(dst_IP, dst_port) EADDRNOTAVAIL yes (good!)

In the case of generic TCP, things work as intended. Towards a single destination it’s possible to have as many connections as an ephemeral range allows. When the range is exhausted (against a single destination), we’ll see EADDRNOTAVAIL error. The system also is able to correctly reuse local two-tuple {source IP, source port} for ESTABLISHED sockets against other destinations. This is expected and desired.

Manually selecting source IP address

Let’s go back to the Cloudflare server setup. Cloudflare operates many services, to name just two: CDN (caching HTTP reverse proxy) and WARP.

For Cloudflare, it’s important that we don’t mix traffic types among our outgoing IPs. Origin servers on the Internet might want to differentiate traffic based on our product. The simplest example is CDN: it’s appropriate for an origin server to firewall off non-CDN inbound connections. Allowing Cloudflare cache pulls is totally fine, but allowing WARP connections which contain untrusted user traffic might lead to problems.

To achieve such outgoing IP separation, each of our applications must be explicit about which source IPs to use. They can’t leave it up to the operating system; the automatically-chosen source could be wrong. While it’s technically possible to configure routing policy rules in Linux to express such requirements, we decided not to do that and keep Linux routing configuration as simple as possible.

Instead, before calling connect(), our applications select the source IP with the bind() syscall. A trick we call “bind-before-connect”:

sd = socket.socket(SOCK_STREAM)
sd.bind( (src_IP, 0) )
sd.connect( (dst_IP, dst_port) )

technique description errno on port exhaustion possible src 2-tuple reuse
bind(src_IP, 0)
connect(dst_IP, dst_port)
EADDRINUSE no (bad!)

This code looks rather innocent, but it hides a considerable drawback. When calling bind(), the kernel attempts to find an unused local two-tuple. Due to BSD API shortcomings, the operating system can’t know what we plan to do with the socket. It’s totally possible we want to listen() on it, in which case sharing the source IP/port with a connected socket will be a disaster! That’s why the source two-tuple selected when calling bind() must be unique.

Due to this API limitation, in this technique the source two-tuple can’t be reused. Each connection effectively “locks” a source port, so the number of connections is constrained by the size of the ephemeral port range. Notice: one source port is used up for each connection, no matter how many destinations we have. This is bad, and is exactly the problem we were dealing with back in 2014 in the WebSockets articles mentioned above.

Fortunately, it’s fixable.

IP_BIND_ADDRESS_NO_PORT

Back in 2014 we fixed the problem by setting the SO_REUSEADDR socket option and manually retrying bind()+ connect() a couple of times on error. This worked ok, but later in 2015 Linux introduced a proper fix: the IP_BIND_ADDRESS_NO_PORT socket option. This option tells the kernel to delay reserving the source port:

sd = socket.socket(SOCK_STREAM)
sd.setsockopt(IPPROTO_IP, IP_BIND_ADDRESS_NO_PORT, 1)
sd.bind( (src_IP, 0) )
sd.connect( (dst_IP, dst_port) )

technique description errno on port exhaustion possible src 2-tuple reuse
IP_BIND_ADDRESS_NO_PORT
bind(src_IP, 0)

connect(dst_IP, dst_port)
EADDRNOTAVAIL yes (good!)

This gets us back to the desired behavior. On modern Linux, when doing bind-before-connect for TCP, you should set IP_BIND_ADDRESS_NO_PORT.

Explicitly selecting a source port

Sometimes an application needs to select a specific source port. For example: the operator wants to control full 4-tuple in order to debug ECMP routing issues.

Recently a colleague wanted to run a cURL command for debugging, and he needed the source port to be fixed. cURL provides the --local-port option to do this¹ :

$ curl --local-port 9999 -4svo /dev/null https://cloudflare.com/cdn-cgi/trace
*   Trying 104.1.1.229:443...

In other situations source port numbers should be controlled, as they can be used as an input to a routing mechanism.

But setting the source port manually is not easy. We’re back to square one in our hackery since IP_BIND_ADDRESS_NO_PORT is not an appropriate tool when calling bind() with a specific source port value. To get the scheme working again and be able to share source 2-tuple, we need to turn to SO_REUSEADDR:

sd = socket.socket(SOCK_STREAM)
sd.setsockopt(socket.SOL_SOCKET, socket.SO_REUSEADDR, 1)
sd.bind( (src_IP, src_port) )
sd.connect( (dst_IP, dst_port) )

Our summary table:

technique description errno on port exhaustion possible src 2-tuple reuse
SO_REUSEADDR
bind(src_IP, src_port)

connect(dst_IP, dst_port)
EADDRNOTAVAIL yes (good!)

Here, the user takes responsibility for handling conflicts, when an ESTABLISHED socket sharing the 4-tuple already exists. In such a case connect will fail with EADDRNOTAVAIL and the application should retry with another acceptable source port number.

Userspace connectx implementation

With these tricks, we can implement a common function and call it connectx. It will do what bind()+connect() should, but won’t have the unfortunate ephemeral port range limitation. In other words, created sockets are able to share local two-tuples as long as they are going to distinct destinations:

def connectx((source_IP, source_port), (destination_IP, destination_port)):

We have three use cases this API should support:

user specified technique
{_, _, dst_IP, dst_port} vanilla connect()
{src_IP, _, dst_IP, dst_port} IP_BIND_ADDRESS_NO_PORT
{src_IP, src_port, dst_IP, dst_port} SO_REUSEADDR

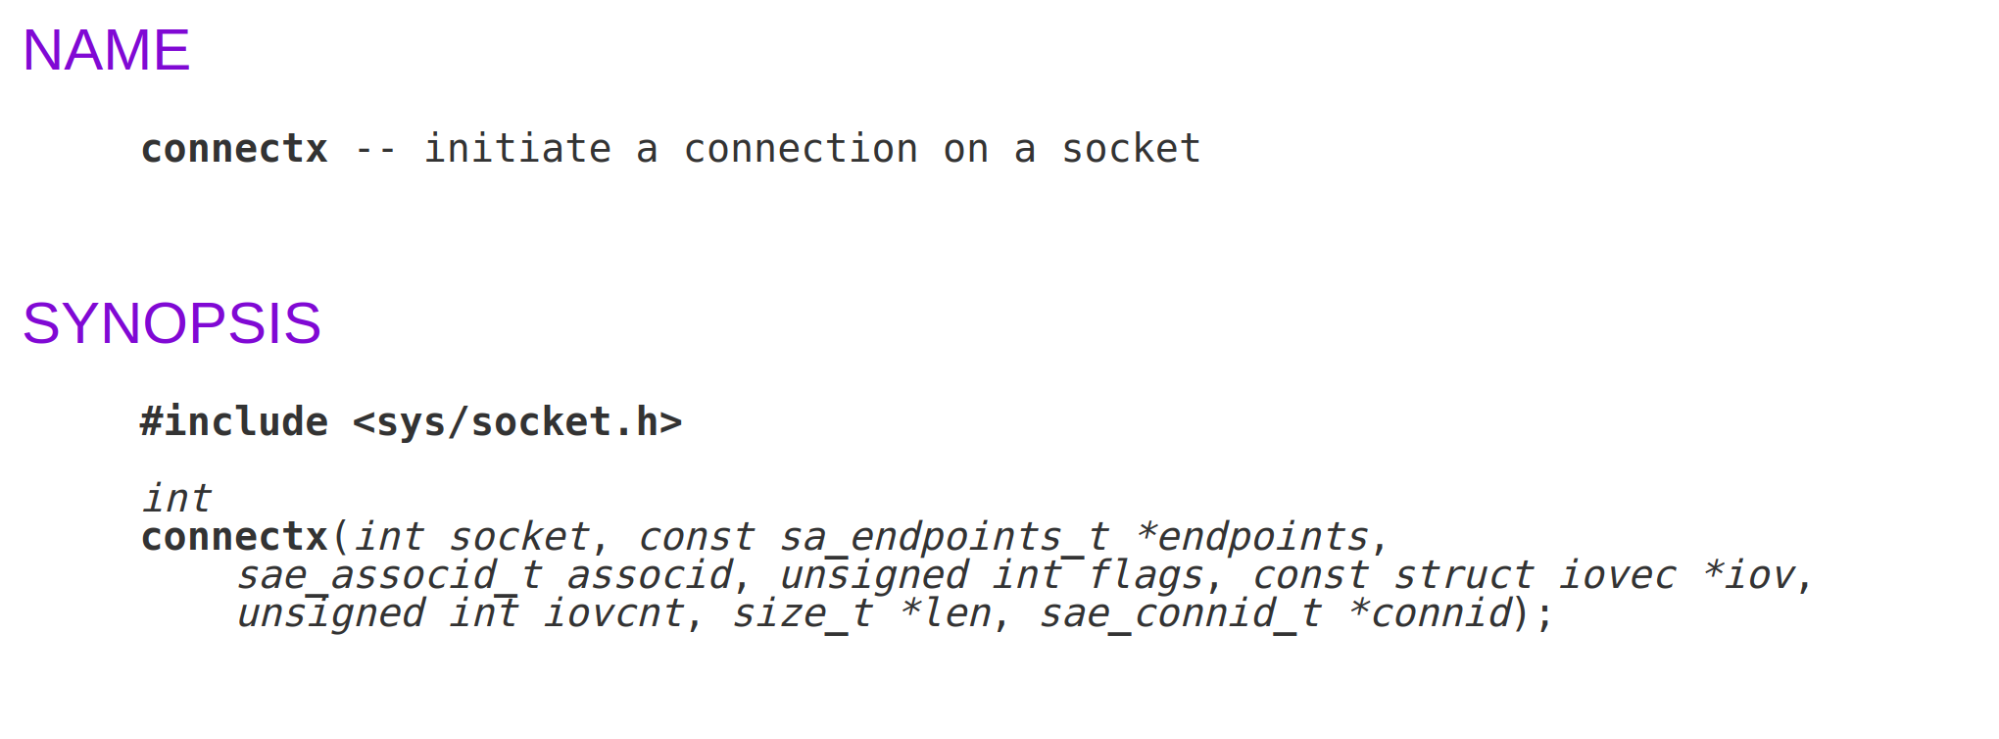
The name we chose isn’t an accident. MacOS (specifically the underlying Darwin OS) has exactly that function implemented as a connectx() system call (implementation):

How to stop running out of ephemeral ports and start to love long-lived connections

It’s more powerful than our connectx code, since it supports TCP Fast Open.

Should we, Linux users, be envious? For TCP, it’s possible to get the right kernel behaviour with the appropriate setsockopt/bind/connect dance, so a kernel syscall is not quite needed.

But for UDP things turn out to be much more complicated and a dedicated syscall might be a good idea.

Outgoing connections on Linux – part 2 – UDP

In the previous section we listed three use cases for outgoing connections that should be supported by the operating system:

  • Vanilla egress: operating system chooses the outgoing IP and port
  • Source IP selection: user selects outgoing IP but the OS chooses port
  • Full 4-tuple: user selects full 4-tuple for the connection

We demonstrated how to implement all three cases on Linux for TCP, without hitting connection count limits due to source port exhaustion.

It’s time to extend our implementation to UDP. This is going to be harder.

For UDP, Linux maintains one hash table that is keyed on local IP and port, which can hold duplicate entries. Multiple UDP connected sockets can not only share a 2-tuple but also a 4-tuple! It’s totally possible to have two distinct, connected sockets having exactly the same 4-tuple. This feature was created for multicast sockets. The implementation was then carried over to unicast connections, but it is confusing. With conflicting sockets on unicast addresses, only one of them will receive any traffic. A newer connected socket will “overshadow” the older one. It’s surprisingly hard to detect such a situation. To get UDP connectx() right, we will need to work around this “overshadowing” problem.

Vanilla UDP is limited

It might come as a surprise to many, but by default, the total count for outbound UDP connections is limited by the ephemeral port range size. Usually, with Linux you can’t have more than ~28,000 connected UDP sockets, even if they point to multiple destinations.

Ok, let’s start with the simplest and most common way of establishing outgoing UDP connections:

sd = socket.socket(SOCK_DGRAM)
sd.connect( (dst_IP, dst_port) )

technique description errno on port exhaustion possible src 2-tuple reuse risk of overshadowing
connect(dst_IP, dst_port) EAGAIN no (bad!) no

The simplest case is not a happy one. The total number of concurrent outgoing UDP connections on Linux is limited by the ephemeral port range size. On our multi-tenant servers, with potentially long-lived gaming and H3/QUIC flows containing WebSockets, this is too limiting.

On TCP we were able to slap on a setsockopt and move on. No such easy workaround is available for UDP.

For UDP, without REUSEADDR, Linux avoids sharing local 2-tuples among UDP sockets. During connect() it tries to find a 2-tuple that is not used yet. As a side note: there is no fundamental reason that it looks for a unique 2-tuple as opposed to a unique 4-tuple during ‘connect()’. This suboptimal behavior might be fixable.

SO_REUSEADDR is hard

To allow local two-tuple reuse we need the SO_REUSEADDR socket option. Sadly, this would also allow established sockets to share a 4-tuple, with the newer socket overshadowing the older one.

sd = socket.socket(SOCK_DGRAM)
sd.setsockopt(socket.SOL_SOCKET, socket.SO_REUSEADDR, 1)
sd.connect( (dst_IP, dst_port) )

technique description errno on port exhaustion possible src 2-tuple reuse risk of overshadowing
SO_REUSEADDR
connect(dst_IP, dst_port)
EAGAIN yes yes (bad!)

In other words, we can’t just set SO_REUSEADDR and move on, since we might hit a local 2-tuple that is already used in a connection against the same destination. We might already have an identical 4-tuple connected socket underneath. Most importantly, during such a conflict we won’t be notified by any error. This is unacceptably bad.

Detecting socket conflicts with eBPF

We thought a good solution might be to write an eBPF program to detect such conflicts. The idea was to put a code on the connect() syscall. Linux cgroups allow the BPF_CGROUP_INET4_CONNECT hook. The eBPF is called every time a process under a given cgroup runs the connect() syscall. This is pretty cool, and we thought it would allow us to verify if there is a 4-tuple conflict before moving the socket from UNCONNECTED to CONNECTED states.

Here is how to load and attach our eBPF

bpftool prog load ebpf.o /sys/fs/bpf/prog_connect4  type cgroup/connect4
bpftool cgroup attach /sys/fs/cgroup/unified/user.slice connect4 pinned /sys/fs/bpf/prog_connect4

With such a code, we’ll greatly reduce the probability of overshadowing:

technique description errno on port exhaustion possible src 2-tuple reuse risk of overshadowing
INET4_CONNECT hook
SO_REUSEADDR
connect(dst_IP, dst_port)
manual port discovery, EPERM on conflict yes yes, but small

However, this solution is limited. First, it doesn’t work for sockets with an automatically assigned source IP or source port, it only works when a user manually creates a 4-tuple connection from userspace. Then there is a second issue: a typical race condition. We don’t grab any lock, so it’s technically possible a conflicting socket will be created on another CPU in the time between our eBPF conflict check and the finish of the real connect() syscall machinery. In short, this lockless eBPF approach is better than nothing, but fundamentally racy.

Socket traversal – SOCK_DIAG ss way

There is another way to verify if a conflicting socket already exists: we can check for connected sockets in userspace. It’s possible to do it without any privileges quite effectively with the SOCK_DIAG_BY_FAMILY feature of netlink interface. This is the same technique the ss tool uses to print out sockets available on the system.

The netlink code is not even all that complicated. Take a look at the code. Inside the kernel, it goes quickly into a fast __udp_lookup() routine. This is great – we can avoid iterating over all sockets on the system.

With that function handy, we can draft our UDP code:

sd = socket.socket(SOCK_DGRAM)
sd.setsockopt(socket.SOL_SOCKET, socket.SO_REUSEADDR, 1)
cookie = sd.getsockopt(socket.SOL_SOCKET, SO_COOKIE, 8)
sd.bind( src_addr )
c, _ = _netlink_udp_lookup(family, src_addr, dst_addr)
if c != cookie:
    raise OSError(...)
sd.connect( dst_addr )

This code has the same race condition issue as the connect inet eBPF hook before. But it’s a good starting point. We need some locking to avoid the race condition. Perhaps it’s possible to do it in the userspace.

SO_REUSEADDR as a lock

Here comes a breakthrough: we can use SO_REUSEADDR as a locking mechanism. Consider this:

sd = socket.socket(SOCK_DGRAM)
cookie = sd.getsockopt(socket.SOL_SOCKET, SO_COOKIE, 8)
sd.setsockopt(socket.SOL_SOCKET, socket.SO_REUSEADDR, 1)
sd.bind( src_addr )
sd.setsockopt(socket.SOL_SOCKET, socket.SO_REUSEADDR, 0)
c, _ = _netlink_udp_lookup(family, src_addr, dst_addr)
if c != cookie:
    raise OSError()
sd.connect( dst_addr )
sd.setsockopt(socket.SOL_SOCKET, socket.SO_REUSEADDR, 1)

The idea here is:

  • We need REUSEADDR around bind, otherwise it wouldn’t be possible to reuse a local port. It’s technically possible to clear REUSEADDR after bind. Doing this technically makes the kernel socket state inconsistent, but it doesn’t hurt anything in practice.
  • By clearing REUSEADDR, we’re locking new sockets from using that source port. At this stage we can check if we have ownership of the 4-tuple we want. Even if multiple sockets enter this critical section, only one, the newest, can win this verification. This is a cooperative algorithm, so we assume all tenants try to behave.
  • At this point, if the verification succeeds, we can perform connect() and have a guarantee that the 4-tuple won’t be reused by another socket at any point in the process.

This is rather convoluted and hacky, but it satisfies our requirements:

technique description errno on port exhaustion possible src 2-tuple reuse risk of overshadowing
REUSEADDR as a lock EAGAIN yes no

Sadly, this schema only works when we know the full 4-tuple, so we can’t rely on kernel automatic source IP or port assignments.

Faking source IP and port discovery

In the case when the user calls ‘connect’ and specifies only target 2-tuple – destination IP and port, the kernel needs to fill in the missing bits – the source IP and source port. Unfortunately the described algorithm expects the full 4-tuple to be known in advance.

One solution is to implement source IP and port discovery in userspace. This turns out to be not that hard. For example, here’s a snippet of our code:

def _get_udp_port(family, src_addr, dst_addr):
    if ephemeral_lo == None:
        _read_ephemeral()
    lo, hi = ephemeral_lo, ephemeral_hi
    start = random.randint(lo, hi)
    ...

Putting it all together

Combining the manual source IP, port discovery and the REUSEADDR locking dance, we get a decent userspace implementation of connectx() for UDP.

We have covered all three use cases this API should support:

user specified comments
{_, _, dst_IP, dst_port} manual source IP and source port discovery
{src_IP, _, dst_IP, dst_port} manual source port discovery
{src_IP, src_port, dst_IP, dst_port} just our “REUSEADDR as lock” technique

Take a look at the full code.

Summary

This post described a problem we hit in production: running out of ephemeral ports. This was partially caused by our servers running numerous concurrent connections, but also because we used the Linux sockets API in a way that prevented source port reuse. It meant that we were limited to ~28,000 concurrent connections per protocol, which is not enough for us.

We explained how to allow source port reuse and prevent having this ephemeral-port-range limit imposed. We showed an userspace connectx() function, which is a better way of creating outgoing TCP and UDP connections on Linux.

Our UDP code is more complex, based on little known low-level features, assumes cooperation between tenants and undocumented behaviour of the Linux operating system. Using REUSEADDR as a locking mechanism is rather unheard of.

The connectx() functionality is valuable, and should be added to Linux one way or another. It’s not trivial to get all its use cases right. Hopefully, this blog post shows how to achieve this in the best way given the operating system API constraints.

___

¹ On a side note, on the second cURL run it fails due to TIME-WAIT sockets: “bind failed with errno 98: Address already in use”.

One option is to wait for the TIME_WAIT socket to die, or work around this with the time-wait sockets kill script. Killing time-wait sockets is generally a bad idea, violating protocol, unneeded and sometimes doesn’t work. But hey, in some extreme cases it’s good to know what’s possible. Just saying.

[$] Python and deprecations redux

Post Syndicated from original https://lwn.net/Articles/883391/rss

The problem of how to deprecate pieces of the Python language
in a minimally disruptive way has cropped in various guises over the last few years—in truth,
it has been wrangled with throughout much of language’s 30-year history.
The scars of the biggest deprecation, that of Python 2, are still rather
fresh, both for users and the core developers, so no one wants (or plans)
a monumental change of that sort. But the language community does want to
continue evolving Python, which means leaving some “baggage” behind; how
to do so without leaving further scars is a delicate balancing act, as yet
another discussion highlights.

Me on App Store Monopolies and Security

Post Syndicated from Bruce Schneier original https://www.schneier.com/blog/archives/2022/02/me-on-app-store-monopolies-and-security.html

There are two bills working their way through Congress that would force companies like Apple to allow competitive app stores. Apple hates this, since it would break its monopoly, and it’s making a variety of security arguments to bolster its argument. I have written a rebuttal:

I would like to address some of the unfounded security concerns raised about these bills. It’s simply not true that this legislation puts user privacy and security at risk. In fact, it’s fairer to say that this legislation puts those companies’ extractive business-models at risk. Their claims about risks to privacy and security are both false and disingenuous, and motivated by their own self-interest and not the public interest. App store monopolies cannot protect users from every risk, and they frequently prevent the distribution of important tools that actually enhance security. Furthermore, the alleged risks of third-party app stores and “side-loading” apps pale in comparison to their benefits. These bills will encourage competition, prevent monopolist extortion, and guarantee users a new right to digital self-determination.

Matt Stoller has also written about this.

EDITED TO ADD (2/13): Here are the two bills.

Best practices to optimize your Amazon Redshift and MicroStrategy deployment

Post Syndicated from Ranjan Burman original https://aws.amazon.com/blogs/big-data/best-practices-to-optimize-your-amazon-redshift-and-microstrategy-deployment/

This is a guest blog post co-written by Amit Nayak at Microstrategy. In their own words, “MicroStrategy is the largest independent publicly traded business intelligence (BI) company, with the leading enterprise analytics platform. Our vision is to enable Intelligence Everywhere. MicroStrategy provides modern analytics on an open, comprehensive enterprise platform used by many of the world’s most admired brands in the Fortune Global 500. Optimized for cloud and on-premises deployments, the platform features HyperIntelligence, a breakthrough technology that overlays actionable enterprise data on popular business applications to help users make smarter, faster decisions.”


Amazon Redshift is a fast, fully managed, petabyte-scale data warehouse. It provides a simple and cost-effective way to analyze all your data using your existing BI tools. Amazon Redshift delivers fast query performance by using columnar storage technology to improve I/O efficiency and parallelizing queries across multiple nodes. Amazon Redshift has custom JDBC and ODBC drivers that you can download from the Connect Client tab on the Amazon Redshift console, allowing you to use a wide range of familiar BI tools.

When using your MicroStrategy application with Amazon Redshift, it’s important to understand how to optimize Amazon Redshift to get the best performance to meet your workload SLAs.

In this post, we look at the best practices for optimized deployment of MicroStrategy using Amazon Redshift.

Optimize Amazon Redshift

In this section, we discuss ways to optimize Amazon Redshift.

Amazon Redshift RA3 instances

RA3 nodes with managed storage help you optimize your data warehouse by scaling and paying for the compute capacity and managed storage independently. With RA3 instances, you can choose the number of nodes based on your performance requirements, and only pay for the managed storage that you use. Size your RA3 cluster based on the amount of data you process daily without increasing your storage costs.

For additional details about RA3 features, see Amazon Redshift RA3 instances with managed storage.

Distribution styles

When you load data into a table, Amazon Redshift distributes the rows of the table to each of the compute nodes according to the table’s distribution style. When you run a query, the query optimizer redistributes the rows to the compute nodes as needed to perform any joins and aggregations. The goal in choosing a table distribution style is to minimize the impact of the redistribution step by locating the data where it needs to be before the query is run.

When you create a table, you can designate one of four distribution styles: AUTO, EVEN, KEY, or ALL. If you don’t specify a distribution style, Amazon Redshift uses AUTO distribution. With AUTO distribution, Amazon Redshift assigns an optimal distribution style based on the size of the table data. You can use automatic table optimization to get started with Amazon Redshift easily or optimize production workloads while decreasing the administrative effort required to get the best possible performance.

MicroStrategy, like any SQL application, transparently takes advantage of the distribution style defined on base tables. MicroStrategy recommends following Amazon Redshift recommended best practices when implementing the physical schema of the base tables.

Sort keys

Defining a table with a sort key results in the physical ordering of data in the Amazon Redshift cluster nodes based on the sort type and the columns chosen in the key definition. Sorting enables efficient handling of range-restricted predicates to scan the minimal number of blocks on disk to satisfy a query. A contrived example would be having an orders table with 5 years of data with a SORTKEY on the order_date column. Now suppose a query on the orders table specifies a date range of 1 month on the order_date column. In this case, you can eliminate up to 98% of the disk blocks from the scan. If the data isn’t sorted, more of the disk blocks (possibly all of them) have to be scanned, resulting in the query running longer.

We recommend creating your tables with SORTKEY AUTO. This way, Amazon Redshift uses automatic table optimization to choose the sort key. If Amazon Redshift determines that applying a SORTKEY improves cluster performance, tables are automatically altered within hours from the time the cluster was created, with minimal impact to queries.

We also recommend using the sort key on columns often used in the WHERE clause of the report queries. Keep in mind that SQL functions (such as data transformation functions) applied to sort key columns in queries reduce the effectiveness of the sort key for those queries. Instead, make sure that you apply the functions to the compared values so that the sort key is used. This is commonly found on DATE columns that are used as sort keys.

Amazon Redshift Advisor provides recommendations to help you improve the performance and decrease the operating costs for your Amazon Redshift cluster. The Advisor analyzes your cluster’s workload to identify the most appropriate distribution key and sort key based on the query patterns of your cluster.

Compression

Compression settings can also play a big role when it comes to query performance in Amazon Redshift. Compression conserves storage space and reduces the size of data that is read from storage, which reduces the amount of disk I/O and therefore improves query performance.

By default, Amazon Redshift automatically manages compression encoding for all columns in a table. You can specify the ENCODE AUTO option for the table to enable Amazon Redshift to automatically manage compression encoding for all columns in a table. You can alternatively apply a specific compression type to the columns in a table manually when you create the table, or you can use the COPY command to analyze and apply compression automatically.

We don’t recommend compressing the first column in a compound sort key because it might result in scanning more rows than expected.

Amazon Redshift materialized views

Materialized views can significantly boost query performance for repeated and predictable analytical workloads such as dashboarding, queries from BI tools, and extract, load, and transform (ELT) data processing.

Materialized views are especially useful for queries that are predictable and repeated over and over. Instead of performing resource-intensive queries on large tables, applications can query the pre-computed data stored in the materialized view.

For example, consider the scenario where a set of queries is used to populate a collection of charts for a dashboard. This use case is ideal for a materialized view, because the queries are predictable and repeated over and over again. Whenever a change occurs in the base tables (data is inserted, deleted, or updated), the materialized views can be automatically or manually refreshed to represent the current data.

Amazon Redshift can automatically refresh materialized views with up-to-date data from its base tables when materialized views are created with or altered to have the auto-refresh option. Amazon Redshift auto-refreshes materialized views as soon as possible after base tables changes.

To update the data in a materialized view manually, you can use the REFRESH MATERIALIZED VIEW statement at any time. There are two strategies for refreshing a materialized view:

  • Incremental refresh – In an incremental refresh, it identifies the changes to the data in the base tables since the last refresh and updates the data in the materialized view
  • Full refresh – If incremental refresh isn’t possible, Amazon Redshift performs a full refresh, which reruns the underlying SQL statement, replacing all the data in the materialized view

Amazon Redshift automatically chooses the refresh method for a materialized view depending on the SELECT query used to define the materialized view. For information about the limitations for incremental refresh, see Limitations for incremental refresh.

The following are some of the key advantages using materialized views:

  • You can speed up queries by pre-computing the results of complex queries, including multiple base tables, predicates, joins, and aggregates
  • You can simplify and accelerate ETL and BI pipelines
  • Materialized views support Amazon Redshift local, Amazon Redshift Spectrum, and federated queries
  • Amazon Redshift can use automatic query rewrites of materialized views

For example, let’s consider the sales team wants to build a report that shows
the product sales across different stores. This dashboard query is based out of a 3 TB Cloud DW benchmark dataset based on the TPC-DS benchmark dataset.

In this first step, you create a regular view. See the following code:

create view vw_product_sales
as
select 
	i_brand,
	i_category,
	d_year,
	d_quarter_name,
	s_store_name,
	sum(ss_sales_price) as total_sales_price,
	sum(ss_net_profit) as total_net_profit,
	sum(ss_quantity) as total_quantity
from
store_sales ss, item i, date_dim d, store s
where ss.ss_item_sk=i.i_item_sk
and ss.ss_store_sk = s.s_store_sk
and ss.ss_sold_date_sk=d.d_date_sk
and d_year = 2000
group by i_brand,
	i_category,
	d_year,
	d_quarter_name,
	s_store_name;

The following code is a report to analyze the product sales by category:

SELECT 
	i_category,
	d_year,
	d_quarter_name,
    sum(total_quantity) as total_quantity
FROM vw_product_sales
GROUP BY 
i_category,
	d_year,
	d_quarter_name
ORDER BY 3 desc

The preceding reports take approximately 15 seconds to run. As more products are sold, this elapsed time gradually gets longer. To speed up those reports, you can create a materialized view to precompute the total sales per category. See the following code:

create materialized view mv_product_sales
as
select 
	i_brand,
	i_category,
	d_year,
	d_quarter_name,
	s_store_name,
	sum(ss_sales_price) as total_sales_price,
	sum(ss_net_profit) as total_net_profit,
	sum(ss_quantity) as total_quantity
from 
store_sales ss, item i, date_dim d, store s
where ss.ss_item_sk=i.i_item_sk
and ss.ss_store_sk = s.s_store_sk
and ss.ss_sold_date_sk=d.d_date_sk
and d_year = 2000
group by i_brand,
	i_category,
	d_year,
	d_quarter_name,
	s_store_name;

The following code analyzes the product sales by category against the materialized view:

SELECT 
	i_category,
	d_year,
	d_quarter_name,
    sum(total_quantity) as total_quantity
FROM mv_product_sales
GROUP BY 
i_category,
	d_year,
	d_quarter_name
ORDER BY 3 desc;

The same reports against a materialized view took around 4 seconds because the new queries access precomputed joins, filters, grouping, and partial sums instead of the multiple, larger base tables.

Workload management

Amazon Redshift workload management (WLM) enables you to flexibly manage priorities within workloads so that short, fast-running queries don’t get stuck in queues behind long-running queries. You can use WLM to define multiple query queues and route queries to the appropriate queues at runtime.

You can query WLM in two modes:

  • Automatic WLM – Amazon Redshift manages the resources required to run queries. Amazon Redshift determines how many queries run concurrently and how much memory is allocated to each dispatched query. Amazon Redshift uses highly trained sophisticated ML algorithms to make these decisions.
  • Query priority is a feature of automatic WLM that lets you assign priority ranks to different user groups or query groups, to ensure that higher-priority workloads get more resources for consistent query performance, even during busy times. For example, consider a critical dashboard report query that has higher priority than an ETL job. You can assign the priority as highest for the report query and high priority to the ETL query.
  • No queries are ever starved of resources, and lower priority queries always complete, but may just take longer to complete.
  • Manual WLM – With manual WLM, you can manage the system performance by modifying the WLM configuration to create separate queues for long-running queries and short-running queries. You can define up to eight queues to separate workloads from each other. Each queue contains a number of query slots, and each queue is associated with a portion of available memory.

You can also use the Amazon Redshift query monitoring rules (QMR) feature to set metrics-based performance boundaries for workload management (WLM) queues, and specify what action to take when a query goes beyond those boundaries. For example, for a queue that’s dedicated to short-running queries, you might create a rule that cancels queries that run for more than 60 seconds. To track poorly designed queries, you might have another rule that logs queries that contain nested loops. You can use predefined rule templates in Amazon Redshift to get started with QMR.

We recommend the following configuration for WLM:

  • Enable automatic WLM
  • Enable concurrency scaling to handle an increase in concurrent read queries, with consistent fast query performance
  • Create QMR rules to track and handle poorly written queries

After you create and configure different WLM queues, you can use a MicroStrategy query label to set the Amazon Redshift query group for queue assignment. This tells Amazon Redshift which WLM queue to send the query to.

You can set the following as a report pre-statement in MicroStrategy:

set query_group to 'mstr_dashboard';

You can use MicroStrategy query labels to identify the MicroStrategy submitted SQL statements within Amazon Redshift system tables.

You can use it with all SQL statement types; therefore, we recommend using it for multi-pass SQL reports. When the label of a query is stored in the system view stl_query, it’s truncated to 15 characters (30 characters are stored in all other system tables). For this reason, you should be cautious when choosing the value for query label.

You can set the following as a report pre-statement:

set query_group to 'MSTR=!o;Project=!p;User=!u;Job=!j;'

This collects information on the server side about variables like project name, report name, user, and more.

To clean up the query group and release resources, use the cleanup post-statement:

reset query_group;

MicroStrategy allows the use of wildcards that are replaced by values retrieved at a report’s run time, as shown in the pre- and post-statements. The following table provides an example of pre- and post-statements.

VLDB Category VLDB Property Setting Value Example
Pre/Post Statements Report Pre-statement set query_group to 'MSTR=!o;Project=!p;User=!u;Job=!j;'
Pre/Post Statements Cleanup Post-statement reset query_group;

For example, see the following code:

VLDB Property Report Pre Statement = set query_group to 'MSTRReport=!o;'
set query_group to 'MSTRReport=Cost, Price, and Profit per Unit;'

Query prioritization in MicroStrategy

In general, you may have multiple applications submitting queries to Amazon Redshift in addition to MicroStrategy. You can use Amazon Redshift query groups to identify MicroStrategy submitted SQL to Amazon Redshift, along with its assignment to the appropriate Amazon Redshift WLM queue.

The Amazon Redshift query group for a MicroStrategy report is set and reset through the use of the following report-level MicroStrategy VLDB properties.

VLDB Category VLDB Property Setting Value Example
Pre/Post Statements Report Pre-statement set query_group to 'MSTR_High=!o;'
Pre/Post Statements Cleanup Post-statement reset query_group;

A MicroStrategy report job can submit one or more queries to Amazon Redshift. In such cases, all queries for a MicroStrategy report are labeled with the same query group and therefore are assigned to same queue in Amazon Redshift.

The following is an example implementation of MicroStrategy Amazon Redshift WLM:

  • High-priority MicroStrategy reports are set with report pre-statement MSTR_HIGH=!o;, medium priority reports with MSTR_MEDIUM=!o;, and low priority reports with MSTR_LOW=!o;.
  • Amazon Redshift WLM queues are created and associated with corresponding query groups. For example, the MSTR_HIGH_QUEUE queue is associated with the MSTR_HIGH=*; query group (where * is an Amazon Redshift wildcard).

Concurrency scaling

With concurrency scaling, you can configure Amazon Redshift to handle spikes in workloads while maintaining consistent SLAs by elastically scaling the underlying resources as needed. When concurrency scaling is enabled, Amazon Redshift continuously monitors the designated workload. If the queries start to get backlogged because of bursts of user activity, Amazon Redshift automatically adds transient cluster capacity and routes the requests to these new clusters. You manage which queries are sent to the concurrency scaling cluster by configuring the WLM queues. This happens transparently in a matter of seconds, so your queries continue to be served with low latency. In addition, every 24 hours that the Amazon Redshift main cluster is in use, you accrue a 1-hour credit towards using concurrency scaling. This enables 97% of Amazon Redshift customers to benefit from concurrency scaling at no additional charge.

For more details on concurrency scaling pricing, see Amazon Redshift pricing.

Amazon Redshift removes the additional transient capacity automatically when activity reduces on the cluster. You can enable concurrency scaling for the MicroStrategy report queue and in case of heavy load on the cluster, the queries run on a concurrent cluster, thereby improving the overall dashboard performance and maintaining a consistent user experience.

To make concurrency scaling work with MicroStrategy, use derived tables instead of temporary tables, which you can do by setting the VLDB property Intermediate table type to Derived table.

In the following example, we enable concurrency scaling on the Amazon Redshift cluster for the MicroStrategy dashboard queries. We create a user group in Amazon Redshift, and all the dashboard queries are allocated to this user group’s queue. With concurrency scaling in place for the report queries, we can see a significant reduction in query wait time.

For this example, we created one WLM queue to run our dashboard queries with highest priority and another ETL queue with high priority. Concurrency scaling is turned on for the dashboard queue, as shown in the following screenshot.

As part of this test, we ran several queries in parallel on the cluster, some of which are ETL jobs (insert, delete, update, and copy), and some are complex select queries, such as dashboard queries. The following graph illustrates how many queries are waiting in the WLM queues and how concurrency scaling helps to address those queries.

In the preceding graph, several queries are waiting in the WLM queues; concurrency scaling automatically starts in seconds to process queries without any delays, as shown in the following graph.

This example has demonstrated how concurrency scaling helps handle spikes in user workloads by adding transient clusters as needed to provide consistent performance even as the workload grows to hundreds of concurrent queries.

Amazon Redshift federated queries

Customers using MicroStrategy often connect various relational data sources to a single MicroStrategy project for reporting and analysis purposes. For example, you might integrate an operational (OLTP) data source (such as Amazon Aurora PostgreSQL) and data warehouse data to get meaningful insights into your business.

With federated queries in Amazon Redshift, you can query and analyze data across operational databases, data warehouses, and data lakes. The federated query feature allows you to integrate queries from Amazon Redshift on live data in external databases with queries across your Amazon Redshift and Amazon Simple Storage Service (Amazon S3) environments.

Federated queries help incorporate live data as part of your MicroStrategy reporting and analysis, without the need to connect to multiple relational data sources from MicroStrategy.

You can also use federated queries to MySQL.

This simplifies the multi-source reports use case by having the ability to run queries on both operational and analytical data sources, without the need to explicitly connect and import data from different data sources within MicroStrategy.

Redshift Spectrum

The MicroStrategy Amazon Redshift connector includes support for Redshift Spectrum, so you can connect directly to query data in Amazon Redshift and analyze it in conjunction with data in Amazon S3.

With Redshift Spectrum, you can efficiently query and retrieve structured and semi-structured data (such as PARQUET, JSON, and CSV) from files in Amazon S3 without having to load the data into Amazon Redshift tables. It allows customers with large datasets stored in Amazon S3 to query that data from within the Amazon Redshift cluster using Amazon Redshift SQL queries with no data movement—you pay only for the data you scanned. Redshift Spectrum also allows multiple Amazon Redshift clusters to concurrently query the same dataset in Amazon S3 without the need to make copies of the data for each cluster. Based on the demands of the queries, Redshift Spectrum can intelligently scale out to take advantage of massively parallel processing.

Use cases that might benefit from using Redshift Spectrum include:

  • A large volume of less-frequently accessed data
  • Heavy scan-intensive and aggregation-intensive queries
  • Selective queries that can use partition pruning and predicate pushdown, so the output is fairly small

Redshift Spectrum gives you the freedom to store your data where you want, in the format you want, and have it available for processing when you need it.

With Redshift Spectrum, you take advantage of a fast, cost-effective engine that minimizes data processed with dynamic partition pruning. You can further improve query performance by reducing the amount of data scanned. You could do this by partitioning and compressing data and by using a columnar format for storage.

For more details on how to optimize Redshift Spectrum query performance and cost, see Best Practices for Amazon Redshift Spectrum.

Optimize MicroStrategy

In this section, we discuss ways to optimize MicroStrategy.

SQL optimizations

With MicroStrategy 2021, MicroStrategy has delivered support for 70 new advanced customizable functions to enhance usability and capability, especially when compared to previously existing Apply functions. Application architects can customize the functions and make them ready and available for regular users like business analysts to use! For more information on how to use these new customizable functions, visit the MicroStrategy community site.

SQL Global Optimization

This setting can substantially reduce the number of SQL passes generated by MicroStrategy. In MicroStrategy, SQL Global Optimization reduces the total number of SQL passes with the following optimizations:

  • Eliminates unused SQL passes – For example, a temp table is created but not referenced in a later pass
  • Reuses redundant SQL passes – For example, the exact same temp table is created multiple times when a single temp table is created
  • Combines SQL passes where the SELECT list is different – For example, two temp tables that have the same FROM clause, joins, WHERE clause, and GROUP BY SELECT lists are combined into single SELECT statement
  • Combines SQL passes where the WHERE clause is different – For example, two temp tables that have same the SELECT list, FROM clause, joins, and GROUP BY predicates from the WHERE clause are moved into CASE statements in the SELECT list

The default setting for Amazon Redshift is to enable SQL Global Optimization at its highest level. If your database instance is configured as an earlier version of Amazon Redshift, you may have to enable this setting manually. For more information, see the MicroStrategy System Administration Guide.

Set Operator Optimization

This setting is used to combine multiple subqueries into a single subquery using set operators (such as UNION, INTERSECT, and EXCEPT). The default setting for Amazon Redshift is to enable Set Operator Optimization.

SQL query generation

The MicroStrategy query engine is able to combine multiple passes of SQL that access the same table (typically the main fact table). This can improve performance by eliminating multiple table scans of large tables. For example, this feature significantly reduces the number of SQL passes required to process datasets with custom groups.

Technically, the WHERE clauses of different passes are resolved in CASE statements of a single SELECT clause, which doesn’t contain qualifications in the WHERE clause. Generally, this elimination of WHERE clauses causes a full table scan on a large table.

In some cases (on a report-by-report basis), this approach can be slower than many highly qualified SELECT statements. Because any performance difference between approaches is mostly impacted by the reporting requirement and implementation in the MicroStrategy application, it’s necessary to test both options for each dataset to identify the optimal case.

The default behavior is to merge all passes with different WHERE clauses (level 4). We recommend testing any option for this setting, but most commonly the biggest performance improvements (if any) are observed by switching to the option Level 2: Merge Passes with Different SELECT.

VLDB Category VLDB Property Setting Value
Query Optimizations SQL Global Optimization Level 2: Merge Passes with Different SELECT

SQL size

As we explained earlier, MicroStrategy tries to submit a single query statement containing the analytics of multiple passes in the derived table syntax. This can lead to sizeable SQL query syntax. It’s possible for such a statement to exceed the capabilities of the driver or database. For this reason, MicroStrategy governs the size of generated queries and throws an error message if this is exceeded. Starting with MicroStrategy 10.9, this value is tuned to current Amazon Redshift capabilities (16 MB). Earlier versions specify a smaller limit that can be modified using the following VLDB setting on the Amazon Redshift DB instance in Developer.

VLDB Category VLDB Property Setting Value
Governing SQL Size/MDX Size 16777216

Subquery type

There are many cases in which the SQL engine generates subqueries (query blocks in the WHERE clause):

  • Reports that use relationship filters
  • Reports that use NOT IN set qualification, such as AND NOT
  • Reports that use attribute qualification with M-M relationships; for example, showing revenue by category and filtering on catalog
  • Reports that raise the level of a filter; for example, dimensional metric at Region level, but qualify on store
  • Reports that use non-aggregatable metrics, such as inventory metrics
  • Reports that use dimensional extensions
  • Reports that use attribute-to-attribute comparison in the filter

The default setting for subquery type for Amazon Redshift is Where EXISTS(select (col1, col2…)):

create table T00001 (
       year_id NUMERIC(10, 0),
       W000001 DOUBLE PRECISION)
 DISTSTYLE EVEN
 
insert into ZZMD00DistKey(1)
select a12.year_id  year_id,
       sum(a11.tot_sls_dlr)  W000001
from   items2 a11
       join   dates    a12
         on   (a11.cur_trn_dt = a12.cur_trn_dt)
where ((exists (select      r11.store_nbr
       from   items r11
       where r11.class_nbr = 1
        and   r11.store_nbr = a11.store_nbr))
 and a12.year_id>1993)
group by      a12.year_id

Some reports may perform better with the option of using a temporary table and falling back to IN for a correlated subquery. Reports that include a filter with an AND NOT set qualification (such as AND NOT relationship filter) will likely benefit from using temp tables to resolve the subquery. However, such reports will probably benefit more from using the Set Operator Optimization option discussed earlier. The other settings are not likely to be advantageous with Amazon Redshift.

VLDB Category VLDB Property Setting Value
Query Optimizations Subquery Type Use temporary table, falling back to IN for correlated subquery

Full outer join support

Full outer join support is enabled in the Amazon Redshift object by default. Levels at which you can set this are database instance, report, and template.

For example, the following query shows the use of full outer join with the states_dates and regions tables:

select pa0.region_id W000000,
       pa2.month_id W000001,
       sum(pa1.tot_dollar_sales) Column1
from   states_dates pa1
       full outer join       regions     pa0
         on (pa1.region_id = pa0.region_id)
       cross join    LU_MONTH      pa2
group by      pa0.region_id, pa2.month_id

DISTINCT or GROUP BY option (for no aggregation and no table key)

If no aggregation is needed and the attribute defined on the table isn’t a primary key, this property tells the SQL engine whether to use SELECT DISTINCT, GROUP BY, or neither.

Possible values for this setting include:

  • Use DISTINCT
  • No DISTINCT, no GROUP BY
  • Use GROUP BY

The DISTINCT or GROUP BY option property controls the generation of DISTINCT or GROUP BY in the SELECT SQL statement. The SQL engine doesn’t consider this property if it can make the decision based on its own knowledge. Specifically, the SQL engine ignores this property in the following situations:

  • If there is aggregation, the SQL engine uses GROUP BY, not DISTINCT
  • If there is no attribute (only metrics), the SQL engine doesn’t use DISTINCT
  • If there is COUNT (DISTINCT …) and the database doesn’t support it, the SQL engine performs a SELECT DISTINCT pass and then a COUNT(*) pass
  • If for certain selected column data types, the database doesn’t allow DISTINCT or GROUP BY, the SQL engine doesn’t do it
  • If the SELECT level is the same as the table key level and the table’s true key property is selected, the SQL engine doesn’t issue a DISTINCT

When none of the preceding conditions are met, the SQL engine uses the DISTINCT or GROUP BY property.

Use the latest Amazon Redshift drivers

For running MicroStrategy reports using Amazon Redshift, we encourage upgrading when new versions of the Amazon Redshift drivers are available. Running an application on the latest driver provides better performance, bugs recovery, and better security features. To get the latest driver version based on the OS, see Drivers and Connectors.

Conclusion

In this post, we discussed various Amazon Redshift cluster optimizations, data model optimizations, and SQL optimizations within MicroStrategy for optimizing your Amazon Redshift and MicroStrategy deployment.


About the Authors

Ranjan Burman is an Analytics Specialist Solutions Architect at AWS. He specializes in Amazon Redshift and helps customers build scalable analytical solutions. He has more than 13 years of experience in different database and data warehousing technologies. He is passionate about automating and solving customer problems with the use of cloud solutions.

Nita Shah is a Analytics Specialist Solutions Architect at AWS based out of New York. She has been building data warehouse solutions for over 20 years and specializes in Amazon Redshift. She is focused on helping customers design and build enterprise-scale well-architected analytics and decision support platforms.

Bosco Albuquerque is a Sr Partner Solutions Architect at AWS and has over 20 years of experience working with database and analytics products from enterprise database vendors and cloud providers, and has helped large technology companies design data analytics solutions as well as led engineering teams in designing and implementing data analytics platforms and data products.

Amit Nayak is responsible for driving the Gateways roadmap at MicroStrategy, focusing on relational and big data databases, as well as authentication. Amit joined MicroStrategy after completing his master’s in Business Analytics at George Washington University and has maintained an oversight of the company’s gateways portfolio for the 3+ years he has been with the company.

Kasper: a tool for finding speculative-execution vulnerabilities

Post Syndicated from original https://lwn.net/Articles/883448/rss

The Systems and Network Security Group at Vrije Universiteit Amsterdam has
announced a tool called
Kasper
that is able to scan the kernel source and locate
speculative-execution vulnerabilities:

Namely, it models an attacker capable of controlling data (e.g.,
via memory massaging or value injection a la LVI), accessing
secrets (e.g., via out-of-bounds or use-after-free accesses), and
leaking these secrets (e.g., via cache-based, MDS-based, or port
contention-based covert channels). As a result, Kasper discovered
1,379 previously unknown gadgets in the heavily-hardened Linux
kernel.

The page includes a discussion of a vulnerability in the kernel’s
linked-list implementation as well as link to the code and the full
paper
. (Thanks to Paul Wise).

Announcing the public launch of Cloudflare’s bug bounty program

Post Syndicated from Rushil Shah original https://blog.cloudflare.com/cloudflare-bug-bounty-program/

Announcing the public launch of Cloudflare's bug bounty program

Announcing the public launch of Cloudflare's bug bounty program

Today we are launching Cloudflare’s paid public bug bounty program. We believe bug bounties are a vital part of every security team’s toolbox and have been working hard on improving and expanding our private bug bounty program over the last few years. The first iteration of our bug bounty was a pure vulnerability disclosure program without cash bounties. In 2018, we added a private bounty program and are now taking the next step to a public program.

Starting today, anyone can report vulnerabilities related to any Cloudflare product to our public bug bounty program, hosted on HackerOne’s platform.

Let’s walk through our journey so far.

Announcing the public launch of Cloudflare's bug bounty program

Step 1: starting a vulnerability disclosure program

In 2014, when the company had fewer than 100 employees, we created a responsible disclosure policy to provide a safe place for security researchers to submit potential vulnerabilities to our security team, with some established rules of engagement. A vulnerability disclosure policy is an important first step for a company to take because it is an invitation to researchers to look at company assets without fear of repercussions, provided the researchers follow certain guidelines intended to protect everyone involved. We still stand by that policy and welcome reports related to all of our services through that program.

Over the years, we received many great reports through that program which led to improvements in our products. However, one early challenge we faced was that researchers struggled to understand our infrastructure and products. Unlike most of the public programs of that era when we launched, our services were not made up primarily of public facing web applications or even mobile applications; our products were primarily network security and performance solutions that operated as a proxy layer in front of customer resources.

Understanding where Cloudflare fits into the HTTP request/response pipeline can get very challenging with multiple products enabled. And because we did not provide much supporting documentation about how our products worked, and had scoped the program to broadly encompass everything, we left researchers to figure out our complicated products on their own. As a result, most of the reports we received over those early years came from people who saw something that seemed atypical to them, but in our view was not actually a vulnerability in need of repair. We dedicated a tremendous amount of time to triaging false positive reports and helping the researchers understand their errors.

Lesson #1 from that experience: we needed to provide much more detail about our products, so researchers could understand how to dig into our products and identify true vulnerabilities. For example, when a zone is being onboarded to Cloudflare, even before ownership is determined, Cloudflare will display the DNS records for the zone. These DNS records are public information, but researchers have filed reports claiming that this is an information leakage issue. The same results can be obtained with open-source tools. This does not affect existing Cloudflare zones since Cloudflare protects the actual origin IPs from being leaked.

We see the same types of issues come up regularly with the platforms that some companies use to assess the security of their vendors. Off-the-shelf scanners will inaccurately detect vulnerabilities in our platforms because our services not only sit in front of our environment, but the environments of many thousands of customers of all shapes and sizes. We encourage researchers not to use those tools and instead learn more about how our services work.

Announcing the public launch of Cloudflare's bug bounty program

Leaving researchers to their own devices, and failing to invest in helping them understand how our product worked, led to a poor signal-to-noise ratio. At the time of writing, 1,197 reports have been submitted to our vulnerability disclosure program. Of those, only 158 resulted in points going to the researcher for a valid report. With only 13% of reports being valid, we needed to invest in improving the signal-to-noise ratio by helping our researchers before we could expand our program.

Rewards: T-shirts?

Early on, we rewarded researchers with a unique “Cloudflare bug hunter” T-shirt after we validated a vulnerability report. We thought it was a nice gesture at a low cost for people who found security bugs. In practice, when we factored in shipping issues, passing through customs, and wrong sizes, it was a nightmare. Shipping turned out to be such a challenge that we sometimes resorted to hand delivering T-shirts to researchers when attending conferences. It was nice to meet the researchers in person, but not a scalable solution!

Step 2: private bounty program

We have always felt that rewarding good security research deserved more than a T-shirt. We also believed that financially supporting researchers would incentivize higher quality reports and deeper security research.


In order to learn the ropes of operating a paid bounty, in 2018 we opened a private bug bounty program and spent the past few years optimizing.

Our end goal has always been to reach a level of maturity that would allow us to operate a paid public program. To reach that goal we needed to learn how to best support the researchers and improve the signal-to-noise ratio of reports, while building our internal processes to track and remediate a stream of reported vulnerabilities with our engineering teams.

When we launched the private bug bounty we included all Cloudflare products eligible for rewards, and by mid-January 2022 we had paid out \$211,512 in bounties. We started the program by inviting a few researchers and slowly added more overtime. This helped us fine tune our policies and documentation and create a more scalable vulnerability management process internally. Our most prolific participant has earned \$54,800 in bounty rewards, and the signal-to-noise ratio has improved to 68%, with 292 of our 430 total reports receiving a reward.


The success of our private program has largely been the result of consistent effort from the members of our Product Security team to improve our internal handling of issues, and through projects to improve the researcher experience. All bug bounty reports are triaged and validated by members of the security team along with some initial support from HackerOne. Once triaged, the security issues flow through our vulnerability management program, where unique issues are tracked in a single ticket that can be shared outside the security team. To support a scaling program and company, automation was baked into this process and integrations were implemented with our ticketing system.

In this example of a valid report, a ticket was filed containing all the information the reporter provided to HackerOne. Once a report is acknowledged and a VULN ticket is filed, we pay out the security researcher to ensure they receive the reward in a timely fashion.

Announcing the public launch of Cloudflare's bug bounty program

Each ticket is assigned to an Engineering Owner and Security Owner who share the responsibility for remediating the vulnerability. Early on in the process, a service-level agreement (SLA) and remediation timeline are determined by the severity of the issue. If the bug is determined to be of critical severity, it’s all hands on deck to fix the issue.

After initial assignment and SLA determination, the open tickets are reviewed weekly by both Engineering and Security to ensure that problems are being addressed in line with the SLA.

We’ve been working hard to improve the researcher experience. We’ve seen that immediately paying researchers led to a huge improvement in satisfaction compared to waiting weeks or months for a T-shirt. Likewise, it was even more frustrating for security researchers to work hard on an issue and then find out it was out of scope. To address this we constantly update our scope section as we get more out-of-scope reports. Our policy page is now much clearer. We also have treasure maps for some products pointing at major risk areas, and even put together a test site where researchers can test theories.

Ultimately, the success of our private bug bounty came down to the researchers who put in the effort to look for issues. Cloudflare thanks all 419 researchers who have participated in our bug bounty program so far, with a special shout out to the top 10 researchers in the program:

  • zeroxyele
  • esswhy
  • turla
  • ginkoid
  • albertspedersen
  • ryotak
  • base_64
  • dward84
  • ninetynine
  • albinowax

Here’s how our total bounty amounts grew as we improved our program:

2018 – \$4,500
2019 – \$25,425
2020 – \$78,877
2021 – \$101,075

The current breakdown of bounty awards for primary targets based on issue severity is listed below. (All amounts in USD)

Severity Bounty
Critical $3,000
High $1,000
Medium $500
Low $250

Lesson learned: making it easier for researchers with Cloudflare’s testing sandbox

Because of how our services work, you need to have our products deployed in a test environment in order to explore their capabilities and limitations. And many of those products offer features that are not free to use. So, to make vulnerability research more accessible, we created CumulusFire to showcase Cloudflare features that typically require a paid level of service. We created this site for two reasons: to provide a standardized playground where researchers can test their exploits, and to make it easier for our teams to reproduce them while triaging.

CumulusFire has already helped us address the constant trickle of reports in which researchers would configure their origin server in an obviously insecure way, beyond default or expected settings, and then report that Cloudflare’s WAF does not block an attack. By policy, we will now only consider WAF bypasses a vulnerability if it is reproducible on CumulusFire.

As we expand our public program we will add additional services to the testing playground. Since we love dogfooding our own products, the entire sandbox is built on Cloudflare Workers.

Next steps

Just as we grew our private program, we will continue to evolve our public bug bounty program to provide the best experience for researchers. We aim to add more documentation, testing platforms and a way to interact with our security teams so that researchers can be confident that their submissions represent valid security issues.

Look forward to us sharing more of our learnings as we grow the program.

Announcing the public launch of Cloudflare's bug bounty program

The collective thoughts of the interwebz