Post Syndicated from The History Guy: History Deserves to Be Remembered original https://www.youtube.com/watch?v=MQ5b-LZ6FMI
Comic for 2025.02.09 – Marilyn
Post Syndicated from Explosm.net original https://explosm.net/comics/32726
New Cyanide and Happiness Comic
Sexy Pirate adventures
Post Syndicated from Oglaf! -- Comics. Often dirty. original https://www.oglaf.com/sexypirateadventures/
![]()

Home Assistant Streaming with Simon Says
Post Syndicated from digiblur DIY original https://www.youtube.com/watch?v=Bb16YYGlIdM
Three stable kernel updates
Post Syndicated from corbet original https://lwn.net/Articles/1008641/
The
6.13.2,
6.12.13, and
6.6.76
stable kernels have been released; each contains another set of important
fixes.
Home Assistant 2025 Roundtable with Simon Says, FutureProofHomes, Apollo Automation, Michael Leen
Post Syndicated from digiblur DIY original https://www.youtube.com/watch?v=bUygOzBu8oA
The Napoleon Telegraph
Post Syndicated from The History Guy: History Deserves to Be Remembered original https://www.youtube.com/watch?v=eSnpzCFTDf0
Comic for 2025.02.08 – Out Of Wine
Post Syndicated from Explosm.net original https://explosm.net/comics/out-of-wine
New Cyanide and Happiness Comic
XikeStor SKS7300-4X4T Review A Cheap Managed 8-Port 10GbE Switch
Post Syndicated from Rohit Kumar original https://www.servethehome.com/xikestor-sks7300-4x4t-review-a-cheap-managed-8-port-10gbe-switch/
The XikeStor SKS7300-4X4T seemed like a great cheap managed 8-port 10G switch with four SFP+ and four 10Gbase-T ports
The post XikeStor SKS7300-4X4T Review A Cheap Managed 8-Port 10GbE Switch appeared first on ServeTheHome.
UK Is Ordering Apple to Break Its Own Encryption
Post Syndicated from Bruce Schneier original https://www.schneier.com/blog/archives/2025/02/uk-is-ordering-apple-to-break-its-own-encryption.html
The Washington Post is reporting that the UK government has served Apple with a “technical capability notice” as defined by the 2016 Investigatory Powers Act, requiring it to break the Advanced Data Protection encryption in iCloud for the benefit of law enforcement.
This is a big deal, and something we in the security community have worried was coming for a while now.
The law, known by critics as the Snoopers’ Charter, makes it a criminal offense to reveal that the government has even made such a demand. An Apple spokesman declined to comment.
Apple can appeal the U.K. capability notice to a secret technical panel, which would consider arguments about the expense of the requirement, and to a judge who would weigh whether the request was in proportion to the government’s needs. But the law does not permit Apple to delay complying during an appeal.
In March, when the company was on notice that such a requirement might be coming, it told Parliament: “There is no reason why the U.K. [government] should have the authority to decide for citizens of the world whether they can avail themselves of the proven security benefits that flow from end-to-end encryption.”
Apple is likely to turn the feature off for UK users rather than break it for everyone worldwide. Of course, UK users will be able to spoof their location. But this might not be enough. According to the law, Apple would not be able to offer the feature to anyone who is in the UK at any point: for example, a visitor from the US.
And what happens next? Australia has a law enabling it to ask for the same thing. Will it? Will even more countries follow?
This is madness.
Level Up Your Cooking: Apollo TEMP-1 with Home Assistant
Post Syndicated from digiblur DIY original https://www.youtube.com/watch?v=HhyBVV27sqM
The only B&O ‘Boombox’
Post Syndicated from Techmoan original https://www.youtube.com/watch?v=0_gyA_qfZz0
Седмицата (3–8 февруари)
Post Syndicated from Светла Енчева original https://www.toest.bg/siedmitsata-3-8-fevruari-2/

Какво да ви кажа – ситуацията хич не е розова. Затова започвам ударно с първия епизод от новата рубрика на Елена Телбис „Т.Е. от Е.Т.“, в която тя представя алтернативен и смешен прочит на събитията от седмицата. Като престанете да се смеете, продължаваме със сериозната част. Което значи, че може и да не продължим…
Буквално допреди дни изглеждаше немислимо. Доналд Тръмп, президент на държавата, която до неотдавна беше символ на демократичния свят, предложи САЩ да придобие ивицата Газа и да я превърне в морски курорт. А палестинците, които я обитават, да отидат… все едно къде. Тръмп не уточнява какво ще стане с костите на палестинските жертви, голяма част от които жени и деца. И те ли ще бъдат преместени някъде, или курортистите ще плажуват върху тях? Следващата стъпка може би ще е американският президент да предложи САЩ да купи концлагерите в Аушвиц и Бухенвалд и да ги превърне в увеселителни паркове.
Сарказмът настрана – идеята на Тръмп е призив за етническо прочистване. Ни повече, ни по-малко. След Втората световна война беше умонепостижимо лидер на демократичния свят да призовава към етническо прочистване. Е, вече е умопостижимо. Когнитивният дисонанс може да се разреши, ако престанем да мислим за САЩ като за демократична държава. Поне за няколко години напред.
Най-страшното обаче дори не е самото предложение на Тръмп. А че то вече изглежда легитимно на други представители на демократичния свят. Сериозни анализатори твърдят, че Тръмп всъщност не искал да превръща Газа в нова Ривиера, а изказването му било хитър политически ход. Представете си да отидете на преговори, а в залата да ви очаква гилотина. Преговарящите може и да нямат намерение да режат главата ви, ако не се съгласите с условията им, но вие не знаете това. Е, може и да е хитро, но редно ли е така да се преговаря?
Предложението на Тръмп за Газа е една от многото му идеи в противоречие с международното право, което той не изглежда да зачита вече. Нито зачита Световната здравна организация. Нито Парижкото споразумение за климата. На Международния наказателен съд в Хага наложи санкции с указ. А програмата на САЩ за хуманитарна помощ USAID просто я стопира. Изведнъж светът се оказа без 40% от хуманитарната помощ, отделяна за лечение и предотвратяване на болести, за борба с глада и подкрепа на демократичните ценности. Друг въпрос е защо светът се е оставил в толкова голяма степен да зависи от американската помощ и каква е отговорността на Европа да се стигне дотам.
На войната на Доналд Тръмп с прогреса е посветена и статията на Надежда Цекулова, която разказва как президентската администрация в САЩ изтри десетилетия напредък в медицинската наука. От сайтовете на Центровете за контрол и превенция на заболяванията и на библиотеката на Националния институт по здравеопазване на САЩ е премахнат голям масив от научна информация, свързана не само с трансджендър хората, но и с репродуктивното здраве, ваксините, ХИВ – изобщо, с много неща. Това затруднява изследователи от цял свят, но най-много американците, които имат нужда от определени видове медицинска помощ и профилактика.
На фона на САЩ Европа (все още) успява да запази базово равнище на нормалност. Дори тукашната политика изглежда почти приемлива. Ключовата дума е „почти“. Бойко Борисов се прицели словесно в журналистката Полина Паунова, която не му остана длъжна. После изкара, че не бил разбран – обидата всъщност била комплимент, – и ѝ се извини с половин уста. Проектозаконите на „Възраждане“ за чуждестранните агенти и на ДПС на Пеевски за комисия, разследваща дейността на Фондация „Отворено общество“, не минаха в парламента.
Внесените в Народното събрание мотиви за „разследване“ на „Отворено общество“ притеснително напомнят аргументите против евреите от нацистки пропаганден филм, откъс от който може да се види в „Дом, ужас, Холокост, надежда“. Според bTV най-подходящото време за премиера на документалния филм е… в полунощ. Дали защото така по-малко зрители ще могат да си направят аналогията между нацизма и посланията на „Възраждане“ и Пеевски, или просто защото телевизията не смята темата за значима.
Но пък кипи треска за назначения на „нови хора в беззъби регулатори“, по думите на Емилия Милчева, която е озаглавила тазседмичния си политически анализ „Нова бодра смяна. Всички, навсякъде, наведнъж“. Едни лоялни винтчета от държавната машина се сменят с други, за да възпроизвеждат същата заучена безпомощност, каквато и предишните. А някои се издигат международно. Десислава Атанасова, чието основно качество е лоялността към ГЕРБ, беше пратена да представя България във Венецианската комисия. В същото време никой не се е загрижил да бори корупцията, а идеята за правосъдна реформа като че остана в миналото.
Като говорим за българския политически живот, дразните ли се, когато политици и журналисти казват „в пленарна зала“, „в Народно събрание“ или „в Министерски съвет“, а не „в пленарната зала“, „в Народното събрание“ и „в Министерския съвет“? Аз, признавам си, се дразня. Но в новата си „порция език“ Павлина Върбанова ни връща чак до романа на Маркес „Сто години самота“, за да ни помогне да разберем на какво се дължи този феномен. И да ни обърне внимание, че всъщност изрази като „на училище“ или „на работа“ не ни правят впечатление, а логиката им е същата, каквато на „в пленарна зала“.
Насред безрадостната реалност е по-уютно да продължаваме да си говорим за думи и за книги. В рубриката „По буквите“ Зорница Христова ни обръща внимание върху две книги. Първата е „Приказки от сърцето на града“ от Шон Тан в превод на Нева Мичева. В нея човешкото същество е представено като смътно, но неудържимо самотно и криещо самотата от себе си. Втората книга е „Нокомис“ от Катерина Стойкова. В нея се проследява ефимерността на връзката между учител и ученик, водач и последовател. Фактът, че връзката не е любовна, не я лишава от емоционална дълбочина.
Стефан Иванов пък ни връща към романа на Селма Лагерльоф „Коларят на Смъртта“, преведен от Меглена Боденска. Публикуван още през 1912 г., повече от век по-късно той продължава да резонира и се нарежда сред литературните произведения, които не само разказват история, а превръщат читателя в свой съучастник. Книгата черпи вдъхновение от биографията на авторката и от нейния интерес към социалните проблеми, алкохолизма на баща ѝ и смъртта на сестра ѝ. И представя смъртта не като трагедия, а като бюрократична институция.
Не мога да се меря с професионализма, с който авторите на рубриките „По буквите“ и „На второ четене“ пишат за книги, но понякога и аз се изкушавам да разкажа за произведение, което ме е впечатлило. В бюлетина на „Тоест“ бях споменала за първата книга на Анета Василева „Kicked a Building Lately?* Архитектурна критика след дигиталната революция“, но не се сдържах да предложа по-подробен критически прочит.
Разговорът за архитектурата ни връща към реалността. Но светът е тръгнал в такава посока, че по-добре да погледнем към Космоса (въпреки че дясната ръка на Тръмп – Илон Мъск, има шансове да го покори преди нас). Анастасия Орманджиева ни разказва за близнаците от NASA и ключа към живота ни в Космоса. Как влияе на човека космическата околна среда при дълги полети? Еднояйчните близнаци Скот и Марк Кели са избрани да допринесат за отговора на този въпрос. Скот е пребивавал в Международната космическа станция цяла година, а брат му е останал на земята. Целта е била да се види какво се е променило в тялото на единия, но не и в това на другия.
Дойде време да ви препоръчам нещо. Продължавам космическата тема, защото, като гледам накъде върви светът, се сещам за „Пътеводител на галактическия стопаджия“ на Дъглас Адамс. Къщата на главния герой беше предназначена за бутане, за да се построи на нейно място магистрала. После се оказа, че цялата планета Земя е предвидена за унищожение, за да се построи на нейно място космическа магистрала. Днес Дъглас Адамс ми се вижда особено актуален. Само да си взема хавлията и отивам да потърся някоя друга галактика. Чао, ако не ме видите пак в „Тоест“, знаете къде съм.
Междувременно, ако за вас е важно да има независими медии, имайте предвид, че „Тоест“ съществува благодарение на даренията от своите читатели.
Tupavco 4 Outlet 10in Rack Power Strip Mini Review
Post Syndicated from E Lopez original https://www.servethehome.com/tupavco-4-outlet-10in-rack-power-strip-mini-review/
We take a look at the Tupavco 4 outlet power strip for 10 inch rack applications since it has become quite popular online
The post Tupavco 4 Outlet 10in Rack Power Strip Mini Review appeared first on ServeTheHome.
Does DeepSeek send your data to China when it’s run locally?
Post Syndicated from Crosstalk Solutions original https://www.youtube.com/watch?v=GsGD8SsBI-U
Egregious Act of Vandalism
Post Syndicated from The History Guy: History Deserves to Be Remembered original https://www.youtube.com/watch?v=S-W-PgDvitQ
Introducing JSONL support with Step Functions Distributed Map
Post Syndicated from Eric Johnson original https://aws.amazon.com/blogs/compute/introducing-jsonl-support-with-step-functions-distributed-map/
This post written by Uma Ramadoss, Principal Specialist SA, Serverless and Vinita Shadangi, Senior Specialist SA, Serverless.
Today, AWS Step Functions is expanding the capabilities of Distributed Map by adding support for JSON Lines (JSONL) format. JSONL, a highly efficient text-based format, stores structured data as individual JSON objects separated by newlines, making it particularly suitable for processing large datasets.
This new capability enables you to process large collection of items stored in JSONL format directly through Distribtued Map and optionally exports the output of the Distributed Map as JSONL file. The enhancement also introduces support for additional delimited file formats, including semicolon and tab-delimited files, providing greater flexibility in data source options. Furthermore, new flexible output transformations gives developers more control over result formatting, enabling better integration with downstream processes for efficient data handling.
Overview
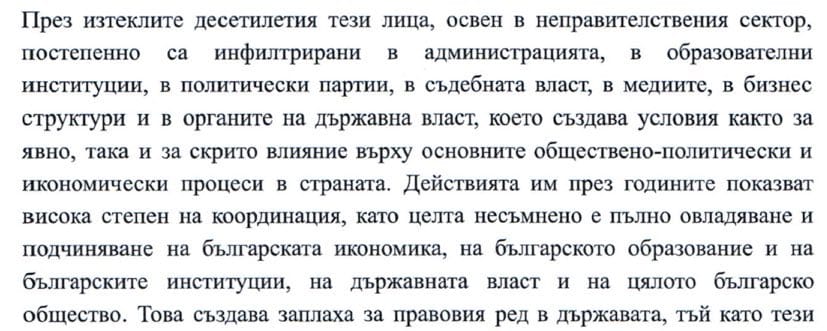
Distributed Map enables parallel processing of large-scale data by concurrently running the same processing steps for millions of entries in a dataset at the maximum scale of 10000. This is particularly useful for use cases like large scale payroll processing, image conversion, document processing and data migrations. Previously, the dataset can come from state input, JSON/CSV files in S3 and collection of S3 objects. With this new feature, the dataset can be a JSONL file in Amazon S3.
The AWS Step Functions workflow
Consider an example of end-to-end GenAI batch inferencing using Amazon Bedrock. Batch inference helps you process a large number of requests efficiently by bundling them as single request and storing the results in an S3 bucket. Since both input and output are handled as JSONL files, the blog uses the scenario as an example to demonstrate the new capabilities of Distributed Map.
The diagram below shows the end-to-end flow –
- Step Functions workflow (Batch inference input generation worfklow) uses Distributed Map to build and bundle AI prompts for a collection of product review data. Workflow then invokes the Amazon Bedrock batch inference API.
- Amazon Bedrock stores the results in S3 as JSONL file when the batch inference is completed.
- An S3 object created event invokes the second Step Functions workflow (Batch inference output processing workflow) that processes the JSONL file and loads the results into an Amazon DynamoDB table.

Batch inferencing workflow
Introducing new output transformations through batch inference input generation workflow
The batch inference input generation workflow processes product review data in S3 using Distributed Map. Distributed Map spins multiple child workflows that generate AI prompts for sentiment analysis of each product review and exports the results of the child workflows to S3 as a JSONL file. The workflow calls Amazon Bedrock batch inference API (CreateModelInvocationJob) with the JSONL file as input upon completion of the Distributed Map state. Since the inference API operates asynchronously, the workflow completes immediately after receiving a successful response from the API.

Batch inference input generation workflow
Each child workflow receives a batch of product reviews as an array. It operates on the array using Pass state to create an array of AI prompts, one for each item. The Pass state manipulates the input using JSONata expressions, generates unique recordId using JSONata numeric functions, and outputs the results in a format Amazon Bedrock expects.

JSONata transformation to generate prompts
Once all child workflows are complete, Distributed Map uses the new output transformations to export the outputs from child workflows to S3.
Using the new output transformations to export in JSONL format
Distributed Map now offers more flexible output handling through an optional writer configuration. While it traditionally exports child workflow execution results to three separate JSON files (successful, failed, and pending), the new writer configuration streamlines the output and supports JSONL format in addition to JSON format.
The previous export option included comprehensive execution details – metadata, child workflow inputs, and outputs. The new configuration allows you to streamline output to include only the child workflow execution results, which are valuable for map/reduce patterns, where the output from one Distributed Map needs to feed directly into another without the need for additional transformation steps.

Output writer config for JSONL
Writer config also allows you to flatten the output array. When a child workflow processes batches of the input, it produces an array of results which will eventually become an array of arrays when the Distributed Map aggregates the outputs from all child workflows. With the new output transformation called FLATTEN, you can choose to flatten the array without additional code.

Flattening output in JSONL
Introducing the new ItemReader for JSONL using batch inference output processing workflow
The second workflow processes output of the batch inference job by launching multiple child workflows using Distributed Map. Each child workflow processes batches of items, examining them for error objects and separating successful inferences from errors. The workflow then loads all successful inferences into a DynamoDB table while sending errors to a dead letter queue for subsequent analysis.

Processing inference results
Using the new InputType to read the JSONL inference results
The Distributed Map in the batch inference results processing workflow uses the newly supported ItemReader-InputType, JSONL. Previously, the InputType only accepted CSV, JSON, and MANIFEST, which is an S3 Inventory manifest file.

Reading JSONL file
There is no other change to how Distributed Map processes and shares data with child workflows. The Pass state in the child workflow receives batches of Items from the Map, and uses JSONata expressions to separate the errors from successful items.

Separating successful processing from errors
The following shows the input received by the Pass state and the output generated by the state using the above JSONata expression.

Sample successful processing records
Using S3 events as connective tissue between the workflows
When Amazon Bedrock completes the batch inference job, it stores the output in the S3 location specified in the API request. An EventBridge rule triggers the batch inference results processing workflow using S3 event notifications. The rule looks for “Object Created” event from the specified S3 bucket and a wildcard pattern for JSONL file extension. When the rule matches the incoming event, it triggers the workflow.

EventBridge rule
You can detect failed batch inference jobs by setting up EventBridge rules that listen to Amazon Bedrock status events. Since failed jobs don’t create output files in S3, monitoring status events directly ensures you catch and handle job failures.
Key considerations
- The new output transformations do not change the information in the FAILED execution results file in order to help you analyze the reasons for failures. To learn more about the output transformation configurations, visit the documentation.
- The new transformation mode FLATTEN, COMPACT stores only the output of the execution results. To inspect the results for fact checking or troubleshooting, use the default transformation.
- As a best practice, when implementing code changes, it’s advised to use the versioning and aliasing feature for gradual deployment of changes to production.
- When using Distributed Map, there is an option to configure the child workflow as either Standard or Express. Express is the recommended choice if each iteration (child workflow) can be completed within 5 minutes, and batching items will help optimize costs. To learn more about optimizations for Distributed Map, visit the workshop.
Conclusion
Step Functions Distributed Map is a powerful feature that enables developers to create large-scale data processing solutions with ease, eliminating concerns about operational aspects and software challenges like batching, concurrency, and failure handling. The addition of JSONL support for both input and output expands workload capabilities and minimizes additional effort through transformations by natively deserializing and flattening the output. This blog demonstrated the new feature’s capabilities through a practical example of building large-scale data processing applications using Distributed Map.
For more information on Distributed Map and how to use it with JSONL files, refer to the user guide.
To explore generative AI samples with Step Functions, visit the the GitiHub repo.
To expand your serverless knowledge, visit Serverless Land.
Friday Squid Blogging: The Colossal Squid
Post Syndicated from Bruce Schneier original https://www.schneier.com/blog/archives/2025/02/friday-squid-blogging-the-colossal-squid.html
Long article on the colossal squid.
Use DeepSeek with Amazon OpenSearch Service vector databases and Amazon SageMaker
Post Syndicated from Jon Handler original https://aws.amazon.com/blogs/big-data/use-deepseek-with-amazon-opensearch-service-vector-databases-and-amazon-sagemaker/
DeepSeek-R1 is a powerful and cost-effective AI model that excels at complex reasoning tasks. When combined with Amazon OpenSearch Service, it enables robust Retrieval Augmented Generation (RAG) applications. This post shows you how to set up RAG using DeepSeek-R1 on Amazon SageMaker with an OpenSearch Service vector database as the knowledge base. This example provides a solution for enterprises looking to enhance their AI capabilities.
OpenSearch Service provides rich capabilities for RAG use cases, as well as vector embedding-powered semantic search. You can use the flexible connector framework and search flow pipelines in OpenSearch to connect to models hosted by DeepSeek, Cohere, and OpenAI, as well as models hosted on Amazon Bedrock and SageMaker. In this post, we build a connection to DeepSeek’s text generation model, supporting a RAG workflow to generate text responses to user queries.
Solution overview
The following diagram illustrates the solution architecture.

In this walkthrough, you will use a set of scripts to create the preceding architecture and data flow. First, you will create an OpenSearch Service domain, and deploy DeepSeek-R1 to SageMaker. You will execute scripts to create an AWS Identity and Access Management (IAM) role for invoking SageMaker, and a role for your user to create a connector to SageMaker. You will create an OpenSearch connector and model that will enable the retrieval_augmented_generation processor within OpenSearch to execute a user query, perform a search, and use DeepSeek to generate a text response. You will create a connector to SageMaker with Amazon Titan Text Embeddings V2 to create embeddings for a set of documents with population statistics. Finally, you will execute the query to compare population growth in Miami and New York City.
Prerequisites
We’ve created and open-sourced a GitHub repo with all the code you need to follow along with the post and deploy it for yourself. You will need the following prerequisites:
- Git – Clone the repo at https://github.com/Jon-AtAWS/opensearch-examples.git.
- Python – The code has been tested with Python version 3.13.
- An AWS account – You will need to be able to create an OpenSearch Service domain and two SageMaker endpoints.
- An integrated development environment (IDE) – An IDE like Visual Studio Code is helpful, although it’s not strictly necessary.
- AWS CLI – Make sure to configure the AWS Command Line Interface (AWS CLI) with the account you plan to use. Alternately, you can follow the Boto 3 documentation to make sure you use the right credentials.
Deploy DeepSeek on Amazon SageMaker
You will need to have or deploy DeepSeek with an Amazon SageMaker endpoint. To learn more about deploying DeepSeek-R1 on SageMaker, refer to Deploying DeepSeek-R1 Distill Model on AWS using Amazon SageMaker AI.
Create an OpenSearch Service domain
Refer to Create an Amazon OpenSearch Service domain for instructions on how to create your domain. Make note of the domain Amazon Resource Name (ARN) and domain endpoint, both of which can be found in the General information section of each domain on the OpenSearch Service console.
Download and prepare the code
Run the following steps from your local computer or workspace that has Python and git:
- If you haven’t already, clone the repo into a local folder using the following command:
- Create a Python virtual environment:
The example scripts use environment variables for setting some common parameters. Set these up now using the following commands. Be sure to update with your AWS Region, your SageMaker endpoint ARN and URL, your OpenSearch Service domain’s endpoint and ARN, and your domain’s primary user and password.
You now have the code base and have your virtual environment set up. You can examine the contents of the opensearch-deepseek-rag directory. For clarity of purpose and reading, we’ve encapsulated each of seven steps in its own Python script. This post will guide you through running these scripts. We’ve also chosen to use environment variables to pass parameters between scripts. In an actual solution, you would encapsulate the code in classes and pass the values where needed. Coding this way is clearer, but is less efficient and doesn’t follow coding best practices. Use these scripts as examples to pull from.
First, you will set up permissions for your OpenSearch Service domain to connect to your SageMaker endpoint.
Set up permissions
You will create two IAM roles. The first will allow OpenSearch to call your SageMaker endpoint. The second will allow you to make the create connector API call to OpenSearch.
- Examine the code in create_invoke_role.py.
- Return to the command line, and execute the script:
- Execute the command line from the script’s output to set the INVOKE_DEEPSEEK_ROLE environment variable.
You have created a role named invoke_deepseek_role, with a trust relationship for OpenSearch Service to assume the role, and with a permission policy that allows OpenSearch Service to invoke your SageMaker endpoint. The script outputs the ARNs for your role and policy and additionally a command line command to add the role to your environment. Execute that command before running the next script. Make a note of the role ARN in case you need to return at a later time.
Now you need to create a role for your user to be able to create a connector in OpenSearch Service.
- Examine the code in create_connector_role.py.
- Return to the command line and execute the script:
- Execute the command line from the script’s output to set the CREATE_DEEPSEEK_CONNECTOR_ROLE environment variable.
You have created a role named create_deepseek_connector_role, with a trust relationship with the current user and permissions to write to OpenSearch Service. You need these permissions to call the OpenSearch create_connector API, which packages a connection to a remote model host, DeepSeek in this case. The script prints the policy’s and role’s ARNs, and additionally a command line command to add the role to your environment. Execute that command before running the next script. Again, make note of the role ARN, just in case.
Now that you have your roles created, you will tell OpenSearch about them. The fine-grained access control feature includes an OpenSearch role, ml_full_access, that will allow authenticated entities to execute API calls within OpenSearch.
- Examine the code in setup_opensearch_security.py.
- Return to the command line and execute the script:
You set up the OpenSearch Service security plugin to recognize two AWS roles: invoke_create_connector_role and LambdaInvokeOpenSearchMLCommonsRole. You will use the second role later, when you connect with an embedding model and load data into OpenSearch to use as a RAG knowledge base. Now that you have permissions in place, you can create the connector.
Create the connector
You create a connector with configuration that tells OpenSearch how to connect, provides credentials for the target model host, and provides prompt details. For more information, see Creating connectors for third-party ML platforms.
- Examine the code in create_connector.py.
- Return to the command line and execute the script:
- Execute the command line from the script’s output to set the DEEPSEEK_CONNECTOR_ID environment variable.
The script will create the connector to call the SageMaker endpoint and return the connector ID. The connector is an OpenSearch construct that tells OpenSearch how to connect to an external model host. You don’t use it directly; you create an OpenSearch model for that.
Create an OpenSearch model
When you work with machine learning (ML) models, in OpenSearch, you use OpenSearch’s ml-commons plugin to create a model. ML models are an OpenSearch abstraction that let you perform ML tasks like sending text for embeddings during indexing, or calling out to a large language model (LLM) to generate text in a search pipeline. The model interface provides you with a model ID in a model group that you then use in your ingest pipelines and search pipelines.
- Examine the code in create_deepseek_model.py.
- Return to the command line and execute the script:
- Execute the command line from the script’s output to set the DEEPSEEK_MODEL_ID environment variable.
You created an OpenSearch ML model group and model that you can use to create ingest and search pipelines. The _register API places the model in the model group and references your SageMaker endpoint through the connector (connector_id) you created.
Verify your setup
You can run a query to verify your setup and make sure that you can connect to DeepSeek on SageMaker and receive generated text. Complete the following steps:
- On the OpenSearch Service console, choose Dashboard under Managed clusters in the navigation pane.
- Choose your domain’s dashboard.

- Choose the OpenSearch Dashboards URL (dual stack) link to open OpenSearch Dashboards.
- Log in to OpenSearch Dashboards with your primary user name and password.
- Dismiss the welcome dialog by choosing Explore on my own.
- Dismiss the new look and feel dialog.
- Confirm the global tenant in the Select your tenant dialog.
- Navigate to the Dev Tools tab.
- Dismiss the welcome dialog.
You can also get to Dev Tools by expanding the navigation menu (three lines) to reveal the navigation pane, and scrolling down to Dev Tools.

The Dev Tools page provides a left pane where you enter REST API calls. You execute the commands and the right pane shows the output of the command. Enter the following command in the left pane, replace your_model_id with the model ID you created, and run the command by placing the cursor anywhere in the command and choosing the run icon.
You should see output like the following screenshot.

Congratulations! You’ve now created and deployed an ML model that can use the connector you created to call to your SageMaker endpoint, and use DeepSeek to generate text. Next, you will use your model in an OpenSearch search pipeline to automate a RAG workflow.
Set up a RAG workflow
RAG is a way of adding information to the prompt so that the LLM generating the response is more accurate. An overall generative application like a chatbot orchestrates a call to external knowledge bases and augments the prompt with knowledge from those sources. We’ve created a small knowledge base comprising population information.
OpenSearch provides search pipelines, which are sets of OpenSearch search processors that are applied to the search request sequentially to build a final result. OpenSearch has processors for hybrid search, reranking, and RAG, among others. You define your processor and then send your queries to the pipeline. OpenSearch responds with the final result.
When you build a RAG application, you choose a knowledge base and a retrieval mechanism. In most cases, you will use an OpenSearch Service vector database as a knowledge base, performing a k-nearest neighbor (k-NN) search to incorporate semantic information in the retrieval with vector embeddings. OpenSearch Service provides integrations with vector embedding models hosted in Amazon Bedrock and SageMaker (among other options).
Make sure that your domain is running OpenSearch 2.9 or later, and that fine-grained access control is enabled for the domain. Then complete the following steps:
- On the OpenSearch Service console, choose Integrations in the navigation pane.
- Choose Configure domain under Integration with text embedding models through Amazon SageMaker.

- Choose Configure public domain.
- If you created a virtual private cloud (VPC) domain instead, choose Configure VPC domain.
You will be redirected to the AWS CloudFormation console.
- For Amazon OpenSearch Endpoint, enter your endpoint.
- Leave everything else as default values.
The CloudFormation stack requires a role to create a connector to the all-MiniLM-L6-v2 model, hosted on SageMaker, called LambdaInvokeOpenSearchMLCommonsRole. You enabled access for this role when you ran setup_opensearch_security.py. If you changed the name in that script, be sure to change it in the Lambda Invoke OpenSearch ML Commons Role Name field.
- Select I acknowledge that AWS CloudFormation might create IAM resources with custom names, and choose Create stack.
For simplicity, we’ve elected to use the open source all-MiniLM-L6-v2 model, hosted on SageMaker for embedding generation. To achieve high search quality for production workloads, you should fine-tune lightweight models like all-MiniLM-L6-v2, or use OpenSearch Service integrations with models such as Cohere Embed V3 on Amazon Bedrock or Amazon Titan Text Embedding V2, which are designed to deliver high out-of-the-box quality.
Wait for CloudFormation to deploy your stack and the status to change to Create_Complete.
- Choose the stack’s Outputs tab on the CloudFormation console and copy the value for ModelID.

You will use this model ID to connect with your embedding model.
- Examine the code in load_data.py.
- Return to the command line and set an environment variable with the model ID of the embedding model:
- Execute the script to load data into your domain:
The script creates the population_data index and an OpenSearch ingest pipeline that calls SageMaker using the connector referenced by the embedding model ID. The ingest pipeline’s field mapping tells OpenSearch the source and destination fields for each document’s embedding.
Now that you have your knowledge base prepared, you can run a RAG query.
- Examine the code in run_rag.py.
- Return to the command line and execute the script:
The script creates a search pipeline with an OpenSearch retrieval_augmented_generation processor. The processor automates running an OpenSearch k-NN query to retrieve relevant information and adding that information to the prompt. It uses the generation_model_id and connector to the DeepSeek model on SageMaker to generate a text response for the user’s question. The OpenSearch neural query (line 55 of run_rag.py) takes care of generating the embedding for the k-NN query using the embedding_model_id. In the ext section of the query, you provide the user’s question for the LLM. The llm_model is set to bedrock/claude because the parameterization and actions are the same as they are for DeepSeek. You’re still using DeepSeek to generate text.
Examine the output from OpenSearch Service. The user asked the question “What’s the population increase of New York City from 2021 to 2023? How is the trending comparing with Miami?” The first portion of the result shows the hits—documents OpenSearch retrieved from the semantic query—as the population statistics for New York City and Miami. The next section of the response includes the prompt, as well as DeepSeek’s answer.
Congratulations! You’ve connected to an embedding model, created a knowledge base, and used that knowledge base, along with DeepSeek, to generate a text response to a question on population changes in New York City and Miami. You can adapt the code from this post to create your own knowledge base and run your own queries.
Clean up
To avoid incurring additional charges, clean up the resources you deployed:
- Delete the SageMaker deployment of DeepSeek. For instructions, see Cleaning Up.
- If your Jupyter notebook has lost context, you can delete the endpoint:
- On the SageMaker console, under Inference in the navigation pane, choose Endpoints.
- Select your endpoint and choose Delete.
- Delete the CloudFormation template for connecting to SageMaker for the embedding model.
- Delete the OpenSearch Service domain you created.
Conclusion
The OpenSearch connector framework is a flexible way for you to access models you host on other platforms. In this example, you connected to the open source DeepSeek model that you deployed on SageMaker. DeepSeek’s reasoning capabilities, augmented with a knowledge base in the OpenSearch Service vector engine, enabled it to answer a question comparing population growth in New York and Miami.
Find out more about AI/ML capabilities of OpenSearch Service, and let us know how you are using DeepSeek and other generative models to build!
About the Authors
 Jon Handler is the Director of Solutions Architecture for Search Services at Amazon Web Services, based in Palo Alto, CA. Jon works closely with OpenSearch and Amazon OpenSearch Service, providing help and guidance to a broad range of customers who have search and log analytics workloads for OpenSearch. Prior to joining AWS, Jon’s career as a software developer included four years of coding a large-scale, eCommerce search engine. Jon holds a Bachelor of the Arts from the University of Pennsylvania, and a Master of Science and a Ph. D. in Computer Science and Artificial Intelligence from Northwestern University.
 Yaliang Wu is a Software Engineering Manager at AWS, focusing on OpenSearch projects, machine learning, and generative AI applications.
Resolving a Mutual TLS session resumption vulnerability
Post Syndicated from Matt Bullock original https://blog.cloudflare.com/resolving-a-mutual-tls-session-resumption-vulnerability/
On January 23, 2025, Cloudflare was notified via its Bug Bounty Program of a vulnerability in Cloudflare’s Mutual TLS (mTLS) implementation.
The vulnerability affected customers who were using mTLS and involved a flaw in our session resumption handling. Cloudflare’s investigation revealed no evidence that the vulnerability was being actively exploited. And tracked as CVE-2025-23419, Cloudflare mitigated the vulnerability within 32 hours after being notified. Customers who were using Cloudflare’s API shield in conjunction with WAF custom rules that validated the issuer’s Subject Key Identifier (SKI) were not vulnerable. Access policies such as identity verification, IP address restrictions, and device posture assessments were also not vulnerable.
The bug bounty report detailed that a client with a valid mTLS certificate for one Cloudflare zone could use the same certificate to resume a TLS session with another Cloudflare zone using mTLS, without having to authenticate the certificate with the second zone.
Cloudflare customers can implement mTLS through Cloudflare API Shield with Custom Firewall Rules and the Cloudflare Zero Trust product suite. Cloudflare establishes the TLS session with the client and forwards the client certificate to Cloudflare’s Firewall or Zero Trust products, where customer policies are enforced.
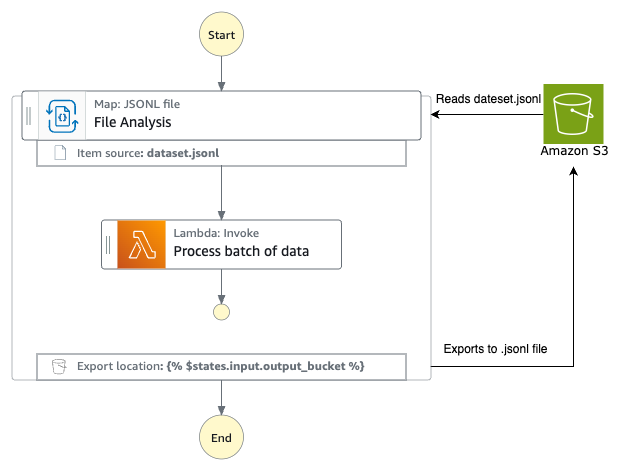
mTLS operates by extending the standard TLS handshake to require authentication from both sides of a connection – the client and the server. In a typical TLS session, a client connects to a server, which presents its TLS certificate. The client verifies the certificate, and upon successful validation, an encrypted session is established. However, with mTLS, the client also presents its own TLS certificate, which the server verifies before the connection is fully established. Only if both certificates are validated does the session proceed, ensuring bidirectional trust.
mTLS is useful for securing API communications, as it ensures that only legitimate and authenticated clients can interact with backend services. Unlike traditional authentication mechanisms that rely on credentials or tokens, mTLS requires possession of a valid certificate and its corresponding private key.
To improve TLS connection performance, Cloudflare employs session resumption. Session resumption speeds up the handshake process, reducing both latency and resource consumption. The core idea is that once a client and server have successfully completed a TLS handshake, future handshakes should be streamlined — assuming that fundamental parameters such as the cipher suite or TLS version remain unchanged.
There are two primary mechanisms for session resumption: session IDs and session tickets. With session IDs, the server stores the session context and associates it with a unique session ID. When a client reconnects and presents this session ID in its ClientHello message, the server checks its cache. If the session is still valid, the handshake is resumed using the cached state.
Session tickets function in a stateless manner. Instead of storing session data, the server encrypts the session context and sends it to the client as a session ticket. In future connections, the client includes this ticket in its ClientHello, which the server can then decrypt to restore the session, eliminating the need for the server to maintain session state.
A resumed mTLS session leverages previously established trust, allowing clients to reconnect to a protected application without needing to re-initiate an mTLS handshake.
In Cloudflare’s mTLS implementation, however, session resumption introduced an unintended behavior. BoringSSL, the TLS library that Cloudflare uses, will store the client certificate from the originating, full TLS handshake in the session. Upon resuming that session, the client certificate is not revalidated against the full chain of trust, and the original handshake’s verification status is respected. To avoid this situation, BoringSSL provides an API to partition session caches/tickets between different “contexts” defined by the application. Unfortunately, Cloudflare’s use of this API was not correct, which allowed TLS sessions to be resumed when they shouldn’t have been.
To exploit this vulnerability, the security researcher first set up two zones on Cloudflare and configured them behind Cloudflare’s proxy with mTLS enabled. Once their domains were configured, the researcher authenticated to the first zone using a valid client certificate, allowing Cloudflare to issue a TLS session ticket against that zone.
The researcher then changed the TLS Server Name Indication (SNI) and HTTP Host header from the first zone (which they had authenticated with) to target the second zone (which they had not authenticated with). The researcher then presented the session ticket when handshaking with the second Cloudflare-protected mTLS zone. This resulted in Cloudflare resuming the session with the second zone and reporting verification status for the cached client certificate as successful,bypassing the mTLS authentication that would normally be required to initiate a session.
If you were using additional validation methods in your API Shield or Access policies – for example, checking the issuers SKI, identity verification, IP address restrictions, or device posture assessments – these controls continued to function as intended. However, due to the issue with TLS session resumption, the mTLS checks mistakenly returned a passing result without re-evaluating the full certificate chain.
We have disabled TLS session resumption for all customers that have mTLS enabled. As a result, Cloudflare will no longer allow resuming sessions that cache client certificates and their verification status.
We are exploring ways to bring back the performance improvements from TLS session resumption for mTLS customers.
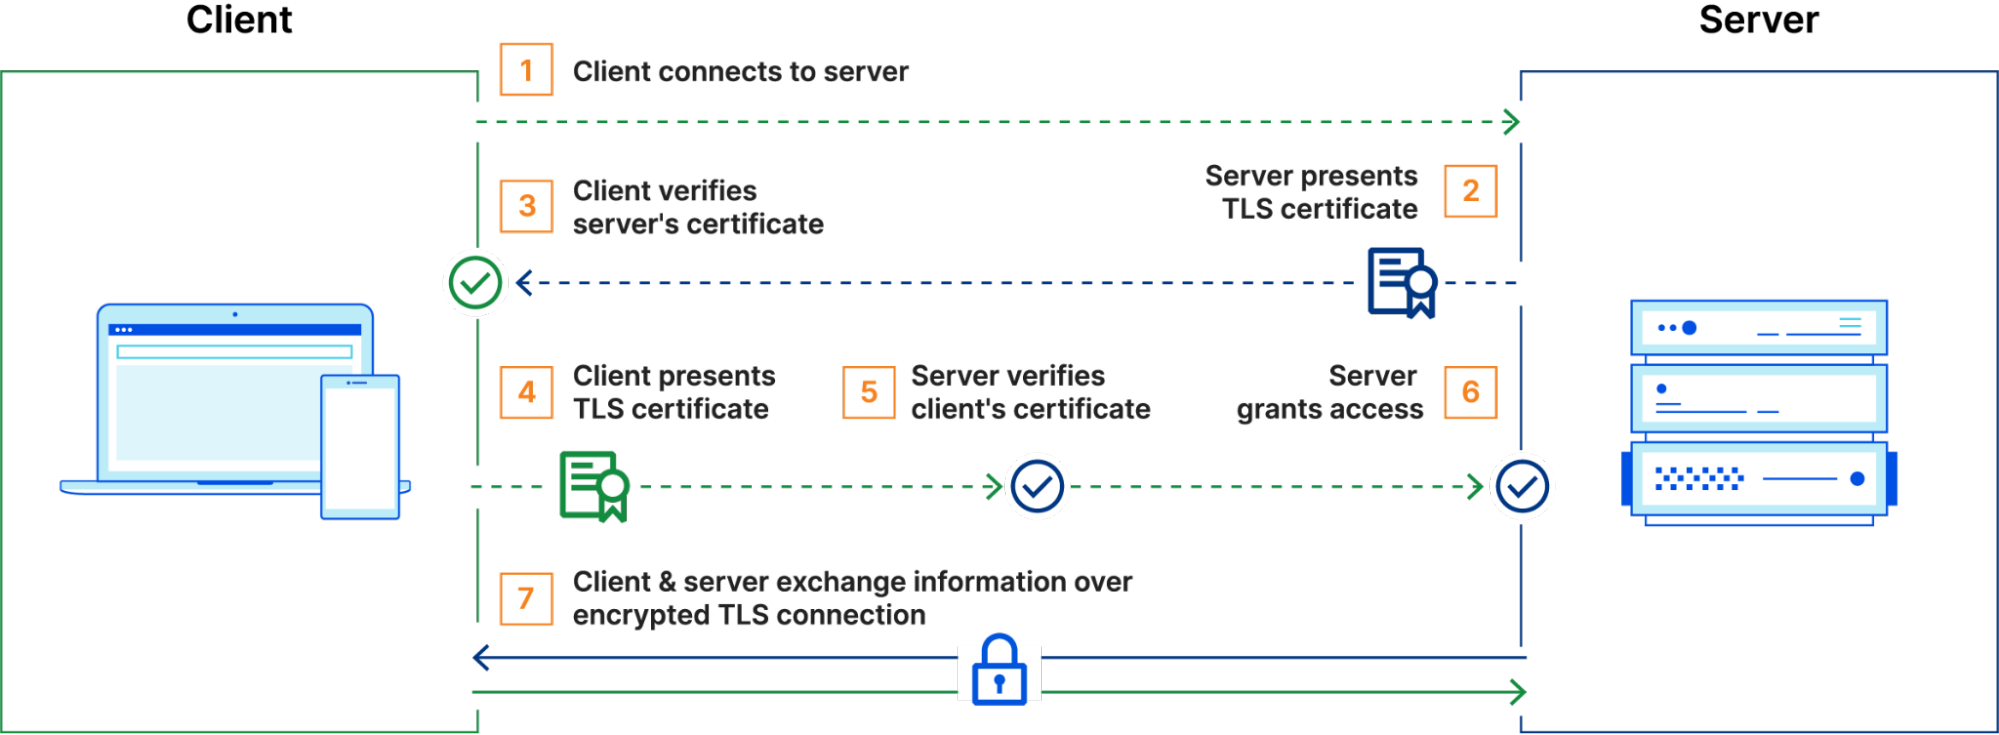
Customers can further harden their mTLS configuration and add enhanced logging to detect future issues by using Cloudflare’s Transform Rules, logging, and firewall features.
While Cloudflare has mitigated the issue by disabling session resumption for mTLS connections, customers may want to implement additional monitoring at their origin to enforce stricter authentication policies. All customers using mTLS can also enable additional request headers using our Managed Transforms product. Enabling this feature allows us to pass additional metadata to your origin with the details of the client certificate that was used for the connection.
Enabling this feature allows you to see the following headers where mTLS is being utilized on a request.
{
  "headers": {
    "Cf-Cert-Issuer-Dn": "CN=Taskstar Root CA,OU=Taskstar\\, Inc.,L=London,ST=London,C=UK",
    "Cf-Cert-Issuer-Dn-Legacy": "/C=UK/ST=London/L=London/OU=Taskstar, Inc./CN=Taskstar Root CA",
    "Cf-Cert-Issuer-Dn-Rfc2253": "CN=Taskstar Root CA,OU=Taskstar\\, Inc.,L=London,ST=London,C=UK",
    "Cf-Cert-Issuer-Serial": "7AB07CC0D10C38A1B554C728F230C7AF0FF12345",
    "Cf-Cert-Issuer-Ski": "A5AC554235DBA6D963B9CDE0185CFAD6E3F55E8F",
    "Cf-Cert-Not-After": "Jul 29 10:26:00 2025 GMT",
    "Cf-Cert-Not-Before": "Jul 29 10:26:00 2024 GMT",
    "Cf-Cert-Presented": "true",
    "Cf-Cert-Revoked": "false",
    "Cf-Cert-Serial": "0A62670673BFBB5C9CA8EB686FA578FA111111B1B",
    "Cf-Cert-Sha1": "64baa4691c061cd7a43b24bccb25545bf28f1111",
    "Cf-Cert-Sha256": "528a65ce428287e91077e4a79ed788015b598deedd53f17099c313e6dfbc87ea",
    "Cf-Cert-Ski": "8249CDB4EE69BEF35B80DA3448CB074B993A12A3",
    "Cf-Cert-Subject-Dn": "CN=MB,OU=Taskstar Admins,O=Taskstar,L=London,ST=Essex,C=UK",
    "Cf-Cert-Subject-Dn-Legacy": "/C=UK/ST=Essex/L=London/O=Taskstar/OU=Taskstar Admins/CN=MB ",
    "Cf-Cert-Subject-Dn-Rfc2253": "CN=MB,OU=Taskstar Admins,O=Taskstar,L=London,ST=London,C=UK",
    "Cf-Cert-Verified": "true",
    "Cf-Client-Cert-Sha256": "083129c545d7311cd5c7a26aabe3b0fc76818495595cea92efe111150fd2da2",
    }
}
Enterprise customers can also use our Cloudflare Log products to add these headers via the Logs Custom Fields feature. For example:
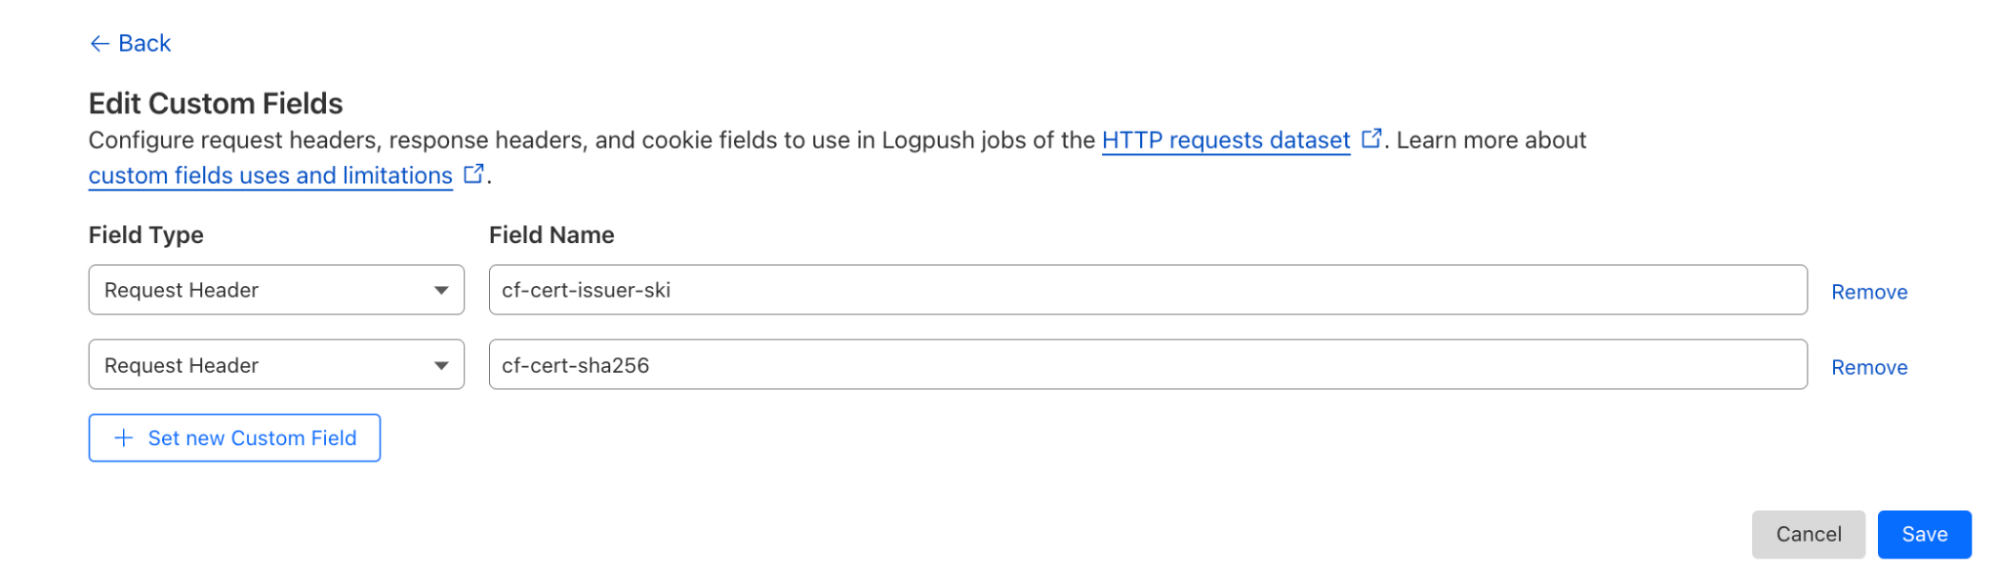
This will add the following information to Cloudflare Logs.
"RequestHeaders": {
    "cf-cert-issuer-ski": "A5AC554235DBA6D963B9CDE0185CFAD6E3F55E8F",
    "cf-cert-sha256": "528a65ce428287e91077e4a79ed788015b598deedd53f17099c313e6dfbc87ea"
  },
Customers already logging this information — either at their origin or via Cloudflare Logs — can retroactively check for unexpected certificate hashes or issuers that did not trigger any security policy.
Users are also able to use this information within their WAF custom rules to conduct additional checks. For example, checking the Issuer’s SKI can provide an extra layer of security.
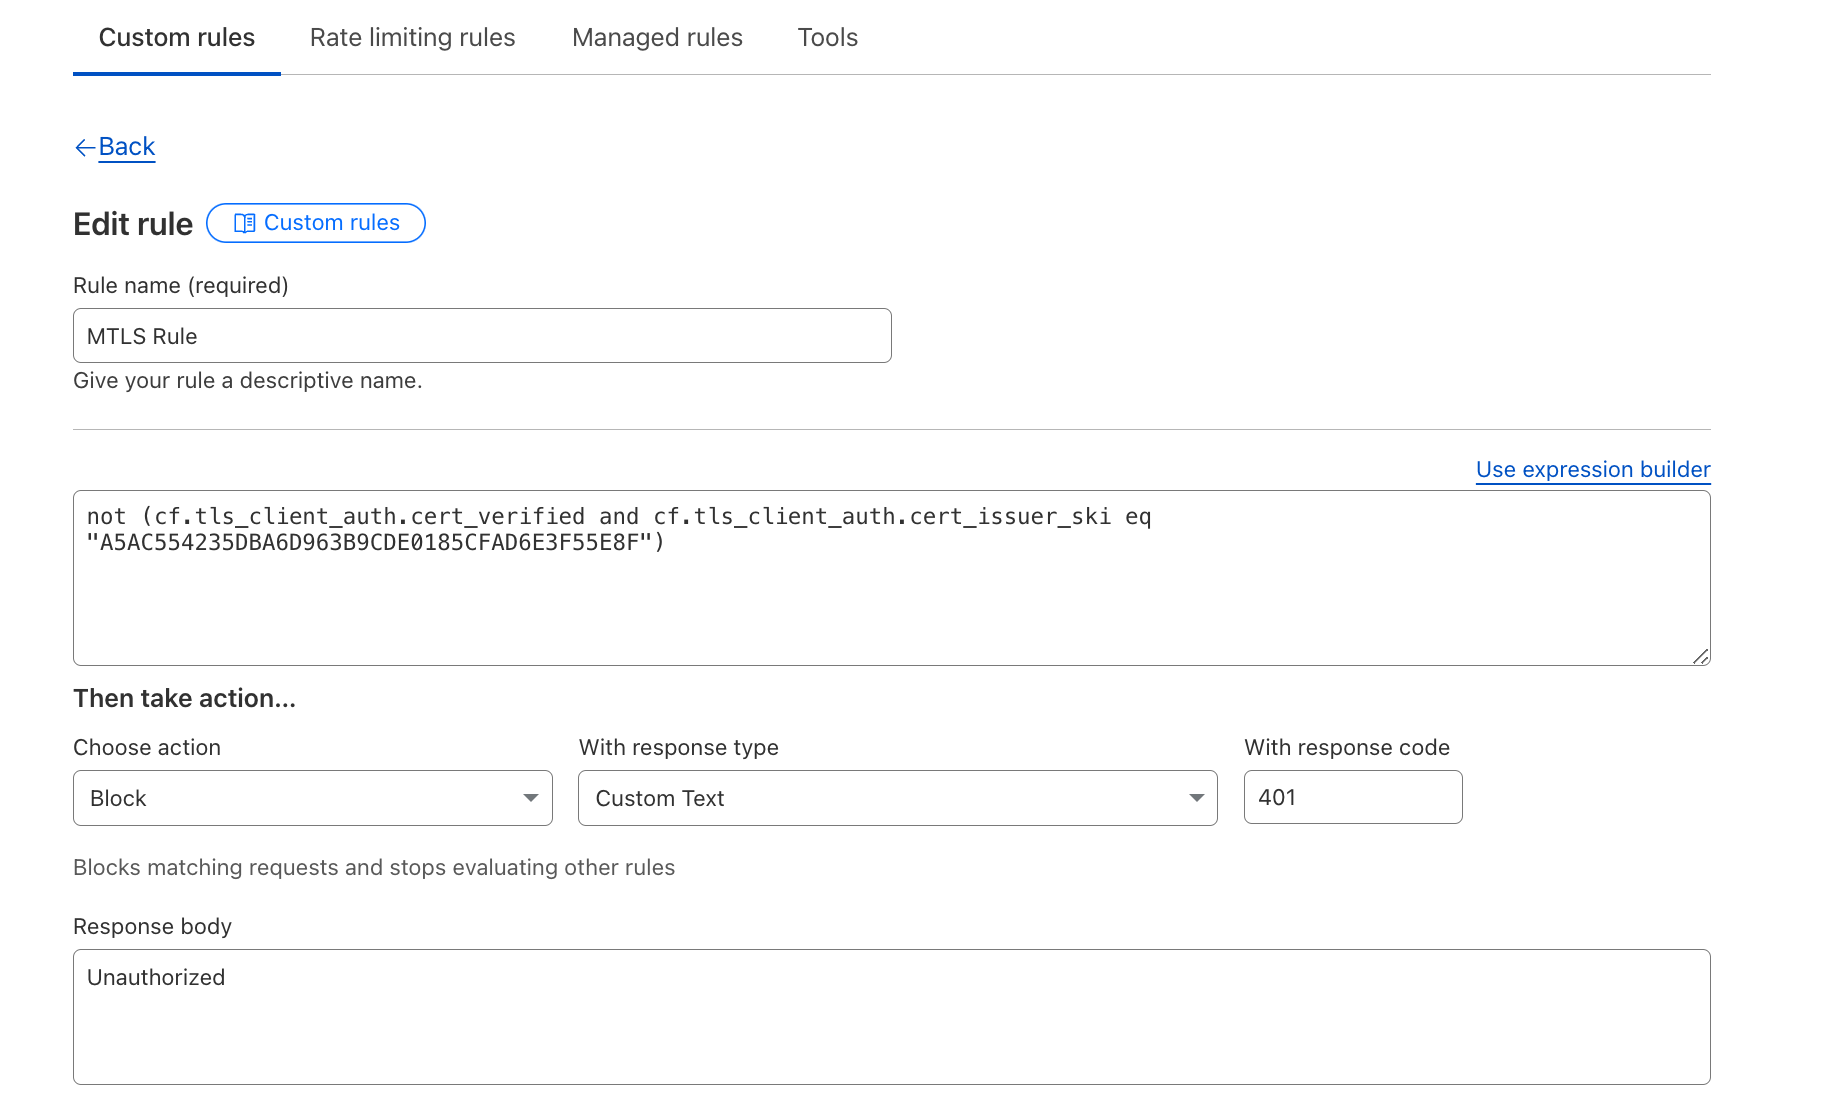
Customers who enabled this additional check were not vulnerable.
We sincerely thank the security researcher who responsibly disclosed this issue via our HackerOne Bug Bounty Program, allowing us to identify and mitigate the vulnerability. We welcome further submissions from our community of researchers to continually improve our products’ security.
Finally, we want to apologize to our mTLS customers. Security is at the core of everything we do at Cloudflare, and we deeply regret any concerns this issue may have caused. We have taken immediate steps to resolve the vulnerability and have implemented additional safeguards to prevent similar issues in the future.
All timestamps are in UTC
-
2025-01-23 15:40 – Cloudflare is notified of a vulnerability in Mutual TLS and the use of session resumption.
-
2025-01-23 16:02 to 21:06 – Cloudflare validates Mutual TLS vulnerability and prepares a release to disable session resumption for Mutual TLS.
-
2025-01-23 21:26 – Cloudflare begins rollout of remediation.
-
2025-01-24 20:15 – Rollout completed. Vulnerability is remediated.