Post Syndicated from LastWeekTonight original https://www.youtube.com/watch?v=s9FsxWK0f1A
Kernel prepatch 6.18-rc2
Post Syndicated from corbet original https://lwn.net/Articles/1042593/
The 6.18-rc2 kernel prepatch is out.
End result: rc2 is on the bigger side, and we still have some of
the remaining regressions outstanding, but we should be making slow
progress. It’s fairly early days yet, so I’m not very
worried. Things on the whole look fairly normal.
Comic for 2025.10.20 – No Pants
Post Syndicated from Explosm.net original https://explosm.net/comics/no-pants
New Cyanide and Happiness Comic
Emperor Palpatine
Post Syndicated from xkcd.com original https://xkcd.com/3157/

Bari Weiss, Billionaires & CBS #lastweektonight
Post Syndicated from LastWeekTonight original https://www.youtube.com/shorts/-xIQxzlXN-0
HACS Update Overload! The Risks of Home Assistant Custom Repositories #shorts
Post Syndicated from BeardedTinker original https://www.youtube.com/shorts/m3Ipp2hUWQE
Sunday stable kernels
The Massive Size of Broadcom Tomahawk 6 102.4T Switch Chips and Tomhawk Ultra Bonus
Post Syndicated from Patrick Kennedy original https://www.servethehome.com/the-massive-size-of-broadcom-tomahawk-6-102-4t-switch-chips-and-tomhawk-ultra-bonus/
We got to see the massive Broadcom Tomahawk 6 102.4T switch chips and even have a bonus appearance by the Tomahawk Ultra
The post The Massive Size of Broadcom Tomahawk 6 102.4T Switch Chips and Tomhawk Ultra Bonus appeared first on ServeTheHome.
Comic for 2025.10.19 – Shock Collar
Post Syndicated from Explosm.net original https://explosm.net/comics/shock-collar
New Cyanide and Happiness Comic
Designing the World’s Best Lenses – Sigma CEO Kazuto Yamaki
Post Syndicated from Matt Granger original https://www.youtube.com/watch?v=4io7pgb0EJY
Wishbone
Post Syndicated from Oglaf! -- Comics. Often dirty. original https://www.oglaf.com/wishbone/


Wild Density Supermicro 2OU 8x NVIDIA B300 Server at OCP 2025
Post Syndicated from Eric Smith original https://www.servethehome.com/wild-density-supermicro-2ou-8x-nvidia-b300-server-at-ocp-2025/
At OCP Summit 2025, we saw the new 2OU Supermicro 8x NVIDIA B300 GPU system that is designed to pack GPUs into a rack
The post Wild Density Supermicro 2OU 8x NVIDIA B300 Server at OCP 2025 appeared first on ServeTheHome.
Къде може да си сложим безплатно ваксина срещу COVID-19?
Post Syndicated from Боян Юруков original https://yurukov.net/blog/2025/covidmap/
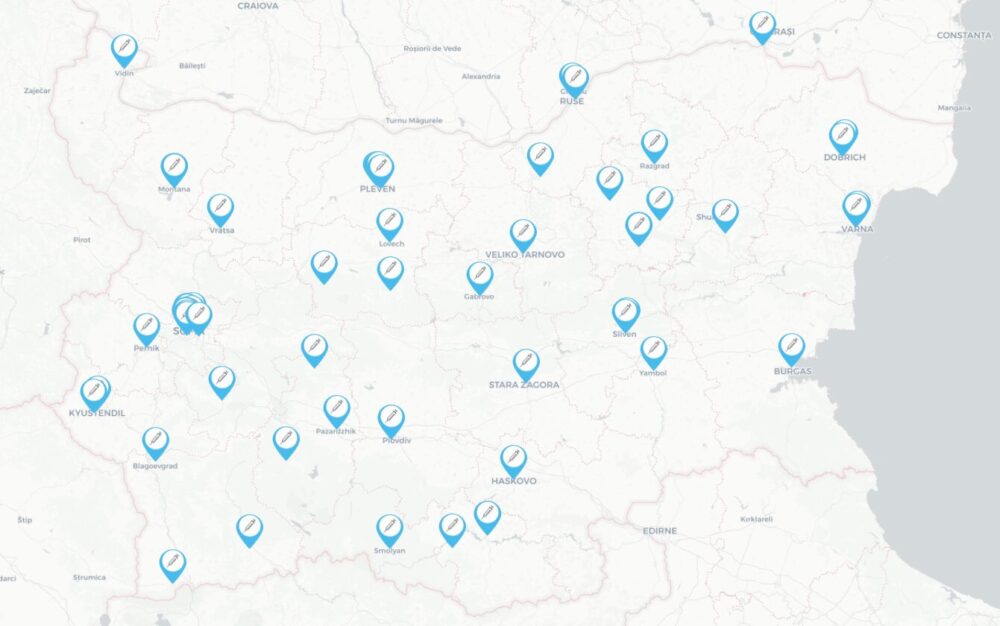
Преди няколко седмици си сложих ваксина срещу COVID-19. До две седмици ще си сложа противогрипна. Първите са безплатни за всички, а вторите – безплатни за хора над 65 г. Беше ми трудно обаче да се ориентирам къде има имунизационни центрове за тези за COVID-19, защото страниците на РЗИ-тата са шарени и трудни за навигиране. Затова направих тази карта с информацията към днешна дата.
Целият списък с места ще намерите на информационния портал за задължителни и препоръчителни имунизации на Министерството на здравеопазването Плюс мен. Препоръчвам ви да го разгледате, защото е изготвен с помощта на имунолози и епидемиолози и за разлика от други ресурси в мрежата, съдържа информация базирана на факти, данни и изследвания.
Списъкът води обаче към отделни страници и файлове на РЗИ-тата, които са разнородни и невинаги разбираеми. Подобно на РДВР-тата и горските стопанства, всяко РЗИ си е държава в държавата и липсва особена координация, носене на отговорност или последователност в усилията, комуникацията или дори практиките. В София има най-много и по таблицата ми беше трудно да се ориентирам къде е най-удобният за мен имунизационен център. Когато си поставих ваксината открих грешки в публикуваните таблици – две болници настояваха, че нямат такива центрове при позвъняване – затова не направих картата по-рано. Виждам обаче, че в края на септември с началото на кампанията са обновили списъците навсякъде и затова реших, че ще е полезно.
Доста РЗИ-та съобщават, че всеки от нас има възможност да поиска личния му лекар да поръча ваксина и да си сложи там. Доколкото някои не знаят, не искат или няма голям интерес, т.е. отварянето на една доза за 1-2-ма души е безсмислено, често се случва да насочват всички към РЗИ-тата. Също така, доста РЗИ-та говорят за мобилни екипи, с които може да се ваксинират трудноподвижни хора или такива в отдалечени райони. На страниците им и на картата са поместени контактите.
На някои места е посочено, че няма нужда от предварително запазване на час, но на повечето изрично казват, че трябва – навярно, за да се групират повече хора в един ден, за да не се прахосват флаконите ваксини. Има доста центрове за имунизиране на деца. Ваксината може да се поставя още от 6 месечна възраст, но не на всякъде е отбелязано, че слагат на деца. Като правило над 12 годишна възраст може да сложат навсякъде.
Припомням също, че пенсионери над 65 години имат право на безплатна ваксина срещу грип. Ако не ви е звъннал вече личния лекар, свържете се, за да поръча ваксина. Останалите трябва да си набавим сами от аптеките. Вече са налични, макар заради огромното търсене да свършват бързо. В някои аптеки има даже списъци на чакащи. Може да ги поставите при личните лекари или в същите имунизационни центрове на картата. Няма проблем да се поставя заедно с ваксината срещу COVID-19.
Може да отворите картата на цял екран тук. Данните в нея са актуални към 18-ти октомври 2025. Непременно сверявайте в страниците на РЗИ-тата и по телефона последното състояние, защото е възможно да променят местата на кабинетите, работното време и други условия. Ако забележите някаква такава промяна или неточност в картата, моля коментирайте под тази статия, за да обърна внимание.
The post Къде може да си сложим безплатно ваксина срещу COVID-19? first appeared on Блогът на Юруков.
This is not a music format
Post Syndicated from Techmoan original https://www.youtube.com/watch?v=c6TiIduyag0
Седмицата (13–18 октомври)
Post Syndicated from Йовко Ламбрев original https://www.toest.bg/sedmitsata-13-18-oktomvri/

Седмицата започна с изключително важно предупреждение, което не бива да подминаваме. „Бюджетът за 2026 г. е изправен пред сериозни трудности“, каза в интервю за БНТ управителят на БНБ Димитър Радев. Уточнявайки, че държавните разходи възлизат на около 40% от брутния вътрешен продукт, той добави:
Ако поддържаме устойчиво тези разходи значително над тази граница, това неизбежно поражда въпроса как ще се финансират. И отговорите не са толкова сложни – чрез дълг или чрез увеличение на данъците, или чрез комбинация от тези две възможности. А те не са добри възможности.
В същия момент Министерството на финансите се бави с проектобюджета, синдикатите шумят за данъчни реформи и увеличаване на осигуровките и данъците, а близки до правителството „говорещи глави“ им пригласят.
След безобразно щедрите увеличения на заплатите в МВР и в другите силови структури на държавата и обвързването на нивото на минималната работна заплата с 50% от средната на фона на скромната производителност на труда, уверено сме се засилили да влезем в еврозоната със свръхдефицит и ускоряваща се инфлация. А после сигурно еврото ще ни е виновно?
В същото това време големите Д-та ни разиграват сценки от самодейни вечеринки. Понеже талантът на Бойко Борисов като стендъп комедиант се поизтърка, напоследък той се упражнява в жанра старогръцка трагедия. В новия епизод на „Т.Е. от Е.Т.“ Елена Телбис за три минути разхвърля този и други „герои“ от седмицата в различните ъгли на тепиха. Докато мята щанги.
Емилия Милчева също взема за информационен повод гибелния гняв на Бойко Борисов. Според нея ние сме в преддверието на криза и е много вероятно следващите парламентарни избори да изпреварят президентските догодина. Не подминавайте седмичния ѝ политически коментар, озаглавен „Конграчулейшънс, Борисов 2.0“.
Емилия Милчева беше и вторият събеседник в поредицата ни „Тоест разговаряме“. Ако сте пропуснали излъчването на живо, може да изгледате или да изслушате записа на срещата, водена от Владислав Севов – линкове ще намерите в статията за епизода, в която е включен още един отговор от Емилия на зрителски въпрос: „Злодей ли е Пеевски?“
Министърът на образованието Красимир Вълчев не изглежда да е злодей, но ми е личен „любимец“. Така далеч е от моите позиции за миналото, настоящето и бъдещето, че дори неволно не можем да нацелим тема, по която да се доближим на по-малко от 200 светлинни години отстояние. Но понеже социалните мрежи според мен вече са фундаментално вредни, за малко да се подхлъзна по идеята му да ги ограничава за подрастващите. След като прочетох обаче статията на Светла Енчева „Не дай боже училището да стане интересно“, благосклонността ми към МОН и министъра отново се разсея.
Джорджа Спадони започва в „Тоест“ публицистична поредица за събитията в съседна Сърбия, които бяха възпламенени от злощастния инцидент на гарата в Нови Сад преди година. На 1 ноември 2024 г. почти 50-метровата бетонна козирка на новоремонтираната гара рухва върху главите на няколко десетки души, 16 от които умират. Трагедията се превръща в сръбския символ на корупцията, която убива. Последвалите студентски протести, които не стихват вече цяла година, разклатиха управлението на Сръбската прогресивна партия и Александър Вучич както нищо друго досега.
Културните войни са темата на новия текст на Йоанна Елми. Почти няма колебания, че те са симптом за социална криза и пренареждане на обществени и икономически слоеве, но колко разрушителни могат да са последиците? И ако несъгласията (от съвсем недалечното минало) бяха белег за жизнена и здрава демокрация, дали тя ще издържи екстремумите на днешните ни разминавания? Прочетете повече в брой 9 на „Гласовете на Америка“ и се абонирайте за този бюлетин, ако все още не сте.
В съвместната ни рубрика с „Екипът на София“ тази седмица Елена Гечева, която е политолог с фокус върху местните политики, показва какво прави един градски бюджет добър. И че водещото в него са не числата, а целите и идеите, заложени в плана за развитие на местната общност, които числата измерват и оценяват.
Автобиографичният роман „Живей бързо“ от Брижит Жиро е изборът на Антония Апостолова в рубриката ни „На второ четене“. В книгата, отличена с наградата „Гонкур“ за 2022 г., Жиро се опитва да разсъди има ли непредвидимост и непредотвратимост и изчислим ли е животът. Романът прераства в значим социален коментар, минава отвъд личното и засяга колективни измерения, смята Антония.
И накрая – ако миналата седмица Атанас Шиников напълно ви е ошашавил със сложния религиозен контекст на невидимите парични преводи хауала и сте очаквали във втората част (някак естествено или божествено) да се стигне до криптовалутите… уви, този път ще бъдем засилени още по-назад в дълбините на времето, чак до делниците на Пророка Мохамед.
Пожелавам ви приятно четене и гледане. А ако цените нашата журналистическа работа, подкрепете ни. „Тоест“ се издържа от месечните дарения на своите читатели.
NVIDIA DGX Spark and Partner GB10 Firmware
Post Syndicated from Eric Smith original https://www.servethehome.com/nvidia-dgx-spark-and-dell-partner-gb10-firmware/
We show you how to update the firmware on your NVIDIA DGX Spark and partner systems as we discuss a key difference between the firmware
The post NVIDIA DGX Spark and Partner GB10 Firmware appeared first on ServeTheHome.
Configure seamless single sign-on with SQL analytics in Amazon SageMaker Unified Studio
Post Syndicated from Arun A K original https://aws.amazon.com/blogs/big-data/configure-seamless-single-sign-on-with-sql-analytics-in-amazon-sagemaker-unified-studio/
Amazon SageMaker Unified Studio provides a unified experience for using data, analytics, and AI capabilities. SageMaker Unified Studio now supports trusted identity propagation (TIP) for SQL workloads, enabling fine-grained data access control based on individual user identities. Organizations can use this integration to manage data permissions through AWS Lake Formation while using their existing single sign-on (SSO) infrastructure.
Organizations already using Amazon Redshift with TIP can extend their existing Lake Formation permissions to SageMaker Unified Studio. Users simply log in through SSO and access their authorized data using the SQL editor, maintaining consistent security controls across their analytics environment.
This post demonstrates how to configure SageMaker Unified Studio with SSO, set up projects and user onboarding, and access data securely using integrated analytics tools.
Solution overview
For our use case, a retail corporation is planning to implement sales analytics to identify sales patterns and product categories that are doing well. This will help the sales team improve on sales planning with targeted promotions and help the finance team plan budgeting with better inventory management. The corporation stores a customer table in an Amazon Simple Storage Service (Amazon S3) data lake and a store_sales table in a Redshift cluster.
The corporation uses SageMaker Unified Studio as the UI, with users onboarded from their identity provider (IdP) to AWS IAM Identity Center with TIP. Amazon SageMaker Lakehouse centralizes data from Amazon S3 and Amazon Redshift, and Lake Formation provides fine-grained access control based on user identity. For our example use case, we explore two different users. The following table summarizes their roles, the tools they use, and their data access.
| User | Group | Tool | Data Access |
| Ethan (Data Analyst) | Sales | Amazon Athena for interactive SQL analysis | Non-sensitive customer data (id, c_country, birth_year) and store_sales full table access |
| Frank (BI Analyst) | Finance | Amazon Redshift for reports and visualization | US customer data (c_country='US') |
The following diagram illustrates the solution architecture.
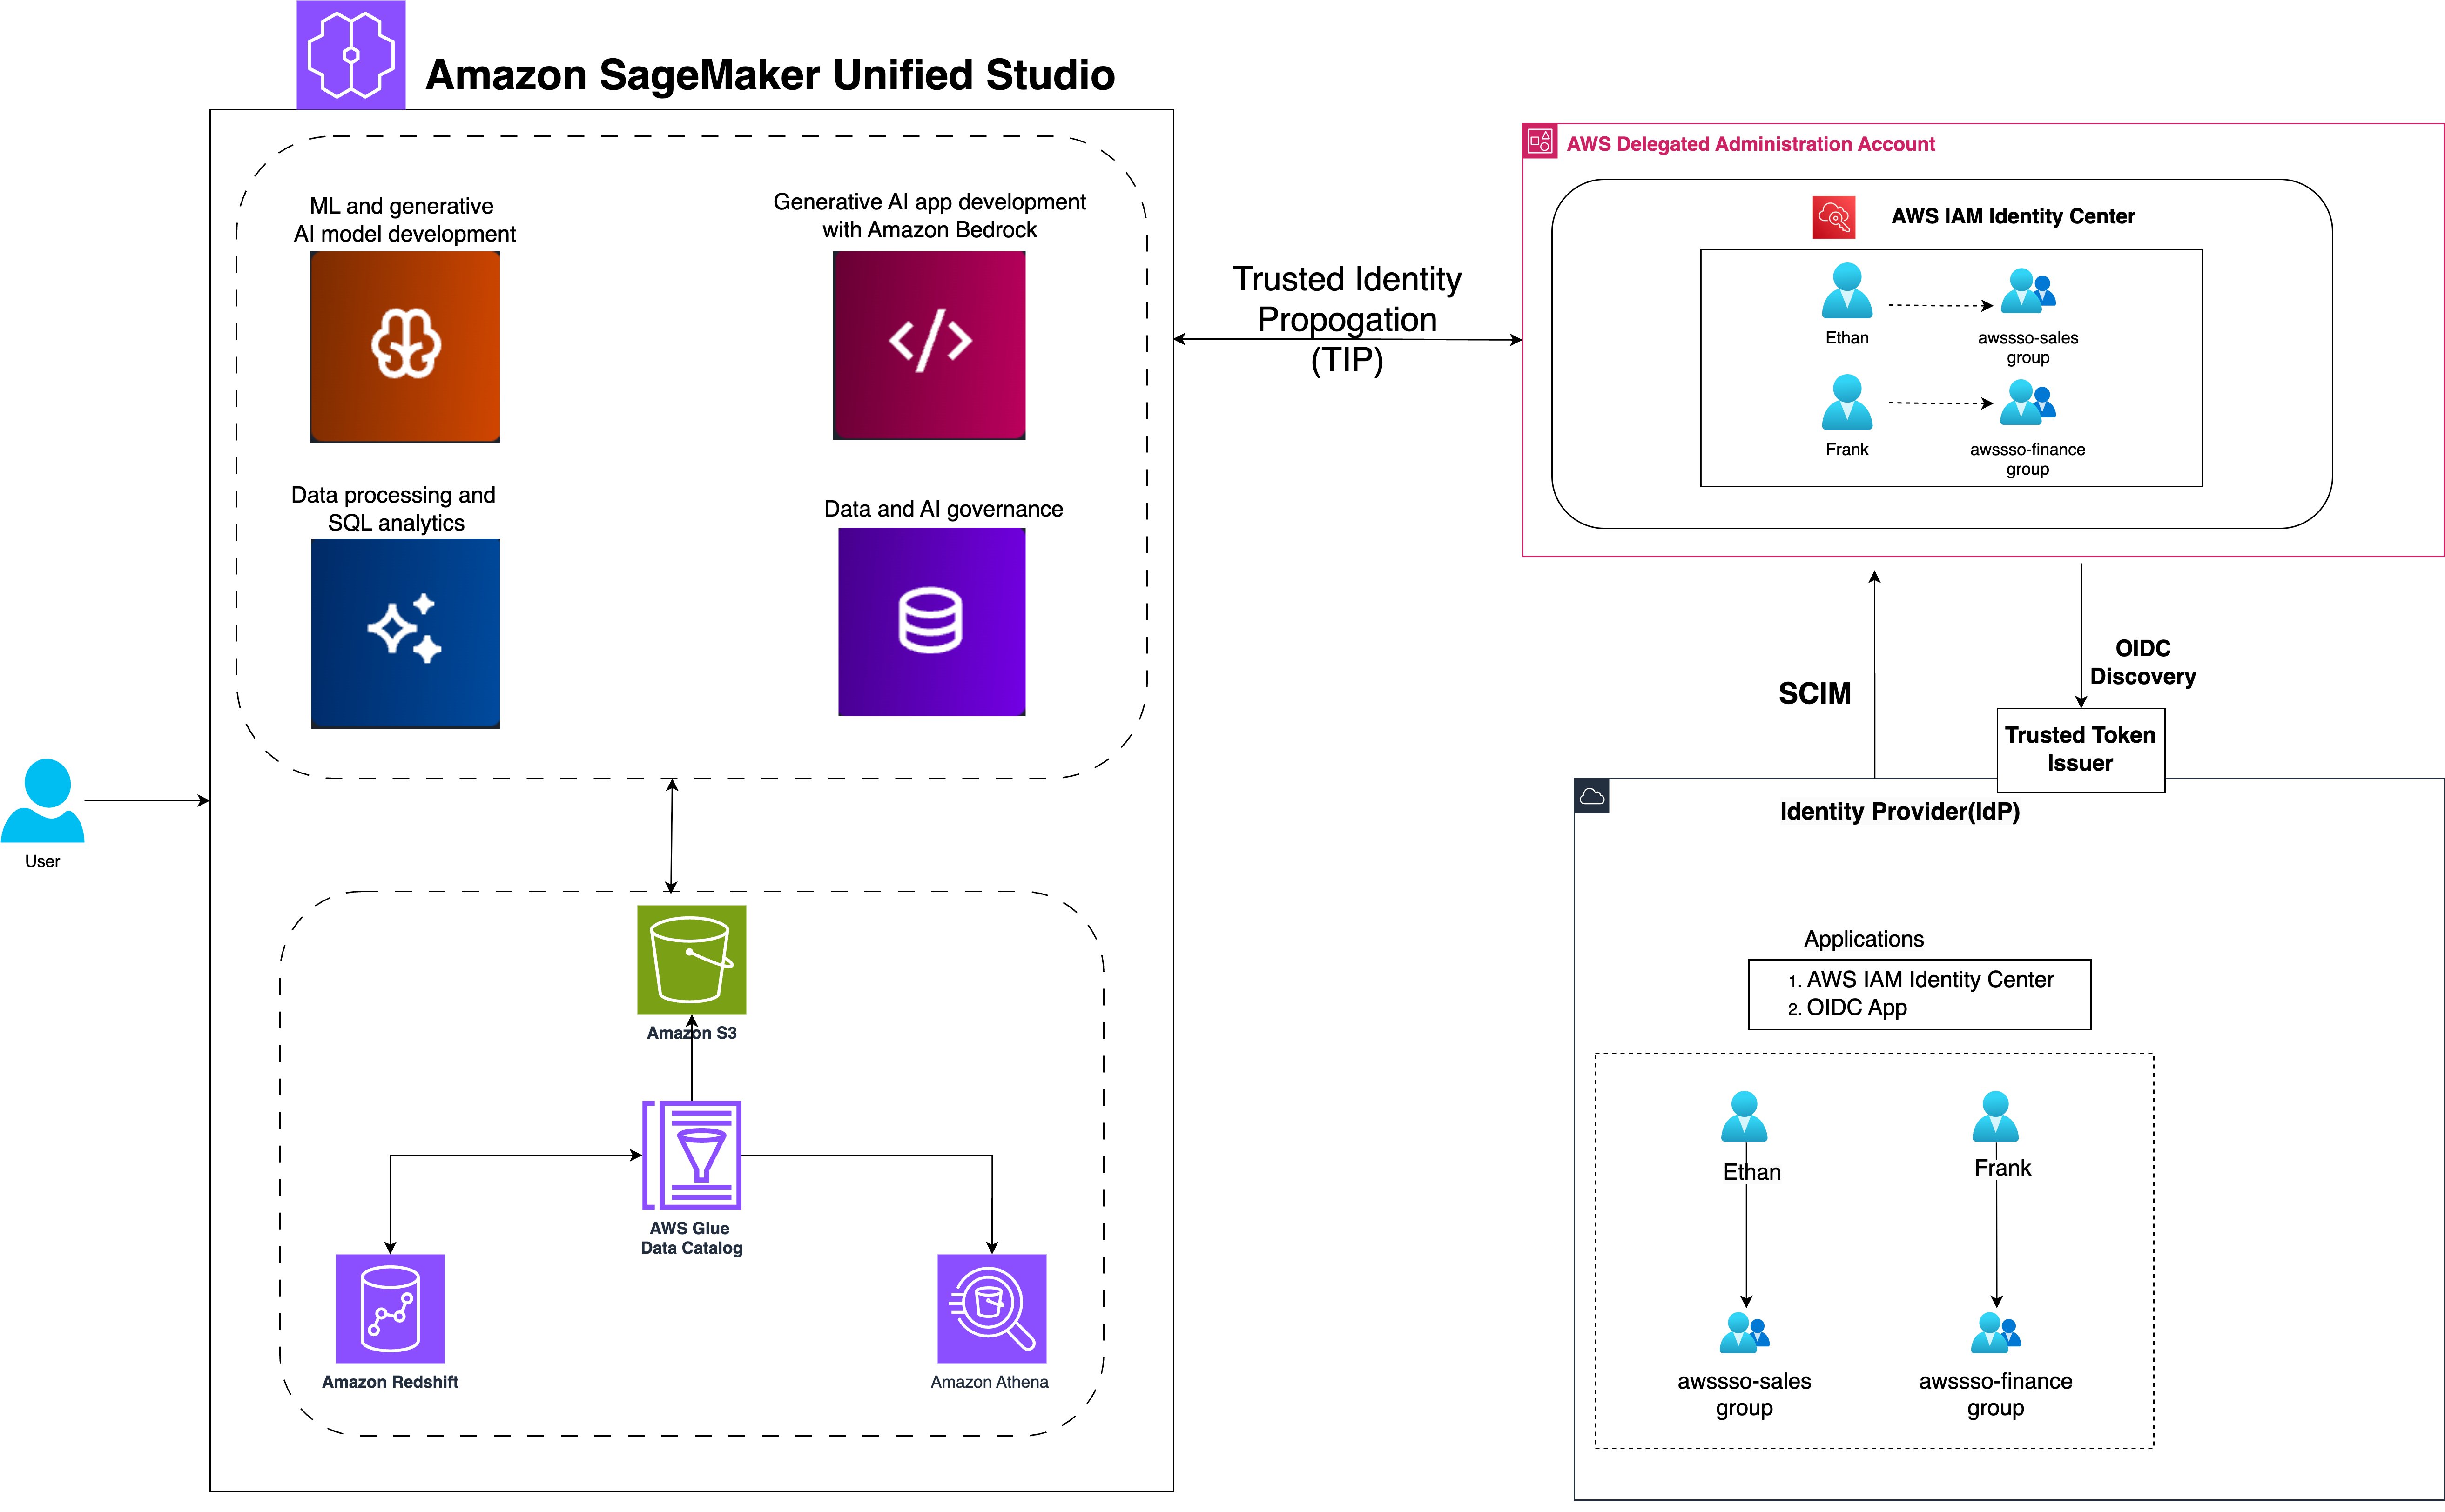
SageMaker Unified Studio with IAM Identity Center simplifies the user journey from authentication to data analysis. The workflow consists of the following steps:
- Users sign in with organizational SSO credentials through their IdP and are redirected to SageMaker Unified Studio.
- Users configure IAM Identity Center authentication for Amazon Redshift, linking identity management with data access.
- Users access the query editor for Amazon Redshift or SageMaker Lakehouse, triggering IAM Identity Center federation to generate session and access tokens.
- SageMaker Unified Studio retrieves user authorization details and group membership using the session token.
- Users are authenticated as IAM Identity Center users, ready to explore and analyze data using Amazon Redshift and Amazon Athena.
To implement our solution, we walk through the following high-level steps:
- Set up SageMaker Lakehouse resources.
- Create a SageMaker Unified Studio domain with SSO and TIP enabled.
- Configure Amazon Redshift for TIP and validate access.
- Validate data access using Amazon Athena.
Prerequisites
Before you begin implementing the solution, you must have the following in place:
- If you don’t have an AWS account, you can sign up for one.
- We provide utility scripts to help set up various sections of the post. To use them:
- Right-click this link and save the utility scripts zip file.
- Unzip the file to a terminal that has the AWS Command Line Interface (AWS CLI) configured. You can also use AWS CloudShell.
- Run the scripts only when prompted in the relevant sections.
- To deploy the infrastructure, right-click this link and select ‘Save Link As’ to save it as
sagemaker-unified-studio-infrastructure.yaml. Then upload the file when creating a new stack in the AWS CloudFormation console, which will create the following resources:- An S3 bucket to hold the customer data used in this post.
- An AWS Identity and Access Management (IAM) role called
DataTransferRolewith permissions as defined in Prerequisites for managing Amazon Redshift namespaces in the AWS Glue Data Catalog. - An IAM role called
IAMIDCRedshiftRole, which will be used later to set up the IAM Identity Center Redshift application. - An IAM role called
LakeFormationRegistrationRole, following the instructions in Requirements for roles used to register locations, and necessary IAM policies.
- If you don’t have a Lake Formation user, you can create one. For this post, we use an admin user. For instructions, see Create a data lake administrator.
- If IAM Identity Center is not enabled, refer to Enabling AWS IAM Identity Center for instructions to enable it.
- If you need to migrate existing Redshift users and groups, use the IAM Identity Center Redshift migration utility.
- For a quick way to test the feature and familiarize yourself with the process, we provide a script to generate mock users and groups. Run the
setup-idc.shscript, which is provided in Step 2, to create test users and groups in IAM Identity Center for demonstration purposes.
- Integrate IAM Identity Center with Lake Formation. For instructions, see Connecting Lake Formation with IAM Identity Center.
- Register the S3 bucket as a data lake location:
- On the Lake Formation console, choose Data lake locations in the navigation pane.
- Choose Register location.
- For the role, use
LakeFormationRegistrationRole.
- Create an IAM Identity Center Redshift application, as detailed in our previous post:
- On the Amazon Redshift console, choose IAM Identity Center connections in the navigation pane and choose Create application.
- For both the display name and application name, enter
redshift-idc-app. - Set the IdP namespace to
awsidc. - Choose
IAMIDCRedshiftRoleas the IAM role. - Choose Next to create the application.
- Take note of the application Amazon Resource Name (ARN) to use in subsequent steps. The ARN format is
arn:aws:sso::<ACCOUNT_NUMBER>:application/ssoins-<RANDOM_STRING>/apl-<RANDOM_STRING>.
- If you don’t have existing Redshift tables to work with, run the script
setup-producer-redshift.sh, which is provided in Step 2, to create a producer namespace and workgroup, set up a sample sales database, and generate necessary tables with test data. - The post also uses simulated customer data stored in the AWS Glue Data Catalog. To set up this data and configure the necessary Lake Formation permissions, run the
setup-glue-tables-and-access.shscript provided in Step 2.
Note: The utility scripts are configured for
us-east-1 region. If you prefer another region, edit the region in the scripts before running them.
Set up SageMaker Lakehouse resources
In this section, we configure the foundational lakehouse resources required for SageMaker to access and analyze data across multiple storage systems. We’ll register the Redshift instance to the AWS Glue Data Catalog to make warehouse data discoverable and establish Lake Formation permissions on lakehouse resources for user identities to ensure secure, governed access to both data lake and data warehouse resources from within SageMaker environments.
Register Redshift instance to the Data Catalog
In this step, we use the store_sales data, which we created earlier using the setup-producer-redshift.sh script. You can register entire clusters to the Data Catalog and create catalogs managed by AWS Glue. To register a cluster to the Data Catalog, complete the following steps:
- On the Lake Formation console, choose Administrative roles and tasks in the navigation pane.
- Under Data lake administrators, choose Add.
- Choose Read-only administrator, then choose
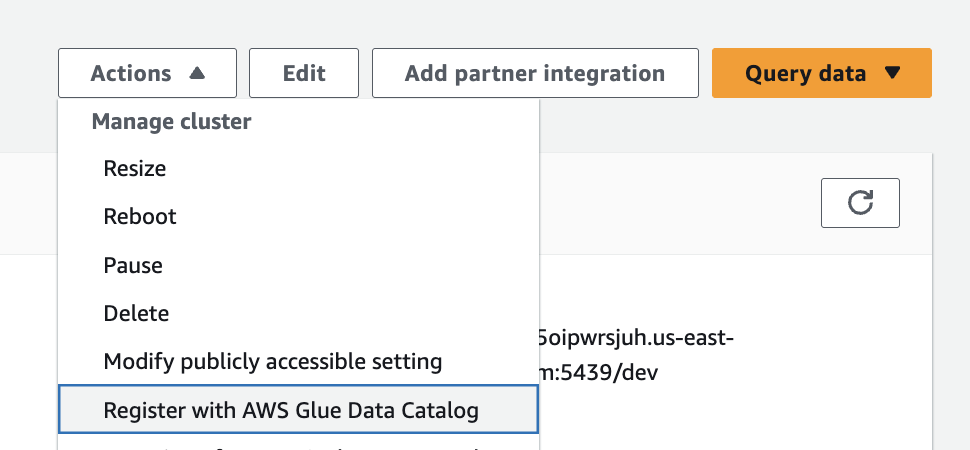
AWSServiceRoleForRedshift. - On the Amazon Redshift console, open your namespace.
- On the Actions dropdown menu, chose Register with AWS Glue Data Catalog, then choose Register.

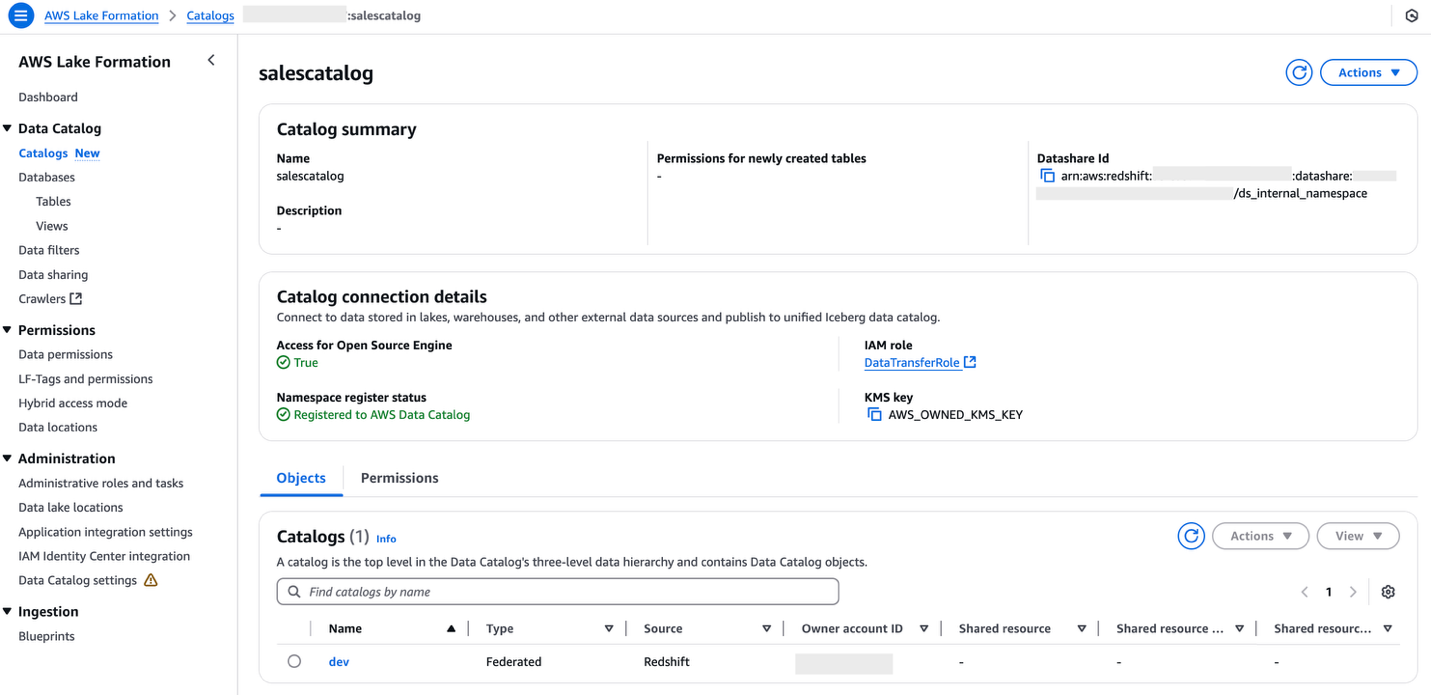
- Sign in to the Lake Formation console as the data lake administrator and choose Catalogs in the navigation pane.
- Under Pending catalog invitations, select the namespace and accept the invitation by choosing Approve and create catalog.
- Provide the name for the catalog as
salescatalog. - Select Access this catalog from Apache Iceberg compatible engines, choose
DataTransferRolefor the IAM role, then choose Next. - Choose Add permissions and choose the admin IAM role under IAM users and roles.
- Select Super user for catalog permissions and choose Add.
- Choose Next.
- Choose Create catalog.

Set up Lake Formation permission on lakehouse resources for user identities
In this section, we configure Lake Formation permissions to enable secure access to lakehouse resources for federated user identities. Lake Formation provides fine-grained access control that works seamlessly with IAM Identity Center, allowing you to manage permissions centrally while maintaining security boundaries.
We’ll focus on granting database access to IAM Identity Center groups in Lake Formation and setting table-level permissions for federated Redshift catalog tables. These permissions form the security foundation for our federated query architecture, enabling users to seamlessly access both S3 data lake and Redshift data warehouse resources through a unified interface.
Grant database access to IAM Identity Center groups in Lake Formation
After you share your Redshift catalog with the Data Catalog and integrate with Lake Formation, you must grant appropriate database access. Follow these steps to set up permissions on your data lake resources for corporate identities:
- On the Lake Formation console, under Permissions in the navigation pane, choose Data permissions.
- Choose Grant.
- Select Principals for Principal type.
- Under Principals, select IAM Identity Center and choose Add.
- In the pop-up window, if this is your first time assigning users and groups, choose Get started.
- Search for and select the IAM Identity Center groups
awssso-salesandawssso-finance. - Choose Assign.
- Under LF-Tags or catalog resources, choose Named Data Catalog resources.
- Choose
<accountid>:salescatalog/devfor Catalogs. - Choose
sales_schemafor Database.
- Choose
- Under Database permissions, select Describe.
- Choose Grant to apply the permissions.
Grant table-level permissions for federated Redshift catalog tables
Complete the following steps to grant table permissions to the IAM Identity Center groups:
- On the Lake Formation console, under Permissions in the navigation pane, choose Data permissions.
- Choose Grant.
- Select Principals for Principal type.
- Under Principals, select IAM Identity Center and choose Add.
- In the pop-up window, if this is your first time assigning users and groups, choose Get started.
- Search for and select the IAM Identity Center group
awssso-sales. - Choose Assign.
- Under LF-Tags or catalog resources, choose Named Data Catalog resources.
- Choose
<accountid>:salescatalog/devfor Catalogs. - Choose
sales_schemafor Database. - Choose
store_salesfor Table.
- Choose
- Select Select and Describe for Table permissions.
- Choose Grant to apply the permissions.
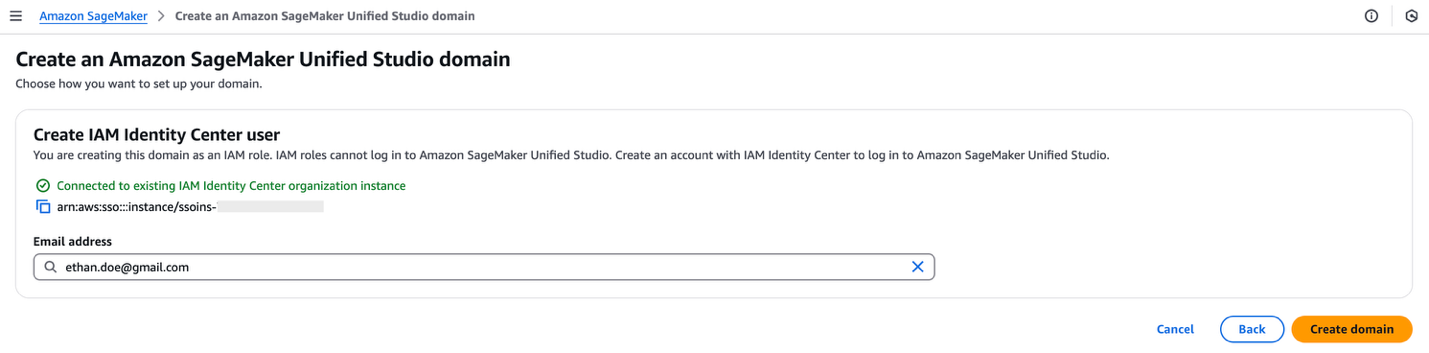
Create a SageMaker Unified Studio domain with SSO and TIP enabled
For instructions to create a SageMaker Unified Studio domain, refer to Create an Amazon SageMaker Unified Studio domain – quick setup. Because your IAM Identity Center integration is already complete, you can specify an IAM Identity Center user in the domain configuration settings.
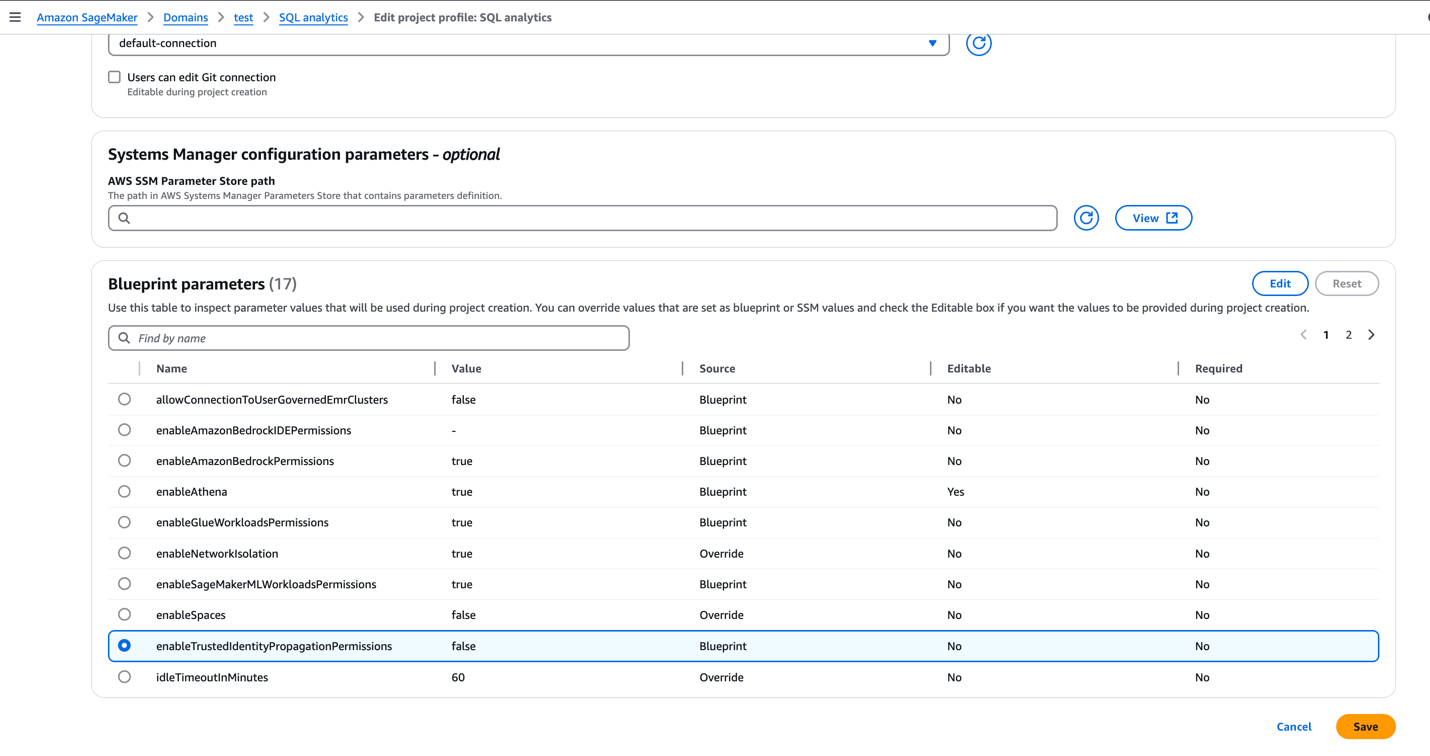
Enable TIP in SageMaker Unified Studio
Complete the following steps to enable TIP in SageMaker Unified Studio:
- On the SageMaker console, use the AWS Region selector in the top navigation bar to choose the appropriate Region.
- Choose View domains and choose the domain’s name from the list.
- On the domain’s details page, on the Project profiles tab, choose a project profile, for example, SQL analytics.
- Select SQL analytics and choose Edit.
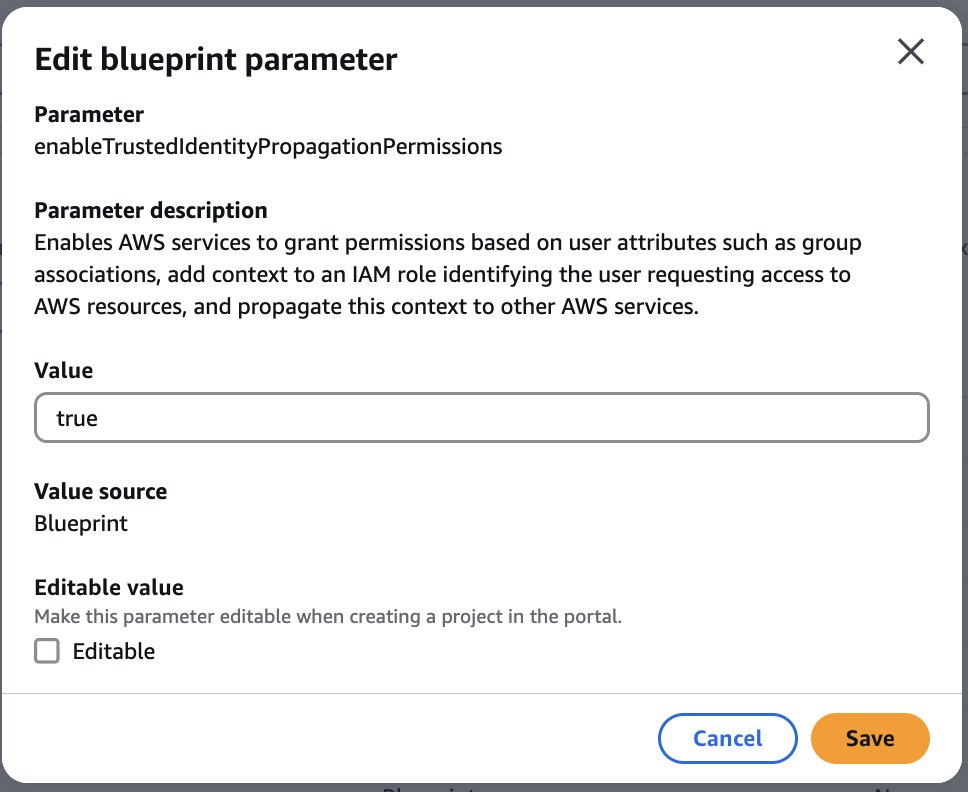
- In the Blueprint parameters section, select
enableTrustedIdentityPropagationPermissionsand choose Edit.
- Update the value as
true. - To enforce authorization-based on TIP, the SageMaker Unified Studio admin can make this parameter non-editable.
- Choose Save.
Enable user access for SageMaker Unified Studio domain
Complete the following steps to enable user access for the SageMaker Unified Studio domain:
- Open the SageMaker console in the appropriate Region and choose Domains in the navigation pane.
- Choose an existing SageMaker Unified Studio domain where you want to add SSO user access.
- On the domain’s details page, on the User management tab, in the Users section, choose Add and Add SSO users and groups.
- Choose the user (for this post, we add the user Frank) from the dropdown list and choose Add users and groups.
Add project members
SageMaker Unified Studio projects facilitate team collaboration for different business initiatives. As the project owner, Ethan now can add Frank as a team member to enable their collaboration. To add members to an existing project, complete the following steps:
- Sign in to the SageMaker Unified Studio console using the SSO credentials of who owns the project (for this post, Ethan).
- Choose Select a project.
- Choose the project you want to edit.
- On the Project overview page, expand Actions and choose Manage members.
- Choose Add members.
- Enter the name of the user or group you want to add (for this post, we add Frank).
- Select Contributor if you want to add the project member as a contributor.
- (Optional) Repeat these steps to add more project members. You can add up to eight project members at a time.
- Choose Add members.
Create a SQL analytics project in Unified Studio
In this step, we federate into SageMaker Unified Studio and create a project using SQL analytics. Complete the following steps:
- Federate into SageMaker Unified Studio using your IAM Identity Center credentials:
- On the SageMaker console, choose Domains in the navigation pane.
- Copy the SageMaker Unified Studio URL for your domain and enter it into a new browser window.
- Choose Sign in with SSO.
- A browser pop-up will redirect you to your preferred IdP login page, where you enter your IdP credentials.
- If authentication if successful, you will be redirected to SageMaker Unified Studio.
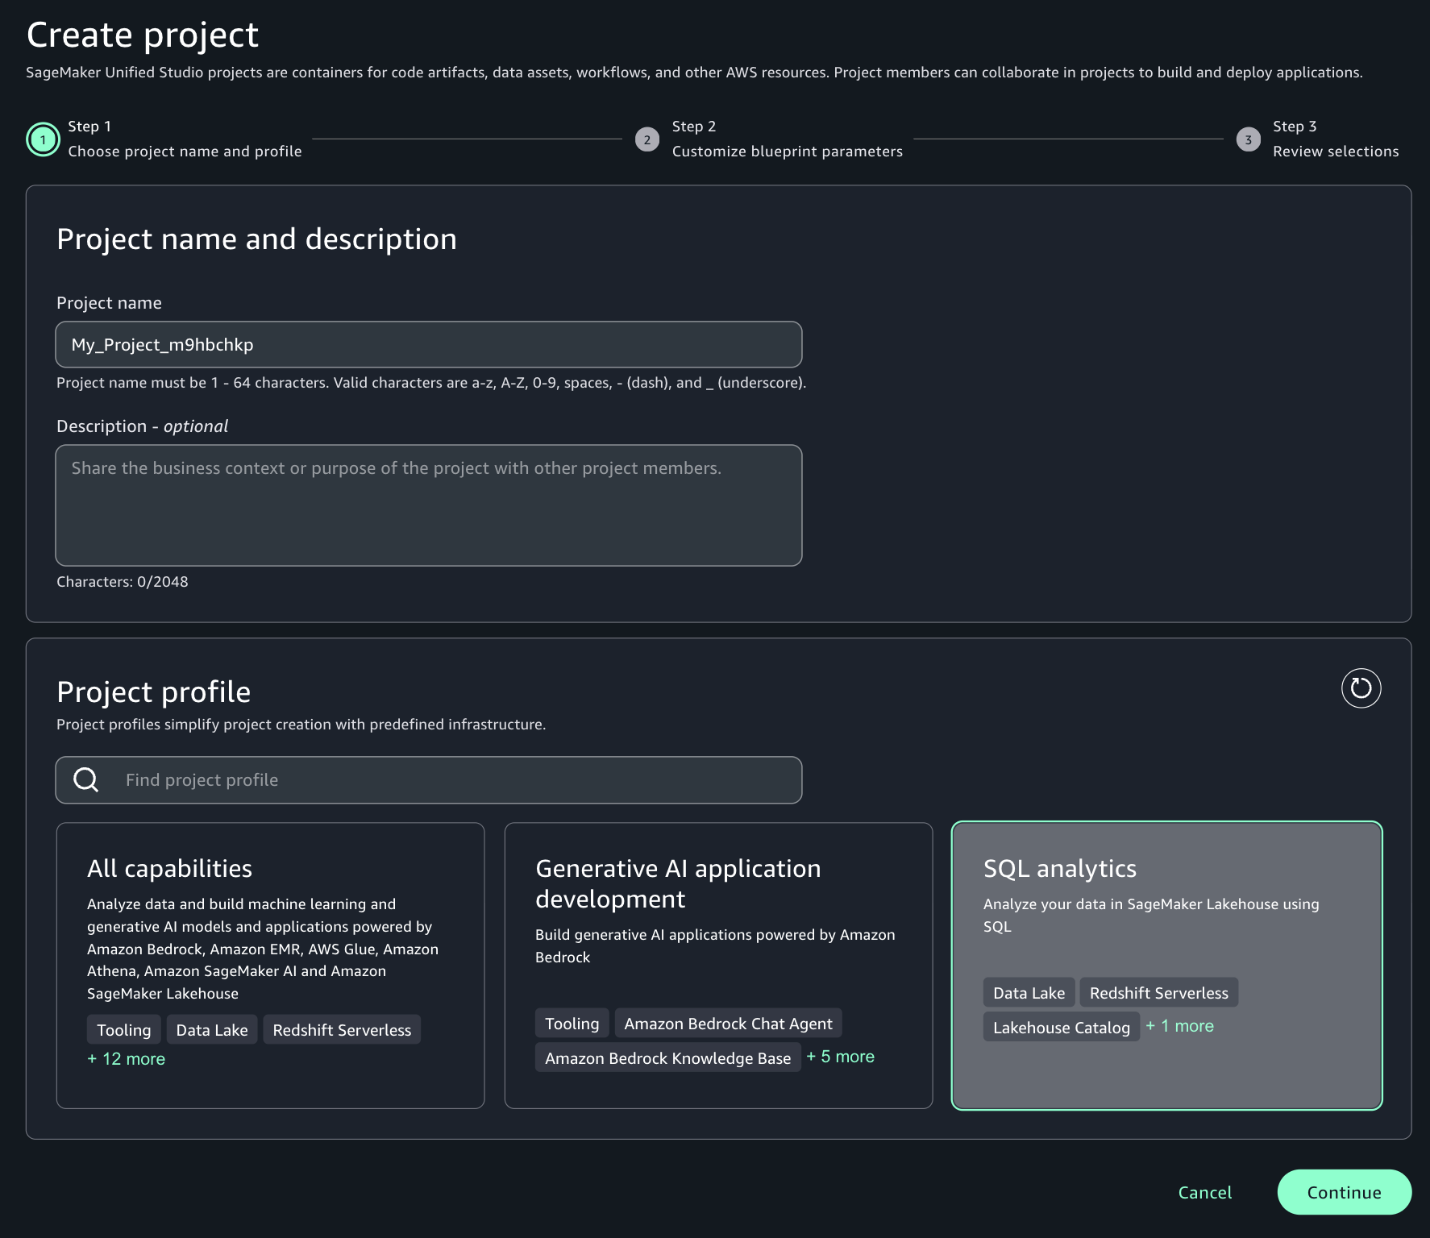
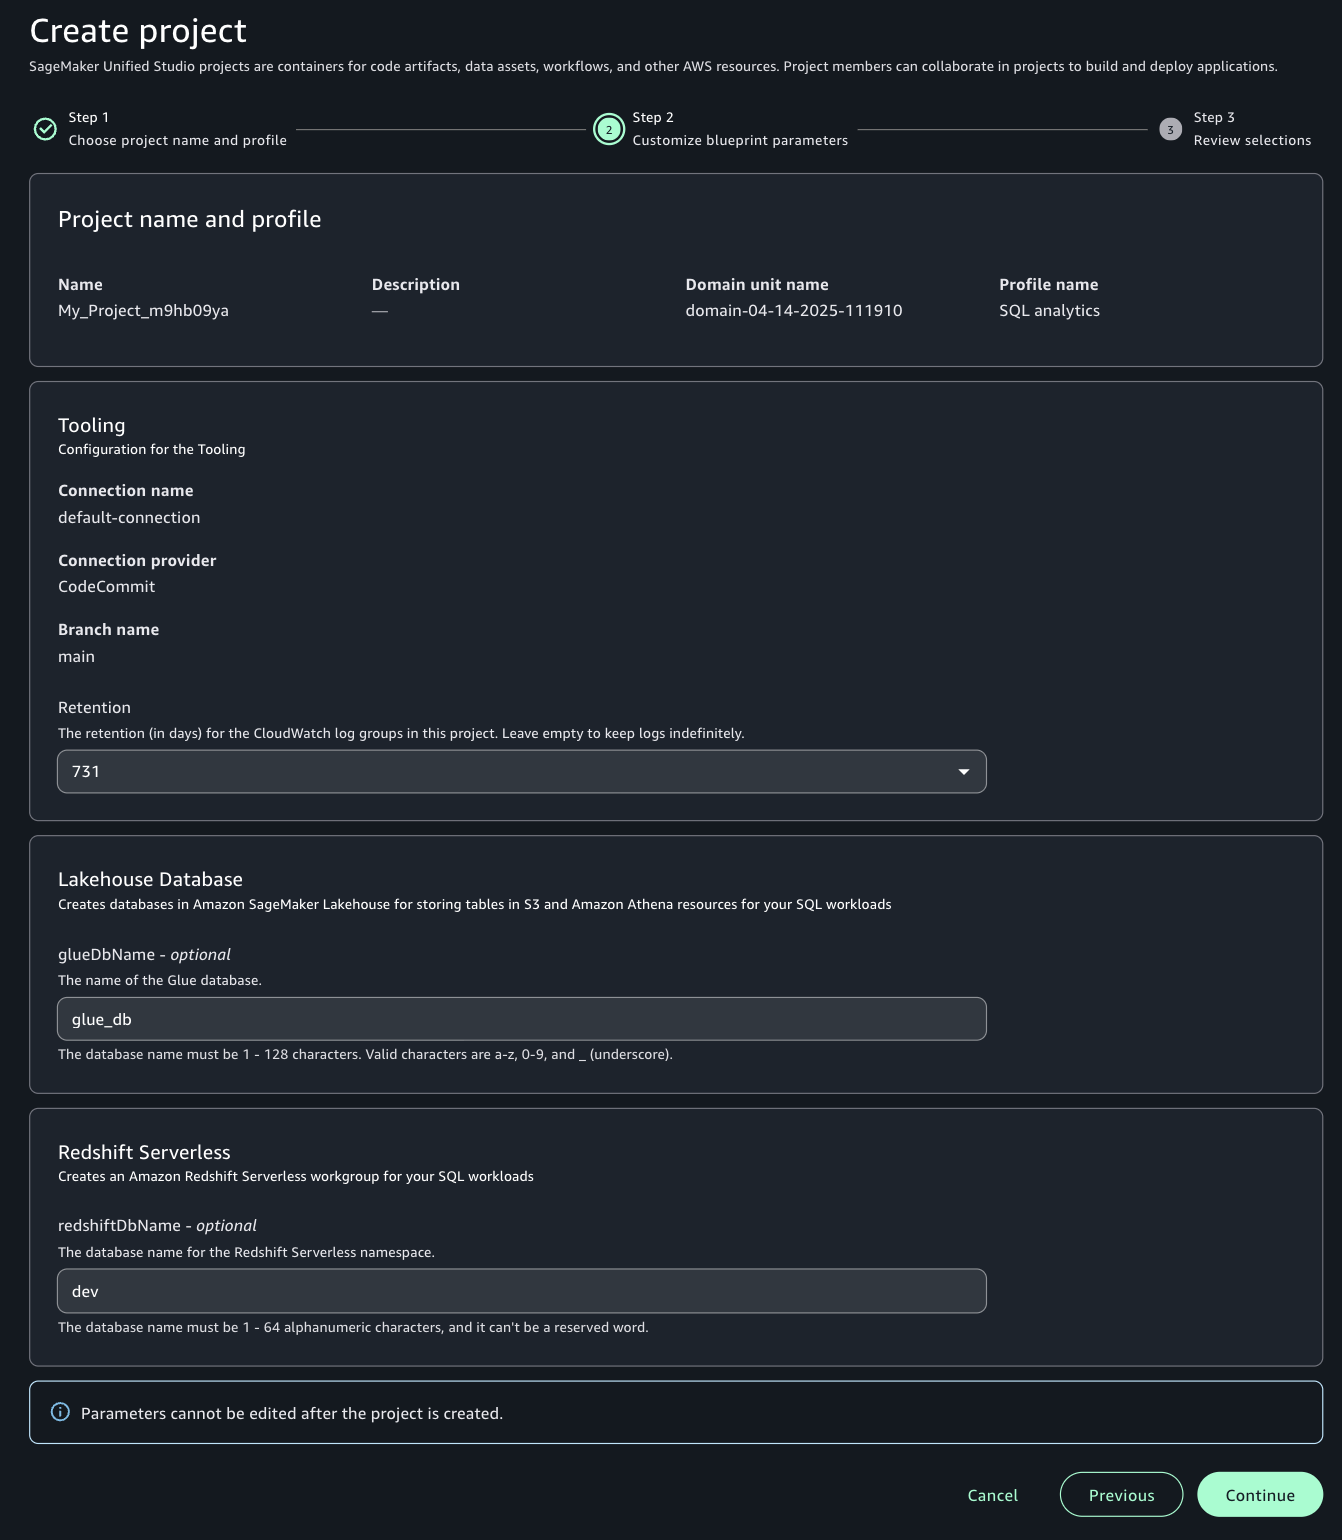
- After logging in, choose Create project.
- Enter a name for your project. This project name is final and can’t be changed later.
- (Optional) Enter a description for your project. You can edit this later.
- Choose a project profile. For this demo, we choose the SQL analytics profile from the available templates.
- Leave the default values as they are or modify them according to your use case, then choose Continue.
- Choose Create project to finalize the project and initialize your SQL analytics workspace.
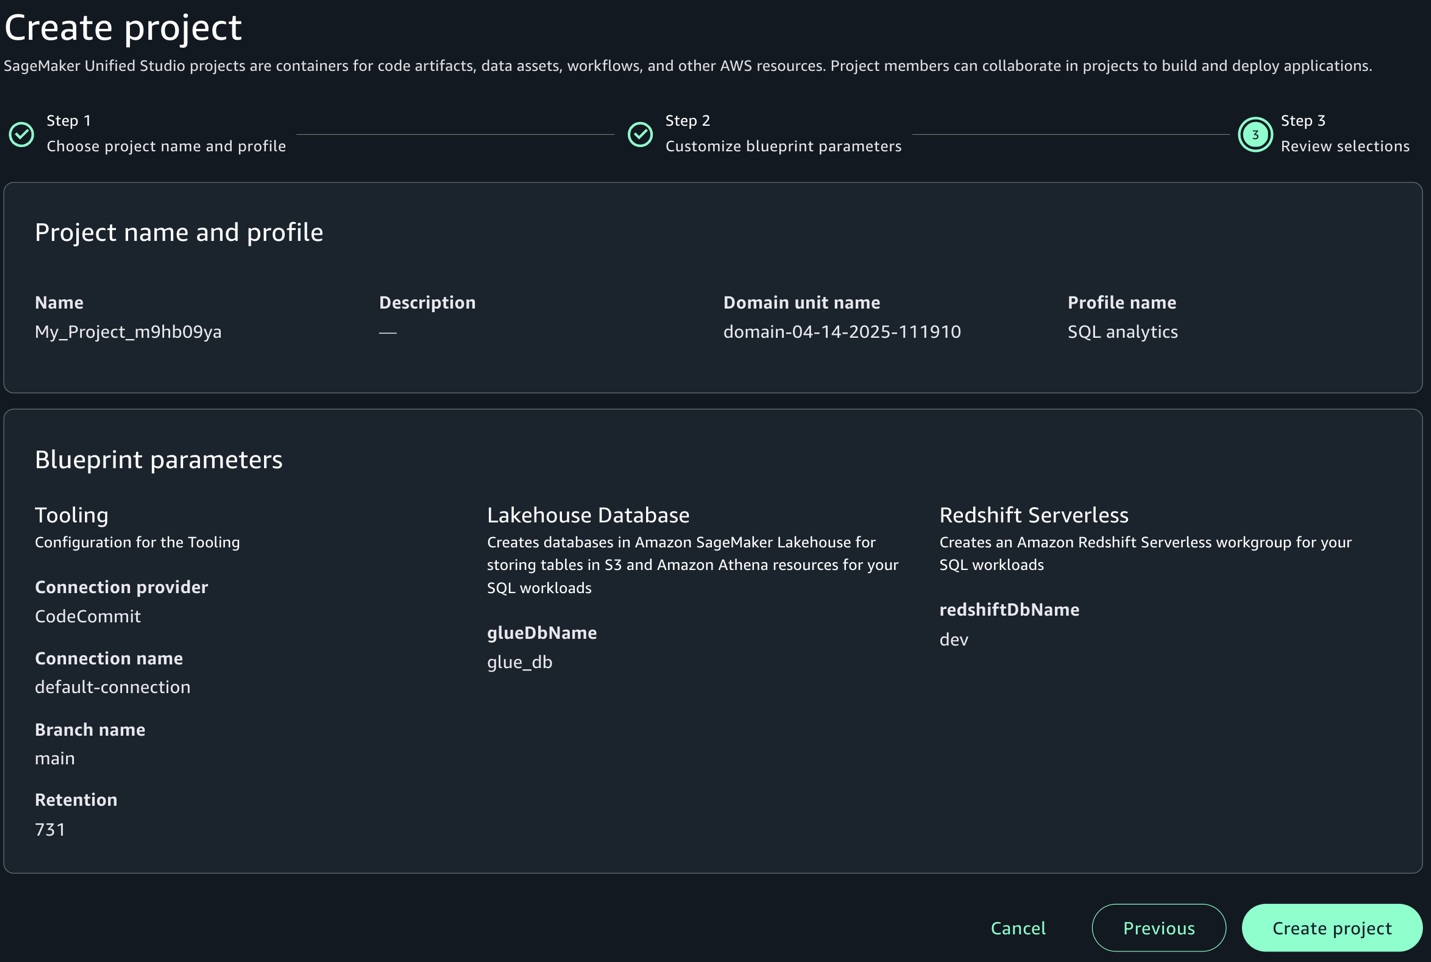
For more detailed information and advanced configurations, refer to Create a project.
Configure Amazon Redshift for TIP and validate access
Run the setup-consumer-redshift.sh script (provided in the prerequisites). This script will create a new namespace and workgroup and add the required tags, which you will use later to integrate with SageMaker Unified Studio compute.
If you are creating the cluster manually, add one of the following tags to the Redshift cluster or workgroup that you want to add to SageMaker Unified Studio:
- Option 1 – Add a tag to allow only a specific SageMaker Unified Studio project to access it:
AmazonDataZoneProject=<projectID> - Option 2 – Add a tag to allow all SageMaker Unified Studio projects in this account to access it:
for-use-with-all-datazone-projects=true
Create compute using IAM Identity Center authentication
After you set up your project, the next step is to establish a compute resource connection on the SageMaker Unified Studio console. Follow these steps to add either Amazon Redshift Serverless or a provisioned cluster to your project environment:
- Go to the Compute section of your project in SageMaker Unified Studio.
- On the Data warehouse tab, choose Add compute.
- You can create a new compute resource or choose an existing one. For this post, we choose Connect to existing compute resources, then choose Next.
- Choose the type of compute resource you want to add, then choose Next. For this post, we choose Redshift Serverless.
- Under Connection properties, provide the JDBC URL or the compute you want to add, which is integrated with IAM Identity Center. If the compute resource is in the same account as your SageMaker Unified Studio project, you can select the compute resource from the dropdown menu. In our example, we use the consumer account that was just provisioned.
- Under Authentication, select IAM Identity Center.
- For Name, enter the name of the Redshift Serverless or provisioned cluster you want to add.
- For Description, enter a description of the compute resource.
- Choose Add compute.

The SageMaker Unified Studio Project Compute and Data pages will now display information for that resource.
If everything is configured correctly, your compute will be created using IAM Identity Center. Because your IdP credentials are already cached while you’re logged in to SageMaker Unified Studio, it uses the same credentials and creates the compute.
Test data access using Amazon Redshift
When Ethan logs in to SageMaker Unified Studio using IAM Identity Center authentication, he successfully federates and can access customer data from all countries but only for non-sensitive columns. Let’s connect to Amazon Redshift in SageMaker Unified Studio by following these steps:
- Choose Actions and choose Open Query editor.
- Choose Redshift in the Data explorer pane.
- Run the customer sales calculation query to observe that user Ethan (a data analyst) can access customer data from all countries but only non-sensitive columns (
id,birth_country,product_id):
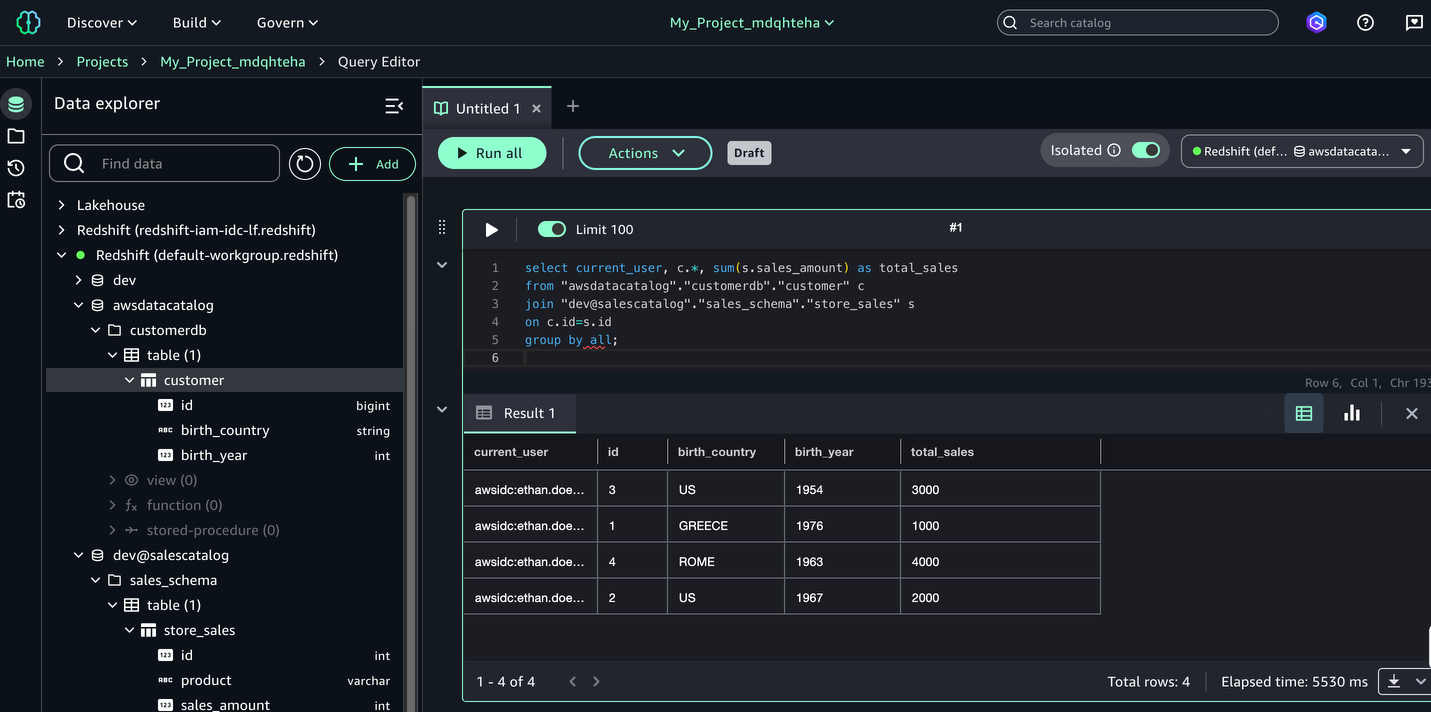
You have successfully configured Redshift to use IAM Identity Center authentication in SageMaker Unified Studio.
Validate data access using Amazon Athena
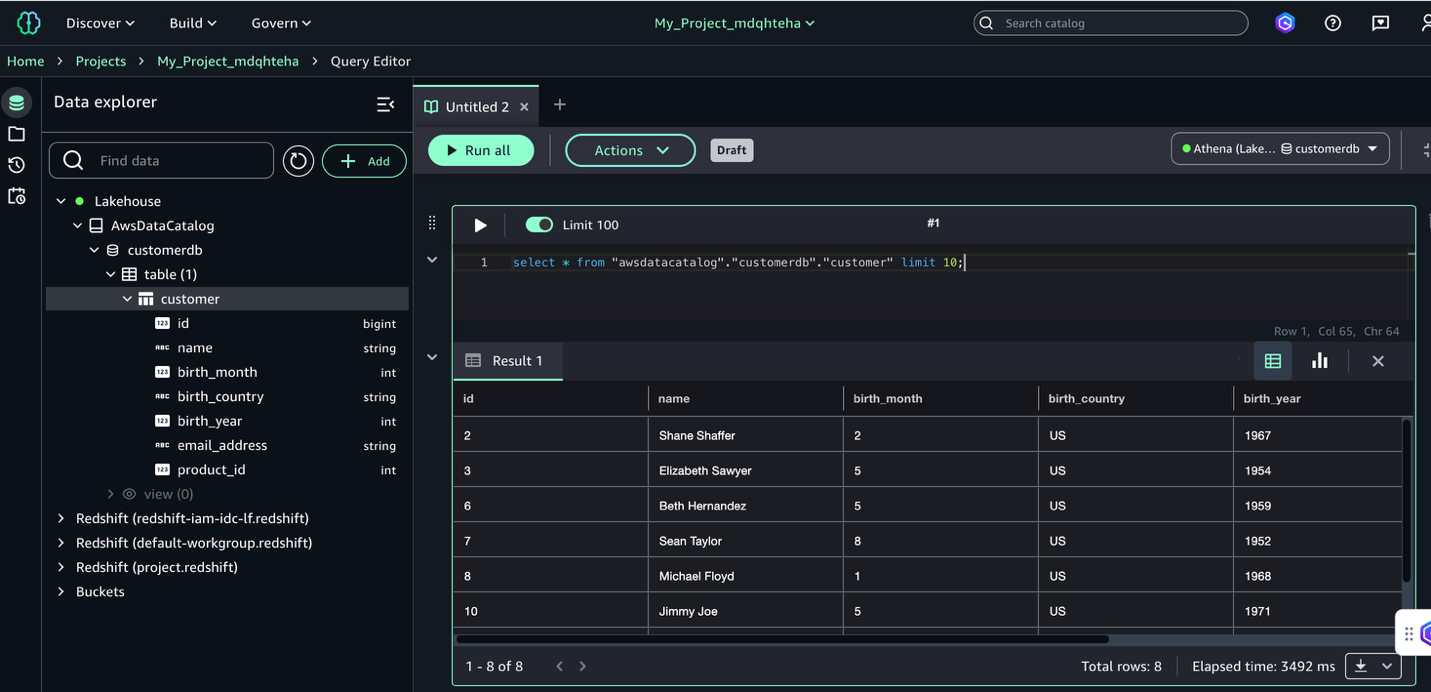
When Frank logs in to SageMaker Unified Studio using IAM Identity Center authentication, he successfully federates and can access customer data only for the United States. To query with Athena, complete the following steps:
- Choose Actions and choose Open Query editor.
- Choose Lakehouse in the Data explorer pane.
- Explore
AwsDataCatalog, expand the database, choose the respective table, and on the options menu (three dots), choose Preview data.
The following demonstration illustrates how user Frank, a BI analyst, can perform SQL analysis using Athena. Due to row-level filtering implemented through Lake Formation, Frank’s access is restricted to customer data from the United States only. Additionally, you can observe that in the Data explorer pane, Frank can only view the customerdb database. The dev@salescatalog database is not visible to Frank because no access has been granted to his respective group from Lake Formation.
The IAM Identity Center authentication integration is complete; you can use both Amazon Redshift and Athena through SageMaker Unified Studio in a simplified, all-in-one interface.Note that, at the time of writing, Athena doesn’t work with Redshift Managed Storage (RMS).
Clean up
Complete the following steps to clean up the resources you created as part of this post:
- Delete the data from the S3 bucket.
- Delete the Data Catalog objects.
- Delete the Lake Formation resources and Athena account.
- Delete the SageMaker Unified Studio project and associated domain.
- If you created new Redshift cluster for testing this solution, delete the cluster.
Conclusion
In this post, we provided a comprehensive guide to enabling trusted identity propagation within SageMaker Unified Studio. We covered the setup of a SageMaker Unified Studio domain with SSO, the creation of tailored projects, efficient user onboarding with appropriate permissions, and the management of AWS Glue and Amazon Redshift managed catalog permissions using Lake Formation. Through practical examples, we demonstrated how to use both Amazon Redshift and Athena within SageMaker Unified Studio, showcasing secure data access and analysis capabilities. This approach helps organizations maintain strict identity controls while helping data scientists and analysts derive valuable insights from both data lake and data warehouse environments, supporting both security and productivity in machine learning workflows.
For more information on this integration, refer to Trusted identity propagation.
About the authors
Friday Squid Blogging: Squid Inks Philippines Fisherman
Post Syndicated from Bruce Schneier original https://www.schneier.com/blog/archives/2025/10/friday-squid-blogging-squid-inks-philippines-fisherman.html
Good video.
As usual, you can also use this squid post to talk about the security stories in the news that I haven’t covered.
How and Why Netflix Built a Real-Time Distributed Graph: Part 1 — Ingesting and Processing Data…
Post Syndicated from Netflix Technology Blog original https://netflixtechblog.com/how-and-why-netflix-built-a-real-time-distributed-graph-part-1-ingesting-and-processing-data-80113e124acc
How and Why Netflix Built a Real-Time Distributed Graph: Part 1 — Ingesting and Processing Data Streams at Internet Scale
Authors: Adrian Taruc and James Dalton
This is the first entry of a multi-part blog series describing how we built a Real-Time Distributed Graph (RDG). In Part 1, we will discuss the motivation for creating the RDG and the architecture of the data processing pipeline that populates it.
Introduction
The Netflix product experience historically consisted of a single core offering: streaming video on demand. Our members logged into the app, browsed, and watched titles such as Stranger Things, Squid Game, and Bridgerton. Although this is still the core of our product, our business has changed significantly over the last few years. For example, we introduced ad-supported plans, live programming events (e.g., Jake Paul vs. Mike Tyson and NFL Christmas Day Games), and mobile games as part of a Netflix subscription. This evolution of our business has created a new class of problems where we have to analyze member interactions with the app across different business verticals. Let’s walk through a simple example scenario:

- Imagine a Netflix member logging into the app on their smartphone and beginning to watch an episode of Stranger Things.
- Eventually, they decide to watch on a bigger screen, so they log into the app on a smart TV in their home and continue watching the same episode.
- Finally, after completing the episode, they log into the app on their tablet and play the game “Stranger Things: 1984”.
We want to know that these three activities belong to the same member, despite occurring at different times and across various devices. In a traditional data warehouse, these events would land in at least two different tables and may be processed at different cadences. But in a graph system, they become connected almost instantly. Ultimately, analyzing member interactions in the app across domains empowers Netflix to create more personalized and engaging experiences.
In the early days of our business expansion, discovering these relationships and contextual insights was extremely difficult. Netflix is famous for adopting a microservices architecture — hundreds of microservices developed and maintained by hundreds of individual teams. Some notable benefits of microservices are:
- Service Decomposition: The overall platform is separated into smaller services, each responsible for a specific business capability. This modularity allows for independent service development, deployment, and scaling.
- Data Isolation: Each service manages its own data, reducing interdependencies. This allows teams to choose the most suitable data schemas and storage technologies for their services.
However, these benefits also led to drawbacks for our data science and engineering partners. In practice, the separation of business concerns and service development ultimately resulted in a separation of data. Manually stitching data together from our data warehouse and siloed databases was an onerous task for our partners. Our data engineering team recognized we needed a solution to process and store our enormous swath of interconnected data while enabling fast querying to discover insights. Although we could have structured the data in various ways, we ultimately settled on a graph representation. We believe a graph offers key advantages, specifically:
- Relationship-Centric Queries: Graphs enable fast “hops” across multiple nodes and edges without expensive joins or manual denormalization that would be required in table-based data models.
- Flexibility as Relationships Grow: As new connections and entities emerge, graphs can quickly adapt without significant schema changes or re-architecture.
- Pattern and Anomaly Detection: Our stakeholders’ use cases often require identifying hidden relationships, cycles, or groupings in the data — capabilities much more naturally expressed and efficiently executed using graph traversals than siloed point lookups.
This is why we set out to build a Real-Time Distributed Graph, or “RDG” for short.
Ingestion and Processing
Three main layers in the system power the RDG:
- Ingestion and Processing — receive events from disparate upstream data sources and use them to generate graph nodes and edges.
- Storage — write nodes and edges to persistent data stores.
- Serving — expose ways for internal clients to query graph nodes and edges.
The rest of this post will focus on the first layer, while subsequent posts in this blog series will cover the other layers. The diagram below depicts a high-level overview of the ingestion and processing pipeline:

Building and updating the RDG in real-time requires continuously processing vast volumes of incoming data. Batch processing systems and traditional data warehouses cannot offer the low latency needed to maintain an up-to-date graph that supports real-time applications. We opted for a stream processing architecture, enabling us to update the graph’s data as events happen, thus minimizing delay and ensuring the system reflects the latest member interactions within the Netflix app.
Kafka as the Ingestion Backbone
Member actions in the Netflix app are published to our API Gateway, which then writes them as records to Apache Kafka topics. Kafka is the mechanism through which internal data applications can consume these events. It provides durable, replayable streams that downstream processors, such as Apache Flink jobs, can consume in real-time.
Our team’s applications consume several different Kafka topics, each generating up to roughly 1 million messages per second. Topic records are encoded in the Apache Avro format, and Avro schemas are persisted in an internal centralized schema registry. In order to strike a balance between maintaining data availability and managing the financial expenses of storage infrastructure, we tailor retention policies for each topic according to its throughput and record size. We also persist topic records to Apache Iceberg data warehouse tables, which allows us to backfill data in scenarios where older data is no longer available in the Kafka topics.
Processing Data with Apache Flink
The event records in the Kafka streams are ingested by Flink jobs. We chose Flink because of its strong capabilities around near-real-time event processing. There is also robust internal platform support for Flink within Netflix, which allows jobs to integrate with Kafka and various storage backends seamlessly. At a high level, the anatomy of an RDG Flink job looks like this:

For the sake of simplicity, the diagram above depicts a basic flow in which a member logs into their Netflix account and begins watching an episode of Stranger Things. Reading the diagram from left to right:
- The actions of logging into the app and watching the Stranger Things episode are ultimately written as events to Kafka topics.
- The Flink job consumes event records from the upstream Kafka topics.
- Next, we have a series of Flink processor functions that:
- Apply filtering and projections to remove noise based on the individual fields that are present — or in some cases, not present — in the events.
- Enrich events with additional metadata, which are stored and accessed by the processor functions via side inputs.
- Transform events into graph primitives — nodes representing entities (e.g., member accounts and show/movie titles), and edges representing relationships or interactions between them. In this example, the diagram only shows a few nodes and an edge to keep things simple. However, in reality, we create and update up to a few dozen different nodes and edges, depending on the member actions that occurred within the Netflix app.
- Buffer, detect, and deduplicate overlapping updates that occur to the same nodes and edges within a small, configurable time window. This step reduces the data throughput we publish downstream. It is implemented using stateful process functions and timers.
- Publish nodes and edges records to Data Mesh, an abstraction layer that connects data applications and storage systems. We write a total (nodes + edges) of more than 5 million records per second to Data Mesh, which handles persisting the records to various data stores that other internal services can query.
From One Job to Many: Scaling Flink the Hard Way
Initially, we tried having just one Flink job that consumed all the Kafka source topics. However, this quickly became a big operational headache since different topics can have different data volumes and throughputs at different times during the day. Consequently, tuning the monolithic Flink job became extremely difficult — we struggled to find CPU, memory, job parallelism, and checkpointing interval configurations that ensured job stability.
Instead, we pivoted to having a 1:1 mapping from the Kafka source topic to the consuming Flink job. Although this led to additional operational overhead due to more jobs to develop and deploy, each job has been much simpler to maintain, analyze, and tune.
Similarly, each node and edge type is written to a separate Kafka topic. This means we have significantly more Kafka topics to manage. However, we decided the tradeoff of having bespoke tuning and scaling per topic was worth it. We also designed the graph data model to be as generic and flexible as possible, so adding new types of nodes and edges would be an infrequent operation.
Acknowledgements
We would be remiss if we didn’t give a special shout-out to our stunning colleagues who work on the internal Netflix data platform. Building the RDG was a multi-year effort that required us to design novel solutions, and the investments and foundations from our platform teams were critical to its successful creation. You make the lives of Netflix data engineers much easier, and the RDG would not exist without your diligent collaboration!
—
Thanks for reading the first season of the RDG blog series; stay tuned for Season 2, where we will go over the storage layer containing the graph’s various nodes and edges.
![]()
How and Why Netflix Built a Real-Time Distributed Graph: Part 1 — Ingesting and Processing Data… was originally published in Netflix TechBlog on Medium, where people are continuing the conversation by highlighting and responding to this story.
Securing Amazon Bedrock API keys: Best practices for implementation and management
Post Syndicated from Jennifer Paz original https://aws.amazon.com/blogs/security/securing-amazon-bedrock-api-keys-best-practices-for-implementation-and-management/
Recently, AWS released Amazon Bedrock API keys to make calls to the Amazon Bedrock API. In this post, we provide practical security guidance on effectively implementing, monitoring, and managing this new option for accessing Amazon Bedrock to help you build a comprehensive strategy for securing these keys. We also provide guidance on the larger family of service-specific credentials, so that you can also reinforce your AWS CodeCommit and Amazon Keyspaces (for Apache Cassandra) implementation if needed.
Note: For the remainder of this post, the terms service-specific credentials and API keys will be used interchangeably.
Choosing the best mechanism to access Amazon Bedrock
Our recommendation is to use temporary security credentials provided by AWS Security Token Service (AWS STS) service whenever possible as a preferred authentication method.
API keys can be used when your use case blocks the use of temporary AWS STS credentials. A common example is when using third-party or packaged software that specifically requires API key authentication through HTTP bearer tokens and cannot be configured to use SigV4 signing with temporary AWS STS credentials.
If you find that you don’t need to use API Keys, consider using service control policies (SCPs) to deny the creation and use of these keys.
If you conclude that your use case requires API keys, then consider the two types of API keys:
- Short-term API keys: Consider using short-term API keys if AWS STS credentials cannot be used, because they provide a built-in expiration mechanism and will automatically expire after a specified duration, stopping credentials from being used indefinitely if they are exposed.
- Long-term API keys: Long-term API Keys should only be used when neither AWS STS credentials nor short-lived credentials can be used, such as with packaged software and SDKs that expect a static long-lived API key and cannot be modified.
While implementing the controls in this post addresses most API key security concerns, remember that security is an ongoing process. Continue following AWS security best practices and regularly review your security posture as part of a comprehensive security strategy.
Understanding service-specific credentials
Service-specific credentials are specialized authentication credentials that provide direct access to specific AWS services. These credentials are different from other AWS security credentials (such as access keys, secret access keys, and session tokens) and are designed for use with specific AWS services.
The key characteristics of service-specific credentials include:
- Each credential is tied to a specific AWS service
- They are associated with AWS Identity and Access Management (IAM) principals
- They can be managed through both the AWS Management Console and the AWS Command Line Interface (AWS CLI)
- They can be monitored through AWS CloudTrail
- The prefix to a service-specific credential ID is
ACCA - Organizations can control the creation and use of service-specific credentials through SCPs
Let’s learn more about service-specific credentials and their use with Amazon Bedrock.
Amazon Bedrock API keys
Amazon Bedrock API keys are service-specific credentials that provide direct access to Amazon Bedrock. The bedrock:CallWithBearerToken permission grants the ability to use these tokens to perform Amazon Bedrock API actions.
Key types and characteristics
There are two types of API keys, and they have the following characteristics.
Short-term API keys:
- Uses pre-signed SigV4 authentication
- Short-term API keys are generated locally on the client side, therefore their creation of these short-term keys won’t be recorded in CloudTrail
- Cannot be retrieved through credential reports or AWS CLI calls
- Last as long as the IAM session that generated the API key or 12 hours, whichever is shortest
- Have the same permissions as the role that you use to generate the key
- Pattern:
bedrock-api-key-YmVkcm9jay5hbWF6b25hd3MuY29tLz9BY3Rpb249Q2FsbFdpdGhCZWFyZXJUb2tlbiZYLUFtei1BbGdvcml0aG09QVdTNC1ITUFDLVNIQTI1NiZYLUFtei1DcmVkZW50aWFsP[A-Za-Z0-9\\]+={0,2}
Long-term API keys:
- When an Amazon Bedrock long-term API key is created through the Amazon Bedrock console, AWS automatically generates a dedicated IAM user with the naming convention
BedrockAPIKey-xxxand attaches the AmazonBedrockLimitedAccess managed policy - The IAM user created through the Amazon Bedrock console doesn’t have console access enabled, a console password, an access key, or multi-factor authentication (MFA) enabled
- Alternatively, when an Amazon Bedrock long-term key is created through the IAM console, you can associate the Amazon Bedrock service-specific credential directly to an existing IAM user
- Each IAM user can have up to two long-term API keys
- Can be configured with expiration periods ranging from one day to indefinite duration.
- Duration can be controlled with three new condition keys to govern API keys for Amazon Bedrock. Here is an example SCP.
- Pattern:
ABSKQmVkcm9ja0FQSUtleS[A-Za-z0-9+\/]+={0,2} - CloudTrail will log an event when long-term API keys are created, as shown in the following example. You can also identify long-term API keys using the AWS CLI.
Identify
There are several key aspects to understand when working with API keys. Short-term API keys are generated on the client-side and aren’t visible through standard AWS API listings.
Long-term API keys offer some additional visibility and can be managed through multiple methods. You can identify which principal has an associated long-term API key by using the Amazon Bedrock console or IAM console. You can list service-specific credentials using AWS CLI commands or the AWS SDK, which will list the service-specific credentials for a specified user.
Protect
Bedrock has introduced three condition keys that enhance your ability to control and secure API key usage within your AWS environment:
- You can use the iam:ServiceSpecificCredentialServiceName condition key to allow the AWS services that a principal can create service-specific credentials for.
- Use the iam:ServiceSpecificCredentialAgeDays condition to enforce security best practices by setting a maximum duration limit for long-term API keys at creation time.
- Finally, by using the bedrock:BearerTokenType condition key, you can deny or allow the use of a specific type of API key for Amazon Bedrock, whether it’s a short-term or long-term API key.
These condition keys play an important role in managing the distinct security characteristics of short-term and long-term API keys, enabling security teams to enforce organizational policies and security best practices through SCPs at the AWS Organizations level. To learn more, see the GitHub repo for examples of how to apply these SCPs.
Short-term API keys include a native expiration window that helps limit potential security exposure. When implementing these keys, be aware that they inherit the permissions of the signing principal, which can be more than Amazon Bedrock permissions. You can implement comprehensive monitoring as described in the Detect section.
Long-term API keys, which can be configured with extended expiration periods, offer convenience for long-running applications but should have special attention regarding controls and monitoring mechanisms to offset the increased exposure window these credentials present.
If your organization has decided that Amazon Bedrock API keys aren’t required for your environment, you can implement SCPs to block the creation of service-specific credentials (iam:CreateServiceSpecificCredential) and block bearer token use for Amazon Bedrock (bedrock:CallWithBearerToken).
Note: If you do not use the condition
iam:ServiceSpecificCredentialServiceNamein an IAM policy,iam:CreateServiceSpecificCredentialwill then also deny the creation of API keys for other services, such as AWS CodeCommit and Amazon Keyspaces (for Apache Cassandra).
Here’s an example SCP that denies the creation of Amazon Bedrock service-specific credentials and the use of API keys in Amazon Bedrock. This prohibits builders in your organization from creating new API keys, reducing the risk of unauthorized key creation. This approach is valuable for organizations that want to maintain strict control over their authentication methods or have no business need for service-specific credentials. A condition can also be added to the SCP to allowlist specific roles to be able to create service-specific credentials by adding a condition ArnNotLikeIfExists for the principals listed under aws:PrincipalArn.
As part of protecting API keys, regularly review and adjust permissions to align with the principle of least privilege. For long-term API keys created through the Amazon Bedrock console, AWS automatically creates an IAM user with the AmazonBedrockLimitedAccess managed policy. This policy grants access to various Amazon Bedrock, AWS Key Management Service (AWS KMS), IAM, Amazon Elastic Compute Cloud (Amazon EC2), and AWS Marketplace actions. For both long-term and short-term API keys, evaluate if your principals have more permissions than required for their use case. If excessive permissions are identified, replace the AmazonBedrockLimitedAccess policy with a custom policy that has scoped down permissions.
Detect
API keys require different monitoring approaches based on their type. While the creation of short-term API keys cannot be detected because they are generated client-side, the creation of long-term API keys can be monitored through CloudTrail events. However, the use of both short-term and long-term API keys can be detected through CloudTrail events. Because of their extended validity period, long-term API keys are more susceptible to unauthorized use, making comprehensive monitoring essential. Organizations should implement stringent monitoring controls including:
- Monitor
CreateUserevents withBedrockAPIKey-prefix usernames. If a user was created through the Amazon Bedrock console, the event will look like the following: - Track
CreateServiceSpecificCredentialevents forrequestparameters.serviceName = bedrock.amazonaws.com - Watch for active API key usage indicators:
additionalEventData.callWithBearerToken = trueeventSource = bedrock.amazonaws.com
- EventBridge rules:
CreateServiceSpecificCredentialRuleandBearerTokenUsageRulemonitor CloudTrail for credential creation and bearer token usage - SNS topic:
BedrockAlertsTopicdelivers encrypted security alerts through email - KMS key:
SNSEncryptionKeyencrypts SNS messages - IAM roles: Provide necessary access for service operations
- Every 24 hours, the AWS Config rule triggers a Lambda function that enumerates IAM users in the account
- For each user, the function checks for active service-specific credentials
- Users with service-specific credentials are marked as
NON_COMPLIANT - Users without active credentials are marked as
COMPLIANT
- Users with service-specific credentials are marked as
- Results are submitted to AWS Config for reporting and potential remediation
git clone https://github.com/awslabs/aws-config-rules.gitcd aws-config-rules/python-rdklibgit fetch && git checkout IAM_USER_NO_SERVICE_SPECIFIC_CREDENTIALSpip install rdk rdklibrdk deploy IAM_USER_NO_SERVICE_SPECIFIC_CREDENTIALSaws configservice start-config-rules-evaluation --config-rule-names “IAM_USER_NO_SERVICE_SPECIFIC_CREDENTIALS”- Identify service-specific credentials:
- For immediate containment, you can deactivate the credential using the credential ID from the previous step:
- After you’ve assessed the event, you can permanently remove the associated API keys:
For a list of events to monitor, see Security Playbook for Responding to Amazon Bedrock Security Events.
Amazon EventBridge rules
You can enhance your security monitoring by implementing Amazon EventBridge rules to detect and alert on Amazon Bedrock API key lifecycle events, such as CreateServiceSpecificCredential.
Using EventBridge rules for monitoring has four components.
The preceding EventBridge rules monitor for specific patterns within a CloudTrail log, keying from eventName (the action being performed), eventSource (the service that the action is being performed by or to), and additionalEventData (the block of details of the response).
The following rule checks for the CloudTrail event CreateServiceSpecificCredential.
Use the following rule to look for actions performed with an API key (BearerToken = true):
EventBridge rule deployment
Use the CloudFormation template to set up automated monitoring for both the creation of service-specific credentials and their subsequent use. The template configures EventBridge to send email notifications when the preceding CloudTrail events are detected, providing real-time awareness of API key operations in your environment. To learn more, see the GitHub repo for the details of this solution and the CloudFormation template.
AWS Config rule for compliance
Use an AWS Config rule to monitor IAM users for active service-specific credentials to help maintain compliance with security policies.
The following are the steps taken by the AWS Config rule:
Config rule deployment
You can deploy this AWS Config rule by using AWS Config RDK, in CloudShell, or using your local CLI.
Respond and recover
Every incident response plan starts with the preparation phase. As part of the preparation phase, you should maintain clear records of API key ownership and usage, document which applications and teams use specific keys, and if long-term API keys are necessary, consider using secure storage such as AWS Secrets Manager.
When a security incident involving API keys is suspected, immediate action is crucial. The first step is to verify the potential compromise by reviewing CloudTrail logs to correlate API key creation use with approved change requests. This helps identify unauthorized key creation or use. Additionally, analyzing the source IP addresses and user agent strings from these logs can help determine if the access originated from approved locations and applications or potentially malicious sources.
The incident response approach varies significantly between key types. For short-term keys, while their maximum 12-hour expiration window limits potential damage, it’s still important to take immediate action rather than waiting for expiration. Security teams should identify applications or systems using the compromised short-term key and revoke the IAM role session or deny permissions to bedrock:CallWithBearerToken from the identity.
If an Amazon Bedrock long-term API key is involved in an active security event, security teams can take immediate action through either the console or AWS CLI. Through the console, teams can use the IAM console to quickly deactivate or delete long-term API keys. For organizations with automated response procedures, the AWS CLI provides commands for key management:
Respond using the AWS CLI
Use the following steps to respond to an API key event.
aws iam list-service-specific-credentials --user-name <user name> --service-name bedrock.amazonaws.com
aws iam update-service-specific-credential --service-specific-credential-id <credential ID> --user-name <user name> --status Inactive
aws iam delete-service-specific-credential --service-specific-credential-id <credential ID> --user-name <user name>
During the recovery phase, focus on creating new secure keys with appropriate configurations, updating application configurations, and make sure that all affected continuous integration and delivery (CI/CD) pipelines and development teams are notified of the changes.
Review of Amazon Bedrock API keys
The following table summarizes the various elements related to Amazon Bedrock API keys mapped to the NIST CSF 2.0 core function.
|
Type |
Identify |
Protect |
Detect (using events in CloudTrail) |
Respond |
|
Short-term API key Whitetexttexttexttext |
Short-term API keys are generated client-side and are not listed by an AWS API. |
Creation: Cannot block creation because short-term API keys are generated client-side. Use: Deny action Modify permissions for long-term and short-term Amazon Bedrock API keys |
Creation: Occurs client-side and no events are present in CloudTrail Use: CloudTrail events with EventBridge rules and SNS to detect/notify on the usage of API keys. |
Revoke IAM role session or deny permissions from identityWhitetexttexttext |
|
Long-term API key Whitetexttexttexttext |
IAM ListServiceSpecificCredentials action using the AWS CLI or SDKs |
Creation: Deny action Use: Deny action Modify permissions for long-term and short-term Bedrock API keys |
Creation: CloudTrail events with Use: CloudTrail events with EventBridge rules and SNS to detect and notify on creation and usage of API keys. |
Use the console or AWS CLI to quickly deactivate or delete long-term API keys Whitetexttexttext |
Broader service-specific credentials: Beyond Amazon Bedrock
Along with Amazon Bedrock support of API keys, other AWS services support service specific credentials, such as AWS CodeCommit and Amazon Keyspaces.
The security measures suggested in this post can also be applied to these services. The following table lists common use cases for these service specific credentials.
|
Service |
Use case |
Service name in response from iam:ListServiceSpecificCredentials |
Suggested alternatives |
|
AWS CodeCommit Git credentials |
Used to upload, add, or edit a file in an AWS CodeCommit repository |
codecommit.amazonaws.com |
Methods include SSH authentication and federated authentication: AWS CodeCommit: Setting up using other methods |
|
Amazon Keyspaces credentials for Apache Cassandra |
Used for Apache Cassandra-compatible access |
cassandra.amazonaws.com |
SigV4 authentication plugin is available and supports multiple programming languages and enables IAM roles and federated identities to authenticate. Create temporary credentials to connect to Amazon Keyspaces using an IAM role and the SigV4 plugin |
Conclusion
Understanding the implications of long-term API keys and how to manage them helps you to make informed decisions about your Amazon Bedrock API key implementation strategy. The key is to align security controls with risk appetite and operational requirements while maintaining a strong security posture.
AWS strongly recommends using AWS STS credentials as the primary authentication method wherever possible. If AWS STS credentials cannot be used, consider short-term API keys with their built-in expiration mechanism. Long-term API keys should only be implemented when neither AWS STS credentials nor short-term credentials are viable options. When implementing API keys, organizations should focus on identifying API keys through AWS CLI and CloudTrail logs, protecting by implementing preventive controls such as SCPs to manage API key creation and usage, detecting API key activities through comprehensive monitoring using CloudTrail events, EventBridge and AWS Config rules, and responding by maintaining clear incident response procedures to quickly address potentially compromised API keys.
Best practice is to implement these controls while maintaining proper access controls through the principle of least privilege. This layered approach helps you maintain a strong security posture while effectively using API keys for your development needs.