Netflix’s TimeSeries Abstraction is a scalable system for ingesting and querying petabytes of temporal event data with millisecond latency. We use Apache Cassandra 4.x as the underlying storage for these main reasons:
Throughput, latency, and cost: Cassandra can handle millions of low‑latency reads and writes in a cost-effective manner.
Operational maturity: Our data platform team has deep operational expertise running large Cassandra clusters in production.
However, using Cassandra at this scale introduces trade‑offs for TimeSeries workloads. A key challenge is wide partitions, as TimeSeries dataset partitions can grow quite large with events accumulating over time.
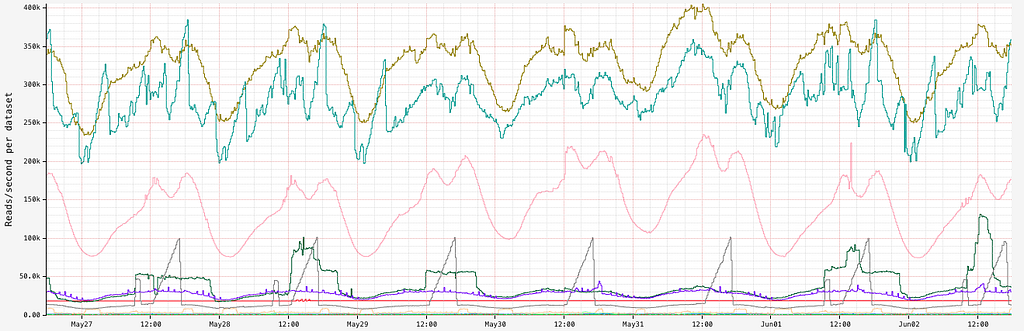
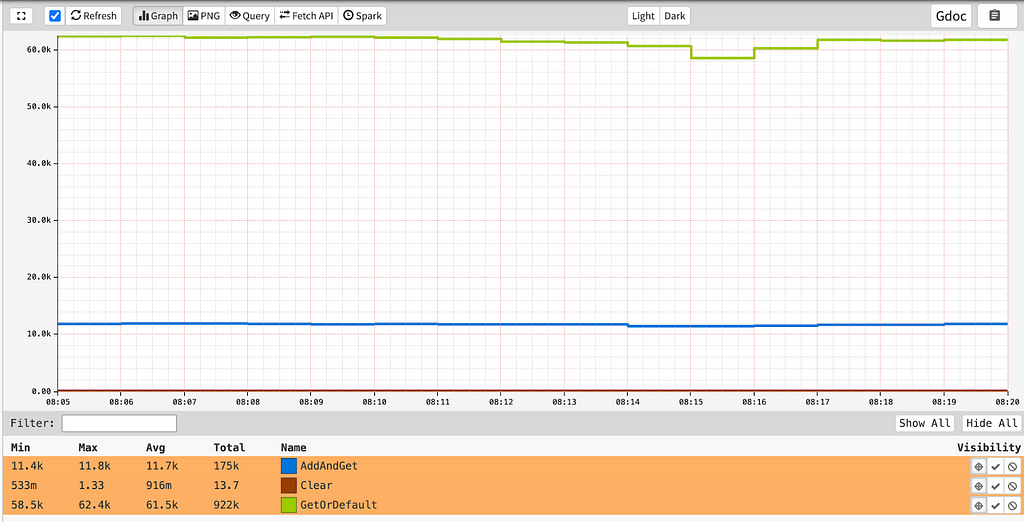
This problem is further compounded by the fact that TimeSeries servers routinely deal with a very high read throughput:
Reads/second for different datasets
This post walks through our journey to reduce the impact of wide partitions in our TimeSeries datasets, the solutions we built, and the lessons we learned.
Impact of Wide Partitions
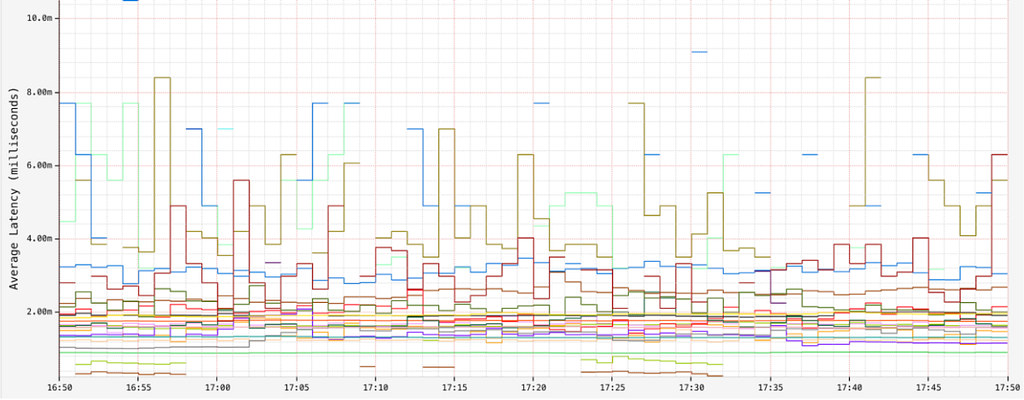
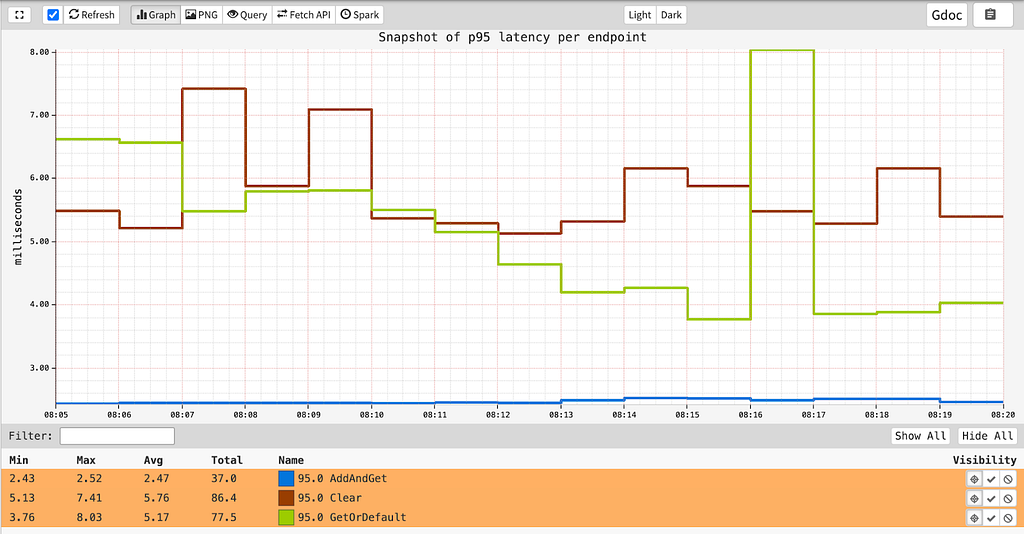
For most of our datasets, we observe an average read latency in the order of single-digit milliseconds:
Ideal Latency for Reads (ms)
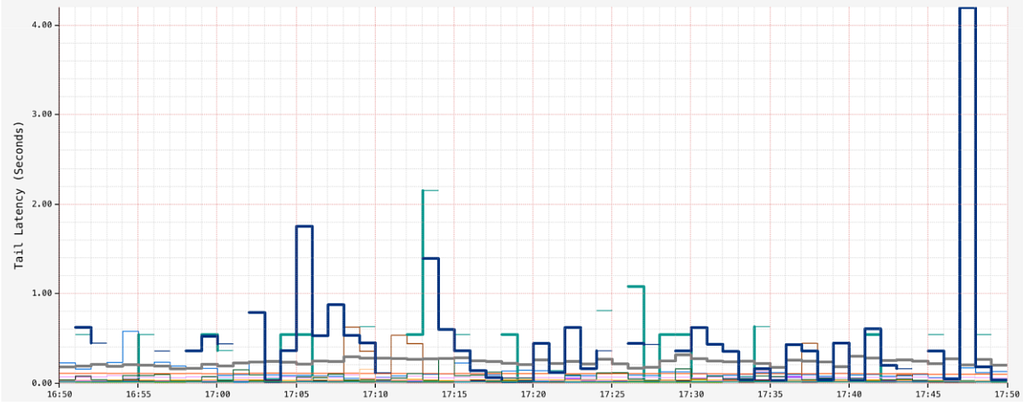
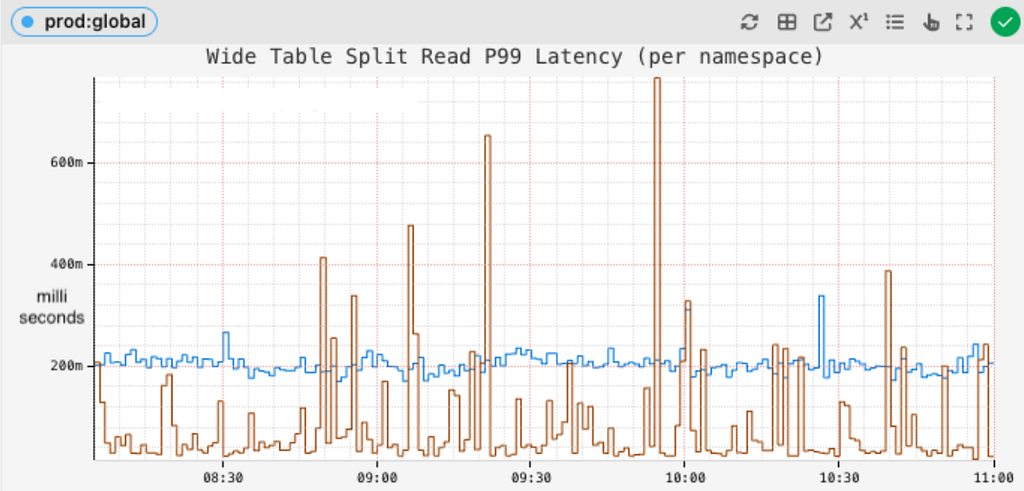
However, in some datasets, as partitions grow too wide, we observe high read latencies in the order of seconds, especially towards the tail end:
High Tail Latency for Reads (seconds)
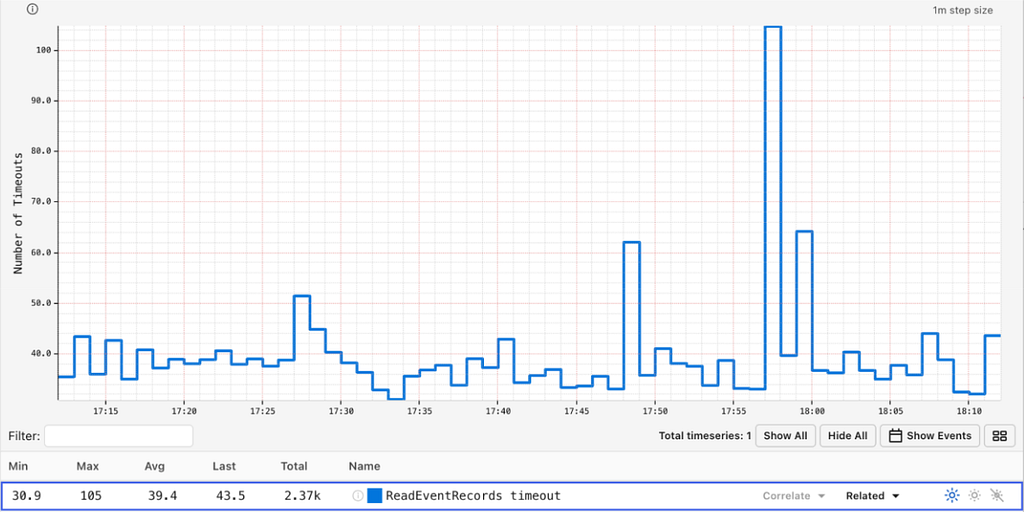
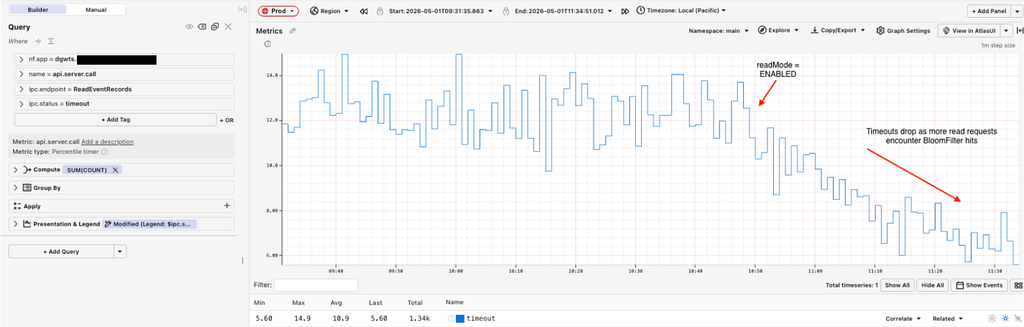
This can result in timeouts:
Read timeouts / second
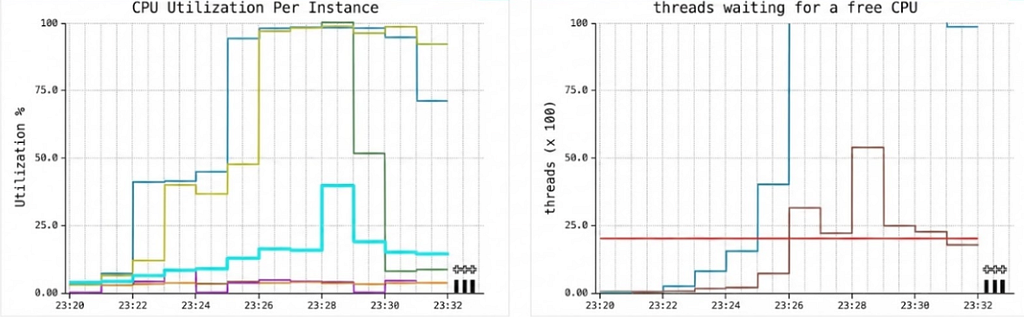
In extreme cases, if most of the reads target wide partitions, we can see Garbage Collection pauses, high CPU utilization and thread queueing.
High CPU utilization and thread-queueing in Cassandra clusters
Scaling up the underlying Cassandra cluster is always an option, but we need smarter alternatives than just throwing more money at the problem.
TimeSeries Partitioning Strategy
The TimeSeries Abstraction was designed to solve the problem of wide partitions by dividing the data into discrete time chunks. For more in-depth information, refer to our previous blog.
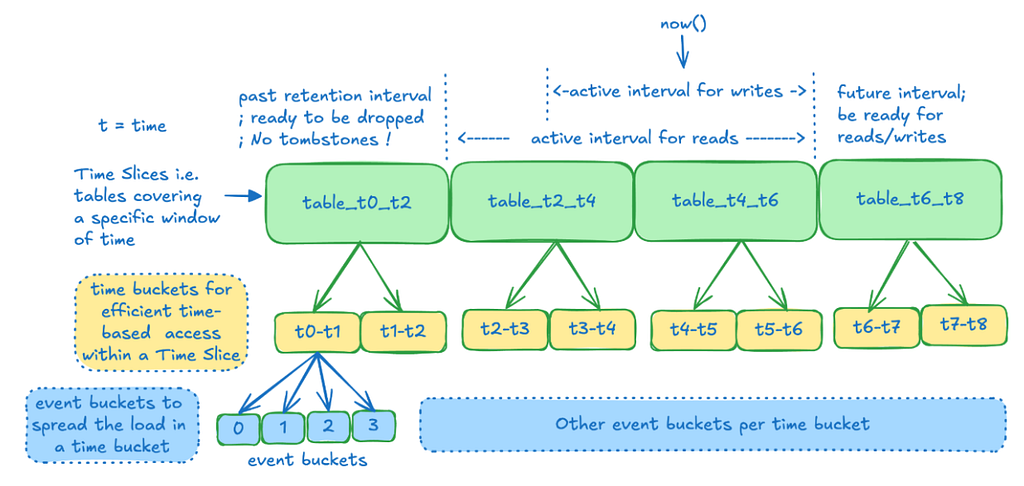
To summarize, here is an illustration of how TimeSeries partitioning strategy helps us break up wide partitions into manageable chunks.
Time Series partitioning breaking up a dataset into Time slices, time buckets and event buckets
This strategy further allows us to efficiently query and drop data based on time, without having to deal with tombstones.
Picking the Partitioning Strategy
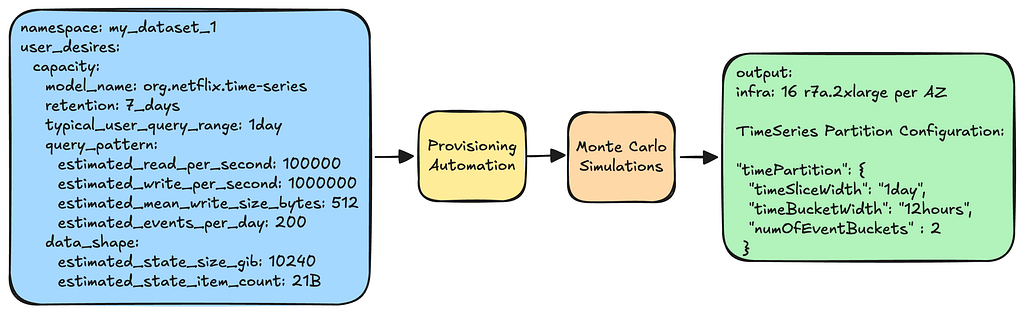
When a namespace (a.k.a. dataset) is created, users must specify their anticipated workload characteristics. This specification is then fed into our provisioning pipeline. The pipeline processes these inputs, runs Monte Carlo simulations, and produces an optimal infrastructure and partition configuration.
Provisioning picks optimal infra and configuration based on user inputs
You can learn more about our methodology of capacity planning in this insightful AWS re:Invent talk given by one of our stunning colleagues.
The Problem with the Current Approach
Although this method of provisioning is effective in many situations, it proves insufficient for TimeSeries workloads under these conditions:
Workload is unknown or inaccurately estimated: Early on in a project, users can lack a reliable picture of production traffic or simply misestimate key parameters.
Workload evolves over time: Traffic patterns, client behavior, and product requirements change. A “good” partitioning strategy on day one can become inefficient months later.
Data outliers exist: Not all TimeSeries IDs behave the same. A small percentage of IDs can receive a vastly higher volume of events than the rest.
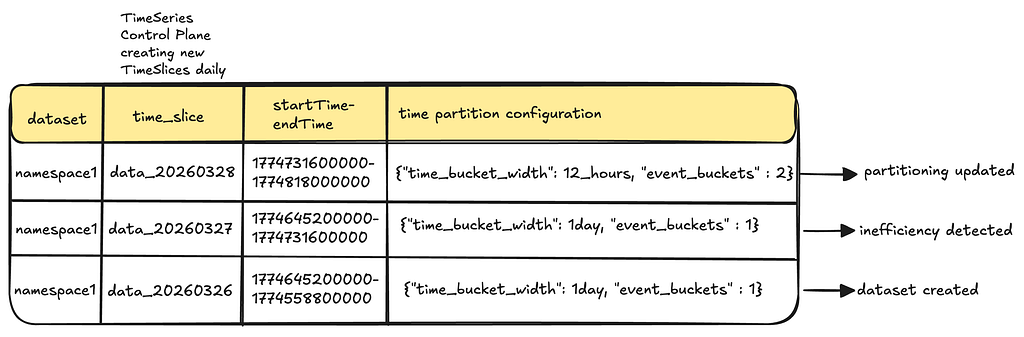
Fortunately, our design with discrete Time Slices gives us a natural escape hatch for the first two scenarios; each new Time Slice can use a different partitioning strategy.
Each Time Slice can have a unique partition strategy
However, manually adjusting these configurations in a fleet that has thousands of TimeSeries datasets is not sustainable. We need automation.
Solution 1: Time Slice Re-Partitioning
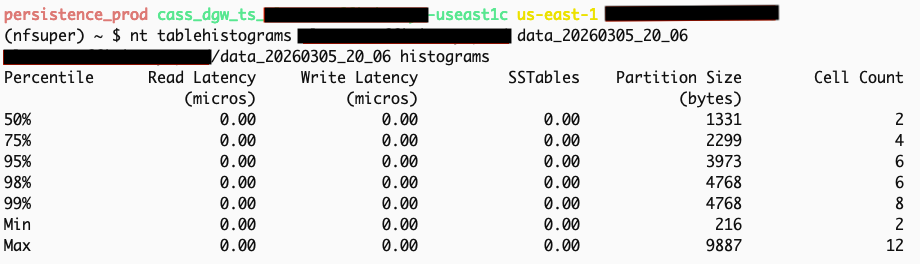
Cassandra exposes useful introspection APIs for understanding data usage and access patterns. For example, nodetool tablehistograms provide percentile distributions for partition sizes in a table. Using these tools, we can detect cases of both over and under partitioning.
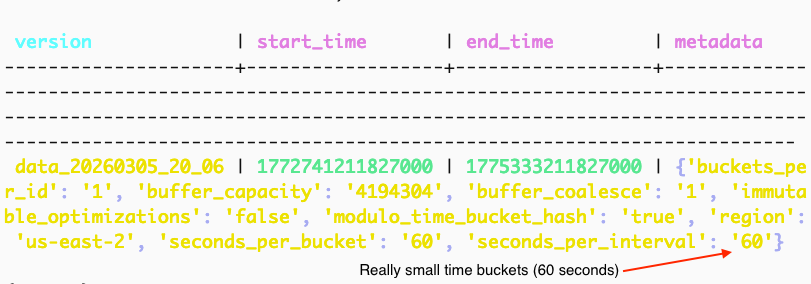
Below is an example of over‑partitioning, where the TimeSeries provisioning pipeline selected very small time_bucket intervals based on user provided inputs:
Provisioning selected 60s time buckets based on user inputs
causing partitions to have less than 10 KB of data, leading to high read amplification and thread queueing:
Histogram of the given Cassandra table showing partition size percentiles
In order to tune partition strategies efficiently, we added a background worker, which monitors partition histograms of Time Slices attached to a given application, and exposes it via a Cassandra virtual table:
Histograms exposed through a Cassandra Virtual table
It then computes an adjustment factor when it detects partition sizes not meeting a configured density. This configured density is often set between 2 MiB to 10 MiB depending on the workload.
DynamicTimeSliceConfigWorker:
namespace: my_dataset_1
Observed: TimeSlices have p99 partitions below configured target of 10MB.
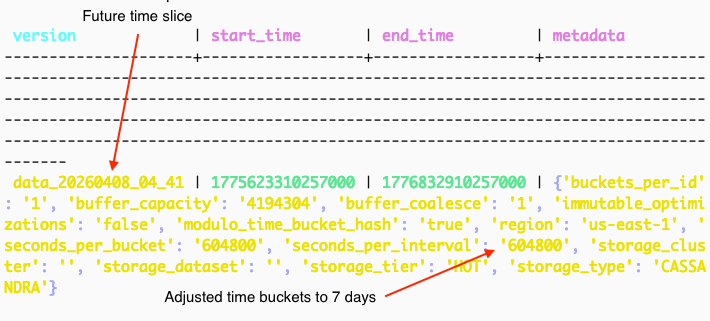
Proposed: time_bucket interval: 60s -> 604800s
The worker can then update future Time Slices with the new partition strategy:
Partitioning adjusted for future Time Slice(s)
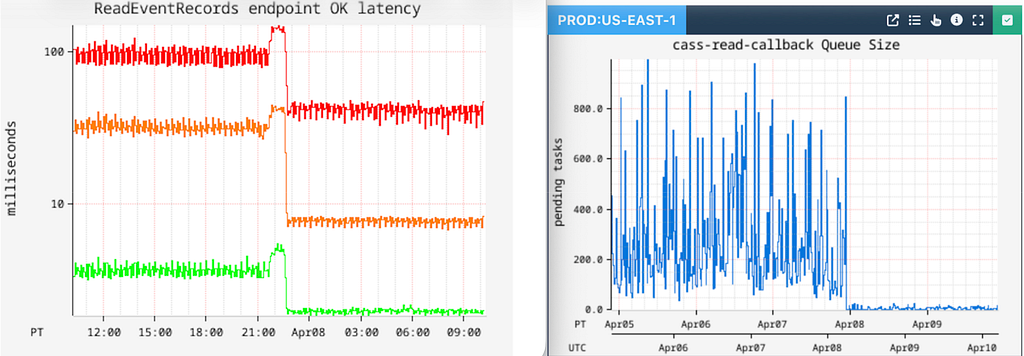
This strategy has yielded real results in reducing our read latencies, as well as reducing the number of timeouts caused by thread queueing.
Reduction in tail latency and thread queueing for
However, this strategy only works if most of the data exhibits such behavior that warrants re-partitioning of the entire table. It does not work in cases where only a percentage of IDs within the table are wide.
We have a couple of options here:
Do Nothing: This is sometimes the right approach if there is no observed impact to the application’s top-level metrics.
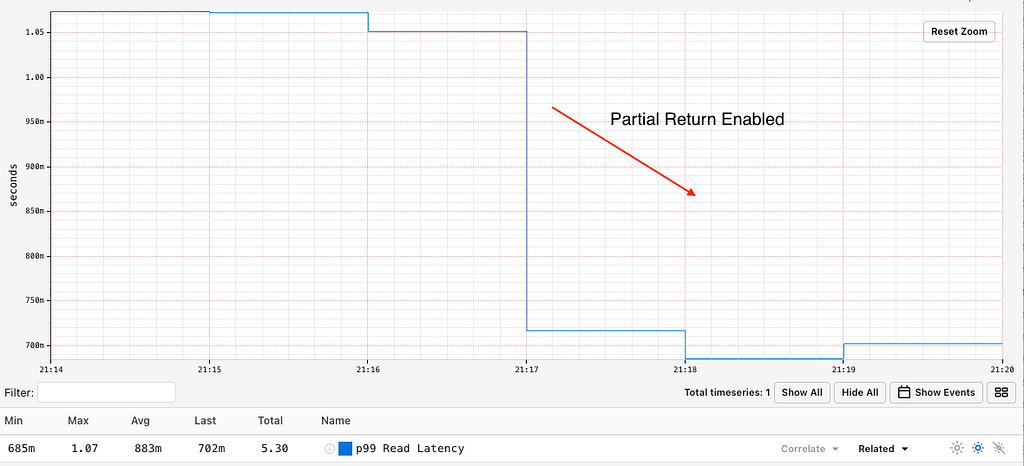
Partial Returns: We implemented a ‘Partial Return’ feature, which aborts an inflight request if it has breached a configured latency SLO, while returning whatever data it has collected up until that point. This is a great option for clients who care more about latency than fetching all the data.
Tail latency drops around the SLO cutoff as Partial Returns are enabled
Block IDs: This is an extreme step but worth mentioning, because we do deal with bad data that occasionally seeps into the system e.g. test or spam IDs that can make the system unstable.
Ultimately, we encounter scenarios where valid and important TimeSeries IDs accumulate a high enough volume of events, with callers needing to process all the related data. Simply tolerating elevated latencies or timeouts when querying these IDs is not a desirable outcome.
This is where dynamic partitioning comes into play.
Solution 2: Dynamic Partitioning per ID
Dynamic partitioning is an asynchronous pipeline that auto-detects and splits wide partitions on a TimeSeries ID level rather than at the table level.
It has three main stages:
Detection: Detects wide partitions for a given TimeSeries ID during the read path.
Planning & Splitting: Plans and executes splits of those partitions into optimal sizes asynchronously.
Serving Reads: Re-routes the read queries transparently to read data from the split partitions when ready.
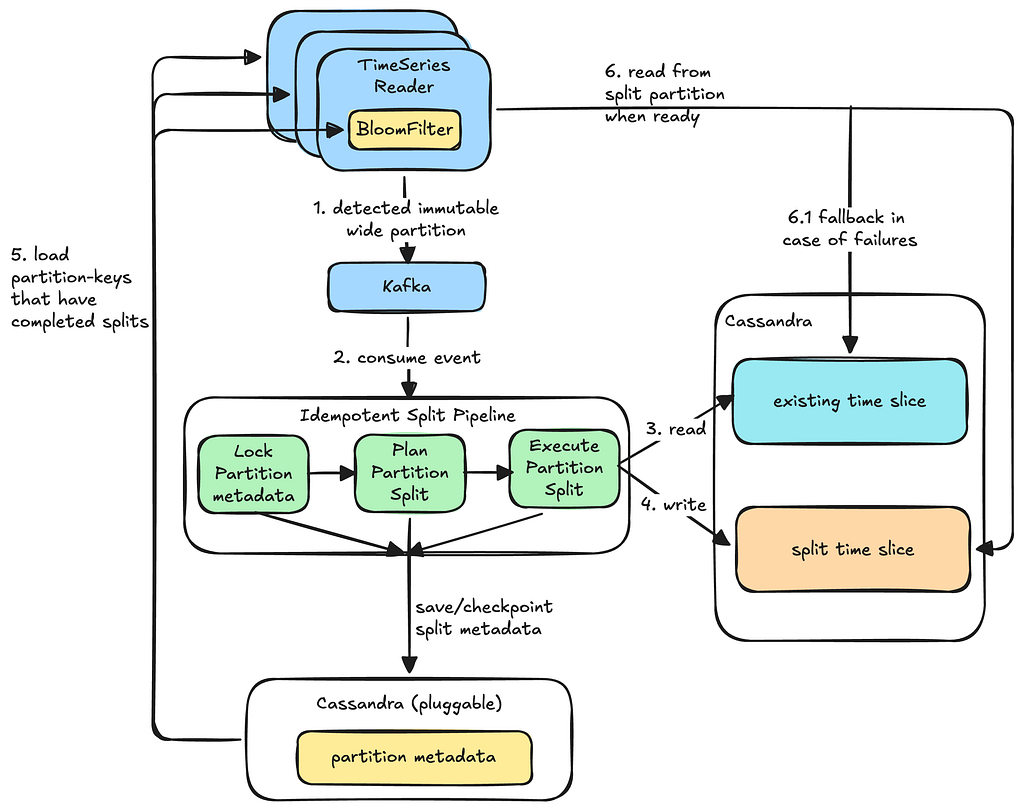
This is how it works at a high level; we will dive into details after:
Dynamic Wide Partition Split Async Pipeline
Here are the different stages of the pipeline:
Detection
Every TimeSeries read operation tracks how many bytes are read for a given partition. If the bytes read exceed a configured threshold, the server emits a detection event to Kafka:
{
  "time_slice": "data_20260328", // the Cassandra table this event was detected in
  "time_series_id": "profileId:123", // the ID detected as wide
  "time_bucket": 7, // the existing time_bucket partition
  "event_bucket": 2, // the existing event_bucket partition
  "immutable": true, // TimeSeries servers can compute if this partition is no longer receiving writes
  "version": "0" // reserved for future use e.g. invalidate if partition is no longer immutable
}
Our decision to detect wide partitions on reads, as opposed to writes, is based on our observation that the majority of the data in the wild doesn’t need this treatment. The slight downside is that some reads on these large partitions may suffer sub-optimal performance for a very short duration (typically seconds) until this process catches up.
Immutability
Although splitting mutable partitions is possible, it is inherently more complex. As a first step towards solving this problem, we chose to reduce the surface area of this change by focusing on immutable partitions, while still meaningfully reducing caller timeouts.
Planning
Detection may occur based on a partial read, so the planner must still read the entire partition once to compute an accurate split plan. The checkpointing becomes crucial here. For planning reads that fail to process the entire partition, the process can always continue from the last saved checkpoint.
Checkpointing
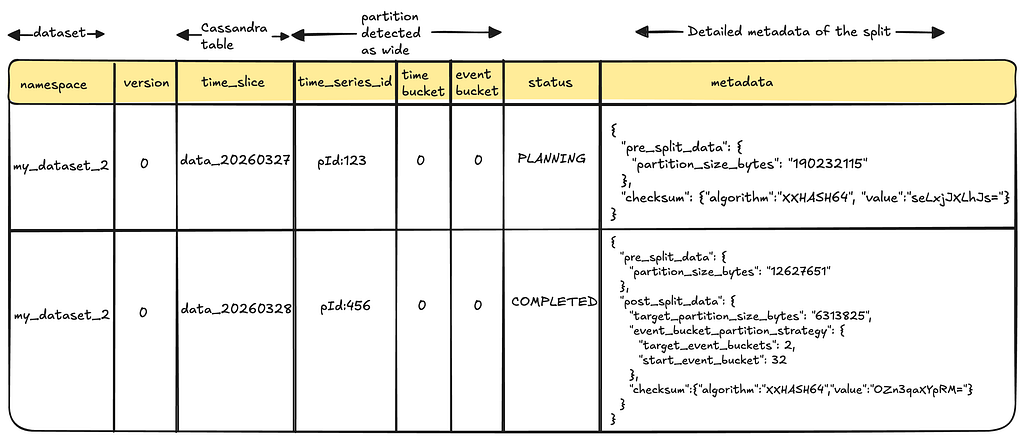
The wide_row metadata table serves as the backbone for state transitions and checkpointing of partition splits. It also stores information that is used later by TimeSeries servers to properly route Read queries.
wide_row metadata for storing split states and checkpoints
Splitting
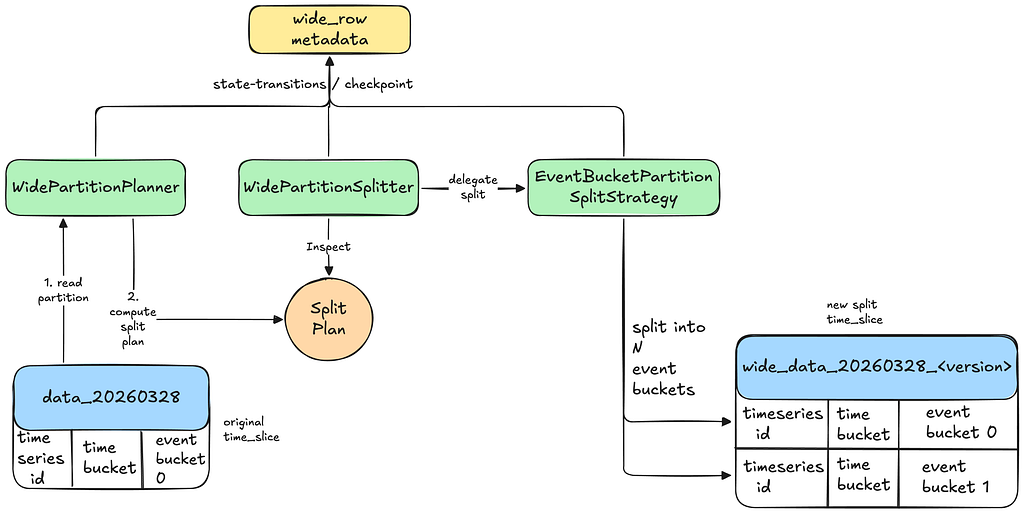
The Planner delegates the splitting of data to an appropriate split-strategy. For example, if EventBucketPartitionSplitStrategy is selected, we split the partition by assigning more event buckets to the same time bucket. If the partition is ultra-wide, we cap the number of event buckets we split into, in order to control the resultant read amplification. Spreading into multiple partitions in such cases is still beneficial in order to spread the read workload to multiple Cassandra replicas.
Split by assigning more event buckets for a given time bucket
Validating Splits
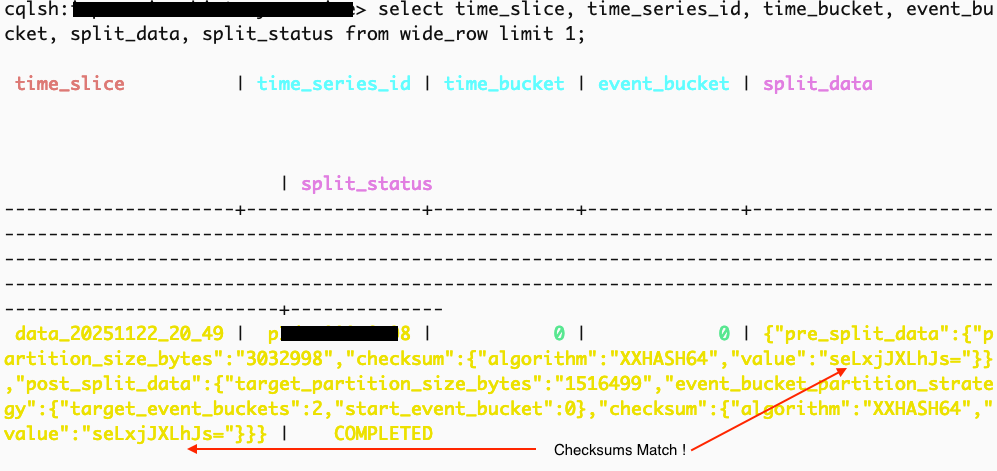
The Planner stores a pre-split checksum of a given partition during the planning phase, while the Splitter computes and stores the post-split checksum. The split status is marked as completed only if the two checksums match.
Ensure checksums match pre- and post-split before marking a split as COMPLETED
Tracking Splits
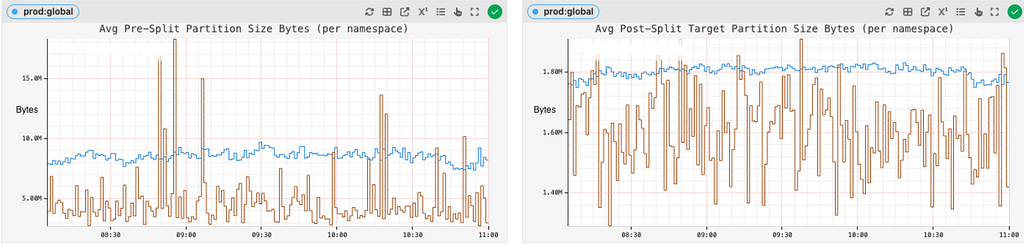
The pre- and post-split partition sizes across different datasets are tracked to see how effectively the partition splits are being planned and executed:
Track pre- and post-split partition sizes to ensure we are splitting optimally
Serving Reads
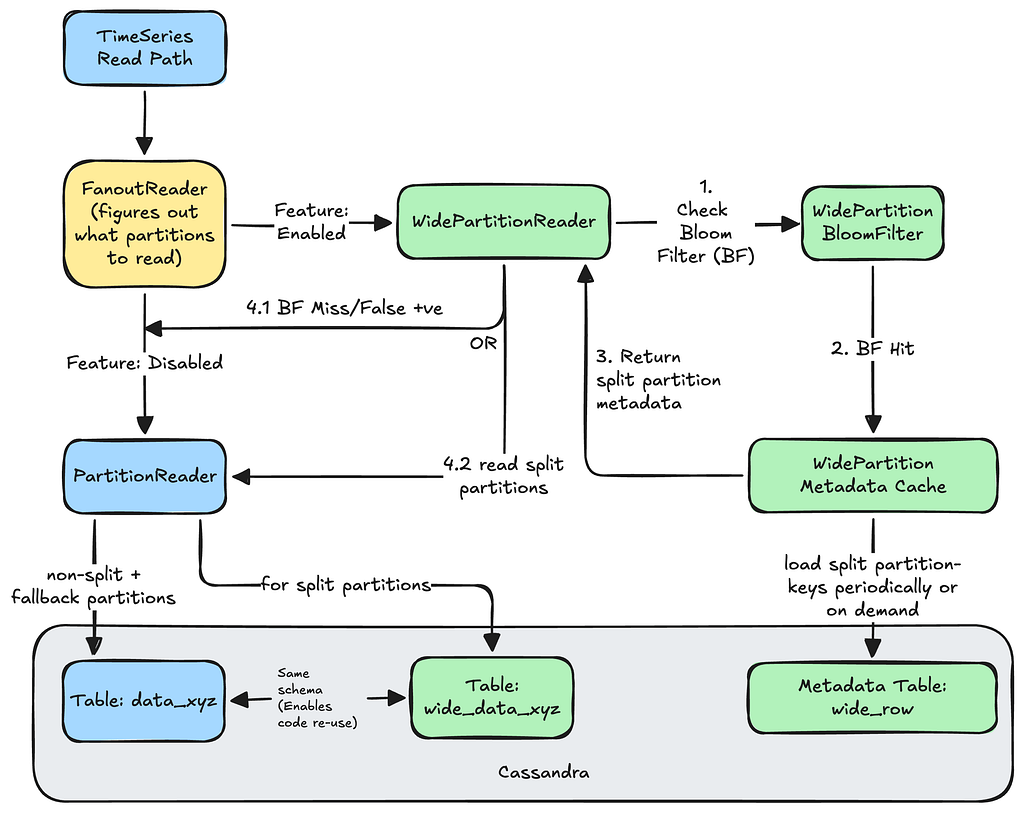
The TimeSeries servers load the partition-keys of completed splits periodically into in-memory Bloom filters. Every read operation checks the Bloom filter to see whether a query can be diverted to the split partitions.
Here is what the Read path looks like:
Read path for diverting reads to existing or split partitions
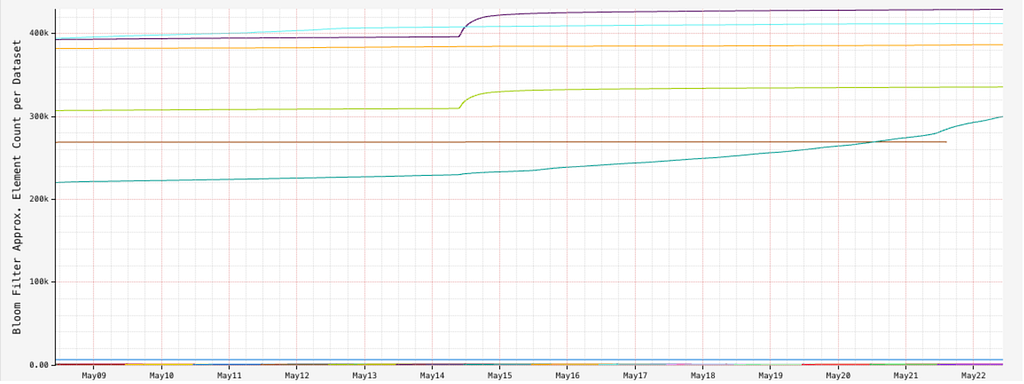
The size of the Bloom filters is monitored to ensure we have enough memory per server. Due to the compactness of partition keys, and ratio of wide partitions in a given dataset, the filters fit comfortably in each server instance.
Bloom filter approximate element count per namespace and time slice
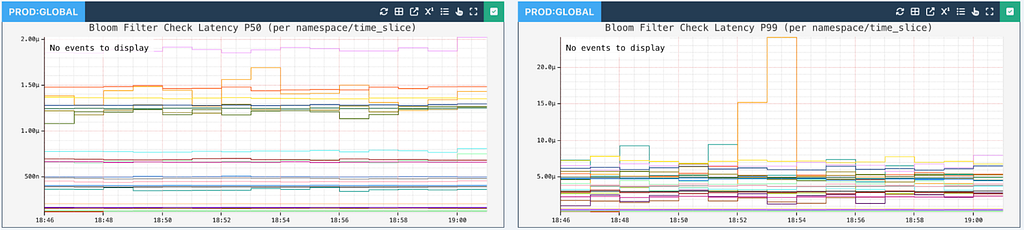
The Bloom filter latency to check whether a given partition key is wide for every read request is typically in single-digit microseconds or better, making this diversion practically invisible to the callers.
Latency for checking Bloom filters is extremely small for callers to notice the diversion
For the cases that do end up with a Bloom filter hit, the TimeSeries servers lookup the wide_row metadata to see how to read a specific wide partition:
{
  "pre_split_data": {
    "time_slice": "data_20260328",
    "time_series_id": "6313825", → What to read
    "time_bucket": 0,
    "event_bucket": 2
    …
  },
  "post_split_data": {
    "time_slice": "wide_data_20260328_0", → Where to read it from
    "event_bucket_partition_strategy": { → Strategy to delegate to for reading
    "target_event_buckets": 2,
    "start_event_bucket": 32 → How should the strategy read it
  }
  …
}
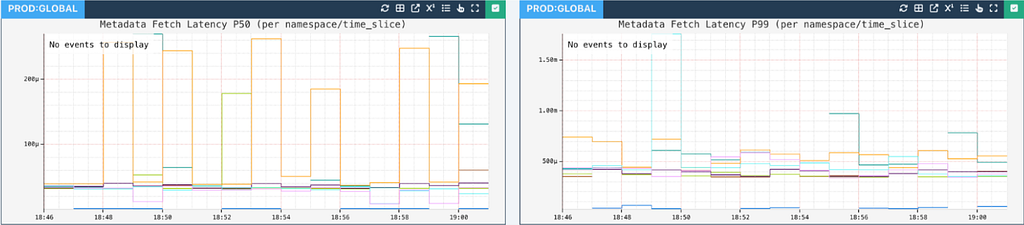
This metadata read is backed by a read-through cache, making it quite performant:
Metadata fetch latency is quite low to affect read operations
Finally, the reads for the split partitions are delegated to our existing PartitionReader. Having the same schema for the split table allows us to reuse code and minimize changes.
Fallbacks
The existing wide partition from the original time slice is never deleted. This helps us in creating safe fallbacks in many different scenarios of partial failures and eventual consistency. The slightly larger storage space we use as a result is worth the operational safety we gain.
Building Additional Confidence
Serving incorrect reads would be disastrous. To establish trust beyond checksums, we leveraged additional mechanisms such as:
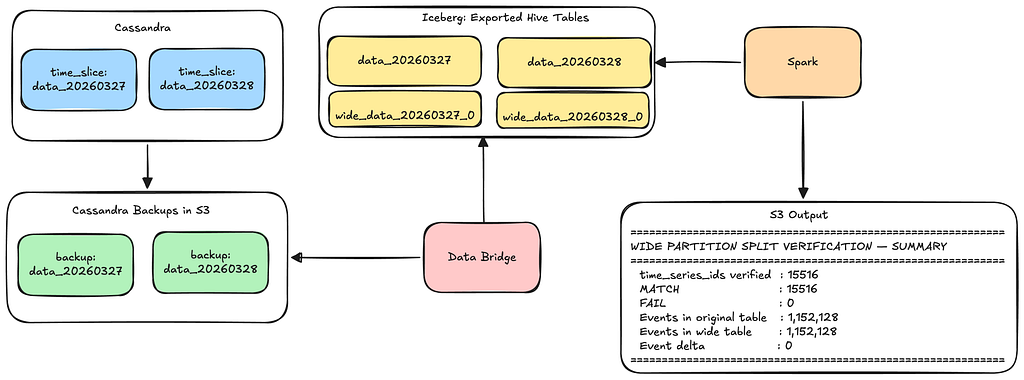
Using our existing Data Bridge pipelines to verify splits offline:
Spark job to ensure that the split data is an exact match to the original data
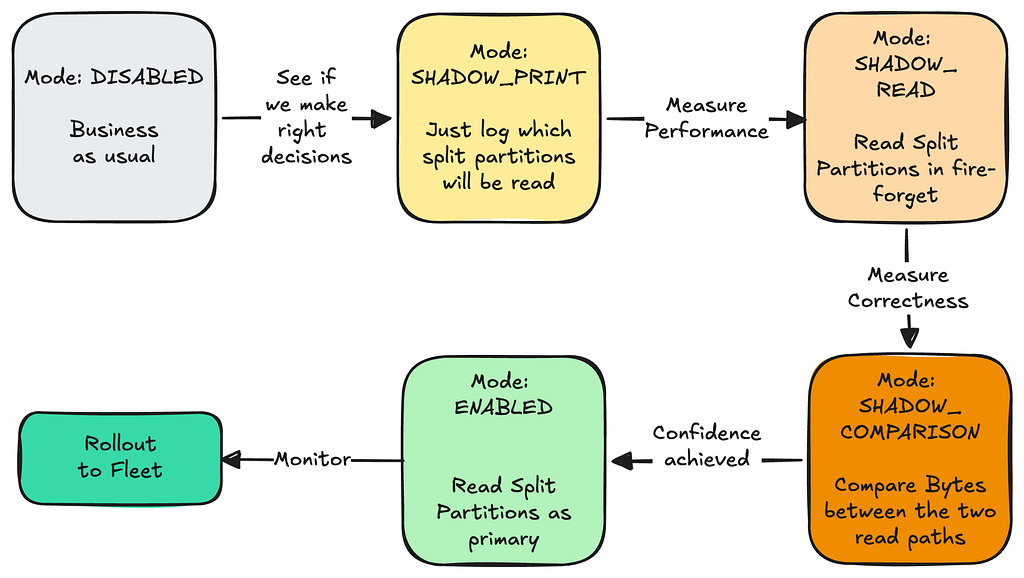
Implementing a phased rollout strategy to safely advance through stages as our confidence in the system grew:
Advance through Read modes once previous mode passes checks
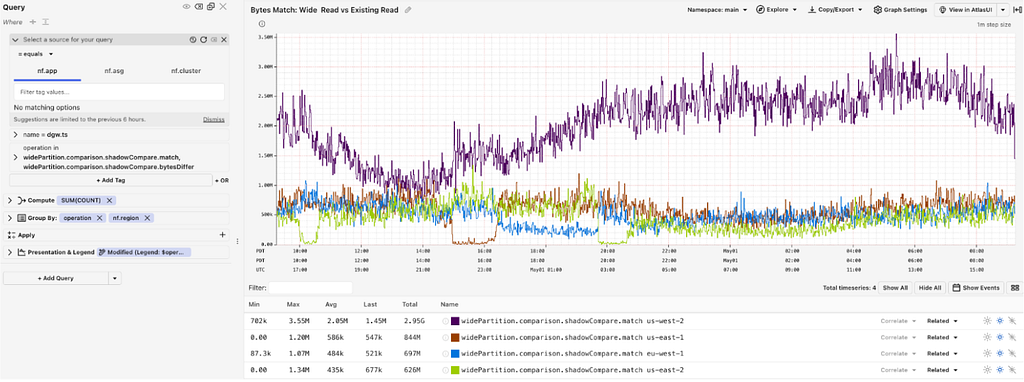
A critical part of this phased rollout was the Comparison phase, which compared bytes served by old read path and the new read path while in shadow mode:
A chart of bytes match vs bytes differ in a given shadow period
Results
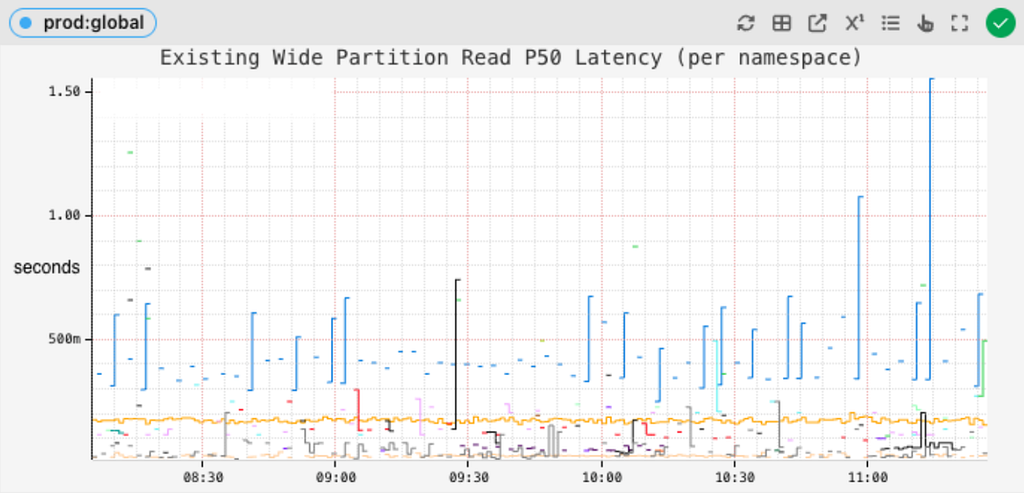
As a result of these dynamic splits, we see a huge improvement in the average read latency of most wide partitions, bringing it down from seconds:
Existing average latency for reading wide partitions
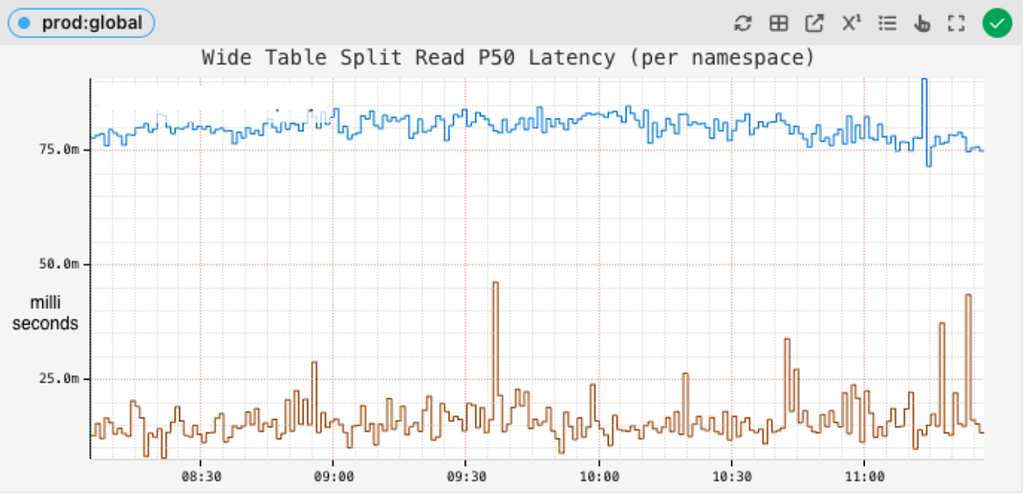
to low double-digit milliseconds!
Average latency for reading dynamically split partitions
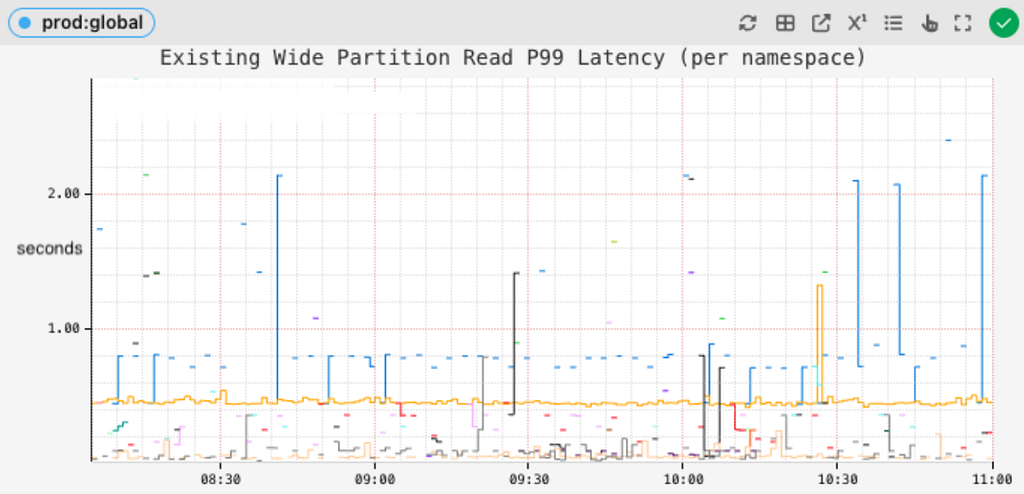
Tail latencies of reading wide partitions dropped from several seconds:
Existing tail latency for reading wide partitions
to around 200 ms or better:
Tail latency for reading dynamically split partitions
resulting in a drop in read timeouts:
Further, for extreme wide rows, where a dataset would face constant timeouts and unavailability blips, the service was able to paginate and query 500MB+ partitions while remaining available:
There is more work planned around this feature, like splitting mutable wide partitions, or re-processing previously failed splits, but this has been a successful start in improving service performance and reducing our support burden.
Further, we would like to highlight some key lessons that we learned at different points in this journey.
Reducing Surface Area: As a first step, explore simpler solutions that can still deliver meaningful impact. Also, reducing the surface area of a complex change and deploying incrementally pays off operationally.
Building Confidence: Invest time and resources to build confidence in new features, especially when justified by the feature complexity, deployment blast radius, and/or potential impact.
Netflix has a diverse range of graph use cases, each serving specific business needs with unique functionality and performance requirements. These use cases fall into two broad categories:
OLAP: These use cases typically involve open-ended and algorithmic exploration of large graph datasets. They often utilize industry-standard models and languages such as RDF with SPARQL, Property Graphs with Gremlin or openCypher, and even SQL. The primary focus in these situations is in-depth analysis, rather than achieving high throughput and low latency.
OLTP: These use cases require extremely high throughput — up to millions of operations per second — while delivering traversal results within milliseconds. Achieving such a level of performance often requires making trade-offs, which can include accepting eventual consistency or restricting query complexity. For example, the service can demand a specified starting point for traversals and enforce a maximum traversal depth. Such use cases are often directly tied to streaming or user experiences and demand high global availability.
Netflix’s Graph Abstraction was designed specifically for this second category of use cases. As of this writing, the abstraction is handling close to 10 million operations per second across 650 TB of graph datasets with low latency and cost efficiency.
This post is the first in a multi-part series that explores the Graph Abstraction architecture in depth. We’ll cover how the abstraction indexes data for real-time and historical views, manages strongly typed graphs, performs efficient traversals, and integrates with the Netflix Big Data ecosystem.
Usage at Netflix
From a business standpoint, the primary driver for developing the Graph Abstraction was internal demand for supporting several key use cases:
Real-Time Distributed Graph (RDG): A graph capturing dynamic relationships across entities and interactions throughout the Netflix ecosystem. You can learn more about the initial RDG implementation in this insightful blog post. This functionality has since been integrated into the Graph Abstraction.
Social Graph: A graph of social connections within Netflix Gaming, designed to boost user engagement.
Service Topology: A graph of all internal Netflix services, used for real-time and historical analysis to improve root cause analysis during incidents.
Let’s examine the overall architecture of the Graph Abstraction and how it integrates with the Netflix Online Datastore ecosystem.
Architecture
Instead of building the persistence and caching layers from scratch, we chose to build taller on top of existing Netflix data abstractions.
The Key-Value (KV) Abstraction stores the latest view of nodes and edges, serving as the real-time index for all queries. Optionally, users can plug-in the TimeSeries (TS) Abstraction if they are interested in a historical view of how the graph evolves over time. Additionally, we use EVCache to achieve low-millisecond latencies and are actively experimenting with more specialized caching layers to further improve performance. Finally, the Graph Abstraction integrates with the Data Gateway Control Plane to manage graph schemas and automate the provisioning, deletion, and configuration of datasets in both KV and TS.
Property Graph Model
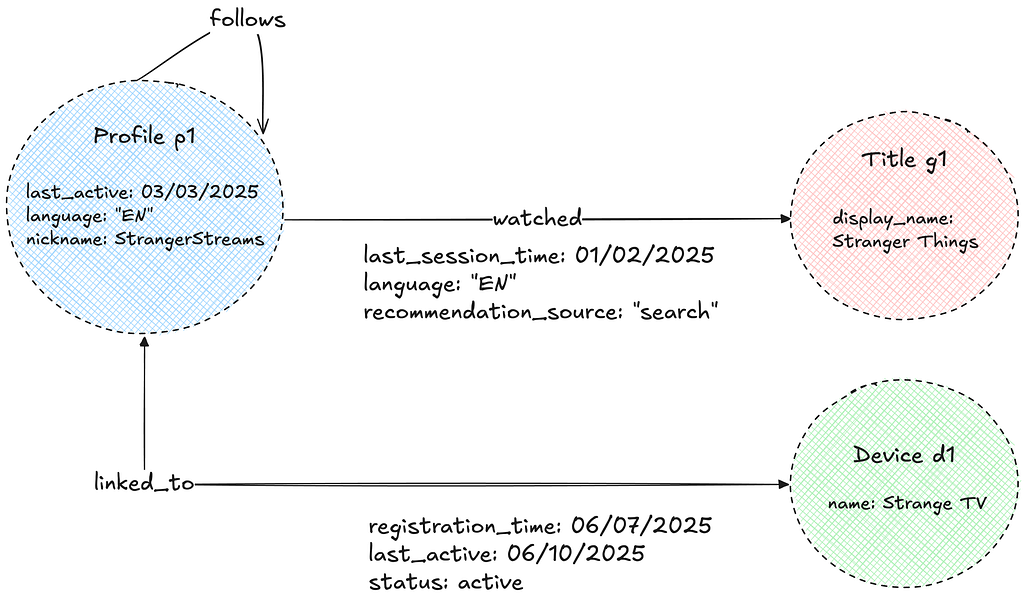
The Abstraction uses the Property Graph model to store its data. The graph consists of nodes and edges of various types, each with associated properties. These properties are strongly typed to enable efficient filtering and ensure consistent data exports. For semantic reasons, edges can be either unidirectional or bidirectional.
Namespaces
The Abstraction separates data into isolated units called “namespaces.” Each namespace is associated with a physical storage layer, as configured in the Data Gateway Control Plane, and can be deployed on either dedicated or shared hardware. The optimal, most cost-effective hardware configuration is determined by our provisioning automation, based on user-provided requirements such as throughput, latency, dataset size, and workload criticality. For more details on this topic, see this talk given by our stunning colleague Joey Lynch at AWS re:Invent.
Graph Schema
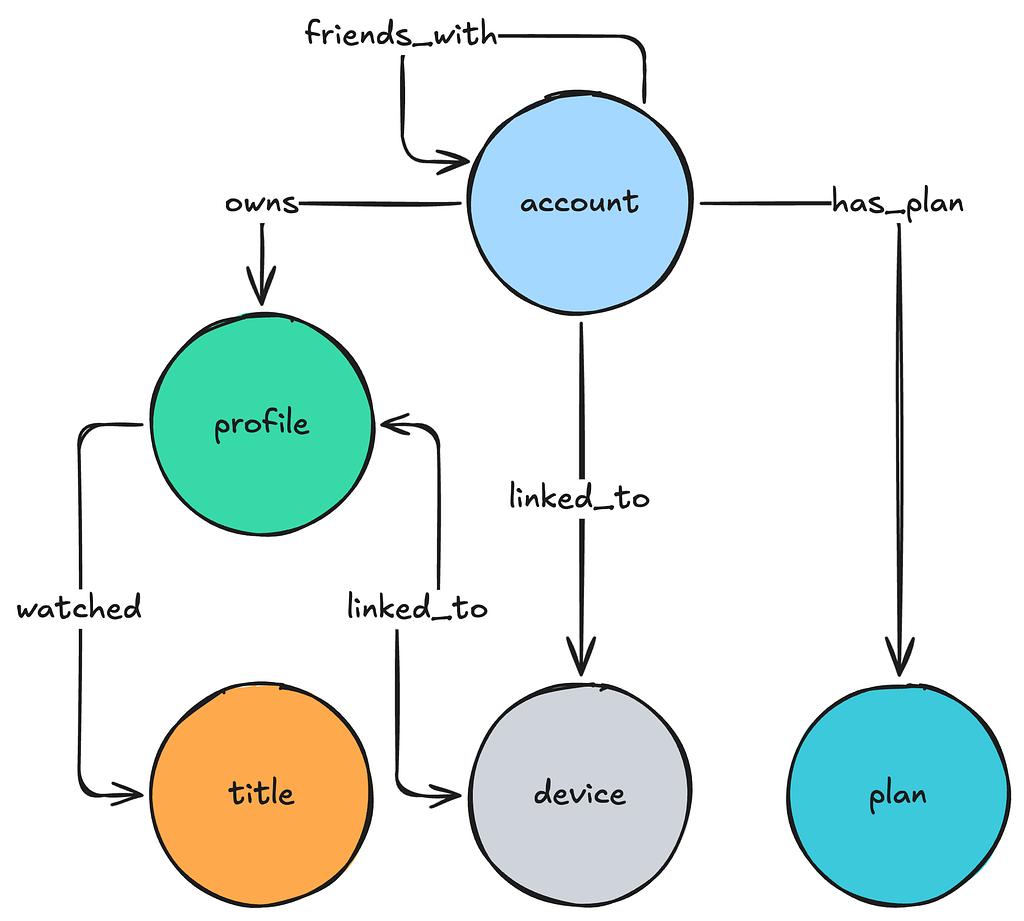
Each namespace is further associated with an explicit graph schema configured in the Control Plane. The graph schema defines node and edge types, allowed properties, permitted relationships, and directions.
The Graph schema is implemented as a collection of edge mappings that describe the nature of the relationship between given node types.
The Abstraction servers load this schema on startup and build an in-memory metadata graph of possible relationships, enabling several key optimizations:
Data Quality: The Abstraction rejects non-conforming nodes, edges, and properties during writes, ensuring high data quality and consistent exports.
Query Planning: The Abstraction uses the schema to quickly construct the possible traversal paths the service should take to answer a given user query.
Deduplication of Traversed Edges: For bidirectional traversals on edges between the same node type, the schema helps avoid redundant processing by deduplicating traversed paths.
Eliminating Traversal paths: For a given user query, the Abstraction removes traversal paths associated with impossible relationships, as well as those where filters or property types are incompatible.
Further, the Abstraction servers periodically poll the schema from the Data Gateway Control Plane in order to keep it updated with user changes. Looking ahead, we plan to leverage the graph schema for additional improvements, such as:
Minimizing Query Fanout: By using edge cardinality within edge mappings, we aim to select the most efficient traversal paths and minimize query fanout.
Improved Developer Experience: The schema will support generating a type-safe data access layer and enhance the Gremlin-like API with schema awareness.
Next, let’s look at how this data is organized in a real-time index within the KV Abstraction.
Real-Time Index: Key-Value Storage
Before we discuss how the data is organized into graph indexes, let’s discuss how KV organizes data within namespaces and provides idempotency guarantees:
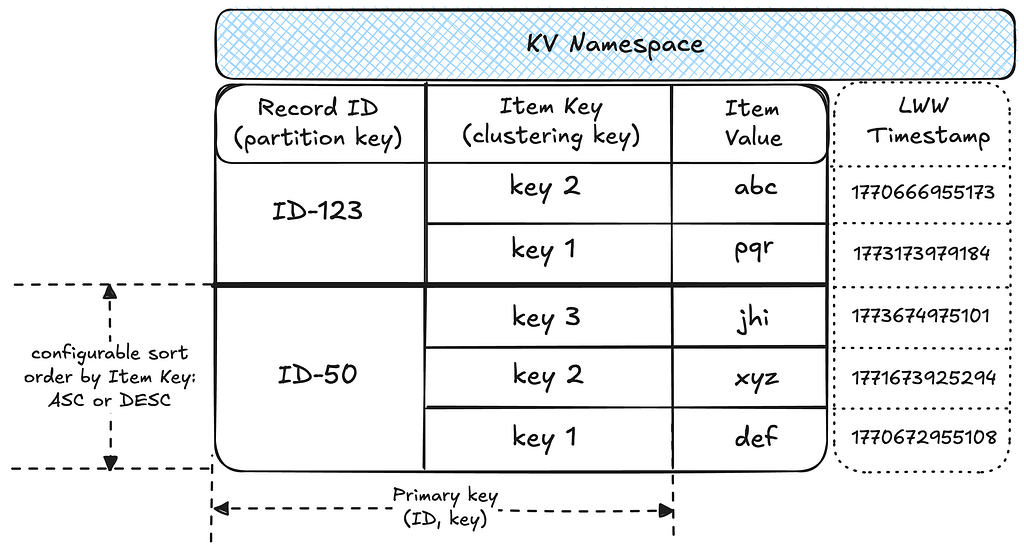
Data partitioning: A namespace is associated with a table in the underlying storage layer. Within the table, data is partitioned into records by unique IDs, with each record holding multiple sorted items as key-value pairs. This structure effectively makes each namespace a map of sorted maps, providing flexibility for diverse access patterns.
Idempotency: Writes to a given ID and key are idempotent, enabling request hedging and safe retries. The idempotency token contains a timestamp, which KV uses to enforce Last-Write-Wins (LWW) semantics at the storage layer.
We use the KV as the underlying storage for all real-time graph indices on nodes and edges. For more on Netflix’s Key-Value Abstraction, see this excellent post published by our KeyValue team.
Node Storage
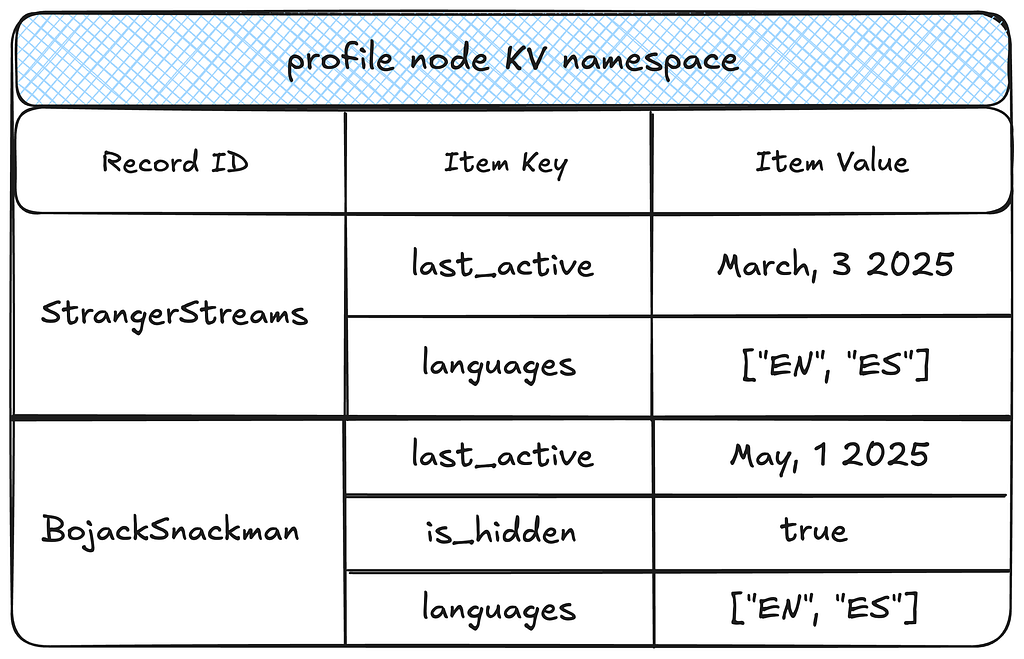
The two-tiered partitioning strategy works well for node storage. Each node type is isolated within its own KV namespace, which stores all the properties for nodes of that type.
This storage format enables several efficient access patterns for nodes:
Efficient reads: A given node and all its properties are fetched in a single partition lookup, achieving single-digit millisecond latency.
Property selection pushdown: Target property keys are pushed down to the KV layer, reducing the amount of data fetched and further decreasing latencies and network overhead.
Property filtering pushdown: Property keys and values can be efficiently filtered at the KV layer.
Efficient exports: This model supports highly parallelized node exports by node type.
Edge Storage
Links and Property Index
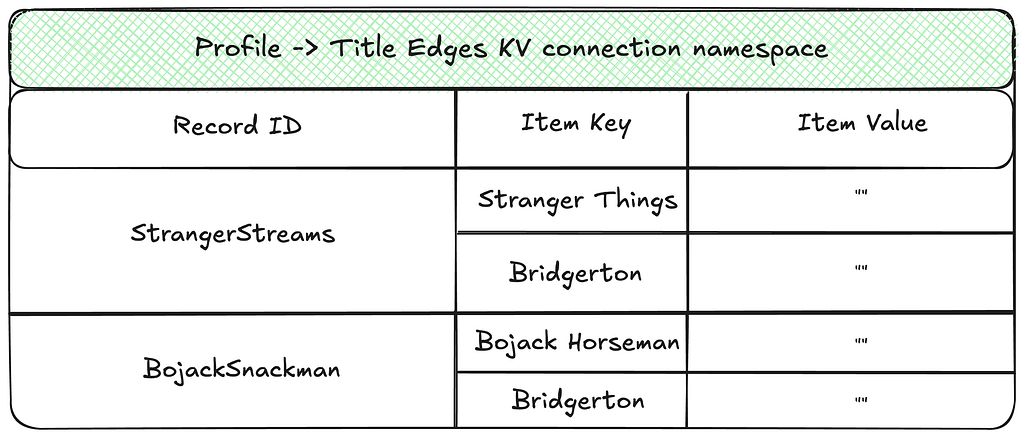
Edges utilize two distinct types of indexes: one exclusively for the edge connections (links), and one for edge properties.
The Edge links are arranged as an adjacency list mapping source nodes to their connected neighbors.
The Edge Property index stores information about properties of every edge.
Separating edge links from their properties brings several benefits, but also introduces a key trade-off:
Benefits:
Efficient property upserts: Allows individual properties to be upserted over time without needing to read the entire property set for an edge.
Wide row prevention: Decoupling edge links from their properties prevents large partitions in databases like Cassandra, enabling efficient storage and low-latency reads — even for edges with millions of connections.
Trade-off:
Non-atomic writes: Storing edges across multiple namespaces means that writes across these namespaces are not atomic. We’ll discuss how this is addressed in the Consistency Enforcement section.
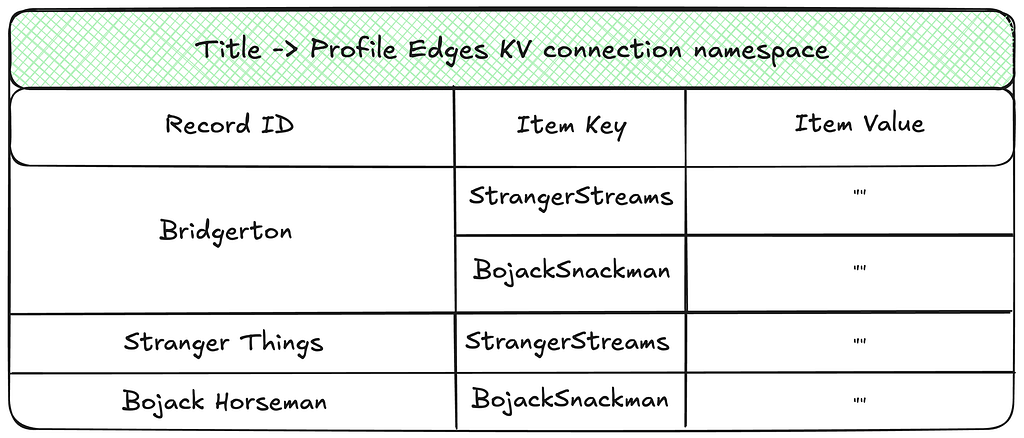
Forward and Reverse Indexes
Additionally, edge indexes are separated into forward and reverse indexes to support traversals in either direction. The illustration below shows an example of the reverse index counterpart for the links namespace shown above.
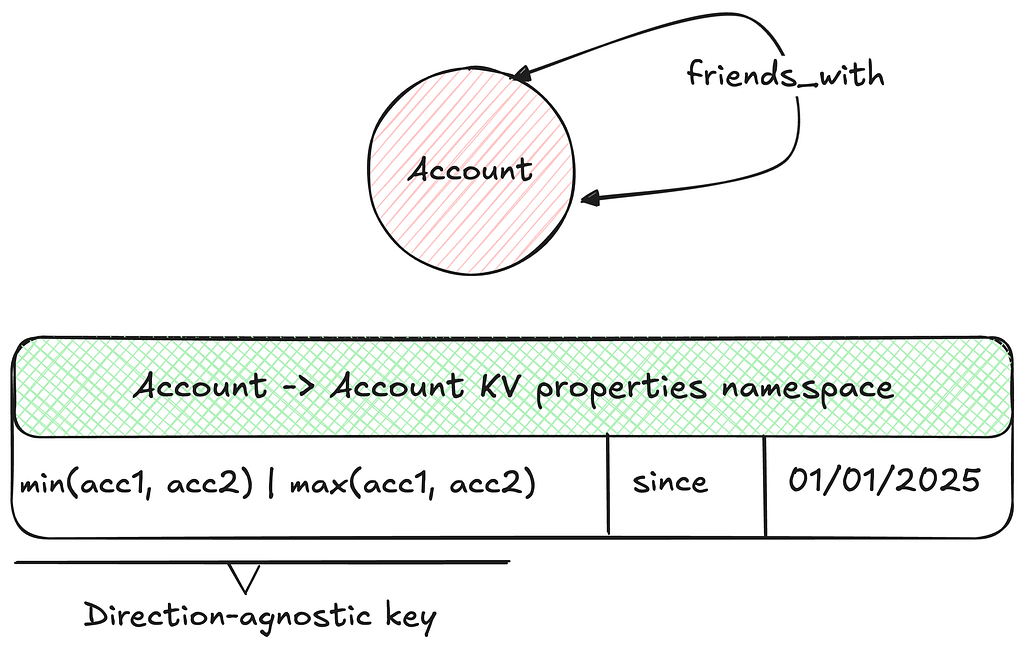
To ensure consistent record identifiers when updating edge properties in either direction, the Abstraction lexicographically sorts and concatenates the source and destination node IDs to create a direction-agnostic identifier for property storage. This ensures that properties can be accessed or mutated in a single database call regardless of the direction specified in the request.
This storage format enables several efficient access patterns:
Point Reads: Given an edge id, all properties can be fetched in a single partition lookup on the properties index.
Range Reads: Given a source node, a range read on a partition in the links index can efficiently return all edges. Depending on the desired direction, the Abstraction can target the forward or reverse index.
Property Filtering: Properties are fetched only for the links that match the record or page limit criteria, minimizing the data exchanged over the network.
Sort Orders: By default, edge links are sorted lexicographically by their target node. To support fetching the latest connections, the Abstraction retrieves target edge links in memory, sorts them by their last-write time, and returns the results. In order to ensure optimal performance without exerting too much memory pressure, we aim to limit the number of edges per source node within the system.
Next, let’s explore the caching strategies used by the Abstraction.
Caching Strategies in Graph Abstraction
Although the Graph Abstraction already provides efficient reads and writes to durable storage, caching remains critical for the stability and performance of any graph datastore for two key reasons:
Write amplification: A single write on the fronting service can result in multiple writes to the backing durable storage due to the use of multiple indexes. Whenever possible, it’s best to avoid unnecessary writes — for example, by not writing an edge link that already exists.
Read amplification: A single traversal request on the fronting service may translate into thousands of fetch operations on the backend, especially for highly interconnected graphs.
To address these challenges, the Graph Abstraction employs two distinct caching strategies.
Write-aside Caching of Edge Links
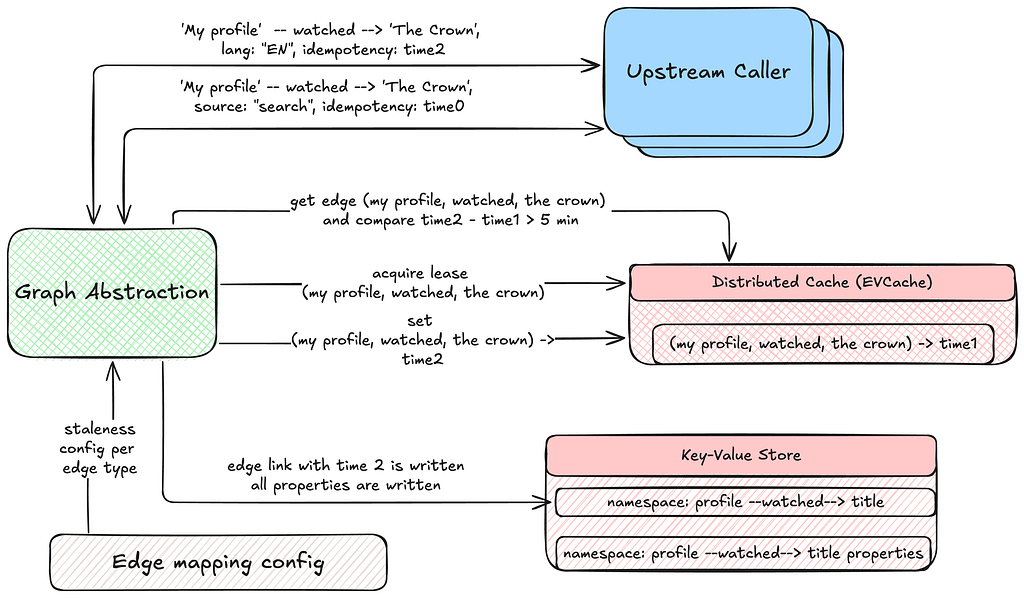
An edge link contains no additional information beyond the link itself and its last-write timestamp. To reduce write amplification on durable storage, we cache edge links for short durations, helping to avoid writing a link that already exists. This mechanism is balanced with configurable TTL windows, cache invalidation on deletes, and lease acquisitions with exponential backoff. These strategies provide the necessary consistency guarantees while still allowing the last-write timestamp to be refreshed according to the predefined staleness.
Read-aside Caching of Properties
To reduce read amplification on the durable store, the Graph Abstraction leverages KV’s integration with EVCache. Multiple KV namespaces can share the same caching clusters for cost efficiency. The Abstraction first fetches data from durable storage, while subsequent reads are served from the cache. Caching is applied at both the record and item levels, benefiting all graph objects.
Graph Abstraction employs two invalidation strategies, selected based on write throughput and consistency requirements:
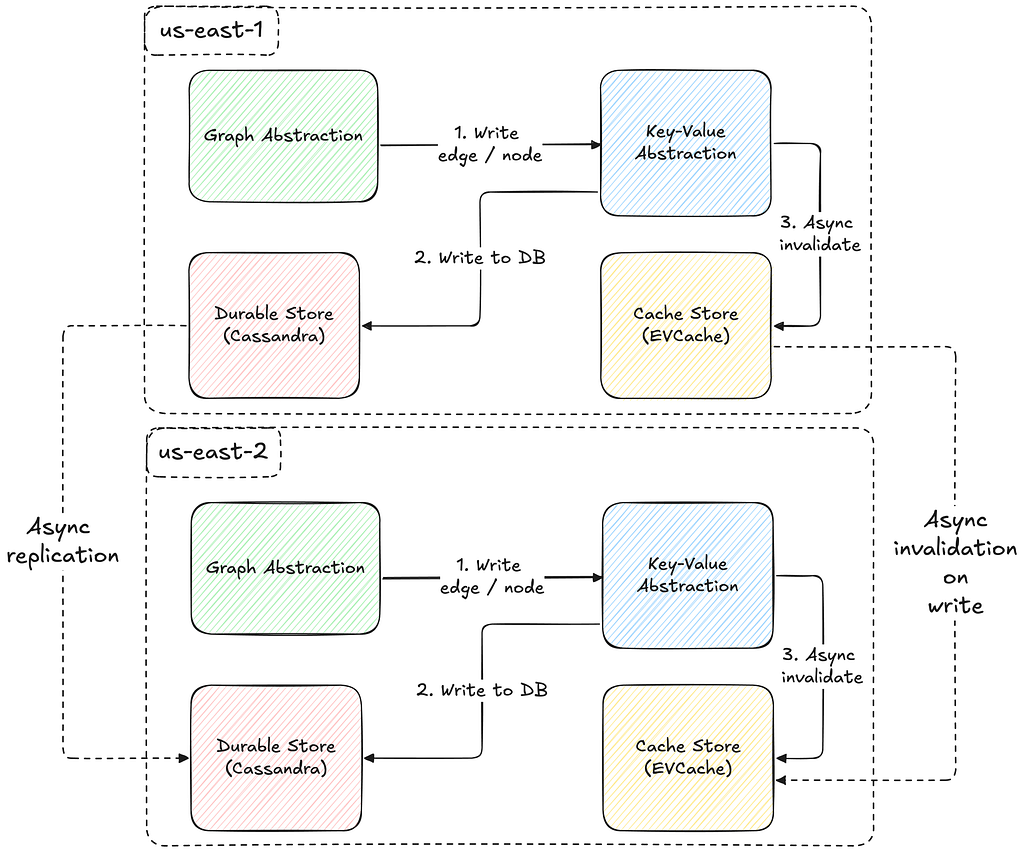
Invalidation on write: Both record and item caches are invalidated with every write, ensuring consistency across regions. This strategy is ideal for graphs that change infrequently and cannot tolerate data staleness, but comes with the tradeoff of pushing a higher throughput on the cache.
TTL-driven invalidation: Cache entries are invalidated only when their TTL expires. This approach works best for frequently modified objects that can tolerate some staleness.
Work In Progress: Write-Through Caching
We are also developing a write-through caching strategy designed to store most of the data required by the Abstraction during traversals. This caching mechanism can organize indexes by different sort orders (e.g., sorting data by last-write timestamp), at the cost of increased memory consumption. Stay tuned for more details on this approach.
Next, let’s examine the consistency guarantees in Graph Abstraction and how they are enforced for both reads and writes.
Consistency Enforcement
Enforcing data consistency in Graph Abstraction poses several challenges. The connected nature of the data, low-latency API requirements, and the need to handle intermittent failures have led to design choices that enforce strict eventual consistency across multiple regions.
Entropy Repair
Each write in the Abstraction persists data for both inward and outward indices in parallel to support high throughput. Further, each write happens on multiple KV namespaces. To prevent inconsistencies or lasting entropy from failures in any operation, the Abstraction uses a robust retry mechanism using Kafka:
Node Deletions
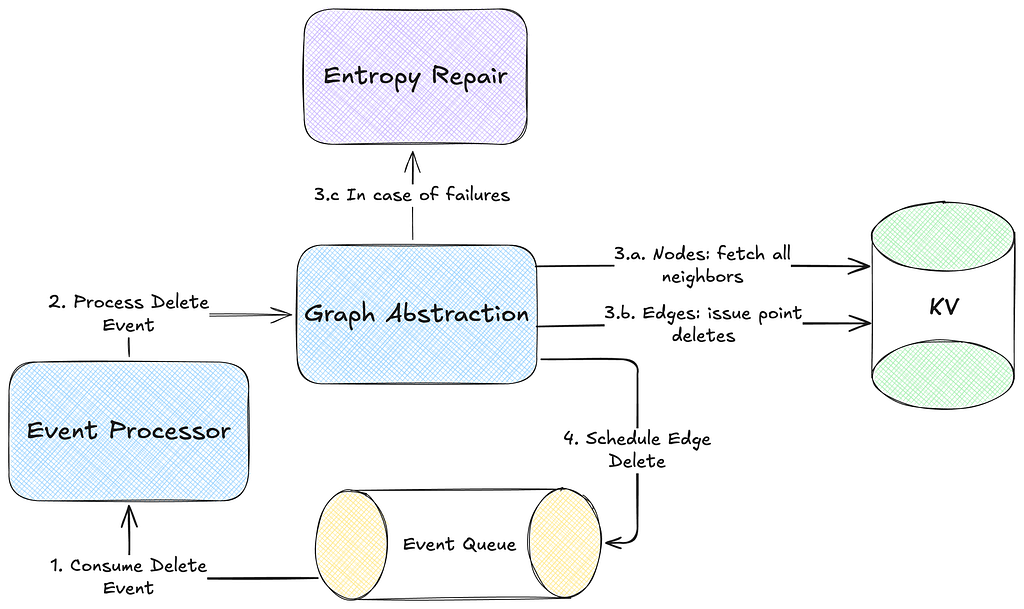
Deleting nodes in a highly connected graph is more complex than simply removing a KV record as each node may have thousands of connected edges that must be handled to maintain graph integrity. Further, synchronously deleting all such connections would introduce unacceptable latency for the Abstraction callers.
The Abstraction employs an asynchronous deletion strategy to manage this issue. The consequence of this approach, however, is that the observed mutated state is only eventually consistent. Further, to ensure correctness of asynchronous deletes during concurrent updates, the Last-Write-Wins (LWW) conflict resolution mechanism is essential.
Global Replication
The consistency guarantees of Graph Abstraction are shaped by its multi-region availability. As illustrated in the diagram below, both the caching layer and durable storage replicate data asynchronously across regions, resulting in an eventually consistent system.
Now that we’ve covered storing the real-time graph index, let’s see how it enables graph traversals.
Graph Traversals
The Abstraction provides a custom gRPC traversal API, inspired by Gremlin, which enables exploration of the distributed graph by letting users chain traversals, apply filter criteria, sort results, limit results, and more.
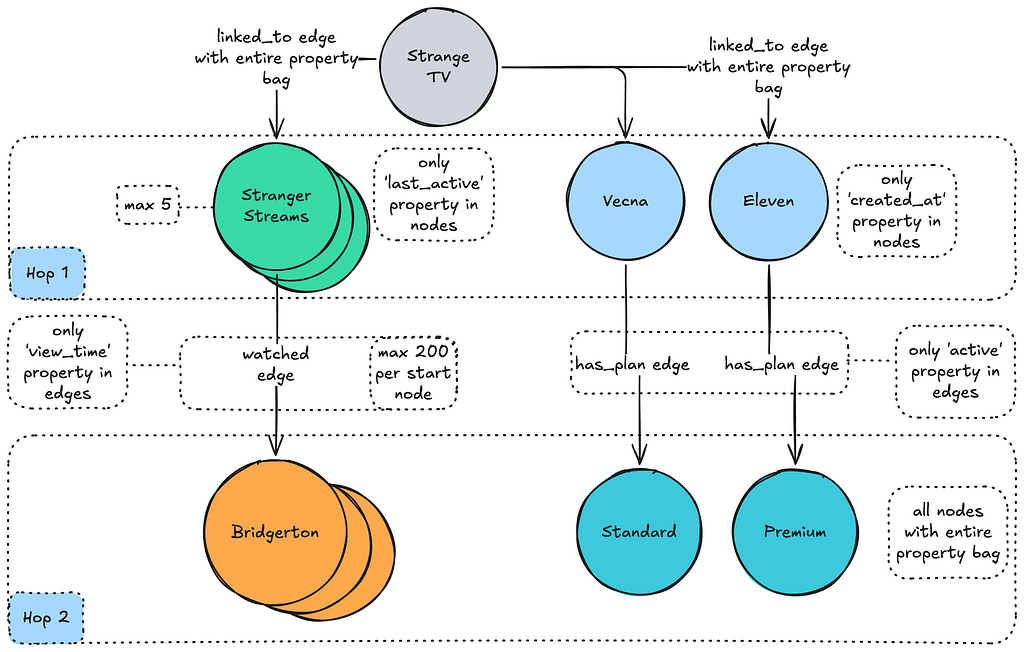
Let’s explore a hypothetical scenario where the Abstraction is used to recommend shows to users on a shared device, by considering the duration of the most recent viewing session for each show across all profiles and accounts associated with that device:
TraversalRequest.newBuilder()
  .setNamespace("<graph-namespace>")
  .setTraversalQuery(
     TraversalQuery.newBuilder()
       // Given id of the 'device' node type.
       .setStartNode(node("device", "my-device-id"))
       .setTraversal(
          Traversal.newBuilder()
            // fetch the first 5 connections
            .setEdgeLimit(5)
            .setDirectionTraversal(
               DirectionTraversal.newBuilder()
                  // traverse in the IN direction
                  .setDirection(IN)
                  // minimize data exchange: only interested in certain properties
                  .addNodePropertiesSelections(propSelection("account", "created_at"))
                  .addNodePropertiesSelections(propSelection("profile", "last_active"))
                  .setDirectionFilter(
                     DirectionFilter.newBuilder()
                       // only interested in certain connected types
                       .setTypeMatchingStrategy(EXCLUDE_NON_TARGETED)
                       .addAllNodeFilters(typeFilters("account", "profile"))))
            // chain traversals to the intermediate result
            .addNextTraversals(
               Traversal.newBuilder()
                 .setOrder(LATEST)
                 // limit to 200 connections for the 2nd hop
                 .setEdgeLimit(200)
                 .setDirectionTraversal(
                    DirectionTraversal.newBuilder()
                      // now traverse in the OUT direction
                      .setDirection(OUT)
                      .addEdgePropertiesSelections(propSelection("watched", "view_time"))
                      .addEdgePropertiesSelections(propSelection("has_plan", "active"))
                      .setDirectionFilter(
                         DirectionFilter.newBuilder()
                           .setTypeMatchingStrategy(EXCLUDE_NON_TARGETED)
                           .addAllNodeFilters(typeFilters("title", "plan")))))))
  .build();
And let’s visualize the intended results set produced by the request above:
We’ll explore the design and implementation of traversal planning and execution, along with different traversal types, in the Part II of this blog series.
Now let’s look at the performance metrics of Graph Abstraction based on current production use cases.
Real World Performance
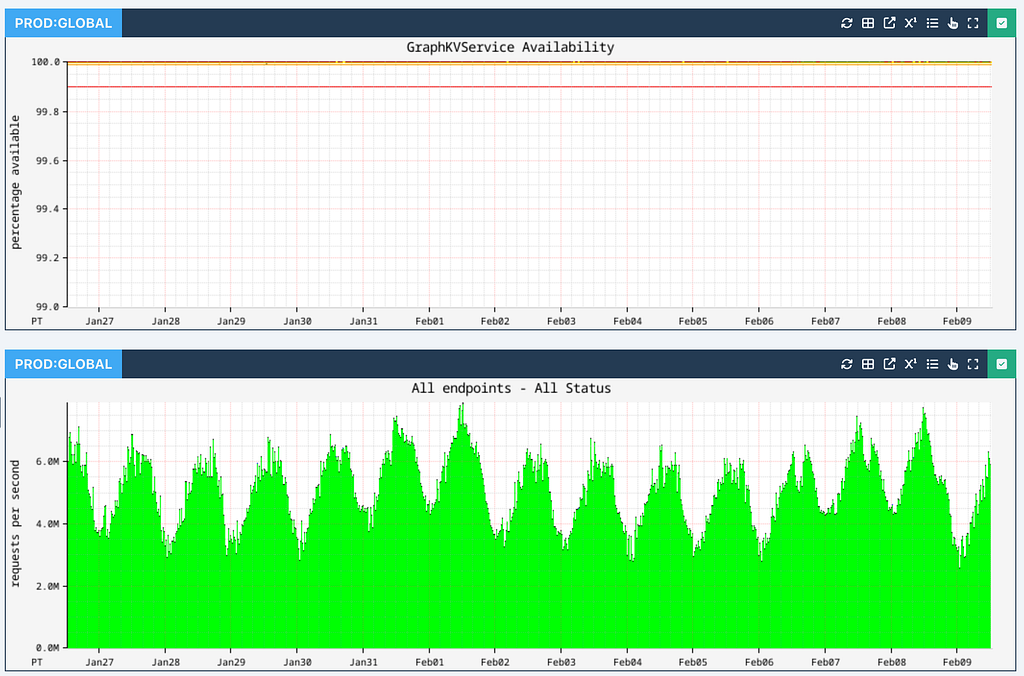
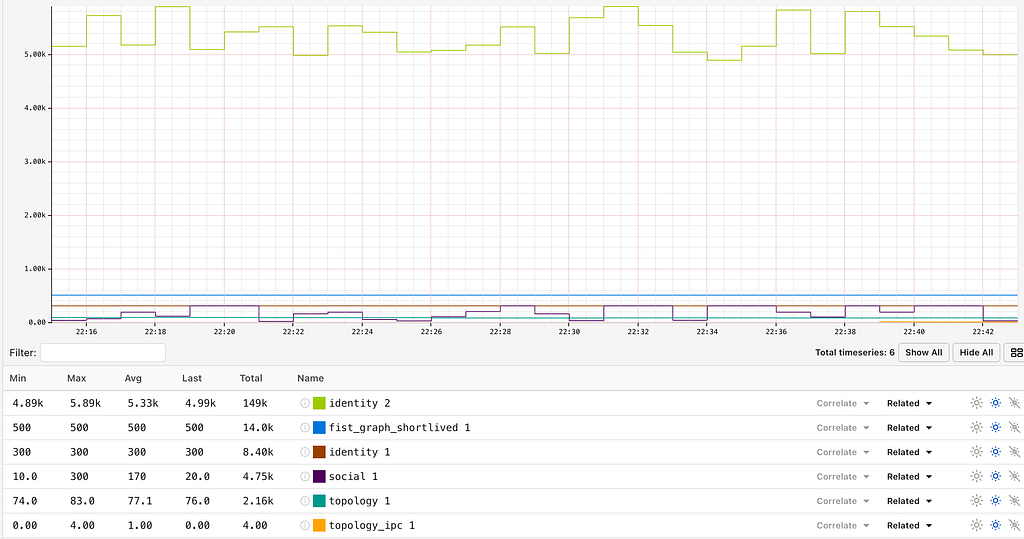
Across all applications at Netflix, Graph Abstraction ensures high availability while processing up to 10 million operations per second across all writes, individual edge / node reads and traversals at peak hours:
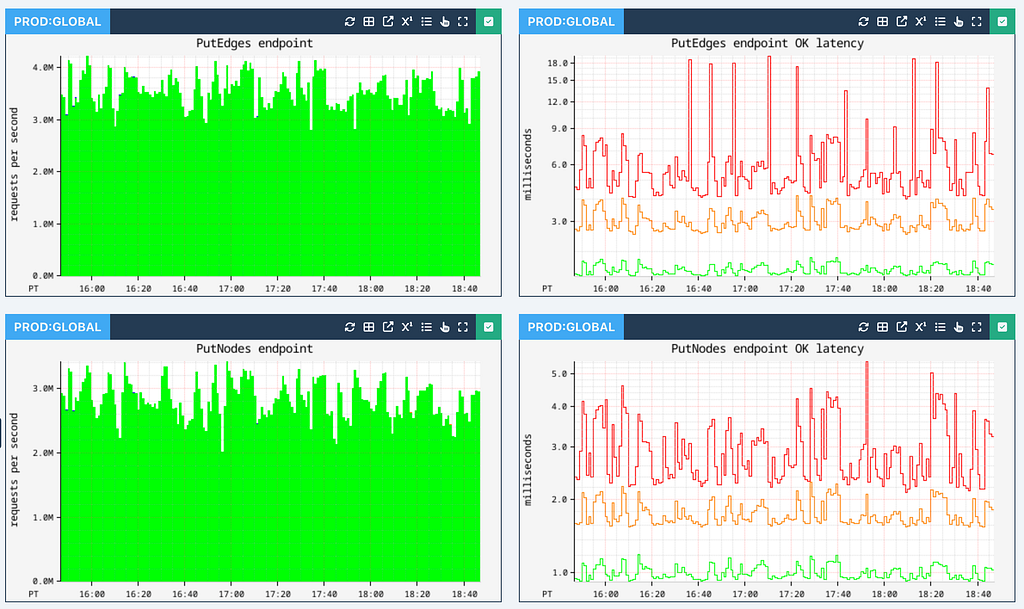
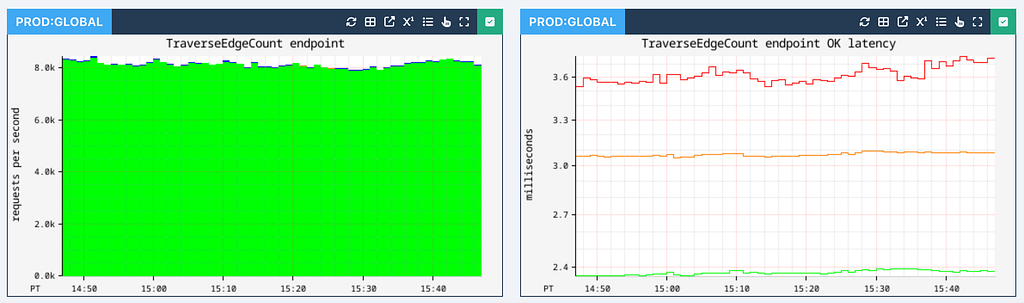
Edge and node persistence achieve single-digit millisecond latencies (p99 shown in red, p90 shown in orange, and p50 shown in green):
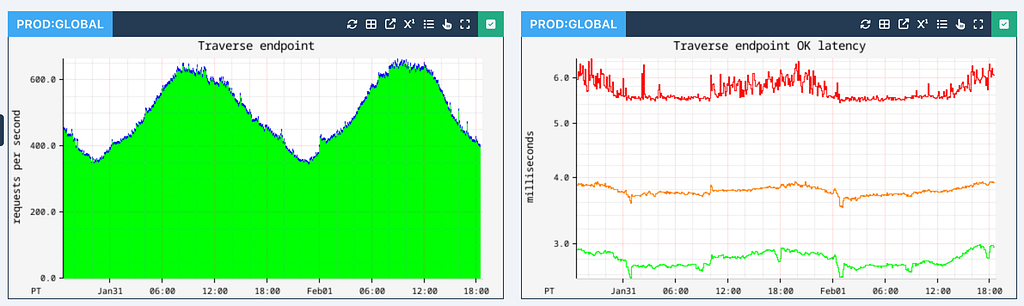
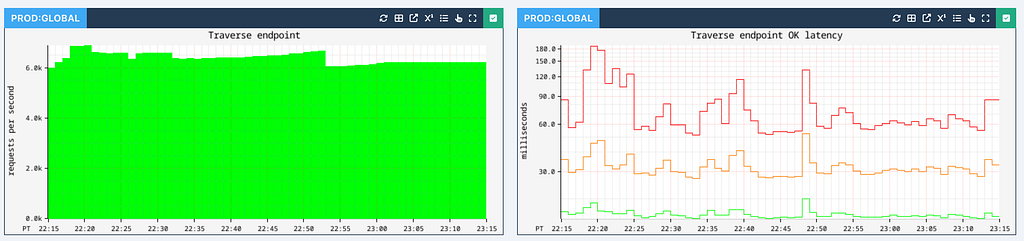
Traversal performance depends on the number of hops, the edge fanout at each stage, and associated filters and sort orders. We parallelize work as much as possible to reduce latencies. Typically 1-hop traversals are executed with single-digit millisecond latency:
1-hop traversal latencies
We also support a Count API that performs counting traversals at a very high rate with similar latencies, which we will cover in Part II of this series:
Currently, the RDG is powered by 2-hop traversals with a higher degree of fan-out. While these operations can reach upwards of 100 ms in latency, the 90th percentile (p90) latency remains under 50ms.
2-hop traversal latencies
We track the average and max edge fanout at different depths to give us insights into the traversal performance for different graph datasets.
Median edge fan-outMax edge fan-out
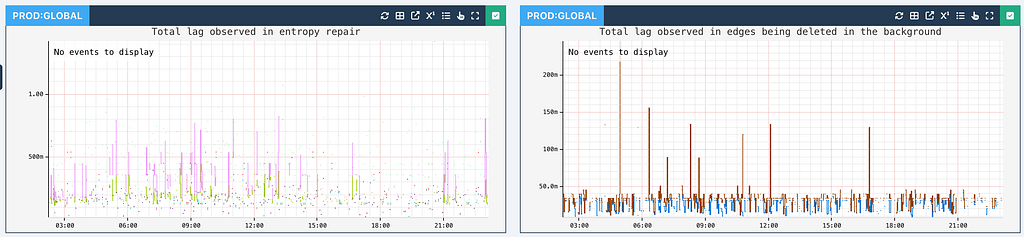
Asynchronous operations such as node deletions can be slightly latent, but typically perform with sub-second latency:
At the moment, we are storing close to 650 TB of data globally across all our graph datasets.
Conclusion
As Netflix scales further into new verticals such as live content, games, and ads, Graph Abstraction will remain crucial for uncovering and leveraging rich connections — while continuing to support a high throughput and availability at low latencies.
Stay tuned for Part II of this blog series, where we’ll explore the implementation of graph traversals, counting and constraint mechanisms.
In Part III, we’ll take a closer look at the temporal index implementation and its integration with the Time Series Abstraction.
In a previous post, we discussed Project Bonsai, our initiative to reduce the Grab app’s download size. We successfully reduced the Android Application Package (APK) download size by 26%. This reduction offers a substantial advantage: it minimizes download friction, allowing users to download the app, even on slower networks. However, the battle for storage doesn’t end after installation.
The Grab app includes a wide range of features and workflows that heavily depend on image content, particularly in services like transportation and e-commerce. Although some images are packaged within the app binary, a large majority are downloaded from Grab’s server at runtime. To optimize the app’s performance and minimize server expenses, the downloaded images are cached in the app’s storage. This reduces both load times and traffic to Grab’s image server, resulting in better user experience and lower costs. Although we use Least Recently Used (LRU) cache to manage storage, many images can remain in the app storage for extended periods, even if they are no longer relevant.
This blog details how we addressed this challenge in our Grab Android app by evolving our standard LRU cache into a Time-Aware Least Recently Used (TLRU) cache. This evolution allows us to reclaim storage space without compromising user experience or increasing server costs.
Understanding LRU cache limitations
Note: In this article, when “cache” or “image cache” is mentioned, it specifically refers to disk cache, which is the persistent storage on the device’s file system, rather than in-memory cache.
The Grab Android app uses the Glide library as its primary image loading framework. Glide provides excellent features for efficient image loading, caching, and display. At its core, by default, Glide uses a cloned version of Jake Wharton’s DiskLruCache for disk-based caching.
To prevent unlimited cache growth, we configured the LRU cache with a maximum size limit of 100 MB. However, our analytics revealed that the 90th percentile (P90) of users were consistently reaching this 100 MB limit, meaning the cache was constantly at capacity. Conversely, for users whose cache hadn’t yet reached the 100 MB threshold, images were never removed, even if they were outdated by several months and no longer relevant.
Our analysis revealed that image caching was a major contributor to the app’s disk footprint, and without proactive management, this would only worsen as we continued adding features and content to Grab’s superapp.
How DiskLruCache works
The LRU cache algorithm manages storage by maintaining entries in access order and automatically evicting the oldest unused entries when space is needed.
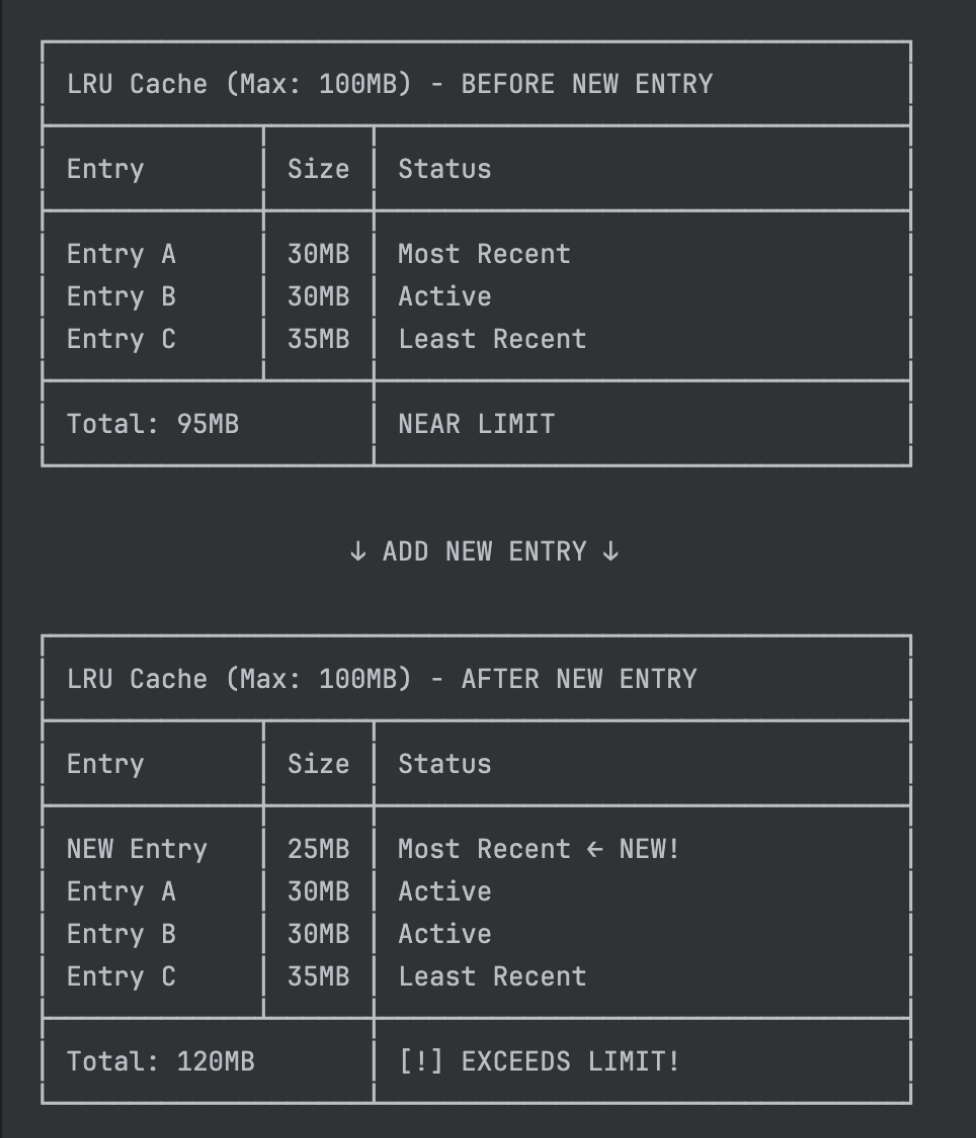
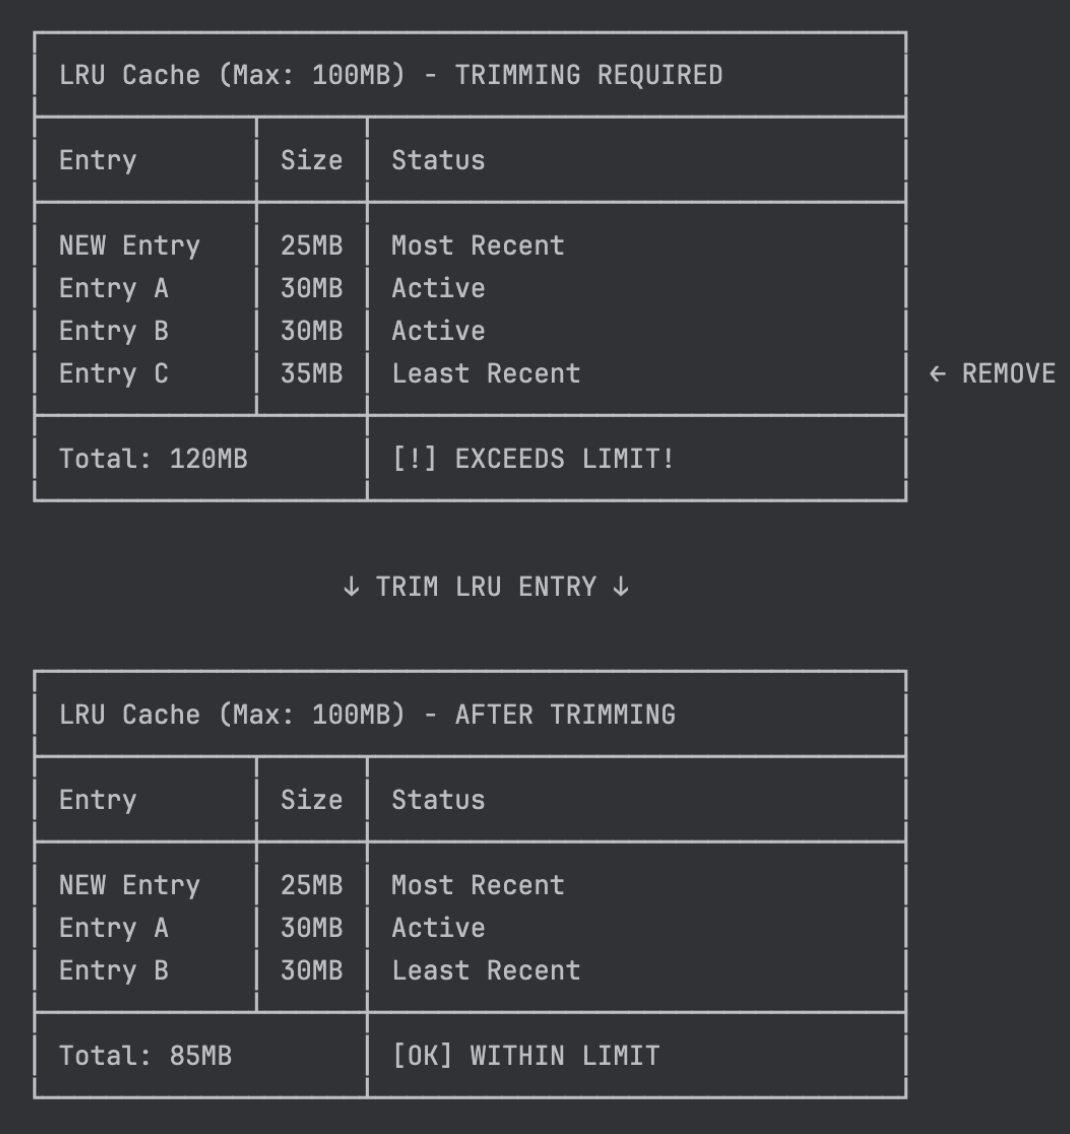
Figure 1 and 2 illustrates how LRU cache trimming works. These diagrams present an LRU cache with a maximum size of 100 MB containing three cache entries totaling 95 MB. When a new 25 MB cache entry is added, it exceeds the cache’s maximum size.
Figure 1. A new cache entry is added to an LRU cache that’s near its 100 MB capacity, exceeding the limit.
Figure 2. The LRU cache automatically trims the least recently used entry to bring the total size back within the 100 MB limit.
The challenge
While DiskLruCache efficiently manages cache size, it has a critical limitation: It does not account for the age of cached content. Due to the lack of time-based eviction rules, the cache does not remove outdated entries until it exceeds the maximum size. This meant that stale promotional images, images from infrequently used features, and outdated content continued occupying disk space indefinitely, as long as the cache remained under the size limit.
What we needed was a cache mechanism that could:
Maintain LRU cache benefits: Preserve efficient caching for users who actively use the app features.
Remove stale content based on time: Automatically identify and evict outdated entries, not just rely on storage constraints.
Protect user experience: Ensure images still load quickly without cache misses.
Keep server costs low: Avoid increased server requests from premature cache evictions.
These requirements pointed us toward an enhanced LRU approach. We needed to enhance LRU with time awareness while preserving its proven size-management capabilities.
TLRU cache: The solution
To address these limitations, we developed a new LRU cache variant named TLRU that extends traditional LRU by introducing time-based eviction while maintaining size-based cache management.
Core TLRU attributes
TLRU introduces three core attributes to manage cache entries:
Time-To-Live (TTL): A threshold that determines when a cache entry is considered expired. An entry is expired if (current_time - last_accessed) > TTL. Expired entries are automatically removed during cache operations.
Minimum cache size threshold: A safety net that ensures a baseline set of essential images always remains cached, even when entries expire. This prevents complete cache deletion when users haven’t used the app for more than the TTL period, maintaining app responsiveness for returning users instead of starting with an empty cache.
Maximum cache size: Inherited from LRU cache, this enforces the upper storage limit (100 MB in our case). When exceeded, the least recently used entries are evicted regardless of their age.
Together, these attributes ensure TLRU maintains optimal cache size by managing both storage constraints and temporal relevance, reducing app disk footprint without impacting user experience.
TLRU cache trimming in action
To better understand how TLRU works in practice, let’s walk through a comprehensive example. The following diagrams demonstrate how the TLRU cache evaluates and trims entries based on both time and size constraints.
Our TLRU cache configuration includes:
Maximum cache size: 100 MB – the storage limit that triggers size-based eviction.
Minimum size threshold: 20 MB – the safety net that protects essential cached content.
TTL: 20 days – entries older than this are considered expired.
Each cache entry includes last_accessed metadata containing the timestamp of its most recent access. When an entry is first created, this timestamp is initialized with the creation time. This timestamp determines whether an entry has expired based on the formula:
Entry is expired if: (current_time - last_accessed) > TTL
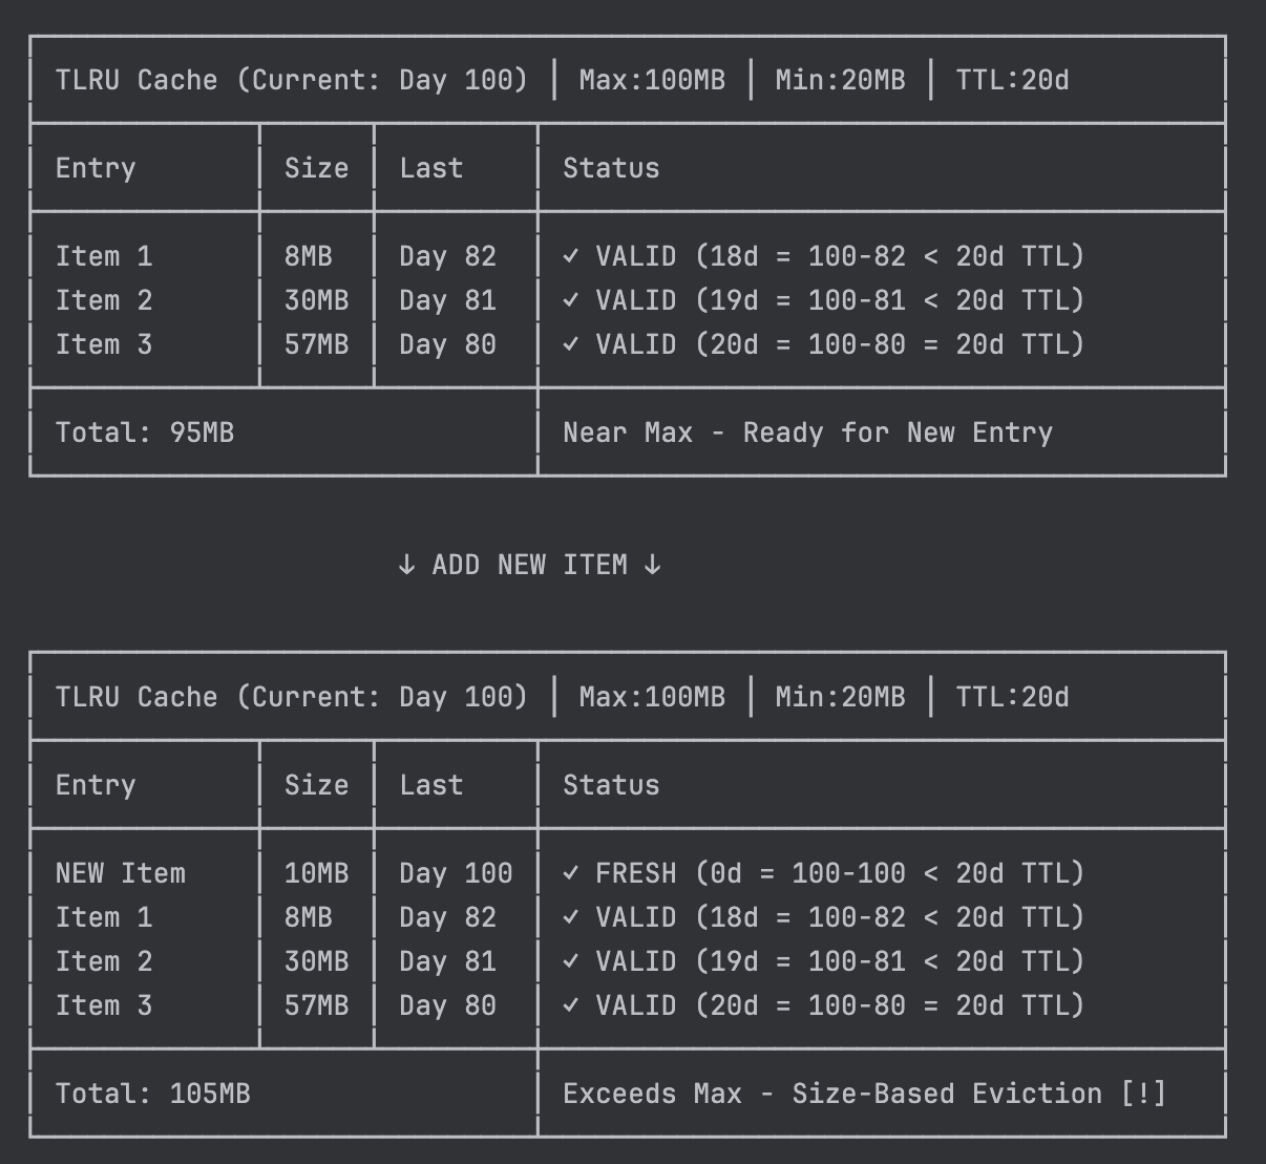
For this walkthrough, we’ll use current_time = Day 100 as our starting point.
Initial cache state analysis
Our example begins with three existing cache entries totaling 95 MB, approaching the 100 MB limit:
Item 1 (8 MB, last accessed Day 82): At 18 days old
Item 2 (30 MB, last accessed Day 81): At 19 days old
Item 3 (57 MB, last accessed Day 80): At exactly 20 days old, valid at the TTL threshold
When a new 10 MB item is added on Day 100, the cache grows to 105 MB, exceeding our 100 MB limit and triggering size-based eviction.
Figure 3. Initial TLRU cache state and the impact of adding new entries.
Size-based eviction process
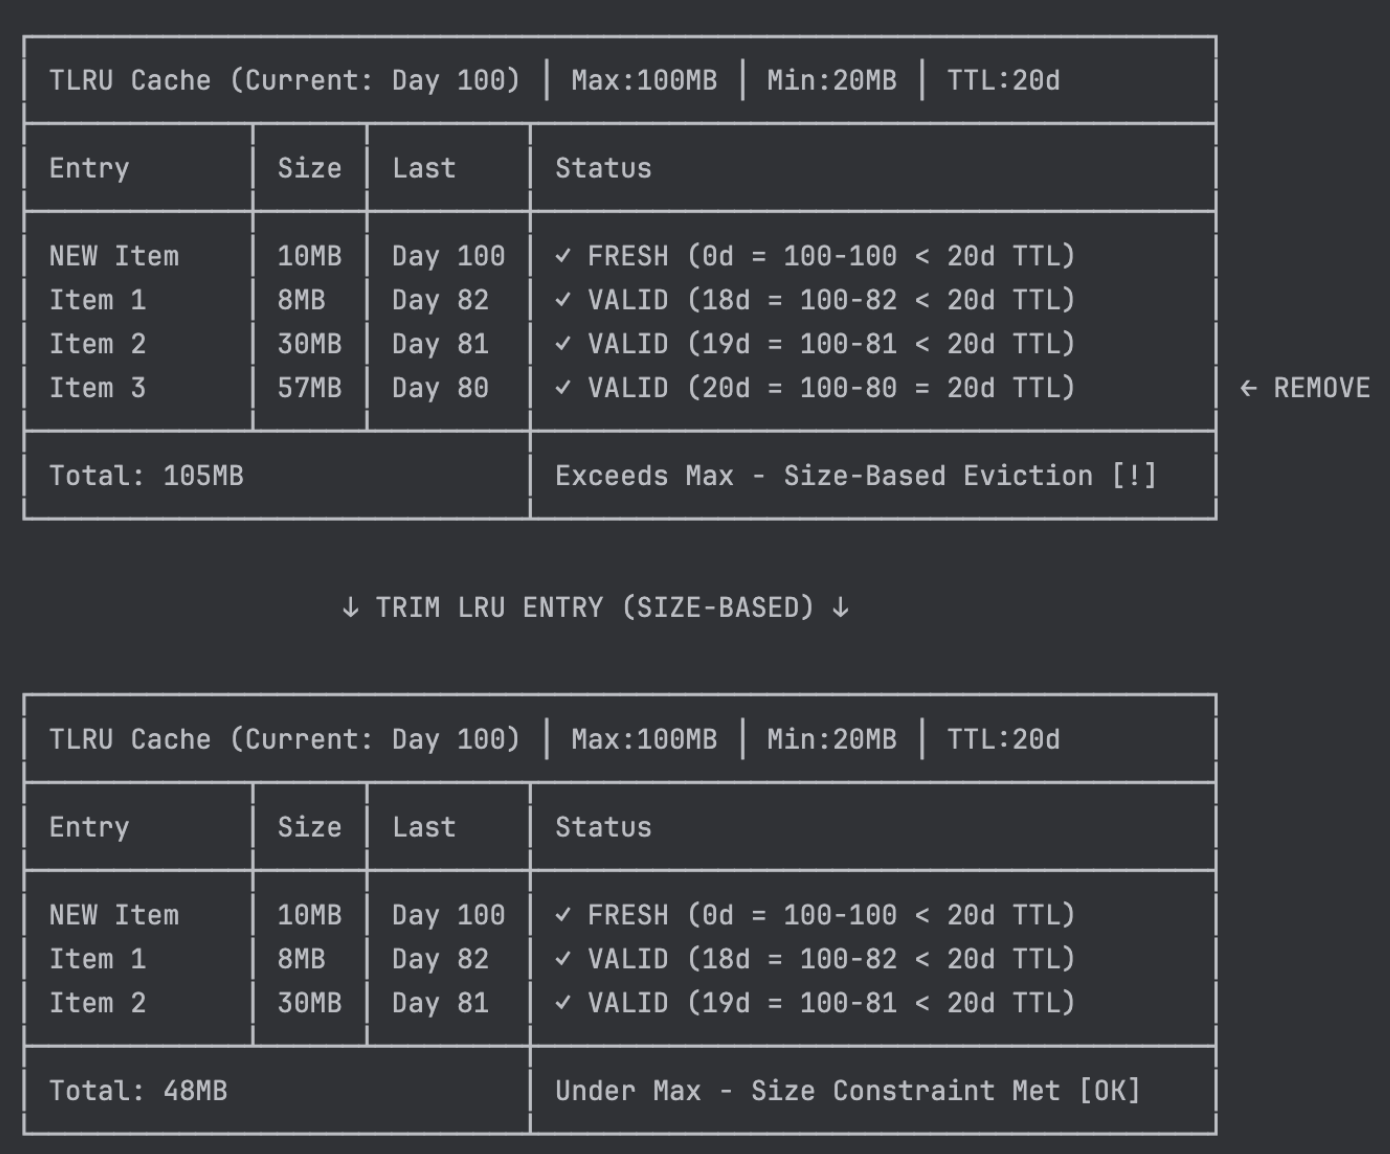
When the cache exceeds its 100 MB limit, TLRU applies traditional LRU eviction logic. Item 3 is selected for eviction because:
It is the least recently used entry (oldest access time).
This demonstrates TLRU maintaining LRU behavior for size enforcement, regardless of expiration status.
Figure 4. Size-based eviction removes the least recently used entry to enforce storage limits.
Time-based eviction process
Five days later (Day 105), Item 1 and Item 2 cross the expiration threshold:
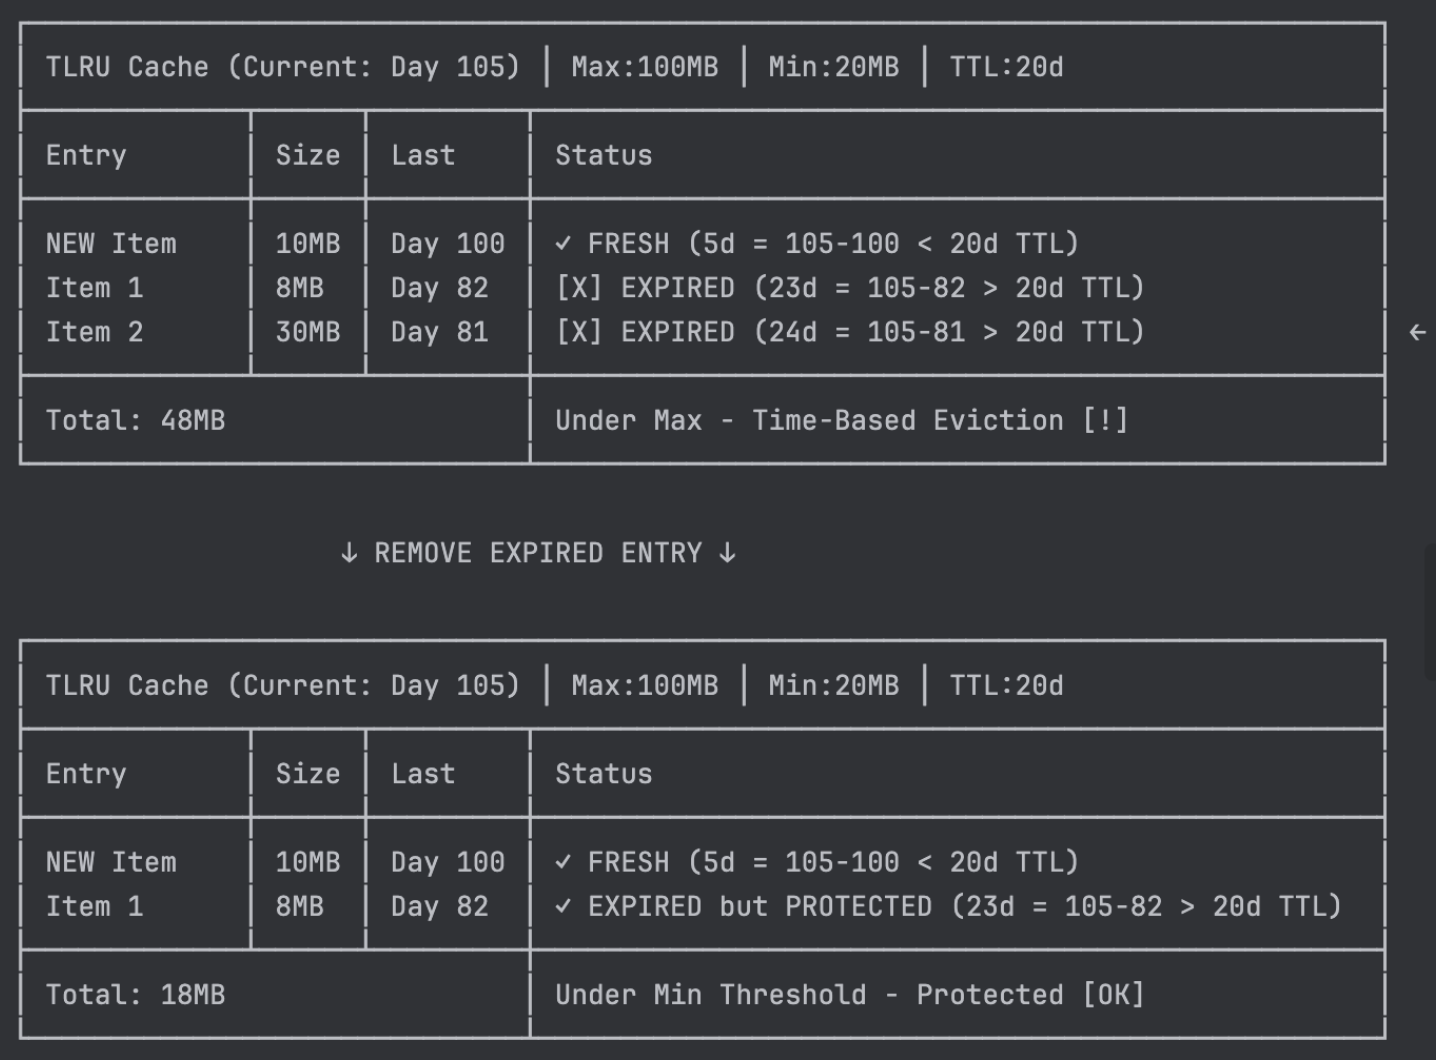
Despite operating well below the size limit (48 MB < 100 MB), TLRU evaluates expired entries for time-based eviction. Item 2 is removed because it’s expired, and the cache remains above the minimum threshold. Item 1, although also expired, is protected by the minimum threshold rule; removing it would leave only 10 MB, which falls below the 20 MB minimum.
Figure 5. Time-based eviction and minimum threshold protection working together.
TLRU behavior summary
This comprehensive example demonstrates TLRU’s three core mechanisms:
Size-based eviction: Enforces storage limits using traditional LRU ordering (Item 3 removed despite being valid).
Time-based eviction: Proactively removes expired content when safe to do so (Item 2 removed for age).
Minimum threshold protection: Preserves essential cache functionality even with expired content (Item 1 protected despite expiration).
Technical implementation
Rather than building an image cache from scratch, we recognized that Glide’s bundled DiskLruCache (originally from Jake Wharton’s implementation) already provided a mature, battle-tested foundation. This implementation is widely adopted across the Android ecosystem and handles complex edge cases like crash recovery, thread safety, and performance optimization that would require substantial effort to replicate.
Our approach was pragmatic, we cloned Glide’s DiskLruCache and extended it to support time-based expiration. This strategy allowed us to inherit the existing reliability while adding the temporal awareness we needed for TLRU.
To understand our implementation, we’ll first explore how the original DiskLruCache works, then dive into the specific modifications we made to transform it into TLRU.
Understanding DiskLruCache
DiskLruCache provides a simple cache solution that stores key-value pairs on disk, while also keeping track of their usage to evict the least recently used items when the cache reaches its maximum size. Here is an overview of how DiskLruCache is implemented:
Data storage: DiskLruCache stores its data in a specified directory, creating files for each entry.
Key-based access: Each entry has a unique key (typically a hash generated by the image loader) used to create the filename of the cached entry.
Atomic writes: When adding an entry, it creates a temporary file and writes the data to it. If successful, it atomically renames the temporary file to the final filename.
Cache retrieval: When reading from the cache, it looks up the key, opens the corresponding file on disk, and returns an InputStream to read the data.
Size management: It maintains a maximum cache size limit. When exceeded, it removes the least recently used items until it is within the specified limit.
The central component that enables this functionality is the journaling mechanism, detailed in the following section.
The journaling mechanism
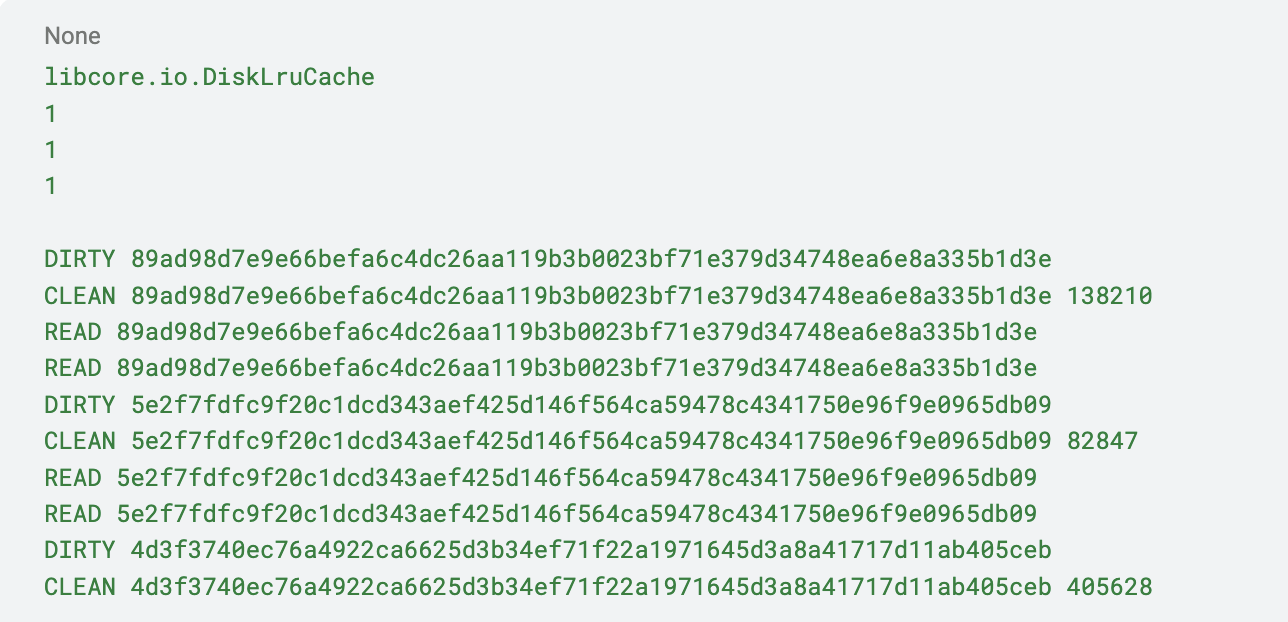
The journaling mechanism in DiskLruCache is designed to maintain consistency and prevent data corruption in the cache. The journal file records all cache operations, such as adding, updating, or removing entries. The journaling mechanism is essential in rebuilding the cache metadata during initialization and performing journal compaction to clean up the journal file.
Figure 6. Example of the journaling mechanism in DiskLruCache.
Journal file format:
The journal file is a plain text file that records cache operations line by line.
DIRTY: Indicates the start of a write operation to a cache entry.
CLEAN: Indicates that a cache entry was successfully written and closed.
REMOVE: Indicates that a cache entry was removed from the cache.
READ: Indicates that a cache entry was read.
To gain a comprehensive understanding of the journal file format, refer to the following detailed explanation.
Key information: Each line includes the key and other relevant information, such as the lengths of the cache entry files.
Cache initialization: Upon initialization, DiskLruCache reads the journal file to reconstruct cache metadata in memory, determining file associations, lengths, and access order. If the journal file is corrupted or missing, the cache will be considered invalid, and DiskLruCache will remove all cache files and start fresh.
Cache operations and journal updates: When performing cache operations like adding, updating, or removing entries, DiskLruCache appends corresponding lines to the journal file, recording the operation details. For example, when starting to write a new cache entry, it writes a DIRTY line with the key, and when the write is successful, it appends a CLEAN line with the key and lengths.
Synchronization and consistency: DiskLruCache uses synchronization to ensure that only one thread can access the cache at a time, preventing race conditions and data corruption. It also uses a journalWriter (java.io.Writer) instance to append operations to the journal file, ensuring that the file is always in a consistent state.
Journal compaction: Over time, the journal file may grow with redundant operations. DiskLruCache periodically compacts the journal by creating a new file that contains only the current cache metadata, then atomically replaces the old file. The compaction process usually happens when the journal file size exceeds a certain threshold.
DiskLruCache ensures consistency and prevents data corruption by using this journaling mechanism, making it a reliable solution for disk-based caching.
Modifying DiskLruCache for TLRU
With a solid understanding of DiskLruCache’s architecture, we can now explore how we extended it to implement the TLRU cache attributes defined earlier.
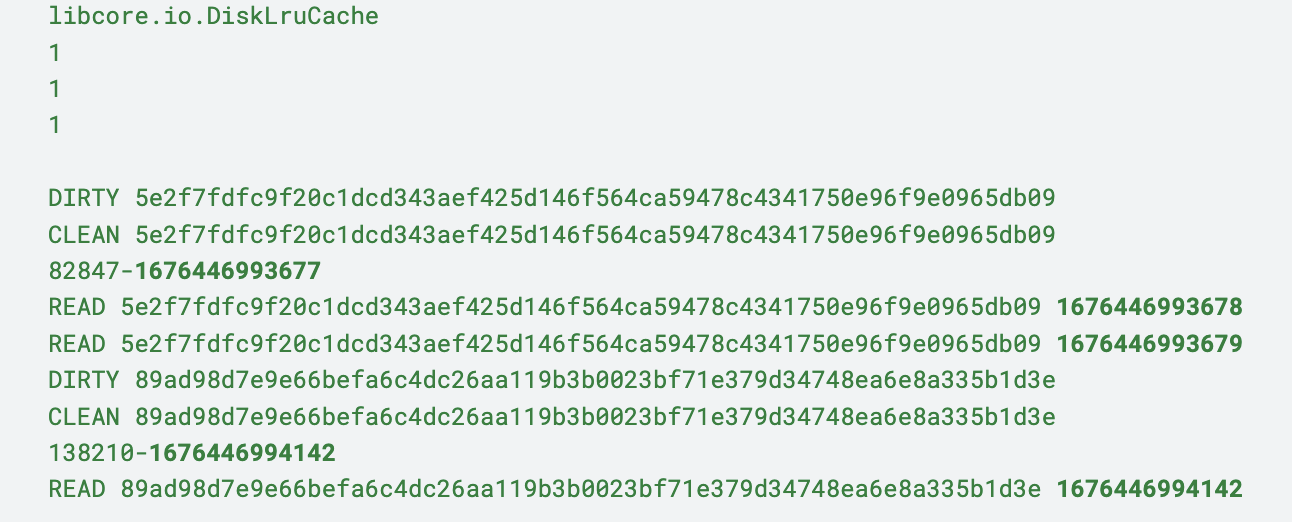
To support time-based eviction, the cache needs to track when each entry was last accessed. This information m ust persist across app restarts, so it’s stored in the journal file itself.
The timestamps are added to READ and CLEAN operations:
READ entries record when a cache entry is accessed, updating its last-access time.
CLEAN entries record the creation time when a new entry is successfully added to the cache.
Figure 7. Example of a TLRU journal file.
Time-based eviction logic
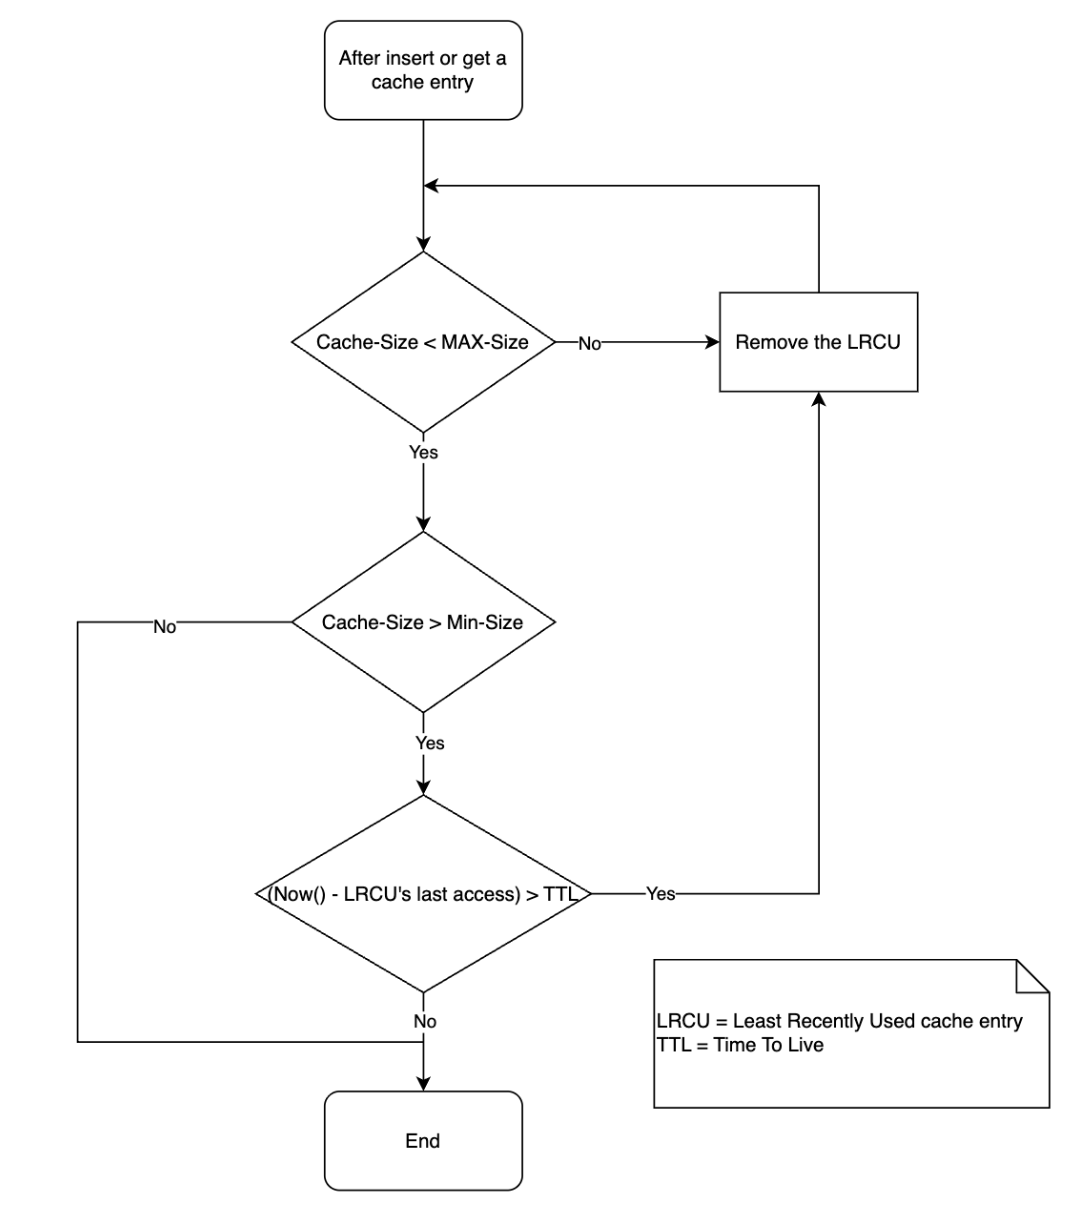
The TLRU cache leverages the existing LRU ordering to optimize expiration checking. For each cache operation, it checks if the least recently accessed entry has expired before proceeding with time-based trimming.
The diagram below shows how the TLRU cache makes the decision to remove the cache entries.
Figure 8. TLRU eviction decision flow – evaluating cache entries based on time expiration and size constraints.
The algorithm leverages the sorted nature of the cache: if the least recently accessed entry hasn’t expired, no other entries need checking. If it has expired, the cache trim operation walks through entries from oldest to newest, removing all expired ones.
Backward-compatible migration
With an extensive user base, invalidating existing cached images would cause millions of users to experience poor performance while creating massive server traffic spikes and infrastructure costs.
One of the challenges was retrieving last-access timestamps from existing LRU entries, as file system APIs do not offer reliable access time data. Our solution was to set the last-access time of all existing entries to the migration timestamp. This approach preserves all cached content and establishes a consistent baseline, although it necessitates waiting one TTL period to realize the full benefits of eviction.
We also ensured bidirectional compatibility – the original LRU implementation can read TLRU journal files by ignoring timestamp suffixes, enabling safe rollbacks if needed.
Upon completing our TLRU implementation, we focused on determining optimal values for the three core attributes: TTL duration, minimum threshold, and maximum cache size. These parameters are crucial for balancing storage optimization and cache performance, requiring careful tuning based on real user behavior.
Finding optimal configuration values
Finding optimal configuration values requires systematic experimentation and data-driven decision-making. Controlled experiments to compare the cache hit ratio with baseline LRU performance must be conducted.
Note: Cache hit ratio, our key success metric, gauges efficiency by the percentage of requests served from cache versus requiring server downloads. Lower ratios lead to higher server costs and increased user data consumption.
Our success criteria is for a cache hit ratio decrease of no more than 3 percentage points (pp) during the transition to TLRU. For instance, a decrease from 59% to 56% hit ratio would result in 7% increase in server requests. This threshold balances storage optimization with acceptable performance impact.
To mitigate potential server cost impact from our maximum acceptable 3 pp cache hit ratio drop, we worked with the server team to optimize image delivery infrastructure, enabling a confident TLRU rollout without infrastructure cost concerns.
Impact and results
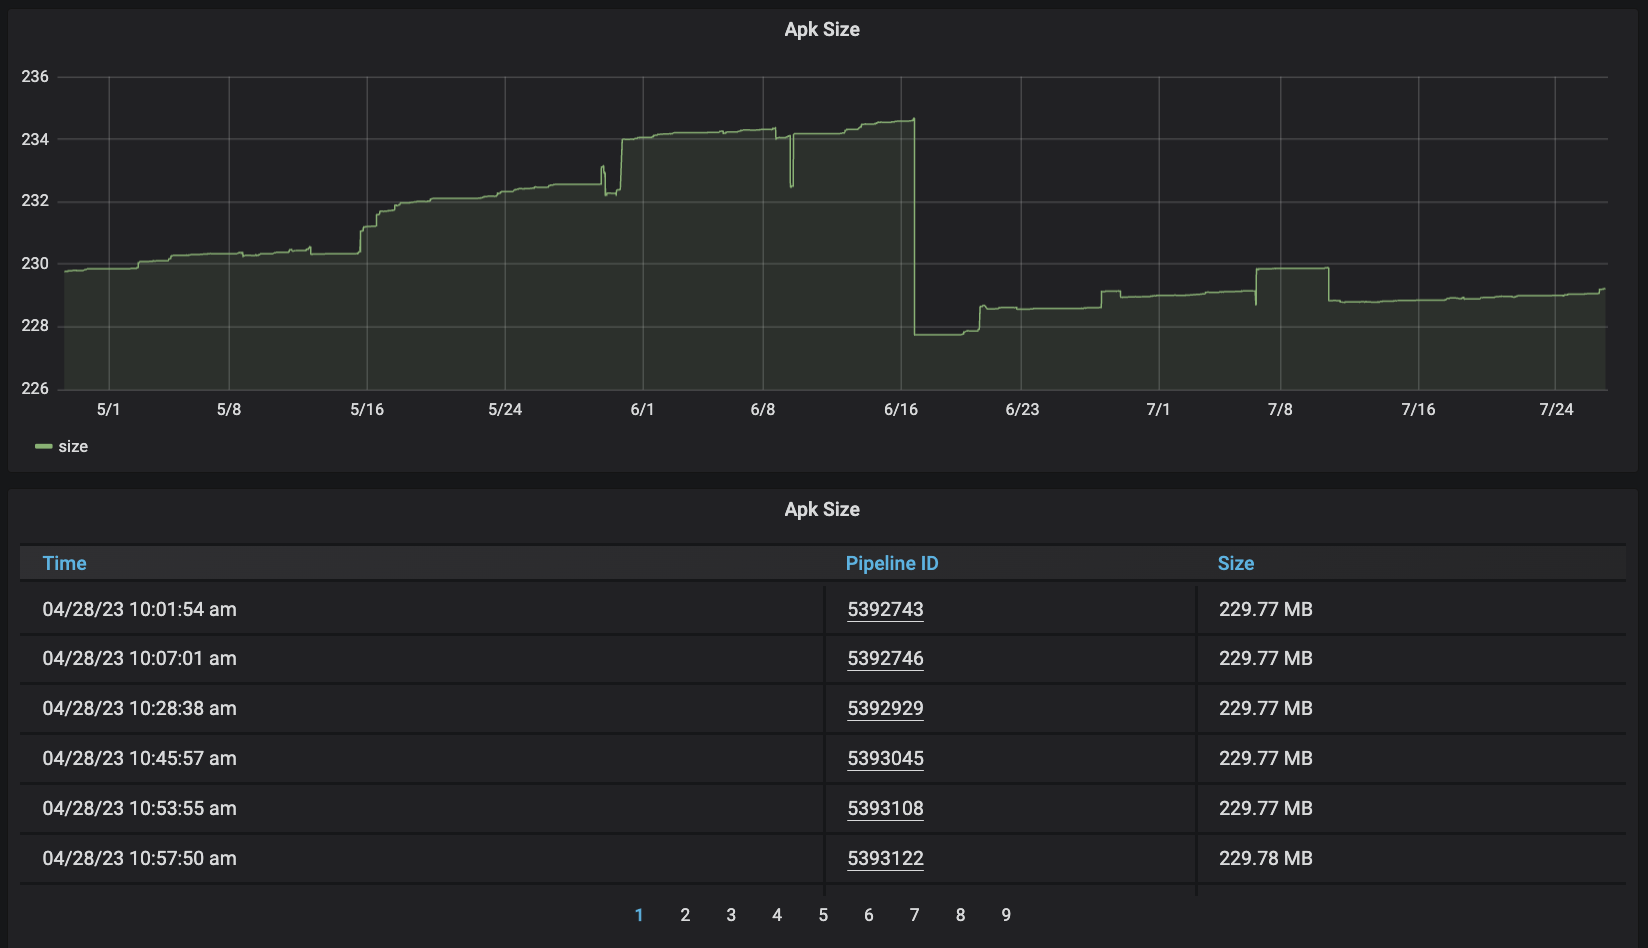
After fully rolling out TLRU to production, we significantly optimized storage while preserving user experience. Post-implementation stabilization, the P95 total app size reduced by approximately 50 MB. This meant that 95% of our users experienced storage reduction up to 50 MB, with the top 5% seeing even greater savings.
With over 100 million downloads of the Grab Android app, even conservative estimates show terabytes of storage reclaimed across all user devices worldwide. This translates to better device performance, especially on low-end devices, and improved user satisfaction.
Critically, we maintained our success criteria: cache hit ratio stayed within target thresholds (no more than 3 pp decrease), with no increase in infrastructure costs. The seamless migration preserved all existing cache data without disruption.
Conclusion
At Grab, we believe that every byte matters. Our users trust us with their device storage, and we take that responsibility seriously. The TLRU implementation exemplifies our commitment to user experience. We don’t just build features, we optimize them to ensure our app respects our users’ devices. The petabytes of storage reclaimed across millions of devices aren’t just a technical achievement; it’s a reflection of our dedication to creating a lighter, faster, more respectful mobile experience.
The implementation demonstrates that meaningful improvements can be achieved through thoughtful modifications to existing, well-tested libraries. Our focus on backward compatibility and safe migration ensured zero disruption for Grab’s users, proving that user experience and technical innovation can coexist.
Join Us
Grab is Southeast Asia’s leading superapp, serving over 900 cities across eight countries (Cambodia, Indonesia, Malaysia, Myanmar, the Philippines, Singapore, Thailand, and Vietnam). Through a single platform, millions of users access mobility, delivery, and digital financial services, including ride-hailing, food delivery, payments, lending, and digital banking via GXS Bank and GXBank. Founded in 2012, Grab’s mission is to drive Southeast Asia forward by creating economic empowerment for everyone while delivering sustainable financial performance and positive social impact.
Powered by technology and driven by heart, our mission is to drive Southeast Asia forward by creating economic empowerment for everyone. If this mission speaks to you, join our team today!
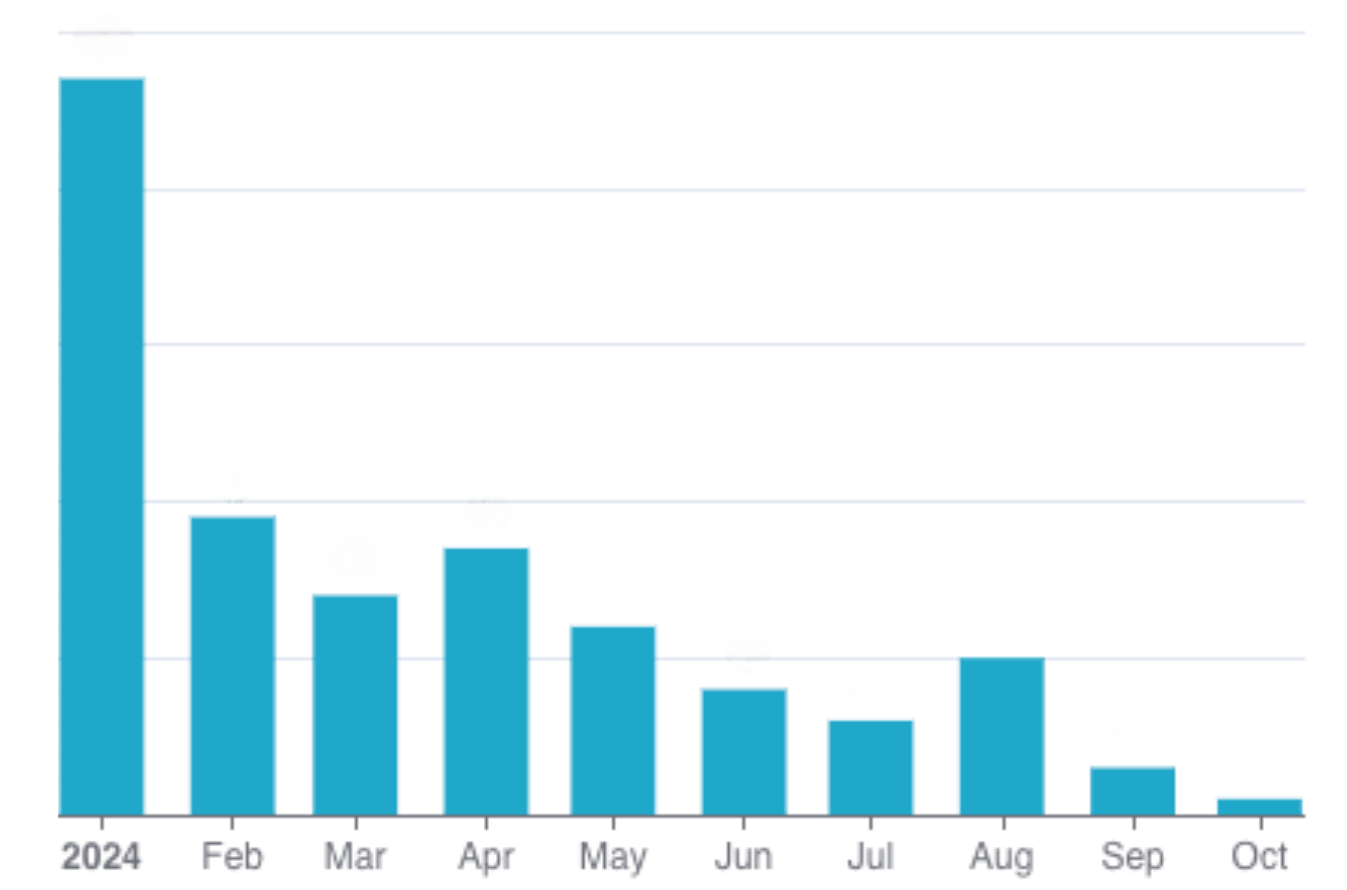
Welcome to the behind-the-scenes story of GrabUnlimited, Grab’s flagship membership program. We undertook the mammoth task of migrating from our legacy system to a Temporal1 workflow-based system, enhancing our ability to handle millions of subscribers with increased efficiency and resilience. The result? A whopping 80% reduction in open production incidents, and most importantly – an improved membership experience for our users. In this first part of the series, you will learn how to design a robust and scalable membership system as we delve into our own experience building one.
What is GrabUnlimited?
The idea behind GrabUnlimited, is pretty simple: you pay a monthly fee, you get monthly benefits as a member (e.g discounted food delivery fee). A membership system plays a key role in enhancing user experience by giving them more value for money, but also by building loyalty, making Grab their go-to app for everyday needs. However, as this program grew and evolved, it brought along unique challenges and opportunities.
With the initial triumph and significant surge in subscriber count by over 1000% from January 2022 to June 2023 – which we were super proud of! – the architecture that supported GrabUnlimited was starting to show signs of strain. Common subscriber concerns such as not receiving their membership benefits, along with developer issues marked by an increase in service outages highlighted the system’s low resiliency. The culprit? A backend service that, while functional, was not built to efficiently manage the complexities of a rapidly scaling membership model.
Deep dive into our previous system design
As engineers, we know that deciding to migrate any system to a new one is like changing the engine of a running car. It requires meticulous evaluation of the existing systems, a deep dive into the issues and their root causes, and a thorough analysis of potential solutions and their trade-offs.
How was GrabUnlimited designed?
Initially, GrabUnlimited systems were designed for an experiment and not a full-fledged regional product. The idea was to try it out as a minimum viable product over a restricted segment of a few hundred thousand users. Let’s first have a look at how the membership program works.
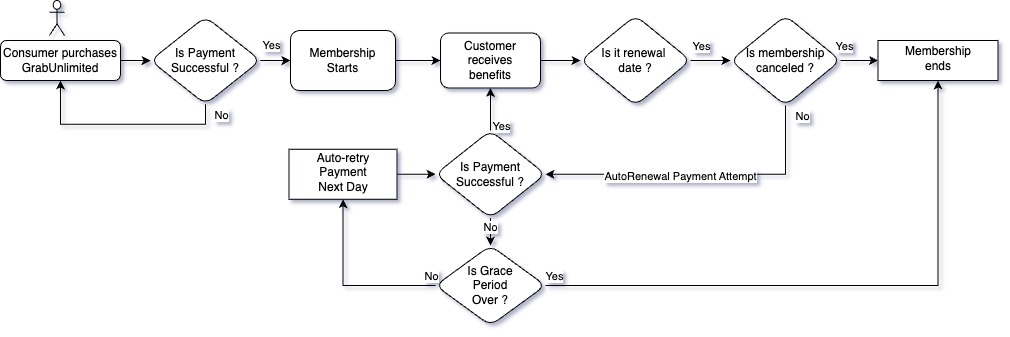
Figure 1. GrabUnlimited life of a membership flowchart.
Under the hood, our membership system relies on two main flows
Membership purchase: The user enrols for a certain duration (e.g 3 months), completes the payment through our Payment service, and receives benefits via our Reward service.
Membership renewal: A daily cron job2 checks which memberships need renewal, processes the payment, and delivers the benefits.
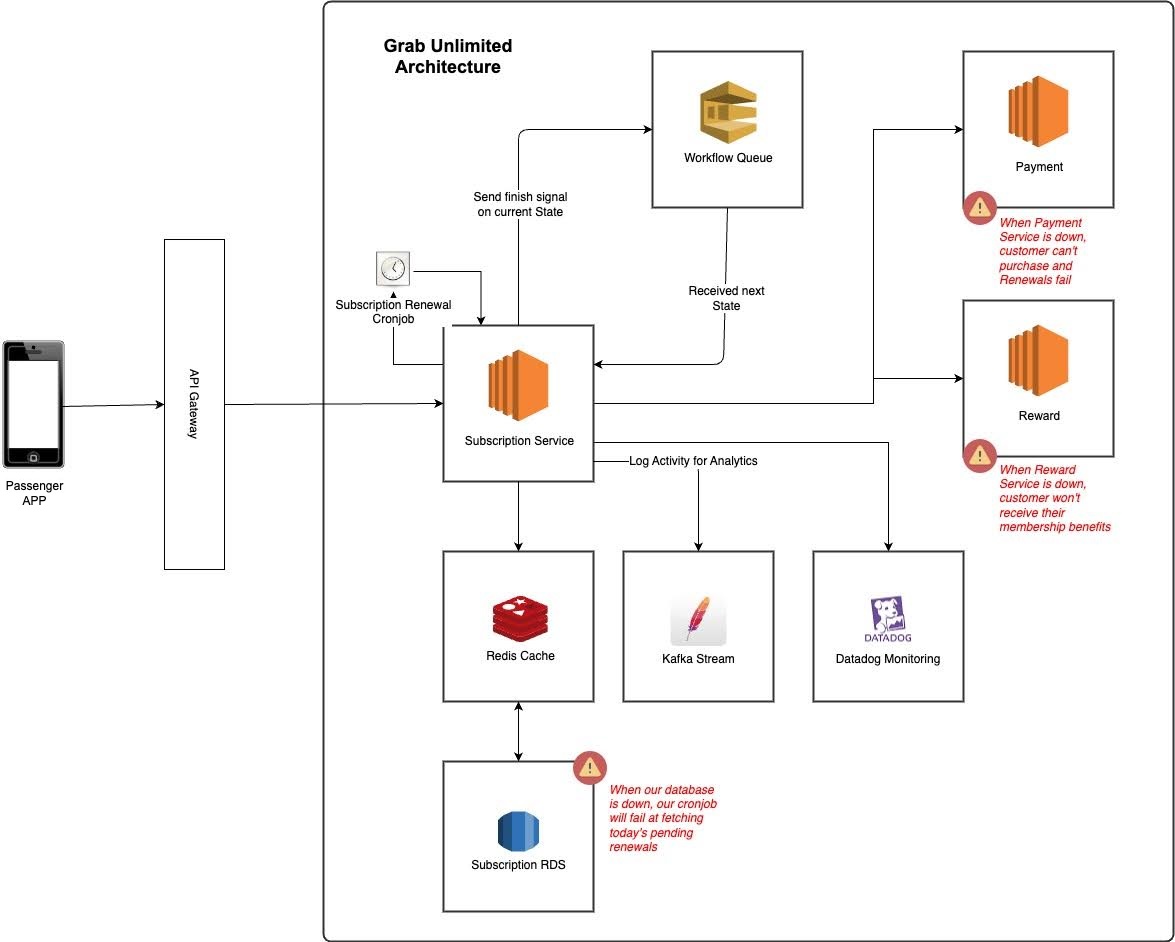
We employed a state machine3 approach to break down the membership process into smaller chunks called state handlers. For instance, a membership might transition through ‘Init’, ‘Charged’, ‘Rewarded’, and ‘Active’ states. To operate these states, we used Amazon’s Simple Queue Service (SQS). SQS acts as a manager, delegating state handlers to workers (our service) and monitoring the status of the state handler. If a worker fails to complete a task, SQS reassigns the task to another worker, ensuring no task is lost. The load is also spread across multiple workers, helping with scalability.
To safeguard our system against duplicate tasks such as charging the user twice, when a worker takes up a task, it would use a Redis lock4 mechanism with a time-to-live (TTL) of five minutes preventing any other worker from picking up the same task. If a worker fails or crashes, the lock expires and another worker can pick up the job.
So far, so good.
Figure 2. GrabUnlimited previous system design overview.
With our success came many challenges
As our subscriber base grew, we experienced an increase in system outages. To address this, we scrutinised metrics like the number of support tickets and gauged the toll on our engineering team. This included the time spent patching up issues and the opportunity cost of not developing new features or improvements.
From our subscribers’ point of view, we saw a steady increase in reported incidents.
Users were blocked because their membership status was corrupted in our database.
Memberships were not automatically renewed, or users were not able to resubscribe.
Users were not receiving their benefits after renewing their membership.
From the engineering team’s perspective, we were dedicating one engineer every week to battle these incidents full time. The on-call engineers were not only tasked with manually fixing all customer reports but were also swamped with frequent system alerts. This situation had three detrimental impacts on our team:
We were constantly putting out fires instead of addressing the root causes.
We were spending resources that could have been used to enhance our customers’ experience.
Our team’s motivation and confidence was taking a big hit.
Finding the architectural culprit
The first step was to clearly identify and understand the issues within our systems. We looked at the frequency of failures and their root cause. From there, we were able to detect recurring patterns, which led us to four major issues in our architecture.
Scalability
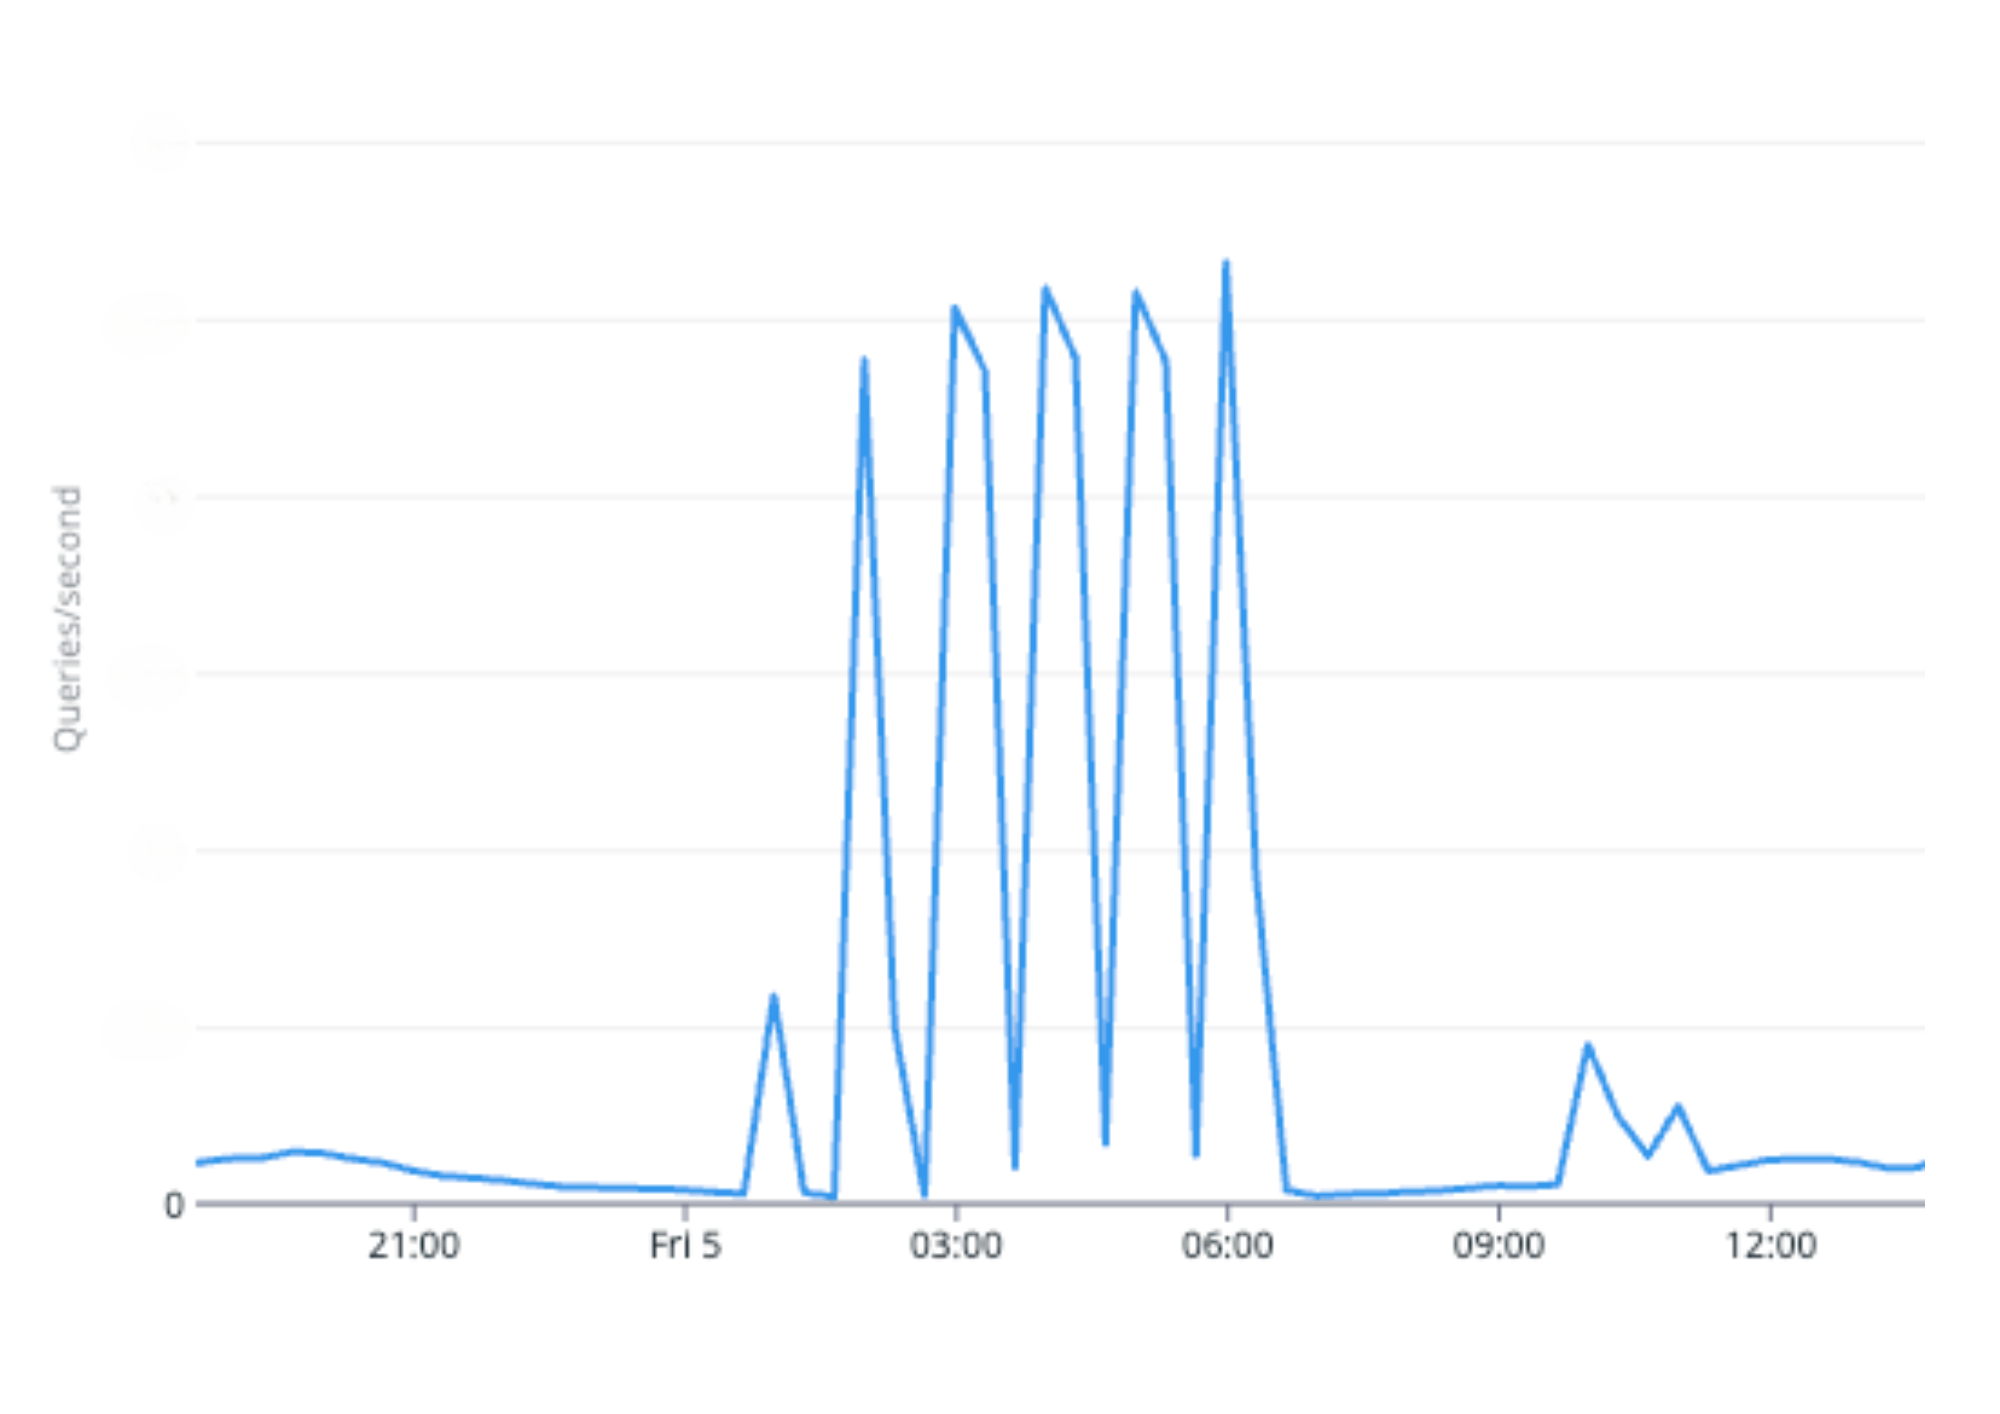
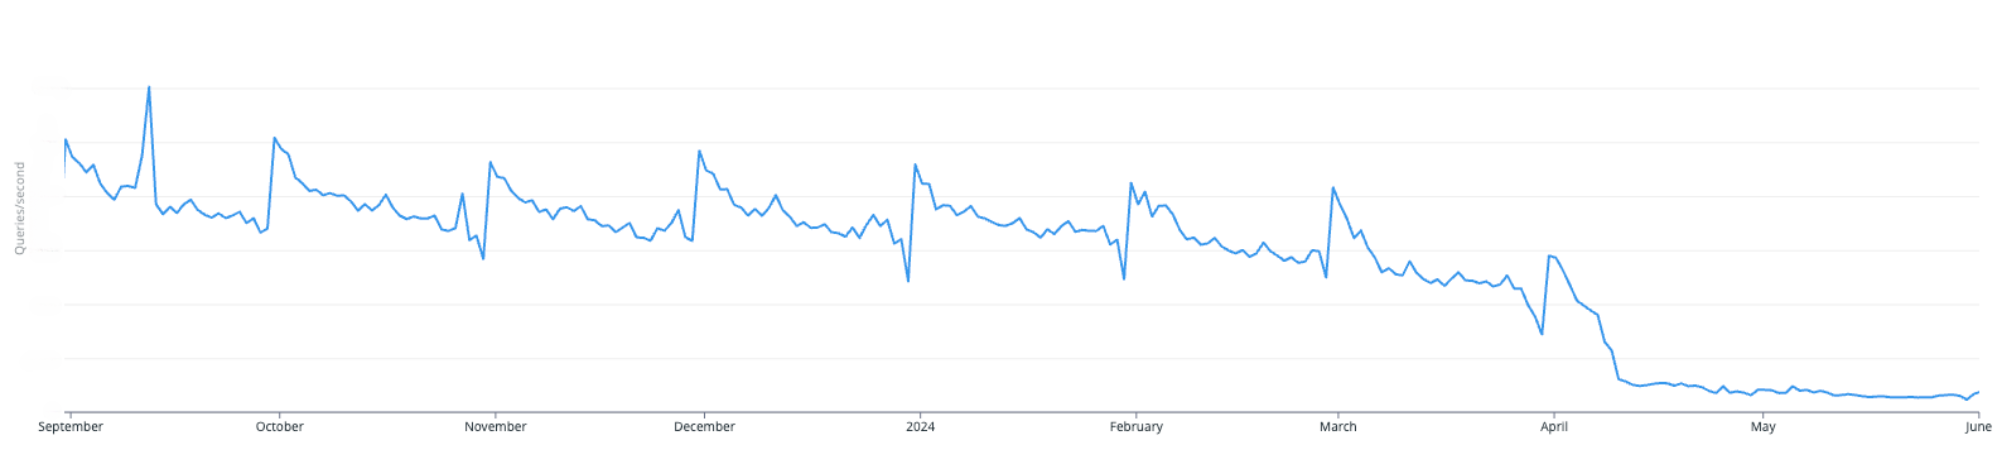
Our system’s cron job, which retrieves all daily memberships due for renewal from our database, becomes slower and more resource-intensive as the number of members increases. Despite our attempt to alleviate high database usage by dividing the process into multiple batches and running several cron jobs, we were still experiencing significant surges each time a cron job runs. So our only viable solution was vertical scaling5 of the database. In other words, we had a serious bottleneck in our system.
Figure 3. Database queries per second during membership renewals at night.
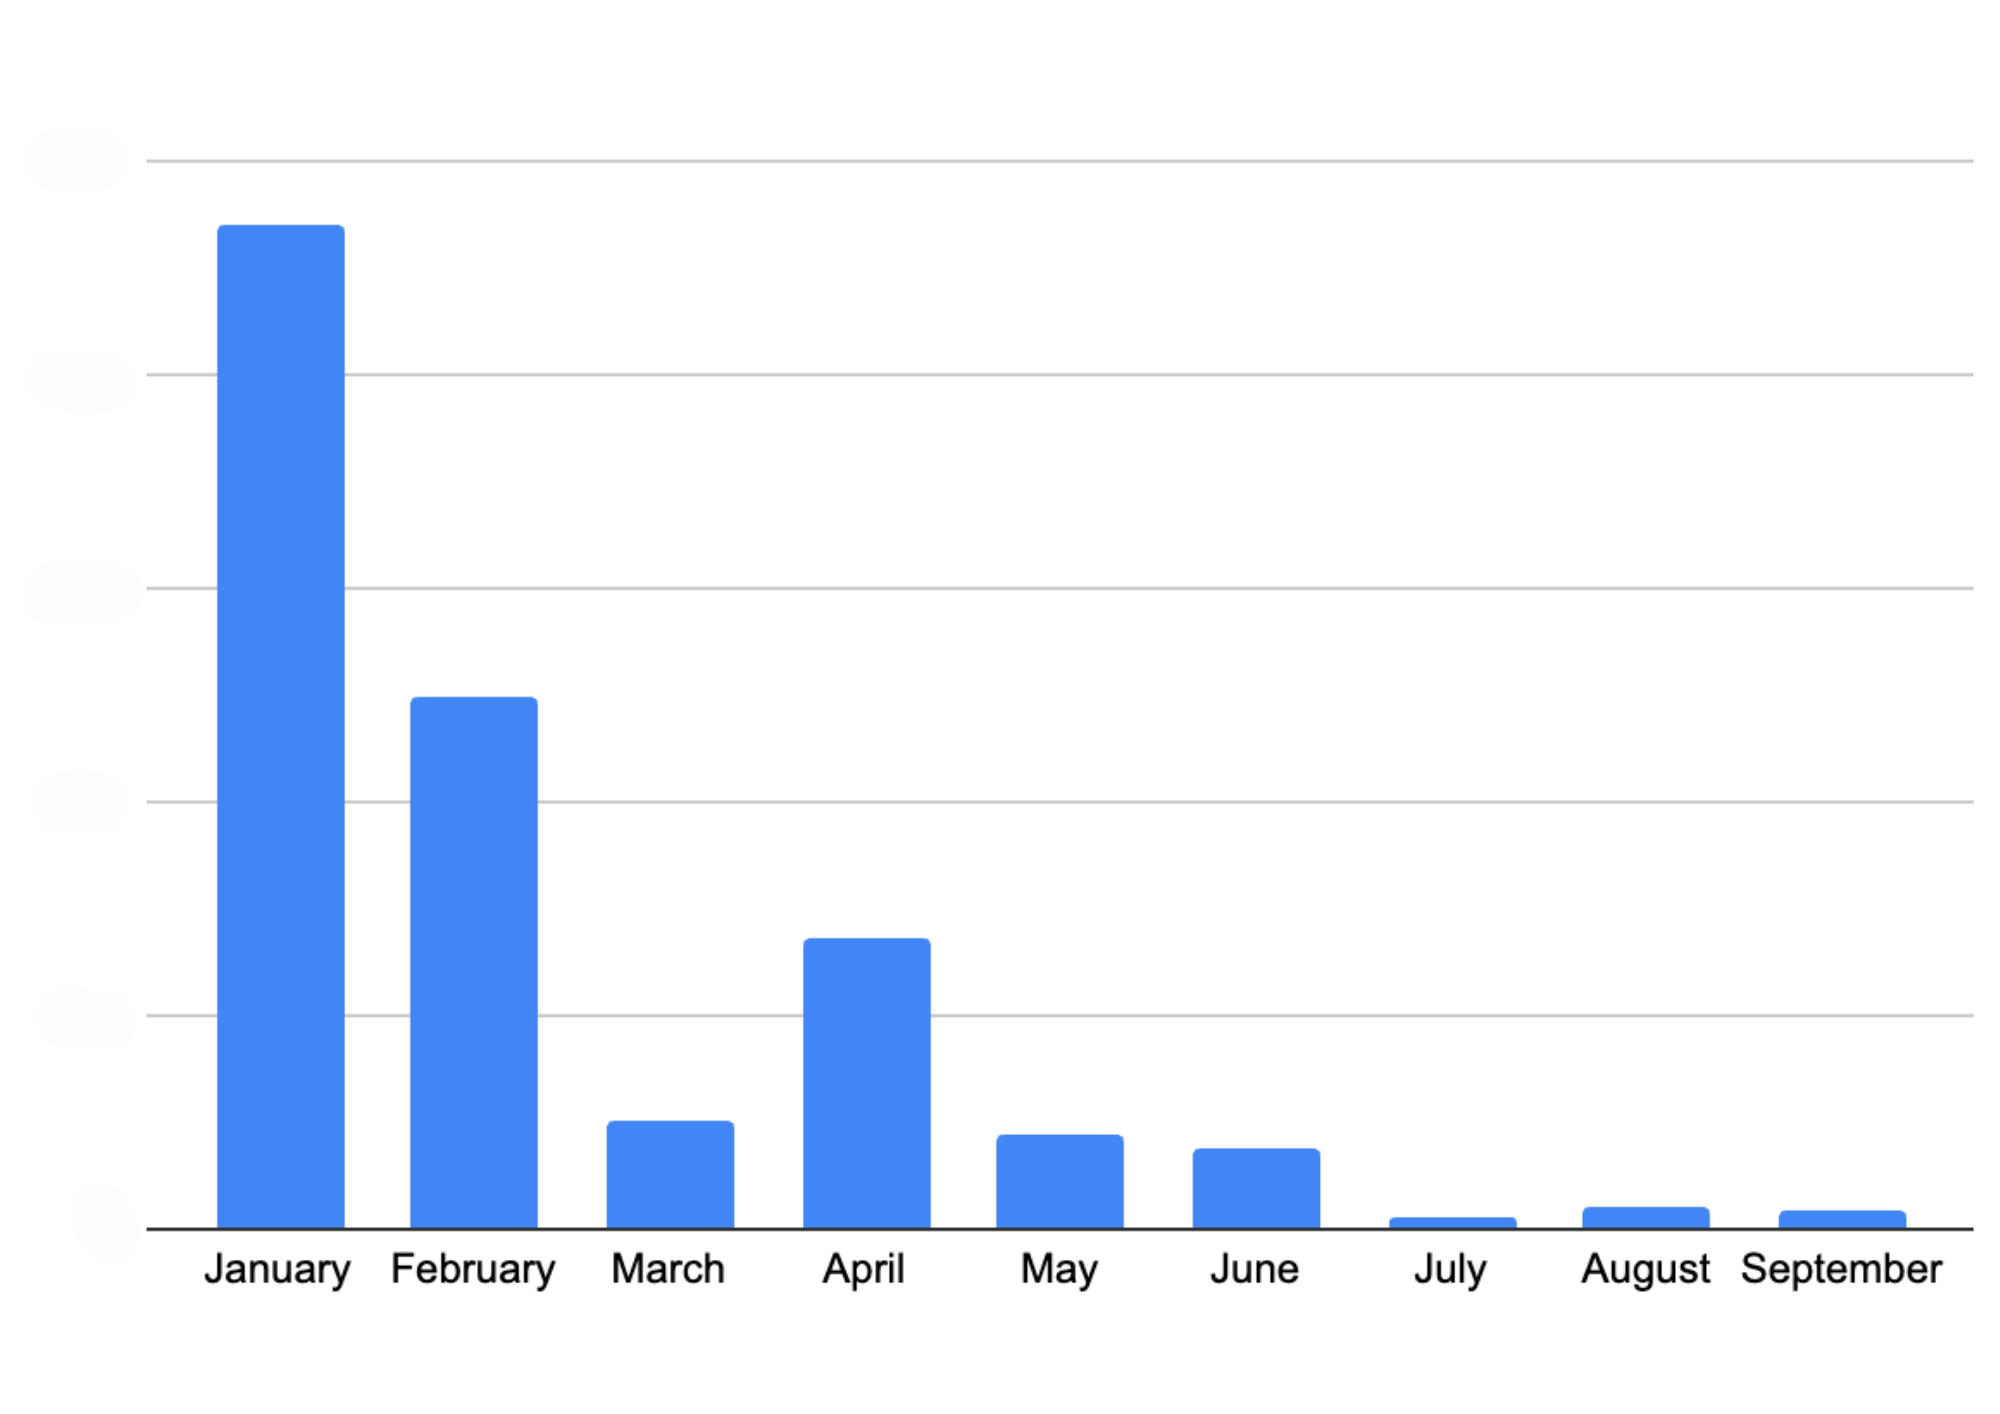
Picture this – A user tries to cancel their membership in the middle of the auto-renewal process, and voila, we have what we call a “zombie” state where the membership is both cancelled and renewed. This situation happens due to the limitations of our 5-minute Redis lock. If the renewal process holding the lock doesn’t complete within the timeout, the lock is released, enabling the cancel process to obtain the lock and run concurrently.
What happens when the Rewards service faces an outage? The user buys a membership but doesn’t receive the rewards. It’s like throwing a party but the guests never arrive. We had three issues here:
In the event where upstream services had an outage, we relied on SQS’s maximum number of retries without exponential backoff8, causing potential overloads on recovering services.
Our cron job being housed within the service itself was susceptible to interruptions during outages or service restarts.
Over time, the logic to transition between states in our state machine became complex and multi-responsibility as more states were added. This made our retry mechanism unreliable due to potential risks of double charging or double awarding users. Which leads us to our fourth culprit.
Even when some steps could be retried, our system lacked idempotency guarantees – a safety net to ensure that a step could be repeated without unintended side effects. Although our critical upstream systems like Payments and Rewards support idempotency via idempotency keys, our service wasn’t originally designed with this in mind.
Users could be stuck in a state where the payment succeeded but they didn’t receive their benefits or received them twice, requiring manual intervention from engineers.
We were not able to auto-retry membership renewals if the cron job, database, or any service had an outage.
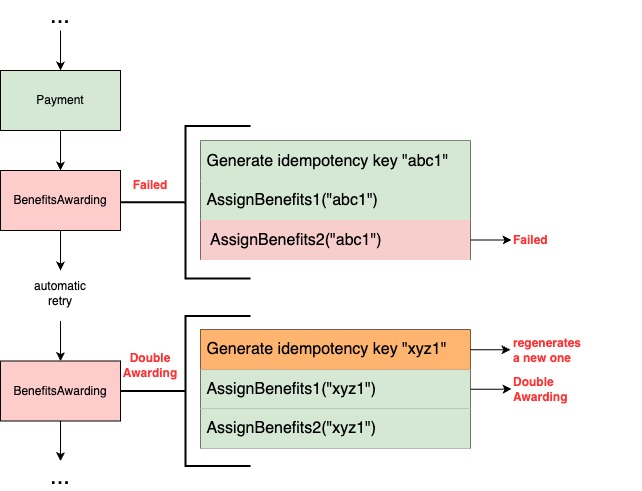
Figure 4. Example of Idempotency issue in our old system design. If a single task fails in a state handler, the whole step would be retried which could lead to a double awarding.
For example, consider a state handler “BenefitsAwarding” that follows these steps:
Generate an idempotency key.
Calls Reward service to award the first set of benefits to the subscriber using the key.
Calls Reward service to award the second set of benefits to the subscriber using the key.
If step 3 fails due to an outage, and the step is retried and re-queued in SQS, it would restart from step 1. This generates a new idempotency key, meaning the Reward system wouldn’t recognize the retry and will award Benefits1 twice. One way to fix this with our current design is to substantially increase the number of states in our SQS state machine, to isolate tasks further rather than handling too much logic in a state handler. However, that would mean having hundreds of states making the whole process difficult to maintain.
Ultimately, most incidents traced back to one fundamental issue: Our systems were relying on a sequential process that couldn’t be easily replayed if any incident or disturbance happened during execution. We were placing all our bets on the happy path, a risky gamble indeed.
The Solution: Migrating our system to Temporal
Armed with a clear understanding of the problems and their impacts, we set out to explore potential solutions. This journey led us to consider refactoring our existing system or migrating to a new architecture that another team introduced to us: Temporal.
Enter Temporal
Temporal is an open-source workflow orchestration engine. Think of it as a more robust and battle-tested implementation of our previous SQS architecture. It’s designed to run millions of workflows concurrently and can recover/resume the state of a workflow execution at the exact point of failure even in the event of an outage. It has features like infinite retries, exponential backoff, rate limiting, and observability out of the box. This sounded exactly like what we needed! By using Temporal, we could offload the complexity of managing state transitions, retries, and task concurrency, allowing us to focus on our core business logic.
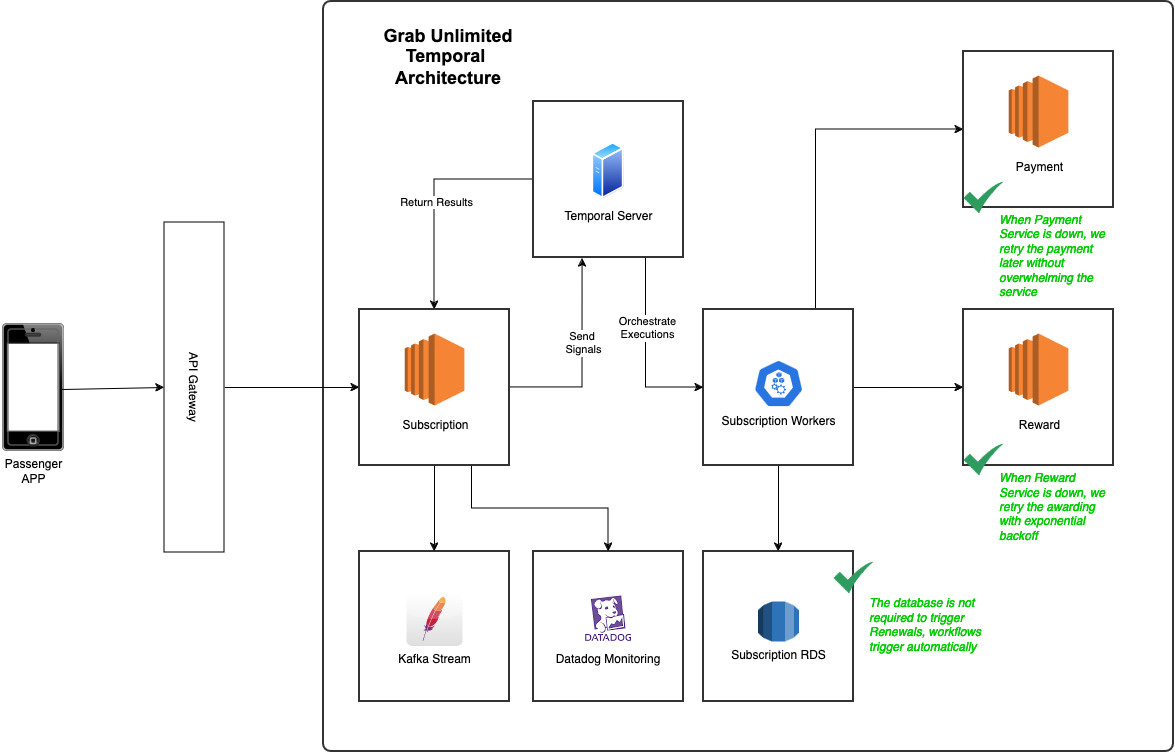
In order to make the right decision, we meticulously assessed our options over the following criteria: scalability10, reliability11, resiliency12, performance, development effort, cost, security, flexibility13, and testability14. We realised that most of what we needed to build to compensate for our system design gaps was already built into Temporal. Let’s have a sneak peek on how the architecture looks and how it solves all four major culprits we discussed.
Figure 5. GrabUnlimited new system design architecture.
Fixing our architecture culprits
Scalability
Let’s start with the easiest fix, remember our old cron job for membership renewals? We replaced it with Timer which allows a workflow to sleep and automatically wake up. Instead of renewing membership by batches, they are now renewed throughout the entire day based on the hour and minute when the user subscribed. What does this mean for us? We no longer need to fetch memberships from our database to trigger renewals. The workflow will resume at the due date to process the renewal, eliminating the database as a bottleneck.
Figure 6. Total queries per second (QPS) on database before and after the migration to Temporal.
Concurrency
Our legacy Redis lock mechanism was clearly not enough. However, with Temporal, we have alternative solutions to avoid race conditions. What happens if a user tries to cancel while the membership renewal workflow is being triggered? Temporal allows us to assign the same workflow ID to multiple workflows running mutually exclusive operations, ensuring only one operation runs at a time. Basically, we assigned the same workflow ID to both cancellation and renewal workflows, either cancellation happens first, removing the need to renew the consumer membership, or renewal takes the lead, and cancellation only happens after.
Figure 7. Total corrupted membership states (zombies) manually handled by engineers significantly decreased during our migration which started in February.
Resiliency
Out of the box, Temporal allowed us to put in place a few key resilience mechanisms like exponential backoff and infinite retry which was a key gap in our previous SQS architecture. That was great because we didn’t have to implement these mechanisms on our own and it meant that when calling key upstream services like Payment, we were able to precisely set our retry policies without overwhelming the service in case of an outage on their end.
Idempotency
Remember our fourth culprit from above? Our state handlers with SQS were performing too many tasks simultaneously, which made it risky to trust the retry process. This multi-responsibility nature introduced significant risks, including potential database corruption, double charging, and double awarding of benefits. Further breaking down these steps would result in hundreds of intermediary steps, each requiring careful maintenance and correct sequencing. With Temporal, you can imagine a membership as an ever-running workflow consisting of a sequence of steps that are automatically managed and retried in case of failures.
While this approach didn’t directly resolve idempotency issues, it made the system and the code more readable and allowed us to design steps with single responsibilities. This, in turn, made it simpler for us to develop and ensure these steps were idempotent.
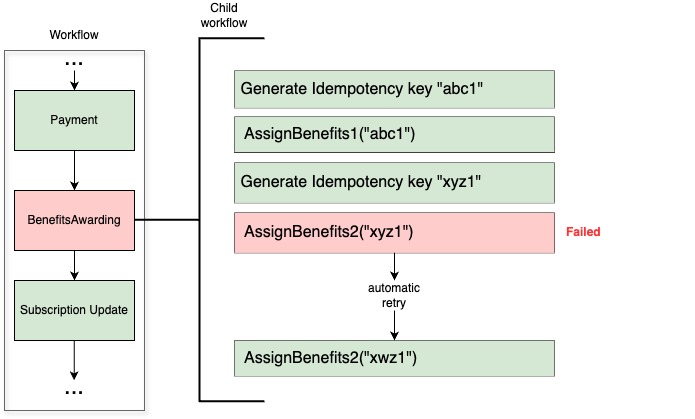
Let’s take a look at our previous example with Temporal.
Figure 8. Temporal workflow: If a single task fails, only that task is retried.
Let’s consider the same use case where a member needs to receive their benefits. The tasks remain the same except we don’t need to persist the idempotency key as it will be in the Temporal workflow state instead.
Generate idempotency keys.
Calls Reward service to award the first set of benefits to the subscriber using the key abc1.
Calls Reward service to award the second set of benefits to the subscriber using the second key xyz1.
If the “AssignBenefits2” step fails, and the process is retried by Temporal, it will restart directly from that step, thus preventing the double awarding we were experiencing with SQS. Thanks to this approach, we largely improved idempotency and resiliency in our system, which also led to great results in decreasing user reported incidents.
Figure 9. Total open production incidents reported by users related to membership issues from January to October 2024.
Embracing Temporal: Challenges and mindset shift
Transitioning to Temporal was quite a paradigm shift for our team. Rather than managing SQS state transitions, we could now focus on our core business logic while Temporal handled the complexities of state management, error handling, and retries. This change allowed us to streamline development, making our processes more intuitive.
However, this shift wasn’t without its challenges. Temporal features such as Workflow and Activity design, deterministic execution, and built-in retry mechanisms required a steep learning curve. We had to quickly adapt to Temporal’s new way of thinking, and while it took some time to master these tools, they ultimately led to a more robust and scalable system. The transition to Temporal brought not only technical improvements but also a new mindset for solving problems efficiently.
Key takeaways and conclusion
After a thorough analysis, we decided to transition our architecture to Temporal, as it outperformed on nearly every evaluation criteria. Here are the key takeaways from our experience:
Understand the problem, fix it for the future: Migrating legacy systems requires more than just patching up issues; it demands a deep dive into the root causes. For us, that meant addressing challenges in scalability, resiliency, and concurrency head-on to prevent future headaches.
Focusing on what matters: By adopting Temporal workflow orchestration, we could shift our focus to what really counts, core business logic. The result? An 80% reduction in production incidents and a much smoother post-migration experience.
Resilience and flexibility at scale: Temporal provided the infrastructure we needed to handle millions of subscribers with more robust processes for retries, idempotency, and state management. These features played a key role in ensuring the system remained stable and flexible as our user base grew.
The learning curve pays off: Every system migration has its challenges, but the payoff was transformative. Despite the initial hiccups, moving to Temporal allowed us to scale GrabUnlimited seamlessly while significantly improving both our development processes and the overall user experience.
Stay tuned for Part 2, where we dive into the challenges of the migration and the lessons learned along the way. How did we seamlessly migrate millions of users to this new architecture without disrupting their memberships? How did we implement Temporal without pausing development for months? And what roadblocks did we encounter as we scaled this solution to all our users? We’ll answer these questions and more in the next post.
Nothing would have been possible without the unwavering support of Abegail Nato Alcantara, Andrys Silalahi, Pavel Sidlo, and Renu Yadav.
Join us
Grab is the leading superapp platform in Southeast Asia, providing everyday services that matter to consumers. More than just a ride-hailing and food delivery app, Grab offers a wide range of on-demand services in the region, including mobility, food, package and grocery delivery services, mobile payments, and financial services across 700 cities in eight countries.
Powered by technology and driven by heart, our mission is to drive Southeast Asia forward by creating economic empowerment for everyone. If this mission speaks to you, join our team today!
Definition of terms
Temporal: Temporal is an open-source workflow orchestration platform. It allows developers to build scalable and reliable applications using familiar development patterns and easy-to-use tools. ↩
Cron job: A cron job is a time-based job scheduler in Unix-like operating systems. Users can schedule jobs (commands or scripts) to run periodically at fixed times, dates, or intervals. ↩
State machine: A state machine is a behavioural model used in computer science. It represents a system in terms of states and transitions between those states. ↩
Redis lock mechanism: Redis is an in-memory data structure store that can be used as a database, cache, and message broker. A Redis lock mechanism is a way to ensure that only one computer in a distributed network can process a certain piece of code at a time. ↩
Vertical scaling: also known as “scaling up”, is the process of adding more resources (such as memory, CPUs, or storage) to an existing server or database to enhance its performance and capacity. Which is different from Horizontal scaling, also known as “scaling out”, the process of adding more servers or nodes to a system to handle increased load. ↩
Concurrency: In computing, concurrency is the ability of different parts or units of a program, algorithm, or problem to be executed out-of-order or in partial order, without affecting the final outcome. ↩
Resiliency: refers to the ability of a system or application to quickly recover from failures and continue its intended operation without significant interruption. ↩
Exponential backoff: Exponential backoff is an algorithm that uses feedback to multiplicatively decrease the rate of some process, in order to gradually find an acceptable rate. In the context of the article, it refers to a strategy for retrying failed tasks with increasing wait times between retries. ↩
Idempotency: An operation is idempotent if the result of performing it once is exactly the same as the result of performing it repeatedly without any intervening actions. ↩
Scalability: The ability of a system to handle increased workload or demand by adding resources. ↩
Reliability: The capacity of a system to consistently perform its intended functions without failure. ↩
Resiliency: The ability of a system to recover quickly and effectively from failures or disruptions, ensuring continuity of service. ↩
Flexibility: The architecture should be flexible enough to accommodate future changes in requirements. ↩
Testability: The architecture should allow for effective testing to ensure the system works as expected. ↩
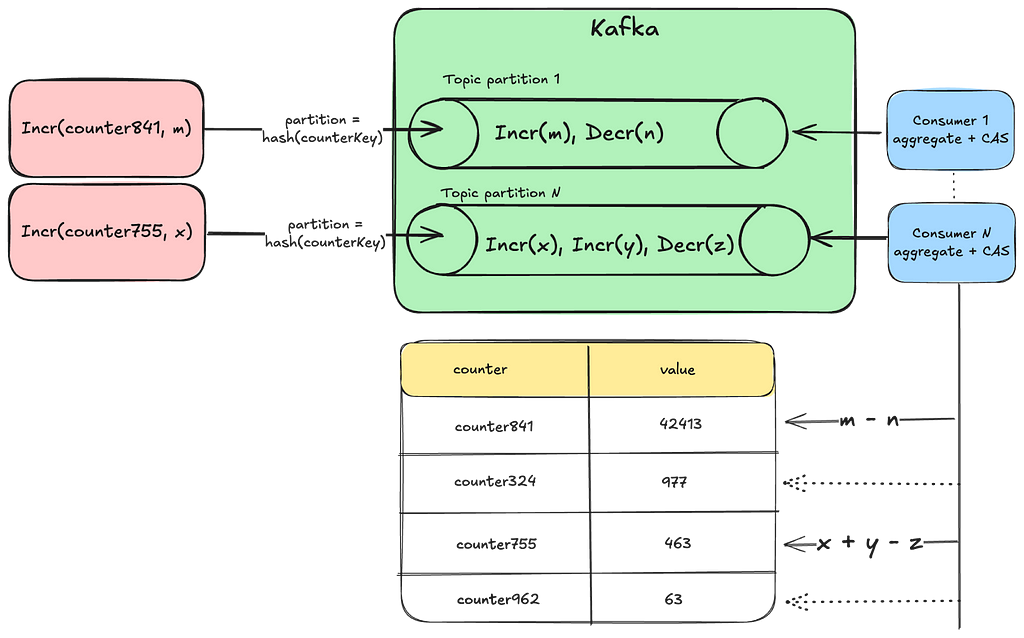
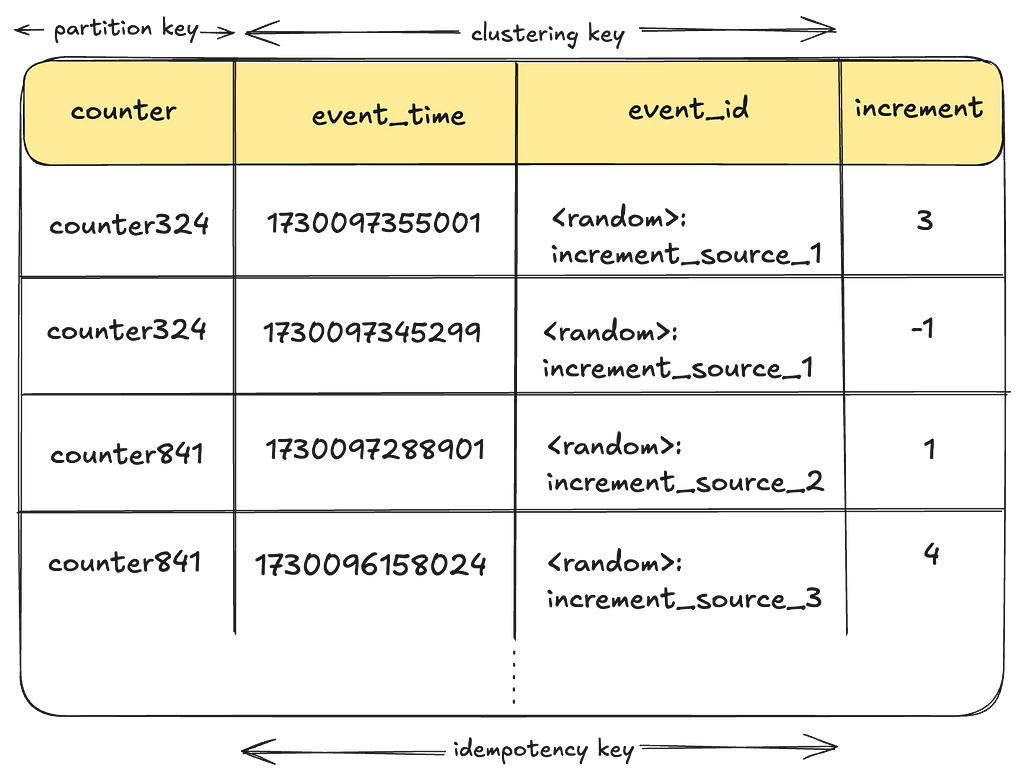
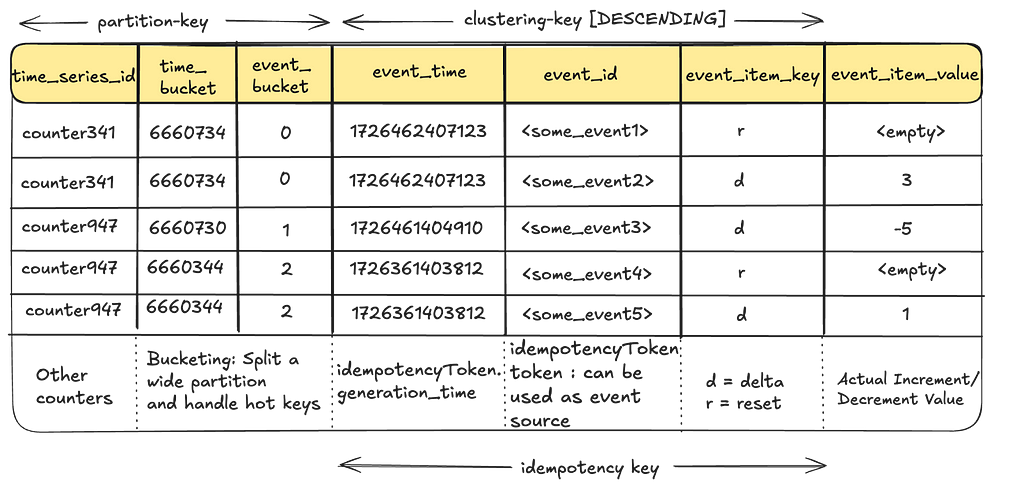
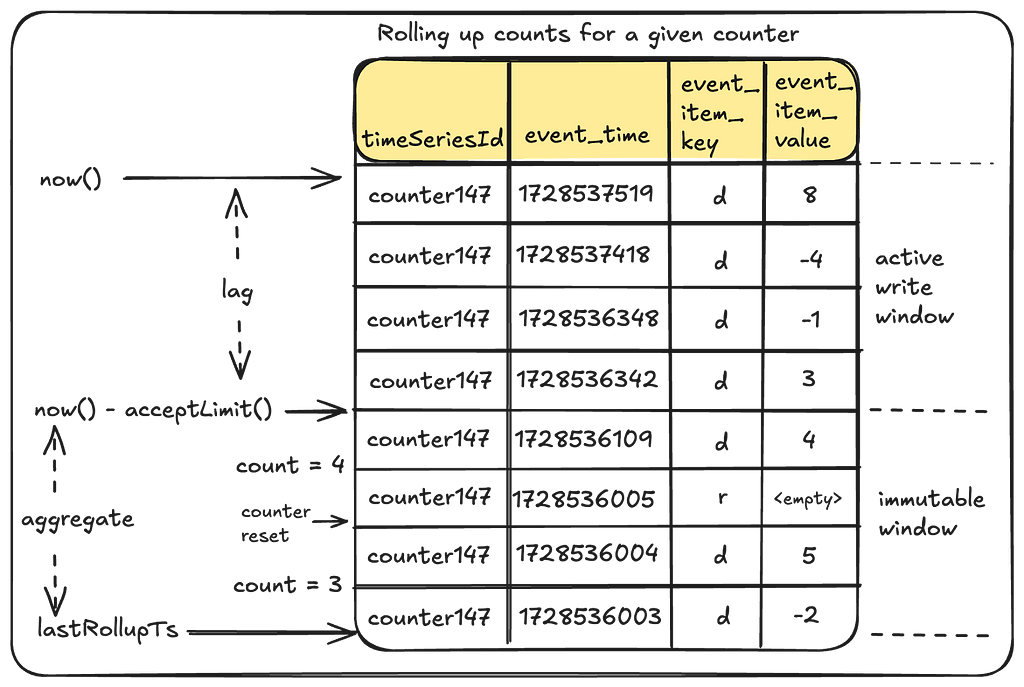
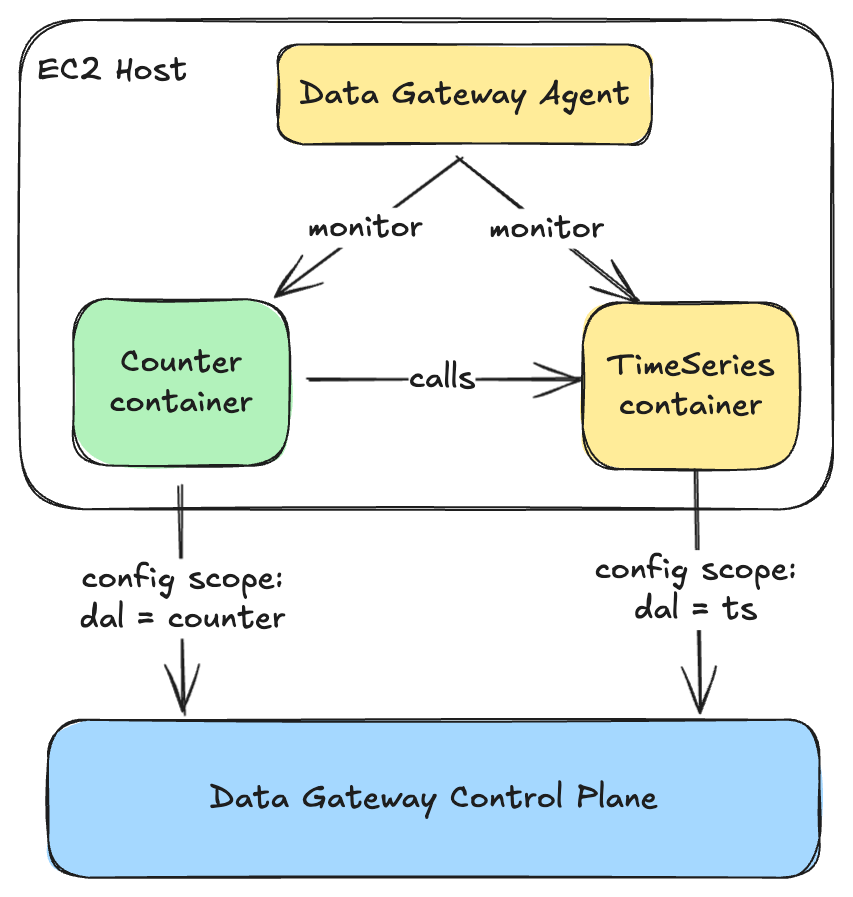
In our previous blog post, we introduced Netflix’s TimeSeries Abstraction, a distributed service designed to store and query large volumes of temporal event data with low millisecond latencies. Today, we’re excited to present the Distributed Counter Abstraction. This counting service, built on top of the TimeSeries Abstraction, enables distributed counting at scale while maintaining similar low latency performance. As with all our abstractions, we use our Data Gateway Control Plane to shard, configure, and deploy this service globally.
Distributed counting is a challenging problem in computer science. In this blog post, we’ll explore the diverse counting requirements at Netflix, the challenges of achieving accurate counts in near real-time, and the rationale behind our chosen approach, including the necessary trade-offs.
Note: When it comes to distributed counters, terms such as ‘accurate’ or ‘precise’ should be taken with a grain of salt. In this context, they refer to a count very close to accurate, presented with minimal delays.
Use Cases and Requirements
At Netflix, our counting use cases include tracking millions of user interactions, monitoring how often specific features or experiences are shown to users, and counting multiple facets of data during A/B test experiments, among others.
At Netflix, these use cases can be classified into two broad categories:
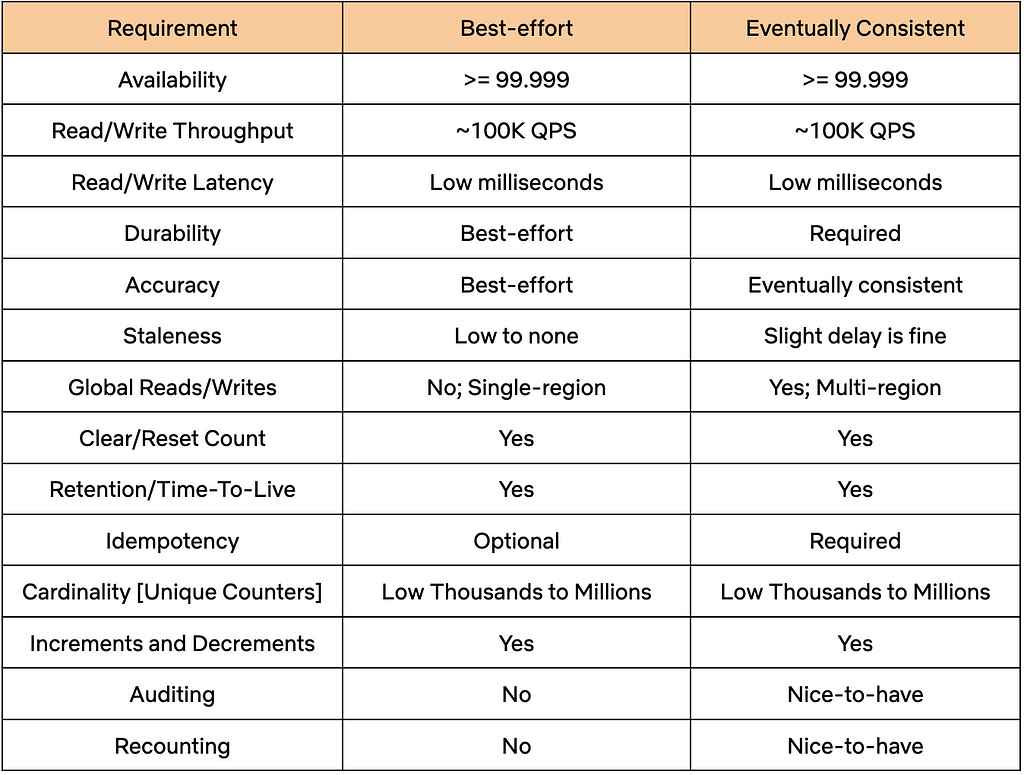
Best-Effort: For this category, the count doesn’t have to be very accurate or durable. However, this category requires near-immediate access to the current count at low latencies, all while keeping infrastructure costs to a minimum.
Eventually Consistent: This category needs accurate and durable counts, and is willing to tolerate a slight delay in accuracy and a slightly higher infrastructure cost as a trade-off.
Both categories share common requirements, such as high throughput and high availability. The table below provides a detailed overview of the diverse requirements across these two categories.
Distributed Counter Abstraction
To meet the outlined requirements, the Counter Abstraction was designed to be highly configurable. It allows users to choose between different counting modes, such as Best-Effort or Eventually Consistent, while considering the documented trade-offs of each option. After selecting a mode, users can interact with APIs without needing to worry about the underlying storage mechanisms and counting methods.
Let’s take a closer look at the structure and functionality of the API.
API
Counters are organized into separate namespaces that users set up for each of their specific use cases. Each namespace can be configured with different parameters, such as Type of Counter, Time-To-Live (TTL), and Counter Cardinality, using the service’s Control Plane.
The Counter Abstraction API resembles Java’s AtomicInteger interface:
AddCount/AddAndGetCount: Adjusts the count for the specified counter by the given delta value within a dataset. The delta value can be positive or negative. The AddAndGetCount counterpart also returns the count after performing the add operation.
The idempotency token can be used for counter types that support them. Clients can use this token to safely retry or hedge their requests. Failures in a distributed system are a given, and having the ability to safely retry requests enhances the reliability of the service.
GetCount: Retrieves the count value of the specified counter within a dataset.
Now, let’s look at the different types of counters supported within the Abstraction.
Types of Counters
The service primarily supports two types of counters: Best-Effort and Eventually Consistent, along with a third experimental type: Accurate. In the following sections, we’ll describe the different approaches for these types of counters and the trade-offs associated with each.
Best Effort Regional Counter
This type of counter is powered by EVCache, Netflix’s distributed caching solution built on the widely popular Memcached. It is suitable for use cases like A/B experiments, where many concurrent experiments are run for relatively short durations and an approximate count is sufficient. Setting aside the complexities of provisioning, resource allocation, and control plane management, the core of this solution is remarkably straightforward:
// clear counts from all replicas cache.delete(counterCacheKey, ReplicaPolicy.ALL);
EVCache delivers extremely high throughput at low millisecond latency or better within a single region, enabling a multi-tenant setup within a shared cluster, saving infrastructure costs. However, there are some trade-offs: it lacks cross-region replication for the increment operation and does not provide consistency guarantees, which may be necessary for an accurate count. Additionally, idempotency is not natively supported, making it unsafe to retry or hedge requests.
Edit: A note on probabilistic data structures:
Probabilistic data structures like HyperLogLog (HLL) can be useful for tracking an approximate number of distinct elements, like distinct views or visits to a website, but are not ideally suited for implementing distinct increments and decrements for a given key. Count-Min Sketch (CMS) is an alternative that can be used to adjust the values of keys by a given amount. Data stores like Redis support both HLL and CMS. However, we chose not to pursue this direction for several reasons:
We chose to build on top of data stores that we already operate at scale.
Probabilistic data structures do not natively support several of our requirements, such as resetting the count for a given key or having TTLs for counts. Additional data structures, including more sketches, would be needed to support these requirements.
On the other hand, the EVCache solution is quite simple, requiring minimal lines of code and using natively supported elements. However, it comes at the trade-off of using a small amount of memory per counter key.
Eventually Consistent Global Counter
While some users may accept the limitations of a Best-Effort counter, others opt for precise counts, durability and global availability. In the following sections, we’ll explore various strategies for achieving durable and accurate counts. Our objective is to highlight the challenges inherent in global distributed counting and explain the reasoning behind our chosen approach.
Approach 1: Storing a Single Row per Counter
Let’s start simple by using a single row per counter key within a table in a globally replicated datastore.
Let’s examine some of the drawbacks of this approach:
Lack of Idempotency: There is no idempotency key baked into the storage data-model preventing users from safely retrying requests. Implementing idempotency would likely require using an external system for such keys, which can further degrade performance or cause race conditions.
Heavy Contention: To update counts reliably, every writer must perform a Compare-And-Swap operation for a given counter using locks or transactions. Depending on the throughput and concurrency of operations, this can lead to significant contention, heavily impacting performance.
Secondary Keys: One way to reduce contention in this approach would be to use a secondary key, such as a bucket_id, which allows for distributing writes by splitting a given counter into buckets, while enabling reads to aggregate across buckets. The challenge lies in determining the appropriate number of buckets. A static number may still lead to contention with hot keys, while dynamically assigning the number of buckets per counter across millions of counters presents a more complex problem.
Let’s see if we can iterate on our solution to overcome these drawbacks.
Approach 2: Per Instance Aggregation
To address issues of hot keys and contention from writing to the same row in real-time, we could implement a strategy where each instance aggregates the counts in memory and then flushes them to disk at regular intervals. Introducing sufficient jitter to the flush process can further reduce contention.
However, this solution presents a new set of issues:
Vulnerability to Data Loss: The solution is vulnerable to data loss for all in-memory data during instance failures, restarts, or deployments.
Inability to Reliably Reset Counts: Due to counting requests being distributed across multiple machines, it is challenging to establish consensus on the exact point in time when a counter reset occurred.
Lack of Idempotency: Similar to the previous approach, this method does not natively guarantee idempotency. One way to achieve idempotency is by consistently routing the same set of counters to the same instance. However, this approach may introduce additional complexities, such as leader election, and potential challenges with availability and latency in the write path.
That said, this approach may still be suitable in scenarios where these trade-offs are acceptable. However, let’s see if we can address some of these issues with a different event-based approach.
Approach 3: Using Durable Queues
In this approach, we log counter events into a durable queuing system like Apache Kafka to prevent any potential data loss. By creating multiple topic partitions and hashing the counter key to a specific partition, we ensure that the same set of counters are processed by the same set of consumers. This setup simplifies facilitating idempotency checks and resetting counts. Furthermore, by leveraging additional stream processing frameworks such as Kafka Streams or Apache Flink, we can implement windowed aggregations.
However, this approach comes with some challenges:
Potential Delays: Having the same consumer process all the counts from a given partition can lead to backups and delays, resulting in stale counts.
Rebalancing Partitions: This approach requires auto-scaling and rebalancing of topic partitions as the cardinality of counters and throughput increases.
Furthermore, all approaches that pre-aggregate counts make it challenging to support two of our requirements for accurate counters:
Auditing of Counts: Auditing involves extracting data to an offline system for analysis to ensure that increments were applied correctly to reach the final value. This process can also be used to track the provenance of increments. However, auditing becomes infeasible when counts are aggregated without storing the individual increments.
Potential Recounting: Similar to auditing, if adjustments to increments are necessary and recounting of events within a time window is required, pre-aggregating counts makes this infeasible.
Barring those few requirements, this approach can still be effective if we determine the right way to scale our queue partitions and consumers while maintaining idempotency. However, let’s explore how we can adjust this approach to meet the auditing and recounting requirements.
Approach 4: Event Log of Individual Increments
In this approach, we log each individual counter increment along with its event_time and event_id. The event_id can include the source information of where the increment originated. The combination of event_time and event_id can also serve as the idempotency key for the write.
However, in its simplest form, this approach has several drawbacks:
Read Latency: Each read request requires scanning all increments for a given counter potentially degrading performance.
Duplicate Work: Multiple threads might duplicate the effort of aggregating the same set of counters during read operations, leading to wasted effort and subpar resource utilization.
Wide Partitions: If using a datastore like Apache Cassandra, storing many increments for the same counter could lead to a wide partition, affecting read performance.
Large Data Footprint: Storing each increment individually could also result in a substantial data footprint over time. Without an efficient data retention strategy, this approach may struggle to scale effectively.
The combined impact of these issues can lead to increased infrastructure costs that may be difficult to justify. However, adopting an event-driven approach seems to be a significant step forward in addressing some of the challenges we’ve encountered and meeting our requirements.
How can we improve this solution further?
Netflix’s Approach
We use a combination of the previous approaches, where we log each counting activity as an event, and continuously aggregate these events in the background using queues and a sliding time window. Additionally, we employ a bucketing strategy to prevent wide partitions. In the following sections, we’ll explore how this approach addresses the previously mentioned drawbacks and meets all our requirements.
Note: From here on, we will use the words “rollup” and “aggregate” interchangeably. They essentially mean the same thing, i.e., collecting individual counter increments/decrements and arriving at the final value.
TimeSeries Event Store:
We chose the TimeSeries Data Abstraction as our event store, where counter mutations are ingested as event records. Some of the benefits of storing events in TimeSeries include:
High-Performance: The TimeSeries abstraction already addresses many of our requirements, including high availability and throughput, reliable and fast performance, and more.
Reducing Code Complexity: We reduce a lot of code complexity in Counter Abstraction by delegating a major portion of the functionality to an existing service.
TimeSeries Abstraction uses Cassandra as the underlying event store, but it can be configured to work with any persistent store. Here is what it looks like:
Handling Wide Partitions: The time_bucket and event_bucket columns play a crucial role in breaking up a wide partition, preventing high-throughput counter events from overwhelming a given partition. For more information regarding this, refer to our previous blog.
No Over-Counting: The event_time, event_id and event_item_key columns form the idempotency key for the events for a given counter, enabling clients to retry safely without the risk of over-counting.
Event Ordering: TimeSeries orders all events in descending order of time allowing us to leverage this property for events like count resets.
Event Retention: The TimeSeries Abstraction includes retention policies to ensure that events are not stored indefinitely, saving disk space and reducing infrastructure costs. Once events have been aggregated and moved to a more cost-effective store for audits, there’s no need to retain them in the primary storage.
Now, let’s see how these events are aggregated for a given counter.
Aggregating Count Events:
As mentioned earlier, collecting all individual increments for every read request would be cost-prohibitive in terms of read performance. Therefore, a background aggregation process is necessary to continually converge counts and ensure optimal read performance.
But how can we safely aggregate count events amidst ongoing write operations?
This is where the concept of Eventually Consistent counts becomes crucial. By intentionally lagging behind the current time by a safe margin, we ensure that aggregation always occurs within an immutable window.
Lets see what that looks like:
Let’s break this down:
lastRollupTs: This represents the most recent time when the counter value was last aggregated. For a counter being operated for the first time, this timestamp defaults to a reasonable time in the past.
Immutable Window and Lag: Aggregation can only occur safely within an immutable window that is no longer receiving counter events. The “acceptLimit” parameter of the TimeSeries Abstraction plays a crucial role here, as it rejects incoming events with timestamps beyond this limit. During aggregations, this window is pushed slightly further back to account for clock skews.
This does mean that the counter value will lag behind its most recent update by some margin (typically in the order of seconds). This approach does leave the door open for missed events due to cross-region replication issues. See “Future Work” section at the end.
Aggregation Process: The rollup process aggregates all events in the aggregation window since the last rollup to arrive at the new value.
Rollup Store:
We save the results of this aggregation in a persistent store. The next aggregation will simply continue from this checkpoint.
We create one such Rollup table per dataset and use Cassandra as our persistent store. However, as you will soon see in the Control Plane section, the Counter service can be configured to work with any persistent store.
LastWriteTs: Every time a given counter receives a write, we also log a last-write-timestamp as a columnar update in this table. This is done using Cassandra’s USING TIMESTAMP feature to predictably apply the Last-Write-Win (LWW) semantics. This timestamp is the same as the event_time for the event. In the subsequent sections, we’ll see how this timestamp is used to keep some counters in active rollup circulation until they have caught up to their latest value.
Rollup Cache
To optimize read performance, these values are cached in EVCache for each counter. We combine the lastRollupCount and lastRollupTsinto a single cached value per counter to prevent potential mismatches between the count and its corresponding checkpoint timestamp.
But, how do we know which counters to trigger rollups for? Let’s explore our Write and Read path to understand this better.
Add/Clear Count:
An add or clear count request writes durably to the TimeSeries Abstraction and updates the last-write-timestamp in the Rollup store. If the durability acknowledgement fails, clients can retry their requests with the same idempotency token without the risk of overcounting.Upon durability, we send a fire-and-forget request to trigger the rollup for the request counter.
GetCount:
We return the last rolled-up count as a quick point-read operation, accepting the trade-off of potentially delivering a slightly stale count. We also trigger a rollup during the read operation to advance the last-rollup-timestamp, enhancing the performance of subsequent aggregations. This process also self-remediates a stale count if any previous rollups had failed.
With this approach, the counts continually converge to their latest value. Now, let’s see how we scale this approach to millions of counters and thousands of concurrent operations using our Rollup Pipeline.
Rollup Pipeline:
Each Counter-Rollup server operates a rollup pipeline to efficiently aggregate counts across millions of counters. This is where most of the complexity in Counter Abstraction comes in. In the following sections, we will share key details on how efficient aggregations are achieved.
Light-Weight Roll-Up Event: As seen in our Write and Read paths above, every operation on a counter sends a light-weight event to the Rollup server:
Note that this event does not include the increment. This is only an indication to the Rollup server that this counter has been accessed and now needs to be aggregated. Knowing exactly which specific counters need to be aggregated prevents scanning the entire event dataset for the purpose of aggregations.
In-Memory Rollup Queues: A given Rollup server instance runs a set of in-memory queues to receive rollup events and parallelize aggregations. In the first version of this service, we settled on using in-memory queues to reduce provisioning complexity, save on infrastructure costs, and make rebalancing the number of queues fairly straightforward. However, this comes with the trade-off of potentially missing rollup events in case of an instance crash. For more details, see the “Stale Counts” section in “Future Work.”
Minimize Duplicate Effort: We use a fast non-cryptographic hash like XXHash to ensure that the same set of counters end up on the same queue. Further, we try to minimize the amount of duplicate aggregation work by having a separate rollup stack that chooses to run fewerbeefier instances.
Availability and Race Conditions: Having a single Rollup server instance can minimize duplicate aggregation work but may create availability challenges for triggering rollups. If we choose to horizontally scale the Rollup servers, we allow threads to overwrite rollup values while avoiding any form of distributed locking mechanisms to maintain high availability and performance. This approach remains safe because aggregation occurs within an immutable window. Although the concept of now() may differ between threads, causing rollup values to sometimes fluctuate, the counts will eventually converge to an accurate value within each immutable aggregation window.
Rebalancing Queues: If we need to scale the number of queues, a simple Control Plane configuration update followed by a re-deploy is enough to rebalance the number of queues.
      "eventual_counter_config": {
          "queue_config": {
            "num_queues" : 8,  // change to 16 and re-deploy
...
Handling Deployments: During deployments, these queues shut down gracefully, draining all existing events first, while the new Rollup server instance starts up with potentially new queue configurations. There may be a brief period when both the old and new Rollup servers are active, but as mentioned before, this race condition is managed since aggregations occur within immutable windows.
Minimize Rollup Effort: Receiving multiple events for the same counter doesn’t mean rolling it up multiple times. We drain these rollup events into a Set, ensuring a given counter is rolled up only onceduring a rollup window.
Efficient Aggregation: Each rollup consumer processes a batch of counters simultaneously. Within each batch, it queries the underlying TimeSeries abstraction in parallel to aggregate events within specified time boundaries. The TimeSeries abstraction optimizes these range scans to achieve low millisecond latencies.
Dynamic Batching: The Rollup server dynamically adjusts the number of time partitions that need to be scanned based on cardinality of counters in order to prevent overwhelming the underlying store with many parallel read requests.
Adaptive Back-Pressure: Each consumer waits for one batch to complete before issuing the rollups for the next batch. It adjusts the wait time between batches based on the performance of the previous batch. This approach provides back-pressure during rollups to prevent overwhelming the underlying TimeSeries store.
Handling Convergence:
In order to prevent low-cardinality counters from lagging behind too much and subsequently scanning too many time partitions, they are kept in constant rollup circulation. For high-cardinality counters, continuously circulating them would consume excessive memory in our Rollup queues. This is where the last-write-timestamp mentioned previously plays a crucial role. The Rollup server inspects this timestamp to determine if a given counter needs to be re-queued, ensuring that we continue aggregating until it has fully caught up with the writes.
Now, let’s see how we leverage this counter type to provide an up-to-date current count in near-realtime.
Experimental: Accurate Global Counter
We are experimenting with a slightly modified version of the Eventually Consistent counter. Again, take the term ‘Accurate’ with a grain of salt. The key difference between this type of counter and its counterpart is that the delta, representing the counts since the last-rolled-up timestamp, is computed in real-time.
And then, currentAccurateCount = lastRollupCount + delta
Aggregating this delta in real-time can impact the performance of this operation, depending on the number of events and partitions that need to be scanned to retrieve this delta. The same principle of rolling up in batches applies here to prevent scanning too many partitions in parallel. Conversely, if the counters in this dataset areaccessedfrequently, the time gap for the delta remains narrow, making this approach of fetching current counts quite effective.
Now, let’s see how all this complexity is managed by having a unified Control Plane configuration.
Control Plane
The Data Gateway Platform Control Plane manages control settings for all abstractions and namespaces, including the Counter Abstraction. Below, is an example of a control plane configuration for a namespace that supports eventually consistent counters with low cardinality:
"persistence_configuration": [
  {
    "id": "CACHE",                             // Counter cache config
    "scope": "dal=counter",
    "physical_storage": {
      "type": "EVCACHE",                       // type of cache storage
      "cluster": "evcache_dgw_counter_tier1"   // Shared EVCache cluster
    }
  },
  {
    "id": "COUNTER_ROLLUP",
    "scope": "dal=counter",                    // Counter abstraction config
    "physical_storage": {
      "type": "CASSANDRA",                     // type of Rollup store
      "cluster": "cass_dgw_counter_uc1",       // physical cluster name
      "dataset": "my_dataset_1"                // namespace/dataset
    },
    "counter_cardinality": "LOW",              // supported counter cardinality
    "config": {
      "counter_type": "EVENTUAL",              // Type of counter
      "eventual_counter_config": {             // eventual counter type
        "internal_config": {
          "queue_config": {                    // adjust w.r.t cardinality
            "num_queues" : 8,                  // Rollup queues per instance
            "coalesce_ms": 10000,              // coalesce duration for rollups
            "capacity_bytes": 16777216         // allocated memory per queue
          },
          "rollup_batch_count": 32             // parallelization factor
        }
      }
    }
  },
  {
    "id": "EVENT_STORAGE",
    "scope": "dal=ts",                         // TimeSeries Event store
    "physical_storage": {
      "type": "CASSANDRA",                     // persistent store type
      "cluster": "cass_dgw_counter_uc1",       // physical cluster name
      "dataset": "my_dataset_1",               // keyspace name
    },
    "config": {
      "time_partition": {                      // time-partitioning for events
        "buckets_per_id": 4,                   // event buckets within
        "seconds_per_bucket": "600",           // smaller width for LOW card
        "seconds_per_slice": "86400",          // width of a time slice table
      },
      "accept_limit": "5s",                    // boundary for immutability
    },
    "lifecycleConfigs": {
      "lifecycleConfig": [
        {
          "type": "retention",                 // Event retention
          "config": {
            "close_after": "518400s",
            "delete_after": "604800s"          // 7 day count event retention
          }
        }
      ]
    }
  }
]
Using such a control plane configuration, we compose multiple abstraction layers using containers deployed on the same host, with each container fetching configuration specific to its scope.
Provisioning
As with the TimeSeries abstraction, our automation uses a bunch of user inputs regarding their workload and cardinalities to arrive at the right set of infrastructure and related control plane configuration. You can learn more about this process in a talk given by one of our stunning colleagues, Joey Lynch : How Netflix optimally provisions infrastructure in the cloud.
Performance
At the time of writing this blog, this service was processing close to 75K count requests/second globally across the different API endpoints and datasets:
while providing single-digit millisecond latencies for all its endpoints:
Future Work
While our system is robust, we still have work to do in making it more reliable and enhancing its features. Some of that work includes:
Regional Rollups: Cross-region replication issues can result in missed events from other regions. An alternate strategy involves establishing a rollup table for each region, and then tallying them in a global rollup table. A key challenge in this design would be effectively communicating the clearing of the counter across regions.
Error Detection and Stale Counts: Excessively stale counts can occur if rollup events are lost or if a rollup fails and isn’t retried. This isn’t an issue for frequently accessed counters, as they remain in rollup circulation. This issue is more pronounced for counters that aren’t accessed frequently. Typically, the initial read for such a counter will trigger a rollup, self-remediating the issue. However, for use cases that cannot accept potentially stale initial reads, we plan to implement improved error detection, rollup handoffs, and durable queues for resilient retries.
Conclusion
Distributed counting remains a challenging problem in computer science. In this blog, we explored multiple approaches to implement and deploy a Counting service at scale. While there may be other methods for distributed counting, our goal has been to deliver blazing fast performance at low infrastructure costs while maintaining high availability and providing idempotency guarantees. Along the way, we make various trade-offs to meet the diverse counting requirements at Netflix. We hope you found this blog post insightful.
Stay tuned for Part 3 of Composite Abstractions at Netflix, where we’ll introduce our Graph Abstraction, a new service being built on top of the Key-Value Abstractionand the TimeSeries Abstraction to handle high-throughput, low-latency graphs.
Grab is Southeast Asia’s leading superapp, providing a suite of services that brings essential needs to users throughout the region. Its offerings include ride-hailing, food delivery, parcel delivery, mobile payments, and more. With safety, efficiency, and user-centered design at heart, Grab remains dedicated to solving everyday issues and improving the lives of millions.
As the app continues to expand with more features, Grab identified the need for a consistent, high-quality experience for new users who may have limited storage space or restricted internet bandwidth. Read to find out more about Project Bonsai and how it reduced app download size and app disk size.
Introduction
In 2020, Google conducted research that highlighted the negative impact of app sizes on conversion rates, revealing a 1% decrease for every 6MB expansion of the app APK size. This finding prompted Grab to ensure new and existing users had a consistently excellent Grab superapp experience, given the prevalence of low-end devices and disparate internet infrastructure in Southeast Asian regions. As a result, Grab initiated Project Bonsai in Q3 2021, with the goal of reducing and optimising the app size while enhancing user experience, reducing installation barriers, and boosting user acquisition.
Understanding the problem
The Grab superapp, with over 4 million lines of code and integration with hundreds of third-party libraries, had a significant app size. Given the prevalence of low-end devices and disparate internet infrastructure in our target region, it is crucial for us to proactively and constantly ensure we are delivering excellence in app-based user experience.
Objectives of the Bonsai project
The Bonsai project focused on these two key metrics:
App Download Size: This represents the total size of the compressed APK file that users need to download from Google Play when performing a fresh installation.
App Disk Size: This encompasses the total storage space occupied by the app on user devices, including both the binary and data generated by the app.
In this article, we will share the strategy and solutions that resulted in a successful 26% reduction in App Download Size, while also reducing the App Disk Size.
Status quo
Prior to the Bonsai project, the Grab app project had implemented various measures to achieve optimal app size. Here are some notable highlights:
Leveraging App Bundle: Since 2019, Grab has been using the app bundle approach to optimise app delivery. This approach generates smaller APKs tailored to specific device configurations, ensuring users receive optimised APKs. This helps reduce the overall app size and improve installation efficiency.
Monitoring: With a team of over 100 Android engineers and multiple collaborative teams, the Grab app undergoes a weekly release process involving hundreds of commits for each release. Closely monitoring app size changes with every commit is essential for our team. The team established debug build (APK file size) monitoring for every commit merged to the master branch. Regular weekly reviews are conducted to stay updated on the app size and identify commits that might lead to changes in app size. However, occasional mismatches may occur due to discrepancies between the debug and release builds.
Monitoring the changes in APK size
R8 Integration: R8/Proguard, known as the code shrinker, obfuscator, and optimiser, has been enabled since the beginning. This powerful tool helps reduce the app’s bytecode and resources, leading to further size optimisation and improved app performance.
Resource Optimisation: The team diligently pursued resource optimisation strategies, including:
Images: Engineers were encouraged to use vector images whenever possible, as they usually have smaller file sizes than raster images. In exceptional cases where raster images were necessary, Grab adopted the webp format instead of png, utilising better image compression to minimise app size.
Language ResourceConfig: Grab enabled resourceConfig to support only the languages actively used by the Grab app, reducing unnecessary resource overhead and enhancing app efficiency.
Third-Party Libraries Review: The team established a review process for third-party libraries, assessing their size impact on the app. This practice ensured that only essential libraries were included, preventing unnecessary bloating of the app size.
Despite the application of these measures and solutions aimed at managing the app size, there was still the potential of significant expansion in magnitude.
Strategy
The Bonsai project revolves around strategic pillars, namely Measurement, Reduction, and Containment.
Project Bonsai’s three strategic pillars for continuous app size reduction
In the Measurement phase, the focus is on providing accurate information on the app’s binary composition and how individual features, modules, libraries impact the overall app size. This allows teams to make informed decisions and gain insights into their components’ influence on the app’s size.
The insights from the Measure phase provided us with a list of actionable items for our backlog. In the Reduction phase, we employ strategic action to tackle this backlog to constantly achieve optimal app size.
Optimising the app size is not a one-time endeavour, especially as more features are added over time, potentially increasing the project’s size. While there may be limited solutions to manage app size, it’s important to find a balance between size and functionality. Else, the effort and trade-offs required may become overwhelming. Therefore, in the Containment phase, we intend to introduce effective long-term strategies and solutions designed to manage the app’s size.
In the remainder of this blog post, we explore the strategic pillars and actions taken to contain the download size.
Measure
The Grab Passenger App Core team actively engages in optimisation projects and recognised the importance of measurement as the foundation for improvement. For example, enhancing the app startup time, pipeline time, build time, and more.
In every optimisation endeavour, we adhere to a crucial principle: “MEASURE” – the first and most critical step for any improvement project. As the famous quote goes, “If you can’t measure it, you can’t improve it.” This emphasises the significance of accurate and comprehensive measurement as the foundation for driving successful optimisation efforts.
In the third quarter of 2021, our team initiated an investigation into existing tools provided by both Google and the broader community. The intention was to employ tools such as APK Analyzer or Android Studio to conduct a thorough analysis of the app binary. However, it soon became evident that these tools were not well-suited to accommodate the extensive scope of our project.
In order to accommodate our discovery, we developed a custom analytics tool called App Sizer. This tool is specifically designed to analyse app binaries from bundle files. Our primary goal was to construct a solution that adheres effectively to our unique needs.
The tool was seamlessly integrated into Grab’s CI system and sends data to a Grafana instance. As a result, the tool collates and transmits daily analytics data from the release candidate branch. It offers the following key functionalities and monitors important aspects such as:
Device-specific App Download Size: Precise information about the app download size for specific devices, focusing on optimising the App Download Size.
Trends for app download size by device type
Comprehensive Size Breakdown: A breakdown of the app’s size, including the proportion attributed to the codebase Kotlin/Java, Kotlin/Java-based libraries, native libraries, resources, and other relevant factors.
Comprehensive breakdown of app download size by component
Size Contribution by Teams: Insights into the size contributed by each individual team within the project’s scope.
Breakdown of Grab’s codebase by TF
Module-wise Size Contribution: Insights into the size impacted by each module, categorised by team.
Breakdown of the codebase by TF modules
Size Contribution by Third-Party Libraries: Information about the size attributed to each third-party library incorporated within the app.
App download size contribution by external libraries and SDK breakdown
List of Large Files: A categorised list of large files (file size exceeding X value), organised by each respective team.
Large file categories broken down by TF
It’s important to note that all the size values presented within these dashboards specifically pertain to the download size, representing the contribution of each item to the overall app download size.
As part of our commitment to the developer community, we plan to open-source this tool in the near future, allowing others to benefit from its capabilities as well.
Reduce
To optimise the app based on the analysis data obtained from the measuring step, we focused on applying common solutions from Google and the suggestions from the community. There were no fancy solutions that we invented. Our concentration centered on optimising the dex file size, refining resources, and eliminating duplication and redundancy.
dex file optimisation (Java/Kotlin)
In our initial findings, it became evident that Java/Kotlin code was the major contributor of app size. Recognising this, we made it our top priority for optimisation.
R classes
During our investigation, we discovered that a proportion of the overall app size was attributable to R classes. Further research unveiled two primary reasons behind this phenomenon:
Transitive R classes: R classes contained ID references not only to their own resources but also to resources from their transitive dependencies. This meant that if Module A depended on Module B, and Module B in turn, depended on Module C (Module A -> Module B -> Module C), then Module A’s R class included IDs references to resources from Modules B and C, even if Module A didn’t directly utilise these resources. This explained why R classes in a modularised project could accumulate millions of lines of code.
A spread of Modules and Third-Party Libraries: Our Grab project comprised over 1,500 modules and integrates hundreds of third-party libraries, leading to the generation of significantly large R classes within the project. Furthermore, this discovery also explained instances where our app size monitor exhibited spikes during certain commits despite no significant additions of resources, libraries, or code within those commits. These fluctuations were linked to changes in the dependency graph, further emphasising the impact of Transitive R classes.
It is worth noting that the team had long been cognisant of the challenges posed by Transitive R classes, especially in terms of optimising build times. Consequently, we had already undertaken various initiatives to address this specific challenge related to build times.
However, it wasn’t long before we started wondering why R8 wasn’t removing unused fields from the R classes, which would have resulted in a size reduction for these classes. It turned out that back in mid-2021, we were using Android Gradle Plugin 4.0 along with the default R8 rules. One of these rules was preserving all fields in the R classes:
-keepclassmembers class **.R$* {

   public static <fields>;

}
This rule was the root cause of why unused fields in the R classes were persisting. Google removed this rule in AGP 4.1, and the solution was straightforward: updating AGP to version 4.1.1 (or newer) helped us resolve the issue.
However, due to the project’s unusual size, there was a risk of inadvertently removing non-used R class fields if there were any instances of code accessing R classes through reflection within the codebase or third-party libraries. Since our automation testing did not yet support R8, conducting a full test of the entire project was possible, but would have demanded significant effort from the team. To avoid this substantial effort, we developed a script to search the entire codebase and identify instances where reflections were used, allowing us to assess their usage. For third-party libraries, we decompiled the libraries and applied the same script to the decompiled code.
Fix & Optimise R8 Rules
Subsequently, we conducted a revision of the R8 configuration rules. This involved assessing the compiled R8 configuration file and paying specific attention to any ‘keep’ rules that contained package wildcards. It is crucial to decipher the purpose behind each rule and its reason for existence. Any rules identified as redundant were recommended for removal. Post the thorough scrutiny of the R8 rules, we initiated request tickets urging the respective teams to work on the elimination and optimisation of these rules.
Enable more aggressive optimisations
In 2019, Google began recommending the utilisation of the proguard-android-optimise.txt configuration with code optimisation enabled. However, our project’s origins predate the introduction of Google’s R8, a time when Proguard was the primary tool for code obfuscation and size reduction. Prior to the release of Android Gradle Plugin 3.4.0, there were no explicit recommendations for enabling code optimisations during the minification process. As a result, our project has persisted in using the proguard-android.txt configuration without activating the code optimisation feature.
Our team has considered adopting a more aggressive approach towards optimisation. This approach spans from exploring the optimisation mode to incorporating the R8 full mode. This includes substantial effort required for testing and addressing issues arising from the introduction of these new modes. We encountered a particular challenge wherein the R8 optimisation exhibits instability, an issue that has been reported to Google. A definitive solution remains a work-in-progress.
At present, we have decided to postpone the implementation of a more aggressive R8 mode. However, this remains a high-priority item on our agenda, and we intend to address it in the near future.
Resources optimisation
In addition to optimising the dex file, we also address resource optimisation.
Handling large resources
During the Measure phase, we use the List Of Large Files dashboard to identify large files categorised by teams. For each team, we create request tickets with straightforward guidance. These guidelines encourage the following actions:
Explore the possibility of removing unnecessary resources.
Consider offloading the resource to the Internet (server) when feasible. Within Grab, we have the Asset Delivery Kit, which facilitates hosting and downloading resources on the client side.
Optimise files by converting them to alternative formats or reducing their size. For instance, for images, we recommend utilising vector images and the Webp format, among other optimisations.
Convert PNG to Webp
The Grab app project has a long history, and while the team has recently established guidelines and implemented CI processes to promote the use of vector and Webp images, there are still existing images that have not been optimised. The team has undertaken an initiative to address these images and has converted all PNG images to Webp format wherever a reduction in file size is achievable.
Fonts
Fonts are another group of files that have a notable impact on the project’s size. We collaborate with the teams to:
Remove fonts that are rarely used in the project.
Eliminate duplicate fonts.
While the project still contains numerous fonts, we have a project to unify all features and transition to using a single font. Our recommendation is to explore the use of one primary font style, with the flexibility to incorporate different typeface variations in your programming to achieve various typefaces using the same font.
Remove stale features and replace large library
Based on the data, it was discovered that a specific library, which was contributing approximately 8% to the overall app size, had an adverse impact. This library has since been removed from the project. Moreover, through analysing the Size Contribution by Third-Party Libraries dashboard, we identified duplicates in functions and have made efforts to eliminate these redundancies.
Moreover, in Grab, we are using the feature toggle to enable or disable a feature. The feature flags are controlled remotely. It’s very useful for running an experiment or turning off if a feature causes us any problems. So, many features in the project are controlled under a feature flag. In certain cases, even when some features are deactivated, the corresponding code remains included in the binary. We identify these cases and collaborate with teams to remove the redundant code.
After six months of working on the above initiatives, the Bonsai team managed to reduce the Grab app download size by 26%. This is particularly noteworthy, considering that prior to the commencement of the Bonsai Project, the average app size exhibited a monthly increase of approximately 1%.
Containment
After dedicating over a semester to the Reduce phase, we started the transition to the Containment phase. The first step for this phase involved setting up an App Growth Rate dashboard that presents the growth rate of app download size per release. Our goal is to keep this rate as low as possible.
The team has been discovering a few solutions, such as introducing the common UI design components to prevent duplication, and experimenting with Dynamic Delivery Feature. This phase of exploration is still ongoing and we are optimistic that it will help maintain a manageable app download size, or perhaps even contribute to further optimization.
Considering alternative initiatives, the team is contemplating recognising app size as a confined resource of our application. We believe it should be the responsibility of every team to maintain an optimal app size. Based on the measurements we have, which provide an insight into each team’s impact on the total app download size, it could be advantageous to allocate an ‘app size budget’ to each team. This would entail each team taking responsibility for managing and maintaining the size influenced by their work.
Conclusion
Grab’s Project Bonsai demonstrated the company’s commitment to optimising the app experience for users in Southeast Asia. By prioritising code optimisation, resource management, modularisation, and asset bundling, we achieved substantial optimisations in app size while enhancing user experience. These efforts not only addressed the challenges we outlined, but also contributed to increased user acquisition and improved user retention rates.
Join us
Grab is the leading superapp platform in Southeast Asia, providing everyday services that matter to consumers. More than just a ride-hailing and food delivery app, Grab offers a wide range of on-demand services in the region, including mobility, food, package and grocery delivery services, mobile payments, and financial services across 428 cities in eight countries.
Powered by technology and driven by heart, our mission is to drive Southeast Asia forward by creating economic empowerment for everyone. If this mission speaks to you, join our team today!
A promotional campaign is a marketing effort that aims to increase sales, customer engagement, or brand awareness for a product, service, or company. The target is to have more orders and sales by assigning promos to consumers within a given budget during the campaign period.
Figure 1 – Merchant feedback on marketing
From our research, we found that merchants have specific goals for the promos they are willing to offer. They want a simple and cost-effective way to achieve their specific business goals by providing well-designed offers to target the correct customers. From Grab’s perspective, we want to help merchants set up and run campaigns efficiently, and help them achieve their specific business goals.
Problem statement
One of Grab’s platform offerings for merchants is the ability to create promotional campaigns. With the emergence of AI technologies, we found that there are opportunities for us to further optimise the platform. The following are the gaps and opportunities we identified:
Globally assigned promos without smart targeting: The earlier method targeted every customer, so everyone could redeem until the promo reached the redemption limits. However, this method did not accurately meet business goals or optimise promo spending. The promotional campaign should intelligently target the best promo for each customer to increase sales and better utilise promo spending.
No customised promos for every merchant: To better optimise sales for each merchant, merchants should offer customised promos based on their historical consumer trends, not just a general offer set. For example, for a specific merchant, a 27% discount may be the appropriate offer to uplift revenue and sales based on user bookings. However, merchants do not always have the expertise to decide which offer to select to increase profit.
No AI-driven optimisation: Without AI models, it was harder for merchants to assign the right promos at scale to each consumer and optimise their business goals.
As shown in the following figure, AI-driven promotional campaigns are expected to bring higher sales with more promo spend than heuristic ones. Hence, at Grab we looked to introduce an automated, AI-driven tool that helps merchants intelligently target consumers with appropriate promos, while optimising sales and promo spending. That’s where Bullseye comes in.
Figure 2 – Graph showing the sales expectations for AI-driven pomotional campaigns
Solution
Bullseye is an automated, AI-driven promo assignment system that leverages the following capabilities:
Automated user segmentation: Enables merchants to target new, churned, and active users or all users.
Automatic promo design: Enables a merchant-level promo design framework to customise promos for each merchant or merchant group according to their business goals.
Assign each user the optimal promo: Users will receive promos selected from an array of available promos based on the merchant’s business objective.
Achieve different Grab and merchant objectives: Examples of objectives are to increase merchant sales and decrease Grab promo spend.
Flexibility to optimise for an individual merchant brand or group of merchant brands: For promotional campaigns, targeting and optimisation can be performed for a single or group of merchants (e.g. enabling GrabFood to run cuisine-oriented promo campaigns).
Architecture
Figure 3 – Bullseye architecture
The Bullseye architecture consists of a user interface (UI) and a backend service to handle requests. To use Bullseye, our operations team inputs merchant information into the Bullseye UI. The backend service will then interact with APIs to process the information using the AI model. As we work with a large customer population, data is stored in S3 and the API service triggering Chimera Spark job is used to run the prediction model and generate promo assignments. During the assignment, the Spark job parses the input parameters, pre-validates the input, makes some predictions, and then returns the promo assignment results to the backend service.
Implementation
The key components in Bullseye are shown in the following figure:
Figure 4 – Key components of Bullseye
Eater Segments Identifier: Identifies each user as active, churned, or new based on their historical orders from target merchants.
Promo Designer: We constructed a promo variation design framework to adaptively design promo variations for each campaign request as shown in the diagram below.
Offer Content Candidate Generation: Generates variant settings of promos based on the promo usage history.
Campaign Impact Simulator: Predicts business metrics such as revenue, sales, and cost based on the user and merchant profiles and offer features.
Optimal Promo Selection: Selects the optimal offer based on the predicted impact and the given campaign objective. The optimal would be based on how you define optimal. For example, if the goal is to maximise merchant sales, the model selects the top candidate which can bring the highest revenue. Finally, with the promo selection, the service returns the promo set to be used in the target campaign.
Figure 5 – Optimal Promo Selection
Customer Response Model: Predicts customer responses such as order value, redemption, and take-up rate if assigning a specific promo. Bullseye captures various user attributes and compares it with an offer’s attributes. Examples of attributes are cuisine type, food spiciness, and discount amount. When there is a high similarity in the attributes, there is a higher probability that the user will take up the offer.
Figure 6 – Customer Response Model
Hyper-parameter Selection: Optimises toward multiple business goals. Tuning of hyper-parameters allows the AI assignment model to learn how to meet success criteria such as cost per merchant sales (cpSales) uplift and sales uplift. The success criteria is the achieving of business goals. For example, the merchant wants the sales uplift after assigning promo, but cpSales uplift cannot be higher than 10%. With tuning, the optimiser can find optimal points to meet business goals and use AI models to search for better settings with high efficiency compared to manual specification. We need to constantly tune and iterate models and hyper-parameters to adapt to ever-evolving business goals and the local landscape.
As shown in the image below, AI assignments without hyper-parameter tuning (HPT) leads to a high cpSales uplift but low sales uplift (red dot). So the hyper-parameters would help to fine-tune the assignment result to be in the optimal space such as the blue dot, which may have lower sales than the red dot but meet the success criteria.
Figure 7 – Graph showing the impact of using AI assignments with HPT
Impact
We started using Bullseye in 2021. From its use we found that:
Hyper-parameters tuning and auto promo design can increase sales and reduce promo spend for food campaigns.
Promo Designer optimises budget utilisation and increases the number of promo redemptions for food campaigns.
The Customer Response Model reduced promo spending for Mart promotional campaigns.
Conclusion
We have seen positive results with the implementation of Bullseye such as reduced promo spending and maximised budget spending returns. In our efforts to serve our merchants better and help them achieve their business goals, we will continue to improve Bullseye. In the next phase, we plan to implement a more intelligent service, enabling reinforcement learning, and online assignment. We also aim to scale AI adoption by onboarding regional promotional campaigns as much as possible.
Special thanks to William Wu, Rui Tan, Rahadyan Pramudita, Krishna Murthy, and Jiesin Chia for making this project a success.
Join us
Grab is the leading superapp platform in Southeast Asia, providing everyday services that matter to consumers. More than just a ride-hailing and food delivery app, Grab offers a wide range of on-demand services in the region, including mobility, food, package and grocery delivery services, mobile payments, and financial services across 428 cities in eight countries.
Powered by technology and driven by heart, our mission is to drive Southeast Asia forward by creating economic empowerment for everyone. If this mission speaks to you, join our team today!
The advertising industry is constantly evolving, driven by advancements in technology and changes in consumer behaviour. One of the key challenges in this industry is reaching the right audience, reaching people who are most likely to be interested in your product or service. This is where the concept of a lookalike audience comes into play. By identifying and targeting individuals who share similar characteristics with an existing customer base, businesses can significantly improve the effectiveness of their advertising campaigns.
However, as the scale of Grab advertisements grows, there are several optimisations needed to maintain the efficacy of creating lookalike audiences such as high service level agreement (SLA), high cost of audience creation, and unstable data ingestion.
The need for an even more efficient and scalable solution for creating lookalike audiences was the motivation behind the development of the scalable lookalike audience platform. By developing a high-performance in-memory lookalike audience retrieval service and embedding-based lookalike audience creation and updating pipelines, this improved platform builds on the existing system and provides an even more effective tool for advertisers to reach their target audience.
Constant optimisation for greater precision
In the dynamic world of digital advertising, the ability to quickly and efficiently reach the right audience is paramount and a key strategy is targeted advertising. As such, we have to constantly find ways to improve our current approach to creating lookalike audiences that impacts both advertisers and users. Some of the gaps we identified included:
Long SLA for audience creation. Earlier, the platform stored results on Segmentation Platform (SegP) and it took two working days to generate a lookalike audience list. This is because inserting a single audience into SegP took three times longer than generating the audience. Extended creation times impacted the effectiveness of advertising campaigns, as it limited the ability of advertisers to respond quickly to changing market dynamics.
Low scalability. As the number of onboarded merchant-partners increased, the time and cost of generating lookalike audiences also increased proportionally. This limited the availability of lookalike audience generation for all advertisers, particularly those with large customer bases or rapidly changing audience profiles.
Low updating frequency of lookalike audiences. With automated updates only occurring on a weekly basis, this increased the likelihood that audiences may become outdated and ineffective. This meant there was scope to further improve to help advertisers more effectively reach their campaign goals, by targeting individuals who fit the desired audience profile.
High cost of creation. The cost of producing one segment can add up quickly for advertisers who need to generate multiple audiences. This could impact scalability for advertisers as they could hesitate to effectively use multiple lookalike audiences in their campaigns.
Solution
To efficiently identify the top N lookalike audiences for each Grab user from our pool of millions of users, we developed a solution that leverages user and audience representations in the form of embeddings. Embeddings are vector representations of data that utilise linear distances to capture structure from the original datasets. With embeddings, large sets of data are compressed and easily processed without affecting data integrity. This approach ensures high accuracy, low latency, and low cost in retrieving the most relevant audiences.
Our solution takes into account the fact that representation drift varies among entities as data is added. For instance, merchant-partner embeddings are more stable than passenger embeddings. By acknowledging this reality, we optimised our process to minimise cost while maintaining a desirable level of accuracy. Furthermore, we believe that having a strong representation learning strategy in the early stages reduced the need for complex models in the following stages.
Our solution comprises two main components:
Real-time lookalike audience retrieving: We developed an in-memory high-performance retrieving service that stores passenger embeddings, audience embeddings, and audience score thresholds. To further reduce cost, we designed a passenger embedding compression algorithm that reduces the memory needs of passenger embeddings by around 90%.
Embedding-based audience creation and updating: The output of this part of the project is an online retrieving model that includes passenger embeddings, audience embeddings, and thresholds. To minimise costs, we leverage the passenger embeddings that are also utilised by other projects within Grab, beyond advertising, thus sharing the cost. The audience embeddings and thresholds are produced with a low-cost small neural network.
In summary, our approach to creating scalable lookalike audiences is designed to be cost-effective, accurate, and efficient, leveraging the power of embeddings and smart computational strategies to deliver the best possible audiences for our advertisers.
Solution architecture
The advertiser creates a campaign with a custom audience, which triggers the audience creation process. During this process, the audience service stores the audience metadata provided by advertisers in a message queue.
A scheduled Data Science (DS) job then retrieves the pending audience metadata, creates the audience, and updates the TensorFlow Serving (TFS) model.
During the serving period, the Backend (BE) service calls the DS service to retrieve all audiences that include the target user. Ads that are targeting these audiences are then selected by the Click-Through Rate (CTR) model to be displayed to the user.
Implementation
To ensure the efficiency of the lookalike audience retrieval model and minimise the costs associated with audience creation and serving, we’ve trained the user embedding model using billions of user actions. This extensive training allows us to employ straightforward methods for audience creation and serving, while still maintaining high levels of accuracy.
Creating lookalike audiences
The Audience Creation Job retrieves the audience metadata from the online audience service, pulls the passenger embeddings, and then averages these embeddings to generate the audience embedding.
We use the cosine score of a user and the audience embedding to identify the audiences the user belongs to. Hence, it’s sufficient to store only the audience embedding and score threshold. Additionally, a global target-all-pax Audience list is stored to return these audiences for each online request.
Serving lookalike audiences
The online audience service is also tasked with returning all the audiences to which the current user belongs. This is achieved by utilising the cosine score of the user embedding and audience embeddings, and filtering out all audiences that surpass the audience thresholds.
To adhere to latency requirements, we avoid querying any external feature stores like Redis and instead, store all the embeddings in memory. However, the embeddings of all users are approximately 20 GB, which could affect model loading. Therefore, we devised an embedding compression method based on hash tricks inspired by Bloom Filter.
We utilise hash functions to obtain the hash64 value of the paxID, which is then segmented into four 16-bit values. Each 16-bit value corresponds to a 16-dimensional embedding block, and the compressed embedding is the concatenation of these four 16-dimensional embeddings.
For each paxID, we have both the original user embedding and the compressed user embedding. The compressed user embeddings are learned by minimising the Mean Square Error loss.
We can balance the storage cost and the accuracy by altering the number of hash functions used.
Impact
Users can see advertisements targeting a new audience within 15 mins after the advertiser creates a campaign.
This new system doubled the impressions and clicks, while also improving the CTR, conversion rate, and return on investment.
Costs for generating lookalike audiences decreased by 98%.
Learnings/Conclusion
To evaluate the effectiveness of our new scalable system besides addressing these issues, we conducted an A/B test to compare it with the earlier system. The results revealed that this new system effectively doubled the number of impressions and clicks while also enhancing the CTR, conversion rate, and return on investment.
Over the years, we have amassed over billions of user actions, which have been instrumental in training the model and creating a comprehensive representation of user interests in the form of embeddings.
What’s next?
While this scalable system has proved its effectiveness and demonstrated impressive results in CTR, conversion rate, and return on investment, there is always room for improvement.
In the next phase, we plan to explore more advanced algorithms, refine our feature engineering process, and conduct more extensive hyperparameter tuning. Additionally, we will continue to monitor the system’s performance and make necessary adjustments to ensure it remains robust and effective in serving our advertisers’ needs.
Grab is the leading superapp platform in Southeast Asia, providing everyday services that matter to consumers. More than just a ride-hailing and food delivery app, Grab offers a wide range of on-demand services in the region, including mobility, food, package and grocery delivery services, mobile payments, and financial services across 428 cities in eight countries.
Powered by technology and driven by heart, our mission is to drive Southeast Asia forward by creating economic empowerment for everyone. If this mission speaks to you, join our team today!
When Zuul was designed and developed, there was an inherent assumption that connections were effectively free, given we weren’t using mutual TLS (mTLS). It’s built on top of Netty, using event loops for non-blocking execution of requests, one loop per core. To reduce contention among event loops, we created connection pools for each, keeping them completely independent. The result is that the entire request-response cycle happens on the same thread, significantly reducing context switching.
There is also a significant downside. It means that if each event loop has a connection pool that connects to every origin (our name for backend) server, there would be a multiplication of event loops by servers by Zuul instances. For example, a 16-core box connecting to an 800-server origin would have 12,800 connections. If the Zuul cluster has 100 instances, that’s 1,280,000 connections. That’s a significant amount and certainly more than is necessary relative to the traffic on most clusters.
As streaming has grown over the years, these numbers multiplied with bigger Zuul and origin clusters. More acutely, if a traffic spike occurs and Zuul instances scale up, it exponentially increases connections open to origins. Although this has been a known issue for a long time, it has never been a critical pain point until we moved large streaming applications to mTLS and our Envoy-based service mesh.
Fixing the Flows
The first step in improving connection overhead was implementing HTTP/2 (H2) multiplexing to the origins. Multiplexing allows the reuse of existing connections by creating multiple streams per connection, each able to send a request. Rather than requiring a connection for every request, we could reuse the same connection for many simultaneous requests. The more we reuse connections, the less overhead we have in establishing mTLS sessions with roundtrips, handshaking, and so on.
Although Zuul has had H2 proxying for some time, it never supported multiplexing. It effectively treated H2 connections as HTTP/1 (H1). For backward compatibility with existing H1 functionality, we modified the H2 connection bootstrap to create a stream and immediately release the connection back into the pool. Future requests will then be able to reuse the existing connection without creating a new one. Ideally, the connections to each origin server should converge towards 1 per event loop. It seems like a minor change, but it had to be seamlessly integrated into our existing metrics and connection bookkeeping.
The standard way to initiate H2 connections is, over TLS, via an upgrade with ALPN (Application-Layer Protocol Negotiation). ALPN allows us to gracefully downgrade back to H1 if the origin doesn’t support H2, so we can broadly enable it without impacting customers. Service mesh being available on many services made testing and rolling out this feature very easy because it enables ALPN by default. It meant that no work was required by service owners who were already on service mesh and mTLS.
Sadly, our plan hit a snag when we rolled out multiplexing. Although the feature was stable and functionally there was no impact, we didn’t get a reduction in overall connections. Because some origin clusters were so large, and we were connecting to them from all event loops, there wasn’t enough re-use of existing connections to trigger multiplexing. Even though we were now capable of multiplexing, we weren’t utilizing it.
Divide and Conquer
H2 multiplexing will improve connection spikes under load when there is a large demand for all the existing connections, but it didn’t help in steady-state. Partitioning the whole origin into subsets would allow us to reduce total connection counts while leveraging multiplexing to maintain existing throughput and headroom.
We had discussed subsetting many times over the years, but there was concern about disrupting load balancing with the algorithms available. An even distribution of traffic to origins is critical for accurate canary analysis and preventing hot-spotting of traffic on origin instances.
Subsetting was also top of mind after reading a recent ACM paper published by Google. It describes an improvement on their long-standing Deterministic Subsetting algorithm that they’ve used for many years. The Ringsteady algorithm (figure below) creates an evenly distributed ring of servers (yellow nodes) and then walks the ring to allocate them to each front-end task (blue nodes).
The algorithm relies on the idea of low-discrepancy numeric sequences to create a naturally balanced distribution ring that is more consistent than one built on a randomness-based consistent hash. The particular sequence used is a binary variant of the Van der Corput sequence. As long as the sequence of added servers is monotonically incrementing, for each additional server, the distribution will be evenly balanced between 0–1. Below is an example of what the binary Van der Corput sequence looks like.
Another big benefit of this distribution is that it provides a consistent expansion of the ring as servers are removed and added over time, evenly spreading new nodes among the subsets. This results in the stability of subsets and no cascading churn based on origin changes over time. Each node added or removed will only affect one subset, and new nodes will be added to a different subset every time.
Here’s a more concrete demonstration of the sequence above, in decimal form, with each number between 0–1 assigned to 4 subsets. In this example, each subset has 0.25 of that range depicted with its own color.
You can see that each new node added is balanced across subsets extremely well. If 50 nodes are added quickly, they will get distributed just as evenly. Similarly, if a large number of nodes are removed, it will affect all subsets equally.
The real killer feature, though, is that if a node is removed or added, it doesn’t require all the subsets to be shuffled and recomputed. Every single change will generally only create or remove one connection. This will hold for bigger changes, too, reducing almost all churn in the subsets.
Zuul’s Take
Our approach to implement this in Zuul was to integrate with Eureka service discovery changes and feed them into a distribution ring, based on the ideas discussed above. When new origins register in Zuul, we load their instances and create a new ring, and from then on, manage it with incremental deltas. We also take the additional step of shuffling the order of nodes before adding them to the ring. This helps prevent accidental hot spotting or overlap among Zuul instances.
The quirk in any load balancing algorithm from Google is that they do their load balancing centrally. Their centralized service creates subsets and load balances across their entire fleet, with a global view of the world. To use this algorithm, the key insight was to apply it to the event loops rather than the instances themselves. This allows us to continue having decentralized, client-side load balancing while also having the benefits of accurate subsetting. Although Zuul continues connecting to all origin servers, each event loop’s connection pool only gets a small subset of the whole. We end up with a singular, global view of the distribution that we can control on each instance — and a single sequence number that we can increment for each origin’s ring.
When a request comes in, Netty assigns it to an event loop, and it remains there for the duration of the request-response lifecycle. After running the inbound filters, we determine the destination and load the connection pool for this event loop. This will pull from a mapping of loop-to-subset, giving us the limited set of nodes we’re looking for. We then load balance using a modified choice-of-2, as discussed before. If this sounds familiar, it’s because there are no fundamental changes to how Zuul works. The only difference is that we provide a loop-bound subset of nodes to the load balancer as a starting point for its decision.
Another insight we had was that we needed to replicate the number of subsets among the event loops. This allows us to maintain low connection counts for large and small origins. At the same time, having a reasonable subset size ensures we can continue providing good balance and resiliency features for the origin. Most origins require this because they are not big enough to create enough instances in each subset.
However, we also don’t want to change this replication factor too often because it would cause a reshuffling of the entire ring and introduce a lot of churn. After a lot of iteration, we ended up implementing this by starting with an “ideal” subset size. We achieve this by computing the subset size that would achieve the ideal replication factor for a given cardinality of origin nodes. We can scale the replication factor across origins by growing our subsets until the desired subset size is achieved, especially as they scale up or down based on traffic patterns. Finally, we work backward to divide the ring into even slices based on the computed subset size.
Our ideal subset side is roughly 25–50 nodes, so an origin with 400 nodes will have 8 subsets of 50 nodes. On a 32-core instance, we’ll have a replication factor of 4. However, that also means that between 200 and 400 nodes, we’re not shuffling the subsets at all. An example of this subset recomputation is in the rollout graphs below.
An interesting challenge here was to satisfy the dual constraints of origin nodes with a range of cardinality, and the number of event loops that hold the subsets. Our goal is to scale the subsets as we run on instances with higher event loops, with a sub-linear increase in overall connections, and sufficient replication for availability guarantees. Scaling the replication factor elastically described above helped us achieve this successfully.
Subsetting Success
The results were outstanding. We saw improvements across all key metrics on Zuul, but most importantly, there was a significant reduction in total connection counts and churn.
Total Connections
This graph (as well as the ones below) shows a week’s worth of data, with the typical diurnal cycle of Netflix usage. Each of the 3 colors represents our deployment regions in AWS, and the blue vertical line shows when we turned on the feature.
Total connections at peak were significantly reduced in all 3 regions by a factor of 10x. This is a huge improvement, and it makes sense if you dig into how subsetting works. For example, a machine running 16 event loops could have 8 subsets — each subset is on 2 event loops. That means we’re dividing an origin by 8, hence an 8x improvement. As to why peak improvement goes up to 10x, it’s probably related to reduced churn (below).
Churn
This graph is a good proxy for churn. It shows how many TCP connections Zuul is opening per second. You can see the before and after very clearly. Looking at the peak-to-peak improvement, there is roughly an 8x improvement.
The decrease in churn is a testament to the stability of the subsets, even as origins scale up, down, and redeploy over time.
Looking specifically at connections created in the pool, the reduction is even more impressive:
The peak-to-peak reduction is massive and clearly shows how stable this distribution is. Although hard to see on the graph, the reduction went from thousands per second at peak down to about 60. Thereis effectively no churn of connections, even at peak traffic.
Load Balancing
The key constraint to subsetting is ensuring that the load balance on the backends is still consistent and evenly distributed. You’ll notice all the RPS on origin nodes grouped tightly, as expected. The thicker lines represent the subset size and the total origin size.
Balance at deployBalance 12 hours after deploy
In the second graph, you’ll note that we recompute the subset size (blue line) because the origin (purple line) became large enough that we could get away with less replication in the subsets. In this case, we went from a subset size of 100 for 400 servers (a division of 4) to 50 (a division of 8).
System Metrics
Given the significant reduction in connections, we saw reduced CPU utilization (~4%), heap usage (~15%), and latency (~3%) on Zuul, as well.
Zuul canary metrics
Rolling it Out
As we rolled this feature out to our largest origins — streaming playback APIs — we saw the pattern above continue, but with scale, it became more impressive. On some Zuul shards, we saw a reduction of as much as 13 million connections at peak, with almost no churn.
Today the feature is rolled out widely. We’re serving the same amount of traffic but with tens of millions fewer connections. Despite the reduction of connections, there is no decrease in resiliency or load balancing. H2 multiplexing allows us to scale up requests separately from connections, and our subsetting algorithm ensures an even traffic balance.
Although challenging to get right, subsetting is a worthwhile investment.
Acknowledgments
We would also like to thank Peter Ward, Paul Wankadia, and Kavita Guliani at Google for developing this algorithm and publishing their work for the benefit of the industry.
Netflix has more than 220 million active members who perform a variety of actions throughout each session, ranging from renaming a profile to watching a title. Reacting to these actions in near real-time to keep the experience consistent across devices is critical for ensuring an optimal member experience. This is not an easy task, considering the wide variety of supported devices and the sheer volume of actions our members perform. To this end, we developed a Rapid Event Notification System (RENO) to support use cases that require server initiated communication with devices in a scalable and extensible manner.
In this blog post, we will give an overview of the Rapid Event Notification System at Netflix and share some of the learnings we gained along the way.
Motivation
With the rapid growth in Netflix member base and the increasing complexity of our systems, our architecture has evolved into an asynchronous one that enables both online and offline computation. Providing a seamless and consistent Netflix experience across various platforms (iOS, Android, smart TVs, Roku, Amazon FireStick, web browser) and various device types (mobile phones, tablets, televisions, computers, set top boxes) requires more than the traditional request-response model. Over time, we’ve seen an increase in use cases where backend systems need to initiate communication with devices to notify them of member-driven changes or experience updates quickly and consistently.
Use cases
Viewing Activity When a member begins to watch a show, their “Continue Watching” list should be updated across all of their devices to reflect that viewing.
Personalized Experience Refresh Netflix Recommendation engine continuously refreshes recommendations for every member. The updated recommendations need to be delivered to the device timely for an optimal member experience.
Membership Plan Changes Members often change their plan types, leading to a change in their experience that must be immediately reflected across all of their devices.
Member “My List” Updates When members update their “My List” by adding or removing titles, the changes should be reflected across all of their devices.
Member Profile Changes When members update their account settings like add/delete/rename profiles or change their preferred maturity level for content, these updates must be reflected across all of their devices.
System Diagnostic Signals In special scenarios, we need to send diagnostic signals to the Netflix app on devices to help troubleshoot problems and enable tracing capabilities.
Design Decisions
In designing the system, we made a few key decisions that helped shape the architecture of RENO:
Single Events Source
Event Prioritization
Hybrid Communication Model
Targeted Delivery
Managing High RPS
Single Events Source
The use cases we wanted to support originate from various internal systems and member actions, so we needed to listen for events from several different microservices. At Netflix, our near-real-time event flow is managed by an internal distributed computation framework called Manhattan (you can learn more about it here). We leveraged Manhattan’s event management framework to create a level of indirection serving as the single source of events for RENO.
Event Prioritization
Considering the use cases were wide ranging both in terms of their sources and their importance, we built segmentation into the event processing. For example, a member-triggered event such as “change in a profile’s maturity level” should have a much higher priority than a “system diagnostic signal”. We thus assigned a priority to each use case and sharded event traffic by routing to priority-specific queues and the corresponding event processing clusters. This separation allows us to tune system configuration and scaling policies independently for different event priorities and traffic patterns.
Hybrid Communication Model
As mentioned earlier in this post, one key challenge for a service like RENO is supporting multiple platforms. While a mobile device is almost always connected to the internet and reachable, a smart TV is only online while in use. This network connection heterogeneity made choosing a single delivery model difficult. For example, entirely relying on a Pull model wherein the device frequently calls home for updates would result in chatty mobile apps. That in turn will be triggering the per-app communication limits that iOS and Android platforms enforce (we also need to be considerate of low bandwidth connections). On the other hand, using only a Push mechanism would lead smart TVs to miss notifications while they are powered off during most of the day. We therefore chose a hybrid Push AND Pull communication model wherein the server tries to deliver notifications to all devices immediately using Push notifications, and devices call home at various stages of the application lifecycle.
Using a Push-and-Pull delivery model combination also supports devices limited to a single communication model. This includes older, legacy devices that do not support Push Notifications.
Targeted Delivery
Considering the use cases were wide ranging in terms of both sources and target device types, we built support for device specific notification delivery. This capability allows notifying specific device categories as per the use case. When an actionable event arrives, RENO applies the use case specific business logic, gathers the list of devices eligible to receive this notification and attempts delivery. This helps limit the outgoing traffic footprint considerably.
Managing High RPS
With over 220 million members, we were conscious of the fact that a service like RENO needs to process many events per member during a viewing session. At peak times, RENO serves about 150k events per second. Such a high RPS during specific times of the day can create a thundering herd problem and put strain on internal and external downstream services. We therefore implemented a few optimizations:
Event Age Many events that need to be notified to the devices are time sensitive, and they are of no or little value unless sent almost immediately. To avoid processing old events, a staleness filter is applied as a gating check. If an event age is older than a configurable threshold, it is not processed. This filter weeds out events that have no value to the devices early in the processing phase and protects the queues from being flooded due to stale upstream events that may have been backed up.
Online Devices To reduce the ongoing traffic footprint, notifications are sent only to devices that are currently online by leveraging an existing registry that is kept up-to-date by Zuul (learn more about it here).
Scaling Policies To address the thundering herd problem and to keep latencies under acceptable thresholds, the cluster scale-up policies are configured to be more aggressive than the scale-down policies. This approach enables the computing power to catch up quickly when the queues grow.
Event Deduplication Both iOS and Android platforms aggressively restrict the level of activity generated by backgrounded apps, hence the reason why incoming events are deduplicated in RENO. Duplicate events can occur in case of high RPS, and they are merged together when it does not cause any loss of context for the device.
Bulkheaded Delivery Multiple downstream services are used to send push notifications to different device platforms including external ones like Apple Push Notification Service (APNS) for Apple devices and Google’s Firebase Cloud Messaging (FCM) for Android. To safeguard against a downstream service bringing down the entire notification service, the event delivery is parallelized across different platforms, making it best-effort per platform. If a downstream service or platform fails to deliver the notification, the other devices are not blocked from receiving push notifications.
Architecture
As shown in the diagram above, the RENO service can be broken down into the following components.
Event Triggers
Member actions and system-driven updates that require refreshing the experience on members’ devices.
Event Management Engine
The near-real-time event flow management framework at Netflix referred to as Manhattan can be configured to listen to specific events and forward events to different queues.
Event Priority Based Queues
Amazon SQS queues that are populated by priority-based event forwarding rules are set up in Manhattan to allow priority based sharding of traffic.
Event Priority Based Clusters
AWS Instance Clusters that subscribe to the corresponding queues with the same priority. They process all the events arriving on those queues and generate actionable notifications for devices.
Outbound Messaging System
The Netflix messaging system that sends in-app push notifications to members is used to send RENO-produced notifications on the last mile to mobile devices. This messaging system is described in this blog post.
For notifications to web, TV & other streaming devices, we use a homegrown push notification solution called Zuul Push that provides “always-on” persistent connections with online devices. To learn more about the Zuul Push solution, listen to this talk from a Netflix colleague.
Persistent Store
A Cassandra database that stores all the notifications emitted by RENO for each device to allow those devices to poll for their messages at their own cadence.
Observability
At Netflix, we put a strong emphasis on building robust monitoring into our systems to provide a clear view of system health. For a high RPS service like RENO that relies on several upstream systems as its traffic source and simultaneously produces heavy traffic for different internal and external downstream systems, it is important to have a strong combination of metrics, alerting and logging in place. For alerting, in addition to the standard system health metrics such as CPU, memory, and performance, we added a number of “edge-of-the-service” metrics and logging to capture any aberrations from upstream or downstream systems. Furthermore, in addition to real-time alerting, we added trend analysis for important metrics to help catch longer term degradations. We instrumented RENO with a real time stream processing application called Mantis (you can learn more about it here). It allowed us to track events in real-time over the wire at device specific granularity thus making debugging easier. Finally, we found it useful to have platform-specific alerting (for iOS, Android, etc.) in finding the root causes of issues faster.
Wins
Can easily support new use cases
Scales horizontally with higher throughput
When we set out to build RENO the goal was limited to the “Personalized Experience Refresh” use case of the product. As the design of RENO evolved, support for new use cases became possible and RENO was quickly positioned as the centralized rapid notification service for all product areas at Netflix.
The design decisions we made early on paid off, such as making addition of new use cases a “plug-and-play” solution and providing a hybrid delivery model across all platforms. We were able to onboard additional product use cases at a fast pace thus unblocking a lot of innovation.
An important learning in building this platform was ensuring that RENO could scale horizontally as more types of events and higher throughput was needed over time. This ability was primarily achieved by allowing sharding based on either event type or priority, along with using an asynchronous event driven processing model that can be scaled by simply adding more machines for event processing.
Looking Ahead
As Netflix’s member base continues to grow at a rapid pace, it is increasingly beneficial to have a service like RENO that helps give our members the best and most up to date Netflix experience. From membership related updates to contextual personalization, and more — we are continually evolving our notifications portfolio as we continue to innovate on our member experience. Architecturally, we are evaluating opportunities to build in more features such as guaranteed message delivery and message batching that can open up more use cases and help reduce the communication footprint of RENO.
Building Great Things Together
We are just getting started on this journey to build impactful systems that help propel our business forward. The core to bringing these engineering solutions to life is our direct collaboration with our colleagues and using the most impactful tools and technologies available. If this is something that excites you, we’d love for you to join us.
New improvements might be unnoticed by many Zabbix users since they come to scalability, rather than to new features or some aspects of the user interface experience. However, these improvements might be beneficial for those Zabbix users who run really large instances.
In case of large instances, the main performance bottleneck would be the database. Zabbix doesn’t establish ad-hoc connections and uses only persistent connections to the database. In Zabbix 5.4, the use of database connections has been further drastically optimized.
More efficient database use
In earlier versions, not only database syncers, but also pollers, and some other processes had a dedicated persistent connection to the database. These connections were necessary for calculated items and aggregate checks. These calculated items and aggregate checks are not real items, since they’re based on the queries to the database, particularly to history tables.
Connections were also required to update host availability status. Pollers (unreachable pollers, JMX pollers, as well as the IPMI manager) were updating it directly in the database.
In addition, in some cases, when proxies were used (that would be true for large instances) host availability was updated by the proxy poller, in case of a passive proxy, and trapper.
Why was it decided to avoid these connections in Zabbix 5.4?
First, they don’t really work smoothly with the default database configuration (PostgreSQL, Oracle). For instance, in PostgreSQL, max_connections is by default set to 100.
They can cause locking on the database side.
They also result in inefficient memory and CPU utilization.
Finally, in earlier versions, it was impossible to perfectly fine-tune the number of connections to the database.
New worker processes
In Zabbix 5.4, two new processes were introduced: history pollers and availability manager. If you have upgraded your Zabbix instance already when you log onto your server and run ps aux | grep zabbix_server, you will notice these new processes:
/usr/sbin/zabbix_server: history poller #1 [got 0 values in 0.000008 sec, idle 1 sec]
/usr/sbin/zabbix_server: history poller #2 [got 2 values in 0.000186 sec, idle 1 sec]
/usr/sbin/zabbix_server: history poller #3 [got 0 values in 0.000050 sec, idle 1 sec]
/usr/sbin/zabbix_server: history poller #4 [got 0 values in 0.000010 sec, idle 1 sec]
/usr/sbin/zabbix_server: history poller #5 [got 0 values in 0.000012 sec, idle 1 sec]
/usr/sbin/zabbix_server: availability manager #1 [queued 0, processed 0 values, idle 5.016162 sec during 5.016415 sec]
History pollers
Since calculated items and aggregate checks represent a different types of items, now they have their own poller – history poller. History pollers are also used for several internal items (zabbix[*] item keys) as well.
New configuration parameters
History poller comes with a new configuration parameter. Here, it is important to keep in mind that more is not always better. So, the StartHistoryPollers value (how many history pollers are being pre-forked) should be increased only if history pollers are too busy according to internal self-monitoring, but should be kept as low as possible to avoid unnecessary connections to the database.
### Option: StartHistoryPollers
#     Number of pre-forked instances of history pollers.
#     Only required for calculated, aggregated and internal checks.
#     A database connection is required for each history poller instance.
#
# Mandatory: no
# Range: 0-1000
# Default:
# StartHistoryPollers=5
Availability manager
In earlier versions, pollers, unreachable pollers, JMX pollers, and the IPMI manager updated host availability directly in the database with a separate transaction for each host. Now, we have this separate availability manager, and all processes — pollers, trappers, etc. — communicate with the availability manager, and the statistics queue is flushed by the availability manager to the database every 5 seconds.
In-memory trend cache
Since Zabbix 5.2, new trigger functions like trendavg, trendmax, etc. were introduced, which operate with the trends data for long periods. Similarly to calculated items, these triggers used database queries to obtain the necessary data.
In Zabbix 5.4, finally, the trend cache has been implemented. It stores the results of calculated trends functions. If the value is not available in the cache yet, Zabbix will query the database and update the cache.
As with all newly introduced processes, this cache’s effectiveness can be monitored using internal check zabbix[tcache,cache,], which can be used to set the relevant TrendFunctionCacheSize parameter value.
### Option: TrendFunctionCacheSize
#           Size of trend function cache, in bytes.
#           Shared memory size for caching calculated trend function data.
#
# Mandatory: no
# Range: 128K-2G
# Default:
# TrendFunctionCacheSize=4M
To sum it up, with all these database-related optimizations:
Now it is possible to have as many database connections as you really need. So, if you, for instance, operate a very large instance and you need a hundred or more pollers, and at the same time, you don’t rely much on some calculated items or aggregate checks functionality, before Zabbix 5.4 you would end up with hundreds or more database connections that you didn’t need.
Moreover, with PostgreSQL with default configuration, if you increased the number of pollers, your database server could go down and bring down your Zabbix instance. For each PostgreSQL worker process, you would have had a limited work_mem as you had too many database connections. So, your overall database performance would have been sacrificed. That is not the case anymore.
In addition, if you are using trend functions with triggers using large periods of time, in the past you might have noticed, for instance, slow queries. Now, these changes will help you to drastically decrease the database load.
More server resiliency
Another important feature — graceful start. Active proxies can keep a backlog, which is useful if the communication between the server and the proxy breaks for any reason, for instance:
— server maintenance during upgrade to the next minor release;
— loss of Internet access at a remote site due to fiber cut, etc.
When communication restores, the proxies can easily overload the server after long downtimes, especially in large instances.
Since Zabbix 5.4, the server lets the proxies know if it’s busy, so the proxies throttle data sending.
Earlier, the data uploaded by the proxies was throttled when the history cache usage was 80% or greater. However, as the server was responsible for that task, all proxies were getting disabled in some situations. That meant the history data upload, as well as other tasks, such as processing of regular data and processing tasks, were getting suspended until the history cache utilization dropped lower than 80%.
This method was ineffective and unacceptable in large environments. Now, the proxies are responsible for checking whether the server can handle the data. When the history cache usage hits 80%, the following scenario is used:
the proxies send the data to the server and the data is accepted;
if the server thinks it’s busy it will respond with a special JSON tag upload set to ‘disable’;
the proxies will stop uploading history data, but will keep polling the server for tasks and uploading other data;
in a while, the proxies will upload data again;
if the server is not too busy, it will respond with the JSON tag upload set to ‘enable’.
Unlike the previous two scalability improvements which are based on serious architectural changes, this change was backported to earlier Zabbix versions — 5.0 and 5.2.
Questions & Answers
Question. Would you recommend using proxies even on the local site to allow for the server to be upgraded without losing data or for performance improvements?
Answer. Yes, in some cases there’re such setups. This idea mainly is to have a unified configuration, not only to improve performance. And in some cases, if you use a lot of proxies, you might want to monitor all the items only with the proxies. Such scenarios are used by many Zabbix customers.
Question. So, throttling can give you some noticeable performance benefits. Which version is required on the server and on the proxy for throttling?
Answer. All these changes have been backported to earlier versions, so you can use either Zabbix 5.4.0 released recently or the latest releases of Zabbix 5.0 or Zabbix 5.2.
Question. Is it possible to have two databases in a cluster and point the select queries to one database and, for instance, execution queries to another database? How would database clustering generally work? Is it of benefit to Zabbix? Can Zabbix utilize it?
Answer. In general, our HA setups use some basic features, which are built-in into database servers. They use replication. So, you have to use the servers that will provide some virtual IP for your cluster. That is completely transparent to Zabbix.
However, it is not recommended to split different queries on different nodes. They should still hit a single specific note. So, it is more of an HA approach rather than a horizontal scalability approach.
Question. Would you elaborate on what a large, or medium, or small instance means? What new values per second should we be looking at?
Answer. We can judge from large instances of our customers, and might not know about even larger instances managed by the customers themselves. Large instances can have, for instance, 100,000 NVPS and more. Sometimes, we upgrade really large instances with databases of dozens of terabytes. Some users like keeping really long records.
In my experience, large instances of 20,000 to 40,000 NPVS are quite common and they could benefit a lot from these changes.
Last week I gave a talk in a local tech group about my experience with Elasticsearch at LogSentinel, and how we achieve multitenancy and scalability.
Obviously, the topic of scalability is huge and it can’t be fully covered in 45 minutes, but I tried presenting the main aspects from the application perspective (I entirely skipped the Ops perspective, as it was a developer audience). The list of resources at the end of the slides show some of the sources of my “research” on the topic, which I recommend going through.
I hope it’s a useful intro to the topic and the main conclusion is – it’s counterintuitive if you are used to relational databases, and some internals (shards, Lucene segments) “leak” through the abstractions to influence the application design (as per the law of leaky abstractions).
Cloud solutions architects should ideally “build today with tomorrow in mind,” meaning their solutions need to cater to current scale requirements as well as the anticipated growth of the solution. This growth can be either the organic growth of a solution or it could be related to a merger and acquisition type of scenario, where its size is increased dramatically within a short period of time.
Still, when a solution scales, many architects experience added complexity to the overall architecture in terms of its manageability, performance, security, etc. By architecting your solution or application to scale reliably, you can avoid the introduction of additional complexity, degraded performance, or reduced security as a result of scaling.
Generally, a solution or service’s reliability is influenced by its up time, performance, security, manageability, etc. In order to achieve reliability in the context of scale, take into consideration the following primary design principals.
Modularity
Modularity aims to break a complex component or solution into smaller parts that are less complicated and easier to scale, secure, and manage.
Figure 1: Monolithic architecture vs. modular architecture
Modular design is commonly used in modern application developments. where an application’s software is constructed of multiple and loosely coupled building blocks (functions). These functions collectively integrate through pre-defined common interfaces or APIs to form the desired application functionality (commonly referred to as microservices architecture).
This design principle can also be applied to different components of the solution’s architecture. For example, when building a cloud solution on a single Amazon VPC, it may reach certain scaling limits and make it harder to introduce changes at scale due to the higher level of dependencies. This single complex VPC can be divided into multiple smaller and simpler VPCs. The architecture based on multiple VPCs can vary. For example, the VPCs can be divided based on a service or application building block, a specific function of the application, or on organizational functions like a VPC for various departments. This principle can also be leveraged at a regional level for very high scale global architectures. You can make the architecture modular at a global level by distributing the multiple VPCs across different AWS Regions to achieve global scale (facilitated by AWS Global Infrastructure).
In addition, modularity promotes separation of concerns by having well-defined boundaries among the different components of the architecture. As a result, each component can be managed, secured, and scaled independently. Also, it helps you avoid what is commonly known as “fate sharing,” where a vertically scaled server hosts a monolithic application, and any failure to this server will impact the entire application.
Horizontal scaling
Horizontal scaling, commonly referred to as scale-out, is the capability to automatically add systems/instances in a distributed manner in order to handle an increase in load. Examples of this increase in load could be the increase of number of sessions to a web application. With horizontal scaling, the load is distributed across multiple instances. By distributing these instances across Availability Zones, horizontal scaling not only increases performance, but also improves the overall reliability.
In order for the application to work seamlessly in a scale-out distributed manner, the application needs to be designed to support a stateless scaling model, where the application’s state information is stored and requested independently from the application’s instances. This makes the on-demand horizontal scaling easier to achieve and manage.
This principle can be complemented with a modularity design principle, in which the scaling model can be applied to certain component(s) or microservice(s) of the application stack. For example, only scale-out Amazon Elastic Cloud Compute (EC2) front-end web instances that reside behind an Elastic Load Balancing (ELB) layer with auto-scaling groups. In contrast, this elastic horizontal scalability might be very difficult to achieve for a monolithic type of application.
Leverage the content delivery network
Leveraging Amazon CloudFront and its edge locations as part of the solution architecture can enable your application or service to scale rapidly and reliably at a global level, without adding any complexity to the solution. The integration of a CDN can take different forms depending on the solution use case.
For example, CloudFront played an important role to enable the scale required throughout Amazon Prime Day 2020 by serving up web and streamed content to a worldwide audience, which handled over 280 million HTTP requests per minute.
Go serverless where possible
As discussed earlier in this post, modular architectures based on microservices reduce the complexity of the individual component or microservice. At scale it may introduce a different type of complexity related to the number of these independent components (microservices). This is where serverless services can help to reduce such complexity reliably and at scale. With this design model you no longer have to provision, manually scale, maintain servers, operating systems, or runtimes to run your applications.
For example, you may consider using a microservices architecture to modernize an application at the same time to simplify the architecture at scale using Amazon Elastic Kubernetes Service (EKS) with AWS Fargate.
Figure 3: Example of a serverless microservices architecture
To avoid any major changes at a later stage to accommodate security requirements, it’s essential that security is taken into consideration as part of the initial solution design. For example, if the cloud project is new or small, and you don’t consider security properly at the initial stages, once the solution starts to scale, redesigning the entire cloud project from scratch to accommodate security best practices is usually not a simple option, which may lead to consider suboptimal security solutions that may impact the desired scale to be achieved. By leveraging CDN as part of the solution architecture (as discussed above), using Amazon CloudFront, you can minimize the impact of distributed denial of service (DDoS) attacks as well as perform application layer filtering at the edge. Also, when considering serverless services and the Shared Responsibility Model, from a security lens you can delegate a considerable part of the application stack to AWS so that you can focus on building applications. See The Shared Responsibility Model for AWS Lambda.
Design with security in mind by incorporating the necessary security services as part of the initial cloud solution. This will allow you to add more security capabilities and features as the solution grows, without the need to make major changes to the design.
Design for failure
The reliability of a service or solution in the cloud depends on multiple factors, the primary of which is resiliency. This design principle becomes even more critical at scale because the failure impact magnitude typically will be higher. Therefore, to achieve a reliable scalability, it is essential to design a resilient solution, capable of recovering from infrastructure or service disruptions. This principle involves designing the overall solution in such a way that even if one or more of its components fail, the solution is still be capable of providing an acceptable level of its expected function(s). See AWS Well-Architected Framework – Reliability Pillar for more information.
Conclusion
Designing for scale alone is not enough. Reliable scalability should be always the targeted architectural attribute. The design principles discussed in this blog act as the foundational pillars to support it, and ideally should be combined with adopting a DevOps model.
The collective thoughts of the interwebz
Manage Consent
To provide the best experiences, we use technologies like cookies to store and/or access device information. Consenting to these technologies will allow us to process data such as browsing behavior or unique IDs on this site. Not consenting or withdrawing consent, may adversely affect certain features and functions.
Functional
Always active
The technical storage or access is strictly necessary for the legitimate purpose of enabling the use of a specific service explicitly requested by the subscriber or user, or for the sole purpose of carrying out the transmission of a communication over an electronic communications network.
Preferences
The technical storage or access is necessary for the legitimate purpose of storing preferences that are not requested by the subscriber or user.
Statistics
The technical storage or access that is used exclusively for statistical purposes.The technical storage or access that is used exclusively for anonymous statistical purposes. Without a subpoena, voluntary compliance on the part of your Internet Service Provider, or additional records from a third party, information stored or retrieved for this purpose alone cannot usually be used to identify you.
Marketing
The technical storage or access is required to create user profiles to send advertising, or to track the user on a website or across several websites for similar marketing purposes.