Post Syndicated from Kevin Hakanson original https://aws.amazon.com/blogs/devops/unit-testing-aws-lambda-with-python-and-mock-aws-services/
When building serverless event-driven applications using AWS Lambda, it is best practice to validate individual components. Unit testing can quickly identify and isolate issues in AWS Lambda function code. The techniques outlined in this blog demonstrates unit test techniques for Python-based AWS Lambda functions and interactions with AWS Services.
The full code for this blog is available in the GitHub project as a demonstrative example.
Example use case
Let’s consider unit testing a serverless application which provides an API endpoint to generate a document. When the API endpoint is called with a customer identifier and document type, the Lambda function retrieves the customer’s name from DynamoDB, then retrieves the document text from DynamoDB for the given document type, finally generating and writing the resulting document to S3.
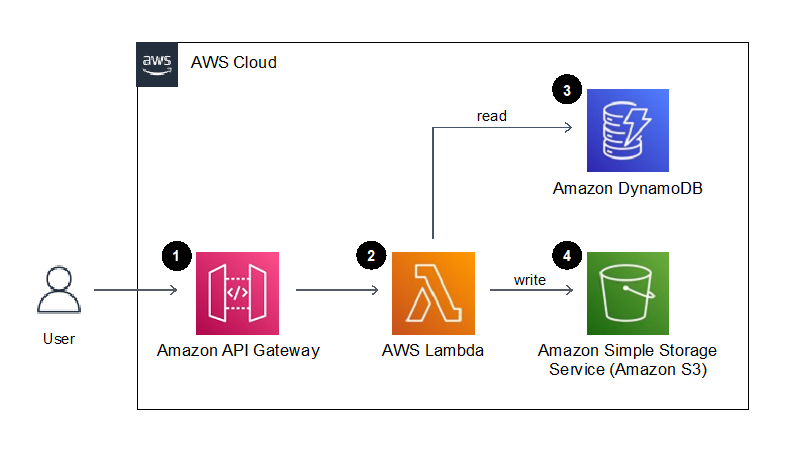
Figure 1. Example application architecture
- Amazon API Gateway provides an endpoint to request the generation of a document for a given customer. A document type and customer identifier are provided in this API call.
- The endpoint invokes an AWS Lambda function that generates a document using the customer identifier and the document type provided.
- An Amazon DynamoDB table stores the contents of the documents and the users name, which are retrieved by the Lambda function.
- The resulting text document is stored to Amazon S3.
Our testing goal is to determine if an isolated “unit” of code works as intended. In this blog, we will be writing tests to provide confidence that the logic written in the above AWS Lambda function behaves as we expect. We will mock the service integrations to Amazon DynamoDB and S3 to isolate and focus our tests on the Lambda function code, and not on the behavior of the AWS Services.
Define the AWS Service resources in the Lambda function
Before writing our first unit test, let’s look at the Lambda function that contains the behavior we wish to test. The full code for the Lambda function is available in the GitHub repository as src/sample_lambda/app.py.
As part of our Best practices for working AWS Lambda functions, we recommend initializing AWS service resource connections outside of the handler function and in the global scope. Additionally, we can retrieve any relevant environment variables in the global scope so that subsequent invocations of the Lambda function do not repeatedly need to retrieve them. For organization, we can put the resource and variables in a dictionary:
_LAMBDA_DYNAMODB_RESOURCE = { "resource" : resource('dynamodb'),
                              "table_name" : environ.get("DYNAMODB_TABLE_NAME","NONE") }
However, globally scoped code and global variables are challenging to test in Python, as global statements are executed on import, and outside of the controlled test flow. To facilitate testing, we define classes for supporting AWS resource connections that we can override (patch) during testing. These classes will accept a dictionary containing the boto3 resource and relevant environment variables.
For example, we create a DynamoDB resource class with a parameter “boto3_dynamodb_resource” that accepts a boto3 resource connected to DynamoDB:
class LambdaDynamoDBClass:
    def __init__(self, lambda_dynamodb_resource):
        self.resource = lambda_dynamodb_resource["resource"]
        self.table_name = lambda_dynamodb_resource["table_name"]
        self.table = self.resource.Table(self.table_name)
Build the Lambda Handler
The Lambda function handler is the method in the AWS Lambda function code that processes events. When the function is invoked, Lambda runs the handler method. When the handler exits or returns a response, it becomes available to process another event.
To facilitate unit test of the handler function, move as much of logic as possible to other functions that are then called by the Lambda hander entry point. Also, pass the AWS resource global variables to these subsequent function calls. This approach enables us to mock and intercept all resources and calls during test.
In our example, the handler references the global variables, and instantiates the resource classes to setup the connections to specific AWS resources. (We will be able to override and mock these connections during unit test.)
Then the handler calls the create_letter_in_s3 function to perform the steps of creating the document, passing the resource classes. This downstream function avoids directly referencing the global context or any AWS resource connections directly.
def lambda_handler(event: APIGatewayProxyEvent, context: LambdaContext) -> Dict[str, Any]:

    global _LAMBDA_DYNAMODB_RESOURCE
    global _LAMBDA_S3_RESOURCE

    dynamodb_resource_class = LambdaDynamoDBClass(_LAMBDA_DYNAMODB_RESOURCE)
    s3_resource_class = LambdaS3Class(_LAMBDA_S3_RESOURCE)

    return create_letter_in_s3(
            dynamo_db = dynamodb_resource_class,
            s3 = s3_resource_class,
            doc_type = event["pathParameters"]["docType"],
            cust_id = event["pathParameters"]["customerId"])
Unit testing with mock AWS services
Our Lambda function code has now been written and is ready to be tested, let’s take a look at the unit test code! The full code for the unit test is available in the GitHub repository as tests/unit/src/test_sample_lambda.py.
In production, our Lambda function code will directly access the AWS resources we defined in our function handler; however, in our unit tests we want to isolate our code and replace the AWS resources with simulations. This isolation facilitates running unit tests in an isolated environment to prevent accidental access to actual cloud resources.
Moto is a python library for Mocking AWS Services that we will be using to simulate AWS resource our tests. Moto supports many AWS resources, and it allows you to test your code with little or no modification by emulating functionality of these services.
Moto uses decorators to intercept and simulate responses to and from AWS resources. By adding a decorator for a given AWS service, subsequent calls from the module to that service will be re-directed to the mock.
@moto.mock_dynamodb
@moto.mock_s3
Configure Test Setup and Tear-down
The mocked AWS resources will be used during the unit test suite. Using the setUp() method allows you to define and configure the mocked global AWS Resources before the tests are run.
We define the test class and a setUp() method and initialize the mock AWS resource. This includes configuring the resource to prepare it for testing, such as defining a mock DynamoDB table or creating a mock S3 Bucket.
class TestSampleLambda(TestCase):
    def setUp(self) -> None:
        dynamodb = boto3.resource("dynamodb", region_name="us-east-1")
        dynamodb.create_table(
            TableName = self.test_ddb_table_name,
            KeySchema = [{"AttributeName": "PK", "KeyType": "HASH"}],
            AttributeDefinitions = [{"AttributeName": "PK",
                                     "AttributeType": "S"}],
            BillingMode = 'PAY_PER_REQUEST'

        s3_client = boto3.client('s3', region_name="us-east-1")
        s3_client.create_bucket(Bucket = self.test_s3_bucket_name )
After creating the mocked resources, the setup function creates resource class object referencing those mocked resources, which will be used during testing.
        mocked_dynamodb_resource = resource("dynamodb")
        mocked_s3_resource = resource("s3")
        mocked_dynamodb_resource = { "resource" : resource('dynamodb'),
                                     "table_name" : self.test_ddb_table_name  }
        mocked_s3_resource = { "resource" : resource('s3'),
                               "bucket_name" : self.test_s3_bucket_name }
        self.mocked_dynamodb_class = LambdaDynamoDBClass(mocked_dynamodb_resource)
        self.mocked_s3_class = LambdaS3Class(mocked_s3_resource)
Test #1: Verify the code writes the document to S3
Our first test will validate our Lambda function writes the customer letter to an S3 bucket in the correct manner. We will follow the standard test format of arrange, act, assert when writing this unit test.
Arrange the data we need in the DynamoDB table:
def test_create_letter_in_s3(self) -> None:

    self.mocked_dynamodb_class.table.put_item(Item={"PK":"D#UnitTestDoc",
                                                        "data":"Unit Test Doc Corpi"})
    self.mocked_dynamodb_class.table.put_item(Item={"PK":"C#UnitTestCust",
                                                        "data":"Unit Test Customer"})
Act by calling the create_letter_in_s3 function. During these act calls, the test passes the AWS resources as created in the setUp().
    test_return_value = create_letter_in_s3(
                        dynamo_db = self.mocked_dynamodb_class,
                        s3=self.mocked_s3_class,
                        doc_type = "UnitTestDoc",
                        cust_id = "UnitTestCust"
                        )
Assert by reading the data written to the mock S3 bucket, and testing conformity to what we are expecting:
bucket_key = "UnitTestCust/UnitTestDoc.txt"
    body = self.mocked_s3_class.bucket.Object(bucket_key).get()['Body'].read()

    self.assertEqual(test_return_value["statusCode"], 200)
    self.assertIn("UnitTestCust/UnitTestDoc.txt", test_return_value["body"])
    self.assertEqual(body.decode('ascii'),"Dear Unit Test Customer;\nUnit Test Doc Corpi")
Tests #2 and #3: Data not found error conditions
We can also test error conditions and handling, such as keys not found in the database. For example, if a customer identifier is submitted, but does not exist in the database lookup, does the logic handle this and return a “Not Found” code of 404?
To test this in test #2, we add data to the mocked DynamoDB table, but then submit a customer identifier that is not in the database.
This test, and a similar test #3 for “Document Types not found”, are implemented in the example test code on GitHub.
Test #4: Validate the handler interface
As the application logic resides in independently tested functions, the Lambda handler function provides only interface validation and function call orchestration. Therefore, the test for the handler validates that the event is parsed correctly, any functions are invoked as expected, and the return value is passed back.
To emulate the global resource variables and other functions, patch both the global resource classes and logic functions.
    @patch("src.sample_lambda.app.LambdaDynamoDBClass")
    @patch("src.sample_lambda.app.LambdaS3Class")
    @patch("src.sample_lambda.app.create_letter_in_s3")
    def test_lambda_handler_valid_event_returns_200(self,
                            patch_create_letter_in_s3 : MagicMock,
                            patch_lambda_s3_class : MagicMock,
                            patch_lambda_dynamodb_class : MagicMock
                            ):
Arrange for the test by setting return values for the patched objects.
patch_lambda_dynamodb_class.return_value = self.mocked_dynamodb_class
        patch_lambda_s3_class.return_value = self.mocked_s3_class

        return_value_200 = {"statusCode" : 200, "body":"OK"}
        patch_create_letter_in_s3.return_value = return_value_200
We need to provide event data when invoking the Lambda handler. A good practice is to save test events as separate JSON files, rather than placing them inline as code. In the example project, test events are located in the folder “tests/events/”. During test execution, the event object is created from the JSON file using the utility function named load_sample_event_from_file.
Act by calling the lambda_handler function.
test_return_value = lambda_handler(event=test_event, context=None)Assert by ensuring the create_letter_in_s3 function is called with the expected parameters based on the event, and a create_letter_in_s3 function return value is passed back to the caller. In our example, this value is simply passed with no alterations.
patch_create_letter_in_s3.assert_called_once_with(
                                        dynamo_db=self.mocked_dynamodb_class,
                                        s3=self.mocked_s3_class,
                                        doc_type=test_event["pathParameters"]["docType"],
                                        cust_id=test_event["pathParameters"]["customerId"])

       self.assertEqual(test_return_value, return_value_200)
Tear Down
The tearDown() method is called immediately after the test method has been run and the result is recorded. In our example tearDown() method, we clean up any data or state created so the next test won’t be impacted.
Running the unit tests
The unittest Unit testing framework can be run using the Python pytest utility. To ensure network isolation and verify the unit tests are not accidently connecting to AWS resources, the pytest-socket project provides the ability to disable network communication during a test.
The pytest command results in a PASSED or FAILED status for each test. A PASSED status verifies that your unit tests, as written, did not encounter errors or issues,

Conclusion
Unit testing is a software development process in which different parts of an application, called units, are individually and independently tested. Tests validate the quality of the code and confirm that it functions as expected. Other developers can gain familiarity with your code base by consulting the tests. Unit tests reduce future refactoring time, help engineers get up to speed on your code base more quickly, and provide confidence in the expected behaviour.
We’ve seen in this blog how to unit test AWS Lambda functions and mock AWS Services to isolate and test individual logic within our code.
AWS Lambda Powertools for Python has been used in the project to validate hander events. Powertools provide a suite of utilities for AWS Lambda functions to ease adopting best practices such as tracing, structured logging, custom metrics, idempotency, batching, and more.
Learn more about AWS Lambda testing in our prescriptive test guidance, and find additional test examples on GitHub. For more serverless learning resources, visit Serverless Land.
About the authors:


 Takeshi Nakatani is a Principal Bigdata Consultant on Professional Services team in Tokyo. He has 25 years of experience in IT industry, expertised in architecting data infrastructure. On his days off, he can be a rock drummer or a motorcyclyst.


