Post Syndicated from Explosm.net original https://explosm.net/comics/burger
New Cyanide and Happiness Comic
Post Syndicated from Explosm.net original https://explosm.net/comics/burger
New Cyanide and Happiness Comic
Post Syndicated from Oglaf! -- Comics. Often dirty. original https://www.oglaf.com/bigbad/


Post Syndicated from Cliff Robinson original https://www.servethehome.com/lenovo-thinkedge-se10-and-se10-i-launched-for-low-power-fanless-edge-intel-atom/
The new Lenovo ThinkEdge SE10 SE10 and SE10-I, powered by 10nm Intel Atom CPUs, are designed to be passively cooled edge appliances
The post Lenovo ThinkEdge SE10 and SE10-I Launched for Low Power Fanless Edge appeared first on ServeTheHome.
Post Syndicated from Techmoan original https://www.youtube.com/watch?v=Uf-kDNFMCD0
Post Syndicated from Боряна Телбис original https://www.toest.bg/sedmitsata-27-fevruari-4-mart/

Ето ни в седмицата, в която с изненада установихме, че небето над милата ни татковина не е непременно от коприна. Каза ни го Европейската прокуратура в контекста на мащабно разследване на сериозни измами с парникови квоти в тецове. Загубите са за милиони евро – и за ЕС, и за България. И в милиони фини прахови частици на сметката на нашите бели дробове.
Един от тецовете, за които се смята, че не са декларирали коректно емисиите на парниковите си газове, е „Брикел“, свързван от кого ли не с Христо Ковачки. В „Тоест“ вече ви разказахме за ТЕЦ „Брикел“, който трябваше да затвори още през 2010 г. Припомнете си двете части на материала, за да разберете как е възможно да се действа с такъв размах и наглост, като се подменя една реалност, в която всички виждаме, че тецът пуши, дими и замърсява, с друга, в която по документи той бълва от комините си едва ли не свежи пролетни цветя.
Докато ги чакаме да цъфнат не само от комините на Ковачки, по стара традиция някои се закичихме с мартеници, а други – със заповеди за уволнение заради „уронване престижа на директора“. Няма значение кой е директорът – важното е, че престижът му е уронен, а това, уважаеми читатели на „Тоест“, е абсолютно не-до-пус-ти-мо.
Разбира се, че става дума за особеното представление „КОЙ работи в Народния театър“, разиграващо се на сцената на общественото (не)внимание от края на октомври м.г. до днес. Е, вече нито Велислава Кръстева, нито Александър Морфов работят в Народния театър. На Кръстева ѝ е за първи път, на Морфов – далеч не. Той е свикнал да бъде „отлъчван“ и уволняван от първата ни сцена. Разказахме ви за това през 2018 г. в краткия филм на Владислав Севов. Вижте го тук, за да затвърдите знанието си, че няма нищо ново под слънцето. Или поне под това „слънце“, което нас ни пече.
Ново би било, ако започне да се действа активно в посока създаване на Закон за театъра (или за сценичните изкуства като цяло), в който да се уредят всички въпроси, засягащи труда на хората, работещи във, над, около, зад и за сцената (и трупата, и сценичните работници, и административния състав).
В този кратък бюлетин няма да оправим въпросите на културата, затова бодро минаваме към политиката, където нещата изглеждат все така комплицирано, да не кажа закучено. В тазседмичния си текст Емилия Милчева задава въпроса на въпросите: какво бъдеще ни предлагат тези, от чиито партийни листи ще избираме на 2 април? Отговорът не е съвсем ясен, а и изглежда, няма много желаещи да го дадат. Поне Емилия е ясна и безкомпромисна в анализа си, както обикновено.
Не е много ясно и какво иска да ни каже Върховният касационен съд с решението си да отмени възможността за юридическа смяна на пола. Това практически предопределя изхода от десетки дела, чакащи решение. Не че не можем да ги водим тези дела, просто никога няма да ги спечелим. „Оправяйте се“, казват от ВКС почти в транс. Какво още – четете в изключително подробния и аргументиран текст по темата на Светла Енчева.
За щастие, в полето на науката всичко е ясно. Или е ясно поне за онези, които разбират от нея. На наша страна си имаме Михаил Ангелов, който ни я превежда на човешки език и ни избира някои особено любопитни научни факти. Тази седмица той ни разказва за хидрогеловете, от които „поникват“ синтетични кожи, нови мозъчни клетки и даже органоиден интелект, който сяда и играе на компютърни игри. Това, последното, е изкуствен интелект, само че естествен – със съвсем реални живи клетки. Объркахте ли се? Вижте текста на Михаил, за да ви се изясни.
Ясно като бял ден в град с тец на Ковачки е положението на центровете в България, предлагащи услуги за зависими хора. Реално тези места са толкова малко, че е цяло чудо, че съществуват. За едно такова „чудо“ ни разказва Юлия Георгиева – председател на Управителния съвет на Фондация „Център за хуманни политики“. Фондацията е двигателят зад Розовата къща – единствения засега у нас нископрагов център за хора със зависимости. Как мечтата да има такова място се превръща в реалност, какво коства всичко това и какво правим после – Юлия разказва от първо лице в „Позитивно за Розовата къща“.
В опит да завърша позитивно, колкото и да ми е трудно в тази мъглива във всяко отношение седмица, ще ви препоръчам да минете едно второ четене със Севда Семер на книгата „Един ден в музея“ (изд. „Точица“ 2021). Това е гид за най-известните музеи в София под формата на комикс с текст от Зорница Христова и илюстрации от Сияна Захариева. Книгата е като карта със съкровища, която превръща музейното пространство в площадка за игра, като разчита на най-великото детско оръжие, пробиващо всеки мрак – любопитството.
Намерете си го това любопитство, в случай че сте го изгубили през годините, и си го ползвайте при нужда, защото може и да е вярно, че е убило котката, но също толкова вярно е, че без него сме едни органоидни интелекти, бързо приближаващи срока си на годност. И спирам да пиша, защото изречения като горното могат да ви откажат да четете. А не бива. „Тоест“ е за четене – приятно да ви е.
Post Syndicated from Crosstalk Solutions original https://www.youtube.com/watch?v=4yYCm3MiOP0
Post Syndicated from Explosm.net original https://explosm.net/comics/facebook
New Cyanide and Happiness Comic
Post Syndicated from Backblaze original https://www.backblaze.com/blog/extended-maintenance-window-for-us-west-data-center-2/

On Wednesday, March 8, 2023, at 8:00 a.m. PT (4:00 p.m. UTC), we’ll be performing planned maintenance on a data center in our U.S. West data region. We expect the work to take up to eight hours. During the window, we do not anticipate any service impacts outside of what customers typically experience during our standard scheduled maintenance. The maintenance is only being performed in one data center in the U.S. West data region. Customers with data stored in this region should see minimal to no impact beyond what is listed below.
Most services, including Computer Backup uploads and most B2 Cloud Storage operations (i.e., uploads, downloads, listing, key creation) will function normally. Within the maintenance window, some customers may experience interruptions of up to eight hours in the following areas:
Web Interface:
Computer Backup:
B2 Cloud Storage:
If timing or impacts change materially—which we do not expect to occur—we will endeavor to offer updates on this blog and on our social media channels. If you have any questions, you can contact our Support Team through the Help page.
The post Extended Maintenance Window for US West Data Center appeared first on Backblaze Blog | Cloud Storage & Cloud Backup.
Post Syndicated from Bruce Schneier original https://www.schneier.com/blog/archives/2023/03/friday-squid-blogging-were-almost-at-flying-squid-drones.html
Researchers are prototyping multi-segment shapeshifter drones, which are “the precursors to flying squid-bots.”
As usual, you can also use this squid post to talk about the security stories in the news that I haven’t covered.
Read my blog posting guidelines here.
Post Syndicated from Patrick Kennedy original https://www.servethehome.com/intel-announces-it-is-ending-traditional-hpc-platforms/
Intel announced the end of the traditional CPU and GPU HPC architecture as we know it with some big roadmap updates
The post Intel Announces it is 3 Years Behind AMD and NVIDIA in XPU HPC appeared first on ServeTheHome.
Post Syndicated from Ahmed Bakry original https://aws.amazon.com/blogs/security/how-to-set-up-least-privilege-access-to-your-encrypted-amazon-sqs-queue/
Amazon Simple Queue Service (Amazon SQS) is a fully-managed message queueing service that enables you to decouple and scale microservices, distributed systems, and serverless applications. Amazon SQS provides authentication mechanisms so that you can control who has access to the queue. It also provides encryption in transit with HTTP over SSL or TLS, and it supports server-side encryption using AWS Key Management Service (AWS KMS) to help protect the data passing through Amazon SQS. These controls allow you to use Amazon SQS to exchange sensitive data between applications. With the integration of Amazon SQS and AWS KMS, you can centrally-manage the keys that protect Amazon SQS, as well as the keys that protect your other AWS resources.
AWS services, such as Amazon Simple Storage Service (Amazon S3) and Amazon Simple Notification Service (Amazon SNS), can act as event sources that send events to Amazon SQS. To enable an event source to access an encrypted SQS queue, you will need to configure the queue with a customer managed key in AWS KMS, and then use the key policy to allow the event source to use the required AWS KMS API methods. The event source also requires permissions to authenticate access to the queue to send events. You can achieve this by using an SQS policy, which is a resource-based policy that you can use to control access to the SQS queue and its data.
In this blog post, we will show you how to control access to your encrypted SQS queue through the key policy and the SQS policy. The policies introduced in this post will guide you towards achieving least privilege. We will also describe how the resource-based policies defined in this post address the confused deputy problem by using the aws:SourceArn, aws:SourceAccount, and aws:PrincipalOrgID global AWS Identity and Access Management (IAM) condition context keys.
In this post, we will walk you through a common use case to illustrate how you can build the key policy and the SQS queue policy. This use case is shown in Figure 1.
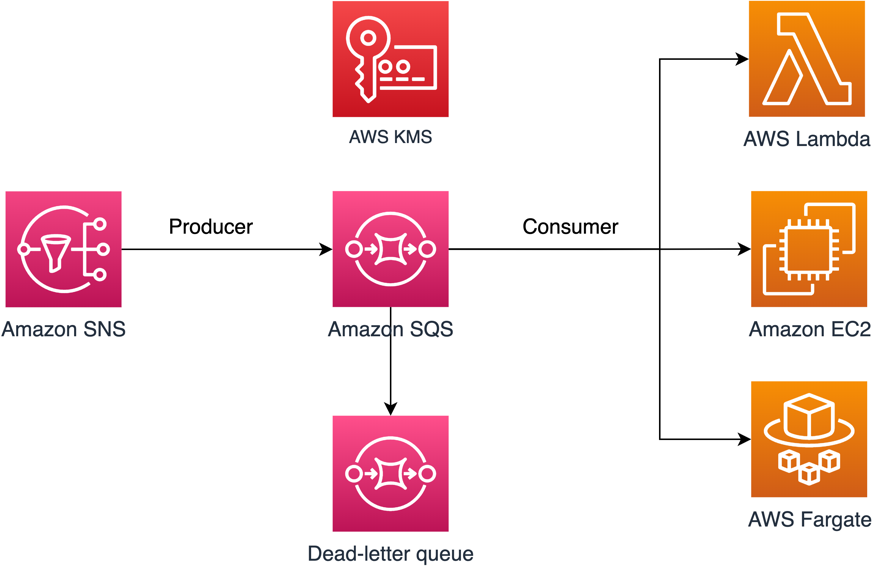
Figure 1: Architecture to publish Amazon SNS messages to Amazon SQS
As shown in Figure 1, the solution has the following steps:
Note: If the message consumer is located in an Amazon Virtual Private Cloud (Amazon VPC) and you need to restrict message reception to that specific VPC, then you should attach the DenyReceivingIfNotThroughVPCE policy statement to your SQS queue policy.
The SQS policy defined in this post doesn’t support redriving messages directly to the same or a different SQS queue.
This post contains only the required IAM permissions in the form of policy statements. To construct the policy, you need to add the statements to your SQS policy or your AWS KMS key policy. This post doesn’t walk you through how to create the SQS queue or the AWS KMS key. Therefore, to use the policies included in this post, make sure that you’ve completed the following prerequisites:
In this section, we describe the required least-privilege permissions in AWS KMS for the customer-managed key that you use to encrypt your SQS queue. With these permissions, you can limit access to only the intended entities while implementing least privilege. The key policy must consist of the following policy statements, which we describe in detail below:
To create an AWS KMS key, you need to provide AWS KMS administrator permissions to the IAM role that you use to deploy the KMS key. These administrator permissions are defined in the AllowKeyAdminPermissions policy statement that follows. When you add this statement to your key policy, make sure to replace <admin-role ARN> with the Amazon Resource Name (ARN) of the IAM role used to deploy the KMS key, manage the KMS key, or both. This can be the IAM role of your deployment pipeline or the administrator role for your organization in AWS Organizations.
Note: In a key policy, the value of the Resource element needs to be “*”, which means “this KMS key”. The asterisk (“*”) identifies the KMS key to which the key policy is attached.
To grant other IAM roles read-only access to your key metadata, add the following AllowReadAccessToKeyMetaData statement to your key policy. This statement allows you, for example, to list the KMS keys in your account for auditing purposes. The statement grants the AWS account root user read-only access to the key metadata. Therefore, an IAM principal in the account can have access to the key metadata when their identity-based policies have the following permissions listed in the statement: kms:Describe*, kms:Get*, and kms:List*. Make sure to replace <account-ID> with your own information.
To allow your SNS topic to publish messages to your encrypted SQS queue, add the following AllowSNSToSendToSQS policy statement to your key policy. This statement grants Amazon SNS permissions to use the KMS key to publish to your SQS queue. Make sure to replace <account-id> with your own information.
Note: The Condition element limits access to the SNS service in the same AWS account where the SNS topic exists.
The following AllowConsumersToReceiveFromTheQueue statement grants the SQS message consumer the required permissions to decrypt messages received from the encrypted SQS queue. When you attach the policy statement, replace <consumer’s runtime role ARN> with the ARN for the IAM runtime role of the message consumer.
In this section, we will walk you through least-privilege SQS queue policies to help you send Amazon SNS messages to Amazon SQS. The defined policy is designed to prevent unintended access by using a mix of both allow and deny statements. The allow statements grant access to the intended entity or entities. The deny statements prevent other unintended entities from accessing the SQS queue, while excluding the intended entity within the policy condition. The SQS policy includes the following statements, which we describe in detail below:
The following RestrictAdminQueueActions policy statement restricts the Amazon SQS management permissions to only the IAM role or roles that you use to deploy the queue, manage the queue, or both.
Make sure to replace the <placeholder values> with your own information. Specify the ARN of the IAM role used to deploy the SQS queue, as well as the ARNs of each administrator role that should have SQS management permissions. For the Resource element, you can specify either “*” or the ARN of the SQS queue.
To help protect your Amazon SQS resources from external access (that is, access by an entity outside your AWS Organizations organization), use the following statement. The statement limits SQS queue access to the organization that you specify in the Condition element. Make sure to replace <org-id> with your organization ID. For the Resource element, you can specify either “*” or the ARN of the SQS queue.
To receive messages from the SQS queue, you need to provide the message consumer with the necessary permissions. The following policy statement grants the consumer, which you specify, the required permissions to consume messages from the SQS queue. When adding the statement to your SQS policy, make sure to replace <consumer’s IAM runtime role ARN> with the ARN of the IAM runtime role used by the consumer. For the Resource element, you can specify either “*” or the ARN of the SQS queue.
To prevent other entities from receiving messages from the SQS queue, add the following DenyOtherConsumersFromReceiving statement to the SQS queue policy. This statement restricts message consumption to the consumer that you specify—allowing no other consumer to have access, even when their identity permissions would grant them access. Make sure to replace <consumer’s runtime role ARN> with your own information. For the Resource element, you can specify either “*” or the ARN of the SQS queue.
The following DenyUnsecureTransport policy statement enforces the consumers and producers to use secure channels (TLS connections) to send and receive messages to and from the SQS queue. For the Resource element, you can specify either “*” or the ARN of the SQS queue.
The following AllowSNSToSendToTheQueue policy statement allows the specified SNS topic to send messages to the SQS queue. Make sure to replace <SNS topic ARN> with the SNS topic ARN. For the Resource element, you can specify either “*” or the ARN of the SQS queue.
The following DenyAllProducersExceptSNSFromSending policy statement prevents other producers from sending messages to the queue. Replace <SNS topic ARN> with your own information. For the Resource element, you can specify either “*” or the ARN of the SQS queue.
To restrict the receipt of messages to only a specific VPC endpoint, add the following DenyReceivingIfNotThroughVPCE policy statement to your SQS queue policy. This statement prevents a message consumer from receiving messages from the queue unless the messages are from the desired VPC endpoint. Replace <vpce_id> with the ID of the VPC endpoint that you created for your SQS queue. For the Resource element, you can specify either “*” or the ARN of the SQS queue.
In this section, we will walk you through how to manage access to your SQS queue when you are using it as a dead-letter queue (DLQ) for another SQS queue.
Add the following policy statements, identified by their statement ID, to your DLQ access policy. These are the same policy statements introduced earlier in this post.
In addition to adding the preceding policy statements to your DLQ access policy, you should add a statement to restrict message transmission to SQS queues, which we describe in the next section.
To restrict access to only SQS queues from the same account, add the following DenyAnyProducersExceptSQS policy statement to the DLQ access policy. This statement doesn’t limit message transmission to a specific queue because you need to deploy the DLQ before you create the main queue, so you won’t know the SQS queue ARN when you create the DLQ. If you need to limit access to only one SQS queue, modify the aws:SourceArn in the Condition element with the ARN of your SQS source queue when you know it.
Important: The SQS queue policies defined in this post don’t restrict the sqs:PurgeQueue action to a certain IAM role or roles. The sqs:PurgeQueue action enables you to delete all messages in the SQS queue. You can also use this action to make changes to the message format without replacing the SQS queue. When debugging an application, you can clear the SQS queue to remove potentially erroneous messages. When testing the application, you can drive a high message volume through the SQS queue and then purge the queue to start fresh before entering production. The reason for not restricting this action to a certain role is that this role might not be known when deploying the SQS queue. You will need to add this permission to the role’s identity-based policy to be able to purge the queue.
The confused deputy problem is a security issue where an entity that doesn’t have permission to perform an action can coerce a more privileged entity to perform the action. To help prevent this problem, AWS provides tools that help you protect your account if you provide third parties (known as cross-account) or other AWS services (known as cross-service) access to resources in your account. The policy statements in this post can help you prevent the cross-service confused deputy problem.
Cross-service impersonation can occur when one service (the calling service) calls another service (the called service). The calling service can be manipulated to use its permissions to act on another customer’s resources in a way it shouldn’t otherwise have permission to access. To help protect against this issue, the resource-based policies defined in this post use the aws:SourceArn, aws:SourceAccount, and aws:PrincipalOrgID global IAM condition context keys. These limit the permissions that a service has to a specific resource, a specific account, or a specific organization in AWS Organizations.
For example, the following AllowS3ToSendToTheQueue policy statement allows Amazon S3 to deliver messages to your Amazon SQS queue; the aws:SourceArn condition in this policy grants access to a specific S3 bucket only.
If a bad actor creates an S3 bucket to try to deliver messages to your Amazon SQS queue, the source ARN will not match that of the S3 bucket specified in this policy, so the policy will deny access. Without the aws:SourceArn condition, the unauthorized S3 bucket would be granted access unintentionally because any S3 bucket would be granted to deliver messages to our queue through the S3 service principal. Adding the aws:SourceArn condition prevents cross-service impersonation.
You can use IAM Access Analyzer to review your SQS queue policies and AWS KMS key policies and alert you when an SQS queue or a KMS key grants access to an external entity. IAM Access Analyzer helps identify resources in your organization and accounts that are shared with an entity outside the zone of trust. This zone of trust can be either an AWS account or the organization within AWS Organizations that you specify when you enable IAM Access Analyzer.
IAM Access Analyzer also helps identify resources shared with external principals by using logic-based reasoning to analyze the resource-based policies in your AWS environment. For each instance of a resource shared outside of your zone of trust, IAM Access Analyzer generates a finding. Figure 2 shows an IAM Access Analyzer finding, in which a sqs:SendMessage API call was made to our SQS queue from an account that is outside of our zone of trust.

Figure 2: IAM Access Analyzer example finding for an Amazon SQS queue
Findings include information about the access and the external principal granted to it. To determine whether the access is intended and safe, or unintended and a security risk, review the findings. For unintended access, review the affected policy and modify it by using the policy statements introduced in this blog post to further restrict access. For more information on how IAM Access Analyzer identifies unintended access to your AWS resources, see the blog post Identify Unintended Resource Access with IAM Access Analyzer.
In this post, you learned how to manage access to your encrypted Amazon SQS queue to help you achieve least privilege. We presented an SQS queue policy and an AWS KMS key policy so that you can use Amazon SQS to receive messages from an SNS topic. We addressed the confused deputy problem, specifying the exact source allowed to emit events. You also learned how to use IAM Access Analyzer to review the external access provided by your existing SQS queue policies and key policies.
You can follow the instructions in this post to resolve findings based on your SQS use case. You can also use the provided policies for newly created SQS queues and their KMS keys, or to modify existing queues (for example, to address IAM Access Analyzer findings). For more use cases, see the AWS SQS documentation.
If you have feedback about this post, submit comments in the Comments section below. If you have questions about this post, start a new thread on the Amazon Simple Queue Service re:Post or contact AWS Support.
Want more AWS Security news? Follow us on Twitter.
Post Syndicated from Михаил Ангелов original https://www.toest.bg/nauchni-novini-sintetichna-kozha-regeneratsiya-na-mozuchna-tukan/

Хидрогеловете са порьозни структури, съставени основно от течност, най-често вода, в която има мрежа от нишки от природни или синтетични полимери. Те са познати от над сто години и имат широко приложение в индустрията, медицината и изследователската дейност.
Пример е абсорбиращият материал в памперсите – някои разработки на такива материали обещават способност да погълнат вода, която е 3000 пъти колкото теглото им. Друг често срещан продукт са меките контактни лещи, чието голямо предимство е, че структурата им позволява преминаването на кислород към тъканите на окото.
Поради изключителните си свойства те са в авангарда на много и различни новосъздаващи се технологии.
Статистически комарите са най-смъртоносните животни на планетата – според СЗО през 2021 г. от малария са починали над 600 000 души. Освен нея, насекомите пренасят и редица други заболявания, като жълта треска, денга, западнонилска треска и зика.
Една от големите трудности в опитите с комари е наблюдението и изучаването на храненето им. Обикновено това включва лабораторни животни или доброволци, склонни да се подложат на няколкочасово изпитание. Този подход не позволява автоматизиране и по-дълги изследвания. Решение на проблема предлага новосъздадена изкуствена кожа от хидрогел.
Използвайки технология за 3D печат с биологичен материал, учени успешно са създали структура, в която може да тече кръв. За повишаване на продуктивността в изпитателната камера се поставят няколко опитни елемента, към които са насочени видеокамери, постоянно заснемащи повърхността им и комарите, които се хранят от тях. След края на експеримента записите се анализират с помощта на компютърен модел, който определя броя кацания, както и времето за хранене. За да направи платформата по-достъпна и по-гъвкава, екипът е използвал малък компютър Raspberry Pi в комбинация с бюджетни видеокамери Arducam, които са управлявани от скрипт, написан на Python.
За изпитанията на системата са сравнени два репелента: синтетичният DEET, разработен в средата на миналия век, и натурален – от растителни масла. Между двата не е открита статистически значима разлика в сравнение с контролното условие, при което не е използван репелент. Този резултат показва потенциала на приложение на платформата, тъй като разработката на нови продукти и одобрението им за пазара е свързано със скъпи изследвания върху хора и животни. Наред с това DEET, въпреки високата си ефективност, причинява нежелани кожни реакции при някои хора, което е стимул за откриването на нови, по-безопасни формули.
Едно от потенциалните приложения на тази платформа е за следене на появата на определени видове, което е все по-актуално поради разширяването на ареалите им, причинено от глобалните климатични промени. В тази връзка авторите предлагат подобрение на работата ѝ в полеви условия. Ако покрай синтетичната кожа се пусне поток от въглероден диоксид с ниска концентрация, комарите ще са още по-силно привлечени от нея, тъй като това е един от стимулите, насочващи ги към потенциални жертви. Друго предложение е използването на синтетични аналози на кръвта, за да се създаде напълно изкуствен изпитателен модел и да се избегне опасността от боравене с биологичен материал, който може да носи патогени в себе си.
Хидрогеловете са основа и за създаването на тъкани и органи в изкуствени условия. От тях най-често чрез 3D биопечат се прави своеобразно скеле, което се поставя в подходяща инкубационна среда. Клетките, които ще изградят тъканта, се прикачват към хидрогелната структура и започват изграждането ѝ. Технологията е основа и при създаването на синтетично месо.
Използвайки тази идея, екип от Университета в Хокайдо е разработил система за терапия на мозъчни травми. Първата стъпка е била намирането на хидрогел с подходящо съдържание, в който да могат да се развиват невронни стволови клетки. След това той е инкубиран в хранителна среда, която стимулира развитието на кръвоносни съдове в него. Когато те достигнат достатъчна плътност, структурата се имплантира в опитни мишки с мозъчна травма.
Около три седмици по-късно в импланта вече има имунни клетки от приемащия организъм. В него са навлезли и неврони от тъканите в непосредствена близост. Ако няма отхвърляне, в хидрогела се инжектират стволови клетки, които успешно се развиват в астроцити (вид мозъчни глиални клетки) и неврони във връзка с околните тъкани. Учените отбелязват, че последователността на стъпките е от особена важност за оптималното протичане на процеса.
При мозъчни увреждания, водещи до загуба на обем вследствие на физическа травма, или хирургическа намеса при тумор или при запушване на кръвоносен съд, в повечето случаи няма регенерация на тъканта. Затова подходът е обещаващ особено при възрастни пациенти, при които възстановяването е по-бавно.
Потенциал за подобрение според авторите има в посока на сравняването между хидрогел, който не се резорбира в тъканите на пациента, и такъв, който е биоразградим. Материалът, използван в изследването, е от първия вид и въпреки че не са забелязани промени в поведението на опитните мишки, не е ясно какви ще са дългосрочните ефекти.
Това е терминът, предложен от група учени, за нов подход в създаването на интелект в изкуствена среда. За разлика от компютърните невронни мрежи, съществуващи като математически модели, тук се обсъжда използването на истински мрежи от неврони, обособени в малки мозъчни органоиди. Това е възможно заради напредъка при биоматериалите, благодарение на които може да се изграждат триизмерни структури. Тези структури позволяват на невроните в тях да създават повече връзки помежду си, повишавайки възможността им за извършване на операции.
Използването на биологични компютри има няколко предимства. Вследствие на еволюционния натиск организмите са изградили изключително ефективна система за учене от околната среда. Биологичните системи са оптимизирани за обработване и съхранение на данни. Пример, който авторите дават, е задачата „еднакво или различно“: хората имат нужда от около 10 опита, за да я разберат, пчелите – от около 100, докато при някои компютърни системи са необходими над 5 пъти повече. Наред с това живите организми използват енергията изключително пестеливо. За сравнение, при обучението на AlphaGo, първия софтуер, успял да победи човек в играта „го“, е изразходвана енергия, достатъчна за поддържане на метаболизма на активен възрастен човек за 10 години.
За комуникация с органоидите се разработват системи от микроелектроди, които улавят електрическите сигнали, предавани от клетките, по подобие на „шапките“ с електроди, използвани в машините за електроенцефалография (ЕЕГ). Тази част от технологията все още предстои да се оптимизира. Повечето такива системи, достъпни в момента, са за клетки, култивирани в една равнина, и за триизмерните органоиди ще е нужно да се направи своеобразна капсула, в която да бъдат поставени. Допълнителна трудност създава и желанието на изследователите да правят микроскопски наблюдения, което налага електродите и конструкцията, към която са прикрепени, да бъде прозрачна.
Всичко това звучи абстрактно и фантастично, но основите са положени и вече има работещи системи. В края на миналата година бе публикувана разработката DishBrain (буквално „мозък в Петри“) – инвитро невронна мрежа, изградена от човешки или миши клетки, която се е научила да играе играта Pong.
Системата има три участъка с неврони – един, който приема стимулите, и два „двигателни“, които подават сигнал за местене на хилката нагоре или надолу. Въпреки че способностите ѝ не са на много високо ниво, това е впечатляващо, защото не е имало предварително обучение и успеваемостта се е повишила значително само след няколко минути игра. Авторите отбелязват две основни ограничения на прототипа – броя микроелектроди, побиращи се на площта, върху която е разположена културата от клетки, и изчислителната мощ, нужна за обработка на данните в реално време.
Освен за изчисления, тези структури може да се използват и като моделна система за проучване на заболявания, засягащи мозъка, например алцхаймер, паркинсон и др. Като се използва възможността за превръщане на кожни клетки в стволови, може да се създадат мозъчни органоиди, които са строго специфични за даден пациент. След оформянето на триизмерната култура тя може да се използва в различни експерименти – от подлагане на медикаменти до ксенотрансплантация (процес на прехвърляне на тъкан от един вид в друг, например от човек в мишка). Това позволява на изследователите да опитат много и различни подходи, което в повечето случаи е невъзможно да се направи инвиво в пациента.
Развитието в тази научна област тепърва започва и има много пречки за преодоляване. За да могат да изпълняват поставените задачи, авторите смятат, че ще са нужни органоиди, съставени от около 10 милиона клетки, което е значително увеличение спрямо сегашните възможности. Ще бъдат необходими също по-добри и по-иновативни системи от микроелектроди.
Не са за пренебрегване и всички етични въпроси, които повдига тази технология. Един от тях е разработването на правила, които уточняват използването на клетки, особено ако те са извлечени от човек. Например кой е собственик на органоида, кой има право да решава какви процедури може да се извършват с него, каква информация може да се извлече за донора.
Друга посока на обсъждане е възможността за поява на съзнание в тези структури, което налага създаването на нови тестове и процедури, следящи за това. Колкото по-продължителен е периодът на инкубация, толкова по-комплексна става структурата, особено когато е изложена на стимули. Ще трябва да се реши и къде да бъде поставена границата между реагиране на стимули, съзнание, разум. Не е ясно и дали тези структури имат възможност да изпитват болка, както и дали могат да я осъзнаят.
Подобни дискусии се водят и за машинните невронни мрежи от по-ново поколение, но поради биологичния си характер мозъчните органоиди са много по-предразположени към третиране като жив организъм.
Не се знае дали ще успеем да видим приложение на технологията по начина, описан от киберпънк авторите, но изглежда, учените са решени да направят каквото е по силите им.
Post Syndicated from Zachary Goldman original https://blog.rapid7.com/2023/03/03/metasploit-weekly-wrap-up-195/
Rapid7’s broader vulnerability research team released our 2022 Vulnerability Intelligence Report this week. The report includes Metasploit and research team data on exploitation, exploitability, and vulnerability profiles that are intended to help security teams understand and prioritize risk more effectively. Put simply, security teams have way too much to do in a threat climate that’s seen some pretty crazy escalation the past few years, and understanding attack trends can help them make better risk-based choices.
There are some longer threads on key findings on Twitter and Mastodon. Some of the highlights:
Read the full report here!
Author: Imran E. Dawoodjee
Type: Auxiliary
Pull request: #17676 contributed by ide0x90
Description: This adds a login module for the Softing Secure Integration Server software.
Authors: HMs, l1k3beef, and sf
Type: Exploit
Pull request: #17624 contributed by sfewer-r7
AttackerKB reference: CVE-2022-21587
Description: This pull request adds an exploit module for an arbitrary file upload vulnerability in Oracle Web Applications Desktop Integrator, as shipped with Oracle E-Business Suite versions 12.2.3 through to 12.2.11, which results in remote code execution. This has been observed to have been exploited in the wild.
Author: Alexander Philiotis
Type: Exploit
Pull request: #17638 contributed by JBince
Description: This adds a module to execute code using Lucee’s scheduled job functionality. The feature requires authentication as an administrator by default and allows a ColdFusion page to be rendered which is used to execute an OS command using the cfexecte directive. The module works on both Linux and Windows targets.
Author: DLL_Cool_J
Type: Post
Pull request: #17672 contributed by archcloudlabs
Description: This PR includes a post module that will disable ClamAV on Linux systems. The bug resides in the ClamAV Unix socket permitting any user to submit the "shutdown" command which will disable ClamAV.
admin/kerberos/inspect_ticket module to display the ticket checksum and full PAC checksumgetprivs and getdesktop commands to Python Meterpreters running on Windows, and also adds support for getting the handle of processes opened via the session. Additionally, fixes were made to support Python 2.5 and to fix the getdesktop output of Python Meterpreters.exploit/linux/http/froxlor_log_path_rce module to note that Foxlor 2.0.7 is the last vulnerable version.route command has been reworked to improve the way it validates arguments and to print out more accurate error messages.You can always find more documentation on our docsite at docs.metasploit.com.
As always, you can update to the latest Metasploit Framework with msfupdate
and you can get more details on the changes since the last blog post from
GitHub:
If you are a git user, you can clone the Metasploit Framework repo (master branch) for the latest.
To install fresh without using git, you can use the open-source-only Nightly Installers or the
binary installers (which also include the commercial edition).
Post Syndicated from Explosm.net original https://explosm.net/comics/the-dillbert-rises
New Cyanide and Happiness Comic
Post Syndicated from Sankar Sundaram original https://aws.amazon.com/blogs/big-data/build-incremental-data-pipelines-to-load-transactional-data-changes-using-aws-dms-delta-2-0-and-amazon-emr-serverless/
Building data lakes from continuously changing transactional data of databases and keeping data lakes up to date is a complex task and can be an operational challenge. A solution to this problem is to use AWS Database Migration Service (AWS DMS) for migrating historical and real-time transactional data into the data lake. You can then apply transformations and store data in Delta format for managing inserts, updates, and deletes.
Amazon EMR Serverless is a serverless option in Amazon EMR that makes it easy for data analysts and engineers to run open-source big data analytics frameworks without configuring, managing, and scaling clusters or servers. EMR Serverless automatically provisions and scales the compute and memory resources required by your applications, and you only pay for the resources that the applications use. EMR Serverless also provides you with more flexibility on overriding default Spark configurations, customizing EMR Serverless images, and customizing Spark driver and executor sizes to better suit specific workloads.
This post demonstrates how to implement a solution that uses AWS DMS to stream ongoing replication or change data capture (CDC) from an Amazon Aurora PostgreSQL-Compatible Edition database into Amazon Simple Storage Service (Amazon S3). We then apply transformations using Spark jobs on an EMR Serverless application and write transformed output into open-source Delta tables in Amazon S3. The Delta tables created by the EMR Serverless application are exposed through the AWS Glue Data Catalog and can be queried through Amazon Athena. Although this post uses an Aurora PostgreSQL database hosted on AWS as the data source, the solution can be extended to ingest data from any of the AWS DMS supported databases hosted on your data centers.
The following diagram shows the overall architecture of the solution that we implement in this post.

The solution consists of the following steps for implementing a full and incremental (CDC) data ingestion from a relational database:
The architecture has the following major features:
The following steps are performed to implement this solution:
We use a CloudFormation template to provision the AWS resources required for the solution. The CloudFormation template requires you to select an EC2 key pair. This key is configured on an EC2 instance that lives in the public subnet. We use this EC2 instance to connect to the Aurora PostgreSQL instance that lives in the private subnet. Make sure you have a key in the Region where you deploy the template. If you don’t have one, you can create a new key pair.
To walk through this post, we use Delta Lake version > 2.0.0, which is supported in Apache Spark 3.2.x. Choose the Delta Lake version compatible with your Spark version by visiting the Delta Lake releases page. We use an EMR Serverless application with version emr-6.9.0, which supports Spark version 3.3.0.
To provision the resources needed for the solution, complete the following steps:
![]()
emr-serverless-deltalake-blog.After the CloudFormation template is complete and the resources are created, the Outputs tab shows the information shown in the following screenshot.

The CloudFormation template creates all the resources needed for the solution workflow:
You can find the PySpark script in the raw S3 bucket on the Amazon S3 console as shown in the following screenshot. The bucket will have the naming structure <CloudFormation template name>-rawS3bucket-<random string>. Make a note of the S3 path to the emr_delta_cdc.py script; you need this information while submitting the Spark job via the EMR Serverless application.

The preceding task for creating the resources via CloudFormation assumes that AWS Lake Formation is not enabled in the Region (which we enable later in this post). If you already have Lake Formation enabled in the Region, make sure the IAM user or role used in the CloudFormation template has the necessary permissions to create a database in the AWS Glue Data Catalog.
Connect to the Aurora PostgreSQL endpoint using your preferred client. For this post, we use the PSQL command line tool. Note that the IP address of the client machine from which you’re connecting to the database must be updated in the Aurora PostgreSQL security group. This is done by the CloudFormation template based on the input parameter value for ClientIPCIDR. If you’re accessing the database from another machine, update the security group accordingly.


In this section, we walk through the steps to set up a data pipeline that loads data from Amazon Aurora PostgreSQL-Compatible Edition into Delta tables on Amazon S3 and then query the data using Athena.
To perform the full table load, complete the following steps:
emrdelta-postgres-s3-migration).The task starts the full load and ongoing replication of data from the source database to Amazon S3.

You can validate that the data has been migrated successfully checking the Load state column for the AWS DMS task.

<CloudFormation template name>-rawS3bucket-<random string>.delta_emr_source/travel_details in the raw S3 bucket. You can verify the S3 folder has Parquet data populated from the AWS DMS task.
We use EMR Studio to manage and submit jobs in an EMR Serverless application.
emr-delta-blog.

emr_delta_blog and then choose Start application. You can verify that the EMR application has started successfully on the Amazon EMR console, as shown in the following screenshot.
The application will move to Stopped status after a period of inactivity. When you submit the job to the application, it will start again and start the job. This provides cost savings because the jobs are run on demand as opposed to maintaining a running EMR cluster.
 Create a new job in the Job details page
emr-delta-load-job.emrserverless-execution-role.emr_delta_cdc.py is uploaded.["I","delta_emr_source","9999-12-31-01","travel_details","route_id"]. The script arguments provide the following details to the EMR Serverless application:
With arguments, you can group a set of tables and submit the job to an EMR Serverless application. You can provide multiple table names separated by semicolons and enter the partition keys for those tables also separated by semicolon. If a particular table doesn’t have a partition key, simply enter a semicolon alone. The number of semicolon-separated values should match the table and partition key arguments for the script to run successfully.
Also, if you want to capture additional tables as part of an existing EMR Serverless job, you need to create a new EMR Serverless job to capture full load separately (set the first argument as I along with the new table names) and then change the argument list of the existing EMR Serverless job to add those new tables to capture incremental data load going forward.
EMR Serverless version 6.9.0 comes pre-installed with Delta version 2.1.0. Refer to About Amazon EMR Releases for more details about pre-installed libraries and applications for a specific Amazon EMR release. Before this, we have to upload the Delta JAR files to an S3 bucket in your account and provide the JAR file path in the application configurations using the spark.jars option. In this walkthrough, we create an EMR Serverless 6.9.0 application and use the pre-installed Delta jars from Amazon EMR.
If you want to use a different version of Delta JAR files, you can replace the S3 path of the JAR files in these configuration options.


You can now use the Spark History Server UI to navigate to various tabs and analyze the job run in a detailed manner. For Spark error and output logs, you can navigate to the Executors tab and explore the driver or executor logs as required. This can help you to debug the job in case of failures by looking at the Spark logs.You can also choose Spark UI (Running jobs) to track the progress of the EMR Serverless Spark jobs while they are running.

The data load script is the same for initial and incremental data load because it can handle both the workflows through script arguments:
We can optionally monitor the EMR Serverless application using CloudWatch dashboards by installing the CloudFormation template from the EMR Serverless CloudWatch Dashboard GitHub repository.Follow the instructions on the Getting started section on the GitHub repository and deploy the CloudFormation template in your account.
You need to provide the EMR Serverless application ID as a parameter while deploying the CloudFormation stack, which can be obtained on the EMR Studio Applications page as shown in the following screenshot.

After the CloudFormation template is successfully deployed, navigate to the CloudWatch console to see a custom dashboard created for the EMR Serverless application ID that was provided to the CloudFormation template.

Choose the dashboard to see the different metrics for the EMR Serverless application in a single dashboard view.
You can see the available workers (one driver and two executors that were pre-initialized in the default configuration) and also the spike under successful job count that indicates the initial data load job that was completed successfully.

You could also monitor the CPU, memory, and storage allocated for the application, driver, and executor nodes separately.
The following image shows application metrics for three workers with 12 vCPUs (both driver and executor initialized with 4 vCPUs) and also the memory and storage usage. You can monitor the metrics from this dashboard and pre-initialize your application capacity that suits your specific workloads.

We can see the number of executors that were utilized for this job execution from the executor metrics section within the CloudWatch dashboard. We have used two executors and a driver for running this job.

Previously, Delta tables were accessed through Athena by generating the manifest files (which maintain the list of data files to read for querying a Delta table). With the newly launched support in Athena for reading native Delta tables, it’s no longer required to generate and update manifest files. The Athena SQL engine version 3 can directly query native Delta tables. If you’re using an older engine version, change the engine version.
Navigate to the Athena console and start querying the data. Run a SELECT query and fetch the first 10 records to verify the data:

The table (native Delta table) has been created and updated to the AWS Glue Data Catalog from the EMR Serverless application code. You can successfully query and explore the data through Athena or Spark applications, but the schema definitions for individual columns aren’t updated in Data Catalog with this approach.
The following screenshot shows the Delta table created through code has a single array column. Athena supports reading native Delta tables and therefore we can read the data successfully even though the Data Catalog shows only a single array column.

If you need the individual column-level metadata to be available in the Data Catalog, run an AWS Glue crawler periodically to keep the AWS Glue metadata updated. For more information, refer to Introducing native Delta Lake table support with AWS Glue crawlers.
In this section, we walk through the steps to run the data pipeline.
update delta_emr_source.travel_details set destination='Tucson' where destination='Miami';
call delta_emr_source.insert_records(200);
delete from delta_emr_source.travel_details where destination='Los Angeles';


You can also verify in the S3 raw bucket location that the files are created under hourly partitioned folders.

After the AWS DMS task has successfully loaded the incremental data, submit the Spark job on the EMR Serverless application to load the incremental data (CDC) with the following script arguments:
The partition path given here as 2022-10-25-21 should be changed as applicable in your use case. We use an example use case where the EMR Serverless job runs every hour, and the input data folder is partitioned on an hourly basis from AWS DMS. You can choose an appropriate partitioning strategy on the S3 raw bucket for your use case.

_delta_log folder, capturing the changes from the current run. Query the Delta tables through Athena to validate the merged data
Go to the Athena console to query the data and validate count to ensure that the table contains the most recent data:

If you also want to query this data from Amazon Redshift, you can create external tables in Redshift Spectrum for Delta tables. For more information, refer to Creating external tables for data managed in Delta Lake. Redshift Spectrum currently supports querying Delta tables through the manifest file option. A Delta table manifest contains a list of files that make up a consistent snapshot of the Delta table. The code snippet given in this post updates the manifest files every time new data is loaded in the Delta tables to ensure only the latest data is read from the Delta tables.
To avoid incurring ongoing charges, clean up your infrastructure by deleting the stack from the AWS CloudFormation console. Delete the EMR Serverless application and any other resources you created during this exercise.
In this post, we demonstrated how to create a transactional data lake with Delta table format using EMR Serverless and AWS DMS. With the flexibility provided by EMR Serverless, you can use the latest version of open-source Delta framework on EMR Serverless (with the latest version of Spark) in order to support a wider range of transactional data lake needs based on various use cases.
Now you can build a transactional data lake for your organization with Delta table format and access data using Athena and Redshift Spectrum for various analytical workloads. You could use this high-level architecture for any other use cases where you need to use the latest version of Spark on EMR Serverless.
 Sankar Sundaram is a Data Lab Architect at AWS, where he helps customers build and modernize data architectures and help them build secure, scalable, and performant data lake, database, and data warehouse solutions.
 Monjumi Sarma is a Data Lab Solutions Architect at AWS. She helps customers architect data analytics solutions, which gives them an accelerated path towards modernization initiatives.
Post Syndicated from Parag Doshi original https://aws.amazon.com/blogs/big-data/how-tricentis-unlocks-insights-across-the-software-development-lifecycle-at-speed-and-scale-using-amazon-redshift/
This is a guest post co-written with Parag Doshi, Guru Havanur, and Simon Guindon from Tricentis.
Tricentis is the global leader in continuous testing for DevOps, cloud, and enterprise applications. It has been well published since the State of DevOps 2019 DORA Metrics were published that with DevOps, companies can deploy software 208 times more often and 106 times faster, recover from incidents 2,604 times faster, and release 7 times fewer defects. Speed changes everything, and continuous testing across the entire CI/CD lifecycle is the key. However, speed is only realized when you have the confidence to release software on demand. Tricentis instills that confidence by providing software tools that enable Agile Continuous Testing (ACT) at scale. Whether exploratory or automated, functional or performance, API or UI, targeting mainframes, custom applications, packaged applications, or cloud-native applications, Tricentis provides a comprehensive suite of specialized continuous testing tools that help its customers achieve the confidence to release on demand.
The next phase of Tricentis’ journey is to unlock insights across all testing tools. Teams may struggle to have a unified view of software quality due to siloed testing across many disparate tools. For users that require a unified view of software quality, this is unacceptable. In this post, we share how the AWS Data Lab helped Tricentis to improve their software as a service (SaaS) Tricentis Analytics platform with insights powered by Amazon Redshift.
Tricentis provides SaaS and on-premises solutions to thousands of customers globally. Every change to software worth testing is tracked in test management tools such as Tricentis qTest, test automation tools such as Tosca or Testim, or performance testing tools such as Neoload. Although Tricentis has amassed such data over a decade, the data remains untapped for valuable insights. Each of these tools has its own reporting capabilities that make it difficult to combine the data for integrated and actionable business insights.
Additionally, the scale is significant because the multi-tenant data sources provide a continuous stream of testing activity, and our users require quick data refreshes as well as historical context for up to a decade due to compliance and regulatory demands.
Finally, data integrity is of paramount importance. Every event in the data source can be relevant, and our customers don’t tolerate data loss, poor data quality, or discrepancies between the source and Tricentis Analytics. While aggregating, summarizing, and aligning to a common information model, all transformations must not affect the integrity of data from its source.
Tricentis Analytics aims to address the challenges of high volume, near-real-time, and visually appealing reporting and analytics across the entire Tricentis product portfolio.
The initial customer objectives were:
Considering the multi-tenant data source, Tricentis and the AWS Data Lab team engineered for the following constraints:
Knowing that data will be unified across many sources deployed in any environment, the architecture called for an enterprise-grade analytics platform. The data pipeline consists of multiple layers:
Some customers will access the repository directly via an API with the proper guardrails for stability to combine their test data with other data sources in their enterprise, while other customers will use dashboards to gain insights on testing. Initially, Tricentis defines these dashboards and charts to enable insight on test runs, test traceability with requirements, and many other pre-defined use cases that can be valuable to customers. In the future, more capabilities will be provided to end-users to come up with their own analytics and insights.
Given the challenge of Tricentis Analytics with live customers in 6 weeks, Tricentis partnered with the AWS Data Lab. From detailed design to a beta release, Tricentis had customers expecting to consume data from a data lake specific to only their data, and all of the data that had been generated for over a decade. Customers also required their own repository, an Apache Parquet data lake, which would combine with other data in the customer environment to gather even greater insights.
The AWS account team proposed the AWS Data Lab Build Lab session to help Tricentis accelerate the process of designing and building their prototype. The Build Lab is a two-to-five-day intensive build by a team of customer builders with guidance from an AWS Data Lab Solutions Architect. During the Build Lab, the customer will construct a prototype in their environment, using their data, with guidance on real-world architectural patterns and anti-patterns, as well as strategies for building effective solutions, from AWS service experts. Including the pre-lab preparation work, the total engagement duration is 3–6 weeks and in the Tricentis case was 3 weeks: two for the pre-lab preparation work and one for the lab. The weeks that followed the lab included go-to-market activities with specific customers, documentation, hardening, security reviews, performance testing, data integrity testing, and automation activities.
The 2 weeks before the lab were used for the following:
For this solution, Tricentis and AWS built a data pipeline that consumes data from streaming, which was in place before the lab, and this streaming has the database transactions captured through CDC. In the streaming, the data from each table is separated by topic, and data from all the customers comes on the same topic (no isolation). Because of that, a pipeline was created to separate customers to create their tables isolated by the schema on the final destination at Amazon Redshift. The following diagram illustrates the solution architecture.
The main idea of this architecture is to be event-driven with eventual consistency. Any time new test cases or test results are created or modified, events trigger such that processing is immediate and new snapshot files are available via an API or data is pulled at the refresh frequency of the reporting or business intelligence (BI) tool. Every time the Amazon Simple Storage Service (Amazon S3) sink connector from Apache Kafka delivers a file on Amazon S3, Amazon EventBridge triggers an AWS Lambda function to transform the multi-tenant file into separated files, one per customer per table, and land it on specific folders on Amazon S3. As the files are created, another process is triggered to load the data from each customer on their schema or table on Amazon Redshift. On Amazon Redshift, materialized views were used to get the queries for the dashboards ready and easier to be returned to the Apache Superset. Also, the materialized views were configured to refresh automatically (with the autorefresh option), so Amazon Redshift updates the data automatically in the materialized views as soon as possible after base tables changes.
In the following sections, we detail specific implementation challenges and additional features required by customers discovered along the way.
As stated earlier, some customers want to get an export of their test data and create their data lake. For these customers, Tricentis provides incremental data as Apache Parquet files and will have the ability to filter on specific projects and specific date ranges. To ensure data integrity, Tricentis uses its technology known as Tosca DI (not part of the AWS Data Lab session).
The solution uses the following data security guardrails:
Tricentis’s objective is to pay for the compute and storage used and grow analytics infrastructure with linear cost scalability. To better manage storage costs in the data plane, Tricentis stores all raw and intermediate data in Amazon S3 storage in a compressed format. The Amazon MSK and Amazon Redshift is right-sized for Tricentis Analytics load and is allowed to scale up or down with no downtime based on future business needs. Data on all the stores, including Amazon MSK, Amazon Redshift, and Amazon S3, is subjected to tiered storage and retention policies per the customer data retention and archival requirements to reduce the cost further and provide linear cost scalability.
In the control plane, Debezium and Kafka Connect resources are turned on and off, so you only pay for what you use. Lambda triggers are triggered on an event or a schedule and turned off after completing tasks.
High data integrity is a fundamental design principle of Tricentis Analytics. Fortunately, Tricentis has a product called ToscaDI, which is used to automate the measurement of data integrity across many different data sources. The main idea is to use the machine-generated data type and log sequence number (LSN) to reflect the latest snapshot data from the change data capture (CDC) streams. Tricentis reached the data integrity automation milestone outside of the AWS Data Lab window by automatically triggering Tosca DI at various stages of the AWS serverless architecture (illustrated earlier), and because of that Tricentis was able to ensure expected record counts at every step, preventing data loss or inadvertent data manipulation. In future versions, Tricentis will have much deeper data integrity verification record counts and incorporate specific fields to ensure data quality (for example, nullness) and semantic or format validation. To date, the combination of CDC and data cleansing has resulted in ultra-high data integrity when comparing source data to the final Parquet file contents.
Performance was tuned for maximum throughput at three stages in the pipeline:
Tricentis worked within the default limit of 1,000 concurrent Lambda function runs by keeping track of available functions at any given time and firing only those many functions for which slots are available. For the 10 GB memory limit per function, Tricentis right-sized the Amazon S3 sink connector generated files and single-tenant S3 files to not exceed 4 GB in size. The Lambda function throttling can be prevented by requesting a higher limit of concurrent runs if that becomes necessary later.
Tricentis also experienced some Amazon Redshift connection limitations. Amazon Redshift has quotas and adjustable quotas that limit the use of server resources. To effectively manage Amazon Redshift limits of maximum connections, Tricentis used connection pools to ensure optimal consumption and stability.
The collaborative approach between Tricentis and the AWS Data Lab allowed considerable acceleration and the ability to meet timelines for establishing a big data solution that will benefit Tricentis customers for years. Since this writing, customer onboarding, observability and alerting, and security scanning were automated as part of a DevSecOps pipeline.
Within 6 weeks, the team was able to beta a data export service for one of Tricentis’ customers.
In the future, Tricentis anticipates adding multiple data sources, unify towards a common, ubiquitous language for testing data, and deliver richer insights so that our customers can have the correct data in a single view and increase confidence in their delivery of software at scale and speed.
In this post, we walked you through the journey the Tricentis team took with the AWS Data Lab during their participation in a Build Lab session. During the session, the Tricentis team and AWS Data Lab worked together to identify a best-fit architecture for their use cases and implement a prototype for delivering new insights for their customers.
To learn more about how the AWS Data Lab can help you turn your ideas into solutions, visit AWS Data Lab.
 Parag Doshi is Vice President of Engineering at Tricentis, where he continues to lead towards the vision of Innovation at the Speed of Imagination. He brings innovation to market by building world-class quality engineering SaaS such as qTest, the flagship test management product, and a new capability called Tricentis Analytics, which unlocks software development lifecycle insights across all types of testing. Prior to Tricentis, Parag was the founder of Anthem’s Cloud Platform Services, where he drove a hybrid cloud and DevSecOps capability and migrated 100 mission-critical applications. He enabled Anthem to build a new pharmacy benefits management business in AWS, resulting in $800 million in total operating gain for Anthem in 2020 per Forbes and CNBC. He also held posts at Hewlett-Packard, having multiple roles including Chief Technologist and head of architecture for DXC’s Virtual Private Cloud, and CTO for HP’s Application Services in the Americas region.
 Guru Havanur serves as a Principal, Big Data Engineering and Analytics team in Tricentis. Guru is responsible for data, analytics, development, integration with other products, security, and compliance activities. He strives to work with other Tricentis products and customers to improve data sharing, data quality, data integrity, and data compliance through the modern big data platform. With over 20 years of experience in data warehousing, a variety of databases, integration, architecture, and management, he thrives for excellence.
 Simon Guindon is an Architect at Tricentis. He has expertise in large-scale distributed systems and database consistency models, and works with teams in Tricentis around the world on scalability and high availability. You can follow his Twitter @simongui.
 Ricardo Serafim is a Senior AWS Data Lab Solutions Architect. With a focus on data pipelines, data lakes, and data warehouses, Ricardo helps customers create an end-to-end architecture and test an MVP as part of their path to production. Outside of work, Ricardo loves to travel with his family and watch soccer games, mainly from the “Timão” Sport Club Corinthians Paulista.
Post Syndicated from Peter Liu original https://www.servethehome.com/asrock-rack-w680d4u-2l2t-g5-motherboard-review-an-intel-core-server-platform/
In our ASRock Rack W680D4U-2L2T/G5 review, we see how this Intel W680-based 10GbE server platform lets Intel Core CPUs use ECC DDR5 in servers
The post ASRock Rack W680D4U-2L2T/G5 Motherboard Review An Intel Core Server Platform appeared first on ServeTheHome.
Post Syndicated from Talks at Google original https://www.youtube.com/watch?v=UdNE3QRFzkM
Post Syndicated from Bruce Schneier original https://www.schneier.com/blog/archives/2023/03/nick-weaver-on-regulating-cryptocurrency.html
Nicholas Weaver wrote an excellent paper on the problems of cryptocurrencies and the need to regulate the space—with all existing regulations. His conclusion:
Regulators, especially regulators in the United States, often fear accusations of stifling innovation. As such, the cryptocurrency space has grown over the past decade with very little regulatory oversight.
But fortunately for regulators, there is no actual innovation to stifle. Cryptocurrencies cannot revolutionize payments or finance, as the basic nature of all cryptocurrencies render them fundamentally unsuitable to revolutionize our financial system—which, by the way, already has decades of successful experience with digital payments and electronic money. The supposedly “decentralized” and “trustless” cryptocurrency systems, both technically and socially, fail to provide meaningful benefits to society—and indeed, necessarily also fail in their foundational claims of decentralization and trustlessness.
When regulating cryptocurrencies, the best starting point is history. Regulating various tokens is best done through the existing securities law framework, an area where the US has a near century of well-established law. It starts with regulating the issuance of new cryptocurrency tokens and related securities. This should substantially reduce the number of fraudulent offerings.
Similarly, active regulation of the cryptocurrency exchanges should offer substantial benefits, including eliminating significant consumer risk, blocking key money-laundering channels, and overall producing a far more regulated and far less manipulated market.
Finally, the stablecoins need basic regulation as money transmitters. Unless action is taken they risk becoming substantial conduits for money laundering, but requiring them to treat all users as customers should prevent this risk from developing further.
Read the whole thing.
Post Syndicated from original https://lwn.net/Articles/924577/
On March 7, 2003, a struggling company called The SCO Group filed a lawsuit against IBM, claiming that the
success of Linux was the result of a theft of SCO’s technology. Two
decades later, it is easy to look back on that incident as a somewhat
humorous side-story in the development of Linux. At the time, though, it
shook our community to its foundations. It is hard to overestimate how
much the community we find ourselves in now was shaped by a ridiculous
lawsuit 20 years ago.