AWS Week in Review – February 6, 2023

Post Syndicated from Marcia Villalba original https://aws.amazon.com/blogs/aws/aws-week-in-review-february-6-2023/

This post is part of our Week in Review series. Check back each week for a quick roundup of interesting news and announcements from AWS!

If you are looking for a new year challenge, the Serverless Developer Advocate team launched the 30 days of Serverless. You can follow the hashtag #30DaysServerless on LinkedIn, Twitter, or Instagram or visit the challenge page and learn a new Serverless concept every day.

Last Week’s Launches
Here are some launches that got my attention during the previous week.

AWS SAM CLIv1.72 added the capability to list important information from your deployments.

  • List the URLs of the Amazon API Gateway or AWS Lambda function URL.
    $ sam list endpoints
  • List the outputs of the deployed stack.
    $ sam list outputs
  • List the resources in the local stack. If a stack name is provided, it also shows the corresponding deployed resources and the ids.
    $ sam list resources

Amazon RDSNow supports increasing the allocated storage size when creating read replicas or when restoring a database from snapshots. This is very useful when your primary instances are near their maximum allocated storage capacity.

Amazon QuickSight Allows you to create Radar charts. Radar charts are a way to visualize multivariable data that are used to plot one or more groups of values over multiple common variables.

AWS Systems Manager AutomationNow integrates with Systems Manager Change Calendar. Now you can reduce the risks associated with changes in your production environment by allowing Automation runbooks to run during an allowed time window configured in the Change Calendar.

AWS AppConfigIt announced its integration with AWS Secrets Manager and AWS Key Management Service (AWS KMS). All sensitive data retrieved from Secrets Manager via AWS AppConfig can be encrypted at deployment time using an AWS KMS customer managed key (CMK).

For a full list of AWS announcements, be sure to keep an eye on the What’s New at AWS page.

Other AWS News
Some other updates and news that you may have missed:

AWS Cloud Clubs – Cloud Clubs are peer-to-peer user groups for students and young people aged 18–28. In these clubs, you can network, attend career-building events, earn benefits like AWS credits, and more. Learn more about the clubs in your region in the AWS student portal.

Get AWS Certified: Profesional challenge – You can register now for the certification challenge. Prepare for your AWS Professional Certification exam and get a 50 percent discount for the certification exam. Learn more about the challenge on the official page.

Podcast Charlas Técnicas de AWS – If you understand Spanish, this podcast is for you. Podcast Charlas Técnicas is one of the official AWS podcasts in Spanish, and every other week, there is a new episode. The podcast is for builders, and it shares stories about how customers implemented and learned AWS services, how to architect applications, and how to use new services. You can listen to all the episodes directly from your favorite podcast app or at AWS Podcasts en Español.

AWS Open-Source News and Updates – This is a newsletter curated by my colleague Ricardo to bring you the latest open-source projects, posts, events, and more.

Upcoming AWS Events
Check your calendars and sign up for these AWS events:

AWS re:Invent recaps – We had a lot of announcements during re:Invent. If you want to learn them all in your language and in your area, check the re: Invent recaps. All the upcoming ones are posted on this site, so check it regularly to find an event nearby.

AWS Innovate Data and AI/ML edition – AWS Innovate is a free online event to learn the latest from AWS experts and get step-by-step guidance on using AI/ML to drive fast, efficient, and measurable results.

  • AWS Innovate Data and AI/ML edition for Asia Pacific and Japan is taking place on February 22, 2023. Register here.
  • Registrations for AWS Innovate EMEA (March 9, 2023) and the Americas (March 14, 2023) will open soon. Check the AWS Innovate page for updates.

You can find details on all upcoming events, in-person or virtual, here.

That’s all for this week. Check back next Monday for another Week in Review!

— Marcia

Introducing MongoDB Atlas metadata collection with AWS Glue crawlers

Post Syndicated from Igor Alekseev original https://aws.amazon.com/blogs/big-data/introducing-mongodb-atlas-metadata-collection-with-aws-glue-crawlers/

For data lake customers who need to discover petabytes of data, AWS Glue crawlers are a popular way to discover and catalog data in the background. This allows users to search and find relevant data from multiple data sources. Many customers also have data in managed operational databases such as MongoDB Atlas and need to combine it with data from Amazon Simple Storage Service (Amazon S3) data lakes to derive insights. AWS Glue crawlers now support MongoDB Atlas, making it simpler for you to understand MongoDB collections’ evolution and extract meaningful insights.

AWS Glue is a serverless data integration service that makes it simple to discover, prepare, move, and integrate data from multiple sources for analytics, machine learning (ML), and application development.

MongoDB Atlas is a developer data service from AWS technology partner MongoDB, Inc. The service combines transactional processing, relevance-based search, real-time analytics, and mobile-to-cloud data synchronization in an integrated architecture.

With today’s launch, you can create and schedule an AWS Glue crawler to crawl MongoDB Atlas. In the crawler setup, you can select MongoDB as a data source. You can then create an AWS Glue connection with MongoDB Atlas and provide the MongoDB Atlas cluster name and credentials. We walk you through this process in this post.

Solution overview

The following architecture illustrates how you can scan a MongoDB Atlas database and collections using AWS Glue.

With each run of the crawler, the crawler inspects specified collections and catalogs information, such as updates or deletes to MongoDB Atlas collections, views, and materialized views in the AWS Glue Data Catalog. In AWS Glue Studio, you can then use the AWS Glue Data Catalog as a source to pull data from MongoDB Atlas and populate an Amazon S3 target. Finally, this job can run and read data from MongoDB Atlas and write the results to Amazon S3, opening up possibilities to integrate with AWS services such as Amazon SageMaker, Amazon QuickSight, and more.

In the following sections, we describe how to create an AWS Glue crawler with MongoDB Atlas as a data source. We then create an AWS Glue connection and provide the MongoDB Atlas cluster information and credentials. Then we specify the MongoDB Atlas database and collections to crawl.

Prerequisites

To follow along with this post, you must have access to MongoDB Atlas and the AWS Management Console. We also assume you have access to a VPC with subnets preconfigured via Amazon Virtual Private Cloud (Amazon VPC). The crawler that we configure later in the post runs in the VPC and connects to MongoDB Atlas via an AWS PrivateLink endpoint.

Set up MongoDB Atlas

To configure MongoDB Atlas, complete the following steps:

  1. Configure a MongoDB cluster on AWS. For instructions, refer to How to Set Up a MongoDB Cluster.
  2. Configure PrivateLink by following the steps described in Connecting Applications Securely to a MongoDB Atlas Data Plane with AWS PrivateLink.

This allows us to simplify our networking architecture and make sure the traffic stays on the AWS network.

Next, we obtain the MongoDB cluster connection string from the Connect UI on the MongoDB Atlas console.

  1. On the MongoDB Atlas console, choose Connect, Private Endpoint, and Connection Method.
  2. Copy the SRV connection string.

We use this SRV connection string in the subsequent steps.

The following screenshot shows that we have loaded a sample collection in MongoDB Atlas, which we crawl over in the next steps. Note that the records in this collection include several arrays as well as nested data.

Set up the MongoDB Atlas connection with AWS Glue

Before we can configure the AWS Glue crawler, we need to create the MongoDB Atlas connection in AWS Glue.

  1. On the AWS Glue Studio console, choose Connectors in the navigation pane.
  2. Choose Create connection.

  1. When filling out the connection details, use the SRV connection string we obtained earlier in MongoDB Atlas.
  2. In the Network options section, the VPC and subnets must correspond to the PrivateLink settings you configured earlier.

Create a MongoDB crawler

After we create the connection, we can create an AWS Glue crawler.

  1. On the AWS Glue console, choose Crawlers in the navigation pane.
  2. Choose Create crawler.

  1. For Name, enter a name.
  2. For the data source, choose the MongoDB Atlas data source we configured earlier and supply the path that corresponds to the MongoDB Atlas database and collection.

  1. Configure your security settings, output, and scheduling.

  1. On the Crawlers page, choose Run crawler.

After the crawler finishes crawling the MongoDB collections, its status shows as Completed.

Review the MongoDB AWS Glue database and table

We can navigate to the AWS Glue Data Catalog to examine the tables that were created by the crawler.

Choose the table to view the schema and other metadata.

Note that the crawler captured nested data as a STRUCT and correctly listed the ARRAY fields.

Import MongoDB Atlas data to Amazon S3

Now we use the MongoDB Atlas-based AWS Glue Data Catalog table to perform a data import without writing code. We use AWS Glue Studio to build boilerplate code quickly. Alternatively, you can build the script in script editor.

  1. On the AWS Glue Studio console, choose Jobs in the navigation pane.
  2. Choose Create job.
  3. Select Visual with a source and target.
  4. Choose the Data Catalog table as the source and Amazon S3 as the target.

  1. In the AWS Glue Studio UI, supply additional parameters such as the S3 bucket name and choose the database and table from the drop-down menus.

  1. Next, review the generated script that is built by AWS Glue Studio. We now need to add a database and collection in the script as follows:
additional_options = {"database": "sample_airbnb","collection": "listingsAndReviews"},

When the ETL job is complete, the extracted data is available on Amazon S3.

  1. On the Amazon S3 console, choose Buckets in the navigation pane.
  2. Choose our bucket and folder containing the extracted files.
  3. Choose a file and on the Actions menu, choose Query with S3 Select to view the contents of the file.

Clean up

To avoid incurring charges for the services used in this walkthrough, complete the following steps to delete your resources:

  1. On the AWS Glue console, choose Crawlers in the navigation pane.
  2. Select your crawler and on the Action menu, choose Delete crawler.
  3. On the AWS Glue Studio console, choose View jobs.
  4. Select the job you created and on the Actions menu, choose Delete job(s).
  5. Return to the AWS Glue console and choose Tables in the navigation pane.
  6. Select your table and choose Delete.
  7. Choose Databases in the navigation pane.
  8. Select your database and choose Delete.
  9. On the Amazon VPC console, choose Endpoints in the navigation pane.
  10. Select the PrivateLink endpoint you created and on the Actions menu, choose Delete VPC endpoints.

Conclusion

In this post, we showed how to set up an AWS Glue crawler to crawl over a MongoDB Atlas collection, gathering metadata and creating table records in the AWS Glue Data Catalog. With the Data Catalog table, we created an ETL process using the AWS Glue Studio UI to extract data from the MongoDB Atlas collection to an S3 bucket without writing a single line of code.

You can try this yourself by configuring an AWS Glue crawler, creating an AWS Glue ETL job with AWS Glue Studio, and launching MongoDB Atlas from a QuickStart or from MongoDB Atlas on AWS Marketplace.

Special thanks to everyone who contributed to this crawler feature launch: Julio Montes de Oca, Mita Gavade, and Alex Prazma.


About the authors

Igor Alekseev is a Senior Partner Solution Architect at AWS in Data and Analytics domain. In his role Igor is working with strategic partners helping them build complex, AWS-optimized architectures. Prior joining AWS, as a Data/Solution Architect he implemented many projects in Big Data domain, including several data lakes in Hadoop ecosystem. As a Data Engineer he was involved in applying AI/ML to fraud detection and office automation.

Sandeep Adwankar is a Senior Technical Product Manager at AWS. Based in the California Bay Area, he works with customers around the globe to translate business and technical requirements into products that enable customers to improve how they manage, secure, and access data.

The technology behind GitHub’s new code search

Post Syndicated from Timothy Clem original https://github.blog/2023-02-06-the-technology-behind-githubs-new-code-search/

From launching our technology preview of the new and improved code search experience a year ago, to the public beta we released at GitHub Universe last November, there’s been a flurry of innovation and dramatic changes to some of the core GitHub product experiences around how we, as developers, find, read, and navigate code.

One question we hear about the new code search experience is, “How does it work?” And to complement a talk I gave at GitHub Universe, this post gives a high-level answer to that question and provides a small window into the system architecture and technical underpinnings of the product.

So, how does it work? The short answer is that we built our own search engine from scratch, in Rust, specifically for the domain of code search. We call this search engine Blackbird, but before I explain how it works, I think it helps to understand our motivation a little bit. At first glance, building a search engine from scratch seems like a questionable decision. Why would you do that? Aren’t there plenty of existing, open source solutions out there already? Why build something new?

To be fair, we’ve tried and have been trying, for almost the entire history of GitHub, to use existing solutions for this problem. You can read a bit more about our journey in Pavel Avgustinov’s post, A brief history of code search at GitHub, but one thing sticks out: we haven’t had a lot of luck using general text search products to power code search. The user experience is poor, indexing is slow, and it’s expensive to host. There are some newer, code-specific open source projects out there, but they definitely don’t work at GitHub’s scale. So, knowing all that, we were motivated to create our own solution by three things:

  1. We’ve got a vision for an entirely new user experience that’s about being able to ask questions of code and get answers through iteratively searching, browsing, navigating, and reading code.
  2. We understand that code search is uniquely different from general text search. Code is already designed to be understood by machines and we should be able to take advantage of that structure and relevance. Searching code also has unique requirements: we want to search for punctuation (for example, a period or open parenthesis); we don’t want stemming; we don’t want stop words to be stripped from queries; and, we want to search with regular expressions.
  3. GitHub’s scale is truly a unique challenge. When we first deployed Elasticsearch, it took months to index all of the code on GitHub (about 8 million repositories at the time). Today, that number is north of 200 million, and that code isn’t static: it’s constantly changing and that’s quite challenging for search engines to handle. For the beta, you can currently search almost 45 million repositories, representing 115 TB of code and 15.5 billion documents.

At the end of the day, nothing off the shelf met our needs, so we built something from scratch.

Just use grep?

First though, let’s explore the brute force approach to the problem. We get this question a lot: “Why don’t you just use grep?” To answer that, let’s do a little napkin math using ripgrep on that 115 TB of content. On a machine with an eight core Intel CPU, ripgrep can run an exhaustive regular expression query on a 13 GB file cached in memory in 2.769 seconds, or about 0.6 GB/sec/core.

We can see pretty quickly that this really isn’t going to work for the larger amount of data we have. Code search runs on 64 core, 32 machine clusters. Even if we managed to put 115 TB of code in memory and assume we can perfectly parallelize the work, we’re going to saturate 2,048 CPU cores for 96 seconds to serve a single query! Only that one query can run. Everybody else has to get in line. This comes out to a whopping 0.01 queries per second (QPS) and good luck doubling your QPS—that’s going to be a fun conversation with leadership about your infrastructure bill.

There’s just no cost-effective way to scale this approach to all of GitHub’s code and all of GitHub’s users. Even if we threw a ton of money at the problem, it still wouldn’t meet our user experience goals.

You can see where this is going: we need to build an index.

A search index primer

We can only make queries fast if we pre-compute a bunch of information in the form of indices, which you can think of as maps from keys to sorted lists of document IDs (called “posting lists”) where that key appears. As an example, here’s a small index for programming languages. We scan each document to detect what programming language it’s written in, assign a document ID, and then create an inverted index where language is the key and the value is a posting list of document IDs.

Forward index

Doc ID Content
1 def lim
puts “mit”
end
2 fn limits() {
3 function mits() {

Inverted index

Language Doc IDs (postings)
JavaScript 3, 8, 12, …
Ruby 1, 10, 13, …
Rust 2, 5, 11, …

For code search, we need a special type of inverted index called an ngram index, which is useful for looking up substrings of content. An ngram is a sequence of characters of length n. For example, if we choose n=3 (trigrams), the ngrams that make up the content “limits” are lim, imi, mit, its. With our documents above, the index for those trigrams would look like this:

ngram Doc IDs (postings)
lim 1, 2, …
imi 2, …
mit 1, 2, 3, …
its 2, 3, …

To perform a search, we intersect the results of multiple lookups to give us the list of documents where the string appears. With a trigram index you need four lookups: lim, imi, mit, and its in order to fulfill the query for limits.

Unlike a hashmap though, these indices are too big to fit in memory, so instead, we build iterators for each index we need to access. These lazily return sorted document IDs (the IDs are assigned based on the ranking of each document) and we intersect and union the iterators (as demanded by the specific query) and only read far enough to fetch the requested number of results. That way we never have to keep entire posting lists in memory.

Indexing 45 million repositories

The next problem we have is how to build this index in a reasonable amount of time (remember, this took months in our first iteration). As is often the case, the trick here is to identify some insight into the specific data we’re working with to guide our approach. In our case it’s two things: Git’s use of content addressable hashing and the fact that there’s actually quite a lot of duplicate content on GitHub. Those two insights lead us the the following decisions:

  1. Shard by Git blob object ID which gives us a nice way of evenly distributing documents between the shards while avoiding any duplication. There won’t be any hot servers due to special repositories and we can easily scale the number of shards as necessary.
  2. Model the index as a tree and use delta encoding to reduce the amount of crawling and to optimize the metadata in our index. For us, metadata are things like the list of locations where a document appears (which path, branch, and repository) and information about those objects (repository name, owner, visibility, etc.). This data can be quite large for popular content.

We also designed the system so that query results are consistent on a commit-level basis. If you search a repository while your teammate is pushing code, your results shouldn’t include documents from the new commit until it has been fully processed by the system. In fact, while you’re getting back results from a repository-scoped query, someone else could be paging through global results and looking at a different, prior, but still consistent state of the index. This is tricky to do with other search engines. Blackbird provides this level of query consistency as a core part of its design.

Let’s build an index

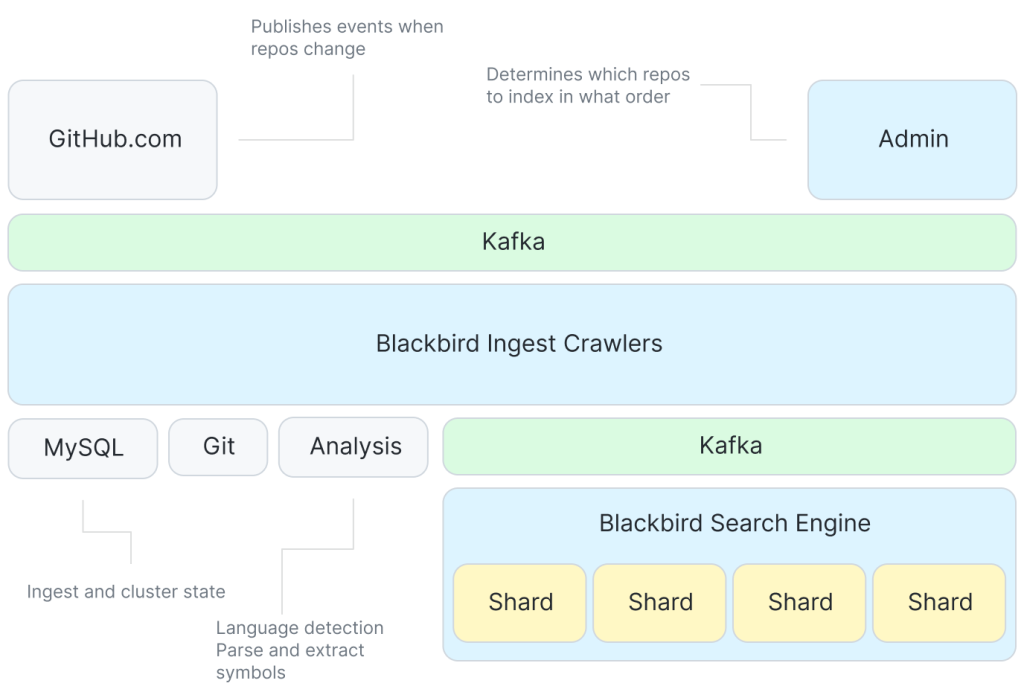
Armed with those insights, let’s turn our attention to building an index with Blackbird. This diagram represents a high level overview of the ingest and indexing side of the system.

a high level overview of the ingest and indexing side of the system

Kafka provides events that tell us to go index something. There are a bunch of crawlers that interact with Git and a service for extracting symbols from code, and then we use Kafka, again, to allow each shard to consume documents for indexing at its own pace.

Though the system generally just responds to events like git push to crawl changed content, we have some work to do to ingest all the repositories for the first time. One key property of the system is that we optimize the order in which we do this initial ingest to make the most of our delta encoding. We do this with a novel probabilistic data structure representing repository similarity and by driving ingest order from a level order traversal of a minimum spanning tree of a graph of repository similarity1.

Using our optimized ingest order, each repository is then crawled by diffing it against its parent in the delta tree we’ve constructed. This means we only need to crawl the blobs unique to that repository (not the entire repository). Crawling involves fetching blob content from Git, analyzing it to extract symbols, and creating documents that will be the input to indexing.

These documents are then published to another Kafka topic. This is where we partition2 the data between shards. Each shard consumes a single Kafka partition in the topic. Indexing is decoupled from crawling through the use of Kafka and the ordering of the messages in Kafka is how we gain query consistency.

The indexer shards then take these documents and build their indices: tokenizing to construct ngram indices3 (for content, symbols, and paths) and other useful indices (languages, owners, repositories, etc) before serializing and flushing to disk when enough work has accumulated.

Finally, the shards run compaction to collapse up smaller indices into larger ones that are more efficient to query and easier to move around (for example, to a read replica or for backups). Compaction also k-merges the posting lists by score so relevant documents have lower IDs and will be returned first by the lazy iterators. During the initial ingest, we delay compaction and do one big run at the end, but then as the index keeps up with incremental changes, we run compaction on a shorter interval as this is where we handle things like document deletions.

Life of a query

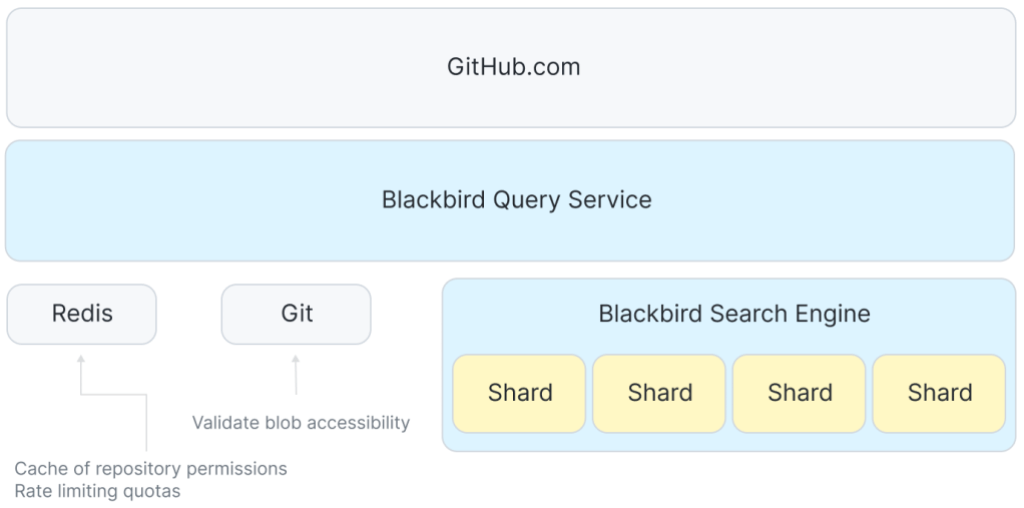
Now that we have an index, it’s interesting to trace a query through the system. The query we’re going to follow is a regular expression qualified to the Rails organization looking for code written in the Ruby programming language: /arguments?/ org:rails lang:Ruby. The high level architecture of the query path looks a little bit like this:

Architecture diagram of a query path.

In between GitHub.com and the shards is a service that coordinates taking user queries and fanning out requests to each host in the search cluster. We use Redis to manage quotas and cache some access control data.

The front end accepts the user query and passes it along to the Blackbird query service where we parse the query into an abstract syntax tree and then rewrite it, resolving things like languages to their canonical Linguist language ID and tagging on extra clauses for permissions and scopes. In this case, you can see how rewriting ensures that I’ll get results from public repositories or any private repositories that I have access to.

And(
    Owner("rails"),
    LanguageID(326),
    Regex("arguments?"),
    Or(
        RepoIDs(...),
        PublicRepo(),
    ),
)

Next, we fan out and send n concurrent requests: one to each shard in the search cluster. Due to our sharding strategy, a query request must be sent to each shard in the cluster.

On each individual shard, we then do some further conversion of the query in order to lookup information in the indices. Here, you can see that the regex gets translated into a series of substring queries on the ngram indices.

and(
  owners_iter("rails"),
  languages_iter(326),
  or(
    and(
      content_grams_iter("arg"),
      content_grams_iter("rgu"),
      content_grams_iter("gum"),
      or(
        and(
         content_grams_iter("ume"),
         content_grams_iter("ment")
        )
        content_grams_iter("uments"),
      )
    ),
    or(paths_grams_iter…)
    or(symbols_grams_iter…)
  ), 
  …
)

If you want to learn more about a method to turn regular expressions into substring queries, see Russ Cox’s article on Regular Expression Matching with a Trigram Index. We use a different algorithm and dynamic gram sizes instead of trigrams (see below3). In this case the engine uses the following grams: arg,rgu, gum, and then either ume and ment, or the 6 gram uments.

The iterators from each clause are run: and means intersect, or means union. The result is a list of documents. We still have to double check each document (to validate matches and detect ranges for them) before scoring, sorting, and returning the requested number of results.

Back in the query service, we aggregate the results from all shards, re-sort by score, filter (to double-check permissions), and return the top 100. The GitHub.com front end then still has to do syntax highlighting, term highlighting, pagination, and finally we can render the results to the page.

Our p99 response times from individual shards are on the order of 100 ms, but total response times are a bit longer due to aggregating responses, checking permissions, and things like syntax highlighting. A query ties up a single CPU core on the index server for that 100 ms, so our 64 core hosts have an upper bound of something like 640 queries per second. Compared to the grep approach (0.01 QPS), that’s screaming fast with plenty of room for simultaneous user queries and future growth.

In summary

Now that we’ve seen the full system, let’s revisit the scale of the problem. Our ingest pipeline can publish around 120,000 documents per second, so working through those 15.5 billion documents should take about 36 hours. But delta indexing reduces the number of documents we have to crawl by over 50%, which allows us to re-index the entire corpus in about 18 hours.

There are some big wins on the size of the index as well. Remember that we started with 115 TB of content that we want to search. Content deduplication and delta indexing brings that down to around 28 TB of unique content. And the index itself clocks in at just 25 TB, which includes not only all the indices (including the ngrams), but also a compressed copy of all unique content. This means our total index size including the content is roughly a quarter the size of the original data!

If you haven’t signed up already, we’d love for you to join our beta and try out the new code search experience. Let us know what you think! We’re actively adding more repositories and fixing up the rough edges based on feedback from people just like you.

Notes


  1. To determine the optimal ingest order, we need a way to tell how similar one repository is to another (similar in terms of their content), so we invented a new probabilistic data structure to do this in the same class of data structures as MinHash and HyperLogLog. This data structure, which we call a geometric filter, allows computing set similarity and the symmetric difference between sets with logarithmic space. In this case, the sets we’re comparing are the contents of each repository as represented by (path, blob_sha) tuples. Armed with that knowledge, we can construct a graph where the vertices are repositories and edges are weighted with this similarity metric. Calculating a minimum spanning tree of this graph (with similarity as cost) and then doing a level order traversal of the tree gives us an ingest order where we can make best use of delta encoding. Really though, this graph is enormous (millions of nodes, trillions of edges), so our MST algorithm computes an approximation that only takes a few minutes to calculate and provides 90% of the delta compression benefits we’re going for. 
  2. The index is sharded by Git blob SHA. Sharding means spreading the indexed data out across multiple servers, which we need to do in order to easily scale horizontally for reads (where we are concerned about QPS), for storage (where disk space is the primary concern), and for indexing time (which is constrained by CPU and memory on the individual hosts). 
  3. The ngram indices we use are especially interesting. While trigrams are a known sweet spot in the design space (as Russ Cox and others have noted: bigrams aren’t selective enough and quadgrams take up too much space), they cause some problems at our scale.

    For common grams like for trigrams aren’t selective enough. We get way too many false positives and that means slow queries. An example of a false positive is something like finding a document that has each individual trigram, but not next to each other. You can’t tell until you fetch the content for that document and double check at which point you’ve done a lot of work that has to be discarded. We tried a number of strategies to fix this like adding follow masks, which use bitmasks for the character following the trigram (basically halfway to quad grams), but they saturate too quickly to be useful.

    We call the solution “sparse grams,” and it works like this. Assume you have some function that given a bigram gives a weight. As an example, consider the string chester. We give each bigram a weight: 9 for “ch”, 6 for “he”, 3 for “es”, and so on.

    Click to view slideshow.

    Using those weights, we tokenize by selecting intervals where the inner weights are strictly smaller than the weights at the borders. The inclusive characters of that interval make up the ngram and we apply this algorithm recursively until its natural end at trigrams. At query time, we use the exact same algorithm, but keep only the covering ngrams, as the others are redundant. 

CVE-2023-22501: Critical Broken Authentication Flaw in Jira Service Management Products

Post Syndicated from Caitlin Condon original https://blog.rapid7.com/2023/02/06/cve-2023-22501-critical-broken-authentication-flaw-in-jira-service-management-products/

CVE-2023-22501: Critical Broken Authentication Flaw in Jira Service Management Products

Emergent threats evolve quickly, and as we learn more about this vulnerability, this blog post will evolve, too.

On February 1, 2023, Atlassian published an advisory for CVE-2023-22501, a critical broken authentication vulnerability affecting its Jira Service Management Server and Data Center offerings. Jira Service Management Server and Jira Service Management Data Center run on top of Jira Core and offer additional features.

According to Atlassian’s advisory, the vulnerability “allows an attacker to impersonate another user and gain access to a Jira Service Management instance under certain circumstances. With write access to a User Directory and outgoing email enabled on a Jira Service Management instance, an attacker could gain access to sign-up tokens sent to users with accounts that have never been logged into. Access to these tokens can be obtained in two cases:

  • If the attacker is included on Jira issues or requests with these users, or
  • If the attacker is forwarded or otherwise gains access to emails containing a “View Request” link from these users.

Bot accounts are particularly susceptible to this scenario. On instances with single sign-on, external customer accounts can be affected in projects where anyone can create their own account.”

The vulnerability is not known to be exploited in the wild as of February 6, 2023. We are warning customers out of an abundance of caution given Atlassian products’ popularity among attackers the past two years.

Affected Products

The following versions of Jira Service Management Server and Data Center are vulnerable to CVE-2023-22501:

  • 5.3.0
  • 5.3.1
  • 5.3.2
  • 5.4.0
  • 5.4.1
  • 5.5.0

Atlassian Cloud sites (Jira sites accessed via an atlassian.net domain) are not affected.

Mitigation guidance

Jira Service Management Server and Data Center users should update to a fixed version of the software as soon as possible and monitor Atlassian’s advisory for further information. Atlassian customers who are unable to immediately upgrade Jira Service Management can manually upgrade the version-specific servicedesk-variable-substitution-plugin JAR file as a temporary workaround.

Rapid7 customers

A remote (unauthenticated) check for CVE-2023-22501 will be published in the February 6, 2023 InsightVM and Nexpose content release.

[$] A survey of free CAD systems

Post Syndicated from original https://lwn.net/Articles/921676/

Computer-aided design (CAD) software is expensive to develop, which is a
good
reason to appreciate the existing free and open-source alternatives to some
of the big names
in the industry. This article takes a bird’s-eye view at free
and open-source software for 2D drafting and 3D parametric solid modeling,
its progress over the years, as well as wins and ongoing challenges.

Ransomware Campaign Compromising VMware ESXi Servers

Post Syndicated from Caitlin Condon original https://blog.rapid7.com/2023/02/06/ransomware-campaign-compromising-vmware-esxi-servers/

Ransomware Campaign Compromising VMware ESXi Servers

On February 3, 2023, French web hosting provider OVH and French CERT issued warnings about a ransomware campaign that was targeting VMware ESXi servers worldwide with a new ransomware strain dubbed “ESXiArgs.” The campaign appears to be leveraging CVE-2021-21974, a nearly two-year-old heap overflow vulnerability in the OpenSLP service ESXi runs. The ransomware operators are using opportunistic “spray and pray” tactics and have compromised hundreds of ESXi servers in the past few days, apparently including servers managed by hosting companies. ESXi servers exposed to the public internet are at particular risk.

Given the age of the vulnerability, it is likely that many organizations have already patched their ESXi servers. However, since patching ESXi can be challenging and typically requires downtime, some organizations may not have updated to a fixed version.

Affected products

The following ESXi versions are vulnerable to CVE-2021-21974, per VMware’s original advisory:

  • ESXi versions 7.x prior to ESXi70U1c-17325551
  • ESXi versions 6.7.x prior to ESXi670-202102401-SG
  • ESXi versions 6.5.x prior to ESXi650-202102101-SG

Security news outlets have noted that earlier builds of ESXi appear to have also been compromised in some cases. It is possible that attackers may be leveraging additional vulnerabilities or attack vectors. We will update this blog with new information as it becomes available.

Attacker behavior

OVH has observed the following as of February 3, 2023 (lightly edited for English translation):

  • The compromise vector is confirmed to use a OpenSLP vulnerability that might be CVE-2021-21974 (still to be confirmed [as of February 3]). The logs actually show the user “dcui” as involved in the compromise process.
  • Encryption is using a public key deployed by the malware in /tmp/public.pem
  • The encryption process is specifically targeting virtual machines files (“.vmdk”, “.vmx”, “.vmxf”, “.vmsd”, “.vmsn”, “.vswp”, “.vmss”, “.nvram”,”*.vmem”)
  • The malware tries to shut  down virtual machines by killing the VMX process to unlock the files. This function is not systematically working as expected, resulting in files remaining locked.
  • The malware creates “argsfile” to store arguments passed to the encrypt binary (number of MB to skip, number of MB in encryption block, file size)
  • No data exfiltration occurred.
  • In some cases, encryption of files may partially fail, allowing the victim to recover data.

Mitigation guidance

ESXi customers should ensure their data is backed up and should update their ESXi installations to a fixed version on an emergency basis, without waiting for a regular patch cycle to occur. ESXi instances should not be exposed to the internet if at all possible. Administrators should also disable the OpenSLP service if it is not being used.

Rapid7 customers

A vulnerability check for CVE-2021-21974 has been available to InsightVM and Nexpose customers since February 2021.

Security updates for Monday

Post Syndicated from original https://lwn.net/Articles/922337/

Security updates have been issued by Debian (libhtml-stripscripts-perl), Fedora (binwalk, java-1.8.0-openjdk, java-11-openjdk, java-17-openjdk, java-latest-openjdk, kernel, sudo, and syncthing), SUSE (syslog-ng), and Ubuntu (editorconfig-core, firefox, pam, and thunderbird).

Previewing environments using containerized AWS Lambda functions

Post Syndicated from Marcia Villalba original https://aws.amazon.com/blogs/compute/previewing-environments-using-containerized-aws-lambda-functions/

This post is written by John Ritsema (Principal Solutions Architect)

Continuous integration and continuous delivery (CI/CD) pipelines are effective mechanisms that allow teams to turn source code into running applications. When a developer makes a code change and pushes it to a remote repository, a pipeline with a series of steps can process the change. A pipeline integrates a change with the full code base, verifies the style and formatting, runs security checks, and runs unit tests. As the final step, it builds the code into an artifact that is deployable to an environment for consumption.

When using GitHub or many other hosted Git providers, a pull request or merge request can be submitted for a particular code change. This creates a focused place for discussion and collaboration on the change before it is approved and merged into a shared code branch.

A powerful mechanism for collaboration involves deploying a pull request (PR) to a running environment. This allows stakeholders to preview the changes live and see how they would look. Spinning up a running environment quickly allows teammates to provide almost immediate feedback, expediting the entire development process.

Deploying PRs to ephemeral environments encourages teams to make many small changes that can be previewed and tested in parallel. This avoids having to first merge into a common source branch and deploy to long-lived environments that are always on and incur costs.

Creating this mechanism has several challenges including setup complexity, environment creation time, and environment cost. This post addresses these challenges by showing how to create a CI/CD pipeline for previewing changes to web applications in ephemeral, quick-to-provision, low-cost, and scale-to-zero environments. This post walks through the steps required to set up a sample application.

Example architecture

The concepts in this post can be implemented using a number of tools and hosted Git providers that connect to CI/CD pipelines. The example code shared in this post uses GitHub Actions to trigger a workflow. The workflow uses a small Terraform module with Docker to build the application source code into a container image, push it to Amazon Elastic Container Registry (ECR), and create an AWS Lambda function with the image.

The container running on Lambda is accessible from a web browser through a Lambda function URL. This provides a dedicated HTTPS endpoint for a function.

This is used instead of AWS App RunnerAmazon ECS Fargate with an Application Load Balancer (ALB), or Amazon EKS with ALB ingress because of speed of provisioning and low cost. Lambda function URLs are ideal for occasionally used ephemeral PR environments as they can be provisioned quickly. Lambda’s scale-to-zero compute environment leads to lower cost, as charges are only incurred for actual HTTP requests. This is useful for PRs that may only be reviewed infrequently and then sit idle until the PR is either merged or closed.

This is the example architecture:

Setting up the example

The sample project shows how to implement this example. It consists of a vanilla web application written in Node.js. All of the code needed to implement the architecture is contained within the .github directory. To enable ephemeral environments for a new project, copy over the .github directory without cluttering your project files.

There are two main resources needed to run Terraform inside of GitHub Actions: an AWS IAM role and a place to store Terraform state. AWS credentials are required to give the pipeline permission to provision AWS resources.

Instead of using static IAM user credentials that must be rotated and secured, assume an IAM role to obtain temporary credentials. Terraform remote state is needed to dispose of the environment when the PR is merged or closed. The sample project uses an Amazon S3 bucket to store Terraform state.

You can use the Terraform module located under .github/setup to create these required resources.

    1. Provide the name of your GitHub organization and repository in the terraform.tfvars file as input parameters. You can replace aws-samples with your GitHub user name:
      cat .github/setup/terraform.tfvars
      github_org  = "aws-samples"
      github_repo = "ephemeral-preview-containers-furl"

    2. To provision the resources using Terraform, run:
      cd .github/setup
      terraform init && terraform apply


      Store the outputted terraform.tfstate file safely so that you can manage these resources in the future if needed.

    3. Place the Region, generated IAM role, and bucket name into the configuration file located under .github/workflows/config.env. This configuration file is read and used by the GitHub Actions workflow.
      export AWS_REGION="<add region from setup>"
      
      export AWS_ROLE="<add role from setup>"
      
      export TF_BACKEND_S3_BUCKET="<add bucket from setup>"

      This IAM role has an inline policy that contains the minimum set of permissions needed to provision the AWS resources. This assumes that your application does not interact with external services like databases or caches. If your application needs this additional access, you can add the required permissions to the policy located here.

Running a web server in Lambda

The sample web (HTTP) application includes a Dockerfile that contains instructions for packaging the web app into a process-based container image. A Lambda extension called Lambda Web Adapter enables you to run this standard web server process on Lambda. The CI/CD workflow makes a copy of the Dockerfile and adds the following line.

COPY --from=public.ecr.aws/awsguru/aws-lambda-adapter:0.6.0 /lambda-adapter /opt/extensions/lambda-adapter

This line copies the Lambda Web Adapter executable binary from a public ECR image and writes it into the container in the /opt/extensions/ directory. When the container starts, Lambda starts the Lambda Web Adapter extension. This translates Lambda event payloads from HTTP-based triggers into actual HTTP requests that it proxies to the web app running inside the container. This is the architecture:

By default, Lambda Web Adapter assumes that the web app is listening on port 8080. However, you can change this in the Dockerfile by setting the PORT environment variable.

The containerized web app experiences a “cold start”. However, this is likely not too much of a concern, as the app will only be previewed internally by teammates.

Workflow pipeline

The GitHub Actions job defined in the up.yml workflow is triggered when a PR is opened or reopened against the repository’s main branch. The following is a summary of the steps that the Job performs.

  1. Read the configuration from .github/workflows/config.env
  2. Assume the IAM Role, which has minimal permissions to deploy AWS resources
  3. Install the Terraform CLI
  4. Add the Lambda Web Adapter extension to the copy of the Dockerfile
  5. Run terraform apply to provision the AWS resources using the S3 bucket for Terraform remote state
  6. Obtain the HTTPS endpoint from Terraform and add it to the PR as a comment

The following code snippet shows the key steps (4-6) from the up.yml workflow.

- name: Lambda-ify
  run: echo "COPY --from=public.ecr.aws/awsguru/aws-lambda-adapter:0.6.0 /lambda-adapter /opt/extensions/lambda-adapter" >> Dockerfile

- name: Deploy to ephemeral environment 
  id: furl
  working-directory: ./.github/workflows
  run: |
    terraform init \
      -backend-config="bucket=${TF_BACKEND_S3_BUCKET}" \
      -backend-config="key=${ENVIRONMENT}.tfstate"

    terraform apply -auto-approve \
      -var="name=${{ github.event.repository.name }}" \
      -var="environment=${ENVIRONMENT}" \
      -var="image_tag=${GITHUB_SHA}"

    echo "Url=$(terraform output -json | jq '.endpoint_url.value' -r)" >> $GITHUB_OUTPUT

- name: Add HTTPS endpoint to PR comment
  uses: mshick/add-pr-comment@v1
  with:
    message: |
      :rocket: Code successfully deployed to a new ephemeral containerized PR environment!
      ${{ steps.furl.outputs.Url }}
    repo-token: ${{ secrets.GITHUB_TOKEN }}
    repo-token-user-login: "github-actions[bot]"
    allow

The main.tf file (in the same directory) includes infrastructure as code (IaC) that is responsible for creating an ECR repository, building and pushing the container image to it, and spinning up a Lambda function based on the image. The following is a snippet from the Terraform configuration. You can see how concisely this can be configured.

provider "docker" {
  registry_auth {
    address  = format("%v.dkr.ecr.%v.amazonaws.com", data.aws_caller_identity.current.account_id, data.aws_region.current.name)
    username = data.aws_ecr_authorization_token.token.user_name
    password = data.aws_ecr_authorization_token.token.password
  }
}

module "docker_image" {
  source = "terraform-aws-modules/lambda/aws//modules/docker-build"

  create_ecr_repo = true
  ecr_repo        = local.ns
  image_tag       = var.image_tag
  source_path     = "../../"
}

module "lambda_function_from_container_image" {
  source = "terraform-aws-modules/lambda/aws"

  function_name              = local.ns
  description                = "Ephemeral preview environment for: ${local.ns}"
  create_package             = false
  package_type               = "Image"
  image_uri                  = module.docker_image.image_uri
  architectures              = ["x86_64"]
  create_lambda_function_url = true
}

output "endpoint_url" {
  value = module.lambda_function_from_container_image.lambda_function_url
}

Terraform outputs the generated HTTPS endpoint. The workflow writes it back to the PR as a comment so that teammates can click on the link to preview the changes:

The workflow takes about 60 seconds to spin up a new isolated containerized web application in an ephemeral environment that can be previewed.

Pull request collaboration

The following screenshot shows an example PR as the author collaborates with their team. After implementing this example, when a new PR arrives, the changes are deployed to a new ephemeral environment. Stakeholders can use the link to preview what the changes look like and provide feedback.

Once the changes are approved and merged into the main branch, the GitHub Actions down.yml workflow disposes of the environment. This means that the ephemeral environment is de-provisioned, including resources like the Lambda function and the ECR repository.

Conclusion

This post discusses some of the benefits of using ephemeral environments in CI/CD pipelines. It shows how to implement a pipeline using GitHub Actions and Lambda Function URLs for fast, low-cost, and ephemeral environments.

With this example, you can deploy PRs quickly, and the cost is based on HTTP requests made to the environment. There are no compute costs incurred while a PR is open and no one is previewing the environment. The only charges are for Lambda invocations, while stakeholders are actively interacting with the environment. When a PR is merged or closed, the cloud infrastructure is disposed of. You can find all of the example code referenced in this post here.

For more serverless learning resources, visit Serverless Land.

Attacking Machine Learning Systems

Post Syndicated from Bruce Schneier original https://www.schneier.com/blog/archives/2023/02/attacking-machine-learning-systems.html

The field of machine learning (ML) security—and corresponding adversarial ML—is rapidly advancing as researchers develop sophisticated techniques to perturb, disrupt, or steal the ML model or data. It’s a heady time; because we know so little about the security of these systems, there are many opportunities for new researchers to publish in this field. In many ways, this circumstance reminds me of the cryptanalysis field in the 1990. And there is a lesson in that similarity: the complex mathematical attacks make for good academic papers, but we mustn’t lose sight of the fact that insecure software will be the likely attack vector for most ML systems.

We are amazed by real-world demonstrations of adversarial attacks on ML systems, such as a 3D-printed object that looks like a turtle but is recognized (from any orientation) by the ML system as a gun. Or adding a few stickers that look like smudges to a stop sign so that it is recognized by a state-of-the-art system as a 45 mi/h speed limit sign. But what if, instead, somebody hacked into the system and just switched the labels for “gun” and “turtle” or swapped “stop” and “45 mi/h”? Systems can only match images with human-provided labels, so the software would never notice the switch. That is far easier and will remain a problem even if systems are developed that are robust to those adversarial attacks.

At their core, modern ML systems have complex mathematical models that use training data to become competent at a task. And while there are new risks inherent in the ML model, all of that complexity still runs in software. Training data are still stored in memory somewhere. And all of that is on a computer, on a network, and attached to the Internet. Like everything else, these systems will be hacked through vulnerabilities in those more conventional parts of the system.

This shouldn’t come as a surprise to anyone who has been working with Internet security. Cryptography has similar vulnerabilities. There is a robust field of cryptanalysis: the mathematics of code breaking. Over the last few decades, we in the academic world have developed a variety of cryptanalytic techniques. We have broken ciphers we previously thought secure. This research has, in turn, informed the design of cryptographic algorithms. The classified world of the NSA and its foreign counterparts have been doing the same thing for far longer. But aside from some special cases and unique circumstances, that’s not how encryption systems are exploited in practice. Outside of academic papers, cryptosystems are largely bypassed because everything around the cryptography is much less secure.

I wrote this in my book, Data and Goliath:

The problem is that encryption is just a bunch of math, and math has no agency. To turn that encryption math into something that can actually provide some security for you, it has to be written in computer code. And that code needs to run on a computer: one with hardware, an operating system, and other software. And that computer needs to be operated by a person and be on a network. All of those things will invariably introduce vulnerabilities that undermine the perfection of the mathematics…

This remains true even for pretty weak cryptography. It is much easier to find an exploitable software vulnerability than it is to find a cryptographic weakness. Even cryptographic algorithms that we in the academic community regard as “broken”—meaning there are attacks that are more efficient than brute force—are usable in the real world because the difficulty of breaking the mathematics repeatedly and at scale is much greater than the difficulty of breaking the computer system that the math is running on.

ML systems are similar. Systems that are vulnerable to model stealing through the careful construction of queries are more vulnerable to model stealing by hacking into the computers they’re stored in. Systems that are vulnerable to model inversion—this is where attackers recover the training data through carefully constructed queries—are much more vulnerable to attacks that take advantage of unpatched vulnerabilities.

But while security is only as strong as the weakest link, this doesn’t mean we can ignore either cryptography or ML security. Here, our experience with cryptography can serve as a guide. Cryptographic attacks have different characteristics than software and network attacks, something largely shared with ML attacks. Cryptographic attacks can be passive. That is, attackers who can recover the plaintext from nothing other than the ciphertext can eavesdrop on the communications channel, collect all of the encrypted traffic, and decrypt it on their own systems at their own pace, perhaps in a giant server farm in Utah. This is bulk surveillance and can easily operate on this massive scale.

On the other hand, computer hacking has to be conducted one target computer at a time. Sure, you can develop tools that can be used again and again. But you still need the time and expertise to deploy those tools against your targets, and you have to do so individually. This means that any attacker has to prioritize. So while the NSA has the expertise necessary to hack into everyone’s computer, it doesn’t have the budget to do so. Most of us are simply too low on its priorities list to ever get hacked. And that’s the real point of strong cryptography: it forces attackers like the NSA to prioritize.

This analogy only goes so far. ML is not anywhere near as mathematically sound as cryptography. Right now, it is a sloppy misunderstood mess: hack after hack, kludge after kludge, built on top of each other with some data dependency thrown in. Directly attacking an ML system with a model inversion attack or a perturbation attack isn’t as passive as eavesdropping on an encrypted communications channel, but it’s using the ML system as intended, albeit for unintended purposes. It’s much safer than actively hacking the network and the computer that the ML system is running on. And while it doesn’t scale as well as cryptanalytic attacks can—and there likely will be a far greater variety of ML systems than encryption algorithms—it has the potential to scale better than one-at-a-time computer hacking does. So here again, good ML security denies attackers all of those attack vectors.

We’re still in the early days of studying ML security, and we don’t yet know the contours of ML security techniques. There are really smart people working on this and making impressive progress, and it’ll be years before we fully understand it. Attacks come easy, and defensive techniques are regularly broken soon after they’re made public. It was the same with cryptography in the 1990s, but eventually the science settled down as people better understood the interplay between attack and defense. So while Google, Amazon, Microsoft, and Tesla have all faced adversarial ML attacks on their production systems in the last three years, that’s not going to be the norm going forward.

All of this also means that our security for ML systems depends largely on the same conventional computer security techniques we’ve been using for decades. This includes writing vulnerability-free software, designing user interfaces that help resist social engineering, and building computer networks that aren’t full of holes. It’s the same risk-mitigation techniques that we’ve been living with for decades. That we’re still mediocre at it is cause for concern, with regard to both ML systems and computing in general.

I love cryptography and cryptanalysis. I love the elegance of the mathematics and the thrill of discovering a flaw—or even of reading and understanding a flaw that someone else discovered—in the mathematics. It feels like security in its purest form. Similarly, I am starting to love adversarial ML and ML security, and its tricks and techniques, for the same reasons.

I am not advocating that we stop developing new adversarial ML attacks. It teaches us about the systems being attacked and how they actually work. They are, in a sense, mechanisms for algorithmic understandability. Building secure ML systems is important research and something we in the security community should continue to do.

There is no such thing as a pure ML system. Every ML system is a hybrid of ML software and traditional software. And while ML systems bring new risks that we haven’t previously encountered, we need to recognize that the majority of attacks against these systems aren’t going to target the ML part. Security is only as strong as the weakest link. As bad as ML security is right now, it will improve as the science improves. And from then on, as in cryptography, the weakest link will be in the software surrounding the ML system.

This essay originally appeared in the May 2020 issue of IEEE Computer. I forgot to reprint it here.

Register your project for Coolest Projects 2023 now

Post Syndicated from Helen Gardner original https://www.raspberrypi.org/blog/register-for-coolest-projects-2023/

Young creators, it’s time to share your ideas with the world! Registration for Coolest Projects is now open.

Coolest Projects logo.

Coolest Projects is an online showcase celebrating all young people who create with digital technology. From today, Monday 6 February, young people can register their projects on the Coolest Projects website. Registered projects will be part of the online showcase gallery, for people all over the world to see.

By entering your digital tech creations into Coolest Projects, you’ll have the chance to get personalised feedback about your project, represent your country in the online showcase, and get fun, limited-edition swag. Your project could even be selected as a favourite by our very special VIP judges.

What you need to know about Coolest Projects

Coolest Projects is an online celebration of young digital tech creators worldwide, their skills, and their wonderful creative ideas. We welcome all kinds of projects, from big to small, beginner to advanced, and work in progress to completed creation.

A young person creating a project at a laptop. An adult is sat next to them.

Here’s what you need to know:

  • Coolest Projects is all online and completely free
  • All digital technology projects are welcome, from very first projects to advanced builds, and they don’t have to be complete
  • Young creators up to age 18 from anywhere in the world can take part individually or in teams of up to five friends
  • Projects can be registered in one of six categories: Scratch, games, web, mobile apps, hardware, and advanced programming
  • Registration is now open and closes on 26 April 2023
  • All creators, mentors, volunteers, teachers, parents, and supporters are invited to the special celebration livestream on 6 June 2023

Five steps to taking part in Coolest Projects

  1. Imagine your idea for a project
  2. Choose your project category
  3. Gather a group of friends or work by yourself to make your project
  4. Register the project in a few clicks to share it in the showcase gallery
  5. Explore the other projects from around the world in the showcase gallery, and join the community at the special celebration livestream
A group of young people plan their projects on laptops.

If you’d like help with your idea or project, take a look at our free, step-by-step Coolest Projects workbook and coding project guides. You can also get inspired by all the creations in the 2022 showcase gallery.

You are also very welcome to register a tech project you’ve already made and want to share with the world this year.

We offer free resources to help mentors and parents support young people through the process of taking part in Coolest Projects, from imagining ideas, to creating projects, to registration.

A parent and young person work on a digital making project at home.

There are loads more announcements to come, so make sure to subscribe to the Coolest Projects newsletter to be the first to find out about this year’s VIP judges, limited-edition digital swag, and much more.

The post Register your project for Coolest Projects 2023 now appeared first on Raspberry Pi.

Отчет на мандата ми като народен представител

Post Syndicated from Bozho original https://blog.bozho.net/blog/4018

48-мото Народно събрание беше разпуснато. Работата му продължи малко повече от 4 месеца, което не е достатъчно за реална законодателна дейност. Поради това Народното събрание прие само 46 закона, 14 от които са ратификации на споразумения, т.е. реално 32 закона за приети. От тях съществени (а не „козметични“, гасящи някой текущ пожар или просто транспониране на директиви) изменения има само в Изборния кодекс, Закона за горите, Закона за кадастъра и имотния регистър, Закона за енергетиката, Закона за устройство на територията, закона, с който въвеждаме особен управител за дружества, опериращи с нефтопродукти (напр. Лукойл), Закона за българския жестов език и измененията, свързани със сините карти (за да бъде по-малко бюрократична процедурата по наемане на висококвалифицирани кадри от трети страни).

Личният ми отчет в рамките на тези 4 месеца включва следното (детайли има на сайта на НС). Законодателната ми дейност включваше:

  • На първия работен ден на Народното събрание внесохме редица законопроекти, като изготвените с мое водещо участие бяха Закона за електронното управление, Закона за движението по пътищата (електронно връчване, отпадане на стикери и син талон и др.), Закона за обществените поръчки (за повече отворени данни за поръчките). По законопроекта за сините карти имах принос на по-ранен етап, но в парламента го движеше изцяло Надежда Йорданова. Нищо от това (с изключение на сините карти) не беше припознато като приоритет и не стигна до приемане в зала. Дневният ред го определят председателят и мнозинството. Ако бяха стигнали до зала, вероятно щяха да минат (в комисии някои от тези предложения минаха).
  • Внесох изменения в Закона за електронната търговия, за да уредим идентифицирането на тролски ферми в социалните мрежи, както и възможността за оспорване на решенията на модератори пред трета страна.
  • По Изборния кодекс и де факто премахването на машинното гласуване, внесохме наш законопроект за повече прозрачност на процеса, вкл. достъп до изходния код за по-дълъг период от време и по-широк кръг лица, както и предложения между четенията (за преброителни центрове), а в крайна сметка и предложения в зала (напр. срока, в който ЦИК да направи експеримент с новата хартия за машините, което предстои да разберем дали ще се окаже проблем). Участвах в дебата в пленарна зала, като опитах да оборя внушенията на „хартиената коалиция“, и да обясня защо машинното гласуване всъщност е сигурно. И че няма „кодове“. Знаем как свърши това, но предстои да видим на изборите дали твърденията за повишена избирателна активност ще са реалност и дали няма да има хаос в изборната нощ.
  • По Закона за кадастъра и имотния регистър направих редица предложения, част от които бяха приети – за електронизация на процеса по вписване, отпадане на документа с печат за платена такса, отпадане на удостоверения и гарантиране на интегритета на данните. Измененията влизат в сила след доста време, за да може Агенция по вписванията да си надгради системите.
  • Подготвих и изменения в Закона за пътищата, с които да се премахне олигопола на текущите посредници на винетки (само два на брой, през които минават всички други продавачи на винетки), както и за получаване на известния при изтичаща винетка и при съставен фиш. ГЕРБ и ДПС не подкрепиха либерализирането на продажбата на винетки, но по останалите предложения имаше внесени текстове от повечето други групи и обединения законопроект беше подкрепен от всички
  • Предложих, заедно с Надежда Йорданова, изменения в антикорупционния закон, за пълна електронизация на декларациите за имущество и интереси, както и публикуване на всички данни в отворен формат. Предложихме и анализ на антикорупционния риск, като при установен висок риск, да се „включат“ новите разследващи функции. Напр. „висок риск“ е ако братовчед на министър печели обществена поръчка в подчинена на министъра агенция.
  • Електронната трудова книжка, проект за която внесохме, мина само на първо четене в комисия, но изглежда има широка подкрепа, вкл. от бизнес асоциациите, и би трябвало в следващ парламент, който се задържи малко повече, да мине.
  • Внесохме заедно с Васил Пандов от ПП изменения в Закона за здравето, с които да уредим няколко неща, като моето участие беше в достъпа до данни от други регистри на Националната здравноинформационна система, подпечатването на всички електронни документи с времеви печат (за да няма възможност за промени пост-фактум), удостоверяване на присъствие по електронен път, за да се избегне разпечатването и съхранението на хартия на електронни документи. Предложих и новата личната карта („с чип“) да може да се използва за потвърждаване на присъствие и съгласие за здравни и здравноосигурителни цели.
  • В закона за лицата, подаващи сигнали (whistleblowers) във всичките му варианти внесох предложения за полу-анонимно подаване на сигнали, като личните данни на подателите се криптират с ключ на съда и могат да се де-анонимизират с решение на съда. Това не беше подкрепено, за съжаление поради неразбиране как би функционирало и нежелание на колегите да разберат (стигнехме до по-остър тон с председателя на правна комисия на заседанието, от което все още липсва стенограма)
  • Електронните ваучери за храна не минаха на първо четене, защото ГЕРБ, ДПС и БСП бяха против. „Какво ѝ е на хартията“, както каза един колега. Електронните ваучери се предвиждаше да съществуват паралелно с хартиените за дълго време, за да свикнат хората. Имаме готов обновен законопроект за следващия път. И на въпроса „ама това ли е най-важното“ – отговорът е „не, не е“, но е постижимо сравнително лесно, както и синия талон, и е срамота да не се направи, тъй като ще намали разходите на участниците (търговци и работодатели) и ще улесни хората.

Малко електронни неща минаха, но направихме много заявки и те се сблъскаха с „искахме, ама нямахме желание“ от страна на мнозинството.

Зададох и доста въпроси на министри, като ето някои от тях:

  • Въпрос до МВР за започналата по мое време оптимизация на регистрацията на автомобили в КАТ (отговорът – подготвени са изменения на наредба)
  • Въпрос до МЕУ за прогрес по електронната идентификация и до МВР относно отказа им да предоставят данни от регистри на МВР за мобилното приложение. По тази важна според мен тема проведох и няколко срещи, като съм обобщил ситуацията в друга публикация.
  • Въпрос до министъра на здравеопазването за липсващи отворени данни. В отговор министърът се ангажира да публикуват редица масиви от данни, които съм поискал във въпроса, като прави уточнение, че на портала за отворени данни не могат да се качват данни в момента (заради изтекла поддръжка)
  • Няколко съвместни въпроса с Алекс Дунчев от ПП относно електронните търгове за дървесина с цел повече прозрачност и намаляване на корупцията в процеса
  • Въпрос до МРРБ за комисионните от продажба на винетки, които отиват в националните доставчици на услуги – по около 20 милиона годишно. Използвах отговора за да мотивирам законодателното предложение за либерализиране на продажбата на винетки и за законово ограничаване на комисионните („такси за услуга по разпространение“).
  • Въпроси до МРРБ за проверките на пътната маркировка, с незадоволителен отговор – за пътната маркировка съм писал преди много години и за съжаление няма особен прогрес.
  • Въпрос до министъра на здравеопазването за нещо много техническо – програмни интерфейси, но имащо отражение в реалния живот – когато лекар или фармацевт търсят електронно направление или електронна рецепта, това да може да става само по идентификатор на пациента (и времеви период), а да не е нужно да се посочва конкретна дата на издаване, или пък идентификационен номер на документ. Това би улеснило много процеса и не би застрашило личните данни, тъй като тези справки се правят от вече идентифициран лекар/фармацевт.
  • Въпрос до външния министъротносно дипломатическата реакция на обявяването на Христо Грозев за издирване в Русия. (Изпратих въпроса няколко часа след самата новина, но тъй като беше почивен ден, той беше получен във Външно на първия работен.)
  • Въпрос до министъра на финансите за информационната страница за въвеждане на еврото и дали тя предвижда презентиране на прогреса – напр. дали неприетия от този парламент Кодекс за застраховането (заради частни интереси) ще блокира влизането в еврозоната
  • Въпрос към МВР относно центъра за безопасен интернет, който подпомага дейността на МВР за борба и превенция на престъпления, свързани с експлоатация на деца, но не получава никакво финансиране от държавата. МВР казва „да, много ни е полезен, но нямаме пари“

Парламентарната активност не винаги води до резултат, но е задължителна, ако искаме по всички тези теми да има резултат в обозримо бъдеще. Смятам, че с тази активност, допринесох за работата на това Народно събрание.

Материалът Отчет на мандата ми като народен представител е публикуван за пръв път на БЛОГодаря.

Kernel prepatch 6.2-rc7

Post Syndicated from original https://lwn.net/Articles/922285/

The 6.2-rc7 kernel prepatch is out for
testing.

So the 6.2 rc releases are continuing to be fairly small and
controlled, to the point where normally I’d just say that this is
the last rc. But since I’ve stated multiple times that I’ll do an
rc8 due to the holiday start of the release, that’s what I’ll do.

How to Add Virtual Media to a Supermicro Server via HTML5 iKVM Web IPMI Interface

Post Syndicated from Eric Smith original https://www.servethehome.com/how-to-add-virtual-media-to-a-supermicro-server-via-html5-ikvm-web-ipmi-interface/

If your Supermicro IPMI HTML5 iKVM virtual media menu option is greyed out, we show you how to remotely mount ISOs on the platform

The post How to Add Virtual Media to a Supermicro Server via HTML5 iKVM Web IPMI Interface appeared first on ServeTheHome.

The collective thoughts of the interwebz