Да изтеглиш късата клечка, или за (не)възможната смяна на юридическия пол в България

Post Syndicated from Светла Енчева original https://www.toest.bg/da-izteglish-kusata-klechka-ili-za-nevuzmozhnata-smyana-na-yuridicheskiya-pol-v-bulgaria/

Да изтеглиш късата клечка, или за (не)възможната смяна на юридическия пол в България

Кампанията срещу Конвенцията на Съвета на Европа за превенция и борба с насилието над жени и домашното насилие, по-известна като Истанбулската конвенция, в България има последствия, отиващи далеч. Потърпевши са не само транс хората, а цялото общество. Този извод може да се направи от прочита на една книга, чиято премиера беше миналата седмица: „Юридическото признаване на пола в България. Настояще и перспективи“. Тя е издание на Фондация „Ресурсен център Билитис“, разпространява се безплатно, а в скоро време ще е налична и в електронен формат.

За книгата

Да изтеглиш късата клечка, или за (не)възможната смяна на юридическия пол в България

Идеята за правен анализ на юридическата смяна на пола възниква поради разнопосочните практики на българските съдилища в това отношение (за тях ще стане дума по-долу). Тези практики допълнително се усложниха от решенията на Конституционния съд (КС) от 2018 г. и 2021 г. С първото решение Истанбулската конвенция беше обявена за противоконституционна, а с второто КС постанови, че полът е единствено биологичен.

Първоначалната идея е за доклад. Понеже темата се оказва твърде обширна, от един доклад стават четири. Когато те са почти готови, Върховният касационен съд (ВКС) излиза с решение, с което на практика отменя юридическата смяна на пола. Именно това събитие дава импулса докладите да се доразвият и да се обединят в книга. Резултатът е книжно тяло от 233 страници, дело на четирима юристи – правозащитника Радослав Стоянов (отговорен и за общата редакция), адвокатките Силвия Петкова и Галина Чеширова, както и доц. Велина Тодорова.

Това е първият мащабен юридически анализ по темата – както в национален план, така и в сравнение с опита на други страни и с практиките на международни съдилища и организации, от които България е част. Трябва да се признае обаче, че тя се чете трудно. Първо, защото е писана от юристи и второ, защото проблематиката, която разглежда, е много комплексна. Тази статия е опит за превод на книгата на „човешки език“ – с ясното съзнание, че при опростяването се жертват множество теми, контексти и нюанси.

Кой има нужда от юридическо признаване на пола?

Юридическо признаване на пола означава промяна на пола в личните документи. То е необходимо за две категории лица. Първата са транс хората – тоест онези, които не се идентифицират с „биологичния си пол“, както е популярно да се казва в България. „Биологичен пол“ обаче може да означава много неща – хормони, хромозоми, първични и вторични полови белези… В книгата се говори конкретно за „генитален пол“, тоест пола според външните полови органи.

При интерсекс хората пък някои от „биологичните“ измерения на пола – хормони, хромозоми и пр. – не съвпадат. Затова те чисто физически не могат да бъдат определени като мъже или като жени. Полът им по документи е определен спрямо това дали приличат (или могат да заприличат след хирургически процедури) повече на мъж или на жена. Но идентичността на някои от тях може да се разминава с тази преценка, затова те също имат нужда от промяна на пола в документите.

Според защитниците на т.нар. традиционни ценности транс- и интерсекс е някаква мода. Но свидетелства за хора, които не могат да се определят категорично като мъже или жени, има още от дълбока древност. Да не говорим, че такива се срещат и в различни митологии. Опитите за „поправяне“ на пола, тоест вкарването му в представите за мъжко или женско, датират някъде от XIII в. Съществуват свидетелства в българския печат от края на XIX в. за няколко случая на хора, чийто пол не отговаря на идентичността им.

Как е решен въпросът със смяната на юридическия пол в други страни?

Разбира се, има държави, в които транс хората се преследват от закона. В книгата обаче се обръща внимание на добрите практики и се дава пример с Малта, Исландия, Норвегия, Швейцария и Аржентина.

Може би сте срещали аргумента на противници на правата на транс хората, че деца си променят пола с хормони или операция и ако по-късно съжалят, вече няма връщане назад. Макар книгата да е посветена на юридическите измерения на темата, в главата за добрите международни практики се засяга и този въпрос. От нея може да се научи, че в тези практики изобщо не се препоръчва физическа промяна на пола на непълнолетни, дори напротив. Нито се препоръчват т.нар. блокери на пубертета (препарати, забавящи развитието на мъжките или женските полови белези).

Но на подрастващите не се забранява да изразяват себе си, нито пък са оставяни „на произвола на съдбата“. Добрата практика е транс децата да бъдат подкрепяни от родители и психолози, докато станат достатъчно зрели, за да могат да вземат толкова важни решения за тялото и живота си.

От друга страна, в тези държави липсата на физическа смяна на пола не е отказ за юридическа промяна на личните документи. Защото важното е зачитането на самоидентификацията на една личност, а не дали тя е привела тялото си в съответствие с типичните стандарти за мъж или жена. А освен това се смята, че държавата няма право да накара никого да се лиши от детеродните си органи.

Интересен детайл в тези добри практики е, че процедурата за смяна на юридическия пол е чисто административна, тоест няма нужда от съдилища и доказателства. Достатъчно е просто вписване в някоя служба или пред нотариус. В някои случаи е нужно съдебно дело, ако човек иска да върне първоначалния си пол.

Смяната на юридическия пол в България до неотдавна – възможна, но неуредена

Смяната на пола по документи в България е възможна в продължение на повече от 30 години – до 20 февруари 2023 г., когато ВКС постанови, че „такова животно няма“. Според Закона за гражданската регистрация и в Правилника за издаване на български лични документи към Закона за българските лични документи се допуска, че човек може да смени юридическия си пол, но нямаше ясни правила как да става това, което беше предпоставка за хаос. Според съдебната практика имаше две минимални условия, но не всички съдилища се съобразяват с тях:

Първият критерий беше наличието на транссексуалност. Това е медицински критерий, защото до неотдавна Световната здравна организация определяше транссексуалността като медицинско състояние. За доказването ѝ се изискваше съдебномедицинска експертиза от вещи лица – психолози, психиатри и сексолози.

Вторият критерий беше „сериозното и непоколебимо решение за биологично потвърждение на изпълняваната от лицето психична и социална полова роля“, тоест желанието за оперативна промяна на пола. Тя се доказва с показания на човека, който иска да смени юридическия си пол, с показания на негови близки, с различни документи, както и отново с експертиза.

Три съдилища, три различни решения

В книгата се прави анализ на всички дела за смяна на пола в България, до които авторките на съответната глава са получили достъп (някои съдилища, включително в София, са отказали да им предоставят такъв). И са стигнали до извода, че има три основни типове решения по тези дела. Ще ги представим чрез три измислени персонажа, разказите за които обобщават много истински истории.

Вариант 1: „Имате грешка!“

Диян е транс мъж, който се е подложил на хормонална терапия и операция за смяна на пола. Преди решението на ВКС неговият вариант се случва статистически най-рядко, но това не му помага – той „изтегля късата клечка“. Съдът постановява, че полът в документите му може да бъде сменен само ако първоначално е бил вписан грешно в акта за раждане. Щом Диян е роден с женско тяло, няма никакво значение, че вече си е направил операция за смяна на пола – по документи трябва да бъде жена, защото полът е само биологичен. Точка по въпроса.

Диян обмисля емиграция в някоя държава, в която има ясни правила за смяна на юридическия пол. Още е млад, има шанс на пазара на труда и може да се адаптира.

Вариант 2: „Първо си направете операция за смяна на пола!“

Лора е транс жена, която въпреки професионалната си квалификация все е без работа, защото външният ѝ вид не съответства на личните ѝ документи и никой не иска да я наеме. Съдът настоява тя първо да премине през хормонална терапия и оперативна промяна на пола, за да бъде и според външните си полови белези жена. Лора обаче има здравословни проблеми, поради които тези процедури са опасни за живота ѝ, затова не иска да рискува. За нея решението също е „къса клечка“ – тя си остава с мъжко име в личната карта.

За разлика от Диян, за Лора емиграцията не е вариант. Тя трябва да се грижи за болните си родители, а докато го прави, годините минават и Лора става все по-неконкурентоспособна.

Вариант 3: „Няма проблем!“

Мариета е транс жена, която се подлага на хормонална терапия, но не си е направила операция за смяна на пола. Сгодена е за Мишо. Тя има късмета да попадне на варианта, който се случва най-често. След като се запознава със съдебнопсихиатричната ѝ експертиза и получава уверения от нея и близките ѝ, че е взела „сериозно и непоколебимо решение“ за биологична смяна на пола, съдът смята, че той самият би извършил престъпление, ако накара Мариета да промени пола си хирургически. Наказателният кодекс предвижда затвор от 3 до 10 години за причиняване на телесна повреда, водеща до безплодие. Затова ѝ разрешава юридическата промяна и без да си е направила операция.

С женско име в личната карта Мариета най-сетне може съвсем законно да се омъжи за Мишо в България. Двамата спретват голяма сватба и както се казва в приказките, три дни всички ядат, пият и се веселят.

Ролята на КС и ВКС

До неотдавна съдилищата, които издаваха решения от типа „Имате грешка!“, се срещаха най-рядко. Големият проблем обаче е, че тяхната позиция, че полът е само биологичен и по рождение, се споделя от най-важните съдебни инстанции в България – КС и ВКС. Решенията им в тази област връщат България десетилетия назад. Затова всички транс хора в страната, които до този момент не са успели да сменят документите си, „теглят късата клечка“.

КС нямаше отношение към темите, свързани с пола, до кампанията срещу Истанбулската конвенция (ИК). В резултат на тази кампания думата „джендър“ беше демонизирана и се надигна мощна трансфобска вълна, въпреки че транс хората изобщо не са централна тема в ИК.

Решението на КС от 2018 г.

През 2018 г. 75 депутати от всички парламентарни групи се обърнаха към КС с искане да направи анализ доколко Конвенцията съответства на Конституцията. В Решението си от 27 юли 2018 г. КС отсъди, че ИК противоречи на Конституцията, с което затвори пътя към ратификацията ѝ в България.

Какви бяха аргументите на КС за това решение? Според него понятието „джендър идентичност“ не съответства на бинарната представа за пол (според която половете са два) в Основния закон. Нищо че нито Конституцията, нито ИК дефинират какво е пол. Нещо повече – съдът свежда социалните роли на пола до биологичните с твърдението, че социалната роля на жената е да бъде майка, което впрочем се подкрепя от всички жени в КС. Използват се религиозни аргументи, въпреки че според Основния закон религията е отделена от държавата.

На всичко отгоре КС се отклонява от собствената си практика да тълкува международни документи, използвайки оригиналния вариант на официалните езици, на които са написани – английски и френски. Вместо това интерпретира единствено българския превод на ИК. А там разликата между „джендър“, преведен като „социален пол“, и „пол“ далеч не е толкова ясна, колкото на оригиналните езици.

Така съдът стига до извода, че с понятието „социален пол“ се въвежда „трети пол“, което няма нищо общо с оригиналния смисъл. И изобщо не го е грижа, че Конвенцията се отнася предимно към насилието над жени и домашното насилие.

Решението от 2021 г.

Решението на КС от 2018 г. променя практиката на ВКС, който е най-висшата инстанция за обжалване на дела. До този момент ВКС е допускал промяната на юридическия пол на транс хората, като се е позовавал на Европейската конвенция за правата на човека (ЕКПЧ) и практиката на Европейския съд за правата на човека в Страсбург (ЕСПЧ). В чл. 8 на ЕКПЧ всеки има право на неприкосновеност на личния и семейния живот, а според ЕСПЧ това включва и сексуалната ориентация и половата идентичност.

След решението на конституционните съдии ВКС започва да постановява и решения в обратния смисъл. Върховните съдии не могат да се разберат помежду си как е правилно да постъпват, и затова отправят няколко въпроса към КС, който да разясни как да се разбира понятието „пол“ и как това се отнася към правото на личен живот, защитено от Конституцията и европейското законодателство.

В решението си КС игнорира темата за правото на личен живот и отговаря само на въпроса „Как следва да се разбира понятието „пол“, използвано в Конституцията, и има ли то смисъл, различен от биологичен пол?“

Отговорът е в стила на предишното решение – че полът има само биологичен смисъл. В мотивите на КС не става дума за правата на гражданите, макар че те са защитени от Конституцията. Но пък много се говори за семейство, традиции, брак, религия и църква.

Решението на ВКС от 2023 г.

В решението си от февруари 2023 г. ВКС постановява, че българското материално право не допуска промяната на юридическия пол на транс лицата, макар това да е ставало десетилетия наред. Съдът впрочем е силно разделен по тази тема – решението се взема от 28 съдии, докато 21 гласуват против, защото според тях така се нарушава балансът между обществените и личните интереси.

В решението съдиите тълкуват твърде фриволно международното право, което България е ратифицирала, както и практиките на ЕСПЧ, и продължават да смесват темите за брака между лица от един и същи пол и правата на транс хората. А в действителност според ЕСПЧ отказът на една държава да промени юридическия пол на транс лицата е нарушение на ЕКПЧ.

ВКС допълнително усилва религиозните и традиционалистки аргументи в решенията на КС. Накрая се стига до абсурда, че самата същност на човека произтича от понятието за брака в Конституцията. Защото КС говори за „бинарно понятие за брака“ в Основния закон (тоест че бракът е само между мъж и жена), а ВКС – за „бинарно съществуване на човешкия вид“.

Размерът на последствията

С решенията си КС и ВКС са в противоречие с международното право, което България е ратифицирала, и с европейските съдилища. Най-малкото ще последват глоби за страната ни, които ще се извадят от джоба на данъкоплатците. Но анализът в книгата стига до далеч по-тревожно заключение – че тези решения предизвикват цели пет кризи.

Първата е в правовата държава и води до отдалечаване от ООН, ЕС и Съвета на Европа, защото решенията демонстрират нихилизъм в областта на правата на човека. Втората е в правораздаването, защото на съдилищата в България вече на практика е забранено да отсъждат по собствена преценка и в съответствие с международните съдилища. Третата е политическа, защото с тези решения България се отдалечава от демократичните страни. Четвъртата е социална, защото се засилват дискриминацията, стереотипите и цензурата. Петата е, че Конституционният съд вече не защитава правата на хората, които живеят в България.

Логично възниква въпросът дали висшите съдии, гласували за тези решения, са толкова глупави, че да не разбират какво са „надробили“. В книгата се защитава тезата, че разбират всичко. Както че има разлика между „пол“ и „джендър“, така и какво действително пише в Конституцията и какво са свободни интерпретации, както и как стоят нещата в международното право.

Тогава защо постъпват така?

На този въпрос книгата не дава пряк отговор, но изводът, който може да се направи от прочита ѝ, е: поддали са се на политически натиск, изпълнили са политическа поръчка.

Как да се излезе от цялата бъркотия?

Книгата „Юридическото признаване на пола в България. Настояще и перспективи“ е предназначена за хората, които могат да се опитат да направят промяна. Например адвокати, съдии, правозащитници, политици, експерти, работещи в държавната администрация, университетски преподаватели, студенти по право.

Промяна е необходима съвсем не само заради документите на транс хората. А най-вече – за да продължи България да бъде част от демократичните страни, за които правата на човека са ценност и които зачитат международното право. А не като диктатурите, в които отделният човек е нищо, а интересът на държавата е всичко.

Препоръките заемат едва една страница от книгата, защото възможните ходове не са много. Най-добре би било, ако КС реши да ревизира решенията си от 2018 г. и 2021 г. Но това е малко вероятно, ако той продължава да се формира по начин, компрометиращ независимостта на съдиите.

Според авторите е реалистично да се правят две неща. Първото е да се продължава със сезирането на ЕСПЧ, въпреки че КС не признава върховенството на решенията му. Второто е публичност – кампании, активизъм по отношение на институциите, ангажиране на медиите, за да се променят обществените нагласи. 

И двете приличат на сизифовски труд, но докато не са забранени, има надежда.


Тази статия е публикувана с финансовата подкрепа на Фондация „Ресурсен център Билитис“.

The AWS Canada West (Calgary) Region is now available

Post Syndicated from Sébastien Stormacq original https://aws.amazon.com/blogs/aws/the-aws-canada-west-calgary-region-is-now-available/

Today, we are opening a new Region in Canada. AWS Canada West (Calgary), also known as ca-west-1, is the thirty-third AWS Region. It consists of three Availability Zones, for a new total of 105 Availability Zones globally.

This second Canadian Region allows you to architect multi-Region infrastructures that meet five nines of availability while keeping your data in the country.

A global footprint
Our approach to building infrastructure is fundamentally different from other providers. At the core of our global infrastructure is a Region. An AWS Region is a physical location in the world where we have multiple Availability Zones. Availability Zones consist of one or more discrete data centers, each with redundant power, networking, and connectivity, housed in separate facilities. Unlike with other cloud providers, who often define a region as a single data center, having multiple Availability Zones allows you to operate production applications and databases that are more highly available, fault tolerant, and scalable than would be possible from a single data center.

AWS has more than 17 years of experience building its global infrastructure. And there’s no compression algorithm for experience, especially when it comes to scale, security, and performance.

Canadian customers of every size, including global brands like BlackBerry, CI Financial, Keyera, KOHO, Maple Leaf Sports & Entertainment (MLSE), Nutrien, Sun Life, TELUS, and startups like Good Chemistry and Cohere, and public sector organizations like the University of Calgary and Natural Resources Canada (NRCan), are already running workloads on AWS. They choose AWS for its security, performance, flexibility, and global presence.

AWS Global Infrastructure, including AWS Local Zones and AWS Outposts, gives our customers the flexibility to deploy workloads close to their customers to minimize network latency. For example, one customer that has benefited from AWS flexibility is Canadian decarbonization technology scale-up, BrainBox AI. BrainBox AI uses cloud-based artificial intelligence (AI) and machine learning (ML) on AWS to help building owners around the world reduce HVAC emissions by up to 40 percent and energy consumption by up to 25 percent. The AWS Global Infrastructure allows their solution to manage with low latency hundreds of buildings in over 20 countries, 24-7.

Services available
You can deploy your workloads on any of the C5, M5, M5d, R5, C6g, C6gn, C6i, C6id, M6g, M6gd, M6i, M6id, R6d, R6i, R6id, I4i, I3en, T3, and T4g instance families. The new AWS Canada West (Calgary) has 65 AWS services available at launch. Here is the list, sorted by alphabetical order: Amazon API Gateway, AWS AppConfig, AWS Application Auto Scaling, Amazon Aurora, Aurora PostgreSQL, AWS Batch, AWS Certificate Manager, AWS CloudFormation, Amazon CloudFront, AWS Cloud Map, AWS CloudTrail, Amazon CloudWatch, Amazon CloudWatch Events, Amazon CloudWatch Logs, AWS CodeDeploy, AWS Config, AWS Database Migration Service (AWS DMS), AWS DataSync, AWS Direct Connect, Amazon DynamoDB, Amazon ElastiCache, Amazon Elastic Block Store (Amazon EBS), Amazon Elastic Compute Cloud (Amazon EC2), Amazon EC2 Auto Scaling, Amazon Elastic Container Registry (Amazon ECR), Amazon Elastic Container Service (Amazon ECS), Amazon Elastic Kubernetes Service (Amazon EKS), Elastic Load Balancing, Elastic Load Balancing – Gateway (GWLB), Elastic Load Balancing – Network (NLB), Amazon EMR, Amazon EventBridge, AWS Fargate, AWS Health Dashboard, AWS Identity and Access Management (IAM), Amazon Kinesis Data Firehose, Amazon Kinesis Data Streams, AWS Key Management Service (AWS KMS), AWS Lambda, AWS Management Console, AWS Marketplace, Amazon OpenSearch Service, AWS Organizations, Amazon Redshift, Amazon Relational Database Service (Amazon RDS), AWS Resource Access Manager, Resource Groups, Amazon Route 53, AWS Secrets Manager, AWS Security Hub, AWS Security Token Service, Service Quotas, AWS Shield Standard, Amazon Simple Notification Service (Amazon SNS), Amazon Simple Queue Service (Amazon SQS), Amazon Simple Storage Service (Amazon S3), Amazon Simple Workflow Service (Amazon SWF), AWS Site-to-Site VPN, AWS Step Functions, AWS Support API, AWS Systems Manager, AWS Trusted Advisor, Amazon Virtual Private Cloud (Amazon VPC), VM Import/Export, and AWS X-Ray.

AWS in Canada
We have been supporting our customers and partners with infrastructure in Canada since December 2016, when the first Canadian AWS Region, AWS Canada (Central), was launched. In the same year, we launched Amazon CloudFront locations in Toronto and Montreal to better serve your customers in the region. To date, there are ten CloudFront points of presence (PoPs) in Canada: five in Toronto, four in Montreal, and one in Vancouver. We also have engineering teams located in multiple cities in the country.

From 2016–2021, AWS has invested over 2.57 billion CAD (1.9 billion USD) in Canada and plans to invest up to 24.8 billion CAD (18.3 billion USD) by 2037 in the two Regions. Using the input-output methodology and statistical tables provided by Statistics Canada, we estimate that the planned investment will add 43.02 billion CAD (31 billion USD) to the gross domestic product (GDP) of Canada and support more than 9,300 full-time equivalent (FTE) jobs in the Canadian economy.

In addition to providing our customers with world-class infrastructure benefits, Amazon is committed to reaching net zero carbon across its business by 2040 and is on a path to powering its operations with 100 percent renewable energy by 2025. In 2022, 90 percent of the electricity consumed by Amazon was attributable to renewable energy sources. Additionally, AWS has a goal to be water positive by 2030, returning more water to communities than it uses in its direct operations. Amazon has a total of four renewable energy projects in Canada: three south of Calgary and one close to Edmonton. According to BloombergNEF, Amazon is the largest corporate purchaser of renewable energy in the country (and the world). These projects generate more than 2.3 million megawatt hours (MWH) of clean energy–enough to power 1.69 million Canadian homes.

Education is one of our top priorities as well. Since 2017, we have trained more than 200,000 Canadians on cloud computing skills through free and paid AWS Training and Certification programs. Learners of various skill levels, roles, and backgrounds can build knowledge and practical skills with more than 600 free online courses in up to 14 languages on AWS Skills Builder. Amazon is committed to providing 29 million people around the world with free cloud computing skills training by 2025.

Security
Customers around the world trust AWS to keep their data safe, and keeping their workloads secure and confidential is foundational to how we operate. Since the inception of AWS, we have relentlessly innovated on security, privacy tools, and practices to meet, and even exceed, our customers’ expectations.

For example, you decide where to store your data and who can access it. Services such as AWS CloudTrail allow you to verify how and when data are accessed. Our virtualization technology, AWS Nitro System, has been designed to restrict any operator access to customer data. This means no person, or even service, from AWS can access data when it is being used in an EC2 instance. NCC Group, a leading cybersecurity consulting firm based in the United Kingdom, audited the Nitro architecture and affirmed our claims.

Our core infrastructure is built to satisfy the security requirements of the military, global banks, and other high-sensitivity organizations.

In Canada, Neo Financial is a financial tech startup that uses the elasticity of the AWS Cloud to scale its business. They chose AWS in 2019 because we helped them to meet their regulatory requirements. They use EC2 for their core infrastructure, S3 for highly durable storage, Amazon GuardDuty to improve their security posture, and CloudFront to improve performance for their customers.

Performance
The AWS Global Infrastructure is built for performance, offering the lowest latency, lowest packet loss, and highest overall network quality. This is achieved with a fully redundant 400 GbE fiber network backbone, often providing many terabits of capacity between Regions.

To help provide Canadian customers with even lower latency, we have announced two AWS Local Zones in Toronto and Vancouver.

Performance is specially important when you are streaming your favorite TV show. Calgary-based Kidoodle.TV offers a streaming service for children. They have more than 100 million app downloads worldwide and more than 1 billion ad seconds for sale every 2 days. Using AWS, Kidoodle.TV was able to build the same service architecture that multibillion-dollar companies can deploy, which allowed them to seamlessly scale up from 400,000 monthly active users to 12 million in a year.

Additional things to know
We preannounced 12 additional Availability Zones in four future Regions in Malaysia, New Zealand, Thailand, and the AWS European Sovereign Cloud. We will be happy to share more information on these Regions so, stay tuned.

I can’t wait to discover how you will innovate and what amazing services you will deploy on this new AWS Region. Go build and deploy your infrastructure on ca-west-1 today.

— seb


Aujourd’hui, nous inaugurons une nouvelle Région Amazon Web Services (AWS) au Canada. La Région AWS Canada Ouest (Calgary), également connue sous le nom ca‑west‑1, est la 33e Région AWS. Elle compte trois Zones de disponibilité, emmenant ainsi le total des Zones de disponibilité à travers le monde à 105.

Cette deuxième Région au Canada vous permet d’élaborer des infrastructures multi-Régions qui demeurent disponibles 99,999 % du temps, tout en conservant vos données à l’intérieur des frontières canadiennes.

Une empreinte mondiale
Notre approche en matière de développement de notre infrastructure est fondamentalement différente de celle adoptée par d’autres fournisseurs. Au cœur de notre infrastructure mondiale, vous trouvez des Régions. Une Région AWS est un lieu physique dans le monde, dans lequel nous avons plusieurs Zones de disponibilité. Les Zones de disponibilité sont formées d’un ou plusieurs centres de données distincts, chacun doté de systèmes d’alimentation, de réseau et de connectivité redondants, et hébergés dans des installations séparées. Contrairement aux autres fournisseurs infonuagiques, qui définissent souvent une région comme étant un centre de données unique, le fait de pouvoir compter sur plusieurs Zones de disponibilité vous permet d’exploiter des applications et des bases de données de production ayant une plus grande disponibilité, une meilleure tolérance aux pannes et une plus importante évolutivité, allant ainsi au-delà des possibilités offertes par un centre de données unique.

AWS compte plus de 17 années d’expérience dans la mise en œuvre de son infrastructure mondiale. Il n’existe pas d’algorithme de compression pour remplacer une telle expérience, surtout lorsqu’il est question d’évolutivité, de sécurité et de performances.

Des clients canadiens de toute taille, dont des marques mondiales telles que BlackBerry, CI Financial, Keyera, KOHO, Maple Leaf Sports & Entertainment (MLSE), Nutrien, Sun Life et TELUS, ainsi que de jeunes pousses comme Good Chemistry and Cohere, en plus d’organismes du secteur public telles que l’Université de Calgary et Ressources naturelles Canada (RNCan), exécutent déjà des charges de travail sur AWS. Ces entreprises et organismes ont choisi AWS pour la sécurité, les performances, la flexibilité et la présence mondiale que nous offrons.

L’infrastructure mondiale AWS, dont font partie les Zones locales AWS et les AWS Outposts, offre à nos clients la flexibilité de déployer leurs charges de travail à proximité de leur clientèle, minimisant ainsi la latence du réseau. Par exemple, un de nos clients qui bénéfice de la flexibilité d’AWS est BrainBox AI, une jeune entreprise en croissance qui élabore des technologies de décarbonation. BrainBox AI utilise l’intelligence artificielle (IA) et l’apprentissage automatique (AA) basés dans le Nuage AWS pour aider des propriétaires d’édifice, partout au monde, à réduire les émissions liées aux systèmes de chauffage, de ventilation et de climatisation jusqu’à 40 %, et la consommation énergétique jusqu’à 25 %. L’infrastructure mondiale AWS permet à leur solution de gérer, avec une latence faible, des centaines d’immeubles dans plus de 20 pays, et ce 24 heures sur 24, sept jours sur sept.

Services disponibles
Vous pouvez déployer vos charges de travail sur n’importe laquelle des familles d’instance C5, M5, M5d, R5, C6g, C6gn, C6i, C6id, M6g, M6gd, M6i, M6id, R6d, R6i, R6id, I4i, I3en, T3 et T4g. La nouvelle Région Canada Ouest (Calgary) compte 65 services AWS, tous disponibles dès le lancement. En voici la liste, en ordre alphabétique : Amazon API Gateway, AWS AppConfig, AWS Application Auto Scaling, Amazon Aurora, Aurora PostgreSQL, AWS Batch, AWS Certificate Manager, AWS CloudFormation, Amazon CloudFront, AWS Cloud Map, AWS CloudTrail, Amazon CloudWatch, Amazon CloudWatch Events, Amazon CloudWatch Logs, AWS CodeDeploy, AWS Config, AWS Database Migration Service (AWS DMS), AWS DataSync, AWS Direct Connect, Amazon DynamoDB, Amazon Elastic Block Store (Amazon EBS), Amazon Elastic Compute Cloud (Amazon EC2), Amazon EC2 Auto Scaling, Amazon Elastic Container Registry (Amazon ECR), Amazon Elastic Container Service (Amazon ECS), Amazon Elastic Kubernetes Service (Amazon EKS ),  , Elastic Load Balancing,  , Elastic Load Balancing – Gateway (GWLB), Amazon EMR, Amazon EventBridge, AWS Fargate, AWS Health Dashboard, AWS Identity and Access Management (IAM), Amazon Kinesis Data Streams, AWS Key Management Service (AWS KMS), AWS Lambda, AWS Management Console, AWS Marketplace, Amazon OpenSearch Service, AWS Organizations, Amazon Redshift, AWS Resource Access Manager,   Resource Groups, Amazon Route 53, AWS Secrets Manager, AWS Security Hub, AWS Security Token Service, Service Quotas, AWS Shield Standard, Amazon Simple Notification Service (Amazon SNS), Amazon Simple Queue Service (Amazon SQS), Amazon Simple Storage Service (Amazon S3), Amazon Simple Workflow Service (Amazon SWF), AWS Site-to-Site VPN, AWS Step Functions, AWS Support API, AWS Systems Manager, AWS Trusted Advisor, VM Import/Export et AWS X-Ray.

AWS au Canada
Nous soutenons nos clients et partenaires grâce à notre infrastructure canadienne depuis décembre 2016, lorsque la première Région AWS au Canada, soit la Région AWS Canada (Centre), a été inaugurée. Au cours de cette même année, nous avons lancé des emplacements Amazon CloudFront à Toronto et Montréal afin de mieux servir vos clients dans ces régions. Actuellement, nous comptons 10 points de présence (PdP) au Canada : cinq à Toronto, quatre à Montréal et un à Vancouver. Nous avons également des équipes d’ingénieurs basées dans plusieurs villes à travers le pays.

Entre 2016 et 2021, AWS a investi plus de 2,57 milliards $ CAD (1,9 milliards $ USD) au Canada et prévoit investir jusqu’à 24,8 milliards $ CAD (18,3 milliards $ USD) dans nos deux Régions d’ici 2037. En se basant sur la méthodologie entrée-sortie et les tableaux statistiques fournies par Statistique Canada, nous estimons que les investissements prévus ajouteront 43,02 milliards $ CAD (31 milliards USD) au produit intérieur brut (PIB) du Canada et soutiendront plus de 9 300 emplois équivalents temps plein (ETP) au sein de l’économie canadienne.

En plus d’offrir les avantages d’une infrastructure de classe mondiale à nos clients, Amazon s’est engagé à atteindre une empreinte carbone nette zéro pour l’ensemble de ses activités d’ici 2040, et est en voie d’alimenter l’ensemble de ses opérations avec des énergies 100 % renouvelables d’ici 2025. En 2022, 90 % de l’électricité consommée par Amazon provenait de sources d’énergie renouvelables. En outre, AWS s’est donné comme objectif d’avoir un bilan positif en matière d’eau d’ici 2030, restituant ainsi plus d’eau aux communautés que la quantité utilisée pour ses activités directes. Amazon compte quatre projets d’énergie renouvelable au Canada, soit trois situés au sud de Calgary et un autre près d’Edmonton. Selon BloombergNEF, Amazon est la plus grande entreprise acheteuse d’énergie renouvelable au pays (et au monde). Ces projets génèrent plus de 2,3 millions de mégawattheures (MWh) d’énergie propre, soit suffisamment pour alimenter 1,69 million de foyers canadiens.

La formation est également l’une de nos principales priorités. Depuis 2017, nous avons formé plus de 200 000 Canadiens et Canadiennes en compétences infonuagiques par le biais de programmes de formation et certification AWS gratuits et payants. Des apprenants ayant différents niveaux de compétences, de responsabilités et d’expérience peuvent acquérir des connaissances et des compétences pratiques grâce à AWS Skills Builder, qui offre plus de 600 cours en ligne gratuits en jusqu’à 14 langues. Amazon s’est engagé à offrir des formations gratuites en compétences infonuagiques à 29 millions de personnes à travers le monde d’ici 2025.

Sécurité
Des clients du monde entier font confiance à AWS pour assurer la sécurité de leurs données, alors que la sécurisation et la confidentialité de leurs charges de travail sont des éléments fondamentaux de notre mode de fonctionnement. Depuis les tous débuts d’AWS, nous innovons sans relâche en matière de sécurité, d’outils de protection de la vie privée et de pratiques afin de répondre aux attentes de nos clients, et même dépasser ces attentes.

Par exemple, les décisions concernant l’emplacement de stockage de vos données, et qui peut y accéder, vous appartiennent. Des services tels qu’AWS CloudTrail vous permettent de vérifier comment et quand les données sont consultées. Notre technologie de virtualisation, AWS Nitro System, a été conçue pour restreindre l’accès de tout opérateur aux données de la clientèle. Cela signifie qu’aucun membre du personnel d’AWS, ou même un service AWS, peut accéder aux données lorsqu’elles sont utilisées au sein d’une instance Amazon Elastic Compute Cloud (Amazon EC2). En effet, NCC Group, une des principales firmes de conseil en cybersécurité au Royaume‑Uni, a procédé à une vérification de notre architecture Nitro et a confirmé nos affirmations.

Notre infrastructure de base est conçue pour répondre aux exigences de sécurité des armées, des banques mondiales, ainsi que d’autres organisations traitant des informations hautement sensibles.

Basée au Canada, Neo est une jeune pousse spécialisée en technologie financière qui profite de l’élasticité du Nuage AWS pour développer ses activités. En 2019, l’entreprise a choisi AWS car nous l’avions aidée à répondre aux exigences réglementaires du secteur. Elle utilise Amazon Elastic Compute Cloud (Amazon EC2) pour son infrastructure de base, Amazon Simple Storage Service (Amazon S3) pour un stockage très durable, Amazon GuardDuty pour améliorer sa posture de sécurité, ainsi qu’Amazon CloudFront afin d’optimiser les performances de ses systèmes pour sa clientèle.

Performances
L’infrastructure mondiale AWS est conçue pour offrir les meilleures performances et la plus faible latence atteignable, minimiser la perte de paquets et fournir la meilleure qualité générale pour l’ensemble du réseau. Cela est rendu possible grâce à un réseau dorsal de fibre optique de 400 GbE entièrement redondant, permettant souvent plusieurs térabits de capacité entre les Régions.

Afin d’offrir une latence encore plus faible à nos clients canadiens, nous avons annoncé la mise en place de deux Zone locales AWS à Toronto et Vancouver.

Les performances sont davantage importantes lorsque vous visionnez la diffusion en continu de votre émission préférée. L’entreprise Kidoodle.TV, basée à Calgary, offre un service de diffusion en continu destiné aux enfants. Elle compte plus de 100 millions de téléchargements de son application à travers le monde et plus d’un milliard de secondes publicitaires à vendre par période de 48 heures. En utilisant AWS, Kidoodle.TV a pu mettre en place le même type d’architecture de service que les entreprises multimilliardaires sont en mesure de déployer. Cela a permis à l’entreprise de passer, en une année, de 400 000 à 1,2 million d’utilisateurs actifs mensuels.

Informations complémentaires
Nous avons annoncé 12 futures Zones de disponibilité dans quatre Régions additionnelles en Malaisie, en Nouvelle‑Zélande, en Thaïlande et la Région souveraine en Europe; nous aurons le plaisir de partager des informations supplémentaires le moment venu.

Je suis impatient de découvrir vos innovations ainsi que les extraordinaires services que vous allez mettre en œuvre au sein de la Région AWS Canada Ouest (Calgary). N’hésitez pas à développer et à déployer votre infrastructure sur ca‑west‑1 dès aujourd’hui.

— Seb

Приехме измененията в Конституцията

Post Syndicated from Bozho original https://blog.bozho.net/blog/4185

Приехме окончателно измененията в Конституцията. Структурните предпоставки за независим съд и за отчетна прокуратура вече са налице. А подобряването на съдебната система е ключово за развитието на страната.

Аргументираните критики към законопроекта бяха чути и бяха направени съответните редакции (критика „заради самата критика“ винаги ще има).

А това, че с наши опоненти сме постигнали съгласие по тази голяма задача, е признак не на слабост, а на политическа адекватност. Никой няма сам да има 160 гласа, затова целите се постигат с разговор.

Дали това е исторически момент, ще кажат историците след десетилетия. Но със сигурност изкачихме един стръмен склон, който катерим от много години. Да, това не е върхът – катереното на стръмни склонове продължава. Това не е краят на съдебната реформа (ако някой реши да го определя така), но е ключова стъпка. Предстоят изменения на устройствени и процесуални закони.

Благодаря на всички за подкрепата, която направи възможно приемането на тези отдавна чакани промени.

Материалът Приехме измененията в Конституцията е публикуван за пръв път на БЛОГодаря.

Making SSH host certificates more usable

Post Syndicated from Matthew Garrett original https://mjg59.dreamwidth.org/68721.html

Earlier this year, after Github accidentally committed their private RSA SSH host key to a public repository, I wrote about how better support for SSH host certificates would allow this sort of situation to be handled in a user-transparent way without any negative impact on security. I was hoping that someone would read this and be inspired to fix the problem but sadly that didn’t happen so I’ve actually written some code myself.

The core part of this is straightforward – if a server presents you with a certificate associated with a host key, then make the trust in that host be whoever signed the certificate rather than just trusting the host key. This means that if someone needs to replace the host key for any reason (such as, for example, them having published the private half), you can replace the host key with a new key and a new certificate, and as long as the new certificate is signed by the same key that the previous certificate was, you’ll trust the new key and key rotation can be carried out without any user errors. Hurrah!

So obviously I wrote that bit and then thought about the failure modes and it turns out there’s an obvious one – if an attacker obtained both the private key and the certificate, what stops them from continuing to use it? The certificate isn’t a secret, so we basically have to assume that anyone who possesses the private key has access to it. We may have silently transitioned to a new host key on the legitimate servers, but a hostile actor able to MITM a user can keep on presenting the old key and the old certificate until it expires.

There’s two ways to deal with this – either have short-lived certificates (ie, issue a new certificate every 24 hours or so even if you haven’t changed the key, and specify that the certificate is invalid after those 24 hours), or have a mechanism to revoke the certificates. The former is viable if you have a very well-engineered certificate issuing operation, but still leaves a window for an attacker to make use of the certificate before it expires. The latter is something SSH has support for, but the spec doesn’t define any mechanism for distributing revocation data.

So, I’ve implemented a new SSH protocol extension that allows a host to send a key revocation list to a client. The idea is that the client authenticates to the server, receives a key revocation list, and will no longer trust any certificates that are contained within that list. This seems simple enough, but a naive implementation opens the client to various DoS attacks. For instance, if you simply revoke any key contained within the received KRL, a hostile server could revoke any certificates that were otherwise trusted by the client. The easy way around this is for the client to ensure that any revoked keys are associated with the same CA that signed the host certificate – that way a compromised host can only revoke certificates associated with that CA, and can’t interfere with anyone else.

Unfortunately that still means that a single compromised host can still trigger revocation of certificates inside that trust domain (ie, a compromised host a.test.com could push a KRL that invalidated the certificate for b.test.com), because there’s no way in the KRL format to indicate that a given revocation is associated with a specific hostname. This means we need a mechanism to verify that the KRL update is legitimate, and the easiest way to handle that is to sign it. The KRL format specifies an in-band signature but this was deprecated earlier this year – instead KRLs are supposed to be signed with the sshsig format. But we control both the server and the client, which means it’s easy enough to send a detached signature as part of the extension data.

Putting this all together: you ssh to a server you’ve never contacted before, and it presents you with a host certificate. Instead of the host key being added to known_hosts, the CA key associated with the certificate is added. From now on, if you ssh to that host and it presents a certificate signed by that CA, it’ll be trusted. Optionally, the host can also send you a KRL and a signature. If the signature is generated by the CA key that you already trust, any certificates in that KRL associated with that CA key will be incorporated into local storage. The expected flow if a key is compromised is that the owner of the host generates a new keypair, obtains a new certificate for the new key, and adds the old certificate to a KRL that is signed with the CA key. The next time the user connects to that host, they receive the new key and new certificate, trust it because it’s signed by the same CA key, and also receive a KRL signed with the same CA that revokes trust in the old certificate.

Obviously this breaks down if a user is MITMed with a compromised key and certificate immediately after the host is compromised – they’ll see a legitimate certificate and won’t receive any revocation list, so will trust the host. But this is the same failure mode that would occur in the absence of keys, where the attacker simply presents the compromised key to the client before trust in the new key has been created. This seems no worse than the status quo, but means that most users will seamlessly transition to a new key and revoke trust in the old key with no effort on their part.

The work in progress tree for this is here – at the point of writing I’ve merely implemented this and made sure it builds, not verified that it actually works or anything. Cleanup should happen over the next few days, and I’ll propose this to upstream if it doesn’t look like there’s any showstopper design issues.

comment count unavailable comments

Hibernating EC2 Instances in Response to a CloudWatch Alarm

Post Syndicated from Macey Neff original https://aws.amazon.com/blogs/compute/hibernating-ec2-instances-in-response-to-a-cloudwatch-alarm/

This blog post is written by Jose Guay, Technical Account Manger, Enterprise Support. 

A typical option to reduce costs associated with running Amazon Elastic Compute Cloud (Amazon EC2) instances is to stop them when they are idle. However, there are scenarios where stopping an idle instance is not practical. For example, instances with development environments that take time to prepare and run which benefit from not needing to do this process every day. For these instances, hibernation is a better alternative.

This blog post explores a solution that will find idle instances using an Amazon CloudWatch alarm that monitors the instance’s CPU usage. When the CPU usage consistently drops below the alarm’s threshold, the alarm enters the ALARM state and raises an event used to identify the instance and trigger hibernation.

With this solution, the instance no longer incurs in compute costs, and only accrues storage costs for any Amazon Elastic Block Store (Amazon EBS) volumes.

Overview

To hibernate an EC2 instance, there are prerequisites and required preparation. The instance must be configured to hibernate, and this is done when first launching it. This configuration cannot be changed after launching the instance.

One way to trigger instance hibernation is to use an AWS Lambda function. The Lambda function needs specific permissions configured with AWS Identity and Access Management (IAM). To connect the function with the alarm that detects the idle instance, use an Amazon EventBridge bus.

The following architecture diagram shows a solution.

Solution architecture

Figure 1 – Solution architecture

  • An EC2 instance sends metrics to CloudWatch.
  • A CloudWatch alarm detects an idle instance and sends the event to EventBridge.
  • EventBridge triggers a Lambda function.
  • The Lambda function evaluates the execution role permissions.
  • The Lambda function identifies the instance and sends the hibernation signal.

To implement the solution, follow these steps:

  1. Configure permissions with IAM
  2. Create the Lambda function
  3. Configure the EC2 instance to send metrics to CloudWatch
  4. Configure EventBridge

a. Configure permissions with IAM

Create an IAM role with permissions to stop an EC2 instance. The Lambda function uses it as its execution role. The IAM role also needs permissions to save logs in CloudWatch. This is useful to log when an instance is entering hibernation.

  1. Open the IAM console.
  2. In the navigation pane, choose Policies.
  3. Select Create policy.
  4. For Select a service, search and select CloudWatch Logs.
  5. In Actions allowed, search “createlog” and select CreateLogStream and CreateLogGroup.
  6. Repeat the search, this time for “putlog”, and select PutLogEvents.
  7. In Resources, choose All.
  8. Select + Add more permissions.
  9. For Select a service, select EC2.
  10. In Actions allowed, search “stop” and select StopInstances from the results.
  11. In Resources, choose Specific, and select the Add Arn
  12. From the pop-up window select Resource in this account, type the region where the instance is, and the instance ID. This forms the ARN of the instances to monitor.
  13. Select Add ARNs.
  14. Select Next.
  15. Name the policy AllowHibernateEC2InstancePolicy.

IAM policy to access EC2 instances and CloudWatch logs

Figure 2 – IAM policy to access EC2 instances and CloudWatch logs

Viewing the IAM policy in JSON format

Figure 3 – Viewing the IAM policy in JSON format

  1. In the navigation page, select Roles.
  2. Select Create role.
  3. For Trusted entity type, select AWS Service.
  4. For Use case, select Lambda.
  5. Select Next.
  6. In the Permissions policies list, search and select Allow HibernateEC2InstancePolicy.
  7. Select Next.
  8. Name the role AllowHibernateEC2InstanceFromLambdaRole.
  9. Select Create role.

IAM role implementing the IAM policy

Figure 4 – IAM role implementing the IAM policy

b. Create the Lambda function

Create a Lambda function that will find the ID of the idle instance using the event data from the CloudWatch alarm to hibernate it. The event data will be in a function parameter.

The event data is in the JSON format. The following is an example of what this data looks like.

{
	"version": "0",
	"id": "77b0f9cf-ebe3-3893-f60e-1950d2b8ef26",
	"detail-type": "CloudWatch Alarm State Change",
	"source": "aws.cloudwatch",
	"account": "<account>",
	"time": "2023-08-10T21:27:58Z",
	"region": "us-east-1",
	"resources": [
		"arn:aws:cloudwatch:<region>:<account>:alarm:alarm-name"
	],
	"detail": {
		"alarmName": "alarm-name",
		"state": {
			"value": "ALARM",
			"reason": "TEST",
			"timestamp": "2023-07-05T21:27:58.659+0000"
		},
		"previousState": {
			"value": "OK",
			"reason": "Unchecked: Initial alarm creation",
			"timestamp": "2023-07-05T21:13:51.658+0000"
		},
		"configuration": {
			"metrics": [
				{
					"id": "26c493f3-c295-4454-ff19-70ce482dca64",
					"metricStat": {
						"metric": {
							"namespace": "AWS/EC2",
							"name": "CPUUtilization",
							"dimensions": {
								"InstanceId": "<instance id>"
							}
						},
						"period": 300,
						"stat": "Average"
					},
					"returnData": true
				}
			],
			"description": "Created from EC2 Console"
		}
	}
}

Follow these steps to create the Lambda function.

  1. Open the Functions page of the Lambda console.
  2. Choose Create function.
  3. Select Author from scratch.
  4. Name the function HibernateEC2InstanceFunction.
  5. For the Runtime, select Python 3.10 (or the latest Python version).
  6. For Architecture, choose arm64.
  7. Expand Change default execution role and select Use an existing role.
  8. Select AllowHibernateEC2InstanceFromLambdaRole from the list of existing roles.
  9. Select Create function at the bottom of the page.

In the Lambda function page, scroll down to view the Code tab at the bottom. Copy the following code onto the editor for the lambda_function.py file.

import boto3

def lambda_handler(event, context):
    instancesToHibernate = []
    region = getRegion(event)
    ec2Client = boto3.client('ec2', region_name=region)
    id = getInstanceId(event)

    if id is not None:
        instancesToHibernate.append(id)
        ec2Client.stop_instances(InstanceIds=instancesToHibernate, Hibernate=True)
        print('stopped instances: ' + str(instancesToHibernate) + ' in region ' + region)
    else:
        print('No instance id found')

def getRegion(payload):
    if 'region' in payload:
        region = payload['region']
        return region 
    
    #default to N. Virginia
    return 'us-east-1'

def getInstanceId(payload):
    if 'detail' in payload:
        detail = payload['detail']
        if 'configuration' in detail:
            configuration = detail['configuration']
            if 'metrics' in configuration:
                if len(configuration['metrics']) > 0:
                    firstMetric = configuration['metrics'][0] 
                    if 'metricStat' in firstMetric:
                        metricStat = firstMetric['metricStat']
                        if 'metric' in metricStat:
                            metric = metricStat['metric']
                            if 'dimensions' in metric:
                                dimensions = metric['dimensions']
                                if 'InstanceId' in dimensions:
                                    id = dimensions['InstanceId']
                                    return id
    
    return None

Lambda function code editor

Figure 5 – Lambda function code editor

The code has the following contents:

  1. Imports section. In this section, import the libraries that the function uses. In our case, the boto3
  2. The main method, called lambda_handler, is the execution entry point. This is the method called whenever the Lambda function runs.
    1. It defines an array to store the IDs of the instances that enter hibernation. This is necessary because the method stop_instances expects an array as opposed to a single value.
    2. Using the event data, it finds the AWS Region and instance ID of the instance to hibernate.
    3. It initializes the Amazon EC2 client by calling the client method.
    4. If it finds an instance ID, then it adds it to the instances array.
    5. Calls stop_instances passing as parameters the instances array and True to indicate the hibernation operation.

c. Configure the EC2 instance to send metrics to CloudWatch

In the scenario, an idle EC2 instance has its CPU utilization under 10% during a 15-minute period. Adjust the utilization percentage and/or period to meet your needs. To enable alarm tracking, the EC2 instance must send the CPU Usage metric to CloudWatch.

  1. Open the Amazon EC2 console.
  2. In the navigation pane, choose Instances.
  3. Select an instance to monitor with the checkbox on the left.
  4. Find the Alarm status column, and select the plus sign to add a new alarm.

Creating a new CloudWatch alarm from the EC2 console

Figure 6 – Creating a new CloudWatch alarm from the EC2 console

  1. In the Manage CloudWatch alarms page, select Create an alarm. Then, turn off Alarm action. Use Alarm notification to notify when hibernating an instance, otherwise, turn off.

CloudWatch alarm notification and action settings

Figure 7 – CloudWatch alarm notification and action settings

  1. In the Alarm thresholds section, select:
    1. Group samples by Average.
    2. Type of data to sample CPU utilization.
    3. Alarm when less than (<).
    4. Percent 10.
    5. Consecutive periods 1.
    6. Period 15 Minutes.
    7. Alarm name Idle-EC2-Instance-LessThan10Pct-CPUUtilization-15Min.

CloudWatch alarm thresholds

Figure 8 – CloudWatch alarm thresholds

  1. Select Create at the bottom of the page.
  2. A successful creation shows a green banner at the top of the page.
  3. Select the Alarm status column for the instance, then select the link that shows in the pop-up window to go to the new CloudWatch alarm details.

Accessing the CloudWatch alarm from the EC2 console

Figure 9 – Accessing the CloudWatch alarm from the EC2 console

  1. Scroll down to view the alarm details and copy its ARN, which shows in the lower right corner. The EventBridge rule needs this.

Finding the CloudWatch alarm ARN

Figure 10 – Finding the CloudWatch alarm ARN

d. Configure EventBridge to consume events from CloudWatch

When the alarm enters the ALARM state, it means it has detected an idle EC2 instance. It will then generate an event that EventBridge can consume and act upon. For this, EventBridge uses rules. EventBridge rules rely on patterns to identify the events and trigger the appropriate actions.

  1. Open the Amazon EventBridge console.
  2. In the navigation pane, choose Rules.
  3. Choose Create rule.
  4. Enter a name and description for the rule. A rule cannot have the same name as another rule in the same Region and on the same event bus.
  5. For Event bus, choose an event bus to associate with this rule. To match events that come from the same account, select AWS default event bus. When an AWS service in the account emits an event, it always goes to the account’s default event bus.
  6. For Rule type, choose Rule with an event pattern.
  7. Select Next.
  8. For Event source, choose AWS services.
  9. Scroll down to Creation method and select Custom pattern (JSON editor).
  10. Enter the following pattern on the Event Pattern
{
  "source": ["aws.cloudwatch"],
  "detail-type": ["CloudWatch Alarm State Change"],
  "detail": {
    "state": {
      "value": ["ALARM"]
    },
    "resources":[
    "<ARN of CW alarms to respond to>"
    ]
  }
}
  1. In the resources element of the pattern, add the ARN of the CloudWatch alarm created for the EC2 instance. The resources element is an array. Add the ARN of every alarm to which this rule monitors and responds. Doing this allows using a single rule to handle the same action for multiple alarms.
  2. Select Next.
  3. Select a target. This is the action that EventBridge executes once it has identified an event. Choose AWS service and select Lambda function.
  4. Select HibernateEC2InstanceFunction.
  5. Select Next.
  6. Add tags to the rule as needed.
  7. Select Next.
  8. Review the rule configuration, and select Create rule.

- EventBridge rule event pattern

Figure 11 – EventBridge rule event pattern

EventBridge rule targets

Figure 12 – EventBridge rule targets

Testing the implementation

To test the solution, wait for the instance’s CPU utilization to fall below the 10% threshold for 15 minutes. Alternatively, force the alarm to enter the ALARM state with the following AWS CLI command.

aws cloudwatch set-alarm-state --alarm-name
"Idle-EC2-Instance-LessThan10Pct-CPUUtilization-15Min"
--state-value ALARM --state-reason "testing"

Conclusion

Hibernating EC2 instances brings savings during periods of low utilization. Another benefit is that when they start again, they continue their work from where they left off. To hibernate the instance, set the hibernation configuration when launching it. Detect the idle instance with a CloudWatch alarm, and use EventBridge to capture the alarms and trigger a Lambda function to call the Amazon EC2 stop API with the hibernate parameter.

To learn more

Introducing Amazon MQ cross-Region data replication for ActiveMQ brokers

Post Syndicated from Pascal Vogel original https://aws.amazon.com/blogs/compute/introducing-amazon-mq-cross-region-data-replication-for-activemq-brokers/

This post is written by Dominic Gagné, Senior Software Development Engineer, and Vinodh Kannan Sadayamuthu, Senior Solutions Architect

Amazon MQ now supports cross-Region data replication for ActiveMQ brokers. This feature enables you to build regionally resilient messaging applications and makes it easier to set up cross-Region message replication between ActiveMQ brokers in Amazon MQ. This blog post explains how cross-Region data replication works in Amazon MQ, how to setup cross-Region replica brokers for ActiveMQ, and how to test promoting a replica broker.

Amazon MQ is a managed message broker service for Apache ActiveMQ and RabbitMQ that simplifies setting up and operating message brokers on AWS.

Cross-Region replication improves the resilience and disaster recovery capabilities of your systems. This new Amazon MQ feature makes it easier to increase resilience of your ActiveMQ messaging systems across AWS Regions.

How cross-Region data replication works in Amazon MQ for ActiveMQ

The Amazon MQ for ActiveMQ cross-Region data replication feature replicates broker state from the primary broker in one AWS Region to the replica broker in another Region. Broker state consists of messages that have been sent to a broker by a message producer. Additionally, message acknowledgments and transactions are replicated. Scheduled messages and broker XML configuration are not replicated from the primary to the replica broker.

State replication occurs asynchronously and runs in the background. When a message is sent to a cross-Region data replication enabled broker, the data is persisted both to the primary data store and also on a queue used to replicate data. The replica broker acts as a client of this queue and consumes data that represents broker state from the primary broker.

At any given moment, only the primary broker is available for client connections. The replica broker is a hot standby and passively replicates the primary broker’s state. However, it does not accept client connections. The following diagram shows a simplified version of a cross-Region data replication broker pair. All replication traffic is encrypted using TLS and remains within AWS’ private backbone.

Amazon MQ for ActiveMQ cross-region data replication architecture

Configuring cross-Region replica brokers for Amazon MQ for ActiveMQ

To set up a cross-Region replica broker, your Amazon MQ for ActiveMQ primary broker must meet the following eligibility criteria:

  • ActiveMQ version 5.17.6 or above
  • Instance size m5.large or higher
  • Active/standby broker deployment enabled
  • Be in the Running state

If you do not have an ActiveMQ broker that meets these criteria, see Creating and configuring an ActiveMQ broker for instructions on how to create a primary broker.

To configure cross-Region replication

  1. Navigate to the Amazon MQ console and choose Create replica broker.
    Amazon MQ console create replica broker
  2. Select a primary broker from the list of eligible primary brokers and choose Next.
    Amazon MQ console choose primary broker
  3. Under Replica broker details, select the Region for your replica broker and enter a Replica broker name.
    Amazon MQ console configure replica broker
  4. In the ActiveMQ console user for replica broker panel, enter a Username and Password for broker access.
    Amazon MQ console user for replica broker
  5. In the Data replication user to bridge access between brokers panel, enter a replication user Username and Password.
    Amazon MQ console user for replica broker
  6. In the Additional settings panel, keep the defaults and choose Next.
  7. Review the settings and choose Create replica broker.
    Note: The broker access type is automatically set based on the primary broker access type.
    Amazon MQ console create replica broker setting summary
  8. The creation process takes up to 25 minutes. Once the replica broker creation is complete, begin replication between the primary and the replica brokers by rebooting the primary broker.
  9. Once the primary broker is rebooted and its status is Running, you can see the replica details in the Data replication panel of the primary broker.
    Amazon MQ console broker replication details

Both brokers now synchronize with each other to establish an inter-Region network and connection through which broker state is replicated. Once both brokers are in the Running state, the primary broker accepts client connections and passes all broker state changes (messages, acknowledgments, transactions, etc.) to the replica broker.

The replica broker now asynchronously mirrors the state of the primary broker. However, it does not become available for client connections until it is promoted via a switchover or a failover. These operations are covered in the following section.

Testing data replication and promoting the replica broker

There are two ways to promote a replica broker: initiating a switchover or a failover.

Switchover Failover
  • Prioritizes consistency over availability.
  • Prioritizes availability over consistency.
  • Brokers are guaranteed to have identical states.
  • Brokers are not guaranteed to be in identical states.
  • Brokers may not be available immediately to serve client traffic.
  • Replica broker is immediately available to serve client traffic.

To initiate a failover or switchover

    1. Navigate to the Amazon MQ console, choose your primary broker, and log in to the ActiveMQ Web Console using the URLs located in the Connections panel.
    2. In the top menu, select Queues. You should be able to see four ActiveMQ.Plugin.Replication queues used by the replication feature.
      Active MQ console queues
    3. To test message replication from the primary to a replica broker, create a queue and send messages. To create the queue:
      • For Queue Name, enter TestQueue.
      • Choose Create.

      ActiveMQ console create queue

    4. Under Operations for the TestQueue, choose Send To and perform the following steps:
      • For Number of messages to send, enter 10 and keep the other defaults.
      • Under Message body, enter a test message.
      • Choose Send.

      ActiveMQ console send test message

    5. To promote the replica broker, navigate to the Amazon MQ console and change the Region to the AWS Region where the replica broker is located.
    6. Select the replica broker (in this example called Secondarybroker) and choose Promote replica.
      Amazon MQ console promote broker
    7. In the Promote replica broker pop-up window:
      • Select Failover or Switchover.
      • Enter confirm in text box.
      • Choose Confirm.

      Amazon MQ console confirm broker promotion

    8. While a replica broker is being promoted, its replication status changes to Promotion in progress. The corresponding primary broker’s replication status changes to Demotion in progress.

Replica Secondarybroker status – Promotion in progress:

Replica Secondarybroker status - Promotion in progress

Primary broker status – Demotion in progress:

Primary broker status - Demotion in progress

Secondarybroker status – Promoted to new primary broker:

Secondarybroker status – Promoted to new primary broker

  1. Once the Secondarybroker status is Running, log in to the ActiveMQ Web Console from the URLs located in the Connections panel. You can see the replicated messages sent from the former primary broker in Step 4 in the TestQueue:
    Replicated message from primary broker in TestQueue

Monitoring cross-Region data replication

To monitor cross-Region data replication progress, you can use the Amazon CloudWatch metrics TotalReplicationLag and ReplicationLag.

Amazon CloudWatch metrics TotalReplicationLag and ReplicationLag

You can use these two metrics to monitor the progress of a switchover. When their value reaches zero, the switchover will complete because the broker states have been synchronized and the replica broker begins accepting client connections. If the switchover does not progress fast enough, or if you need the replica broker to be immediately available to serve client traffic, you can request a failover at any time.

Note: A failover can interrupt an ongoing switchover. However, a switchover cannot interrupt an ongoing failover.

Issuing a failover request causes the replica broker to become immediately available, but does not provide any guarantees about what data has been replicated to the replica broker. This means that a failover can make data tracking and reconciliation more challenging for your client application than a switchover.

For this reason, we recommend that you always start with a switchover and interrupt it with a failover if necessary. To interrupt an ongoing switchover, follow the same steps as for promoting a replica broker, select the failover option, and confirm.

Note: If you fail back to the original primary broker, messages that are not replicated from the primary to the replica broker during the failover will still exist on the primary broker. Therefore, consumers must manage these messages. We recommend tracking the processed message IDs in a data store such as Amazon DynamoDB global tables and comparing the message to the processed message IDs.

If you no longer need to replicate broker data across Regions or if you need to delete a primary or replica broker, you must unpair the replica broker and reboot the primary broker. You can unpair the replica broker in the Amazon MQ console by following Delete a CRDR broker.

To unpair the broker using the AWS Command Line Interface (AWS CLI), run the following command, replacing the --broker-id with your primary broker ID:

aws mq update-broker --broker-id <primary broker ID> \
--data-replication-mode "NONE" \
--region us-east-1

Conclusion

Using the cross-Region data replication feature for Amazon MQ for ActiveMQ provides a straightforward way to implement cross-Region replication to improve the resilience of your architecture and meet your business continuity and disaster recovery requirements. This post explains how cross-Region data replication works in Amazon MQ, how to set up a cross-Region replica broker, and how to test and promote the replica broker.

For more details, see the Amazon MQ documentation.

For more serverless learning resources, visit Serverless Land.

How we organize and get things done with SERVICEOWNERS

Post Syndicated from Max Beizer original https://github.blog/2023-12-19-how-we-organize-and-get-things-done-with-serviceowners/


GitHub’s primary codebase is a large Ruby on Rails monolith with over 4.2 million lines of code across roughly 30,000 files. As the platform has grown over the years, we have come to realize that we need a new way to organize and think about the systems we run. Our traditional approach to organizing Hubbers and code has been through CODEOWNERS in combination with GitHub teams, organizations, issues, and repositories. However, as GitHub’s user base continues to grow, we have discovered we need a new layer of abstraction. This is where SERVICEOWNERS comes in.

Service-oriented architecture is not new, but we do not talk often about how large engineering teams organize around services–especially in a hybrid monolith/services architecture. GitHub engineering determined that we were missing a layer in between CODEOWNERS, how we group humans, and work to be done. Injecting a “service” layer between groups of functionality and the people maintaining them opens up a number of interesting possibilities.

One side-effect of adopting SERVICEOWNERS was realizing that the “ownership” model does not quite express how we work. Given our place in the open source ecosystem and what we value as a company, we thought the “maintainer” model more accurately describes the relationships between services and teams. So, no team “owns” anything, but instead they “maintain” various services.

Consistent, company-wide grouping

Achieving consistency in how we map running code–both within and without our monolith–to humans has had a number of positive outcomes. It promotes a shared lexicon, and, therefore, a shared understanding. The durability of services reduces the disruption of team reorganization. As priorities shift, services stay the same and require only minimal updates to yaml metadata to be accurate. Consistency in our service definitions also allows us to centralize information about the services we run into a service catalog. Our service catalog is the one-stop shop for up-to-date information on the services that power GitHub. Within the catalog, Hubbers of all stripes can find information on, for example, how a service is performing vis-a-vis an SLO. Each service in the service catalog also has a number of scorecards as part of our fundamentals program.

With clearly defined services collected in a service catalog, we can easily visualize the relationships between services. We can identify dependencies and map how information flows through the platform. All this information improves the onboarding experience for new engineers, too, as the relationships between services define the platform architecture—without having to rely on out-of-date docs or hand-waving to explain our architecture.

The service catalog also has the huge benefit of centralizing information about which teams maintain which services, how to reach an on-call engineer, and what expectations the service has set in terms of support SLAs. Clean lines of communication to maintainers of running services has been a huge help in reducing our incident remediation time. Incident commanders know how to contact on-call engineers because they can find it in the service catalog. All of this is only possible thanks to SERVICEOWNERS.

How it works

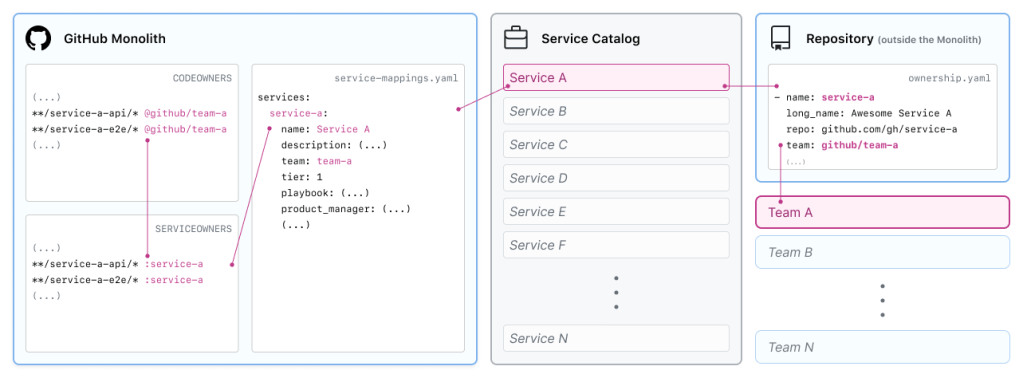
a diagram depicting the connections between the GitHub monolith, the service catalog, repositories, and teams.

The SERVICEOWNERS file

A SERVICEOWNERS file lives next to the CODEOWNERS file within our monolith. Like a traditional CODEOWNERS file, SERVICEOWNERS consists of a series of glob patterns (for example, app/api/integration*), directory names (for example, config/access_control/) and filenames (for example, app/api/grants.rb) followed by a service name (for example :apps maps to the team github/apps). Our CI enforces rules like:

  • There can be no duplicate patterns/directories/files in SERVICEOWNERS.
  • All new files added to the github/github repository must have a service owner.
  • All patterns/directories/files must match at least one existing file.
  • Files matched by multiple glob patterns must be disambiguated by a file or directory definition.

The service-mappings.yaml file

A service-mappings file defines how services referenced in the SERVICEOWNERS file relate to services in the service catalog and GitHub teams. This configuration can define a service’s product manager, engineering manager, repository, and chat information. Service mappings can also define information about a service’s various classifications, such as its “tier” rating, with zero being critical to the GitHub platform and three being experimental/non-critical.

The serviceowners gem

We have developed a Ruby gem we integrate with our Rails app that combines data from the SERVICEOWNERS and service-mappings files to produce several types of output. The serviceowners gem generates our CODEOWNERS file. So, instead of manually updating CODEOWNERS, changing which team or teams maintain a service is a one-line YAML change. The serviceowners gem also has an executable which allows engineers to query information about the maintainer of a file or which files a service maintains.

Because it’s GitHub, there’s of course also a chat-op for that:

me: hubot serviceowners for test/jobs/do_the_thing_with_the_stuff_test.rb

hubot: The file test/jobs/do_the_thing_with_the_stuff_test.rb is part of the github/some_service service and is maintained by the cool-fun-team team who can be reached in #hijinx.

The ownership.yaml file

The above examples mostly focus on breaking up the monolith into services, but our service catalog can slurp up service information from any repository within the GitHub org that has an ownership.yaml file. Like the service-mappings file, ownership expresses version controlled values for various service metadata. This allows us to have the boundaries of a service span across multiple repositories; for example, the GitHub Desktop app can have a component service within the monolith while also having its own standalone artifact from a different repository. Another benefit of the ownership file is that it allows us to focus code changes to the monolith codebase primarily around functionality and not maintainership.

Conclusion

The combination of CODEOWNERS and SERVICEOWNERS has provided serious value for us at GitHub. The tooling we continue to build atop these primitives will serve to make maintaining services clearer and easier. That’s good news for the future of GitHub. It also pairs quite nicely with our open source identity and access management project, entitlements, too. If SERVICEOWNERS sounds like something your organization, open source or corporate alike, would benefit from, let us know on X at @github.

The post How we organize and get things done with SERVICEOWNERS appeared first on The GitHub Blog.

NAS Life Expectancy: How to Extend NAS Longevity

Post Syndicated from Vinodh Subramanian original https://www.backblaze.com/blog/nas-life-expectancy-how-to-extend-nas-longevity/

A decorative image showing a NAS device and a cloud in the background.

There’s only one truth you need to know about tech: at some point, it will fail. Hard drives die. You get the blue screen of death the day of the big presentation. You lose cell service right when your mom calls. (Or maybe you pretend to lose service right when your mom calls. We won’t judge.) Whatever it is, we’ve all been there. 

If you use network attached storage (NAS) for your business or at home, you’re probably well aware of this fact. The redundancy you get from a solid RAID configuration might be one of the reasons you invested in a NAS—to prepare for inevitable drive failures. NAS devices are a great investment for a business for their durability and reliability, but there are things you can do to extend the lifespan of your NAS and get even more out of your investment.

Extending the lifespan of a NAS system isn’t just about preventing hardware failures; it’s crucial for ensuring uninterrupted access to critical data while maximizing ROI on your IT investments. In this blog, you’ll learn about the key factors that influence NAS longevity and get real-world strategies to strengthen and optimize your NAS infrastructure. 

Understanding NAS Lifespan

Today’s NAS devices offer faster processing, enhanced performance, and significantly larger storage capabilities than ever before. These technological advancements have paved the way for efficient local data management using NAS in both professional and personal settings. 

A decorative image showing a NAS device, an office building, and the Backblaze logo on a cloud.

Despite these advancements, it’s important to acknowledge that NAS devices tend to have a finite lifespan. This limitation is due to several factors, including the physical wear and tear of hardware components, ever-evolving software requirements, and the constant advancement of technology which can render older systems less efficient or incompatible with new standards. 

Also, it’s crucial to differentiate between the life expectancy of a NAS device and that of the hard drives within the device. While the NAS itself may continue to function, the hard drives that are subjected to intense read/write operations often have a shorter lifespan. If you want to learn more about hard drive reliability and failure rates, refer to Backblaze’s Hard Drive Stats.

Key Factors Affecting NAS Longevity

From the quality of the hardware to the environment it operates in, multiple elements contribute to the lifespan of NAS. Let’s explore these key factors in detail:

1. Hardware Components: Quality and Durability

One of the key factors that heavily affects the NAS device is the quality of the hardware itself. Additionally, factors such as the processor, memory, and power unit also play crucial roles. High-quality hardware and components from reputable manufacturers tend to last longer and offer better performance and reliability which contribute to the overall lifespan of the NAS.

2. Workload and Usage Intensity

The workload handled by the NAS is a significant determinant of its longevity. Devices that are constantly under heavy load, managing large data transfers, or running intensive applications will likely experience wear and tear more rapidly than those used for lighter tasks. 

3. Environmental Factors: Temperature, Humidity, and Corrosion

Operating a NAS in environments with high temperatures or humidity levels can lead to overheating and moisture-related damage. Additionally, locations with high levels of dust or corrosive elements can lead to physical deterioration of components.

4. Quality of Network Environment

The quality and stability of the network environment in which the NAS operates can also affect its lifespan. Frequent network issues or unstable connections can strain the NAS’s hardware and software, potentially leading to earlier failures. 

5. Support, Technological Advancements, and Compatibility

Ongoing support and compatibility with new technologies are also vital for the longevity of NAS systems. As technology evolves, older NAS devices may struggle with compatibility issues, rendering them less efficient or even obsolete.

Maintenance and Care for Enhanced Lifespan

Now that we understand the factors that affect NAS longevity, let’s explore how proactive maintenance and care are crucial to extending its lifespan. There are a number of things you can do to keep your NAS functioning properly for the long haul:

  • Regular Maintenance: Routine cleaning is vital for maintaining NAS efficiency. Dust accumulation can lead to overheating. Regularly cleaning the external vents and fans, and ensuring the device is in a well-ventilated area can prevent thermal issues and prolong the device’s life. 
  • Proactive Drive Replacements: Hard drives are among the most failure-prone components in a NAS. Implementing a regular schedule to check drive health and replacing unhealthy or borderline drives proactively can prevent data loss and reduce the workload on the NAS’s remaining drives, thus preserving its overall integrity. 
  • Updating Software and Patches: Keeping the NAS software and firmware up to date is essential for security and performance. Regular updates often include patches for vulnerabilities, performance enhancements, and new features that can improve the efficiency and longevity of the NAS. 
  • Monitoring NAS Health: Utilizing the tools and built-in functionalities to monitor the health and performance of your NAS also helps extend its lifespan. Many NAS systems come with software that can alert you to issues such as failing drives, high temperatures, or network problems. Keeping an eye on these metrics can help you address potential problems before they escalate. 
  • Environmental Considerations: The operating environment of a NAS plays a significant role in NAS longevity. Keeping your NAS in a stable environment with controlled temperature and humidity levels should be considered to extend its lifespan. 
  • Power Protection: Protect your NAS from power surges and outages using uninterrupted power supply (UPS). This can not only prevent data loss but also help avoid any potential hardware damage caused by electrical issues. 
A product image of a CyberPower 900 AVR uninterrupted power supply tower.
The CyberPower 900 AVR is just one example of a UPS. Source.
  • Recognizing When to Replace the NAS: Look out for indicators that suggest it’s time to replace your NAS. These include the expiration of the manufacturer’s warranty, noticeable performance declines, increased frequency of repairs, or when the device no longer meets your evolving storage needs. Waiting until a complete failure can be more costly and disruptive. 

By adhering to these maintenance and care guidelines, you can significantly enhance the lifespan and reliability of your NAS, ensuring that it continues to serve as a robust and efficient data storage solution for your business or personal needs. 

Implementing Fault Tolerance and Off-Loading Data to Cloud

In addition to proactive maintenance and care, there are a few other strategies you can use to extend NAS lifespan such as implementing fault tolerance and adding cloud storage to your backup strategy to offload data from your NAS. Let’s explore them below. 

The Importance of Fault Tolerance and RAID Configurations in NAS

Fault tolerance refers to the ability of a NAS to continue operating correctly even if one or more of its hard drives fail. It’s critical for NAS systems to have fault tolerance in place, especially in business environments where data availability and integrity can not be compromised. 

RAID (Redundant Array of Independent Disks) plays a pivotal role in achieving fault tolerance. It involves combining multiple hard drives into a single system to improve data redundancy and performance. By doing so, RAID protects against data loss due to single or multiple disk failures, depending on the RAID level implemented. 

An image showing a RAID 5 configuration.
RAID 5: Striping and parity distributed across disks.

RAID Configurations

Various RAID configurations offer different balances of data protection, storage efficiency, and performance. Common configurations include RAID 0 (striping), RAID 1 (mirroring), RAID 5 and RAID 6, each with its specific advantages and use cases. For example, RAID 1 is simple and offers data redundancy, while RAID 5 and 6 provide a good balance between storage capacity and data protection. To fully understand which RAID configuration suits your needs, explore our NAS RAID Levels blog which explains how to choose the right RAID level for your NAS data. 

Off-Loading and Backing Up NAS Data to the Cloud

Off-loading data from your NAS to a cloud storage service can significantly reduce the workload on your NAS hardware, thus potentially extending its life. You can consider creating a cloud archive of old data and a system for off-loading data on a regular cadence or as projects close.  

The cloud also helps you establish a robust 3-2-1 backup strategy (three total copies of your data, two of which are local but on different mediums, and one copy off-site). This ensures data redundancy and offers enhanced data protection against local disasters, theft, or hardware failure. Many NAS devices, like Synology and QNAP, have built-in backup utilities that back up directly to cloud storage like Backblaze B2. 

By integrating fault tolerance through RAID configurations and backing up data to the cloud, you can significantly enhance the data protection capabilities of your NAS. This approach not only ensures data safety but also contributes to the overall health and longevity of your NAS system.

Extending Your NAS Lifespan

Navigating the complexities of NAS systems can be a journey full of learning and adaptation. While NAS offers unparalleled convenience of local storage, it’s essential to recognize that its longevity relies on more than just its initial setup. It requires a proactive approach with diligent maintenance while embracing technological advancements such as fault tolerance and RAID levels. When properly cared for, however, many users find NAS to be a long-lived piece of their tech stack. 

But, it doesn’t have to stop there. The integration of cloud storage with NAS systems can significantly help reduce the strain on your local system, and safeguard your NAS data off-site while ensuring you have comprehensive 3-2-1 data protection in place. 

It’s time to hear from you. What strategies have you employed to extend the lifespan of your NAS device? Share your stories and tips in the comments below to help others in the NAS community.

The post NAS Life Expectancy: How to Extend NAS Longevity appeared first on Backblaze Blog | Cloud Storage & Cloud Backup.

[$] The Linux graphics stack in a nutshell, part 1

Post Syndicated from jake original https://lwn.net/Articles/955376/

Linux graphics developers often speak of modern Linux graphics
when they refer to a number of individual software components and how they
interact
with each other.
Among other things, it’s a mix of kernel-managed display resources,
Wayland for compositing, accelerated 3D rendering, and decidedly not X11.
In a two-part series, we will take a fast-paced journey
through the graphics code to see how it converts application data
to pixel data and displays it on the screen. In this installment, we look
at application rendering, Mesa internals, and the
necessary kernel features.

[$] The Linux graphics stack in a nutshell, part 1

Post Syndicated from jake original https://lwn.net/Articles/955376/

Linux graphics developers often speak of modern Linux graphics
when they refer to a number of individual software components and how they
interact
with each other.
Among other things, it’s a mix of kernel-managed display resources,
Wayland for compositing, accelerated 3D rendering, and decidedly not X11.
In a two-part series, we will take a fast-paced journey
through the graphics code to see how it converts application data
to pixel data and displays it on the screen. In this installment, we look
at application rendering, Mesa internals, and the
necessary kernel features.

Sun King uses Amazon Redshift data sharing to accelerate data analytics and improve user experience

Post Syndicated from Aaber Jah original https://aws.amazon.com/blogs/big-data/sun-king-uses-amazon-redshift-data-sharing-to-accelerate-data-analytics-and-improve-user-experience/

This post is co-authored with Guillaume Saint-Martin at Sun King. 

Sun King is the world’s leading off-grid solar energy company, and is on a mission to power access to brighter lives through off-grid solar. Sun King designs, distributes, installs, and finances solar home energy products for people currently living without reliable energy access. It serves over 100 million users in 65 countries across the world.

Over 26,000 agents across Africa today help local families get access to Sun King off-grid products to have more productive lives. These agents are informed in near-real time to find the right geographical areas and families who do not have access to low cost power. Sun King is driven by data for analyzing areas of growth across thousands of miles using a dashboards that are powered by Amazon Redshift.

In this post, we share how Sun King uses Amazon Redshift and Redshift’s features like Data Sharing capabilities to improve the performance of queries in Looker for over 1,000 of our staff.

Amazon Redshift is a fully managed, scalable cloud data warehouse that accelerates your time to insights with fast, easy, and secure analytics at scale. Tens of thousands of customers rely on Amazon Redshift to analyze exabytes of data and run complex analytical queries, making it a widely used cloud data warehouse. You can run and scale analytics in seconds on all your data without having to manage your data warehouse infrastructure.

Use case

Sun King uses a Redshift provisioned cluster to run its extract, transform and load (ETL) and analytics processes to source and transform data from various sources. It then provides access to this data for business users through Looker. Amazon Redshift currently manages varied consumption requirements for Looker users across the globe
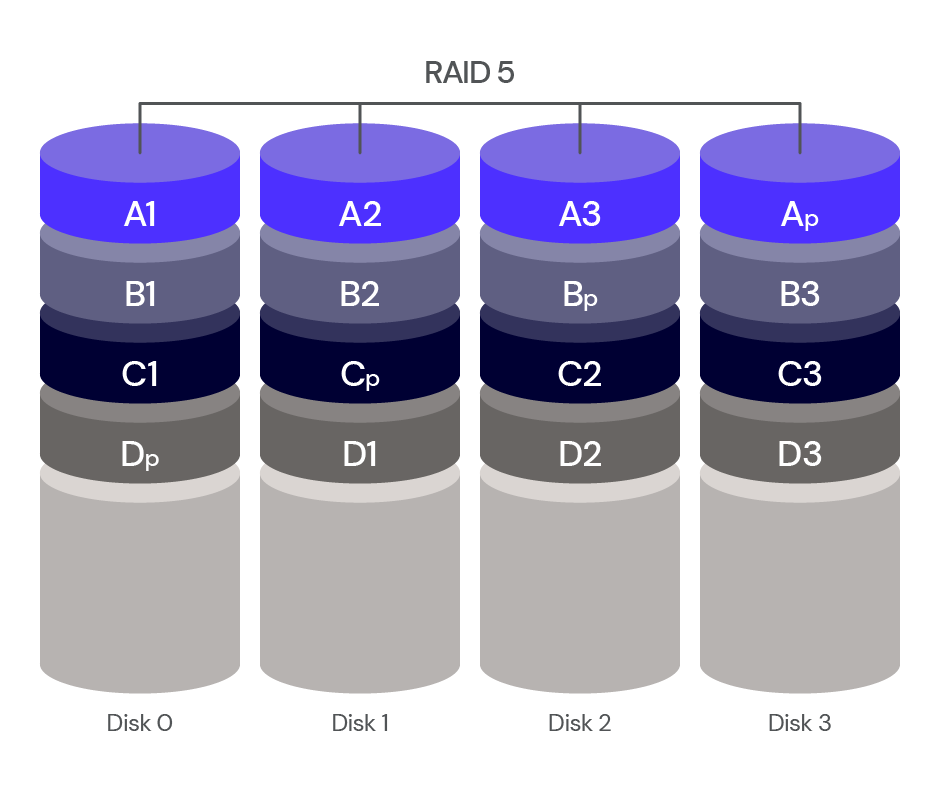
Amazon Redshift is used to clean and aggregate data into pre-processed tables, execute Sun King’s ETL pipelines, and process Looker “persistent derived tables” (PDTs) scheduled at an hourly frequency or less. These ETLs pipelines and PDTs were competing workloads and sometimes ran into read/write conflicts.

As data-driven company continues expanding, Sun King needed a solution that does the following:

  • Allows hundreds of queries to run in parallel with desired query throughput.
  • Optimize workload management to enable ETL, business intelligence (BI4) and Looker workloads to run simultaneously without impacting each other.
  • Seamlessly scale capacity with the increase in user base and maintain cost efficiency.

Solution overview

As the data volumes, query counts, and users continue to grow, Sun King decided to move from a single cluster to a multi-cluster architecture with data sharing to take advantage of workload isolation and separate ETL and analytics workloads across different clusters while still using a single copy of the data.

The solution at Sun King is comprised of multiple Redshift provisioned clusters and an Amazon Elastic Compute Cloud (EC2) Network Load Balancer, using the data sharing capability in Amazon Redshift.

Amazon Redshift Data Sharing enables data access across Redshift clusters without having to copy or move data. Therefore, when a workload is moved from one Redshift cluster to another, the workload can continue to access data in the initial Redshift cluster. For more information, refer to Sharing Amazon Redshift data securely across Amazon Redshift clusters for workload isolation.

The solution consists of the following key components:

  • Core ETL cluster: A core ETL producer cluster (8 ra3.xlplus nodes) with data share.
  • Looker cluster: A producer/consumer cluster (8 ra3.4xlarge nodes) with data share to run the following:
    • Large ETL processes
    • Looker initiated ETL processes (PDTs)
    • Data team workloads
  • BI clusters: This consists of four large consumer clusters (6 ra3.4xlarge nodes each):
    • Three clusters using reserved instances (RIs) that are on 24/7
    • One on-demand cluster turned on for six hours every weekday
  • Network Load Balancer: The network load balancer distributes queries originating from Looker between the consumer clusters
  • Concurrency scaling free tier: Each of the three clusters using reserved instances (RIs) produces one hour of concurrency scaling credits per day, which are used on Mondays, while the on-demand cluster produces four hours of concurrency scaling credits keeping the concurrency scaling cost under free tier.

The following diagram shows the solution and workflow steps

Results

Sun King saw the following improvements with this solution:

  • Performance – The improvement in performance was drastic and immediate after implementing the distributed producer/consumer architecture. Most queries (95%) that used to take between 50-90 seconds to complete before now take at most 40 seconds, 75% of queries used to take up to five seconds before now take less than one second. Additionally, the number of queries run (Amazon Redshift Adoption) increased by 40%, driven by a greater utilization of Looker following the architecture change.
  • Workload management – After this architectural change, queries don’t spend a long time queued anymore. The following chart illustrates queued vs running queries on one of the clusters before and after the modernization engagement.
  • Scalability – With this Redshift data share enabled architecture, the Sun King data team was able to bring back an acceptable performance to its users, leading to renewed engagement , measured with the doubling of the number of monthly queries over the following few month, thus increasing adoption of Amazon Redshift across the company.

Sun King costs are estimated to only increase by 35%, by reserving most instances used for three years (26 ra3.4xlarge and 8 ra3.xlplus) and relying on the concurrency scaling free tier for a boost of performance on the day of highest utilization. This is compared to the smaller number of reserved clusters (8 ra3.4xlarge) and a much larger utilization of concurrency scaling (two concurrency scaling clusters, nearly always on). This modernization increased the productivity of the agents by providing them faster and near real time access to areas that need access to low cost power.

Conclusion:

In this post, we discussed how Sun King used Amazon Redshift data sharing capabilities to distribute workload and scale Amazon Redshift to address end-user performance requirements from Looker and keep control over the cost of Amazon Redshift consumption. Try the approaches discussed in this post and let us know your feedback in the comments.


About the authors

Guillaume Saint-Martin leads the Data and Analytics team at Sun King. With 10 years of experience in the data and development sectors, he manages a team of over 30 analysts, data engineers, and data scientists to support Sun King long term modeling and trend analysis.

Aaber Jah is a Senior Analytics Specialist at AWS based in Chicago, Illinois. He focuses on driving and maintaining AWS Data Analytics business value for customers.

Rohit Vashishtha is a Senior Analytics Specialist Solutions Architect at AWS based in Dallas, Texas. He has over 17 years of experience architecting, building, leading, and maintaining big data platforms. Rohit helps customers modernize their analytic workloads using the breadth of AWS services and ensures that customers get the best price/performance with utmost security and data governance.

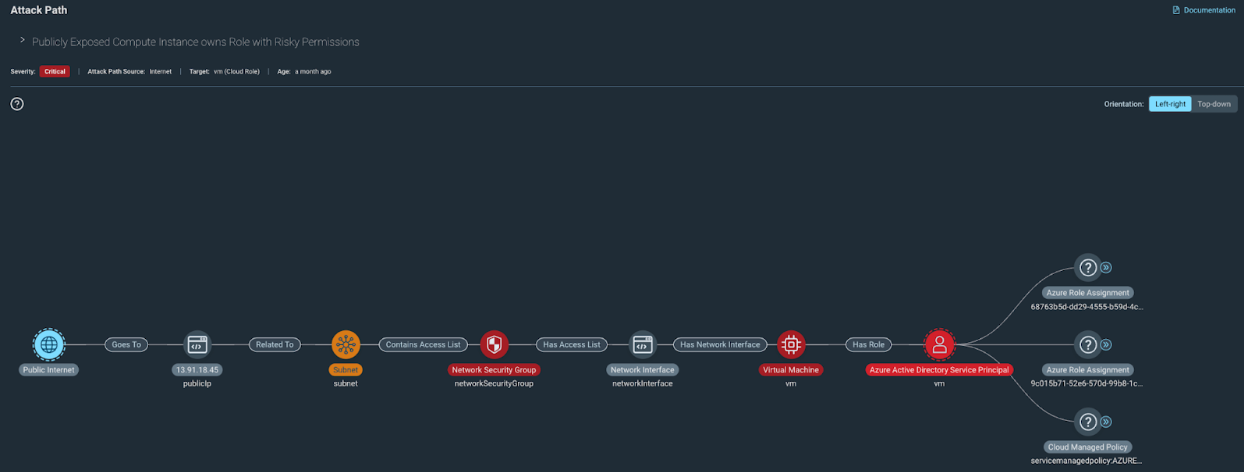
Expanded Coverage and New Attack Path Visualizations Help Security Teams Prioritize Cloud Risk and Understand Blast Radius

Post Syndicated from Pauline Logan original https://blog.rapid7.com/2023/12/19/expanded-coverage-and-new-attack-path-visualizations-help-security-teams-prioritize-cloud-risk-and-understand-blast-radius/

Expanded Coverage and New Attack Path Visualizations Help Security Teams Prioritize Cloud Risk and Understand Blast Radius

Cloud environments differ in a number of ways from more traditional on-prem environments. From the immense scale and compounding complexity to the rate of change, the cloud creates a host of challenges for security teams to navigate and grapple with. By definition, anything running in the cloud has the potential to be made publicly available, either directly or indirectly. The interconnected nature of these environments is such that when one account, resource, or service is compromised, it can be fairly easy for a bad actor to move laterally across your environment and/or grant themselves the permissions to wreak havoc. These avenues for lateral movement or privilege escalation are often referred to as attack paths.

Having a solution in place that can clearly and dynamically detect and depict these attack paths is critical to helping teams not only understand where risks exist across their environment but arguably more importantly how they are most likely to be exploited and what that means for an organization – particularly with respect to protecting high-value assets.

Detect and Remediate Attack Paths With InsightCloudSec

Attack Path Analysis in InsightCloudSec enables Rapid7 customers to see their cloud environments from the perspective of an attacker. It visualizes the various ways an attacker could gain access, move between resources, and compromise the cloud environment. Attack Paths are high fidelity signals in our risk prioritization model that focuses on identifying toxic combinations that lead to real business impact.

Since Rapid7 initially launched Attack Path Analysis, we’ve continued to roll out incremental updates to the feature, primarily in the form of expanded attack path coverage across each of the major cloud service providers (CSPs). In our most recent InsightCloudSec release (12.12.2023), we’ve continued this momentum, announcing additional attack paths as well as some exciting updates around how we visualize risk across paths and the potential blast radius should a compromised resource within an existing attack path be exploited. In this post, we’ll dive into an example of one of our recently added attack paths for Microsoft Azure along with a bit more detail about the new risk visualizations. So with that, let’s jump right in.

Expanding Coverage With New Attack Paths

First, on the coverage side of things we’ve added seven new paths in recent releases across AWS and Azure. Our AWS coverage was extended to support ECS across all of our AWS Attack Paths, and we also introduced 3 new Azure Attack paths. In the interest of brevity, we won’t cover each of them, but we do have an ever-developing list of supported attack paths you can access here on the docs page. As an example, however, let’s dive into one of the new paths we released for Azure, which identifies the presence of attack paths targeting publicly exposed instances that also have attached privileged roles.

Expanded Coverage and New Attack Path Visualizations Help Security Teams Prioritize Cloud Risk and Understand Blast Radius

This type of attack path is concerning for a couple of reasons: First and foremost, an attacker could use the publicly exposed instance as an inroad to your cloud environment due to the fact that it’s publicly accessible, gaining access to sensitive data on the resource itself or accessing data the resource in question has indirect access to. Secondly, since the attached role is capable of escalating privileges, an attacker could then leverage the resource to assign themselves admin permissions which could in turn be used to open up new attack vectors.

Because this could have wide-reaching ramifications should it be exploited, we’ve assigned this a critical severity. That means we’ll want to work to resolve this as fast as possible any time this path shows up across our cloud environments, maybe even automating the process of closing down public access or adjusting the resource permissions to limit the potential for lateral movement or privilege escalation. Speaking of paths with widespread impact should they be exploited, that brings me to some other exciting updates we’ve rolled out to Attack Path Analysis.

Clearly Visualizing Risk Severity and Potential Blast Radius

As I mentioned earlier, along with expanded coverage, we’ve also updated Attack Path Analysis to make it clearer for users where your riskiest assets lie across a given attack path and to clearly show the potential blast radius of an exploitation.

To make it easier to understand the overall riskiness of an attack path and where its choke points are, we’ve added a new security view that visualizes the risk of each resource along a given path. This new view makes it very easy for security teams to immediately understand which specific resources present the highest risk and where they should be focusing their remediation efforts to block potential attackers in their tracks.

Expanded Coverage and New Attack Path Visualizations Help Security Teams Prioritize Cloud Risk and Understand Blast Radius

In addition to this new security-focused view, we’ve also extended Attack Path Analysis to show a potential blast radius by displaying a graph-based topology map that helps clearly outline the various ways resources across your environment – and specifically within an attack path – interconnect with one another.

This topology map not only makes it easier for security teams to quickly hone in on what needs their attention first during an investigation, but also where a bad actor could move next. Additionally, this view helps security teams and leaders in communicating risk across the organization, particularly when engaging with non-technical stakeholders that find it difficult to understand why exactly a compromised resource presents a potentially larger risk to the business.

We will continue to expand on our existing Attack Path Analysis capabilities in the future, so be sure to keep an eye out for additional paths being added in the coming months as well as a continued effort to enable security teams to more quickly analyze cloud risk with the context needed to effectively detect, communicate, prioritize, and respond.

OpenSSH 9.6 released

Post Syndicated from corbet original https://lwn.net/Articles/955680/

OpenSSH
9.6
has been released. It includes some minor improvements and a fix
for the so-called Terrapin
attack
.

While cryptographically novel, the security impact of this attack
is fortunately very limited as it only allows deletion of
consecutive messages, and deleting most messages at this stage of
the protocol prevents user authentication from proceeding and
results in a stuck connection.

The collective thoughts of the interwebz