Readers of a certain age may remember the so-called “dot com boom” that took place in the early 2000’s. The boom’s “dot com” is what is known as a Top-Level Domain (TLD). Originally intended to organize domain names into a small set of categorical groupings, over the past 40+ years, the set of TLDs has expanded to include country code top-level domains (ccTLDs, like .us, .pt, and .cn), as well as additional generic top-level domains (gTLDs) beyond the initial seven, such as .biz, .shop, and .nyc. Internationalized TLDs, such as .сайт, .онлайн,.شبكة, .游戏, and brand TLDs, like .google and .nike have also been added. As of October 2025, over 1,400 entries can be found in ICANN’s list of all valid top-level domains, and a further expansion is expected to begin in April 2026.
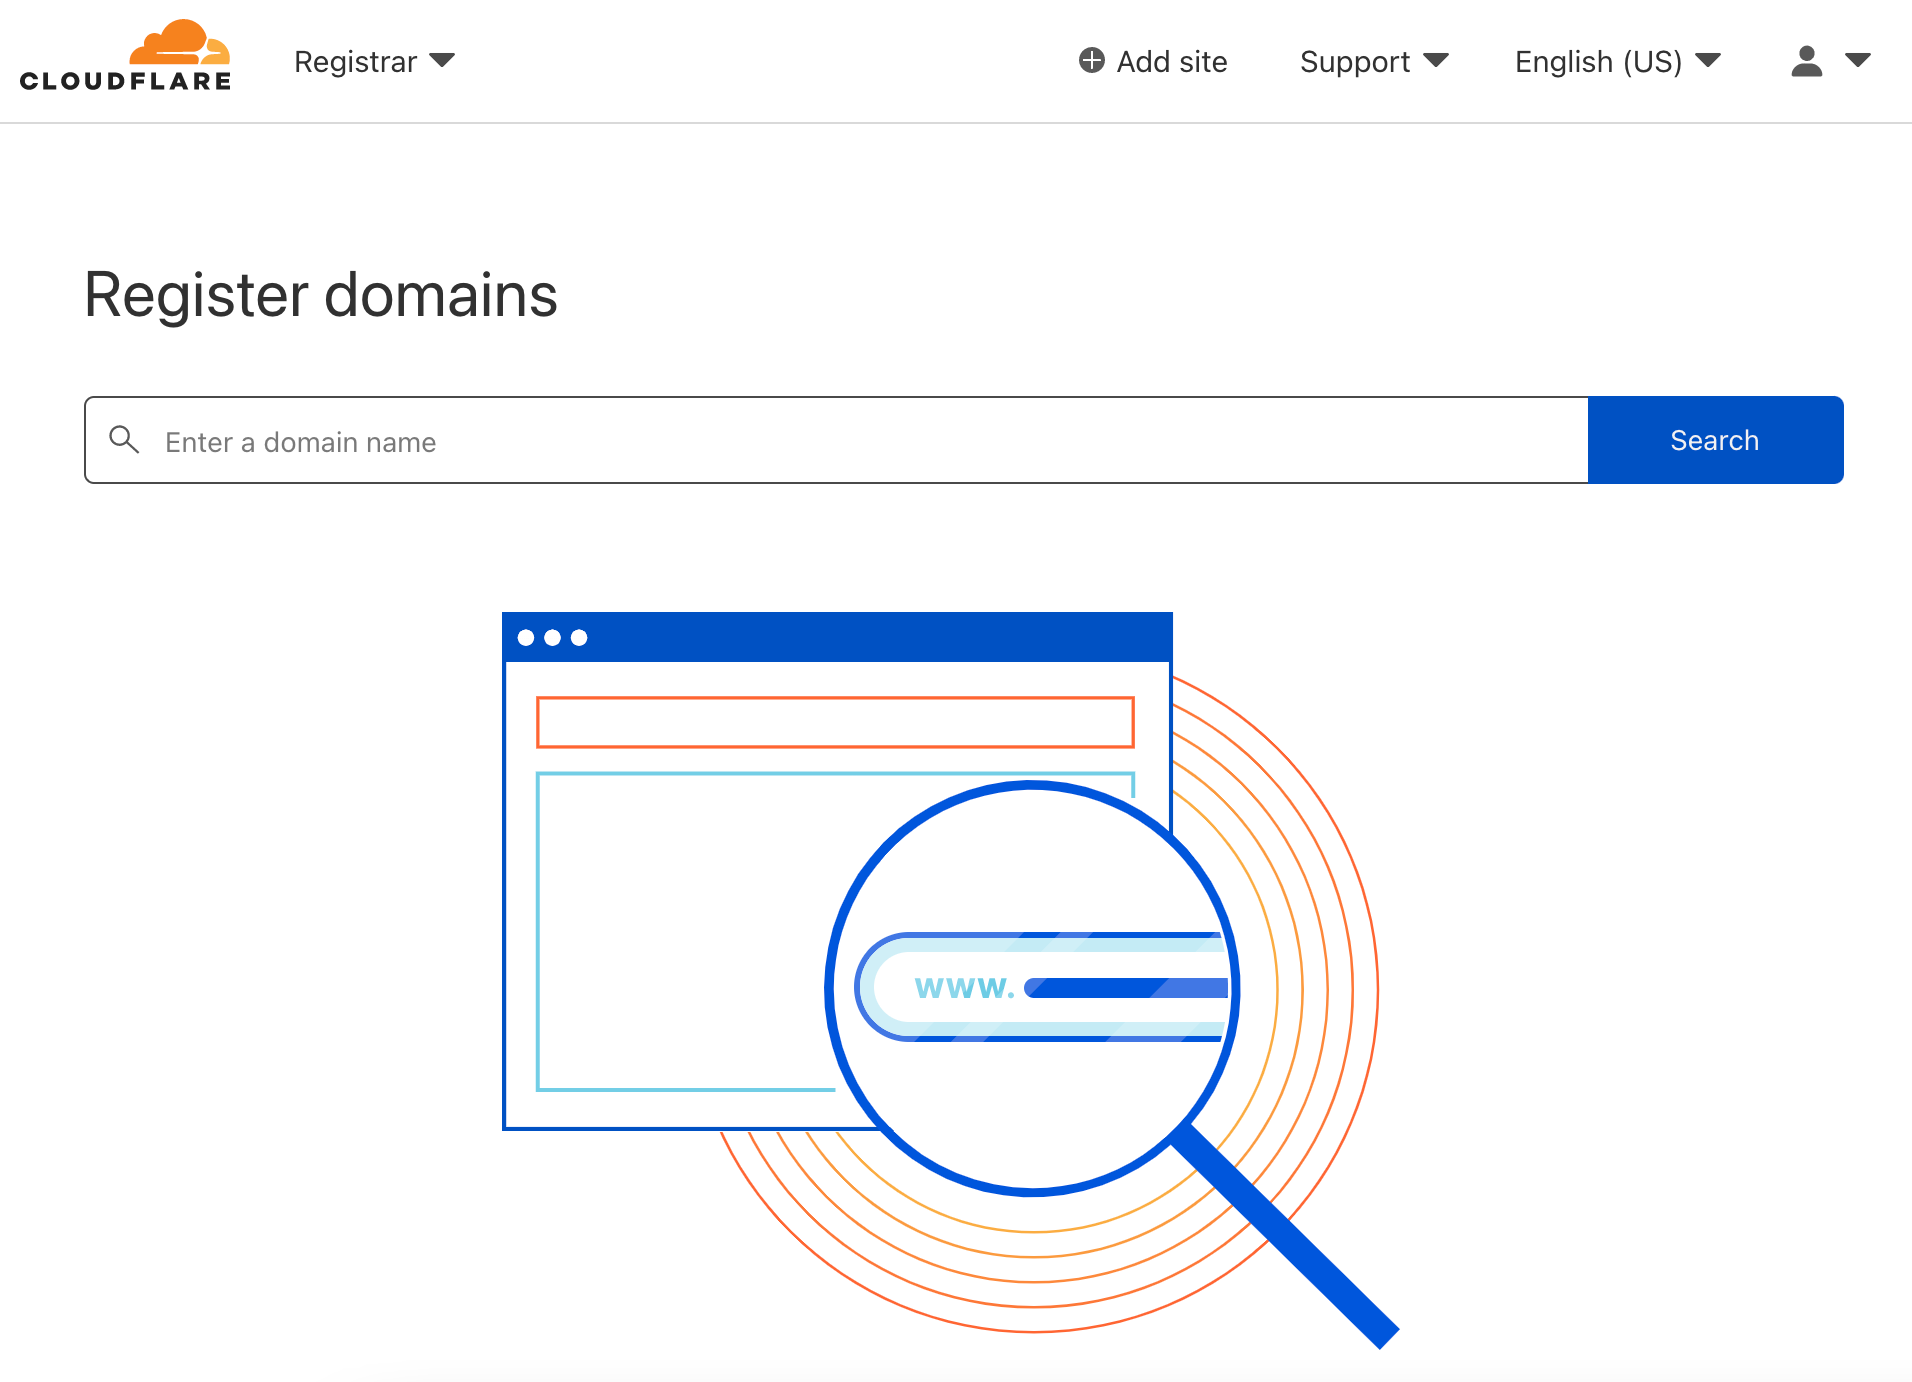
Building on this, today we are launching a new TLD page on Radar that, based on aggregated data from multiple Cloudflare services, provides insights into TLD popularity, activity, and security, along with links directly into Cloudflare Registrar to enable users to register domain names in supported TLDs.
Initial security-related insights
Before today, Radar already offered insights into TLDs, though these were distributed across a couple of different pages and datasets.
In March 2024, when we launched the Email Security page, we introduced the “Most abused TLDs” metric. This chart highlights TLDs associated with the largest shares of malicious and spam email. The analysis is based on the sending domain’s TLD, extracted from the From: header in email messages, with data sourced from Cloudflare’s cloud email security service.
More recently, during 2025’s Birthday Week, we introducedCertificate Transparency (CT) insights on Radar, leveraging data from CT logs monitored by Cloudflare. One highlight is the Certificate Coverage section, which visualizes the distribution of pre-certificates across the top 10 TLDs. These insights give a different perspective on TLD activity, complementing email-based metrics by showing which domains are actively securing web traffic.
A new aggregate overview based on DNS Magnitude
Today, we’re excited to announce the new TLD page on Radar. The landing page and the dedicated per-TLD pages provide TLD managers and site owners with a perspective on the relative popularity of TLDs they manage or may be considering domains in, as well as insights into TLD traffic volume and distribution.
Located under the DNS menu, the landing page introduces a ranking of top-level domains based on DNS Magnitude — a metric originally developed by nic.at to estimate a domain’s overall visibility on the Internet.
Instead of simply counting the total number of DNS queries, DNS Magnitude incorporates a sense of how many unique clients send queries to domains within the TLD. This approach gives a more accurate picture of a TLD’s reach, since a small number of sources can generate a large number of queries. Our ranking is based on queries observed at Cloudflare’s 1.1.1.1 resolver. We aggregate individual client IP addresses into subnets, referred to here as “networks”.
The magnitude value ranges from 0 to 10, with higher values (closer to 10) indicating that the TLD is queried by a broader range of networks. This reflects greater global visibility and, in some cases, a higher likelihood of name collision across different systems. According to ICANN, a name collision occurs when an attempt to resolve a name used in a private name space (such as under a non-delegated Top-Level Domain) results in a query to the public Domain Name System (DNS). When the administrative boundaries of private and public namespaces overlap, name resolution may yield unintended or harmful results. For example, if ICANN were to delegate .home, that could cause significant issues for hobbyists that use the (currently non-delegated) TLD within their local networks.
The table displays a paginated ranking of the top 2,500 TLDs, along with several key attributes. Each entry includes the TLD itself — which links to a dedicated page for delegated TLDs — as well as its type:
gTLD (generic TLD): used for general purposes, such as .com or.info.
grTLD (generic restricted TLD): limited to specific communities or uses, such as.name.
ccTLD (country code TLD): assigned to individual countries or territories, such as.uk or .jp.
iTLD (infrastructure TLD): reserved for technical infrastructure, such as .arpa.
sTLD (sponsored TLD): operated by a sponsoring organization representing a defined community, such as .edu or .gov.
The status column indicates whether the TLD is delegated, meaning it is officially assigned and active in the root zone of the DNS, or non-delegated, meaning it is not currently part of the public DNS. The table also shows the manager of each TLD — typically the organization or registry responsible for its operation — and the corresponding DNS magnitude value.
While the top 10 TLDs include stalwarts such as .com/.net/.org and ccTLDs that have been commercially repurposed, such as .io/.co/.tv, the TLD at the top of the list may be a bit surprising: .su.
This TLD was delegated for the Soviet Union back in 1990, but its use waned after the dissolution of the USSR, with constituent republics becoming independent and using their own dedicated ccTLDs. (ICANN reportedly plans to retire.su in 2030.) Looking at a single day’s worth of data, the .su TLD does not rank #1 by unique networks. However, over a longer period of time, such as seven days, it sees queries from more unique networks than other TLDs, placing it atop the magnitude list. Further analysis of the top hostnames observed within this TLD suggests that they are mostly associated with a popular online world-building game. Interestingly, over half of the queries for .su domains come from the United States, Germany, and Brazil.
More detailed TLD insights
The new TLD section also offers dedicated pages for individual TLDs. By clicking on a TLD in the DNS Magnitude table or searching for a TLD in the top search bar, users can access a page with detailed insights and information about that TLD. It’s important to note that while non-delegated TLDs are included in the DNS Magnitude ranking, TLD-specific pages are only available for delegated TLDs. The list of delegated TLDs, along with their type and manager, is sourced from the IANA’s Root Zone Database.
When a user enters an individual TLD page, they see two main cards. The first card provides general information about the TLD, including its type, manager, DNS magnitude value, DNSSEC support, and RDAP support. DNSSEC support is determined by checking whether the TLD has a Delegation Signer (DS) record in the root zone. We also parse the record to get the associated DNSSEC algorithm. RDAP support is indicated if the TLD is listed in the IANA RDAP bootstrap file. RDAP (Registration Data Access Protocol) is a new standard for querying domain contact and nameserver information for all registered domains.
The second card contains WHOIS data for the TLD, including its creation date, the date of the last update, and the list of nameservers. If the TLD is supported by Cloudflare Registrar, an additional card appears, giving users direct access to registration options. As of today, Cloudflare Registrar supports over 400 TLDs.
Below these cards, the page features the DNS query volume section, which presents insights based on queries to Cloudflare’s 1.1.1.1 resolver for domains under the TLD. This section includes a chart showing DNS queries over the selected time period, along with a donut chart breaking down queries by type, response code, and DNSSEC support. A choropleth map further illustrates the percentage of DNS queries by country, highlighting which regions generate the most queries for domains under the TLD.
Each individual TLD page also includes a Certificate Transparency section, offering visibility into TLS/SSL certificate issuance for the TLD. This section displays a line chart showing the total number of certificates issued over the selected period, as well as a donut chart depicting the distribution of certificate issuance among the top Certificate Authorities.
When we launched the DNS page earlier in 2025, we provided query volumes by TLDs, but this was limited to ccTLDs. Today, we’re extending that dataset to include all delegated TLDs. With these new insights, we’ve added the “Top-level domain distribution” section to the DNS page, featuring a line chart that shows the distribution of queries to 1.1.1.1 across the top 10 TLDs, alongside a table extending this ranking to the top 100. Not surprisingly, .com tops the ranking with more than 60% of queries, followed by .net, .arpa (an infrastructure TLD), and .org.
Because TLDs are a foundational component of the Domain Name System, it is critical that the associated name servers are highly performant. Based on billions of daily queries to these name servers, we plan to add insights into their performance to Radar’s TLD pages in 2026. These insights will provide TLD managers with an external perspective on query responsiveness, and will give developers and site owners a perspective on the potential impact of the performance of the associated TLD name servers as they look to register new domain names.
The underlying data for these new TLD pages is available via the API and can be interactively explored in more detail using Radar’s Data Explorer and AI Assistant. And as always, Radar and Data Assistant charts and graphs are downloadable for sharing, and embeddable for use in your own blog posts, websites, or dashboards.
If you share our TLD charts and graphs on social media, be sure to tag us: @CloudflareRadar (X), noc.social/@cloudflareradar (Mastodon), and radar.cloudflare.com (Bluesky). If you have questions or comments, or suggestions for data that you’d like to see us add to Radar, you can reach out to us on social media, or contact us via email.
Cloudflare launched fifteen years ago with a mission to help build a better Internet. Over that time the Internet has changed and so has what it needs from teams like ours. In this year’s Founder’s Letter, Matthew and Michelle discussed the role we have played in the evolution of the Internet, from helping encryption grow from 10% to 95% of Internet traffic to more recent challenges like how people consume content.
This year’s themes focused on helping prepare the Internet for a new model of monetization that encourages great content to be published, fostering more opportunities to build community both inside and outside of Cloudflare, and evergreen missions like making more features available to everyone and constantly improving the speed and security of what we offer.
We shipped a lot of new things this year. In case you missed the dozens of blog posts, here is a breakdown of everything we announced during Birthday Week 2025.
To support a diverse and open Internet, we are now sponsoring Ladybird (an independent browser) and Omarchy (an open-source Linux distribution and developer environment).
We are opening our office doors in four major cities (San Francisco, Austin, London, and Lisbon) as free hubs for startups to collaborate and connect with the builder community.
We are removing cost as a barrier for the next generation by giving students with .edu emails 12 months of free access to our paid developer platform features.
We are partnering with Coinbase to create the x402 Foundation, encouraging the adoption of the x402 protocol to allow clients and services to exchange value on the web using a common language
Our Automatic SSL/TLS system has upgraded over 6 million domains to more secure encryption modes by default and will soon automatically enable post-quantum connections.
We made our CSAM Scanning Tool easier to adopt by removing the need to create and provide unique credentials, helping more site owners protect their platforms.
Updates across Workers and beyond for a more powerful developer platform – such as support for larger and more concurrent Container images, support for external models from OpenAI and Anthropic in AI Search (previously AutoRAG), and more.
A deep-dive into how we’ve hardened the Workers runtime with new defense-in-depth security measures, including V8 sandboxes and hardware-assisted memory protection keys.
We announced the Cloudflare Email Service private beta, allowing developers to reliably send and receive transactional emails directly from Cloudflare Workers.
The TCP Connection Time (Trimean) graph shows that we are the fastest TCP connection time in 40% of measured ISPs – and the fastest across the top networks.
We are using our network’s vast performance data to tune congestion control algorithms, improving speeds by an average of 10% for QUIC traffic.
Come build with us!
Helping build a better Internet has always been about more than just technology. Like the announcements about interns or working together in our offices, the community of people behind helping build a better Internet matters to its future. This week, we rolled out our most ambitious set of initiatives ever to support the builders, founders, and students who are creating the future.
For founders and startups, we are thrilled to welcome Cohort #6 to the Workers Launchpad, our accelerator program that gives early-stage companies the resources they need to scale. But we’re not stopping there. We’re opening our doors, literally, by launching new physical hubs for startups in our San Francisco, Austin, London, and Lisbon offices. These spaces will provide access to mentorship, resources, and a community of fellow builders.
We’re also investing in the next generation of talent. We announced free access to the Cloudflare developer platform for all students, giving them the tools to learn and experiment without limits. To provide a path from the classroom to the industry, we also announced our goal to hire 1,111 interns in 2026 — our biggest commitment yet to fostering future tech leaders.
And because a better Internet is for everyone, we’re extending our support to non-profits and public-interest organizations, offering them free access to our production-grade developer tools, so they can focus on their missions.
Whether you’re a founder with a big idea, a student just getting started, or a team working for a cause you believe in, we want to help you succeed.
Until next year
Thank you to our customers, our community, and the millions of developers who trust us to help them build, secure, and accelerate the Internet. Your curiosity and feedback drive our innovation.
It’s been an incredible 15 years. And as always, we’re just getting started!
Cloudflare is well ahead of NIST’s schedule. Today, over 45% of human-generated Internet traffic sent to Cloudflare’s network is already post-quantum encrypted. Because we believe that a secure and private Internet should be free and accessible to all, we’re on a mission to include PQC in all our products, without specialized hardware, and at no extra cost to our customers and end users.
That’s why we’re proud to announce that Cloudflare’s WARP client now supports post-quantum key agreement — both in our free consumer WARP client 1.1.1.1, and in our enterprise WARP client, the Cloudflare One Agent.
Post-quantum tunnels using the WARP client
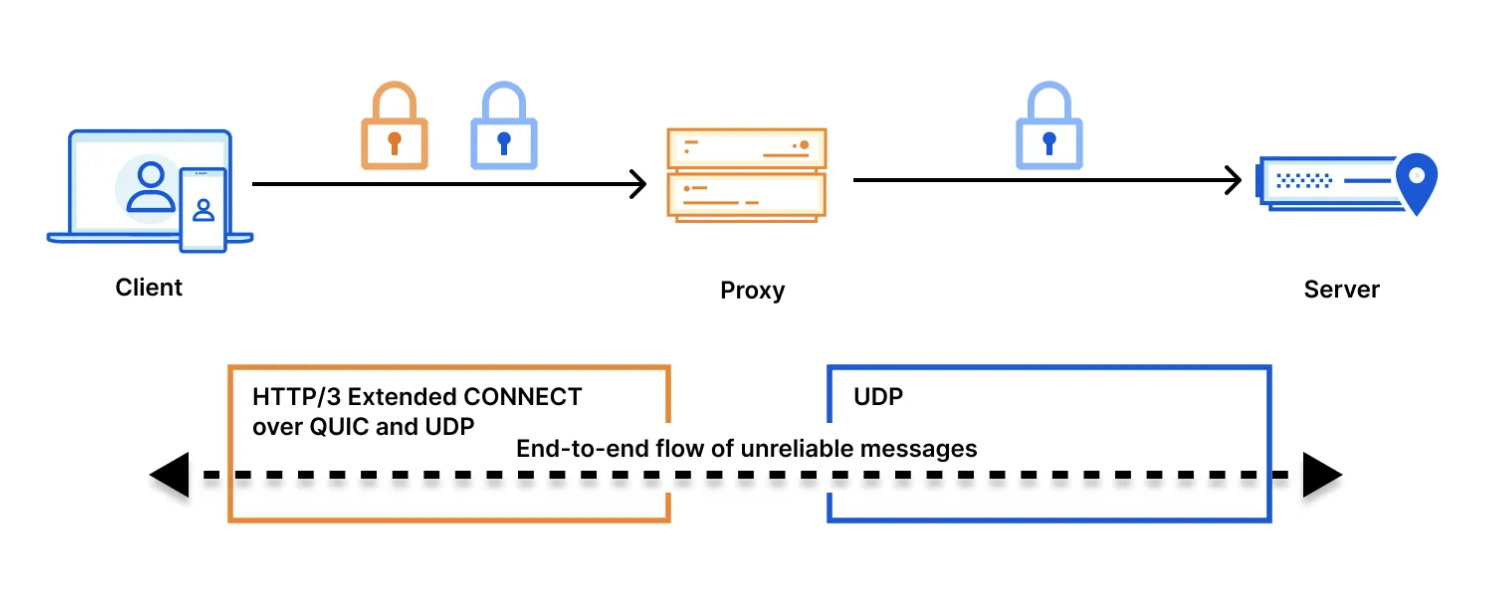
This upgrade of the WARP client to post-quantum key agreement provides end users with immediate protection for their Internet traffic against harvest-now-decrypt-later attacks. The value proposition is clear — by tunneling your Internet traffic over the WARP client’s post-quantum MASQUE tunnels, you get immediate post-quantum encryption of your network traffic. And this holds even if the individual connections sent through the tunnel have not yet been upgraded to post-quantum cryptography.
We have upgraded the Cloudflare One Agentto post-quantum key agreement, providing end-to-end post quantum protection for traffic sent to internal corporate resources.
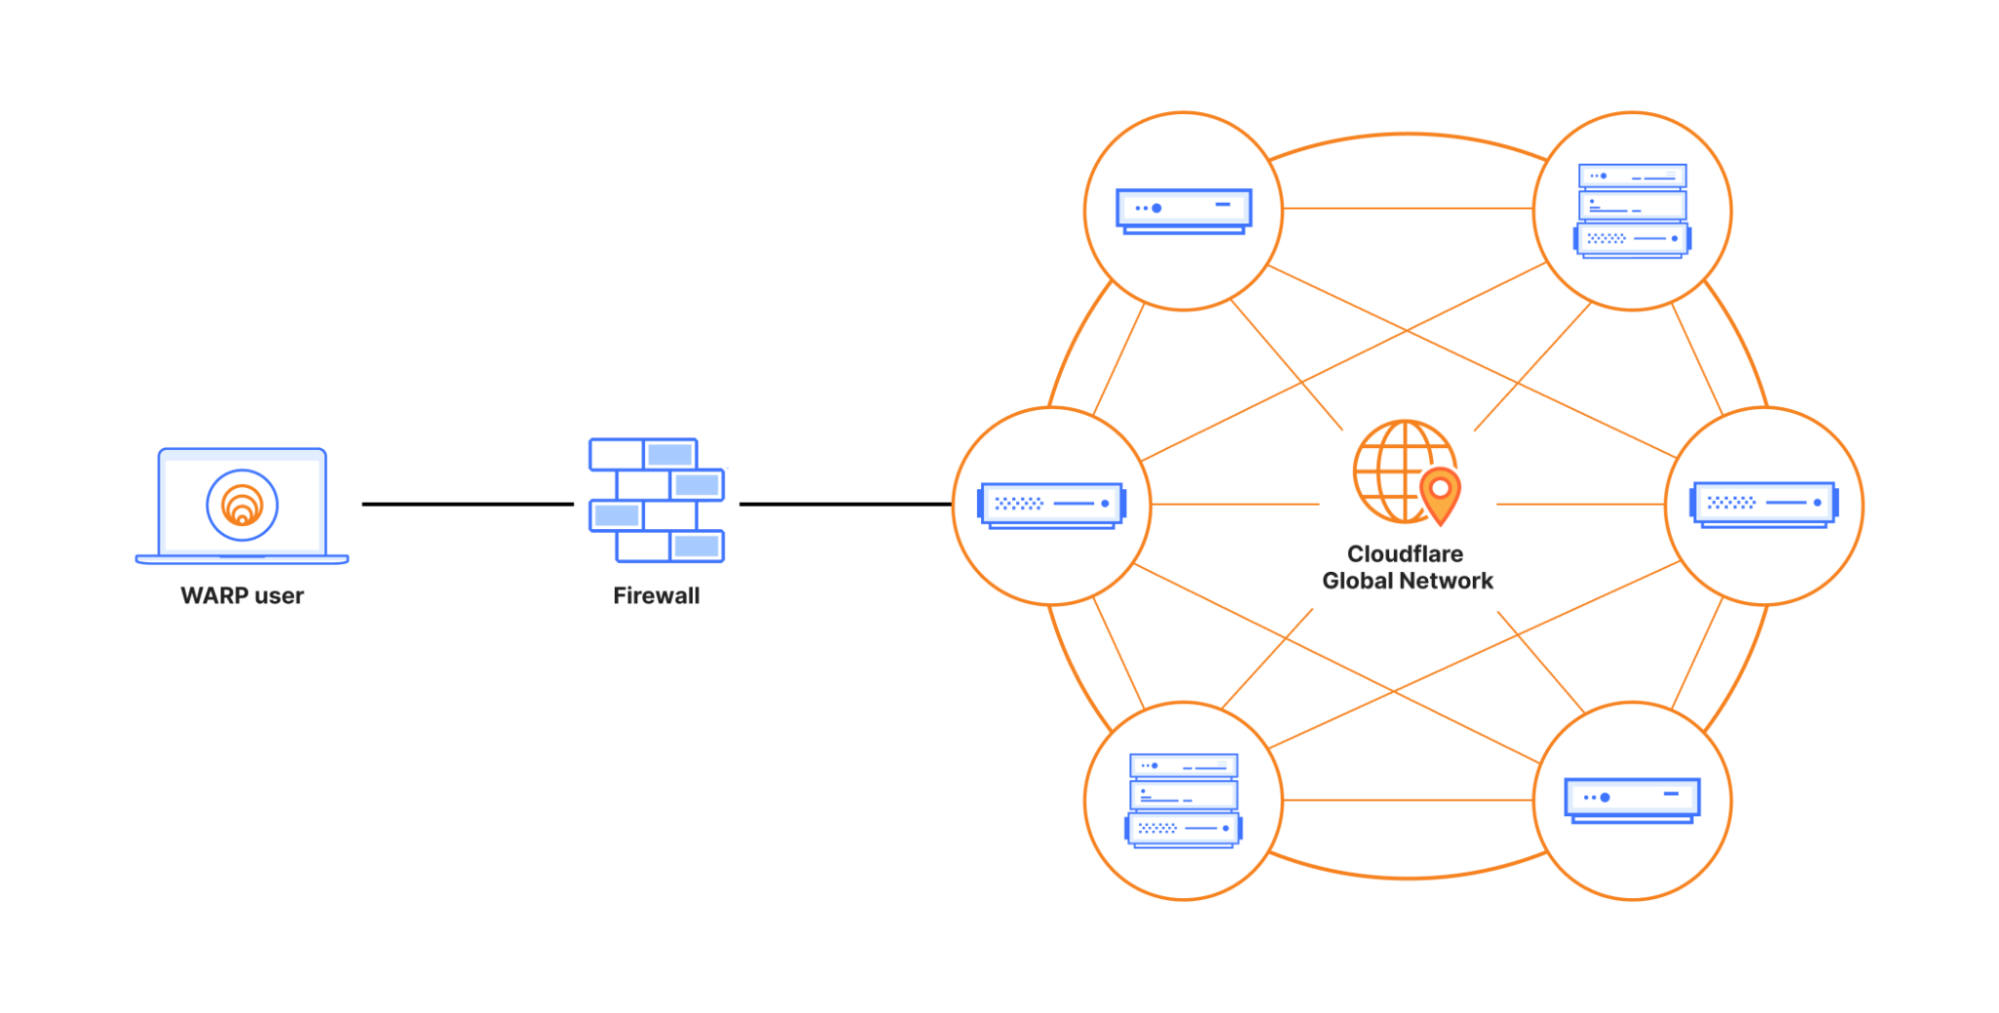
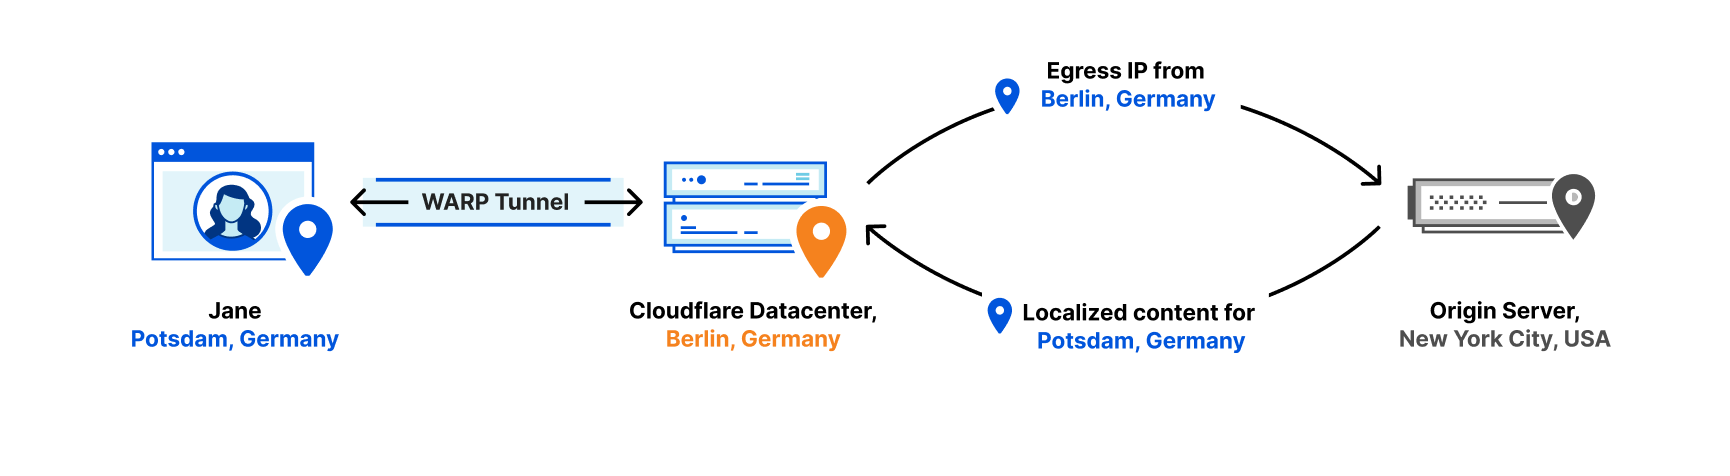
When an end user installs the consumer WARP Client (1.1.1.1), the WARP client wraps the end user’s network traffic in a post-quantum encrypted MASQUE tunnel. As shown in the figure below, the MASQUE tunnel protects the traffic on its way to Cloudflare’s global network (link (1)). Cloudflare’s global network then uses post-quantum encrypted tunnels to bring the traffic as close as possible to its final destination (link (2)). Finally, the traffic is forwarded over the public Internet to the origin server (i.e. its final destination). That final connection (link (3)) may or may not be post-quantum (PQ). It will not be PQ if the origin server is not PQ. It will be PQ if the origin server is (a) upgraded to PQC, and (b) the end user is connecting to over a client that supports PQC (like Chrome, Edge or Firefox). In the future, Automatic SSL/TLS will ensure that your entire connection will be PQ as long as the origin server is behind Cloudflare and supports PQ connections (even if your browser doesn’t).
Consumer WARP client (1.1.1.1) is now upgraded to post-quantum key agreement.
The cryptography landscape
Before we get into the details of our upgrade to the WARP client, let’s review the different cryptographic primitives involved in the transition to PQC.
Key agreement is a method by which two or more parties can establish a shared secret key over an insecure communication channel. This shared secret can then be used to encrypt and authenticate subsequent communications. Classical key agreement in Transport Layer Security (TLS) typically uses the Elliptic Curve Diffie Hellman (ECDH) cryptographic algorithm, whose security can be broken by a quantum computer using Shor’s algorithm.
This is why we upgraded the WARP client to post-quantum key agreement.
Post-quantum key agreement is already quite mature and performant; our experiments have shown that deploying the post-quantumModule-Lattice-Based Key-Encapsulation Mechanism (ML-KEM) algorithm in hybrid mode (in parallel with classical ECDH) over TLS 1.3 is actually more performant than using TLS 1.2 with classical cryptography.
Over one-third of the human-generated traffic to our network uses TLS 1.3 with hybrid post-quantum key agreement (shown as X25519MLKEM768 in the screen capture above); in fact, if you’re on a Chrome, Edge or Firefox browser, you’re probably reading this blog right now over a PQ encrypted connection.
Post-quantum digital signatures and certificates, by contrast, are still in the process of being standardized for use in TLS and the Internet’s Public Key Infrastructure (PKI). PQ signatures and certificates are required to prevent an active attacker who uses a quantum computer to forge a digital certificate/signature and then uses it to decrypt or manipulate communications by impersonating a trusted server. As far as we know, we don’t have such attackers yet, which is why post-quantum signatures and certificates are not widely deployed across the Internet. We have not yet upgraded the WARP client to PQ signatures and certificates, but we plan to do so soon.
A unique challenge: PQC upgrade in the WARP client
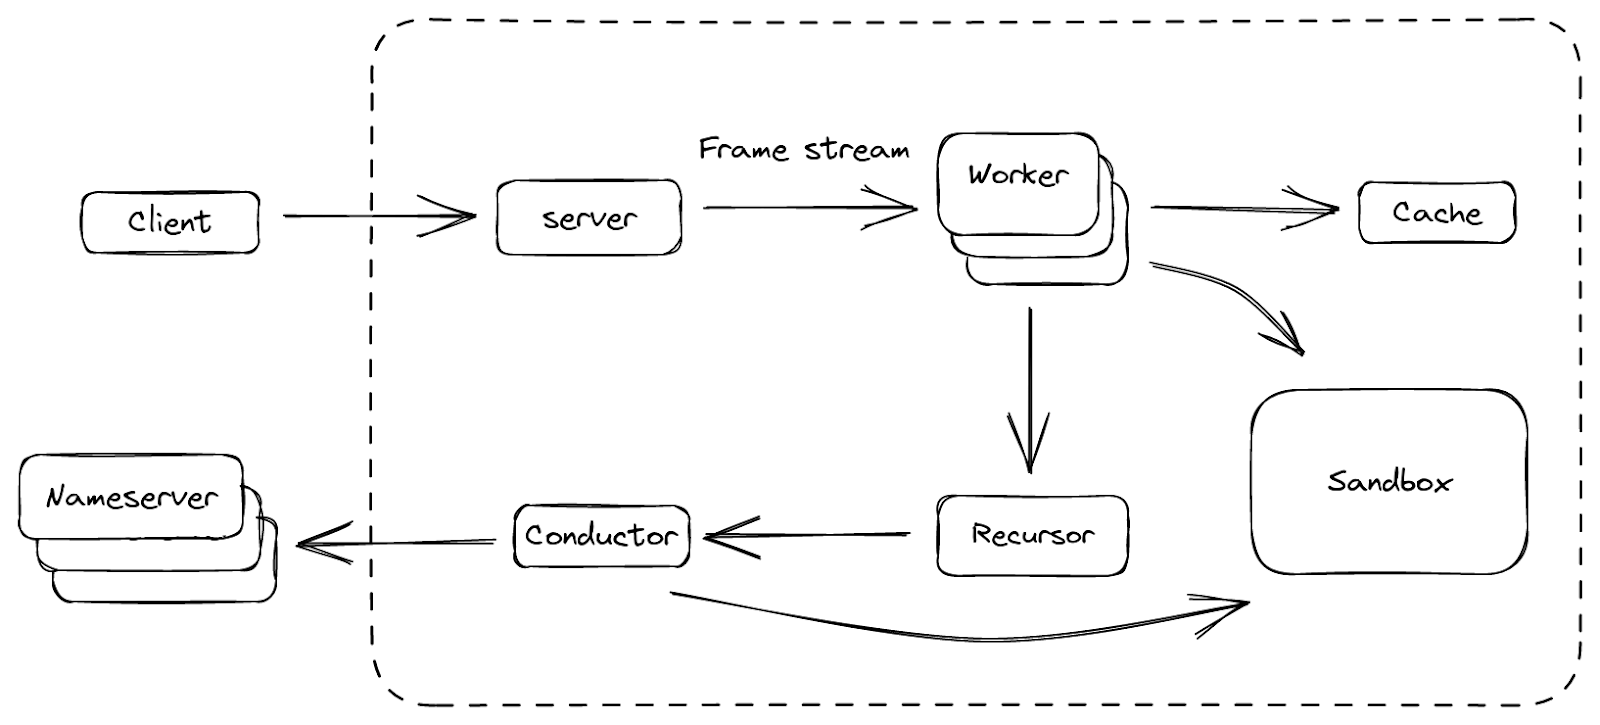
While Cloudflare is on the forefront of the PQC transition, a different kind of challenge emerged when we upgraded our WARP client. Unlike a server that we fully control and can hotfix at any time, our WARP client runs directly on end user devices. In fact, it runs on millions of end user devices that we do not control. This fundamental difference means that every time we update the WARP client, our release must work properly on the first try, with no room for error.
To make things even more challenging, we need to support the WARP client across five different operating systems (Windows, macOS, Linux, iOS, and Android/ChromeOS), while also ensuring consistency and reliability for both our consumer 1.1.1.1 WARP client and our Cloudflare One Agent. In addition, because the WARP client relies on the fairly new MASQUE protocol, which the industry only standardized in August 2022, we need to be extra careful to make sure our upgrade to post-quantum key agreement does not expose latent bugs or instabilities in the MASQUE protocol itself.
All these challenges point to a slow and careful transition to PQC in the WARP client, while still supporting customers that want to immediately activate PQC. To accomplish this, we used three techniques:
temporary PQC downgrades,
gradual rollout across our WARP client population, and
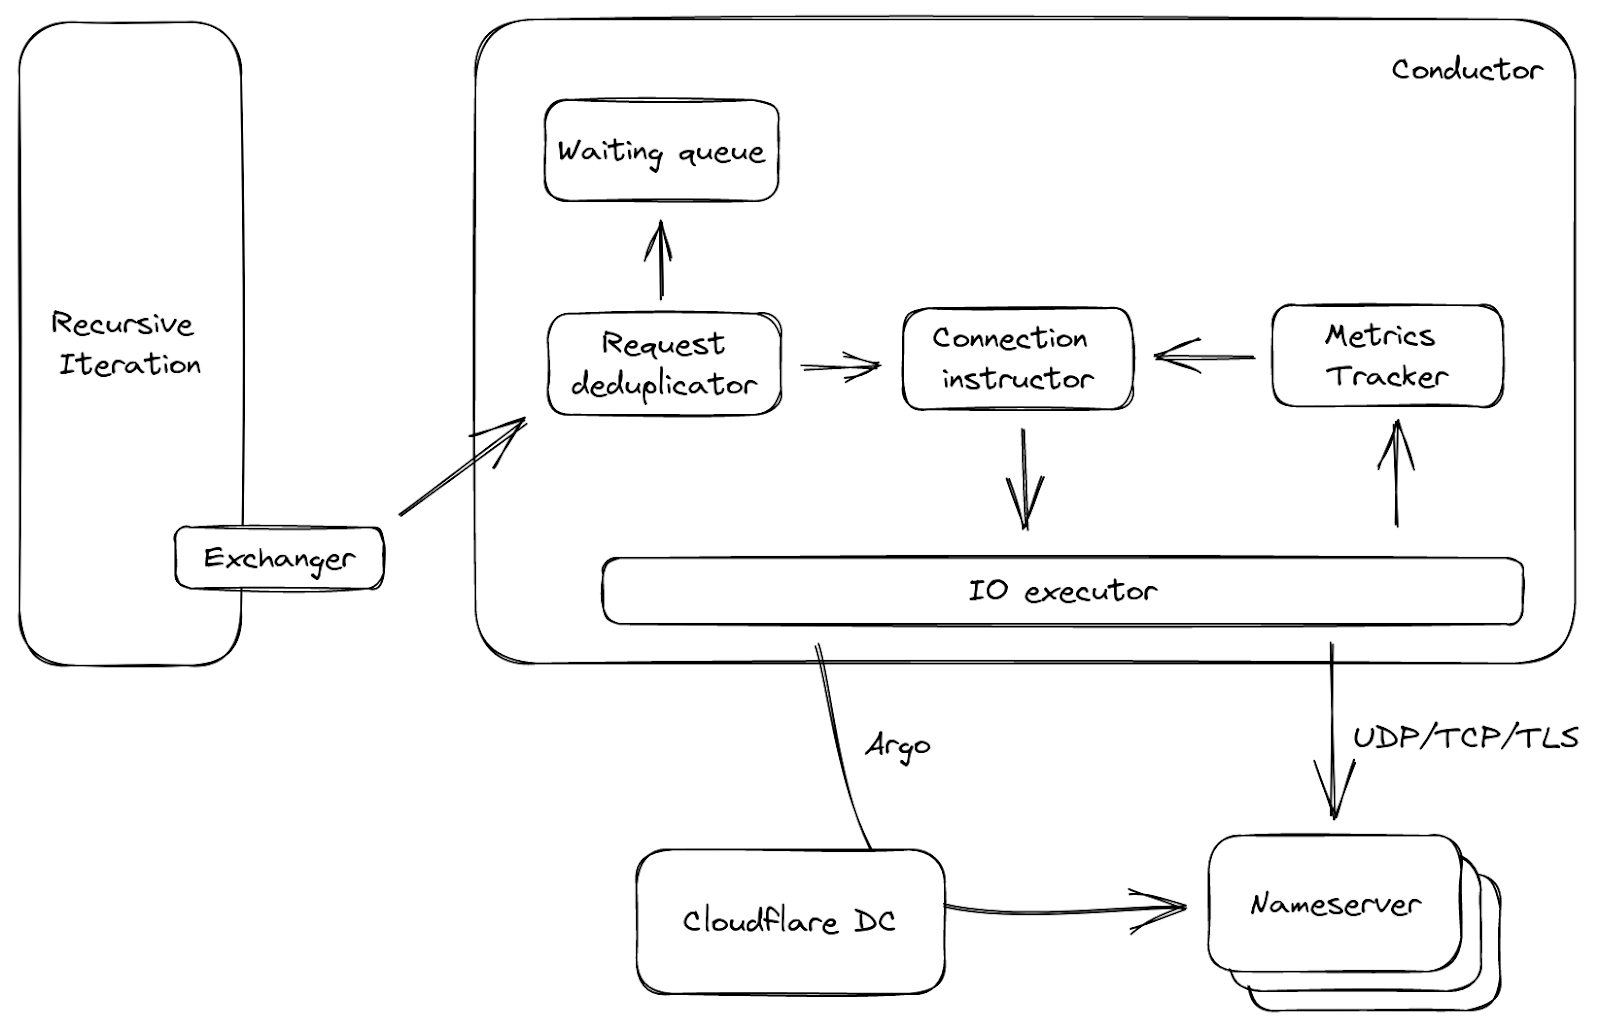
As we roll out PQ key agreement in MASQUE to the WARP client, we want to make sure we don’t have WARP clients that struggle to connect due to an error, middlebox, or a latent implementation bug triggered by our PQC migration. One way to accomplish this level of robustness is to have clients downgrade to a classic cryptographic connection if they fail to negotiate a PQ connection.
To really understand this strategy, we need to review the concept of cryptographic downgrades. In cryptography, a downgrade attack is a cyber attack where an attacker forces a system to abandon a secure cryptographic algorithm in favor of an older, less secure, or even unencrypted one that allows the attacker to introspect on the communications. Thus, when newly rolling out a PQ encryption, it is standard practice to ensure that: if the client and server both support PQ encryption, it should not be possible for an attacker to downgrade their connection to a classic encryption.
Thus, to prevent downgrade attacks, we should ensure that if the client and server both support PQC, but fail to negotiate a PQC connection, then the connection will just fail. However, while this prevents downgrade attacks, it also creates problems with robustness.
We cannot have both robustness (i.e. the ability for client to downgrade to a classical connection if the PQC fails) and security against downgrades (i.e. the client is forbidden to downgrade to classical cryptography once it supports PQC) at the same time. We have to choose one. For this reason, we opted for a phased approach.
Phase 1: Automated PQC downgrades. We start by choosing robustness at the cost of providing security against downgrade attacks. In this phase, we support automated PQC downgrades — if a client fails to negotiate a PQC connection, it will downgrade to classical cryptography. That way, if there are bugs or other instability introduced by PQC, the client automatically downgrades to classical cryptography and the end user will not experience any issues. (Note: because MASQUE establishes a single very long-lived TLS connection only when the user logs in, an end user is unlikely to notice a downgrade.)
Phase 2: PQC with security against downgrades. Then, once the rollout is stable and we are convinced that there are no issues interfering with PQC, we will choose security against downgrade attacks over robustness. In this phase, if a client fails to negotiate a PQC connection, the connection will just fail, which provides security against downgrade attacks.
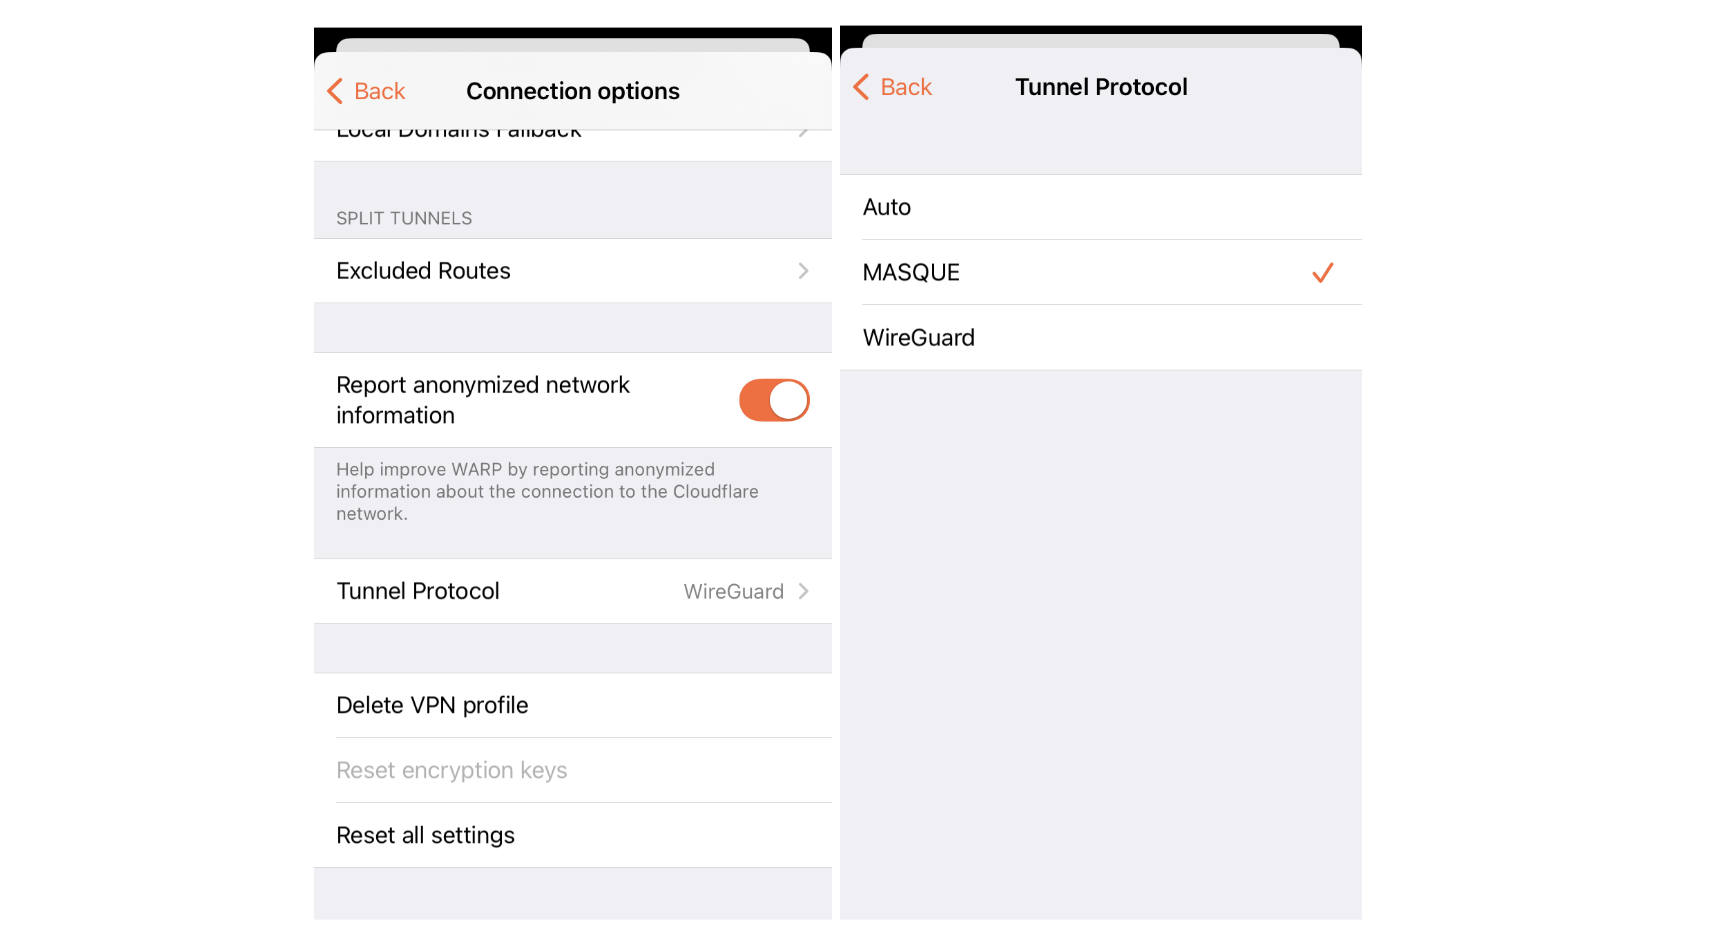
To implement this phased approach, we introduced an API flag that the client uses to determine how it should initiate TLS handshakes, which has three states:
No PQC: The client initiates a TLS handshake using classical cryptography only. .
PQC downgrades allowed: The client initiates a TLS handshake using post-quantum key agreement. If the PQC handshake negotiation fails, the client downgrades to classical cryptography. This flag supports Phase 1 of our rollout.
PQC only: The client initiates a TLS handshake using post-quantum key agreement cryptography. If the PQC handshake negotiation fails, the connection fails. This flag supports Phase 2 of our rollout.
With this as our framework, the next question becomes: what timing makes sense for this phased approach?
Gradual rollout across the WARP client population
To limit the risk of errors or latent implementation bugs triggered by our PQC migration, we gradually rolled out PQC across our population of WARP clients.
In Phase 1 of our rollout, we prioritized robustness rather than security against downgrade attacks. Thus, initially the API flag is set to “No PQC” for our entire client population, and we gradually turn on the “PQC downgrades allowed” across groups of clients. As we do this, we monitor whether any clients downgrade from PQC to classical cryptography. At the time of this writing, we have completed the Phase 1 rollout to all of our consumer WARP (1.1.1.1) clients. We expect to complete Phase 1 for our Cloudflare One Agent by the end of 2025.
Downgrades are not expected during Phase 1. In fact, downgrades indicate that there may be a latent issue that we have to fix. If you are using a WARP client and encounter issues that you believe might be related to PQC, you can let us know by using the feedback button in the WARP client interface (by clicking the bug icon in the top-right corner of the WARP client application). Enterprise users can also file a support ticket for the Cloudflare One Agent.
We plan to enter Phase 2 — where the API flag is set to “PQC only” in order to provide security against downgrade attacks — by summer of mid 2026.
MDM override
Finally, we know that some of our customers may not be willing to wait for us to complete this careful upgrade to PQC. So, those customers can activate PQC right now.
We’ve built a Mobile Device Management (MDM) override for the Cloudflare One Agent. MDM allows organizations to centrally manage, monitor, and secure mobile devices that access corporate resources; it works on multiple types of devices, not just mobile devices. The override for the Cloudflare One Agent allows an administrator (with permissions to manage the device) to turn on PQC. To use the MDM post-quantum override, set the ‘enable_post_quantum’ MDM flag to true. This flag takes precedence over the signal from the API flag we described earlier, and will activate PQC without downgrades. With this setting, the client will only negotiate a PQC connection. And if the PQC negotiation fails, the connection will fail, which provides security against downgrade attacks.
Ciphersuites, FIPS and Fedramp
The Federal Risk and Authorization Management Program (FedRAMP) is a U.S. government standard for securing federal data in the cloud. Cloudflare has a FedRAMP certification that requires that we use cryptographic ciphersuites that comply with FIPS (Federal Information Processing Standards) for certain products that are inside our FIPS boundary.
Because the WARP client is inside Cloudflare’s FIPS boundary for our FedRAMP certification, we had to ensure it uses FIPS-compliant cryptography. For internal links (where Cloudflare controls both sides of the connection) within the FIPS boundary, we currently use a hybrid key agreement consisting of FIPS-compliant EDCH using the P256 Elliptic curve, in parallel with an early version of ML-KEM-768 (which we started using before the ML-KEM standards were finalized) — a key agreement called P256Kyber768Draft00. To observe this ciphersuite in action in your WARP client, you can use the warp-cli tunnel stats utility. Here’s an example of what we find when PQC is enabled:
And here is an example when PQC is not enabled:
PQC tunnels for everyone
We believe that PQC should be available to everyone, without specialized hardware, at no additional cost. To that end, we’re proud to help shoulder the burden of the Internet’s upgrade to PQC.
A powerful strategy is to use tunnels protected by post-quantum key agreement to protect Internet traffic, in bulk, from harvest-now-decrypt-later attacks – even if the individual connections sent through the tunnel have not yet been upgraded to PQC. Eventually, we will upgrade these tunnels to also support post-quantum signatures and certificates, to stop active attacks by adversaries armed with quantum computers after Q-Day.
This staged approach keeps up with Internet standards. And the use of tunnels provides customers and end users with built-in cryptographic agility, so they can easily adapt to changes in the cryptographic landscape without a major architectural overhaul.
Cloudflare’s WARP client is just the latest tunneling technology that we’ve upgraded to post-quantum key agreement. You can try it out today for free on personal devices using our free consumer WARP client 1.1.1.1, or for your corporate devices using our free zero-trust offering for teams of under 50 users or a paid enterprise zero-trust or SASE subscription. Just download and install the client on your Windows, Linux, macOS, iOS, Android/ChromeOS device, and start protecting your network traffic with PQC.
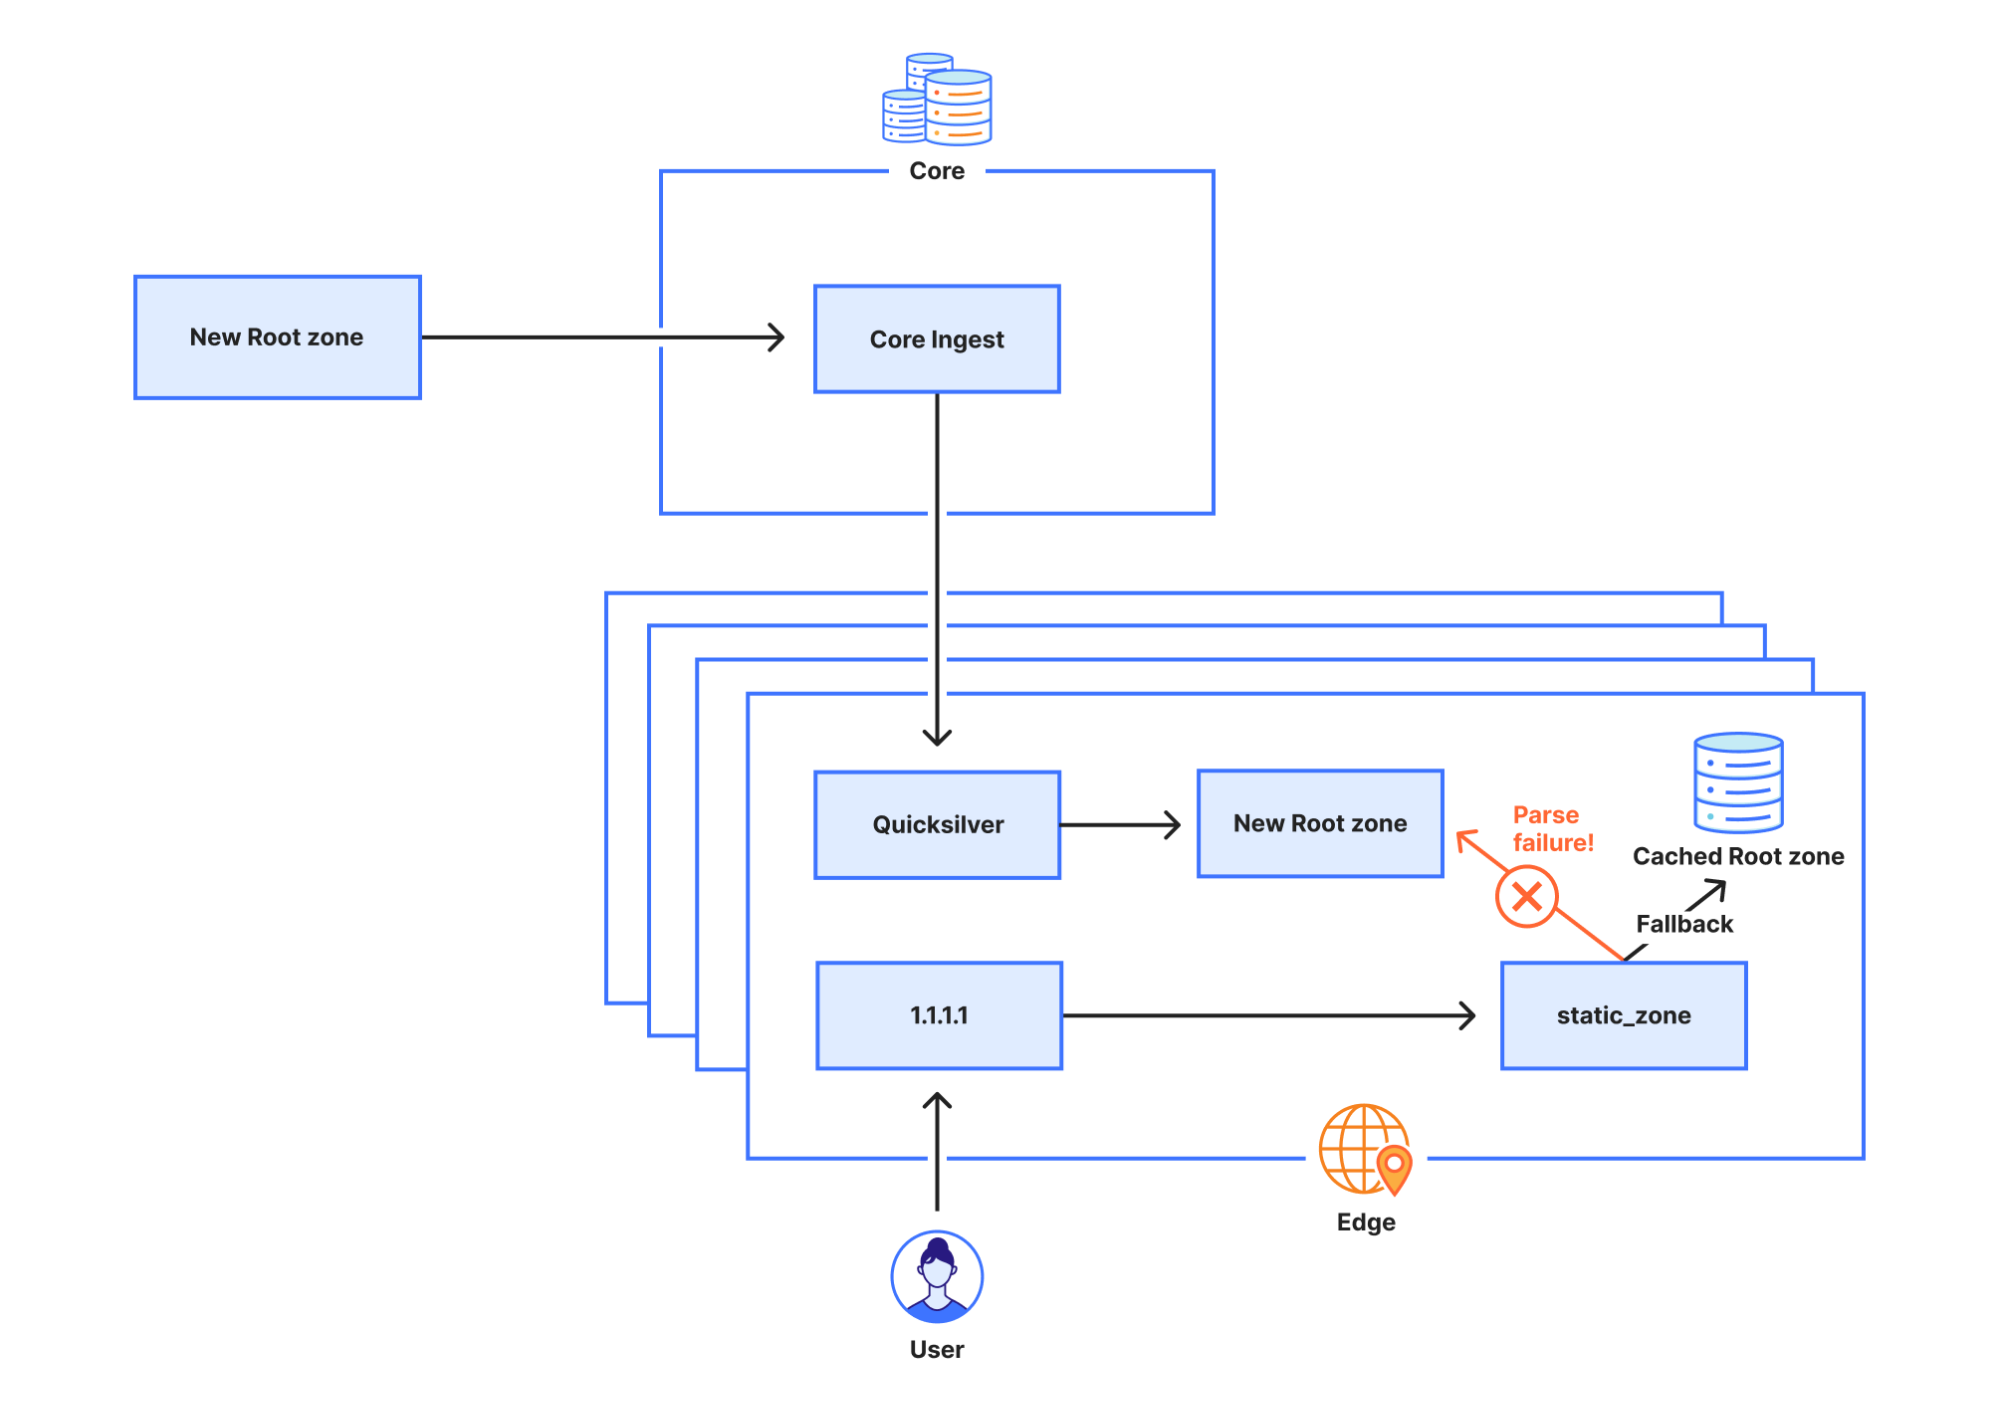
Over the past few days Cloudflare has been notified through our vulnerability disclosure program and the certificate transparency mailing list that unauthorized certificates were issued by Fina CA for 1.1.1.1, one of the IP addresses used by our public DNS resolver service. From February 2024 to August 2025, Fina CA issued twelve certificates for 1.1.1.1 without our permission. We did not observe unauthorized issuance for any properties managed by Cloudflare other than 1.1.1.1.
We have no evidence that bad actors took advantage of this error. To impersonate Cloudflare’s public DNS resolver 1.1.1.1, an attacker would not only require an unauthorized certificate and its corresponding private key, but attacked users would also need to trust the Fina CA. Furthermore, traffic between the client and 1.1.1.1 would have to be intercepted.
While this unauthorized issuance is an unacceptable lapse in security by Fina CA, we should have caught and responded to it earlier. After speaking with Fina CA, it appears that they issued these certificates for the purposes of internal testing. However, no CA should be issuing certificates for domains and IP addresses without checking control. At present all certificates have been revoked. We are awaiting a full post-mortem from Fina.
While we regret this situation, we believe it is a useful opportunity to walk through how trust works on the Internet between networks like ourselves, destinations like 1.1.1.1, CAs like Fina, and devices like the one you are using to read this. To learn more about the mechanics, please keep reading.
Background
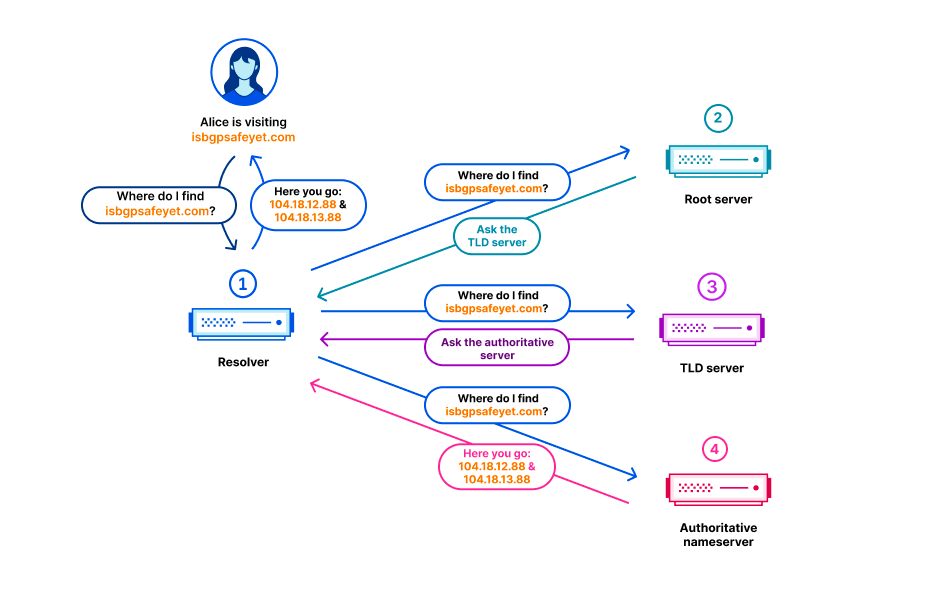
Cloudflare operates a public DNS resolver 1.1.1.1 service that millions of devices use to resolve domain names from a human-readable format such as example.com to an IP address like 192.0.2.42 or 2001:db8::2a.
The 1.1.1.1 service is accessible using various methods, across multiple domain names, such as cloudflare-dns.com and one.one.one.one, and also using various IP addresses, such as 1.1.1.1, 1.0.0.1, 2606:4700:4700::1111, and 2606:4700:4700::1001. 1.1.1.1 for Families also provides public DNS resolver services and is hosted on different IP addresses — 1.1.1.2, 1.1.1.3, 1.0.0.2, 1.0.0.3, 2606:4700:4700::1112, 2606:4700:4700::1113, 2606:4700:4700::1002, 2606:4700:4700::1003.
As originally specified in RFC 1034 and RFC 1035, the DNS protocol includes no privacy or authenticity protections. DNS queries and responses are exchanged between client and server in plain text over UDP or TCP. These represent around 60% of queries received by the Cloudflare 1.1.1.1 service. The lack of privacy or authenticity protection means that any intermediary can potentially read the DNS query and response and modify them without the client or the server being aware.
To address these shortcomings, we have helped develop and deploy multiple solutions at the IETF. The two of interest to this post are DNS over TLS (DoT, RFC 7878) and DNS over HTTPS (DoH, RFC 8484). In both cases the DNS protocol itself is mainly unchanged, and the desirable security properties are implemented in a lower layer, replacing the simple use of plain-text in UDP and TCP in the original specification. Both DoH and DoT use TLS to establish an authenticated, private, and encrypted channel over which DNS messages can be exchanged. To learn more you can read DNS Encryption Explained.
During the TLS handshake, the server proves its identity to the client by presenting a certificate. The client validates this certificate by verifying that it is signed by a Certification Authority that it already trusts. Only then does it establish a connection with the server. Once connected, TLS provides encryption and integrity for the DNS messages exchanged between client and server. This protects DoH and DoT against eavesdropping and tampering between the client and server.
The TLS certificates used in DoT and DoH are the same kinds of certificates HTTPS websites serve. Most website certificates are issued for domain names like example.com. When a client connects to that website, they resolve the name example.com to an IP like 192.0.2.42, then connect to the domain on that IP address. The server responds with a TLS certificate containing example.com, which the device validates.
However, DNS server certificates tend to be used slightly differently. Certificates used for DoT and DoH have to contain the service IP addresses, not just domain names. This is due to clients being unable to resolve a domain name in order to contact their resolver, like cloudflare-dns.com. Instead, devices are first set up by connecting to their resolver via a known IP address, such as 1.1.1.1 in the case of Cloudflare public DNS resolver. When this connection uses DoT or DoH, the resolver responds with a TLS certificate issued for that IP address, which the client validates. If the certificate is valid, the client believes that it is talking to the owner of 1.1.1.1 and starts sending DNS queries.
You can see that the IP addresses are included in the certificate Cloudflare’s public resolver uses for DoT/DoH:
Certificate:
  Data:
      Version: 3 (0x2)
      Serial Number:
          02:7d:c8:c5:e1:72:94:ae:c9:ed:3f:67:72:8e:8a:08
      Signature Algorithm: sha256WithRSAEncryption
      Issuer: C=US, O=DigiCert Inc, CN=DigiCert Global G2 TLS RSA SHA256 2020 CA1
      Validity
          Not Before: Jan  2 00:00:00 2025 GMT
          Not After : Jan 21 23:59:59 2026 GMT
      Subject: C=US, ST=California, L=San Francisco, O=Cloudflare, Inc., CN=cloudflare-dns.com
      X509v3 extensions:
          X509v3 Subject Alternative Name:
              DNS:cloudflare-dns.com, DNS:*.cloudflare-dns.com, DNS:one.one.one.one, IP Address:1.0.0.1, IP Address:1.1.1.1, IP Address:162.159.36.1, IP Address:162.159.46.1, IP Address:2606:4700:4700:0:0:0:0:1001, IP Address:2606:4700:4700:0:0:0:0:1111, IP Address:2606:4700:4700:0:0:0:0:64, IP Address:2606:4700:4700:0:0:0:0:6400
Rogue certificate issuance
The section above describes normal, expected use of Cloudflare public DNS resolver 1.1.1.1 service, using certificates managed by Cloudflare. However, Cloudflare has been made aware of other, unauthorized certificates being issued for 1.1.1.1. Since certificate validation is the mechanism by which DoH and DoT clients establish the authenticity of a DNS resolver, this is a concern. Let’s now dive a little further in the security model provided by DoH and DoT.
Consider a client that is preconfigured to use the 1.1.1.1 resolver service using DoT. The client must establish a TLS session with the configured server before it can send any DNS queries. To be trusted, the server needs to present a certificate issued by a CA that the client trusts. The collection of certificates trusted by the client is also called the root store.
A Certification Authority (CA) is an organisation, such as DigiCert in the section above, whose role is to receive requests to sign certificates and verify that the requester has control of the domain. In this incident, Fina CA issued certificates for 1.1.1.1 without Cloudflare’s involvement. This means that Fina CA did not properly check whether the requestor had legitimate control over 1.1.1.1. According to Fina CA:
“They were issued for the purpose of internal testing of certificate issuance in the production environment. An error occurred during the issuance of the test certificates when entering the IP addresses and as such they were published on Certificate Transparency log servers.”
Although it’s not clear whether Fina CA sees it as an error, we emphasize that it is not an error to publish test certificates on Certificate Transparency (more about what that is later on). Instead, the error at hand is Fina CA using their production keys to sign a certificate for an IP address without permission of the controller. We have talked about misuse of 1.1.1.1 in documentation, lab, and testing environments at length. Instead of the Cloudflare public DNS resolver 1.1.1.1 IP address, Fina should have used an IP address it controls itself.
Unauthorized certificates are unfortunately not uncommon, whether due to negligence — such as IdenTrust in November 2024 — or compromise. Famously in 2011, the Dutch CA DigiNotar was hacked, and its keys were used to issue hundreds of certificates. This hack was a wake-up call and motivated the introduction of Certificate Transparency (CT), later formalised in RFC 6962. The goal of Certificate Transparency is not to directly prevent misissuance, but to be able to detect any misissuance once it has happened, by making sure every certificate issued by a CA is publicly available for inspection.
In certificate transparency several independent parties, including Cloudflare, operate public logs of issued certificates. Many modern browsers do not accept certificates unless they provide proof in the form of signed certificate timestamps (SCTs) that the certificate has been logged in at least two logs. Domain owners can therefore monitor all public CT logs for any certificate containing domains they care about. If they see a certificate for their domains that they did not authorize, they can raise the alarm. CT is also the data source for public services such as crt.sh and Cloudflare Radar’s certificate transparency page.
Not all clients require proof of inclusion in certificate transparency. Browsers do, but most DNS clients don’t. We were fortunate that Fina CA did submit the unauthorized certificates to the CT logs, which allowed them to be discovered.
Investigation into potential malicious use
Our immediate concern was that someone had maliciously used the certificates to impersonate the 1.1.1.1 service. Such an attack would require all the following:
An attacker would require a rogue certificate and its corresponding private key.
Attacked clients would need to trust the Fina CA.
Traffic between the client and 1.1.1.1 would have to be intercepted.
In light of this incident, we have reviewed these requirements one by one:
1. We know that a certificate was issued without Cloudflare’s involvement. We must assume that a corresponding private key exists, which is not under Cloudflare’s control. This could be used by an attacker. Fina CA wrote to us that the private keys were exclusively in Fina’s controlled environment and were immediately destroyed even before the certificates were revoked. As we have no way to verify this, we have and continue to take steps to detect malicious use as described in point 3.
2. Furthermore, some clients trust Fina CA. It is included by default in Microsoft’s root store and in an EU Trust Service provider. We can exclude some clients, as the CA certificate is not included by default in the root stores of Android, Apple, Mozilla, or Chrome. These users cannot have been affected with these default settings. For these certificates to be used nefariously, the client’s root store must include the Certification Authority (CA) that issued them. Upon discovering the problem, we immediately reached out to Fina CA, Microsoft, and the EU Trust Service provider. Microsoft responded quickly, and started rolling out an update to their disallowed list, which should cause clients that use it to stop trusting the certificate.
3. Finally, we have launched an investigation into possible interception between users and 1.1.1.1. The first way this could happen is when the attacker is on-path of the client request. Such man-in-the-middle attacks are likely to be invisible to us. Clients will get responses from their on-path middlebox and we have no reliable way of telling that is happening. On-path interference has been a persistent problem for 1.1.1.1, which we’ve been working on ever since we announced 1.1.1.1.
A second scenario can occur when a malicious actor is off-path, but is able to hijack 1.1.1.1 routing via BGP. These are scenarios we have discussed in aprevious blog post, and increasing adoption of RPKI route origin validation (ROV) makes BGP hijacks with high penetration harder. We looked at the historical BGP announcements involving 1.1.1.1, and have found no evidence that such routing hijacks took place.
Although we cannot be certain, so far we have seen no evidence that these certificates have been used to impersonate Cloudflare public DNS resolver 1.1.1.1 traffic. In later sections we discuss the steps we have taken to prevent such impersonation in the future, as well as concrete actions you can take to protect your own systems and users.
A closer look at the unauthorized certificates attributes
All unauthorized certificates for 1.1.1.1 were valid for exactly one year and included other domain names. Most of these domain names are not registered, which indicates that the certificates were issued without proper domain control validation. This violates sections 3.2.2.4 and 3.2.2.5 of the CA/Browser Forum’s Baseline Requirements, and sections 3.2.2.3 and 3.2.2.4 of the Fina CA Certificate Policy.
The full list of domain names we identified on the unauthorized certificates are as follows:
It’s also worth noting that the Subject attribute points to a fictional organisation TEST D.D., as can be seen on this unauthorized certificate:
        Serial Number:
            a5:30:a2:9c:c1:a5:da:40:00:00:00:00:56:71:f2:4c
        Signature Algorithm: sha256WithRSAEncryption
        Issuer: C=HR, O=Financijska agencija, CN=Fina RDC 2015
        Validity
            Not Before: Nov  2 23:45:15 2024 GMT
            Not After : Nov  2 23:45:15 2025 GMT
        Subject: C=HR, O=TEST D.D., L=ZAGREB, CN=testssl.finatest.hr, serialNumber=VATHR-32343828408.306
        X509v3 extensions:
            X509v3 Subject Alternative Name:
                DNS:testssl.finatest.hr, DNS:testssl2.finatest.hr, IP Address:1.1.1.1
Incident timeline and impact
All timestamps are UTC. All certificates are identified by their date of validity.
The first certificate was issued to be valid starting February 2024, and revoked 33 min later. 11 certificate issuances with common name 1.1.1.1 followed from February 2024 to August 2025. Public reports have been made on Hacker News and on the certificate-transparency mailing list early in September 2025, which Cloudflare responded to.
While responding to the incident, we identified the full list of misissued certificates, their revocation status, and which clients trust them.
First response by Cloudflare on the mailing list about starting the investigation
2025-09-03 12:08:00
Incident declared
2025-09-03 12:16:00
Notification of an unauthorised issuance sent to Fina CA, Microsoft Root Store, and EU Trust service provider
2025-09-03 12:23:00
Cloudflare identifies an initial list of nine rogue certificates
2025-09-03 12:24:00
Outreach to Fina CA to inform them about the unauthorized issuance, requesting revocation
2025-09-03 12:26:00
Identify the number of requests served on 1.1.1.1 IP address, and associated names/services
2025-09-03 12:42:00
As a precautionary measure, began investigation to rule out the possibility of a BGP hijack for 1.1.1.1
2025-09-03 18:48:00
Second notification of the incident to Fina CA
2025-09-03 21:27:00
Microsoft Root Store notifies us that they are preventing further use of the identified unauthorized certificates by using their quick-revocation mechanism.
2025-09-04 06:13:27
Fina revoked all certificates.
2025-09-04 12:44:00
Cloudflare receives a response from Fina indicating “an error occurred during the issuance of the test certificates when entering the IP addresses and as such they were published on Certificate Transparency log servers. […] Fina will eliminate the possibility of such an error recurring.”
It is therefore disappointing that we failed to properly monitor certificates for our own domain. We failed three times. The first time because 1.1.1.1 is an IP certificate and our system failed to alert on these. The second time because even if we were to receive certificate issuance alerts, as any of our customers can, we did not implement sufficient filtering. With the sheer number of names and issuances we manage it has not been possible for us to keep up with manual reviews. Finally, because of this noisy monitoring, we did not enable alerting for all of our domains. We are addressing all three shortcomings.
We double-checked all certificates issued for our names, including but not limited to 1.1.1.1, using certificate transparency, and confirmed that as of 3 September, the Fina CA issued certificates are the only unauthorized issuances. We contacted Fina, and the root programs we know that trust them, to ask for revocation and investigation. The certificates have been revoked.
Despite no indication of usage of these certificates so far, we take this incident extremely seriously. We have identified several steps we can take to address the risk of these sorts of problems occurring in the future, and we plan to start working on them immediately:
Alerting: Cloudflare will improve alerts and escalation for issuance of certificates for missing Cloudflare owned domains including 1.1.1.1 certificates.
Transparency: The issuance of these unauthorised 1.1.1.1 certificates were detected because Fina CA used Certificate Transparency. Transparency inclusion is not enforced by most DNS clients, which implies that this detection was a lucky one. We are working on bringing transparency to non-browser clients, in particular DNS clients that rely on TLS.
Bug Bounty: Our procedure for triaging reports made through our vulnerability disclosure program was the cause for a delayed response. We are working to revise our triaging process to ensure such reports get the right visibility.
Monitoring: During this incident, our team relied on crt.sh to provide us a convenient UI to explore CA issued certificates. We’d like to give a shout to the Sectigo team for maintaining this tool. Given Cloudflare is an active CT Monitor, we have started to build a dedicated UI to explore our data in Radar. We are looking to enable exploration of certs with IP addresses as common names to Radar as well.
What steps should you take?
This incident demonstrates the disproportionate impact that the current root store model can have. It is enough for a single certification authority going rogue for everyone to be at risk.
If you are an IT manager with a fleet of managed devices, you should consider whether you need to take direct action to revoke these unauthorized certificates. We provide the list in the timeline section above. As the certificates have since been revoked, it is possible that no direct intervention should be required; however, system-wide revocation is not instantaneous and automatic and hence we recommend checking.
If you are tasked to review the policy of a root store that includes Fina CA, you should take immediate actions to review their inclusion in your program. The issue that has been identified through the course of this investigation raises concerns, and requires a clear report and follow-up from the CA. In addition, to make it possible to detect future such incidents, you should consider having a requirement for all CAs in your root store to participate in Certificate Transparency. Without CT logs, problems such as the one we describe here are impossible to address before they result in impact to end users.
We are not suggesting that you should stop using DoH or DoT. DNS over UDP and TCP are unencrypted, which puts every single query and response at risk of tampering and unauthorised surveillance. However, we believe that DoH and DoT client security could be improved if clients required that server certificates be included in a certificate transparency log.
Conclusion
This event is the first time we have observed a rogue issuance of a certificate used by our public DNS resolver 1.1.1.1 service. While we have no evidence this was malicious, we know that there might be future attempts that are.
We plan to accelerate how quickly we discover and alert on these types of issues ourselves. We know that we can catch these earlier, and we plan to do so.
The identification of these kinds of issues rely on an ecosystem of partners working together to support Certificate Transparency. We are grateful for the monitors who noticed and reported this issue.
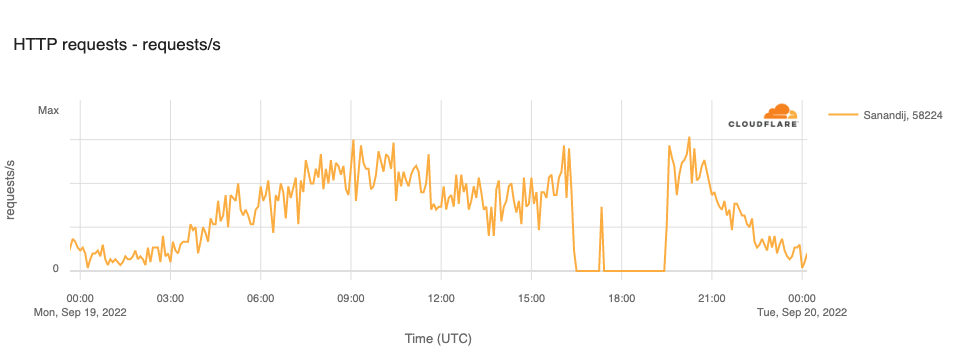
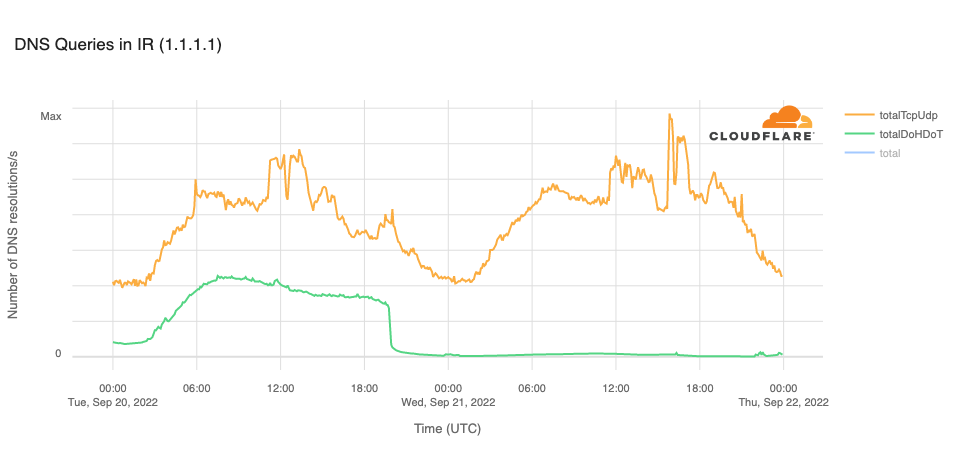
On 14 July 2025, Cloudflare’s 1.1.1.1 Resolver service became unavailable to the Internet starting at 21:52 UTC and ending at 22:54 UTC. The majority of 1.1.1.1 users globally were affected. For many users, not being able to resolve names using the 1.1.1.1 Resolver meant that basically all Internet services were unavailable. This outage can be observed on Cloudflare Radar.
The outage occurred because of a misconfiguration of legacy systems used to maintain the infrastructure that advertises Cloudflare’s IP addresses to the Internet.
This was a global outage. During the outage, Cloudflare’s 1.1.1.1 Resolver was unavailable worldwide.
We’re very sorry for this outage. The root cause was an internal configuration error and not the result of an attack or a BGP hijack. In this blog, we’re going to talk about what the failure was, why it occurred, and what we’re doing to make sure this doesn’t happen again.
Background
Cloudflare introduced the 1.1.1.1 public DNS Resolver service in 2018. Since the announcement, 1.1.1.1 has become one of the most popular DNS Resolver IP addresses and it is free for anyone to use.
Almost all of Cloudflare’s services are made available to the Internet using a routing method known as anycast, a well-known technique intended to allow traffic for popular services to be served in many different locations across the Internet, increasing capacity and performance. This is the best way to ensure we can globally manage our traffic, but also means that problems with the advertisement of this address space can result in a global outage.
Cloudflare announces these anycast routes to the Internet in order for traffic to those addresses to be delivered to a Cloudflare data center, providing services from many different places. Most Cloudflare services are provided globally, like the 1.1.1.1 public DNS Resolver, but a subset of services are specifically constrained to particular regions.
These services are part of our Data Localization Suite (DLS), which allows customers to configure Cloudflare in a variety of ways to meet their compliance needs across different countries and regions. One of the ways in which Cloudflare manages these different requirements is to make sure the right service’s IP addresses are Internet-reachable only where they need to be, so your traffic is handled correctly worldwide. A particular service has a matching “service topology” – that is, traffic for a service should be routed only to a particular set of locations.
On June 6, during a release to prepare a service topology for a future DLS service, a configuration error was introduced: the prefixes associated with the 1.1.1.1 Resolver service were inadvertently included alongside the prefixes that were intended for the new DLS service. This configuration error sat dormant in the production network as the new DLS service was not yet in use, but it set the stage for the outage on July 14. Since there was no immediate change to the production network there was no end-user impact, and because there was no impact, no alerts were fired.
Incident Timeline
Time (UTC)
Event
2025-06-06 17:38
ISSUE INTRODUCED – NO IMPACT
A configuration change was made for a DLS service that was not yet in production. This configuration change accidentally included a reference to the 1.1.1.1 Resolver service and, by extension, the prefixes associated with the 1.1.1.1 Resolver service.
This change did not result in a change of network configuration, and so routing for the 1.1.1.1 Resolver was not affected.
Since there was no change in traffic, no alerts fired, but the misconfiguration lay dormant for a future release.
2025-07-14 21:48
IMPACT START
A configuration change was made for the same DLS service. The change attached a test location to the non-production service; this location itself was not live, but the change triggered a refresh of network configuration globally.
Due to the earlier configuration error linking the 1.1.1.1 Resolver’s IP addresses to our non-production service, those 1.1.1.1 IPs were inadvertently included when we changed how the non-production service was set up.
The 1.1.1.1 Resolver prefixes started to be withdrawn from production Cloudflare data centers globally.
2025-07-14 21:52
DNS traffic to 1.1.1.1 Resolver service begins to drop globally
2025-07-14 21:54
Related, non-causal event: BGP origin hijack of 1.1.1.0/24 exposed by withdrawal of routes from Cloudflare. This was not a cause of the service failure, but an unrelated issue that was suddenly visible as that prefix was withdrawn by Cloudflare.
2025-07-14 22:01
IMPACT DETECTED
Internal service health alerts begin to fire for the 1.1.1.1 Resolver
2025-07-14 22:01
INCIDENT DECLARED
2025-07-14 22:20
FIX DEPLOYED
Revert was initiated to restore the previous configuration. To accelerate full restoration of service, a manually triggered action is validated in testing locations before being executed.
2025-07-14 22:54
IMPACT ENDS
Resolver alerts cleared and DNS traffic on Resolver prefixes return to normal levels
2025-07-14 22:55
INCIDENT RESOLVED
Impact
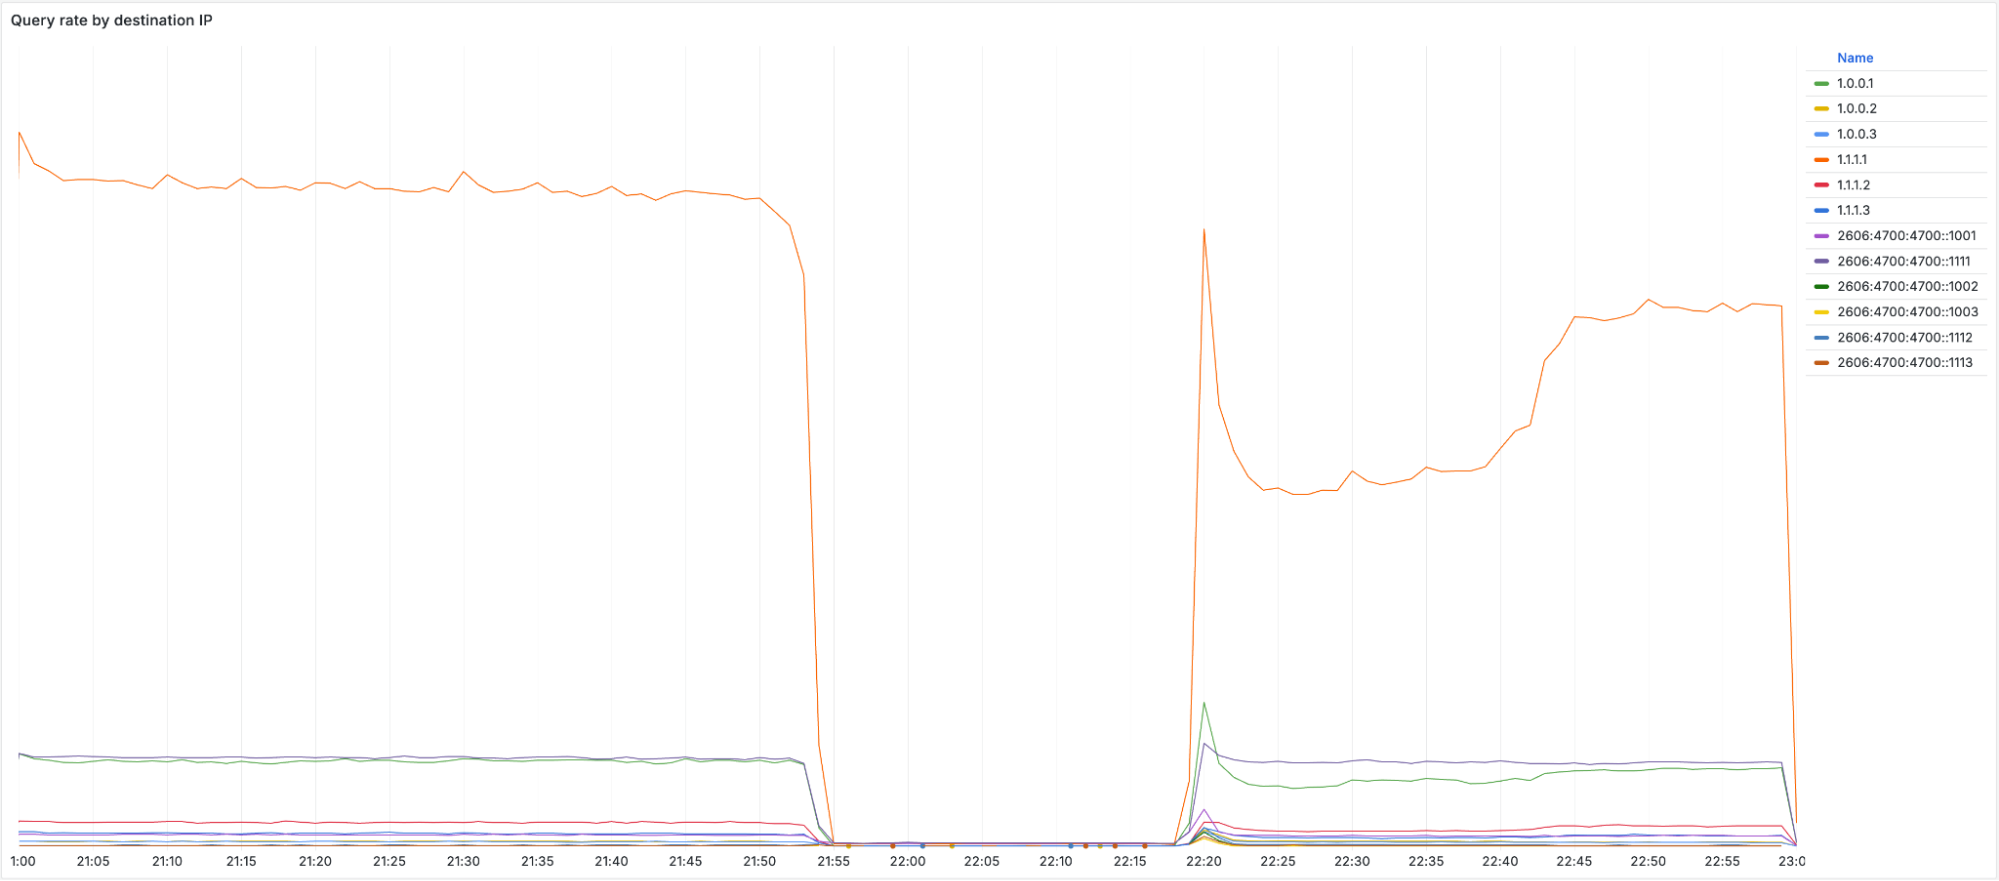
Any traffic coming to Cloudflare via 1.1.1.1 Resolver services on these IPs was impacted. Traffic to each of these addresses were also impacted on the corresponding routes.
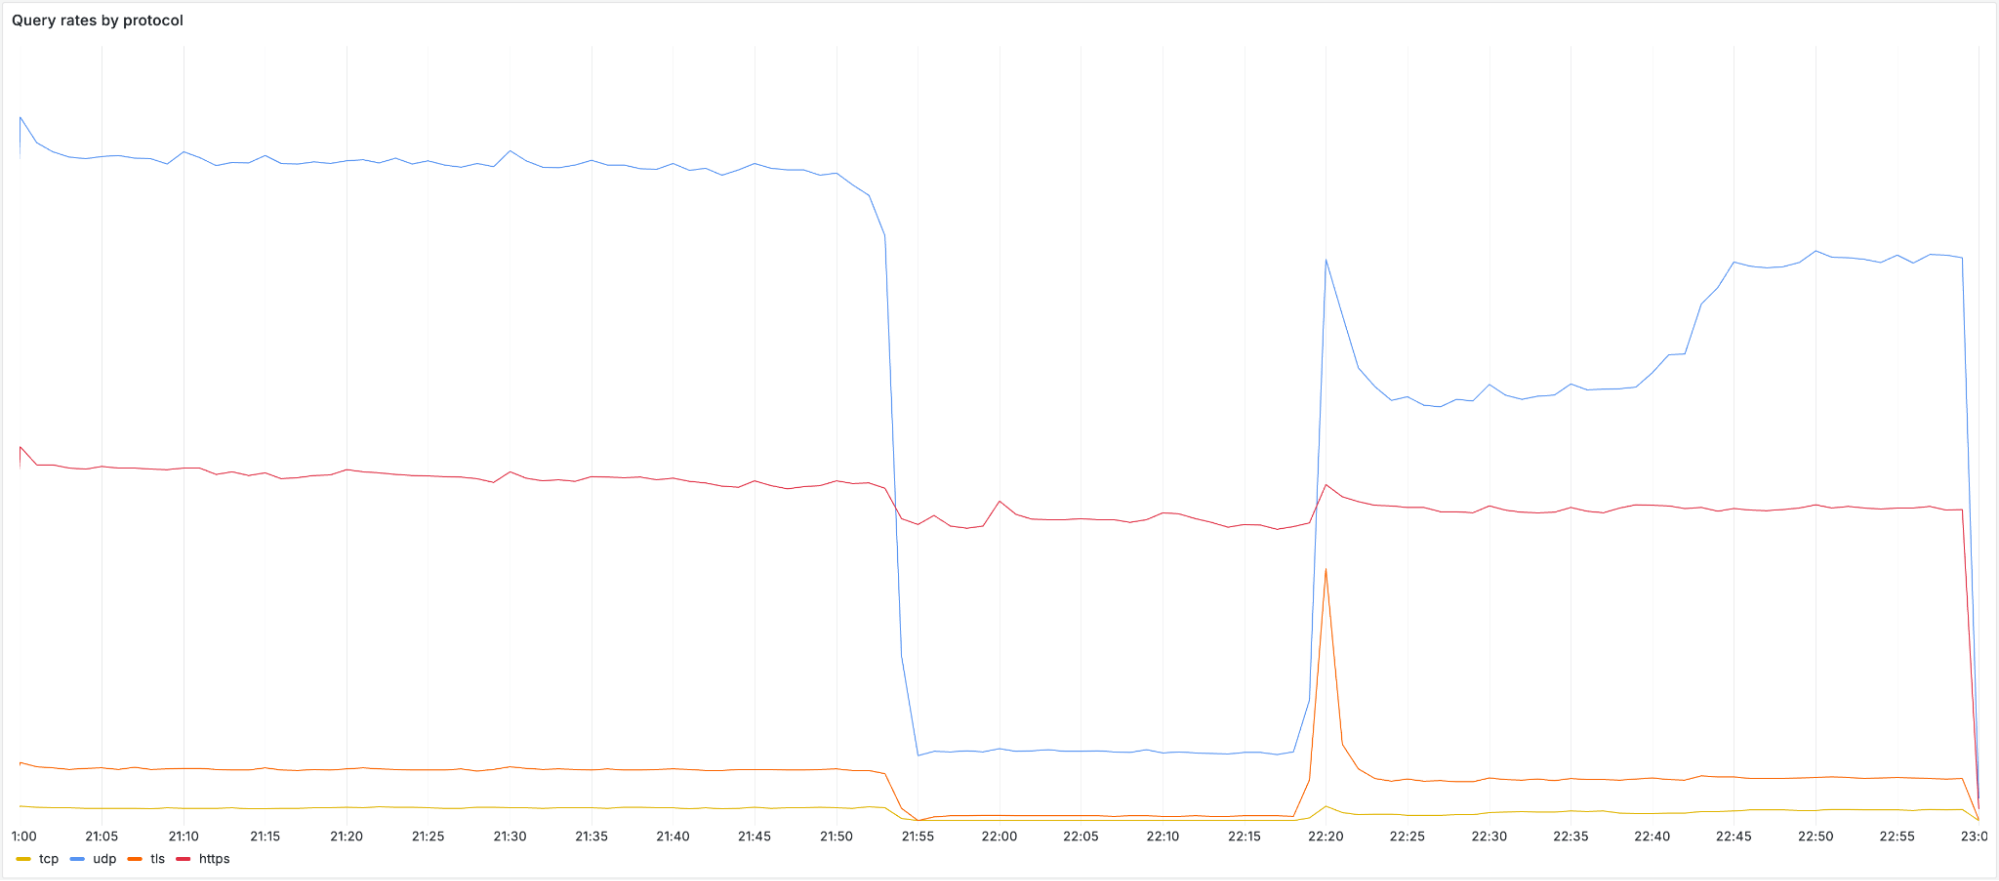
When the impact started we observed an immediate and significant drop in queries over UDP, TCP and DNS over TLS (DoT). Most users have 1.1.1.1, 1.0.0.1, 2606:4700:4700::1111, or 2606:4700:4700::1001 configured as their DNS server. Below you can see the query rate for each of the individual protocols and how they were impacted during the incident:
It’s worth noting that DoH (DNS-over-HTTPS) traffic remained relatively stable as most DoH users use the domain cloudflare-dns.com, configured manually or through their browser, to access the public DNS resolver, rather than by IP address. DoH remained available and traffic was mostly unaffected as cloudflare-dns.com uses a different set of IP addresses. Some DNS traffic over UDP that also used different IP addresses remained mostly unaffected as well.
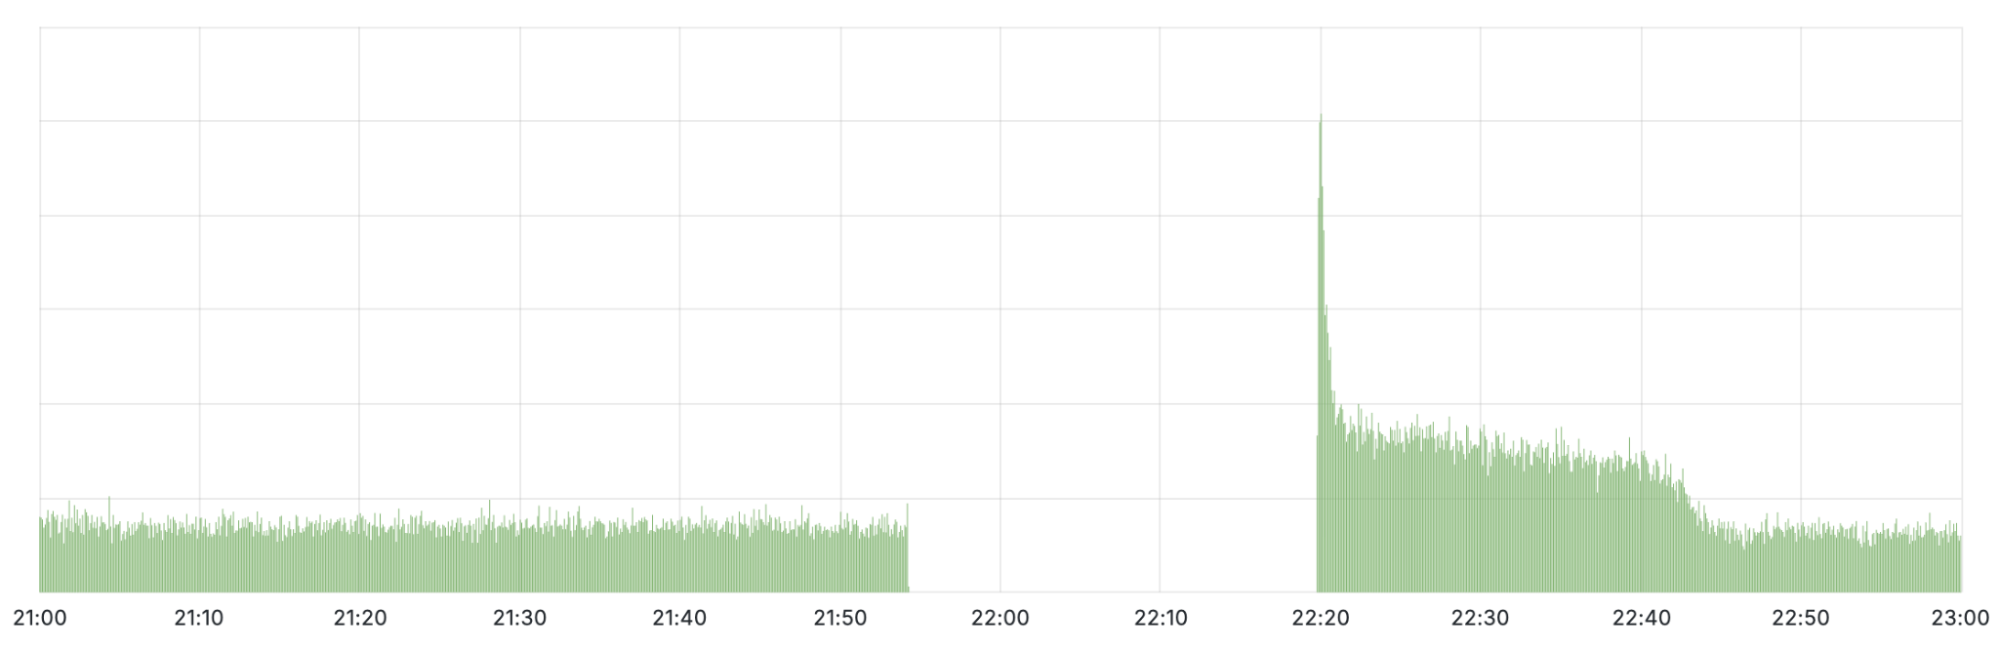
As the corresponding prefixes were withdrawn, no traffic sent to those addresses could reach Cloudflare. We can see this in the timeline for the BGP announcements for 1.1.1.0/24:
Pictured above is the timeline for BGP withdrawal and re-announcement of 1.1.1.0/24 globally
When looking at the query rate of the withdrawn IPs it can be observed that almost no traffic arrives during the impact window. When the initial fix was applied at 22:20 UTC, a large spike in traffic can be seen before it drops off again. This spike is due to clients retrying their queries. When we started announcing the withdrawn prefixes again, queries were able to reach Cloudflare once more. It took until 22:54 UTC before routing was restored in all locations and traffic returned to mostly normal levels.
Technical description of the error and how it happened
Failure of 1.1.1.1 Resolver Service
As described above, a configuration change on June 6 introduced an error in the service topology for a pre-production, DLS service. On July 14, a second change to that service was made: an offline data center location was added to the service topology for the pre-production DNS service in order to allow for some internal testing. This change triggered a refresh of the global configuration of the associated routes, and it was at this point that the impact from the earlier configuration error was felt. The service topology for the 1.1.1.1 Resolver’s prefixes was reduced from all locations down to a single, offline location. The effect was to trigger the global and immediate withdrawal of all 1.1.1.1 prefixes.
As routes to 1.1.1.1 were withdrawn, the 1.1.1.1 service itself became unavailable. Alerts fired and an incident was declared.
Technical Investigation and Analysis
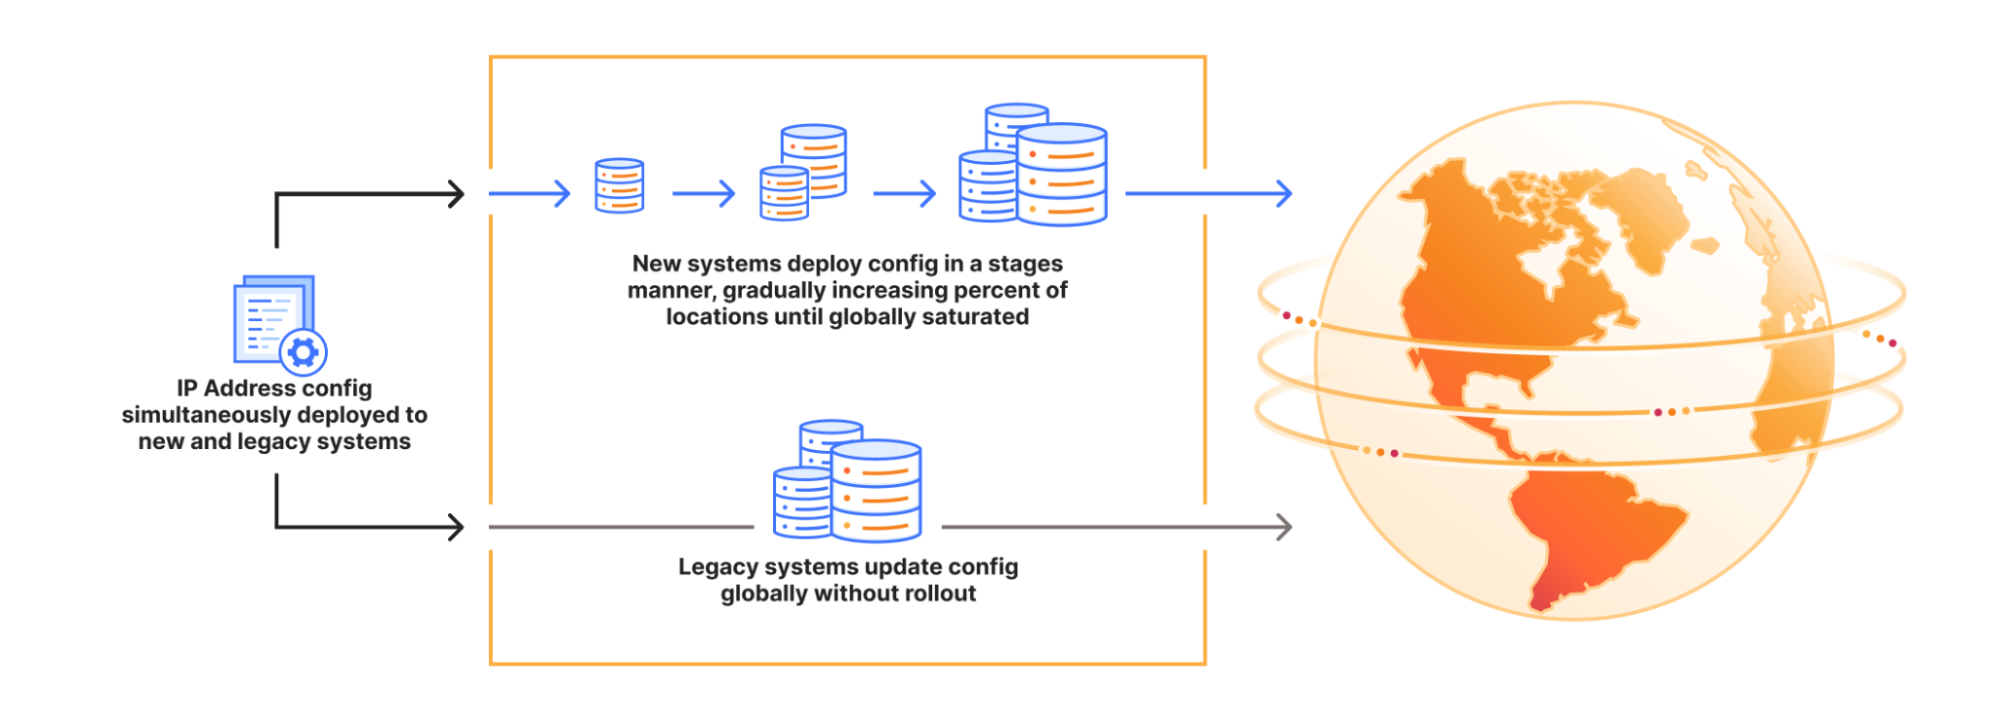
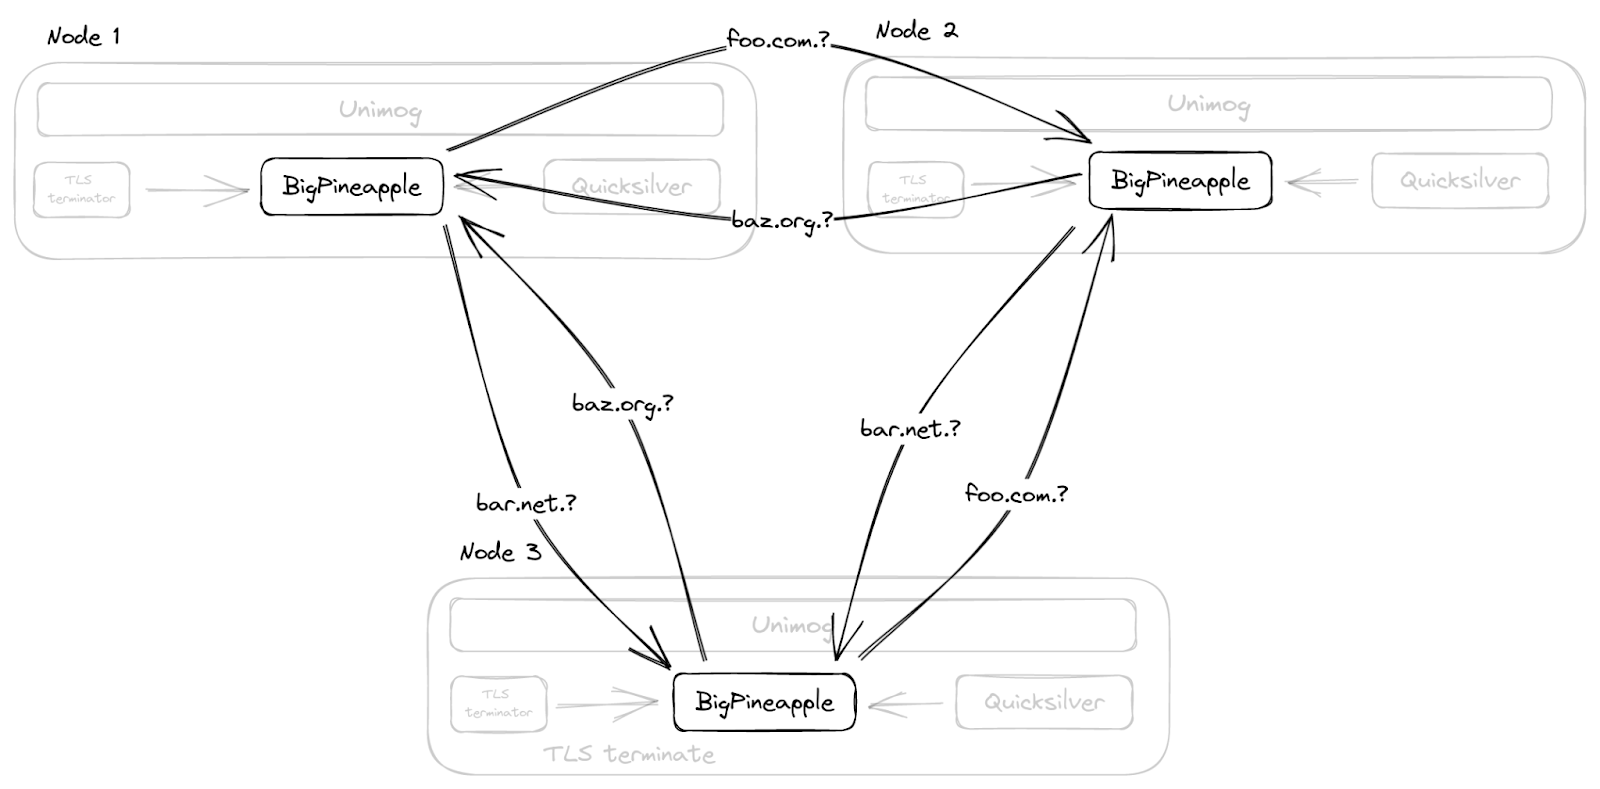
The way that Cloudflare manages service topologies has been refined over time and currently consist of a combination of a legacy and a strategic system that are synced. Cloudflare’s IP ranges are currently bound and configured across these systems that dictate where an IP range should be announced (in terms of datacenter location) on the edge network. The legacy approach of hard-coding explicit lists of data center locations and attaching them to particular prefixes has proved error-prone, since (for example) bringing a new data center online requires many different lists to be updated and synced consistently. This model also has a significant flaw in that updates to the configuration do not follow a progressive deployment methodology: Even though this release was peer-reviewed by multiple engineers, the change didn’t go through a series of canary deployments before reaching every Cloudflare data center. Our newer approach is to describe service topologies without needing to hard-code IP addresses, which better accommodate expansions to new locations and customer scenarios while also allowing for a staged deployment model, so changes can propagate slowly with health monitoring. During the migration between these approaches, we need to maintain both systems and synchronize data between them, which looks like this:
Initial alerts were triggered for the DNS Resolver at 22:01, indicating query, proxy, and data center failures. While investigating the alerts, we noted traffic toward the Resolver prefixes had drastically dropped and was no longer being received at our edge data centers. Internally, we use BGP to control route advertisements, and we found the Resolver routes from servers were completely missing.
Once our configuration error had been exposed and Cloudflare systems had withdrawn the routes from our routing table, all of the 1.1.1.1 routes should have disappeared entirely from the global Internet routing table. However, this isn’t what happened with the prefix 1.1.1.0/24. Instead, we got reports from Cloudflare Radar that Tata Communications India (AS4755) had started advertising 1.1.1.0/24: from the perspective of the routing system, this looked exactly like a prefix hijack. This was unexpected to see while we were troubleshooting the routing problem, but to be perfectly clear: this BGP hijack was not the cause of the outage. We are following up with Tata Communications.
Restoring the 1.1.1.1 Service
We reverted to the previous configuration at 22:20 UTC. Near instantly, we began readvertising the BGP prefixes which were previously withdrawn from the routers, including 1.1.1.0/24. This restored 1.1.1.1 traffic levels to roughly 77% of what they were prior to the incident. However, during the period since withdrawal, approximately 23% of the fleet of edge servers had been automatically reconfigured to remove required IP bindings as a result of the topology change. To add the configurations back, these servers needed to be reconfigured with our change management system which is not an instantaneous process by default for safety.
The process by which the IP bindings can be restored normally takes some time, as the network in individual locations is designed to be updated over a course of multiple hours. We implement a progressive rollout, rather than on all nodes at once to ensure we don’t introduce additional impact. However, given the severity of the incident, we accelerated the rollout of the fix after verifying the changes in testing locations to restore service as quickly and safely as possible. Normal traffic levels were observed at 22:54 UTC.
Remediation and follow-up steps
We take incidents like this seriously, and we recognise the impact that this incident had. Though this specific issue has been resolved, we have identified several steps we can take to mitigate the risk of a similar problem occurring in the future. We are implementing the following plan as a result of this incident:
Staging Addressing Deployments: Legacy components do not leverage a gradual, staged deployment methodology. Cloudflare will deprecate these systems which enables modern progressive and health mediated deployment processes to provide earlier indication in a staged manner and rollback accordingly.
Deprecating Legacy Systems: We are currently in an intermediate state in which current and legacy components need to be updated concurrently, so we will be migrating addressing systems away from risky deployment methodologies like this one. We will accelerate our deprecation of the legacy systems in order to provide higher standards for documentation and test coverage.
Conclusion
Cloudflare’s 1.1.1.1 DNS Resolver service fell victim to an internal configuration error.
We are sorry for the disruption this incident caused for our customers. We are actively making these improvements to ensure improved stability moving forward and to prevent this problem from happening again.
No joke – Cloudflare’s 1.1.1.1 resolver was launched on April Fool’s Day in 2018. Over the last seven years, this highly performant and privacy–conscious service has grown to handle an average of 1.9 Trillion queries per day from approximately 250 locations (countries/regions) around the world. Aggregated analysis of this traffic provides us with unique insight into Internet activity that goes beyond simple Web traffic trends, and we currently use analysis of 1.1.1.1 data to power Radar’s Domains page, as well as the Radar Domain Rankings.
In December 2022, Cloudflare joined the AS112 Project, which helps the Internet deal with misdirected DNS queries. In March 2023, we launched an AS112 statistics page on Radar, providing insight into traffic trends and query types for this misdirected traffic. Extending the basic analysis presented on that page, and building on the analysis of resolver data used for the Domains page, today we are excited to launch a dedicated DNS page on Cloudflare Radar to provide increased visibility into aggregate traffic and usage trends seen across 1.1.1.1 resolver traffic. In addition to looking at global, location, and autonomous system (ASN) traffic trends, we are also providing perspectives on protocol usage, query and response characteristics, and DNSSEC usage.
The traffic analyzed for this new page may come from users that have manually configured their devices or local routers to use 1.1.1.1 as a resolver, ISPs that set 1.1.1.1 as the default resolver for their subscribers, ISPs that use 1.1.1.1 as a resolver upstream from their own, or users that have installed Cloudflare’s 1.1.1.1/WARP app on their device. The traffic analysis is based on anonymised DNS query logs, in accordance with Cloudflare’s Privacy Policy, as well as our 1.1.1.1 Public DNS Resolver privacy commitments.
Below, we walk through the sections of Radar’s new DNS page, reviewing the included graphs and the importance of the metrics they present. The data and trends shown within these graphs will vary based on the location or network that the aggregated queries originate from, as well as on the selected time frame.
Traffic trends
As with many Radar metrics, the DNS page leads with traffic trends, showing normalized query volume at a worldwide level (default), or from the selected location or autonomous system (ASN). Similar to other Radar traffic-based graphs, the time period shown can be adjusted using the date picker, and for the default selections (last 24 hours, last 7 days, etc.), a comparison with traffic seen over the previous period is also plotted.
For location-level views (such as Latvia, in the example below), a table showing the top five ASNs by query volume is displayed alongside the graph. Showing the network’s share of queries from the selected location, the table provides insights into the providers whose users are generating the most traffic to 1.1.1.1.
When a country/region is selected, in addition to showing an aggregate traffic graph for that location, we also show query volumes for the country code top level domain (ccTLD) associated with that country. The graph includes a line showing worldwide query volume for that ccTLD, as well as a line showing the query volume based on queries from the associated location. Anguilla’s ccTLD is .ai, and is a popular choice among the growing universe of AI-focused companies. While most locations see a gap between the worldwide and “local” query volume for their ccTLD, Anguilla’s is rather significant — as the graph below illustrates, this size of the gap is driven by both the popularity of the ccTLD and Anguilla’s comparatively small user base. (Traffic for .ai domains from Anguilla is shown by the dark blue line at the bottom of the graph.) Similarly, sizable gaps are seen with other “popular” ccTLDs as well, such as .io (British Indian Ocean Territory), .fm (Federated States of Micronesia), and .co (Colombia). A higher “local” ccTLD query volume in other locations results in smaller gaps when compared to the worldwide query volume.
Depending on the strength of the signal (that is, the volume of traffic) from a given location or ASN, this data can also be used to corroborate reported Internet outages or shutdowns, or reported blocking of 1.1.1.1. For example, the graph below illustrates the result of Venezuelan provider CANTV reportedly blocking access to 1.1.1.1 for its subscribers. A comparable drop is visible for Supercable, another Venezuelan provider that also reportedly blocked access to Cloudflare’s resolver around the same time.
Individual domain pages (like the one for cloudflare.com, for example) have long had a choropleth map and accompanying table showing the popularity of the domain by location, based on the share of DNS queries for that domain from each location. A similar view is included at the bottom of the worldwide overview page, based on the share of total global queries to 1.1.1.1 from each location.
Query and response characteristics
While traffic trends are always interesting and important to track, analysis of the characteristics of queries to 1.1.1.1 and the associated responses can provide insights into the adoption of underlying transport protocols, record type popularity, cacheability, and security.
Published in November 1987, RFC 1035 notes that “The Internet supports name server access using TCP [RFC-793] on server port 53 (decimal) as well as datagram access using UDP [RFC-768] on UDP port 53 (decimal).” Over the subsequent three-plus decades, UDP has been the primary transport protocol for DNS queries, falling back to TCP for a limited number of use cases, such as when the response is too big to fit in a single UDP packet. However, as privacy has become a significantly greater concern, encrypted queries have been made possible through the specification of DNS over TLS (DoT) in 2016 and DNS over HTTPS (DoH) in 2018. Cloudflare’s 1.1.1.1 resolver has supported both of these privacy-preserving protocols since launch. The DNS transport protocol graph shows the distribution of queries to 1.1.1.1 over these four protocols. (Setting up 1.1.1.1 on your device or router uses DNS over UDP by default, although recent versions of Android support DoT and DoH. The 1.1.1.1 app uses DNS over HTTPS by default, and users can also configure their browsers to use DNS over HTTPS.)
Note that Cloudflare’s resolver also services queries over DoH and Oblivious DoH (ODoH) for Mozilla and other large platforms, but this traffic is not currently included in our analysis. As such, DoH adoption is under-represented in this graph.
Aggregated worldwide between February 19 – February 26, distribution of transport protocols was 86.6% for UDP, 9.6% for DoT, 2.0% for TCP, and 1.7% for DoH. However, in some locations, these ratios may shift if users are more privacy conscious. For example, the graph below shows the distribution for Egypt over the same time period. In that country, the UDP and TCP shares are significantly lower than the global level, while the DoT and DoH shares are significantly higher, suggesting that users there may be more concerned about the privacy of their DNS queries than the global average, or that there is a larger concentration of 1.1.1.1 users on Android devices who have set up 1.1.1.1 using DoT manually. (The 2024 Cloudflare Radar Year in Review found that Android had an 85% mobile device traffic share in Egypt, so mobile device usage in the country leans very heavily toward Android.)
RFC 1035 also defined a number of standard and Internet specific resource record types that return the associated information about the submitted query name. The most common record types are A and AAAA, which return the hostname’s IPv4 and IPv6 addresses respectively (assuming they exist). The DNS query type graph below shows that globally, these two record types comprise on the order of 80% of the queries received by 1.1.1.1. Among the others shown in the graph, HTTPS records can be used to signal HTTP/3 and HTTP/2 support, PTR records are used in reverse DNS records to look up a domain name based on a given IP address, and NS records indicate authoritative nameservers for a domain.
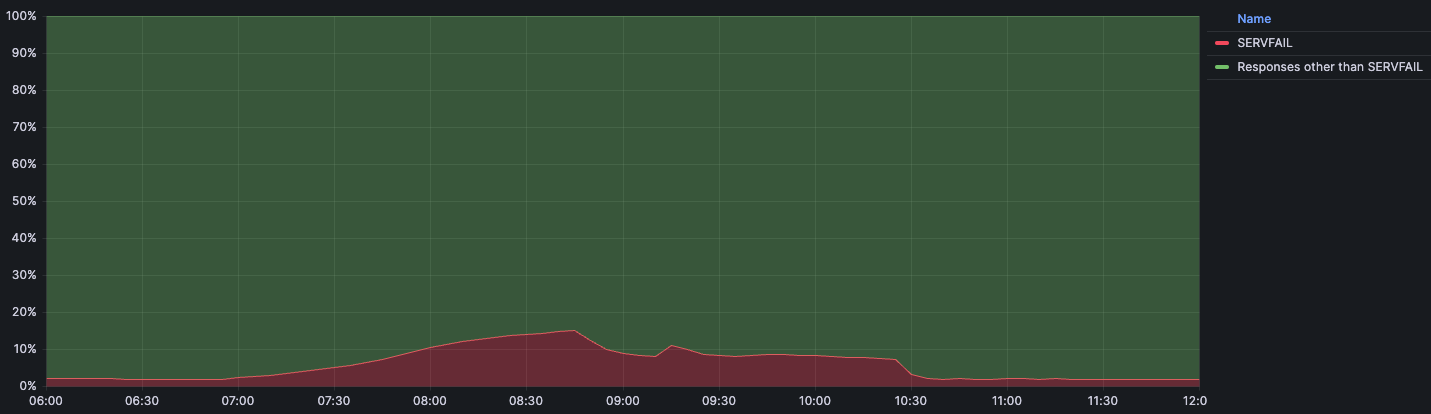
A response code is sent with each response from 1.1.1.1 to the client. Six possible values were originally defined in RFC 1035, with the list further extended in RFC 2136 and RFC 2671. NOERROR, as the name suggests, means that no error condition was encountered with the query. Others, such as NXDOMAIN, SERVFAIL, REFUSED, and NOTIMP define specific error conditions encountered when trying to resolve the requested query name. The response codes may be generated by 1.1.1.1 itself (like REFUSED) or may come from an upstream authoritative nameserver (like NXDOMAIN).
The DNS response code graph shown below highlights that the vast majority of queries seen globally do not encounter an error during the resolution process (NOERROR), and that when errors are encountered, most are NXDOMAIN (no such record). It is worth noting that NOERROR also includes empty responses, which occur when there are no records for the query name and query type, but there are records for the query name and some other query type.
With DNS being a first-step dependency for many other protocols, the amount of queries of particular types can be used to indirectly measure the adoption of those protocols. But to effectively measure adoption, we should also consider the fraction of those queries that are met with useful responses, which are represented with the DNS record adoption graphs.
The example below shows that queries for A records are met with a useful response nearly 88% of the time. As IPv4 is an established protocol, the remaining 12% are likely to be queries for valid hostnames that have no A records (e.g. email domains that only have MX records). But the same graph also shows that there’s still a significant adoption gap where IPv6 is concerned.
When Cloudflare’s DNS resolver gets a response back from an upstream authoritative nameserver, it caches it for a specified amount of time — more on that below. By caching these responses, it can more efficiently serve subsequent queries for the same name. The DNS cache hit ratio graph provides insight into how frequently responses are served from cache. At a global level, as seen below, over 80% of queries have a response that is already cached. These ratios will vary by location or ASN, as the query patterns differ across geographies and networks.
As noted in the preceding paragraph, when an authoritative nameserver sends a response back to 1.1.1.1, each record inside it includes information about how long it should be cached/considered valid for. This piece of information is known as the Time-To-Live (TTL) and, as a response may contain multiple records, the smallest of these TTLs (the “minimum” TTL) defines how long 1.1.1.1 can cache the entire response for. The TTLs on each response served from 1.1.1.1’s cache decrease towards zero as time passes, at which point 1.1.1.1 needs to go back to the authoritative nameserver. Hostnames with relatively low TTL values suggest that the records may be somewhat dynamic, possibly due to traffic management of the associated resources; longer TTL values suggest that the associated resources are more stable and expected to change infrequently.
The DNS minimum TTL graphs show the aggregate distribution of TTL values for five popular DNS record types, broken out across seven buckets ranging from under one minute to over one week. During the third week of February, for example, A and AAAA responses had a concentration of low TTLs, with over 80% below five minutes. In contrast, NS and MX responses were more concentrated across 15 minutes to one hour and one hour to one day. Because MX and NS records change infrequently, they are generally configured with higher TTLs. This allows them to be cached for longer periods in order to achieve faster DNS resolution.
DNS security
DNS Security Extensions (DNSSEC) add an extra layer of authentication to DNS establishing the integrity and authenticity of a DNS response. This ensures subsequent HTTPS requests are not routed to a spoofed domain. When sending a query to 1.1.1.1, a DNS client can indicate that it is DNSSEC-aware by setting a specific flag (the “DO” bit) in the query, which lets our resolver know that it is OK to return DNSSEC data in the response. The DNSSEC client awareness graph breaks down the share of queries that 1.1.1.1 sees from clients that understand DNSSEC and can require validation of responses vs. those that don’t. (Note that by default, 1.1.1.1 tries to protect clients by always validating DNSSEC responses from authoritative nameservers and not forwarding invalid responses to clients, unless the client has explicitly told it not to by setting the “CD” (checking-disabled) bit in the query.)
Unfortunately, as the graph below shows, nearly 90% of the queries seen by Cloudflare’s resolver are made by clients that are not DNSSEC-aware. This broad lack of client awareness may be due to several factors. On the client side, DNSSEC is not enabled by default for most users, and enabling DNSSEC requires extra work, even for technically savvy and security conscious users. On the authoritative side, for domain owners, supporting DNSSEC requires extra operational maintenance and knowledge, and a mistake can cost your domain to disappear from the Internet, causing significant (including financial) issues.
The companion End-to-end security graph represents the fraction of DNS interactions that were protected from tampering, when considering the client’s DNSSEC capabilities and use of encryption (use of DoT or DoH). This shows an even greater imbalance at a global level, and highlights the importance of further adoption of encryption and DNSSEC.
For DNSSEC validation to occur, the query name being requested must be part of a DNSSEC-enabled domain, and the DNSSEC validation status graph represents the share of queries where that was the case under the Secure and Invalid labels. Queries for domains without DNSSEC are labeled as Insecure, and queries where DNSSEC validation was not applicable (such as various kinds of errors) fall under the Other label. Although nearly 93% of generic Top Level Domains (TLDs) and 65% of country code Top Level Domains (ccTLDs) are signed with DNSSEC (as of February 2025), the adoption rate across individual (child) domains lags significantly, as the graph below shows that over 80% of queries were labeled as Insecure.
Conclusion
DNS is a fundamental, foundational part of the Internet. While most Internet users don’t think of DNS beyond its role in translating easy-to-remember hostnames to IP addresses, there’s a lot going on to make even that happen, from privacy to performance to security. The new DNS page on Cloudflare Radar endeavors to provide visibility into what’s going on behind the scenes, at a global, national, and network level.
While the graphs shown above are taken from the DNS page, all the underlying data is available via the API and can be interactively explored in more detail across locations, networks, and time periods using Radar’s Data Explorer and AI Assistant. And as always, Radar and Data Assistant charts and graphs are downloadable for sharing, and embeddable for use in your own blog posts, websites, or dashboards.
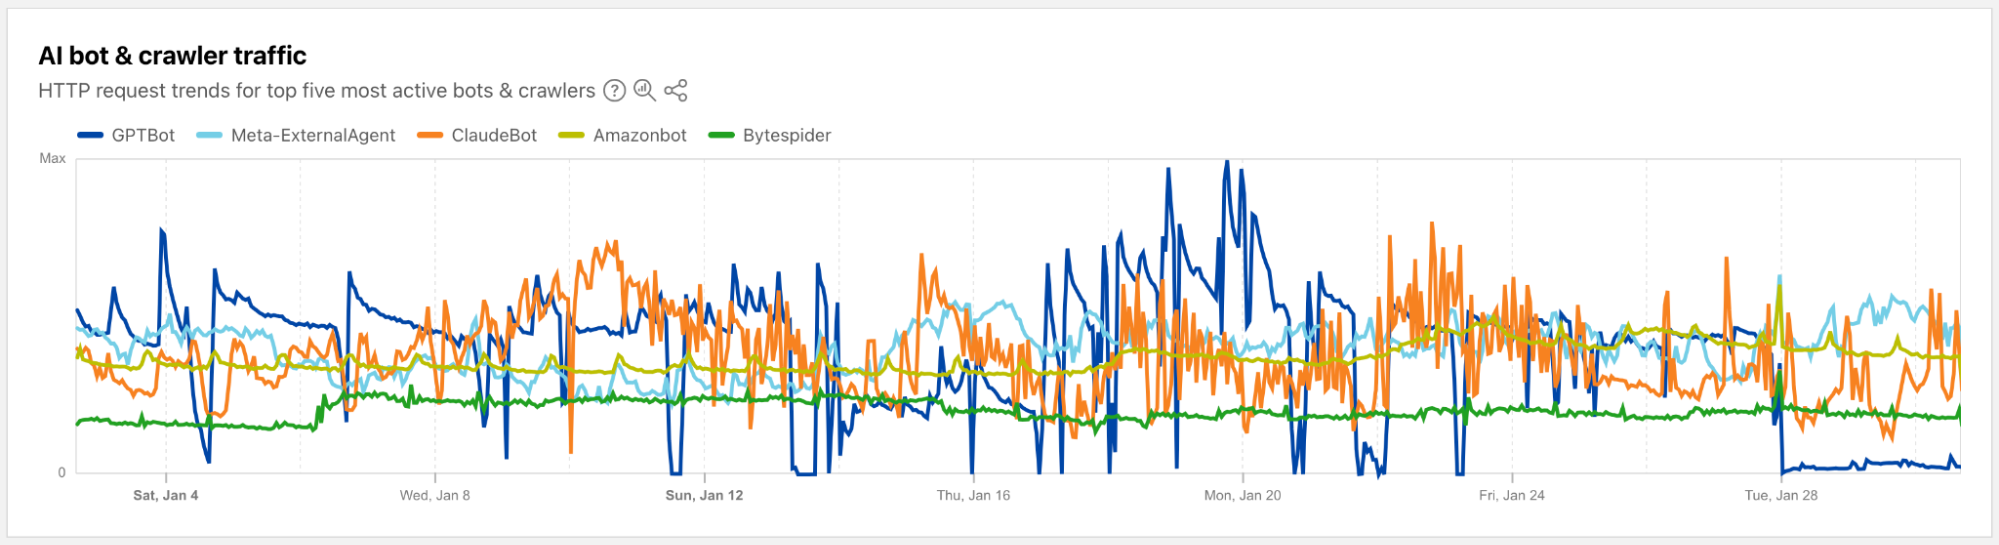
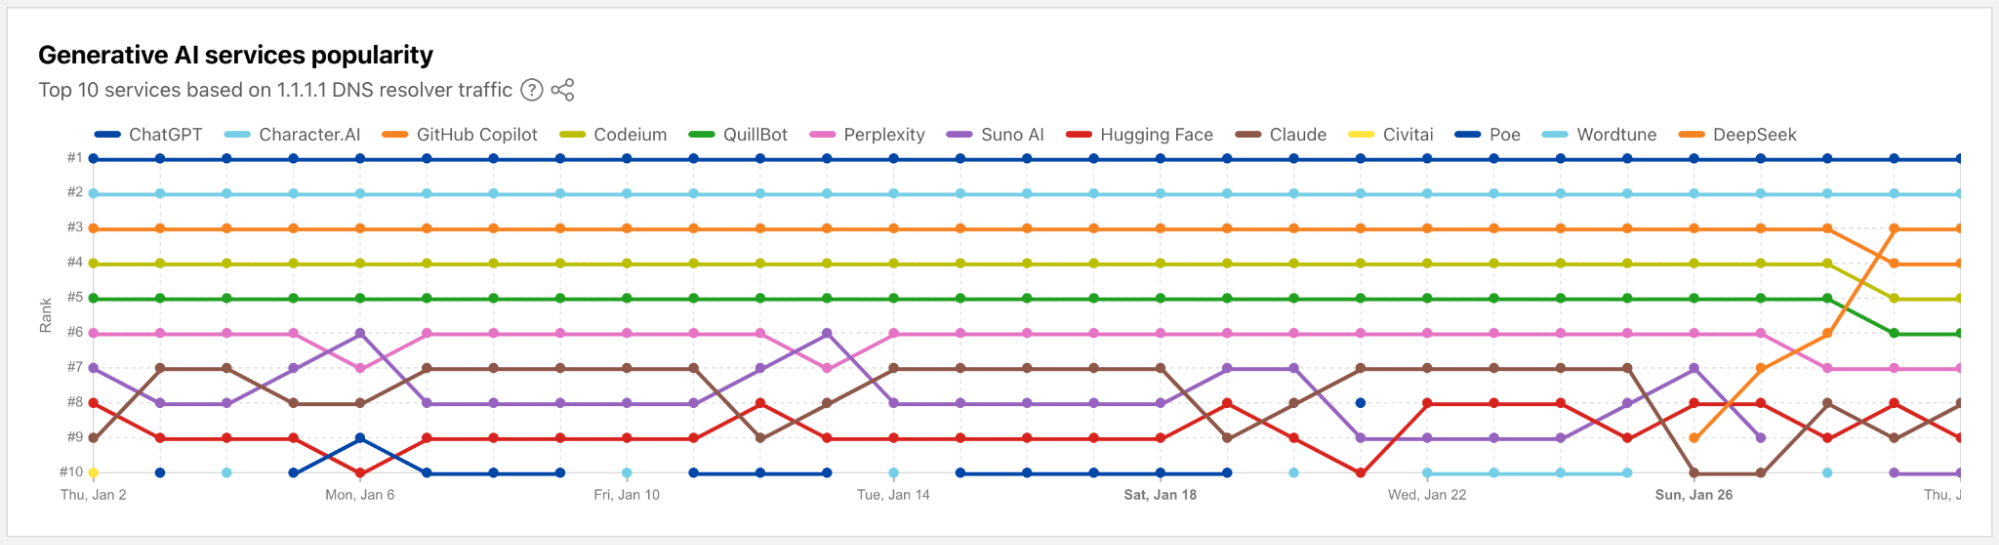
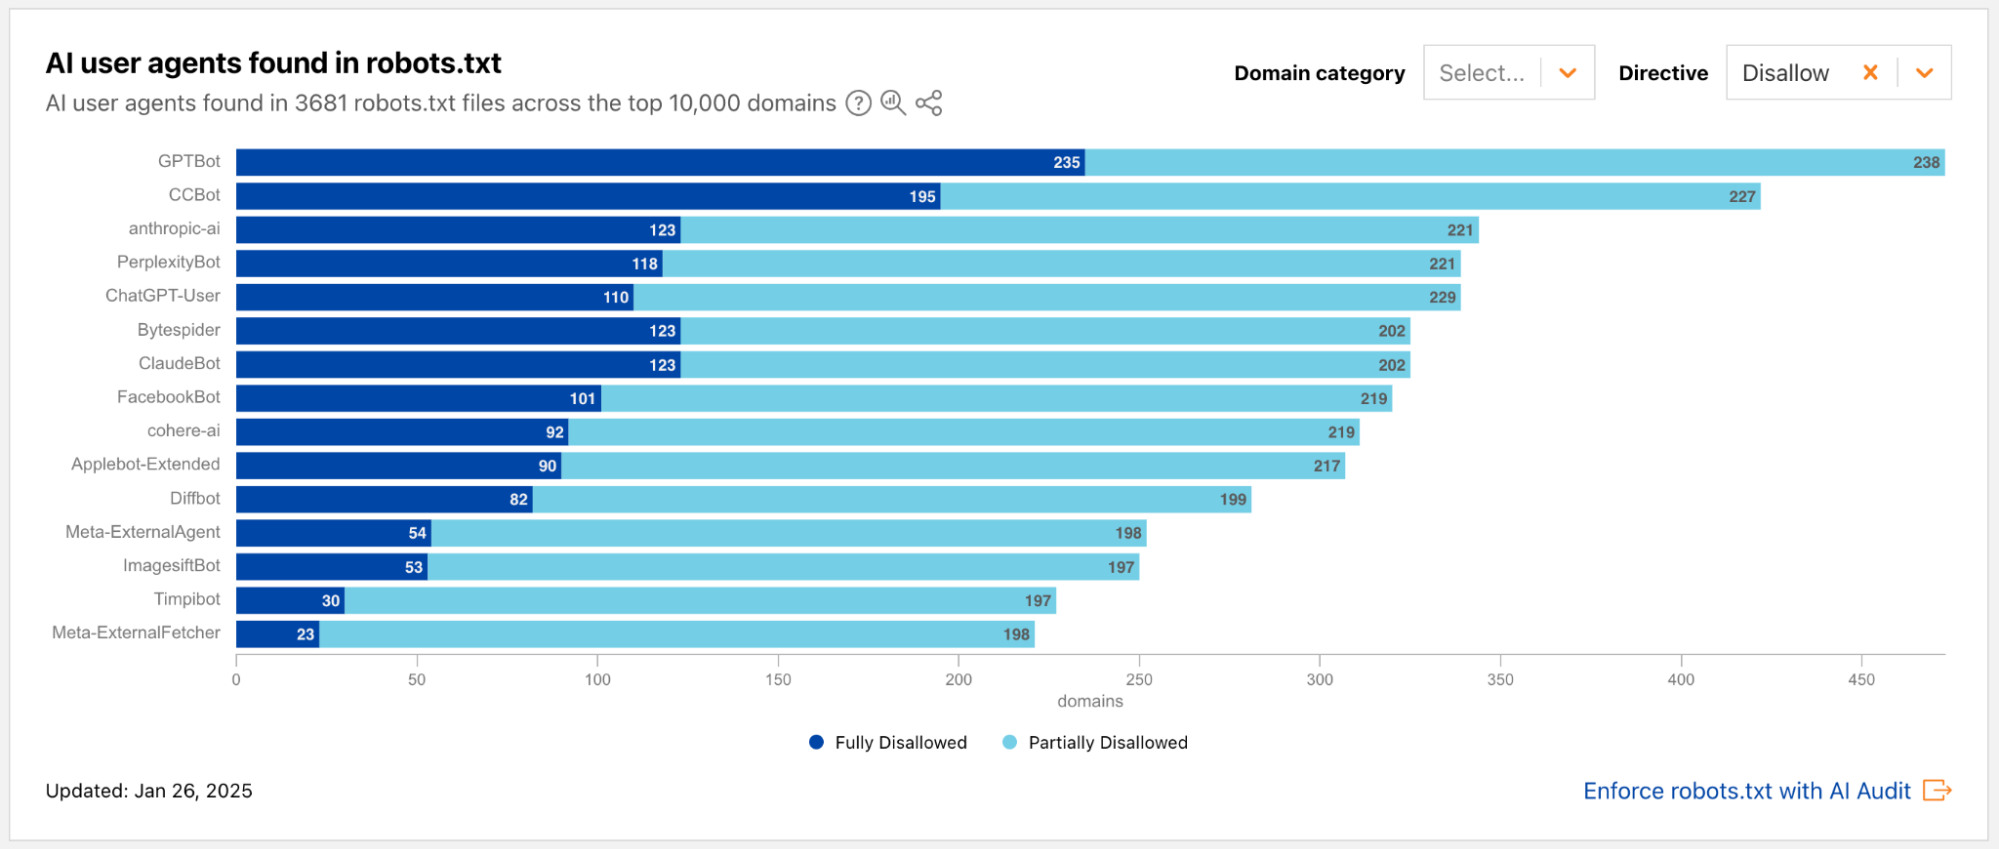
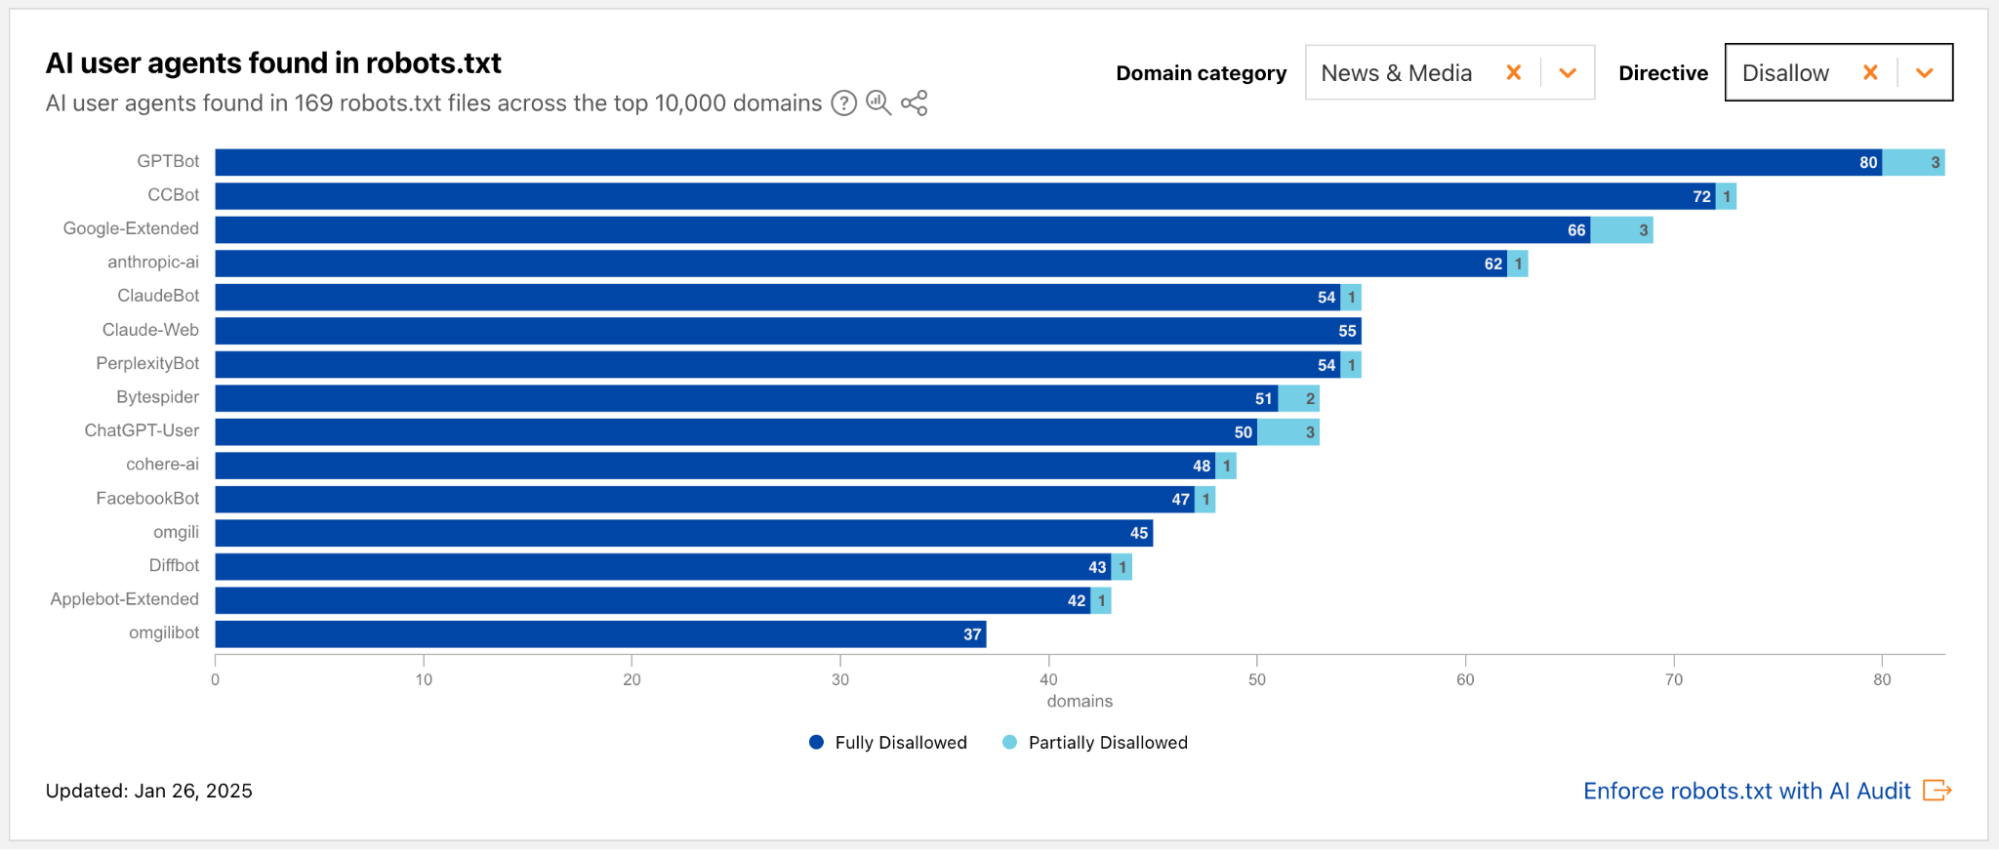
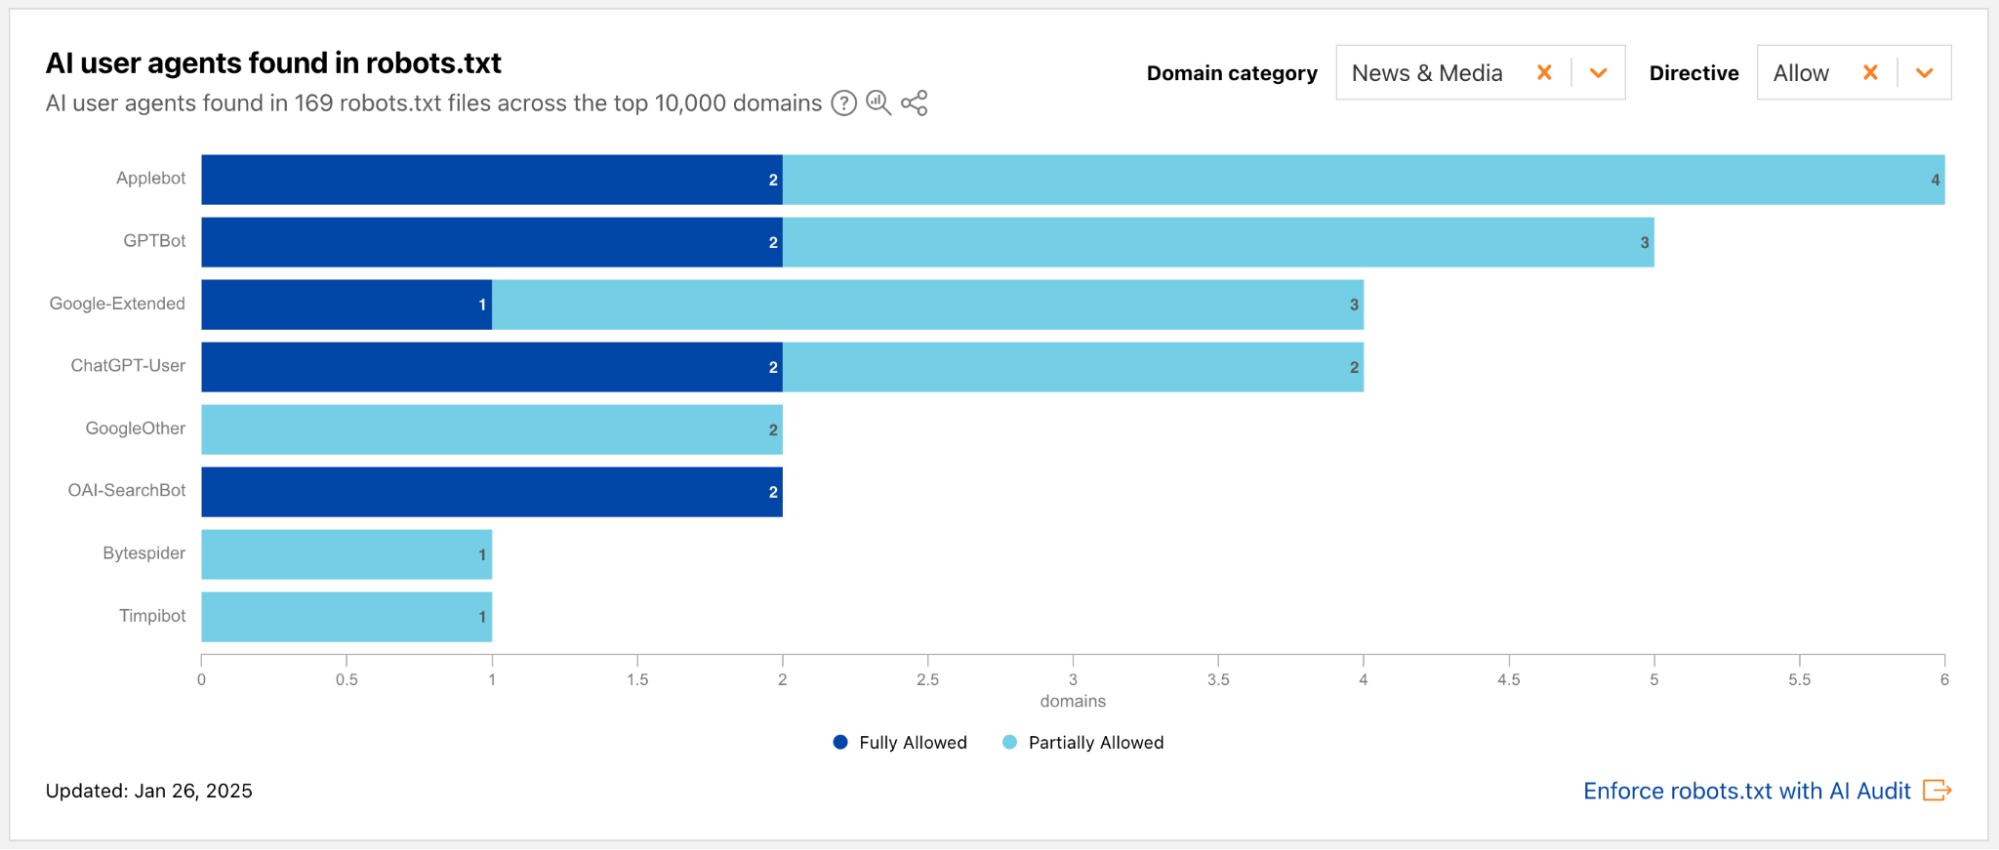
During 2024’s Birthday Week, we launched an AI bot & crawler traffic graph on Cloudflare Radar that provides visibility into which bots and crawlers are the most aggressive and have the highest volume of requests, which crawl on a regular basis, and more. Today, we are launching a new dedicated “AI Insights” page on Cloudflare Radar that incorporates this graph and builds on it with additional metrics that you can use to understand AI-related trends from multiple perspectives. In addition to the traffic trends, the new section includes a view into the relative popularity of publicly available Generative AI services based on 1.1.1.1 DNS resolver traffic, the usage of robots.txt directives to restrict AI bot access to content, and open source model usage as seen by Cloudflare Workers AI.
Below, we’ll review each section of the new AI Insights page in more detail.
AI bots and crawlers traffic trends
Tracking traffic trends for AI bots can help us better understand their activity over time. Initially launched in September 2024 on Radar’s Traffic page, the AI bot & crawler traffic graph has moved to the AI Insights page and provides visibility into traffic trends gathered globally over the selected time period for the top five most active AI bots & crawlers. The associated list of user agents tracked here is based on the ai.robots.txt list, and will be updated with new entries as they are identified. The time series and summary data for this graph is available from the Radar API, and traffic trends for the full set of AI bots & crawlers we see traffic from can be viewed in the Data Explorer.
Popularity of Generative AI services
Over the last several years, the Cloudflare Radar Year in Review has analyzed request traffic data from our 1.1.1.1 DNS resolver to present rankings of the most popular Internet services, both generally and across several categories. In both 2023 and 2024, this section included rankings for publicly-available Generative AI services, with ChatGPT topping the list both years. While an accompanying blog post provides a more detailed look at how the rankings shifted over the course of the year, it too is looking through the rearview mirror. That is, it doesn’t provide visibility into the changes as they are occurring. The new Generative AI services popularity graph shows the relative rankings of these services and platforms based on DNS request traffic for domains associated with these services aggregated at a daily level. The underlying time series data is available through the Radar API, using the serviceCategory=Generative%20AI parameter.
The graph below shows that as of the end of January 2025, the top five services were fairly stable over the preceding four weeks, but there was regular movement among those ranked #6-10. We expect that the rankings will continue to change over time. DeepSeek, a Generative AI service that took the industry by storm at the end of January, can be seen making its initial appearance at #9 on January 26, rising rapidly to #3 on January 29, just three days later.
Analysis of robots.txt files
Content providers can attempt to control access to their full site, or specific portions of it, through the use of Allow or Disallow directives in a robots.txt file. However, successful access control is dependent on the bots respecting the listed directives. Cloudflare’s AI Audit gives you visibility and control into how AI bots are interacting with your website, and now Cloudflare Radar gives you insights into how other sites are handling them.
On a weekly basis, we analyze Radar’s top 10,000 domains to determine which associated sites publish robots.txt files, as well as aggregating the AI-specific directives within those files. In our new AI user agents found in robots.txt graph, seen below, we are now providing insights into actions that these top sites are taking with respect to AI bots. These actions are specified by directives that allow or disallow access by a given user agent (bot identifier) for either all content on the site (Fully Allowed/Disallowed) or certain sections (Partially Allowed/Disallowed).
In addition, we have also organized these domains by category (for example, Ecommerce or News & Media), highlighting the specific bots that the sites within those categories have listed in their directives. For example, the News & Media domain category graph shown below illustrates that these types of sites almost universally fully disallow access to their sites by AI user agents.
Changing the directive to “Allow” shows a much smaller set of user agents, with a drastically smaller set of sites explicitly allowing full or partial access. (Note that if a user agent is not listed in a robots.txt file, and a wildcard “*” user agent is not specified, then access is fully allowed by default.)
In addition to appearing on the AI Insights page, the underlying data is available for further exploration and analysis through the Radar API and the Data Explorer.
Popularity of models and tasks on Workers AI
The AI model landscape is rapidly evolving, with providers regularly releasing more powerful models, capable of tasks like text and image generation, speech recognition, and image classification. Cloudflare works closely with AI model providers to ensure that Workers AI supports these models as soon as possible following their release. On the new AI Insights page, Radar now provides visibility into the popularity of publicly available supported models (Workers AI model popularity) as well as the types of tasks (Workers AI task popularity) that these models perform, based on customer account share. Extended insights, including share trends and summary shares for the full list of models and tasks, as well as the ability to compare model and task shares across time periods, are available through the Data Explorer. The underlying model popularity and task popularity data is also available through API endpoints.
Conclusion
The AI space is extremely dynamic, with new platforms, services, and models regularly appearing. In some cases, these new entrants even have the power to upset the market as they see rapid growth in interest and usage. And over two years since ChatGPT was announced, there continues to be tension between content providers and AI platforms about scraping content for model training. The new “AI Insights” page on Cloudflare Radar provides timely trends and information about this dynamic space, enabling industry observers and participants to better understand how it is changing and evolving over time.
If you share AI Insights graphs on social media, be sure to tag us: @CloudflareRadar (X), noc.social/@cloudflareradar (Mastodon), and radar.cloudflare.com (Bluesky). You can also reach out on social media, or contact us via email, with suggestions for AI metrics that we can explore adding to the page in the future.
At Cloudflare, we are constantly innovating and launching new features and capabilities across our product portfolio. Today’s roundup blog post shares two exciting updates across our platform: our cross-platform 1.1.1.1 & WARP applications (consumer) and device agents (Zero Trust) now use MASQUE, a cutting-edge HTTP/3-based protocol, to secure your Internet connection. Additionally, DEX is now available for general availability.
Faster and more stable: our 1.1.1.1 & WARP apps now use MASQUE by default
We’re excited to announce that as of today, our cross-platform 1.1.1.1 & WARP apps now use MASQUE, a cutting-edge HTTP/3-based protocol, to secure your Internet connection.
As a reminder, our 1.1.1.1 & WARP apps have two main functions: send all DNS queries through 1.1.1.1, our privacy-preserving DNS resolver, and protect your device’s network traffic via WARP by creating a private and encrypted tunnel to the resources you’re accessing, preventing unwanted third parties or public Wi-Fi networks from snooping on your traffic.
There are many ways to encrypt and proxy Internet traffic — you may have heard of a few, such as IPSec, WireGuard, or OpenVPN. There are many tradeoffs we considered when choosing a protocol, but we believe MASQUE is the future of fast, secure, and stable Internet proxying, it aligns with our belief in building on top of open Internet standards, and we’ve deployed it successfully at scale for customers like iCloud Private Relay and Microsoft Edge Secure Network.
Why MASQUE?
MASQUE is a modern framework for proxying traffic that allows a variety of application protocols, including HTTP/3, to utilize QUIC as their transport mechanism. That’s a lot of acronyms, so let’s make sure those are clear.
QUIC is a general-purpose transport protocol and Internet standard that operates on top of UDP (instead of TCP), is encrypted by default, and solves several performance issues that plagued its predecessors. HTTP/3is the latest version of the HTTP protocol, defining the application-layer protocol that runs on top of QUIC as its transport mechanism. MASQUE is a set of mechanisms for tunneling traffic over HTTP. It extends the existing HTTP CONNECT model, to allow tunneling UDP and IP traffic. This is especially efficient when combined with the QUIC’s unreliable datagram extension.
For example, we can use MASQUE’s CONNECT-IP method to establish a tunnel that can send multiple concurrent requests over a single QUIC connection:
The benefit these protocols have for the quality and security of everyone’s Internet browsing experience is real. Earlier transport protocols were built before the advent of smartphones and mobile networks, so QUIC was designed to support a mobile world, maintaining connections even in poorly connected networks, and minimizing disruptions as people switch rapidly between networks as they move through their day. Leveraging HTTP/3 as the application layer means that MASQUE is more like “normal” HTTP traffic on the Internet, meaning that it is easier to support, is compatible with existing firewall and security rules, and that it supports cryptographic agility (i.e. support for post-quantum crypto), making this traffic more secure and resilient in the long term.
Get started now
All new installations of our 1.1.1.1 & WARP apps support MASQUE, including iOS, Android, macOS, Windows, and Linux, and we’ve started to roll it out as the preferred protocol over WireGuard. On mobile, to check if your connection is already secured over MASQUE, or change your device’s default option, you can toggle this setting via Advanced > Connection options > Tunnel protocol:
Protocol connection options shown here on the iOS app
We offer the following options:
Auto: this allows the app to choose the protocol.
MASQUE: always use MASQUE to secure your connection.
WireGuard: always use WireGuard to secure your connection.
On desktop versions, you can switch the protocol by using the WARP command-line interface. For example:
warp-cli tunnel protocol set WireGuard
warp-cli tunnel protocol set MASQUE
With this rollout, we’re excited to see MASQUE deliver increased performance and stability to millions of users. Download one of the WARP apps today!
DEX now Generally Available: Announcing detailed device visibility with DEX Remote Captures
Following the successful beta launch of Digital Experience Monitoring (DEX), we are thrilled to announce the general availability of DEX, along with new Remote Captures functionality.
Imagine this: an end user is frustrated with a slow application, and your IT team is struggling to pinpoint the root cause. Traditionally, troubleshooting such issues involved contacting the end user and asking them to manually collect and share network traffic data. This process is time-consuming, prone to errors, and often disruptive to the end user’s workflow.
Building upon the capabilities of DEX, we are excited to introduce Remote Captures, a powerful new feature that empowers IT admins to gain unprecedented visibility into end-user devices and network performance. DEX now introduces Remote Captures, a powerful new feature that empowers IT admins to remotely initiate network packet captures (PCAP) and WARP Diag logs directly from your end users’ devices and capture diagnostic information automatically from our device client. This streamlined approach accelerates troubleshooting, reduces the burden on end users, and provides valuable insights into network performance and security.
Why Remote Captures?
Remote Captures offer several key advantages. By analyzing detailed network traffic, IT teams can quickly pinpoint the root cause of network issues. Furthermore, granular network data empowers security teams to proactively detect and investigate potential threats. Finally, by identifying bottlenecks and latency issues, Remote Captures enable organizations to optimize network performance for a smoother user experience.
How Remote Captures work
Initiating a Remote Capture is straightforward. First, select the specific device you wish to troubleshoot. Then, with a few simple clicks, start capturing network traffic and/or WARP Diag data. Once the capture is complete, download the captured data and utilize your preferred tools for in-depth analysis.
Get started today
DEX Remote Captures are now available for Cloudflare One customers. They can be configured by going to Cloudflare Dashboard > Zero Trust > DEX > Remote Captures, and then selecting the device you wish to collect from. For more information, refer to Remote captures. This new capability highlights just one of the many ways our unified SASE platform helps organizations find and fix security issues across SaaS applications. Try it out now using our free tier to get started.
Never miss an update
We hope you enjoy reading our roundup blog posts as we continue to build and innovate. Stay tuned to the Cloudflare Blog for the latest news and updates.
In 2018, Cloudflare announced 1.1.1.1, one of the fastest, privacy-first consumer DNS services. 1.1.1.1 was the first consumer product Cloudflare ever launched, focused on reaching a wider audience. This service was designed to be fast and private, and does not retain information that would identify who is making a request.
In 2020, Cloudflare announced 1.1.1.1 for Families, designed to add a layer of protection to our existing 1.1.1.1 public resolver. The intent behind this product was to provide consumers, namely families, the ability to add a security and adult content filter to block unsuspecting users from accessing specific sites when browsing the Internet.
Today, we are officially announcing that any ISP and equipment manufacturer can use our DNS resolvers for free. Internet service, network, and hardware equipment providers can sign up and join this program to partner with Cloudflare to deliver a safer browsing experience that is easy to use, industry leading, and at no cost to anyone.
Leading companies have already partnered with Cloudflare to deliver superior and customized offerings to protect their customers. By delivering this service in a place where the customer is familiar, you can help us make the Internet a safe place for all.
A need to intentionally focus on families
COVID-19 presented new challenges beginning in 2020 as kids’ online activity increased and the reliance on home networks was more present than ever before. Research shows around 67% of adolescents have access to a tablet, with ages as low as two years old accessing media content. While it is often impressive to watch the ease with which a young child can navigate a smartphone or tablet handed to them and pull up their favorite YouTube show, it becomes increasingly concerning that kids may unintentionally stumble onto harmful content in the process.
Our launch of 1.1.1.1 for Families in 2020 provided that peace of mind to users around the globe, and it continues to deliver those protections. Today, households can set up this service using our guide. They can select the DNS resolver they want to use, focusing on just privacy, or include blocking security threats and adult content across their entire home network.
Although this service is available and free for anyone to use, there are still many users who browse online daily without protections in place. Setting up protection like this can feel daunting, and many users are at a loss on where to begin and/or how to configure this on their devices or home network. Today we are announcing a partnership that will make setup and configuration much easier for users.
Partnering to extend security even further
ISPs and network providers can use Cloudflare’s different resolver services to provide various offerings to their customers. Our existing partners have taken these offerings and built them into their platforms as an extension of the services that they are already providing to their customers. This built-in model allows for easy adoption and a consistent and comprehensive end customer journey. Each service is designed with a specific purpose in mind, outlined below:
Our core privacy resolver (1.1.1.1) is designed for speed and privacy. Additionally, DNS requests to our public resolver can be sent over a secure channel using DNS over HTTPS (DoH) or DNS over TLS (DoT), significantly decreasing the odds of any unwanted spying or monster-in-the-middle attacks.
Our security resolver (1.1.1.2) has all the benefits of 1.1.1.1, with the additional benefit of protecting users from sites that contain malware, spam, botnet command and control attacks, or phishing threats.
Our family resolver (1.1.1.3) provides all the benefits of 1.1.1.2, with the additional benefit of blocking unwanted adult content from both direct site navigation, as well as locking public search engines to Safe Search only. This prevents anyone from unknowingly searching for something that might return an unwanted result.
Premium Safety & Customizations
If users want even more flexibility than what our public DNS resolvers provide, Cloudflare also offers a Gateway product that allows customized filtering, reporting, logging, analytics, and scheduling. This advanced Gateway offering includes over 114 categories ranging from social media, online messaging platforms, gaming, and “safe search” results, all the way to “home & garden”.
The additional filters and scheduling functionality empowers users to exercise more nuanced and time-based controls, such as limiting social media during school hours or dinner time.
If you are an ISP or equipment manufacturer looking to provide easily customizable options for your customers, this is also an available option. We have a multi-tenant environment available for our Gateway offering that enables our customers to empower their individual subscribers to configure their own individual filters for their users and homes. If you are a device manufacturer or ISP looking to offer customizable protections for your individual subscribers, this may be a good option for you.
Our continued commitment to privacy, security, and safety
An easy choice
Simply put, Cloudflare is an easy and obvious choice for protecting individuals and families. This is why leading companies have all chosen to partner with Cloudflare to help protect customers and their families. In 2020, after launching 1.1.1.1 for Families, we were serving 200+ billion DNS queries per day for 1.1.1.1. Today, we serve 1.7 trillion queries per day for 1.1.1.1 and our network presence spans over 330 cities and interconnects with over 12,500+ other networks. It is this network that puts us within a blink of an eye for 95% of the world’s Internet-connected population (your customers), ensuring they receive lightning fast speed while browsing.
Join us in making a safe browsing experience easy for everyone
Cloudflare began with a singular goal of helping build a better Internet, and our annual Birthday Week is a catalyst for many developments that have shaped a better Internet for everyone.
We remain committed to helping to protect and build a better Internet for every user, and to do so, we need to meet them where they are. Our partnerships are critical in making this a reality, and we want you to be a part of the solution with us.
Whether you are interested in our public DNS resolvers or our more advanced Gateway options, Cloudflare has easy and scalable options for everyone. You can sign up to join this program as a partner today by submitting this form, and we will be in touch to understand your needs and bring you on board.
In June 2023, we told you that we were building a new protocol, MASQUE, into WARP. MASQUE is a fascinating protocol that extends the capabilities of HTTP/3 and leverages the unique properties of the QUIC transport protocol to efficiently proxy IP and UDP traffic without sacrificing performance or privacy
At the same time, we’ve seen a rising demand from Zero Trust customers for features and solutions that only MASQUE can deliver. All customers want WARP traffic to look like HTTPS to avoid detection and blocking by firewalls, while a significant number of customers also require FIPS-compliant encryption. We have something good here, and it’s been proven elsewhere (more on that below), so we are building MASQUE into Zero Trust WARP and will be making it available to all of our Zero Trust customers — at WARP speed!
This blog post highlights some of the key benefits our Cloudflare One customers will realize with MASQUE.
Before the MASQUE
Cloudflare is on a mission to help build a better Internet. And it is a journey we’ve been on with our device client and WARP for almost five years. The precursor to WARP was the 2018 launch of 1.1.1.1, the Internet’s fastest, privacy-first consumer DNS service. WARP was introduced in 2019 with the announcement of the 1.1.1.1 service with WARP, a high performance and secure consumer DNS and VPN solution. Then in 2020, we introduced Cloudflare’s Zero Trust platform and the Zero Trust version of WARP to help any IT organization secure their environment, featuring a suite of tools we first built to protect our own IT systems. Zero Trust WARP with MASQUE is the next step in our journey.
The current state of WireGuard
WireGuard was the perfect choice for the 1.1.1.1 with WARP service in 2019. WireGuard is fast, simple, and secure. It was exactly what we needed at the time to guarantee our users’ privacy, and it has met all of our expectations. If we went back in time to do it all over again, we would make the same choice.
But the other side of the simplicity coin is a certain rigidity. We find ourselves wanting to extend WireGuard to deliver more capabilities to our Zero Trust customers, but WireGuard is not easily extended. Capabilities such as better session management, advanced congestion control, or simply the ability to use FIPS-compliant cipher suites are not options within WireGuard; these capabilities would have to be added on as proprietary extensions, if it was even possible to do so.
Plus, while WireGuard is popular in VPN solutions, it is not standards-based, and therefore not treated like a first class citizen in the world of the Internet, where non-standard traffic can be blocked, sometimes intentionally, sometimes not. WireGuard uses a non-standard port, port 51820, by default. Zero Trust WARP changes this to use port 2408 for the WireGuard tunnel, but it’s still a non-standard port. For our customers who control their own firewalls, this is not an issue; they simply allow that traffic. But many of the large number of public Wi-Fi locations, or the approximately 7,000 ISPs in the world, don’t know anything about WireGuard and block these ports. We’ve also faced situations where the ISP does know what WireGuard is and blocks it intentionally.
This can play havoc for roaming Zero Trust WARP users at their local coffee shop, in hotels, on planes, or other places where there are captive portals or public Wi-Fi access, and even sometimes with their local ISP. The user is expecting reliable access with Zero Trust WARP, and is frustrated when their device is blocked from connecting to Cloudflare’s global network.
Now we have another proven technology — MASQUE — which uses and extends HTTP/3 and QUIC. Let’s do a quick review of these to better understand why Cloudflare believes MASQUE is the future.
Unpacking the acronyms
HTTP/3 and QUIC are among the most recent advancements in the evolution of the Internet, enabling faster, more reliable, and more secure connections to endpoints like websites and APIs. Cloudflare worked closely with industry peers through the Internet Engineering Task Force on the development of RFC 9000 for QUIC and RFC 9114 for HTTP/3. The technical background on the basic benefits of HTTP/3 and QUIC are reviewed in our 2019 blog post where we announced QUIC and HTTP/3 availability on Cloudflare’s global network.
Most relevant for Zero Trust WARP, QUIC delivers better performance on low-latency or high packet loss networks thanks to packet coalescing and multiplexing. QUIC packets in separate contexts during the handshake can be coalesced into the same UDP datagram, thus reducing the number of receive and system interrupts. With multiplexing, QUIC can carry multiple HTTP sessions within the same UDP connection. Zero Trust WARP also benefits from QUIC’s high level of privacy, with TLS 1.3 designed into the protocol.
MASQUE unlocks QUIC’s potential for proxying by providing the application layer building blocks to support efficient tunneling of TCP and UDP traffic. In Zero Trust WARP, MASQUE will be used to establish a tunnel over HTTP/3, delivering the same capability as WireGuard tunneling does today. In the future, we’ll be in position to add more value using MASQUE, leveraging Cloudflare’s ongoing participation in the MASQUE Working Group. This blog post is a good read for those interested in digging deeper into MASQUE.
OK, so Cloudflare is going to use MASQUE for WARP. What does that mean to you, the Zero Trust customer?
Proven reliability at scale
Cloudflare’s network today spans more than 310 cities in over 120 countries, and interconnects with over 13,000 networks globally. HTTP/3 and QUIC were introduced to the Cloudflare network in 2019, the HTTP/3 standard was finalized in 2022, and represented about 30% of all HTTP traffic on our network in 2023.
We are also using MASQUE for iCloud Private Relay and other Privacy Proxy partners. The services that power these partnerships, from our Rust-based proxy framework to our open source QUIC implementation, are already deployed globally in our network and have proven to be fast, resilient, and reliable.
Cloudflare is already operating MASQUE, HTTP/3, and QUIC reliably at scale. So we want you, our Zero Trust WARP users and Cloudflare One customers, to benefit from that same reliability and scale.
Connect from anywhere
Employees need to be able to connect from anywhere that has an Internet connection. But that can be a challenge as many security engineers will configure firewalls and other networking devices to block all ports by default, and only open the most well-known and common ports. As we pointed out earlier, this can be frustrating for the roaming Zero Trust WARP user.
We want to fix that for our users, and remove that frustration. HTTP/3 and QUIC deliver the perfect solution. QUIC is carried on top of UDP (protocol number 17), while HTTP/3 uses port 443 for encrypted traffic. Both of these are well known, widely used, and are very unlikely to be blocked.
We want our Zero Trust WARP users to reliably connect wherever they might be.
Compliant cipher suites
MASQUE leverages TLS 1.3 with QUIC, which provides a number of cipher suite choices. WireGuard also uses standard cipher suites. But some standards are more, let’s say, standard than others.
NIST, the National Institute of Standards and Technology and part of the US Department of Commerce, does a tremendous amount of work across the technology landscape. Of interest to us is the NIST research into network security that results in FIPS 140-2 and similar publications. NIST studies individual cipher suites and publishes lists of those they recommend for use, recommendations that become requirements for US Government entities. Many other customers, both government and commercial, use these same recommendations as requirements.
Our first MASQUE implementation for Zero Trust WARP will use TLS 1.3 and FIPS compliant cipher suites.
How can I get Zero Trust WARP with MASQUE?
Cloudflare engineers are hard at work implementing MASQUE for the mobile apps, the desktop clients, and the Cloudflare network. Progress has been good, and we will open this up for beta testing early in the second quarter of 2024 for Cloudflare One customers. Your account team will be reaching out with participation details.
Continuing the journey with Zero Trust WARP
Cloudflare launched WARP five years ago, and we’ve come a long way since. This introduction of MASQUE to Zero Trust WARP is a big step, one that will immediately deliver the benefits noted above. But there will be more — we believe MASQUE opens up new opportunities to leverage the capabilities of QUIC and HTTP/3 to build innovative Zero Trust solutions. And we’re also continuing to work on other new capabilities for our Zero Trust customers. Cloudflare is committed to continuing our mission to help build a better Internet, one that is more private and secure, scalable, reliable, and fast. And if you would like to join us in this exciting journey, check out our open positions.
Cloudflare has been part of a multivendor, industry-wide effort to mitigate two critical DNSSEC vulnerabilities. These vulnerabilities exposed significant risks to critical infrastructures that provide DNS resolution services. Cloudflare provides DNS resolution for anyone to use for free with our public resolver 1.1.1.1 service. Mitigations for Cloudflare’s public resolver 1.1.1.1 service were applied before these vulnerabilities were disclosed publicly. Internal resolvers using unbound (open source software) were upgraded promptly after a new software version fixing these vulnerabilities was released.
All Cloudflare DNS infrastructure was protected from both of these vulnerabilities before they were disclosed and is safe today. These vulnerabilities do not affect our Authoritative DNS or DNS firewall products.
All major DNS software vendors have released new versions of their software. All other major DNS resolver providers have also applied appropriate mitigations. Please update your DNS resolver software immediately, if you haven’t done so already.
Background
Domain name system (DNS) security extensions, commonly known as DNSSEC, are extensions to the DNS protocol that add authentication and integrity capabilities. DNSSEC uses cryptographic keys and signatures that allow DNS responses to be validated as authentic. DNSSEC protocol specifications have certain requirements that prioritize availability at the cost of increased complexity and computational cost for the validating DNS resolvers. The mitigations for the vulnerabilities discussed in this blog require local policies to be applied that relax these requirements in order to avoid exhausting the resources of validators.
The design of the DNS and DNSSEC protocols follows the Robustness principle: “be conservative in what you do, be liberal in what you accept from others”. There have been many vulnerabilities in the past that have taken advantage of protocol requirements following this principle. Malicious actors can exploit these vulnerabilities to attack DNS infrastructure, in this case by causing additional work for DNS resolvers by crafting DNSSEC responses with complex configurations. As is often the case, we find ourselves having to create a pragmatic balance between the flexibility that allows a protocol to adapt and evolve and the need to safeguard the stability and security of the services we operate.
Cloudflare’s public resolver 1.1.1.1 is a privacy-centric public resolver service. We have been using stricter validations and limits aimed at protecting our own infrastructure in addition to shielding authoritative DNS servers operated outside our network. As a result, we often receive complaints about resolution failures. Experience shows us that strict validations and limits can impact availability in some edge cases, especially when DNS domains are improperly configured. However, these strict validations and limits are necessary to improve the overall reliability and resilience of the DNS infrastructure.
The vulnerabilities and how we mitigated them are described below.
A DNSSEC signed zone can contain multiple keys (DNSKEY) to sign the contents of a DNS zone and a Resource Record Set (RRSET) in a DNS response can have multiple signatures (RRSIG). Multiple keys and signatures are required to support things like key rollover, algorithm rollover, and multi-signer DNSSEC. DNSSEC protocol specifications require a validating DNS resolver to try every possible combination of keys and signatures when validating a DNS response.
During validation, a resolver looks at the key tag of every signature and tries to find the associated key that was used to sign it. A key tag is an unsigned 16-bit number calculated as a checksum over the key’s resource data (RDATA). Key tags are intended to allow efficient pairing of a signature with the key which has supposedly created it. However, key tags are not unique, and it is possible that multiple keys can have the same key tag. A malicious actor can easily craft a DNS response with multiple keys having the same key tag together with multiple signatures, none of which might validate. A validating resolver would have to try every combination (number of keys multiplied by number of signatures) when trying to validate this response. This increases the computational cost of the validating resolver many-fold, degrading performance for all its users. This is known as the Keytrap vulnerability.
Variations of this vulnerability include using multiple signatures with one key, using one signature with multiple keys having colliding key tags, and using multiple keys with corresponding hashes added to the parent delegation signer record.
Mitigation
We have limited the maximum number of keys we will accept at a zone cut. A zone cut is where a parent zone delegates to a child zone, e.g. where the .com zone delegates cloudflare.com to Cloudflare nameservers. Even with this limit already in place and various other protections built for our platform, we realized that it would still be computationally costly to process a malicious DNS answer from an authoritative DNS server.
To address and further mitigate this vulnerability, we added a signature validations limit per RRSET and a total signature validations limit per resolution task. One resolution task might include multiple recursive queries to external authoritative DNS servers in order to answer a single DNS question. Clients queries exceeding these limits will fail to resolve and will receive a response with an Extended DNS Error (EDE) code 0. Furthermore, we added metrics which will allow us to detect attacks attempting to exploit this vulnerability.
NSEC3 iteration and closest encloser proof vulnerability (CVE-2023-50868)
Introduction
NSEC3 is an alternative approach for authenticated denial of existence. You can learn more about authenticated denial of existence here. NSEC3 uses a hash derived from DNS names instead of the DNS names directly in an attempt to prevent zone enumeration and the standard supports multiple iterations for hash calculations. However, because the full DNS name is used as input to the hash calculation, increasing hashing iterations beyond the initial doesn’t provide any additional value and is not recommended in RFC9276. This complication is further inflated while finding the closest enclosure proof. A malicious DNS response from an authoritative DNS server can set a high NSEC3 iteration count and long DNS names with multiple DNS labels to exhaust the computing resources of a validating resolver by making it do unnecessary hash computations.
Mitigation
For this vulnerability, we applied a similar mitigation technique as we did for Keytrap. We added a limit for total hash calculations per resolution task to answer a single DNS question. Similarly, clients queries exceeding this limit will fail to resolve and will receive a response with an EDE code 27. We also added metrics to track hash calculations allowing early detection of attacks attempting to exploit this vulnerability.
Timeline
Date and time in UTC
Event
2023-11-03 16:05
John Todd from Quad9 invites Cloudflare to participate in a joint task force to discuss a new DNS vulnerability.
2023-11-07 14:30
A group of DNS vendors and service providers meet to discuss the vulnerability during IETF 118. Discussions and collaboration continues in a closed chat group hosted at DNS-OARC
2023-12-08 20:20
Cloudflare public resolver 1.1.1.1 is fully patched to mitigate Keytrap vulnerability (CVE-2023-50387)
2024-01-17 22:39
Cloudflare public resolver 1.1.1.1 is fully patched to mitigate NSEC3 iteration count and closest encloser vulnerability (CVE-2023-50868)
We would like to thank Elias Heftrig, Haya Schulmann, Niklas Vogel, Michael Waidner from the German National Research Center for Applied Cybersecurity ATHENE, for discovering the Keytrap vulnerability and doing a responsible disclosure.
We would like to thank John Todd from Quad9 and the DNS Operations Analysis and Research Center (DNS-OARC) for facilitating coordination amongst various stakeholders.
And finally, we would like to thank the DNS-OARC community members, representing various DNS vendors and service providers, who all came together and worked tirelessly to fix these vulnerabilities, working towards a common goal of making the internet resilient and secure.
On 4 October 2023, Cloudflare experienced DNS resolution problems starting at 07:00 UTC and ending at 11:00 UTC. Some users of 1.1.1.1 or products like WARP, Zero Trust, or third party DNS resolvers which use 1.1.1.1 may have received SERVFAIL DNS responses to valid queries. We’re very sorry for this outage. This outage was an internal software error and not the result of an attack. In this blog, we’re going to talk about what the failure was, why it occurred, and what we’re doing to make sure this doesn’t happen again.
Background
In the Domain Name System (DNS), every domain name exists within a DNS zone. The zone is a collection of domain names and host names that are controlled together. For example, Cloudflare is responsible for the domain name cloudflare.com, which we say is in the “cloudflare.com” zone. The .com top-level domain (TLD) is owned by a third party and is in the “com” zone. It gives directions on how to reach cloudflare.com. Above all of the TLDs is the root zone, which gives directions on how to reach TLDs. This means that the root zone is important in being able to resolve all other domain names. Like other important parts of the DNS, the root zone is signed with DNSSEC, which means the root zone itself contains cryptographic signatures.
The root zone is published on the root servers, but it is also common for DNS operators to retrieve and retain a copy of the root zone automatically so that in the event that the root servers cannot be reached, the information in the root zone is still available. Cloudflare’s recursive DNS infrastructure takes this approach as it also makes the resolution process faster. New versions of the root zone are normally published twice a day. 1.1.1.1 has a WebAssembly app called static_zone running on top of the main DNS logic that serves those new versions when they are available.
What happened
On 21 September, as part of a known and planned change in root zone management, a new resource record type was included in the root zones for the first time. The new resource record is named ZONEMD, and is in effect a checksum for the contents of the root zone.
The root zone is retrieved by software running in Cloudflare’s core network. It is subsequently redistributed to Cloudflare’s data centers around the world. After the change, the root zone containing the ZONEMD record continued to be retrieved and distributed as normal. However, the 1.1.1.1 resolver systems that make use of that data had problems parsing the ZONEMD record. Because zones must be loaded and served in their entirety, the system’s failure to parse ZONEMD meant the new versions of the root zone were not used in Cloudflare’s resolver systems. Some of the servers hosting Cloudflare's resolver infrastructure failed over to querying the DNS root servers directly on a request-by-request basis when they did not receive the new root zone. However, others continued to rely on the known working version of the root zone still available in their memory cache, which was the version pulled on 21 September before the change.
On 4 October 2023 at 07:00 UTC, the DNSSEC signatures in the version of the root zone from 21 September expired. Because there was no newer version that the Cloudflare resolver systems were able to use, some of Cloudflare’s resolver systems stopped being able to validate DNSSEC signatures and as a result started sending error responses (SERVFAIL). The rate at which Cloudflare resolvers generated SERVFAIL responses grew by 12%. The diagrams below illustrate the progression of the failure and how it became visible to users.
Incident timeline and impact
21 September 6:30 UTC: Last successful pull of the root zone 4 October 7:00 UTC: DNSSEC signatures in the root zone obtained on 21 September expired causing an increase in SERVFAIL responses to client queries. 7:57: First external reports of unexpected SERVFAILs started coming in. 8:03: Internal Cloudflare incident declared. 8:50: Initial attempt made at stopping 1.1.1.1 from serving responses using the stale root zone file with an override rule. 10:30: Stopped 1.1.1.1 from preloading the root zone file entirely. 10:32: Responses returned to normal. 11:02: Incident closed.
This below chart shows the timeline of impact along with the percentage of DNS queries that returned with a SERVFAIL error:
We expect a baseline volume of SERVFAIL errors for regular traffic during normal operation. Usually that percentage sits at around 3%. These SERVFAILs can be caused by legitimate issues in the DNSSEC chain, failures to connect to authoritative servers, authoritative servers taking too long to respond, and many others. During the incident the amount of SERVFAILs peaked at 15% of total queries, although the impact was not evenly distributed around the world and was mainly concentrated in our larger data centers like Ashburn, Virginia; Frankfurt, Germany; and Singapore.
Why this incident happened
Why parsing the ZONEMD record failed
DNS has a binary format for storing resource records. In this binary format the type of the resource record (TYPE) is stored as a 16-bit integer. The type of resource record determines how the resource data (RDATA) is parsed. When the record type is 1, this means it is an A record, and the RDATA can be parsed as an IPv4 address. Record type 28 is an AAAA record, whose RDATA can be parsed as an IPv6 address instead. When a parser runs into an unknown resource type it won’t know how to parse its RDATA, but fortunately it doesn’t have to: the RDLENGTH field indicates how long the RDATA field is, allowing the parser to treat it as an opaque data element.
The reason static_zone didn’t support the new ZONEMD record is because up until now we had chosen to distribute the root zone internally in its presentation format, rather than in the binary format. When looking at the text representation for a few resource records we can see there is a lot more variation in how different records are presented.
.			86400	IN	SOA	a.root-servers.net. nstld.verisign-grs.com. 2023100400 1800 900 604800 86400
.			86400	IN	RRSIG	SOA 8 0 86400 20231017050000 20231004040000 46780 . J5lVTygIkJHDBt6HHm1QLx7S0EItynbBijgNlcKs/W8FIkPBfCQmw5BsUTZAPVxKj7r2iNLRddwRcM/1sL49jV9Jtctn8OLLc9wtouBmg3LH94M0utW86dKSGEKtzGzWbi5hjVBlkroB8XVQxBphAUqGxNDxdE6AIAvh/eSSb3uSQrarxLnKWvHIHm5PORIOftkIRZ2kcA7Qtou9NqPCSE8fOM5EdXxussKChGthmN5AR5S2EruXIGGRd1vvEYBrRPv55BAWKKRERkaXhgAp7VikYzXesiRLdqVlTQd+fwy2tm/MTw+v3Un48wXPg1lRPlQXmQsuBwqg74Ts5r8w8w==
.			518400	IN	NS	a.root-servers.net.
.			86400	IN	ZONEMD	2023100400 1 241 E375B158DAEE6141E1F784FDB66620CC4412EDE47C8892B975C90C6A102E97443678CCA4115E27195B468E33ABD9F78C
When we run into an unknown resource record it’s not always easy to know how to handle it. Because of this, the library we use to parse the root zone at the edge does not make an attempt at doing so, and instead returns a parser error.
Why a stale version of the root zone was used
The static_zone app, tasked with loading and parsing the root zone for the purpose of serving the root zone locally (RFC 7706), stores the latest version in memory. When a new version is published it parses it and, when successfully done so, drops the old version. However, as parsing failed the static_zone app never switched to a newer version, and instead continued using the old version indefinitely. When the 1.1.1.1 service is first started the static_zone app does not have an existing version in memory. When it tries to parse the root zone it fails in doing so, but because it does not have an older version of the root zone to fall back on, it falls back on querying the root servers directly for incoming requests.
Why the initial attempt at disabling static_zone didn’t work
Initially we tried to disable the static_zone app through override rules, a mechanism that allows us to programmatically change some behavior of 1.1.1.1. The rule we deployed was:
phase = pre-cache set-tag rec_disable_static
For any incoming request this rule adds the tag rec_disable_static to the request. Inside the static_zone app we check for this tag and, if it’s set, we do not return a response from the cached, static root zone. However, to improve cache performance queries are sometimes forwarded to another node if the current node can’t find the response in its own cache. Unfortunately, the rec_disable_static tag is not included in the queries being forwarded to other nodes, which caused the static_zone app to continue replying with stale information until we eventually disabled the app entirely.
Why the impact was partial
Cloudflare regularly performs rolling reboots of the servers that host our services for tasks like kernel updates that can only take effect after a full system restart. At the time of this outage, resolver server instances that were restarted between the ZONEMD change and the DNSSEC invalidation did not contribute to impact. If they had restarted during this two-week period, they would have failed to load the root zone on startup and fallen back to resolving by sending DNS queries to root servers instead. In addition, the resolver uses a technique called serve stale (RFC 8767) with the purpose of being able to continue to serve popular records from a potentially stale cache to limit the impact. A record is considered to be stale once the TTL amount of seconds has passed since the record was retrieved from upstream. This prevented a total outage; impact was mainly felt in our largest data centers which had many servers that had not restarted the 1.1.1.1 service in that timeframe.
Remediation and follow-up steps
This incident had widespread impact, and we take the availability of our services very seriously. We have identified several areas of improvement and will continue to work on uncovering any other gaps that could cause a recurrence.
Here is what we are working on immediately:
Visibility: We’re adding alerts to notify when static_zone serves a stale root zone file. It should not have been the case that serving a stale root zone file went unnoticed for as long as it did. If we had been monitoring this better, with the caching that exists, there would have been no impact. It is our goal to protect our customers and their users from upstream changes.
Resilience: We will re-evaluate how we ingest and distribute the root zone internally. Our ingestion and distribution pipelines should handle new RRTYPEs seamlessly, and any brief interruption to the pipeline should be invisible to end users.
Testing: Despite having tests in place around this problem, including tests related to unreleased changes in parsing the new ZONEMD records, we did not adequately test what happens when the root zone fails to parse. We will improve our test coverage and the related processes.
Architecture: We should not use stale copies of the root zone past a certain point. While it’s certainly possible to continue to use stale root zone data for a limited amount of time, past a certain point there are unacceptable operational risks. We will take measures to ensure that the lifetime of cached root zone data is better managed as described in RFC 8806: Running a Root Server Local to a Resolver.
Conclusion
We are deeply sorry that this incident happened. There is one clear message from this incident: do not ever assume that something is not going to change! Many modern systems are built with a long chain of libraries that are pulled into the final executable, each one of those may have bugs or may not be updated early enough for programs to operate correctly when changes in input happen. We understand how important it is to have good testing in place that allows detection of regressions and systems and components that fail gracefully on changes to input. We understand that we need to always assume that “format” changes in the most critical systems of the internet (DNS and BGP) are going to have an impact.
We have a lot to follow up on internally and are working around the clock to make sure something like this does not happen again.
On April 1, 2018, Cloudflare announced the 1.1.1.1 public DNS resolver. Over the years, we added the debug page for troubleshooting, global cache purge, 0 TTL for zones on Cloudflare, Upstream TLS, and 1.1.1.1 for families to the platform. In this post, we would like to share some behind the scenes details and changes.
When the project started, Knot Resolver was chosen as the DNS resolver. We started building a whole system on top of it, so that it could fit Cloudflare’s use case. Having a battle tested DNS recursive resolver, as well as a DNSSEC validator, was fantastic because we could spend our energy elsewhere, instead of worrying about the DNS protocol implementation.
Knot Resolver is quite flexible in terms of its Lua-based plugin system. It allowed us to quickly extend the core functionality to support various product features, like DoH/DoT, logging, BPF-based attack mitigation, cache sharing, and iteration logic override. As the traffic grew, we reached certain limitations.
Lessons we learned
Before going any deeper, let’s first have a bird’s-eye view of a simplified Cloudflare data center setup, which could help us understand what we are going to talk about later. At Cloudflare, every server is identical: the software stack running on one server is exactly the same as on another server, only the configuration may be different. This setup greatly reduces the complexity of fleet maintenance.
Figure 1 Data center layout
The resolver runs as a daemon process, kresd, and it doesn’t work alone. Requests, specifically DNS requests, are load-balanced to the servers inside a data center by Unimog. DoH requests are terminated at our TLS terminator. Configs and other small pieces of data can be delivered worldwide by Quicksilver in seconds. With all the help, the resolver can concentrate on its own goal – resolving DNS queries, and not worrying about transport protocol details. Now let’s talk about 3 key areas we wanted to improve here – blocking I/O in plugins, a more efficient use of cache space, and plugin isolation.
Callbacks blocking the event loop
Knot Resolver has a very flexible plugin system for extending its core functionality. The plugins are called modules, and they are based on callbacks. At certain points during request processing, these callbacks will be invoked with current query context. This gives a module the ability to inspect, modify, and even produce requests / responses. By design, these callbacks are supposed to be simple, in order to avoid blocking the underlying event loop. This matters because the service is single threaded, and the event loop is in charge of serving many requests at the same time. So even just one request being held up in a callback means that no other concurrent requests can be progressed until the callback finishes.
The setup worked well enough for us until we needed to do blocking operations, for example, to pull data from Quicksilver before responding to the client.
Cache efficiency
As requests for a domain could land on any node inside a data center, it would be wasteful to repetitively resolve a query when another node already has the answer. By intuition, the latency could be improved if the cache could be shared among the servers, and so we created a cache module which multicasted the newly added cache entries. Nodes inside the same data center could then subscribe to the events and update their local cache.
The default cache implementation in Knot Resolver is LMDB. It is fast and reliable for small to medium deployments. But in our case, cache eviction shortly became a problem. The cache itself doesn’t track for any TTL, popularity, etc. When it’s full, it just clears all the entries and starts over. Scenarios like zone enumeration could fill the cache with data that is unlikely to be retrieved later.
Furthermore, our multicast cache module made it worse by amplifying the less useful data to all the nodes, and led them to the cache high watermark at the same time. Then we saw a latency spike because all the nodes dropped the cache and started over around the same time.
Module isolation
With the list of Lua modules increasing, debugging issues became increasingly difficult. This is because a single Lua state is shared among all the modules, so one misbehaving module could affect another. For example, when something went wrong inside the Lua state, like having too many coroutines, or being out of memory, we got lucky if the program just crashed, but the resulting stack traces were hard to read. It is also difficult to forcibly tear down, or upgrade, a running module as it not only has state in the Lua runtime, but also FFI, so memory safety is not guaranteed.
Hello BigPineapple
We didn’t find any existing software that would meet our somewhat niche requirements, so eventually we started building something ourselves. The first attempt was to wrap Knot Resolver’s core with a thin service written in Rust (modified edgedns).
This proved to be difficult due to having to constantly convert between the storage, and C/FFI types, and some other quirks (for example, the ABI for looking up records from cache expects the returned records to be immutable until the next call, or the end of the read transaction). But we learned a lot from trying to implement this sort of split functionality where the host (the service) provides some resources to the guest (resolver core library), and how we would make that interface better.
In the later iterations, we replaced the entire recursive library with a new one based around an async runtime; and a redesigned module system was added to it, sneakily rewriting the service into Rust over time as we swapped out more and more components. That async runtime was tokio, which offered a neat thread pool interface for running both non-blocking and blocking tasks, as well as a good ecosystem for working with other crates (Rust libraries).
After that, as the futures combinators became tedious, we started converting everything to async/await. This was before the async/await feature that landed in Rust 1.39, which led us to use nightly (Rust beta) for a while and had some hiccups. When the async/await stabilized, it enabled us to write our request processing routine ergonomically, similar to Go.
All the tasks can be run concurrently, and certain I/O heavy ones can be broken down into smaller pieces, to benefit from a more granular scheduling. As the runtime executes tasks on a threadpool, instead of a single thread, it also benefits from work stealing. This avoids a problem we previously had, where a single request taking a lot of time to process, that blocks all the other requests on the event loop.
Figure 2 Components overview
Finally, we forged a platform that we are happy with, and we call it BigPineapple. The figure above shows an overview of its main components and the data flow between them. Inside BigPineapple, the server module gets inbound requests from the client, validates and transforms them into unified frame streams, which can then be processed by the worker module. The worker module has a set of workers, whose task is to figure out the answer to the question in the request. Each worker interacts with the cache module to check if the answer is there and still valid, otherwise it drives the recursor module to recursively iterate the query. The recursor doesn’t do any I/O, when it needs anything, it delegates the sub-task to the conductor module. The conductor then uses outbound queries to get the information from upstream nameservers. Through the whole process, some modules can interact with the Sandbox module, to extend its functionality by running the plugins inside.
Let’s look at some of them in more detail, and see how they helped us overcome the problems we had before.
Updated I/O architecture
A DNS resolver can be seen as an agent between a client and several authoritative nameservers: it receives requests from the client, recursively fetches data from the upstream nameservers, then composes the responses and sends them back to the client. So it has both inbound and outbound traffic, which are handled by the server and the conductor component respectively.
The server listens on a list of interfaces using different transport protocols. These are later abstracted into streams of “frames”. Each frame is a high level representation of a DNS message, with some extra metadata. Underneath, it can be a UDP packet, a segment of TCP stream, or the payload of a HTTP request, but they are all processed the same way. The frame is then converted into an asynchronous task, which in turn is picked up by a set of workers in charge of resolving these tasks. The finished tasks are converted back into responses, and sent back to the client.
This “frame” abstraction over the protocols and their encodings simplified the logic used to regulate the frame sources, such as enforcing fairness to prevent starving and controlling pacing to protect the server from being overwhelmed. One of the things we’ve learned with the previous implementations is that, for a service open to the public, a peak performance of the I/O matters less than the ability to pace clients fairly. This is mainly because the time and computational cost of each recursive request is vastly different (for example a cache hit from a cache miss), and it’s difficult to guess it beforehand. The cache misses in recursive service not only consume Cloudflare’s resources, but also the resources of the authoritative nameservers being queried, so we need to be mindful of that.
On the other side of the server is the conductor, which manages all the outbound connections. It helps to answer some questions before reaching out to the upstream: Which is the fastest nameserver to connect to in terms of latency? What to do if all the nameservers are not reachable? What protocol to use for the connection, and are there any better options? The conductor is able to make these decisions by tracking the upstream server’s metrics, such as RTT, QoS, etc. With that knowledge, it can also guess for things like upstream capacity, UDP packet loss, and take necessary actions, e.g. retry when it thinks the previous UDP packet didn’t reach the upstream.
Figure 3 I/O conductor
Figure 3 shows a simplified data flow about the conductor. It is called by the exchanger mentioned above, with upstream requests as input. The requests will be deduplicated first: meaning in a small window, if a lot of requests come to the conductor and ask for the same question, only one of them will pass, the others are put into a waiting queue. This is common when a cache entry expires, and can reduce unnecessary network traffic. Then based on the request and upstream metrics, the connection instructor either picks an open connection if available, or generates a set of parameters. With these parameters, the I/O executor is able to connect to the upstream directly, or even take a route via another Cloudflare data center using our Argo Smart Routing technology!
The cache
Caching in a recursive service is critical as a server can return a cached response in under one millisecond, while it will be hundreds of milliseconds to respond on a cache miss. As the memory is a finite resource (and also a shared resource in Cloudflare’s architecture), more efficient use of space for cache was one of the key areas we wanted to improve. The new cache is implemented with a cache replacement data structure (ARC), instead of a KV store. This makes good use of the space on a single node, as less popular entries are progressively evicted, and the data structure is resistant to scans.
Moreover, instead of duplicating the cache across the whole data center with multicast, as we did before, BigPineapple is aware of its peer nodes in the same data center, and relays queries from one node to another if it cannot find an entry in its own cache. This is done by consistent hashing the queries onto the healthy nodes in each data center. So, for example, queries for the same registered domain go through the same subset of nodes, which not only increases the cache hit ratio, but also helps the infrastructure cache, which stores information about performance and features of nameservers.
Figure 4 Updated data center layout
Async recursive library
The recursive library is the DNS brain of BigPineapple, as it knows how to find the answer to the question in the query. Starting from the root, it breaks down the client query into subqueries, and uses them to collect knowledge recursively from various authoritative nameservers on the internet. The product of this process is the answer. Thanks to the async/await it can be abstracted as a function like such:
The function contains all the logic necessary to generate a response to a given request, but it doesn’t do any I/O on its own. Instead, we pass an Exchanger trait(Rust interface) that knows how to exchange DNS messages with upstream authoritative nameservers asynchronously. The exchanger is usually called at various await points – for example, when a recursion starts, one of the first things it does is that it looks up the closest cached delegation for the domain. If it doesn’t have the final delegation in cache, it needs to ask what nameservers are responsible for this domain and wait for the response, before it can proceed any further.
Thanks to this design, which decouples the “waiting for some responses” part from the recursive DNS logic, it is much easier to test by providing a mock implementation of the exchanger. In addition, it makes the recursive iteration code (and DNSSEC validation logic in particular) much more readable, as it’s written sequentially instead of being scattered across many callbacks.
Fun fact: writing a DNS recursive resolver from scratch is not fun at all!
Not only because of the complexity of DNSSEC validation, but also because of the necessary “workarounds” needed for various RFC incompatible servers, forwarders, firewalls, etc. So we ported deckard into Rust to help test it. Additionally, when we started migrating over to this new async recursive library, we first ran it in “shadow” mode: processing real world query samples from the production service, and comparing differences. We’ve done this in the past on Cloudflare’s authoritative DNS service as well. It is slightly more difficult for a recursive service due to the fact that a recursive service has to look up all the data over the Internet, and authoritative nameservers often give different answers for the same query due to localization, load balancing and such, leading to many false positives.
In December 2019, we finally enabled the new service on a public test endpoint (see the announcement) to iron out remaining issues before slowly migrating the production endpoints to the new service. Even after all that, we continued to find edge cases with the DNS recursion (and DNSSEC validation in particular), but fixing and reproducing these issues has become much easier due to the new architecture of the library.
Sandboxed plugins
Having the ability to extend the core DNS functionality on the fly is important for us, thus BigPineapple has its redesigned plugin system. Before, the Lua plugins run in the same memory space as the service itself, and are generally free to do what they want. This is convenient, as we can freely pass memory references between the service and modules using C/FFI. For example, to read a response directly from cache without having to copy to a buffer first. But it is also dangerous, as the module can read uninitialized memory, call a host ABI using a wrong function signature, block on a local socket, or do other undesirable things, in addition the service doesn’t have a way to restrict these behaviors.
So we looked at replacing the embedded Lua runtime with JavaScript, or native modules, but around the same time, embedded runtimes for WebAssembly (Wasm for short) started to appear. Two nice properties of WebAssembly programs are that it allows us to write them in the same language as the rest of the service, and that they run in an isolated memory space. So we started modeling the guest/host interface around the limitations of WebAssembly modules, to see how that would work.
BigPineapple’s Wasm runtime is currently powered by Wasmer. We tried several runtimes over time like Wasmtime, WAVM in the beginning, and found Wasmer was simpler to use in our case. The runtime allows each module to run in its own instance, with an isolated memory and a signal trap, which naturally solved the module isolation problem we described before. In addition to this, we can have multiple instances of the same module running at the same time. Being controlled carefully, the apps can be hot swapped from one instance to another without missing a single request! This is great because the apps can be upgraded on the fly without a server restart. Given that the Wasm programs are distributed via Quicksilver, BigPineapple’s functionality can be safely changed worldwide within a few seconds!
To better understand the WebAssembly sandbox, several terms need to be introduced first:
Host: the program which runs the Wasm runtime. Similar to a kernel, it has full control through the runtime over the guest applications.
Guest application: the Wasm program inside the sandbox. Within a restricted environment, it can only access its own memory space, which is provided by the runtime, and call the imported Host calls. We call it an app for short.
Host call: the functions defined in the host that can be imported by the guest. Comparable to syscall, it’s the only way guest apps can access the resources outside the sandbox.
Guest runtime: a library for guest applications to easily interact with the host. It implements some common interfaces, so an app can just use async, socket, log and tracing without knowing the underlying details.
Now it’s time to dive into the sandbox, so stay awhile and listen. First let’s start from the guest side, and see what a common app lifespan looks like. With the help of the guest runtime, guest apps can be written similar to regular programs. So like other executables, an app begins with a start function as an entrypoint, which is called by the host upon loading. It is also provided with arguments as from the command line. At this point, the instance normally does some initialization, and more importantly, registers callback functions for different query phases. This is because in a recursive resolver, a query has to go through several phases before it gathers enough information to produce a response, for example a cache lookup, or making subrequests to resolve a delegation chain for the domain, so being able to tie into these phases is necessary for the apps to be useful for different use cases. The start function can also run some background tasks to supplement the phase callbacks, and store global state. For example – report metrics, or pre-fetch shared data from external sources, etc. Again, just like how we write a normal program.
But where do the program arguments come from? How could a guest app send log and metrics? The answer is, external functions.
Figure 5 Wasm based Sandbox
In figure 5, we can see a barrier in the middle, which is the sandbox boundary, that separates the guest from the host. The only way one side can reach out to the other, is via a set of functions exported by the peer beforehand. As in the picture, the “hostcalls” are exported by the host, imported and called by the guest; while the “trampoline” are guest functions that the host has knowledge of.
It is called trampoline because it is used to invoke a function or a closure inside a guest instance that’s not exported. The phase callbacks are one example of why we need a trampoline function: each callback returns a closure, and therefore can’t be exported on instantiation. So a guest app wants to register a callback, it calls a host call with the callback address “hostcall_register_callback(pre_cache, #30987)”, when the callback needs to be invoked, the host cannot just call that pointer as it’s pointing to the guest’s memory space. What it can do instead is, to leverage one of the aforementioned trampolines, and give it the address of the callback closure: “trampoline_call(#30987)”.
Isolation overhead Like a coin that has two sides, the new sandbox does come with some additional overhead. The portability and isolation that WebAssembly offers bring extra cost. Here, we’ll list two examples.
Firstly, guest apps are not allowed to read host memory. The way it works is the guest provides a memory region via a host call, then the host writes the data into the guest memory space. This introduces a memory copy that would not be needed if we were outside the sandbox. The bad news is, in our use case, the guest apps are supposed to do something on the query and/or the response, so they almost always need to read data from the host on every single request. The good news, on the other hand, is that during a request life cycle, the data won’t change. So we pre-allocate a bulk of memory in the guest memory space right after the guest app instantiates. The allocated memory is not going to be used, but instead serves to occupy a hole in the address space. Once the host gets the address details, it maps a shared memory region with the common data needed by the guest into the guest’s space. When the guest code starts to execute, it can just access the data in the shared memory overlay, and no copy is needed.
Another issue we ran into was when we wanted to add support for a modern protocol, oDoH, into BigPineapple. The main job of it is to decrypt the client query, resolve it, then encrypt the answers before sending it back. By design, this doesn’t belong to core DNS, and should instead be extended with a Wasm app. However, the WebAssembly instruction set doesn’t provide some crypto primitives, such as AES and SHA-2, which prevents it from getting the benefit of host hardware. There is ongoing work to bring this functionality to Wasm with WASI-crypto. Until then, our solution for this is to simply delegate the HPKE to the host via host calls, and we already saw 4x performance improvements, compared to doing it inside Wasm.
Async in Wasm Remember the problem we talked about before that the callbacks could block the event loop? Essentially, the problem is how to run the sandboxed code asynchronously. Because no matter how complex the request processing callback is, if it can yield, we can put an upper bound on how long it is allowed to block. Luckily, Rust’s async framework is both elegant and lightweight. It gives us the opportunity to use a set of guest calls to implement the “Future”s.
In Rust, a Future is a building block for asynchronous computations. From the user’s perspective, in order to make an asynchronous program, one has to take care of two things: implement a pollable function that drives the state transition, and place a waker as a callback to wake itself up, when the pollable function should be called again due to some external event (e.g. time passes, socket becomes readable, and so on). The former is to be able to progress the program gradually, e.g. read buffered data from I/O and return a new state indicating the status of the task: either finished, or yielded. The latter is useful in case of task yielding, as it will trigger the Future to be polled when the conditions that the task was waiting for are fulfilled, instead of busy looping until it’s complete.
Let’s see how this is implemented in our sandbox. For a scenario when the guest needs to do some I/O, it has to do so via the host calls, as it is inside a restricted environment. Assuming the host provides a set of simplified host calls which mirror the basic socket operations: open, read, write, and close, the guest can have its pseudo poller defined as below:
Here the host call reads data from a socket into a buffer, depending on its return value, the function can move itself to one of the states we mentioned above: finished(Ready), or yielded(Pending). The magic happens inside the host call. Remember in figure 5, that it is the only way to access resources? The guest app doesn’t own the socket, but it can acquire a “handle” via “hostcall_socket_open”, which will in turn create a socket on the host side, and return a handle. The handle can be anything in theory, but in practice using integer socket handles map well to file descriptors on the host side, or indices in a vector or slab. By referencing the returned handle, the guest app is able to remotely control the real socket. As the host side is fully asynchronous, it can simply relay the socket state to the guest. If you noticed that the waker function isn’t used above, well done! That’s because when the host call is called, it not only starts opening a socket, but also registers the current waker to be called then the socket is opened (or fails to do so). So when the socket becomes ready, the host task will be woken up, it will find the corresponding guest task from its context, and wakes it up using the trampoline function as shown in figure 5. There are other cases where a guest task needs to wait for another guest task, an async mutex for example. The mechanism here is similar: using host calls to register wakers.
All of these complicated things are encapsulated in our guest async runtime, with easy to use API, so the guest apps get access to regular async functions without having to worry about the underlying details.
(Not) The End
Hopefully, this blog post gave you a general idea of the innovative platform that powers 1.1.1.1. It is still evolving. As of today, several of our products, such as 1.1.1.1 for Families, AS112, and Gateway DNS, are supported by guest apps running on BigPineapple. We are looking forward to bringing new technologies into it. If you have any ideas, please let us know in the community or via email.
Published reports indicate that the growing protests have resulted in at least eight deaths. Iran has a history of restricting Internet connectivity in response to protests, taking such steps in May 2022, February 2021, and November 2019. They have taken a similar approach to the current protests, including disrupting Internet connectivity, blocking social media platforms, and blocking DNS. The impact of these actions, as seen through Cloudflare’s data, are reviewed below.
On September 21, Internet disruptions started to become more widespread, with mobile networks effectively shut down nationwide. (Iran is a heavily mobile-centric country, with Cloudflare Radar reporting that 85% of requests are made from mobile devices.) Internet traffic from Iran Mobile Communications Company (AS197207) started to decline around 1530 UTC, and remained near zero until it started to recover at 2200 UTC, returning to “normal” levels by the end of the day.
Internet traffic from RighTel (AS57218) began to decline around 1630 UTC. After an outage lasting more than 12 hours, traffic returned at 0510 UTC.
Internet traffic from MTN Irancell (AS44244) began to drop just before 1700 UTC. After a 12-hour outage, traffic began recovering at 0450 UTC.
The impact of these disruptions is also visible when looking at traffic at both a regional and national level. In Tehran Province, HTTP request volume declined by approximately 70% around 1600 UTC, and continued to drop for the next several hours before seeing a slight recovery at 2200 UTC, likely related to the recovery also seen at that time on AS197207.
Similarly, Internet traffic volumes across the whole country began to decline just after 1600 UTC, falling approximately 40%. Nominal recovery at 2200 UTC is visible in this view as well, again likely from the increase in traffic from AS197207. More aggressive traffic growth is visible starting around 0500 UTC, after the remaining two mobile network providers came back online.
In analyzing DNS requests to Cloudflare’s resolver for domains associated with leading social media platforms, we observe that requests for instagram.com hostnames drop sharply at 1310 UTC, remaining lower for the rest of the day, except for a significant unexplained spike in requests between 1540 and 1610 UTC. Request volumes for hostnames associated with other leading social media platforms did not appear to be similarly affected.
In addition, it was reported that access to WhatsApp had also been blocked in Iran. This can be seen in resolution requests to Cloudflare’s resolver for whatsapp.com hostnames. The graph below shows a sharp decline in query traffic at 1910 UTC, dropping to near zero.
The Open Observatory for Network Interference (OONI), an organization that measures Internet censorship, reported in a Tweet that the cloudflare-dns.com domain name, used for DNS-over-HTTPS (DoH) and DNS-over-TLS (DoT) connections to Cloudflare’s DNS resolver, was blocked in Iran on September 20. This is clearly evident in the graph below, with resolution volume over DoH and DoT dropping to zero at 1940 UTC. The OONI tweet also noted that the 1.1.1.1 IP address “remains blocked on most networks.” The trend line for resolution over TCP or UDP (on port 53) in the graph below suggests that the IP address is not universally blocked, as there are still resolution requests reaching Cloudflare.
Interested parties can use Cloudflare Radar to monitor the impact of such government-directed Internet disruptions, and can follow @CloudflareRadar on Twitter for updates on Internet disruptions as they occur.
It’s a Saturday night. You open your browser, looking for nearby pizza spots that are open. If the search goes as intended, your browser will show you results that are within a few miles, often based on the assumed location of your IP address. At Cloudflare, we affectionately call this type of geolocation accuracy the “pizza test”. When you use a Cloudflare product that sits between you and the Internet (for example, WARP), it’s one of the ways we work to balance user experience and privacy. Too inaccurate and you’re getting pizza places from a neighboring country; too accurate and you’re reducing the privacy benefits of obscuring your location.
With that in mind, we’re excited to announce two major improvements to our 1.1.1.1 + WARP apps: first, an improvement to how we ensure search results and other geographically-aware Internet activity work without compromising your privacy, and second, a larger network with more locations available to WARP+ subscribers, powering even speedier connections to our global network.
A better Internet browsing experience for every WARP user
When we originally built the 1.1.1.1+ WARP mobile app, we wanted to create a consumer-friendly way to connect to our network and privacy-respecting DNS resolver.
What we discovered over time is that the topology of the Internet dictates a different type of experience for users in different locations. Why? Sometimes, because traffic congestion or technical issues route your traffic to a less congested part of the network. Other times, Internet Service Providers may not peer with Cloudflare or engage in traffic engineering to optimize their networks how they see fit, which could result in user traffic connecting to a location that doesn’t quite map to their locale or language.
Regardless of the cause, the impact is that your search results become less relevant, if not outright confusing. For example, in somewhere dense with country borders, like Europe, your traffic in Berlin could get routed to Amsterdam because your mobile operator chooses to not peer in-country, giving you results in Dutch instead of German. This can also be disruptive if you’re trying to stream content subject to licensing restrictions, such as a person in the UK trying to watch BBC iPlayer or a person in Brazil trying to watch the World Cup.
So we fixed this. We just rolled out a major update to the service that powers WARP that will give you a geographically accurate browsing experience without revealing your IP address to the websites you’re visiting. Instead, websites you visit will see a Cloudflare IP address instead, making it harder for them to track you directly.
How it works
Traditionally, consumer VPNs deliberately route your traffic through a server in another country, making your connection slow, and often getting blocked because of their ability to flout location-based content restrictions. We took a different approach when we first launched WARP in 2018, giving you the best possible performance by routing your traffic through the Cloudflare data center closest to you. However, because not every Internet Service Provider (ISP) peers with Cloudflare, users sometimes end up exiting the Cloudflare network from a more “random” data center – one that does not accurately represent their locale.
Websites and third party services often infer geolocation from your IP address, and now, 1.1.1.1 + WARP replaces your original IP address with one that consistently and accurately represents your approximate location.
Here’s how we did it:
We ran an analysis on a subset of our network traffic to find a rough approximation of how many users we have per city.
We divided that amongst our egress IPs, using an anycast architecture to be efficient with the number of additional IPs we had to allocate and advertise per metro area.
We then submitted geolocation information of those IPs to various geolocation database providers, ensuring third party services associate those Cloudflare egress IPs with an accurate approximate location.
It was important to us to provide the benefits of this location accuracy without compromising user privacy, so the app doesn’t ask for specific location permissions or log your IP address.
An even bigger network for WARP+ users
We also recently announced that we’ve expanded our network to over 275 cities in over 100 countries. This gave us an opportunity to revisit where we offered WARP, and how we could expand the number of locations users can connect to WARP with (in other words: an opportunity to make things faster).
From today, all WARP+ subscribers will benefit from a larger network with 20+ new cities: with no change in subscription pricing. A closer Cloudflare data center means less latency between your device and Cloudflare, which directly improves your download speed, thanks to what’s called the Bandwidth-Delay Product (put simply: lower latency, higher throughput!).
As a result, sites load faster, both for those on the Cloudflare network and those that aren’t. As we continue to expand our network, we’ll be revising this on a regular basis to ensure that all WARP and WARP+ subscribers continue to get great performance.
Speed, privacy, and relevance
Beyond being able to find pizza on a Saturday night, we believe everyone should be able to browse the Internet freely – and not have to sacrifice the speed, privacy, or relevance of their search results in order to do so.
In the near future, we’ll be investing in features to bring even more of the benefits of Cloudflare infrastructure to every 1.1.1.1 + WARP user. Stay tuned!
Over the last several years, both Area 1 and Cloudflare built pipelines for ingesting threat indicator data, for use within our products. During the acquisition process we compared notes, and we discovered that the overlap of indicators between our two respective systems was smaller than we expected. This presented us with an opportunity: as one of our first tasks in bringing the two companies together, we have started bringing Area 1’s threat indicator data into the Cloudflare suite of products. This means that all the products today that use indicator data from Cloudflare’s own pipeline now get the benefit of Area 1’s data, too.
Area 1 built a data pipeline focused on identifying new and active phishing threats, which now supplements the Phishing category available today in Gateway. If you have a policy that references this category, you’re already benefiting from this additional threat coverage.
How Cloudflare identifies potential phishing threats
Cloudflare is able to combine the data, procedures and techniques developed independently by both the Cloudflare team and the Area 1 team prior to acquisition. Customers are able to benefit from the work of both teams across the suite of Cloudflare products.
Cloudflare curates a set of data feeds both from our own network traffic, OSINT sources, and numerous partnerships, and applies custom false positive control. Customers who rely on Cloudflare are spared the software development effort as well as the operational workload to distribute and update these feeds. Cloudflare handles this automatically, with updates happening as often as every minute.
Cloudflare is able to go beyond this and work to proactively identify phishing infrastructure in multiple ways. With the Area 1 acquisition, Cloudflare is now able to apply the adversary-focused threat research approach of Area1 across our network. A team of threat researchers track state-sponsored and financially motivated threat actors, newly disclosed CVEs, and current phishing trends.
Cloudflare now operates mail exchange servers for hundreds of organizations around the world, in addition to its DNS resolvers, Zero Trust suite, and network services. Each of these products generates data that is used to enhance the security of all of Cloudflare’s products. For example, as part of mail delivery, the mail engine performs domain lookups, scores potential phishing indicators via machine learning, and fetches URLs. Data which can now be used through Cloudflare’s offerings.
How Cloudflare Area 1 identifies potential phishing threats
The Cloudflare Area 1 team operates a suite of web crawling tools designed to identify phishing pages, capture phishing kits, and highlight attacker infrastructure. In addition, Cloudflare Area 1 threat models assess campaigns based on signals gathered from threat actor campaigns; and the associated IOCs of these campaign messages are further used to enrich Cloudflare Area 1 threat data for future campaign discovery. Together these techniques give Cloudflare Area 1 a leg up on identifying the indicators of compromise for an attacker prior to their attacks against our customers. As part of this proactive approach, Cloudflare Area 1 also houses a team of threat researchers that track state-sponsored and financially motivated threat actors, newly disclosed CVEs, and current phishing trends. Through this research, analysts regularly insert phishing indicators into an extensive indicator management system that may be used for our email product or any other product that may query it.
Cloudflare Area 1 also collects information about phishing threats during our normal operation as the mail exchange server for hundreds of organizations across the world. As part of that role, the mail engine performs domain lookups, scores potential phishing indicators via machine learning, and fetches URLs. For those emails found to be malicious, the indicators associated with the email are inserted into our indicator management system as part of a feedback loop for subsequent message evaluation.
How Cloudflare data will be used to improve phishing detection
In order to support Cloudflare products, including Gateway and Page Shield, Cloudflare has a data pipeline that ingests data from partnerships, OSINT sources, as well as threat intelligence generated in-house at Cloudflare. We are always working to curate a threat intelligence data set that is relevant to our customers and actionable in the products Cloudflare supports. This is our North star: what data can we provide that enhances our customer’s security without requiring our customers to manage the complexity of data, relationships, and configuration. We offer a variety of security threat categories, but some major focus areas include:
Malware distribution
Malware and Botnet Command & Control
Phishing,
New and newly seen domains
Phishing is a threat regardless of how the potential phishing link gets entry into an organization, whether via email, SMS, calendar invite or shared document, or other means. As such, detecting and blocking phishing domains has been an area of active development for Cloudflare’s threat data team since almost its inception.
Looking forward, we will be able to incorporate that work into Cloudflare Area 1’s phishing email detection process. Cloudflare’s list of phishing domains can help identify malicious email when those domains appear in the sender, delivery headers, message body or links of an email.
1+1 = 3: Greater dataset sharing between Cloudflare and Area 1
Threat actors have long had an unfair advantage — and that advantage is rooted in the knowledge of their target, and the time they have to set up specific campaigns against their targets. That dimension of time allows threat actors to set up the right infrastructure, perform reconnaissance, stage campaigns, perform test probes, observe their results, iterate, improve and then launch their ‘production’ campaigns. This precise element of time gives us the opportunity to discover, assess and proactively filter out campaign infrastructure prior to campaigns reaching critical mass. But to do that effectively, we need visibility and knowledge of threat activity across the public IP space.
With Cloudflare’s extensive network and global insight into the origins of DNS, email or web traffic, combined with Cloudflare Area 1’s datasets of campaign tactics, techniques, and procedures (TTPs), seed infrastructure and threat models — we are now better positioned than ever to help organizations secure themselves against sophisticated threat actor activity, and regain the advantage that for so long has been heavily weighted towards the bad guys.
If you’d like to extend Zero Trust to your email security to block advanced threats, contact your Customer Success manager, or request a Phishing Risk Assessment here.
It can be frustrating to get errors (SERVFAIL response codes) returned from your DNS queries. It can be even more frustrating if you don’t get enough information to understand why the error is occurring or what to do next. That’s why back in 2020, we launched support for Extended DNS Error (EDE) Codes to 1.1.1.1.
As a quick refresher, EDE codes are a proposed IETF standard enabled by the Extension Mechanisms for DNS (EDNS) spec. The codes return extra information about DNS or DNSSEC issues without touching the RCODE so that debugging is easier.
Now we’re happy to announce we will return more error code types and include additional helpful information to further improve your debugging experience. Let’s run through some examples of how these error codes can help you better understand the issues you may face.
To try for yourself, you’ll need to run the dig or kdig command in the terminal. For dig, please ensure you have v9.11.20 or above. If you are on macOS 12.1, by default you only have dig 9.10.6. Install an updated version of BIND to fix that.
Let’s start with the output of an example dig command without EDE support.
In the output above, we tried to do DNSSEC validation on dnssec-failed.org. It returns a SERVFAIL, but we don’t have context as to why.
Now let’s try that again with 1.1.1.1’s EDE support.
% dig @1.1.1.1 dnssec-failed.org +dnssec

; <<>> DiG 9.18.0 <<>> @1.1.1.1 dnssec-failed.org +dnssec
; (1 server found)
;; global options: +cmd
;; Got answer:
;; ->>HEADER<<- opcode: QUERY, status: SERVFAIL, id: 34492
;; flags: qr rd ra; QUERY: 1, ANSWER: 0, AUTHORITY: 0, ADDITIONAL: 1

;; OPT PSEUDOSECTION:
; EDNS: version: 0, flags: do; udp: 1232
; EDE: 9 (DNSKEY Missing): (no SEP matching the DS found for dnssec-failed.org.)
;; QUESTION SECTION:
;dnssec-failed.org.		IN	A

;; Query time: 15 msec
;; SERVER: 1.1.1.1#53(1.1.1.1) (UDP)
;; WHEN: Fri Mar 04 12:53:45 PST 2022
;; MSG SIZE  rcvd: 103
We can see there is still a SERVFAIL. However, this time there is also an EDE Code 9 which stands for “DNSKey Missing”. Accompanying that, we also have additional information saying “no SEP matching the DS found” for dnssec-failed.org. That’s better!
Another nifty feature is that we will return multiple errors when appropriate, so you can debug each one separately. In the example below, we returned a SERVFAIL with three different error codes: “Unsupported DNSKEY Algorithm”, “No Reachable Authority”, and “Network Error”.
Here’s a list of the additional codes we now support:
Error Code Number
Error Code Name
1
Unsupported DNSKEY Algorithm
2
Unsupported DS Digest Type
5
DNSSEC Indeterminate
7
Signature Expired
8
Signature Not Yet Valid
9
DNSKEY Missing
10
RRSIGs Missing
11
No Zone Key Bit Set
12
NSEC Missing
We have documented all the error codes we currently support with additional information you may find helpful. Refer to our dev docs for more information.
I joined Cloudflare a few weeks ago, and as someone new to the company, there’s a ton of information to absorb. I have always learned best by doing, so I decided to use Cloudflare like a brand-new user. Cloudflare customers range from individuals with a simple website to companies in the Fortune 100. I’m currently exploring Cloudflare from the perspective of the individual, so I signed up for a free account and logged into the dashboard. Just like getting into a new car, I want to turn all the dials and push all the buttons. I looked for things that would be fun and easy to do and would deliver some immediate value. Now I want to share the best ones with you.
Here are my five ways to get started with Cloudflare. These should be easy for anyone, and they’re free. You’ll likely even save some money and improve your privacy and security in the process. Let’s go!
1. Transfer or register a domain with Cloudflare Registrar
If you’re like me, you’ve acquired a few (dozen) Internet domains for things like personalizing your email address, a web page for your nature photography hobby, or maybe a side business. You probably registered them at one or more of the popular domain name registrars, and you pay around $15 per year for each domain. I did an audit and found I was spending a shocking amount each year to maintain my domains, and they were spread across three different registrars.
Cloudflare makes it easy to transfer domains from other registrars and doesn’t charge a markup for domain registrar services. Let me say that again; there is zero price markup for domain registration with Cloudflare Registrar. You’ll pay exactly what Cloudflare pays. For example, a .com domain registered with Cloudflare currently costs half of what I was paying at other registrars.
Not only will you save on the domain registration, but Cloudflare doesn’t nickel-and-dime you like registrars who charge extra for WHOIS privacy and transfer lock and then sneakily bundle their website hosting services. It all adds up.
To get started registering or transferring a domain, log into the Cloudflare Dashboard, click “Add a Site,” and bring your domains to Cloudflare.
2. Configure DNS on Cloudflare DNS
DNS servers do the work of translating hostnames into IP addresses. To put a domain name to use on the Internet, you can create DNS records to point to your website and email provider. Every time someone wants to put a website or Internet application online, this process must happen so the rest of us can find it. Cloudflare’s DNS dashboard makes it simple to configure DNS records. For transfers, Cloudflare will even copy records from your existing DNS service to prevent any disruption.
The Cloudflare DNS dashboard will also improve security on your domains with DNSSEC, protect your domains from email spoofing with DMARC, and enforce other DNS best practices.
I’ve now moved all my domains to Cloudflare DNS, which is a big win for me for security and simplicity. I can see them all in one place, and I’m more confident with the increased level of control and protection I have for my domains.
3. Set up a blog with Cloudflare Pages
Once I moved my domains, I was eager to set up a new website. I have been thinking lately it would be fun to have a place to post my photos where they can stand out and won’t get lost in the stream of social media. It’s been a while since I’ve built a website from scratch, but it’s fun getting back to basics. In the old days, to host a website you’d set up a dedicated web server or use a shared web host to serve your site. Today, many web hosts provide ready-to-go templates for websites and make hosting as easy as one click to set up a new site.
I wanted to learn by doing, so I took the do-it-yourself route. What I discovered in the process is an architecture called Jamstack. It’s a bit different from the traditional way of building and hosting websites. With Jamstack, your site doesn’t live at a traditional hosting provider, nor is it dynamically generated from CGI scripts and a database. Your content is now stored on a code repository like GitHub. The site is pre-generated as a static site and then deployed and delivered directly from Cloudflare’s network.
I used a Jamstack static site generator called Hugo to build my photo blog, pushed it to GitHub, and used Cloudflare Pages to generate the content and host my site. Now that it’s configured, there’s zero work necessary to maintain it. Jamstack, combined with Pages, alleviates the regular updates required to keep up with security patches, and there are no web servers or database services to break. Delivered from Cloudflare’s edge network, the site scales effortlessly, and it’s blazingly fast from a user perspective.
By the way, you don’t need to register a domain to deploy to Pages. Cloudflare will generate a pages.dev site that you can use.
For extra credit, have a look at the Cloudflare Workers serverless platform. Workers will allow you to write and deploy even more advanced custom code and run it across Cloudflare’s globally distributed network.
4. Protect your network with Cloudflare for Teams
At first, it wasn’t evident to me how I was going to use Cloudflare for Teams. I initially thought it was only for larger organizations. After all, I’m sitting here in my home office, and I’m just a team of one. Digging into the product more, it became clear that Teams is about privacy and security for groups of any size.
We’ve discussed the impressive Cloudflare DNS infrastructure, and you can take advantage of the Cloudflare DNS resolver for your devices at home by simply configuring them to point to Cloudflare 1.1.1.1 DNS servers. But for more granular control and detailed logging, you should try the DNS infrastructure built into the Cloudflare for Teams Gateway feature.
When you point your home network to Cloudflare for Teams DNS servers, your dashboard will populate with logs of all DNS requests coming from your network. You can set up rules to block DNS requests for various categories, including known malware, phishing, adult sites, and other questionable content. You’ll see the logs instantly and can add or remove categories as needed. If you trigger one of the rules, Cloudflare will display a page that shows you’ve hit one of these blocked sites.
Malware can bypass DNS, so filtering DNS is no silver bullet. Think of DNS filtering as another layer of defense that may help you avoid nefarious sites in the first place. For example, known phishing sites sent as URLs via email won’t resolve and will be blocked before they affect you. Additionally, DNS logs should give you visibility into what’s happening on the network and that may lead you to implement even better security in other areas.
There’s so much more to Cloudflare for Teams than DNS filtering, but I wanted to give you just a little taste of what you can do with it quickly and for free.
5. Secure your traffic with the Cloudflare 1.1.1.1 app and WARP
Finally, let’s discuss the challenge of securing Internet communications on your mobile phones, tablets, and devices at home and while traveling. We know that the SSL/TLS encryption on secure websites provides a degree of protection, but the apps you use and sites you visit are still visible to your ISP and upstream network operators. Some providers sell this data or use it to target you with ads.
If you install the 1.1.1.1 app, Cloudflare will create an always-on, encrypted tunnel from your device to the nearest Cloudflare data center and secure your Internet traffic. We call this Cloudflare WARP. WARP not only encrypts your traffic but can even help accelerate it by routing intelligently across the Cloudflare network.
WARP is a compelling VPN replacement without the risks associated with some shady VPN providers who may also want to sell your data. Remember, Cloudflare will never sell your data!
The Cloudflare WARP client combined with Cloudflare for Teams gives you enhanced visibility into DNS queries and unlocks some advanced traffic management and filtering capabilities. And it’s all free for small teams.
Hopefully, my exploration of the Cloudflare product portfolio gives you some ideas of what you can do to make your life a little easier or your team more secure. I’m just scratching the surface, and I’m excited to keep learning what’s possible with Cloudflare. I’ll continue to share what I learn, and I encourage you to experiment with some of these capabilities yourself and let me know how it goes.
A big part of the job of a technical writer is getting feedback on the content you produce. Writing and maintaining product documentation is a deeply collaborative and cyclical effort — through constant conversation with product managers and engineers, technical writers ensure the content is clear and serves the user in the most effective way. Collaboration with other technical writers is also important to keep the documentation consistent with Cloudflare’s content strategy.
So whether we’re documenting a new feature or overhauling a big portion of existing documentation, sharing our writing with stakeholders before it’s published is quite literally half the work.
In my experience as a technical writer, the feedback I’ve received has been exponentially more impactful when stakeholders could see my changes in context. This is especially true for bigger and more strategic changes. Imagine I’m changing the structure of an entire section of a product’s documentation, or shuffling the order of pages in the navigation bar. It’s hard to guess the impact of those changes just by looking at the markdown files.
We writers check those changes in context by building a development server on our local machines. But sharing what we see locally with our stakeholders has always been a pain point for us. We’ve sent screenshots (hardly a good idea). We’ve recorded our screens. We’ve asked stakeholders to check out our branches locally and build a development server on their own. Lately, we’ve added a GitHub action to our open-source cloudflare-docs repo that allows us to generate a preview link for all pull requests with a certain label. However, that requires us to open a pull request with our changes, and that is not ideal if we’re documenting a feature that’s yet to be announced, or if our work is still in its early stages.
So the question has always been: could there be a way for someone else to see what we see, as easily as we see it?
Enter Cloudflare Tunnel
I was working on a complete refresh of Cloudflare Tunnel’s documentation when I realized the product could very well answer that question for us as a technical writing team.
If you’re not familiar with the product, Cloudflare Tunnel provides a secure way to connect your local resources to the Cloudflare network without poking holes in your firewall. By running cloudflared in your environment, you can create outbound-only connections to Cloudflare’s edge, and ensure all traffic to your origins goes through Cloudflare and is protected from outside interference.
For our team, Cloudflare Tunnel could offer a way for our stakeholders to interact with what’s on our local environments in real-time, just like a customer would if the changes were published. To do that, we could expose our local environment to the edge through a tunnel, assign a DNS record to that tunnel, and then share that URL with our stakeholders.
So if each member in the technical writing team had their own tunnel that they could spin up every time they needed to get feedback, that would pretty much solve our long-standing problem.
Setting up the tunnel
To test out that this would work, I went ahead and tried it for myself.
First, I made sure to create a local branch of the cloudflare-docs repo, make local changes, and run a development server locally on port 8000.
Since I already had cloudflared installed on my machine, the next thing I needed to do was log into my team’s Cloudflare account, pick the zone I wanted to create tunnels for (I picked developers.cloudflare.com), and authorize Cloudflare Tunnel for that zone.
$ cloudflared login
Next, it was time to create the Named Tunnel.
$ cloudflared tunnel create alice
Tunnel credentials written to /Users/alicebracchi/.cloudflared/0e025819-6f12-4f49-8183-c678273feef4.json. cloudflared chose this file based on where your origin certificate was found. Keep this file secret. To revoke these credentials, delete the tunnel.

Created tunnel alice with id 0e025819-6f12-4f49-8183-c678273feef4
Alright, tunnel created. Next, I needed to assign a DNS record to it. I wanted it to be something readable and easily shareable with stakeholders (like abracchi.developers.cloudflare.com), so I ran the following command and specified the tunnel name first and then the desired subdomain:
$ cloudflared tunnel route dns alice abracchi
Next, I needed a way to tell the tunnel to serve traffic to my localhost:8000 port. For that, I created a configuration file in my default cloudflared directory and specified the following fields:
Time to run the tunnel. The following command established connections between my origin and the Cloudflare edge, telling the tunnel to serve traffic to my origin according to the parameters I’d specified in the config file:
$ cloudflared tunnel --config /Users/alicebracchi/.cloudflared/config.yml run alice
2021-10-18T09:39:54Z INF Starting tunnel tunnelID=0e025819-6f12-4f49-8183-c678273feef4
2021-10-18T09:39:54Z INF Version 2021.9.2
2021-10-18T09:39:54Z INF GOOS: darwin, GOVersion: go1.16.5, GoArch: amd64
2021-10-18T09:39:54Z INF Settings: map[cred-file:/Users/alicebracchi/.cloudflared/0e025819-6f12-4f49-8183-c678273feef4.json credentials-file:/Users/alicebracchi/.cloudflared/0e025819-6f12-4f49-8183-c678273feef4.json url:http://localhost:8000]
2021-10-18T09:39:54Z INF Generated Connector ID: 90a7e3a9-9d59-4d26-9b87-4b94ebf4d2a0
2021-10-18T09:39:54Z INF cloudflared will not automatically update when run from the shell. To enable auto-updates, run cloudflared as a service: https://developers.cloudflare.com/argo-tunnel/reference/service/
2021-10-18T09:39:54Z INF Initial protocol http2
2021-10-18T09:39:54Z INF Starting metrics server on 127.0.0.1:64193/metrics
2021-10-18T09:39:55Z INF Connection 13bf4c0c-b35b-4f9a-b6fa-f0a3dd001951 registered connIndex=0 location=MAD
2021-10-18T09:39:56Z INF Connection 38510c22-5256-45f2-abf8-72f1207ca242 registered connIndex=1 location=LIS
2021-10-18T09:39:57Z INF Connection 9ab0ea06-b1cf-483c-bd48-64a067a87c39 registered connIndex=2 location=MAD
2021-10-18T09:39:58Z INF Connection df079efe-8246-4e93-85f5-10caf8b7c354 registered connIndex=3 location=LIS
And sure enough, at abracchi.developers.cloudflare.com, my teammates could see what I was seeing on localhost:8000.
Securing the tunnel
After creating the tunnel, I needed to make sure only people within Cloudflare could access that tunnel. As it was, anyone with access to abracchi.developers.cloudflare.com could see what was in my local environment. To fix this, I set up an Access self-hosted application by navigating to Access > Applications on the Teams Dashboard. For this application, I then created a policy that restricts access to the tunnel to a user group that includes only Cloudflare employees and requires authentication via Google or One-time PIN (OTP).
This makes applications like my tunnel easily shareable between colleagues, but also safe from potential vulnerabilities.
Et voilà!
Back to the Tunnels page, this is what the content team’s Cloudflare Tunnel setup looks like after each writer completed the process I’ve outlined above. Every writer has their personal tunnel set up and their local environment exposed to the Cloudflare Edge:
What’s next
The team is now seamlessly sharing visual content with their stakeholders, but there’s still room for improvement. Cloudflare Tunnel is just the first step towards making the feedback loop easier for everyone involved. We’re currently exploring ways we can capture integrated feedback directly at the URL that’s shared with the stakeholders, to avoid back-and-forth on separate channels.
We’re also looking into bringing in Cloudflare Pages to make the entire deployment process faster. Stay tuned for future updates, and in the meantime, check out our developer docs.
Last October we released WARP for Desktop, bringing a safer and faster way to use the Internet to billions of devices for free. At the same time, we gave our enterprise customers the ability to use WARP with Cloudflare for Teams. By routing all an enterprise’s traffic from devices anywhere on the planet through WARP, we’ve been able to seamlessly power advanced capabilities such as Secure Web Gateway and Browser Isolation and, in the future, our Data Loss Prevention platforms.
Today, we are excited to announce Cloudflare WARP for Linux and, across all desktop platforms, the ability to use WARP with single applications instead of your entire device.
What is WARP?
WARP was built on the philosophy that even people who don’t know what “VPN” stands for should be able to still easily get the protection a VPN offers. It was also built for those of us who are unfortunately all too familiar with traditional corporate VPNs, and need an innovative, seamless solution to meet the challenges of an always-connected world.
Enter our own WireGuard implementation called BoringTun.
The WARP application uses BoringTun to encrypt traffic from your device and send it directly to Cloudflare’s edge, ensuring that no one in between is snooping on what you’re doing. If the site you are visiting is already a Cloudflare customer, the content is immediately sent down to your device. With WARP+, we use Argo Smart Routing to use the shortest path through our global network of data centers to reach whomever you are connecting to.
Combined with the power of 1.1.1.1 (the world’s fastest public DNS resolver), WARP keeps your traffic secure, private and fast. Since nearly everything you do on the Internet starts with a DNS request, choosing the fastest DNS server across all your devices will accelerate almost everything you do online.
Bringing WARP to Linux
When we built out the foundations of our desktop client last year, we knew a Linux client was something we would deliver. If you have ever shipped software at this scale, you’ll know that maintaining a client across all major operating systems is a daunting (and error-prone) task. To avoid these pitfalls, we wrote the core of the product in Rust, which allows for 95% of the code to be shared across platforms.
Internally we refer to this common code as the shared Daemon (or Service, for Windows folks), and it allows our engineers to spend less time duplicating code across multiple platforms while ensuring most quality improvements hit everyone at the same time. The really cool thing about this is that millions of existing WARP users have already helped us solidify the code base for Linux!
The other 5% of code is split into two main buckets: UI and quirks of the operating system. For now, we are forgoing a UI on Linux and instead working to support three distributions:
Ubuntu
Red Hat Enterprise Linux
CentOS
We want to add more distribution support in the future, so if your favorite distro isn’t there, don’t despair — the client may in fact already work with other Debian and Redhat based distributions, so please give it a try. If we missed your favorite distribution, we’d love to hear from you in our Community Forums.
So without a UI — what’s the mechanism for controlling WARP? The command line, of course! Keen observers may have noticed an executable that already ships with each client called the warp-cli. This platform-agnostic interface is already the preferred mechanism of interacting with the daemon by some of our engineers and is the main way you’ll interact with WARP on Linux.
Installing Cloudflare WARP for Linux
Seasoned Linux developers can jump straight to https://pkg.cloudflareclient.com/install. After linking our repository, get started with either sudo apt install cloudflare-warp or sudo yum install cloudflare-warp, depending on your distribution.
Once you’ve installed WARP, you can begin using the CLI with a single command:
warp-cli --help
The CLI will display the output below.
~$ warp-cli --help
WARP 0.2.0
Cloudflare
CLI to the WARP service daemon

USAGE:
    warp-cli [FLAGS] [SUBCOMMAND]

FLAGS:
        --accept-tos    Accept the Terms of Service agreement
    -h, --help          Prints help information
    -l                  Stay connected to the daemon and listen for status changes and DNS logs (if enabled)
    -V, --version       Prints version information

SUBCOMMANDS:
    register                    Registers with the WARP API, will replace any existing registration (must be run
                                before first connection)
    teams-enroll                Enroll with Cloudflare for Teams
    delete                      Deletes current registration
    rotate-keys                 Generates a new key-pair, keeping the current registration
    status                      Asks the daemon to send the current status
    warp-stats                  Retrieves the stats for the current WARP connection
    settings                    Retrieves the current application settings
    connect                     Asks the daemon to start a connection, connection progress should be monitored with
                                -l
    disconnect                  Asks the daemon to stop a connection
    enable-always-on            Enables always on mode for the daemon (i.e. reconnect automatically whenever
                                possible)
    disable-always-on           Disables always on mode
    disable-wifi                Pauses service on WiFi networks
    enable-wifi                 Re-enables service on WiFi networks
    disable-ethernet            Pauses service on ethernet networks
    enable-ethernet             Re-enables service on ethernet networks
    add-trusted-ssid            Adds a trusted WiFi network, for which the daemon will be disabled
    del-trusted-ssid            Removes a trusted WiFi network
    allow-private-ips           Exclude private IP ranges from tunnel
    enable-dns-log              Enables DNS logging, use with the -l option
    disable-dns-log             Disables DNS logging
    account                     Retrieves the account associated with the current registration
    devices                     Retrieves the list of devices associated with the current registration
    network                     Retrieves the current network information as collected by the daemon
    set-mode
    set-families-mode
    set-license                 Attaches the current registration to a different account using a license key
    set-gateway                 Forces the app to use the specified Gateway ID for DNS queries
    clear-gateway               Clear the Gateway ID
    set-custom-endpoint         Forces the client to connect to the specified IP:PORT endpoint
    clear-custom-endpoint       Remove the custom endpoint setting
    add-excluded-route          Adds an excluded IP
    remove-excluded-route       Removes an excluded IP
    get-excluded-routes         Get the list of excluded routes
    add-fallback-domain         Adds a fallback domain
    remove-fallback-domain      Removes a fallback domain
    get-fallback-domains        Get the list of fallback domains
    restore-fallback-domains    Restore the fallback domains
    get-device-posture          Get the current device posture
    override                    Temporarily override MDM policies that require the client to stay enabled
    set-proxy-port              Set the listening port for WARP proxy (127.0.0.1:{port})
    help                        Prints this message or the help of the given subcommand(s)
You can begin connecting to Cloudflare’s network with just two commands. The first command, register, will prompt you to authenticate. The second command, connect, will enable the client, creating a WireGuard tunnel from your device to Cloudflare’s network.
Once you’ve connected the client, the best way to verify it is working is to run our trace command:
~$ curl https://www.cloudflare.com/cdn-cgi/trace/
And look for the following output:
warp=on
Want to switch from encrypting all traffic in WARP to just using our 1.1.1.1 DNS resolver? Use the warp-cli set-mode command:
~$ warp-cli help set-mode
warp-cli-set-mode

USAGE:
    warp-cli set-mode [mode]

FLAGS:
    -h, --help       Prints help information
    -V, --version    Prints version information

ARGS:
    <mode>     [possible values: warp, doh, warp+doh, dot, warp+dot, proxy]
~$ warp-cli set-mode doh
Success
Protecting yourself against malware with 1.1.1.1 for Families is just as easy, and it can be used with either WARP enabled or in straight DNS mode:
~$ warp-cli set-families-mode --help
warp-cli-set-families-mode

USAGE:
    warp-cli set-families-mode [mode]

FLAGS:
    -h, --help       Prints help information
    -V, --version    Prints version information

ARGS:
    <mode>     [possible values: off, malware, full]
~$ warp-cli set-families-mode malware
Success
A note on Cloudflare for Teams support
Cloudflare for Teams support is on the way, and just like our other clients, it will ship in the same package. Stay tuned for an in-app update or reach out to your Account Executive to be notified when a beta is available.
We need feedback
If you encounter an error, send us feedback with the sudo warp-diag feedback command:
When WARP launched in 2019, one of our primary goals was ease of use. You turn WARP on and all traffic from your device is encrypted to our edge. Through all releases of the client, we’ve kept that as a focus. One big switch to turn on and you are protected.
However, as we’ve grown, so have the requirements for our client. Earlier this year we released split tunnel and local domain fallback as a way for our Cloudflare for Teams customers to exclude certain routes from WARP. Our consumer customers may have noticed this stealthily added in the last release as well. We’ve heard from customers who want to deploy WARP in one additional mode: Single Applications. Today we are also announcing the ability for our customers to run WARP in a local proxy mode in all desktop clients.
When WARP is configured as a local proxy, only the applications that you configure to use the proxy (HTTPS or SOCKS5) will have their traffic sent through WARP. This allows you to pick and choose which traffic is encrypted (for instance, your web browser or a specific app), and everything else will be left open over the Internet.
Because this feature restricts WARP to just applications configured to use the local proxy, leaving all other traffic unencrypted over the Internet by default, we’ve hidden it in the advanced menu. To turn it on:
1. Navigate to Preferences -> Advanced and click the Configure Proxy button.
2. On the dialog that opens, check the box and configure the port you want to listen on.
3. This will enable a new mode you can select from:
To configure your application to use the proxy, you want to specify 127.0.0.1 for the address and the value you specified for a port (40000 by default). For example, if you are using Firefox, the configuration would look like this:
Download today
You can start using these capabilities right now by visiting https://one.one.one.one. We’re super excited to hear your feedback.
The collective thoughts of the interwebz
Manage Consent
To provide the best experiences, we use technologies like cookies to store and/or access device information. Consenting to these technologies will allow us to process data such as browsing behavior or unique IDs on this site. Not consenting or withdrawing consent, may adversely affect certain features and functions.
Functional
Always active
The technical storage or access is strictly necessary for the legitimate purpose of enabling the use of a specific service explicitly requested by the subscriber or user, or for the sole purpose of carrying out the transmission of a communication over an electronic communications network.
Preferences
The technical storage or access is necessary for the legitimate purpose of storing preferences that are not requested by the subscriber or user.
Statistics
The technical storage or access that is used exclusively for statistical purposes.The technical storage or access that is used exclusively for anonymous statistical purposes. Without a subpoena, voluntary compliance on the part of your Internet Service Provider, or additional records from a third party, information stored or retrieved for this purpose alone cannot usually be used to identify you.
Marketing
The technical storage or access is required to create user profiles to send advertising, or to track the user on a website or across several websites for similar marketing purposes.