Tag Archives: Multi-tenant

How to implement multi-tenancy with Amazon Pinpoint

Post Syndicated from Tristan Nguyen original https://aws.amazon.com/blogs/messaging-and-targeting/how-to-implement-multi-tenancy-with-amazon-pinpoint/

Navigating Multi-Tenancy in Amazon Pinpoint

Businesses are constantly evolving, often managing multiple product lines, customer segments, or even geographical locations. Furthermore, many business-to-business (B2B) companies that are Independent Software Vendors (ISVs) will often need to manage their customer’s marketing automation environment. This complexity necessitates a robust customer engagement strategy that can adapt and scale efficiently. However, managing disparate systems for each tenant is not only cumbersome but also resource-intensive, leading to increased operational costs and potential data silos. A multi-tenancy setup in Amazon Pinpoint addresses these challenges head-on, allowing businesses to streamline their customer engagement efforts under a unified architecture.

The question is not just whether to adopt multi-tenancy, but how to implement it in a way that aligns with your unique business requirements. Amazon Pinpoint offers multiple approaches to achieve this. This blog explores three:

  • Single Pinpoint Project: Simple but demands careful permissions management.
  • Multiple Pinpoint Projects: Granular control but limited by soft project quotas.
  • Multiple Account & Multi Pinpoint Projects: Highly scalable but needs comprehensive monitoring.

We’ll delve into the pros, cons, and best use-cases for each as well as how to choose the different multi-tenancy configuration depending on your communications channels needs, guiding you to make an informed architectural decision.

In this blog, we’ll cut through the complexity, helping you align your Amazon Pinpoint architecture with your business goals. Let’s get started.

Single Account / Single Project (SA/SP)

Overview

In a Single Pinpoint Project setup, all customer engagement activities reside within one project and multi-tenancy within this context will leverage customer endpoint attributes. This streamlined approach allows for easy management, especially for those new to Amazon Pinpoint. A configuration example for this case is shown below:

Single Account / Single Project (SA/SP)

When preparing one Pinpoint Project and managing information for multiple tenants, tenant information can be managed by using custom user attributes of endpoints. Also, campaign information can be managed for each tenant by using the tag function for campaign information. The elements required to take this configuration are shown below.

  • S3 buckets that hold customer data:
    • Prepare an S3 bucket to store customer information lists to be imported into Pinpoint. Amazon Pinpoint allows you to import CSV files in S3 as segments. In order to make settings for each tenant in Amazon Pinpoint, we will include tenant information as custom user attributes in the CSV file.
  • 1 Amazon Pinpoint Project:
    • Create 1 Amazon Pinpoint Project.
    • Settings for each channel to be distributed are also required.
    • Campaign information can be assigned to tenant information by using the tag function.
  • Amazon Kinesis:
  • Athena and S3 buckets to analyze event data:
    • Store Amazon Pinpoint event data in S3 and analyze it via Athena. Take advantage of this solution.

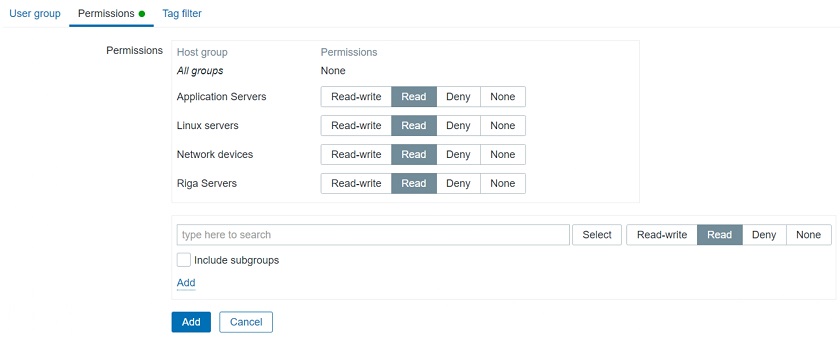
One thing to keep in mind when adopting this configuration is that customer endpoint information exists in the same Pinpoint Project. It is possible to specify values that can be used to identify each tenant, such as custom attributes, and solve the problem with AWS Identity and Access Management (IAM) policies, but it is necessary to manage access rights and attributes on your own.

Also, to add an endpoint, you’ll need to specify its Channel and Address. Take note that one project cannot have the same channel and address for different endpoints. From the above, if the channel and address of the endpoint do not overlap between tenants, it is possible to construct your own access permission control, then this pattern can be examined.

Since fewer components are required compared to other patterns, the configuration is easier to start with. Some customers that want to build on top of Pinpoint API and want to simplify configuration on the Pinpoint side as much as possible can also choose this option. However, this approach can get complex to manage later on as you onboard more tenants. The issue presents itself when you want to create detailed reporting for your tenant in this configuration. You’ll have to have dedicated tags on each campaigns, journeys to operationalize granular reporting for your Amazon Pinpoint project.

Lastly, take note of service limits per Amazon Pinpoint project/AWS account to ensure your use case will be scalable should the need arise.

Single Account / Multiple Projects (SA/MP)

Overview

For this architecture, you are still using a single AWS account to host your Amazon Pinpoint environment, however, you will be creating multiple projects for each customer or tenant. A configuration example for this case is shown diagram.

Single Account / Multiple Projects (SA/MP)

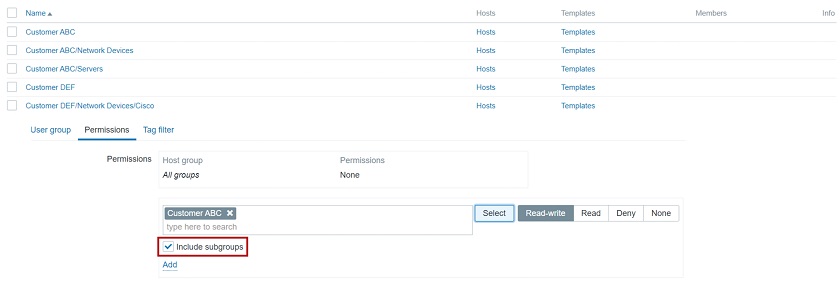
In this example, we will create multiple Amazon Pinpoint Projects. One major difference from the case of the Single Pinpoint Project is that it is possible to completely separate customer endpoint information. When importing customer data segments, it is possible to manage each tenant in a separate state simply by importing them from S3 into the target Pinpoint Project. This makes it easy to control permissions via IAM policies.

Also, with Amazon Pinpoint, you can use email addresses, SMS numbers, message templates, etc. for transmission obtained with the relevant account in common to all projects, and event data for each project can be aggregated via Amazon Kinesis. By adopting such a configuration, you gain the benefits of separating endpoint information per project while still retaining basic setting information management and operator operations.

An example starter solution architecture to set up this configuration are shown below.

  • S3 buckets that hold customer data:
    • Similar to SA/SP, prepare an S3 bucket to store a list of customer information to be imported into Pinpoint. CSV to be imported must be prepared for each project.
  • Amazon DynamoDB Table:
    • Prepare a DynamoDB (or other key-value database) table to manage Pinpoint project information. Tenant information can also be stored as metadata in the DynamoDB table.
  • AWS Lambda:
    • Create a Pinpoint Project using Lambda. Amazon Pinpoint allows you to create and configure projects using the Amazon Pinpoint API, the AWS SDK, or the AWS Command Line Interface (AWS CLI). Thus, it is possible to automate the creation of the Pinpoint project and associated campaigns/journeys. Tenant information is also registered in DynamoDB at the time of creation.
  • Multiple Amazon Pinpoint Projects:
    • This is a Project created by Lambda above. There will now be a Pinpoint Project for each tenant, and endpoint information will be completely separated. It is also easy to control access rights for each project by using the IAM function.
    • Message templates: templates can be created and shared across projects.
    • By using Amazon Pinpoint’s event stream settings, campaign/journeys/app/channels events can be streamed to Amazon Kinesis. Multiple Amazon Pinpoint projects can all stream to one Amazon Kinesis stream. When setup correctly, event data will be tagged with the relevant tenant information so that an analytics solution can decompose the stream later on.
  • Athena and S3 buckets to analyze event data:
    • Amazon Pinpoint event data is stored in Amazon S3 and analyzed via Amazon Athena. The analytics solution, Amazon Athena in this case will be responsible for filtering event data and according to the tenant. Refer to this solution for more details.

Note that Pinpoint projects have a soft limit of 100 projects per AWS account, which can be increased via raising a Support Ticket, other quotas also apply at the project and the account level which should be taken into account.

From the above, it is necessary to note that there are restrictions on quotas per account when using the SA/MP and more initial configurations would be required to automate the process of project creation for individual tenants. However, when compared to SA/SP architecture,

Multiple Accounts & Multi Pinpoint Projects (MA/MP)

Overview

Before diving into the MA/MP approach, it’s crucial to understand the role of AWS Organizations in this configuration. AWS Organizations allows you to consolidate multiple AWS accounts into an organization to achieve centralized governance and billing. This feature is particularly useful in a MA/MP setup, as it enables streamlined management of multiple AWS accounts and Amazon Pinpoint projects from a single central management AWS account. For more information on AWS Organizations, you can visit the official AWS Organizations documentation.

In an MA/MP setup, we utilize separate AWS Accounts for each customer or tenant. A configuration example for this case is shown below.

In this example, we have created a Management account and prepared multiple AWS accounts under it. The management account manages the AWS account ID and the Pinpoint project ID, and has a configuration created with Lambda. Customer data and Event Stream Data are managed through a Management account, and information on each project is aggregated. A major benefit of this configuration is the ability to segregate actions of individual tenants, preventing the such as noisy neighbours antipattern. It also enables AWS accounts from being freed from quota restrictions that cannot be handled by a single AWS account. Additionally, Amazon Pinpoint has excellent CloudFormation coverage, and it is also possible to deploy highly reproducible architectures automatically.

The elements required to set up this configuration are shown below.

  • AWS Organizations:
    • Set up Organizations to manage multiple accounts. See Best Practices for setting up multiple accounts.
  • Management account:
    • Create an account to manage multiple account information. Here we will set the following elements. Use IAM roles and Service control policies (SCPs) when manipulating resources across accounts. This allows cross-account access. The required elements are the same as the SA/MP described above.
      • S3 buckets that hold customer data: With AWS, you can utilize S3 data across accounts. Set up cross-account settings and securely link customer data to each account.
      • Dynamo DB Table: Holds your AWS account ID, Pinpoint Project ID, and management information associated with it.
      • AWS Lambda: Create a Pinpoint project using Lambda.
      • Athena and S3 buckets to analyze event data: Event information from multiple accounts and Pinpoint projects is aggregated and analyzed.
  • AWS accounts and Pinpoint projects per tenant:
    • Depending on how tenants are separated, prepare an AWS account and Pinpoint Project. You can also consider automating account creation by using AWS CloudFormation.
    • There are cases where it is necessary to set the distribution channel email address, SMS number, etc. for each account. See the next section for details.
    • Amazon Kinesis is prepared for each account, but everything is stored in the same S3 in the Management account for easier bird-eye’s view reporting.

One thing to keep in mind is that since accounts are separated, it becomes necessary to manage each one separately. For example, newly created account will be placed in the sandbox state, and an application for actual use via support tickets is required for each account. Also, since all reputation is done on a single account, it is also necessary to monitor reputation for each account.

Navigating Channels in Amazon Pinpoint: Aligning Service Delivery with Architecture

Beyond choosing a Pinpoint architecture for multi-tenancy, it’s pivotal to decide which channels best deliver your services and how that decision is affected by your choice of multi-tenancy architecture. Below is a non-exhaustive lists of capabilities in Amazon Pinpoint that will help with your multi-channel, multi-tenancy configurations as well as potential blockers that you’d need to be aware of for each channels.

Email

Email is one of the most versatile channels, with integration with Amazon SES’s configuration sets and email suppression list capability, easily fitting into any of the three multi-tenancy models.

  • Configurations Sets: Using configuration sets, you’d be able to segregate your email sending activities using different IP Pools, as well as different event destinations.
    • You can use configuration sets in both Amazon Pinpoint and Amazon SES. Configuration sets rules that you configure in Amazon SES are also applied to email messages that you send using Amazon Pinpoint.
    • SA/SP and SA/MP: Email templates and sending IP addresses needs to be tagged using configuration sets for each tenant in the Pinpoint project.
    • MA/MP: Email templates and sending IP address can be sent using the account default, or follow granular tagging using configuration sets.
  • Email Suppression List: Suppression list is managed automatically at the account level. Alternatively, you can specify whether a specific configuration can override the account-level suppression list.
    • SA/SP and SA/MP:
      • All tenants will also follow the same account suppression list:
        • If any tenant sends to an email address that hard-bounced or complaint, all other tenants will also be unable to send emails to the same address.
        • You will have to manually override the account-level suppression list for each email addresses.
    • MA/MP:
      • If one of your tenant sends an email to a hard-bounced or complaint address, only the AWS account that the tenant belongs to will respect the suppression list i.e. other tenants in other AWS account can still send email to that email address.
  • Noisy Neighbour Threat: Broadly, this occurs when one tenant’s performance is degraded because of the activities of another tenant. Applied to email, the anti-pattern needs to be addressed because you don’t want one bad actor tenant to affect the entire environment’s email sending activity.
    • SA/SP and SA/MP:
      • Because email bounce and complaint rates are tracked at the account level, it is possible your entire account email sending domain to be blocked due to high bounce/complaint incidences from one bad tenant.
      • To mitigate this, it’s best practice to set up dedicated configuration sets and alarms to alert when any individual tenant is exhibiting high bounce/complaint rate.
    • MA/MP:
      • Offers the most segregation and ensure email identities/domains are only usable by one tenant/account.
  • Email Sending Quota:
    • Email daily sending quota and email sending rate live at the account level.
    • SA/SP and SA/MP:
      • You would need to anticipate the total daily sending quota and sending rate for all tenants in your AWS account and raise the service limits accordingly. Therefore, more planning will be involved to estimate the correct service limit threshold.
    • MA/MP:
      • You can raise service limits per individual tenant’s needs since each tenant will be on a separate AWS account.
      • It is best practice to have business process in place for individual tenant to notify of their email sending quota request in advance so that it can be raised accordingly for their AWS account.
  • For further discussion into sending emails in a multi-tenancy environment, refer to this AWS blog on Multi-Tenancy in SES.

SMS

  • Origination Identity procurement: When opting for MA/MP setup, remember that OIDs (phone numbers) are bound to AWS accounts.
  • Since OIDs do not carry across account, you will need to repeat the procurement process for every new AWS account.Number Pooling: This feature groups phone numbers or sender IDs. It’s particularly useful in a Single Project model to segment communications per tenant.
  • Configuration Sets: With the release of the V2 SMS and Voice API, you can now use configuration sets to manage your SMS opt-out lists, OIDs and event streaming destinations for a multi-tenant environment.
  • Noisy Neighbour Threat:
    • SA/SP and SA/MP:
      • Take note that if you do not specify an OID in your API call, Amazon Pinpoint will attempt to use the most suitable (in terms of throughput and deliverability) OID to send your SMS. This
      • Similar to email, you can leverage number pooling and configuration sets to segregate SMS sending activity within a single account. This helps protect’s your SMS OID reputation because it can be costly and time-consuming to request new OIDs.
    • MA/MP:
      • Offers the most segregation and ensure numbers are only usable by one tenant/account.
  • SMS Opt Outs: Similar to the email channel’s suppression list, opt-outs are managed per account and configuration sets. Therefore, in a MA/MP setup, a customer that has opted out from communication in one account can still receive communications from other accounts.

Push Notifications

Amazon Pinpoint integrates with various push services like FCM, APNS, Baidu Cloud Push, and ADM.

  • Project-level Authentication: Authentication information is set at the Pinpoint Project level, requiring separate management.
    • Therefore, you will not be able to use the SA/SP architecture for multiple tenants using different applications.
  • For more information, refer to the Mobile Push Guide

In-app Messages

  • Pinpoint Project Specific: Similar to push notifications, each Pinpoint Project can only house one in-app message application.
    • If you have multiple applications requiring in-app messages, you will not be able to employ the SA/SP architecture.
  • For more information, refer to the In-app Channel Documentation.

Custom Channels

  • Custom channels in Amazon Pinpoint allow you to send messages through any service that has an API, including third-party services. You can interact with APIs by using a webhook, or by calling an AWS Lambda function.If you are using custom channels extensively from Amazon Pinpoint, you’ll need to be aware of service limits in AWS Lambda, , especially if you’re considering SA/SP or SA/MP architectures.

Conclusion

In this blog, we’ve untangled the intricacies of implementing multi-tenancy in Amazon Pinpoint. Our deep dive covered three architectural patterns:

  • Single Account/Single Project (SA/SP): A beginner-friendly approach offering simple management but requiring meticulous permissions handling to segregate sending activity between different tenants.
  • Single Account/Multiple Projects (SA/MP): Offers granular control over customer data with slight increased in management complexity. However, this approach faces soft quotas and potential ‘Noisy Neighbor’ issues.
  • Multiple Accounts/Multiple Projects (MA/MP): Provides the most flexibility and isolation, albeit with increased management complexity.

Each approach comes with its own set of trade-offs related to ease of management/reporting, scalability, and control over customer data. Our discussion didn’t stop at architecture; we also examined how your multi-tenancy decisions will affect your channel configurations in Amazon Pinpoint. From email and SMS to push notifications, the architectural choices you make will have a direct impact on how efficiently you can manage these distribution channels. Armed with this information, you’re now better equipped to make informed decisions that align with your business objectives.

Call to Action

Your next step? Implement and architect your Amazon Pinpoint environment. Use the best practices and architectural guidelines outlined in this blog post as your north star. Going forward, the architectural blueprint you choose should be tailored to your specific needs—be it user count, company size, or distribution channels. Take into account not just the initial setup but also the long-term management aspects, including the respective service limits and quotas.

Relevant Links

About the Authors

Tristan (Tri) Nguyen

Tristan (Tri) Nguyen

Tristan (Tri) Nguyen is an Amazon Pinpoint and Amazon Simple Email Service Specialist Solutions Architect at AWS. At work, he specializes in technical implementation of communications services in enterprise systems and architecture/solutions design. In his spare time, he enjoys chess, rock climbing, hiking and triathlon.

Tatsuya Nakamura

Tatsuya Nakamura

Nakamura Tatsuya is a Solutions Architect in charge of enterprise companies at AWS. He is mainly in charge of the trading company industry and the distribution/retail industry, also supporting the implementation of Amazon Pinpoint for Japanese customers. His career so far includes ERP implementation support and multiple new web service launches.

How to implement multi tenancy with Amazon SES

Post Syndicated from satyaso original https://aws.amazon.com/blogs/messaging-and-targeting/how-to-manage-email-sending-for-multiple-end-customers-using-amazon-ses/

In this blog post, you will learn how to design multi-tenancy with Amazon SES, as well as the fundamental best practices for implementing a multi-tenant architecture that can effectively handle bulk the email sending needs of your downstream customers.

Amazon Simple Email Service (SES) is utilized by customers across various industries to send emails to their recipients. Often, they need to send emails on behalf of their downstream customers or for other business divisions. Organizations commonly refer to these use cases as “multi-tenant email sending practices. To implement email sending multi-tenancy practices (i.e. to send bulk emails on behalf of end customers), Amazon SES customers need to adopt an architecture that enables them to effectively meet the email sending needs of thousands of downstream customers while also ensuring that the email sending reputation of each customer or the tenant is isolated.

Use cases

  1. Onboard multiple brands from different Business units (BUs) with different domains.
  2. Separate marketing and transaction tenants.
  3. ISV Customer’s requirement to segregate email sending reputation of their end customers.
  4. Domain management via configuration sets.
  5. Track individual customer’s email sending repurataion and control their email sending process.

Prerequisites

For this post, you should be familiar with the following:

Solution Overview

In the email ecosystem, domain and IP reputation are critical in getting emails delivered to the inbox. Tenants in a multi-tenant scenario might be unique businesses or an internal team (eg marketing team, customer service team and so on). Because the maturity of each tenant varies greatly, implementing a multi-tenant environment may be increasingly complicated and difficult. While one tenant may have a well-validated and highly-engaged recipient list, another tenant may have an untrusted email recipient list, and sending emails to such email addresses may result in bounces or spam, lowering the IP and domain reputation. So, organizations have to build safe guards to prevent an unsophisticated sender or a bad actor from impacting the other tenants.

To better understand multi-tenancy, let us first look at how Amazon SES sends emails. Any emails sent via Amazon SES to end users are sent using IP addresses that have been mapped within Amazon SES. Amazon SES offers two types of IP addresses: shared IP addresses and dedicated IP addresses. (Currently Amazon SES offers two kinds of dedicated IPs, which are 1/ Standard dedicated IPs, 2/ Managed dedicated IPs). Shared IPs are shared across many SES customers, and all your emails are sent using shared IP addresses by default unless you have requested for dedicated IPs. Dedicated IP addresses/addresses are designated for a single customer or tenant, where the tenant might be a business unit within the customer’s own eco system or a downstream customer of an ISV.

If a customer is using shared IPs to send email via SES and trying to achieve multi tenancy, then they can do so to segregate the business functions of multiple tenants such as tenant tagging, SES event destination routing, cost allocation for each tenant, and so on; but it won’t help to manage or isolate email sending reputation from one tenant to another. This is because; these shared IPs are mapped to an AWS region and incase one rogue tenant is trying to send spam emails then it will impact other customers in the same region who are using same set of shared IPs.

If you are an Amazon SES user and wish to separate the reputation of one end-customer from another then dedicated IPs are the ideal solution. Dedicated IP or Dedicated IPs (also known as dedicated IP pool) can be assigned to a tenant, and the email sending reputation for that tenant can be readily isolated from that of another tenant. If tenant one is a problematic sender and internet service providers (ISPs) such as Gmail, Hotmail, Yahoo and, so on, flags the respective domain or IPs, the reputation of the other tenants’ domains and IPs are unaffected since they are mutually exclusive.

Amazon SES supports multi-tenancy primarily through two constructs: 1/configuration sets, 2/Dedicate IP pools. Configuration sets are setup rules that are applicable to your verified identities, whereas  dedicated IP pool is to group dedicated IPs into a pool, which can then be mapped to a configuration set, such that the respective Identity/Identities may only utilize the same IP Pool without affecting other tenants. Let’s now witness a simplified architecture view.

Amazon SES multi tenancy using a single AWS account

Multi tenancy using a single AWS account

In this architecture, if you notice tenant 1, tenant 2 and tenant 3 are using the distinct configurations with respective dedicated IPs while tenant 4 is using shared IPs. i.e. the tenants can chose which configuration sets needs to be used for their domain. This provides customers capability to achieve multi tenancy.

Amazon SES multi tenancy – best practices

Always proactively reach out to your account team or raise a support case under “service limit increase” category informing that you will be sending on behalf of tens of thousands of customers. This will help AWS in rightly setup limits within your account and be cognizant of your sending patterns.

While the architecture described above will most of the time help Amazon SES users manage multiple end customers effectively, in rare cases; Amazon SES users may receive a notification from AWS support stating that their Amazon SES account is being reviewed. This indicates that your Amazon SES account is being used to send problematic email to end recipients, or that the account has been paused (if you haven’t reacted proactively upon controlling the faulty senders within the review timeframe), which means you can’t send email from your SES account because your spam or complaint rate has exceeded a certain threshold. These type of situations occurs because, Amazon SES sanitization process is implemented at the AWS account level by default. So, even if any of the tenants using a dedicated IP or a dedicated IP pool and their spam or complaint rates exceed the approved SES limit, Amazon SES sends a notification to the account admin, flagging the concern in their account. In such cases, it is recommended to implement a process known as “automatically pausing email sending for a configuration set“. You can configure Amazon SES to export reputation metrics that are specific to emails that are sent using a specific configuration set to Amazon CloudWatch. You can then use these metrics to create CloudWatch alarms that are specific to those configuration sets. When these alarms exceed certain thresholds, you can automatically pause the sending of emails that use the specified configuration sets, without impacting the overall email sending capabilities of your Amazon SES account.

If you are an Enterprise ISV customer and you have tens of thousands of downstream customers then there is a possibility that you will hit Amazon SES provided maximum quota. In those scenarios you have two options; 1/ Ask for an exception for your AWS SES account – In this approach, you need to request AWS to increase your quota applicable for the existing account to a higher threshold and depending upon your previous usage and reputation AWS shall increase your account limit to accommodate more customers/tenants. To do this you need to raise an AWS support case under “service limit increase” and present your requirement on why you want to increase your Amazon SES account quota to a higher limit. There is no guaranty that the exception will always be granted. If your exception request is denied, you must proceed to the second option, which is to 2/ segment your customers across multiple AWS accounts. In this approach, you must calculate your customer base ahead of time and distribute your downstream customers across multiple accounts within the same AWS region in order to set up their email sending mechanism using SES. To better understand option 2, refer to the architecture diagram below.

Amazon SES multi tenancy using multiple AWS account

Multi tenancy using multiple AWS account

In the above architecture various tenants are connecting to Amazon SES in different AWS accounts to implement multi tenancy. Email event responses can be taken back to a central data lake located in the same AWS region or in different region. Furthermore, as shown in the diagram above, all AWS accounts mapped to different tenants are under a Parent AWS account; this hierarchical structure is known as AWS Organizations. it is recommended to use AWS Organizations which enables you to consolidate multiple AWS accounts into an organization that you create and centrally manage. It helps in security and compliance guide lines, managing consolidated billing for all the child accounts.

Conclusion

Appropriate multi-tenancy implementation within Amazon SES not only helps you manage end-customer reputation but also aids in tracking usage of each user independently from one another. In this post, we have showcased how Amazon SES users can utilize Amazon SES to manage large number of end customer, what are the design best practices to implement multi-tenant architecture with Amazon SES.


Satyasovan Tripathy works at Amazon Web Services as a Senior Specialist Solution Architect. He is based in Bengaluru, India, and specialises on the AWS customer developer service product portfolio. He likes reading and travelling outside of work.


Performance isolation in a multi-tenant database environment

Post Syndicated from Justin Kwan original https://blog.cloudflare.com/performance-isolation-in-a-multi-tenant-database-environment/

Performance isolation in a multi-tenant database environment

Performance isolation in a multi-tenant database environment

Operating at Cloudflare scale means that across the technology stack we spend a great deal of time handling different load conditions. In this blog post we talk about how we solved performance difficulties with our Postgres clusters. These clusters support a large number of tenants and highly variable load conditions leading to the need to isolate activity to prevent tenants taking too much time from others. Welcome to real-world, large database cluster management!

As an intern at Cloudflare I got to work on improving how our database clusters behave under load and open source the resulting code.

Cloudflare operates production Postgres clusters across multiple regions in data centers. Some of our earliest service offerings, such as our DNS Resolver, Firewall, and DDoS Protection, depend on our Postgres clusters’ high availability for OLTP workloads. The high availability cluster manager, Stolon, is employed across all clusters to independently control and replicate data across Postgres instances and elect Postgres leaders and failover under high load scenarios.

PgBouncer and HAProxy act as the gateway layer in each cluster. Each tenant acquires client-side connections from PgBouncer instead of Postgres directly. PgBouncer holds a pool of maximum server-side connections to Postgres, allocating those across multiple tenants to prevent Postgres connection starvation. From here, PgBouncer forwards queries to HAProxy, which load balances across Postgres primary and read replicas.

Problem

Our multi-tenant Postgres instances operate on bare metal servers in non-containerized environments. Each backend application service is considered a single tenant, where they may use one of multiple Postgres roles. Due to each cluster serving multiple tenants, all tenants share and contend for available system resources such as CPU time, memory, disk IO on each cluster machine, as well as finite database resources such as server-side Postgres connections and table locks. Each tenant has a unique workload that varies in system level resource consumption, making it impossible to enforce throttling using a global value.

This has become problematic in production affecting neighboring tenants:

  • Throughput. A tenant may issue a burst of transactions, starving shared resources from other tenants and degrading their performance.
  • Latency: A single tenant may issue very long or expensive queries, often concurrently, such as large table scans for ETL extraction or queries with lengthy table locks.

Both of these scenarios can result in degraded query execution for neighboring tenants. Their transactions may hang or take significantly longer to execute (higher latency) due to either reduced CPU share time, or slower disk IO operations due to many seeks from misbehaving tenant(s). Moreover, other tenants may be blocked from acquiring database connections from the database proxy level (PgBouncer) due to existing ones being held during long and expensive queries.

Previous solution

When database cluster load significantly increases, finding which tenants are responsible is the first challenge. Some techniques include searching through all tenants’ previous queries under typical system load and determining whether any new expensive queries have been introduced under the Postgres’ pg_stat_activity view.

Database concurrency throttling

Once the misbehaving tenants are identified, Postgres server-side connection limits are manually enforced using the Postgres query.

ALTER USER "some_bad-user" WITH CONNECTION LIMIT 123;

This essentially restricts or “squeezes” the concurrent throughput for a single user, where each tenant will only be able to exhaust their share of connections.

Manual concurrency (connection) throttling has shown improvements in shedding load in Postgres during high production workloads:

Performance isolation in a multi-tenant database environment

While we have seen success with this approach, it is not perfect and is horribly manual. It also suffers from the following:

  • Postgres does not immediately kill existing tenant connections when a new user limit is set; the user may continue to issue bursty or expensive queries.
  • Tenants may still issue very expensive, resource intensive queries (affecting neighboring tenants) even if their concurrency (connection pool size) is reduced.
  • Manually applying connection limits against a misbehaving tenant is toil; an SRE could be paged to physically apply the new limit at any time of the day.
  • Manually analyzing and detecting misbehaving tenants based on queries can be time-consuming and stressful especially during an incident, requiring production SQL analysis experience.
  • Additionally, applying new throttling limits per user/pool, such as the allocated connection count, can be arbitrary and experimental while requiring extensive understanding of tenant workloads.
  • Oftentimes, Postgres may be under so much load that it begins to hang (CPU starvation). SREs may be unable to manually throttle tenants through native interfaces once a high load situation occurs.

New solution

Gateway concurrency throttling

Typically, the system level resource consumption of a query is difficult to control and isolate once submitted to the server or database system for execution. However, a common approach is to intercept and throttle connections or queries at the gateway layer, controlling per user/pool traffic characteristics based on system resource consumption.

We have implemented connection throttling at our database proxy server/connection pooler, PgBouncer. Previously, PgBouncer’s user level connection limits would not kill existing connections, but only prevent exceeding it. We now support the ability to throttle and kill existing connections owned by each user or each user’s connection pool statically via configuration or at runtime via new administrative commands.

PgBouncer Configuration
[users]
dns_service_user = max_user_connections=60
firewall_service_user = max_user_connections=80
[pools]
user1.database1 = pool_size=90
PgBouncer Runtime Commands
SET USER dns_service_user = ‘max_user_connections=40’;
SET POOL dns_service_user.dns_db = ‘pool_size=30’;

This required major bug fixes, refactoring and implementation work in our fork of PgBouncer. We’ve also raised multiple pull requests to contribute all of our features to PgBouncer open source. To read about all of our work in PgBouncer, read this blog.

These new features now allow for faster and more granular “load shedding” against a misbehaving tenant’s concurrency (connection pool, user and database pair), while enabling stricter performance isolation.

Future solutions

We are continuing to build infrastructure components that monitor per-tenant resource consumption and detect which tenants are misbehaving based on system resource indicators against historical baselines. We aim to automate connection and query throttling against tenants using these new administrative commands.

We are also experimenting with various automated approaches to enforce strict tenant performance isolation.

Congestion avoidance

An adaptation of the TCP Vegas congestion avoidance algorithm can be employed to adaptively estimate and enforce each tenant’s optimal concurrency while still maintaining low latency and high throughput for neighboring tenants. This approach does not require resource consumption profiling, manual threshold tuning, knowledge of underlying system hardware, or expensive computation.

Traditionally, TCP Vegas converges to the initially unknown and optimal congestion window (max packets that can be sent concurrently). In the same spirit, we can treat the unknown congestion window as the optimal concurrency or connection pool size for database queries. At the gateway layer, PgBouncer, each tenant will begin with a small connection pool size, while we dynamically sample each tenant’s transaction’s round trip time (RTT) against Postgres. We gradually increase the connection pool size (congestion window) of a tenant so long as their transaction RTTs do not deteriorate.

Performance isolation in a multi-tenant database environment

When a tenant’s sampled transaction latency increases, the formula’s minimum by sampled request latency ratio will decrease, naturally reducing the tenant’s available concurrency which reduces database load.

Performance isolation in a multi-tenant database environment

Essentially, this algorithm will “back off” when observing high query latencies as the indicator of high database load, regardless of whether the latency is due to CPU time or disk/network IO blocking, etc. This formula will converge to find the optimal concurrency limit (connection pool size) since the latency ratio always converges to 0 with sufficiently large sample request latencies. The square root of the current tenant pool size is chosen as a constant request “burst” headroom because of its fast growth and being relatively large for small pool sizes (when latencies are low) but converges when the pool size is reduced (when latencies are high).

Rather than reactively shedding load, congestion avoidance preventatively or “smoothly” throttles traffic before load induced performance degradation becomes an issue. This algorithm aims to prevent database server resource starvation which causes other queries to hang.

Theoretically, if one tenant misbehaves and causes load induced latency for others, this TCP congestion algorithm may incorrectly blindly throttle all tenants. Hence why it may be necessary to apply this adaptive throttling only against tenants with high CPU to latency correlation when the system performance is degrading.

Tenant resource quotas

Configurable resource quotas can be introduced per each tenant. Upstream application service tenants are restricted to their allocated share of resources expressed as CPU % utilized per second and max memory. If a tenant overuses their share, the database gateway (PgBouncer) should throttle their concurrency, queries per second and ingress bytes to force consumption within their allocated slice.

Resource throttling a tenant must not “spillover” or affect other tenants accessing the same cluster. This could otherwise reduce the availability of other customer-facing applications and violate SLO (service-level objectives). Resource restriction must be isolated to each tenant.

If traffic is low against Postgres instances, tenants should be permitted to exceed their allocation limit. However, when load against the cluster degrades the entire performance of the system (latency), the tenant’s limit must be re-enforced at the gateway layer, PgBouncer. We can make deductions around the health of the entire database server based on indicators such as average query latency’s rate of change against a predefined threshold. All tenants should agree that a surplus in resource consumption may result in query throttling of any pattern.

Each tenant has a unique and variable workload, which may degrade multi tenant performance at any time. Quick detection requires profiling the baseline resource consumption of each tenant’s (or tenant’s connection pooled) workload against each local Postgres server (backend pids) in near real-time. From here, we can correlate the “baseline” traffic characteristics with system level resource consumption per database instance.

Taking an average or generalizing statistical measures across distributed nodes (each tenant’s resource consumption on Postgres instances in this case) can be inaccurate due to high variance in traffic against leader vs replica instances. This would lead to faulty throttling decisions applied against users. For instance, we should not throttle a user’s concurrency on an idle read replica even if the user consumes excessive resources on the primary database instance. It is preferable to capture tenant consumption on a per Postgres instance level, and enforce throttling per instance rather than across the entire cluster.

Multivariable regression can be employed to model the relationship between independent variables (concurrency, queries per second, ingested bytes) against the dependent variables (system level resource consumption). We can calculate and enforce the optimal independent variables per tenant under high load scenarios. To account for workload changes, regression adaptability vs accuracy will need to be tuned by adjusting the sliding window size (amount of time to retain profiled data points) when capturing workload consumption.

Gateway query queuing

User queries can be prioritized for submission to Postgres at the gateway layer (PgBouncer). Within a one or multiple global priority queues, query submissions by all tenants are ordered based on the current resource consumption of the tenant’s connection pool or the tenant itself. Alternatively, ordering can be based on each query’s historical resource consumption, where each query is independently profiled. Based on changes in tenant resource consumption captured from each Postgres instance’s server, all queued queries can be reordered every time the scheduler forwards a query to be submitted.

To prevent priority queue starvation (one tenant’s query is at the end of the queue and is never executed), the gateway level query queuing can be configured to only enable when there is peak load/traffic against the Postgres instance. Or, the time of enqueueing a query can be factored into the priority ordering.

Performance isolation in a multi-tenant database environment

This approach would isolate tenant performance by allowing non-offending tenants to continue reserving connections and executing queries (such as critical health monitoring queries). Higher latency would only be observed from the tenants that are utilizing more resources (from many/expensive transactions). This approach is straightforward to understand, generic in application (can queue transactions based on other input metrics), and non-destructive as it does not kill client/server connections, and should only drop queries when the in-memory priority queue reaches capacity.

Conclusion

Performance isolation in our multi-tenant storage environment continues to be a very interesting challenge that touches areas including OS resource management, database internals, queueing theory, congestion algorithms and even statistics. We’d love to hear how the community has tackled the “noisy neighbor” problem by isolating tenant performance at scale!

Deploying and configuring Zabbix 5.4 in a multi-tenant environment

Post Syndicated from Arturs Lontons original https://blog.zabbix.com/deploying-and-configuring-zabbix-5-4-in-a-multi-tenant-environment/15109/

In this post and the video, we will discuss deploying and configuring Zabbix 5.4 in a multi-tenant environment and how Zabbix is finally ready for real multi-tenant use cases thanks to multiple features.

Contents

I. Monitoring requirements of multi-tenant environments (0:30)
II. Supported monitoring approaches (2:32)

III. Zabbix and multi-tenant environment (5:56)

IV. To-do list (21:36)
V. Questions & Answers (23:32)

Monitoring requirements of multi-tenant environments

Before talking Zabbix, let us first analyze the core requirements behind multi-tenant environments. Such environments can be quite complex with a particular set of prerequisites that we have to be sure we can satisfy before continuing further.

  • The core idea behind multi-tenancy is support for multiple customers. Therefore we need to support granular role/permission schema. The ability to define different roles for different customers and limit what they can access is key to success for such deployments.
  • Multiple customers means a lot of data. No matter if we’re talking about a single Zabbix instance or scaling by deploying multiple Zabbix instances (say, for different regions) we need to have the ability to process large amounts of data. 
  • On top of that, we must be able to scale upwards, ideally – both horizontally and vertically. More customers, different requirements, varying amounts of data to process – all of this needs to be accounted for in advance.
  • Redundancy is another key factor for us. As service providers, we absolutely cannot afford any downtime or data loss. While this may be acceptable in our own home labs or classrooms, this is not the case here. Unscheduled downtime could potentially result in a loss of a customer.

Supported monitoring approaches

Now that we have covered the architectural requirements, let’s focus on data collection. No matter the monitoring solution, the easiest approach in most cases would simply be to tell our customer to deploy an agent and be done with it. Unfortunately, this often doesn’t sit will with the end user and their security team. Let us also not forget that it is simply not possible to deploy an agent on some devices or environments – what then? Having a vast selection of monitoring methods is key for successful deployment of a multi-tenant monitoring service.

Let us take a look at this in the context of Zabbix.

Agent

  • With Zabbix agents we can obtain data in two ways – in passive (polling) and active modes (trapping). This is extremely useful while working with multiple customers, since each of them will have different internal network security policies. I have personally seen cases where only one of these approaches is supported, while the other is restricted by the security policies.
  • Agents also support deployment on different platforms (Windows, Unix, etc.), as well as execution of external third-party scripts either by way of User parameters or system.run item key.
  • Active agents are also capable of reading log files and event logs on Windows environments. This can be extremely useful, since many applications, even in-house ones, can provide a lot of monitoring data by logging it.

Agent-supported deployment on various platforms


Since we need to stay flexible, there are many other monitoring approaches supported by Zabbix that we can utilize:

  • SNMP, HTTP, IPMI and SSH agentless monitoring.
  • Simple checks (ICMP pings, port statuses).
  • Database and Java application monitoring.
  • External scripts (executed by the Zabbix server, Zabbix proxy or Zabbix agent).
  • Aggregations and calculations of existing data.
  • VMware monitoring and integration.
  • Web monitoring by creating web scenarios.
  • Synthetic monitoring for simulating real life user transactions.

Latest improvements

Why are we putting emphasis on multi tenancy just now? The reason is a couple of great features added in the last few releases. These features can finally allow us to utilize Zabbix in a truly multitenant environment:

Added in Zabbix 5.2:

  • Ability to create customizable user roles based on user types;
  • Secrets can now be stored in an, highly secure external vault;
  • Improvements in configuring frontend were also added. For example, each user can now select their time zone for frontend data display. This will be relevant for users in different geographical locations.

Added in Zabbix 5.4:

  • Users now have the ability to send scheduled reports. This is extremely useful for customers who may wish to receive scheduled reports about their environments. Now, instead of utilizing third-party scripts to export data and generate reports, you can use the native Zabbix functionality.
  • Major performance improvements have also been added, especially for really large instances with tens of thousands of new incoming values per second.

Zabbix and multi-tenant environment

How do we use Zabbix in a multi-tenant environment? Essentially, we provide Zabbix as a service. We use the Zabbix monitoring tool to monitor our clients (ABC and BCD in the image). We monitor their network traffic, their operating system statistics, application statistics, log files, etc. For each tenant, these monitoring requirements are going to be different.

Multi-tenant environment

Zabbix proxy

Multi-tenancy would not be possible without Zabbix proxies. With Zabbix proxies we can deploy them in customer offices, data centers, organization branches and collect data locally. Since proxies also perform preprocessing, we can even utilize them to transform and normalize metrics or even discard some of the collected metrics before forwarding them to the central Zabbix backend server.

  • Proxies are capable of performing preprocessing ever since Zabbix version 5.0. This allows us to normalize and transform data, for example – change our textual data to numeric data, use throttling and other pre-processing approaches. Even custom JavaScript is supported nowadays to format or normalize the data before we send it to our central Zabbix backend server. So, instead of the server being responsible for all of the preprocessing and having quite a large preprocessing overhead, now the proxy can do it and then forward the data to the server.
  • In addition, on the proxy, the data gets compressed before forwarding to the server thus saving some network traffic overhead.
  • The proxy still continues collecting data and storing it in its own database even in case of a network outage on the customer’s site.
  • Once we collect the data by the proxy, it gets sent to the server via a single connection, which is a lot more feasible from the network security perspective. In this case we need to create only a single firewall rule as opposed to a wide array of rules if we were to monitor the customer’s site directly from the central Zabbix backend server.
  • We can execute remote scripts on the proxy.
  • We can also deploy multiple proxies to improve scalability. If a single proxy cannot handle the amount of data that we are gathering or preprocessing, we can always deploy an extra proxy. They are easy to deploy, and can even use out-of-the-box SQLite databases.

Passive and active proxies

With proxies can also select the direction of the connection. We can deploy passive proxies, which get polled by the Zabbix backend server. In that case, the Zabbix server pulls the data from the proxy. In this scenario the Zabbix server is the one responsible for establishing the connection to the proxy. This adds a minor performance overhead to the Zabbix backend server. On the other hand, we can also deploy active proxies, where we remove that overhead from the server and proxy sends the data autonomously to the server.

At the end of the day, similar to how it goes with agent requirements, the proxy mode will depend on the security policies of the customer. Don’t forget that we aren’t restricted to a single type of proxy –  we can have both of these proxy types running at the same time.

Selecting the connection direction

Data preprocessing — throttling

Preprocessing can help us not only normalize our data, but we can also utilize it to save up on storage and performance overhead, which is vital in large environments.

When monitoring a service or an application state, we are going to be obtaining discrete values such as 1, 2, or 3, or any number. These numbers have a tendency to repeat – if our server stays up, we are going to continue receiving a number which represents “Up”. By using the preprocessing method called throttling, we can decrease the amount of these numbers stored by discarding repeating values. Only status changes are stored, therefore we can potentially save some database space and remove unneeded data processing overhead.

Discarding unchanged values


At this point in time, this feature sees more and more usage in many Zabbix environments, though it was severely underutilized initially when Zabbix 5.0 came out. So, if you aren’t using throttling yet and you’re running on 5.0 or newer, I definitely suggest trying to implement it to some extent. It is available in Preprocessing section of the item configuration.

Permissions

Robust permission design is essential to a multi-tenant environment. Even though permission logic has seen an addition of roles, the user group to host group relations haven’t been abandoned and still play vital role in overall permission schema.

With roles we still have to utilize the three user types – Users, Admin, and Super admins.

User role overview

Here you can see the user role and the UI elements the user has access to together with API restrictions and the actions the user can perform.

Roles grant the ability to configure access to specific UI elements, actions and restrict API calls in a granular fashion. So, when you’re configuring a role, you will see a screen similar to the one below:

Configuring user roles

User roles

Here you can select User type. The user type restrictions still apply. Users can get access only to Monitoring and Inventory, Admins can get access to except the Administration section, and Super admins can get access to every section, including Administration.

With roles we can further restrict these user types. You can have Super admins with some limitations, so that they could only do specific actions and access specific UI sections.

This option has two core benefits. The first one is security as we can limit what our customers can do and what they can access. The other benefit is in the UX, as we can simplify the UI for our users, especially people not experienced with Zabbix. We can restrict the visibility of the sections that the end users don’t have access to, so they will not be concerned with navigating through multiple sections and subsections that they are not familiar with.

User groups

We still have user groups and user groups to host groups relations, which we have to take into consideration. Access to hosts is defined on User groups. So, we have to define our user groups and assign Full/Read only/Deny permissions on particular host groups. This is how we limit what specific customers can access.

User groups

In addition, we can have host groups defined in a hierarchical manner. For instance, if you have two customers each of then having a “Network Devices” subgroup, we can select to include the root group and all of its subgroups when assigning user group to host group permissions. This is a really elegant and quick way to give a User or an Admin on the customer’s side access to all of their hosts or limit a specific organizational unit to only access what they need, e.g.: only permit access to network devices for network administrators.

Using group hierarchy

High availability

The next important decision is the HA implementation. Going without some sort of HA solution is simply too risky and therefore is not an option with such environments.

  • HA can be used to minimize downtime and add redundancy.
  • Zabbix supporst Linux HA tools – PCS, Corosync, Pacemaker, which are used to enable HA. You are also welcome to try and use other third-party tools for HA.
  • Out-of-the-box HA is planned for Zabbix 6.0.

HA setup

To achieve a quorum in our HA environment, we will require an odd number of nodes. For Zabbix backend HA it is very much recommended to have at least three nodes. Does that mean that you have to deploy 3 Zabbix servers? Not really – our third node is going to be a really small arbitration node, which is simply going to be checking connections to the two other Zabbix nodes and giving a vote to achieve quorum in case of issues with one of the nodes.

In the end we will have three nodes:  Zabbix server A, Zabbix server B, and the Arbiter node

  • An odd number of nodes is recommended to achieve quorum.
  • Only Active/Passive cluster architecture is supported.
  • We cannot have two Zabbix nodes active running at the same time and talking to the same database. It is important to use some ‘shoot the other node in the head’ mechanism — STONITH to avoid such split-brain scenarios.

Failure to abide by these requirements can result in issues with database consistency, issues with underlying queries and cleaning up or inserting data. This can cause unexpected Zabbix backend server crashes down the line.

In addition, it is very common to have a requirement for proxies to be deployed with HA. Before implementing HA for proxies, we need to decide if we really do need it. HA adds a significant configuration management overhead. We can have hundreds if not thousands of proxies, and managing HA for each of those can add a significant overhead. Of course, the more comfortable you feel with the HA tools, the easier the deployment and the management of the environment.

Another approach for  Zabbix proxy HA can also be implemented by using Zabbix API scripts. We can essentially have two proxies running without the need to have the HA suite. In this case, if proxy A is down, we can use Zabbix API to move a host from proxy A to proxy B.

Using Zabbix API script to change the proxy

Here, host.massupdate is used to change the proxy on the hosts. Combine this with a robust scripting logic and you end up with a very viable approach to move your hosts between proxies in failover scenarios.

Database replication

We have covered the HA for Zabbix server backend and let’s remember that with frontend servers, we can simply bring up additional frontends, for instance, by utilizing Docker containers. But what about the DB redundancy?

  • Database replication can be used as a form of redundancy for the Zabbix DB. No matter the DB backend – Postgres, MySQL, Oracle, we can deploy multiple DB nodes and utilize the native DB replication or use third-party tools for replication, for instance, Galera Cluster.
  • I personally prefer using native replication tools as it is a bit more simple and you don’t have to concern yourself with another configuration and management layer that could potentially fail and be a bother to troubleshoot. But this will depend on your requirements, design and skillset.

Let’s look at an example with MySQL replication. You can set it up in many different ways as multiple replication approaches are supported: master/slave, master/master, or even have multiple masters replicating to one another. It is completely up to you how to implement replication, especially if you are already experienced with such deployments.

Which approach is best? At the end of the day it will all depend on your company policies, database backend and a compromise between simplicty and extra redundancy. I definitely suggest delving deeper and studying use cases and articles for the DB backend of your choice, before you decide to go with any particular approach.

Database replication

Database performance tuning

Database tuning is vital for the long term stability of your Zabbix instance. The database defaults might be sufficient for your home office, but for large multi-tenant environments with tens of thousands new values per second they will not suffice. The database defaults depend on the database backend and the database version used, but ideally, these should be tuned and tested, preferably during the design stage, before you have deployed your Zabbix instance in production.

After installing the database backend we need to take a look at the hardware resources available. Ideally, you have already estimated the hardware resources required for your instance and ensured that DB hosts have sufficient memory, CPU resources and storage has been selected according to the I/O requirements. Now, you can move on to tuning your database backend.

As an example with Postgres I used PGTune — an online database tuning tool. This is a simple estimate that should still provide you with a somewhat adequate configuration. Though ideally, you should have a DBA on board that is aware of what kind of data loads you will be dealing with to help you with an optimal database configuration.

Database performance tuning

History table partitioning

In such large environments, you will most likely see that housekeeper cannot keep up with the amount of data stored, unable to clean it up in a timely fashion with the housekeeper processes utilization reaching reaching 100 percent for 20-30 minutes at a time. This will have a negative effect on the overall database performance for the duration of housekeeping.

At this point, it is recommended to implement partitioning for history/trend tables. We can use Postgres with TimescaleDB plugin for this. Partitioning is supported out of the box, and you can configure it in Administration > General > Housekeeping.

For MySQL and Oracle backends we would have to rely on custom partitioning scripts or procedures. In addition, community-provided partitioning scripts are publicly available.

As always – don’t forget to test 3rd party scripts in a test environment before deploying it in production!

Community partitioning solution for MySQL

You can always create your own partitioning script, but you should be aware of what you’re doing and how things should be partitioned. We should always be partitioning only history and trend tables.

History table partitioning with TimescaleDB

  • TimescaleDB plugin for PostgreSQL DB backends supports out-of-the-box partitioning. You don’t have to rely on community scripts.
  • On TimescaleDB, we need to specify the chunk_time_interval parameter, which will define the partition chunk size.
  • In addition, we can also add compression of history/trends, which helps to reduce the history table size by 60-80 percent. Again, in such scenarios, your database is going to be huge — terabytes in size with hundreds of customers, each having thousands of metrics per second. So, compression is a really valuable asset.
  • The only thing we have to take into account is that compressed data is read-only and cannot be changed post-compression. So, no more changes or inserts are possible for the compressed chunks.

History and trends compression

To-do list

  • Deploy the latest available Zabbix version. Ideally stick with an LTS version.
  • Deploy proxy servers, define and configure HA/Replication on Zabbix proxies, as well as on Zabbix servers and databases.
  • Implement partitioning to improve database performance.
  • Implement throttling to reduce the volume of the incoming data.
  • Tune your database! Either use online guides or consult with your DBA.

With our to-do list completed, we can have our Zabbix environment with deployed with redundancy in mind, providing monitoring as a service for hundreds of customers, multiple proxies running for each of the customers, HA in place, and Zabbix performing up to our expectations.

Questions & Answers

Question. Will Zabbix have its native HA solution? Will it be the whole package or does it involve installing individual components and maintaining them?

Answer. It’s planned on the roadmap to have a native HA solution in Zabbix 6.0. You should be able to get your hands on it when the 6.0 beta version gets released. Hopefully, you’ll be able to get your hands on it, test it out yourselves and give us feedback. From the looks of it it should be very much plug-and-play and will remove a lot of management overhead when comparing it with current HA implementation. Right now this is being developed only for the Zabbix backend server. As for the frontend – nothing is stopping you from having multiple frontends pointed at the same DB/Zabbix backend server. 

Question. Can I run Zabbix on a single server and sell monitoring service to several customers with fully isolated environments, not just GUI, but also items, triggers, etc.

Answer. Yes, you can. You can have a single Zabbix instance and multiple customers being monitored by this instance. The only extra step that might be required is deploying proxies on the customer’s side. By using permission restrictions, proxy servers, roles, etc., we can then monitor multiple customers from a single Zabbix instance.

Question. When we change proxy, the agent configuration has to be updated. What about HA configuration on the proxy?

Answer. That really depends on the approach. If the agent is getting pointed at the virtual IP address and HA is managed by PCS, Corosync, or Pacemaker, then it should be fine as is and the VIP should just be on the currently active host. So, you’ll be essentially rerouted. With the HA by way of API approach, you can simply allow your agent to accept connections from both proxies. With ServerActive we can also specify multiple endpoints, so agents can actually be prepared for such an environment.

Question. How to merge two different instances into a single monitoring instance?

Answer. This is a complex task. First off, both instances need to have the same major Zabbix backend version. You might simply migrate the history from one instance to another, but then you will have some problems with underlying element IDs. So, in one instance you have your own set of items, triggers, users, etc. with your own set of IDs. These will most likely conflict with the set of IDs on the other instance.

You can do partial migration or use the export function to export your templates, hosts, value maps, network maps. I would try to export as much as I can as migration on SQL level will be a real pain. It is possible if you’re stubborn enough, but it can end up being a really complex task that can take days if not weeks to fully implement and test.

Question. Do subgroups relate to templates as well?

Answer. Subgroups relate to templates in a way where we can also define permissions to reading and modifying templates. For templates, you can also create per-customer templates and assign them to host groups. Users that have access to these host groups can then read or modify the templates.