Tag Archives: multichannel communications

Building a generative AI Marketing Portal on AWS

Post Syndicated from Tristan Nguyen original https://aws.amazon.com/blogs/messaging-and-targeting/building-a-generative-ai-marketing-portal-on-aws/

Introduction

In the preceding entries of this series, we examined the transformative impact of Generative AI on marketing strategies in “Building Generative AI into Marketing Strategies: A Primer” and delved into the intricacies of Prompt Engineering to enhance the creation of marketing content with services such as Amazon Bedrock in “From Prompt Engineering to Auto Prompt Optimisation”. We also explored the potential of Large Language Models (LLMs) to refine prompts for more effective customer engagement.

Continuing this exploration, we will articulate how Amazon Bedrock, Amazon Personalize, and Amazon Pinpoint can be leveraged to construct a marketer portal that not only facilitates AI-driven content generation but also personalizes and distributes this content effectively. The aim is to provide a clear blueprint for deploying a system that crafts, personalizes, and distributes marketing content efficiently. This blog will guide you through the deployment process, underlining the real-world utility of these services in optimizing marketing workflows. Through use cases and a code demonstration, we’ll see these technologies in action, offering a hands-on perspective on enhancing your marketing pipeline with AI-driven solutions.

The Challenge with Content Generation in Marketing

Many companies struggle to streamline their marketing operations effectively, facing hurdles at various stages of the marketing operations pipeline. Below, we list the challenges at three main stages of the pipeline: content generation, content personalization, and content distribution.

Content Generation

Creating high-quality, engaging content is often easier said than done. Companies need to invest in skilled copywriters or content creators who understand not just the product but also the target audience. Even with the right talent, the process can be time-consuming and costly. Moreover, generating content at scale while maintaining quality and compliance to industry regulations is the key blocker for many companies considering adopting generative AI technologies in production environments.

Content Personalization

Once the content is created, the next hurdle is personalization. In today’s digital age, generic content rarely captures attention. Customers expect content tailored to their needs, preferences, and behaviors. However, personalizing content is not straightforward. It requires a deep understanding of customer data, which often resides in siloed databases, making it difficult to create a 360-degree view of the customer.

Content Distribution

Finally, even the most captivating, personalized content is ineffective if it doesn’t reach the right audience at the right time. Companies often grapple with choosing the appropriate channels for content distribution, be it email, social media, or mobile notifications. Additionally, ensuring that the content complies with various regulations and doesn’t end up in spam folders adds another layer of complexity to the distribution phase. Sending at scale requires paying attention to deliverability, security and reliability which often poses significant challenges to marketers.

By addressing these challenges, companies can significantly improve their marketing operations and empower their marketers to be more effective. But how can this be achieved efficiently and at scale? The answer lies in leveraging the power of Amazon Bedrock, Amazon Personalize, and Amazon Pinpoint, as we will explore in the following solution.

The Solution In Action

Before we dive into the details of the implementation, let’s take a look at the end result through the linked demo video.

Use Case 1: Banking/Financial Services Industry

You are a relationship manager working in the Consumer Banking department of a fictitious company called AnyCompany Bank. You are assigned a group of customers and would like to send out personalized and targeted communications to the channel of choice to every members of this group of customer.

Behind the scene, the marketer is utilizing Amazon Pinpoint to create the segment of customers they would like to target. The customers’ information and the marketer’s prompt are then fed into Amazon Bedrock to generate the marketing content, which is then sent to the customer via SMS and email using Amazon Pinpoint.

  • In the Prompt Iterator page, you can employ a process called “prompt engineering” to further optimize your prompt to maximize the effectiveness of your marketing campaigns. Please refer to this blog on the process behind engineering the prompt as well as how to apply an additional LLM model for auto-prompting. To get started, simply copy the sample banking prompt which has gone through the prompt engineering process in this page.
  • Next, you can either upload your customer group by uploading a .csv file (through “Importing a Segment”) or specify a customer group using pre-defined filter criteria based on your current customer database using Amazon Pinpoint.

UseCase1Segment

E.g.: The screenshot shows a sample filtered segment named ManagementOrRetired that only filters to customers who are management or retirees.

  • Once done, you can log into the marketer portal and choose the relevant segment that you’ve just created within the Amazon Pinpoint console.

PinpointSegment

  • You can then preview the customers and their information stored in your Amazon Pinpoint’s customer database. Once satisfied, we’re ready to start generating content for those customers!
  • Click on 1:1 Content Generator tab, your content is automatically generated for your first customer. Here, you can cycle through your customers one by one, and depending on the customer’s preferred language and channel, an email or SMS in the preferred language is automatically generated for them.
    • Generated SMS in English

PostiveSMS

    • A negative example showing proper prompt-engineering at work to moderate content. This happens if we try to insert data that does not make sense for the marketing content generator to output. In this case, the marketing generator refuses to output (justifiably) an advertisement for a 6-year-old on a secured instalment loan.

NegativeSMS

  • Finally, we choose to send the generated content via Amazon Pinpoint by clicking on “Send with Amazon Pinpoint”. In the back end, Amazon Pinpoint will orchestrate the sending of the email/SMS through the appropriate channels.
    • Alternatively, if the auto-generated content still did not meet your needs and you want to generate another draft, you can Disagree and try again.

Use Case 2: Travel & Hospitality

You are a marketing executive that’s working for an online air ticketing agency. You’ve been tasked to promote a specific flight from Singapore to Hong Kong for AnyCompany airline. You’d first like to identify which customers would be prime candidates to promote this flight leg to and then send out hyper-personalized message to them.

Behind the scene, instead of using Amazon Pinpoint to manually define the segment, the marketer in this case is leveraging AIML capabilities of Amazon Personalize to define the best group of customers to recommend the specific flight leg to them. Similar to the above use case, the customers’ information and LLM prompt are fed into the Amazon Bedrock, which generates the marketing content that is eventually sent out via Amazon Pinpoint.

  • Similar to the above use case, you’d need to go through a prompt engineering process to ensure that the content the LLM model is generating will be relevant and safe for use. To get started quickly, go to the Prompt Iterator page, you can use the sample airlines prompt and iterate from there.
  • Your company offers many different flight legs, aggregated from many different carriers. You first filter down to the flight leg that you want to promote using the Filters on the left. In this case, we are filtering for flights originating from Singapore (SRCCity) and going to Hong Kong (DSTCity), operated by AnyCompany Airlines.

PersonalizeInstructions

  • Now, let’s choose the number of customers that you’d like to generate. Once satisfied, you choose to start the batch segmentation job.
  • In the background, Amazon Personalize generates a group of customers that are most likely to be interested in this flight leg based on past interactions with similar flight itineraries.
  • Once the segmentation job is finished as shown, you can fetch the recommended group of customers and start generating content for them immediately, similar to the first use case.

Setup instructions

The setup instructions and deployment details can be found in the GitHub link.

Conclusion

In this blog, we’ve explored the transformative potential of integrating Amazon Bedrock, Amazon Personalize, and Amazon Pinpoint to address the common challenges in marketing operations. By automating the content generation with Amazon Bedrock, personalizing at scale with Amazon Personalize, and ensuring precise content distribution with Amazon Pinpoint, companies can not only streamline their marketing processes but also elevate the customer experience.

The benefits are clear: time-saving through automation, increased operational efficiency, and enhanced customer satisfaction through personalized engagement. This integrated solution empowers marketers to focus on strategy and creativity, leaving the heavy lifting to AWS’s robust AI and ML services.

For those ready to take the next step, we’ve provided a comprehensive guide and resources to implement this solution. By following the setup instructions and leveraging the provided prompts as a starting point, you can deploy this solution and begin customizing the marketer portal to your business’ needs.

Call to Action

Don’t let the challenges of content generation, personalization, and distribution hold back your marketing potential. Deploy the Generative AI Marketer Portal today, adapt it to your specific needs, and watch as your marketing operations transform. For a hands-on start and to see this solution in action, visit the GitHub repository for detailed setup instructions.

Have a question? Share your experiences or leave your questions in the comment section.

About the Authors

Tristan (Tri) Nguyen

Tristan (Tri) Nguyen

Tristan (Tri) Nguyen is an Amazon Pinpoint and Amazon Simple Email Service Specialist Solutions Architect at AWS. At work, he specializes in technical implementation of communications services in enterprise systems and architecture/solutions design. In his spare time, he enjoys chess, rock climbing, hiking and triathlon.

Philipp Kaindl

Philipp Kaindl

Philipp Kaindl is a Senior Artificial Intelligence and Machine Learning Solutions Architect at AWS. With a background in data science and
mechanical engineering his focus is on empowering customers to create lasting business impact with the help of AI. Outside of work, Philipp enjoys tinkering with 3D printers, sailing and hiking.

Bruno Giorgini

Bruno Giorgini

Bruno Giorgini is a Senior Solutions Architect specializing in Pinpoint and SES. With over two decades of experience in the IT industry, Bruno has been dedicated to assisting customers of all sizes in achieving their objectives. When he is not crafting innovative solutions for clients, Bruno enjoys spending quality time with his wife and son, exploring the scenic hiking trails around the SF Bay Area.

Build Better Engagement Using the AWS Community Engagement Flywheel: Part 2 of 3

Post Syndicated from Tristan Nguyen original https://aws.amazon.com/blogs/messaging-and-targeting/build-better-engagement-using-the-aws-community-engagement-flywheel-part-2-of-3/

Introduction

Part 2 of 3: From Cohorts to Campaigns

Businesses are constantly looking for better ways to engage with customer communities, but it’s hard to do when profile data is limited to user-completed form input or messaging campaign interaction metrics. Neither of these data sources tell a business much about their customer’s interests or preferences when they’re engaging with that community.

To bridge this gap for their community of customers, AWS Game Tech created the Cohort Modeler: a deployable solution for developers to map out and classify player relationships and identify like behavior within a player base. Additionally, the Cohort Modeler allows customers to aggregate and categorize player metrics by leveraging behavioral science and customer data. In our first blog post, we talked about how to extend Cohort Modeler’s functionality.

In this post, you’ll learn how to:

  1. Use the extension we built to create the first part of the Community Engagement Flywheel.
  2. Process the user extract from the Cohort Modeler and import the data into Amazon Pinpoint as a messaging-ready Segment.
  3. Send email to the users in the Cohort via Pinpoint’s powerful and flexible Campaign functionality.

Use Case Examples for The Cohort Modeler

For this example, we’re going to retrieve a cohort of individuals from our Cohort Modeler who we’ve identified as at risk:

  • Maybe they’ve triggered internal alarms where they’ve shared potential PII with others over cleartext.
  • Maybe they’ve joined chat channels known to be frequented by some of the game’s less upstanding citizens.

Either way, we want to make sure they understand the risks of what they’re doing and who they’re dealing with.

Pinpoint provides various robust methods to import user contact and personalization data in specific formats, and once Pinpoint has ingested that data, you can use Campaigns or Journeys to send customized and personalized messaging to your cohort members – either via automation, or manually via the Pinpoint Console.

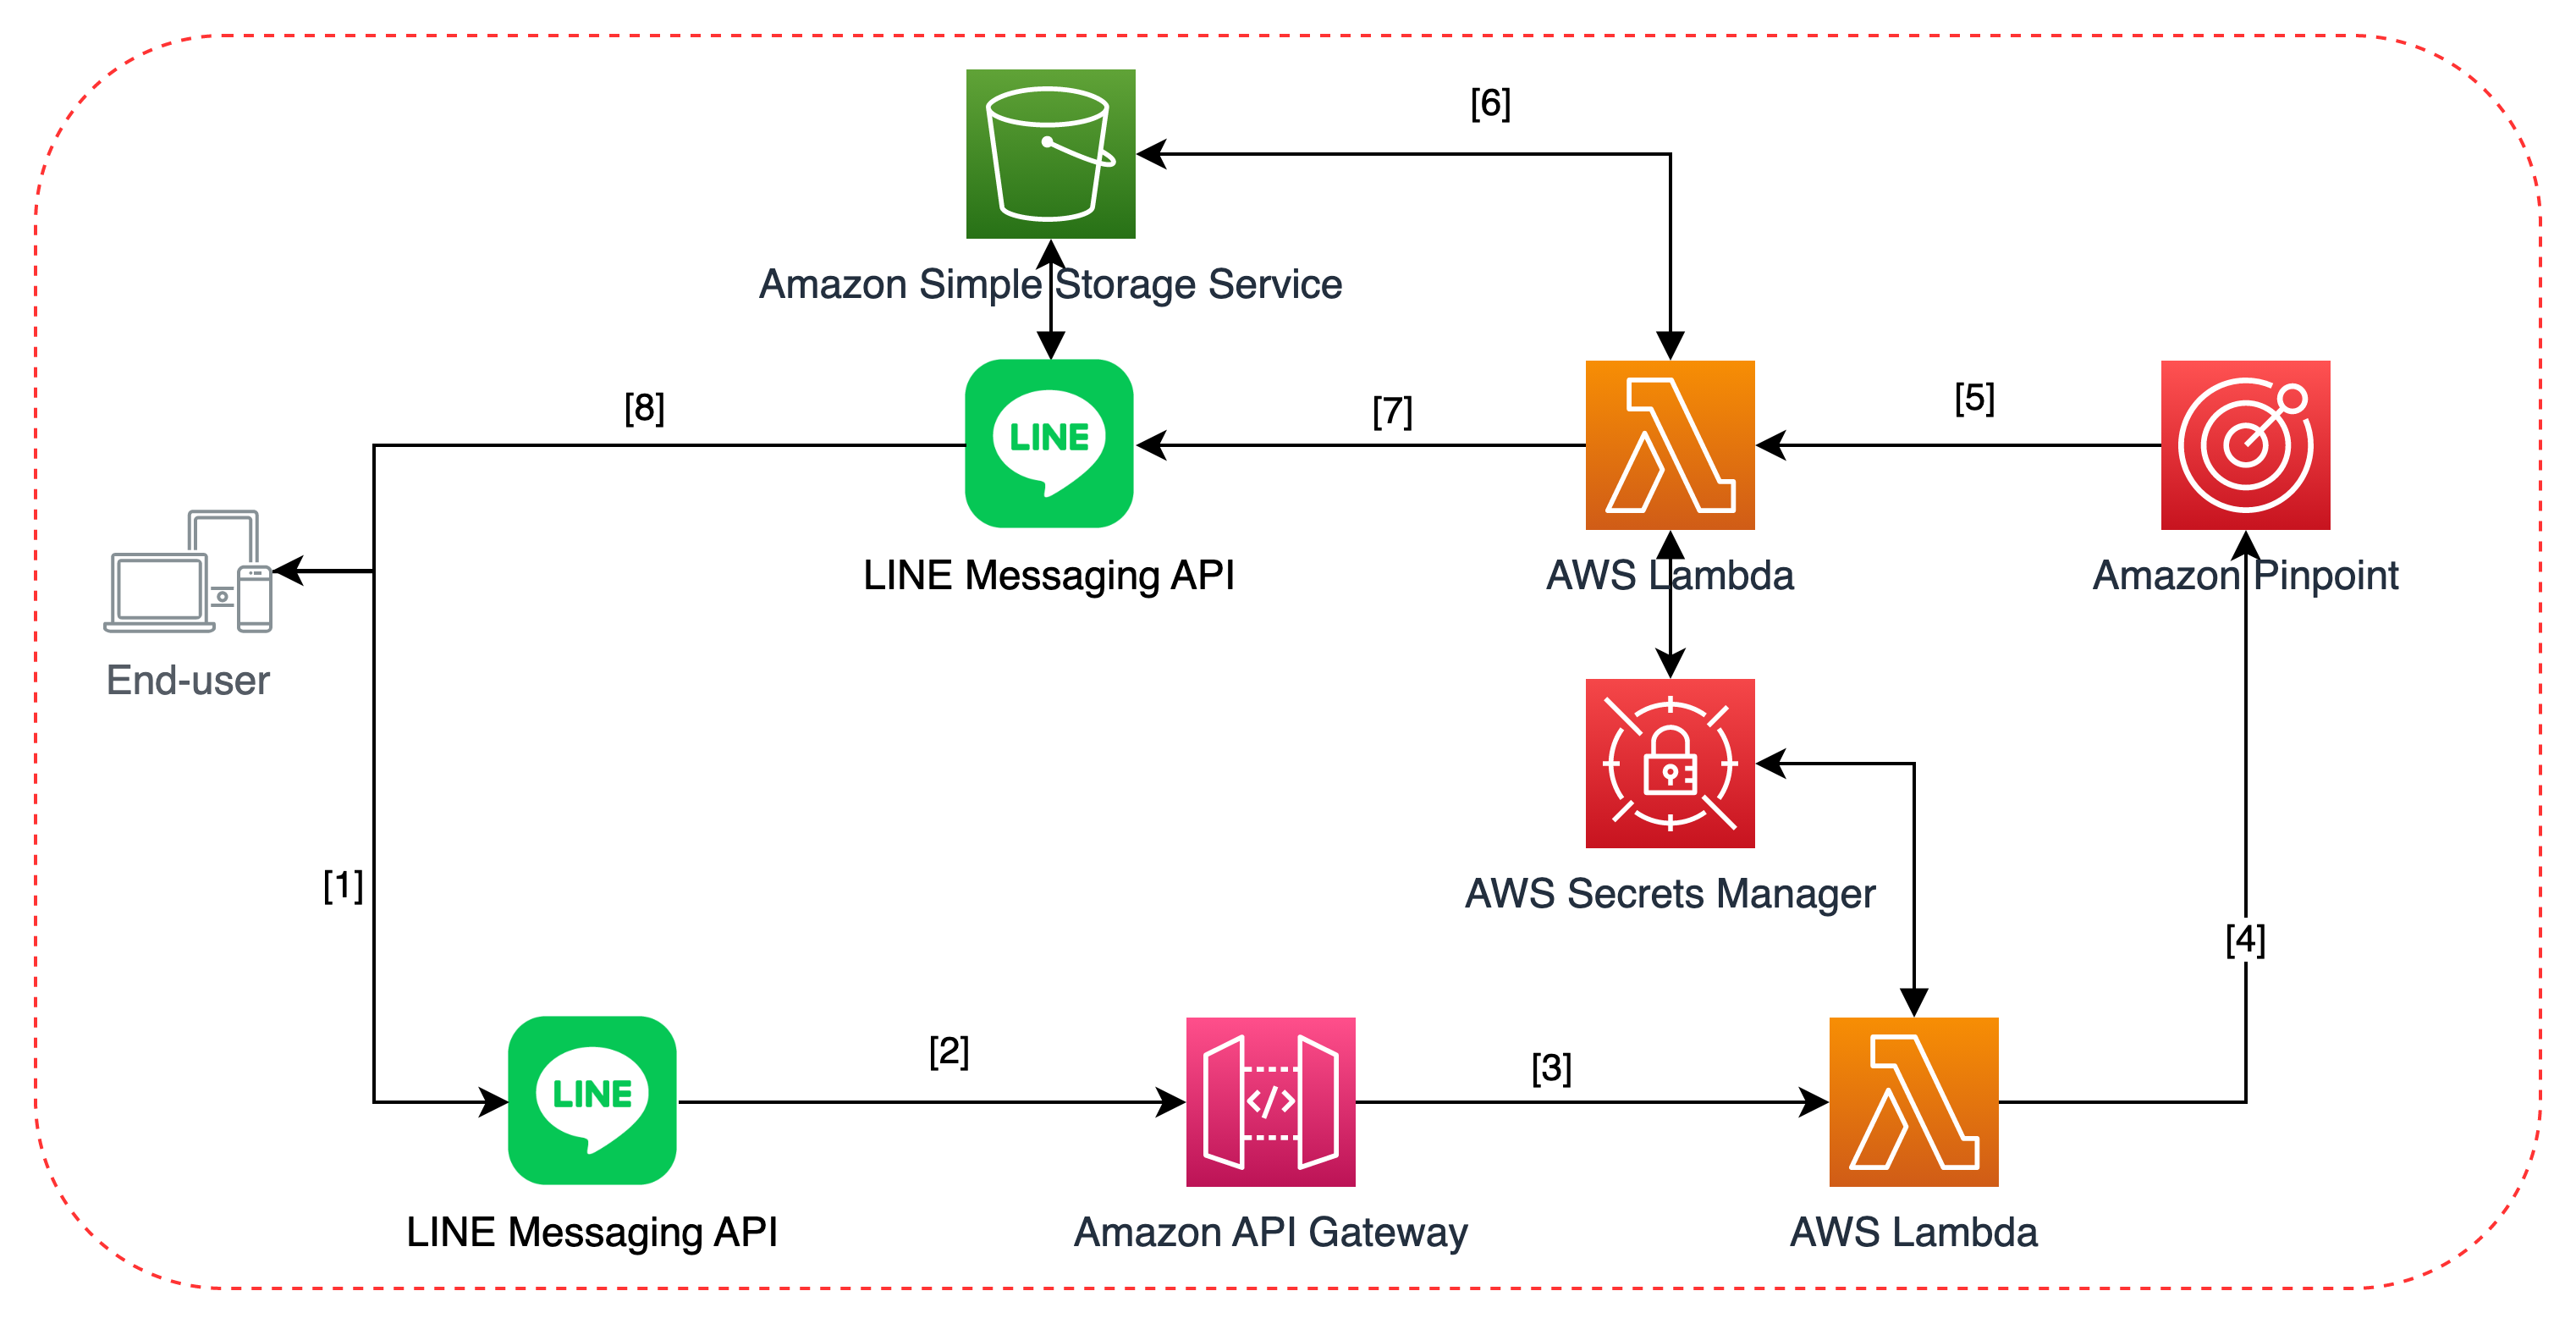
Architecture overview

In this architecture, you’ll create a simple Amazon DynamoDB table that mimics a game studio’s database of record for its customers. You’ll then create a Trigger for Amazon Simple Storage Service (Amazon S3) bucket that will ingest the Cohort Modeler extract (created in the prior blog post) and convert it into a CSV file that Pinpoint can ingest. Lastly, once generated, the AWS Lambda function will prompt Pinpoint to automatically ingest the CSV as a static segment.

Once the automation is complete, you’ll use Pinpoint’s console to quickly and easily create a Campaign, including an HTML mail template, to the imported segment of players you identified as at risk via the Cohort Modeler.

Prerequisites

At this point, you should have completed the steps in the prior blog post, Extending the Cohort Modeler. This is all you’ll need to proceed.

Walkthrough

Messaging your Cohort

Now that we’ve extended the Cohort Modeler and built a way to extract cohort data into an S3 bucket, we’ll transform that data into a Segment in Pinpoint, and use the Pinpoint Console to send a message to the members of the Cohort via a Pinpoint Campaign. In this walkthrough, you’ll:

  • Create a Pinpoint Project to import your Cohort Segments.
  • Create a Dynamo table to emulate your database of record for your players.
  • Create an S3 bucket to hold the cohort contact data CSV file.
  • Create a Lambda trigger to respond to Cohort Modeler export events and kick off Pinpoint import jobs.
  • Create and send a Pinpoint Campaign using the imported Segment.

Create the Pinpoint Project

You’ll need a Pinpoint Project (sometimes referred to as an “App”) to send messaging to your cohort members, so navigate to the Pinpoint console and click Create a Project.

  • Sign in to the AWS Management Console and open the Pinpoint Console.
  • If this is your first time using Amazon Pinpoint, you will see a page that introduces you to the features of the service. In the Get started section, you’ll need to enter the name you want to call your project. We used ‘CohortModelerPinpoint‘ but you can use whatever you’d like.
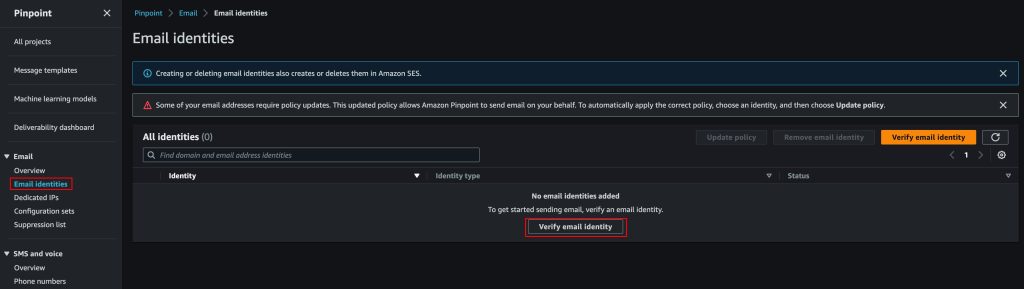
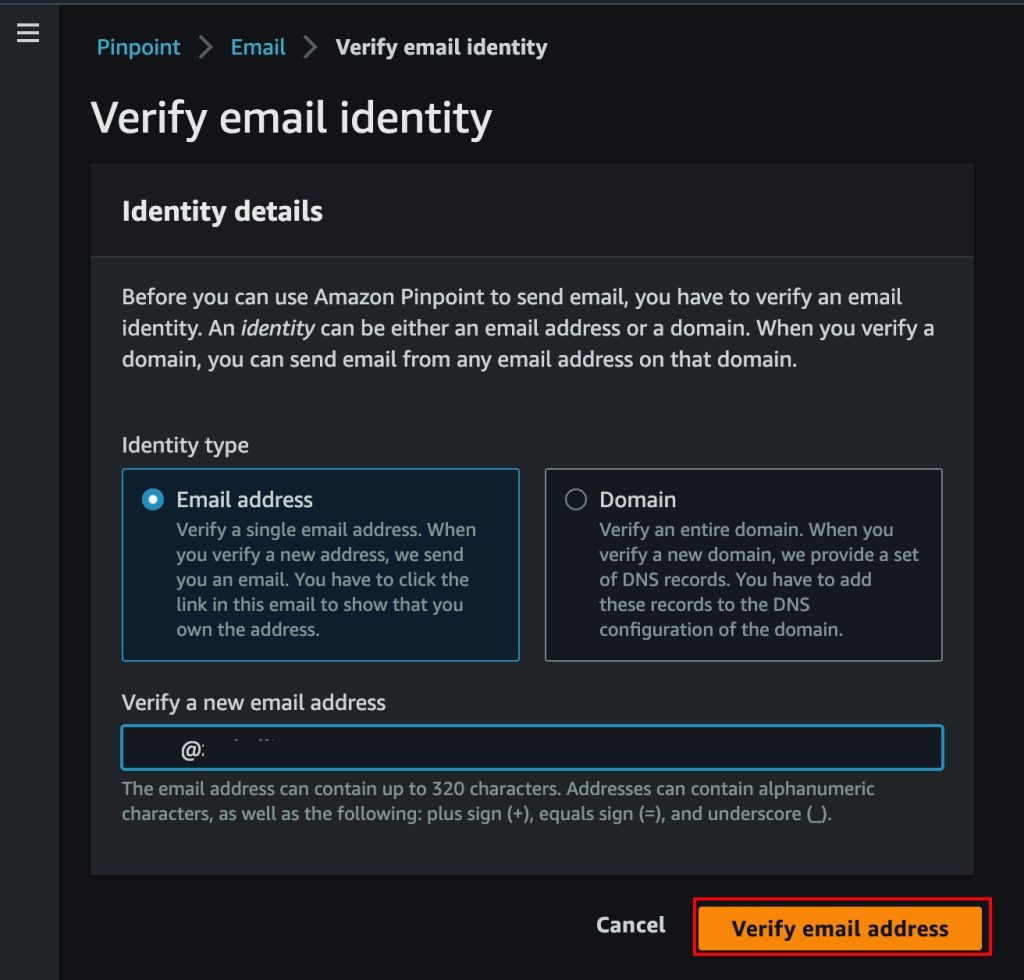
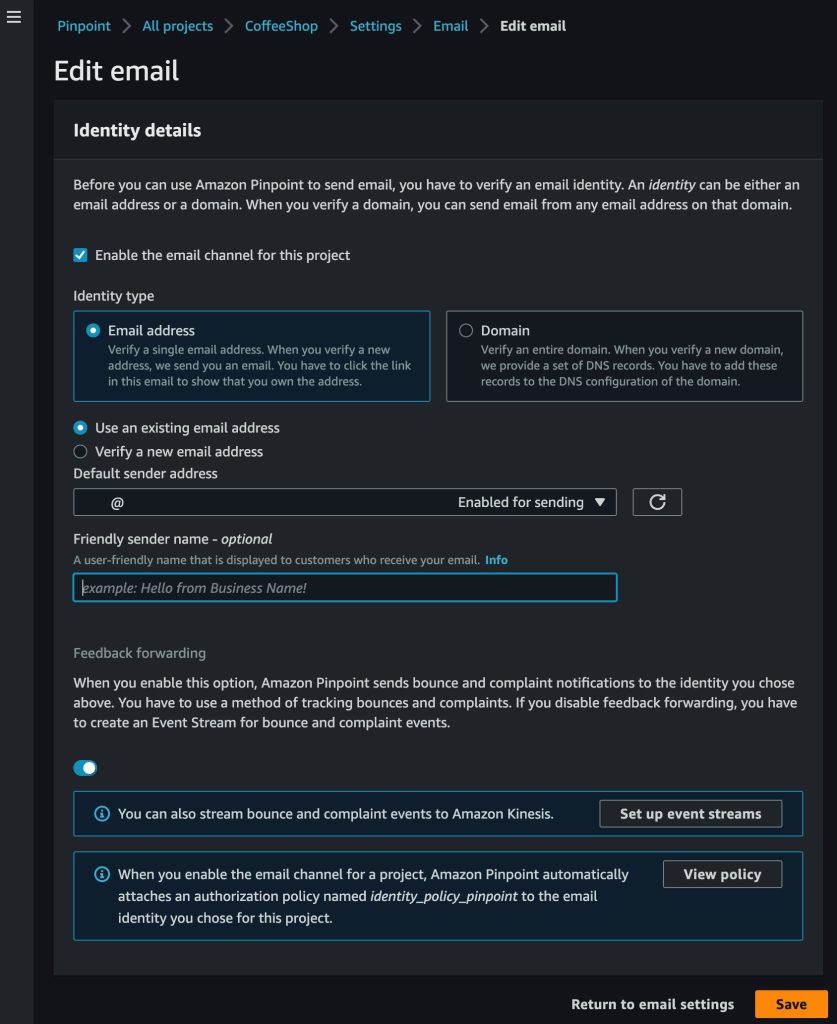
  • On the following screen, the Configure features page, you’ll want to choose Configure in the Email section.
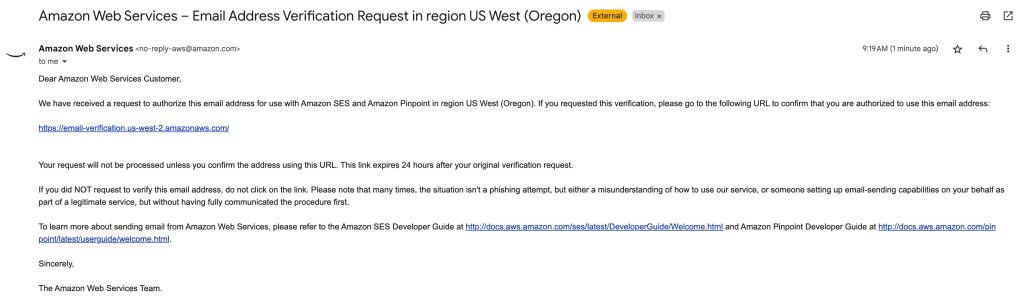
    • Pinpoint will ask you for an email address you want to validate, so that when email goes out, it will use your email address as the FROM header in your email. Enter the email address you want to use as your sending address, and Choose Verify email address.
    • Check the inbox of the address that you entered and look for an email from [email protected]. Open the email and click the link in the email to complete the verification process for the email address.
    • Note: Once you have verified your email identity, you may receive an alert prompting you to update your email address’ policy. If so, highlight your email under All identities, and choose Update policy. To complete this update, Enter confirm where requested, and choose Update.

  • Later on, when you’re asked for your Pinpoint Project ID, this can accessed by choosing All projects from the Pinpoint navigation pane. From there, next to your project name, you will see the associated Project ID.

Create the Dynamo Table

For this step, you’re emulating a game studio’s database of record for its players, and therefore the Lambda function that you’re creating, (to merge Cohort Modeler data with the database of record) is also an emulation.

In a real-world situation, you would use the same ingestion method as the S3TriggerCohortIngest.py example that will be created further below. However, instead of using placeholder data, you would use the ‘playerId’ information extracted from the Cohort Modeler. This would allow you to formulate a specific query against your main database, whether it requires an SQL statement, or some other type of database query.

Creating the Table

Navigate to the DynamoDB Console. You’re going to create a table with ‘playerId’ as the Primary key, and four additional attributes: email, favorite role, first name, and last name.

  • In the navigation pane, choose Tables. On the next page, in the Tables section, choose Create table.
  • In the Table details section, we entered userdata for our Table name. (In order to maintain simple compatibility with the scripts that follow, it is recommended that you do the same.)
  • For Partition key, enter playerId and leave the data type as String.
  • Intentionally leave the Sort key blank and the data type as String.
  • Below, in the Table settings section, leave everything at their Default settings value.
  • Scroll to the end of the page and choose Create table.
Adding Synthetic Data

You’ll need some synthetic data in the database, so that your Cohort Modeler-Pinpoint integration can query the database, retrieve contact information, and then import that contact information into Pinpoint as a Segment.

  • From the DynamoDB Tables section, choose your newly created Table by selecting its name. (The name preferably being userdata).
  • In the DynamoDB navigation pane, choose Explore items.
  • From the Items returned section, choose Create item.
  • Once on the Create item page, ensure that the Form view is highlighted and not the JSON view. You’re going to create a new entry in the table. Cohort Modeler creates the same synthetic information each time it’s built, so all you need to do is to create three entries.
    • For the first entry, enter wayne96 as the Value for playerID.
    • Select the Add new attribute dropdown, and choose String.
    • Enter email as the Attribute name, and the Value should be your own email address since you’ll be receiving this email. This should be the same email used to configure your Pinpoint project from earlier.
    • Again, select the Add new attribute dropdown, and choose String.
    • Enter favoriteRole as the Attribute name, and enter Tank as the attribute’s Value.
    • Again, select the Add new attribute dropdown, and choose String.
    • Enter firstName as the Attribute name, and enter Wayne as the attribute’s Value.
    • Finally, select the Add new attribute dropdown, and choose String.
    • And enter the lastName as the Attribute name, and enter Johnson as the attribute’s value.

  • Repeat the process for the following two users. You’ll be using the SES Mailbox Simulator on these player IDs – one will simulate a successful delivery (but no opens or clicks), and the other will simulate a bounce notification, which represents an unknown user response code.


A B C D E
1 playerId email favoriteRole firstName lastName
2 xortiz [email protected] Healer Tristan Nguyen
3 msmith [email protected] DPS Brett Ezell

Now that the table’s populated, you can build the integration between Cohort Modeler and your new “database of record,” allowing you to use the cohort data to send messages to your players.

Create the Pinpoint Import S3 Bucket

Pinpoint requires a CSV or JSON file stored on S3 to run an Import Segment job, so we’ll need a bucket (separate from our Cohort Modeler Export bucket) to facilitate this.

  • Navigate to the S3 Console, and inside the Buckets section, choose Create Bucket.
  • In the General configuration section, enter a bucket a name, remembering that its name must be unique across all of AWS.
  • You can leave all other settings at their default values, so scroll down to the bottom of the page and choose Create Bucket. Remember the name – We’ll be referring to it as your “Pinpoint import bucket” from here on out.
Create a Pinpoint Role for the S3 Bucket

Before creating the Lambda function, we need to create a role that allows the Cohort Modeler data to be imported into Amazon Pinpoint in the form of a segment.

For more details on how to create an IAM role to allow Amazon Pinpoint to import endpoints from the S3 Bucket, refer to this documentation. Otherwise, you can follow the instructions below:

  • Navigate to the IAM Dashboard. In the navigation pane, under Access management, choose Roles, followed by Create role.
  • Once on the Select trusted entity page, highlight and select AWS service, under the Trusted entity type section.
  • In the Use case section dropdown, type or select S3. Once selected, ensure that S3 is highlighted, and not S3 Batch Operations. Choose, Next.
  • From the Add permissions page, enter AmazonS3ReadOnlyAccess within Search area. Select the associated checkbox and choose Next.
  • Once on the Name, review, and create page, For Role name, enter PinpointSegmentImport. 
  • Scroll down and choose Create role.
  • From the navigation pane, and once again under Access management, choose Roles. Select the name of the role just created.
  • In the Trust relationships tab, choose Edit trust policy.
  • Paste the following JSON trust policy. Remember to replace accountId, region and application-id with your AWS account ID, the region you’re running Amazon Pinpoint from, and the Amazon Pinpoint project ID respectively.
{
    "Version": "2012-10-17",
    "Statement": [
        {
            "Action": "sts:AssumeRole",
            "Effect": "Allow",
            "Principal": {
                "Service": "pinpoint.amazonaws.com"
            },
            "Condition": {
                "StringEquals": {
                    "aws:SourceAccount": "accountId"
                },
                "ArnLike": {
                    "aws:SourceArn": "arn:aws:mobiletargeting:region:accountId:apps/application-id"
                }
            }
        }
    ]
}

Build the Lambda

You’ll need to create a Lambda function for S3 to trigger when Cohort Modeler drops its export files into the export bucket, as well as the connection to the Cohort Modeler export bucket to set up the trigger. The steps below will take you through the process.

Create the Lambda

Head to the Lambda service menu, and from Functions page, choose Create function. From there:

  • On the Create function page, select Author from scratch.
  • For Function Name, enter S3TriggerCohortIngest for consistency.
  • For Runtime choose Python 3.8
  • No other complex configuration options are needed, so leave the remaining options as default and click Create function.
  • In the Code tab, replace the sample code with the code below.
import json
import os
import uuid
import urllib

import boto3
from botocore.exceptions import ClientError

### S3TriggerCohortIngest

# We get activated once we're triggered by an S3 file getting Put.
# We then:
# - grab the file from S3 and ingest it.
# - negotiate with a DB of record (Dynamo in our test case) to pull the corresponding player data.
# - transform that record data into a format Pinpoint will interpret.
# - Save that CSV into a different S3 bucket, and
# - Instruct Pinpoint to ingest it as a Segment.


# save the CSV file to a random unique filename in S3
def save_s3_file(content):
    
    # generate a random uuid csv filename.
    fname = str(uuid.uuid4()) + ".csv"
    
    print("Saving data to file: " + fname)
    
    try:
        # grab the S3 bucket name
        s3_bucket_name = os.environ['S3BucketName']
        
        # Set up the S3 boto client
        s3 = boto3.resource('s3')
        
        # Lob the body into the object.
        object = s3.Object(s3_bucket_name, fname)
        object.put(Body=content)
        
        return fname
        
    # If we fail, say why and exit.
    except ClientError as error:
        print("Couldn't store file in S3: %s", json.dumps(error.response))
        return {
            'statuscode': 500,
            'body': json.dumps('Failed access to storage.')
        }
        
# Given a list of users, query the user dynamo db for their account info.
def query_dynamo(userlist):
    
    # set up the dynamo client.
    ddb_client = boto3.resource('dynamodb')
    
    # Set up the RequestIems object for our query.
    batch_keys = {
        'userdata': {
            'Keys': [{'playerId': user} for user in userlist]
        }
    }

    # query for the keys. note: currently no explicit error-checking for <= 100 items.     
    try:        
 
        db_response = ddb_client.batch_get_item(RequestItems=batch_keys)


        return db_response
        
    # If we fail, say why and exit.
    except ClientError as error:
        print("Couldn't access data in DynamoDB: %s", json.dumps(error.response))
        return {
            'statuscode': 500,
            'body': json.dumps('Failed access to db.')
        }
        
def ingest_pinpoint(filename):
    
    s3url = "s3://" + os.environ.get('S3BucketName') + "/" + filename
    
    
    try:
        pinClient = boto3.client('pinpoint')
        
        response = pinClient.create_import_job(
            ApplicationId=os.environ.get('PinpointApplicationID'),
            ImportJobRequest={
                'DefineSegment': True,
                'Format': 'CSV',
                'RegisterEndpoints': True,
                'RoleArn': 'arn:aws:iam::744969268958:role/PinpointSegmentImport',
                'S3Url': s3url,
                'SegmentName': filename
            }
        )
        
        return {
            'ImportId': response['ImportJobResponse']['Id'],
            'SegmentId': response['ImportJobResponse']['Definition']['SegmentId'],
            'ExternalId': response['ImportJobResponse']['Definition']['ExternalId'],
        }
        
    # If we fail, say why and exit.
    except ClientError as error:
        print("Couldn't create Import job for Pinpoint: %s", json.dumps(error.response))
        return {
            'statuscode': 500,
            'body': json.dumps('Failed segment import to Pinpoint.')
        }
        
# Lambda entry point GO
def lambda_handler(event, context):
    
    # Get the bucket + obj name from the incoming event
    incoming_bucket = event['Records'][0]['s3']['bucket']['name']
    filename = urllib.parse.unquote_plus(event['Records'][0]['s3']['object']['key'], encoding='utf-8')
    
    # light up the S3 client
    s3 = boto3.resource('s3')
    
    # grab the file that triggered us
    try:
        content_object = s3.Object(incoming_bucket, filename)
        file_content = content_object.get()['Body'].read().decode('utf-8')
        
        # and turn it into JSON.
        json_content = json.loads(file_content)
        
    except Exception as e:
        print(e)
        print('Error getting object {} from bucket {}. Make sure they exist and your bucket is in the same region as this function.'.format(filename, incoming_bucket))
        raise e

    # Munge the file we got into something we can actually use
    record_content = json.dumps(json_content)

    # load it into json
    record_json = json.loads(record_content)
    
    # Initialize an empty list for names
    namelist = []
    
    # Iterate through the records in the list
    for record in record_json:
        # Check if "playerId" key exists in the record
        if "playerId" in record:
            # Append the first element of "playerId" list to namelist
            namelist.append(record["playerId"][0])

    # use the name list and grab the corresponding users from the dynamo table
    userdatalist = query_dynamo(namelist)
    
    # grab just what we need to create our import file
    userdata_responses = userdatalist["Responses"]["userdata"]
    
    csvlist = "ChannelType,Address,User.UserId,User.UserAttributes.FirstName,User.UserAttributes.LastName\n"
    
    for user in userdata_responses:
        newString = "EMAIL," + user["email"] + "," + user["playerId"] + "," + user["firstName"] + "," + user["lastName"] + "\n"
        csvlist += newString
        
    # Dump it to S3 with a unique filename. 
    csvFile = save_s3_file(csvlist)

    # and tell Pinpoint to import it as a Segment.
    pinResponse = ingest_pinpoint(csvFile)
    
    return {
        'statusCode': 200,
        'body': json.dumps(pinResponse)
    }

Configure the Lambda

Firstly, you’ll need to raise the function timeout, because sometimes it will take time to import large Pinpoint segments. To do so, navigate to the Configuration tab, then General configuration and change the Timeout value to the maximum of 15 minutes.

Next, select Environment variables beneath General configuration in the navigation pane. Choose Edit, followed by Add environment variable, for each Key and Value below.

  • Create a key – DynamoUserTableName – and give it the name of the DynamoDB table you built in the previous step. (If following our recommendations, it would be userdata. )
  • Create a key – PinpointApplicationID – and give it the Project ID (not the name), of the Pinpoint Project you created in the first step.
  • Create a key – S3BucketName – and give it the name of the Pinpoint Import S3 Bucket.
  • Finally, create a key – PinpointS3RoleARN – and paste the ARN of the Pinpoint S3 role you created during the Import Bucket creation step.
  • Once all Environment Variables are entered, choose Save.

In a production build, you could have this information stored in System Manager Parameter Store, in order to ensure portability and resilience.

While still in the Configuration tab, from the navigation pane, choose the Permissions menu option.

  • Note that just beneath Execution role, AWS has created an IAM Role for the Lambda. Select the role’s name to view it in the IAM console.
  • On the Role’s page, in the Permissions tab and within the Permissions policies section, you should see one policy attached to the role: AWSLambdaBasicExecutionRole
  • You will need to give the Lambda access to your Pinpoint import bucket, so highlight the Policy name and select the Add permissions dropdown and choose Create inline policy – we won’t be needing this role anywhere else.
  • On the next screen, click the JSON tab.
    • Paste the following IAM Policy JSON:
{
    "Version": "2012-10-17",
    "Statement": [
        {
            "Effect": "Allow",
            "Action": [
                "s3:GetObject",
                "s3:PutObject",
                "s3:ListBucket"
            ],
            "Resource": [
                "arn:aws:s3:::YOUR-PINPOINT-BUCKET-NAME-HERE/*",
                "arn:aws:s3:::YOUR-PINPOINT-BUCKET-NAME-HERE",
                "arn:aws:s3:::YOUR-CM-BUCKET-NAME-HERE/*",
                "arn:aws:s3:::YOUR-CM-BUCKET-NAME-HERE"
            ]
        },
        {
            "Effect": "Allow",
            "Action": "dynamodb:BatchGetItem",
            "Resource": "arn:aws:dynamodb:region:accountId:table/userdata"
        },
        {
            "Effect": "Allow",
            "Action": "mobiletargeting:CreateImportJob",
            "Resource": "arn:aws:mobiletargeting:region:accountId:apps/application-id"
        },
        {
            "Effect": "Allow",
            "Action": "iam:PassRole",
            "Resource": "arn:aws:iam::accountId:role/PinpointSegmentImport"
        }
    ]
}
    • Replace the placeholder YOUR-CM-BUCKET-NAME-HERE with the name of the S3 Bucket you created in the previous blog post to store, and the YOUR-PINPOINT-BUCKET-NAME-HERE with the bucket to store Amazon Pinpoint segment endpoint you created earlier in the blog.
    • Remember to replace accountId, region and application-id with your AWS account ID, the region you’re running Amazon Pinpoint from, and the Amazon Pinpoint project ID respectively.
    • Choose Review Policy.
    • Give the policy a name – we used S3TriggerCohortIngestPolicy.
    • Finally, choose Create Policy.
Trigger the Lambda via S3

The goal is for the Lambda to be triggered when Cohort Modeler drops the extract file into its designated S3 delivery bucket. Fortunately, setting this up is a simple process:

  • Navigate back to the Lambda Functions page. For this particular Lambda script S3TriggerCohortIngest, choose the + Add trigger from the Function overview section.
    • From the Trigger configuration dropdown, select S3 as the source.
    • Under Bucket, enter or select the bucket you’ve chosen for Cohort Modeler extract delivery. (Created in the previous blog.)
    • Leave Event type as “All object create events
    • Leave both Prefix and Suffix blank.
    • Check the box that acknowledges that using the same bucket for input and output is not recommended, as it can increase Lambda usage and thereby costs.
    • Finally, choose Add.
    • Lambda will add the appropriate permissions to invoke the trigger when an object is created in the S3 bucket.
Test the Lambda

The best way to test the end to end process is to simply connect to the endpoint you created in the first step of the process and send it a valid query. I personally use Postman, but you can use curl or any other HTTP tool to send the request.

Again, refer back to your prior work to determine the HTTP API endpoint for your Cohort Modeler’s cohort extract endpoint, and then send it the following query:

https://YOUR-ENDPOINT.execute-api.YOUR-REGION.amazonaws.com/Prod/data/cohort/ea_atrisk?threshold=2

You should receive back a response that looks something like this:

{'statusCode': 200, 'body': 'export/ea_atrisk_2_2023-09-12_13-57-06.json'}

The Status code confirms that the request was successful, and the body provides the name of the export file which was created.

  • From the AWS console, navigate to the S3 Dashboard, and select the S3 Bucket you assigned to Cohort Modeler exports. You should see a JSON file corresponding to the response from your API call in that bucket.
  • Still in S3, navigate back and select the S3 bucket you assigned as your Pinpoint Import bucket. You should find a CSV file with the same file prefix in that bucket.
  • Finally, navigate to the Pinpoint dashboard and choose your Project.
  • From the navigation pane, select Segments. You should see a segment name which directly corresponds to the CSV file which you located in the Pinpoint Import bucket.

If these three steps are complete, then the outbound arm of the Community Engagement Flywheel is functional. All that’s left now is to test the Segment by using it in a Campaign.

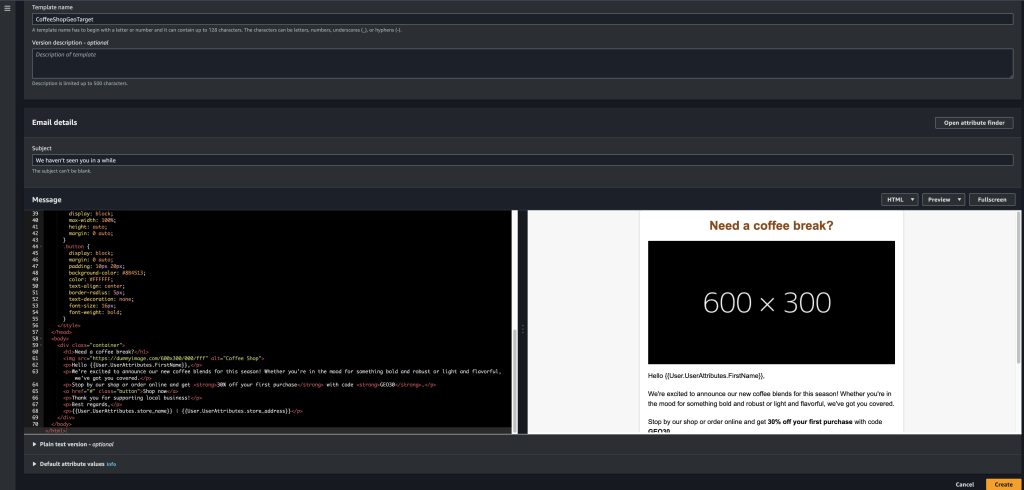
Create an email template

In order to send your message recipients a message, you’ll need a message template. In this section, we’ll walk you through this process. The Pinpoint Template Editor is a simple HTML editor, but other third-party services like visual designers, can integrate directly with Pinpoint to provide a seamless integration between the design tool and Pinpoint.

  • From the navigation pane of the Pinpoint console, choose Message templates, and then select Create template.
  • Leave the Channel set to Email, and under Template name, enter a unique and memorable name.
  • Under Subject – We entered and used ‘Happy Video Game Day!’, but enter and use whatever you would like.
  • Locate and copy the contents of EmailTemplate.html, and paste the contents into the Message section of the form.
  • Finally, choose Create, and your Template will now be available for use.

Create & Send the Pinpoint Campaign

For the final step, you will create and send a campaign to the endpoints included in the Segment that the Community Engagement Flywheel created. Earlier, you mapped three email addresses to the identities that Cohort Modeler generated for your query: your email, and two test emails from the SES Email Simulator. As a result, you should receive one email to the email address you selected when you’ve completed this process, as well as events which indicate the status of all campaign activities.

  • In the navigation bar of the Pinpoint console, choose All projects, and select the project you’ve created for this exercise.
  • From the navigation pane, choose Campaigns, and then Create a campaign at the top of the page.
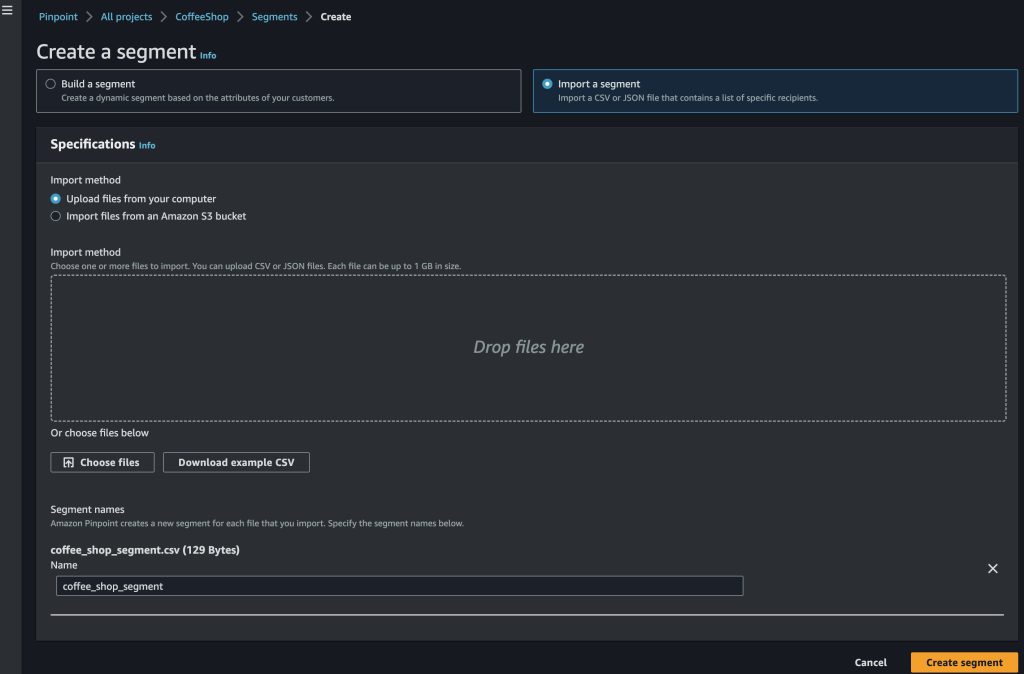
  • On the Create a campaign page, give your campaign a name, highlight Standard campaign, and choose Email for the Channel. To proceed, choose Next.
  • On the Choose a segment page, highlight Use an existing segment, and from the Segment dropdown, select the segment .csv that was created earlier. Once selected, choose Next.
  • On the Create your message page, you have two tasks:
    • You’re going to use the email template you created in the prior step, so in the Email template section, under Template name, select Choose a template, followed by the template you created, and finally Choose template.
    • In the Email settings section, ensure you’ve selected the sender email address you verified previously when you initially created the Pinpoint project.
    • Choose Next.
  • On the Choose when to send the campaign page, ensure Immediately is highlighted for when you want the campaign to be sent. Scroll down and choose Next.
  • Finally, on the Review and launch page, verify your selections as you scroll down the page, and finally Launch campaign.

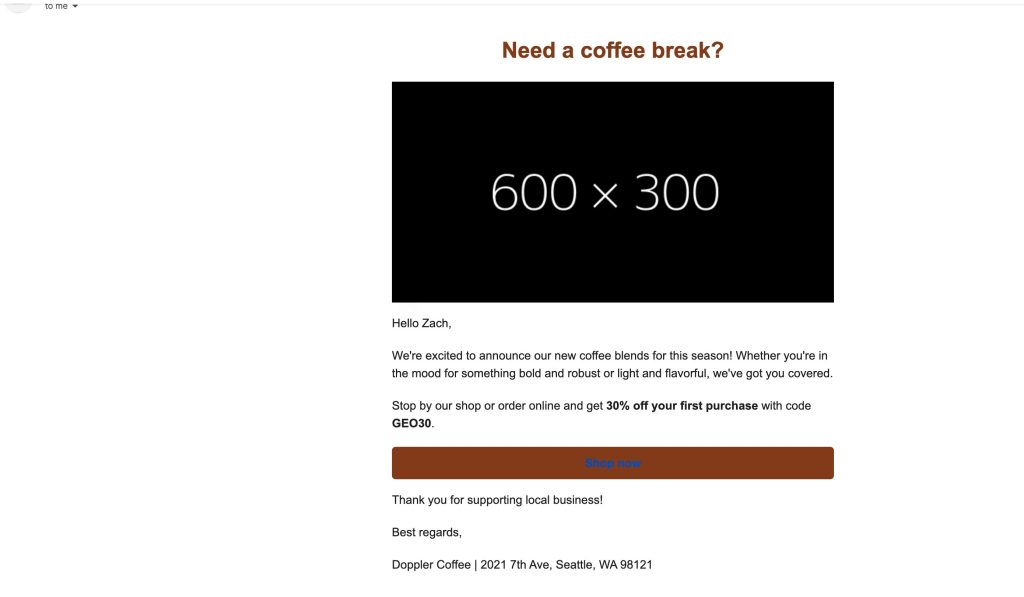
Check your inbox! You will shortly receive the email, and this confirms the Campaign has been successfully sent.

Conclusion

So far you’ve extended the Cohort Modeler to report on the cohorts it’s built for you, you’ve operated on that extract and built an ETL machine to turn that cohort into relevant contact and personalization data, you’ve imported the contact data into Pinpoint as a static Segment, and you’ve created a Pinpoint Campaign witih that Segment to send messaging to that Cohort.

In the next and final blog post, we’ll show how to respond to events that result from your cohort members interacting with the messaging they’ve been sent, and how to enrich the cohort data with those events so you can understand in deeper detail how your messaging works – or doesn’t work – with your cohort members.

Related Content

About the Authors

Tristan (Tri) Nguyen

Tristan (Tri) Nguyen

Tristan (Tri) Nguyen is an Amazon Pinpoint and Amazon Simple Email Service Specialist Solutions Architect at AWS. At work, he specializes in technical implementation of communications services in enterprise systems and architecture/solutions design. In his spare time, he enjoys chess, rock climbing, hiking and triathlon.

Brett Ezell

Brett Ezell

Brett Ezell is an Amazon Pinpoint and Amazon Simple Email Service Specialist Solutions Architect at AWS. As a Navy veteran, he joined AWS in 2020 through an AWS technical military apprenticeship program. When he isn’t deep diving into solutions for customer challenges, Brett spends his time collecting vinyl, attending live music, and training at the gym. An admitted comic book nerd, he feeds his addiction every Wednesday by combing through his local shop for new books.

How to implement multi-tenancy with Amazon Pinpoint

Post Syndicated from Tristan Nguyen original https://aws.amazon.com/blogs/messaging-and-targeting/how-to-implement-multi-tenancy-with-amazon-pinpoint/

Navigating Multi-Tenancy in Amazon Pinpoint

Businesses are constantly evolving, often managing multiple product lines, customer segments, or even geographical locations. Furthermore, many business-to-business (B2B) companies that are Independent Software Vendors (ISVs) will often need to manage their customer’s marketing automation environment. This complexity necessitates a robust customer engagement strategy that can adapt and scale efficiently. However, managing disparate systems for each tenant is not only cumbersome but also resource-intensive, leading to increased operational costs and potential data silos. A multi-tenancy setup in Amazon Pinpoint addresses these challenges head-on, allowing businesses to streamline their customer engagement efforts under a unified architecture.

The question is not just whether to adopt multi-tenancy, but how to implement it in a way that aligns with your unique business requirements. Amazon Pinpoint offers multiple approaches to achieve this. This blog explores three:

  • Single Pinpoint Project: Simple but demands careful permissions management.
  • Multiple Pinpoint Projects: Granular control but limited by soft project quotas.
  • Multiple Account & Multi Pinpoint Projects: Highly scalable but needs comprehensive monitoring.

We’ll delve into the pros, cons, and best use-cases for each as well as how to choose the different multi-tenancy configuration depending on your communications channels needs, guiding you to make an informed architectural decision.

In this blog, we’ll cut through the complexity, helping you align your Amazon Pinpoint architecture with your business goals. Let’s get started.

Single Account / Single Project (SA/SP)

Overview

In a Single Pinpoint Project setup, all customer engagement activities reside within one project and multi-tenancy within this context will leverage customer endpoint attributes. This streamlined approach allows for easy management, especially for those new to Amazon Pinpoint. A configuration example for this case is shown below:

Single Account / Single Project (SA/SP)

When preparing one Pinpoint Project and managing information for multiple tenants, tenant information can be managed by using custom user attributes of endpoints. Also, campaign information can be managed for each tenant by using the tag function for campaign information. The elements required to take this configuration are shown below.

  • S3 buckets that hold customer data:
    • Prepare an S3 bucket to store customer information lists to be imported into Pinpoint. Amazon Pinpoint allows you to import CSV files in S3 as segments. In order to make settings for each tenant in Amazon Pinpoint, we will include tenant information as custom user attributes in the CSV file.
  • 1 Amazon Pinpoint Project:
    • Create 1 Amazon Pinpoint Project.
    • Settings for each channel to be distributed are also required.
    • Campaign information can be assigned to tenant information by using the tag function.
  • Amazon Kinesis:
  • Athena and S3 buckets to analyze event data:
    • Store Amazon Pinpoint event data in S3 and analyze it via Athena. Take advantage of this solution.

One thing to keep in mind when adopting this configuration is that customer endpoint information exists in the same Pinpoint Project. It is possible to specify values that can be used to identify each tenant, such as custom attributes, and solve the problem with AWS Identity and Access Management (IAM) policies, but it is necessary to manage access rights and attributes on your own.

Also, to add an endpoint, you’ll need to specify its Channel and Address. Take note that one project cannot have the same channel and address for different endpoints. From the above, if the channel and address of the endpoint do not overlap between tenants, it is possible to construct your own access permission control, then this pattern can be examined.

Since fewer components are required compared to other patterns, the configuration is easier to start with. Some customers that want to build on top of Pinpoint API and want to simplify configuration on the Pinpoint side as much as possible can also choose this option. However, this approach can get complex to manage later on as you onboard more tenants. The issue presents itself when you want to create detailed reporting for your tenant in this configuration. You’ll have to have dedicated tags on each campaigns, journeys to operationalize granular reporting for your Amazon Pinpoint project.

Lastly, take note of service limits per Amazon Pinpoint project/AWS account to ensure your use case will be scalable should the need arise.

Single Account / Multiple Projects (SA/MP)

Overview

For this architecture, you are still using a single AWS account to host your Amazon Pinpoint environment, however, you will be creating multiple projects for each customer or tenant. A configuration example for this case is shown diagram.

Single Account / Multiple Projects (SA/MP)

In this example, we will create multiple Amazon Pinpoint Projects. One major difference from the case of the Single Pinpoint Project is that it is possible to completely separate customer endpoint information. When importing customer data segments, it is possible to manage each tenant in a separate state simply by importing them from S3 into the target Pinpoint Project. This makes it easy to control permissions via IAM policies.

Also, with Amazon Pinpoint, you can use email addresses, SMS numbers, message templates, etc. for transmission obtained with the relevant account in common to all projects, and event data for each project can be aggregated via Amazon Kinesis. By adopting such a configuration, you gain the benefits of separating endpoint information per project while still retaining basic setting information management and operator operations.

An example starter solution architecture to set up this configuration are shown below.

  • S3 buckets that hold customer data:
    • Similar to SA/SP, prepare an S3 bucket to store a list of customer information to be imported into Pinpoint. CSV to be imported must be prepared for each project.
  • Amazon DynamoDB Table:
    • Prepare a DynamoDB (or other key-value database) table to manage Pinpoint project information. Tenant information can also be stored as metadata in the DynamoDB table.
  • AWS Lambda:
    • Create a Pinpoint Project using Lambda. Amazon Pinpoint allows you to create and configure projects using the Amazon Pinpoint API, the AWS SDK, or the AWS Command Line Interface (AWS CLI). Thus, it is possible to automate the creation of the Pinpoint project and associated campaigns/journeys. Tenant information is also registered in DynamoDB at the time of creation.
  • Multiple Amazon Pinpoint Projects:
    • This is a Project created by Lambda above. There will now be a Pinpoint Project for each tenant, and endpoint information will be completely separated. It is also easy to control access rights for each project by using the IAM function.
    • Message templates: templates can be created and shared across projects.
    • By using Amazon Pinpoint’s event stream settings, campaign/journeys/app/channels events can be streamed to Amazon Kinesis. Multiple Amazon Pinpoint projects can all stream to one Amazon Kinesis stream. When setup correctly, event data will be tagged with the relevant tenant information so that an analytics solution can decompose the stream later on.
  • Athena and S3 buckets to analyze event data:
    • Amazon Pinpoint event data is stored in Amazon S3 and analyzed via Amazon Athena. The analytics solution, Amazon Athena in this case will be responsible for filtering event data and according to the tenant. Refer to this solution for more details.

Note that Pinpoint projects have a soft limit of 100 projects per AWS account, which can be increased via raising a Support Ticket, other quotas also apply at the project and the account level which should be taken into account.

From the above, it is necessary to note that there are restrictions on quotas per account when using the SA/MP and more initial configurations would be required to automate the process of project creation for individual tenants. However, when compared to SA/SP architecture,

Multiple Accounts & Multi Pinpoint Projects (MA/MP)

Overview

Before diving into the MA/MP approach, it’s crucial to understand the role of AWS Organizations in this configuration. AWS Organizations allows you to consolidate multiple AWS accounts into an organization to achieve centralized governance and billing. This feature is particularly useful in a MA/MP setup, as it enables streamlined management of multiple AWS accounts and Amazon Pinpoint projects from a single central management AWS account. For more information on AWS Organizations, you can visit the official AWS Organizations documentation.

In an MA/MP setup, we utilize separate AWS Accounts for each customer or tenant. A configuration example for this case is shown below.

In this example, we have created a Management account and prepared multiple AWS accounts under it. The management account manages the AWS account ID and the Pinpoint project ID, and has a configuration created with Lambda. Customer data and Event Stream Data are managed through a Management account, and information on each project is aggregated. A major benefit of this configuration is the ability to segregate actions of individual tenants, preventing the such as noisy neighbours antipattern. It also enables AWS accounts from being freed from quota restrictions that cannot be handled by a single AWS account. Additionally, Amazon Pinpoint has excellent CloudFormation coverage, and it is also possible to deploy highly reproducible architectures automatically.

The elements required to set up this configuration are shown below.

  • AWS Organizations:
    • Set up Organizations to manage multiple accounts. See Best Practices for setting up multiple accounts.
  • Management account:
    • Create an account to manage multiple account information. Here we will set the following elements. Use IAM roles and Service control policies (SCPs) when manipulating resources across accounts. This allows cross-account access. The required elements are the same as the SA/MP described above.
      • S3 buckets that hold customer data: With AWS, you can utilize S3 data across accounts. Set up cross-account settings and securely link customer data to each account.
      • Dynamo DB Table: Holds your AWS account ID, Pinpoint Project ID, and management information associated with it.
      • AWS Lambda: Create a Pinpoint project using Lambda.
      • Athena and S3 buckets to analyze event data: Event information from multiple accounts and Pinpoint projects is aggregated and analyzed.
  • AWS accounts and Pinpoint projects per tenant:
    • Depending on how tenants are separated, prepare an AWS account and Pinpoint Project. You can also consider automating account creation by using AWS CloudFormation.
    • There are cases where it is necessary to set the distribution channel email address, SMS number, etc. for each account. See the next section for details.
    • Amazon Kinesis is prepared for each account, but everything is stored in the same S3 in the Management account for easier bird-eye’s view reporting.

One thing to keep in mind is that since accounts are separated, it becomes necessary to manage each one separately. For example, newly created account will be placed in the sandbox state, and an application for actual use via support tickets is required for each account. Also, since all reputation is done on a single account, it is also necessary to monitor reputation for each account.

Navigating Channels in Amazon Pinpoint: Aligning Service Delivery with Architecture

Beyond choosing a Pinpoint architecture for multi-tenancy, it’s pivotal to decide which channels best deliver your services and how that decision is affected by your choice of multi-tenancy architecture. Below is a non-exhaustive lists of capabilities in Amazon Pinpoint that will help with your multi-channel, multi-tenancy configurations as well as potential blockers that you’d need to be aware of for each channels.

Email

Email is one of the most versatile channels, with integration with Amazon SES’s configuration sets and email suppression list capability, easily fitting into any of the three multi-tenancy models.

  • Configurations Sets: Using configuration sets, you’d be able to segregate your email sending activities using different IP Pools, as well as different event destinations.
    • You can use configuration sets in both Amazon Pinpoint and Amazon SES. Configuration sets rules that you configure in Amazon SES are also applied to email messages that you send using Amazon Pinpoint.
    • SA/SP and SA/MP: Email templates and sending IP addresses needs to be tagged using configuration sets for each tenant in the Pinpoint project.
    • MA/MP: Email templates and sending IP address can be sent using the account default, or follow granular tagging using configuration sets.
  • Email Suppression List: Suppression list is managed automatically at the account level. Alternatively, you can specify whether a specific configuration can override the account-level suppression list.
    • SA/SP and SA/MP:
      • All tenants will also follow the same account suppression list:
        • If any tenant sends to an email address that hard-bounced or complaint, all other tenants will also be unable to send emails to the same address.
        • You will have to manually override the account-level suppression list for each email addresses.
    • MA/MP:
      • If one of your tenant sends an email to a hard-bounced or complaint address, only the AWS account that the tenant belongs to will respect the suppression list i.e. other tenants in other AWS account can still send email to that email address.
  • Noisy Neighbour Threat: Broadly, this occurs when one tenant’s performance is degraded because of the activities of another tenant. Applied to email, the anti-pattern needs to be addressed because you don’t want one bad actor tenant to affect the entire environment’s email sending activity.
    • SA/SP and SA/MP:
      • Because email bounce and complaint rates are tracked at the account level, it is possible your entire account email sending domain to be blocked due to high bounce/complaint incidences from one bad tenant.
      • To mitigate this, it’s best practice to set up dedicated configuration sets and alarms to alert when any individual tenant is exhibiting high bounce/complaint rate.
    • MA/MP:
      • Offers the most segregation and ensure email identities/domains are only usable by one tenant/account.
  • Email Sending Quota:
    • Email daily sending quota and email sending rate live at the account level.
    • SA/SP and SA/MP:
      • You would need to anticipate the total daily sending quota and sending rate for all tenants in your AWS account and raise the service limits accordingly. Therefore, more planning will be involved to estimate the correct service limit threshold.
    • MA/MP:
      • You can raise service limits per individual tenant’s needs since each tenant will be on a separate AWS account.
      • It is best practice to have business process in place for individual tenant to notify of their email sending quota request in advance so that it can be raised accordingly for their AWS account.
  • For further discussion into sending emails in a multi-tenancy environment, refer to this AWS blog on Multi-Tenancy in SES.

SMS

  • Origination Identity procurement: When opting for MA/MP setup, remember that OIDs (phone numbers) are bound to AWS accounts.
  • Since OIDs do not carry across account, you will need to repeat the procurement process for every new AWS account.Number Pooling: This feature groups phone numbers or sender IDs. It’s particularly useful in a Single Project model to segment communications per tenant.
  • Configuration Sets: With the release of the V2 SMS and Voice API, you can now use configuration sets to manage your SMS opt-out lists, OIDs and event streaming destinations for a multi-tenant environment.
  • Noisy Neighbour Threat:
    • SA/SP and SA/MP:
      • Take note that if you do not specify an OID in your API call, Amazon Pinpoint will attempt to use the most suitable (in terms of throughput and deliverability) OID to send your SMS. This
      • Similar to email, you can leverage number pooling and configuration sets to segregate SMS sending activity within a single account. This helps protect’s your SMS OID reputation because it can be costly and time-consuming to request new OIDs.
    • MA/MP:
      • Offers the most segregation and ensure numbers are only usable by one tenant/account.
  • SMS Opt Outs: Similar to the email channel’s suppression list, opt-outs are managed per account and configuration sets. Therefore, in a MA/MP setup, a customer that has opted out from communication in one account can still receive communications from other accounts.

Push Notifications

Amazon Pinpoint integrates with various push services like FCM, APNS, Baidu Cloud Push, and ADM.

  • Project-level Authentication: Authentication information is set at the Pinpoint Project level, requiring separate management.
    • Therefore, you will not be able to use the SA/SP architecture for multiple tenants using different applications.
  • For more information, refer to the Mobile Push Guide

In-app Messages

  • Pinpoint Project Specific: Similar to push notifications, each Pinpoint Project can only house one in-app message application.
    • If you have multiple applications requiring in-app messages, you will not be able to employ the SA/SP architecture.
  • For more information, refer to the In-app Channel Documentation.

Custom Channels

  • Custom channels in Amazon Pinpoint allow you to send messages through any service that has an API, including third-party services. You can interact with APIs by using a webhook, or by calling an AWS Lambda function.If you are using custom channels extensively from Amazon Pinpoint, you’ll need to be aware of service limits in AWS Lambda, , especially if you’re considering SA/SP or SA/MP architectures.

Conclusion

In this blog, we’ve untangled the intricacies of implementing multi-tenancy in Amazon Pinpoint. Our deep dive covered three architectural patterns:

  • Single Account/Single Project (SA/SP): A beginner-friendly approach offering simple management but requiring meticulous permissions handling to segregate sending activity between different tenants.
  • Single Account/Multiple Projects (SA/MP): Offers granular control over customer data with slight increased in management complexity. However, this approach faces soft quotas and potential ‘Noisy Neighbor’ issues.
  • Multiple Accounts/Multiple Projects (MA/MP): Provides the most flexibility and isolation, albeit with increased management complexity.

Each approach comes with its own set of trade-offs related to ease of management/reporting, scalability, and control over customer data. Our discussion didn’t stop at architecture; we also examined how your multi-tenancy decisions will affect your channel configurations in Amazon Pinpoint. From email and SMS to push notifications, the architectural choices you make will have a direct impact on how efficiently you can manage these distribution channels. Armed with this information, you’re now better equipped to make informed decisions that align with your business objectives.

Call to Action

Your next step? Implement and architect your Amazon Pinpoint environment. Use the best practices and architectural guidelines outlined in this blog post as your north star. Going forward, the architectural blueprint you choose should be tailored to your specific needs—be it user count, company size, or distribution channels. Take into account not just the initial setup but also the long-term management aspects, including the respective service limits and quotas.

Relevant Links

About the Authors

Tristan (Tri) Nguyen

Tristan (Tri) Nguyen

Tristan (Tri) Nguyen is an Amazon Pinpoint and Amazon Simple Email Service Specialist Solutions Architect at AWS. At work, he specializes in technical implementation of communications services in enterprise systems and architecture/solutions design. In his spare time, he enjoys chess, rock climbing, hiking and triathlon.

Tatsuya Nakamura

Tatsuya Nakamura

Nakamura Tatsuya is a Solutions Architect in charge of enterprise companies at AWS. He is mainly in charge of the trading company industry and the distribution/retail industry, also supporting the implementation of Amazon Pinpoint for Japanese customers. His career so far includes ERP implementation support and multiple new web service launches.

How to send geofenced marketing messages using Amazon Pinpoint

Post Syndicated from Zach Elliott original https://aws.amazon.com/blogs/messaging-and-targeting/send-geofenced-marketing-messages-using-amazon-pinpoint/

Introduction

Geofencing, which creates a virtual geographical boundary that triggers a marketing action to a mobile device when a user enters or exits that boundary, can be used in marketing messages to drive more traffic and increase conversions. Amazon Pinpoint, AWS’ multichannel communication tool, can be used to create mobile notifications using geofencing technology, so customers receive notifications about a business when they’re close by that physical location.

Ways retailers can use geofencing:

There are a number of different use cases that retail or location-based businesses can use geofencing to drive customer conversions:

  1. Target the customer with real-time offers and promotions when the customer is near the store: Detecting and establishing an interaction with the customer while in the store improves the customer experience. Using geofencing, retailers will be able to detect the presence and will be able to send coupon or promotional notifications.
  2. Improve product search in the store: As the consumer enters the geofenced store, activate the product search for the store to help the consumer to search and navigate easily within the store.
  3. Get more information about the customer in the store: Retailers will be able to collect more accurate consumer behavior inside the store by recording the interaction between the consumers and product search, and using geofencing and position to calculate the dwell time inside the store or how long the consumer is waiting in the queue.

In this blog we will talk about how you can use Amazon Location Service to trigger a notification using Amazon Pinpoint when a consumer enters a geofenced store.

Architecture Overview

Architecture Overview for Pinpoint and Geofencing Solution

Fig. 1: Geofencing and Pinpoint – Sample Architecture

Figure 1 depicts the solution architecture and resources deployed by the AWS CloudFormation Template, described in more detail in later sections. In the solution workflow:

  1.  Store Management defines a Geofence around store locations they wish to enroll using Amazon Location Service Geofencing and circular geofences.
  2. A customer who has opted into location tracking using the app will update an Amazon Location Service Tracker Resource. This tracker will be evaluated against the store geofences.
  3. If a geofence ENTER event is triggered, a message is sent to Amazon EventBridge.
  4. EventBridge will trigger an AWS Lambda function.
  5. The Lambda function looks up the Store Information in an Amazon DynamoDB table that matches the geofence ID in order to enrich the email.
  6. Event is sent to a Pinpoint Journey with information from the Geofence event as well as store info.
  7. Personalized email is sent to customer via Pinpoint

Configuring AWS Cloudformation

To deploy the Amazon Location Service resources as well as EventBridge, DynamoDB, and Lambda, we have created an AWS Cloudformation Template.

Use this link to launch the CloudFormation stack in the US-West-2 region. Selecting the button next to “I acknowledge that AWS CloudFormation might create IAM resources.” click Create stack

Fig 2. Cloudformation Console

Fig. 2: AWS CloudFormation Console showing stack options.

Once the stack is complete. We can begin configuring Pinpoint.

Configuring Pinpoint

Our project was created for us via the CloudFormation template, but we still need to configure some items in Pinpoint. First, we’ll set up our email identity to send and receive messages from; for the purposes of this blog, you’ll use the same email address for sending and receiving the email, but in a production environment, your sending identity could either be a specific email address you’ve verified for messaging, or an entire email domain you’ve verified via DNS.

Configuring email channel

Adding an email

  1. On the left-side Pinpoint menu, expand the Email option and choose Email identities
  2. Select Verify email identity
  3. Enter an email address you have access to for the confirmation step
  4. Select Verify email address
Fig. 3: Verifying email identity

Fig. 3: AWS Console showing email verification

Fig. 4: Email verification options

Fig. 4: Email verification options

Now, check your inbox for a verification email. It should look something like this:

Fig. 5: Email Verification message from Amazon Pinpoint

Fig. 5: Email Verification message from Amazon Pinpoint

Click the link to verify your email address. Now we can begin sending and receiving messages at this address.

Now that we have a verified email, we can configure the email channel.

Configuring the email channel

  1. On the left-side Pinpoint menu, navigate to All projects and select CoffeeShop
  2. Navigate to Settings and select Email
  3. Select Edit next to Identity details
  4. Select the checkbox for Enable the email channel for this project
  5. Select Use an existing email address and select the address you verified in the previous step.
  6. Select Save
Fig. 6: Configuring the email channel

Fig. 6: Configuring the email channel

Configuring email template

Next, we need to define what our email looks like that is sent to our customers when they enter a geofence. We’ve provided HTML code for a basic Coffee Shop template here

Configure email template

  1. On the left-side Pinpoint menu, navigate to Message templates, select Create template
  2. Name the template CoffeeShopGeoTarget and set the subject to “We haven’t seen you in a while”
  3. Paste the contents of the HTML template into the Message field.
  4. Select Create
Fig. 7: Configuring the email template

Fig. 7: Configuring the email template

You can see multiple attributes are used in the template. These attributes come from our segment in the case of FirstName, and DynamoDB in the case of the store name and address.

Configuring email segment

Now we need to define who we are going to send an email to. For this, we need to set up our segment within Pinpoint. We’ve provided a sample segment file here. Download this file and open it in a text editor.

Fig. 8: Configuring the email segment

Fig. 8: Configuring the email segment

Replace all the values with your own information . The email needs to be the same email we verified in an earlier step. Create a UserID for the user that can be used to uniquely identify them. Leave ChannelType as “EMAIL” to indicate we are using the email channel in Pinpoint, and leave OptOut as “NONE” which indicates the user would like to receive all communications and has not opted-out of receiving notifications. Once the information is edited, save the file.

Importing the segment

  1. On the left-side Pinpoint menu, navigate to All projects, and select your CoffeeShop Project
  2. Navigate to Segments and select Import a segment
  3. Drag the downloaded csv file into the Drop files here box.
  4. Select Create Segment
Fig. 9: Importing a segment

Fig. 9: Importing a segment

Configuring Journey

In this post, we will be setting up a very simple Journey that sends an email anytime a user enters a geofence. If we wanted to go a step farther, we could add additional activities later in the Journey such as determining if the customer purchased something based on receiving the email, and sending them targeted emails based on the drink they ordered.
Now that we’ve added the email channel, we can set up our journey.

Configuring journey entry

  1. On the left-side Pinpoint menu, navigate to the CoffeeShop Project and select Journeys
  2. Select Create journey
  3. Name the journey “CoffeeShopGeoTarget
  4. Set the entry condition to “geofence enter”
  5. Select Save
Fig. 10: Journey event configuration

Fig. 10: Journey event configuration

Configuring journey activity

  1. Select the Add activity icon
  2. Select Send an email from the dropdown
  3. Choose the email template we created earlier
  4. Enter the verified email we configured earlier
  5. Select Save
Fig. 11: Journey email destination configuration

Fig. 11: Journey email destination configuration

Reviewing Journey

  1. Select Review
  2. Select Mark as reviewed
  3. Select Publish
Fig. 12: Reviewing the Journey

Fig. 12: Reviewing the Journey

Once we publish our journey, a 5 minute timer will start, which will give us time to set up our tracking environment.

Configuring Amazon Location Resources

Now that we’ve configured Pinpoint to send geotargeted emails, we need to set up our Geofences as well as emulate a person passing nearby our coffee shops. To do that, we will use the AWS CLI and AWS Cloudshell .

To open AWS CloudShell, select it in the upper right near the region selection.

Fig. 13: Location of AWS Cloudshell in the AWS Console

Fig. 13: Location of AWS Cloudshell in the AWS Console

AWS CloudShell will now open in the bottom half of the AWS Console , note it may take up to a minute on first launch. First, we’ll create our geofences. For this, we will use Circular geofences around a point location. In this case, we will create two geofences, one for a Coffee shop at Amazon’s Doppler office, and one for a shop at Amazon’s Nitro North office. These correlate with the DynamoDB store information table.

aws location put-geofence --collection-name StoreCollection --geofence-id store_1508 --geometry 'Circle={Center=[-122.33826293063228, 47.61530011310656], Radius=100}'

Successful Geofence creation will create output similar to the below:

{
"CreateTime": "2023-04-21T19:31:57.807000+00:00",
"GeofenceId": "store_1508",
"UpdateTime": "2023-04-21T19:31:57.807000+00:00"
}

Next we create our second geofence:

aws location put-geofence --collection-name StoreCollection --geofence-id store_1509 --geometry 'Circle={Center=[-122.34051934099395, 47.61751544952795], Radius=100}'

Successful Geofence creation will create output similar to the below:

{
"CreateTime": "2023-04-21T19:32:41.980000+00:00",
"GeofenceId": "store_1509",
"UpdateTime": "2023-04-21T19:32:41.980000+00:00"
}

Now that our geofences are created, we can emulate a person walking by and triggering a geofence. We will do this using Amazon Location Service Trackers. In CloudShell, enter the following command:

aws location batch-update-device-position --tracker-name CustomerDevices --updates Accuracy={Horizontal=0},DeviceId=111,Position=-122.33811005706218,47.61541094771129,SampleTime=$(date +%s)

When this command is issued, a geofence is then evaluated which will trigger an event sent to Amazon EventBridge. This event then triggers a Lambda, which creates an event with Pinpoint. This triggers the Journey, which sends an email.

Now check your email, you should see a customized email with the store you were close to and your name . Note because we are not using domain verification, you may receive a warning on the email message. See our documentation on how to use domain verification.

Fig. 14: Email received from Amazon Pinpoint

Fig. 14: Email received from Amazon Pinpoint

Next Steps

For this blog, we used the default Journey configuration. However, we can further optimize our Journey by following Tips and best practices for journeys. You can also set up push notifications or in-app notifications to further optimize the customer experience to catch them in the moment they walk by, instead of when they may check their email next. You can read more about push notifications here.

Clean up

Deleting CloudFormation template

  1. In the AWS Console, navigate to the AWS CloudFormation console. Select the PinpointGeotarget stack
  2. Select Delete Stack

Deleting Pinpoint resources

  1. In the AWS Console, navigate to the Pinpoint Console
  2. Select Message templates
  3. Select the CoffeeShop template
  4. Select Delete then confirm you wish to delete it

Removing email identity

  1. In the AWS Console, navigate to the Pinpoint Console
  2. Navigate to Email, and select Email identities
  3. Select the radio button next to the verified email you configured
  4. Select Remove email identity
  5. Type Delete to confirm the removal

Conclusion

In this post, we explored how you can detect the presence of the customer whenever they cross near the geofenced physical store, using Amazon Location Service in which Amazon EventBridge receives the event, triggers an AWS Lambda function, and then triggers a Journey in Amazon Pinpoint to send a notification to the customer with a coupon.

Further more, integrating this solution with your customer data platform and with Amazon Personalize will help you to personalize the promotions and vouchers to fit the tastes and tendencies of customers

Zach Elliott works as a Solutions Architect focusing on Amazon Location Service at AWS. He is passionate about helping customers build geospatial solutions on AWS. He is also part of the IoT Subject Matter Expert community at AWS and loves helping customers develop unique IoT-based solutions.

Anshul Srivastava Headshot

With an illustrious track record as a technology thought-leader, Anshul joined AWS in 2016 and is the EMEA technology leader for retail. He is responsible for defining and executing the company’s retail technology strategy, which includes building retail-focused solutions with services like Amazon Forecast and Amazon Personalize, as well as experiences like Frictionless Shopping with AI/ML and IoT services from AWS. Anshul also works very closely with AWS global retail customers to help transform their businesses with cutting-edge AWS technologies.

Customize marketing messages and promotions for personalized outreach

Post Syndicated from binpazho original https://aws.amazon.com/blogs/messaging-and-targeting/customize-marketing-messages-and-promotions-for-personalized-outreach/

Introduction

Amazon Pinpoint is widely used by many customers for their various user engagement use cases like marketing campaigns, scheduled communications (newsletters, reminders, etc.), and transactional messaging. By using the message template feature in Amazon Pinpoint, customers can design messages personalized to the specific end users, by using variable attributes. While Amazon Pinpoint enables customers to include up to 250 attributes for each user, often times there might be need to pick and choose from a wide range of attributes about a user, that can lead to needing more than the allowed number of attributes.

The CampaignHook feature of Amazon Pinpoint can come to rescue for a situation like this. Using the CampainHook feature, we can filter out attributes that are not applicable to a specific user, while allowing to add new attributes, right before of sending the message. In this blog, I will walk you through how I have implemented the CampaignHook feature for a similar use case.

Sample Use-Cases

When setting up your Pinpoint campaign, following are the use cases where a CampaignHook can be enabled:

  • Retrieving data and perform custom compute logic in real time from third party data stores.
  • Filter endpoints out of the send: This is useful if you need to do some type of custom logic that you can’t do in Segmentation (custom opt-out, quiet time, campaign prioritization, etc.)
  • Avoid costly and time consuming Extract, Transform & Load (ETL) processes by accessing the data sources directly and applying custom compute logic in real-time.

Solution overview

CampaignHook Demo Architecture

The diagram above shows the solution that we will setup in this blog. As you can see, the Campaign event will trigger the Amazon Pinpoint Campaign. The event can be triggered from your web or mobile app that are accessed by your end-users, and can be setup to be triggered when the user performs a certain action. You can read more about setting up Amazon Pinpoint campaign in the user guide. By having the CampaignHook enabled on your Amazon Pinpoint campaign, the Lambda function that is configured with the CampaignHook will be triggered. This function will have access to the endpoint attributes passed by the Campaign event, and perform additional logic to derive new attributes for the user. Once all the new fields are derived, the function will update the user endpoint. Amazon pinpoint will then perform the next steps in the Campaign, and substitute the variables in the message template, before the personalized message is sent to the end user.

Prerequisites

  • AWS Account with Console and Programmatic access
  • Access to AWS CloudShell
  • Email channel enabled in Amazon Pinpoint

Building the demo

Build the Amazon Pinpoint Project

From the AWS Management console, go to Amazon Pinpoint and create a new project called “PinpointCampaignHookDemo”, and choose the option to enable the email channel. For more information about creating a project see the user guide, and follow the instructions here to setup your email channel.

If your account is in the Sandbox account, you will need to verify the email address, before you can send the email. You can follow the steps here to upgrade your account to a Production status if you are ready to deploy this solution to production.

Create the segment.

A segment is a group of your users that share certain attributes. For example, a segment might contain all of your users who use version 2.0 of your app on an Android device, or all users who live in the city of Los Angeles. You can send multiple campaigns to a single segment, and you can send a single campaign to multiple segments.

For this demo, let’s create a Dynamic Segment. Let’s call it ‘CampaignHookDemoSegment’.  Follow the steps here to create your Dynamic Segment.

Create a Segment

Setup message template

Let’s create our first template and call it “CampaignHookDemoTemplate”. You can read more about Amazon Pinpoint templates in the user guide.

For this demo, I have used the HTML template shown below, and I have 3 endpoint attribute variables: 2 that are passed from the campaign event trigger, and the third one (Company) that will be generated by the CampaignHook lambda function. For the subject of the email, I used “Campaign Hook Demo Campaign“.

Create eMail Template

The email template can be found in this GitHub repository.

Create Campaign

Next, create your campaign and use the Segment and email Template that you created in the previous steps by following the instructions here.

Select the ‘when an event occurs’ option to trigger the campaign when an event occurs. (This option will trigger the campaign when a specific event occurs). Yoy may also schedule your campaign to run on a scheduled bases as available in the setup screen. I used ‘CampaignHookTrigger’ as my event name.

Create a campaign

Set your Campaign Start date, time and end date. I have left all the other settings to default and saved the campaign. Now that you have successfully created your first Campaign, you are ready for the next steps.

Set Campaign Start and End Times

Create the Lambda function

This is the function that we will configure to trigger the Amazon pinpoint campaign event . From the Lambda console page, create a new function by clicking on the ‘Create function’ button. You can then pick the following options and create the function.

Name: Campaign_event_trigger_function

Runtime: Python 3.9 or higher.

Replace the default script with the code from the GitHub repository, and then deploy your code by clicking on the “Deploy” button.

Assign permissions

In-order for the Lambda function trigger to trigger the Pinpoint Campaign, you will need to add an inline policy to the IAM role that is attached to your Lambda function, by selecting Pinpoint as the service and PutEvents from the Write options. You can select the Lambda function as the resource to which the access will be granted.

{

    "Version" :"2012-10-17",

    "Statement":[

        {

            "Sid": "VisualEditor0",

            "Effect": "Allow",

            "Action": [

                "mobiletargeting:PutEvents"

            ],

            "Resource":"ARN of your Lambda function goes here."

        }

    ]

}

Create the CampaignHook Lambda function

This is the function that we will triggered from the CampaignHook. From your Lambda console, click on “Create function” and enter the basic information as shown below to create your function.

Name: CampaignHookFunction

Runtime: Python 3.9 or higher.

Next replace your default code with the sample GitHub code, and then deploy your code by clicking on the “Deploy” button.

Assign permissions

Next add permissions for Amazon Pinpoint to invoke the Lambda function by running the command below from your Command Shell. Replace the Lambda function name and Account number with yours.

aws lambda add-permission \

--function-name [YourCampaignHookLambdaFunctionName] \

--statement-id my-hook-id1 \

--action lambda:InvokeFunction \

--principal pinpoint.us-east-1.amazonaws.com \

--source-arn 'arn:aws:mobiletargeting:us-east-1:[YourAccountNumber]:apps/*'

You can also do this from the Lambda console, by clicking on “Configuration” and then scrolling down to “Resource based Policy” and by clicking on “Add permissions“.

Update Campaign settings to add the Campaign Hook

Now that you have the Lambda function that needs to act as the hook is created, and granted Amazon Pinpoint service to invoke that function, run the command below to update the Campaign settings to add the Campaign Hook. You can also set a default CampaignHook for ALL campaigns in the project by setting the CampaignHook property on the Project Settings via this API.

Replace the application-id (project id), campaign-id, and the arn of the Campaign Hook lambda function and run the command below. (You can find the Project ID by clicking on All Projects at the top-left of the Pinpoint Console. The Campaign ID can be found by opening your Pinpoint Project and then clicking Campaigns in the Pinpoint Console.)

aws pinpoint   update-campaign --application-id /

[your-application-id-goes-here] –campaign-id /

[your-campaign-id-goes-here] --cli-input-json '{"ApplicationId": /

"","CampaignId": "","WriteCampaignRequest": {"Hook": {"LambdaFunctionName": /

"your-CampaignHook-Function-goes-here","Mode": "FILTER","WebUrl": ""}}}'

You can optionally run the command below to make sure that the campaign settings have been updated:

aws pinpoint get-campaign –application-id [your-application-id-goes-here]  –campaign-id [your-campaign-id-goes-here]

Test your Campaign.

Go back to your Lambda function that you have created to trigger the Campaign in the “Create the Lambda function” step above. I have used the test event as shown below. Update the Application id to reflect your Project id and change the email address to the email you verified earlier and click on “Test” button.

{

    "application_id": "your application id",

    "endpoint_id": "223",

    "event_type": "CampaignHookEvent",

    "nextTestDate": "12/15/2025",

    "FirstName": "Jack",

    "email": "[email protected]",

    "userid": "Jack123"

}

You should now receive an email with the variables replaced with the values that was passed from your json payload. Further you can see the Company name was added to the endpoint from the CampaignHook Lambda, which is passed to the email template. If you have not received the email, please check the following:

  • The Lambda function ran without any errors
  • The LambdaHook function has the proper rights assigned to be invoked from Pinpoint
  • The From and To email id that you have used are verified in SES.

Verify email identity

Clean up resources

Once you are satisfied with your setup and testing, you can now clean up the resources by following the steps below:

  • Delete your Amazon Pinpoint Project, Campaign and Segment.
    • aws pinpoint delete-campaign –application-id [your appl id] –campaign-id [your campaign id]
    • aws pinpoint delete-segment –application-id [your app id]  –segment-id [your segment id]
    • aws pinpoint delete-app –application-id [your app id]
  • Delete you Lambda functions
    • aws lambda delete-function –function-name CampaignHookFunction
    • aws lambda delete-function –function-name Campaign_event_Trigger_Function

Conclusion

By dynamically generating the attributes in real-time, customers can now add greater levels of personalization within a single user message template. By invoking a Lambda function, you can perform custom compute logic, calculate new attribute values, and access external data stores, to modify the campaign’s segment, right before Amazon Pinpoint sends the message. Campaign Hook feature makes this possible as explained in this blog by running few basic CLI commands to enable the feature on your Amazon Pinpoint Campaign. You can read more about Amazon Pinpoint Campaign from the user guide documentation”.

How to build LINE messaging into business communications

Post Syndicated from nnatri original https://aws.amazon.com/blogs/messaging-and-targeting/how-to-build-line-messaging-into-business-communications/

In today’s interconnected world, businesses need to communicate with their customers through multiple channels. This means using a variety of messaging apps, social media platforms, and other communication tools to reach customers where they are. One such platform that has gained immense popularity in select Asian markets is LINE. As the biggest social network in Japan, LINE offers businesses a unique opportunity to connect with customers in this region. Within Japan alone, LINE’s 2021 data shows 86 million users, constituting approximately 85% of Japan’s adult population. However, managing communication through multiple channels can be challenging for businesses.

That’s where Amazon Pinpoint comes in. Amazon Pinpoint is a flexible communication service for businesses that simplifies the process of sending targeted messages to customers across multiple channels. In this blog post, we’ll focus on how to integrate LINE with Amazon Pinpoint. This post is part of a series on integrating different communication channels with Amazon Pinpoint, and it is intended for both marketing operations and communication developers.

If you are already using LINE, this blog post will help you centralize management within Amazon Pinpoint. Additionally, if you are looking to integrate another messaging service with an open API, the steps outlined here will provide a helpful guide. Finally, if you’re a business looking to tap into Asian markets, this blog post is essential reading. By integrating LINE with Amazon Pinpoint, you’ll be able to reach your customers on the platform they are already using, providing seamless end-to-end customer engagements that will greatly enhances customer experience.

Note
Line is a third-party service that is subject to additional terms and charges. Amazon Web Services isn’t responsible for any third-party service that you use to send messages with custom channels.

Why Integrate LINE with Amazon Pinpoint?

Integrating LINE with Amazon Pinpoint has several benefits for businesses:

  • Centralized communication management: With LINE integrated into Amazon Pinpoint, businesses can centralize the management of outbound communication channels and simplify their communication workflows.
  • Increased flexibility for marketing campaigns: With LINE added as a custom channel in Amazon Pinpoint, businesses can create targeted messaging campaigns and reach customers through multiple channels, including LINE. Along with Pinpoint journeys, businesses can craft end-to-end customer engagement journeys that start from one channel and end in another.
  • Access to LINE’s popular messaging platform: With LINE integrated into Amazon Pinpoint, businesses can tap into the app’s massive user base in select Asian markets and engage with their customers through a popular and widely used messaging platform. Having access to LINE’s demographics of approximately 50% office workers with high penetration into 20s-30s age band, brands can tap into this high-spending power segment to drive revenue for their products.

Architecture

This solution uses Amazon Pinpoint,AWS Lambda, Amazon API Gateway, Amazon Simple Storage Service (Amazon S3), AWS Secrets Manager and LINE Messaging API

Line Pinpoint Solution Architecture

The solution architecture can be broken up into two main sections:

  • Steps 1-4 cover handling inbound user events and managing user data within Amazon Pinpoint.
  • Steps 5-8 cover how to send outbound campaigns via Amazon Pinpoint Custom Channel.
  1. The customer subscribes to the business’ LINE channel.
  2. The subscribe/unsubscribe event is received and checked via Amazon API Gateway.
  3. The edge-optimized Amazon API Gateway passes valid requests via a proxy integration to the backend Lambda.
  4. The backend Lambda compares the request body with the x-line-signature request header to confirm that the request was sent from the LINE Platform, as recommended by LINE API document. Afterwards, the Lambda function processes the user events:
    1. If the user subscribes to the channel, a new endpoint will be added to Amazon Pinpoint’s user database.
    2. If the user unsubscribes from the channel, the corresponding endpoint (identified by the LINE User ID) is deleted from Amazon Pinpoint’s user database.
  5. Amazon Pinpoint initiates a call to a Lambda function via Custom Channel with a payload. Of particular importance would be the Data field contained within the payload, which can be specified within the Amazon Pinpoint console to modify the content of the message.
  6. If the message contains image/audio/video files, the Lambda will request the file from the corresponding Amazon S3 buckets to be included for step 7. Amazon S3 then sends back the presigned URL containing the requested file(s).
  7. The Lambda function puts the message in the correct format expected by the LINE Messaging API and sends it over to the LINE Platform.
  8. The LINE Messaging API receives the request and processes the message content. If necessary, it will retrieve and download the file from Amazon S3 using the presigned URLs generated in step 6 then finally send the message to the corresponding user on the LINE Mobile App.

Step-by-Step Deployment Guide

Prerequisites

To deploy this solution, you must have the following:

  1. An AWS account, with the appropriate AWS CLI profile.
    • Named Profile: Run aws configure with the --profile option. The following steps assumed you have created a profile called line-integration to use with AWS CDK.
  2. Minimum Python v3.7, with pip and venv
  3. AWS CDK v2 installed.
  4. Docker Engine installed. You can download and install the appropriate Docker Desktop Distribution for your system via this link
  5. A LINE Account.
    • If you have never worked with LINE Messaging API before, you should login to to LINE Developers Console using one of the following accounts.
      • LINE account
      • Business account
    • Afterwards, you should create a new provider. Create Line provider
    • Within the provider page, you can then choose to create a new channel. For our Integration purposes, we will be choosing Messaging API channel type.
      Create Line channel

Preparation

The source code can be found in this GitHub Repository.

  1. Fork the GitHub Repo into your account. This way you can experiment with changes as necessary to fit your workload.
  2. In your local compute environment, clone the GitHub Repository and cd into the project directory.
  3. Run the following commands to create a virtual environment, activate it and install required dependencies.
python3 -m venv env \
&& source env/bin/activate \
&& python -m pip install -r requirements.txt

Deploy the CDK

  1. We can set the AWS CLI profile in CDK commands by adding the --profile flag. Run the following commands to bootstrap your AWS environment, synthesize the CDK template and deploy to your environment.
cdk bootstrap --profile LINE-integration \
&& cdk synth --profile LINE-integration  \
&& cdk deploy --profile LINE-integration 

Note
Enter y when prompted with Do you wish to deploy these changes (y/n)?

  1. After the deployment is done, the CDK template will output the API Gateway endpoint URL which takes the form of https://[********].execute-api.[region].amazonaws.com/prod/. Copy down this information as you will need it to set up the webhook connection later on.

Getting LINE Official Account Credentials

  1. Log in to LINE developer console.
    Login to Line account
  2. Once inside, choose the channel you’d like to have integrated with Amazon Pinpoint. This assumes that you’ve created a provider and a channel as mentioned in the Prerequisite section.
    Inside Line account console
  3. In the Basic settings tab, scroll down and note down the Channel Secret.
  4. In the Messaging API tab, scroll down and click on Edit under Webhook URL and enter the API Gateway endpoint URL you have noted down in step 5. Click on Update to save the changes.
    Line Webhook settings
    NOTE Once you have finished entering your Channel Secret token in step 14, you can return to this page to Verify your webhook URL is set up correctly).
  5. Finally, issue a Channel Access Token (at the bottom of the Messaging API tab) and note it down.
    Line channel access token settings

Registering Secrets in AWS Secrets Manager

  1. Navigate to the AWS Secrets Manager console. Make sure you’re in the same region as your CDK deployment region.
  2. Click on Secrets in the left side pane. You should find a secret with the name LINE_secrets
  3. Click on Retrieve Secret Value.
    Set Line secrets in Secrets Manager
  4. Then click on Edit:
    • Replace YOUR_CHANNEL_SECRET secret value with the channel secret you issued in step 10.
    • Replace YOUR_CHANNEL_ACCESS_TOKEN secret value with the access token you issued in step 10

Marketing Operations Demonstration

Once you’ve successfully deployed the CDK and configured your secrets, you can immediately get started sending communications campaign to your customers.

LINE supports multimedia messaging formats, meaning that you can choose to send texts, images, audio and even video files to your customers as part of your campaigns. You just need to make sure that your customers have subscribed to your channel.

Create a segment of subscribed users

The deployed solution has integrated user database management with Amazon Pinpoint so once users start subscribing to your LINE channel, they will be added as endpoints. To start filtering out who we should send to, you can create segments of your subscribers.

  1. Navigate to the Amazon Pinpoint console.
  2. On the All projects page, a project named Line-Pinpoint-Project has been created for you.
  3. On the left-side pane, choose Segments and then Create a segment.Create Segment
  4. Give your segment a descriptive name and add the appropriate criteria to filter down to your target audience (E.g.: filter down to customers who have Custom channel type).Set segment attributes
  5. Confirm the number of endpoints that you will be sending in the Segment estimate section matches your expectations and then choose Create segment.

Upload media files for campaign

If you’d like to use your own image, audio and video files for the campaign, follow along with this section. Otherwise, proceed to the Create Campaigns section (step 9).

Note
Depending on the media type, there are restrictions imposed such as maximum file size and file format extensions. You can find more information here.

  1. Navigate to the Amazon S3 console.
  2. Here you will find a list of buckets which corresponds to the type of media files you want to upload:
    • part-1-stack-images3bucket...: contains image files.
    • part-1-stack-audios3bucket...: contains audio files.
    • part-1-stack-videos3bucket...: contains both video and image cover files.
  3. Upload the corresponding files that you want to use for your campaign by choosing Upload.
    Asset bucket image

Create campaigns

  1. In the navigation pane, choose Campaigns, and then choose Create a campaign.
  2. Give your campaign a descriptive name. Under Campaign Type choose Standard campaign and under Channel, choose Custom. Click Next to confirm.
    Campaign Creation
  3. On the Choose a segment page, choose the segment that you created in step 5, and then choose Next.
  4. In Create your message, depending on the type of message that you want to send, choose the corresponding Lambda function. Your function should be named part-1-stack-send[text/image/audio/video]lambda...
    Choose Lambda function
  5. In the custom data section, you can choose to leave it blank, which will trigger the campaign to send the sample message.
  6. Otherwise, depending on the type of message, you can customize your campaigns to send the content that you want by inputting the following values into Custom Data.
    • Text Campaign: Enter the Text Message that you want to send.
    • Image Campaign: Enter the name of the image file you’ve uploaded in step 8 including the extension name (E.g.: sample_image.png)
    • Audio Campaign: Enter the name of the audio file you’ve uploaded in step 8 including the extension name and the duration of the audio file in milliseconds separated by a comma (E.g.: sample_audio.mp3,5000)
    • Video Campaign: Enter the name of the video file you’ve uploaded in step 8 including the extension name and the name of the image file you’ve uploaded in step 8 including the extension name, separated by a comma (E.g.: sample_video.mp4,sample_image.png)
  7. Choose Next and configure when to send the campaign depending on your needs. Once done, choose Next again.
  8. On the Review and launch page, verify all your information is correct and then click on Launch campaign.

That’s it! Your message will be sent through LINE to the designated recipients.

Cleanup

To delete the sample application that you created, use the AWS CDK.


cdk destroy

You’ll be asked:


Are you sure you want to delete: part-1-stack (y/n)?

Hit “y” and you’ll see your stack being destroyed.

What’s Next?

In conclusion, integrating LINE with Amazon Pinpoint provides businesses with a powerful tool to centralize their communication management, create more flexible marketing campaigns, and tap into LINE’s massive user base. With the step-by-step guide and demo provided in this blog post, you can easily get started with integrating LINE with Pinpoint and start leveraging its benefits for your business.

The solution presented in this blog post serves as a template that you can develop and customize to make it your own:

  1. Adding additional message types: The LINE messaging platform is famous for its rich messaging types and format. The deployed solution only utilized a fraction of what is available. You can add additional Lambda functions to send Stickers, Locations, Image Maps, Buttons or Carousel and more.
  2. Orchestrate LINE with other channels: Using Amazon Pinpoint Journeys, you can now meet the customer where they are most likely to see and respond to your message. Create a journey that starts with an SMS, send targeted communications based on yes/no or multivariate splits via emails and seal the deal with LINE. With Pinpoint and journey custom channel input and response support, you can craft the perfect omni-channel journey for your customers.
  3. Watch this space: Do stay tuned for the next blog post in this series, where we’ll show you how to manage inbound communications through LINE using Amazon Connect and Amazon Lex bots.

AWS Communication Developer Services (CDS) recognized in the 2022 Gartner Market Guide for CPaaS

Post Syndicated from laurcudn original https://aws.amazon.com/blogs/messaging-and-targeting/aws-communication-developer-services-cds-recognized-in-the-2022-gartner-market-guide-for-cpaas/

2022 Gartner Market Guide for CPaaS recognizes AWS Communication Developer Services (CDS)

Every business needs to communicate with customers through channels like email, SMS, notifications, voice, and even video. CPaaS, or Communications Platform as a Service, provers combine those capabilities into a single offering. Communication developers exploring new CPaaS solutions can read the 2022 Gartner Market Guide for CPaaS to learn about AWS Communication Developer Services’ (CDS) capabilities in these channels.

What is CPaaS?

Gartner defines CPaaS, or Communication Platform as a Service, as “cPaaS offer[ing] application leaders a cloud-based, multilayered middleware on which they can develop, run and distribute communications software. The platform offers APIs and integrated development environments that simplify the integration of communications capabilities (for example, voice, messaging and video) into applications, services or business processes.” CPaaS offerings allow companies to integrate communication capabilities into their apps, websites, and technologies in a flexible and customized manner. Companies can choose to add channels and features, like SMS, email, voice, notifications, and more through APIs and SDKs. CPaaS also describes the layers of target audience segmentation, message orchestration and vertical solutions in communication technologies.

2022 Gartner CPaaS Market Guide

The 2022 Gartner CPaaS Market Guide provides key considerations to keep in mind when selecting a communications platform partner to increase customer engagement across channels. Gartner defines the market in three levels, Foundational, Emerging, and Potential Differentiation.

Foundational: Foundational requirements are common communication APIs, and are estimated by Gartner to represent about 85% of current market spend. These fall in to channel-based capabilities like SIP trunking, phone numbers, long and short codes, network connections, SMS, voice, notifications, orchestration, inbound and outbound email, and basic security like 2-factor authorization (2FA) via SMS, email, voice, or other channels. AWS Communication Developer Services (CDS) are built on flexible APIs that support all of the channels listed above. CDS allows builders to use APIs as simple configuration out of the box, or customize APIs through more advanced coding.

Emerging: Emerging offerings include ML capabilities like messaging and voice bots or sentiment analysis, advanced message options, reputation and delivery managers, and campaign managers. AWS Communication Developer Services (CDS) is built using AWS’ leading ML capabilities, and makes it easy for developers to implement advanced machine learning and artificial intelligence features like voice and messaging bots, speech to text, and sentiment analysis. AWS Communication Developer Services (CDS) has orchestrated email and message capabilities. Campaign management is simple through designated campaign and journey features.

Potential differentiation: Gartner identifies potential long-term opportunities for differentiation in areas like vertical solutions and integration with contact centers. CDS has helped many healthcare, financial services, and entertainment customers modernize their customer communications. Our customers work closely with leading partners like Accenture, Local Measure, and many more for seamless integration into current technology and communication stacks. Through CDS’ close ties with the Amazon Connect contact center solution, it’s easy to integrate contact center capabilities with messaging and multichannel communications.

Gartner CPaaS Architecture Diagram

Market Direction and Trends:

Gartner predicts continued growth of the CPaaS category. Gartner reports that most new CPaaS customers enter the category with a specific channel need, such as push notifications, then expands their offerings to include additional channels and functionalities as new needs arise.
Trends include conversational everything and the rise of messaging and voice bots, predictive intelligence for personalization, and local global expansion through Channel Partners.

About AWS Communication Developer Services

AWS Communication Developer Services (CDS) are a set of SDKs and APIs that allow developers to embed customer communications directly into their applications. Developers use AWS CDS to improve communication with their customers across different use cases, including application-to-person (A2P) communications, asynchronous communications, and real-time communications. AWS CDS supports channels like email, SMS, push notifications, chat, audio, video, and voice over the PSTN. Send messages to your customers with the scale of AWS and pay only for what you use.

Use Cases

Alerts + Notifications

Send customers alerts or notifications through email, SMS, push, in-app notifications, or via voice API

Promotional Messages

Send promotions and marketing messages with top email inbox deliverability and segmented messaging

In-App Video

Build your application or website with scalable video technology that can support telehealth, field support, education, and more

Interactive Voice Response (IVR)

Build an IVR system that can support touch-tone, conversation voice bots, and text-to-speech

Want to read the full Market Guide?
Download the 2022 Gartner CPaaS Market Guide for free here.