Today we are announcing a preview of Amazon OpenSearch Service zero-ETL integration with Amazon S3, a new way to query operational logs in Amazon S3 and S3-based data lakes without needing to switch between services. You can now analyze infrequently queried data in cloud object stores and simultaneously use the operational analytics and visualization capabilities of OpenSearch Service.
Amazon OpenSearch Service direct queries with Amazon S3 provides a zero-ETL integration to reduce the operational complexity of duplicating data or managing multiple analytics tools by enabling customers to directly query their operational data, reducing costs and time to action. This zero-ETL integration will be configurable within OpenSearch Service, where you can take advantage of various log type templates, including predefined dashboards, and configure data accelerations tailored to that log type. Templates include VPC Flow Logs, Elastic Load Balancing logs, and NGINX logs, and accelerations include skipping indexes, materialized views, and covered indexes.
With direct queries with Amazon S3, you can perform complex queries critical to security forensic and threat analysis that correlate data across multiple data sources, which aids teams in investigating service downtime and security events. After creating an integration, you can start querying their data directly from the OpenSearch Dashboards or OpenSearch API. You can easily audit connections to ensure that they are set up in a scalable, cost-efficient, and secure way.
Getting started with direct queries with Amazon S3 You can easily get started by creating a new Amazon S3 direct query data source for OpenSearch Service through the AWS Management Console or the API. Each new data source uses AWS Glue Data Catalog to manage tables that represent S3 buckets. Once you create a data source, you can configure Amazon S3 tables and data indexing and query data in OpenSearch Dashboards.
1. Create a data source in OpenSearch Service Before you create a data source, you should have an OpenSearch Service domain with version 2.11 or later and a target Amazon S3 table in AWS Glue Data Catalog with the appropriate IAM permissions. IAM will need access to the desired S3 bucket(s) and read and write access to AWS Glue Data Catalog. To learn more about IAM prerequisites, see Creating a data source in the AWS documentation.
Go to the OpenSearch Service console and choose the domain you want to set up a new data source for. In the domain details page, choose the Connections tab below the general information and see the Direct Query section.
To create a new data source, choose Create, input the name of your new data source, select the data source type as Amazon S3 with AWS Glue Data Catalog, and choose the IAM role for your data source.
Once you create a data source, you can go to the OpenSearch Dashboards of the domain, which you use to configure access control, define tables, set up log type–based dashboards for popular log types, and query your data.
2. Configuring your data source in OpenSearch Dashboards To configure data source in OpenSearch Dashboards, choose Configure in the console and go to OpenSearch Dashboards. In the left-hand navigation of OpenSearch Dashboards, under Management, choose Data sources. Under Manage data sources, choose the name of the data source you created in the console.
Direct queries from OpenSearch Service to Amazon S3 use Spark tables within AWS Glue Data Catalog. To create a new table you want to direct query, go to the Query Workbench in the Open Search Plugins menu.
Now run as in the following SQL statement to create http_logs table and run MSCK REPAIR TABLE mys3.default.http_logs command to update the metadata in the catalog
CREATE EXTERNAL TABLE IF NOT EXISTS mys3.default.http_logs (
   `@timestamp` TIMESTAMP,
    clientip STRING,
    request STRING,
    status INT,
    size INT,
    year INT,
    month INT,
    day INT)
USING json PARTITIONED BY(year, month, day) OPTIONS (path 's3://mys3/data/http_log/http_logs_partitioned_json_bz2/', compression 'bzip2')
To ensure a fast experience with your data in Amazon S3, you can set up any of three different types of accelerations to index data into OpenSearch Service, such as skipping indexes, materialized views, and covering indexes. To create OpenSearch indexes from external data connections for better performance, choose the Accelerate Table.
Skipping indexes allow you to index only the metadata of the data stored in Amazon S3. Skipping indexes help quickly identify data stored by narrowing down a specific location of where the data is stored.
Materialized views enable you to use complex queries such as aggregations, which can be used for querying or powering dashboard visualizations. Materialized views ingest data into OpenSearch Service for anomaly detection or geospatial capabilities.
Covering indexes will ingest all the data from the specified table column. Covering indexes are the most performant of the three indexing types.
3. Query your data source in OpenSearch Dashboards After you set up your tables, you can query your data using Discover. You can run a sample SQL query for the http_logs table you created in AWS Glue Data Catalog tables.
To learn more, see Working with Amazon OpenSearch Service direct queries with Amazon S3 in the AWS documentation.
Join the preview Amazon OpenSearch Service zero-ETL integration with Amazon S3 is now previewed in the AWS US East (Ohio), US East (N. Virginia), US West (Oregon), Asia Pacific (Tokyo), Europe (Frankfurt), and Europe (Ireland) Regions.
OpenSearch Service separately charges for only the compute needed as OpenSearch Compute Units to query your external data as well as maintain indexes in OpenSearch Service. For more information, see Amazon OpenSearch Service Pricing.
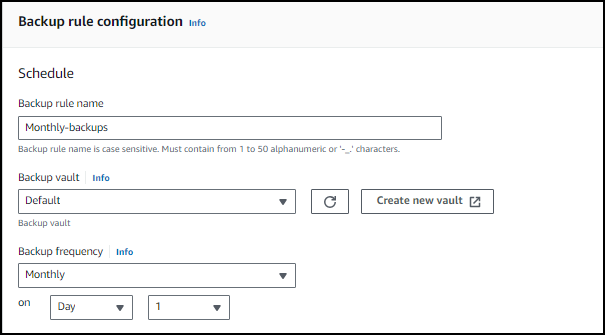
Amazon EBS Snapshots Archive in the AWS Backup console Snapshots Archive with AWS Backup is only available for snapshots with a backup frequency of one month or longer (28-day cron expression) and a retention of more than 90 days. This is a protective measure to ensure that you don’t archive snapshots, such as hourly snapshots that wouldn’t benefit from the transition to the cold tier.
The ability to archive Amazon EBS Snapshots is a new parameter of the Lifecycle section of the AWS Backup Plans. You must explicitly opt into moving your Amazon EBS Snapshots to cold storage, because this has different properties of our existing cold storage including:
Always converting an incremental backup to a full backup.
Longer recovery time objective (RTO) (up to 72 hours).
Limitations on the frequency of backups that can be transitioned to cold storage (monthly or greater).
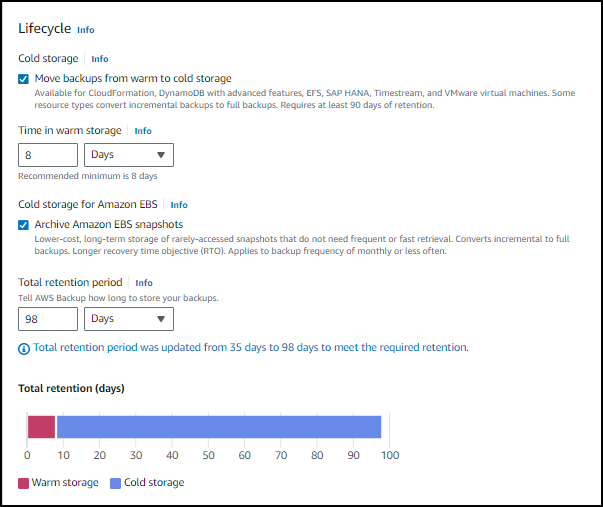
Time in warm storage indicates how long the backups will remain in warm storage before they are transitioned to cold storage. Total retention period is the total time the backups will be retained by AWS Backup, and its value is the sum of both warm and cold storage. For backups in cold storage, the minimum retention period is 90 days. This is why the default total retention is 98 days (8 days in warm + 90 days in cold). The bar graph shows the total retention of your backups and where the backups will reside during that time. In the example shown in this graph, 8 days is in warm storage (red bar), and 90 days is in cold storage (blue bar).
To restore or use the archived Amazon EBS snapshot today (outside of AWS Backup), you have to follow a two-step process:
Temporarily or permanently restore the snapshot from archive to standard tier.
Once it’s in standard tier, call the CreateVolumeAPI from the standard tier.
With this announcement, using either the AWS Backup console or the API to restore the archived Amazon EBS snapshot in AWS Backup, the following restore workflow applies:
Enter the number of days you want to temporarily restore your snapshot from cold to standard tier.
Choose your volume configuration.
The end result will be a restored EBS volume. You will not have to manually move the snapshot from cold to standard tier, then restore the volume, this will be done automatically for you.
Now available Amazon EBS Snapshots Archive with AWS Backup is available for you today in all AWS Regions except China and AWS GovCloud (US).
As usual, you pay as you go, with no minimum or fixed fees. There are two metrics that influence Amazon EBS Snapshots Archive billing: data storage and data retrieval. You are charged for a 90-day period at minimum. This means that if you delete a snapshot archive or permanently restore it less than 90 days after creation, then we charge for the full 90-day period. The AWS Backup pricing page has the details.
Replication failback – Failback support for EFS replication makes it easier and more cost-effective to synchronize changes between EFS file systems when performing disaster recovery (DR) workflows. You can now quickly replicate incremental changes from your secondary back to your primary file system after disaster events and other DR-related activities.
Increased IOPS – Amazon EFS now supports up to 250,000 read IOPS and up to 50,000 write IOPS per file system, making it easier to run more IOPS-heavy workloads at any scale for virtual servers, containers, and serverless functions that require shared storage.
Let’s see more in depth how these work in practice.
Introducing Amazon EFS replication failback With Amazon EFS replication, you can create a replica of your file system in the same or in another AWS Region. When replication is enabled, Amazon EFS automatically keeps the primary (source) and secondary (destination) file systems synchronized. To help you meet your compliance and business continuity goals, EFS replication is designed to provide a recovery point objective (RPO) and a recovery time objective (RTO) measured in minutes.
Now, with failback support, you can respond to disaster recovery (DR) events, conduct planned business continuity tests, and manage other DR-related activities with greater speed and cost efficiency. Failback support allows you to switch the direction of replication between the primary and secondary file systems. EFS replication keeps the two file systems in sync by copying only incremental changes, eliminating the need to make full copies of your data or use a self-managed, custom solution to complete a recovery workflow.
Using Amazon EFS replication failback I have a file system replicated to another Region. As part of a periodic DR test, I want to switch to using the secondary file system and then revert back to the primary file system, preserving all the changes made on the secondary file system. To do so, I can use EFS Replication failback in just a few steps.
First, I delete the replication from the primary (source) to the secondary (destination) file system. After this, the secondary file system becomes writable. To do so, in the Amazon EFS console, I check I am in the correct Region and select the secondary file system. In the Replication tab, I choose Delete replication and confirm deletion. I can also start from the primary file system. In that case, the Delete replication link in the Replication tab opens a new browser tab and asks to confirm deletion like before.
I can now use the secondary file system and change its data as needed.
To go back to using the primary file system, I create a “reverse replication” from the secondary to the primary file system. To do so, I check I am in the correct Region and select the secondary file system. In the Replication tab, I choose Create replication and the new option Replicate to existing file system. Then, I select the Region of the primary file system and use the console to browse the EFS file systems in that Region and choose the primary one.
The console warns me that Replication overwrite protection is enabled for the primary file system. I follow the Disable protection link to open a new browser tab and edit the primary file system to disable replication overwrite protection.
Now, I go back to the browser tab where I am creating the failback replication from the secondary to the primary file system. I refresh the protection check and choose to create the replication.
In the following dialog, I confirm that I want Amazon EFS to write to the primary file system.
To know when the primary file system is back in sync, I check the Last synced timestamp in the Replication tab, which indicates that all changes made to the source file system before that time are replicated to the destination. Optionally, I can look at the TimeSinceLastSync metric (expressed in minutes) in Amazon CloudWatch to understand how data is being replicated.
When the primary file system is back in sync, I delete the replication from the secondary to the primary file system. To complete the restore of the original configuration, I again create the replication from the primary to the secondary file system.
Increased IOPS per file system The Amazon EFS team has been able to increase IOPS again! The last time they did it was just a few months back. Starting today, an EFS file system can handle up to 50,000 write IOPS (a 2x improvement) and up to 250,000 read IOPS (a 4.5x improvement) when working with frequently-accessed data from a high-performance cache managed by Amazon EFS.
You can monitor the percentage utilization of your file system’s available IOPS using the PercentIOLimit CloudWatch metric. This metric considers the maximum IOPS for writes and uncached reads, including combinations of the two. Reads from the cache are not included in the PercentIOLimit metric.
With these performance improvements, you can run even more IOPS-demanding workloads on Amazon EFS, such as machine learning (ML) training, fine-tuning, and inference. Other use cases that can benefit from the increased IOPS are data science user shares, SaaS applications, and media processing.
Things to know EFS replication failback is available in all AWS Regions where EFS is available. There are no additional costs for using replication failback. You pay for the usual replication and file system changes as described in Amazon EFS pricing.
The increased IOPS limits are immediately available for all file systems using the Elastic Throughput mode in all Regions where EFS is available. You don’t need to do anything to benefit from these performance improvements. To achieve the maximum IOPS, your application needs sufficient parallelization. For example, using multiple clients and distributing the load across a large number of files. For more information, see the performance tips in the user guide.
Performing automatic game day testing of all your critical resources is an important step in determining that you are prepared to respond to ransomware or any data loss event. This gives you the opportunity to take appropriate corrective actions based on the results and monitor results such as success or failure from these tests. Ultimately, you will be able to ascertain if the restore times meet your expected organization’s recovery time objective (RTO) goals, helping you develop improved recovery strategies.
Today, we’re announcing restore testing, a new capability in AWS Backup that allows you to perform restore testing of your AWS resources across storage, compute, and databases. With this feature, you can automate the entire restore testing process and avoid surprises later by determining now whether you can successfully recover using your backups in the event of a data loss such as ransomware. As an additional option, to demonstrate compliance with your organizational and regulatory data governance requirements, you can use the restore job results.
Earlier, I created EC2 instances and a backup of these instances. Then, I created my restore testing plan in the AWS Backup console.
In this General section, I enter the name of the plan, a test frequency, a Start time, and a Start within. Start time sets the time for the test to begin, for example, if you have a daily test frequency set, you specify what time the plan will run each day. Start within is the period of time in which the restore test is designated to begin. AWS Backup makes a best effort to commence all designated restore jobs during the Start within time window. You have a choice to keep this very minimal or very large based on your preference.
In the Recovery point selection section, I specify the vaults that the recovery points should come from, and a timeframe of eligible recovery points as part of this restore testing plan. I left the criteria for a recovery point at the default selection. I also didn’t opt to include recovery points generated by point-in-time recovery (PITR) in this restore testing plan.
Tagging is optional so for the purposes of this test I didn’t add a tag. I was then finished with setup, and it was time for me to choose Create restore testing plan to proceed with creating this restore testing plan.
Once the restore testing plan has been created, it is time to assign resources. I start by specifying the IAM role that AWS Backup will assume when running the restore test. In terms of retention period before cleanup, I kept the default selection of deleting the restored resources immediately, to optimize costs. Alternatively, by specifying a retention period I could have also configured to integrate my own tests (for example, AWS Lambda) using Amazon EventBridge (CloudWatch Events) and send back validation status using the new PutRestoreValidationResultAPI so that it is reported in the restore job.
I have EC2 instances that I created and backed up earlier, and I specify that this plan is for Amazon EC2 resource types. I include all protected resources of this EC2 resource type in the selection scope. I have very few resources, so I didn’t add the optional tags.
I opted to use the default instance type for the restore. I also didn’t specify any additional parameters. It’s then time to choose Assign resources.
Once the resources have been assigned, all information related to the restore testing plan will be presented in a summarized form where you’ll be able to see when the restore testing jobs have executed.
Once I have enough restores performed over time, I can also view the Restore time history for every resource restored from the Protectedresources tab.
Now available Restore testing in AWS Backup is available in all AWS Regions where AWS Backup is available except AWS China Regions, AWS GovCloud (US), and Israel (Tel Aviv). To learn more, visit the AWS Backup user guide. You can submit your questions to AWS re:Post for AWS Backup or through your usual AWS Support contacts.
Today we’re adding to Amazon FSx for OpenZFS the capability to send a snapshot from a file system to another file system in your account.
You can trigger the copy with one single API call or CLI command, and we take care of the rest. You don’t need to use commands like rsync and monitor the state of the transfer. The service takes care of the copy on your behalf. It manages potential network interruptions and retries automatically until the transfer completes. It transfers data incrementally at block level using OpenZFS’s native send and receive capabilities.
This new capability helps you to maintain agility by, for example, allowing quicker and easier creation of testing and development environments, and performance improvements by simplifying the management of read replicas to provide scale-out performance.
Amazon FSx for OpenZFS is a fully managed file storage service that lets you launch, run, and scale fully managed file systems built on the open source OpenZFS file system. FSx for OpenZFS makes it easy to migrate your on-premises ZFS file servers without changing your applications or how you manage data and to build new high-performance, data-intensive applications on the cloud.
Snapshots are one of the most powerful features of ZFS file systems. A snapshot is a read-only copy of a file system or volume. Snapshots can be created almost instantly and initially consume no additional disk space within the storage pool. When a snapshot is created, its space is initially shared between the snapshot and the file system and possibly with previous snapshots. As the file system changes, space that was previously shared becomes unique to the snapshot. The snapshot consumes incremental disk space by continuing to reference the old data and so prevents the space from being freed. Snapshots can be rolled back on-demand and almost instantly, even on very large file systems. Snapshots can also be cloned to form new volumes.
Snapshots are block-level copies. They are more efficient to transfer than traditional file-level copies, where the system must sometimes traverse millions of files to detect the ones that changed. Transferring an incremental snapshot is also more efficient than transferring an incremental file-based copy because snapshots are incremental at block level. They only contain blocks modified since the last snapshot.
On-demand replication of ZFS snapshots allows the transfer of terabytes of data using the native send and receive capability of OpenZFS without having to worry about the underlying infrastructure. We detect and manage network interruptions and other types of errors for you, making it easier for you to replicate data across file systems.
There are two main use cases where you might want to use this new capability.
Developers and quality assurance (QA) engineers might send on-demand snapshots to development and testing environments. It allows them to work with production data, ensuring accurate testing and development outcomes. The use of recent snapshots as consistent starting points for testing enhances the efficiency of the development and testing processes.
Data engineers might use on-demand replication to run parallel experiments on a dataset. Imagine your application processes a large dataset. You want to run multiple versions of your data processing algorithm on the same base dataset to find the best tuning for your use case. With on-demand data replication, you can create multiple identical copies of your file system and run each experiment in parallel.
Let’s see how it works To prepare this demo, I use the FSx for OpenZFS section of the AWS Management Console. First, I create two Amazon FSx for OpenZFS volumes. Then, I mount the two file systems on one Amazon Linux instance (/zfs-filesystem1 and /zfs-filesystem2). I prepare a file on the first volume, and I expect to find the same file on the second volume after an on-demand replication.
To synchronize data between my two volumes, I navigate to the snapshot section of the console. Then I select Copy snapshot and update volume. I also have the option to copy the snapshot to a new ZFS volume.
On the Copy snapshot and update volume page, I select the destination File system and Volume. I also confirm the source snapshot. I choose the Source snapshot copy strategy, either requesting a full copy or an incremental copy. When ready, I select Update.
After a while—how long depends on the amount of data to transfer—I observe a new snapshot listed on the destination volume. In my demo scenario, it just takes a few seconds.
I return to my Linux instance and list the content available in my second mount point /zfs-snapshot. I am happy to see my cow ASCII art on the second file system .
Alternatively, I can automate on-demand transfers using the new FSx APIs: CopySnapshotAndUpdateVolume and CopySnapshotAndCreateVolume.
To set up an ongoing periodic replication, I use the provided CloudFormation template to create an automated replication schedule. When deployed, the system periodically takes a snapshot of the volume on the source file system and performs an incremental replication to a volume on the destination file system. For example, I could schedule replication to a development file system to happen once every 15 minutes for testing purposes.
Pricing and availability This new capability is available in all AWS Regions where FSx for OpenZFS is available.
It comes at no additional cost. AWS charges the usual fees for network data transfer between Availability Zones.
You pay standard FSx for OpenZFS charges for the amount of storage used by the remote file system.
The new on-demand replication for Amazon FSx for OpenZFS allows you to efficiently transfer incremental file system snapshots to a new volume on your account. It allows developers and QA engineers to work with copies of production data and data engineers to run parallel experiments on datases.
With this launch, Amazon EFS supports three Regional storage classes:
EFS Standard – Powered by SSD storage and designed to deliver submillisecond latency for active data.
EFS Infrequent Access (EFS IA) – Cost-optimized for data accessed only a few times a quarter, and that doesn’t need the submillisecond latencies of EFS Standard.
EFS Archive – Cost-optimized for long-lived data accessed a few times a year or less and offering similar performance to EFS IA.
All Regional storage classes deliver gigabytes-per-second throughput and hundreds of thousands of IOPS performance and are designed for eleven nines of durability.
You don’t need to manually pick and choose a storage class for your file systems because EFS lifecycle management can automatically migrate files across storage classes based on their access patterns. This allows you to have a single shared file system that contains files processed in very different ways: from active latency-sensitive to cold rarely-accessed data.
Many datasets have subsets of data that are valuable for generating insights but aren’t often used. With EFS Archive, you can store rarely accessed data cost-effectively while keeping it in the same shared file system as other data. This simplified storage approach allows end users and applications to collaborate on large shared datasets in one place, making it easier and quicker to set up and scale analytics workloads.
Using EFS Archive, you can optimize costs for workloads with large file-based datasets that contain a mix of active and inactive data such as user shares, machine learning (ML) training datasets, SaaS applications, and data retained for regulatory compliance like financial transactions and medical records.
Let’s see how this works in practice.
Using EFS Archive storage To use the new EFS Archive storage class, I need to configure lifecycle management for the file system. In the Amazon EFS console, I select one of my file systems and choose Edit. To use EFS Archive storage, the file system Throughput mode must be Elastic. Elastic Throughput is the recommended choice for most workloads because it is designed to provide applications with as much throughput as they need with pay-as-you-use pricing.
Now, I configure Lifecycle management to transition files into EFS IA or EFS Archive based on my workload’s access patterns.
My workloads rarely use files older than one month. Files older than a quarter are not used by normal activities but need to be kept for a longer time. Based on these considerations, I select to automatically transition files to EFS IA after 30 days and to EFS Archive after 90 days since the last access. These are the default settings for new file systems.
When one of my old files is accessed, it’s usually an indicator that is being used in a new analysis, so it’ll become active again for some period. For this reason, I use the option to transition files back to Standard storage on their first access in IA or Archive storage.
I save changes, and that’s it! This file system will now automatically use different storage classes based on how files are being processed by my applications.
Things to know EFS Archive is available today in all AWS Regions where Amazon EFS is offered, excluding those based in China.
To offer a more cost-optimized experience for colder, rarely-accessed files, EFS Archive offers 50 percent lower storage cost than EFS IA with a three times higher request charge when data is accessed. For more information, see Amazon EFS pricing.
You can use EFS Archive with existing file systems by configuring the file system lifecycle policies. New file systems are created by default with a lifecycle policy that automatically transitions files to EFS IA after 30 days and to EFS Archive after 90 days since the last access.
November 14, 2023: We’ve updated this post to use IAM Identity Center and follow updated IAM best practices.
In this post, we discuss the concept of folders in Amazon Simple Storage Service (Amazon S3) and how to use policies to restrict access to these folders. The idea is that by properly managing permissions, you can allow federated users to have full access to their respective folders and no access to the rest of the folders.
Overview
Imagine you have a team of developers named Adele, Bob, and David. Each of them has a dedicated folder in a shared S3 bucket, and they should only have access to their respective folders. These users are authenticated through AWS IAM Identity Center (successor to AWS Single Sign-On).
In this post, you’ll focus on David. You’ll walk through the process of setting up these permissions for David using IAM Identity Center and Amazon S3. Before you get started, let’s first discuss what is meant by folders in Amazon S3, because it’s not as straightforward as it might seem. To learn how to create a policy with folder-level permissions, you’ll walk through a scenario similar to what many people have done on existing files shares, where every IAM Identity Center user has access to only their own home folder. With folder-level permissions, you can granularly control who has access to which objects in a specific bucket.
You’ll be shown a policy that grants IAM Identity Center users access to the same Amazon S3 bucket so that they can use the AWS Management Console to store their information. The policy allows users in the company to upload or download files from their department’s folder, but not to access any other department’s folder in the bucket.
After the policy is explained, you’ll see how to create an individual policy for each IAM Identity Center user.
Throughout the rest of this post, you will use a policy, which will be associated with an IAM Identity Center user named David. Also, you must have already created an S3 bucket.
Note: S3 buckets have a global namespace and you must change the bucket name to a unique name.
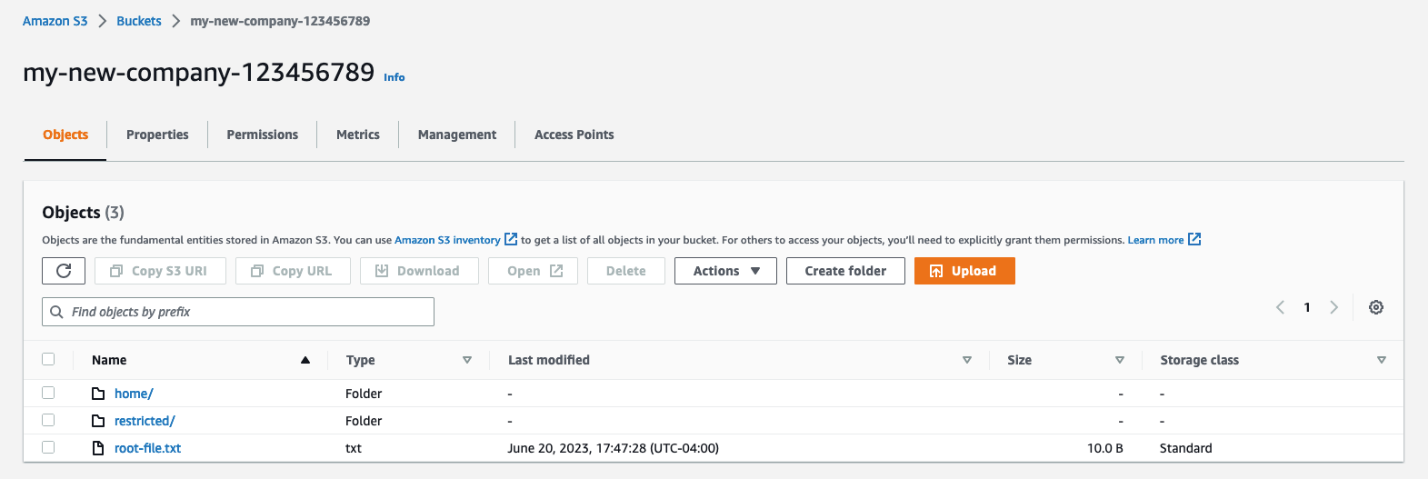
For this blog post, you will need an S3 bucket with the following structure (the example bucket name for the rest of the blog is “my-new-company-123456789”):
Figure 1: Screenshot of the root of the my-new-company-123456789 bucket
Your S3 bucket structure should have two folders, home and confidential, with a file root-file.txt in the main bucket directory. Inside confidential you will have no items or folders. Inside home there should be three sub-folders: Adele, Bob, and David.
Figure 2: Screenshot of the home/ directory of the my-new-company-123456789 bucket
A brief lesson about Amazon S3 objects
Before explaining the policy, it’s important to review how Amazon S3 objects are named. This brief description isn’t comprehensive, but will help you understand how the policy works. If you already know about Amazon S3 objects and prefixes, skip ahead to Creating David in Identity Center.
Amazon S3 stores data in a flat structure; you create a bucket, and the bucket stores objects. S3 doesn’t have a hierarchy of sub-buckets or folders; however, tools like the console can emulate a folder hierarchy to present folders in a bucket by using the names of objects (also known as keys). When you create a folder in S3, S3 creates a 0-byte object with a key that references the folder name that you provided. For example, if you create a folder named photos in your bucket, the S3 console creates a 0-byte object with the key photos/. The console creates this object to support the idea of folders. The S3 console treats all objects that have a forward slash (/) character as the last (trailing) character in the key name as a folder (for example, examplekeyname/)
To give you an example, for an object that’s named home/common/shared.txt, the console will show the shared.txt file in the common folder in the home folder. The names of these folders (such as home/ or home/common/) are called prefixes, and prefixes like these are what you use to specify David’s department folder in his policy. By the way, the slash (/) in a prefix like home/ isn’t a reserved character — you could name an object (using the Amazon S3 API) with prefixes such as home:common:shared.txt or home-common-shared.txt. However, the convention is to use a slash as the delimiter, and the Amazon S3 console (but not S3 itself) treats the slash as a special character for showing objects in folders. For more information on organizing objects in the S3 console using folders, see Organizing objects in the Amazon S3 console by using folders.
Creating David in Identity Center
IAM Identity Center helps you securely create or connect your workforce identities and manage their access centrally across AWS accounts and applications. Identity Center is the recommended approach for workforce authentication and authorization on AWS for organizations of any size and type. Using Identity Center, you can create and manage user identities in AWS, or connect your existing identity source, including Microsoft Active Directory, Okta, Ping Identity, JumpCloud, Google Workspace, and Azure Active Directory (Azure AD). For further reading on IAM Identity Center, see the Identity Center getting started page.
Begin by setting up David as an IAM Identity Center user. To start, open the AWS Management Console and go to IAM Identity Center and create a user.
Note: The following steps are for Identity Center without System for Cross-domain Identity Management (SCIM) turned on, the add user option won’t be available if SCIM is turned on.
From the left pane of the Identity Center console, select Users, and then choose Add user.
Figure 3: Screenshot of IAM Identity Center Users page.
Enter David as the Username, enter an email address that you have access to as you will need this later to confirm your user, and then enter a First name, Last name, and Display name.
Leave the rest as default and choose Add user.
Select Users from the left navigation pane and verify you’ve created the user David.
Figure 4: Screenshot of adding users to group in Identity Center.
Now that you’re verified the user David has been created, use the left pane to navigate to Permission sets, then choose Create permission set.
Figure 5: Screenshot of permission sets in Identity Center.
Select Custom permission set as your Permission set type, then choose Next.
Figure 6: Screenshot of permission set types in Identity Center.
David’s policy
This is David’s complete policy, which will be associated with an IAM Identity Center federated user named David by using the console. This policy grants David full console access to only his folder (/home/David) and no one else’s. While you could grant each user access to their own bucket, keep in mind that an AWS account can have up to 100 buckets by default. By creating home folders and granting the appropriate permissions, you can instead allow thousands of users to share a single bucket.
Now, copy and paste the preceding IAM Policy into the inline policy editor. In this case, you use the JSON editor. For information on creating policies, see Creating IAM policies.
Figure 7: Screenshot of the inline policy inside the permissions set in Identity Center.
Give your permission set a name and a description, then leave the rest at the default settings and choose Next.
Verify that you modify the policies to have the bucket name you created earlier.
After your permission set has been created, navigate to AWS accounts on the left navigation pane, then select Assign users or groups.
Figure 8: Screenshot of the AWS accounts in Identity Center.
Select the user David and choose Next.
Figure 9: Screenshot of the AWS accounts in Identity Center.
Select the permission set you created earlier, choose Next, leave the rest at the default settings and choose Submit.
Figure 10: Screenshot of the permission sets in Identity Center.
You’ve now created and attached the permissions required for David to view his S3 bucket folder, but not to view the objects in other users’ folders. You can verify this by signing in as David through the AWS access portal.
Figure 11: Screenshot of the settings summary in Identity Center.
Navigate to the dashboard in IAM Identity Center and go to the Settings summary, then choose the AWS access portal URL.
Figure 12: Screenshot of David signing into the console via the Identity Center dashboard URL.
Sign in as the user David with the one-time password you received earlier when creating David.
Figure 13: Second screenshot of David signing into the console through the Identity Center dashboard URL.
Open the Amazon S3 console.
Search for the bucket you created earlier.
Figure 14: Screenshot of my-new-company-123456789 bucket in the AWS console.
Navigate to David’s folder and verify that you have read and write access to the folder. If you navigate to other users’ folders, you’ll find that you don’t have access to the objects inside their folders.
David’s policy consists of four blocks; let’s look at each individually.
Before you begin identifying the specific folders David can have access to, you must give him two permissions that are required for Amazon S3 console access: ListAllMyBuckets and GetBucketLocation.
The ListAllMyBuckets action grants David permission to list all the buckets in the AWS account, which is required for navigating to buckets in the Amazon S3 console (and as an aside, you currently can’t selectively filter out certain buckets, so users must have permission to list all buckets for console access). The console also does a GetBucketLocation call when users initially navigate to the Amazon S3 console, which is why David also requires permission for that action. Without these two actions, David will get an access denied error in the console.
Block 2: Allow listing objects in root and home folders
Although David should have access to only his home folder, he requires additional permissions so that he can navigate to his folder in the Amazon S3 console. David needs permission to list objects at the root level of the my-new-company-123456789 bucket and to the home/ folder. The following policy grants these permissions to David:
Without the ListBucket permission, David can’t navigate to his folder because he won’t have permissions to view the contents of the root and home folders. When David tries to use the console to view the contents of the my-new-company-123456789 bucket, the console will return an access denied error. Although this policy grants David permission to list all objects in the root and home folders, he won’t be able to view the contents of any files or folders except his own (you specify these permissions in the next block).
This block includes conditions, which let you limit under what conditions a request to AWS is valid. In this case, David can list objects in the my-new-company-123456789 bucket only when he requests objects without a prefix (objects at the root level) and objects with the home/ prefix (objects in the home folder). If David tries to navigate to other folders, such as confidential/, David is denied access. Additionally, David needs permissions to list prefix home/David to be able to use the search functionality of the console instead of scrolling down the list of users’ folders.
To set these root and home folder permissions, I used two conditions: s3:prefix and s3:delimiter. The s3:prefix condition specifies the folders that David has ListBucket permissions for. For example, David can list the following files and folders in the my-new-company-123456789 bucket:
But David cannot list files or subfolders in the confidential/, home/Adele, or home/Bob folders.
Although the s3:delimiter condition isn’t required for console access, it’s still a good practice to include it in case David makes requests by using the API. As previously noted, the delimiter is a character—such as a slash (/)—that identifies the folder that an object is in. The delimiter is useful when you want to list objects as if they were in a file system. For example, let’s assume the my-new-company-123456789 bucket stored thousands of objects. If David includes the delimiter in his requests, he can limit the number of returned objects to just the names of files and subfolders in the folder he specified. Without the delimiter, in addition to every file in the folder he specified, David would get a list of all files in any subfolders.
Block 3: Allow listing objects in David’s folder
In addition to the root and home folders, David requires access to all objects in the home/David/ folder and any subfolders that he might create. Here’s a policy that allows this:
In the condition above, you use a StringLike expression in combination with the asterisk (*) to represent an object in David’s folder, where the asterisk acts as a wildcard. That way, David can list files and folders in his folder (home/David/). You couldn’t include this condition in the previous block (AllowRootAndHomeListingOfCompanyBucket) because it used the StringEquals expression, which would interpret the asterisk (*) as an asterisk, not as a wildcard.
In the next section, the AllowAllS3ActionsInUserFolder block, you’ll see that the Resource element specifies my-new-company/home/David/*, which looks like the condition that I specified in this section. You might think that you can similarly use the Resource element to specify David’s folder in this block. However, the ListBucket action is a bucket-level operation, meaning the Resource element for the ListBucket action applies only to bucket names and doesn’t take folder names into account. So, to limit actions at the object level (files and folders), you must use conditions.
Block 4: Allow all Amazon S3 actions in David’s folder
Finally, you specify David’s actions (such as read, write, and delete permissions) and limit them to just his home folder, as shown in the following policy:
For the Action element, you specified s3:*, which means David has permission to do all Amazon S3 actions. In the Resource element, you specified David’s folder with an asterisk (*) (a wildcard) so that David can perform actions on the folder and inside the folder. For example, David has permission to change his folder’s storage class. David also has permission to upload files, delete files, and create subfolders in his folder (perform actions in the folder).
An easier way to manage policies with policy variables
In David’s folder-level policy you specified David’s home folder. If you wanted a similar policy for users like Bob and Adele, you’d have to create separate policies that specify their home folders. Instead of creating individual policies for each IAM Identity Center user, you can use policy variables and create a single policy that applies to multiple users (a group policy). Policy variables act as placeholders. When you make a request to a service in AWS, the placeholder is replaced by a value from the request when the policy is evaluated.
For example, you can use the previous policy and replace David’s user name with a variable that uses the requester’s user name through attributes and PrincipalTag as shown in the following policy (copy this policy to use in the procedure that follows):
To implement this policy with variables, begin by opening the IAM Identity Center console using the main AWS admin account (ensuring you’re not signed in as David).
Select Settings on the left-hand side, then select the Attributes for access control tab.
Figure 15: Screenshot of Settings inside Identity Center.
Create a new attribute for access control, entering userName as the Key and ${path:userName} as the Value, then choose Save changes. This will add a session tag to your Identity Center user and allow you to use that tag in an IAM policy.
Figure 16: Screenshot of managing attributes inside Identity Center settings.
To edit David’s permissions, go back to the IAM Identity Center console and select Permission sets.
Figure 17: Screenshot of permission sets inside Identity Center with Davids-Permissions selected.
Select David’s permission set that you created previously.
Select Inline policy and then choose Edit to update David’s policy by replacing it with the modified policy that you copied at the beginning of this section, which will resolve to David’s username.
Figure 18: Screenshot of David’s policy inside his permission set inside Identity Center.
You can validate that this is set up correctly by signing in to David’s user through the Identity Center dashboard as you did before and verifying you have access to the David folder and not the Bob or Adele folder.
Figure 19: Screenshot of David’s S3 folder with access to a .jpg file inside.
Whenever a user makes a request to AWS, the variable is replaced by the user name of whoever made the request. For example, when David makes a request, ${aws:PrincipalTag/userName} resolves to David; when Adele makes the request, ${aws:PrincipalTag/userName} resolves to Adele.
It’s important to note that, if this is the route you use to grant access, you must control and limit who can set this username tag on an IAM principal. Anyone who can set this tag can effectively read/write to any of these bucket prefixes. It’s important that you limit access and protect the bucket prefixes and who can set the tags. For more information, see What is ABAC for AWS, and the Attribute-based access control User Guide.
Conclusion
By using Amazon S3 folders, you can follow the principle of least privilege and verify that the right users have access to what they need, and only to what they need.
See the following example policy that only allows API access to the buckets, and only allows for adding, deleting, restoring, and listing objects inside the folders:
To provide the best experiences, we use technologies like cookies to store and/or access device information. Consenting to these technologies will allow us to process data such as browsing behavior or unique IDs on this site. Not consenting or withdrawing consent, may adversely affect certain features and functions.
Functional
Always active
The technical storage or access is strictly necessary for the legitimate purpose of enabling the use of a specific service explicitly requested by the subscriber or user, or for the sole purpose of carrying out the transmission of a communication over an electronic communications network.
Preferences
The technical storage or access is necessary for the legitimate purpose of storing preferences that are not requested by the subscriber or user.
Statistics
The technical storage or access that is used exclusively for statistical purposes.The technical storage or access that is used exclusively for anonymous statistical purposes. Without a subpoena, voluntary compliance on the part of your Internet Service Provider, or additional records from a third party, information stored or retrieved for this purpose alone cannot usually be used to identify you.
Marketing
The technical storage or access is required to create user profiles to send advertising, or to track the user on a website or across several websites for similar marketing purposes.


 .
.