Post Syndicated from Dylan Souvage original https://aws.amazon.com/blogs/security/automate-and-enhance-your-code-security-with-ai-powered-services/
Organizations are increasingly embracing a shift-left approach when it comes to security, actively integrating security considerations into their software development lifecycle (SDLC). This shift aligns seamlessly with modern software development practices such as DevSecOps and continuous integration and continuous deployment (CI/CD), making it a vital strategy in today’s rapidly evolving software development landscape. At its core, shift left promotes a security-as-code culture, where security becomes an integral part of the entire application lifecycle, starting from the initial design phase and extending all the way through to deployment. This proactive approach to security involves seamlessly integrating security measures into the CI/CD pipeline, enabling automated security testing and checks at every stage of development. Consequently, it accelerates the process of identifying and remediating security issues.
By identifying security vulnerabilities early in the development process, you can promptly address them, leading to significant reductions in the time and effort required for mitigation. Amazon Web Services (AWS) encourages this shift-left mindset, providing services that enable a seamless integration of security into your DevOps processes, fostering a more robust, secure, and efficient system. In this blog post we share how you can use Amazon CodeWhisperer, Amazon CodeGuru, and Amazon Inspector to automate and enhance code security.
CodeWhisperer is a versatile, artificial intelligence (AI)-powered code generation service that delivers real-time code recommendations. This innovative service plays a pivotal role in the shift-left strategy by automating the integration of crucial security best practices during the early stages of code development. CodeWhisperer is equipped to generate code in Python, Java, and JavaScript, effectively mitigating vulnerabilities outlined in the OWASP (Open Web Application Security Project) Top 10. It uses cryptographic libraries aligned with industry best practices, promoting robust security measures. Additionally, as you develop your code, CodeWhisperer scans for potential security vulnerabilities, offering actionable suggestions for remediation. This is achieved through generative AI, which creates code alternatives to replace identified vulnerable sections, enhancing the overall security posture of your applications.
Next, you can perform further vulnerability scanning of code repositories and supported integrated development environments (IDEs) with Amazon CodeGuru Security. CodeGuru Security is a static application security tool that uses machine learning to detect security policy violations and vulnerabilities. It provides recommendations for addressing security risks and generates metrics so you can track the security health of your applications. Examples of security vulnerabilities it can detect include resource leaks, hardcoded credentials, and cross-site scripting.
Finally, you can use Amazon Inspector to address vulnerabilities in workloads that are deployed. Amazon Inspector is a vulnerability management service that continually scans AWS workloads for software vulnerabilities and unintended network exposure. Amazon Inspector calculates a highly contextualized risk score for each finding by correlating common vulnerabilities and exposures (CVE) information with factors such as network access and exploitability. This score is used to prioritize the most critical vulnerabilities to improve remediation response efficiency. When started, it automatically discovers Amazon Elastic Compute Cloud (Amazon EC2) instances, container images residing in Amazon Elastic Container Registry (Amazon ECR), and AWS Lambda functions, at scale, and immediately starts assessing them for known vulnerabilities.
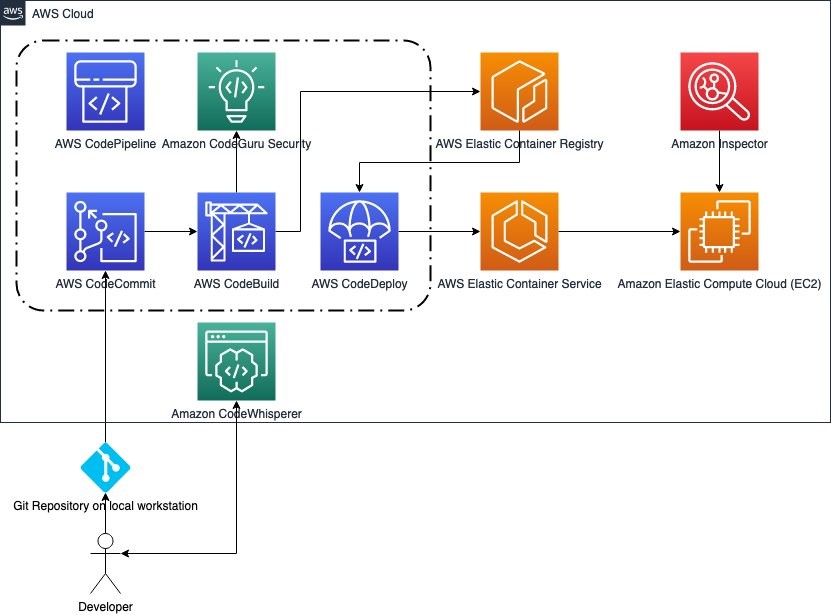
Figure 1: An architecture workflow of a developer’s code workflow
Amazon CodeWhisperer
CodeWhisperer is powered by a large language model (LLM) trained on billions of lines of code, including code owned by Amazon and open-source code. This makes it a highly effective AI coding companion that can generate real-time code suggestions in your IDE to help you quickly build secure software with prompts in natural language. CodeWhisperer can be used with four IDEs including AWS Toolkit for JetBrains, AWS Toolkit for Visual Studio Code, AWS Lambda, and AWS Cloud9.
After you’ve installed the AWS Toolkit, there are two ways to authenticate to CodeWhisperer. The first is authenticating to CodeWhisperer as an individual developer using AWS Builder ID, and the second way is authenticating to CodeWhisperer Professional using the IAM Identity Center. Authenticating through AWS IAM Identity Center means your AWS administrator has set up CodeWhisperer Professional for your organization to use and provided you with a start URL. AWS administrators must have configured AWS IAM Identity Center and delegated users to access CodeWhisperer.
As you use CodeWhisperer it filters out code suggestions that include toxic phrases (profanity, hate speech, and so on) and suggestions that contain commonly known code structures that indicate bias. These filters help CodeWhisperer generate more inclusive and ethical code suggestions by proactively avoiding known problematic content. The goal is to make AI assistance more beneficial and safer for all developers.
CodeWhisperer can also scan your code to highlight and define security issues in real time. For example, using Python and JetBrains, if you write code that would write unencrypted AWS credentials to a log — a bad security practice — CodeWhisperer will raise an alert. Security scans operate at the project level, analyzing files within a user’s local project or workspace and then truncating them to create a payload for transmission to the server side.
For an example of CodeGuru in action, see Security Scans. Figure 2 is a screenshot of a CodeGuru scan.

Figure 2: CodeWhisperer performing a security scan in Visual Studio Code
Furthermore, the CodeWhisperer reference tracker detects whether a code suggestion might be similar to particular CodeWhisperer open source training data. The reference tracker can flag such suggestions with a repository URL and project license information or optionally filter them out. Using CodeWhisperer, you improve productivity while embracing the shift-left approach by implementing automated security best practices at one of the principal layers—code development.
CodeGuru Security
Amazon CodeGuru Security significantly bolsters code security by harnessing the power of machine learning to proactively pinpoint security policy violations and vulnerabilities. This intelligent tool conducts a thorough scan of your codebase and offers actionable recommendations to address identified issues. This approach verifies that potential security concerns are corrected early in the development lifecycle, contributing to an overall more robust application security posture.
CodeGuru Security relies on a set of security and code quality detectors crafted to identify security risks and policy violations. These detectors empower developers to spot and resolve potential issues efficiently.
CodeGuru Security allows manual scanning of existing code and automating integration with popular code repositories like GitHub and GitLab. It establishes an automated security check pipeline through either AWS CodePipeline or Bitbucket Pipeline. Moreover, CodeGuru Security integrates with Amazon Inspector Lambda code scanning, enabling automated code scans for your Lambda functions.
Notably, CodeGuru Security doesn’t just uncover security vulnerabilities; it also offers insights to optimize code efficiency. It identifies areas where code improvements can be made, enhancing both security and performance aspects within your applications.
Initiating CodeGuru Security is a straightforward process, accessible through the AWS Management Console, AWS Command Line Interface (AWS CLI), AWS SDKs, and multiple integrations. This allows you to run code scans, review recommendations, and implement necessary updates, fostering a continuous improvement cycle that bolsters the security stance of your applications.
Use Amazon CodeGuru to scan code directly and in a pipeline
Use the following steps to create a scan in CodeGuru to scan code directly and to integrate CodeGuru with AWS CodePipeline.
Note: You must provide sample code to scan.
Scan code directly
- Open the AWS Management Console using your organization management account and go to Amazon CodeGuru.
- In the navigation pane, select Security and then select Scans.
- Choose Create new scan to start your manual code scan.

Figure 3: Scans overview
- On the Create Scan page:
- Choose Choose file to upload your code.
Note: The file must be in .zip format and cannot exceed 5 GB.
- Enter a unique name to identify your scan.
- Choose Create scan.

Figure 4: Create scan
- Choose Choose file to upload your code.
- After you create the scan, the configured scan will automatically appear in the Scans table, where you see the Scan name, Status, Open findings, Date of last scan, and Revision number (you review these findings later in the Findings section of this post).
Figure 5: Scan update


Automated scan using AWS CodePipeline integration
- Still in the CodeGuru console, in the navigation pane under Security, select Integrations. On the Integrations page, select Integration with AWS CodePipeline. This will allow you to have an automated security scan inside your CI/CD pipeline.
Figure 6: CodeGuru integrations
- Next, choose Open template in CloudFormation to create a CodeBuild project to allow discovery of your repositories and run security scans.
Figure 7: CodeGuru and CodePipeline integration
- The CloudFormation template is already entered. Select the acknowledge box, and then choose Create stack.
Figure 8: CloudFormation quick create stack
- If you already have a pipeline integration, go to Step 2 and select CodePipeline console. If this is your first time using CodePipeline, this blog post explains how to integrate it with AWS CI/CD services.
Figure 9: Integrate with AWS CodePipeline
- Choose Edit.
Figure 10: CodePipeline with CodeGuru integration
- Choose Add stage.
Figure 11: Add Stage in CodePipeline
- On the Edit action page:
- Enter a stage name.
- For the stage you just created, choose Add action group.
- For Action provider, select CodeBuild.
- For Input artifacts, select SourceArtifact.
- For Project name, select CodeGuruSecurity.
- Choose Done, and then choose Save.
Figure 12: Add action group


Test CodeGuru Security
You have now created a security check stage for your CI/CD pipeline. To test the pipeline, choose Release change.
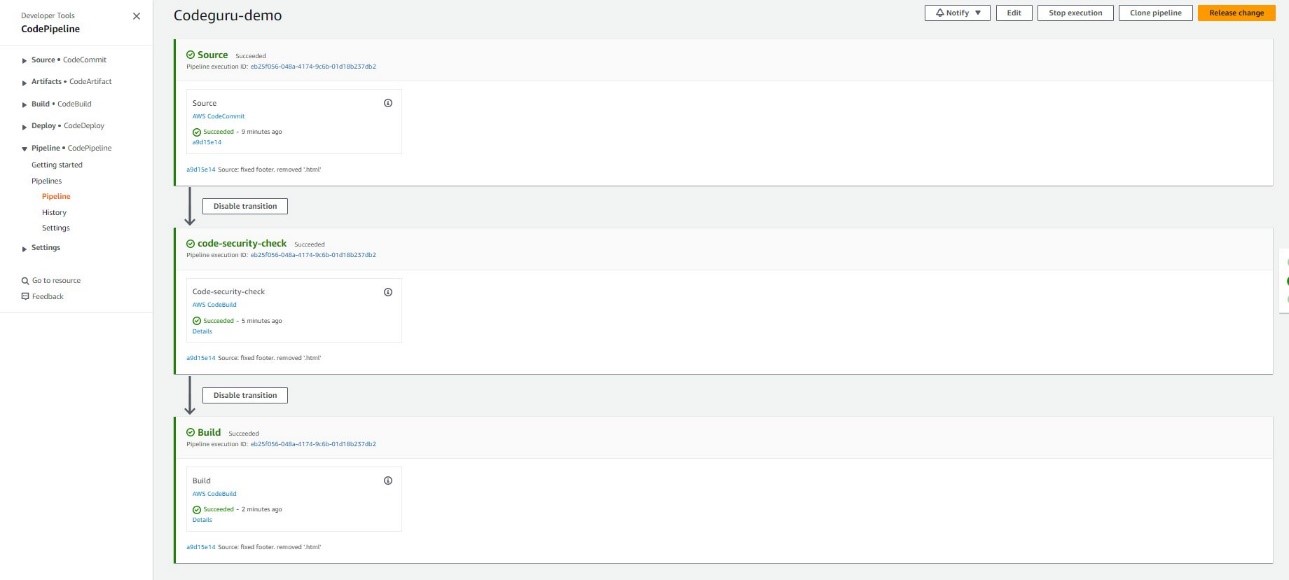
Figure 13: CodePipeline with successful security scan
If your code was successfully scanned, you will see Succeeded in the Most recent execution column for your pipeline.
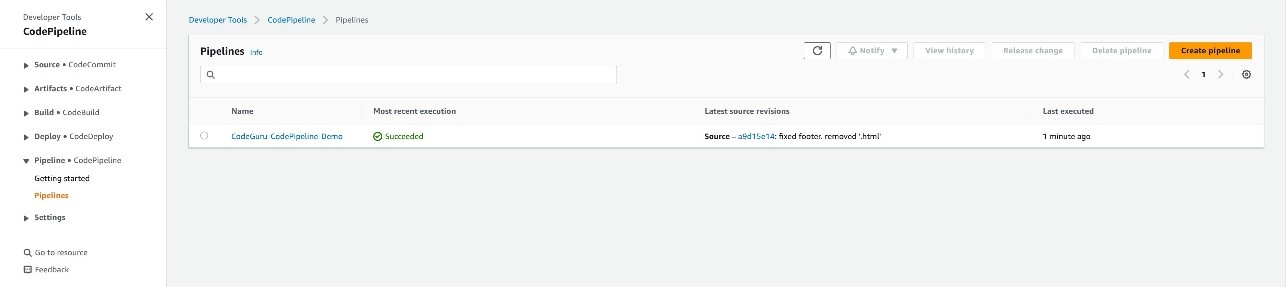
Figure 14: CodePipeline dashboard with successful security scan
Findings
To analyze the findings of your scan, select Findings under Security, and you will see the findings for the scans whether manually done or through integrations. Each finding will show the vulnerability, the scan it belongs to, the severity level, the status of an open case or closed case, the age, and the time of detection.
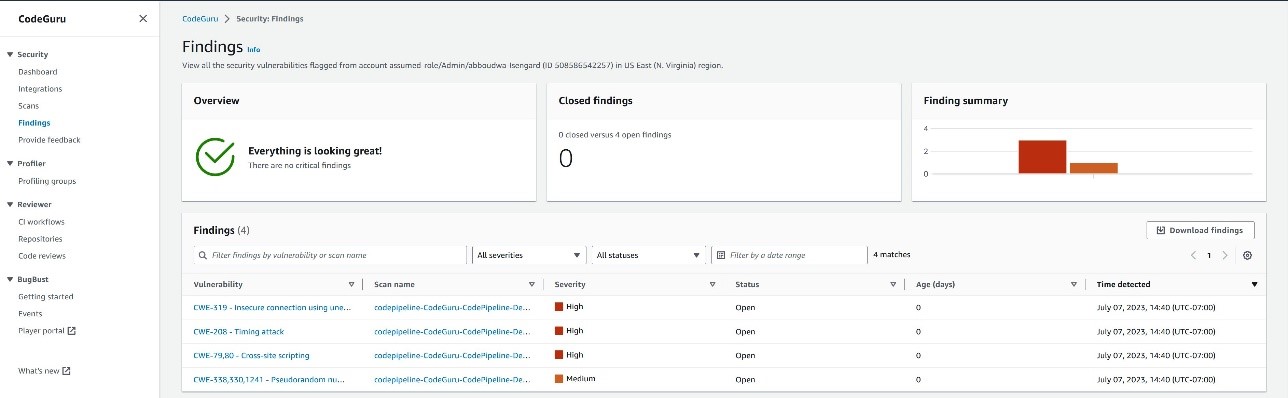
Figure 15: Findings inside CodeGuru security
Dashboard
To view a summary of the insights and findings from your scan, select Dashboard, under Security, and you will see high level summary of your findings overview and a vulnerability fix overview.
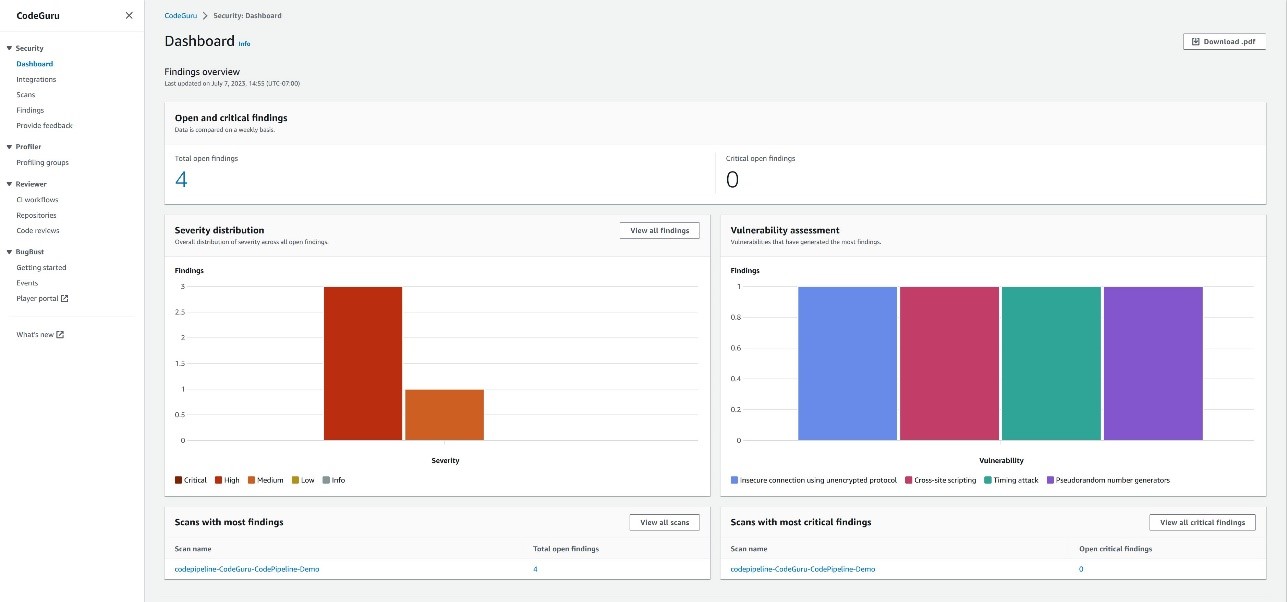
Figure 16:Findings inside CodeGuru dashboard
Amazon Inspector
Your journey with the shift-left model extends beyond code deployment. After scanning your code repositories and using tools like CodeWhisperer and CodeGuru Security to proactively reduce security risks before code commits to a repository, your code might still encounter potential vulnerabilities after being deployed to production. For instance, faulty software updates can introduce risks to your application. Continuous vigilance and monitoring after deployment are crucial.
This is where Amazon Inspector offers ongoing assessment throughout your resource lifecycle, automatically rescanning resources in response to changes. Amazon Inspector seamlessly complements the shift-left model by identifying vulnerabilities as your workload operates in a production environment.
Amazon Inspector continuously scans various components, including Amazon EC2, Lambda functions, and container workloads, seeking out software vulnerabilities and inadvertent network exposure. Its user-friendly features include enablement in a few clicks, continuous and automated scanning, and robust support for multi-account environments through AWS Organizations. After activation, it autonomously identifies workloads and presents real-time coverage details, consolidating findings across accounts and resources.
Distinguishing itself from traditional security scanning software, Amazon Inspector has minimal impact on your fleet’s performance. When vulnerabilities or open network paths are uncovered, it generates detailed findings, including comprehensive information about the vulnerability, the affected resource, and recommended remediation. When you address a finding appropriately, Amazon Inspector autonomously detects the remediation and closes the finding.
The findings you receive are prioritized according to a contextualized Inspector risk score, facilitating prompt analysis and allowing for automated remediation.
Additionally, Amazon Inspector provides robust management APIs for comprehensive programmatic access to the Amazon Inspector service and resources. You can also access detailed findings through Amazon EventBridge and seamlessly integrate them into AWS Security Hub for a comprehensive security overview.
Scan workloads with Amazon Inspector
Use the following examples to learn how to use Amazon Inspector to scan AWS workloads.
- Open the Amazon Inspector console in your AWS Organizations management account. In the navigation pane, select Activate Inspector.
- Under Delegated administrator, enter the account number for your desired account to grant it all the permissions required to manage Amazon Inspector for your organization. Consider using your Security Tooling account as delegated administrator for Amazon Inspector. Choose Delegate. Then, in the confirmation window, choose Delegate again. When you select a delegated administrator, Amazon Inspector is activated for that account. Now, choose Activate Inspector to activate the service in your management account.
Figure 17: Set the delegated administrator account ID for Amazon Inspector
- You will see a green success message near the top of your browser window and the Amazon Inspector dashboard, showing a summary of data from the accounts.
Figure 18: Amazon Inspector dashboard after activation


Explore Amazon Inspector
- From the Amazon Inspector console in your delegated administrator account, in the navigation pane, select Account management. Because you’re signed in as the delegated administrator, you can enable and disable Amazon Inspector in the other accounts that are part of your organization. You can also automatically enable Amazon Inspector for new member accounts.
Figure 19: Amazon Inspector account management dashboard
- In the navigation pane, select Findings. Using the contextualized Amazon Inspector risk score, these findings are sorted into several severity ratings.
- The contextualized Amazon Inspector risk score is calculated by correlating CVE information with findings such as network access and exploitability.
- This score is used to derive severity of a finding and prioritize the most critical findings to improve remediation response efficiency.
Figure 20: Findings in Amazon Inspector sorted by severity (default)
When you enable Amazon Inspector, it automatically discovers all of your Amazon EC2 and Amazon ECR resources. It scans these workloads to detect vulnerabilities that pose risks to the security of your compute workloads. After the initial scan, Amazon Inspector continues to monitor your environment. It automatically scans new resources and re-scans existing resources when changes are detected. As vulnerabilities are remediated or resources are removed from service, Amazon Inspector automatically updates the associated security findings.
In order to successfully scan EC2 instances, Amazon Inspector requires inventory collected by AWS Systems Manager and the Systems Manager agent. This is installed by default on many EC2 instances. If you find some instances aren’t being scanned by Amazon Inspector, this might be because they aren’t being managed by Systems Manager.
- Select a findings title to see the associated report.
- Each finding provides a description, severity rating, information about the affected resource, and additional details such as resource tags and how to remediate the reported vulnerability.
- Amazon Inspector stores active findings until they are closed by remediation. Findings that are closed are displayed for 30 days.
Figure 21: Amazon Inspector findings report details


Integrate CodeGuru Security with Amazon Inspector to scan Lambda functions
Amazon Inspector and CodeGuru Security work harmoniously together. CodeGuru Security is available through Amazon Inspector Lambda code scanning. After activating Lambda code scanning, you can configure automated code scans to be performed on your Lambda functions.
Use the following steps to configure Amazon CodeGuru Security with Amazon Inspector Lambda code scanning to evaluate Lambda functions.
- Open the Amazon Inspector console and select Account management from the navigation pane.
- Select the AWS account you want to activate Lambda code scanning in.
Figure 22: Activating AWS Lambda code scanning from the Amazon Inspector Account management console
- Choose Activate and select AWS Lambda code scanning.

With Lambda code scanning activated, security findings for your Lambda function code will appear in the All findings section of Amazon Inspector.
Amazon Inspector plays a crucial role in maintaining the highest security standards for your resources. Whether you’re installing a new package on an EC2 instance, applying a software patch, or when a new CVE affecting a specific resource is disclosed, Amazon Inspector can assist with quick identification and remediation.
Conclusion
Incorporating security at every stage of the software development lifecycle is paramount and requires that security be a consideration from the outset. Shifting left enables security teams to reduce overall application security risks.
Using these AWS services — Amazon CodeWhisperer, Amazon CodeGuru and Amazon Inspector — not only aids in early risk identification and mitigation, it empowers your development and security teams, leading to more efficient and secure business outcomes.
For further reading, check out the AWS Well Architected Security Pillar, the Generative AI on AWS page, and more blogs like this on the AWS Security Blog page.
If you have feedback about this post, submit comments in the Comments section below. If you have questions about this post, start a new thread on the Amazon CodeWhisperer re:Post forum or contact AWS Support.
Want more AWS Security news? Follow us on Twitter.